

Page 1

I
Page 2

Contents
About This Guide........................................................................................ 9
Related Documentations..................................................................................................................... 9
Getting Started.............................................................................................9
T55A Hardware................................................................................................................................. 10
MP54 Hardware.................................................................................................................................11
Overview of Phone Screens............................................................................................................. 11
Idle Screen..............................................................................................................................12
Dialing Screen........................................................................................................................ 12
Favorites Screen.....................................................................................................................14
History Screen........................................................................................................................ 14
Contacts Screen..................................................................................................................... 15
Calls Screen........................................................................................................................... 15
Icon Introductions.............................................................................................................................. 16
Icons in the Status Bar...........................................................................................................17
Icons in the Main Window......................................................................................................17
LED Instructions................................................................................................................................ 18
Power Indicator LED............................................................................................................... 18
Entering Data and Editing Fields...................................................................................................... 18
Using the Onscreen Keyboard............................................................................................... 19
Using the Onscreen Dial Pad.................................................................................................19
Using the Phone Keypad........................................................................................................20
| Contents | ii
Signing into and Locking Your Phone.................................................... 20
Multi-Factor Authentication (MFA)..................................................................................................... 20
Binding Online Account with Your Mobile Phone Number..................................................... 20
Passing Multi-Factor Authentication........................................................................................21
Signing into Your Phone....................................................................................................................22
Sign in Using Your Skype for Business User Credentials...................................................... 22
Sign in Using BToE................................................................................................................ 22
Sign in Using Your PIN Authentication Credentials................................................................23
Sign in Using Web..................................................................................................................23
Signing out of the Phone....................................................................................................... 23
Using a Common Area Phone (CAP)............................................................................................... 23
Setting a Common Area Phone............................................................................................. 24
Signing into a Common Area Phone..................................................................................... 24
Signing out of the Common Area Phone............................................................................... 24
Using Hot Desking Feature............................................................................................................... 24
Sign in as a Guest User........................................................................................................ 24
Signing out of the Guest User............................................................................................... 25
Disabling Hot Desking............................................................................................................ 25
Phone Lock........................................................................................................................................25
Tips for Phone Lock............................................................................................................... 25
Setting a Lock PIN................................................................................................................. 26
Setting the Idle Timeout for Phone Lock................................................................................26
Setting the Unlock Attempts................................................................................................... 26
Locking Your Phone................................................................................................................26
Page 3

| Contents | iii
Unlocking Your Phone............................................................................................................ 27
Changing Your Lock PIN........................................................................................................ 27
Resetting Your Lock PIN........................................................................................................ 27
Disabling Phone Lock.............................................................................................................27
Audio Calls................................................................................................. 27
Switching among the Handset, Speakerphone, and Headset Modes...............................................28
Placing Calls...................................................................................................................................... 28
Placing Calls using the Dialer................................................................................................ 28
Placing Multiple Calls............................................................................................................. 29
Placing Calls from a Locked Phone.......................................................................................29
Placing Calls from the Call History........................................................................................ 29
Calling Favorites from the Favorites Screen.......................................................................... 29
Calling Contacts from the Contacts Screen........................................................................... 29
Calling Contacts from the Search Results List...................................................................... 30
Setting a Hotline Number and Delay Time............................................................................ 30
Answering Calls................................................................................................................................. 30
Answering Calls...................................................................................................................... 30
Answering a Call When in a Call........................................................................................... 31
Answering Calls Automatically................................................................................................31
Muting and Unmuting Audio..............................................................................................................31
Holding and Resuming Calls.............................................................................................................31
Placing a Call on Hold........................................................................................................... 31
Resuming a Call..................................................................................................................... 31
Ending Calls...................................................................................................................................... 32
Transferring Calls...............................................................................................................................32
Performing a Blind Transfer.................................................................................................... 32
Performing a Consultative Transfer........................................................................................ 32
Parking and Retrieving Calls.............................................................................................................32
Parking Skype for Business Calls.......................................................................................... 33
Retrieve Parked Calls on the Same Phone........................................................................... 33
Retrieve Parked Calls on Another Phone.............................................................................. 33
Silencing or Rejecting Incoming Calls.............................................................................................. 33
Silencing Incoming Calls........................................................................................................ 33
Rejecting Incoming Calls........................................................................................................ 33
Forwarding an Incoming Call Manually............................................................................................. 34
Forwarding an Incoming Call to a Contact Manually............................................................. 34
Forwarding an Incoming Call to Your Voicemail Manually......................................................34
Forwarding All Incoming Calls...........................................................................................................34
Forwarding Calls to a Contact................................................................................................34
Forwarding Calls to Voicemail................................................................................................ 35
Forwarding Calls to Delegates............................................................................................... 35
Simultaneously Ring a Contact.............................................................................................. 35
Simultaneously Ring a Group of Contacts............................................................................. 35
Simultaneously Ring Delegates..............................................................................................36
Disabling Call Forward Feature.............................................................................................. 36
Configuring the Delay Time for Forwarding Incoming Calls................................................... 36
Skype for Business Conferences............................................................ 36
Initiating a SfB Conference Call........................................................................................................36
Initiating a SfB Conference Call by Meet Now.......................................................................37
Initiating a SfB Conference Call during a Call....................................................................... 37
Initiating a SfB Conference by Calling a Group of Participants..............................................37
Initiating a SfB Conference by Merging Multiple Calls........................................................... 37
Page 4

| Contents | iv
Initiating a SfB Conference by Merging an Active Call and a Hold Call................................. 37
Sending the SfB Conference Information......................................................................................... 38
Viewing the SfB Conference Participants......................................................................................... 38
Managing the SfB Conference Participants...................................................................................... 38
Muting and Unmuting All Conference Participants.................................................................39
Muting or Unmuting Individual Conference Participants........................................................ 39
Demoting or Promoting Conference Participants................................................................... 39
Enabling or Disabling Conference Announcements............................................................... 39
Locking or Unlocking a Conference Call................................................................................40
Admitting or Denying Participants to a Locked Conference Call............................................40
Removing Conference Participants........................................................................................ 40
Leaving the SfB Conference............................................................................................................. 40
Recording Audios...................................................................................... 41
Recording Local Audios.................................................................................................................... 41
Recording a Call................................................................................................................................42
Playing the Recorded Audios............................................................................................................42
Copying Recorded Audios to USB Flash Drive................................................................................ 42
Copying a Recorded Audio to USB Flash Drive.................................................................... 43
Copying Multiple Recorded Audios to USB Flash Drive........................................................ 43
Renaming the Recorded Audios....................................................................................................... 43
Deleting the Recorded Audios.......................................................................................................... 43
Deleting a Recorded Audio.................................................................................................... 43
Deleting Multiple Recorded Audios........................................................................................ 44
Checking Storage Space...................................................................................................................44
Boss-Admin for Skype for Business....................................................... 44
Assigning Delegates.......................................................................................................................... 44
Viewing the Delegates Group........................................................................................................... 45
Viewing Bosses................................................................................................................................. 45
Editing Delegates.............................................................................................................................. 45
Managing Calls on the Boss's Line.................................................................................................. 46
Responding to Incoming Boss Calls...................................................................................... 46
Viewing Held Boss Calls........................................................................................................ 47
Resuming Held Boss Calls.....................................................................................................47
Transferring a Boss Call......................................................................................................... 47
Resuming a Transferred Boss Call.........................................................................................47
Transferring a Call to a Boss's Voicemail...............................................................................47
Placing a Call on Behalf of a Boss........................................................................................ 47
Initiating a Conference Call on Behalf of a Boss................................................................... 48
Joining a Conference Call on Behalf of a Boss..................................................................... 48
Managing the Call History........................................................................ 48
Viewing Call Records........................................................................................................................ 48
Deleting Call Records....................................................................................................................... 48
Deleting a Call Record........................................................................................................... 49
Deleting Multiple Call Records............................................................................................... 49
Disabling Contact Avatar...................................................................................................................49
Disabling History Record...................................................................................................................49
Managing Contact Directory.....................................................................50
Searching for Contacts......................................................................................................................50
Page 5

| Contents | v
Skype for Business Directory............................................................................................................ 50
Adding Skype for Business Contacts..................................................................................... 50
Viewing Skype for Business Contacts....................................................................................51
Deleting Skype for Business Contacts................................................................................... 52
Local Directory...................................................................................................................................52
Adding Local Contacts............................................................................................................52
Viewing Local Contacts.......................................................................................................... 53
Editing Local Contacts............................................................................................................53
Deleting Local Contacts..........................................................................................................54
Searching for Local Contacts................................................................................................. 54
Managing Favorites................................................................................... 54
Skype for Business Favorites............................................................................................................54
Adding Skype for Business Favorites.....................................................................................55
Viewing Skype for Business Favorites on the Favorites Screen............................................ 55
Viewing Skype for Business Favorites in the Directory.......................................................... 55
Local Favorites...................................................................................................................................56
Adding Local Favorites........................................................................................................... 56
Viewing Local Favorites on the Favorites Screen.................................................................. 56
Viewing Local Favorites on the Contacts Screen...................................................................57
Reordering Local Favorites.....................................................................................................57
Deleting Local Favorites......................................................................................................... 57
Using the Voicemail...................................................................................58
Leaving a Voicemail.......................................................................................................................... 58
Accessing the Message Center........................................................................................................ 58
Managing the Voicemail.................................................................................................................... 58
Listening to the Voicemail...................................................................................................... 59
Calling a Contact from Voicemail...........................................................................................59
Marking the Message as Read or Unread............................................................................. 59
Deleting Voicemail Messages.................................................................................................59
Using the Calendar....................................................................................60
Opening the Calendar....................................................................................................................... 60
Conference Status............................................................................................................................. 62
Navigating Month View......................................................................................................................62
Navigating Day View......................................................................................................................... 62
Displaying Meeting View on the Calendar........................................................................................ 62
Tracking the Calendar....................................................................................................................... 63
Turning off the Conference Reminders............................................................................................. 63
Setting the Reminder Interval........................................................................................................... 63
Responding to Conference Reminders............................................................................................. 64
Joining Skype Conferences...............................................................................................................64
Joining a Skype Conference from a Conference Reminder................................................... 64
Joining a Skype Conference from Meeting View................................................................... 64
Joining a Skype Conference by Dialing the Conference Dial-in Number............................... 65
Phone Settings...........................................................................................65
Setting the Language........................................................................................................................ 65
Changing the Backlight Brightness and Time...................................................................................65
Disabling Playing Tone...................................................................................................................... 66
Disabling Call Waiting....................................................................................................................... 66
Page 6

| Contents | vi
Changing the Administrator Password.............................................................................................. 66
Time and Date Display......................................................................................................................66
Setting Time and Date Manually............................................................................................67
Changing the Time and Date Format.................................................................................... 67
Setting a Send Key........................................................................................................................... 67
Setting Screen Savers.......................................................................................................................68
Changing Audio Settings...................................................................................................................68
Adjusting the Volume..............................................................................................................68
Setting a Ringtone for the Phone...........................................................................................68
Setting a Ringtone for a Contact............................................................................................68
Setting a Ringtone for Incoming Private Line........................................................................ 69
Setting a Ringtone for an Incoming Team-Call...................................................................... 69
Setting a Ringtone for the Response Group..........................................................................69
Turning off the Key Tone........................................................................................................ 69
Presence............................................................................................................................................70
Updating Your Skype for Business Presence.........................................................................71
Enhanced 911................................................................................................................................... 71
E911 Location Tip.................................................................................................................. 71
Adding the Location Information.............................................................................................71
Selecting a Default Location...................................................................................................72
Viewing the Location Information........................................................................................... 72
Advanced Phone Features........................................................................72
Privacy Mode..................................................................................................................................... 73
Modifying the Privacy Mode from the Phone......................................................................... 73
Modifying the Privacy Mode from the Skype for Business Client...........................................73
Editing Your Team-Call Group Members...........................................................................................74
Private Lines...................................................................................................................................... 74
Call Queue.........................................................................................................................................75
Response Group............................................................................................................................... 75
Group Call Pickup............................................................................................................................. 75
Picking Up a Call for Your Group...........................................................................................76
Shared Line Appearance(SLA)......................................................................................................... 76
Viewing Shared Line Appearances........................................................................................ 76
Answering SLA Calls.............................................................................................................. 77
Placing SLA Calls on Hold.....................................................................................................77
Resuming Held SLA Calls...................................................................................................... 78
Missed and Received Calls on Shared Lines........................................................................ 78
Branch Office Resiliency................................................................................................................... 78
Wireless Network.......................................................................................79
Connecting the Wi-Fi USB Dongle WF50.........................................................................................79
Activating the Wi-Fi Mode................................................................................................................. 79
Connecting to the Wireless Network.................................................................................................79
Connecting to an Available Wireless Network Manually........................................................ 79
Connecting to the Wireless Network Using WPS.................................................................. 80
Adding a Wireless Network Manually.....................................................................................81
Viewing the Wireless Network Information....................................................................................... 81
Disconnecting the Wireless Network Connection............................................................................. 81
Deactivating the Wi-Fi Mode............................................................................................................. 81
Connecting a Bluetooth-enabled Mobile Phone..................................... 82
Activating the Bluetooth Mode.......................................................................................................... 82
Page 7

| Contents | vii
Pairing and Connecting the Bluetooth-Enabled Mobile Phone......................................................... 82
Placing a Mobile Call over Bluetooth on your Mobile Phone............................................................83
Handling Incoming Mobile Phone Calls on the Phone..................................................................... 83
Deactivating the Phone Audio Feature............................................................................................. 84
Editing Your Phone's Bluetooth Device Name.................................................................................. 84
Disabling Bluetooth Device Discovery...............................................................................................84
Renaming the Paired Bluetooth Devices.......................................................................................... 85
Disconnecting the Bluetooth Device................................................................................................. 85
Un-pairing the Mobile Phone............................................................................................................ 85
Deactivating the Bluetooth Mode...................................................................................................... 86
Using Yealink BToE Connector Software................................................86
Getting Started with BToE.................................................................................................................86
Downloading and Installing the Yealink BToE Connector Software.................................................. 86
Starting the Yealink BToE Connector Software.................................................................................87
Setting Yealink BToE Connector Software........................................................................................ 87
Pairing Your Phone with Your PC..................................................................................................... 87
Enabling BToE and Selecting a Paring Mode........................................................................ 87
Pairing Your Phone with Your PC over Ethernet.................................................................... 88
Pairing Your Phone with Your PC using Phone IP Address................................................... 88
Viewing Pairing Status............................................................................................................88
Using Your Phone as Your Primary Audio Device for Your PC.........................................................89
Using BToE to Lock and Unlock Your Phone................................................................................... 89
Turning off Phone Lock with PC....................................................................................................... 90
Using BToE to Manage Calls on Your Phone and Skype for Business Client...................................90
Setting Your Phone as Your Primary Audio Device................................................................90
Answering BToE Calls............................................................................................................ 91
Placing Calls........................................................................................................................... 91
Pausing and Resuming BToE Calls....................................................................................... 91
Moving Call Audio between Your Phone and PC...................................................................91
Disabling BToE on Your Phone.........................................................................................................92
Exiting Yealink BToE Connector Software........................................................................................ 92
Uninstalling the Yealink BToE Connector Software...........................................................................92
Maintaining Skype for Business Phones................................................ 92
Rebooting Your Phone...................................................................................................................... 92
Viewing Phone Status....................................................................................................................... 93
Updating Phone Firmware................................................................................................................ 93
Resetting Your Phone........................................................................................................................93
Troubleshooting......................................................................................... 93
Why is the screen blank?..................................................................................................................94
Why does the device display “Network unavailable”?.......................................................................94
Why does the device display time and date incorrectly?.................................................................. 94
How can I obtain the MAC address of a device when the device is not powered on?...................... 94
Why can’t I sign into the Skype for Business server on the phone?................................................ 94
Why can't the phone pair with my Skype for Business client?......................................................... 94
Why can't I see the Calendar menu on the phone?.........................................................................95
Why can't I get a dial tone?..............................................................................................................95
Why doesn't the phone ring?............................................................................................................ 95
Why can't I receive calls?................................................................................................................. 95
How can I switch to Teams edition?................................................................................................. 95
Why doesn't my handset work?........................................................................................................ 95
Page 8

Regulatory Notices.................................................................................... 95
Service Agreements.......................................................................................................................... 96
Limitations of Liability........................................................................................................................ 96
Safety Instructions............................................................................................................................. 96
Page 9

About This Guide
Thank you for choosing Yealink MP54/T55A Skype for Business phones, which are designed to work with
the Skype for Business Server. This guide provides everything you need to quickly use your new phone.
Firstly, verify with your system administrator that the IP network is ready for phone configuration. Also be
sure to read the Quick Start Guide in your phone package before you set up and use the phone. As you
read this guide, keep in mind that some features are configurable by your system administrator.
• Related Documentations
Related Documentations
You can view the following types of documents on each product support page on Yealink Support:
• Quick Start Guide: This guide describes the contents of your package, how to assemble the phone or
accessory, and how to use the basic features. This guide is also included in your phone package.
• Administrator Guide: This guide provides detailed information about setting up your network and
configuring features.
| About This Guide | 9
Getting Started
This chapter aims to make you familiar with the phone user interface.
Note: As you read this guide, keep in mind that some features are only configurable by your
system administrator or determined by your phone environment. As a result, some features may not
be enabled or may be operated differently on your phone. Additionally, the examples and graphics in
this guide may not directly reflect what is displayed or is available on your phone screen.
• T55A Hardware
• MP54 Hardware
• Overview of Phone Screens
• Icon Introductions
• LED Instructions
• Entering Data and Editing Fields
Page 10
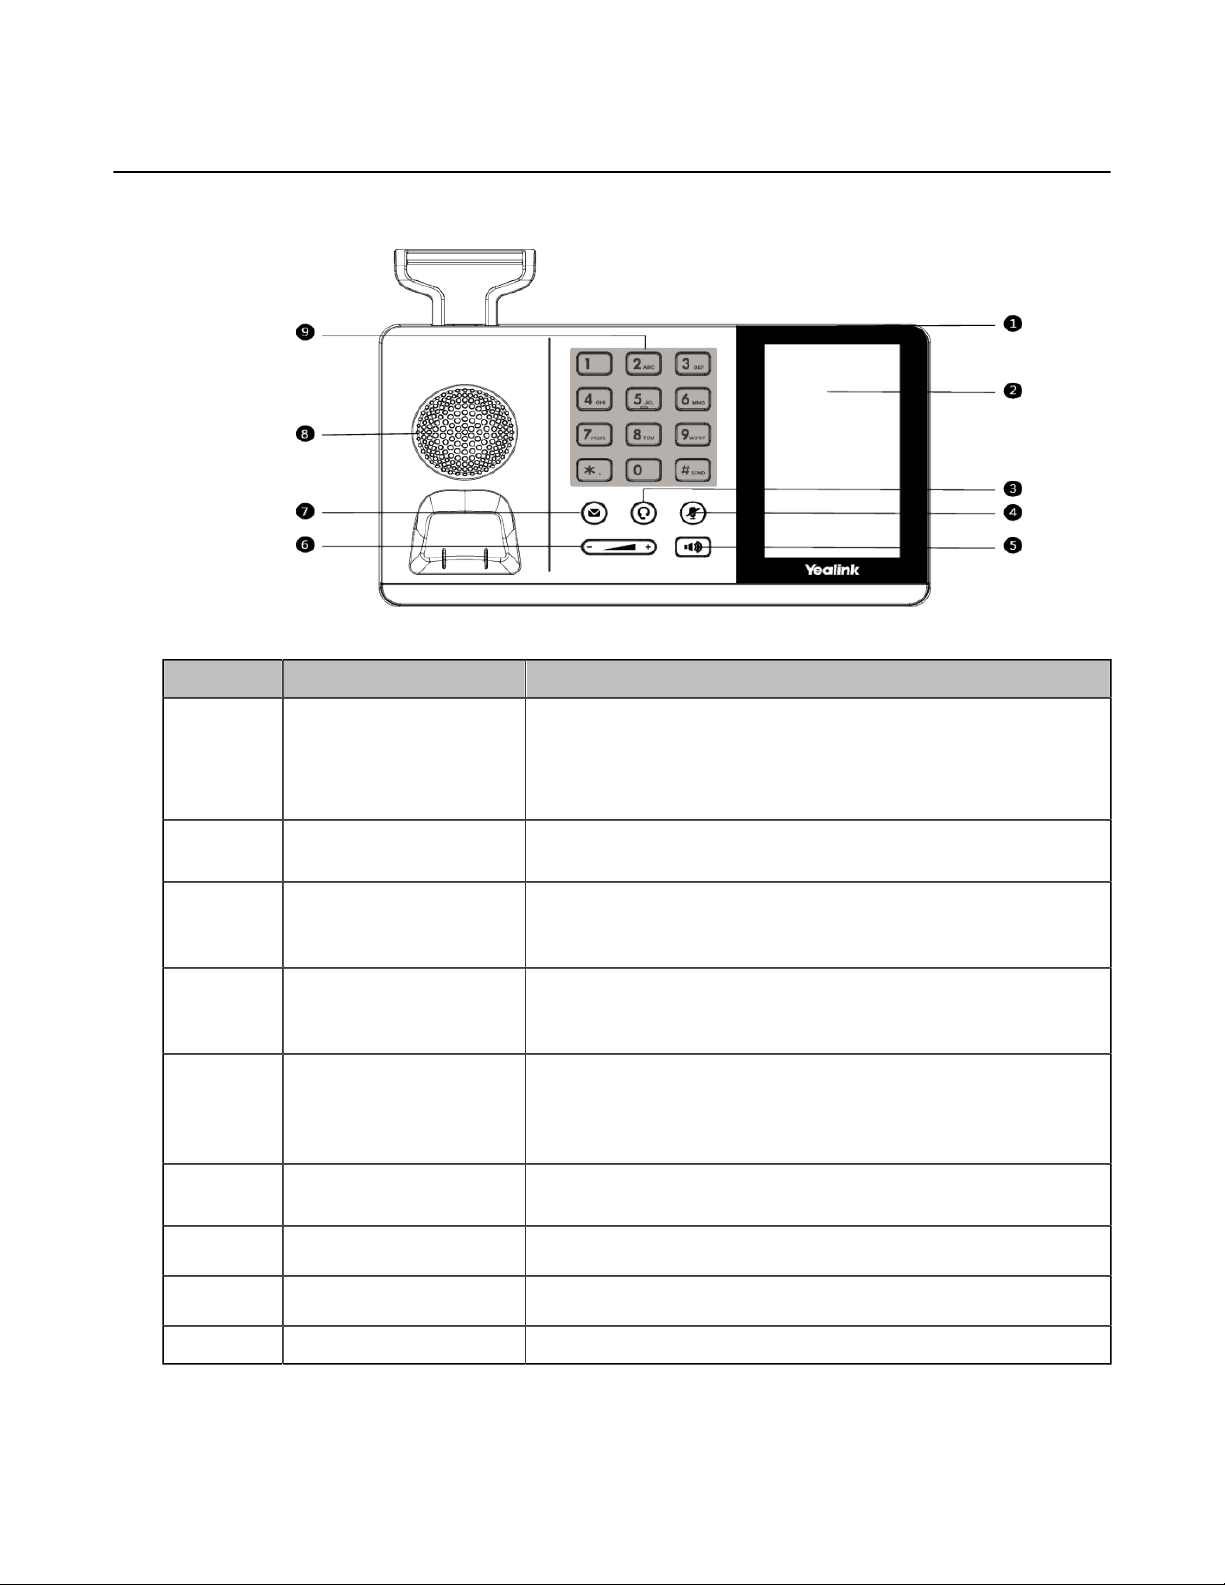
T55A Hardware
The following figure displays the hardware features on the T55A phones. The table lists each feature
numbered in the figure.
| Getting Started | 10
No. Name Description
1 Power Indicator LED
2 Touch Screen 4.3 inch (480 x 272) capacitive touch screen, tap to select items
3 HEADSET Key
4
5
6
7
MUTE Key Mutes local audio during calls and conferences.
Speakerphone Key Enables you to place and receive calls using the speakerphone.
Volume Key
MESSAGE Key
Indicate phone statuses:
• When receiving an incoming call, it fast flashes.
• When receiving an voice message, it slowly flashes.
and navigate menus.
Enables you to place and receive calls through a headset.
The LED indicator glows green when the headset is activated.
The LED indicator glows red when the mute feature is activated.
The LED indicator glows green when the speakerphone is
activated.
Adjust the volume of handset, headset, speaker, ringer, or
media.
Accesses your voice messages.
8
9 Keypad Keys Enable you to enter numbers, letters, and special characters.
Speaker
Provides audio output during hands-free.
Page 11

MP54 Hardware
The following figure displays the hardware features on the MP54 phones. The table lists each feature
numbered in the figure.
| Getting Started | 11
No. Item Description
1 Volume Key Adjusts the volume of the handset, the speakerphone, the earphone, ringer,
or the media.
2 Teams Key Initiates a Skype for Business conference call by meet now.
3 Speaker Provides audio output during hands-free.
4 Keypad Enable you to enter numbers, letters, and special characters.
5 Speakerphone Toggles the speakerphone (hands-free) mode or not. The LED indicator
glows green when the speakerphone is activated.
6 Mute Key Toggles the microphone on or off. The LED indicator glows red when the
mute feature is activated.
7 Headset Key Toggles the headset on or off. The LED indicator glows green when the
headset is activated.
8 Touch Screen 4 inches (480 x 800) capacitive touch screen, tap to select items and
navigate menus.
9 Power LED
indicator
Indicate phone statuses:
• When receiving an incoming call, it fast flashes.
• When receiving an voice message, it slowly flashes.
Overview of Phone Screens
You can access the following screens on your phone.
Page 12
• Idle Screen
• Dialing Screen
• Favorites Screen
• History Screen
• Contacts Screen
• Calls Screen
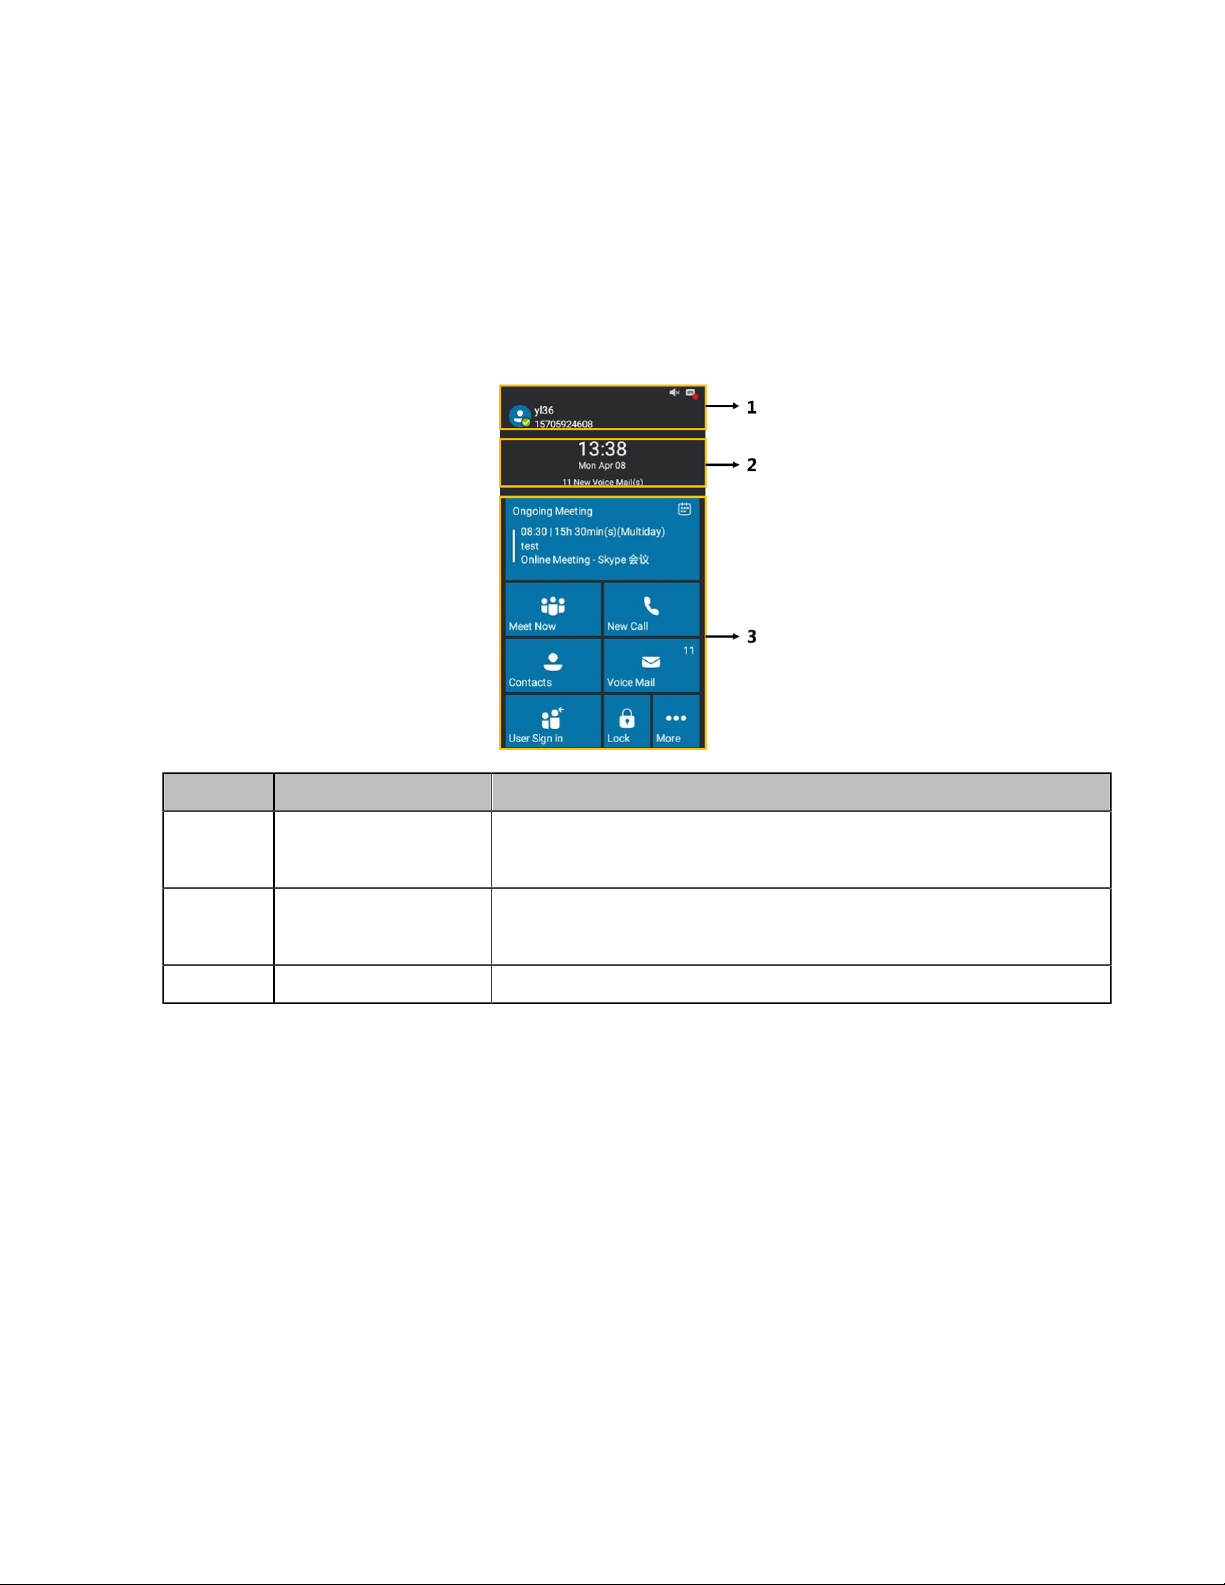
Idle Screen
After the phone starts up and a user signs into a Skype for Business account, the phone automatically
enters the idle screen.
| Getting Started | 12
No. Name Description
1 Screen Title Area
2 Digital Clock Widget
3 Main Window Displays menus
• Shows the account
• Shows the icons
• Displays the phone’s time and date
• Displays the prompts
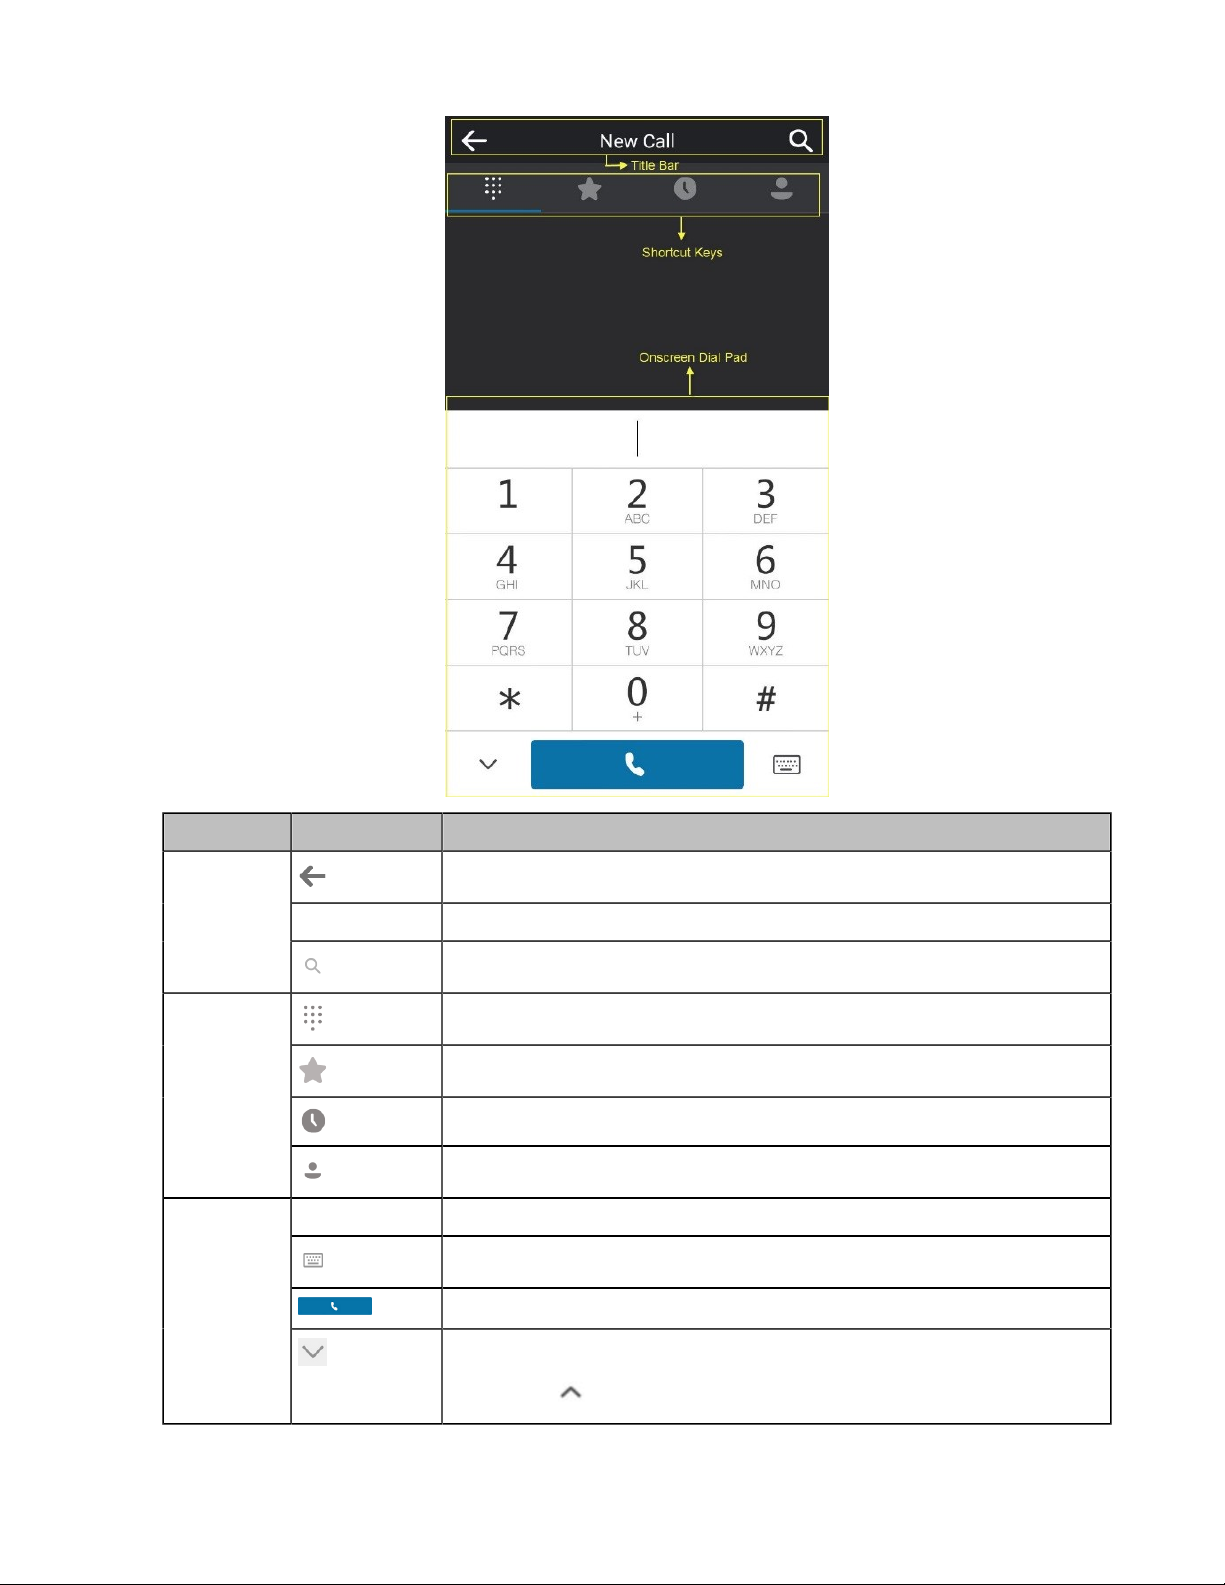
Dialing Screen
You can dial numbers in the Dialing screen.
Procedure
Tap New Call to access the Dialing screen.
Page 13
| Getting Started | 13
Name Item Description
Title Bar
Shortcut
Keys
Onscreen
Dial Pad
New Call Shows the name of the current screen.
Dial key Tap to enter the desired number.
Tap to go back to the idle screen.
Tap to search for contacts.
Tap to enter the Dialing screen.
Tap to enter the Favorites screen.
Tap to enter the History screen.
Tap to enter the Contacts screen.
Tap to display the onscreen keyboard.
Tap to dial out the number.
Tap to hide the dial pad.
You can tap to display the dial pad again.
Page 14

Favorites Screen
Local favorites and Skype for Business favorites are displayed on the Favorites screen. By default, local
favorites are displayed before the Skype for Business favorites. Local favorites are indicated by the icon
. Skype for Business favorites are indicated by the presence status icon.
Procedure
1.
Tap Favorites, and tap .
2. Slide up and down to view more favorites.
| Getting Started | 14
History Screen
You can view missed, placed, received, and forwarded calls in the History screen.
Procedure
1.
Tap Contacts, and tap .
Page 15
2. Slide up and down to view more records.
| Getting Started | 15
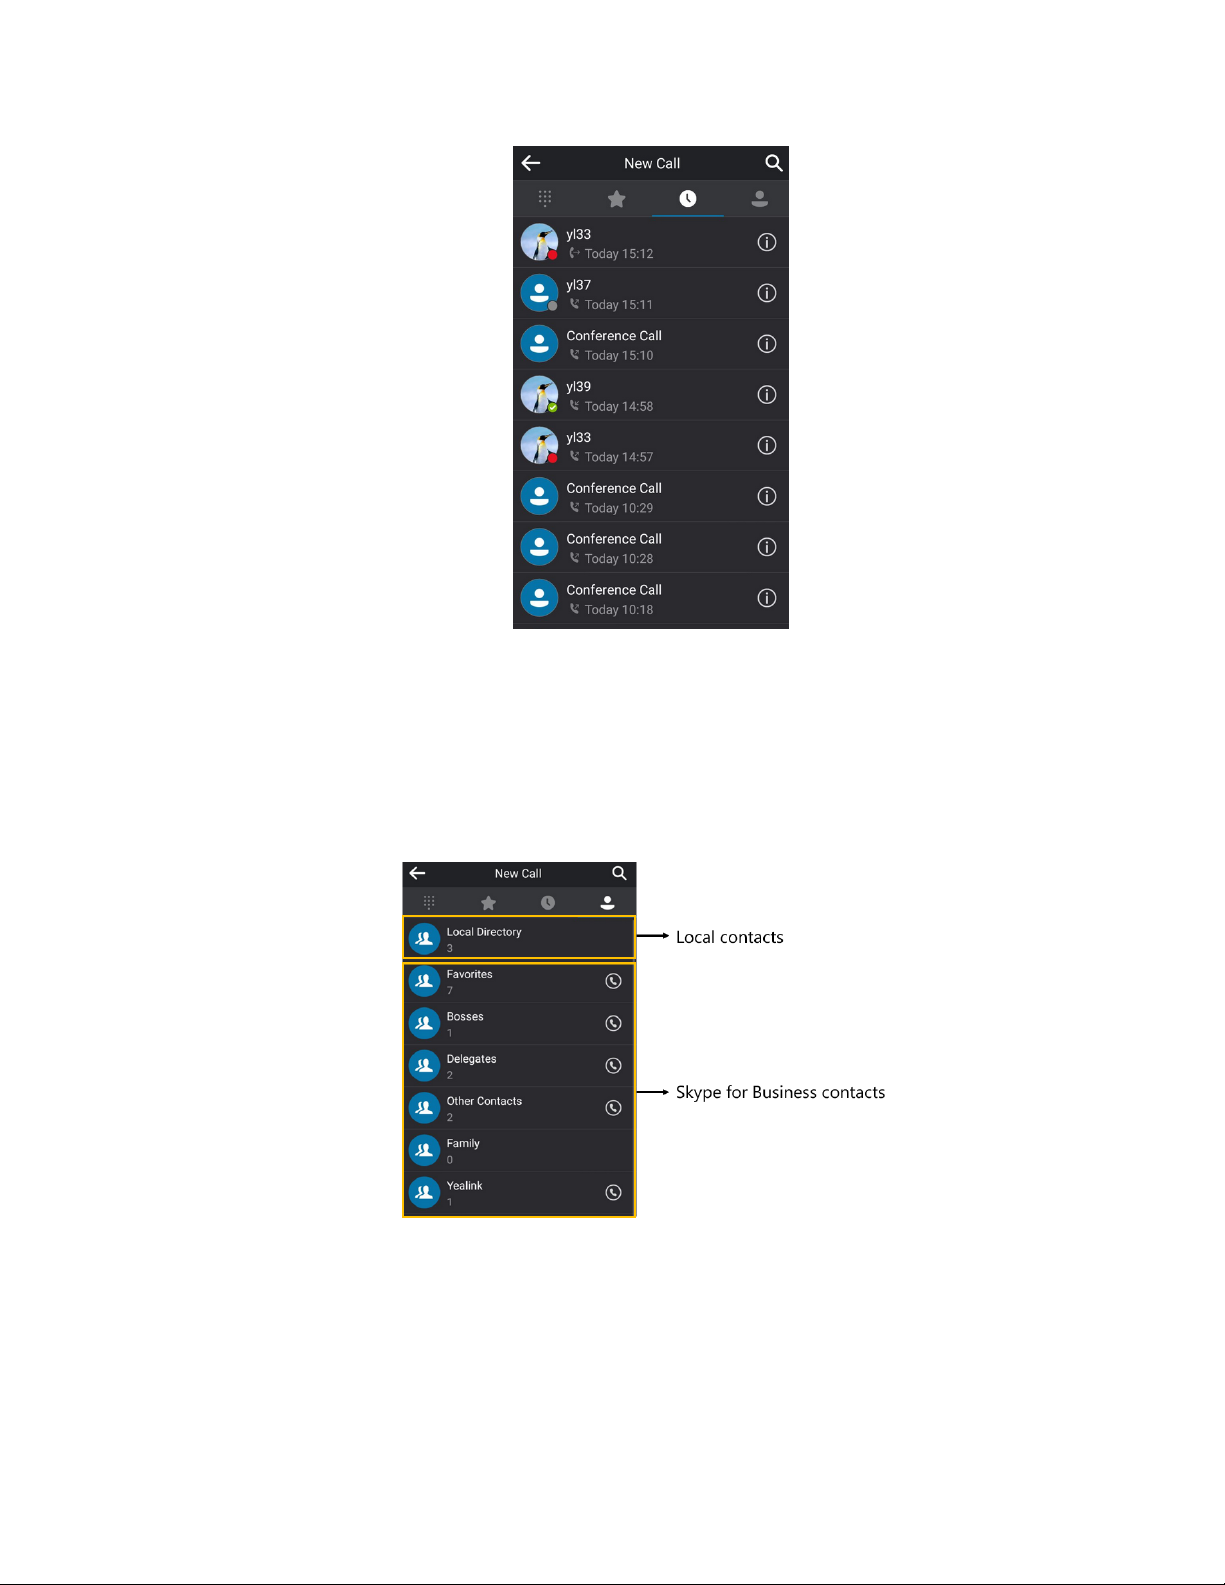
Contacts Screen
The Contacts screen includes your local directory and Skype for Business directory.
Procedure
1. Tap Contacts.
2. Slide up and down to view more groups.
Calls Screen
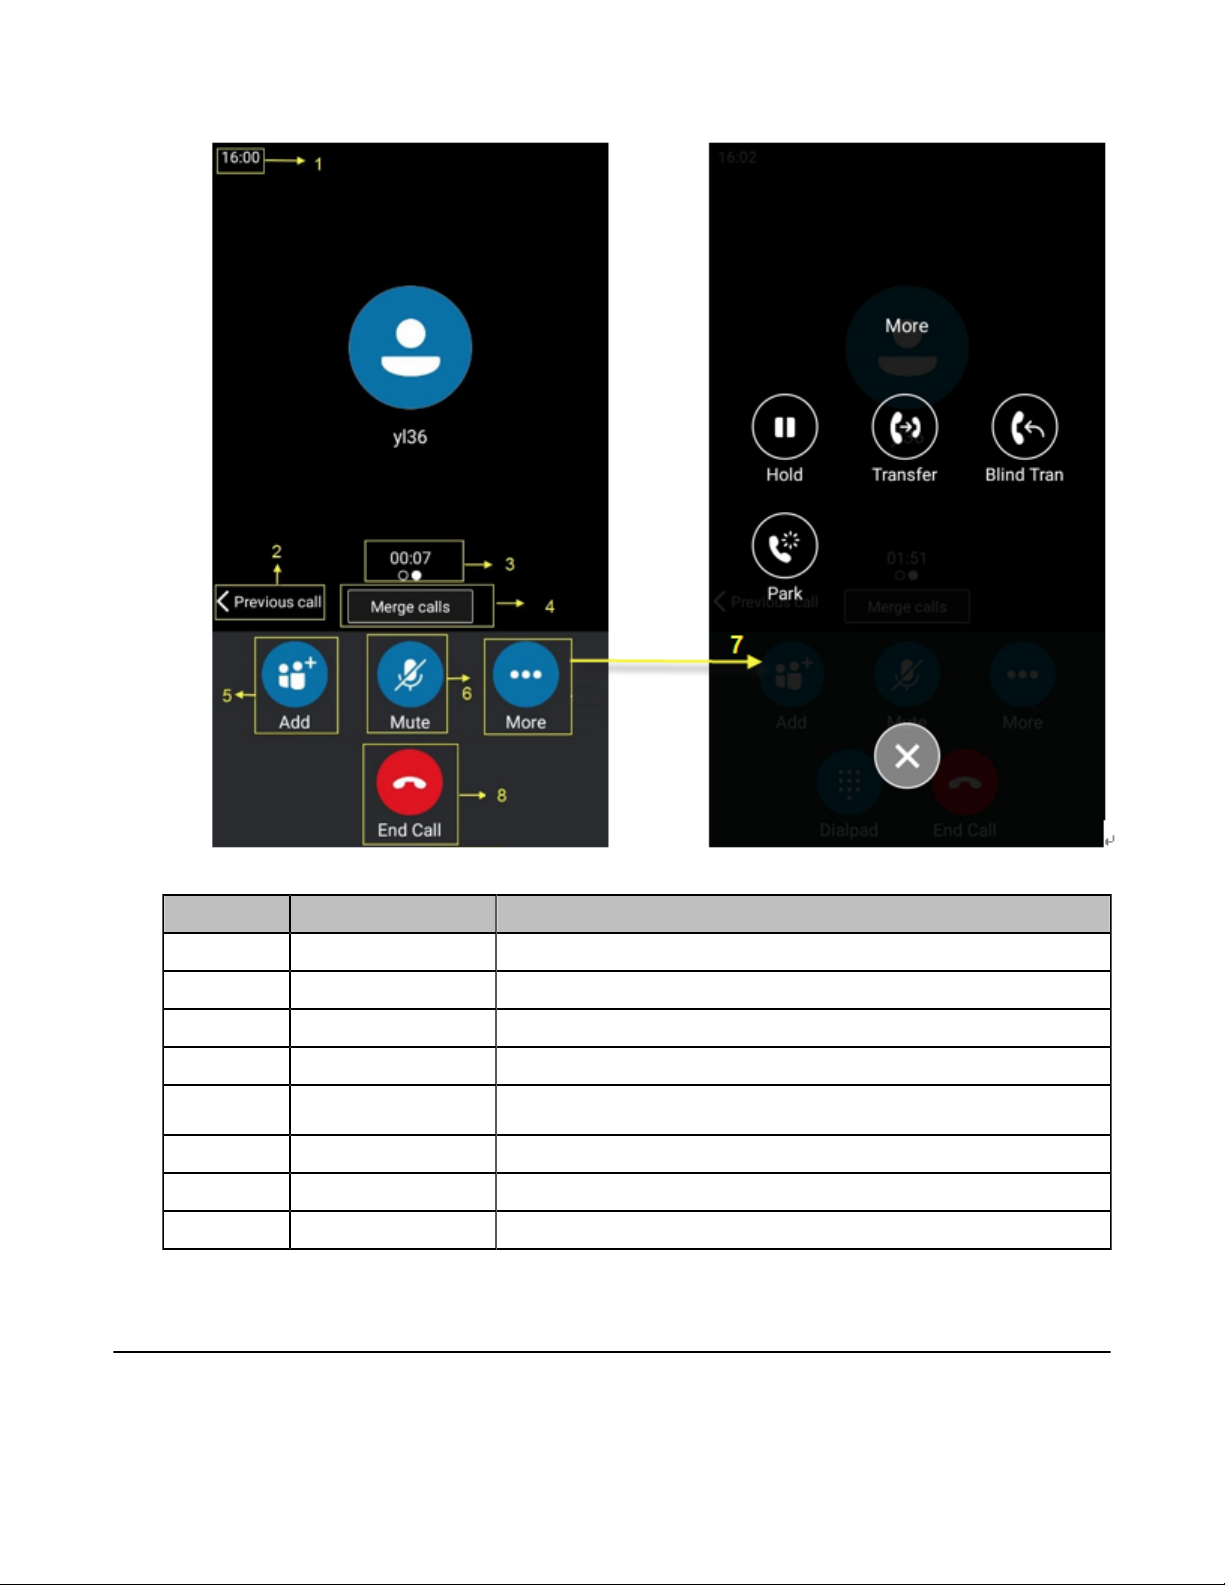
The Calls screen is displayed when you have one or more calls in progress.
Procedure
The following shows an example of the Calls screen when there is an active call and a held call on the
phone:
Page 16
| Getting Started | 16
No. Item Description
1 Time Shows the current time.
2 Previous call Tap to switch to the previous call screen.
3 Call Duration Timer Shows the duration time of current call.
4 Merge calls Tap to merge multiple calls into a conference call.
5 Add
6 Mute Tap to mute the call.
7 More Tap to bring up more keys.
8 End Call Tap to end the call.
Tap to add other party into a conference call.
Icon Introductions
The phone icons are used to indicate phone statuses.
• Icons in the Status Bar
• Icons in the Main Window
Page 17
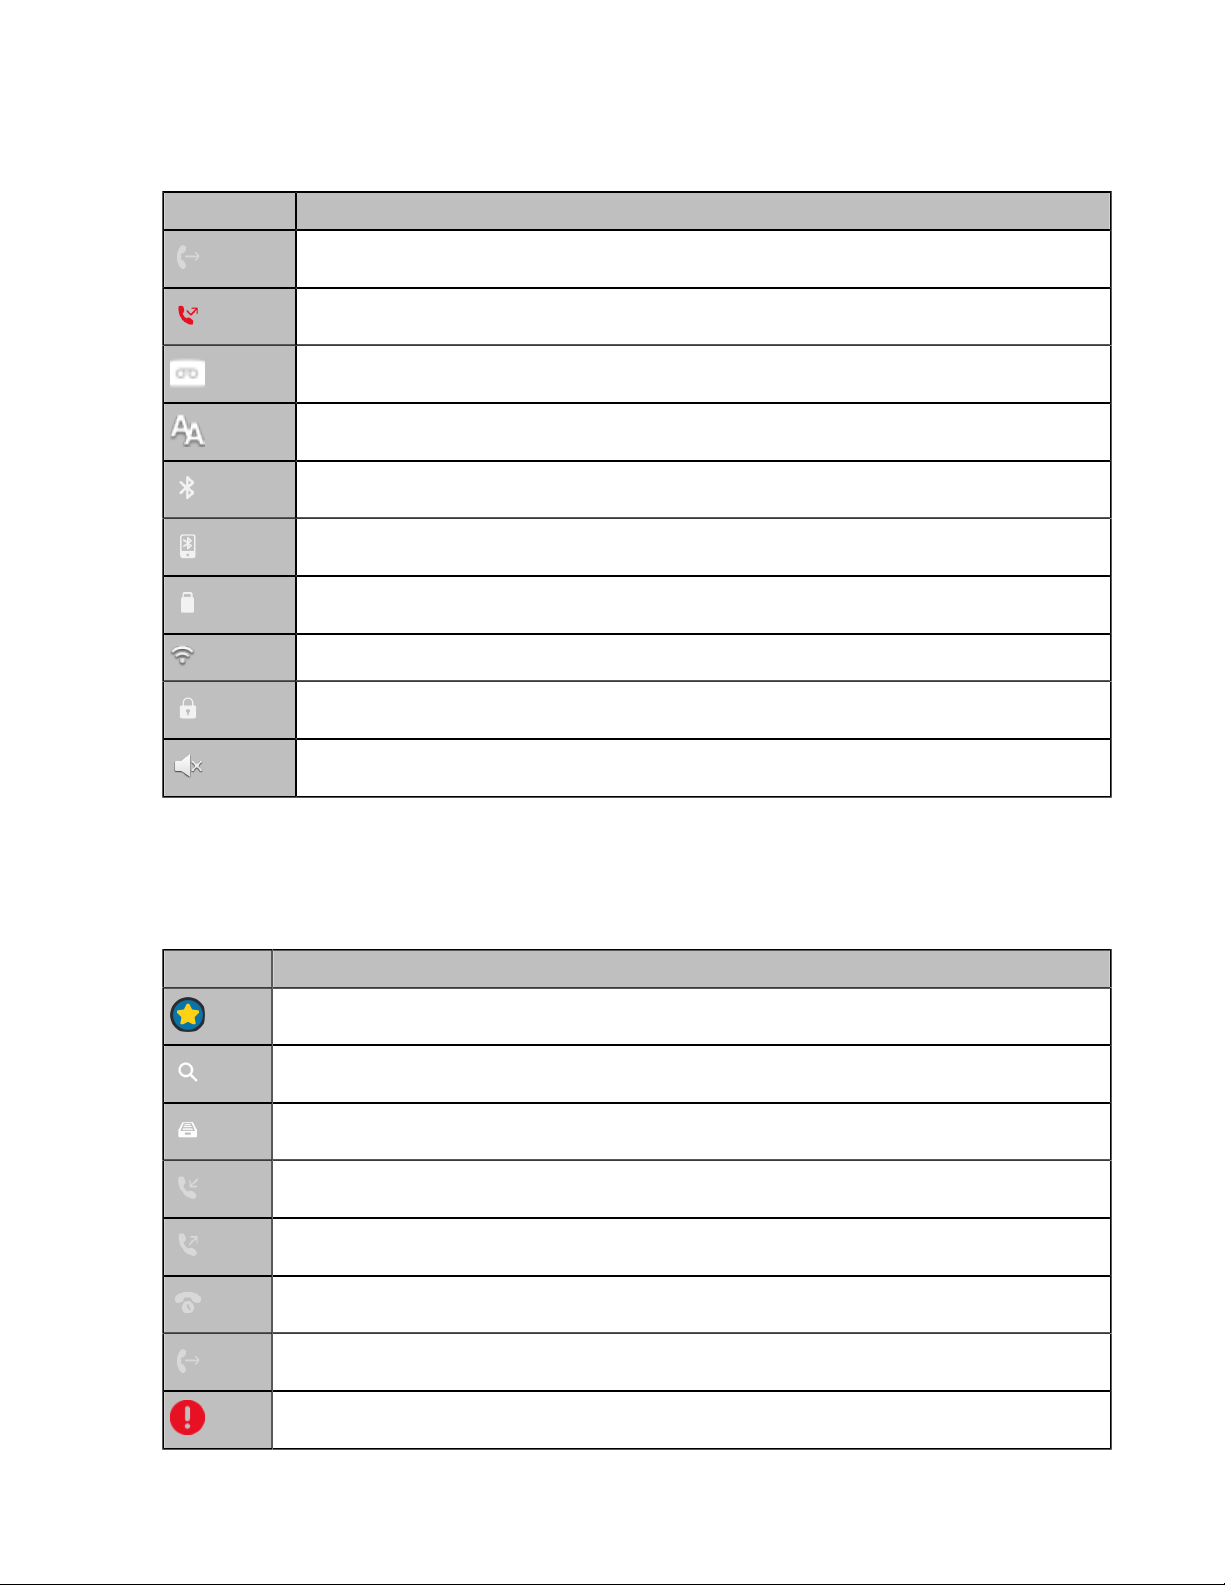
Icons in the Status Bar
The following table displays icons in the status bar.
Icon Description
Forwarded Calls
Missed Calls
Voicemail
Auto Answer
Bluetooth mode is on
Bluetooth-enabled mobile phone paired and connected
USB flash drive is connected
| Getting Started | 17
Wi-Fi is connected
Conference/Phone lock
Ringer volume is 0
Icons in the Main Window
The following table displays icons in the main window.
Icon Description
Local Favorites
Searching for Contacts
Accessing the Message Center
Received Calls
Placed Calls
Missed Calls
Forwarded Calls
Location is not set
Page 18
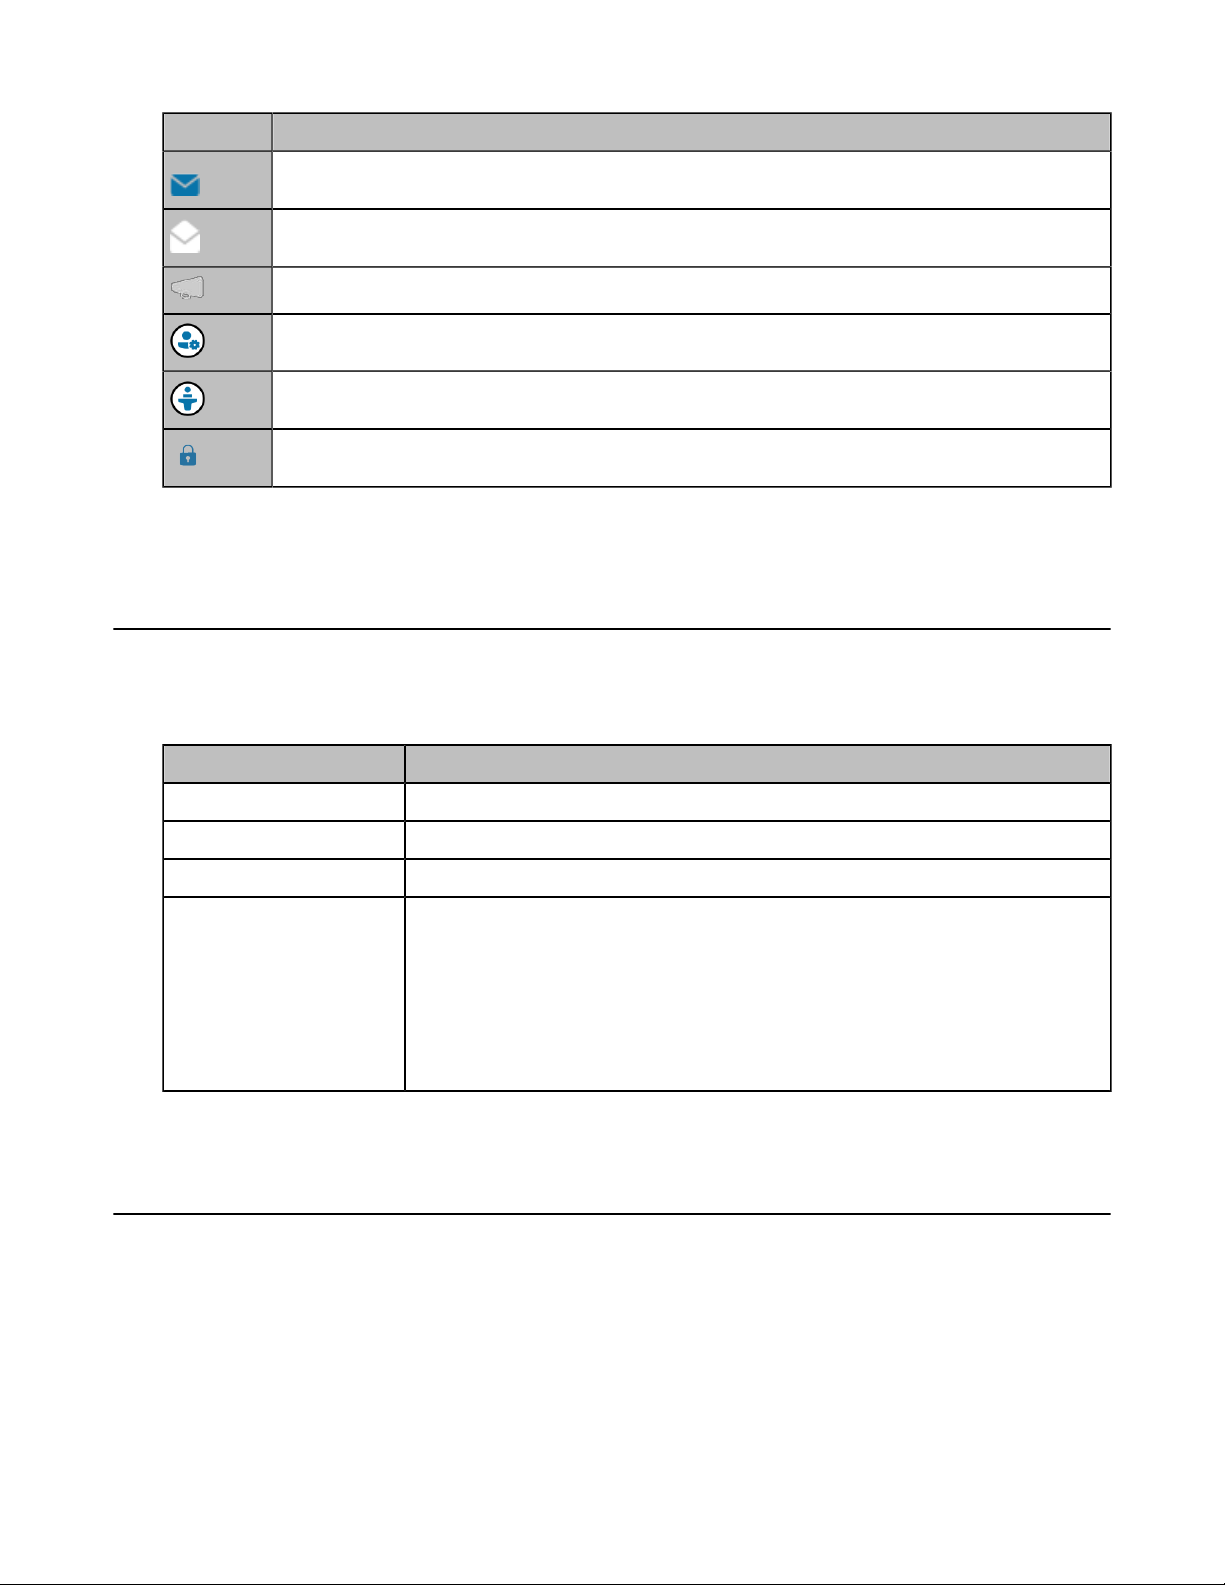
Icon Description
Unread voicemail
Read voicemail
Enable the conference announcement
Conference organizer
Conference presenter
Private conference
| Getting Started | 18
LED Instructions
• Power Indicator LED
Power Indicator LED
LED Status Description
Red The phone is initializing.
Fast flashing red (300ms) The phone is ringing.
Slowly flashing red The phone receives a voicemail.
Off
The phone is powered off.
The phone is idle.
The phone is busy.
The call is placed on hold.
The call is muted.
Entering Data and Editing Fields
You can use the keyboard on the phone's touch screen (here in after referred to as the on screen
keyboard) and the phone keyboard to enter or edit data.
• Using the Onscreen Keyboard
• Using the Onscreen Dial Pad
• Using the Phone Keypad
Page 19
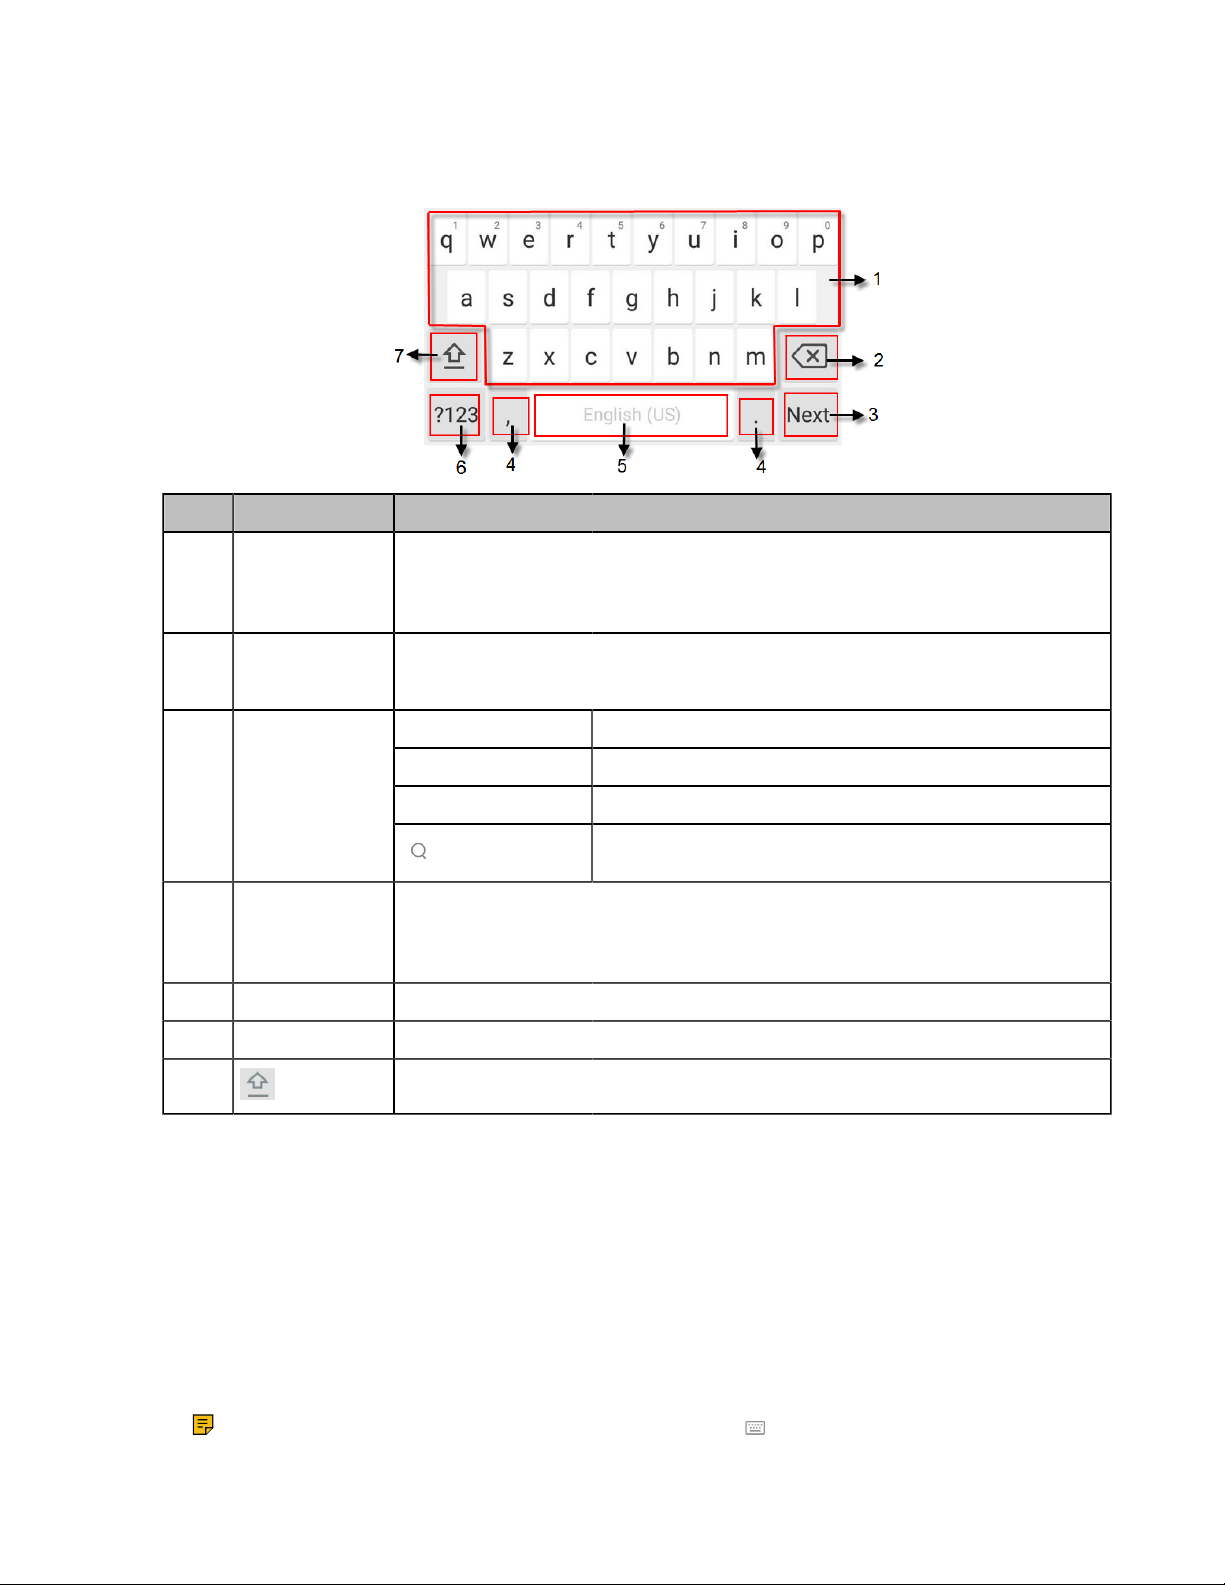
Using the Onscreen Keyboard
Before using the onscreen keyboard to enter data, you need to know the function of the keys on the
onscreen keyboard. The phone supports the English (US) input method.
No. Name Description
| Getting Started | 19
1 26 English
Letters
2 Delete key
3 Label
automatically
to identify
the contextsensitive
features.
4 Two Special
Characters
5 Space Key Enter a space.
6 Input Method Tap to switch between input modes.
7 Tap to switch to the uppercase letter input mode.
• Enter the letter.
• Long tap a key then slide to choose one of the options to enter an alternate
character.
• Tap to delete the entered character one by one.
• Long tap to delete two or more characters.
Next Tap to go to the next field.
Done Key Save the change.
Send Tap to dial out the number.
Tap to search for contacts.
• Tap to enter special characters.
• Long tap point key (.) then slide to choose one of the options to enter an
alternate character.
Using the Onscreen Dial Pad
Instead of using the onscreen keyboard, you can also use the dial pad on the dialing screen to enter data.
The onscreen dial pad only provides digit keys, # key and * key.
Procedure
1. Tap New Call.
2. Use the dial pad to enter numbers.
Note: When using the onscreen dial pad, you can tap to display the onscreen keyboard.
Page 20

| Signing into and Locking Your Phone | 20
Using the Phone Keypad
Instead of using the onscreen keyboard, you can also use phone keypad to enter data. The phone keypad
only provides digit keys, # key and * key.
Signing into and Locking Your Phone
You can sign into the phone with your Skype for Business credentials and lock your phone when
necessary.
• Multi-Factor Authentication (MFA)
• Signing into Your Phone
• Using a Common Area Phone (CAP)
• Using Hot Desking Feature
• Phone Lock
Multi-Factor Authentication (MFA)
To guarantee the security of account, your network administrator may enable multi-factor authentication
(MFA) feature for your Online account. In this case, you need to pass a 2-step verification at the initial signin. It means that you should sign in with your password and a verification sent to your phone.
• Binding Online Account with Your Mobile Phone Number
• Passing Multi-Factor Authentication
Binding Online Account with Your Mobile Phone Number
To use MFA feature, you should bind your mobile phone number with Online account first.
Procedure
1. On the Skype for Business Client, enter your Online account, and then click Sign in.
2. Click Set it up now.
Page 21

| Signing into and Locking Your Phone | 21
3. Enter your mobile phone number in the corresponding field and select an authentication method.
4. Click Next.
5. Select a method to complete the authentication:
• If you select Call me, your mobile phone will receive a call and you need to follow the voice prompt
to complete the authentication, and then click Done.
• If you select Send me a code by text message, enter the correct verification code received from
your mobile phone in the corresponding field, and then click Verify.
Passing Multi-Factor Authentication
MFA applies to user sign-in, web sign-in and sign in via PC methods. You can use Voice call verification or
Text verification to log in and use the phones. The phones will use the authentication mode you set on the
Skype for Business client by default.
Procedure
1. Log into your phones using the user sign-in, web sign-in or sign in via PC method.
Your phone or web browser enters the verification screen.
2. Depend on the authentication mode you selected on the Skype for Business client:
• If you select Call me, your mobile phone will receive a call. Answer the call and follow the voice
prompt to complete authentication.
• If you select Send me a code by text message, your mobile phone will receive a verification code.
Enter the verification code into the phones or web browser and then select Verify.
After verification, the phone logs in successfully.
Note: You can switch between the Voice call verification and Text verification methods on
your phone or web browser.
Related tasks
Sign in Using Your Skype for Business User Credentials
Sign in Using BToE
Sign in Using Web
Page 22

| Signing into and Locking Your Phone | 22
Signing into Your Phone
You can use one of the following methods to sign into your phone with your user credentials:
• User Sign-in: This method uses the user credentials (sign-in address, user name, and password) to
sign into Skype for Business server. This sign-in method is applicable to On-Premises account and
Skype for Business Online account.
• Sign in via PC: Sign in with the Skype for Business client when your phone is paired to your computer
with Better Together over Ethernet (BToE). This sign-in method is applicable to On-Premises account
and Online account.
• PIN Authentication: This method uses the user’s phone number (or extension) and personal
identification number (PIN) to sign into Skype for Business server. This sign-in method is only applicable
to On-Premises account.
• Web Sign-in: Use the web address displayed on the phone to log into the Skype for Business server.
This sign-in method is only applicable to Skype for Business Online account.
Note: If the phone reboots after successful login, the user credentials from the previous Sign-In will
be cached. User can sign in successfully without re-entering the credentials.
• Sign in Using Your Skype for Business User Credentials
• Sign in Using BToE
• Sign in Using Your PIN Authentication Credentials
• Sign in Using Web
• Signing out of the Phone
Related tasks
Setting a Lock PIN
Sign in Using Your Skype for Business User Credentials
You can sign into your Skype for Business account using your user credentials, which includes your
address, username, and password. Contact your system administrator to get your PIN authentication
credentials.
Procedure
1. Tap Sign in.
2. Select User Sign-in.
3. Enter your user credentials and select Sign in.
Sign in Using BToE
When your phone is connected to your PC and paired using Better Together over Ethernet (BToE), you can
sign into the phone using the Skype for Business client on your PC.
Procedure
1. Tap Sign in.
2. Select Sign in via PC.
3. On the Skype for Business client on your PC, enter your user credentials, and click Sign in.
Related tasks
Using Yealink BToE Connector Software
Page 23

| Signing into and Locking Your Phone | 23
Sign in Using Your PIN Authentication Credentials
You can sign into your Skype for Business account using your PIN authentication credentials. Contact your
system administrator to get your PIN authentication credentials.
Before you begin
Your system administrator should configure· network environment in advanced for PIN authentication
method. If not, your phone may not display this sign-in method. For more information, contact the system
administrator.
Procedure
1. Tap Sign in.
2. Select PIN Authentication.
3. Enter your user credentials and select Sign in.
Sign in Using Web
You can use the web address displayed on the phone to log into the Skype for Business server. Contact
your system administrator to get your PIN authentication credentials.
Procedure
1. Tap Sign in.
2. Select Web Sign-in.
A web address and paring code are displayed.
3. Enter the web address into the web browser on your PC.
4. On the Skype for Business Authentication website, enter your email address then select Verify email.
5. Enter the pairing code generated on the phone into the web browser.
A confirmation message is displayed when the phone successfully signs into Skype for Business.
Signing out of the Phone
You may want to sign out of your account when you are using a public phone. After you sign out of your
account, the account-related features (for example: calling or viewing your Skype for Business contacts)
are not available. However, you can still use other available features.
Procedure
1. Tap your avatar at the top-left corner of the touch screen.
2. Tap Sign Out.
The phone screen prompts you whether to log out or not.
3. Select OK.
Using a Common Area Phone (CAP)
Your phone can be set as a common area phone. Common area phones are Skype for Business phones
that are not associated with individuals. Instead of being located in someone’s office, common area phones
are typically located in building lobbies, cafeterias, employee lounges, conference rooms, and other
locations where a large number of people are likely to gather.
• Setting a Common Area Phone
• Signing into a Common Area Phone
• Signing out of the Common Area Phone
Page 24

| Signing into and Locking Your Phone | 24
Setting a Common Area Phone
You can configure an individual phone to be a Common Area Phone.
Procedure
1. Go to More > Advanced > Common Area Phone.
2. Turn on Common Area Phone.
3. Save the change.
The phone screen prompts whether to reboot the phone or not.
4. Select OK.
Signing into a Common Area Phone
The system administrator can use a web browser to provision numerous common area phones quickly. As
a user, you can also sign into a common area phone by yourself.
Before you begin
Setting a Common Area Phone
Procedure
1. Select a sign-in method.
2. Enter your user credentials and select Sign in.
Related concepts
Signing into Your Phone
Signing out of the Common Area Phone
You can sign out of your account after you use the common area phone.
Procedure
1. Go to More > Advanced > CAP sign Out.
2. Press CAP sign out (Sign Out
).
Using Hot Desking Feature
Hot desking makes multiple employees use the same phone at different times. It is convenient for different
employees to share one Skype for Business phone. If your system administrator enables the hot desking
feature for your phone in your environment, you can sign into a phone as a guest user.
• Sign in as a Guest User
• Signing out of the Guest User
• Disabling Hot Desking
Sign in as a Guest User
You can sign into Skype for Business on your phone or common area phone as a guest user.
Procedure
1. Tap User Sign in.
The phone prompts if you are you sure to start the hot-desking.
2. Select OK.
Page 25

| Signing into and Locking Your Phone | 25
3. Select a sign-in method.
4. Enter your user credentials and select Sign in
The phone displays “It is in the hot-desking mode”.
Related concepts
Signing into Your Phone
Signing out of the Guest User
You can sign out of the guest user after you use the phone.
Procedure
Do one of the following:
• When the phone is locked, select Sign Out.
• When the phone is unlocked, tap your avatar at the top-left corner of the touch screen and then tap
Sign Out.
The guest user is signed out and the host user is signed in automatically.
Note: When the phone has been inactive for a designated time (this time is set by the administrator
on the Skype for Business server), the guest user will automatically be signed out. One minute
before logout, the phone will prompt you to sign out immediately or continue using the phone as a
guest user for 5 minutes.
Disabling Hot Desking
You can disable the Hot Desking feature, so that guests are not allowed to sign into your phone.
Procedure
1. Go to More > Features > Hot-Desking.
2. Turn off Hot-Desking.
3.
Phone Lock
If your system administrator enables the phone lock feature for your phone in your environment, you can
lock your phone when necessary.
• Tips for Phone Lock
• Setting a Lock PIN
• Setting the Idle Timeout for Phone Lock
• Setting the Unlock Attempts
• Locking Your Phone
• Unlocking Your Phone
• Changing Your Lock PIN
• Resetting Your Lock PIN
• Disabling Phone Lock
Tips for Phone Lock
You do not use the phone for a while, you can enable the phone lock feature. You can choose to lock your
phone in following situations:
• Prevent unauthorized outgoing calls.
Page 26

| Signing into and Locking Your Phone | 26
• Prevent people from viewing or modifying phone information, such as your conference schedules and
history records.
When your phone is locked, you can:
• Place outgoing calls to a contact, unless your system administrator restricts your phone to placing calls
to emergency and authorized numbers only.
• Answer incoming calls, unless your administrator has set your phone to require a password to answer
calls.
Setting a Lock PIN
When you sign into your Skype for Business account, you are prompted to set a lock PIN, which is used for
unlocking your phone.
Procedure
1. Enter the lock PIN in the New PIN field.
2. Enter the lock PIN again in the Confirm PIN field.
3. Save the change.
Note: If you do not create a lock PIN when prompted, you will be automatically signed out of the
phone in a set amount of time. You must create a lock PIN when you try to sign in again.
Related concepts
Signing into Your Phone
Setting the Idle Timeout for Phone Lock
You can configure an idle timeout, after which the phone will lock automatically. The default time is 10
minutes.
Procedure
1. Go to More > Basic > Phone Lock > Lock Time Out(mins).
2. Enter the integer between 1 to 1440 minutes in the Lock Time Out(mins) field.
3. Save the change.
Related tasks
Locking Your Phone
Setting the Unlock Attempts
You can specify the maximum number of unsuccessful unlock attempts for a locked phone. You will be
automatically signed out of the phone when the unsuccessful unlock attempts exceeds the limit.
Procedure
1. Go to More > Basic > Phone Lock.
2. Select the desired value from the Unlock attempts field.
3. Save the change.
Locking Your Phone
You can manually lock the phone.
Procedure
Tap Lock.
Page 27

Related tasks
Setting the Idle Timeout for Phone Lock
Unlocking Your Phone
You can unlock your phone by using your lock PIN.
Procedure
1.
Tap and enter the lock PIN in the input field.
2. Tap Unlock.
Changing Your Lock PIN
After setting the lock PIN for the first time, you can change the PIN at any time.
Procedure
1. Go to More > Basic > Phone Lock.
2. Enter the lock PIN in the Current PIN field.
3. Enter the lock PIN in the New PIN field.
4. Enter the lock PIN in the Confirm PIN field.
5. Save the change.
| Audio Calls | 27
Resetting Your Lock PIN
If you forget your lock PIN, you can reset the lock PIN from a phone using your login password.
Procedure
1. On the lock screen, tap Forgot unlock PIN.
2. Enter your login password for your Skype for Business account.
3. Select Unlock.
4. Enter and confirm your new lock PIN.
Disabling Phone Lock
If you do not want to lock your phone, you can disable phone lock.
Procedure
1. Go to More > Basic > Phone Lock.
2. Turn off Lock Enable.
3. Save the change.
Audio Calls
You can place calls, answer calls, transfer a call to someone else, or conduct a Skype for Business
conference call.
• Switching among the Handset, Speakerphone, and Headset Modes
• Placing Calls
Page 28

• Answering Calls
• Muting and Unmuting Audio
• Holding and Resuming Calls
• Ending Calls
• Transferring Calls
• Parking and Retrieving Calls
• Silencing or Rejecting Incoming Calls
• Forwarding an Incoming Call Manually
• Forwarding All Incoming Calls
Switching among the Handset, Speakerphone, and Headset Modes
You can place and answer calls on your phone using the handset, headset, or speakerphone, and you can
alternate among this three modes during calls, if available.
Procedure
Do one of the following:
• Pick up the handset to use the handset mode.
• Press the Speakerphone key to use the speakerphone mode. The key LED glows green.
• Press the HEADSET key to use the headset mode. The key LED glows green.
| Audio Calls | 28
Placing Calls
You can use your phone like a regular phone to place calls in many ways easily.
• Placing Calls using the Dialer
• Placing Multiple Calls
• Placing Calls from a Locked Phone
• Placing Calls from the Call History
• Calling Favorites from the Favorites Screen
• Calling Contacts from the Contacts Screen
• Calling Contacts from the Search Results List
• Setting a Hotline Number and Delay Time
Placing Calls using the Dialer
You can enter a phone number by using the onscreen dialpad or phone keypad to place a call.
Procedure
1. Do one of the following:
• Pick up the handset.
• Press the Speakerphone key.
• Press the HEADSET key.
2. Enter the desired number.
You can also tap a desired contact from the search result list, favorites screen, history screen or
contacts screen.
3.
Press .
Page 29

Placing Multiple Calls
When you are in a call, you can hold your current call and place a new call. Only one active call (the call
that has audio associated with it) can be in progress at any time.
Procedure
1. During a call, tap More > Hold.
The active call is placed on hold.
2. Select New Call.
3. Enter the desired number.
You can also tap a desired contact from the search result list, favorites screen, history screen or
contacts screen.
4.
Tap .
Placing Calls from a Locked Phone
On the locked phone, you can place outgoing calls to any contact unless your system administrator
restricts your phone to placing calls only to emergency numbers, such as 911, and authorized numbers
that your system administrator can set up.
| Audio Calls | 29
Procedure
1. Tap Emerg Call..
2. Dial the desired number.
Placing Calls from the Call History
You can place a call to the history record.
Procedure
1.
Tap Contacts and tap .
2. Slide up and down to view more records.
3. Tap the desired entry directly.
4.
Press .
Calling Favorites from the Favorites Screen
Favorites screen displays your local favorites and Skype for Business favorites.
Procedure
1.
Tap Contacts, and tap .
2. Slide up and down to view more favorites.
3. Select the desired favorites.
Calling Contacts from the Contacts Screen
You can place calls to your contacts.
Procedure
1. Tap Contacts.
Page 30

2. Select the desired contact group.
3. Tap the desired contact.
4.
Press .
Calling Contacts from the Search Results List
On the Dialing screen, you can search for Skype for Business contacts, local contacts, and Microsoft
Outlook contacts.
Procedure
1.
Tap New Call, and then tap .
2. Enter the first or first few characters of the contact name or number.
3. Tap the desired entry from the result list directly.
Setting a Hotline Number and Delay Time
You can configure a hotline number and a delay. When you lift the handset, press the Speakerphone key,
or tap New Call, the phone will dial out the hotline number automatically after a designated period of time.
| Audio Calls | 30
Procedure
1. Go to More > Features > Hotline.
2. Enter the desired number in the Number field.
3. Enter the desired delay time in the HotLine Delay(s) field.
4. Save the change.
Answering Calls
You can answer calls in a variety of ways.
• Answering Calls
• Answering a Call When in a Call
• Answering Calls Automatically
Answering Calls
Procedure
Do one of the following:
• Pick up the handset to use the handset mode.
• Press the Speakerphone key to use the speakerphone mode. The key LED glows green.
• Press the HEADSET key to use the headset mode. The key LED glows green.
• Select Answer.
Page 31

Answering a Call When in a Call
When you receive a new call during an active call, the call waiting tone beeps, and the phone display the
incoming call information.
Procedure
Tap Answer.
The active call is placed on hold.
Related tasks
Disabling Call Waiting
Answering Calls Automatically
You can enable auto answer feature to automatically answer an incoming call in speakerphone (handsfree) mode when your phone is idle.
Procedure
1. Go to More > Features > Auto Answer.
2. Turn on Auto Answer.
3. Save the change.
| Audio Calls | 31
Note: When you are in an active call and an incoming call arrives on the phone, the incoming
call will not be automatically answered even if auto answer is enabled.
Muting and Unmuting Audio
You can mute the microphone during an active call, and then the other party cannot hear you.
Procedure
1. During a call, press the mute key on the phone or tap Mute.
2. To unmute audio, press the mute key or Mute on the touch screen.
Holding and Resuming Calls
You can place an active call on hold. Only one active call can be in progress on the phone at any time.
• Placing a Call on Hold
• Resuming a Call
Placing a Call on Hold
Procedure
During a call, tap More > Hold.
Your phone will beep softly every 30 seconds to remind you that you still have a call on hold.
Resuming a Call
Procedure
Do one of the following:
Page 32

• If only one call is placed on hold, select Resume.
• If multiple calls are placed on hold, slide left or right to choose the on-hold call, and tap Resume.
Ending Calls
Procedure
Do one of the following:
• If you are using the handset, hang up the handset or select End Call.
• If you are using the headset, tap End Call.
• If you are using the speakerphone, press the Speakerphone key or select End Call.
Transferring Calls
You can transfer a call to another party using the blind transfer or consultative transfer method.
• Performing a Blind Transfer
• Performing a Consultative Transfer
| Audio Calls | 32
Performing a Blind Transfer
You can transfer calls to another contacts immediately without consulting with them first.
Procedure
1. During a call, go to More > Blind Tran.
2. Do one of the following:
•
Enter a number and then tap .
• Tap a desired contact directly from the search result list, the favorites screen, the history screen or
the contacts screen.
Performing a Consultative Transfer
You can transfer calls to other contacts after consulting them first.
Procedure
1. During a delegation call, go to More > Transfer.
2. Do one of the following:
•
Enter a number and then tap .
• Select a desired contact directly from the search result list, the Favorites screen, the History screen,
or the Contacts screen.
3. After the party answers the call, select Transfer to complete the transfer.
Parking and Retrieving Calls
Parked calls are placed in the call orbit and you are given a retrieval number to retrieve the call. And you
are given a retrieval number to retrieve the call.
• Parking Skype for Business Calls
Page 33

• Retrieve Parked Calls on the Same Phone
• Retrieve Parked Calls on Another Phone
Parking Skype for Business Calls
You can park a call, and continue to make calls and answer other incoming calls on your phone.
Procedure
During a call, go to More > Park.
The call is placed in the call orbit and the phone displays a retrieval number.
Retrieve Parked Calls on the Same Phone
After you park a call, you can retrieve it on the same phone.
Procedure
Tap Retrieve Park.
Retrieve Parked Calls on Another Phone
After you park a call, you can provide another contact with the call retrieval number to retrieve the call.
| Audio Calls | 33
Procedure
Dial the retrieval number.
Note: If the call is ended before being retrieved, the prompting message “Parked call ended before
it can be retrieved” is displayed on the screen of the person who parked the call.
Silencing or Rejecting Incoming Calls
When you receive an incoming call, you can choose to silence or reject the call instead of answering.
• Silencing Incoming Calls
• Rejecting Incoming Calls
Silencing Incoming Calls
You can silence a call to stop your phone from ringing. Even if you silence the ringer, an incoming call
notification continues to display on your phone.
Procedure
When you receive an incoming call, select Silence.
Rejecting Incoming Calls
You can reject a call and send the call directly to voicemail (if voicemail is available). Rejected calls display
in the Received Calls list in your call history.
Procedure
When you receive an incoming call, select Reject.
Page 34

Forwarding an Incoming Call Manually
You can manually forward the call to another contact or your voicemail when your phone is ringing.
• Forwarding an Incoming Call to a Contact Manually
• Forwarding an Incoming Call to Your Voicemail Manually
Forwarding an Incoming Call to a Contact Manually
You can manually forward the incoming call to another contact when your phone is ringing.
Procedure
1. When your phone is ringing, tap Forward.
2. Do one of the following:
•
Enter a number and then tap .
• Tap a desired contact directly from the search result list, favorites screen, history screen, or contacts
screen.
Forwarding an Incoming Call to Your Voicemail Manually
You can manually forward the call to your voicemail when your phone is ringing.
| Audio Calls | 34
Procedure
When your phone is ringing,
Forwarding All Incoming Calls
You can set up your phone to forward all incoming calls to a specified destination.
• Forwarding Calls to a Contact
• Forwarding Calls to Voicemail
• Forwarding Calls to Delegates
• Simultaneously Ring a Contact
• Simultaneously Ring a Group of Contacts
• Simultaneously Ring Delegates
• Disabling Call Forward Feature
• Configuring the Delay Time for Forwarding Incoming Calls
Forwarding Calls to a Contact
You can forward all incoming calls to a contact.
Procedure
1. Go to More > Features > Call Forward.
2. turn on Call Forward.
3. Select Forwarding Calls to a Contact.
4. Enter a contact's number or select a contact.
5. Save the change.
Page 35

Forwarding Calls to Voicemail
You can forward all incoming calls to your voicemail.
Procedure
1. Go to More > Features > Call Forward.
2. turn on Call Forward.
3. Select Forward to Voice Mail.
4. Save the change.
Forwarding Calls to Delegates
You can forward all incoming calls directly to your delegates.
Before you begin
Assigning Delegates
Procedure
1. Go to More > Features > Call Forward.
2. turn on Call Forward.
3. Select Forward to Delegates.
4. Save the change.
| Audio Calls | 35
Simultaneously Ring a Contact
You can choose to simultaneously ring a contact when you receive incoming calls.
Procedure
1. Go to More > Features > Call Forward.
2. turn on Call Forward.
3. Select Simultaneously Ring to a Contact.
4. Enter or select a contact number.
5. Save the change.
Simultaneously Ring a Group of Contacts
You can choose to simultaneously ring a group of Skype for Business contacts when you receive incoming
calls.
Before you begin
Editing Your Team-Call Group Members
Procedure
1. Go to More > Features > Call Forward.
2. turn on Call Forward.
3. Select Simultaneously Ring to Team Call.
4. Save the change.
Page 36

| Skype for Business Conferences | 36
Simultaneously Ring Delegates
You can enable your delegates' phones to simultaneously ring when you receive incoming calls.
Before you begin
Assigning Delegates
Procedure
1. Go to More > Features > Call Forward.
2. turn on Call Forward.
3. Select Simultaneously Ring to Delegates.
4. Save the change.
Disabling Call Forward Feature
Procedure
1. Go to More > Features > Call Forward.
2. Turn off Call Forward.
3. Save the change.
Configuring the Delay Time for Forwarding Incoming Calls
You can configure the delay time for forwarding incoming calls. That is, incoming calls are forwarded if it is
not answered after designated delay time.
Procedure
1. Go to More > Features > Call Forward.
2. Select the desired value from the Reject call delay(s) field.
3. Save the change.
Skype for Business Conferences
This chapter provides basic operating instructions about initiating and managing a Skype for Business
conference call.
• Initiating a SfB Conference Call
• Sending the SfB Conference Information
• Viewing the SfB Conference Participants
• Managing the SfB Conference Participants
• Leaving the SfB Conference
Initiating a SfB Conference Call
You can initiate a Skype for Business conference call in many ways.
• Initiating a SfB Conference Call by Meet Now
• Initiating a SfB Conference Call during a Call
• Initiating a SfB Conference by Calling a Group of Participants
Page 37

• Initiating a SfB Conference by Merging Multiple Calls
• Initiating a SfB Conference by Merging an Active Call and a Hold Call
Initiating a SfB Conference Call by Meet Now
Procedure
Tap Meet Now.
Initiating a SfB Conference Call during a Call
You can initiate a Skype for Business conference call by inviting contacts to the active call.
Procedure
1. During a call, tap Add.
2. Do one of the following:
•
Enter the desired number, and then tap .
• Tap a desired contact directly from the search result list, the favorites screen, the history screen or
the contacts screen.
| Skype for Business Conferences | 37
Initiating a SfB Conference by Calling a Group of Participants
You can initiate a Skype for Business conference call by calling a group of Skype for Business contacts.
Procedure
1. Tap Contacts.
2.
Tap beside the desired Skype for Business group.
The phone screen prompts you whether to start a conference or not.
3. Select OK.
Initiating a SfB Conference by Merging Multiple Calls
You can merge multiple calls into a conference call.
Before you begin
Placing Multiple Calls
Procedure
During multiple calls, tap Merge calls.
Note: Multiple conferences cannot be merged into one conference call.
Initiating a SfB Conference by Merging an Active Call and a Hold Call
You can merge two individual calls instead of all calls into a conference call.
Before you begin
Placing Multiple Calls
Procedure
1. During multiple calls, tap Add.
Page 38

| Skype for Business Conferences | 38
2. Tap the avatar of the caller.
The active call and the selected held call are merged into a conference.
Sending the SfB Conference Information
If you are a conference participant, you can send the conference dial-in number and conference ID to
contacts who want to join the conference.
Procedure
1. During a Skype for Business conference, go to More > Conf Info to view the dial-in number and
conference ID.
2. Send the dial-in number and conference ID to the contacts who you want to join the conference.
Note: If the conference is locked, anyone that tries to join the conference will enter the lobby
and wait for the organizer or presenters to accept the call.
Viewing the SfB Conference Participants
When you initiate or join a conference call, you can view the conference participants.
Procedure
1. Go to More > Participants to view the conference participants’ information during a conference.
2. There are three roles in a conference:
• Organizer: the user who creates a conference. The organizer can manage the presenters and
attendees.
•
Presenter( ): the participant who is invited to the conference will be a presenter by default. The
presenter can only manage other presenters and attendees.
•
Attendee ( ) : the user who is invited to a conference but who is not authorized to act as a
presenter. The attendee cannot manage call participants.
Managing the SfB Conference Participants
When you initiate a Skype for Business conference call, you will be an organizer and other participants are
listed as presenters by default. As an organizer or presenter, you can manage call participants.
• Muting and Unmuting All Conference Participants
• Muting or Unmuting Individual Conference Participants
• Demoting or Promoting Conference Participants
• Enabling or Disabling Conference Announcements
• Locking or Unlocking a Conference Call
• Admitting or Denying Participants to a Locked Conference Call
• Removing Conference Participants
Page 39

Muting and Unmuting All Conference Participants
The organizer and presenters can mute or unmute all conference participants.
Procedure
1. During a conference, go to More > Mute All.
The mute icon is displayed on the person who is muted.
2. Go to More > Unmute All to enable all participants to speak in the conference.
The muted participants tap UnMute or the mute key to unmute.
Muting or Unmuting Individual Conference Participants
The organizer and presenters can mute or unmute individual conference participants.
Procedure
1. During a Skype for Business conference, go to More > Participants.
2. To forbid the participant from speaking,
3.
To unmute the participant, tap next to the participant.
The muted participants tap UnMute or the mute key to unmute.
| Skype for Business Conferences | 39
Demoting or Promoting Conference Participants
The organizer and presenters can promote conference participants from attendees to presenters or
demote conference participants from presenters to attendees.
Procedure
1. During a conference, tap More > Participants.
2. Do one of the following:
•
Tap to demote a presenter to an attendee.
•
Tap to promote an attendee to a presenter.
Enabling or Disabling Conference Announcements
Only the organizer and presenters can enable or disable the announcement. When the announcement
feature is enabled, the phone will issue a voice message to announce that a participant joins or leaves the
conference.
Procedure
Do one of the following:
• Go to More > E.Anc to enable announcements.
• Go to More > U.Anc to disable announcement.
Page 40

| Skype for Business Conferences | 40
Locking or Unlocking a Conference Call
The organizer and presenters can lock a conference call to prevent other people from joining the
conference call without approval. When the conference is locked, contacts must wait for the organizer or
presenters to admit them to the meeting.
Procedure
1. During a conference, go to More > Participants.
An icon (the number indicates the participants waiting in the lobby) appears on the screen.
2. When you're ready to enable people to join the conference, go to More > ConfUnLock.
Admitting or Denying Participants to a Locked Conference Call
The conference participants can invite others to join a locked conference. Others can also dial the dial-in
number and Conference ID to join the locked conference.
Before you begin
The conference is locked and you are the conference organizer or presenter.
Procedure
1. Go to More > Lobby to view the callers waiting in the lobby.
2. Do one of the following:
•
Select to allow the caller to join the locked conference as a presenter successfully.
•
Tap Press Reject to reject the caller to join the locked conference. The caller drops the call
automatically.
• Tap Admint All. All callers join the locked conference as presenters successfully.
• Tap Reject All. All callers fail to join the locked conference, and the callers drop the call
automatically.
Related tasks
Locking or Unlocking a Conference Call
Removing Conference Participants
An organizer can remove presenters and attendees. A presenter can remove other presenters and
attendees. An attendee cannot remove other participants.
Procedure
1. During a conference, tap More > Participants.
2.
Tap on the right side of the desired participant.
Leaving the SfB Conference
All participants can leave the conference at any moment.
Procedure
Tap End Call.
Other participants remain connected.
Page 41

Recording Audios
If your system administrator has enabled the recording feature, you can record the audio in a call or
conference. After the administrator enables the recording fast entrance, you can record the local audio or
view the recorded audio files in idle state.
About this task
You can record up to 12 hours in one file. By default, the recorded audios are saved in the internal SD
card. You can also connect a USB flash drive to your phone, and choose to save the recorded audios
to it instead of the internal SD card. You can play the recorded audios either on the phone itself or on a
computer.
Note: If recording feature is disabled, you can only view and play the recorded audios, if they exist.
If recording fast entrance is disabled, you cannot record local audio or view recorded audio files.
• Recording Local Audios
• Recording a Call
• Playing the Recorded Audios
• Copying Recorded Audios to USB Flash Drive
• Renaming the Recorded Audios
• Deleting the Recorded Audios
• Checking Storage Space
| Recording Audios | 41
Recording Local Audios
You can record local audio when the phone is idle. The recorded audios are saved in *.amr format. The
recorded audios are saved with the name consisting of a prefix “record@” and date & time stamp, for
example, record@180530-151118 was created on May 30, 2018, at 15:11:18. During recording, you can
mark specific moments so that you can quickly find and listen to them later.
Before you begin
Make sure the recording fast entrance and recording feature are enabled.
Procedure
1. Go to More > Features > Audio Recorder.
2. If you insert a USB flash drive, tap USB to save the recorded audio to USB flash drive.
3.
Tap to start recording.
4. During recording, you can do one of the following:
•
Tap to mark specific moments.
•
Tap to cancel the recording.
•
Tap to pause the recording, and then tap to resume the recording.
•
Tap to end the recording and save the recorded audio.
Page 42

Recording a Call
You can record active calls. The recorded calls are saved in *.aac format and include a date & time stamp
and the other party’s number or name. For example, 20200302-1514-Mac was created on March 2, 2020,
at 15:14 and you have a call with Mac. During recording, you can mark specific moments so that you can
quickly find and listen to them later.
Procedure
1. During a call, tap More > Start REC.
2. If a USB flash drive is connected, select where to save your recording.
3. During recording, you can do one of the following:
•
Tap in the top-right corner to mark specific moments.
• Tap More > Pause REC to pause the recording, and then tap More > Resume REC to resume the
recording.
• Tap More > Stop REC to end the recording and save the recorded audio
• Tap End Call to end the call and save the recorded audio.
| Recording Audios | 42
Playing the Recorded Audios
When you receive an incoming call while playing a recording, the recording is paused automatically. If you
do not answer or reject the incoming call, or if you answer the incoming call and end the call, the recording
will continue to play automatically.
Procedure
1. Go to More > Features > Audio Recorder.
2. If you want to play the recorded audio saved in USB flash drive, tap USB.
3.
Tap beside the desired recorded audio to play the recorded audio.
4. During the playing, you can do the following:
•
Tap to pause playing recorded audio.
•
Tap to continue the playing.
• Drag the slider to skip forward the playing or rewind the playing.
• Drag the slider to the position with red flag to listen to the marked moments.
• Tap the Volume key to increase or decrease the volume of the speakerphone.
•
Tap to stop the playing.
Copying Recorded Audios to USB Flash Drive
Before copying recorded audios to USB flash drive, you should connect a USB flash drive first.
• Copying a Recorded Audio to USB Flash Drive
• Copying Multiple Recorded Audios to USB Flash Drive
Page 43

Copying a Recorded Audio to USB Flash Drive
You can copy recorded audios that are stored in the internal SD card to a USB flash drive.
Procedure
1. Go to More > Features > Audio Recorder.
2.
Tap after the desired recorded audio, and then tap Copy to USB.
Copying Multiple Recorded Audios to USB Flash Drive
You can copy multiple or all recorded audios that are stored in the internal SD card to a USB flash drive.
Procedure
1. Go to More > Features > Audio Recorder.
2.
Tap in the top-right corner.
3. Tap the desired recorded audios or tap the radio box on the top-left of the screen to select all recorded
audios.
4. Tap Copy to USB.
| Recording Audios | 43
Renaming the Recorded Audios
You can rename recorded audios.
Procedure
1. Go to More > Features > Audio Recorder.
2. If you want to rename the recorded audio saved in USB flash drive, tap USB.
3.
Tap after the desired recorded audio, and then tap Rename.
4. Enter the desired file name.
5. Tap OK to accept the change.
Deleting the Recorded Audios
When you have played a recording or need additional space for new file, you can delete recorded audios
from the phone.
• Deleting a Recorded Audio
• Deleting Multiple Recorded Audios
Deleting a Recorded Audio
Procedure
1. Go to More > Features > Audio Recorder.
2. If you want to delete the recorded audio saved in USB flash drive, tap USB.
3.
Tap after the desired recorded audio, and then tap Delete.
The phone screen prompts you are sure to delete.
4. Tap OK.
Page 44

| Boss-Admin for Skype for Business | 44
Deleting Multiple Recorded Audios
You can delete multiple or all recorded audios.
Procedure
1. Go to More > Features > Audio Recorder.
2. If you want to delete the recorded audio saved in USB flash drive, tap USB.
3.
Tap in the top-right corner.
4. Tap the desired recorded audios or tap the radio box on the top-left of the screen to select all recorded
audios.
5.
Tap .
The phone screen prompts you whether to delete or not.
6. Select OK.
Checking Storage Space
You can check the storage space (total space and available space) of the internal SD card or connected
USB flash drive. At least 10M free space is required for recording.
Procedure
1. Go to More > Features > Audio Recorder.
2. If you want to check the storage space of the USB flash drive, tap USB.
3. Check the capacity and remaining recordable time.
Boss-Admin for Skype for Business
The Boss-Admin feature enables a "boss" phone and delegates’ phones to ring simultaneously when a
user calls the boss. When one party answers the call, the other phone will stop ringing. The delegates can
answer the call for the boss, transfer the call to the boss's voice mailbox, transfer the call to the boss, make
a call on behalf of the boss, or join the meeting on behalf of the boss.
• Assigning Delegates
• Viewing the Delegates Group
• Viewing Bosses
• Editing Delegates
• Managing Calls on the Boss's Line
Assigning Delegates
You can assign delegates to your line using the Skype for Business client only. However, you cannot assign
yourself as a delegate. As a delegate, you can be assigned to multiple bosses’ lines.
Procedure
1.
On your Skype for Business client, click , and select Call Forwarding Settings.
Page 45

| Boss-Admin for Skype for Business | 45
2. Select Simultaneously Ring > My Delegates, as shown below.
3. In the Call Forwarding - Delegates dialog field, click Add.
4. In the Choose a Delegate field, select the contact you want to add as a delegate and click OK.
5. Click OK when you have finished assigning contacts as delegates.
If the boss's line receives an incoming call, both the boss and delegate's phones ring.
Viewing the Delegates Group
Your delegates are automatically added to the Delegates group on your phone and in the Skype for
Business client.
Procedure
Go to Contacts > Delegates.
Viewing Bosses
You can view the contacts for which you are assigned as a delegate in the Bosses group on your phone
and in the Skype for Business client.
Procedure
Go to Directory > Bosses.
Editing Delegates
You cannot edit the delegates on your phone. If you want to add or remove delegates, you need to edit the
Delegates group on your Skype for Business client.
Procedure
1.
On your Skype for Business client, click , and select Call Forwarding Settings.
Page 46

2. Select Edit my delegate members. As shown below:
3. Do one of the following:
• Select a delegate and click Remove to delete the delegate from the group.
• Select Add to add delegates.
| Boss-Admin for Skype for Business | 46
Managing Calls on the Boss's Line
Delegates can place, answer, hold, or transfer calls on behalf of the boss's line.
• Responding to Incoming Boss Calls
• Viewing Held Boss Calls
• Resuming Held Boss Calls
• Transferring a Boss Call
• Resuming a Transferred Boss Call
• Transferring a Call to a Boss's Voicemail
• Placing a Call on Behalf of a Boss
• Initiating a Conference Call on Behalf of a Boss
• Joining a Conference Call on Behalf of a Boss
Responding to Incoming Boss Calls
When a call is placed to the boss's line, the call is displayed on the boss’s and delegate's phones. As a
delegate, you can answer an incoming call on a boss's line, reject the call, or forward the call directly to the
boss's voicemail.
Procedure
Do one of the following:
• Select Answer to answer an incoming conference call.
• Select Boss VM to forward the call to the boss's voicemail.
• Select Forward (FWD) to forward the call to the other people.
• Select Silence to mute the ringtone.
• Select FWD VM to forward the call to your voicemail.
• Select Reject to reject the call.
Page 47

| Boss-Admin for Skype for Business | 47
Viewing Held Boss Calls
Bosses and delegates can both view held calls on the boss' line. If there is an active call on boss’ line, the
Boss/Admin soft key glows red on the delegate’s phone.
Procedure
Tap the Boss/Admin soft key.
Resuming Held Boss Calls
Any assigned delegate can resume held calls on the boss's line.
Procedure
1. Tap the Boss/Admin soft key.
2. Tap the avatar of the caller.
Transferring a Boss Call
After a delegate answers the call for the boss, the delegate can transfer the call to the boss’s phone via
Safe Transfer, which enables the delegate to transfer the call to the boss’s phone and prevents the call from
going to voicemail if the boss does not answer the call. The delegate can resume the call and talk with the
client continuously.
Procedure
During a delegation call, go to More > Safe Tran.
The call is transferred to the boss's phone.
Resuming a Transferred Boss Call
If the boss is not available to answer the transferred call or rejects the transferred call, the delegate’s phone
displays a notification stating that the transferred call failed. The delegate can resume the call.
Procedure
Tap Resume.
Transferring a Call to a Boss's Voicemail
If a boss is unavailable to take calls, delegates can transfer the calls directly to the voicemail of the boss.
Procedure
During a delegation call, select More > Boss VM.
Placing a Call on Behalf of a Boss
As a delegate, you can make calls on behalf of your assigned boss on their lines.
Procedure
1. Go to Directory > Bosses.
2.
Tap on the right side of the desired boss.
3.
Tap , and tap On behalf from the pop-up box.
4.
Enter the desired number, and then tap ..
Page 48

| Managing the Call History | 48
Initiating a Conference Call on Behalf of a Boss
As a delegate, you can initiate a conference call on behalf of your assigned boss on their lines.
Procedure
1. Go to Directory > Bosses.
2.
Tap on the right side of the desired boss.
3.
Tap , and tap On behalf of Conf from the pop-up box.
Joining a Conference Call on Behalf of a Boss
As a delegate, you can join an incoming conference call on behalf of a boss on their line and add the boss
to the conference call.
Procedure
1. Select Answer to answer an incoming conference call.
2. Go to More > Invite Boss to add the boss to the conference call.
3. Select OK.
4. After you have connected the boss's line to the conference call, select End Call to leave the conference
call.
Managing the Call History
The call history on your phone includes missed, placed, and received calls. Each list holds up to 100
entries.
• Viewing Call Records
• Deleting Call Records
• Disabling Contact Avatar
• Disabling History Record
Viewing Call Records
You can view received, missed, placed, and forwarded calls.
Procedure
1.
Tap Contacts, and tap .
2. Slide up and down to view more records.
3.
Tap on the right side of the desired entry.
Deleting Call Records
You can delete one call record or a batch of call records.
• Deleting a Call Record
Page 49

• Deleting Multiple Call Records
Deleting a Call Record
Procedure
1.
Tap Contacts, and tap .
2. Slide up and down to view more records.
3.
Tap on the right side of the desired entry.
4.
Tap , and select Delete from the pop-up box.
The phone screen prompts you whether to delete or not.
5. Select OK.
Deleting Multiple Call Records
You can delete multiple call records or all records.
Procedure
| Managing the Call History | 49
1.
Tap Contacts, and tap .
2. Long tap any entry.
3. Do one of the following:
• Tap the desired entries.
• Tap the check box on the title area.
4.
Tap .
Disabling Contact Avatar
If you do not want to see the avatars of call records, you can disable contact avatar feature.
Procedure
1. Go to More > Features > History Setting.
2. Turn off Contacts Avatar.
Disabling History Record
If you do not want to save the call history, you can disable history record feature.
Procedure
1. Go to More > Features > History Setting.
2. Turn off History Record.
Page 50

| Managing Contact Directory | 50
Managing Contact Directory
The phone directory includes local directory and Skype for Business directory. Local directory is stored
on the phone only. The contacts of Skype for Business directory and the Skype for Business client are
synchronized.
• Searching for Contacts
• Skype for Business Directory
• Local Directory
Searching for Contacts
You can search for Skype for Business contacts, local contacts, and Microsoft Outlook contacts.
Procedure
1.
Tap Contacts, and tap .
2. Enter the search criteria to search for a desired contact.
The search result is displayed.
Skype for Business Directory
The Skype for Business directory on your phone displays all Skype for Business contacts. You can view
and search Skype for Business contacts via the phone only. If you want to add, edit or delete Skype for
Business contacts, you can use Skype for Business client.
• Adding Skype for Business Contacts
• Viewing Skype for Business Contacts
• Deleting Skype for Business Contacts
Adding Skype for Business Contacts
You can add Skype for Business contacts using your Skype for Business client only.
• Adding Skype for Business Contacts from the Search Results
• Adding Skype for Business Contacts from Local Directory
• Adding Skype for Business Contacts from Call Records
Adding Skype for Business Contacts from the Search Results
Procedure
1.
Tap on the right side of the desired contact from the search results.
2.
Tap , and select Add to SFB from the pop-up box.
3. Select the desired Skype for Business group.
Page 51

| Managing Contact Directory | 51
Adding Skype for Business Contacts from Local Directory
If you want to display a local contact on your Skype for Business client, you should add the local contact to
the Skype for Business directory on the phone first.
Procedure
1. Go to Contacts > Local Directory.
2. Select the desired group (All Contact or Favorites) that contains the desired local contact.
3.
Tap on the right side of the desired contact.
4.
Tap , and select Add to SFB from the pop-up box.
5. Select the desired Skype for Business group.
Adding Skype for Business Contacts from Call Records
You can add a call record to the Skype for Business directory.
Procedure
1.
Tap Contacts, and tap .
2. Slide up and down to view more records.
3.
Tap on the right side of the desired entry..
4.
Tap , and select Add to SFB from the pop-up box.
Note: Conference records cannot be added to the Skype for Business directory.
Viewing Skype for Business Contacts
You can view the information about each Skype for Business contact on the phone, for example, the name,
the number, the status and so on.
Procedure
1. Tap Contacts.
2. Select the desired Skype for Business group.
3.
Tap on the right side of the desired contact.
Page 52

Deleting Skype for Business Contacts
You can delete Skype for Business contacts on your phone.
Procedure
1. Tap Contacts.
2. Select the desired Skype for Business group.
3.
Tap on the right side of the desired contact.
4.
Tap , and select Delete from SfB from the pop-up box.
The phone screen prompts you whether to delete or not.
5. Select OK.
Local Directory
You can add, edit or delete local contacts on your phone.
• Adding Local Contacts
• Viewing Local Contacts
• Editing Local Contacts
• Deleting Local Contacts
• Searching for Local Contacts
| Managing Contact Directory | 52
Adding Local Contacts
You can add local contacts using the following ways:
• Adding Local Contacts Manually
• Adding Local Contacts from Skype for Business Directory
• Adding Local Contacts from the History Record
Adding Local Contacts Manually
You can add contacts to local directory. Make sure that the contact name is unique.
Procedure
1. Go to Directory > Local Directory > All Contacts.
2.
Tap .
3. Edit the contact information.
4. Select the desired ring tone for this contact from the Ring field.
5. Save the change.
Adding Local Contacts from Skype for Business Directory
Procedure
1. Tap Contacts.
Page 53

2. Select the desired Skype for Business group.
3.
Tap on the right side of the desired contact.
4.
Tap , and select Add to Local from the pop-up box.
5. Edit the contact information.
6. Save the change.
| Managing Contact Directory | 53
Adding Local Contacts from the History Record
You can add a history record to the local directory.
Procedure
1.
Tap Contacts, and tap .
2. Slide up and down to view more records.
3.
Tap on the right side of the desired entry.
4.
Tap , and select Add to Local from the pop-up box.
5. Edit the contact information and save the change.
Note: Conference records cannot be added to the Skype for Business directory.
Viewing Local Contacts
You can view information about each local contact on the phone.
Procedure
1. Go to Contacts > Local Directory.
2. Select the desired contact group.
3.
Tap on the right side of the desired contact.
Editing Local Contacts
You can edit the local contact information on the phone.
Procedure
1. Go to Contacts > Local Directory.
Page 54

2. Select the desired contact group.
3.
Tap on the right side of the desired contact.
4.
Tap .
5. Edit the contact information.
6. Save the change.
Deleting Local Contacts
You can delete local contacts to make room for new local contacts.
Procedure
1. Go to Contacts > Local Directory.
2. Select the desired contact group.
3.
Tap on the right side of the desired contact.
4.
Tap , and tap Delete from the pop-up box.
The phone screen prompts you whether to delete or not.
5. Select OK.
| Managing Favorites | 54
Searching for Local Contacts
You can search local contacts.
Procedure
1. Go to Contacts > Local Directory > Directory > Local Directory.
2.
Tap .
3. Enter the phone number or the contact name in the Search field.
The search result is displayed on the screen.
Managing Favorites
Favorites are the contacts in your directory that you call most often. The favorites on your phone include
local favorites and Skype for Business favorites.
• Skype for Business Favorites
• Local Favorites
Skype for Business Favorites
Skype for Business favorites on your phone synchronize with the favorites in the Skype for Business client.
• Adding Skype for Business Favorites
• Viewing Skype for Business Favorites on the Favorites Screen
• Viewing Skype for Business Favorites in the Directory
Page 55

| Managing Favorites | 55
Adding Skype for Business Favorites
You can only add Skype for Business favorites through the Skype for Business client.
Procedure
1. Right-click the desired Skype for Business contact.
2. Click Add to Favorites.
The contact is added to the Favorites group.
Viewing Skype for Business Favorites on the Favorites Screen
You can view the favorites on the Favorites screen. By default, local favorites are displayed before the
Skype for Business contacts. Local favorites are indicated by the icon . Skype for Business favorites are
indicated by the presence status icon.
Procedure
Tap Contacts, and tap .
Viewing Skype for Business Favorites in the Directory
You can view Skype for Business favorites in the directory.
Procedure
Go to Contacts > Favorites.
Page 56

Local Favorites
Local favorites are stored on your phone only.
• Adding Local Favorites
• Viewing Local Favorites on the Favorites Screen
• Viewing Local Favorites on the Contacts Screen
• Reordering Local Favorites
• Deleting Local Favorites
Adding Local Favorites
You can add local favorites. Local favorites are displayed on the Favorites screen and in your directory.
Procedure
1. Go to Contacts > Local Directory > All Local Contacts.
2.
Tap on the right side of the desired contact.
3.
Tap , and select Favorite from the pop-up box.
4. Select the desired index number for this contact from the Index field.
The favorite with the lowest index number is displayed first. The lowest number is Null
5. Save the change.
| Managing Favorites | 56
Viewing Local Favorites on the Favorites Screen
You can view the favorites on the Favorites screen. By default, local favorites are displayed before the
Skype for Business contacts. Local favorites are indicated by the icon . Skype for Business favorites are
indicated by the presence status icon.
Procedure
Tap Contacts, and tap .
Page 57

| Managing Favorites | 57
Viewing Local Favorites on the Contacts Screen
You can view local favorites in the directory.
Procedure
Go to Contacts > Local Directory > Favoritelist.
Reordering Local Favorites
You can change the order in which your favorites display on the idle or Favorites screen. The favorite with
the lowest index number is displayed first.
Procedure
1. Go to Contacts > Local Directory > Favoritelist.
2.
Tap on the right side of the desired contact.
3.
Tap .
4. Select the desired value from the Index field.
5. Save the change.
Deleting Local Favorites
You can delete local favorites to make room for new local favorites.
Procedure
1. Go to Contacts > Local Directory > Favoritelist.
2.
Tap on the right side of the desired contact.
Page 58

3.
Tap , and tap Delete from the pop-up box.
The phone screen prompts you whether to delete or not.
4. Select OK.
Using the Voicemail
You can leave voicemails for someone else using the Skype for Business phone. You can also listen to
voicemails that are stored in your voicemail. Voicemail is available only when the system administrator
enables it for the Skype for Business user.
• Leaving a Voicemail
• Accessing the Message Center
• Managing the Voicemail
Leaving a Voicemail
| Using the Voicemail | 58
You can leave voicemails for others who are busy or inconvenient to answer your call. Follow the voice
prompt from the system server to leave a voicemail, and then hang up. You can also dial the voicemail
address of a Skype for business contact to leave a voicemail.
Procedure
1. Tap Contacts.
2. Select the desired Skype for Business group.
3.
Tap on the right side of the desired contact.
4. Tap Voice Mail to leave a voicemail.
Accessing the Message Center
You can access the message center, and then follow the voice prompts to listen to your voicemails.
Procedure
Do one of the following:
• If you sign into the phone using PIN Authentication method, tap Voice Mail.
• If you sign into the phone using User Sign-in, Web Sign-In or Signing in via PC method, tap Voice
Mail, and then tap .
Managing the Voicemail
When the phone is connected to Microsoft Exchange Server, you can manage the visual voicemails,
including viewing a list of voicemails, call back to those who left the voicemails list, mark voicemails as read
and delete voicemails, and so on. Make sure that you sign into the phone using User Sign-in, Web Sign-
In or Signing in via PC method.
• Listening to the Voicemail
• Calling a Contact from Voicemail
Page 59

• Marking the Message as Read or Unread
• Deleting Voicemail Messages
Listening to the Voicemail
You can listen to a voicemail directly.
Procedure
1. Tap Voice Mail.
2. Do one of the following:
•
Tap beside the desired voicemail.
•
Tap beside the desired voicemail.
Calling a Contact from Voicemail
After you listen to a contact's voicemail, you can call the contact from the Voicemail screen.
Procedure
| Using the Voicemail | 59
1. Tap Voice Mail.
2. Select the desired voicemail.
3.
Tap , and tap Call from the pop-up box.
Marking the Message as Read or Unread
You can choose to mark unread messages that you do not want to listen to as read, and you can choose to
mark read messages that you want to listen to again as unread.
Procedure
1. Tap Voice Mail.
2. Tap the desired voicemail.
3.
Tap , and tap Mark as Read or Mark as UnRead from the pop-up box.
Deleting Voicemail Messages
After you listen to a message, you can delete them.
Procedure
1. Tap Voice Mail.
2. Tap the desired voicemail.
3.
Tap , and tap Delete from the pop-up box.
The phone screen prompts you are sure to delete.
4. Select OK.
Page 60

Using the Calendar
When connected to Microsoft Exchange Server, you can view and join meetings scheduled in Microsoft
Outlook from your phones. Make sure that you sign into the phone using User Sign-in, Web Sign-In or
Signing in via PC method.
• Opening the Calendar
• Conference Status
• Navigating Month View
• Navigating Day View
• Displaying Meeting View on the Calendar
• Tracking the Calendar
• Turning off the Conference Reminders
• Setting the Reminder Interval
• Responding to Conference Reminders
• Joining Skype Conferences
| Using the Calendar | 60
Opening the Calendar
You can access to Skype conference, appointment, meeting and event scheduled in Microsoft Outlook.
Procedure
1.
Tap .
Page 61

| Using the Calendar | 61
2.
Tap to view today's meeting schedule.
• If your system administrator configures the phone to display today’s schedules only, the screen is
shown as below:
• If your system administrator configures the phone to display all schedules, the screen is shown as
below:
Page 62

Conference Status
When scheduling a meeting on the Outlook software, you can set your availability during the meeting.
Therefore, others can schedule a meeting according to your availability on the Outlook software.
Availability Description
Your availability during this time shows as Free or Working Elsewhere
on the Outlook software.
Your availability during this time shows as Tentative on the Outlook
software.
Your availability during this time shows as Busy on the Outlook software.
| Using the Calendar | 62
Your availability during this time shows as Out of Office on the Outlook
software.
Navigating Month View
From Month view, you can select a date to view meetings for that day. The days have meeting are
displayed in blue. The current day is displayed within a blue frame.
Procedure
In the meeting schedule, open the month view by month title.
Navigating Day View
In Day view, you can see your scheduled meetings for the day.
Displaying Meeting View on the Calendar
Meeting view displays the details for a chosen meeting. If the conference organizer schedules a public
meeting on the Outlook software, you can view the subject, organizer, start and end time, location, account
availability, participants and content on the phone. If the conference organizer schedules a private meeting
on the Outlook software, you can only see the organizer, start and end time, and account availability on the
phone.
Procedure
Do one of the following:
Page 63

• From Day view, select a meeting.
• From Month view, select a date and select a meeting.
Note: You can only go to the month view only when your system administrator configures the
phone to display all schedules.
Tracking the Calendar
When you schedule a Skype conference via the Outlook software, the attendees can respond to the
conference request via Outlook software. You can see response on your phone.
Procedure
1. In the day view, select a Skype conference.
2. The replies are as below:
• Do not reply the invitation (show as None beside the participant).
• Accept the invitation (show as Accepted beside the participant)
• Tentatively accept the invitation (show as Tentative beside the participant)
• Decline the invitation (show as Declined beside the participant)
| Using the Calendar | 63
Turning off the Conference Reminders
Meeting reminders are enabled by default and display reminders for all meetings. You can disable meeting
reminders so they do not display for any meetings.
Procedure
1. Go to More > Basic > Calendar Settings.
2. Turn off Reminder.
3. Save the change.
Setting the Reminder Interval
If you snooze a meeting reminder, it appears again in 5 minutes by default. You can change the reminder
interval.
Procedure
1. Go to More > Basic > Calendar Settings.
2. Turn on Reminder.
3. In the Reminder Interval (mins) field, enter the desired value.
4. Save the change.
Page 64

| Using the Calendar | 64
Responding to Conference Reminders
If you enable conference reminder feature, a reminder pop-up is displayed 15 minutes before a meeting
starts.
Procedure
Do one of the following:
• Select Snooze to temporarily remove the reminder from the screen, until the next schedule reminder.
• Select Ignore to permanently remove the reminder from the screen and stop all future reminders for the
Skype conference.
• If you receive a Skype conference, select Join to join the Skype conference.
Joining Skype Conferences
You can join the Skype conferences from calendar in following three ways:
• Joining a Skype conference from a conference reminder (Once joined, presenter and attendee will be
muted automatically, organizer will not be muted).
• Joining a Skype conference from meeting view (Once joined, presenter and attendee will be muted
automatically, the organizer will not be muted).
• Dialing the conference dial-in number to join a Skype conference (Once joined, presenter, attendee and
the organizer will not be muted).
Note: When the organizer sets up a conference in Outlook and enables Mute all attendees feature,
all conference participants will be muted automatically once join the Skype conferences in above
ways.
• Joining a Skype Conference from a Conference Reminder
• Joining a Skype Conference from Meeting View
• Joining a Skype Conference by Dialing the Conference Dial-in Number
Joining a Skype Conference from a Conference Reminder
If the conference reminder feature is enabled, you can join the Skype conferences from a conference
reminder.
Procedure
On the conference reminder, tap Join.
Related tasks
Turning off the Conference Reminders
Joining a Skype Conference from Meeting View
Procedure
1. In the day view, select a Skype conference.
2. Tap Join to join the conference.
Related tasks
Displaying Meeting View on the Calendar
Page 65

Joining a Skype Conference by Dialing the Conference Dial-in Number
When you are invited to a Skype conference scheduled via Outlook software, you will receive an email
including the dial-in number and the conference ID. You can join the Skype conference from phone by
dialing dial-in number and conference ID.
Procedure
1. In the day view, select a Skype conference.
2. Obtain the dial-in number and conference ID.
3. Dial the dial-in number to join the conference.
Phone Settings
You can make your phone more personalized by customizing various settings.
• Setting the Language
• Changing the Backlight Brightness and Time
• Disabling Playing Tone
• Disabling Call Waiting
• Changing the Administrator Password
• Time and Date Display
• Setting a Send Key
• Setting Screen Savers
• Changing Audio Settings
• Presence
• Enhanced 911
| Phone Settings | 65
Setting the Language
The default language of the phone user interface is English. You can change the language for the phone
user interface.
Procedure
1. Go to More > Basic > Language.
2. Select the desired language.
3. Save the change.
Changing the Backlight Brightness and Time
You can change the backlight brightness of the phone screen.
About this task
The backlight has the following two options:
Backlight Active Level: The brightness level of the phone screen when the phone is active.
Backlight Time: The delay time to change the brightness of the phone screen when the phone is inactive.
Backlight time includes the following settings:
Page 66

• Always On: Backlight is on permanently.
• 15s, 30s, 60s, 120s, 300s, 600s or 1800s: Backlight is changed when the phone is inactive after the
designated time (in seconds).
Procedure
1. Go to More > Basic > Display > Backlight.
2. Slide the Backlight Active Level slider to change the intensity of the screen.
3. Tap the desired time from the Backlight Time drop-down menu.
Disabling Playing Tone
The playing tone feature is enabled by default. When you are in an active call, your phone plays a warning
tone when the new incoming call arrives. You can disable the playing tone feature.
Procedure
1. Go to More > Features > Call Waiting.
2. Turn off Play Tone.
| Phone Settings | 66
Disabling Call Waiting
The call waiting feature is enabled by default. By default, you can receive another call when you are during
an active call when the new incoming call arrives. You can disable the call waiting feature, so that the new
incoming call will be rejected automatically.
Procedure
1. Go to More > Features > Call Waiting.
2. Turn off Call Waiting.
Changing the Administrator Password
Accessing advanced features on the phone requires an administrator password. The default administrator
password is “admin”. For security reasons, you should change it as soon as possible.
Procedure
1. Go to More > Advanced > Set Password.
2. In the Current Password field, enter the current password.
3. In the New Password (New PWD) field, enter the current password.
4. In the Confirm Password (Confirm PWD) field, enter the new password.
5. Save the change.
Time and Date Display
You can set the time and date manually. The time and date format is also customizable.
• Setting Time and Date Manually
• Changing the Time and Date Format
Page 67

Setting Time and Date Manually
If your phone cannot obtain the time and date automatically, you can set the time and date manually.
Procedure
1. Go to More > Basic > Date&Time > General.
2. Select Manual Setting from the Type drop-down menu.
3. Enter the specific date and time in the corresponding fields.
4. Save the change.
Changing the Time and Date Format
You can change the time and date format.
About this task
You can customize the date by choosing among a variety of time and date formats. The built-in date
formats are listed below:
Date Format Example (3/23/2020)
WWW MMM DD Mon Mar 23
| Phone Settings | 67
DD-MMM-YY 23-Mar-20
YYYY-MM-DD 3/23/2020
DD/MM/YYYY 23/03/2020
MM/DD/YY 03/23/20
DD MMM YYYY 23 Mar 2020
WWW DD MMM Mon 23 Mar
Procedure
1. Go to More > Basic > Date&Time > Format.
2. Select the desired date format from the Date Format field.
3. Select the desired date format from the Time Format field.
4. Save the change.
Setting a Send Key
You can set the “#” key or “*” key to perform as a send key while dialing.
Procedure
1. Go to More > Features > Key as Send.
2. Select # or * from the Key As Send field, or select Disabled to disable this feature.
Page 68

Setting Screen Savers
The screen saver automatically starts each time your phone is idle for a certain amount of time. You can
stop the screen saver at any time by pressing any key. When your phone is idle again for a preset waiting
time, the screen saver starts again.
Procedure
1. Tap More > Basic > Display > Screen Saver.
2. Select the desired time from the Screen Saver Wait Time field.
3. Tap the radio box after desired screen saver type.
Changing Audio Settings
You can control certain audio settings on your phone, including adjusting the audio volume, setting a
ringtone and key tone.
• Adjusting the Volume
• Setting a Ringtone for the Phone
• Setting a Ringtone for a Contact
• Setting a Ringtone for Incoming Private Line
• Setting a Ringtone for an Incoming Team-Call
• Setting a Ringtone for the Response Group
• Turning off the Key Tone
| Phone Settings | 68
Adjusting the Volume
You can increase or decrease the volume.
Procedure
Press Volume key to adjust the volume.
If ringer volume is adjusted to the minimum when the phone is idle, the minimum volume icon appears
on the screen.
Setting a Ringtone for the Phone
You can choose a ringtone for all incoming calls. Phone’s ringtones are used to indicate incoming calls and
distinguish your phone from your neighbor’s.
Procedure
1. Go to More > Basic > Sounds > Ring Tones > Normal.
2. Select the desired ringtone.
3. Save the change.
Setting a Ringtone for a Contact
You can select a unique ringtone for various local contacts. This helps you quickly identify callers according
to the ringtones. By default, the Auto is selected, and this contact uses the ringtone according to this
priority: Contact ringtone > Phone ringtone.
Related tasks
Adding Local Contacts
Page 69

Setting a Ringtone for Incoming Private Line
Private line feature allows your phone to play a specific ringtone when receiving a private call.
Procedure
1. Go to More > Basic > Sounds > Ring Tones > Private Line.
2. Select the desired ringtone.
3. Save the change.
Setting a Ringtone for an Incoming Team-Call
Team-call ringtone feature allows the phone to play a distinct ringtone when receiving a team call.
Before you begin
You set a team-call group.
Procedure
1. Go to More > Basic > Sounds > Ring Tones > Team Call.
2. Select the desired ringtone.
3. Save the change.
| Phone Settings | 69
Related tasks
Editing Your Team-Call Group Members
Setting a Ringtone for the Response Group
When someone calls a response group, the phone in the group will ring. Response group ringtone feature
allows your phone to play a distinct ringtone when receiving a call for your response group.
Before you begin
Your system administrator set you to be a member of a response group.
Procedure
1. Go to More > Basic > Sounds > Ring Tones > Response Group.
2. Select the desired ringtone.
3. Save the change.
Related concepts
Response Group
Turning off the Key Tone
Key tone is enabled by default. The phone produces a sound when you press the dial pad. You can disable
it according to your needs.
Procedure
1. Go to More > Basic > Sounds > Key Tone.
2. Turn off Key Tone.
3. Save the change.
Page 70

Presence
Your presence information is a quick way for other people to see your availability status. Presence is
automatically set based on your Outlook calendar, but you can change it manually if you want to. For
example, when you are busy with urgencies, you can change your status to DND to avoid being disturbed.
The following table lists the status of Skype for Business support:
If your presenceisIt means How this status gets set
| Phone Settings | 70
Available
Be Right Back
Inactive
Away
Off Work
Busy
Urgent
interruptions only
You are online and
available to contacts.
You are stepping away
from the phone for a few
moments.
Your phone has been idle
for a specified period of
time (set by you).
Your phone has been idle
for a specified period (set
by you).
You are not working
and not available to be
contacted.
You are busy and do not
want to be interrupted.
You are allowed to call a
contact even though his
status is Do not Disturb.
Set automatically for you based on your phone activity
or Outlook calendar.
You can also set this status when you want others to
know you’re in your office.
You can set your presence to this anytime you want.
Set automatically for you when your phone has been
idle for a specified time (5 minutes by default).
Set automatically for you when your phone has been
inactive for a specified time (5 minutes by default). You
can also set your presence to this anytime you want.
You can set your presence to this anytime you want.
Set automatically for you based on your Outlook
calendar.
You can set your presence to this anytime you want.
You can see this status for a contact whose status is
Do not Disturb, and the contact has configured your
privacy relationship to be Workgroup.
In a call
In a meeting
Do Not Disturb
In a Skype for Business
call (a two-way audio
call) and don’t want to be
disturbed.
In a meeting and don’t
want to be disturbed.
Have a Skype for Business
meeting and don’t want to
be disturbed.
You don’t want to be
disturbed and will see
conversation notifications
only if sent by someone in
your workgroup.
Set automatically for you based on your phone activity.
Set automatically for you based on your Outlook
calendar.
When you join a conference call, or hold a conference
call.
If you manually set it to Do Not Disturb, the phone
will automatically reject calls from members outside
the workgroup. But you can still receive calls from the
workgroup.
Page 71

If your presenceisIt means How this status gets set
| Phone Settings | 71
Out of Office
Offline
Unknown
• Updating Your Skype for Business Presence
You have set the automatic
reply feature in Outlook.
Not signed in or you’ll
appear as Offline to
people whom you’ve
blocked from seeing your
presence.
Your presence can't be
detected.
Set automatically for you when you set automatic
replies in Outlook.
Set automatically for you when you log off your phone.
Or you’ll appear as Offline to people whom you’ve
blocked from seeing your presence.
This status might appear to contacts who are not
using Skype for Business as their instant messaging
program.
Updating Your Skype for Business Presence
You can update your Skype for Business presence on the phone, and your presence is automatically
updated in the Skype for Business client.
Procedure
1. Tap your avatar at top-left corner of the touch screen.
2. Select the desired status from the drop-down menu.
Enhanced 911
Enhanced 911 (E911) is a location technology that enables the called party to identify the geographical
location of the calling party.
• E911 Location Tip
• Adding the Location Information
• Selecting a Default Location
• Viewing the Location Information
E911 Location Tip
After you sign into the phone, your phone may prompt "Location is not set" when the phone’s location is not
set. You can ignore the tip or add your phone’s location. If you ignore it, an icon (it is only available on
the T46S phones) appears on the Status field.
Related tasks
Adding the Location Information
Adding the Location Information
If your system administrator does not add a location information for you, you can add the location
information manually.
Procedure
1. Go to More > Status > Location > Edit.
Page 72

| Advanced Phone Features | 72
2. Select Custom from the Mode drop-down menu.
3. Edit your location information.
4. Save the change.
Selecting a Default Location
If your system administrator has already configured a location for your account and you also add a location
manually on the phone, you can select one of them to be the default location.
Procedure
1. Do one of the following:
• Go to More > Status > Location, and then tap Edit.
• Tap More > Basic > Location.
2. Select the desired value from the field.
• If you select Default, the location configured on the Skype for Business Server will be the default
one.
• If you select Custom, the location configured on the phone will be the default one.
3. Save the change.
Viewing the Location Information
You can view location information of your phone.
Procedure
Do one of the following:
• Go to More > Basic > Location.
• Go to More > Status > Location.
Advanced Phone Features
Most features described in this chapter require configurations by your system administrator. Contact your
system administrator to find out if your phone supports the following features.
• Privacy Mode
• Editing Your Team-Call Group Members
• Private Lines
• Call Queue
• Response Group
• Group Call Pickup
• Shared Line Appearance(SLA)
• Branch Office Resiliency
Page 73

| Advanced Phone Features | 73
Privacy Mode
Privacy mode allows you to hide your presence information, so that your presence information is only
visible to the contacts in your Skype for Business directory. However, your status is offline to other contacts
in Microsoft Active Directory domain.
Note: Microsoft Active Directory includes all Skype for Business users configured by the system
administrator. If you add a contact in the domain as a Skype for Business contact of the phone, it
will appear in the Skype for Business contact list of the phone, and you can also view its real-time
status.
When the privacy mode is disabled on the Skype for Business Server, you can select one of the following
options available on the phone/Skype for Business client:
• Everyone Can See My Status Regardless Of System Settings/I want everyone to be able to see
my presence regardless of system settings (override default settings): Everyone in my Microsoft
Active Directory Domain can see my presence regardless of system settings. Even if the administrator
enables the privacy mode, anyone can still view my presence information.
• Only Contacts Can See My Status If System Setting/I want the system administrator to decide:
Currently everyone can see my presence but this could be changed in the future. If the administrator
enables the privacy mode, only the contacts in my Skype for Business directory can see my presence.
But my presence is offline for those contacts who are in my Microsoft Active Directory Domain.
When the privacy mode is enabled on the Skype for Business Server, you can select one of the following
options available on the phone or Skype for Business client:
• Everyone can see my status/I want everyone to be able to see my presence: Everyone in my
Microsoft Active Directory Domain can see my presence.
• Only contacts can see my status/I only want people in Contacts to see my presence: Only the
contacts in my Skype for Business directory can see my presence. But my presence is offline for those
contacts who are in my Microsoft Active Directory Domain.
• Modifying the Privacy Mode from the Phone
• Modifying the Privacy Mode from the Skype for Business Client
Modifying the Privacy Mode from the Phone
Procedure
1. Go to More > Features > Privacy Mode.
2. Select the desired value.
3. Save the change.
Modifying the Privacy Mode from the Skype for Business Client
Procedure
1. Open Skype for Business client.
2.
Click .
Page 74

3. In the Skype for Business - Options dialog box, click Status.
| Advanced Phone Features | 74
4. Select the desired privacy mode.
5. Click OK.
Editing Your Team-Call Group Members
A team-call group is a team of people who can answer your work calls. You can edit or delete members
in the team-call group via Skype for Business client. Assume that you have a team working on the same
project or task. When you receive an incoming call, the phones of other members in the team-call group
ring. If you are away from your desk and your phone rings, anyone in the team-call group can answer the
call for you. As soon as a team member picks up the phone, the other phones stop ringing.
Procedure
1.
On your Skype for Business client, click , and select Call Forwarding Settings.
2. Select Simultaneously Ring > My Team-Call Group.
3. In the Call Forwarding - Team-Call Group dialog box, click Add.
4. In the Choose a Team-Call Group Member dialog box, click OK.
The contacts you add as group members are displayed in the Call Forwarding - Team-Call Group
dialog box.
5. Click the Ring your team-call group after this many seconds drop-down menu to determine when
your contacts' phones ring.
Related tasks
Setting a Ringtone for an Incoming Team-Call
Simultaneously Ring a Group of Contacts
Private Lines
Beyond the primary Skype for Business account, your system administrator may assign a private line to
you in one of the following situations occurs:
• You do not want to miss important calls denied by your DND status.
Page 75

| Advanced Phone Features | 75
• As a boss, you do not want the delegate to answer some important or confidential calls for you.
• You wish your friends and families to reach you directly or bypass your delegate.
Note: If you sign into the phone using On-Premises account, you can use inbound private line
feature. Current Online environment does not support this feature.
Related tasks
Setting a Ringtone for Incoming Private Line
Call Queue
Your system administrator may assign you to be a member of a queue.
The call queue is a feature that route and queue incoming calls to group members, called agents, such
as a help desk or a customer service desk. When people dial a phone number that is set with a call
queue, they will hear a greeting first (if any is setup), and then they will be put in the queue and wait for
the available call agent. The person calling in will hear music while they are placed on hold and waiting,
and the call in the queue will ring all call agents at the same time. After a call agent accepts the call, other
agents’ phones stop ringing.
Note: If you sign into the phone using Online account, you can use call queue feature. OnPremises environment does not support this feature.
Response Group
Your system administrator may assign you to be a member of a response group.
A response group is a feature that route and queue incoming calls to groups of people, called agents, such
as for a help desk or a customer service desk. When someone calls a response group, the call is routed
to an agent based on a hunt group or the caller's answers to interactive voice response (IVR) questions.
The Response Group application uses standard response group routing methods to route the call to the
next available agent. After a call agent accepts the call, other agents’ phones stop ringing. For example,
you have been selected by your system administrator to be a call agent for a response group named
“YEALINK”. When a user calls your response group, your phone prompts that this is a call for YEALINK.
Note: If you sign into the phone using On-Premises account, you can use response group feature.
Current Online environment does not support this feature.
Related tasks
Setting a Ringtone for the Response Group
Group Call Pickup
Your system administrator may assign you to be a member of a pre-defined group. Group call pickup is
used for picking up incoming calls for your group members. If many group members receive incoming calls
at once, you will pick up the first incoming call, by dialing the group pickup code.
Note: If you sign into the phone using On-Premises account, you can use group call pickup feature.
Current Online environment does not support this feature.
• Picking Up a Call for Your Group
Page 76

| Advanced Phone Features | 76
Picking Up a Call for Your Group
Procedure
When any group member receives an incoming call, you can dial the group pick code (for example: #603)
to answer it.
Shared Line Appearance(SLA)
When your phone is registered with the Skype for Business Server, you can use the Shared Line
Appearance (SLA) feature to share a single line with other contacts as a member of a group. System
administrators assign members to the SLA group.
Any SLA group member can answer, hold, or resume calls on the shared line. And all group members can
view the status of a call on the shared line on their phones. Each line supports up to 25 call appearances.
Only one call at a time can be active on the shared line appearance. If a call is placed to the shared line
with an active call in place, the incoming call is sent to another shared line.
Note: SLA feature is configurable via Skype for Business server only. Contact your system
administrator for more information. A user can be assigned to one SLA group only. If the user has to
be a delegate for multiple shared numbers, the phone will perform Boss-Admin feature to handle the
delegate calls.
• Viewing Shared Line Appearances
• Answering SLA Calls
• Placing SLA Calls on Hold
• Resuming Held SLA Calls
• Missed and Received Calls on Shared Lines
Viewing Shared Line Appearances
When you (group member) sign into your phone, your phone notifies that you joined a SLA group, and all
shared line appearances are displayed on the SLA screen.
In the following figure, all shared line appearances of the SLA group member (yl576) are displayed on the
phone. The name of the shared line appearance consists of the sequence number and the group name.
Page 77

| Advanced Phone Features | 77
Answering SLA Calls
Any incoming call to the shared line rings on all group members' phones simultaneously.
Procedure
Tap Answer.
Note: Any group member can answer an incoming call for the shared line. When a group member
answers an incoming call, the line key's LED indicator of the shared line appearance on all phones
changes to red to indicate the call is answered. a red status bar will appear under the shared line
appearance. Other members can view the status of a call on the shared line by tapping the line.
Placing SLA Calls on Hold
Procedure
Press Hold.
All group members are notified of the call's hold status by a flashing red status bar under the shared line
appearance on all members' phones.
Page 78

| Advanced Phone Features | 78
Resuming Held SLA Calls
Any SLA member can resume a held call on the shared line.
Procedure
1. Tap the shared line appearance (flashing red status bar) on the SLA screen to view the held call.
2. Select Resume.
Missed and Received Calls on Shared Lines
If all SLA group members do not answer an incoming call, the call is logged as missed calls on all the
phones. If any SLA group member answers the incoming call, the call is logged as received calls on all the
phones. The duration of the call is only shown to the receiver in the call history.
Branch Office Resiliency
Branch office resiliency is critical for multi-site deployments of Skype for Business where the control
servers are located at a central site or data center. It allows branch site users to continue to have
Enterprise Voice service and voicemail (if voicemail rerouting settings are configured) when the branch
site loses the connection to the central site. In this situation, your phone will prompt “Limited service due to
outage”, and the presence icon is displayed as Unknown. When the WAN connection between the branch
site and central site becomes available, the phone comes out of resiliency mode automatically. Notification
of resiliency is automatically dismissed, and you can use phone features as normal.
Note: If you sign into the phone using On-Premises account, you can use branch office resiliency
feature. Current Online environment does not support this feature.
Page 79

Wireless Network
You can connect the phone to the wireless network via Wi-Fi USB Dongle WF50. The phones support
the Wi-Fi feature. If there is available Wi-Fi, you can turn on Wi-Fi to connect the phone to the wireless
network.
• Connecting the Wi-Fi USB Dongle WF50
• Activating the Wi-Fi Mode
• Connecting to the Wireless Network
• Viewing the Wireless Network Information
• Disconnecting the Wireless Network Connection
• Deactivating the Wi-Fi Mode
Connecting the Wi-Fi USB Dongle WF50
Procedure
| Wireless Network | 79
Insert the Wi-Fi USB Dongle WF50 into the USB port on the back of the phone.
For more information on WF50, refer to the WF50 user guide on Yealink Technical Support page.
Activating the Wi-Fi Mode
When you insert Wi-Fi USB dongle WF50 into the USB port on the back of the phone, it prompts that
adapter has been added and whether you want to scan the wireless network right now. You can tap OK to
turn on Wi-Fi directly and scan wireless devices automatically. If you tap Cancel, you need to turn on Wi-Fi
manually when you want to use the Wi-Fi feature.
Procedure
1. Go to More > Basic > Wi-Fi.
2. Turn on Wi-Fi.
The phone scans the available wireless networks in your area.
Connecting to the Wireless Network
There are three ways to connect the phone to the wireless network:
• Connecting to an Available Wireless Network Manually
• Connecting to the Wireless Network Using WPS
• Adding a Wireless Network Manually
Connecting to an Available Wireless Network Manually
Before you begin
Get the password of the wireless network from your system administrator. Make sure that the Wi-Fi mode
is activated.
Page 80

Procedure
1. Go to More > Basic > Wi-Fi.
2.
Tap > Scan.
3. Select the desired wireless network.
4. If the network is secure, enter its password.
5. Tap Connect to save the change.
Connecting to the Wireless Network Using WPS
Wi-Fi Protected Setup (WPS) provides simplified mechanisms to configure secure wireless networks,
which can automatically configure a wireless network with a network name (SSID) and strong WPA data
encryption and authentication.
About this task
Two methods supported by Yealink devices in the Wi-Fi protected setup:
• Push Button Configuration (PBC): The user simply presses the WPS key on both the device and
router to connect.
• Personal Identification Number (PIN): The user has to enter a PIN generated randomly by the device
on the router to connect.
| Wireless Network | 80
Note: It is not available to MP54 phones.
• Connecting to the Wireless Network Using PBC
• Connecting to the Wireless Network Using PIN
Connecting to the Wireless Network Using PBC
Before you begin
Make sure you have activated the Wi-Fi mode.
Procedure
1. Go to More > Basic > Wi-Fi.
2.
Tap WPS > WPS.
The phone prompts that you need to press the Wi-Fi Protected Setup button on your router.
3. Long press the WPS button on your router.
Once WPS setup has completed successfully, the phone displays the connection is successful.
Connecting to the Wireless Network Using PIN
Before you begin
Make sure you have activated the Wi-Fi mode.
Procedure
1. Go to More > Basic > Wi-Fi.
2. Tap
The phone prompts The phone prompts that you need to enter the PIN xxx on your WLAN router.
3. Log into your router’s web interface, and configure it to search the clients.
Once WPS-PIN setup completes successfully, the web interface of gateway displays the connection is
successful.
Page 81

Adding a Wireless Network Manually
If the SSID broadcast of the wireless network device is disabled, the phone will not be able to search for
this wireless network, you can add it manually.
Before you begin
Make sure you have activated the Wi-Fi mode.
Procedure
1. Go to More > Basic > Wi-Fi.
2.
Tap > Add.
3. Enter the SSID and then select the desired value from the Security Mode drop-down menu:
• If you select None, save the change directly.
• If you select WEP or WPA/WPA2-PSK, enter the password and save the change.
• If you select 802.1×EAP, select the desired EAP method, Phase-2 authentication and CA certificate,
enter the desired values in the Identity, Anonymous identity and Password fields and then save
the change.
If you tap the Show advanced options radio box, select the desired value in the Proxy field; if you
select Manual, enter the information about proxy server in the corresponding fields.
| Wireless Network | 81
Viewing the Wireless Network Information
After connecting to the wireless network, you can view the wireless network information (such as wireless
status, profile name, SSID, signal strength and so on.)
Procedure
Go to More > Basic > Wi-Fi > Wireless Status.
Related tasks
Connecting to the Wireless Network
Disconnecting the Wireless Network Connection
Procedure
1. Go to More > Basic > Wi-Fi.
2. Tap the connected wireless network.
3. Tap Forget from the pop-up menu.
The wireless network is disconnected. You can tap it again to connect.
Deactivating the Wi-Fi Mode
You should deactivate the Wi-Fi mode when you need to connect your phone to the wired network.
Procedure
1. Go to More > Basic > Wi-Fi.
2. Turn off Wi-Fi.
Page 82

| Connecting a Bluetooth-enabled Mobile Phone | 82
Connecting a Bluetooth-enabled Mobile Phone
You can use Bluetooth USB Dongle to make T55A/MP54 (BT40 for T55A, BT41 for MP54) phone supports
the Bluetooth feature. Bluetooth enables low-bandwidth wireless connections within a range of 10 meters
(32 feet). The best performance is in the 1 to 2 meters (3 to 6 feet) range. You can pair and connect the
Bluetooth-enabled mobile phone with your phone.
• Activating the Bluetooth Mode
• Pairing and Connecting the Bluetooth-Enabled Mobile Phone
• Placing a Mobile Call over Bluetooth on your Mobile Phone
• Handling Incoming Mobile Phone Calls on the Phone
• Deactivating the Phone Audio Feature
• Editing Your Phone's Bluetooth Device Name
• Disabling Bluetooth Device Discovery
• Renaming the Paired Bluetooth Devices
• Disconnecting the Bluetooth Device
• Un-pairing the Mobile Phone
• Deactivating the Bluetooth Mode
Activating the Bluetooth Mode
You need to activate Bluetooth mode to use the Bluetooth feature (MP58 is activated Bluetooth mode by
default).
Procedure
1. Go to More > Basic > Bluetooth.
2. Turn on Bluetooth.
The phone scans the available Bluetooth devices automatically.
Pairing and Connecting the Bluetooth-Enabled Mobile Phone
You can pair and connect the Bluetooth-Enabled mobile phone to your phone.
Before you begin
Make sure that you have activated the Bluetooth mode and the Bluetooth-Enabled mobile phone is
discoverable.
Procedure
1. Go to More > Basic > Bluetooth.
The phone will search for the Bluetooth-Enabled mobile phone automatically.
2.
If there is no mobile phone found on the touch screen, tap to search for the Bluetooth-Enabled
mobile phone.
3. Tap the desired mobile phone in the available devices list to connect the it to your Skype for Business
phone.
Page 83

| Connecting a Bluetooth-enabled Mobile Phone | 83
4. Tap Pair on both mobile phone and Skype for Business phone.
Once the connection is successful, the prompt “Connected” appears under the mobile phone name.
The Bluetooth icon is displayed in the status bar.
Note: The phone supports up to connect one mobile phone, one Bluetooth handset, and one
Bluetooth headset simultaneously.
Related tasks
Activating the Bluetooth Mode
Placing a Mobile Call over Bluetooth on your Mobile Phone
The phone audio feature is enabled by default. You can make a mobile call using the phone. The phone
acts as a hands-free device for your mobile phone. The call is made through your mobile phone, but the
audio is present on the phone and the call control is done by the phone.
Before you begin
Pair and connect the Bluetooth-enabled mobile phone. Make sure the phone audio feature is enabled.
Procedure
1. Do one of the following:
• Pick up the handset.
• Press the Speakerphone key.
• Press the HEADSET key.
2. Enter the desired number.
3.
Tap .
4. Select a phone number from the pop-up box and dial out.
Note: If you disable the phone audio feature, your mobile phone will be disconnected with your
phone.
Related tasks
Pairing and Connecting the Bluetooth-Enabled Mobile Phone
Handling Incoming Mobile Phone Calls on the Phone
The phone audio feature is enabled by default. You can handle a mobile call using the phone. Therefore,
the incoming call of your mobile phone can be shown on the phone. You can answer, silent, or reject the
call by using your phone.
Before you begin
Pair and connect the Bluetooth-enabled mobile phone.
Procedure
When the paired mobile phone receives an incoming call, do one of the following on your phone:
• Tap Answer.
• Tap Silence.
• Tap Reject.
Note: If you disable the phone audio feature, your mobile phone will be disconnected with your
phone.
Page 84

| Connecting a Bluetooth-enabled Mobile Phone | 84
Related tasks
Pairing and Connecting the Bluetooth-Enabled Mobile Phone
Deactivating the Phone Audio Feature
The phone audio feature is enabled by default. You can place or receive incoming calls on Skype for
Business phone. You can disable the phone audio feature.
Procedure
1. Go to More > Basic > Bluetooth.
2.
Tap beside the connected mobile phone.
3. Turn off Phone Audio.
4. Save the change.
Editing Your Phone's Bluetooth Device Name
By default, the device name for Yealink Skype for Business phones display as Yealink-T55A (Yealink-MP54
for MP54 phones). You can change the Bluetooth device name for your phone.
Procedure
1. Go to More > Basic > Bluetooth.
2. Tap Edit My Device Information.
3. Enter the desired name in the Device Name field.
4. Save the change.
Related tasks
Activating the Bluetooth Mode
Disabling Bluetooth Device Discovery
After Bluetooth is turned on, your phone is visible to other Bluetooth-enabled devices by default. You can
choose to disable this feature to not allow your phone to show as an available device on other Bluetooth
devices.
Procedure
1. Go to More > Basic > Bluetooth.
2. Tap Edit My Device Information.
3. Turn off Open Discover.
4. Save the change.
Related tasks
Activating the Bluetooth Mode
Page 85

Renaming the Paired Bluetooth Devices
You can rename the paired Bluetooth devices for better recognition effect.
Before you begin
Pair and connect the Bluetooth-Enabled mobile phone.
Procedure
1. Go to More > Basic > Bluetooth.
2.
Tap after the connected mobile phone name.
3. Enter the desired device name in the Rename.
4. Save the change.
Related tasks
Pairing and Connecting the Bluetooth-Enabled Mobile Phone
Disconnecting the Bluetooth Device
| Connecting a Bluetooth-enabled Mobile Phone | 85
You can disconnect the Bluetooth device from your phone. After you disconnect the Bluetooth device, it
stay in the paired devices list, so that you can easily connect it to your phone next time.
Procedure
1. Go to More > Basic > Bluetooth.
2. Tap the connected Bluetooth devices.
The phone screen prompts you are sure to disconnect.
3. Tap OK.
Related tasks
Pairing and Connecting the Bluetooth-Enabled Mobile Phone
Un-pairing the Mobile Phone
You can un-pair your mobile phone and your Skype for Business phone. After you un-pair them, the mobile
phone disappears from the paired devices list. To connect mobile phone to your Skype for Business phone
again, you need to find and tap the desired mobile phone in the available devices list.
Procedure
1. Go to More > Basic > Bluetooth.
2. Tap after the connected mobile phone name.
3. Tap Unpair.
Related tasks
Pairing and Connecting the Bluetooth-Enabled Mobile Phone
Page 86

| Using Yealink BToE Connector Software | 86
Deactivating the Bluetooth Mode
If you do not need connect to Bluetooth devices, you can turn off Bluetooth.
Procedure
1. Go to More > Basic > Bluetooth.
2. Turn off Bluetooth.
The Skype for Business phone scans the available Bluetooth device automatically.
Using Yealink BToE Connector Software
Better Together over Ethernet (BToE) feature enables the phone to interoperate with the Skype for
Business client on the PC to achieve third-party call control. You can make calls, answer incoming calls,
or hold calls on the Skype for Business client on the phone and the PC at the same time. In order to use
BToE, you need to download and install the Yealink BToE Connector software first.
• Getting Started with BToE
• Downloading and Installing the Yealink BToE Connector Software
• Starting the Yealink BToE Connector Software
• Setting Yealink BToE Connector Software
• Pairing Your Phone with Your PC
• Using Your Phone as Your Primary Audio Device for Your PC
• Using BToE to Lock and Unlock Your Phone
• Turning off Phone Lock with PC
• Using BToE to Manage Calls on Your Phone and Skype for Business Client
• Disabling BToE on Your Phone
• Exiting Yealink BToE Connector Software
• Uninstalling the Yealink BToE Connector Software
Getting Started with BToE
To enable and use BToE (Better Together over Ethernet), you need to ensure the following requirements
are available on your PC:
• Install Skype for Business client
• A registered Skype for Business user (Obtain user credentials from your system administrator)
• Running Windows Vista version or later / MAC 10.12 version or later
• Administrator privileges are needed to install the Yealink BToE Connector software
Downloading and Installing the Yealink BToE Connector Software
Before enabling BToE, you need to install the Yealink BToE Connector software on your PC. You can
download the software from Yealink Support.
Procedure
1. Unzip the downloaded file.
2. Double click the installation application Yealink BToE Connector for Lync.msi.
Page 87

| Using Yealink BToE Connector Software | 87
3. Follow the steps in the installation wizard to complete the installation.
When the installation completes, the Yealink BToE Connector software starts on your PC and the icon
is displayed in the notification area of your system tray.
Starting the Yealink BToE Connector Software
You can start the Yealink BToE connector manually if it does not start automatically.
Procedure
Double-click the Yealink BToE Connector desktop icon on your PC or click Start > All Programs > Yealink
BToE Connector.
Setting Yealink BToE Connector Software
You can customize settings for the Yealink BToE Connector software.
Procedure
1.
Right-click in the system tray and select Settings.
2. Do the following:
• Check the Run automatically when starting Windows checkbox, this software starts automatically
once the PC starts.
• If you uncheck the Wired checkbox, you need to enter the IP address of your phone manually.
• If you check the Wired checkbox, and you connect a PC to the PC port on your phone using an
Ethernet cable, the IP address of your phone is entered automatically.
Pairing Your Phone with Your PC
Before you can begin using BToE, you must pair your phone with your PC.
• Enabling BToE and Selecting a Paring Mode
• Pairing Your Phone with Your PC over Ethernet
• Pairing Your Phone with Your PC using Phone IP Address
• Viewing Pairing Status
Enabling BToE and Selecting a Paring Mode
By default, your phone is set to pair with your computer automatically when Better Together over Ethernet
is enabled and you connect your phone to your computer over Ethernet. You can also choose to manually
pair your phone with your computer using the BToE Connector application and a pairing code generated by
your phone. Manual pairing ensures user information security and prevents anyone from pairing with the
phone.
Procedure
1. Go to More > Features > BToE.
2. Turn on BToE.
3. In the BToE Pairing Mode field, select Auto or Manual.
4. Save the change.
Page 88

| Using Yealink BToE Connector Software | 88
Pairing Your Phone with Your PC over Ethernet
You can connect an Ethernet cable from your PC to the PC port on your phone.
Before you begin
Ensure that the Yealink BToE Connector software is running on your PC.
Procedure
1. On the Yealink BToE connector software, make sure the Wired checkbox is checked. The IP address of
your phone is automatically filled.
2. Click OK.
• If BToE Pairing Mode is set to Auto, your phone pairs with Skype for Business client directly.
• If BToE Pairing Mode is set to Manual, a six-digit pairing code displays. You should enter the six-digit
pairing code shown on the phone into the notification on your PC.
The dialog box indicating that the computer has successfully paired with the phone displays on your
phone.
3. If the phone is not registered, enter your user credentials into the dialog displayed on your PC.
Note: If the dialog box does not display on your computer, select Sign In on your phone and
choose Sign in via PC. The dialogue box will pop up on the PC.
Pairing Your Phone with Your PC using Phone IP Address
If you do not connect an Ethernet cable from your PC to the PC port on your phone, you can choose to
enter phone IP address manually.
Before you begin
Ensure that the Yealink BToE Connector software is running on your PC.
Procedure
1. On the Yealink BToE connector software, make sure the Wired checkbox is unchecked.
2. Enter the IP address of your phone.
3. Click OK.
• If BToE Pairing Mode is set to Auto, your phone pairs with Skype for Business client directly.
• If BToE Pairing Mode is set to Manual, a six-digit pairing code displays. You should enter the six-digit
pairing code shown on the phone into the notification on your PC.
The dialog box indicating that the computer has successfully paired with the phone displays on your
phone.
4. If the phone is not registered, enter your login credentials into the dialog displayed on your PC.
Note: If the dialog box does not display on your computer, select Sign In on your phone and
choose Sign in via PC. The dialogue box will pop up on the PC.
Viewing Pairing Status
You can view the pairing status between your phone and PC.
Procedure
1. Go to More > Features > BToE.
Page 89

| Using Yealink BToE Connector Software | 89
2. View the BToE pairing status in the BToE Pairing Status field.
• Unpaired (Not signed in): Your phone and your PC are not paired.
• Paired (Not signed in): Your phone and your PC are paired but the Skype for Business user signing
on your phone differs from the one signing on the Skype for Business client.
• Paired (Signed in): Your phone and your computer are paired and the Skype for Business user
signing on the phone is same as the one signing on the Skype for Business client. This status
means that the Skype for Business user logged in on the phone is the same as the user logged in on
the client.
Note: You can also hover your mouse over the BToE icon in the system tray to view the BToE
pairing status.
Using Your Phone as Your Primary Audio Device for Your PC
With BToE, you can use your Skype for Business phone to play audio from media, such as music or web
videos, by setting your phone as your default communication device for your PC.
Procedure
1. On your PC, click Start > Control Panel > Hardware and Sound > Sound.
2. Click Yealink USB Audio Playback, and click Set Default.
3. Click OK. The PC Audio screen is displayed as following:
Using BToE to Lock and Unlock Your Phone
When your phone is paired with your PC, you can lock and unlock your phone automatically when you lock
or unlock your PC. When the PC is unlocked, the phone can be unlocked automatically.
Before you begin
Make sure the BToE status is Paired (Sign In) and the phone lock with PC feature is enabled:
Page 90

About this task
The phone locks automatically when one of the following situations occur:
• The paired PC gets locked.
• The paired PC enters sleep mode.
• The paired PC starts the screen saver.
• The account status changes to inactive.
• BToE status changes from Paired (Sign In) to Paired (Sign Out) or Unpaired.
The phone unlocks automatically when one of the following situations occur:
• The paired PC gets unlocked.
• The paired PC wakes up and is not locked.
• The paired PC stops the screen saver and is not locked.
• The account status changes from inactive to active.
• BToE status changes from Paired (Sign Out) or Unpaired to Paired (Sign In).
Turning off Phone Lock with PC
| Using Yealink BToE Connector Software | 90
When your phone is paired with your PC, you can turn off phone lock with PC feature, so that your phone
will not be locked or unlocked with your PC.
Procedure
1. Go to More > Basic > Phone Lock > Phone Lock with PC.
2. Turn off Phone Lock with PC.
3. Save the change.
Using BToE to Manage Calls on Your Phone and Skype for Business Client
After your phone is paired with your PC, you can manage calls with your Skype for Business contacts on
your phone and in the Skype for Business client on your PC. Using any registered phone as your primary
audio device, you can answer, place, hold and resume calls on your phone. If the Skype for Business client
and the connected phone are signed in with different accounts, the phone acts as a speakerphone for all
audio and video calls initiated in the Skype for Business client on your PC.
• Setting Your Phone as Your Primary Audio Device
• Answering BToE Calls
• Placing Calls
• Pausing and Resuming BToE Calls
• Moving Call Audio between Your Phone and PC
Setting Your Phone as Your Primary Audio Device
Before you begin using your phone to manage the calls of Skype for Business client, you need to ensure
that your phone is set as your primary audio device in your Skype for Business client on your PC.
Procedure
In your Skype for Business client, click the audio device icon and select your phone as your primary
device.
Page 91

| Using Yealink BToE Connector Software | 91
Answering BToE Calls
You can sign into the same or different accounts on the Skype for Business client and the phone. These
two login methods will produce different answering situations.
Procedure
Do one of the following:
•
If signed in with the same account, select Answer on your phone or click on the Skype for Business
client.
• If signed in with different accounts and the incoming call is for the account signed into Skype for
Business client, click on the Skype for Business client. The call is displayed on your phone and
Skype for Business client. On your phone, the icon is displayed during the call and the audio for the
call is played through the phone's speakerphone.
• If signed in with different accounts and the incoming call is for the account signed into the phone, select
Answer on your phone. The call is displayed on your phone only.
Placing Calls
You can place calls to Skype for Business contacts in the Skype for Business client and on your phone.
Procedure
Choose a contact and select Call.
Pausing and Resuming BToE Calls
When your Skype for Business client is during an audio or video call and different user accounts are signed
in to your phone and Skype for Business client, you can pause active audio and video calls on your phone.
When your Skype for Business client is during a video call and same user accounts are signed in to your
phone and Skype for Business client, you can pause active video calls on your phone. However, when you
pause an audio or a video call on your phone, the call remains active in the Skype for Business client on
your PC.
Procedure
1. When your Skype for Business client is during a call, select Pause on your phone.
The call is paused on your phone but not in the Skype for Business client on your PC.
2. Select Resume on your phone to continue talking.
Moving Call Audio between Your Phone and PC
During an active Skype for Business call, you can move the call audio from your phone to your PC or from
your PC to your phone.
Procedure
1.
During an active call in the Skype for Business client, click , and select .
2. Do one of the following:
• Click PC Mic and Speakers to move the call audio from your phone to your PC.
• Click Handset to move the call audio from your PC to your phone.
Page 92

| Maintaining Skype for Business Phones | 92
Disabling BToE on Your Phone
When you disable BToE, you can no longer use the feature on your phone and Skype for Business client
on your computer.
Procedure
Do one of the following:
• Disconnect the Ethernet cable from the PC port on your phone.
• Go to More > Features > BToE, and turn off BToE.
Exiting Yealink BToE Connector Software
You can exit the Yealink BToE Connector software at any time to unpair the phone from the PC.
Procedure
On your PC, right-click in the system tray and select Exit.
Uninstalling the Yealink BToE Connector Software
You can uninstall Yealink BToE Connector software at any time. After you uninstall the Yealink BToE
Connector software, you can no longer use BToE feature. If you want to re-use the BToE feature, you must
reinstall the Yealink BToE Connector software and repair the phone and PC.
Procedure
On your PC, select Menu > All Programs > Yealink BToE Connector > Uninstall.
Maintaining Skype for Business Phones
When the phone is not operating properly, you can investigate or troubleshoot issues along with any other
tasks your administrator may ask you to perform.
• Rebooting Your Phone
• Viewing Phone Status
• Updating Phone Firmware
• Resetting Your Phone
Rebooting Your Phone
Your system administrator may ask you to reboot if it malfunctions or to assist in troubleshooting.
Procedure
1. Go to More > Advanced.
2. Select Reboot.
The phone screen prompts if you want to reboot the phone.
Page 93

3. Select OK to reboot the phone.
Viewing Phone Status
On your phone, you can view network, firmware, location, license information and so on.
Procedure
1. Go to More > Status.
2. Tap the desired item to view the specific information.
Updating Phone Firmware
When a firmware update is available on the Skype for Business server, you can trigger an update manually.
Procedure
1. Go to More > Advanced > Firmware Update.
2. Tap Update.
| Troubleshooting | 93
Resetting Your Phone
You can reset the phone to factory default settings.
Procedure
1. Go to More > Advanced.
2. Tap Reset.
The phone screen prompts if you want to reset to factory setting.
3. Select OK.
Troubleshooting
If you are having issues with your device, you can try the troubleshooting options and solutions in the
following topics to resolve certain issues.
• Why is the screen blank?
• Why does the device display “Network unavailable”?
• Why does the device display time and date incorrectly?
• How can I obtain the MAC address of a device when the device is not powered on?
• Why can’t I sign into the Skype for Business server on the phone?
• Why can't the phone pair with my Skype for Business client?
• Why can't I see the Calendar menu on the phone?
• Why can't I get a dial tone?
• Why doesn't the phone ring?
• Why can't I receive calls?
• How can I switch to Teams edition?
• Why doesn't my handset work?
Page 94

Why is the screen blank?
• If the device is powered from PoE, ensure you use a PoE-compliant switch or hub.
• Ensure that the device is properly plugged into a functional AC outlet.
Why does the device display “Network unavailable”?
• Ensure that the Ethernet cable is plugged into the Internet port on the phone and the Ethernet cable is
not loose.
• Ensure that the switch or hub in your network is operational.
Why does the device display time and date incorrectly?
Check whether your device obtains the time and date from the SNTP server automatically. If the device
fails to connect the SNTP server, contact your system administrator for more information. You can also
configure the time and date manually.
| Troubleshooting | 94
How can I obtain the MAC address of a device when the device is not powered on?
You can use one of the following ways to obtain the MAC address of a device:
• The PO (Purchase Order) provided by the supplier.
• The label of the carton box.
• The phone’s bar code on the back of the phone.
Why can’t I sign into the Skype for Business server on the phone?
• Check your phone is properly connected to the switch or hub.
• Ensure that your user credentials are correct.
• Ensure that the IP address of the DNS server is correctly configured on the phone, or configure a
DHCP server, and the DHCP server provides the IP address of the DNS server.
• Ensure that the phone can obtain the correct date and time through the SNTP server.
• Ensure that the phone has obtained the license.
Why can't the phone pair with my Skype for Business client?
• Ensure that your Skype for Business client is installed on your PC and a Skype for Business user signs
into Skype for Business server successfully.
• Ensure that the user signing on the phone is the same as the one signing on the Skype for Business
client.
• Re-pair the phone and Skype for Business client manually.
Page 95

| Regulatory Notices | 95
• Ensure that Yealink BToE Connector and application driver are successfully installed on your PC, and
both of them start successfully. If the phone still cannot pair with the Skype for Business client, reboot
the PC.
• After a reboot, if the phone still cannot pair with the Skype for Business client, uninstall the Yealink BToE
Connector and application driver, and then reinstall them.
Why can't I see the Calendar menu on the phone?
It is possible that the phone is not connected to the Microsoft Exchange Server. Make sure that your sign
into the phone using user sign-in, web sign-In or signing in via PC method.
Why can't I get a dial tone?
• Switch between the Handset, Headset (if present) or Hands-Free Speakerphone to check whether the
dial tone is present for one of the audio modes.
• If the dial tone exists on another audio mode, connect a different handset or headset to isolate the
problem.
Why doesn't the phone ring?
Check the ringer volume on the phone. To adjust the ringer volume setting, tap the Volume key when the
phone is idle.
Why can't I receive calls?
• Check if the account is logged in.
• Check whether your status is DND mode, if it is, you should reset status.
• Check whether the call forward is enabled on the phone.
How can I switch to Teams edition?
• Upgrade firmware via the web user interface.
• Auto provisioning.
Why doesn't my handset work?
Note: It is not available to the Wireless Bluetooth handset.
• Check that the headset cord is fully connected to the headset jack on the phone.
Regulatory Notices
• Service Agreements
Page 96

| Regulatory Notices | 96
• Limitations of Liability
• Safety Instructions
Service Agreements
Contact your Yealink Authorized Reseller for information about service agreements applicable to your
product.
Limitations of Liability
TO THE FULL EXTENT ALLOWED BY LAW, YEALINK EXCLUDES FOR ITSELFAND ITS SUPPLIERS
ANY LIABILITY, WHETHER BASED IN CONTRACT OR TORT (INCLUDING NEGLIGENCE), FOR
INCIDENTAL, CONSEQUENTIAL, INDIRECT, SPECIAL, OR PUNITIVE DAMAGES OF ANY KIND, OR
FOR LOSS OF REVENUE OR PROFITS, LOSS OF BUSINESS, LOSS OF INFORMATION OR DATA, OR
OTHER FINANCIAL LOSS ARISING OUT OF OR IN CONNECTION WITH THE SALE,INSTALLATION,
MAINTENANCE, USE, PERFORMANCE, FAILURE, OR INTERRUPTION OF ITS PRODUCTS,EVEN
IF YEALINK OR ITS AUTHORIZED RESELLER HAS BEEN ADVISED OF THE POSSIBILITY OF
SUCH DAMAGES, AND LIMITS ITS LIABILITY TO REPAIR, REPLACEMENT, OR REFUND OF THE
PURCHASERICE PAID, AT YEALINK’S OPTION. THIS DISCLAIMER OF LIABILITY FOR DAMAGES
WILL NOT BE AFFECTED IF ANY REMEDY PROVIDED HEREIN SHALL FAIL OF ITS ESSENTIAL
PURPOSE.
Safety Instructions
Save these instructions. Read these safety instructions before use!
The following basic safety precautions should always be followed to reduce risk of fire, electrical shock, and
other personal injury.
General Requirements
• Before you install and use the device, read the safety instructions carefully and observe the situation
during operation.
• During the process of storage, transportation, and operation, please always keep the device dry and
clean.
• During the process of storage, transportation, and operation, please avoid collision and crash of the
device.
• Please attempt not to dismantle the device by yourself. In case of any discrepancy, please contact the
appointed maintenance center for repair.
• Without prior written consent, no organization or individual is permitted to make any change to the
structure or the safety design of the device. Yealink is under no circumstance liable to consequences or
legal issues caused by such changes.
• Please refer to the relevant laws and statutes while using the device. Legal rights of others should be
respected as well.
Environmental Requirements
• Place the device at a well-ventilated place. Do not expose the device under direct sunlight.
• Keep the device dry and free of dusts.
• Place the device on a stable and level platform.
• Please place no heavy objects on the device in case of damage and deformation caused by the heavy
load.
• Keep at least 10 cm between the device and the closest object for heat dissipation.
Page 97

| Regulatory Notices | 97
• Do not place the device on or near any inflammable or fire-vulnerable object, such as rubber-made
materials.
• Keep the device away from any heat source or bare fire, such as a candle or an electric heater.
• Keep the device away from any household appliance with strong magnetic field or electromagnetic field,
such as a microwave oven or a refrigerator.
Operating Requirements
• Do not let a child operate the device without guidance.
• Do not let a child play with the device or any accessory in case of accidental swallowing.
• Please use the accessories provided or authorized by the manufacturer only.
• The power supply of the device shall meet the requirements of the input voltage of the device. Please
use the provided surge protection power socket only.
• Before plugging or unplugging any cable, make sure that your hands are completely dry.
• Do not spill liquid of any kind on the product or use the equipment near water, for example, near a
bathtub, washbowl, kitchen sink, wet basement or near a swimming pool.
• Do not tread on, pull, or over-bend any cable in case of malfunction of the device.
• During a thunderstorm, stop using the device and disconnect it from the power supply. Unplug the
power plug and the Asymmetric Digital Subscriber Line (ADSL) twisted pair (the radio frequency cable)
to avoid lightning strike.
• If the device is left unused for a rather long time, disconnect it from the power supply and unplug the
power plug.
• When there is smoke emitted from the device, or some abnormal noise or smell, disconnect the device
from the power supply, and unplug the power plug immediately. Contact the specified maintenance
center for repair.
• Do not insert any object into equipment slots that is not part of the product or auxiliary product.
• Before connecting a cable, connect the grounding cable of the device first. Do not disconnect the
grounding cable until you disconnect all other cables.
Cleaning Requirements
• Before cleaning the device, stop using it and disconnect it from the power supply.
• Use a piece of soft, dry and anti-static cloth to clean the device.
• Keep the power plug clean and dry. Using a dirty or wet power plug may lead to electric shock or other
perils.
 Loading...