

Yealink MeetingEye 600 User Manual

Contents
About This Guide........................................................................................ 7
Related Documents.............................................................................................................................7
Getting Started.............................................................................................8
Hardware of VCR11 Remote Control................................................................................................. 8
Introduction of VCR11 Remote Control................................................................................... 9
Entering Characters by Remote Control................................................................................ 10
CTP20 Touch Panel.......................................................................................................................... 12
Using Onscreen Keyboard of CTP20..................................................................................... 12
CP960 Conference Phone................................................................................................................ 13
Introduction of CP960 Conference Phone............................................................................. 13
Entering Characters by CP960...............................................................................................14
Familiarizing with the Idle Screen..................................................................................................... 17
Idle Screen..............................................................................................................................17
Idle Screen of CTP20.............................................................................................................18
Idle Screen of CP960............................................................................................................. 20
CP960 Control Center/Notification Center............................................................................. 20
Familiarizing with Icons..................................................................................................................... 21
Icons on the Monitor/CTP20.................................................................................................. 21
Icons on CP960......................................................................................................................24
Running the Setup Wizard................................................................................................................ 25
Powering on the System................................................................................................................... 25
Powering off the System................................................................................................................... 25
Putting the System to Sleep............................................................................................................. 26
Waking up the System...................................................................................................................... 26
| Contents | ii
Calling......................................................................................................... 26
Placing a Call by Entering a Number............................................................................................... 26
Dialing the Number by Remote Control................................................................................. 27
Dialing the Number by CP960............................................................................................... 27
Dialing the Number by CTP20............................................................................................... 27
Editing Numbers Before Calling........................................................................................................ 27
Editing Numbers Before Calling by CP960............................................................................ 28
Placing Calls to Contacts.................................................................................................................. 28
Placing Calls to Contacts by Remote Control........................................................................28
Placing Calls to Contacts by CP960...................................................................................... 28
Placing Calls to Contacts by CTP20......................................................................................28
Placing Calls from Call History......................................................................................................... 29
Placing a Call from the Call History by Remote Control........................................................ 29
Placing a Call from the Call History by CP960...................................................................... 29
Placing a Call from the Call History by CTP20......................................................................29
Answering Calls................................................................................................................................. 29
Manually Answering Calls...................................................................................................... 30
Answering a Call Automatically When not in a Call............................................................... 30
Answering Multiple Calls Automatically..................................................................................30
Muting Automatically Answered Calls.................................................................................... 31
DND (Do Not Disturb)....................................................................................................................... 31

| Contents | iii
Enabling DND When Not in a Call by Remote Control..........................................................32
Enabling DND When Not in a Call by CP960........................................................................32
Enabling DND When Not in a Call by CTP20........................................................................32
Enabling DND in a Call by Remote Control...........................................................................32
Enabling DND in a Call by CP960......................................................................................... 32
Enabling DND in a Call by CTP20.........................................................................................33
Rejecting Incoming Calls...................................................................................................................33
Ending Calls...................................................................................................................................... 33
Local Video Conference (Built-in MCU).................................................. 33
Initiating a Local Video Conference.................................................................................................. 34
Initiating a Conference by Dialing a Group............................................................................ 34
Initiating a Conference by Inviting Contacts...........................................................................35
Controlling the Local Video Conference........................................................................................... 36
Muting/Unmuting a Conference Participant by CP960...........................................................36
Muting/Unmuting a Participant by CP960.............................................................................. 36
Turning off the Local Camera.................................................................................................36
Controlling Participants Cameras by CTP20..........................................................................37
Removing Conference Participants........................................................................................ 37
Ending the Local Video Conference.......................................................................................38
Switching Platform Quickly by CTP20.....................................................39
Using the Yealink VC Cloud Management Service Platform................. 39
Initiating Meet Now Conferences...................................................................................................... 40
Viewing Scheduled Conferences.......................................................................................................40
Joining Scheduled Conferences........................................................................................................40
Joining a Scheduled Conference from the Conference Reminder......................................... 41
Joining a Scheduled Conference from the Conference Schedule..........................................41
Joining a Scheduled Conference from the Notification Center.............................................. 41
Going to Virtual Meeting Room........................................................................................................ 41
Joining a VMR by Remote Control........................................................................................ 42
Joining a VMR by CP960.......................................................................................................42
Joining a VMR by CTP20...................................................................................................... 42
Joining Conferences by Dialing the Conference ID.......................................................................... 42
Using CTP20 to Dial the Conference ID................................................................................42
Using the Remote Control to Dial the Conference ID............................................................ 43
Conference Control of Yealink Cloud Video Conferences.................................................................43
Inviting Participants.................................................................................................................44
Removing Participants............................................................................................................ 45
Locking/Unlocking the Conference by CTP20........................................................................ 46
Allowing/Rejecting Participants to Join the Conference by CTP20........................................ 46
Switching Roles between Moderator and Guest.................................................................... 47
Switching Free Speak and Raise Hand Mode by CTP20...................................................... 47
Applying for Speaking.............................................................................................................47
Managing the Speaking Application....................................................................................... 47
Blocking/Unblocking Audio by CTP20.................................................................................... 48
Muting/Unmuting All Participants............................................................................................48
Muting/Unmuting a Participant............................................................................................... 48
Controlling Participants Cameras by CTP20..........................................................................49
Enabling/Disabling Participant Cameras by CTP20............................................................... 49
Setting/Cancelling the Spotlight Video................................................................................... 49
Changing the Meeting Layout................................................................................................ 50

| Contents | iv
Viewing the Message List...................................................................................................... 50
Leaving the Conference......................................................................................................... 51
Ending the Conference...........................................................................................................51
Group Chat and Private Chat in the Conference..............................................................................52
Creating a Group Chat by CTP20..........................................................................................52
Creating a Private Chat by CTP20........................................................................................ 52
Enabling/Disabling Message Preview During a Conference by CTP20..................................52
Using Yealink Meeting Server.................................................................. 53
Initiating Meet Now Conferences...................................................................................................... 54
Joining Scheduled Conferences........................................................................................................54
Joining a Scheduled Conference from the Conference Reminder......................................... 54
Joining a Scheduled Conference from the Conference Schedule..........................................55
Joining a Scheduled Conference from the Notification Center.............................................. 55
Joining the VMR................................................................................................................................55
Joining a VMR by Remote Control........................................................................................ 55
Joining a VMR by CP960.......................................................................................................56
Joining a VMR by CTP20...................................................................................................... 56
Joining Conferences by Dialing the Conference ID.......................................................................... 56
Using CTP20 to Dial the Conference ID................................................................................56
Watching the Live Broadcast by Scanning the Code........................................................................57
Viewing Scheduled Conferences.......................................................................................................57
Conference Control of YMS Video Conferences.............................................................................. 57
Inviting Participants.................................................................................................................59
Removing Participants............................................................................................................ 59
Locking/Unlocking the Conference by CTP20........................................................................ 60
Allowing/Rejecting Participants to Join the Conference by CTP20........................................ 60
Appointing a Lecturer............................................................................................................. 61
Switching Roles between Moderator and Guest.................................................................... 61
Applying for Speaking.............................................................................................................61
Managing the Speaking Application....................................................................................... 62
Blocking/Unblocking Audio by CTP20.................................................................................... 62
Muting/Unmuting All Participants............................................................................................62
Muting/Unmuting a Participant............................................................................................... 63
Enabling or Disabling Participant Cameras by CTP20...........................................................63
Controlling Participants Cameras by CTP20..........................................................................63
Changing the Meeting Layout................................................................................................ 64
View the message list............................................................................................................ 64
Leaving the Conference......................................................................................................... 65
Ending Conferences............................................................................................................... 65
Using the Third-Party Video Conference Platforms............................... 66
Content Sharing.........................................................................................66
Sharing Content with VCH50/VCH51 Video Conferencing Hub....................................................... 67
Sharing Content When not in a Call...................................................................................... 67
Stopping Sharing Content When not in a Call....................................................................... 68
Sharing Content in a Call.......................................................................................................68
Stopping Sharing Content in a Call....................................................................................... 68
Using WPP20 Wireless Presentation Pod........................................................................................ 69
Sharing Content via WPP20.................................................................................................. 69
Switching the Shared Content via WPP20.............................................................................69
Stopping Sharing Content via WPP20................................................................................... 70

| Contents | v
Sharing Content via Apple Device....................................................................................................70
Sharing Content via Apple Device......................................................................................... 70
Stopping Sharing Content via Apple Device..........................................................................71
Controlling the Shared Content by CTP20....................................................................................... 72
Introduction of CTP20 Note Toolbar.......................................................................................73
Presenting by CTP20............................................................................................................. 74
Making Notes on the Content by CTP20............................................................................... 74
Controlling the PC Content by CTP20................................................................................... 74
Switching to Local Sharing by CTP20................................................................................... 74
Stopping Presentation by CTP20........................................................................................... 74
Using the Whiteboard Feature................................................................. 75
Introduction of the Whiteboard Toolbar.............................................................................................75
Initiating the Whiteboard....................................................................................................................77
Importing an Existing Whiteboard during a Call............................................................................... 77
Saving/Sharing Whiteboard Source Files......................................................................................... 77
Setting/Canceling as the Whiteboard Collaboration Speaker........................................................... 78
Stopping the Whiteboard Follow....................................................................................................... 79
Using Multiple CTP20s for Collaboration................................................79
Using WPP20 Wireless Presentation Pod...............................................79
Introduction of the WPP20 Whiteboard Note Toolbar.......................................................................80
Introduction of WPP20 Note Toolbar................................................................................................ 80
Receiving Shared Whiteboard or Content........................................................................................ 81
Initiating Whiteboard Sharing on WPP20......................................................................................... 81
Saving the Content or Whiteboard Picture Locally via WPP20........................................................ 82
Saving/Sharing Whiteboard Source Files via WPP20...................................................................... 82
Importing the Whiteboard Source File via WPP20........................................................................... 83
Importing an Existing Whiteboard during a Call via WPP20............................................................ 83
Configuring Camera Settings...................................................................83
Control a camera...............................................................................................................................83
Adjusting Cameras When not in a Call by Remote Control................................................... 84
Adjusting Cameras When not in a Call by CP960................................................................. 84
Adjusting Cameras in a Call by Remote Control................................................................... 84
Controlling Cameras by CP960 during a Call........................................................................ 84
Adjusting Cameras by CTP20................................................................................................ 84
Camera Presets.................................................................................................................................85
Storing a Camera Preset........................................................................................................85
Adjusting the Local Camera to a Preset................................................................................ 85
Updating the Stored Preset....................................................................................................86
Editing the Stored Preset....................................................................................................... 86
Deleting the Stored Preset..................................................................................................... 86
Allowing the Remote System to Control Your Camera..................................................................... 86
Enabling Far Control Near Camera by Remote Control.........................................................87
Enabling Far Control Near Camera by CTP20.......................................................................87
Local Screen Layout................................................................................. 87
Available Screen Layouts.................................................................................................................. 87
Single Screen Layouts...................................................................................................................... 88

Dual Screen Layout...........................................................................................................................89
Layouts of Multiple Display Devices..................................................................................................90
Local Camera Layout........................................................................................................................ 90
Changing the Camera Layout by CP960............................................................................... 91
Changing the Camera Layout by CTP20............................................................................... 91
Changing the Local Screen Layout...................................................................................................91
Specifying Content to the Secondary Screen...................................................................................91
Specifying Content to the Secondary Screen by Remote Control......................................... 91
Specifying Content to the Secondary Screen by CTP20....................................................... 92
Recording Videos and Taking Screenshots............................................92
Recording Videos.............................................................................................................................. 92
Recording Local Videos..........................................................................................................92
Recording Server Videos........................................................................................................94
Taking Screenshots........................................................................................................................... 95
Capturing Screenshots by Remote Control............................................................................95
Capturing Screenshots by CP960.......................................................................................... 95
Capturing Screenshots by CTP20..........................................................................................96
Managing Videos and Screenshots.................................................................................................. 96
Viewing Screenshots.............................................................................................................. 96
Viewing Local Recorded Videos.............................................................................................96
Copying the Screenshot from the Local Storage to the USB Flash Drive.............................. 97
Copying the Video from the Local Storage to the USB Flash Drive.......................................97
Deleting Screenshots..............................................................................................................97
Deleting Local Recorded Videos............................................................................................ 97
Basic Settings............................................................................................ 97
Configuring the Audio Settings......................................................................................................... 98
Adjusting the Volume..............................................................................................................98
Configuring Key Tone............................................................................................................. 98
Enabling Silent Mode..............................................................................................................99
Muting the Microphone........................................................................................................... 99
Configuring Video Settings..............................................................................................................100
Adjusting the Monitor Display Proportion............................................................................. 100
Video Input Source...............................................................................................................100
Setting the Wallpaper for CTP20 and VCS Codec......................................................................... 101
Setting the CTP20 Brightness.........................................................................................................101
Using CPE90 Wired Expansion Microphones.......................................102
Placing CPE90 Wired Expansion Microphones.............................................................................. 102
Muting or Unmuting the Microphone...............................................................................................102
Using the CPW90-BT Bluetooth Wireless Microphones with VCS......102
Muting or Unmuting the Microphone...............................................................................................103

About This Guide
Thank you for choosing the Yealink Full HD video conferencing system.
It supports 1080P full HD video conferencing and includes outstanding features such as good compatibility,
easy deployment and intelligent network adaptability. With the video conferencing system, the enterprises
can solve the video conferencing dilemma they face, and the users can experience high-quality video
conferences, as well as rich and reliable data-cooperation.
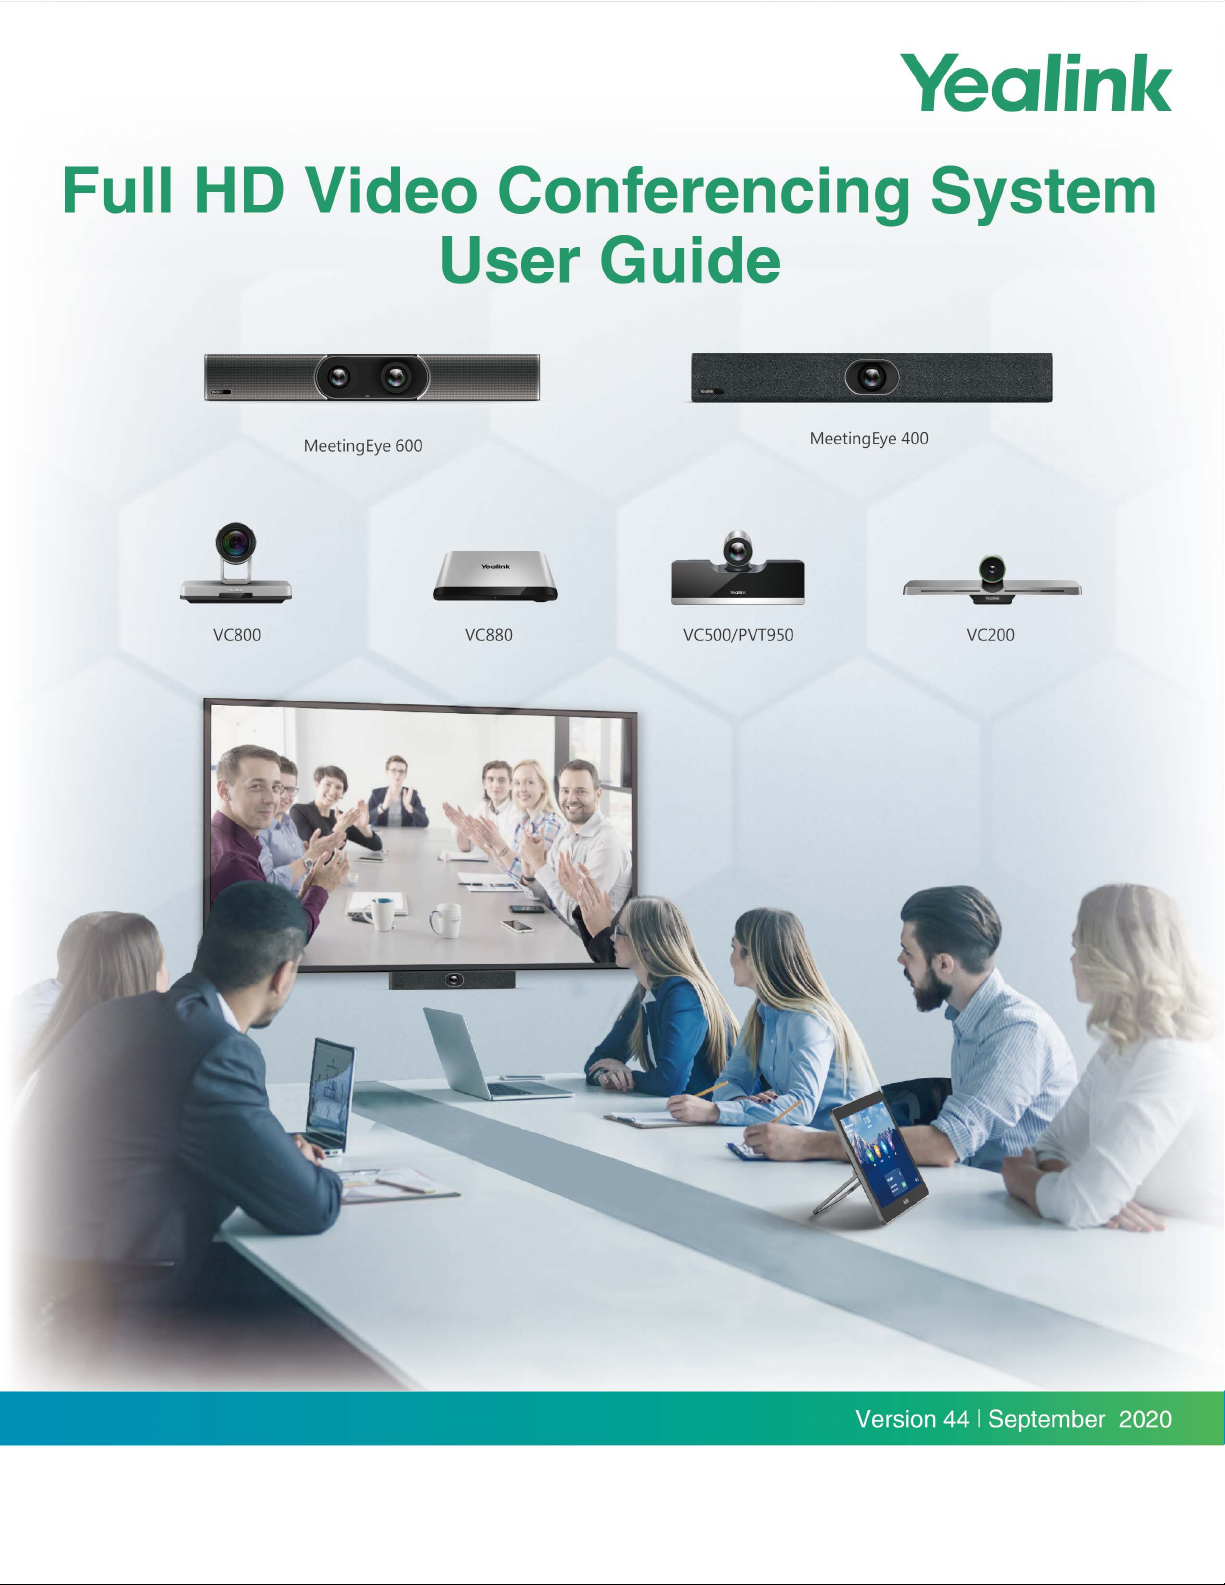
This guide is applicable to the following models:
• VC880 video conferencing system: suitable for large meeting rooms.
• PVT980 video conferencing system: suitable for meeting control rooms or lecture halls with cabinet.
• VC800 video conferencing system and VC500 (Pro)/PVT950 video conferencing endpoint: suitable for
medium meeting room.
• VC200 video conferencing endpoint: suitable for huddle rooms.
This guide can help you to quickly use your video conferencing system. Before you set up and use the
phone, check with your system administrator that the IP network is ready for phone configuration and read
the Quick Start Guide in the product package.
| About This Guide | 7
• Related Documents
Related Documents
The following table lists the documents available for the video conferencing system.
Name Contents Where to
Yealink VC880 Full HD Video Conferencing
System Quick Start Guide
Yealink VC800 Full HD Video Conferencing
System Quick Start Guide
Yealink VC500 Full HD Video Conferencing
Endpoint Quick Start Guide
Yealink VC200 Video Conferencing Endpoint
Quick Start Guide
Yealink PVT980 Full HD Video Conferencing
System Quick Start Guide
Yealink PVT950 Full HD Video Conferencing
System Quick Start Guide
System installation and
network configuration
find
On the
website
/in the
package
Language
English/
Chinese
Yealink VCR11 Remote Control Quick
Reference Guide
Yealink VCC22 Video Conferencing Camera
Quick Start Guide
Use VCR11 Remote
Control
Install VCC22 Video
Conferencing Camera
On the
website
On the
website
English/
Chinese
English/
Chinese

| Getting Started | 8
Name Contents Where to
find
Yealink CPW90-BT Bluetooth Wireless
Microphones Quick Start Guide
Yealink Wi-Fi USB Dongle WF50 User Guide Connect to Wi-Fi and
Yealink WPP20 Wireless Presentation Pod
Quick Start Guide
Yealink CP960 HD IP Conference Phone Quick
Reference Guide
Yealink CTP20 Quick Start Guide Connect CTP20 touch
Yealink VCH51 Quick Start Guide Connect VCM34 to
Connect CPW90-BT
Bluetooth wireless
microphones to video
conferencing system
providing wireless AP
Connect WPP20
wireless presentation
pod to VCS
Use CP960 Conference
Phone
panel to VCS
VCS
On the
website
/in the
package
On the
website
On the
website
/in the
package
On the
website
On the
website
On the
website
Language
English/
Chinese
English/
Chinese
English/
Chinese
English/
Chinese
English/
Chinese
English/
Chinese
Note: You can download the latest documents online: http://support.yealink.com/documentFront/
forwardToDocumentFrontDisplayPage.
Getting Started
This chapter introduces the basic operation of VCS endpoints. You can use the VCR11 remote control,
CTP20 touch panel, or CP960 conference phone to control the VCS endpoints.
• Hardware of VCR11 Remote Control
• CTP20 Touch Panel
• CP960 Conference Phone
• Familiarizing with the Idle Screen
• Familiarizing with Icons
• Running the Setup Wizard
• Powering on the System
• Powering off the System
• Putting the System to Sleep
• Waking up the System
Hardware of VCR11 Remote Control
You can use the following features with VCR20 remote control:
• Initiate or join a conference
• Control conferences, for example, inviting participants or ending the conference
• Control a camera
• Record video or audio, present content, or take screenshots
• Modify system settings
The following introduces the keys of the VCR11 remote control and how to enter characters using your
remote control.
• Introduction of VCR11 Remote Control
• Entering Characters by Remote Control
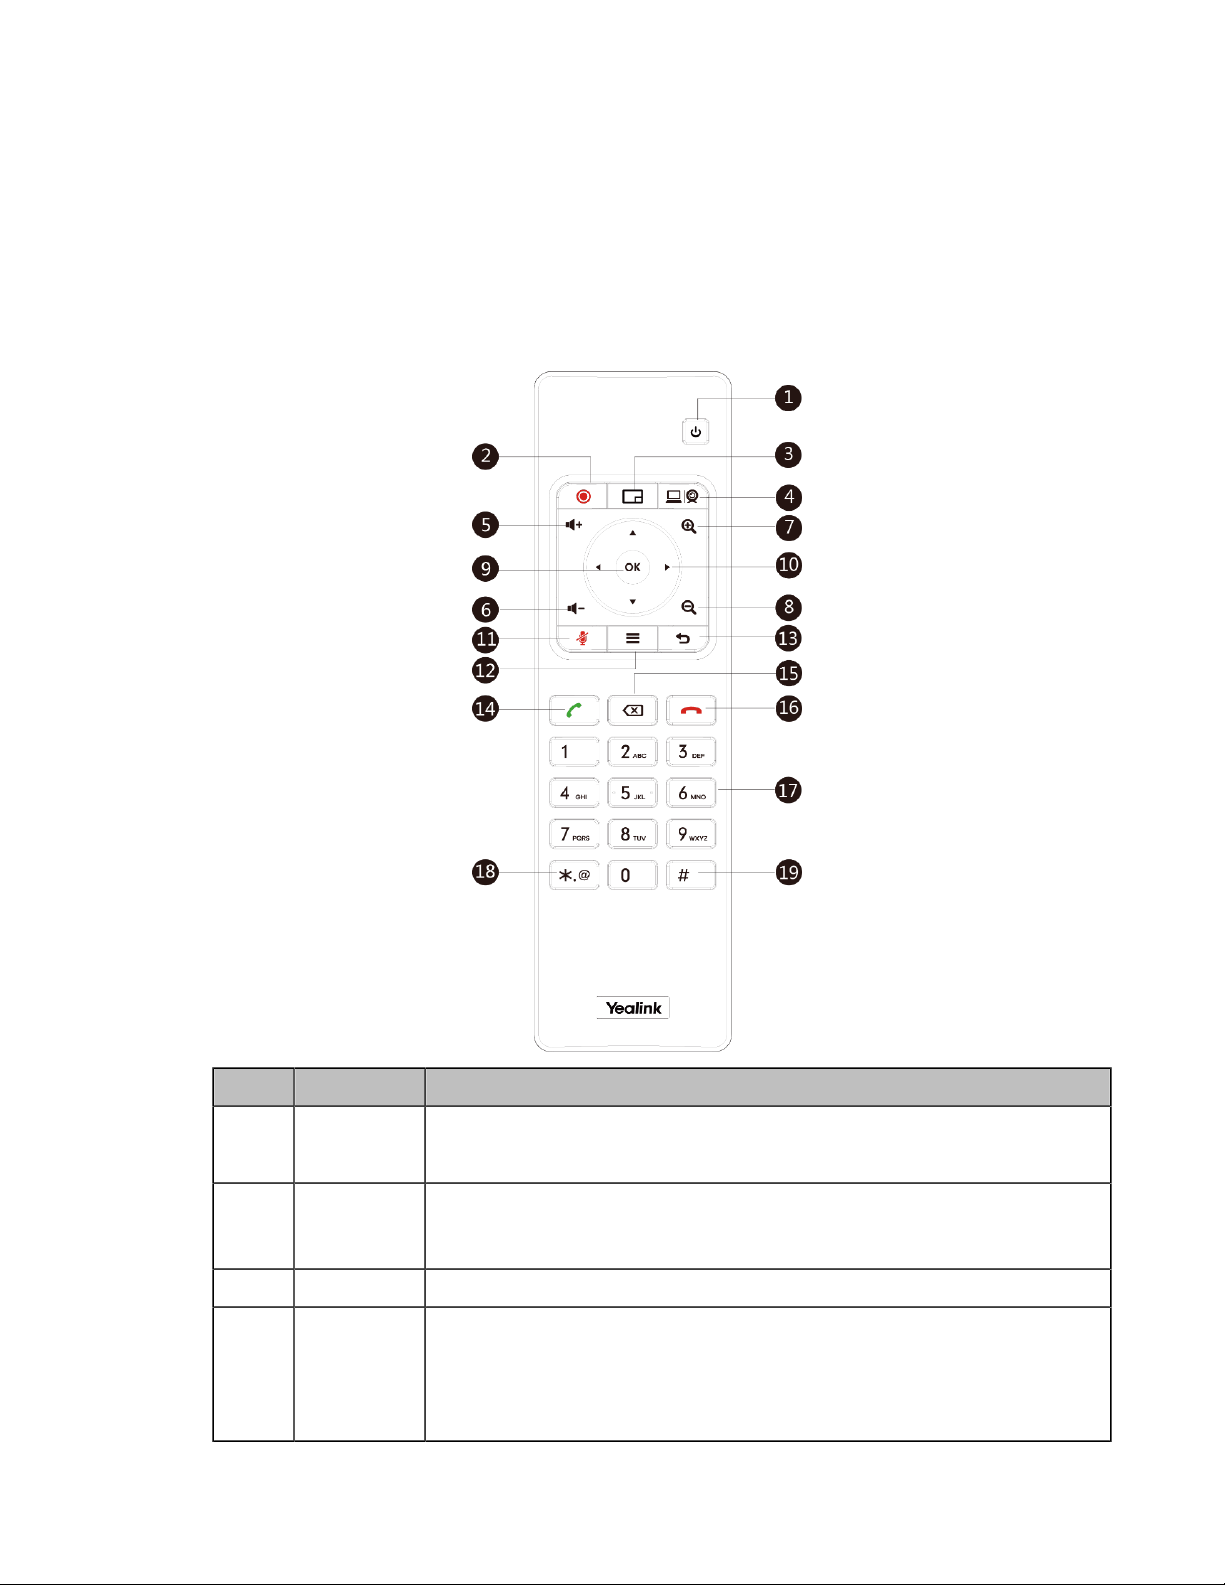
Introduction of VCR11 Remote Control
The features of the keys on the remote control are described as below:
| Getting Started | 9
No. Name Description
1 Power Key
2 Video
Recording
Key
3 Layout Key Adjust the layout during a video call.
4 Custom Key
• Power on or power off the endpoint
• Put the endpoint to sleep or wake up the endpoint
Start or stop recording the video and audio.
Customize the key function.
The system administrator can customize the key as the Presentation key
(default), the Input key, the ScreenShot key, Mute Speaker key, or Preset
key.
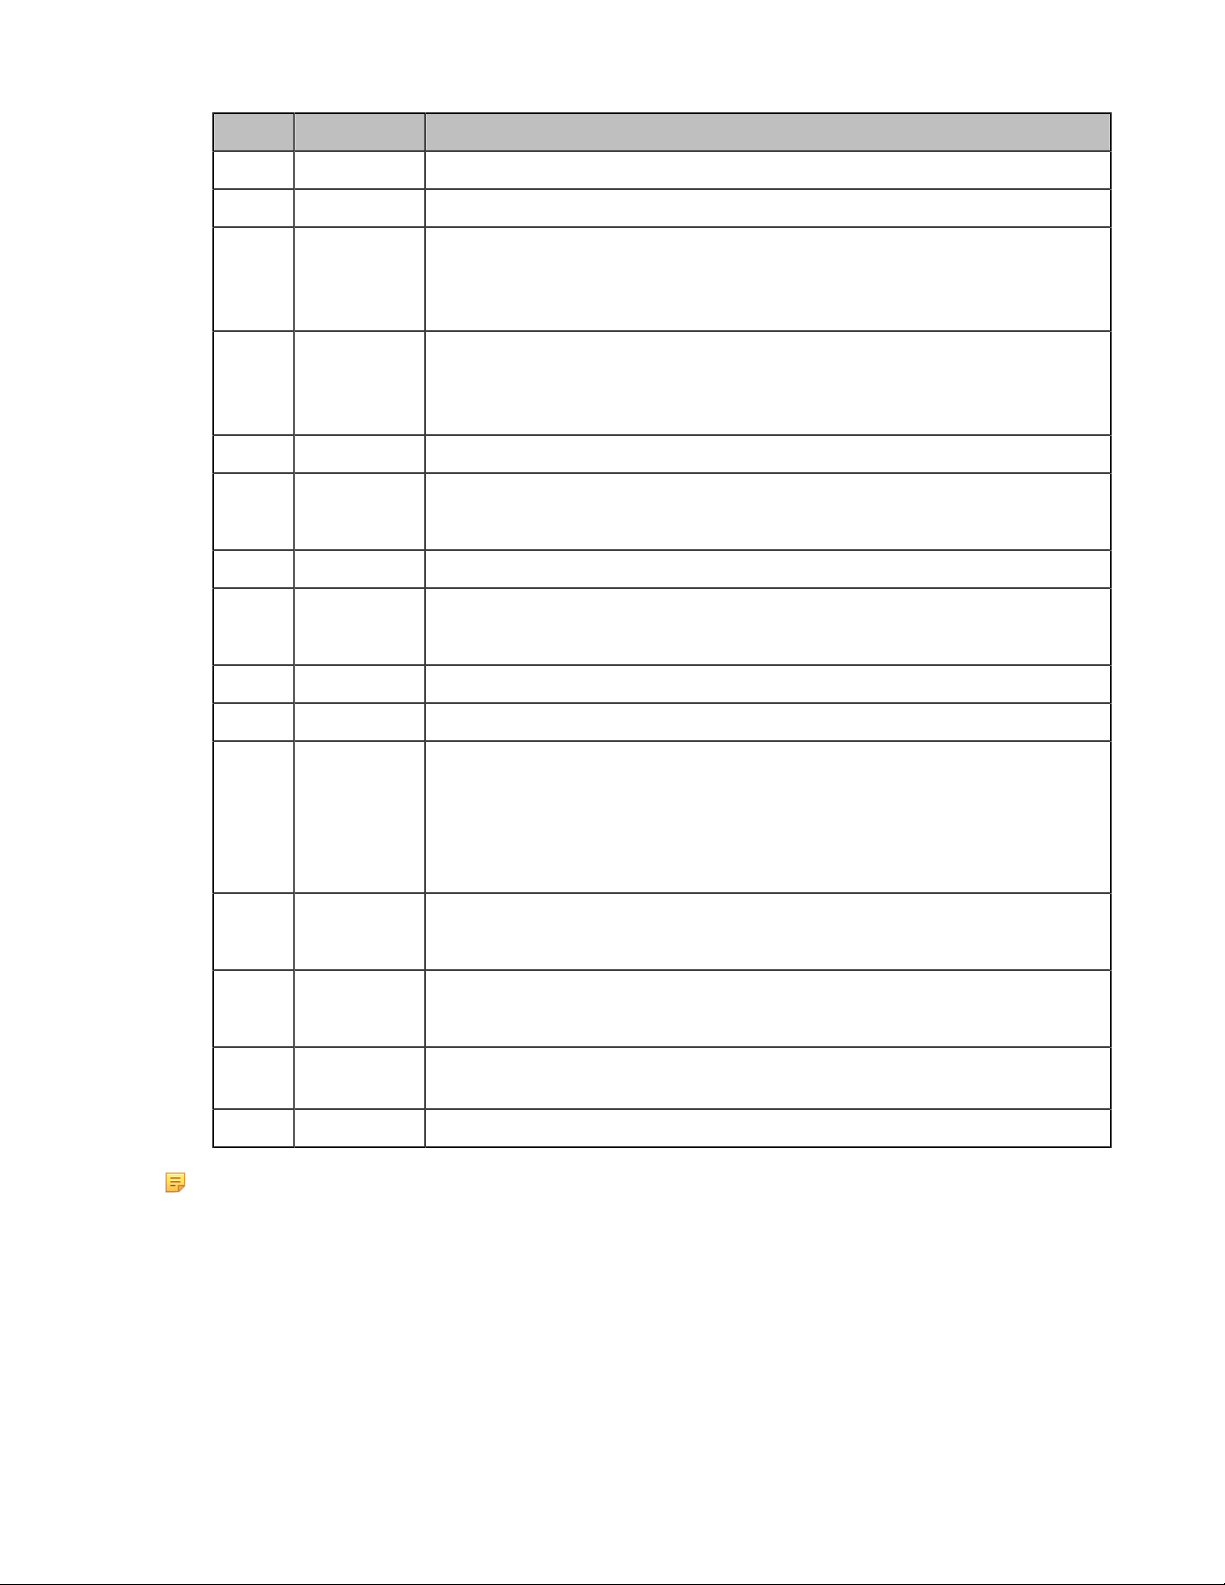
No. Name Description
5 Volume+ Key Turn up the speaker volume.
6 Volume- Key Turn down the speaker volume.
| Getting Started | 10
7 Zoom in key
8 Zoom out
key
9 OK key Go the sub-menu, confirm the action or select one item.
10 Navigation
Key
11 Mute Key Mute or unmute the microphone
12 Home key
13 Back key Return to the previous menu.
14 Off-hook Key Enter the pre-dialing screen, the dialing screen or the answering screen.
15 Delete Key
• Zoom the camera focal length in.
• Zoom the captured image in.
• Turn the page up
• Zoom the camera focal length out.
• Zoom the captured image out
• Turn the page down
• Navigate to the desired menu item.
• Pan or tilt the camera to adjust the angle.
• Return to the idle screen when the endpoint is not in a call.
• Open Talk Menu during a call
• Delete one character at a time
• Long press to delete all characters in the input field
• If the system is connected to a USB flash drive, you can long press it
for 2 seconds to start capturing packets and long press it for 2 seconds
again to stop capturing packets
16 On-hook Key
17 Keypad
18 Character
Key
19 Pound key Enter the pound key (#).
Note: The infrared sensor locates within the LED indicator of camera. Aim the remote control at the
infrared sensor to operate the camera.
• End a call or exit a conference call
• Return to the idle screen
• Enter digits
• Go to the Dialing screen
Enter the special characters: .@*.
Entering Characters by Remote Control
You can use onscreen keyboard on the monitor or use keypad on the remote control to enter characters.
• Entering Characters by Dial Pad
• Using the Onscreen Keyboard
| Getting Started | 11
Entering Characters by Dial Pad
The keypad of your remote control only provides digit keys and #.@* keys.
Procedure
Press the keypad on the remote control to enter characters.
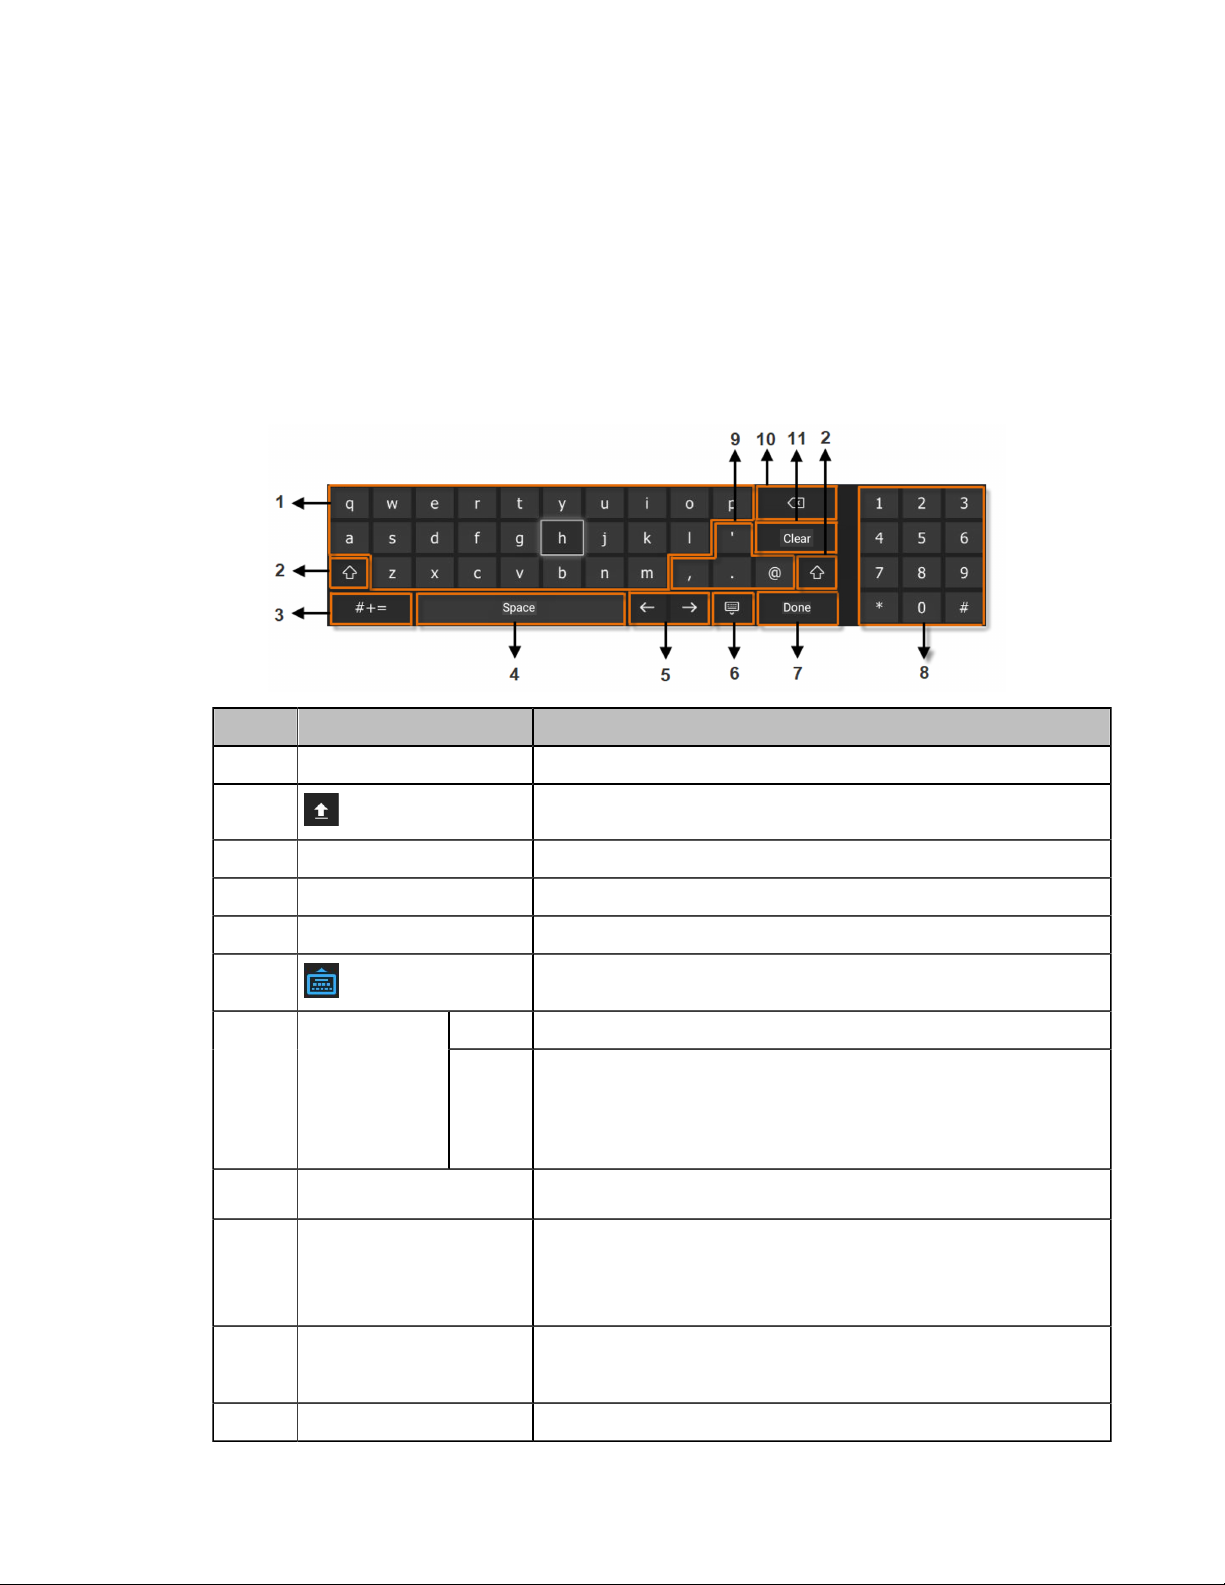
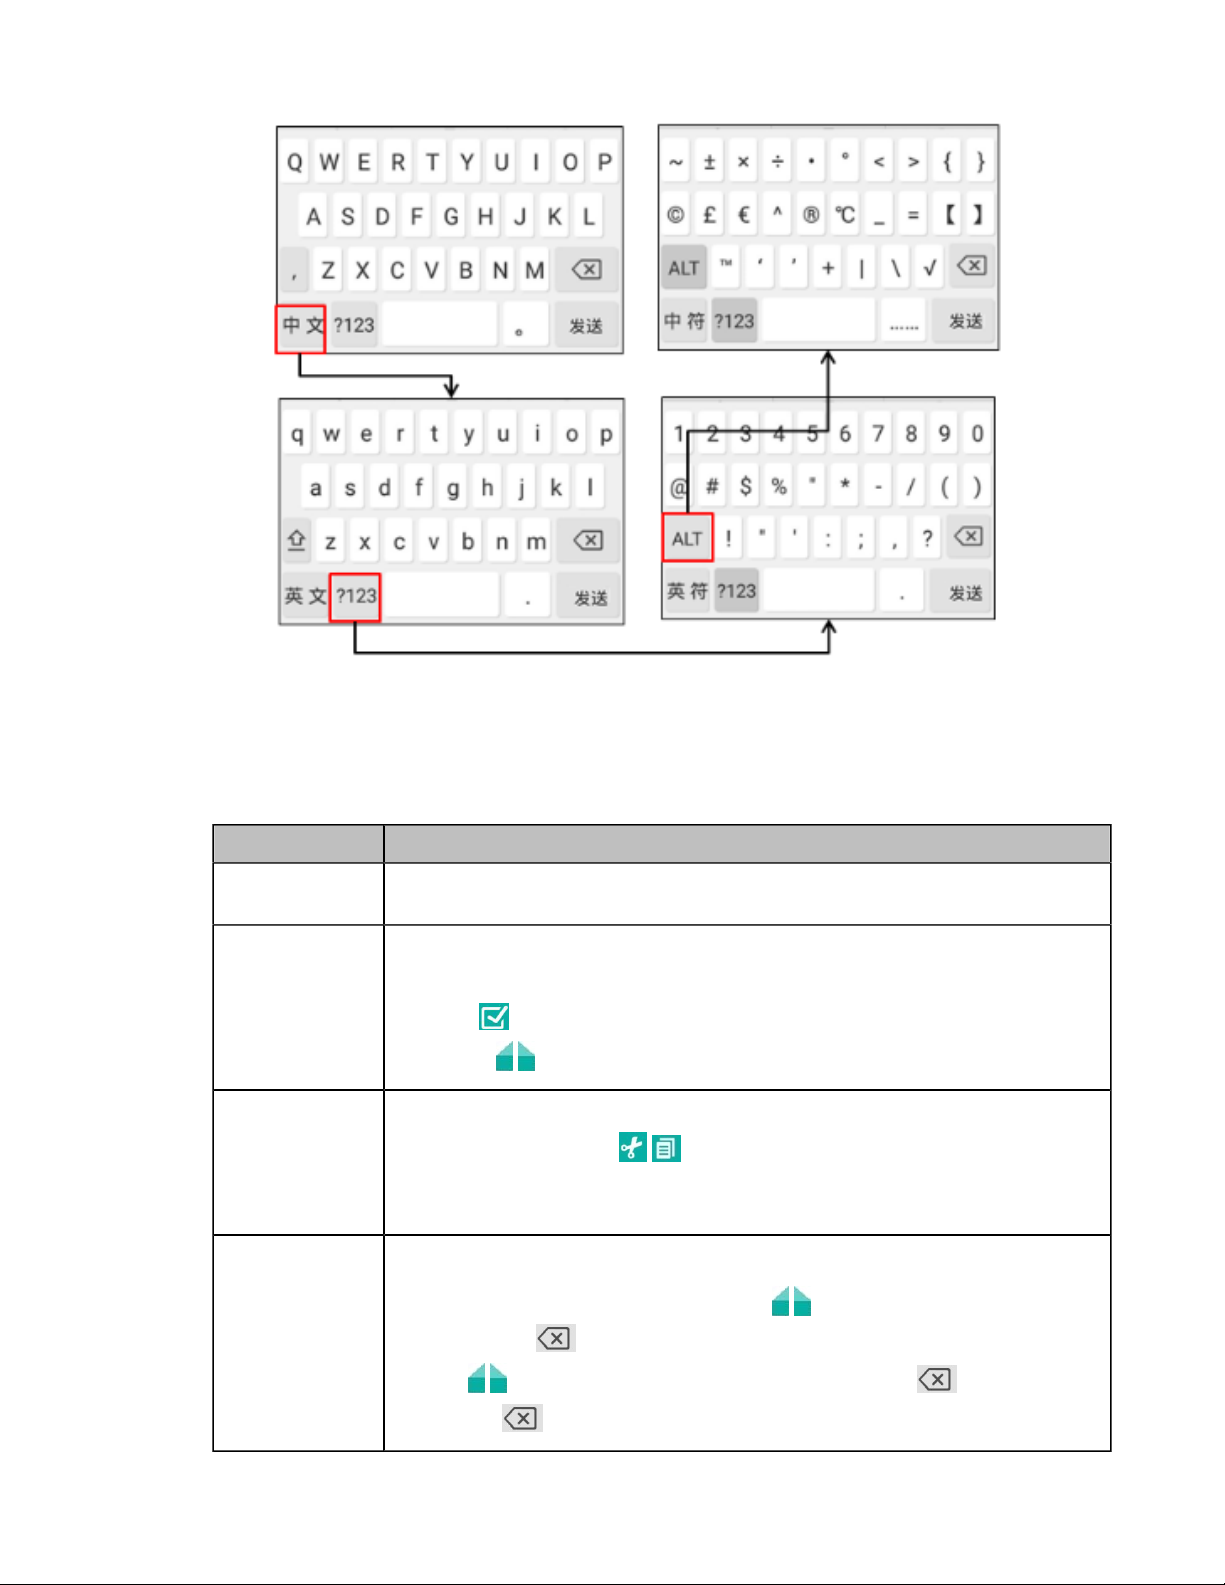
Using the Onscreen Keyboard
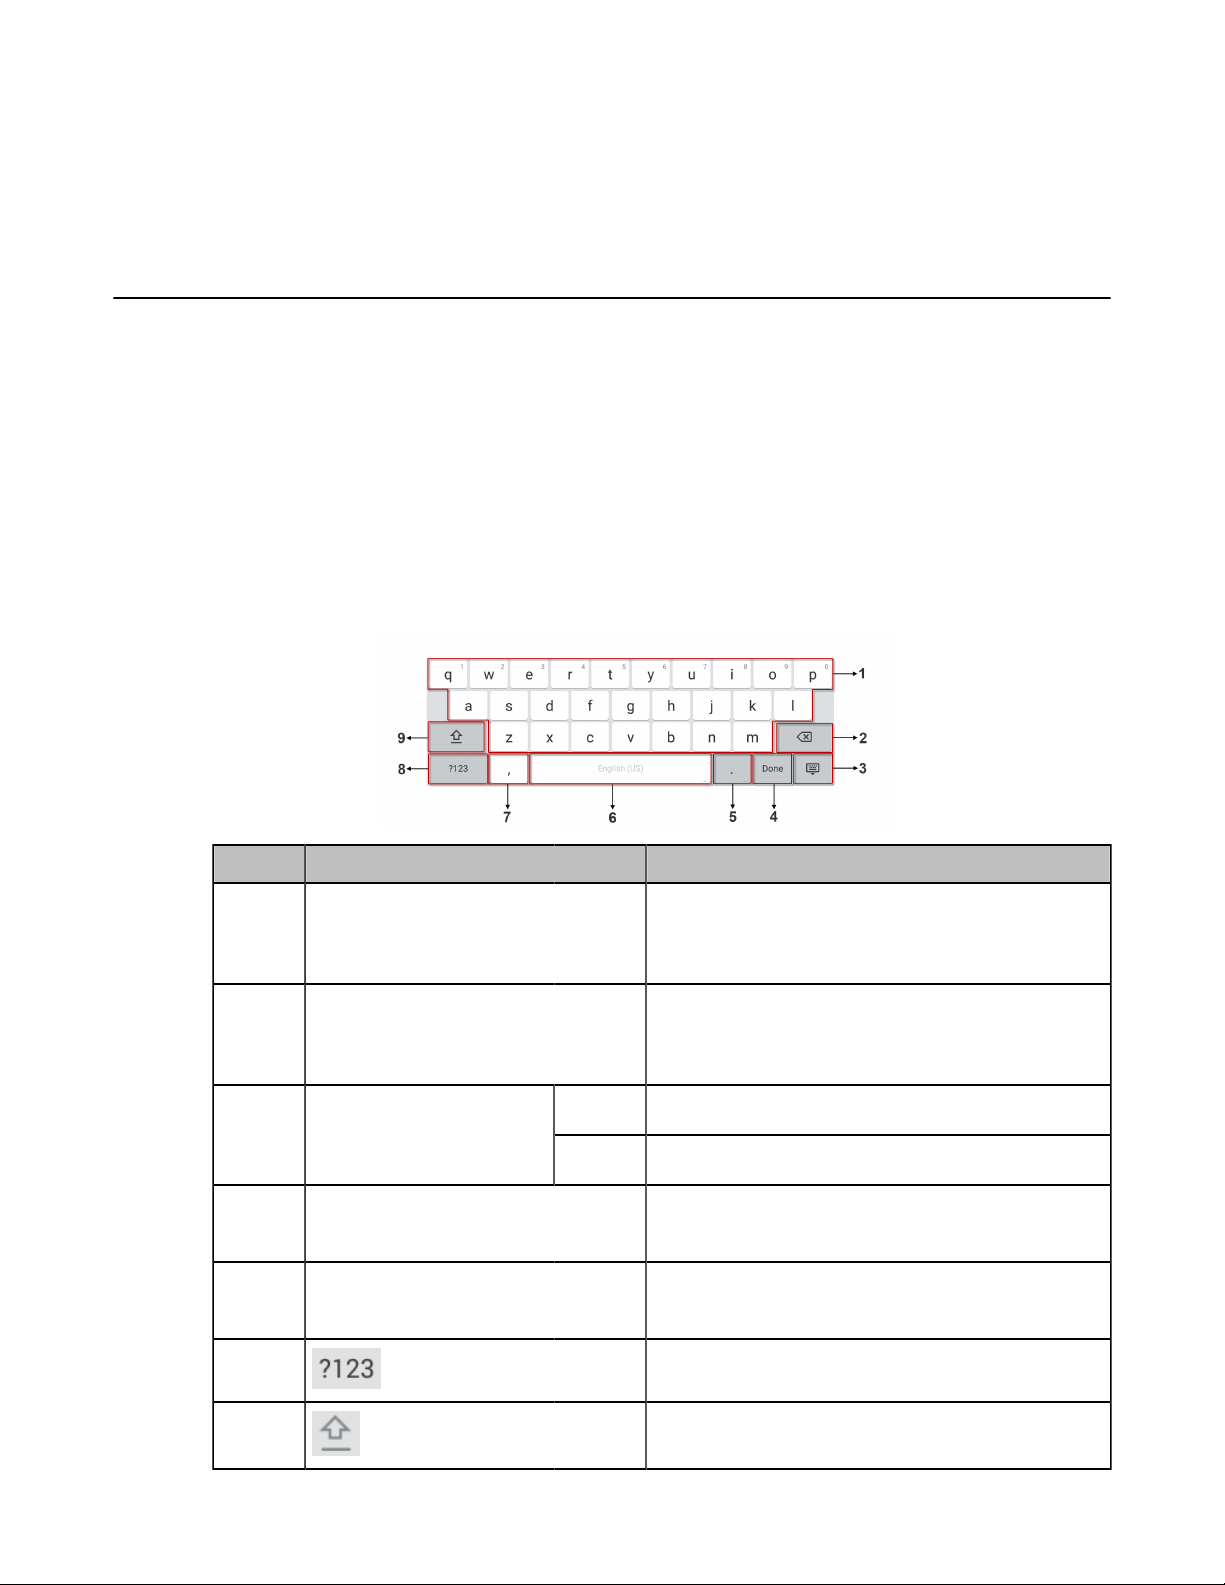
You need to be familiar with the onscreen keyboard before using it. The following takes the English input
method as an example, introducing the function of the keys:
About this task
No. Name Description
1 26 English Letters Enter the letter.
2 Switch to the uppercase input mode.
3 Special characters Enter the corresponding special character.
4 Space Key Enter a space.
5 Cursor Position a cursor.
6 Hide the onscreen keyboard.
Done Finish typing.7 This key
is flexible
to identify
the context
sensitive
features.
8 Numeric keypad
9 4 special characters Enter the corresponding special character. Position a cursor.
Next Go to the next one.
Enter the number.
• Delete one character at a time
• Long press to delete multiple characters
10 Delete Key
11 Clear Clear all characters.
• Delete one character at a time
• Long press to delete multiple characters
Procedure
1. In the editing field, press OK Key to open the onscreen keyboard.
2. Select the corresponding characters and press OK key.
CTP20 Touch Panel
As the controller of VCS endpoints, CTP20 touch panel can help you fully control the VCS endpoints. You
can use it to place calls, initiate conferences, adjust the volume, control the camera, record videos, and so
on. What’s more, CTP20 supports collaborative editing and the annotation, that is to say, participants can
add notes to the presentation or to the whiteboard, which can improve the communication efficiency of the
traditional video conferencing presentation.
• Using Onscreen Keyboard of CTP20
Using Onscreen Keyboard of CTP20
You need to be familiar with the onscreen keyboard before using it. CTP20 provides English (US) and
Google Pinyin input methods.
Android Keyboard (AOSP) – English (US) Input Method
| Getting Started | 12
Number Key Description
1 26 English Letters
2 Delete Key
3 This key is flexible to
identify the context
sensitive features.
4 Two special characters
5 Space Key
6 Switch to the numeric & symbolic input mode.
7 Switch to the uppercase input mode.
Done
Next
• Enter the letter
• Long tap a character, and then slide to choose
an item
• Tap to delete the entered characters one by
one
• Long tap to delete two or more characters
• Finish typing.
• Go to the next one.
• Enter the corresponding special character
• Long tap the period and then select an item
• Enter a space
• Long tap the space to change the input method
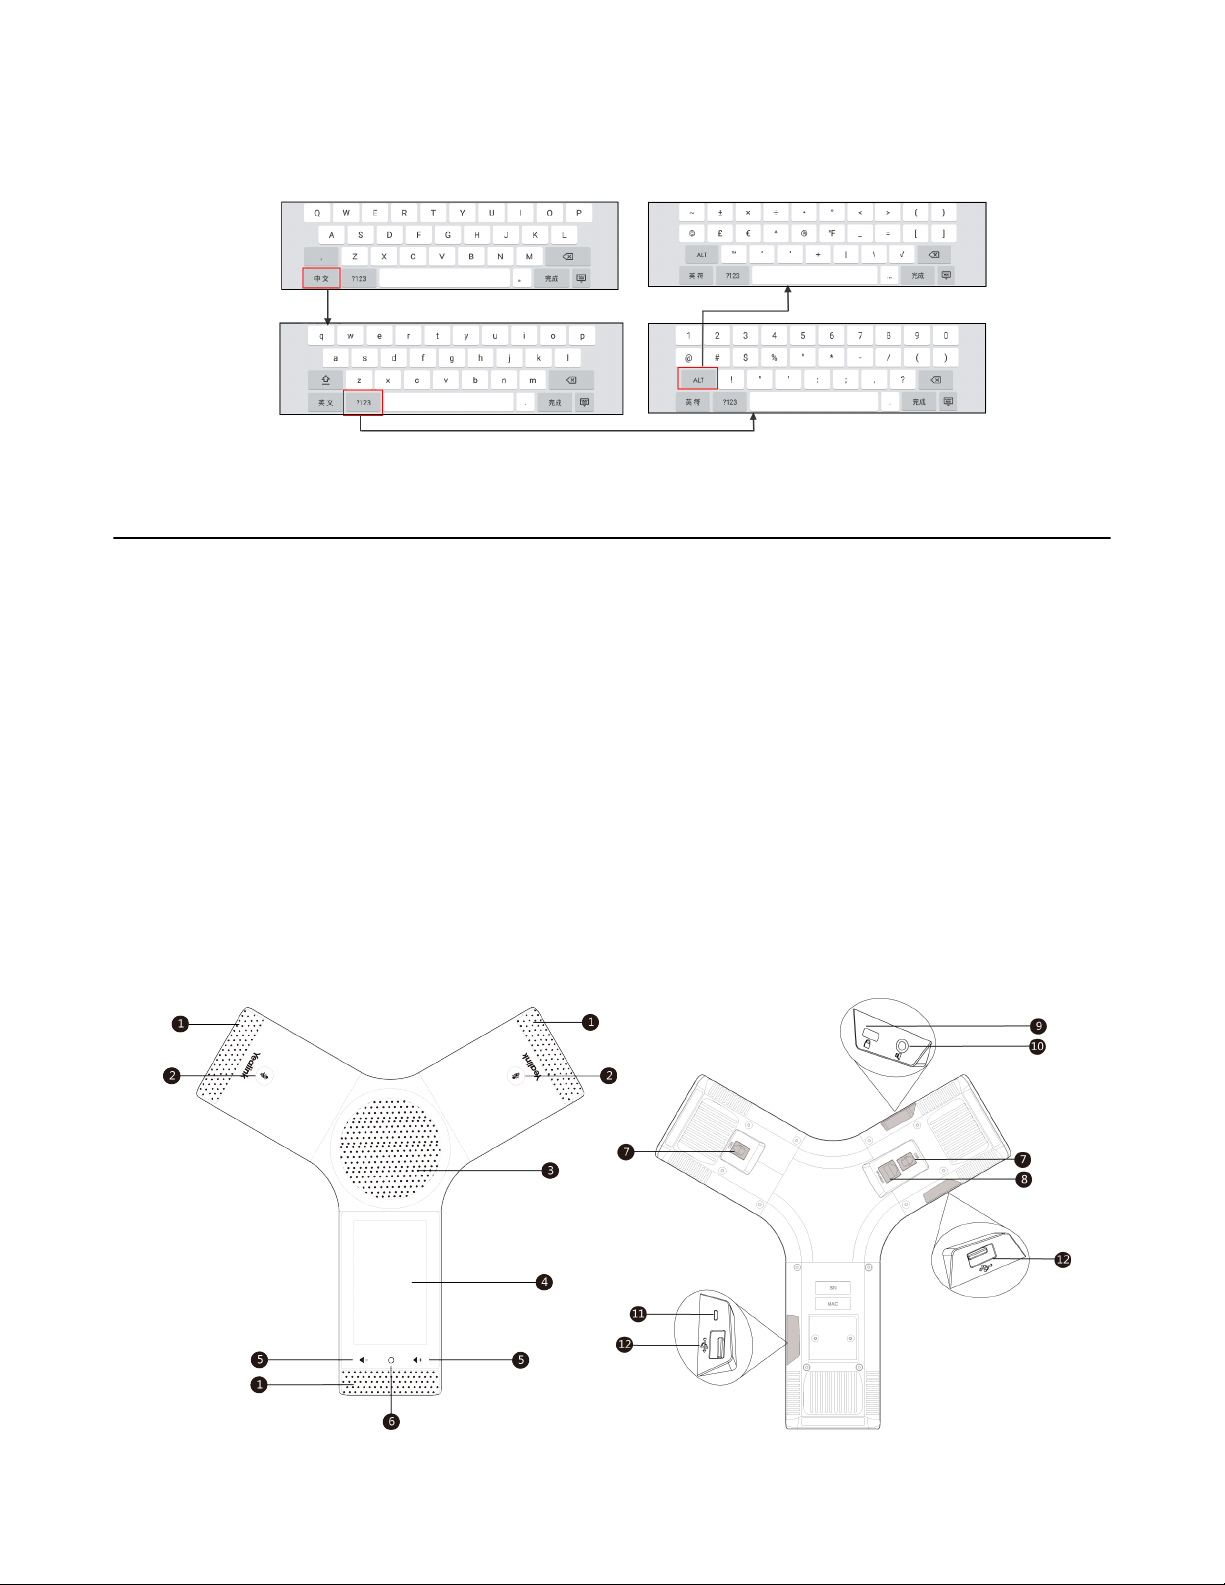
Google Pinyin Input Method
You can long tap the space key to change the input method to Google Pinyin, then you can enter Chinese.
CP960 Conference Phone
You can use the following features with CP960:
• Initiate or join a conference
• Control a conference (for example, invite participants, change the conference layout and end the
conference)
• Control a camera
• Record a conference, initiate a presentation and others
• Modify system settings
• Edit local contacts
| Getting Started | 13
The following introduces the hardware of CP960 and how to enter characters by your CP960.
• Introduction of CP960 Conference Phone
• Entering Characters by CP960
Introduction of CP960 Conference Phone
CP960 supports 360-degree audio pickup at a radius of up to 6 meters. It can work as an audio device for
the system. You can also place calls, answer calls or view directory and history on CP960.
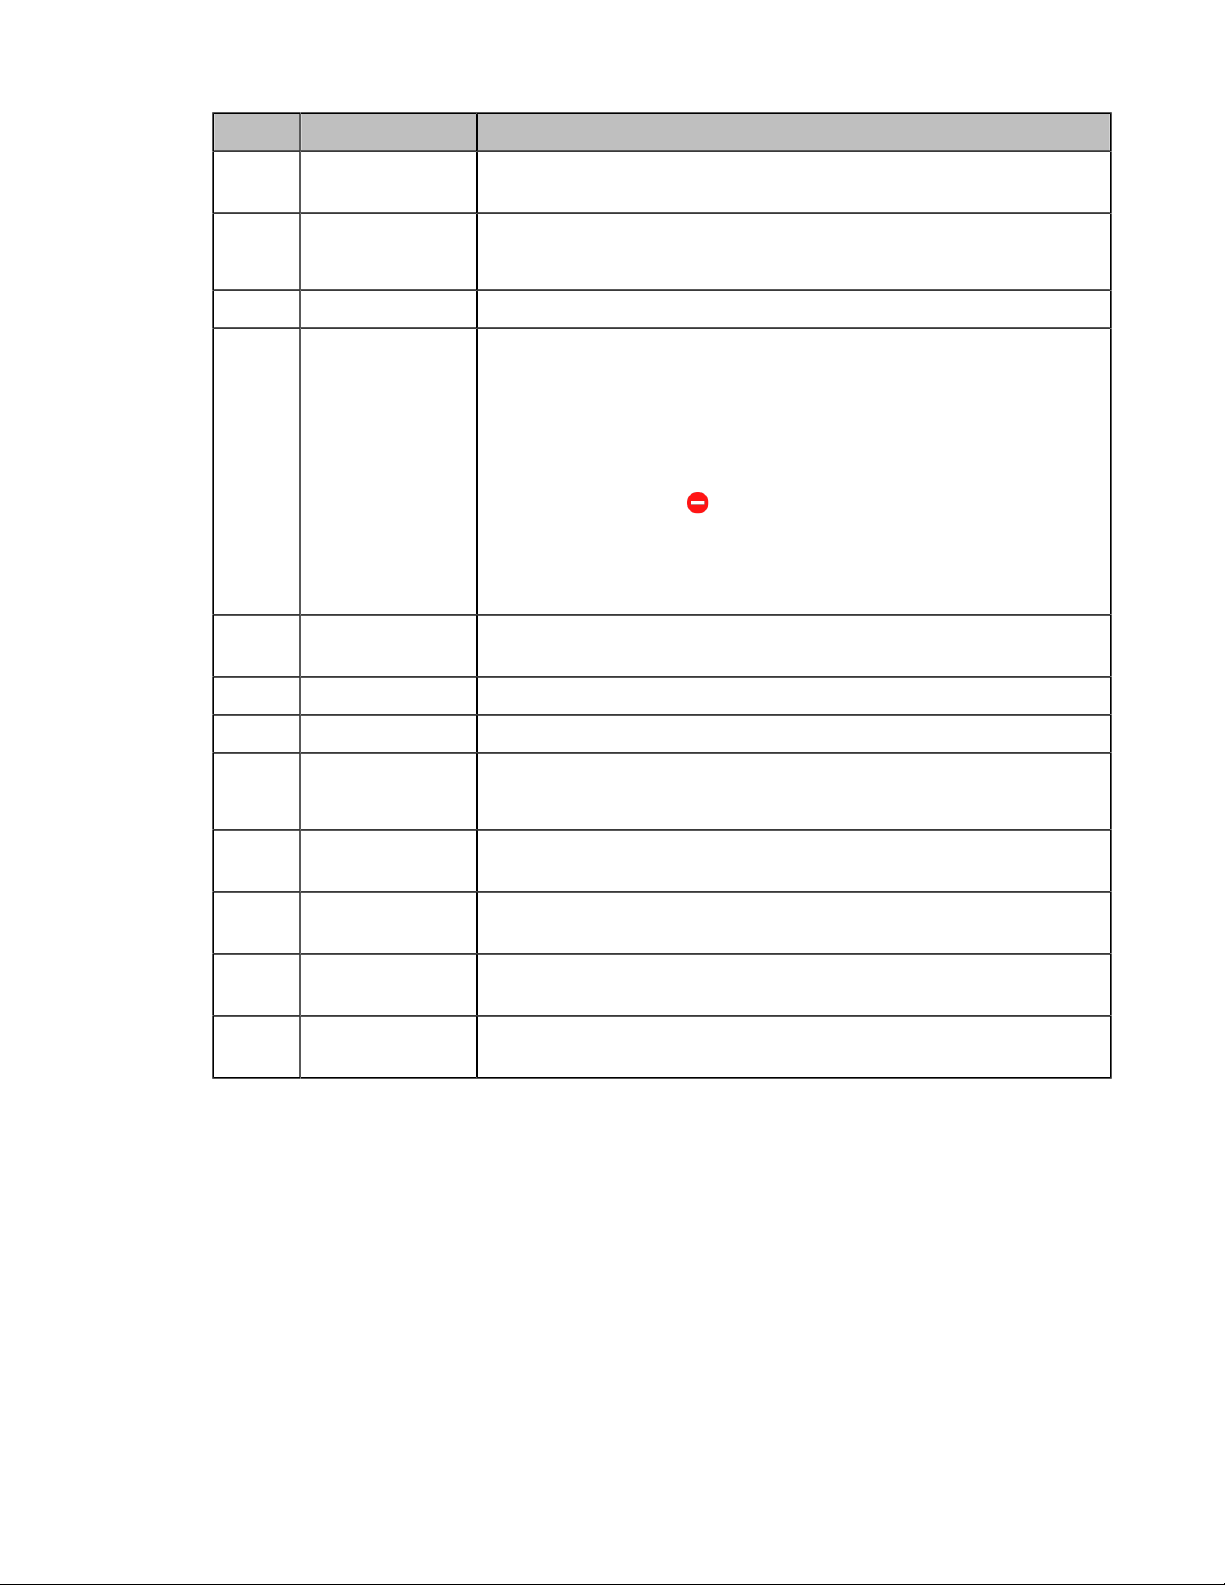
No. Name Description
| Getting Started | 14
1 Three Built-in
Microphones
2 Mute Touch Keys
3 Speaker Provide hands-free (speakerphone) audio output.
4 Touch Screen
5 Volume Touch
Keys
6 HOME Touch Key Return to the idle screen.
7 Wired Mic Ports Connect CPE90 to your phone (optional).
Support 360-degree audio pickup at a radius of up to 6 meters.
• Indicate the status of the device and the call.
• Toggle the mute mode.
5 inches (720 x 1280) capacitive (5 point) touch screen with two idle
screens. Tap the screen and select the desired menu.
Display the information about the call, the message, the time, the date
and other relevant data:
• Call information: the caller ID and the call duration
•
Icons (for example, )
• The prompts of the missed calls
• Prompts (for example, “Delete selected item?”)
• Time and Date
Adjust the volume of the speaker, ringer or media.
8 Internet
9 Security Slot Allow you to connect a universal security cable to your phone so you
10 3.5mm Audio-out
Port
11 Micro USB Port This port is unavailable when CP960 works with the video
12 USB Insert a USB flash drive to a USB port for storing screenshots,
• Connect to the VC Hub/Phone port on the VCS endpoint.
• Connect to the Audio port on the VCH50 video conferencing hub.
can fix your phone on the table.
This port is unavailable when CP960 works with the video
conferencing system.
conferencing system.
recording videos or captured packets (optional).
Entering Characters by CP960
You can use the onscreen keyboard on the touch screen or use the onscreen dial pad on the dialing screen
to enter characters.
• Entering Characters by Onscreen Keyboard
• Performing Other Operations by the Onscreen Keyboard
• Entering Characters by Dial Pad
Entering Characters by Onscreen Keyboard
You need to be familiar with the onscreen keyboard before using it. CP960 provides English (US) and
Google Pinyin input methods.
Android Keyboard (AOSP) – English (US) Input Method
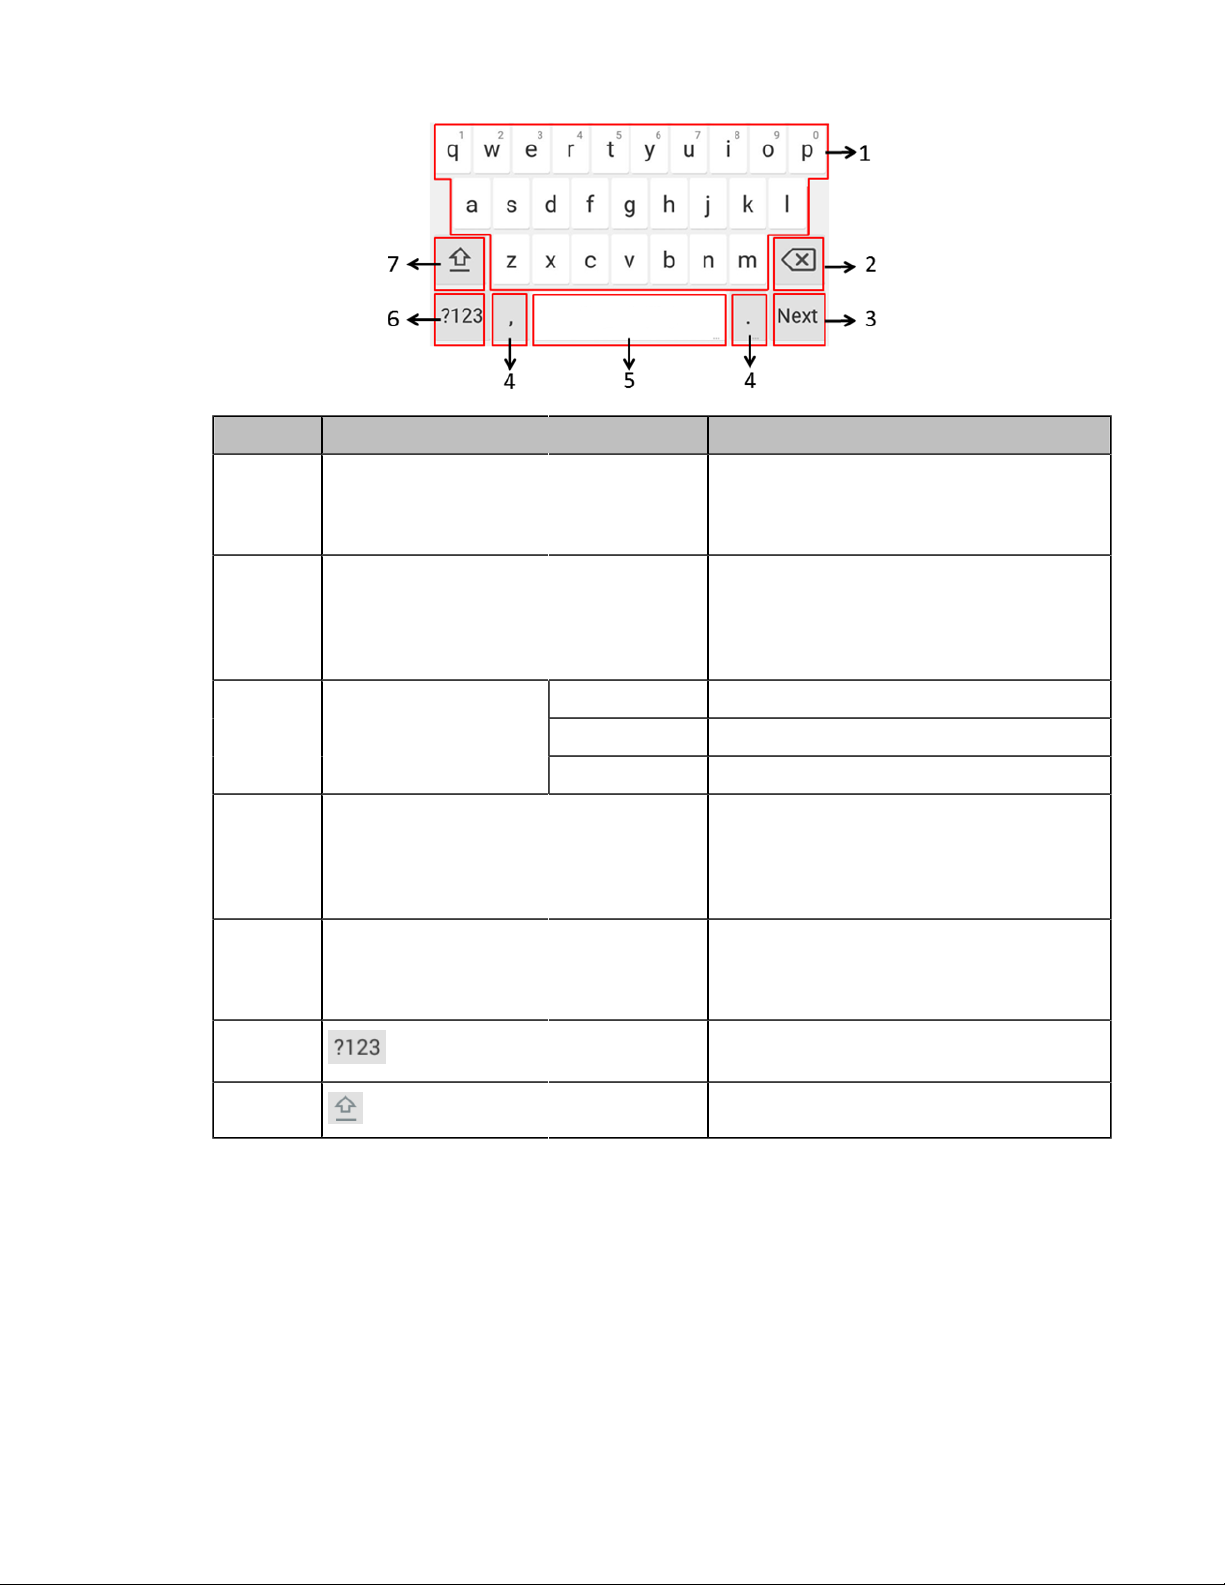
Number Key Description
| Getting Started | 15
1 26 English Letters
2 Delete Key
3 This key is flexible to
identify the context
sensitive features.
4 Two Special Characters
5 Space Key
6 Switch to the numeric & symbolic input
Next Key Tap to go to the next field.
Send Key Tap to dial out the number.
Search Searching for Contacts.
• Enter the letter
• Long tap a character, and then slide to
choose an item
• Tap to delete the entered characters one
by one
• Long tap to delete two or more
characters
• Enter the corresponding special
character
• Long tap the period and then select an
item
• Enter a space
• Long tap the space to change the input
method
mode.
7 Switch to the uppercase input mode.
Google Pinyin Input Method
You can long tap the space key to change the input method to Google Pinyin, then you can enter Chinese.
| Getting Started | 16
Tap the key in the left corner to change the input method to Android Keyboard (AOSP).
Performing Other Operations by the Onscreen Keyboard
About this task
Operation Procedure
Position the
cursor.
Select a desired
character.
Cut/Copy
characters.
Delete more
characters at a
time.
Tap the desired position on the touch screen.
1. Long tap the character.
2. Do one of the following:
•
Tap on the top of the touch screen to select all characters
•
Drag / to select parts of the characters
1. Select characters.
2.
Tap CUT/POTY or tap / on the status bar.
3. Long tap the desired field.
4. Tap PASTE.
Do one of the following:
•
Long tap the entered character(s), drag / to select the desired characters,
and then tap
•
Drag / to select the desired characters, and then tap
•
Long tap .
Operation Procedure
| Getting Started | 17
Replace
characters.
Entering Characters by Dial Pad
On the Dial page, you can enter the desired number. The dial pad only provides digit keys and #.@* key.
1. Drag the cursor to select the desired character.
2. Enter the desired character.
Familiarizing with the Idle Screen
• Idle Screen
• Idle Screen of CTP20
• Idle Screen of CP960
• CP960 Control Center/Notification Center
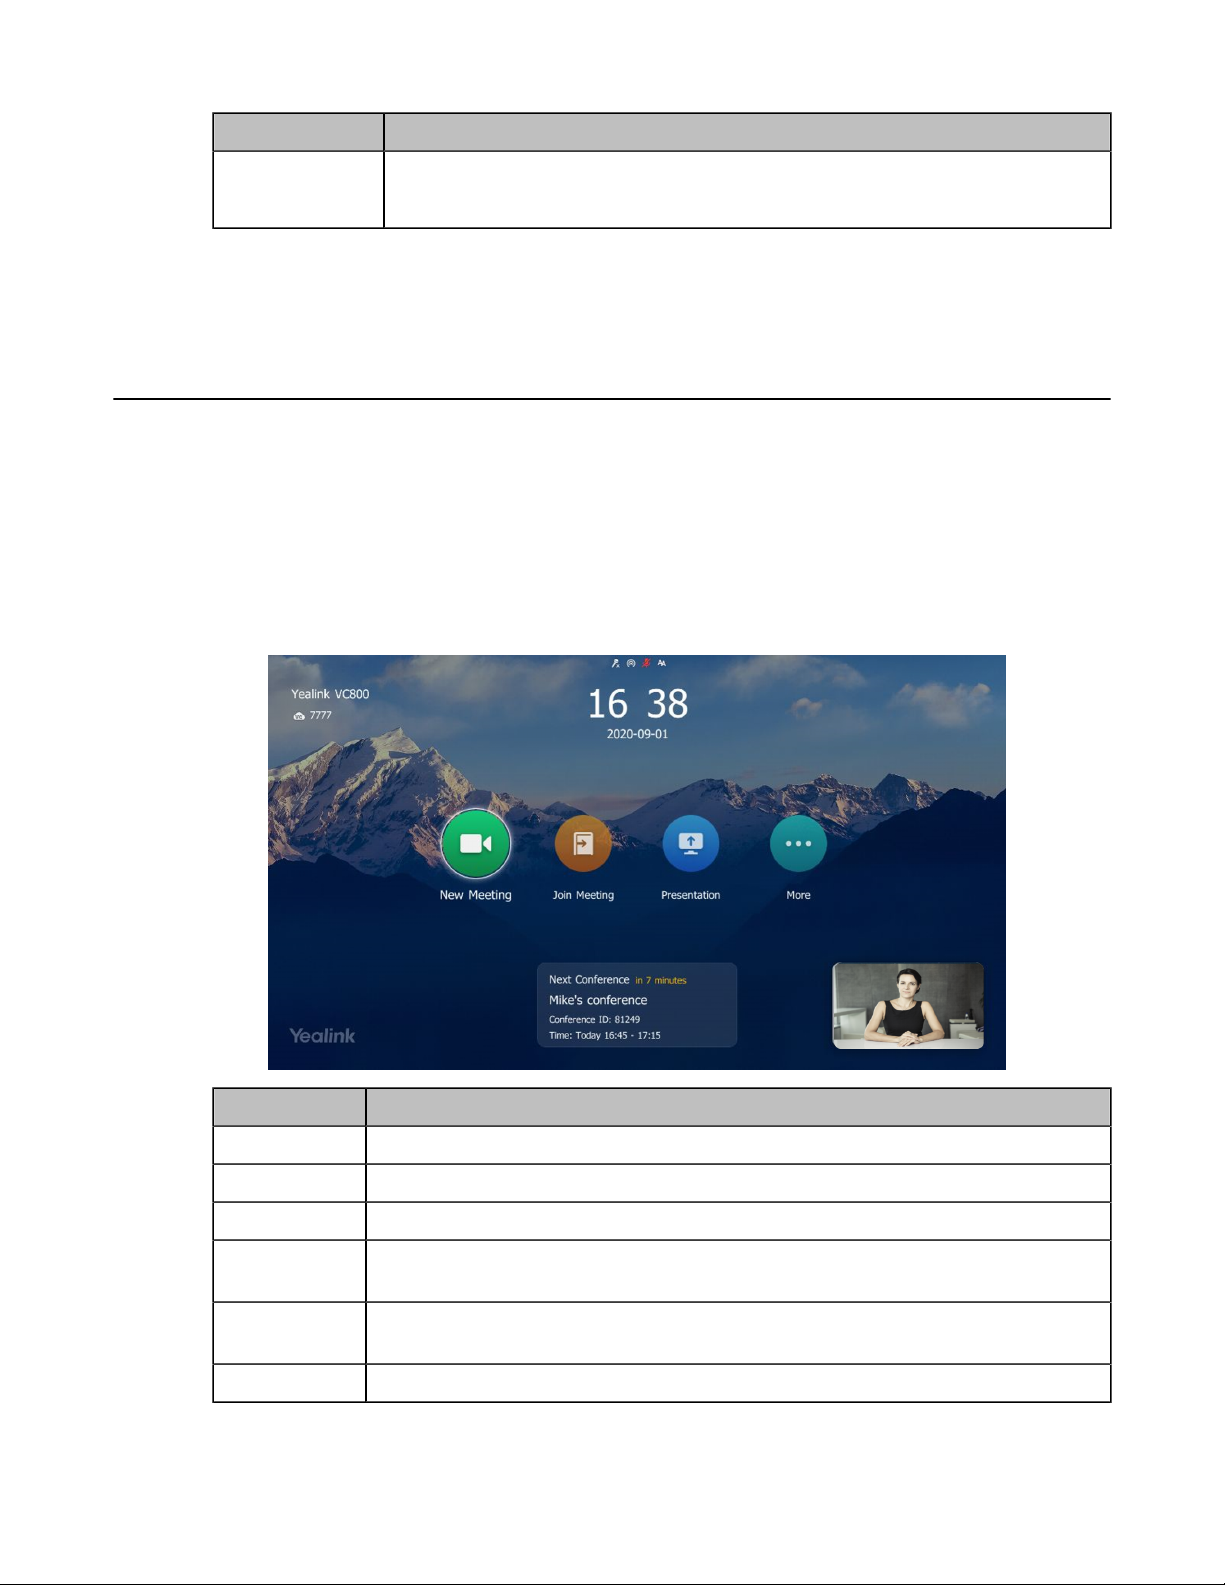
Idle Screen
If a YMS account is registered on the VCS endpoint, the idle screen (not the touch screen) is displayed as
below:
Name Description
Status Icon The status icons are displayed in the center of the status bar.
Time and Date The time and date are displayed below the status bar.
Site Name The site name of the system.
Register
Account
New Meeting
(Dial)
Join Meeting Enter the conference ID and password to join conferences.
Generally, your system administrator will pre-configure the related account
information for the phone. If not, contact your system administrator.
If you register a Yealink Cloud/YMS account, you can initiate Yealink Cloud/YMS
conferences. If not, you can only initiate local conferences.
Name Description
| Getting Started | 18
More
Presentation When the VCS endpoint is connected to the PC, you can use this feature to
IP
• LAN:X.X.X.X: indicates that the system has obtained an IP address.
• Network disconnected: indicates the system does not connect to a network
cable , and you need check the network cable.
• 255.255.255.255: indicates the system fails to obtain an IP address. Check the
connection between the VCS endpoint and the DHCP server, or configure a
static IP address for the system.
Note: If you do register a cloud account, it displays when you go to the
More menu. If you do not register an account, it will display on the Idle
screen)
Configure the following features:
• Mute/unmute the microphone
• Enable/disable DND
• Enable/disable the auto answer
• Camera Control
• Go to the Setting screen to view the device information of CTP20 and the VCS
endpoint, the network information, the related setting on the VCS endpoint, and
diagnosis.
• Go to File Manager to manage the screenshot and videos
present the content of the PC.
Conference
Schedule
When you register a Yealink Cloud account or YMS account, you can view the
schedule and the status of the next conference.
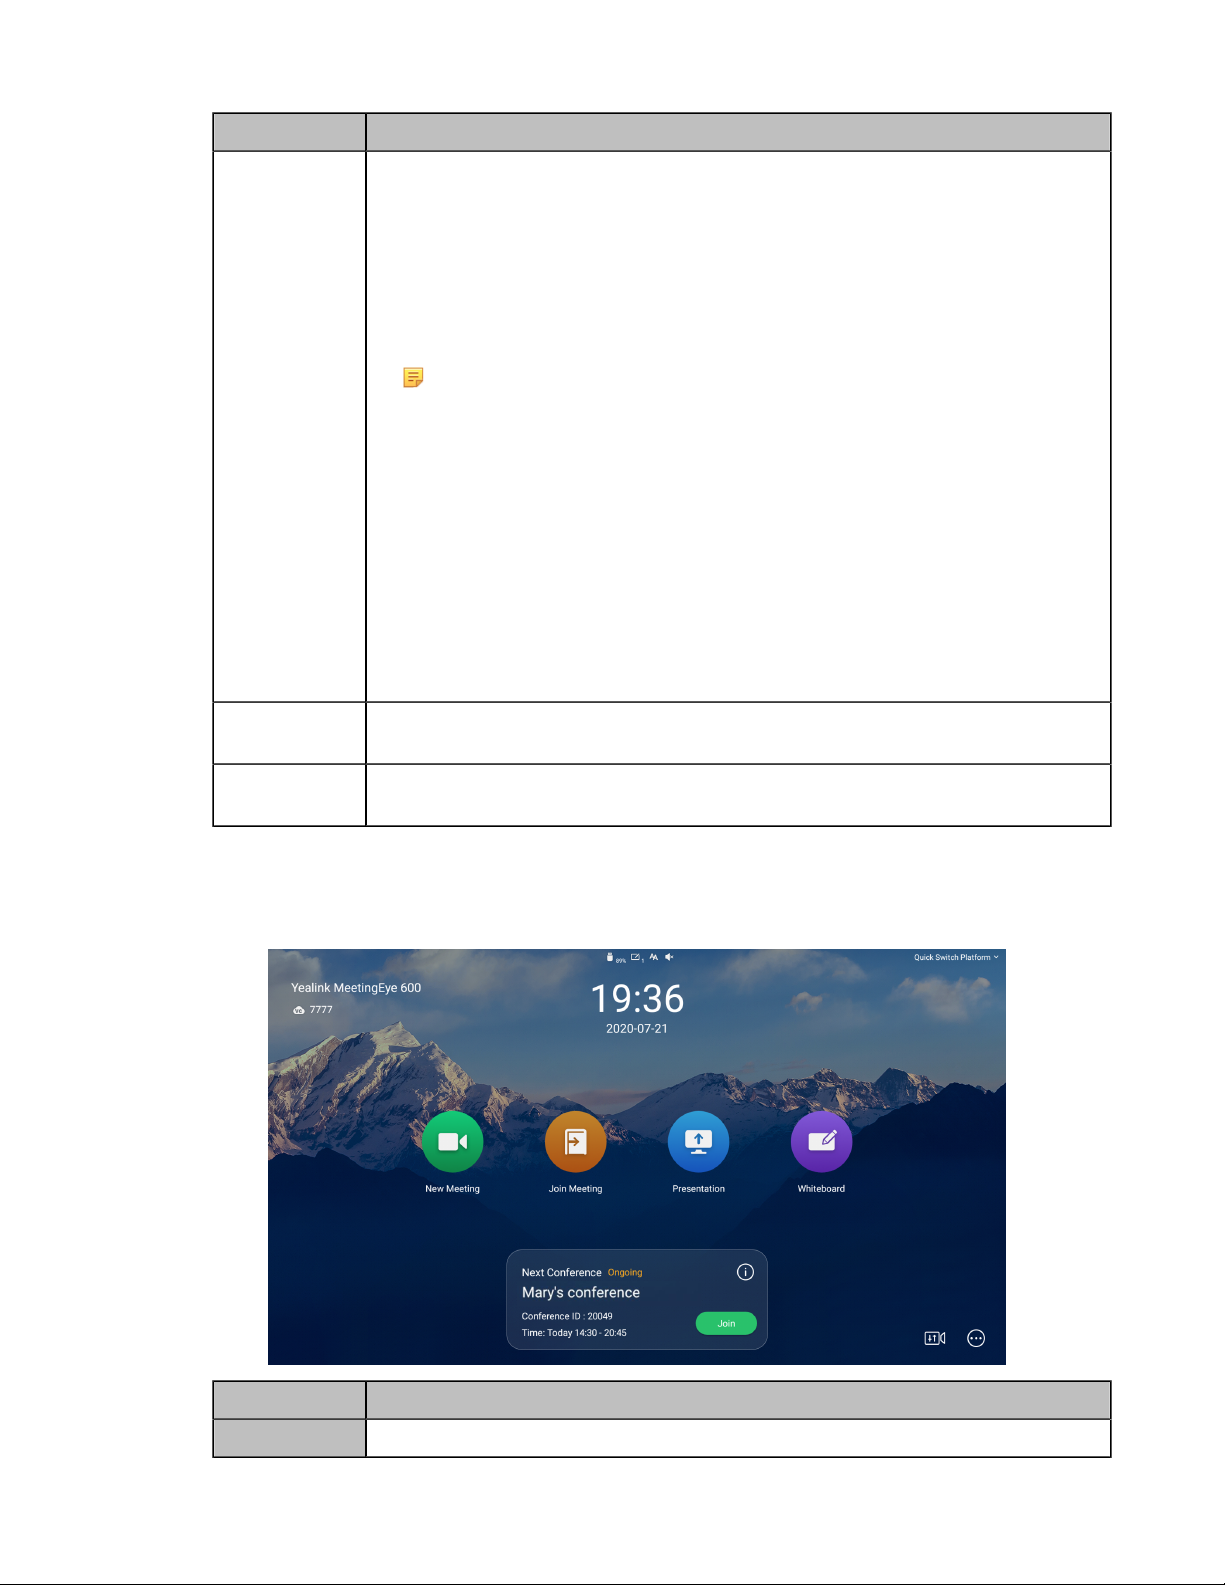
Idle Screen of CTP20
If a YMS account is registered on the VCS endpoint, the idle screen of CTP20 is displayed as below:
Name Description
Site Name The site name of the system.
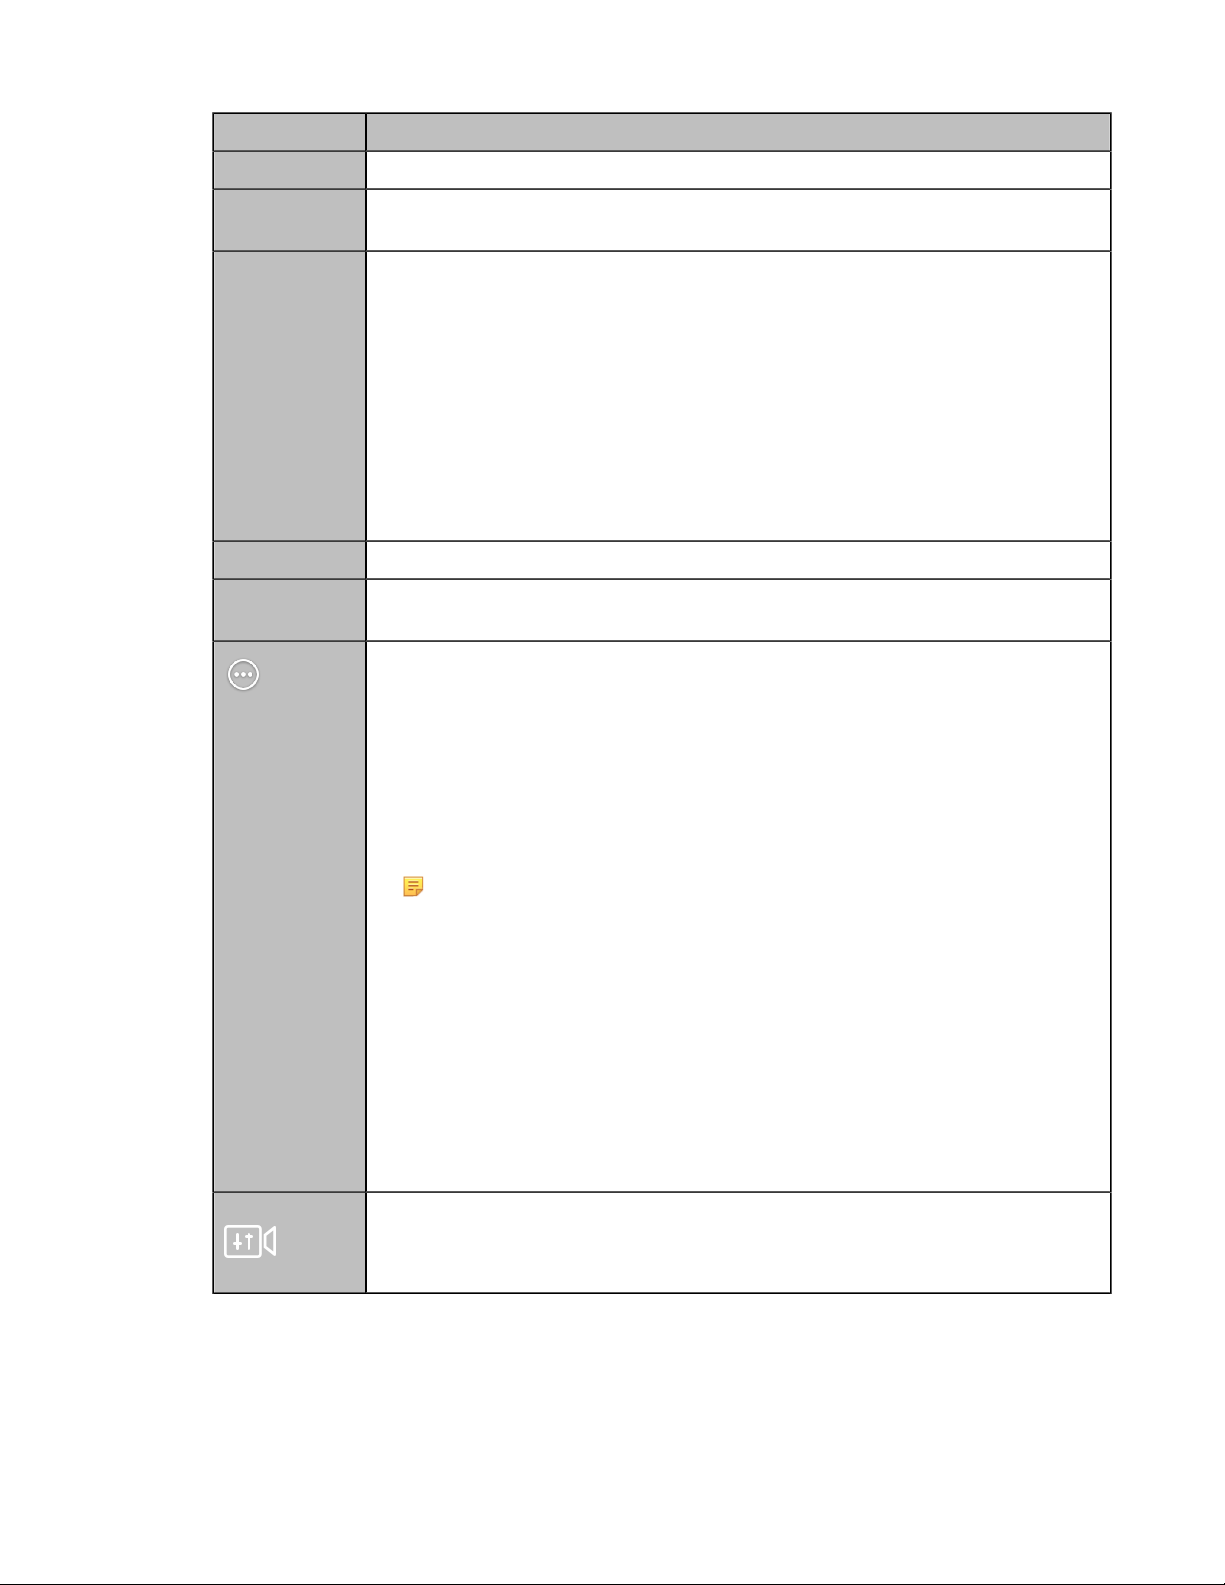
Name Description
Status Icon The status icons are displayed in the center of the status bar.
| Getting Started | 19
Register
Account
Home page
Time and Date The time and date are displayed on the top of the screen.
Volume
adjuster
Generally, your system administrator will pre-configure the related account
information for the phone. If not, contact your system administrator.
• New Meeting(Dial): create a new conference.
If you register a Yealink Cloud/YMS account, you can initiate Yealink Cloud/
YMS conferences. If not, you can only initiate local conferences.
• Join Meeting: enter the conference ID and password to join a conference.
• Whiteboard: you can initiate a whiteboard collaboration in your local meeting
room.
• Presentation: when the VCS endpoint is connected to the PC, you can use
this feature to present the content of the PC.
• Conference Schedule: when you register a Yealink Cloud account or YMS
account, you can view the schedule and the status of the next conference.
Adjust the volume.
IP
• LAN:X.X.X.X: indicates that the system has obtained an IP address.
• Network disconnected: indicates the system does not connect to a network
cable , and you need check the network cable.
• 255.255.255.255: indicates the system fails to obtain an IP address. Check the
connection between the VCS endpoint and the DHCP server, or configure a
static IP address for the system.
Note: If you do register a cloud account, it displays when you go to the
More menu. If you do not register an account, it will display on the Idle
screen)
Configure the following features:
• Mute/unmute the microphone
• Enable/disable DND
• Enable/disable the auto answer
• Camera Control
• Go to the Setting screen to view the device information of CTP20 and the VCS
endpoint, the network information, the related setting on the VCS endpoint, and
diagnosis.
• Go to File Manager to manage the screenshot and videos
• Set or adjust the camera presets
• Enable or disable the camera (this feature is available to VC800/VC880/
PVT980)
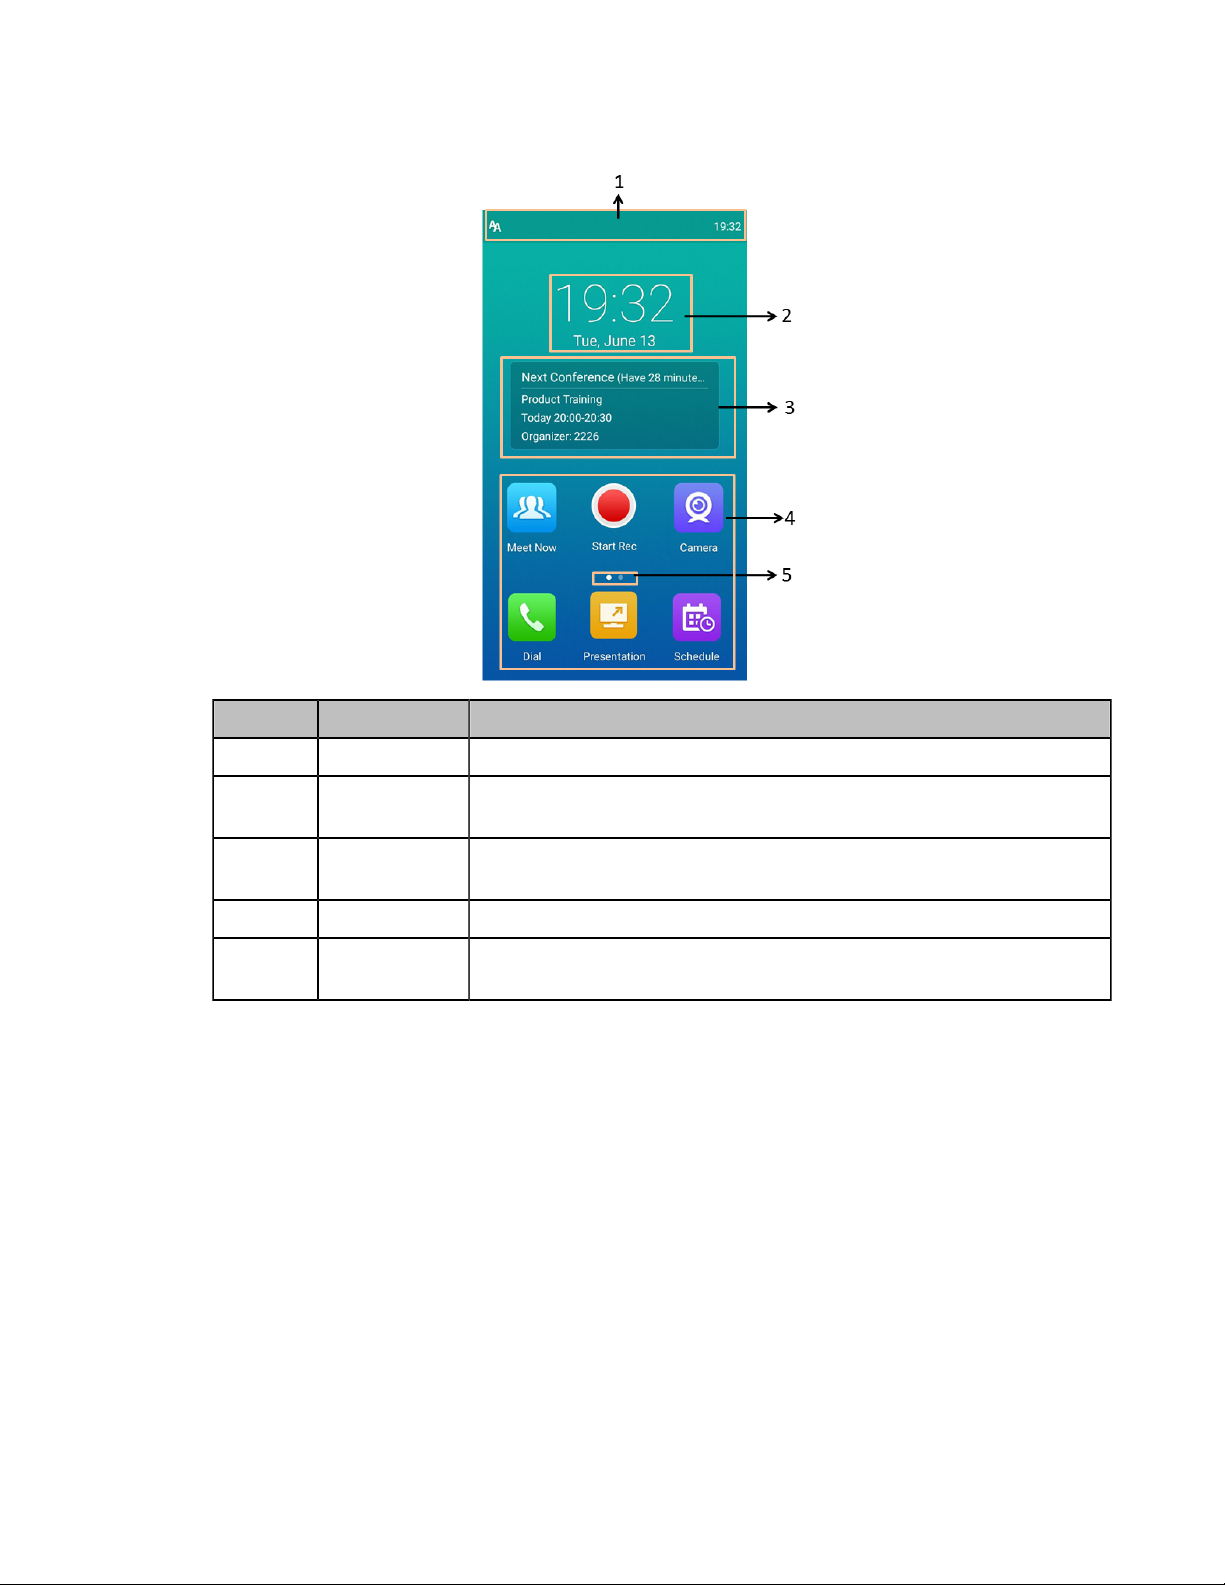
Idle Screen of CP960
If the phone has a Yealink Cloud account or a YMS account logged in, the idle screen is shown as below.
| Getting Started | 20
Number Name Description
1 Status Bar Display the status icons of the phone and the time.
2 Digital Clock
Widget
3 Conference
Schedule
4 Application Use the corresponding feature.
5 Screen
Indicator
Display the time and date.
When you register a Yealink Cloud account or a YMS account, you can
view the conference schedule.
Indicates the current screen. You can swipe to left or right to view more
screens.
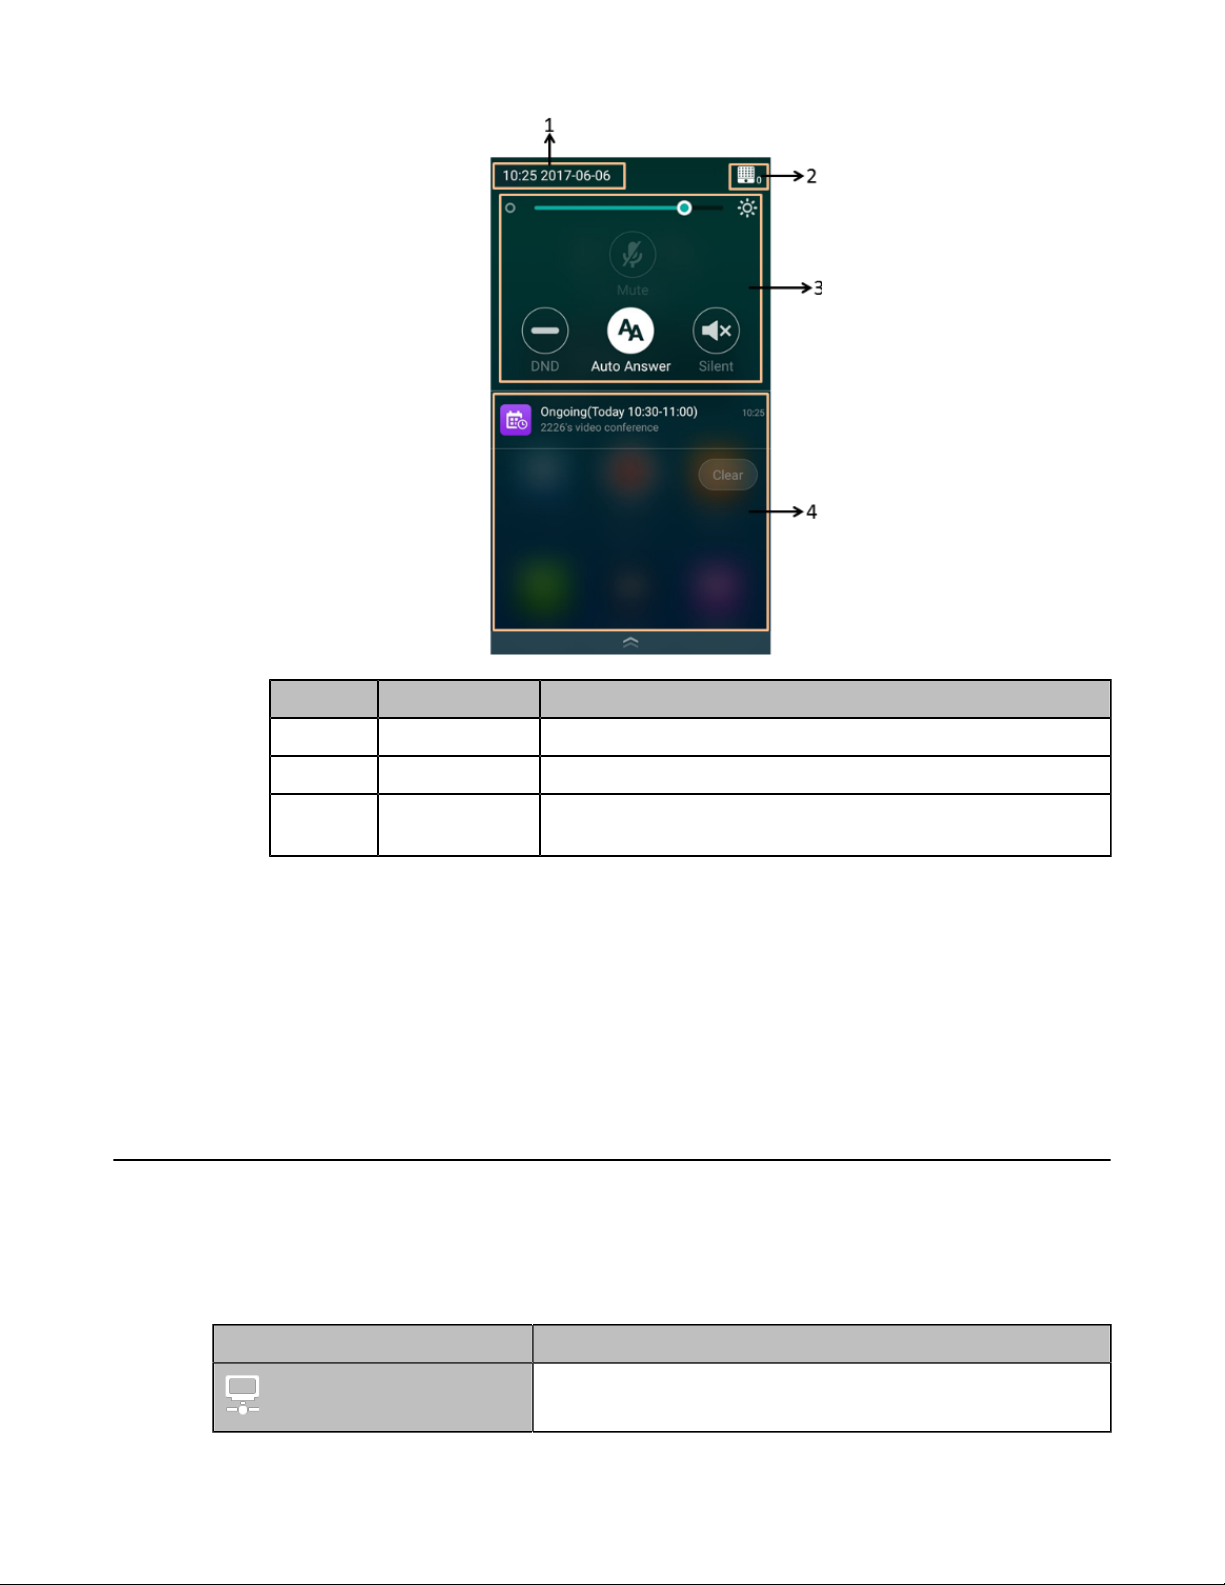
CP960 Control Center/Notification Center
The control center or notification center of CP960 allows you to quickly enable/disable the related feature or
view the latest notifications.
• Going to the Control Center/Notification Center
• Exiting Control Center/Notification Center
Going to the Control Center/Notification Center
Procedure
On your CP960, swipe down from the top to go to the control center/notification center:
| Getting Started | 21
No. Name Description
1 Time and Date Display the time and date.
2 Control Center Adjust the screen brightness or configure the related features.
3 Notification
Center
Exiting Control Center/Notification Center
Procedure
On your CP960, do one of the following:
• Swipe up from the bottom of the screen.
• Tap the Home touch key.
Display the notifications, for example the reminder of the
ongoing conference.
Familiarizing with Icons
• Icons on the Monitor/CTP20
• Icons on CP960
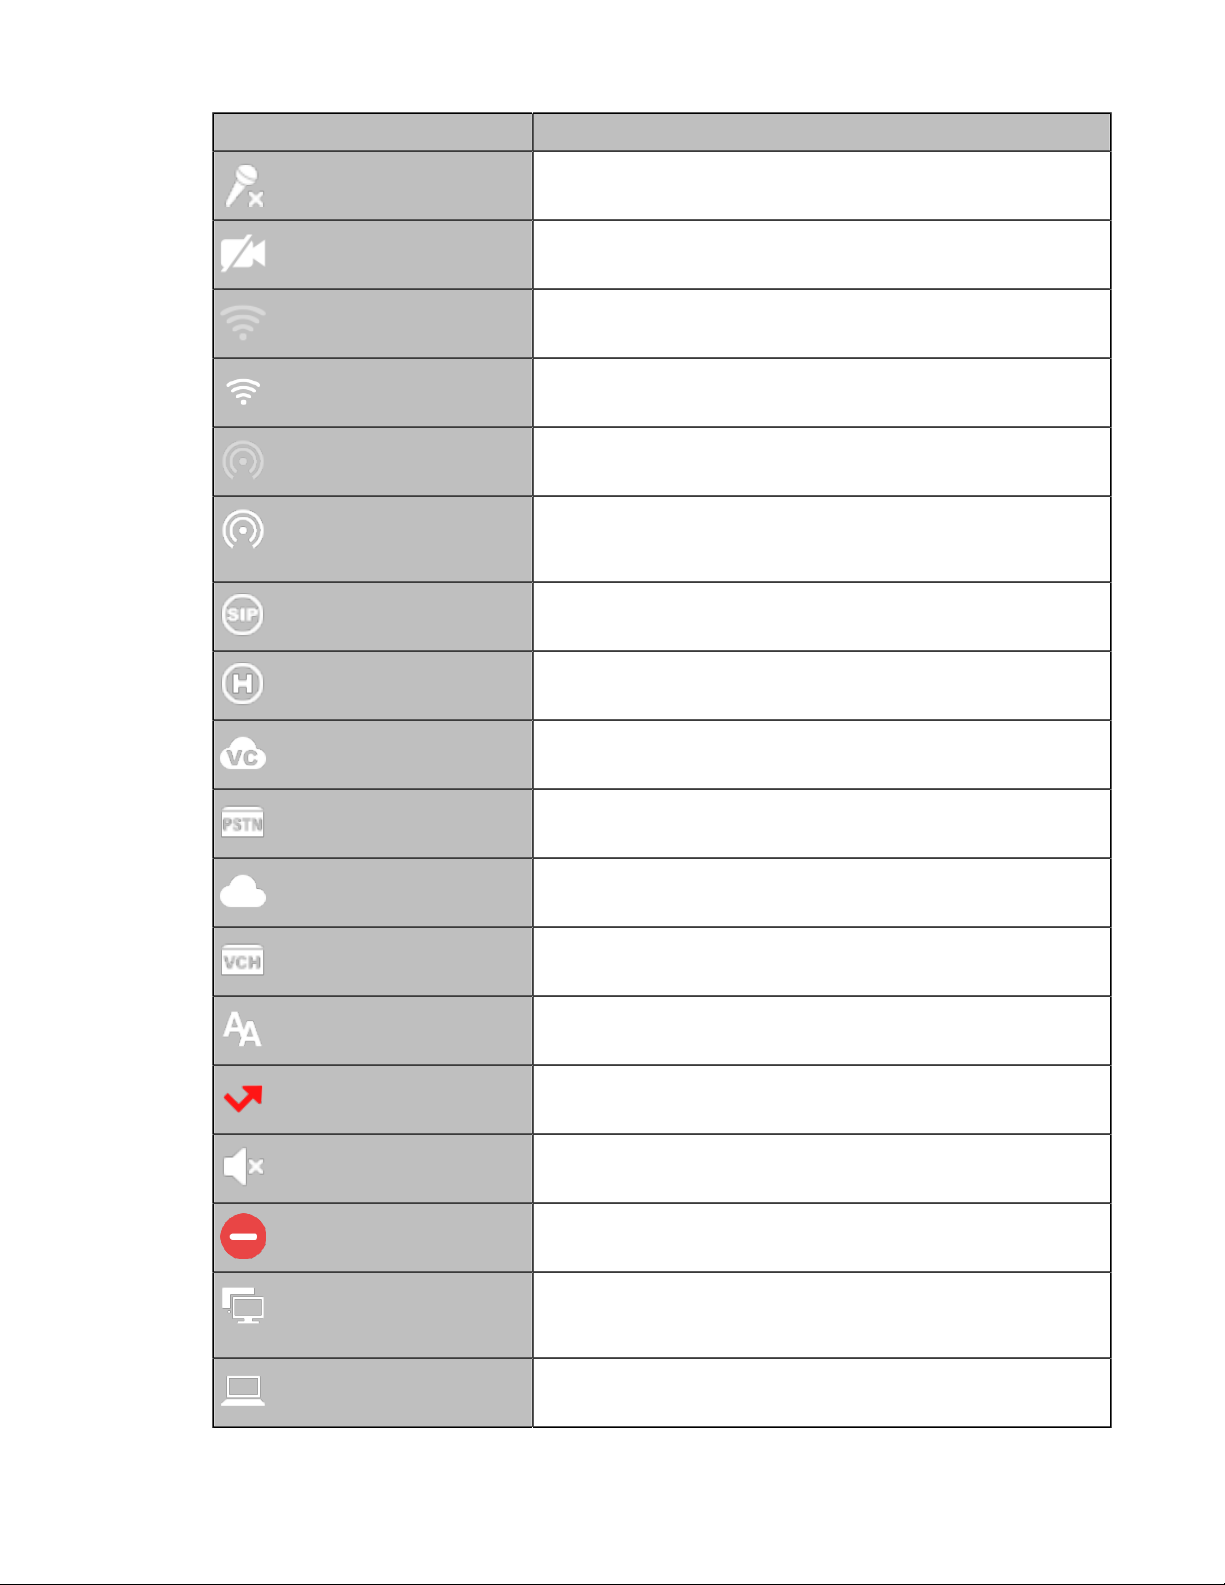
Icons on the Monitor/CTP20
The icons displayed in the status bar of the monitor/CTP20 are introduced as below:
Icon Description
Network is available
Icon Description
CP960 is not connected
The local camera is disabled (it is only applicable to VC880/
VC800/VC500/PVT980/PVT950)
Wi-Fi mode is enabled, but is not connect the wireless network
Wi-Fi mode is enabled, and is connected the wireless network
Wireless hotspot is enabled, but no device is connected to it
Wireless hotspot is enabled, and some devices are connected to
the system (the number of the connected devices is displayed in
the bottom-right corner)
A SIP account is registered
| Getting Started | 22
An H.323 account is registered
A Yealink Cloud account/YMS account is registered
A PSTN account is registered
Log into StarLeaf/Zoom/Pexip/BlueJeans/EasyMeet/Videxio
platform
The VCH50/VCH51 video conferencing hub is connected to the
VCS endpoint
Auto answer
Missed calls (it is displayed in the status bar of the monitor)
The volume is 0
DND (do not disturb) is enabled
Dual-screen mode(it is only applicable to VC880/VC800/VC500/
PVT980/PVT950 and the HDMI 1 and HDMI 2 ports of the VCS
endpoint are connected to display control)
Wired sharing (when a PC is connected to the VCH50/VCH51
video conferencing hub)
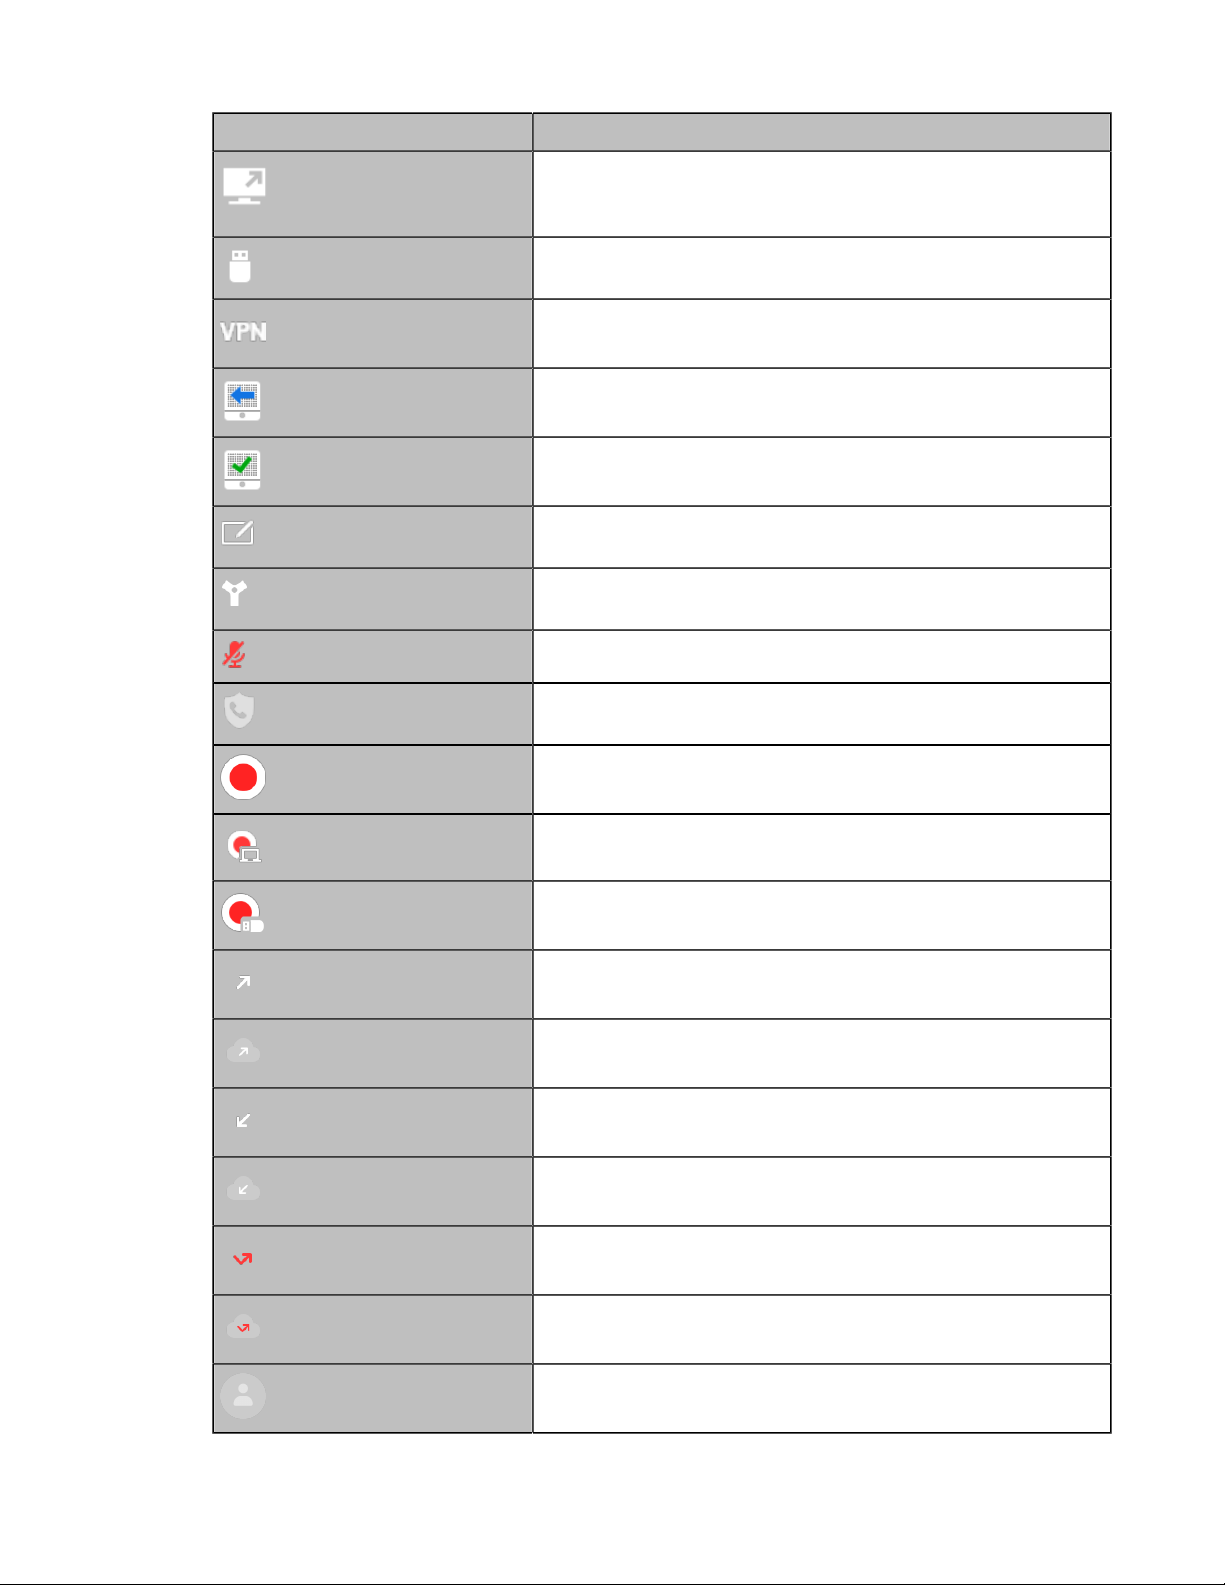
Icon Description
Wireless sharing (use the WPP20 wireless presentation pod
to share the content on PC and the number of the connected
WPP20 is displayed in the bottom-right corner)
A USB flash drive is inserted
VPN is enabled
BT42 dongle is connected, but the CPW90-BT Bluetooth wireless
microphones are unregistered.
BT42 dongle is connected, and the CPW90-BT Bluetooth
wireless microphones are registered.
VCM34 is connected to the device (the number of connected
VCM34 is displayed in the button-right corner)
VCM34 is connected to the device (the number of connected
VCM34 is displayed in the button-right corner)
| Getting Started | 23
The device is muted
Call encryption
Records the video and the audio to your system memory (only
applicable to VC200)
Records the video and the audio to your PC by Yealink Wireless
Presentation Pod
Records the video and the audio to the USB flash drive
Dialed calls (H.323 account/SIP account/IP Call)
Dialed calls (Cloud platform)
Received calls (H.323 account/SIP account/IP Call)
Received calls (Cloud platform)
Missed calls (H.323 account/SIP account/IP Call)
Missed calls (Cloud platform)
Local directory
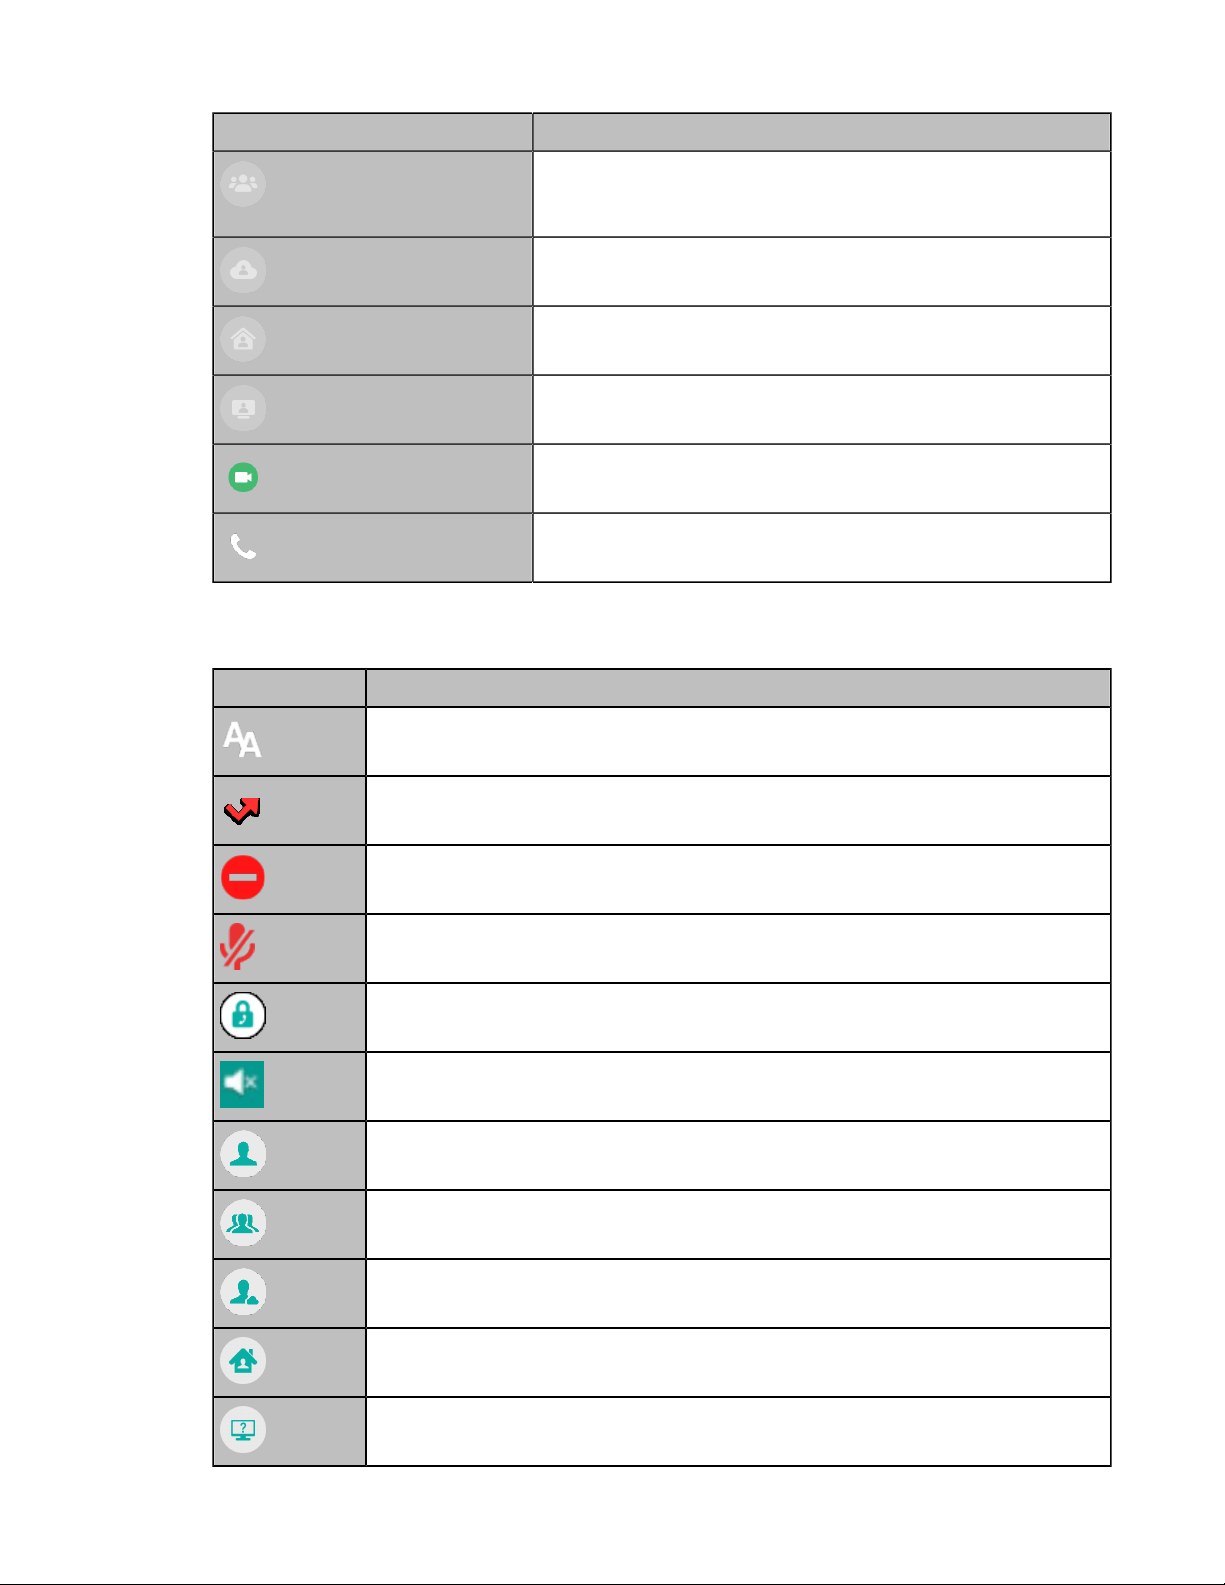
Icon Description
The conference contact (it is only applicable to the PVT980/
PVT950 video conference system and VC880/VC800 that has a
multipoint license).
Yealink Cloud contacts or YMS contacts
Virtual Meeting Room (VMR)
Room system
Place video calls
Place voice calls
| Getting Started | 24
Icons on CP960
Icon Description
Auto answer
Missed calls (it is displayed in the status bar of the monitor)
DND (Do Not Disturb)
Call mute
Call encryption
The volume is 0
Local directory
Conference directory (it is only applicable to PVT980/PVT950 and the VC880/
VC800 that has an imported multipoint license)
Yealink Cloud contacts or YMS contacts
Virtual Meeting Room (VMR)
Third-party devices

Icon Description
Room system
Dialed calls (H.323 account/SIP account/IP Call)
Dialed calls (Cloud platform)
Received calls (H.323 account/SIP account/IP Call)
Received calls (Cloud platform)
Missed calls (H.323 account/SIP account/IP Call)
Missed calls (Cloud platform)
| Getting Started | 25
Running the Setup Wizard
The setup wizard appears automatically at the first time when you start up the system or reset the system
to factory. You can configure the initial settings, for example the language, the network, and the account, for
the device by your remote control/CTP20 touch panel.
Note: You can also tap Exit Boot Wizard on your CP960 conference phone to skip the setup
wizard.
Powering on the System
Your system starts up automatically after you connect an electrical supply. If you power off the system
using the remote control, do the following to power it on.
Procedure
On your remote control, long press the Power Key for 3 seconds.
Your system is powered on successfully, and the LED indicator glows green.
Related tasks
Powering off the System
Powering off the System
Procedure
1. On your remote control, long press the Power Key for 3 seconds.
The option pops up on the display.
2. Select Shut down.

The system shuts down immediately, and the LED on the system goes out.
Putting the System to Sleep
You can put the system to sleep immediately if you do not use it temporarily.
Procedure
Do one of the following:
• On your remote control, long press the Power Key for 3 seconds.
•
On your CTP20, tap > Sleep.
The system goes to sleep immediately, and the LED on the system or the camera glows red.
Waking up the System
| Calling | 26
Procedure
Do one of the following:
• On your remote control, press any button.
• On your CP960, tap the touch screen or any key.
• Touch the CTP20 screen.
Calling
• Placing a Call by Entering a Number
• Editing Numbers Before Calling
• Placing Calls to Contacts
• Placing Calls from Call History
• Answering Calls
• DND (Do Not Disturb)
• Rejecting Incoming Calls
• Ending Calls
Placing a Call by Entering a Number
About this task
You can dial the following contacts on your system:
• SIP URI (for example, 2210@sip.com)
• IP address (for example, 192.168.1.15)
• H. 323 account, SIP account, Cloud account, YMS account or PSTN (E.164) account
• If you register different accounts on the phone, you can use one of them to place the call, including the
Cloud account/YMS account/H.323 account/SIP account/PSTN account/H.323 IP Call/SIP IP Call
• Calling a video conference system that is set up as a virtual conference room

• If the virtual meeting room requires no password, dial the IP address of the device (for example,
10.3.6.201) or the account number to enter the virtual meeting room.
• If the virtual meeting room requires a password, dial IP##meeting password or conference
meeting password@IP (for example, 10.3.6.201##123 or 123@10.3.6.201).
• Dialing the Number by Remote Control
• Dialing the Number by CP960
• Dialing the Number by CTP20
Dialing the Number by Remote Control
Procedure
1. Go to Dial > Dial.
If you register a Yealink Cloud account or YMS account, select New Meeting > Dial.
2. Optional: Go to Auto at the bottom of the screen, and select the desired call type from the drop-down
menu.
3. Enter the number.
4.
Tap to place a video call.
| Calling | 27
Dialing the Number by CP960
Procedure
1. Tap Dial.
2. Optional: Tap Auto, and select the desired call type from the drop-down menu.
3. Enter the number.
4. Tap Send.
Tip: If the administrator enables the Fast Audio Call feature, you can tap Audio Call on CP960
to place voice calls.
Dialing the Number by CTP20
Procedure
1. Tap Dial > Dial.
If you register a Yealink Cloud account or YMS account, tap New Meeting > Dial.
2. Optional: Tap Auto at the bottom of the screen, and select the desired call type from the drop-down
menu.
3. Enter the number.
4.
Tap to place a video call.
Editing Numbers Before Calling
Editing numbers before calling allows you to edit the call record before you place a call so that you do not
need to enter the similar number again, but to add a prefix, a sufix, or otherwise alter the entry to ensure
success.
• Editing Numbers Before Calling by CP960

Editing Numbers Before Calling by CP960
Procedure
1. Tap History.
2.
Tap beside the desired record.
3. Tap Edit before calling.
The selected call record will be filled in the dialing input box automatically.
4. Edit the number and dial out.
Placing Calls to Contacts
• Placing Calls to Contacts by Remote Control
• Placing Calls to Contacts by CP960
• Placing Calls to Contacts by CTP20
Placing Calls to Contacts by Remote Control
| Calling | 28
Procedure
1. Go to Dial > Directory.
If you register a Yealink Cloud account or YMS account, go to New Meeting > Directory.
2. Press the right navigation key to select the desired contact type.
3. Select the desired contact.
4. Press the OK key to place a video call.
Placing Calls to Contacts by CP960
Procedure
1. Tap Directory.
2. Select the desired contact type.
3. Tap the desired contact to place a video call.
Placing Calls to Contacts by CTP20
Procedure
1. Tap Dial > Directory.
If you register a Yealink Cloud account or YMS account, tap New Meeting > Directory.
2. Select the desired contact type.
3. Select the desired contact.
4.
Tap to place a video call.

Placing Calls from Call History
You can place a call from the call history. The call history includes missed calls, placed calls and received
calls.
• Placing a Call from the Call History by Remote Control
• Placing a Call from the Call History by CP960
• Placing a Call from the Call History by CTP20
Placing a Call from the Call History by Remote Control
Procedure
1. Go to Dial > History.
If you register a Yealink Cloud account or YMS account, go to New Meeting > Dial > History.
2. Select the desired type of the call record.
3. Tap the desired record.
4.
Tap to place a video call.
| Calling | 29
Placing a Call from the Call History by CP960
Procedure
1. Tap History.
2. Tap the All Calls field, and select the desired item from the drop-down menu.
3. Tap the desired call history to place a video call.
If you want to place a voice call, tap beside the desired call record, and then tap Voice Call.
Placing a Call from the Call History by CTP20
Procedure
1. Tap Dial > History.
If you register a Yealink Cloud account or YMS account, tap New Meeting > History.
2. Select the desired type of the call record.
3. Tap the desired record.
4.
Tap to place a video call.
Answering Calls
You can manually answer the incoming calls, you can also enable the auto answer feature when the
system is idle or in a call.
• Manually Answering Calls
• Answering a Call Automatically When not in a Call
• Answering Multiple Calls Automatically
• Muting Automatically Answered Calls

Manually Answering Calls
If you do not enable the auto answer or the auto answer multiway feature for the system, you can answer
an incoming call manually.
Procedure
Do one of the following:
• On your remote control, press Dial key or press OK key.
• On your CP960, tap Answer.
• On your CTP20, tap Answer.
Answering a Call Automatically When not in a Call
You can enable the auto answer feature to answer calls automatically when the system is idle, which can
avoid missing incoming calls.
About this task
Note: Auto answer feature may create security issues. For example, an unexpected caller can view
your video conference room randomly.
| Calling | 30
• Configuring Auto Answer by Remote Control
• Configuring Auto Answer by CP960
• Configuring Auto Answer by to CTP20
Configuring Auto Answer by Remote Control
Procedure
1. Go to More.
2. Enable Auto Answer.
Configuring Auto Answer by CP960
Procedure
1. On your CP960, swipe down from the top to go to the control center.
2. Tap Auto Answer.
Configuring Auto Answer by to CTP20
Procedure
1.
Tap in the bottom-right corner.
2. Enable Auto Answer.
Answering Multiple Calls Automatically
You can specify whether to answer a call automatically when the system is already in a call.
About this task
Note: Auto answer multiway feature may create security issues, for example, an unexpected caller
could interrupt an ongoing meeting.
 Loading...