

Page 1
P. O. BOX 36940
CLEVELAND, OHIO 44136
1410 West Ganson Street -Jack$On, Michigan 49202
MAN CO.
PR1NTED IN U.S.A.
~k~YARD.
0611.7578
Page 2
RULES FOR SAF:E OPERATION
Your SNOW THROWER is a precision piece of snow throwin9,,~ltiPJr'~t,:EQQi~(5~L~9i'~~i.~1;,;,,~d ~perience have been combjn~d to
provide the Ijltirnate. 41, safety ~nd effic!en~Y. As with any type on the part of the operator
cal'lresuft in injury, EXERCISE EXTREME CAUTION AT ALL TtMES.
1. READ tHE OWNER'S MANUAL CAREFULLY. Know the controls to operate your SNOW THROWER properly and how
to q1.Jickly Stop th~unlt.
2. BEFORE START-ING ENGINE,dise";gage all clutches and shift unit into neutral. Keep hands, feet. and clothing away from
power driven parts.
DISENGAGE PQWE:fit AND STOP MOTOR befor.e cle~riil;g discharge, removing o.bstaol~s, ma~ing adjustments. or when
.
leavmg operating positlori;
4 NEVER DIRECTDISCHARG~:AT, gYSrfi,NDERS nor allow anyone in front of mach'n~ --debris may be hidden in the
snow,
KEEP CH ILDREN AND P~TS a safe distaiice:a~ay.
6, DO NOT ALLOW CHILDREN TQO~ERAtEMACHI.NE 11or allow adult!i'"tQ 9periitemachil1e without proper instruction.
ADJUST SCOOP HEIGHT to clear gravel or c;:r~shedrock Slirface,
8. EXERCISE CAUTION to avoidslippil1QO:I: falling.. especially when optlratingfn reverse.
HANDLE GASOLINE WITH CARE -,~j$highjytlamroable.
Use approved gasoline container.
t>,
c.
add gasoline to a running;,1Qtor. FUt tank 6ut~oors andwipe:'up, spilled gasolitle.
Replace Q'S$olinft cap securely,
..-
Open doors if motor is running indoors -exhaust fumesaredangel'ous.
10, USE A GROUNDED THFt'EE-WIRE PLUG,IN for all units equipp~withelettfiestartingkits.
,
3.
5.
7.
9.
a.
f\Iever
d.
11. KEEP UN}T IN GOO!) OP~RftTING CONDITION and keep safety d~jc~sil'1ptace.
2
Page 3
MA1NrEN AN CE ;.
GIN.ERA:L SNOW THROWING
Alw~ys keep area to be cleaned cleared before :s~o~fa,ll.A!ways start. e~ine with machine on Ie:vel S'.!rf.ac~ with m~ster~lutch 'disengaged; After startil)Q, let engine warm up $~veral
minutes at $Iow speed before starting tor~mov9$i'I~w,'fm~&hjn~ is'5toredtndoors, let engine anq machine adjust to outdoorttlmperatures
before st"r~lh9 to: throw snow, ,:':,:When
3.4,5,
throwing St10W. run machine at full throttle for bestl'e~ults,.:' ,
When in deep heavy S('10W, shift to slowest speed, and start at ~~e'~dgp: of area to be cleared, discharging snow to the outside,
AlwaY$ run engine a fe:\hJ minlJtes before storing, to dry moisture that collects inside of engine from blowing snow.NOTE,
:r"EVERRUN ENGINE INDOORS OR:lN AN ENCLOSEDAAEA. ;.-
MAINtENANCE:
Your SNO,W THROWEFi"like all machines wjth moving par~s, must tecerve ('~re and mainten~nce. The following tips. if used, will
contribute marly trouble-free hQUI'S"to vallI" machine,
{)heck engine oil leVel trequ~l'I:tly( 6r. every 5 hours 6of use. When changing Qil. make sure dirt and debris is cleaned from oil
drain ?rea before r~(novJng oil plug.
Keep fan ~hd aliger housing$c!e:~f\.
3:
Check atl nuts, bolts and screws Oco~sior\al:tY fpr tightness to be sure machi"IB is in good operating C9!'1dition.
Should excessive vibration develop, check VOlar tal1 ar;id tan ~h3ft immediately. Do not o~rnt!! the machine with a bsnt fan or
4;
shaff:
The mschil1e is pre-lubricated at the f~t6r.y. However ; JubrJcation with ~ach usage will p~olong life of working parts.
If you are going to store your SNOW TH ROWER fl.)\" any length of time (30 days or Jol1ger) it is irrlportant that the fQllowing
$.
$teps.be;.:taken... .
a.
b.
$h~tJld I.Inusual vi~r~tiO;~ develop i~',t~anslrii~~on:. remove rl~bber panel in resr colfer and check rubber drive disc condition. For
refer:tJ.nce..see page 11.::- '
the gC\si;ank. and ~!:Ir~L;(re1:()r. Start the ei1gine and run it until out of ga$.Gi1~line
~et~:.jl:l, ~he~ngin~ Wilt leave gwm dep~it& in the carbufstorar\dgas tank.
Cleary ef!9ine of .:all fCireign matter:
Lli~r}ca1;~ r,vl1nder by fe"ioVlngthe sparl<:cplug and pouring One ounce i;>f cleanlu~r~ati"'i;i~iJthr.QU9h
the sp~~~ ~'ug hol~ Into the cYlinder.. Crank engine slowly to~reaQ
O}1. 4ridreP:!~c~'$parkplug,
2.
2.
6,
<:.Drain
7:
9;1<;).
The belt tension isac;lII:lStabl~. The tensiol)ing ()f belt$hould be ched,edcvery 5.19 hl;Jurs of operation. Refer to adjustments
8.
se!:::tiO~ for re.~tting;To
prevent recqil fr~eli~y; ~hensnow. thrower is to t.J:e srored outside 6r in sub.frf!ezing shelter, pull recoil rope out 6" to 12"
alidfie knot i~;({)pe.:~r fasten handle tb keep rope fromr~.windin9' ThisproCe:pure will Set inner parts in positioN for starting.
Just as v~r a~ltomoblle needs prot~s9ionaj mech!1nic~i maintenallce from time to 1imE.', so does your air-cooled engil1e. A yearly
tune-\ip and checK b.Y " qualified service c;enter is recommended to avoid breakdowns ~nd uJinecessary delays during the snow
throwihgseason. '
3
Page 4
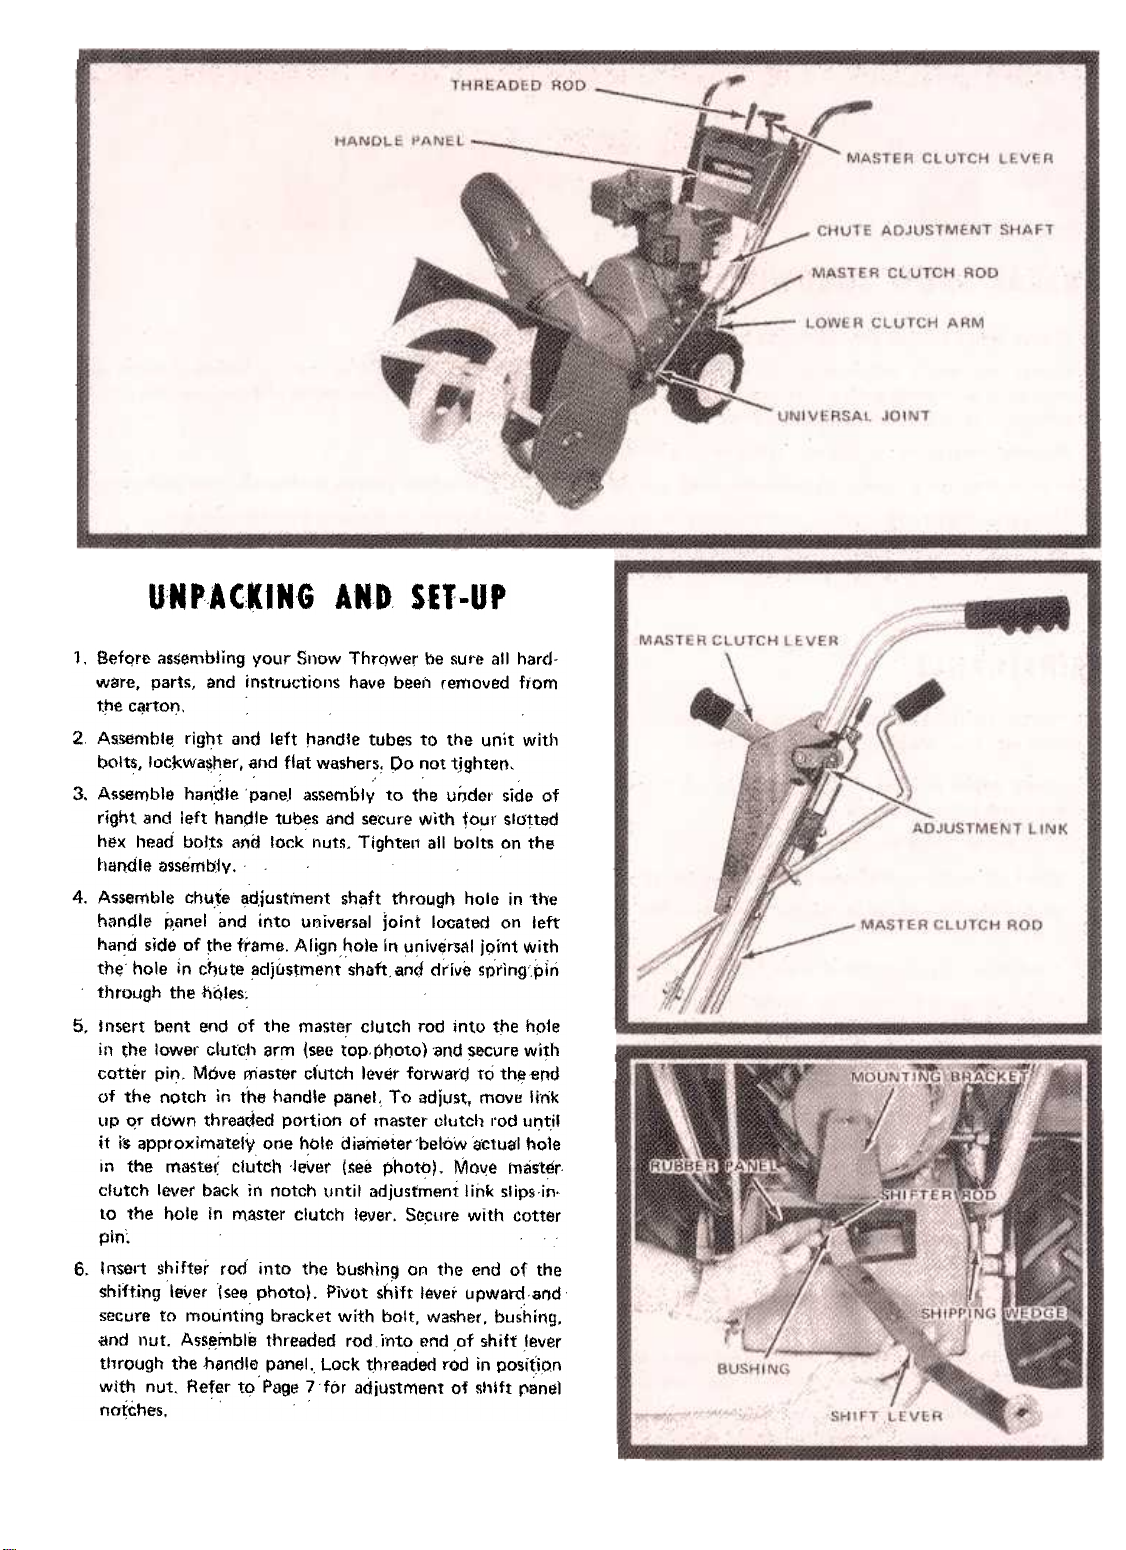
UNPA(:kING AND SIT-UP
1. BefQre assembling your Snow Thrqwer be sUl'e all har<Jware, parts, and instructions have been removed from
the c~rtol),
2 Assen1ble: right and left !1andle tubes to the unit with
bolts, lockwa~~er, and flat w&shers~ po not tighten,3.
Assemble han!:ile pane.! assembly to the under side of
right and left hanpte tubes and seCIJre with tour slO'tted
hex head bo/:ts and lock nuts. Tighteli all bolts on the
handle tJ9semb'Jv.4.
Assemble c;hu,te ~djustl'nent sh~ft through hole in 1t\e
hi')ndle p,anel and into universal Joint looated on left
hand side of ~he trame. Align hole in universAl j9fnt With
the hole in CfJute adjiJstment shaft and dtive spring'pln
through the n6tes;5.
Insert bent end of the master clutch rod into tt1e hple
il'l the lower C!utC!1 arm (see top,Pt:Joto) 'and ~&cure with
cotter pin. Move master ciutch lever forward to th~end
of the notch in the handle panel. To adjust, mOIl!! Irnk
up O;f down threaded portion of master ol\Jtch rod ur:-til
it i-s approximately one hole diameter'below ~CtLJgl hole
in the mastet: clutch 'j~ver (see photo). Move tncist~r
clutch lever back in notch until adjustment link Slips in.
to the hole in master clutch lever. Socure with cotter
pin:6.
Insert shifter rod into the bLJshin~ on the end of the
shifting lever (see photo). Pivot shift lever upward,and
secure to mounting bracket with bolt, wa!\her, bushing,
.and nut. Assemble threaded rod rnto end ,of shift .lever
tllrough the h~ndlE) panel. Lock threaded rod in posi(ion
wIth nut. Refer tl;>' Page 7 for adjustment of sl'ift panel
n(J~ches,
Page 5

,,1, ~111 the fuel tank \",i-th fresh wl!'\ter blehd regular gilSO.
r""'"
line. 00" 'NOT MI..Xbll. WITH GA$OLINt:. ~Jl8f<~
certain th'e' fU!1! s!:iut.off vQI~e' under the 9~S 1;ank 'is
turned on.
,
',~. Plac~ fflQchine o:n ~ !evel $urf~ce: Remo,ve oil fill c.a,p
and fiil crankcase with go~(j quality detergento!l,
Use MS cl()ssifica:~'on $AE 5W;:20 Qil ,tor- operatio,f1
below 40"'F:, U~ M$,'cla-ssif)t:'iitio,) $AE;;,,3QOII ft,r
operation ab6ve'40~f,,':' ::":' ,',": "
3. During initial "Bl'e~k.in", 'peri9~. 'the' bif:':'Snouicl' b~
{;hecked often. ' ,',,'
'4. Change 011 after first two (2) hours pf'o:pera,iof1 and
cheCK oil level evet:y tiye (5~ ciperatillg: hol,itsor esc.h
time machine is used. "..
,
, ..
S t AI'J 1."6
$hift the masier :CIU~ cOl'ltfOI:' to "1ne'Ni'!utr~J",p6St'i~n.MO\f~
tj1'e : Choke lev~r to flJll ctiok~ 'pos:i:ion. Move $peed
control I~\ler'-to rul) position. $tal:t ttlt! ;~i't~~ne by pulling
(ap)dly on t~j'ecoll startefyope. As th,e engine starts and
begins to wa:iir' up, yr~dual]y ~~url') the choke le\fer to t~e
"No Choke" pos.ition.,: ,
'NOTE ~ TemperattJre.,1' :1'9°F ~:'and~elow use "Primer." PlI!.l,
,primer button in :anc!:,~old; putl engine slowly over :co~-
presSion: '-once 8rid::~ rale.a&e I?rimer' buit~n- ,;00 'N:O'T
AT1'EMPT T-() STAR'! T~E,-EI\IG!NE WITH PRIMER
.:BUll"ON H,ELD IN. (Do ,not' U!ie prim{;!r with 110 vbl,~
electric starter.) , '-'
if the engi1,e should fail to sta~~ t:~f~r' to your engine
I n$tru~tjdn M~mjf1l :', ,: :c ' ,
To stqp :the"&f1gjl:i~ mo'ifi;i lh~ sp~ed(:(Jntr()1 lever to the 8tqp
positiOn Qr c,I.ow the fV,el f1l:\ut:off ,\jalv~ under the 91100lifie"tank
The' sp,/lrkplu9 ":JI!ire rJ:'ay also be removed to prfNent
accidental starting while ui'lattel1ded. Always fun ('.ngine. Ii
few ~:i!'lutes !?l)f9r~ 9tQrirl~ ~~d,I:Y' !'r1o..st~l'~ th~t: I;,oll~c't$'n~i~1'
ofe;n9!ne from bloW'1:I9' s1)Qw.
Try, ,you,rSnow.- tlitowe;rniachlne in a large open space
" " ,'"
'v"jt!~ e~9ine thr'ottl-e in .'!.tow position,; Learn to, $t3I't, 5tO;P
,-and ~~tk~up durin9,thj,s~f.iel!Un; .-,
,2. ,"I n 'rough areas; 10,w~r'the ~dlust!lble ,Skids.
,:3. Rcmove ~t'one$, wi:f~;,C~I:1!\, board$,:b'oric~ or oth~r SQlid
object!:. from area to:b~ ~earcd.
:4, Always fUn engine: a t~w :minutes oUt-dOVf5 befo:r~
,throwing ~"'I19w; to ,adjust ~l1g)ne an.d m~chil1e ~o 9,!J~~ide
',. " " ,,' , ,
air tempffrBture. '
'1.
5
Page 6

OP:I,I":TIOI 0"(01110\$
MASTER '(101(:8,/ (OITIO:(
The ti'ia~t~r clu~h c9i1tl'ol i!\:jocated Oil handle panel 81')0 is:
~$ed to engage ~II ~we~. Select ,t} forwardspeedcr r~\1er:sii
wj~b shift lever, the'~'rele~~mas!erclutc:h conTrol and push
f°f"'!~td 10 el'\g~ge d~lvit di!jc(!an;'I'~~I: 'to:~iSengag~, putt
tnBstel" clutch CQ,htt:blb8Ck~"d'loC~ '(n nOtCh. nle mast~r
clutch controi ~us~:al\l!l&Ys bp}:i'1'I n~qtrfil :-p()sition befoi~
starting engi~e, '
f'llI _"flUNG
The whee! clutdl:1es ~r.ejocated9:\,l(I/h~els:!ind:ar~ '(i~Qdto
enga~ or di.seng?ge ,power tq ~h~el-s; r (:I free::theWhe~j~ 'f ~
pushing; ~uI10\J~ ont!;~ ki1()ba~~cturntQiof.'k,. T9 pr'~~ide
~!f.p:ro~jlin~,pQ~~r to t~ wf1liel~turf1 clutches in t/1e
9Pposite ~lrt!Cti?n::~nd release, The Wi1e~ICly~cf1e;~. 'are
Spring~)qad~d,': ri'\6veVtllt untj.i tt!e:<::lut~hes ie~k .triwhee~;
DEfLECTOI
The deflector may lie pOsitioned in either a vertical or a 45"
position in reti)tion to the spout as needed for proper snow
~fiection by loosening the two wing nuts on both $ides o'f
thE! deflector. NOTE: For shipping pi,J.rposes the deftect'or is
lowered off the:hinging pin. looStf() th~ Wil19 'Juts and
rePosition the defle~:tor over the pin before Qperating tt)e
Sn.ow:ThroWer.
.15CHARGE
To rotato the di~charge chlJte 1;0 the right or left, rel1ja~
I:hute 1ock lever. :~hen rot~te ':o"'ith Chl!t& t1dlustmen-t sh~ft to
ctesir~ position anqlqck. NOTE: Th~ spOIJt and defiect?r
rQ1ste$ &ut9matlcally when r<>t;stin_Q the discharge chute to
the right and (e!1;, If- it is desrr'ed to change position of the
~lIt, lift spout :;joc~ [ever on the right hand side of u()it
3r\d h-old V'Jhile rota;ting the wout. Release the lev~r:, iJn:d
~rn spout slightly ut1til It locks into pqsltioll./
AD JUSrMIN:fS ';
NOTE: 'Make ~It ~justm~"'ts with the engine: tu,'ned off
~nd Wire 1e~~ved :fi~~ the !>p;~~~plug, (Fasten wire ~<?
~Ylirider head at :ieast -1" 'away fr!1ro i:P~rkplug,) ,
CHUtE
,
;: ':,; -'
AND
SPOUT
..-
GIPtH ADJUSTMENf :
:the apjus1:$ble skids may be: set lower to prevent picking up
~Oose stones 1!l1d foreIgn material. Also they con be rai~ to
~Iiow the reel to slightly tbi)ch 'the ground fot ~ddirional
'pu:ling,pQwer, '"
6
Page 7

..'LACfNG SAfETY SHEAR BOLT
If the intake- snow reel $hQutd jam causing the ~fetv shear
bolt to shear, it may b.e rap.laced witi:l a new bolt, tu~f1ished
-.
in t]1e part& bag, after rerooving the broken pi~ce$ in the
shaft, NOTE; AlwiiYS aii.9n the hole in the reel shaft and the
s~)rQClset shaft before dtlviflg out the broken bott. DO. NOT
remove soUl;!. pin looated neifr she!)r bi.1lt hole.
(HUTI CHAI" AND: ADJUST MINT
To tighten tb<~ chute cham, rotati:! the chute all the WBY to
the left, until a adjust!¥letlt bolt j~ accessible. TigbtCfl the
adjustment nut to :tight$fI th~ chain:
CAUT ION ~ Gham'must be kept snug on chute housing,
.~
'CHUTE CAB~t ADJUSJM£NT
RemovP;:(""bl~ roller cover, 'td,osa;i1 the lock ing bolt on to\-')
of the cilble' roller bracket' ~Qd 1;\~hten rIle adjustment bolt
on:~he 'side" ' ,
'CAUTION: The cable $j,ould not be adjus,ted 10,0 tightiy.
adNst~ent :~hould a116~ the spout to' rot$te freely.
Retighten the lo'c~ing bolt arid, replace the cable roller
~cover .
SN-IfT PAN_L A.JU~f.£Nt
T l) ~t or aqitist the 'snift pani;;1 for correct speeds. plac~
llills:ter r::Jl,ltch control in stqp position and the shift iever
IntQ the fifth speed notth. Loosen the two mounting bolt~
ond push shift lever righ~, as far as allowed. hold, and
tigh1en mounting bolts. DO NOT ATTEMPT TH IS AD-
JUSTMENT WITH THE ENGINS RUr-,lNING. To check
adjuSti'I1ent, Start ~nnine, move shift lever to first speed
notch and ei19f1ge mast~r cl~ltch control, Unit should move
forward very slowly,
If first or reverse speeds are not satisfactory with thi5 ad-
justment, mOve panel to the right for a faster first speed.
Move panel to the left for II :taster reverse speed,
NOTE: Adjustment section continued on page 12.
7
Page 8
Page 9
Page 10

Page 11

Page 12

Page 13

LUJRICA t:ION
CH:ANGIN:G ENGINE OIL.
Dr.,in oil: when t'ctlgint) is warm. To drain oil place pCin
under f'ralTTe qirectly beneath oij drain extensi9n. Remove
oil drain, cap .and ailow:o/1 to drain completely, Replace
cap and tighten securely. R;efill to "Full". ap~foxim8tely
1 pint. See el1gfne, m~nual for complete engine lubri.
cation and service instru(;tions,
lUII:JOTIQN POINTS
LUBRICATE THI: PAf{TS PERI'ODICALL Y AS ILlU$-T~ATEO:
TI1e following points ~re to be lubricated every
five hoLlrs of operation with SAE 20 weight light duty oil,
I.Inles.~ otherwise noted.
1. Spherical Bearings (Both Sides)
2, Wheels
3. DiSClJ$tge Spout
4, Blower Housi1'l!:}
, 6.; 'Reei Chain
6, Chute Adju'stmentCh"in
7, Chain G\I(jtd B,!Jshil':19
8. Universal JdilJt:
9 Reel Bearii)g!'
10. :Cable Rol!er~ ;
11. Idler Arm ~ Lil1kaye
12. Clut~h Handlefil/ot
13: Shi~t Yok~Slicle
AFTe;R ~REAK IN PERIOD '~fiRST 3 TO 4 HOURS OF
OPERATiON), CHECK ALL,:BOLTS 'AND NUTS FOR
T)GHTNESS.
END OF SEAS/OM $101A61
In the e'vent the engine is to bR stored for any length of
time (3b daY$ or ~ore) or at,the end of the sn~w thr~willg
seaSOfl, ,prepa;:e it ~~ outlir'lf!:d in:, thefol!bwing step~;
1. Drain g8$ ,tank co~plete\y t?y removing fuel Ime' ~t the
C'atburetor:~r fuel tank, whichever is (!asier.
2. Drain the c8rb~.retQr by p(ewlng upward on the boWl
drain. '.
3. To pro1ect the :engine when storing, rempve the $park.
piyg :,and irlje!it ontJ ovnc~ <;>f SAE 1 q weight oil tti:rough
th6 spar1<~lug hple into the cylinder, Crank, the :el1gi!,e
(without !itarting) ~-veralti('rie~to spread thE! oil over the
t~ylinder wails.
4. Lubricate all !ubrication:Pbints as outlined in Luprica
tion S~cri6n.
5. H~N('(les can be~removed 'to save space by disco"necting
mas~r clutch r6d, I.IhIVf1t's81 :jo.iht 8119 ;shift lever,
13
Page 14

(HD:fE :'("-:L- RfPLACEMIN:T
'OIIEPAIR
1. REMOVE T."E BLOWER HOU$tl'l!U FROM .:rHE
MACHiNe;
A. 'Remove the roai~~iI~d and d~nnec.t the reel."drive
chain at fh,e{;~~fn t;Orinecting lInk. :;
8. Remove ~. fout c&r~iageb~lts;fastenin9 the ~oop
~o the m~l,!ntin~: t,ir~c;kE!:t$: Remo\f& the sc;oop and
reel ~~mt;llyint8ci, no rot remoVe ,mol,jiiting
brackets frt!)tn tl:an:i~estr~ps;
.
cable rqller brDck-et 9nd down to tl1e right hole in the
top of the blower housing-
C. Turn the cable pulley with the c;able boit toward the
bottom of the blower housing.
D. Put the e~s of the;:csble UP throug~ the hoj~s in the
bottom of the dable p~'ley and croSs the ends up and
Over the cable bolt and Und~r the washer. Pull the
cable 1;ight and tighten 'the cable'bolt and nut, making
sure the cable remains in the track around the cabJe
'PiJlley,
E.S1ide cable p\11ley back Into plac&,
F. Tighten cable with adjusting cable boIL
'~:,
~
c. Remove th~SPtm9p:inandreTQye fan.
D. Loosen chute chain to allow for removal of blower
housihQ.
E. Rem9~t) the bI9~~( l)ou~,ln.9 f.ro~ tryeunit. ,
R~MOVE THe WORN CABLE.
A. Place the blower housing on a bench with the cable
,.pulle:Y ex;posfld;: , : ': ;,.
8. Re~ove th~ cable roller ~over.
C, Loo~n the lock bolt on top of tl1e cable roller
bracket and adjust the cable adjusting bOliandtabie
roller in as far as possible.
: ,p~ lif~ ~he ~~ble pulley a~ay fr~~ t.h~ blower hOusing
';. .~Pr:~xj~8~ly3- incheg.
.E. LQasen: the cabte moun1ing bo'it andrernove the Qble
~rJds from thecablepuHey. "
F. I..oo~n m$ nut on the cable ~:as~ir WhiOI:1 h9(d~ the
table to 'the upper W<>ut 8ssemb,ly ar:l4,'remove the
."
worn c~ble. "
REPLACE ~~w ~A~LE: '-.
REPLAce THE BLOWER HOUSING
A. Reverse the steps outlined 'In Step' '1 'to replace the
bio\/,!er housing and parts to the Snow Th(ower,
5.
~2.
3;
4.:~LACIN9
: A, Fasten a loop in center of the cableUilder the cable
, ,
Was~e( lfiakiffg.cer1air that bdth:ends of th!;! cable are
~ven-. , --, '- ' ,
8, With the cable crossed, wrap each end of the Cable
around the upper spout.
TtiENEWCABL£ OVER THE CABLE
R()LLERS.
A. ~9tate th~:up~r ';pout asiiiembly witht~e disCharge
side ilj:tfiti.oppOsite qir&ci.io~from the c~ble:pulley
~ide 01 th~ bloWer housing; "
8; Exte~d th& ~ble f,rbm tJ:le.,fight ~ide 01:-t1)6 .upper
, Spout qssembiyover the to!liiron the left side -of the
q~bfe roller bracketandttlrough th&let~c;:~bJe.hole in
.
thfj top of the blower !j?uSlrig'. Ext~nd':t6e cable from
the left sid!1 ()f the ~out assemblyacros$ the c~nt;er
table roller, b:ack f)nd around the cab'&" adjustment
roller and over the t:able yo"ertJr'\ the right side of the
14
Page 15

Page 16

..
WARRANTY
We gvorOnfe& 011 PQrts against defects in mOleriaJ and wQrkmClnship for a period of one (1)
yeClf from the date of pul'chClse whel'\ used for residential 90 days for (omlT1er~iClI
We agree to ~epoir or replace without charge to the original Purch()s~r, inclvding labor/any
port or port$ upon examination by a Yard.Man Authorized De:aler to be defective within the
guarantee period except the enQine. which is wartonteed separately by the monufocturer. All
tran'tportb1.an char9~s for repla~ement under this guarantee must be paid by the Purchaser
rhis 9uQrQnte~ will not apply to a unit which has been svb;jeded to misuse. negligence. occident
or to a un}t which has been ottered if' any way.
Yard-Mon reScerves the right to make engineering changes without prior notificolio., or respon'
sibility to the Purchaser. '
7/73
 Loading...