

Page 1

MOBILE MINI KEYBOARD
EN
Owner’s Manual
Page 2
For reface CS/DX/CP/YC
SPECIAL MESSAGE SECTION
This product utilizes batteries or an external power supply
(adapter). DO NOT connect this product to any power supply or
adapter other than one described in the manual, on the name
plate, or specifically recommended by Yamaha.
This product should be used only with the components supplied
or; a cart, rack, or stand that is recommended by Yamaha. If a
cart, etc., is used, pl ease observe all safety markings and
instructions that accompany the accessory product.
SPECIFICATIONS SUBJECT TO CHANGE:
The information contained in this manual is believed to be correct at the time of printing. However, Yamaha reserves the right
to change or modify any of the specifications without notice or
obligation to update existing units.
This product, either alone or in combination with an amplifier
and headphones or speaker/s, may be capable of producing
sound levels that could cause permanent hearing loss. DO
NOT operate for long periods of time at a high volume level or
at a level that is uncomfortable. If you experience any hearing
loss or ringing in the ears, you should consult an audiologist.
IMPORTANT: The louder the sound, the shorter the time period
before damage occurs.
NOTICE:
Service charges incurred due to a lack of knowledge relating to
how a function or effect works (when the unit is operating as
designed) are not covered by the manufacturer’s warranty, and
are therefore the owners responsibility. Please study this manual carefully and consult your dealer before requesting service.
ENVIRONMENTAL ISSUES:
Yamaha strives to produce products that are both user safe and
environmentally friendly. We sincerely believe that our products
and the production methods used to produce them, meet these
goals. In keeping with both the letter and the spirit of the law, we
want you to be aware of the following:
Battery Notice:
This product MAY contain a small non-rechargeable battery
which (if applicable) is soldered in place. The average life span
of this type of battery is approximately five years. When
replacement becomes necessary, contact a qualified service
representative to perform the replacement.
This product may also use “household” type batteries. Some of
these may be rechargeable. Make sure that the battery being
charged is a rechargeable type and that the charger is intended
for the battery being charged.
When installing batteries, never mix old batteries with new ones,
and never mix different types of batteries. Batteries MUST be
installed correctly. Mismatches or incorrect installation may
result in overheating and battery case rupture.
Warning:
Do not attempt to disassemble, or incinerate any battery. Keep
all batteries away from children. Dispose of used batteries
promptly and as regulated by the laws in your area. Note:
Check with any retailer of household type batteries in your area
for battery disposal information.
Disposal Notice:
Should this product become damaged beyond repair, or for
some reason its useful life is considered to be at an end, please
observe all local, state, and federal regulations that relate to the
disposal of products that contain lead, batteries, plastics, etc. If
your dealer is unable to assist you, please contact Yamaha
directly.
NAME PLATE LOCATION:
The name plate is located on the bottom of the product. The
model number, serial number, power requirements, etc., are
located on this plate. You should record the model number,
serial number, and the date of purchase in the spaces provided
below and retain this manual as a permanent record of your
purchase.
Model
Serial No.
Purchase Date
PLEASE KEEP THIS MANUAL
92-BP (bottom)
reface CS/DX/CP/YC Owner’s Manual
S-1
Page 3

For reface CS/DX/CP/YC
* This applies only to products distributed by YAMAHA CORPORATION OF AMERICA.
COMPLIANCE INFORMATION STATEMENT
(DECLARATION OF CONFORMITY PROCEDURE)
Responsible Party : Yamaha Corporation of America
Address : 6600 Orangethorpe Ave., Buena Park, Calif. 90620
Telephone : 714-522-9011
Type of Equipment : Mobile Mini Keyboard
Model Name : reface CS/DX/CP/YC
This device complies with Part 15 of the FCC Rules.
Operation is subject to the following two conditions:
1) this device may not cause harmful interference, and
2) this device must accept any interference received including interference that may cause undesired operation.
See user manual instructions if interference to radio reception is suspected.
(FCC DoC)
For AC adaptor and reface CS/DX/CP/YC
1. IMPORTANT NOTICE: DO NOT MODIFY
THIS UNIT!
This product, when installed as indicated in the
instructions contained in this manual, meets FCC
requirements. Modifications not expressly
approved by Yamaha may void your authority,
granted by the FCC, to use the product.
2. IMPORTANT: When connecting this product to
accessories and/or another product use only high
quality shielded cables. Cable/s supplied with this
product MUST be used. Follow all installation
instructions. Failure to follow instructions could void
your FCC authorization to use this product in the
USA.
3. NOTE: This product has been tested and found to
comply with the requirements listed in FCC Regulations, Part 15 for Class “B” digital devices. Compliance with these requirements provides a
reasonable level of assurance that your use of this
product in a residential environment will not result
in harmful interference with other electronic
devices. This equipment generates/uses radio frequencies and, if not installed and used according to
the instructions found in the users manual, may
cause interference harmful to the operation of other
electronic devices. Compliance with FCC regula-
tions does not guarantee that interference will not
occur in all installations. If this product is found to
be the source of interference, which can be determined by turning the unit “OFF” and “ON,” please
try to eliminate the problem by using one of the following measures:
Relocate either this product or the device that is
being affected by the interference.
Utilize power outlets that are on different branch
(circuit breaker or fuse) circuits or install AC line filter/s.
In the case of radio or TV interference, relocate/
reorient the antenna. If the antenna lead-in is 300
ohm ribbon lead, change the lead-in to co-axial
type cable.
If these corrective measures do not produce satisfactory results, please contact the local retailer
authorized to distribute this type of product. If you
can not locate the appropriate retailer, please contact Yamaha Corporation of America, Electronic
Service Division, 6600 Orangethorpe Ave, Buena
Park, CA90620
The above statements apply ONLY to those products distributed by Yamaha Corporation of America
or its subsidiaries.
* This applies only to products distributed by YAMAHA CORPORATION OF AMERICA. (class B)
FCC INFORMATION (U.S.A.)
reface CS/DX/CP/YC Owner’s Manual
S-2
Page 4
For AC adaptor
This device complies with Part 15 of the FCC Rules. Operation is subject to the following two conditions:
(1) this device may not cause harmful interference, and (2) this device must accept any interference received,
including interference that may cause undesired operation.
• This applies only to products distributed by Yamaha Canada Music Ltd.
• Ceci ne s’applique qu’aux produits distribués par Yamaha Canada Musique Ltée.
(can_b_01)
CAN ICES-3 (B)/NMB-3(B)
Explanation of Graphical Symbols
The lightning flash with arrowhead symbol
within an equilateral triangle is intended to alert
the user to the presence of uninsulated
“dangerous voltage” within the product’s
enclosure that may be of sufficient magnitude
to constitute a risk of electric shock to persons.
The exclamation point within an equilateral
triangle is intended to alert the user to the
presence of important operating and
maintenance (servicing) instructions in the
literature accompanying the product.
1 Read these instructions.
2 Keep these instructions.
3 Heed all warnings.
4 Follow all instructions.
5 Do not use this apparatus near water.
6 Clean only with dry cloth.
7 Do not block any ventilation openings. Install in
accordance with the manufacturer’s
instructions.
8 Do not install near any heat sources such as
radiators, heat registers, stoves, or other
apparatus (including amplifiers) that produce
heat.
9 Do not defeat the safety purpose of the polarized
or grounding-type plug. A polarized plug has two
blades with one wider than the other. A
grounding type plug has two blades and a third
grounding prong. The wide blade or the third
prong are provided for your safety. If the
provided plug does not fit into your outlet,
consult an electrician for replacement of the
obsolete outlet.
10 Protect the power cord from being walked on or
pinched particularly at plugs, convenience
receptacles, and the point where they exit from
the apparatus.
11 Only use attachments/accessories specified by
the manufacturer.
12 Use only with the cart, stand,
tripod, bracket, or table specified
by the manufacturer, or sold with
the apparatus. When a cart is
used, use caution when moving
the cart/apparatus combination
to avoid injury from tip-over.
13 Unplug this apparatus during lightning storms or
when unused for long periods of time.
14 Refer all servicing to qualified service personnel.
Servicing is required when the apparatus has
been damaged in any way, such as power-supply
cord or plug is damaged, liquid has been spilled
or objects have fallen into the apparatus, the
apparatus has been exposed to rain or moisture,
does not operate normally, or has been dropped.
(UL60065_03)
CAUTION
IMPORTANT SAFETY INSTRUCTIONS
WARNING
TO REDUCE THE RISK OF FIRE OR ELECTRIC SHOCK, DO NOT EXPOSE THIS APPARATUS TO RAIN
OR MOISTURE.
RISK OF ELECTRIC SHOCK
DO NOT OPEN
CAUTION: TO REDUCE THE RISK OF
ELECTRIC SHOCK, DO NOT REMOVE
COVER (OR BACK). NO USER-SERVICEABLE
PARTS INSIDE. REFER SERVICING TO
QUALIFIED SERVICE PERSONNEL.
reface CS/DX/CP/YC Owner’s Manual
S-3
Page 5

PRECAUTIONS
For AC adaptor
For reface CS/DX/CP/YC
Power supply/AC adaptor
Do not open
Water warning
Fire warning
Battery
PLEASE READ CAREFULLY BEFORE PROCEEDING
Please keep this manual in a safe and handy place for future reference.
WARNING
• This AC adaptor is designed for use with only Yamaha electronic
instruments. Do not use for any other purpose.
• Indoor use only. Do not use in any wet environments.
CAUTION
• When setting up, make sure that the AC outlet is easily accessible. If
some trouble or malfunction occurs, immediately turn off the power
switch of the instrument and disconnect the AC adaptor from the
outlet. When the AC adaptor is connected to the AC outlet, keep in
mind that electricity is flowing at the minimum level, even if the
power switch is turned off. When you are not using the instrument
for a long time, make sure to unplug the power cord from the wall AC
outlet.
WARNING
Always follow the basic precautions listed below to avoid the possibility of serious injury or even death from
electrical shock, short-circuiting, damages, fire or other hazards. These precautions include, but are not
limited to, the following:
• Do not place the power cord near heat sources such as heaters or
radiators. Also, do not excessively bend or otherwise damage the
cord, or place heavy objects on it.
• Only use the voltage specified as correct for the instrument. The
required voltage is printed on the name plate of the instrument.
• Use the specified adaptor (page 48) only. Using the wrong adaptor
can result in damage to the instrument or overheating.
• Check the electric plug periodically and remove any dirt or dust
which may have accumulated on it.
• This instrument contains no user-serviceable parts. Do not open the
instrument or attempt to disassemble or modify the internal
components in any way. If it should appear to be malfunctioning,
discontinue use immediately and have it inspected by qualified
Yamaha service personnel.
• Do not expose the instrument to rain, use it near water or in damp or
wet conditions, or place on it any containers (such as vases, bottles
or glasses) containing liquids which might spill into any openings. If
any liquid such as water seeps into the instrument, turn off the power
immediately and unplug the power cord from the AC outlet. Then
have the instrument inspected by qualified Yamaha service
personnel.
• Never insert or remove an electric plug with wet hands.
• Do not put burning items, such as candles, on the unit. A burning
item may fall over and cause a fire.
• Follow the precautions below. Failure to do so might result in
explosion, fire, overheating or battery fluid leakage.
- Do not tamper with or disassemble batteries.
- Do not dispose of batteries in fire.
- Do not attempt to recharge batteries that are not designed to be
charged.
- Keep the batteries separate from metallic objects such as
necklaces, hairpins, coins, and keys.
- Use the specified battery type (page 48) only.
- Use new batteries, all of which are the same type, same model,
and made by the same manufacturer.
- Always make sure all batteries are inserted in conformity with the
+/- polarity markings.
- When the batteries run out, or if the instrument is not to be used
for a long time, remove the batteries from the instrument.
- When using Ni-MH batteries, follow the instructions that came
with the batteries. Use only the specified charger device when
charging.
DMI-5 1/2
reface CS/DX/CP/YC Owner’s Manual
S-4
Page 6
• Keep batteries away from small children who might accidentally
If you notice any abnormality
Power supply/AC adaptor
Location
Connections
Handling caution
swallow them.
• If the batteries do leak, avoid contact with the leaked fluid. If the
battery fluid should come in contact with your eyes, mouth, or skin,
wash immediately with water and consult a doctor. Battery fluid is
corrosive and may possibly cause loss of sight or chemical burns.
• When one of the following problems occur, immediately turn off the
power switch and disconnect the electric plug from the outlet. (If you
are using batteries, remove all batteries from the instrument.) Then
have the device inspected by Yamaha service personnel.
- The power cord or plug becomes frayed or damaged.
- It emits unusual smells or smoke.
- Some object has been dropped into the instrument.
- There is a sudden loss of sound during use of the instrument.
CAUTION
Always follow the basic precautions listed below to avoid the possibility of physical injury to you or others, or
damage to the instrument or other property. These precautions include, but are not limited to, the following:
• Do not connect the instrument to an electrical outlet using a
multiple-connector. Doing so can result in lower sound quality, or
possibly cause overheating in the outlet.
• When removing the electric plug from the instrument or an outlet,
always hold the plug itself and not the cord. Pulling by the cord can
damage it.
• Remove the electric plug from the outlet when the instrument is not
to be used for extended periods of time, or during electrical storms.
• Do not place the instrument in an unstable position where it might
accidentally fall over.
• Before moving the instrument, remove all connected cables, to
prevent damage to the cables or injury to anyone who might trip over
them.
• When setting up the product, make sure that the AC outlet you are
using is easily accessible. If some trouble or malfunction occurs,
immediately turn off the power switch and disconnect the plug from
the outlet. Even when the power switch is turned off, electricity is still
flowing to the product at the minimum level. When you are not using
the product for a long time, make sure to unplug the power cord from
the wall AC outlet.
Yamaha cannot be held responsible for damage caused by improper use or modifications to the instrument, or data that is lost or destroyed.
Always turn the power off when the instrument is not in use.
Even when the [ ] (Standby/On) switch is in standby status (power lamp is off/ display is off), electricity is still flowing to the instrument at the
minimum level.
When you are not using the instrument for a long time, make sure you unplug the power cord from the wall AC outlet.
Make sure to discard used batteries according to local regulations.
• Before connecting the instrument to other electronic components,
turn off the power for all components. Before turning the power on or
off for all components, set all volume levels to minimum.
• Be sure to set the volumes of all compo nents at their minimum levels
and gradually raise the volume controls while playing the instrument
to set the desired listening level.
• Do not insert a finger or hand in any gaps on the instrument.
• Never insert or drop paper, metallic, or other objects into the gaps on
the panel. This could cause physical injury to you or others, damage
to the instrument or other property, or operational failure.
• Do not rest your weight on, or place heavy o bjects on the instrument,
and do not use excessive force on the buttons, switches or
connectors.
• Do not use the instrument/device or headphones for a long period of
time at a high or uncomfortable volume level, since this can cause
permanent hearing loss. If you experience any hearing loss or
ringing in the ears, consult a physician.
reface CS/DX/CP/YC Owner’s Manual
S-5
DMI-5 2/2
Page 7
NOTICE
To avoid the possibility of malfunction/ damage to
the product, damage to data, or damage to other
property, follow the notices below.
Handling
• Do not use the instrument in the vicinity of a TV,
radio, stereo equipment, mobile phone, or other
electric devices. Otherwise, the instrument, TV,
or radio may generate noise. When you use the
instrument along with an application on your
iPad or iPhone, we recommend that you set
“Airplane Mode” to “ON” on that device in order
to avoid noise caused by communication.
• Do not expose the instrument to excessive dust
or vibrations, or extreme cold or heat (such as in
direct sunlight, near a heater, or in a car during
the day) to prevent the possibility of panel disfiguration, damage to the internal components or
unstable operation.
• Do not place vinyl, plastic or rubber objects on
the instrument, since this might discolor the
panel or keyboard.
Maintenance
• When cleaning the instrument, use a soft and
dry cloth. Do not use paint thinners, solvents,
alcohol, cleaning fluids, or chemical-impregnated wiping cloths.
Saving data
• Keyboard settings (page 41) are stored automatically. It should be noted, however, that
stored data may be lost in the event of malfunction, incorrect operation, and the like.
• Loop phrases recorded on the reface CS and
reface DX cannot be stored.
• reface DX
- Voice settings:
If voice setting data is not stored, it will be lost
when the instrument is turned off, either manually or by the Auto Power-Off function (page
8).
- MIDI and system settings:
MIDI and system settings will be lost if the
instrument is turned off, either manually or by
the Auto Power-Off function, without first
changing the screen. It should also be noted
that stored data may be lost in the event of
malfunction, incorrect operation, and the like.
Information
About copyrights
• Copying of the commercially available musical
data including but not limited to MIDI data and/
or audio data is strictly prohibited except for your
personal use.
• This product incorporates and bundles contents
in which Yamaha owns copyrights or with
respect to which Yamaha has license to use others’ copyrights. Due to copyright laws and other
relevant laws, you are NOT allowed to distribute
media in which these contents are saved or
recorded and remain virtually the same or very
similar to those in the product.
* The contents described above include a com-
puter program, Accompaniment Style data,
MIDI data, WAVE data, voice recording data,
a score, score data, etc.
* You are allowed to distribute medium in which
your performance or music production using
these contents is recorded, and the permission of Yamaha Corporation is not required in
such cases.
About this manual
• The illustrations as shown in this manual are for
instructional purposes only, and may appear
somewhat different from those on your instrument.
• Apple, iTunes, Mac, Macintosh, iPhone, and
iPad are trademarks of Apple Inc., registered in
the U.S. and other countries.
• The company names and product names in this
manual are the trademarks or registered trademarks of their respective companies.
• The names of buttons, terminals, and the like
from the instrument’s front and rear panels are
enclosed in [ ] (square brackets).
• Some sections of this manual refer to the reface
CS, reface DX, reface CP, and reface YC as
“CS,” “DX,” “CP,” and “YC,” respectively.
The model number, serial number, power
requirements, etc., may be found on or near the
name plate, which is at the bottom of the unit.
You should note this serial number in the space
provided below and retain this manual as a
permanent record of your purchase to aid
identification in the event of theft.
Model No.
Serial No.
(bottom_en_01)
reface CS/DX/CP/YC Owner’s Manual
S-6
Page 8

Welcome
Main Features
• The specially developed tone generator of a full-fledged musical instrument and an HQ mini keys
packed into a compact body.
• Built-in speakers and support for batteries so that you can easily make music anywhere, anytime.
• Genuine synthesizer sounds produced by analog
physical modeling (the AN tone generator)
• User interface featuring sliders for direct, intuitive control
• Four powerful, versatile effects built-in
• Phrase Looper for new forms of musical expression
• Six classic keyboard sounds
• Carefully selected vintage effects can be combined with the keyboard sounds for even greater
sonic diversity
• Distinct retro feel in both design and control
• FM tone generator featuring a new feedback
process
• Carefully designed FM section makes FM synthesis easy, even for the beginner
• Two slots each holding one of seven powerful,
versatile effects
• Phrase Looper for new forms of musical expression
• Five vintage organ sounds produced by an
Organ Flutes tone generator
• Organ-like additive synthesis made possible by
FOOTAGE sli ders
• Intuitive control of the rotary speaker effect by
using the ROTARY SPEED lever
reface CS
reface CP
reface DX
reface YC
Thank you for purchasing a Yamaha reface synthesizer. This manual covers all four reface models—namely, the reface CS, reface DX, reface CP, and reface YC.
To get the most out of your new instrument, please confirm its model and then read this manual
carefully. In addition, please keep this manual in a safe place so that you can refer back to it whenever needed.
Package contents
Owner’s Manual
AC adaptor (May not be included depending on your area. Check with your Yamaha dealer.)
MIDI breakout cable (mini-DIN to MIDI IN/OUT)
Digital manuals (PDF)
In addition to this Owner’s Manual, the following manuals are available in digital format for this instrument.
• Reference Manual
• MIDI Reference
• iPhone/iPad Connection Manual
The digital-format manuals listed above can be obtained from the Yamaha Downloads web page. To do
so, go to the web page using the following URL, enter "reface" or “iPhone/iPad” into the “Model Name”
field, and then click “Search.”
Yamaha Downloads: http://download.yamaha.com/
You will need Adobe Reader® installed on your computer in order to view pdf files. The newest version
can be downloaded free of charge from the Adobe web site.
reface CS/DX/CP/YC Owner’s Manual
2
Page 9
Contents
Functions of Front Panel Components ..................... 10
Using the Phrase Looper ............................................ 14
Functions of Front Panel Components ..................... 16
Using the Phrase Looper ............................................ 24
Functions of Front Panel Components ..................... 26
Voice Setting Examples .............................................. 30
Functions of Front Panel Components ..................... 32
Voice Setting Examples .............................................. 35
CSDXCPYC
PRECAUTIONS ........................... S-4
Welcome ......................................... 2
Package contents........................... 2
Main Features ................................. 2
Functions of Rear Panel
Components ................................... 4
Turning On and Off ........................6
Using with the AC Adaptor ...............6
Using with Batteries..........................7
Turning On .......................................8
Turning Off .......................................8
Auto Power-Off.................................8
Connecting to Other Devices...... 36
Connecting to a MIDI Device..........36
Connecting a Computer..................37
Precautions when
Using the [USB] Terminal .......39
Yamaha USB-MIDI Driver .........39
Connecting an iPhone or iPad........39
Restoring the Factory Default
Settings (Factory Reset).............. 40
Using the Factory Reset Function ..40
Appendix....................................... 41
Keyboard Settings ..........................41
reface DX Messages ......................45
Troubleshooting..............................46
Specifications .................................48
Index...............................................49
reface CS/DX/CP/YC Owner’s Manual
3
Page 10
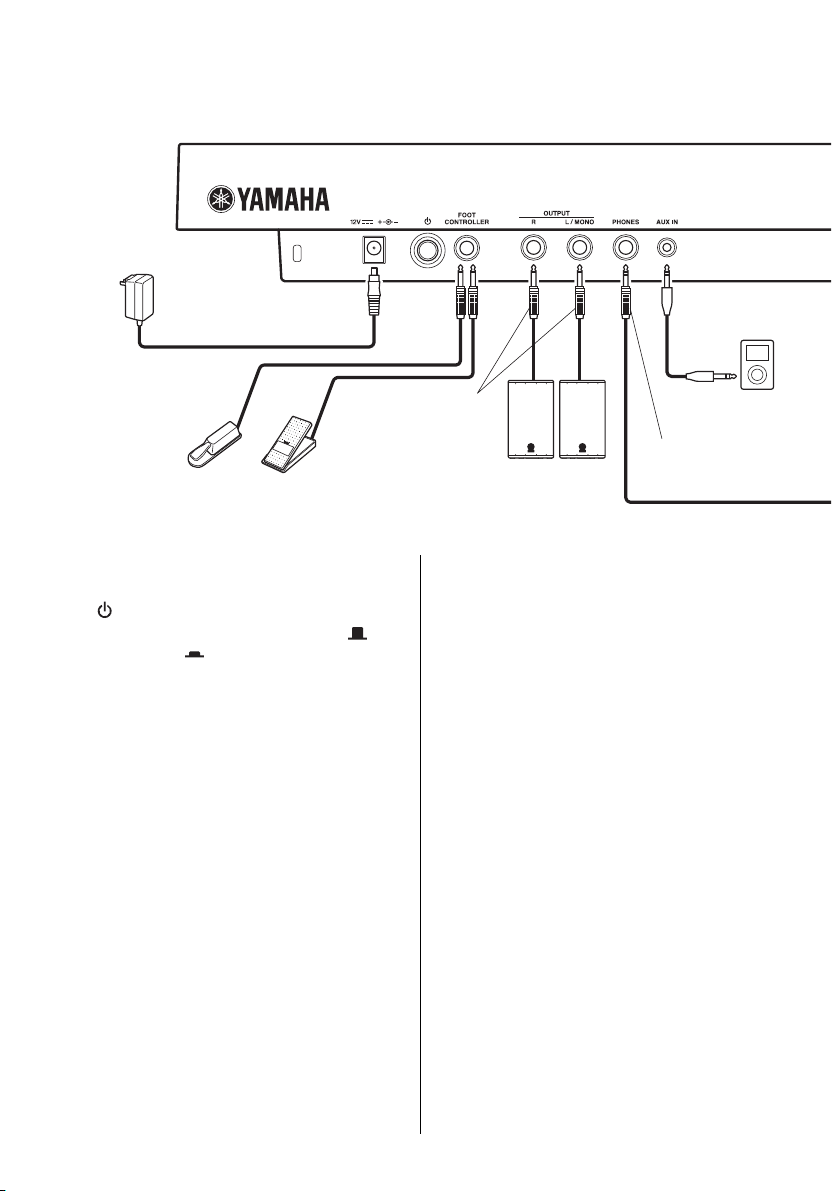
Functions of Rear Panel Components
qwe r ty
AC adaptor
DX and CP:
FC3, FC4, or FC5
CS and YC:
FC7
6.3-mm,
TS phone jack
3.5-mm, mini stereo
phone jack
Audio
player
6.3-mm,
stereo phone jack
(Right) (Left)
Keyboard amplifier or
powered speaker
qDC IN jack (page 6)
For connecting the included AC adaptor.
w[ ] (Standby/On) switch (page 8)
For setting the instrument to standby ( ) or
turning it on ( ).
e[FOOT CONTROLLER] or [SUSTAIN]
jack
reface CS and reface YC:
For connection of a separately sold foot controller (FC7) to adjust the volume.
reface DX:
For connection of a separately sold foot
switch (FC4 or FC5) to add sustain. Notes
played while the foot switch is operated will
sustain for longer than normal after you
release the corresponding keys.
When a separately sold FC3 foot pedal is
connected, MIDI messages for the halfdamper position can be transmitted to any
other connected MIDI device or computer. To
do so, change “SUSTAIN” on the instrument’s System Settings screen to “FC3.”
Please note that this instrument’s sounds are
not affected by the half-damper effect.
reface CS/DX/CP/YC Owner’s Manual
4
reface CP:
When a separately sold foot pedal (FC3) is
connected, a sustain effect corresponding to
the half-damper position can be applied.
Notes played while the foot switch is operated will sustain for longer than normal after
you release the corresponding keys. The
degree to which the foot switch is applied
will control the length of sustain.
Furthermore, when a separately sold foot
switch (FC4 or FC5) is connected, a sustain
effect unrelated to the half-damper position
can be applied. In such a case, turn on the
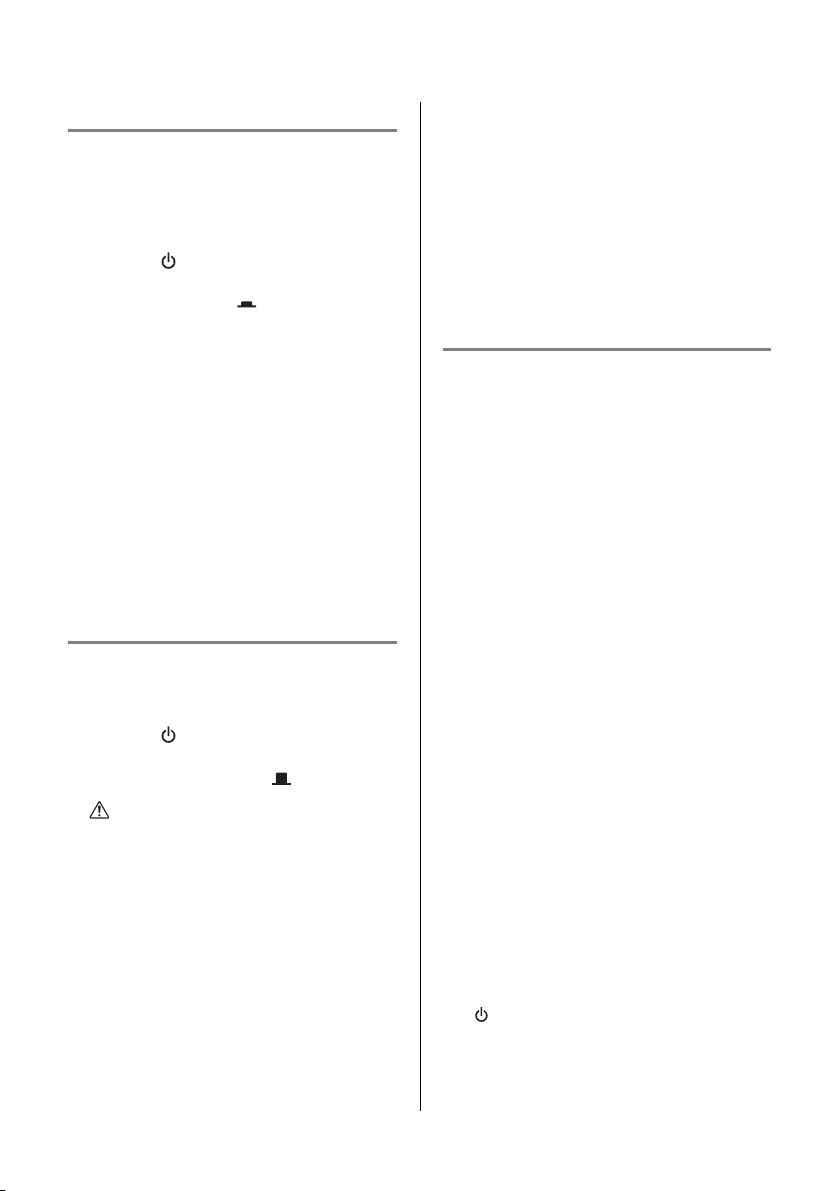
instrument by pressing the power button
while holding down the G2 key on the keyboard. Multiple lamps on the front panel will
flash, and the instrument’s pedal setting will
change to “FC4/5.” See page 41 for details.
• In this manual, the term “FC3” refers to the
FC3 and all other equivalent products, such
as the FC3A.
• In this manual, the term “FC4” refers to the
FC4 and all other equivalent products, such
as the FC4A.
Page 11
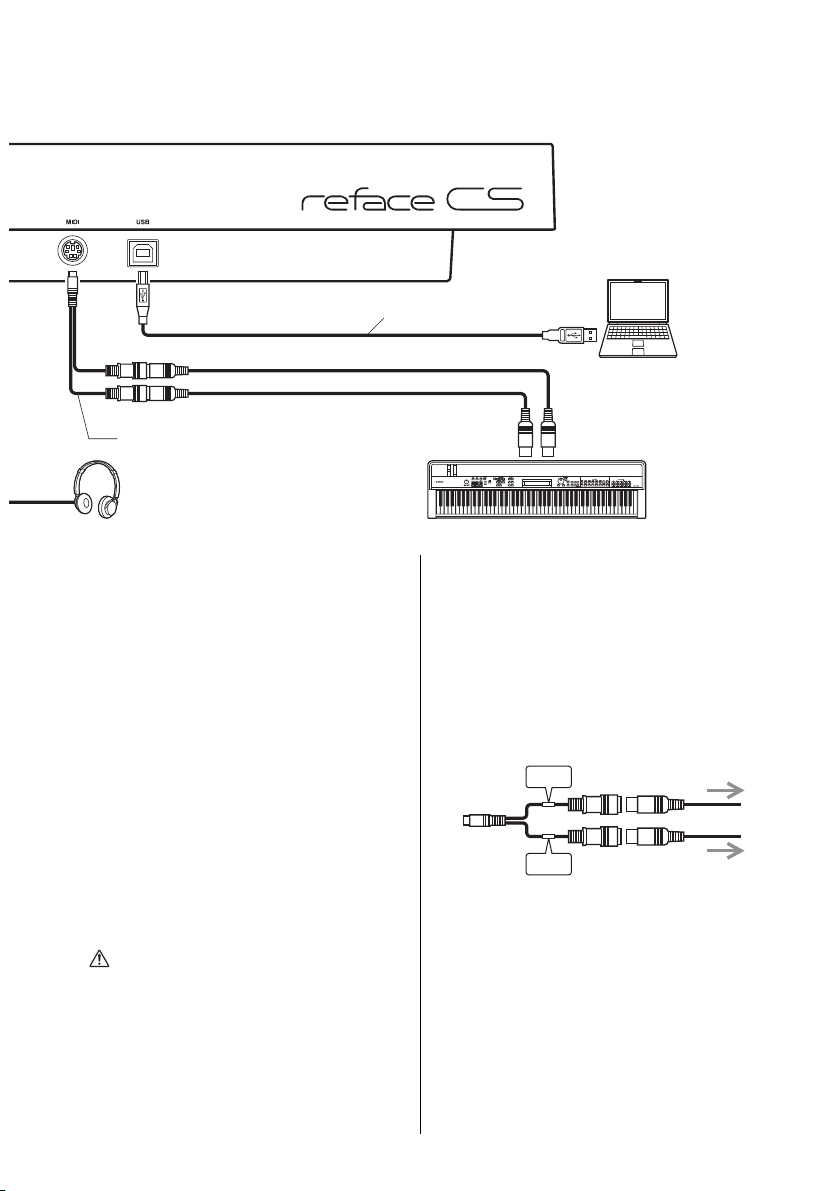
Functions of Rear Panel Components
ui
USB cable
MIDI OUT
MIDI IN
MIDI breakout cable
(mini-DIN to MIDI IN/OUT)
Computer
MIDI IN
terminal
MIDI OUT
terminal
Headphones MIDI device
MIDI IN terminal
MIDI OUT terminal
The illustration shows a reface CS but applies to all models.
rOUTPUT [R]/[L/MONO] jacks
For connecting keyboard amplifiers or powered speakers. The output from these standard stereo phone jacks is identical to that
from the instrument’s built-in speakers. If
mono output is required, only the [L/MONO]
jack should be connected.
t[PHONES] jack
For connecting a pair of stereo headphones
with a standard stereo phone plug (6.3-mm).
If you wish to connect earphones or headphones having a mini stereo phone plug (3.5mm) to this instrument, you will need to use a
3.5 mm to 6.3 mm adapter.
The instrument’s built-in speakers automatically stop producing sound when headphones
are connected to this jack. However, the
OUTPUT jacks will continue to output the
same sound as the [PHONES] jack.
CAUTION
To prevent hearing loss, avoid using headphones at high volumes for extended periods of time.
y[AUX IN] jack
For connecting other audio equipment. The
sound output from connected audio equipment
can be mixed with that of this instrument.
NOTE
Adjust the volume of the connected audio equipment to balance the volumes of the two devices.
u[MIDI] terminal (page 36)
For connecting other MIDI devices via the
included MIDI breakout cable and standard
MIDI cables (sold separately). MIDI messages can be both transmitted and received
via this terminal.
OUT
IN
i[USB] terminal (page 39)
For connecting a computer or a smart device
such an iPhone or iPad by using a USB 1.1 or
2.0 cable. MIDI messages can be both trans-
mitted and received via this terminal. Refer to
“Precautions when Using the [USB] Terminal” (page 39) for details.
NOTE
For details on how to connect an iPhone or iPad,
refer to the “iPhone/iPad Connection Manual,”
which is available from the Yamaha web site.
reface CS/DX/CP/YC Owner’s Manual
5
Page 12

Turning On and Off
q [ ] (Standby/On) switch
DC plug
w DC IN jack
Domestic-use,
AC wall socket
e AC adaptor
Plug
Insert by sliding in the
direction of the arrow
This instrument can be powered by either an AC adaptor or batteries.
Using with the AC Adaptor
q Ensure that the [ ] (Standby/On) switch is
set to the standby condition ( ).
w Insert the AC adaptor’s DC plug into the
instrument’s DC IN jack.
e Plug the AC adaptor into a domestic-use, AC
wall socket.
WARNING
• Be sure to use only the correct AC adaptor (page 48). The use of other adaptors
may damage the instrument, cause it to
overheat, or create a fire hazard. In such a
case, the product warranty will immediately become void, even if the warranty
period has not yet expired.
• Ensure that the included AC adaptor is
plugged into a wall socket at the correct
voltage .
• If your AC adaptor has a detachable plug,
ensure that it is always used and stored
with the plug attached. Inserting only the
plug section into a wall socket can lead to
electric shock or create a fire hazard.
• If the plug detaches from your AC adaptor, slide it back in until it clicks into
place, taking care to avoid touching any
internal metal parts. Please also ensure
that no foreign objects enter the AC adaptor. Failure to observe this precaution can
lead to electric shock, short circuits, or
malfunction.
NOTE
• When disconnecting the AC adaptor, turn off
the instrument and then carry out this procedure in reverse order.
• If the AC adaptor is connected, it will be used
to power the instrument regardless of
whether or not it contains batteries.
• Do not insert or remove the DC plug with the
[ ] (Standby/On) switch set to the On position ( ). Failure to observe this precaution
can lead to malfunction.
reface CS/DX/CP/YC Owner’s Manual
6
CAUTION
If you notice anything unusual when using
this instrument in close proximity to a wall
socket, immediately turn it off and remove
the plug from the wall socket.
Page 13
Turning On and Off
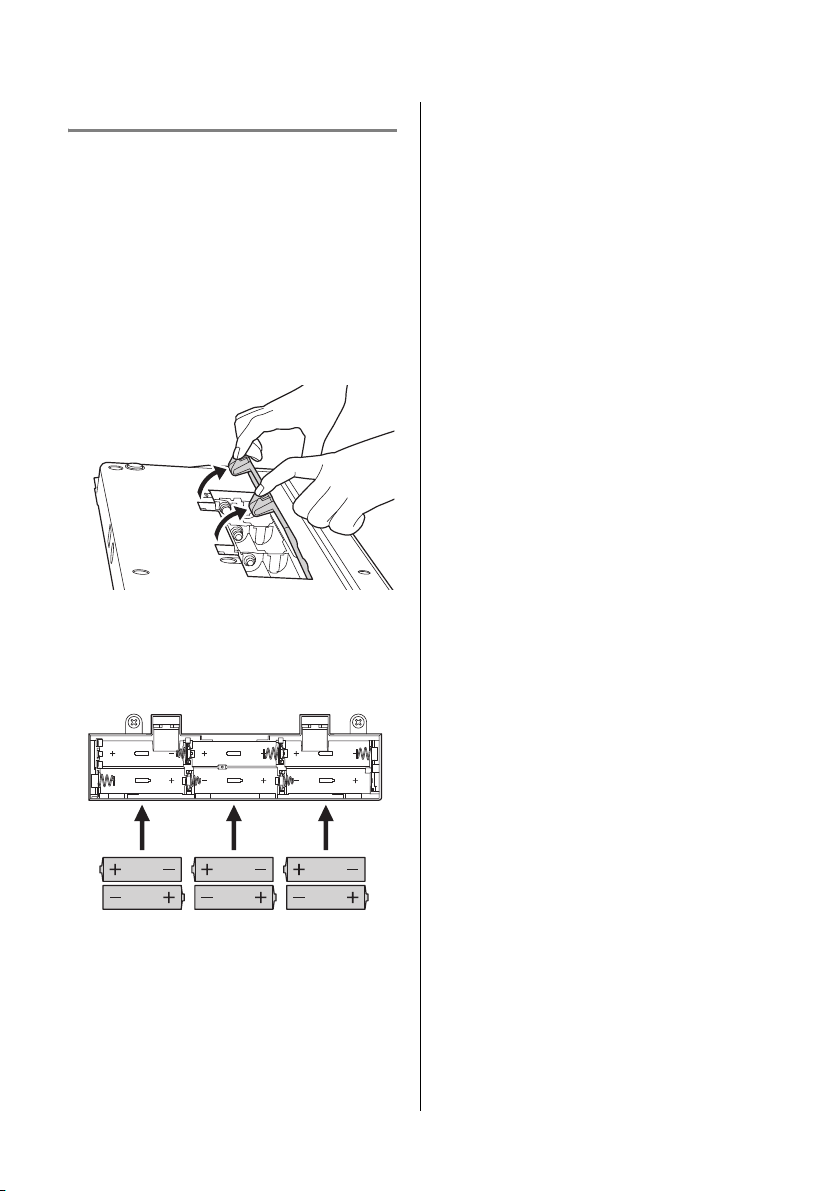
Using with Batteries
Type AA alkaline, zinc-carbon, or rechargeable
nickel–metal hydride batteries can be used to
power this instrument. However, certain modes
of use can consume large amounts of power, and
therefore, we recommend that you use either
alkaline or rechargeable batteries.
q Ensure that the instrument is turned off.
w Place the instrument upside down on a soft
cloth or the like, and then remove the battery
cover.
e Insert six batteries. When doing so, be sure to
observe the polarity markings in the following illustration.
r Close the battery cover.
NOTICE
• If you connect or disconnect the AC
power while this instrument is turned on
and powered by batteries, it may turn off.
Please note that any data being recorded
or not yet stored will be lost in such a
case.
• We recommend that you replace worn
batteries as soon as possible. Certain
modes of operation, such as when
Speaker Output is turned on, may cause
the batteries to quickly become worn, and
as a result, the instrument may be unable
to function properly. In such a case, all of
the batteries should be either replaced (if
non-rechargeable) or recharged (if
rechargeable). Furthermore, if you intend
to use the instrument for an extended
period of time, we recommend that the AC
adaptor be used to power it.
• If you are using rechargeable batteries
and lamps flash or a message is displayed to indicate that they have become
worn, immediately recharge the batteries.
Continued use of rechargeable batteries
in this condition has an adverse effect on
their lifespan.
NOTE
• Be sure to use a dedicated charger with
rechargeable batteries. This instrument does
not recharge batteries.
• If the AC adaptor is plugged into this instrument while it contains batteries, it will draw
power from the adaptor.
The instrument behaves as follows when its
batteries become worn.
reface CS
The OSC lamp will flash.
reface DX
The message “Battery Low!” will be displayed on-screen.
reface CP
The TYPE lamp will flash.
reface YC
The WAVE lamp will flash.
reface CS/DX/CP/YC Owner’s Manual
7
Page 14
Turning On and Off
Tur nin g O n
q Move the [VOLUME] or [VOL] slider all the
way down to minimize the output volume. If
speakers or any other equipment such as a
keyboard is connected, also turn the volume
on those devices all the way down.
w Press the [ ] (Standby/On) switch, which is
located on the instrument’s rear panel, to set
it to the On position ( ).
reface CS, reface CP, and reface
YC
Multiple lamps on the front panel will light
up.
reface DX
The display will turn on.
e Turn on any connected speakers or other
equipment such as a keyboard.
Slowly raise the volume while playing the keyboard to confirm how loud the instrument is.
Tur nin g O ff
q Turn the volume of this instrument and any
other connected equipment all the way down.
w Turn off the other equipment.
e Press the [ ] (Standby/On) switch, which is
located on the instrument’s rear panel, to set
it to the Standby position ( ).
CAUTION
This instrument remains charged and
draws a small amount of power even when
turned off. Be sure to unplug the adaptor
from the AC wall socket during electrical
storms or if the instrument is not to be
used for an extended period of time. In
addition, batteries should be removed from
the instrument in such a case.
NOTICE
• reface CS:
Loop phrases will be lost when the instrument is turned off.
• reface DX:
Loop phrases and any parameter settings
not yet stored will be lost when the instrument is turned off.
Auto Power-Off
This instrument features an Auto Power-Off
function that will help to save energy should you
forget to turn it off yourself. This function automatically turns off the instrument after 30 minutes of inactivity. The Auto Power-Off setting is
retained when the instrument is turned off.
If this instrument is connected to other equipment such as amplifiers, speakers, or a computer, but you do not intend to use it for some
time, we recommend that you turn off all
devices as described in their owner’s manuals.
Doing so eliminates the risk of damage to the
other equipment. If you do not want the instrument to turn off automatically when connected
to other equipment, disable the Auto Power-Off
function.
NOTICE
• In certain modes of operation, the Auto
Power-Off function will not turn off the
instrument when 30 minutes has elapsed.
We recommend, therefore, that you always
turn off the instrument manually when you
are finished using it.
• reface DX only:
When the instrument is turned off by the
Auto Power-Off function, any Voice settings
not yet stored will be lost.
NOTE
To turn the instrument back on after it has been
turned off by the Auto Power-Off function, press
the [ ] (Standby/On) switch once to return it to
the Standby position, and then press it once again
to set it to the On position.
reface CS/DX/CP/YC Owner’s Manual
8
Page 15
Turning On and Off
Leftmost key
Disabling the Auto Power-
Off function
q Ensure that the instrument is turned off.
w While holding down the leftmost key on the
keyboard, turn on the instrument.
reface CS, reface CP, and reface
YC
Multiple lamps on the front panel will flash.
reface DX
The message “Auto power off disabled” will
be displayed on-screen.
e When the lamps stop flashing or the message
is no longer displayed, remove your finger
from the keyboard.
reface DX:
The Auto Power-Off function can also be disabled by using the [FUNCTION] button.
q Select the System Settings screen by pressing
the [FUNCTION] button.
w Tap the leftmost switch in the DATA ENTRY
section.
The “ON” setting for the “AUTO P.OFF”
parameter at the left of the screen will change
to “off.”
Enabling the Auto Power-
Off function
To enable the Auto Power-Off function after it
has been disabled, do a Factory Reset. For
details, refer to “Restoring the Factory Default
Settings (Factory Reset)” (page 40).
reface DX:
The Auto Power-Off function can also be
enabled by using the [FUNCTION] button.
q Select the System Settings screen by pressing
the [FUNCTION] button.
w Tap the left-most switch in the DATA
ENTRY section.
The “off” setting for the “AUTO P.OFF”
parameter at the left of the screen will change
to “ON.”
reface CS/DX/CP/YC Owner’s Manual
9
Page 16
q
t-2y-1y-2y
-3
i
-1
o-1o
-2
i-2i
-3
t
-1
we ur
ty io
C3 C4C2
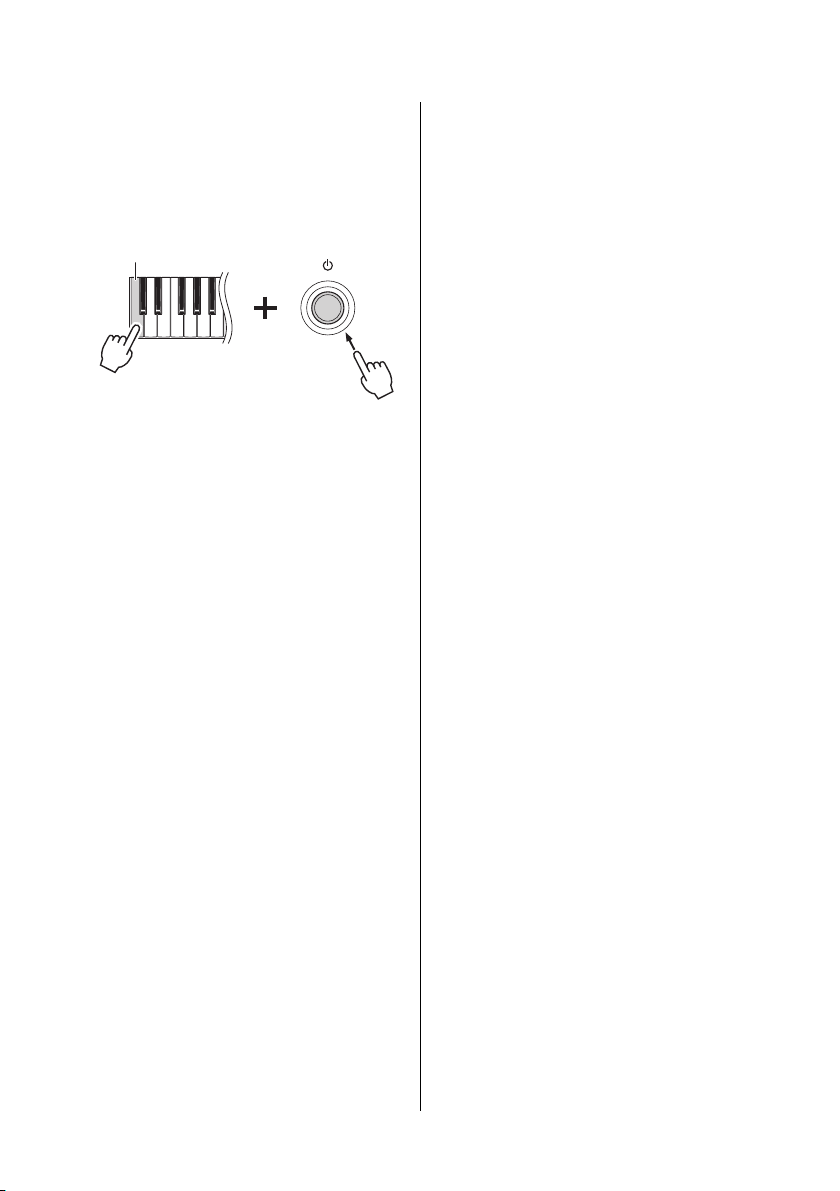
reface CS
Functions of Front Panel Components
qBuilt-in speakers
For outputting the instrument’s sounds. If
you do not want sound to be output from
these speakers, turn the instrument on while
holding down the D2 key on the keyboard.
See page 41 for details.
No sound will be output from the built-in
speakers when headphones are connected.
w[PITCH BEND] lever
For smoothly varying the pitch of the instrument. The pitch rises when you move the lever
up; it drops when you move the lever down.
By switching the direction in which note
pitches are changed by the [PITCH BEND]
lever, you can produce guitar-like note bending
effects when playing the reface CS as a keytar.
Inverting the pitch bend range makes the pitch
rise when you move the lever down and drop
when you move the lever up. For details, refer
to “Keyboard Settings” (page 41).
e[VOLUME] slider
For adjusting the instrument’s overall volume. When you move the slider up, the sound
output from the built-in speakers, the OUTPUT [R]/[L/MONO] jacks, and the
[PHONES] jack will become louder.
r[OCTAVE] slider
For transposing the keyboard in units of 1
octave. For example, when set to “+,” the
note C4 will be produced when you play C3
on the keyboard (see the illustration above).
The available settings are “++” (2 octaves
up), “+” (1 octave up), “0” (no change in
pitch), “-” (1 octave down), and “--” (2
octaves down).
tLOOPER section
For operating the Phrase Looper, which can
record and play back multiple, overlaid loop
phrases. Phrases containing a maximum of
2,000 notes or ten minutes at 120 BPM can
be temporarily recorded as MIDI data by
using this section. For details on how to use
the Phrase Looper, refer to page 14.
NOTE
• When you turn off the instrument, all loop
• If the total number of notes produced simulta-
phrases recorded in the Phrase Looper will
be lost.
neously by the Phrase Looper and by playing
the keyboard exceeds eight, the older ones
stop playing (priority is given to the newest).
reface CS/DX/CP/YC Owner’s Manual
10
Page 17
q
!0-1!0
-2
!1
-1
!0
-3
!0
-4
!0
-5
!0 !1
!1
-3
!1
-2
C5
t-1. LOOPER slider
CLEAR Deletes recorded loop phrases.
When recording the first phrase:
Sets the Phrase Looper to Recording Standby mode.
Recording will start as soon as you
play the keyboard with REC
selected.
REC
When recording the second and
subsequent phrases (overdubbing):
Recording will start as soon as you
PAU SE
move the slider to the REC position.
Starts playback. When you switch
from REC to PLAY, recording stops
and playback of the recorded loop
phrase(s) starts. When you switch
PLAY
from PAUSE to PLAY, loop playback will begin from the next beat.
STOP Stops playback.
When you switch from STOP to
PLAY, playback will begin from the
start of the loop.
When you switch from PLAY to
PAUSE, loop playback will be
paused.
Functions of Front Panel Components
t-2. [TEMPO] slider
For adjusting the tempo of loop playback.
When the slider is at the very bottom, the
tempo is 30 BPM; when at the very top, it is
CS
300 BPM.
yLFO section
For adjusting the settings of the low frequency oscillator (LFO).
y-1. [ASSIGN] slider
For selecting what to modulate with the LFO.
Unique oscillator parameter
OSC
(Oscillator)
PITCH
FILTER
AMP
OFF The LFO has no effect.
will be modulated. The actual
parameters modulated depend
on the OSC [TYPE] slider setting.
The pitch of the oscillator will
be modulated.
The filter cutoff frequency will
be modulated.
The volume of the oscillator
will be modulated.
y-2. [DEPTH] slider
For adjusting the depth of the LFO (the
degree to which it has an effect).
y-3. [SPEED] slider
For changing the LFO’s rate (or operating
frequency).
u[PORTAMENTO] slider
For setting the portamento time and the playing mode of the entire instrument.
Sets the instrument to Monophonic mode and adjusts the
portamento time.
MONO
POLY
Sets the instrument to Monophonic mode.
Sets the instrument to Polyphonic mode. Portamento will
not be applied.
reface CS/DX/CP/YC Owner’s Manual
11
Page 18
Functions of Front Panel Components
iOSC (Oscillator) section
For setting the oscillator(s). A voice can be
created by using the three sliders in this section. In addition, the voice can be further
modified by setting the LFO section’s
[ASSIGN] slider (y-1) to “OSC” and
adjusting its [DEPTH] and [SPEED] sliders.
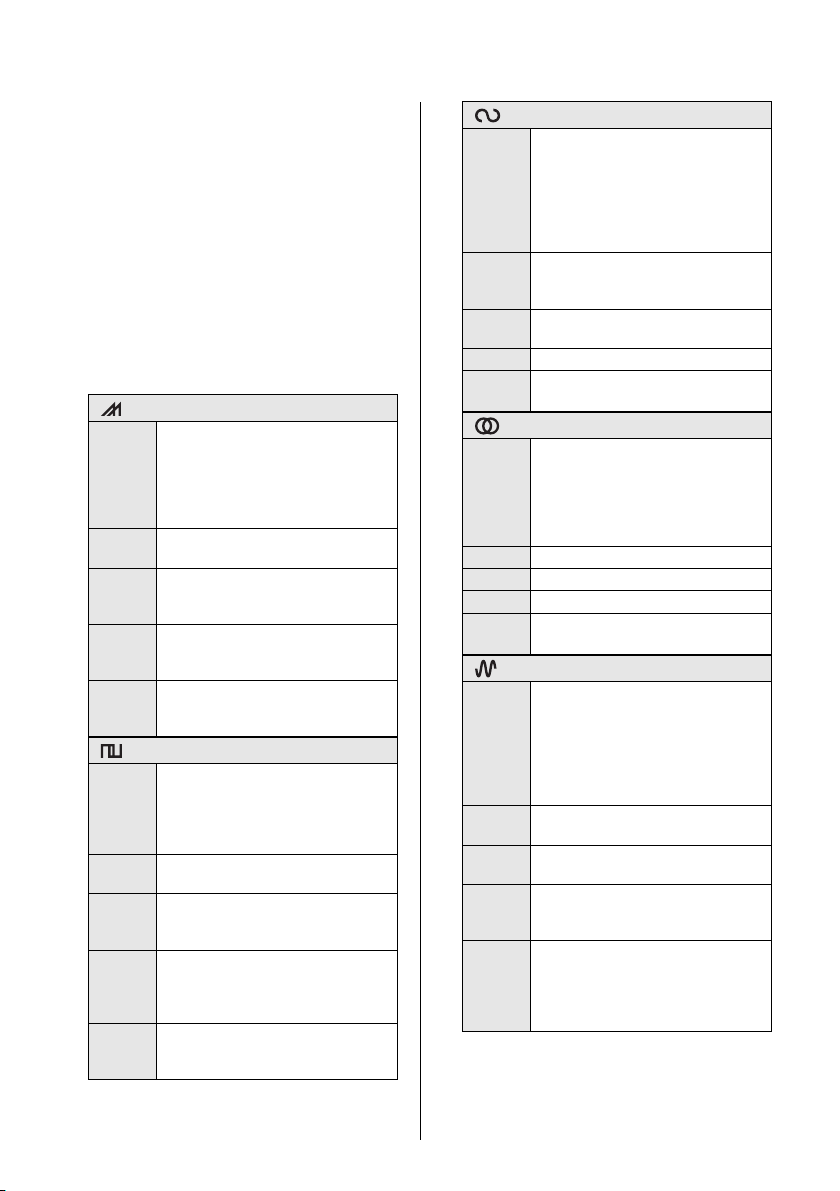
i-1. [TYPE] slider
i-2. [TEXTURE] slider
i-3. [MOD] (Modulation) slider
* The “LFO (OSC)” rows in the following
tables indicate what can be done when the
LFO section is set to “OSC.”
(Multi-saw)
Produces a basic synthesizer voice
Descrip-
[TEXTURE]
LFO (OSC)
Mode of
Descrip-
[TEXTURE]
LFO (OSC)
Mode of
by using sawtooth waves. Multiple
sawtooth waves can be layered to
create thicker voices, or a “sub-oscil-
tion
lator” that plays 1 octave lower can
be added to fatten the sound.
Adds a sub-oscillator to fatten the
sound.
Layers multiple sawtooth waves to
[MOD]
make a thicker, more undulating
sound.
The LFO modulates the oscillator’s
pitch. This does not affect the suboscillator.
Ideal for the creation of trance
pads, techno basses, and other
use
similar sounds.
(Pulse)
Produces a basic synthesizer voice
by using square waves. Two
square waves with different pitches
tion
can be layered to make the sound
more complex.
Changes the pitch of the second
square wave.
Changes the pulse width. Raising
[MOD]
the slider produces a distinctive
thinner sound.
The LFO modulates the pulse
width. This makes it possible to
create a distinctive effect known as
“pulse width modulation.”
Ideal for the creation of leads,
pads, synth basses, and other sim-
use
ilar sounds.
(Oscillator Sync)
Produces voices having two oscillators (OSC1 and OSC2), with OSC2
Descrip-
[TEXTURE]
LFO (OSC)
Mode of
Descrip-
[TEXTURE]
LFO (OSC)
Mode of
Descrip-
[TEXTURE]
LFO (OSC)
Mode of
locked in sync with OSC1. Intense
harmonics can be generated by
tion
changing the pitch and tone of
OSC2, making it possible to create
highly distinctive, dazzling sounds.
Changes the pitch and tone of
OSC2. This makes the generated
harmonics mellower.
Sets the degree to which the OSC2
[MOD]
pitch is changed.
The LFO modulates the OSC2 pitch.
Ideal for lead voices used to play
solos and other similar sounds.
use
(Ring Modulation)
Produces voices by multiplying the
signals from two oscillators (OSC1
and OSC2). Metallic-sounding
voices with no distinct pitch can be
tion
created by changing the pitches of
the oscillators.
Changes the pitch of OSC1.
[MOD]
Changes the pitch of OSC2.
The LFO modulates the OSC2 pitch.
Ideal for extreme basses and
sound effects.
use
(Frequency Modulation)
Produces voices having two oscillators (OSC1 and OSC2), with the
frequency of OSC1 modulated by
OSC2. This makes it possible to
tion
create voices with intense harmonics such as those of the Yamaha
DX7 and other FM synthesizers.
Sets the degree to which modulation
is applied.
Changes the pitch of the modulat-
[MOD]
ing oscillator (OSC2).
The LFO can modulate the degree
to which frequency modulation is
applied.
Ideal for leads, synth comping
voices, and sound effects. With the
[MOD] slider moved all the way up,
use
noise and electronic snare drum
sounds can also be created.
reface CS/DX/CP/YC Owner’s Manual
12
Page 19

Functions of Front Panel Components
Key on Key off
Attack Decay
Sustain
Time
Release
Level
AEG Depth FEG Depth
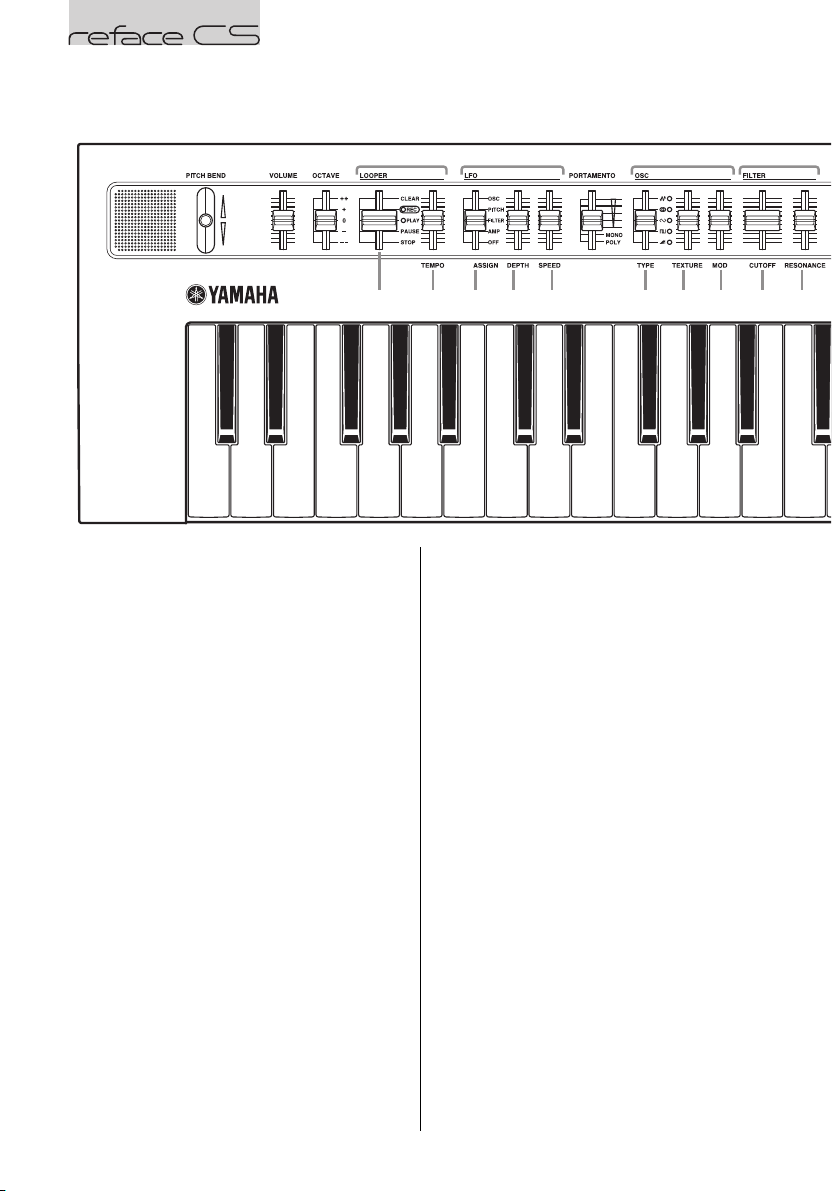
oFILTER section
For setting the filter.
o-1. [CUTOFF] slider
For setting the cutoff frequency of the lowpass filter (LPF; 24 dB per octave). The
sound can be brightened by moving the slider
up, or darkened by moving it down.
o-2. [RESONANCE] slider
For setting the resonance, which changes the
character of the sound. This effect can be
made more pronounced by moving the slider
up and less pronounced by moving it down.
NOTICE
Take special care when lowering the cutoff
frequency at a high resonance setting. This
action can damage the speakers.
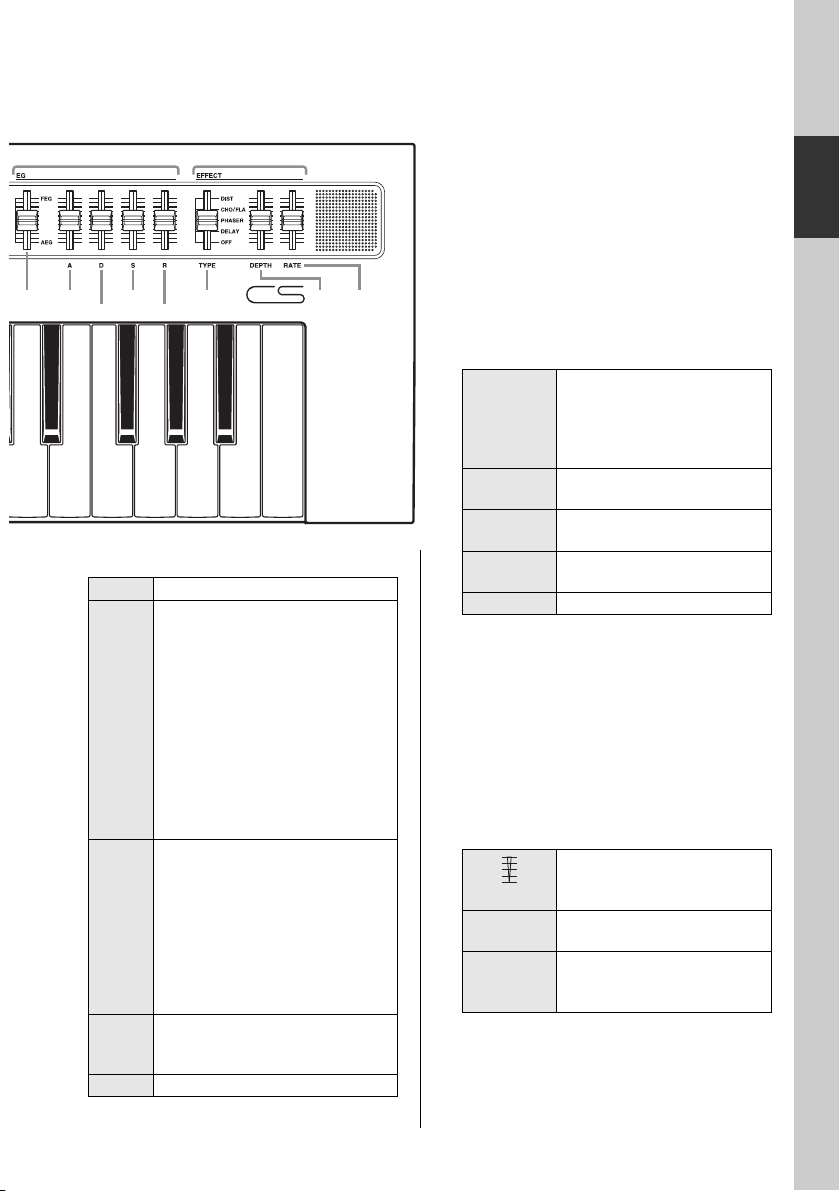
!0EG section
By using the Envelope Generator (EG), you
can adjust the level (volume) of all elements
of the sound from attack to release.
!0-1. EG Balance slider
For changing the degree to which the Filter
Envelope Generator (FEG) and the Amplitude Envelope Generator (AEG) affect the
sound by adjusting the balance between
them. The effect of the FEG can be maximized by moving the slider all the way up.
The effect of the AEG can be maximized by
moving the slider all the way down. The FEG
will have no effect in this position. The FEG
and AEG will each affect the sound by the
same amount when the slider is in the middle
position.
!0-2 to !0-5. [A][D][S][R] sliders
For adjusting the attack time (A), decay time
(D), sustain level (S), and release time (R) of
the FEG and AEG.
!1EFFECT section
For setting the instrument’s effects.
!1-1. [TYPE] slider
For selecting either DIST (Distortion), CHO/
FLA (Chorus/Flanger), PHASER, DELAY,
or OFF. In the OFF position, the sound passes
through without being affected in any way.
!1-2. [DEPTH] slider
For setting the effect depth (how much it
affects the sound).
!1-3. [RATE] slider
For setting the tone when the EFFECT section’s [TYPE] slider is set to “DIST”; the rate
when it is set to “CHO/FLA” or “PHASER”;
or the delay time when it is set to “DELAY.”
CS
reface CS/DX/CP/YC Owner’s Manual
13
Page 20

Using the Phrase Looper
The Phrase Looper can be used to record and play loop phrases. With this feature,
you can overdub to record multiple phrases on top of one another, or you can choose
loop playback to repeat the recorded phrases over and over. In addition to changing
the tempo after making a recording, the Phrase Looper on the reface CS lets you
control the sound using the sliders from other sections such as OSC, FILTER, and
EG.
Playing with the Phrase
Looper
The Phrase Looper can record up to 2,000 notes
or ten minutes at 120 BPM.
NOTE
Loop phrases will be lost when this instrument is
turned off.
Starting a new loop
phrase recording
Get the Phrase Looper
1.
ready.
q Set the LOOPER slider to “CLEAR.”
Any currently recorded loop phrases will
be deleted, and the Phrase Looper will be
set up for recording a new loop phrase.
2. Record the first phrase.
q Set the LOOPER slider to “REC.”
The Phrase Looper is set to Recording
Standby. In time with the tempo, a guide
sound is produced and the “REC” lamp
flashes.
You can adjust the tempo by using the
[TEMPO] slider.
The guide sound is produced only when
recording the first phrase. If you do not
wish to hear the guide sound, move the
LOOPER slider from “CLEAR” to
“PLAY” before setting it to “REC.”
The current voice is used for the guide
sound. If you change the voice by using
the sliders, the guide sound also changes.
w Play the phrase you wish to record by
using the keyboard.
When recording the first phrase, the
instrument will start recording as soon as
you play the first note. On the reface CS,
the Key-on Start function is the only way
to start recording in this situation.
When recording starts, the “REC” lamp
will light up and the “PLAY” lamp will
flash.
e When you wish to end recording, set the
LOOPER slider to “PLAY.”
Recording will stop, and the recorded
phrase will start to play as a loop. During
loop playback, the “PLAY” lamp will
flash in time with the tempo. The guide
sound is not produced during loop playback.
reface CS/DX/CP/YC Owner’s Manual
14
Page 21

Using the Phrase Looper
3. Record an overdub.
The recording of overdubs will begin as soon
as you move the LOOPER slider to “REC.”
The guide sound is not produced when overdubbing.
q Set the LOOPER slider to “REC” once
again.
w Play the phrase you wish to overdub on
the keyboard along with the phrase(s) currently being played.
e When you wish to end recording, set the
LOOPER slider to “PLAY.”
Recording will stop, and the overdubbed
phrases that were recorded will play as a
loop.
If necessary, you can repeat the overdubbing
process.
NOTE
• Once you reach 2,000 notes, no additional
events will be recorded with the LOOPER
slider set to “REC.”
• If you exceed the maximum polyphony, the
older notes will be overwritten with newer
notes (priority is given to the newest).
Changing the sound of loop
phrases
You can use the sliders from the LFO, PORTAMENTO, OSC, FILTER, EG, and
EFFECT sections to control the sound of the
recorded loop phrases as you play them back.
Stopping loop phrases
Pausing
Move the LOOPER slider from “PLAY” to
“PAUSE.”
Looped playback of the phrases will be
paused.
When you switch to “PLAY” once again,
playback will restart from the position at
which it was paused.
Stopping
Move the LOOPER slider from “PLAY” to
“STOP.”
Looped playback of the phrases will be
stopped.
When you switch to “PLAY” once again,
playback will start from the beginning of the
phrases.
CS
reface CS/DX/CP/YC Owner’s Manual
15
Page 22

q
t
-1
t
-2
wer
t
C3C2
reface DX
Functions of Front Panel Components
qBuilt-in speakers
For outputting the instrument’s sounds. If
you do not want sound to be output from
these speakers, turn the instrument on (page
8) while holding down the D2 key on the key-
board. See page 41 for details.
No sound will be output from the built-in
speakers when headphones are connected.
You can also press the [FUNCTION] button to
call up the System Settings screen and change
the Speaker Output setting.
w[PITCH BEND] lever
For smoothly varying the pitch of the instrument. The pitch rises when you move the
lever up; it drops when you move the lever
down. Pitch bend can be set for individual
Voices.
By switching the direction in which note
pitches are changed by the [PITCH BEND]
lever, you can produce guitar-like note bending effects when playing the reface DX as a
keytar. Inverting the pitch bend range makes
the pitch rise when you move the lever down
and drop when you move the lever up.
On the reface DX, pitch bend settings can be
changed by using the [FUNCTION] button.
e[VOLUME] slider
For adjusting the instrument’s overall volume. When you move the slider up, the sound
output from the built-in speakers, the OUTPUT [R]/[L/MONO] jacks, and the
[PHONES] jack will become louder.
r[OCTAVE] slider
For moving the range of notes covered by the
keyboard in units of 1 octave. For example,
when set to “+,” the note C4 will be produced
when you play C3 on the keyboard (see the
illustration above). The available settings are
“++” (2 octaves up), “+” (1 octave up), “0”
(no change in pitch), “-” (1 octave down),
and “--” (2 octaves down).
tDATA ENTRY section
t-1. Touch-type sliders or switches
By flicking, tapping, or tapping and holding
these four touch-sensitive areas, which operate as sliders or switches, you can adjust values and change settings. The screen on the
right shows the parameters that can be set.
Thanks to multi-touch support, meanwhile,
you can simultaneously control up to four
sliders
reface CS/DX/CP/YC Owner’s Manual
16
Page 23

Basic operation
q
y-2y
-4
y
-3
y
-1
u
-1
yuio !0 !1
u
-3
u
-2
C4 C5
Flick up
Flick down
Tap the top
Tap and hold
the top
Tap the bottom
Tap and hold
the bottom
Tap a switch
to operate it.
A “flick” is a sudden, quick movement of your finger along a slider.
Depending on the speed of the flick,
the value corresponding to the
slider will be changed by a small or
large amount.
We recommend that you use your
index finger for flicking.
Functions of Front Panel Components
DX
A “tap” is a single, quick touch and
release of the slider. If you do not
release when you tap (tap and
hold), the value corresponding to
the slide will continue to change
until you do so. (Auto Repeat function)
Flick
Tap
Tap and
hold
reface CS/DX/CP/YC Owner’s Manual
17
Page 24

Functions of Front Panel Components
When you operate a
slider,
the change will be displayed on-screen.
Sound
output
Carrier
Modulator
Waveform to be
modulated
Modulated
waveform
When the volume of
the modulator
increases, the carrier
waveform changes.
*: The carrier wave-
form is n ot affected
when the volume is
0.
Modulating
waveform
Typ e Settings Mode of use
Flick upward to
increase the value;
flick downward to
decrease it. Flick
quickly to change the
value by a large
amount; flick slowly to
Values
On and off
Ty p e
selection
change it by a small
amount.
Tap “ ” or “ ” to
change the value in
units of one.
Tap and hold “ ” or
“ ” to change the
value continuously.
Tap “ ” to toggle
between on and off or
to switch types, etc.
The FM tone generator
FM stands for “frequency modulation.” This
type of tone generator modulates the frequency of a sound’s fundamental waveform
of a sound with a different waveform to produce a totally new one. Waveforms are generated by “operators,” of which the reface
DX has four. An operator that generates a
fundamental waveform is a “carrier,” and an
operator that modulates these waveforms is a
“modulator.” Each of the four operators can
be used as either a carrier or a modulator. By
changing the way operators are combined
and further modulating with other elements
such as levels and envelopes, you can make
sounds change in a highly complex fashion.
t-2. Display
For displaying settings.
The screen itself is not touch-sensitive.
When a setting screen contains multiple
pages, they are indicated in the form
“ ” (page 1 of 4 pages).
yFM section
For changing the sound by modifying some
of the FM tone generator’s more distinctive
parameters.
When you press a button in the FM section, it
will light up to indicate that the corresponding item can be set. You can then use the
DATA ENTRY sliders to change the settings
of individual parameters.
reface CS/DX/CP/YC Owner’s Manual
18
Page 25

Functions of Front Panel Components
Carrier (square) Modulators (circular)
Algorithm number Carrier (square)
Feedback level
y-1. [FREQ] (frequency) button
For displaying the Operator Frequency Settings screen. If you flick at a certain speed or
greater, the setting will change to the closest
integer value. For example, if the current setting is 9.29 and you flick quickly upward, the
value will change to 10.00.
Frequencies can be specified as either a ratio
or a fixed frequency. Refer to the “Reference
Manual” (a digital manual) for details on the
setting procedure.
NOTICE
Take special care when setting a low carrier
frequency in FIXED mode as this action can
damage the speakers.
y-2. [ALGO] (Algorithm) button
For displaying the Algorithm Setting screen.
On this screen, you can specify how the four
operators should be combined. A total of 12
algorithms are available.
y-3. [LEVEL] button
For displaying the Operator Level Settings
screen. On this screen, you can adjust the volume (for carriers) or the degree to which the
corresponding carrier is modulated (for modulators).
y-4. [FB] (Feedback) button
For displaying the Feedback Settings screen.
Waveforms can be changed by feeding some
of the signal generated by an operator back
through that operator.
The reface DX allows you to set feedback
levels for each of the operators. If, for example, you were to select Algorithm No. 8 and
apply feedback to all of the operators, the signal flow would be as follows.
2
1
4
3
If you move the slider up from the center
position, the feedback type becomes sawtooth ( ) and the feedback level will
increase. As a result, the waveform morphs
from a sine to a sawtooth shape, and at the
maximum level, it is transformed fully into a
sawtooth wave. If you move the slider down
from the center position, the feedback type
becomes square ( ) and the feedback level
will increase. As a result, the waveform
morphs from a sine to a square shape, and at
the maximum level, it is transformed fully
into a square wave. At the center position, the
feedback level is “0.” Here, none of the signal
is fed back and a sine wave is produced.
DX
reface CS/DX/CP/YC Owner’s Manual
19
Page 26

Functions of Front Panel Components
Bank number (1–4) Voice number (1–8)
uVOICE SELECT/EDIT section
For recalling a total of 32 Voices by changing
Bank numbers (1 to 4) and Voice numbers (1
to 8).
u-1. [BANK] button
For changing the bank number. Each time
you press this button, the number cycles
through 1 to 4.
u-3. [1]–[8] buttons
For selecting one of eight Voices from the
selected Bank.
u-2. [EDIT] button
For activating Edit mode for the selected
Voice. In this mode, you can edit sounds by
setting the EG level, LFO, and other parameters from area u-3.
NOTE
If you open the Job screen by pressing the
[FUNCTION] button and then do a Voice Initialize, you can start editing with parameters set
so as to produce a sine wave.
u-3. [OP1]–[OP4], [EG level], [EG
rate], [LFO], and [Pitch EG] buttons
[OP1]–[OP4]: For displaying the setting
screen for the corresponding operator.
These buttons can be pressed repeatedly to
cycle through the screen’s individual
pages.
[EG level]: For displaying the EG Level Set-
tings screen for operators. This button can
be pressed repeatedly to cycle through the
four operators.
[EG rate]: For displaying the EG Rate Set-
tings screen. This button can be pressed
repeatedly to cycle through the four operators.
[LFO]: For displaying the LFO Settings
screen. This button can be pressed repeatedly to cycle through the screen’s individual pages.
[Pitch EG]: For displaying the Pitch EG Set-
tings screen. This button can be pressed
repeatedly to cycle through the screen’s
individual pages.
For details regarding the [EDIT] button (u-
2) and the [OP1] to [Pitch EG] buttons (u-
3), refer to the “Reference Manual” (a digital
manual).
reface CS/DX/CP/YC Owner’s Manual
20
Page 27

Functions of Front Panel Components
i[FUNCTION] button
When pressed, the button’s lamp lights up and
Function mode is activated. In this condition,
the button can be pressed repeatedly to cycle
through the mode’s individual pages. When
you press a different button, the lamp goes out
and the instrument leaves Function mode. In
Function mode, you can set Voice Parameter,
MIDI, System, and Job parameters.
Page 1: Voice Parameter Settings
screen
For setting the way sounds are produced for
each Voice.
Whenever you store a Voice by using the
[STORE] button, Voice parameter settings
are stored.
TP
(Transpose)
MONO/
POLY
PORTA
(Portamento
Time)
PB
(Pitch Bend
Range)
-24–
+24
POLY
MONOFULL
MONOLGATO
(MonoLegato)
0–127
-24–
+24
Adjusts the pitch in
semitone units.
Sets the Voice to
Polyphonic mode.
Sets the Voice to
Monophonic mode.
Portamento will be
applied to all notes.
Sets the Voice to
Monophonic mode.
Portamento will be
applied only to notes
played legato.
Set the portamento
time.
Sets the pitch bend
range in semitone
units.
Page 2: MIDI Settings screen
TR CH
(MIDI trans-
mit channel)
RV CH
(MIDI
receive
channel)
CONTROL ON, off
LOCAL
(Local
Control)
1–16,
off
All,
1–16
ON, off
Sets the MIDI transmit channel.
When set to “off,” no
data is transmitted.
Sets the MIDI
receive channel.
When set to “ALL,”
data is received on
all channels.
Sets whether or not
MIDI Control is to be
used.
MIDI Control
Change messages
specifically for the
reface will be transmitted if a setting is
changed in the FM
section ([FREQ],
[LEVEL], [ALGO],
and [FB] buttons)
while MIDI Control is
turned on. If these
messages are
received, the FM
section’s settings will
change accordingly.
Turns Local Control
on or off.
When set to “off,” the
reface’s internal tone
generator and keyboard are disconnected from one
another; when set to
“ON” they are connected.
DX
reface CS/DX/CP/YC Owner’s Manual
21
Page 28

Functions of Front Panel Components
Switch Sliders
Page 3: System Settings screen
AUTO
P. OF F
(Auto
Power-Off)
SP
(Speaker
Output)
SUSTAIN
CONTRAST 0–63
ON, off
ON, off
FC3,
FC4/5
Activates or deactivates the Auto
Power-Off function.
Sets whether or not
sound is to be output
from the speakers.
Sets the type of sustain pedal connected
to the instrument.
If using a pedal that
supports halfdamper operation,
set this to “FC3.”
Adjusts the contrast
of the instrument’s
display.
Page 4: Job screen
Returns the currently
EDIT RECAL
(Edit Recall)
VOICE INIT
(Voice
Initialize)
VOICE
RECALL
FCTRY RESET
(Factory Reset)
selected Voice to the last
edited condition. This may
be necessary if you have
moved to a different Voice
while editing.
Sets the selected Voice to
the default condition (a
sine wave).
Returns the currently
selected Voice to the factory default settings.
Returns all of the instrument’s parameters to the
factory default settings.
o[EFFECT] button
For displaying the Effect Settings screen. On
this screen, two different Insert Effects can be
configured. Each time the button is pressed
with the Effect Settings screen displayed, the
screen toggles between Effect 1 and Effect 2
parameters.
Example: Effect 1 Settings screen
When you select an effect type by using the
switch on the left, the editable parameters
corresponding to that effect will be displayed
on the right of the screen. Flick or tap the
parameters’ sliders to change their settings.
Effect types
THRU No effects are applied.
DIST
T.WA H
CHO
FLA
PHA
DLY
REV
Distortion is applied. DRIVE
and TONE can be adjusted.
Touch wah is applied. SENS
and REZ can be adjusted.
Chorus is applied. DEPTH
and RATE can be adjusted.
A flanger is applied. DEPTH
and RATE can be adjusted.
A phaser is applied. DEPTH
and RATE can be adjusted.
Delay is applied. DEPTH and
TIME can be adjusted.
Reverb is applied. DEPTH
and TIME can be adjusted.
reface CS/DX/CP/YC Owner’s Manual
22
Page 29

Functions of Front Panel Components
NOTE
The [BANK] button and
buttons [1]–[8] can also be
used to make this setting.
!0[STORE] button
For displaying the Store Settings screen. On
this screen, you can specify where to store settings and store them with a name. When you
store a Voice, it overwrites the Preset Voice
stored in the selected location. If you wish to
restore Preset Voices, do a Voice Recall (page
22) or a Factory Reset (page 22 or 40).
When you press this button, the Store screen
will be displayed.
Store screen
name
Bank
1-1 to
4-8
STORE
TO
CHECK
Switches to the Store Name
screen.
Sets where to store the current Voice.
Used if you wish to listen to
the Voice at the location
selected for storing.
Tap the switch to toggle
between and .
: When you play the
keyboard, you will hear the
Voice selected for storing.
: When you play the
keyboard, you will hear the
Voice stored at the location
selected by using “STORE
TO BANK.”
Used to store Voices. When
you tap the switch, a confirmation message will be displayed on-screen.
STORE
Tap the “YES” switch to
store the Voice. Tap the
“NO” switch to return to the
Store screen without storing
any data.
Store Name screen
store
ABC
Upper- and
lower-case
letters and
symbols
Switches back to the
Store screen.
Moves the cursor to the
left.
Tap the switch to display
the Name Input screen.
On this screen, you can
input a new Voice name
by flicking and tapping
the slider to select letters and symbols.
Moves the cursor to the
right.
!1[LOOPER] button
For displaying the Phrase Looper screen. On
this screen, you can operate the MIDI looper,
recording, overdubbing, and playing back
loop phrases. By using this section, phrases
containing a maximum of 2,000 notes or ten
minutes at 120 BPM can be temporarily
recorded.
reface CS/DX/CP/YC Owner’s Manual
DX
23
Page 30

Using the Phrase Looper
The Phrase Looper can be used to record and play loop phrases. With this feature,
you can overdub to record multiple phrases on top of one another, or you can choose
loop playback to repeat the recorded phrases over and over. The Phrase Looper on
the reface DX lets you change the tempo of recorded loop phrases and control the
sound by using the FM and VOICE SELECT/EDIT sections.
Press the [LOOPER] button to use the Phrase Looper.
Playing with the Phrase
Looper
The Phrase Looper can record up to 2,000 notes
or ten minutes at 120 BPM.
NOTE
Loop phrases will be lost when this instrument is
turned off.
Starting a new loop-
phrase recording
Start the Phrase looper.
1.
q Press the [LOOPER] button.
The Phrase Looper screen will be displayed.
You can turn the guide sound on and off
by tapping the “GUIDE” switch.
The current voice is used for the guide
sound. If you change the voice by using
the sliders or buttons, the guide sound also
changes.
You can adjust the tempo by using the
[TEMPO] slider.
w Play a phrase on the keyboard.
When recording the first phrase, the
instrument’s Key-on Start function will
start recording as soon as you play the first
note. If you wish to record silence at the
start of the phrase, you can tap “REC
START” before playing the keyboard to
start recording.
During recording, the slider and the
[LOOPER] button flash in time with the
tempo, and the total number of beats is
incremented on-screen.
2. Record the first phrase.
q Tap the “REC” switch from the DATA
ENTRY section.
The Phrase Looper is set to Recording
Standby. In time with the tempo, a guide
sound is produced and the slider and the
[LOOPER] button flash.
reface CS/DX/CP/YC Owner’s Manual
24
e When you wish to end recording, tap
“REC STOP.”
Page 31

Using the Phrase Looper
Progress indicator
Recording will stop, and the recorded
phrase will play as a loop. The guide
sound is not produced during loop playback.
During loop playback, the slider and the
[LOOPER] button will flash in time with
the tempo, and the current beat will be displayed on-screen together with the total
number of recorded beats. In addition, the
position indicator at the top of the display
allows you to confirm the current position
during loop playback.
3. Record an overdub.
The recording of overdubs will begin as soon
as you tap “REC.” The guide sound is not
produced when overdubbing.
NOTE
When you stop playback of the first phrase, the
Phrase Looper is set to Recording Standby. If
you tap “REC START” in that condition, the
Key-on Start function starts recording.
Changing the sound of loop
phrases
You can use the FM and VOICE SELECT/
EDIT sections to control the sound of the
recorded loop phrases as you play them back.
Regardless of the screen currently displayed,
the [LOOPER] button will continue to flash
during looped playback.
Stopping loop phrases
Stopping
Tap the “STOP” switch.
Looped playback of the phrases will be
stopped.
When you wish to restart a paused phrase, tap
the “PLAY” switch.
Recorded phrases start from the beginning
when played as loops.
DX
q Tap “REC” or “REC START.”
w Play the phrase you wish to overdub on
the keyboard along with the phrase(s) currently being played.
e When you wish to end recording, tap
“REC STOP.”
Recording will stop, and the recorded,
overdubbed phrases will play as a loop.
If necessary, you can repeat the overdubbing
process.
NOTE
• Once you reach 2,000 events, the message
“Looper Memory Full” is displayed on-screen
and no additional events are recorded after
tapping “REC.”
• If you exceed the maximum polyphony, the
older notes will be overwritten with newer
notes (priority is given to the newest).
Deleting loop phrases
Recorded loop phrases can be deleted by tapping the “CLEAR” switch with loop-phrase
playback stopped.
This will delete all recorded phrases.
reface CS/DX/CP/YC Owner’s Manual
25
Page 32

qwe r t
y
y
-3
y
-1
y
-2
y
-4
C3C2
reface CP
Functions of Front Panel Components
qBuilt-in speakers
For outputting the instrument’s sounds. If
you do not want sound to be output from
these speakers, turn the instrument on while
holding down the D2 key on the keyboard.
See page 41 for details.
No sound will be output from the built-in
speakers when headphones are connected.
w[VOL] (Volume) slider
For adjusting the instrument’s overall volume. When you move the slider up, the sound
output from the built-in speakers, the OUTPUT [R]/[L/MONO] jacks, and the
[PHONES] jack will become louder.
e[OCT] (Octave) slider
For transposing the keyboard in units of 1
octave. For example, when set to “+,” the
note C4 will be produced when you play C3
on the keyboard (see the illustration above).
The available settings are “++” (2 octaves
up), “+” (1 octave up), “OCT” (no change in
pitch), “-” (1 octave down), and “--” (2
octaves down).
reface CS/DX/CP/YC Owner’s Manual
26
r[TYPE] knob
For selecting different voice types.
Sets a distinctive electric piano voice
from the early 1970s. This type of
electric piano is characterized by a
dark, heavy sound with sustained
RdI
notes. It sounds particularly good
when combined with the phaser effect
and was widely used in 70s jazz,
R&B, and soul.
Sets a distinctive electric piano voice
from the late 1970s. Compared with
the Rdl, it has a characteristically
bright, high-fidelity sound. It sounds
RdII
particularly good when combined with
the chorus or phaser effect and was
primarily used in the pop ballads and
fusion music of the 80s.
Sets a distinctive electric piano voice
Wr
that became famous in the late 1960s.
This type of electric piano is notable
for the gentle attack and fast decay of
flat metal reeds. Often combined with
a tremolo effect, it was widely used in
70s pop, R&B, and soul.
Page 33

Functions of Front Panel Components
q
u io
u
-3
u
-1
u
-2
u
-4
i
-3
i
-1
i
-2
i
-4
o
-1
o
-2
C4 C5
CP
t[DRIVE] knob
Sets the voice of a struck-string type of
electric keyboard that arrived on the
scene in the 1970s. Its electric guitar-
Clv
like sound is highly distinctive. This
voice works very well with a wah effect
and was primarily used in the funk and
rock music of the 70s.
Sets the voice of a vintage toy piano
from the 1970s. This setting combines a
bright, undulating tone with the distinctive noisy keyboard of toy pianos.
Toy
Although originally developed as a
child’s toy, this type of instrument has
recently found its way into popular
music thanks to its highly unique sound.
Sets the voice of the Yamaha CP80
electric grand piano of the late 1970s.
The CP80 was notable for a fast attack
similar to that produced by using com-
CP
pression, and also for its unique harmonic overtones. It works very well
with a chorus effect and was used in
the pop, rock, jazz, and fusion music of
the 80s.
For distorting the sound, thereby reproducing
the effect of a guitar amp or an old radio.
Turning the knob clockwise increases the
amount of distortion and produces a brighter
tone. When the knob is turned all the way
counter-clockwise, no effect is applied to the
sound.
yTREMOLO/WAH
The reface CP features four Insert Effects
arranged in series. The TREMOLO/WAH
section lets you add a tremolo or wah effect.
TREMOLO
Modulates the volume in a cyclical fashion.
When [TYPE] is set to Rdl, Rdll, or
CP:
The sound will be cyclically panned left
and right in stereo.
When [TYPE] is set to Wr, Clv, or
Toy :
The volume will be cyclically varied up
and down.
WA H
Modulates the filter cutoff frequency based
on the input volume. This produces a cyclical
change in tone.
reface CS/DX/CP/YC Owner’s Manual
27
Page 34

Functions of Front Panel Components
Light tremolo Intense tremolo
Level
Light wah Intense wah
Level
Frequency Frequency
Slow tremolo Fast tremolo
Level
Character of the
sound unchanged
Character of the sound
significantly changed
Frequency Frequency
Resonance
y-1. [TREMOLO/WAH] switch
For selecting whether to add tremolo (up
position), add wah (down position), or pass
the sound through unaffected (middle position).
The lamp (y-4) will light up when either
tremolo or wah is selected and go out when
the sound passes through unaffected.
y-2. [DEPTH] knob
Increases the effect on the sound when turned
clockwise.
With tremolo
When [TYPE] is set to Rdl, Rdll, or
CP:
Adjusts the degree to which the sound is
modulated left and right.
When [TYPE] is set to Wr, Clv, or
Toy :
Adjusts the degree to which the volume is
modulated.
With wah
Adjusts the sensitivity of the wah filter.
y-3. [RATE] knob
Increases the effect on the sound when turned
clockwise.
With tremolo
Adjusts the speed of modulation.
With wah
Adjusts the resonance offset value. This
changes the character of the modulated
sound.
uCHORUS/PHASER
This section lets you add a chorus or phaser
effect.
CHORUS
Adds richness and depth, making it sound
like multiple tone generators are simultaneously outputting the same voice. This makes
the voice sound much wider.
PHASER
Creates a highly distinctive sweeping, swelling tone by shifting the phase of the sound
and mixing it back into the original signal.
u-1. [CHORUS/PHASER] switch
For selecting whether to add chorus (up position), add the phaser effect (down position),
or pass the sound through unaffected (middle
position). The lamp (u-4) will light up when
either chorus or the phaser is selected and go
out when the sound passes through unaffected.
reface CS/DX/CP/YC Owner’s Manual
28
Page 35

Functions of Front Panel Components
u-2. [DEPTH] knob
For adjusting the degree to which the chorus
or phaser effect is applied. Turn the knob
clockwise to increase the depth of the effect.
u-3. [SPEED] knob
For adjusting the speed at which the sound
undulates. Turn the knob clockwise to
increase the speed.
iD. DELAY/A. DELAY (Digital Delay /
Analog Delay)
This section lets you add either digital or analog delay to the sound.
Delay effects create a delayed version of the
input signal, and as such, they can be used for
many different purposes, such as creating a
sense of spaciousness or thickening a sound.
D. DELAY (Digital Delay)
Compared with analog delay, this effect produces delay sounds that are more exact replicas of the original.
A.DELAY (Analog Delay)
Simulates the warm delay sound of analog
gear.
i-1. [D.DELAY/A.DELAY] switch
Set this three-position switch to the up position for Digital Delay, to the down position
for Analog Delay, or to the middle position to
pass the sound through unaffected.
The lamp (i-4) will light up when either
digital or analog delay is selected and go out
when the sound passes through unaffected.
i-2. [DEPTH] knob
For adjusting the degree to which delay is
applied. Turn the knob clockwise to increase
the depth of the effect.
i-3. [TIME] knob
For adjusting the length of the delay. Turn the
knob clockwise to increase the length.
oREVERB section
This section can model complex reverberation to artificially create a sense of space.
The lamp (o-2) will light up when reverb is
applied and go out when the sound passes
through unaffected.
o-1. [DEPTH] knob
For adjusting the degree to which the reverb
effect is applied. Turn the knob clockwise to
increase the depth of the effect. When the
knob is turned all the way counter-clockwise,
no effect is applied to the sound.
CP
reface CS/DX/CP/YC Owner’s Manual
29
Page 36

Voice Setting Examples
The following settings are recommended for the reface CP.
Rd I
Perfect settings for the pop, soul, and fusion music of the 70s. You may like to raise the DRIVE setting
to increase the distortion, to move the phaser’s DEPTH setting to a relatively high level between 6 and
7, or to turn on the tremolo and move each of the DEPTH and RATE settings to around 5.
Rd II
These wet-sounding settings are ideal for 80s ballads and the like. You could try changing the chorus
DEPTH and SPEED settings.
Wr
Perfect settings for playing 70s pop and the like. You might like to add some short reverberation by
turning on A.DELAY and setting DEPTH to roughly 5 and TIME to roughly 1.5.
reface CS/DX/CP/YC Owner’s Manual
30
Page 37

Voice Setting Examples
Clv
Ideal settings for 70s funk and rock performances. You may like to raise the DRIVE to get a distorted
guitar-like sound. It could also sound good to switch from wah to tremolo and apply a little reverb.
Toy
Simple settings are probably the best choice for the toy piano. You might, however, like to raise the
DRIVE setting to 5 or even 10 to get a vintage, radio-like sound.
CP
These settings are great for 80s pop and the like. The chorus setting is quite light. If necessary, you
could add presence in the high-frequency band by raising the DRIVE setting to around 5. In addition, it
might sound good to turn on D.DELAY and set both DEPTH and TIME to 1.5.
CP
reface CS/DX/CP/YC Owner’s Manual
31
Page 38

q
w e rt
y
y
-1
y-2y-3y-4y-5y
-6
C3C2
reface YC
Functions of Front Panel Components
qBuilt-in speakers
For outputting the instrument’s sounds. If
you do not want sound to be output from
these speakers, turn the instrument on while
holding down the D2 key on the keyboard.
See page 41 for details.
No sound will be output from the built-in
speakers when headphones are connected.
w[ROTARY SPEED] lever
For switching the rotary speaker speed. Moving the lever up or down changes the setting
between “FAST” (fast rotation), “SLOW”
(slow rotation), “STOP” (no rotation), and
“OFF” (no effect applied).
Examples:
To switch from “SLOW” to “FAST”:
Move up once.
To switch from “SLOW” to “OFF”:
Move down twice.
e[VOLUME] slider
For adjusting the instrument’s overall volume. When you move the slider up, the sound
output from the built-in speakers, the OUTPUT [R]/[L/MONO] jacks, and the
[PHONES] jack will become louder.
r[OCTAVE] slider
For transposing the keyboard in units of 1
octave. For example, when set to “+,” the
note C4 will be produced when you play C3
on the keyboard (see the illustration above).
The available settings are “++” (2 octaves
up), “+” (1 octave up), “0” (no change in
pitch), “-” (1 octave down), and “--” (2
octaves down).
reface CS/DX/CP/YC Owner’s Manual
32
Page 39

t[WAVE] knob
q
iuo
y-7y-8y-9u-1u-2i-1i-2i
-3
o
-1
o
-2
C4 C5
Minimum Maximum
For selecting the organ voice type.
Sets a distinctive electric organ sound
from the 1960s, characterized by sine-
H
like waveforms that are simple yet warm.
This sound was used in many genres of
music, such as rock, pop, and jazz.
Sets the sound of a transistor organ
from the 1960s. With harmonic content
very close to that of a square wave, it is
V
notable for highly present tones. This
type of organ was often used in psychedelic rock and ska.
Sets the sound of a transistor organ
from the 1960s. This organ is notable
for a thick sound with its sawtooth com-
F
ponent boosted in volume. It was put to
use in 60s pop music and the alternative pop of the 90s.
Sets the sound of a transistor organ
made in Japan during the 1970s. This
A
organ was notable for a bright sound
similar to that produced by the sawtooth
waveforms of a synthesizer.
Sets the sound of a Yamaha transistor
organ that was released in 1972. With
harmonic content very close to that of a
Y
square wave, it was characterized by
highly present tones in the high range
and extreme sound crushing when distortion was increased.
Functions of Front Panel Components
YC
yFOOTAGE section
Used by moving the sliders downwards in the
same way as vintage organs. To create the
organ tone you desire, you can move each of
these sliders to change the component elements of the sound.
NOTE
No organ sound will be produced if all of the
FOOTAGE sliders are moved all the way up.
reface CS/DX/CP/YC Owner’s Manual
33
Page 40

Functions of Front Panel Components
y-1y-2y-3y-4y-5y-6y-7y-8y
-9
The tones produced by moving each of the
sliders are as follows.
Sliders Tone
y-1 16’ 8 scale degrees below
y-2 5 1/3’ 5 scale degrees above
y-3 8’ Fundamental tone
y-4 4’ 8 scale degrees above
y-5 2 2/3’ 12 scale degrees above
y-6 2’ 15 scale degrees above
y-7 1 3/5’ 17 scale degrees above
y-8 1 1/3’ 19 scale degrees above
y-9 1’ 22 scale degrees above
*: When the [OCTAVE] slider is moved down,
the 16’ pitch may be too low to be heard via
the built-in speakers.
uVIBRATO/CHORUS section
This section can apply an undulating effect to
the sound.
u-1. [VIBRATO/CHORUS] switch
For switching between vibrato and chorus to
apply different types of undulating effects.
Press down the side corresponding to the
effect you wish to use.
u-2. [DEPTH] slider
For adjusting the degree to which vibrato or
chorus is applied. Moving this slider all the
way down turns off the vibrato or chorus
effect.
iPERCUSSION section
When turned on, an accent can be applied to
the attack portion of the sound. When all of
the FOOTAGE volumes are zero (that is, the
sliders are moved all the way up), only these
percussion sounds will be produced.
The settings “A” and “B” change the pitch of
the percussion.
NOTE
Regardless of the slider position, FOOTAGE
[1’] does not produce any organ tones when
the WAVE knob is set to “H” and PERCUSSION is turned on. In addition, when notes are
played legato with the H-type organ, the volume of the percussion sound decays over
those notes.
i-1. [ON/OFF] switch
For turning the percussion sounds on and off.
When the off side is pressed down, no percussion sounds will be produced.
i-2. [TYPE] switch
For switching the percussion pitch type.
Press down the side for either Type A or Type
B.
i-3. [LENGTH] slider
For adjusting the length of the percussion
sounds’ release.
oEFFECT section
For applying effects. When the sliders are
moved all the way down, no effects will be
applied.
o-1. [DIST] slider
For applying distortion.
o-2. [REVERB] slider
For applying reverb.
reface CS/DX/CP/YC Owner’s Manual
34
Page 41

Voice Setting Examples
The following settings are recommended for the reface YC.
H Type 1
These settings can be used in rock, jazz, and a wide range of other musical genres. You might like to
move the [4’] slider up for a more refined sound or to move each of the [2 2/3’], [2’], [1 3/5’], [1 1/3’],
and [1’] sliders down to produce a brighter sound characteristic of rock music. Try both SLOW and
FAST rotary speeds, and add distortion and reverb to taste.
H Type 2
Settings like these are often used for bossa nova and reggae music. The fact that the H-type organ produces no [1’] tones when percussion is turned on is a distinctive feature of this sound. Turning percussion on and off while playing allows the [1’] tones to be added and removed in a unique way.
YC
V Type
These settings are ideal for psychedelic rock and the like. Try raising the DIST setting to increase the
distortion.
F Type
Ideal settings for an alternative rock band with a slightly vintage sound. Try raising the DIST setting to
increase the distortion.
reface CS/DX/CP/YC Owner’s Manual
35
Page 42

Connecting to Other Devices
MIDI keyboard MIDI OUT
MIDI cable
MIDI IN
MIDI
breakout
cable
reface CS
MIDI cable
MIDI
breakout
cable
reface CS
MIDI OUT
MIDI IN
Tone generator module
Connecting your reface to another MIDI device (such as a keyboard or tone generator module) expands its performance features and allows you to do the following.
• Play the reface from a MIDI keyboard
• Play a tone generator module by using the reface
• Synchronize the Phrase Loopers of a reface CS and reface DX
In addition, if you connect your reface to a computer, you can also make use of the
following additional recording and playing features.
• Record performances on the reface as MIDI data in a DAW application
• Play the reface using recorded data from a DAW application
• Play a software synthesizer from the reface
This section explains how to connect the devices and make the necessary settings.
The illustrations show the reface CS but apply to all models.
Connecting to a MIDI Device
Playing the reface from a
MIDI keyboard
q Connect the MIDI OUT terminal on the
MIDI keyboard to the reface’s MIDI IN terminal.
Playing a tone generator
module by using the reface
q Turn off Local Control, and also turn off
MIDI Control. For details, refer to “Keyboard Settings” (page 41).
To play a tone generator module from the
reface, the transmit channel on the reface and
the receive channel on the tone generator
module must be the same. By default, the
reface’s transmit channel is set to “1.” On the
reface DX only, the transmit channel can be
changed (by using the [FUNCTION] button).
For details on how to change the receive
channel on the tone generator module, refer
to the owner’s manual that came with it.
w
Connect the reface’s MIDI OUT terminal to
the tone generator module’s MIDI IN terminal.
w Play the MIDI keyboard and confirm that the
reface produces sound in response.
reface CS/DX/CP/YC Owner’s Manual
36
e Play the reface and confirm that the tone gen-
erator module produces sound in response.
Page 43

Connecting to Other Devices
MIDI cable
MIDI
breakout
cable
reface CS
MIDI
OUT
MIDI IN
reface DX
MIDI
breakout
cable
USB cable
reface CS
Computer
DAW
application
Connecting a reface CS
and reface DX and synchronizing their Phrase
Loopers
With, for example, a reface CS and a reface DX
connected via a MIDI cable, operations performed by using the Phrase Looper on the reface
CS will cause the Phrase Looper on the reface
DX to play simultaneously.
q Set the transmit channel on the reface you
will operate (in this example, the reface CS)
to “off.” For details, refer to “Keyboard Settings” (page 41).
w Create a phrase loop on each of the reface CS
and the reface DX.
e Connect the MIDI OUT terminal of the
reface you will operate (in this example, the
reface CS) and the MIDI IN terminal on the
reface you want to produce sound simultaneously (in this example, the reface DX).
Connecting a Computer
Recording performances
on the reface as MIDI
data in a DAW application
q Turn off Local Control, and turn on MIDI
Control. For details, refer to “Keyboard Settings” (page 41).
w Connect your reface to the computer by using
a USB cable.
NOTE
• Be sure to read “Precautions when Using the
[USB] Terminal” (page 39) before using the
[USB] terminal.
• If your computer does not recognize the
reface or you experience other similar problems, refer to “Yamaha USB-MIDI Driver”
(page 39).
r Switch the Phrase Looper on the reface CS to
“PLAY” to also start simultaneous playback
of the Phrase Looper on the reface DX at the
same tempo. Using both of the Phrase Loopers together makes it possible to create even
more complex loop phrases.
e Start recording in the DAW application and
play the reface.
reface CS/DX/CP/YC Owner’s Manual
37
Page 44

Connecting to Other Devices
USB cable
reface CS
Computer
DAW
application
USB cable
reface CS
Computer
Software
synthesizer
Playing the reface using
recorded data from a
DAW application
q Turn on MIDI Control. For details, refer to
“Keyboard Settings” (page 41).
w Connect the computer to your reface by using
a USB cable.
NOTE
• Be sure to read “Precautions when Using the
[USB] Terminal” (page 39) before using the
[USB] terminal.
• If your computer does not recognize the
reface or you experience other similar problems, refer to “Yamaha USB-MIDI Driver”
(page 39).
Playing a software syn-
thesizer from the reface
q Turn off Local Control, and also turn off
MIDI Control. For details, refer to “Keyboard Settings” (page 41).
w Connect your reface to the computer by using
a USB cable.
NOTE
• Be sure to read “Precautions when Using the
[USB] Terminal” (page 39) before using the
[USB] terminal.
• If your computer does not recognize the
reface or you experience other similar problems, refer to “Yamaha USB-MIDI Driver”
(page 39).
e Start playback of the MIDI data in the DAW
application.
38
reface CS/DX/CP/YC Owner’s Manual
e Launch the software synthesizer on the com-
puter and play your reface’s keyboard.
NOTE
If using a software synthesizer inside a
DAW application:
By using a function known as echo back or
MIDI thru, DAW applications can send
received performance data back to the
source—in this case, the reface. This function
must be disabled if you do not want the reface
to produce sounds in response to returned
MIDI data. For details on how to do this, refer
to the owner’s manual that came with your
DAW application.
Page 45

Connecting to Other Devices
NOTICE
• Use a USB A-B cable of no more than 3
meters in length. Do not use a USB 3.0
cable.
• Before connecting to your computer via
the [USB] terminal, disable any powersaving mode (such as Suspend, Sleep,
or Standby).
• Connect your computer via the [USB]
terminal before turning on the instrument.
• Be sure to always perform the following
steps before turning the instrument on
or off (standby) and either plugging in
or unplugging a USB cable.
- Quit all applications.
- Ensure that no data is being transmitted from the instrument. (Note
that even playing a single key
causes data to be transmitted.)
• When connected to a computer, allow at
least six seconds to pass between turning the instrument on and off and plugging in and unplugging the USB cable.
NOTE
• Information on system requirements can
also be found on the above web page.
• The USB-MIDI driver may be revised and
updated without prior notice. Before installing, visit the above web page to confirm the
latest related information and ensure that
you have the most up-to-date version.
Precautions when Using the [USB] Terminal
When connecting this instrument to a computer via the [USB] terminal, be sure to
observe the following precautions. Failing to
do so risks freezing your computer or instrument and corrupting or losing data.
If your computer or instrument should
freeze, try restarting the application being
used, rebooting the computer, and turning
the instrument off and then back on.
Yamaha USB-MIDI Driver
Normally, the transmission and receipt of
data begins automatically after connecting
MIDI cables and turning on the instrument.
If, however, your computer is having difficulty communicating with the instrument,
please download the standard Yamaha USBMIDI driver from the following web page
and install it on your computer.
http://download.yamaha.com/
Connecting an iPhone or iPad
NOTE
In order to eliminate the risk of noise from other
communication when using this instrument with
an iPad or iPhone app, be sure to turn on Airplane
Mode and then turn on Wi-Fi.
NOTICE
Be sure to place your iPad or iPhone on a stable surface to prevent it from falling over and
being damaged.
Apps compatible with the reface provide many
more convenient, enjoyable ways to use this
musical instrument.
For details on how to connect the devices, refer
to the “iPhone/iPad Connection Manual,” which
is available from the Yamaha web site.
Details of compatible smart devices and apps
can be found on the following page from the
Yamaha web site.
http://www.yamaha.com/kbdapps/
reface CS/DX/CP/YC Owner’s Manual
39
Page 46

Restoring the Factory Default Settings (Factory Reset)
When you do a Factory Reset, all parameters will be returned to their factory default
settings.
NOTICE
• reface DX only:
All settings stored on the instrument by using the [FUNCTION] button will be overwritten
with their factory defaults when you do a Factory Reset.
Using the Factory Reset Function
q While holding down the rightmost key on the
keyboard, turn on the instrument.
reface CS, reface CP, and reface
YC
The instrument’s lamps will flash.
reface DX
The message “Factory reset” will be displayed on-screen.
When the Factory Reset has finished, the
lamps will stop flashing or the message will
disappear.
w When the lamps stop flashing or the message
is no longer displayed, remove your finger
from the keyboard.
reface DX:
You can also use the [FUNCTION] button to do
a Factory Reset.
q Select the Job screen by pressing the [FUNC-
TION] button.
w Tap the “FCTRY RESET” switch.
A confirmation message will be displayed
on-screen.
e Tap the “YES” switch.
All parameters will be returned to their factory default settings.
reface CS/DX/CP/YC Owner’s Manual
40
Page 47

Appendix
Setting Confirmation
C2 D2 E2 F2 G2 A2 B2 C5
C#2
Pitch-bend Range Inversion
Transmit Channel
Sustain
Local Control
MIDI Control
Speaker Output
Auto Power-Off
Factory Reset
Keyboard Settings
To make the keyboard settings described below, hold down the corresponding key on the keyboard and
press the [ ] (Standby/On) switch. If the instrument is turned on, you will need to turn it off once to
make settings in this way.
Each setting is toggled on and off, etc. whenever this procedure is carried out. However, when you have
set the Auto Power-Off function to off (disabled), you will need to do a Factory Reset to turn in back on
(enabled).
Keyboard settings are retained when the instrument is turned off.
On the reface DX, these settings can also be made by using the [FUNCTION] button. For details, refer
to “Functions of Front Panel Components” for the reface DX (page 16).
Auto Power-Off
ON (enabled): To conserve power, the instrument will turn off automatically after 30 minutes of
inactivity.
off (disabled): The instrument will not turn off automatically.
For details, refer to “Auto Power-Off” (page 8).
Factory default setting: ON (enabled)
Display when turned off (disabled)
CS The lamps from the LOOPER section flash.
DX “Auto power off disabled” is displayed on-screen.
The [TYPE] knob’s Clv lamp and the lamps from the TREMOLO/WAH to D.DELAY/A.DELAY
CP
sections flash.
YC The ROTARY SPEED lamps flash.
reface CS/DX/CP/YC Owner’s Manual
41
Page 48

Appendix
Factory Reset
For returning all settings, including keyboard settings, to their factory defaults. On the reface CS and
the reface DX, loop phrases are also restored to the factory default condition.
For details, refer to “Restoring the Factory Default Settings (Factory Reset)” (page 40).
Display when carried out
CS The OSC [TYPE] lamps flash.
DX “Factory reset” is displayed on-screen.
CP The TYPE lamps flash.
YC The WAVE lamps flash.
Speaker Output
For setting whether or not to output the instrument’s sound from its built-in speakers. The speakers
will not produce any sound when this parameter is set to “off.”
Factory default setting: ON
Display when set
ON: The lamps from the LOOPER section light up.
CS
off: The lamps from the LOOPER section flash.
DX “speakers ON” or “speakers off” is displayed on-screen.
ON: The [TYPE] knob’s Clv lamp and the lamps from the TREMOLO/WAH to D.DELAY/
CP
YC
A.DELAY sections light up.
off: The [TYPE] knob’s Clv lamp and the lamps from the TREMOLO/WAH to D.DELAY/
A.DELAY sections flash.
ON: The ROTARY SPEED lamps light up.
off: The ROTARY SPEED lamps flash.
MIDI Control
For turning on and off the transmission and receipt of MIDI Control Change messages specifically for
the reface. When you operate the instrument with this parameter turned on, MIDI messages for your
specific model will be transmitted. No messages are transmitted when you change the volume or
octave. On the reface DX, a MIDI Control Change message is transmitted when a setting is changed in
the FM section ([FREQ], [LEVEL], [ALGO], and [FB] buttons) but not when any other settings are
changed. For more information about the correspondence between controllers, control change numbers, and values, refer to the MIDI Reference (a digital manual).
Factory default setting: off
Display when set
ON: The lamps from the LOOPER section light up.
CS
off: The lamps from the LOOPER section flash.
DX “MIDI control ON” or “MIDI control off” is displayed on-screen.
ON: The [TYPE] knob’s Clv lamp and the lamps from the TREMOLO/WAH to D.DELAY/
CP
YC
reface CS/DX/CP/YC Owner’s Manual
42
A.DELAY sections light up.
off: The [TYPE] knob’s Clv lamp and the lamps from the TREMOLO/WAH to D.DELAY/
A.DELAY sections flash.
ON: The ROTARY SPEED lamps light up.
off: The ROTARY SPEED lamps flash.
Page 49

Appendix
Local Control
For setting whether to internally disconnect (“off”) or connect (“ON”) the instrument’s internal tone
generator and keyboard. If you wish to control your reface’s internal tone generator by using an
external MIDI controller but not its keyboard, set MIDI Control to “ON” and Local Control to “off.”
Factory default setting: ON
Display when set
ON: The lamps from the LOOPER section light up.
CS
off: The lamps from the LOOPER section flash.
DX “Local control ON” or “Local control off” is displayed on-screen.
ON: The [TYPE] knob’s Clv lamp and the lamps from the TREMOLO/WAH to D.DELAY/
CP
YC
A.DELAY sections light up.
off: The [TYPE] knob’s Clv lamp and the lamps from the TREMOLO/WAH to D.DELAY/
A.DELAY sections flash.
ON: The ROTARY SPEED lamps light up.
off: The ROTARY SPEED lamps flash.
Sustain (reface DX and reface CP)
For switching the sustain setting. If you have connected a foot pedal (FC3) or a foot switch (FC4 or
FC5) to the instrument, you will need to set either “FC3” or “FC4/5” depending on whether or not it
supports half-damper operation.
Factory default settings:
DX: FC4/5 (an FC4 or FC5, or an FC3 without half-damper operation)
CP: FC3 (an FC3 with half-damper operation)
Display when set
DX “Sustain FC3” or “Sustain FC4/5” is displayed on-screen.
FC3: The [TYPE] knob’s Clv lamp and the lamps from the TREMOLO/WAH to D.DELAY/
CP
A.DELAY sections light up.
FC4/5: The [TYPE] knob’s Clv lamp and the lamps from the TREMOLO/WAH to D.DELAY/
A.DELAY sections flash.
Transmit Channel (reface CS and reface DX)
For setting the MIDI transmit channel. This parameter can be set to either “1 ch” (Channel 1) or
“off.”
Factory default settings: 1 ch (Channel 1)
Display when set
1 ch: The lamps from the LOOPER section light up.
CS
off: The lamps from the LOOPER section flash.
DX “MIDI transmit ch 1” or “MIDI transmit ch off” is displayed on-screen.
On the reface DX, channels 2 to 16 can also be selected on the MIDI Settings screen, which is displayed by using the [FUNCTION] button. For details, refer to “Functions of Front Panel Components” for the reface DX (page 16).
reface CS/DX/CP/YC Owner’s Manual
43
Page 50

Appendix
Auto Power-Off
ON (enabled): Lit
off (disabled): Flashing
Speaker Output
ON: Lit
off: Flashing
MIDI Control
ON: Lit
off: Flashing
Pitch-bend Range Inversion
+12: Lit
-12: Flashing
Transmit Channel
1ch: Lit
off: Flashing
Local Control
ON: Lit
off: Flashing
Auto Power-Off
ON (enabled): Lit
off (disabled): Flashing
Speaker Output
ON: Lit
off: Flashing
MIDI Control
ON: Lit
off: Flashing
Local Control
ON: Lit
off: Flashing
Sustain
FC3: Lit
FC4/5: Flashing
Pitch-bend Range Inversion (CS only)
By changing the direction in which note pitches are changed by the [PITCH BEND] lever, you can
produce guitar-like note bending effects when playing the reface CS as a keytar.
Factory default settings: +12 (the pitch rises when you move the lever up)
Display when set
+12: The lamps from the LOOPER section light up.
CS
-12: The lamps from the LOOPER section flash.
Setting Confirmation
For confirming the current settings of all parameters set by using the keyboard.
Display when confirming
CS
DX Presented on-screen
CP
reface CS/DX/CP/YC Owner’s Manual
44
Page 51

YC
Auto Power-Off
ON (enabled): Lit
off (disabled): Flashing
Speaker Output
ON: Lit
off: Flashing
MIDI Control
ON: Lit
off: Flashing
Local Control
ON: Lit
off: Flashing
reface DX Messages
Message Description
Are you sure?
Battery Low!
Looper Memory Full
Stopping Looper, OK?
Confirms whether or not you wish to proceed with the selected
operation.
Indicates that the battery voltage has dropped. Either replace the
batteries or correctly connect the AC adaptor.
Indicates that the memory allocated to the Phrase Looper is full,
preventing recorded data from being stored.
Indicates that playback or recording with the Phrase Looper must
be stopped before performing an operation.
Appendix
reface CS/DX/CP/YC Owner’s Manual
45
Page 52

Appendix
Troubleshooting
If this instrument does not behave as expected—for example, not producing the correct sound or producing no sound at all—please try to resolve the issue as described below. Many issues can also be
resolved by doing a Factory Reset (page 40). If any specific issue should persist, please contact your
Yamaha dealer or a service center (see the back of this booklet).
Issue
The instrument turns off unexpectedly.
No sound is produced by the
built-in speakers.
Sound input via
the [AUX IN] jack
cannot be heard.
No sound is
produced.
The instrument
stopped producing sound when a
setting was
changed.
Model(s)
All
All
CS
YC
All
CS
CS
CS
DX
DX The carrier level is set to 0. Increase the carrier level.
DX All carriers are turned off.
DX
YC
Suspected cause Solution
This is normal when the
Auto Power-Off function is
enabled.
The volume is turned fully
down.
Headphones are connected.
Local Control is turned off.
Speaker Output is turned
off.
MIDI volume or expression
has been set to a very low
level by a foot controller.
The volume on the connected audio equipment
has been turned fully down.
The Attack (A) setting from
the EG section is too high.
The filter’s cutoff frequency
is too low.
Amplitude (AMP) is being
modulated by the LFO, the
LFO’s depth is high, and its
speed is low.
The FREQ or RATIO setting for a carrier (or multiple
carriers) is too high.
All of the FOOTAGE sliders
are fully up. In this condition, the volume is 0.
If necessary, you can deactivate the Auto Power-Off function to prevent it turning off the
instrument again. (Page 41)
Raise the volume by using the
[VOLUME] or [VOL] slider.
Unplug the headphones.
(Page 5)
Turn on Local Control. (Page
43)
Turn on Speaker Output.
(Page 42)
If a foot controller has been
connected to the [FOOT
CONTROLLER] jack, try
using it to increase the volume.
Raise the volume on the connected audio equipment.
Lower the [A] slider.
Adjust the filter’s cutoff frequency.
Change the LFO assignment,
reduce the depth, or increase
the speed.
Turn a carrier on and ensure
that its level is sufficiently
high.
Decrease the FREQ or RATIO
setting.
Lower some of the FOOTAGE
sliders.
reface CS/DX/CP/YC Owner’s Manual
46
Page 53

Appendix
Issue
Certain sounds
stopped being
produced after
operating a controller.
Only one note can
Certain
sounds are
not produced.
Sound output is intermittent and
stuttered.
Sounds continue without
end.
Sounds are distorted. All
A pedal has no effect. All
be played at any
time.
Low notes are not
produced.
The instrument
stopped producing organ sounds.
(Only percussion
can be heard.)
Changing a setting caused
sounds to continue without end.
Model(s)
CS
DX
CSDXThe playing mode has been
YC
YC
CS
CSDXThe delay’s depth is set too
CSDXThe Phrase Looper is play-
CP
Suspected cause Solution
The maximum number of
sounds that can be produced by the Phrase
Looper has been
exceeded.
set to “MONO.”
Only the [16’] FOOTAGE
slider is lowered, and the
[OCTAVE] slider is also
lowered. In this condition,
notes are too low to be produced.
With the H-type organ, lowering the [1’] FOOTAGE
slider does not cause organ
sounds to be produced.
Instead, it produces only
percussion sounds.
The Release (R) setting
from the EG section is too
high.
high.
ing a loop phrase.
The depth for D.DELAY or
A.DELAY is set too high.
Parameters used to distort
the sound have been set.
The pedal is not correctly
connected.
Use the instrument in such a
way that the maximum number of simultaneous sounds is
not exceeded.
Switch the playing mode from
“MONO” to “POLY” to play
multiple notes at the same
time.
Raise the [OCTAVE] slider.
This is normal.
Lower the [R] slider from the
EG section.
Lower the delay depth.
Pause or stop the Phrase
Looper.
Lower the D.DELAY or
A.DELAY depth.
On the reface CS, change the
OSC, resonance, or distortion
effect settings; on the reface
DX, change modulator values
or distortion effect settings; on
the reface CP, change the
[DRIVE] knob setting; on the
reface YC, change the DIST
setting.
Ensure that the pedal’s cord is
fully plugged into the [FOOT
CONTROLLER] or [SUSTAIN]
jack.
reface CS/DX/CP/YC Owner’s Manual
47
Page 54

Appendix
Specifications
FM
Details
SCM (Spectral
Component
Modeling) +
Drive, Tremolo,
Wah, Chorus,
Phaser,
Digital Delay,
Analog-Type
Delay, Reverb
AWM
(Organ Flutes)
AWM2
Rotary Speaker,
Distortion,
Reverb
——
FOOT
CONTROLLER
Item
Number of Keys 37 keys
Keyboard
Tone Generation
Voices
Phrase Looper Ye s Ye s — —
Display Type —
Connectivity
Amplifiers/
Speakers
Power
Supply
Size/
Weight
Included Accessories
* The contents of this manual apply to the latest specifications as of the printing date.
Since Yamaha makes continuous improvements to the product, this manual may not apply to the specifications of
your particular product. To obtain the latest manual, access the Yamaha website then download the manual file.
Since specifications, equipment or separately sold accessories may not be the same in every locale, please
check with your Yamaha dealer.
Amplifiers 2 W x 2
Speakers 3 cm x 2
Power
Supply
Power Consumption 6W (When using PA-130 power adaptor)
Auto Power Off Ye s
Dimensions (W x D x H) 530 (W) x 175 (D) x 60 (H) mm (20 7/8" x 6 7/8" x 2 3/8")
Weight 1.9 kg (4 lbs, 3 oz) (not including batteries)
Typ e HQ (High Quality) Mini Keys
Initial Touch Ye s
Ton e
Generation
Technology
Number of
Polyphony (Max.)
Number of Types
Number of
Voices
Effects
DC IN DC IN (12 V) jack
Headphones PHONES (6.3 mm, stereo phone jack)
OUTPUT OUTPUT L/MONO, R (6.3 mm, TS phone jack, unbalanced)
Pedal
AUX IN AUX IN (3.5 mm, mini stereo phone jack)
USB TO HOST USB (TO HOST)
MIDI MIDI (mini-DIN IN/OUT)
Adaptor PA-130 or an equivalent recommended by Yamaha
Batteries Six “AA” size batteries or Ni-MH rechargeable batteries
reface CS reface DX reface CP reface YC
AN
(Analog Physi-
cal Modeling)
88128128
5 12 (Algorithms) 6 5
—32——
Distortion,
Distortion,
Chorus/Flanger,
Phaser,
Delay
FOOT
CONTROLLER
AC adaptor*, MIDI breakout cable, Owner’s Manual, Warranty*
Touch Wah,
Chorus,
Flanger,
Phaser, Delay,
Reverb
Full Dot LCD
(128 x 64 dots)
SUSTAIN SUSTAIN
*May be included depending on your locale
reface CS/DX/CP/YC Owner’s Manual
48
Page 55

Index
Numerics
[1]–[8] buttons .......................... 20
A
AC Adaptor ................................. 6
[A][D][S][R] sliders .....................13
[ALGO] (Algorithm) button .........19
[ASSIGN] slider .........................11
Auto Power-Off ............... 8, 22, 41
[AUX IN] jack .............................. 5
B
[BANK] button ........................... 20
Batteries ..................................... 7
Built-in speakers ......10, 16, 26, 32
C
carrier ........................................18
CHORUS/PHASER .................. 28
[CHORUS/PHASER] switch ..... 28
Computer ................................. 37
CONTRAST ............................. 22
[CUTOFF] slider ........................13
D
DATA ENTRY section ................16
DAW application .................. 37, 38
DC IN jack .................................. 4
D. DELAY/A. DELAY
(Digital Delay Analog Delay) . 29
[D.DELAY/A.DELAY] switch ...... 29
[DEPTH] knob .................... 28, 29
[DEPTH] slider ..............11, 13, 34
Display ......................................18
[DIST] slider ............................. 34
[DRIVE] knob ........................... 27
E
[EDIT] button ............................ 20
Edit Recall ................................ 22
[EFFECT] button ...................... 22
EFFECT section ..................13, 34
EG Balance slider .....................13
[EG level] button ....................... 20
[EG rate] button ........................ 20
EG section ................................13
F
Factory Reset ............... 22, 40, 42
[FB] (Feedback) button ..............19
FILTER section ..........................13
Flick ...........................................17
FM section ................................18
FM tone generator .....................18
[FOOT CONTROLLER] jack ...... 4
FOOTAGE section .................... 33
[FREQ] (frequency) button ........19
[FUNCTION] button .................. 21
I
iPhone/iPad .............................. 39
J
Job screen ................................ 22
L
[LENGTH] slider ....................... 34
[LEVEL] button ......................... 19
[LFO] button .............................. 20
LFO section ...............................11
Local Control ...................... 21, 43
[LOOPER] button ...................... 23
LOOPER section ...................... 10
LOOPER slider ..........................11
M
MIDI control ........................ 21, 42
MIDI keyboard .......................... 36
MIDI receive channel ................21
MIDI Settings screen ................ 21
[MIDI] terminal ............................ 5
MIDI transmit channel .............. 21
[MOD] (Modulation) slider ........ 12
modulator ................................. 18
MONO/POLY ............................ 21
O
[OCT] (Octave) slider ............... 26
[OCTAVE] slider .............10, 16, 32
[ON/OFF] switch ....................... 34
[OP1]–[OP4] buttons ................ 20
operators .................................. 18
OSC (Oscillator) section ........... 12
Other Devices ........................... 36
OUTPUT [R]/[L/MONO] jacks ..... 5
overdub .............................. 15, 25
P
PERCUSSION section ............. 34
[PHONES] jack ........................... 5
Phrase Looper .................... 14, 24
[PITCH BEND] lever ............10, 16
Pitch Bend Range .................... 21
[Pitch EG] button ...................... 20
Pitch-bend Range Inversion ..... 44
[PORTAMENTO] slider ..............11
Portamento Time ...................... 21
R
[RATE] knob ............................. 28
[RATE] slider ............................ 13
Rear Panel ................................. 4
[RESONANCE] slider ............... 13
REVERB section ...................... 29
[REVERB] slider ....................... 34
[ROTARY SPEED] lever ........... 32
Appendix
S
Setting Confirmation .................44
software synthesizer ................. 38
Speaker Output .................. 22, 42
[SPEED] knob ........................... 29
[SPEED] slider .......................... 11
[ ] (Standby/On) switch ............4
[STORE] button ......................... 23
Store Name screen ................... 23
Store screen ............................. 23
Sustain ................................ 22, 43
[SUSTAIN] jack ........................... 4
switches .................................... 16
synchronizing ............................ 37
System Settings screen ............ 22
T
Tap ............................................ 17
[TEMPO] slider ......................... 11
[TEXTURE] slider ..................... 12
[TIME] knob .............................. 29
tone generator module ..............36
Touch-type sliders ..................... 16
Transmit Channel ...................... 43
Transpose ................................. 21
TREMOLO/WAH ....................... 27
[TREMOLO/WAH] switch .......... 28
Turning On and Off ................. 6, 8
[TYPE] knob .............................26
[TYPE] slider ....................... 12, 13
[TYPE] switch ........................... 34
U
[USB] terminal ...................... 5, 39
V
VIBRATO/CHORUS section .....34
[VIBRATO/CHORUS] switch ..... 34
Voice Initialize ........................... 22
Voice Parameter
Settings screen ...................... 21
VOICE RECALL ........................ 22
VOICE SELECT/EDIT section .. 20
[VOL] (Volume) slider ................ 26
[VOLUME] slider ........... 10, 16, 32
W
[WAVE] knob .............................33
Y
Yamaha USB-MIDI Driver ......... 39
reface CS/DX/CP/YC Owner’s Manual
49
Page 56

(standby)
OBSERVERA!
Apparaten kopplas inte ur växelströmskällan (nätet) så länge som den ar ansluten till vägguttaget, även om
själva apparaten har stängts av.
ADVARSEL: Netspændingen til dette apparat er IKKE afbrudt, sålænge netledningen sidder i en stikkon-
takt, som er tændt — også selvom der er slukket på apparatets afbryder.
VAR OIT US: Laitteen toisiopiiriin kytketty käyttökytkin ei irroita koko laitetta verkosta.
Information for Users on Collection and Disposal of Old Equipment and used Batteries
These symbols on the products, packaging, and/or accompanying documents mean that
used electrical and electronic products and batteries should not be mixed with general
household waste.
For proper treatment, recovery and recycling of old products and used batteries, please take
them to applicable collection points, in accordance with your national legislation and the
Directives 2002/96/EC and 2006/66/EC.
By disposing of these products and batteries correctly, you will help to save valuable
resources and prevent any potential negative effects on human health and the environment
which could otherwise arise from inappropriate waste handling.
For more information about collection and recycling of old products and batteries, please
contact your local municipality, your waste disposal service or the point of sale where you
purchased the items.
[For business users in the European Union]
If you wish to discard electrical and electronic equipment, please contact your dealer or supplier for further information.
[Information on Disposal in other Countries outside the European Union]
These symbols are only valid in the European Union. If you wish to discard these items,
please contact your local authorities or dealer and ask for the correct method of disposal.
Note for the battery symbol (bottom two symbol examples):
This symbol might be used in combination with a chemical symbol. In this case it complies
with the requirement set by the Directive for the chemical involved.
(weee_battery_eu_en_01)
(battery)
Entsorgung leerer Batterien (nur innerhalb Deutschlands)
Leisten Sie einen Beitrag zum Umweltschutz. Verbrauchte Batterien oder Akkumulatoren dürfen nicht in den
Hausmüll. Sie können bei einer Sammelstelle für Altbatterien bzw. Sondermüll abgegeben werden. Informieren Sie sich bei Ihrer Kommune.
50
reface CS/DX/CP/YC Owner’s Manual
Page 57

reface CS/DX/CP/YC Owner’s Manual
51
Page 58

reface CS/DX/CP/YC Owner’s Manual
52
Page 59

For details of products, please contact your nearest Yamaha
representative or the authorized distributor listed below.
Pour plus de détails sur les produits, veuillez-vous adresser à Yamaha
ou au distributeur le plus proche de vous figurant dans la liste suivante.
Die Einzelheiten zu Produkten sind bei Ihrer unten aufgeführten
Niederlassung und bei Yamaha Vertragshändlern in den jeweiligen
Bestimmungsländern erhältlich.
Para detalles sobre productos, contacte su tienda Yamaha más
cercana o el distribuidor autorizado que se lista debajo.
CANADA
Yamaha Canada Music Ltd.
135 Milner Avenue, Toronto, Ontario,
M1S 3R1, Canada
Tel: 416-298-1311
U.S.A.
Yamaha Corporation of America
6600 Orangethorpe Avenue, Buena Park, CA
90620, U.S.A.
Tel: 714-522-9011
MEXICO
Yamaha de México, S.A. de C.V.
Av. Insurgentes Sur 1647 “Prisma Insurgentes”,
Col. San Jose Insurgentes, Del. Benito Juarez,
03900, Mexico, D.F.
Tel: 55-5804-0600
BRAZIL
Yamaha Musical do Brasil Ltda.
Rua Fidêncio Ramos, 302 – Cj 52 e 54 – Torre B –
Vila Olímpia – CEP 04551-010 – São Paulo/SP
Tel: 011-3704-1377
ARGENTINA
Yamaha Music Latin America, S.A.,
Sucursal Argentina
Olga Cossettini 1553, Piso 4 Norte,
Madero Este-C1107CEK
Buenos Aires, Argentina
Tel: 54-11-4119-7000
VENEZUELA
Yamaha Music Latin America, S.A.,
Sucursal Venezuela
C.C. Manzanares Plaza P4
Ofic. 0401- Manzanares-Baruta
Caracas Venezuela
Tel: 58-212-943-1877
PANAMA AND OTHER LATIN
AMERICAN COUNTRIES/
CARIBBEAN COUNTRIES
Yamaha Music Latin America, S.A.
Torre Banco General, Piso No.7, Marb ella,
Calle 47 y Aquilino de la Guardia,
Ciudad de Panamá, República de Panamá
Tel: +507-269-5311
THE UNITED KINGDOM/IRELAND
Yamaha Music Europe GmbH (UK)
Sherbourne Drive, Tilbrook, Milton Keynes,
MK7 8BL, U.K.
Tel: 01908-366700
GERMANY
Yamaha Music Europe GmbH
Siemensstraße 22-34, 25462 Rellingen, Germany
Tel: 04101-3030
SWITZERLAND/LIECHTENSTEIN
Yamaha Music Europe GmbH
Branch Switzerland in Zürich
Seefeldstrasse 94, 8008 Zürich, Switzerland
Tel: 044-387-8080
AUSTRIA
Yamaha Music Europe GmbH Branch Austria
Schleiergasse 20, A-1100 Wien, Austria
Tel: 01-60203900
CZECH REPUBLIC/HUNGARY/
ROMANIA/SLOVAKIA/SLOVENIA
Yamaha Music Europe GmbH
Branch Austria (Central Eastern Europe Office)
Schleiergasse 20, A-1100 Wien, Austria
Tel: 01-60203900
POLAND/LITHUANIA/LATVIA/
ESTONIA
Yamaha Music Europe GmbH
Branch Poland Office
ul. Wrotkowa 14 02-553 Warsaw, Poland
Tel: +48 22 88 00 888
BULGARIA
Dinacord Bulgaria LTD.
Bul.Iskarsko Schose 7 Targowski Zentar Ewropa
1528 Sofia, Bulgaria
Tel: 02-978-20-25
MALTA
Olimpus Music Ltd.
The Emporium, Level 3, St. Louis Street Msida
MSD06
Tel: 02133-2144
NETHERLANDS/BELGIUM/
LUXEMBOURG
Yamaha Music Europe Branch Benelux
Clarissenhof 5-b, 4133 AB Vianen, Netherlands
Tel: 0347-358 040
FRANCE
Yamaha Music Europe
7 rue Ambroise Croizat, Zone d'activites Pariest,
77183 Croissy-Beaubourg, France
Tel: 01-64-61-4000
ITALY
Yamaha Music Europe GmbH, Branch Italy
Viale Italia 88, 20020 Lainate (Milano), Italy
Tel: 02-935-771
SPAIN/PORTUGAL
Yamaha Music Europe GmbH Ibérica, Sucursal
en España
Ctra. de la Coruna km. 17,200, 28231
Las Rozas (Madrid), Spain
Tel: +34-91-639-88-88
GREECE
Philippos Nakas S.A. The Music House
147 Skiathou Street, 112-55 Athens, Greece
Tel: 01-228 2160
SWEDEN
Yamaha Music Europe GmbH Germany filial
Scandinavia
J. A. Wettergrensgata 1, Box 30053
S-400 43 Göteborg, Sweden
Tel: +46 31 89 34 00
DENMARK
Yamaha Music Europe GmbH, Tyskland – filial
Denmark
Generatorvej 6A, DK-2730 Herlev, Denmark
Tel: 44 92 49 00
FINLAND
F-Musiikki Oy
Kluuvikatu 6, P.O. Box 260,
SF-00101 Helsinki, Finland
Tel: 09 618511
NORWAY
Yamaha Music Europe GmbH Germany Norwegian Branch
Grini Næringspark 1, N-1361 Østerås, Norway
Tel: 67 16 78 00
ICELAND
Skifan HF
Skeifan 17 P.O. Box 8120, IS-128 Reykjavik,
Iceland
Tel: 525 5000
RUSSIA
Yamaha Music (Russia) LLC.
Room 37, bld. 7, Kievskaya street, Moscow,
121059, Russia
Tel: 495 626 5005
TURKEY/CYPRUS
Yamaha Music Europe GmbH
Merkezi Almanya Türkiye İstanbul Şubesi
Maslak Meydan Sokak No:5 Spring Giz Plaza
Bağımsız Böl. No:3, 34398 Şişli, İstanbul
Tel: +90-212-999-8010
OTHER EUROPEAN COUNTRIES
Yamaha Music Europe GmbH
Siemensstraße 22-34, 25462 Rellingen, Germany
Tel: +49-4101-3030
SOUTH AFRICA
Global Music Instruments
World of Yamaha
19 Eastern Service Road, Eastgate Ext.6, Sandton,
South Africa
Tel: +27-11-259-7700
OTHER COUNTRIES
Yamaha Music Gulf FZE
LOB 16-513, P.O.Box 17328, Jebel Ali,
Dubai, United Arab Emirates
Tel: +971-4-881-5868
THE PEOPLE’S REPUBLIC OF CHINA
Yamaha Music & Electronics (China) Co.,Ltd.
2F, Yunhe dasha, 1818 Xinzha-lu, Jingan-qu,
Shanghai, China
Tel: 400-051-7700
HONG KONG
Tom Lee Music Co., Ltd.
11/F., Silvercord Tower 1, 30 Canton Road,
Tsimshatsui, Kowloon, Hong Kong
Tel: 2737-7688
INDIA
Yamaha Music India Pvt. Ltd.
Spazedge building, Ground Floor, Tower A, Sector
47, Gurgaon- Sohna Road, Gurgaon, Haryana, India
Tel: 0124-485-3300
INDONESIA
PT. Yamaha Musik Indonesia (Distributor)
Yamaha Music Center Bldg. Jalan Jend. Gatot
Subroto Kav. 4, Jakarta 12930, Indonesia
Tel: 021-520-2577
KOREA
Yam ah a M us ic K or ea Lt d.
8F, 9F, Dongsung Bldg. 158-9 Samsung-Dong,
Kangnam-Gu, Seoul, Korea
Tel: 02-3467-3300
MALAYSIA
Yamaha Music (Malaysia) Sdn., Bhd.
No.8, Jalan Perbandaran, Kelana Jaya, 47301
Petaling Jaya, Selangor, Malaysia
Tel: 03-78030900
SINGAPORE
Yamaha Music (Asia) Private Limited
Block 202 Hougang Street 21, #02-00,
Singapore 530202, Singapore
Tel: 65-6747-4374
TAI WAN
Yamaha Music & Electronics Taiwan Co.,Ltd.
2F., No.1, Yuandong Rd. Banqiao Dist.
New Taipei City 22063 Taiwan
Tel: 02-7741-8888
THAILAND
Siam Music Yamaha Co., Ltd.
3, 4, 15 and 16th floor, Siam Motors Building,
891/1 Rama 1 Road, Wangmai,
Pathumwan, Bangkok 10330, Thailand
Tel: 02-215-2622
VIETNAM
Yamaha Music Vietnam Company Limited
15th Floor, Nam A Bank Tower, 201-203 Cach
Mang Thang Tam St., Ward 4, Dist.3,
Ho Chi Minh City, Vietnam
Tel: +84-8-3818-1122
OTHER ASIAN COUNTRIES
http://asia.yamaha.com
AUSTRALIA
Yamaha Music Australia Pty. Ltd.
Level 1, 99 Queensbridge Street, Southbank,
Victoria 3006, Australia
Tel: 3-9693-5111
NEW ZEALAND
Music Works LTD
P.O.BOX 6246 Wellesley, Auckland 4680,
New Zealand
Tel: 9-634-0099
COUNTRIES AND TRUST
TERRITORIES IN PACIFIC OCEAN
http://asia.yamaha.com
NORTH AMERICA
CENTRAL & SOUTH AMERICA
EUROPE
AFRICA/MIDDLE EAST
ASIA
OCEANIA
DMI10
HEAD OFFICE: Yamaha Corporation Nakazawa-cho 10-1, Naka-ku, Hamamatsu, Japan 430-8650
reface CS/DX/CP/YC Owner’s Manual
53
Page 60

ZP87460
Manual Development Department
© 2015 Yamaha Corporation
Published 06/2015 POBL*.*- **B0
Printed in China
Yamaha Web Site (English only)
http://www.yamahasynth.com/
Yamaha Downloads
http://download.yamaha.com/
 Loading...