

Page 1
PSS2ÁD
Owner's Manual
Bedienungsanleitung
Mode d’emploi
Manual de instrucciones
®YAMAHA
Page 2

Introduction
Einführung
Introduction
Introducción
Thank you for purchasing the YAMAHA
PortaSound PSS-260. The PortaSound
PSS-260 is one more product resulting from
YAMAHA'S internationally recognized ex
pertise in the design and manufacture of
electronic musical instruments. With its
wide-range, 49-note keyboard packed into
a compact body, you'll be able to play a rich
variety of instrumental voices as well as
rhythm patterns and professional-like ac
companiments, performing the latter two
simply and easily using the Single Finger
function, or manually once you've polished
your playing skills. The PSS-260 even fea
tures a Custom Drummer function so that
you can compose your own rhythm patterns
or enjoy the excitement of playing any one
of six percussion instruments with its Manual
Percussion feature. A new Manual Bass
function even let's you play Bass Accom
paniment by yourself!
This manual contains important instructions
on how to properly handle and play your
new PSS-260. In order to be able to use its
features to the fullest and obtain maximum
playing satisfaction, we suggest you follow
the steps in this manual with the PSS-260 in
front of you as you familiarize yourself with it.
Herzlichen Glückwunsch zum Kauf des
YAMAHA PortaSound PSS-260. Das
PortaSound PSS-260 ist ein weiteres Produkt,
das auf der Grundlage der international
anerkannten Expertise von Yamaha bei der
Entwicklung und Herstellung von Musik
instrumenten entstanden ist. Mit seiner
breiten 49-Noten-Thstatur, in einem kom
pakten Gehäuse unter gebracht, sind Sie in
der Lage, eine reiche Vielfalt von Instru
mentenstimmen und Rhythmen, ebenso wie
professionelle Begleitungen, zu spielen,
wobei die letzteren beiden Aufgaben sich
leicht mit der Single-Finger-Funktion durch
führen lassen oder manuell, wenn Sie geübt
genug sind. Das PSS-260 bietet sogar eine
Schlagzeugerfunktion, so daß Sie Ihre eigenen
Rhythmen komponieren oder zur automa
tischen Begleitung von einem von sechs
Schlagzeuginstrumenten mit dem ManuellSchlagzeug-Merkmal spielen können. Eine
neue manuelle Baßfunktion erlaubt es sogar,
Ihre eigene Baßbegleitung zu spielen! Diese
Bedinungsanleitung enthält wichtige Anwei
sungen zur richtigen Handhabung und
Bedienung Ihres neuen PSS-260. Um die
Merkmale voll ausnutzen zu können und
maximale Spielfreude zu erhalten, raten wir
an, die Schritte dieser Bedienungsanleitung
mit dem PSS-260 vor Ihnen gleich auszupro
bieren, während Sie sich mit dem Instrument
vertraut machen.
Nous vous remercions de votre achat du
PortaSound PSS-260 de Yamaha. Cet ap
pareil est un nouveau produit de la gamme
d'instruments de musique électroniques
pour lesquels Yamaha s'est acquis une
réputation internationale de qualité et de
savoir-faire sophistiqué.
Sur son large clavier de 49 notes intégré dans
un boîtier compact, vous serez capable de
jouer une grande variété de voix instrumen
tales, de rythmes et d'accompagnements
professionnels, ces deux derniers étant
utilisables très simplement par la fonction à
un seul doigt, ou manuellement après avoir
atteint un certain degré de pratique. Le
PSS-260 est même doté une fonction
Batterie "sur mesure" qui vous permettra
de composer vos propres rythmes ou de
goûter aux plaisirs de jouer d'un des six
instruments à percussion par son dispositif
de Percussion manuelle. Enfin, une nouvelle
fonction Basse manuelle vous autorise à
jouer un accompagnement de basse de
façon personnalisée.
Ce manuel renferme des explications im
portantes sur la façon d'utiliser votre
nouveau PSS-260. Pour tirer profit au
maximum des avantages de votre PSS-260
et en être pleinement satisfait, veuillez suivre
les démarches énoncées dans cette brochure
en plaçant votre instrument devant vous de
manière à vous familiariser avec lui.
Gracias рог haber adquirido el PortaSound
PSS-260 YAMAHA. El PortaSound PSS-260
es un producto resultante de la competencia
internalmente reconocida de YAMAHA en
el diseño y fabricación de instrumentos
musicales electrónicos.
Con este teclado de amplia gama de 49
notas, instalado en un cuerpo compacto,
podrá tocar gran variedad de voces instru
mentales, así como patrones rítmicos y
acompañamientos de aire profesional,
consiguiendo los dos últimos simple y fácil
mente con la función de un solo dedo o,
cuando alcance cierto grado de destreza,
manualmente. El PSS-260 se caracteriza
también por la función de batería ajustable
que le permitirá componer sus propios
patrones rítmicos o disfrutar de la emoción
de tocar cualquiera de los seis instrumentos
de percusión con su característica de percu
sión manual. Además, una nueva función
de bajos manuales ¡le permitirá tocar
acompañamiento de bajos!
Este manual contiene instrucciones
importantes sobre cómo manejar y tocar
adecuadamente su nuevo PSS-260. A fin de
lograr emplear al máximo sus funciones y
obtener la mayor satisfacción tocando
música, le sugerimos que siga los pasos de
este manual con el PSS-260 frente a usted
para familiarizarse con él.
Page 3

Before playing
Vor dem Spielen
Avant la mise en
Antes de comenzar
Inserting batteries
Remove the battery compartment cover on
the bottom of the instrument and insert six
1.5V SUM-2. “C" size, R-14 or equivalent
alkaline batteries (sold separately), making
sure that the polarities are placed as
directed inside the compartment. Replace
the cover, ensuring that it is locked
securely in place.
Optional power adaptors
Household current; YAMAHA power adaptor
PA-1 is available for household current.
No other adaptor is recommended.
Car battery: Car Battery Adaptor CA-1
allows you to plug your PSS-260 into a car
cigarette lighter socket.
Einlegen der Batterien
Nehmen Sie den Batteriefachdeckel am
Boden des Instrumentes ab, und legen Sie
sechs 1,5-V-Monozellen des Typs SUM-2,
Größe “C”, R-14 oder entsprechende
Batterien (nicht mitgeliefert) ein, wobei Sie
die im Inneren des Batteriefachs angegebene
Polarität beachten. Setzen Sie dann den
Deckel wieder auf, und achten Sie darauf
daß er richtig einrastet.
Als Sonderzubehör erhältliche Adapter
Für Netzstrom: Das Netzteil Yamaha PA-1
steht für Netzstrombetrieb zur Verfügung.
Von der Verwendung anderer Netzteile wird
abgeraten.
Autobatterie: Der Autobatterie-Adapter
CA-1 erlaubt es Ihnen, das PSS-260 in den
Zigarettenanzünder Ihres Wagens
einzustecken.
service
Mise en place des piles
Retirer le couvercle du logement des piles
sur le fond de l'instrument et installer six
piles SUM-2 de taille "C" et de 1,5V, R-14
ou des piles alcalines équivalentes (vendues
séparément). Veiller à respecter les polarités
des piles, comme illustré à l'intérieur du loge
ment. Replacer le couvercle et veiller à ce
qu'il soit bien immobilisé à sa place originale.
Adaptateurs d'alimentation en option
Courant secteur; L'adaptateur YAMAHA
PA-1 est disponible pour l'alimentation sur
le secteur. Comme aucun autre ne convient
pour cet instrument, exiger le PA-1 au
moment de l'achat.
Batterie de voiture: L'adaptateur pour
batterie de voiture CA-1 permet de brancher
le PSS-260 sur la douille de l'allume-cigare
d'un véhicule.
a tocar
Inserción de las pilas
Extraiga la tapa del compartimiento de las
pilas de la parte inferior del instrumento e
inserte seis pilas de 1,5V SUM-2, tamaño
“C”, R-14, o pilas alcalinas equivalentes
(no suministradas), asegurándose de que los
polos de las mismas queden como se indica
en el interior del compartimiento. Coloque
la tapa y compruebe que quede bien
encajada en su lugar.
Adaptadores de alimentación opcionales
Tensión de la red: Adaptador de alimenta
ción PA-1 YAMAHA. No se recomienda
ningún otro adaptador.
Batería de automóvil: El adaptador de batería
de automóvil CA-1 YAMAHA le permitirá
tocar su PSS-260 conectado a la toma del
encendedor de cigarrillos de su automóvil.
Contents
Nomenclature
Starting to Play
ORCHESTRA
Orchestra Section.............................. 4
ACCOMPANIMENT
RHYTHM Section
Auto Bass Chord Section.................... 6
CUSTOM DRUMMER
Custom Drummer Section
External Jacks and Optional Items...........13
Taking Care of Your PortaSound.............14
Specifications
......................................
.....................................
.............................
..................
.......................................
2
3
5
i o
16
Inhalt
Bezeichnung der Bedienungselemente.. 2
Spielbeginn.............................................. 3
ORCHESTRA
Orchester-Bereich ............................... 4
ACCOMPANIMENT
Rhythmus-Bereich............................... 5
Auto-Baßakkord-Bereich
CUSTOM DRUAAMER
Eingebauter Schlagzeug Sektion
Anschlußbuchsen und
Sonderzubehör
Pflege Ihres PortaSound..........................14
Technische Daten
........................................
....................................
....................
.........
Table des matières
Nomenclature
Mise en marche................................... 3
ORCHESTRA
ACCOMPANIMENT
e
10
13
16
CUSTOM DRUMMER
Prises extérieures et dispositifs
en option............................................ 13
Entretien du PortaSound
Fiche technique...................................15
.....................................
Section orchestre
Section RYTHME............................. 5
Section accord basse automatique .. c
Section Batterie Personalisée
.............................
............
......................
10
¡4
Indice
2
4
Nomenclatura.......................................... 2
Comenzando a tocar................................ 3
ORCHESTRA
Sección de orquesta
(ORCHESTRA)
ACCOMPANIMENT
Sección de ritmos (RHYTHM)
Sección de bajos y acordes auto
máticos (AUTO BASS CHORD) .... e
CUSTOM DRUAAMER
Sección de batería ajustable
Tomas externas e ítems opcionales
Cuidado de su PortaSound
Especificaciones
..................................
...........
................
.........
......................
......................................
4
5
¡q
13
14
Page 4
Nomenclature
Bezeichnung der Bedìenungselemente
Nomenclature
Nomenclatura
lïlilïlililililtlïlllilililïiilïlilïliliiil^
YWWÄ ¡Mfeiniud].
IWBUIIIIIHIIIIIMI
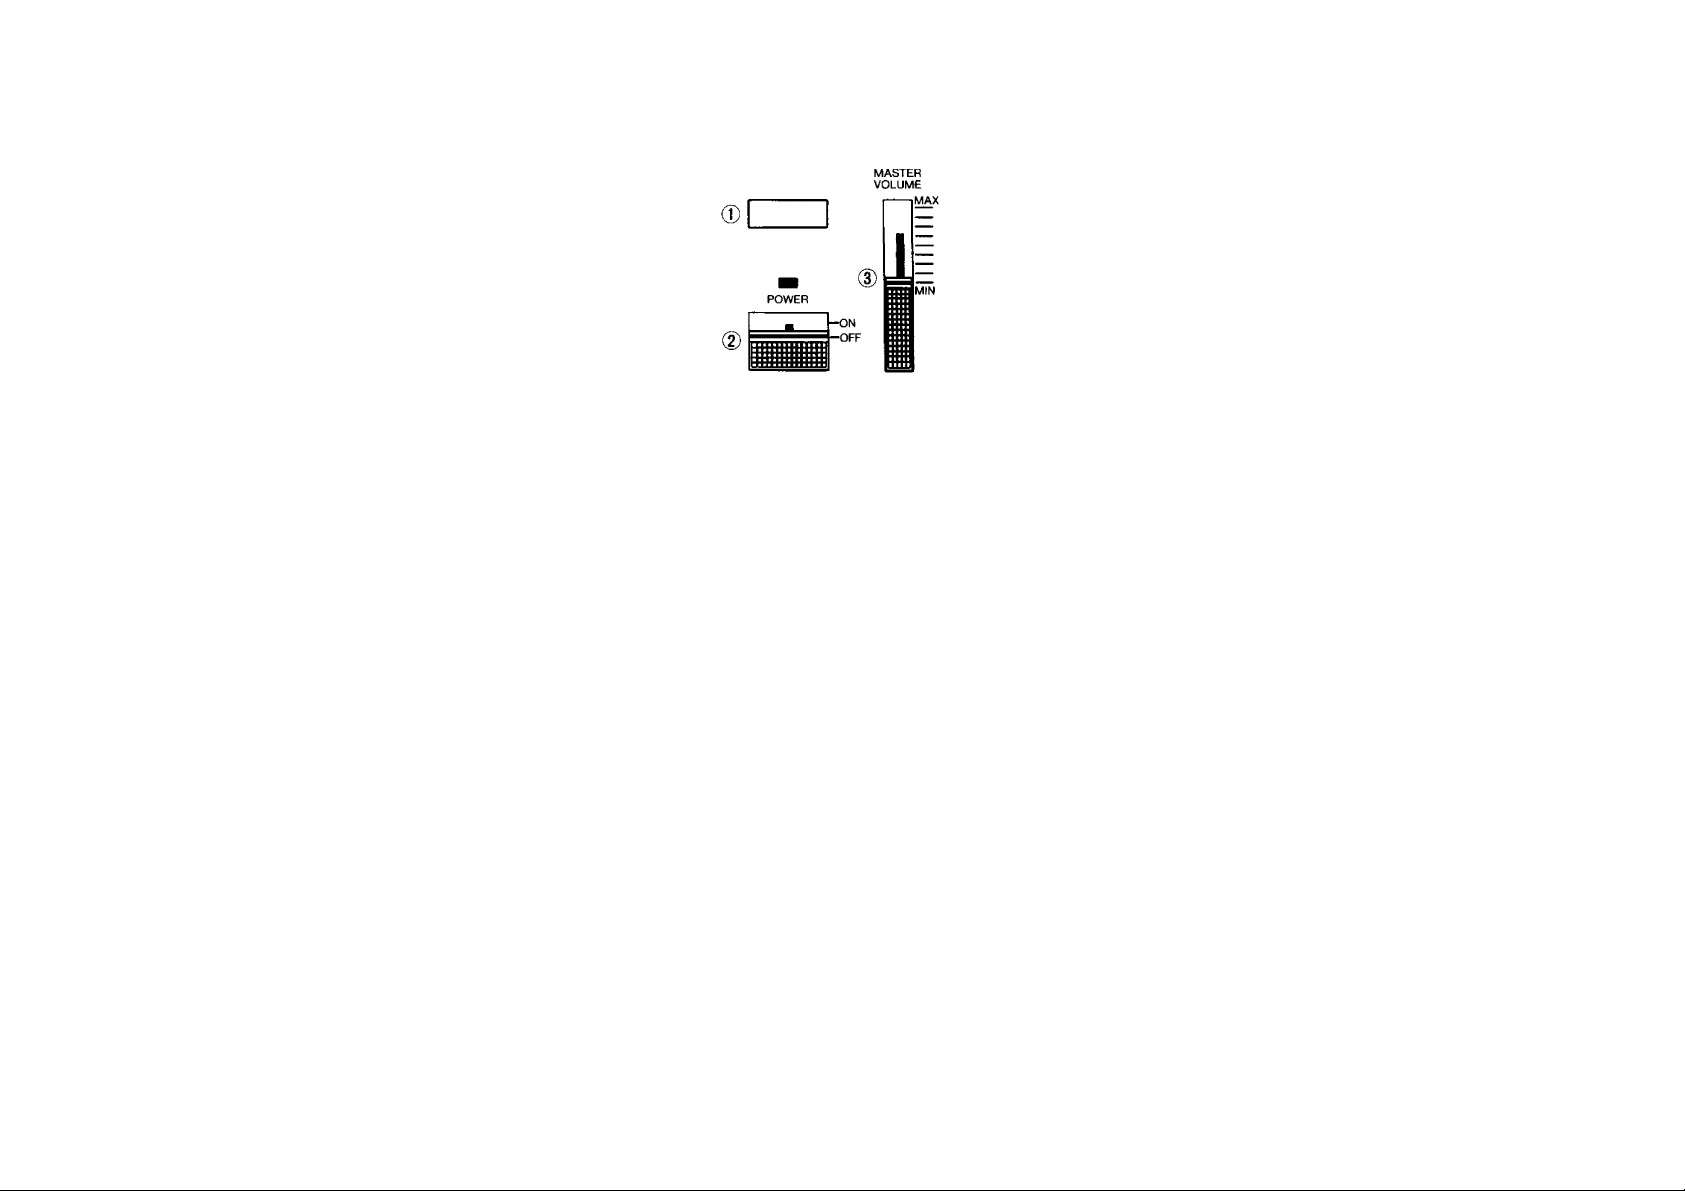
0
DEMONSTRATION button
@ POWER switch
@ MASTER VOLUME control
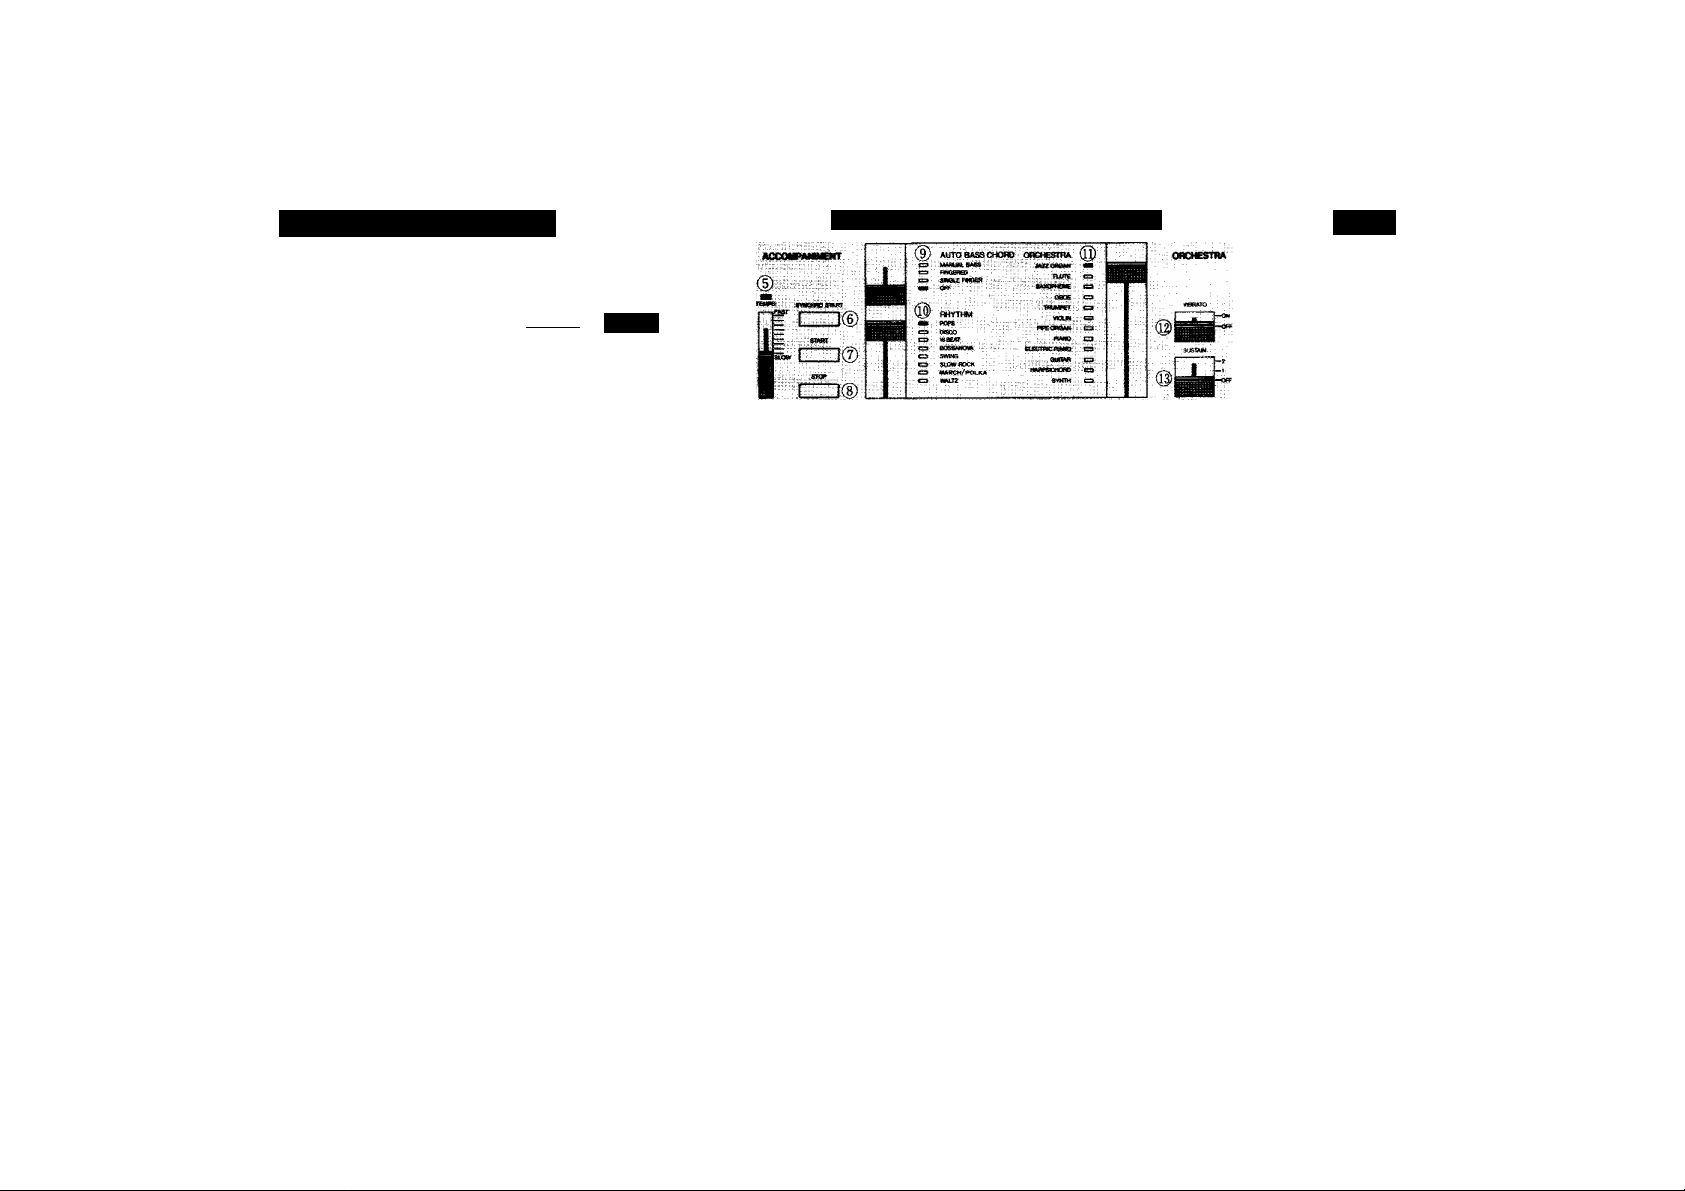
ACCOMPANIMENT
0
ACCOMPANIMENT VOLUME control
® TEMPO control
® SYNCHRO START
START
0
0 STOP
® AUTO BASS CHORD selector
® RHYTHM selector
ORCHESTRA
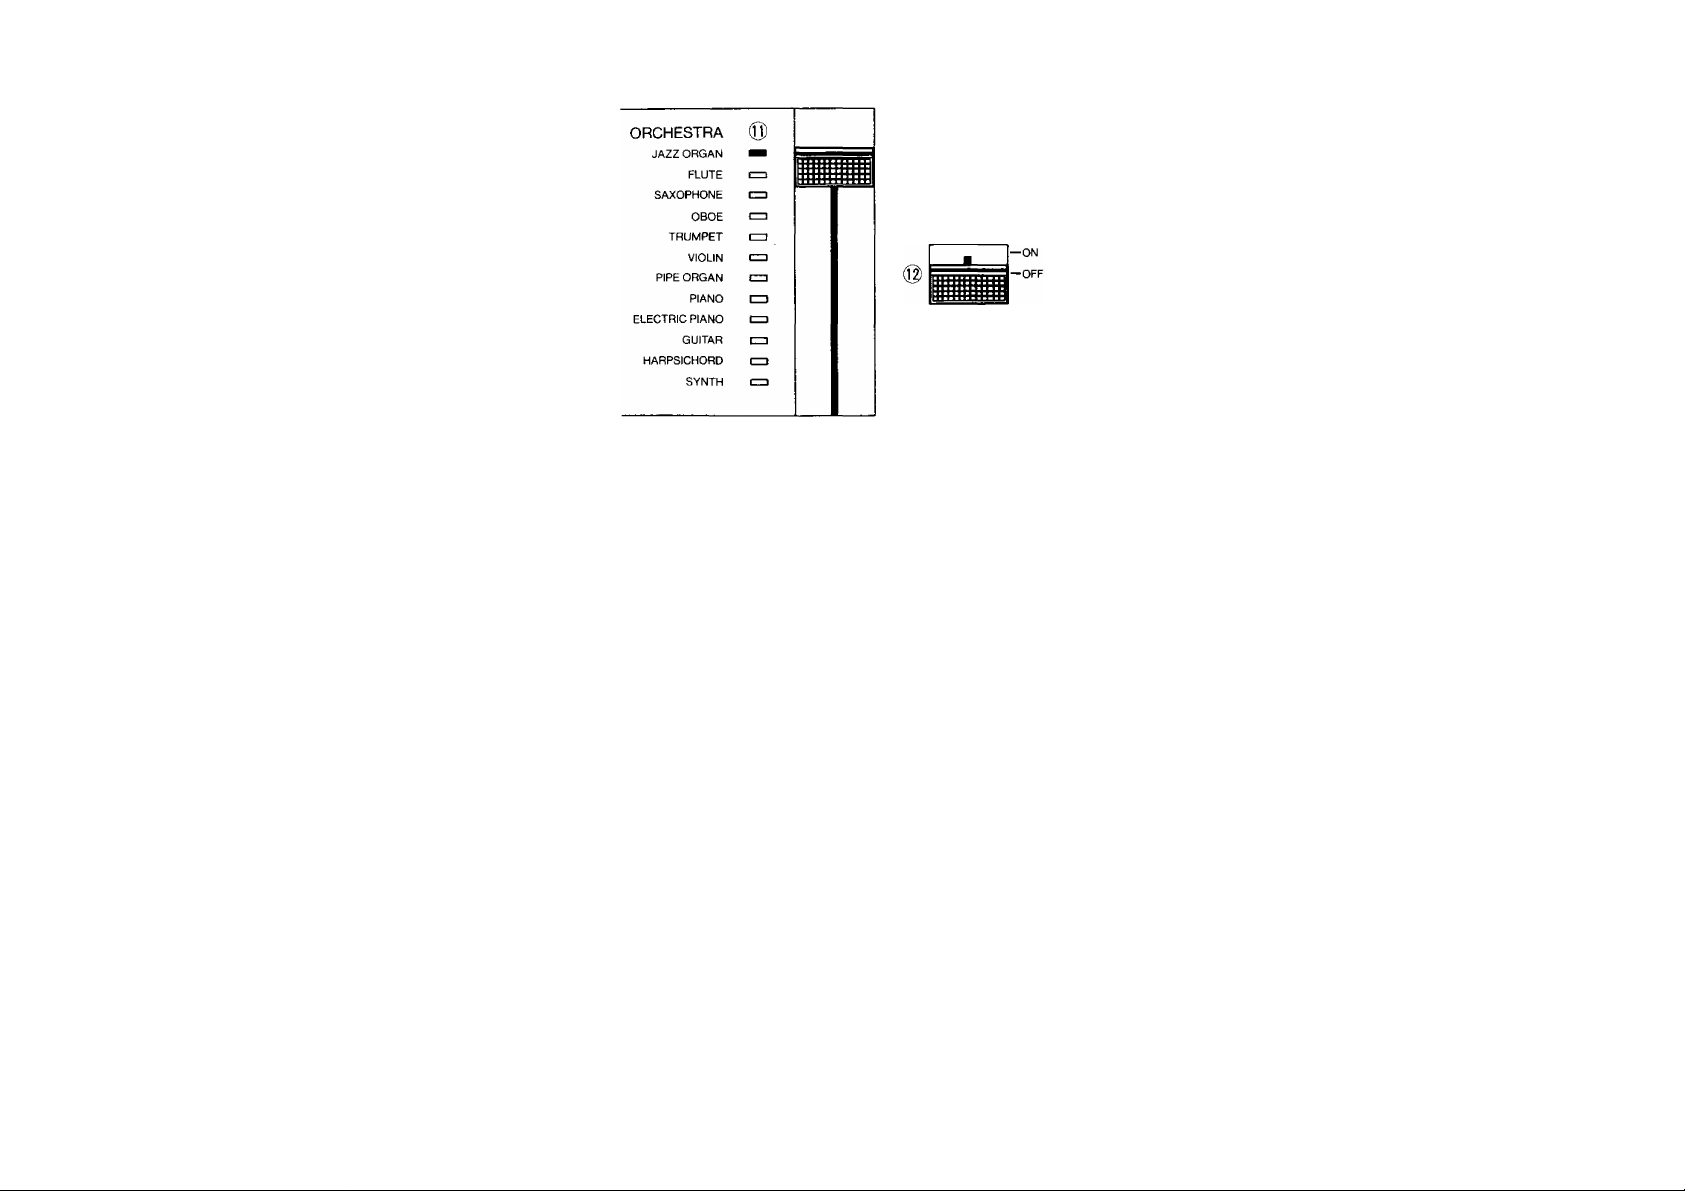
® ORCHESTRA voice selector
© VIBRATO
© SUSTAIN
CUSTOM DRUMMER
© PROGRAM START/END
© CANCEL
© PLAY/STOP
® Lower Keyboard section
® Custom Drummer Keys
CD 0
01
------
1 ^
BP ® A S© E) BP
0
Vorführschalter (DEMONSTRATION)
0 Ein-Schalter (POWER)
@ Hauptlautstärkeregler (MASTER
VOLUME)
BEGLEITUNG
0
Begleitlautstärkeregler (ACCOMPANI
MENT VOLUME)
® Temporegler (TEMPO)
® SYNCHRO START-Schalter
0 START-Schalter
0 STOP-Schalter
0 Baßakkord-Automatik-Schalter (AUTO
BASS CHORD)
® Rhythmuswähler (RHYTHM)
ORCHESTER
® Orchesterstimmen-Register
(ORCHESTRA)
© VIBRATO
© Hallregler (SUSTAIN)
EINGEBAUTER SCHLAGZEUGER
© Programmstart/Ende-Schalter
© Löschschalter (CANCEL)
© Spiel/Stoppschalter ^LAY/STOP)
® Unterer Tastaturbereich
® Schlagzeugerschalter
© Ö ^ ee 0
0 Touche de démonstration
(DEMONSTRATION)
0 Interrupteur d'alimentation (POWER)
0 Réglage de volume principal (MASTER
VOLUME)
Accompagnement
0 Réglage du volume d'accompagnement
(ACCOMPANIMENT VOLUME)
0 Réglage de tempo (TEMPO)
0 Touche de départ synchronisé
(SYNCHRO START)
0 Touche de mise en marche (START)
0
Touche d'arrêt (STOP)
0 Sélecteur d'accord basse automatique
(AUTO BASS CHORD)
© Sélecteur de rythme (RHYTHM)
Orchestre
© Sélecteur de voix orchestre (ORCHESTRA)
© Interrupteur de vibrato (VIBRATO)
© Touche de soutien (SUSTAIN)
Batterie
© Touche de mise en marche/arrêt
programmée (PROGRAM START/END)
® Touche d'annulation (CANCEL)
© Touche de lecture/arrêt (PLAY/STOP)
© Section clavier inférieur
© Touches de batterie personnalisée
ililililil
©c
©[ZZI
0 Botón de demostración
(DEMONSTRATION)
0 Interruptor de alimentación (POWER)
0 Control general de volumen (MASTER
VOLUME)
ACOMPAÑAMIENTO
0 Control de volumen del acompañamiento
(ACCOMPANIMENT VOLUME)
0 Control de tempo (TEMPO)
0 Inicio sincronizado (SYNCHRO START)
0 Inicio (START)
0 Paro (STOP)
0
Selector de bajos y acordes automáticos
(AUTO BASS CHORD)
© Selector de ritmos (RHYTHM)
ORQUESTA
© Selector de voces de orquesta
(ORCHESTRA)
® Vibrato (VIBRATO)
© Sostenido (SUSTAIN)
BATERÍA AJUSTABLE
© Comienzo/ñn de programa (PROGRAM
START/END)
© Cancelación (CANCEL)
® Reproducción/paro (PLAY/STOP)
© Sección del teclado inferior
® Teclas de la batería ajustable
Page 5
Starting to Play I Spielbeginn
DEMON
STRATION
Mise en marche Comenzando a tocar
1. Turning the Power On
Turn the POWER switch ® ON and the
POWER ON light will light up. If the POWER
ON light should begin to flash while operating
the instrument on batteries, this is a signal
that the batteries are getting weak; please
replace all of them as soon as possible.
2. Adjusting the MASTER VOLUME
Control
Use the MASTER VOLUME control (D to
adjust the overall volume.
■ Listening to the PSS-260's Demonstra
tion Performance
You can listen to an automatic demonstration
performance of Mozart's "Rondo alia Turca"
using all of the PSS-260's twelve authenticsounding instrument voices and various
rhythms by simply pressing the DEMON
STRATION START/STOP button®;
pressing it a second time will stop the
automatic performance.
You can adjust the tempo of the demon
stration performance by means of the
TEMPO control (D.
1. Einschalten des Geräts
Schieben Sie den POWER-Schalter ® auf
Ein (ON), und das Ein-Lämpchen (POWER
ON) leuchtet auf. Wenn das Lämpchen beim
Betrieb des Instrumentes flackert, sind die
Batterien schwach geworden und müssen so
schnell wie möglich ersetzt werden.
2. Einstellen des Hauptlautstäiicereglers
Stellen Sie den Hauptlautstärkeregler
(MASTER VOLUME) CD auf die gewünschte
Gesamtlautstärke ein.
■Hören der Vorfühmummer des PSS-260
Sie können eine automatische Vorführung
von Mozarts “Rondo alia Turca’* hören,
bei der alle zwölf authentisch klingenden
Instrumentenstimmen und verschiedene
Rhythmen eingesetzt werden, indem Sie ein
fach den Vorführschalter DEMONSTRA
TION START/STOP ® drücken; durch
ein weiteres Drücken wird die automatische
Vorführung gestoppt. Sie können das
Tempo der Vorführung mit dem Tempo
regler (5) einstellen.
1. Mise sous tension
Allumer l'interrupteur POWER ® de sorte
que s'allume le témoin POWER ON. Si ce
témoin commence à clignoter pendant l'utili
sation de l'instrument, c'est le signe que la
tension des piles s'est affaiblie. Dans ce cas,
remplacer toutes les piles par des neuves.
2. Ajuster le réglage MASTER VOLUME.
Se servir du réglage MASTER VOLUME ®
pour ajuster l'intensité sonore d'ensemble.
■ Ecoute de la démonstration du PSS-260
On pourra écouter une démonstration
automatique de la "Ronda alla Turca" de
Mozart, où sont utilisées toutes les douze
voix instrumentales et les divers rythmes du
PSS-260 en appuyant simplement sur la
touche DEMONSTRATION START/STOP
0 ; une nouvelle poussée sur cette touche
arrêtera l'interprétation automatique,
il est possible d'ajuster le tempo de la
démonstration à l'aide du réglage TEMPO CD.
1. Conexión de la alimentación
Ponga el interruptor POWER CD en ON, y
se iluminará la lámpara POWER ON. Si, al
emplear el instrumento con pilas, comienza
a parpadear la lámpara POWER ON,
significará que las pilas están a punto de
agotarse; reemplácelas todas lo antes posible
por otras nuevas.
2. Ajuste del control MASTER VOLUME
Emplee el control MASTER VOLUME CD
para ajustar el nivel global.
■ Escucha de la ejecución de demostración
del PSS-2Ó0
Simplemente presionando el botón DEM
ONSTRATION START/STOP Ф, podrá
escuchar la ejecución de demostración auto
mática “Rondo alia Turca” de Mozart que
emplea todas las doce voces instrumentales
de sonido auténtico y varios ritmos del
PSS-260; si lo presiona por segunda vez, la
ejecución automática cesará. Usted podrá
ajustar el tempo de la ejecución de demostra
ción con el control TEMPO ®.
Page 6
ORCHESTRA
ORCHESTRA
SUSTAIN
—2
—OFF
Orchestra Section
By selecting one of the 12 voices available
in the Orchestra Section, your PSS-260 will
let you play melodies using the authentic
sound of the selected instrument.
1. Select the instrument you want to 'play'
by sliding the Orchestra Voice selector
lever ID to the position corresponding
to the desired instrument. Slide the lever
gently until it latches into position and
the red indicator appears in the small
window next to the name of the selected
instrument.
2. Try playing a melody using a number of
different voices. You can produce up to
nine notes at any one time.
3. Try playing the melody with Vibrato by
turning the VIBRATO switch ® ON: the
pitch will waver slightly, adding a certain
"warmth" to your performance.
4. Next, try adding the SUSTAIN effect®;
even after you've taken your finger from
a key, the sound will continue for a few
seconds. Your PSS-260 has a SUSTAIN 1
and a SUSTAIN 2 function, each with its
own unique characteristics. We suggest
familiarizing yourself with both of them
so that you can select the one most
appropriate to the mood of the song
you're playing.
Orchester-Bereich
Durch Wahl einer der 12 verfügbaren
Instrumentenstimmen im Orchester-Bereich
erlaubt Ihr PSS-260 es Ihnen, Melodien mit
dem authentischen Klang der gewählten
Instrumente zu spielen.
1. Wählen Sie das Instrument, das Sie
“spielen” wollen, indem Sie das Orchester-
stimmen-Registerschieber ® in die dem
gewünschten Instrument entsprechende
Stellung schieben. Schieben Sie den
Schieber vorsichtig, bis er in der richtigen
Stellung einrastet und der rote Anzeiger
in dem kleinen Fenster neben dem Namen
des gewählten Instruments erscheint.
2. Versuchen Sie, eine Melodie mit einer
Reihe verschiedener Stimmen zu spielen.
Sie können bis zu neun Noten gleichzeitig
erzeugen.
3. Versuchen Sie, die Melodie mit Vibrato
durch Einschalten des VIBRATO-Reglers
® zu spielen: Die Tonhöhe schwankt nun
leicht und fügt dem Spiel eine gewisse
“Wärme” hinzu.
4. Anschließend fügen Sie der Stimme etwas
Sustain-Effekt (Nachhall) hinzu®: Auch
nachdem Sie den Finger von der Taste
genommen haben, klingt der Ton noch
einige Sekunden nach. Ihr PSS-260 hat
eine SUSTAIN 1 und SUSTAIN 2 Funk
tion, beide mit einem typischen Effekt.
Machen Sie sich mit beiden vertraut, so
daß Sie die der Stimmung des gespielten
Stückes entsprechende Einstellung
wählen können.
Section orchestre
En choisissant une des 12 voix, disponibles
dans la section orchestre, le PSS-260
permettra de jouer des mélodies en utilisant
le son authentique de l'instrument choisi.
1. Choisir l'instrument que l'on souhaite
"jouer" en déplaçant le sélecteur de voix
orchestre ® à la position correspondant
à l'instrument désiré. Glisser doucement
le levier de manière qu'il s'enclenche à la
position voulue et que le témoin rouge
apparaisse dans la petite fenêtre, voisine
du nom de l'instrument choisi.
2. Essayer de jouer une mélodie en utilisant
différentes voix. On pourra produire
jusqu'à neuf notes à la fois.
3. Essayer de jouer la mélodie avec vibrato
en allumant (ON) l'interrupteur VIBRATO
@. Le son vibrera légèrement et ajoutera
une certaine "chaleur" à l'interprétation.
4. Essayer ensuite d'ajouter un effet de
soutien®. Même après avoir retiré le doigt
d'une touche, le son persistera pendant
quelques secondes. Le PSS-260 est doté
d'une fonction SUSTAIN 1 et SUSTAIN 2,
chacune fournissant un effet particulier.
Il est conseillé de se familiariser avec les
deux de manière à pouvoir choisir celle qui
convient le mieux à la chanson exécutée.
Sección de orquesta (ORCHESTRA)
Seleccionando una de las 12 voces de la
sección de orquesta, su PSS-260 le permitirá
tocar melodías empleando el sonido auténtico
del instrumento seleccionado.
1. Seleccione el instrumento que desee
“tocar” deslizando la palanca del selector
de voces ORCHESTRA ® hasta la posi
ción correspondiente al instrumento
deseado. Deslice suavemente la palanca
hasta que encaje y aparezca el indicador
rojo en la ventana pequeña situada al lado
del nombre del instrumento seleccionado.
2. Pruebe a tocar una melodía empleando
varias voces diferentes. Usted podrá pro
ducir hasta nueve notas al mismo tiempo.
3. Pruebe a tocar la melodía con vibrato
poniendo el interruptor VIBRATO ® en
ON: el diapasón temblará ligeramente
añadiendo cierto “calor” a su ejecución.
4. A continuación, pruebe la adición del
efecto de sostenido®; aunque separe el
dedo de una tecla, el sonido continuará
durante algunos segundos. Su PSS-260
tiene la función de dos sostenidos,
SUSTAIN 1 y SUSTAIN 2, cada uno de
ellos con su propia y exclusiva caracterís
tica. Lb sugerimos que se familiarice con
ambos a fin de poder seleccionar el más
apropiado al ambiente de la canción que
esté tocando.
Page 7

ACCOMPANIAAENT
AUTO BASS CHORD
MANUAL BASS
FINGERED
SINGLE FINGER
OFF
RHYTHM
POPS
DISCO
16 BEAT
BOSSANOVA
SWING
SLOW ROCK
MARCH/POLKA
WALTZ
RHYTHM Section
Now, try playing a melody with rhythm
accompaniment.
1. Select the Rhythm
Select the type of rhythm best suited for the
song you're going to play from among the
eight choices given in the RHYTHM section.
Slide the selector lever ® to the position
corresponding to your desired rhythm.
2. Start the Rhythm
By pressing the START button ®, the
selected rhythm will begin immediately.
■ SYNCHRO START
The SYNCHRO START button (D is con
venient when you wish to begin your melody
and the rhythm simultaneously. Pressing the
SYNCHRO START button (6) puts the
PSS-260 In the Rhythm "Standby" mode.
To start the rhythm, press any key in the
Lower Keyboard Section
3. Adjusting the TEMPO
Use the TEMPO control (5) to adjust the
rhythm speed to suit the melody you wish
to play.
Rhythmus-Bereich
Jetzt wollen wir eine Melodie mit Rhythmus
begleitung spielen.
1. Wahl des Rhythmus
Wählen Sie den Rhythmus, der am besten
zu Ihrer Musik paßt, durch Drücken einer
der acht Tasten im Rhythmus-Bereich.
Schieben Sie den Rhythmuswähler
(RHYTHM) ® in die Stellung, die dem
gewünschten Rhythmus entspricht.
2. Start des Rhythmus
Durch Drücken des START-Schalters ©
beginnt der gewählte Rhythmus sofort.
■ SYNCHRO START
Der SYNCHRO START-Schalter (© ist
praktisch, wenn sie Ihre Melodie und den
Rhythmus gleichzeitig beginnen wollen.
Durch Drücken das SYNCHRO STARTSchalters ® wird das PSS-260 in die
Rhythmus-Bereitschafts-Betriebsart gestellt.
Zum Start des Rhythmus drücken Sie jede
Taste im unteren Tastaturbereich ®.
3. Einstellen des Tempos
Stellen Sie das Rhythmustempo mit dem
Temporegler (TEMPO) (D ein, um es der
gewählten Melodie anzupassen.
Section RYTHME
Essayer à présent de jouer une mélodie
avec un accompagnement rythmé.
1. Choisir le rythme
Parmi les huit que comporte la section
RHYTHM, choisir ie type qui convient le
mieux à la chanson à interpréter. Déplacer
le sélecteur à la position correspondant
au rythme désiré.
2. Mise en marche
Le rythme choisi se mettra en marche par
une simple poussée sur la touche START ®.
■ Mise en marche synchronisée
La touche SYNCHRO START ® est pratique
quand on désire faire commencer simultané
ment la mélodie et le rythme. Une poussée
sur la touche SYNCHRO START (ë) placer le
PSS-260 en mode "Attente". Pour lancer le
rythme, appuyer sur une des touches de la
section clavier inférieur
3. Ajuster le tempo
Se servir du réglage TEMPO (5) pour ajuster
la vitesse du rythme de manière qu'elle con
vienne à la musique à interpréter.
Sección de ritmos (RHYTHM)
Ahora, pruebe a tocar una melodía con
acompañamiento rítmico.
1. Selección del ritmo
Seleccione el tipo de ritmo que mejor se
adecúe a la canción que vaya a tocar de
entre las ocho posibilidades que ofrece la
sección de ritmos. Deslice la palanca del
selector RHYTHM ® hasta la posición
correspondiente al ritmo deseado.
2. Inicio del ritmo
Al presionar el botón START @, el ritmo
seleccionado se iniciará inmediatamente.
■ INICIO SINCRONIZADO
El botón SYNCHRO START ® le será
muy útil cuando desee iniciar simultánea
mente su melodía y el ritmo. Al presionar
este botón, el PSS-260 pasará al modo de
ritmo “en espera”. Para iniciar el ritmo,
pulse cualquier tecla de la sección del
teclado inferior ®.
3. Ajuste del tempo
Emplee el control TEMPO ® para ajustar
la velocidad del ritmo para acompasarlo a
la melodía que toque.
Page 8

•TEMPO LIGHT
The TEMPO LIGHT will illuminate to indicate
the tempo speed of the rhythm. Use it as a
guide for determining the tempo while ad
justing it to the desired speed. In 4/4 time,
the TEMPO LIGHT will illuminate as des
cribed below:
First beat: illuminates brightly
Second beat; illuminates dimly
Third beat: illuminates at medium
intensity
Fourth beat: will go out.
In Waltz or 3/4 time, it will illuminate as
follows:
First beat: illuminates brightly
Second beat: illuminates dimly
Third beat: will go out.
When the SYNCHRO START switch is
pressed the TEMPO LIGHT will flash on each
beat until a key is pressed.
4. Adjusting Rhythm Volume
The loudness of the rhythm accompaniment
can be adjusted as desired by sliding the
ACCOMPANIMENT VOLUME control 0
up or down. We recommend using the
ACCOMPANIMENT VOLUME 0 and the
MASTER VOLUME ® controls to set and
maintain a good balance between the ac
companiment and melody sounds.
Volume balance.
5. STOP the Rhythm
Press the STOP button (D to stop the
rhythm.
• Tempolämpchen
Das Tempolämpchen (TEMPO LIGHT)
leuchtet auf, um das Tempo des Rhythmus
anzuzeigen. Verwenden Sie es als Richtmaß
zur Bestimmung des Tempos, während Sie
es nach Wunsch einstellen. Beim 4/4-Takt
leuchtet das Tempolämpchen auf wie unten
beschrieben:
Erster Taktschlag: leuchtet hell
Zweiter Taktschlag: leuchtet schwach
Dritter Taktschlag: leuchtet mit mittlerer
Stärke
Vierter Taktschlag: erlischt.
Bei Walzer oder 3/4-Takt leuchtet es auf
wie folgt:
Erster Taktschlag: leuchtet hell
Zweiter Taktschlag: leuchtet schwach
Dritter Taktschlag; erlischt.
Wenn der SYNCHRO START-Schalter
gedrückt wird, blinkt das Tempolämpchen
bei jedem Taktschlag auf, bis eine Taste
gedrückt wird.
4. EinsteUen der Rhythmusiautstärke Die Lautstärke der Rhythmusbegleitung kann nach Wunsch eingestellt werden, indem der Begleitlautstärkeregler (ACCOMPANIMENT VOLUME) 0nach oben oder unten geschoben wird. Wir empfehlen die Ver wendung der Regler für Begleitlautstärke ACCOMPANIMENT VOLUME 0 und Hauptlautstärke (MASTER VOLUME) @, um eine gute Balance zwischen Begleitung und Melodie einzustellen.
5. Stoppen des Rhythmus
Drücken Sie die Taste ® zum Stoppen des
Rhythmus.
•Lampe de tempo
La lampe TEMPO s'allume pour indiquer la
vitesse du rythme. On s'en servira comme
guide pour déterminer le tempo en
recherchant la vitesse appropriée. En mode
4/4, la lampeTEMPO s'allume comme suit:
Première mesure: Eclairage intense
Seconde mesure: Eclairage faible
Troisième mesure: Eclairage d'intensité
Quatrième mesure: Extinction
Lors d'une valse ou mesure 3/4, cette lampe
s'allume comme suit:
Première mesure: Eclairage intense
Deuxième mesure: Eclairage faible
Troisième mesure: Extinction
Lorsque la touche SYNCHRO START est
actionnée, la lampe TEMPO clignote à
chaque mesure jusqu'à ce qu'une touche
soit actionnée.
4. Réglage du volume du rythme
L'intensité de l'accompagnement rythmé
peut s'ajuster à volonté en déplaçant le
réglage ACCOMPANIMENT VOLUME 0
vers le haut ou vers le bas. Il est conseillé
d'ajuster les réglages ACCOMPANIMENT
VOLUME
manière à obtenir un bon équilibre entre
l'accompagnement et la mélodie.
Equilibre du volume
5. Arrêt du rythme
Appuyer sur la touche STOP ® pour arrêter
le rythme.
0 et MASTER VOLUME 0 de
moyenne
•Lámpara indicadora de tempo (TEMPO
LIGHT )
La lampara TEMPO LIGHT se iluminará
para indicar la velocidad del tempo del
ritmo. Empléela como guía para determinar
el tempo mientras lo ajuste a la velocidad
deseada. En un compás de 4/4, la lámpara
TEMPO LIGHT se iluminará como se
describe a continuación:
Primer tiempo; iluminación con mucho
brillo
Segundo tiempo: iluminación con poco
brillo
Tercer tiempo: iluminación con brillo
medio
Cuarto tiempo: sin iluminación
En Vals o compás de 3/4, se Uuminará de la
forma siguiente:
Primer tiempo: iluminación con
mucho brillo
Segundo tiempo: iluminación con poco
brillo
Tercer tiempo: sin iluminación
Cuando presione el interruptor SYNCHRO
START, la lámpara TEMPO LIGHT des te
1 la rá en cada tiempo hasta que pulse una tecla.
4. Ajuste del volumen del ritmo
La sonoridad del acompañamiento rítmico
podrá ajustarse al nivel deseado deslizando
el control ACCOMPANIMENT VOLUME
0 hacia arriba o hacia abajo. Recomenda
mos el empleo de este control y de MASTER
VOLUME 0 para establecer у mantener un
buen equilibrio de volumen entre los
sonidos del acompañamiemto y la melodía.
5. Paro del ritmo
Para parar el ritmo, presione el botón
STOP 0.
Auto Bass Chord Section
The Auto Bass Chord function is an auto
matic accompaniment feature; please turn it
off when you do not wish to use it by setting
the slide switch 0 to the OFF position.
A. Single Finger Operation
By putting the Auto Bass Chord feature in
the SINGLE FINGER mode, you can play
chords and bass with a single finger by
pressing any key in the Lower Keyboard
Section ®.
Auto-Baßakkord-Berdch
Die Auto-Baßakkord-Funktion ist ein automatiches Begleitmerkmal: Schalten Sie sie
aus, wenn Sie sie nicht einsetzen wollen,
indem Sie den Schieberegler d) auf Aus
stellung (OFF) schieben,
A. Single-Finger-Betrieb
Indem Sie den Auto-Baß-Akkord auf SingleFinger-Betrieb stellen, können Sie Akkorde
und Baßrhythmen mit einem einzigen Finger
spielen, indem Sie eine Taste im unteren
Tastaturbereich ® drücken.
Section accord basse automatique
La fonction Accord basse automatique
fournît un accompagnement automatique.
Quand on ne souhaite pas utiliser cette
fonction, prière de la mettre hors service en
ramenant le sélecteur 0 à la position OFF.
A. Utilisation à un seul doigt
En plaçant la fonction accord basse auto
matique en mode SINGLE FINGER, il sera
possible de jouer les accords et les basses
avec un seul doigt en actionnant une des
touches de la section clavier inférieur®.
Sección de bajos y acordes auto
máticos (AUTO BASS CHORD)
Ésta es una función de acompañamiento
automático; cuando no vaya a utilizarla,
desactívela poniendo el selector AUTO
BASS CHORD 0 en OFF,
A. Operación con un solo dedo
Poniendo la función de bajos у acordes
automáticos en el modo de un solo dedo
(SINGLE FINGER), podrá tocar acordes y
bajos con un solo dedo pulsando cualquier
tecla de la sección del teclado inferior ®,
Page 9

1. Put your PSS-260 into the SINGLE
FINGER Mode
Set the AUTO BASS CHORD selector
switch (D to the SINGLE FINGER position.
1. Stellen Sie Ihr PSS-260 auf Single-FingerBetrieb
Stellen Sie den Auto-Baßakkord-Schalter (9)
auf Single-Finger-Begleitung.
1. Placer le PSS-260 en mode SINGLE
FINGER
Régler le sélecteur AUTO BASS CHORD (D
à la position SINGLE FINGER.
1. Ponga el PSS-260 en el modo de un solo
dedo
Ponga el selector AUTO BASS CHORD CD
en la posición SINGLE FINGER.
2. Select a Rhythm Pattern
Select the desired rhythm pattern with the
Rhythm Select slide switch then set the
rhythm speed with the TEMPO control (D
and adjust the ACCOMPANIMENTVOLUME
® as desired.
3. Press the SYNCHRO START button
4. Press any Key
Pressing any key in the Lower Keyboard
Section ® will automatically provide a
chord and bass note accompaniment to
compliment the selected rhythm.
5. Play a Melody with Accompaniment
Try playing a melody with the Single Finger
accompaniment.
■ How to Play Chords in the Single
Finger Mode
Major Chords
To play major chords, you only need to
press the key in the Lower Keyboard Section
(i|) corresponding to the chord's root note.
Minor Chords
To play a minor chord, press the key
corresponding to the root note in the Lower
Keyboard Section ® together with the black
key to its left.
Seventh Chords
To play a seventh chord, press the key
corresponding to the root note in the Lower
Keyboard Section ® together with the
white key to its left.
Minor Seventh Chords
To play a minor seventh chord, press the
key corresponding to the root note in the
Lower Keyboard Section ® together with
the white and the black keys to its left.
2. Wählen Sie einen Rhythmus
Wählen Sie den gewünschten Rhytmus mit
dem Rhythmusschiebeschalter (RHYTHM)
® und stellen Sie den Temporegler (D und
den Begleitlautstärkeregler (ACCOMPANIMENT VOLUME) (4) nach Wunsch ein.
3. Drücken Sie den SYNCHRO STARTSchalter
4. Drücken Sie jede beliebige Taste
Drücken Sie jede beliebige Taste im un
teren Tastaturbereich und Sie erhalten
automatisch einen Akkord und Baß
begleitung zur Ergänzung des gewählten
Rhythmus.
5. Spielen Sie eine Melodie mit Begleitung
Versuchen Sie, eine Melodie mit der SingleFinger-Begleitung zu spielen.
■ spielen von Akkorden in Single-FingerEinstellung
Dur-Akkorde
Zum Spielen von Dur-Akkorden brauchen
Sie nur die Taste im unteren Tastaturbereich
@ zu drücken, die der Grundnote des
Akkords entspricht.
Moll-Akkorde
Zum Spielen von Moll-Akkorden brauchen
Sie nur die Taste im unteren Tastaturbereich
® zu drücken, die der Grundnote des
Akkords entspricht, zusammen mit der
schwarzen Taste links davon.
Septimenakkorde
Zum Spielen von Septimen-Akkorden
Brauchen Sie nur die Taste im unteren
Tastaturbereich ® zu drücken, die der
Grundnote des Akkords entspricht, zusam
men mit der weißen Taste hnks davon.
MoU-Septimenakkorde
Zum Spielen von Moll-Septimen-Akkorden
brauchen Sie nur die Taste im unteren
Tastauturbereich ® zu drücken, die der
Grundnote des Akkords entspricht,
zusammen mit den schwarzen und weißen
Tasten links davon.
2. Choisir un rythme
Choisir le rythme souhaité à l'aide du
sélecteur RHYTHM 0), puis selon ses pré
férences, ajuster la vitesse par le réglage
TEMPO
ACCOMPANIMENT VOLUME d).
3. Appuyer sur la touche SYNCHRO
4. Appuyer sur une des touches
Une poussée sur une quelconque des touches
de la section clavier inférieur ® produira
automatiquement un accord et un accom
pagnement de basse qui s'adapteront au
rhythme choisi.
5. Jouer une mélodie avec accom
Essayer de jouer une mélodie avec
l'accompagnement à un seul doigt.
■ Pour jouer les accords en mode à un
Accords majeurs
Pour jouer les accords majeurs, il suffit
d'actionner la touche de la section clavier
inférieur ® qui correspond à la note de
base de l'accord.
Accords mineurs
Pour jouer un accord mineur, appuyer sur la
touche correspondant à la note de base
dans la section clavier inférieur ® en même
temps que sur la touche noire à sa gauche.
Septième
Pour jouer un accord de septième, appuyer
la touche correspondant à la note de base
dans la section clavier inférieur ®) avec la
touche blanche à sa gauche.
Accord septième mineur
Pour jouer un accord de septième en mineur,
appuyer sur la touche correspondant à la
note de base dans la section clavier inférieur
® avec les touches blanche et noire à sa
gauche.
(5)
et l'intensité sonore par le réglage
START
pagnement.
seul doigt
2. Seleccione un patrón rítmico
Elija el patrón rítmico deseado con el
selector RHYTHM ®, después ajuste la
velocidad del ritmo con el control TEMPO
y, el volumen del acompañamiento con
(D
el control ACCOMPANIMENT VOLUME
0 en la forma deseada.
3. Presione el botón SYNCHRO START
4. Pulse cualquier tecla
Al pulsar cualquier tecla de la sección del
teclado inferior ® obtendrá automática
mente un acompañamiento de notas de
acordes y bajos que se añadirán al ritmo
seleccionado.
5. Toque una melodía con acompañamiento
Pruebe a tocar una melodía con acompaña
miento de un solo dedo.
■ Cómo tocar acordes en el modo de un
solo dedo
Acordes mayores
Para tocar acordes mayores, solamente
tendrá que pulsar la tecla correspondiente a
la nota raíz del acorde de la sección del
teclado inferior (®.
Acordes menores
Para tocar un acorde menor, pulse la tecla
correspondiente a la nota raíz de la sección
del teclado inferior ® junto con la tecla negra
situada a su izquierda.
Acordes de séptima
Para tocar un acorde de séptima, pulse la
tecla correspondiente de la nota raíz de la
sección del teclado inferior ® junto con la
tecla blanca situada a su derecha.
Acordes de séptima menores
Para tocar un acorde de séptima menor,
pulse la tecla correspondiente a la nota raíz
de la sección del teclado inferior ® junto
con las teclas blanca y negra situadas a su
izquierda.
Page 10

Example
ehe™
C (major chord)
B. Fingered Mode
The FINGERED mode permits you to play
your own chords (three or four notes).
A bass note will automatically be added and
the resulting accompaniment will be syn
chronized with the selected rhythm. This
mode allows you to play more than the
"basic" chords generated in the Single
Finger mode.
1. Set the Auto Bass Chord selector switch
(D to the FINGERED position.
2. Select the desired rhythm pattern with
the Rhythm Selector switch , set the
tempo with the TEMPO control is; and
adjust the ACCOMPANIMENT VOLUME
control ® as desired.
3. Press the SYNCHRO START button ®.
4. Play a chord with your left hand. When
a chord is played in the Lower Keyboard
Section , it will be automatically heard
with bass, as accompaniment.
Try playing a melody with this fingered
accompaniment.
Cm (minor chord)
imfim
C? (seventh chord)
B. Fingered-Betriebsart
Die Fingered-Betriebsart erlaubt es Ihnen,
Ihre eigenen Akkorde (drei oder vier Noten)
zu spielen. Eine Baßnote wird automatisch
hinzugefügt, und die resultierende Begleitung
wird mit dem gewählten Rhythmus syn chro
nisiert. Diese Betriebsart erlaubt es Ihnen,
mehr als die “grundlegenden” Akkorde zu
spielen, die in der Fingered-Betriebsart
erzeugt werden.
1. Stellen sie den Baßakkord-AutomatikSchalter (AUTO BASS CHORD) (D auf
Stellung FINGERED.
2. Wählen Sie den gewünschten Rhythmus
mit dem Rhythmuswähler (RHYTHM) @,
stellen Sie das Tempo mit dem Temporegler
® ein und stellen sie die Begleitlautstärke
mit dem Begleitlautstärkeregler (AC
COMPANIMENT VOLUME) (4) nach
Wunsch ein.
3. Drücken Sie den SYNCHRO STARTSchalter ®.
4. Spielen Sie einen Akkord mit der linken
Hand. Wenn ein Akkord im unteren
Tastaturbereich ® gespielt wird, wird er
automatisch mit Baßbegleitung gehört.
Versuchen Sie, eine Melodie mit dieser
Fingerbegleitung zu spielen.
Mí H
B. Le mode FINGERED
Ce mode permet de jouer ses propres
accords (trois ou quatre notes). Une note
basse sera automatiquement ajoutée et
l'accompagnement qui résultera sera
synchronisé avec le rythme choisi. Ce mode
permet de jouer plus que les accords de
"base" qu'autorise le mode à un seul doigt.
1. Amener le sélecteur AUTO BASS CHORD
® à la position FINGERED.
2. Choisir le type de rythme souhaité par le
sélecteur RHYTHM @ et ajuster, selon
ses préférences, la vitesse par le réglage
TEMPO ® et l'intensité par le réglage
ACCOMPANIMENT VOLUME ®.
3. Appuyer sur la touche SYNCHRO
START®.
4. Jouer un accord de la main gauche.
Lorsqu'un accord est joué dans la section
clavier inférieur il est automatiquement
perçu avec les basses comme accom
pagnement.
Essayer de jouer une mélodie avec cet
accompagnement.
T
Em™
Cm? (minor seventh chord)
B. Modo con todos los dedos
El modo con todos los dedos (FINGERED)
le permitirá tocar sus propios acordes (tres
o cuatro notas). Se añadirá automáticamente
una nota de bajo y el acompañamiento
resultante se sincronizará con el ritmo
seleccionado. Este modo le permitirá tocar
más acordes que los “básicos” generados
en el modo de un solo dedo.
1. Ponga el selector AUTO BASS CHORD
® en la posición FINGERED.
2. Elija el patrón rítmico deseado con el
selector RHYTHM después ajuste la
velocidad del ritmo con el control TEMPO
®, y el volumen del acompañamiento
con el control ACCOMPANIMENT
VOLUME ® en la forma deseada.
3. Presione el botón SYNCHRO START ®.
4. Toque un acorde con la mano izquierda.
Cuando toque un acorde con la sección
del teclado inferior @, éste se oirá auto
máticamente con un bajo de acompaña
miento. Pruebe a tocar una melodía con
este acompañamiento con todos los dedos.
Page 11

Example
штш ишиш Ешии
NOTE:
• When playing the accompaniment in the
Single Finger or the Fingered mode, the
bass note or fingered chord played will
automatically continue until you play a
new single finger bass note or fingered
chord.
• The tone of the Auto Bass Chord Accom
paniment remains the same regardless
of the instrument voice selected in the
Orchestra section 0).
C. Manual Bass
The Manual Bass function lets you play the
bass part without the chord accompaniment.
The bass voice heard will differ according to
the selected rhythm pattern. This function
is convenient when you wish to perform
using your PSS-260 as an electronic piano
or a synthesizer.
1. Set the Auto Bass Chord selector switch
(D to the MANUAL BASS position.
2. Select the rhythm pattern as desired with
the Rhythm Select switch set the
Tempo with the TEMPO control (|), and
adjust the ACCOMPANIMENT VOLUME
control 0 as necessary.
Press the SYNCHRO START switch.
3. Play the bass part with your left hand
and the melody with your right hand.
ANMERKUNG:
• Wenn die Begleitung in Single-Finger
oder Fingered-Betriebsart gespielt wird,
werden die Baßnoten oder die FingeredAkkorde automatisch fortgesetzt, bis Sie
eine neue Single-Finger-Baßnote oder
einen Fingered-Akkord spielen.
• Der Ton der Auto-Baß-Begleitung
verbleibt gleich, ungeachtet der im
Orchesterstinmien-Register (ORCHESTRA)
© gewählten Instrumentenstimme.
C. ManueU-Baß
Die Manuell-Baß-Funktion erlaubt es Ihnen,
den Baß-Part ohne Akkordbegleitung zu
spielen. Die gehörte Baßstimme unterscheidet
sich je nach Rhythmus. Diese Funktion ist
praktisch, wenn Sie Ihr PSS-260 als elek
trisches Piano oder Synthesizer zur Vor
führung einsetzen wollen.
1. Stellen Sie den Baßakkord-AutomatikSchalter (AUTO BASS CHORD) 0 in
Stellung MANUAL BASS.
2. Wählen Sie den gewünschten Rhythmus
mit dem Rhythmuswähler (RHYTHM) @,
stellen Sie das Tempo mit dem Tempo
regler (TEMPO) i5) ein und stellen Sie
den Begleitlautstärkeregler (ACCOM
PANIMENT VOLUME) 0 nach
Wunsch ein.
Drücken Sie die Taste SYNCHRO START.
3. Spielen Sie den Baß-Part mit Ihrer linken
Hand und die Melodie mit der rechten.
Remarques:
• Quand on joue ^accompagnement en
mode à un seul doigt ou à plusieurs doigts,
la note basse ou raccord joué à plusieurs
doigts continuera automatiquement
jusqu'à ce que Гоп joue une nouvelle note
basse à un seul doigt ou à plusieurs doigts.
• Le ton de l'accompagnement de l'accord
basse automatique restera le même, quelle
que soit la voix instrumentale choisie dans
la section orchestre 0.
C. Basse manuelle
La fonction basse manuelle permet de
jouer la partie basse sans accompagnement
d'accord. La voix de basse perçue sera
différée selon le type de rythme choisi.
Cette fonction est pratique quand on désire
effectuer une interprétation en utilisant le
PSS-260 comme piano électronique ou
comme synthétiseur.
1. Régler le sélecteur d'accord basse auto
matique ® à la position MANUAL BASS.
2. Choisir le type de rythme voulu à l'aide
du sélecteur RHYTHM et ajuster,
selon ses préférences, la vitesse par le
réglage TEMPO ® et l'intensité par le
réglage ACCOMPANIMENT VOLUME®.
Appuyer sur la touche SYNCHRO
START ®.
3. Jouer la partie de basse avec la main
gauche et la mélodie avec la main droite.
N01AS:
• Cuando toque el acompañamiento en el
modo de un solo dedo o de todos los
dedos, la nota de bajo o el acorde con
todos los dedos tocado continuará hasta
que usted toque una nueva nota de bajo
con un solo dedo o un acorde con todos
los dedos.
• El tono del acompañamiento de bajos
y acordes automáticos permanecerá igual
independientemente de la voz instru
mental elegida con el selector de voces
ORCHESTRA®.
C. Bajos manuales
La función de bajos manuales le permitirá
tocar la parte de bajos sin acompañamiento
de acordes. La voz de bajo oída diferirá de
acuerdo con el patrón rítmico selecionado.
Esta función será muy útil cuando desee
tocar empleando su PSS-260 como piano
electrónico o sintetizador.
1. Ponga el selector AUTO BASS CHORD
X en la posición MANUAL BASS.
2. Elija el patrón rítmico deseado con el
selector RHYTHM después ajuste la
velocidad del ritmo con el control TEMPO
®, y el volumen del acompañamiento
con el control ACCOMPANIMENT
VOLUME 0 en la forma deseada.
Presione el interruptor SYNCHRO
START ®.
3. Toque la parte de bajos con la mano iz
quierda y la melodía con la derecha.
Page 12

CUSTOM DRUMMER
Custom Drummer Keys
With the PSS-260's Custom Drummer
section, you can:
(A) Compose and program your very own
original rhythm patterns;
(B) Use your PSS-260 as your own drummer
by playing any of six percussion instru
ment voices.
(A) Creating a Rhythm Pattern of your
own
1. Select a Rhythm Pattern
Use the Rhythm Selector ® to select a
rhythm pattern similar to the one you want
to create. When you wish to make a
pattern in 4/4 time, then select either the
POPS, DISCO, 16 BEAT, BOSSANOVA, or
MARCH pattern; when in 12/8 time, use the
SWING or the SLOW ROCK pattern, and
when in 3/4 time, use the WALTZ pattern.
2. Press the PROGRAM START/END
Button (|$
The rhythm pattern selected in the previous
step will begin to sound.
3. Erase the Rhythm Pattern
Pressing any of the Custom Drummer keys
® while holding the CANCEL button ®
down will erase the sound of the percussion
instrument corresponding to the pressed
key or keys. If you press all six of the
Custom Drummer keys at once (with the
CANCEL button held down), only the sound
of the closed hi-hat will remain as a
metronome sounding in 4/4 time.
CUSTOM DRUMMER
PROGRAM START/END
CANCEL
PLAY/STOP
Mit dem eingebauten Schlagzeuger des
PSS-260 können Sie:
(A) Ihre ganz persönlichen Rhythmen
komponieren und programmieren;
(B) Das PSS-260 als Ihren eigenen Schlag
zeuger einsetzen, indem Sie eine beliebige
unter sechs Schlagzeugstimmen spielen.
(A) Erzeugung Ihres eigenen Rhythmus
1. Wahl eines Rhythmusmusters
Verwenden Sie den Rhythmuswähler
(RHYTHM) um einen Rhythmus zu
wählen, der dem von Ihnen gewünschten
ähnelt. Wenn Sie einen Rhythmus im 4/4Takt erzeugen wollen, wählen Sie entweder
das Muster POPS, DISCO, 16 BEAT,
BOSSANOVA oder MATCH; bei 12/8-Takt
verwenden Sie das Muster SWING oder
SLOW ROCK, und bei 3/4-Takt das
Walzer-Muster.
2. Drücken Sie den Programmstart/EndeSchalter iO)
Das im vorangehenden Schritt gewählte
Rhythmusmuster beginnt zu spielen.
3. Löschen des Rhythmusmusters
Durch Drücken einer der Schlagzeugertasten
® bei gleichzeitigem Drücken der CANCELTaste (l|) wird der Ton des Schlagzeug
instrumentes, das der (den) gedrückten
Taste(n) entspricht, gelöscht. Wenn Sie alle
sechs Schlagzeugertasten gleichzeitig drücken
(bei gedrückter CANCEL-Taste) verbleibt
nur der Klang des Closed Hi-Hat als
Metronom im 4/4-Takt.
These three keys are invalid in this mode.
Diese drei Tasten sind in dieser Betriebsart wirkungslos.
Ces trois touches sont invalides dans ce mode.
Estas tres teclas no funcionarán en este modo.
Grâce à la section Batterie "Custom" du
PSS-260, il est possible de:
(A) Composer et programmer ses types de
rythmes originaux;
(B) Utiliser le PSS-260 comme une batterie
personnelle en jouant une des six voix
instrumentales de percussion.
(A) Création d'un type de rythme
personnel
1. Choisir un type de rythme
Se servir du sélecteur RHYTHM ® pour
choisir un type de rythme similaire à celui
que l'on souhaite créer. Quand on désire
créer un type en mesure 4/4, choisir le type
POPS, DISCO, 16 BEAT, BOSSANOVA ou
MARCH; pour une mesure 12/8, utiliser le
type SWING ou SLOW ROCK et pour
mesure 3/4, utiliser le type WALTZ.
2. Appuyer sur la touche PROGRAM
START/END ®
Le type de rythme choisi à la démarche
précédente commencera à être audible.
3. Annuler le type de rythme
Une poussée sur une des touches
CUSTOM DRUMMER @ tout en
maintenant la touche CANCEL ® enfoncée
aura pour résultat d'effacer le son de
l'instrument à percussion, correspondant à
ta (ou aux) touche(s) actionnée(s). Si Гоп
appuie simultanément sur toutes les six
touches CUSTOM DRUMMER (avec la
touche CANCEL enfoncée), seul le son "hi-
hat" fermé subsistera comme un son de
métronome en mesure 4/4.
Con la sección de batería ajustable del
PSS-260, podrá:
(A) Componer у programar sus propios y
originales patrones rítmicos, y
(B) emplear el PSS-260 como su propia
batería para tocar cualquiera de las seis
voces instrumentales de percusión.
(A) Creación de sus propios patrones rítmicos
1. Seleccione un patrón rítmico
Emplee el selector RHYTHM ® para elegir
un patrón rítmico similar al que desee crear.
Cuando desee componer un patrón rítmico
con compás de 4/4, seleccione POPS,
DISCO, 16 BEAT, BOSSANOVA, o
MARCH; cuando desee un compás de
12/8, emplee SWING o SLOW ROCK, y si
desea un compás de 3/4, utilice WALTZ.
2. Presione el botón PROGRAM START/
END®
El patrón rítmico seleccionado en el paso
anterior comenzará a sonar.
3. Borrado de patrones rítmicos
Para borrar el sonido del instrumento de
percusión correspondiente a la(s) tecla(s)
pulsada(s), pulse cualquiera de las teclas de
la batería ajustable ® manteniendo pre
sionado el botón CANCEL ©. Si pulsa las
seis teclas de la batería ajustable a la vez (con
el botón CANCEL presionado), solamente
quedarán los platiUos cerrados como sonido
de metrónomo en el compás de 4/4.
10
Page 13

4. Tap a Key
Tap any one of the Custom Drummer keys
® as desired to create and program into
memory your own original single-measure
rhythm pattern. We suggest watching the
TEMPO LIGHT to stay in tempo while you're
composing your new rhythm pattern.
5. Press the PROGRAM START/END
Button Again ®
Once you've satisfactorily completed your
new rhythm pattern, press the PROGRAM
START/END button ® once again to store
it into your PSS-260's memory and stop the
programming mode. You can play back the
pattern you've just composed by pressing
the PLAY/END button
4. Anschlägen einer Taste
Schlagen Sie eine der Schlagzeugertasten ®
nach Wunsch an, um Ihren persönlichen
Single-Finger-Rhythmus zu erzeugen und zu
programmieren. Wir schlagen vor, das
Tempolämpchen im Auge zu behalten,
während Sie Ihr neues Rhythmusmuster
programmieren.
5. Drücken Sie den Programmstart/EndeSchalter ® erneut
Wenn Sie das neue Rhythmusmuster zur
Zufriedenheit aufgebaut haben, drücken Sie
den Programmstart/Ende-Schalter i0i erneut,
um den Rhythmus in den Speicher des
PSS-260 einzugeben und die ProgrammierBetriebsart aufzuheben. Sie können den
gerade erzeugten Rhythmus durch Drücken
des Spiel/Stoppschalters (PLAY/STOP) (S>
wiedergeben.
4. Actionner une touche
Appuyer sur une touche de batterie per
sonnalisée ® selon les besoins pour créer
et programmer en mémoire son propre type
de rythme original à simple mesure. Il est
conseillé d'observer la lampe TEMPO pour
rester en mesure pendant que l'on compose
son nouveau type de rythme.
5. Appuyer à nouveau sur la touche
PROGRAM START/END @
Lorsqu'on a complété son propre type de
rythme de façon satisfaisante, appuyer une
nouvelle fois sur la touche PROGRAM
START/END (g) pour le placer dans la
mémoire du PSS-260 et arrêter le mode de
programmation. On pourra reproduire le
type de rythme que Гоп vient de composer
en appuyant sur la touche PLAY/END (®.
4. Pulse una teda
Para crear y programar en la memoria su
patrón rítmico original de un solo compás,
pulse cualquiera de las teclas de la batería
ajustable ® . Le sugerimos que observe la
lámpara TEMPO LIGHT para no perder el
tempo dureinte la composición de un nuevo
patrón rítmico.
5. Presione de nuevo el botón PROGRAM
START/END®
Después de haber creado satisfactoriamente
su nuevo patrón rítmico, presione de nuevo
el botón PROGRAM START/END ®
para almacenarlo en la memoria del PSS-260
y desactivar el modo de programación. El
patrón recién compuesto podrá tocarlo
presionando el botón PLAY/END ®.
BASS DRUM
SNARE DRUM
CLOSED HI-HAT
OPEN HI-HAT
bongo
NOTE;
• Your programmed rhythm pattern will be
erased if you turn the unit's POWER
switch off or press the PROGRAM
START/END button once again.
Ex.l 8 Beat
—ia
—il" к jf—lit—A Ji" Jt-
^
--------------------------------
J J J - J
ANMERKUNG:
• Ihr programmierter Rhythmus wird
gelöscht, wenn Sie den Ein/Aus-Schalter
des Geräts drücken oder den Schalter
PROGRAM START/END erneut
drücken.
Ex.2 Marching Drum
BASS DRUM
SNARE DRUM
CLOSED HI-HAT
OPEN HI-HAT
Remarques:
• Le type de rythme programmé sera effacé
si l'on coupe l'interrupteur POWER de
l'instrument ou si l'on appuie une nouvelle
fois sur la touche PROGRAM START/
END®.
j
___ _ _
i.
7 7 у
I
1
NOTAS:
• Su patrón rítmico programado se
borrará cuando ponga el interruptor del
PSS-260 en OFF, o si vuelve a presionar
el botón PROGRAM START/END.
Page 14

(B) Manual Percussion
This function offers you the pleasure of
playing six percussion instrument voices
(bass drum, snare drum, closed hi-hat,
open hi-hat, bongo and conga) by yourself,
as if playing real percussion instruments.
(B) Manuelle Schlagzeugfunktion
Diese Funktion bietet Ihnen das Vergügen,
bis zu sechs Schlagzeuginstrumente selber
zu spielen (Bass Drum, Snare Drum, Closed
Hi-Hat, Open Hi-Hat, Bongo), genau als
hätten Sie die Originsilinstrumente.
(B) Percussion manuelle
Cette fonction permet de profiter de six voix
instrumentales de percussion (Caisse basse,
caisse claire, hi-hat fermé, hi-hat ouvert,
bongo et conga) comme si l'on jouait réelle
ment de ces instruments a percussion.
(B) Percusión manual
Esta función le permitirá tocar seis voces
instrumentales de percusión (bombo, tambor,
platillos cerrados, platillos abiertos, bongo,
y conga) como si estuviese tocando instru
mentos de percusión reales.
1. Switch power on
Turn off the Power Switch to erase what was
previously stored in the memory, and turn it
on again. (If nothing has been programmed,
this switching operation is not necessary.)
2. Press PLAY/STOP
If you press the PLAY / STOP selector, the
six white keys on the right side of the
keyboard will turn into manual percussion
keys. They can not be used for melody
playing in this mode.
3. Enjoying Manual Percussion
Tap the six white keys — to enjoy the
excitement of becoming a drummer.
1. Einschalten
Schalten Sie das Gerät mit dem Ein/AusSchalter aus, um im Speicher vorhandene
Daten zu löschen und schalten Sie es erneut
ein. (Wenn keine Programminhalte
vorhanden sind, ist dies nicht nötig.)
2. Schalter PLAY/STOP drücken
Wenn Sie den Schalter PLAY/STOP drücken,
übernehmen die sechs weißen Tasten auf der
rechten Seite der Tastatur die Funktion von
manuellen Schlagzeugtasten. Sie können in
dieser Betriebsart keine Melodie spielen.
3. Einsatz der manuellen Schlagzeugfunktion
Schlagen Sie die sechs weißen Tasten an—
und fühlen Sie sich als Schlagzeuger.
Ex,l Disco
1. Mise sous tension
Couper l'interrupteur d'alimentation pour
effacer le contenu antérieur de la mémoire,
puis remettre l'instrument sous tension. (Si
rien n'avait été programmé en mémoire,
cette commutation n'est pas nécessaire.)
2. Appuyer sur la touche PLAY/STOP
Si l'on actionne la touche PLAY/STOP,les six
touches blanches sur le côté droit du clavier
se changeront en touches de percussion
manuelle. Elles ne peuvent plus être
utilisées pour la mélodie dans ce mode.
3. Pratique de la percussion manuelle
Actionner les six touches blanches et
goûter aux plaisirs ressentis à la batterie.
Ex.2 BBeat
1. Conecte la alimentación
Ponga el interruptor POWER en OFF para
borrar lo previamente almacenado en la
memoria, y vuelva a ponerlo en ON. (Si no
había programado nada, esta operación
será innecesaria.)
2. Presione PLAY/STOP
Cuando presione el botón PLAY/STOP,
las seis tedas blancas de la parte derecha del
teclado pasarán a ser teclas de percusión
manual. Estas teclas no podrán emplearse
para tocar melodías en este modo.
3. Disfrute de la percusión manual
Para disfrutar del entusiasmo de convertirse
en un batería, pulse las seis teclas blancas.
-0—•
0 g
0 •
© © cp. ^ 00 Q
Note:
• You can return to normal keyboard mode
by pressing the STOP button. Schalters jederzeit zur Normaltastatur
Anmerkung:
• Sie können durch Drücken des STOPzurückkehren.
Remarque:
• On repassera en mode clavier normal par
une poussée sur la touche STOP.
Nota:
• Usted podrá volver al modo de teclado
normal presionando el botón STOP.
Page 15

External Jacks and
Anschlußbuchsen
Prises extérieures
Tomas externas e
Optional Items
Several jacks are provided at the back of
the keyboard for connecting a variety of
optional accessories.
A. AUX. OUT Jack
This jack is used when you wish to connect
your PSS-260 to an amplifier or tape recorder
when performing before an audience or
when you wish to record your performance.
Please use a PC-2 Connector Cable (sold
separately) when using this jack to connect
into other audio equipment.
• Impedance: 4i2
• Output level: +2dBm
B. HEADPHONES Jack
Connect a set of headphones to this jack
and to enjoy your performance without
disturbing others.
C. External power source jack
DC-IN (9-12V)
• AC Power
Connect the AC Powor Adaptor PA-1 to
the DC*IN (9-12V) Jack.
• Car battery
The Car Battery Adaptor CA-1 plugs into
the DC*IN (9—12V) jack and a cigarette
lighter socket.
und Sonderzubehör
An der Geräterückseite sind verschiedene
Buchsen vorhanden, an denen
Sonderzubehörteile angeschlossen werden
können.
A. AUX. OUT-Buchse
Diese Buchse dient zum Anschluß des PSS-260
an einen Verstärker oder ein Tonbandgerät,
wenn Sie vor Zuhörern spielen oder Ihre
Vorführung aufzeichnen wollen. Verwenden
Sie ein PC-2-Verbindungskabel (getrennt
erhältlich), wenn Sie diese Buchse zum
Anschluß an andere Audiogeräte verwenden.
• Impedanz: 4 Ohm
• Ausgangspegel: -i- 2 dBm
B. Kopfhörerbuchsen (HEADPHONES)
SchlieiSen Sie hier Kopfhörer an, und Sie
können Ihr Spiel genießen, ohne andere zu
stören.
C. Fremdstrombuchse DC*IN (9—12V)
• Netzstrom
Schließen Sie das Netzteil PA-1 an die
Fremdstrombuchse DC*IN (9—12V) an.
• Autobatterie
Schließen Sie den Autobatterieadapter
CA-I an die Fremdstrombuchse
DC*IN (9—12V) und an den Zigarettenan
zünder Ihres Wagens an.
et dispositifs en
option
AUX'OUT HEADPHONES DC-IN
Plusieurs prises sont implantées sur l'arrière
du clavier pour permettre de raccorder
divers accessoires en option.
A. Prise de sortie auxiliaire (AUX. OUT)
Cette prise s'emploie quand on désire
raccorder le PSS-260 à un amplificateur ou
à un magnétophone pour une interprétation
devant un auditoire ou pour enregistrer son
interprétation. Prière d'utiliser le câble de
connexion PC-2 (vendu séparément) quand
on désire raccorder un autre appareil audio
sur cette prise.
• Impédance: 4 ohms
• Niveau desortie: 4-2dBm
B. Prise de casque (HEADPHONES)
Elle accepte la fiche d'un casque à utiliser
pour écouter son interprétation sans
déranger les autres.
C. Prise de source d'alimentation
• Secteur
• Batterie de voiture
9-1SV
extérieure DC*IN (9—12V)
Brancher l'adaptateur secteur PA-1 sur la
prise DC-IN (9-12V).
L'adaptateur de batterie de voiture CA-1
se branche sur la prise DC*IN (9—12V) et
sur la douille de l'allume-cigare du véhicule.
ítems opcionales
En la parte posterior del teclado se en
cuentran varias tomas para conectar gran
variedad de accesorios opcionales.
A. Toma de salida exterior (AUX. OUT)
Empléela para conectar el PSS-260 a un
amplificador o un magnetófono a fin de
tocar ante audiotrio, o para grabar sus
ejecuciones.
Para conectar el PSS-260 a otro equipo
de audio, emplee el cable conector PC-2
(opcional).
• Impedancia: 4 ohmios
• Nivel de salida: 4- 2 dBm
B. Toma de auriculares (HEADPHONES)
Conéctele un juego de auriculares para
disfrutar de sus ejecuciones sin molestar a
los demás.
C. Toma de alimentación exterior
DC-IN (9—12V)
• Tensión de la red
Conecte a esta toma el adaptador de ali
mentación de PA-1.
• Batería de automóvil
Conecte a esta toma el adaptador de bate
ría de automóvil CA-1, y éste a la toma del
encendedor de cigarrillos de su automóvil.
13
Page 16

Optional Items
Sonderzubehör
Accessoires en option
ítems opcionales
• AC Power Adaptor (PA-1)
Transforms AC voltage to DC voltage.
• Car Battery Adaptor (CA-1)
Enables you to provide power to the
instrument from a car battery using the
cigarette lighter socket.
• Soft Carrying Case SCC-15
For convenient transportation.
• Headphones (YH series)
Specially designed lightweight dynamic
headphones with extra-soft ear pads.
• Connecting Cord (PC-2)
For connecting the keyboard to a stereo
hi-fi system.
Taking Care of
Your PortaSound
Your PortaSound will remain in excellent
playing condition if care is taken concerning
the following.
1. The POWER on light flashes when the
batteries begin to get weak. When this
happens, please remove all of the old
batteries and replace them with new
ones as soon as possible. If you con
tinue to play the instrument with weak
batteries, output sound will get weaker
and eventually fade out (in such cases,
the POWER on light will sometimes
remain lit.)
2. When you use AC power be sure to use
the optional PA-1 adaptor. Before use,
read the adaptor instructions carefully.
3. The optional car battery adaptor CA-1 is
only for use with a negative ground 12V
battery. Ensure that this is the case
before connecting the adaptor.
14
• NetzteUPA-l
Wandelt Netzstrom in Gleichstrom um.
• Autobatterieadapter (CA-1)
Ermöglicht es Ihnen, das Instrument mit
Strom aus der Autobatterie durch den
Zigarettenanzünder Ihres Wagens zu
betreiben.
• Weiche Ti^etasche (SCC-15)
Zum bequemen Tragen des Instrumentes.
• Kopfhörer (YH-Serie)
Speziell leicht ausgelegte, dynamische
Kopfhörer mit extraweichen Ohrmuscheln.
• Verbindungskabel (PC-2)
Zum Anschluß des Instrumentes an ein
HiFi-Stereosystem.
Pflege Ihres PortaSound
Ihr PortaSound ist immer in erstklassigem
Spielzustand, wenn Sie die folgenden
Punkte beachten:
1. Das Ein-Lämpchen blinkt, wenn die
Batterien schwach werden. Wenn dieser
Fall eintritt, entfernen Sie alle alten
Batterien und ersetzen sie so schnell wie
möglich durch neue. Wenn Sie weiterhin
das Instrument mit schwachen Batterien
spielen, wird der Klang immer
schwächer und verschwindet schließlich
(in diesem Fall verbleibt das EinLämpchen manchmal erleuchtet).
2. Wenn Sie das PortaSound PSS-260 mit
Netzstrom betreiben, verwenden Sie
immer das Netzteil PA-1. Vor dem
Einsatz lesen Sie die Bedienungsanleitung
des Netzteils sorgfältig durch.
3. Der als Sonderzubehör erhältliche
Autobatterie-Adapter CA-1 ist nur zur
Verwendung mit einer 12-VoltAutobatterie nüt negativer Masse
gedacht. Verwenden Sie ihn nur, wenn
die elektrische Anlage Ihres Fahrzeugs
diesen Angaben entspricht.
• Adaptateur secteur (PA-1)
Transforme le courant alternatif en
courant continu.
• Adaptateur de batterie de voiture
(CA-1)
Permet d'alimenter l'instrument sur le
courant d'une batterie de voiture via la
douille de l'allume-cigare du véhicule.
• Etui de transport souple (SCC-15)
Pratique pour le transport de l'instrument.
• Casque (Série YH)
Casque léger et dynamique, de concep
tion spéciale et doté de pavillons
extra-doux.
• Cordon de connexion (PC-2)
Pour raccorder le clavier à une chaîne hi-
fi stéréd.
Entretien du PortaSound
Votre PortaSound restera en excellent état
si vous prenez soin des points suivants.
1. Le témoin d'alimentation (POWER)
clignote quand la tension des piles
commence à faiblir. Dans ce cas, retirer
les piles usagées et les remplacer le plus
tôt possible par des neuves. Si l'on con
tinue de jouer sur l'instrument dont les
piles sont devenues très faibles, le son
sera affaibli et, à la limite, il deviendra
inaudible. (Cependant,quelquefois, le
témoin POWER reste allumé dans ce cas.)
2. Pour une alimentation sur le secteur,
utiliser uniquement l'adaptateur secteur
PA-1 en option et lire attentivement les
explications qui s'y rapportent avant son
emploi.
3. L'adaptateur de batterie de voiture CA-1
en option doit être réservé à une batterie
de 12 volts à masse négative. Confirmer
ce point avant le branchement de
l'adaptateur.
• Adaptador de alimentación de CA (PA-1)
Transforma la tensión de CA en CC.
• Adaptador de batería de automóvil (CA-1)
Le permitirá alimentar el PSS-260 con la
batería de su automóvil empleando la toma
del encendedor de cigarrillos del mismo.
• Funda de transporte (SCC-15)
Para facilitar el transporte.
• Auriculares (serie YH)
Auriculares dinámicos y ligeros,
especialmente diseñados, con almohadillas
auriculares extrablandas.
• Cable conector (PC-2)
Para coneaar el teclado a un sistema
estéreo de alta fidelidad.
Cuidado de su
PortaSound
Su PortaSound estará siempre en
condiciones excelentes si tiene en cuenta los
puntos siguientes.
1. Cuando las pilas estén a punto de
agotarse, la lámpara POWER ON
parpadeará. Cuando suceda esto,
extraiga todas las pilas y reemplácelas
por otras nuevas lo antes posible. Si
continúa tocando el instrumento con las
pilas en este estado, el sonido de salida
se debilitará y llegará a desaparecer (en
tales casos es posible que la lámpara
POWER ON permanezca iluminada).
2. Emplee solamente el adaptador de
alimentación PA-1 opcional. Antes de
utilizarlo, lea cuidadosamente su manual
de instrucciones.
3. El adaptador de batería de automóvil
CA-1 opcional es solamente para em
plearse con baterías de 12V y negativo a
la carroceria. Antes de utilizarlo,
asegúrese de que éste es el caso de su
automóvil.
Page 17

4. Connections made between the
Porta Sound and any other device should
be made with both units turned off.
5. Do not set the MASTER VOLUME at
MAX when you connect the PortaSound
to a stereo system. Use the stereo sys
tem's volume control to adjust the
sound level.
6. Avoid placing the instrument in exces
sively humid areas.
7. Do not subject the unit to physical shock,
and avoid placing anything heavy on it.
8. The PortaSound should not be placed
In direct sunlight for a long time.
9. Do not place the instrument near any
heating appliance, or leave it inside a
car in direct sunlight for any length of
time. Direct sunshine can raise the
interior temperature of a car with closed
doors and windows to as high as 80°C
(176°F.) Temperatures in excess of 60°C
(140°F) can cause physical and/or elec
trical damage not covered by warranty.
10. Use a dry or slightly damp cloth for
cleaning.
11. Be sure to turn the POWER switch OFF
after use. If you should forget and leave
the power on, an alarm will sound at
intervals of about two minutes until the
unit is turned off.
12. Because the accompaniment volume
control is phase-controlled it may not
render the desired volume if the power
switch is turned on with it left at an
intermediate setting; if this should
happen, simply move it a little bit in
either direction and its function will
return to normal.
4. Verbindungen, die zwischen dem
PortaSound und anderen Geräten
hergestellt werden, müssen bei ausge
schalteten Geräten vorgenommen werden.
5. Stellen Sie nicht die Hauptlautstärke
(MASTER VOLUME) auf Maximum,
wenn Sie das PortaSound an eine Stereo
anlage anschließen. Verwenden Sie die
Lautstärkeregelung der Stereoanlage
zum Einstellen des Lautstärkepegels.
6. Stellen Sie das Instrument nicht an
Orten mit hoher Luftfeuchtigkeit auf.
7. Schützen sie das PortaSound vor starken
Stößen und stellen sie keine schweren
Gegenstände darauf.
8. Das PortaSound darf nicht längere.Zeit
im prallen Sonnenlicht aufgestellt werden.
9. Stellen Sie das PortaSound nicht in der
Nähe von Heizkörpern auf und lassen
Sie es nicht im in der Sonne geparkten
Auto stehen. Direkte Sonnenbestrahlung
bei geschlossenen Türen und Fenstern
kann die Innentemperatur in einem
geparkten Wagen auf solch hohe Tem
peraturen wie 80°C ansteigen lassen.
Temperaturen von über 60°C können
Schäden im Material und in der Elek
tronik verursachen, die nicht von der
Garantie gedeckt werden.
10. Verwenden Sie ein weiches trockenes
oder leicht angefeuchtetes Tüch zur
Reinigung.
11. Stellen Sie sicher, daß das Gerät nach
dem Spielen mit dem Ein/Aus-Schalter
ausgeschaltet wird. Wenn Sie das ver
gessen und es eingeschaltet lassen, ertönt
ein Alarmton in Abständen von etwa zwei
Minuten, um Sie daran zu erinnern, daß
das PSS-260 immer noch eingeschaltet ist.
12. Weil der Regler für BegleitungsLautstärke phasengesteuert ist, kann es
sein, das die gewünschte Lautstärke
nicht erzielt wird, wenn das Gerät bei
in Mittenstellung stehendem Regler
eingeschaltet wird; wenn dieser Fall
eintritt, schieben Sie einfach die
störende Lautstärkeregelung ein wenig
in eine beliebige Richtung, und die
Funktion normalisiert sich.
4. Couper l'alimentation électrique avant
de brancher le PortaSound sur un autre
appareil.
5. Ne pas amener le réglage MASTER
VOLUME à la position MAX lors du
branchement du PortaSound sur une
chaîne stéréo. Se servir du réglage de
volume de la chaîne stéréo pour ajuster
le volume sonore.
6. Eviter de placer l'instrument dans un
endroit très humide.
7. Eviter tout choc violent à l'appareil et
ne rien y déposer de lourd.
8. Ne pas laisser le PortaSound pendant
longtemps en plein soleil.
9. Ne pas placer l'instrument près d'appareils
de chauffage et ne pas le laisser pendant
longtemps dans un véhicule exposé en
plein soleil. Les rayons directs du soleil
peuvent entraîner une élévation de tem
pérature jusqu'à 80°C (176°F) dans une
voiture dont les portes et les fenêtres
sont closes. Des températures dépassant
60°C (140°F) peuvent entraîner des
dégâts physiques et/ou électriques qui
ne sont pas couverts par la garantie.
10. Se servir d'un linge sec ou légèrement
humide pour le nettoyage.
11. Veiller à couper (OFF) l'interrupteur
POWER après utilisation. Si l'instrument
n'est pas mis hors tension, une alarme
retentira à intervalles de 2 minutes environ
jusqu'à ce que l'interrupteur soit coupé.
12. Comme le réglage de volume d'accom
pagnement est contrôlé en phase, il se
peut qu'il ne rende pas le volume
souhaité si l'alimentation est fournie
alors qu'il se trouve à une position
intermédiaire. Si le cas se présente,
déplacer légèrement le réglage dans une
direction ou une autre et sa fonction
redeviendra normale.
4. Las conexiones entre el PortaSound y
cualquier otro dispositivo deberán
realizarse con la alimentación de ambas
unidades desconectada.
5. Cuando conecte el PortaSound a un
sistema estéreo, no ponga el control
MASTER VOLUME en MAX. Para
ajustar el nivel del sonido, emplee el con
trol de volumen de dicho sistema estéreo.
6. Evite colocar el instrumento en lugares
excesivamente húmedos.
7. No exponga el instrumento a choques,
y evite colocar objetos pesados sobre el
mismo.
8. El PortaSound no deberá colocarse a la
luz solar directa durante mucho tiempo.
9. No coloque el instrumento cerca de
aparatos de calefacción, ni lo deje dentro
de un automóvil expuesto a la luz solar.
El sol puede aumentar la temperatura
interior de un automóvil con puertas y
ventanas cerradas hasta 80® C. Las
temperaturas superiores a 60°C pueden
causar daños físicos y/o eléctricos no
cubiertos por la garantía.
10. Para la limpieza, emplee un paño seco o
ligeramente humedecido.
11. Después de emplear el instrumento,
asegúrese de poner el interruptor POWER
en OFF. Si se olvida de hacerlo, sonará
una alarma a intervalos de aproximada
mente dos minutos hasta que desconecte
la alimentación.
12. Como el control de volumen de
acompañamiento está controlado por
fase, es posible que no ofrezca el volumen
deseado si se conecta la alimentación
con dicho control en un punto inter
medio, Cuando suceda esto, simplemente
mueva el control de volumen en
cualquier sentido y su función volverá
a la normalidad.
1.R
Page 18

Specifications
Keyboard
49 keys {Cl ~ C5)
Orchestra Voices
Jazz Organ, Flute, Saxophone, Oboe,
Trumpet, Violin, Pipe Organ, Piano,
Electric Piano, Guitar, Harpsichord, Synth
Effect
Vibrato, Sustain 1-2
Accompaniment Section
Rhythm (Pops, Disco, 16 Beat, Bossanova,
Swing, Slow Rock, March/Polka, Waltz)
Auto Bass Chord System (Manual Bass,
Fingered, Single finger. Off)
Synchro Start, Start, Stop, Tempo Volume,
Accompaniment Volume
Custom Drummer
Program Start/End, Cancel, Play/Stop
Other Controls
Power Switch, Pilot Lamp, Master Volume,
Demonstration
Auxiliary Jacks
Headphones, Aux-Out DC In (9 — 12V)
Amplifier
2W
Speaker
9cm (4i2)
Rated Voltage
DC9V (six 1.5V SUM-2, "C" size, R-14 or
equivalent batteries), AC Power Adaptor
(PA-1) or Car Battery Adaptor (CA-1)
Dimensions (W x H x D)
628.5x229x56.6 (mm)
(24-3/4" x9"x2-1/4")
Weight
2.3kg (5.1 lbs.)
Technische Daten
Tastatur
49 Tasten (Ci ~ Cs)
Orchesterstimmen
Jazz-Orgel, Flöte, Saxophon, Oboe, Trom
pete, Violine, klassische Orgel, Klavier,
Elektrisches Piano, Gitarre, Cembalo,
Synthesizer
Effekte
Vibrato, Sustain 1, 2 Vibrato, Soutien 1, 2
Begleitungsbereich
Rhythmus (Pop, Disco, 16-Beat, Bossanova,
Swing, Slow Rock, Marsch/Polka, Walzer)
Auto-Baßakkord (Manueller Baß, Fingered,
Single-Finger, Aus)
Synchro Start, Start, Stopp, Tempo
Lautstärke, Begleitungslautstärke
Eingebauter Schlagzeuger
Programm-Start/Ende, Löschen, Spielen/
Stopp
Andere Regler
Netzschalter, Leitlämpchen, Hauptlautstärke,
Vorführung
Anschlußbuchsen
Kopfhörer, Aux-Out, DC (9—12 V) IN
Verstärker
2 W
Lautsprecher Amplificateur
9 cm (4 Ohm)
Nennspannung
Gleichstrom 9 V (sechs 1,5 V SUM-2 “C”- 9 cm (4 ohms)
Format, R-14 oder entsprechende Batterien),
Netzteil (PA-1) oder Autobatterieadapter
(CA-1) R-14 ou équivalentes). Adaptateur secteur
Abmessungen (B x H x T) (PA-1) ou adaptateur de batterie de voiture
628.5x229x56.6 (mm)
Gewicht
2.3 kg
Fiche technique
Clavier
49 touches (Ci~Cs)
Voix orchestre
Orgue jazz, flûte, saxophone, hautbois.
trompette, violon, grandes orgues, piano.
Piano électrique, guitare, clavecin.
synthétiseur
Effet
Section accompagnement
Rythme (Pops, Disco, 16 mesures. Bossanova, Swing, Slow Rock, Marche/Polka,
Valse) Système accord basse automatique
(Basse manuelle, plusieurs doigts, un seul
doigt, coupé)
Départ synchronisé. Mise en marche. Arrêt,
Volume tempo. Volume accompagnement
Batterie personnalisée
Début/fin programmé. Annulation,
Lecture/arrêt
Autres commandes
Interrupteur d'alimentation, témoin, réglage
de volume principal, démonstration
Prises auxiliaires
Casque, Sortie auxiliaire. Entrée courant
continu DC IN (9-12 V)
2W
Haut-parleur
Tension nominale
DC 9 V (six piles 1,5 V SUM-2 de taille "C",
(CA-1)
Dimensions (1 x p x h)
628.5 x 229 X 56.6 mm
(24-3/4x9x2-1/4 pouces)
Poids
Z3kg (5.1 livres)
Especificaciones
Teclado
49 teclas (Ci-Cs)
Voces de orquesta
Órgano de jazz. Flauta, Saxofón, Oboe,
Trompeta, Violín, Órgano de tubos, Piano,
Piano Eléctrico, Guitarra, Clavicordio,
y Sintetizador
Efectos
Vibrato, y Sostenido 1 y 2
Sección de acompañamiento
Ritmos (Pops, Disco, 16 Beat, Bossanova,
Swing, Rock lento, Marcha/Polca, y Vals)
Sistema de bajos y acordes automáticos
(Bajos manuaJes, Todos los dedos, Un solo
dedo, y Desactivación)
Inicio sincronizado. Inicio, Paro, Volumen
de tempo, y Volumen de acompañamiento.
Batería ajustable
Comienzo/fin de programa, Cancelación, y
Reproducción/paro
Otros controles
Interruptor de alimentación. Lámpara piloto,
Control de volumen, y Demostración
Tomas auxiliares
Auriculares, Salida auxiliar, y Toma de
alimentación exterior (9—12VIN)
AmpUfícador
2W
Altavoz
9 cm (4 ohmios)
Tensión nominal
9V CC (seis pilas de 1,5V SUM-2, tamaño
“C”, R-14, 0 pilas alcalinas equivalentes),
Adaptador de alimentación de la red (PA-1),
o Adaptador de batería de automóvil (CA-1)
Dimensiones (An x AI x Prf)
628.5x229x56.6 (mm)
Peso
2.3 kg
•Specifications are subject to change without notice.
16
•Änderungen bei Design und technischen Daten ohne
Vorankündigung Vorbehalten.
•Spécifications sujettes à modifications sans préavis.
•Las especificationes están sujetas a combio sin previo
aviso.
Page 19

Attention u sers in th e U.S.A .
Po rtaS oun d P SS -260 p re pared in accorda nce
with F C C ru ie s .
The PortaSound PSS-260 uses frequencies that appear in the radio fre
quency range, and if installed in the immediate proximity (within three
meters) of some types of audio or video devices interference may occur
The PortaSound PSS-260 has been type tested and found to comply
with the specifications set for a Class B computing device in accordance
with those specifications listed in Subpart J of Part 15 of the FCC rules.
These rules are designed to provide a reasonable measure of protection
against such interference. However, this does not guarantee that inter
ference will not occur. If your PortaSound should be suspected of
causing interference with other electronic devices, verification can be
made by turning your PortaSound PSS-260 off and on. If the interference
continues when your PortaSound PSS-260 is off, the PortaSound
PSS-260 is not the source of the interference. If your PortaSound
PSS-260 does appear to be the source of the interference, you should try
to correct the situation by using one or more of the following measures:
Relocate either the PortaSound PSS-260 or the electronic device
that is being affected by the interference.
Utilize power outlets for the PortaSound PSS-260 and the device
being affected that are on different branch (circuit breaker or fuse)
circuits, or install A/C line filters.
In the case of radio-TV interference, relocate the antenna or, if the
antenna lead-in is a 300 ohm ribbon lead, change the lead-in to a co
axial type cable.
If these corrective measures do not produce satisfactory results,
please contact your Authorized Yamaha Specialty Products dealer for
suggestions and/or corrective measures. If you cannot locate an
Authorized Yamaha Specialty Products dealer in your general area,
contact the Specialty Products Service Center, Yamaha International,
66(X) Orangethorpe Ave., Buena Park, CA 90620.
If for any reason you should need additional information relating to
radio or TV interference, you may find a booklet prepared by the
Federal Communications Commission helpful: "How to identify and
Resolve Radio-TV Interference Problems". This booklet is available
from the U.S. Government Printing Office, Washington D.C.
20402-Stock #004-000-345-4.
Page 20

0 YAMAHA
NIPPON GAKKI CO.. LTO. HAMAMATSU. JAPAN
The serial number of this product may be found on the
bottom of the unit. You should note this serial number in
the space provided below and retain this manual as a
permanent record of your purchase toaid identification in
the event of theft.
Model No. PSS-260
__________________
Serial No.
Concerning Warranty
This product was made for international distribution, and
since the warranty for this type of product varies from
marketing area to marketing area, please contact the
selling agency for information concerning the applicable
warranty and /or service policies.
Die Seriennummer befindet sich an der Unterseite des In
struments. Wir empfehlen, diese Nummer sicherheitshalber
an der unten vorgesehenen Stelle einzutragen, um sie auch
im Falle eines Diebstahls jederzeit zur Hand zu haben.
Modell-Nr. PSS-260
Serien-Nr.
_____________________
Hinweis zur Garantie
Dieses Produkt wird international vertrieben, und die
Garantiebedingungen sind von Vertriebsland zu Vetriebsland verschieden. Ihr Händler gibt Ihnen gerne genauere
Informationen zu den in Ihrem Land gültigen Garantieund/oder Servicebedingungen.
Le numéro de série de ce produit figure sur le socle de
l'appareil. Il conviendra de noter ce numéro de série dans
l'espace réservé au-dessous et de conserver ce manuel:
celui-ci constitue le document permanent de votre achat
et permet l'identification en cas de vol.
Modèle No. PSS-260
_________________
No. de série.
E1 número de serie de este producto se encuentra en la parte
inferior de la unidad. Sírvase anotar este número de serie en
el espacio proporcionado debajo y guarde este manual como
comprobante de compra para ayudar a la identificación en
caso de robo.
N? de modelo PSS-260
N? de serie
Remarque relative à la garantie
Ce modèle est destiné à être distribué à l'échelle inter
nationale. Etant donné que les conditions de garantie pour
ce type de produit varient en fonction des zones de
commercialisation, prière de prendre contact avec l'agence
chargée des ventes pour tous renseignements relatifs aux
conditions de garantie etiou de service après-vente.
Este producto ha sido fabricado para ser distribuido inter
nacionalmente y, como la garantía para este tipo de producto
varía en relación a su área de comercialización,
sírvase consultar con el agente de ventas sobre la informadon
en torno a la garantía aplicable y/o poh'ticas de servicio.
___________________
Concerniente a la garantía
® ^ 603 Printed in Japan
 Loading...