

Page 1

YAMAHA
PQrtdSQUI\d
OWNER’S MANUAL MANUEL DU PROPRIETAIRE
BETRIEBSANLEITUNG MANUAL DEL PROPIETARIO
Thank you for purchasing a Yamaha PortaSound PSS-100
This PortaSound is an ultra-modern keyboard with a design based on the latest digital technology, which allows you to record
and replay your music. To be sure you get maximum satisfaction from your keyboard, we suggest you follow the steps in this
manual carefully while actually playing the instrument.
Herzlichen Glückwunsch zum Kaufeines Yamaha PortaSound PSS-100
Dieses PortaSound ist ein ultramodernes Keyboard mit einem Design, das die neueste Digitaltechnologie enthält. Diese
ermöglicht es, Ihr Spiel aufzuzeichnen und wiederzugeben. Um immer beste Befriedigung durch das Keyboard zu erhalten,
sollten Sie die in dieser Anleitung aufgeführten Bedienungsschritte sorgfältig befolgen, während Sie das Instrument vor sich
haben.
Precautions
Your PortaSound will give you years of playing pleasure if you follow the simple rules given
below:
1. Use ONLY the optional Yamaha AC adaptors with your PortaSound, Read the adaptor
instructions carefully before use.
2. Avoid placing the PortaSound in areas that are subject to excessive humidity or heat.Do
not leave the instrument near heaters or in a car exposed to direct sunlight, for example.
3. Do not subject the instrument to strong physical shocks, and avoid placing heavy objects
on it, or placing excessive stress on the keys and buttons.
4. Do not use the keyboard in the vicinity of a radio or TV set, as noise may be caused in the
radio or TV set.
5. Be sure to turn OFF the power switch after use. It is recommended that the batteries be
removed if the instrument is not going to be used for a long time, since the batteries may
leak.
6. Use a soft cloth, dry or slightly damp, for cleaning. Never use chemicals such as benzine
or thinner.
Before You Begin
<1> when using batteries:
Remove the battery compartment cover on the bottom of the instrument, and insert four 1.5V
AA-size, SUM-3, R-6 batteries (sold separately), making sure that the polarities are observed
as directed beside the cover. Replace the cover, ensuring that if locks securely in place.
Caution:
* Replace all the batteries at the same time. Using old batteries with new ones might be
dangerous.
* Be sure all the polarities are correct. Setting one of the batteries in the wrong direction might
be dangerous.
<2> When using the AC adaptor
The Yamaha Power Adaptor PA-1, PA-1B or PA-3 is available for household current. No
other adaptor is usable. Connect the adaptor to the terminal on the rear pane! of the unit, and
plug in the adaptor.
Vorsichtsmaßregeln
Ihr PortaSound garantiert ihnen jahrelange Spielfreude, wenn Sie die folgenden einfachen
Regeln befolgen:
1. Immer NUR die als Sonderzubehör erhältlichen Netzteile von Yamaha mit dem Por
taSound verwenden. Die Bedienungsanweisungen für die Netzteile befolgen.
2. Das PortaSound nicht an Orten mit starker Hitze oder Luftfeuchtigkeit aufstellen, wie z.ß.
neben Heizkörpern oder im direkten Sonnenlicht.
3. Starke Stöße können das Gerät beschädigen. Immer mit Vorsicht behandeln. Die Schalter
und Regler nicht mit Gewalt betätigen, und keine schweren Gegenstände auf das Gerät
stellen,
4. Das Keyboard nicht in der Nähe eines Radios oder Fernsehers aufstellen, da es Störungen
verursachen kann.
5. Nach dem Einsatz immer mit dem Betriebsschalter ausschalten. Wir empfehlen, die
Batterien zu entnehmen, wenn das Gerät längere Zeit nicht verwendet werden soll, da
diese leck werden können.
6. Niemals Lösungsmittel wie Benzol oder Farbverdünner zum Reinigen des Geräts verwen
den, Zum Reinigen mit einem weichen und trockenen oder nur leicht angefeuchteten
Lappen abwischen.
Bevor Sie beginnen
<1> Bei Verwendung von Batterien:
Den Batteriefachdeckel am Boden des Instrumentes abnehmen und vier Batterien AA-Typ,
SUM-3, R-6 (Mignonzellen, getrennt erhältlich) einlegen. Beim Einlegen aufrichtige Polarität
(Ausrichtung von Plus- und Minuspol) entsprechend den Markierungen neben dem Batter
iefachdeckel achten. Dann den Batteriefachdeckel wieder aufsetzen und sicherstellen, daß
er fest an der richtigen Stelle einrastet.
Vorsicht:
* Immer alle Batterien gleichzeitig austauschen. Es kann gefährlich sein, alte Batterien mit
frischen zusammen zu verwenden.
* Immer sicherstellen, daß die Polarität richtig ist. Es kann gefährlich sein, eine Batterie in
falscher Richtung einzulegen.
<2> Bei Verwendung eines Netzteils
Netzspannung; Die Yamaha-Netzteile PA-1, PA-IB oder PA-3 stehen für Betrieb mit
Netzstrom zur Verfügung. Andere Netzteile sind nicht geeignet. Das Netzteil an die Buchse
an der Rückwand des Geräts anschließen und dann den Stecker in die Steckdose stecken.
Page 2

Nous vous félicitons d'avoir fait l'achat d'un Yamaha PortaSound PSS-100
Ce PortaSound est un clavier ultra-moderne dont la conception est basée sur la technologie numérique la plus récente, qui vous
permet d'enregistrer et de rejouer votre musique. Pour être sûr de tirer le maximum de satisfaction de votre clavier, nous vous
suggérons de suivre soigneusement les étapes indiquées dans ce manuel en les essayant sur l'instrument.
Gracias por la adquisición de un PortaSound PSS-100 Yamaha
Este PortaSound es un teclado ultramoderno con un diseño basado en la última tecnología digital, que le permitirá grabar y
reproducirse música. Para asegurar la obtención de la máxima satisfacción de su teclado, le sugerimos que siga cuidadosamente
los pasos indicados en este manual mientras toque el instrumento.
Précautions
Votre PortaSound vous donnera des années de plaisir musical si vous suivez les règles simples
énoncées ci-dessous:
1. N'utilisez avec votre PortaSound QUE les adaptateurs secteur Yamaha optionnels. Lisez
attentivement la notice de l'adaptateur avant de l'utiliser.
2. Evitez de placer le PortaSound dans des endroits soumis à une humidité ou une chaleur
excessives. Ne laissez pas l'instrument près d'un appareil de chauffage ou dans une voiture
en plein soleil par exemple.
3. N'exposez pas l'instrument à des chocs physiques importants et évitez de placer des objets
lourds dessus, ou d'appliquer une force excessive sur les touches et les commandes.
4. N'utilisez pas le clavier à proximité d'une radio ou d'un téléviseur, car des parasites
peuvent se produire dans la radio ou le téléviseur.
5. N'oubliez pas de mettre l'interrupteur d'alimentation surOFF après utilisation. Nous vous
recommandons de retirer les piles de l'instrument si vous ne comptez pas l'utiliser pendant
longtemps, pour éviter une fuite d'électrolyte.
6. Utilisez un chiffon doux et sec ou légèrement humide pour nettoyer l'instrument. N'util
isez jamais de produit chimique comme de l'essence ou du diluant.
Avant de commencer
<1> Si vous utilisez des pites:
Retirez le couvercle du logement des piles situé dans la partie inférieure de l'instrument, et
introduisez quatre piles 1,5 V format AA, SUM-3, R-6 (vendues séparément), en respectant
le schéma de polarité indiqué à côté du couvercle. Replacez le couvercle, et assurez-vous
qu'il s'emboîte correctement.
Précautiorts:
* Remplacez toutes les piles en même temps. Il peut être dangereux d'utiliser des vieilles piles
avec des neuves.
* Assurez-vous que toutes les polarités sont correctes. Il peut être dangereux de placer une
pile dans le mauvais sens.
<2> Si vous ui/7i'sez l'adaptateur secteur
L'adaptateur d'alimentation Yamaha PA-1, PA-1 B ou PA-3 est disponible pour le courant
domestique. Aucun autre adaptateur ne peut être utilisé. Raccordez l'adaptateur à la borne
située sur le panneau arrière de l'appareil, puis branchez l'adaptateur.
Precauciones
Su PortaSound le ofrecerá años de entretenimiento musical si sigue las sencillas normas
ofrecidas a continuación:
1. Con el PortaSound, emplee SOLAMENTE adaptadores de CA Yamaha opcionales. Antes
de emplear el adaptador, lea cuidadosamente las instrucciones del mismo.
2. Evite colocar el PortaSound en lugares sometidos a humedad y calor excesivos. No deje
el instrumento cerca de aparatos de calefacción, ni en un automóvil expuesto a la luz solar
directa, por ejemplo.
3. No someta el instrumento a golpes físicos fuertes, y evite colocar objetos pesados sobre
él y aplicar demasiada fuerza sobre las teclas y botones,
4. No utilice el teclado cerca de un aparato de radio ni de televisión, ya que podría causar
ruido en ellos.
5. Después de emplear el instrumento, cerciórese de poner el interruptor de alimentación
en OFF. Cuando no vaya a emplear el instrumento durante mucho tiempo, se recomienda
extraer las pilas porque el electrólito de las mismas podría fugarse.
6. Para la limpieza, emplee un paño suave seco o ligeramente humedecido. No utilice
nunca productos químicos tales como bencina o diluidor de pintura.
Antes de comenzar
<1> Para emplear pilas;
Extraiga la tapa del compartimiento de las pilas de la parte inferior del instrumento, e inserte
cuatro pilas de tamaño AA, SUM-3, R6 de 1,5V (opcionales), cerciorándose de instalarlas
correctamente como se indica detás de la tapa. Vuelva a colocar la tapa, cerciorándose de
que quede cerrada con seguridad en su lugar.
Precaución:
* Reemplace todas las pilas al mismo tiempo. El empleo de pilas viejas con otras nuevas
puede resultar peligroso.
* Cerciórese de que todas las pilas queden instaladas con la polaridad correcta. La
instalación de una pila en sentido incorrecto puede resultar peligroso.
<2> Para emplear el adaptador de CA
Para la corriente de la red está disponible el adaptador de alimentación PA-1, PA-1 B, o PA-
3 Yamaha, No emplee ningún otro adaptador. Conecte el adaptador a la toma del panel
posterior de la unidad, y enchúfelo en la red.
Page 3
VOLUME
r^i
▼ 1
DEMO RESET
START. ïï
STOP II
MEASURE/VO
O
¡LJ k
POWER SWITCH
INTERRUPTEUR D’ALIMENTATION
Betriebsschalter
Interruptor de alimentación
r
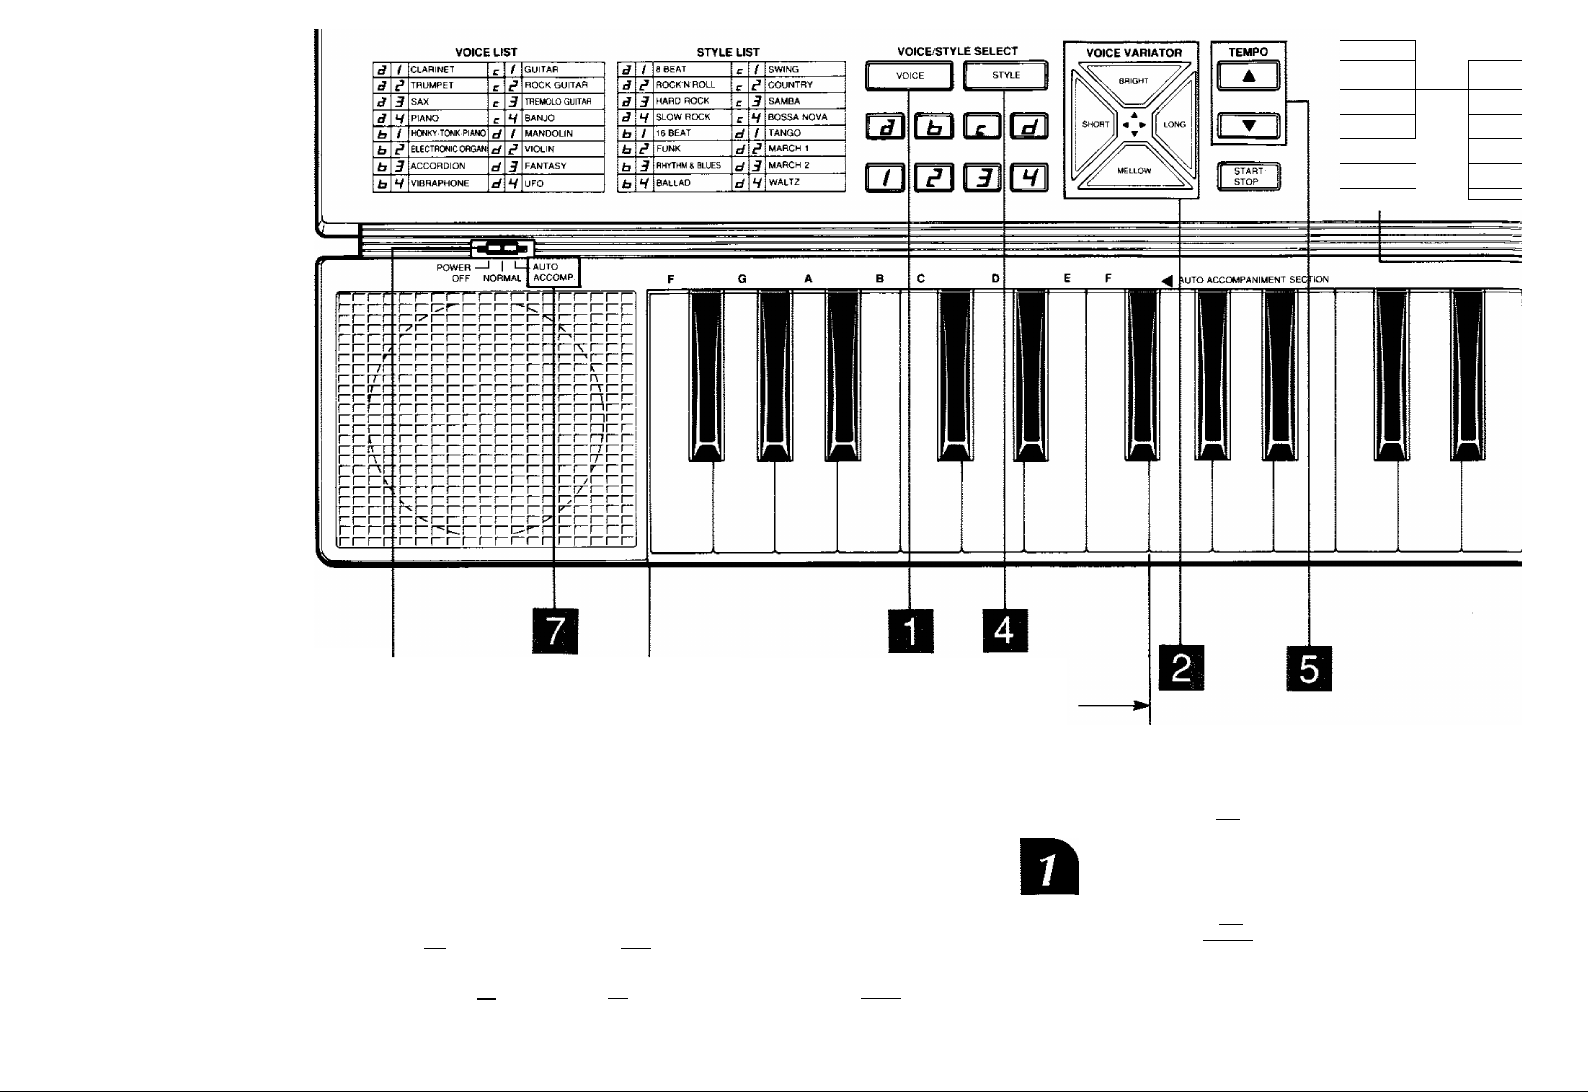
Using the Voice Section
1. Turn the power switch to NORMAL.
2. Choose the voice you want to play from the voice list on the panel.
3. Press I I , one of i Jl - ^3 ' B / I - ^3 ■
e.g. Ifyouwantaguitarvoice, press I
4. Play the keyboard, and the guitar sound will be produced,
* When the power is turned ON, the clarinet voice is automatically selected.
~l
then
(Zl
and then| / |, and the LED indicator will display [ C. /«
*L.... I
Auto Accompaniment Section
Section d’accompagnement automatique
Sektion automatische Begleitung
Sección de acompañamiento automático
r
Playing Back the Demonstration Son
Press the || t button to play the demonstration sonf
* To stop the demonstration songs, press the
Wiedergabe der Demonstrationstitei
Die Taste |[ \ drücken, um die Demo-Titel abzuspie
* Zum Stoppen der Demo-Titel die Taste
DEMO
DEMO
Ecoute des morceaux de démonstrat
Appuyez sur la touche
pour écouter les morce;
Page 4
iUR£/VOfC&STYL£
-BEAT^ DIGITAL RECORDER
RESET REwitJD STOP PLAV fastforhuro
! ^ l! ■ 1 1 ► ¡1 ►►
Ai
YAMAHAR^^HOO
PartdSomd digital recording keyboard
RECORD
: • 1
Using the Volume Controls
Use the volume controls to adjust the level of the volume.
The level can be changed in 5 steps.
Press fi A ll to increase the volume.
Press fl T ^1 to decrease the volume.
* The volume is set to just below maximum when the power is turned on.
* To return the level of the volume to the preset setting, press the (Ca 1] and fi ▼ 1) buttons together.
]]
fongs
songs,
] button again.
tel
uspielen.
;rneut drücken.
\ration
orceaux de démonstration.
Verwendung der Lautstärkeregler
Mit den Lautstärkereglern wird der Lautstärkepegel eingestellt.
Der Pegel kann in 5 Stufen eingestellt werden.
Die Taste il drücken, um die Lautstärke zu steigern.
Die Taste fi ▼ Hl drücken, um die Lautstärke zu senken.
* Ein Lautstärkepegel kurz unter Maximum wird beim Einschalten des Geräts eingestellt.
* Zum Rückstellen des Lautstärkepegels auf die vorherige Einstellung die Tasten und
drücken.
Utilisation des régiages de voiume
Utilisez les réglages de volume pour ajuster le niveau d'intensité sonore.
Le niveau peut être modifié en 5 incréments.
Appuyez sur f A ll pour augmenter le voiume.
Appuyez sur I: ▼ ll pour diminuer le volume.
* Le volume est réglé juste en-dessous du maximum lorsque l'appareil est mis sous tension.
Pour ramener le volume ä la valeur nréréelée aoouvez en même temns sur les touches ir“*'"t et T
^ gleichzeitig
Page 5
When the power is turned ON, the clarinet voice is automatically selected.
You can play up to 6 notes at a time. If you press 7 keys, the first key that you pressed will no longer sound.
A click sound confirms the operation of the switches.
Ein toiler Sound von Ihrem PortaSound
1. Verwendung der Stimmensektion Den Betriebsschalter auf NORMAL stellen.
2. Die gewünschte Stimme von der Stimmensektion auf dem Bedienfeld wählen und die entsprechende Taste drücken.
3. Die Taste I ''°
tarrenstimme spielen wollen, dann drücken
Sie
4. Spielen Sie auf dem Keyboard, und der Gitarrensound wird automatisch produziert.
* Beim Einschalten wird automatisch die Klarinettstimme gewählt,
* Es können bis zu 6 Noten gleichzeitig gespielt werden. Wenn 7 Tasten gedrückt werden, erklingt die erste gedrückte
Taste nicht länger.
* Ein Klickton bestätigt die Schalterbetätigung.
drücken, eine der Tasten von (ZI o und eine von dl [H ■ Wenn Sie z.ß. eine Gi
] , anschließend und schließlich! / I. und im LED-Display erscheint
C.Í
y •
Utilisation de la section timbres
1. Réglez l'interrupteur d'alimentation sur NORMAL.
2. Choisissez le timbre que vous voulez reproduire à partir de la liste de timbres sur le panneau.
3. Appuyez sur la touche H j , une des touches ca S „ et une des touches mm
Si, par example, vous vouiez un fimbre de guitare, appuyez sur ^ ^ f puis sur (D puis sur m pour
affecher
4. Jouez quelque chose sur le clavier, et le son de guitare est reproduit.
* Lorsque l'appareil est mis sous tension, le timbre de clarinette est automatiquement sélectionné.
* Vous pouvez jouer jusqu'à 6 notes à la fois. Si vous appuyez sur 7 touches, le son de la première touche enfoncée
s'arrête.
* Un clic vous confirme le fonctionnement des sélecteurs.
c./.
Empleo de la sección de voces
1. Ponga el interruptor de alimentación en NORMAL.
2. Elija la voz que desee reproducir de la lista de voces del panel.
3. Presione un botón de E3 IZ] , y un botón de
P. ej., si desea una voz de guitarra, presione | vocs |
m El
y después m , y el indicador de LED mostrará
(D
Appuyez sur la touche |j [ pour écouter les more
* Pour arrêter la lecture des morceaux de démonstrafi
PEMO
Reproducción de las canciones de <
Para reproducir las canciones de demostración, presioi
* Para cesar las canciones de demostración, vuelva a ,
r
Using the Rhythm Section
1, Pick a rhythm from the style list on the panel.
2. Press I I of I ß I - {^d\ , and one of
e.g. If you want a rock'n' roll rhythm, press
display
3. Press the red
Dots on the LED indicator shows the beat. Two dot;
4. Press the red II 11^I button again to stop the rh
* When the power is turned on, the 8 beat rhythm is e
3¿
button to start the rhythm.
Verwendung der Rhythmussektion
1, Einen Rhythmus aus der Stilliste im Bedienfeld wähf
2, I I drücken, eine der Tasten CZ S u
Roll Rhythmus spielen wollen, dann drücken
Sie [ , cz und dann m , und im LEC
3, Die rote Taste || j erneut drücken, um den Rh>
Punkte in der LED-Anzeige zeigen den Taktschlag ar
Taktschlag des Taktes an.
4. Die rote Taste B tl»" I drücken, um den Rhythrr
* Beim Einschalten wird automatisch der 8-Beat RhytE
4. Toque con el teclado, y se reproducirá el sonido de guitarra.
* Cuando conecte la alimentación, se seleccionará automáticamente la voz de clarinete,
* Usted podrá tocar hasta 6 notas a la vez. Si pulsa 7 teclas, la primera tecla que haya pulsado dejará de sonar.
Un chasquido confirmará la operación de los botones.
V.
r
Using the Voice Variator Controls
You can change the tone of the voice through 4 variator controls.
* Voice brightness has 8 variations, and voice length has 5 variations.
Pressing SHORT makes the voice length shorter.
Pressing LONG makes the voice length longer.
Utilisation de la section rythme
1. Choisissez un rythme dans la liste des styles sur le p;
2. Appuyez sur la touche [ smt | , une touche
Ex: Si vous voulez un rythme de rock'n'roll, appuyez
diode affiche
3. Appuyez sur la touche rouge
Les points sur l'indicateur à diode indiquent le rythnn
de la mesure. _=
4, Appuyez de nouveau sur la touche rouge 11 1 pc
* Lorsque l'appareil est mis sous tension, le rythme à f
33
___
M pour corn men
Empleo de la sección de ritmos
Page 6

mon, appuyez ae nouveau sur ta loucne i|
demostración
î presionar el botón
DEMO
Empleo de los controles de volumen
Emplee los controles de volumen para ajustar el nivel del volumen. El nivel podrá cambiarse en 5 pasos.
Presione Ir a ll para aumentar el volumen.
Presione ll ▼ ’~l] para disminuir el volumen.
Al conectar la alimentación, el volumen se ajustará a un nivel justamente inferior al máximo.
Para devolver el volumen a su valor preajustado, presione los botones |
's.
1 y
al mismo toempo.
■f m - m
□ ca
its at the same time means the first beat of the bar
'hythm.
; automatically selected.
hien,
und eine der Tasten j / | | *71 Wenn Sie z.B. einen Rock'n
iD-Display erscheint
hythmus zu stoppen.
an. Zwei gleichzeitig erscheinende Punkte zeigen den ersten
imus wieder zu stoppen.
Thmus eingestellt.
panneau,
^ (Z3 ,et une touche
5z sur les touches m puis m . L'indicateur à
encer le rythme.
me. Deux points en même temps marquent le premier temps
pour arrêter le rythme.
i 8 temps est automatiquement sélectionné.
and then m , and the LED indicator will
3¿
DD ra
Using The Auto Accompaniment
The auto accompaniment feature makes it easy to produce an accompaniment by pressing a few keys in the Auto
Accompaniment section of the keyboard.
1. Turn the power switch to AUTO ACCOMP.
2. Select the voice and rhythm.
3. Press any key in the range of the auto accompaniment section, and the auto accompaniment and rhythm will start
automatically.
4. Play the melody with your right hand, accompanied by chords and rhythm produced from the auto accompaniment
keys played by your left hand.
* You can play up to 3 melody notes in the auto accompaniment mode. If you press 4 keys, the first key that you
pressed will no longer sound.
If you press a "C" key, for example, a C-major accompaniment will be played. Press another key in the auto ac
companiment section to select a new chord. The highest key you press will always determine the "root" of the
chord played (e.g. "C" for a C chord).
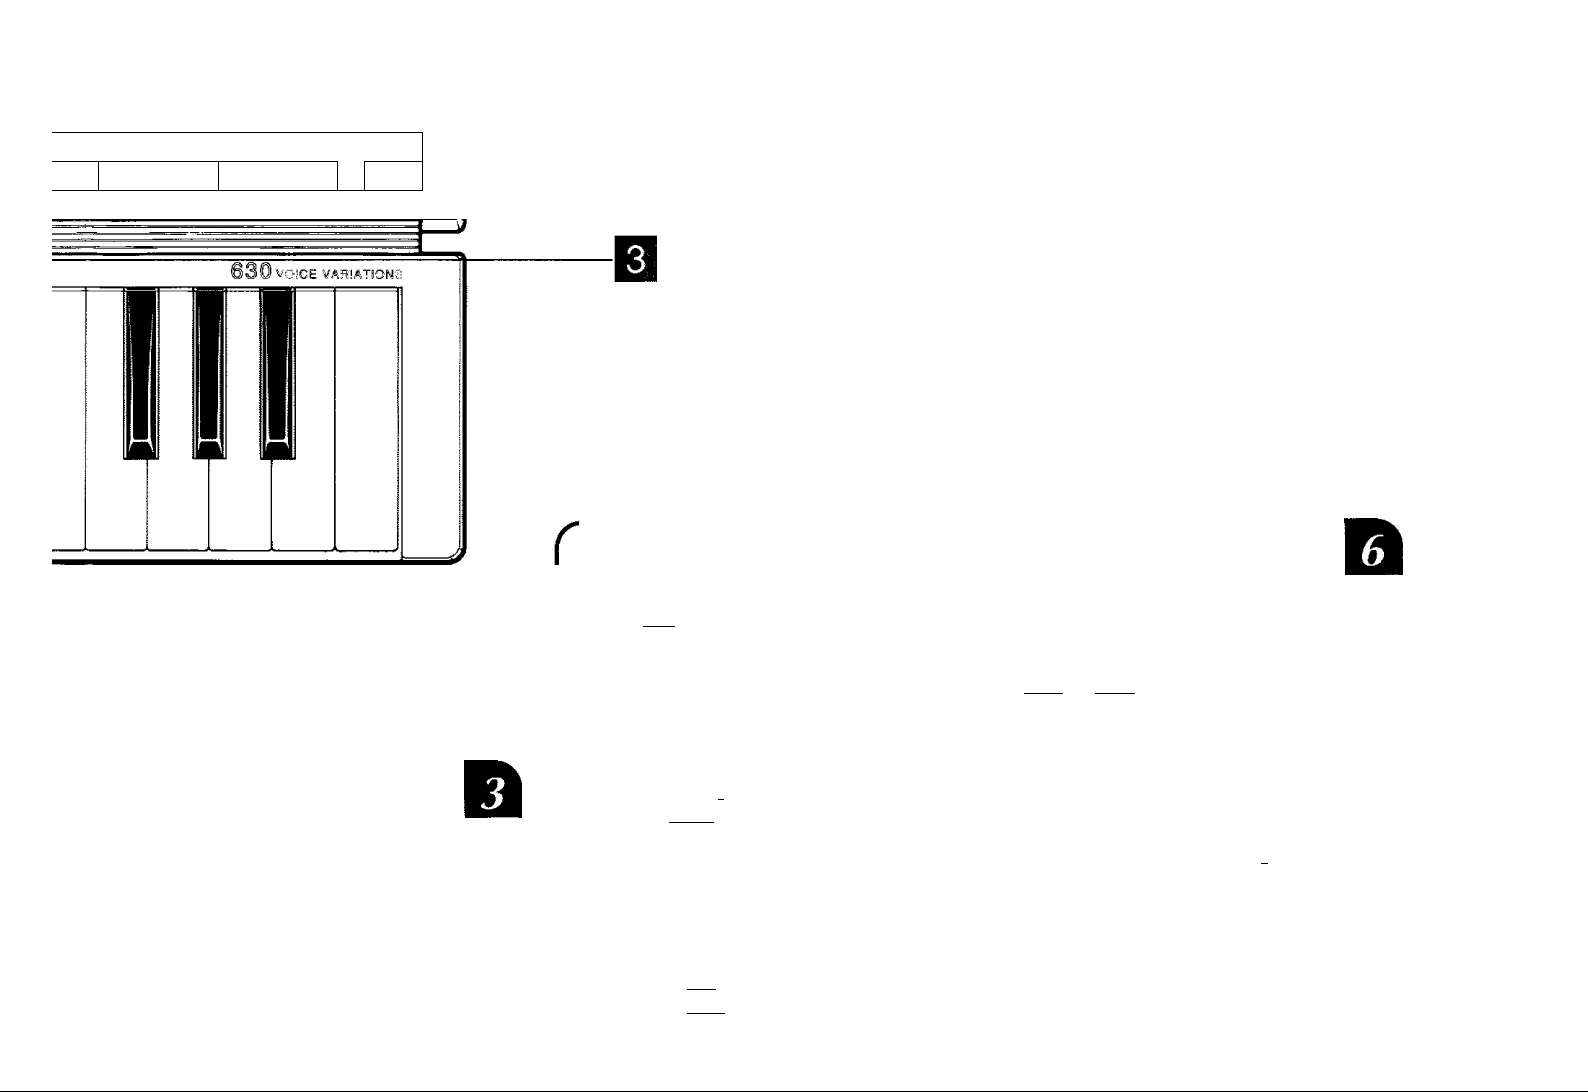
Playing Minor, Seventh, and Minor-seventh Chords, {See Illustration CDbelow.)
* For a minor chord, press the root key and any black key to its left.
* For a seventh chord, press the root key and any white key to its left.
* For a minor-seventh chord, press the root key and both any white and black keys to its left.
Verwendung der automatischen Begleitung
Mit der automatischen Begleitung wird es möglich, Begleitung durch einfaches Drücken einiger Tasten Inder Sektion
Auto Accompaniment des Keyboards zu erhalten.
1. Den Betriebsschalter auf AUTO ACCOMP stellen.
2. Die gewünschte Stimme und den gewünschten Rhythmus wählen.
3. Eine Taste im Bereich der Sektion Auto Accompaniment drücken, und der Rhythmus sowie die automatische
Begleitung starten automatisch.
4. Die Melodie mit der rechten Hand spielen, und die begleitenden Akkorde und der Rhythmus werden von den mit
der linken Hand gespielten Tasten erzeugt.
* Bis zu 3 Melodienoten können im Modus Auto Accompaniment gleichzeitig gespielt werden. Wenn Sie 4 Tasten
drücken, erklingt die erste gedrückte Taste nicht.
Wenn Sie z.B. eine "C"-Taste drücken, wird ein C-Dur Akkord gespielt. Drücken Sie eine weitere Taste in der Sektion
automatische Begleitung, um einen neuen Akkord zu wählen. Die höchste gespielte Note bestimmt immer die
"Crundnote" des gespielten Akkords (z.B. "C" bei einem C-Akkord),
Spielen von Moll-, Septimen- und Mollseptimen-Akkorden. (Siehe Illustrierung ©hierunten.)
* links daneben drücken.
* Bei Septimenakkorden die Grundtaste und eine beliebige weiße Taste links daneben drücken.
* Bei Mollseptimenakkorden die Grundtaste und sowohl eine Halbtontaste als auch eine weiße Taste links daneben
drücken.
Page 7

Pressing LONG makes the voice length longer.
Pressing BRIGHT makes the voice bright.
Pressing MELLOW makes the voice mellow.
When you press the Voice Variator buttons, a click sound will be heard as long as the variation is effective.
To return to the preset setting.
Press the LONG and SHORT buttons at the same time.
Press the BRIGHT and MELLOW buttons at the same time.
For the honky-tonk piano, the voice brightness has 6 variations.
Einsatz der Stimmenvariatorregler
Der Stimmenklang kann mit den 4 Variatorreglern eingestellt werden.
* Die Stimmenhelligkeit hat 8 Variationen, und die Stimmenlänge 5,
Durch Drücken von SHORT wird die Stimmenlänge verkürzt.
Durch Drücken von LONG wird die Stimmenlänge verlängert.
Durch Drücken von BRIGHT wird die Stimme schärfer.
Durch Drücken von MELLOW wird die Stimme weicher.
Wenn die Stimmenvariatortasten betätigt werden, ertönt ein Klickton solange die Variation wirksam ist.
Zum Rückstellen auf vorherige Einstellung.
Die Tasten LONG und SHORT gleichzeitig drücken.
Die Tasten BRIGHT und MELLOW gleichzeitig drücken.
Für Honky-tonk Piano hat die Stimmenhelligkeit 6 Variationen.
Utilisation des réglages du variateur de timbre
Vous pouvez modifier la tonalité d'un timbre grâce aux 4 réglages du variateur.
* L'éclat du timbre a 8 variations et la longueur du timbre en a 5.
La touche SHORT permet de raccourcir la longueur du timbre.
La touche LONG permet de rallonger la longueur du timbre.
La touche BRIGHT permet d'accentuer le timbre,
La touche MELLOW permet d'atténuer le timbre.
* Lorsque vous appuyez sur les touches du variateur de timbre, un bruit de clic se fait entendre tant que la variation est
effective,
* Pour revenir à la valeur préréglée.
Appuyez en même temps sur les touches LONG et SHORT.
Appuyez en même temps sur les touches BRIGHT et MELLOW,
* Pour le piano honky-tonk, l'éclat du timbre a 6 variations.
Empleo de ios controles del variador de voces
Usted podrá cambiar el tono de la voz mediante 4 controles de variador.
* El brillo de la voz posee 8 variaciones, y su duración 5 variaciones.
Si presiona SHORT, la duración de la voz se acortará.
Si presiona LONG, la duración de la voz se alargará.
Si presiona BRIGHT, la voz se volverá brillante.
Si presiona MELLOW, la voz se volverá suave.
* Cuando presione los botones del variador de voces, oirá un chasquido mientras la variación permanezca en efecto.
* Para volver al valor preajustado.
Presione los botones LONG y SHORT al mismo tiempo.
Presione los botones BRIGHT y MELLOW al mismo tiempo.
Para piano Honky-tonk, el brillo de la voz posee 6 variaciones.
's.
Empleo de la sección de ritmos
1. Escoja un ritmo de la lista de estilos del pane!.
2. Presione j g , un botón de Q] [3 y
P. ej., si desea un ritmo de rock and roll, presione |
mostrará
3. Los puntos de indicador de
del compás.
4. Para cesar el ritmo, vuelva a presionar el botón rojo
Cuando conecte la alimentación, se seleccionará ac
зг
mostrarán el tiem
r
Using the Tempo Controls
Use the tempo controls to adjust the speed of the rhytl
Press
Press
To return the tempo to the preset setting, press the
A tempo of J =124 will be set when the power ie
Verwendung der Temporegler
Mit den Temporeglern kann die Geschwindigkeit des I
eingestellt werden.
Die Taste fr
Die Taste [r~T ^1 drücken, um das Tempo zu senl<
Zum Rückstellen des Tempos auf die vorherige Einst
Ein Tempo von J = 124 wird beim Einschalten des
Utilisation des réglages de tempo
utilisez les réglages de tempo pour ajuster la vitesse di
Appuyez sur II A il pour augmenter le tempo.
Appuyez sur
Pour ramener le tempo à la valeur préréglée, appuy
Le tempo est réglé sur J = 124 à la mise sous ten
Empleo'de los controles de tempo
Emplee los controles de tempo para ajustar la velocida
Presione
Presione
* Para volver al valor de tempo preajustado, presione
* Cuando conecte la alimentación se establecerá un t(
to increase the tempo.
to decrease the tempo.
drücken, um das Tempo zu steij
f[ T 1]
pour diminuer le tempo.
para aumentar el tempo,
para disminuir el tempo.
Page 8

ntmos
5 del panel.
E , y un botón de ^ .
I roll, presione j style | ^ [°^ , y después , y el indicador de LED
Tiostrarán el tiempo. Dos puntos al mismo tiempo significan el primer tiempo
mar el botón rojo H .
e seleccionará automáticamente el ritmo 8 Beat.
Is
speed of the rhythm. The tempo can be changed in 16 steps.
po.
ipo.
etting, press the | a i] and [I ▼ ~ l1 buttons together.
/hen the power is turned on.
"egter
:hwindigkeit des Rhythmus eingestellt werden. Das Tempo kann in 16 Stufen
js Tempo zu steigern.
IS Tempo zu senken.
lie vorherige Einstellung die Tasten i a ll und fl ▼ 1 gleichzeitig drücken,
n Einschalten des Geräts eingestellt.
de tempo
¡uster la vitesse du rythme. Le tempo peut être modifié en 16 incréments,
nter le tempo,
ler le tempo.
préréglée, appuyez en même temps sur les touches II il et ir ▼
î la mise sous tension de l'appareil.
de tempo
ijustar la velocidad del ritmo. El tempo podrá cambiarse en 16 pasos,
el tempo,
el tempo.
ustado, presione los botones f ll y [I________▼, Jl al mismo tiempo.
I establecerá un tempo de j =124.
Utilisation de i’accompagnement automatique
La fonction d'accompagnement automatique facilite la création d'un accompagnement en appuyant seulement sur
quelques touches de la section d'accompagnement automatique du clavier,
1. Réglez l'interrupteur d'alimentation sur AUTO ACCOMP.
2. Sélectionnez le timbre et le rythme.
3. Appuyez sur n'importe quelle touche dans la gamme de la section d'accompagnement automatique. L'accompag
nement automatique commence automatiquement.
4. jouez la mélodie à la main droite, accompagnée par les accords et le rythme produits par les touches d'accompag
nement automatique jouées à la main gauche.
* Vous pouvez jouer jusqu'à 3 notes de mélodie en mode d'accompagnement automatique. Si vous appuyez sur 4
touches, le son de celle enfoncée en premier cesse de retentir.
Si vous appuyez sur une touche Do par exemple, l'accompagnement sera en Do majeur. Appuyez sur une autre touche
de la section d'accompagnement automatique pour sélectionner un nouvel accord. La touche supérieure indique
toujours la dominante de l'accord joué (par exemple un Do pour un accord de Do).
Accords mineurs, de septième et de septième diminuée. (Voir illustration ©ci-dessus.)
* Pour obtenir un accord mineur, appuyez sur la touche de dominante et sur n'importe quelle touche noire située
à sa gauche.
* Pour obtenir un accord de septième, appuyez sur la touche de dominante et sur n'importe quelle touche blanche
située à sa gauche.
* Pour obtenir un accord de septième diminuée, appuyez sur la touche de dominante et sur une touche blanche et
une touche noire situées à sa gauche.
Empieo dei acompañamiento automático
La función de acompañamiento automático facilitará la producción de un acompañamiento pulsando unas pocas
teclas de la sección de acompañamiento automático del teclado.
1. Ponga el interruptor de alimentación en AUTO ACCOMP.
2. Seleccione la voz y el ritmo.
3. Pulse cualquier tecla de la gama de la sección de acompañamiento automático, y se iniciarán automáticamente
el acompañamiento automático y el ritmo.
4. Toque la melodía con la mano derecha, acompañada por los acordes y el ritmo producidos por las teclas de acom
pañamiento automático tocadas con la mano izquierda.
* En el modo de acompañamiento automático, usted podrá tocar hasta 3 notas de melodía. Si pulsa 4 teclas, la
primera que haya pulsado dejará de sonar.
S pulsa una tecla "C (Do)", por ejemplo, se reproducirá un acompañamiento en Do mayor. Pulse cualquier tecla de
la sección de acompañamiento automático para seleccionar un nuevo acorde. La tecla superior que usted pulse
determinará siempre la "raíz" del acorde tocado (p. ej., "C (Do)" para un acorde de Do).
Cómo tocar acordes menores, de séptima, y de séptima menor. (Véase Ilustración ©baja.)
* Para un acorde menor, pulse la tecla de la raíz y cualquier tecla negra situada a su izquierda
* Para un acorde de séptima, pulse la tecla de la raíz y cualquier tecla blanca situada a su izquierda.
* Para un acorde de séptima menor, pulse la tecla de la raíz y una tecla blanca y otra negra situadas a su izquierda.
Cm 7
Ф
C
Hi
л
\ I
Cm
■
J
Page 9

Have More Fun Playing “Aura Lee”!
Mehr Spaß mit “Aura Lee”!
Amusez-vous davantage avec “Aura Lee”!
Divertase más, tocando “Aura Lee”!
r
Using the Digital Recorder
Verwendung des Digital Recorders
m
C-
c
^ J J J J I J j. J
Using the Digital Recorder
You can record your performance, and then
play a different melody in a different voice,
accompanied by your recorded music,
e.g. Playing "Aura Lee"
See score Ш
1. Turn the power switch to AUTO ACCOMP.
2. Select the violin voice by pressing | уже
then ,and then m
3. Select the 8 beat rhythm by pressing
I, then rm , and then m
4, Press the ca button, and the
metronome will sound. This means that the
unit is ready for recording.
Recording your Performance
without Auto Accompaniment
1. Turn the power switch to NORMAL.
2. Select a voice and rhythm.
3. Press the
by pressing any key or pressing the red
s™2' I button.
Recording your Performance
without Rhythm Sound
1. Turn the power switch to NORMAL
2. Select a voice.
3. Press the button.
button, and start playing
Verwendung des Digital
Recorders
Es ist möglich, eine Melodie aufeuzeichnen
und dann eine andere Melodie in einer
anderen Stimme zu spielen, begleitet von der
aufgezeichneten Musik.
Z.ß. "Aura Lee"
Siehe das Liniensystem [T]
1. Den Betriebsschalter auf AUTO ACCOMP stellen.
2. Durch Drücken von | "o'« | und ansch
ließend und dann die
Violinstimme wählen.
3. Durch Drücken von
ließend Ш und dann Ш den 8-Beaf
____________
I und ansch
Aufzeichnen des Spiels ohne
automatische Begleitung
1. Den Betriebsschalter auf NORMAL
stellen.
2. Eine Stimme und einen Rhythmus
wählen.
3. Die Taste drücken, und durch
Drücken einer beliebigen Taste oder
durch Drücken der Taste I I mit
dem Spiel beginnen.
Aufzeichnen des Spiels ohne
Rhythmus-Sound
1. Den Netzschalter auf NORMAL stellen.
Page 10

^7
c
U 4 i ,1 -o-
c
UOT~
-o-
2
--------------------------------------------
¿4 ...............—=
------------------------------
o itti
---------------
--------------
\_^
----------------
----------—Q------------
---------
1 —
—^
------------------
c
J—Q
------------------------
c
-----------------------------1
-----------------------------1
-o-
-------
F
‘ ^ J ^ J
^7
U j i j
utilisation de l'enregistreur numérique
Utilisation de renregistreur
numérique
iVous pouvez enregistrer votre exécution
ipuis jouer une mélodie différente dans un
timbre différent, accompagné par la mu
sique enregistrée.
Ex. Exécution de "Aura Lee"
Voyez la portée ¡T|
1. Réglez l'interrupteur d'alimentation sur
AUTO ACCOMP.
2. Sélectionnez le timbre de violon en ap
puyant sur la touche I I , puis
^0 et iV I .
3. Sélectionnez le rythme à 8 temps en ap
3 puyanî sur la touche ü stv
, puis
Enregistrement de votre
composition sans
accompagnement automatique
1. Réglez ¡'interrupteur d'alimentation sur
NORMAL.
2, Sélectionnez un timbre et un rythme.
3. Appuyez sur la touche I ♦ i , et
commencez à jouer en appuyant sur
n'importe quelle touche ou en appuyant
sur la touche rouge
Enregistrement de votre
composition sans rythmique
1, Réglez l'interrupteur d'alimentation sur
----------------------------------y-—
----------;---------------------------^®^ |(n
Empleo del grabador digital
Empleo del grabador digital
Usted podrá grabar su actuación y después
tocar una melodía diferente en una voz
distinta, acompañada por la música gra
bada.
P. ej. Para tocar "Aura Lee"
Véase la partitura [T]
1. Ponga el interruptor de alimentación en
AUTO ACCOMP.
2. Seleccione la voz de violín presionado el
botón I I , [ e/1 , y después | .
3. Seleccione el ritmo 8 Beat presionando
L a, [3 , y después m .sección
de ritmos.
4. Presione el botón Œ2 , y sonará el
^ Cfi ^
^ -...........
.
-------------
--------------o------------
----------—o-------------
Grabación de su actuación sin
sonido de ritmo
1. Ponga el interruptor de alimentación en
NORMAL.
2. Seleccione una voz.
3. Presione el botón P» ] .
* z PIAV
4. Presione el boton ii ^ j y comience
a tocar. Cuando toque, oirá el ritmo, pero
solamente se grabará la música que toque
con el teclado.
Regrabación desde la mitad de
una canción
fstpH nocirá iniciar la repraharion dpsrip la
Page 11

4. Press the button, and the
metronome will sound. This means that the
unit is ready for recording.
5. When you press any key, recording wiii
start.
The LED indicator will display the num
ber of measures (bars) you have recorded so
far.
6. After performing, press the CX] to stop
recording.
7. Press the
button to return to the
top bar.
8. Press the I I button to play back,
STOP
9. Press the i it I button to stop.
e.g. Playing a harmony over the "Aura
Lee" you have just recorded.
See score [2]
10.Select the electronic organ voice.
11. Press the [ a I to return to the top bar.
12. Press the ] | , and while listening to
the recorded music, play the harmony.
* You can record up to 100 bars.
* Do not turn the power off during record
ing, since the recorded data might be
destroyed.
* The PSS-100 stores the recorded music
until the batteries lose their power even after
the power is turned off.
2. Select a voice,
3. Press the r~*~lbutton.
4. Press the! 1 button and start playing.
When playing, you can hear the rhythm,
but only the music you played on the key
board will be recorded.
Re-recording from the Middle of
the Song
You can start re-recording in the middle of
the song, if you want to change the music or
if you make a mistake in playing.
1. Press theT "«^~lor I 1 button to search
for the bar from which you want to start re
recording.
mooPD
2. Press the IX] button and start recording
again.
3. Press the
button to stop.
The 3 or II i buttons step
backwards or forwards respectively by
one bar for each press of the button.
* Re-recording of the music always starts
from the first beat of the bar.
* Recording is done for each bar. When
recording, play up to the last beat of the
bar. If you stop playing in the middle of
the bar, the previous data in the remaining
part of the bar will be erased.
Clearing all the Recorded Music
at a Time
1. Turn the power switch OFF.
2. While pressing the
the power switch to
NORMAL or AUTO ACCOMP. Allthe re
corded data will be erased.
button, turn
Violinstimme wählen.
3. Durch Drücken von j | und ansch
ließend tu und dann I / I den 8-Beat
Rhythmus wählen.
wecowD
4. Die Taste drücken, und der
Metronomton erklingt. Das bedeutet, daß
das Gerät zur Aufnahme bereit ist.
5. Durch Drücken einer beliebigen Taste be
ginnt die Aufzeichnung. Die LED-Anzeige
zeigt die Anzahl der bereits aufgenomme
nen Takte.
6. Nach dem Spiel die Taste drücken.
um die Aufnahme zu stoppen.
RESET
7. Die Taste f a1 drücken, um zum ersten
Takt zurückzukehren.
PLAY
8. Die Taste IX] zur Wiedergabe
drücken.
STOP
9. Die Taste I ■ I zum Stoppen drücken.
Z.ß. Spielen einer Harmonie über dem
gerade aufgezeichneten Titel "Aura Lee".
Siehe das Liniensystem [2]
10. Die elektronische Orgelstimme wählen.
11. Die Taste ( a j drücken, um zum
ersten Takt zurückzukehren.
12.Die Taste
drücken, und beim
Hören der aufgezeichneten Musik die
Harmonie spielen.
Bis zu etwa 100 Noten können beim
Spiel von Einzelnoten aufgezeichnet
werden.
Während der Aufzeichnung nicht das
Gerät ausschalten. Wenn das
geschieht, können die aufgezeichneten
Daten gelöscht werden.
Das PSS-100 speichert die aufgezeich
nete Musik, auch nach dem Ausschal
ten, bis die Batterien ihre Kraft verli-
Aufzeichnen des Spiels ohne
Rhythmus-Sound
1. Den Netzschalter auf NORMAL stellen.
2. Eine Stimme wählen.
3. Die Taste
drücken.
4, Die Taste F"I drücken und mit dem
Spie! beginnen. Beim Spielen wird der
Rhythmus gehört, aber nur die auf dem
Keyboard gespielte Musik wird
aufgezeichnet.
Erneutes Aufzeichnen von der
Mitte eines Titels an
Wenn beim Spiel ein Fehler gemacht wurde
oder wenn der Titel modifiziert werden soll,
ist es möglich, in der Mitte eines Titels eine
neue Aufzeichnung zu machen,
REWiNO -iS,-
1. Die Taste 1 oder f ! drücken,
um den Takt aufzusuchen, von dem an die
Neuaufzeichnung beginnen soll.
RlCORe
2. Die Taste XU drücken und mit der
Neuaufzeichnung beginnen.
3. Die Taste | ■ | zum Stoppen drücken,
gTQP
REWINO r P.S’
* Die Tasten i I oder t | drücken,
um jeweils einen Takt vorwärts oder
rückwärts zu gehen.
* Die Neuaufzeichnung beginnt immer mit
dem ersten Taktschlag des gewählten
Taktes,
* Die Aufzeichnung geschieht Takt für Takt.
Bei der Aufnahme bis zum letzten
Taktschlag des Taktes spielen. Wenn das
Spiel mitten im Takt stoppt, werden die
vorherigen Daten des restlichen Taktes
gelöscht.
Löschen der gesamten
aufgezeichneten Musik auf einmal
1, Den Betriebsschalter auf OFF stellen.
2. Die Taste RESET gedrückt halten und
den Netzschalter auf NORMAL oder
AUTO ACCOMP stellen. Alle
aufgezeichneten Daten werden gelöscht.
V.
Page 12

CZI et O
3. Sélectionnez le rythme à 8 temps en ap
puyant sur la touche | style j ^ puis
r^l et I / I
4. Appuyez sur la touche Œ2 . Le
métronome se met en marche. Cela signi
fie que l'appareil est prêt à enregistrer.
5. Lorsque vous appuyez sur une touche,
l'enregistrement commence.
L'indicateur à diode affiche le nombre de
mesures (barres) enregistrées jusqu'à
présent.
6. Lorsque l'exécution est terminée, appyyez sur
trement.
7. Appuyez sur la touche j a j pour revenir
à la première mesure.
8. Appuyezsurlatouche cni pourécouter
la mélodie. ^
9. Appuyez sur la touche | » | pour
l'arrêter.
Ex. Exécution d'une harmonie sur la mélodie
"Aura Lee" que vous venez d'enregistrer.
Voyez la portée
10. Sélectionnez le timbre d'orgue élec
tronique.
11. Appuyez sur I A I pour revenir à la
première barre de mesure.
12. Appuyez sur la touche , et tout
en écoutant la musique enregistrée,
jouez l'harmonie.
* Vous pouvez enregistrer jusqu'à 100
mesures.
* Ne mettez pas l'appareil hors tension pen
dant l'enregistrement, car les données en
registrées risquent d'être effacées.
* Le PS5-100 garde en mémoire la musique
enregistrée jusqu'à épuisement des piles,
même après la mise hors tension de l'ap
pareil.
pour terminer l'enregis-
ftCSET
wecQWP
PLAY
Enregistrement de votre
composition sans rythmique
1. Réglez l'interrupteur d'alimentation sur
NORMAL.
2. Sélectionnez un timbre.
RËCQWD
3. Appuyez sur la touche
4. Appuyez sur la touche un et
commencez l'exécution. Pendant que
vous jouez, vous pouvez entendre le
rythme, mais seule la musique que vous
jouez sur le clavier est enregistrée.
Ré-enregistrement à partir du
milieu rf'ti/i morceau
Vous pouvez recommencer l'enregistrement
à partir du milieu d'un morceau si vous
désirez modifier la musique, ou si vous avez
fait une erreur pendant l'exécution.
1. Appuyez sur la touche El ou
1 pour retrouver la mesure à partir de
laquelle vous voulez recommencer l'en
registrement.
2. Appuyez sur la touche I ♦ 1 et
recommencez l'enregistrement.
3. Appuyez sur la touche I ■ I pour
arrêter.
wewiNO rjimtfi:
* Les touches ! t ou I i permettent
respectivement de reculer ou d'avancer
d'une mesure à chaque pression.
* Le ré-enregistrement d'une musique com
mence toujours sur le premier temps de la
mesure.
* L'enregistrement est effectué pour chaque
mesure. Lors de l'enregistrement, jouez
jusqu'au dernier temps de la mesure. Si
vous arrêtez de jouer au milieu de la
mesure, les données précédemment en
registrées dans la mesure sont effacées.
Effacement en une seule fois de
toute la musique enregistrée
1. Réglez l'interrupteur d'alimentation sur
OFF.
2. Tout en tenant la touche I a 1 en
foncée, positionnez l'interrupteur d'al
imentation sur NORMAL ou AUTO
ACCOMP. Toutes les données enregis
trées sont effacées.
STOP
R6SET
I sr,L.E^ j ^ y después j / i. sección
de ritmos.
4. Presione el botón ra , y sonará el
metrónomo. Esto significará que la
unidad está lista para grabar.
5. Cuando pulse cualquier tecla, se iniciará
la grabación.
El indicador de LED mostrará el número
de compases (barras) que haya grabado
hasta el momento. stop
6. Después de su actuación, presione [T]
para cesar la grabación.
7. Para volver al compás superior, presione
el botón r~¿~] . pmv
8. Para reproducir, presione el botónr»- I.
9. Para cesar la reproducción, presione el
botón I ■ I .
P. ej. Para tocar una armonía sobre "Aura
Lee" recién grabada.
Véase la partitura [2
10.Seleccione la voz de órgano electrónico.
11, Presione | ^ ] para volver al compás
superior.
12. Presione I >• 1 y, escuchando la música
grabada, toque la armonía.
* Usted podrá grabar aproximadamente
hasta 100 compases.
* No desconecte la alimentación durante la
grabación, porque podría perder los datos
grabados.
* El PSS-100 mantendrá almacenados los
datos musicales, incluso después de
haber desconectado la alimentación,
hasta que se descarguen las pilas.
Grabación de su actuación sin
acompañamiento automático
1. Ponga el interruptor de alimentación en
NORMAL.
2. Seleccione una voz y un ritmo.
3. Presione el botón [ ^ ]| , y comience a
tocar pulsando cualquier tecla o pre
sionando el botón rojo
WeCQUQ
Regrabación desde la mitad de
una canción
Usted podrá iniciar la regrabación desde la
mitad de una canción cuando desee cam
biar la música o cuando cometa un error al
tocar.
1. Presione el botón I I o [ i para
buscar el compás a partir del cual desee
iniciar la regrabación,
2. Presione el botón y comience la
«COflO
regrabación,
3. Presione el botón para parar.
gTQP
* Cada vez que presione el botón
] se producirá el retroceso o el
avance, respectivamente, de un compás.
* La regrabación de la música comenzará
siempre desde el primer tiempo del
compás.
* La grabación se realizará para cada
compás. Para grabar, toque hasta el
último tiempo del compás. Si deja de
tocar en medio de un compás, los datos
anteriores de la parte restante de dicho
compás se borrarán.
Borrado de toda la música
grabada a la vez
1. Ponga el interruptor de alimentación en
OFF.
2. Manteniendo presionado el botón IHZn
ponga el interruptor de alimentación en
NORMAL o en AUTO ACCOMP. Todos
los datos grabados se borrarán.
flESÉT
Page 13

Troubleshooting
Symptoms
* The volume decreases without pressing the volume control button. Replace the batteries with new ones.
* The voices sound intermittently,
* The LED indicator suddenly goes off and all the buttons and keys become ineffective, then the
indicator illuminates again. The indicator goes off again when starting to play.
* Only a few notes can be heard, even if you press many keys at a time. The PSS-100 can produce 6 notes at a time, including tones in DEMO songs and playback
* Your performance is not played back as you recorded it.
* No click sound is heard when pressing the buttons.
music, excluding the rhythm sound. Therefore, the first tone sounded will not sound any
more when the seventh tone is produced by pressing a key, or when playing the DEMO songs
or recorded music.
<l>When recording in a sixteenth-note rhythm style, you cannot record triplets. When
recording in a triplet-rhythm style, you cannot record sixteenth notes,
<2>You cannot record notes shorter than a sixteenth note (semiquaver) in a sixteenth-note
style. You cannot record notes shorter than eighth-note triplets {triplet quaver) in a
triplets style.
A click sound is heard only when the buttons are effective. For example, no click sound will
be heard when the volume is already set to the maximum.
Remedies
Fehlersuche
Symptom
* Die Lautstärke nimmt ab, ohne daß der Lautstärkeregler betätigt wird.
* Die Stimmen verschwinden manchmal,
* Die LED-Anzeige erlischt plötzlich, und alle Tasten und Schalter werden unwirksam. Dann
leuchtet die Anzeige wieder auf. Die Anzeige erlischt erneut, wenn mit dem Spiel begonnen
wird,
* Nur einige Noten werden gehört, auch wenn mehrere gleichzeitig gedrückt werden. Das PSS-100 kann im Normalmodus bis zu 6 Noten gleichzeitig erzeugen, einschließlich
* Das Spiel wird anders wiedergegeben als es aufgezeichnet wurde.
* Bei Drücken von Tasten ertönt kein Klickton, Ein Klickton ertönt nur, wenn die Tasten wirksam sind. Wenn die Lautstärke z.B. bereits auf
Die alten Batterien durch neue ersetzen.
Töne von DEMO-Titeln und Wiedergabemusik, ausschließlich Rhylhmus-Sound. Darum
erklingt der erste Ton nicht mehr, wenn der siebte Ton durch Drücken einer Taste produziert
wird, oder wenn DEMO-Titel oder aufgezeichnete Musik gespielt werden.
<1 >Bei Aufzeichnung im Sechzehntelnoten-Rhythmus können keine Triolen aufgezeichnet
werden. Bei Aufzeichnung im Triolen-Rhythmus können keine Sechzehntelnoten
aufgezeichnet werden.
<2>Es ist nicht möglich, kürzere Noten als eine Sechzehntelnote aufzuzeichnen, wenn
Sechzehntelnotenstil eingestellt ist. Es ist nicht möglich, kürzere Noten als eine Ach
telnote aufzuzeichnen, wenn Triolenstil eingestellt ist.
Maximum gestellt ist, ertönt kein Klickton.
Abhilfe
Keyboard:
Voice:
Rhythm style:
Specifications
32 keys (F1-C4)
16 voices
Clarinet, Trumpet, Sax, Piano, Honky-tonk piano, Electronic organ,
Accordion, Vibraphone, Guitar, Rock guitar, Tremolo guitar. Banjo,
Mandolin, Violin, Fantasy, UFO
16 styles
8 beat. Rock'n'roll, Hard rock. Slow rock, 16 beat. Funk, Rhythm &
blues. Ballad, Swing, Country, Samba, Bossa nova. Tango, March 1,
March 2, Waltz
Tastatur:
Stimmen:
Rhythmusstile:
Technische Daten
32 Tasten {FI bis C4)
16 Stimmen
Clarinet, Trumpet, Sax, Piano, Honky-tonk Piano, Electric Organ, Ac
cordion, Vibraphone, Guitar, Rock Guitar, Tremolo Guitar, Banjo, Man
dolin, Violin, Fantasy, UFO
16 Stile
8 Beat, Rock'n Roll, Hard Rock, Slow Rock, 16 Beat, Funk, Rhythm &
Blues, Ballad, Swing, Country, Samba, Bossa Nova, Tango, March 1,
March 2, Waltz
Page 14

Dépannage
Symptômes
* Le volume diminue alors que la touche de réglage de volume n'est pas actionnée.
* Les timbres retentissent de manière intermittente.
* Le témoin à diode s'éteint brusquement, aucune touche ou commande ne répond, puis
le témoin s'allume de nouveau. Le témoin s'éteint de nouveau lorsque vous commencez
à jouer.
* Seules quelques notes se font entendre, alors que vous actionnez beaucoup de touches
à la fois.
* Votre exécution n'est pas reproduite alors que vous l'avez enregistrée.
* Aucun clic ne se fait entendre lorsque vous actionnez des commandes.
Remplacez les piles par des neuves.
Le PSS-100 peut produire 6 notes à la fois, y compris des morceaux de démonstration et de la
musique de playback, sons rythmiques exclus. Le premier son actionné cesse de retentir lorsqu'une
septième note est produite en appuyant sur une touche, ou lors de la lecture d'un morceau de
démonstration ou d'une musique enregistrée.
<1> Lorsque vous enregistrez dans un rythme comportant des seizièmes de note, vous ne pouvez
pas enregistrer de triolets. Lorsque vous enregistrez dans un rythme comportant des triolets,
vous ne pouvez pas enregistrer de seizièmes de note.
<2> Vous ne pouvez pas enregistrer de notes plus courtes qu'un seizième de note (double croche)
dans un rythme comportant des seizièmes de note. Vous ne pouvez pas enregistrer de notes
plus courtes qu'un triolet de huitième de note (triolet de croche) dans un rythme comportant
des triolets.
Le clic ne se fait entendre que lorsque les touches sont effectives. Par exemple, aucun clic ne se
fait entendre lorsque le volume est déjà réglé au maximum.
Remèdes
Cuta para ¡a solución de problemas
Síntomas
* El volumen disminuye sin presionar el botón de control de volumen.
* Las voces suenan intermitentemente.
* El indicador de LED se apaga repentinamente y todos los botones y teclas dejan de
trabajar, y después el indicador vuelve a encenderse. El indicador vuelve a apagarse al
comenzar a tocar.
* Solamente se oyen algunas notas, aunque se pulsen muchas teclas al mismo tiempo. El PSS-100 puede producir 6 notas a la vez, incluyendo tonos en las canciones de demostración
* La actuación no se reproduce como se grabó.
* No se oye el chasquido al presionar ios botones. el volumen ya esté al máximo.
Reemplace las pilas por otras nuevas.
y música de reproducción, con excepción de! sonido dei ritmo. Por lo tanto, la primera nota que
sonó dejará de hacerlo cuando se produzca la séptima nota al pulsar una tecla, o cuando se
reproduzcan las canciones de demostración o la música grabada.
<1 >AI grabar en un estilo de ritmo de semicorchea, usted no pdrá grabar tresillos. Cuando grabé
en un estilo de ritmo de tresillo, usted no podrá grabar semicorcheas,
<2>Usted no podrá grabar notas más cortas que una semicorchea en un estilo de semicorcheas.
Usted no podrá grabar notas más cortas que un tresillo de corcheas en un estilo de tresillos.
El chasquido se oirá solamente cuando los botones sean efectivos. Por ejemplo, no se oirá cuando
Soluciones
Clavier;
Timbres:
Rythmes:
Spécifications
32 touches (Fai-Do4)
16 timbres
Clarinette, trompette, saxophone, piano, piano honky-tonk, orgue élec- ;
tronique, accordéon, vibraphone, guitare, guitare rock, guitare trémolo,
banjo, mandoline, violon, fantaisie, OVNI
16 types de rythme
8 temps, rock'n'roll, hard rock, slow rock, 16 temps, funk, rythm & blues, ;
ballade, swing, country, samba, bossa nova, tango, marche 1, marche i
2, valse
Teclado:
Voces:
Estilos de ritmo:
Especificaciones
32 teclas (F1-C4 (Fa1-Do4))
16 voces
Clarinete, Trompeta, Sax'fono, Piano, Piano Honky-tonk, 'Organo elec
trónico, Acordeón, Vibràfono, Guitarra, Guitarra rock. Guitarra de trém
olo, Banjo, Mandolina, Violín, Fantasía, y OVNI
16 estilos
8 Beat, Rock and roll. Rock duro. Rock lento, 16 Beat, Funk, Ritmo &
blues, Balada, Swing, Country, Samba, Bossa nova, Tango, Marcha 1,
Marcha 2, y Vals
Page 15

Rhythm style:
16 styles
8 beat. Rock'n'roll, Hard rock, Slow rock, 16 beat. Funk, Rhythm &
blues. Ballad, Swing, Country, Samba, Bossa nova. Tango, March 1,
March 2, Waltz
Digital Recorder:
Voice Variator:
Other Controls &
Indicator:
Reset, Rewind, Stop, Play, Fast Forward, Record
Bright, Mellow, Long, Short
Voice/Style Select, Tempo Controls, Volume Controls, Demo Start/Stop,
Rhythm StaiVStop, Power OFF , NORMAL , AUTO ACCOMP, Measure/
Voice/Style Indicator
Terminal:
DC(9-12V)IN
Main Amplifier: 0.7W
Speaker:
Rated Voltage:
7,7cm {4Q.)
DC6V {4 X AA-size, SUM-3, R-6 batteries)
AC Power Adaptor (PA-1, PA-1 B, PA-3)
Power consump 3.0W (with AC adaptor PA-1 )
tion:
Material:
Dimensions:
0.4W (with battery cells)
Styrole resin
59mm{H) x 502mm(W) x 1 77.5mm(D)
(2-l/3"(H) X 19-5/6"(W) X 7"(D))
Weight:
1.2kg(2-1/2lb) without batteries
Specifications are subject to change without notice.
This applies only to products distributed by Yamaha Corporation of America.
Dies bezieht sich nur auf die von der YAMAHA CORPORATION OF AMERICA vetriebenen
Produkte.
Ceci ne s’applique qu’aux produits distribués par Yamaha Corporation of America.
Esto se aplica soiamente a productos distribuidos por Yamaha Corporation of America.
Attention users in the U.S.A.
PortaSound PSS-100 prepared in accordance with FCC rules.
The PortaSound PSS-100 uses frequencies that appear in the radio frequency range, and if
installed in the immediate Proximity (within three meters) of some types of audio or video devices
interference may occur.
The PortaSound PSS-100 has been type tested and found to comply with the specifications set
for a CLASS B compuhng device in accordance with those specifications listed in Subpart J of
Part 15 of the FCC rules. Theses rules are designed to provide a reasonable measure of
protection against such interference. However, this does not guarantee that interference will not
occur. If your PortaSound PSS-100 shouid be suspected of causing interference with other
electronic devices, verification can be made by turning your PortaSound PSS-100 off and on. If
the interference continues when your PortaSound PSS-100 is off, the PortaSound PSS-100 is
not the source of the interference. If your PortaSound PSS-100 does appear to be the source of
the interference, you should try to correcf the situation by using one or more of the following
measures:
Relocate either the PortaSound PSS-100 or the electronic device that is being affected by the
interference.
Utilize power outlets for the PortaSound PSS-100 and the device being affected that are on
different branch (circuit breaker or fuse) circuits, or install A/C line filters.
In the case of radio-TV interference, relocate the antenna or, if the antenna lead-in is a 300
ohm ribbon lead, change the lead-in to a co-axial type cable.
If these corrective measures do not produce satisfactory results, please contact your
Authorized Yamaha Consumer Products dealer for suggestions and/or corrective measures. If
you cannot locate an Authorized Yamaha Consumer Products dealer in your general area, con
tact the Consumer Products Service Center, Yamaha Corporation of America, 6600
Orangethorpe Ave., Buena Park, CA 90620.
If for any reason you should need additional information relating to radio or TV interference,
you may find a booklet prepared by the Federal Communications Commission helpful: “How to
identify and Resolve Radio-TV Interference Problems". This booklet is available from the
U.S.Government Printing Office, Washington D.C. 20402-Stock #004-000-345-4.
uumi, VJUMII, rclIKdì^y^ urw
Rhythmusstile;
16 Stile
8 Beat, Rock'n Roll, Hard Rock, Slow Rock, 16 Beat, Funk, Rhythm &
Blues, Ballad, Swing, Country, Samba, Bossa Nova, Tango, March 1,
March 2, Waltz
Digital Recorder:
Stimmenvariator:
Andere Bedi
enungselemente:
Rückstellen, Rücklauf, Stopp, Wiedergabe, 'vorlauf, Aufnahme
Bright, Mellow, Long, Short
Stimmen/Stilwahltasten, Temporegler, Lautstärkeregler, Demo Start/
Stopp, Rhythmus Start/Stopp, Betriebsschalter OFF, NORMAL, AUTO
ACCOMP, Takt-, Stimmen-, Stilanzeigen
Buchsen:
Hauptverstärker:
Lautsprecher;
Nennspannung;
ßetriebsstrom DC (9-12 V) IN
0,7 W
7,7 cm ( 4 Ohm)
Gleichstrom 6 V (4 R6-Batterien, Typ Mignonzelle)
Netzteil (PA-1, PA-1 B, PA-3)
Leis 3,0 V (mit Netzteil PA-1)
tungsaufnahme;
Gehäusematerial;
Abmessungen:
Gewicht:
0,4 W (mit Batterien)
Styrol harz
59 X 502 X 177,5 mm (H x B x T)
1,2 kg ohne Batterien
Änderungen der technischen Daten ohne Vorankündigung Vorbehalten,
This applies only to products distributed by YAMAHA Europe GmbH.
tries bezieht sich nur auf die von der YAMAHA EUROPA GmbH vertriebenen Produkte.
Ceci ne s’applique qu’aux produits distribués par Yamaha Europe GmbH.
Esto .se aplica soiamente a productos distribuidos por Yamaha Europa GmbH.
Wichitiger Hinweis fur die Benutzung in der Bundesrepublik Deutschland.
Hiermit wird bescheinigt, daß der/die/das
Mmikinstruj^nt Typ PS.S-100
(Gerät, Typ, Bezeichnung)
in Übereinstimmung mit den Bestimmungen der
VERFÜGUNG 1046/84
(Amtsblattverfiigung)
funk-entstört ist.
Der Deutschen Bundespo.st wurde das Inverkehrbringen dieses Gerätes angezeigt und die Berechtigung zur
Überprüfung der Serie auf Einhaltung der Bestimmungen eingeräumt.
Yamaha Europa BmbH
Name des Imponeurs
This applies only to products distributed by YAMAHA Canada Music Ltd.
Dies bezieht sich nur auf die von der Yamaha Canada Music Ltd. vertriebenen Produkte.
Ceci ne s’applique au’aux produits distribués par Yamaha Canada Music Ltd.
Esto se aplica soiamente a productos distribuidos por Yamaha Canada Music Ltd.
THIS DIGITAL APPARATUS DOES NOT EXCEED THE “CLASS B” LIMITS FOR RADIO NOISE
EMISSIONS FROM DIGITAL APPARATUS SET OUT IN THE RADIO INTERFERENCE REGULA
TION OF THE CANADIAN DEPARTMENT OF COMMUNICATIONS.
LE PRESENT APPAREIL NUMERIQUE N'EMET PAS DE BRUITS RADIOELECTRIQUES DE
PASSANT LES LIMITES APPLICABLES AUX APPAREILS NUMERIQUES DE LA “CLASSE B"
PRESCRITES DANS LE REGLEMENT SUR LE BROUILLAGE RADIOELECTRIQUE EDICTE
PAR LE MINISTERE DES COMMUNICATIONS DU CANADA.
Bescheinigung des Importeurs
Page 16

Rythmes: 16 types de rythme
8 temps, rock'n'roll, hard rock, slow rock, 16 temps, funk, rythm & blues,
ballade, swing, country, samba, bossa nova, tango, marche 1, marche
2
Enregistreur
numérique:
Variateur de
timbre:
Autres réglages et
indicateurs:
Borne:
Amplificateur
principal:
Haut-parleurs: 7,7 cm (4 ohms)
Tension nominale: CC 6 V (4 piles R-6, SUM-3, format AA)
Consommation: 3 W (avec l'adaptateur secteur PA-1)
Matériau: Résine au styrène
Dimensions; 59 mm (H) x 502 mm (L) x 177,5 mm (P)
Poids: 1,2 kg (2-1/2 livres) sans les piles
** Les spécifications peuvent être modifiées sans préavis.
, valse
Remise à zéro, rebobinage, arrêt, lecture, avance rapide, enregistrement
Eclatant, atténué, long, court
Sélection de timbre/style, réglages de tempo, réglages de volume,
marche/arrêt de démonstration, marche/arrêt de rythme, alimentation
OFF, NORMAL, AUTO ACCOM P, indicateur de mesure/timbre/style
DC (9-12 V) IN
0,7 W
Adaptateur d'alimentation secteur {PA-1, PA-1 B, PA-3)
0,4 W (avec des piles)
(2-1/3 po. (H) X 19-5/6 po. (L) X 7 po. (P)
Estilos de ritmo: 16 estilos
8 Beat, Rock and roll. Rock duro. Rock lento, 16 Beat, Funk, Ritmo &
blues. Balada, Swing, Country, Samba, Bossa nova. Tango, Marcha 1,
Grabador digital; Reposición, Retroceso rápido. Parada, Reproducción, Avance rápido, y
Varíador de voces; Brillante, Suave, Larga, y Corta
Otros controles e Selector de voz/estilo. Tempo, Controles de volumen, Inicio/parada de
indicadores:
Terminal:
Amplificador
principal:
Altavoz:
Tensión de alimen- 6V CC (4 pilas de tamaño AA, SUM-3, R6)
tación; Adaptador de alimentación de CA (PA-1, PA-1 B, o PA-3)
Consumo; 3,0W (con el adaptador de CA PA-1)
Material: Resina de estirol
Dimensiones: 59 mm (Al) x 502 mm (An) x 1 77,5 mm (Prf)
Peso: 1,2 kg sin pilas
** Las especificaciones están sujetas a cambio sin previo aviso.
Marcha 2, y Vals
Grabación
demostración, Inicio/parada del ritmo, Alimentación OFF, NORMAL,
AUTO ACCOMP, e Indicador de compás/voz/estilo
DC (9-1 2V) IN
0,7W
7,7 cm (4 ohmios)
0,4W (con pilas)
The sériai number of this product may be found on the bottom of the
unit. You should note this serial number in the space provided below
and retain this manual as a permanent record of your purchase to aid
identification in the event of theft.
Model No.
Serial No. ___________________________________
PSS-100
__________________________________
Concerning Warranty
This product was made for international distribution, and since the
warranty for this type of product varies from marketing area to
marketing area, please contact the selling agency for information
concerning the applicable warranty and/or service policies.
Die Serienummer befindet sich an der Unterseite des Instrumentes.
Wir empfehlen, diese Nummer sicherheitshalber an der unten
vorgesehenen Stelle einzutragen, um sie auch im Falle eines Dieb
stahls jederzeit zur Fland zu haben.
Modeii-Nr. PSS-1QQ
Serien-Nr. __________________________________
________________
Hinweis zur Garantie
Dieses Produkt wird international vertrieben, und die Garan
tiebedingungen sind von Vertriebsland zu Vertriebsland verschieden.
Ihr Händler gibt Ihnen gerne genauere Informationen zu den in Ihrem
Land gültigen Garantie- und/oder Serveicebedingungen.
Le numéro de série de ce produit figure sur le socle. Il conveindra de
noter ce numéro de série dans l'espace réservé ci-dessous et de
conderver ce manuel: celui-ci constitue le docuent permanent de votre
achat et permet l’identification en cas de vol.
Modèle No.
No. de série
PSS-100
___________________________________
_________________________________
Remarque relative à la garantie
Ce modèle est destiné à être distribué à l’échelle internationale. Etant
donné que les conditions de garantie pour ce type de produit varient
en fonction des zones de commercialisation, prière de prendre contact
avec l’agence chargée des ventes pour tous renseignements relatifs
aux conditions de garantie et de servie après-vente.
EI número de serie de este producto se encuentra en la parte
inferior de la unidad. Sírvase anotar este número de serie en el
espacio proporcionado debajo y guarde este manual como
comprobante de compra para ayudar a la identificación en caso de
robo.
№ de modelo ___________________________________
N° de serie:
PSS-100
________________________________
Concerniente a la garantía
Este producto ha sido fabricado para ser distribuido internacion
almente y, como la gatantía para est tipo de producto varia en
relación a su área de comercialización, sírvase consultar con el
agente de ventas sobre la información en torno a la garantía
aplicable y/o políticas de servicio.
YAMAHA
YAMAHA CORPORATION
RO. Box 1, Hamamatsu, Japan
(T @ ^ 903 VG79760 Printed in Japan
 Loading...