

Page 1
Network CD Receiver
OWNER’S MANUAL
EN
Page 2
IMPORTANT SAFETY INSTRUCTIONS
12 Use only with the cart, stand, tripod, bracket, or table specifi ed by the
13 Unplug t his apparatus during l ight ning st orms or whe n unuse d for long periods
14 Refer all servicing to qualifi ed service personnel. Servicing is required when the apparatus
We Want You Listening For A Lifetime
• Explanation of Graphical Symbols
1 Read these instructions.
2 Keep these instructions.
3 Heed all warnings.
4 Follow all instructions.
5 Do not use this apparatus near water.
6 Clean only with dry cloth.
7 Do not block any ventilation openings. Install in accordance with the manufacturer’s
instructions.
8 Do not install near any heat sources such as radiators, heat registers, stoves, or other apparatus
(including amplifi ers) that produce heat.
9 Do not defeat the safety purpose of the polarized or grounding-type plug. A polarized plug
has two blades with one wider than the other. A grounding type plug has two blades and a
third grounding prong. The wide blade or the third prong are provided for your safety. If the
provided plug does not fi t into your outlet, consult an electrician for replacement of the obsolete
outlet.
10 Protect the power cord from being walked on or pinched particularly at plugs, convenience
receptacles, and the point where they exit from the apparatus.
11 Only use attachments/accessories specifi ed by the manufacturer.
The lightning fl ash with arrowhead symbol, within an equilateral triangle, is
intended to alert you to the presence of uninsulated “dangerous voltage” within
the product’s enclosure that may be of suffi cient magnitude to constitute a risk of
electric shock to persons.
The exclamation point within an equilateral triangle is intended to alert you to the
presence of important operating and maintenance (servicing) instructions in the
literature accompanying the appliance.
Since hearing damage from loud sounds is often undetectable until it is too late, Yamaha and
the Electronic Industries Association’s Consumer Electronics Group recommend you to avoid
prolonged exposure from excessive volume levels.
manufacturer, or sold with the apparatus. When a cart is used, use caution
when moving the cart/apparatus combination to avoid injury from tip-over.
of time.
has been damaged in any way, such as power-supply cord or plug is damaged, liquid has been
spilled or objects have fallen into the apparatus, the apparatus has been exposed to rain or
moisture, does not operate normally, or has been dropped.
Yamaha and the Electronic Industries Association’s Consumer Electronics
Group want you to get the most out of your equipment by playing it at a safe
level. One that lets the sound come through loud and clear without annoying
blaring or distortion – and, most importantly, without affecting your sensitive
hearing.
2 En
Page 3
FCC INFORMATION (for US customers)
1 IMPORTANT NOTICE: DO NOT MODIFY THIS UNIT!
This product, when installed as indicated in the instructions contained in this manual,
meets FCC requirements. Modifi cations not expressly approved by Yamaha may void your
authority, granted by the FCC, to use the product.
2 IMPORTANT: When connecting this product to accessories and/or another product use
only high quality shielded cables. Cable/s supplied with this product MUST be used. Follow
all installation instr uctions. Failure to follow instr uctions could void your FCC authorization
to use this product in the USA.
3 NOTE: This product has been tested and found to comply with the requirements listed
in FCC Regulations, Part 15 for Class “B” digital devices. Compliance with these
requirements provides a reasonable level of assurance that your use of this product in a
residential environment will not result in harmful interference with other electronic devices.
This equipment generates/uses radio frequencies and, if not installed and used according to
the instructions found in the users manual, may cause interference harmful to the operation
of other electronic devices.
Compliance with FCC regulations does not guarantee that interference will not occur in all
installations. If this product is found to be the source of interference, which can be determined
by turning the unit “OFF” and “ON”, please try to eliminate the problem by using one of
the following measures:Relocate either this product or the device that is being affected by the
interference.Utilize power outlets that are on different branch (circuit breaker or fuse) circuits
or install AC line fi lter/s.In the case of radio or TV interference, relocate/reorient the antenna.
If the antenna lead-in is 300 ohm ribbon lead, change the lead-in to coaxial type cable.If
these corrective measures do not produce satisfactory results, please contact the local retailer
authorized to distribute this type of product. If you can not locate the appropriate retailer, please
contact Yamaha Corporation of America A/V Division, 6600 Orangethorpe Avenue, Buena
Park, CA 90620.The above statements apply ONLY to those products distributed by Yamaha
Corporation of America or its subsidiaries.
FCC CAUTION
Change or modifi cations not expressly approved by the party responsible for compliance could
void the user’s authority to operate the equipment.
FOR CANADIAN CUSTOMERS
To prevent electric shock, match wide blade of plug to wide slot and fully insert.
CAN ICE-3 (B)/NMB-3 (B)
CO MPLIA NCE INFO RMATIO N STATEM ENT
Responsible Party: Yamaha Corporation of America A/V Division
Address: 6600 Orangethorpe Avenue, Buena Park, CA 90620
Telephone: 714-522-9011
Type of Equipment: Network CD Receiver
Model Name: CRX-N470
This device complies with part 15 of FCC Rules and Industry Canada’s licence-exempt RSSs.
Operation is subject to the following two conditions: (1) this device may not cause harmful
interference, and (2) this device must accept any interference received, including interference
that may cause undesired operation.
NOTICE
This equipment has been tested and found to comply with the limits for a Class B digital device,
pursuant to part 15 of the FCC Rules. These limits are designed to provide reasonable protection
against harmful interference in a residential installation.
This equipment generates, uses and can radiate radio frequency energy and, if not installed
and used in accordance with the instructions, may cause harmful interference to radio
communications. However, there is no guarantee that interference will not occur in a particular
installation. If this equipment does cause harmful interference to radio or television reception,
which can be determined by turning the equipment off and on, the user is encouraged to try to
correct the interference by one or more of the following measures:
– Reorient or relocate the receiving antenna.
– Increase the separation between the equipment and receiver.
– Connect the equipment into an outlet on a circuit different from that to which the receiver is
connected.
– Consult the dealer or an experienced radio/TV technician for help.
This equipment complies with FCC/IC radiation exposure limits set forth for an uncontrolled
environment and meets the FCC radio frequency (RF) Exposure Guidelines and RSS-102 of
the IC radio frequency (RF) Exposure rules. This equipment should be installed and operated
keeping the radiator at least 20cm or more away from person’s body.
This transmitter must not be co-located or operated in conjunction with any other antenna or
transmitter.
The FDA-related label is located on the bottom of the unit.
IMPORTANT
Please record the serial number of this unit in the space below.
MODEL:
Serial No.:
The serial number is located on the rear of the unit. Retain the Owner’s Manual in a safe place
for future reference.
3 En
Page 4
CAUTION: READ THIS BEFORE OPERATING YOUR UNIT.
1 To assure the fi nest performance, please read this manual carefully. Keep it in a safe place for
future reference.
2 Install this sound system in a well ventilated, cool, dry, clean place - away from direct sunlight,
heat sources, vibration, dust, moisture, and/or cold. For proper ventilation, allow the following
minimum clearances.
Top: 10 cm (4 in), Rear: 6 cm (2.5 in), Sides: 6 cm (2.5 in)
3 Locate this unit away from other electrical appliances, motors, or transformers to avoid
humming sounds.
4 Do not expose this unit to sudden temperature changes from cold to hot, and do not locate
this unit in an environment with high humidity (i.e. a room with a humidifi er) to prevent
condensation inside this unit, which may cause an electrical shock, fi re, damage to this unit,
and/or personal injury.
5 Avoid installing this unit where foreign object may fall onto this unit and/or this unit may be
exposed to liquid dripping or splashing. On the top of this unit, do not place:
– Other components, as they may cause damage and/or discoloration on the surface of this
unit.
– Burning objects (i.e. candles), as they may cause fi re, damage to this unit, and/or personal
injury.
– Containers with liquid in them, as they may fall and liquid may cause electrical shock to the
user and/or damage to this unit.
6 Do not cover this unit with a newspaper, tablecloth, curtain, etc. in order not to obstr uct heat
radiation. If the temperature inside this unit rises, it may cause fi re, damage to this unit, and/or
personal injury.
7 Do not plug in this unit to a wall outlet until all connections are complete.
8 Do not operate this unit upside-down. It may overheat, possibly causing damage.
9 Do not use force on switches, knobs and/or cords.
10 When disconnecting the power cable from the wall outlet, grasp the plug; do not pull the cable.
11 Do not clean this unit with chemical solvents; this might damage the fi nish. Use a clean, dry
cloth.
12 Only voltage specifi ed on this unit must be used. Using this unit with a higher voltage than
specifi ed is dangerous and may cause fi re, damage to this unit, and/or personal injury. Yamaha
will not be held responsible for any damage resulting from use of this unit with a voltage other
than specifi ed.
13 To prevent damage by lightning, keep the power cable and outdoor antennas disconnected
from a wall outlet or this unit during a lightning storm.
14 Do not attempt to modify or fi x this unit. Contact qualifi ed Yamaha service personnel when
any service is needed. The cabinet should never be opened for any reasons.
15 When not planning to use this unit for long periods of time (i.e. vacation), disconnect the AC
power plug from the wall outlet.
16 Be sure to refer to the “Troubleshooting” section for common operating errors before
concluding that this unit is faulty.
17 Before moving this unit, press A to set it to standby mode and disconnect the AC power plug
from the wall outlet.
18 Condensation will form when the surrounding temperature changes suddenly. Disconnect the
power cable from the outlet, then leave this unit alone.
19 When using this unit for a long time, this unit may become warm. Turn the power off, then
leave this unit alone for cooling.
20 Install this unit near the AC outlet and where the AC power plug can be reached easily.
21 The batteries shall not be exposed to excessive heat such as sunshine, fi re or the like. When you
dispose of batteries, follow your regional regulations.
22 Excessive sound pressure from earphones and headphones can cause hearing loss.
WARNING
TO REDUCE THE RISK OF FIRE OR ELECTRIC SHOCK, DO NOT EXPOSE
THIS UNIT TO RAIN OR MOISTURE.
This unit is not disconnected from the AC power source as long as it is connected to the wall
outlet, even if this unit itself is turned off by A. This state is called the standby mode. In this
state, this unit is designed to consume a very small quantity of power.
Radio waves may affect electro-medical devices. Do not use this unit near medical devices or
inside medical facilities.
Do not use this unit within 22 cm (9 inches) of persons with a heart pacemaker implant or
defi brillator implant.
■ Notes on remote controls and batteries
• Do not spill water or other liquids on the remote control.
• Do not drop the remote control.
• Do not leave or store the remote control in the following conditions:
– places of high humidity, such as near a bath
– places of high temperatures, such as near a heater or stove
– places of extremely low temperatures
–dusty places
• Insert the battery according to the polarity markings (+ and -).
• Change all batteries if you notice the following condition:
– the operation range of the remote control narrows
• If the batteries run out, immediately remove them from the remote control to prevent an
explosion or acid leak.
• If you fi nd leaking batteries, discard the batteries immediately, taking care not to touch the
leaked material. If the leaked material comes into contact with your skin or gets into your
eyes or mouth, rinse it away immediately and consult a doctor. Clean the battery compartment
thoroughly before installing new batteries.
• Do not use old batteries together with new ones. This may shorten the life of the new batteries
or cause old batteries to leak.
4 En
Page 5
• Do not use different types of batteries (such as alkaline and manganese batteries) together.
Specifi cation of batteries may be different even though they look the same. Danger of explosion
may happen if batteries are incorrectly replaced.
• Before inserting new batteries, wipe the compartment clean.
• Dispose of batteries according to your regional regulations.
• Keep batteries away from children. If a battery is accidentally swallowed, contact your doctor
immediately.
• When not planning to use the remote control for long periods of time, remove the batteries
from the remote control.
• Do not charge or disassemble the supplied batteries.
The user shall not reverse engineer, decompile, alter, translate or disassemble the software used
in this unit, whether in part or in whole. For corporate users, employees of the corporation itself
as well as its business partners shall observe the contractual bans stipulated within this clause.
If the stipulations of this clause and this contract cannot be observed, the user shall im mediately
discontinue using the software.
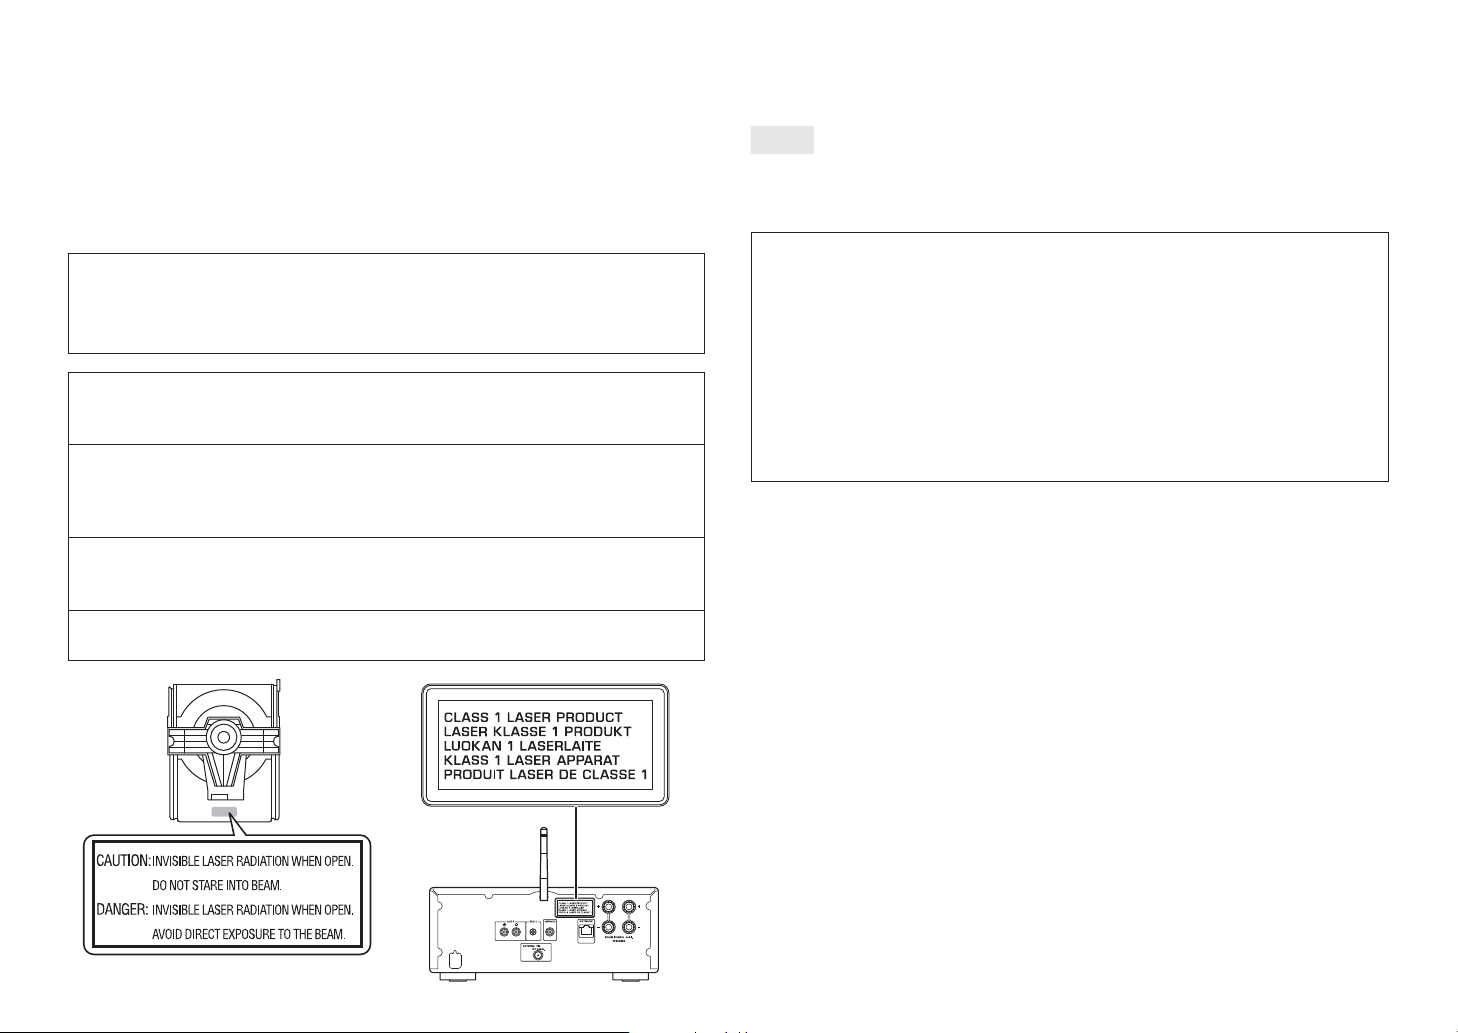
LASER SAFETY
This unit employs a laser. Due to possible eye injury, only a qualifi ed service person
should remove the cover or attempt to service this device.
DANGER
This unit emits visible laser radiation when open. Avoid direct eye exposure to beam.
When this unit is plugged into the wall outlet, do not place your eyes close to the
opening of the disc tray and other openings to look into inside.
CAUTION
Use of controls or adjustments or performance of procedures other than those
specifi ed herein may result in hazardous radiation exposure.
The laser component in this product is capable of emitting radiation exceeding the
limit for Class 1.
■ For U.K. customers
If the socket outlets in the home are not suitable for the plug supplied with this appliance, it should
be cut off and an appropriate 3 pin plug fi tted. For details, refer to the instructions described below.
Note
The plug severed from the mains lead must be destroyed, as a plug with bared fl exible cord is
hazardous if engaged in a live socket outlet.
■ Special Instructions for U.K. Model
IMPORTANT
THE WIRES IN MAINS LEAD ARE COLOURED IN ACCORDANCE WITH
THE FOLLOWING CODE:
Blue: NEUTRAL
Brown: LIVE
As the colours of the wires in the mains lead of this apparatus may not correspond
with the coloured markings identifying the terminals in your plug, proceed as follows:
The wire which is coloured BLUE must be connected to the terminal which is marked
with the letter N or coloured BLACK. The wire which is coloured BROWN must be
connected to the terminal which is marked with the letter L or coloured RED.
Making sure that neither core is connected to the earth terminal of the three pin plug.
5 En
Page 6
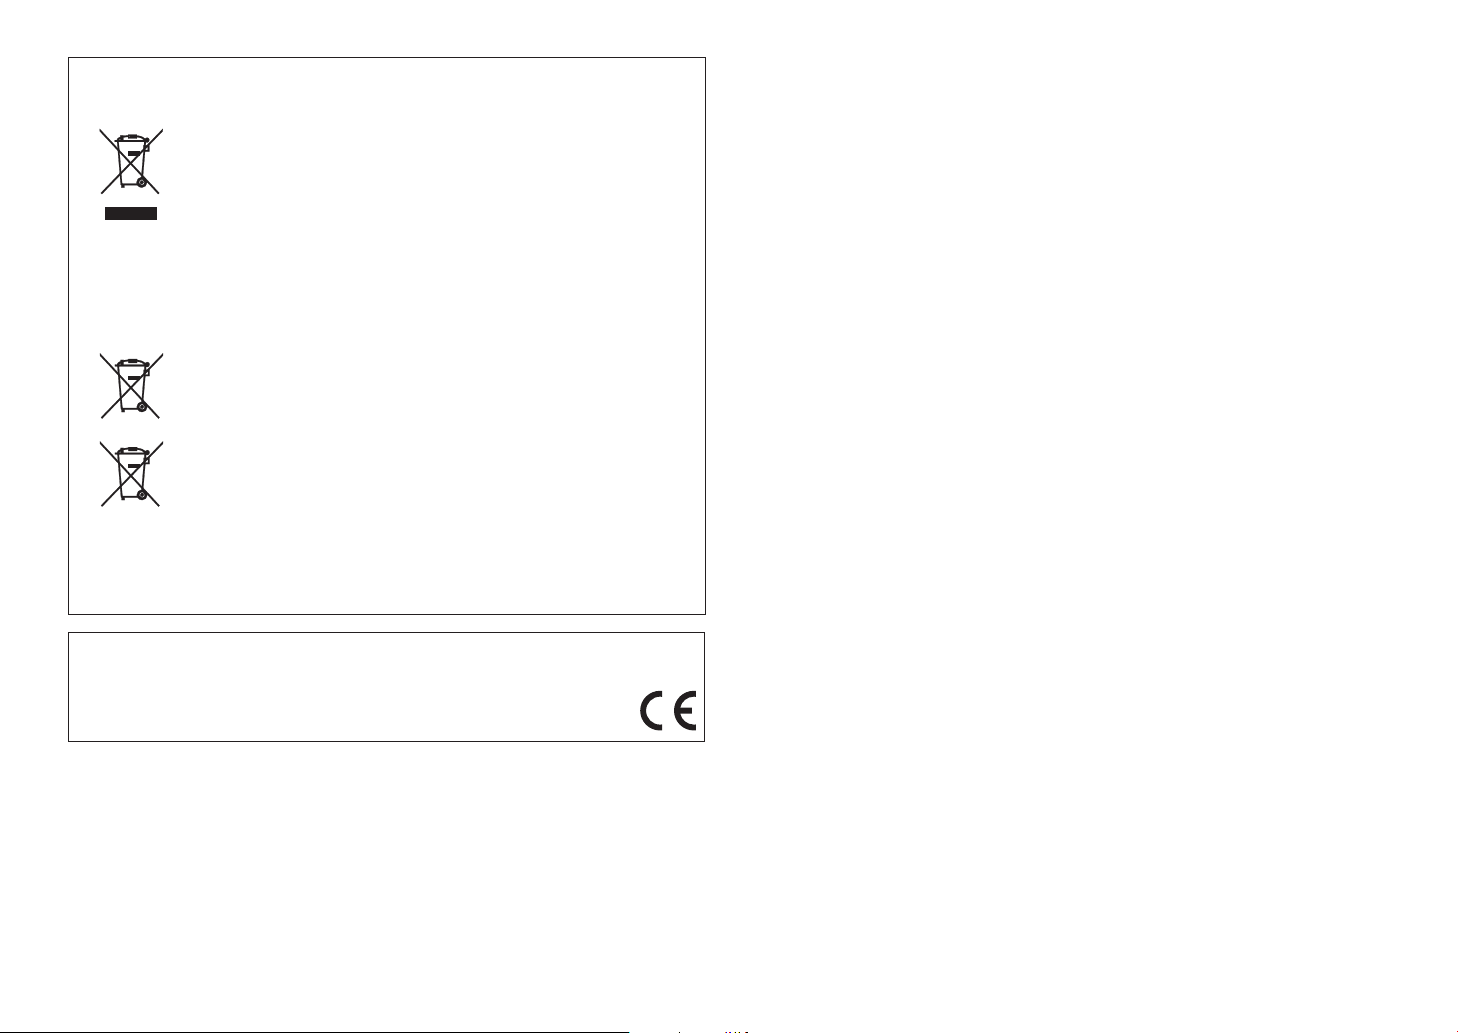
Information for users on collection and disposal of old equipment
and used batteries:
These sy mbols on the products, packagi ng, and/or accompany ing documents
mean that used electrical and electronic products and batteries should not be
mixed with general household waste.
For proper treatment, recovery and recycling of old products and used
batteries, please take them to applicable collection points, in accordance
with your national legislation.
By disposing of these products and batteries correctly, you will help to save
valuable resources and prevent any potential negative effects on human
health and the environment which could otherwise arise from inappropriate
waste handling.
For more information about collection and recycling of old products and
batteries, please contact your local municipality, your waste disposal ser vice
or the point of sale where you purchased the items.
Information on Disposal in other Countries outside the European
Union:
These symbols are only valid in the European Union. If you wish to discard
these items, please contact your local authorities or dealer and ask for the
correct method of disposal.
Pb
We, Yamaha Music Europe GmbH hereby declare that this unit is in compliance with the
essential requirements and other relevant provisions of Directive 1999/5/EC.
Note for the battery symbol (bottom two symbol examples):
This symbol might be used in combination with a chemical symbol. In this
case it complies with the requirement set by the EU Battery Directive for the
chemical involved.
Yamaha Music Europe GmbH
Siemensstr. 22-34 25462 Rellingen, Germany
Tel : +49 - 4101-303-0
Handling USB devices
• Yamaha is not liable for any loss or corruption of data in USB devices that are used. It is
recommended that you make backups of data for restoring in the event of data loss.
• Some USB devices may not function properly.
Handling Bluetooth communications
• The 2.4 GHz band used by Bluetooth compatible devices is a radio band shared by many
types of equipment. While Bluetooth compatible devices use a technology minimizing the
infl uence of other components using the same radio band, such infl uence may reduce the speed
or distance of communications and in some cases interrupt communications.
• The speed of signal transfer and the distance at which communication is possible differs
according to the distance between the communicating devices, the presence of obstacles, radio
wave conditions and the type of equipment.
• Yamaha does not guarantee all wireless connections between this unit and devices compatible
with Bluetooth function.
Bluetooth
• Bluetooth is a technology for wireless communication between devices within an area of about
10 meters (33 ft) employing the 2.4 GHz frequency band, a band which can be used without a
license.
6 En
Page 7
Table of Contents
What you can do with this unit······8
Introduction······9
Accessories······9
About this manual······9
Part names······10
Front panel······10
Rear panel······11
Front panel display······12
Remote control······13
Preparations······14
Connecting speakers······14
Connecting the antenna······15
Preparing to connect to a network ······15
Turning on the power······16
Connecting to a network······17
Selecting connection method······17
Connecting using MusicCast CONTROLLER······18
Connecting to a wireless network······19
Connecting to a wired network······21
Updating the firmware······22
Listening to music······23
Listening to CDs······23
Playing back music on USB devices······24
Playing back music via Bluetooth connection······25
Playing back music from external devices······27
Listening to DAB stations (CRX-N470D only)······28
Listening to FM radio stations······31
Radio Data System (U.K. and Europe models only)······33
Listening to the Internet radio······34
Playing back songs in the computer······35
Presetting network content······37
Playing back music with AirPlay······38
Connect the unit directly with a
mobile device
······39
More on playback······40
Shuffle/Repeat playback······40
Playback information······41
Presetting content to FAVORITES······42
Adjusting sound quality······43
Using the sleep timer······43
Option settings······44
Troubleshooting······46
General······46
Network······47
Bluetooth······48
Disc······49
USB devices······49
DAB reception (CRX-N470D only)······50
FM reception······50
Messages on the front panel display······51
Supported devices/media and file
formats
Supported devices/media······52
File format······53
······52
Specifications······54
Trademarks······55
7 En
Page 8
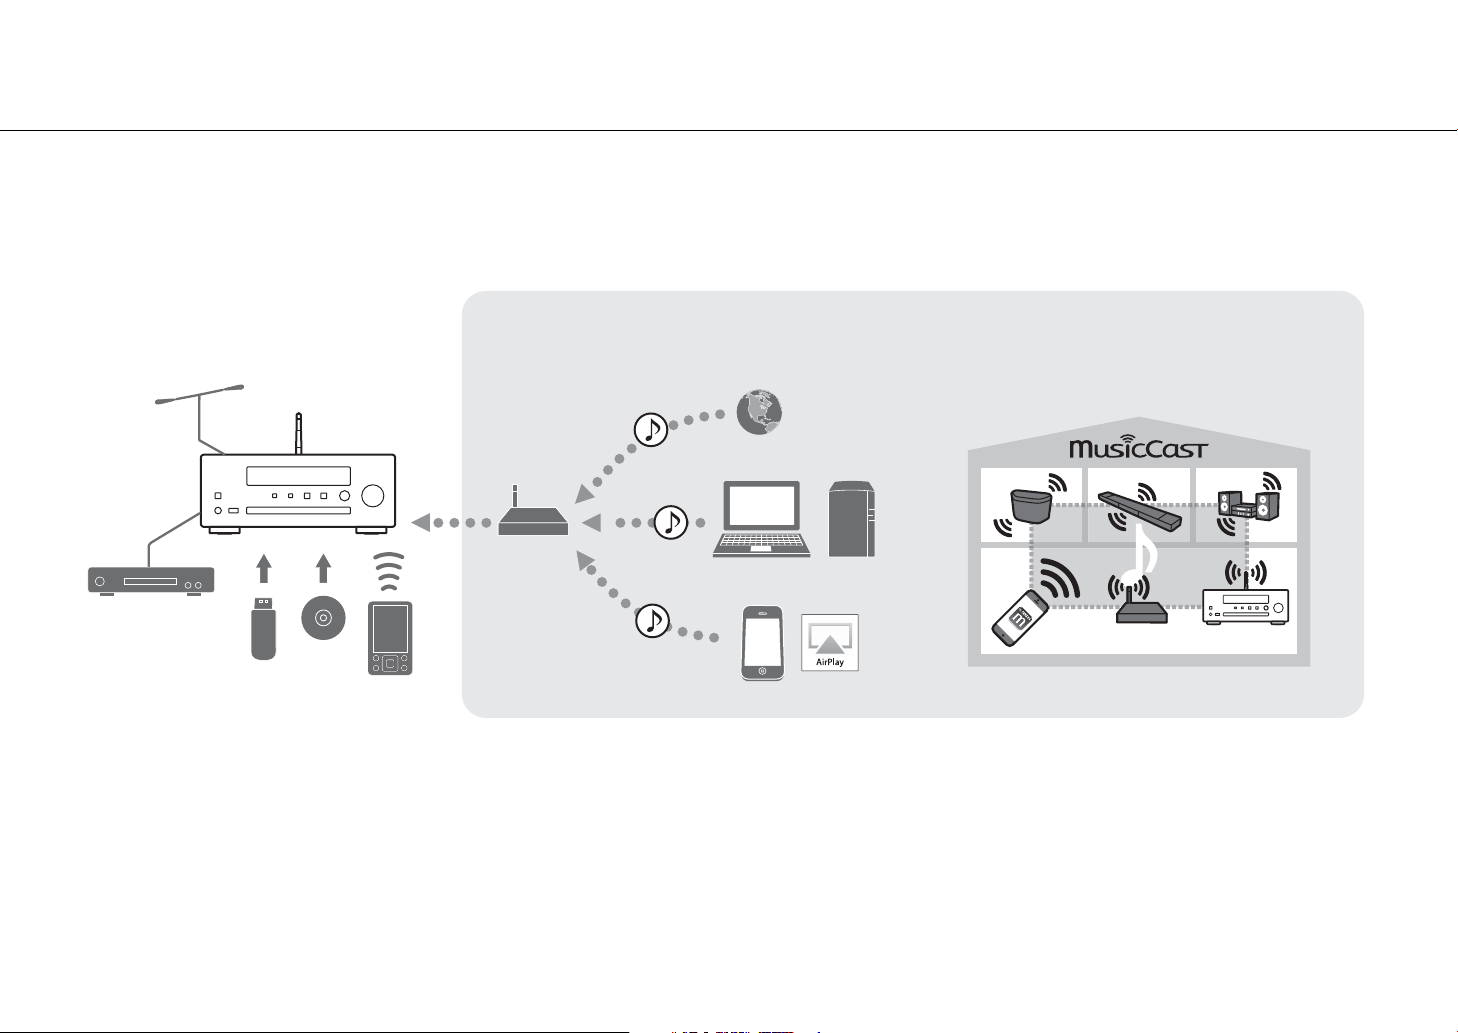
What you can do with this unit
Router*
6 Internet radio
This unit
8 AirPlay
1 FM radio
DAB (CRX-N470D only)
7 PC or NAS
3 USB
device
2 External device
5 Bluetooth-
compatible
device
4 CD
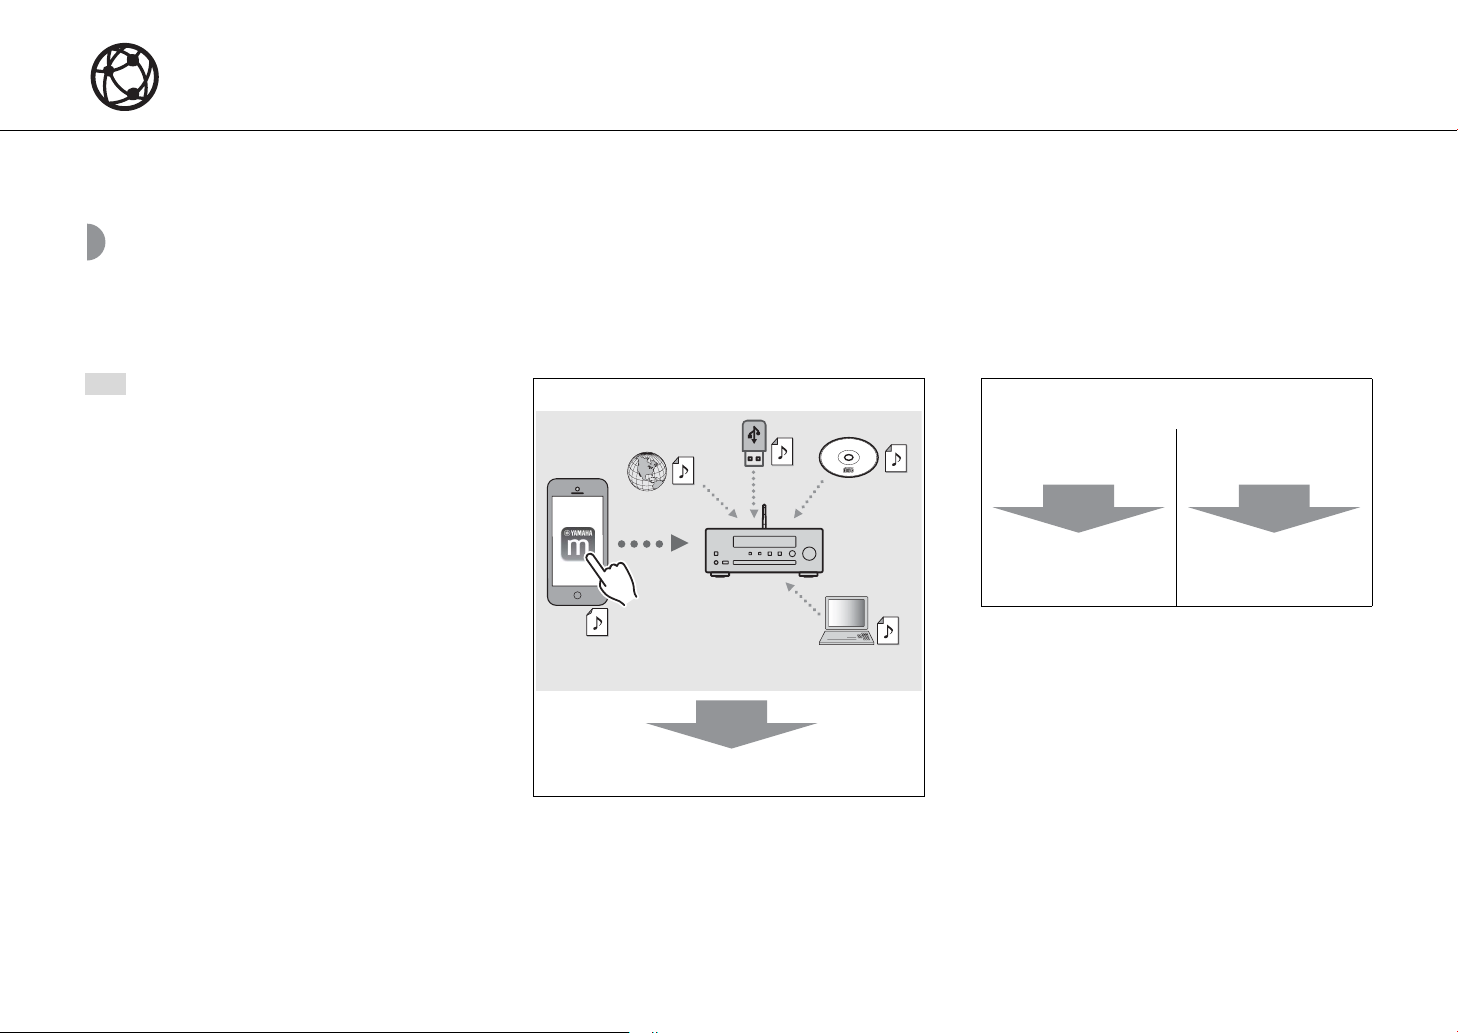
When you install the “MusicCast CONTROLLER” app on your mobile device and connect to a network...
You can enjoy Internet radio and music files stored in mobile
devices, PCs, servers, and other equipment.
You can control this unit from your mobile device and establish a
wireless connection with other devices that are compatible with
MusicCast CONTROLLER for vastly expanding your entertainment
possibilities.
9
* You need a commercially available wireless router (access point) when you use a mobile device.
• This unit is a Network CD Receiver, on which you can enjoy playing back music files stored on your media servers (PC or NAS) connected to the same network,
USB devices, audio content on Internet radio, FM radio, CD, AirPlay devices (iPhone/iTunes), and external devices including DVD players, by connecting the unit
to your home network and audio system.
• You can select songs and operate the unit easily by using the free dedicated "MusicCast CONTROLLER" app supporting iOS/Android.
1 Listening to FM radio stations (& P.31)
2 Play back music in an external device (& P.27)
3 Play back music in a USB device (& P.24)
4 Play back a CD (& P.23)
Listening to DAB stations (CRX-N470D only) (& P.28)
5 Play back music in a Bluetooth compatible device (& P.25)
6 Play back Internet radio (& P.34)
7 Play back music files stored on your PC or NAS (& P.35)
8 Play back your iPhone with AirPlay (& P.38)
9 Use of MusicCast CONTROLLER (& P.17)
8 En
Page 9
Introduction
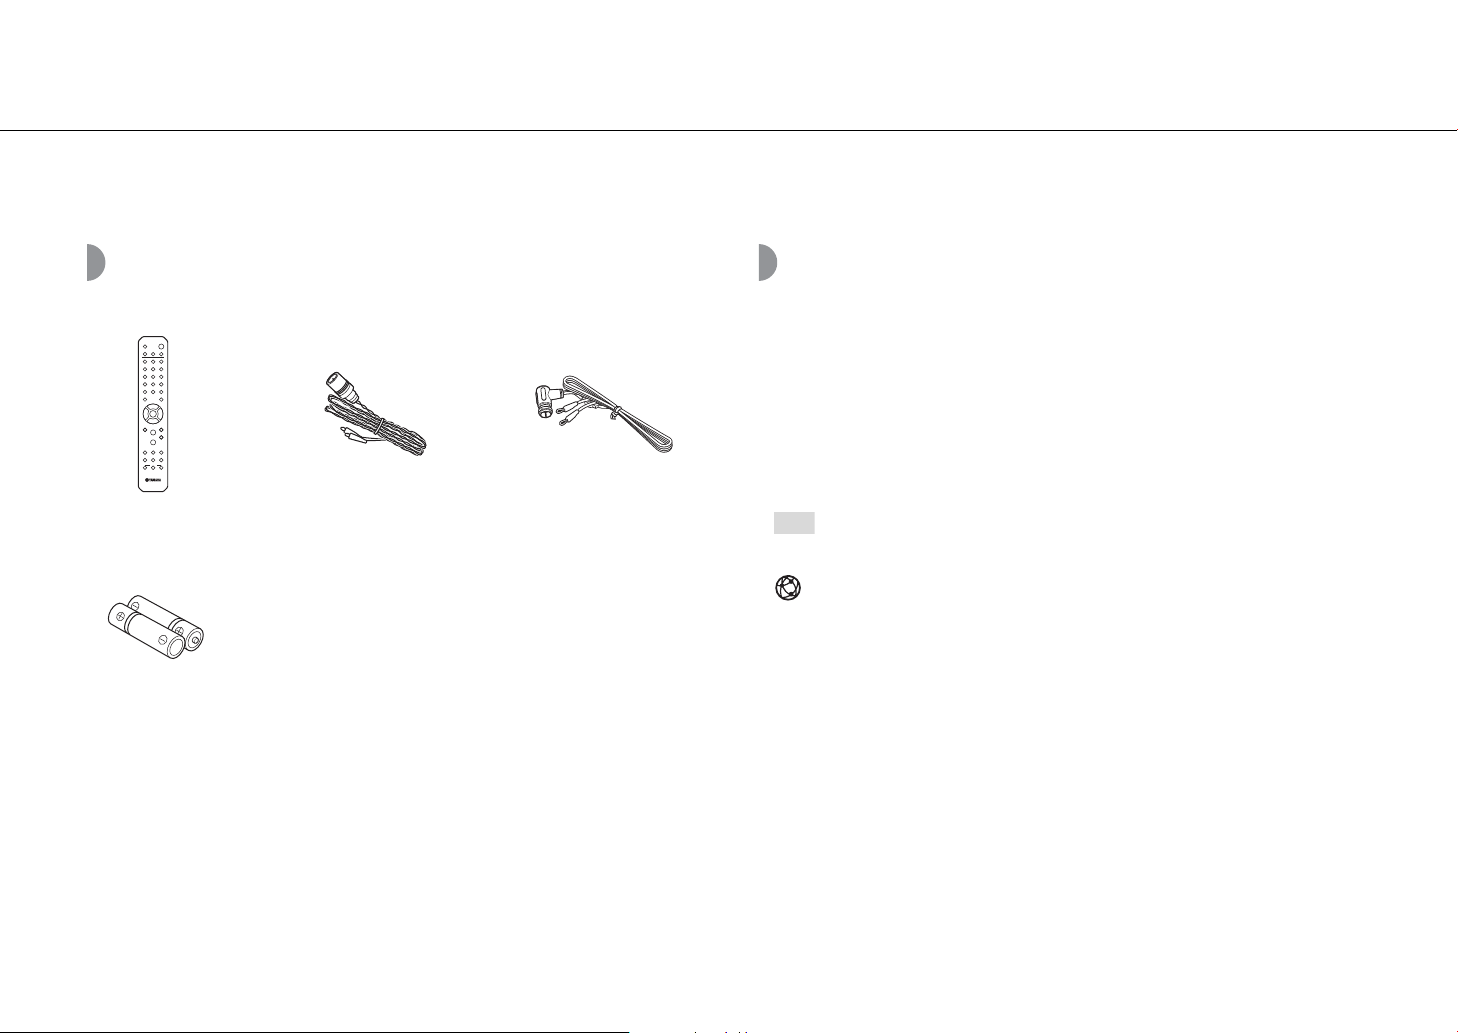
Remote control FM antenna
(for CRX-N470)
Batteries (x 2)
(AA, R6, UM-3)
DAB/FM antenna
(for CRX-N470D)
Note
Confirm the package contents and useful points of this manual.
Accessories About this manual
• Instructions and illustrations used in this manual refer to the CRX-N470, unless otherwise
specified.
• How to operate this unit is described mainly using the remote control.
• iOS and Android mobile devices are collectively referred to as “mobile devices.” The
specific type of mobile device is noted in explanations as needed.
• “iPhone” described in this manual may also refer to “iPod” or “iPad.”
• Illustrations may differ from actual item depicted.
• Symbols:
Indicates tips for usage and supplementary information.
& Indicates the corresponding reference page(s).
This icon appears for features that require a network connection.
9 En
Page 10
Part names
PHONES
USB
INPUT
VOLUME
Wi-Fi
BLUETOOTH
CONNECT
D C B
A
E
0987654321
Note
Familiarize yourself with all parts and their functions.
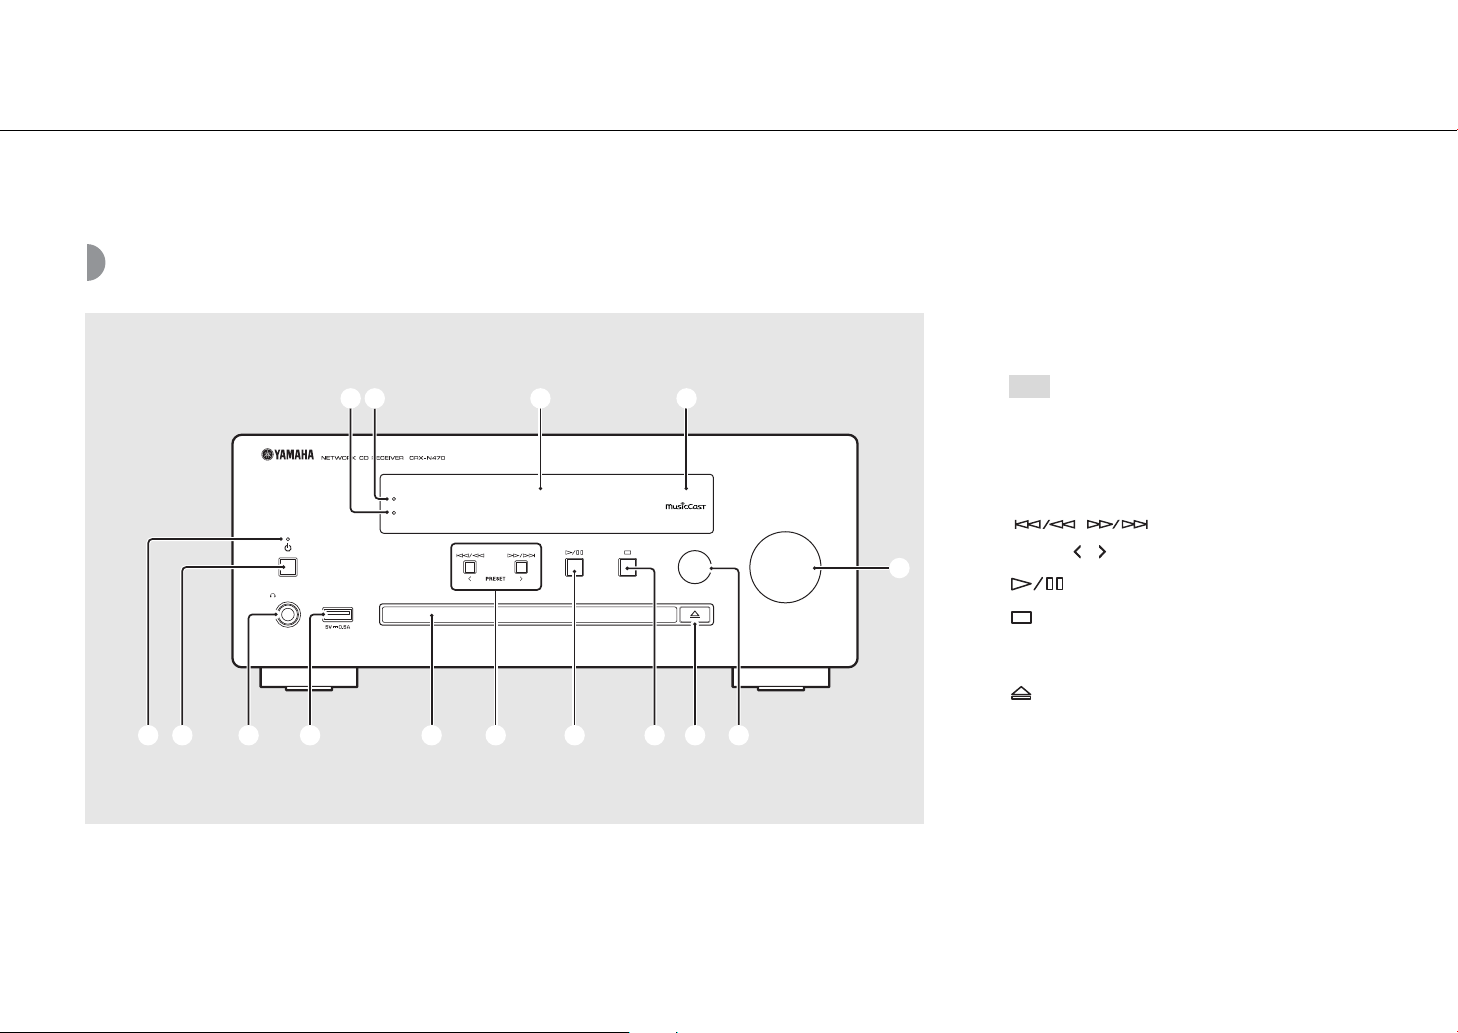
Front panel
1 Power indicator
Lights up when the unit is on.
2 A (Power) (& P.16)
3 PHONES
Connect headphones to this jack.
• When headphones are connected to it,
there is no sound from the speakers or
subwoofer.
4 USB jack (& P.24)
5 Disc tray (& P.23)
6 (& P.23, 24, 36)
PRESET / (& P.32)
7 (Play/pause) (& P.23, 24, 36)
8 (Stop) (& P.23, 24, 34, 36)
CONNECT (& P.18)
Use to connect to a network.
9 (Open/close the disc tray) (& P.23)
0 INPUT (& P.23, 24)
Change the input source. (The source is shown on the
front panel display.)
A VOLUME
Controls the volume.
B Remote control sensor
C Front panel display (& P.12)
D Wi-Fi indicator (& P.19)
E Bluetooth indicator (& P.25)
10 En
Page 11
Rear panel
7654321 8
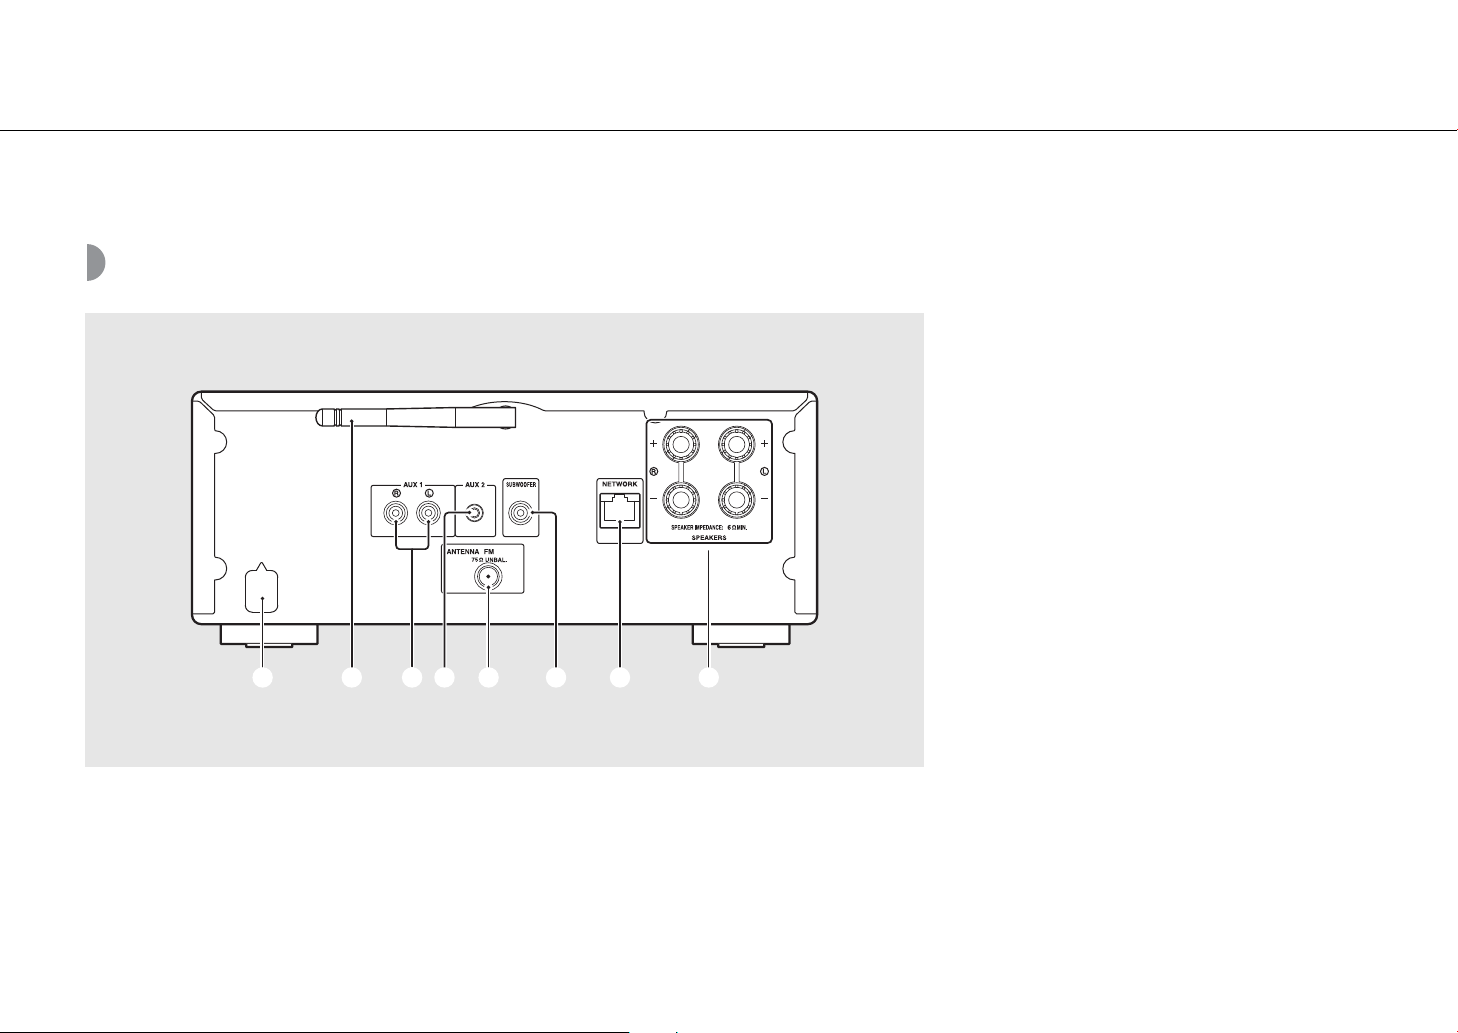
Part names
1 Power cable (& P.16)
2 Wireless antenna (& P.19)
3 AUX 1 jacks (RCA input) (& P.27)
4 AUX 2 jack (mini jack input) (& P.27)
5 ANTENNA jack (& P.15)
6 SUBWOOFER jack (& P.14)
7 NETWORK jack (& P.15)
Connects to a network using a commercially available
network cable.
8 SPEAKERS terminals (& P.14)
11 En
Page 12

Part names
1 2 3 4 5 6
Note
Front panel display
1 Multi information display
Shows various information, such as music information
and the radio frequency.
Characters shown on the front panel display are
alphanumerics only.
2 STEREO indicator
Lights up when the unit is receiving a signal from an FM
stereo broadcast.
3 TUNED indicator
Lights up when the unit is receiving a signal from an FM
station.
4 MUTE indicator
Lights up when the sound is muted (& P.13).
5 SLEEP indicator
Lights up when the sleep timer is set (& P.43).
6 Shuffle/repeat indicator
Lights up when you shuffle or repeat music of your CD,
USB device or computer.
Adjusting display brightness
You can adjust the brightness of the display by
pressing the DIMMER button on the remote control
(& P.13).
• Each press of the button changes the brightness:
bright (default), mid dim, or dim.
12 En
Page 13
Part names
1
2
3
4
5
6
7
8
9
0
A
B
C
D
E
F
G
Note
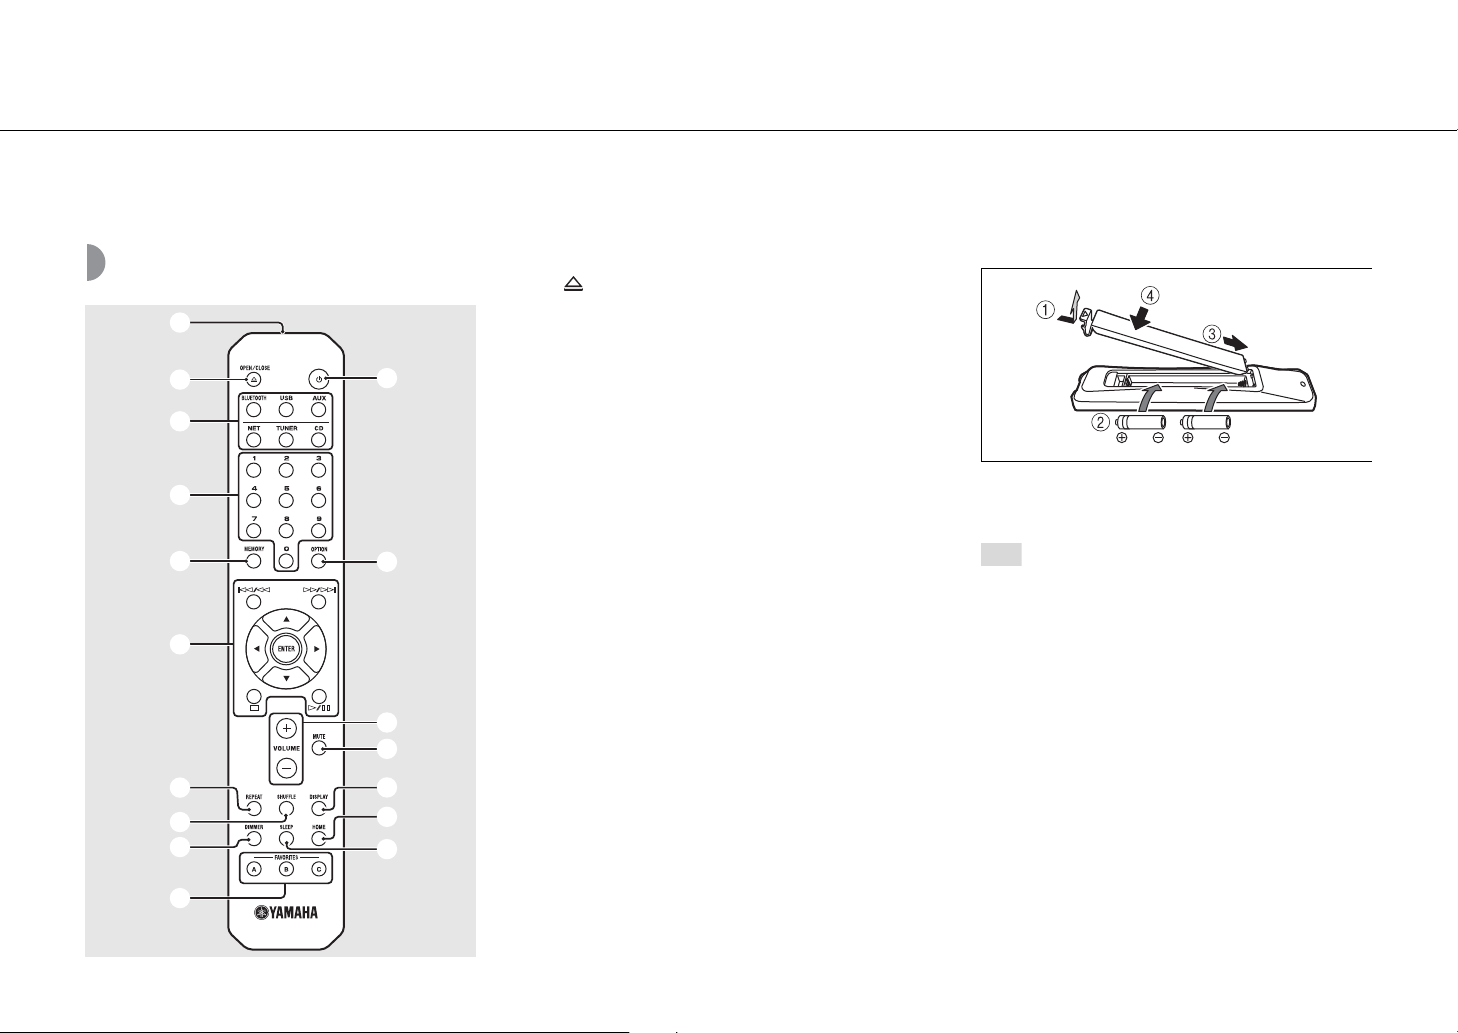
Remote control
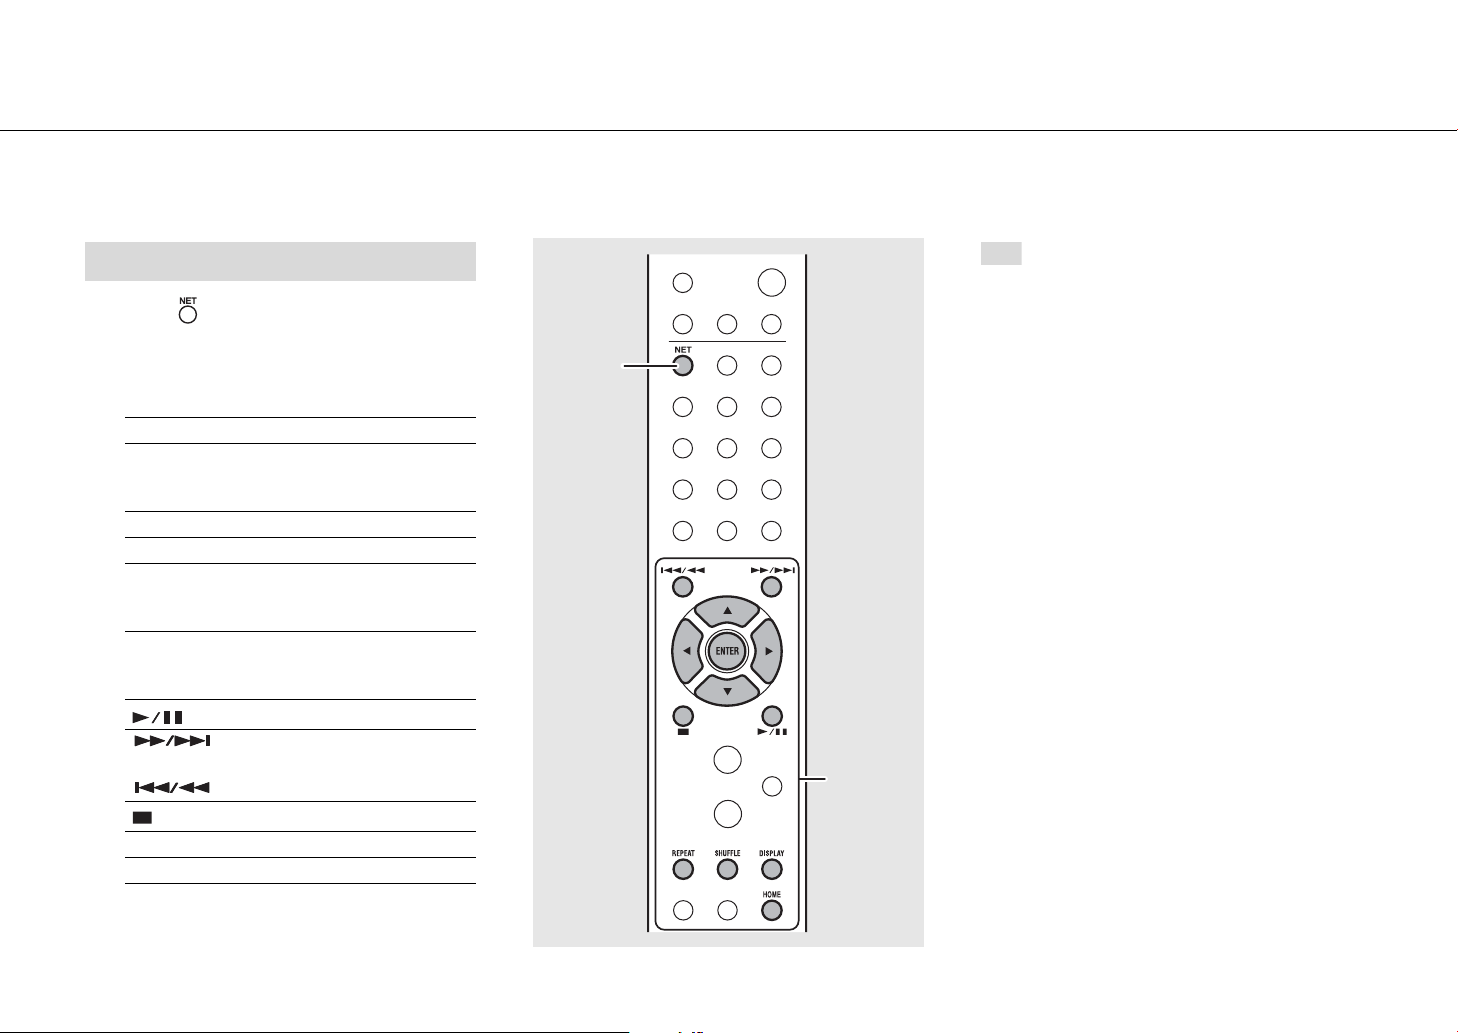
1 Infrared signal transmitter
2 (Open/close the disc tray) (& P.23)
3 Source buttons
Switch the input source to be played.
4 Numeric buttons (& P.23, 37)
5 MEMORY (& P.31, 37)
6 Audio control, cursor control buttons
(& P.23, 24, 34, 36)
7 REPEAT (& P.40)
8 SHUFFLE (& P.40)
9 DIMMER (& P.12)
0 FAVORITES (& P.42)
A A (Power) (& P.16)
B OPTION (& P.44)
C VOLUME +/–
Controls the volume.
D MUTE
Turns mute on or off.
E DISPLAY (& P.41)
F HOME (& P.34, 36)
G SLEEP (& P.43)
Installing batteries
Check the “+” and “-” of the batteries and insert them facing
the correct directions.
• Change both batteries when the operation range
of the remote control decreases.
13 En
Page 14
Preparations
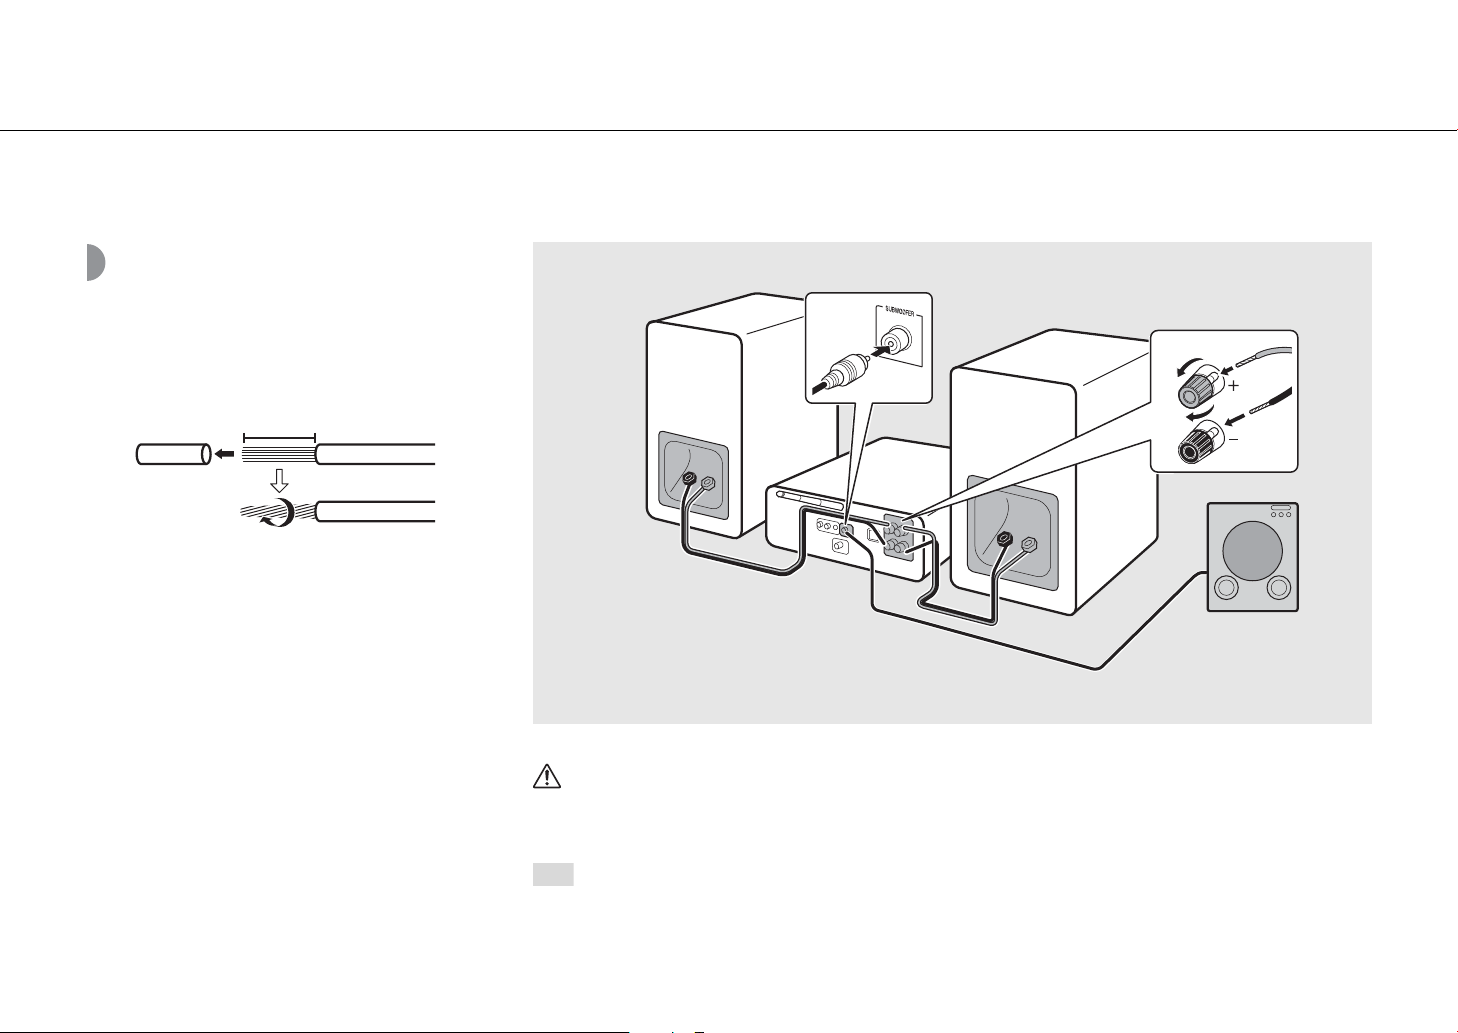
15 mm (5/8 in.)
1
3
2
Right speaker
Left speaker
Subwoofer
Monaural pin cable
Speaker cable
Note
Connect speakers, the antenna, etc. and turn the unit on.
Do not connect the power cable of the unit until you have finished connecting all cables.
Connecting speakers
1 Remove the insulation from the ends
of the speaker cables to expose the
bare wires.
2 Connect speakers to the unit, as the
illustration shows.
• Prepare speakers, subwoofer and speaker cables
separately.
• For connection of the speakers, refer to the
owner’s manual supplied with them.
Caution
• If the bare speaker wires touch each other or any metal part of the unit, it could damage the unit and/or the
speakers.
• Use speakers of at least 6 Ω impedance.
• Make sure that left and right (L, R) connections and polarity (red: +, black: -) are correct. If connections are incorrect, the
sound will be unnatural.
• You can also connect a subwoofer to the unit (it must have a built-in amplifier).
14 En
Page 15
Preparations
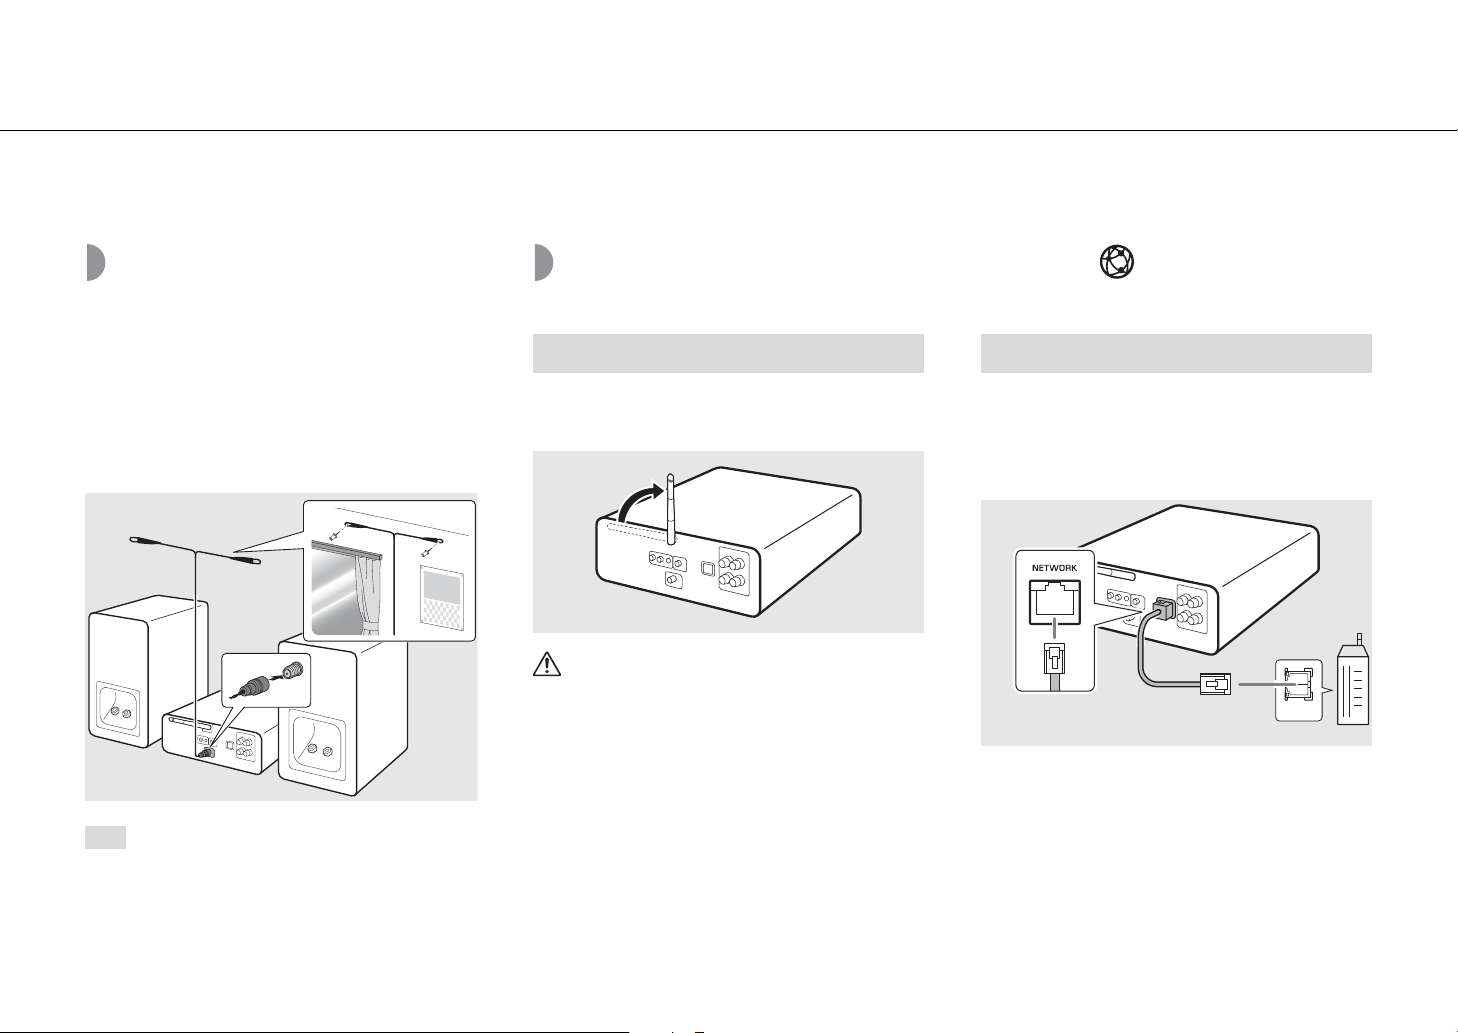
Supplied antenna
2
1
Note
LAN
Network cable
Router
Connecting the antenna
1 Connect the supplied antenna to the
unit.
2 Install it with pins where the unit can
obtain good reception.
• Be sure to stretch out the antenna as the
illustration shows.
• If radio reception with the supplied antenna is
not satisfactory, a commercially available
outdoor antenna may improve reception.
Preparing to connect to a network
Connecting to a wireless network
Raise the wireless antenna.
• Raise the wireless antenna on the rear panel.
Caution
• Do not apply excessive force to the
wireless antenna.
• Do not remove the antenna.
Connecting to a wired network
Connect the unit to a router, as the
illustration shows.
• Connect using a commercially available network cable
(CAT-5 or higher straight cable).
15 En
Page 16
Preparations
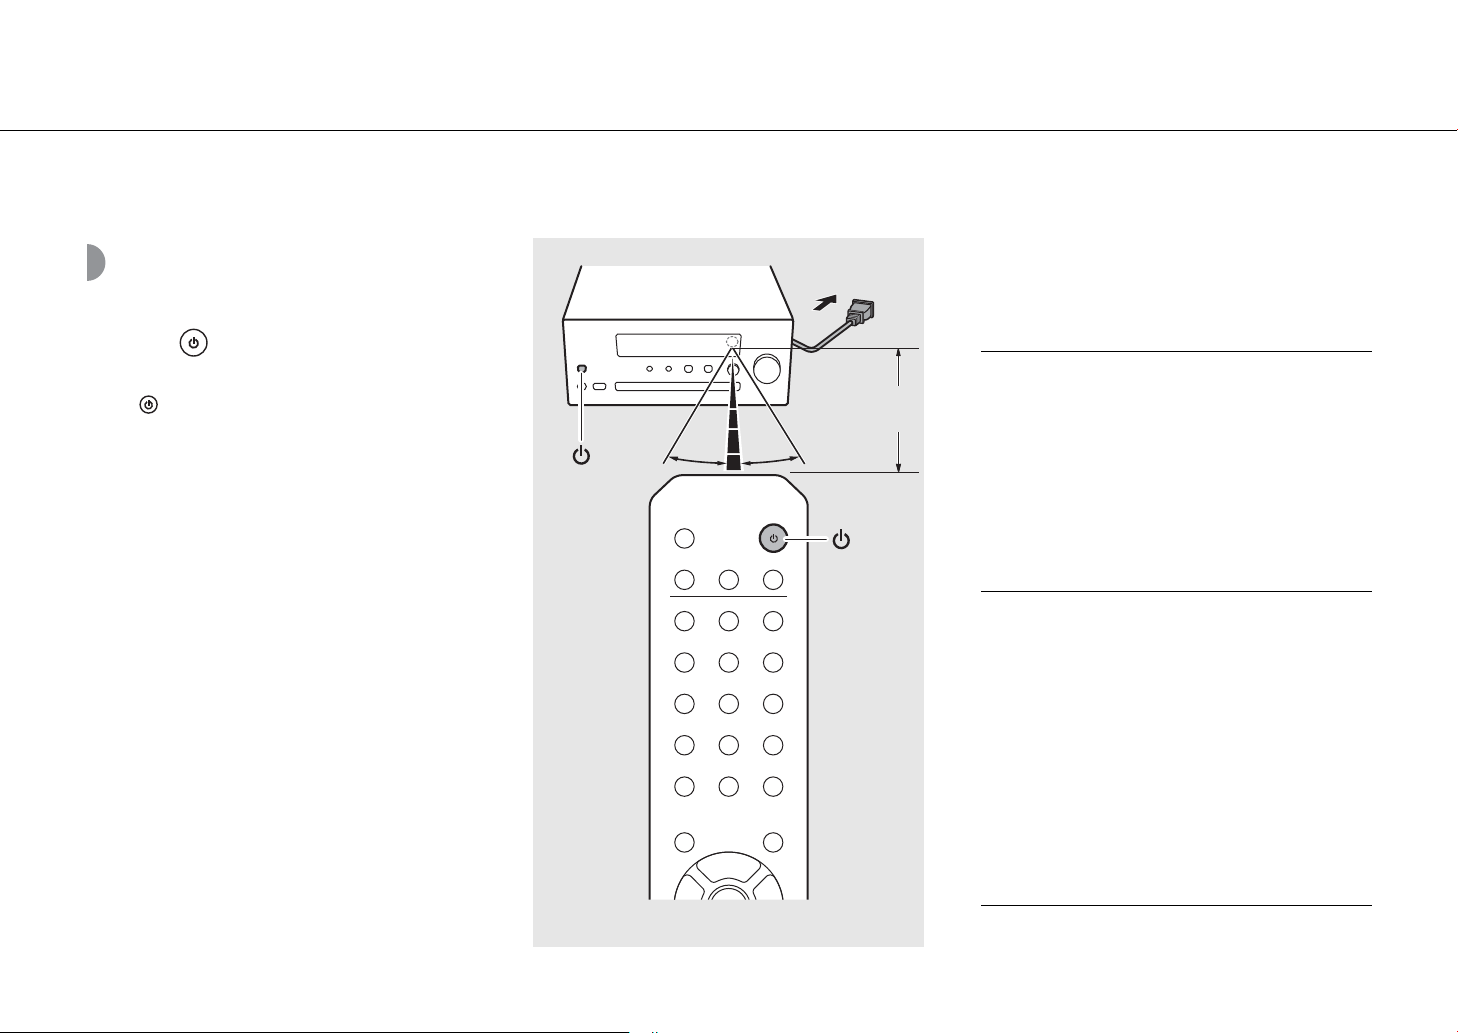
30° 30°
Within 6 m
(20 ft)
Turning on the power
Plug the power cable into a power outlet,
and press .
• The unit turns on.
• Press again to turn the unit off (standby mode).
•
When the power of the unit is turned on for the first time
after purchase, the network settings preparation message
(Share WiFi Set) may appear. If it appears, refer to step 6 in
“Sharing the settings of an iOS device” (&
P.20).
Option menu regarding power (System Config)
(Bold: default)
For details on operating the option menu, refer to
"Option settings" (& P.44).
AutoPowerStby
This configures whether the unit automatically enters the
standby mode.
(On, Off)
When set to On, the unit automatically enters the standby
mode under the following conditions according to the
input source:
•Network/Bluetooth/CD/USB: When no operation or
playback is performed for 20 minutes
• Other sources: When no operation is performed for 8
hours
Net Standby
This configures whether the unit performs network
operations while in the standby mode.
(On, Off)
When set to Off, network operations while the unit is in
standby mode are stopped, and power consumption is
reduced. When Net Standby is Off, the following features
cannot be used while the unit is in standby mode:
- Using the MusicCast CONTROLLER app (& P.18) to
turn on the unit's power
- Charging of USB devices
- AirPlay
- Bluetooth
16 En
Page 17
Connecting to a network
Note
This unit can be controlled from your mobile device.
You can play back music files stored on your PC, mobile devices, DLNA*-compatible NAS, or audio content on the Internet by connecting this unit to a network.
* Digital Living Network Alliance
Selecting connection method
Using the MusicCast CONTROLLER app is the most simple and recommended way to connect to a network.
• When playing back high-resolution audio
sources, it is recommended to use a wired
network in order to maintain a stable
connection.
• For details on Internet connection, refer to the
owner’s manuals of your network devices.
• Some security software installed on your PC or
the firewall settings of network devices (such as
a router) may block the access of the unit to the
network devices or the Internet. In this case,
change the setting of the security software or
network devices.
Connecting using MusicCast CONTROLLER
Go to "Connecting using MusicCast CONTROLLER"
(& P.18)
Connecting without using MusicCast
CONTROLLER
Connecting to a
wireless network
Go to "Connecting to
a wireless network"
(& P.19)
Connecting to a
wired network
Go to "Connecting to
a wired network"
(& P.21)
17 En
Page 18
Connecting to a network
Wi-Fi
BLUETOOTH
1
2
3
Note
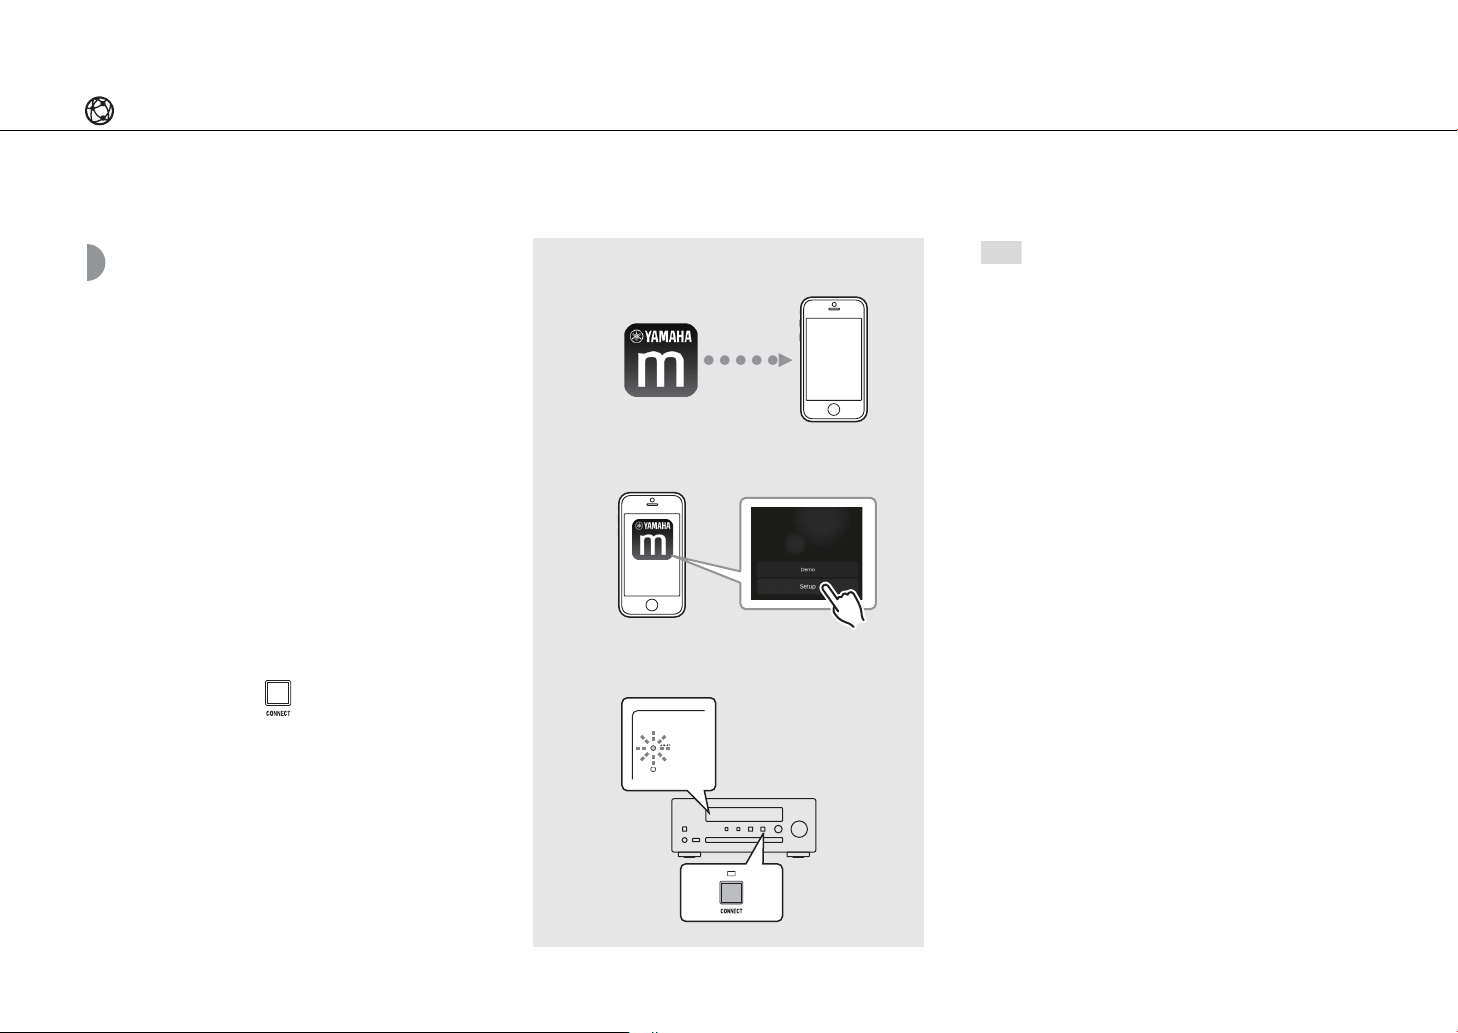
Connecting using MusicCast CONTROLLER
Connect this unit to the same home network as your
mobile devices.
1 Install the “MusicCast CONTROLLER”
app on your mobile device.
• This app can be downloaded for free from the
App Store or Google Play.
2 Start “MusicCast CONTROLLER” and
tap “Setup”.
• Follow the app’s instructions.
3 Press and hold for about 5
seconds.
• The Wi-Fi indicator starts flashing. Configure the
settings by following the app’s instructions.
• For more information about MusicCast
CONTROLLER, refer to the following site:
http://www.yamaha.com/musiccast/
• For setting up MusicCast CONTROLLER, you can
also refer to the "MusicCast Setup Guide", which
is available on the following site:
Yamaha Downloads
http://download.yamaha.com/
18 En
Page 19

Connecting to a network
2, 3, 4, 5
/
,
ENTER
1
OPTION
Note
Connecting to a wireless network
Setup can be performed using a WPS (Wi-Fi Protected
Setup) button, or by sharing settings from an iOS device
(iPhone, etc.).
Setup using a WPS button
• A wireless router (access point) with a WPS button is
required.
1 Press .
2 Select [Network Config] with S/T,
and press .
3 Select [Select Network] with S/T,
and press .
4 Select [Wireless] with S/T, and press
.
5 Select [WPS] with S/T, and press .
About WPS
WPS (Wi-Fi Protected Setup) is a standard established by
the Wi-Fi Alliance, which allows easy establishment of a
wireless home network.
• You cannot simultaneously use this setting with
a wired network connection or Wireless Direct
(& P.39).
• If the unit is placed far away from the wireless
router (access point), a connection may not be
able to be established. In that case, place them
closer together.
6 Press the WPS button on the wireless
router (access point).
• Once connected, the Wi-Fi indicator stays lit.
19 En
Page 20

Connecting to a network
2, 3, 4, 5
/
,
ENTER
1
OPTION
Note
Sharing the settings of an iOS device
This applies the network settings of your iOS device to the
unit.
• An iOS device with iOS 7.1 or later is required.
• Before starting setup, check that your iOS device is
connected to the wireless router.
1 Press .
2 Select [Network Config] with S/T,
and press .
3 Select [Select Network] with S/T,
and press .
4 Select [Wireless] with S/T, and press
.
5 Select [Share WiFi Set] with S/T, and
press .
• A message about the initialization of the network
will be shown on the front panel display. Press
ENTER.
6 Display the Wi-Fi setup screen on the
iOS device and select the unit from
“SETUP A NEW AIRPLAY SPEAKER...”.
• Follow the on-screen instructions displayed on
the iOS device.
• Once connected, the Wi-Fi indicator stays lit.
• If the network settings of an iOS device are
applied, all network and Bluetooth connection
settings as well as account information for
streaming services will be initialized.
20 En
Page 21

Connecting to a network
2, 3, 4
/
,
ENTER
1
OPTION
Note
Connecting to a wired network
1 Press .
2 Select [Network Config] with S/T,
and press .
3 Select [Select Network] with S/T,
and press .
4 Select [Wired] with S/T, and press
.
• By default, [Wired] is set for the unit.
• If you are using a router that does not support
DHCP, configure the network settings from
[Network Config] within Option settings
(& P.44).
• When setting the subnet manually, each server
must be connected to the same subnet as the
unit (& P.45).
21 En
Page 22

Connecting to a network
1
OPTION
2, 3, 4
/
ENTER
Note
Updating the firmware
When a new firmware for the unit is released, a message
to update your current firmware will be shown on the
front panel display (when the unit is connected to the
Internet only).
If this message is shown, follow the steps below to
perform the update.
1 Press .
2 Select [Firmware Update] with S/T,
and press .
3 Select [Update] with S/T and press
.
4 Select [Network] with S/T, and press
• Press ENTER again to begin the update.
• When the update finishes, messages are shown in
.
the following order: “UPDATE SUCCESS”, “PLEASE
...”, and “POWER OFF!”
• Do not operate the unit or disconnect the power
cable and network cables while updating.
• When Internet speed is not fast enough or the
unit is connected to the wireless network via a
wireless network adapter, network update may
not be possible depending on the condition of
the wireless connection. In this case, try again or
update the firmware using a USB memory device.
The firmware can be downloaded from the
Yamaha Website.
To update the firmware using a USB memory
device
You can download the firmware to a USB memory
device, and connect that USB memory device to
the USB jack on the unit.
• Select [USB] in step 4 to start the update.
5 Press A (Power) on the front panel.
• The update is applied.
22 En
Page 23

Listening to music
3
1
CD
1
INPUT
2
Note
Listening to CDs
1 Press INPUT to select [CD]. Or, press
on the remote control.
2 Set a CD in the disc tray.
• Press to open/close the disc tray.
3 Playback starts.
The remote control functions are shown below.
Play/pause
Stop
Skip to the beginning of the song being
played back, or skip to the previous song.
Press and hold to fast rewind.
Skip to the next song. Press and hold to
fast forward.
SHUFFLE Starts shuffle playback (& P.40).
REPEAT Starts repeat playback (& P.40).
1 - 9, 0 Specify the song number.
ENTER
Confirmation of the song number
selected with the numeric buttons.
• This u nit al lows p layba ck of a udio C Ds, an d data CDs in
which MP3/WMA files are recorded. For details on
playable CDs, see “Supported devices/media”
(& P.52).
• When CD playback is stopped, playback will
resume from the beginning of the song last
played. Pressing while playback is stopped will
clear resume playback.
• You can cancel the song number selected with
the numeric buttons by pressing W.
• If you turn off the unit with CD selected as the
input source and a CD set in it, the unit
automatically plays back the set CD next time you
turn on the unit.
23 En
Page 24
Listening to music
3, 4
1
USB
1
INPUT
2
Note
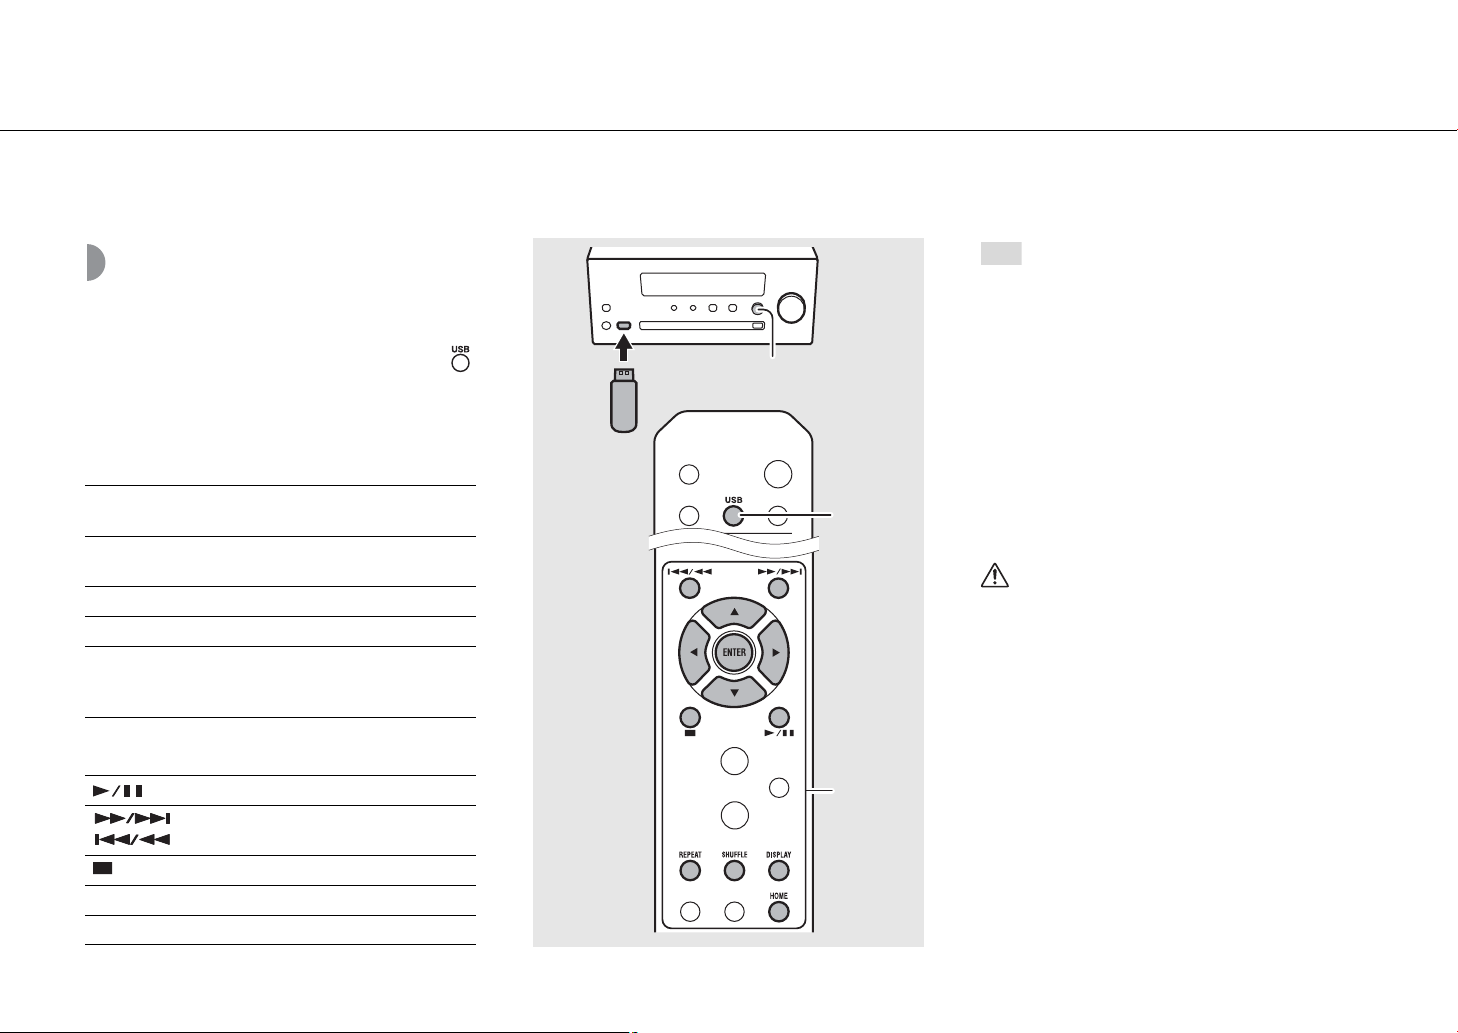
Playing back music on USB devices
1 Press INPUT to select [USB] or press
on the remote control.
2 Connect a USB device to the USB jack.
3 Browse and select a song.
S
T
ENTER/X
HOME Shows the top-level item.
W Returns to the previous item.
DISPLAY
Shows other items.
Confirms the selected item and proceeds
to the next level or starts playback.
Finishes browsing and displays
information about the content being
played back.
4 Playback starts.
Play/pause
/ Moves to the next or previous song in
the folder.
Stop
SHUFFLE Starts shuffle playback (& P.40).
REPEAT Starts repeat playback (& P.40).
• This unit allows playback from USB devices on
which music files are saved. For details on
playable USB devices, see “Supported devices/
media” (& P.52).
• Some USB devices may not work properly even if
they meet the requirements. Playability of and
power supply to all USB devices are not
guaranteed.
• Stop playback before disconnecting the USB
device.
• A USB device is automatically charged when it is
connected to the unit (except when Net
Standby is Off (& P.16)). However, some devices
may not charge when connected.
Caution
• Yamaha and suppliers do not accept any
liability for the loss of data saved on a USB
device connected to the unit. As a
precaution, it is recommended to make
backup copies of important files.
24 En
Page 25
Listening to music
1
BLUETOOTH
Bluetooth device
Note
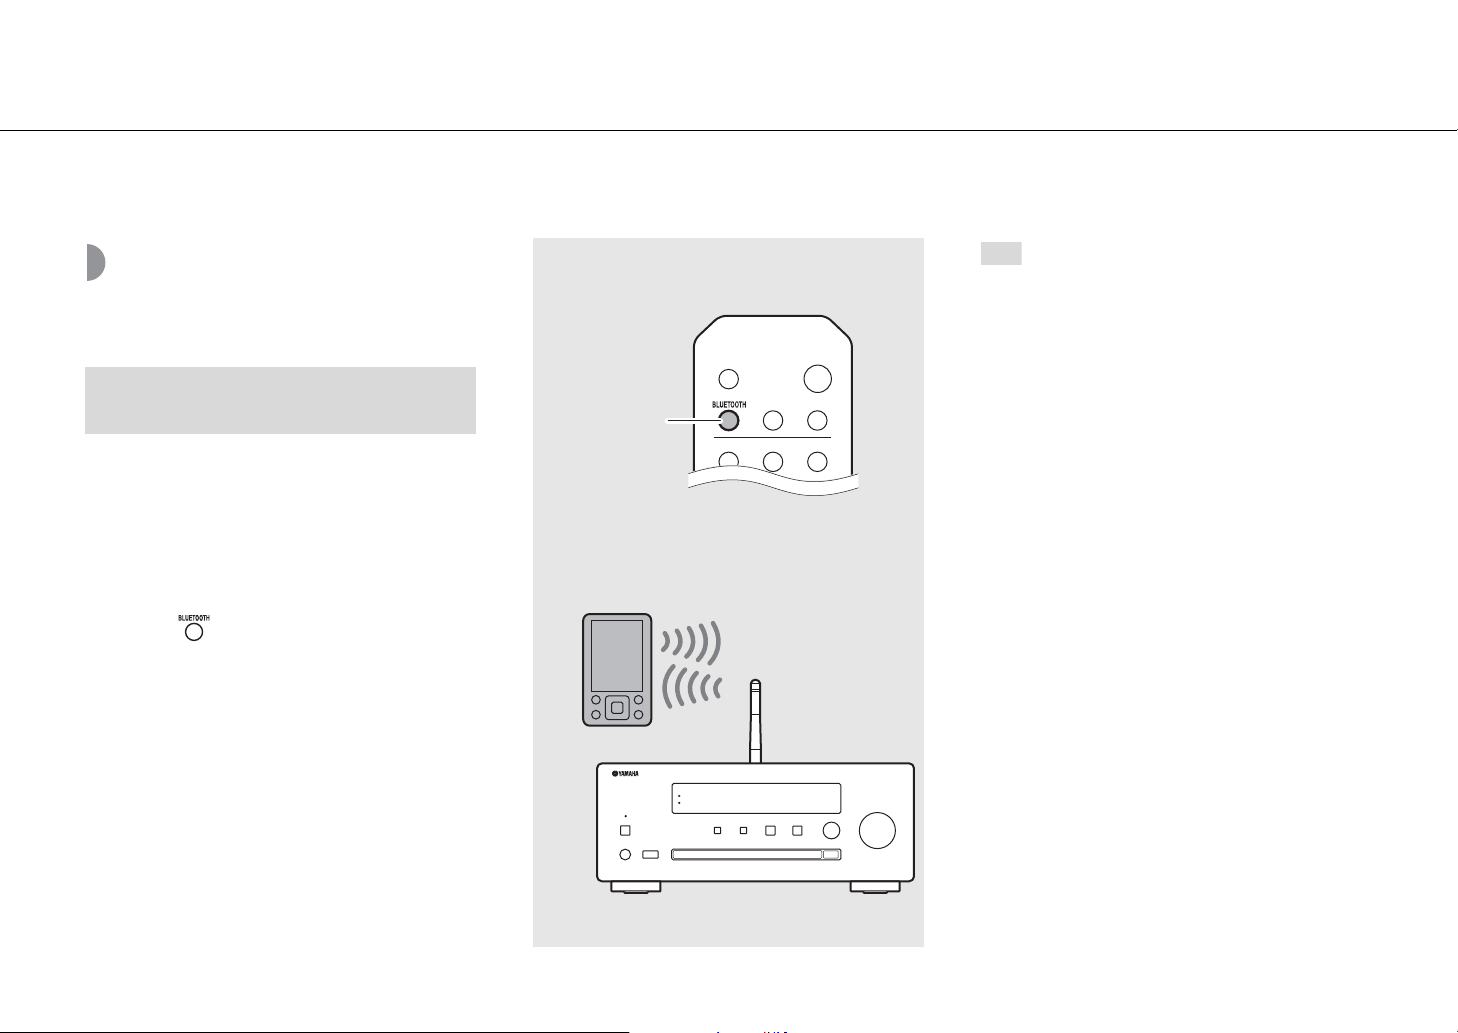
Playing back music via Bluetooth connection
Pairing a Bluetooth device and playing
back music
When connecting a Bluetooth device to the unit for the
first time, the device must be registered (paired) to the
unit. After pairing has been performed once, it is easy to
reconnect after the Bluetooth connection has been
disconnected.
Set the Bluetooth setting of your Bluetooth device to ON
before connecting.
1 Press .
2 Select this unit in the Bluetooth
3 Play back music using your Bluetooth
settings of your device.
• The Bluetooth indicator lights up when a
connection is established.
device.
• If the device does not connect to the unit
automatically after the pairing is completed,
select the unit again in the Bluetooth setting on
your device.
• If pairing information for a device is deleted, you
will need to perform pairing of that device again
in order to connect it again.
• If another device is already connected to the
unit, press and hold BLUETOOTH to terminate
the Bluetooth connection, then perform pairing
with the new device.
• If a passkey is required during the pairing
operation, enter the number “0000.”
• For details on connecting, see the owner’s
manual of your device.
25 En
Page 26

Listening to music
Note
Connecting a paired Bluetooth device
and playing back music
If the unit is connected to another device via Bluetooth
connection, terminate that connection (see “Terminating
the Bluetooth connection” on the right) before
connecting to the target device.
1 Perform Bluetooth connection.
• Connecting from the unit: Press BLUETOOTH.
• Connecting from the Bluetooth device:
Turn on the Bluetooth function of the Bluetooth
device, and select the unit from the available
device list.
• The Bluetooth indicator lights up when a
connection is established.
2 Play back music using your Bluetooth
device.
• Decrease the volume of the unit before
playback. Otherwise, playback volume may be
1
1, 2
too loud.
• If connecting from the unit, the unit searches for
the Bluetooth device connected the last time. In
this case, make sure that device's Bluetooth
function is turned on.
Terminating the Bluetooth connection
• Bluetooth connection can be terminated by any
of the following methods:
- Terminate the Bluetooth connection from the
connected device.
- Change to another input source.
- Press and hold BLUETOOTH.
- Set the unit to standby mode.
Wi-Fi
BLUETOOTH
26 En
Page 27

Playing back music
3
2
DVD player, etc.
Stereo pin cable
(RCA connector)
1
3.5 mm stereo
mini-plug cable
Portable music player, etc.
Note
from external devices
This unit allows playback from external devices, such as a
DVD player.
1 Unplug the power cable of the unit
and connect the external device to the
unit.
• Prepare commercially available cables for
connection.
2 Plug the power cable of the unit back
into the wall outlet and press to
turn the unit on.
Listening to music
3 Change the input source.
• Each time AUX is pressed, the input source
switches between AUX 1 and AUX 2.
4 Play back the connected external
device.
• For details on playback, refer to the owner’s
manual supplied with the external device.
• Decrease the volume of the unit and the connected external device before connection. Otherwise, playback
volume may be too loud.
• Use the jacks (AUX 1 or AUX 2) according to the device to be connected (& P.11). For the connection of each external
device, refer to its supplied owner’s manual.
27 En
Page 28

Listening to music
OPTION
1
TUNER
2
/
Note
Listening to DAB stations (CRX-N470D only)
See “Connecting the antenna” (& P.15) for connecting
the supplied antenna to the unit.
Initial scan
Press repeatedly to select [DAB].
• Initial scan starts automatically when you select [DAB]
for the first time.
• When scanning is completed, the number of receivable
DAB stations is shown on the front panel display
momentarily, and the first station stored is played.
Tuning in DAB stations
1 Press repeatedly to select [DAB].
• When the unit cannot receive the DAB signal, “Off
Air” is shown on the front panel display.
2 Press W/X to select a DAB station.
• You can also perform an initial scan from the
Option settings.
1 Press when the source is DAB.
- Option menu is shown on the front panel
display.
2 Press S/T to select [Initial Scan] and press
.
- Initial scan starts and finishes automatically.
• If an initial scan is performed, stored DAB station
information and preset DAB stations are cleared.
• This unit can receive only Band III DAB
frequencies.
Frequency in MHz/Channel label
28 En
Page 29

Listening to music
OPTION
DISPLAY
2
/
1
MEMORY
3
ENTER
2
/
1
TUNER
Note
STATION (default)
DLS (Dynamic Label Segment)
ENSEMBLE
CHANNEL/FREQ (Channel label and
frequency)
SIGQ. (signal quality)
AUDIO FORMAT
Presetting DAB stations
Use the preset function to store your favorite 30 DAB
stations.
1 Tune in a DAB station you want to
preset (& P.28) and press .
• The preset number flashes on the front panel
display.
2 Press S/T to select the desired preset
number.
3 Press to complete presetting.
Selecting preset DAB stations
1 Press repeatedly to select [DAB].
2 Press S/T to select a preset station.
• To cancel the DAB preset setting, press .
• You can change the information of the DAB
station shown on the front panel display by
pressing the DISPLAY button. The display
switches in the order shown below each time
you press the DISPLAY button.
Deleting a preset station
Use the Option settings to delete a preset station.
1 Press when the source is DAB.
- The Option menu is shown on the front panel
display.
2 Press S/T to select [Preset Delete] and press
.
3 Press S/T to select the preset number to be
deleted.
4 Press .
- The preset station is deleted.
5 Press to exit the Option settings.
29 En
Page 30

Listening to music
S/T
ENTER
2, 3
OPTION
1, 4
Note
Confirming the reception
You can confirm the DAB signal level. This is useful when
setting up the antenna.
1 Press when the source is [DAB].
• Option menu is shown on the front panel display.
2 Press S/T to select [Tune Aid] and
press .
3 Press S/T to change the channel
label.
• The measured DAB signal reception level is
displayed.
• The level is from 0 (none) to 100 (best).
4 Press to exit the Option settings.
• When performing Tune Aid and the DAB signal
is weak, try adjusting the position of the antenna
to obtain good reception.
30 En
Page 31

Listening to music
1
TUNER
2
/
1
TUNER
2, 3
MEMORY
Note
Note
Listening to FM radio stations
See “Connecting the antenna” (& P.15) for connecting
the supplied antenna to the unit.
Tuning in FM stations
1 Press .
2 Press and hold W/X.
• Automatic tuning starts, then stops automatically
Presetting FM stations
Auto preset
Tunes in stations with good reception and presets them
automatically.
when a station is tuned in.
STEREO
TUNED
1 Press .
2 Press and hold for 2 seconds or
more.
• If station reception is weak, you can tune into a
station manually by pressing the W/X button
repeatedly. Playback in this case is monaural.
• Auto preset replaces all currently-stored stations
with newly-stored stations.
• You can preset up to 30 FM stations.
• To cancel the auto preset, press .
• You can also preset stations automatically from
the Option menu (& P.44).
3 Press .
• Auto preset starts, and when it finishes,
“Completed!” is shown on the front panel display.
31 En
Page 32

Listening to music
3
/
OPTION
2
MEMORY
4
ENTER
1
TUNER
2
/
Note
Manual preset
1 Tune into a station you want to preset
(& P.31).
2 Press .
• The preset number flashes on the front panel
display.
3 Press S/T to select the desired preset
number.
4 Press to preset the station.
Selecting preset FM stations
1 Press .
2 Press S/T to select a station.
• The number of a registered preset can also be
selected using the numeric buttons.
• To cancel manual preset setting, press .
Deleting a preset station
Use the option settings to delete a preset station.
1 Press OPTION when the source is FM.
- The Option menu is shown on the front panel
display.
- To cancel deleting preset stations, press
OPTION.
2 Press S/T to select [Preset Delete] and press
ENTER.
3 Press S/T to select the preset number to be
deleted.
4 Press ENTER.
- The preset station is deleted and [Deleted!] is
shown on the front panel display.
5 Press OPTION to exit the Option settings.
32 En
Page 33
Listening to music
DISPLAY
Note
Radio Data System (U.K. and Europe models only)
The unit can receive Radio Data System information.
Press when the source is FM.
• Each press of the button changes the information
displays shown below.
PService (Program Service)
PTY (Program Type)
RT (Radio Text)
CT (Clock Time)
Frequency
• If the signal transmission of the Radio Data
System station is too weak, this unit may not be
able to receive Radio Data System information
completely. In particular, RT (Radio Text)
information uses a lot of bandwidth, so it may be
less available compared to other types of
information.
33 En
Page 34

Listening to music
2, 3
1
NET
Note
Radio station name (default)
Playing time
Song title
Listening to the Internet radio
Make sure that the unit is connected to the Internet
properly (& P.17).
1 Press repeatedly and select
[NetRadio].
2 Browse the Internet and select a radio
station.
• The remote control functions are shown below.
S/T Shows other items.
Confirm the selected item and
ENTER/X
HOME Show the top-level item.
W Back to the previous item.
DISPLAY
proceed to the next level or start
playback.
Finish browsing and display
information about the content
being played back.
• Playback information can be shown by pressing
the DISPLAY button while Internet radio is
played back, as shown below.
• You can register your favorite Internet radio
stations to the “Bookmarks” folder by accessing
the following website with the web browser on
your PC.
http://yradio.vtuner.com
- Before registering Internet radio stations, play
back any of the Internet radio stations with the
unit.
- To use this feature, you need the vTuner ID of
the unit and your e-mail address to create
your personal account. You can check the
vTuner ID in [Network Info] (& P.45) in the
option settings.
• Some Internet radio stations may not be
receivable during certain time periods.
• This feature makes use of the vTuner radio
station database.
• This service may be canceled without prior
notice.
• The stations of the Internet radio can be preset
(& P.37).
3 Playback starts.
• To stop playback, press .
34 En
Page 35

Listening to music
2
3
4
Note
Playing back songs in the computer
Setting the media sharing of music files
To play back music files in your computer with this unit,
you need to configure the media sharing settings
between the unit and computer (with Windows Media
Player 11 or later).
(Example: Windows Media Player 12 (Windows 7))
1 Start Windows Media Player 12 on
your PC.
2 Select “Stream,” then “Turn on media
streaming.”
• The control panel window of your PC is shown.
3 Click “Turn on media streaming.”
4 Select “Allowed” from the drop-down
list next to the unit's model name.
• For details on the file formats that this unit can
play back, refer to “File Formats” (& P.53).
• For details on media sharing settings, refer to the
Help of Windows Media Player.
For a PC or a NAS with other DLNA server
software installed
Refer to the owner’s manual of your device or
software and configure the media sharing settings.
5 Click “OK” to exit.
35 En
Page 36
Listening to music
2, 3
1
NET
Note
Playing back songs in the PC
1 Press repeatedly and select
[Server].
2 Browse and select a song.
S/T Shows other items.
Confirm the selected item and
ENTER/X
HOME Show the top-level item.
W Back to the previous item.
DISPLAY
proceed to the next level or start
playback.
Finish browsing and display
information about the content
being played back.
3 Playback starts.
Play/pause
/
SHUFFLE Starts shuffle playback (& P.40)
REPEAT Starts repeat playback (& P.40)
Move to the next or previous song
in the folder.
Stop
• If playback is not possible, check the network
connections and your router settings, and then
connect the unit and the PC to the same
network.
• The music files in your PC can be preset (& P.37).
36 En
Page 37

Listening to music
1, 3
MEMORY
2
1
NET
2
Note
Presetting network content
Presetting network content allows it to be played back
more easily in the future.
Presetting network content
The following types of network content can be preset:
• Internet radio
• Music files stored in a PC (server)
1 Press during the playback of the
network content.
2 Enter the desired preset number using
the numeric buttons.
• The numbers from 1 to 37 are available for
presets.
3 Press to preset the station.
Selecting preset network content
• If the input preset number already has content
registered, the content is overwritten.
• If is pressed during presetting, the preset is
canceled.
1 Press .
2 Enter the preset number using the
numeric buttons.
• The content that is preset for the number is
played back when the unit is connected to the
network.
37 En
Page 38

Listening to music
1
2
(Example)
When the iPhone recognizes the unit, appears
on the screen.
1
CRX-N470 XXXX
My Computer
2
(Example)
When iTunes recognizes the unit, appears on
the iTunes window.
iPhone iOS7/iOS8/iOS9
Note
Playing back music with AirPlay
Make sure that the unit and your PC or iPhone are
connected to the same router (& P.17).
Playing back songs with an iPhone
1 Turn on the unit and display the
playback screen on the iPhone.
2 Tap and select the unit's name.
• The input source switches to [AirPlay] (except
when Net Standby is Off (& P.16)).
3 Play back songs with the iPhone.
Playing back songs with iTunes
1 Turn on the unit and start iTunes.
2 Click and select the unit's name.
• The input source switches to [AirPlay] (except
when Net Standby is Off (& P.16)).
3 Play back songs with iTunes.
iPhone
CRX-N470 XXXX
• For an iPhone with iOS7/iOS8/iOS9 installed, the
indication is displayed within the control center.
To display the control center, swipe the iPhone
screen in an upward direction.
• You can also use the unit and remote control to
play back, pause, stop, and skip songs.
Canceling AirPlay
• Tap/click on the iPhone/iTunes screen and
select a device other than the unit from the
speaker list. Or, change the unit’s input source to
something other than AirPlay.
38 En
Page 39

Connect the unit directly with a mobile device
2, 3, 4, 5
/
,
ENTER
1
OPTION
Mobile
device
This unit
Note
Connect the unit directly with a mobile device wirelessly (Wireless Direct). Put up the wireless antenna of the unit in advance (& P.15).
1 Press .
2 Select [Network Config] with S/T,
and press .
3 Select [Select Network] with S/T,
and press .
4 Select [Direct] with S/T, and press
.
5 Select desired security method with
S/T, and press .
• Refer to the Note at right.
6 Check the SSID and the security key.
• These are required for step 7.
• You can check the values from the option menu -
[Network Info] - [Direct Info].
7 Configure the Wi-Fi settings of the
mobile device.
• Enable the Wi-Fi function of the mobile device.
• When the access points are listed, select the SSID
you have checked in step 6.
• When the mobile device prompts you to enter a
password, enter the security key you have
checked in step 6.
• The security methods selectable in step 5 are
[OPEN] and [WPA2-PSK(AES)].
If [OPEN] is selected, the connection may be
insecure since the communication is not
encrypted.
• You cannot simultaneously use this setting with
a wired network connection or a wireless
network connection.
• When using Wireless Direct, you cannot connect
the unit to the Internet. Therefore, the Internet
services, such as Internet radio, are unavailable.
• For details about how to set up the Wi-Fi
connection of the mobile device, see the user's
guide of your mobile device.
39 En
Page 40

More on playback
REPEAT
SHUFFLE
Note
Features such as shuffle/repeat playback, displaying song information, and presetting favorites make this unit even more convenient to use.
Shuffle/Repeat playback
Shuffle (Random) playback
Press during playback.
• The shuffle indicator in the front panel display switches
as shown below each time you press the button.
Performs shuffle playback.*
Not displayed Does not perform shuffle playback.
* The range of shuffle depends on the media being played
back.
Repeat playback
Press during playback.
• The repeat indicator in the front panel display switches
as shown below each time you press the button.
Repeats the song being played back.
Performs repeat playback.*
Not displayed Does not perform repeat playback.
* The range of repeat depends on the playback media.
• Operation is the same for playback of content
from PCs (servers), USB devices, AirPlay, and CDs.
40 En
Page 41

More on playback
ALMBeUtM
eora
DISPLAY
Note
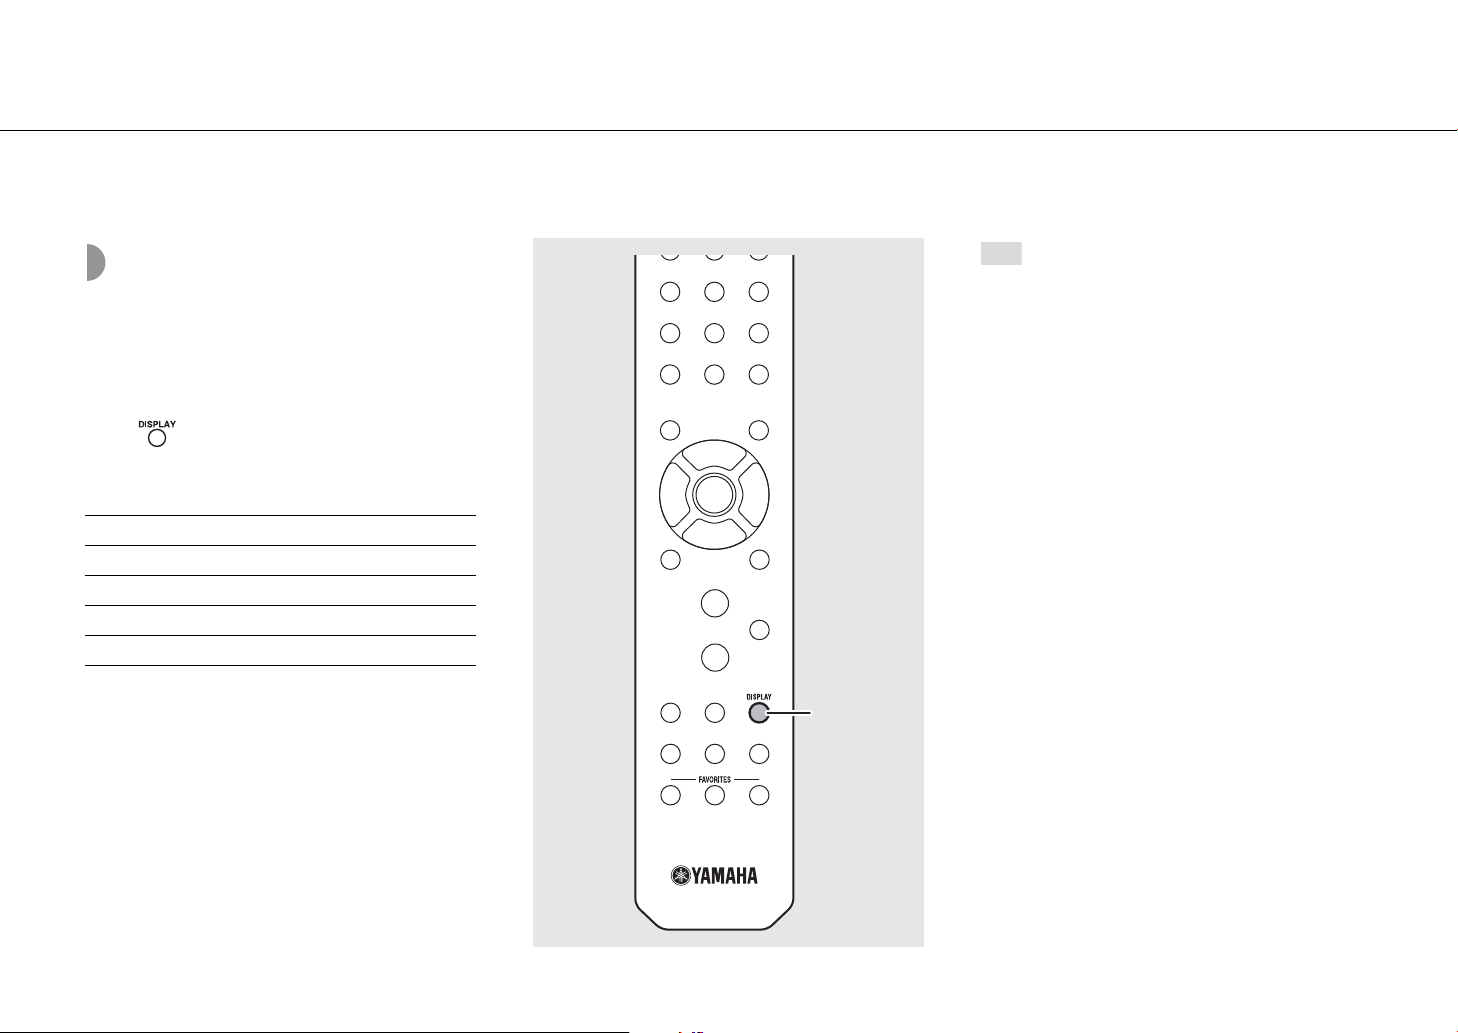
Playback information
While content from a PC (server), a USB device, AirPlay, or
a CD is being played back, the song title, elapsed time, etc.
can be shown on the front panel display.
Press during playback.
• The display switches in the order shown below each
time you press the button.
USB/AirPlay/Server CD
Song title*
Artist name
Album title
Playing time Song title*1,*
*1 If the song title cannot be obtained, the file name may be
displayed.
*2 Only when playing an audio CD.
*3 Only when playing an audio CD and when there is
information to display.
1
Playing time
Remaining time of the
Remaining time of the
*2
song
2
disc*
Artist name*
Album title*
3
3
3
• Characters shown on the front panel display are
alphanumerics only.
41 En
Page 42
More on playback
FAVORITES
(A〜C)
Note
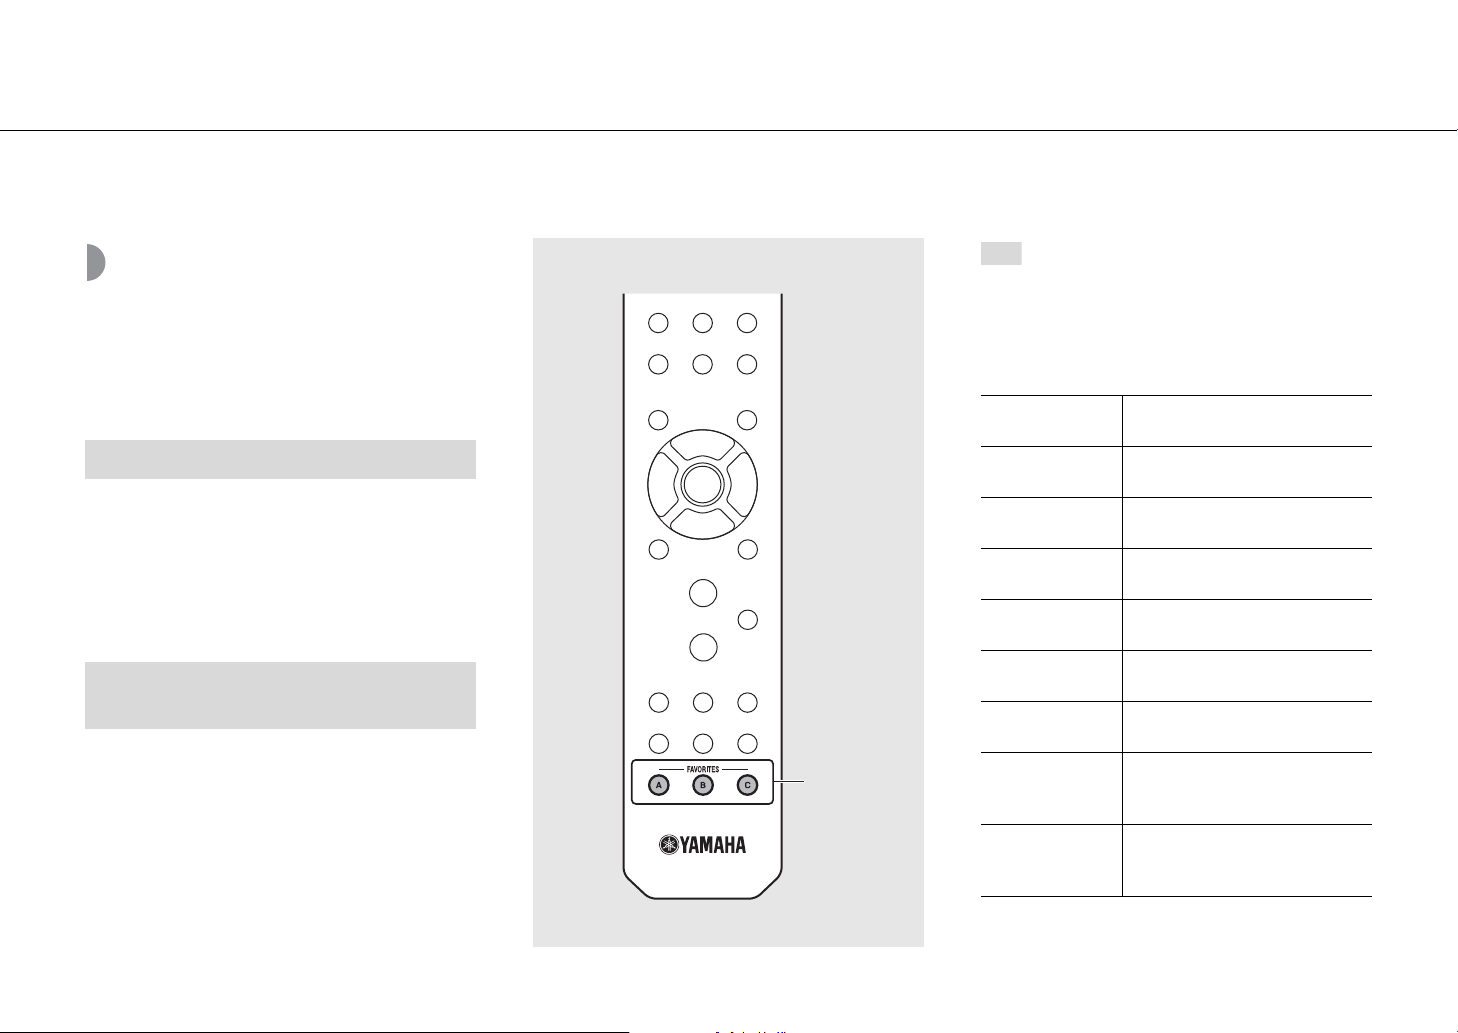
Presetting content to FAVORITES
You can register your favorite content to the FAVORITES
buttons (A to C) so that it can be played back easily in the
future.
Presetting content
Press and hold any of the FAVORITES
buttons during the playback of the
content.
• The content being played back is registered to that
FAVORITES button.
Selecting content that is registered to
FAVORITES
Press the FAVORITES button to which the
content that you want to play back is
registered.
• The content that is registered to the pressed FAVORITES
button is played back.
• When presetting content to a FAVORITES
button, any content that is already registered to
that button will be replaced.
• Pressing a FAVORITES button triggers one of the
actions below, depending on the input source
of the content registered to it.
Input sources
PC (Server)
NetRadio
AirPlay*
Bluetooth*
USB
CD
FM
DAB (CRX-N470D
only)
AUX 1, 2*
* To play back content from this input source, the connected
device must be configured.
What happens when the
FAVORITES buttons are pressed
The registered songs are played
back.
The registered radio station is
played back.
The input source is switched to
AirPlay.
The input source is switched to
Bluetooth.
The registered songs are played
back.
The registered songs are played
back.
The registered radio/DAB station is
played back.
Depending on the content that is
registered, the input source is
switched to AUX1 or AUX2.
42 En
Page 43

More on playback
SLEEP
2, 3
/
ENTER
1, 4
OPTION
Note
Note
Adjusting sound quality
The unit’s sound quality can be adjusted. Refer to “Option
menu for sound quality” at right.
1 Press .
2 Press S/T to select the desired item
and press .
3 Press S/T to change the setting and
press .
• To set other items, repeat steps 2 and 3.
4 Press to exit the Option settings.
Using the sleep timer
You can set the time after which the unit automatically
enters standby mode. The time can be selected from 120/
90/60/30 min., or OFF.
• To cancel audio quality configuration, press
OPTION.
Option menu for sound quality
(Bold: default)
Equalizer
Adjusts low frequency [Bass] and high frequency [Treble].
The setting is also applied when using headphones.
(-10 to 0 to +10)
Balance
Adjusts the volume balance of the left and right speakers.
This setting is not applied when using headphones.
(Lch. +10 to --center-- to Rch.+10)
Music Enhancer
Regenerates musical elements that are lost through
compression.
(On, Off)
When playing back a high quality music source, such as
FLAC or WAV, it is recommended to set this function to
[Off]. When playing back an audio CD that has not been
compressed, this function is not available even if [On] is
set.
• To cancel the sleep timer, press SLEEP again.
Press repeatedly to select the time.
• The SLEEP indicator lights up when the sleep timer is
set.
43 En
Page 44

More on playback
1, 4
OPTION
2, 3
//
ENTER
Option settings
Option settings allow you to configure the unit to suit
how you will use it.
1 Press .
• The Option menu list is shown on the front panel
display. Refer to “Option menu list” (& P.45).
2 Select a desired option menu with S/
T and press .
3 Change the setting with S/T and
press .
• Repeat step 3 if there is a sub menu.
• Press W to cancel the setting and return to the
previous level.
• Repeat steps 2 and 3 if you want to set another
menu item.
4 Press to exit the Option settings.
44 En
Page 45

Option menu list
More on playback
Menu Sub menu Default Function
Preset Delete
Auto Preset
Equalizer
(& P.43)
Balance (& P.43) center
*1
(& P.32) Deletes preset stations.
*1
Sets the Auto Preset.
Bass 0 Adjusts low frequency.
Treble 0 Adjusts high frequency.
Adjusts the volume balance of the left and
right speakers.
Music Enhancer (& P.43) Off Enables/disables Music Enhancer.
Initial Scan
Tune Aid
*1,*2
(& P.28)
*1,*2
(& P.30) Shows the level of received DAB signal.
Status
Scans all receivable frequencies and
registers them in the unit.
Shows the connection status of the
NETWORK jack.
LAN MAC Address Shows MAC address.
WiFi MAC Address Shows MAC address.
Bluetooth Addr Confirms the Bluetooth address.
Network
Info
MusicCast Info Shows the information on MusicCast.
SSID Confirms the SSID.
Direct Info Shows the information for Wireless Direct.
Network Name
Shows the name of the unit that appears on
the network.
vTuner ID Confirms the vTuner ID.
IP Address 0.0.0.0 Confirms the IP address.
Menu Sub menu Default Function
Subnet Mask 0.0.0.0 Confirms the subnet mask.
Network
Info
Default Gateway 0.0.0.0 Confirms the default gateway.
DNS Server(P) 0.0.0.0 Confirms the primary DNS server.
DNS Server(S) 0.0.0.0 Confirms the secondary DNS server.
Network
Config
System
Config
Select Network Wired Selects a network connection method.
DHCP On Enables/disables DHCP.
AutoPowerStby
Net Standby On
Sets the unit to enter standby mode
On
automatically (& P.16).
Sets the network status for when the unit is
in standby mode (& P.16).
Bluetooth On Sets Bluetooth.
Initialize Set
Firmware
Update
*1 Only when the radio is played back
*2 CRX-N470D only
Version Shows the firmware version of the unit.
Update
Network
Resets to the factory default settings.
Updates the firmware of the unit (& P.22).
45 En
Page 46

Troubleshooting
Refer to the table below when the unit does not function properly. If your problem is not listed below or if the instruction below does not help, turn off the unit,
disconnect the power cable, and contact the nearest authorized Yamaha dealer or service center.
First, check that the connectors of each cable are securely inserted in to jacks on each device. Check also that the power cable is plugged into an outlet.
General
Problem Cause Solution
The unit enters the standby mode soon
after the power is turned on.
The unit does not operate properly.
No sound.
Sound is heard from the speaker on one
side only.
Noise is heard.
The power suddenly turns off.
There is noise interference from digital or
high-frequency equipment.
The remote control does not work or does
not function properly.
The power cable is not properly connected. Connect the power cable firmly.
The unit got a strong electric shock from an outside source, such as lighting
or excessive static electricity.
No appropriate source has been selected.
Speaker connections are not secure. Secure the connections (& P.14).
The volume is minimum or mute. Turn up the volume.
Source device or speakers are not connected properly.
This unit is too close to digital or radio-frequency equipment. Move this unit away from such equipment.
The audio cable between this unit and Source device is defective.
The sleep timer may be set (& P.43).
Auto Power Standby function is activated. (& P.16).
This unit is too close to the digital or high-frequency equipment. Place this unit farther away from such equipment.
The remote control may be outside its operation range. Operate the remote control within its operation range (& P.16).
The remote control sensor on this unit may be exposed to direct sunlight or
strong lighting such as an inverter type fluorescent lamp.
The battery may be worn out. Replace the batteries with new ones (& P.13).
There are obstacles between the sensor of this unit and the remote control. Remove the obstacles.
Hold down A on the front panel for more than 10 seconds to initialize and
reboot the unit. (If the problem persists, unplug the power cable from the
wall outlet and plug it again after 30 seconds or more.)
Select an appropriate source with INPUT on the front panel or the source
buttons on the remote control (& P.10, 13).
Connect the source device or speaker cables properly (& P.14, 27). If the
problem persists, the cables may be defective.
Connect the audio cable firmly. If the problem persists, use another audio
cable.
Turn on the unit and play the source again.
Change the orientation of lighting or the unit, or location of the unit.
46 En
Page 47

Network
Problem Cause Solution
The network feature does not function. The network parameters (IP address) have not been obtained properly.
Playback stops (songs cannot be played
back continuously).
The unit does not detect the PC.
The files in the PC cannot be viewed or
played back.
Internet radio cannot be played.
The dedicated application for mobile
devices does not detect the unit.
Update of the firmware via network failed. The network connection is unstable.
There are unsupported files in the server.
The media sharing setting is not correct.
Some security software installed on your PC is blocking the access of the
unit to your PC.
The unit and PC are not in the same network.
The files are not supported by the unit or the media server.
The selected Internet radio station is currently not available.
The selected Internet radio station is currently broadcasting silence.
Access to the network is restricted by the firewall settings of your network
devices (such as the router).
The unit and mobile devices are not in the same network.
Troubleshooting
Enable the DHCP server function of the router. In addition, in the [Network
Config] of the option settings of the unit, set [DHCP] to [On]. If you want to
configure the network parameters manually, check that you are using an IP
address which is not used by other network devices in your network
(& P.45). For details on how to set the router, contact the manufacturer of
the router.
Remove the files (including image files or hidden files) which the unit does
not support from the folder being played back.
Configure the sharing setting and select the unit as a device to which music
contents are shared (& P.35).
Check the setting of the security software installed in your PC.
Check the network connections and your router settings, and then connect
the unit and the PC to the same network.
Use the file format supported by both the unit and the media server
(& P.53).
There may be a network problem at the radio station, or the service may
have been stopped. Try the station later or select another station.
Some Internet radio stations broadcast silence at certain of times of the day.
In this case, no sound is output even if the signal is received. Try the station
later or select another station.
Check the firewall settings of your network devices. Internet radio can be
played only when it passes through the port designated by each radio
station. The port number varies depending on the radio station.
Check the network connections and your router settings, and then connect
the unit and the PC to the same network.
Try updating again after a while. Or update the firmware via USB memory
device (& P.22).
47 En
Page 48

Troubleshooting
Problem Cause Solution
The iPhone does not recognize the unit
when using AirPlay.
The unit cannot connect to the Internet
via a wireless router (access point).
Wireless network is not found.
Bluetooth
Problem Cause Solution
Cannot make the unit pair with a
Bluetooth device.
Cannot make a Bluetooth connection.
The network separation function of the router may prevent the iPhone
A multi-SSID supported router is used.
The wireless router is turned off. Turn on the wireless router.
The unit is placed too far from the wireless router. Place the unit and the wireless router closer to each other.
There is an obstacle between the unit and the wireless router. Remove the obstacles.
Wireless communication is interrupted by the electromagnetic waves
emitted from a microwave oven or other wireless devices.
Access to the network is restricted by the firewall settings of your wireless
router.
The unit is turned off. Turn the unit on and perform the pairing (& P.25).
The [Bluetooth] of the option settings is set to [Off]. Set it to [On].
Another Bluetooth device is connected.
This unit and the device are too far apart. Pair the unit and device within a distance of 10 m (33 ft).
There is a device (microwave oven, wireless LAN, etc.) that outputs signals
in the 2.4 GHz frequency band nearby.
A Bluetooth adapter, etc., that you want to pair with this unit has a passkey
other than “0000.”
The Bluetooth device does not support A2DP. Perform pairing with a device which supports A2DP.
The [Bluetooth] of the option settings is set to [Off]. Set it to [On].
Another Bluetooth device is connected.
The Bluetooth function of the device is turned off. Turn on the Bluetooth function of the device.
The pairing information has been deleted.
This unit is not registered on the device’s Bluetooth connection list. Perform pairing again (& P.25).
from accessing the unit. When connecting an iPhone, use SSID that can
access the unit.
When using the unit via wireless connection, place it away from devices
emitting electromagnetic waves.
Check the firewall setting of the wireless router.
Terminate current Bluetooth connection, and perform pairing with the new
device.
Move this unit away from the device that is emitting radio-frequency
signals.
Use a device whose passkey is “0000.”
Terminate current Bluetooth connection, then establish a Bluetooth with
that device again.
Delete the Bluetooth device's pairing information and perform pairing
again.
48 En
Page 49

Problem Cause Solution
No sound is produced, or the sound is
interrupted during playback.
Disc
Problem Cause Solution
Playback does not start after a disc is
inserted.
Some button operations do not work.
Playback does not start (or stops
immediately) after pressing on
the unit or on the remote control.
The volume of the Bluetooth device is set too low. Turn up the volume of the Bluetooth device.
The Bluetooth device is not set to send Bluetooth audio signals to the unit.
The Bluetooth connection of the unit with the device has terminated. Perform Bluetooth connection operations again (& P.25).
There is a device (microwave oven, wireless LAN, etc.) that outputs signals
in the 2.4 GHz frequency band nearby.
This unit and the Bluetooth device are too far apart. Move the Bluetooth device to within 10 m (33 ft) of the unit.
The Bluetooth function of the device is turned off. Turn on the Bluetooth function of the device.
The
Bluetooth
device is not set to send
The disc inserted in the unit may not be supported. Use a disc supported by the unit (& P.52).
The disc may be dirty. Wipe the disc clean (& P.52).
The disc inserted in the unit may not be supported. Use a disc supported by the unit (& P.52).
If the unit was moved from a cold to warm place, condensation may have
formed on the disc reading lens.
Bluetooth
audio signals to this unit.
Switch the output of Bluetooth audio signals of the Bluetooth device to the
unit.
Move this unit away from the device that is emitting radio-frequency
signals.
Check that the Bluetooth function of the Bluetooth device is set properly.
Wait for an hour or two until the unit adjusts to the room temperature, and
try again.
Troubleshooting
USB devices
Problem Cause Solution
The unit does not detect the USB device.
Folders and files in the USB device cannot
be viewed.
The USB device is not connected to the USB jack securely.
A USB device in a format other than FAT16/32 format is used. Use a USB device with FAT16 or FAT32 format.
The data in the USB device is protected by encryption. Use a USB device without an encryption function.
Turn off the unit, reconnect your USB device, and turn the unit on again
(& P.24).
49 En
Page 50

Troubleshooting
DAB reception (CRX-N470D only)
Problem Cause Solution
Cannot tune into any DAB stations. The initial scan operations were not performed. Perform the initial scan operations (& P.28).
The initial scan operations are not
successful and [Not Found] is shown on
the front panel display.
There is noise interference (e.g. hiss,
crackle or jitter)
The DAB station information is not shown
or is inaccurate.
The DAB signals are too weak.
The positioning of the antenna is not optimal for DAB reception.
There is no DAB coverage in your area.
The antenna needs to be repositioned. Readjust the position of the antenna (& P.15).
The DAB signals are too weak.
The DAB station may be temporarily out of service, or the DAB station
information is not provided by the DAB broadcaster.
Use the DAB Tune Aid feature to conform the best position of the antenna
(& P.30).
Check with your dealer or WorldDMB online at http://www.worlddab.org
for a listing of the DAB coverage in your area.
Use the DAB Tune Aid feature to conform the best position of the antenna
(& P.30).
Contact the DAB broadcaster.
FM reception
Problem Cause Solution
The antenna is not connected properly.
FM stereo reception is noisy.
Automatic tuning does not work.
Cannot select a preset radio station. The preset (memory) may have been erased. Preset radio stations again (& P.31, 32).
There is distortion, and clear reception
cannot be obtained even with a good FM
antenna or an outdoor antenna.
The radio station you selected may be far from your area, or the antenna
input is poor.
The radio station you selected may be far from your area, or the antenna
input is poor.
Multipath reflection or other radio interference may be occurring. Change the height, direction, or placement of the antenna.
Make sure the antenna is connected properly and change the position of
the antenna (& P.15).
Use a commercially available outdoor antenna. For details, consult a
specialist store.
Use a commercially available outdoor antenna. For details, consult a
specialist store.
Use the manual tuning method (& P.31).
50 En
Page 51
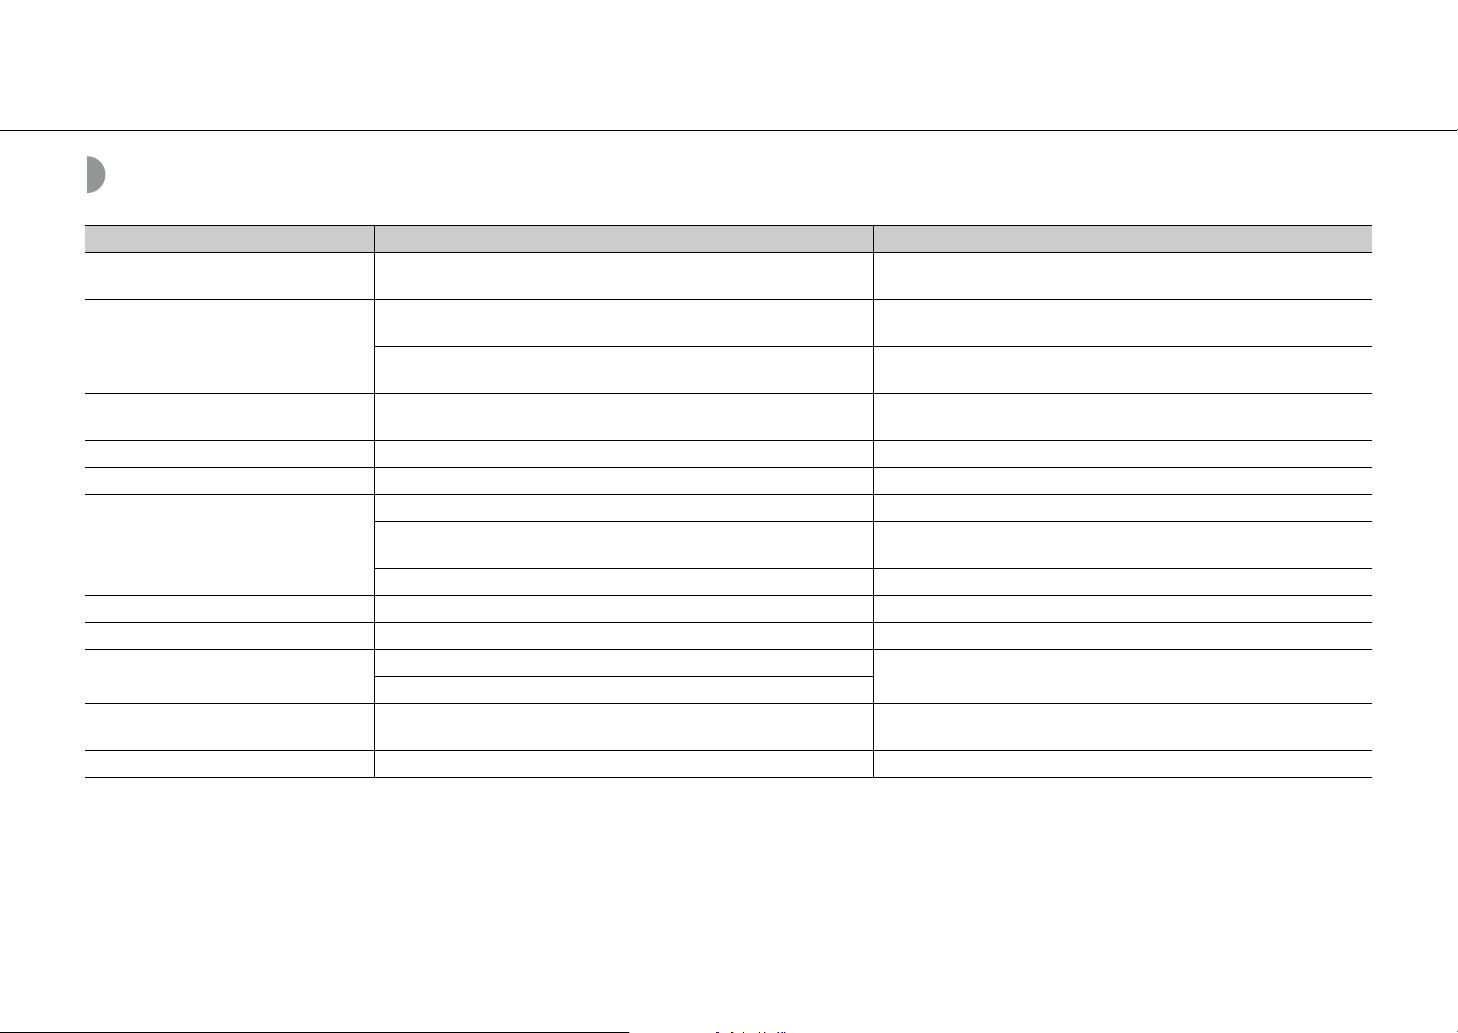
Messages on the front panel display
Message Cause Solution
Access Denied Access to the PC is denied.
The unit cannot access the USB device.
Access Error
There is a problem with the signal path from the network to the unit.
Initializing The unit is starting up.
Loading... The unit is loading the specified file/content. Wait until the unit finishes loading.
No Content Selected folder does not contain playable files. Select a folder with playable files (& P.53).
The disc inserted in the unit may not be supported. Use a disc supported by the unit (& P.52).
No Disc
No Songs The disc does not contain playable files. Set a disc with playable files (& P.52).
Not Connected The unit is not connected to the network. Check the network connection.
Overcurrent
Unable to play
Version Error Firmware update has failed. Update the firmware again.
The disc may be dirty, or foreign matter may be attached to it.
Disc is set upside-down. Set the disc with the labeled side facing up.
The connected USB device is not supported by the unit.
USB device is not connected properly.
The unit cannot play back the songs stored on the USB devices or the
computer for some reason.
Configure the sharing settings and select the unit as a device to which
music contents are shared (& P.35).
Turn off the unit and reconnect your USB device. If the problem persists, try
another USB device.
Make sure your router and modem are turned on. Check the connection
between the unit and your router (or hub) (& P.17).
Wait until the message disappears. If the message stays more than 3
minutes, turn off the unit and turn it on again.
Wipe the disc clean. Alternatively, remove foreign matter adhered to the
disc.
Disconnect the USB device, turn off the unit, and turn it on again. If this
does not solve the problem for the USB device, it is not playable on the unit.
Check if the format of files you are trying to play is supported by the unit
(& P.53).
Troubleshooting
51 En
Page 52

Supported devices/media and file formats
Supported devices/ media
PCs
PC with Windows Media Player 11 or Windows Media
Player 12 installed.
NAS
NAS compatible with DLNA version 1.5.
USB devices
• The unit is compatible with USB mass storage class
devices (e.g., flash memories or portable audio players)
using FAT16/FAT32 format.
• Do not connect devices other than the USB mass
storage class devices (USB charger, USB hub, etc.), PCs,
card readers, and external hard discs.
• USB devices with encryption cannot be used.
• Depending on the manufacturer or type of the USB
device, the unit may not recognize the USB device or
some functions may be unavailable.
Discs
• This unit is designed for use with audio CD, CD-R/RW
(ISO 9660 format) with any of the following logos
printed on the disc or the disc jacket.
Audio CD
CD-R/RW*
* Discs which bear one of the following.
FOR CONSUMER
FOR CONSUMER USE
FOR MUSIC USE ONLY
• 8-cm discs are playable with this unit.
Set a disc in the inner recessed area of the disc tray.
Notes on discs
• Do not set any other type of disc other than stated
above in this unit. Doing so may damage the unit.
• CD-R/RW cannot be played back unless finalized.
Finalization means the process for making a disc to be
ready for playback on a compatible device .
• Some discs cannot be played back depending on the
disc characteristics or recording conditions.
• Do not use any non-standard shaped discs such as a
heart-shaped disc.
• Do not use discs with many scratches or a crack on their
surface, or warped/glued discs.
Handling discs
• Do not touch the surface of the disc.
Hold a disc by its edge or center hole.
• Use a soft-tipped pen when writing
on the label side of a disc.
• Do not put tape, seal, glue, etc., on a disc.
• Do not use a protective cover to prevent scratches.
• Do not set foreign object on the disc tray.
• Do not set more than one disc in this unit at one time.
This could cause damage to both this unit and the discs.
• If a disc becomes dirty, wipe it
with a clean, dry soft cloth from
the center out to the edge. Do not
use record cleaner or paint
thinner.
• Do not use any lens cleaners as
they may cause malfunction.
• Do not expose discs to direct sunlight, high
temperature, high humidity, or dust.
• When a disc is not being used, remove it from this unit
and store in an appropriate case.
52 En
Page 53

File format
File format the unit supporting is as follows.
Supported devices/media and file formats
DLNA/USB
Sampling
Format
*
WAV
MP3 32/44.1/48 - 8-320 2 -
WMA 32/44.1/48 - 8-320 2 -
MPEG-4 AAC 32/44.1/48 - 8-320 2 -
FLAC
ALAC
AIFF
* Linear PCM format only
frequency
(kHz)
32/44.1/48/
88.2/96/176.4/
192
32/44.1/48/
88.2/96/176.4/
192
32/44.1/48/
88.2/96
32/44.1/48/
88.2/96/176.4/
192
Quantization
bitrate (bit)
16/24 - 2 3
16/24 - 2 3
16/24 - 2 3
16/24 - 2 3
Bitrate
(kbps)
Number of
channels
• To play back FLAC files, you need to install server software that supports sharing of FLAC
files via DLNA on your PC or use a NAS that supports FLAC files.
• Digital Rights Management (DRM) files cannot be played back.
Gapless
playback
supported
Disc
Format Sampling frequency (kHz) Quantization bitrate
MP3 8-48 16
WMA 16-48 16
53 En
Page 54

Specifications
Input
AUX IN
AUX 1 Stereo L/R: RCA
AUX 2 3.5 mm stereo mini jack
CD
Type Semiconductor laser GaAs/GaAlAs
Laser
Media CD, CD-R/RW
Audio format Audio CD, MP3, WMA
Wave length 790 nm
Output power 7 mW
USB
Supported file format MP3, WMA, MPEG4 AAC, WAV, FLAC, ALAC, AIFF
Network
Interface 100Base-TX/10Base-T
Internet radio vTuner service supported
PC client function DLNA Ver. 1.5 (DMP/DMR function) supported
Supported file format Same as USB supported file format
AirPlay AirPlay supported
Wi-Fi
Wireless network standards IEEE802.11 b/g/n
Radio frequency 2.4 GHz
Available security methods WEP, WPA2-PSK (AES), Mixed Mode
Tuner
Preset memory 30
Tuning range FM
U.S.A. and Canada models: 87.5 MHz to 107.9 MHz
Other models: 87.5 MHz to 108.0 MHz
Bluetooth
Bluetooth version Ver. 2.1+EDR
Supported profile
Compatible codecs SBC, AAC (AAC is Sink only)
Operating modes Sink or Source
Wireless output Bluetooth Class 2
Maximum communication range 10 m (33 ft) (without interference)
A2DP (Advanced Audio Distribution Profile)
AVRCP (Audio/Video Remote Control Profile)
Amplifier section
Maximum output power 22 W + 22 W (6 Ω, 1 kHz, 10% THD)
Frequency response 20 Hz to 20 kHz (0±3 dB)
Total harmonic distortion ≤ 0.05 % (10 W/6 Ω 1 kHz)
Headphones
Subwoofer output power 1.5 V/1 kΩ
500 mV/32 Ω
Input: 1 kHz 300 mV, 32 Ω terminated
General
Power supply/Frequency AC 100 to 240 V, 50/60 Hz
Power consumption 25 W
Network standby off: 0.4 W
Standby power consumption
Dimensions (W × H × D)
(with wireless antenna upright)
Weight 3.0 kg
Network standby on
Wired (Ethernet): 1.8 W
Wireless (Wi-Fi/Wireless Direct/Bluetooth):
1.9W/1.9W/1.7W
270 × 110 × 330 mm
(270 × 179 × 330 mm)
The contents of this manual apply to the latest specifications as of the publishing date. To
obtain the latest manual, access the Yamaha website then download the manual file.
DAB (CRX-N470D ONLY)
Preset Memory 30
Tuning range DAB 174 to 240 MHz (Band III)
Compatibility DAB/DAB+
54 En
Page 55

Trademarks
AirPlay, iPad, iPhone, iPod, iPod touch and iTunes are trademarks of Apple Inc., registered in the
U.S. and other countries.
AirPlay works with iPhone, iPad, and iPod touch with iOS 4.3.3 or later, Mac with OS X Mountain
Lion or later, and Mac and PC with iTunes 10.2.2 or later.
(as of July 2015)
DLNA™ and DLNA CERTIFIED™ are trademarks or registered trademarks of Digital Living Network
Alliance. All rights reserved. Unauthorized use is strictly prohibited.
The Wi-Fi CERTIFIED Logo is a certification mark of the Wi-Fi Alliance.
The Wi-Fi Protected Setup Identifier Mark is a mark of the Wi-Fi Alliance.
Wi-Fi, Wi-Fi Alliance, Wi-Fi CERTIFIED, Wi-Fi Protected Setup, WPA and WPA2 are trademark or
regitstered trademark of Wi-Fi Alliance.
The Bluetooth
any use of such marks by Yamaha Corporation is under license.
Bluetooth protocol stack (Blue SDK)
Copyright 1999-2014 OpenSynergy GmbH
All rights reserved. All unpublished rights reserved.
®
word mark and logos are registered trademarks owned by Bluetooth SIG, Inc. and
(For CRX-N470D)
The unit supports DAB/DAB+ tuning.
Explanations regarding GPL
This product utilizes GPL/LGPL open-source software in some sections. You have the right to
obtain, duplicate, modify, and redistribute this open-source code only. For information on GPL/
LGPL open source software, how to obtain it, and the GPL/LGPL license, refer to the Yamaha
Corporation website (http://download.yamaha.com/sourcecodes/musiccast/).
Windows™
Windows is a registered trademark of Microsoft Corporation in the United States and other countries.
Internet Explorer, Windows Media Audio and Windows Media Player are either registered trademarks
or trademarks of Microsoft Corporation in the United States and/or other countries.
Android™
Android and Google Play are trademarks of Google Inc.
MusicCast is a trademark or registered trademark of Yamaha Corporation.
55 En
Page 56

VAROITUS
Muiden kuin tässä esitettyjen toimintojen säädön tai asetusten muutto saattaa altistaa vaaralliselle
säteilylle tai muille vaarallisille toiminnoille.
DK
Advarsel: Usynlig laserstråling ved åbning når sikkerhedsafbrydere er ude af funktion. Undgå
utsættelse for stråling.
Bemærk: Netafbryderen A er sekundært indkoblet og ofbryder ikke strømmen fra nettet. Den
indbyggede netdel er derfor tilsluttet til lysnettet så længe netstikket sidder i stikkontakten.
N
Observer: Nettbryteren A er sekundert innkoplet. Den innebygdenetdelen er derfor ikke frakoplet
nettet så lenge apparatet er tilsluttet nettkontakten.
S
Klass 1 laseraparat
Varning! Om apparaten används på annat sättþän i denna bruksanvisning specifi cerats, kan
användaren utsättas för osynlig laserstrålning, som överskrider gränsen för laserklass 1.
Observera! Strömbrytaren A är sekundärt kopplad och inte bryter inte strömmen från nätet. Den
inbyggda nätdelen är därför ansluten till elnätet så länge stickproppen sitter i vägguttaget.
SF
Luokan 1 laserlaite
Varoitus! Laitteen käyttäminen muulla kuin tässä käyttöohjeessa mainitulla tavalla saattaa
altistaa käyttäjän turvallisuusluokan 1 ylittävälle näkymättömälle lasersäteilylle.
Oikeus muutoksiin varataan. Laite ei saa olla alttiina tippu-ja roiskevedelle.
Huom. Toiminnanvalitsin A on kytketty toisiopuolelle, eikä se kytke laitetta irti sähköverkosta.
Sisäänrakennettu verkko-osa on kytkettynä sähköverkkoon aina silloin, kun pistoke on
pistorasiassa.
VARO!
AVATTAESSA JA SUOJALUKITUS OHITETTAESSA OLET ALTTIINA
NÄKYMÄTTÖMÄLLE LASERSÄTEILYLLE. ÄLÄ KATSO SÄ TEESEEN.
VARNING!
OSYNLIG LASERSTRÅLNING NÄR DENNA DEL ÄR ÖPPNAD OCH SPÄRREN ÄR
URKOPPLAD. BETRAKTA EJ STRÅLEN.
OBSERVERA
Apparaten kopplas inte bort från växelströmskällan (nätet) så länge som den är ansluten till
vägguttaget, även om själva apparaten har stängts av.
ADVARSEL
Netspæendingen til dette apparat er IKKE af brudt, sålæenge netledningen siddr i en stikkontakt,
som er t endt - også selvom der or slukket på apparatets af bryder.
VAROITUS
Laitteen toisiopiiriin kytketty käyttökytkin ei irroita koko laitetta verkosta.
56 En
Page 57

Important Notice: Guarantee Information for customers in EEA*
English
and Switzerland
For detailed guarantee information about this Yamaha product, and Pan-EEA* and
Switzerland warranty service, please either visit the website address below (Printable file is
available at our website) or contact the Yamaha representative office for your country.
* EEA: European Economic Area
http://europe.yamaha.com/warranty/
AVEEA71102A
Yamaha Global Site
http://www.yamaha.com/
Yamaha Downloads
http://download.yamaha.com/
Manual Development Group
© 2016 Yamaha Corporation
Published 06/2016 NV-A0
CRX-N470OM/EN
 Loading...