

Yamaha DVX-S120, DVR-S120 Owner’s Manual
IYAMAHA
DVD HOMETHEATER SOUND SYSTEM
DVX-S120
(DVR-S120+NX-S120+NX-C120+NX-SW120)
DVD RECEIVER
XXX;XIIIIIIIIIIIIiiiii
DVR-S120
OWNER'S MANUAL
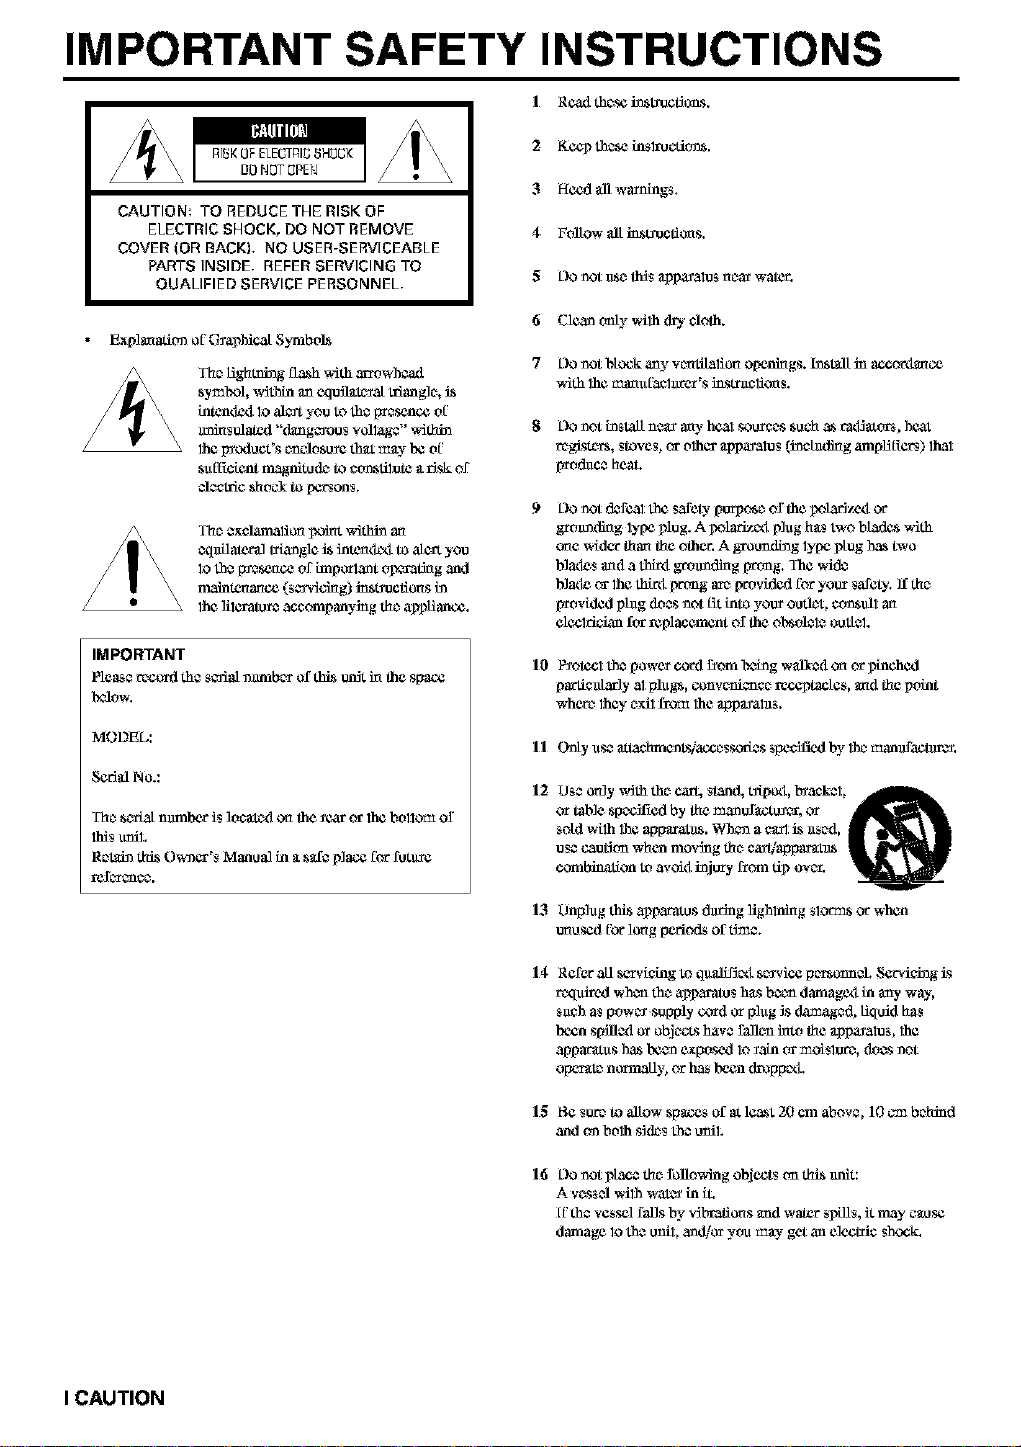
IMPORTANT SAFETY INSTRUCTIONS
I R¢_1 thc_sei_L_¢t_s.
I_I_II[L_I
R]_KOF ELE_I_I_ 8HOCK
DONOT0PEN
CAUTION TO REDUCE THE RISK OF
ELECTRIC SHOCK, DO NOT REMOVE
COVER (OR BACKL NO USER-SERVICEABLE
PAIn'S INSIDE, REFERSERVICING TO
QUALIFIED SERVICE PERSONNEL,
2 K¢_ these insl_dt'rns.
3 Hccd all warnings.
4 FalLow all instructions.
5 L)OnoL u$_ _$ _ppa_ato$ n_ar waJ_r,
Exp]maadt-,_of G_phicaL Symbois
Tha Hghming flash v,ith m_owhoa_1
$y_I',oi,_dth_ _Ln_[_1_a[ 11iang]o,is
intcnd_iIoa]_ youtotho_nc¢ of
m_a_l "d_ng_ou_vo]lag¢"_Sthin
lhap_oduct'8¢nclo_u_ed_t _n_y_ of
_ufF_cfentmagnitu_ to¢o_atitot¢__Jskof
_J¢CL_cshocYtopctson_.
T'hc_excl_d_lio_ _7_xlt wit_ art
¢q1_[1_tor_ L_le is i;l_n<l¢_l to a[_ you
lo I_a,_[_e_no_ of inll)ork._nt o_Li_g _d
maimcna_c¢ (sca_dd_g)instn_cfio_sin
lhali1_at_ accompanying th_a_Hanc¢.
IMPORTANT
Pleaser_ord the sc_al number _f _s ,.m_L_ the .space
MODEL:
Scd_ No.:
T'hasc_a[ n_nhar is]ocatodon theyearor lhabollOm of
l]_sunil,
Re_in th_ Owner's Manual in _ s_e place forfuL_L_e
6 Clean only with (h_, cloth.
7 L)Onot l_fock any v_tilatio_ opcn_gs, h_talL in accor_la_o_
_Sth lha_na_aClnrCr's i_sLr_cliCas.
L]Onot i_ SL011nea_ ar(y heal SOU_'_S_u_h as P,_atol'b _hc_t
regi,$t_'$, Stove$_ ca"olhq_" _ppayatos (in¢ f_(ting ampHE_ers) 1hal
_d_ce heal.
Do notdofCaltheSafetyp_po_ ofthe_o]_rJy_iOr
_o_n_g lyp¢plug.A _olar_i pingh_stwo blades_Jth
one widertha_theother.A _u_1_ng lyp¢plug_ two
b]ad¢_mada thaigro_nd_g prong.]he wid¢
bladeorlhathi_iprongar¢Wovfdcdforyour_afety.]£th_
_vfdcd p_ doe8not_ intoyouroud¢_¢o_su11a_
elcclrLianforreplacementoftheol_ole1_outiel.
10 P_oiccl the power cord _som treing walked o_ or pinched
partictdzx]y al Nlugs, conveniencc_ receptacles, mad the point
where they _xil frea_ 1he appaXal_s.
II Onty use attaehm_Ls]accessor[e8 specifietl bv 1ha _,anufactur_.
12 USe ordy _dth th_ car_ stand, rapport,byaekel,
or table sFecL_ed by the mantffacto_er, or
sold w_lh 1he ap0aratus. Wh_n a ¢g0 is _s_d,
u_e cau_tm when mov_g th_ ego_ap0ar_tus
combination to avokt injory from _ over.
I CAUTION
13 Unplug Lhisappara_8 dtuSng lighlni_g $1_ o_when
ur_usedJ_ot"10r_gperiods of ti_ae.
14 Refer a_ servf¢ingtoqu_if]_is_,ice p_onn_. Serviehag is
_,q _'1 when th_ appm-at_ s hasbeechdamagett in any way,
s_¢h as power .supply co_xl or phtg is (ismaged_ liquid has
been 8pilled or obj _'_s have fallen hato the _ppa_atos_ 1ha
apparatus has been exposed lo _ain or moi_lure, doe8 not
operate norma_y_ or has been (h_p0et_.
15 Be sur_ to allow sFaces of at leaat 20 cm above, 10 _m behind
anti on both s](_s the o!liL
16 Oo not place the following objects on this trait:
A vessel With wal_ in fL
ff the vessd fan8 by v_braiio_8 am1water spi11_,it may cause
damage lo the unil_ anchor you _y get an electric _hock_
FCCINFORMATION(forUScustomers)
]. II_fPORTANT NOTICE : DO NOT MODIfY'THIS
UNIT!
Ilfis _roclu ¢%wben installed as bid_cal_d in the bistra_ions
ModW_cafi(-msno1 e_pressLv approved by Yamaha may void
your aathoiity, grantcxl by 1h¢I_CC, to usa the pfcalucL
2. II_fPORTANT :
When cccmecting this [_dn¢l to ac_cssofies an_or another
_lu _'tuse onlyhighquality_li_d_dcahJes.Cahk'4s
*u]_li_ with this[_,rodnclM[JST _ u_L FOllOWall
instollaficci inslr_cfions. Fallm-¢ to follow instructions ¢oaM
void yourFCC authcaJzafi( -mto use _s _lu¢_ inthe USA.
3. NOTE :
This _oro_lucLhas bc_rt 1,_tcdanti folmd to comply _4th the
rcqukc_nt_ l_steclin I_CC R_galafio_s, Pa_ 15 for Clf_ss
"B" dtgitfd devices. Compliance v,iththese requircmen_s
_vi_Les a reasonable kwel of assurance lhat yoar ase of Ibis
_lucx ina rc_sidcntial cnviromnent _il] not rcsatt in harmful
interference _dth oth_ clec_o_icde_Aces.
II'ds eqaipme_t gcncraWsi_scs radio fxx_qucn_cs an€i, if no1
installed and u$¢fl acco_ling 1_ the _$tracliort$ fourt¢l in lh¢
asc*s manual, may cause iat_thrc_ce hm-mful 1_the
O_X_afi_-m of othc_r ¢1e¢1_¢ de,does.
Compliance _ithFCC _Jgakafio_s does not guarantee lhat
biterthrencc will not occm_ in all iusto31ations. If lbi$ pfcxlt;or1$
found to be lh¢ source of bitc_thtvacc, which can be dctermincM
by lurning the unit "OFF" and "ON", p]case try.to cFminate the
problem by using one of the followkig mca_m-cs:
R_[ocal_ _lth_ this proda¢l o_the device that is b_ing affecLod
by lh¢ inl_rf_¢e.
Utilize f_owcr outlets l_al ar_ ca dig_l b_anch (circuit breaker
or f_._) circth_s o_ inst 011AC line fill_r!s.
In the c_e of rml_o or TV interf_¢nce, re]ocat¢./_caJcnt the
antenna. ]_ the anl_nna lead in is 300 ohm ribbon P'_ad,change
thc [ "_d m to ¢_ ty_ cah]e.
ff tbesa ¢ofr¢Clivc m¢_su_ do not produce salisfaClory resulLs,
please contact lh¢ thcal r_ail_ aothod_l to th_tfibuL_ ffds lyp¢
of _dacl. ITyou can not thcaw lhe _pI_opr_l_ _¢r, pl_f_
contact Yamaha Electrordcs Co_p., U.S.A. 6_0 Grangcthoyp¢
Ave, t_a_na Pa_k, CA 90_9.
The above sta_m_nl_ apply ONLY to those l_Oducts disbibeted
by Yamaha Corpo_afio_ of Arnica or i1_ sul"a_kliarics.
We Want You Listening For A Lifetime
YAMAHA ffft¢lthc_Eiectrordc bidll_tri¢$ Associalica'$ Ctm_u=m_r
E1¢C1_¢* C_'oup want you 10g_t thc_most out of your _thl_m_fl
by _a)dng _tat _ saC€]ex_. Onc that ]e_s lbe sou_¢l comc through
thad ariel clear without anno)4ng blaring or distortion - an€l, mo_t
importantly, wilhout aff¢Clbig your _c_gltive h_g.
Sbice h_g d,2mgtge from load sou_l_ is ofl_,_n
un¢lete_tab]e_ntilitis too ]at_,YAMAHA aml the
Electrordc thdustr[¢s Association's Consumcr
Electrordcs G_oup _c_ommerM you 1_ avokl pro[onge_l
CAUTION II
/
I Io _ssltre the fi_est perthrmance, ple&se*'_cadthis manual
car c_f_lly.Keep il iu a safe ptace for futo_ reference.
2 histallllfissouridsysL2_ninaweltvc_atLlated, eoM, dey, atcan
placc_ with al least 10 cm on the top, 10 cm on the k-$1and rigM,
and 10 cm at the bacl or DVR S 120, and _3 em on 1he top, 20
_'mon the left and fight, and 20 cm at thc_back di' NX SW12P
-- away fl3ymt_t_ct sun_ghl, heal souxcc_s,vth_aliort,d.ugt,
moisture, and/or cold.
3 Locate 1hisunil away frtrm other O_¢M _ppl[._a]¢es,m01ot_,
or t_m_sfor_ers to avoid hummhig spreads.
4 DOnol expose Lhis unit to sndden temperate_ changes fro_
curl to hot, anti do nol locate this refit in _ environment with
high huzmidity (i.¢. a room with _thmlfidiFler) to [_fCwc_t
comk_safion hialde Ibisu_L which m_- cause an eleeLr[cal
shock, F_, t_gc_ lOthis unit, and]or personal inju3"y.
5 Avcdd histaDing this unit where f_gn o_ect m_y fall onto
this urdt and]_ this urdt m_y he _xposetl Ioliqtfitl dripping or
splashing. Urnthc_top of tiffs uniLdo not #ace:
Othor compon_nls, _s they may cause dmrfftge and]or
discoloration on the *u_face of this tufit.
Burning O_eCL_ (_.c. candies), as they :_ay cause Ytrc,
damage to this unit, and]or personal injury.
Conta_ac_rs with Hqukl hi them, _s they m_y f_dl anti Hqu]d
may cause C-3eCLTiC_shock Iolheuser anti]or t_tuage to
1histrail.
Do not cover tiffs unit with _tnewspa0or, lablccloth, curlatn, ete.
in order not lo obstsuct heat ratliation. 1_lhe tomp_atore hiskle
this urdt rises, it may cause ll_, t_tuage to lhisunil, and]o_
pc_s_mal hij_,.
7 Do no1 ping in _ unit to a wa_ outle_ until all cormecO_m_ _e
complete.
8 Do ROtOperate thiS unit upg(L_ down. 11Lt_ty overheat, possibly
causing damage.
9 Do no1 use force on _dtohes, knobs and]or co_ls.
10 When dSscormec0ng the power ecaxl from the wall ontlet, grasp
the plug; do not pull the ecaxg
I] DOnot clean 1his unil wilh chemical solvent% 1hismight
damage the flrdsh. Use _ clean, d_,-cloth.
12 Only voltage spee'flied ori tiffs unit mnst he nsotLUsing ffds
unil with _.higher voltage than speffffied is dang-aou s anti may
cause fire, tMmage Iothis unit, and]or persorial injusy.
YAMAHA vail nol l_e head responsthl_ for any damage
_esulting frtrm use of this unit with a voltage other than
sdec_exl.
13 To prevenl tMmage by l_ghlning, 3iscormect lhe powc_ cord
6-ore the wall onllet dmSug an electrical ,torm.
14 Do not att_z_pl to modify or V_xtiffs trail.Contact q_a/llied
YAMAHA service personnat when any service is needed. The
eabhio¢ _hodid never be oponed for any reasons.
15 Wh_ not planning lOuse lhis unil for long pedo_Ls of time 0.e.
va_afitrn), disconneClthc_AC power plug from the walt outl_.
16 Bc_sate to _agl the "Solutions to Ccazmon Frobl_" sc_cfion
on common operalhig errm bcr_xe conctnding that lifts unit is
fadity.
17 Bc_thremoving this milL,press STANDBYjON to set lhis unil
in standby m_le, anti disccamccz the AC power plug frcem the
wall outiel.
18 Do nol placc_much pres_use against lhe Subwoofer ha. _tm_-
b_"_cakthe net or lhe unit may faU, rasu]ting in injury.
19 Do nol place anyikfiug fTagi]e treskle the Subwoofcr, as air
I_esSU_ is l_oduc_l 1]]al_ay by_ak it, resalt i_ :malf/in_on or
13_US¢ _L
III CAUTION
20 Condi.'_3f_afionv,q_lform when thc_g_rounding temperattn'¢
chan_g gtldd_nl y. Disct'qln¢¢l the power cord from the onflet,
then le_v_ the trait atone.
21 When uKmg the anit [o_ _ long tim_, the unit may "heccan_
warm. Tam the power off, then leave the unil alone [or cooling.
DVR-S120
lifts unil lS I101(li_0_*__ from the AC pow_ sotu_ &$long
• s it is conne_ted to 1he wall purls, even if _ anit itsel_ is
tu_nexl oil. TMS state _s calted the standby m_le. ha _ stale,
this urdt is dcsign_d to consame_ ve_, sma0 qnanfity of power.
FOR CANADIAN CUSTOMERS
TO p_v_nl _-3eatficshock, match wide bl0xL_of plug to wide slot
and [ulty ins_.
lifts Class B digital aplxacams complSes with CanadSan ICES
003.
DANGER
When this tufit is plnggexl lOthe wan outlel, do no1 plac_ your eyes
closc_to 1he opening of 1hedisc l_y and oth_ op_mings to look inlO
inside.
The l_ser componenthi _ product is c_p_bleof entitling
•adialion exce_(ling the limit for Class 1.
DVR-S120
The name platc_is locat_(1 on 1he boltom of th_ anit.
WARNING
TO REDUCE THE RISK OD fqRE OR ELECTRIC SHOCK,
DO NOT EXa%ISE TH!S APPLIANCE TO RAIN OR
MOISTURE.
• For U.K. customers
1Ithe sockel onllats in the home a_x_not suilable for lhe plug s_l
with 1_d8_Liance, it sho_dtl he cut off anti an ap_ 3 pin plug
fitted. For details, refer to the instsuctic_as desedhed below.
• The plug severed from the mah_ Dad mnst he &,.stroyed, as u plug
with bored tleKthlc_ ctax_,is hazardous if c_agugcxlin u live _ocket
ontlet.
• Special Instructions for U.K. Model
IMPORTANT
THE WIRES IN MAfNS LEAD ARE COLOURED IN
ACCORDANCE WITH THE FOLLOWfNG CODE:
Blu_: NEUTRAL
Brown: LIVE
As the colo_t'_ of the _S in the _ lead of this apparatus
may not correspond with the colou_d _ark_ngs identifying the
t_mi_als in yottr ping, _ceetl as follows:
The wire which £s cdiour_d BLUE must he connected lo the
t_mi_al which is marled with the le11_r N or coloused BLACK.
The _4_e wlfich is colou_ed BROWN must he cormeotetl lo the
t_mi_al wlfich is ma_ked with 1he le11_rL o_ coloared RED.
Making sare 1_alneither cca'eis connected lo the earth torminal
of the tt_ee lyin_g.
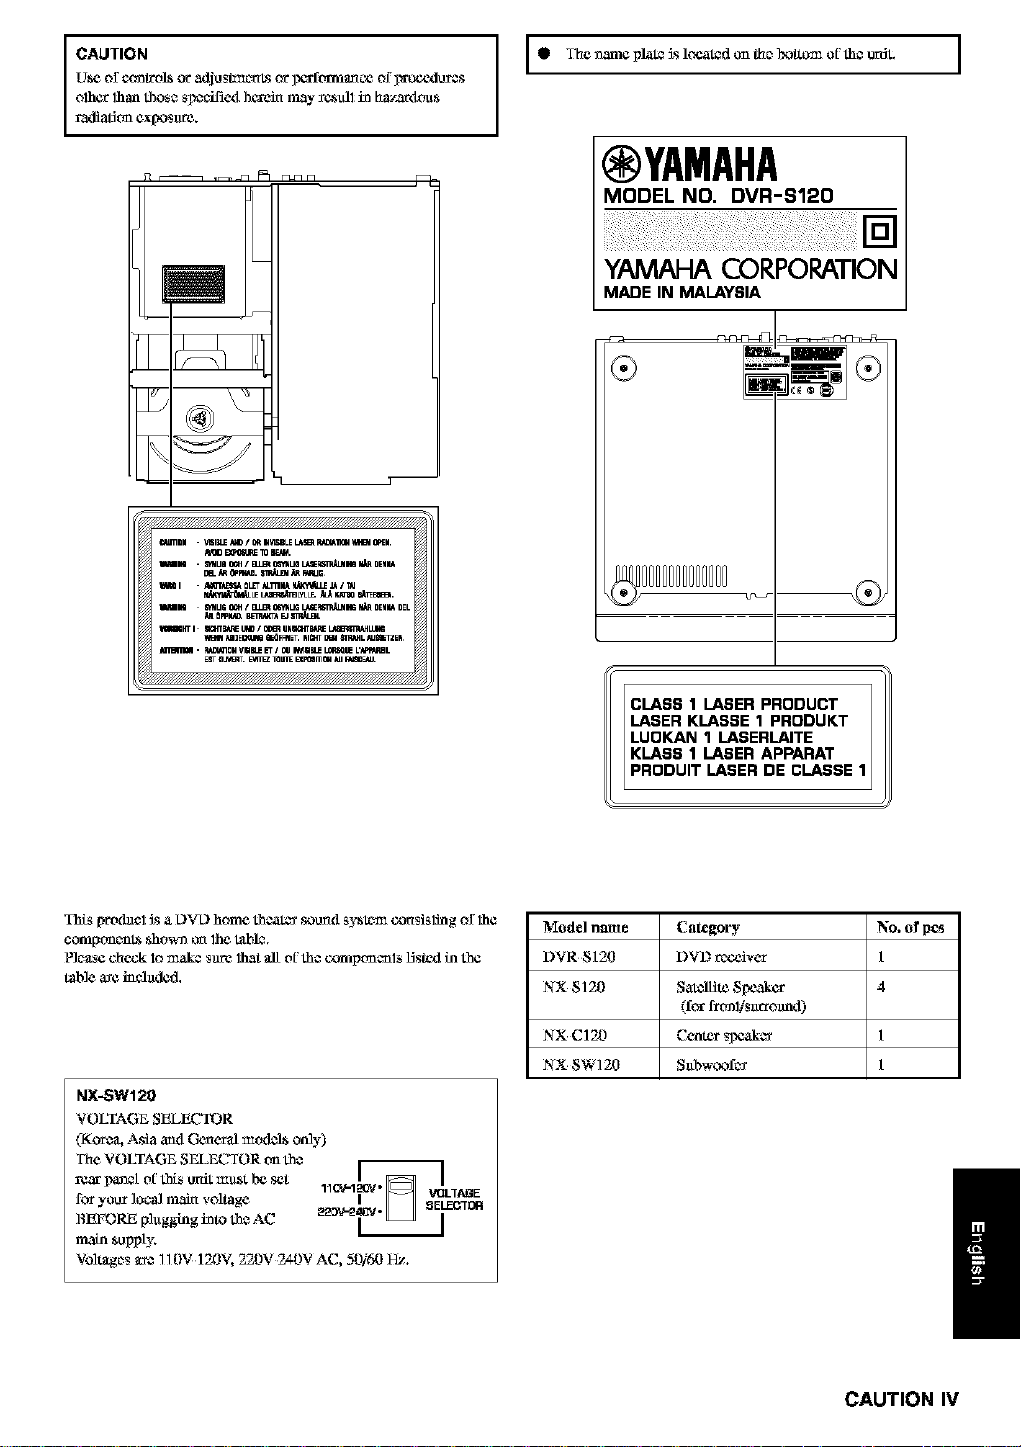
¢Ahrfloa V]SIRLEk_[_/ ORmI,I_LE LASE_R,_£_I_I_IftdBt0pEN.
_NI . SyttLJnO_A/BLERC_tT&BaL_WOII_DHN4
II m 0LET_TRN_ _ _ I T_J
raND MUG O_ ! _ _UG U,t£ _ m p,_ DEHMDEL
_ fiPPBLW.B_a_:TX r:J_,Ia J_
ihTi BCmB_E UI_ / 0_ UHS,_TB_E IL_G
_t,_l M_EcmIo _dFmET. mGHTU _L mmTZE_
ESTOL_mT._ mLr_ mnlOU _ FalaC_,,_
g Th¢ _m¢ platels lo_ated_mLhe_o_ oi'_c _z_dt. ]
IYAMAHA
MODEL NO. DVR--q120
YAMAHA CORPORATION
MADE IN MALAYSIA
_S [_d_clJs& L)VL)bom_ 1_o_t_-_"_u_d sy_ _islin_ o_lhc
NX-SW120
VOLTAGE SELECTOR
(Korc_ Asia aml General rod(_L?a8oMy)
The VOLTAGE SEL_ TOR on th_
rg_r_i oi' this unit m_st b_ s_t _.[_ . ]
for you_ local main voltage i _ELE_ltm
BEFORE p]_gging into th_ AC 22_'2
main supply.
Voltages _o_ 110V 120V, 220V 2_-0V AC, 50/50 _.
1_ _V-120/"_ _t LIAGE
PRODUIT LASER DE CLASSE
Model name Category No. of pcs
DVR 8120 DVD receiver 1
NX $120 Satellite Speaker 4
(lea"fl_nl/$_ro_nd)
NX C120 Cente_ _ 1
NX SW120 Sabw_,x)f_ 1
/
CAUTION IV
In a few steps, a whole new world of DVD will open up.
,<__..............
I]1,.!_;__," IIII, _,1,<<:_,_._ ........
7
LET'S 13 READY!
'-)Page 6, "Preparation"
Decide on a place for the speakers, perform a few simple cormecfions, and that's aH there
is to it,
• Connec:ing Speakers and TV to CinemaStation cotdch)'t be easier.
• Connec:ing the Speaker Cables with one touch colored connectors.
Come a DVD!
,,,*Page 1O,"Basic Operations,'
Transform your room into a home theater in 3 StepS+
• Soand fields to match the movie
experience the feeling of being there,
• Progressive scan technology for enjoying ]
video even on a large screen,
:;; ;i¸¸¸¸¸¸¸;¸71£¸¸¸¸
Double and tripl6 your enjoy
CONNECTING OTHER EQUIPMENT.
'-)Page 46, "Using Other Equipment"
• Enhance the feeling of movement with DSP Programs when yon play video games.
• Listen to and Jecord CD-R and MiniDi_ media,
• View ned dab video media.
2
_tation
Enjoy playing A VARIETY OF DISCS!
--Page 28, "Playing Video End Music Discs"
In 3 short steps play everytNng from commercial CDs to your own homemade discs,
v
v
• Enioy playing
midio and video CDs and MP3 music
to whether
concert hall.
"Listening to the Radio"
ov live radio broadcasts.
• hi addition to Aato Tuning, you can ase various conl:J-ols
_[ng Amo Preset for FM charmels.
It's time to TAKE YOUR LISTENING
EXPERIENCE UP A NOTCH!
=_Page 53, "Creating the Best Listening Space"
• Wifll the SpeWers yoa can create a sound space to match the tistening envtronment of the room.
• The Ma_tx 6.1 Decoder provides virtuJ s_rround back speakers for experiencing a remarkable
acoustic presence.
• SILENT CINEN£_ provides an incredible listening presence with headphones.
3
CONTENTS
4
_tation
0
0
Z
"4
m
Z
"4
T,O
5

Introduction
Your DVD Home Theater Sound System DVX-S120 consists of the following components.
DVD R_o_]vc_(DVR S]20) I urn1
Spe_&c_rSc-_(NX P120) Sal_llite8Ix_kca_ (Fronl, Surmu_P) (NX 8120)4 milts
CCnlCrSpeaker _ C120) 1m_t
Subwoofcr (NX SW120) 1unil
Explanations in this Owner's Manual am based on DVX-S120 (DVD Receiver (DVR-S120) and Speaker Set (NX-
P] 20)). If you use speakc_ other than NX-P120, make sure to set the speaker siT_ and volmne lcxe] in advance.
--+Page 62, "Selling the Speaker Size"
--+Page 58, "Adjusting the Speaker Volume Level"
• _ explains additional operating tips that ymt
find xtsefld,
• indicates an operation that yolt should
defi_iteay perform.
@ In this manual, operations that can be,peffomlcd on
either the DVD Rc_:_iver or Remote Control are
explained using file Rcanote Control.
@ In this manual, Remote Conm._]descriptions and
ilhtstrations are ba._d on models other than those iN
the U.K. or Europe. Any exceptions are clearly stated.
Supplied Accessories
Make sate all of 1he folin_dng accessories arg ha the box.
DVR-S120
Indoor l-7vl.zmtem_a VMeo 15n C,_le
@ This Owner's Manual was Irrintcxl before final irroduct
dcxelolmlcat. AfCcsprinting, _le product
specifications may change due to operational upgrades
and other reasons. In this ca._, the spezifications of"file
product itself will take prcgadcace over the
specifications in this manual.
@ In _le cases, graphics or terms ltscd may differ
sfightly from the actaal product or packaging to
fac;tlitate explanation.
NX-P120: NX-S] 20, NX-C] 20, NX-SW120
Subwoofer (;able blomating Braakets (Front,
(1 pit,, 5 m, (1)) Stwromxl Speakers (4))
Screw*(M4X 1O)(Front.
Stm_am_lSpeakers(4))
Coni*ol C_le
Sy_m
(5m (1))
SpeakerCa_les(Surromad: 5 m f2),
I'm _ Center:5m f3))
Non-S_M P_Ls
(Stzbwoo_, L Set (4))
No_-Ski4Pads(t_onr.Sttrrot_d
8pe_, 2 Sets06))
6
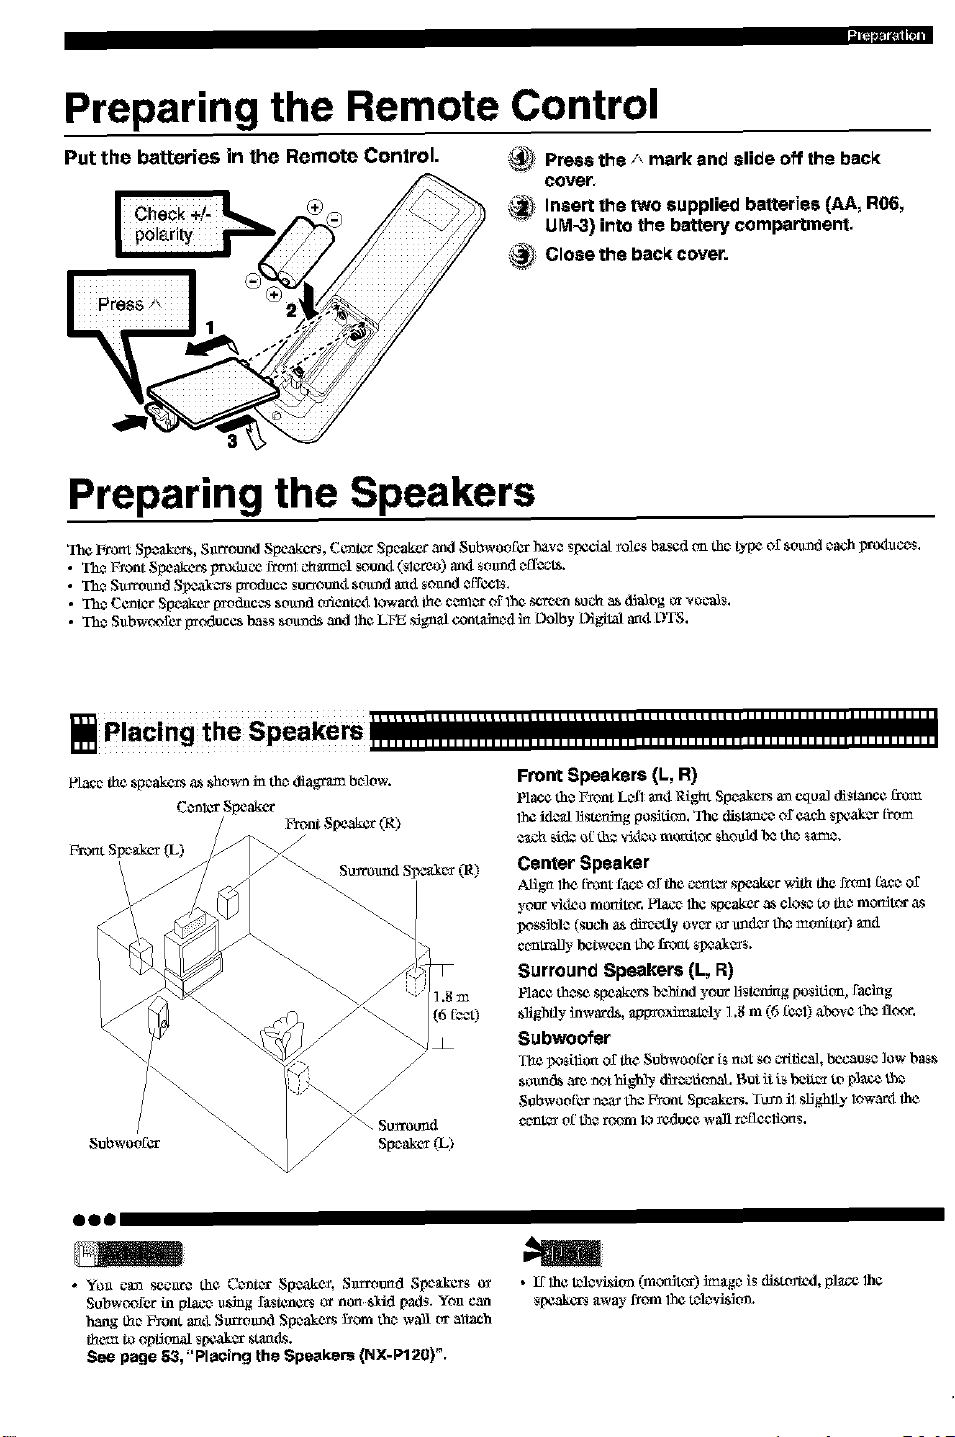
Preparing the Remote Control
Put the batteries in the Remote Control.
pol_rity
Press the/_ mark and slide off lhe bac_(
cover,
_ Insert the two supplied batteries (AA, R06,
UM-3) into the battery compartment,
Close the bac_(cover.
Preparing the Speakers
The Front Spoakcrrs, Sarround Spcakcrs, Ccntcr Spc_akcvand Subwoo_k_r haw sf_cia[ _olcs buscd (-_ thc_typc of soand c_ach_wz_lacc_s.
• Th_ F_oot Spcakcrs pro_cc r_l ch_c_l soun_l (slcrco) an_l _oavd _ff_.
• Th_ Slkrrolmd Sp_ak_ p-_ac_ surmun_l sound _d _oand _ff¢c1_.
• Th_ Ccntcr Sp_akcr frm_ac_s so_n_ oficntc_llov,-arfl Ihe c_nl_r of 1he scrcgn suc_ a_ 6_fiog o_ _ o_-a]_.
• Th_ Sl_bwc_£cr produccs ba_s so_n_ and 1heLFE _gnal coot_n_d i_ Oolby k_gital a_l OTS.
Placing the Speakers
ooo
• Yon can sccarJ the Cc_t:_ Spcakcf, Sa_mu_d Spc_akcrs o_
Subwc_fcr in placc_aaing fustcncrs or non _id pmis. Yoa can
hang th_ F_oot a_l SarrearS1 Speakers _om th_ wall or a_u_ch
them to opfigmal sf"_kor s_.
See page 53,"Placing the $peeke_s (NX-P120)".
Front Speakers (L, R)
Place the F_ontLc-$1_l R_ghtSpc_akcrsan_u_] dist_ncc
1hei_loall_stordngposition,The distanc_ of cach s_wakor_m
Center Speaker
AUg_ lhc_b:mtfac_ of the c_t_ _akcr ,_,'_ the J'_"_r_l_',__o£
your vidco mordtor, l_lac_ 1he spcakcr a_ close to th_ mordtor _s
_x_s][ilc (such as dlr_ly o,/_ o_ _1_ the mgr_itor) aml
c_tral]y bctwccn the fro_t _aa_r_.
Surround Speakers (L, R)
Place those spcakcrs lyahlnd your Ustcni_g posifi( -_, facbxg
Subwoofer
Thc po_i1_o_o£the Subwoo_L_ri_ _ot _o_-dlic_1,_._u_c low b_s
so_a_ _rc not highly _'fi,_(_. B_t it i_ bettc_ to p]_ t_a
S_bwoo_L_nca_ the F_oot Sp_akc_s.TuJ_ il sUghlly 1owar_ithe
_J
• If 1heI£_lgvi_it_ (mordtor) _ge is distgrJ_Cd,plg_ 1he
speakers uw_- f_om 1het£_kwifi_t_.
_l|=],_l_-ill,i
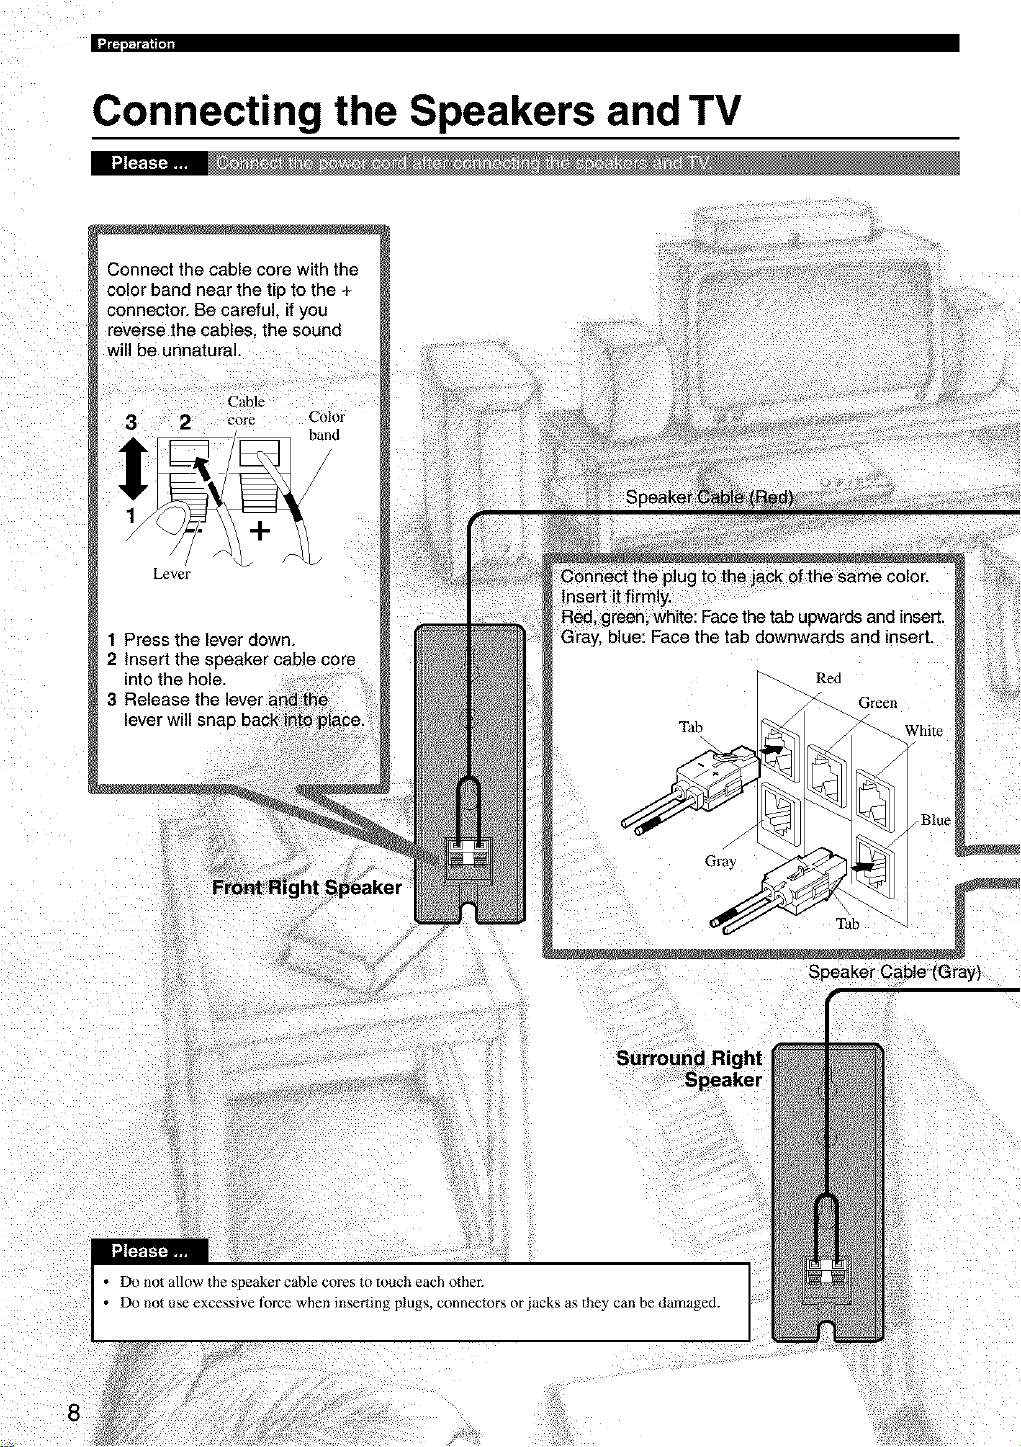
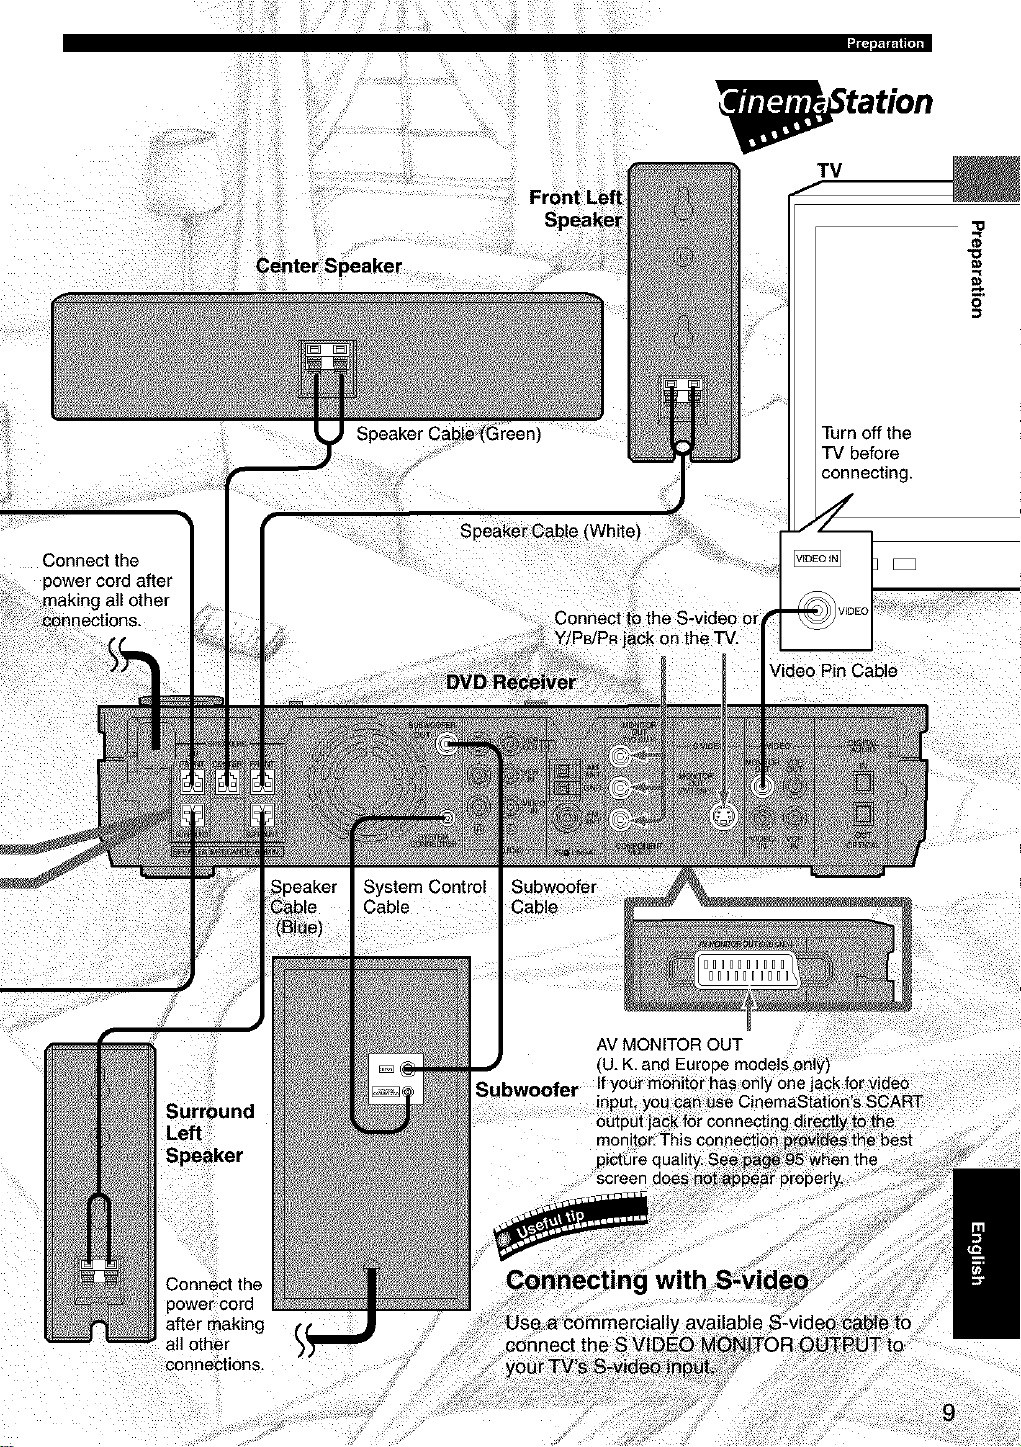
Connecting the Speakers and TV
Connect the cable core with the
color band near the tip to the +
connector. Be careful, if you
"everse the cables, the sound
will be unnatural.
Cable
3 2 core Color
Lever
band
1 Press the lever down.
2 Insert the speaker cane core
into the hole.
3 Release the
Speaker Cable (Gray)
• Do not use excessive force when inserting plugs, connectors or jacks as the? can be damaged.
• Do not allow the speaker cable cores to touch each othe_
power cord after
making all other
Connect the 1
connections.
C_ii!_!i!ii_;i!!_!!!ill¸!i!iiiili%!i_iiiiii!_ii!iii_,_iO_ii!_ii_i)ii!_i_ii!!_i_!ii!i!_iii_ii_iliL
i|t_,_lr-lUll
_tation
TV
Fr_ntL
"O
"€3
0
Turn off the
"iV before
connecting.
Speaker Cable
Speaker
Speaker
Cable
(B_ue)
System Control
Cable
Subwoofer
Cable
IIIIIIIIII
IIIIIIIIII
AV MONITOR OUT
II
Subwoofer If your monitor has onl,
screen
Video Pin Cable
nthe
Connect the
Viewing a DVD
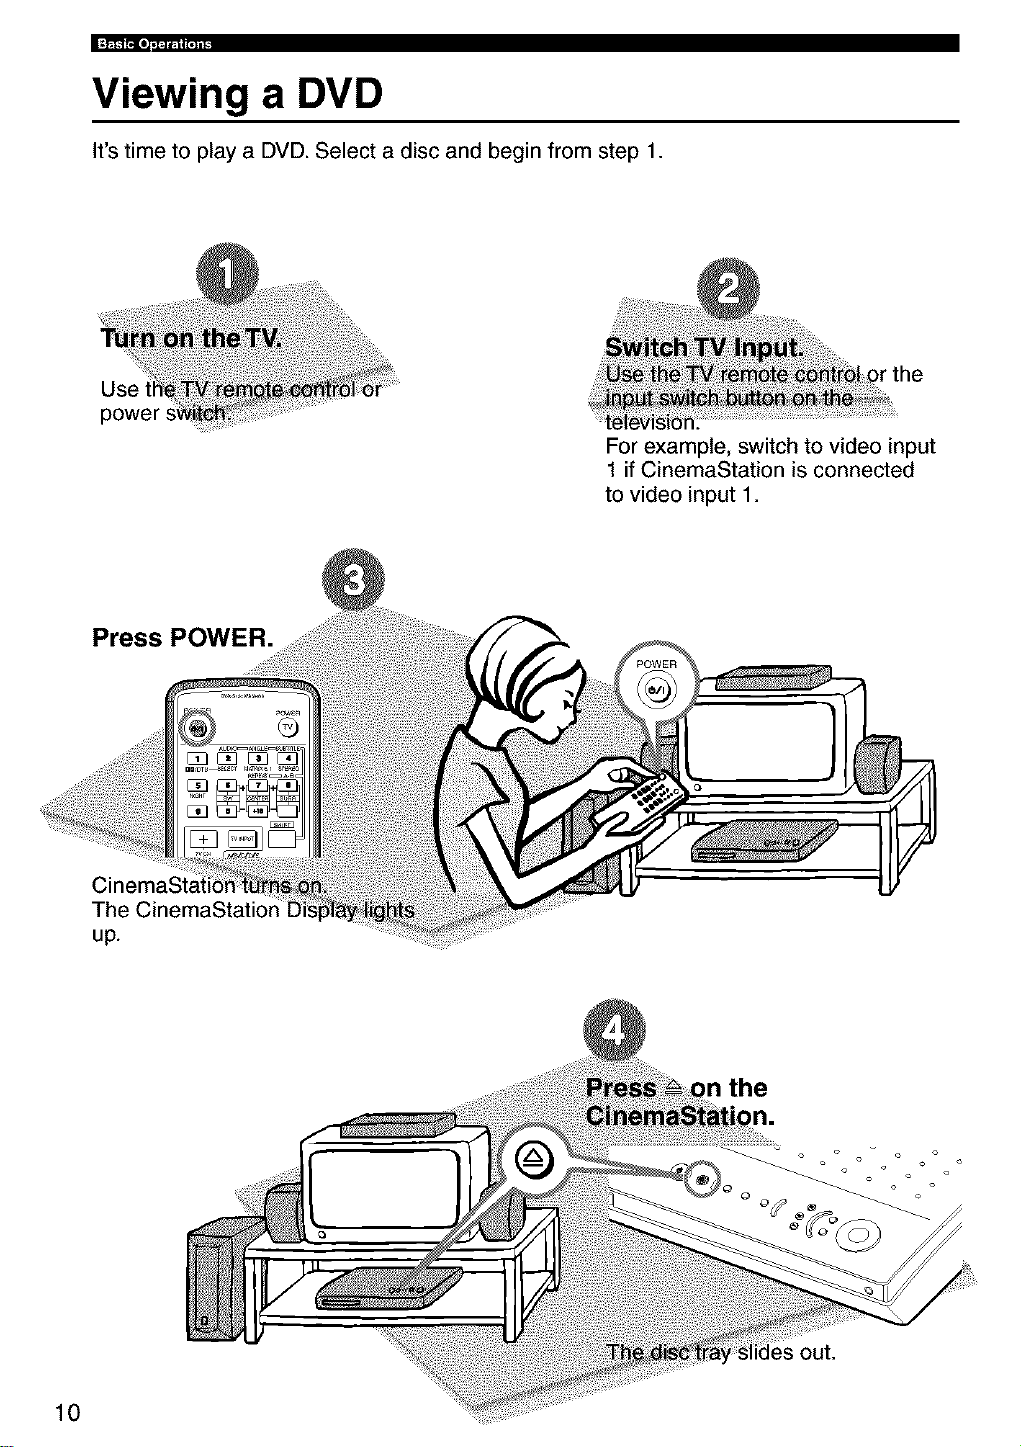
It's time to play a DVD. Select a disc and begin from step 1.
Use
power
For example, switch to video input
1 if CinemaStation is connected
to video input 1.
Press POWER.
10
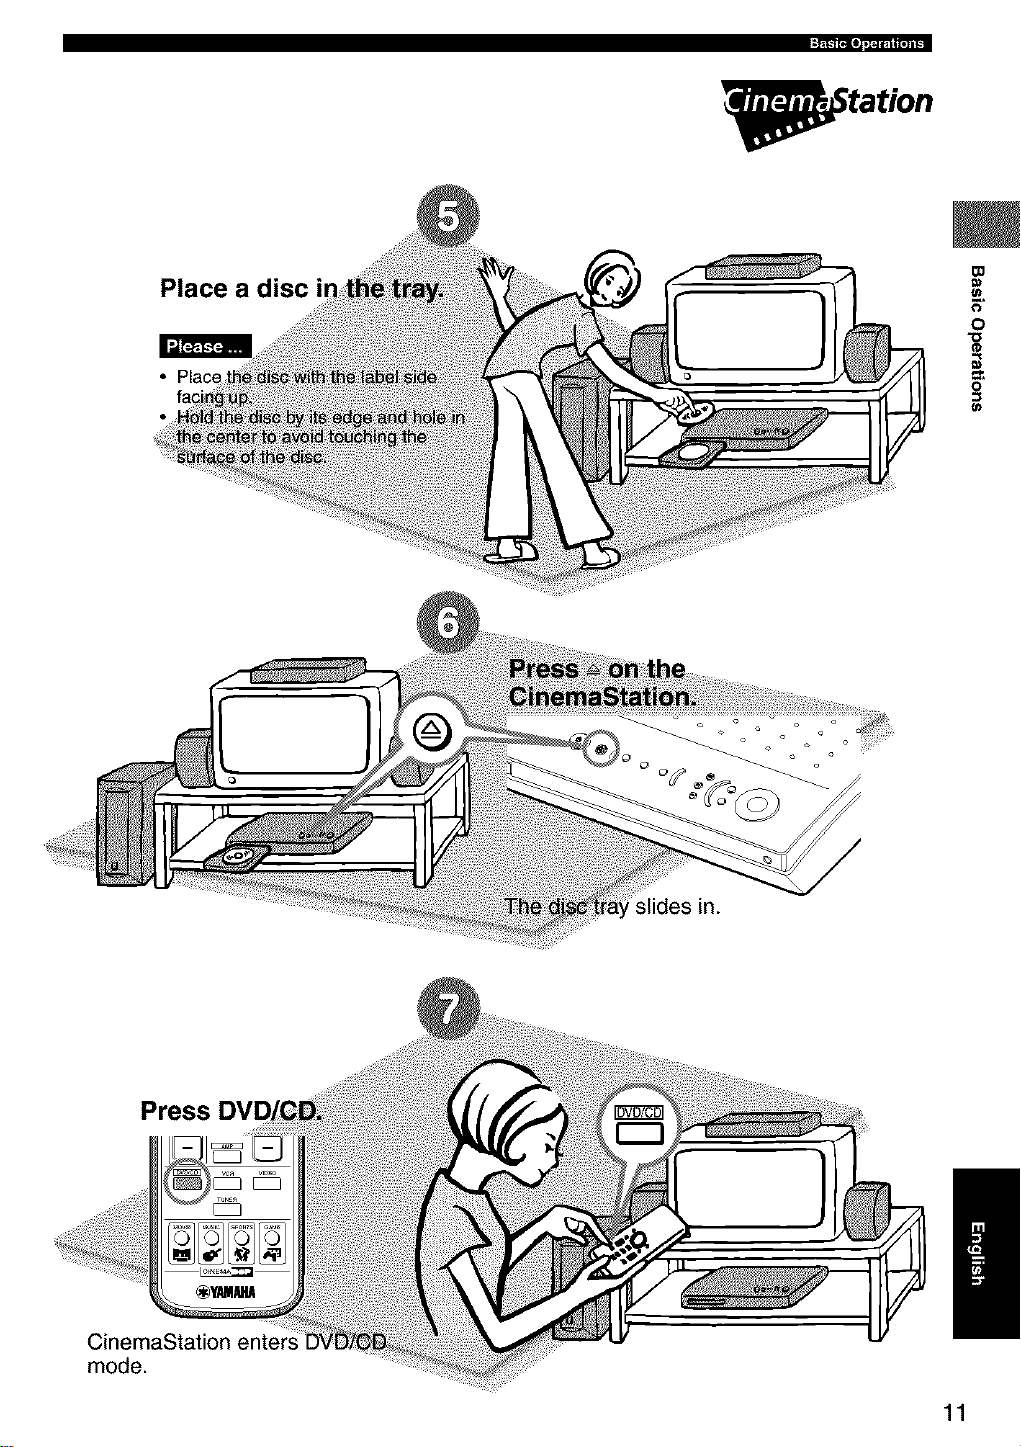
_tation
Place a disc
_o
0
0
Press
CinemaStation enters
mode.
11
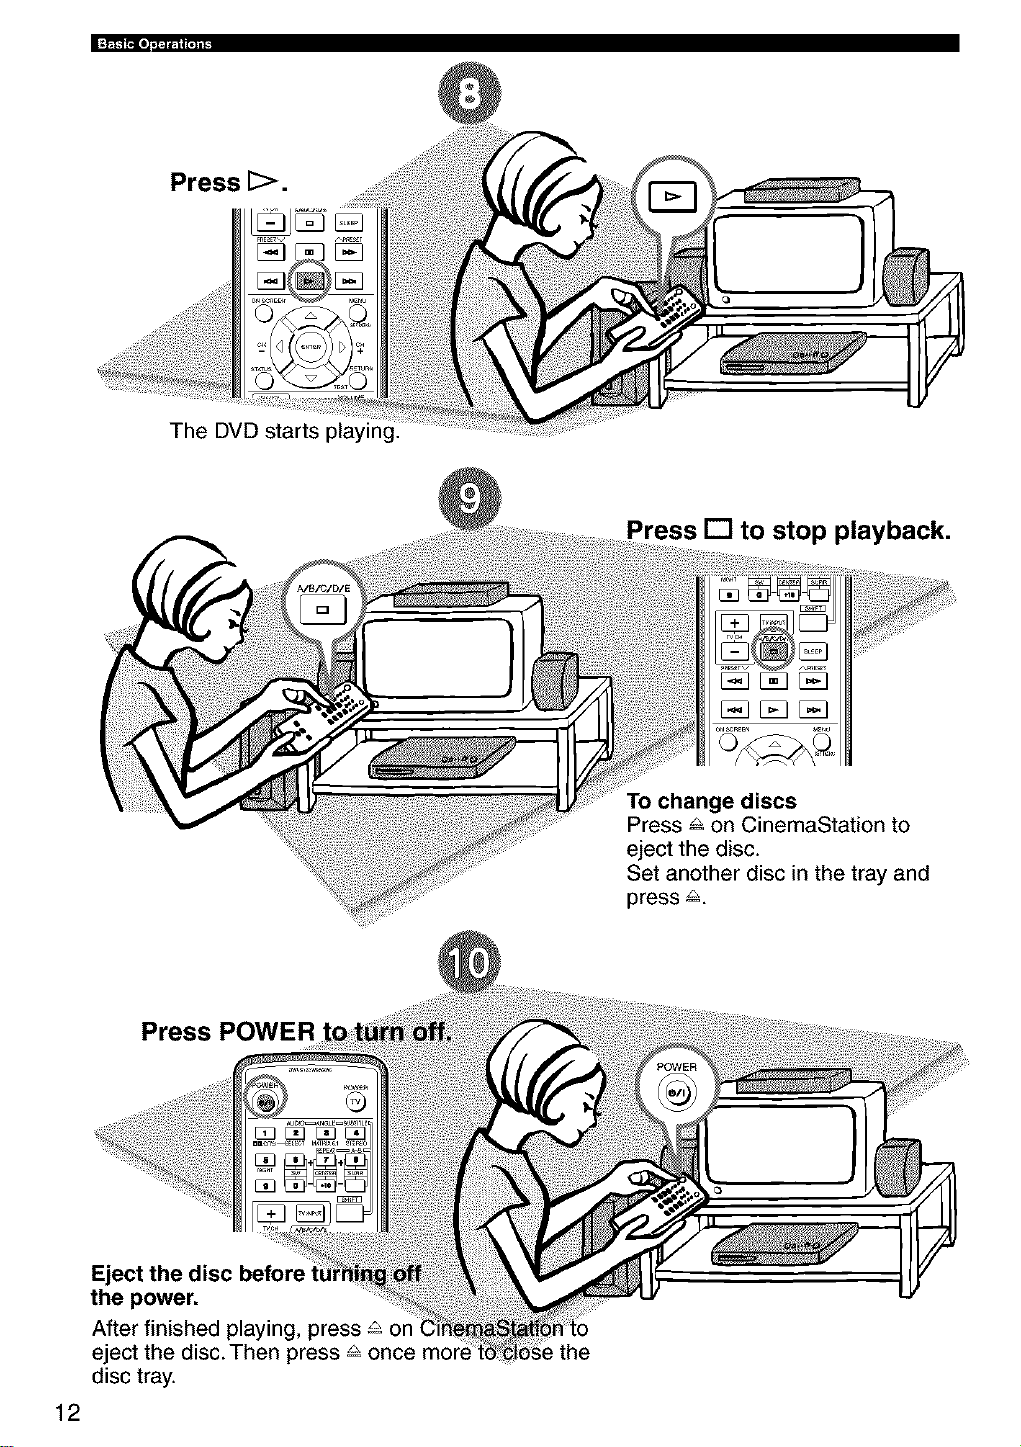
Press [>.
The DVD starts playing.
Press [] to stop playback.
Press POWER
Eject the disc before
the power.
After finished playing, press _ on
eject the disc.Then press _ once
disc tray.
12
To change discs
Press & on CinemaStation to
eject the disc.
Set another disc in the tray and
press 8.
the
iPmblems
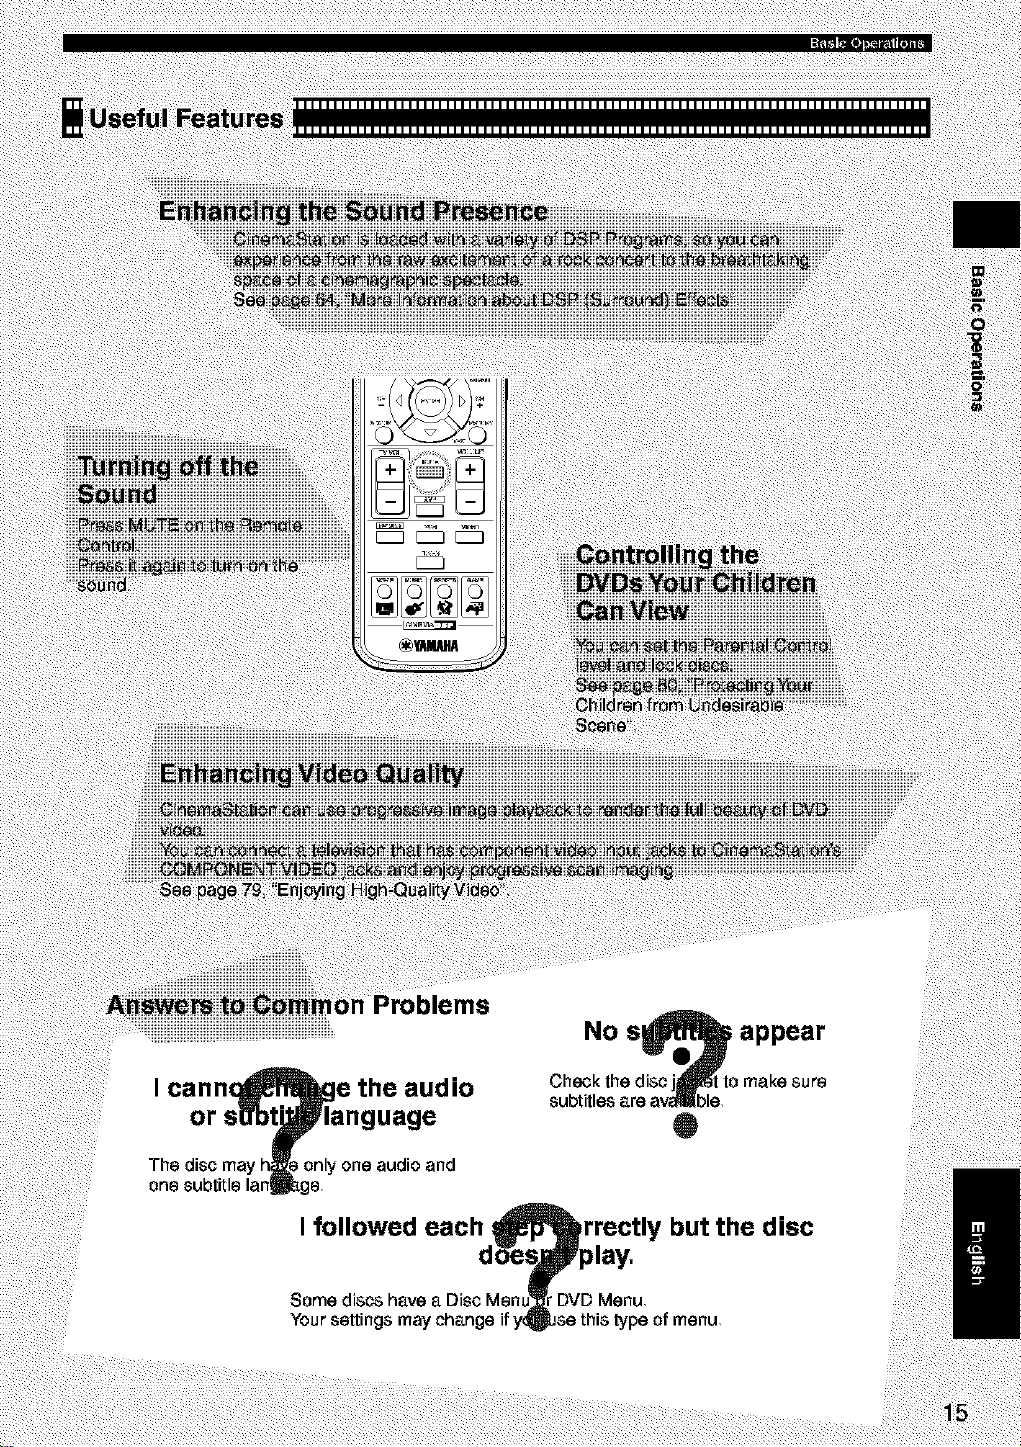
No s_ appear
Check the disc jj_l_t to make sure
subtitles are a_ble,
Q
I followed each
Somediscs havea Disc Menu'
Your settings
rrectly but the disc
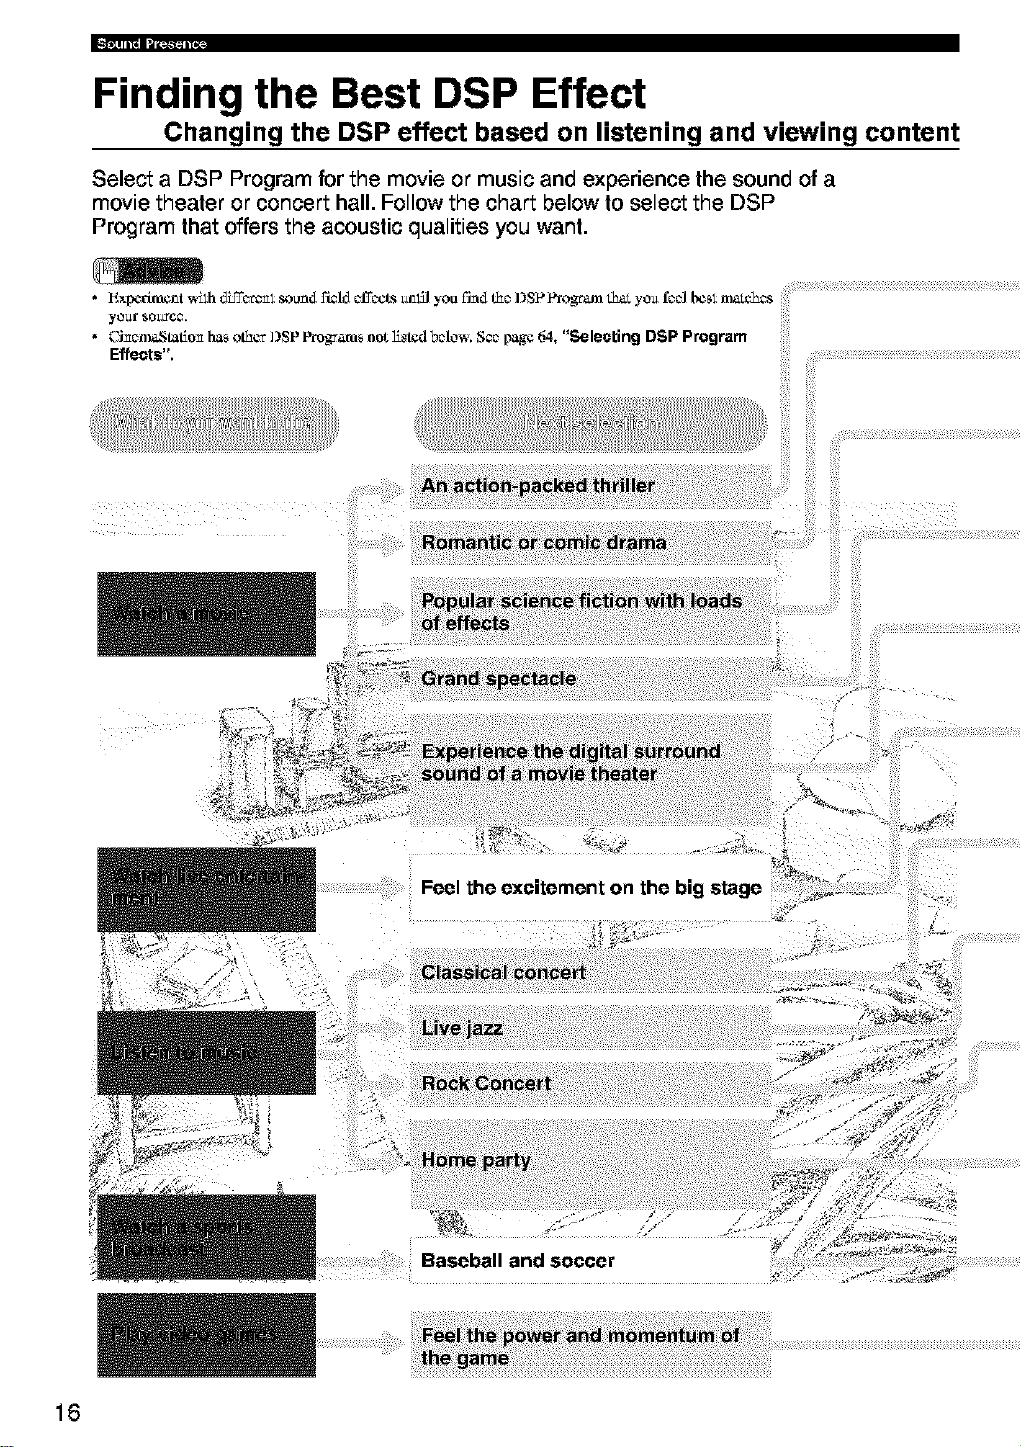
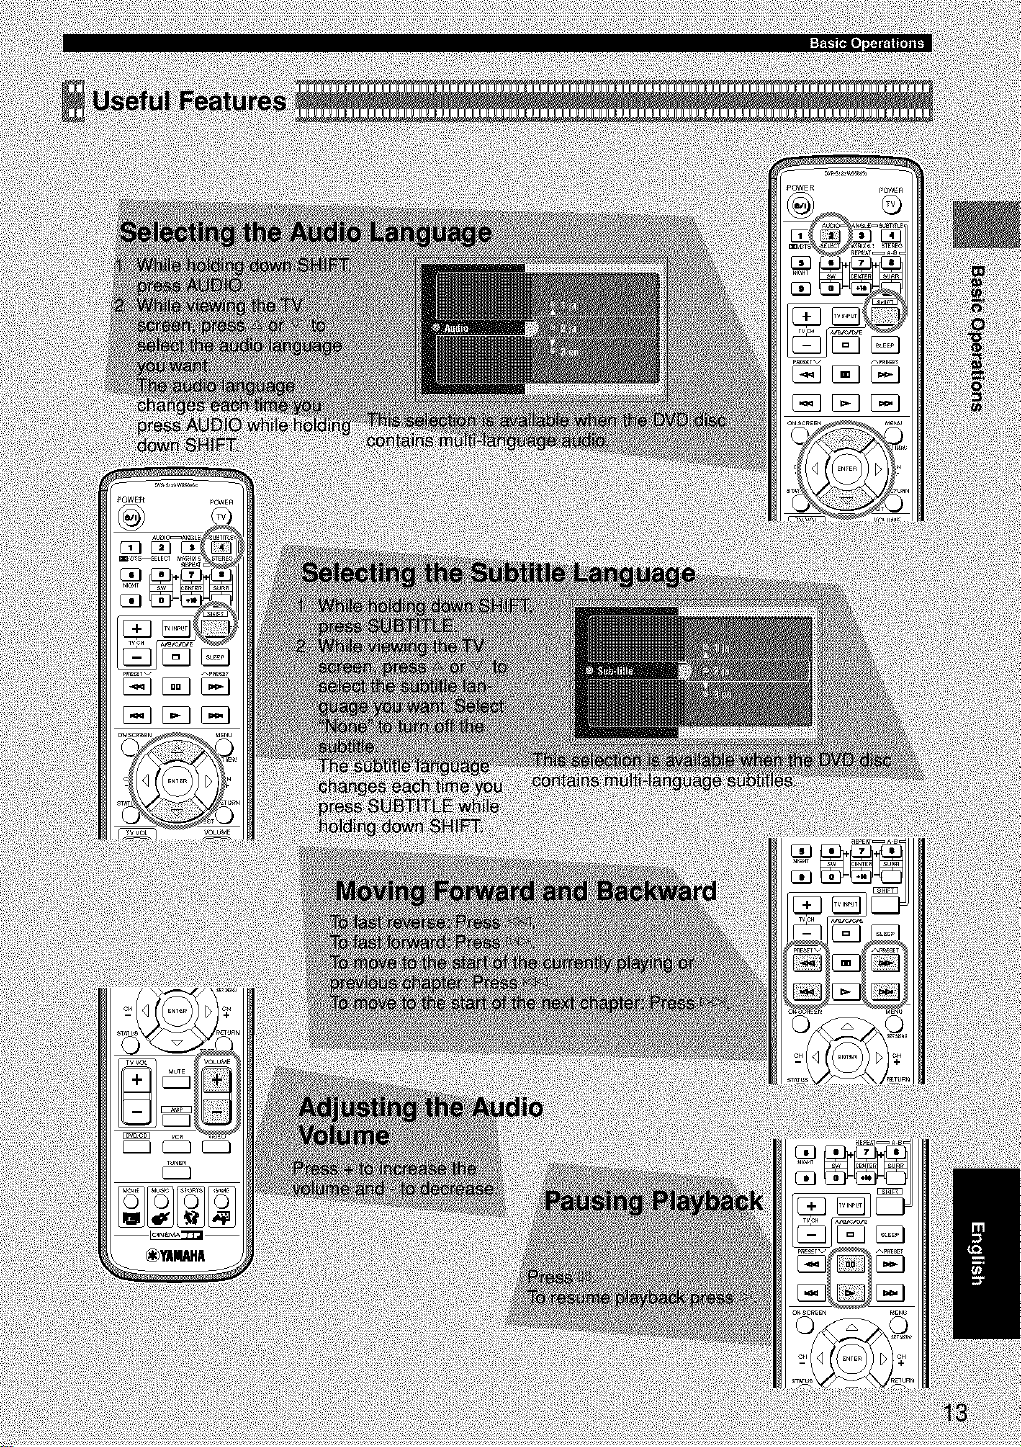
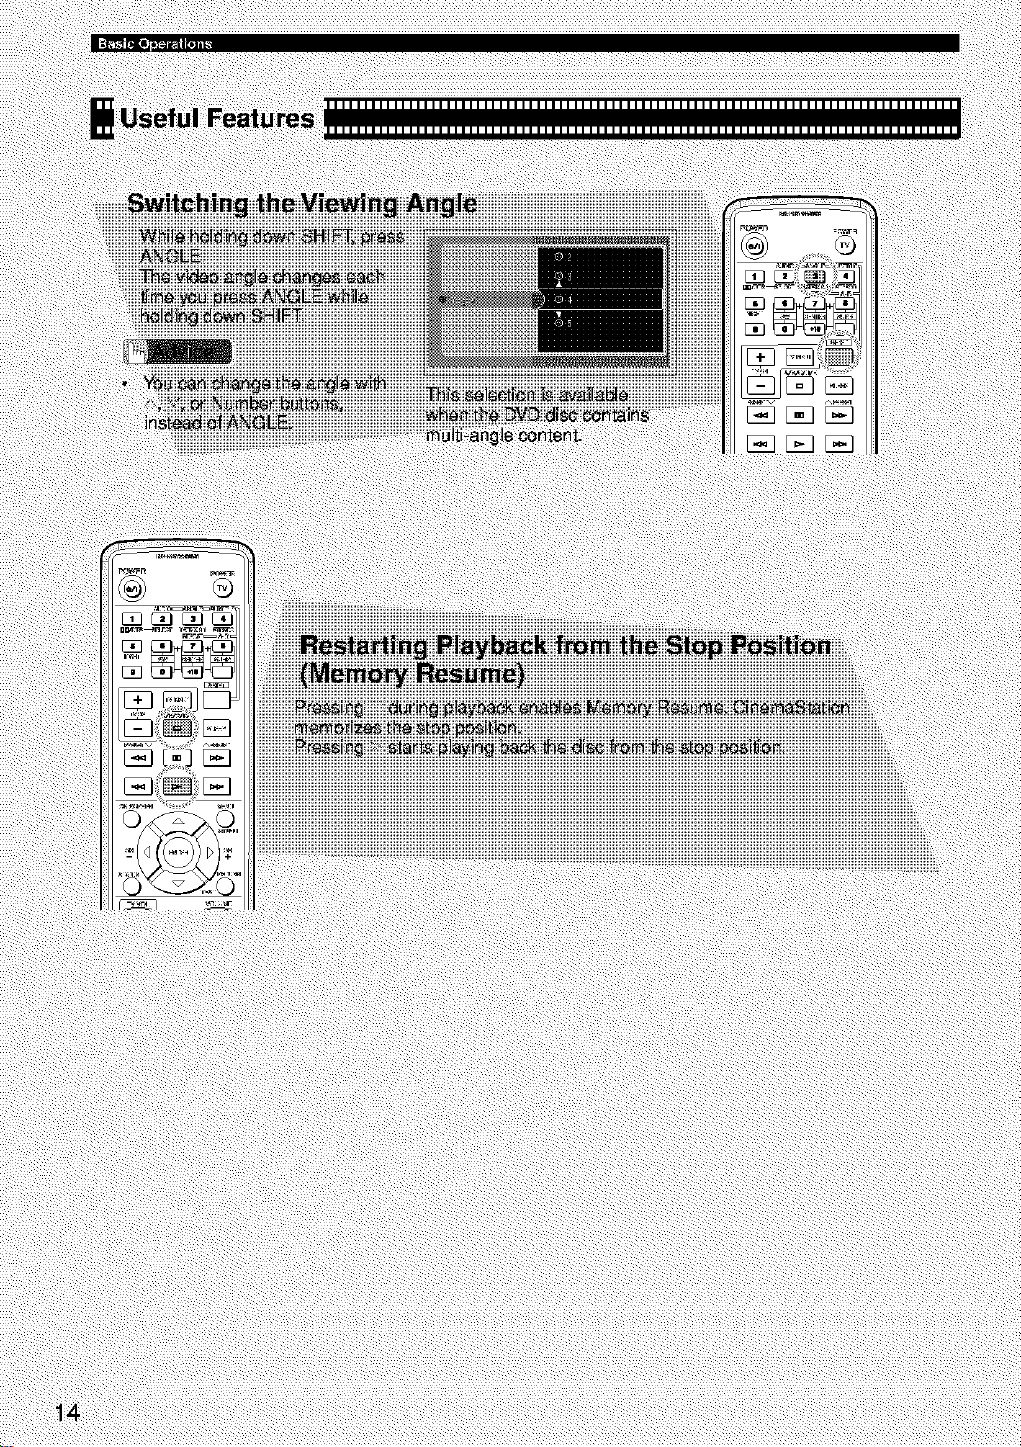
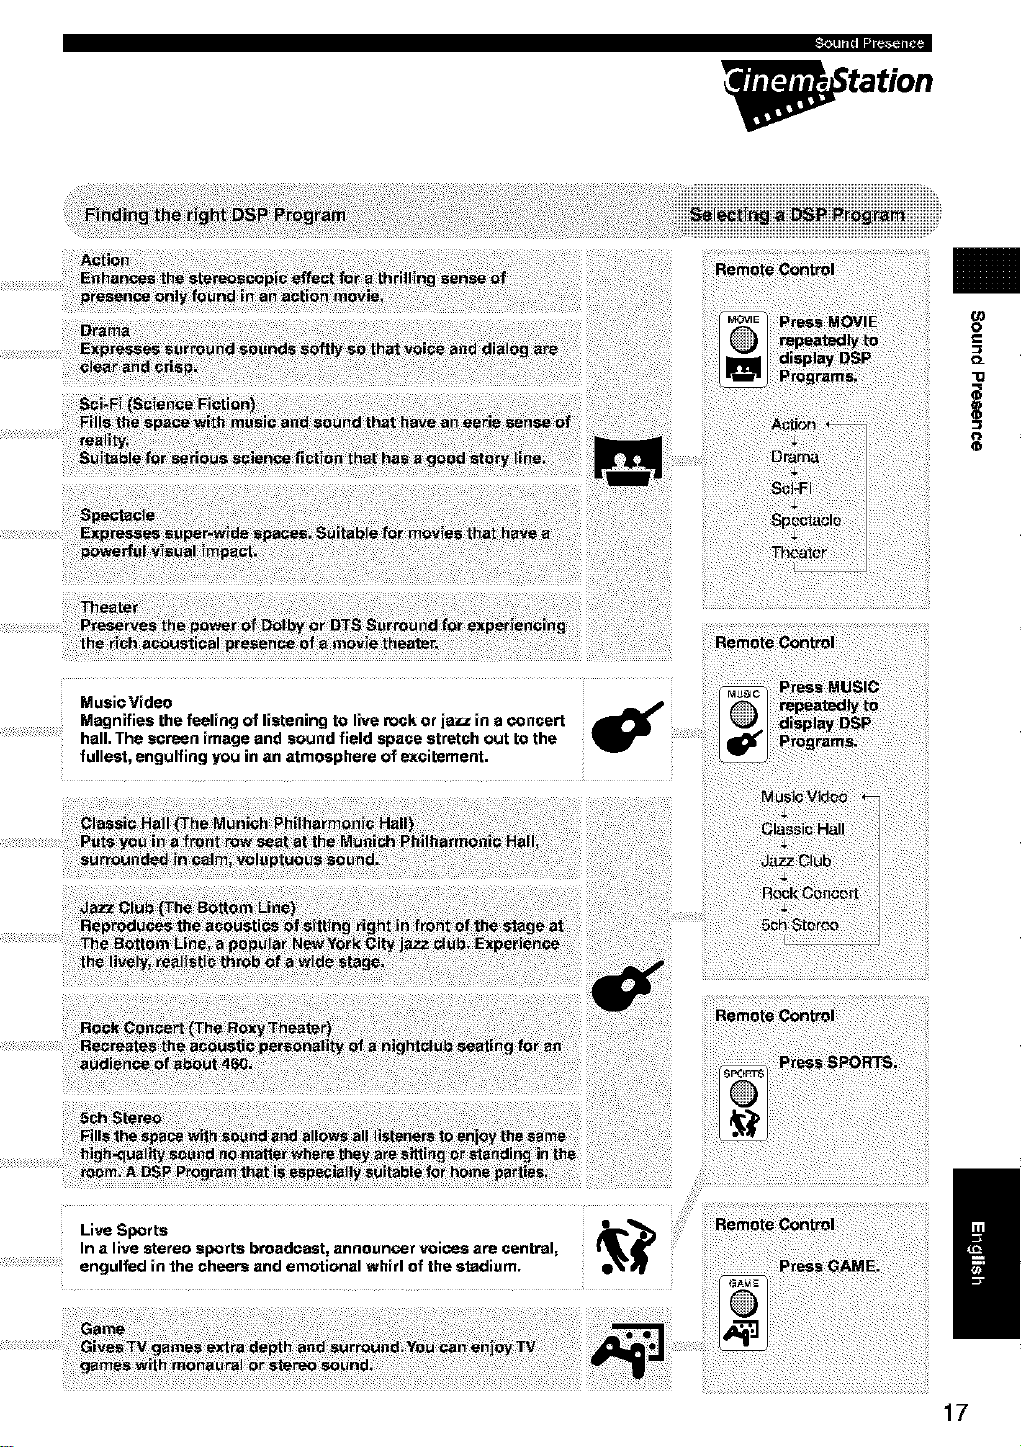
Finding the Best DSP Effect
Changing the DSP effect based on listening and viewing content
Select a DSP Program for the movie or music and experience the sound of a
movie theater or concert hall. Follow the chart below to select the DSP
Program that offers the acoustic qualities you want.
16
tation
o
_L
"O
0
MusieVideo
Magnifies the feeling of listening to live rock or iazz in a concert
hall. The screen image and sound field space stretch out to the
fullest, engulfing you in an atmosphere of excitement.
In a live stereo sports broadcast, announcer voicos are central,
Live Sports e_'_
engulfed in the cheers and emotional whirl of the stadi_Jm.
/
17
Names and Functions of Parts
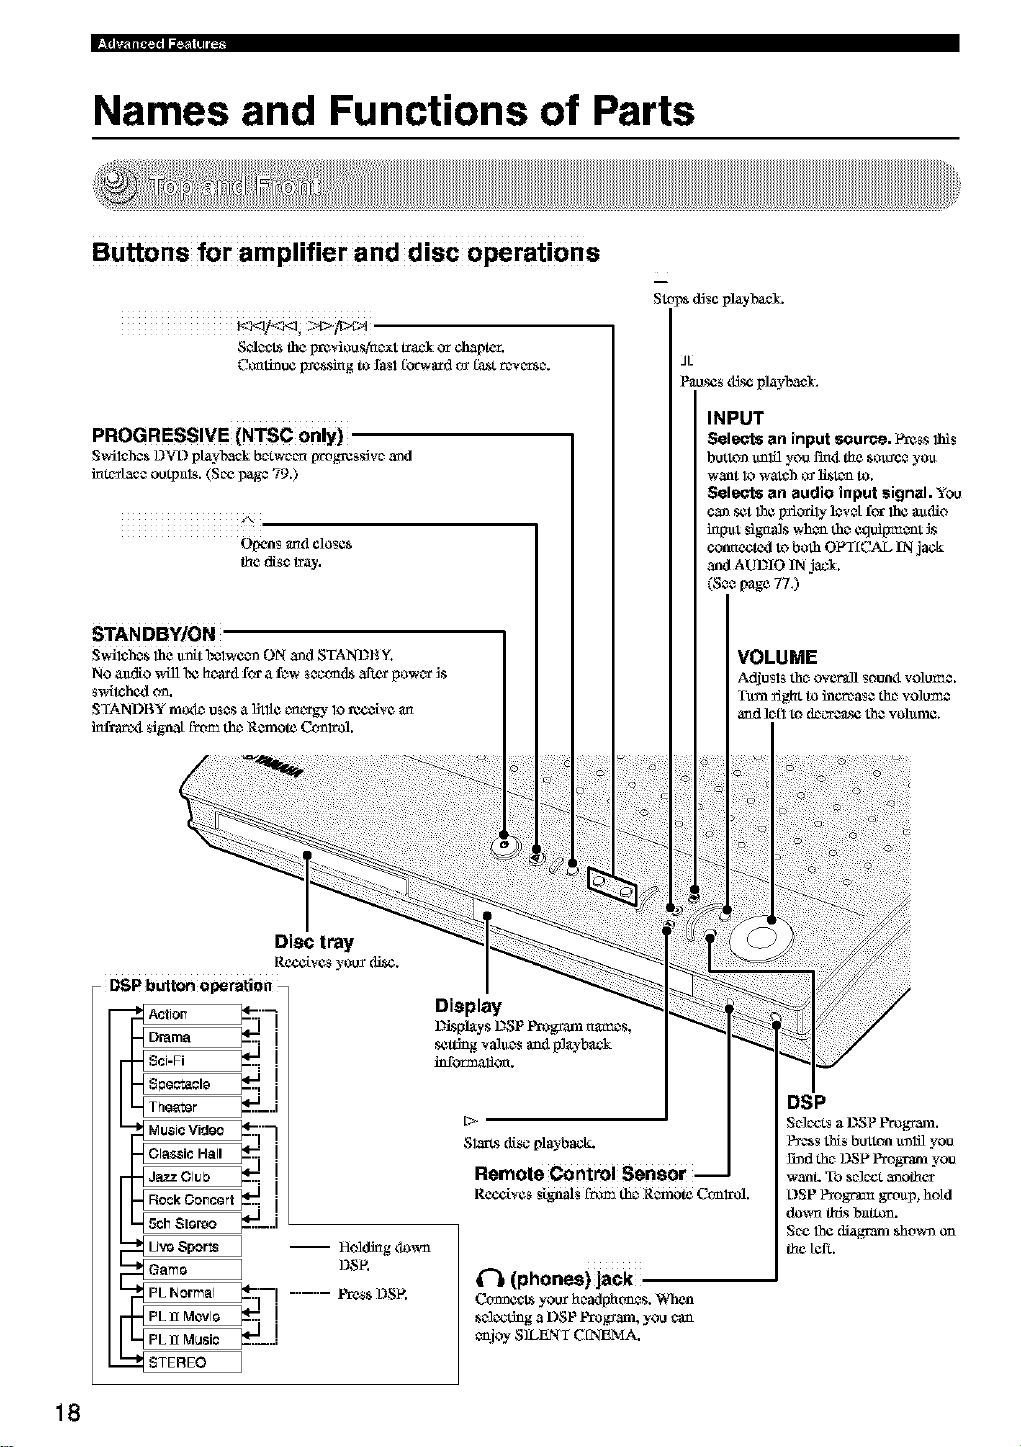
Buttons for amplifier and disc operations
Stops d_scplayl'axcL
S_*_ the prcviou s,tac_xttrack or chapter.
Cccati_u¢ Izcssing to fasl fbrwfu_d tv f_t rcwc_tsc_.
PROGRESSIVE (NTSC only)
S_i_hcsL)_L)playback bc_twc_c_[wog_css_vc_and
im_/acc outpals. (Soe _ag_ 79.)
A
Opens and close*
the disc tray.
JL
P_oscs ¢fi_ playback.
INPUT
Selects an input source. P_ss this
button u_lfl you I'm4 the sou_c_ yo_
w_nt Iowatch o_li_tcn to.
Selects an audio input signal. You
cansetthe _odly ]cvctf_ the _dio
h_l_t signals whoa th_ Ctldipt_c_t _s
connected toboth OFT[CAL IN jack
and AUDIO IN jacl.
(S** page 77.)
18
,'. iIltl I IIl.;tlI _..._1 _II I
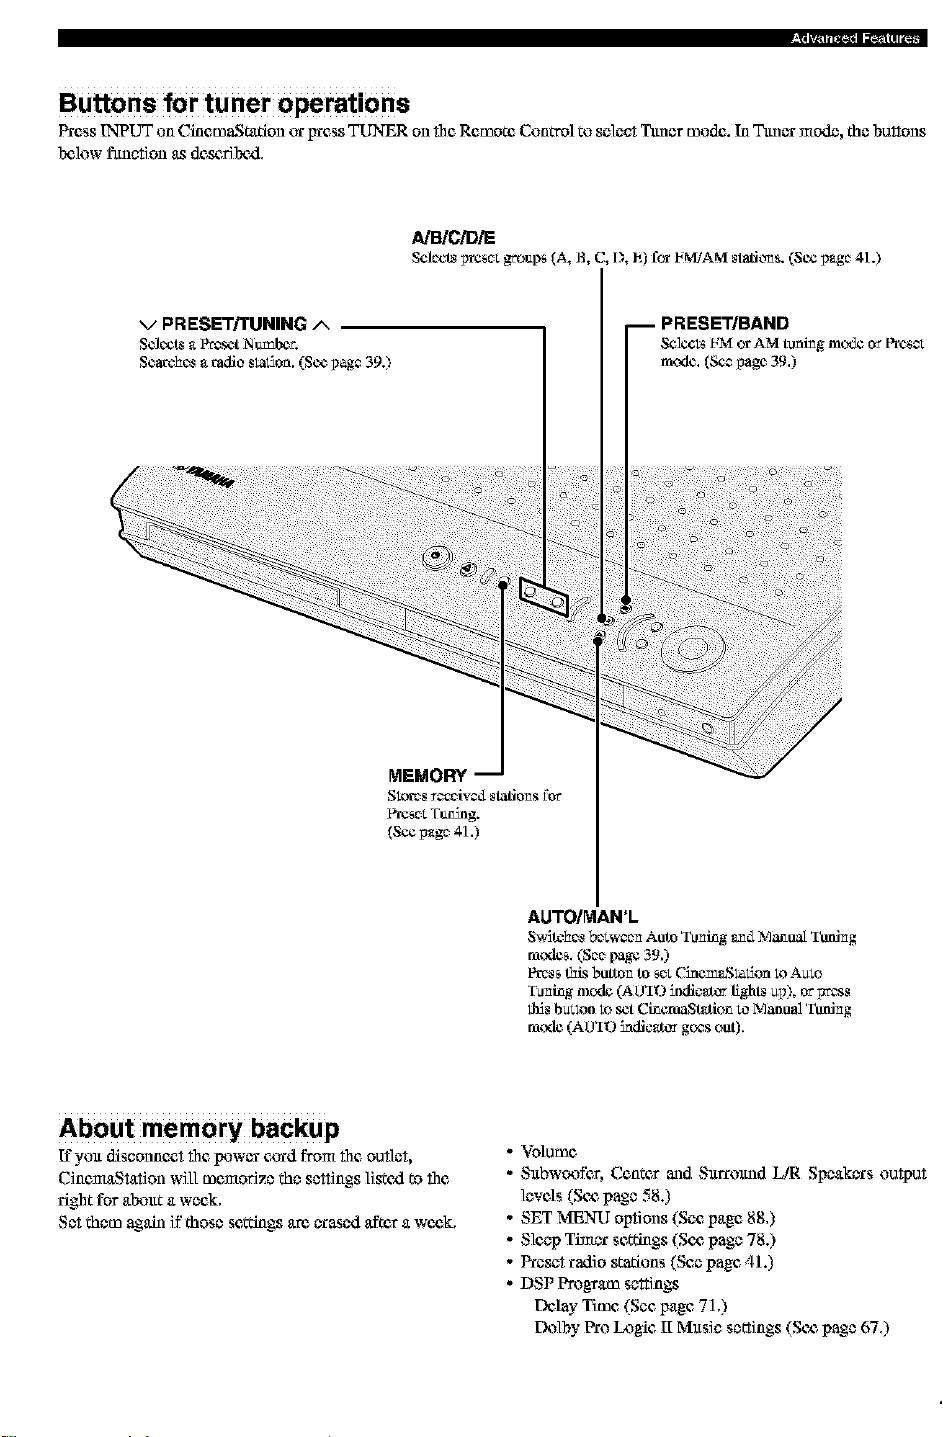
Buttons for tuner operations
Press INPUT on CinemaSt_ttion cx_ess TUNER on the Remote Cun0"ol tu select l_er mude. In 3hmurmode, the buttons
b_luw fimction as desc,ribczl,
/_B/CiD/E
ScJcctsi)r¢_c:;_up_ (A, B, C,1), h) for I_MiAMstatiLv_s.(SC¢I)_gc41.)
v PRESET/TUNING A
ScJccts _ P_t Ntz_be_.
Searches _ radio sla_on. (See I)_gc 39.)
I PRESET/BAND
Selcct_I-NIorAMtuningmc_tco_Fre_
mode. (Seapage 39.)
About memory backup
If yuu disconnc, et the lX_WUfc_,;_rd from the outlet,
CinemaStation will memorize the settings listczl to the
right for aIx_ut a week,
Set them agair_if those settings a_ urased after a wc_,k,
AUTO/MAN'L
$_tc_cs bcCwcc_ Auto 'ruling _mdMan_ Toning
mode_. (Scc page 39.)
Pres_ this botto_ to _cz_mem_,Slatioa to A_,o
Tu_ing mcxle (AU_B"9indic_tcv lights _I)), or pt'_ss
this b_ton to _t CineraaSt_tion to Manual Twfi_g
mode (AU_ID iodic_J_v goes out).
o Volume
- Subwo_fer, Center madSurrum_dLIR Speakers output
levels (Sc_ page 58.)
- SET MENU options (See page 88,)
- Sleep Timca"settings (Sc_ page 78.)
- Preset radio statiuns (See page 41.)
- DSP Program settings
Delay Time (Sec page 71,)
FX_lb)' Pru Ix_gic II Music settings (Sc_ page 67,)
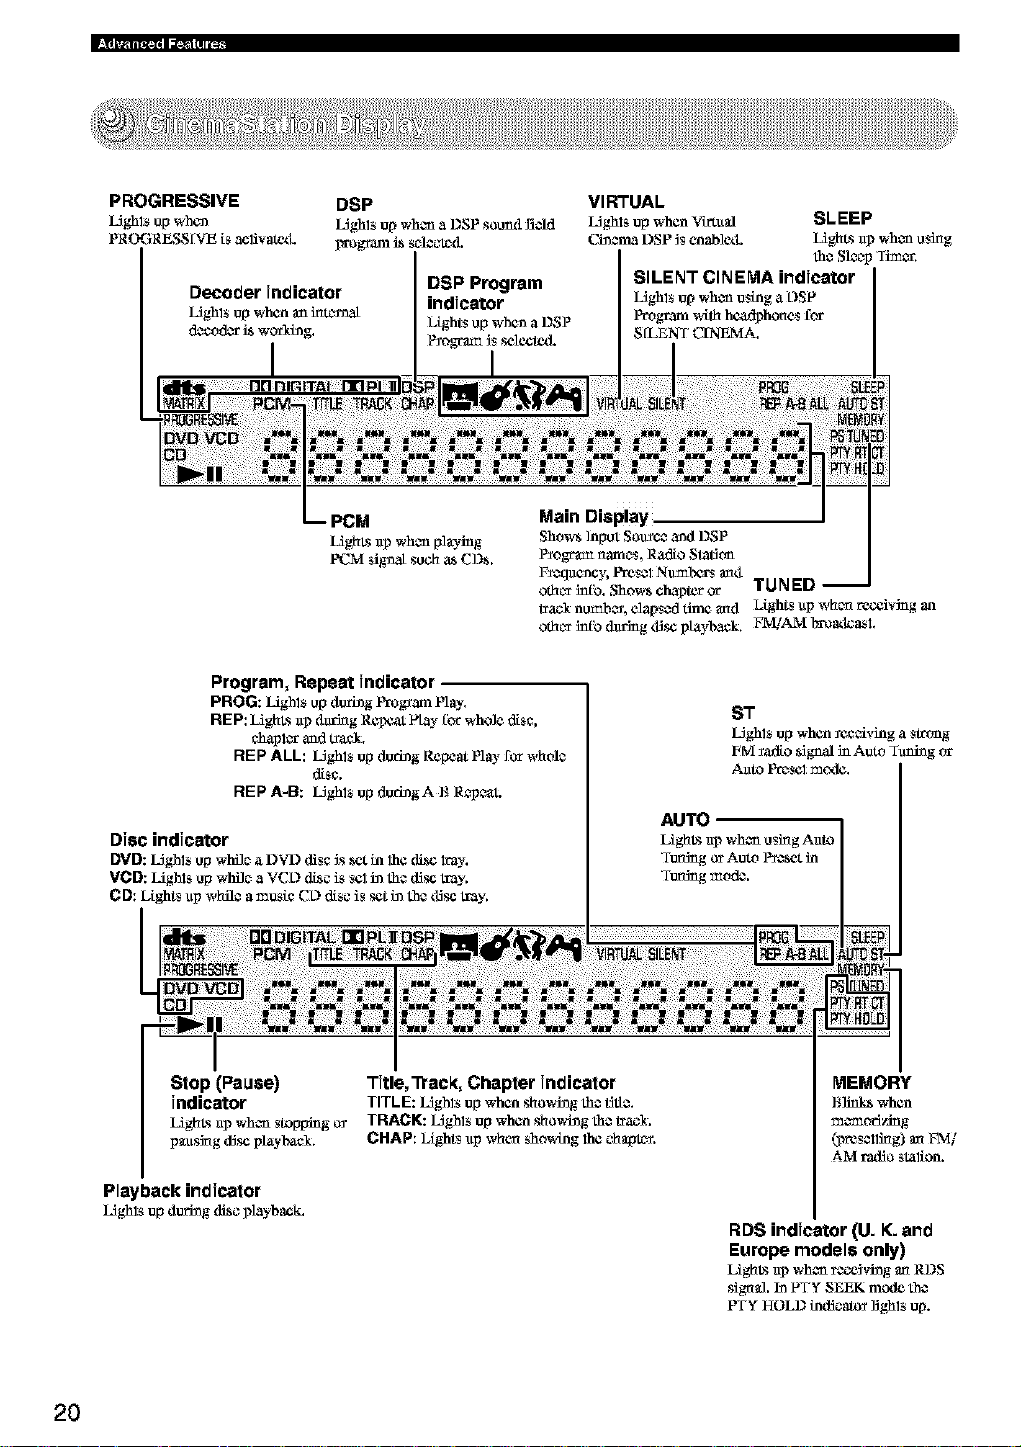
PROGRESSIVE
L_ghlsup when
PROGRESS [VE is acl:ivat_L
Program, Repeat Jndicatel
PROG: Lighls up d_ing Frogfam Play.
REP: LighLs @ daring Re_t flay _orwhole disc,
chapl_ and tr_.
REP ALL: LJghls up during Repeat Ply- for whole
REP A-B: LJghls up dudngA B Repc_t.
disc.
DSP Program
indicator
l)tghts up when a DSP
P_ogrm:nJsselected.
VIRTUAL
L_ghlsup when Viz'_ltal SLEEP
ChacmaDSP Jsenable<L LighLs ap when using
she Sleep Timer.
SILENT CINEMA indicator
L_ghls up when using a L)SP
P_ogramwifl_ h_hones for
SfLENT C_A.
Stop (Pause) Title,'Ptec_, Chapter indicator
indicator TITLE:LJghls upwhenshowhagthe title.
LighLsap when stopping o_ TRACK: IAghlsupwhen showingth_trac_,
p_usJ_gdisc playbael. CHAP: IAghtsup when showing lh¢ ¢hapt_.
Playback indicator
LJghls up during disc playback.
2O
RDS indicator (U. K. and
Europe models only)
LighLsap when receivinganRDS
sigual, in PTY SEEK mcxleth_
PTYHOLD indicato_rlighlsup.
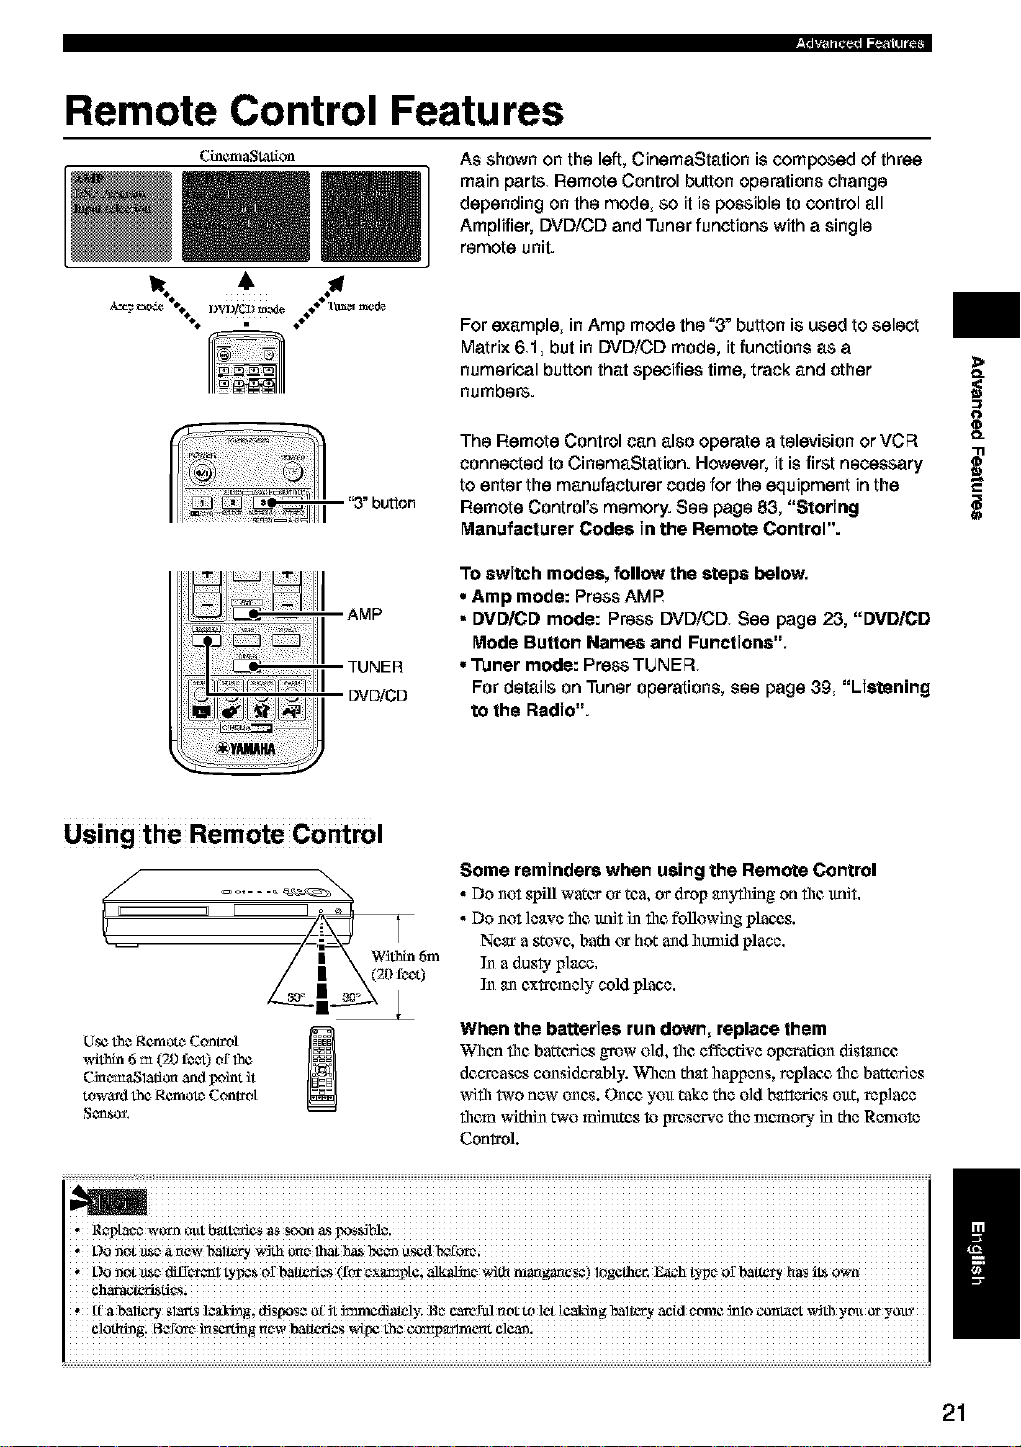
Remote Control Features
Cinem_t_t_on
'3"bu_on
DVDiCD
As shown on the left, CinemaStation is composed of three
main parts Remote Control button operations change
depending on the mode, so it is possible to control all
Amplifier, DVD/CD and Tuner functions with a single
remote unit.
For example, in Amp mode the "3" button is used to select
Matrix 61, but in DVD/CD mode, it functions as a
numerical button that specifies time, track and other
numbers.
The Remote Control can also operate a television or VCR
connected to CinemaStation. However, it is first necessary
to enter the manufacturer code for the equipment in the
Remote Control's memory. See page 83, "Storing
Manufacturer Codes in the Remote Control".
To switch modes, follow the steps below,
• Amp mode: Press AMP
• DVD/CD mode: Press DVD/CD See page 23, "DVD/CD
Mode Butlon Name8 and Functions",
• Tuner mode: Press TUNER
For details on Tuner operations, see page 39 "Listening
to the Radio".
>
O_
O
q_
O_
i
Using the Remote Control
Some reminders when using the Remote Control
• Do not s!_tll water or tea, or drop anyflling on file tmR.
• Do not leave file ttnR i_ file following plan_,s.
Within 6m
0
[.[setheRemotc_Control _1
_4thin 6m (20 f¢_) of 1he
Cinc_l_lion and point it
toward the Remotc_Conh_ot
, oon0t_ea_ewba_ry w_th
L)O llOt 11_€_¢_ffC't¢I_l tyI_s Of batteries (for c_xam3Na; alkalJn €_,_-I_ _r_angan_s¢) logathar. _h t)q_¢_of bal_ry has iLS
, If' a bal_ry sl_ts l_aJ_ dJspos_ _£ Jt 5mmediately; _e c,_erul not t_ let [caking baltery acid ¢twae 5nlo conlat,_t with yott or y_l!_
Near a _ovc, bath or hot andhunfid place.
In a dusty place.
N an c,x_c,mely cold place.
When the batteries run down, replace them
When the barcc,ries grow old, the effective operation distancg
decreases considerably. When that happens, replant, file barcc,ries
with two new ones. Once, you take the old batteries out, replace
them within two minxttcs toIrrcsc'rve the nlcmory in the Remote
Control.
i
I
21
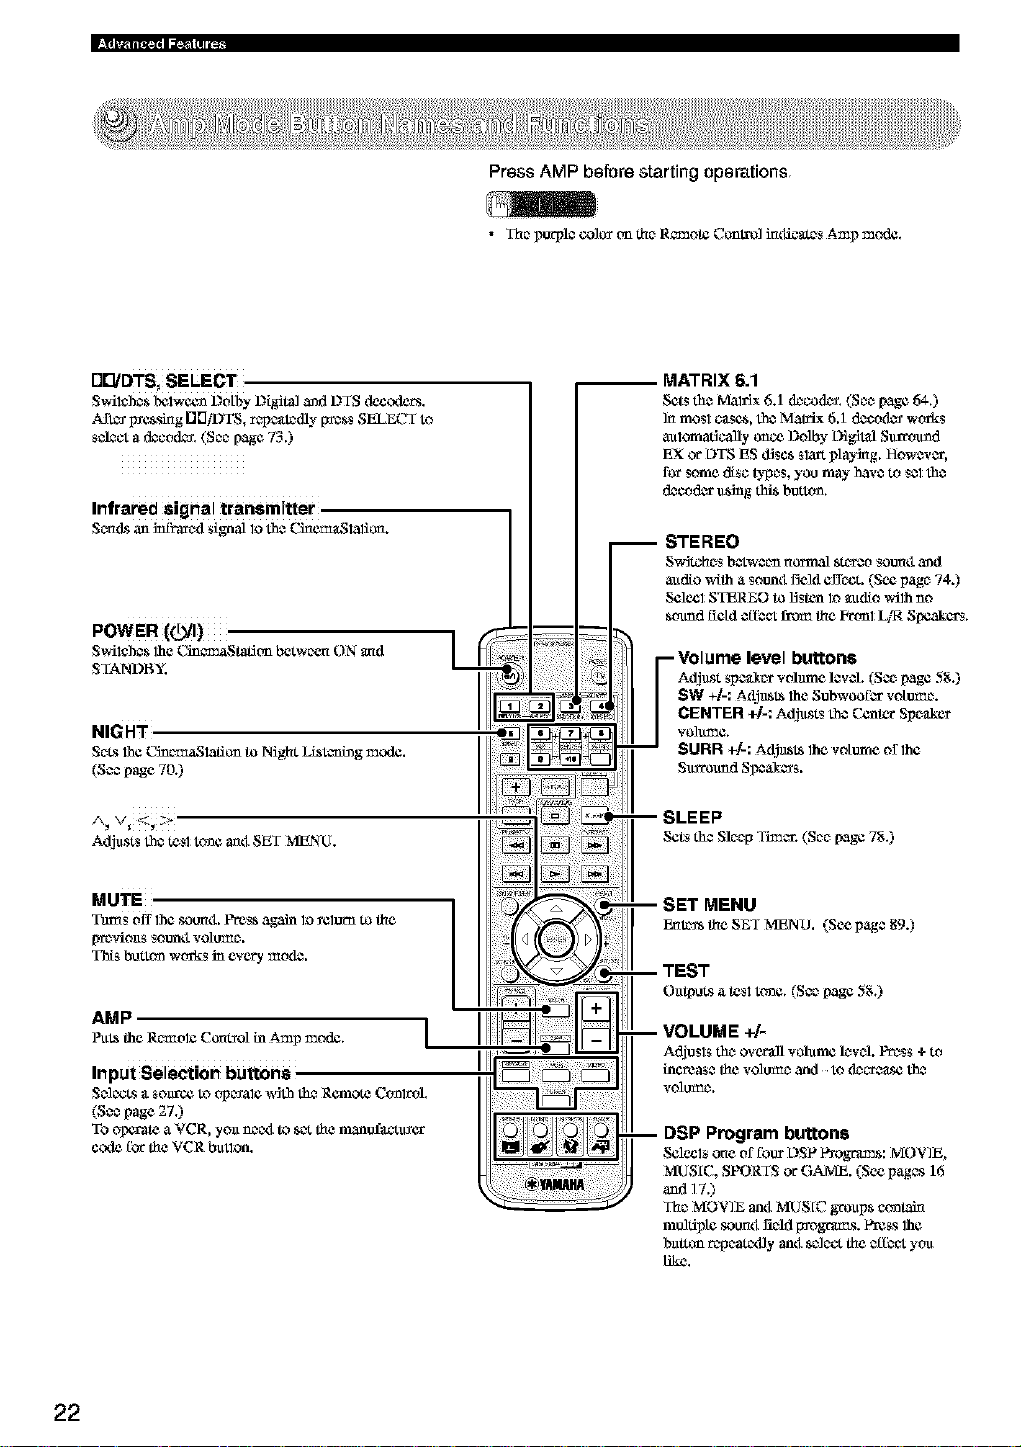
Press AMP before starting operations
• The p_pl$ co]o_ _m the Remote Co_t_] inditers Amp mode.
MATRIX 6.1
Sets the Malfix 6.1 (k_cod_. (See page 64.)
]n mos1 c_scs, the Matrix 6.1 dcco(L_ works
automatically once Dolby t}ig]tal Sin-round
EX or L)TSES d_scs slatt playing. However,
for some disc types, you may have to Selthe
d_cod_ u_g this button.
-Volume level buttons
Adjust spe_x volume levO. (nee page 5g.)
SW +t.: A£_SI_ the Subwoofer votumc.
CENTER +]-: Adjusts the Center Speaker
"¢o]tLl_e.
$URR _]-: A_st_ the votume orlhc
Surmuad SI_ea_ers.
Adjusts th$ tes1to_e _4 SET MENU.
MUTE
Tams off the soun4. Press again lo _elorn to the
[_f_,clouts Sottntl volu_e.
This button works in every me(L*.
AMP
SLEEP
Sets the Sleep Timer. (See [,age7g.)
SET MENU
_t_ theSEf MENO. (Seepage89.)
/
DSP Program buttons
Selc_ls one of foot L)SP l_ograms: MOVIE,
MUSIC, SPORTS or GAME. (See pages 16
and 17.)
The MOVIE anti MUSIC groups conlah_
molfipte soon4 _ld I_ogrm_s. Press 1he
barton repeattxfly anti se]eo,the efI_ you
like.
22
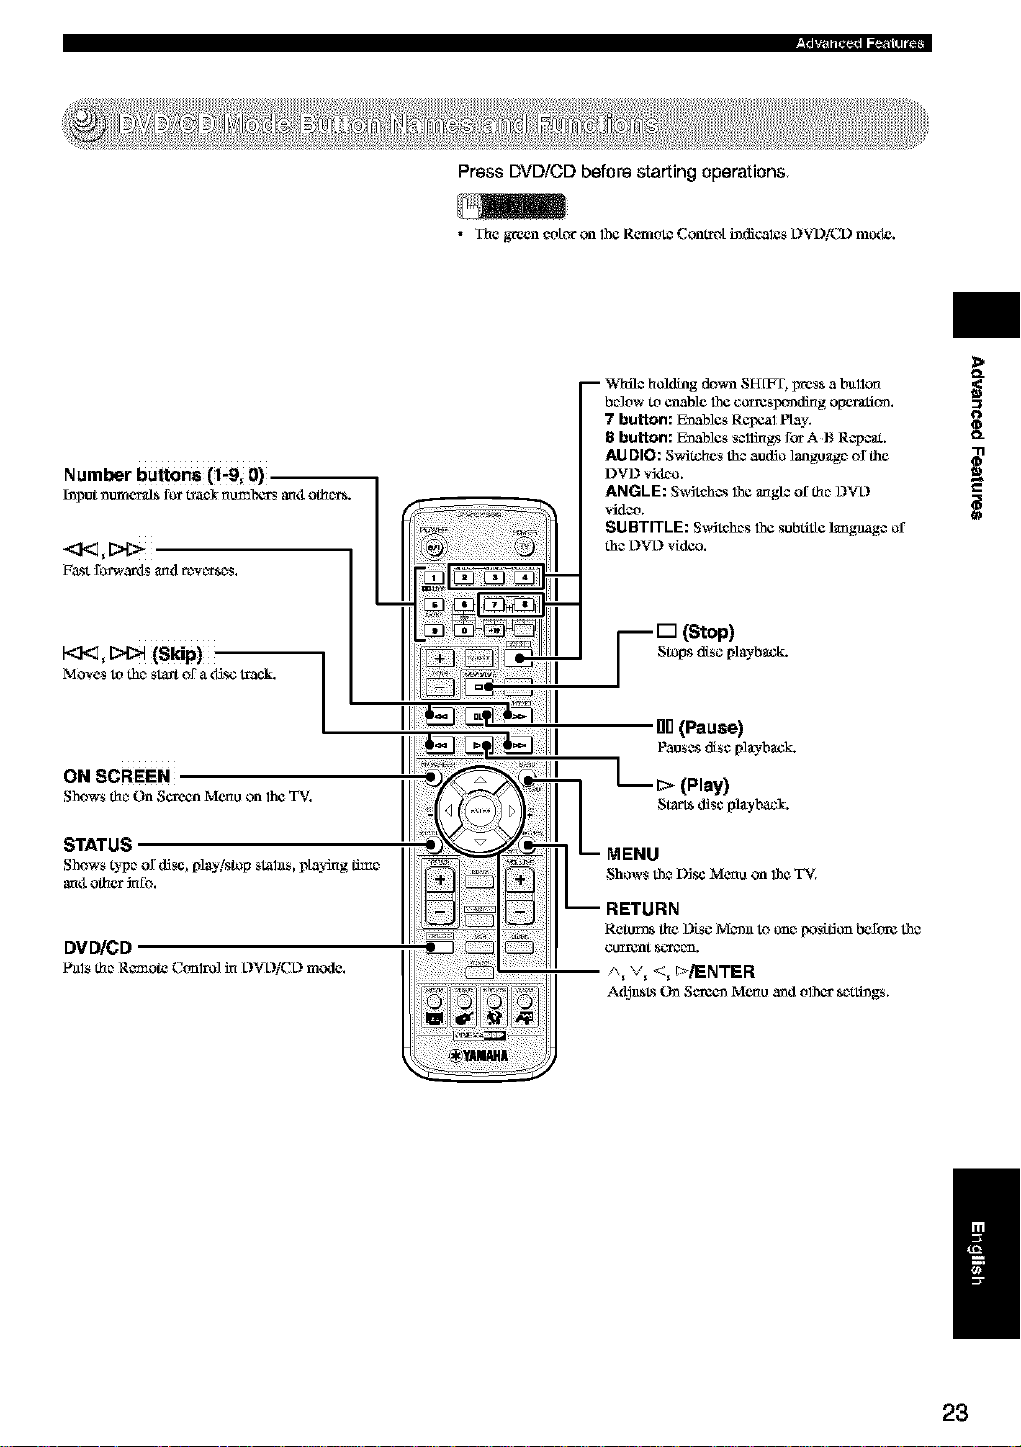
Number buttons (_9; 0),
koput_tar=eralsfor t_ael nu_alxa_anti othcrrs.
F_st £_wartls and rc_vcrrsc_s.
ON SCREEN
Shows thc_On ScreenMenuon the TV.
• The green ¢dior on the Remt_ Comrdi i_diCalCs DVD/CD mode.
L
Press DVD/CD before starting operations
-- While hokling do_a SFf[FT, press a bullon
be3ow to enable the corresponding opemtlom
7 button: E_ables ReI_l Play.
8 button: E_ables s¢l_gs for A t_ R_pcat.
AUDIO: S_Stohes the audio langu_g_ _the
DVD vktho.
ANGLE: S_dtohcs 1he an,gl_ofth_ 12VL)
vidzo.
SUBTITLE: S_dtohes 1he subtitle language of
the L)VL)vk_.
-- [] (Stop)
Stops disc ply-back.
gO(Pause)
Pauses disc pie-back.
>
o
STATUS
Shows type of disc, play/stop slahls, playing _c
anti other_o.
DVD/CD
Pals thc_Remote C(-_lrO]_ L)_L)/CL)mode.
MENU
;hE__ sUR_Disc Men_ on the TV.
Retorts the Disc M_n to on_ _s_don bel_ore the
/_ v_ <_ I:>./ENTER
A_usl_s (h_ S¢r¢_ Menu and other sc_tthags.
/
23
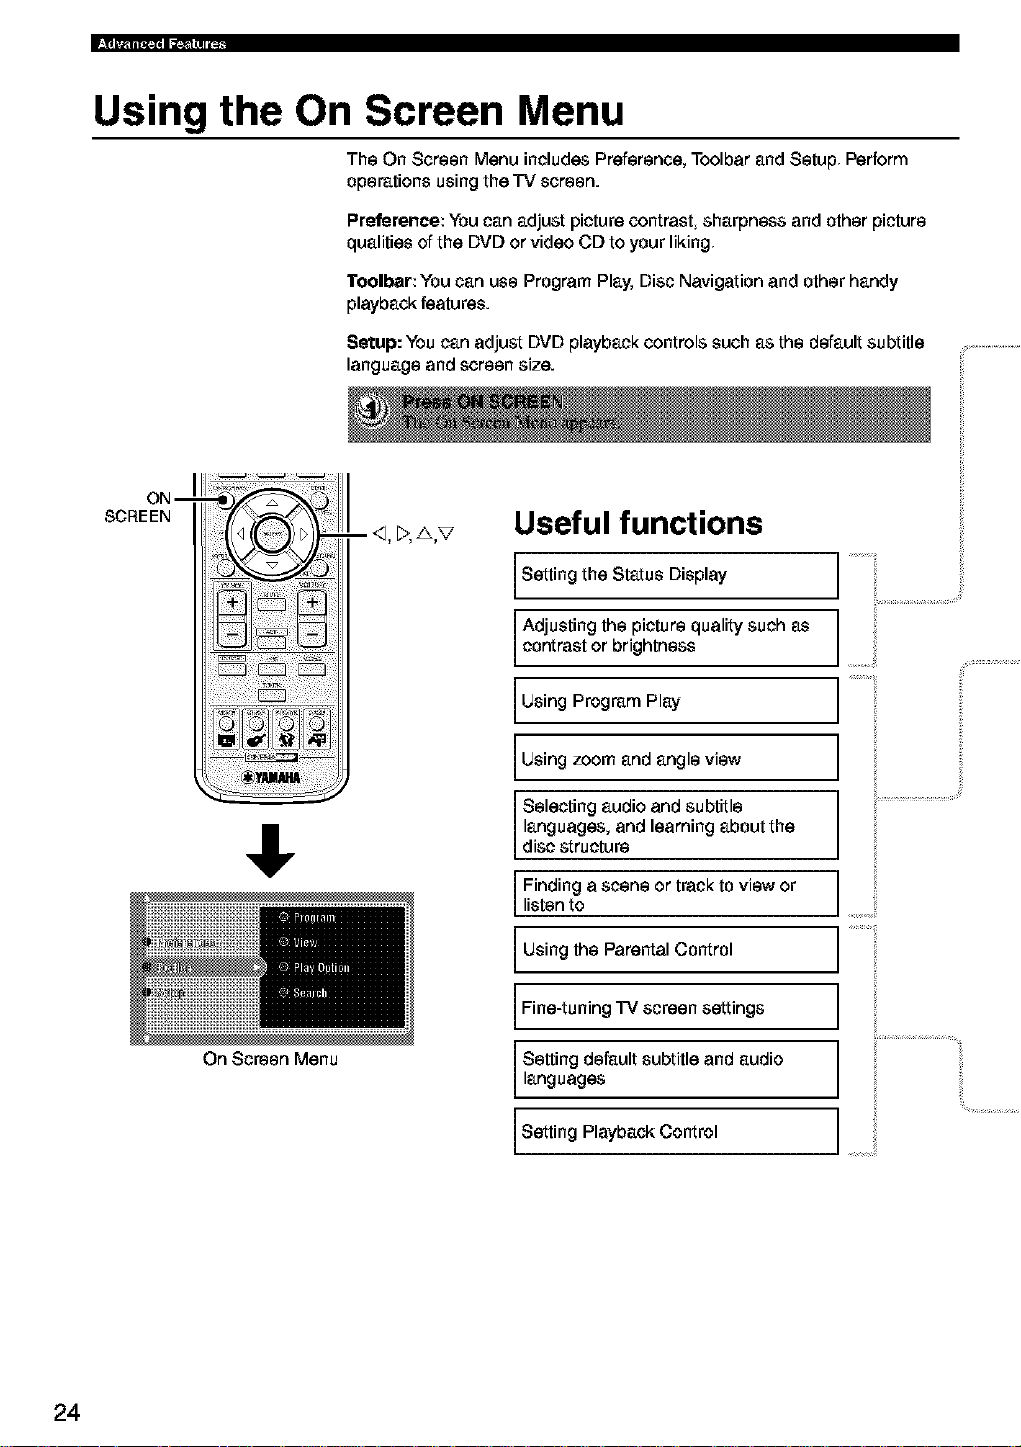
Using the On Screen Menu
The On Screen Menu includes Preference, Toolbar and Setup Perform
operations using the TV screen.
Preference: You can adjust picture contrast sharpness and other picture
qualities of the DVD or video CD to your liking
l"oolbar: You can use Program Play, Disc Navigation and other handy
playback features.
Setup: You can adjust DVD playback controls such as the default subtitle
language and screen size.
ON--
SCREEN
- _1,_,A,V
• . ;; ;
ii_!i!;ii!i !iii_i_i
Useful functions
Setting the Status Display
Adjusting the picture quality such as
contrast or brightness
Using Program Play
i;
On Screen Menu
Using zoom and angle view
Selecting audio and subtitle
languages, and learning about the
disc structure
Finding a scene or track to view or
listen to
Using the Parental Control
Fine-tuning TV screen settings
Setting default subtitle and audio
languages
Setting Playback Control
24
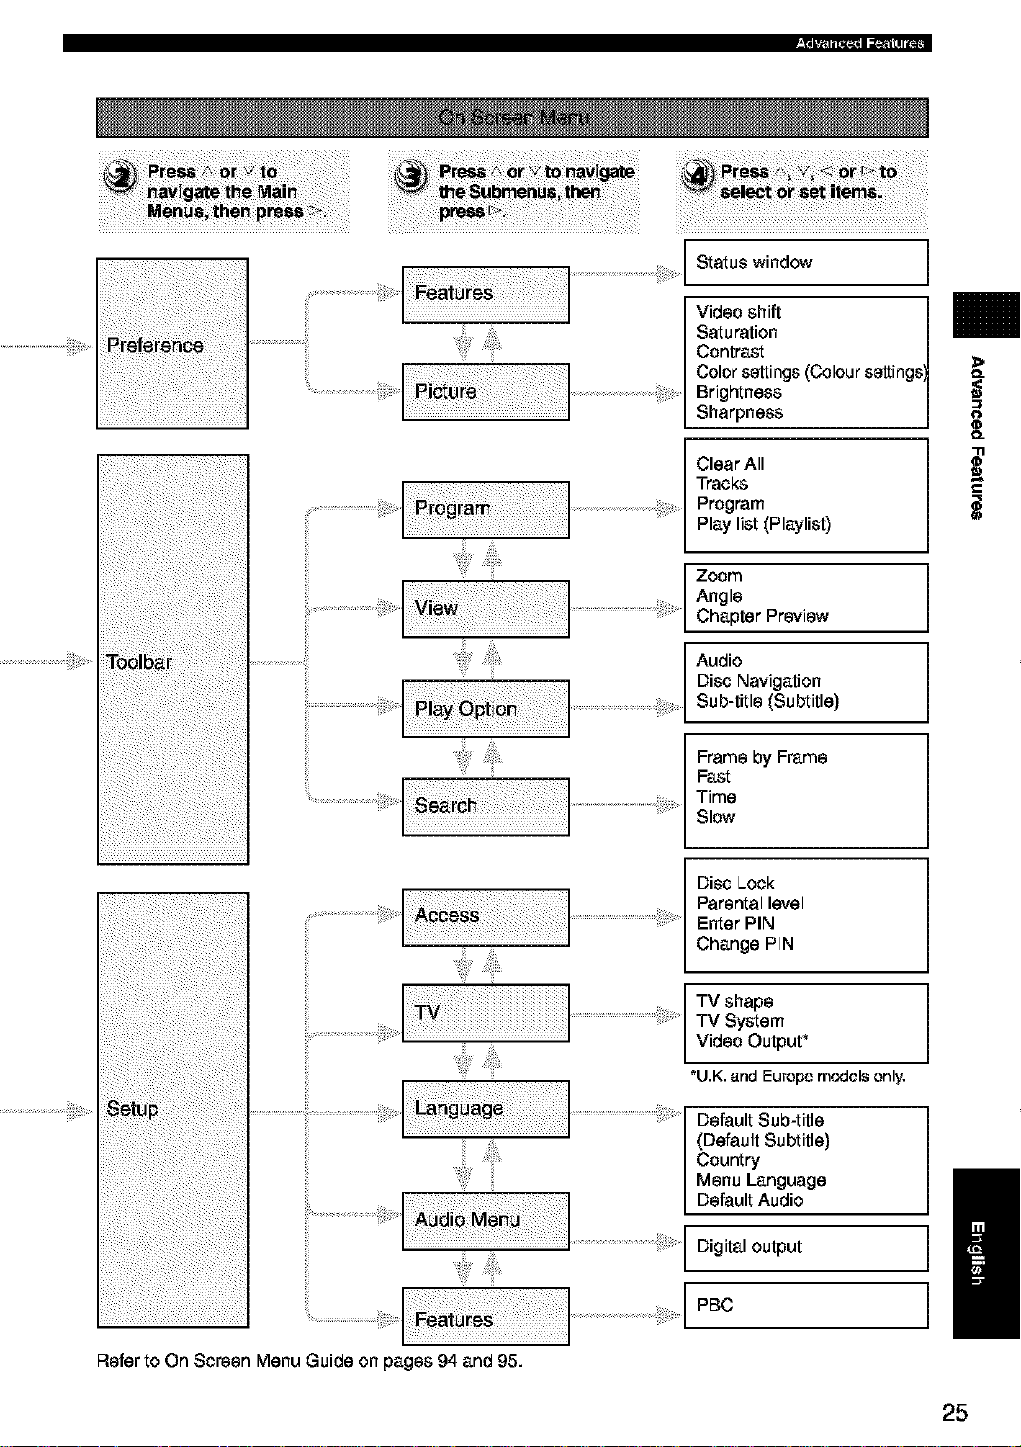
Status window
Video shift
Saturation
Contrast
Color settings (Colour settings
Brightness
Sharpness
Clear All
Tracks
Program
Play list (Playlist)
Zoom
Angle
Chapter Preview
Audio
Disc Navigation
Sub-title (Subtitle)
Frame by Frame
Fast
Time
Slow
O_
O_
_'ii_iiiii_i_ 4i_!_:_
Refer to On Screen Menu Guide on pages 94 and 95.
Disc Lock
Parentallevel
Enter PIN
Change PIN
TV shape
TV System
Video Output _
*U.K.and Europemodels only,
Default Sub-title
(Default Subtitle)
Country
Menu Language
Default Audio
Digital output
PE]C
25
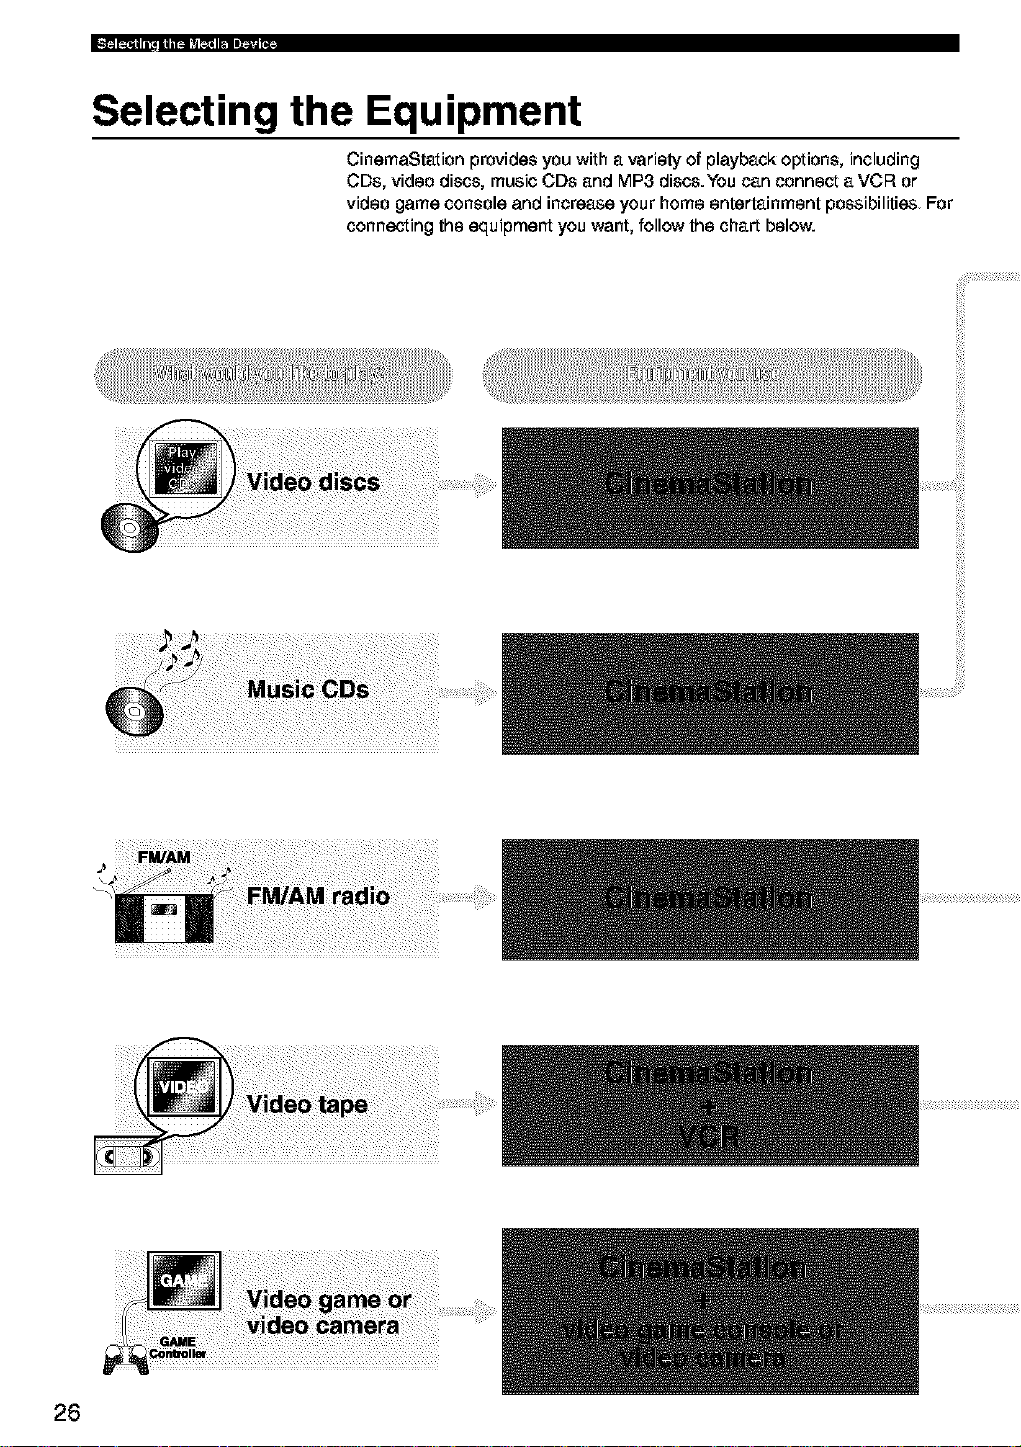
Selecting the Equipment
CinemaStation provides you with a variety of playback options, including
CDs, video discs, music CDs and MP3 discs.You can connect a VCF_ or
video game console and increase your home entertainment possibilities For
connecting the equipment you want, follow the chart below.
26
 Loading...