

Yamaha DVX-1000 Owners Manual

DVX-1000
(DVR-1000 + NX-SW1000 + NX-P1000)
R
OWNER’S MANUAL
MANUAL DE INSTRUCCIONES
Caution: read this before operating your unit.
1 To assure the finest performance, please read this manual
carefully. Keep it in a safe place for future reference.
2 Install this sound system in a well ventilated, cool, dry, clean
place with at least 10 cm on the top, 10 cm on the left and
right, and 10 cm at the back of DVR-1000 and at least 1 m
above, 30 cm behind and on both sides of NX-SW1000 for
adequate ventilation. — away from direct sunlight, heat
sources, vibration, dust, moisture, and/or cold.
3 Locate this unit away from other electrical appliances, motors,
or transformers to avoid humming sounds.
4 Do not expose this unit to sudden temperature changes from
cold to hot, nor locate this unit in an environment with high
humidity (i.e., a room with a humidifier) to prevent
condensation inside this unit, which may cause an electrical
shock, fire, damage to this unit, and/or personal injury.
5 Avoid installing this unit in a location where foreign objects
may fall onto this unit or where this unit may be exposed to
liquid dripping or splashing. On the top of this unit, do not
place:
– Other components, as they may cause damage and/or
discoloration on the surface of this unit.
– Burning objects (i.e., candles), as they may cause fire,
damage to this unit, and/or personal injury.
– Containers with liquid in them, as they may fall, spilling
the liquid and causing an electrical shock to the user and/
or damage to this unit.
6 Do not cover this unit with a newspaper, tablecloth, curtain,
etc. in order not to obstruct heat radiation. If the temperature
inside this unit rises, it may cause fire, damage to this unit,
and/or personal injury.
7 Do not plug in this unit to a wall outlet until all connections
are complete.
8 Do not operate this unit upside-down. It may overheat,
possibly causing damage.
9 Do not use excessive force on switches, knobs and/or cords.
10 When disconnecting the power cord from the wall outlet,
grasp the plug; do not pull the cord.
11 Do not clean this unit with chemical solvents; this might
damage the finish. Use a clean, dry cloth.
12 Use only the voltage specified on this unit. Using this unit
with a higher voltage than specified is dangerous and may
cause fire, damage to this unit, and/or personal injury.
Yamaha will not be held responsible for any damage resulting
from use of this unit with a voltage other than as specified.
13 To prevent damage by lightning, keep the power cord out and
outdoor antennas disconnected from a wall outlet or the unit
during a lightning storm.
14 Do not attempt to modify or fix this unit. Contact qualified
Yamaha service personnel when any service is needed. The
cabinet should never be opened for any reason.
15
When not planning to use this unit for long periods of time (i.e.,
vacation), disconnect the AC power plug from the wall outlet.
16 Be sure to read the “Troubleshooting” section on common
operating errors before concluding that this unit is faulty.
17 Before moving this unit, press STANDBY/ON to set the unit
in standby mode, then disconnect the AC power plug from the
wall outlet.
18 Condensation will form when the surrounding temperature
changes suddenly. Disconnect the power cable from the
outlet, then leave the unit alone.
19 When using the unit for a long time, the unit may become
warm. Turn the power off, then leave the unit alone for
cooling.
20 Install this unit near the AC outlet and where the AC power
plug can be reached easily.
21 The batteries shall not be exposed to excessive heat such as
sunshine, fire or like.
22 Excessive sound pressure from earphones and headphones
can cause hearing loss.
This unit is not disconnected from the AC power
source as long as it is connected to the wall outlet,
even if this unit itself is turned off. This state is called
the standby mode. In this state, this unit is designed to
consume a very small quantity of power.
Laser component in this product is capable of emitting
radiation exceeding the limit for Class 1.
WARNING
TO REDUCE THE RISK OF FIRE OR ELECTRIC
SHOCK, DO NOT EXPOSE THIS UNIT TO RAIN
OR MOISTURE.
CAUTION
Danger of explosion if battery is incorrectly replaced.
Replace only with the same or equivalent type.
This symbol mark is according to the
EU directive 2002/96/EC.
This symbol mark means that electrical
and electronic equipment, at their endof-life, should be disposed of separately
from your household waste.
Please act according to your local rules
and do not dispose of your old products
with your normal household waste.
This product complies with the radio interference
requirements of the European Community.
This product complies with the
requirements of the following directives
and guidelines: 2006/95/EC + 2004/
108/EC
En

Contents
1
1. INTRODUCTION
Introduction................................................ 2
Main unit......................................................... 4
Supplied accessories........................................ 4
Functional overview .................................. 5
Top and front panels (DVR-1000).................. 5
Rear panel (DVR-1000).................................. 6
Rear panel (NX-SW1000)............................... 7
Remote control
(For DVR-1000).......................................... 8
2. PREPARATION
Connections ............................................. 10
Roles and layout of the speakers................... 10
System connections................................ 11
Connecting the speakers................................ 11
Other connections................................... 14
Connecting a TV........................................... 14
Connecting an HDMI component................. 15
Connecting the FM/AM antennas................. 17
Connecting external AV components ........... 18
Connecting a digital audio component.......... 19
Connecting a USB device ............................. 19
3. BASIC OPERATION
Getting started ......................................... 20
Inserting batteries into the remote control .... 20
Using the remote control............................... 20
Setting a TV .................................................. 21
Setting language preferences......................... 23
Setting speaker channels ............................... 24
5. ON-SCREEN MENU
DVD setup menu options........................ 33
Menu overview.............................................. 33
General setup menu....................................... 34
Audio setup menu.......................................... 36
Video setup menu.......................................... 37
Preference setup menu................................... 41
6. OTHER FEATURES
Tuner operations..................................... 44
Tuning radio stations..................................... 44
Presetting radio stations................................. 44
Receiving Radio Data System stations (Europe
and Russia models only)............................ 45
Sound controls........................................ 47
Using the Virtual Surround function ............. 47
Setting music enhancer.................................. 47
Night listening mode ..................................... 48
Adjusting the treble/bass level....................... 48
Adjusting the volume level............................ 48
Other functions........................................ 49
Switching to standby mode ........................... 49
Dimming the display screen.......................... 49
Setting the sleep timer ................................... 49
Recording on an external AV component ..... 49
7. ADDITIONAL INFORMATION
Troubleshooting...................................... 50
Glossary................................................... 53
Specifications.......................................... 55
Index......................................................... 56
2
3
4
5
6
7
4. OPERATIONS
Disc operation.......................................... 25
Playing discs.................................................. 25
Basic playback controls................................. 25
Selecting various repeat shuffle functions .... 26
Other operations for video playback
(DVD/VCD/SVCD) .................................. 27
Playing MP3/WMA/JPEG/DivX® discs...... 29
Special features for picture disc playback..... 30
Using a USB device...................................... 31
APPENDIX
(at the end of this manual)
LIST OF LANGUAGE CODES...................... i
LASER INFORMATION ............................... ii
English
1 En
INTRODUCTION
Introduction
Thank you for purchasing this unit. This Owner’s Manual
explains the basic operation of this unit.
Notes about discs
– This receiver is designed for use with the following
discs: DVD-Video, Video CD, Super Video CD,
Audio CD, CD-R, CD-RW, DVD+RW, DVD+R,
DVD-R, DVD-RW and DVD-RW (VR format).
This receiver can play:
– MP3 and picture (Kodak, JPEG) files recorded on
CD-R/RW, DVD-R/RW and DVD+R/RW.
– JPEG/ISO 9660 format
– Maximum 30 character display
–DivX
– CD-R, CD-RW and DVD-RW (VR format) cannot
– Some discs cannot be played depending on the
– Be sure to use only CD-R/RW, DVD-R/RW and
– Do not use any non-standard shaped discs (heart-
– Do not use discs with tape, seals, or paste on their
– Do not use discs affixed with labels printed by a
®
disc on CD-R[W]/DVD+R[W]/
DVD-R[W](3.11, 4.x and 5.x)
Notes
be played unless finalized.
recording conditions, such as the PC environment
and application software. The characteristics and
condition of some discs; materials, scratches,
curvature, etc. may result in playback failure.
DVD+R/RW discs made by reliable manufacturers.
shaped, etc.).
surface. Doing so may damage this receiver.
commercially available label printer.
Cleaning discs
– When a disc becomes dirty, clean it with a cleaning
cloth. Wipe the disc from the center out. Do not
wipe in a circular motion.
– Do not use solvents such as benzine, thinner,
commercially available cleaners, or antistatic spray
intended for analog records.
Avoid high temperatures, moisture, water
and dust
– Do not expose the system, batteries or discs to
humidity, rain, sand or excessive heat (caused by
heating equipment or direct sunlight).
Avoid condensation problem
– The lens may cloud over when the receiver is
suddenly moved from cold to warm surroundings,
making it impossible to play a disc. Leave the
receiver in the warm environment until the moisture
evaporates.
Disc care
– Write only on the printed side of a CD-R[W]/
DVD+R[W]/DVD-R[W] and only with a soft felttipped pen.
– Handle the disc by its edge; do not touch the
surface.
Cabinet care
– Use a soft cloth slightly moistened with a mild
detergent solution. Do not use a solution containing
alcohol, spirits, ammonia, or abrasives.
Choosing a suitable location
– Place the receiver on a flat, hard, and stable surface.
2 En
Introduction
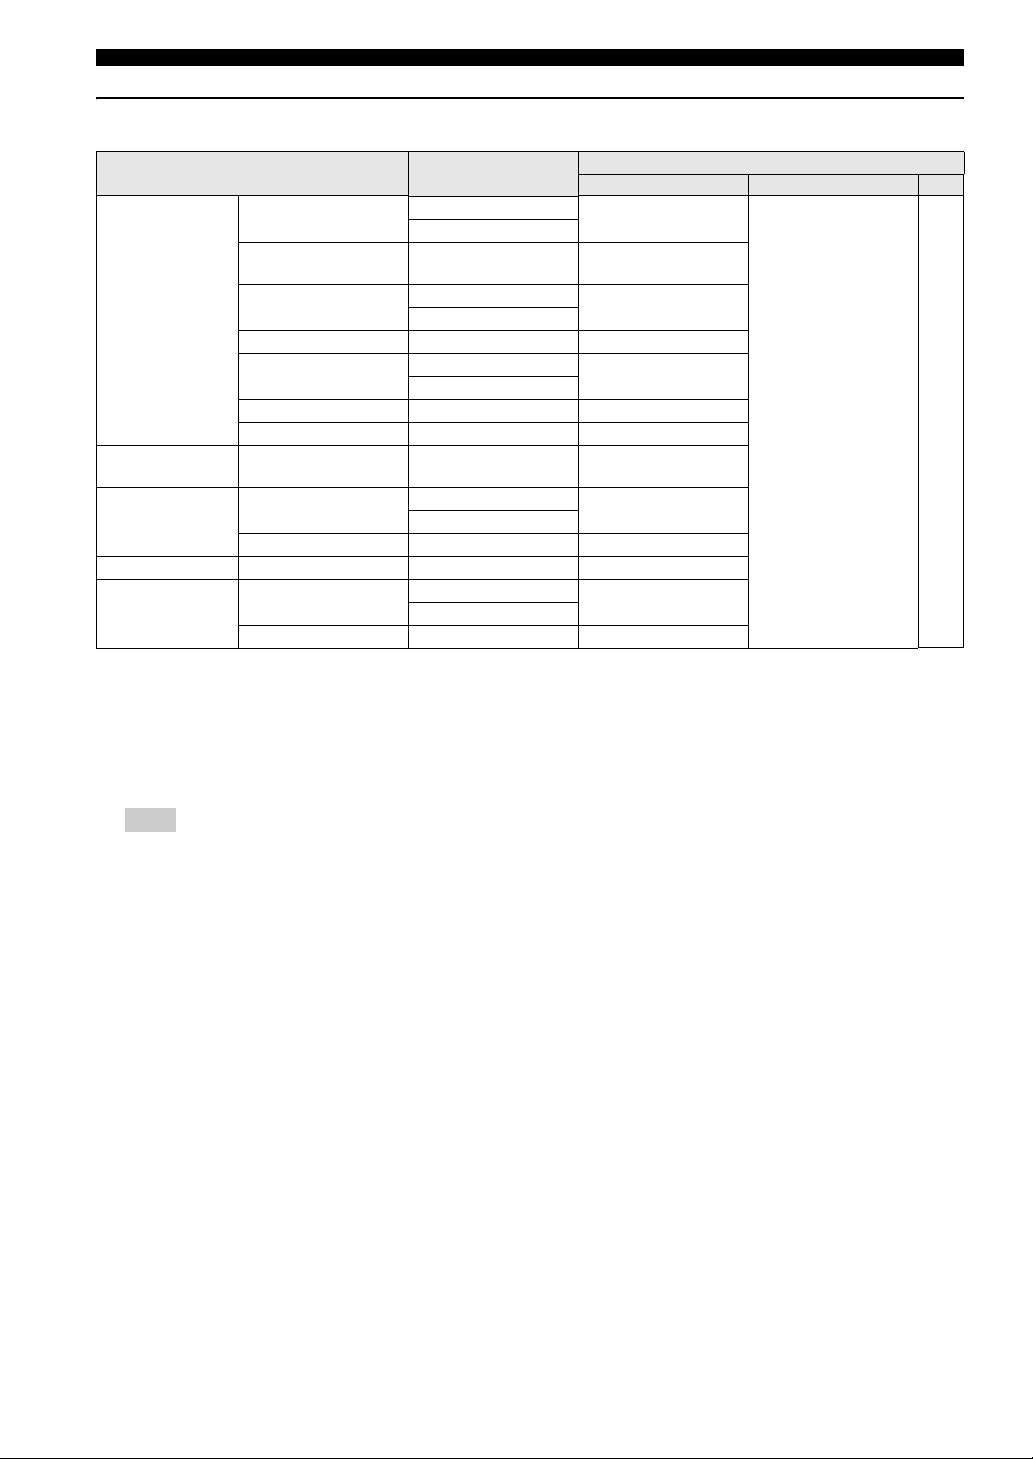
Region codes
The unit is designed to support the Region Management
System. Check the region code number on the disc
package. If the number does not match the unit’s region
number (see the table below or the back of the unit), the
unit may be unable to play the disc.
Destination
Europe
model
Australia
model
Korea, Asia and
Taiwan models
Russia
model
Region
code of
DVR-1000
2 2
4 4
3 3
5 5
Playable
discs
ALL
ALL
ALL
ALL
Sound field features
Manufactured under license from Dolby
Laboratories. “Dolby”, “Pro Logic”, “MLP
Lossless” and the double-D symbol are
trademarks of Dolby Laboratories.
“DTS” and “DTS Digital Surround” are
registered trademarks of DTS, Inc.
DivX, DivX Ultra Certified, and associated
logos are trademarks of DivX, Inc. and are used
under license.
“DCDi” is a trademark of Faroudja, a division
of Genesis Microchip, Inc.
HDMI, the HDMI logo and High Definition
Multimedia Interface are trademarks or
registered trademarks of HDMI Licensing LLC.
This product incorporates copyright protection
technology that is protected by method claims of
certain U.S. patents and other intellectual property
rights owned by Macrovision Corporation and other
rights owners. Use of this copyright protection
technology must be authorized by Macrovision
Corporation, and is intended for home and other
limited viewing uses only unless otherwise authorized
by Macrovision Corporation. Reverse engineering or
disassembly is prohibited.
1
INTRODUCTION
Active Servo Processing Subwoofer System with built-in
power amplifier.
This subwoofer system (NX-SW1000) employes Advanced
Yamaha Active Servo Technology which Yamaha has
developed for reproducing higher quality super-bass sound.
This super-bass sound adds a more realistic, theater-in-thehome effect to your stereo system.
English
3 En
Introduction
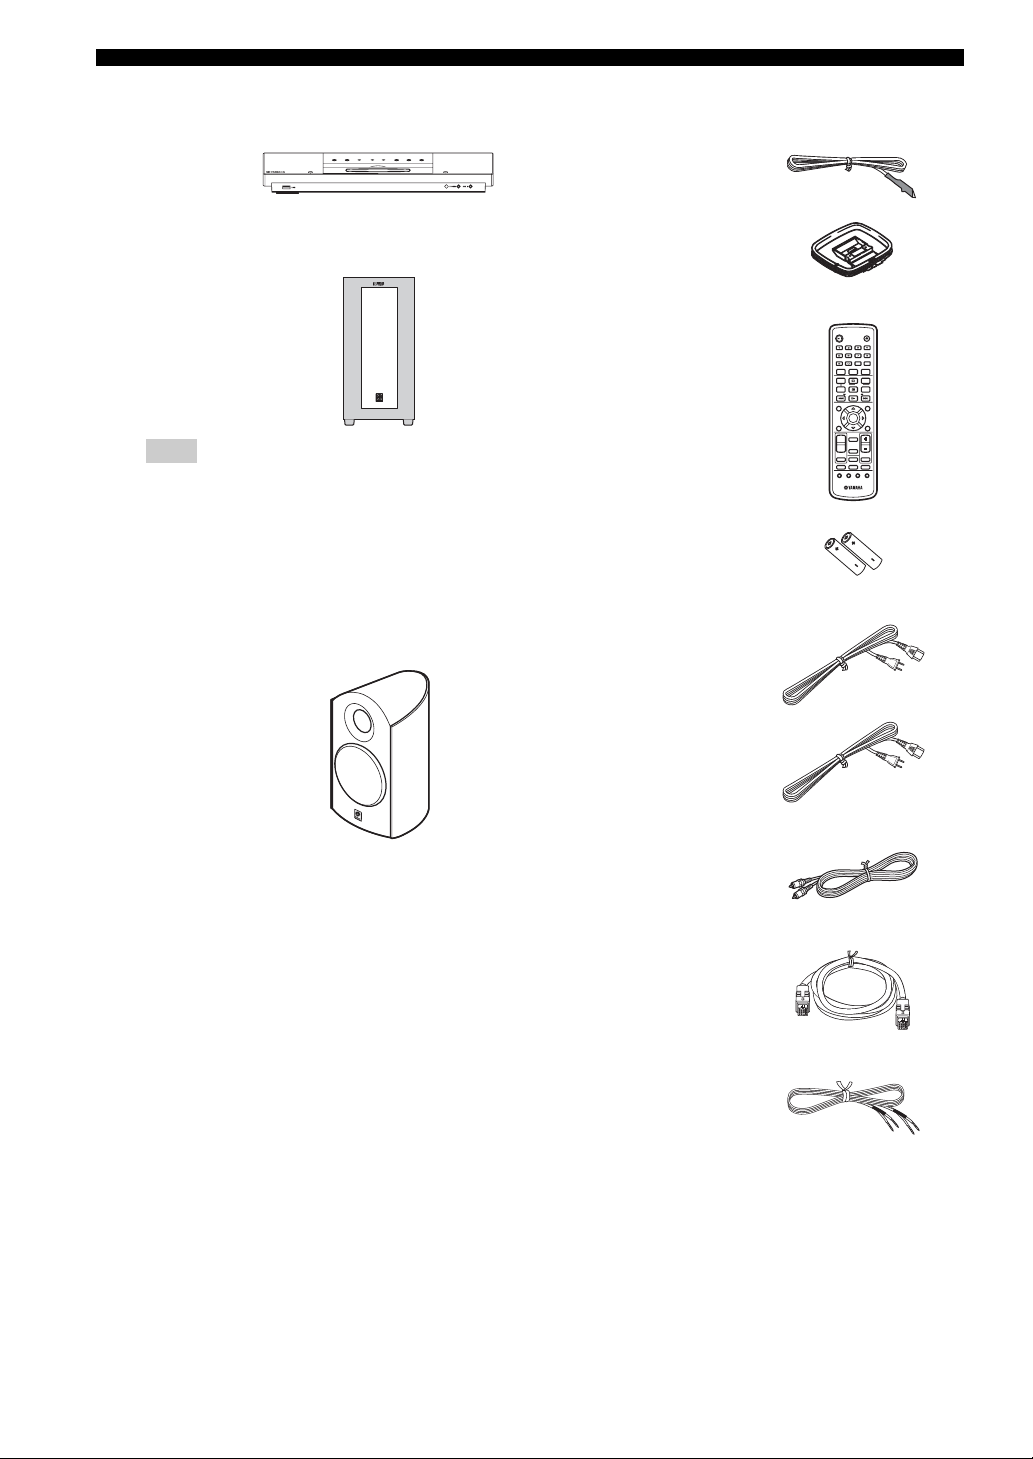
■ Main unit ■ Supplied accessories
DVD receiver
(DVR-1000)
Subwoofer
(NX-SW1000)
Note
Be sure to connect the power cable of the
subwoofer (NX-SW1000) to the AC outlet
before you turn on the DVD receiver (DVR-
1000). Otherwise, the subwoofer (NX-SW1000)
will not be powered correctly.
Front speakers (x2)
(NX-P1000)
Indoor FM antenna
AM loop antenna
(Asia, Australia, Korea,
and Taiwan models only)
Remote control
Batteries (x 2)
Power cable
(For DVR-1000)
Power cable
(For NX-SW1000: except
Europe and Russia models)
STANDBY/ON
BASS TREBLE
FREQ/TEXT
REPEAT
MODE START
A-B
PRESET PRESET
ON SCREEN
SET UP
AREA
MODE
ENHANCER
SURROUND
AUX
SUBTITLE
ANGLE ZOOM AUDIO
EJECT
DIMMER
SLEEP
NIGHT
PROG
PTY SEEK
SHUFFLE
MENU
ENTER
TOP MENU
/RETURN
DIRECT
DVD/CD
MUTE
TUNER
USB
4 En
Video pin cable (1.4 m)
System control cable (4 m)
(For NX-SW1000)
Speaker cables (4 m x 2)
(For NX-P1000)
Functional overview
■ Top and front panels (DVR-1000)
1
INTRODUCTION
1
0
A
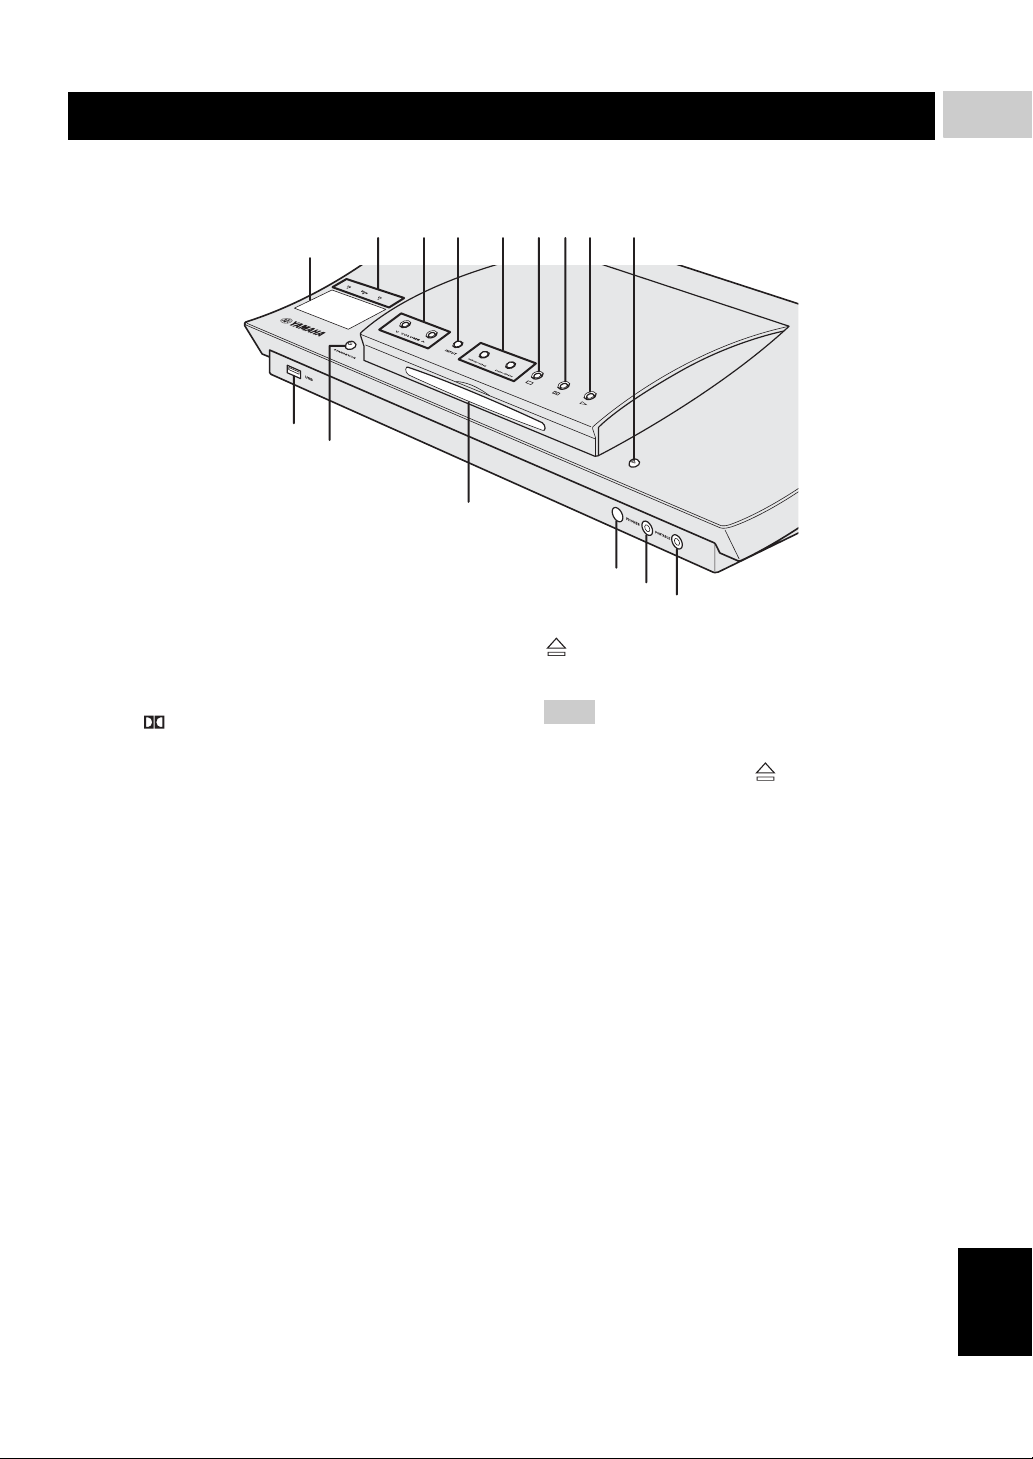
1 System display panel
Shows information about the operational status of the
unit.
2 PCM/ Digital/DTS indicator
Indicates the format of the audio being played back.
3 d VOLUME u
Adjusts the volume level.
4 INPUT
Selects input source or sets the priority level for the
audio input signals.
5 b/w, f/a
DVD/CD mode: selects the previous/next track or
chapter. Press and hold to fast forward or fast reverse.
TUNER mode: tunes the radio preset up/down.
USB mode: selects the previous/next track. Press and
hold to fast forward or fast reverse.
6 s
Exits an operation.
DVD/CD mode: stops disc playback.
TUNER mode: erases a preset radio station in Preset
mode if held more than two seconds, or stops preset
radio station installation in Auto Preset mode.
USB mode: stops playback.
7 e
DVD/CD mode: pauses disc playback.
USB mode: pauses playback.
7 8 965432
B
C
9
Ejects a disc in the DVD receiver.
Note
Do not push the ejected disc when reloading it. To
reload the ejected disc, press or h, or remove the
disc from the disc loading slot fully, then insert it to
the disc loading slot once again.
0 USB terminal
Connect to the USB connector of your USB device
(see page 19).
A STANDBY/ON
Turns on the DVD receiver, or sets it to the standby
mode (see “Turning the auto standby function on/off”
on page 35).
B Disc loading slot
Insert a disc to be played.
C Remote control sensor
Point the remote control towards this sensor.
D PHONES jack
Connects headphones.
E PORTABLE jack
Connects a portable audio player.
When this input source is selected, “FRONT IN”
appears on the system display panel.
D
E
English
8 h
DVD/CD mode: starts disc playback.
USB mode: starts playback.
5 En
Functional overview
■ Rear panel (DVR-1000)
(Europe model)
21 4 5
3
AUX IN
SYSTEM
DIGITAL IN
OPTICAL
TO SUBWOOFER
CONNECTOR
MAINS
LRL
PCM/DTS
AUDIO
q
DIGITAL
67
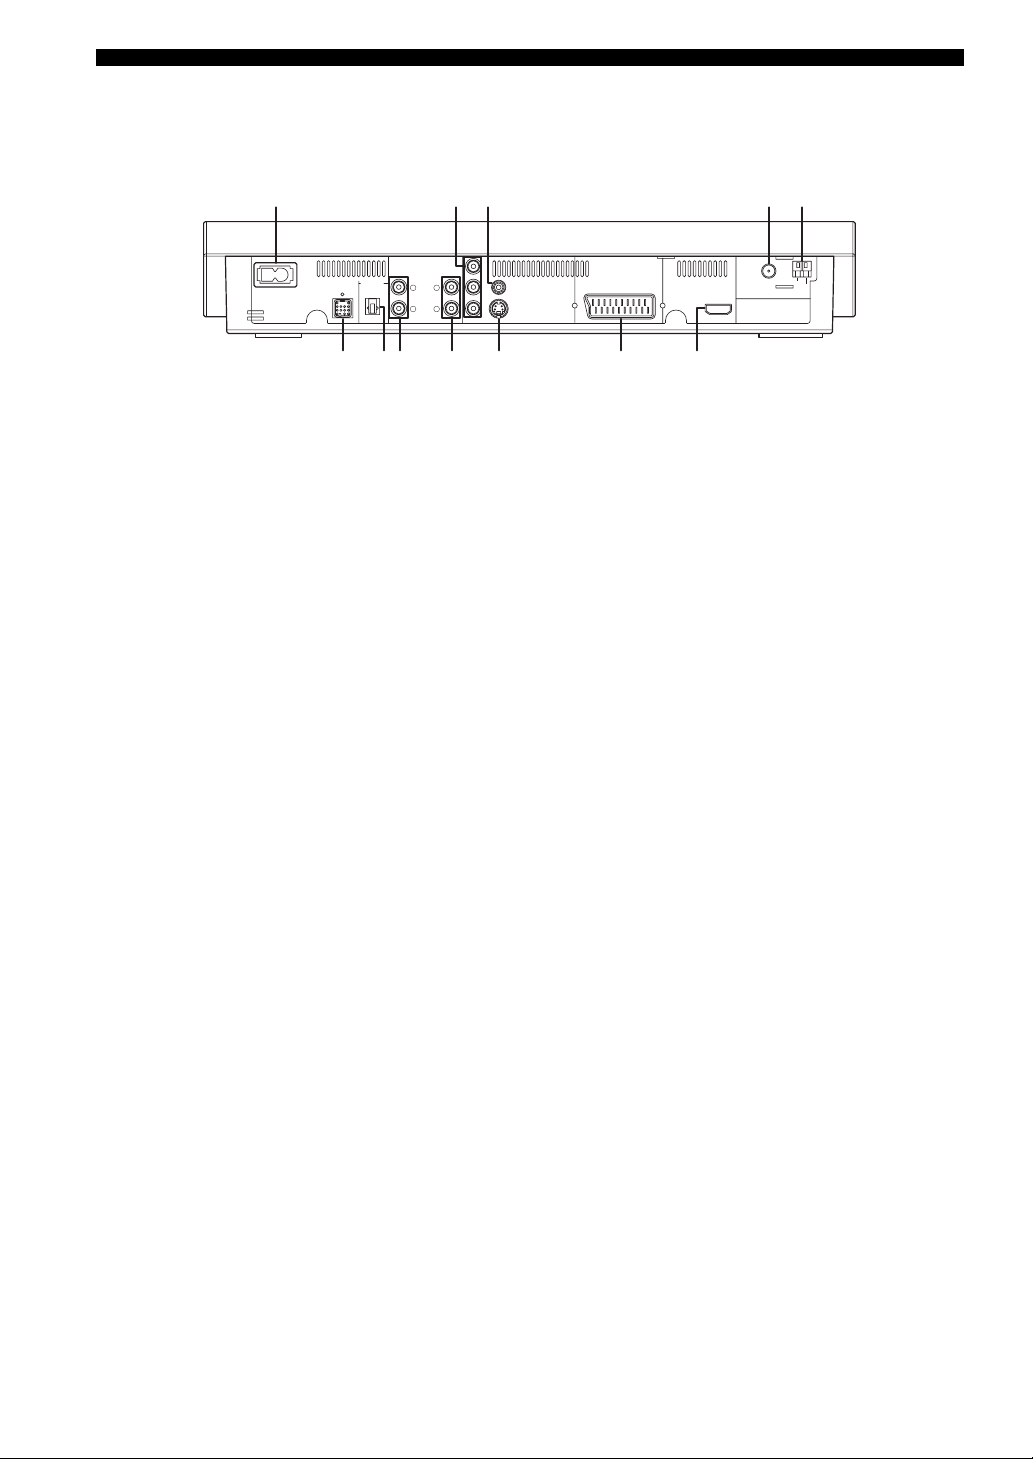
1 AC inlet
Connect the supplied power cable.
2 COMPONENT VIDEO OUT jacks
Connect to the Y P
B/CB PR/CR jacks on your TV (see
page 14).
3 VIDEO output jack
Connect to the video (composite) jack on your TV
(see page 14).
4 FM ANT terminal
Connect the FM antenna.
5 GND and AM ANT terminals
Connect the AM loop antenna.
6 SYSTEM CONNECTOR terminal
Connect the subwoofer.
Y
LINE OUT
PB
R
P
R
COMPONENT
0 A
98
VIDEO
S VIDEO
VIDEO OUT
(DVD ONLY)
AV MONITOR OUT
(
DVD ONLY
)
HDMI
B
7 OPTICAL DIGITAL IN jack
Connect to the DIGITAL OUT jack on your digital
audio component.
8 AUX IN jacks
Connect to the AUDIO OUT jacks on your VCR or
cassette deck.
9 LINE OUT jacks
Connect to the AUDIO IN jacks on your VCR.
0 S VIDEO output jack
Connect to the S-video jack on your TV or VCR.
A AV MONITOR OUT terminal
(Europe and Russia models only)
Connect to your TV (see page 14).
B HDMI terminal
Connect to the HDMI input terminal of your HDMI
component (see page 15).
TUNER
GND
FM
AM
ANT
ANT
75Ω UNBAL
6 En
■ Rear panel (NX-SW1000)
Functional overview
1
INTRODUCTION
SPEAKERS
R
L
1
CONNECTOR
SYSTEM
6
Ω
MIN. /SPEAKER
MAINS
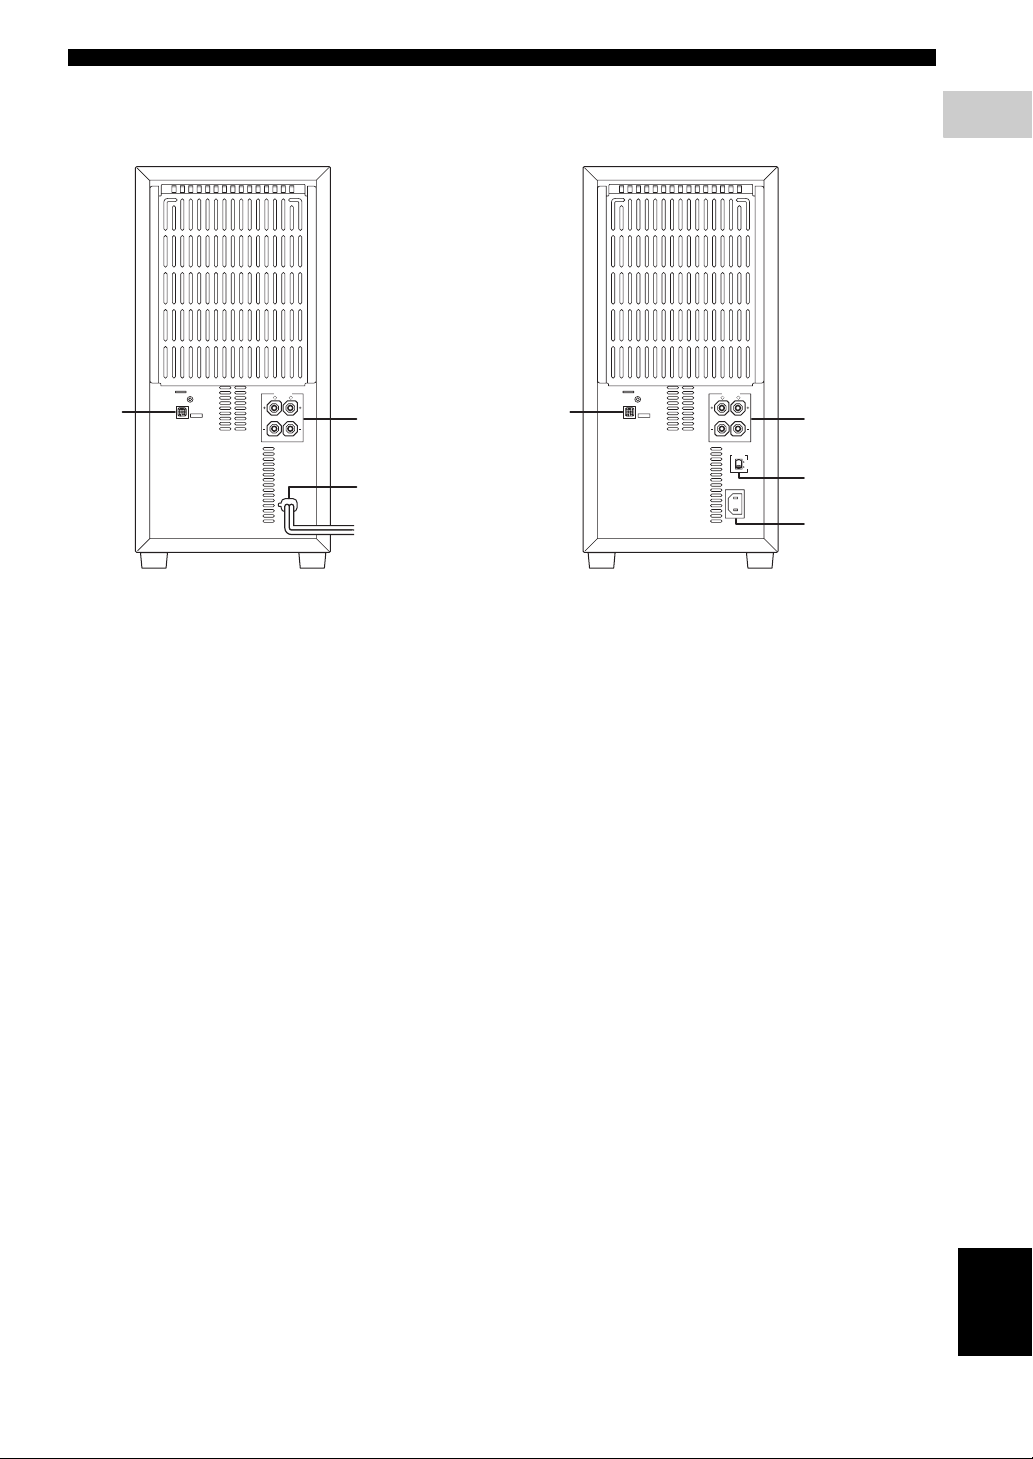
1 SYSTEM CONNECTOR terminal
Connect to the DVD receiver.
2 SPEAKER terminals
Connect to the speakers.
3 AC power cord
Connect to a standard AC outlet.
2
3
SPEAKERS
R
L
1
CONNECTOR
SYSTEM
6
Ω
MIN. /SPEAKER
VOLTAGE
SELECTOR
110V-120V
220V-240V
AC IN
(except Europe and Russia models)(Europe and Russia models)
1 SYSTEM CONNECTOR terminal
Connect to the DVD receiver.
2 SPEAKER terminals
Connect to the speakers.
3 VOLTAGE SELECTOR
Select the voltage according to your region.
4 AC inlet
Connect the supplied power cable.
2
3
4
7 En
English
Functional overview
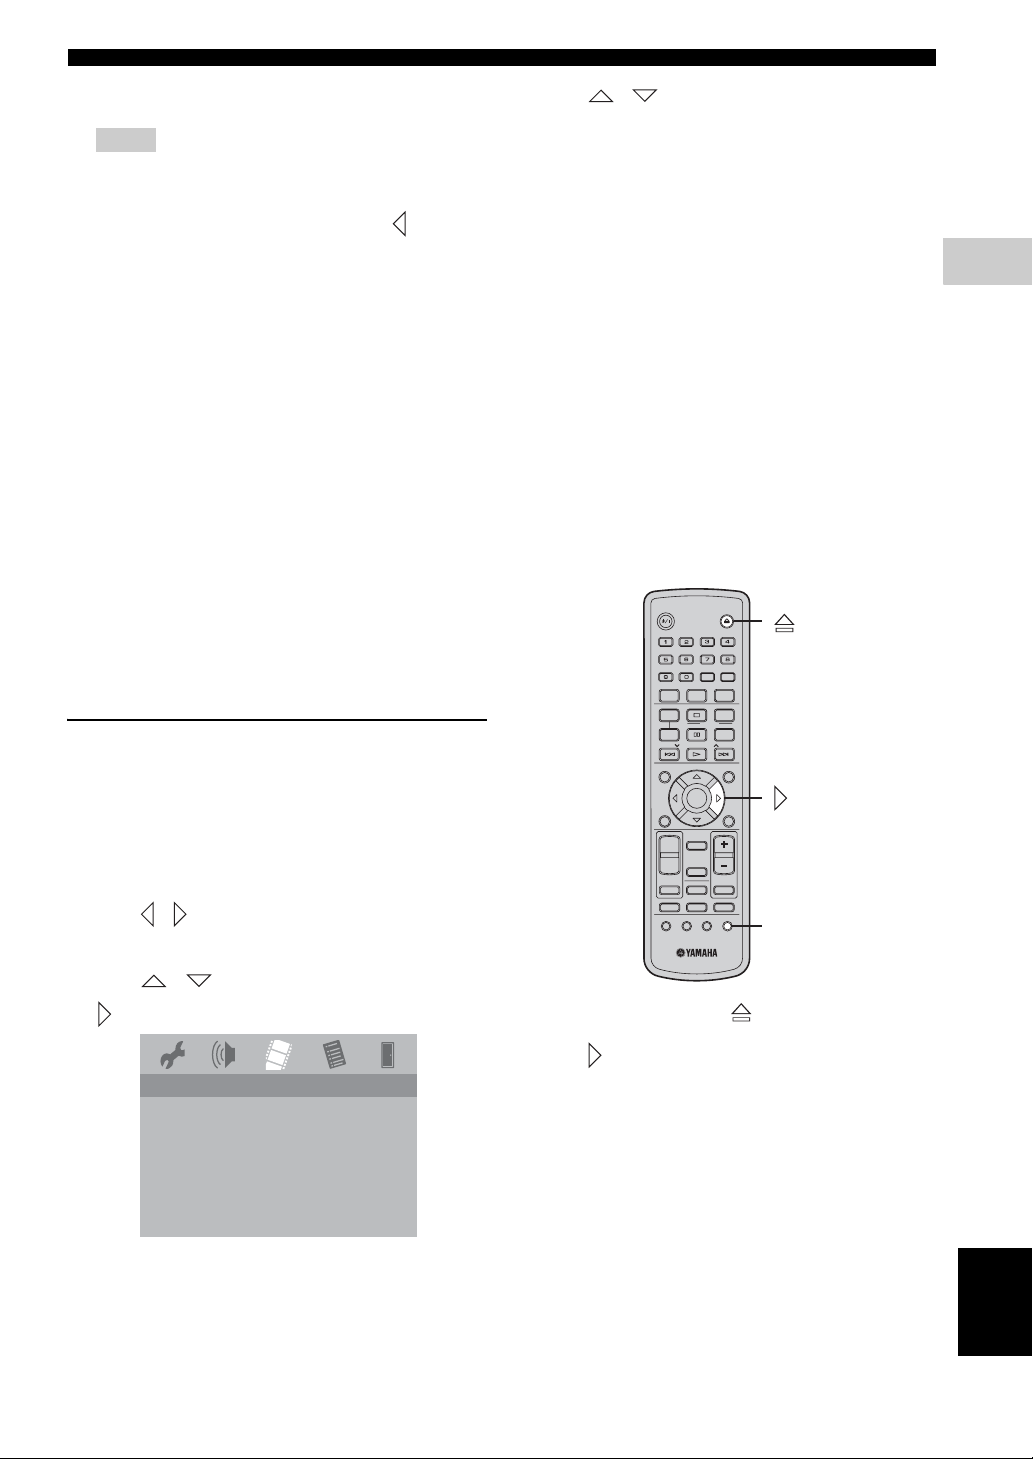
■ Remote control (For DVR-1000)
STANDBY/ON
1
2
4
6
8
0
B
D
F
3
5
7
9
A
C
E
BASS TREBLE
FREQ/TEXT
REPEAT
MODE START
A-B
PRESET PRESET
ON SCREEN
ENTER
SET UP
AREA
DIRECT
MODE
ENHANCER
DVD/CD
SURROUND
TUNER
AUX
SUBTITLE
ANGLE ZOOM AUDIO
DIMMER
PTY SEEK
EJECT
SLEEP
NIGHT
PROG
SHUFFLE
MENU
TOP MENU
MUTE
USB
/RETURN
G
I
K
M
O
Q
S
U
W
J
L
H
N
P
R
t
V
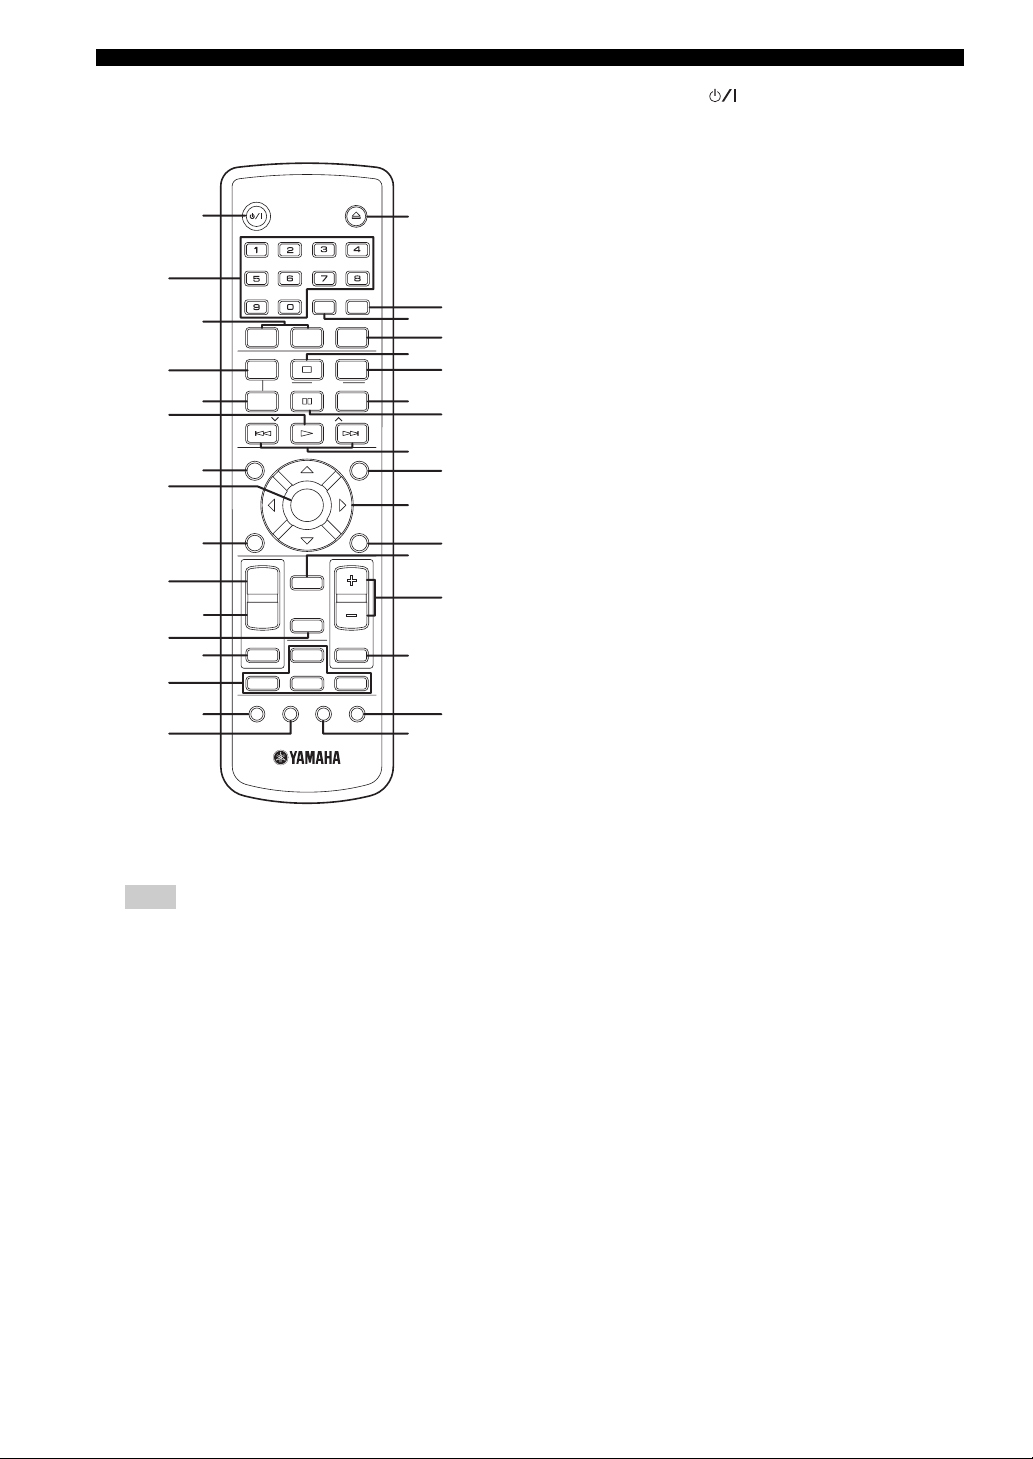
1 STANDBY/ON ( )
Turns on the DVD receiver, or sets it to the standby
mode.
2 Numeric keypad (0 – 9)
Enters a track/title number of the disc.
Enters a number of a preset radio station.
3 TREBLE/BASS
Selects the TREBLE (high tone) or BASS (low tone)
sound mode.
Use the VOLUME control to change the tone level.
4 REPEAT
Selects various repeat modes.
FREQ/TEXT
TUNER mode: switches the information display when
receiving Radio Data System.
5 REPEAT A-B
Repeats a specific section on a disc.
6 h
DVD/CD mode: starts disc playback.
USB mode: starts playback.
7 ON SCREEN
Displays the current status or disc information.
8 ENTER
Confirms a selection.
9 SET UP
Enters or exits the system setup menu.
0 AREA
Select either the WIDE or NARROW listening area
(see page 47).
Note
For details on how to use the remote control, see page 20.
8 En
A MODE
Select the Virtual Surround mode (see page 47).
B ENHANCER
Switches the Enhancer mode on or off (see page 47).
C SURROUND
Turns the surround effect on or off (see page 47).
D Input selection buttons
Selects the appropriate active source mode.
DVD/CD: switches to DVD/CD mode.
AUX: switches to ANALOG/FRONT IN/DIGITAL
input.
TUNER: switches to tuner (FM/AM) input.
USB: switches to USB mode. Accesses the contents of
the connected USB device or exits from the USB
mode (see page 31).
E SUBTITLE
Selects a subtitle language.
F ANGLE
Selects a DVD disc camera angle (if available).

Functional overview
G EJECT ( )
Ejects a disc in the DVD receiver.
H SLEEP
Sets the sleep timer (see page 49).
I DIMMER
Selects different levels of brightness for the display
panel (see page 49).
J NIGHT
Turns the Night listening mode on or off
(see page 48).
K s
Exits an operation.
DVD/CD mode: stops disc playback.
DVD/CD mode: holding down the button will eject
the disc.
TUNER mode: erases a preset radio station if held for
more than two seconds.
USB mode: stops playback.
L PROG
DVD/CD mode: starts programming.
TUNER mode: starts automatic/manual preset
programming if held for more than two seconds.
M SHUFFLE
Plays tracks in random order.
PTY SEEK START
TUNER mode: starts searching for a Radio Data
System station.
frequency.
TUNER mode: press up or down to select auto tuning.
R TOP MENU/RETURN
Returns to the previous menu.
Displays the top-level disc menu
(if available).
S DIRECT
Switches the video output on or off during audio disc
playback.
This function (Audio Direct) is not available for
HDMI output.
In the DIRECT mode, the display panel dims to “DIM
2 (40% brightness)”.
T VOLUME (+/–)
Adjusts the volume level.
U MUTE
Mutes or restores the volume.
V AUDIO
Selects an audio language (DVD) or an audio channel
(VCD).
W ZOOM
Enlarges or reduces the TV screen picture.
1
INTRODUCTION
N e
DVD/CD mode: pauses disc playback.
USB mode: pauses playback.
PTY SEEK MODE
TUNER mode: sets the DVD receiver to the PTY
SEEK mode.
O b / a
DVD/CD mode: selects the previous/next track or
chapter. Press and hold to fast forward or fast reverse.
USB mode: selects the previous/next track. Press and
hold to fast forward or fast reverse.
d PRESET u
TUNER mode: press to select a preset radio station.
P MENU
Enters or exits the disc contents menu.
For VCD version 2.0 only:
In stop mode, turns on/off playback control (PBC)
mode.
During playback, returns to the main menu.
Q Cursors ( / / / )
Selects movement direction in the menu.
TUNER mode: press left or right to tune the radio
English
9 En
PREPARATION
Connections
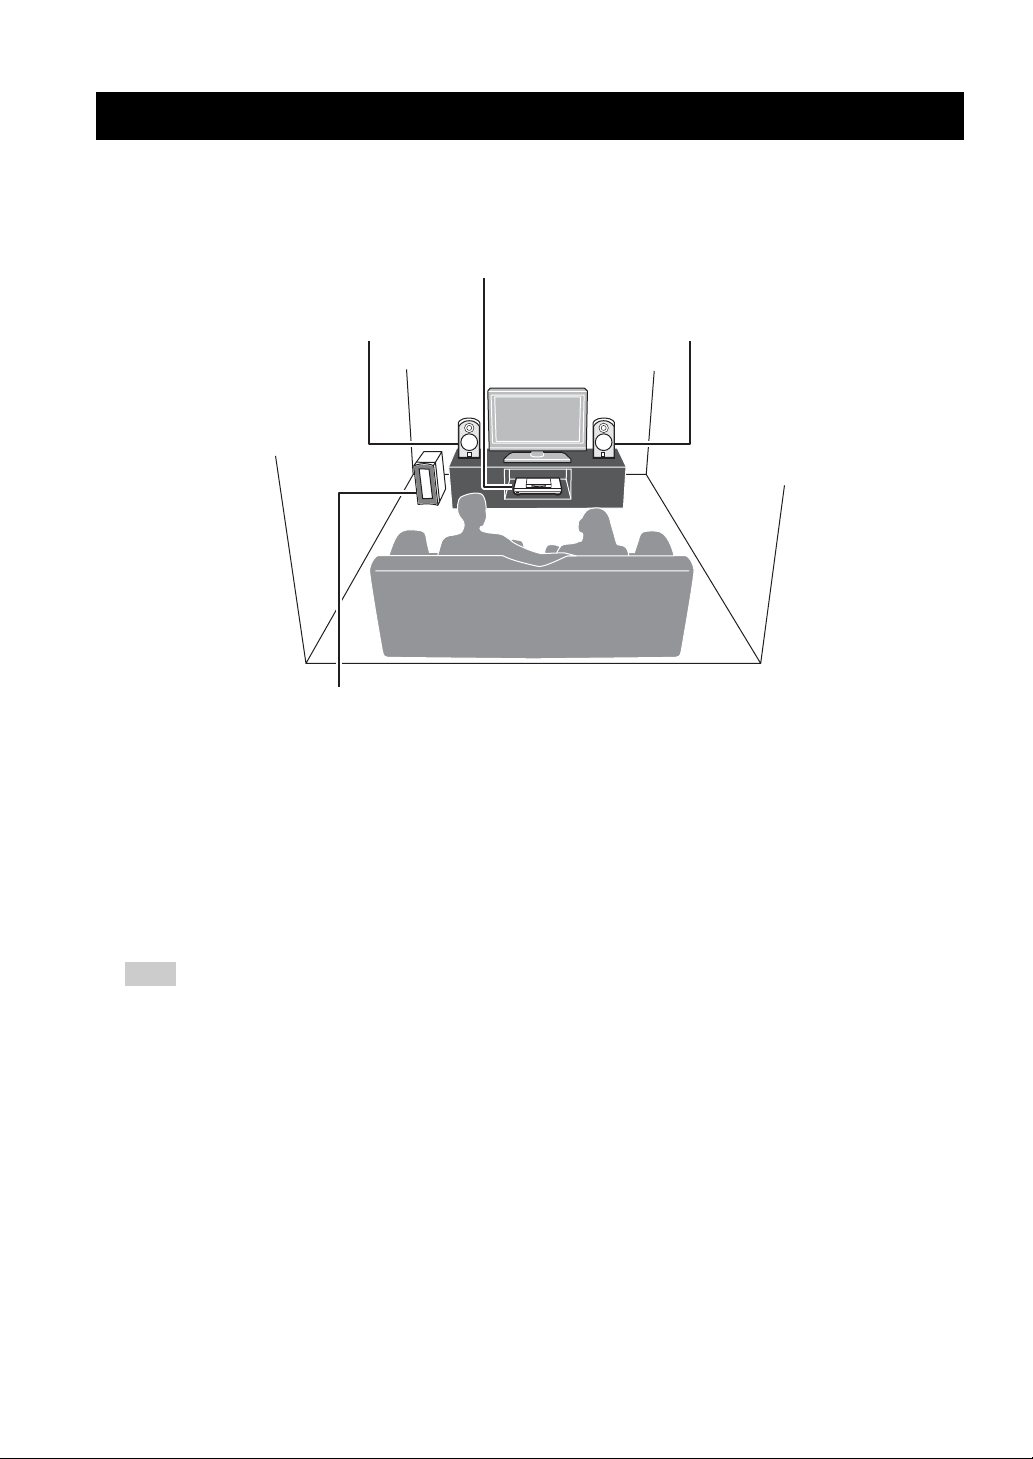
■ Roles and layout of the speakers
To enjoy quality sounds you need to place the speakers in their appropriate positions and install them correctly.
The following show the recommended layout of the speakers.
DVD receiver
Front
speaker (L)
For the best possible surround sound, all of the speakers (except the subwoofer) should be placed at the same distance
from the listening position.
1 Front Speakers (L, R)
Place the front left/right speakers on both sides of your TV at equal distances.
Main roles: Produces front channel (stereo) sounds and effect sounds.
2 Subwoofer
Place the subwoofer near a front speaker and turn it slightly toward the center of the room to reduce wall reflections.
Main roles: Produces bass sounds and low frequency (LFE) sounds contained in Dolby Digital or DTS.
1
Subwoofer
2
Front
1
speaker (R)
Note
To avoid magnetic interference, do not position the front speakers too close to your TV.
Allow adequate ventilation around the DVD receiver and subwoofer.
Bass sounds produced by the subwoofer may be heard differently depending on the listening position and subwoofer location.
To enjoy desired sounds, try to change the location of the subwoofer according to the listening position.
10 En

System connections
■ Connecting the speakers
Notes
– Do not connect the power cord of the subwoofer and DVD receiver into an AC outlet until all cable connections
are completed.
– Be sure to connect the end of the supplied speaker cable (where the red and black cable lengths differ) to the front
speaker, and leave some slack.
– Be sure to connect the red cable to the red terminal (subwoofer and front speakers) and the black cable to the
black terminal.
Subwoofer
R L
DVD receiver
DIGITAL IN
OPTICAL
CONNECTOR
MAINS
TO SUBWOOFER
PCM/DTS
q
DIGITAL
VIDEO
PB
LRL
R
COMPONENT
AUDIO
AV MONITOR OUT
VIDEO OUT
(DVD ONLY)
R
P
S VIDEO
Y
AUX IN
LINE OUT
SYSTEM
TUNER
GND
FM
AM
(
DVD ONLY
ANT
)
ANT
75Ω UNBAL
HDMI
SYSTEM
CONNECTOR
SPEAKERS
R
6
ΩMIN. /SPEAKER
L
2
PREPARATION
Front speaker (R)
MAINS
Front speaker (L)
English
11 En
System connections
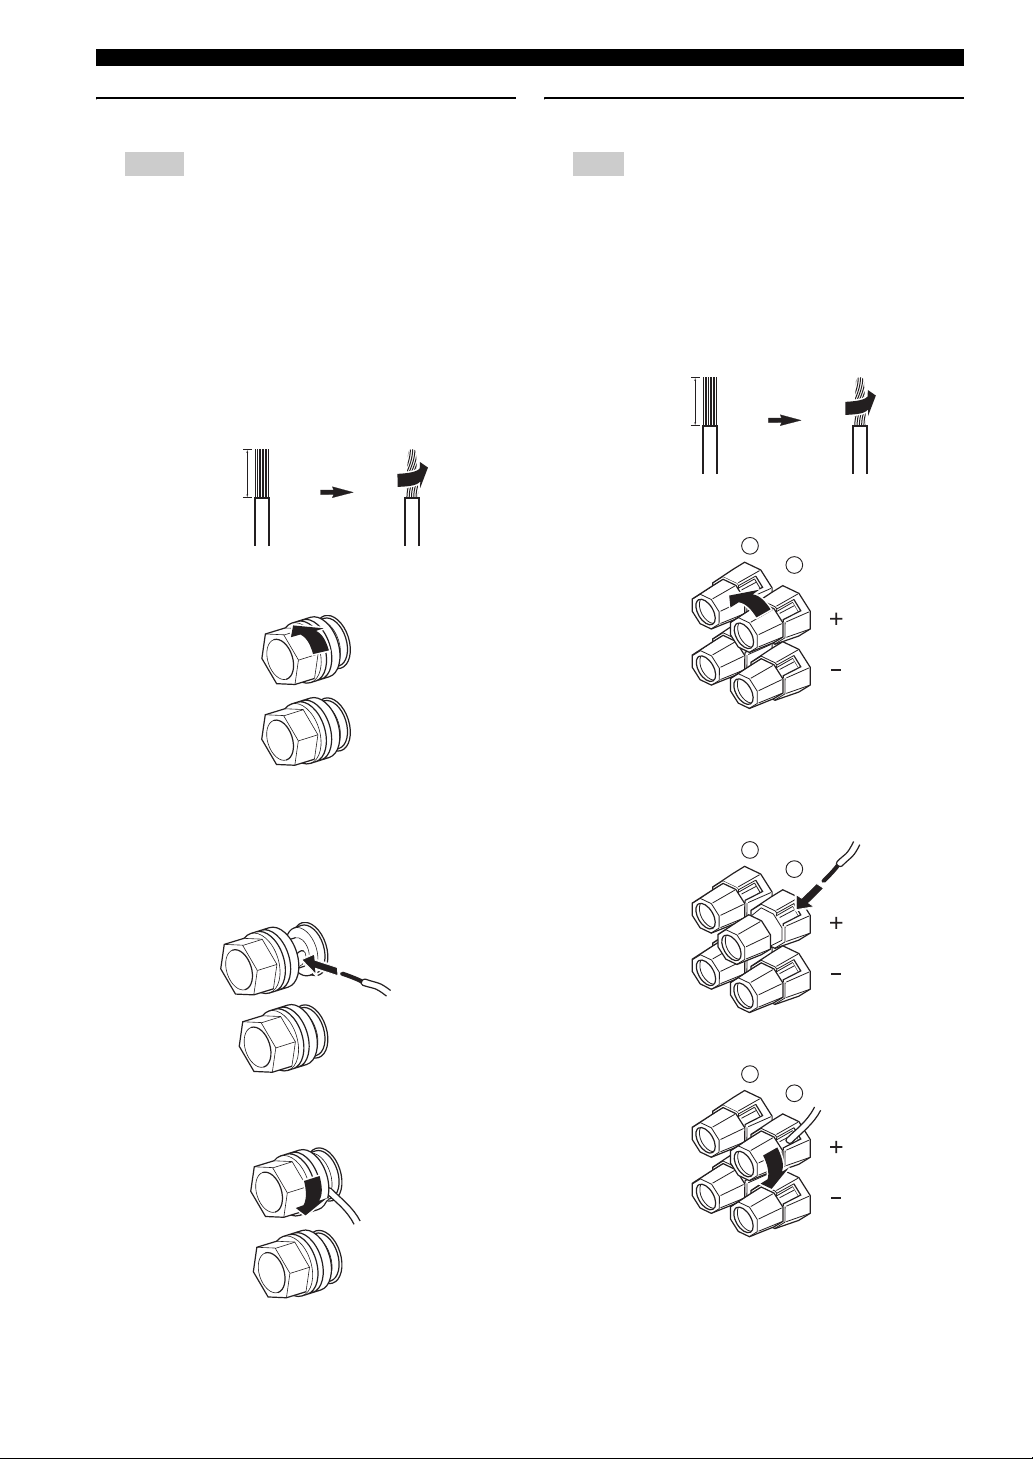
Connecting the speaker cables
Notes
– Be sure to connect the end of the supplied speaker
cable (where the red and black cable lengths differ)
to the front speaker, and leave some slack.
– Be sure to connect the red cable to the red terminal
(subwoofer and front speakers) and the black cable
to the black terminal.
1 Remove approximately 10 mm (0.4 in) of insulation
from the end of each speaker cable and then twist the
exposed wires of the cable together to prevent short
circuits.
10 mm (0.4 in)
2 Loosen the knob.
Connecting the subwoofer
Note
Be sure to connect the red cable to the red terminal
(subwoofer and front speakers) and the black cable to the
black terminal.
1 Remove approximately 10 mm (0.4 in) of insulation
from the end of each speaker cable and then twist the
exposed wires of the cable together to prevent short
circuits.
10 mm (0.4 in)
2 Loosen the knob.
R
L
Red: positive (+)
Black: negative (–)
3 Insert one bare wire into the hole in the center of each
terminal.
4 Tighten the knob to secure the wire.
Red: positive (+)
Black: negative (–)
3 Insert one bare wire into the hole on the side of each
terminal.
R
L
4 Tighten the knob to secure the wire.
R
L
12 En
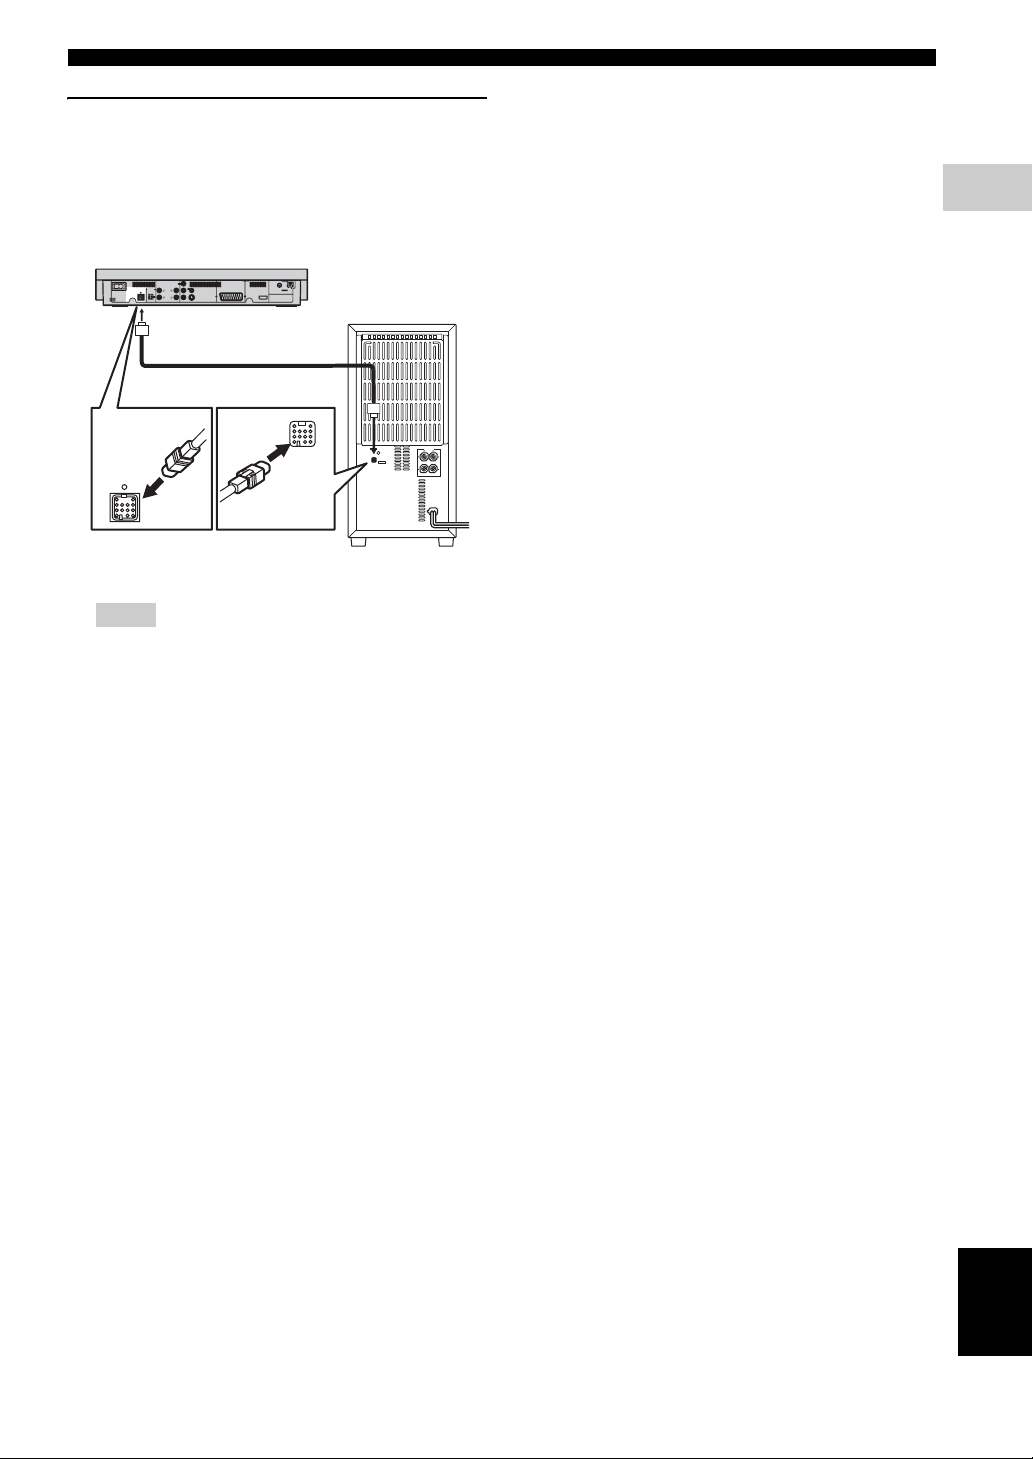
Connecting the DVD receiver and the
subwoofer
Connect the subwoofer to the DVD receiver using the
system control cable. Attach one end to the subwoofer and
the other to the SYSTEM CONNECTOR terminal at the
rear of the DVD receiver.
System connections
2
PREPARATION
MAINS
TO SUBWOOFER
SYSTEM
CONNECTOR
Y
AUX IN
LINE OUT
SYSTEM
DIGITAL IN
VIDEO
PB
OPTICAL
LRL
CONNECTOR
VIDEO OUT
(DVD ONLY)
P
R
R
S VIDEO
PCM/DTS
COMPONENT
AUDIO
q
DIGITAL
TUNER
GND
FM
AM
ANT
(
)
AV MONITOR OUT
DVD ONLY
ANT
75Ω UNBAL
HDMI
SPEAKERS
R
L
R
SYSTEM
CONNECTOR
SYSTEM
CONNECTOR
L
6
ΩMIN. /SPEAKER
MAINS
NX-SW1000
Notes
– When connecting the system control cable, be sure
to insert the plug until it clicks. When
disconnecting the system control cable, slide the
collar of the plug back to unlock.
– Ensure that the speaker cables are correctly
connected. Improper connections may damage the
system due to a short-circuit.
– When connecting the speakers, fix the speaker
cables in place so that cables do not loosen. If your
foot or hand accidentally gets caught on a loose
speaker cable, the speaker may fall.
– To prevent unwanted noise, do not place the
subwoofer too close to the DVD receiver, AC
power adaptor, TV or other sources of radiation.
– Be sure to connect the power cable of the
subwoofer (NX-SW1000) to the AC outlet before
you turn on the DVD receiver (DVR-1000).
Otherwise, the subwoofer (NX-SW1000) will not
be powered correctly.
13 En
English

Other connections
O
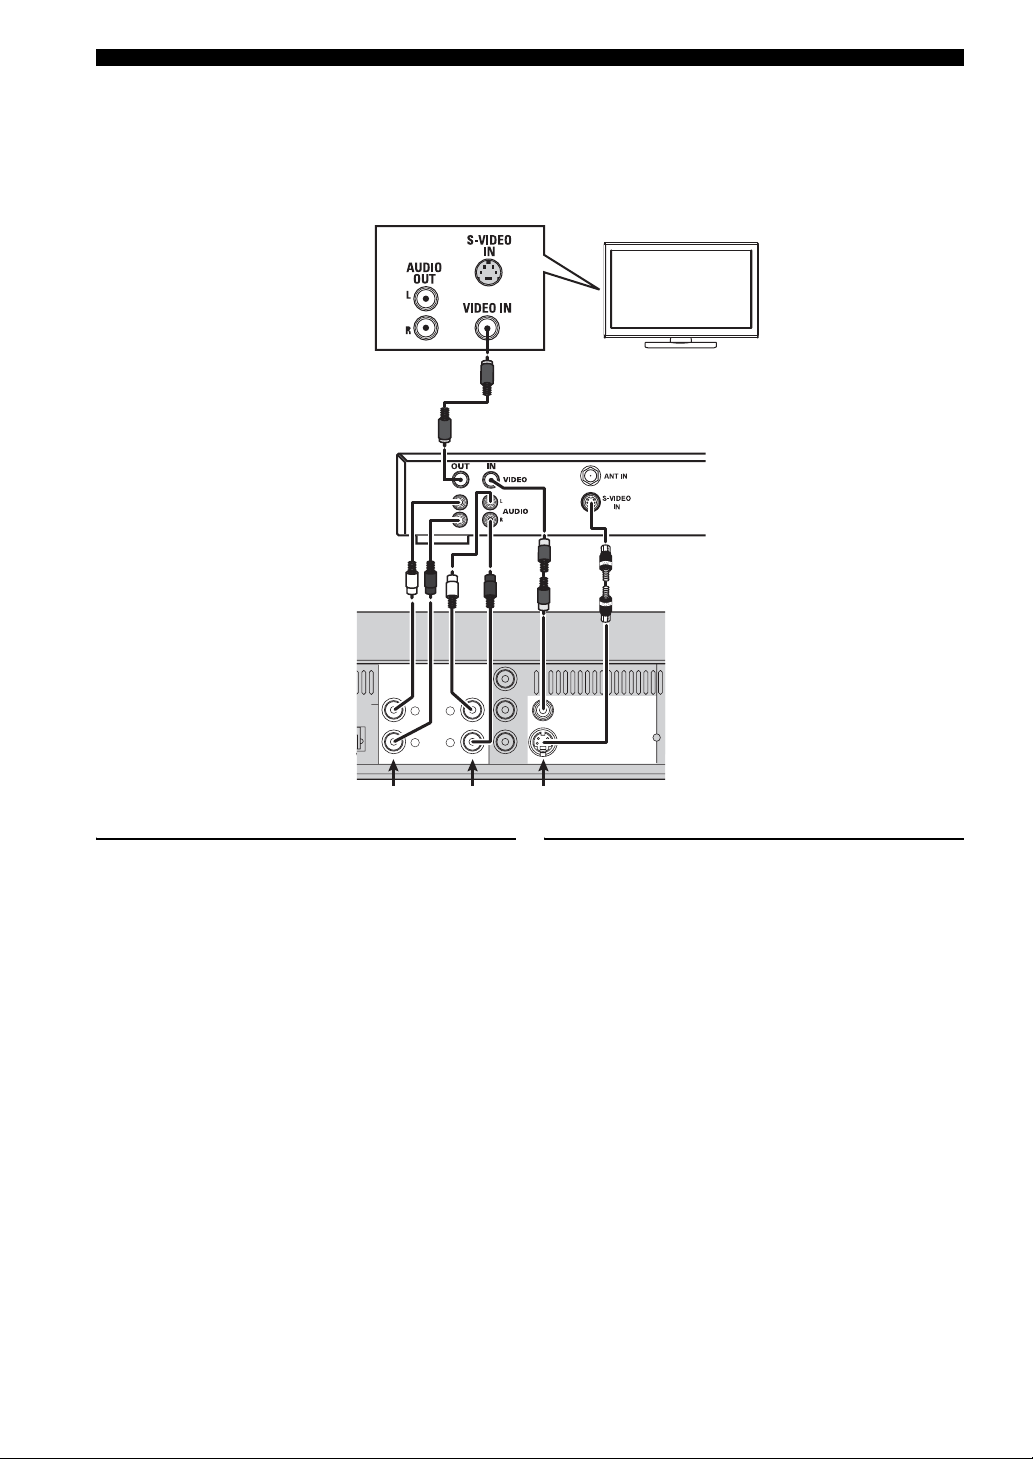
■ Connecting a TV
Notes
– You only need to make one video connection from the following options (A, B, C, or D), depending on the
capabilities of your TV.
– Do not connect the power cords until all cable connections are completed.
R
DIGITAL IN
OPTICAL
PCM/DTS
q
DIGITAL
AUX IN
<A>
LINE OUT
LRL
R
AUDIO
COMPONENT
<B>
Y
VIDEO
PB
R
P
S VIDEO
VIDEO OUT
(DVD ONLY)
<C>
COMPONENT VIDEO OUT jacks <A>
Use the component video cables (red/blue/green, not
supplied) to connect the DVD receiver’s Y P
B PR jacks to
the corresponding component video input jacks (or the Y
Pb/Cb Pr/Cr/ YUV jacks) on your TV.
Progressive scan video quality is only available when
using Y PB PR in conjunction with a progressive scan TV.
To activate the progressive scan function see “Progressive
function” on page 40.
VIDEO output jack <B>
Use a composite video cable (yellow -supplied) to connect
the DVD receiver’s VIDEO output jack to the video input
jack (or A/V In/Video In/Composite/Baseband jack) on
your TV.
S VIDEO output jack <C>
S (separate)-video connections achieve a clearer picture
than composite video connections. Use an S-video cable
(not supplied) to connect the DVD receiver’s
S VIDEO output jack to the S-video input jack (or Y/C or
S-VHS jack) on your TV.
AV MONITOR OUT
(
DVD ONLY
<D>
)
TV
AV MONITOR OUT terminal <D>
(Europe and Russia models only)
The SCART cable, or “Euro AV cable”, supports AV
MONITOR OUT signal transmission, providing you with
the best possible picture and sound. If your TV has only
one terminal for video input, and you want to connect it
directly to the DVD receiver, you can use the AV
MONITOR OUT connector. Connect one end of the
SCART cable to the AV MONITOR OUT connector and
the other end to the SCART connector on your TV.
Notes
– TV channels, if you use AV MONITOR OUT
terminal to connect the TV. To use AV MONITOR
OUT terminal, make sure to set the DVD
receiver’s component setting to “RGB” (see
page 22).
– When using AV MONITOR OUT terminal to
listen to the TV channels, set the DVD receiver’s
component setting to “RGB” (see page 22).
– S-video signal is not output at AV MONITOR
OUT terminal.
14 En
Other connections
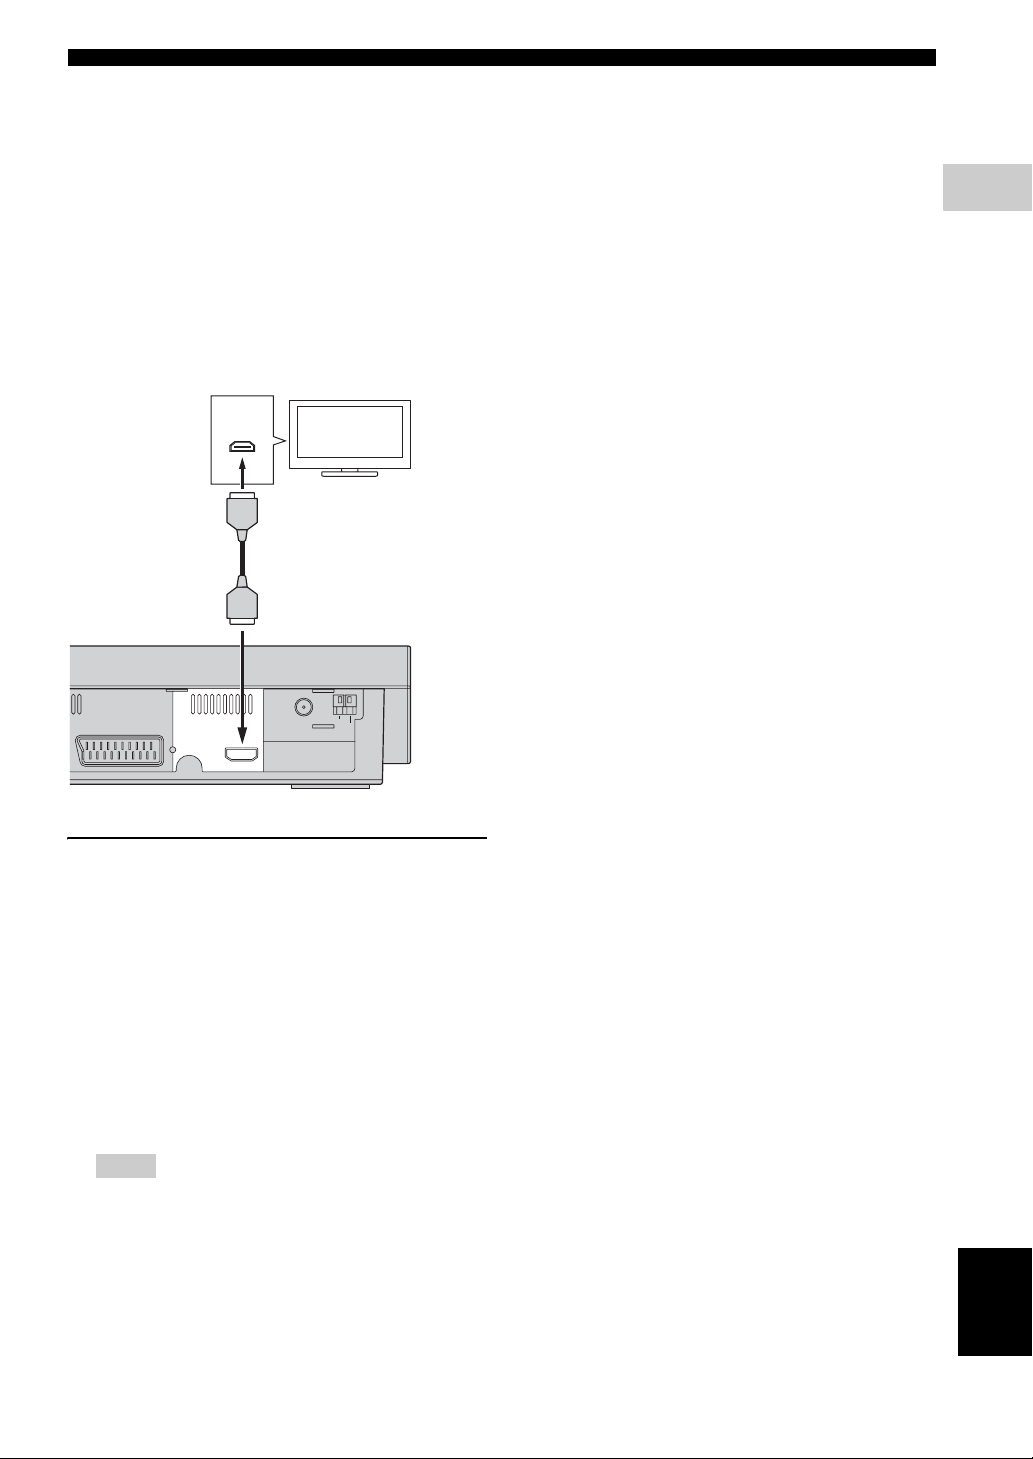
■ Connecting an HDMI component
HDMI (High-Definition Multimedia Interface) is the first
industry-supported, uncompressed, all-digital A/V (audio/
video) interface.
By connecting to an HDMI component (such as a TV),
you can enjoy standard, enhanced or high-definition video
as well as multi-channel digital audio using a single cable.
When used in combination with HDCP (High-bandwidth
Digital Content Protection), HDMI provides a secure
audio/video interface that meets the security requirements
of content providers and system operators.
For further information on HDMI, visit the HDMI website
at “http://www.hdmi.org/”.
HDMI
IN
TV
– Do not disconnect or connect the HDMI cable from
the DVD receiver or turn off the power of the
HDMI/DVI component connected to the HDMI
terminal of the DVD receiver while data is being
transferred. Doing so may disrupt playback or
cause noise.
2
PREPARATION
TUNER
AV MONITOR OUT
(
DVD ONLY
)
L
R
HDMI
GND
FM
AM
ANT
ANT
75Ω UNBAL
DVD receiver
Viewing and Listening to playback
from an HDMI component
1 Connect HDMI terminal of the DVD receiver to the
HDMI input terminal of your HDMI compatible
component using a commercially available HDMI
cable.
2 Select the appropriate audio output from [HDMI
AUDIO OUT] in [AUDIO SETUP PAGE] (see
page 36).
3 Select the appropriate video output from [HDMI
VIDEO] in [VIDEO SETUP PAGE] (see page 39).
Notes
– The DVD receiver is not compatible with HDCP-
incompatible HDMI or DVI components.
– You need a commercially available HDMI/DVI
conversion cable when you connect the DVD
receiver to other DVI components.
– When connecting an HDMI component, refer to
the instruction manual for the component.
English
15 En
Other connections
HDMI audio output
HDMI AUDIO OUT
*2,3
*2
PCM 2-channel Off
DVD-Video
CD/MP3/WMA/
®
DivX
DTS-CD
Audio format Analog output
*1
Dolby Digital Multichannel
Dolby Digital
2-channel
DTS
Multi-channel
DTS 2-channel Multi
MPEG
Multi-channel
MPEG 2-channel Multi
PCM 2-channel
*4
Multi
Stereo
*1
Multi
/Stereo Dolby Digital
*1
Multi
Stereo
*1
/Stereo DTS
*1
Multi
Stereo
*1
/Stereo MPEG
Dolby Digital
DTS
MPEG
Multi*1/Stereo PCM 2-channel
2-channel Multi*1/Stereo PCM 2-channel
*1
Multi-channel
2-channel Multi
Multi
Stereo
*1
/Stereo DTS
DTS
AUTO PCM OFF
*2,3
*2
*2,3
*2
*2,3
*2
VCD 2-channel Multi*1/Stereo PCM 2-channel
*1
SVCD
Multi-channel
2-channel Multi
*1
The audio output is automatically changed from multi-channel audio signals to downmixed stereo signals.
*2
If the connected HDMI component does not support bitstream signals (Dolby Digital, DTS, and MPEG), the audio output is
Multi
Stereo
*1
/Stereo MPEG
MPEG
*2,3
*2
automatically changed from bitstream signals to PCM signals.
*3
If the connected HDMI component does not support multi-channel audio signals, the audio output is automatically changed from
PCM multi-channel signals to PCM stereo signals and 48 kHz/16 bits signals or less.
*4
If the connected HDMI component does not support more than 48 kHz, the audio output is automatically changed to 48 kHz/16 bits
signals or less.
Note
You need to set [HDMI AUDIO OUT] (see page 36).
16 En

■ Connecting the FM/AM antennas
AM loop
antenna
1
Other connections
2
PREPARATION
FM antenna
2
TUNER
GND
FM
AM
ANT
ANT
75Ω UNBAL
HDMI
Ground (GND terminal)
For minimum interference, connect
the antenna GND terminal to a
good earth ground. A good earth
ground is a metal stake driven into
moist earth.
1 Connect an AM loop antenna to the AM ANT
terminal. Place the AM loop antenna on a shelf or
attach it to a stand or wall.
2 Connect an indoor FM antenna to the FM ANT
terminal. Extend the FM antenna and fix its ends to
the wall.
For better FM stereo reception, connect an external
FM antenna.
Notes
– Adjust the position of the antennas for optimal
reception.
– Position the antennas as far as possible from your
TV, VCR or other sources of radiation to prevent
unwanted interference.
17 En
English
Other connections
■ Connecting external AV components
If you connect external AV equipment such as a VCR, cassette deck or digital audio component to the following audio
terminals on the DVD receiver, you can enjoy those audio sources with the DVD receiver. Also, you can record AV
sources played on the DVD receiver using the recording equipment. This section provides some examples of other AV
equipment connections. For information on your AV equipment, refer to the manual provided.
TV
1
VCR (for example)
AUX IN
L IN
AL
DTS
ITAL
LINE OUT
LRL
R
AUDIO
2
Viewing and listening to playback
1 Connect the DVD receiver’s VIDEO output jack to
the VIDEO IN jack on your VCR. Or, connect the
VCR to the TV as shown.
2 Connect the DVD receiver’s AUX IN jacks to the
AUDIO OUT jacks on your VCR.
Before starting operation, press AUX to select
“ANALOG” in order to activate the input source.
Y
VIDEO
PB
VIDEO OUT
(DVD ONLY)
P
R
COMPONENT
S VIDEO
12
DVD receiver
Using the VCR for recording DVD
playback
Some DVDs are copy-protected. You cannot record or
dub protected discs using a VCR.
1 Connect the DVD receiver’s VIDEO output jack to
the VIDEO IN jack on your VCR. Or, connect the
DVD receiver’s S VIDEO output jack to the SVIDEO IN jack on your VCR.
2 Connect the DVD receiver’s LINE OUT jacks to the
AUDIO IN jacks on your VCR.
This will allow you to make analog stereo (two
channels, right and left) recordings.
18 En
Other connections
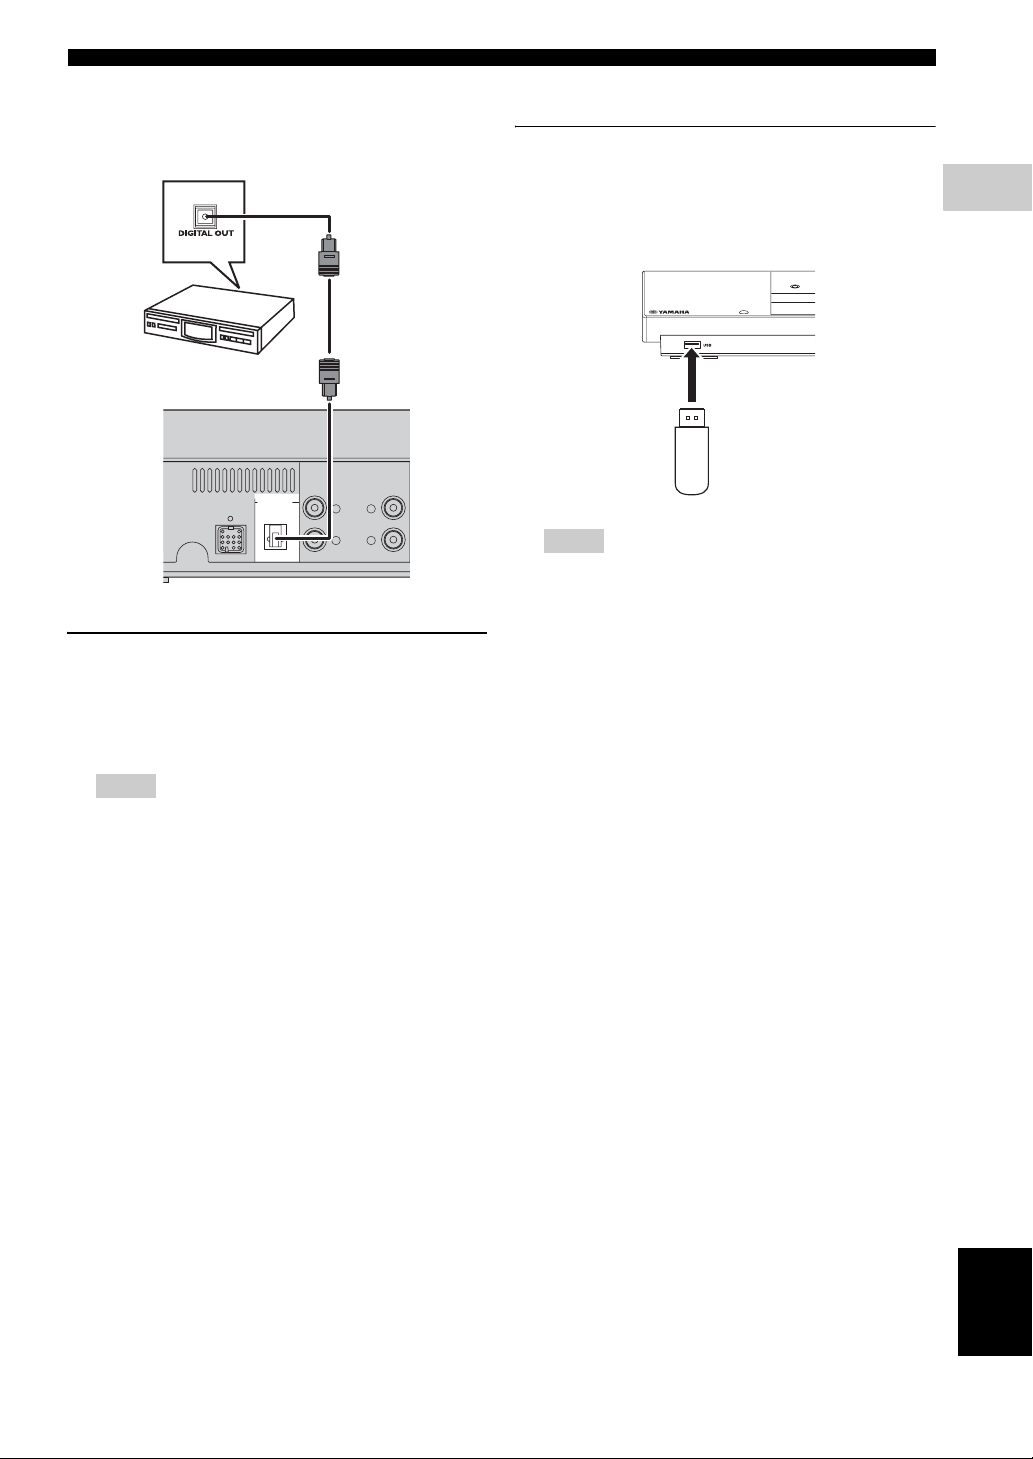
■ Connecting a digital audio component
Digital audio
component
DIGITAL IN
OPTICAL
PCM/DTS
q
DIGITAL
AUX IN
TO SUBWOOFER
SYSTEM
CONNECTOR
Listening to playback
Connect the DVD receiver’s OPTICAL DIGITAL IN jack
to the DIGITAL OUT jack on a digital audio component.
Before starting operation, press AUX repeatedly to select
“DIGITAL” in order to activate the input source.
LINE OUT
LRL
R
AUDIO
DVD receiver
■ Connecting a USB device
USB terminal
The DVD receiver has a USB terminal and can access
MP3, WMA and AAC files saved on your USB device.
Connect the USB terminal on the front panel of the DVD
receiver to a USB connector of your USB device.
DVD receiver
USB
device
Notes
– The DVD receiver may not recognize some USB
devices.
– For details about the USB features, see “Using a
USB device” on page 31.
2
PREPARATION
Notes
– You cannot hear or record the MP3-CD playback if
you use a digital connection.
– Always refer to the owner’s manual of the
connected component for complete connection and
usage details.
English
19 En
BASIC OPERATION
3
Getting started
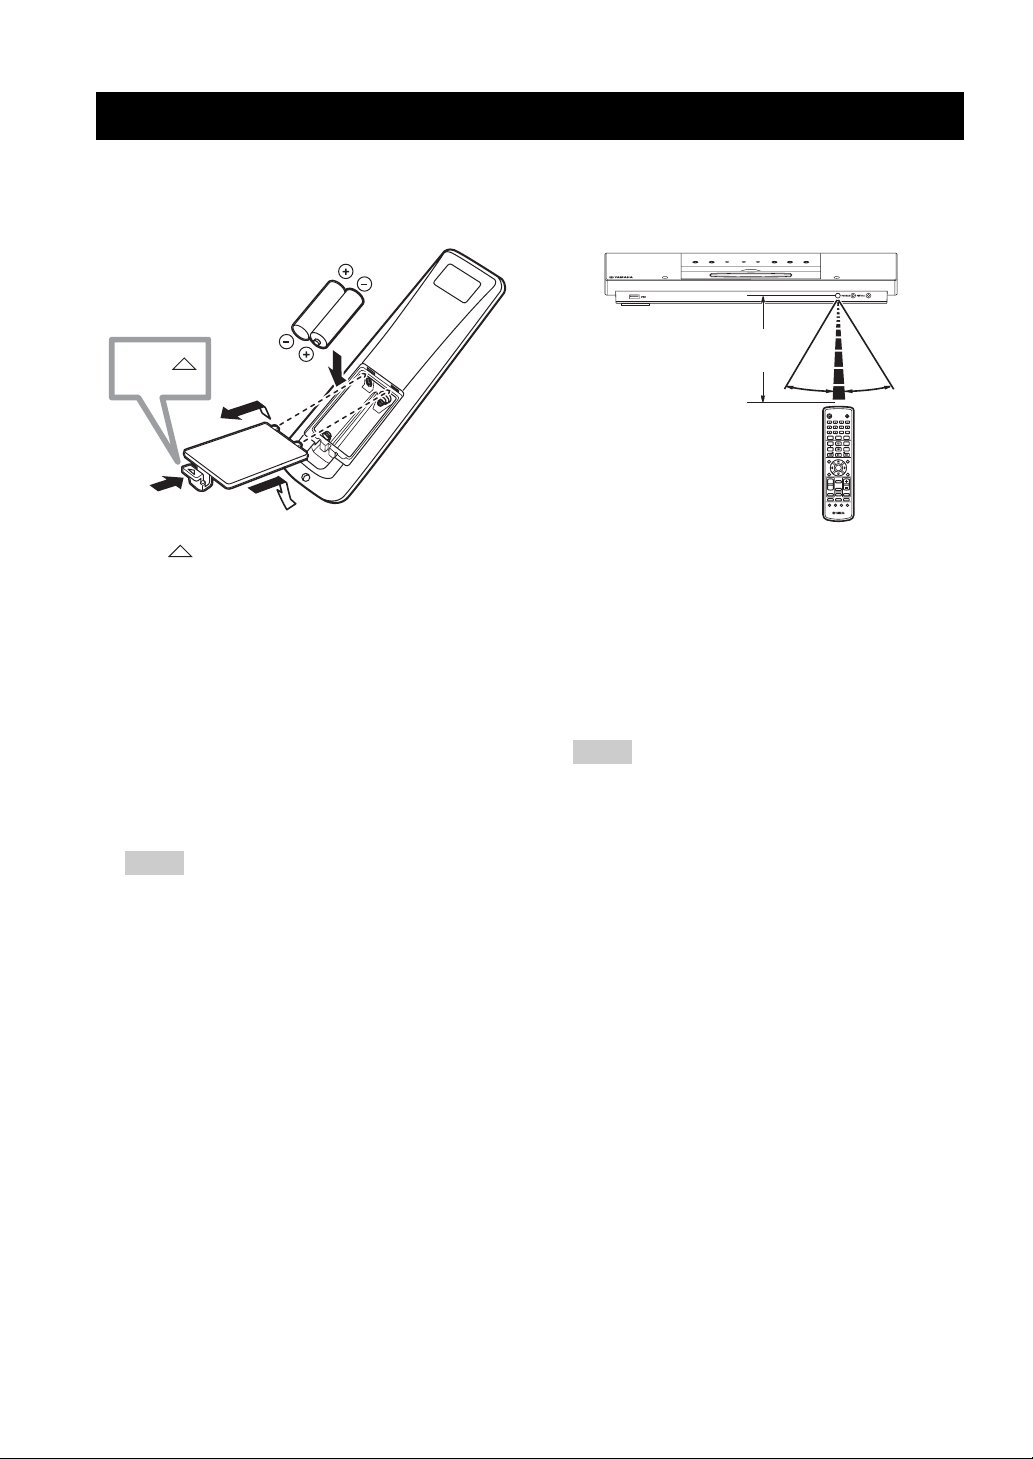
■ Inserting batteries into the remote control
Press
1
1 Press on the battery cover and open the cover.
2 Insert the two supplied batteries (AA, R06, UM-3)
into the battery compartment.
Insert the batteries according to the polarity markings
(+ and -).
3 Close the battery cover.
To replace the batteries
If the batteries grow old, the effective operation distance
of the remote control decreases considerably. If this
happens, replace the batteries with two new ones as soon
as possible.
Notes
– Do not use an old battery together with new one.
– Do not use different types of batteries (for
example, alkaline and manganese) together. Each
type of battery has its own characteristics even if
they are similar in shape.
– If the batteries run out, immediately remove them
from the remote control to prevent an explosion or
acid leak.
– Dispose of the batteries according to the regional
regulations.
– If a battery starts leaking, dispose of it
immediately.
Be careful not to let leaking battery acid come into
contact with your skin or clothing. Before inserting
new batteries, wipe the compartment clean.
– Replace the batteries within two minutes to
preserve the memory in the remote control.
2
■ Using the remote control
Use the remote control within 6 m of the DVD receiver
and point it toward the remote control sensor.
Within 6 m
30˚ 30˚
STANDBY/ON
EJECT
DIMMER
SLEEP
BASS TREBLE
NIGHT
FREQ/TEXT
PROG
REPEAT
PTY SEEK
MODE START
A-B
SHUFFLE
PRESET PRESET
ON SCREEN
MENU
ENTER
TOP MENU
SET UP
/RETURN
AREA
DIRECT
MODE
ENHANCER
DVD/CD
SURROUND
MUTE
TUNER
AUX
USB
SUBTITLE
ANGLE ZOOM AUDIO
1 Use the input selection buttons on the remote control
to select the mode you wish to control (for example
DVD/CD).
→ The selected source mode appears in the display
panel.
2 Select the desired function (for example, h or b /
a).
Notes
– Be careful not to spill liquid on the remote control.
– Be careful not to drop the remote control.
– Do not leave the remote control in the following
places:
– hot or humid places, such as near a heater or in a
bathroom
– extremely cold places
– dusty places
20 En
Getting started
■ Setting a TV
Notes
– Make sure you have completed all the necessary
connections (see “Connecting a TV” on page 14).
– To return to the previous menu, press .
– To exit from the menu, press SET UP.
– If the settings you have selected are not
appropriate, you can reset all settings to the initial
factory settings (see “Restoring to the factory
defaults” on page 43).
1 Press DVD/CD.
→ “DVD/CD” appears in the display panel.
2 Turn on the TV and set to the correct video-in
channel.
→ You should see the background screen on the TV.
–
Usually this channel is between the lowest and
highest channels and may be called FRONT, A/V IN
or VIDEO. See your TV manual for more details.
–
Or, you may go to channel 1 on your TV, then press
the Channel down button repeatedly until you see the
Video In channel.
–
Or, the TV remote control may have a button or
switch that chooses different video modes.
Selecting the TV type
In order for a DVD to play on this DVD receiver, the color
system of the DVD, the TV and the DVD receiver should
match. Before changing the TV system, determine the
color system of your TV.
1 In DVD/CD mode, press SET UP.
2 Press / repeatedly to select [VIDEO SETUP
PAGE].
4 Press / to highlight one of the options below:
PA L – Select this if the connected TV has the PAL
color system. It will change the video signal of an
NTSC disc and output it to PAL format.
NTSC – Select this if the connected TV has the NTSC
color system. It will change the video signal of a PAL
disc and output it to NTSC format.
MULTI – Select this if the connected TV is compatible
with both NTSC and PAL (multisystem). The output
format will be in accordance with the video signal of
the disc.
5 Select a setting and press ENTER.
–
Follow the instructions shown on the TV to confirm
the selection (if any).
–
If a blank/distorted TV screen appears, wait for 15
seconds for auto recovery to activate.
Selecting color system by using the
remote control
STANDBY/ON
ON SCREEN
SET UP
DIMMER
BASS TREBLE
FREQ/TEXT
REPEAT
PTY SEEK
MODE START
SHUFFLE
A-B
PRESET PRESET
ENTER
AREA
DIRECT
MODE
ENHANCER
SURROUND
DVD/CD
TUNER
AUX
SUBTITLE
ANGLE ZOOM AUDIO
EJECT
SLEEP
NIGHT
PROG
MENU
TOP MENU
/RETURN
MUTE
USB
AUDIO
3
BASIC OPERATION
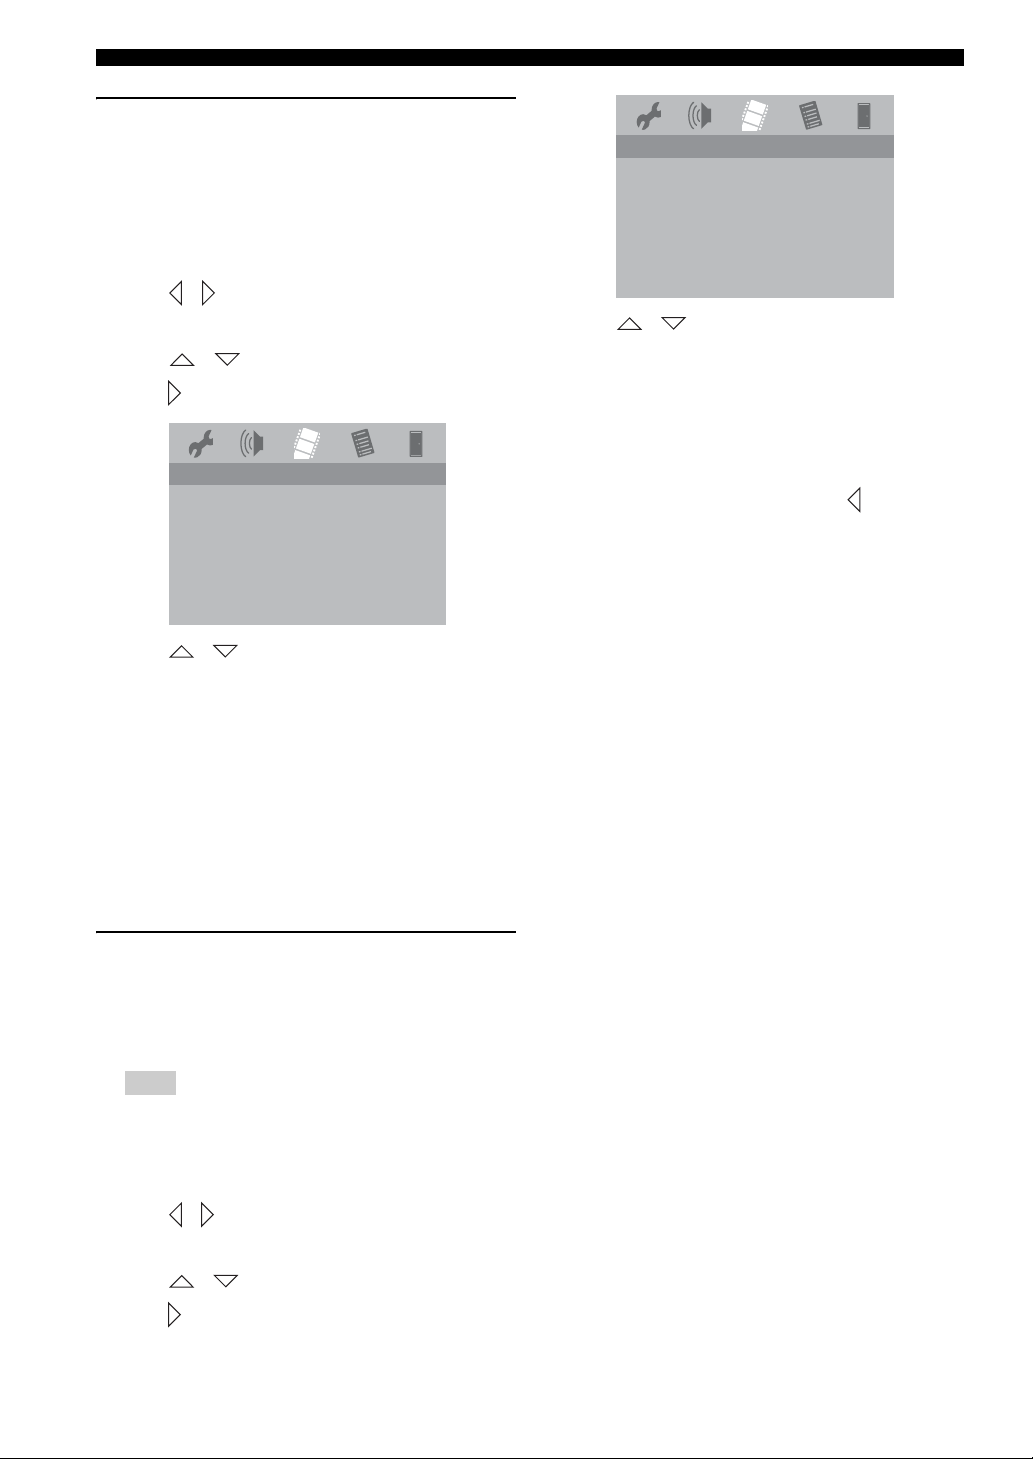
3 Press / to highlight [TV TYPE], then press
.
VIDEO SETUP PAGE
TV TYPE PAL
TV DISPLAY NTSC
PICTURE SETTING MULTI
ADV PICTURE
PROGRESSIVE
COMPONENT
1 If a disc is inserted, press to eject the disc.
2 Press , then press AUDIO.
→ If the default setting of the color system is NTSC,
it will be changed to PA L.
→ If the default setting of the color system is PAL, it
will be changed to NTSC.
English
21 En
Getting started
Setting the TV display
Set the aspect ratio of the DVD receiver according to the
TV you have connected. The format you select must be
available on the disc. If it is not, the TV display setting
will not affect the picture during playback.
1 In DVD/CD mode, press SET UP.
2 Press / repeatedly to select [VIDEO SETUP
PAGE].
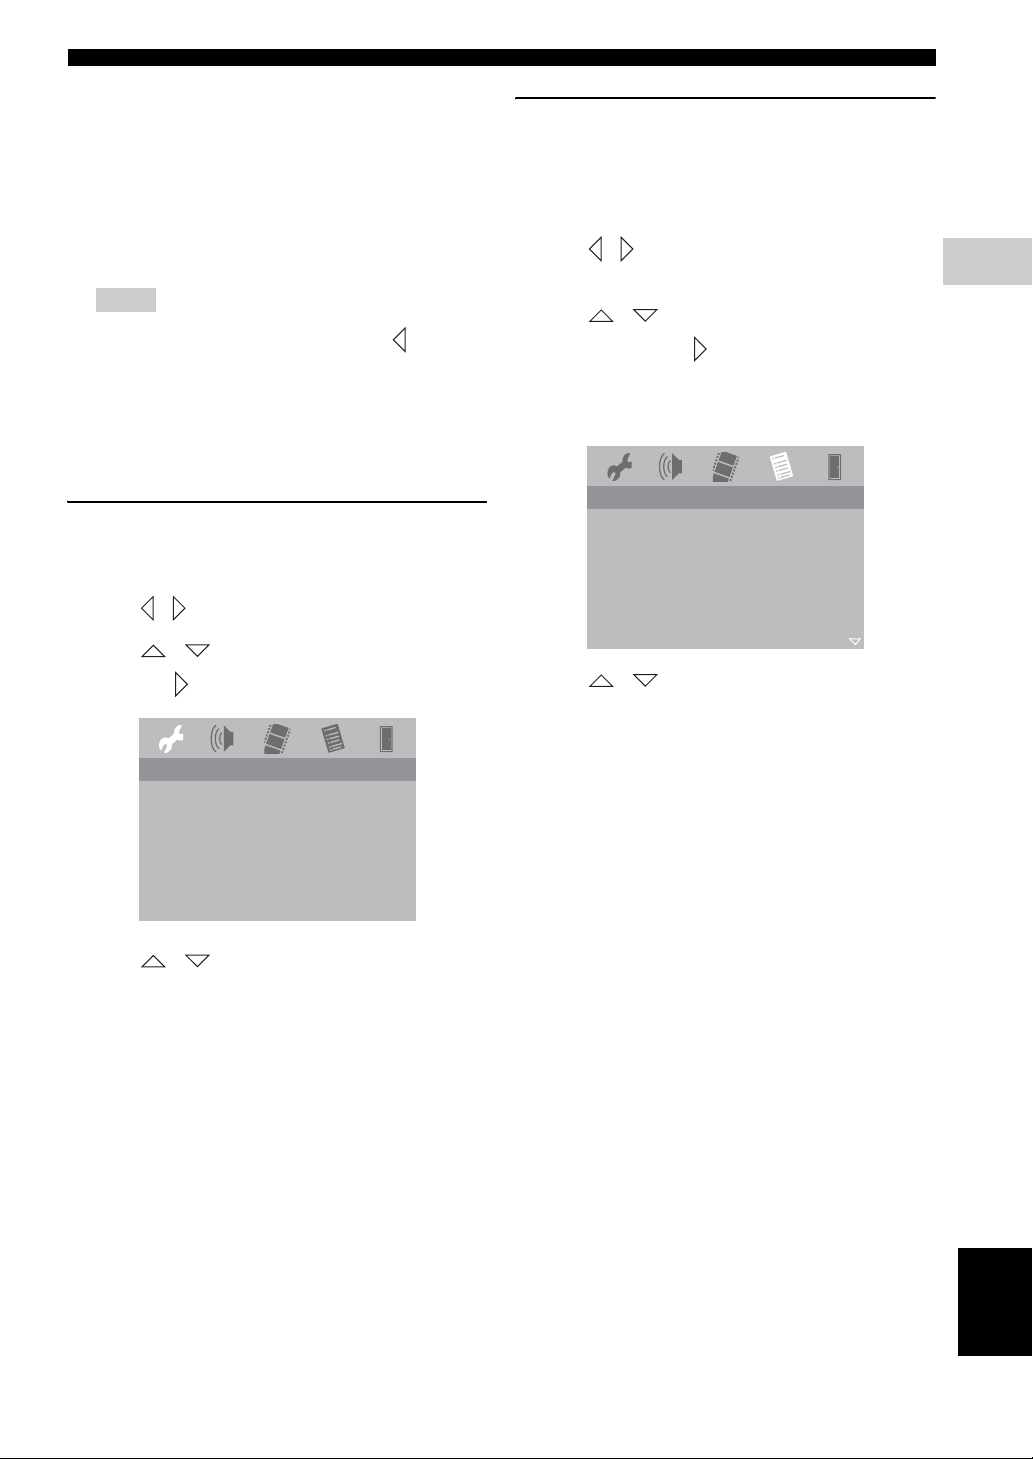
3 Press / to highlight [TV DISPLAY], then
press .
VIDEO SETUP PAGE
TV TYPE
TV DISPLAY
PICTURE SETTING
ADV PICTURE
PROGRESSIVE
COMPONENT YUV
RGB
4 Press / to highlight one of the options below:
YUV – Select this for Y P
B PR or S-Video
connections.
RGB – Select this for AV MONITOR OUT
connections.
VIDEO SETUP PAGE
TV TYPE
TV DISPLAY 4:3 PAN SCAN
PICTURE SETTING 4:3 LETTER BOX
ADV PICTURE 16:9
PROGRESSIVE
COMPONENT
4 Press / to highlight one of the options below:
4:3 PAN SCAN – Select this if you have a
conventional TV and want both sides of the picture to
be trimmed or formatted to fit your TV screen.
4:3 LETTER BOX – Select this if you have a
conventional TV. In this case, a wide picture with
black bands on the upper and lower portions of the TV
screen will be displayed.
16:9 – Select this if you have a wide-screen TV.
5 Select a setting and press ENTER.
Selecting the color system
(Europe and Russia models only)
This setting allows you to toggle the video signal output
between YUV (Y P
RGB (AV MONITOR OUT connections).
B PR or S-Video connections) and
5 Select a setting and press ENTER.
6 To return to the previous menu, press .
To exit the menu, press SET UP.
Note
AV MONITOR OUT (SCART) connections are only
available for Europe and Russia models.
1 In DVD/CD mode, press SET UP.
2 Press / repeatedly to select [VIDEO SETUP
PAGE].
3 Press / to highlight [COMPONENT], then
press .
22 En
■ Setting language preferences
You can select your preferred language settings so that
this receiver will automatically switch to your preferred
language whenever you load a disc. If the language
selected is not available on the disc, the disc’s default
setting language will be used instead. The OSD (on-screen
display) language for the system menu will remain as you
set it, regardless of various disc languages.
Notes
– To return to the previous menu, press .
– To exit from the menu, press SET UP.
– If the settings you have selected are not
appropriate, you can reset all settings to the initial
factory settings (see “Restoring to the factory
defaults” on page 43).
On-screen display (OSD) language
1 In DVD/CD mode, press SET UP.
2 Press / to select [GENERAL SETUP PAGE].
3 Press / to highlight [OSD LANGUAGE],
then press .
GENERAL SETUP PAGE
DISC LOCK ENGLISH
PROGRAM DANSK
OSD LANGUAGE DEUTSCH
SCREEN SAVER ESPAÑOL
AUTO STANDBY FRANÇAIS
DIVX(R) VOD CODE ITALIANO
NEDERLANDS
NORSK
Getting started
Audio, Subtitle and Disc menu
languages
1 Press s twice to stop playback (if any), then press
SET UP.
2 Press / repeatedly to select [PREFERENCE
PAGE].
3 Press / to highlight one of the options below
at a time, then press .
– [AUDIO] (disc’s soundtrack)
– [SUBTITLE] (disc’s subtitles)
– [DISC MENU] (disc’s menu)
PREFERENCE PAGE
AUDIO ENGLISH
SUBTITLE CHINESE
DISC MENU FRENCH
PARENTAL JAPANESE
PBC SPANISH
MP3/JPEG NAV PORTUGUESE
VR LIST POLISH
PASSWORD ITALIAN
4 Press / to select a language and press
ENTER to confirm.
If the language you want is not in the list, then select
[OTHERS].
Use the numeric keypad (0-9) on the remote control
to enter the 4-digit language code (see “LIST OF
LANGUAGE CODES” at the end of this manual”)
and press ENTER to confirm.
5 Repeat steps 3 and 4 for other settings.
3
BASIC OPERATION
4 Press / to select a language and press
ENTER to confirm.
English
23 En
Getting started
■ Setting speaker channels
You can adjust the delay times and volume level for
individual speakers. This adjustment lets you optimize the
sound of your system to best suit your surroundings and
setup.
Notes
– To return to the previous menu, press .
– To exit from the menu, press SET UP.
– If the settings you have selected are not
appropriate, you can reset all settings to the initial
factory settings (see “Restoring to the factory
defaults” on page 43).
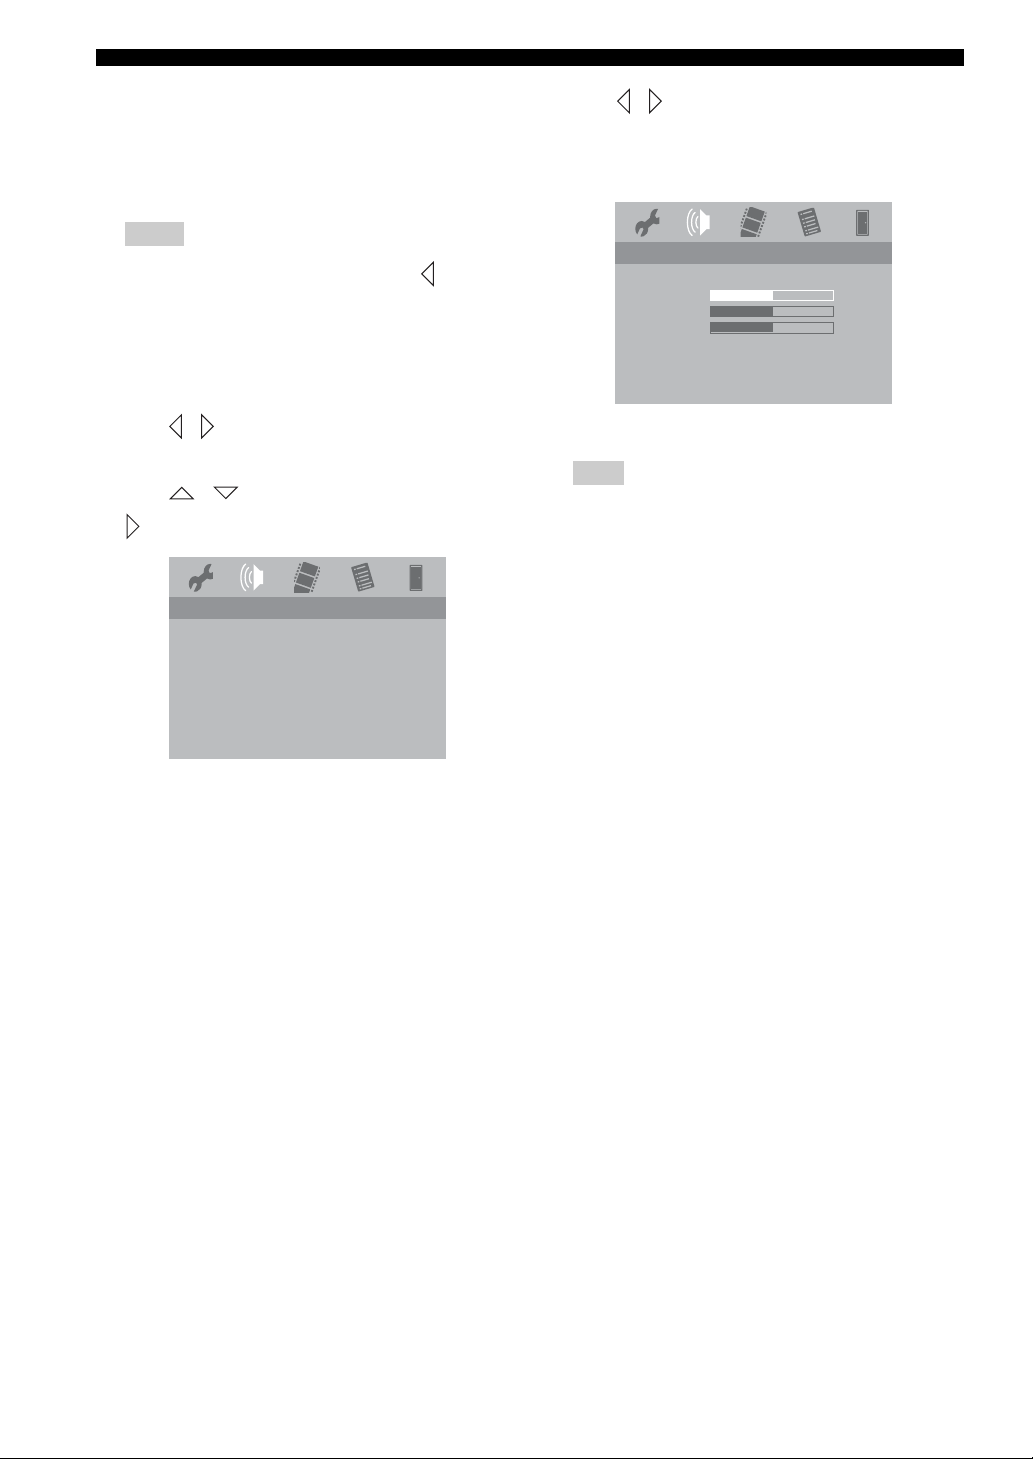
1 Press / repeatedly to select [AUDIO SETUP
PAGE].
2 Press / to highlight [SPEAKER], then press
.
AUDIO SETUP PAGE
HDMI AUDIO OUT
SPEAKER
CD UPSAMPLING
LIP SYNC
3 Press / to adjust the setting that best suit your
surround sound needs.
You can adjust the volume level for the individual
speakers from -6dB to +6dB.
SPEAKER VOLUME SETUP
FRONT LEFT
FRONT RIGHT
SUBWOOFER
0db
0db
0db
4 Press ENTER to confirm.
Note
A test tone will be automatically generated to help you judge
the sound level of each speaker.
→ The [SPEAKER] menu appears.
24 En
OPERATIONS
Disc operation
IMPORTANT!
– If the inhibit icon ( or ) appears on the TV
screen when a button is pressed, the function for
that button is not available on the current disc or at
the current time.
– DVD discs and players are designed with regional
restrictions. Before playing a disc, make sure the
disc is for the same zone as your receiver.
– Do not insert any objects other than discs into the
disc loading slot. Doing so may cause the disc
player to malfunction.
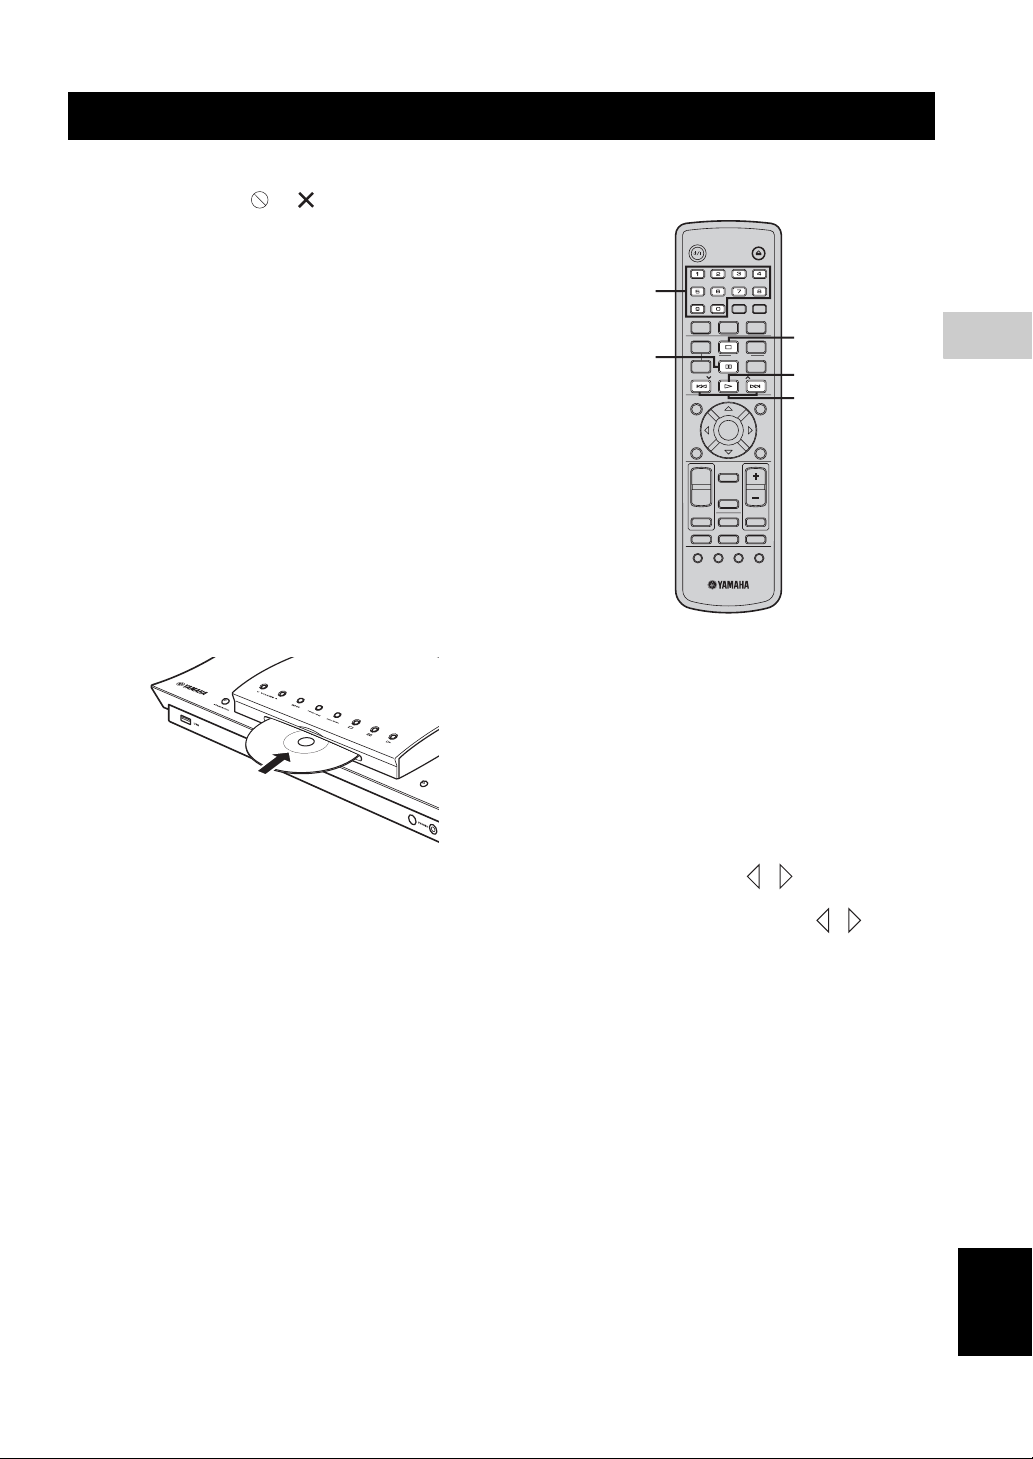
■ Playing discs
1 Press DVD/CD until “DVD/CD” appears in the display
panel.
2 Turn on the TV power and set to the correct Video In
channel (see “Setting a TV” on page 21).
→ You should see the background screen on the TV.
3 Insert the disc into the disc loading slot.
4 Playback will start automatically.
→ If a disc menu shows on the TV, see “Using the
disc menu” on page 27.
→ If the disc is locked by parental control, you must
enter your six-digit password (see “Restricting
playback with parental control” on page 41).
■ Basic playback controls
STANDBY/ON
Numeric
keypad (0-9)
e
ON SCREEN
SET UP
SUBTITLE
To pause playback
During playback, press e.
– To resume normal playback, press h.
To select another track/chapter
Press b / a or use the numeric keypad (0-9) to
enter a track/chapter number.
–
During repeat playback of a track/chapter, pressing
b / a replays the same track/chapter.
To search backward/forward
Press and hold b / a (or / ).
– To resume normal playback, press h.
–
While searching, press b / a (or / ) again to
increase the search speed.
To stop playback
Press s.
DIMMER
NIGHT
BASS TREBLE
FREQ/TEXT
PROG
REPEAT
PTY SEEK
MODE START
SHUFFLE
A-B
PRESET PRESET
ENTER
AREA
DIRECT
MODE
ENHANCER
MUTE
SURROUND
DVD/CD
TUNER
AUX
ANGLE ZOOM AUDIO
EJECT
SLEEP
USB
MENU
TOP MENU
/RETURN
s
h
b / a
4
OPERATIONS
25 En
English
Disc operation
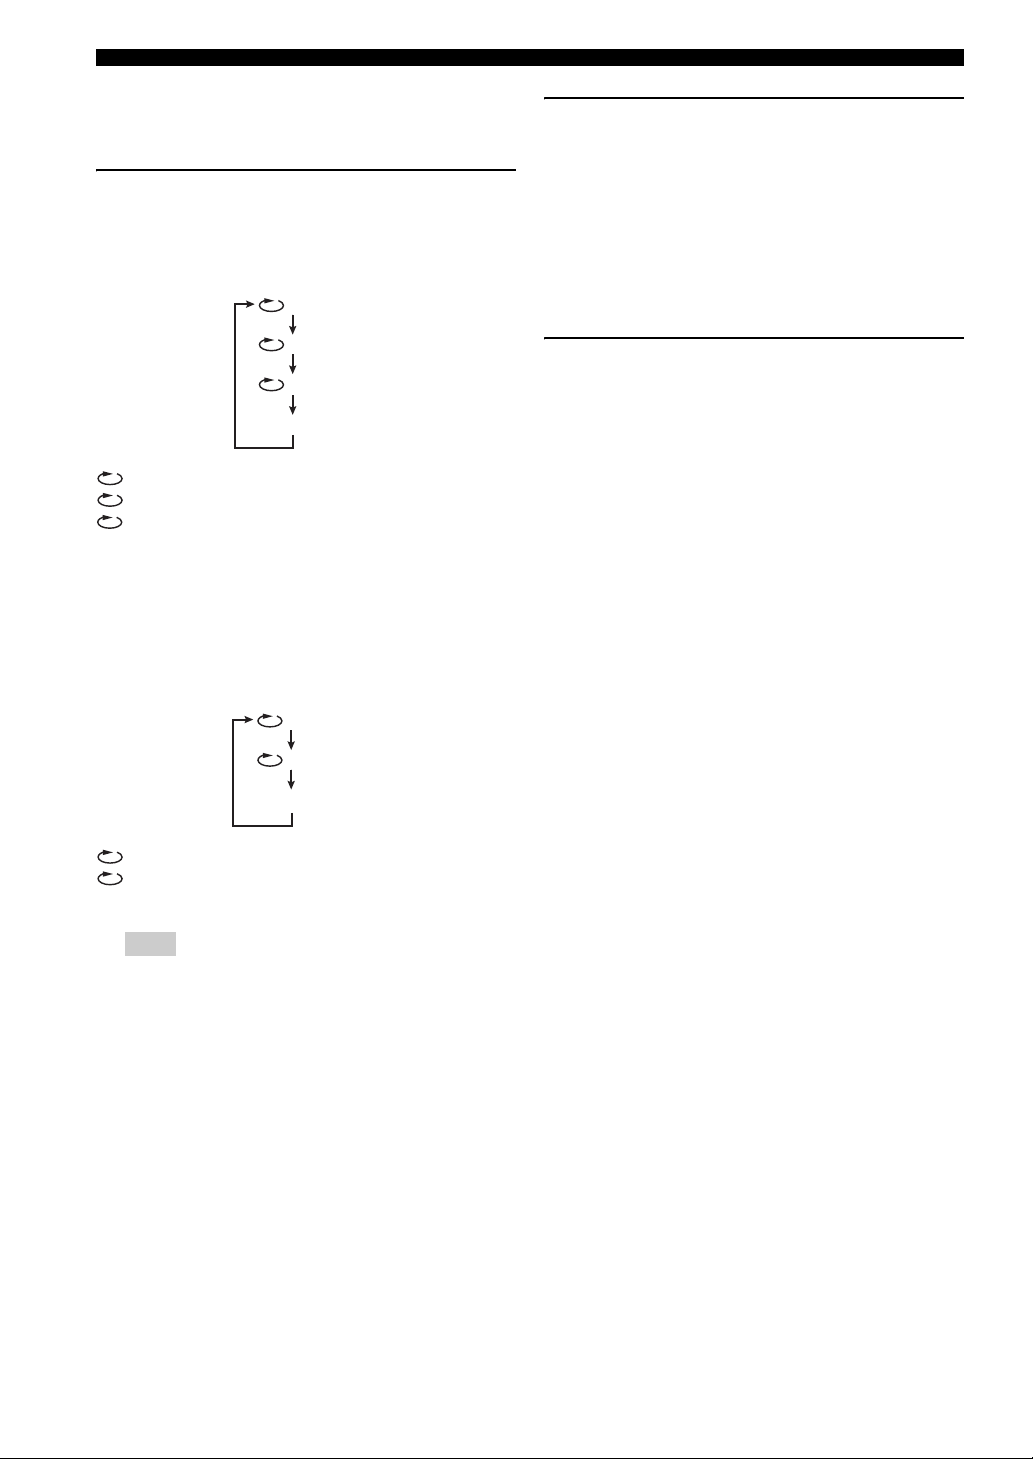
■ Selecting various repeat shuffle functions
Repeat playback
Repeat chapter/title/disc (DVD-Video)
Each time you press REPEAT, the display changes as
follows:
CHAPTER
TITLE
DISC
REPEAT OFF
CHAPTER*: repeats the current chapter.
TITLE*: repeats the current title.
DISC*: repeats the entire disc.
REPEAT OFF: exits repeat mode.
* This feature may not be available with some discs.
Repeat track/disc
(except DVD-Video)
Each time you press REPEAT, the display changes as
follows:
Repeating a section within a chapter/
track
1 While playing a disc, press A-B at your chosen
starting point.
2 Press A-B again at your chosen end point.
→ The section will now repeat continuously.
3 To exit the sequence, press A-B.
Shuffle (except VR format disc)
With the Shuffle function, you can play tracks in random
order.
– During playback, press SHUFFLE repeatedly to
select between SHUFFLE, SHUFFLE REPEAT
and SHUFFLE OFF.
→ The selected mode appears in the display for
several seconds.
– In SHUFFLE mode, all tracks on the disc currently
playing are played in random order.
– In SHUFFLE REPEAT mode, all tracks are played
in random order and continuously.
TRACK
DISC
REPEAT OFF
TRACK: repeats the current track.
DISC: repeats the entire disc.
REPEAT OFF: exits repeat mode.
Note
For VCD, repeat playback is not possible if the PBC
mode is selected.
26 En
■ Other operations for video playback (DVD/VCD/SVCD)
STANDBY/ON
FREQ/TEXT
PRESET PRESET
ON SCREEN
SUBTITLE
ON SCREEN
SET UP
SUBTITLE
ANGLE
Using the disc menu
Depending on the disc, a menu may appear on the TV
screen once you load the disc.
To select a playback feature or item
Use / / / or the numeric keypad (0-9)
on the remote control, then press ENTER to start
playback.
To access or remove the menu
Press MENU on the remote control.
Displaying disc information and the
current status
BASS TREBLE
REPEAT
A-B
AREA
MODE
SURROUND
AUX
ANGLE ZOOM AUDIO
DIMMER
PTY SEEK
MODE START
SHUFFLE
ENTER
DIRECT
ENHANCER
DVD/CD
TUNER
EJECT
SLEEP
NIGHT
PROG
MENU
TOP MENU
/RETURN
MUTE
USB
MENU
TOP MENU/
RETURN
AUDIO
ZOOM
Disc operation
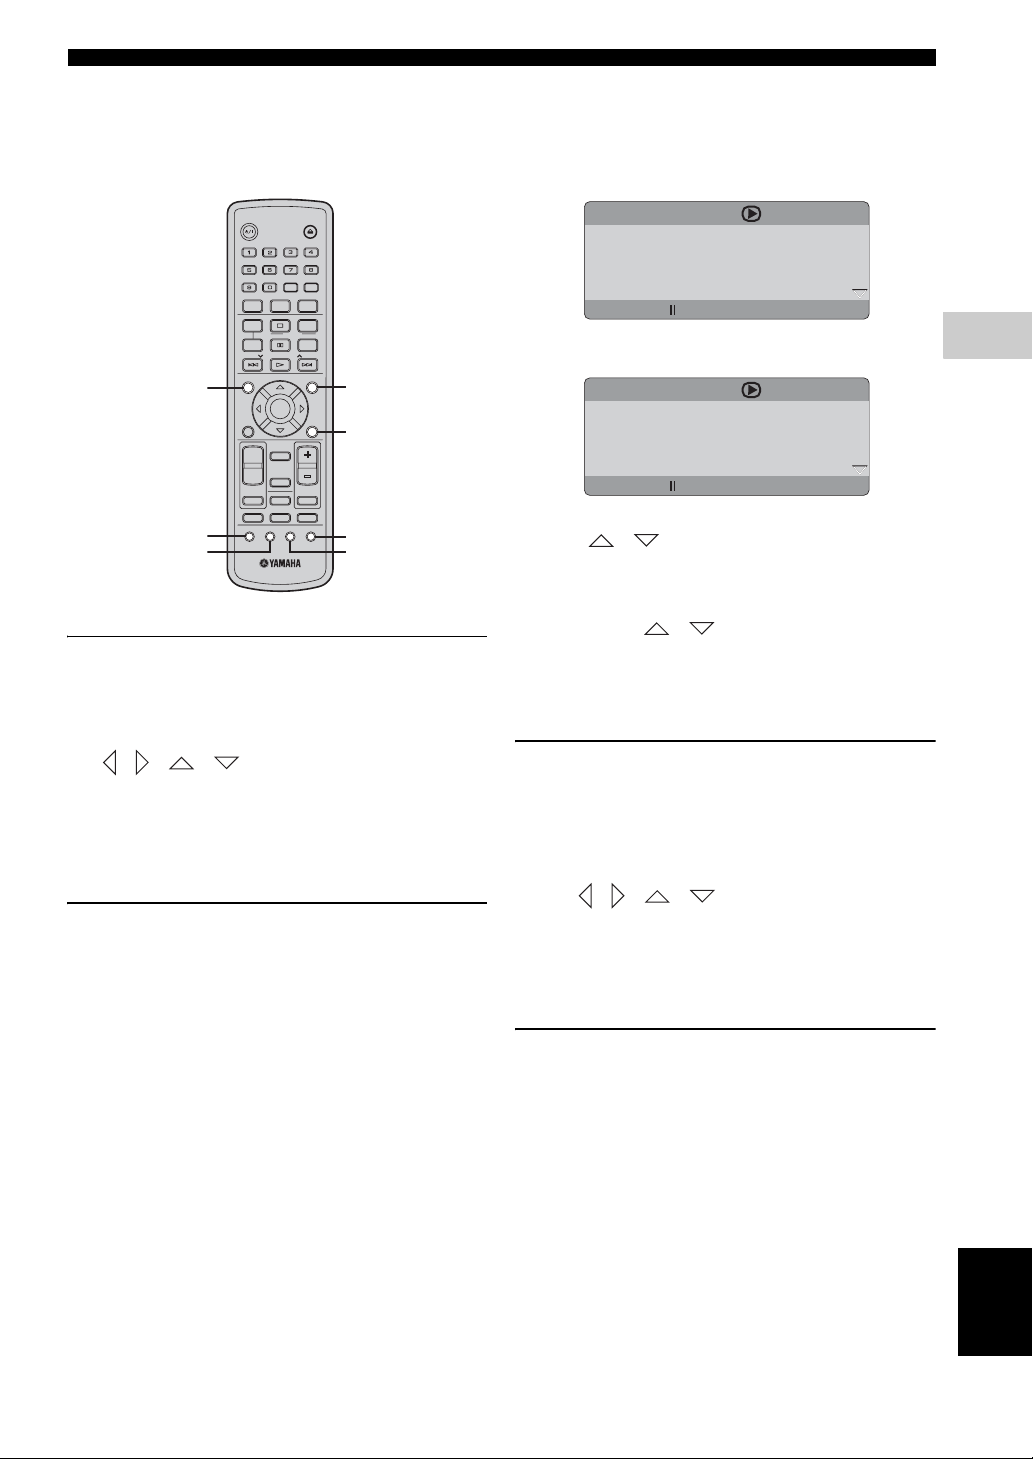
1 During playback, press ON SCREEN.
→ A list of available disc information appears on the
TV screen.
DVD
MENU
TITLE 02/14
CHAPTER 02/14
AUDIO 5.1CH
SUBTITLE ENG
BITRATE 16 TITLE ELAPSED 0:02:25
VCD/SVCD
MENU
TRACK 02/14
DISC TIME 0:49:17
TRACK TIME 0:03:43
REPEAT OFF
BITRATE 16 TOTAL ELAPSED 0:02:25
2 Press / to view the information and press
ENTER to access.
3 Use the numeric keypad (0-9) to enter the number/
time or press / to make the selection, then
press ENTER to confirm.
→ Playback will change to the chosen time or to the
selected title/chapter/track.
Zooming in
This function allows you to enlarge the picture on the TV
screen and pan through the enlarged picture.
1 During playback, press ZOOM repeatedly to select a
different zoom factor.
Use / / / to move through the zoomed
image.
→ Playback continues.
4
OPERATIONS
You can display disc information and the disc’s current
status (for example, title or chapter number, elapsed
playing time, audio/subtitle language). A number of
operations can be performed without interrupting disc
playback.
2 Press ZOOM repeatedly to return to the original size.
Resuming playback from the last
stopped point
You can resume playback of the last 10 discs, even if the
disc was ejected or this receiver’s power switched off.
1 Load one of the last played 10 discs.
→ “LOAD” appears.
2 Press h and the disc will be played back from the last
stop point.
English
To cancel the resume mode
In stop mode, press s again.
27 En

Disc operation
Advancing by frame
1 During playback, press e on the remote control.
→ Play will pause and sound will be mute.
2 Press e again to select the next picture frame.
3 To resume normal playback, press h.
Changing sound track language
This operation works only on DVDs (or a connected
digital audio component) with multiple language
soundtracks, you can change the language while playing a
DVD (or a connected digital audio component).
Press AUDIO repeatedly to select the available audio
languages.
For VCD - changing the audio channel
Press AUDIO repeatedly to select the available audio
channels provided by the disc (STEREO, MONO LEFT,
MONO RIGHT or MIX-MONO).
Changing subtitle language (DVD only)
This operation works only on DVDs with multiple subtitle
languages, you can change the language you want while
playing a DVD.
Press SUBTITLE repeatedly to select from the various
subtitle languages.
Viewing from another angle (DVD
only)
If the disc contains sequences recorded from different
camera angles, this function allows you to view the picture
from a number of different angles.
Press ANGLE repeatedly to select the desired angle.
→ Playback changes to the selected angle.
Selecting a title (DVD only)
Some DVDs may contain several titles. If the disc has
been recorded with a title menu recorded on it, you can
start playback from the selected movie title.
1 Press TOP MENU/RETURN.
→ The disc title menu appears on the TV screen.
2 Use / / / or the numeric keypad (0-
9) to select a play option.
3 Press ENTER to confirm.
Playback control (PBC) (VCD only)
PBC playback allows you to play Video CDs
interactively, following the menu on the display.
This function can also be accessed via the
‘PREFERENCE PAGE’ menu (see “PBC” on page 42).
For VCDs with Playback Control (PBC)
feature (version 2.0 only)
With playback stopped, press MENU to toggle between
‘PBC ON’ and ‘PBC OFF’.
→ If you select ‘PBC ON’, the disc menu (if available)
will appear on the TV. Use b / a or the numeric
keypad (0-9) to select a play option and press ENTER to
confirm.
→ If you select ‘PBC OFF’, the VCD will skip the index
menu and playback directly from the beginning.
28 En
 Loading...