

Page 1

YAMAHA
[f
Professional Series Digital Audio Tape Recorder
Digital AudioTape
OWNER'S MANUAL
MODE D'EMPOl
BEDIENUNGSANLEITUNG
Page 2

Thank you for purchasing the YAMAHA DTR2 Digital Audio Tape Recorder.
SAFETY INSTRUCTIONS
CAUTION
RISK OF ELECTRIC SHOCK
1
CAUTION; TO REDUOE THE RISK OF ELECTRIC
SHOCK, DO NOT REMOVE COVER (OR BACK) NO
USER-SERVICEABLE PARTS INSIDE, REFER
SERVICING TO QUALIFIED SERVICE PERSONNEL.
• Explanation of Graphical Symbols
DO NOT OPEN
The lightning flash v/ith arrowhead symbol, within an
equilateral triangle, is intended to alert you to the presence
of uninsulated "dangerous voltage” within the product's
enclosure that may be of sufficient magnitude to constitute a
risk of electric shock to persons.
The exclamation point within an equilateral triangle is
intended to alert you to the presence of important operating
and maintenance (servicing) instructions in the literature
accompanying the appliance.
1. IMPORTANT NOTICE; DO NOT MODIFY THIS UNIT!
FCC INFORMATION (U.S.A.)
This product, when installed as indicated in the instructions
contained in this manual, meets FCC requirements.
Modifications not expressly approved by Yamaha may void your
authority, granted by the FCC, to use the product.
2. IMPORTANT; When connecting this product to accessories and/
or another product use only high quality shielded cables. Cable/
s supplied with this product MUST be used. Follow all installation
instructions. Failure to follow instructions could void your FCC
authorization to use this product in the USA.
3. NOTE: This product has been tested and found to comply with
the requirements listed in FCC Regulations, Part 15 for Class "B"
digital devices. Compliance with these requirements provides a
reasonable level of assurance that your use of this product, in a
residential environment, will not result in harmful interference with
other electronic devices.
This equipment generates/uses radio frequencies and, if not
installed and used according to the instructions found in the
users manual, may cause interference harmful to the operation of
other electronic devices. Compliance with FCC regulations does
not guarantee that interference will not occur in all installations. If
this product is found to be the source of interference, which can
be determined by turning the product "OFF" and "ON", please try
to eliminate the problem using one of the following measures:
Relocate either the product generating the interference of the
device that is being affected by the interference.
WARNING: CHEMICAL
CONTENT NOTICE!
The solder used in the manufacture of this product contains
LEAD. In addition, the electrical/electronic and/or plastic
(where applicable) components may also contain traces of
chemicals found by the California Health and Welfare
Agency (and possibly other entities) to cause cancer and/or
birth defects or other reproductive harm.
DO NOT REMOVE ANY ENCLOSURE COMPONENTS! There
are no user serviceable parts inside. All service should be
performed by a service representative authorized by Yamaha
to perform such service.
IMPORTANT MESSAGE: Yamaha strives to produce
products that are both user safe and environmentally
"friendly". We sincerely believe that our products meet
these goals. However, in keeping with both the spirit and the
letter of various statutes we have included the messages
shown above and others in various locations in this manual.
Utilize power outlets that are on different branch (circuit breaker
or fuse) circuits or install AC line filter/s.
In the case of radio or TV interference, reiocate/reorient the
antenna. If the antenna lead-in is 300 ohm ribbon lead, change
the lead-in to coaxial type cable.
If these corrective measures do not produce satisfactory results,
please contact your local retailer that is authorized to distribute
this type of product, if you cannot locate the appropriate retailer,
please contact Yamaha Corporation of America, Electronic
Service Division, 6600 Orangethorpe Ave., Buena Park, CA9G620
The above statements apply ONLY to those products distributed
by Yamaha Corporation of America or its subsidiaries.
For Canada model
THIS DIGITAL APPARATUS DOES NOT EXCEED THE OLASS B'
LIMITS FOR RADIO NOISE EMISSIONS FROM DIGITAL
APPARATUS SET OUT IN THE RADIO INTERFERENOE
REGULATION OF THE CANADIAN DEPARTMENT OF
COMMUNICATIONS.
Page 3

CAUTION: READ THIS BEFORE OPERATING
YOUR UNIT.
On drum life
It is recommended to replace the head drum with a new one
within about 1,500 hours of use.
1. This unit is a sophisticated.digitai audio tape recorder. To
ensure proper operation for the best possible performance,
please read this manual carefully.
2. Before using this unit for the first time, wait 1 to 2 hours after
plugging the AC power cord into the wall outlet.
3. Choose the installation location of your unit carefully. Avoid
placing it in direct sunlight or close to a source of heat. Also
avoid locations subject to vibration and excessive dust, heat,
cold or moisture. Keep it away from sources of hum such as
transformers or motors. If interference in TV or radio
reception occurs during operation, increase the distance
between the two components.
4. Do not open the cabinet as this may result in damage to the
deck or electrical shock, if a foreign object should drop into
the deck, contact your local dealer.
5. When removing the power plug from the wall outlet, always
pull directly on the plug; never pull the cord itself.
6. Do not apply excessive force when operating switches and
knobs.
7. When moving the deck, be sure to first pull out the power
plug and remove all cords connecting the deck to other
equipment.
8. Do not attempt to clean this unit with chemical solvents as
this may damage the finish. Use a clean, dry cloth.
9. If the unit does not work properly while in use, after turning
the POWER switch OFF, disconnect the AC power cord plug
from the AC outlet and wait for about 30 seconds. After that,
connect it again to operate.
Dew condensation
Dew is the moisture that collects on a cold object in a warm room.
Dew can form on the drum and head inside the tape deck
causing damage to tapes and head. This unit contains a dew
prevention heater. Once the unit is connected to an AC outlet,
the heater turns on to prevent dew from forming. It takes from 1
to 2 hours to remove dew. When dew is detected on the drum
and head, the "DEW" indicator appears and the unit does not
operate. Wait about 1 to 2 hours after the display returns to
normal before using the unit.
Dew forms easily.
In highly humid and steamy rooms.
When carrying the unit from a cold place to a warm room.
* Use the unit at room temperatures from 5° C to 35° C. Dew
forms especially easily in cold temperature regions.
Amplifier volume adjustment
Digital audio tapes produce considerably less noise than regular
records and cassette tapes, and are extremely quiet between
programs. Be careful not to raise the volume too high and
exceed the amplifier and speaker ratings.
Recommended amplifier input impedance is 600 ohms or higher.
Connecting an amplifier (or other external audio device) having
an input impedance that is too low may decrease the level of the
output.
Rack mount
The front panel of this unit conforms to the 2U size standards and
can directly be installed in the 19 inch rack. Ffowever, if the
space of the rack is small, remove 4 legs from the bottom panel,
then install the unit in the rack. If the rack is not well ventilated,
the temperature inside the rack becomes high. Be sure to keep
the rack well ventilated.
10. Be sure to read the “Troubleshooting” section of this manual
for advice on common operating errors before concluding
that your unit is faulty.
11. Keep this manual in a safe place for future reference.
Cleaning the head
When the head is slightly dirty, noise is heard or dropouts occur
during playback. If the head becomes excessively dirty, a signal
read error occurs during playback, and the sound cannot be
heard. At this time, the "WARNING" Indicator appears. If this
occurs, use a commercially available digital audio cleaning tape
or have your Yamaha dealer clean the head. After prolonged
use, the head may require replacement due to wear. Consult
your Yamaha dealer.
WARNING: THIS APPARATUS MUST BE EARTHED
IMPORTANT: The wires in this mains lead are coloured in
accordance with the following code;
Green- and -yellow: Earth
Blue: Neutral
Brown: Live
As the colours of the wires in the mains lead of this apparatus
may not correspond with the coloured markings identifying the
terminals in your plug proceed as follows;
The wire which is coloured green- and -yellow must be
connected to the terminal in the plug which is marked by the
letter E or by the safety earth symbol 4^ or coloured green or
green- and -yellow.
The wire which is coloured blue must be connected to the
terminal which is marked with the letter N or coloured black.
The wire which is coloured brown must be connected to the
terminal which is marked with the letter L or coloured red.
Page 4

TABLE OF CONTENTS
“1
Features....................................................................................4
Names of controls.....................................................................5
Connections
DAT (Digital Audio Tape)
Loading and unloading cassettes
Recording................................................................................16
............................................................................
..........
..............................................
...........................................
10
15
FEATURES
ARMS function allows you to program up to 30 tunes in
any desired order
APSS function skips to the beginning of previous/
subsequent tunes
Direct tune selection function allows you to quickly play
any tune by simply entering its number
ABS Search function allows you to locate any desired
position on the tape by its absolute time (elapsed time
from the start of the tape)
Repeat function repeatedly plays all the tunes on the
tape or in a program
Skip Playback function skips undesirable sections of
the tape
Automatic tune number recording function
automatically writes tune numbers on the tape during
recording
Convenient renumbering function allows you to
renumber tunes after editing
End Search function makes it easy to continue a
recording from the end of a previous recording
13
Start ID signals and tune numbers...........i..............................19
End ID signals.........................................................................20
Playback
Troubleshooting
Specifications........................................................................ 30
.................................................................................
......................................................................
Cue/Review function lets you listen to the sound while
fast-forwarding or rewinding
Fast search speed of up to 200 times the normal
playback speed
Usable sampling frequencies of 48 kHz, 44.1 kHz, and
32 kHz allow you to record/play a wide variety of digital
sources
Equipped with balanced type analog input/output jacks
(XLR-3-31/XLR-3-32)
Equipped with two types of digital jacks (coaxial pin
jack, optical connector)
Employs a theoretically distortion-free 1-bit A/D
converter in the A/D converter circuit, providing high-
grand sound quality
Combination of digital filter and 1-bit PDM D/A
converter provides superior sound quality
Two direct drive motors provide stable tape transport
22
29
Page 5
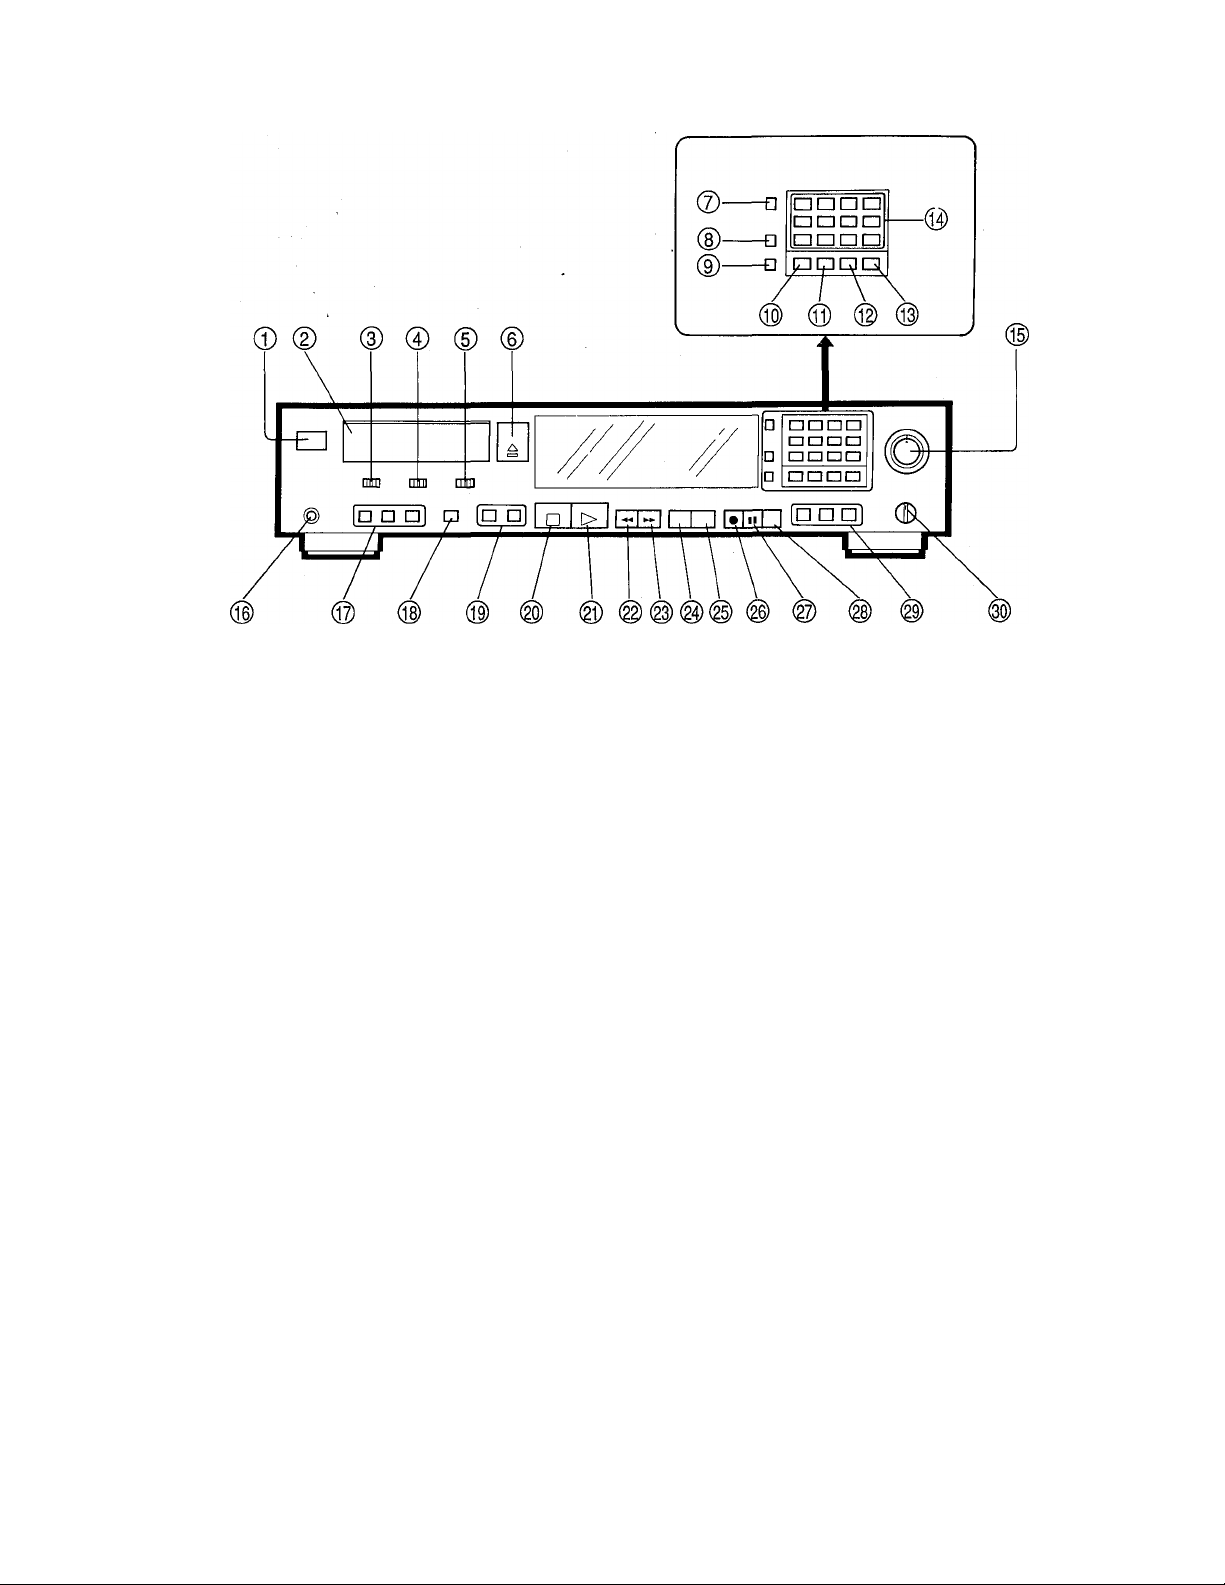
Front panel
NAMES OF CONTROLS
© POWER switch
Turns the power on and off.
© Cassette holder
Holds the digital audio tape.
® INPUT selector
Set to DIGITAL to record from an audio source
connected to the DIGITAL INPUT terminals. Set to
ANALOG to record from an audio source connected to
the ANALOG INPUT terminals.
© REC fs (Recording Sampling Frequency) selector
When recording is performed using the ANALOG
INPUT terminals, the sampling frequency can be
switched to 44.1 kHz or 48 kHz.
® SKIP PLAY switch
Switches the skip play function.
® OPEN/CLOSE button {±)
Press to open the cassette holder, press again to close
it.
® DISPLAY button
Selects either absolute time (ABS) or individual tune
playback time (PROG) or tape counter (COUNTER).
When tapes which contain "TOC" signals are used, the
total number of tunes and total playback time are
displayed.
® REPEAT button
Press to continuously repeat playback.
® PROGRAM button
Used for programming tunes.
® CLEAR button
Press to clear the input digit or programmed tune No.
® CALL button
Press to check the program contents.
® ABS (Absolute) TIME button
Press to input the specified time for absolute time
search.
® Digit buttons
Used to select desired tune numbers for program
playback or direct playback. These buttons are also
used to input the specified time for absolute time
search.
® REC (Record) LEVEL control
Used to adjust the recording level when recording from
an audio source connected to the ANALOG INPUT
jacks. This control can adjust the left and right channels
independently.
® PHONES jack
Connect stereo headphones to this jack.
® COUNTER RESET button
Press to reset the tape counter (0000).
• Only effective in counter display mode.
Page 6

START ID buttons
AUTO WRITE: Press to automatically write the start ID
signals and their tune numbers during recording.
WRITE: Used to write the start ID signal manually
during recording or playback.
ERASE: Press to erase the start ID signal.
(S)
RENUMBER button
Used to renumber the tunes in sequence from the
beginning of the tape.
SKIP ID buttons
WRITE: Press to write the skip ID signal. When the
SKIP PLAY switch is set to ON, playback skips from the
point where this button was pressed to the beginning of
the next tune.
ERASE: Press to erase the skip ID signal.
STOP button (■)
Press to stop the tape running.
PLAY button (►)
Press to start playback. When the REG button is
pressed, pressing this button or the PAUSE button
initiates recording.
END ID buttons
WRITE: Press this button at the end of a recording.
The end ID signal is written to indicate that point.
ERASE: Press to erase the end ID signal.
SEARCH: Press to search for the end ID signal. The
tape rapidly goes to the end of a recording and
recording can be easily started from that point.
PHONES LEVEL control
Adjusts the volume of the headphones.
REW (Rewind) button (-^)
Press to rewind the tape.
When this button is pressed during playback, playback
starts from the beginning of the current tune. To play
the previous tune, press this button again (APSS).
FF (Fast forward) button (►►)
Press to fast forward the tape.
When this button is pressed during playback, playback
starts from the beginning of the next tune (APSS).
REVIEW button
Press to rewind the tape while listening to its contents at
approximately 3 times the normal speed.
CUE button
Press to fast forward the tape while listening to its
contents at approximately 3 times the normal speed.
REC (Record) button (•)
Press to enter record stand-by mode. To start
recording, press the PLAY button or PAUSE button.
PAUSE button (II)
Press to stop playback or recording temporarily. To
resume playback or recording, press the PLAY button
or this button again.
REC MUTE button
Press to create a blank section while recording. A
blank section continues as long as the button is
pressed.
Page 7
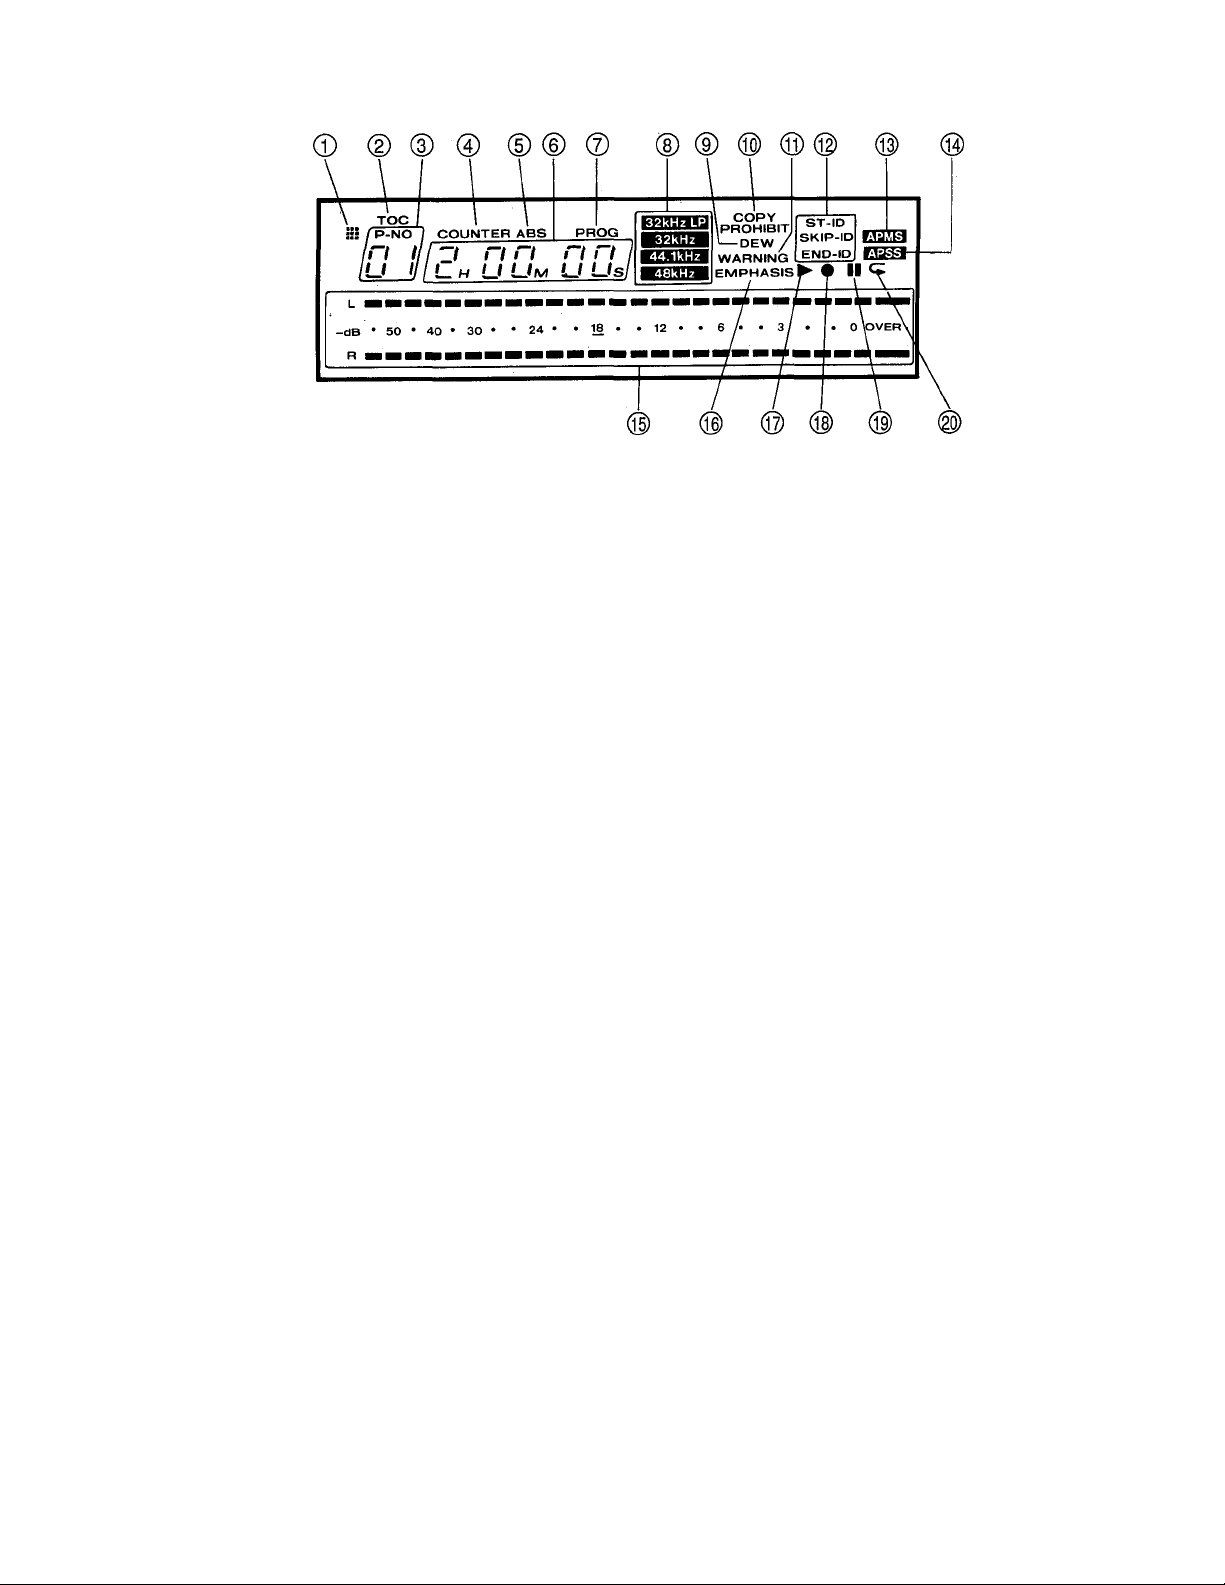
Display window
0 Remote control transmit indicator
Lights when the remote control transmitter is operated.
0 TOC (Table of Contents) indicator
Lights when a tape containing a TOC is played.
0 Tune number display
Indicates the tune number.
0 COUNTER indicator
Lights when the display is in counter mode.
0 ABS (Absolute time) indicator
Lights when the display shows ABS time (elapsed
playing time from the beginning of the tape).
© Counter/ABS time/Tune playing time/Programmed
tune number display
Displays the tape counter reading, ABS time, tune
playing time (elapsed playing time from the beginning
of the current tune) or programmed tune number.
© PROG indicator
Lights when the display shows the elapsed playing time
from the beginning of the current tune.
0
Sampling frequency indicators
Light according to the sampling frequency of the audio
signal.
If this occurs, use a commercially available digital audio
cleaning tape or have your Yamaha dealer clean the
head.
® ST-ID/SKIP-ID/END-ID indicators
Light when the start ID, skip ID or end ID signal is
detected, or flashes when it is written or erased.
0 APMS (Automatic Programmable Music Selector)
indicator
Appears when programming or during program
playback.
0 APSS (Auto Program Search System) indicator
Appears when the beginning of a tune is searched for.
0
Peak levei meter
Displays the recording level or playback level.
0
EMPHASIS indicator
Appears when tapes recorded with emphasis are
played, or when recording from a digital source on
which emphasis is applied. The emphasis function
reduces the noise of the high frequency fevel by
boosting the high frequency level during recording
(Pre-emphasis function) and lowering it during
playback (De-emphasis function). This unit
incorporates only the de-emphasis circuit. You can
play or record emphasized signals but cannot newly
apply emphasis to signals.
© DEW indicator
Appears when condensation occurs in this unit (drum,
head, etc.).
0 COPY PROHIBIT indicator
Appears when a recording cannot be performed with a
digital signal. In this case, record the source using the
ANALOG jacks.
0 WARNING indicator
If the head becomes excessively dirty, a signal read
error occurs during playback, and the sound cannot be
heard. At this time, the "WARNING" indicator appears.
© Play indicator (►)
Lights when the PLAY button is pressed.
0
Recording indicator (•)
Lights when the REG button is pressed.
0
Pause indicator (ii)
Lights when the PAUSE button is pressed, or in record
stand-by mode.
0 Repeat indicator (c;)
Lights during repeat playback.
Page 8
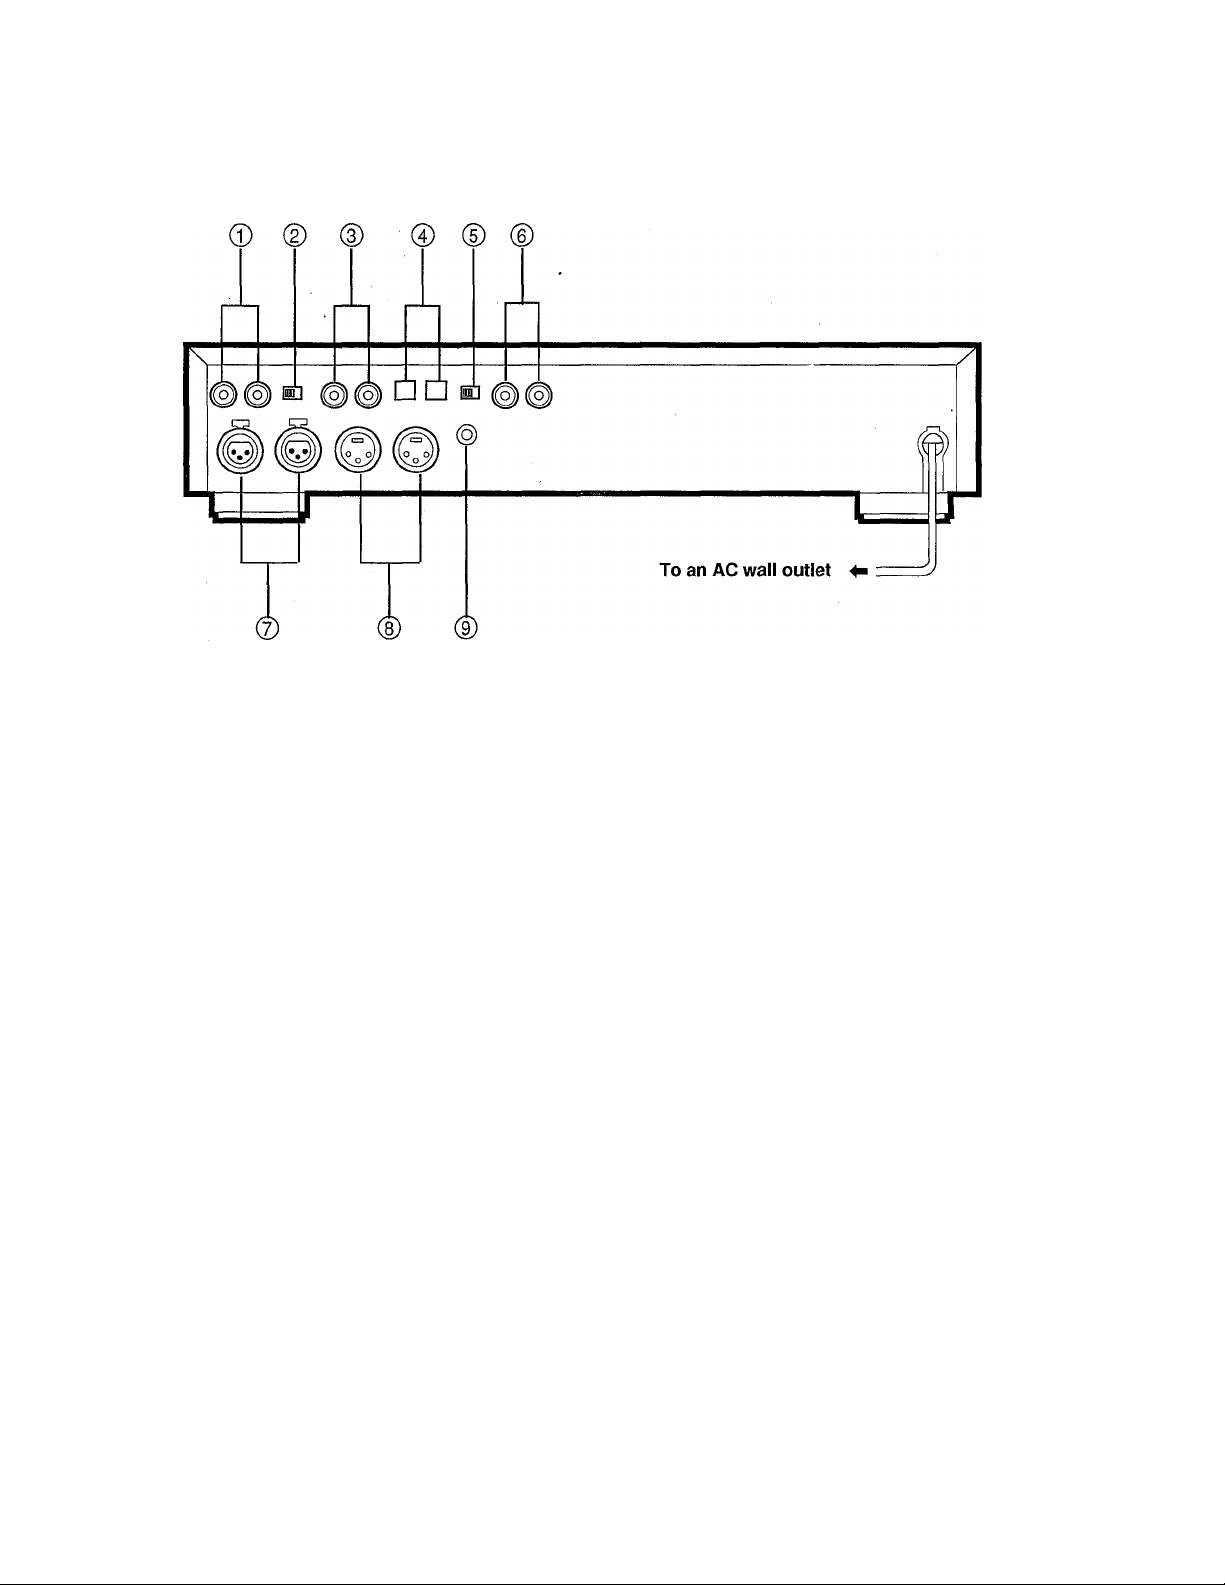
NAMES OF CONTROLS
Rear Panel
® ANALOG INPUT jacks (unbalanced type pin-jacks)
When these jacks are used for recording, adjust the
input level with the REC LEVEL control.
(D ANALOG INPUT selector
Used to select the analog input jacks between
balanced type (XLR) and unbalanced type.
(D ANALOG OUTPUT jacks (unbalanced type pin-jacks)
Maximum output level is 2 V.
© OPTICAL DIGITAL INPUT/OUTPUT jacks
These optical digital I/O jacks are based on EIAJ CP
340 specifications.
® DIGITAL INPUT selector
Used to select the digital input jacks between OPTICAL
and COAXIAL.
COAXIAL DIGITAL INPUT/OUTPUT jacks
These coaxial digital I/O jacks are based on lEC 958
specifications.
® ANALOG INPUT terminals (balanced type Cannon-
jacks)
The second pin is HOT.
© ANALOG OUTPUT terminals (balanced type
Cannon-jacks)
Reference level is +4 dBm.
Pin assignment of the balanced type (XLR-3-31/XLR-
3-32) connectors
REMOTE jack
Connect to the plug of the supplied remote control
transmitter.
Never connect a remote control unit other than the
supplied remote control transmitter.
8
Page 9

Wired remote control transmitter
® start ID buttons
(D Skip ID buttons
(D End ID buttons
d) Clear button
(D Program button
(D Repeat button
(Z)
Open/close button (±)
(D Stop button (■)
(D Play button (►)
® Record button (•)
(0) Pause button (ii)
® Remote control cable
Connect to the REMOTE jack on the rear panel.
® Absolute time button
® Display button
(0) Counter reset button
(is) Cue button
® Review button
® Fast forward button (►►)
(© Rewind button (-^)
NOTES:
• All buttons have the same functions as those on the
front panel.
• The remote control transmitter does not require any
battery. Power Is supplied from the REMOTE jack on
the rear panel.
(0) Renumber button
Page 10
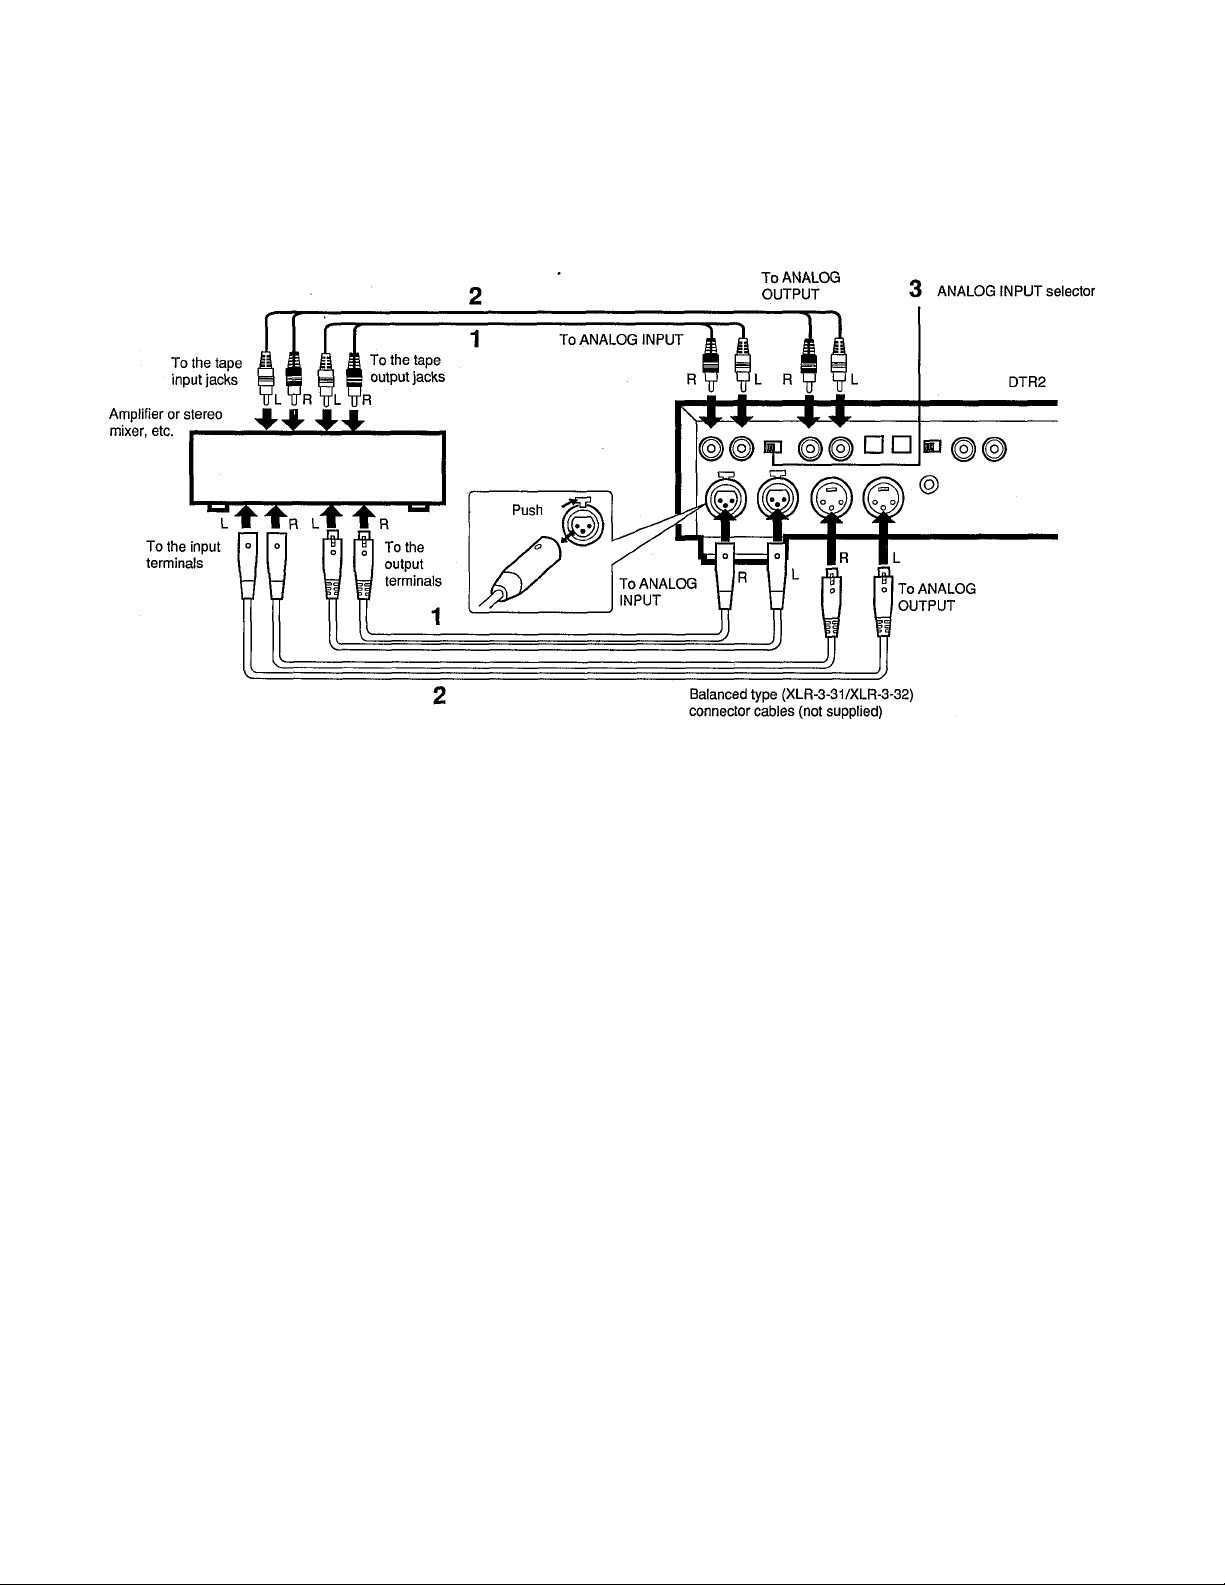
Connecting an analog audio component
CONNECTIONS
• Be sure to disconnect the power cords of both
components from the AC outlet before connecting.
• The same channels of this unit and the other
component should be connected properly; right to
right, and left to left.
1 Connect the ANALOG INPUT jacks (balanced type or
unbalanced type) of this unit to the analog output jacks
of the amplifier or stereo mixer, etc.
2 Connect the ANALOG OUTPUT jacks (balanced type or
unbalanced type) of this unit to the analog input jacks
of the amplifier or stereo mixer, etc.
3 Set the ANALOG INPUT selector. When using the
balanced type terminals, set this selector to the XLR
position. When using the unbalanced type jacks, set
this selector to the PIN position.
NOTE:
Make sure all connections are securely made. Loose
connections may cause intermittent sound or noise.
10
Page 11
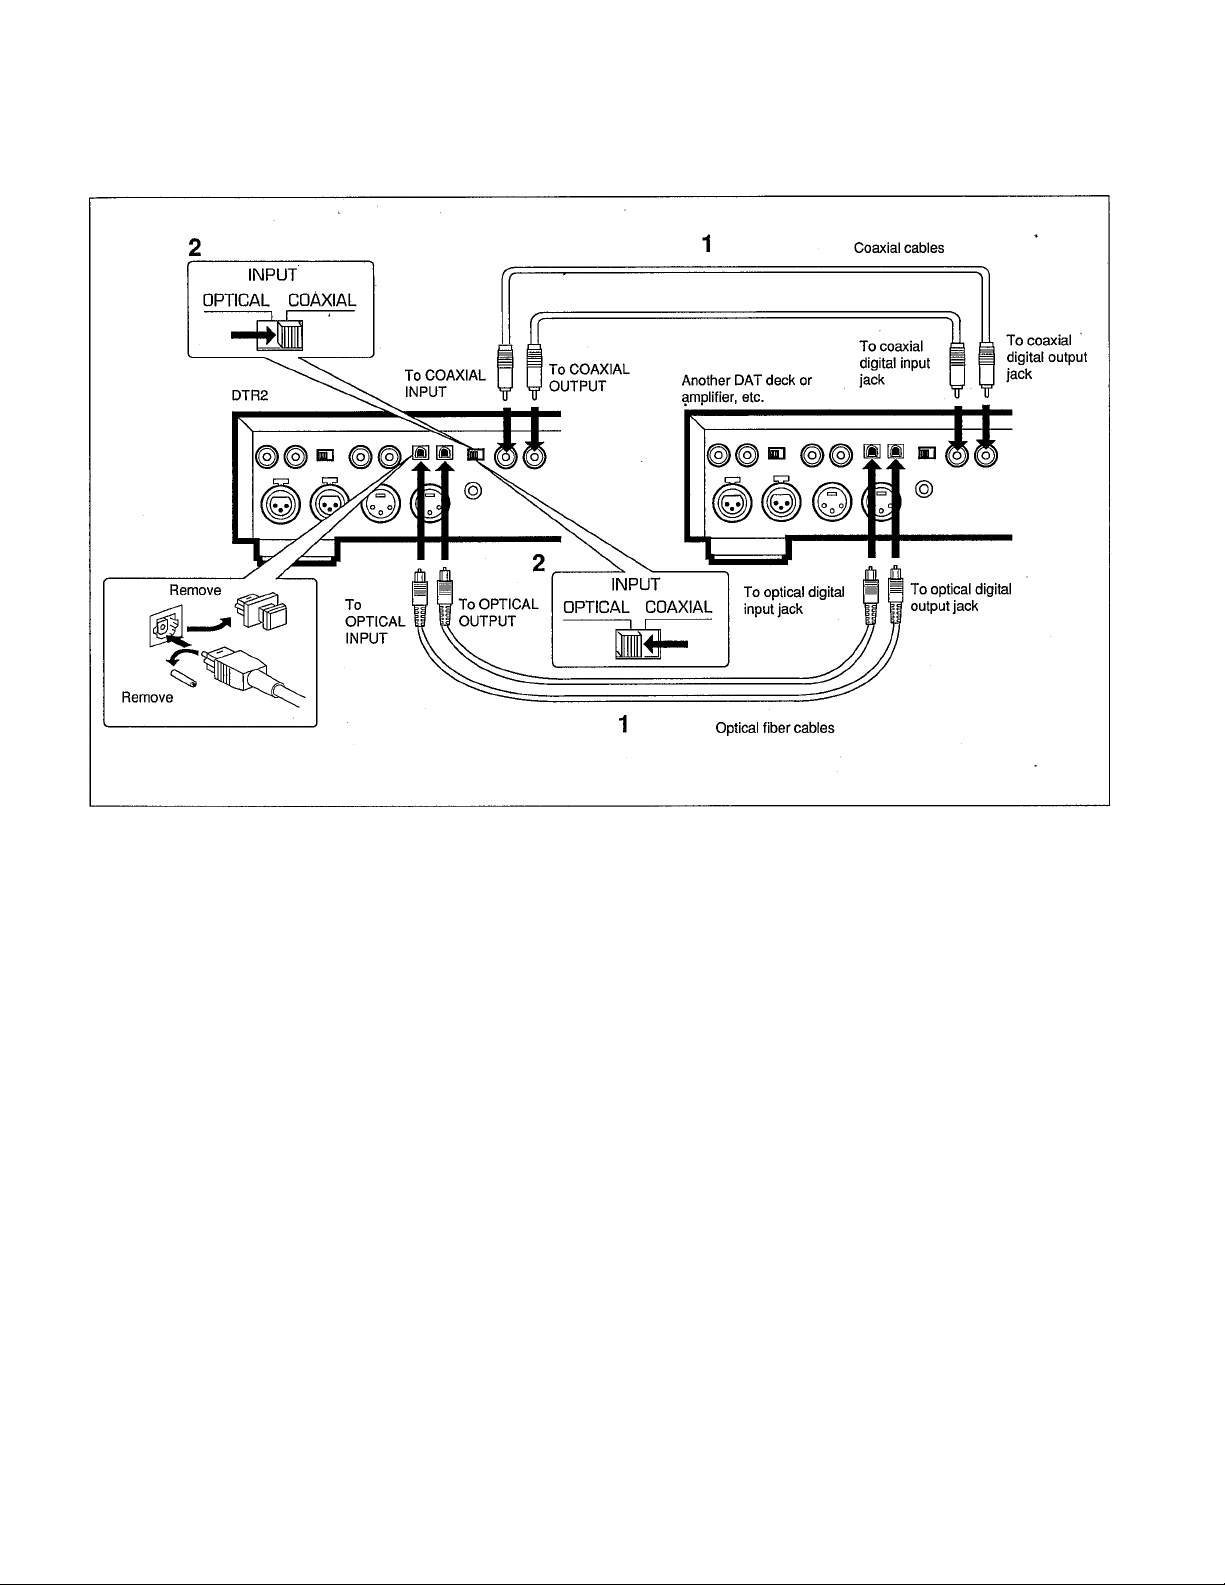
Connecting to another digital audio tape deck, or an amplifier, etc. which has digital jacks
• When this unit is connected to another DAT deck,
amplifier or other digital source, such as a CD player
with digital jacks, digital-to-digital recording will be
carried out.
• Be sure to disconnect the power cords of both
components from the AC outlet before connecting.
When using the COAXIAL DIGITAL jacks
1 Connect the COAXIAL DIGITAL INPUT jack to the
coaxial digital output jack and the COAXIAL DIGITAL
OUTPUT jack to the coaxial digital input jack of another
DAT deck, or amplifier, etc. using the coaxial cables.
2 Set the DIGITAL INPUT selector to the COAXIAL
position.
When using the OPTICAL DIGITAL jacks
1 Connect the OPTICAL DIGITAL INPUT jack to the
optical digital output jack and the OPTICAL DIGITAL
OUTPUT jack to the optical digital Input jack of another
DAT deck, or amplifier, etc. using the optical fiber
cables.
2 Set the DIGITAL INPUT selector to the OPTICAL
position.
NOTES:
• When the POWER switch is turned on, the inside of the
OPTICAL OUTPUT jack Illuminates red. This red light
(which is completely harmless) is used to send the
digital signal.
• Do not fold or bend the optical fiber cable because It
damages easily.
11
Page 12
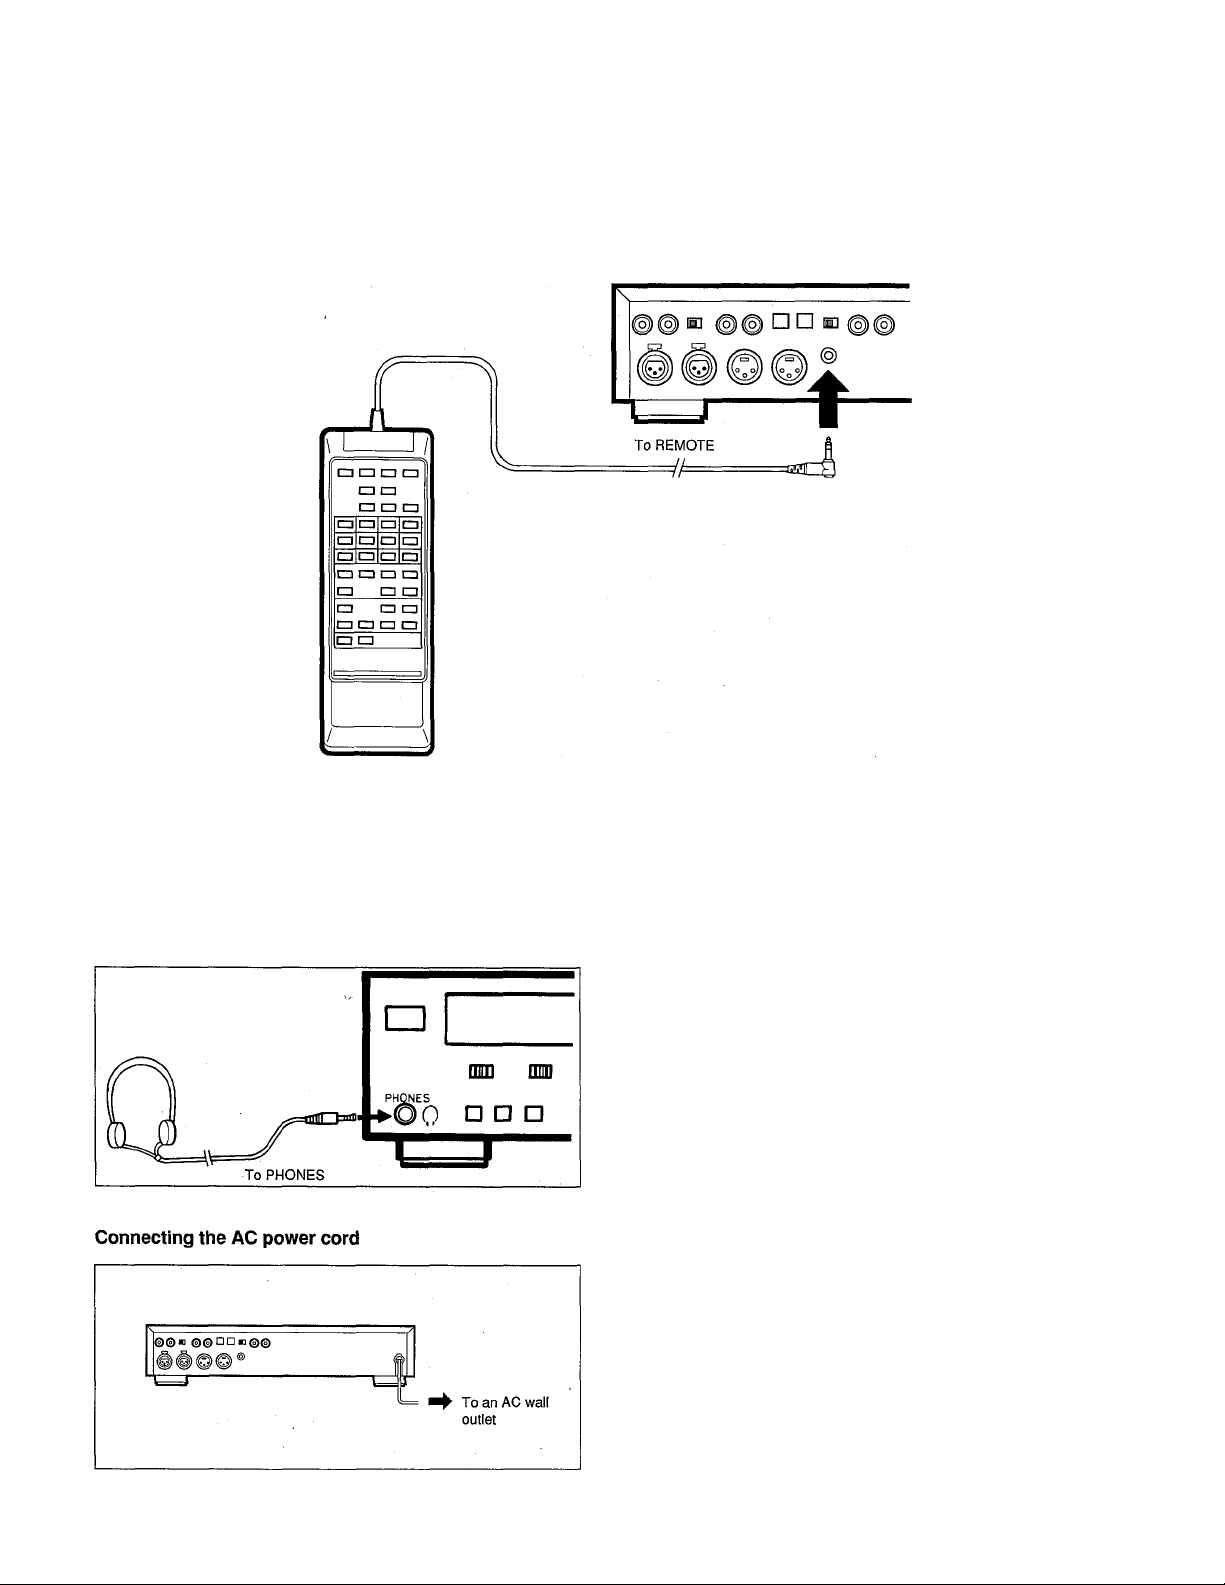
Connecting the remote control transmitter
By connecting the rennote control cable to the REMOTE jack on the rear panel, this unit can be operated with the remote
control transmitter.
NOTES:
• Do not strike or drop the remote control transmitter.
Also, do not get the remote control transmitter wet or
place it in a humid location.
Connecting headphones
• Do not connect this remote control transmitter to other
equipment.
• Connect only the supplied remote control transmitter to
the REMOTE jack.
For best results, use 8-ohm to 32-ohm headphones with a
standard stereo headphone plug 1/4” (6.3 mm).
The headphone volume can be adjusted with the PHONES
LEVEL control.
After connecting all equipment, connect the AC power cord
plug to an AC wall outlet.
12
Page 13

DAT (Digital Audio Tape)
DAT cassettes
Digital audio tape (DAT)
(OEm
Compact cassette tape
8.15 mm/Sec
A DAT cassette measures 2-7/8" x 7/16" x 2-1/8" (73 mm x
10.5 mm X 54 mm), nearly half the size of analog audio
cassettes. Furthermore, the case is constructed to prevent
the tape from being soratched or soiled.
DAT recording scheme
In the DAT system, the head is rotated at high speed and
mounted at an angle with respect to the direction of tape
travel.
The PCM (audio signal) area is recorded with the digital
signal which has been converted from the audio signal.
(PCM=Pulse Code Modulation). The subcode areas are
recorded with information such as the tune number,
individual tune elapsed time and absolute time. The
subcode areas enable accurate tune searching since the
signals in the subcode areas are read while the tape is
moving.
Sampling frequencies
There are 3 sampling frequencies used when converting
analog audio signals to digital signals: 48 kHz, 44.1 kHz
and 32 kHz.
48 kHz: Used for commercially available DAT music tapes
or standard recorded DAT tapes.
44.1 kHz: Used for oommercially available DAT music tapes
and CDs.
32 kHz: Used for satellite broadcasts.
At 32 kHz, this DAT deck can not record analog signals.
13
Page 14
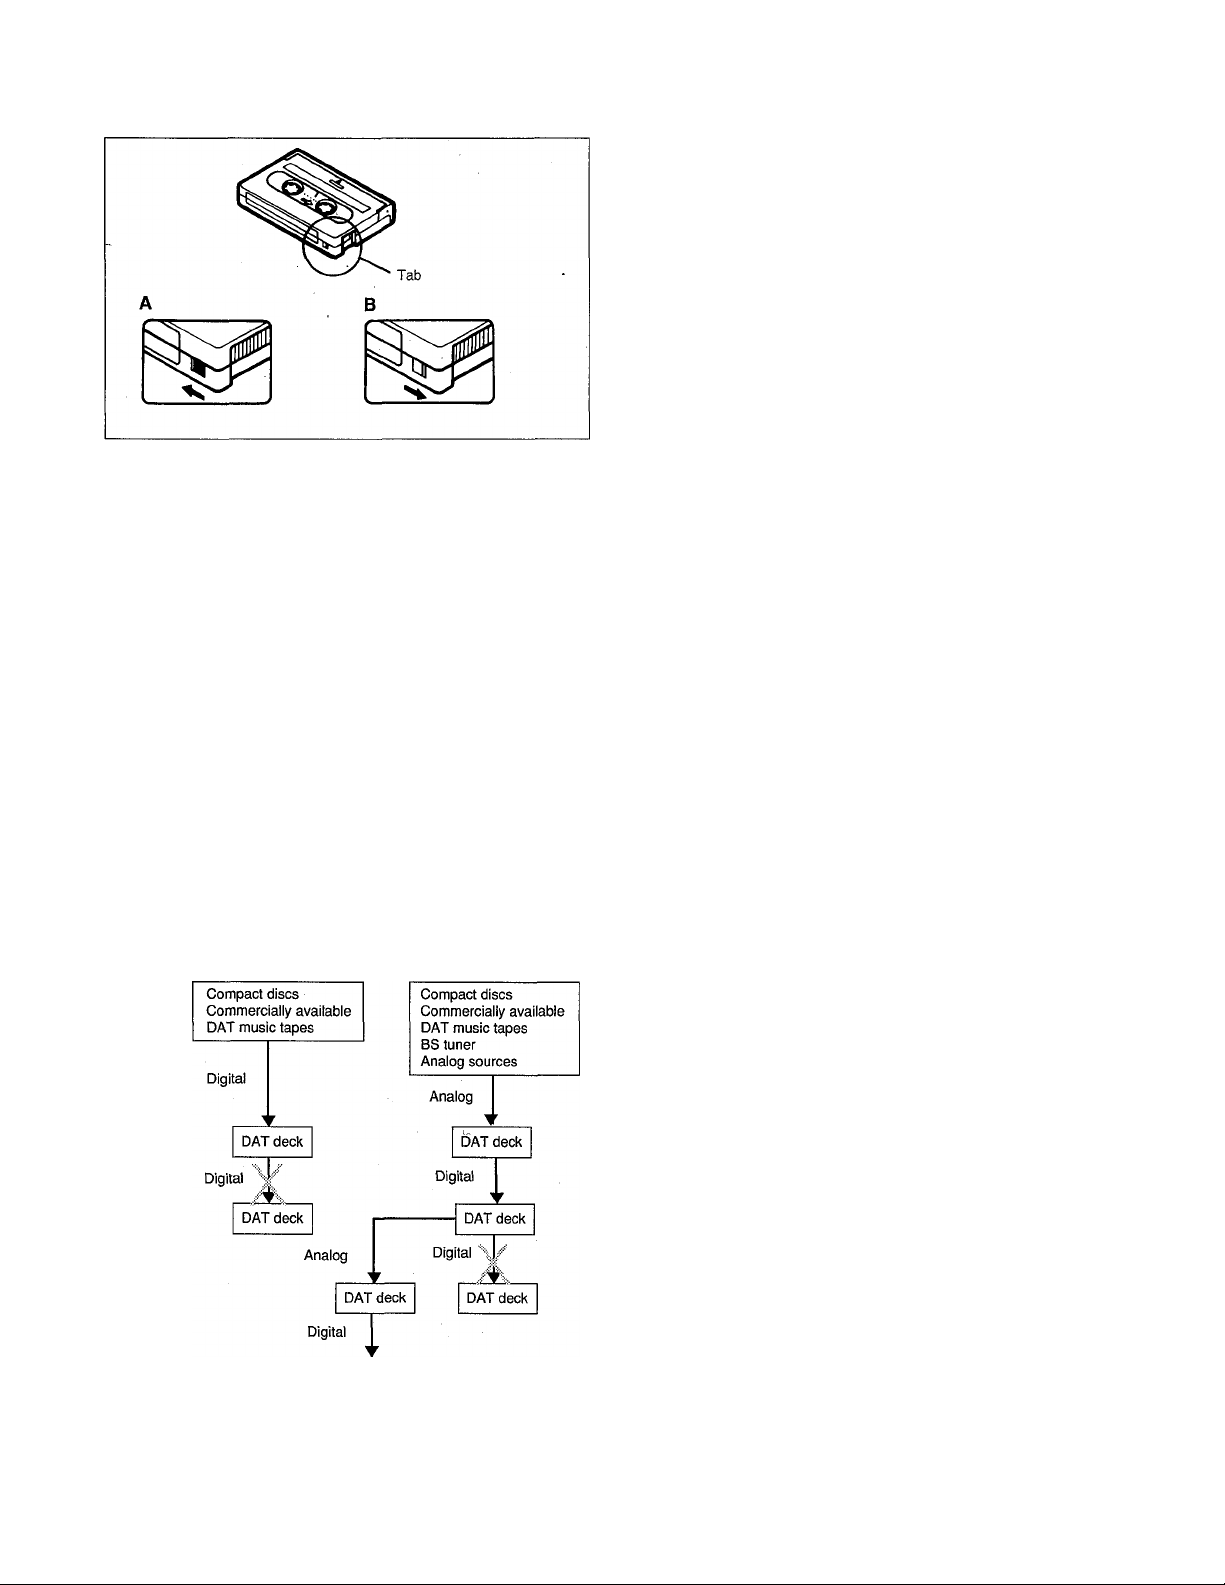
Preventing accidental erasure
• To prevent accidental erasure, slide the tab to the left to
open the hole. The tape cannot be recorded even if the
REC button is pressed. See Fig. A.
• To allow recording on the tape again, slide the tab to
the right to close the hole. See Fig. B.
Handling digital audio tapes
• Digital audio tapes are precisely constructed to record
and play back highly accurate data. Never open the
cassette lid and touch the tape. Touching the tape may
damaged it.
• Do not use scratched, dirty or wrinkled tapes. Use of
such tapes may cause sound dropouts or damage the
head.
Storing digital audio tapes
• Always keep tapes that are not in use in their cases.
• Avoid storing tapes in direct sunlight, near heat
generating equipment or in humid locations.
• Avoid storing tapes in dusty locations.
• Do not store near strong magnetic fields (e.g. near
electric clocks, toys using magnets, etc.). Magnetic
fields will damage recordings.
• Do not drop or subject the tape to strong vibrations.
• Rewind the tape after use. If there is any slack in the
tape, rewind again.
First
generation
Second
generation
Third
generation
When recording
digital signals
When recording
analog signals
Serial Copy Management System (SCMS)
Most digital sources contain a copy prohibit code. This
unit utilizes the serial copy management system that
permits digital-to-digital recording for at least one
generation.
Even when a tape which has been recorded from analog
sources is dubbed, this system regards the source as a
digital source containing the copy prohibit code since the
dubbing was performed through the A/D converter, and
permits digital-to-digital recording only for one generation.
14
Page 15
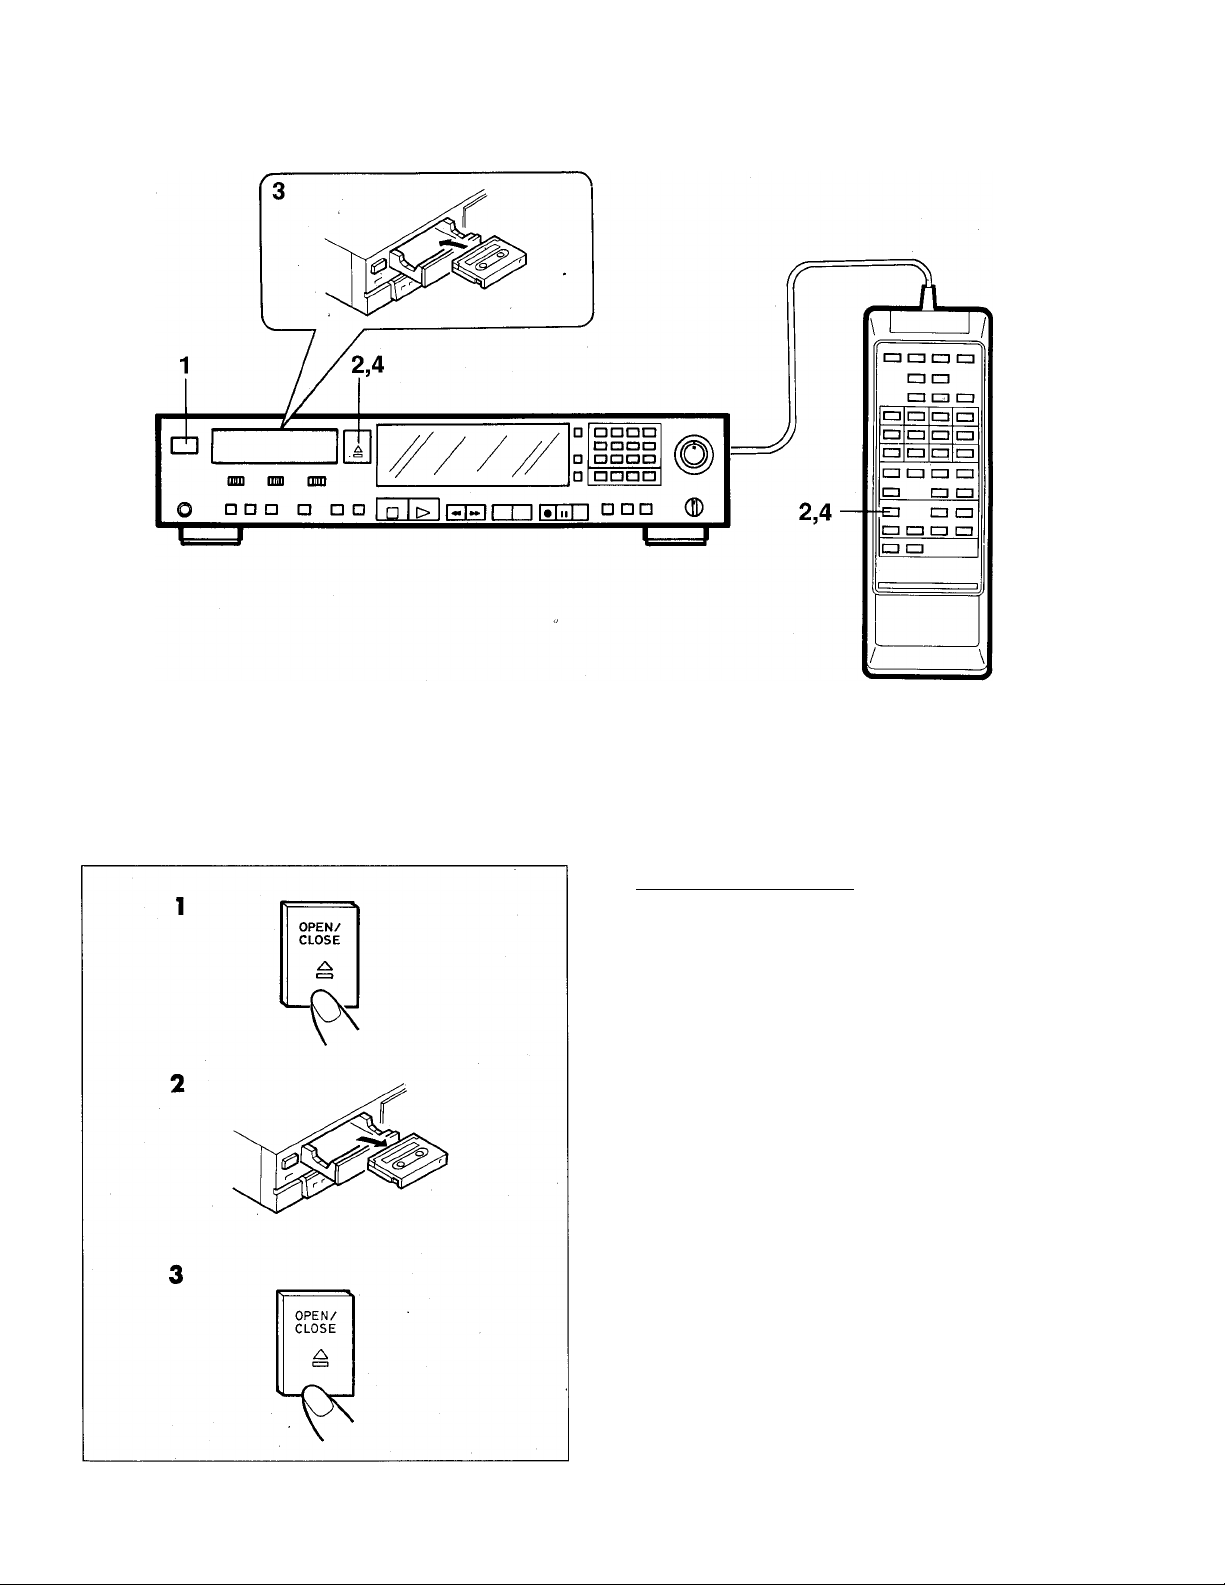
Loading a cassette
LOADING AND UNLOADING CASSETTES
1 Turn the POWER switch ON. 2 Press the OPEN/CLOSE button {±) to open the
cassette holder.
"OPEN" flashes on the display.
Place a DAT cassette in the cassette holder.
Be sure the window of the cassette faces you and the
slide tab faces you on the right side.
Press the OPEN/CLOSE button (^) again to close
the cassette holder.
Unloading the cassette
1 Press the OPEN/CLOSE button (A) to open the
cassette holder.
2 Remove the cassette from the cassette holder. 3 Press the OPEN/CLOSE button (^) again to close
the cassette holder.
NOTES:
• The cassette holder will not close completely if the tape
is inserted Improperly. In this case, press the OPEN/
CLOSE button (±) to open the cassette holder and
insert again.
• If the cassette holder does not close completely, It will
automatically open after about 10 seconds even if the
OPEN/CLOSE button (A) is not pressed.
• Do not attempt to open or close the cassette holder by
hand. Doing so will damage it.
15
Page 16
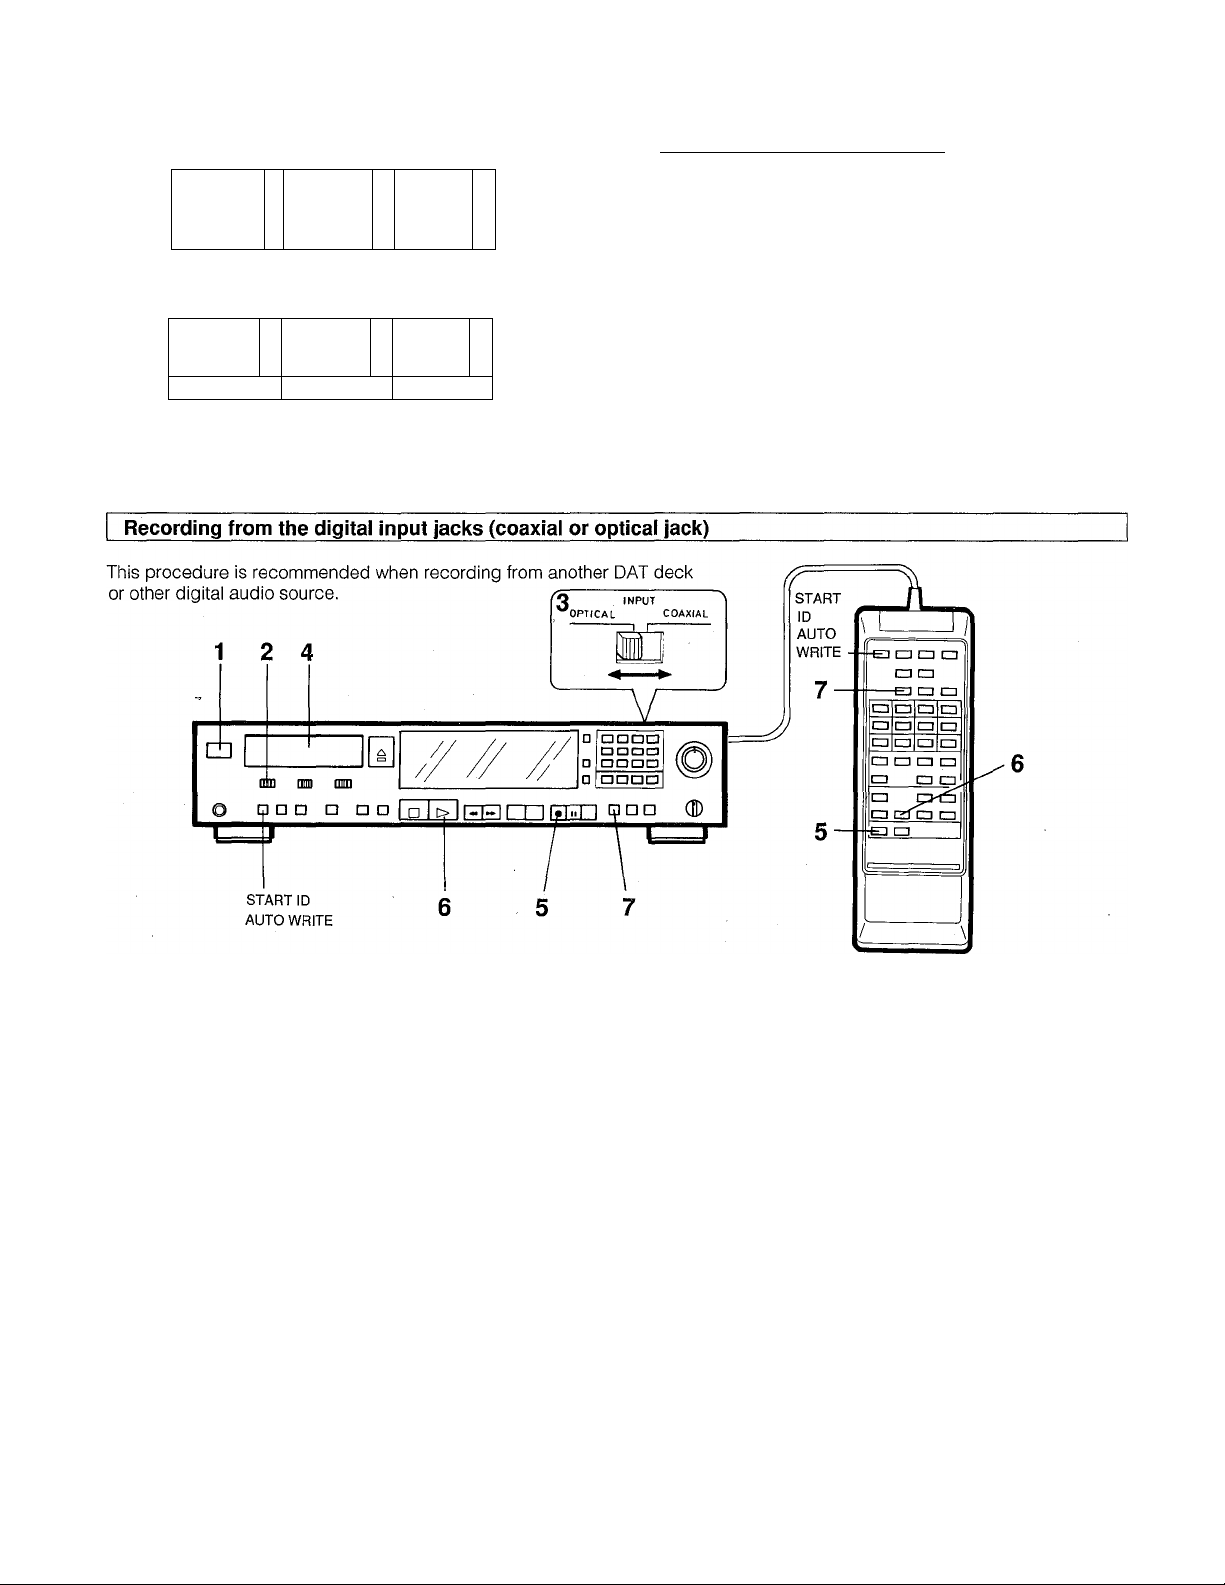
RECORDING
Ordinary audio cassette tape
Tune No.1 Tune No.2
(Audio
signal) signal) signal)
Tune No.1
(Audio
signal)
SUB No.1 SUB No.2
(Audio
DAT cassette
Tune No.2
(Audio
signal)
(SUB = Subcode area)
Tune No.3
Tune No.3
SUB No.3
(Audio
(Audio
signal)
Introduction to DAT recording
Unlike ordinary audio cassette tapes, various control codes
called subcodes can be written on the DAT cassette tape
separately from the audio signal. The subcodes^are written
for a variety of convenient playback and tape editing
functions. You can write three types of subcodes; start ID,
end ID and skip ID.
Start ID: indicates the beginning of each tune and is used
for programming and searching for tunes.
End ID: Indicates the end of the recording.
Skip ID: Indicates the beginning of a section to be
skipped.
In addition, absolute time is automatically written after the
recording is completed.
• Before making an important recording, it is
recommended that you make a trial recording to ensure
that the desired audio is being recorded properly.
•
Turn the POWER switch ON.
Whenever the POWER switch is turned ON, the START
ID AUTO WRITE button is set to on and the button
lights up. The tune numbers will be written
automatically during recording. If the tune numbers are
not necessary, press the START ID AUTO WRITE button
so that the light of the button goes off.
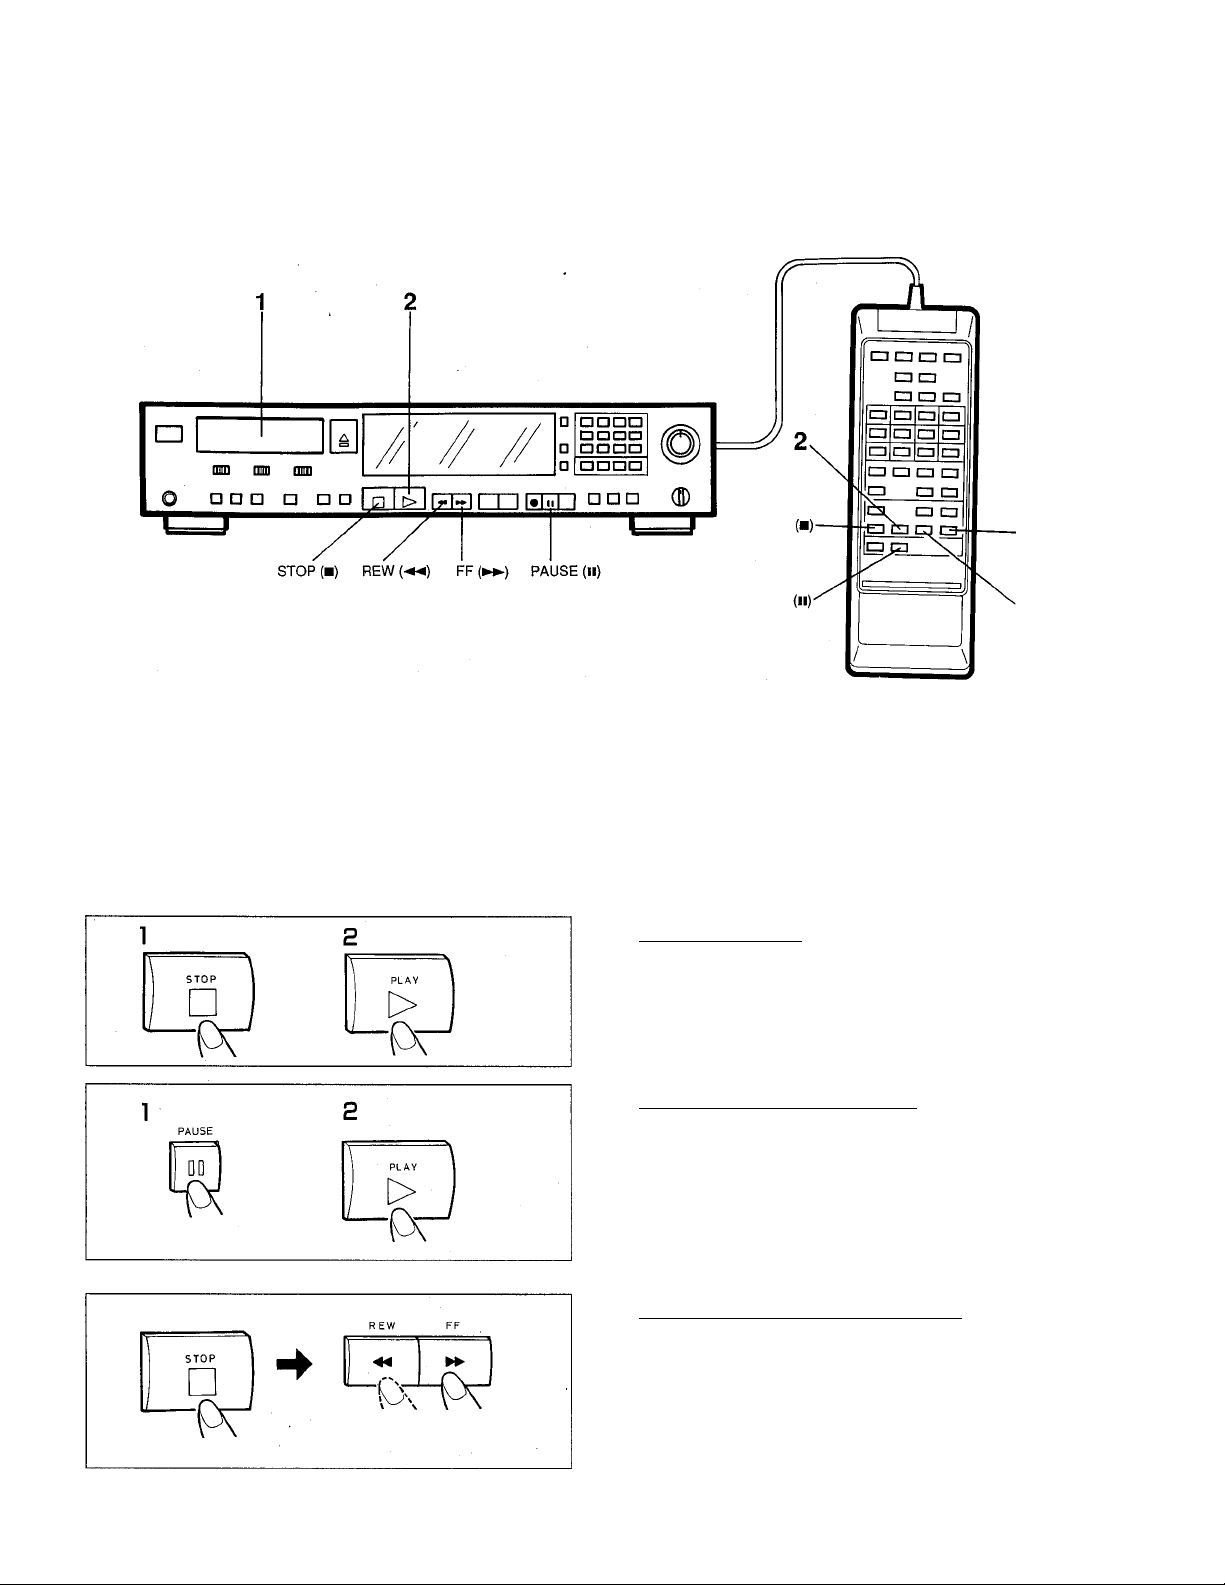
2
Set the INPUT selector to the DIGITAL position.
3
Set the DIGITAL INPUT selector on the rear panel
according to the jacks to be used.
Coaxial jacks: Set to the COAXIAL position.
Optical jacks: Set to the OPTICAL position.
4
Load a DAT cassette in the cassette holder.
5
Press the REC button (•).
The unit enters record stand-by mode. When recording
from the beginning of the tape, a sound muted section
of about 7 seconds is automatically recorded before the
deck enters record stand-by mode.
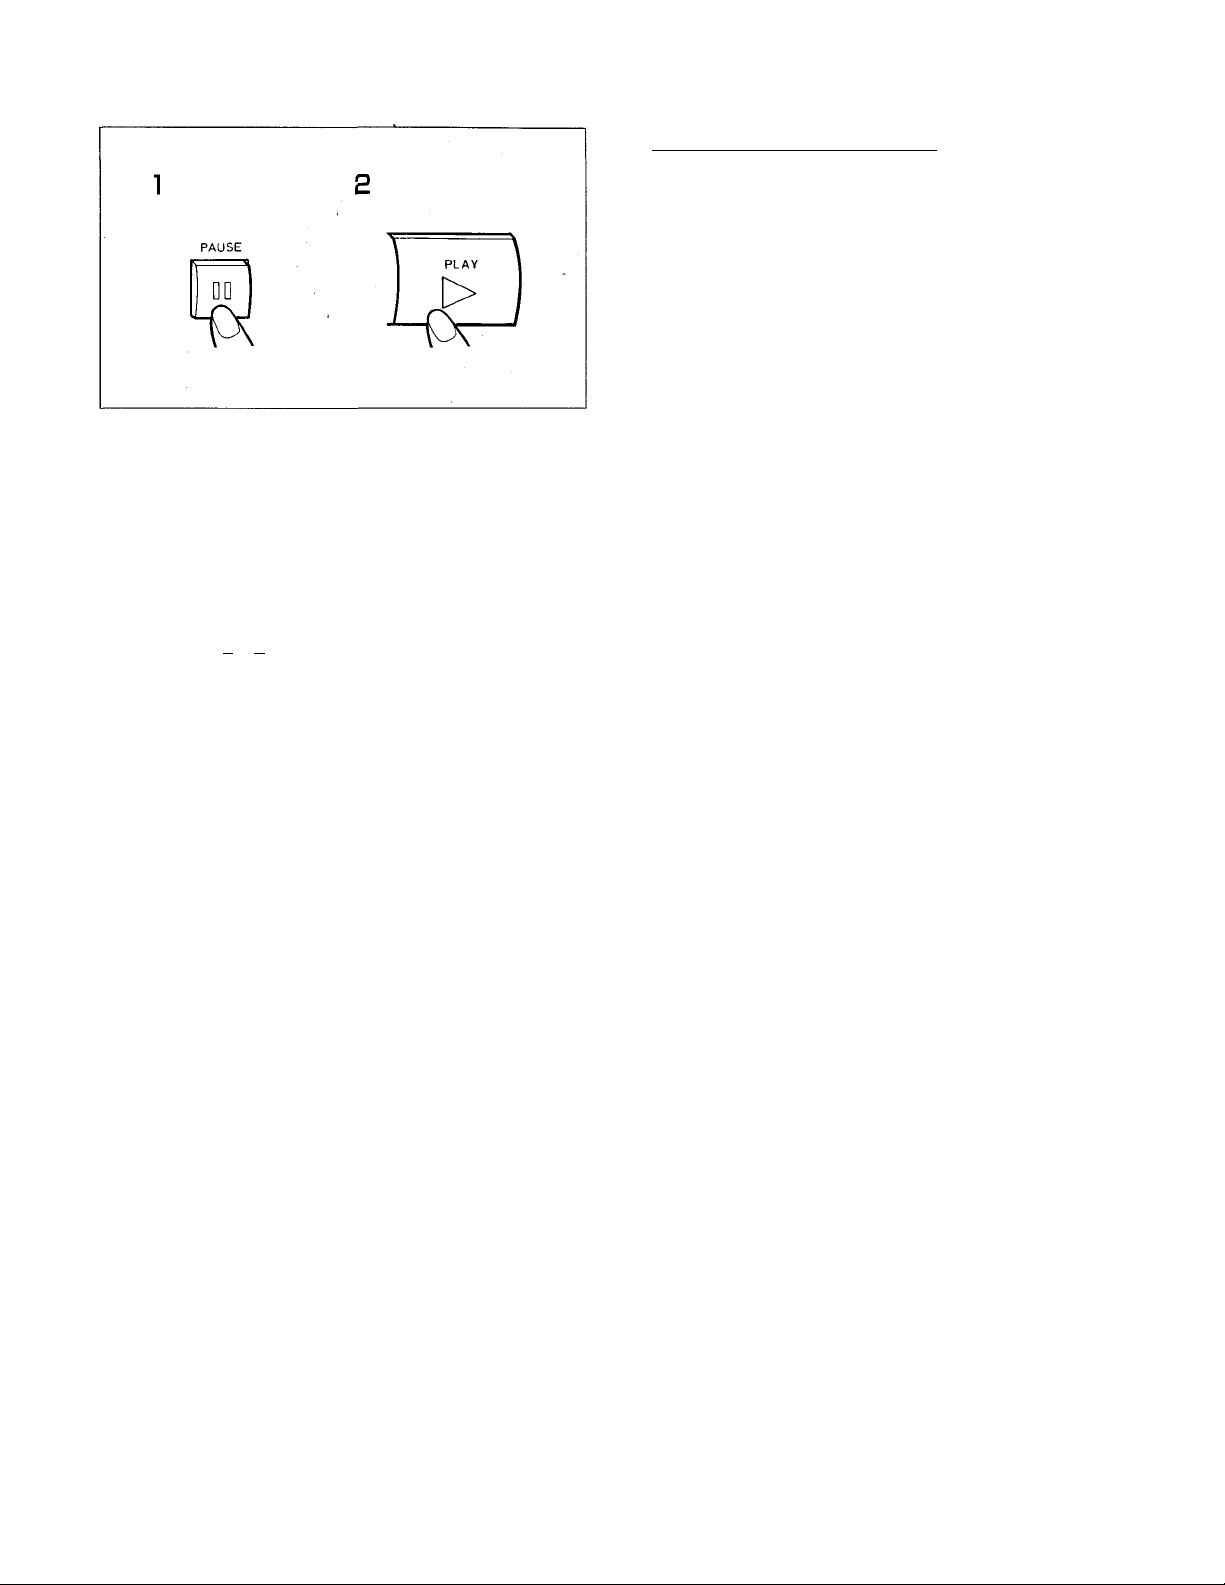
Set the source to be recorded to play mode and
press the PLAY button {►) to start recording.
When the START ID AUTO WRITE button is set to on
and the unit encounters a sound muted section of more
than 2 seconds, a start ID is written and the tune is
numbered automatically.
16
7 When the recording is completed, press the END ID
WRITE button.
After the end ID signal is written, the tape stops
automatically.
• If the end ID signal is written, it is easy to continue a
recording from the end of a previous recording. See
page 20.
NOTES:
• When digital sources are recorded from a DAT deck
which can send category code "DAT" and the start ID
and skip ID signals to digital outputs, make sure the
START ID AUTO WRITE button is turned on (lit). The
unit records start ID and skip ID signals, which are
contained in the source, as they are.
• If the power of the source to be recorded is turned off,
the unit enters record stand-by mode and the tape
running stops. In this state, turning on the power of the
source to be recorded resumes recording starting from
the next tune number.
• When recording through the digital input jaoks, no
signal is output to the digital output jacks.
• Be sure to set the INPUT selector and DIGITAL INPUT
selector before recording. If they are switched during
recording, the unit enters pause mode.
• The sampling frequenoy is automatically switched
according to the source being recorded.
• When recording from the digital input jacks, there is no
need to adjust the recording level.
Page 17
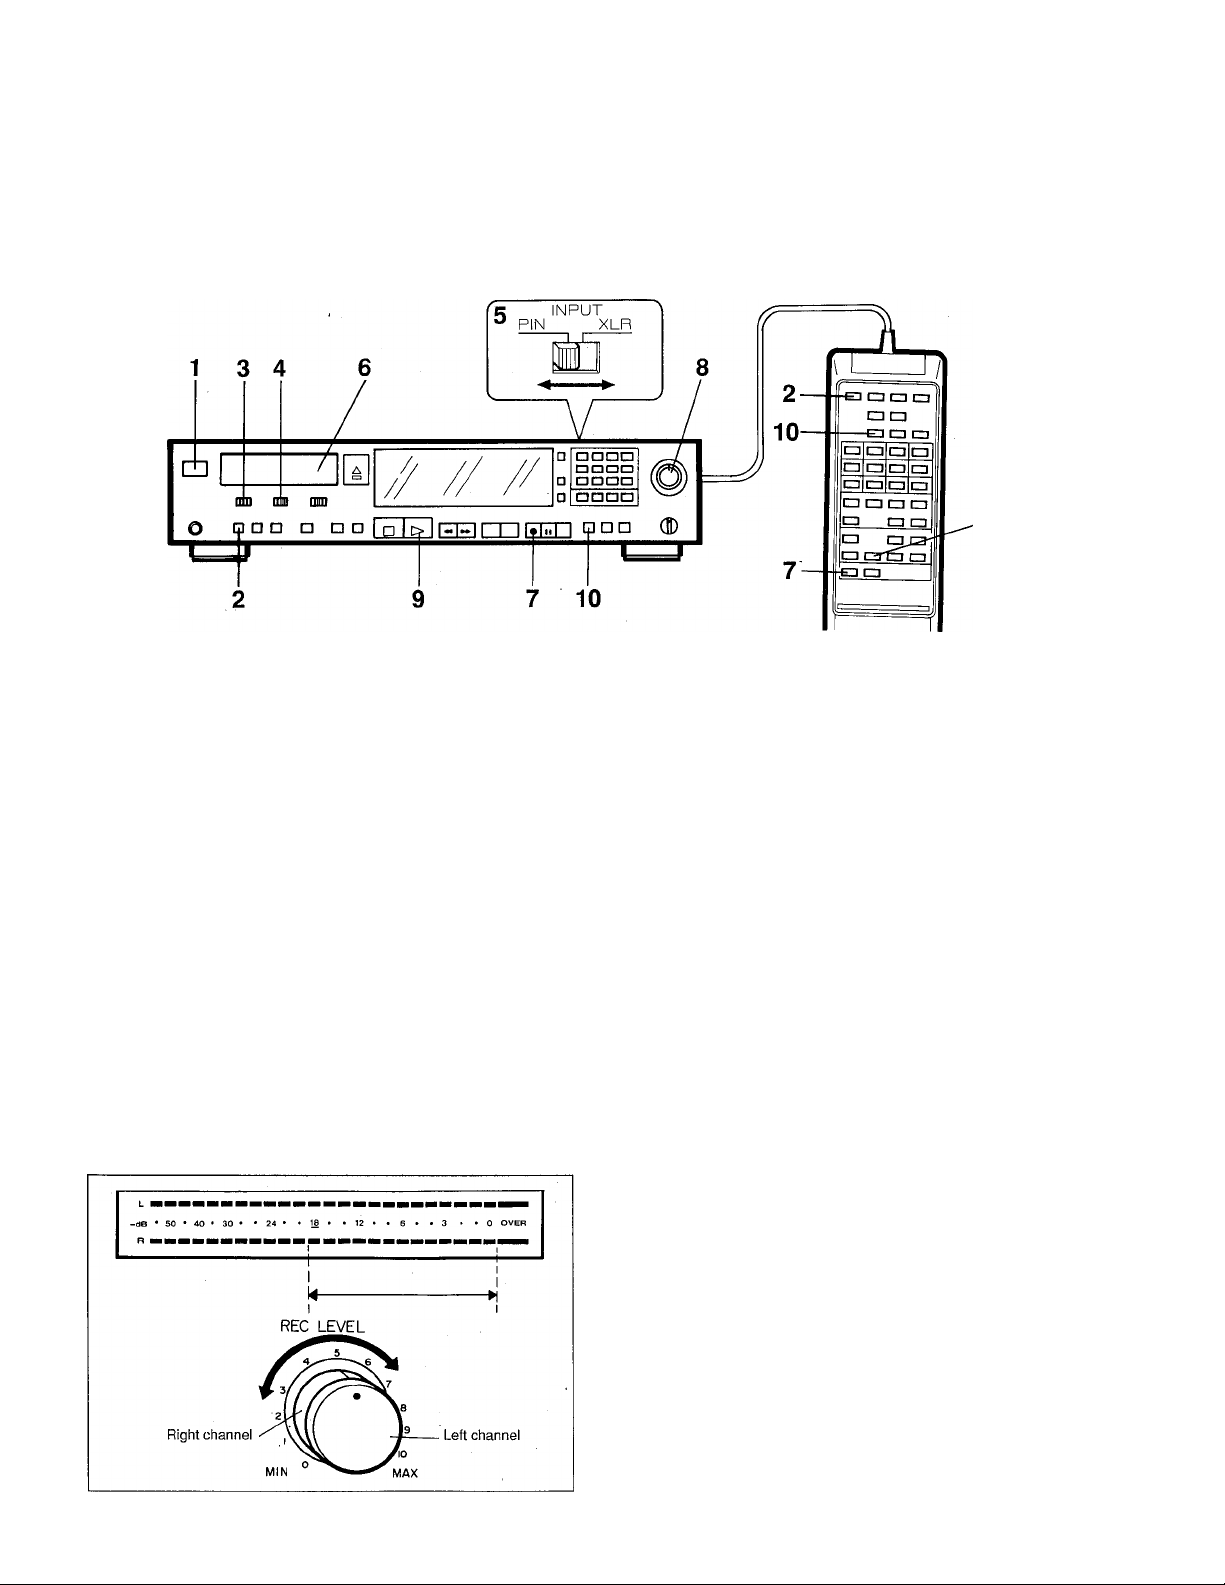
Recording from the analog input jacks
This procedure is recommended when making a recording
from a mixing consoie, anaiog tape deck, tuner,
phonograph or other simiiar externai audio source.
1 Turn the POWER switch ON.
2 Set the START ID AUTO WRITE button.
if the source to be recorded does not contain a sound
muted section of about 2 seconds between tunes,
press the START iD AUTO WRiTE button so that the
light of the button goes off.
3 Set the INPUT selector to the ANALOG position. 4 Set the REC fs selector. 5 Set the ANALOG INPUT selector on the rear panel
according to the jacks to be used.
Unbalanced pin jacks: Set to the PIN position.
Balanced pin jacks: Set to the XLR position.
6 Load a DAT cassette. 7 Press the REC button (•).
The unit enters record stand-by mode. When recording
from the beginning of the tape, a sound muted section
of about 7 seconds is automatically recorded and the
unit enters record stand-by mode.
When recording from these sources, the tune numbers may
not be written properiy with the Start iD Auto Write function,
in this case, you can manuaiiy write start iD signais during
recording or after recording. See page 19.
8 Play the source to be recorded and adjust the
recording level with the REC LEVEL control. See
below.
9 Press the PLAY button (►) to start recording.
10 When recording is completed, press the END ID
WRITE button.
After the end ID signal is written, the tape stops
automatically.
• If the end ID signal is written, it is easy to continue a
recording from the end of a previous recording. See
page 20.
NOTE:
Be sure to set the INPUT, ANALOG INPUT and REC fs
selectors before recording. If the INPUT or REC fs selector
is switched during recording, the unit enters pause mode.
If the ANALOG INPUT selector is switched, a several-
second blank section is recorded.
To adjust the recording level when recording from the analog input jacks
As a guide, adjust the recording level so that the peak level
meter is between "-18 dB" and "0". Be sure the peak levels
do not reach "OVER". If the peak levels exceed "0", "OVER"
lights and distorted sound may result.
• If the recording levels for the left and right channels are
different, adjust the left and right channels separately
(See the figure.)
17
Page 18
To stop recording temporarily
1 Press the PAUSE button (ii).
Recording stops temporarily.
2 Press the PLAY button (►) or PAUSE button (ii)
again to resume recording.
• When the START iD AUTO WRITE button is ON (iit), the
start ID signal is written at the point where recording
resumes.
NOTE:
To protect the tape and the head, the head wili separate
from the tape after about 5 minutes have passed in
recording pause mode.
Blank sections and sound muted sections
Blank sections
I Recording | i Recording i
I
___________
Tune Tune Tune Tune
Sound muted sections
Tune Tune Tune
I I I
> I H »I
I I I
Recording
Sound muted sections
I I I
I Recording | | Recording
!◄- ■^i
Biank sections
With conventionai analog audio tapes, the sections on
which no recording has ever been made (biank seotion
created with fast-forwarding, etc.) and the sections on
which a recording has been made but the sound is muted
I I
(sound muted section created with the record muting
function) are treated the same, and they are used to search
for tunes, since no sound can be heard from these sections.
Conversely, the DAT deck distinguishes between blank
sections and sound muted sections, if biank sections
remain on the tape, search operation using the APSS
function may take quite a iong time and search operation
using absolute time may not be carried out properiy.
Therefore, when recording, be sure that no biank sections
are left on the tape.
In addition, since no-sound seotions between tunes must be
recorded on anaiog audio tapes for tune search operation,
-►i
recording no-sound sections (sound muted sections)
between tunes is recommended considering dubbing from
DAT cassettes to anaiog audio tapes.
Tune
• To insert siience between tunes, press the REC MUTE
button during recording. A sound muted section wiii be
created as long as the button is kept pressed. It is
recommended to create a sound muted section of
about 4 seconds for dubbing onto an anaiog audio tape
iater on. Do not create a biank section by advancing
the tape with the FF button (►►) or FLAY button (►).
• To start recording from the middle of the tape, use the
end search function (page 20) to locate the end of the
previous recording. This wiil avoid leaving a biank
section.
18
Page 19
START ID SIGNALS AND TUNE NUMBERS
The actual number of a recorded tune on a tape and the
tune number displayed on the unit may not be the same,
even if the tune numbers are written automatically with the
START ID AUTO WRITE function. This may occur due to the
contents of the recorded tune.
The tune numbers may not be recorded properly when
reoording from sources that contain the following:
• Conversations with breaks in them.
• Low overall reoording level.
• Short intervals (i. e., 2 seconds or less) between tunes.
• Long quiet pianissimo passages.
• Noise or hum between tunes.
If the tune numbers are not written properly, it may be
necessary to add or erase the tune numbers.
When recording is performed from sources without silence
between tunes, it is recommended to write the tune
numbers manually during recording or after recording.
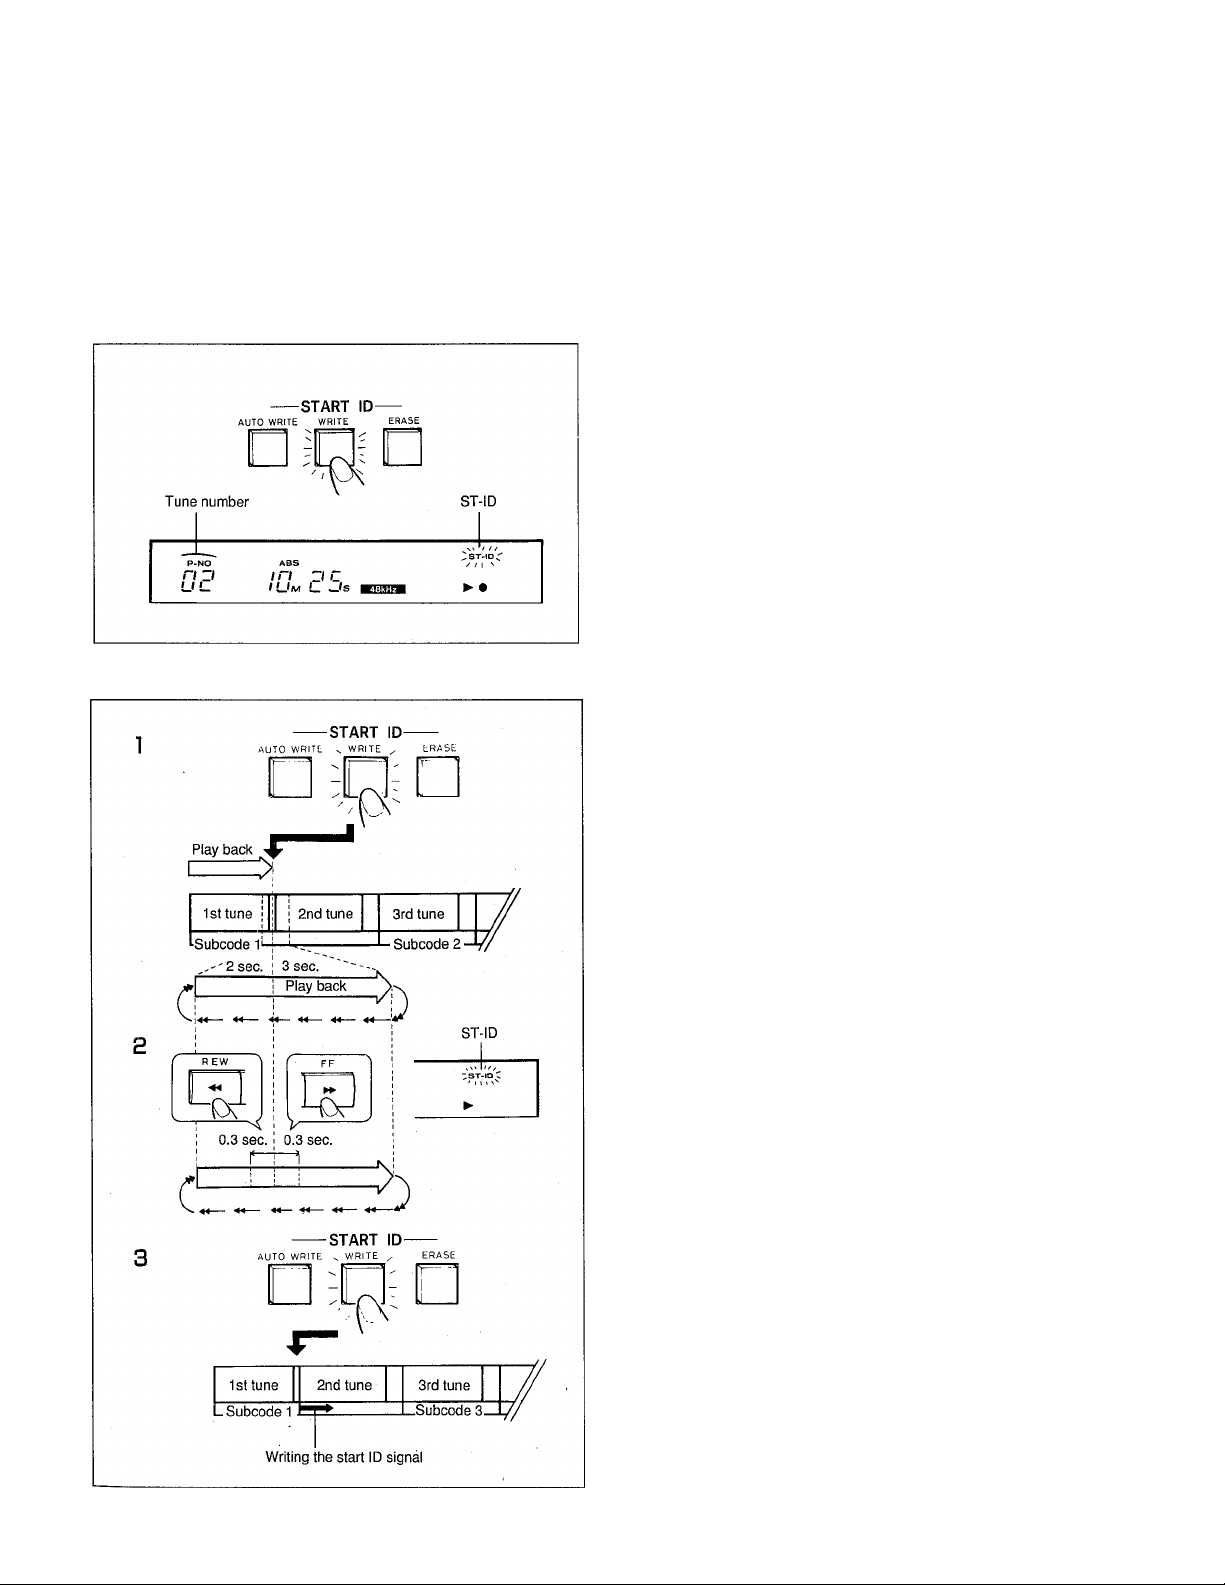
To write tune numbers manually during
recording
Press the START ID WRITE button (the button lights) at
the beginning of each tune.
Every time the START ID WRITE button is pressed, the start
ID signal is written and the tune number is switched to next
number. While the start ID signal is written, the ST-ID
indicator flashes.
• Manually writing the tune numbers is possible
regardless of the setting of the START ID AUTO WRITE
button.
• Up to 99 tune numbers can be written. If a tape which
contains more than 99 tunes is played, the tune number
is not displayed after the 100th tune.
To write start ID signals manually during
playback
A start ID signal indicates the beginning of a tune. If this
signal and corresponding tune number are not written, tune
selection by APSS, ARMS and direct selection is
impossible.
If start ID signals and tune numbers are not written properly
on a tape, insert start ID signals according to the following
procedure, and thdn renumber them (page 20).
1 During playback, press the START ID WRITE button
(the button starts flashing) at the point where the
start ID signal is to be inserted.
The tape is played back for 3 seconds and then
rewound to a point 2 seconds before the START ID
WRITE button was pressed. Playback starts from this
point for 5 seconds and repeats 10 times (Test
playback). Since the ST-ID indicator lights when the
tape encounters the start-ID signal, the placement of
the start ID signal can be verified. Check the position
of the start ID signal while listening to the test playback.
2 If the start ID signal is not correctiy inserted at the
beginning of the tune, move it backward or forward
with the REW (<4^) or FF (►►) button.
Each time the REW button (◄◄) is pressed, the start ID
signal moves backward 0.3 seconds. Each time the FF
button (►►) is pressed, the start ID signal moves
forward 0.3 seconds.
3 When the start ID signal is correctly inserted, press
the START ID WRITE button again during test
playback.
The button lights and the tape is rewound to the
beginning of the tune, and the start ID signal is written.
(While writing, the ST-ID indicator flashes.) Playback
resumes after the start ID signal is written.
19
Page 20
Notes on writing start iD signais
• If a start ID signal Is written on a point where a skip ID
signal has been written, the skip ID signal Is erased.
The Interval between start ID signals (playing time of a
tune) should be 9 seconds or more. This 9-second
interval Is necessary to ensure proper operation of the
APSS function, ARMS function and renumbering tunes.
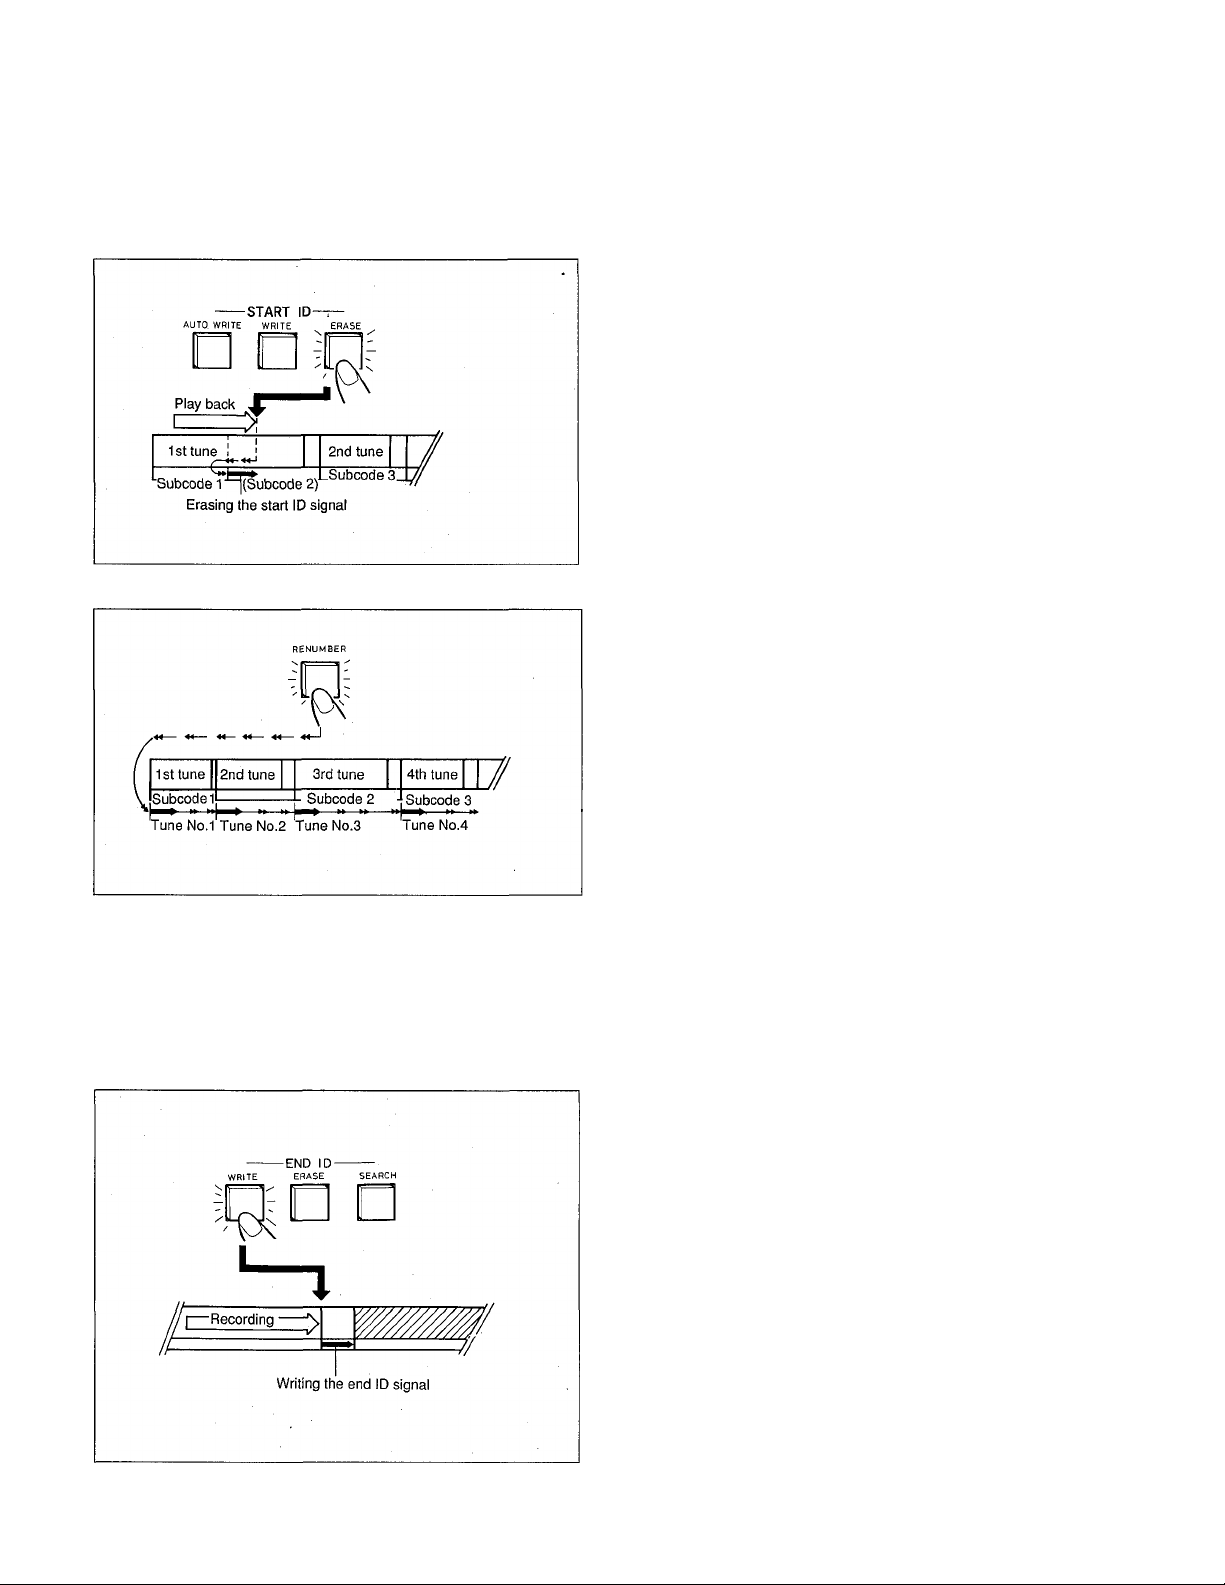
To erase start ID signals
If a start ID signal Is written on a undesirable point, you can
erase it during playback. Be sure to renumber the tunes
after erasing a start ID signal.
Press the START ID ERASE button (the button flashes) when the ST-ID indicator appears on the display.
The tape rewinds to the beginning of the tune being played
and the start ID signal is erased. While erasing, the ST-ID
indicator flashes. Playback resumes after the start ID
signal is erased.
• If a tune number is also written with the start ID, both
signals will be erased at the same time.
To renumber tune numbers
When start ID signals are inserted or erased, tune numbers
are displaced. Renumber the tune numbers following this
procedure.
END ID SIGNALS
An end ID signal indicates the end of a recording. The tape
does not advance beyond the point where this signal is
written. Therefore, it is easy to continue a recording from
Press the RENUMBER button in stop mode.
The tape is rewound to the beginning of the tape, and the
tune numbers are automatically renumbered at high speed.
Whenever the unit encounters a start ID signal, the proper
tune number is written starting from P-NO 1.
• When renumbering is completed at the end of the tape,
the tape automatically rewinds to the beginning.
the end of a previous recording. Also, this will avoid making
a blank section between recordings.
To write an end iD signal
During recording, press the END iD WRiTE button.
A sound muted section is automatically inserted and the
end ID signal is written. While the end ID signal is being
written, the END-ID indicator flashes and then the tape
automatically stops.
• When the unit encounters an end ID during playback,
fast-forwarding or cueing, the tune number changes to
"EE", and the tape stops automatically.
• Do not write an end ID signal if the interval between
start ID signals is shorter than 9 seconds. APSS and
renumbering functions may not be carried out properly.
20
Page 21
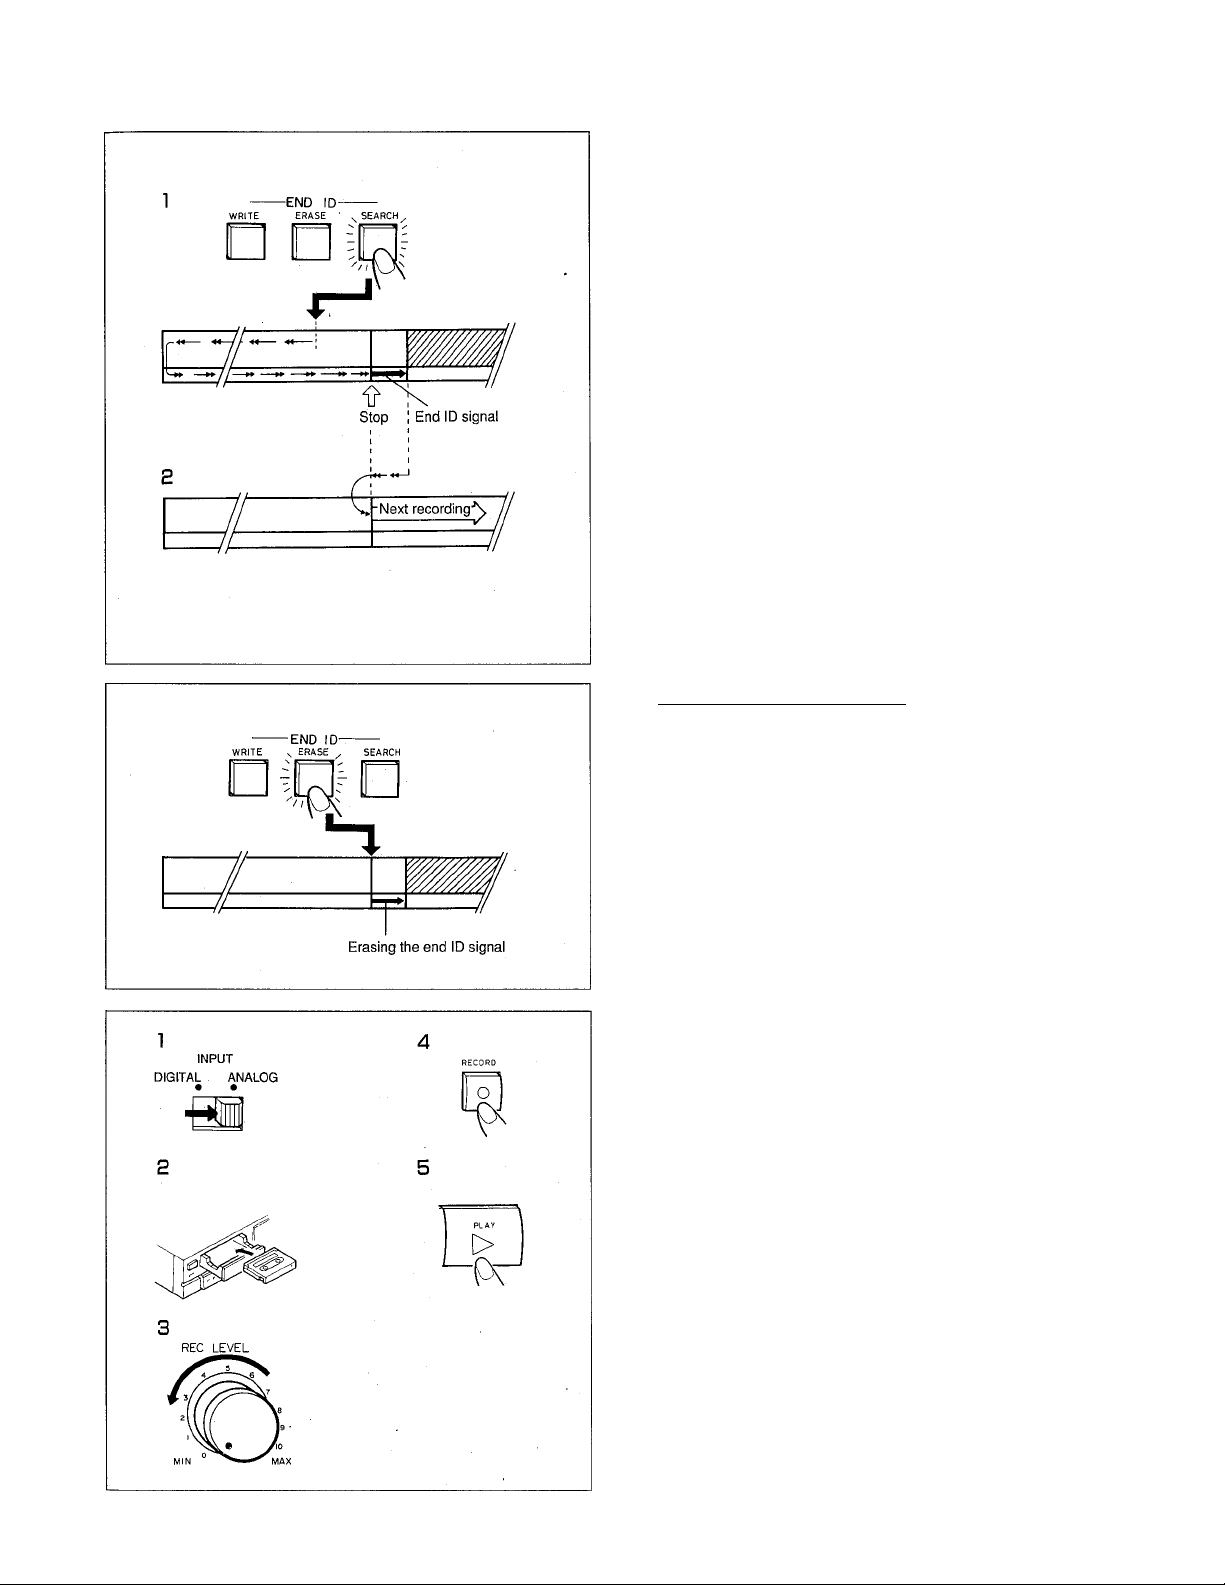
To continue a recording from the end of a previous recording
1 Press the END ID SEARCH button in stop mode or
during playback.
The button starts flashing. The tape is rewound to the
beginning and then fast-forwarded to the point where
the end ID signal is written (End search function). The
light of the button goes off when the tape stops.
2 start recording from the point where the tape stops.
Tune numbers and absolute time will be continued from
the previously recorded contents.
• The end ID signal of the previous recording is
automatically erased.
To erase the end ID signal
An end ID signal is automatically erased when successive
recording is performed using the end search function. To
erase an end ID signal without successive recording,
perform the following procedure.
When the tape stops after end search operation, press the END ID ERASE button.
The button starts flashing. When the end ID signal is
erased, the tape stops. (While erasing the end ID signal,
the tape is advanced for a few seconds and the END-ID
indicator flashes.)
To erase the recorded contents
When a recording is made over a previous recording, the
previous recording is automatically erased. To erase the
recorded contents without making a new recording, perform
the following procedure.
1 Set the INPUT selector to the ANALOG position. 2 Load the tape in the cassette holder. 3 Turn the REC LEVEL control fully counterclockwise
to 0 (MIN).
4 Press the REC button (•). 5 Press the PLAY button (►).
The previously recorded contents will be erased.
21
Page 22
Normal playback
PLAYBACK
1 Load the tape into the cassette holder.
2 Press the PLAY button (►).
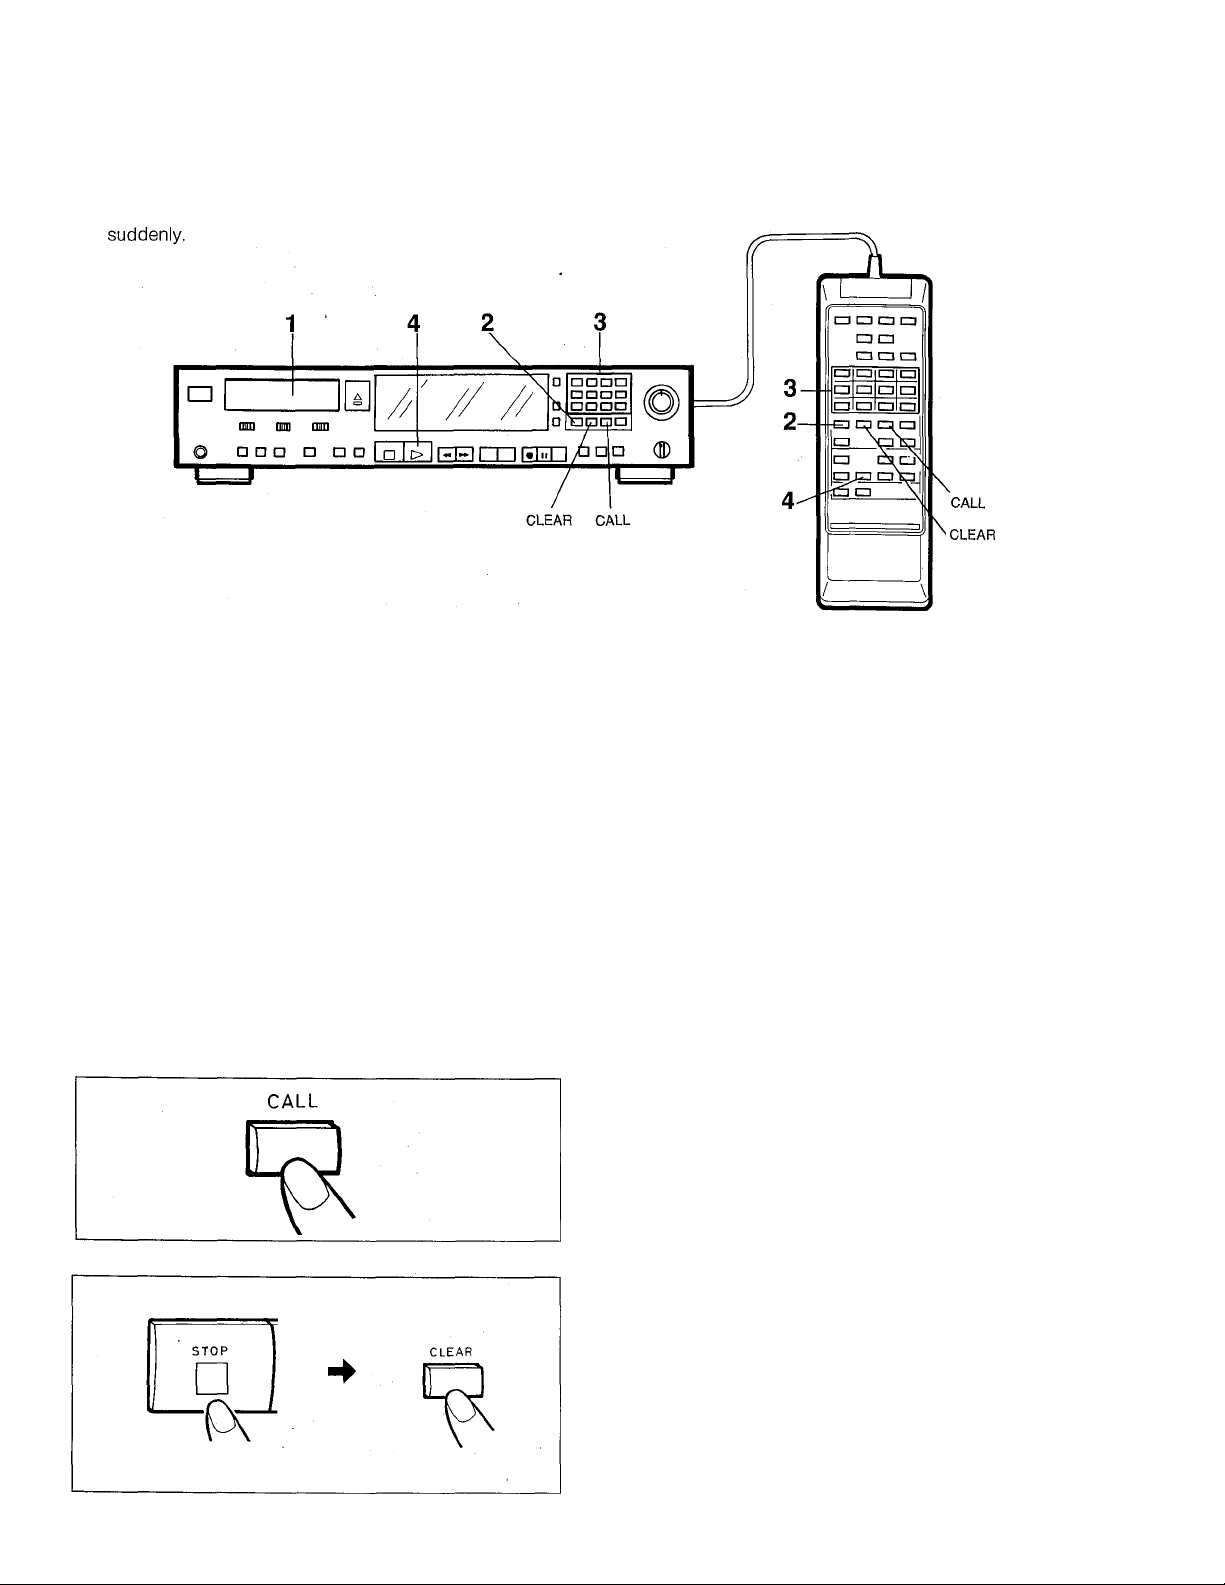
To stop playback
1 Press the STOP button (■).
2 To start playback again, press the PLAY button (►).
To stop playback temporarily
1 Press the PAUSE (li) button.
2 To resume playback, press the PLAY button (►) or
PAUSE (II) button again.
• To protect the tape, the pause mode automatically
cancels after 5 minutes and the unit enters stop mode.
22
To fast-forward or rewind the tape
1 To fast-forward the tape, press the STOP button (■),
then the FF button (►►).
To rewind the tape, press the STOP button (■), then
the REW button {«).
2 Press the STOP button (■) to stop the tape running.
Page 23

<Examples>
ÀPSS (Auto Program Search System)
APSS allows you to locate the beginning of any tune during
playback. Simply press the REW (◄◄) or FF (►►) button to
move backward or forward.
NOTES:
• For tapes with a start ID signal interval shorter than 9
seconds, APSS may not function properly (page 20).
• If a tune Is not played according to the tune number
selected with APSS, the start ID signal and tune number
have not been correctly written. See page 19.
Press the FF button (►►) to go to the beginning of the
next tune. Press the REW button (<^) to return to the
beginning of the current tune.
Each press of the FF button (►►) skips to the beginning of
the subsequent tunes. Each press of the REW button (◄◄)
skips to the beginning of the previous tunes.
• The tape can be paused at the beginning of the desired
tune by pressing the PAUSE button (II) after pressing
the FF (►►) or REW (◄◄) button. The desired tune can
then be played by pressing the PLAY button (►).
L' D L<M u L
U >
I Cm U U.
'L«,V (Cm
nn ZI c n n
uu c _'m u u*
To go to tune 4 while tune 3 is playing
Press the FF button (►►) once while tune 3 is playing. The
tune number indicator changes from 3 to a flashing 4 and
the tape is fast-forwarded to the beginning of tune 4.
Playback starts from the beginning of tune 4.
Hv
To replay from the beginning of tune 4 while tune 4 is playing
Press the REW button (◄◄) once while tune 4 is playing.
The tune number indicator changes to a flashing 4 and the
tape is rewound to the beginning of tune 4. Playback starts
again from the beginning of tune 4.
To skip to tune 8 while tune 5 is playing
Press the FF button (►►) three times while tune 5 is playing
The tune number indicator changes from 5 to a flashing 8
and the tape is fast-forwarded to the beginning of tune 8.
Playback starts from the beginning of tune 8.
n,Q z> n n
u i-' L L»M LJ L/»
To skip to tune 6 while tune 10 is playing
Press the REW button (◄◄) five times while program 10 is
playing. The tune number indicator changes from 10 to a
flashing 6 and the tape is rewound to the beginning of tune
6. Playback starts from the beginning of tune 6.
23
Page 24
To program desired tunes (APMS=Automatic Programmable Music Selector)
You can program desired tunes in any desired order.
• if the tunes are not numbered properiy, the desired tunes may not be programmed, or program piayback may stop
1 Load the tape. 2 Press the PROGRAM button.
The ARMS indicator iights.
3 Using the digit buttons (1-0, +10, +20), enter the
desired tune numbers in the desired order.
Exampie:
Toseiecttune 12:
Press "+10" and "2".
To seiect tune 20:
Press "+20“ and "0".
To select tune 54:
Press "+20" twice, "+10" and “4".
The dispiay shows the program number (piayback
order) and the programmed tune number.
4 Press the PLAY button (►).
The programmed tunes are played in the programmed
order.
To skip to the beginning of a tune in the program:
Press the FF (►►) or REW (◄◄) button to skip to the
beginning of previous/subsequent programmed tunes.
To check the program contents
in stop mode, press the CALL button.
The programmed tunes are dispiayed in programmed
order.
• When the CALL button is pressed during program
playback, the next programmed tune number to be
played is displayed for about one second.
24
To erase a programmed tune
Press the STOP button {■), then the CLEAR button.
Each time the CLEAR button is pressed, one programmed
tune wiil be erased beginning with the last programmed
tune.
To clear the whole program
Press the PROGRAM button in stop mode. Aiso, pressing
the OPEN/CLOSE button or turning off the power clears the
whole program.
Page 25
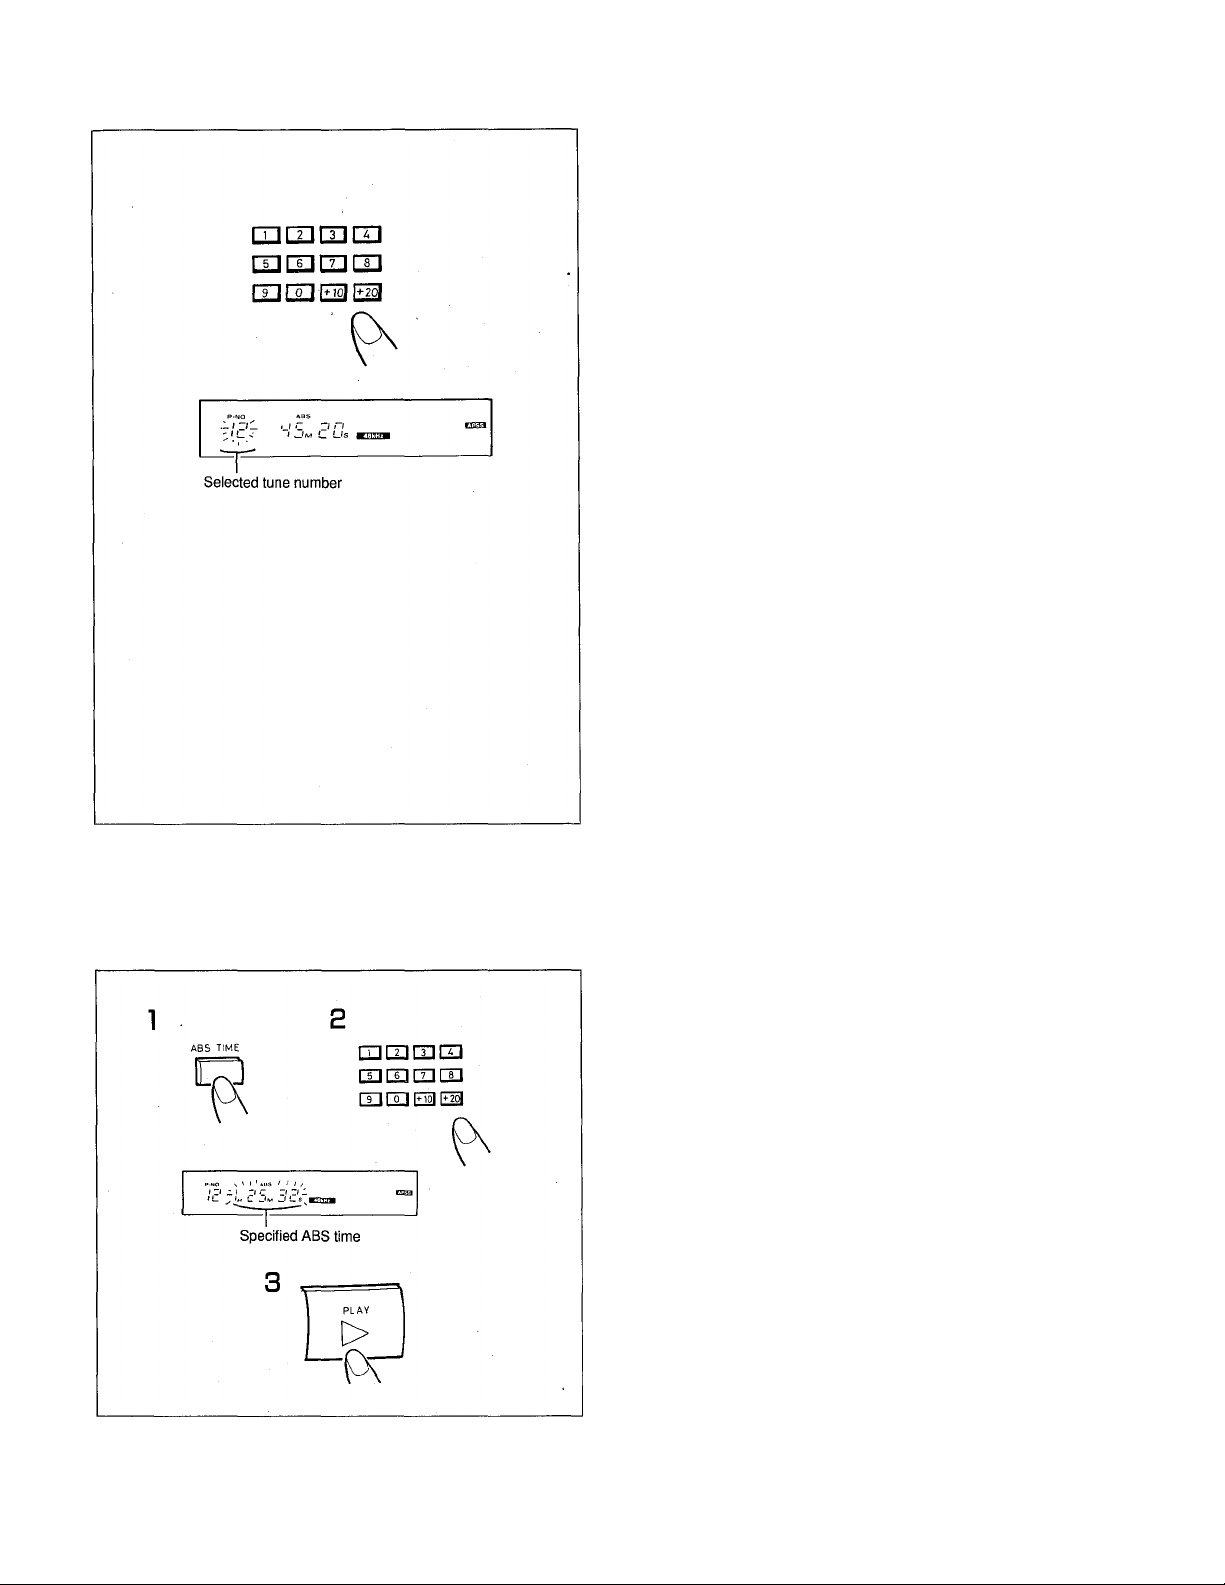
Direct selection
Any tune can be directly selected and played back by
specifying the tune number.
In stop mode or play mode, enter the desired tune number using the digit buttons (0-1, +10, +20).
Example:
To select tune 12:
Press "+10" and "2".
To select tune 20:
Press "+20" and ''0''.
To select tune 54:
Press "+20" twice, "+10" and "4".
The beginning of the specified tune will be searched for and
played automatically.
• The direct selection function can be used to cue up to
the beginning of a tune. Enter a tune number and
press the PAUSE button (ll). The specified tune is
searched for and the unit enters pause mode. To start
playback, press the PLAY button (►).
• If a tune number which does not exist on the tape is
specified, the tape fast-forwards until the end.
• Direct selection cannot be carried out on tapes which
do not oontain tune numbers, or have their tunes
numbered incorrectly.
• Direct selection cannot be used for programmed tunes
in APMS.
Absolute time search
Playback can be started from any point when the absolute
time (from the beginning of the tape to the point where you
want to start playback) is specified.
1 Press the ABS TIME button in stop mode or
playback mode.
2 Enter the desired absolute time using the digit
buttons (0-1).
For example, when searching for "one hour, 25 minutes
and 32 seconds", press "1", "2“, "5", "3" and "2".
3 Press the PLAY button (►).
Playback starts from the specified ABS time.
• When a time longer than the recording time on the tape
is specified, the tape will stop at the end.
• During playback, the absolute time must be entered
within 4 seconds after pressing the ABS TIME button.
Otherwise, the function will be canceled.
25
Page 26
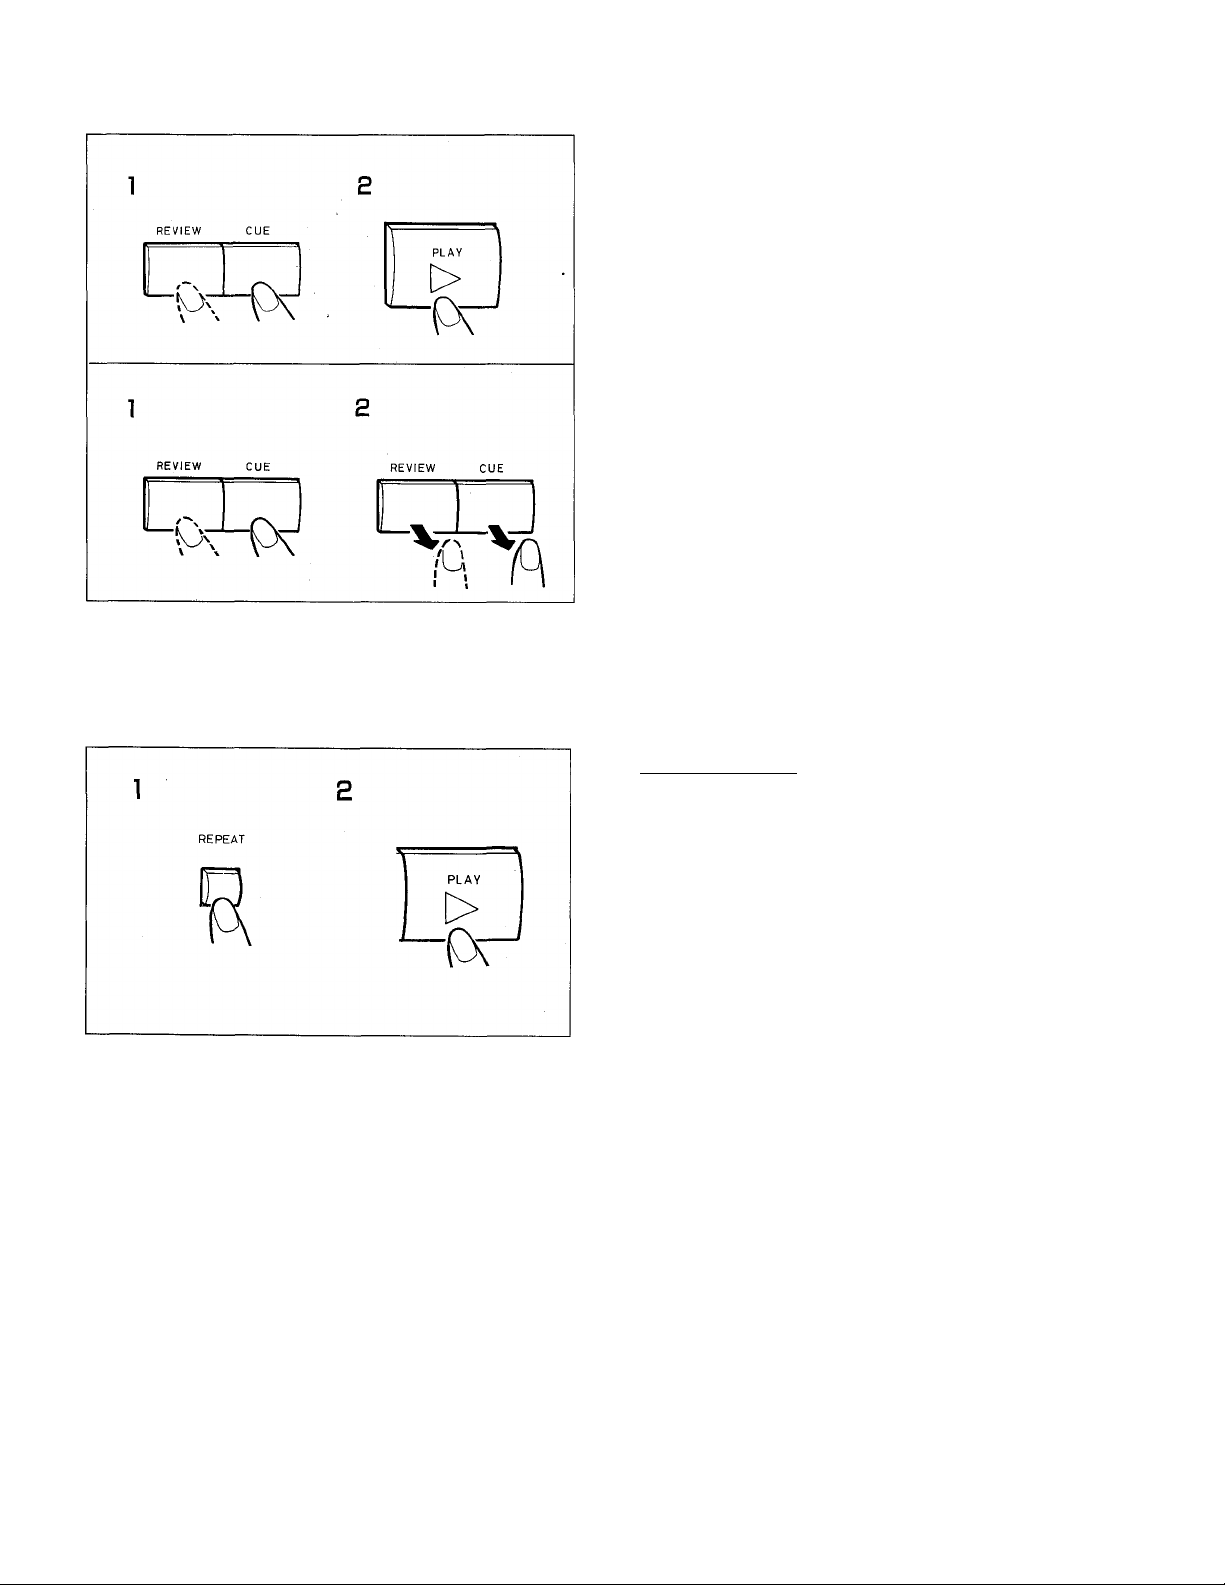
Cue and review
The CUE and REVIEW buttons allow you to quickly move to
a desired location on the tape while listening to the tunes at
3 times the speed of normal playback.
In stop mode:
1 Press the CUE button to move forward or the
REVIEW button to move backward.
2 Press the PLAY button (►) when the desired
position is reached.
During playback:
1 Press and hold the CUE button to move forward or
the REVIEW button to move backward.
2 Playback will resume when the CUE or REVIEW
button is released.
• When the end of the tape is reached, the tape stops
automatically.
NOTE:
The CUE and REVIEW buttons do not function for
programmed tunes in ARMS.
Repeat playback
Repeat playback allows you to continuously repeat an entire
tape or a program in ARMS. To repeat a program, program
the tunes beforehand (page 24).
1 Press the REPEAT button.
The c: indicator lights.
2 Press the PLAY button (►).
The entire tape or program will be played repeatedly.
• To return to normal playback, press the REPEAT button
again.
• Repeat playback will stop automatically after playback
is repeated 24 times.
26
Page 27
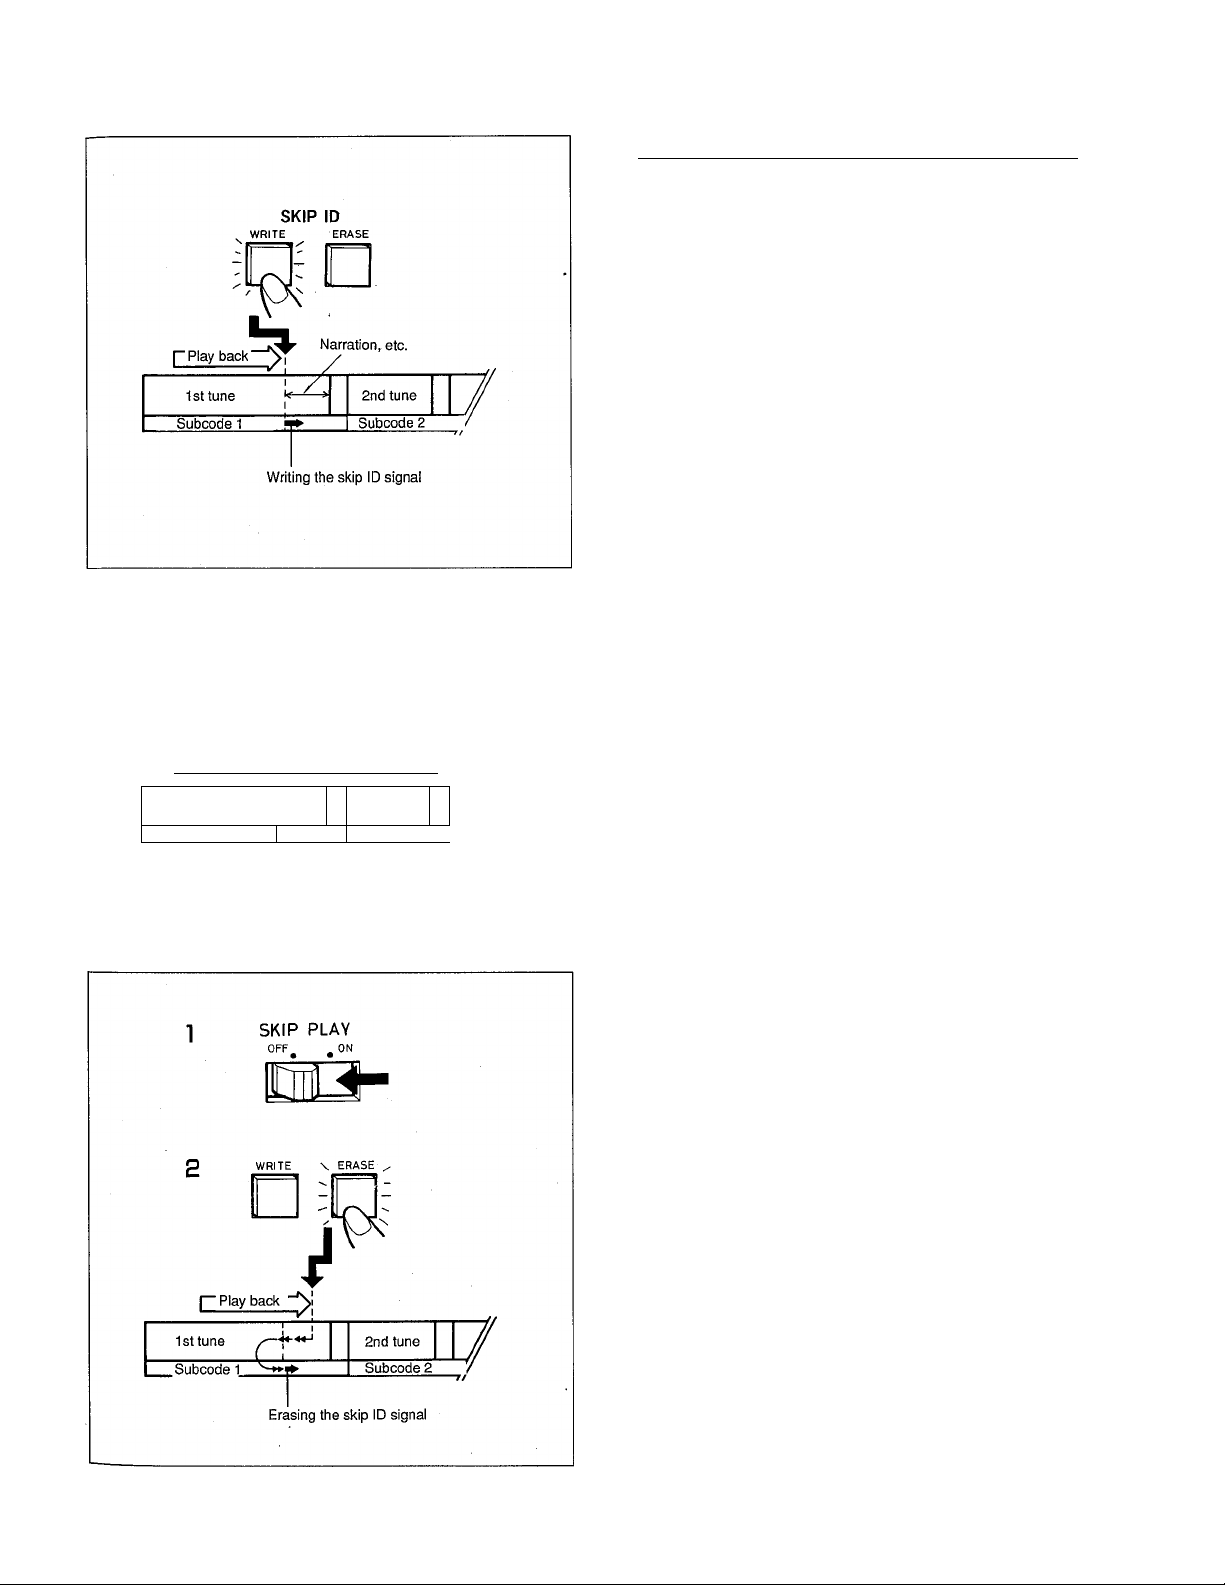
To skip undesirable sections using the skip ID
When the unit encounters a skip iD signai, the tape fastforwards to the beginning of the next tune.
To write the skip iD signai
During piayback, press the SKiP iD WRiTE button at the
beginning of the section to be skipped.
The button lights. Piayback stops temporarily and the skip
iD signai is written. (Whiie writing, the SKiP-iD indicator
flashes.)
Skip piayback
SKIP PLAY
OFF^ ^ON
7T
1st tune I
Fast-forward
I
Skip ID signal
2nd tune
Subcode 2
Play back Playback ^
Subcode 1
Set the SKiP PLAY button to the ON position.
When a skip iD signal is detected during playback, the tape
fast-forwards to the beginning of the next tune and
piayback resumes.
• When you want to piay a tape containing a skip iD
signai without the skip piay function, set the SKiP PLAY
button to the OFF position. The tape wiii be played
normally, but the skip ID signal is not erased.
To erase the skip iD signai
1 Set the SKiP PLAY button to the OFF position.
2 Piay the tune which contains the skip iD to be
erased, and press the SKiP iD ERASE button when
the SKiP iD indicator iights.
The tape is rewound to the position where the skip ID
was written. The SKiP iD indicator fiashes and the skip
iD is erased. Piayback resumes after the skip iD is
erased.
27
Page 28

The tape is 3 minutes and 15 seconds
from the beginning of the tune 2.
«.•m I w*S f
The counter reading is "0563",
The tape is 7 minutes from the beginning
of the tape.
TOC
When a tape which contains a TOC starts piaying from the
beginning of the tape, the TOC indicator iights several seconds
after, and the total number of tunes and total playing time of the
tape are dispiayed after the counter reading by pressing the
DISPLAY button.
To display elapsed time and the tape counter
Each time the DISPLAY button is pressed during playback,
the display changes to 1, 2, or 3, in that order.
1
The PROG indicator iights and the eiapsed piayback
time from the beginning of the current tune is
displayed.
When a tune which does not contain a start ID signal is
played,M -- S" is displayed.
The absolute time is displayed during APSS mode.
In fast-forward, rewind, cue or review mode,M -S" is
displayed.
The COUNTER indicator lights and the tape counter
reading is displayed.
To reset the counter reading, press the COUNTER
RESET button. The display shows "0000". In any other
display mode, the COUNTER RESET button does not
function.
The ABS indicator lights and the total elapsed time
(absolute time) from the beginning of the tape is
displayed.
For tapes on which the absolute time is not recorded,
M -S" is displayed.
NOTES:
• When a section which does not contain both a start ID
signal and a tune number is played, the tune number is
not displayed.
28
T
fr
e
b
Page 29

TROUBLESHOOTING
If this unit functions abnormaiiy during operation, first check the foiiowing items, if the unit continues to function abnormaiiy, or
if an abnormaiity other than those listed below appears, turn off the deck's power and disconnect the AC plug, then consult
your Yamaha dealer or servicing personnel.
PROBLEM
Power does not turn on.
The cassette holder does not close after a tape is
loaded.
This unit does not operate.
No playback sound from both channels.
No playback sound from one channel.
The absolute time is incorrectly displayed.
The actual number of recorded tunes and the tune
numbers do not match, (e.g. There are 6 recorded
tunes but tune numbers are 1, 2, 3, 4 and 5 only.)
A tune selected with APSS or APMS is not the desired
tune.
The tape stops during APMS operation.
CHECK
• Is the AC power cord plugged in?
• Is the tape loaded properly?
• Is a DAT cassette used?
• Is there a tape loaded?
• Are there any foreign objects in the cassette holder?
• Is there dew on the head or tape?
• Is this unit connected properly to an amplifier?
• Is a cable loose or disconnected?
• Are the program numbers written in the correct order?
• This can happen with certain types of recorded material
(caused by noise.between tunes, short interval between
tunes, dropouts, etc.). See page 19.
• bo the actual number of recorded tunes and the tune
numbers match? See page 19.
• Are all the APMS tune numbers valid?
• Are the tune numbers renumbered?
The sound from the digital input cannot be recorded.
The recording level cannot be adjusted when recording
from the digital input.
Clicking sounds are heard from the tape deck when a
button is pressed.
• Is the INPUT selector set to DIGITAL?
• Is the coaxial cable or optical fiber cable connected
properly?
• Is the DIGITAL INPUT selector on the rear panel set
properly?
• Is the optical fiber cable cut or broken?
• There is no need to adjust the recording level when
recording from the digital input.
• These sounds are heard when the tape or head protection
function is operating.
• These sounds may also be heard when a blank section on
the tape is reached during fast-forwarding or rewind.
(These sounds are normal.)
29
Page 30

SPECIFICATIONS
DAT system ...Rotary head type digital audio tape recorder
Loading system
Recording system
Recording sampiing frequency
Digitai..........................48 kHz, 44.1 kHz, 32 kHz/2-channel
Anaiog.......................................48 kHz, 44.1 kHz/2-channel
Quantization system .........................
Tape speed
Fast winding time ....45 sec. maximum for 120-minute tape
Overaii frequency response
fs=48 kHz
fs=44.1 kHz
THD + Noise
Dynamic range..................................................................92 dB
Separation..........................................................96 dB at 1 kHz
Digitai input
Coaxiai
Optical............................................................................. (EIAJ CP-340)
Digital output
Coaxial......................................0.5 Vp-p/75 ohms (lEC 958)
Optical
Analog input
Balance
Unbalance................................................0.3 Vrms minimum
Analog output
Balance....................................................Ref. level +4 dBm/
Unbalance
Headphone output.........................75 mW/32 ohms maximum
Power consumption..........................................................28 W
..................................
.............
........................
........................................
.....................................
....................................................
..............
..............................................................
...................
.......................
........................
Serial Copy Management System
............
Ref. level +4 dB/10 kohms (XLR 3-31)
2 Vrms maximum (RCA pin jack)
Horizontal front loading
16 bit linear conversion
.....................
2 Hz to 22 kHz, ±0.5 dB
2 Hz to 20 kHz, +0.5 dB
0.003% at 1 kHz
0.2 Vp-p/75 ohms (lEC 958)
for full scale (RCA pin jack)
Full scale +22 dBm (XLR 3-32)
(1/4" phone jack)
8.15 mm /sec.
(EIAJ CP-340)
Power supplies
U.S.A. model
Europe model
....................................................
..................................................
120 V, 60 Hz
230 V, 50 Hz
Dimensions (W x H x D)..........................480 x 88 x 329 mm
(18-7/8" X 3-7/16" X 12-15/16")
Weight.........................................................6 kg (13 lbs. 4 oz.)
Accessories
Remote control transmitter...............................................1
Specifications subject to change without notice.
10.
11.
P
L
R
A
D
R
C
30
Page 31

Hz
Hz
im
5")
Z.)
ATTENTION: LIRE CECI AVANT DE FAIRE
FONCTIONNER L’APPAREIL
1. Cet appareil est une platine à cassette numérique
sophistiquée. Pour garantir un fonctionnement s^ur pour la
meilleure performance possible, lire ce manuel attentivement.
2. Avant d'utiliser cet appareil pour la première fois, attendre 1 à
2 heures après avoir branché le cordon d’alimentation CA sur
une prise murale.
3. Choisir avec soin l’emplacement de votre appareil. Eviter de
le placer directement au soleil ou près d’une source de
chaleur. Eviter aussi les endroits sujets à des vibrations, de
la poussière en excès, la chaleur, le froid ou l’humidité. Le
garder éloigné de sources de bourdonnement comme des
transformateurs ou moteurs. Si une interférence sur la
réception TV ou radio se produit pendant le fonctionnement,
augmenter la distance entre les deux éléments.
4. Ne pas ouvrir le coffret car ceci peut endommager la platine
ou provoquer un choc électrique. Si un objet pénètre dans la
platine, consulter votre revendeur.
5. Lors du débranchement du cordon secteur de la prise murale,
toujours tirer directement sur la prise; ne jamais tirer sur le
cordon.
6. Ne pas forcer lors de l’opération des commutateurs et
boutons.
7. Lors du déplacement de la platine, bien débrancher d’abord la
prise d'alimentation et retirer tous les câbles raccordant la
platine à un autre équipement.
8. Ne pas essayer de nettoyer l’appareil avec des solvants
chimiques car ceci peut en endommager la surface. Utiliser
un chiffon propre et sec.
9. Si l’appareil ne fonctionne pas correctement pendant qu’il
marche, après avoir mis l’interrupteur POWER sur OFF,
débrancher la prise du cordon d’alimentation de la prise CA et
attendre environ 30 secondes. Après cela, le rebrancher.
10. Bien lire la section “en cas de problème’’ de ce manuel pour
des conseils sur les erreurs de fonctionnement communes
avant de conclure que votre appareil est en panne.
11. Garder ce manuel dans un endroit s^^ur pour une référence
future.
Nettoyage de la tête
Quand la tête est légèrement sale, du bruit se remarque ou des
pertes de niveau se produisent pendant ia lecture. Si la tête
devient très sale, une erreur de lecture de signal se produit
pendant la lecture et le son ne s’entend pas. L’indicateur
“WARNING" apparaît alors. Si ceci se produit, utiliser une bande
de nettoyage audio numérique du commerce ou demander à votre
concessionnaire Yamaha de nettoyer la tête. Après un usage
prolongé, la tête peut devoir être changée à cause de l’usure.
Consulter votre revendeur Yamaha.
Longévité du tambour
Il est recommandé de remplacer le tambour de tête par un
nouveau à moins de 1.500 heures d’usage.
Condensation d’humidité
La condensation est l’humidité qui se forme sur un objet froid dans
une pièce chaude. La condensation se formé sur le tambour et la
tête à l’intérieur de la platine à cassette, endommageant les
bandes et la tête. Cet appareil contient un chauffage anti
condensation. Une fois que l’appareil est branché sur une prise
CA, le chauffage se met en route pour éviter la formation de
condensation. Il faut 1 à 2 heures pour éliminer la condensation.
Quand de la condensation est détectée sur le tambour et la tête,
l’indicateur “DEW” apparaît et l’appareil ne fonctionne pas.
Attendre environ 1 à 2 heures après que l’affichage retourne à la
normale avant d’utiliser l’appareil.
La condensation se produit facilement:
Dans les pièces très humides ou remplies de vapeur.
Lors du déplacement de l’appareil d’un endroit froid à un endroit
chaud.
* Utiliser l’appareil sous des températures de 5°C à 35°C. La
condensation se forme aisément en particulier dans les
régions à basse température.
Ajustement du volume de l’amplificateur
Les bandes audio numériques produisent beaucoup moins de bruit
que les disques microsillon ou les bandes de cassette et les
sections entre les programmes sont très calmes. Attention à ne
pas trop élever le volume et à ne pas dépasser les taux de
l’amplificateur et des haut-parieurs.
L’impédance d’entrée de l’amplificateur recommandée est de 600
ohms ou plus. La connexion d’un amplificateur (ou autre appareil
audio externe) ayant une impédance d’entrée trop basse peut
diminuer le niveau de sortie.
Montage sur rack
Le panneau avant de cet appareil est conforme aux normes de
taille 2U et peut être directement installé dans un rack de 19
pouces. Cependant, si l’espace du rack est trop petit, retirer les 4
pieds du panneau du dessous puis installer l’appareil dans le rack.
Si le rack n’est pas bien aéré, la température peut s’élever. Assurer
une bonne aération du rack.
Pour le modèle canadien
LE PRESENT APPAREIL NUMERIQUE N’EMET PAS DE BRUITS
RADICELECTRIQUES DEPASSANT LES LIMITES APPLICABLES
AUX APPAREILS NUMERIQUES DE LA "CLASS B’’ PRESCRITES
DANS LE REGLEMENT SUR LE BRQUILLAGE
RADIQELECTRIQUE EDICTE PAR LE MINISTERE DES
CQMMUNICATIQNS DU CANADA.
31
Page 32

SOMMAIRE
Caractéristiques......................................................................32
Noms des commandes...........................................................33
Connexions.............................................................................38
Bande audio numérique (DAT)
Chargement et retrait des cassettes.......................................43
Enregistrement
.......................................................................
..............................................
41
44
CARACTERISTIQUES
La fonction APMS vous permet de programmer jusqu'à
30 morceaux dans n'importe quel ordre
La fonction APSS passe au début des morceaux
précédents/suivants
La fonction de séiection directe des morceaux vous
permet de lire rapidement n’importe quel morceau en
entrant simplement son numéro
La fonction de recherche ABS vous permet de localiser
toute position voulue de la bande par sa durée absolue
(durée écoulée depuis le début de la bande)
La fonction de répétition lit tous les morceaux de la
bande ou d’un programme plusieurs fois
La fonotion de lecture avec passage passe les
sections non désirées de la bande
La fonction d'enregistrement automatique de numéro
de morceau écrit automatiquement les numéros de
morceau sur la bande pendant l’enregistrement
La fonction pratique de renumérotage vous permet de
renuméroter les morceaux après l’édition
La fonction de recherche de fin.permet de continuer
facilement un enregistrement à partir de la fin d’un
enregistrement précédent
La fonction de repérage/révision vous permet d’écouter
le son pendant l’avance ou le rebobinage rapide
Signaux d'identification de début et numéros
de moroeaux...........................................................................47
Signaux d’identification de fin.................................................48
Lecture....................................................................................50
En cas de probième............................................................... 57
Caractéristiques techniques
Vitesse de recherche rapide de jusqu’à 200 fois la
vitesse de lecture normale
Les fréquences d’échantillonnage utilisables de 48 kHz,
44,1 kHz et de 32 kHz vous permettent d’enregistrer/lire
une grande variété de sources numériques
Munie de prises de type équilibrées d’entrée/sortie
analogique (XLR-3-31/XLR-3-32)
Equipée de deux types de prises numériques (prise
coaxiale, connecteur optique)
Emploie un convertisseur A/N à 1 bit théoriquement
libre de distorsion dans le oircuit de convertisseur A/N,
offrant une haute qualité sonore
La combinaison du filtre numérique et du convertisseur
N/A RDM 1 bit offre une qualité sonore supérieure
Deux moteurs à entraînement direct offrent un transport
de bande stable
Télécommande avec fil
...................................................
58
(i
(i
32
Page 33

Hz,
lire
© Interrupteur d’alimentation (POWER)
Fournit et coupe l’aiimentation.
® Touche de répétition (REPEAT)
La presser pour ia iecture répétée continue.
H,
ur
art
® Porte-cassette
Contient ia cassette audio numérique.
® Sélecteur d’entrée (INPUT)
Le régier sur DiGiTAL pour enregistrer à partir d’une
source audio connectée aux bornes DiGiTAL INPUT,
Le régier sur ANALOG pour enregistrer à partir d’une
source audio connectée aux bornes ANALOG iNPUT.
© Sélecteur de fréquence d’échantillonnage
d’enregistrement (REC fs)
Lorsque i’enregistrement est effectué en utilisant ies
bornes ANALOG INPUT, la fréquence
d’échantillonnage peut être commutée sur 44,2 kHz ou
48 kHz.
® Touche de lecture avec passage (SKIP PLAY)
Commute la fonction de lecture avec passage.
® Touche d’ouverture/fermeture (OPEN/CLOSE A)
La presser pour ouvrir ie porte-cassette, ia presser à
nouveau pour le fermer.
® Touche d’affichage (DiSPLAY)
Sélectionne soit ia durée absolue (ABS) ou la durée de
lecture individuelle des morceaux (PROG) ou le
compteur de bande (COUNTER). Quand des bandes
qui contiennent des signaux ”TOC” sont utilisées, ie
nombre totai de morceaux et ia durée de iecture totaie
sont affichés.
© Touche de programme (PROGRAM)
Utiiisée pour la programmation des morceaux.
(0) Touche d’annulation (CLEAR)
La presser pour annuier le chiffre d’entrée ou le nx de
morceau programmé.
© Touche de rappël (CALL)
La presser pour vérifier ie contenu d’un programme.
© Touche de durée absolue (ABS TIME)
La presser pour entrer la durée spécifiée pour ia
recherche de durée absolue.
© Touches numériques
Utilisées pour sélectionner les numéros de morceaux
voulus pour la lecture programmée ou la lecture
directe. Ces touches sont aussi utiiisées pour entrer ia
durée spécifiée pour ia recherche de durée absolue.
© Commande de niveau d’enregistrement (REC
LEVEL)
Utilisée pour ajuster le niveau d’enregistrement lors de
l’enregistrement à partir d’une source audio connectée
aux prises ANALOG iNPUT. Cette commande peut
ajuster indépendamment ies canaux de gauche et de
droite.
© Prise de casque d’écoute (PHONES)
Y connecter un casque d’écoute stéréo.
® Touche de remise à zéro du compteur (COUNTER
RESET)
La presser pour remettre le compteur de bande à zéro
(0000).
• Uniquement en mode d’affichage de compteur.
33
Page 34

Touche d’identification de début (START ID)
AUTO WRITE: La presser pour écrire automatiquement
les signaux d’identification de début et leurs numéros
de morceau pendant l'enregistrement.
WRITE: Utilisée pour écrire le signal d’identification
manuellement pendant l’enregistrement ou la lecture.
ERASE: La presser pour,effacer le signal
d’identification de début.
Touche de renumérotage (RENUMBER)
Utilisée pour renuméroter les morceaux dans l’ordre à
partir du début de la bande.
Touche d’identification de passage (SKIP ID)
WRITE: La presser pour écrire le signal d’identification
de passage. Quand le commutateur SKIP PLAY est
réglé sur ON, la lecture passe du point où cette touche
a été pressée au début du morceau suivant.
ERASE: La presser pour effacer le signal
d’identification de passage.
Touche d’arrêt (STOP ■)
La presser pour arrêter le défilement de la bande.
Touche de lecture (PLAY ►)
La presser pour commencer la lecture. Quand la
touche REC est pressée, une pression sur cette touche
ou la touche PAUSE fait démarrer l’enregistrement.
Touche d’enregistrement silencieux (REC MUTE)
La presser pour créer une section vierge pendant
l’enregistrement. La section vierge continue tant que la
touohe est maintenue pressée.
Touche d’identification de fin (END ID)
WRITE: Presser cette touche à la fin d’un
enregistrement. Le signal d’identification de fin est
écrit pour indiquer ce point.
ERASE: Presser pour etfacer le signal d’identification
de fin.
SEARCH: Presser pour rechercher le signal
d’identification de fin. La bande passe rapidement à la
fin d’un enregistrement et le suivant peut facilement
être démarré à partir de ce point.
Commande de niveau du casque (PHONES LEVEL)
Ajuste le volume du casque d’écoute.
d
(i
Touche de rebobinage (REW >4^)
La presser pour rebobiner la bande.
Quand cette touche est pressée pendant la lecture, la
lecture recommence à partir du début du morceau
actuel. Pour lire le morceau précédent, presser à
nouveau cette touche (APSS).
Touche d’avance rapide (FF ►►)
La presser pour avancer la bande.
Quand cette touche est pressée pendant la lecture, la
lecture commence à partir du début du morceau
suivant. (APSS)
Touche de révision (REViEW)
La presser pour rebobiner la bande tout en écoutant
son contenu à environ 3 fois la vitesse normale.
Touche de repérage (GUE)
La presser pour avancer la bande tout en écoutant son
contenu à environ 3 fois la vitesse normale.
Touche d’enregistrement (REC •)
La presser pour engager le mode d’attente
d’enregistrement. Pour commencer l’enregistrement,
presser la touche PLAY ou PAUSE.
0
Touche de pause (PAUSE il)
La presser pour arrêter momentanément la lecture ou
l’enregistrement. Pour reprendre la lecture ou
l’enregistrement, presser la touche PLAY ou à nouveau
cette touche.
34
(Q
Page 35

Fenêtre d’affichage
la
la
0
Indicateur de transmission de la télécommande
S’allume quand la télécommande est utilisée.
0 Indicateur de table des matières (TOC)
S’allume quand une bande contenant une TOC est lue.
(1^ Indicateurs de signal d’identification de début/
passage/fin (ST-ID/SKIP-ID/END-ID)
S’allument quand le signal d’identification de début, de
passage ou de fin est détecté ou clignote quand il est
écrit ou effacé.
0 Affichage du numéro de morceau
Indique le numéro du morceau.
0
Indicateur de compteur (COUNTER)
S’allume quand l’aiffichage est en mode de compteur.
© Indicateur de durée absolue (ABS)
S’allume quand l’affichage indique la durée ABS (durée
de lecture écoulée depuis le début de la bande).
® Affichage de compteur/durée ABS/durée de lecture
de morceau/numéro de morceau programmé
Affiche la lecture du compteur de bande, la durée ABS,
la durée de lecture de morceau (durée de lecture
écoulée depuis le début du morceau actuel) ou le
numéro de morceau programmé
0 Indicateur de programme (PROG)
S’allume quand l’affichage indique la durée de lecture
écoulée depuis le début du morceau actuel.
0 Indicateurs de fréquence d’échantillonnage
S’allument selon la fréquence d’échantillonnage du
signal audio.
0
Indicateur de condensation (DEW)
Apparaît quand de la condensation de produit dans cet
appareil (tambour, tête, etc.).
© Indicateur d’interdiction de copie (COPY PROHIBIT)
Apparaît quand un enregistrement ne peut pas être
effectué avec un signal numérique. Dans ce cas,
enregistrer la source en utilisant les prises ANALOG.
® Indicateur d’avertissement (WARNING)
Si la tête devient très sale, une erreur de lecture de
signal se produit pendant la lecture et le son ne
s’entend pas. L’indicateur “WARNING” apparaît alors..
Si ceci se produit, utiliser une bande de nettoyage
audio numérique du commerce ou demander à votre
concessionnaire Yamaha de nettoyer la tête.
© Indicateur de sélecteur automatique de musique
programmable (APMS)
Apparaît pendant la programmation ou la lecture
programmée.
© Indicateur de système de recherche automatique de
programme (APSS)
Apparaît quand le début d’un morceau est recherché.
® Compteur de niveau de crête
Affiche le niveau d’enregistrement ou le niveau de
lecture.
© Indicateur d’accentuation (EMPHASIS)
Apparaît quand des bandes enregistrées avec
accentuation sont lues ou lors de l’enregistrement à
partir d’une source numérique sur laquelle
¡’accentuation est appliquée. La fonction
d’accentuation réduit le bruit des hautes fréquences en
suramplifiant le niveau des hautes fréquences pendant
l’enregistrement (fonction de pré-accentuation) et en le
baissant pendant la lecture (fonction de
désaccentuation). Cet appareil ne comporte que le
circuit de désaccentuation. Vous pouvez lire ou
enregistrer des signaux accentués mais ne pouvez pas
appliquer l’accentuation aux signaux.
© Indicateur de lecture (►)
S’allume quand la touche PLAY est pressée.
© Indicateur d’enregistrement (•)
S’allume quand la touche REC est pressée.
© Indicateur de pause (il)
S’allume quand la touche PAUSE est pressée ou en
mode d’attente d’enregistrement.
© indicateur de répétition (d)
S’allume pendant la lecture répétée.
35
Page 36

NOMS DES COMMANDES
Panneau arrière
(D Prises d’entrée analogique (ANALOG INPUT) (prises
à broches de type non équilibrées)
Quand ces prises sont utilisées pour l'enregistrement,
ajuster le niveau d’entrée avec la commande REC
LEVEL.
Sélecteur d’entrée analogique (ANALOG INPUT)
Utilisé pour sélectionner les prises d’entrée analogique
entre type équilibré (XLR) et non équilibré.
(D Prises de sortie analogique (ANALOG OUTPUT)
(prises à broches de type non équilibrées)
Le niveau de sortie maximum est de 2V.
@ Prises d’entrée/sortie numérique optique (OPTICAL
DIGITAL INPUT/OUTPUT)
Ces prises d’entrée/sortie numériques optiques sont
basées sur les spécifications EIAJ CP 340.
(D Sélecteur d’entrée numérique (DIGITAL INPUT)
Utilisé pour sélectionner les prises d’entrée numérique
entre QPTICAL et CQAXIAL.
Prises d’entrée/sortie numérique coaxiale (COAXIAL
DIGITAL INPUT/OUTPUT)
Ces prises d’entrée/sortie numériques scoaxiale sont
basées sur les spécifications IEC 958.
® Bornes d’entrée analogique (ANALOG INPUT)
(prises Cannon de type équilibrées)
La seconde broche est active.
Bornes de sortie analogique (prises Cannon de type
équilibrées)
Le niveau de référence est de +4 dBm.
Attribution des broches des connecteurs de type
équilibré (XLR-3-31/XLR-3-32)
Prise de télécommande (REKIOTE)
Connecter la télécommande fournie à cette prise.
Ne jamais y raccorder une télécommande autre que
celle qui est fournie.
36
Page 37

Télécommande à fil
te
(D Touches d’identification de début
(D Touches d’identification de passage
(D Touches d’identification de fin
(4) Touche d’annulation
(D Touche de programme
(D Touche de répétition
(Z)
Touche d’ouverture/fermeture (A)
d) Touche d’arrêt (■)
® Touche de lecture (►)
Touche d’enregistrement (•)
® Touche de pause (11)
® Câble de télécommande
Le connecter à la prise REMOTE du panneau arrière.
Touche de rappei
® Touche de durée absolue
® Touche d’affichage
® Touche de remise à zéro du compteur
® Touche de repérage
Touche de révision
® Touche d’avance rapide (►►)
® Touche de rebobinage (•**)
REMARQUES:
• Toutes les touches ont les mêmes fonctions que celles
du panneau avant.
• La télécommande ne requiert pas de pile.
L’alimentation est fournie par la prise REMOTE du
panneau arrière.
® Touche de renumérotage
® Touches numériques
37
Page 38

Connexion à un élément audio analogique
CONNEXIONS
Bien débrancher les cordons d’alimentation des
éléments avant d’effectuer les connexions.
Les mêmes canaux de cet appareil et de l’autre
élément doivent être raccordés correctement: droite
sur droite et gauche sur gauche.
Raccorder les prises d’entrée analogique (ANALOG
INPUT) (type équilibré ou non équilibré) de cet appareil
aux prises de sortie analogique de l’amplificateur ou du
mixeur stéréo, etc.
Raccorder les prises de sortie analogique (ANALOG
OUTPUT) (type équilibré ou non équilibré) de cet
appareil aux prises d’entrée analogique de
l’amplificateur ou du mixeur stéréo, etc.
Régler le sélecteur ANALOG INPUT. Lors de
l’utilisation des bornes de type équilibré, régler ce
sélecteur sur XLR. Lors de l’utilisation des prises de
type non équilibré, le régler sur PIN.
REMARQUE:
S’assurer que les connexions sont fermes. Des connexions
lâches peuvent provoquer une coupure du son ou du bruit.
38
Page 39

Connexion à une autre platine à cassette audio numérique ou à un amplificateur, etc., ayant des prises numériques
• Quand cet appareil est connecté à une autre platine
DAT, un amplificateur ou une autre source numérique,
comme un lecteur CD avec des prises numériques,
l’enregistrement numérique-numérique sera effectué.
• Bien débrancher les cordons d’alimentation des deux
éléments avant la connexion.
Lors de l’utilisation des prises COAXIAL DIGITAL
1 Connecter la prise COAXIAL DIGITAL INPUT à la prise
de sortie numérique coaxiale et la prise COAXIAL
DIGITAL OUTPUT à la prise d’entrée numérique
coaxiale de l’autre platine DAT ou amplifioateur, etc.,
avec les câbles coaxiaux.
2 Régler le séleoteur DIGITAL INPUT sur la position
COAXIAL.
Lors de l’utilisation des prises OPTICAL DIGITAL
1 Connecter la prise OPTICAL DIGITAL INPUT à la prise
de sortie numérique optique et la prise OPTICAL
DIGITAL OUTPUT à la prise d’entrée numérique
optique de l’autre platine DAT ou amplificateur, etc.,
avec les câbles de fibres optiques.
2 Régler le sélecteur DIGITAL INPUT sur la position
OPTICAL.
REMARQUES:
• Quand l’interrupteur POWER est sur la position de
marche, l’intérieur de la prise OPTICAL OUTPUT
s’allume en rouge. Cette lampe rouge (qui est sans
danger) est utilisée pour envoyer le signal numérique.
• Ne pas plier le câble de fibres optiques car il est
fragile.
39
Page 40

Connexion de la télécommande
En raccordant le câble de télécommande à la prise REMOTE du panneau arrière, cet appareil peut être activé depuis la
télécommande
REMARQUES:
• Ne pas cogner ni faire tomber la télécommande. Ne
pas non plus la mouiller ni la laisser dans un endroit
humide.
Connexion d’un casque d’écoute
• Ne pas connecter cette télécommande à d’autres
appareils.
• Ne raccorder que la télécommande à la prise REMOTE.
Pour de bons résultats, utiliser un casque de 8 ohms à
32 ohms avec une prise de casque stéréo standard de
6,3 mm.
Le volume du casque peut être ajusté avec la commande
PHONES LEVEL.
Après avoir raccordé tous les éléments, brancher le cordon
d’alimentation CA sur une prise CA murale.
40
Page 41

L
Bande audio numérique (DAT)
Cassettes DAT
J
Bande audio numérique (DAT)
Bande de cassette compacte
8,15 mm/s
Une cassette DAT mesure 73 mm x 10,5 mm x 54 mm, à
peu près la moitié des cassettes audio analogiques. De
plus, leur boîtier est construit pour éviter que la bande ne
soit rayée ou salie.
Schéma de l’enregistrement DAT
La zone de modulation de code d’impulsion (PGM) (signal
audio) est enregistrée aveo le signal numérique qui a été
oonverti du signal audio. Les zones de nodes auxiliaires
sont enregistrées aveo des informations comme le numéro
de morceau, la durée écoulée de morceaux individuels et la
durée absolue. Les zones des nodes auxiliaires permettent
une recherche précise des morceaux car les signaux dans
ces zones sont lus alors que la bande se déplace.
Fréquences d’échantillonnage
Il y a 3 fréquences d'échantillonnage utilisées lors de la
oonversion des signaux audio analogiques en signaux
numériques: 48 kHz, 44,1 kHz et 32 kHz.
48 kHz: Utilisée pour les bandes musicales DAT du
commerce ou les bandes DAT standard enregistrées.
44,1 kHz: Utilisée pour les bandes musioales DAT et les CD
du oommerce.
32 kHz: Utilisée pour les émissions par satellite.
A 32 kHz, cette platine DAT ne peut pas enregistrer les
signaux analogiques.
41
Page 42

Lors de l’enregistrement
de signaux numériques
Lors de l’enregistrement
de signaux analogiques
Protection anti effacement
• Pour éviter un effacement accidentel, coulisser la
languette vers la gauche pour ouvrir le trou. La bande
ne peut pas être enregistrée même si la touche REC
est pressée. Voir la figure A.
• Pour permettre de réenregistrer la bande, coulisser la
languette vers la gauche pour fermer le trou. Voir la
figure B.
Manipulation des bandes audio numériques
• Les bandes audio numériques sont construites avec
précision pour enregistrer et lire des données très
précises. Ne jamais ouvrir le couvercle de la cassette
ni toucher la bande, car ceci peut l’endommager.
• Ne pas utiliser de bandes rayées, sales ou fripées.
L’utilisafion de felles bandes peut provoquer des pertes
de niveau sonore ou endommager la tête.
Entreposage des bandes audio numériques
• Toujours laisser les bandes non utilisées dans leur
boîte.
• Eviter d’entreposer les bandes directement au soleil,
près d’un équipement générant de la chaleur ou dans
des endroits humides.
• Eviter de les entreposer dans des endroits
poussiéreux.
• Ne pas les entreposer près de champs magnétiques
puissants (par exemple des horloges électroniques,
des jouets utilisant des aimants, etc.). Les champs
magnétiques endommageront les enregistrements.
• Ne pas faire tomber les bandes ni les soumettre à de
fortes vibrations.
• Rebobiner la bande après usage. Si elle est détendue,
la rebobiner.
1
2
42
Système de management de copie en série (SCMS)
La plupart des sources numériques contiennent un code
d'interdiction de copie. Cet appareil utilise le système de
management de copie en série qui permet l’enregistrement
numérique-numérique au moins pour une génération.
Même quand une bande qui a été enregistrée à partir de
sources analogiques est copiée, ce système considère la
source comme une source numérique contenant ie code
d’interdiction de copie du fait que la copie a été effectuée
via le convertisseur A/N et ne permet l’enregistrement
numérique-numérique que pour une génération.
Page 43

3S
■ I
Chargement d’une cassette
CHARGEMENT ET RETRAIT DES CASSETTES
1 Mettre l’interrupteur POWER sur ON. 2 Presser la touche OPEN/CLOSE (éi) pour ouvrir le
porte-cassette.
"OPEN” clignote à l’affichage.
Placer une cassette DAT dans le porte-cassette.
S’assurer que la fenêtre de la cassette vous fait face et
que la languette coulissante vous fait face sur le côté
droit.
Presser à nouveau la touche OPEN/CLOSE (À) pour fermer le porte-cassette.
Retrait de la cassette
1 Presser la touche OPEN/CLOSE (À) pour ouvrir le
porte-cassette.
2 Retirer la cassette du porte-cassette. 3 Presser à nouveau la touche OPEN/CLOSE (À) pour
fermer le porte-cassette.
REMARQUES:
• Le porte-cassette ne se fermera pas complètement si la
bande est mal insérée. Dans ce cas, presser la touche
OPEN/CLOSE (A) pour ouvrir le porte-cassette et
insérer à nouveau la cassette.
• Si le porte-cassette ne se ferme pas complètement, il
s’ouvrira automatiquement après environ 10 secondes,
même si la touche OPEN/CLOSE (^) n’est pas pressée.
• Ne pas essayer d’ouvrir ni de fermer' le porte-cassette à
la main car ceci l’endommagera.
43
Page 44

ENREGISTREMENT
Cassette audio ordinaire
Introduction à l’enregistrement DAT
A la différence des bandes audio ordinaires, de nombreux
Morceau n°1
(signal
audio)
Morceau n°2 Morceau
(signal ‘ n°3 (signal
audio) audio)
codes appelés codes auxiliaires peuvent être écrits sur les
cassettes DAT séparément du signal audio. Les codes
auxiliaires sont écrits pour toute une variété de fonctions
pratiques en lecture et édition de bande. Vous pouvez
écrire trois types de codes auxiliaires: identification de
début, identification de fin et identification de passage.
Identification de début: Indique le début de chaque
morceau et est utilisée pour la programmation et la
recherche des morceaux.
Identification de fin: Indique la fin d'un enregistrement.
Identification de passage: Indique le début d'une section
à passer.
En outre, la durée absolue est automatiquement écrite
Morceau n°1
(signal
audio)
SUBn"1 SUBn°2
Morceau n°2
(SUS = zone de code auxiliaire)
Cassette DAT
(signal
audio)
Morceau n°
3 (signal
audio)
SUB n° 3
après que l'enregistrement est terminé.
• Avant d'effectuer un enregistrement important, il est
recommandé de faire un essai pour s'assurer que
l'audio désiré est enregistré correctement.
Enregistrement à partir des prises d’entrée numérique (prise coaxiale ou optique)
Ce processus est recommandé quand vous enregistrez
d'une autre platine DAT ou d'une autre source audio
numérique.
m
fïtii mm fmn
g □ D □ OD I □ I [>
A
3 iNPUT
'^OPTICAL COAXIAL
□ □ □□a
□□□□
□ ciana
0 aaaa
□ □
Ce|
pali
ana
ou<
1
2
START ID
AUTO WRITE
Fournir l’alimentation.
Quand l'alimentation est fournie, la touche START ID
AUTO WRITE est automatiquement mise en circuit et la
touche s'allume. Les numéros de morceaux seront
automatiquement écrits pendant l'enregistrement. Si
les numéros de morceaux ne sont pas nécessaires,
presser la touche START ID AUTO WRITE pour que
l'Illumination de la touche s'éteigne.
2
Régler le sélecteur INPUT sur la position DIGITAL.
3
Régler le sélecteur DIGITAL INPUT du panneau
arrière selon les prises à utiliser.
Prises coaxiales: Le régler sur la position COAXIAL.
Prises optiques: Le régler sur la position OPTICAL.
4
Charger une cassette DAT dans le porte-cassette.
5
Presser la touche REC (•).
L'appareil entre en mode d'attente d'enregistrement.
Lors de l'enregistrement depuis le début de la bande,
une section silencieuse d'environ 7 secondes est
automatiquement enregistrée avant que la platine
n'entre en mode d'attente d'enregistrement.
Régler la source à enregistrer sur le mode de lecture
et presser la touche PLAY (►) pour commencer
l’enregistrement.
Quand la touche START ID AUTO WRITE est en circuit
et que l’appareil détecte une section silencieuse de
plus de 2 secondes, un signal d'identification de début
est écrit et le morceau est automatiquement numéroté.
Quand l’enregistrement est terminé, presser la
touche END ID WRITE.
Une fois que le signal d’identification de fin est écrit, la
bande s’arrête automatiquement.
44
• Si le signal d’identification de fin est écrit, il est facile de
continuer un enregistrement à partir de la fin de
l’enregistrement précédent. Voir page 48.
REMARQUES:
• Quand des sources numériques sont enregistrées à
partir d’une platine DAT qui peut envoyer des signaux
de code de catégorie "DAT" et d’identification de début
et de passage aux sorties numériques, s’assurer que la
touche START ID AUTO WRITE est en circuit (allumée).
L’appareil enregistre les signaux d’identification de de
début et de passage qui sont contenus dans la source,
et ce tels quels.
• Si l’alimentation de la source à enregistrer est hors
circuit, l’appareil entre en mode d’attente
d’enregistrement et le défilement de la bande s’arrête.
Dans cet état, la mise sous tension de la source à
enregistrer fait reprendre l’enregistrement à partir du
numéro de morceau suivant.
• Lors de l’enregistrement par les prises d’entrée
numérique, aucun signal n'est mis en sortie sur les
prises de sortie numérique.
• Bien régler le sélecteur INPUT et le sélecteur DIGITAL
INPUT avant l’enregistrement. S’ils sont commutés
pendant l’enregistrement, l’appareil entre en mode de
pause.
O La fréquence d’échantillonnage est automatiquement
commutée selon la source à enregistrer.
• Lors de l’enregistrement à partir des prises d’entrée
numériques, il n’est pas nécessaire d’ajuster le niveau
d’enregistrement.
3
4
5
6
7
Page 45

Enregistrement à partir des prises d’entrée analogiques
Ce processus est recommandé lors d’un enregistrement à
partir d’une console de mixage; d’une platine à cassette
analogique, d’un syntoniseur, d’une platine tourne-disque
ou autre source audio externe similaire.
Lors de l’enregistrement à partir de ces sources, les
numéros de morceau peuvent ne pas être écrits
correctement avec la fonction d’écriture automatique de
signal d’identification de début. Dans ce cas, vous pouvez
écrire manuellement les signaux d’identification de début
pendant l’enregistrement ou après. Voir page 47.
:
1
Fournir l’alimentation.
2
Régler la touche START ID AUTO WRITE.
Si la source à enregistrer ne contient pas une section
silencieuse d’environ 2 secondes entre les morceaux,
presser la touche START ID AUTO WRITE pour que
l’illumination de la touche s’éteigne.
3
Régler le sélecteur INPUT sur la position ANALOG.
4
Régler le sélecteur REC fs.
5
Régler le sélecteur ANALOG INPUT du panneau
arrière selon les prises à utiliser.
Prises à broches non équilibrées: Le régler sur la
position PIN.
Prises à broches équilibrées: Le régler sur la position
XLR.
6
Charger une cassette DAT.
7
Presser la touche REC (•).
L’appareil entre en mode d’attente d’enregistrement.
Lors de l’enregistrement depuis le début de la bande,
une section silencieuse d’environ 7 secondes est
automatiquement enregistrée avant que la platine
n’entre en mode d’attente d’enregistrement.
Lire la source à enregistrer et ajuster le niveau
8
d’enregistrement avec la commande REC LEVEL.
Voir ci-dessous.
9 Presser la touche PLAY (►) pour commencer
l’enregistrement.
10 Quand l’enregistrement est terminé, presser la
touche END ID WRITE.
Une fois que le signal d’identification de fin est écrit, la
bande s’arrête automatiquement.
• Si le signal d’identification de fin est écrit, il est facile de
continuer un enregistrement à partir de la fin de
l’enregistrement précédent. Voir page 48.
REMARQUE:
Bien régler les sélecteurs INPUT, ANALOG INPUT et REC fs
avant l’enregistrement. Si le sélecteur INPUT ou REC fs est
commuté pendant l’enregistrement, l’appareil entre en
mode de pause. SI le sélecteur ANALOG INPUT est
commuté, une section vierge de quelques secondes est
enregistrée.
Pour ajuster le niveau d’enregistrement lors de
l’enregistrement à partir des prises d’entrée
analogiques
Comme guide, ajuster le niveau d’enregistrement pour que
le compteur de niveau de crête soit entre ”-18 dB” et ”0”.
S’assurer que les niveaux dè crête n’atteignent pas
“OVER”. Si les niveaux de crête dépasse ”0”, ”OVER”
s’allume et un son distordu peut en résulter.
• Si les niveaux d’enregistrement pour les canaux de
gauche et de droite sont différents, ajuster séparément
les canaux de gauche et de droite. (Voir la figure.)
45
Page 46

Pour arrêter mornentanément l’enregistrement
1
Presser la touche PAUSE (8i).
L’enregistrement s'arrête momentanément.
2 Presser la touche PLAY (g>-) ou la touche PAUSE (ai)
à nouveau pour reprendre l’enregistrement.
© Quand la touche START ID AUTO WRITE est en circuit
(allumée), le signal d'identification de début est écrit au
point où l’enregistrement reprend.
REMARQUE:
Pour protéger la bande et la tête, cette dernière sera
séparée de la bande après qu’environ 5 minutes se soient
écoulées en mode de pause d’enregistrement.
Sections vierges et sections silencieuses
D
Le
nur
diff
aut
WF
enr
Les
cor
dot
Sections vierges
I Enregistre- I i Enregistre- i ' Enregistre-' ' Enregistre
ment
I I
Morceau
Sections silencieuses
Morceau Morceau Morceau
Morceau Morceau Morceau
I I
ment
ment
I I
Sections vierges
Enregistrement
Sections silencieuses
ment
Morceau
Sur les bandes audio analogiques conventionnelles, les
sections sur lesquelles aucun enregistrement n’a été
effectué (section vierge créée par l’avance rapide, etc.) et
les sections sur lesquelles un enregistrement a été effectué
mais qui ne comporte pas de son (section créée par la
fonction d’enregistrement silencieux) sont traitées de la
même manière et elles sont utilisées pour la recherche de
morceaux, du fait qu’aucun son ne s’entend dans ces
sections.
Au contraire, la platine DAT distingue les sections vierges
et les sections silencieuses. Si des sections vierges restent
sur la bande, le fonctionnement de la recherche avec la
fonction APSS peut prendre longtemps et la recherche
utilisant la durée absolue risque de ne pas se produire
correctement. Par conséquent, lors de l’enregistrement,
s’assurer qu’aucune section vierge n'est laissée sur la
bande.
De plus, du fait que les sections silencieuses entre les
morceaux doivent être enregistrées sur les bandes audio
analogiques pour la recherche des morceaux, les sections
silencieuses entre les morceaux sont recommandées, si
l’on considère le point de vue de la copie de cassettes DAT
sur des bandes audio analogiques.
Pour insérer un silence entre les morceaux, presser la
touche REC MUTE pendant l’enregistrement. Une
section silencieuse sera créée tant que la touche est
maintenue pressée. Il est recommandé de créer une
section silencieuse d’environ 4 secondes pour la copie
ultérieure sur une bande audio analogique. Ne pas
créer de sections vierges en avançant la bande avec la
touche FF (>^) ou PLAY (»►).
Pour commencer l’enregistrement au cours de la
bande, utiliser la fonction de recherche de fin (page
20) pour localiser la fin de l’enregistrement précédent.
Ceci évitera de laisser une section vierge.
46
Page 47

SIGNAUX D’IDENTIFICATION DE DEBUT ET NUMEROS DE MORCEAUX
Le numéro réel d’un morceau enregistré sur une bande et le
:
numéro de morceau affiché sur l’appareil peuvent être
différents, même si les numéros de morceaux sont
automatiquement écrits avec la fonction START iD AUTO
WRITE. Ceci peut arriver à cause du contenu du morceau
enregistré.
Les numéros de morceaux peuvent ne pas être enregistrés
correctement iors de l'enregistrement à partir de sources
dont le contenu est le suivant:
• Conversations avec des coupures
• Bas niveau d’enregistrement giobai
• Intervaiies courts (moins de 2 secondes) entre ies morceaux
• Longs passages en pianissimo
• Bruit ou bourdonnement entre ies morceaux.
Si ies numéros de morceaux ne sont pas écrits
correctement, ii peut être nécessaire d’ajouter ou d’effacer
ies numéros de morceaux.
Quand l’enregistrement est effectué à partir de sources
sans siience entre ies morceaux, il est recommandé d’écrire
manueliement ies numéros de morceaux pendant ou après
l’enregistrement.
Pour écrire manuellement les numéros de
morceaux pendant l’enregistrement
Presser la touche START ID WRITE (la touche s’allume) au début de chaque morceau.
A chaque pression sur la touche START ID WRITE, le signal
d’identification de début est écrit et le numéro de morceau
passe au suivant.. Pendant que ie signal d’identification de
début est écrit, i’indicateur ST-iD clignote.
• L’écriture manueiie des numéros de morceau est
□
le
possibie quei que soit ie réglage de la touche START ID
AUTC WRITE.
• Jusqu’à 99 numéros de morceau peuvent être écrits. Si
une bande qui contient pius de 99 morceaux est iue, ie
numéro de morceau n’est pas affiché après ie lOOème.
Pour écrire manuellement les signaux
d’identification de début pendant la lecture
Un signai d’identification de début indique ie début d’un
morceau. Si ce signai et le numéro de morceau
correspondant ne sont pas écrits, ia sélection de morceau
par i’APSS, l’APMS et directe est impossible.
Si les signaux d’identification de début et ies numéros de
morceau ne sont pas correctement écrits sur une bande,
insérer les signaux d’identification de début seion le
processus suivant puis les renuméroter (page 48).
1 Pendant la lecture, presser la touche START ID
WRITE (la touche commence à clignoter) au point
où le signal d’identification de début doit être
inséré.
La bande est lue pendant 3 secondes puis rebobinée à
un point 2 secondes avant que ia touche START iD
WRiTE a été pressé. La lecture commence à partir de
ce point pendant 5 secondes et se répète 10 fois
(lecture test). Du fait que i’indicateur ST-iD s’aliume
quand ia bande détecte le signal d’identification de
début, i’empiacement du signai d’identification de
début peut être vérifié. Le vérifier tout en écoutant ia
lecture test.
2 Si le signal d’identification de début n’est pas
correctement inséré au début du morceau, le
déplacer vers l’arrière ou i’avant avec les touches
REW (-<◄) ou FF (►►).
A chaque pression sur ia touche REW (◄◄), le signal
d’identification de début recule de 0,3 secondes. A
chaque pression sur la touche FF (►►), il se déplace
vers l’avant de 0,3 secondes.
3 Quand le signal d’identification de début est
correctement inséré, presser à nouveau la touche
START ID WRITE pendant la lecture test.
La touche s’allume et la bande est rebobinée jusqu’au
début du morceau et le signal d’identification de début
est écrit. (Pendant l’écriture, l’indicateur ST-ID
clignote.) La lecture reprend après que le signal
d’identification de début soit écrit.
47
Page 48

Remarque concernant les signaux d’identification de
début
® Si un signal d’identification de début est écrit sur un
point où un signal d’identification de passage a été
écrit, le signal d’identification de passage est effacé.
’P
1er
morceau
Code aux
1*'morceau S'*™ morceau 4*™ morceau
2ème
morceau
liaire 1
---H--
2èmo morceau
3éme
morceau
-------
Code auxiliaire 2
^ôme
morceau
J
L’intervalle entre les signaux d’identification de début
(durée de lecture d’un morceau) doit être de plus de 9
secondes. Cet intervalle de 9 secondes est nécessaire
pour garantir un fonctionnement correct de la fonction
APSS, APMS et le renumérotage des morceaux.
Pour effacer les signaux d’identification de
début
Si un signal d’identification de début est écrit à un point
inutile, vous pouvez l’effacer pendant la lecture. Bien
renuméroter les morceaux après avoir effacé un signal
d’identificafion de début.
Presser la touche START ID ERASE (la touche clignote)
quand l’indicateur ST-ID apparaît à l’affichage.
La bande se rebobine jusqu’au début du morceau en cours
de lecture et le signal d’identification de début est effacé.
Pendanf l’effacement, l’indicateur ST-ID clignote, La lecture
reprend après que le signal d’identification de début soit
effacé.
e Si un morceau de morceau est aussi écrit avec le signal
d’identification de début, les deux signaux seront
effacés en même temps.
Pour renuméroter les numéros de morceau
Quand les signaux d’identification de début sont insérés ou
effacés, les numéros de morceau sonf déplacés. Les
renumérofer selon ce processus.
Presser la touche RENUMBER en mode d’arrêt.
La bande esf rebobinée jusqu’au débuf de la bande et les
numéros de morceau sont automatiquement renumérotés à
grande vitesse. Chaque fois que l’appareil détecte un
signal d’identification de début, le numéro de morceau
correct est écrit en commençant par P-N01.
® Quand le renumérotage est terminé à la fin de la
bande, celle-ci esf automafiquement rebobinée
jusqu’au début.
r
SIGNAUX D’IDENTIFICATION DE FIN
Un signal d’identification de fin indique la fin d’un
enregistrement. La bande n’avance pas au-delà du point
où ce signal est écrit. Il est par conséquent facile de
48
continuer un enregistrement à partir de la fin d’un autre.
Ceci évite aussi de créer une section vierge entre les
enregistrements.
Pour écrire un signal d’identification de lin
Pendant l’enregistrement, presser la touche END ID
WRITE.
Une section silencieuse est automatiquement insérée et le
signal d’identification de fin est écrit. Alors que le signal
d’identification de fin est écrit, l’indicateur END-ID clignote
puis la bande s’arrête automatiquement.
Quand l'appareil détecte un signal d’identification de fin
pendant la lecture, l’avance rapide ou le repérage, le
numéro de morceau change pour “EE” et la bande
s’arrête automatiquement.
Ne pas écrire un signal d’identification de fin si
l’intervalle entre les signaux d’identification de début
est inférieur à 9 secondes. Les fonctions APSS et de
renumérotage risquent de ne pas être correctement
effectuées.
Page 49

rs
lal
<)
re
□
Pour continuer un enregistrement à partir de ia
fin d’un autre
1 Presser la touche END ID SEARCH en mode d’arrêt
ou pendant la lecture.
La touche commence à clignoter. La bande est
rebobinée au début puis est avancée rapidement au
point où le signal d’identification de fin est écrit
(fonction de recherche de fin). L’illumination de la
touche s’éteint quand la bande s’arrête.
2 Commencer l’enregistrement à partir du point où la
bande s’arrête.
Les numéros de morceau et la durée absolue
continueront à partir du contenu enregistré auparavant.
• Le signal d’identification de fin de l’enregistrement
précédent est automatiquement effacé.
Pour effacer un signal d’identification de fin
Un signal d’identification de fin est automatiquement effacé
quand un enregistrement successif est effectué avec la
fonction de recherche de fin. Pour effacer un signal
d’identification de fin sans enregistrement le suivant,
procéder comme suit.
Quand la bande s’arrête après la recherche de fin, presser la touche END ID ERASE.
La touche commence à clignoter. Quand le signal
d’identification de fin est effacé, la bande s’arrête.
(Pendant l’effacement d’un signal d’identification de fin, la
bande est avancée pendant quelques secondes et
l’indicateur END-ID clignote.)
Pour effacer le contenu enregistré
Quand vous effectuez un enregistrement sur un autre,
]
l’enregistrement précédent est automatiquement effacé.
Pour effacer le contenu enregistré sans faire de nouvel
enregistrement, procéder comme suit.
1 Régler le sélecteur INPUT sur la position ANALOG.
2 Charger ia bande dans ie porte-cassette.
3 Tourner ia commande REC LEVEL compiètement
dans le sens contraire des aiguilles d’une montre
sur 0 (MIN).
4 Presser la touche REC (•) 5 Presser la touche PLAY (►)
Le contenu enregistré auparavant sera effacé.
49
Page 50

Lecture normale
LECTURE
1 Charger la bande dans le porte-cassette.
2 Presser la touche PLAY (^).
Pour arrêter la lecture
1 Presser la touche STOP (s).
2 Pour recommencer la lecture, presser la touche
PLAY (►)■
Pour arrêter momentanément la lecture
1 Presser la touche PAUSE (oi).
2 Pour recommencer la lecture, presser la touche
PLAY (>) ou à nouveau la touche PAUSE (ii).
® Pour protéger la bande, le mode de pause est
automatiquement annulé après 5 minutes et l’appareil
entre en mode d’arrêt.
50
Pour avancer rapidement ou rebobiner la bande
Pour avancer rapidement la bande, presser la
touche STOP (■) puis la touche FF {►►).
Pour rebobiner la bande, presser la touche STOP (m)
puis la touche REW (-^).
2
Presser la touche STOP (b) pour arrêter le
défilement de la bande.
Page 51

<Exemple>
-U C Cs
HV
Système de recherche automatique de programme (APSS)
L’APSS vous permet de localiser de début de n’importe
quel morceau pendant la lecture. Il suffit de presser la
touche REW (◄◄) ou FF (►►) pour passer en arriè’re ou en
avant.
REMARQUES;
• Pour les bandes avec un intervalle de signaux
d’identification de début de moins de 9 secondes,
l’APSS peut ne pas fonctionner correctement (page 48).
• Si un morceau n’est pas lu selon le numéro de morceau
sélectionné avec l'APSS, le signal d’identification de
début et le numéro de morceau n’ont pas été
correctement écrits. Voir page 47.
Presser la touche FF (►►) pour passer au début du
morceau suivant. Presser la touche REW (mm) pour
retourner au début du morceau actuel.
Chaque pression sur la touche FF (►►) passe au début des
morceaux suivants. Chaque pression sur la touche REW
(◄◄) passe au début des morceaux précédents.
• La bande peut être momentanément arrêtée au début
du morceau voulu en pressant la touche PAUSE (II)
après avoir pressé la touche FF (►►) ou REW (■♦^). Le
morceau voulu peut ensuite être lu en pressant la
touche PLAY (►).
Pour passer au morceau 4 alors que le morceau 3 est lu
Presser la touche FF (►►) une fois pendant la lecture du
morceau 3. L’indicateur de numéro de morceau change de
3 à un 4 clignotant et la bande est avancée rapidement
jusqu’au début du morceau 4. La lecture commence à
partir du morceau 4.
'L',"'-. <Cm
1 •“
-fx
Pour relire ie début du morceau 4 aiors que ceiui-ci est en lecture
Presser la touche REW (◄◄) une fois pendant la lecture du
morceau 4. L’indicateur de numéro de morceau change
pour un 4 clignotant et la bande est rebobinée jusqu’au
début du morceau 4. La lecture commence à partir du
début du morceau 4.
Pour passer au morceau 8 alors que le morceau 5 est lu
Presser la touche FF (►►) trois fois pendant la lecture du
morceau 5. L’indicateur de numéro de morceau change
de 5 à un 8 clignotant et la bande est avancée rapidement
jusqu’au début du morceau 8. La lecture commence à
partir du morceau 8.
Pour passer au morceau 6 alors que le morceau 10 est lu
Presser la touche REW ( m m ) cinq fois pendant la lecture du
morceau 10. L’indicateur de numéro de morceau change
de 10 à un 6 clignotant et la bande est rebobinée jusqu’au
début du morceau 6. La lecture commence à partir du
début du morceau 6.
51
Page 52

Pour programmer les morceaux voulus (sélecteur automatique de musique programmable = APMS)
Vous pouvez programmer les morceaux de votre choix dans n’importe quel ordre.
® Si ies morceaux ne sont pas numérotés correctement, ies morceaux désirés peuvent ne pas être programmés ou ia
1
Charger une bande.
2
Presser la touche PROGRAM.
L’indicateur APMS s’aiiume.
Avec les touches numériques (1-0, +10, +20), entrer
les numéros de morceau voulus dans l’ordre désiré.
Exemple;
Pour sélectionner le morceau 12:
Presser “+10” et "2”.
Pour séiectionner le morceau 20:
Presser "+20" et “0”.
Pour sélectionner le morceau 54:
Presser "+20” deux fois, “+10” et “4”.
4 Presser la touche PLAY (è>).
Les morceaux programmés sont ius dans i’ordre
programmé.
Pour passer au début d’un morceau du programme:
Presser ia touche FF ou REW {« ) pour passer au
début des morceaux programmés précédents/suivants.
L’affichage indique le numéro de programme (ordre de
lecture) et les numéros de morceau programmés.
52
Pour vérifier le contenu programmé
En mode d’arrêt, presser la touche CALL.
Les morceaux programmés sont affichés dans l’ordre
programmé.
® Quand la touche CALL est pressée pendant la lecture
programmée, le numéro de morceau programmé à lire
ensuite est affiché pendant environ une seconde.
Pour effacer un morceau programmé
Presser la touche STOP (®) puis la touche CLEAR.
A chaque pression sur la touche CLEAR, un morceau
programmé sera effacé en commençant par le dernier.
Pour annuler tout le programme
Presser la touche PROGRAM en mode d’arrêt.
Une pression sur la touche OPEN/CLOSE ou la mise hors
tension de l’appareil annulent aussi le programme entier.
Page 53

Sélection directe
N’importe quel morceau peut être directement sélectionné
et lu en spécifiant le numéro de morceau.
En mode d’arrêt ou de lecture, entrer le numéro de morceau voulu avec les touches numériques (0-1, +10, +20).
Exemple:
Pour sélectionner le morceau 12:
Presser ’’+10” et "2" .
Pour sélectionner le morceau 20:
Presser "+20” et “O".
Pour sélectionner le morceau 54:
Presser “+20” deux fois, “+10” et “4”.
Le début du morceau spécifié sera recherché et
automatiquement lu.
• La fonction de sélection directe peut être utilisée pour
repérer le début d'un morceau. Entrer un numéro de
morceau et presser la touche PAUSE (il). Le morceau
spécifié est recherché et l’appareil entre en mode de
pause. Pour commencer la lecture, presser la touche
PLAY (►).
• Si un numéro de morceau qui n’existe pas sur la bande
est spécifié, la bande est avancée rapidement jusqu’à
la fin.
• La sélection directe ne peut pas être effectuée sur des
bandes qui ne contiennent pas de numéros de
morceau ou dont les morceaux ne sont par numérotés
correctement.
• La sélection directe ne peut pas être utilisée pour les
morceaux programmés en APMS.
Recherche de durée absolue
La lecture peut être démarrée à partir de n’importe quel
point quand la durée absolue (depuis le début de la bande
jusqu’au point où vous voulez commencer la lecture) est
spécifiée.
1 Presser la touche ABS TIME en mode d’arrêt ou de
lecture.
2 Entrer la durée absolue avec les touches
numériques (0-1).
Par exemple, pour la recherche de “une heure 25
minutes 32 secondes”, presser “1”, “2", “5”, ’’3” et “2”.
3 Presser la touche PLAY (►).
La lecture commence à partir de la durée absolue
spécifiée.
• Quand une durée plus longue que la durée
d’enregistrement de la bande est spécifiée, la bande
s’arrêtera à la fin.
• Pendant la lecture, la durée absolue doit être entrée en
moins de 4 secondes après avoir pressé la touche ABS
TIME. Autrement, la fonction sera annulée.
53
Page 54

Repérage et révision
Les touches GUE et REVIEW vous permettent de passer
rapidement à un endroit donné de la bande tout en
écoutant les morceaux à 3 fois la vitesse de lecture
normale.
En mode d’arrêt:
1 Presser la touche CUE pour passer en avant ou
REVIEW pour passer en arrière.
2 Presser la touche PLAY (►) quand la position
voulue est atteinte.
Pendant la lecture:
1 Presser et maintenir la touche CUE pressée pour
passer en avant ou la touche REVIEW pour passer
en arrière.
2 La lecture reprend quand la touche CUE ou REVIEW
est relâchée.
ffl Quand la fin de la bande est atteinte, la bande s'arrête
automatiquement.
REMARQUE:
Les touches GUE et REVIEW ne fonctionnent pas pour les
morceaux programmés en ARMS.
Lecture répétée
La lecture répétée vous permet de répéter continuellement
une bande entière ou un programme en ARMS. Pour
répéter un programme, programmer les morceaux à
l'avance (page 52).
1 Presser la touche REPEAT.
L'indicateur c: s'allume.
2 Presser la touche PLAY (►).
La bande entière ou le programme seront lus
continuellement.
» Pour reprendre la lecture normale, presser à nouveau la
touche REPEAT.
» La lecture répétée est automatiquement arrêtée une
fois que la lecture a été répétée 24 fois.
54
Page 55

r
Pour passer des sections inutiles en utilisant le
signal d’identification de passage
Quand l'appareil détecte un signal d’identification de
passage, la bande avance rapidement jusqu’au début du
morceau suivant.
Pour écrire le signal d’identification de passage
Pendant la lecture, presser la touche SKIP ID WRITE au
début de la section à passer.
La touche s’aiiume. La iecture s’arrête momentanément et
ie signal d’identification de passage est écrit. (Pendant
l’écriture, l’indicateur SKIP-ID clignote.)
Lecture avec passage
SKIP PLAY
OFF . ON
Avance rapide
Lecture > Lecture
1®'morceau |
____________________I_______
Code auxiliaire 1
I
Signal d’identification de passage
gômo
morceau
Code auxiliaire 2 /
‘ 1 /
7
Régler la touche SKIP PLAY sur la position ON.
Quand un signal d’identification de passage est détecté
pendant la lecture, la bande avance rapidement jusqu’au
début du morceau suivant et la lecture reprend.
• Quand vous voulez lire une bande contenant un signal
d’identification de passage sans la fonction de lecture
>
avec passage, régler la touche SKIP PLAY sur la
position QFF. La bande sera lue normalement mais le
signal d’identification de passage n’est pas effacé.
Pour effacer un signal d’identification de passage
1 Régler la touche SKIP PLAY sur la position OFF.
2 Lire le morceau qui contient le signal
d’identification de passage à effacer et presser la
touche SKIP ID ERASE quand l’indicateur SKiP iD
s’allume.
La bande est rebobinée jusqu’à la position où le signal
d’identification de passage a été écrit. L’indicateur
SKIP ID clignote et le signal d’identification de passage
est effacé. La lecture reprend après que le signal
d’identification de passage est effacé.
55
Page 56

TO C
—I—
Quand une bande qui contient une TOC commence à être lue du
début de la bande, l’indicateur TOC s’allume quelques secondes
plus tard et le nombre total des morceaux ainsi que la durée de
lecture totale de la bande est affichée après la lecture du comteur
en pressant la touche DISPLAY.
Pour afficher la durée écoulée et le compteur de
bande
A chaque pression sur la touche DISPLAY pendant la
lecture, l’affichage change sur 1,2 ou 3 dans cet ordre.
1
L’indicateur PROG s’allume et la durée de lecture
écoulée depuis le morceau actuel est affichée.
Quand un morceau qui ne contient pas de signal
d'identification de début est lu, M - S” est affiché.
La durée absolue est affichée en mode APSS.
En avance rapide, rebobinage, repérage ou révision,
M -- S” est affiché.
L’indicateur COUNTER s’allume et la lecture du
compteur de bande est affichée.
Pour remettre le compteur à zéro, presser la touche
COUNTER RESET. L’affichage indique “0000”. Dans
tout autre mode d’affichage, la touche COUNTER
RESET ne fonctionne pas.
L’indicateur ABS s’allume et la durée écoulée totale
(durée absolue) depuis le début de la bande est
affichée.
Pour les bandes sur lesquelles la durée absolue n’est
pas enregistrée, M -- S” est affiché.
REMARQUE:
® Quand une section qui ne contient pas un signal
d’identification de début et un numéro de morceau est
lue, le numéro de morceau n'est pas affiché.
56
Page 57

c
Si cet appareil ne fonctionne pas normalement, vérifier d’abord les points suivants. Si l’appareil oontinue à fonctionner
anormalement, ou si un problème autre que ceux de la liste suivante se produit, couper l’alimentation de la platine et
débranoher la prise CA; consulter ensuite ootre oonoesslonnalre ou personnel de servies Yamaha.
EN CAS DE PROBLEME
r PROBLEME
L’alimentation n’est pas fournie.
Le porte-oassette ne se ferme pas après le chargement
d’une bande.
Cet appareil ne fonctionne pas.
Pas de son de lecture des deux canaux.
Pas de son de leeture d’un canal.
La durée absolue afflohée est incorreote.
Le numéro réel des moroeaux enregistrés et les
numéros de moroeau ne oorrespondent pas. (Par
exemple, Il y a 6 morceaux enregistrés mais les
numéros de morceau ne sont que 1, 2, 3, 4 et 5.)
Un morceau sélectionné avec l’APSS ou l’APMS n’est
celui désiré.
La bande s’arrête pendant le fonctionnement APMS.
VERIFICATION
• Le cordon d’alimentation est-il branché?
• La cassette est-elle bien insérée?
• Une bande est-elle chargée?
• Y a-t-il des objets étrangers dans le porte-cassette?
• Y a-t-ll de la condensation sur la bande ou la tête?
• Cet appareil est-ll bien raccordé à un amplificateur?
• Un câble est-ll lâche ou déconnecté?
• Les numéros de morceau sont-ils écrits dans l'ordre
correct?
• Ceci peut se produire avec certains types de matériau
enregistré (provoqué par du bruit entre les morceaux, un
court Intervalle entre les morceaux, des pertes de niveau,
etc.). Voir page 47.
• Le numéro réel et des morceaux enregistrés et les numéros
de morceau correspondent-ils? Voir page 47.
• Les numéros de morceau APMS sont-ils valides?
• Les numéros de morceau sont-ils renumérotés?
Le son provenant de l’entrée numérique ne peut pas
être enregistré.
Le niveau d’enregistrement ne peut pas être ajusté
pendant l’enregistrement à partir d’une entrée
numérique.
Des bruits de craquement s’entendent de la platine
quand une touche est pressée.
• Le sélecteur INPUT est-ll réglé sur DIGITAL?
• Le câble coaxial ou le câble de fibres optiques est-il
connecté correctement?
• Le sélecteur DIGITAL INPUT du panneau arrière est-il réglé
correctement?
• Le câble de fibres optiques est-il coupé ou cassé?
• Il n’est pas nécessaire de régler le niveau d’enregistrement
pour l’enregistrement à partir d’une entrée numérique.
• Ces sons s’entendent quand la fonction de protection de la
bande ou de la tête fonctionne.
• Ces sons peuvent aussi s’entendre quand une section
vierge sur la bande est atteinte en avance rapide ou
rebobinage. (Ces sons sont normaux.)
57
Page 58

CARACTERISTIQUES TECHNIQUES
Système DAT
Système de chargement
Enregistrement.........................Système de management de
Fréquence d’échantillonnage d’enregistrement
Numérique...................48 kHz, 44,1 kHz, 32 kHz/2 canaux
Analogique
Système de quantification
Vitesse de la bande..................................................8,15 mm/s
Durée d’enroulement rapide
Réponse en fréquence globale
fs=48 kHz
fs=44,1 kHz
DHT + bruit
Gamme dynamique...........................................................92dB
Séparation
Entrée numérique
Coaxiale
Optique............................................................(EIAJ CP-340)
Sortie numérique
Coaxiale
Optique
Entrée analogique
Equilibrée
Non équilibrée
Sortie analogique
Equilibrée
Non équilibrée.............................2 Vrms maximum (prise à
Sortie de casque d’écoute
Consommation..................................................................28 W
.......
Platine à bande audio numérique de type
..........
Chargement avant horizontal
......................
..........................................
.......................................
......................................................
..........................................................
..............
...................................
...........................................................
.....................
.......
Niveau de réf. +4 dB/10 kohms (XLR 3-31)
.................
..............
.........................
..........
Conversion 16 bits linéaire
...........
0,2 Vc-c/75 ohms (IEC 958)
0,5 Vc-c/75 ohms (IEC 958)
0,3 Vrms minimum pour l’échelle
complète (prise à broches RCA)
Niveau de réf. +4 dB/échelle complète
...........
75 mW/32 ohms maximum
(prise stéréo standard de 6,3 mm)
48 kHz, 44,1 kHz
45 s maximum avec une
bande de 120 minutes)
2 Hz à 22 kHz ±0,5 dB
2 Hz à 22 kHz ±0,5 dB
+22 dBm (XLR 3-32)
têtes rotatives
copieen série
0,003% à 1 kHz
96 dB à 1 kHz
(EIAJ CP-340)
broches RCA)
Alimentation
Modèle pour les Etats-Unis..........................120 V, 60 Hz
Modèle pour l’Europe....................................230 V, 50 Hz
Dimensions (L x H x P)...........................440 x 88 x 329 mm
Poids......................................................................
........
6 kg
Accessoire
Télécommande....................................................................1
Les caractéristiques techniques sont sujettes à des
modifications sans préavis.
5Ì
6;:
7
58
R;
D
dì
ni
BÎ
vy
irr
B)
Page 59

ZUR BEACHTUNG: LESEN SIE DIESEN
ABSCHNITT VOR INBETRIEBNAHME DES
1. Dieses Gerät ist ein fortschrittlicher DAT-Recorder (DAT =
Digital Audio Tape). Lesen Sie diese Bedienungsanleitung
sorgfältig, um sich mit der Bedienung vertraut zu machen und
einen einwandfreien Betrieb zu erzielen.
2. Lassen Sie dieses Gerät vor der ersten Verwendung für _
ein bis zwei Stunden an einer Netzsteckdose
angeschlossen, ohne es in Betrieb zu setzen.
3. Der Aufstellplatz sollte mit Sorgfalt gewählt werden.
Direkte Sonnenbestrahlung und Nähe von Wärmequellen
sollten vermieden werden. Weiterhin müssen
Aufstellplätze vermieden werden, an denen das Gerät
Vibrationen, Staub, Hitze, Kälte oder Feuchtigkeit ausgesetzt
ist. Zu Transformatoren, Motoren und anderen Geräten, die
elektromagnetische Felder aufbauen, muß ein ausreichender
Abstand gewahrt werden. Wenn dieses Gerät den Fernseh
oder Radioempfang stört, den Abstand zum Empfangsgerät
vergrößern.
4. Niemals das Gehäuse öffnen, weil dadurch das Gerät
beschädigt werden kann und außerdem die Gefahr eines
elektrischen Schlages besteht. Wenden Sie sich an Ihren
Fachhändler, falls ein Gegenstand in das Gerät
eingedrungen sein sollte.
5. Zum Ziehen des Netzsteckers immer am Stecker
anfassen, niemals am Kabel ziehen.
6. Beim Betätigen der Schalter und Regler darf niemals
Gewalt angewendet werden.
7. Wenn das Gerät zu einem anderen Platz gebracht werden
soll, müssen zuerst der Netzstecker gezogen und alle
Kabelanschlüsse mit anderen Geräten gelöst werden.
8. Zum Reinigen niemals chemische Lösungsmittel
verwenden, weil das Gehäuse dadurch Schaden nehmen
kann. Ein sauberes, trockenes Tuch verwenden.
9. Wenn das Gerät nicht einwandfrei funktionieren sollte, den
POWER-Schalter ausschalten und den Netzstecker ziehen.
Nach etwa 30 Sekunden den Netzstecker wieder anschließen
und das Gerät erneut in Betrieb nehmen.
10. Im Abschnitt "Bei Störungen" dieser
Bedienungsanleitung finden Sie Informationen und
Ratschläge zur Behebung von Problemen aufgrund von
Bedienungsfehiern.
11. Heben Sie diese Bedienungsanleitung zum späteren
Nachschlagen gut auf.
Rack-Montage
Die Front dieses Gerätes entspricht der Größennorm 2U und kann
direkt in ein 19-2oll-Rack installiert werden. Wenn im Rack jedoch
nicht ausreichend Platz vorhanden ist, die 4 Füße von der
Bodenplatte antfornon und das Gerät dann in das Rack ein bauen.
Wenn Das Rack nicht ausreichend belüftet ist, kann die Temperatur
im Rack stark ansteigen. Daher muß für eine ausreichende
Belüftung im Rack gesorgt werden.
Reinigung des Tonkopfes
Schon bei geringfügiger Verschmutzung des Tonkopfes können bei
der Wiedergabe Störgeräusche oder Tonausfälle auftreten. Wenn
der Tonkopf stark verschmutzt ist, tritt bei der Wiedergabe ein
Signallesefehler auf, und der Ton kann nicht mehr reproduziert
werden. In diesem Fall erscheint die Anzeige "WARNING”. Sollte
dies Vorkommen, reinigen Sie den Tonkopf mit einer im Fachhandel
vertriebenen DAT-Tonkopf-Reinigungscassette oder lassen Sie den
Tonkopf vom Yamaha-Fachhändler reinigen. Nach Verwen'dung
über lange Zeit muß der Tonkopf wegen Abnutzung erneut werden. .
Wenden Sie sich dafür an Ihren Yamaha-Fachhändler.
Verwendungsdauer der Kopftrommel
Es wird empfohlen, die Kopftrommel vor Ablauf von 1500
Betriebsstunden zu erneuern.
Kondensation
An kalten Gegenständen in einer warmen Umgebung schlägt
sich Feuchtigkeit nieder. Kondensation kann auch auf der
Trommel und dem Tonkopf im Gerät auftreten, wodurch das
Band und der Tonkopf beschädigt werden können. Dieses
Gerät ist mit einer Heizvorrichtung zur Verhinderung von
Kondensation ausgestattet. Sobald das Gerät an eine
Netzsteckdose angeschlossen wird, wird die Heizung
eingeschaltet, um das Auftreten von Kondensation zu
verhindern. Es dauert ein bis zwei Stunden, bis
niedergeschlagene Feuchtigkeit verdampft ist. Wenn
Kondensation auf Trommel und Tonkopf festgestellt wird,
erscheint die Anzeige "DEW", und das Gerät läßt sich nicht
in Betrieb setzen. Warten Sie etwa ein bis zwei Stunden, bis
die Anzeige erlischt, bevor Sie das Gerät verwenden.
Kondensation tritt auf:
In feuchtwarmen Räumen.
Wenn das Gerät aus einer kalten in eine warme Umgebung
gebracht wird.
* Das Gerät sollte bei Raumtemperatur zwischen 5°C und
35°C verwendet werden. Kondensation tritt vor allem
in der kalten Jahreszeit auf.
Einstellung der Verstärker-Lautstärke
DAT-Cassetten weisen beträchtlich weniger Rauschen als normale
Schallplatten und Compact-Cassetten auf und sind zwischen den
einzelnen Titel etrem leise. Daher muß darauf geachtet werden, die
Lautstärke nicht zu hoch einzustellen, um die Nennwerte des
Verstärkers und der Lautsprecher nicht zu Überschreiten.
Die empfohlene Verstärker-Eingangsbalance beträgt 600 Ohm oder
mehr. Durch Anschluß an einen Verstärker (oder an ein anderes
Audiogerät) mit einer zu niedrigen Eingangsimpedanz kann die
Reproduktionsiautstärke verringert werden.
Bescheinigung des Importeurs
Hiermit wird bescheinigt, daß der/die/das
DAT Recorder Typ: DTR2_________________________
(Gerät, Typ, Bezeichnung)
in Übereinstimmung mit den Bestimmungen der
VERFÜGUNG 1046/84
(Amtsblattverfügung)
funk-entstört ist.
Der Deutschen Bundespost wurde das Inverkehrbringen
dieses Gerätes angezeigt und die Berechtigung zur
Überprüfung der Serie auf Einhaltung der Bestimmungen
eingeräumt.
___________________________
Yamaha Europa GmbH
Name des Importeurs
59
Page 60

INHALT
Merkmale................................................................................60
Bezeichnungen der Bedienelemente.....................................61
Anschlüsse
DAT (Digital Audio Tape)
Einlegen und Entnehmen von Cassetten
Aufnahme
.............................................................................
...........
............................................
..............................
...............................................................................
71
MERKMALE
Die APMS-Funktion gestattet die Programmierung von
bis zu 30 Titeln in beliebiger Reihenfolge.
Mit der APSS-Funktion können Titel vor/hinter
dem laufenden Titel angesprungen w/erden.
Mit der Titel-Direktwahlfunktion kann ein Titel
einfach durch Eingabe seiner Nummer schnell
wiedergegeben werden.
Die ABS-Funktion ermöglicht es, jede
Bandposition mittels der Spielzeit vom
Bandanfang anzuspringen.
Mit der Wiederholfunktion können alle Titel auf
der Cassette oder alle programmierten Titel
wiederholt wiedergegeben werden.
Die Auslaß-Wiedergabefunktion Überspringt nicht
erwünschte Bandabschnitte.
Die Titelnummer-Aufzeichnungsfunktion nimmt
während der Aufnahme automatisch die
Titelnummern auf dem Band auf.
Mit der praktischen Neunumerierfunktion können
die Titel nach dem Editieren neu durchnumeriert
werden.
Dank der Endposition-Suchfunktion ist es
einfache, die Aufnahme nach dem Ende einer
früheren Aufnahme fortzusetzen.
66
69
72
Start-ID-Signale und Titelnummern........................................75
End-ID-Signale.......................................................................76
Wiedergabe............................................................................ 78
Bei Störungen.........................................................................85
Technische Daten.................................................................. 86
Mit der Cue-/Review-Funktion können Sie beim
Schnellvorlauf/Schnellrücklauf den Ton hören.
Die Suchlaufgeschwindigkeit erreicht das
200fache der normalen
Wiedergabegeschwindigkeit.
Die verfügbaren Abtastfrequenzen von 48 kFIz,
44,1 kFIz und 32 kFIz ermöglichen Aufnahme/
Wiedergabe einer Vielzahl von Digitalquellen.
Das Gerät Ist mit symmetrischen Analog-Eingangs-/
Ausgangsbuchsen ausgestattet (XLR-3-31/XLR-3-32).
Das Gerät verfügt über zwei Arten von Digitalbuchsen
(Koaxial-Cinchbuchsen, Lichtwellenleiter-Buchsen).
Im A/D-Wandler-Schaltkreis kommt ein theoretisch
verzerrungsfreier 1-Bit-A/D-Wandlerzum Einsatz,
wodurch eine erstklassige Klangqualität gewährleistet
wird.
Die Kombination von Digitalfilter und 1-Bit-PDM-
D/A-Wandler resultiert in einer hervorragenden
Klangqualität.
Zwei Direktantriebsmotoren sorgen für einen
stabilen Bandtransport.
Die Bedienung ist mit einer Kabel-Fernbedienung
möglich.
60
Page 61

© Netzschalter (POWER)
Dient zum Ein- und Ausschalten der
Spannungsversorgung.
© Cassettenlade
Hier wird die DAT-Cassette eingelegt.
© Eingangswähler (INPUT)
Für Aufnahme von einer Audioquelle, die an den
DIGITAL INPUT-Buchsen angeschlossen ist, auf
DIGITAL stellen. Für Aufnahme von einer
Audioquelle, die an den ANALOG INPUT-Buchsen
angeschlossen ist, auf ANALOG stellen.
© Aufnahme-Abtastefrequenz-Wähler (REC fs)
Wenn die Aufnahme von den ANALOG INPUTBuchsen erfolgt, kann die Abtastfrequenz auf
44,1 kHz oder 48 kHz geschaltet werden.
® Auslaßwiedergabe-Schalter (SKIP PLAY)
Aktiviert die Auslaßwiedergabe-Funktion.
© Öffnen/Schließen-Taste (OPEN/CLOSE ±)
Durch Drücken dieser Taste wird die
Gassettenlade geöffnet bzw. geschlossen.
© Anzeigetaste (DISPLAY)
Mit dieser Taste wird zwischen Absolutzeit
(ABS), Titel-Wiedergabezeit (PROG) und
Bandzählwerk (GOUNTER) umgeschaltet. Bei
Cassetten, die 'TOG’'-Signale enthalten, werden
die Gesamtzahl der Titel und die gesamte Spielzeit
angezeigt.
Zählwerk-Rückstelltaste (COUNTER RESET)
Durch Drücken dieser Taste wird das Zählwerk auf
0000 zurückgestellt.
• Diese Taste ist nur im Zählwerk-Anzeigemodus
wirksam.
Wiederholtaste (REPEAT)
Durch Drücken dieser Taste wird auf Wiedergabe-
Wiederholung geschaltet.
® Programmtaste (PROGRAM)
Dient zum Programmieren von Titeln.
® Löschtaste (CLEAR)
Durch Drücken dieser Taste wird die eingegebene
Ziffer oder die programmierte Titelnummer gelöscht.
® Abruftaste (CALL)
Diese Taste zum öberprüfen des Programminhalts
drücken.
® Absolutzeit-Taste (ABS TIME)
Diese Taste drücken, um die Zeit für
Absolutzeitsuche einzugeben.
© Zahlentasten
Diese Tasten dienen zur Wahl von Titelnummern
für Programm-Wiedergabe und direkte
Wiedergabe. Mit ihnen wird außerdem die Zeit für
Absolutzeitsuche eingegeben.
61
Page 62

(1§) Aufnahmepegel-Regler (REC LEVEL)
Dieser Regler client zum einstellen des
Aufnahmepegels bei Aufnahme einer Audioquelle, die
an den ANALOG INPUT-Buchsen angeschlossen ist.
Mit diesem Regler kann der Aufnahmepegel für den
linken und rechten Kanal unabhängig eingestellt
werden,
® Kopfhörerbuchse (PHONES)
Diese Buchse dient zum Anschließen eines StereoKopfhörers.
© Start-ID-Tasten (START ID)
AUTO WRITE: Diese Taste drücken, um während der
Aufnahme automatisch Start-ID-Signale und die
zugehörigen Titelnummern aufzuzeichnen.
WRITE: Diese Taste dient zur manuellen Aufzeichnung
von Start-ID-Signalen während Aufnahme oder
Wiedergabe.
ERASE: Diese Taste drücken, um ein Start-ID-Signal zu
löschen.
® Neunumerier-Taste (RENUMBER)
Dient zum Neunumerieren der Titel vom Anfang des
Bandes an.
® Skip-ID-Tasten (SKIP ID)
WRITE: Durch Drücken dieser Taste wird das Skip-IDSignal auf Band aufgezeichnet. Wenn der SKIP PLAYSchalter auf ON eingestellt ist, wird bei der
Wiedergabe der Abschnitt von der Position, an der
diese Taste gedrückt wurde, bis zum Anfang des
nächsten Titels Übersprungen.
ERASE: Diese Taste drücken, um ein Skip-ID-Signal zu
löschen.
Stopptaste (STOP ■)
Diese Taste drücken, um den Bandlauf zu stoppen.
Rücklauftaste (REVIEW)
Durch Drücken dieser Taste wird das Band mit etwa
der Stachen Normalgeschwindigkeit zurückgespult,
wobei der Ton gehört werden kann.
Vorlauftaste (CUE)
Durch Drücken dieser Taste wird das Band mit etwa
der Stachen Normalgeschwindigkeit vorgespult, wobei
der Ton gehört werden kann.
Aufnahmetaste (REC •)
Durch Drücken dieser Taste wird auf
Aufnahmebereitschaft geschaltet. Dann kann die
Aufnahme durch Drücken der PLAY- oder PAUSETaste gestartet werden.
Pausetaste (PAUSE ii)
Diese Taste dient zum kurzzeitigen Unterbrechen der
Wiedergabe oder Aufnahme. Zum Fortsetzen der
Wiedergabe bzw. Aufnahme die PLAY-Taste oder
diese Taste erneut drücken.
Stummaufnahmetaste (REC MUTE)
Durch Drücken dieser Taste wird während der
Aufnahme ein stummer Bandabschnitt für die Dauer,
die die Taste gedrückt gehalten wird, erstellt.
End-ID-Tasten (END ID)
WRITE: Diese Taste am Ende der Aufnahme drücken,
um diese Bandposition durch das End-ID-Signal zu
markieren.
ERASE: Die Taste drücken, um das End-ID-Signal zu
löschen.
SEARCH: Diese Taste drücken, um das End-ID-Signal
zu suchen. Das Band wird schnell zur Aufnahme-
Endposition gespult, so daß die Aufnahme von dort
fortgesetzt werden kann.
Wiedergabetaste (PLAY ►)
Zum Starten der Wiedergabe drücken. Wenn die RECTaste gedrückt Ist, wird die Aufnahme durch Drücken
dieser Taste oder der PAUSE-Taste gestartet.
Rückspultaste (REW -^)
Zum Rückspulen des Bandes drücken.
Wenn diese Taste während der Wiedergabe gedrückt
wird, springt die Wiedergabeposition zum Anfang des
laufenden Titels. Zum Anspringen eines vorherigen
Titels diese Taste erneut drücken (APSS).
Schnellvorlauftaste (FF ►►)
Zum Schnellvorspulen des Bandes drücken.
Wenn diese Taste während der Wiedergabe gedrückt
wird, springt die Wiedergabeposition zum Anfang des
nächsten Titels (APSS).
62
Kopfhörer-Lautstärkeregler (PHONES LEVEL)
Dient zum Einstellen der Kopfhörerlautstärke.
Page 63

Display
(D Fernbedienungsanzeige
Diese Anzeige leuchtet, wenn der
Fernbedienungsgeber eingesetzt wird.
(D inhaitsverzeichnis-Anzeige (TOC)
Diese Anzeige ieuchtet, wenn eine Cassette
wiedergegeben wird, die ein TOC enthält.
d) Titeinummer-Anzeige
Hier wird die Titeinummer angezeigt.
(D Zähiwerk-Anzeige (COUNTER)
Leuchtet, wenn das Dispiay im Zählwerksmodus ist.
(5) Absolutzeit-Anzeige (ABS)
Leuchtet, wenn die ABS-Zeit (bisherige Spielzeit vom
Bandanfang) angezeigt wird.
® Zähiwerk-/ABS-Zeit-/Titei-Spieizeit-/Programm-
Titeinummer-Anzeige
Hier wird die Zähiwerkposition, die ABS-Zeit, die TiteiSpieizeit (bisherige Spielzeit vom Anfang des iaufenden
Titels) oder die Nummer des programmierten Titels
angezeigt.
Programm-Anzeige (PROG)
Leuchtet, wenn die bisherige Spielzeit vom Anfang des
laufenden Titels auf dem Display angezeigt wird.
(D Abtastfrequenz-Anzeigen
Leuchten entsprechend der Abtastfrequenz des
Audiosignais.
d) Kondensation-Anzeige (DEW)
Erscheint, wenn Kondensation im Gerät (auf
Kopftrommel, Tonkopf usw.) aufgetreten Ist.
® Kopiersperre-Anzeige (COPY PROHiBiT)
Erseheint, wenn Aufnahme des zugeführten
Digitaisignals nicht mögiich ist. in diesem Fall die
Aufnahmequeile an die ANALOG-Buchsen anschließen.
dg) Start-iD-/Skip-ID-/End-iD-Anzeigen (ST-iD/SKiP-ID/
END-iD)
Die entsprechende Anzeige ieuchtet, wenn das StartiD-, Skip-iD- oder End-iD-Signai festgesteiit wird, und
biinkt, wenn das Signai aufgezeichnet oder gelöscht
wird.
® Programm-Wiedergabe-Anzeige (APMS = Automatic
Programmabie Music Seiector)
Erscheint bei der Programmierung und während der
Programm-Wiedergabe.
® Titeisuchiauf-Anzeige (APSS = Auto Program
Search System)
Erscheint während der Suche nach einem Titelanfang.
Spitzenpegeianzeige
Hier wird der Aufnahmeangezeigt.
oder Wiedergabepegei
Emphasis-Anzeige (EMPHASiS)
Erscheint während der Wiedergabe von Cassetten, die
mit Emphasis aufgenommen wurden, sowie während
der Aufnahme von einer Digitalquelie, die Emphasis
aufweist. Die Emphasis-Funktion reduziert den
Hochfrequenz-Störpegei durch Anhebung des
Hochfrequenzpegeis während der Aufnahme .
(Preemphasis-Funktion) und Absenkung während der
Wiedergabe (Deemphasis-Funktion). Dieses Gerät
enthäit nur den Deemphasis-Schaitkreis. Signaie, die
Emphasis aufweisen, können wiedergegeben und
aufgenommen werden, aber es ist nicht möglich, den
Signalen Emphasis zuzufügen.
® Wiedergabe-Anzeige (►)
Diese Anzeige leuchtet, wenn die PLAY-Taste gedrückt
ist.
(0) Aufnahme-Anzeige (•)
Diese Anzeige leuchtet, wenn die REC-Taste gedrückt
ist.
(0) Warnanzeige (WARNiNG)
Wenn der Tonkopf stark verschmutzt ist, tritt während
der Wiedergabe ein Signailesefehier auf, und der Ton
kann nicht reproduziert werden. Dann erscheint die
Anzeige "WARNING”. Sollte dies verkommen, den
Tonkopf mit einer im Fachhandei erhäitiichen DAT-
Reinigungscassette reinigen oder vom Yamaha-
Fachhändler reinigen lassen.
(S) Pause-Anzeige (II)
Diese Anzeige leuchtet, wenn die PAUSE-Taste
gedrückt ist, sowie während der Aufnahmebereitschaft.
® Wiederholungs-Anzeige (d)
Diese Anzeige leuchtet während der wiederholten
Wiedergabe.
63
Page 64

BEZEICHNUNGEN DER BEDIENELEMENTE
Geräterückseite
(i) Analogeingangsbuchsen (ANALOG INPUT)
(unsymmetrische Cinch-Buchsen)
Wenn diese Buchsen für Aufnahme verwendet werden,
den Aufnahmepegel mit dem REG LEVEL-Regler
einstellen.
(D Anaiogeingangswähler (ANALOG INPUT)
Dient zur Wahl der Analogeingangsbuchsen zwischen
symmetrisch (XLR) und unsymmetrisch.
(D Analogausgangsbuchsen (ANALOG OUTPUT)
(unsymmetrische Cinch-Buchsen)
Der maximale Ausgangspegel beträgt 2 V.
(D Lichtweilenleiter-Digital-Eingangs-/
Ausgangsbuchsen (OPTICAL DIGITAL INPUT/
OUTPUT)
Die Lichtwellenleiter-Digital-Eingangs-/
Ausgangsbuchsen entsprechen den EIAJ CP 340Vorschriften.
\5) Digitaleingangswähler (DIGITAL INPUT)
Dient zur Wahl der Digitaleingangsbuchsen zwischen
OPTICAL und COAXIAL.
® Analogeingangsbuchsen (ANALOG iNPUT)
(symmetrische XLR-Buchsen)
Der zweite Stift ist HOT.
(§) Analogausgangsbuchsen (ANALOG OUTPUT)
(symmetrische XLR-Buchsen)
Der Referenzpegel beträgt +4 dBm.
Stiftbelegung der symmetrischen Buchsen (XLR-331/XLR-3-32)
Fernbedienungsbuchse (REMOTE)
Hier wird der Stecker des mitgelieferten
Fernbedienungsgebers angeschlossen.
Hier darf niemals ein anderer als der mitgelieferte
Fernbedienungsgeber angeschlossen werden.
© Koaxial-Digital-Eingangs-ZAusgangsbuchsen
(COAXIAL DIGITAL INPUT/OUTPUT)
Die Koaxial-Digital-Eingangs-ZAusgangsbuchsen
entsprechen den lEC 958-Vorschriften.
64
Page 65

Kabel-Fernbedienungsgeber
(D Start-ID-Tasten
d) Skip-ID-Tasten
d) End-ID-Tasten
® Löschtaste
(D Programmtaste
© Wiederholteste
® Öffnen/Schließen-Taste (Ä)
® Stopptaste (■)
© Wiedergabetaste (►)
© Autnahmetaste (•)
® Pausetaste (ii)
© Fernbedienungskabel
An die REMOTE-Buchse an der Geräterückseite
anschließen.
(1^ Absolutzeittaste
® Anzeigetaste
© Zählwerkrückstelltaste
® Cue-Taste
© Review-Taste
® Schnellvorspultaste (►►)
© Rückspultaste (◄◄)
HINWEISE:
• Alle Tasten haben die gleichen Funktionen wie die
entsprechenden Tasten an der Gerätevorderseite.
• Für den Fernbedienungsgeber sind keine Batterien
erforderlich. Die Spannungsversorgung erfolgt über die
REMOTE-Buchse an der Geräterückseite.
© Neunumeriertaste
65
Page 66

Anschluß von Analog-Audiogeräten
ANSCHLÜSSE
Vor dem Herstellen der Anschlüsse die Netzstecker
beider Geräte ziehen,
Darauf achten, die Kanäle beim Anschließen nicht zu
vertauschen; rechts mit rechts und links mit links
verbinden.
Die ANALOG INPUT-Buchsen (XLR- oder Cinch-
Buchsen) dieses Gerätes mit den AnalogAusgangsbuchsen des Verstärkers, Stereomischers
us\A/. verbinden.
Die ANALOG OUTPUT-Buchsen (XLR- oder Cinch-
Buchsen) dieses Gerätes mit den Analog-
Eingangsbuchsen des Verstärkers, Stereomischers
usw. verbinden.
Den ANALOG INPUT-Wähler einstellen. Bei
Verwendung der XLR-Buchsen auf XLR und bei
Verwendung der Cinch-Buchsen auf PIN stellen.
HINWEIS:
Auf guten Kontakt aller Anschlüsse achten. Unzureichende
Anschlüsse können Tonausfälle und Störgeräusche
verursachen.
66
L
Page 67

Anschluß an einen anderen DAT-Recorder oder an einen Verstärker o.ä. mit Digitalbuchsen
• Wenn dieses Gerät an einen anderen DAT-Recorder
oder an einen Verstärker oder eine andere Digitaiqueiie
wie zum Beispiei einen CD-Spieier mit Digitaibuchsen
angeschiossen ist, wird Digitai-zu-Digital-Aufnahme
durchgeführt.
• Vor dem Hersteilen der Anschlüsse die Netzstecker
beider Geräte ziehen.
Verwendung der COAXIAL DIGITAL-Buchsen
1 Die COAXIAL DIGITAL INPUT-Buchse mit der Koaxial-
Digital-Ausgangsbuchse und die COAXIAL DIGITAL
OUTPUT-Buchse mit der Koaxial-DigitalEingangsbuchse des anderen DAT-Recorders,
Verstärkers o.ä. mit Koaxialkabel verbinden.
2 Den DIGITAL INPUT-Wähler auf COAXIAL stellen.
Verwendung der OPTICAL DIGITAL-Buchsen
1 Die OPTICAL DIGITAL INPUT-Buchse mit der
Lichtwellenleiter-Digital-Ausgangsbuchse und die
OPTICAL DIGITAL OUTPUT-Buchse mit der
Lichtwellenleiter-Digital-Eingangsbuchse des anderen
DAT-Recorders, Verstärkers o.ä. mit
Lichtwellenleiterkabel verbinden.
2 Den DIGITAL INPUT-Wähler auf OPTICAL stellen.
HINWEISE:
• Wenn der POWER-Schalter eingeschaltet ist, leuchtet
das Innere der OPTICAL OUTPUT-Buchse rot. Dieses
rote Licht (das absolut harmlos ist) dient zur
Übertragung des Digitalsignals.
• Lichtwellenleiterkabel dürfen nicht stark gebogen oder
geknickt werden, weil sie sonst unbrauohbar werden.
67
Page 68

Anschluß des Fernbedienungsgebers
Wenn das Fernbedienungskabel an die REMOTE-Buchse an der Geräterückseite angeschlossen wird, ist Bedienung dieses
Gerätes mit dem Fernbedienungsgeber möglich.
HINWEISE:
• Den Fernbedienungsgeber nicht stoßen oder
fallenlassen. Den Fernbedienungsgeber außerdem vor
Nässe sohützen.
Anschluß eines Kopfhörers
Anschluß des Netzkabels
• Dieser Fernbedienungsgeber darf nicht an andere
Geräte angeschlossen werden.
• Nur den mitgelieferten Fernbedienungsgeber an die
REMOTE-Buohse anschließen.
Ein Kopfhörer mit 8 bis 32 Ohm mit einem StereoKlinkenstecker (6,3 mm) verwenden.
Die Kopfhörer-Lautstärke kann mit dem PFIONES LEVELRegler eingestellt werden.
Nach Flerstellung aller anderen Anschlüsse das Netzkabel
an eine Netzsteckdose ansohließen.
68
Page 69

DAT (Digital Audio Tape)
DAT-Cassetten
DAT-Cassette
0(Ol-(Cj/)
Audio-Compact-Cassette
1 1
i 1
PCM (Audioprogramm)
(Signalbereich)
” \-o ^ oO| «
t
—___________________
8,15 mm/s
Eine DAT-Cassette ist mit 73 x 10,5 x 54 mm nur etwa haib
so groß wie eine Audio-Compact-Cassette. Das Gehäuse ist
so konstruiert, daß das Band vor Kratzern und Schmutz
geschützt ist.
®
DAT-Aufnahmemethode
im PCM-Bereich (Audiosignal) wird das Digitaisignal
aufgenommen, in das das Audiosignai umgewandeit wurde
(PGM = Puise Code Moduiation). in den SubcodeBereichen werden informationen wie Titeinummer, Laufzeit
der einzelnen Titel und Gesamtzeit aufgezeichnet. Mittels
der Informationen in den Subcode-Bereichen ist präzise
Titelsuche möglich, weil die Signale in den Subcode-
Bereichen gelesen werden, während das Band läuft.
Abtastfrequenzen
Bei der Umwandlung von Analog-Audiosignalen in
Digitalsignale kommen 3 Abtastfrequenzen zum Einsatz:
48 kHz, 44,1 kHz und 32 kHz.
48 kHz: Für DAT-Musicassetten, die im Fachhandel
vertrieben werden, und für normal aufgenommene DAT-
Cassetten.
44,1 kHz: Für DAT-Musicassetten und CDs, die im
Fachhandel vertrieben werden.
32 kHz: Für Satellitenempfang.
Dieser DAT-Recorder kann keine 32-kHz-Analogsignale
aufnehmen.
Subcode-Bereiche
69
Page 70

Aufnahme von
Digitalsignalen
Aufnahme von
Analogsignalen
Verhinderung von versehentlichem Löschen
• Zur Verhinderung von versehentlichem Löschen die
Zunge nach links schieben, um die Öffnung zu öffnen.
Dann ist Aufnahme durch Drücken der REC-Taste nicht
möglich. Siehe Abb. A.
• Für erneute Aufnahme auf der Cassette die Zunge nach
links schieben, um die Öffnung zu schließen. Siehe
Abb. B.
Umgang mit DAT-Cassetten
• DAT-Cassetten sind präzise hergestellt, um Aufnahme
und Wiedergabe mit hoher Zuverlässigkeit zu
ermöglichen. Niemals die Cassettenklappe öffnen und
das Band berühren, weil es dadurch beschädigt
werden kann.
• Keine zerkratzten, schmutzigen oder zerknitterten
Bänder verwenden, weil dadurch Tonausfälle und eine
Beschädigung des Tonkopfes verursacht werden
können.
Aufbewahrung von DAT-Cassetten
• Nicht verwendete Cassetten immer in ihren Behältern
auf bewahren.
• Die Cassetten nicht unter direkter Sonnenbestrahlung,
in der Nähe von Wärmequellen und an feuchten Plätzen
auf bewahren.
• Die Cassetten nicht an staubigen Plätzen aufbewahren.
• Die Cassetten nicht in der Nähe starker Magnetfelder
(d.h. in der Nähe von elektrischen Uhren, Spielzeugen
mit Magneten usw.) aufbewahren, weil die Aufnahmen
durch Magnetfelder zerstört werden.
• Die Cassetten nicht fallenlassen und keine starken
Stößen aussetzen.
• Das Band nach der Verwendung zurückspulen. Wenn
das Band lose ist, es erneut umspulen.
70
Serial Copy Management System (SCMS)
Die meisten Digitalquellen enthalten einen KopiersperreCode. Für dieses Gerät wird das Serial Copy Management
System eingesetzt, das Digital-zu-Digital-Aufnahme für
mindestens eine Generation verhindert.
Auch wenn eine Cassette von einer Analogquelle
aufgenommen wurde, sieht dieses System die Quelle als
Digitalquelle mit Kopiersperre-Code an, da die Aufnahme
durch den A/D-Wandler erfolgte, und gestattet Digital-zu-
Digital-Aufnahme nur für eine Generation.
Page 71

EINLEGEN UND ENTNEHMEN VON CASSETTEN
Einlegen einer Cassette
1
2 Die OPEN/CLOSE-Taste {±) drücken, um die
Cassettenlade zu öffnen.
"OPEN" blinkt im Display.
Das Sichtfenster der Cassette muß nach vorne und die
Schiebezunge nach rechts weisen.
Die OPEN/CLOSE-Taste (^) erneut drücken, um die
Cassettenlade zu schließen.
Entnehmen der Cassette
1 Die OPEN/CLOSE-Taste (^) drücken, um die
Cassettenlade zu öffnen.
2 Die Cassette aus der Cassettenlade entnehmen. 3 Die OPEN/CLOSE-Taste {±) erneut drücken, um die
Cassettenlade zu schließen.
HINWEISE:
• Die Cassettenlade schließt sich nicht vollständig, wenn
die Cassette nicht richtig eingelegt wurde. In diesem
Fall die OPEN/CLOSE-Taste (4^) drücken, um die
Cassettenlade zu öffnen, und die Cassette erneut
einlegen.
• Wenn die Cassettenlade sich nicht vollständig
schließen kann, öffnet sie sich automatisch nach 10
Sekunden, auch wenn die OPEN/CLOSE-Taste (A)
nicht gedrückt wird.
• Niemals versuchen, die Cassettenlade mit der Hand zu
öffnen oder zu schließen, weil sie dadurch beschädigt
wird.
71
Page 72

AUFNAHME
Titel Nr. 1
(Audio
Signal)
Audio-Compact-Cassette
Titel Nr. 2
(Audio (Audio
Signal)
Titel Nr. 3
Signal)
Beschreibung der DAT-Aufnahme
Anders als bei Audio-Compact-Cassetten können
verschiedene Steuercodes, die als Subcodes bezeichnet
werden, getrennt vom Audiosignal auf das DAT-Band
aufgezeichnet werden. Die Subcodes werden für eine
Vielzahl von praktischen Wiedergabe- und Editierfunktionen
verwendet. Vom Benutzer können drei Subcodes
aufgezeiohnet werden: Start-ID, End-ID und Skip-ID.
Start-ID: Markiert den Anfang jedes Titels und dient zum
Programmieren und Suchen von Titeln.
End-ID: Markiert das Ende der Aufnahme.
Skip-ID: Markiert den Anfang eines Abschnitts, der
Übersprungen werden soll.
Außerdem wird nach Beendigung der Aufnahme
* •
Titel Nr. 1
(Audio
Signal)
SUB Nr. 1
DAt-Cassette
Titel Nr. 2
(Audio
Signal)
SUB Nr. 2 SUB Nr. 3
(SUB = Subcode-Bereich)
Titel Nr. 3
(Audio
Signal)
automatisch die Absolutzeit aufgezeichnet.
• Es wird empfohlen, vor der Durchführung einer wichtigen
Aufnahme eine Probeaufnahme zu machen, um
sicherzustellen, daß der Ton richtig aufgezeichnet wird.
Aufnahme von den Digitaleingangsbuchsen (Koaxial- oder Lichtwellenleiter-Buchse)
Diese Methode wird für Aufnahme von einem anderen DAT-Recorder oder einer sonstigen Digital-Audio-Quelle empfohlen.
f3
OPTICAL
INPUT
I
N
COAXIAL
2 4
\
___________
)
A
Iml fTim ffftn
// / / //
/ / / / //
tpa n D □ □ I □ I [> I pirRf ET
T
START ID
AUTOWRITE
Den POWER-Schalter einschalten (ON).
Bei jedem Einschalten des POWER-Schalters wird die
START ID AUTO WRITE-Taste aktiviert, dann leuchtet
die Taste. Dann werden die Titelnummern während der
Aufnahme automatisch aufgezeichnet. Wenn keine
Titelnummern benötigt werden, die START ID AUTO
WRITE-Taste drücken, so daß die Anzeige auf der
Tsst© ©rlischt
2
Den INPUT-Wähler auf DIGITAL stellen.
3
Den DIGITAL INPUT-Wähler an der Geräterückseite
entsprechend der verwendeten Buchsen einstelien.
Koaxial-Buchsen: Auf COAXIAL stellen.
Lichtwellenleiter-Buchsen: Auf OPTICAL stellen.
4
Eine DAT-Cassette in die Cassettenlade einlegen.
5
Die REC-Taste (•) drücken.
Das Gerät schaltet auf Aufnahmebereitschaft. Wenn die
Aufnahme am Bandanfang startet, wird automatisch ein
stummer Abschnitt von etwa 7 Sekunden Dauer erstellt,
bevor das Deck auf Aufnahmebereitschaft schaltet.
Die Aufnahmequelle auf Wiedergabe schalten und die
PLAY-Taste (►) drücken, um die Aufnahme zu starten.
Wenn die START ID AUTO WRITE-Taste aktiviert ist und
das Gerät einen stummen Abschnitt von mehr als 2
Sekunden Dauer erkennt, werden automatisch eine
Start-ID aufgezeichnet und der Titel numeriert.
Wenn die Aufnahme beendet ist, die END ID WRITETaste drücken.
Nach Aufzeichnung der End-ID stoppt der Bandlauf
automatisch.
72
□
□ □□n
□ □OO
□ aaan
□naa
□
TTTi tapp
• Wenn eine End-ID aufgezeichnet wird, ist es einfach,
die Aufnahme vom Ende der vorigen Aufnahme
fortzusetzen. Siehe Seite 76.
HINWEISE:
• Für Aufnahme von Digitalquellen von einem DAT-Recorder,
der den Kategorie-Code “DAT” sowie die Start-ID- und Skip-
ID-Signale zu den Digitalausgängen senden kann, muß
sichergestellt werden, daß die START ID AUTO WRITE-Taste
aktiviert ist (leuchtet). Dann zeichnet das Gerät die Start-IDund Skip-ID-Signale, die in der Quelle enthalten sind,
unverändert auf.
• Wenn die Spannungsversorgung der Aufnahmequelle
ausgeschaltet wird, schaltet das Gerät auf
Aufnahmebereitschaft, und der Bandlauf stoppt. Wenn
in dieser Situation die Spannungsversorgung der
Aufnahmequelle wieder eingeschaltet wird, wird die
Aufnahme vom nächsten Titel an fortgesetzt.
• Bei Aufnahme über die Digitaleingangsbuchsen wird
kein Signal über die Digitalausgangsbuchsen
ausgegeben.
• Den INPUT-Wähler und den DIGITAL INPUT-Wähler
unbedingt vor der Aufnahme einstellen. Wenn Sie
während der Aufnahme umgestellt werden, schaltet
das Gerät auf Aufnahmepause.
• Die Abtastfrequenz wird automatisch entsprechend der
Aufnahmequelle eingestellt.
• Bei Aufnahme von den Digitaleingangsbuchsen ist es
nicht erforderlich, den Aufnahmepegel einzustellen.
Page 73

Aufnahme von den Analogeingangsbuchsen
Diese Methode wird empfohlen, um eine Aufnahme von
einem Mischpult, Analog-Cassettendeck, Tuner,
Plattenspieler oder ähnlichen Audlogerät durchzuführen.
1 Den POWER-Schalter einschalten (ON).
2 Die START ID AUTO WRITE-Taste einstellen.
Wenn die Aufnahmequelle keine stummen Abschnitte
von etwa 2 Sekunden Dauer zwischen den Titeln
enthält, die START iD AUTO WRITE-Taste drücken, so
daß die Anzeige der Taste eriischt.
3 Den INPUT-Wähler auf ANALOG stellen. 4 Den REC fs-Wähler einstellen. 5 Den ANALOG INPUT-Wähler an der Geräterückseite
entsprechend der zu verwendenden Buchsen
einstellen.
Cinchbuchsen: Auf PiN stellen.
XLR-Buchsen: Auf XLR stellen.
6 Eine DAT-Cassette einlegen. 7 Die REC-Taste (•) drücken.
Das Gerät schaltet auf Aufnahmebereitschaft. Bei
Aufnahme vom Bandanfang an wird automatisch ein
stummer Abschnitt von etwa 7 Sekunden Dauer erstelit,
anschließend schaltet das Gerät auf
Aufnahmebereitschaft.
Bei Aufnahme von diesen Queilen kann es verkommen, daß
die Titeinummern mit der Start-iD-Auto-Write-Funktion nicht
einwandfrei aufgezeichnet werden. In diesem Fail es
mögiieh, während oder nach der Aufnahme die Start-ID-
Signale manuell aufzuzeichnen. Siehe Seite 75.
8 Die Aufnahmequelle wiedergeben und den
Aufnahmepegel mit dem REC LEVEL-Regler
aussteuern. Siehe unten.
9 Die PLAY-Taste (►) drücken, um die Aufnahme zu
starten.
10 Bei Beendigung der Aufnahme die END ID WRITE-
Taste drücken.
Nach Aufzeichnung des End-ID-Signals stoppt der
Bandiauf automatisch.
• Wenn eine End-iD aufgezeichnet wird, ist es einfach,
die Aufnahme vom Ende der vorigen Aufnahme
fortzusetzen. Siehe Seite 20.
HINWEIS:
Den INPUT-Wähier und den DiGITAL iNPUT-Wähler
unbedingt vor der Aufnahme einsteilen. Wenn Sie während
der Aufnahme umgestelit werden, schaitet das Gerät auf
Aufnahmepause.
Einstellung des Aufnahmepegels bei Aufnahme
von den Analogeingangsbuchsen
ln der Regel sollte der Aufnahmepegel so eingestellt
werden, daß die Spitzenpegei zwischen “-18 dB” und “0”
liegen. Sie dürfen auf keinen Fall "OVER” erreichen. Wenn
die Spitzenpegel “0" Überschreiten, leuchtet "OVER”, und
der Klang kann verzerrt sein.
• Wenn der Aufnahmepegel für den linken und rechten
Kanai unterschiedlich ist, den linken und rechten Kanal
getrennt aussteuern. (Siehe die Abbildung.)
___________
73
Page 74

Kurzzeitiges Unterbrechen der Aufnahme (Pause)
1 Die PAUSE-Taste (8) drücken.
Die Aufnahme wird unterbrochen.
2 Zum Fortsetzen der Aufnahme die PLAY-Taste (3)
öder die PAUSE-Taste (8) drücken.
• Wenn die START iD AUTO WRITE-Taste aktiviert ist
(leuchtet), wird an der Steiie, wo die Aufnahme
fortgesetzt wird, eine Start-ID aufgezeichnet.
HINWEIS:
Nach etwa 5 Minuten Aufnahmepause wird der Tonkopf
vom Band entfernt, um das Band und den Tonkopf zu
schützen.
Nicht bespielte Abschnitte und stumme Abschnitte
Nicht bespielte Abschnitte
I Aufnahme I ) Aufnahme I I Aufnahme i i Aufnahme
.H4——►! I< » I l<-.' > I
____
II i I II
Titel
Stumme Abschnitte
Titel
nicht bespielte Abschnitte
Aufnahme
Titel Titel
l^
Titel
Titel Titel
stumme Abschnitte
Titel
Bei Audio-Compact-Cassetten werden die Abschnitte, auf
denen nie eine Aufnahme durchgeführt wurde (durch
Schnellvorspulen erzeugte nicht bespielte Abschnitte), und
die Abschnitte, auf denen Aufnahme ohne Ton
durchgeführt wurde (mit der Stummaufnahmefunktion
erzeugte stumme Abschnitte), gleich behandelt. Diese
Abschnitte werden zum Suchen von Titeln verwendet, da in
ihnen kein Wiedergabeton gehört wird.
Bei DAT-Recordern wird dagegen zwischen nicht
bespielten und stummen Abschnitten unterschieden. Wenn
nicht bespielte Abschnitte auf dem Band vorhanden sind,
kann für den Suchlauf mit der APSS-Funktion viel Zeit
erforderlich sein, während der Suchlauf unter Verwendung
der Absolutzeit unter Umständen nicht einwandfrei
durchgeführt wird. Daher muß bei der Durchführung der
Aufnahme darauf geachtet werden, daß keine nicht
bespielten Abschnitte auf dem Band verbleiben.
Da für den Titelsuchlauf auf Audio-Compact-Cassetten
unbespielte Bandabschnitte erstellt werden müssen, wird
empfohlen, auf DAT-Cassetten stumme Abschnitte
zwischen den Titeln aufzunehmen, um ein Überspielen von
diesen Cassetten auf Audio-Compact-Cassetten zu
ermöglichen.
• Zum Erstellen eines stummen Abschnitts während der
Aufnahme die REC MUTE-Taste drücken. Dann wird für
die Dauer, die die Taste gedrückt gehalten wird, ein
stummer Abschnitt erstellt. Es wird empfohlen, stumme
Abschnitte von etwa 4 Sekunden Dauer zu erstellen,
wenn Überspielen auf eine Audio-Compact-Cassette
vorgesehen ist. Auf keinen Fall nicht bespielte
Abschnitte durch Vorspulen des Bandes mit der FFTaste (►►) oder der PLAY-Taste (►) erzeugen.
• Um die Aufnahme auf einem teilweise bespielten Band
fortzusetzen, die Endsuohfunktion (Seite 20)
verwenden, um das Ende der vorigen Aufnahme zu
suchen. Auf diese Weise wird vermieden, daß ein nicht
bespielter Abschnitt erzeugt wird.
74
Page 75

START-ID-SIGNALE UND TITELNUMMERN
Die tatsächliche Nummer eines auf Band aufgenommenen
Titels und die am Gerät angezeigte Titelnummer können
unterschiedlich sein, auch wenn die Titelnummern
automatisch mit der START ID AUTO WRITE-Funktlon
aufgezeichnet wurden. Dies kann aufgrund des Inhalts des
aufgenommenen Titels verkommen.
Die Titelnummern werden unter Umständen bei der
Aufnahme von Quellen folgenden Inhalts nicht einwandfrei aufgezeichnet:
• Gespräche mit Unterbrechungen.
• Insgesamt niedriger Aufnahmepegel
• Zu kurze stumme Abschnitte (2 Sekunden oder
weniger) zwisohen den Titeln
• Lange leise Passagen
• Störgeräusche oder Rauschen zwischen den Titeln
Wenn die Titelnummern nicht richtig aufgezeichnet werden,
kann es erforderlich sein, Titelnummern hinzuzufügen oder
zu löschen.
Es wird empfohlen, die Titelnummern bei Aufnahme von
, Quellen ohne stumme Abschnitte zwischen den Titeln
während oder nach der Aufnahme manuell aufzuzeichnen.
Manuelle Aufzeichnung der Titelnummern
während der Aufnahme
Die START ID WRITE-Taste am Anfang jedes Titels
drücken (die Taste leuchtet).
Bei jedem Drücken der START ID WRITE-Taste werden
eine Start-ID und die jeweils nächsthöhere Titelnummer
aufgezeichnet. Während der Aufzeichnung einer Start-ID
blinkt die ST-ID-Anzeige.
• Die manuelle Aufzeichnung von Titelnummern Ist
unabhängig von der Einstellung der START ID AUTO
WRITE-Taste möglich.
• Bis zu 99 Titelnummern können aufgezeichnet werden.
Bei Wiedergabe einer Cassette, die mehr als 99 Titel
enthält, wird die Titelnummer nach dem 100. Titel nicht
angezeigt.
Manuelle Aufzeichnung von Start-ID-Signalen
während der Wiedergabe
Ein Start-ID-Signal markiert den Anfang eines Titels. Wenn
dieses Signal und die entsprechende Titelnummer nicht
aufgezeichnet werden, sind APSS-, APMS- und DirektTitelwahl nicht möglich.
Falls die Start-ID-Signale und Titelnummern nicht richtig auf
dem Band aufgezeichnet wurden, Start-ID-SIgnale nach
dem folgenden Verfahren einfügen und dann die Titel
neunumerieren (Seite 76).
1 Während der Wiedergabe die START ID WRITE-
Taste an der Stelle drücken (die Taste blinkt), an der
das Start-ID-Signal eingefügt werden soll.
Das Band wird für 3 Sekunden wiedergegeben und
dann zu dem Punkt 2 Sekunden vor Drücken der
START ID WRITE-Taste zurückgespult. Die Wiedergabe
startet von diesem Punkt für 5 Sekunden und wird 10
Mal wiederholt (Testwiedergabe). Da die ST-ID-Anzeige
leuchtet, wenn das Start-ID-Signal erkannt wird, kann
die Plazierung des Start-ID-Signals Überprüft werden.
Die Position des Start-ID-Signals beim Flören der
Testwiedergabe Überprüfen.
2 Wenn das Start-ID-Signal nicht richtig am
Titelanfang eingefügt wurde, kann es mit der REWTaste (◄◄) zurück- oder mit der FF-Taste (►►)
vorverlegt werden.
Bei jedem Drücken der REW-Taste (◄◄) wird das StartID-Signal um 0,3 Sekunden zurück- und bei jedem
Drücken der FF-Taste (►►) um 0,3 Sekunden
vorverlegt.
3 Wenn das Start-ID-Signal richtig eingefügt wurde,
die START ID WRITE-Taste während der
Testwiedergabe erneut drücken.
Die Taste, leuchtet, und das Band wird zum
Bandanfang zurückgespult, wo das Start-ID-Signal
aufgezeichnet wird. (Während der Aufzeichnung blinkt
die ST-ID-Anzeige.) Die Wiedergabe wird nach
Aufzeichnung des Start-ID-Signals fortgesetzt.
75
Page 76

Hinweise zur Aufzeichnung der Start-iD-Signaie
• Wenn ein Start-ID-Signal an einem Punkt aufgezeichnet
wird, wo ein Skip-iD-Signai aufgezeichnet wurde, wird
das Skip-ID-Signal geiöscht.
• Der Abstand zwischen Start-iD-Signalen (Spieizeit des
Titeis) soilte mindestens 9 Sekunden betragen. Dieser
9-Sekunden-Abstand ist erforderiich, um einen
einwandfreien Betrieb der APSS- und APMS-Funktion
und der Neunumerierung von Titein zu gewährieisten.
Löschen von Start-ID-Signalen
Wenn ein Start-iD-Signai an einer faischen Steile
aufgezeichnet wurde, kann es während der Wiedergabe
geiöscht werden. Nach dem Löschen eines Start-ID-Signais
ist es unbedingt erforderlich, die Titei neu zu numerieren.
Wenn die ST-ID-Anzeige auf dem Display erscheint, die START ID ERASE-Taste drücken (die Taste blinkt).
Das Band wird zum Anfang des laufenden Titels
zurückgespult, und das Start-ID-Signal wird gelöscht. Beim
Löschen blinkt die ST-ID-Anzeige. Nach dem Löschen des
Start-ID-Signals wird die Wiedergabe fortgesetzt.
• Wenn bei dem Start-ID-Signal auoh eine Titelnummer
aufgezeiohnet wurde, werden beide Signale
gleichzeitig gelöscht.
Neunumerieren der Titel
Beim Einfügen und Löschen von Start-ID-Signalen werden
Titelnummern ersetzt. Dann müssen die Titel nach dem
folgenden Verfahren neu numeriert werden.
END-ID-SIGNALE
Ein End-ID-Signal markiert das Ende der Aufnahme. Das
Band wird nicht weiter gespult als die Stelle, wo dieses
Signal aufgezeichnet wurde. Auf diese Weise ist es einfach.
Die RENUMBER-Taste im Stoppmodus drücken.
Das Band wird zum Anfang zurückgespult, und die Titel
werden automatisch mit hoher Geschwindigkeit neu
numeriert. Jedesmal, wenn ein Start-ID-Signal gefunden
wird, wird die entsprechende Titelnummer, beginnend bei
P.NO 1, aufgezeichnet.
• Bei Beendigung der Neunumerierung wird das Band
automatisch zum Anfang zurückgespult.
die Aufnahme am Ende einer vorigen Aufnahme
fortzusetzen. Dadurch wird außerdem vermieden, daß ein
nicht bespielter Abschnitt auf dem Band entsteht.
Aufzeichnung eines End-ID-Signals
Während der Aufnahme die END ID WRITE-Taste drücken.
Ein stummer Bandabschnitt wird automatisch erstellt, und
das End-ID-Signal wird aufgezeichnet. Während der
Aufzeichnung des End-ID-Signals blinkt die END-IDAnzeige, danach stoppt das Band automatisch.
• Wenn das Gerät während Wiedergabe,
Schnellvorspulen oder Cueing ein End-ID-Signal
erkennt, wechselt die Titelnummer zu ‘‘EE’’, und der
Bandlauf stoppt automatisch.
• Der Abschnitt zwischen dem End-ID-Signal und dem
vorherigen Start-ID-Signal darf nicht weniger als 9
Sekunden betragen, weil sonst die APSS- und die
Neunumerier-Funktion nicht einwandfrei ausgeführt
werden können.
76
Page 77

Fortsetzen der Aufnahme vom Ende der vorigen
Aufnahme
1 Die END ID SEARCH-Taste im Stoppmodus oder
während der Wiedergabe drücken.
Die Taste blinkt. Das Band wird zum Anfang
zurückgespult und dann zu dem Punkt vorgespult, wo
das End-ID-Signal aufgezeichnet ist (Endsuchfunktion).
Die Anzeige der Taste erlischt, wenn das Band stoppt.
2 Die Aufnahme an der Steile starten, an der das
Band stoppt.
Die Titelnummern und die Absolutzeit werden von der
vorigen Aufnahme fortgesetzt.
• Das End-ID-Signal der vorigen Aufnahme wird
automatisch gelöscht.
Löschen des End-ID-Signals
Das End-ID-Signal wird automatisch gelöscht, wenn die
Aufnahme mithilfe der Endsuchfunktion fortgesetzt wird.
Das End-ID-Signal kann nach dem folgenden Verfahren
gelöscht werden, ohne eine anschließende Aufnahme
durchzuführen.
Wenn das Band nach Starten der Endsuchfunktion stoppt, die END iD ERASE-Taste drücken.
Die Taste blinkt. Wenn das End-ID-Signal gelöscht ist,
stoppt das Band. (Während dem Löschen des End-IDSignals wird das Band für einige Sekunden vorgespult, und
die END-ID-Anzeige blinkt.)
Löschen des Aufnahmeinhalts
Wenn eine Aufnahme durchgeführt wird, wird eine eventuell
vorhandene frühere Aufnahme automatisch gelöscht. Eine
Aufnahme kann nach dem folgenden Verfahren gelöscht
werden, ohne eine Neuaufnahme durchzuführen.
1 Den iNPUT-Wähler auf ANALOG steilen.
2 Die Cassette in die Cassetteniade einiegen. 3 Den REC LEVEL-Regier ganz entgegen dem
Uhrzeigersinn auf 0 (MIN) einstellen.
4 Die REC-Taste (•) drücken. 5 Die PLAY-Taste (►) drücken.
Die Aufnahme wird gelöscht.
77
Page 78

Page 79

<Beispiele>
~nui o
n o I ZI n n
(J » »L « l; u«
APSS (Automatisches Programm-Such-System)
Die APSS-Funktion gestattet den Anfang jedes Titels
während der Wiedergabe. Einfach durch Drücken der
REW-Taste (◄◄) oder der FF-Taste (►►) kann zurück oder
vorwärts gegangen werden.
HINWEISE:
• Die APSS-Funktion arbeitet eventuell nicht einwandfrei,
wenn der Abstand zwischen den Start-IDs weniger als
9 Sekunden beträgt (Seite 76).
• Wenn ein Titel nicht gemäß der mit der APSS-Funktion
gewählten Titelnummer wiedergegeben wird, wurden
das Start-ID-Signal und die Titelnummer nicht richtig
auf dem Band aufgezeichnet. Siehe Seite 75.
Während der Wiedergabe die FF-Taste (►►) drücken,
um zum Anfang des nächsten Titels weiterzugehen.
Durch Drücken der REW-Taste (-<4) wird zum Anfang
des laufenden Titels zurückgekehrt.
Bei jedem Drücken der FF-Taste (►►) wird ein Titel in
Vorwärts- und bei jedem Drücken der REW-Taste (◄◄) ein
Titel in Rückwärtsrichtung übersprungen.
• Wenn die PAUSE-Taste (ll) nach der FF-Taste (►►)
bzw. REW-Taste (-♦<) gedrückt wird, wird am Anfang
des angesprungenen Titels auf Pause geschaltet. Dann
wird der Titel wiedergegeben, wenn die PLAY-Taste
(►) gedrückt wird.
Anspringen des 4. Titels während der Wiedergabe von Titel 3:
Während der Wiedergabe von Titel 3 die FF-Taste (►►)
einmal drücken. Die Titelnummer-Anzeige wechselt von 3
zu einer blinkenden 4, und das Band wird bis zum Anfang
von Titel 4 schnellvorgespult. Am Anfang von Titel 4 startet
die Wiedergabe.
'•j-',"'- tCM
L' ■ ' tCM U Us
-UÜ V I ÜM ■
L' ü C Dк^ u Us I
L' U C Um U U* I
HV
Erneute Wiedergabe von Titel 4 während der Wiedergabe von Titel 4
Während der Wiedergabe von Titel 4 die REW-Taste (◄◄)
einmal drücken. Die Titelnummer-Anzeige wechselt zu
einer blinkenden 4, und das Band wird bis zum Anfang von
Titel 4 zurückgespult. Am Anfang von Titel 4 startet die
Wiedergabe.
Anspringen von Titel 8 während der Wiedergabe von Titel 5
Während der Wiedergabe von Titel 5 die FF-Taste (►►)
dreimal drücken. Die Titelnummer-Anzeige wechselt von 5
zu einer blinkenden 8, und das Band wird bis zum Anfang
von Titel 8 schnellvorgespult. Am Anfang von Titel 8 startet
die Wiedergabe.
Anspringen von Titel 6 während der Wiedergabe von Titel 10
Während der Wiedergabe von Titel 10 die REW-Taste (◄◄)
fünfmal drücken. Die Titelnummer-Anzeige wechselt von 10
zu einer blinkenden 6, und das Band wird bis zum Anfang
von Titel 6 zurückgespult. Am Anfang von Titel 6 startet die
Wiedergabe.
79
Page 80

Programmierung von Titeln (APMS = Automatic Programmable Musik Selector)
Die gewünschten Titel können in beiiebiger Reihenfoige programmiert werden.
• Wenn die Titel nicht richtig numeriert sind, kann es verkommen, daß die falschen Titel programmiert werden oder daß die
1
Die Cassette einlegen.
2
Die PROGRAM-Taste drücken.
Die APMS-Anzeige leuchtet.
Die gewünschten Titelnummern mit den
Zahlentasten (1 - 0, +10, +20) in der gewünschten
Reihenfolge eingeben.
Beispiel:
Wahl von Titel 12:
"+10” und''2" drücken.
Wahl von Titel 20:
'‘+20’’ und “0” drücken.
Wahl von Titel 54:
“+20” zweimal, dann ”+10" und ’’4” drücken.
4 Die PLAY-Taste (►) drücken.
Die programmierten Titel werden in der programmierten
Reihenfolge wiedergegeben.
Anspringen eines Titels in einem Programm:
Die FF-Tasfe (►►) oder die REW-Taste (◄◄) drücken, um
den Anfang eines nachfolgenden/vorherigen Titels im
Programm anzuspringen.
Im Display werden die Programmnummer
(Wiedergabe-Reihenfolge) und die programmierte
Titelnummer angezeigt.
80
Uberprüfen des Programminhalts
Im Stoppmodus die CALL-Taste drücken.
Die programmierten Titel werden in der programmierten
Reihenfolge angezeigt.
• Wenn die CALL-Taste während der ProgrammWiedergabe gedrückt wird, wird die nächste
programmierte Titelnummer für etwa eine Sekunde
angezeigt.
Löschen eines programmierten Titels
Die STOP-Taste (■) und dann die CLEAR-Taste drücken.
Bei jedem Drücken der CLEAR-Taste wird der jeweils letzte
Titel im Programm gelöscht.
Löschen des gesamten Programms
Die PROGRAM-Taste im Stoppmodus drücken.
Das gesamte Programm wird außerdem durch Drücken der
OPEN/CLOSE-Taste und durch Ausschalten der
Spannungsversorgung gelöscht.
Page 81

Direktwahl
Jeder Titel kann direkt gewählt und wiedergegeben werden,
indem die Titelnummer spezifiziert wird.
Die gewünschte Titelnummer im Stopp- oder
Wiedergabemodus mit den Zahlentasten (0 -1,+10, +20)
eingeben.
Beispiel:
Wahl von Titel 12:
“+10" und “2” drücken.
Wahl von Titel 20:
"+20" und "0” drücken.
Wahl von Titel 54:
‘'+20" zweimal, dann ‘‘+10” und “4" drücken.
Der Anfang des spezifizierten Titels wird gesucht und der
Titel automatisch wiedergegeben.
• Die Direktwahlfunktion kann auch eingesetzt werden,
um bis zum Anfang eines Titels vorzuspulen. Eine
Titelnummer eingeben und die Pause-Taste (ll)
drücken. Der spezifizierte Titel wird gesucht, und das
Gerät schaltet am Titelanfang auf Pause. Zum Starten
der Wiedergabe die PLAY-Taste (►) drücken.
• Wenn eine Titelnummer spezifiziert wird, die nicht auf
der Cassette vorhanden ist, wird das Band bis zum
Bandende vorgespult.
• Direkte Wahl kann nicht auf Cassetten durchgeführt
werden, die keine Titelnummern enthalten oder auf
denen die Titel nicht richtig numeriert sind.
• Direktwahl kann nicht für programmierte Titel im APMSModus eingesetzt werden.
Absolutzeit-Suche
Die Wiedergabe kann an jeder gewünschten Bandstelle
gestartet werden, indem die Absolutzeit (Zeitdauer vom
Bandanfang bis zu der Stelle, an der die Wiedergabe
beginnen soll) spezifiziert wird.
1
Die ABS TIME-Taste im Stopp- oder
Wiedergabemodus drücken.
Die gewünschte Absolutzeit mit den Zahlentasten
(0-1) eingeben.
Zum Suchen der Bandstelle "1 Stunde, 25 Minuten und
32 Sekunden” müssen ''T’,’’2", ‘‘5’’, "3” und “2” gedrückt
werden.
Die PLAY-Taste (►) drücken.
Die Wiedergabe startet von der spezifizierten ABS-Zeit.
Wenn die eingegebene Zeit länger ist als die
Aufnahmezeit der Cassette, stoppt das Band am
Bandende.
Während der Wiedergabe muß die Absolutzeit
innerhalb von 4 Sekunden nach Drücken der ABS
TIME-Taste eingegeben werden, weil die Funktion
danach deaktiviert wird.
81
Page 82

1 2
REVIEW CUE
1
Cue und Review
Mit der CUE-Taste und der REVIEW-Taste ist es mögiich,
^^
PLAY
mit dem Stachen der normaien Wiedergabegeschwindigkeit
vor- bzw. zurückzuspuien, wobei der Wiedergabeton gehört
wird.
Im Stoppmodus:
1 Die CUE-Taste zum Vorwärtsspulen oder die
REVIEW-Taste zum Rückwärtsspulen drücken.
2 Die PLAY-Taste (►) drücken, wenn die gesuchte
E
Steiie erreicht ist.
REVIEW CUE REVIEW CUE
i'P A
' I
Während der Wiedergabe:
1 Die CUE-Taste zum Vorwärtsspuien oder die
REViEW-Taste zum Rückwärtsspuien gedrückt
haiten.
2 Die Wiedergabe wird bei Losiassen der CUE- bzw.
REViEW-Taste fortgesetzt.
• Bei Erreichen des Bandendes stoppt der Bandiauf
automatisch.
HiNWEiS:
Die CUE- und die REViEW-Taste funktionieren nicht für die
programmierten Titei im APMS-Modus.
Wiederholte Wiedergabe
Diese Funktion gestattet die kontinuieriiche Wiederhoiung
eines gesamten Bandes oder eines APMS-Programms. Für
Programm-Wiederhoiung müssen vorher Titei programmiert
werden (Seite 80).
1 Die REPEAT-Taste drücken.
Die Anzeige G ieuchtet.
2 Die PLAY-Taste (►) drücken.
Das gesamte Band oder das Programm wird wiederhoit
wiedergegeben.
• Zum Fortsetzen der normaien Wiedergabe die REPEATTaste erneut drücken.
• Die wiederhoite Wiedergabe stoppt nach 24
Wiederhoiungen automatisch.
82
Page 83

Überspringen von unerwünschten Abschnitten mit der Skip-ID
Wenn das Gerät eine Skip-ID findet, wird das Band bis zum
Anfang des nächsten Titeis schnellvorgespult.
Aufzeichnung des Skip-ID-Signals
Während der Wiedergabe die SKIP ID WRITE-Taste am
Anfang des zu Überspringenden Abschnitts drücken.
Die Taste leuchtet. Die Wiedergabe stoppt kurzzeitig, und
das Skip-ID-Signal wird aufgezeichnet.^ (Während der
Aufzeichnung blinkt die SKIP-ID-Anzeige.)
Uberspring-Wiedergabe
SKIP PLAY
OFF ON
Schnellvorlauf
I Wiedergabe -»p Wiedergabe
------------------------1
1. Titel I
______________I_____
Subcode 1
-------
Skip-ID-Signal
SKIP PLAY
OFF. . ON
WRITE \ ERASE
2. Titel
Subcode 2
□
Die SKIP PLAY-Taste auf ON stellen.
Wenn während der Wiedergabe ein Skip-ID-Signal
gefunden wird, wird das Band bis zum Anfang des
nächsten Titels schnellvorgespult, von wo aus die
Wiedergabe fortgesetzt wird.
• Wenn eine Cassette, die ein Skip-ID-Signal enthält,
ohne die Überspring-Wiedergabefunktion
wiedergegeben werden soll, die SKIP PLAY-Taste auf
OFF stellen. Dann wird die Cassette normale
wiedergegeben, aber das Skip-ID-Signal wird nicht
gelöscht.
Löschen des Skip-ID-Signals
1 Die SKIP PLAY-Taste auf OFF stellen.
2 Den Titel, der das Skip-ID-Signal enthält,
wiedergeben, und die SKIP ID ERASE-Taste
drücken, wenn die SKIP ID-Anzeige leuchtet.
Das Band wird zu der Stelle zurückgespult, wo das
Skip-ID-Signal aufgezeichnet wurde. Die SKIP IDAnzeige blinkt, und die Skip-ID wird gelöscht. Nach
Löschen der Skip-ID wird die Wiedergabe fortgesetzt.
r Wiedergabe"^
1. Titel
Subcode 1
2. Titel
Subcode 2
Löschen des Skip-ID-Signals
83
Page 84

Anzeige der bisherigen Spielzeit und des
Bandzählwerks
Das Band ist3 Minuten und 15 Sekunden
vom Anfang von Titel 2 entfernt.
Die Zählwerkposition ist ''0563”.
J l_ u u u
Das Band ist 7 Minuten vom Bandanfang
entfernt..
TOC
t_ U Ih ~i U m Z J Us I
Bei beginn der Wiedergabe einer Cassette vom Bandanfang an,
die TOC-Daten enthält, leuchtet die TOC-Anzeige für mehrere
Sekunden, und die Gesamtzahl der Titel und die Gesamtspielzeit
der Cassette werden durch Drücken der DISPALY-Taste hinter
der Zählwerkanzeige angezeigt.
Bei jedem Drücken der DISPLAY-Taste während der
Wiedergabe wechseit die Anzeige in der Reihenfoige 1, 2
und 3.
1 Die PROG-Anzeige leuchtet, und die bisherige
Spielzeit vom Anfang des laufenden Titels wird
angezeigt.
• Bei Wiedergabe eines Titels, der kein Start-ID-Signal
enthält, wird M -- S” angezeigt.
• Im APSS-Modus wird die Absolutzeit angezeigt.
• Während Schnellvorlauf, Rückspulen, Cue und Review
wird M -- S” angezeigt.
2 Die COUNTER-Anzeige leuchtet, und die
Bandzählwerkposition wird angezeigt.
• Zum Rückstellen des Bandzählwerks die COUNTER
RESET-Taste drücken. Auf dem Display erscheint
"0000". In den anderen Display-Modi ist die COUNTER
RESET-Taste wirkungslos.
3 Die ABS-Anzeige leuchtet, und die gesamte
bisherige Spielzeit vom Bandanfang (Absolutzeit)
wird angezeigt.
• Bei Cassetten, auf denen keine Absolutzeit
aufgezeichnet ist, wird M - S” angezeigt.
HINWEIS:
• Wenn ein Abschnitt wiedergegeben wird, der weder
Start-ID-Signale noch Titelnummern enthält, wird keine
Titelnummer angezeigt.
84
Page 85

BEI STORUNGEN
Sollte das Gerät nicht einwandfrei arbeiten, Überprüfen Sie es anhand der folgenden Tabelle. Wenn das Problem sich nicht
beheben läßt oder nicht in der Tabelle aufgeführt ist, schalten Sie die Spannungsversorgung aus, ziehen Sie den Netzstecker
und wenden Sie sich an Ihren Yamaha-Fachhändler oder eine Kundendienststelle.
PROBLEM PRÜFPUNKT
Spannungsversorgung kann nicht eingeschaltet
werden.
Nach Einlegen einer Cassette schließt sich die
Cassettenlade nicht.
Das Gerät arbeitet nicht. • Ist eine Cassette eingelegt?
Kein Wiedergabeton von beiden Kanälen. • Ist das Gerät richtig am Verstärker angeschlossen?
Kein Wiedergabeton von einem Kanal.
Die Absoultzeit wird falsch angezeigt. • Sind die Titelnummern in der richtigen Reihenfolge
Die tatsächliche Anzahl der aufgenommenen Titel und
die Titelnummern stimmen nicht Überein. (Z.B.
befinden sich 6 Titel auf dem Band, aber es erscheinen
nur die Titelnummern 1, 2, 3, 4 und 5.)
Ein mit APSS oder APMS gewählter Titel ist nicht der
gewünschte Titel.
Das Band stoppt imn APMS-Modus.
• Ist das Netzkabel angeschlossen?
• Wurde die Cassette richtig eingelegt?
• Ist die verwendete Cassette eine DAT-Cassette?
• Befinden sich andere Gegenstände in der Cassettenlade?
• Hat sich am Tonkopf oder an der Cassette Kondensation
gebildet?
• Ist ein Kabel lose oder abgetrennt?
aufgezeichnet?
• Dies kann bei bestimmten Programmquellen verkommen
(verursacht durch Störgeräusche zwischen den Titeln, zu
kurze Abstände zwischen den Titeln, Tonausfälle usw.)
Siehe Seite 75.
• Stimmt die tatsächliche Anzahl der aufgenommenen Titeln
mit den Titelnummern Überein? Siehe Seite 75.
• Sind alle APMS-Titelnummern gültig?
• Wurden die Titel neunumeriert?
Der Ton vom Digitaleingang kann nicht aufgenommen
werden.
Bei Aufnahme vom Digitaleingang kann der
Aufnahmepegel nicht ausgesteuert werden.
Bei Drücken einer Taste sind Klickgeräusche hörbar.
• Ist der INPUT-Wähler auf DIGITAL eingestellt?
• Ist das Koaxial- oder Lichtweilenleiterkabel richtig
angeschlossen?
• Ist der DIGITAL INPUT-Wähler an der Geräterückseite
richtig eingestellt?
• Ist das Lichtwellenleiterkabel beschädigt oder gebrochen?
• Bei Aufnahme vom Digitaleingang ist eine Einstellung des
Aufnahmepegels nicht erforderlich.
• Diese Geräusche treten auf, wenn die Band- oder TonkopfSchutzfunktion aktiviert wird.
• Diese Geräusche können außerdem auftreten, wenn
während Schnellvorlauf oder Rückspulen ein nicht
bespielter Bandabschnitt erreicht wird.
(Diese Geräusche sind normal.)
85
Page 86

TECHNISCHE DATEN
DAT-System........................Digital-Audio-Tape-Recorder mit
rotierendem Tonkopf
Ladesystem
Aufnahmesystem
Aufnahme-Abtastfrequenz
Digital
Analog
Quantisierung
Bandgeschwindigkeit
Schnellspulzeit
Gesamtfrequenzgang
fs = 48 kHz
fs = 44,1 kHz
Gesamtklirrgrad und Rauschen
Dynamikumfang...............................................................92 dB
Separation
Digitaleingang
Koaxial
Lichtwellenleiter
Digitalausgang
Koaxial
Lichtwellenleiter
Analogeingang
symmetrisch
unsymmetrisch
Analogausgang
symmetrisch
unsymmetrisch...................................2 Vrms max. (Cinch)
Kopfhörerausgang.................................75 mW/32 Ohm max.
Leistungsaufnahme
........................................
..............
...........................
..........................
.....................
..............
.................................
..............................
.......................................................
.......................................
.............................................
..........................
.............................................
......................
...............
............
Sériai Copy Management System
48 kHz, 44,1 kHz, 32 kHz/2 Kanäie
.............
.................16-Bit-Linearwandiung
...........
45 s max. für 120-Minuten-Cassette
............
Referenzpegel +4 dB/10 kOhm
0,3 Vrms min. für Skalenendwert
Referenzpegel +4 dB/Skalenendwert
....................
horizontaie Frontiadung
48 kHz, 44,1 kHz/2 Kanäie
...................................8,15 mm/s
2 Hz bis 22 kHz, +/-0,5 dB
2 Hz bis 20 kHz, +/-0,5 dB
.................
0,2 Vs-s/75 Ohm (lEC 958)
0,5 Vs-s/75 Ohm (iEC 958)
......................................28 W
0,003% bei 1 kHz
96 dB bei 1 kHz
(EiAJ CP-340)
(EiAJ CP-340)
(XLR3-31)
(Cinch)
+22 dBm (XLR 3-32)
(1/4" Klinkenbuchse)
Spannungsversorgung
USA-Modell
Europa-Modell
..................................................
.............................................
120 V, 60 Hz
230 V, 50 Hz
Abmessungen (B x H x T).....................480 x 88 x 329 mm
Gewicht.................................................................
.........
6 kg
Zubehör
Fernbedienungsgeber....................................................1
* Technische Änderungen Vorbehalten.
86
Page 87

• This product complies with the radio frequency interference
requirements of the Councii Directive 82/499/ECC and /or
> 87/308/EEC.
• Get appareil est conforme aux prescriptions de la directive
communautaire 87/308/CEE.
Diese Geräte entsprechen der EG-Richtiinie 82/499/EWG
und/oder 87/308/EWG.
• Dette apparat overholder det gaeldende EF-direktiv
vedrorende raduistej.
• Questo apparecchio è conforme al D.M.13 aprile 1989
(Direttiva CEE/87/308) sulla soppressione dei radiodisturbi.
• Este producto está de acuerdo con los requisitos sobre
interferencias de radio frequencia fijados por el Consejo
Directivo 87/308/CEE.
OBSERVERA!
Apparaten kopplas inte ur växelströmskällan (nätet) sâ länge
som den ar ansluten tili vägguttaget, även om själva apparaten
har stängts av.
ADVARSEL
Netspæendingen til dette apparat er IKKE afbrudt, sâlæebge
netledningen siddr i en stikkontakt, som er t endt — ogsä
selvom der or slukket pä apparatele afbryder.
VAROITUS
Laitteen toisiopiiriin kytketty käyttökytkin ei irroita koko laitetta
verkosta.
Page 88

YAMAHA
SERVICE
This product is supported by Yamaha's worldwide network of
factory trained and qualified dealer service personnel.
In the event of a problem, contact your nearest Yamaha
dealer.
SERVICE APRES-VENTE
Cet appareil est couvert par le réseau mondial de service
après-vente Yamaha. En cas de problème, contactez le
concessionnaire Yamaha le plus proche.
KUNDENDIENST
Dem DTR2 steht das weltweite Yamaha Kundendienstnetz mit
qualifizierten Technikern zur Verfügung. Im Falle einer Störung
sofort den Fachhandel in Ihrer Nähe benachrichtigen.
YAMAHA CORPORATION
VL09750-2 BWWB.g Printed in Japan O©
 Loading...