

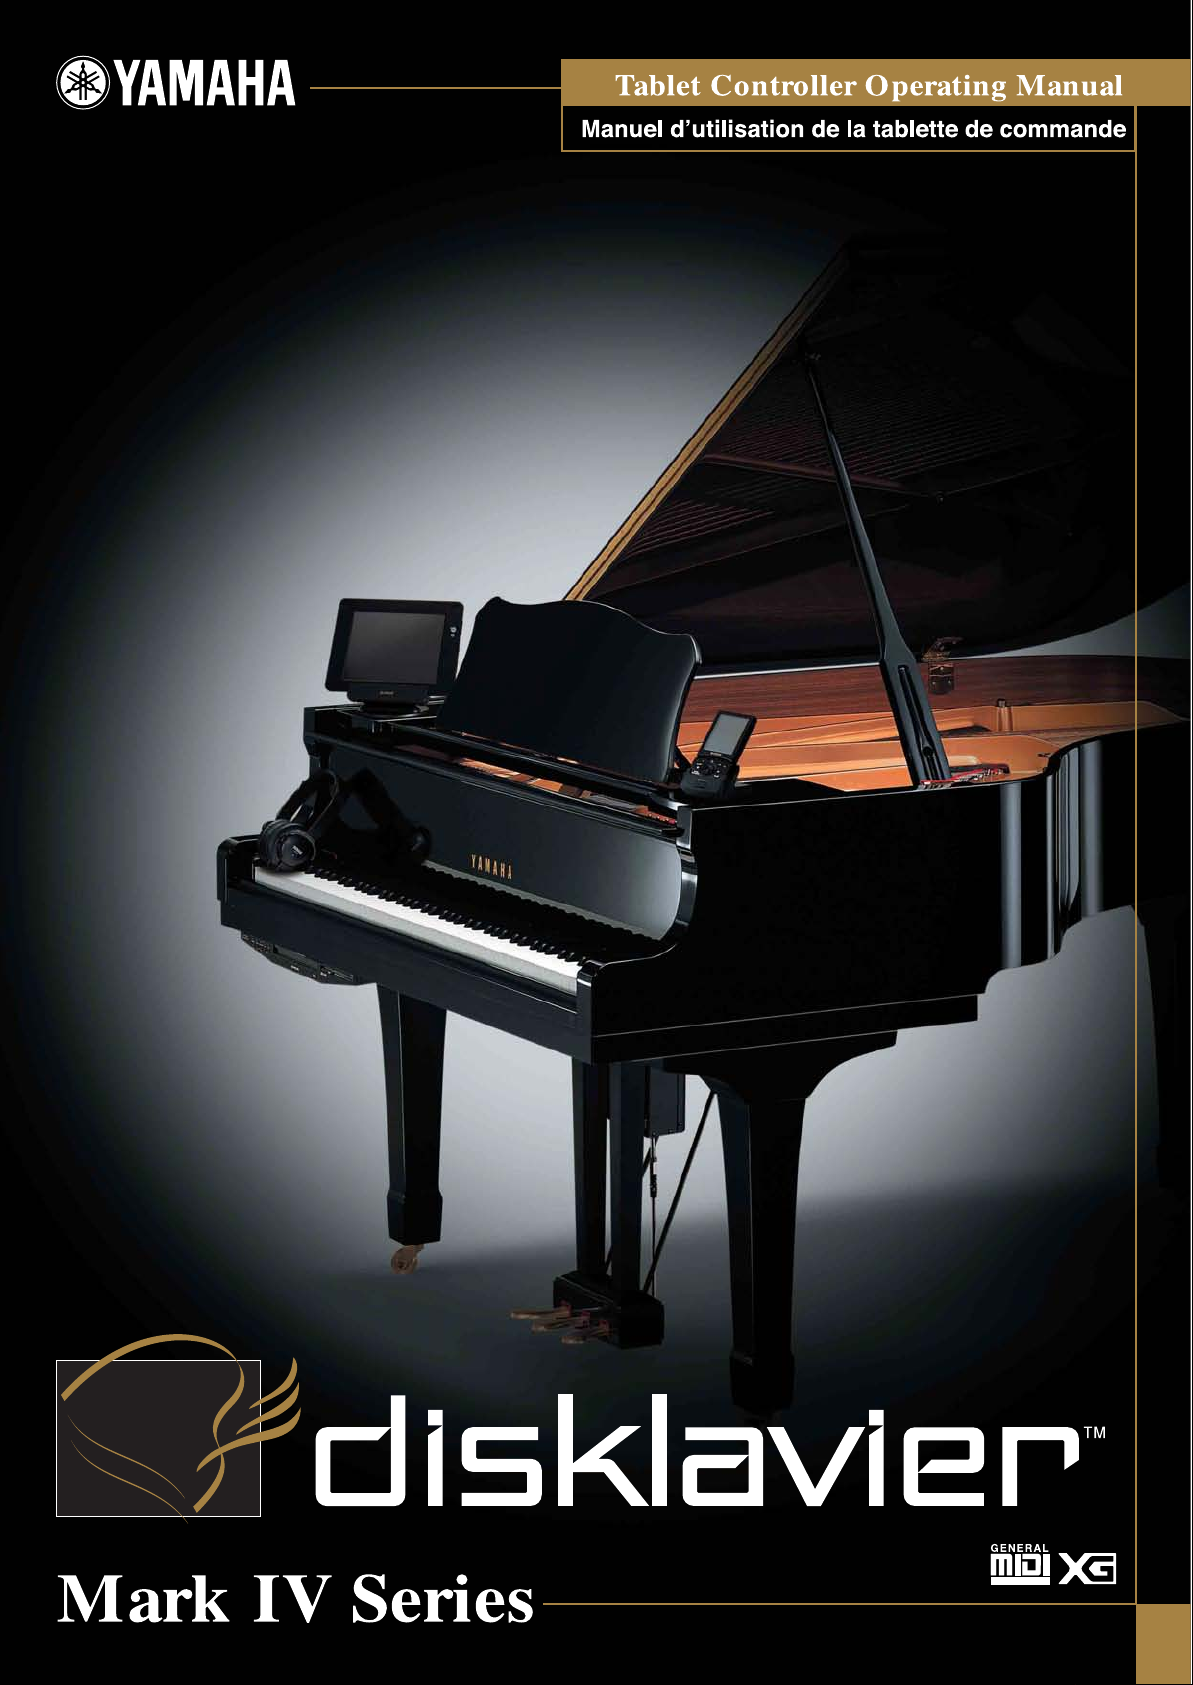
Yamaha DC1M4PE User Manual [ru]
English
3
4
9
15
18
19
21
22
23
24
25
26
27
28
32
33
36
39
40
41
44
47
49
52
53
54
55
60
62
63
64
65
Table of Contents
Chapter 1
Items Supplied with the Disklavier...............................
Names of Parts and Their Functions ............................
Chapter 2
Operating the Tablet Controller.................................. 8
Turning the Disklavier On ..........................................
Chapter 3
Playing Back the Sample Songs in the Song Library ....
Adjusting the Overall Volume ..................................
Selecting a Song....................................................
Searching Forward and Backward in a Song ............
Selecting Directly the Different Song
from the Current Album........................................
Repeating Song Playback........................................
Chapter 4
Getting Started
Basic Operations
Basic Playback
Basic Piano Playing
3
Preparing the Tablet Controller ...................................
8
Turning the Disklavier Off (Standby Mode)................ 12
Shutting Down the Disklavier ...................................
13
15
Changing the Playback Tempo................................
Playing Back Songs in a Different Key
(Transposition) ...................................................
Playing Back Only the Desired Piano Part .................
Playing Back Songs with the Lyrics on the Screen.......
Changing the Background of the Lyric Screen ...........
Adjusting the Volume of the Microphone’s Input
and the Depth of it’s Reverbration.........................
30
32
6
Playing the Acoustic Piano (Acoustic Mode)............... 32
Playing the Digital Piano (Quiet Mode) .....................
Using Headphones (Headphone Mode) ....................
Chapter 5
Basic Operation on the File Manager .......................
Creating an Album in the Library .............................
Renaming an Album, Song, or Play List .....................
Creating a New Play List.........................................
Adding the Desired Song to Play List ........................ 43
Chapter 6
Key Prompt Display during SmartKey
Display during Recording ........................................ 52
Display during Playback of DisklavierRadio ............... 53
Display during Using the IDC Service........................
Changing the Design of the Room (Background) ........
Chapter 7
Creating a Song Library
Other Features
TM
Playback .......
Function of the Configuration Bar
Adjusting the Volume Balance among the Keyboard
Playing, Ensemble Sound, Software Playback, and
Microphone’s Input............................................. 34
36
Copying Albums, Songs or the Entire Contents
in a Source........................................................
Deleting Albums, Songs and Play Lists ......................
Rearranging the Order of Albums, Songs
and Play Lists .....................................................
Erasing the Data in a Floppy Disk ............................
51
52
Changing the Picture in the Frame ...........................
Slide Show ........................................................... 57
Adding Images to the Picture Collection for the Frames
in a Room (Background)...................................... 58
Refreshing Contents in [From/To PC Folder] .............. 59
60
Pairing the Tablet Controller and the Disklavier ..........
Restarting the Interface Screen .................................
Adjusting the Volume of the Tablet Controller.............
Chapter 8
Troubleshooting
2
Adjusting the Brightness of the Touch Screen .............
Setting the Time Zone.............................................
Other Buttons ........................................................
67
66

3
Chapter 1
Getting Started
Items Supplied with the Disklavier
In addition to the items listed in “Items Supplied with the Disklavier” in “Advanced
Operating Manual”, the items below are supplied with your Disklavier as well.
• Tablet Controller (1)
• Rechargeable batteries for Tablet Controller (1)
•Cradle for Tablet Controller (1)
• AC adaptor for Tablet Controller (1)
• AC power cord for Tablet Controller (1)
• Tablet Controller Operation manual (this book) (1)

Chapter 1: Getting Started
Names of Parts and Their Functions
Tablet Controller
Left side Right sideFront
Cradle
Bottom side
4
Tablet Controller
Chapter 1: Getting Started
Touch screen
Speaker
CHARGE lamp
(power button)/
Power lamp
P button
CF card slot
Headphone jack
Microphone jack
pg. 8 “Tapping with your fingers or the stylus pen”
Outputs the sound of the Tablet Controller itself.
Lights up orange when the Tablet Controller is being
charged. Lights up green when the Tablet Controler is
fully charged. Blinks red when the battery is almost
empty.
Turns on the Tablet Controller. When this button is
pressed while the Tablet Controller is on, the Power
Management screen appears to shut down the system. /
Lights up when the Tablet Controller is on.
Shows the configuration bar. When this button is pressed
while the configuration bar appears, the configuration
bar is cleared.
For future use.
For future use.
For future use.
English
USB port
AC adaptor jack
Stylus pen
Pen holder
Microphone
Cradle interface
PC card slot
Cradle
USB port
AC adaptor jack
For future use.
Accepts the AC adaptor when the Tablet Controller is
used without a cradle.
For operating the touch screen.
Holds the stylus pen.
For future use.
Accepts the terminal on the cradle.
For future use.
Same as 9.
Accepts the AC adaptor.
5
Chapter 1: Getting Started
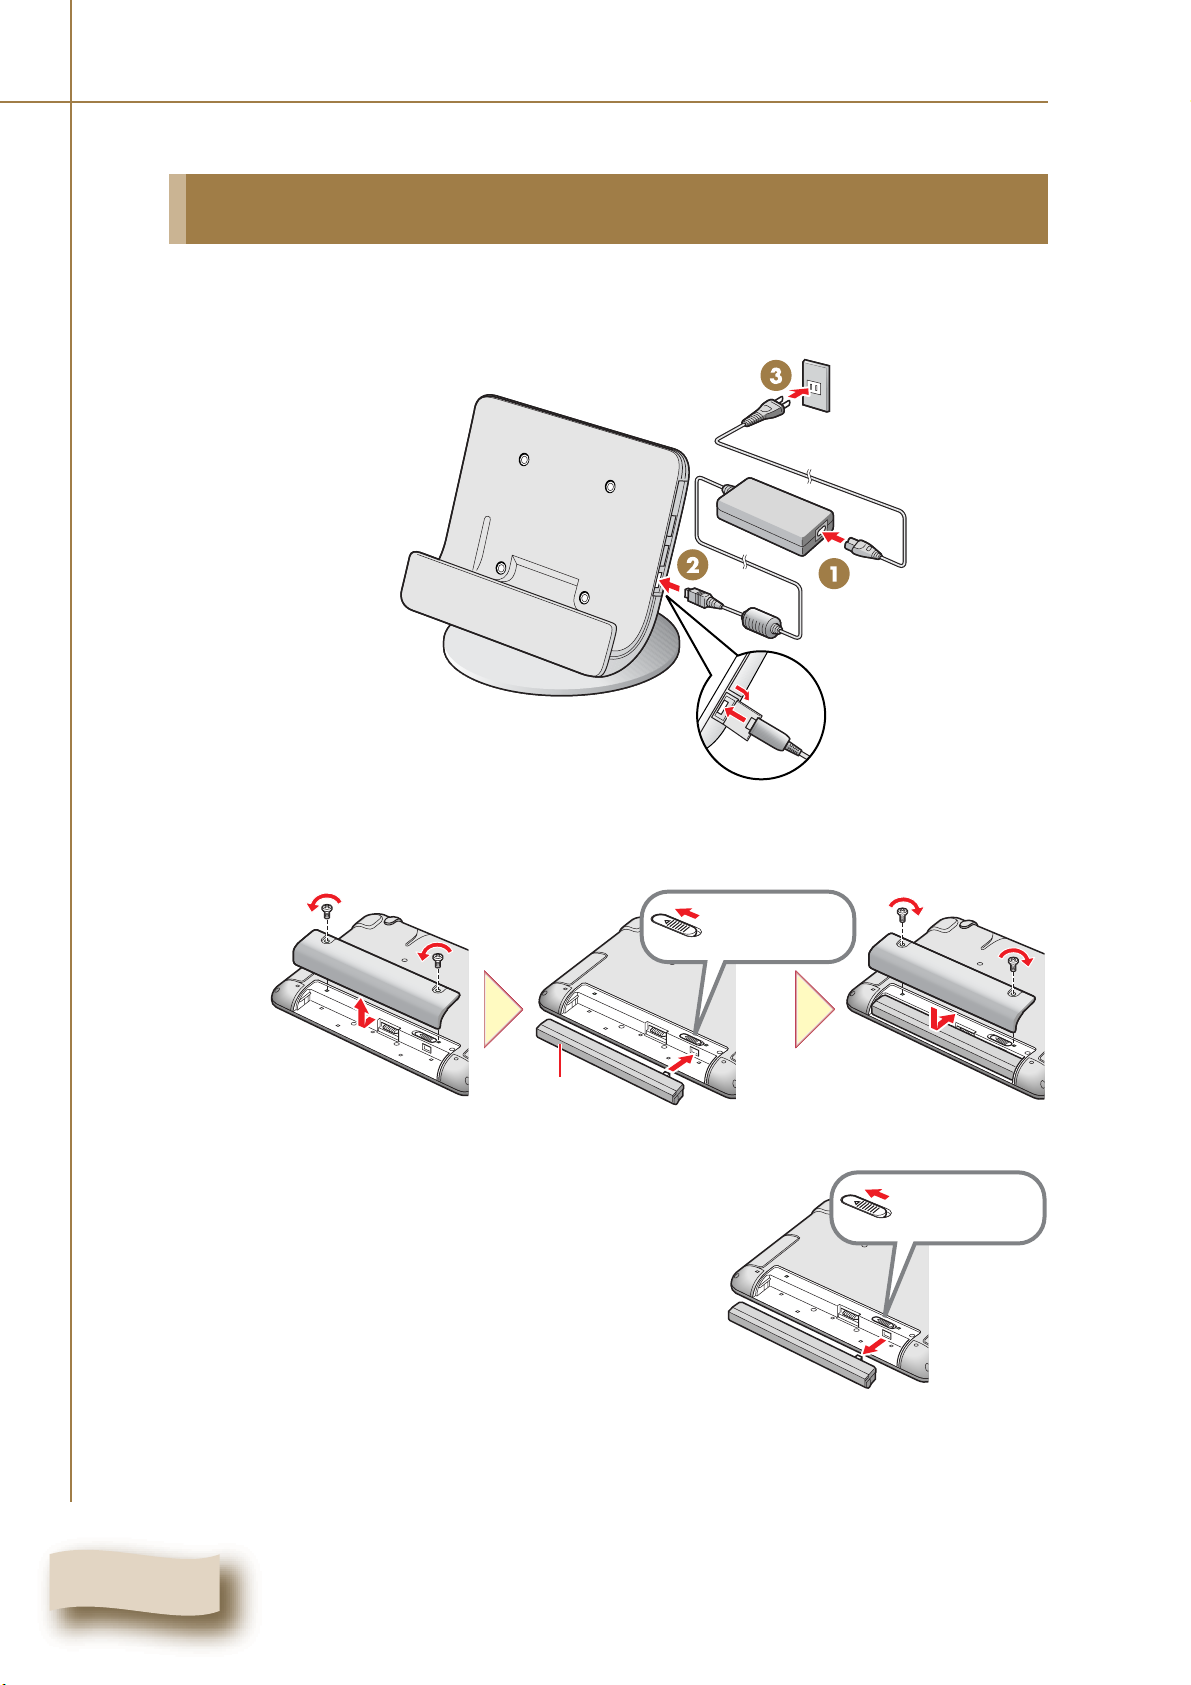
Preparing the Tablet Controller
Set up the cradle.
1
2
Put the rechargeable battery into the Tablet Controller.
Battery lock
Rechargeable
battery
Tip: Before removing the battery, move
the battery lock to the direction of an
arrow.
Battery lock
6
Chapter 1: Getting Started
Open the cover of the cradle interface, and then set the
3
Tablet Controller on the cradle.
Charging starts and the charge lamp lights in orange.
Charge lamp
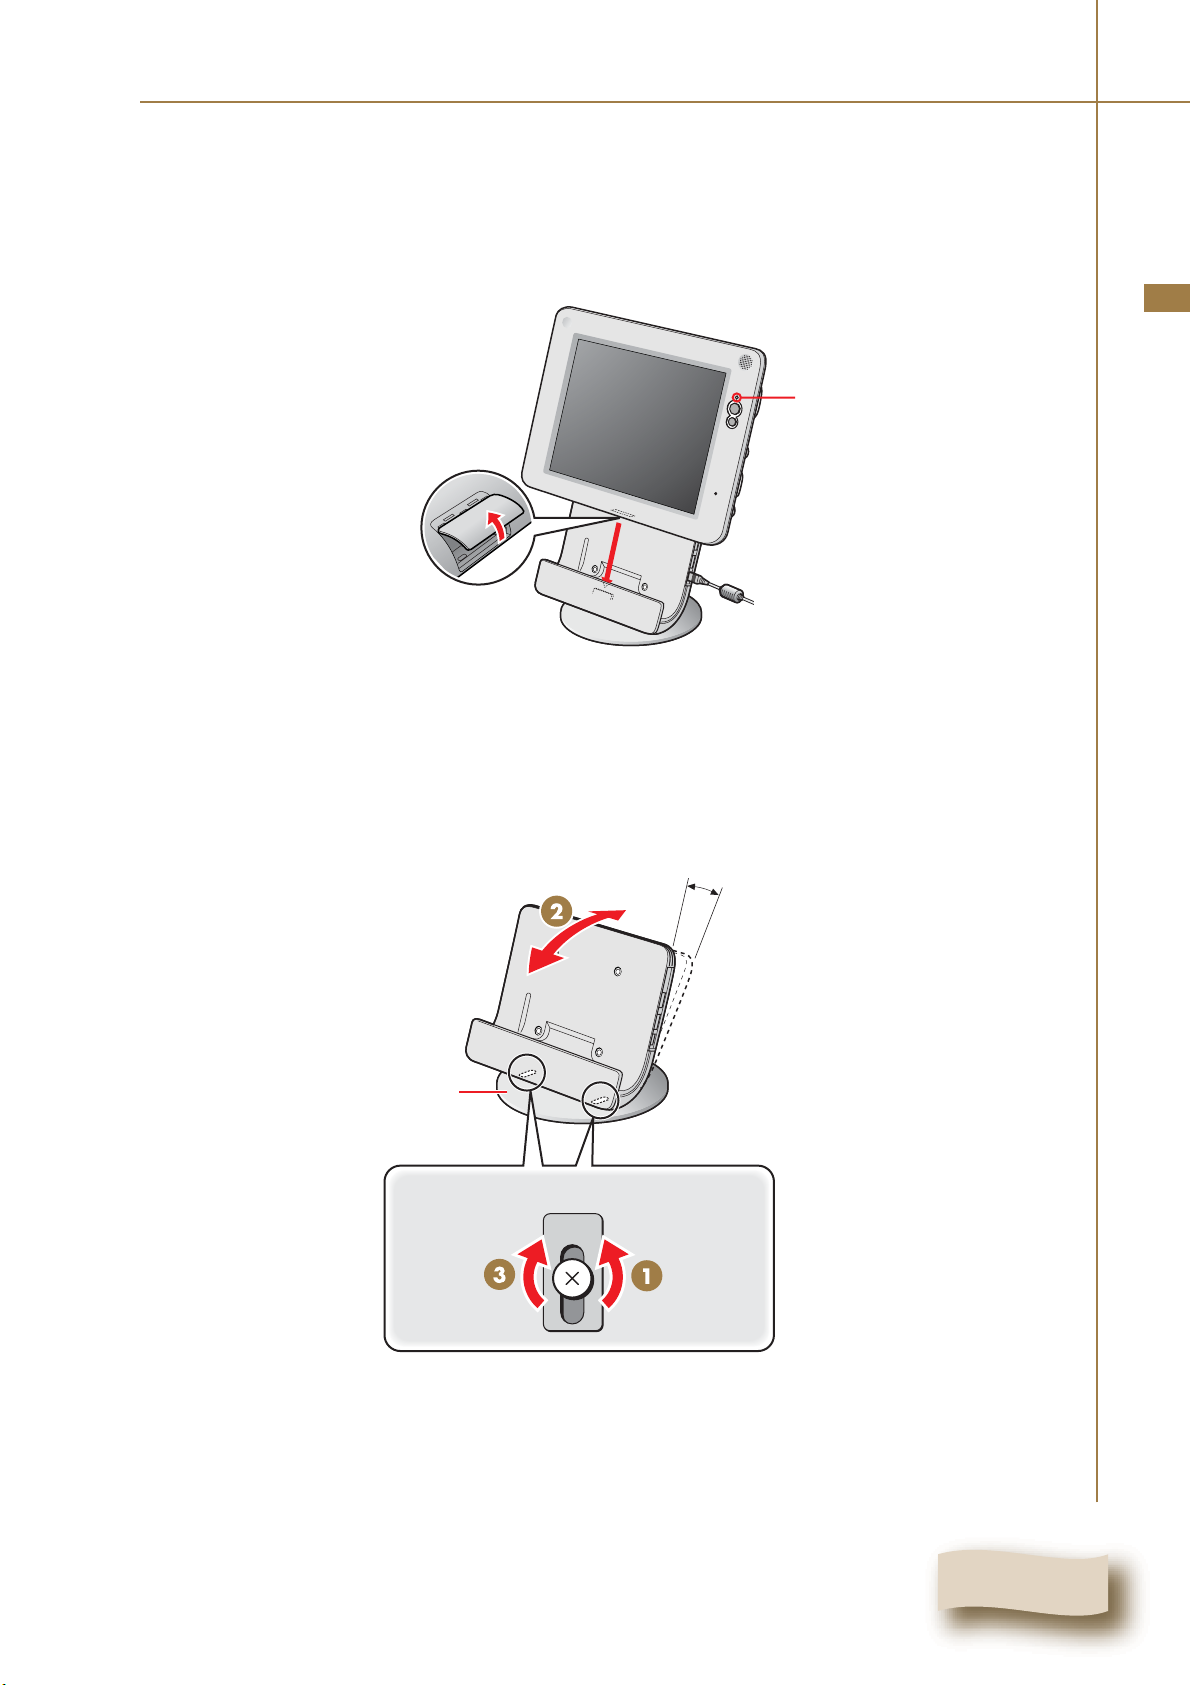
Adjusting the angle of the cradle to your preference
Loosen the two screws on the bottom of the base plate, adjust the angle, and then tighten
the screws.
English
Base plate
Bottom
20º
7
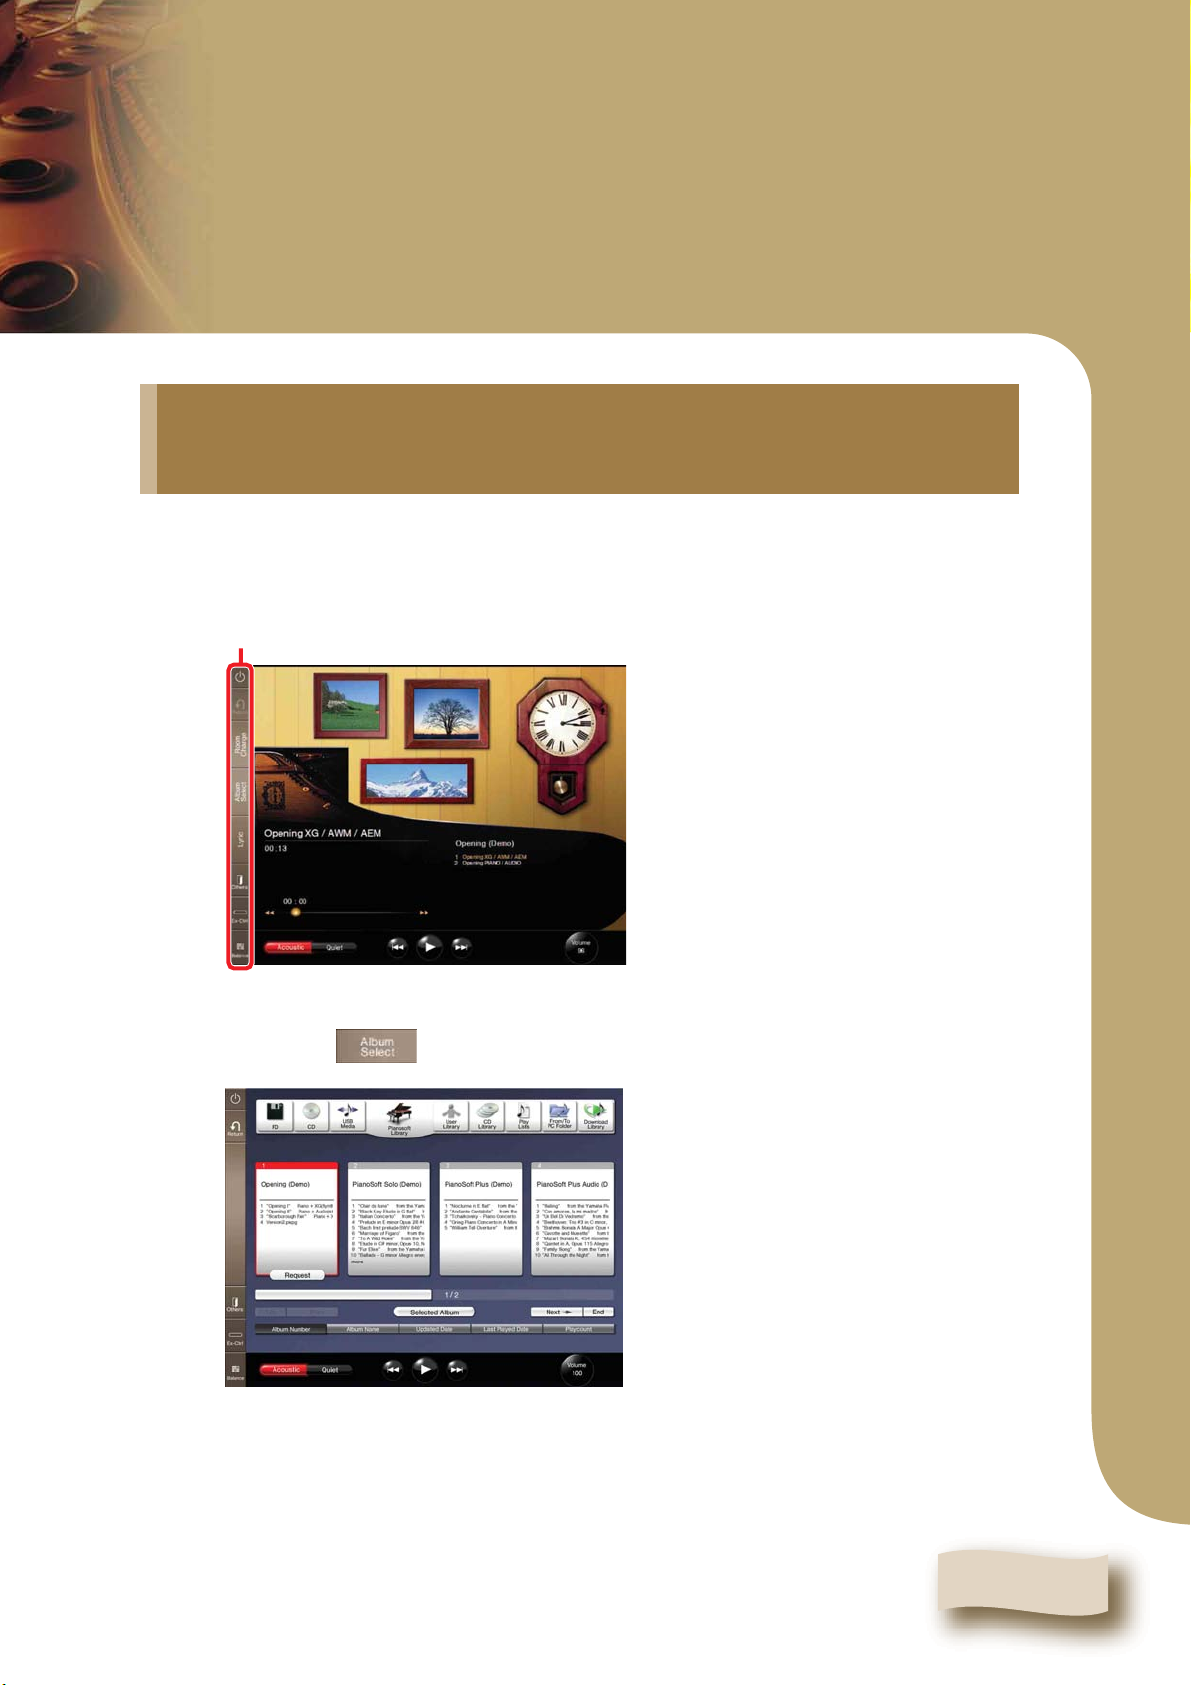
Chapter 2
Basic Operations
Before operating the Disklavier
Be sure to set up the Disklavier and the Tablet Controller. ( pg. 11 “Setting Up the
Disklavier” in Advanced Operating Manual)
Convention
In the following procedures, the buttons and controls are of the Tablet Controller
unless otherwise noted.
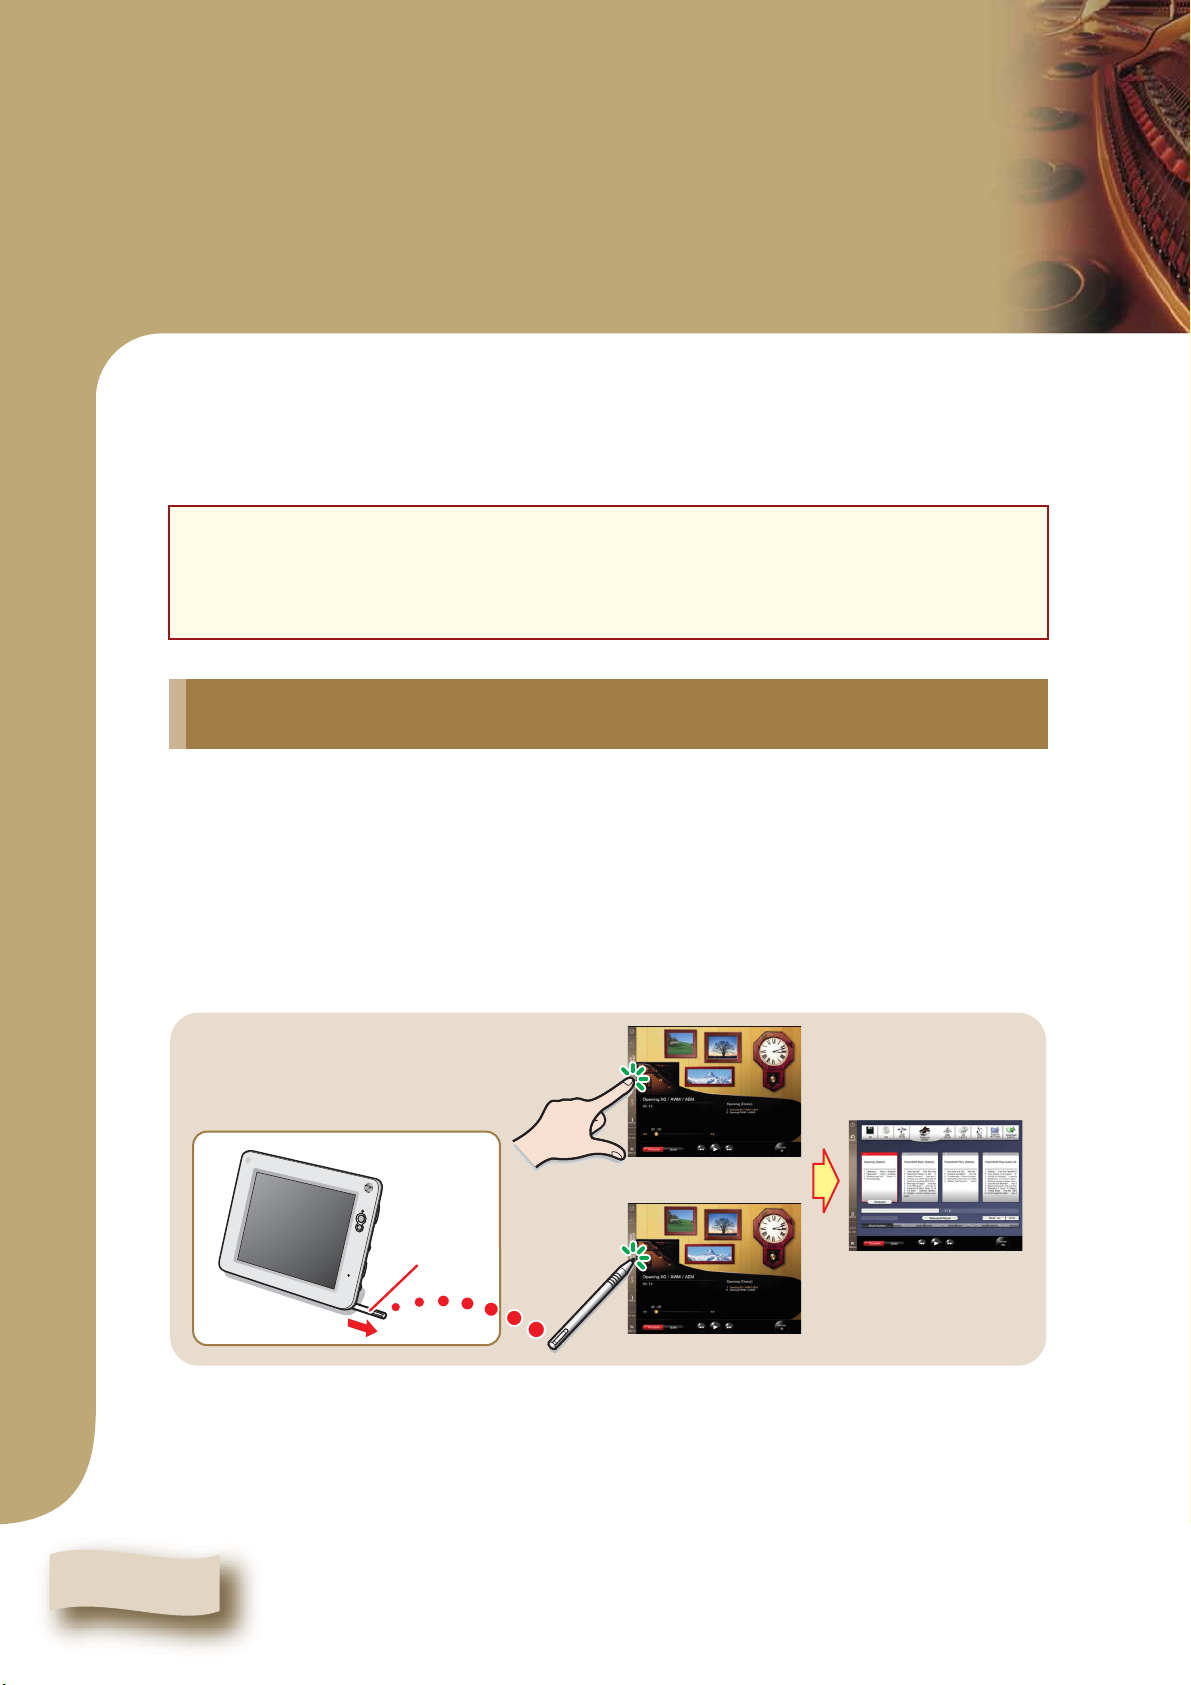
Operating the Tablet Controller
You can operate the Tablet Controller by tapping items on the touch screen with your
fingers. It is, however, recommended to use the supplied stylus pen to tap on a small
point.
Tapping with your fingers or the stylus pen
Touch an item (application icon, button, control, etc.) on the touch screen once to execute
its function.
OR
Stylus pen
8
Turning the Disklavier On
Chapter 2: Basic Operations
1
2
3
4
Confirm that the power cable of the Power Supply unit
is connected to an AC wall outlet.
Press the [ON] side of the [POWER] switch on the
Monitor speakers. ( pg. 10 in “Advanced Operating
Manual”)
Note: This step is necessary only for models supplied with the Monitor
speakers.
Press the [ON] side of the [MAINS] switch on the Power
Supply unit. ( pg. 5 in “Advanced Operating
Manual”)
Press the [ON] side of the [MAINS] switch on the I/O
Center. ( pg. 4 in “Advanced Operating Manual”)
on the Media Center starts flashing green.
Wait until on the Media Center stops flashing and dimly lights green, and
then go to step 5.
English
Note: It may take several minutes.
Continue to next page . . .
9
Chapter 2: Basic Operations
Press (power button).
5
The Tablet Controller is turned on and the Play screen appears.
Function bar
Play screen
Note: This may take approximately two minutes. When turning the Disklavier
back on after shutting down, be sure to wait 10 seconds before doing so.
Tip: Pressing on the Media Center also turns the Disklavier on. In such
a case, be sure to press (power button) to turn on the Tablet Controller as
well.
Note: After turning on the Tablet Controller for the first time, set up the Time
Zone. For the procedure, pg. 65 “Setting the Time Zone”.
10
Chapter 2: Basic Operations
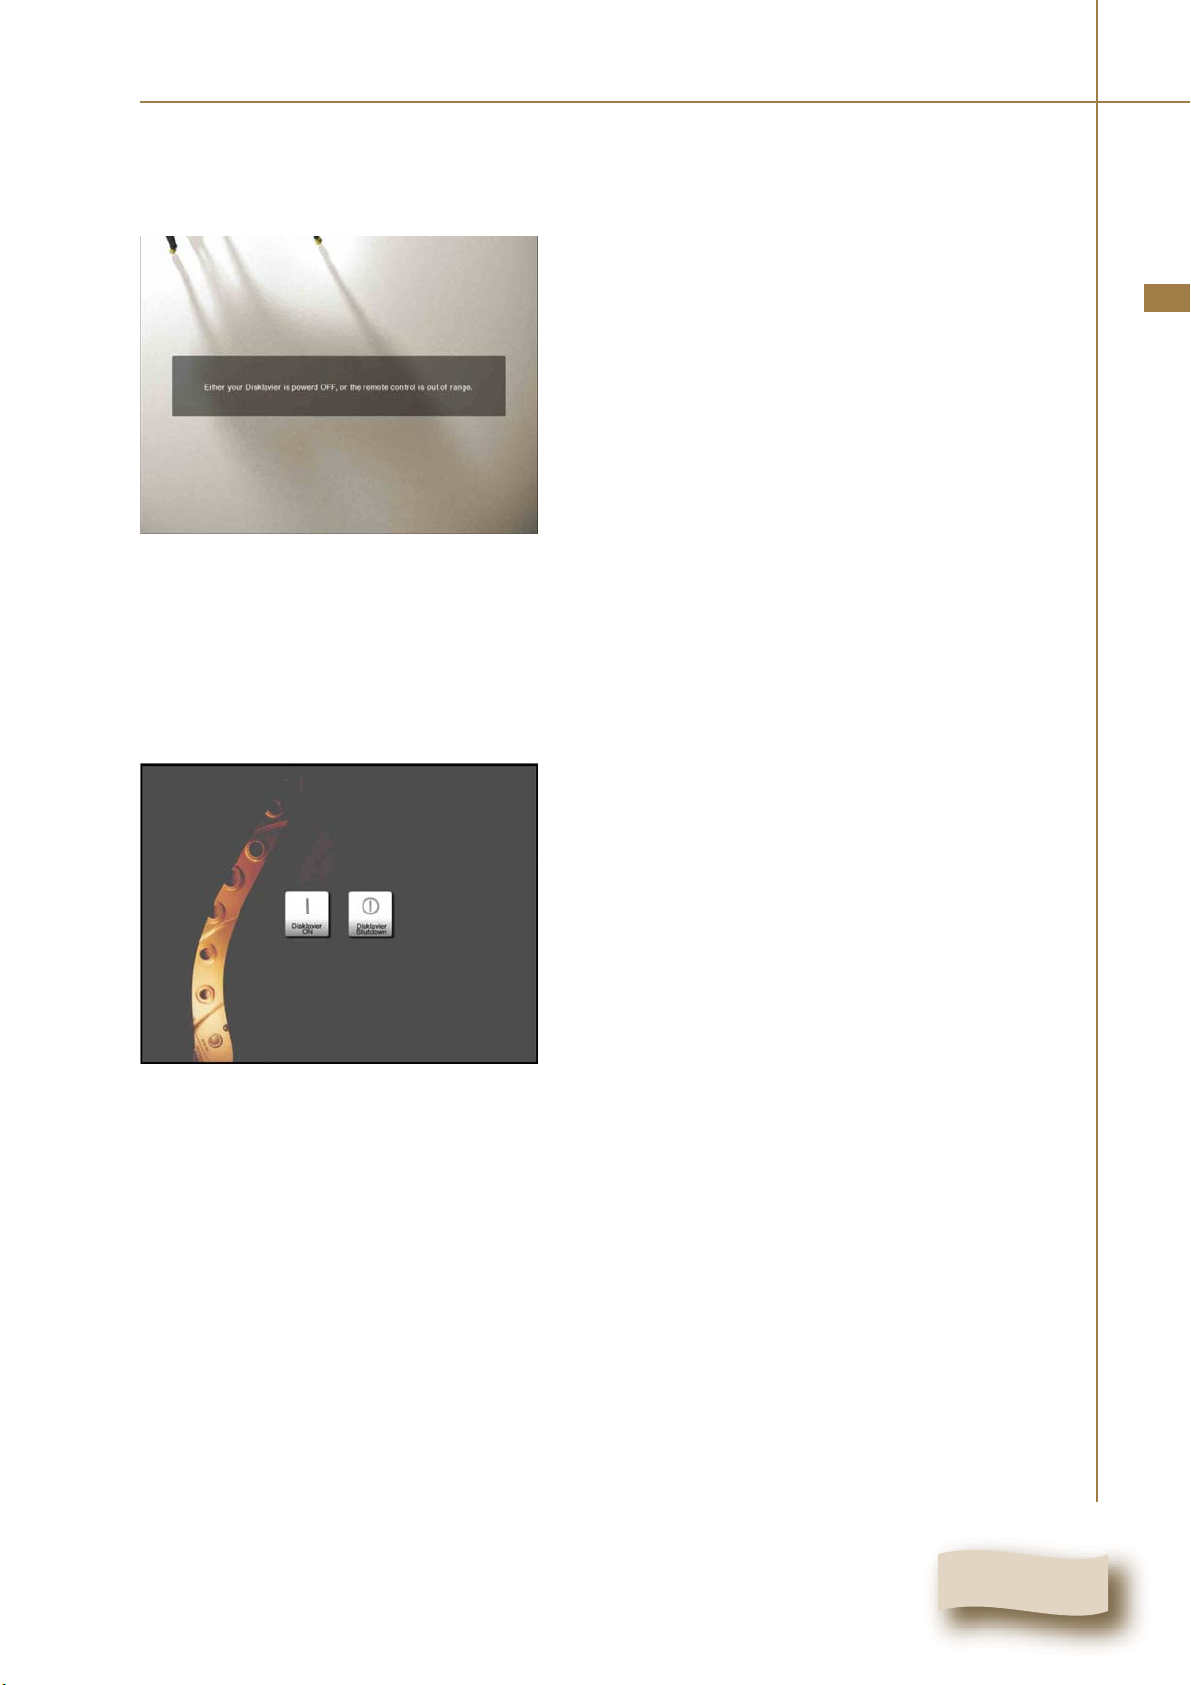
Note: In case the Disklavier and the Tablet Controller cannot connect in wireless, the
following display appears.
If this happens, either the Disklavier is turned off or the Tablet Controller is out of
specified operation range.
Note: It takes several minutes to turn on the Disklavier. So if you turn on the Tablet
Controller and the Disklavier at the same time, the above display may appear for a while.
Once the Disklavier is turned on, the above display will be changed to the standby display
automatically.
English
Standby display
11

Chapter 2: Basic Operations
Turning the Disklavier Off (Standby Mode)
After daily use, be sure to turn the Disklavier off by following the procedure below.
In Standby mode, the piano is in effect turned off. However, electrically it is in a state in
which a small quantity of power is being consumed.
Tap on at the top of the Function bar.
1
2
3
Tap on .
on the media center lights dimly green.
The following screen appears.
Tap to restart the Disklavier.
Tap on .
The Disklavier turns off.
12
Chapter 2: Basic Operations
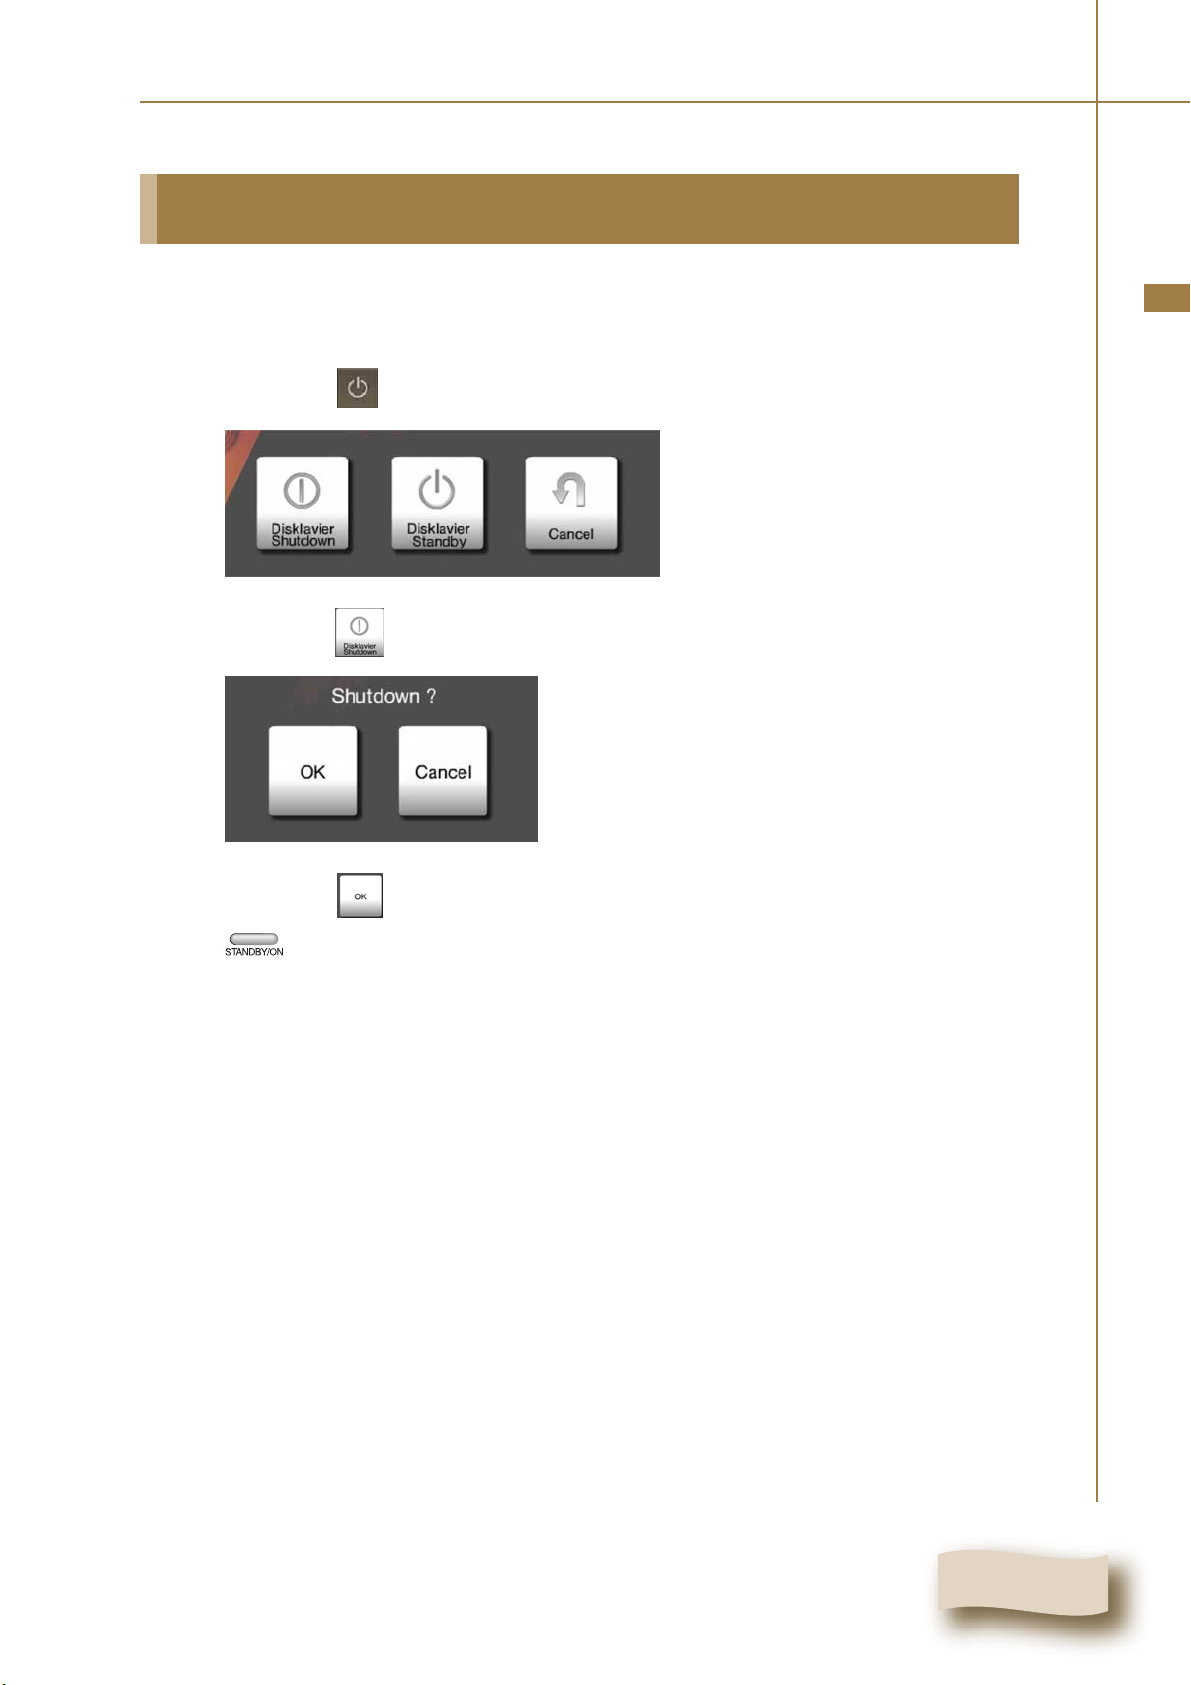
Shutting Down the Disklavier
Before disconnecting the power cable from the AC wall outlet, be sure to shut down the
Disklavier by following the procedure below.
Tap on at the top of the Function bar.
1
Tap on .
English
2
3
Tap on to shut down the Disklavier.
on the media center goes out.
Continue to next page . . .
13
Chapter 2: Basic Operations
Press (power button) to shut down the Tablet
4
Controller.
Power Management
Power Button Pressed
Enter Low Power Mode
Shutdown System
Dismiss
[Power Management] screen
Tap on to shut down the Tablet Controller.
Shutdown System
Tap to turn off the back light of the touch
screen.
Tap to clear the [Power Management]
screen.
5
When turning the Disklavier back on, be sure to wait for 10 seconds before
doing so.
About the [MAINS] switches
The [MAINS] switches (on both the Power Supply unit and the I/O Center) only need to
be switched off when you are not going to use the Disklavier for a long period of time.
It is effectively the same as disconnecting the power cable from the AC wall outlet. For
daily use, you can keep the [MAINS] switches on, and turn the Disklavier on and off by
following the procedure “Turning the Disklavier Off (Standby Mode)” ( pg. 12).
14
Chapter 3
Basic Playback
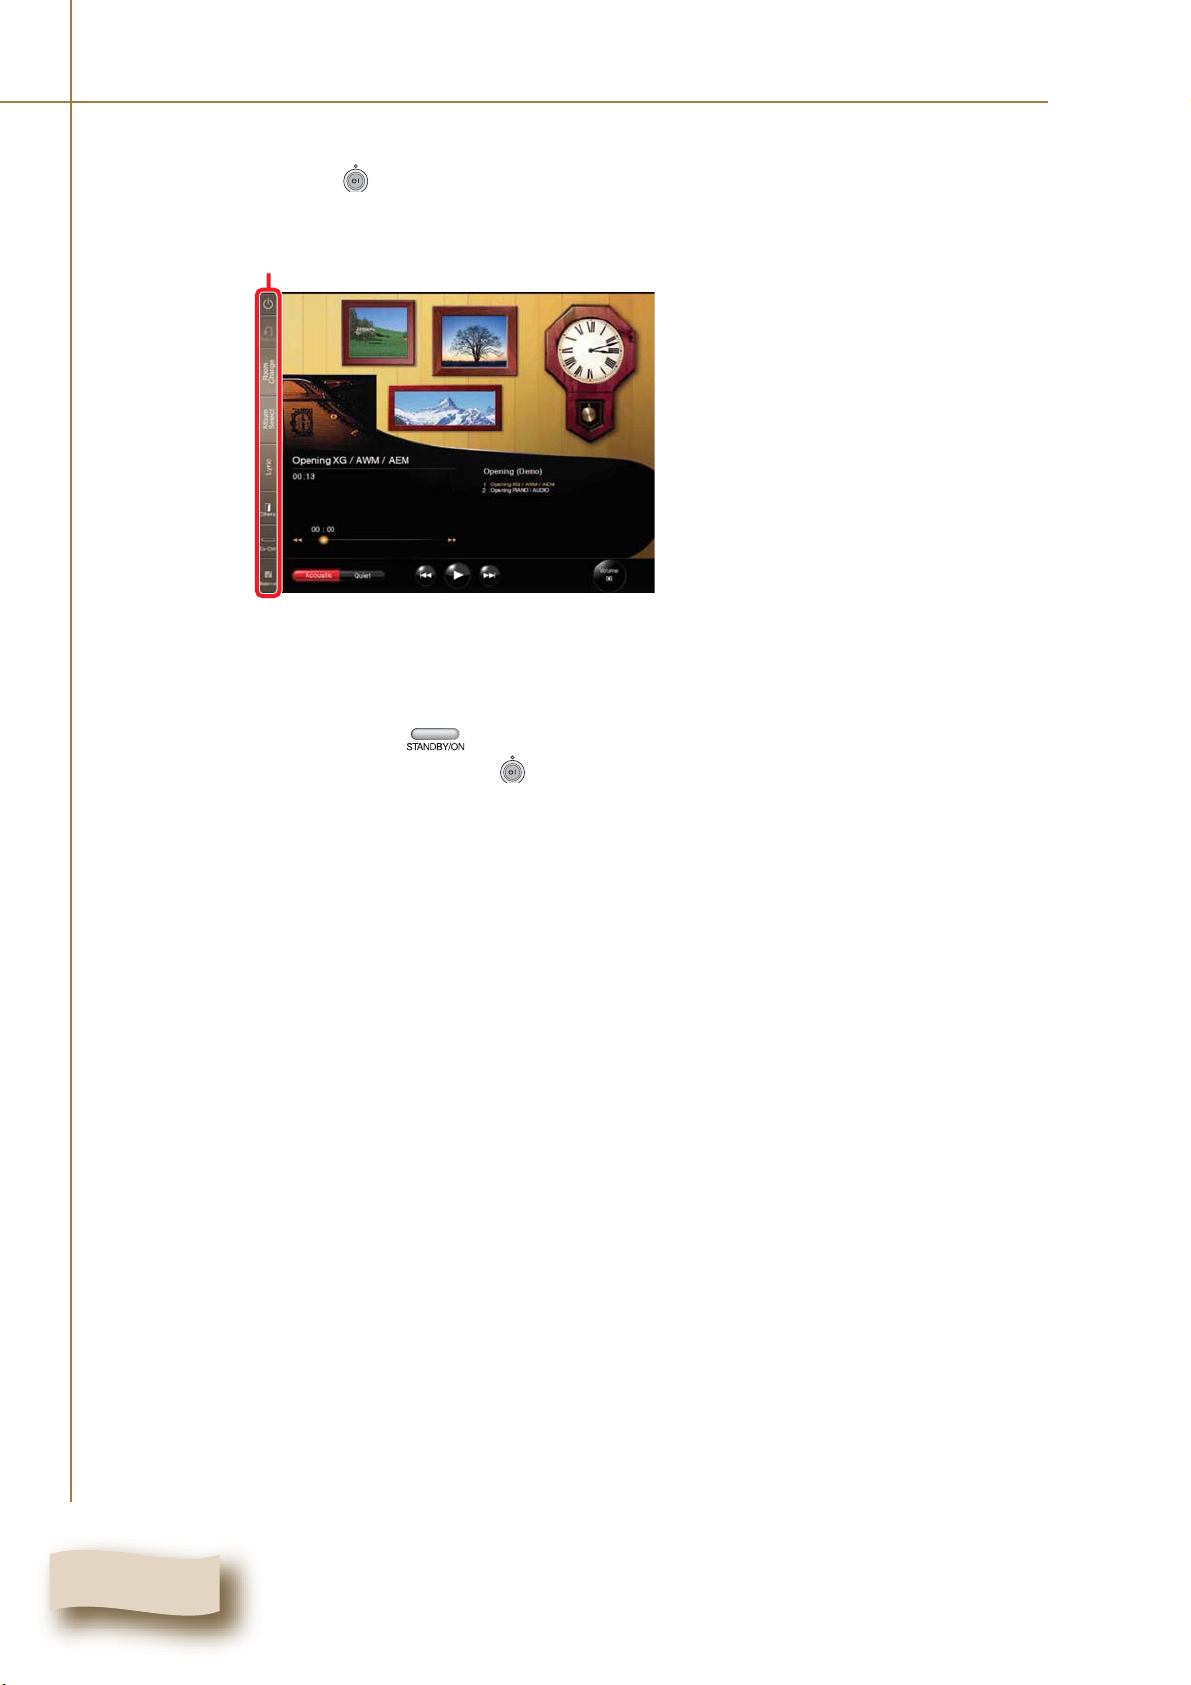
Playing Back the Sample Songs in the Song Library
Turn the Disklavier on. ( pg. 9 “Turning the
1
2
Disklavier On”).
Function bar
Play screen
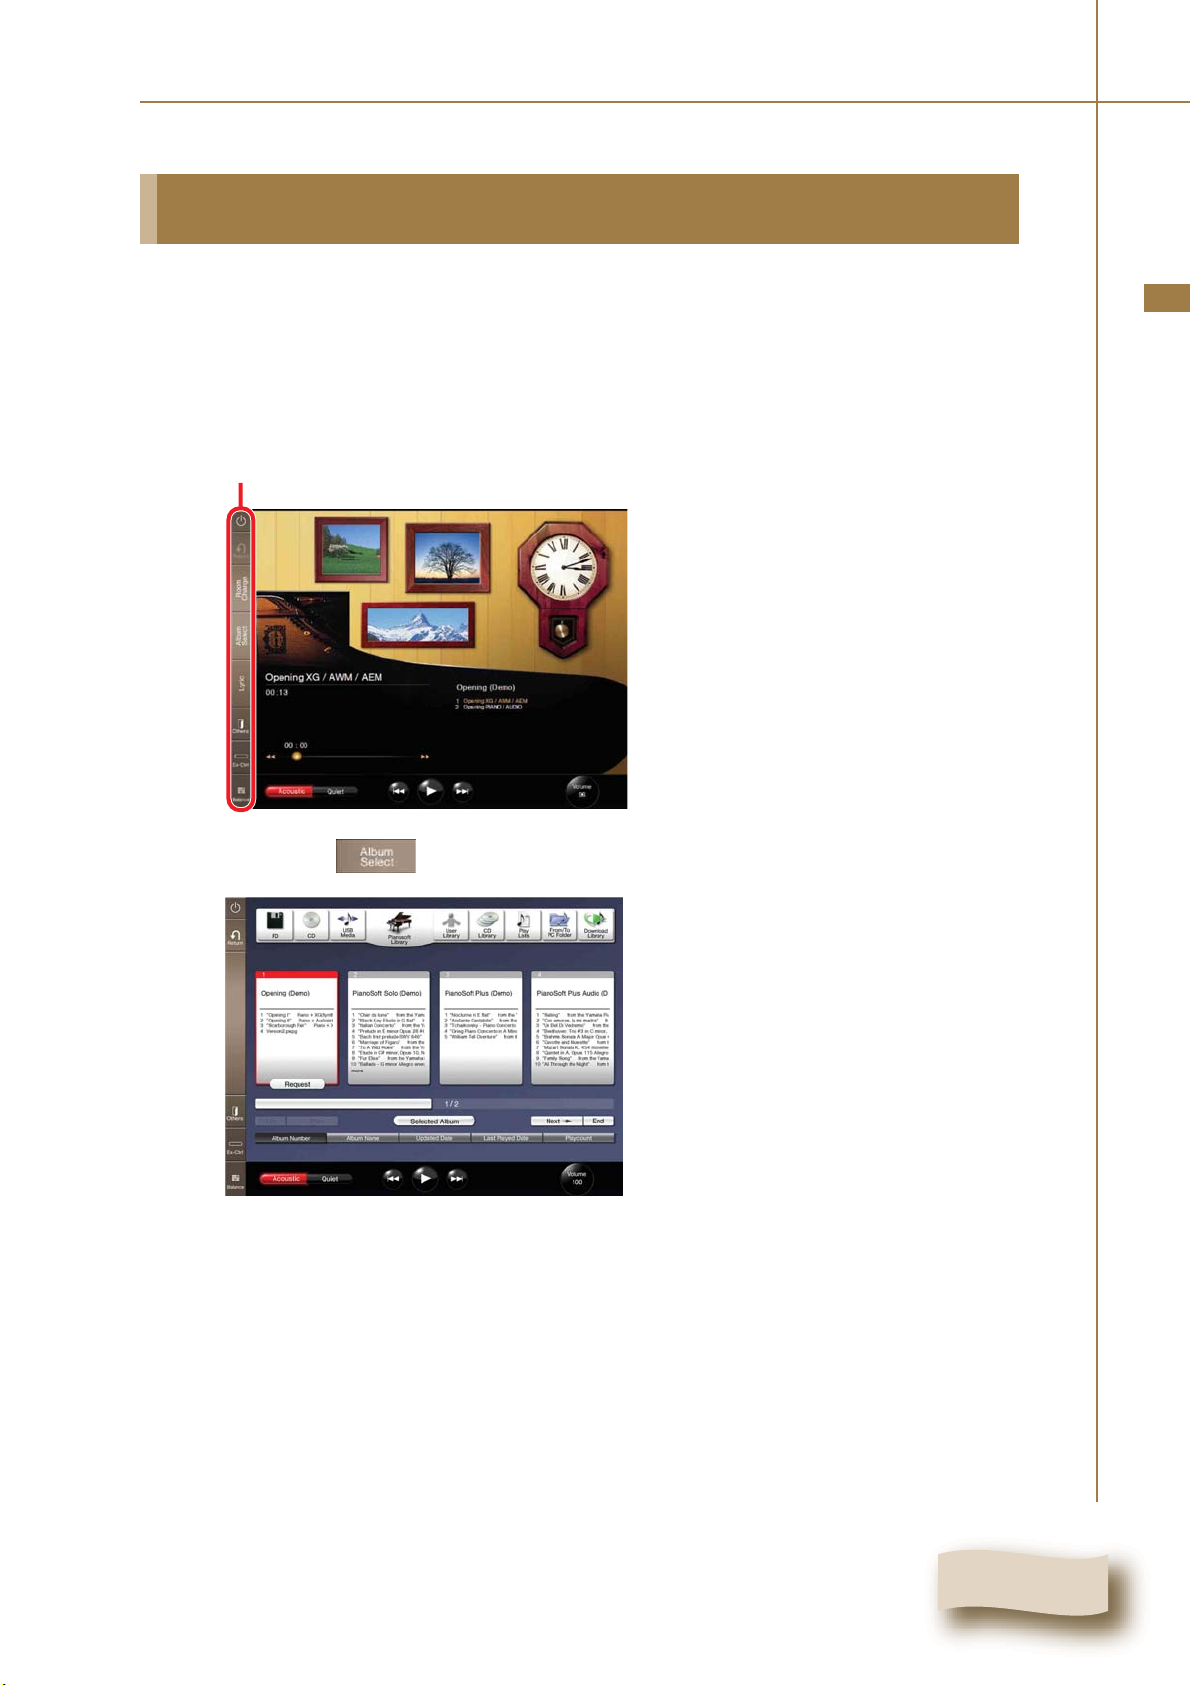
Tap on on the Function bar in the Play screen.
Continue to next page . . .
15
Chapter 3: Basic Playback
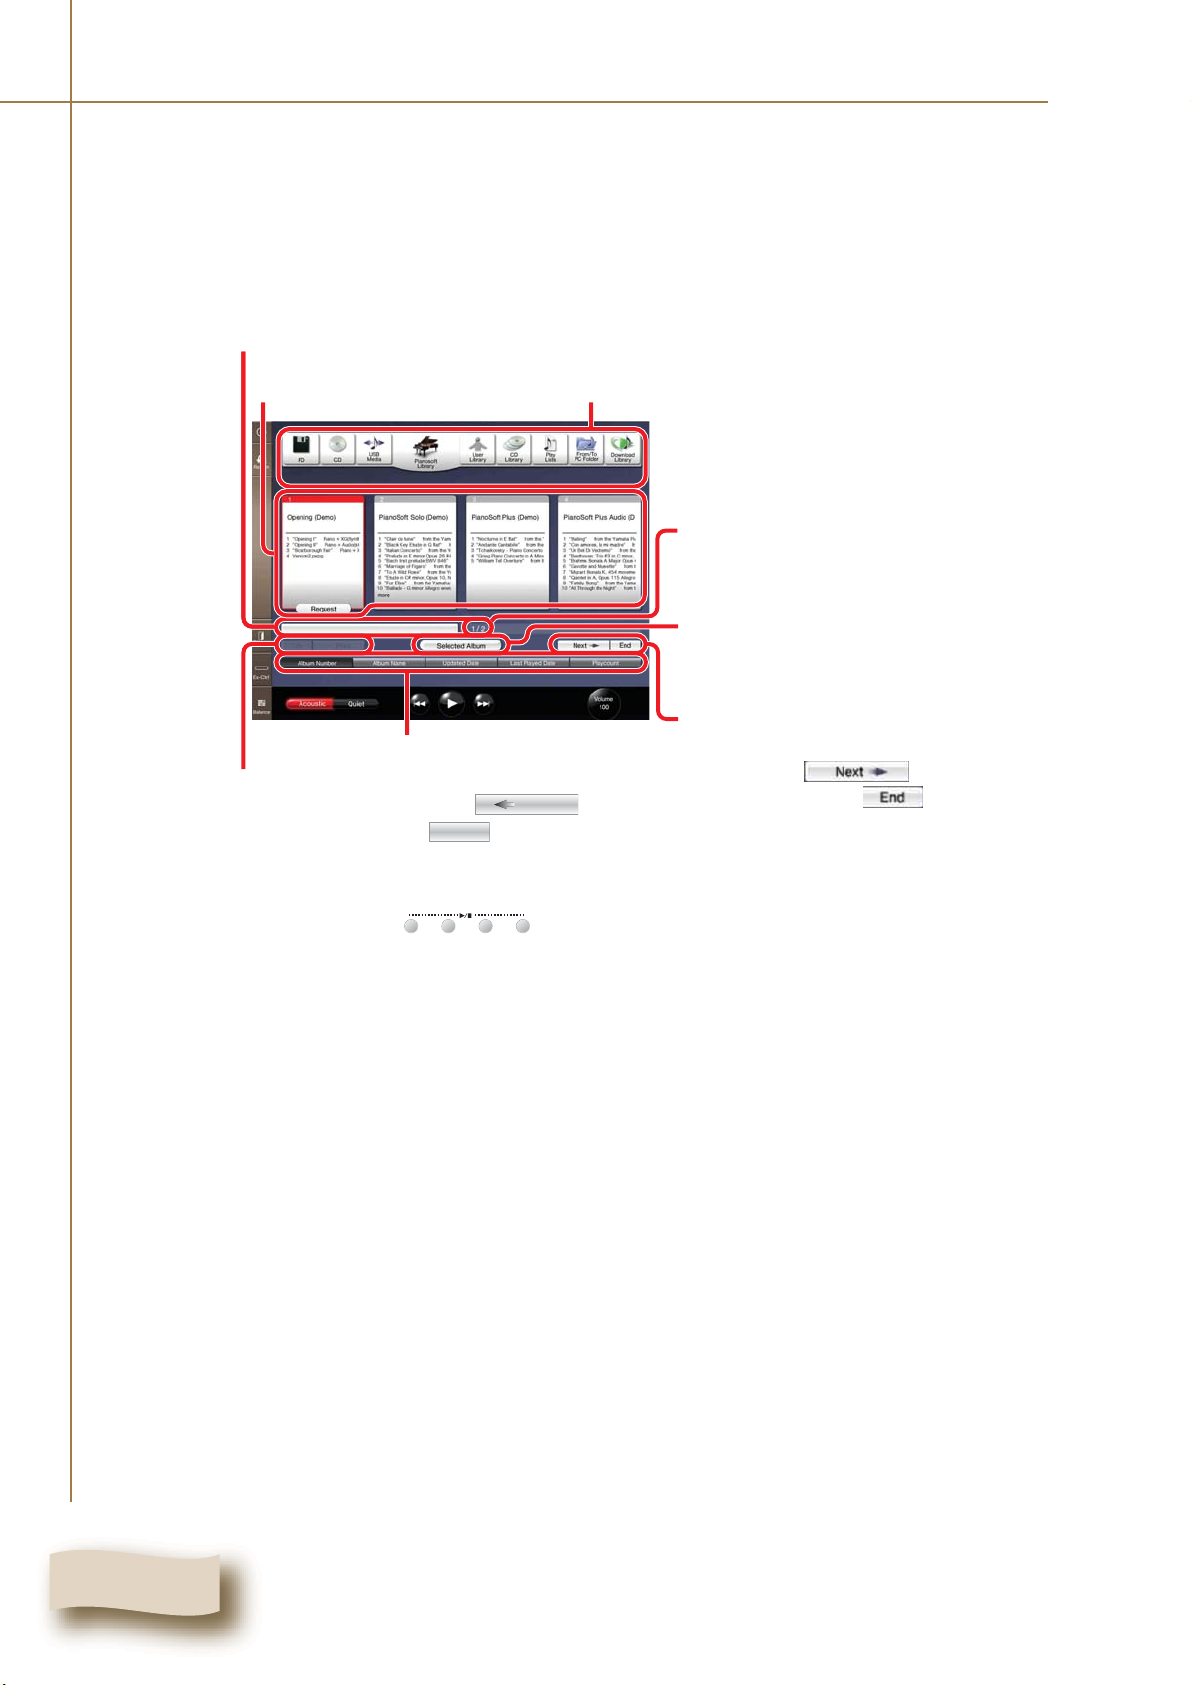
Tap on .
3
Appears when there are more albums not shown in
the screen. In such a case, move the slide bar to
show the hidden albums.
Appears when there are more albums not shown in
the screen. In such a case, tap on to show
the previous album. Tap on to show the first
album.
Sort buttons
Top
Prev
Albums contained in the [Pianosoft
Library]
Current page/Total page
Tap to show the page containing the
selected album.
Appears when there are more albums
not shown in the screen. In such a
case, tap on to show the
next album. Tap on to show the
last album.
4
Tap on the desired album.
The frame of the selected album will be displayed in red.
To select songs other than the first one in the album, tap on the desired
album again, and then tap on the desired song. ( pg. 22)
16
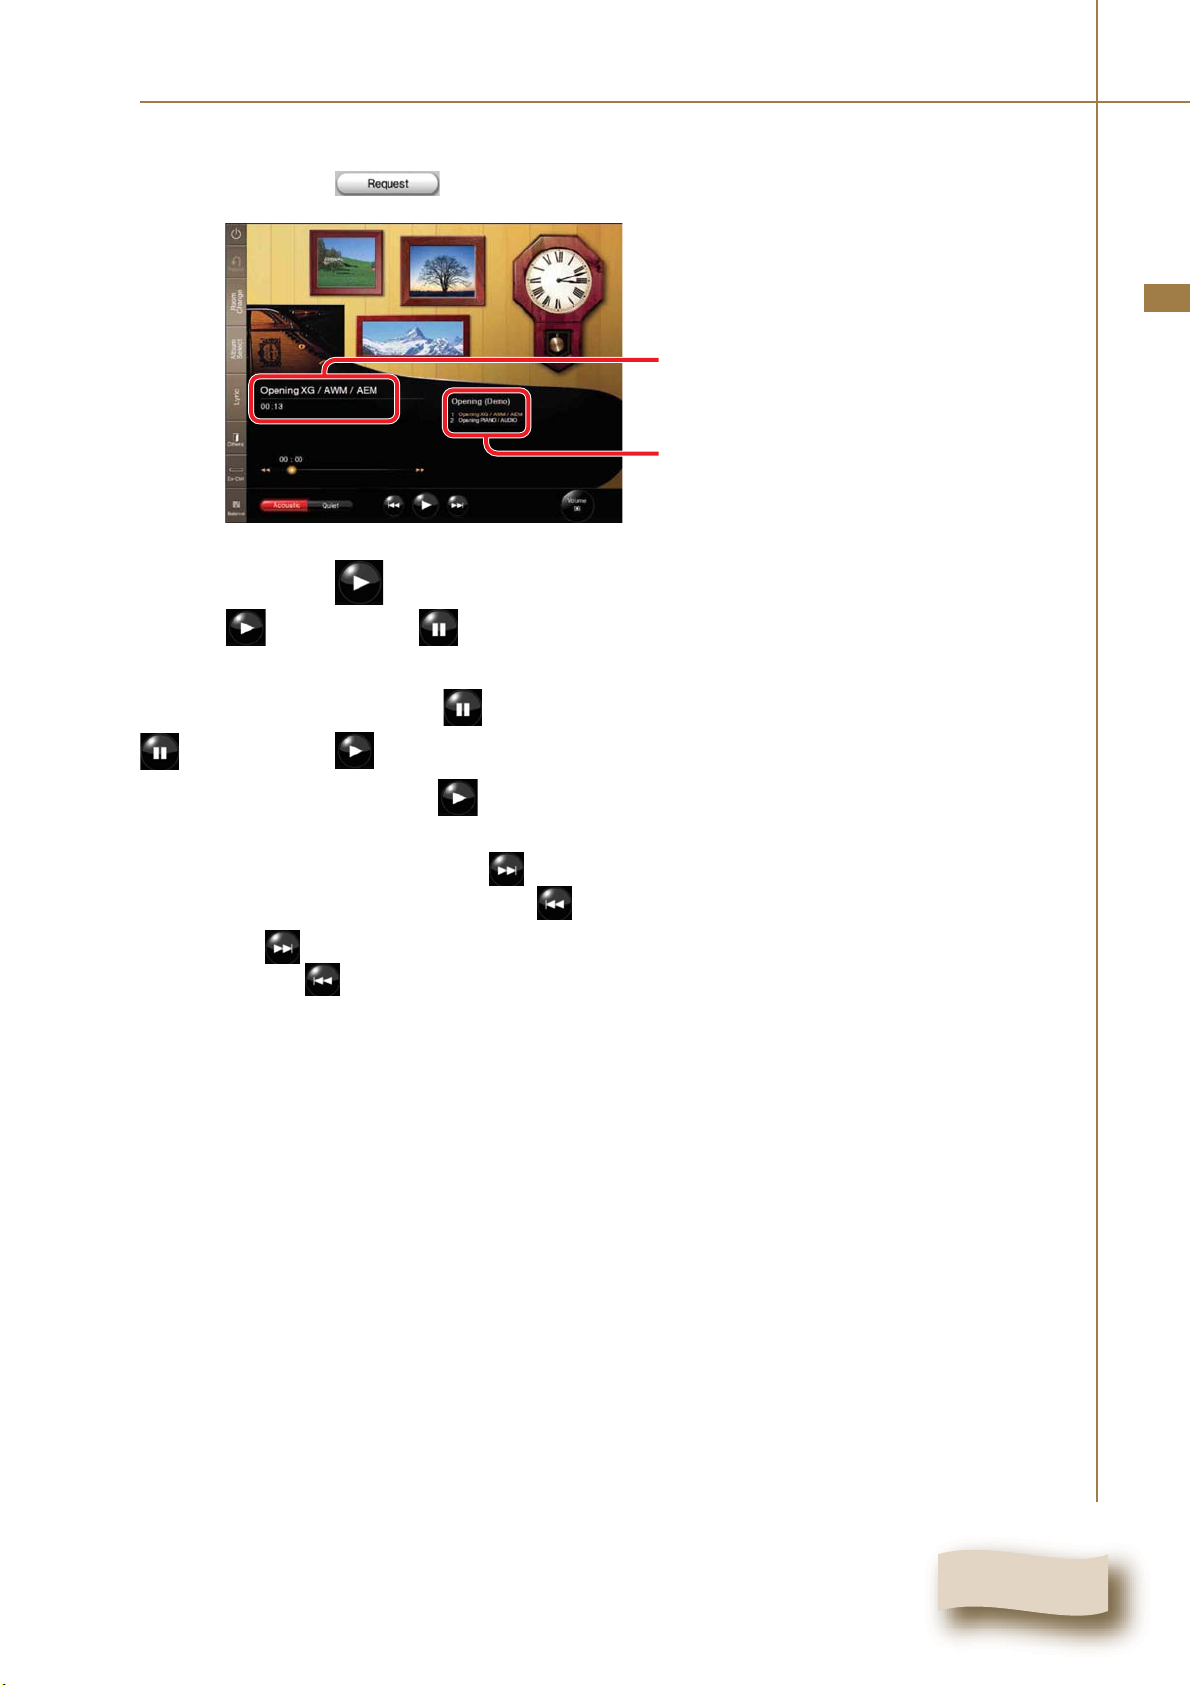
5
Chapter 3: Basic Playback
Tap on .
English
Selected song and elapsed playing
time
Selected album and songs in the
selected album
Tap on to start playback.
6
To pause playback, tap on .
will change to .
To continue playback, tap on .
To select the next song, tap on .
To select the previous song, tap on .
Tip: When is pressed while the last song of the album is played back, nothing
happens. When is pressed while the first song of the album is played back, nothing
happens.
will change to .
17
Chapter 3: Basic Playback
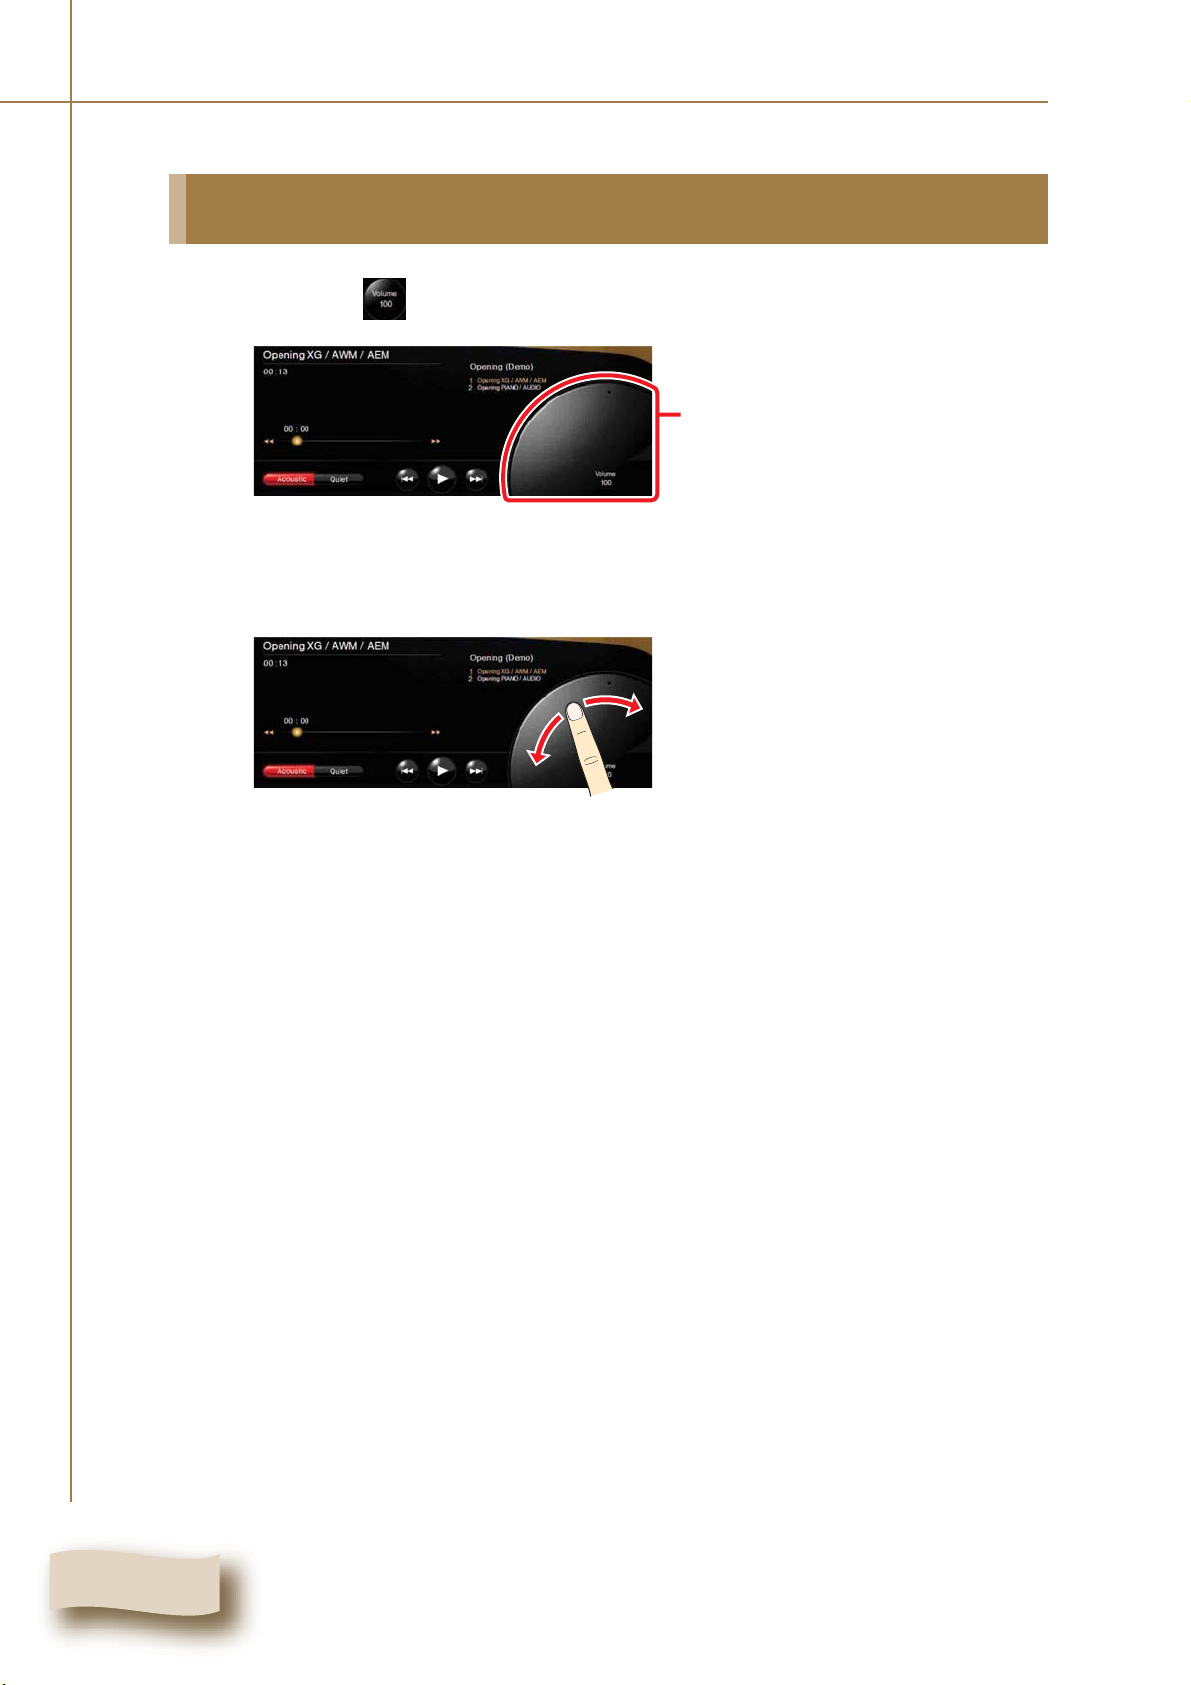
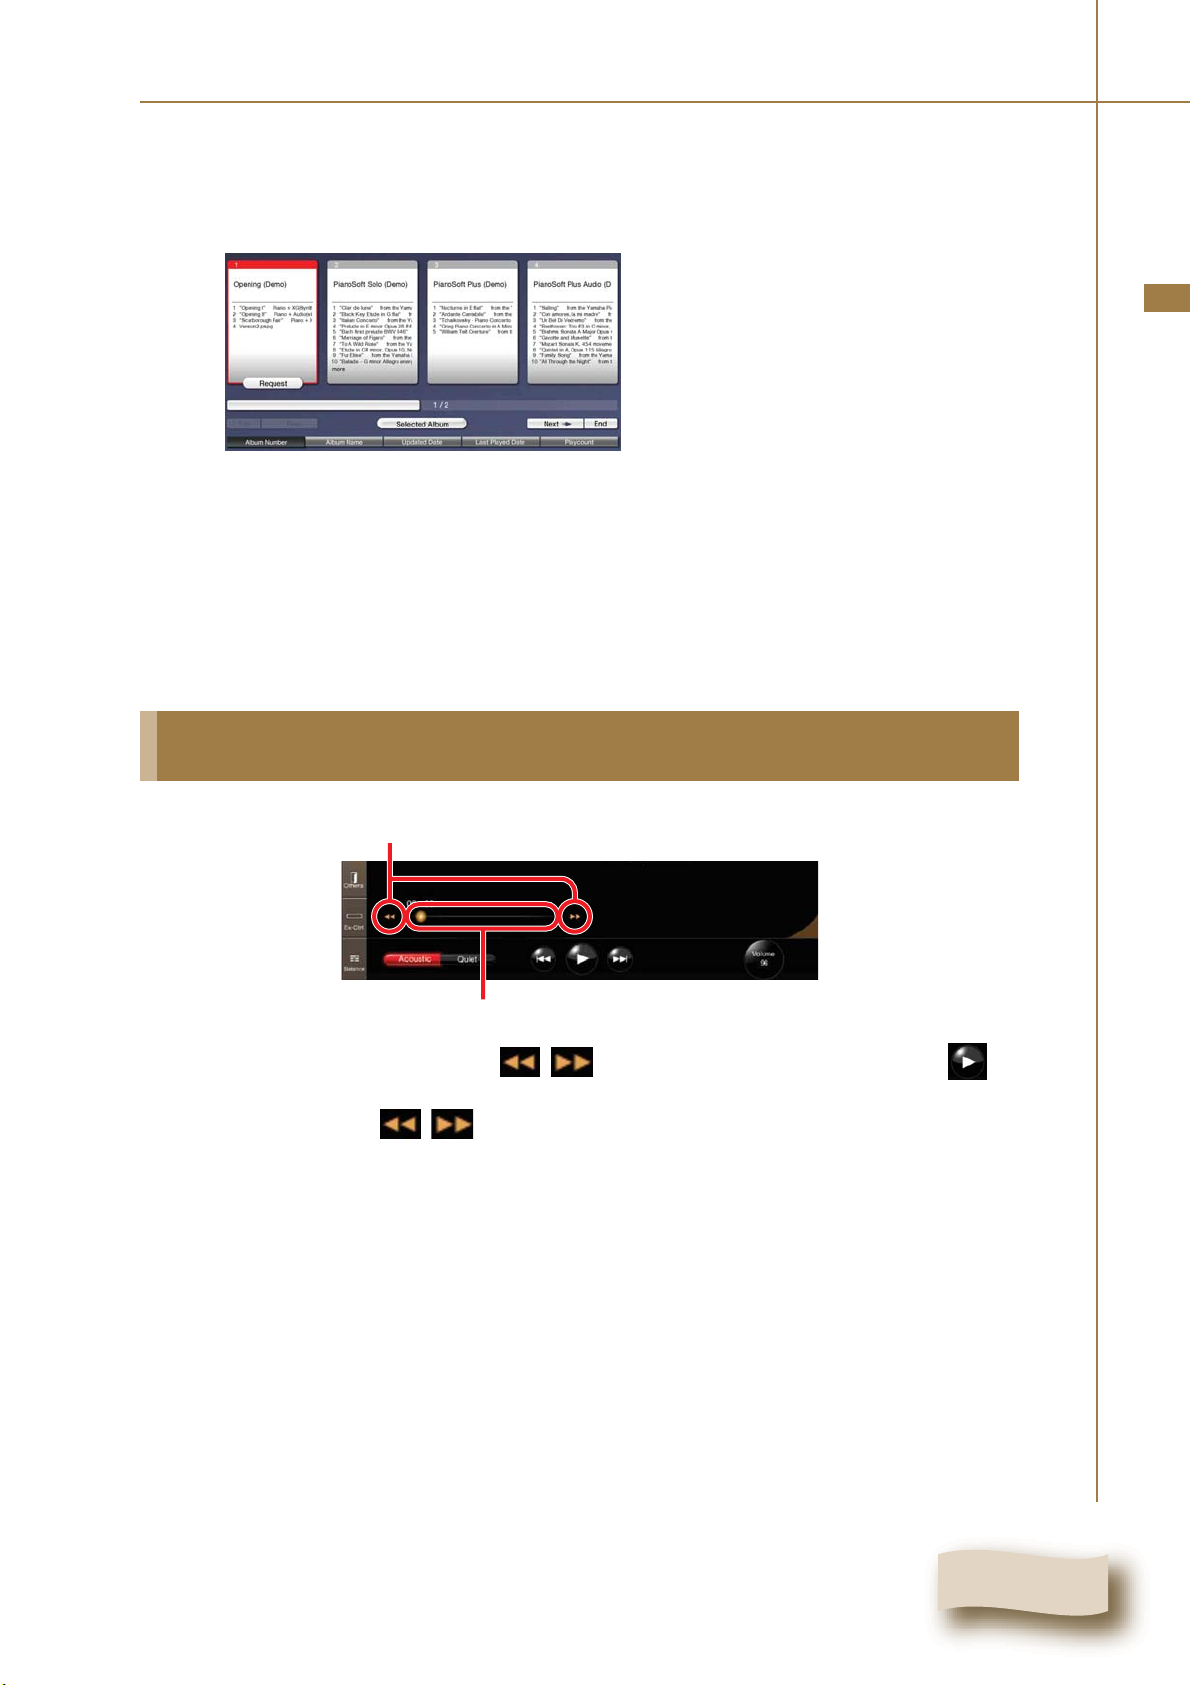
Adjusting the Overall Volume
Tap on on the right bottom of a screen.
1
Drag the volume knob to adjust the volume.
Volume knob
2
The volume knob will disappear if you don’t touch it for about 3 seconds.
18
Selecting a Song
Chapter 3: Basic Playback
1
When you play back a song on a floppy disk, a CD, or
a USB medium, load the relevant medium into their
respective drives or port on the Media Center. ( pg.
2, 20 in “Advanced Operating Manual”)
Function bar
Tap on on the Function bar.
English
2
Continue to next page . . .
19
Chapter 3: Basic Playback
A
Tap on the desired source*.
3
ppears when there are more albums not shown in the screen. In such a case,
move the slide bar to show the hidden albums.
Appears when there are more albums not shown in
the screen. In such a case, tap on to show
the previous album. Tap on to show the first
album.
* In this manual, we call each removable medium (floppy disk, CD, and USB flash memory,
etc.) and the internal song library as a “source”.
Selectable albums
Sort buttons
Top
Selectable sources
Prev
Current page/Total page
Tap to show the page containing the
selected album.
Appears when there are more albums
not shown in the screen. In such a
case, tap on to show the
next album. Tap on to show the
last album.
Tip: Pressing on the Media Center also select the source, and
then starts playback.
User PianoSoft CD FD
Tip: You can change the order of album on the screen by tapping on sort
buttons.
Album Number
Album Name
Updated Date
Last Played Date
Playcount
20
Tap on the desired album.
Chapter 3: Basic Playback
4
The frame of the selected album will be displayed red.
To select songs other than the first one, tap on the desired album again,
and then tap on the desired song. ( pg. 22)
To play the selected album from its first song, see step 5 – 6 on “Playing
Back the Sample Songs in the Song Library”. ( pg. 17)
Searching Forward and Backward in a Song
English
Forward/Backward button
Playback status bar
During playback or pausing, tap on / to locate the desired point. Tap on to
start playback.
During pausing, tap on / , and then tap on the same button again to pause at
the desired point.
Tip: Tapping on the desired point on the playback status bar starts playback from that
point.
21
 Loading...