

Page 1

Page 2

English
Page 3
3
4
9
15
18
19
21
22
23
24
25
26
27
28
32
33
36
39
40
41
44
47
49
52
53
54
55
60
62
63
64
65
Table of Contents
Chapter 1
Items Supplied with the Disklavier...............................
Names of Parts and Their Functions ............................
Chapter 2
Operating the Tablet Controller.................................. 8
Turning the Disklavier On ..........................................
Chapter 3
Playing Back the Sample Songs in the Song Library ....
Adjusting the Overall Volume ..................................
Selecting a Song....................................................
Searching Forward and Backward in a Song ............
Selecting Directly the Different Song
from the Current Album........................................
Repeating Song Playback........................................
Chapter 4
Getting Started
Basic Operations
Basic Playback
Basic Piano Playing
3
Preparing the Tablet Controller ...................................
8
Turning the Disklavier Off (Standby Mode)................ 12
Shutting Down the Disklavier ...................................
13
15
Changing the Playback Tempo................................
Playing Back Songs in a Different Key
(Transposition) ...................................................
Playing Back Only the Desired Piano Part .................
Playing Back Songs with the Lyrics on the Screen.......
Changing the Background of the Lyric Screen ...........
Adjusting the Volume of the Microphone’s Input
and the Depth of it’s Reverbration.........................
30
32
6
Playing the Acoustic Piano (Acoustic Mode)............... 32
Playing the Digital Piano (Quiet Mode) .....................
Using Headphones (Headphone Mode) ....................
Chapter 5
Basic Operation on the File Manager .......................
Creating an Album in the Library .............................
Renaming an Album, Song, or Play List .....................
Creating a New Play List.........................................
Adding the Desired Song to Play List ........................ 43
Chapter 6
Key Prompt Display during SmartKey
Display during Recording ........................................ 52
Display during Playback of DisklavierRadio ............... 53
Display during Using the IDC Service........................
Changing the Design of the Room (Background) ........
Chapter 7
Creating a Song Library
Other Features
TM
Playback .......
Function of the Configuration Bar
Adjusting the Volume Balance among the Keyboard
Playing, Ensemble Sound, Software Playback, and
Microphone’s Input............................................. 34
36
Copying Albums, Songs or the Entire Contents
in a Source........................................................
Deleting Albums, Songs and Play Lists ......................
Rearranging the Order of Albums, Songs
and Play Lists .....................................................
Erasing the Data in a Floppy Disk ............................
51
52
Changing the Picture in the Frame ...........................
Slide Show ........................................................... 57
Adding Images to the Picture Collection for the Frames
in a Room (Background)...................................... 58
Refreshing Contents in [From/To PC Folder] .............. 59
60
Pairing the Tablet Controller and the Disklavier ..........
Restarting the Interface Screen .................................
Adjusting the Volume of the Tablet Controller.............
Chapter 8
Troubleshooting
2
Adjusting the Brightness of the Touch Screen .............
Setting the Time Zone.............................................
Other Buttons ........................................................
67
66
Page 4

3
Chapter 1
Getting Started
Items Supplied with the Disklavier
In addition to the items listed in “Items Supplied with the Disklavier” in “Advanced
Operating Manual”, the items below are supplied with your Disklavier as well.
• Tablet Controller (1)
• Rechargeable batteries for Tablet Controller (1)
•Cradle for Tablet Controller (1)
• AC adaptor for Tablet Controller (1)
• AC power cord for Tablet Controller (1)
• Tablet Controller Operation manual (this book) (1)
Page 5
Chapter 1: Getting Started
Names of Parts and Their Functions
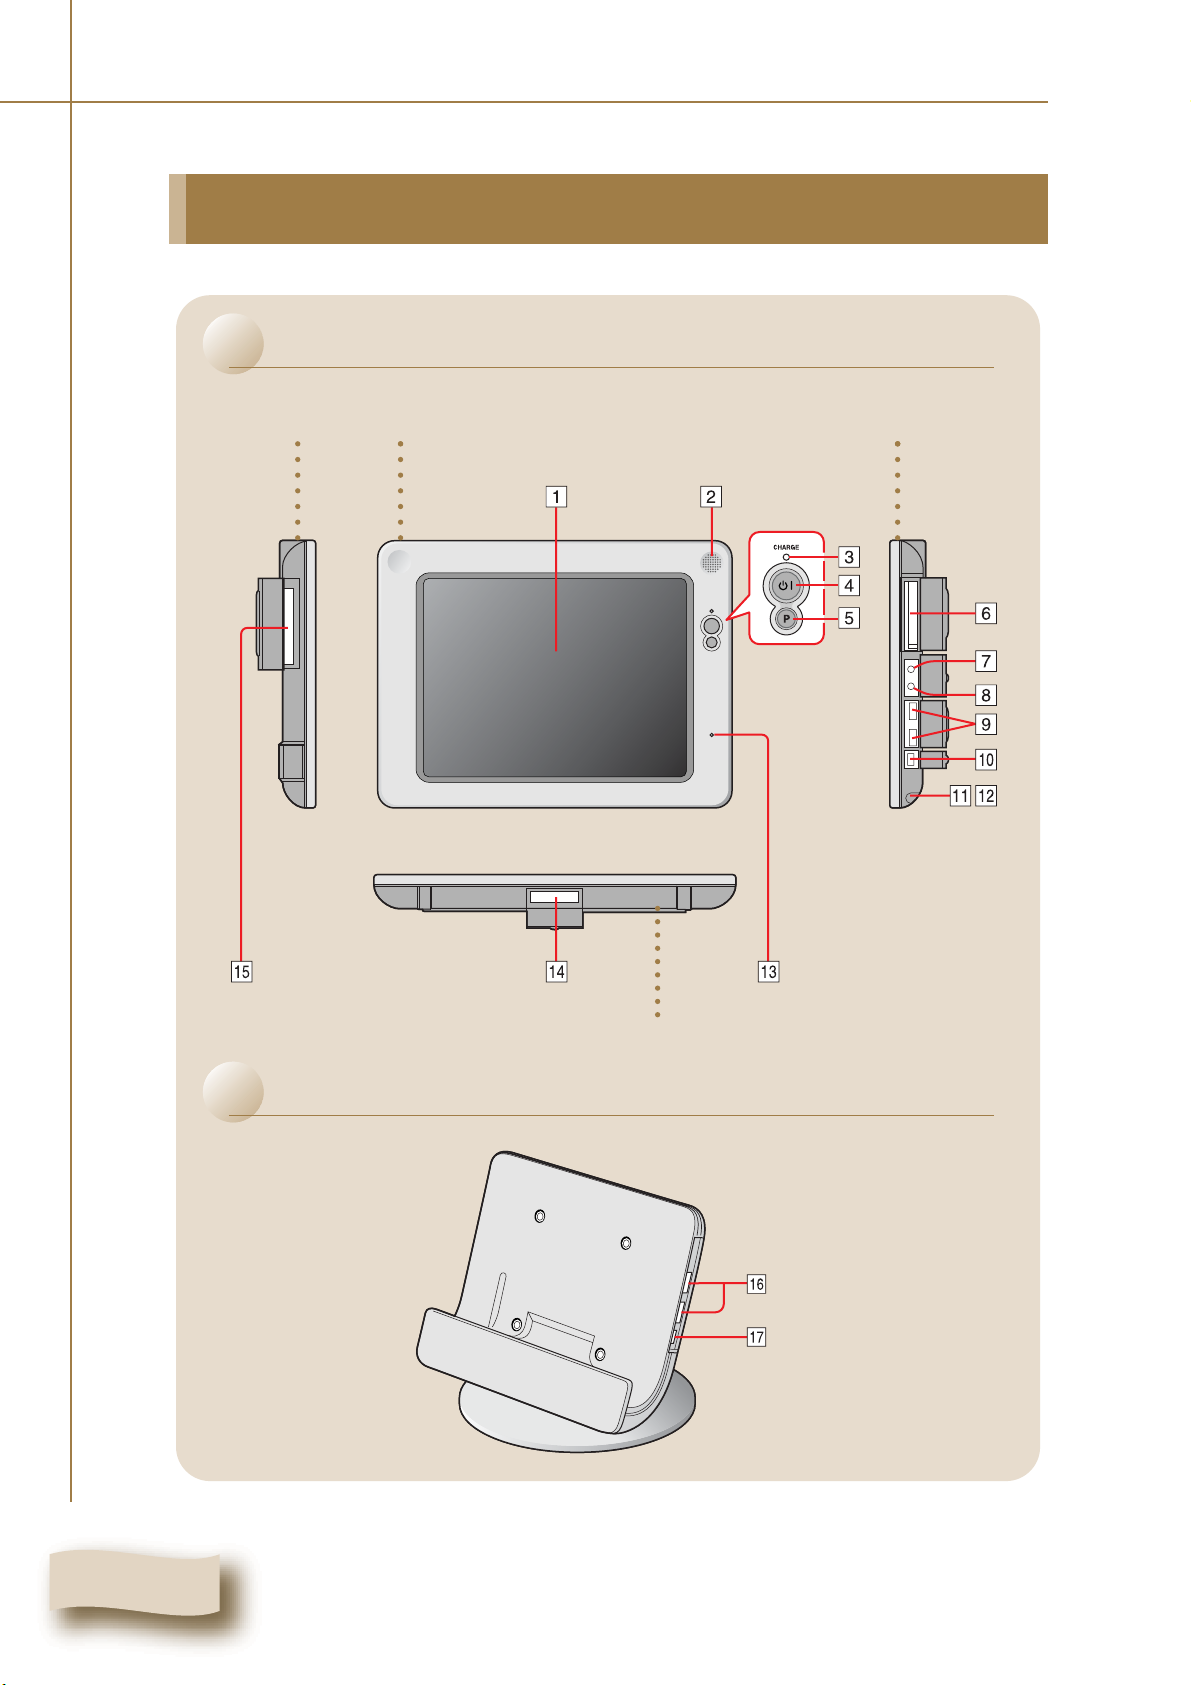
Tablet Controller
Left side Right sideFront
Cradle
Bottom side
4
Page 6

Tablet Controller
Chapter 1: Getting Started
Touch screen
Speaker
CHARGE lamp
(power button)/
Power lamp
P button
CF card slot
Headphone jack
Microphone jack
pg. 8 “Tapping with your fingers or the stylus pen”
Outputs the sound of the Tablet Controller itself.
Lights up orange when the Tablet Controller is being
charged. Lights up green when the Tablet Controler is
fully charged. Blinks red when the battery is almost
empty.
Turns on the Tablet Controller. When this button is
pressed while the Tablet Controller is on, the Power
Management screen appears to shut down the system. /
Lights up when the Tablet Controller is on.
Shows the configuration bar. When this button is pressed
while the configuration bar appears, the configuration
bar is cleared.
For future use.
For future use.
For future use.
English
USB port
AC adaptor jack
Stylus pen
Pen holder
Microphone
Cradle interface
PC card slot
Cradle
USB port
AC adaptor jack
For future use.
Accepts the AC adaptor when the Tablet Controller is
used without a cradle.
For operating the touch screen.
Holds the stylus pen.
For future use.
Accepts the terminal on the cradle.
For future use.
Same as 9.
Accepts the AC adaptor.
5
Page 7

Chapter 1: Getting Started
Preparing the Tablet Controller
Set up the cradle.
1
2
Put the rechargeable battery into the Tablet Controller.
Battery lock
Rechargeable
battery
Tip: Before removing the battery, move
the battery lock to the direction of an
arrow.
Battery lock
6
Page 8

Chapter 1: Getting Started
Open the cover of the cradle interface, and then set the
3
Tablet Controller on the cradle.
Charging starts and the charge lamp lights in orange.
Charge lamp
Adjusting the angle of the cradle to your preference
Loosen the two screws on the bottom of the base plate, adjust the angle, and then tighten
the screws.
English
Base plate
Bottom
20º
7
Page 9
Chapter 2
Basic Operations
Before operating the Disklavier
Be sure to set up the Disklavier and the Tablet Controller. ( pg. 11 “Setting Up the
Disklavier” in Advanced Operating Manual)
Convention
In the following procedures, the buttons and controls are of the Tablet Controller
unless otherwise noted.
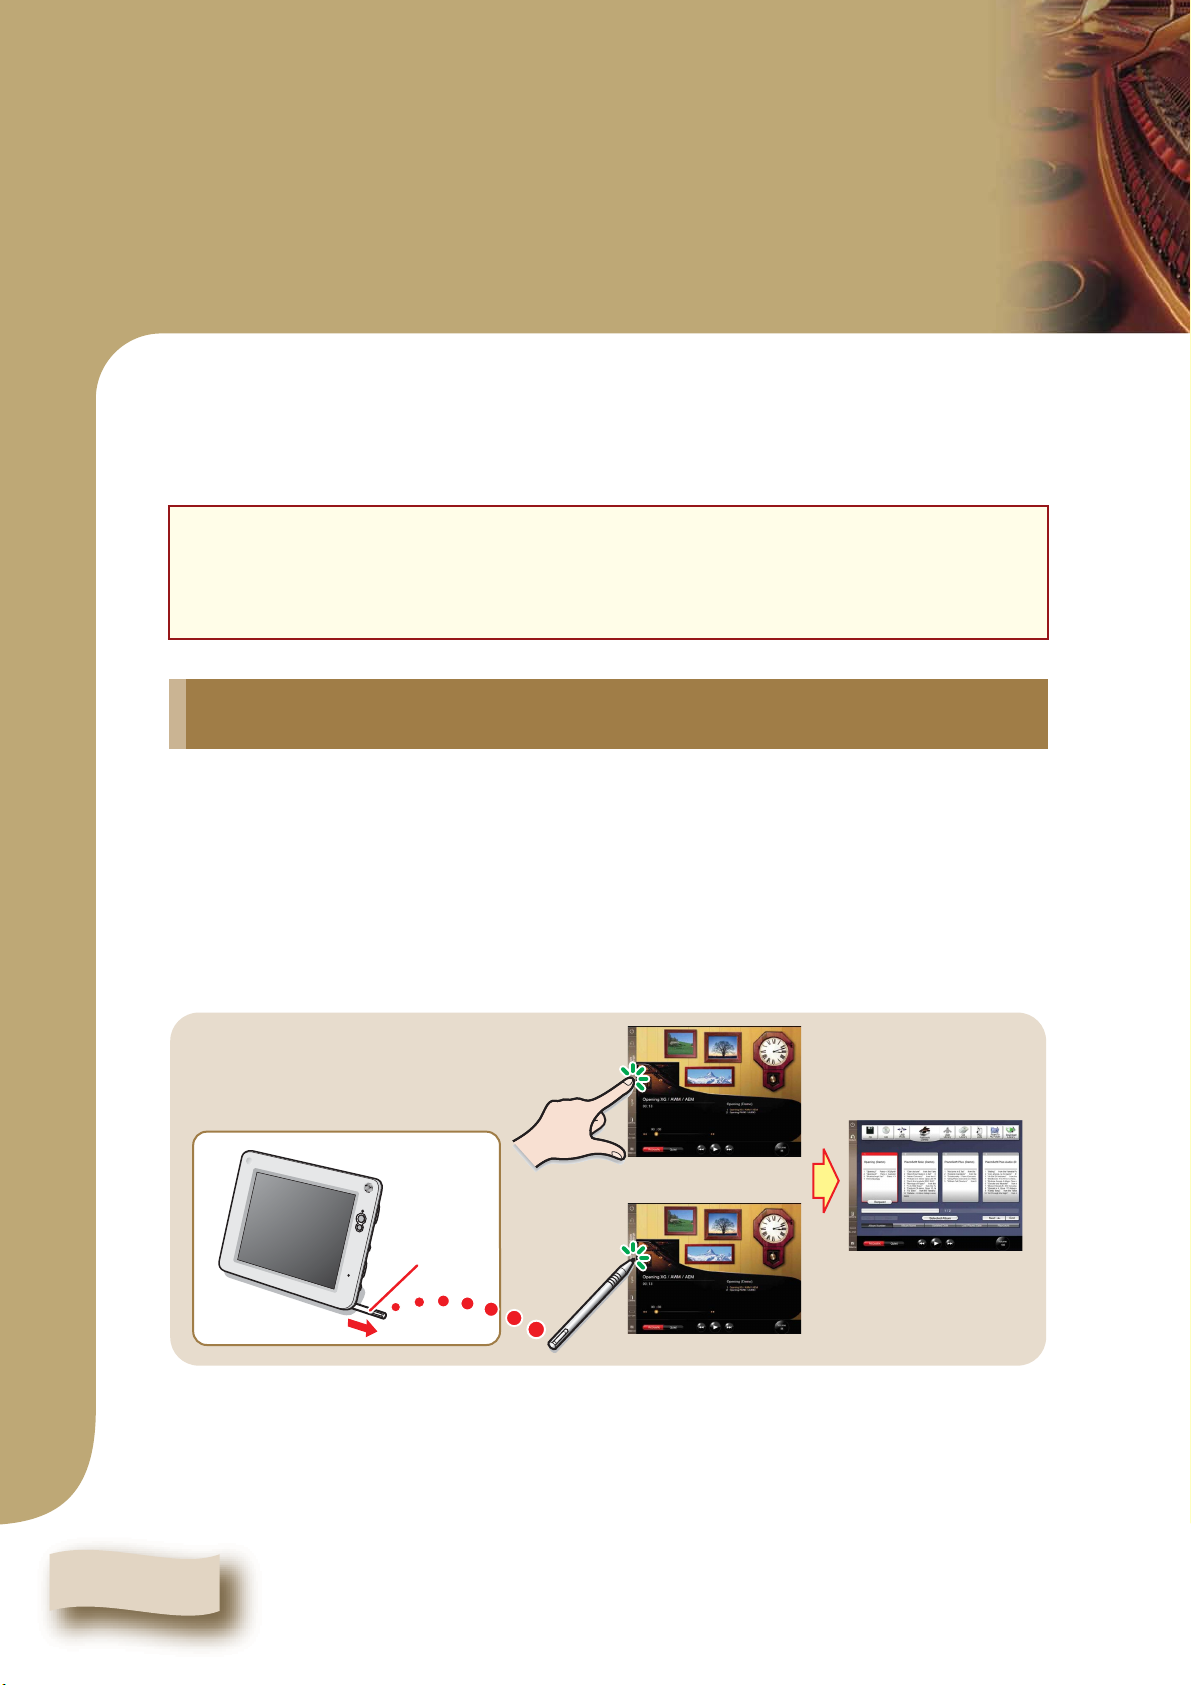
Operating the Tablet Controller
You can operate the Tablet Controller by tapping items on the touch screen with your
fingers. It is, however, recommended to use the supplied stylus pen to tap on a small
point.
Tapping with your fingers or the stylus pen
Touch an item (application icon, button, control, etc.) on the touch screen once to execute
its function.
OR
Stylus pen
8
Page 10
Turning the Disklavier On
Chapter 2: Basic Operations
1
2
3
4
Confirm that the power cable of the Power Supply unit
is connected to an AC wall outlet.
Press the [ON] side of the [POWER] switch on the
Monitor speakers. ( pg. 10 in “Advanced Operating
Manual”)
Note: This step is necessary only for models supplied with the Monitor
speakers.
Press the [ON] side of the [MAINS] switch on the Power
Supply unit. ( pg. 5 in “Advanced Operating
Manual”)
Press the [ON] side of the [MAINS] switch on the I/O
Center. ( pg. 4 in “Advanced Operating Manual”)
on the Media Center starts flashing green.
Wait until on the Media Center stops flashing and dimly lights green, and
then go to step 5.
English
Note: It may take several minutes.
Continue to next page . . .
9
Page 11

Chapter 2: Basic Operations
Press (power button).
5
The Tablet Controller is turned on and the Play screen appears.
Function bar
Play screen
Note: This may take approximately two minutes. When turning the Disklavier
back on after shutting down, be sure to wait 10 seconds before doing so.
Tip: Pressing on the Media Center also turns the Disklavier on. In such
a case, be sure to press (power button) to turn on the Tablet Controller as
well.
Note: After turning on the Tablet Controller for the first time, set up the Time
Zone. For the procedure, pg. 65 “Setting the Time Zone”.
10
Page 12

Chapter 2: Basic Operations
Note: In case the Disklavier and the Tablet Controller cannot connect in wireless, the
following display appears.
If this happens, either the Disklavier is turned off or the Tablet Controller is out of
specified operation range.
Note: It takes several minutes to turn on the Disklavier. So if you turn on the Tablet
Controller and the Disklavier at the same time, the above display may appear for a while.
Once the Disklavier is turned on, the above display will be changed to the standby display
automatically.
English
Standby display
11
Page 13
Chapter 2: Basic Operations
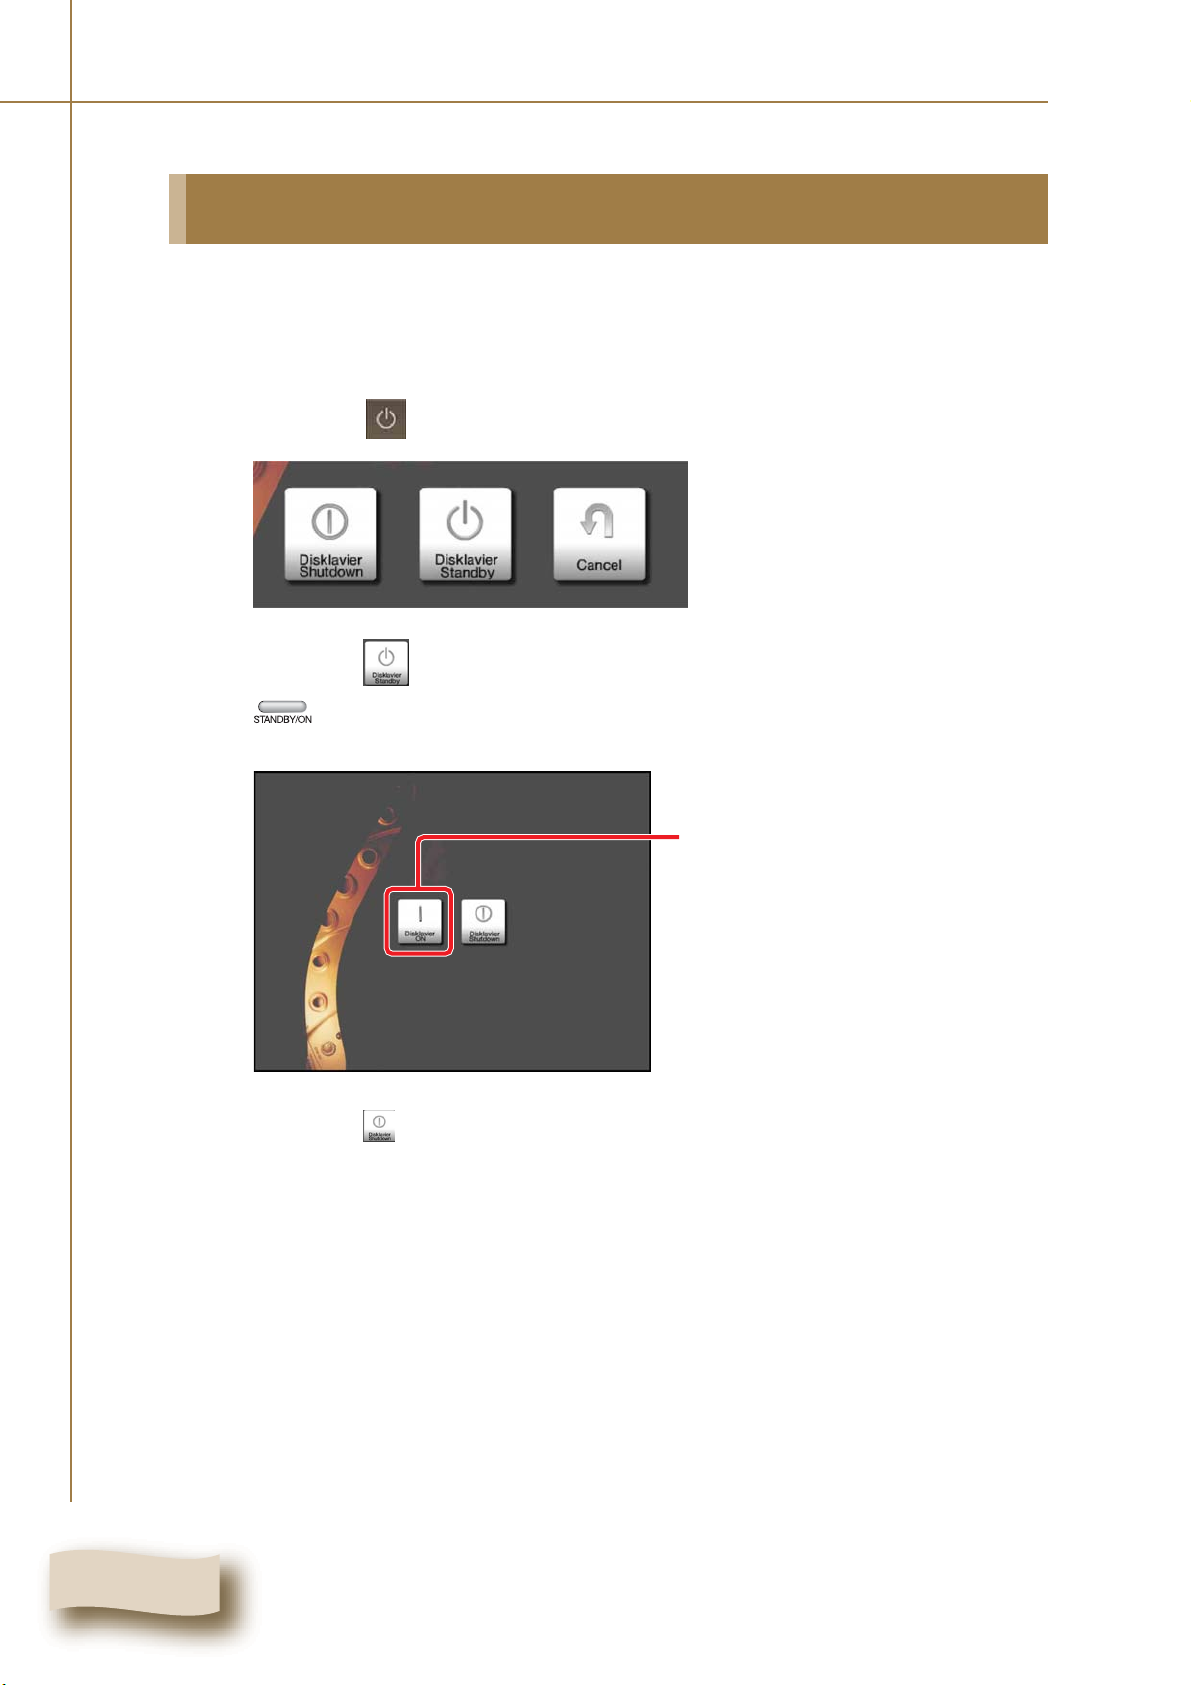
Turning the Disklavier Off (Standby Mode)
After daily use, be sure to turn the Disklavier off by following the procedure below.
In Standby mode, the piano is in effect turned off. However, electrically it is in a state in
which a small quantity of power is being consumed.
Tap on at the top of the Function bar.
1
2
3
Tap on .
on the media center lights dimly green.
The following screen appears.
Tap to restart the Disklavier.
Tap on .
The Disklavier turns off.
12
Page 14

Chapter 2: Basic Operations
Shutting Down the Disklavier
Before disconnecting the power cable from the AC wall outlet, be sure to shut down the
Disklavier by following the procedure below.
Tap on at the top of the Function bar.
1
Tap on .
English
2
3
Tap on to shut down the Disklavier.
on the media center goes out.
Continue to next page . . .
13
Page 15

Chapter 2: Basic Operations
Press (power button) to shut down the Tablet
4
Controller.
Power Management
Power Button Pressed
Enter Low Power Mode
Shutdown System
Dismiss
[Power Management] screen
Tap on to shut down the Tablet Controller.
Shutdown System
Tap to turn off the back light of the touch
screen.
Tap to clear the [Power Management]
screen.
5
When turning the Disklavier back on, be sure to wait for 10 seconds before
doing so.
About the [MAINS] switches
The [MAINS] switches (on both the Power Supply unit and the I/O Center) only need to
be switched off when you are not going to use the Disklavier for a long period of time.
It is effectively the same as disconnecting the power cable from the AC wall outlet. For
daily use, you can keep the [MAINS] switches on, and turn the Disklavier on and off by
following the procedure “Turning the Disklavier Off (Standby Mode)” ( pg. 12).
14
Page 16
Chapter 3
Basic Playback
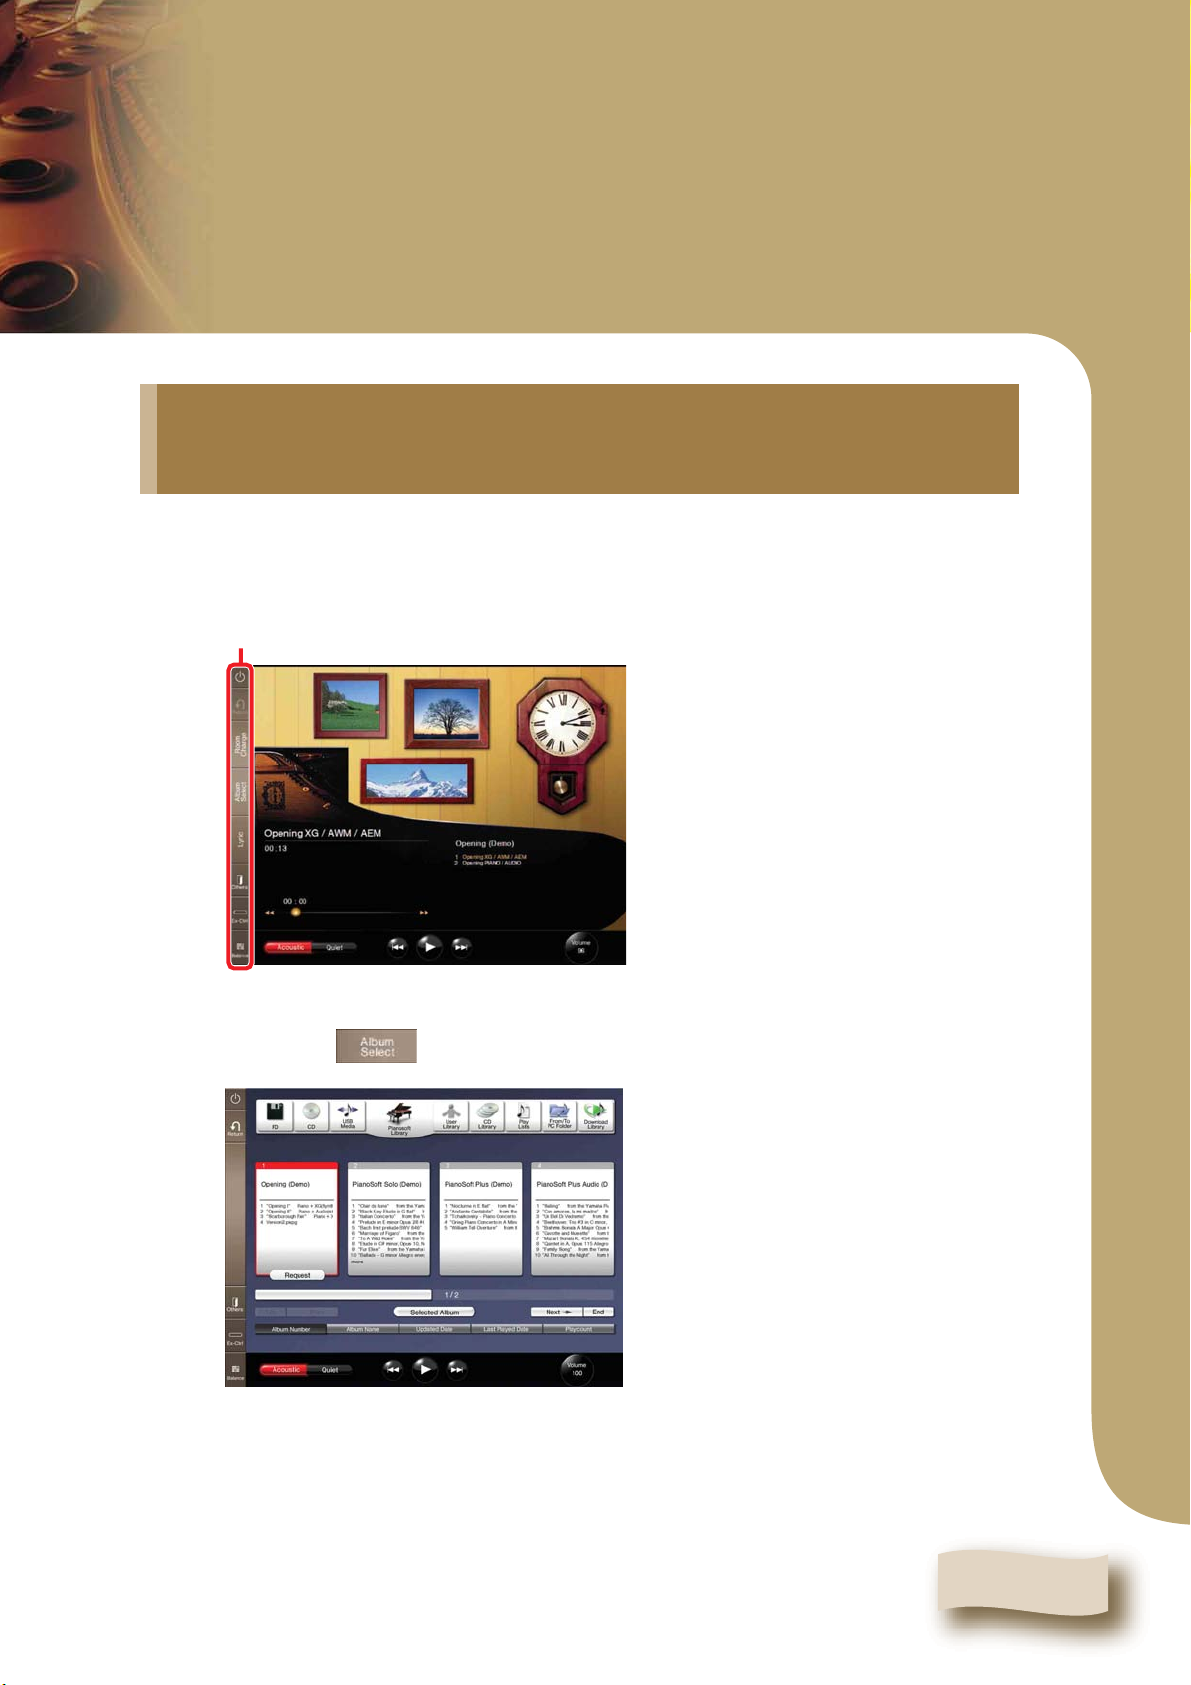
Playing Back the Sample Songs in the Song Library
Turn the Disklavier on. ( pg. 9 “Turning the
1
2
Disklavier On”).
Function bar
Play screen
Tap on on the Function bar in the Play screen.
Continue to next page . . .
15
Page 17

Chapter 3: Basic Playback
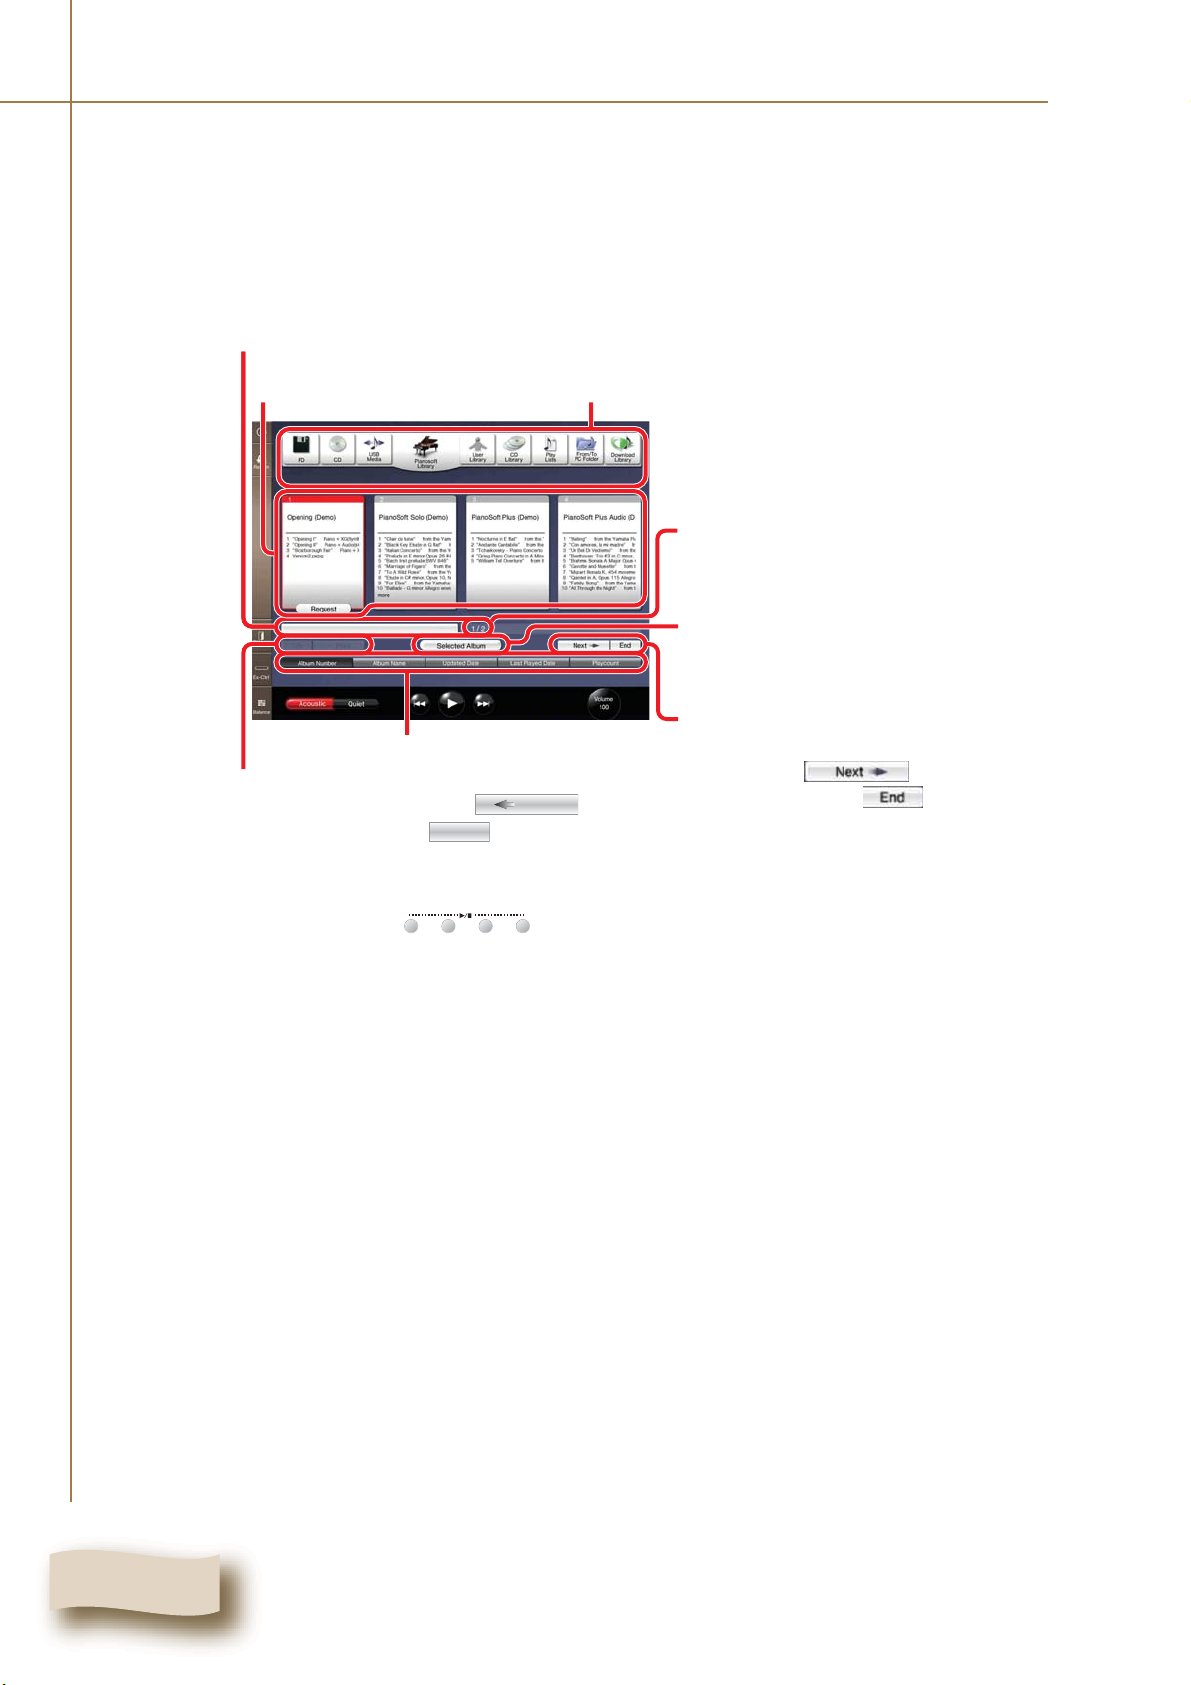
Tap on .
3
Appears when there are more albums not shown in
the screen. In such a case, move the slide bar to
show the hidden albums.
Appears when there are more albums not shown in
the screen. In such a case, tap on to show
the previous album. Tap on to show the first
album.
Sort buttons
Top
Prev
Albums contained in the [Pianosoft
Library]
Current page/Total page
Tap to show the page containing the
selected album.
Appears when there are more albums
not shown in the screen. In such a
case, tap on to show the
next album. Tap on to show the
last album.
4
Tap on the desired album.
The frame of the selected album will be displayed in red.
To select songs other than the first one in the album, tap on the desired
album again, and then tap on the desired song. ( pg. 22)
16
Page 18

5
Chapter 3: Basic Playback
Tap on .
English
Selected song and elapsed playing
time
Selected album and songs in the
selected album
Tap on to start playback.
6
To pause playback, tap on .
will change to .
To continue playback, tap on .
To select the next song, tap on .
To select the previous song, tap on .
Tip: When is pressed while the last song of the album is played back, nothing
happens. When is pressed while the first song of the album is played back, nothing
happens.
will change to .
17
Page 19
Chapter 3: Basic Playback
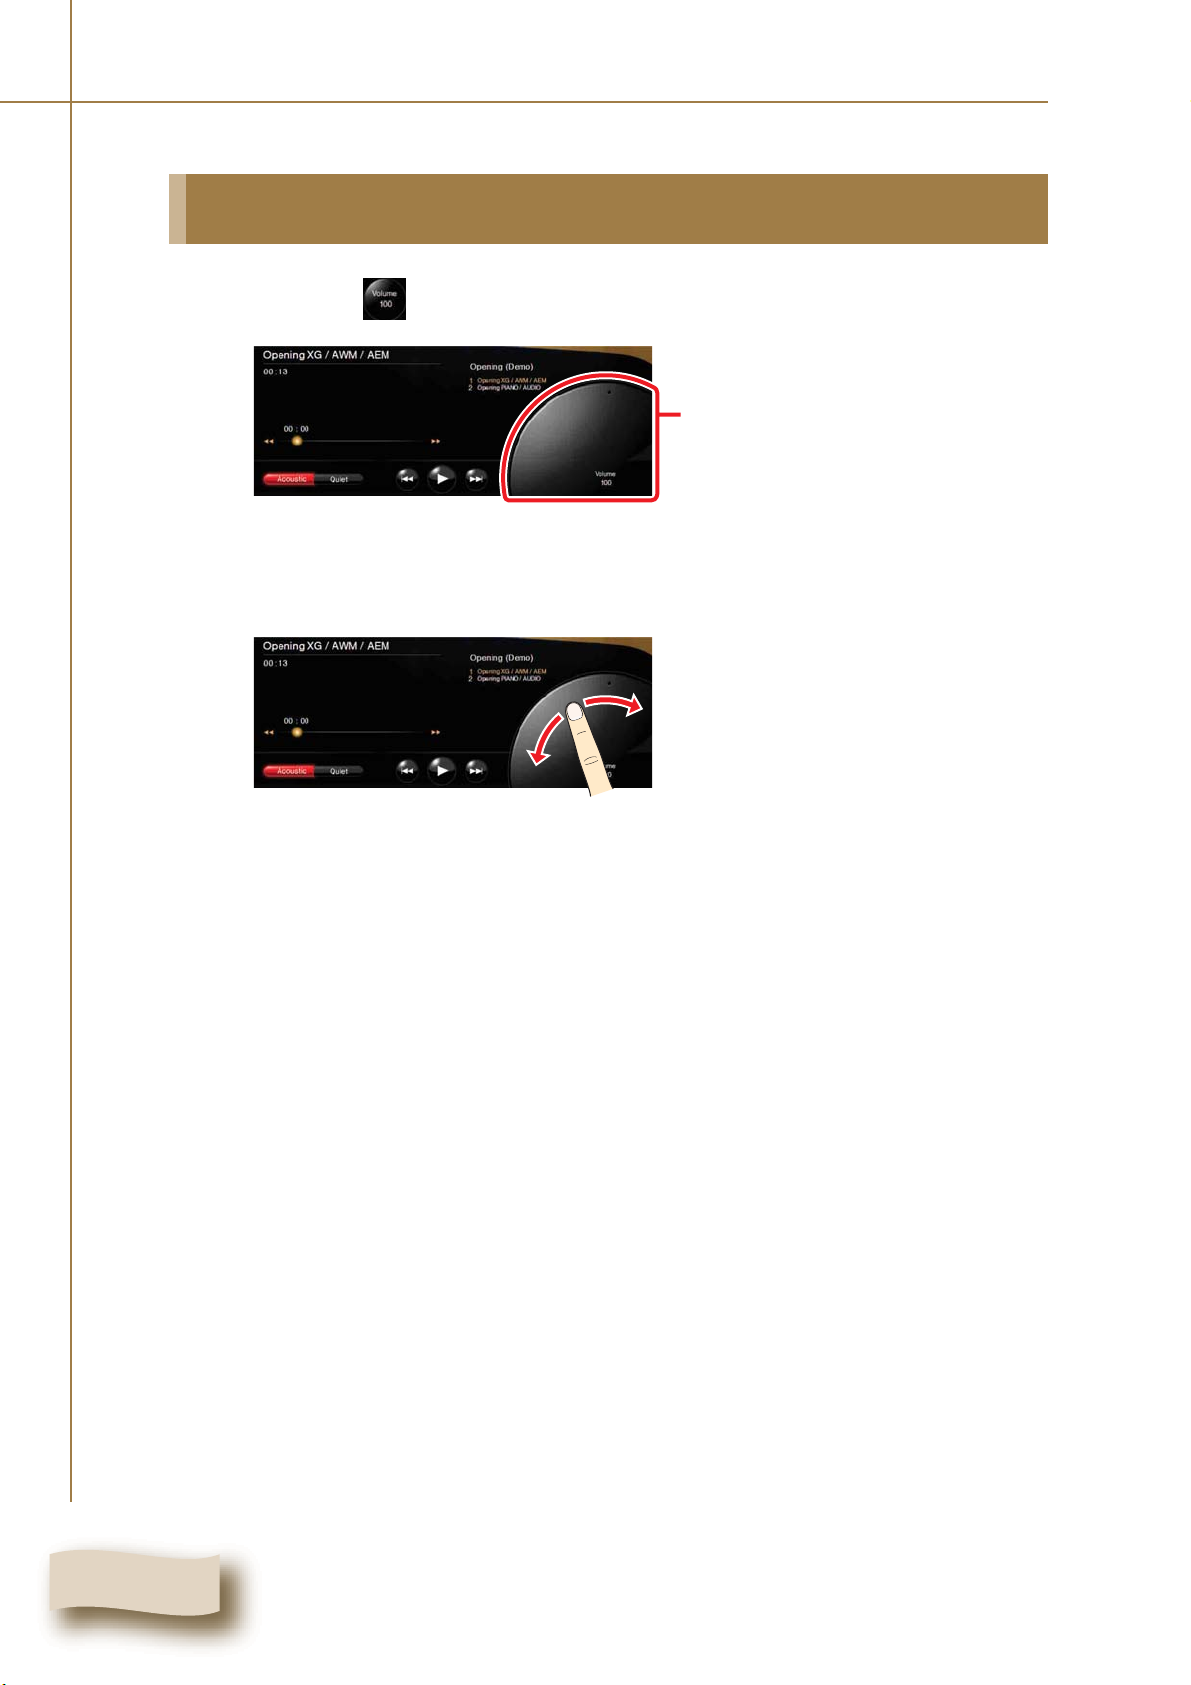
Adjusting the Overall Volume
Tap on on the right bottom of a screen.
1
Drag the volume knob to adjust the volume.
Volume knob
2
The volume knob will disappear if you don’t touch it for about 3 seconds.
18
Page 20

Selecting a Song
Chapter 3: Basic Playback
1
When you play back a song on a floppy disk, a CD, or
a USB medium, load the relevant medium into their
respective drives or port on the Media Center. ( pg.
2, 20 in “Advanced Operating Manual”)
Function bar
Tap on on the Function bar.
English
2
Continue to next page . . .
19
Page 21
Chapter 3: Basic Playback
A
Tap on the desired source*.
3
ppears when there are more albums not shown in the screen. In such a case,
move the slide bar to show the hidden albums.
Appears when there are more albums not shown in
the screen. In such a case, tap on to show
the previous album. Tap on to show the first
album.
* In this manual, we call each removable medium (floppy disk, CD, and USB flash memory,
etc.) and the internal song library as a “source”.
Selectable albums
Sort buttons
Top
Selectable sources
Prev
Current page/Total page
Tap to show the page containing the
selected album.
Appears when there are more albums
not shown in the screen. In such a
case, tap on to show the
next album. Tap on to show the
last album.
Tip: Pressing on the Media Center also select the source, and
then starts playback.
User PianoSoft CD FD
Tip: You can change the order of album on the screen by tapping on sort
buttons.
Album Number
Album Name
Updated Date
Last Played Date
Playcount
20
Page 22

Tap on the desired album.
Chapter 3: Basic Playback
4
The frame of the selected album will be displayed red.
To select songs other than the first one, tap on the desired album again,
and then tap on the desired song. ( pg. 22)
To play the selected album from its first song, see step 5 – 6 on “Playing
Back the Sample Songs in the Song Library”. ( pg. 17)
Searching Forward and Backward in a Song
English
Forward/Backward button
Playback status bar
During playback or pausing, tap on / to locate the desired point. Tap on to
start playback.
During pausing, tap on / , and then tap on the same button again to pause at
the desired point.
Tip: Tapping on the desired point on the playback status bar starts playback from that
point.
21
Page 23

Chapter 3: Basic Playback
Selecting Directly the Different Song from the Current Album
You can specify the desired song to be played on the Play screen.
Playback the desired song. ( pg. 19 “Selecting a
1
2
Song”).
Selected album and
songs in the selected album
Tap on nearby the song list.
Song screen
22
3
Tap on the desired song, and then on .
The desired song is selected.
Page 24

Repeating Song Playback
Chapter 3: Basic Playback
1
2
3
Tap on on the Function bar.
The Ex-Ctrl (Extra control) bar appears on top center of the screen.
[Repeat] control buttons
Tip: You can move the Ex-ctrl bar wherever you want by dragging the right side
of the bar.
Tap on / to select the desired repeat mode.
ALL: Repeats all songs in the current album.
ONE: Repeats the current song only.
RND: Repeats all songs in the current album in random order.
OFF: Cancels repeat setting.
Tap on after you finish setting to clear the bar.
To cancel the repeat mode, select OFF in step 2.
English
Tip: You can also clear the bar by tapping on again.
23
Page 25

Chapter 3: Basic Playback
Changing the Playback Tempo
This feature is useful, for example, when you listen to a complicated piano part with more
care in slow tempo, and also when you practice a difficult piano part in slow tempo.
You can change the tempo while the song is played back or stopped.
Select the desired song. ( pg. 19 “Selecting a Song”)
1
Tap on on the Function bar.
2
3
4
The Ex-Ctrl bar appears on top center of the screen.
[Tempo] control buttons
Tap on [Tempo] / to adjust the value.
To resume the original tempo, tap on [Tempo] .
Tip: The value can be adjusted from –50% to +20% in 1% increments.
Tap on after you finish changing the tempo to clear
the bar.
Tip: You can also clear the bar by tapping on .
24
Page 26

Chapter 3: Basic Playback
Playing Back Songs in a Different Key (Transposition)
This feature is useful, for example, when you want to sing along in a key you are most
comfortable with.
Select the desired song. ( pg. 19 “Selecting a Song”)
1
Tap on on the Function bar.
2
The Ex-Ctrl bar appears on top center of the screen.
[Transpose] control buttons
Tap on [Transpose] / to adjust the value.
3
To cancel the transposition, tap on [Transpose] .
Tip: The song can be temporarily transposed in half-step keys up or down two
octaves (–24 to +24).
English
4
Note: Care must be taken when transposing songs on CDs, as increasing or
decreasing the transposition value too much may have an adverse effect on
sound quality.
Tap on after you finish adjusting the value to clear
the bar.
Tip: You can also clear the bar by tapping on .
25
Page 27

Chapter 3: Basic Playback
Playing Back Only the Desired Piano Part
This could be useful, for example, when you listen to one part with more care, and also
when you practice only the left- or right-hand part while the Disklavier plays the other.
Select the desired song. ( pg. 19 “Selecting a Song”)
1
Tap on on the Function bar.
2
3
The Ex-Ctrl bar appears on top center of the screen.
[Part Cancel] control buttons
Tap on (left-hand part) / (right-hand part) to
play/mute the part.
Each time you tap on the part, its setting changes as follows showing the status
with the color of the part icon:
Ex.: The setting of the left-hand part
Play Mute
Tap on after you finish selecting the part to clear the
26
4
bar.
Tip: You can also clear the bar by tapping on .
Page 28

Chapter 3: Basic Playback
Playing Back Songs with the Lyrics on the Screen
You can display the lyrics of songs played back. You can enjoy singing to your own Piano
accompaniment and singing in Karaoke.
Tap on on the Function bar in the Play screen (
1
pg. 10).
Lyric screen
Select the desired song. ( pg. 19 “Selecting a Song”)
English
2
Continue to next page . . .
27
Page 29

Chapter 3: Basic Playback
Tap on .
3
4
Playback starts. The lyrics appear, and a color of the lyric changes as the song
proceeds.
Note: The lyrics are not shown when a song does not include the lyric’s data.
Note: When a song does not include the lyric’s data, only a song title is shown.
Tap on to return to the Play screen.
Note: For a user in North America, it is recommended to visit the website below to
purchase songs with lyrics.
http://www.yamahamusicsoft.com/
For a user living in an area other than in North America, it is recommended to consult
your dealer.
Changing the Background of the Lyric Screen
You can change the background of the Lyric Screen depending on your mood. You can
select an image from the category such as Nature, Flowers, Vacation, World, Textures,
Holiday, and Romantic.
28
Page 30

Chapter 3: Basic Playback
Tap on on the Function bar in the Play screen (
1
2
pg. 10).
English
Lyric screen
Tap on on the left bottom of the Lyric
screen.
[Background Select] screen
Categories
3
4
Images
Tap on the desired category, and then the image.
Tap on to show the selected image as the
background.
The [Background Select] screen is cleared.
29
Page 31

Chapter 3: Basic Playback
Adjusting the Volume of the Microphone’s Input and the Depth of it’s Reverbration
Tap on on the Function bar in the Play screen (
1
2
pg. 10).
Lyric screen
Tap on on the left bottom of the Lyric screen.
30
[MIC Volume] bar
[Reverb Type] buttons
[Reverb Depth] bar
Page 32

Chapter 3: Basic Playback
Tap on the desired point on the [MIC Volume] bar to
3
4
5
adjust the volume of the Microphone’s input.
Tap on the desired [Reverb Type] button, and then tap
English
on the desired point on the [Reverb Depth] bar to
adjust it’s depth.
Tap on .
The [MIC Setting] screen is cleared.
31
Page 33

Chapter 4
Basic Piano Playing
The Disklavier is a versatile instrument offering various functions that integrate
innovative technologies, but let’s start with the most basic use of the piano: playing the
keyboard.
Playing the Acoustic Piano (Acoustic Mode)
Play the keyboard as you would play any acoustic piano. You do not need to “turn the
Disklavier on”.
Playing the Digital Piano (Quiet Mode)
Put the Disklavier in Quiet mode when you want to play the keyboard more quietly or
more privately than on the acoustic piano. When Quiet Mode is activated, you are
essentially playing the digital piano. Since the play sound is output through the Monitor
speakers*, you can adjust the volume to your preference.
Turn the Disklavier on. ( pg. 9 “Turning the
1
Disklavier On”)
32
Page 34

Chapter 4: Basic Piano Playing
T
T
Tap on on the left bottom of a screen to engage
2
3
the Quiet Mode.
The color of turns to blue ( ).
Tip: Pressing on the Media Center also engages the Quiet Mode.
Play the Disklavier.
You will hear the sound of the digital piano through the Monitor speakers*.
To disengage Quiet Mode, tap on on left bottom of a screen.
The color of turns to red ( ).
Tip: Pressing on the Media Center also inactivates the Quiet Mode.
*Only for models supplied with the Monitor speakers.
QUIE
QUIE
Using Headphones (Headphone Mode)
English
1
2
Turn the Disklavier on. ( pg. 9 “Turning the
Disklavier On”)
Connect the supplied stereo headphones to the
PHONES jack on the bottom of the Media Center. (
pg. 2 in “Advanced Operating Manual”)
Continue to next page . . .
33
Page 35

Chapter 4: Basic Piano Playing
Play the Disklavier.
appears.
Headphone mode indication
3
The Acoustic mode is silenced and the digital piano sound is heard only from the
connected headphones.
Note: Two sets of headphones can be connected simultaneously. In this case,
the two headphones should be of the same model.
Adjusting the Volume Balance among the Keyboard Playing, Ensemble Sound, Software Playback, and Microphone’s Input
Tap on on the Function bar.
1
Balance control display
[Reset] button
34
Page 36

Chapter 4: Basic Piano Playing
Voice: Adjusts the volume of the digital piano sound* that you play on the
Disklavier’s keyboard in Quiet/Headphone mode. ( pg. 32 “Playing
the Digital Piano (Quiet Mode)”)
* Note that this setting has no effect on the volume of the piano part pre-recorded on the
software.
TG: Adjust the volume of the ensemble sound produced by the tone
generator (TG) of the Disklavier.
Audio: Adjusts the volume of the accompaniment or standard audio sound
pre-recorded on the software (CDs).
MIC: Adjusts the volume of the connected microphone.
Tap on the desired point on the volume bar of the
English
2
3
desired sound to adjust its volume.
To reset the setting, tap on .
Tap on after you finish adjustment.
Balance control display is cleared.
Tip: You can also clear the Balance control display by tapping on .
35
Page 37

Chapter 5
Creating a Song Library
The following functions are useful for organizing the contents in the song libraries
([Pianosoft Library], [CD Library], [Download Library], [From/To PC Folder], and [User
Library]) as well as the [Play Lists]. (pg. 25 “Utilizing the Play Lists” in “Advanced
Operating Manual”.)
Basic Operation on the File Manager
This section explains how to select an album, song, or play list.
Tap on on the Function bar.
1
Tap on .
2
File Manager screen appears.
36
Page 38

Finishes the file operation and returns to play screen.
[Source] buttons [Album] list [Song] list
Starts playing the selected song.
Chapter 5: Creating a Song Library
English
Information area
Shows the selected
source and details of the
album or song.
File operation buttons
Once a source, album or
song is selected, the
available operation
buttons are displayed.
Tip: The File Manager screen shows the hierarchical directory structure of the
Disklavier in an easy-to-understand appearance. You can intuitively select your
desired song file or album.
Source Album Song
[FD] Song 01
[CD]
[USB Media]
[Pianosoft Library]
[User Library]
[CD Library]
[Play Lists]
[From/To PC
Folder]
[Download
Library]
Album 01*
Album 01
Album 02
·····
Album 01
·····
Song 02
Song 03
·····
Song 01
·····
* The [FD] can contain only one album.
Continue to next page . . .
37
Page 39

Chapter 5: Creating a Song Library
Tap on the desired source.
3
4
Ex: When [Pianosoft Library] is selected
The background of [Source] become pink.
The available operation
appears.
Tap on the desired album.
Ex: When [PianoSoft Solo (Demo)] is selected
The background of [Album] become pink.
The selected source
become red.
5
The available operation
appears.
Tap on the desired song.
Ex: When [Black Key Etude in G flat from…] is selected
The background of [Song] become pink.
The available operation
appears.
The selected album
become red.
The selected song
become red.
38
Page 40

Creating an Album in the Library
Chapter 5: Creating a Song Library
1
2
3
Select the desired source. ( pg. 36.)
Tap on .
[New Album] screen
Tap on .
English
4
5
Software keyboard
Tap on each character for the name of the new album.
Note: The name must be within 64 characters.
Tap on or .
The software keyboard is cleared.
Continue to next page . . .
39
Page 41

Chapter 5: Creating a Song Library
Make sure the name is correct, and then tap on
6
Make sure [Complete] appears, and then tap on .
.
7
Renaming an Album, Song, or Play List
Select the desired album, song, or play list. ( pg. 36.)
1
Tap on .
2
The title of the selected album, song,
or play list
3
Tap on .
Software keyboard
40
Page 42

Chapter 5: Creating a Song Library
Tap on each character for the name of the new album.
4
5
6
7
Note: The name must be within 64 characters.
Tap on or .
The software keyboard is cleared.
Make sure the name is correct, and then tap on
.
Make sure [Complete] appears, and then tap on .
English
Creating a New Play List
Tap on to select [Play Lists] as the source.
1
( pg. 36.)
Tap on .
2
[Create List] screen
Continue to next page . . .
41
Page 43

Chapter 5: Creating a Song Library
Tap on .
3
Software keyboard
Tap on each character for the name of the new Play
4
5
6
List.
Note: The name must be within 64 characters.
Tap on or .
The software keyboard is cleared.
Make sure the name is correct, and then tap on
.
Make sure [Complete] appears, and then tap on
42
7
.
Page 44

Chapter 5: Creating a Song Library
Adding the Desired Song to Play List
1
2
3
Select the desired song. ( pg. 36.)
Tap on .
The selected song
[Add to PlayList] screen
Tap on , and then on the desired album as a
destination.
English
4
5
Tap on .
Make sure [Complete] appears, and then tap on .
43
Page 45

Chapter 5: Creating a Song Library
Copying Albums, Songs or the Entire Contents in a Source
This function is available except for [CD Library] and [Play Lists].
Select the desired source, album or song. ( pg. 36.)
1
Tap on one of the desired file operation buttons below:
2
: Selects the desired source to be copied
: Select the desired album to be copied.
: Select the desired song to be copied.
Note: The available file operation buttons differ depending on the selected
contents.
The screen asking the destination appears.
Ex.: When you tap on
Selected source
[Copy All] screen
44
Page 46

Chapter 5: Creating a Song Library
Ex.: When you tap on
Selected album
[Copy Album] screen
From now on, the procedure for coping a song is explained as an example.
Ex.: When you tap on
English
3
Selected song
[Copy Song] screen
Tap on for destination source selection.
[Select Source] screen
4
Tap on the destination source, and then on .
[Select Source] screen is cleared.
Continue to next page . . .
45
Page 47

Chapter 5: Creating a Song Library
Tap on for destination album selection.
5
[Select Album] screen
Tap on the destination album, and then on .
6
7
8
Note: The contents of a source other than CD cannot be copied to [CD Library].
[Select Album] screen is cleared.
Destination source and album
Make sure the destination is correct, and then tap on
.
Make sure [Complete] appears, and then tap on
.
46
Page 48

Deleting Albums, Songs and Play Lists
This function is available for all song libraries and [Play Lists].
Select the desired album, song, or play list. ( pg. 36.)
1
Tap on one of the desired file operation buttons below:
Chapter 5: Creating a Song Library
English
2
: Delete the desired album
: Delete the desired song
: Delete the desired play list
: Delete the desired song on the desired play list
Ex.: When you tap on
Selected album
[Delete Album] screen
Ex.: When you tap on
Selected song
[Delete Song] screen
Continue to next page . . .
47
Page 49

Chapter 5: Creating a Song Library
Ex.: When you tap on
[Delete List] screen
Ex.: When you tap on
Selected list
Selected song
3
4
[Clear Song] screen
From now on, the procedure for deleting a song is explained as an example.
Make sure it is all right to delete it, and then tap on
.
Make sure [Complete] appears, and then tap on
.
Tip: Even if you delete a play list or song of the play list, the original song file
cannot be deleted.
48
Page 50

Chapter 5: Creating a Song Library
Rearranging the Order of Albums, Songs and Play Lists
This function is available for all libraries and [Play Lists].
Select the desired album, song or play list. ( pg. 36.)
1
Tap on one of the desired file operation buttons below:
2
Ex.: When you tap on
: Rearrange the order of albums
: Rearrange the order of songs
The selected album
Rearranging buttons
the source.
downward.
upward.
of the source.
English
: Moves the album to the top of
:Moves the album
:Moves the album
: Moves the album to the end
[Sort Album] screen
Continue to next page . . .
The destination
49
Page 51

Chapter 5: Creating a Song Library
Ex.: When you tap on
[Sort Song] screen
The selected song
Rearranging buttons
: Moves the song to the top of
the album.
:Moves the song
downward.
:Moves the song
upward.
: Moves the song to the end of
the album.
The destination
3
4
Tap on the rearranging button to move the selected
album or song to the desired position, and then on
.
Make sure [Complete] appears, and then tap on .
50
Page 52

Erasing the Data in a Floppy Disk
Make sure that the floppy disk is already formatted.
Chapter 5: Creating a Song Library
1
2
3
Tap on .( pg. 36.)
English
Tap on .
[Delete All] screen
Tap on .
Note: Before tapping on , make sure it is all right to delete the
contents.
4
Note: DO NOT turn off the Disklavier or eject the floppy disk while the deletion
is in progress.
Tap on .
51
Page 53

Chapter 6
Other Features
Key Prompt Display during SmartKeyTM Playback
See pg. 35 “SmartKeyTM Playback” in “Advanced Operating Manual” for details.
Key prompt is shown here.
Display during Recording
While recording, the following display appears.
Note: While this screen appears, the Disklavier cannot be controlled by the Tablet
Controller.
52
Page 54

Chapter 6: Other Features
Display during Playback of DisklavierRadio
While playing back DisklavierRadio, the following display appears.
Channel name
Volume knob ( pg. 18 “Adjusting the
Overall Volume”)
[Acoustic/Quiet] button ( pg. 32 “Playing
the Digital Piano (Quiet Mode)”)
Song title
Display during Using the IDC Service
While connecting the Disklavier to the IDC service, the following display appears and
operations on the Tablet Controller are disabled.*
* Except for during DisklavierRadio playback.
English
53
Page 55

Chapter 6: Other Features
Changing the Design of the Room (Background)
You can change the design of the room (background) depending on your mood.
Tap on on the Function bar in the Play screen (
1
pg. 10).
Every time you tap on it, the design of the room changes as follows:
Room 1
Room 2
Room 3
Room 6
Tip: You can change a picture in a frame on the wall of the room.
( pg. 55 “Changing the Picture in the Frame”)
Note: The design and the number of the Rooms are subject to change without notice.
Room 5
Room 4
54
Page 56

Chapter 6: Other Features
Changing the Picture in the Frame
You can change, move, zoom in or out the picture in the frame on the Room
(background).
(This is limited to only the design with a picture in a frame.)
Tap on on the Function bar.
1
English
2
Tap on .
Frames
Continue to next page . . .
55
Page 57

Chapter 6: Other Features
Tap on the frame in which you want to change the
3
picture.
The inside of the frame turns to red.
Saves the modification
Zooms in or out
Moves the picture upward, downward, right, and left
Select the previous/next picture
Current picture number
Tip: You can add your favorite pictures as options for the frame. See pg. 58
for details.
Tap on the arrows or / to modify the picture in the
4
5
selected frame.
Tap on .
The changed design is saved.
Tip: When you want to change the picture in another room, tap on to
select the desired room, and then start from step 1.
To return to the Play screen, tap on .
56
Page 58

Chapter 6: Other Features
Slide Show
You can enjoy a slide show using pictures saved in My Picture folder. ( pg. 58)
Tap on a picture in a frame.
1
Frame
English
2
A picture saved in My Picture folder is displayed in turn in the whole area of a
screen.
Tap on a screen during a slide show.
The slide show finishes, and then the screen returns to the Play screen.
57
Page 59

Chapter 6: Other Features
Adding Images to the Picture Collection for the Frames in a Room (Background)
You can replace the picture in a frame at the shipment with your favorite ones by adding
the pictures to the picture collection. Furthermore, the added pictures are used for the
slide show ( pg. 57).
Connect the I/O Center to a LAN (local area network)
1
to which a Windows PC with a picture data is also
connected.
Note: It is necessary that I/O center
can get IP address as a DHCP client.
I/O Center
(right side)
LAN
Windows PC
58
2
Start up Explore, and then open [My Network Places]
on the PC.
Tip: Make sure that the Disklavier is on, and then start up Explore.
Page 60

Chapter 6: Other Features
Open [Dkv******]* and confirm that [My Picture] is
3
4
shown under that.
* [******] differs depending on the model.
Copy your favorite images to [My Picture].
Note: Only the JPEG files are available for this function. The extension should
be “.jpeg”, “.jpg”, “.jpe”, “.JPEG”, “.JPG” or “.JPE”.
Note: The recommended solution of the image file is 800 x 600 pixels or
lower. In case a solution of the image file is more than the size recommended
above, it may take more time to show the entire image.
Refreshing Contents in [From/To PC Folder]
Perform step 1 – 2 in “Selecting a Song”. ( pg. 19)
1
English
2
3
Tap on .
Tap on .
Note: For details on copying song files to [From/To PC Folder], refer to
“Copying Song File from a Personal Computer to the Disklavier” on pg. 37 in
“Advanced Operating Manual”.
59
Page 61

Chapter 7
Function of the
Configuration Bar
Pairing the Tablet Controller and the Disklavier
When purchased, this setting is already done. So
you don’t have to perform the following procedure.
Note: Before making this setting, you are recommended to turn off all wireless
appliances other than the Disklavier.
Press (P button).
P
1
Configuration bar
Tap on .
2
60
Page 62

3
Chapter 7: Function of the Configuration Bar
Tap on .
English
[Message Box] screen
Tap on .
4
5
The program starts searching for the Disklavier.
Tip:
Tap on .
The setting is saved, and the following message appears.
Tap on .
differs depending on the model.
******
6
Now you can use the Tablet Controller as a remote controller of the Disklavier.
Continue to next page . . .
61
Page 63

Chapter 7: Function of the Configuration Bar
Note: If the following message appears, the Tablet Controller may be connected to
another wireless appliance, or the Disklavier may not be turned on.
In this case, turn on the Disklavier, turn off all other wireless appliances, and perform the
procedure from step 1 again while standing near the Disklavier.
Restarting the Interface Screen
If the Tablet Controller malfunctions, or does not respond, restart the interface screen.
Press (P button).
P
1
Configuration bar
Tap on .
2
Tap on .
3
62
Page 64

Tap on .
Chapter 7: Function of the Configuration Bar
4
You can adjust the volume of the Tablet Controller.
The interface screen closes, and then restarts.
Adjusting the Volume of the Tablet Controller
Press (P button).
P
1
Configuration bar
Tap on .
2
Slider
English
3
Drag the slider to adjust the volume, and then tap on
.
63
Page 65

Chapter 7: Function of the Configuration Bar
Adjusting the Brightness of the Touch Screen
1
2
3
Press (P button).
Tap on .
Drag the slider to adjust the Brightness, and then tap
on .
P
Configuration bar
Slider
64
Page 66

Setting the Time Zone
Chapter 7: Function of the Configuration Bar
1
2
3
Press (P button).
P
Configuration bar
Tap on .
Configuration
Brightness Adjustment
Tap on .
Power Supply
Network
Network Device
LAN
Wireless LAN
Disable
Current Configuration
Network Device: Wireless LAN
Host Name: localhost
Domain Name: localdomain
ESS-ID: ANY
IP Adress: Acquires automatically
Netmask:
Gateway:
Name Server:
Time & Date
Configuration
IeConfig
English
Volume Adjustment
Touch Panel Calibration
4
Modify...
Cancel
OKUpdate
Tap on tab.
Continue to next page . . .
65
Page 67

Chapter 7: Function of the Configuration Bar
Tap on [Time Zone] , and then on your time zone in
5
6
the drop down list.
Power Supply
Network
Corrent Time 07/21/2004 18:31:12
Time & Date Configuration
Timezone:
Year:
Month:
Day:
Time:
Minute:
Second:
IeConfig
Time & Date
America/Los_Angeles
Africa/Abidjan
Africa/Accra
Africa/Addis_Ababa
Africa/Algiers
Africa/Asmera
Africa/Bamako
Africa/Bangui
Africa/Banjul
Africa/Bissau
Africa/Blantyre
Africa/Brazzaville
Africa/Bujumbura
Africa/Cairo
Africa/Casablanca
Africa/Ceuta
Africa/Conakry
Africa/Dakar
Africa/Dar_es_Salaam
Africa/Djibouti
Africa/Douala
Africa/El_Aaiun
Africa/Freetown
Africa/Gaborone
Africa/Harare
Africa/Johannesburg
Africa/Kampala
Cancel
OK
Tap on .
Tap on .
7
Other Buttons
Other buttons such as and on the configuration bar are not generally used.
66
Page 68

Chapter 8
Troubleshooting
If you have problems operating the Disklavier, see if any of the symptoms listed below
apply to your problem and follow the recommended remedy.
You cannot turn on
the Tablet Controller.
You cannot operate
the Tablet Controller.
The Tablet Controller
does not respond
even when you press
the buttons.
•Make sure the Tablet Controller contains batteries.
•Make sure the Tablet Controller is charged.
• If the Tablet Controller is broken, consult your
Disklavier dealer.
The Tablet Controller and the Disklavier do not
connect in a wireless environment.
•Make sure the Tablet Controller is within the
specified operating range. (Make sure you are
using the Tablet Controller in a close range to the
Disklavier.) If the Tablet Controller still does not
connect to the Disklavier, the Tablet Controller may
be broken. Consult your Disklavier dealer.
•Make sure that the Disklavier is turned on. If the
problem continues, consult your Disklavier dealer.
• Restart the interface screen. ( pg. 62)
•When interface restarting does not solve the
problem, press the Power button on the Tablet
Controller for 4 seconds. This will force the Tablet
Controller to shut down.
You cannot shut
down the Tablet
Controller.
• Press the Power button on the Tablet Controller for
4 seconds. This will force the Tablet Controller to
shut down.
67
Page 69

Chapter 8: Troubleshooting
Contains Macromedia® Flash™ Player technology by Macromedia, Inc.,
Copyright © 1995-2004 Macromedia, Inc. All rights reserved.
Macromedia, Flash and Macromedia Flash are trademarks or registered
trademarks of Macromedia, Inc. in the United States and internationally.
®
“This product features the Macromedia
information on the Macromedia Flash Player, visit
http://www.macromedia.com/software/flash/about/.”
Flash™ Player technology. For further
68
Page 70

Page 71

For U.S.A.
COMPLIANCE INFORMATION STATEMENT
(DECLARATION OF CONFORMITY PROCEDURE)
Responsible Party : Yamaha Corporation of America
Address : 6600 Orangethorpe Avenue, Buena Park, CA 90620 USA
Telephone : 1-714-522-9011
Fax : 1-714-522-9301
Type of Equipment : Tablet Controller
Model Name : TRC-100
These devices complies with Part 15 of the FCC Rules.
Operation is subjected to the following conditions;
1) this device may not cause harmful interference, and
2) this device must accept any interference received including interference that may cause undesired operation.
See user manual instructions if interference to radio reception is suspected.
FCC INFORMATION (U.S.A.)
1. IMPORTANT NOTICE: DO NOT MODIFY THIS UNIT!
This product, when installed as indicated in the instructions contained in this manual, meets FCC requirements. Modifications not expressly
approved by Yamaha may void your authority, granted by the FCC, to use the product.
2. IMPORTANT: When connecting this product to accessories and/or another product use only high quality shielded cables.
Cable/s supplied with this product MUST be used. Follow all installation instructions. Failure to follow instructions could void your FCC
authorization to use to use this product in the USA.
3. NOTE: This product has been tested and found to comply with the requirements listed in FCC Regulations, Part 15 for Class “B” digital
devices. Compliance with these requirements provides a reasonable level of assurance that your use of this product in a residential environment
will not result in harmful interference with other electronic devices. This requirement generates/uses radio frequencies and, if not installed and
used according to the instructions found in the users manual, may cause interference harmful to the operation of other electronic devices.
Compliance with FCC regulations does not guarantee that interference will not occur in all installations. If this product is found to be the
source of interference, which can be determined by turning the unit “OFF” and “ON”, please try to eliminate the problem by using one of the
following measures: Relocate either this product or the device that is being affected by the interference.
Utilize power outlets that are on different branch (circuit breaker or fuse) circuits or install AC line filter/s.
In the case of radio or TV interference, relocate/reorient the antenna. If the antenna lead-in is 300 ohm ribbon lead, change the lead-in to
coaxial type cable.
If these corrective measures do not produce satisfactory results, please contact the local retailer authorized to distribute this type of product. If
you can not locate the appropriate retailer, please contact Yamaha Corporation of America, Electronic Service Division, 6600 Orangethorpe
Ave, Buena Park, CA 90620.
For U.S.A.
The Tablet Controller contains a small amount of mercury. Disposal of this material may be regulated due to environmental considerations.
For disposal information in the United States, refer to the Electronic Industries Alliance web site: www.eiae.org
This applies only to products distributed by Yamaha Corporation of America.
For U.S.A.
This product contains a battery that contains perchlorate material. Perchlorate Material-special handling may apply.
See www.dtsc.ca.gov/hazardouswaste/perchlorate
YA371A0
 Loading...