

Page 1
DB-SREV1 DSP Expansion Board
for
hank you for choosing the Yamaha DB-SREV1 DSP Expansion Board.
T
Ask an authorized Yamaha service engineer to install the board. Do not install the board yourself.
ous vous remercions d’avoir choisi la carte d’extension DB-SREV1 DSP.
N
Demandez à un spécialiste agréé d’un centre de maintenance Yamaha d’installer la carte. N’installez
pas la carte vous-même.
ielen Dank für Ihre Entscheidung zu einer Erweiterungsplatine DB-SREV1 DSP.
V
Bitte lassen Sie diese Platine von einer anerkannten Yamaha-Kundendienststelle einbauen. Bauen Sie
sie niemals selbst ein.
uchas gracias por haber elegido la Tarjeta de Ampliación DB-SREV1 DSP.
M
Diríjase a un técnico autorizado de Yamaha para instalar la tarjeta. No la instale usted mismo.
の度はヤマハサンプリングリバーブレーターSREV1用DB-SREV1DSPエクスパンションボードをお買上げいた
ここ
だき、ありがとうございます。
ボードの取付けは、必ずヤマハサービスエンジニアにご依頼ください。お客様ご自身では行なわないでください。
Specifications / Caractéristiques techniques / Spezifikationen / Especificaciones /仕様
Dimensions / Dimensions / Abmessungen / Dimensiones / 外形寸法 (W×H×D) = 195×15×330 mm
Weight / Poids / Gewicht / Peso / 重量 = 0.5 kg
Supplied accessories / Accessoires fournis / Lieferumfang / Accesorios incluídos /付属品
FPC (Flat Cable) ×2 / FPC (câble ruban) ×2 / FPC (Flachbandkabel) ×2 / FPC (cable plano) ×2 / フラットケーブル×2
Screw / Vis / Schraube / Tornillo / ネジ
For Yamaha Engineers
Before installing the DB-SREV1 Expansion Board, turn off the SREV1 and disconnect the power cord.
In order to install the DB-SREV1 Expansion Board, you’ll need to remove the top cover and temporarily remove the
existing DSP board, as explained below. A cross-headed screwdriver is required for this.
Pour le service technique Yamaha
Avant d’installer la carte d’extension DB-SREV1, ils est indispensable de mettre le SREV1 hors tension et de
débrancher son cordon d’alimentation de la prise murale.
Pour pouvoir installer la carte d’extension DB-SREV1, vous devez retirer le couvercle supérieur du SREV1 et la carte
DSP préinstallée. Voyez les consignes plus loin. Pour ce faire, vous avez besoin d’un tournevis en forme de croix.
Für Yamaha-Wartungstechniker
Vor der Installation der DB-SREV1 Erweiterungsplatine müssen Sie das SREV1 ausschalten und den Netzanschluss lösen.
Für die Installation der DB-SREV1 Erweiterungsplatine müssen Sie die obere Abdeckplatte entnehmen und die
vorhandene DSP-Platine ausbauen. Siehe die Anweisungen weiter unten. Hierfür brauchen Sie einen
Kreuzkopfschraubenzieher.
Para los ingenieros de Yamaha
Antes de instalar la tarjeta de ampliación DB-SREV1, desconecte la alimentación del SREV1 y desenchufe el cable de
alimentación.
Instalar la tarjeta de ampliación DB-SREV1, tendrá que quitar la cubierta superior y extraer temporalmente la
tarjeta DSP existente, como se explica a continuación. Para esto necesitará un destornillador de punta en cruz.
ヤマハサービスエンジニア向け
DB-SREV1エクスパンションボードを装着する前にSREV1の電源を切り、電源コードを取り外してください。
DB-SREV1エクスパンションボードをSREV1に装着するには以下の手順でSREV1のトップカバーを取り外し、既設の
DSP ボードを一時、取り外す必要があります。取り外しにはプラスドライバーが必要です。
Page 2
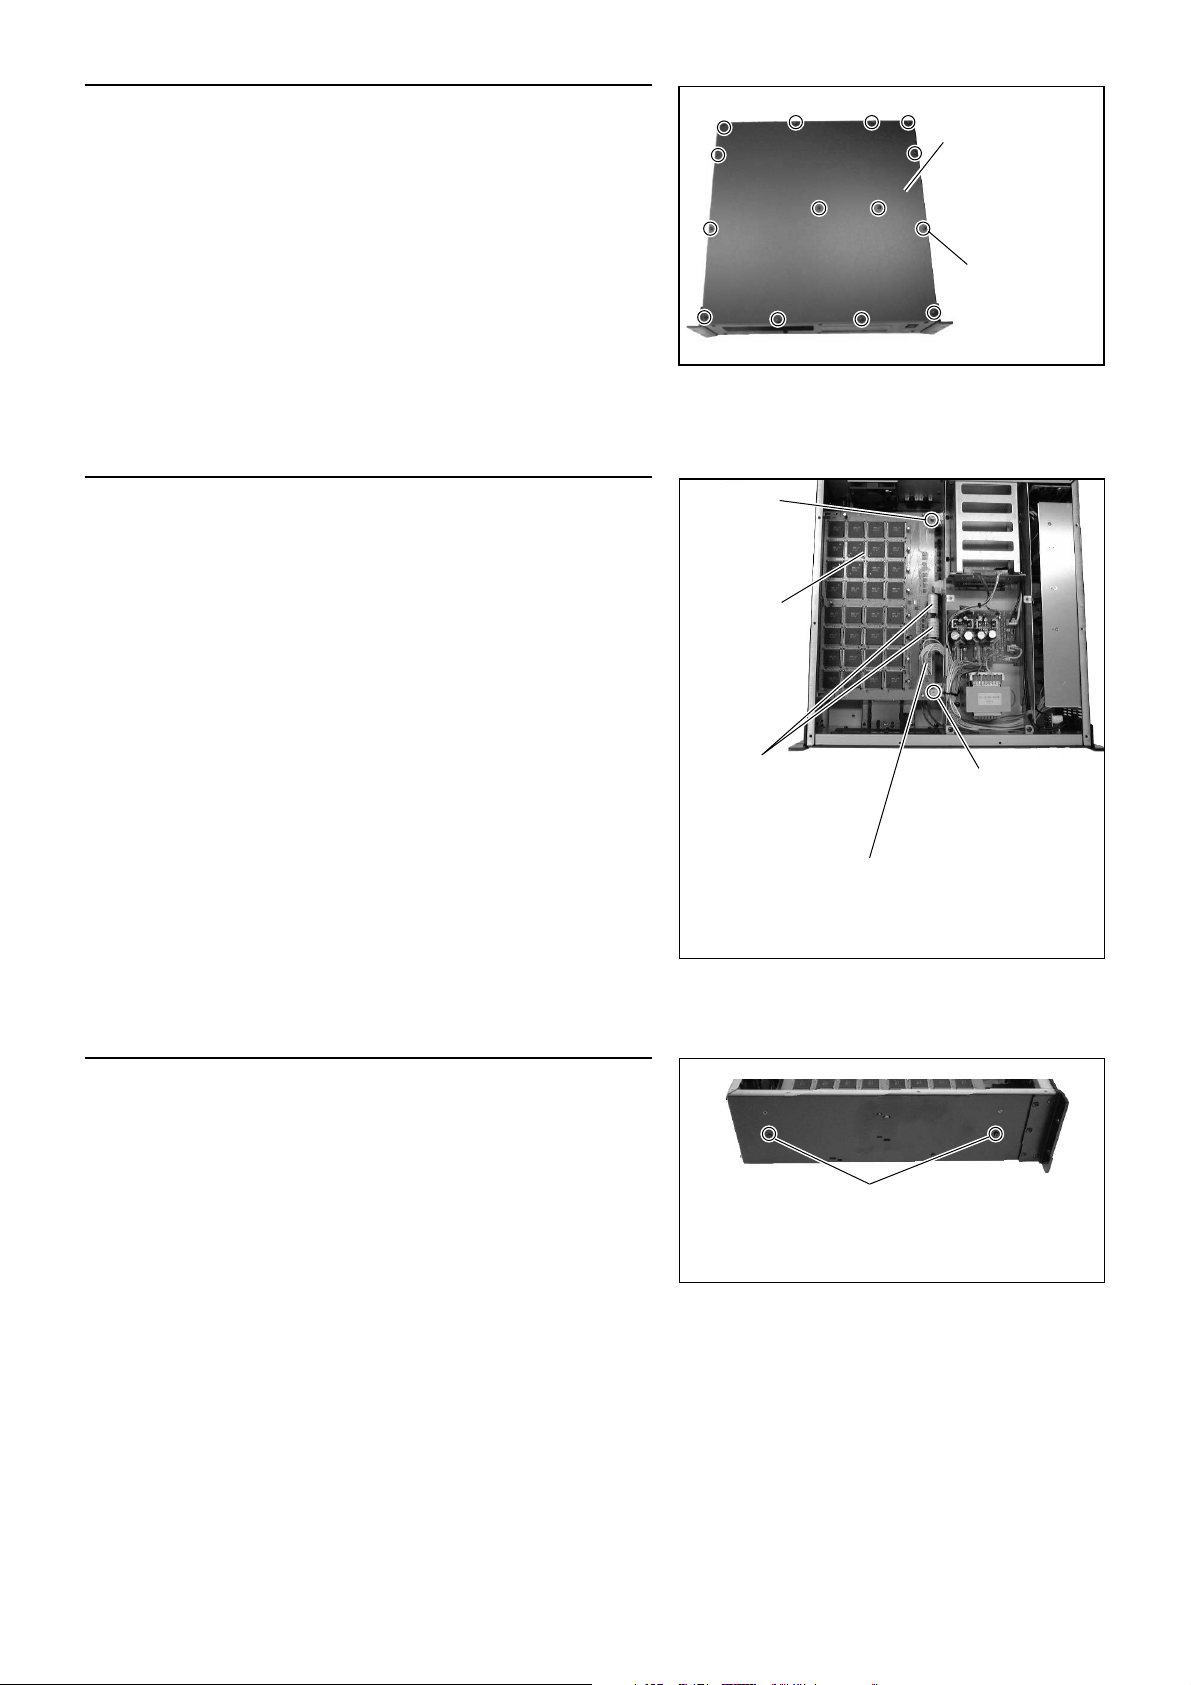
1. Remove the 14 fixing screws from the SREV1 top cover, as shown
Screws
Vis
Schrauben
Tornillos
ネジ
SREV1 T op cover
Couvercle supérieur du
SREV1
Obere Abdeckplatte des
SREV1
Cubierta superior del
SREV1
SREV1トップカバー
in Figure 1, and remove the cover.
Retirez les 14 vis qui retiennent le couvercle supérieur du SREV1
(voyez “Figure 1”) et enlevez le couvercle.
Lösen Sie die 14 Befestigungsschrauben an der Oberseite des SREV1.
Siehe “Figure 1”. Entnehmen Sie anschließend die obere
Abdeckplatte.
Quite los 14 tornillos de la cubierta superior del SREV1, como se
muestra en la figura 1, y extraiga la cubierta.
SREV1のトップカバー上の14個のネジをプラスドライバーで取り外
し、トップカバーを外してください。
2. Disconnect the two flat cable connectors and the power supply
connector from the existing DSP board, as shown in Figure 2.
Remove the two fixing screws securing the existing DSP board, as
shown in Figure 2.
Retirez les deux connecteurs des câbles ruban ainsi que celui du
câble d’alimentation de la carte DSP préinstallée (voyez “Figure
2”). Desserrez les deux vis qui retiennent la carte DSP (voyez “Figure
2”).
Lösen Sie beiden Flachbandstecker sowie jenen der
Stromversorgung auf der vorhandenen DSP-Platine (siehe “Figure
2”). Lösen Sie die beiden Schrauben, mit denen die DSP-Platine
am Chassis arretiert wird (siehe “Figure 2”).
Desconecte los dos conectores de cable plano y el conector de
alimentación de la tarjeta DSP existente, como se muestra en la
figura 2. Quite los dos tornillos de fijación que aseguran la tarjeta
DSP existente, como se muestra en la figura 2.
フラットケーブル×2カ所と電源コネクターを既設のDSPボードから
抜きます。
DSPボードを止めているネジ2個を取り外します。
Figure 1
Screw
Vis
Schrauben
Tornillo
ネジ
Existing board
Carte actuelle
Momentane Leiterplatte
Tarjeta existente
既設のボード
Flat cables
Câble ruban
Flachbandkabel
Cable plano
フラットケーブル
Figure 2
Screw
Vis
Schrauben
Tornillo
ネジ
Power supply connector
Connecteur d’alimentation
Stromversorgungsstecker
Conector de alimentación
電源コネクター
3. Remove the two fixing screws securing the DSP board to the side
panel, as shown in Figure 3, and then remove the board.
Desserrez les deux vis avec lesquelles la carte DSP est attachée à la
paroi latérale (voyez “Figure 3”) et retirez la carte DSP.
Entfernen Sie die beiden Schrauben, mit denen die DSP-Platine an
der Seitenwand gehalten wird (siehe “Figure 3”) und entnehmen
Sie die DSP-Platine.
Quite los dos tornillos de fijación que aseguran la tarjeta DSP
existente al panel lateral, como se muestra en la figura 3, y después
extraiga la tarjeta.
左側面パネルのDSPボードを止めているネジ 2個を取り外しDSPボー
ドを取り外します。
2
Screws
Vis
Schrauben
Tornillos
ネジ
Figure 3
Page 3

4. Connect the two supplied flat cables to the SREV1 so that the printed side appears as shown in Figure 4, and then close the
securing clips on each side of the connectors.
The two supplied flat cables are identical.
Connectez les deux câbles ruban au SREV1 de façon à ce que la face imprimée soit visible comme dans l’illustration “Figure
4”. Fixez les connecteurs au moyen des attaches de part et d’autre.
Les deux câbles ruban sont exactement les mêmes.
Verbinden Sie die beiden beiliegenden Flachbandkabel mit dem SREV1. Sorgen Sie dafür, dass die bedruckte Seite wie in
“Figure 4” zu sehen ist. Arretieren Sie die Stecker anschließend mit den beiden Klemmen.
Die beiden beiliegenden Flachbandkabel sind miteinander identisch.
Conecte los dos cables planos suministrados al SREV1 de forma que la cara impresa aparezca como se muestra en la figura
4, y después cierre las presillas de fijación de cada lado de los conectores.
Los dos cables planos uministrados son idénticos.
DB-SREV1DSPボードに付属のフラットケーブルを 2本、図のように印刷面が上側になるようSREV1に接続します。コネクター
部の両サイドの爪を押し込んで固定します。
フラットケーブルは2枚とも同じです。
Printed side
Face imprimé
Bedruckte Seite
Cara impreso
印刷面
Figure 4
5. Cut and remove the cable fastener holding the power supply cable
intended for the DB-SREV1 Expansion Board, as shown in Figure 5.
Reinstall the previously removed DSP board, remembering to
replace the two internal fixing screws and the two external fixing
screws, and to reconnect the two flat cable connectors and the
Cable fastener
Attache de câble
Kabelklemme
Sujetacables
束線止め
power supply connector.
Coupez et retirez l’attache de câble qui retient le câble
d’alimentation destinée à la carte d’extension DB-SREV1 (voyez
“Figure 5”) et retirez cette attache.
Installez à nouveau la carte DSP que vous venez de retirer et
attachez-la avec les deux vis internes ainsi que les deux vis
externes. Connectez ensuite les deux connecteurs des câbles
ruban ainsi que celui du câble d’alimentation.
Schneiden Sie die Kabelklemme des Stromversorgungskabels für
die DB-SREV1 wie in “Figure 5” gezeigt” auf und entnehmen Sie
Figure 5
sie.
Installieren Sie die zuvor entnommene DSP-Platine wieder und bringen Sie die Befestigungsschrauben wieder an der
Chassis-Unterseite sowie an der Seitenwand (zwei interne und zwei externe Schrauben) an. Stellen Sie die Verbindung
der beiden Flachbandkabel sowie des Stromversorgungskabels wieder her.
Corte y extraiga el sujetacables que asegura el cable de alimentación destinado para la tarjeta de ampliación DB-SREV1,
como se muestra en la figura 5.
Vuelva a instalar la tarjeta DSP previamente extraída, no olvidándose de volver a colocar los dos tornillos de fijación
internos y los otros dos externos, y conecte los dos conectores de cable plano y el conector de alimentación.
DB-SREV1ボード用の電源ケーブルを止めている束線止めを切って外します。
取り外した既設のDSPボードを再装着します。内部のネジ×2、外側パネルのネジ×2を止め直しフラットケーブル×2と電源ケー
ブルコネクターを再接続します。
3
Page 4

6. Install the DB-SREV1 Expansion Board above the existing DSP
board, secure it by using two internal fixing screws and two external
fixing screws, and connect the two flat cable connectors and the
power supply connector, as shown in Figure 6. Replace the SREV1
top cover.
Logez la DB-SREV1 sur la carte DSP et attachez-la au moyen de
deux vis internes et des deux vis externes. Connectez les deux
câbles ruban et le câble d’alimentation comme dans “Figure 6”.
Installez ensuite le couvercle supérieur.
Bringen Sie die DB-SREV1 Erweiterungsplatine auf der DSP-Platine
an, arretieren Sie sie mit den beiden internen sowie den beiden
externen Befestigungsschrauben und schließen Sie die beiden
Flachbandkabel sowie das Stromversorgungskabel wie in “Figure 6”
gezeigt an. Bringen Sie danach wieder die obere Abdeckplatte an.
Instale la tarjeta de ampliación DB-SREV1 sobre la tarjeta DSP
existente, asegúrela utilizando dos tornillos de fijación internos y
otros dos externos, y conecte los dos conectores de cable plano y
el conector de alimentación, comno se muestra en la figura 6.
Vuelva a colocar la cubierta superior del SREV1.
DB-SREV1 ボードを再装着したDSPボードの上に装着します。内部のネ
ジ×2、外側パネルのネジ×2を止め、フラットケーブル×2と電源ケー
ブルコネクターを接続します。再度トップカバーを取付けます。
Figure 6
■ Checking that the DB-SREV1 Expansion Board is Working Correctly
If the DB-SREV1 Expansion Board is working correctly, when the SREV1 is turned on the two rows of INPUT and OUTPUT front
panel indicators light up alternately in a streaming pattern from left to right. If the indicators do not light up like this, the DB-SREV1
Expansion Board is not working correctly, in which case you should check that it’s installed in accordance with these instructions.
■ Vérification si la carte d’extension DB-SREV1 est reconnue
Lorsque le SREV1 reconnaît la DB-SREV1 comme il se doit, les deux rangées de témoins INPUT et OUTPUT en face avant du
SREV1 s’allument en alternance, de gauche à droite, lors de la mise sous tension du SREV1. Si les témoins ne s’allument pas de
cette façon, la carte d’extension DB-SREV1 n’a pas été reconnue. Dans ce cas, vérifiez si elle a effectivement été installée selon les
consignes données plus haut.
■ Kontrolle, ob die DB-SREV1 Erweiterungsplatine ordnungsgemäß funktioniert
Wenn die DB-SREV1 ordnungsgemäß erkannt wird, leuchten die beiden Reihen der INPUT- und OUTPUT-Dioden auf der
Frontplatte des SREV1 abwechselnd von links nach rechts auf. Wenn die Dioden nicht in diesem Muster leuchten, wird die DBSREV1 nicht erkannt. Kontrollieren Sie dann noch einmal, ob sie den Anweisungen entsprechend eingebaut wurde.
■ Comprobación del funcionamiento correcto de la tarjeta de ampliación DB-SREV1
Cuando conecte la alimentación del SREV1, si la tarjeta de ampliación DB-SREV1 está funcionando correctamente, las dos filas
de indicadores INPUT y OUTPUT del panel frontal se encenderán alternativamente en sucesión continua de izquierda a derecha.
Si los indicadores no se encienden de esta forma, la tarjeta de ampliación DB-SREV1 no estará funcionando correctamente, en
cuyo caso deberá comprobar si la ha instalado de acuerdo con estas instrucciones.
■DB-SREV1エクスパンションボード装着の確認
DB-SREV1エクスパンションボードが正しく動作する場合はSREV1の電源オン時、フロントパネルの8個のINPUT/OUTPUT
信号インジケーターが上段と下段で互いに左右反対の向きに流れるように点滅します。インジケーターがこのように点滅し
ない場合、DB-SREV1ボードは正しく装着出来ていません。前述の手順に従って装着をチェックしてください。
For European Model
Purchaser/User Information specified in EN55103-1 and EN55103-2.
Conformed Environment: E1, E2, E3 and E4
Pour le modèle européen
Informations pour l’acheteur/usager spécifiées dans EN55103-1 et EN55103-2.
Environnement adapté: E1, E2, E3 et E4
Für das europäische Modell
Kunden-/Benutzerinformation nach EN55103-1 und EN55103-2.
Entspricht den Umweltschutzbestimmungen: E1, E2, E3 und E4
Modelo para Europa
Información sobre el comprador/usuario especificada en EN55103-1 y EN55103-2.
Entorno de acuerdo con: E1, E2, E3 y E4
YAMAHA CORPORATION
V653520 R0 1 IP Pro Audio & Digital Musical Instrument Division
P.O. Box 3, Hamamatsu, 430-8651, Japan
00 12 150 CP Printed in Japan
 Loading...