

Page 1

Owner’s Manual
IMPORTANT
Check Your Power Supply
Make sure that your local AC mains voltage matches
the voltage specified on the name plate on the bottom
panel. In some areas a voltage selector may be
provided on the bottom panel of the main keyboard
unit near the power cord. Make sure that the voltage
selector is set for the voltage in your area. The voltage
selector is set at 240V when the unit is initially shipped.
To change the setting use a “minus” screwdriver to
rotate the selector dial so that the correct voltage
appears next to the pointer on the panel.
Page 2
SPECIAL MESSAGE SECTION
PRODUCT SAFETY MARKINGS: Yamaha electronic
products may have either labels similar to the graphics
shown below or molded/stamped facsimiles of these
graphics on the enclosure. The explanation of these graphics appears on this page. Please observe all cautions indicated on this page and those indicated in the safety instruction section.
CAUTION
RISK OF ELECTRIC SHOCK
DO NOT OPEN
CAUTION: TO REDUCE THE RISK OF ELECTRIC SHOCK.
DO NOT REMOVE COVER (OR BACK).
NO USER-SERVICEABLE PARTS INSIDE.
REFER SERVICING TO QUALIFIED SERVICE PERSONNEL.
See bottom of Keyboard enclosure for graphic symbol markings.
The exclamation point within the equilateral triangle is intended to alert the
user to the presence of important operating and maintenance (servicing) instructions in the literature accompanying the product.
ENVIRONMENTAL ISSUES: Yamaha strives to produce products that are both user safe and environmentally
friendly. We sincerely believe that our products and the
production methods used to produce them, meet these
goals. In keeping with both the letter and the spirit of the
law, we want you to be aware of the following:
Battery Notice: This product MAY contain a small nonrechargable battery which (if applicable) is soldered in
place. The average life span of this type of battery is approximately five years. When replacement becomes necessary, contact a qualified service representative to perform the replacement.
Warning: Do not attempt to recharge, disassemble, or
incinerate this type of battery. Keep all batteries away
from children. Dispose of used batteries promptly and as
regulated by applicable laws. Note: In some areas, the
servicer is required by law to return the defective parts.
However, you do have the option of having the servicer
dispose of these parts for you.
Disposal Notice: Should this product become damaged
beyond repair, or for some reason its useful life is considered to be at an end, please observe all local, state, and
federal regulations that relate to the disposal of products
that contain lead, batteries, plastics, etc.
The lightning flash with arrowhead
symbol, within the equilateral triangle,
is intended to alert the user to the presence of uninsulated “dangerous voltage” within the product’s enclosure that
may be of sufficient magnitude to constitute a risk of electrical shock.
IMPORTANT NOTICE: All Yamaha electronic products are tested and approved by an independent safety
testing laboratory in order that you may be sure that when
it is properly installed and used in its normal and customary manner, all foreseeable risks have been eliminated.
DO NOT modify this unit or commission others to do so
unless specifically authorized by Yamaha. Product performance and/or safety standards may be diminished.
Claims filed under the expressed warranty may be denied
if the unit is/has been modified. Implied warranties may
also be affected.
SPECIFICATIONS SUBJECT TO CHANGE: The
information contained in this manual is believed to be
correct at the time of printing. However, Yamaha reserves
the right to change or modify any of the specifications
without notice or obligation to update existing units.
NOTICE: Service charges incurred due to lack of knowledge relating to how a function or effect works (when the
unit is operating as designed) are not covered by the
manufacturer’s warranty, and are therefore the owners
responsibility. Please study this manual carefully and consult your dealer before requesting service.
NAME PLATE LOCATION: The graphic below indicates the location of the name plate. The model number,
serial number, power requirements, etc., are located on
this plate. You should record the model number, serial
number, and the date of purchase in the spaces provided
below and retain this manual as a permanent record of
your purchase.
CVP-105
CVP-109/CVP-107
CVP-700
92-469- ➀ (bottom)
Model _____________________________________
Serial No. __________________________________
Purchase Date ______________________________
Page 3
PRECAUTIONS
PLEASE READ CAREFULLY BEFORE PROCEEDING
* Please keep these precautions in a safe place for future reference.
WARNING
Always follow the basic precautions listed below to avoid the possibility of serious injury or even death from electrical shock,
short-circuiting, damages, fire or other hazards. These precautions include, but are not limited to, the following:
• Do not open the instrument or attempt to disassemble the internal parts or
modify them in any way. The instrument contains no user-serviceable parts.
If it should appear to be malfunctioning, discontinue use immediately and
have it inspected by qualified Yamaha service personnel.
• Do not expose the instrument to rain, use it near water or in damp or wet
conditions, or place containers on it containing liquids which might spill
into any openings.
• If the power cord or plug becomes frayed or damaged, or if there is a sudden
loss of sound during use of the instrument, or if any unusual smells or
CAUTION
Always follow the basic precautions listed below to avoid the possibility of physical injury to you or others, or damage to the
instrument or other property. These precautions include, but are not limited to, the following:
smoke should appear to be caused by it, immediately turn off the power
switch, disconnect the electric plug from the outlet, and have the instrument
inspected by qualified Yamaha service personnel.
• Only use the voltage specified as correct for the instrument. The required
voltage is printed on the name plate of the instrument.
• Before cleaning the instrument, always remove the electric plug from the
outlet. Never insert or remove an electric plug with wet hands.
• Check the electric plug periodically and remove any dirt or dust which may
have accumulated on it.
• Do not place the power cord near heat sources such as heaters or radiators,
and do not excessively bend or otherwise damage the cord, place heavy
objects on it, or place it in a position where anyone could walk on, trip over,
or roll anything over it.
• When removing the electric plug from the instrument or an outlet, always
hold the plug itself and not the cord. Pulling by the cord can damage it.
• Do not connect the instrument to an electrical outlet using a multiple-connector. Doing so can result in lower sound quality, or possibly cause overheating in the outlet.
• Remove the electric plug from the outlet when the instrument is not to be
used for extended periods of time, or during electrical storms.
• Before connecting the instrument to other electronic components, turn off
the power for all components. Before turning the power on or off for all
components, set all volume levels to minimum. Also, be sure to set the
volumes of all components at their minimum levels and gradually raise the
volume controls while playing the instrument to set the desired listening
level.
• Do not expose the instrument to excessive dust or vibrations, or extreme
cold or heat (such as in direct sunlight, near a heater, or in a car during the
day) to prevent the possibility of panel disfiguration or damage to the internal components.
• Do not use the instrument near other electrical products such as televisions,
radios, or speakers, since this might cause interference which can affect
proper operation of the other products.
• Do not place the instrument in an unstable position where it might accidentally fall over.
• Before moving the instrument, remove all connected cables.
• When cleaning the instrument, use a soft, dry cloth. Do not use paint thinners,
solvents, cleaning fluids, or chemical-impregnated wiping cloths. Also, do
not place vinyl, plastic or rubber objects on the instrument, since this might
discolor the panel or keyboard.
• On the CVP-109/700, gently remove dust and dirt with a soft cloth. Do not
wipe too hard since small particles of dirt can scratch the instrument’s finish.
• On the CVP-109/700, bumping the surface of the instrument with metal,
porcelain, or other hard objects can cause the finish to crack or peel. Use
caution.
• Do not rest your weight on, or place heavy objects on the instrument, and do
not use excessive force on the buttons, switches or connectors.
• Take care that the key cover does not pinch your fingers, and do not insert a
finger or hand in the key cover gap.
• Never insert or drop paper or metallic or other objects between the slits of
the key cover and the keyboard. If this happens, immediately turn off the
power and remove the electric plug from the outlet and have the instrument
inspected by qualified Yamaha service personnel.
• Do not place the instrument against a wall (allow at least 3 cm/one-inch
from the wall), since this can cause inadequate air circulation, and possibly
result in the instrument overheating.
• Read carefully the attached documentation explaining the assembly process. Failure to assemble the instrument in the proper sequence might result in damage to the instrument or even injury.
• Do not operate the instrument for a long period of time at a high or uncomfortable volume level, since this can cause permanent hearing loss. If you
experience any hearing loss or ringing in the ears, consult a physician.
■USING THE BENCH (if included)
• Do not play carelessly with or stand on the bench. Using it as a tool or stepladder or for any other purpose might result in accident or injury.
• Only one person should sit on the bench at a time, in order to prevent the
possibility of accident or injury.
• If the bench screws become loose due to extensive long-term use, tighten
them periodically using the included tool.
■SAVING USER DATA
• Always save data to a floppy disk frequently, in order to help prevent the loss
of important data due to a malfunction or user operating error.
Yamaha cannot be held responsible for damage caused by improper use or
modifications to the instrument, or data that is lost or destroyed.
(1)B_EL/CL-4vari.
1
Always turn the power off when the instrument is not in use.
CVP-109/107/105/700
3
Page 4
Thank you for purchasing the Yamaha Clavinova! We recommend that you read this man ual carefully so that you can fully take advantage of the advanced and convenient functions of the Clavinova.
We also recommend that you keep this manual in a safe and handy place for future reference.
Accessories
● Music Software Collection Disk (and Music Book)
This disk features sample songs that you can play back on your Clavinova, as well as MIDI
driver software for computers.
● Floppy Disk
Use this blank disk to record your performances.
● Owner’s Manual
This manual contains complete instructions for operating your Clavinova.
● Reference Booklet
This manual contains lists of voices, styles, and parameters, etc., as well as specifications
and assembly instructions for your Clavinova.
● Bench
A bench may be included or optional, depending on your locale.
• The illustrations and LCD screens as shown in this owner’s
manual are for instructional purposes only, and may appear
somewhat different from those on your instrument.
• Unauthorized copying of copyrighted software for purposes other
than the purchaser’s personal use is prohibited.
• This product is manufactured under license of U.S. Patents
No.5231671, No.5301259, No.5428708, and No.5567901 from
IVL Technologies Ltd.
● Trademarks:
• Apple and Macintosh are trademarks of Apple Computer, Inc.
• IBM-PC/AT is a trademark of International Business
Machines Corporation.
• Windows is the registered trademark of Microsoft®
Corporation.
• All other trademarks are the property of their respective holders.
The Panel Logos
The logos printed on the Clavinova panel indicate standards/formats it supports and special features it includes.
GM System Level 1
“GM System Level 1” is an addition to the MIDI standard which
guarantees that any data conforming to the standard will play
accurately on any GM-compatible tone generator or synthesizer
from any manufacturer.
XG Format
XG is a new Yamaha MIDI specification which significantly expands and improves on the “GM System Level 1” standard with
greater voice handling capacity, expressive control, and effect
capability while retaining full compatibility with GM. By using the
Clavinova’s XG voices, it is possible to record XG-compatible
song files.
XF Format
The Yamaha XF format enhances the SMF (Standard MIDI File)
standard with greater functionality and open-ended expandability
for the future. The Clavinova is capable of displaying lyrics when
an XF file containing lyric data is played. (SMF is the most common format used for MIDI sequence files. The Clavinova is compatible with SMF Formats 0 and 1, and records “song” data using
SMF Format 0.)
Vocal Harmony (CVP-109/107/700)
Vocal Harmony employs state-of-the-art digital signal processing technology to automatically add appropriate vocal harmony
to a lead vocal line sung by the user. Vocal Harmony can even
change the character and gender of the lead voice as well as
the added voices to produce a wide range of vocal harmony
effects.
Disk Orchestra Collection
The DOC voice allocation format provides data playback compatibility with a wide range of Yamaha instruments and MIDI
devices.
Style File Format
The Style File Format (SFF) is Yamaha’s original style file
format, which uses a unique conversion system to provide highquality automatic accompaniment based on a wide range of
chord types. The Clavinova uses the SFF internally, reads
optional SFF style disks, and creates SFF styles using the
Custom Style feature.
4
CVP-109/107/105/700
2
Page 5

○○○○○○○○○○○○○○○○○○○○○○○○○○○○○○
Features of the Clavinova
● Large, Easy-to-use LCD Display
The large LCD (together with the various panel buttons) provides comprehensive and easy-to-un-
derstand control of the Clavinova’s operations (page 16).
● Wealth of Rich, Realistic Voices
The Clavinova has a wide variety of authentic and dynamic voices, including 224 original voices
(195 voices on the CVP-105), 6 Organ Flute voices (CVP-109/107/700), 480 XG voices, and 13 drum/
SFX kits (12 kits on the CVP-105). These include exceptionally natural-sounding piano, strings and
brass voices, and the particularly expressive “sweet” wind voices (the CVP-105 has one sweet voice,
“SweetTrumpet”). Moreover, you can play realistic drum and percussion sounds directly from the keyboard (page 36).
● Playback of Song Disks
The Clavinova can play back various commercially available song disks. With the appropriate disk
software, you can play the piano part of the song yourself along with a full orchestra or backing band
(page 113). If the software contains lyrics, you can display them on the Clavinova’s LCD — on the
CVP-107, CVP-109 and CVP-700, you can even output them to a television screen via the VIDEO
OUT jack (page 215).
● Special Guide Functions for Easy Learning
With the appropriate disk software, the LCD display and guide lamps help you learn songs by
showing you when and where to play the proper notes. The three-step system helps you to master each
song quickly and easily (page 125).
● Fun, Dynamic Automatic Accompaniment
The Auto Accompaniment of the Clavinova gives you full, exciting instrumental backing in your
favorite music styles, according to the chords you play (page 69). There’s even a wide selection of
“Pianist” styles that allow you to enjoy solo piano accompaniment (page 70). Choose from no less
than 170 accompaniment styles (the exact number of styles depends on the model), or create your own
custom styles (page 91).
● Easy Access to a Variety of Musical Enjoyment
The Clavinova off ers several ways to change panel settings without a lot of fuss. You can use the
One Touch Setting feature to select from four sets of voice, effect, and other settings appropriate to
each accompaniment style (page 90). Or access the Music Database to choose from more than 400 sets
of style and voice settings, selectable by title or style (page 79). You can even save your current setup
for instant recall later using the handy Registration function (page 108).
● Easy-to-use Recording Features
You can record songs using a variety of methods, depending on your keyboard expertise and preference. Choose from the Quick Recording, Track Recording, Chord Sequence Recording, and Step Edit
functions (page 130).
● Automatic Vocal Harmony Function (CVP-109/107/700)
The Clavinova’s unique Vocal Harmony feature employs advanced voice-processing technology to
automatically produce vocal harmony based on a lead vocal, allowing a single singer to sound like a
vocal group (page 175).
● Convenient TO HOST Terminals for Direct Connection to Computers
The Clavinova can be used as a high-quality sound source to play back music software for computers. It can also be used as a master keyboard, to enter performance data and create music with a computer (page 216).
3
CVP-109/107/105/700
5
Page 6
Table of Contents
○○○○○○○○○○○○○○○○○○○○○○○○○○○○○○○○○○○○○○○○○
CHAPTER 1:
Getting Ready
About This Manual 8
Handling the Floppy Disk Drive (FDD) and Floppy Disks 9
Setting Up the Clavinova 10
Music Stand .....................................................................................10
Key Cover ........................................................................................10
Lid (CVP-700 only)........................................................................... 11
Turning the Power On and Off ......................................................... 11
Panel Controls and Terminals 12
Playing the Demo Songs 14
CHAPTER 2:
Basic Operation
Using the LCD Display Controls 16
Selecting a Function ........................................................................ 16
Changing a Setting .......................................................................... 17
Changing a Setting in a Menu Display ............................................. 18
Resetting a Function’s Value ...........................................................19
Displaying a Different Page ............................................................. 20
Using Functions in Non-rounded Rectangles .................................. 21
Exiting to the Main Display............................................................... 21
Using the Direct Access Function .................................................... 22
Adjusting the Volume 23
Adjusting the Overall Volume........................................................... 23
Adjusting the Accompaniment or Song Volume...............................23
Setting the Keyboard Volume .......................................................... 23
Adjusting Accompaniment or Song Part Levels............................... 24
Using an Expression Pedal (CVP-109/107/700).............................. 24
Adjusting the Timbre (CVP-109/107/700) 25
Changing the Master Equalizer Settings.......................................... 25
Using the Equalizer Lock Function .................................................. 26
Using the Metronome 27
Using the Metronome.......................................................................27
Changing the Metronome Settings .................................................. 28
Using the Help Mode 29
CHAPTER 3:
Voices
Selecting Voices 31
Selecting a Voice from the VOICE SELECT Display ....................... 31
Selecting Voices from the Main Display........................................... 32
Organ Flutes (CVP-109/107/700) .................................................... 33
Keyboard Percussion ....................................................................... 36
Changing the Keyboard Settings for the Main Voice ....................... 36
Playing Two Voices Simultaneously — Dual Mode 38
Selecting the Second Voice ............................................................. 38
Changing the Main Voice in Dual Mode........................................... 38
Changing the Keyboard Settings for the Second Voice................... 39
Exiting the Dual Mode...................................................................... 40
Playing Two Voices on Different Sides of the Keyboard
— Split Mode 41
Selecting the Left Voice ................................................................... 41
Changing the Main Voice in Split Mode ........................................... 42
Changing the Keyboard Settings for the Left Voice ......................... 42
Using the Dual and Split Functions Simultaneously ........................ 44
Exiting the Split Mode ...................................................................... 44
Using the Pedals 45
Damper Pedal (Right) ...................................................................... 45
Sostenuto Pedal (Center) ................................................................ 45
Soft Pedal (Left) ............................................................................... 45
CHAPTER 4:
Reverb and Other Effects
Reverb 46
Turning the Reverb On or Off .......................................................... 46
Changing the Reverb Settings ......................................................... 47
Chorus 51
Turning the Chorus On or Off .......................................................... 51
Changing the Chorus Settings ......................................................... 52
Voice Effects (CVP-109/107/700) 54
Turning the Effects On or Off ........................................................... 54
Changing the Effect Settings ........................................................... 55
Voice Effects (CVP-105) 58
Turning the Effects On ..................................................................... 58
Changing the Effect Settings ........................................................... 58
CHAPTER 5:
Accompaniment Styles
(Rhythm and Auto Accompaniment)
Selecting Accompaniment Styles 61
Selecting a Style .............................................................................. 61
Playing the Accompaniment Styles 63
Varying the Style .............................................................................. 63
Starting the Accompaniment Style ................................................... 64
Stopping the Accompaniment Style ................................................. 67
Playing with the Auto Accompaniment 69
Using the Auto Accompaniment....................................................... 69
Starting the Auto Accompaniment ................................................... 70
Stopping the Auto Accompaniment.................................................. 70
Changing the Auto Accompaniment Settings .................................. 71
Adjusting Individual Part Levels ....................................................... 77
Other Auto Accompaniment Functions 79
Music Database ............................................................................... 79
Accompaniment Assistance ............................................................. 81
Harmony .......................................................................................... 87
One Touch Setting ........................................................................... 90
Creating Your Own Styles 91
Recording a Custom Style ............................................................... 91
Other Custom Style Functions ......................................................... 99
Playing Back Your Custom Styles ................................................. 103
Messages in Custom Style Mode .................................................. 103
6
CVP-109/107/105/700
4
Page 7
○○○○○○○○○○○○○○○○○○○○○○○○○○○○○○○○○○○○○○○○○○○○○○○○○○○○○○○○○○○○○○○○○○
Using Style Files 105
About the Yamaha Style File Format ............................................. 105
Loading Styles from a Disk ............................................................ 105
Playing Loaded Style Files............................................................. 107
CHAPTER 6:
Registrations
Using Registrations (Registering and Recalling Panel Setups)
Storing a Panel Setup .................................................................... 108
Recalling the Registered Panel Settings........................................ 109
Protecting Panel Settings............................................................... 110
Naming the Registration ................................................................ 111
CHAPTER 7:
108
Song Control
Song Playback 113
Song Playback ............................................................................... 113
Part Cancel .................................................................................... 117
Assignment of Tracks to 1/RIGHT and 2/LEFT, and Voice Assignment....
Overall Song Playback Volume Control ......................................... 119
Adjustment of Track Settings ......................................................... 120
Changing Settings in the MIXER Display....................................... 121
Repeat Functions ........................................................................... 122
Other Playback Controls ................................................................ 124
Playing Other Types of Music Data ............................................... 124
Guide Control 125
Guide Methods and Piano Roll ...................................................... 125
Using the Guide Function .............................................................. 126
Other Guide-related Functions....................................................... 128
Song Recording 130
Recording Setup: Disk Format ....................................................... 131
Quick Recording ............................................................................ 132
Track Recording (Multi-track Recording) ....................................... 135
Adding New Tracks ........................................................................ 138
Punch-in/out Recording ................................................................. 138
Chord Sequence 141
Other Chord Sequence Functions ................................................. 144
Step Edit 146
Editing Song Events....................................................................... 146
Common Parameters ..................................................................... 150
Event-specific Parameters ............................................................. 151
Editing the Event Lists ................................................................... 158
Filtering the Event List ................................................................... 161
Recording Music in Step Edit Mode ............................................... 162
Saving Your Changes .................................................................... 165
Other Record Edit Functions 166
Song Name .................................................................................... 166
Track Edit ....................................................................................... 167
Initial Edit (Changing the Initial Data)............................................. 170
Making Settings in the INITIAL EDIT Display ................................ 171
Setup Memory................................................................................ 172
Vocal Harmony Memory (CVP 109/107/700)................................. 173
Recording Without a Disk 174
About the CVP MEMORY Song..................................................... 174
118
CHAPTER 8:
Vocal Harmony
Singing with Vocal Harmony (CVP-109/107/700) 175
Using Vocal Harmony .................................................................... 175
Changing the Vocal Harmony Settings .......................................... 176
Using Vocal Harmony Data............................................................ 184
CHAPTER 9:
The Utility Functions
Keyboard 188
FUNCTION [KEYBOARD 1] Display — page 1 ............................. 188
FUNCTION [KEYBOARD 2] Display — page 2 ............................. 189
Pedal 190
FUNCTION [PEDAL] Display — page 3 ........................................ 190
Disk 192
FUNCTION [DISK 1] Display — page 4......................................... 192
FUNCTION [DISK 2] Display — page 5......................................... 196
FUNCTION [DISK 3] Display — page 6......................................... 198
FUNCTION [DISK 4] Display — page 7......................................... 199
FUNCTION [DISK 5] Display — page 8......................................... 200
MIDI 201
FUNCTION [MIDI 1] Display — page 9 ......................................... 201
FUNCTION [MIDI 2] Display — page 10 ....................................... 202
FUNCTION [MIDI 3] Display — page 11 ....................................... 203
FUNCTION [MIDI 4] Display — page 12 ....................................... 204
Backup 206
FUNCTION [BACKUP 1] Display — page 13 ................................ 206
FUNCTION [BACKUP 2] Display — page 14 ................................ 207
Utility 208
FUNCTION [MICRO TUNING] Display — page 15 ....................... 208
FUNCTION [SCALE TUNING] Display — page 16 ....................... 209
FUNCTION
[VIDEO OUT] Display — page 17 (CVP-109/107/700) ..
CHAPTER 10:
212
Connections
Audio and Video Connections 213
Headphones................................................................................... 213
Microphone (CVP-109/107/700) .................................................... 213
Audio Input and Output .................................................................. 214
Expression Pedal (CVP-109/107/700) ........................................... 215
Video Monitor (CVP-109/107/700) ................................................. 215
Data Connections 216
Connecting MIDI Equipment .......................................................... 216
Connecting to a Host Computer..................................................... 216
APPENDICES
Effect Type Lists ............................................................................ 218
Messages....................................................................................... 221
Troubleshooting ............................................................................. 227
MIDI and Data Compatibility .......................................................... 229
Index .............................................................................................. 230
5
CVP-109/107/105/700
7
Page 8
CHAPTER 1: Getting Ready
About This Manual
○○○○○○○○○○○○○○○○○○○○○○○○○
This section explains the notation conventions that are used
throughout this manual.
■ Square brackets [ ] ............................................................................................
Square brackets enclose the names of panel buttons,
sliders, and connectors as they appear on your
Clavinova. For example, the DEMO button is expressed
as [DEMO] in this manual.
DEMO
HELP
VOCAL
HARMONY
■ Bold characters....................................................................................................
Bold type represents items shown in the LCD display, as well as the corresponding LCD buttons (i.e., the buttons directly belo w, or to the left or
right of, these items). For example, the phrase “Select RIGHT1 VOICE”
means that you should press the button directly below the “RIGHT1
VOICE” label at the bottom of the display .
CVP-107/700
PAG E
EXI T DIRECT ACCESS
■ Arrows in Operation Explanations..................................................
Different types of arrows are used to distinguish the steps of an operation
from its results.
Operation steps
♥ ➾ ♣ …indicates that you should do ♥, then do ♣.
Operation results
♥ ➔ ♠ …indicates that doing ♥ results in ♠.
8
CVP-109/107/105/700
6
Page 9
Handling the Floppy Disk
Drive (FDD) and Floppy Disks
● Precautions
Be sure to handle floppy disks and treat the disk drive with
care. Follow the important precautions below.
● Compatible Disk Type
3.5" 2DD and 2HD type floppy disks can be used.
■ Inserting/Ejecting Floppy Disks .............
To insert a floppy disk into the disk drive:
Hold the disk so that the label of the disk is facing
upward and the sliding shutter is facing forward, towards
the disk slot. Carefully insert the disk into the slot, slowly
pushing it all the way in until it clicks into place and the
eject button pops out.
D
IS
K
IN
U
S
E
To eject a floppy disk:
Before ejecting the disk, be sure to confirm that the
FDD is stopped (check if the [DISK IN USE] lamp is off).
Press the eject button slowly as far as it will go; the disk
will automatically pop out. When the disk is fully ejected,
carefully remove it by hand.
DISK IN USE lamp
D
IS
K
IN
U
S
E
Never attempt to remove the disk or turn the power off
during recording, reading and playing back. Doing so can
damage the disk and possibly the disk drive.
If the eject button is pressed too quickly, or if it is not
pressed in as far as it will go, the disk may not eject properly. The eject button may become stuck in a half-pressed
position with the disk extending from the drive slot by only
a few millimeters. If this happens, do not attempt to pull
out the partially ejected disk, since using force in this
situation can damage the disk drive mechanism or the
floppy disk. To remove a partially ejected disk, try pressing the eject button once again, or push the disk back into
the slot and then repeat the eject procedure.
Be sure to remove the floppy disk from the disk drive
before turning off the power. A floppy disk left in the drive
for extended periods can easily pick up dust and dirt that
can cause data read and write errors.
○○○○○○○○○○○
■ Cleaning the Disk Drive Read/Write
Head......................................................................................
● Clean the read/write head regularly. This instrument
employs a precision magnetic read/write head which,
after an extended period of use, will pick up a layer of
magnetic particles from the disks used that will eventually cause read and write errors.
● To maintain the disk drive in optimum working order
Yamaha recommends that you use a commerciallyavailable dry-type head cleaning disk to clean the
head about once a month. Ask your Yamaha dealer
about the availability of proper head-cleaning disks.
● Never open or close the key cover while a disk is
extending from the drive (i.e. in the ejected position).
The key cover may contact the disk, possibily damaging the disk or even the disk drive.
● Never insert anything but floppy disks into the disk
drive. Other objects may cause damage to the disk
drive or floppy disks.
■ About the Floppy Disks ...................................
To handle floppy disks with care:
● Do not place heavy objects on a disk or bend or
apply pressure to the disk in any way. Always keep
floppy disks in their protective cases when they are
not in use.
● Do not expose the disk to direct sunlight, extremely
high or low temperatures, or excessive humidity, dust
or liquids.
● Do not open the sliding shutter and touch the exposed surface of the floppy disk inside.
● Do not expose the disk to magnetic fields, such as
those produced by televisions, speakers, motors,
etc., since magnetic fields can partially or completely
erase data on the disk, rendering it unreadable.
● Never use a floppy disk with a deformed shutter or
housing.
● Do not attach anything other than the provided labels
to a floppy disk. Also make sure that labels are attached in the proper location.
To protect your data (Write-protect Tab):
To prevent accidental erasure of important data, slide the
disk’s write-protect tab to the “protect” position (tab open).
Data backup
For maximum data security Yamaha
recommends that you keep two copies of
important data on separate floppy disks.
This gives you a backup if one disk is lost
or damaged. To make a backup disk use
the Disk Copy function on page 196.
7
CVP-109/107/105/700
9
Page 10
Music Stand
CVP-109
Setting Up the Clavinova
■ To raise the music stand:...........................................................................
Z Pull the stand up and toward yourself as far as it will go.
X Flip down the two metal supports at the left and the right on the rear
of the music stand.
C Lower the music stand so that it rests on the metal supports.
On the CVP-109/107/105, the illustration shows that the angle of the
music stand can be set in one of three positions, according to the position
of the metal supports. Set the left and right metal supports to the same
position.
■ To lower the music stand: ........................................................................
○○○○○○○○○○○○○○○○○
CVP-109
Key Cover
CVP-109
Be careful to avoid catching your
fingers when opening or closing
the cover.
Z Pull the music stand toward yourself as far as it will go.
X Raise the two metal supports until they are flat against the rear sur-
face of the stand.
C Gently lower the music stand backward until it is all the way down.
CAUTION
• Do not try to use the music stand in a half-raised position. Also, when lowering the
stand, let the stand all the way down before releasing it.
■ To open the key cover:..................................................................................
Z Lift the cover slightly (not too much).
X Slide the cover open.
■ To close the key cover:.................................................................................
Z Slide the cover toward you.
10
CVP-109
CVP-109/107/105/700
X Gently lower the cover over the keys.
CAUTION
• Hold the cover with both hands when moving it, and do not release it until it is fully
opened or closed. Be careful to avoid catching fingers (yours or others) between the
cover and main unit.
• Do not place objects on top of the key cover. Small objects placed on the key cover
may fall inside the instrument when the cover is opened, and may be impossible to
remove. This could cause electric shock, short circuit, fire or other serious damage to
the instrument.
8
Page 11

○○○○○○○○○○○○○○○○○○○○○○○○○○○○○○○○○○○○○○○
Lid (CVP-700 only)
■ To open the lid: .....................................................................................................
ZRaise the music stand as described in “Music Stand” on page 10.
XRaise and hold the right side of the lid (viewed from the keyboard end
of the instrument).
CRaise the lid stay and carefully lower the lid so that the end of the stay
fits into the recess in the lid.
■ To close the lid:.....................................................................................................
ZHold the lid stay and carefully raise the lid.
-2
-1
XHold the lid in its raised position and lower the lid stay.
CCarefully lower the lid, then lower the music stand as described in
“Music Stand” on page 10.
Setting Up the Clavinova
CAUTION
• Make sure that the end of the stay fits securely in the lid recess. If the stay is not prop-
erly seated in the recess the lid may fall causing damage or injury.
• Be careful that you or others do not bump the stay while the lid is raised. The stay may
be bumped out of the lid recess causing the lid to fall.
• Be careful not to catch your fingers when raising or lowering the lid.
Turning the Power On and Off
Z Connect the power cord.
Insert the plugs at the ends of the cord, one into the AC INLET on the
bottom panel of the Clavinova, and the other into a standard AC outlet.
In some areas, a plug adapter may be provided to match the pin con-
POWER
CONTRAST
VOLUME
MASTER
VOLUME
MAX
ACMP/SONG
VOLUME
MAX
figuration of the AC wall outlets in your area.
X Press the [POWER] switch.
The main display appears in the LCD display. (Initially, the voice
Grand Piano and the accompaniment style 8 Beat 1 are selected.)
The power lamp below the lower left end of the keyboard also lights.
C Adjust the LCD.
If the LCD is difficult to read, adjust the contrast with the [CONTRAST] knob at the left of the LCD.
V Adjust the volume.
Use the [MASTER VOLUME] slider to adjust the volume to an ap-
propriate level.
MIN
MIN
● When you’re ready to turn off the power, press the [POWER] switch
again. Both the LCD display and the power lamp below the left end
of the keyboard will turn off.
9
CVP-109/107/105/700
11
Page 12
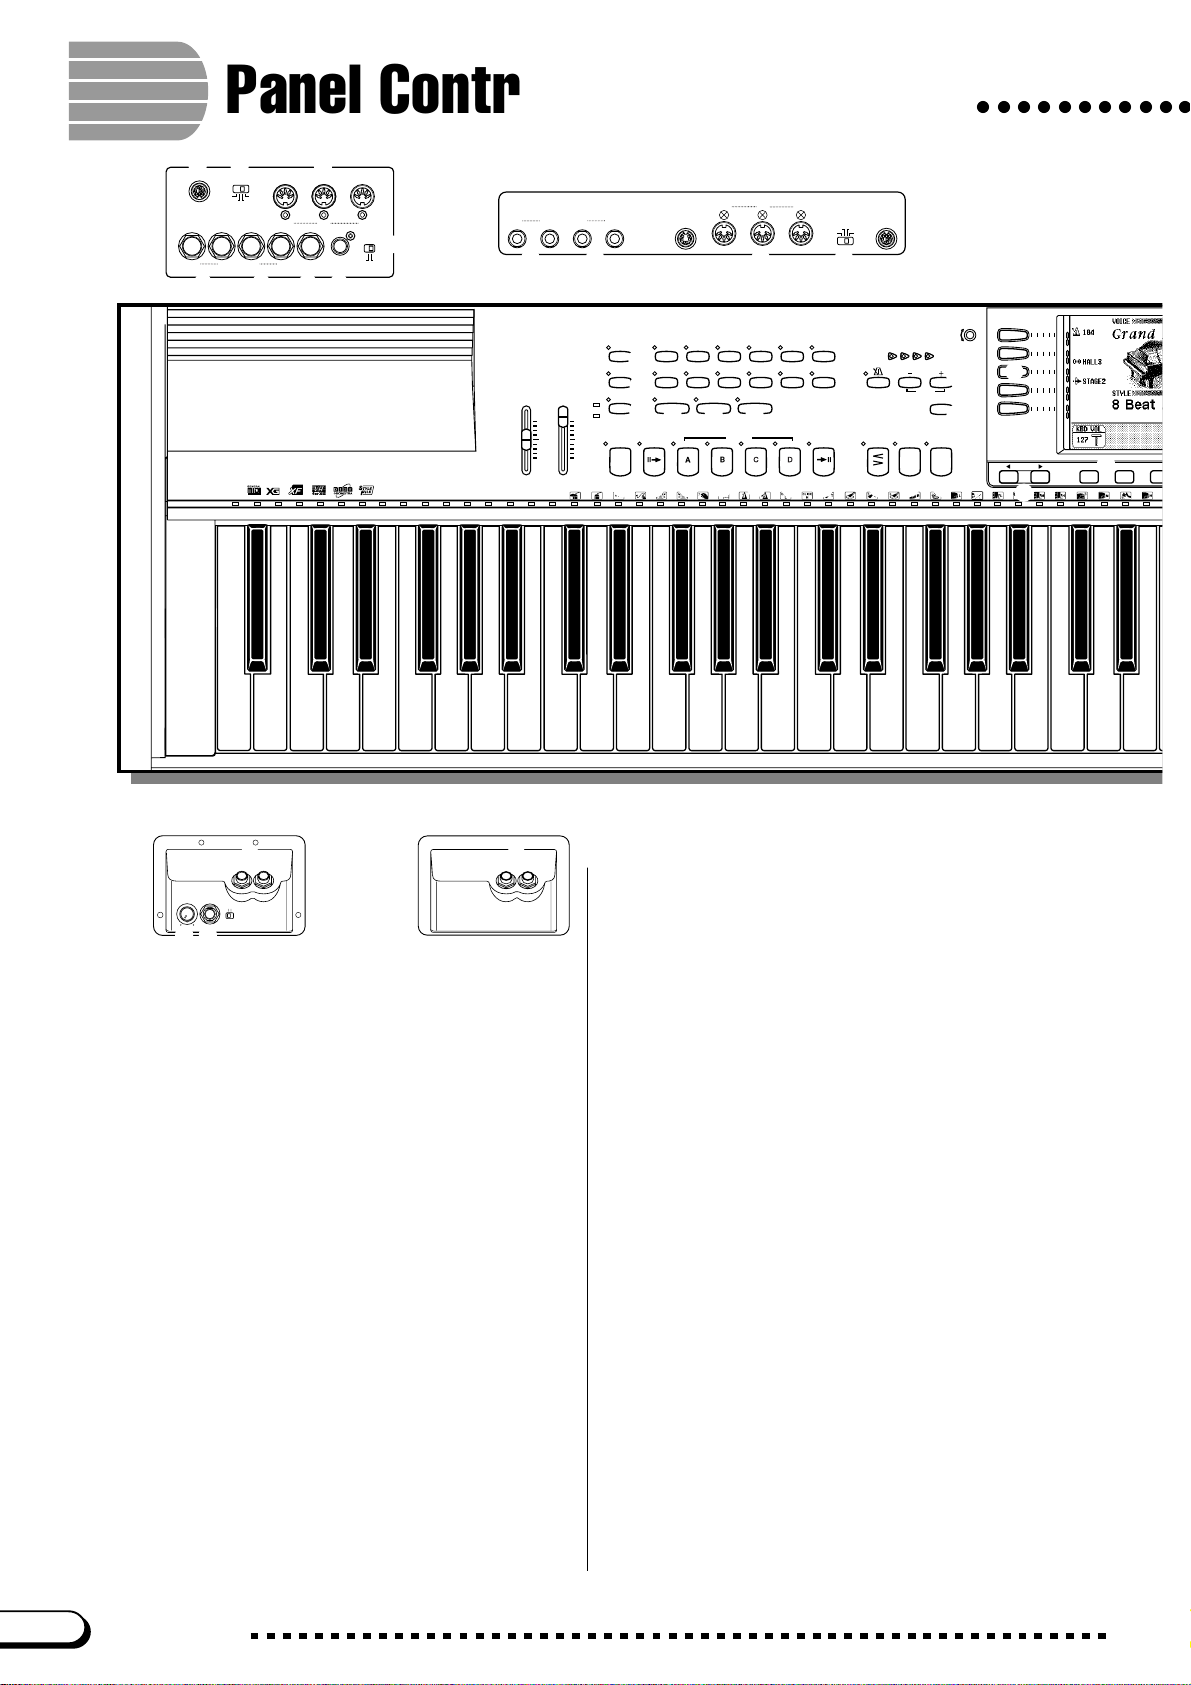
Panel Controls and Terminals
PHONESMIC. VOL.
MIN MAX
MIC.
MIC/LINE
zxcvv
bnm.,
/
bnm,/ZX
.
○○○○○○○○○○○
CVP-109
CVP-107
CVP-700
MIDIMac
PC-2PC-1
TO HOST
HOST SELECT
+
+
R
RL/L
AUX OUT
R
AUX IN
L/L
CVP-109
MIDI
OUT
IN
6
16BE AT
BALLAD PIANIST
LATIN
COUNTRY DISK
ACMP ASSIST
9
8
AUTO ACCOMPANIMENT
AUTO FILL
MAIN BMAIN A MAIN C MAIN D ENDING SYNCHRO START
MASTER
VOLUME
AUX IN
THRU
OUT
IN
MIDI
PEDAL
EXP.
PAL
VIDEO
OUT VIDEO SELECT
R
CVP-105
NTSC
AUX OUT
RR
L/L+RL/L
21
VOLUME
ACMP/SONG
VOLUME
MAX
MIN
+
R
DEMO
3
HELP
4
VOCAL
HARMONY
OVER
SIGNAL
5
MAX
ACMP ON
MIN
8BEAT DANCE
SWING/
JAZZ
MUSIC
DATABASE
INTRO
! @ # $ % ^
C1 D1 E1 F1 G1 A1 B1 C2 D2 E2 F2 G2 A2 B2 C3 D3 E3
B0A0G0F0E0D0C0B-1A-1
STYLE
HARMONY
0
THRU
HOST SELECT
TO HOSTPEDAL
PC-1
PC-2
MIDI
Mac
CONTRAST
(
FADE
IN
/
w
*
BEAT
t
TEMPO
RESET
TAP
/
STOP
START
OUT
e
/
r
)
q
STOP
i
PAGE
y
u
p
ROCK/
R&B
TRAD/
BALL–
WALTZ
ROOM
CUSTOM METRONOME
7
&
CVP-109
PHONES
CVP-109
CVP-107
CVP-700
CVP-105
Volume Section
1 [MASTER VOLUME] ....................................page 23
2 [ACMP/SONG VOLUME ] ............................page 23
Special Mode Control Section
3 [DEMO] .........................................................page 14
4 [HELP] ..........................................................page 28
5 [VOCAL HARMONY]
Accompaniment Style Section
(CVP-109/107/700)..
page 175
6 STYLE buttons .............................................page 61
7 [DISK/CUSTOM]...........................................page 91
8 [MUSIC DATABASE] .................................... page 79
9 [ACMP ASSIST]............................................page 81
0 [HARMONY] .................................................page 87
Auto Accompaniment Section
! [ACMP ON] ...................................................page 69
@ [INTRO].........................................................page 66
# [MAIN A] .......................................................page 63
$ [ M AI N B ] .......................................................page 63
% [ M AI N C ] .......................................................page 63
^ [ M AI N D ] .......................................................page 63
& [ENDING]......................................................page 67
Metronome Section
* [BEAT]...........................................................page 64
( [METRONOME] ............................................page 27
) TEMPO [–], [+] .............................................page 27
q [TAP] .............................................................page 65
Start/Stop Section
w [FADE IN/OUT].....................................pages 67, 68
e [SYNCHRO]..................................................page 65
r [START/STOP] .....................................pages 64, 67
Display Control Section
t [CONTRAST] ................................................page 10
y PAG E [<], [>] ..............................................page 20
u LCD display ..................................................page 16
i Left LCD buttons ..........................................page 18
o Right LCD buttons ........................................page 18
p LCD buttons..................................................page 17
Q [EXIT] ............................................................page 21
W [DIRECT ACCESS] ......................................page 22
E Data dial .......................................................page 17
R [–], [+]............................................................page 17
Main Mode Control Section
T [SONG] .......................................................page 114
Y [MIXER] ........................................................page 24
U
[MASTER EQUALIZER] (CVP-109/107/700)..
page 25
12
CVP-109/107/105/700
10
Page 13
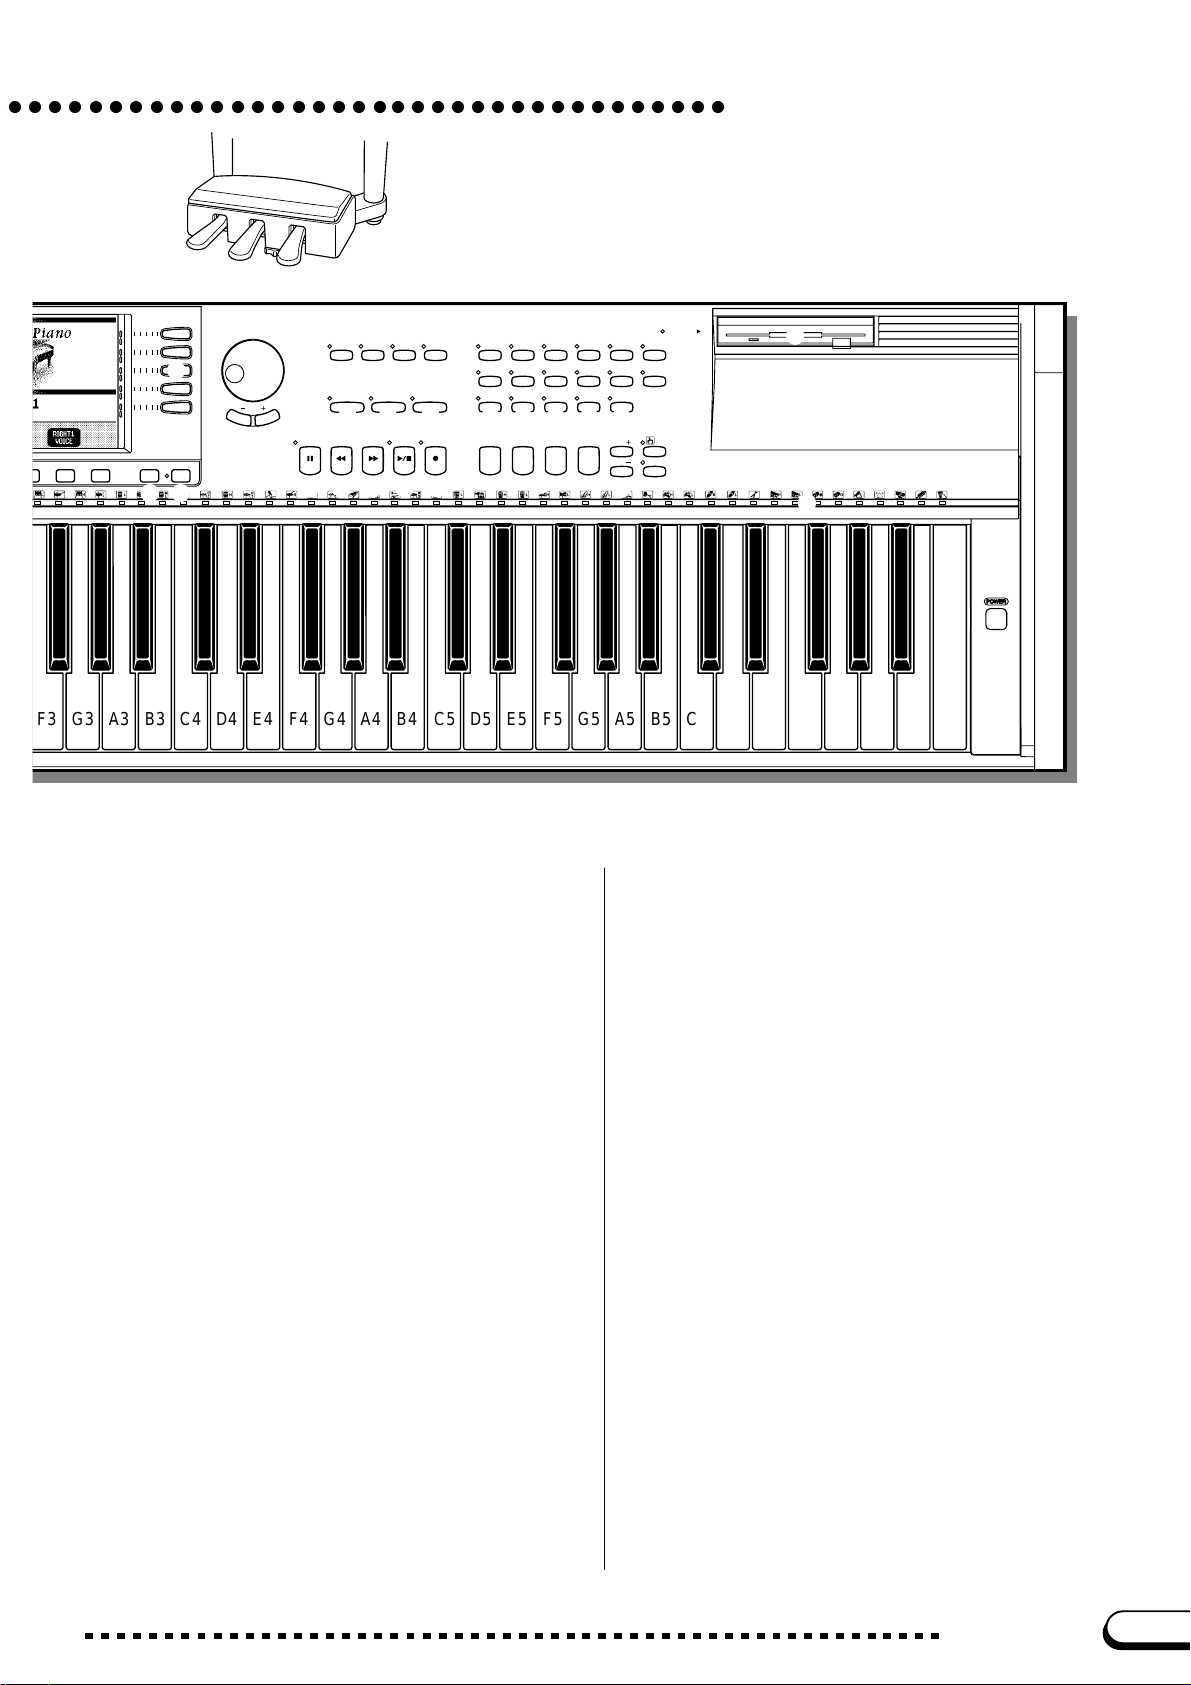
Panel Controls and Terminals
B
o
EXIT DIRECT ACCESS
W
Q
C
V
E
R
PAUSE REW
s
CVP-109
T
SONG MIXER
EASY PLAY
O
SONG CONTROL
d
Y
U
MASTER
EQUALIZER
GUIDE CONTROL
NEXT NOTE
P
PLAY
STOP
FF REC
f
g
J
I
PIANO E. PIANO GUITAR
FUNCTION
SOUND
REPEAT
a
/
DUAL SPLIT REVERB CHORUS
k
1234
h
VOICE
j
SYNTHE-
SIZER
SAX
/
BASSBRASS
;
PER-
CUSSION
A S
FLUTE
l
REGISTRATION/ONE TOUCH SETTING
D
STRINGS/
ORGAN
CHOIR
ENSEMBLE
XG
EFFECT
ONE TOUCH
BANK
SETTING
BANK REGISTRATION
F
DISK IN USE
G
H
F3 G3 A3 B3 C4 D4 E4 F4 G4 A4 B4 C5 D5 E5 F5 G5 A5 B5 C6
K
:
D6 E6 F6 G6 A6 B6 C7
L
POWER
I [FUNCTION] ...............................................page 188
Guide Control Section
O [ EA S Y P L AY] ..............................................page 125
P [NEXT NOTE] .............................................page 125
a [SOUND REPEAT] ..................................... page 126
Song Control Section
s [PAUSE]......................................................page 124
d [REW] .........................................................page 124
f [FF] .............................................................page 124
g [PLAY/STOP]..............................................page 115
h [REC] ..........................................................page 133
Voice Section
j VOICE buttons .............................................page 31
k [DUAL] ..........................................................page 38
l [SPLIT]..........................................................page 41
; [REVERB] .....................................................page 46
A [CHORUS] ....................................................page 51
S [EFFECT]..............................................pages 54, 58
Registration/One Touch Setting Section
D [1] through [4] .....................................pages 90, 109
F BANK [–] [+]................................................page 108
G [ONE TOUCH SETTING] .............................page 90
H [REGISTRATION] .......................................page 109
K Floppy disk drive (3.5”) ..................................page 9
L [POWER] ......................................................page 11
: Keyboard guide lamps ...............................page 129
Microphone and Headphone Connectors
z [MIC. V OL.] (CVP-109/107/700) ................page 213
x [MIC.] (CVP-109/107/700) .........................page 213
c [MIC/LINE] (CVP-109/107/700) .................page 213
v [PHONES]...................................................page 213
Connectors
b [ TO HOST] ..................................................page 216
n [HOST SELECT].........................................page 216
m MIDI [IN], [OUT], [THRU] ...........................page 216
, AUX OUT [L/L+R], [R] ................................page 215
. AUX IN [L/L+R], [R] ....................................page 214
/ [EXP. PEDAL] (CVP-109/107/700).............page 215
Z [VIDEO OUT] (CVP-109/107/700) .............page 215
X [VIDEO SELECT] (CVP-109/107/700) ......page 215
Pedals
C Soft pedal .....................................................page 45
V Sostenuto pedal ...........................................page 45
B Damper pedal ...............................................page 45
J [DISK IN USE] lamp .......................................page 9
11
CVP-109/107/105/700
13
Page 14
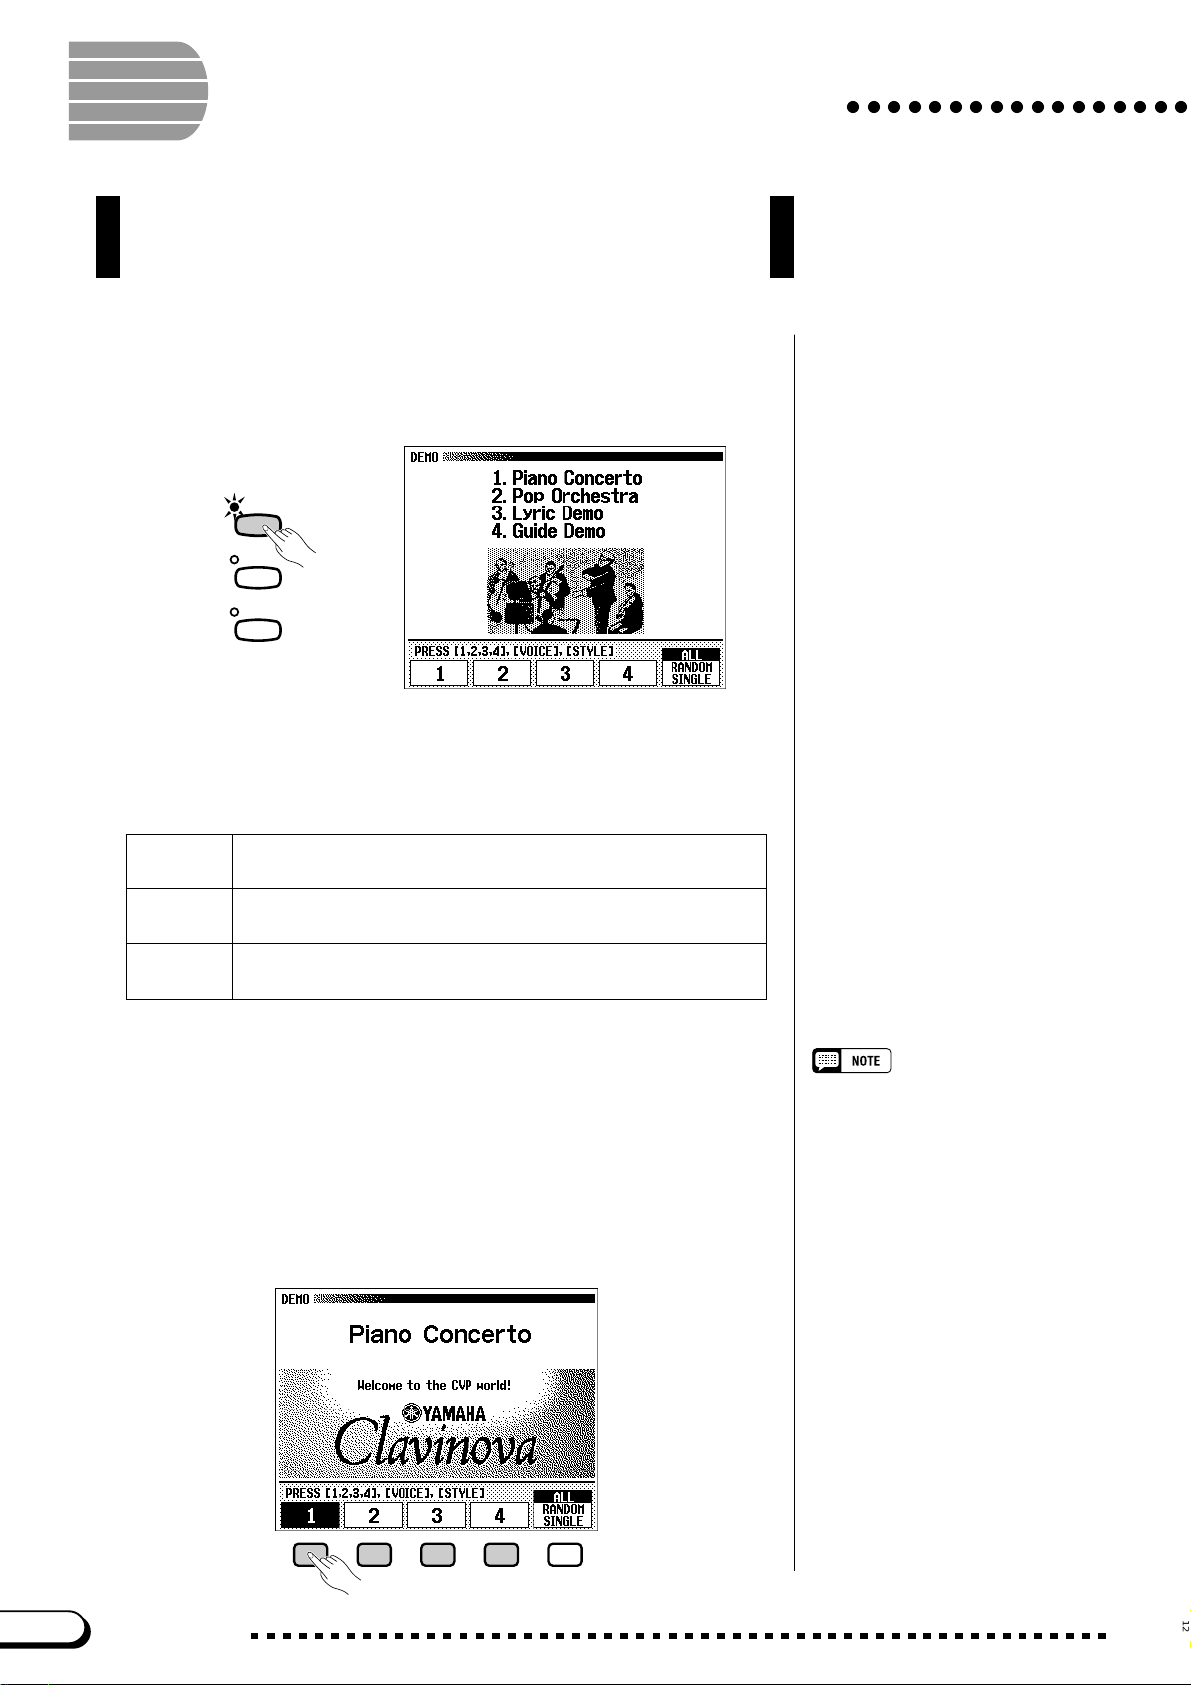
Playing the Demo Songs
The Clavinova f eatures a total of 50 demo songs: 4 f eature songs,
24 special pieces showcasing the voices, and 22 pieces showcasing
the styles. Listen to them all and hear what the Clavinova can do.
Z Call up the Demo Play mode. ..............................................................
Press [DEMO]. The lamps of the STYLE button and VOICE button
flash continuously, and the DEMO display appears.
DEMO
HELP
VOCAL
HARMONY
○○○○○○○○○○○○○○○○○
X Select the desired play mode. ............................................................
Select the desired play mode by pressing the rightmost LCD button. The
following three modes are available:
ALL All the songs play back continuously in order, starting from the
selected song. Playback continues repeatedly until stopped.
RANDOM All the songs play back randomly, starting from the selected
song. Playback continues repeatedly until stopped.
SINGLE Only the selected song plays back. When the song is finished,
playback stops automatically.
C Select the song and start playback..............................................
When you select a song, the demo automatically starts playing in the
selected play mode. There are three ways to select a demo song, as described below:
(A) To listen to one of the featured demo songs, press one of
the buttons under the numbers 1 through 4 in the display.
➔ The current song number is highlighted during playback.
• You can also start the demo playback,
beginning with the first feature song, by
pressing [START/STOP] or [PLAY/
STOP].
• For a complete list of the Clavinova’s
demo songs, refer to page 9 of the
Reference Booklet.
14
12
CVP-109/107/105/700
Page 15

○○○○○○○○○○○○○○○○○○○○○○○○○○○○○○○○○○○○○○○
(B) To listen to a voice demo, press the VOICE button corre-
sponding to the desired voice category.
➔ Playback starts from the first demo song for the selected category.
The lamp of the corresponding VOICE button flashes.
VOICE
PIANO E. PIANO GUITAR
SAX
/
FLUTE
BASSBRASS
SYNTHE-
SIZER
PER-
CUSSION
ORGAN
ENSEMBLE
STRINGS/
CHOIR
XG
(C) To listen to a style demo, press the STYLE button cor-
responding to the desired style category.
➔ Playback starts from the first demo song for the selected category.
The lamp of the corresponding STYLE button flashes.
Playing the Demo Songs
There are two demo songs for each voice
category. To skip to the second song,
press the flashing button a second time.
There are two demo songs for each style
category. To skip to the second song,
press the flashing button a second time.
STYLE
ROCK/
R&B
TRAD/
WALTZ
CUSTOM
JAZZ
16BEAT
LATIN
BALLAD PIANIST
BALL–
COUNTRY DISK
ROOM
8BEAT DANCE
SWING/
V Adjust the volume. ..........................................................................................
Use the [MASTER VOLUME] slider to adjust the volume.
B Stop the demo playback. .........................................................................
To stop playback, press either [START/STOP] or [PLAY/STOP], or
the LCD button corresponding to the song that’s currently playing.
N Exit the Demo mode......................................................................................
To exit the Demo mode, press [DEMO] again (or press [EXIT]).
The [ACMP/SONG VOLUME] control
cannot be used.
To change songs during playback:
Press the LCD button, VOICE button, or
STYLE button of another song; the song
then changes. When ALL or RANDOM is
selected as the play mode, the Clavinova
will play other songs when the selected
song is finished.
● Playing Along with the Demo Songs
You can play the keyboard while a demo song is playing back. You
can also change the tempo (page 27) and use the [REW], [FF] and
[PAUSE] buttons. When you play 3. Lyric Demo, the Clavinova will
Demo song data is not output through
the [MIDI OUT] terminal; however, your
keyboard performance data is output.
display the lyrics so you can sing (as well as play) along; if you sing into
a microphone connected to the CVP-109/107/700, you can use the Vocal
Harmony function to add harmony to your vocals. Also, you can use the
Guide function (page 125) while the Clavinova is playing 4. GUIDE
Demo. You cannot change the voice selection while the demo is playing, however.
13
CVP-109/107/105/700
15
Page 16

CHAPTER 2: Basic Operation
Using the LCD Display Controls
You will refer to the LCD displa y frequently as you operate your
Clavinova. This section consists of a short tutorial that will help
you learn how to read the LCD display and use the related
controls.
Selecting a Function
Many of the Clavinova’s functions are displayed at the bottom of the
LCD. The main display shown below contains two functions: KBD VOL
and RIGHT1 VOICE. These items are displayed in rounded rectangles,
which means they represent settings that can be changed.
CVP-107/700
○○○○○○○○○
Main display
Remember, the
play that appears first when you turn the
power on.
main display
is the dis-
Before you can change a function’ s setting, however, you have to select it
first. In the main display, the RIGHT1 VOICE function is highlighted, indi-
cating that this function is currently selected.
To select a function, press and quickly release the LCD button directly
below that function. For example, you can select KBD VOL by pressing the
leftmost LCD button.
Press to select.
Highlighted items
Selected items are
letters on a dark background).
LCD buttons
The five LCD buttons under the LCD
display represent different functions,
depending on the contents of the display.
highlighted
(i.e., white
16
14
CVP-109/107/105/700
Page 17

○○○○○○○○○○○○○○○○○○○○○○○○○○○○○○○○○○○
Changing a Setting
There are several ways to change a function’s value. Here are two of the
main ways:
■ Using the data dial or [–] and [+] buttons.................................
Once you have selected a function, you can change its setting with the
data dial or the [–] and [+] buttons. Since you have just selected KBD
VOL, try turning the dial or pressing the [–] button until it reads 0.
The KBD VOL function sets the keyboard volume. When you set it to
0, you will find that the keyboard won’t pr oduce any sound, no matter
how high you set the [MASTER V OLUME] slider!
Using the LCD Display Controls
You can press the [–] and [+] buttons
repeatedly to change the value a little, or
hold them down to change it quickly.
Refer to page 23 for details on the KBD
VOL function.
■ Using the LCD buttons..................................................................................
You can also increase a setting by simply pressing and holding the
corresponding LCD button. For now, since you’ll want to hear your keyboard later on, press and hold the leftmost LCD button until the value for
KBD VOL is back up to 127.
Hold down to increase.
Once you’ve got the keyboard volume back where it belongs, you can
learn about a couple of other ways to change settings.
This is why you should release the LCD
button quickly when you select a function: you could end up raising its value
when you want to lower it!
15
CVP-109/107/105/700
17
Page 18

Using the LCD Display Controls
○○○○○○○○○○○○○○○○○○○○○○○○○○○○○○○○○○○○
Changing a Setting in a Menu Display
You can use either of the methods described previously to change the current voice
selection. Just press RIGHT1 VOICE and hold the button down, or use the data dial or
the [+] button to scan through the options. Try listening to a few of the voices while
you’re at it…
The problem with this method is that it can be hard to find the voice you’re looking
for — after all, the Clavinova has more than 600 voices! So you’ll probably want to use
a menu display to see what your choices are. Try pressing the [PIANO] button now.
SYNTHE-
PIANO
E. PIANO GUITAR
When you press one of the VOICE buttons, the LCD displays a two-column
menu listing the voices of that type. You should now be looking at a menu of
piano voices.
SIZER
Voice
A voice is one of the sounds
the Clavinova uses to make
music.
Refer to page 31 for more
details about selecting voices.
■ Using the ▲ and ▼ LCD buttons.......................................................................
This display has one function, VOICE, that corresponds to two LCD buttons
labeled ▲ and ▼. You can use these buttons to select a different piano voice, much
as you would use the [–] and [+] buttons.
■ Using the left and right LCD buttons............................................................
You may have noticed that each item in the menu corresponds to one of the buttons to the left and right of the LCD. Y ou can press one of these buttons to select
the corresponding menu item directly — which is much quicker than using the ▲
and ▼ buttons.
Use any of the shaded controls to select a voice.
As you can see, the menu display lets you select voices using any of a
number of controls: the two rightmost LCD buttons, any of the left and right
LCD buttons, the data dial, or the [–] and [+] buttons. Try selecting different
piano voices in this display before you move on.
Left and right LCD buttons
The buttons to the left and right
of the LCD are referred to as
the left and right LCD buttons.
18
16
CVP-109/107/105/700
Page 19

○ ○○○○○○○○○○○○○○○○○○○○○○○○○○○○○○○○○○○
Resetting a Function’s Value
After you have changed a function’s value, you may find you want to
restore its basic setting. To demonstrate this, we’ll have to look at another of
the Clavinova’s displays. Press the [FUNCTION] button.
MASTER
SONG
MIXE R FUNCT ION
This button calls up one of the Clavinova’s FUNCTION displays. You
can use this display to tune and transpose the keyboard.
The TUNE function in this display has ▼ and ▲ LCD buttons like the
ones you used in the VOICE SELECT display. You can use these buttons to
tune the keyboard up or down. Press and hold the ▼ button (or use the data
dial or the [–] button) to tune the keyboard down as far as it will go.
EQUALIZ ER
Using the LCD Display Controls
Basic settings
• The functions of the Clavinova are set
to certain standard values or standard
conditions when the instrument is
shipped. These settings and conditions
are called the basic settings.
• A function’s basic settings are generally noted in the sidebar together with
the possible settings for that function.
• You can also use the Recall function
(page 207) to restore basic settings at
any time.
Refer to page 188 for details on the
TUNE and TRANSPOSE functions.
If you play a few notes, you’ll notice that your Clavinova is flat by quite
a bit. Now, let’s assume that you want to reset the ke yboard to the standard
+
440.0 Hz. Y ou could use the ▲ button (or the data dial, or the [
] button) to
return the value to its basic setting — but there’s an easier way:
When a function has a basic setting, you can reset it to that value by
pressing both the ▲ and ▼ buttons (or both the [–] and [+] buttons) simultaneously. Try doing this now.
There are some functions whose settings
cannot be returned to the basic value by
pressing the ▲ and ▼ buttons (or [–] and
[+] buttons) simultaneously.
When you’ve got the keyboard back in tune, you’re ready to go on to the
next operation.
17
CVP-109/107/105/700
19
Page 20

Using the LCD Display Controls
Displaying a Different Page
Whereas the ▲ and ▼ buttons of the VOICE function you used in the
VOICE SELECT display change the menu selection, those of the TUNE
function do not. The menu items in the FUNCTION display are not related
to the TUNE function; instead, they represent different FUNCTION display
pages. If you look again at the top of the display, you’ll see that you’re looking at a display named FUNCTION [KEYBOARD 1], and it’s apparently
the first of many function displays.
Remember that you can always select menu items using the left and right
LCD buttons. Press the left LCD button that corresponds to PEDAL in the
menu.
○○○○○○○○○○○○○○○○○○○○○○○○○○○○○○○○○○○○
Display pages
Some displays are divided into two or
more pages, indicated by a series of
overlapping boxes in the upper right
corner of the display. The number in the
topmost box is the number of the current
display page.
This button displays the FUNCTION [PEDAL] page, which you can use
to adjust the operation of your Clavinova’s pedals. But wait — the box in
the upper right corner says this is page 3! We seem to have skipped right
past page 2…
When a display is divided into pages, you can use PAGE buttons to
change pages. Try pressing the [<] button now to see page 2.
PAG E
Page 2 is FUNCTION [KEYBOARD 2], another page of keyboard settings. Y ou can use the page buttons to select different pages of multi-page
displays, not only in FUNCTION mode, but also in certain VOICE SELECT
and STYLE SELECT displays. But don’t change the page yet: we’ re going
to use page 2 to discuss the next operation.
Refer to page 190 for details about the
functions on the FUNCTION [PEDAL]
display page.
20
18
CVP-109/107/105/700
Page 21

S
○ ○○○○○○○○○○○○○○○○○○○○○○○○○○○○○○○○○○○
Using Functions in Non-rounded Rectangles
In addition to the FIXED VELOCITY function, which is selected in this
display , the FUNCTION [KEYBOARD 2] page has two functions in normal
rectangles: KEY TOUCH and VOICE SETTING. Such functions cannot be
selected; instead, pressing the corresponding LCD button changes the setting
directly without selecting the function.
By pressing the LCD button under KEY TOUCH, for example, you can
set the Clavinova’s response to how hard you play. The value displayed in
the rectangle switches from NORMAL to SOFT, then FIXED, then HARD
— but the FIXED VELOCITY function remains selected.
Using the LCD Display Controls
The FIXED VELOCITY function is described on page 189.
For more details on the KEY TOUCH
function, refer to page 189.
The VOICE SETTING function determines whether reverb, chorus,
effect, and other settings are automatically selected when a voice is selected. It works a little differently: when you press the LCD button, the
highlighted setting switches between AUTO and MANUAL. Still,
FIXED VELOCITY remains selected.
There are other sorts of functions that are displayed in non-rounded
rectangles, like the ones you used to select a demo song in Demo mode
(see page 14). The important thing to remember about these functions is
that you don’t select them, you execute them.
Now we’re ready to return to the main display. First, however, set the
KEY TOUCH and VOICE SETTING functions back to NORMAL and
AUTO, respectively.
Exiting to the Main Display
To exit the current display, press the [EXIT] button.
EXI T DIRECT ACCES
The main display should show the name of the last piano voice that you
selected in the VOICE SELECT [PIANO] display.
For more details on the VOICE SETTING
function, refer to page 189.
You can usually use [EXIT] to get back to
the main display. In some cases, however, this button will return you to a previous setting display instead. When this
happens, pressing [EXIT] again will get
you back to the main display.
19
CVP-109/107/105/700
21
Page 22
Using the LCD Display Controls
○○○○○○○○○○○○○○○○○○○○○○○○○○○○○○○○○○○
Using the Direct Access Function
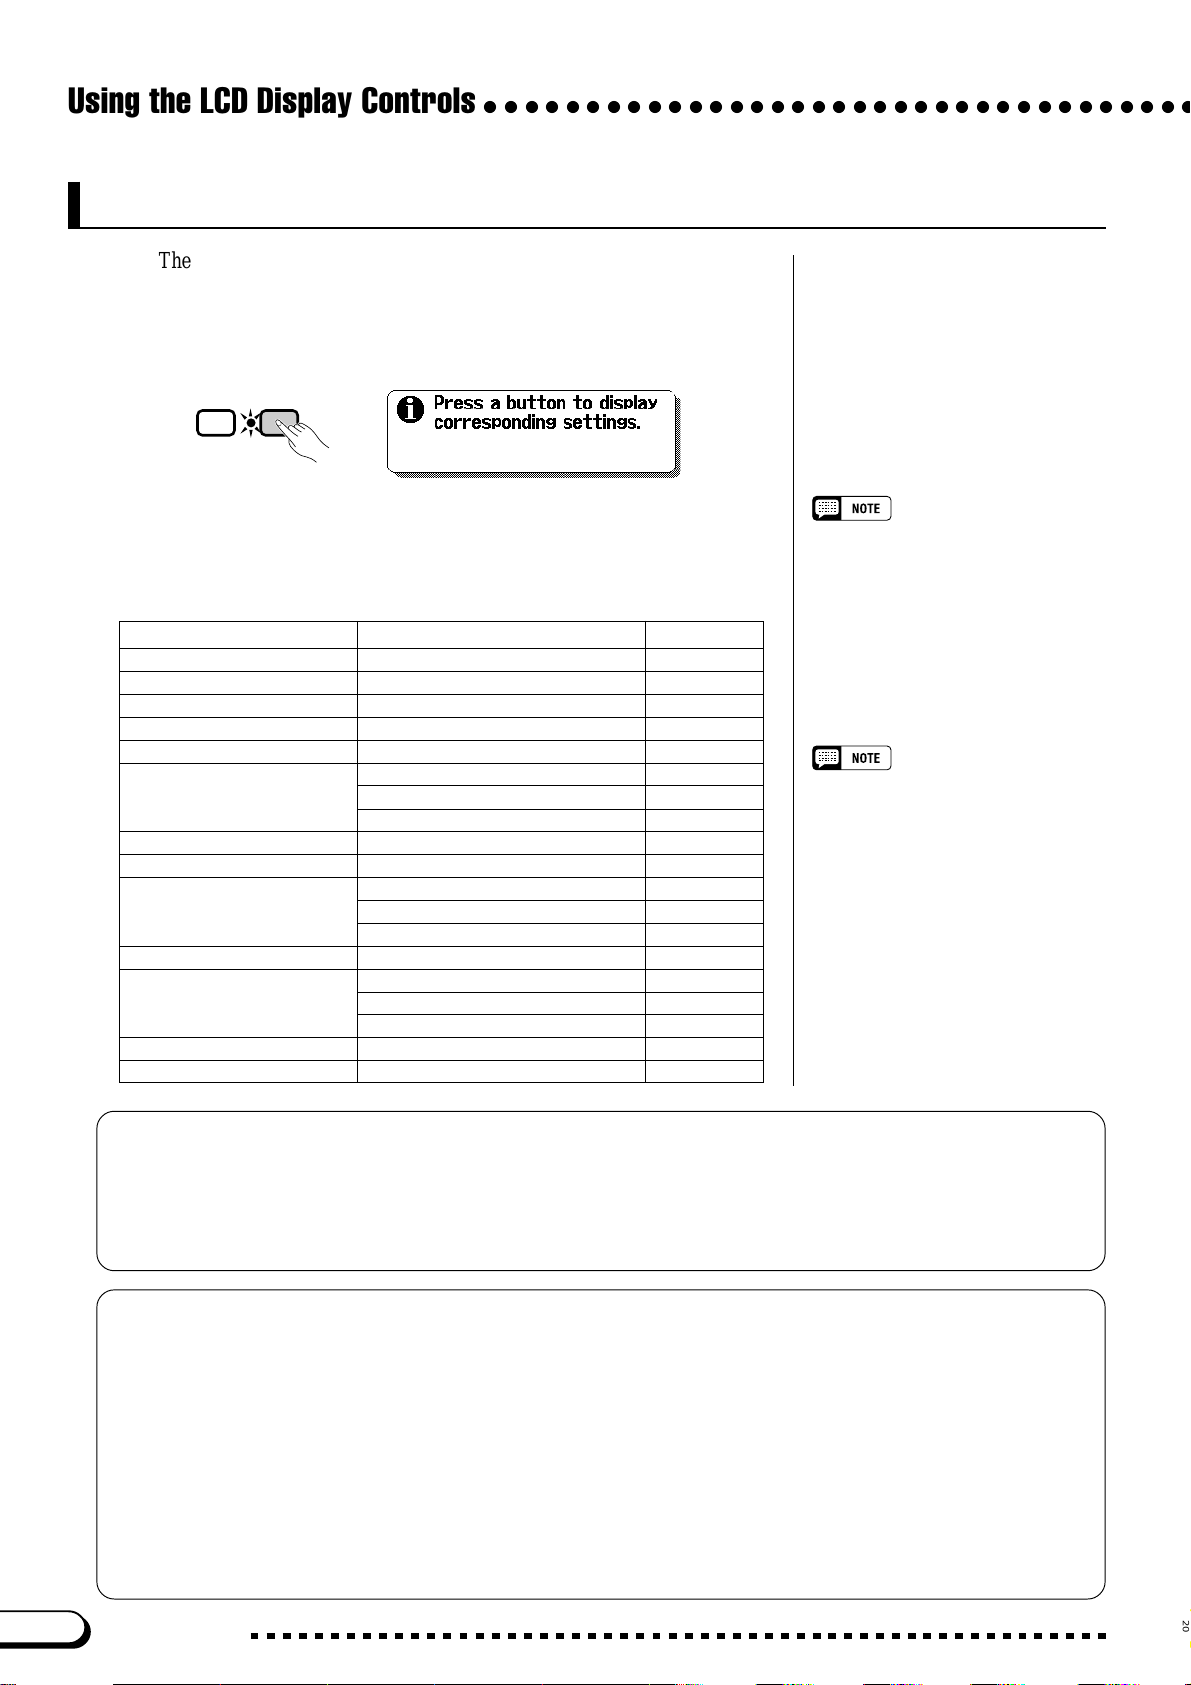
The last function we need to discuss is Direct Access. The [DIRECT AC-
CESS] button lets you jump directly to pages with particularly useful settings.
When you press [DIRECT A CCESS], the “Press a button to display
corresponding settings” message will appear in the LCD display.
EXI T DIRECT ACCESS
This message will remain onscreen for about three seconds. Press the
button corresponding to the settings you want to display before the message disappears.
Here is a list of pages you can access with Direct Access:
[DIRECT ACCESS] plus: Displays: See page:
[VOCAL HARMONY]
[ACMP ASSIST] ACMP ASSIST 81
[HARMONY] HARMONY 87
[ACMP ON]
[METRONOME] METRONOME 28
Any VOICE button KEYBOARD [RIGHT2]
[DUAL] KEYBOARD [RIGHT2] 39
[SPLIT] KEYBOARD [LEFT] 42
[REVERB]
[CHORUS] CHORUS 52
[EFFECT]
[1], [2], [3], or [4] REGISTRATION [NAME] 111
[REGISTRATION]
(4)
(4)
VOCAL HARMONY (CVP-109/107/700)
ACCOMPANIMENT MODE
KEYBOARD [RIGHT1]
KEYBOARD [LEFT]
NATURAL REVERB (CVP-109) 47
REVERB 47
REVERB DEPTH 50
EFFECT 1 (CVP-109/107/700) 55
EFFECT 2 (CVP-109/107/700) 55
EFFECT (CVP-105) 58
REGISTRATION [FREEZE]
You can also press an appropriate button
while holding down the [DIRECT ACCESS] button.
176
71
(1)
(2)
(3)
36
36
36
110
(1)
When RIGHT1 VOICE is selected in
the main display.
(2)
When RIGHT2 VOICE is selected in
the main display.
(3)
When LEFT VOICE is selected in the
main display.
(4)
Selects whichever page was most
recently displayed.
22
● A Word about Messages
For ease of operation, the Clavinova displays various messages (like the message displayed by the Direct
Access function as described above) that either prompt you to the next operation, ask for confirmation, or inform you that the last operation is not effective, valid, or appropriate. When such messages appear, follow the
instructions as shown. For details about each message, please refer to the “Messages” section on page 221.
● Saving Your Changes
Now that you’ve started learning how to change the Clavinova’s settings, you may be wondering whether it
will remember the changes you’ve made even after you’ve turned the power off. The answer is yes — but you
need to tell it which settings you want it to remember .
By default, the Clavinov a will not remember most of your setting changes. You have two ways to tell it which
settings you want to remember:
• You can register your settings with the Registration function (page 108). Once you have registered your
settings, you can restore them at any time by pressing a couple of buttons.
•
You can instruct the Clavinova to remember certain settings when the power is off, and recall these settings
when you turn the power back on. To do this, you need to change the settings of the Backup function (page 206).
CVP-109/107/105/700
20
Page 23

Adjusting the Volume
The Clavinova has two sliders that let you adjust the overall volume
and the accompaniment or song playback volume. There are also
settings that you can use to adjust the keyboard volume and the
volume of each part of the automatic accompaniment or song.
VOLUME
MASTER
ACMP/SONG
VOLUME
VOLUME
MAX
MAX
MIN
MIN
VOLUME
MASTER
VOLUME
MAX
MIN
Adjusting the Overall Volume
ACMP/SONG
VOLUME
MAX
MIN
DEMO
HELP
VOCAL
HARMONY
OVER
SIGNAL
ACMP ON
STYLE
16BEAT
8BEAT DANCE
BALLAD PIANIST
BALL–
SWING/
LATIN
ROOM
COUNTRY DISK
JAZZ
MUSIC
DATABASE
ACMP ASSIST
HARMONY
AUTO ACCOMPANIMENT
AUTO FILL
MAIN BMAIN A MAIN C MAIN D ENDING SYNCHRO START
INTRO
ROCK/
R&B
TRAD/
WALTZ
CUSTOM METRONOME
CONTRAST
BEAT
TEMPO
RESET
TAP
/
STOP
START
FADE
/
OUT
IN
/
STOP
○○○○○○○○○○○○○○○○○○○○○
DISK IN USE
VOICE
SYNTHE-
PIANO E. PIANO GUITAR
SAX
/
FLUTE
BASSBRASS
DUAL SPLIT REVERB CHORUS
REGISTRATION/ONE TOUCH SETTING
1234
STRINGS/
SIZER
ORGAN
CHOIR
PER-
ENSEMBLE
XG
CUSSION
EFFECT
ONE TOUCH
BANK
SETTING
BANK REGISTRATION
MASTER
EQUALIZER
SONG MIXER
FUNCTION
GUIDE CONTROL
SOUND
REPEAT
EASY PLAY
NEXT NOTE
SONG CONTROL
PLAY
/
STOP
PAUSE REW
PAGE
EXIT DIRECT ACCESS
FF REC
Use the [MASTER VOLUME]
slider to set the overall volume of
the Clavinova.
MASTER
VOLUME
VOLUME
ACMP/SONG
MAX
MIN
VOLUME
MAX
MIN
Adjusting the Accompaniment or Song Volume
MASTER
VOLUME
VOLUME
ACMP/SONG
MAX
MIN
VOLUME
MAX
MIN
Use the [ACMP/SONG VOL-
UME] slider to set the playback
volume of the automatic accompaniment and songs.
Setting the Keyboard Volume
• The [MASTER VOLUME] slider also
determines the output level of the
signal at the [PHONES] jack.
• Signals input to the AUX IN jacks are
also affected by the [MASTER VOLUME] setting; however, signals output
via the AUX OUT jacks are not.
This control has no effect on the volume
of your keyboard performance.
Select KBD VOL in the main
display, then use the data dial or
the [–] and [+] buttons to change
the keyboard volume.
21
CVP-109/107/105/700
23
Page 24
R
U
Adjusting the Volume
○○○○○○○○○○○○○○○○○○○○○○○○○○○○○○○○○○○○○○○○○○
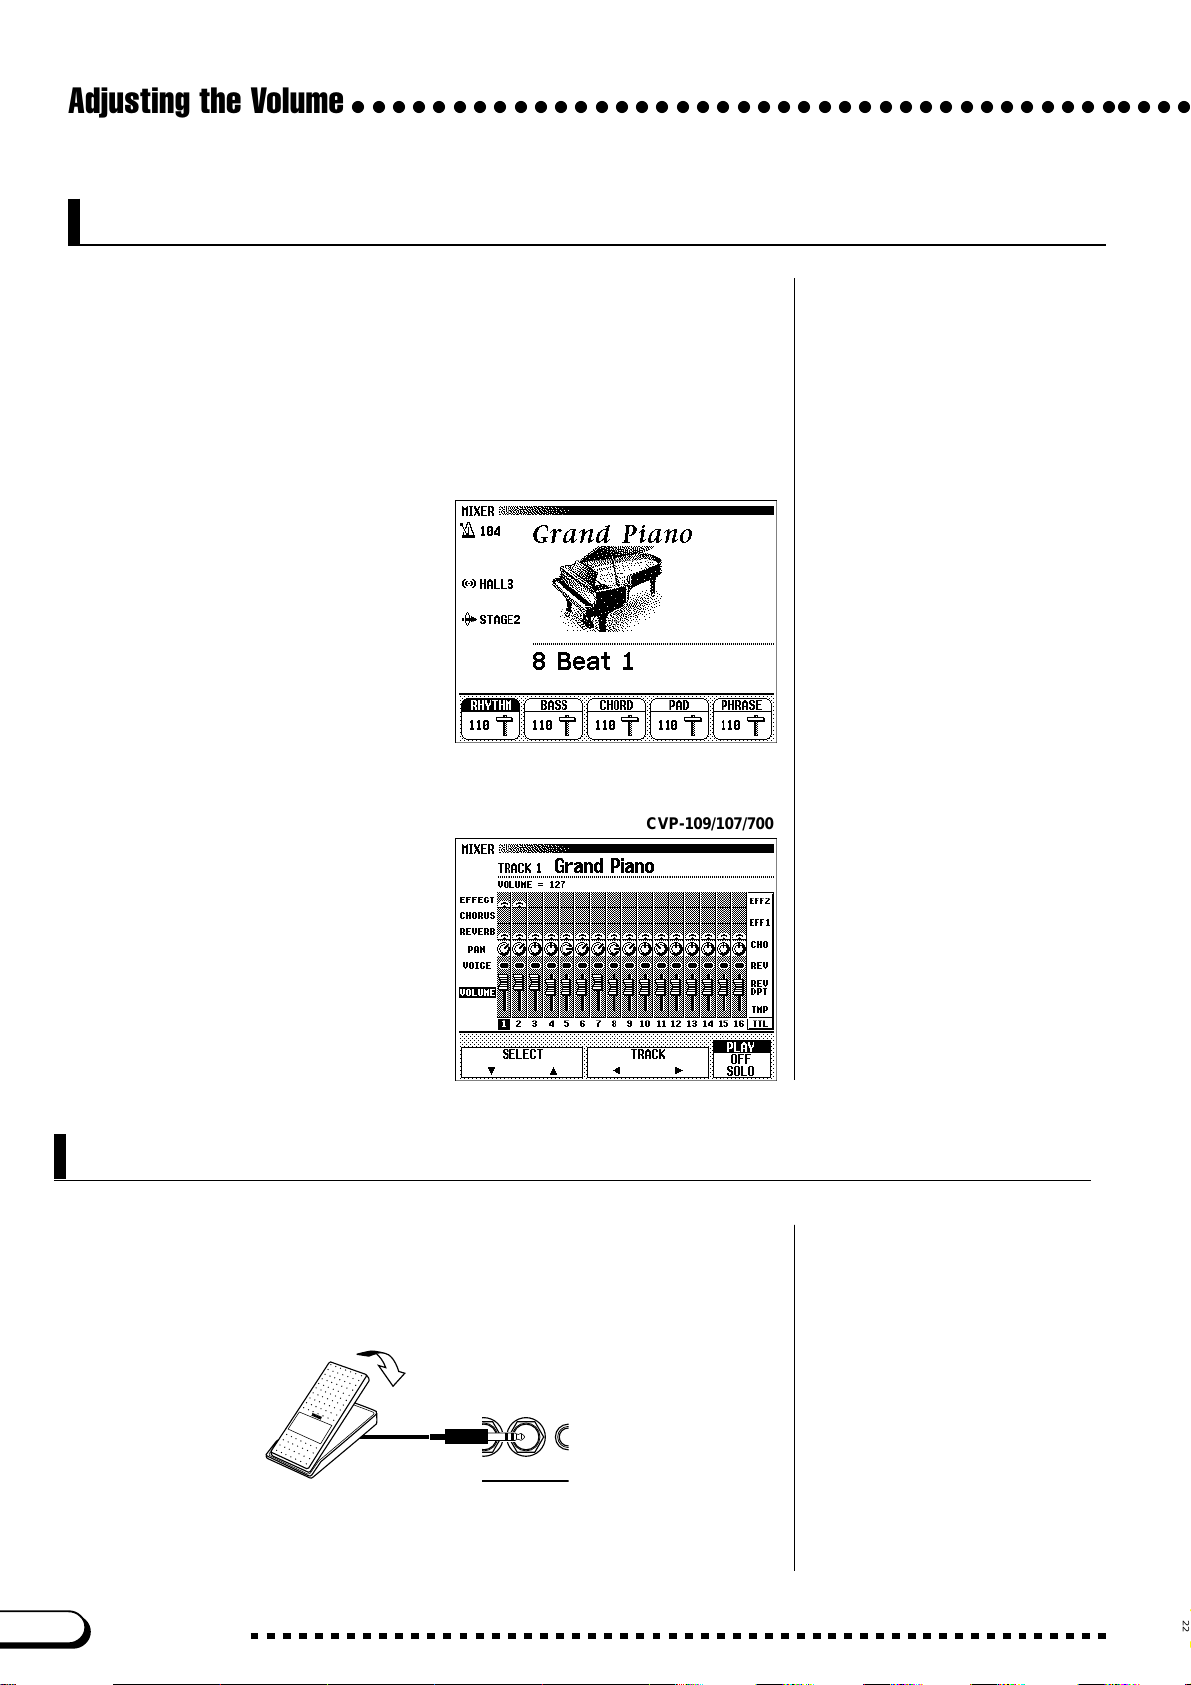
Adjusting Accompaniment or Song Part Levels
Call up the MIXER display by pressing [MIXER]. In the Mixer display,
the volume of Automatic Accompaniment and indi vidual parts of a song can
be adjusted. Press [MIXER] again (or [EXIT]) to return to the previous
display .
There are two types of mixer display, as shown below.
● Automatic Accompaniment Mixer
This MIXER display appears when you’re not using
the Song mode. See “Adjusting Individual Part Levels”
(page 77) for details.
● Song Mixer
CVP-109/107/700
This MIXER display
appears in the Song mode.
See “Adjusting Individual
Track Levels” (page 120) for
details.
Using an Expression Pedal (CVP-109/107/700)
You can control the volume of your keyboard performance with your
foot, by connecting the optional Yamaha FC7 foot controller to the
[EXP.PEDAL] jack of the Clavinova.
Press the pedal down to increase
the volume.
EXP.
VID
PEDAL
O
24
CVP-109/107/105/700
22
Page 25
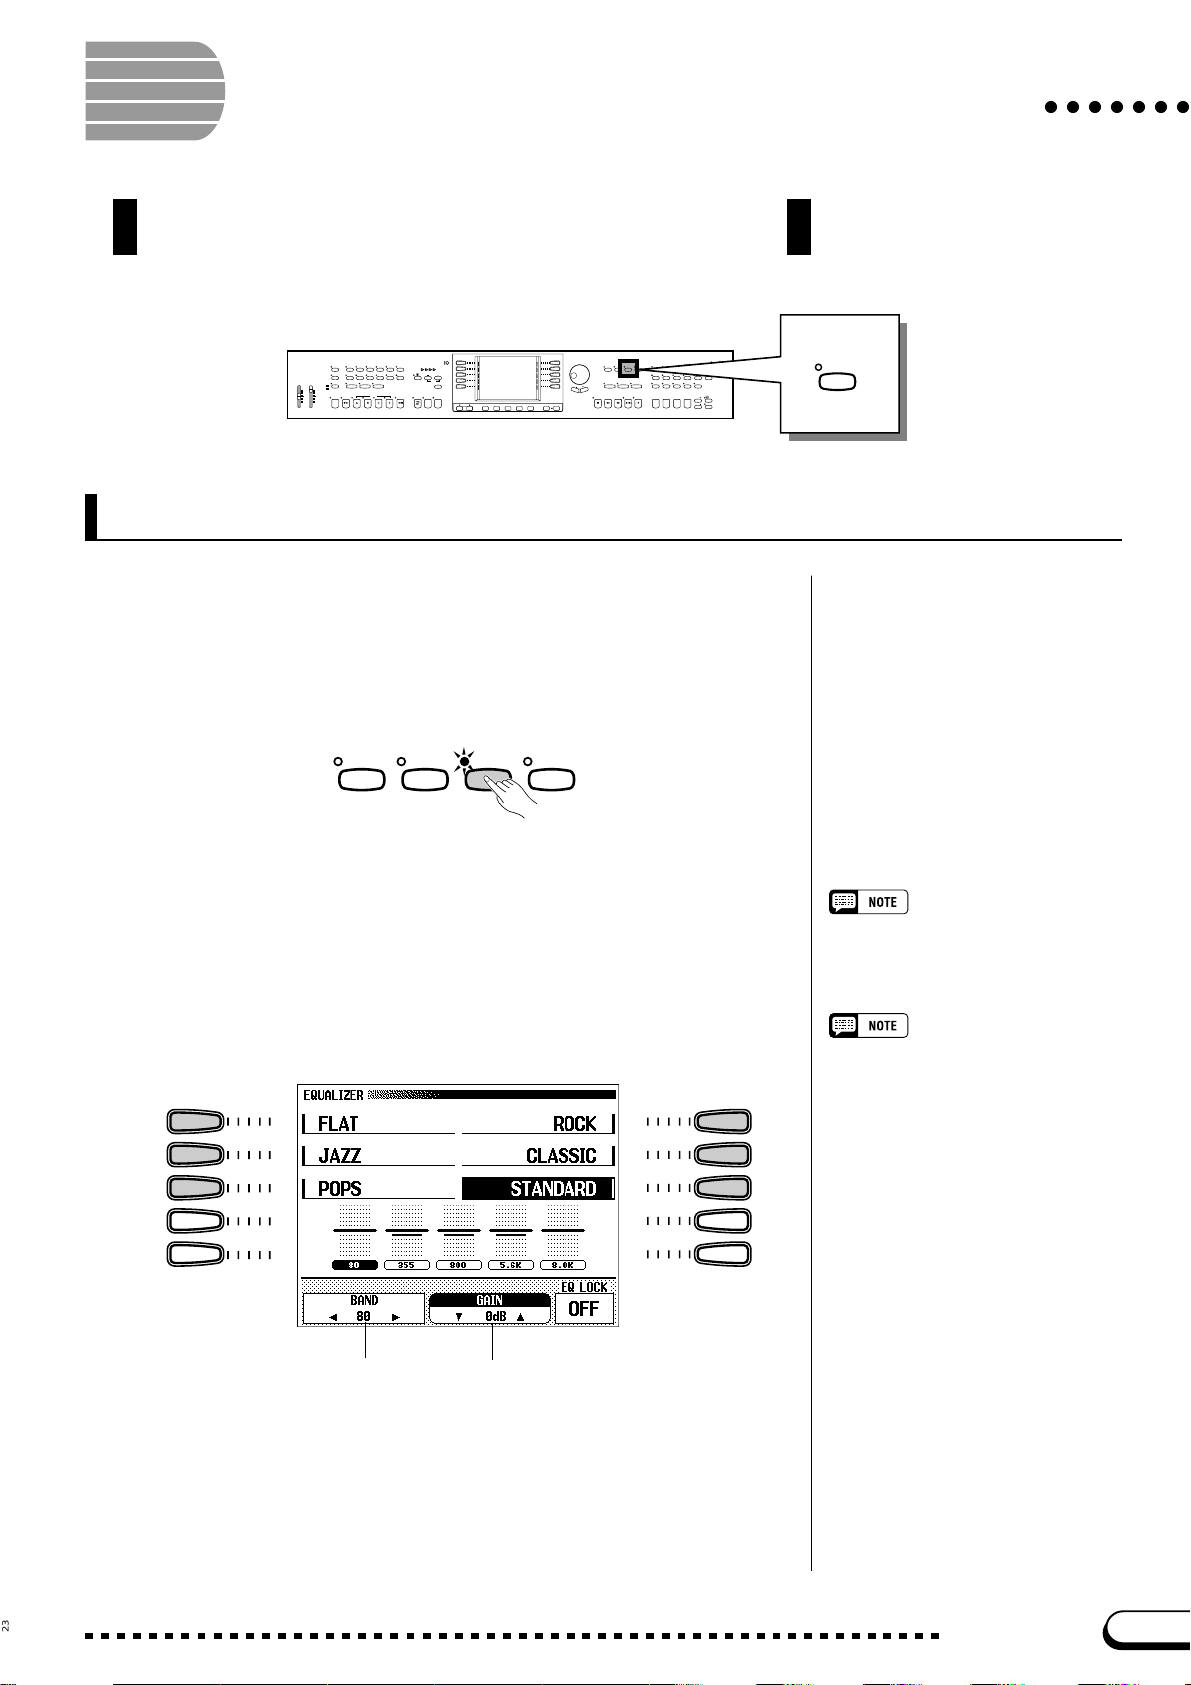
Adjusting the Timbre (CVP-109/107/700)
You can adjust the sound timbre of the CVP-109/107/700 using
the Master Equalizer function.
○○○○○○○
STYLE
DEMO
16BEAT
8BEAT DANCE
BALLAD PIANIST
SWING/
LATIN
COUNTRY DISK
JAZZ
HELP
VOLUME
MUSIC
VOCAL
MASTER
ACMP/SONG
DATABASE
HARMONY
ACMP ASSIST
HARMONY
OVER
VOLUME
VOLUME
SIGNAL
MAX
MAX
AUTO ACCOMPANIMENT
AUTO FILL
MAIN BMAIN A MAIN C MAIN D ENDING SYNCHRO START
INTRO
ACMP ON
MIN
MIN
CONTRAST
ROCK/
R&B
BEAT
TRAD/
BALL–
WALTZ
ROOM
TEMPO
CUSTOM METRONOME
RESET
TAP
START
/
STOP
FADE
/
OUT
IN
/
STOP
PAGE
EXIT DIRECT ACCESS
MASTER
EQUALIZER
SONG MIXER
FUNCTION
GUIDE CONTROL
SOUND
EASY PLAY
REPEAT
NEXT NOTE
SONG CONTROL
PLAY
/
STOP
PAUSE REW
FF REC
PIANO E. PIANO GUITAR
SAX
/
FLUTE
BASSBRASS
DUAL SPLIT REVERB CHORUS
REGISTRATION/ONE TOUCH SETTING
1234
DISK IN USE
VOICE
SYNTHE-
STRINGS/
SIZER
ORGAN
CHOIR
PER-
ENSEMBLE
XG
CUSSION
EFFECT
ONE TOUCH
BANK
SETTING
BANK REGISTRATION
Changing the Master Equalizer Settings
Z Call up the MASTER EQUALIZER display..............................
Press the [MASTER EQUALIZER] button. The button’s lamp
lights, and the MASTER EQUALIZER display appears. You can use the
five-band equalizer in this display to fine-adjust the timbre of the sound.
MASTER
SONG MIXER FUNCTION
X Select the type of equalization. .........................................................
Use the left and right LCD buttons to select the equalizer setup that
you will use as the basis for your settings. Six different setups are available: FLAT, JAZZ, POPS, ROCK, CLASSIC, and STANDARD.
EQUALIZ ER
MASTER
EQUALIZE R
Equalizer setup
Basic setting: STANDARD
➔ The lowest band for the selected setup is selected, and the gain
for that band is displayed by the GAIN function.
80 Hz band selected Gain
The gain becomes 0 for all frequencies
when FLAT is selected.
23
CVP-109/107/105/700
25
Page 26

Adjusting the Timbre (CVP-109/107/700)
○○○○○○○○○○○○○○○○○○○○○○○○○○○○○○○
C Select the band to be adjusted. ........................................................
Select the band you wish to adjust by pressing the BAND < or >
buttons.
➔ The central frequency of the selected band (expressed in Hz) is
displayed by the BAND function.
V Change the gain value................................................................................
Change the value of the gain either by pressing the GAIN ▼ and ▲
buttons, or by using the data dial or [–] and [+] buttons.
➔ The new value is shown in the GAIN section of the display.
Since the value can be changed during playback, you can adjust the
settings while listening to the changes in the sound.
When you change a gain value, an asterisk (*) will appear near the
name of the selected equalizer setup to indicate that the settings have
been changed. By default, these settings will not be retained when the
power is turned off. If you want the Clavinova to retain your settings
while the power is off, you can turn on the BACKUP function for the
VOICE SETTING parameter group (page 206).
Gain
• Settings: –12 — 0 — +12 (dB)
• Basic setting: varies depending on
equalizer setup and band.
• Backup of last settings: OFF
• Distortion could result if the gain is set
to higher levels. If this happens, reduce the overall volume with the [MASTER VOLUME] control.
Using the Equalizer Lock Function
When equalizer setting values are contained in the song data, or when the
equalizer setting data is received via MIDI, the current settings in the MASTER EQUALIZER display will be overridden by the settings of the song
data or MIDI data. Set EQ LOCK to ON to prevent reception of this data, or
OFF to enable reception.
EQ LOCK
• Settings: ON, OFF
• Basic setting: OFF
26
24
CVP-109/107/105/700
Page 27

Using the Metronome
○○○○○○○○○○○○○○○○○○○○
The Clavinova features a convenient metronome that is ideal for practicing. The
procedure for setting the metronome tempo can also be used to set the playback
tempo for the Auto Accompaniment (page 63) and Song (page 113) modes.
METRON OME
STYLE
DEMO
16BEAT
8BEAT DANCE
BALLAD PIANIST
SWING/
LATIN
COUNTRY DISK
JAZZ
HELP
VOLUME
VOCAL
MUSIC
MASTER
ACMP/SONG
HARMONY
DATABASE
ACMP ASSIST
HARMONY
OVER
VOLUME
VOLUME
SIGNAL
MAX
MAX
AUTO ACCOMPANIMENT
AUTO FILL
MAIN BMAIN A MAIN C MAIN D ENDING SYNCHRO START
INTRO
ACMP ON
MIN
MIN
CONTRAST
ROCK/
R&B
BEAT
TRAD/
BALL–
WALTZ
ROOM
TEMPO
CUSTOM METRONOME
RESET
TAP
START
/
STOP
FADE
/
OUT
IN
/
STOP
PAGE
Using the Metronome
You can start the metronome and set the tempo from any display, including
the main display.
■ Starting and Stopping the Metronome .......................................
To start the metronome, simply press the [METRONOME] button.
TEMPO
METRONOME RESET
➔ The [METRONOME] lamp lights, and the metronome starts keeping
time (indicated by the flashing of the BEAT lamps).
BEAT
DISK IN USE
VOICE
SYNTHE-
PIANO E. PIANO GUITAR
SAX
/
FLUTE
BASSBRASS
DUAL SPLIT REVERB CHORUS
REGISTRATION/ONE TOUCH SETTING
1234
STRINGS/
SIZER
ORGAN
CHOIR
PER-
ENSEMBLE
XG
CUSSION
EFFECT
ONE TOUCH
BANK
SETTING
BANK REGISTRATION
EXIT DIRECT ACCESS
MASTER
EQUALIZER
SONG MIXER
FUNCTION
GUIDE CONTROL
SOUND
REPEAT
EASY PLAY
NEXT NOTE
SONG CONTROL
PLAY
/
STOP
PAUSE REW
FF REC
• The metronome can also be used
during playback in Auto Accompaniment (page 63) or Song mode
(page 113).
• The metronome cannot be used
when playing disk software that
was recorded in free-tempo (see
page 116).
TEMPO
METRONOME RESET
Press the [METRONOME] button again to stop the metronome.
■ Adjusting the Tempo......................................................................................
The current tempo, indicated in the upper left corner of the display, de-
pends on the selected style (see page 62). To change the tempo, press the
TEMPO [–] and [+] buttons.
TEMPO
METRONOME RESET
Slower Faster
➔ The tempo indication in the main display is highlighted, and the
tempo changes.
You can either press TEMPO [–] or [+] buttons briefly to change the
tempo value by one, or hold down the button to change it continuously.
When the tempo is highlighted in the display, you can also use the data
dial or [–] and [+] buttons to set the tempo.
Tempo
• Range: 32 — 280
• Basic setting: Depends on style.
Restoring the Basic Tempo
You can restore the preset tempo for
the currently selected style by simultaneously pressing both TEMPO [–]
and [+] buttons.
During Style or Song Playback…
• If a style or song is started while the
metronome is playing, the metronome will continue to sound along
with the style or song.
• The metronome uses the time signa-
ture of the style or song instead of
the BEAT setting during style or
song playback.
• The metronome stops when the
style or song stops.
25
CVP-109/107/105/700
27
Page 28
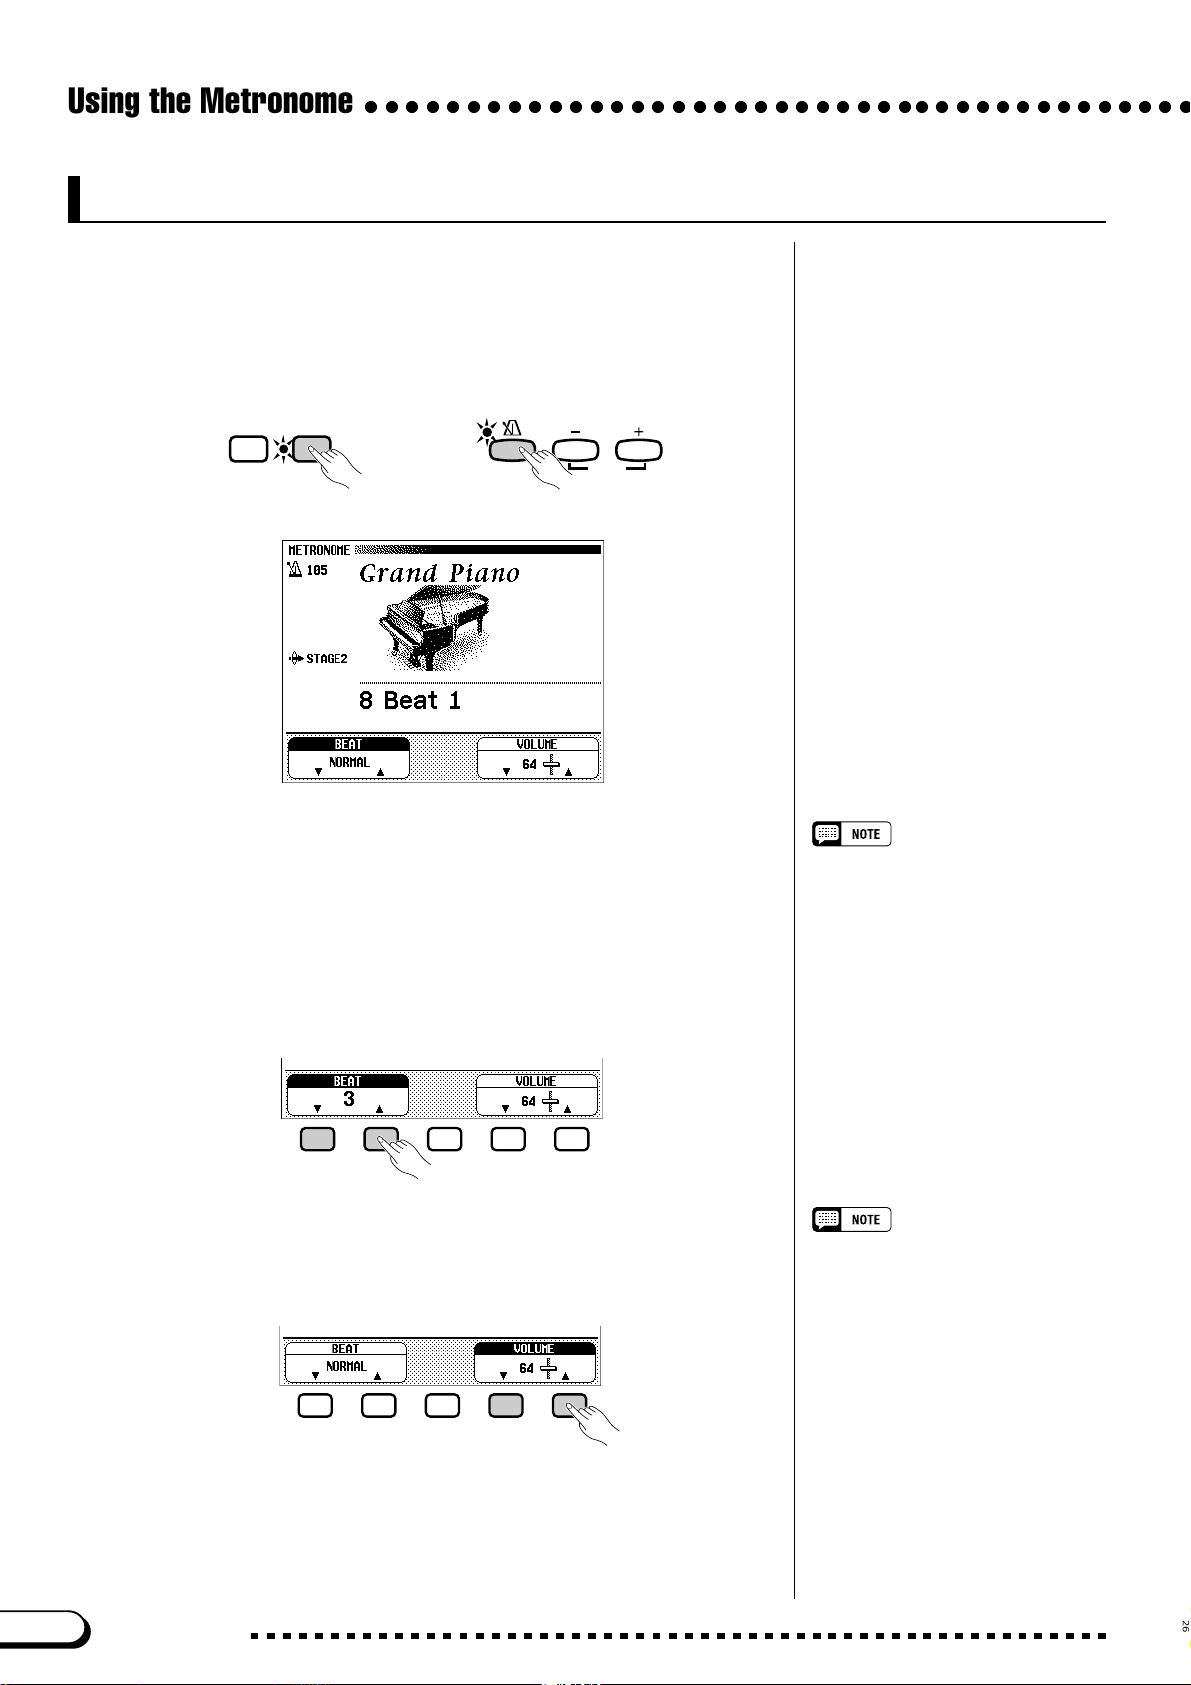
Using the Metronome
○○○○○○○○○○○○○○○○○○○○○○○○○○○○○○○○○○○○○○○○○
Changing the Metronome Settings
You can change the metronome’s time signature and volume using the
settings in the METRONOME page.
■ Displaying the Metronome Settings..............................................
To display the METRONOME page, press [DIRECT ACCESS], then
[METRONOME].
EXI T DIRECT ACCESS
➾
➔ The METRONOME display appears.
METRONOME RESET
TEMPO
■ Setting the Beat (Time Signature)....................................................
Use the BEAT ▼ and ▲ buttons to change the time signature. (If the BEAT
function is highlighted, you can also change its settings with the data dial or the
[–] and [+] buttons.)
When NORMAL is selected, the metronome ticks steadily at the current
tempo with no accented beats.
When BEAT is set to 2, 3, 4, or 5, the metronome ticks of f measures with the
selected number of beats, playing a bell sound on the first beat of each measure.
■ Setting the Metronome Volume ..........................................................
Use the VOLUME ▼ and ▲ buttons to change the metronome volume.
(If the VOLUME function is highlighted, you can also change its settings
with the data dial or the [–] and [+] buttons.)
BEAT
• Settings: NORMAL, 2 — 5
• Basic setting: NORMAL
VOLUME
• Range: 0 — 127
• Basic setting: 64
28
The volume of the metronome is determined by both the VOLUME func-
tion and the [ACMP/SONG V OLUME] slider (exce pt in Song mode, in
which case the volume of the metronome is not affected by the slider). If you
use the slider, the playback v olume for the Automatic Accompaniment (page
62) will also be affected.
26
CVP-109/107/105/700
Page 29
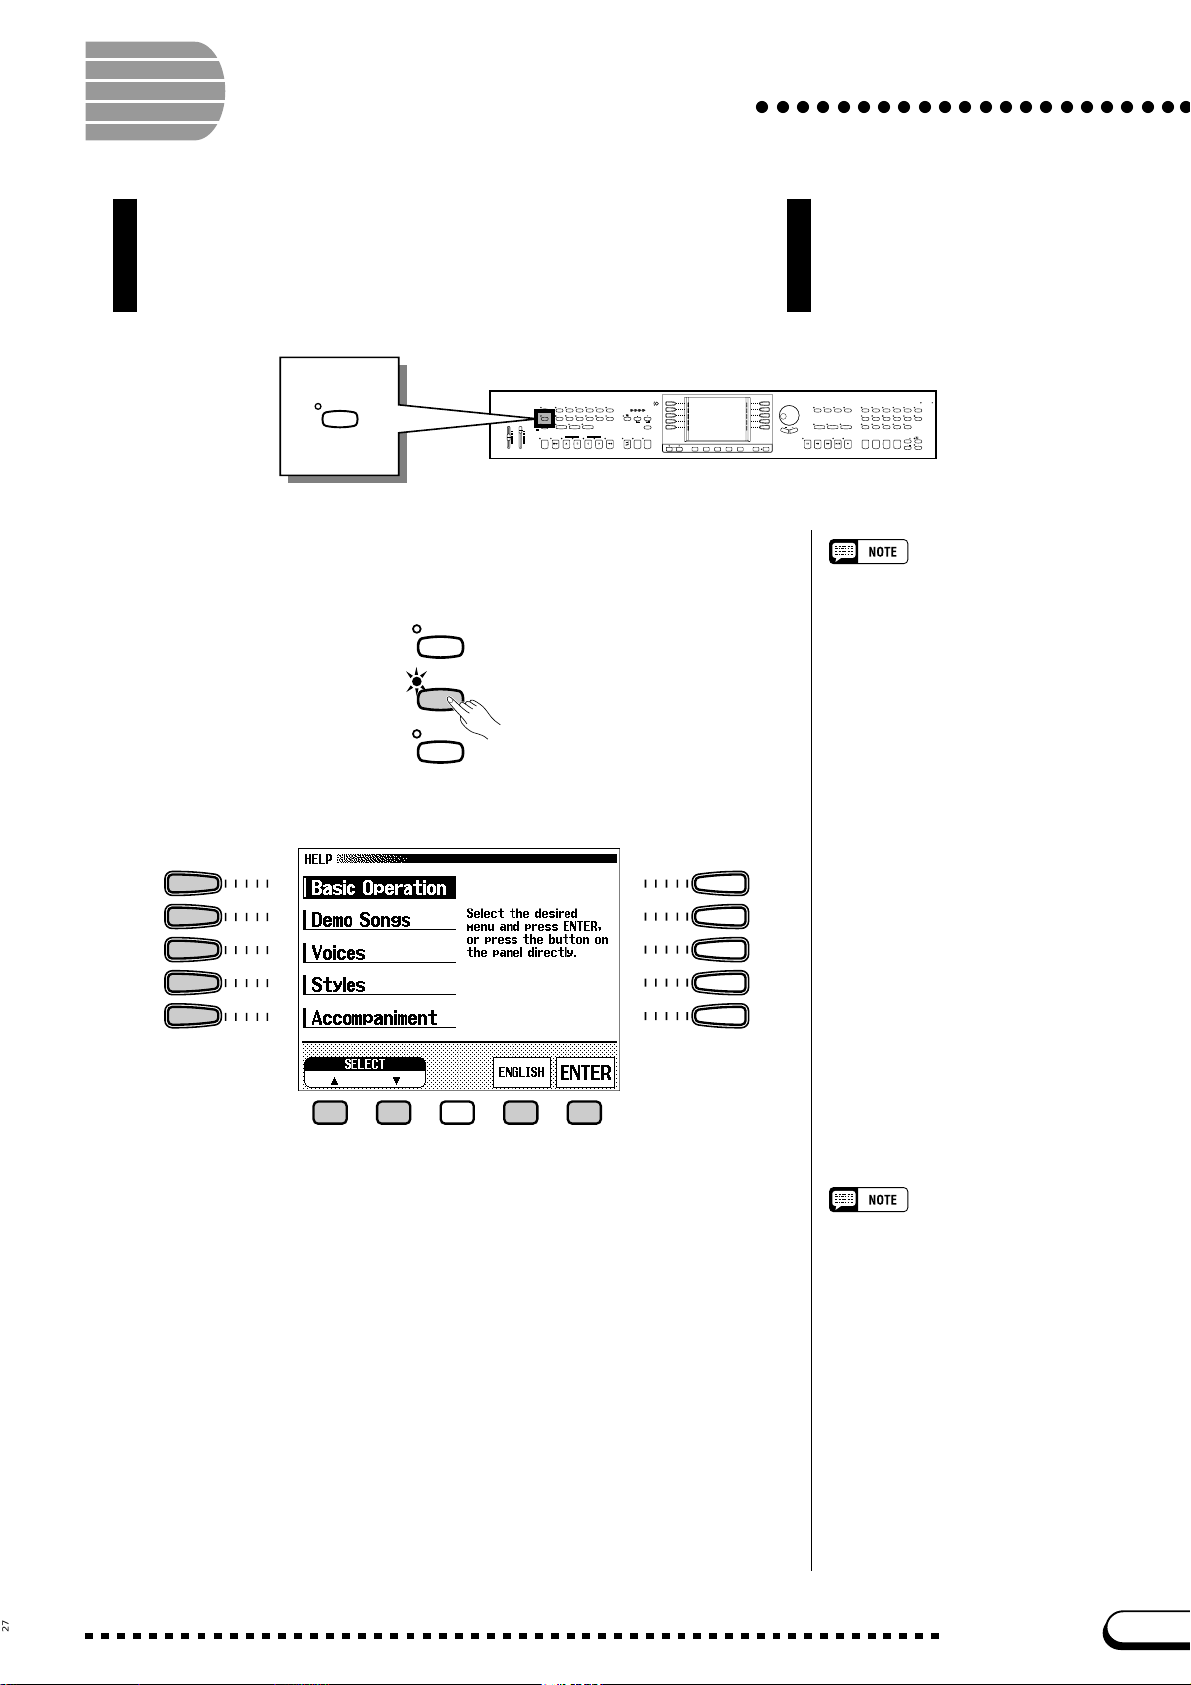
Using the Help Mode
The Help mode provides convenient explanations of the main
functions of the Clavinov a. You can select help topics from a menu
displayed on the LCD, or press a button on the panel to get help
information related to that control.
○○○○○○○○○○○○○○○○○○○○○○
HELP
STYLE
DEMO
16BEAT
8BEAT DANCE
BALLAD PIANIST
SWING/
LATIN
COUNTRY DISK
JAZZ
HELP
VOLUME
VOCAL
MUSIC
MASTER
ACMP/SONG
HARMONY
DATABASE
ACMP ASSIST
OVER
VOLUME
VOLUME
SIGNAL
MAX
MAX
AUTO ACCOMPANIMENT
AUTO FILL
MAIN BMAIN A MAIN C MAIN D ENDING SYNCHRO START
INTRO
ACMP ON
MIN
MIN
CONTRAST
ROCK/
R&B
BEAT
TRAD/
BALL–
WALTZ
ROOM
TEMPO
CUSTOM METRONOME
RESET
HARMONY
TAP
START
/
STOP
FADE
/
OUT
IN
/
STOP
PAGE
EXIT DIRECT ACCESS
Z Call up the Help mode. ...............................................................................
Press the [HELP] button.
DEMO
HELP
VOCAL
HARMONY
➔ The Help menu display appears.
DISK IN USE
VOICE
SYNTHE-
PIANO E. PIANO GUITAR
SAX
/
FLUTE
BASSBRASS
DUAL SPLIT REVERB CHORUS
REGISTRATION/ONE TOUCH SETTING
1234
STRINGS/
SIZER
ORGAN
CHOIR
PER-
ENSEMBLE
XG
CUSSION
EFFECT
ONE TOUCH
BANK
SETTING
BANK REGISTRATION
MASTER
EQUALIZER
SONG MIXER
FUNCTION
GUIDE CONTROL
SOUND
REPEAT
EASY PLAY
NEXT NOTE
SONG CONTROL
PLAY
/
STOP
PAUSE REW
FF REC
While the Help mode is active, no other
operations can be performed.
X Select the language if necessary....................................................
Select the desired language for help (ENGLISH, JAPANESE, GER-
MAN, FRENCH, or SPANISH) by pressing the fourth LCD button.
27
The selected language is always backed
up even after the power is turned off.
CVP-109/107/105/700
29
Page 30
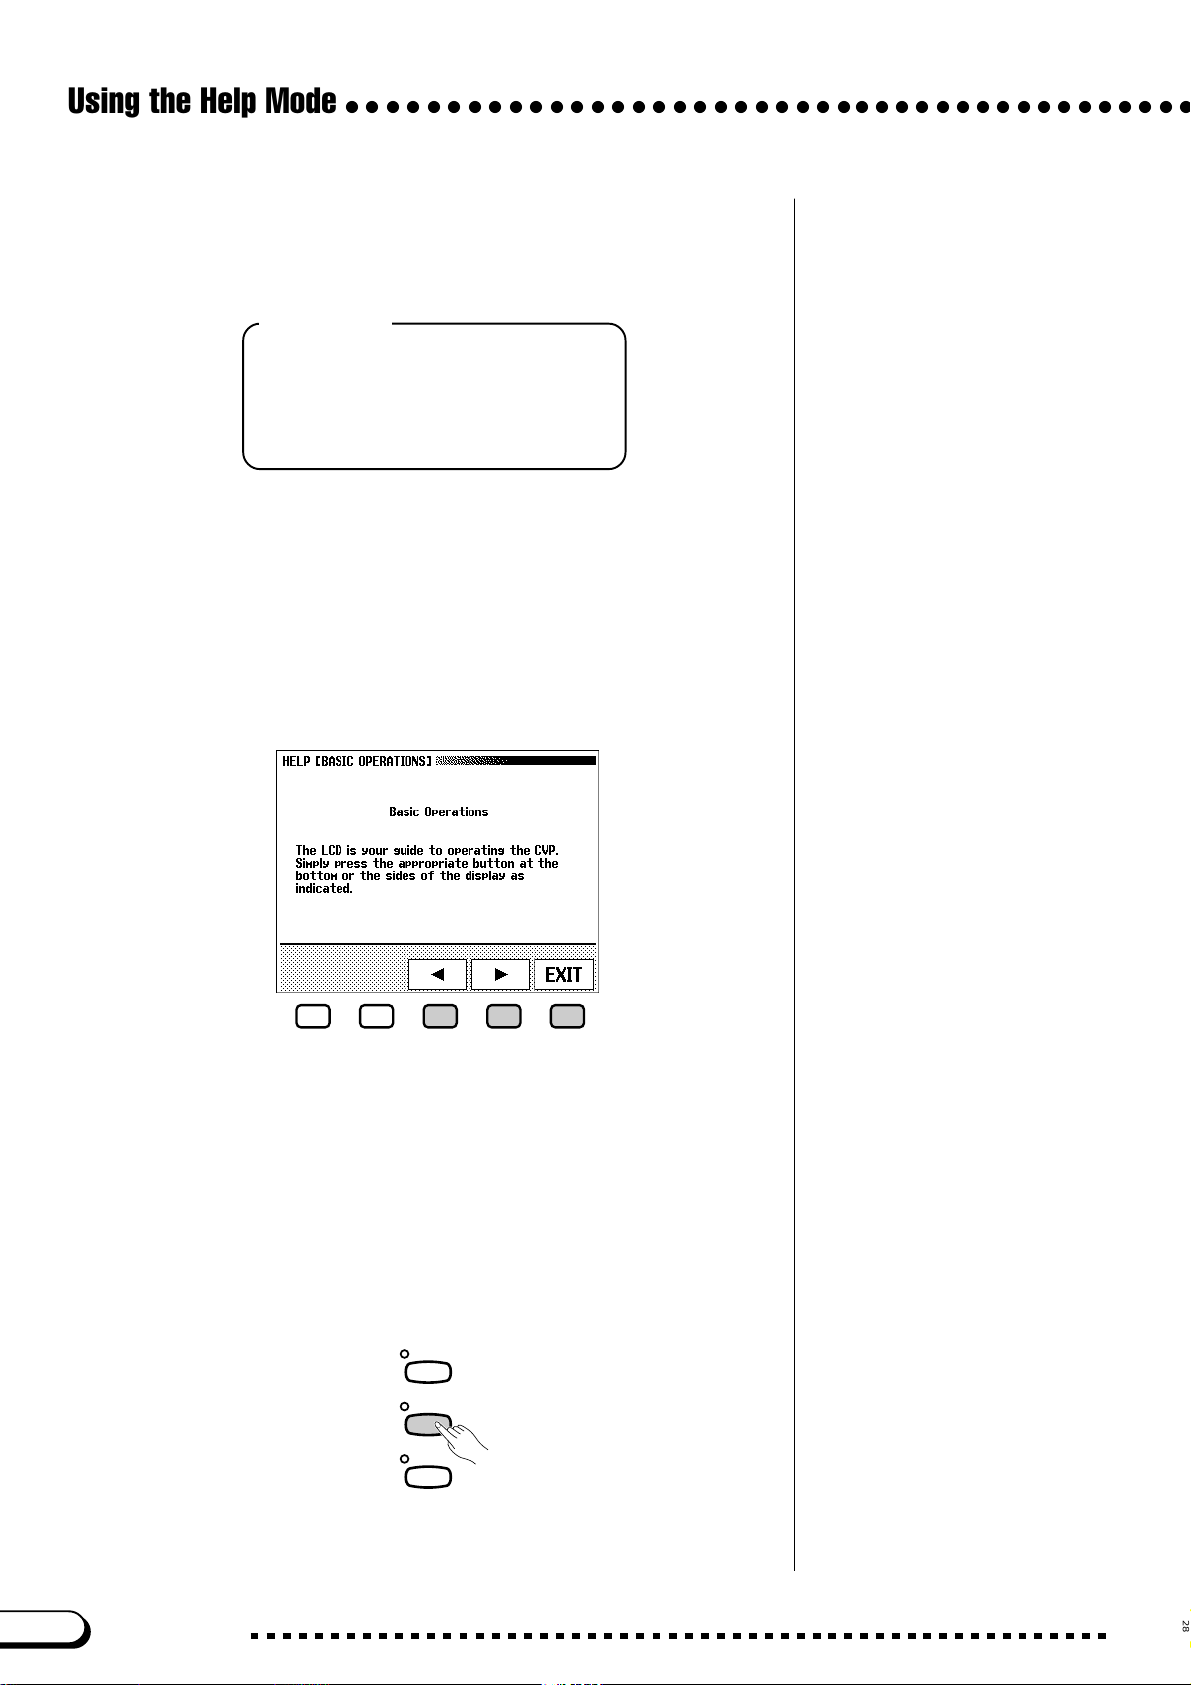
Using the Help Mode
○○○○○○○○○○○○○○○○○○○○○○○○○○○○○○○○○○○○○○○○○○
C Select a help topic. .........................................................................................
Use the left LCD buttons or the ▲ and ▼ LCD buttons to select one
of the following eight menu items.
Help Topics
• Basic Operations • Accompaniment
• Demo Songs • Song Playback
• Voices • Song Recording
• Styles • Functions
➔ The selected menu is highlighted.
➾ Press the LCD button under ENTER to enter your selection.
➔ The first page of the selected help information is displayed.
V Turn the pages and read the help information. ...............
Use the fourth LCD button to advance the page. You can also press
the third LCD button if you want to go back and read the previous page.
B Exit the Help topic...........................................................................................
Press the LCD button under EXIT to return to the Help menu. You
can select another menu item or panel button and read through other help
topics.
N Exit the Help mode. ........................................................................................
30
To exit the Help mode and to go back to the main display at any time,
simply press [HELP].
DEMO
HELP
VOCAL
HARMONY
CVP-109/107/105/700
28
Page 31

CHAPTER 3: Voices
Selecting Voices
○○○○○○○○○○○○○○○○○○○○○○○○○○
The Clavinova features a wealth of rich, authentic voices, including
piano, strings and brass instruments. It also features a Keyboard
Percussion function that lets you play the realistic drum and
percussion sounds directly from the keyboard.
STYLE
DEMO
16BEAT
8BEAT DANCE
BALLAD PIANIST
SWING/
LATIN
COUNTRY DISK
JAZZ
HELP
VOLUME
MUSIC
VOCAL
MASTER
ACMP/SONG
DATABASE
HARMONY
ACMP ASSIST
HARMONY
OVER
VOLUME
VOLUME
SIGNAL
MAX
MAX
AUTO ACCOMPANIMENT
AUTO FILL
MAIN BMAIN A MAIN C MAIN D ENDING SYNCHRO START
INTRO
ACMP ON
MIN
MIN
CONTRAST
ROCK/
R&B
BEAT
TRAD/
BALL–
WALTZ
ROOM
TEMPO
CUSTOM METRONOME
RESET
TAP
START
/
STOP
FADE
/
OUT
IN
/
STOP
PAGE
EXIT DIRECT ACCESS
SONG MIXER
GUIDE CONTROL
EASY PLAY
NEXT NOTE
SONG CONTROL
PAUSE REW
FF REC
● Voice Types
• Clavinova Voices : 224 (CVP-109/107/700)
195 (CVP-105)
DISK IN USE
VOICE
SYNTHE-
PIANO E. PIANO GUITAR
SAX
/
FLUTE
BASSBRASS
DUAL SPLIT REVERB CHORUS
REGISTRATION/ONE TOUCH SETTING
1234
STRINGS/
SIZER
ORGAN
CHOIR
PER-
ENSEMBLE
XG
CUSSION
EFFECT
ONE TOUCH
BANK
SETTING
BANK REGISTRATION
MASTER
EQUALIZER
FUNCTION
SOUND
REPEAT
PLAY
/
STOP
* For a list of the voices, see page 3 in the Reference Booklet.
* The Clavinova’s voices are divided into twelve groups, corre-
sponding to the twelve VOICE buttons on the panel.
PIANO E. PIANO GUITAR
• XG Voices: 480
• Organ Flutes Voices: 6 (CVP-109/107/700)
• Drum/SFX Kits: 13 (CVP-109/107/700)
12 (CVP-105)
SAX
FLUTE
VOICE
SYNTHE-
SIZER
/
PER-
BASSBRASS
CUSSION
ORGAN
ENSEMBLE
STRINGS/
CHOIR
XG
Selecting a Voice from the VOICE SELECT Display
ZSelect the voice group.............................................................................
Select the desired voice group by pressing the appropriate VOICE
button.
➔ The VOICE SELECT display appears.
VOICE
SYNTHE-
PIANO E. PIANO GUITAR
SAX
/
FLUTE
BASSBRASS
SIZER
PER-
CUSSION
ORGAN
ENSEMBLE
STRINGS/
CHOIR
XG
Exiting the Display
To return to the main display, press [EXIT].
Backing Up the Selected Voice
• When the power is turned ON, the Grand
Piano voice is selected automatically.
However, if the Backup function (page
206) is set to ON, the last selected voice
will automatically be selected.
• The last selected voice in each group can
be retained in memory, even after turning
off the power, when the Backup function
(page 206) is set to ON.
29
CVP-109/107/105/700
31
Page 32

Selecting Voices
○○○○○○○○○○○○○○○○○○○○○○○○○○○○○○○○○○○○○○○○○○○○○
XSelect the voice..................................................................................................
Select the desired voice by pressing the appropriate left or right LCD
button. The data dial and [–] and [+] buttons can be also used.
You can also select the voice by pressing the VOICE ▲ and ▼ but-
tons.
Some of the VOICE SELECT displays have several successive pages.
Use the PAGE [<] and [>] buttons to call up the various pages.
CPlay the selected voice..............................................................................
Adjust the volume by using the [MASTER V OLUME] slider.
Selecting Voices from the Main Display
You can also select a voice using the RIGHT1 VOICE function in the
main display.
Automatic Voice-related Settings
Selecting a voice automatically selects
the best-suited reverb, chorus, effect,
and other settings for that particular
voice. You can disable this so that settings are not automatically selected by
using the VOICE SETTING function
(page 189).
ZSelect the RIGHT1 VOICE function...............................................
If the RIGHT1 VOICE function is not already highlighted, press the
fourth LCD button to highlight it.
XSelect the voice...................................................................................................
Select the voice using the data dial or [–] and [+] buttons. You can
also hold down RIGHT1 VOICE to advance the voice selection continuously. (When selecting a voice in this way, the voice can be selected not
only from a certain voice group but from all voices.)
CPlay the voice........................................................................................................
Adjust the volume by using the [MASTER V OLUME] slider.
About Ensemble Voices
The Clavinova’s ensemble voices are
rich, dual-like voices that you can play
without entering the Dual mode (page
38.) Press the [Ensemble] button to
display a menu of ensemble voices.
About XG Voices
Yamaha’s XG format is a major new
enhancement to the GM (General MIDI)
System Level 1 format. It provides for
more instrument sounds and variations,
as well as greater expressive control over
voices and effects. XG also ensures
compatibility with future instruments and
software.
• Press the [XG] button to display a
menu of XG voices.
• Press another VOICE button while
holding down the [XG] button to display a list of XG voices in the corresponding category.
32
30
CVP-109/107/105/700
Page 33

○ ○○○○○○○○○○○○○○○○○○○○○○○○○○○○○○○○○○○○○○○○○○○○
Organ Flutes (CVP-109/107/700)
To call up the ORGAN FLUTES display, press the [ORGAN] button
and select Organ Flutes in the VOICE SELECT [ORGAN] display.
With the Organ Flutes function in this display, you can select from six
different kinds of organ sounds, and even create your own organ sounds
by editing these voices.
■ Selecting Organ Flutes Voices ............................................................
Select the desired voice by pressing the left/right LCD buttons in the
ORGAN FLUTES display.
➔ The settings of the selected voice are shown in the display.
The edited voices can be backed up in
sets of six by setting VOICE SETTING to
ON (in the Function section’s Backup
parameter, page 206).
An asterisk (*) appears next to the voice
name when the selected voice has been
already edited.
Selecting Voices
■ Editing Organ Flutes Voices..................................................................
The editing features in this function let you recreate organ voices by
adjusting several footage settings, just as on conventional organs. Various organ voices can be created using the settings shown below.
● FOOTAGE display
• Footage volume settings (eight continuous voices corresponding to conventional organ footages)
• Rotary speaker effect speed setting (FAST or SLOW)
● ATTACK display
• Attack footage volume settings (three decay voices used as percussive
attack sounds)
• LENGTH setting (length of attack sound for decaying voices)
• RESPONSE setting (speed of sound starting for continuous voices)
• Attack mode setting (EACH or FIRST)
To create a percussive organ sound, adjust the volume of the decay
sound and the attack length of attack sound to appropriate settings, then
add them to the continuous voice. To recreate the sound of a pipe organ
with a slow attack, set the RESPONSE to a large value.
Rotary speed effect
A rich, swirling chorus effect, created by
actual rotation of a speaker.
Attack sound
A sharp, percussive sound at the beginning of a note.
Attack mode
The manner in which the attack sound is
output.
31
CVP-109/107/105/700
33
Page 34

Selecting Voices
○○○○○○○○○○○○○○○○○○○○○○○○○○○○○○○○○○○○○○○○○○○○○
■ Editing the Voice ...............................................................................................
Select the desired voice for editing, then set each parameter.
The ORGAN FLUTES display has two pages: [FOOTAGE] and [ATTACK]. Press the rightmost LCD button to change between the displays.
Press the PRESET button in each display to instantly return to the preedited voice.
● Making settings in the ORGAN FLUTES [FOOTAGE] dis-
play
Footage volume settings
Select the footage “bar” to be adjusted by using the CURSOR but-
tons, then set the volume by using the data dial or [–] and [+] buttons.
Setting the speed of the rotary speaker effect
Press the middle LCD button to change between FAST and SLOW.
To call up the [ATTACK] display, either
press ATTACK or press the CURSOR
button when the cursor is at “1.”
• The FAST/SLOW function is only
displayed when an effect (page 54) is
being applied to the keyboard part
playing the Organ Flutes voice.
• If an effect type other than rotary
speaker is applied to a part playing the
Organ Flutes voice, the FAST/SLOW
function switches the effect variation
on or off (see page 56) instead of
adjusting the speaker modulation
speed.
>
34
● Voice Type and Volume Image (About Organ Footages)
The standard pitch is 8 feet. A setting of 4 feet is one octave higher
than 8 feet, 2 feet is two octaves higher, and 1 foot is three octaves
higher; 16 feet is one octave lower.
Continuous tones Decay tones
,
16
16-foot
CVP-109/107/105/700
,
8
8-foot
,
5+1/
3
5+1/3-foot
,
4
4-foot
2+2/
,
3
2-2/3-foot
,
2
2-foot
,
1+1/
3
1+1/3-foot
,
1
1-foot
,
4
4-foot
2+2/
,
3
2
2+2/3-foot
,
2-foot
32
Page 35

○ ○○○○○○○○○○○○○○○○○○○○○○○○○○○○○○○○○○○○○○○○○○○○
● Making Settings in the ORGAN FLUTES [ATTACK] Display
Attack footage volume and LENGTH and RESPONSE settings
Select the appropriate bar in the display by pressing the CURSOR
To call up the [FOOTAGE] display, either
press FOOTAGE or press the CURSOR
>
button when the cursor is at “4.”
buttons, then set the volume, LENGTH, or RESPONSE by using the
data dial or [–] and [+] buttons.
Setting the Attack Mode
Press the middle LCD button to change between the EACH and
FIRST settings. When set to EACH, the attack sound is applied to all
played notes.
When set to FIRST, the attack sound is applied only to the first
played note in a legato sequence, and is not applied to subsequent
notes played in legato.
Selecting Voices
● Image of Attack Length and Response
Continuous Tone
Volume
33
Greater response time
Volume
Time
Decay Tone
Longer attack length
Attack length
Time
CVP-109/107/105/700
35
Page 36

Selecting Voices
○○○○○○○○○○○○○○○○○○○○○○○○○○○○○○○○○○○○○○○○○○○○○
Keyboard Percussion
The Clavinova has eleven drum kits (ten on the CVP-105) and two
SFX kits, found on display pages 2 and 3 of the [PERCUSSION] voice
group. When one of the drum or SFX kits is selected, various drum, percussion, and special effect sounds are assigned to individual keys, letting
you play the sounds from the keyboard.
The various drums and percussion instruments of the Standard
Kit are indicated by symbols above the assigned keys.
See the drum/SFX kit list on page 10 in the Reference Booklet for a
listing of the sounds in each drum/SFX kit.
VOICE
SYNTHE-
PIANO E. PIANO GUITAR
SAX
/
FLUTE
BASSBRASS
SIZER
PER-
CUSSION
ORGAN
ENSEMBLE
STRINGS/
CHOIR
XG
• When a drum kit is selected, only the
keys with drum or percussion symbols
printed above them will sound.
• When an SFX kit is selected, keys
other than those which have been
assigned a special effect sound will not
produce any sound.
•
The Transpose (page 188), Tune (page
188) and Octave (pages 37, 39 and 43)
functions do not affect the drum/SFX kits.
Changing the Keyboard Settings for the Main Voice
You can use the settings in the KEYBOARD [RIGHT1] display page
to change the volume, octave, and pan of the voice selected using the
RIGHT1 VOICE function.
■ Displaying the Main Voice Keyboard Settings .................
Z If you are playing in Dual mode or Split mode, make sure RIGHT1
VOICE is selected in the main display.
X Press [DIRECT ACCESS] followed by any of the VOICE buttons.
➔ The KEYBOARD [RIGHT1] display appears.
VOICE
EXI T DIRECT ACCESS
➾
PIANO E. PIANO GUITAR
SAX
/
FLUTE
BASSBRASS
SYNTHE-
SIZER
PER-
CUSSION
ORGAN
ENSEMBLE
STRINGS/
CHOIR
XG
The settings you make in this page affect
any voices you select using the RIGHT1
VOICE function. Different settings cannot
be made for each voice.
You can switch between the KEYBOARD
[RIGHT1] page and the [RIGHT2] (page
39) or [LEFT] (page 42) displays using
the PAGE [<] and [>] buttons.
36
34
CVP-109/107/105/700
Page 37

○ ○○○○○○○○○○○○○○○○○○○○○○○○○○○○○○○○○○○○○○○○○○○○
■ Setting the Volume of the Main Voice..........................................
You can use the VOLUME function in the KEYBOARD [RIGHT1]
page to change the volume of the main voice.
Z Press the VOLUME button.
➔ The VOLUME function is highlighted.
X Adjust the volume of the main voice.
To adjust the overall keyboard volume,
use the KBD VOL function in the main
display (page 23) instead.
Selecting Voices
Use the data dial or [–] and [+] buttons to change the volume, or hold
down the VOLUME button to increase the volume.
Press the [–] and [+] buttons simultaneously to restore the basic setting.
■ Setting the Octave of the Main Voice...........................................
The OCTAVE function in the KEYBOARD [RIGHT1] display lets
you adjust the pitch of the main voice up or down by one or two octaves.
Press the OCTAVE button.
➔ The value changes each time you press the button.
■ Setting the Stereo Position of the Main Voice ...................
The PAN function in the KEYBOARD [RIGHT1] display lets you
adjust the stereo position of the main voice.
VOLUME
• Range: 0 — 127
• Basic setting: 127
OCTAVE
• Settings: –2 (2 octaves lower)
–1 (1 octave lower)
0 (no octave shift)
+1 (1 octave higher)
+2 (2 octaves higher)
• Basic setting: 0
Some voices have octave settings that
are selected automatically when the
voice is selected. (Such settings are not
displayed by the OCTAVE function.) You
can prevent the octave setting from
changing when a voice is selected by
setting the VOICE SETTING function
(page 189) to MANUAL.
Z Press the PAN button.
➔ The PAN function is highlighted.
X Adjust the stereo position.
Use the data dial or [–] and [+] buttons to change the stereo position,
or hold down the PAN button to move the position to the right.
Press the [–] and [+] buttons simultaneously to restore the basic set-
PAN
• Settings: L — ▼ — R
• Basic setting: ▼ (center)
ting.
35
CVP-109/107/105/700
37
Page 38

Playing Two Voices
Simultaneously — Dual Mode
The Dual mode of the Clavinova allows you to select and play two
different voices simultaneously in a layer. This makes it easy to
create exceptionally rich and thick tonal te xtures. You can also set
the volume, octave, and stereo position for the second voice, and
detune the second voice from the main voice to create a thicker
sound.
○○○○○○○○○○○
STYLE
8BEAT DANCE
BALLAD PIANIST
16BEAT
DEMO
SWING/
LATIN
HELP
COUNTRY DISK
JAZZ
VOLUME
MUSIC
VOCAL
MASTER
ACMP/SONG
DATABASE
HARMONY
HARMONY
ACMP ASSIST
OVER
VOLUME
VOLUME
SIGNAL
MAX
MAX
AUTO ACCOMPANIMENT
AUTO FILL
MAIN BMAIN A MAIN C MAIN D ENDING SYNCHRO START
INTRO
ACMP ON
MIN
MIN
CONTRAST
ROCK/
R&B
BEAT
TRAD/
BALL–
WALTZ
ROOM
TEMPO
CUSTOM METRONOME
RESET
TAP
/
STOP
START
FADE
/
OUT
IN
/
STOP
PAGE
EXIT DIRECT ACCESS
MASTER
EQUALIZER
FUNCTION
SONG MIXER
GUIDE CONTROL
SOUND
REPEAT
NEXT NOTE
EASY PLAY
SONG CONTROL
PLAY
/
STOP
FF REC
PAUSE REW
VOICE
PIANO E. PIANO GUITAR
SAX
/
FLUTE
BASSBRASS
DUAL SPLIT REVERB CHORUS
REGISTRATION/ONE TOUCH SETTING
1234
DISK IN USE
SYNTHE-
STRINGS/
SIZER
ORGAN
CHOIR
PER-
ENSEMBLE
XG
CUSSION
EFFECT
ONE TOUCH
BANK
SETTING
BANK REGISTRATION
Selecting the Second Voice
Z Select the main voice. ..................................................................................
Select a voice in the normal way (page 31), then press [EXIT] to re-
turn to the main display.
X Call up the Dual mode. ................................................................................
To call up the Dual mode, press the [DUAL] button.
➔ The RIGHT2 VOICE function appears in the lower right corner of
the LCD display, and the current second voice is displayed below
and to the right of the main voice (after the plus sign).
DUAL SPLIT REVERB CHORUS EFFECT
DUAL
38
C Select the second voice. ..........................................................................
Select the second voice in the same manner as described for the main
voice (page 31). To select the second voice, the RIGHT2 VOICE function must be highlighted.
Changing the Main Voice in Dual Mode
To change the main voice while playing in Dual mode, select the
RIGHT1 VOICE function then select the main voice in the normal
manner.
CVP-109/107/105/700
Second Voice
• Range: All voices
• Basic setting: StringsSlow
If you use the VOICE buttons to select a
voice while either the tempo or the KBD
VOL function is highlighted, the voice you
select will be used as the main voice.
36
Page 39

○ ○○○○○○○○○○○○○○○○○○○○○○
Changing the Keyboard Settings for the Second Voice
You can use the settings in the KEYBOARD [RIGHT2] display page
to change the volume, octave, pan, and detune of the voice selected using
the RIGHT2 VOICE function.
■ Displaying the Second Voice Keyboard Settings...........
Press [DIRECT ACCESS] , then [DUAL].
➔ The KEYBOARD [RIGHT2] display appears.
EXI T DIRECT ACCESS
DUAL SPLIT REVERB CHORUS EFFECT
➾
Playing Two Voices Simultaneously — Dual Mode
The settings you make in this page affect
any voices you select using the RIGHT2
VOICE function. Different settings cannot
be made for each voice.
If the RIGHT2 VOICE function is selected
in the main display, you can also display
the KEYBOARD [RIGHT2] page by
pressing [DIRECT ACCESS] followed by
any one of the VOICE buttons.
You can switch between the KEYBOARD
[RIGHT2] page and the [RIGHT1] (page
36) or [LEFT] (page 42) displays using
the PAGE [<] and [>] buttons.
■ Setting the Volume of the Second Voice..................................
You can use the VOLUME function in the KEYBOARD [RIGHT2]
page to change the volume of the second voice.
Z Press the VOLUME button.
➔ The VOLUME function is highlighted.
X Adjust the volume of the second voice.
Use the data dial or [–] and [+] buttons to change the volume, or hold
down the VOLUME button to increase the volume.
Press the [–] and [+] buttons simultaneously to restore the basic setting.
■ Setting the Octave of the Second Voice...................................
The OCTAVE function in the KEYBOARD [RIGHT2] display lets
you adjust the pitch of the second voice up or down by one or two octaves. Press the OCTAVE button.
➔ The value changes each time you press the button.
To adjust the overall keyboard volume,
use the KBD VOL function in the main
display (page 23) instead.
VOLUME
• Range: 0 — 127
• Basic setting: 127
OCTAVE
• Settings: –2 (2 octaves lower)
–1 (1 octave lower)
0 (no octave shift)
+1 (1 octave higher)
+2 (2 octaves higher)
• Basic setting: 0
Some voices have octave settings that
are selected automatically when the
voice is selected. (Such settings are not
displayed by the OCTAVE function.) You
can prevent the octave setting from
changing when a voice is selected by
setting the VOICE SETTING function
(page 189) to MANUAL.
37
CVP-109/107/105/700
39
Page 40

Playing Two Voices Simultaneously — Dual Mode
■ Setting the Stereo Position of the Second Voice...........
The PAN function in the KEYBOARD [RIGHT2] display lets you
adjust the stereo position of the second voice.
Z Press the PAN button.
○○○○○○○○○○○○○○○○○○○○○○○
➔ The PAN function is highlighted.
X Adjust the stereo position.
Use the data dial or [–] and [+] buttons to change the stereo position, or
hold down the PAN button to move the position to the right.
Press the [–] and [+] buttons simultaneously to restore the basic setting.
■ Detuning the Second Voice ...................................................................
The DETUNE function in the KEYBOARD [RIGHT2] display page
lets you detune the pitch of the second voice slightly from that of the
main voice, to produce an even richer sound.
Z Press the DETUNE button.
➔ The DETUNE function is highlighted.
PAN
• Settings: L — ▼ — R
• Basic setting: ▼ (center)
DETUNE
• Range: 0 — 10
• Basic setting: 5
40
X Adjust the detune depth.
Use the data dial or [–] and [+] buttons to change the detune depth, or
hold down the DETUNE button to increase the detune depth.
Press the [–] and [+] buttons simultaneously to restore the basic set-
ting.
Exiting the Dual Mode
Press the [DUAL] button to exit Dual mode.
➔ The [DUAL] button lamp turns off, and the keyboard no longer
plays in Dual mode.
DUAL SPLIT REVERB CHORUS EFFECT
38
CVP-109/107/105/700
Page 41

Playing Two Voices on Different
Sides of the Keyboard — Split Mode
The Split mode of the Clavinova allows you to select and play two
different voices with each hand. For example, you can play the
bass with your left hand and the piano with your right hand.
STYLE
8BEAT DANCE
BALLAD PIANIST
16BEAT
DEMO
SWING/
LATIN
HELP
COUNTRY DISK
JAZZ
VOLUME
MUSIC
VOCAL
MASTER
ACMP/SONG
DATABASE
HARMONY
HARMONY
ACMP ASSIST
OVER
VOLUME
VOLUME
SIGNAL
MAX
MAX
AUTO ACCOMPANIMENT
AUTO FILL
MAIN BMAIN A MAIN C MAIN D ENDING SYNCHRO START
INTRO
ACMP ON
MIN
MIN
CONTRAST
ROCK/
R&B
BEAT
TRAD/
BALL–
WALTZ
ROOM
TEMPO
CUSTOM METRONOME
RESET
TAP
/
STOP
START
FADE
/
OUT
IN
/
STOP
PAGE
EXIT DIRECT ACCESS
MASTER
EQUALIZER
FUNCTION
SONG MIXER
GUIDE CONTROL
SOUND
REPEAT
NEXT NOTE
EASY PLAY
SONG CONTROL
PLAY
/
STOP
FF REC
PAUSE REW
Selecting the Left Voice
Z Select the main voice. ...................................................................................
Select a voice in the normal way (page 31), then press [EXIT] to re-
turn to the main display. The voice you select will be played by the right
range of the keyboard.
PIANO E. PIANO GUITAR
SAX
/
FLUTE
BASSBRASS
DUAL SPLIT REVERB CHORUS
REGISTRATION/ONE TOUCH SETTING
1234
DISK IN USE
VOICE
SYNTHE-
STRINGS/
SIZER
ORGAN
CHOIR
PER-
ENSEMBLE
XG
CUSSION
EFFECT
ONE TOUCH
BANK
SETTING
BANK REGISTRATION
○○○○○○
SPLI T
X Call up the Split mode. .................................................................................
To call up the Split mode, press the [SPLIT] button.
➔ The LEFT VOICE function appears in the bottom center of the LCD
display, and the current left voice is displayed below and to the
right of the main voice (after the slash). Also, the keyboard guide
lamp corresponding to the split point lights.
DUAL SPLIT REVERB CHORUS EFFECT
Split point
The split point is the key that divides the
right and left sides of the keyboard. You
can change the split point using the
SPLIT POINT function in the KEYBOARD [LEFT] display page (page 43).
You can use the Single Finger, Multi
Finger, Fingered1, or Fingered2 modes
(page 72) of the Automatic Accompaniment function while playing in Split
mode. In this case, pressing the keys in
the left range will play the Automatic
Accompaniment voices as well as the left
voice.
C Select the left voice. ........................................................................................
Select the left voice in the same manner as described for the main
voice (page 31). To select the left voice, the LEFT VOICE function must
be highlighted.
39
Left Voice
• Range: All voices
• Basic setting: Acous.Bass 1
CVP-109/107/105/700
41
Page 42

Playing Two Voices on Different Sides of the Keyboard — Split Mode
Changing the Main Voice in Split Mode
To change the main voice while playing in Split mode, select the
RIGHT1 VOICE function then select the main voice in the normal manner.
If you use the VOICE buttons to select a
voice while either the tempo or the KBD
VOL function is highlighted, the voice you
select will be used as the main voice.
Changing the Keyboard Settings for the Left Voice
You can use the settings in the KEYBOARD [LEFT] display page to
change the volume, octave, and pan of the voice selected using the LEFT
VOICE function. You can also select the keyboard range that is affected
by the pedals, as well as the split point that separates the right and left
ranges, using the functions in this page.
■ Displaying the Left Voice Keyboard Settings....................
Press [DIRECT A CCESS], then [SPLIT].
➔ The KEYBOARD [LEFT] display appears.
The settings you make in this page affect
any voices you select using the LEFT
VOICE function. Different settings cannot
be made for each voice.
If the LEFT VOICE function is selected in
the main display, you can also display
the KEYBOARD [LEFT] page by pressing
[DIRECT ACCESS] followed by any one
of the VOICE buttons.
○○○○○○○○
EXI T DIRECT ACCESS
DUAL SPLIT REVERB CHORUS EFFECT
➾
■ Setting the Volume of the Left Voice ...........................................
You can use the VOLUME function in the KEYBOARD [LEFT] page
to change the volume of the left voice.
ZZ
Z Press the VOLUME button.
ZZ
➔ The VOLUME function is highlighted.
You can switch between the KEYBOARD
[LEFT] page and the [RIGHT1] (page 36)
or [RIGHT2] (page 39) displays using the
PAGE [<] and [>]buttons.
To adjust the overall keyboard volume,
use the KBD VOL function in the main
display (page 23) instead.
42
XX
X Adjust the volume of the left voice.
XX
Use the data dial or [–] and [+] buttons to change the volume, or hold
down the VOLUME button to increase the volume.
Press the [–] and [+] buttons simultaneously to restore the basic setting.
CVP-109/107/105/700
VOLUME
• Range: 0 — 127
• Basic setting: 127
40
Page 43

○○○○○○○○
■ Setting the Octave of the Left Voice.............................................
Playing Two Voices on Different Sides of the Keyboard — Split Mode
The OCTAVE function in the KEYBOARD [LEFT] display lets you
adjust the pitch of the left voice up or down by one or two octaves. Press
the OCTAVE button.
➔ The value changes each time you press the button.
■ Setting the Stereo Position of the Left Voice......................
The PAN function in the KEYBOARD [LEFT] display lets you adjust the stereo position of the left voice.
Z Press the PAN button.
➔ The PAN function is highlighted.
OCTAVE
• Settings: –2 (2 octaves lower)
–1 (1 octave lower)
0 (no octave shift)
+1 (1 octave higher)
+2 (2 octaves higher)
• Basic setting: +1
Some voices have octave settings that
are selected automatically when the
voice is selected. (Such settings are not
displayed by the OCTAVE function.) You
can prevent the octave setting from
changing when a voice is selected by
setting the VOICE SETTING function
(page 189) to MANUAL.
X Adjust the stereo position.
Use the data dial or [–] and [+] buttons to change the stereo position, or
hold down the PAN button to move the position to the right.
Press the [–] and [+] buttons simultaneously to restore the basic setting.
■ Setting the Range Affected by the Right and Left
Pedals.........................................................................................................................
The PEDAL function in the KEYBOARD [LEFT] display lets you
specify which ranges of the keyboard will be affected by the damper,
glide, and pitch bend functions (CVP-109/107/700) controlled by the left
and right pedals when playing in Split mode. Press the PEDAL button.
➔ The value changes each time you press the button.
■ Changing the Split Point............................................................................
You can use the SPLIT POINT function in the KEYBOARD [LEFT]
display to set the split point at any desired key position. In Split mode, the
left voice is played by all keys to the left of (and including) the split point.
The basic setting of the Split Point is F#2.
F 2
Left range
PAN
• Settings: L — ▼ — R
• Basic setting: ▼ (center)
PEDAL
• Settings: R (right only)
L (left only)
L+R (both)
• Basic setting: R
See pages 190 and 191 for a list of the
functions that can be controlled by the
left and right pedals.
SPLIT POINT
• Settings: Any key of the keyboard
• Basic setting: F#2
C3 C4 C5 C6 C7C2C1C0
Right range
41
CVP-109/107/105/700
43
Page 44

Playing Two Voices on Different Sides of the Keyboard — Split Mode
Z Press the SPLIT POINT button.
➔ The SPLIT function is highlighted.
X Change the split point.
Use the data dial or [–] and [+] buttons to change the split point, or hold
down the SPLIT POINT button to move the split point to the right.
Press the [–] and [+] buttons simultaneously to restore the basic setting.
➔ The keyboard guide lamp corresponding to the selected Split Point
lights, and the key name is displayed by the SPLIT POINT function.
○○○○○○○○○○
C3
Using the Dual and Split Functions Simultaneously
The [DUAL] and [SPLIT] buttons can be turned on simultaneously.
When you do so, the right range of the keyboard will play both the main
voice and the second voice.
44
Exiting the Split Mode
Press the [SPLIT] button to exit Split mode.
➔ The [SPLIT] button lamp turns off, and the keyboard no longer plays
in Split mode.
DUAL SPLIT REVERB CHORUS EFFECT
42
CVP-109/107/105/700
Page 45

Using the Pedals
○○○○○○○○○○○○○○○○○○○○○○○○○○
The Clavinova has three pedals.
Damper Pedal (Right)
The damper pedal performs the same function as the damper pedal on an
actual acoustic piano, letting you sustain the sound of the voices even after
releasing the keys. On the CVP-109/107/700, you can also set the damper
pedal to bend the pitch of notes up or down using the RIGHT PEDAL function (page 191).
• Certain voices in the [PERCUSSION]
and [XG] groups may not be affected
by use of the damper pedal.
• Some voices may sound continuously
or have a long decay after the notes
have been released while the damper
pedal is held.
Sostenuto Pedal (Center)
If you play a note or chord on the keyboard and press the sostenuto
pedal while the note(s) are held, those notes will be sustained as long as
the pedal is held, but all subsequently played notes will not be sustained.
This makes it possible to sustain a chord, for example, while other notes
are played staccato.
Soft Pedal (Left)
Pressing this pedal reduces the volume and slightly changes the timbre of
the notes you play.
You can also assign one of many other functions to this pedal; for exam-
ple, you can use it to start/stop the Automatic Accompaniment, or use it to
play Fill Ins. See page 190 for details.
• Certain voices in the [PERCUSSION]
and [XG] groups may not be affected
by use of the sostenuto pedal.
• Certain voices, such as [STRINGS] or
[BRASS], sustain continuously when
the sostenuto pedal is pressed.
The effect of the soft pedal may differ
slightly depending on the selected voice.
43
CVP-109/107/105/700
45
Page 46

CHAPTER 4: Reverb and Other
Reverb
○○○○○○○○○○○○○○○○○○○○○○○○○○○○○○○○○○○○○○○
Reverb is an eff ect that recreates the acoustic ambiance of a perf ormance space —
anything from a room in a jazz club to a concert hall. The Clavinova lets you choose
from a variety of rev erb effects; the CVP-109 giv es you the additional option of using
the high-quality Natural Reverb — effects of a caliber normally employed in professional recording studios. Of course, you can set the depth of any re verb eff ect to your
preference. With the CVP-109/107/700, you can also apply re verb effects to the signal
from the microphone using the Vocal Harmony settings (see page 177).
STYLE
DEMO
16BEAT
8BEAT DANCE
BALLAD PIANIST
SWING/
LATIN
COUNTRY DISK
JAZZ
HELP
VOLUME
VOCAL
MUSIC
MASTER
ACMP/SONG
HARMONY
DATABASE
ACMP ASSIST
HARMONY
OVER
VOLUME
VOLUME
SIGNAL
MAX
MAX
AUTO ACCOMPANIMENT
AUTO FILL
MAIN BMAIN A MAIN C MAIN D ENDING SYNCHRO START
INTRO
ACMP ON
MIN
MIN
CONTRAST
ROCK/
R&B
BEAT
TRAD/
BALL–
WALTZ
ROOM
TEMPO
CUSTOM METRONOME
RESET
TAP
START
/
STOP
FADE
/
OUT
IN
/
STOP
PAGE
EXIT DIRECT ACCESS
MASTER
EQUALIZER
SONG MIXER
FUNCTION
GUIDE CONTROL
SOUND
REPEAT
EASY PLAY
NEXT NOTE
SONG CONTROL
PLAY
/
STOP
PAUSE REW
FF REC
PIANO E. PIANO GUITAR
SAX
/
FLUTE
BASSBRASS
DUAL SPLIT REVERB CHORUS
REGISTRATION/ONE TOUCH SETTING
1234
DISK IN USE
VOICE
SYNTHE-
STRINGS/
SIZER
ORGAN
CHOIR
PER-
ENSEMBLE
XG
CUSSION
EFFECT
ONE TOUCH
BANK
SETTING
BANK REGISTRATION
REVERB
Turning the Reverb On or Off
To apply reverb to the keyboard part(s), press the [REVERB] button.
DUAL SPLIT REVERB CHORUS EFFECT
➔ The lamp lights, and the reverb icon “ ” appears in the main display,
followed by the name of the currently selected reverb type.
Current reverb type
To turn the reverb off, press [REVERB] again.
➔ The lamp turns off, and the reverb icon and reverb type are no
longer displayed.
Reverb ON/OFF
Basic setting: Depends on voice.
The setting of the [REVERB] button has
no effect on song mode or Auto Accompaniment playback, or on audio signals
input via a microphone (CVP-109/107/
700).
46
Because the basic setting of the [REVERB] button depends on the
voice, the reverb may turn on or off automatically when you select a different voice.
44
CVP-109/107/105/700
Page 47

Effects
○○○○○○○○○○○○○○○○○○○○○○○○○○○○○○○○○○○○○○○○○○○○○○○○○○○
Changing the Reverb Settings
You can change the reverb type and depth using the REVERB and
REVERB DEPTH display pages. With the CVP-109, you can also select
a Natural Reverb effect from the NATURAL REVERB page.
■ Displaying the Reverb Settings .........................................................
ZZ
Z Press [DIRECT ACCESS], then [REVERB].
ZZ
EXI T DIRECT ACCESS
DUAL SPLIT REVERB CHORUS EFFECT
➾
➔ The LCD displays either the REVERB page or the REVERB
DEPTH page (whichever was selected most recently).
CVP-107/700
Reverb
If you are using the CVP-109, the LCD will display the NATURAL
REVERB page, the REVERB page, or the REVERB DEPTH page.
CVP-109
XX
X Use the PAGE [<] and [>] buttons to switch between the NATURAL
XX
REVERB page (CVP-109), the REVERB page, and the REVERB
DEPTH page.
45
On the CVP-109, the NATURAL
REVERB display is page 1; the REVERB
and REVERB DEPTH pages are numbered 2 and 3, respectively.
If you press the [>] button while the
REVERB DEPTH page is showing, the
CHORUS page will be displayed. Refer
to the other sections of this chapter for
details on chorus and other effect settings.
CVP-109/107/105/700
47
Page 48

Reverb
○○○○○○○○○○○○○○○○○○○○○○○○○○○○○○○○○○○○○○○○○○○○○○○○○○○
■ Changing the Natural Reverb Type (CVP-109)...............
You can change the Natural Reverb type selection in the NATURAL
REVERB display (page 47).
Use the left LCD buttons to select the desired Natural Reverb type.
You can also select a Natural Reverb type with the REVERB TYPE ▲
and ▼ buttons, the data dial, or the [–] and [+] buttons.
➔ The selected Natural Reverb type is highlighted.
Because the basic setting of the Natural Reverb type depends on the
current RIGHT1 VOICE setting, the Natural Reverb type may change
automatically when you select a different main voice (see page 31).
Natural Reverb Type
• Settings: See table on page 218.
• Basic setting: Depends on voice.
• The Natural Reverb type selection
affects all keyboard parts that use
Natural Reverb. Different settings
cannot be made for each part.
• The depth of the Natural Reverb effect
can be set separately for each part that
uses the effect (page 50).
• Depending on the selected voice, the
depth of the effect may sound stronger
or weaker, even though the same
reverb type is selected.
■ Changing the Reverb System (CVP-109).................................
You can assign each keyboard part to use either the Natural Reverb
system or normal reverb using the functions in the NATURAL REVERB
display (page 47).
Press the LCD button corresponding to the keyboard part whose
reverb system you want to change. Select LEFT to change the reverb
system for the left part, RIGHT1 for the main part, or RIGHT2 for the
second part.
➔ The selected function switches between REV and N.REV.
Because the basic settings of the reverb system functions depend on
the current voice selection, these settings may change automatically
when you select a different voice.
Reverb System
Settings: N.REV (Natural Reverb),
REV (normal reverb)
Basic setting: Depends on voice.
• If you switch a part to N.REV, it will
use the Natural Reverb type selected
in the NATURAL REVERB display.
• If you switch a part to REV, it will use
the reverb type selected in the
REVERB display.
48
46
CVP-109/107/105/700
Page 49

○○○○○○○○○○○○○○○○○○○○○○○○○○○○○○○○○○○○○○○○○○○○○○○○○○○
■ Changing the Reverb Type .....................................................................
Reverb
You can change the reverb type using the REVERB display (page 47).
Use the REVERB TYPE ▲ and ▼ buttons to change the reverb type,
or select the REVERB TYPE function and use the data dial or the [–] and
[+] buttons. (You can also use the left and right LCD buttons to select
one of the reverb types listed in the display.)
➔ The selected reverb type is highlighted.
CVP-107/700
Because the basic setting of the reverb type depends on the accompaniment style, the reverb type may change automatically when you select
a different style.
Reverb Type
• Settings: See table on page 218.
• Basic setting: Depends on style.
• The reverb type selection affects all
voices played by the keyboard or Auto
Accompaniment. Different settings
cannot be made for each part.
• Depending on the selected voice, the
depth of the effect may sound stronger
or weaker, even though the same
reverb type is selected.
• The reverb effect cannot be applied to
the sounds input through the AUX IN
[R] and [L/L+R] jacks.
• It is also possible to apply reverb effects to the keyboard voices using the
[EFFECT] button. See the Effect Type
List on page 219 for details.
• If both the [REVERB] button and the
[CHORUS] and/or [EFFECT] buttons
are turned on, all effects will be applied.
■ Setting the Total Depth................................................................................
The overall depth of the selected reverb effect(s) can be set using the
TOTAL DEPTH function in the REVERB display (page 47).
Z Select the TOTAL DEPTH function.
➔ The TOTAL DEPTH function is highlighted.
X Set the total de pth of the reverb effect(s).
You can change the setting using the TOTAL DEPTH ▼ and ▲ buttons, the data dial, or the [–] and [+] buttons.
To reset the value to the basic setting of 64, simultaneously press
either the TOTAL DEPTH ▼ and ▲ buttons or the [–] and [+] buttons.
On the CVP-109, the TOTAL DEPTH
setting determines the depth of both the
Natural Reverb and normal reverb effects.
TOTAL DEPTH
• Range: 0 (no effect) — 127 (max.)
• Basic setting: 64
• The TOTAL DEPTH setting globally
affects all voices. Different settings
cannot be made for each voice.
• You can also set the reverb depth
separately for the rhythm and accompaniment parts, and for each keyboard
part. (See the next operation.)
47
CVP-109/107/105/700
49
Page 50

Reverb
○○○○○○○○○○○○○○○○○○○○○○○○○○○○○○○○○○○○○○○○○○○○○○○○○○○
■ Setting the Reverb Depth for Each Part....................................
The settings in the REVERB DEPTH display (page 47) let you set the
reverb depth separately for the rhythm and accompaniment parts, as well
as the parts you play from the keyboard.
Z Select a part.
Press the LCD button corresponding to RHYTHM to set the reverb
depth for the drum part, or ACMP to set it for all other accompani-
ment parts. Select LEFT, RIGHT1, or RIGHT2 to set the reverb
depth for the corresponding keyboard part.
➔ The selected function is highlighted.
CVP-107/700
X Set the reverb depth.
Set the reverb depth for the highlighted part by using the data dial or
[–] and [+] buttons.
You can also advance a value by pressing the corresponding LCD
button. To reset a value to its basic setting, simultaneously press the
[–] and [+] buttons.
• You can also select several parts at
once and adjust their settings simultaneously.
• On the CVP-109, the LEFT, RIGHT1,
and RIGHT2 settings also set the
depth of the Natural Reverb effects.
RHYTHM and ACMP
• Range: 0 (no effect) — 127 (max.)
• Basic setting: 64
LEFT, RIGHT1, and RIGHT2
• Range: 0 (no effect) — 127 (max.)
• Basic setting: Depends on voice.
50
Because the basic settings of the LEFT, RIGHT1, and RIGHT2 functions depend on the voices selected, a reverb depth setting may
change automatically when you select a different part.
CVP-109/107/105/700
The amount of reverb that is applied to a
part depends on both the part depth and
TOTAL DEPTH settings. If one of the
settings is 0, no reverb will be applied to
that part even if the other setting is 127.
48
Page 51

Chorus
○○○○○○○○○○○○○○○○○○○○○○○○○○○○○○○○○○○○○○
The Clavinov a’s chorus eff ects let you modify the voices y ou play from the k eyboard,
adding warmth for an e ven richer sound. Flanger effects add pronounced modulation,
for a spacy futuristic quality. You can choose from a variety of chorus and flanger
effects, and set the depth of the eff ect added to each ke yboard v oice. With the CVP109/107/700, you can also apply the selected chorus effect to the signal from the
microphone using the Vocal Harmony settings (see page 178).
STYLE
DEMO
16BEAT
8BEAT DANCE
BALLAD PIANIST
SWING/
LATIN
COUNTRY DISK
JAZZ
HELP
VOLUME
VOCAL
MUSIC
MASTER
ACMP/SONG
HARMONY
DATABASE
ACMP ASSIST
HARMONY
OVER
VOLUME
VOLUME
SIGNAL
MAX
MAX
AUTO ACCOMPANIMENT
AUTO FILL
MAIN BMAIN A MAIN C MAIN D ENDING SYNCHRO START
INTRO
ACMP ON
MIN
MIN
CONTRAST
ROCK/
R&B
BEAT
TRAD/
BALL–
WALTZ
ROOM
TEMPO
CUSTOM METRONOME
RESET
TAP
START
/
STOP
FADE
/
OUT
IN
/
STOP
PAGE
EXIT DIRECT ACCESS
Turning the Chorus On or Off
To apply chorus to the keyboard part(s), press the [CHORUS] button.
DUAL SPLIT REVERB CHORUS EFFECT
➔ The lamp lights, and the chorus icon “ ” appears in the main
display, followed by the name of the currently selected chorus type.
Current chorus type
DISK IN USE
VOICE
SYNTHE-
PIANO E. PIANO GUITAR
SAX
/
FLUTE
BASSBRASS
DUAL SPLIT REVERB CHORUS
REGISTRATION/ONE TOUCH SETTING
1234
STRINGS/
SIZER
ORGAN
CHOIR
PER-
ENSEMBLE
XG
CUSSION
EFFECT
ONE TOUCH
BANK
SETTING
BANK REGISTRATION
CHORUS
MASTER
EQUALIZER
SONG MIXER
FUNCTION
GUIDE CONTROL
SOUND
REPEAT
EASY PLAY
NEXT NOTE
SONG CONTROL
PLAY
/
STOP
PAUSE REW
FF REC
Chorus ON/OFF
Basic setting: Depends on voice.
The setting of the [CHORUS] button has
no effect on song mode or Auto Accompaniment playback, or on audio signals
input via a microphone (CVP-109/107/
700).
To turn the chorus off, press [CHORUS] again.
➔ The lamp turns off, and the chorus icon and chorus type are no
longer displayed.
Because the basic setting of the [CHORUS] button depends on the
voice, the chorus may turn on or off automatically when you select a
different voice.
You can change the current chorus type and depth using the CHO-
RUS display page.
49
CVP-109/107/105/700
51
Page 52

Chorus
○○○○○○○○○○○○○○○○○○○○○○○○○○○○○○○○○○○○○○○○○○○○○○○○○○○
Changing the Chorus Settings
■ Displaying the Chorus Settings.....................................................
Press [DIRECT ACCESS], then [CHORUS] to display the CHO-
RUS display page.
EXI T DIRECT ACCESS
DUAL SPLIT REVERB CHORUS EFFECT
➾
➔ The LCD displays the CHORUS page.
CVP-107/700
■ Changing the Chorus Type....................................................................
You can change the chorus type selection in the CHORUS page. Se-
lect the chorus type using the left and right LCD buttons.
You can also change the chorus type using the CHORUS TYPE ▲
and ▼ buttons, or by selecting the CHORUS TYPE function and using
the data dial or the [–] and [+] buttons.
If you press the [<] button or the [>]
button while the CHORUS page is showing, the REVERB DEPTH page or the
EFFECT 1 page (the EFFECT page on
the CVP-105) will be displayed. Refer to
the other sections of this chapter for
details on reverb and other effect settings.
Chorus Type
• Settings: See table on page 219.
• Basic setting: Depends on style.
52
➔ The selected chorus type is highlighted.
CVP-107/700
Because the basic setting of the chorus type depends on the accompaniment style, the chorus type may change automatically when you select
a different style.
CVP-109/107/105/700
• The chorus type selection affects all
keyboard parts. Different settings
cannot be made for each part.
• Depending on the selected voice, the
depth of the effect may sound stronger
or weaker, even though the same
chorus type is selected.
• It is also possible to apply chorus
effects to the keyboard voices using
the [EFFECT] button. See the Effect
Type List on page 219 for details.
• If both the [CHORUS] button and the
[REVERB] and/or [EFFECT] buttons
are turned on, all effects will be applied.
50
Page 53

○○○○○○○○○○○○○○○○○○○○○○○○○○○○○○○○○○○○○○○○○○○○○○○○○○○
■ Setting the Chorus Depth for Each Part...................................
The other settings in the CHORUS page let you set the chorus depth
separately for each part you play from the keyboard.
Z Select a part.
Press LEFT, RIGHT1, or RIGHT2 to set the chorus depth for the
corresponding keyboard part.
➔ The selected function is highlighted.
CVP-107/700
You can also select several parts at once
and adjust their settings simultaneously.
Chorus
X Set the chorus depth.
Set the chorus depth for the highlighted part by using the data dial or
[–] and [+] buttons.
You can also advance a value by pressing the corresponding LCD
button. To reset a value to its basic setting, simultaneously press the
[–] and [+] buttons.
Because the basic settings of the chorus depth functions depend on
the voices selected, a chorus depth setting may change automatically
when you select a different voice.
Chorus Depth functions
• Range: 0 (no effect) — 127 (max.)
• Basic setting: Depends on voice.
51
CVP-109/107/105/700
53
Page 54

Voice Effects (CVP-109/107/700)
○○○○○○○○○○○○○○○○○○
The Clavinova has a variety of effects besides reverb and chorus that you can use to
enhance the sound of the voices or create wild, special effects. The CVP-109/107/700
features two complete effect systems, which you can apply individually to any of the
voices you play from the keyboard. You can adjust the depth of the effects as desired.
The CVP-109/107/700 also applies an independent effect to the signal from the
microphone; settings for this effect system can be made in the VOCAL HARMONY
display (page 179).
STYLE
DEMO
16BEAT
8BEAT DANCE
BALLAD PIANIST
SWING/
LATIN
COUNTRY DISK
JAZZ
HELP
VOLUME
VOCAL
MUSIC
MASTER
ACMP/SONG
HARMONY
DATABASE
ACMP ASSIST
OVER
VOLUME
VOLUME
SIGNAL
MAX
MAX
AUTO ACCOMPANIMENT
AUTO FILL
MAIN BMAIN A MAIN C MAIN D ENDING SYNCHRO START
INTRO
ACMP ON
MIN
MIN
CONTRAST
ROCK/
R&B
BEAT
TRAD/
BALL–
WALTZ
ROOM
TEMPO
CUSTOM METRONOME
RESET
HARMONY
TAP
START
/
STOP
FADE
/
OUT
IN
/
STOP
PAGE
EXIT DIRECT ACCESS
MASTER
EQUALIZER
SONG MIXER
FUNCTION
GUIDE CONTROL
SOUND
REPEAT
EASY PLAY
NEXT NOTE
SONG CONTROL
PLAY
/
STOP
PAUSE REW
FF REC
PIANO E. PIANO GUITAR
SAX
/
FLUTE
BASSBRASS
DUAL SPLIT REVERB CHORUS
REGISTRATION/ONE TOUCH SETTING
1234
DISK IN USE
VOICE
SYNTHE-
STRINGS/
SIZER
ORGAN
CHOIR
PER-
ENSEMBLE
XG
CUSSION
EFFECT
ONE TOUCH
BANK
SETTING
BANK REGISTRATION
Turning the Effects On or Off
You can use the [EFFECT] button to turn effects on or off for the
keyboard parts.
ZSelect a part in the main display. ....................................................
If you are playing in Dual mode or Split mode, press the LCD button
corresponding to the keyboard part whose effect you want to turn on.
➔ The selected function is highlighted.
EFFECT
• Only the effect system assigned to the
currently selected keyboard part is
affected when you press the [EFFECT]
button.
• To turn both effect systems (page 55)
on or off, you must perform this operation twice, selecting each of the affected parts in turn.
54
XPress the [EFFECT] button....................................................................
DUAL SPLIT REVERB CHORUS EFFECT
➔ The lamp lights, and the effect icon “ ” appears in the main dis-
play, followed by the name of the currently selected effect type.
Current effect type
CVP-109/107/105/700
Effect ON/OFF
Basic setting: Depends on voice.
If both of the effect systems (page 55)
are assigned to the same part, only the
effect type selected in the EFFECT 1
page will be displayed.
52
Page 55

○ ○○○○○○○○○○○○○○○○○○○○○○○○○○○○○○○○○
If the lamp does not light, neither effect system has been assigned to
the part in question. Check the PART function settings (page 57).
If the lamp lights but the sound of the voice does not change, the effect
depth may have been set to 0. Check the effect depth settings (page 57).
To turn an effect off, select the part that uses that effect in the main
display and press [EFFECT] again.
➔ The lamp turns off, and the effect icon and effect type are no
longer displayed.
Because the basic setting of the [EFFECT] button depends on the
voice, the effect(s) may turn on or off automatically when you select a
different voice.
Changing the Effect Settings
You can change the effect type, depth and affected part using the set-
tings on the EFFECT pages.
Voice Effects (CVP-109/107/700)
• The setting of the [EFFECT] button
has no effect on song mode or Auto
Accompaniment playback, or on audio
signals input via a microphone (CVP109/107/700).
• When an effect system is used by a
song, it is automatically turned off for
the keyboard part(s) when that song is
selected for playback. If you press
[EFFECT] to apply an effect to the
keyboard part(s) after selecting the
song, the effect will not be applied to
the song.
■ Displaying the Effect Settings.............................................................
Press [DIRECT ACCESS], then [EFFECT] to display the EFFECT
display pages.
EXI T DIRECT ACCESS
DUAL SPLIT REVERB CHORUS EFFECT
➾
➔ The LCD displays either the EFFECT 1 page or the EFFECT 2 page
(whichever was selected most recently).
CVP-107/700
Use the PAGE [<] and [>] buttons to switch between the EFFECT 1
page and the EFFECT 2 page.
53
If you press the [<] button while the
EFFECT 1 page is showing, the CHORUS page will be displayed. Refer to the
first two sections of this chapter for details on reverb and chorus settings.
CVP-109/107/105/700
55
Page 56

Voice Effects (CVP-109/107/700)
○○○○○○○○○○○○○○○○○○○○○○○○○○○○○○○○○○
■ Changing the Effect Type..........................................................................
You can change the effect type selection for one of the effect systems
in the appropriate EFFECT display (page 55). Select an effect type using
the EFFECT TYPE ▲ and ▼ buttons, or highlight the EFFECT TYPE
function and use the data dial or the [–] and [+] buttons.
You can also use the left and right LCD buttons to select one of the
effect types listed in the display screen.
To reset the effect type to its basic setting, simultaneously press the
EFFECT TYPE ▲ and ▼ buttons or the [–] and [+] buttons.
➔ The selected effect type is highlighted.
Effect Type
• Settings: See table on page 219.
• Basic setting: Depends on voice.
Because the basic setting of the effect type depends on the voice, the
effect type may change automatically when you select a different voice.
■ Varying the Effect.............................................................................................
Each of the Clavinova’s effect types has a variation that can be selected using the VARIATION functions in the EFFECT 1 and EFFECT
2 displays (page 55). To vary the effect produced by the effect type selected for an effect system, display the EFFECT page for that system,
then press the LCD button under VARIATION.
➔ The value displayed by the VARIATION function switches be-
tween OFF and ON, and the effect changes.
The way in which the effect changes depends on the effect type (see
the table on page 219). Also, because the basic setting of the VARIA-
TION function depends on the voice, the setting of this function may
change automatically when you select a different voice.
If both the [EFFECT] button and the
[REVERB] and/or [CHORUS] buttons are
turned on, all effects will be applied.
VARIATION
• Settings: OFF, ON
• Basic setting: Depends on voice.
56
54
CVP-109/107/105/700
Page 57

Voice Effects (CVP-109/107/700)
■ Setting the Affected Part .................................................................................
You can use the PART function in each EFFECT display to select the keyboard part that is to be affected by the corresponding effect system. To change
the part affected by one of the effect systems, display the EFFECT page for
that system, then press the LCD button under PART.
➔ The value of the PART function changes, displaying each of the
settings (R1, R2, LEFT, and OFF) in turn.
Since the changing the value of the PART function means the effect
will probably be applied to a different voice, the effect type (page 56)
and effect depth (see below) may also change automatically to match the
voice that is currently selected for the chosen part.
PART
Settings: R1 (main)
R2 (second)
LEFT
OFF (no effect)
Basic settings: R1 (EFFECT 1)
R2 (EFFECT 2)
When neither effect system has been
assigned to the keyboard part that is
currently selected in the main display, the
[EFFECT] button cannot be used to turn
an effect on.
■ Setting the Effect Depth .............................................................................
The DEPTH function in each of the EFFECT pages lets you adjust the
depth of the currently selected effect type. To set the depth of the effect
produced by an effect system, select DEPTH in the appropriate EFFECT
page, then and use the data dial or [–] and [+] buttons to change the value.
➔ The DEPTH value changes.
You can also advance the value by holding down the DEPTH button.
To reset the value to its basic setting, simultaneously press the [–] and
[+] buttons.
Since the basic setting of the DEPTH function depends on the voice
selected for the part affected by the effect system in question, the effect
depth may change automatically when you select a different voice.
DEPTH
• Range: 0 (no effect) - 127 (max.)
• Basic setting: Depends on voice.
The effect depth cannot be changed for
certain effect types. In such cases a row
of dashes ( - - -) is displayed as the
DEPTH setting, and the DEPTH function
cannot be selected.
55
CVP-109/107/105/700
57
Page 58

Voice Effects (CVP-105)
○○○○○○○○○○○○○○○○○○○○○○○○○
The Clavinova has a var iety of effects besides reverb and chorus
that you can use to enhance the sound of the voices or create wild,
special effects. You can adjust the depth of the effect as desired.
STYLE
DEMO
16BEAT
8BEAT DANCE
BALLAD PIANIST
SWING/
LATIN
COUNTRY DISK
JAZZ
HELP
VOLUME
VOCAL
MUSIC
MASTER
ACMP/SONG
HARMONY
DATABASE
ACMP ASSIST
HARMONY
OVER
VOLUME
VOLUME
SIGNAL
MAX
MAX
AUTO ACCOMPANIMENT
AUTO FILL
MAIN BMAIN A MAIN C MAIN D ENDING SYNCHRO START
INTRO
ACMP ON
MIN
MIN
CONTRAST
ROCK/
R&B
BEAT
TRAD/
BALL–
WALTZ
ROOM
TEMPO
CUSTOM METRONOME
RESET
TAP
START
/
STOP
FADE
/
OUT
IN
/
STOP
PAGE
Turning the Effects On
To a pply the effect to the keyboard parts, press the [EFFECT] button.
DUAL SPLIT REVERB CHORUS EFFECT
➔ The lamp lights, and the effect icon “ ” appears in the main dis-
play, followed by the name of the currently selected effect type.
Current effect type
To turn the effect off, press [EFFECT] again.
➔ The lamp turns off, and the effect icon and effect type are no
longer displayed.
EXIT DIRECT ACCESS
DISK IN USE
VOICE
SYNTHE-
PIANO E. PIANO GUITAR
SAX
/
FLUTE
BASSBRASS
DUAL SPLIT REVERB CHORUS
REGISTRATION/ONE TOUCH SETTING
1234
STRINGS/
SIZER
ORGAN
CHOIR
PER-
ENSEMBLE
XG
CUSSION
EFFECT
ONE TOUCH
BANK
SETTING
BANK REGISTRATION
EFFECT
MASTER
EQUALIZER
SONG MIXER
FUNCTION
GUIDE CONTROL
SOUND
REPEAT
EASY PLAY
NEXT NOTE
SONG CONTROL
PLAY
/
STOP
PAUSE REW
FF REC
Effect ON/OFF
Basic setting: Depends on voice.
The [EFFECT] lamp will not light if the
effect depth (page 60) is set to 0.
When the effect system is also used by
an accompaniment style or song, the
effect being applied to the keyboard
part(s) may automatically be turned off
when you start the Auto Accompaniment
or select the song for playback, depending on the effect type selected by the
style or song. If this happens, you may
be able to apply the effect to the keyboard part(s) by pressing the [EFFECT]
button - again, this depends on the selected effect type. If you do so, the effect
will not be applied to voices played by the
Auto Accompaniment or song.
58
Because the basic setting of the [EFFECT] button depends on the
voice, the effect may turn on or off automatically when you select a different voice.
Changing the Effect Settings
You can change the current effect type and depth using the EFFECT
display pages.
■ Displaying the Effect Settings............................................................
ZPress [DIRECT ACCESS], then [EFFECT].
EXI T DIRECT ACCESS
DUAL SPLIT REVERB CHORUS EFFECT
➾
CVP-109/107/105/700
If you press the [<] button while the first
EFFECT page is showing, the CHORUS
page will be displayed. Refer to the first
two sections of this chapter for details on
reverb and chorus settings.
56
Page 59

○ ○○○○○○○○○○○○○○○○○○○○○○○○○○○○○○○○○○○○○○○
➔ The LCD displays the EFFECT page that was used most recently.
X Use the PAGE [<] and [>] buttons to switch between the EF-
FECT pages.
■ Changing the Effect Type.........................................................................
You can change the effect type selection in the first EFFECT page
(page 4 of the display). Select an effect type using the EFFECT TYPE ▲
and ▼ buttons, or highlight the EFFECT TYPE function and use the data
dial or the [–] and [+] buttons.
You can also use the left and right LCD buttons to select one of the
effect types listed in the display screen.
To reset the effect type to its basic setting, simultaneously press the
EFFECT TYPE ▲ and ▼ buttons or the [–] and [+] buttons.
Voice Effects (CVP-105)
Effect Type
• Settings: See table on page 219.
• Basic setting: Depends on voice.
➔ The selected effect type is highlighted.
Because the basic setting of the effect type depends on the voice, the
effect type may change automatically when you select a different voice.
• The effect type selection affects all
keyboard parts. Different settings
cannot be made for each part.
• When the basic setting of the [EFFECT] button is ON for two or three
voices selected in Dual and/or Split
mode, the Clavinova will automatically
select the most appropriate effect type
and set the effect depth (page 60) for
each part to an appropriate level.
• Depending on the selected voice, the
depth of the effect may sound stronger
or weaker, even though the same
effect type is selected.
• If both the [EFFECT] button and the
[REVERB] and/or [CHORUS] buttons
are turned on, all effects will be applied.
57
CVP-109/107/105/700
59
Page 60

Voice Effects (CVP-105)
○○○○○○○○○○○○○○○○○○○○○○○○○○○○○○○○○○○○○○○○
■ Varying the Effect.............................................................................................
Each of the Clavinova’s effect types has a variation that can be selected using the VARIATION function in the first EFFECT page (page 4
of the display). To vary the effect produced by the selected effect type,
press the LCD button under VARIATION.
➔ The value displayed by the VARIATION function switches be-
tween OFF and ON, and the effect changes.
The way in which the effect changes depends on the effect type (see
the table on page 219). Also, because the basic setting of the VARIA-
TION function depends on the voice, the setting of this function may
change automatically when you select a different voice.
VARIATION function
• Settings: OFF, ON
• Basic setting: Depends on voice.
■ Setting the Effect Depth for Each Part .......................................
The settings in the second EFFECT page (page 5 of the display) let you
set the effect depth separately for each part you play from the keyboard.
Z Select a part.
Press LEFT, RIGHT1, or RIGHT2 to set the effect depth for the cor-
responding keyboard part.
➔ The selected function is highlighted.
X Set the effect depth.
Set the effect depth for the highlighted part by using the data dial or
[–] and [+] buttons.
You can also advance a value by pressing the corresponding LCD
button. To reset a value to its basic setting, simultaneously press the
[–] and [+] buttons.
Because the basic settings of the effect depth functions depend on the
voices selected, an effect depth setting may change automatically
when you select a different voice.
Effect Depth functions
• Range: 0 (no effect) — 127 (max.)
• Basic setting: Depends on voice.
60
58
CVP-109/107/105/700
Page 61

CHAPTER 5:
Accompaniment Styles
(Rhythm and Auto Accompaniment)
Selecting Accompaniment Styles
The Clavinova has a wide variety of musical “styles” that you can use for simple
percussion accompaniment, or as the basis of a fully orchestrated accompaniment
— including bass and rhythm parts — using the Auto Accompaniment feature (page
69). There is also a selection of “Pianist” styles that let you play with piano
accompaniment when you activate the Auto Accompaniment.
STYLE
8BEAT DANCE
SWING/
JAZZ
BALLAD PIANIST
16BEAT
LATIN
COUNTRY DISK
● Style Types
• Rhythm styles: 157 (CVP-109)
147 (CVP-107/700)
135 (CVP-105)
• Pianist styles: 35
• Custom styles: 12
BALL–
ROOM
ROCK/
R&B
TRAD/
WALTZ
CUSTOM
STYLE
DEMO
16BEAT
8BEAT DANCE
BALLAD PIANIST
SWING/
LATIN
COUNTRY DISK
JAZZ
HELP
VOLUME
MUSIC
VOCAL
MASTER
ACMP/SONG
DATABASE
HARMONY
ACMP ASSIST
HARMONY
OVER
VOLUME
VOLUME
SIGNAL
MAX
MAX
AUTO ACCOMPANIMENT
AUTO FILL
MAIN BMAIN A MAIN C MAIN D ENDING SYNCHRO START
INTRO
ACMP ON
MIN
MIN
CONTRAST
ROCK/
R&B
BEAT
TRAD/
BALL–
WALTZ
ROOM
TEMPO
CUSTOM METRONOME
RESET
TAP
START
/
STOP
FADE
/
OUT
IN
/
STOP
PAGE
EXIT DIRECT ACCESS
MASTER
EQUALIZER
SONG MIXER
FUNCTION
GUIDE CONTROL
SOUND
EASY PLAY
REPEAT
NEXT NOTE
SONG CONTROL
PLAY
/
STOP
PAUSE REW
FF REC
* For information on the styles, see the Style List on page 12 in the Refer-
ence Booklet.
* The Clavinova’s styles are divided into eleven groups, corresponding to
the eleven STYLE buttons on the panel.
* The PIANIST styles and Guitar Waltz in the TRAD/WALTZ style group
do not include drum sounds. Use the Auto Accompaniment (page 70) to
play these styles.
PIANO E. PIANO GUITAR
SAX
/
FLUTE
BASSBRASS
DUAL SPLIT REVERB CHORUS
REGISTRATION/ONE TOUCH SETTING
1234
○○○○○○
DISK IN USE
VOICE
SYNTHE-
STRINGS/
SIZER
ORGAN
CHOIR
PER-
ENSEMBLE
XG
CUSSION
EFFECT
ONE TOUCH
BANK
SETTING
BANK REGISTRATION
Selecting a Style
Z Select an accompaniment style group......................................
Select the desired style group by pressing the appropriate STYLE
button.
STYLE
ROCK/
R&B
TRAD/
WALTZ
CUSTOM
JAZZ
16BEAT
LATIN
BALLAD PIANIST
BALL–
COUNTRY DISK
ROOM
8BEAT DANCE
SWING/
➔ The corresponding STYLE SELECT display appears.
Disk and Custom Styles
The [DISK/CUSTOM] button lets you use
styles on optional Style File Disks (page
105) or your original styles (page 91) .
• The last selected style in each group
can be retained in memory, even after
turning off the power, when the Backup
function (page 206) is set to ON.
• When the power is turned on, the 8
Beat 1 style is automatically selected.
However, if the Backup function (page
206) is set to ON, the last selected
style will be selected instead.
• Accompaniment styles cannot be
selected in the Song Play mode (page
113).
59
CVP-109/107/105/700
61
Page 62

S
Selecting Accompaniment Styles
○○○○○○○○○○○○○○○○○○○○○○○○○○○○○○○○○○
X Select a style...........................................................................................................................
Select the desired style by pressing the appropriate left or right LCD button.
PAG E
You can also select a style using the data dial, the [–] and [+] buttons, or the
STYLE ▲ and ▼ buttons.
Some STYLE SELECT displays consist of more than one page. Use the
PAGE [<] and [
>>
>] buttons to switch between pages.
>>
Accompaniment Tempo
• Whenever you select a style,
the preset tempo for that
style is also selected (unless
you change the style during
playback, in which case the
current tempo is maintained).
• Adjust the tempo as described on page 27.
Accompaniment Volume
Use the [ACMP/SONG VOLUME] slider to adjust the playback volume, as described on
page 23.
C Return to the main display.......................................................................................
Press [EXIT] to return to the main display.
EXI T DIRECT ACCES
62
CVP-109/107/105/700
60
Page 63

Playing the Accompaniment Styles
Y ou will use the A UTO ACCOMP ANIMENT b uttons and the ST ART/
STOP b uttons to select style variations and control style playbac k.
○○○○○○
ACMP ON
AUTO ACCOMPANI MENT
INTRO
AUTO F ILL
MAIN BMAIN A MAIN C MAIN D ENDING SYNCHRO START/STOP
STYLE
8BEAT DANCE
BALLAD PIANIST
16BEAT
DEMO
SWING/
LATIN
HELP
COUNTRY DISK
JAZZ
VOLUME
VOCAL
MUSIC
MASTER
ACMP/SONG
HARMONY
DATABASE
HARMONY
ACMP ASSIST
OVER
VOLUME
VOLUME
SIGNAL
MAX
MAX
AUTO ACCOMPANIMENT
AUTO FILL
MAIN BMAIN A MAIN C MAIN D ENDING SYNCHRO START
INTRO
ACMP ON
MIN
MIN
CONTRAST
ROCK/
R&B
BEAT
TRAD/
BALL–
WALTZ
ROOM
TEMPO
CUSTOM METRONOME
RESET
TAP
/
STOP
START
FADE
IN
/
OUT
/
STOP
FAD E
IN
/
OUT
PAGE
Varying the Style
Each of the Clavinova’s styles has four variations, corresponding to
the AUTO ACCOMPANIMENT buttons labeled as [MAIN A], [MAIN
B], [MAIN C], and [MAIN D].
ACMP ON
AUTO ACCOMPANI MENT
INTRO
Use these buttons to select style variations.
AUTO FILL
MAIN BMAIN A MAIN C MAIN D ENDING
START/STOP
EXIT DIRECT ACCESS
DISK IN USE
VOICE
SYNTHE-
PIANO E. PIANO
BRASS
DUAL SPLIT
12
GUITAR
SAX
/
FLUTE
BASS
REVERB CHORUS
REGISTRATION/ONE TOUCH SETTING
34
STRINGS/
SIZER
ORGAN
CHOIR
PER-
ENSEMBLE
XG
CUSSION
EFFECT
ONE TOUCH
BANK
SETTING
BANK REGISTRATION
MASTER
EQUALIZER
FUNCTION
SONG MIXER
GUIDE CONTROL
SOUND
REPEAT
NEXT NOTE
EASY PLAY
SONG CONTROL
PLAY
/
STOP
FF REC
PAUSE REW
Main A is generally the most rudimentary f orm of the style; the other
variations are more or less lavish embellishments on the same basic
theme. By judiciously switching between variations as you play, you can
add variety and make the performance more interesting.
■ Selecting a Variation........................................................................................
You can select a style variation before you start playing the style. To
select a variation, simply press the corresponding button.
AUTO ACCOMPANI MENT
ACMP ON
INTRO
➔ The button’s lamp lights.
AUTO FILL
MAIN BMAIN A MAIN C MAIN D ENDING
The Clavinova will begin playing the selected style variation when
you start the style using one of the methods described in the next section.
■ Playing Fill-in Patterns..................................................................................
If you select a different style variation while the style is playing, the
Clavinova will play an automatic fill-in pattern as it switches to the new
variation. The fill-in pattern, like the main pattern, is different for each
variation.
Fill-in patterns
A “fill-in pattern” is a embellishment of the
basic rhythm, usually played at the end of
a musical phrase as an exciting transition
into the next segment.
61
CVP-109/107/105/700
63
Page 64

Playing the Accompaniment Styles
○○○○○○○○○○○○○○○○○○○○○○○○○○○○○○○○○○
To change the variation while the style is playing, press the button
corresponding to the new variation.
➔ The button’s lamp flashes as the Clavinova plays the fill-in pattern.
Generally speaking, the Clavinova will start the fill-in pattern soon
after you press the button. If you select a variation after the last eighth
note of a measure, however, it will begin the fill-in pattern from the start
of the next measure.
➔ When the fill-in pattern is finished, the button’s lamp lights steadily
as the Clavinov a plays the main pattern.
The auto fill-in feature provides an exciting transition as you switch
from one variation to another. If Main A is playing and you press [MAIN
B], for example, the Clavinova will play Fill-in B, then start playing
Main B.
■ More Fun With Fill-ins....................................................................................
Using the Pedals
You can also use the left pedal to pause
the style or play a special fill-in pattern by
setting the LEFT PEDAL function (page
190) to BREAK or BREAK FIL.
You can also play fill-in patterns without
selecting a different variation. Just press
the button for the variation that is playing.
The Clavinova will play the fill-in for that
variation, then return to the main pattern.
● Changing the Fill-in
It is possible to switch variations while a fill-in pattern is playing. The
Clavinova will switch to the fill-in pattern for the new variation, then
continue with the new main pattern as usual.
● Repeating the Fill-in
If you hold down the flashing button, or press it after the last eighth
note of the measure while the fill-in pattern is playing, the f ill-in pat-
tern will be repeated.
● Canceling the Fill-in
If you press the flashing button earlier than the last eighth note of the
measure while the fill-in pattern is playing, the Clavinova will stop
playing the fill-in pattern and continue with the main pattern.
Starting the Accompaniment Style
There are several ways to start the accompaniment style, as described
below:
64
■ Standard Start.........................................................................................................
This is the simplest way to start a style. If necessary, select a variation
as described on page 63, then press the [START/STOP] button.
START/STOP
FADE
/
OUT
IN
SYNCHRO STAR T/STOP
➔ The lamp lights and the style starts.
CVP-109/107/105/700
Using the Pedals
You can also use the left pedal to start
and stop the style by setting the LEFT
PEDAL function (page 190) to START/
STOP.
Beat Indicator
During style playback, the leftmost beat
lamp (red) flashes on the first beat of
each measure, and the other lamps
(green) flash for each successive beat.
The current tempo and measure number
are shown in the upper left corner of the
main display.
62
Page 65

○○○○○○○○○○○○○○○○○○○○○○○○○○○○○○○○○○
■ Synchronized Start............................................................................................
This method lets you start the style by simply playing a note or chord
on the keyboard.
Z Set the Synchronized Start function.
Playing the Accompaniment Styles
If necessary, select a variation as described on page 63, then press the
[SYNCHRO] button.
START/STOP
FADE
IN
/
OUT
SYNCHRO STAR T/STOP
➔ The lamp lights, and the red [BEAT] lamp flashes in time with the
current tempo.
X Start playing.
When you are ready, play a note on the keyboard. The style starts
playing when you play the first note.
➔ The [SYNCHRO] lamp turns off, the [START/STOP] lamp lights,
and the style starts.
■ T ap Start ........................................................................................................................
This function lets you set the tempo and start the style in one opera-
tion.
If necessary, select a variation as described on page 63, then tap the
[TAP] button at the desired tempo. Tap four times for 2- and 4-beat
styles, three times for 3-beat styles, and five times for 5-beat styles.
• If the [SYNCHRO] button is pressed
while a style is playing, style playback
stops and Synchronized Start is automatically set to stand-by.
• When you play the keyboard in Split
mode (page 41) or use the Auto Accompaniment in a mode other than
FULL KEYBOARD (page 73), only the
left-hand section of the keyboard will
trigger a synchronized start.
To cancel the Synchronized Start function before you start the style, press the
[SYNCHRO] button again.
If you do not tap the [TAP] button the
required number of times (i.e., 3 times for
a 3-beat style), the Tap Start function will
be canceled after a few seconds.
TEMPO
METRONOME RESET
When playing a 4-beat style… ➾ Tap 4 times.
TAP
The [TAP] button can also be used to change the tempo during style
playback (by tapping the button twice). In this case the tap “click” will
not sound.
63
CVP-109/107/105/700
65
Page 66

Playing the Accompaniment Styles
○○○○○○○○○○○○○○○○○○○○○○○○○○○○○○○○○○
■ Adding an Introduction.................................................................................
This function lets you embellish the start of a tune by adding an intro-
duction.
Z Set the introduction pattern.
Select the variation to play the intro pattern as described on page 63,
then press the [INTRO] button. There ar e three introduction patterns,
as shown below:
Intro Patterns
Pattern Played by:
Intro A [MAIN A]
Intro B [MAIN B]
Intro C/D [MAIN C] or [MAIN D]
➔ The [INTRO] lamp lights, and the lamp for the selected variation
flashes.
ACMP ON
AUTO ACCOMPANI MENT
INTRO
AUTO FILL
MAIN BMAIN A MAIN C MAIN D ENDING
The flashing light indicates the variation
that will play after the intro. In the illustration at left, the Clavinova will play Intro A,
followed by Main A.
X Select the main pattern.
Select the variation to play the main pattern when the intro is finished. (If you want the style to continue playing with the same variation as the introduction, you can skip this step.)
➔ The lamp for the previously selected button lights, and the lamp of
the selected button flashes.
ACMP ON
AUTO ACCOMPANI MENT
INTRO
AUTO FILL
MAIN BMAIN A MAIN C MAIN D ENDING
C Start the style.
Use one of the three methods described on the preceding pages to
start playing the style.
Since the flashing light indicates the
variation that will play after the intro, the
illustration at left indicates that the
Clavinova will play Intro C/D, followed by
Main A.
To cancel the introduction before starting
the style, press the [INTRO] button again.
66
64
CVP-109/107/105/700
Page 67

○○○○○○○○○○○○○○○○○○○○○○○○○○○○○○○○○○
■ Fading In.............................................................................................................................
This function lets you gradually fade in the volume of the style. You can
set the Fade In function at any time before you start the style, and use it in
combination with any start method (including the Introduction function).
Z Press the [FADE IN/OUT] button.
START/STOP
FADE
IN
/
OUT
SYNCHRO STAR T/STOP
➔ The lamp lights, and the Synchronized Start function (page 65)
turns on automatically.
X Start the style.
Use one of the three methods described on the preceding page to start
playing the style.
Playing the Accompaniment Styles
Using the Pedals
You can also use the left pedal to trigger
a fade-in or fade-out by setting the LEFT
PEDAL function (page 190) to FADE IN/
OUT.
To cancel the fade-in before starting the
style, press the [FADE IN/OUT] button
again.
➔ The [FADE IN/OUT] lamp flashes during the fade-in, then turns off
when the fade-in is completed.
Stopping the Accompaniment Style
There are also several ways to stop accompaniment style playback, as
described below:
■ Standard Stop.........................................................................................................
To stop style playback, press the [START/STOP] button.
START/STOP
FADE
IN
/
OUT
SYNCHRO STAR T/STOP
➔ The lamp turns off and the style stops instantly.
■ Adding an Ending...............................................................................................
Using the Pedals
You can also use the left pedal to start
and stop the style by setting the LEFT
PEDAL function (page 190) to START/
STOP.
To play an ending pattern before the style playback stops, press the
[ENDING] button.
AUTO ACCOMPANI MENT
➔ The ENDING lamp lights, and the Clavinova stops style playback
after playing an ending pattern.
65
AUTO FILL
MAIN BMAIN A MAIN C MAIN D ENDING
If you press the [ENDING] button on or
after the second beat of a measure, the
ending pattern will start at the top of the
next measure.
CVP-109/107/105/700
67
Page 68

Playing the Accompaniment Styles
○○○○○○○○○○○○○○○○○○○○○○○○○○○○○○○○○○
The Clavinova will play one of three ending patterns, depending on
the main pattern that is currently playing, as shown below.
Ending Patterns
Pattern Played by:
Ending A [MAIN A]
Ending B [MAIN B]
Ending C/D [MAIN C] or [MAIN D]
Press [ENDING] a second time while the ending pattern is playing to
produce a ritardando (gradually slowing) effect.
■ Fading Out..................................................................................................................
You can have the style fade out and automatically stop by pressing
the [FADE IN/OUT] button.
START/STOP
FADE
IN
/
OUT
SYNCHRO STAR T/STOP
Using the Pedals
You can also use the left pedal to trigger
the ending pattern and ritardando by
setting the LEFT PEDAL function (page
190) to ENDING/RIT.
Using the Pedals
You can also use the left pedal to trigger
a fade-in or fade-out by setting the LEFT
PEDAL function (page 190) to FADE IN/
OUT.
➔ The lamp flashes as the style fades out.
You can use the Fade Out function in combination with any pattern
(including the Introduction and Ending functions).
68
66
CVP-109/107/105/700
Page 69

Playing with the Auto Accompaniment
The Clavinova includes a sophisticated Auto Accompaniment
system that can provide automated rhythm, bass and chord
backing for y our performance in 157 different styles (147 styles
on the CVP-107/700; 135 on the CVP-105), as well as 35
different types of piano-only accompaniment.
The Auto Accompaniment playback data is normally not output by the
MIDI [OUT] terminal. To send the Auto Accompaniment data to another
MIDI instrument, use the ACMP&RHY and HARMONY functions in the
FUNCTION [MIDI 4] display described on page 205.
○○○○
ACMP ON
STYLE
DEMO
16BEAT
8BEAT DANCE
BALLAD PIANIST
SWING/
LATIN
COUNTRY DISK
JAZZ
HELP
VOLUME
MUSIC
VOCAL
MASTER
ACMP/SONG
DATABASE
HARMONY
ACMP ASSIST
OVER
VOLUME
VOLUME
SIGNAL
MAX
MAX
AUTO ACCOMPANIMENT
AUTO FILL
MAIN BMAIN A MAIN C MAIN D ENDING SYNCHRO START
INTRO
ACMP ON
MIN
MIN
CONTRAST
ROCK/
R&B
BEAT
TRAD/
BALL–
WALTZ
ROOM
TEMPO
CUSTOM METRONOME
RESET
HARMONY
TAP
START
/
STOP
FADE
/
OUT
IN
/
STOP
PAGE
EXIT DIRECT ACCESS
Using the Auto Accompaniment
You can use one of several methods to indicate the chords that are to
be played by the Auto Accompaniment. Choose the accompaniment
mode that best suits your playing style.
● Single Finger
The Single Finger method makes it easy to obtain accompaniment in
major, seventh, minor, and minor-seventh chords by pressing certain keys
(according to simple rules) to the left of the split point indicated by the
keyboard guide lamp. (See page 72.)
● Multi Finger
When you select the Multi Finger mode, you can use either the Single
Finger method or the Fingered 1 method to indicate chords for the accompaniment. (See page 72.)
DISK IN USE
VOICE
SYNTHE-
PIANO E. PIANO GUITAR
SAX
/
FLUTE
BASSBRASS
DUAL SPLIT REVERB CHORUS
REGISTRATION/ONE TOUCH SETTING
1234
STRINGS/
SIZER
ORGAN
CHOIR
PER-
ENSEMBLE
XG
CUSSION
EFFECT
ONE TOUCH
BANK
SETTING
BANK REGISTRATION
MASTER
EQUALIZER
SONG MIXER
FUNCTION
GUIDE CONTROL
SOUND
REPEAT
EASY PLAY
NEXT NOTE
SONG CONTROL
PLAY
/
STOP
PAUSE REW
FF REC
Detailed explanations of each accompaniment mode are given on pages 72 and
73.
● Fingered 1
The Fingered 1 method lets you control the Auto Accompaniment by
playing full chords to the left of the split point. (See page 72.)
● Fingered 2
This mode accepts the same fingerings as the Fingered 1 mode, with
the exception that the lowest note played to the left of the split point is
used as the bass root (in Fingered 1 mode, the root of the chord is always
used as the bass root). Hence, you can select this mode to play “on bass”
or “fraction” chords. (See page 73.)
● Full Keyboard
The Full Keyboard mode automatically produces appropriate automatic accompaniment for virtually anything you play, anywhere on the
keyboard. (See page 73.)
67
CVP-109/107/105/700
69
Page 70

Playing with the Auto Accompaniment
○○○○○○○○○○○○○○○○○○○○○○○○○○○○○○○○○
Starting the Auto Accompaniment
You may want to select an accompaniment mode (page 71) before
you start playing. If the accompaniment mode is set to your liking, you
can start the Auto Accompaniment as follows:
Z Select a style.........................................................................................................
Select the desired style. (See page 61.)
STYLE
ROCK/
R&B
TRAD/
WALTZ
CUSTOM
JAZZ
16BEAT
LATIN
BALLAD PIANIST
BALL–
COUNTRY DISK
ROOM
8BEAT DANCE
SWING/
X Set the tempo and accompaniment volume.......................
Pianist styles
You can play the PIANIST styles and
Guitar Waltz in the TRAD/WALTZ style
group with the Auto Accompaniment
(page 61). Since these styles do not
contain drum parts, you’ll have to indicate
a chord as you start the style to hear the
accompaniment.
Use the TEMPO buttons to adjust the tempo (page 27), and the
[A CMP/SONG V OLUME] slider to adjust the volume of the accompaniment parts (page 23).
C Turn on the Auto Accompaniment. ...............................................
Press the [ACMP ON] button.
ACMP ON
INTRO
➔ The [ACMP ON] lamp lights, and the current accompaniment
mode is indicated at the left edge of the main display.
MAIN A
The [SYNCHRO] lamp also lights, indicating that you can start the
Auto Accompaniment with the Synchronized Start function (page 65).
Also, a keyboard lamp shows the current split point.
V Start the Auto Accompaniment. .......................................................
Begin playing to start the Auto Accompaniment with the Synchronized Start function, or start the style using one (or more) of the other
methods described on pages 64 and 67.
The methods used to indicate Auto Accompaniment chords are described in the following pages.
• The Auto Accompaniment will automatically turn on when you select a
style in the Pianist style group.
• The Auto Accompaniment can also be
turned on during playback of song data
recorded on the CVP-109/107/105/
700/103.
• If you turn the Auto Accompaniment on
while playing back songs recorded
using the Auto Accompaniment, the
recorded accompaniment track will be
dropped in favor of the accompaniment
you play on the keyboard.
• You can also select style variations
and play fill-in patterns as described on
page 63 while playing along with the
Auto Accompaniment.
• Press the [ACMP ON] button again to
turn the Auto Accompaniment off
before you start playing.
70
Stopping the Auto Accompaniment
Use one of the methods described on page 67 to stop playback of the
style, including the Auto Accompaniment.
To turn Auto Accompaniment off, press the [ACMP ON] button so
that the lamp goes out.
68
CVP-109/107/105/700
Page 71

○○○○○○○○○○○○○○○○○○○○○○○○○○○○○○○○○
Changing the Auto Accompaniment Settings
You can change the accompaniment mode (which selects the chord
indication method), the split point, and other Auto Accompaniment settings in the ACCOMPANIMENT MODE display page.
■ Displaying the Auto Accompaniment Settings..................
Press [DIRECT ACCESS], then [ACMP ON].
Playing with the Auto Accompaniment
EXI T DIRECT ACCESS
ACMP ON
INTRO
MAIN A
➾
➔ The ACCOMPANIMENT MODE display appears.
■ Selecting an Accompaniment Mode..............................................
To select an accompaniment mode, press one of the left LCD buttons.
Accompaniment Mode
• Settings: See insert below.
• Basic setting: MULTI FINGER
➔ The selected accompaniment mode is highlighted.
The method for indicating chords in each accompaniment mode are
described in detail below.
69
CVP-109/107/105/700
71
Page 72

Playing with the Auto Accompaniment
○○○○○○○○○○○○○○○○○○○○○○○○○○○○○○○○○
Accompaniment Modes
● Single Finger
To control the Auto Accompaniment, press one, two, or three keys in
the left range of the keyboard (below and including the split point), following the rules described below. Play the melody in the right range
along with the Auto Accompaniment.
■ Single Finger Chords
The following four chord types can be played in Single Finger mode:
• The Clavinova displays the names of
the chords you play at the left edge of
the main display, below the measure
number.
• The same accompaniment continues
(even after you release the chord in
the left range) until you play the next
chord.
C
• Major
Press the root note of the chord.
Cm
• Minor [m]
Simultaneously press the root note of the chord and any
black key to the left of it.
C
Cm
7
7
• Seventh [7]
Simultaneously press the root note of the chord and any
white key to the left of it.
• Minor Seventh [m7]
Simultaneously press the root note of the chord and any
white and black keys to the left of it (three keys at once).
● Multi Finger
This method allows you to control the Auto Accompaniment using
either the Single Finger method (described above) or the Fingered 1
method (described below). However, when indicating minor, seventh or
minor seventh chords, it is necessary to play the white key and/or black
key nearest the root note of the chord.
The illustration below shows the key
corresponding to each root note.
F# Ab Bb
C# Eb
(Db)(D#)
CDEFGAB
(Gb)(G#)(A#)
72
● Fingered 1
To control the Auto Accompaniment, play any chord in the left range
of the keyboard (below and including the split point). Play the melody in
the right range along with the Auto Accompaniment.
CVP-109/107/105/700
• The automatic accompaniment will
sometimes not change when related
chords are played in sequence (e.g.
some minor chords followed by the
minor seventh).
• If the Clavinova cannot recognize a
chord you play, an asterisk “ * ” will
appear instead of the chord name in
the display.
• Drums-only accompaniment can be
produced by pressing any three consecutive keys (e.g., C, C#, D) simultaneously. This lets you create dynamic
“drum breaks” in the accompaniment.
A series of dashes “- - -” will appear
instead of a chord name in the display.
Two-note fingerings will produce a chord
based on the previously played chord.
70
Page 73

○○○○○○○○○○○○○○○○○○○○○○○○○○○○○○○○○
■ Chords in Fingered 1 mode
The chord types below can be played in Fingered 1 mode. For a fingering chart showing all chords in the example key of C, see page 15
of the Reference Booklet.
•
Major
•
Sixth [6]
•
Major seventh [M7]
•
Major seventh flatted fifth [M7 (b5)]
• Major seventh sharp eleventh [M7 (#11)]
•
Added ninth [add 9]
•
Major seventh ninth [M7 (9)]
•
Six ninth [6 (9)]
•
Flatted fifth [(b5)]
•
Augmented [aug]
•
Seventh augmented [7 (#5)]
•
Major seventh augmented [M7 (#5)]
•
Minor [m]
•
Minor sixth [m6]
•
Minor seventh [m7]
•
Minor seventh flatted fifth [m7 (b5)]
•
Minor added ninth [m add 9]
•
Minor seventh ninth [m7 (9)]
•
Minor seventh eleventh [m7 (11)]
•
Minor major seventh flatted fifth [mM7 (b5)]
•
Minor major seventh [mM7]
•
Minor major seventh ninth [mM7 (9)]
•
Minor flatted fifth [m (b5)]
•
Diminished seventh [dim7]
•
Seventh [7]
•
Seventh suspended fourth [7sus4]
•
Seventh ninth [7 (9)]
•
Seventh sharp eleventh [7 (#11)]
•
Seventh added thirteenth [7 (13)]
•
Seventh flatted fifth [7 (b5)]
•
Seventh flatted ninth [7 (b9)]
•
Seventh added flatted thirteenth [7 (b13)]
•
Seventh sharp ninth [7 (#9)]
•
Suspended fourth [sus4]
Playing with the Auto Accompaniment
● Fingered 2
To control the Auto Accompaniment, play chords in the left range of
the keyboard as for Fingered 1. In this mode, however, the lowest note
you play in the will be used as the bass root, as shown at right.
■ Chords in Fingered 2 mode
The Clavinova will recognize the same chord types as listed above for
Fingered 1 mode.
● Full Keyboard
When the Full Keyboard mode is selected, the Clavinova will automatically create appropriate accompaniment while you play just about
anything using both hands, anywhere on the keyboard. You don’t have to
worry about specifying the accompaniment chords. The name of the detected chord will appear in the display.
On-bass Chords
C
C on G
• Although Full Keyboard mode is
designed to work with many types of
music, some arrangements may not
be suitable for use with this feature.
• Chord detection occurs at approximately 8th-note intervals. Extremely
short chords — less than an 8th note
in length — may not be detected.
Keep in mind…
You can use the Dual and Split modes
together with the Auto Accompaniment.
C on E
71
CVP-109/107/105/700
73
Page 74

Playing with the Auto Accompaniment
○○○○○○○○○○○○○○○○○○○○○○○○○○○○○○○○○
■ Using the Synchronized Stop Function...................................
The SYNCHRO STOP function in the ACCOMPANIMENT MODE
display automatically stops the Auto Accompaniment when you’re not
holding down any keys to the left of the split point.
Press the SYNCHRO STOP button to turn the function on.
➔ The SYNCHRO STOP function is highlighted, and the [SYNCHRO]
lamp lights.
The Auto Accompaniment automatically starts when you play in the
left range of the keyboard, and stops when you release it.
To turn the function off, press SYNCHRO STOP again.
This function can only be turned on if the
Auto Accompaniment is on and Full
Keyboard mode is not selected.
This is useful for beginning players who
have difficulty playing in precise time. It is
also effective for creating accompaniment “breaks” during the performance.
■ Changing the Split Point............................................................................
You can use the SPLIT POINT function in the ACCOMPANIMENT
MODE display to set the split point at any desired key position. The keys
to the left of (and including) the split point control the chords played by
the Auto Accompaniment in every accompaniment mode except Full
Keyboard.
F 2
Left range
C3 C4 C5 C6 C7C2C1C0
Right range
Use the SPLIT POINT ▼ and ▲ buttons, the data dial, or the [–] and
[+] buttons to change the split point.
Press either the ▼ and ▲ buttons or the [–] and [+] buttons simultaneously to restore the basic setting.
SPLIT POINT function
• Settings: Any key of the keyboard
• Basic setting: F#2
• The split point cannot be set when Full
Keyboard mode is selected.
• Changing the split point here also
changes it for the Split mode (see
page 43).
74
➔ The selected key name is displayed by the SPLIT POINT function.
If the Auto Accompaniment or the Split mode (page 41) is on, the
keyboard guide lamp corresponding to the selected split point lights.
72
CVP-109/107/105/700
Page 75

○○○○○○○○○○○○○○○○○○○○○○○○○○○○○○○○○
■ Getting Help With Chords .........................................................................
The CHORD ASSIST function in the ACCOMPANIMENT MODE
display uses the keyboard guide lamps to show you appropriate
fingerings for chords.
Z Turn the Chord Assistance function on.
Press the CHORD ASSIST button.
➔ The CHORD ASSIST display appears, and the accompaniment
mode automatically changes to Fingered 1.
Playing with the Auto Accompaniment
Chord Assistance
The Chord Assistance feature is essentially an electronic “chord book” that
shows you appropriate fingerings for
chords; it is useful when you want to
quickly learn how to play certain chords.
Simply specify the desired chord via the
display, and the fingerings for the Fingered 1 method are indicated by the
keyboard guide lamps.
• If the [ACMP ON] button is off, it will
turn on.
• If the split point is set below F#2, it will
automatically be reset to F#2.
• The keyboard guide lamps do not
indicate the split point when Chord
Assistance is on, since they are used
to indicate chord fingerings instead.
X Start the Auto Accompaniment.
Press [START/STOP] or use the Synchronized Start function (page
65) to start the Auto Accompaniment.
C Enter the chord root.
Use the ROOT button to select a root.
➔ The ROOT function is highlighted, and the root changes.
When the ROOT function is highlighted, you can also use the data
dial or the [–] and [+] buttons to select a root.
ROOT function
Settings: See sidebar on page 72.
If you hold the ROOT button down, the
INVERT setting may also change.
73
CVP-109/107/105/700
75
Page 76

Playing with the Auto Accompaniment
○○○○○○○○○○○○○○○○○○○○○○○○○○○○○○○○○
V Enter the chord type.
Use the TYPE ▼ and ▲ buttons to select a chord type.
➔ The TYPE function is highlighted, and the type changes.
When the TYPE function is highlighted, you can also use the data dial
or the [–] and [+] buttons to select a chord type.
The following chord types can be specified in the display:
Major [Maj]
Minor [m]
Seventh [7]
Minor seventh [m7]
Minor seventh flatted fifth [m7 (b5)]
Sixth [6]
Minor sixth [m6]
Major seventh [M7]
Suspended fourth [sus4]
Augmented [aug]
Minor flatted fifth [m (b5)]
Seventh suspended fourth [7sus4]
Seventh augmented [7 (#5)]
Diminished seventh [dim7]
Flatted fifth [(b5)]
Seventh flatted fifth [7 (b5)]
Minor major seventh [mM7]
TYPE function
Settings: See list at left.
B Rotate the fingering as desired.
Press INVERT to shift the fingering down the keyboard. Each time
the INVERT button is pressed, the next viable fingering for the chord
appears. The INVERT function displays the inversion number.
N Enter the chord.
The keyboard guide lamps indicate the fingering for the selected
chord, and the musical notation for the chord is displayed in the
center of the LCD display. At this point you can either play the chord
on the keyboard or press the ENTER button to hear the accompaniment play it.
M Stop the Auto Accompaniment.
When you’re done with Chord Assistance, press [START/STOP] or
[ENDING] to stop the accompaniment.
• Any chords recognized in Fingered 1
mode can be entered from the keyboard.
• The Clavinova displays the name of
the chord recognized from the keyboard at the left edge of the LCD display, under the measure number. You
can compare this chord root and type
displayed by the ROOT and TYPE
functions to make sure you’re fingering
the chord correctly. When the root of
the chord being played corresponds to
one of the black keys on the keyboard,
the root may be displayed as either
flat or sharp; for example, Bb may also
be displayed as A# (see the sidebar on
page 72 for details).
• A flashing keyboard guide lamp indicates a note which may be omitted.
76
< Turn Chord Assistance off.
To turn Chord Assistance off, press [EXIT] or [ACMP ON].
➔ The main display appears. If you press [ACMP ON], the Auto Ac-
companiment is turned off at the same time.
74
CVP-109/107/105/700
Page 77

○○○○○○○○○○○○○○○○○○○○○○○○○○○○○○○○○
Adjusting Individual Part Levels
The Clavinova has five accompaniment parts: Rhythm, Bass, Chord,
Pad, and Phrase.
RHYTHM
BASS
CHORD
PAD
PHRASE
The volume settings for the five accompaniment parts can be adjusted
individually in the MIXER display page.
This part forms the basis of the accompaniment. The Rhythm
part usually plays one of the drum kits.
The Bass part uses voices appropriate to each style, including
acoustic bass and synth bass.
The Chord part provides appropriate rhythmic chordal accompaniment for each style. You’ll find guitar, piano, and other chordal
instruments here.
The Pad part plays long chords where necessary, using sustained instruments such as strings, organ, and choir.
The Phrase part is used for embellishments such as punchy
brass stabs, arpeggiated chords, and other extras that make the
accompaniment more interesting.
Playing with the Auto Accompaniment
• The overall accompaniment playback
volume can be adjusted using the
[ACMP/SONG VOLUME] slider.
• By adjusting the volume balance of the
various parts, or setting the volume of
some parts to 0, you can create variations on the basic style accompaniment.
• Some styles may not use all five ac-
companiment parts.
• You can also adjust the level of reverb
that is applied to the Auto Accompaniment parts. See page 50 for details.
Part volume relationships
• The volume level of each Auto Accom-
paniment part is relative to the [ACMP/
SONG VOLUME] setting.
• The [ACMP/SONG VOLUME] setting
is relative to the [MASTER VOLUME]
setting.
Z Press the [MIXER] button........................................................................
MASTER
SONG M IXER FUNC TION
EQUALIZ ER
➔ The lamp lights, and the MIXER page appears.
X Select a part. ..........................................................................................................
Press the LCD button for the part whose level you want to set.
➔ The selected function is highlighted.
75
CVP-109/107/105/700
77
Page 78

Playing with the Auto Accompaniment
S
○○○○○○○○○○○○○○○○○○○○○○○○○○○○○○○○○
C Set the volume level......................................................................................
Use the data dial or [–] and [+] buttons to adjust the volume level.
You can also increase the level by holding down the button you used to
select the part.
You can set the volume of the highlighted part to 0 by pressing and
quickly releasing its button. Press and release the button a second time to
restore the previous value.
To reset the highlighted part’s volume to the basic setting of 110,
simultaneously press the [–] and [+] buttons.
V Repeat steps Xand C...............................................................................
Repeat the preceding steps to set the level for other parts. (You can
also select several parts and adjust their volume settings simultaneously.)
B Exit the MIXER display...............................................................................
Part volume levels
• Range: 0 (min.) — 127 (max.)
• Basic setting: 110
To exit the function, press the [MIXER] button again, or press
[EXIT].
MASTER
SONG MIXER FUNCTION
EQUALIZ ER
➔ The lamp turns off, and the main display appears.
EXI T DIRECT ACCES
78
CVP-109/107/105/700
76
Page 79

Other Auto Accompaniment Functions
The Clavinova has many other features and functions that make
the use of the Auto Accompaniment e ven more convenient and
enjoyable. With these functions you can easily select panel
settings to suit a certain type of music, have the Clavinova play
harmony to your melody line, or program Auto Accompaniment
changes in advance so you can concentrate on playing the
keyboard.
○○○○
MUSIC
DATABASE
ACMP ASSIST HARMONY
STYLE
DEMO
16BEAT
8BEAT DANCE
BALLAD PIANIST
SWING/
LATIN
COUNTRY DISK
HELP
JAZZ
VOLUME
MUSIC
VOCAL
MASTER
ACMP/SONG
DATABASE
HARMONY
ACMP ASSIST
HARMONY
OVER
VOLUME
VOLUME
SIGNAL
MAX
MAX
AUTO ACCOMPANIMENT
AUTO FILL
MAIN BMAIN A MAIN C MAIN D ENDING SYNCHRO START
INTRO
ACMP ON
MIN
MIN
CONTRAST
ROCK/
R&B
BEAT
TRAD/
BALL–
WALTZ
ROOM
TEMPO
CUSTOM METRONOME
RESET
TAP
/
STOP
START
FADE
/
OUT
IN
/
STOP
PAGE
EXIT DIRECT ACCESS
SONG MIXER
EASY PLAY
PAUSE REW
REGISTRATION/ONE TOUCH SETTING
1234
Music Database
The Clavinova’s built-in Music Database gives you a convenient way
to select the style, voice, and effect settings that will suit a particular type
of music. Just select one of the more than 400 panel setups in the Music
Database; the Clavinova does the rest!
For a list of Music Database setup parameters, refer to page 13 of the
Reference Booklet.
Z Display the Music Database.................................................................
Press the [MUSIC DATABASE] button.
MUSIC
DATABASE
➔ The lamp lights, and the MUSIC DATABASE menu appears.
Highlighted setup
ACMP ASSIST HARMONY
Style name
PIANO E. PIANO GUITAR
SAX
/
FLUTE
BASSBRASS
DUAL SPLIT REVERB CHORUS
REGISTRATION/ONE TOUCH SETTING
1234
STRINGS/
SIZER
ORGAN
CHOIR
PER-
ENSEMBLE
XG
CUSSION
EFFECT
ONE TOUCH
BANK
SETTING
BANK REGISTRATION
BANK
BANK REGISTRATION
ONE TOUCH
SETTING
SONG CONTROL
GUIDE CONTROL
NEXT NOTE
FF REC
MASTER
EQUALIZER
FUNCTION
SOUND
REPEAT
PLAY
/
STOP
DISK IN USE
VOICE
SYNTHE-
Panel Setups
• CVP-109: 564
• CVP-107/700: 534
• CVP-105: 498
• When you display the Music Database,
the Clavinova automatically recalls a
panel setup that uses the current style.
(The name of this setup is highlighted
in the Music Database menu.) If you
want to use the selected setup, you
can simply skip to step 4 of this procedure.
• The Automatic Accompaniment also
turns on when you display the Music
Database. If you access the Music
Database before starting the style, the
Synchronized Start function (page 65)
is also turned on.
The MUSIC DATABASE menu display contains a listing of panel setups
that can be sorted either by style or alphabetically. The name of the style
that is used by the currently highlighted setup is shown at the upper right
edge of the display.
77
CVP-109/107/105/700
79
Page 80

Other Auto Accompaniment Functions
○○○○○○○○○○○○○○○○○○○○○○○○○○○○○○○
X Sor t the list, if necessary.........................................................................
Press the SORT button to switch the highlighted setting between
STYLE and A–Z.
➔ When STYLE is highlighted, the menu list is sorted by style, and a
panel setup that uses the currently selected style is highlighted.
➔ When A–Z is highlighted, the menu is sorted alphabetically.
C Select and recall a panel setup.........................................................
Press one of the left or right LCD buttons to highlight the desired
panel setup in the Music Database list.
➔ The panel setup is highlighted.
To display the panel setups for a specific
style group, simply press the corresponding STYLE button. The menu is automatically sorted by style, and a panel setup
that uses the currently selected style in
the chosen group is highlighted.
The Harmony function will not be turned
on if the Full Keyboard mode is selected,
even if the selected Music Database
setup includes “Harmony On.”
You can also use the data dial or the [–] and [+] buttons to change the
highlighted panel setup. Use the PAGE [<] and [>] buttons to display a
different page of the Music Database.
➾ Press the SET button to recall the highlighted setup.
➔ The style, voice, and effect settings change automatically.
Once you have selected a panel setup from the Music Database, you
can change the style, voice and effect settings to suit your preferences.
You can also use the Registration function (page 108) to save the panel
setup in the Clavinova’s memory.
80
V Return to the main display.....................................................................
Press [EXIT] to exit the Music Database menu display.
➔ The previous display appears. (The selected Music Database
setup is indicated below the style name in the main display.)
78
CVP-109/107/105/700
Page 81

○○○○○○○○○○○○○○○○○○○○○○○○○○○○○○○
B Turn off the Music Database................................................................
When you’re done using the Music Database setup, press the [MU-
SIC DATABASE] button again.
➔ The [MUSIC DATABASE] lamp turns off, and the panel settings
you were using before you accessed the Music Database are restored.
Accompaniment Assistance
At times you may find it difficult to control the Auto Accompaniment
while playing a complicated piece of music that requires your full attention on the keyboard. The Accompaniment Assistance function lets you
program chord and pattern changes in advance, so that the Auto Accompaniment will play itself, letting you concentrate on playing the keyboard
parts.
Other Auto Accompaniment Functions
■ Setting Up the Accompaniment Assistance..................
Use the following procedure to create Accompaniment Assistance
data before you begin your performance:
Z Open the ACMP ASSIST display.
Press [DIRECT ACCESS], then [A CMP ASSIST].
EXI T DIRECT ACCESS
MUSIC
DATABASE
ACMP ASSIST HARMONY
➾
➔ The [ACMP ASSIST] and [ACMP ON] lamps light, and the page 1
of the ACMP ASSIST display appears .
• If the Clavinova’s memory contains
Accompaniment Assistance data, it will
be displayed in the ACMP ASSIST
display.
• The [ACMP ON] lamp will not light
when you load Accompaniment Assistance data that includes an “accompaniment off” event (page 84). If you wish
to add chords to the loaded data, you
must first change this to an “accompaniment on” event. To do so, move the
cursor to the top of the first measure
as described in step 2 (page 82), press
[ACMP ON] to light the lamp, then
press SET. (See the sidebar on page
86 for details regarding the use of
“accompaniment off” events in Accompaniment Assistance playback.)
79
CVP-109/107/105/700
81
Page 82

Other Auto Accompaniment Functions
X Move the cursor to the entry point.
The display shows each measure as a horizontal line with 8th-note
divisions. The number of each measure is shown to the left of the
line. Previously entered data is indicated by a thick line segment.
Previously entered data
Measure number
Use the CURSOR < and > buttons, the data dial, or the [–] and [+]
buttons to move the triangular cursor to the point at which you want
to enter a chord or style change.
C Enter a chord, if desired.
To enter a chord, play the chord with appropriate fingering in the left
range of the keyboard (lower than the split point).
➔ The name of the chord you play appears in the box below the
measure bars, as well as in the ROOT and TYPE functions.
Chord
Chord root
You can also select the ROOT and TYPE buttons, then use the data
dial or [–] and [+] buttons to manually set the chord root and type.
Eighth note divisions
Chord type
○○○○○○○○○○○○○○○○○○○○○○○○○○○○○○○
• When you first open the ACMP ASSIST display, the current AUTO ACCOMPANIMENT panel settings are
entered at the top of the first measure.
This data is represented as a thick line
segment with no chord (i.e., a series of
dashes).
• You may want to change the data in
the initial segment, setting a chord and
perhaps adding an intro pattern or
fade-in (page 66), before you move the
cursor to another entry point.
• If Full Keyboard was last selected as
the accompaniment mode (page 73),
Fingered 1 is automatically selected
when you open the ACMP ASSIST
display. To indicate chords by a different method, move the cursor to the top
of the first measure, then open the
ACCOMPANIMENT MODE display
and select an accompaniment mode
(other than Full Keyboard) as described on page 71. (You can also set
a different split point in this display.)
The Clavinova will return to the ACMP
ASSIST display when you press the
[EXIT] button.
• The chord input resolution will be
automatically selected according to the
current style. For styles with 2/4, 3/4,
4/4, and 5/4 time signatures, one chord
can be entered on every 8th note or
8th-note triplet. For other time signatures, one chord can be entered for
each measure.
82
V Enter a style change, if desired.
To add a fill-in pattern at any point in a measure, press the button corresponding to the desired fill-in pattern as usual (see page 63).
To change the style variation at the start of a measure without playing
a fill-in pattern, press the button twice.
To change the style at the start of a measure, simply select a new style
in the usual manner (see page 61).
CVP-109/107/105/700
• Intro patterns can only be entered at
the beginning of a song.
• Style changes, variation changes, and
ending patterns can only be entered at
the beginning of a measure.
• Fill-in patterns can be entered anywhere in the measure. (The “break fill”
pattern triggered by the left pedal
(page 190) cannot be entered using
the Accompaniment Assistance function, however.)
• A fade-out cannot be entered during a
fade-in.
• You can also use an original style
created using the Custom Style function (page 91). Only one custom style
can be included in a given set of Accompaniment Assistance data.
80
Page 83

○○○○○○○○○○○○○○○○○○○○○○○○○○○○○○○
➔ The names of the selected style and variation (or fill-in pattern) are
shown at the top the display.
Other Auto Accompaniment Functions
Style name
Variation or pattern
B Set the entered data.
When you have entered chord and style control data, press the SET button.
➔ A thick line segment appears at the cursor position to indicate that
the data has been recorded, and the cursor automatically moves
to the next position.
N Repeat until the data is complete.
Repeat steps 2 through 5 until your Accompaniment Assistance data
is complete. You can press the [PLAY/STOP] button at any time to
play back the data and check your settings.
• If you have programmed a chord
change, the chord name may also be
displayed above the segment in question.
• The chord name is indicated only at
the first beat of the measure line,
except when a style uses the 4/4 time
signature, in which case the chord
name is indicated at the first and third
beats.
• A chord change event will not be en-
tered if the chord is the same as that
which was last entered.
You can program up to 999 measures of
data using the Accompaniment Assistance function.
M Set the end mark
.
When you have completed your Accompaniment Assistance data,
press the PAGE [>] button to select page 2 of the ACMP ASSIST
display, then press the END MARK button to enter an “end mark”
that identifies the end of the data.
➔ The end mark symbol is displayed in the box in the middle of the
display.
➾ Press the SET button to set the end mark.
• An end mark is unnecessary when an
ending pattern or fade-out event has
been programmed.
• See page 85 for more information
about the end mark.
End mark
< Exit the ACMP ASSIST display.
Press [ACMP ASSIST] or [EXIT] to return to the main display.
➔ The [ACMP ASSIST] lamp turns off, and the main display appears.
81
You can always modify the Accompaniment Assistance data later by reopening
the ACMP ASSIST display and making
the desired changes.
CVP-109/107/105/700
83
Page 84

Other Auto Accompaniment Functions
○○○○○○○○○○○○○○○○○○○○○○○○○○○○○○○
■ Advanced Accompaniment Assistance...................................
Here are some other things you can do with Accompaniment Assist-
ance data.
● Changing Part Volumes
You can program volume changes for the Auto Accompaniment parts.
Used judiciously, these can help you create professional-sounding dynamic changes in your performance. To do this, press the [MIXER] button and change the part volume settings as desired, then press [EXIT] to
return to the ACMP ASSIST display. The volume event symbol (which
looks like a speaker) should now appear in the box in the middle of the
display. Press the SET button to set the volume change as entered.
● Changing the Tempo
You can also program tempo changes in the middle of a performance.
Simply position the cursor at the point where you want the tempo to
change, then use the TEMPO [–] and [+] buttons to select the new
tempo. The new tempo is displayed in the box in the middle of the
ACMP ASSIST display. Press the SET button to set the tempo change as
entered.
An initial volume event is automatically
entered at the top of the first measure,
based on the current part volume settings
when the ACMP ASSIST display is first
opened.
An initial tempo event is automatically
entered at the top of the first measure,
based on the current tempo settings
when the ACMP ASSIST display is first
opened.
● Entering a Rhythm Break
You can have Accompaniment Assistance play the rhythm part alone
(without other accompaniment) as a transitional “rhythm break.” To do
this, you must record a “no chord” event at the beginning of the break.
Press any three adjacent keys (two white keys and a black key, or vice
versa) in the left range of the keyboard when using the Fingered 1 or
Fingered 2 mode, or select TYPE and use the data dial or [–] and [+]
buttons to display a series of dashes (- - -) as the setting for that function.
Then press the SET button to register the break.
● Entering an Accompaniment Break
A complete break can be useful if you want to play the keyboard part
solo. To create an accompaniment break, set a “no chord” event as described above, and turn the rhythm off as described on the next page.
● Entering an “Accompaniment Off” Event
When you first open the ACMP ASSIST display to create new Accompaniment Assistance data, an “accompaniment on” event is registered at the top of the first measure. You can enter an “accompaniment
off” event by moving the cursor to the top of the first measure, pressing
the [ACMP ON] button so the lamp turns off, and pressing the SET but-
ton. See the sidebar on page 86 for details regarding the use of “accompaniment off” events in Accompaniment Assistance playback.
84
82
CVP-109/107/105/700
Page 85

○○○○○○○○○○○○○○○○○○○○○○○○○○○○○○○
■ Other Accompaniment Assistance Functions..................
Page 2 of the ACMP ASSIST display contains some useful functions
that help you to enter Accompaniment Assistance data more efficiently.
● ALL DELETE function
To delete all of the Accompaniment Assistance data and start from
scratch, press the ALL DELETE button. An “Are you sure?” message
is displayed. Press YES to delete the data, or NO to cancel.
● DELETE function
To delete the Accompaniment Assistance data at the current cursor
location, press the DELETE button. An “Are you sure?” message is
displayed. Press YES to execute the operation, or NO to cancel.
● END MARK function
This function is used to enter an “end mark” that identifies the end of
the Accompaniment Assistance data (see page 83). An end mark should
generally be entered to properly end the data. The cursor cannot be
moved past an end mark. You can delete an end mark with the DELETE
function, just as with other data.
● RHYTHM ON/OFF function
To turn the rhythm part on or off, press the RHYTHM ON/OFF but-
ton followed by the SET button.
No rhythm sounds are produced following the location at which a
“rhythm off” event has been entered; the rhythm starts sounding again
from the location to which a “rhythm on” event is entered.
The status of the rhythm part is indicated by the drum symbol in the
box in the middle of the display.
Other Auto Accompaniment Functions
• An end mark is unnecessary when an
ending pattern or fade-out event has
been programmed.
• If the Accompaniment Assistance data
is not ended by an end mark, an ending pattern, or a fade-out event, playback will end one measure after the
last entered data.
An initial “rhythm on” event is automatically entered at the top of the first measure.
This mark indicates
that the rhythm part is
playing.
■ Playing with Accompaniment Assistance.............................
Use the following procedure to play back your Accompaniment As-
sistance data:
Z Turn on Accompaniment Assistance.
Press the [ACMP ASSIST] button.
MUSIC
DATABASE
➔ The [ACMP ASSIST] lamp lights.
83
ACMP ASSIST HARMONY
CVP-109/107/105/700
85
Page 86

Other Auto Accompaniment Functions
○○○○○○○○○○○○○○○○○○○○○○○○○○○○○○○
X Turn on the Auto Accompaniment.
Press the [ACMP ON] button.
➔ The [ACMP ON] lamp lights, and the current accompaniment
mode is indicated at the left edge of the main display.
The [SYNCHRO] lamp also lights, indicating that you can start the
Auto Accompaniment with the Synchronized Start function (page 65).
Also, a keyboard lamp shows the current split point.
C Start playing.
Press the [START/STOP] button, or start playing the keyboard.
➔ The Auto Accompaniment starts playing automatically, including
any section changes and chord changes indicated by the previously recorded Accompaniment Assistance data.
Play the keyboard part in the right-hand range of the keyboard, along
with the Auto Accompaniment. (The left-hand range can be used to
indicate chords, as described below in “Playing the Chords Yourself.”)
■ Other Ways to Use Accompaniment Assistance............
● Playing the Chords Yourself
Since the Clavinova will respond to the chords you indicate in the left
range of the keyboard when the [ACMP ON] lamp is lit, you can manually change chords even if the Accompaniment Assistance data already
includes chord changes. The Auto Accompaniment will always play the
most recently detected chord, regardless of whether that chord was indicated by the Accompaniment Assistance data or the keyboard.
If you want to play all the chord changes (while the Accompaniment
Assistance function controls the style changes for you), simply don’t
include any chord changes in the Accompaniment Assistance data.
You can play back song data and Accompaniment Assistance data at the
same time. However, you will not be able
to use the [REW] or [FF] buttons, or any
of the Repeat (page 122) and Guide
Control (page 125) functions that are
normally available during song playback.
Moreover, the style changes and time
signature information in the Accompaniment Assistance data will take priority
over those in the song; any rhythm, bass,
and chord parts recorded in the song will
therefore not play back. The playback
tempo will be determined by tempo data
in the song, however.
If you have already included chords in
your Accompaniment Assistance data,
but later decide that you want to play the
chords yourself, you don’t have to go to
the trouble of erasing them. You can
achieve the same result by adding an
“accompaniment off” event at the top of
the first measure (see page 84), then
starting the Auto Accompaniment as
described in “Playing with Accompaniment Assistance,” above.
86
● Using the Entire Keyboard
To pla y a keyboard part using the entir e rang e of the keyboard, just omit
step 2 of the procedure above. (You will also have to press [SYNCHRO]
before you start playing if you want to use the Synchronized Start function.) You won’t be able to indicate chords manually, but the Auto Accompaniment will still play according to the Accompaniment Assistance data.
● Playing the Style Without Auto Accompaniment
By combining the two techniques described above, you can have the
Accompaniment Assistance control only the style changes played by the
rhythm section without using the other accompaniment parts, to provide an
automatic percussion-only accompaniment. Just don’t include any chord
changes in the Accompaniment Assistance da ta, and leave the [ACMP
ON] button off when you start playing. You will be able to play along to a
simple percussion accompaniment, using the entire range of the keyboard.
■ Saving and Loading Your Data...........................................................
Since the Clavinova’s memory can only hold one set (up to 999 measures)
of Accompaniment Assistance data at a time, you may want to save your data
on a disk so that you can load it again after programming other sets.
You can save and load Accompaniment Assistance data using the functions in the FUNCTION [DISK 1] display (see page 192).
CVP-109/107/105/700
As was mentioned above, if you have
already programmed chords in your
Accompaniment Assistance data, you
can achieve the same result by adding
an “accompaniment off” event at the top
of the first measure (see page 84).
You can also record the Accompaniment
Assistance data to a floppy disk using the
Song Record function.
84
Page 87

○○○○○○○○○○○○○○○○○○○○○○○○○○○○○○○
Harmony
This feature adds harmony or embellishment notes to the melody you
play using the main voice in the right range of the keyboard. The harmony notes are produced automatically to match chords played with
Auto Accompaniment.
■ Adding Harmony.................................................................................................
Since the Harmony function can be turned on and off while playing,
you can add “spice” and professional polish to your performance by applying harmony to selected phrases as you play.
Z Turn the Harmony function on.
Press the [HARMONY] button.
MUSIC
DATABASE
ACMP ASSIST HARMONY
Other Auto Accompaniment Functions
• The Harmony feature cannot be turned
on when Full Keyboard is selected as
the accompaniment mode (page 71).
• The Harmony feature can be used
while playing back the intro or ending,
or while the Auto Accompaniment is
off, if one of the following harmony
types (page 88) is selected: Octave,
1+5, Echo, Tremolo, or Trill.
➔ The lamp lights.
X Play the keyboard.
Play the keyboard along with the Auto Accompaniment.
C Turn the Harmony function off.
Press the [HARMONY] button again.
➔ The lamp turns off.
■ Displaying the Harmony Settings ....................................................
You can change the harmony type, the volume of the harmony voice,
and other harmony settings in the HARMONY display page.
To display the HARMONY page, press [DIRECT A CCESS], then
[HARMONY].
EXI T DIRECT ACCESS
MUSIC
DATABASE
ACMP ASSIST HARMONY
➾
• With some Harmony types the voice
used for the Harmony will be different
from the currently selected main voice.
• When chords are played in the righthand section of the keyboard, the
harmony will be applied to the last note
played.
Using the Pedals
• If you set the LEFT PEDAL function to
HARMONY (page 190), the Clavinova
will play harmony only while the left
pedal is pressed.
• If you use the left pedal to control the
harmony, that pedal will have no effect
when the Harmony function is off (i.e.,
when the [HARMONY] lamp is not lit).
➔ The HARMONY display appears.
85
CVP-109/107/105/700
87
Page 88

Other Auto Accompaniment Functions
○○○○○○○○○○○○○○○○○○○○○○○○○○○○○○○
■ Selecting a Harmony Type........................................................................
You can change the type of harmony that is played using the HAR-
MONY TYPE function in the HARMONY display.
Z Select the HARMONY TYPE function.
If necessary, press one of the LCD buttons under the HARMONY
TYPE function.
➔ The HARMONY TYPE function is highlighted.
X Select a harmony type.
Use the left and right LCD buttons to select a harmony type. If necessary, use the PAGE [<] or [>] buttons to display additional harmony
types.
HARMONY TYPE function
• Settings: See table on this page.
• Basic setting: Depends on main voice.
➔ The selected harmony type is highlighted.
You can also change the harmony type with the HARMONY TYPE ▲
and ▼ buttons, the data dial, or the [–] and [+] buttons. To restore the
basic setting for the currently selected main voice, press the HAR-
MONY TYPE ▲ and ▼ buttons or the [–] and [+] buttons simultane-
ously.
Since the basic setting of the HARMONY TYPE function depends on
the currently selected main voice, a different harmony type may be
selected automatically if you change the main voice selection.
Harmony Types
Type Effect Speed
Duet ❍ –
Trio ❍ –
Block ❍ –
4 Part ❍ –
Country ❍ –
Octave ❍ –
1+5 ❍ –
Echo – ❍
Tremolo – ❍
Trill – ❍
Strumming – –
Add Jazz Gtr – –
Add Brass – –
Add Strings – –
In The Forest – –
• On the CVP-109/107/700, effects
applied to the main voice will also be
applied to the harmony part when
certain harmony types (indicated by a
“❍” in the Effect column of the table at
left) are selected.
• Some harmony types (indicated by a
“❍” in the Speed column of the table at
left) have a speed setting that can be
adjusted. See the next topic for details.
88
86
CVP-109/107/105/700
Page 89

○○○○○○○○○○○○○○○○○○○○○○○○○○○○○○○
■ Changing the Harmony Speed.............................................................
You can change the speed of the harmony notes played by the Echo,
Tremolo, and Trill harmony types using the SPEED function in the
HARMONY display .
Z Select the SPEED function.
Press the LCD button under the SPEED function.
➔ The SPEED function is highlighted.
X Change the SPEED setting.
Other Auto Accompaniment Functions
SPEED function
• Settings: 4, 6, 8, 12 (Echo)
8, 12, 16, 32 (Tremolo)
12, 16, 24, 32 (Trill)
• Basic setting: Depends on main voice.
Use the SPEED button, the data dial, or the [–] and [+] buttons to
change the value of the SPEED function.
■ Changing the Harmony Volume .........................................................
You can change the volume of the harmony notes using the VOL-
UME function in the HARMONY display .
Z Select the VOLUME function.
Press the one of the LCD buttons under the VOLUME function.
➔ The VOLUME function is highlighted.
X Change the VOLUME setting.
Use the VOLUME ▼ and ▲ buttons, the data dial, or the [–] and [+]
buttons to change the value of the VOLUME function.
To restore the VOLUME function to its basic setting for the currently
selected main voice, press the VOLUME ▼ and ▲ buttons or the [–]
and [+] buttons simultaneously.
VOLUME function
• Settings: 0 (min.) — 127 (max.)
• Basic setting: Depends on main voice.
87
CVP-109/107/105/700
89
Page 90

Other Auto Accompaniment Functions
○○○○○○○○○○○○○○○○○○○○○○○○○○○○○○○
One Touch Setting
The Clavinova’s convenient One Touch Setting function makes it easy
for you to select voices and effects that are appropriate to the style you’re
playing. Each style has four preprogrammed panel setups that you can
select by pressing a single button.
For a list of the One Touch Setting parameters, refer to page 13 of the
Reference Booklet.
Z Select a style.........................................................................................................
Select the desired style in the normal way (see page 61).
STYLE
ROCK/
8BEAT DANCE
16BEAT
BALLAD PIANIST
R&B
The One Touch Setting function cannot
be used with styles in the [DISK/CUSTOM] group.
SWING/
JAZZ
LATIN
COUNTRY DISK
BALL–
ROOM
TRAD/
WALTZ
CUSTOM
X Make sure the ONE TOUCH SETTING function is on.
If necessary, press the [ONE TOUCH SETTING] button.
REGISTRATION/ONE TOUCH SETTING
1234
BANK
BANK REGISTRATION
➔ The [ONE TOUCH SETTING] button lamp lights.
ONE TOUCH
SETTING
C Select a panel setup......................................................................................
Press one of the four numbered buttons under REGISTRATION/ONE
TOUCH SETTING.
REGISTRATION/ONE TOUCH SETTING
1234
BANK
BANK REGISTRATION
ONE TOUCH
SETTING
• When you select a panel setup, the
Auto Accompaniment turns on automatically. If you select a panel setup
before starting the style, the Synchronized Start function (page 65) will also
turn on.
• The Harmony function will not be
turned on if the Full Keyboard mode is
selected, even if the selected One
Touch Setting setup includes “Harmony On.”
90
➔ The voice and effect settings change automatically, and the se-
lected OTS setup is indicated in the main display, below and to the
right of the style name.
Once you have selected a panel setup using the One Touch Setting
function, you can change the voice and effect settings to suit your preferences. You can also use the Registration function (page 108) to save the
panel setup in the Clavinova’s memory.
88
CVP-109/107/105/700
Page 91

Creating Your Own Styles
The Clavinova lets you create custom accompaniment styles
that you can recall and play back at any time, just like the presets.
Up to 12 custom styles can be maintained in the Clavinova’s
memory at the same time, and any number can be saved to disk
for later reloading and use.
Recording a Custom Style
Use the following procedure to record your own custom styles.
Z Select the DISK/CUSTOM style group. ......................................
Press the [DISK/CUSTOM] button.
STYLE
ROCK/
R&B
TRAD/
WALTZ
CUSTOM
JAZZ
16BEAT
LATIN
BALLAD PIANIST
BALL–
COUNTRY DISK
ROOM
8BEAT DANCE
SWING/
○○○○○○○○○○○○○○○
• One temporary style (named
TEMP.STYLE) is automatically loaded
into the DISK/CUSTOM style memory
when the power is turned on.
• If you have loaded other style data
(see page 106), you can select any of
the styles from the DISK/CUSTOM
STYLE menu to serve as the basis for
your new custom style.
➔ The lamp lights, and the DISK/CUSTOM STYLE display appears.
X Select the CUSTOM STYLE function. ............................................
Press the CUSTOM STYLE button.
89
CVP-109/107/105/700
91
Page 92

Creating Your Own Styles
○○○○○○○○○○○○○○○○○○○○○○○○○○○○○○○○○○○○○○○
➔ The “Select a source style” message is displayed for a few
seconds, then replaced by page 1 of the CUSTOM STYLE display.
The style that was selected in the DISK/CUSTOM STYLE display
begins playing.
C Select a source style....................................................................................
Select a preset style that is close to the style you want to create. Preset
style selection is carried out in the normal way (page 61).
You can also use the style already selected in the DISK/CUSTOM
STYLE display as the basis for your new style, or select a different
DISK/CUSTOM style just as you would a preset style.
V Select the section you want to record. .....................................
In page 1 of the CUSTOM STYLE display, press the SECTION button as many times as necessary to display the section you want to record:
MAIN A, MAIN B, MAIN C, MAIN D, INTRO, FILL IN, or ENDING.
Current recording section and part
➔ The SECTION function is highlighted, and each section is displayed
in turn. The Clavinova plays the currently displayed section repeatedly.
• In the CUSTOM STYLE display, the
variations and patterns that make up a
style are referred to as “sections.”
• A custom style includes only one intro
section, one fill-in section, and one
ending section.
• The custom style’s intro, fill-in, and
ending sections are based on the
corresponding patterns for the style
variation (MAIN A, MAIN B, MAIN C, or
MAIN D) that was selected when the
CUSTOM STYLE button was pressed
(page 91).
92
90
CVP-109/107/105/700
Page 93

○ ○○○○○○○○○○○○○○○○○○○○○○○○○○○○○○○○○○○○○○
B Change the beat and section length...........................................
If you want to create a style with a different time signature than the
selected style, or change the number of measures in the selected section,
press the PAGE [>] button.
➔ Page 2 of the CUSTOM STYLE display appears.
Beat of selected style
Current measure
number of selected
section
Total measure number
of selected section
Creating Your Own Styles
● Changing the beat:
Press the BEAT button to select a different time signature.
➔ The “Clear style?” message is displayed.
➾ Press OK to clear the style, or CANCEL to abort. Once the style
has been cleared, you can use the BEAT button, the data dial, or
the [–] and [+] buttons to select a new time signature.
BEAT function
• Settings: 2, 3, 4, 5
• Basic setting: Depends on style.
Clear style?
Since the patterns of the selected
style will not match the new beat,
you will have to completely clear
the style and start recording from
scratch if you change the time
signature.
91
CVP-109/107/105/700
93
Page 94

Creating Your Own Styles
● Changing the section length:
Press the MEASURE button to change the number of measures in the
current section.
➔ The “Clear section?” message is displayed.
○○○○○○○○○○○○○○○○○○○○○○○○○○○○○○○○○○○○○○○
MEASURE function
• Settings: 1 — 8
• Basic setting: Depends on style.
Clear section?
• You will have to clear all parts of the
currently selected section and start
recording from scratch if you change
the number of measures.
• The “Clear section?” message will not
be displayed if you have already
cleared the section by changing the
beat, as described above.
The length of the FILL IN section can
only be set to one measure.
➾ Press OK to clear the section, or CANCEL to abort. Once the style
has been cleared, you can use the MEASURE button, the data
dial, or the [–] and [+] buttons to set the section length.
● When you’re done here:
Once the BEAT and/or MEASURE parameters have been set as re-
quired, press the PAGE [<] button to return to page 1 of the CUSTOM
STYLE display.
N Select the part you want to record................................................
Use the PART LCD button, the data dial, or [–] and [+] buttons to
select the part you want to record.
R1 Rhythm 1
R2 Rhythm 2
Bs Bass
C1 Chord 1
C2 Chord 2
Pd Pad
P1 Phrase 1
P2 Phrase 2
The R1 part is initially selected and set to
record.
94
Recording part
OFF
Part containing no dataPlayback part
Any part you select can be set to record by using the rightmost LCD
button to select RECORD after selecting the part.
CVP-109/107/105/700
• Only one part can be set to record.
• All other parts will be set to PLAY (the
part number is surrounded by a box) or
OFF (only the part number is displayed).
92
Page 95

○ ○○○○○○○○○○○○○○○○○○○○○○○○○○○○○○○○○○○○○○
➔ The part number is highlighted. If you have selected a part other than
R1 or R2, the “Clear part?” message will be displayed.
➾ Press OK to clear the part and continue, or CANCEL to abort.
Creating Your Own Styles
Clear part?
• If the source style is a preset style or a
style loaded from an optional Style File
disk, parts other than R1 and R2 must
be cleared before they can be recorded.
• The “Clear part?” message will not be
displayed if the selected part does not
contain any data.
M Select the voice for the part. .........................................................
At this point you can also select the voice you want to record the
part with. Select the voice as you would the main keyboard voice
(see page 31).
Part Voices that can be used
R1 Any drum or SFX kit in PERCUSSION group
R2 Any except Organ Flute (CVP-109/107/700)
Others
Any except a drum kit, SFX kit, or Organ Flute (CVP-109/107/700)
< Record the selected part...................................................................
You can now record new notes in the selected part by playing the
keyboard at the appropriate timing. Record non-percussion parts in C
major seventh (CM7), since the custom style is recorded as a C major seventh pattern.
If you want to create a totally new part from scratch, press the
CLEAR LCD button to clear the selected part before beginning to
record. If both the R1 and R2 parts are cleared, the metronome will
sound to provide a timing guide. (The metronome sound is not recorded, and will stop as soon as the custom style is stored.)
The preset voice for the part being recorded is initially selected.
• Playback of the custom style can be
started and stopped by pressing the
[START/STOP] button. (Data cannot
be recorded while playback is
stopped.)
• All notes are automatically stopped at
the end of the style (i.e., at the point
between repeats when recording). It is
therefore not advisable to record over
this point.
93
CVP-109/107/105/700
95
Page 96

Creating Your Own Styles
When recording a drum kit voice in part R1 or R2, you can clear a
single drum instrument from the part by pressing the key corresponding
to the instrument to be cleared while holding down the C1 key on the
keyboard. (The C1 key is labeled “CANCEL.”) The metronome timing
guide can also be cleared in this way.
Another useful recording aid is the SOLO LCD button: when this
button is pressed and highlighted, only the selected part will sound. Press
the SOLO button again to turn the solo function off and hear all parts in
the selected section.
○○○○○○○○○○○○○○○○○○○○○○○○○○○○○○○○○○○○○○○
> Quantize the recorded part, if necessary...............................
You can “tighten up” the timing of a recorded part by using the PART
QUANTIZE functions in page 2 of the CUSTOM STYLE display to
align all the notes to a specified beat. Press the PAGE [>] button to dis-
play the function, then press the middle LCD button to select the
quantize size:
3
3
3
Once the required quantize size has been selected, press the START
LCD button to quantize the current part. The part will begin to play using
the new timing, and the START button will change to UNDO, allowing
you to undo the quantize operation and return to the pre-quantized data if
the results are not as you expected. You will not be able to UNDO once
another button has been pressed.
32nd notes
16th note triplets
16th notes
8th note triplets
8th notes
quarter-note triplets
quarter notes
96
94
CVP-109/107/105/700
Page 97

○ ○○○○○○○○○○○○○○○○○○○○○○○○○○○○○○○○○○○○○○
? Repeat until the custom style is complete...........................
Repeat steps 4 through 9 to record other parts for the currently se-
lected section.
Repeat steps 4 through 10 to record other sections, until all sections
have been recorded.
[ Name the custom style. .............................................................................
When your custom style is complete, use the PAGE buttons to select
page 3 of the CUSTOM STYLE display, then press the STYLE NAME
LCD button to display the NAME page.
Creating Your Own Styles
During custom style recording, no MIXER
display is available.
Use the CHAR > LCD button to position the underline cursor at the
character you want to change (style names can be up to 12 characters in
length). Use the data dial and/or the [–] and [+] buttons to select the
character you want to enter from the list in the center of the display, then
press the CHAR SET LCD button to enter the character at the current
cursor position. Repeat this procedure until your name is complete. The
BACK SPACE LCD button can be used to back up one space and delete
the preceding character.
When the name is complete, press OK to register the name for the
current custom style, or CANCEL to abort.
95
CVP-109/107/105/700
97
Page 98

S
Creating Your Own Styles
Store the custom style...............................................................................
Press the STORE LCD button in page 3 of the CUSTOM STYLE
display to store the current custom style in the Clavinova’s memory.
➔ The Clavinova displays a message asking you to confirm your
decision to store the style.
○○○○○○○○○○○○○○○○○○○○○○○○○○○○○○○○○○○○○○○
The current tempo setting at the time the
custom style is stored becomes the
preset tempo for that style.
➾ Use the MEMORY NO. ▼ and ▲ buttons, the data dial, or the [–]
and [+] buttons to select the memory number (1 through 12)
where you want to store the custom style, then press OK to store
or CANCEL to abort.
● Be Sure to Save Your Data!
Custom style data is not retained in memory when the power is turned
off, so be sure to save your custom style before turning the power off
(see page 101).
Exit when done...................................................................................................
Press the [EXIT] button to exit the CUSTOM STYLE display and
return to the main display.
EXI T DIRECT ACCES
If the selected memory number already
contains a style, the style name will
appear next to the memory number. The
existing style will be overwritten when a
new style is stored.
98
CVP-109/107/105/700
96
Page 99

○ ○○○○○○○○○○○○○○○○○○○○○○○○○○○○○○○○○○○○○○
Other Custom Style Functions
In addition to the various functions described in the basic custom
style recording procedure, above, the CUSTOM STYLE display pages
include several other functions that you may find useful when creating
custom styles.
■ RECALL SECTION function .....................................................................
This function makes it possible to recall the last-stored version of the
currently selected section (all parts of the section are recalled). Simply
press the RECALL SECTION LCD button in page 2 of the CUSTOM
STYLE display. If the Clavinova cannot recall the preceding operation
(i.e., after time signature has been changed), the “Can’t recall!” message will be displayed. If this happens, press OK to return to the previous
display.
Creating Your Own Styles
■ STYLE CLEAR function.................................................................................
Press the STYLE CLEAR LCD button in page 3 of the CUSTOM
STYLE display to completely clear the current custom style. The “Are
you sure?” message will be displayed. Press YES to clear the style, or
NO to cancel the change.
97
CVP-109/107/105/700
99
Page 100

Creating Your Own Styles
○○○○○○○○○○○○○○○○○○○○○○○○○○○○○○○○○○○○○○○
■ Volume and Effects .........................................................................................
Page 4 of the CUSTOM STYLE display includes several functions
that let you set the volume, reverb, chorus type and depth, effect (CVP109/107/700), and pan for each part of each custom style section.
Z Select the section and part.
Use the SECTION function to select a section (or select ALL for all
sections), and the PART function to select a part (or select ALL for all
parts).
CVP-109/107/700
X Select the parameter you want to set.
The third LCD button selects the parameter to be set for the current
section and part. Choose from VOLUME, REVERB, CHORUS, EF-
FECT (CVP-109/107/700) or PAN.
CVP-109/107/700
CVP-105
C Select the chorus type.
If you selected CHORUS in step 2, the TYPE function is displayed
above the fourth LCD button. Use this function to select the chorus
type you want to apply to the current section and part.
100
Chorus Type List
• CHORUS 1
• CHORUS 2
• CHORUS 3
CVP-109/107/105/700
• CELESTE 1
• CELESTE 2
• CELESTE 3
CVP-109/107/700
• FLANGER 1
• FLANGER 2
• OFF
The word “OTHERS” may appear as the
chorus type if the preset style uses a
chorus type other than those in the list.
The OTHERS setting cannot be re-selected once you select a different chorus
type.
98
 Loading...