

Classical Guitar
Owner’s Manual
Thank you for purchasing a Yamaha Classic Guitar.
Before you use your guitar, please read this manual carefully in order to get
maximum satisfaction from and to provide proper care for your guitar for
the life or your guitar.
■ Caution
1. When transporting the guitar, we strongly recommend that you transport it
in a hard case. It not only provides protection from shocks caused by dropping, etc., but also protects the guitar from damage caused by sudden
changes in temperature or humidity.
2. Never leave your guitar in an automobile for long periods of time. Temperature extremes experienced in the summer and winter will degrade the quality
of the guitar.
3. When caring for your guitar, please wipe the instrument with a soft, dry
cloth. Also, never use spray insecticides near the instrument. Doing so will
result in damage to the instrument’s quality and finish.
4. This product has already been properly setup and adjusted before leaving
the factory. If adjustment is necessary, please consult with your Yamaha
dealer. Depending upon the part, special techniques may be required for
proper adjustment.
■ Changing the Strings
When changing strings or tuning, do not hold the instrument
close to your face. If a string breaks it may cause serious damage to your eyes. Also, if it is necessary to cut the string when
changing strings, fully loosen the tuning peg. Sudden tension
loss will not only cause damage to the neck but also the string
lashing back may result in injury.
When attaching strings, please use the following procedure.
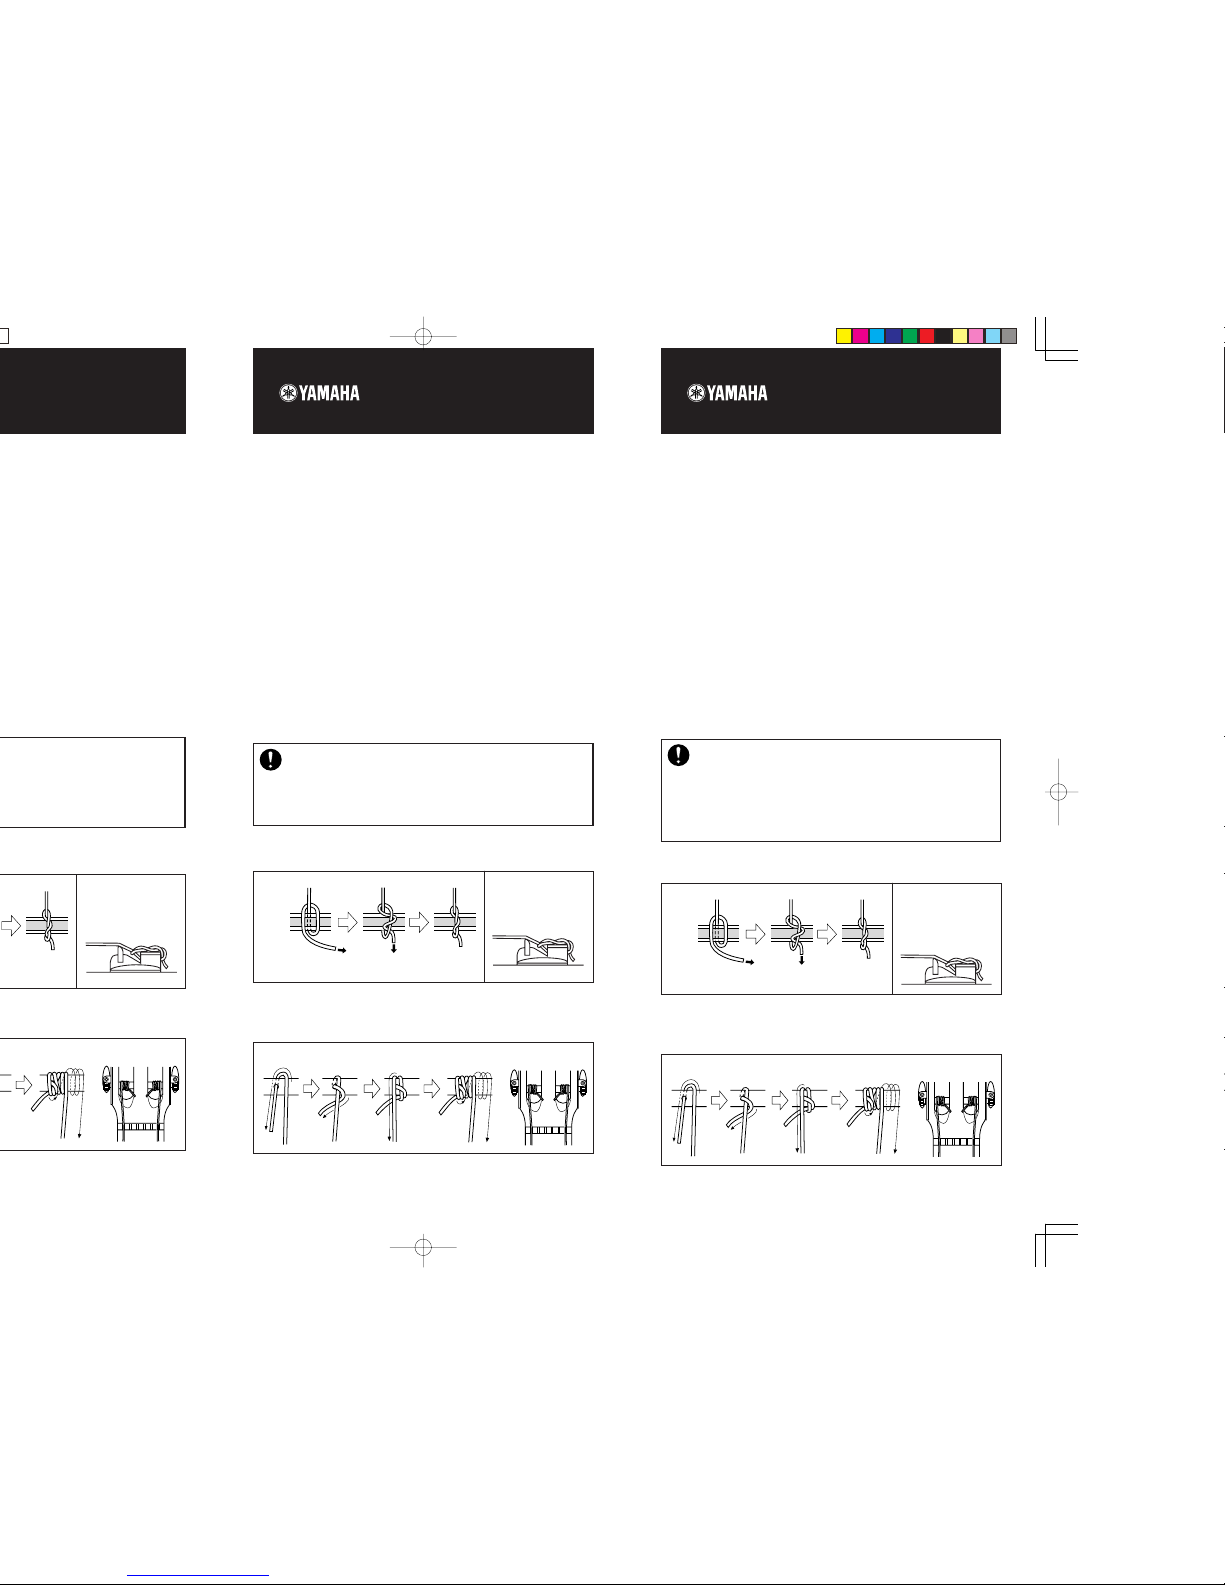
1. Tie the strings to the bridge.
2. Next, tie and wind the strings onto the peg.
* The following illustration shows how to attach the 1st string (the 4th and 5
th
strings are the same). To attach the 2nd, 3rd and 6th strings tie and wind the
strings in the opposite direction.
3. After all six strings have been wound, use a tuning meter or tuning fork to
tune the instrument to the proper pitch.
bridge
neck side
Konzertgitarre
Bedienungsanleitung
Vielen Dank für den Kauf einer Yamaha Konzertgitarre.
Bevor Sie Ihre Gitarre benutzen, lesen Sie bitte diese Anleitung sorgfältig
durch. Bei richtiger Handhabung und Pflege werden Sie viele Jahre lang
Spaß an und mit Ihrer Gitarre haben.
■ Vor sichtshinweise
1. Zum Mitführen oder Transportieren der Gitarre empfehlen wir Ihnen den
Gebrauch eines robusten Gitarrenkoffers. Der Koffer schützt die Gitarre
nicht nur vor Schlag, Stoß und Fall, sondern auch vor Schäden durch drastische Temperatur- und Luftfeuchtigkeitsänderungen.
2. Lassen Sie Ihre Gitarre niemals längere Zeit in einem Auto liegen. Die
extremen Temperaturänderungen, die dort im Sommer und Winter auftreten, schaden der Gitarre.
3. Verwenden Sie zum Säubern der Gitarre ein weiches, trockenes Tuch.
Versprühen Sie auch keine Insektenvernichtungsmittel in der Nähe der
Gitarre. Solche Mittel greifen den Lack an und schaden dem Instrument.
4. Dieses Instrument wurde werkseitig bereits ordnungsgemäß vorbereitet
und eingestellt. Wenn eine erneute Einstellung erforderlich wird, wenden
Sie sich bitte an Ihren Yamaha-Fachändler. Gewisse Teile müssen mit speziellen Verfahren eingestellt werden.
■ Auswechseln von Saiten
Halten Sie das Instrument beim Auswechseln einer Saite oder
beim Stimmen nicht zu dicht an Ihr Gesicht. Wenn eine Saite
reißt, könnte dies eine schwere Augenverletzung zur Folge haben. Wenn Sie eine Saite zum leichteren Entfernen durchtrennen
möchten, lockern Sie sie zunächst mit dem entsprechenden Wirbel. Nicht nur würde ein plötzlicher Spannungsverlust dem Hals
der Gitarre schaden, sondern die beim Durchtrennen hochspringende Saite könnte Sie auch verletzen.
Ziehen Sie Saiten bitte folgendermaßen auf:
1. Befestigen Sie die Saite am Saitenhalter.
2. Befestigen Sie die Saite am Wirbel, um Sie dann aufzuwickeln.
* Die folgende Abbildung zeigt die Befestigung der 1. Saite (die 4. und die 5.
Saite werden auf dieselbe Weise befestigt). Die 2., 3. und 6. Saite werden in
entgegengesetzter Richtung geknotet und gewickelt.
1弦のペグ側
に巻いていく
弦末端の結び目がブリッ
ジの垂直面にくるように
してください。
After wrapping once
on the 2nd string side,
wrap towards the
1st string’s peg.
* If the string slips (1st, 2nd, 3
rd
strings) tie one more knot.
Make sure the last
knot is positioned over
the edge of the bridge.
Saitenhalter
halsseitig
Nach einer Wicklung an
der Seite der 2. Saite,
in Richtung des Wirbels
der 1. Saite wickeln.
*Wenn Sie Saite rutscht (1., 2., 3. Saite),
machen Sie einen weiteren Knoten.
Achten Sie darauf, daß
der letzte Knoten über
dem Rand des
Saitenhalters liegt.
3. Nachdem Sie alle sechs Saiten aufgezogen haben, stimmen Sie das Instrument mit einem Stimmgerät oder einer Stimmgabel auf die korrekte
Tonhöhe ab.

WH25980 R0 0601 Printed in China
Guitarra clásica
Manual de instrucciones
Le agradecemos la adquisición de una guitarra clásica Yamaha.
Antes de utilizar la guitarra, tenga la amabilidad de leer con atención este
manual para poder aprovechar al máximo las ventajas de la guitarra y poder darle los cuidados adecuados durante toda su vida útil.
■ Precaución
1. Cuando transporte la guitarra, le recomendamos encarecidamente que la
lleve en un estuche duro. No sólo proporciona protección contra golpes
debidos a caídas, etc., sino que también protege la guitarra contra daños
causados por los cambios súbitos de la temperatura o de la humedad.
2. No deje nunca la guitarra dentro de un automóvil durante largos períodos
de tiempo. Las altas temperaturas que se producen en verano y en invierno degradarán la calidad de la guitarra.
3. Cuando realice los cuidados de la guitarra, frote el instrumento con un
paño suave y seco. No emplee nunca insecticidas cerca del instrumentos.
De lo contrario, ocasionaría daños en la calidad y en el acabado del instrumento.
4. Este producto ya ha sido correctamente ajustado y preparado antes de
salir de fábrica. Si se requiere algún ajuste, consulte a la tienda Yamaha
donde compró la guitarra. Dependiendo de la parte, es posible que se
requieran técnicas especiales para realizar el ajuste adecuado.
■ Cambio de las cuerdas
Cuando cambie las cuerdas o cuando afine la guitarra, no sostenga el instrumento cerca de la cara, Si se rompe una cuerda podría
causarle heridas graves en los ojos. Además, si es necesario cortar la cuerda para cambiarla, afloje por completo la clavija de afinación. La pérdida súbita de la tensión no sólo causa daños en el
cuello sino que la cuerda puede también ocasionar heridas.
Para instalar las cuerdas, siga el procedimiento siguiente.
1. Ate las cuerdas en el puente.
2. Luego, ate y enrolle las cuerdas en la clavija.
* La ilustración siguiente muestra cómo se coloca la 1.ª cuerda (las cuerdas
4.ª y 5.ª se colocan igual). Para colocar las cuerdas 2.ª, 3.ª y 6.ª, ate y enrolle las cuerdas en la dirección opuesta.
Chitarra classica
Libretto d’istruzioni
Vi ringraziamo per aver acquistato una chitarra classica Yamaha. prima di
usare questa chitarra classica, si raccomanda di leggere per intero le seguenti
istruzioni per poterla usare al meglio e farla durare a lungo.
■ Attenzione
1. Quando si trasporta la chitarra, si raccomanda fortemente l’uso di un fodero
rigido. Non solo protegge lo strumento da urti violenti durante il trasporto,
ma evita anche danni dovuti a cambi repentini della temperatura.
2. Non lasciare mai la chitarra in un’automobile per lunghi periodi. Le
temperature estreme d’estate ed in inverno ne fanno scadere la qualità.
3. Pulire la chitarra solo con un panno soffice e pulito. Non usare mai insetticidi
vicino allo strumento. Facendo se ne rovinano le finiture ed il suono.
4. Questo prodotto è stato messo a punto prima di lasciare la fabbrica. Se
dovesse necessitare riparazione, queste devono venire affidate ad un
rivenditore Yamaha. Esse possono infatti richiedere tecniche speciali.
■ Sostituzione delle corde
Nel sostituire le corde o durante l’accordatura, non tenere lo
strumento vicino al viso. Se una corda si dovesse spezzare, può
colpire e danneggiare gli occhi. Inoltre, se si decide di tagliare
una corda per sostituirla farlo solo dopo averla allentata al
massimo. La perdita improvvisa di tensione danneggia il manico
della chitarra e può far volare la corda, con risultati imprevedibili.
Nell’applicare le corde, fare quanto segue.
1. Legare la corda al ponte.
enroulez dans la direction de
la cheville de la 1ère corde.
Assurez-vous que le
dernier nœud se trouve
bien sur le bord du
chevalet.
puente
lado del cuello
Después de dar una vuelta
en el lado de la cuerda 2.ª,
dé la vuelta hacia la
clavija de la cuerda 1.ª.
* Si resbala la cuerda (cuerdas 1.ª,
2,ª, y 3.ª) haga otro nudo.
Asegúrese de que el
último nudo quede
colocado encima de la
esquina del puente.
Ponte
Lato del manico
Avvolta la corda una volta attorno al perno verso la seconda corda ...
... avvolgerla
verso la prima.
* Se la prima, seconda o terza corda
scivola, aggiungere un nodo.
Controllare che l’ultimo
nodo si trovi oltre il
bordo del ponte.
3. Después de haber enrolado las seis cuerdas, emplee un afinador o una
horquilla de afinación para afinar el instrumento al tono adecuado.
2. Legare quindi la corda al perno e tenderla leggermente.
* La seguente illustrazione mostra come installare la prima corda. La quarta e
quinta sono installate analogamente. Per applicare la seconda, terza e sesta,
stringerle ed avvolgerle in doirezioone opposta.
3. Dopo che si sono installate tutte e sei le corde, usare un diapason per
accordarla correttamente.
 Loading...