

Page 1

C4FM/FM 144/430MHz
DUAL BAND DIGITAL TRANSCEIVER
FT3DR
FT3DE
Instruction Manual (WIRES-X Edition)
Page 2

Contents
What is WIRES-X? ............................................................................................................................3
Terminology ................................................................................................................................4
Connecting to a Faraway Station Using WIRES-X ........................................................................7
Finding a local node .......................................................................................................................7
Connecting in digital mode .............................................................................................................7
Connecting to a WIRES-X digital node ......................................................................................7
Connecting to the other node ID or the other room ID ...............................................................7
Connecting to a node or room on the Internet ..........................................................................10
Communicating with others ......................................................................................................13
Useful functions in digital mode ....................................................................................................14
Using preset channels ..............................................................................................................14
Connecting to registered nodes or rooms ................................................................................15
Releasing the WIRES-X connection .............................................................................................17
Connecting to analog nodes .........................................................................................................18
Connecting to nodes or rooms on the Internet .........................................................................18
Communicating with others ......................................................................................................19
Disconnecting from the node or room ......................................................................................19
Various display functions ..............................................................................................................19
Confirming the location of the local node and the partner station ............................................19
Confirming the frequency .........................................................................................................19
Returning to the initial screen ...................................................................................................19
Using the News Function of WIRES-X ..........................................................................................20
Viewing messages ........................................................................................................................20
Viewing text data in local nodes ...............................................................................................20
Viewing text data on the WIRES-X server (INT NEWS) ...........................................................22
Viewing text data in nodes or rooms on the Internet ................................................................23
Importing images ..........................................................................................................................25
Importing images from local nodes ..........................................................................................25
Importing images from the WIRES-X server (INT NEWS) .......................................................25
Importing data from nodes or rooms on the Internet ................................................................26
Viewing imported data later ..........................................................................................................26
Deleting imported data .................................................................................................................27
Deleting a file ............................................................................................................................27
Listening to audio messages ........................................................................................................28
Listening to emergency information in the local node ..............................................................28
Listening to routine messages in local nodes ...........................................................................29
Listening to routine messages on the WIRES-X server (INT NEWS) .....................................29
Listening to emergency information in nodes or rooms on the Internet ...................................30
Listening to routine messages in nodes or rooms on the Internet ............................................30
Transmitting messages and images .............................................................................................31
Creating and transmitting messages to local nodes .................................................................31
Transmitting saved messages or images to local nodes ..........................................................33
Creating and transmitting messages to nodes or rooms on the Internet ..................................33
Transmitting saved messages or images to nodes or rooms on the Internet ...........................33
Transmitting audio messages .......................................................................................................34
Transmitting emergency information to local nodes .................................................................34
Transmitting routine voice messages to local nodes ................................................................34
Transmitting emergency information to nodes or rooms on the Internet ..................................35
Transmitting routine messages to nodes or rooms on the Internet ..........................................35
WIRES-X Setting Mode Menus ......................................................................................................36
WIRES-X setting mode list ...........................................................................................................36
Using the WIRES-X setting mode ................................................................................................36
Setting the operating frequencies for repeaters/WIRES-X .......................................................36
Setting the item order on the node & room lists .......................................................................37
Editing category names ............................................................................................................37
Deleting the registered nodes and rooms ................................................................................37
The DG-ID feature to access the WIRES-X node station .........................................................38
2
Page 3
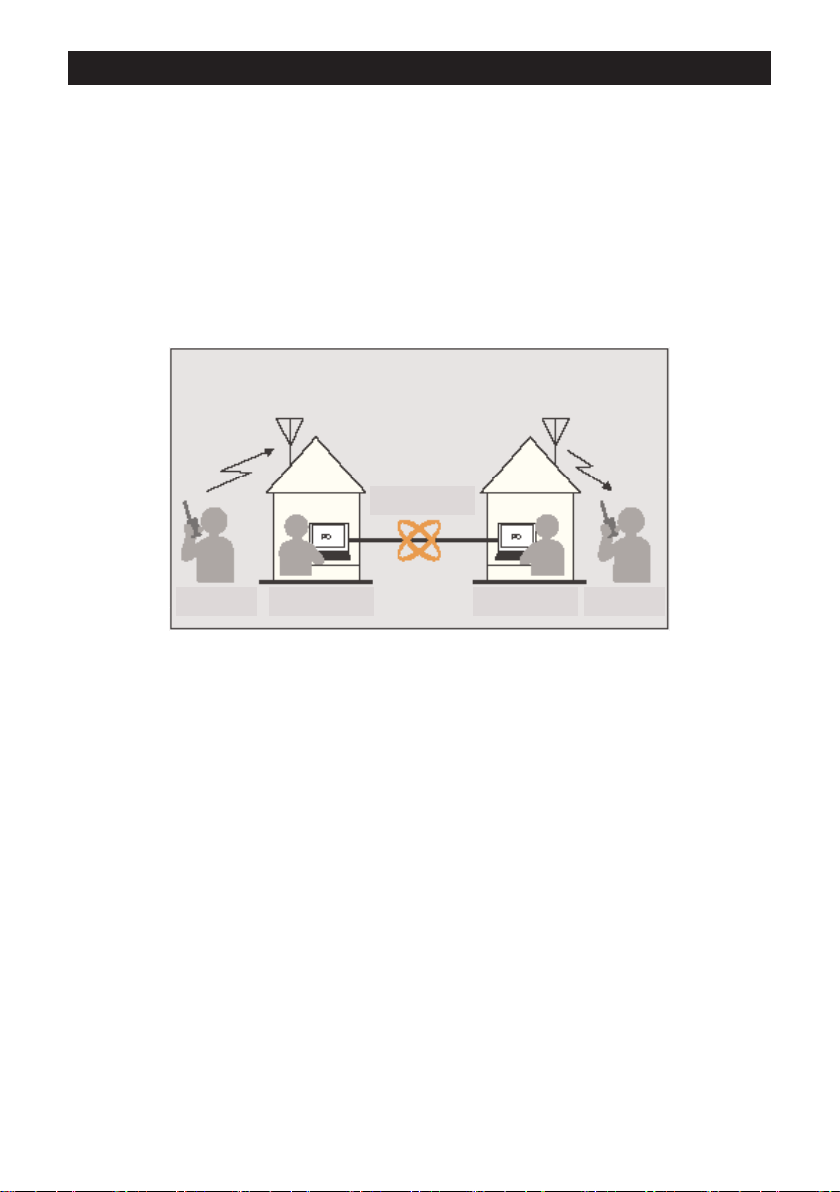
What is WIRES-X?
WIRES (Wide-coverage Internet Repeater Enhancement System) is an Internet
communication system which expands the range of amateur radio communication. By
relaying radio signals via the Internet, stations can be connected where radio waves
cannot reach each other.
WIRES uses local nodes (stations connected to the Internet via PCs) as access points
which repeat communications of conventional amateur radio stations. When the local
nodes are connected to each other via the Internet, amateur stations all over the world
can communicate with each other just by connecting conventional stations to the local
nodes.
Internet
Local node Local node StationStation
In addition to the WIRES features, WIRES-X also supports digital communications. Using
WIRES-X, you can transmit and receive digitalized data such as text, image data and
audio.
Using the WIRES-X in conjunction with the transceiver allows you to have analog/digital
communications with stations outside the communication range. In digital communication
mode, you can search stations by call signs or keywords, and exchange data such as
messages and location information.
3
Page 4
Terminology
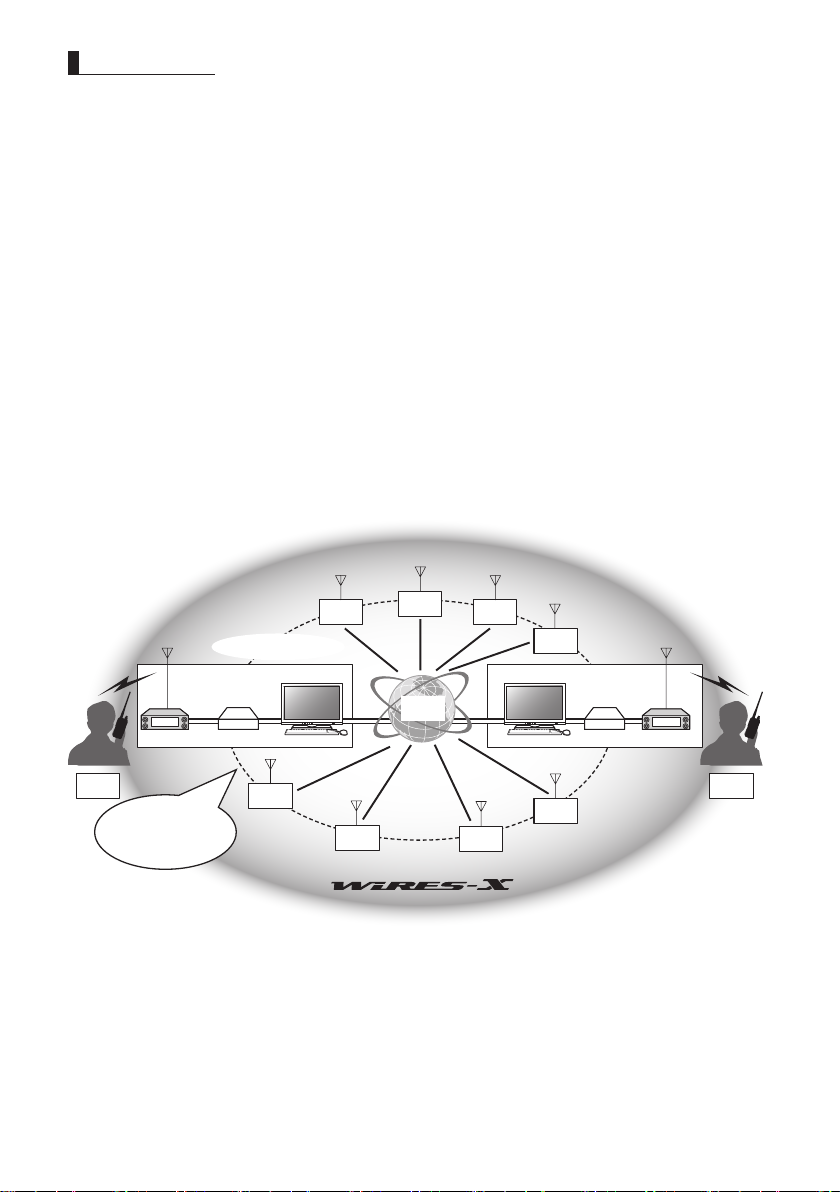
■ Node
Radio repeater connected to the Internet via a PC, which repeats communications of
conventional amateur radio stations as an access point
z Local node
Node within the radio communication range of a conventional amateur radio station
z Analog node
Node which is a transceiver or repeater using the conventional FM format and can only
repeat DTMF (Dual Tone Multi Frequencies) codes and analog audio transmissions/
receptions
z Digital node
Node which is a transceiver or repeater compatible with digital communications in C4FM
(Continuous 4 level FM) format. With this type of node, you can transmit/receive audio
as well as text and image data. You can also repeat DTMF codes and analog audio
transmissions/receptions.
Local
node
Internet connection
Local node
HRI-200
Station Station
As long as the local nodes
are linked to each other, stations
can communicate with each
other by connecting to a
local node
Local
node
Local
node
Local
node
WIRES
server
Local
node
Local
node
Local
node
PCPC
Local
node
Local node
HRI-200
4
Page 5
■ WIRES-X user ID
YAESU provides identification names with the WIRES-X nodes. For each node, a DTMF
ID (5-digit number) and user ID (alphanumeric characters consisting of up to 10 digits)
are provided.
If you know the ID of the node you want to connect with, you can transmit the DTMF
code from the transceiver, and directly specify the node to connect to by searching by
characters (only for digital nodes).
z ID list
Nodes and rooms which are currently operating WIRES are listed and published on our
website. We provide information such as IDs, call signs and operating frequencies (some
may not be published due to the wishes of owners).
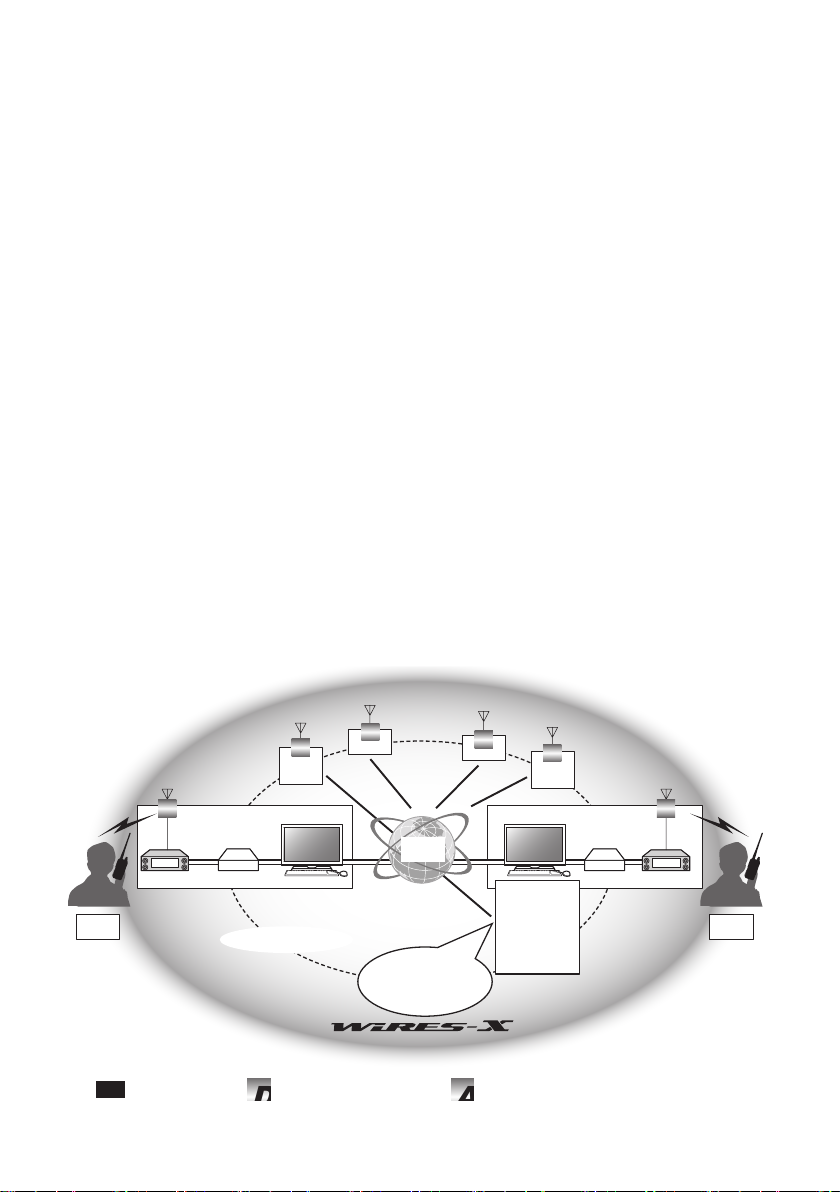
■ Room (Round QSO Room)
WIRES system community space to which multiple nodes can connect simultaneously.
As well as voice communications, you can also chat with text messages on the PC used
for the local node.
z Open room
Room which allows all nodes to connect to
z Closed room
Room only registered nodes can connect to
z Owner
Node which opens and organizes a room
z Activity
Nodes currently connected to a specific room
D
JQ1YBF-ND1
JA1XXX
-S1
Tip In the illustration,
D
JF7XXX
-ND3
HRI-200
Internet connection
refers to digital nodes and
A
WIRES
server
When a local node
connects to a room,
stations already connected to
that node are also connected
to the room
5
A
D
JH4XXX
-ND4
PCPC
JA2-ROOM
JQ1YBF-ND1
JF7XXX-ND3
JA1XXX-S1
* Currently
3 activities
in this room
JA2YSO-ND2
HRI-200
refers to analog nodes.
D
JA2XXX
-S2
Page 6
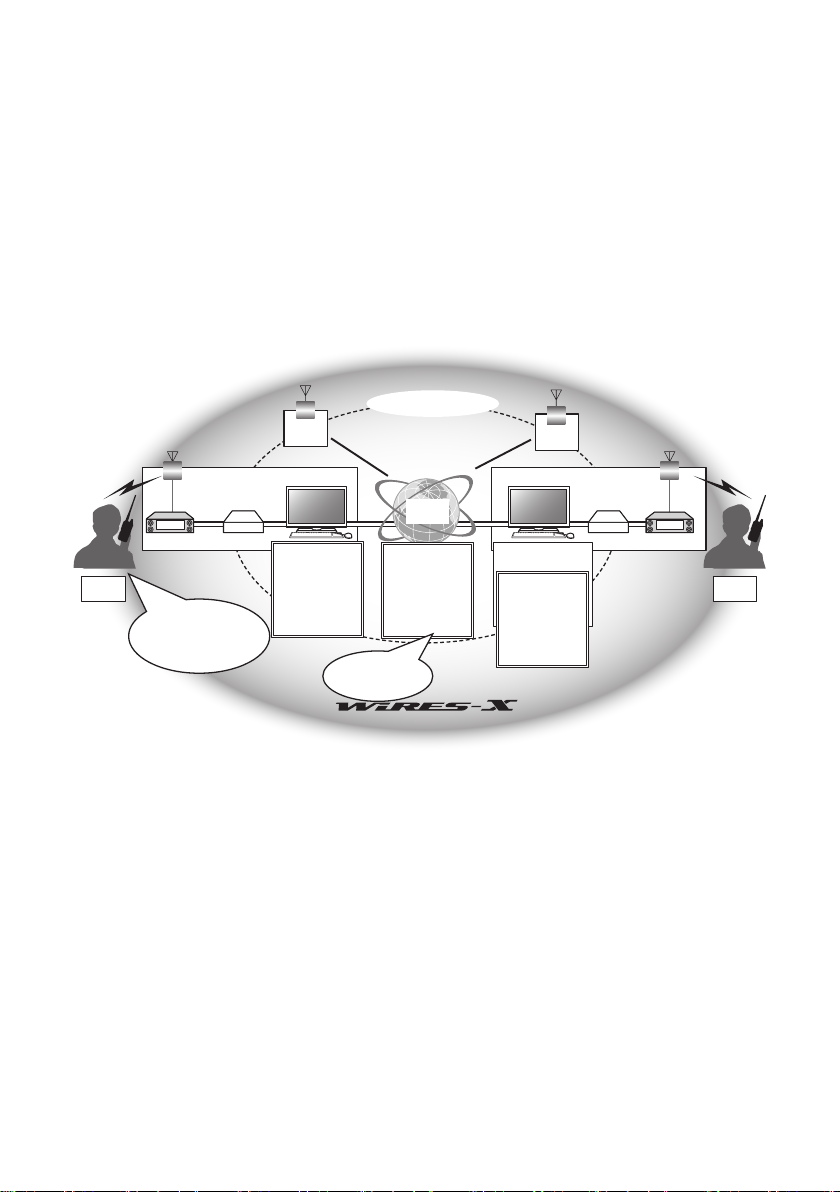
■ News function
This feature allows you to save digital data such as text, image and audio data on the PC
used for the local node, and access the data from the connected digital station.
From the digital transceiver, you can access the local node (LOCAL NEWS) and the data
storage area (news station) in the node or room you connect to, and import (upload) and
export (download) data.
The owners of a node or room can import/export data from/to their own station via a PC.
The owner can also delete data and change information such as its name and attribution.
The WIRES-X server also has its own news station (INT NEWS) where you can read
information and data supplied by YAESU.
Internet connection
WIRES
server
INT news
Audio messages
(emergency)
News Station
Audio files
Text data
Images
Data on the WIRES-X
server is only for
downloading
D
JH4XXX
-ND4
PCPC
JA2-ROOM
Local news
Audio messages
(emergency)
News Station
Audio files
Text data
Images
JA2YSO-ND2
HRI-200
D
JA2XXX
-S2
JA1XXX
-S1
in the local node, the WIRES-X
server, and a node or room
D
JQ1YBF-ND1
HRI-200
Connecting to a node
allows you to access data
on the Internet
D
JF7XXX
-ND3
Local news
Audio messages
(emergency)
News Station
Audio files
Text data
Images
■ Preset search function
If the preferred channel for connecting to a local node is programmed (preset) in the
transceiver, the channel can be scanned automatically when you start up WIRES-X.
Utilize this function as follows:
• Quickly connect to the local node you usually access by presetting its frequency in
advance.
• By presetting to a shared channel frequency with your friends nodes, you can quickly
connect the transceiver to a local node even while you are traveling in other areas.
You can use two transceivers as nodes, one for the preset search channel (receive only
channel) and the other for the voice channel (operation channel).
6
Page 7

Connecting to a Faraway Station Using WIRES-X
Finding a local node
To communicate using WIRES-X, a WIRES-X node station (local node) must be
established within radio contact range of the user transceiver.
WIRES-X nodes are stations users voluntarily registered with Yaesu. Their information
such as locations and operation styles are listed on our website:
https://www.yaesu.com/jp/en/wires-x/index.php
First use this list to search for a nearby local node, and nodes on the Internet used by
people you want to communicate with; write down the node names and frequencies.
Since the connection procedure differs between digital stations and analog stations,
confirm whether the node is an analog station or a digital station.
• When the local node is a digital station:
Connect from your transceiver in digital mode.
(Nodes on the Internet can connect to both digital and analog stations.)
• When the local node in an analog station:
Connect from your transceiver in analog mode.
(Nodes on the Internet can connect to both analog and digital stations.)
Connecting in digital mode
• Ascertain the DSQ code or the DG-ID setting of the WIRES-X node station. Connecting
to the WIRES-X node requires the transceiver DG-ID be set according to the DSQ code
or the DG-ID code set on the WIRES-X node station.
• Confirm that the operating mode of WIRES-X node has been set to the C4FM digital
mode.
• Before using WIRES-X, set the communication mode (modulation mode) to C4FM.
Connecting to a WIRES-X digital node
1 Set the transmit/receive DG-ID to the same ID number as the node station. For details,
refer to the FT3DR/DE Operating Manual.
2 Transmit corresponding to the transmit/receive fre-
quency.
Tips •Ifreceivingthesignalfromthenode,transmititasis.
•Ifnotreceivingthesignal from the node, it is possible
that the node station is not connected to the Internet à
proceed to step “Connecting to the other node ID or the
other room ID”.
Connecting to the other node ID or the other room ID
5 DG-ID
DG-ID: AUTO
1 Press and hold the [DISP]key→Touch[WIRES-X]→[5 GD-ID].
7
Page 8
The WIRES-X DG-ID setting screen will be displayed.
2 Rotate the DIAL knob to set the WIRES-X DG-ID to the same ID number as the node
station.
AUTO: Only open nodes, set to the DG-ID number “00” may be connected.
01 to 99: Only nodes matching the set DG-ID number may be connected.
3 Press the PTT.
Returns the screen to the frequency display screen.
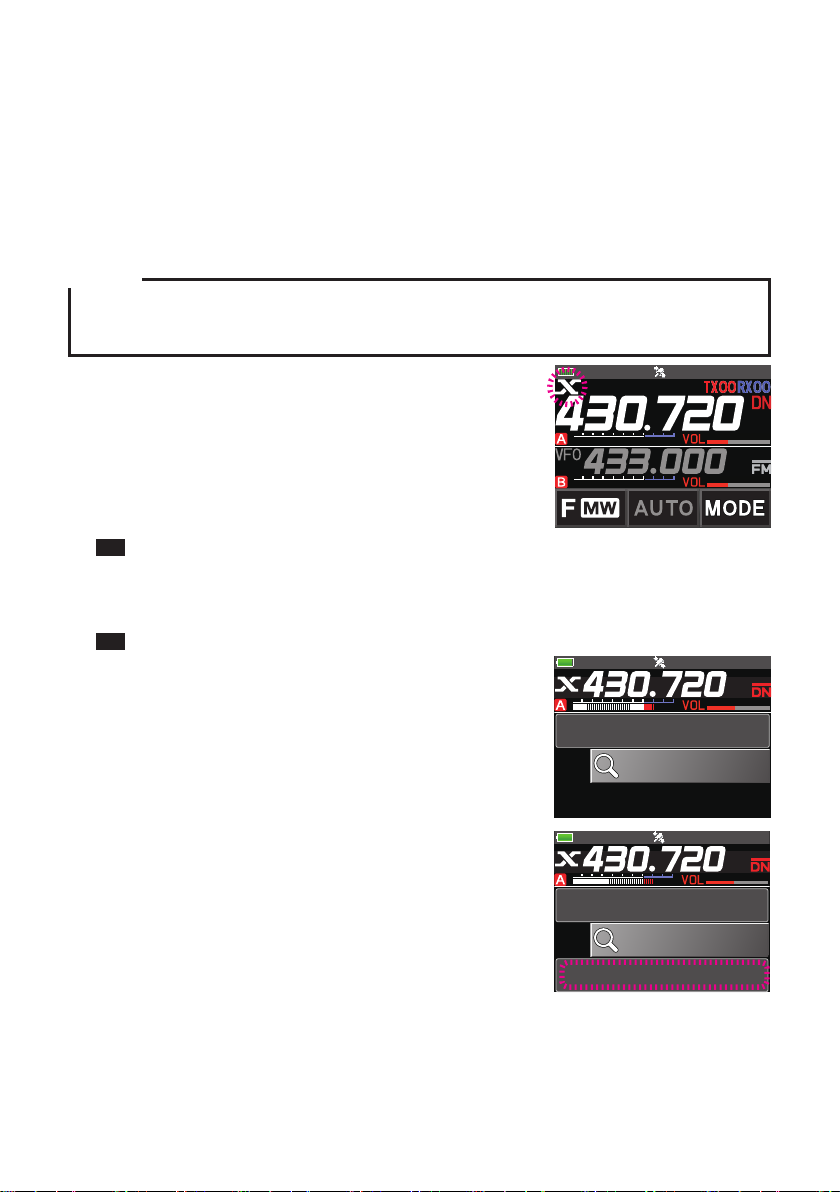
4 Rotate the DIAL to set the A-band to the frequency of the desired local node.
Caution
WIRES-X can only be used on the A-band.
If using the B-band (shown on the bottom part of the screen) as the operation band, pressing the [
key automatically switches the operation band to the A-band (shown on the top part of the screen).
X
]
5 Press the [
X
] flashes on the left side of the frequency display.
[
Tip •While[X] is flashing, briefly press the [X] key to re-establish connection to the local node.
X
] key.
•Whenanylocalnodecannotbefound,[
X
] will disappear in 30 seconds.
When a local node is found, [X] is lit solid, and the node name and city name appear
on the bottom part of the screen.
Tip Depending on the connection status, the screen will show one of four display patterns.
(1) Connected to the local node, but unable to connect
to Internet nodes or rooms (never before established
connection to Internet nodes or rooms)
JQ1YBG-ND1 Shinagawa-
SEARCH & DIRECT
(2) Connected to the local node, but unable to connect
to Internet nodes or rooms (previously succeeded in
establishing connection to Internet nodes or rooms)
JQ1YBG-ND1 Shinagawa-
SEARCH & DIRECT
JA1YOE-ROOM12345
8
Page 9
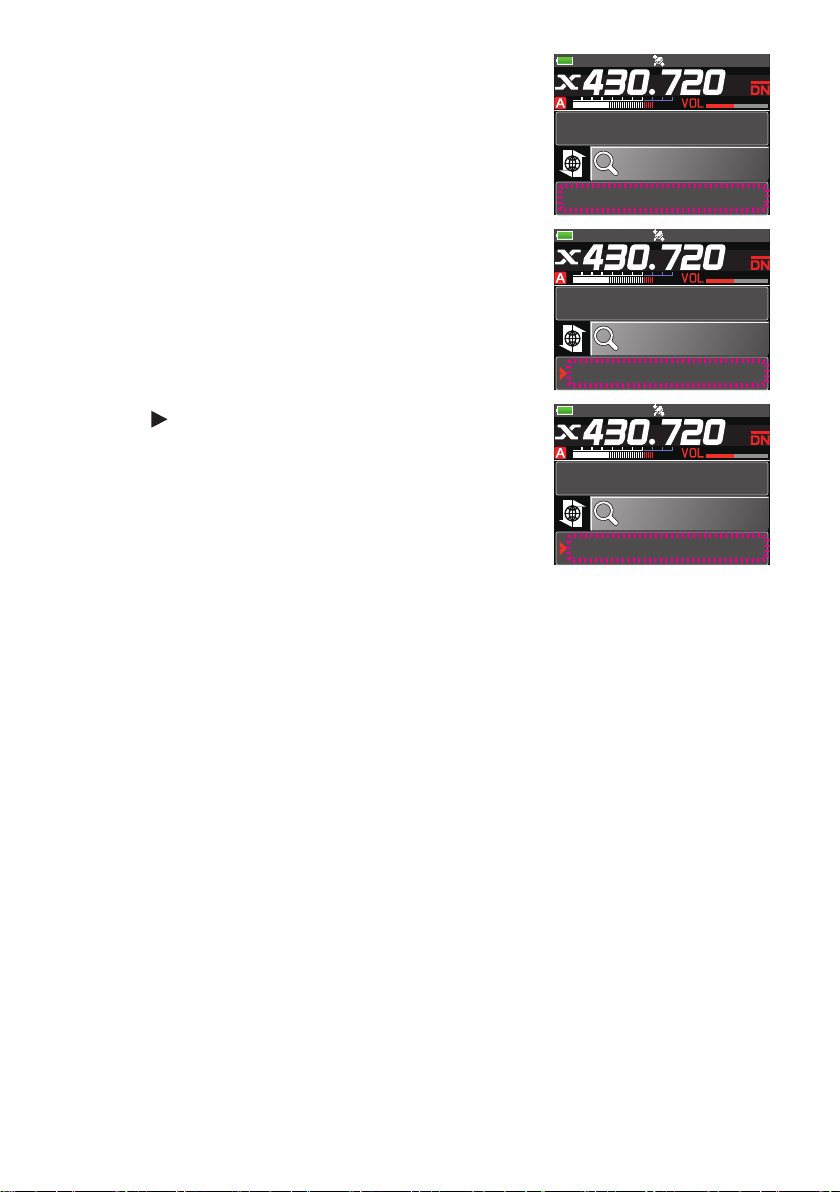
(3) Connected to the local node, successfully connected to
an Internet node or room (the Internet node or room is
the same as the one most recently used)
(4) Connected to the local node, successfully connected to
an Internet node or room (the Internet node or room is
different from the one most recently used)
When is displayed, rotate the DIAL. Call signs of
nodes and rooms on the Internet you previously
connected to flash.
JQ1YBG-ND1 Shinagawa-
SEARCH & DIRECT
JA1YOE-ROOM12345 24
JQ1YBG-ND1 Shinagawa-
SEARCH & DIRECT
JH1YPC-ND
JQ1YBG-ND1 Shinagawa-
SEARCH & DIRECT
JA1YOE-ROOM12345 24
9
Page 10
Connecting to a node or room on the Internet
JA1YOE-TKY-ROOM
You can connect to the desired node or room in one of the following ways:
• Selecting an accessible node or room from the list
• Specifying the node name or room name
• Selecting the most recently connected node or room
• Specifying the DTMF ID of the node or room you want to connect to
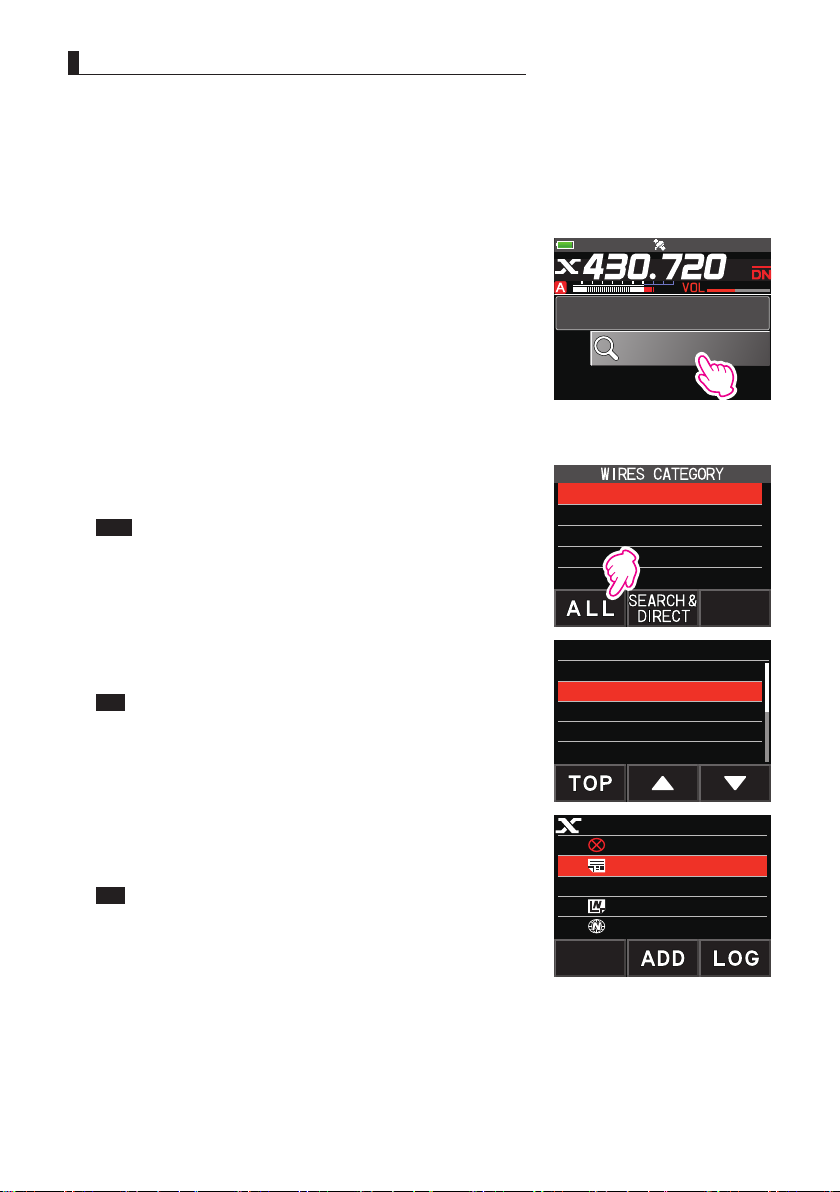
z Searching from the node & room lists
1 While displaying the local node, touch [SEARCH &
DIRECT].
Displays the category list.
JQ1YBG-ND1 Shinagawa-
SEARCH & DIRECT
2 Touch [ALL].
Displays the list of accessible nodes and rooms.
Tips •Connectiondestinationsaredisplayedfromtheroomlist
and then node list.
•On the connection destination room columns, the
number of activities (the number of nodes connected to
each room) appears on the right side.
3 Touch the node or room you want to connect to.
Starts connection.
Tip Rotate the DIAL to select the node or room you want to
connect, then press PTT to establish a connection
Once connection is successfully established, the
menu list of the node (room) you are connected to will
appear.
Tip If connection is unsuccessful, an error message appears
and the screen returns to the list of nodes and rooms.
C1:---------------C2:---------------C3:---------------C4:---------------C5:----------------
ALL [999]
CQ-OPEN-ROOM 194
JA1YOE-TKY-ROOM 21
.
JA1YOE-ROOM-B 16
JA1YOE-ROOM-C 9
JQ1YBG-13-ROOM-B 8
EMERGENCY
NEWS STATION
LOCAL NEWS
INT NEWS
10
Page 11
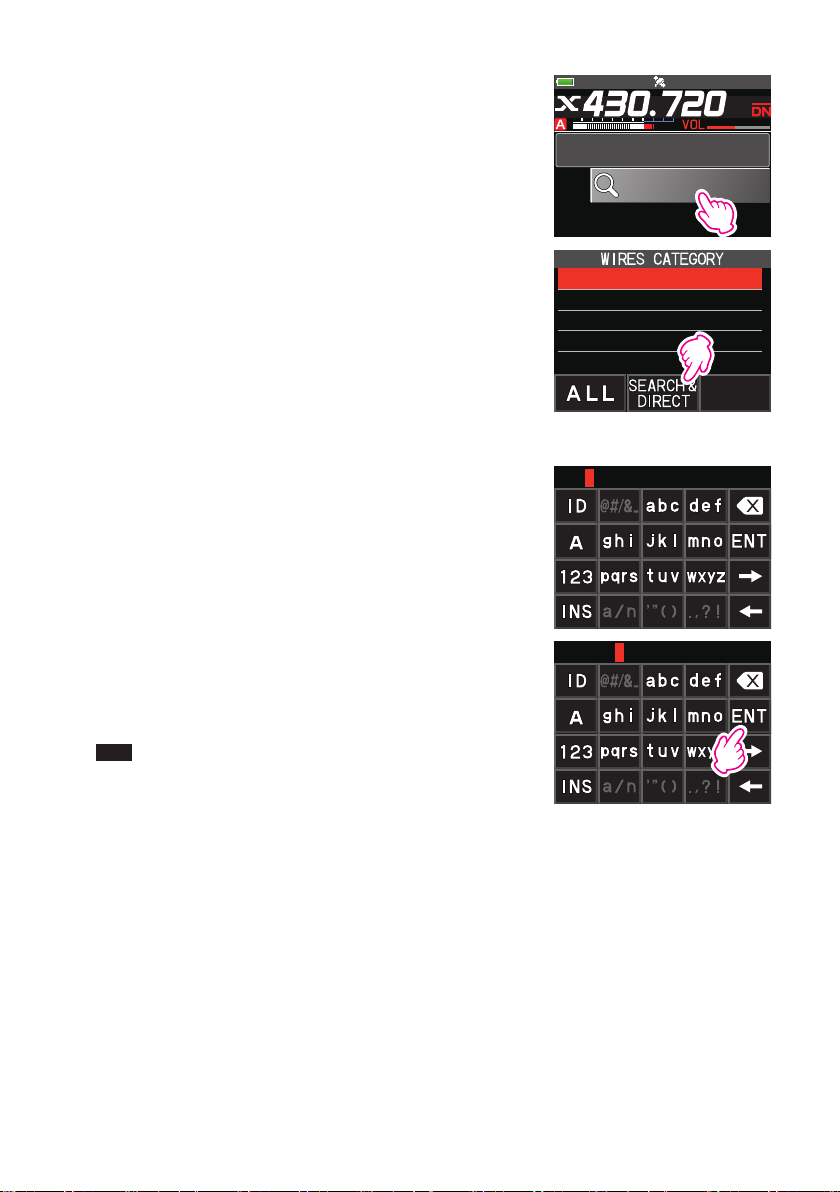
z Searching by node or room name
1 While displaying the local node, touch [SEARCH &
DIRECT].
Displays the category list.
JQ1YBG-ND1 Shinagawa-
SEARCH & DIRECT
2 Touch [SEARCH & DIRECT].
Displays the character input screen.
3 Enter all or part of the room or node name.
The characters you have just entered appear on the
screen.
4 Touch [ENT].
If connection destinations with the first part of a name
partially matching the name you entered are found,
they will be listed.
Tips •If there is no connection destination matching the
entered name, “No Matches
screen returns to the character input screen.
”
appears and then the
C1:---------------C2:---------------C3:---------------C4:---------------C5:----------------
JA1Y
•If the name you entered is found, the transceiver
establishes connection immediately.
•Thescreendisplaystheroomlistsearchresultsfollowed
by the node list search results.
•Ontheroomcolumnsinthesearchresults,thenumber
of activities (the number of nodes connected to each
room) appears on the right side.
11
Page 12

5 Touch the node or room you want to connect to.
JA1Y [ 24]
Starts connection.
Tips •RotatetheDIALtoselectthenodeorroomyouwantto
connect, then press PTT to establish a connection.
•Onceconnectionissuccessfully established, themenu
list of the node (room) you are connected to will appear.
•Ifconnectionisunsuccessful,anerrormessageappears
and the screen returns to the list of nodes and rooms.
z Connecting to the node or room you have most recently connected
If you have previously connected to a node or room on the Internet, it appears and flashes
at the bottom of the screen.
Touch the flashing node or room to start connection, and once connection is established,
the menu list of the node (room) you are connected to will appear.
If is displayed on the left side of the node name at the
bottom part of the screen, rotate the DIAL to display the
node most recently connected.
Tip If connection is unsuccessful, an error message appears and
the name flashes again.
JA1YOE-TKY-ROOM 21
JA1YOE-ROOM-A 4
JA1YOE-ROOM-B 3
JA1YOE-ROOM-C 0
JQ1YBG-ND
JQ1YBG-ND1 Shinagawa-
SEARCH & DIRECT
JA1YOE-ROOM12345 24
12
Page 13

z Specifying the DTMF ID of the node or room you want to connect to
1 While displaying the local node, touch [SEARCH &
DIRECT].
Displays the category list.
JQ1YBG-ND1 Shinagawa-
SEARCH & DIRECT
2 Touch [SEARCH & DIRECT].
Displays the character input screen.
3 Touch [ID].
Displays the DTMF input screen.
4 Enter the 5-digit DTMF ID.
5 Touch [ENT].
Tips •Theconnectionbeginsand"Waiting"flashes.
•Onceconnectionissuccessfully established, themenu
list of the node (room) you are connected to will appear.
•Ifconnectionisunsuccessful,anerrormessageappears,
and the screen returns to the node and room list screen.
Communicating with others
1 While displaying the station you are currently
connected to, press PTT.
The transceiver switches to transmission mode.
2 Speak into MIC.
3 Release the PTT.
The transceiver switches to reception mode.
C1:---------------C2:---------------C3:---------------C4:---------------C5:----------------
#
#22000
JQ1YBG-ND1 Shinagawa-
SEARCH & DIRECT
JA1YOE-ROOM12345 24
Tip
You can communicate with the node or room you are connected to by pressing the PTT even when
viewing data in a node or room on the Internet using the NEWS function in digital mode on page 20.
13
Page 14

Useful functions in digital mode
Using preset channels
Programming (presetting) a channel frequency allows you to easily connect to a local
node.
By sharing a channel frequency with other nodes, you can connect the transceiver to a
local node even while you are out. This is useful for a group to operate a station.
z Presetting a channel
1 Press and hold the [DISP] key.
2 Touch [WIRES-X].
Displays the menu list.
3 Touch [1 RPT/WIRES FREQ].
4 Rotate the DIAL to select [PRESET].
Tips •Every time the DIAL is rotated, the setting switches
between [MANUAL] and [PRESET].
•ThedefaultsettingisMANUAL.
5 Press the [DISP] key.
1 RPT/WIRES FREQ
PRESET
: 145.375 MHz
PUSH “DISP”
6 Rotate the DIAL to select the frequency.
Tips •Touching[BAND] switches the preset frequency band.
7 Press the PTT.
Sets the frequency and returns the screen to the
frequency display screen.
z Connecting to a preset channel
1 RPT/WIRES FREQ
PRESET
: 145.375 MHz
1 Follow the procedure in “Presetting a channel” on page 14 to make the preset
channel available in advance.
2 Press the [
P
] flashes on the left side of the frequency display.
[
X
] key.
14
Page 15

When a local node is found, [X] lights up, and the
node name and city name appear on the bottom part
of the screen.
Tip When any local node cannot be found, [P] disappears in 30
seconds.
Tip
If the frequency of the detected local node is different from that of the preset channel, the frequency
automatically switches to the node frequency.
z Ending searching by a preset channel
JQ1YBG-ND1 Shinagawa-
SEARCH & DIRECT
1 Follow steps 1 to 3 in “Presetting a channel” on page 14 to display the selection
items of [1 RPT/WIRES FREQ].
2 Rotate the DIAL to display [MANUAL].
Tip Every time the DIAL is rotated, the setting switches between [MANUAL] and [PRESET].
3 Press the PTT.
Returns the screen to the frequency display screen.
Connecting to registered nodes or rooms
You can register names of nodes and rooms on the Internet and sort them into 5 categories.
Up to a total of 20 nodes and rooms can be registered in each category.
z Registering category names
1 Press and hold the [DISP] key.
2 Touch [WIRES-X].
Displays the menu list.
3 Touch [3 EDIT CATEGORY TAG].
Displays the category name setting screen.
4 Rotate the DIAL to select one of [C1] to [C5], then
press the [DISP] key.
Displays the character input screen.
3 EDIT CATEGORY TAG
C1 ---------------C2 ---------------C3 ---------------C4 ---------------C5 ----------------
5 Enter the category name.
The characters you have just entered appear on the screen.
6 Press the [BACK] key.
Returns the screen to the list.
Tip Repeat steps 3 to 6 to set more category names.
7 Press the PTT.
Sets the category name and returns the screen to the frequency display screen.
15
Page 16

z Registering a node or room
ADD TO CATEGORY
1 Touch the node or room you want to connect to.
Displays the menu list of the node (room) you are
connected to.
JQ1YBG-ND1 Shinagawa-
SEARCH & DIRECT
JA1YOE-ROOM12345 24
2 Touch [ADD].
Displays the category list.
3 Touch the desired category.
The name of the node or room you are currently
connected to is added to the list of the registered node
and room lists.
4 Press the [BACK] key.
Returns the screen to the list.
JA1YOE-ROOM12345
EMERGENCY
NEWS STATION
LOCAL NEWS
INT NEWS
C1:TOKYO AREA
C2:FISHING
C3:---------------C4:---------------C5:----------------
C1:TOKYO AREA
JA1YOE-ROOM-A
JQ1YBG-ND
JA1YOE-ROOM12345
z Connecting to registered nodes or rooms
1 Touch [SEARCH & DIRECT].
Displays the category list.
JQ1YBG-ND1 Shinagawa-
SEARCH & DIRECT
16
Page 17

2 Touch one of [C1] to [C5].
C1:TOKYO AREA
JA1YOE-ROOM12345
Displays the node and room lists.
Tip On room columns, the number of activities (the number of
nodes connected to each room) appears on the right side.
C1:TOKYO AREA
C2:FISHING
C3:---------------C4:---------------C5:----------------
3 Touch the node or room you want to connect to.
Starts connection.
Tips •RotatetheDIALtoselectthenodeorroomyouwantto
connect, then press PTT to establish a connection.
•Ifconnectionissuccessful, themenulistofthe nodeor
room you are connected to appears.
•Ifconnectionisunsuccessful,anerrormessageappears
and the screen returns to the list of nodes and rooms.
Tip
You can list items in order according to the number of activities or access history from [WIRES-X] →
[2 SEARCH SETUP] in setting mode.
z Disconnecting from the node or room
JA1YOE-ROOM-A 15
JQ1YBG-ND
JA1YOE-ROOM12345 2
EMERGENCY
NEWS STATION
LOCAL NEWS
INT NEWS
1 Press and hold the [BACK] key.
If disconnection is successful, the screen returns to the local node connection screen.
Releasing the WIRES-X connection
Pressing and holding the [X] key for over one second switches the screen to the frequency
display screen, and [
Tip If you did not perform the disconnection operation, the local node and the node or room remain
connected.
X
] displayed on the left side of the frequency display disappears.
17
Page 18

Connecting to analog nodes
When the node you want to connect to is an analog station, use the DTMF function on
the transceiver. For details on how to use the DTMF function, refer to “DTMF Operation”
in the Advance Manual.
Connecting to nodes or rooms on the Internet
1 Set the main band frequency to the local node frequency.
2 Touch [MODE] to switch to analog FM mode.
Tip For details, refer to “Selecting the Communication Mode” in the basic operating manual.
3 While pressing the PTT, touch [DTMF] displayed on
the screen.
Displays the numeric keypad.
4 Touch the DTMF ID key (#) followed by the 5 digits of
the room or node you want to connect with.
5 Release the PTT, and keep the transceiver in reception mode for about 10 seconds.
Once connection is established, you will be able to hear audio.
Caution The connection destination screen does not appear.
Tip
You can store DTMF codes consisting of up to 16 digits for 10 channels on the transceiver. If you
register the codes of frequently-used connection destinations in advance, you can easily transmit a
code by pressing its abbreviated number while pressing the PTT
in the Advance Manual.
. For details, refer to “DTMF Operation”
18
Page 19

Communicating with others
1 Press the PTT.
The transceiver switches to transmission mode.
2 Speak into [MIC].
3 Release the PTT.
The transceiver switches to reception mode.
Disconnecting from the node or room
1 While pressing the PTT, touch [DTMF] displayed on the screen.
2 Press the #99999 (DTMF disconnection command) key.
Disconnects the node or room.
Various display functions
Confirming the location of the local node and the partner station
When the signal from the local node you have connected to contains location information,
you can display the location information on the screen.
Pressing the [DISP] key on any screen of WIRES-X switches the screen to the compass
screen which displays the name of the partner station as well as the direction and distance
to the partner station from your station.
Callsign and distance to
Tip
When “NUMERIC” is selected from [DISPLAY] → [1 TARGET LOCATION] in the setting mode, the
latitude & longitude screen appears instead of the compass screen.
partner station
Progress direction of
own station
JA1YOE-123
H-UP: Heading Up
N-UP: North Up
Direction of remote station
Confirming the frequency
On the WIRES-X screen, press the [V/M] key to change to the frequency display screen
that was displayed before using WIRES-X. Press the [V/M] key again to return to the
WIRES-X screen.
Returning to the initial screen
While on the WIRES-X screen, press and hold the [A/B] key to display the frequency
display screen.
On the frequency display screen, press and hold the [A/B] key to return to the WIRES-X
startup screen (initial screen).
19
Page 20

Using the News Function of WIRES-X
LOCAL NEWS
JQ1YBG-ND1 Shinagaw
JQ1YBG-ND1 Shinagaw
When using WIRES-X in digital mode, you can transmit/receive messages (text data) and
images; you can also record/play audio messages.
Caution
To using the News function, insert a microSD memory card into the transceiver in advance. For details,
refer to “Using a microSD Memory Card” in the basic operating manual.
Viewing messages
You can read messages (text data) that are transmitted/received by either a local node,
or a node or room on the Internet, from the transceiver.
Viewing text data in local nodes
1 Touch the local node.
Displays the menu list of the local node.
JQ1YBG-ND1 Shinagawa-
SEARCH & DIRECT
2 Touch the local node name displayed in [LOCAL
NEWS].
If data reception is successful, the menu list of the
local node appears.
3 Touch [NEWS STATION].
Displays the UPLOAD (transmission)/DOWNLOAD
(reception) select screen.
4 Touch [DOWNLOAD].
Displays the data type select screen.
JQ1YBG-ND1 Shinagawa
JQ1YBG-ROOM
0202-ROOM
EMERGENCY
NEWS STATION
INT NEWS
NEWS STATION
UPLOAD
DOWNLOAD
20
Page 21

5 Touch [MESSAGE].
JQ1YBG-ND1 Shinagaw
JQ1YBG-ND1 Shinagaw
TO:JQ1YBG-ND
If data reception is successful, the list of data appears.
Tip The list shows the registered data in reverse chronological
order.
NEWS STATION
...
DOWN LOAD
...
VOICE
MESSAGE
PICT
6 Touch the message you want to view.
Downloads the data and displays the content of the
message.
JH1YPC 6/18
JQ1YBF 6/17
JQ1YBF 5/24
JQ1YBG2 5/11
JQ1YBG/1 4/07
TEXT
FROM:JH1YPC
7 Press the [BACK] key.
Returns the screen to the data list.
Tips
• On the data content display screen, press the [DISP] key to display the sender’s location information
at the time the data was sent.
• On each screen, press the [BACK] key to return to the previous screen.
z Operations on the data list
When there is a large number of data items available, the list will be divided into smaller
lists with 20 data items each. At the end of each list, the following icons appear to allow
you to move to the previous/next lists. Touch the item to switch the display.
[TOP] Displays the beginning of the first list.
[▲] Displays the previous list.
Not available on the first list.
[▼] Displays the next list.
Not available on the last list.
JQ1YBG-ND1 Shinagaw
JH1YPC 6/18
JQ1YBF 6/17
JQ1YBF 5/24
JQ1YBG2 5/11
JQ1YBG/1 4/07
21
Page 22

Viewing text data on the WIRES-X server (INT NEWS)
LOCAL NEWS
INT NEWS
You can read text information provided by Yaesu on the WIRES-X server from the
transceiver.
1 Touch the local node, or node or room you want to
connect to.
Displays the menu list of the local node, or node or
room you connect to.
JQ1YBG-ND1 Shinagawa-
SEARCH & DIRECT
2 Touch the local node name displayed in [LOCAL
NEWS].
If data reception is successful, the menu list of the
local node appears.
3 Touch [INT NEWS].
Displays the menu of the WIRES-X server.
4 Touch [NEWS STATION].
Displays the data type select screen.
5 Touch [MESSAGE].
If data reception is successful, the list of data appears.
Tip The list shows the registered data in reverse chronological
order.
JQ1YBG-ND1 Shinagawa
JQ1YBG-ROOM
0202-ROOM
JQ1YBG-ND1 Shinagaw
EMERGENCY
NEWS STATION
INT NEWS
EMERGENCY
NEWS STATION
JQ1YBG-ND1 Shinagaw
NEWS STATION
...
DOWN LOAD
VOICE
MESSAGE
PICT
...
22
Page 23

6 Touch the message you want to view.
JQ1YBG-ND1 Shinagaw
JQ1YBG-ND1 Shinagaw
JQ1YBG-ND1 Shinagaw
Downloads the data and displays the content of the
message.
7 Press the [BACK] key.
Returns the screen to the data list.
Viewing text data in nodes or rooms on the Internet
1 Touch the node or room on the Internet you want to
connect to.
Displays the menu list of the node or room on the
Internet.
JH1YPC 6/18
JQ1YBF 6/17
JQ1YBF 5/24
JQ1YBG2 5/11
JQ1YBG/1 4/07
JQ1YBG-ND1 Shinagawa-
SEARCH & DIRECT
JA1YOE-ROOM12345 24
2 Touch [NEWS STATION].
Displays the upload (transmission)/download (recep-
tion) select screen.
3 Touch [DOWNLOAD].
Displays data type select screen.
4 Touch [MESSAGE].
If data reception is successful, the list of data appears.
Tip The list shows the registered data in reverse chronological
order.
JQ1YBG-ND1 Shinagaw
EMERGENCY
NEWS STATION
INT NEWS
NEWS STATION
UPLOAD
DOWNLOAD
NEWS STATION
...
DOWN LOAD
VOICE
MESSAGE
PICT
...
23
Page 24

5
JQ1YBG-ND1 Shinagaw
TO:JQ1YBG-ND
Touch the message you want to view.
Downloads the data and displays the content of the
message.
JH1YPC 6/18
JQ1YBF 6/17
JQ1YBF 5/24
JQ1YBG2 5/11
JQ1YBG/1 4/07
TEXT
FROM:JH1YPC
Tip
On the content display screen, press the [DISP] key to display the sender’s location information at the
time the data was sent.
Caution
When the category list or data list is displayed, pressing the PTT readies the transceiver to transmit audio
to the node or room on the Internet you are currently connected to.
24
Page 25

Importing images
You can import images transmitted/received by either a local node, or a node or room on
the Internet onto the transceiver.
Importing images from local nodes
1 Follow steps 1 to 4 in “Viewing text data in local nodes” on page 20 to display the
data type select screen.
2 Touch [PICT].
Displays the data list.
Tip The list shows the registered data in reverse chronological order.
3 Touch the image you want to download.
The confirmation message appears.
4 Touch [OK].
Starts downloading and “Waiting” appears.
After data import completes, the image appears.
Tips •TosavethedataontothemicroSDmemorycard,touch[SAVE].
•Data in unsupported formats cannot be imported. In such a case, “NOT COMPLETED”
appears, and then the screen returns to the data type select screen.
•WhenthemicroSDmemorycarddoesnothaveenoughfreespace,datacannotbeimported.
In such a case, “Memory is full” appears, and then the screen returns to the data list.
5 Press the [OK] key.
Returns the screen to the data list.
Importing images from the WIRES-X server (INT NEWS)
You can import images provided by Yaesu on the WIRES-X server onto the
transceiver.
1 Follow steps 1 to 4 in “Viewing text data on the WIRES-X server (INT NEWS)” on page
22 to display the data type select screen.
2 Touch [PICT].
Displays the data list.
Tip The list shows the registered data in reverse chronological order.
3 Touch the image you want to download.
The confirmation message appears.
4 Touch [OK].
Starts downloading and “Waiting” appears.
After data import completes, the image appears.
Tips •TosavethedataontothemicroSDmemorycard,touch[SAVE].
•Data in unsupported formats cannot be imported. In such a case, “NOT COMPLETED”
appears, and then the screen returns to the data type select screen.
•WhenthemicroSDmemorycarddoesnothaveenoughfreespace,datacannotbeimported.
In such a case, “Memory is full” appears, and then the screen returns to the data list.
5 Touch [OK].
Returns the screen to the data list.
25
Page 26

Importing data from nodes or rooms on the Internet
LOCAL NEWS
1 Follow steps 1 to 3 in “Viewing text data in nodes or rooms on the Internet” on page
23 to display the data type select screen.
2 Touch [PICT].
Displays the data list.
Tip The list shows the registered data in reverse chronological order.
3 Follow step 3 in “Importing images from local nodes” on page 25 to import data.
Tip
On the content display screen, press the [DISP] key to display the sender’s location information at the
time the data was sent.
Caution
When the category list or data list is displayed, pressing the PTT readies the transceiver to transmit audio
to node or room on the Internet you are currently connected to.
Viewing imported data later
You can also view the imported data later.
1 Touch the local node.
Displays the menu list of the local node.
JQ1YBG-ND1 Shinagawa-
SEARCH & DIRECT
2 Touch the local node name displayed in [LOCAL
NEWS].
If data reception is successful, the menu list of the
local node appears.
3 Touch [LOG].
Displays the data type select screen.
26
JQ1YBG-ND1 Shinagawa
JQ1YBG-ROOM
0202-ROOM
JQ1YBG-ND1 Shinagaw
EMERGENCY
NEWS STATION
INT NEWS
Page 27

4 Touch [MESSAGE] or [PICT].
TO:JQ1YBG-ND
Displays the data list.
Tip The list shows the registered data in reverse chronological
order.
VOICE
MESSAGE
PICT
5 Touch the data you want to view.
Displays the content of the message or the image.
6 Press the [BACK] key.
Returns the screen to the data list.
Deleting imported data
Deleting a file
1 Follow steps 1 to 5 “Viewing imported data later” on page 26 to display the content
of the message or image data.
2 Touch [DEL].
The confirmation message appears.
Thank you!
FROM:JH1YPC
3 Touch [OK].
Deletes the data and returns the screen to the data list.
27
Page 28

Listening to audio messages
JQ1YBG-ND1 Shinagaw
You can play and listen to audio files transmitted/received by a local node, or node or
room on the Internet.
Audio files are categorized into the following two types:
EMERGENCY: Emergency information. Depending on the node or room settings,
mandatory updates are supplied to connected nodes and rooms
in five-minute intervals for two hours starting from the initial
dissemination of the news.
NEWS STATION: Normal message. You can listen to the message anytime you
want as long as the message is not deleted from the node or
room.
Caution
You can play and listen to audio files using the transceiver but you cannot save audio files onto the
transceiver.
Listening to emergency information in the local node
1 Follow steps 1 to 2 in “Viewing text data in local nodes” on page 20 to display the
menu list of the local node.
2 Touch [EMERGENCY].
Displays the data list.
Tips •The list shows the registered data in reverse
chronological order.
•Dataregisteredwithinthepast2hoursflashes.
EMERGENCY
NEWS STATION
INT NEWS
3 Touch the audio file you want to play.
Starts audio playback. “DOWNLOAD” appears and flashes.
After playback ends, the screen returns to the data list.
Tip
During audio playback, press the [DISP] key to display the sender’s location information at the time the
audio file was recorded.
28
Page 29

Listening to routine messages in local nodes
JQ1YBG-ND1 Shinagaw
JQ1YBG-ND1 Shinagaw
1 Follow steps 1 to 4 in “Viewing text data in local nodes” on page 20 to display the
data type select screen.
2 Touch [VOICE].
Displays the data list.
Tip The list shows the registered data in reverse chronological
order.
NEWS STATION
...
DOWN LOAD
...
VOICE
MESSAGE
PICT
3 Touch the audio file you want to play.
Starts audio playback. “DOWNLOAD” appears and flashes.
After playback ends, the screen returns to the data list.
Tip
During audio playback, press the [DISP] key to display the sender’s location information at the time the
audio file was recorded.
Listening to routine messages on the WIRES-X server (INT NEWS)
1 Follow steps 1 to 4 in “Viewing text data on the WIRES-X server (INT NEWS)” on page
22 to display the data type select screen.
2 Touch [VOICE].
Displays the data list.
Tip The list shows the registered data in reverse chronological
order.
NEWS STATION
...
DOWN LOAD
...
VOICE
MESSAGE
PICT
3 Touch the audio file you want to play.
Starts audio playback. “DOWNLOAD” appears and flashes.
After playback ends, the screen returns to the data list.
29
Page 30

Listening to emergency information in nodes or rooms on the Internet
1 Follow step 1 in “Viewing text data in nodes or rooms on the Internet” on page 23 to
display the menu list of the node or room you want to connect to.
2 Touch [EMERGENCY].
Displays the data list.
Tips •Thelistshowstheregistereddatainreversechronologicalorder.
•Dataregisteredwithinthepast2hoursflashes.
3 Touch the audio file you want to play.
Starts audio playback. “DOWNLOAD” appears and flashes.
After playback ends, the screen returns to the menu list of the node or room you are
connected to.
Tip
During audio playback, press the [DISP] key to display the sender’s location information at the time the
audio file was recorded.
Listening to routine messages in nodes or rooms on the Internet
1 Follow steps 1 to 3 in “Viewing text data in nodes or rooms on the Internet” on page
23 to display the data type select screen.
2 Touch [VOICE].
Displays the data list.
Tip The list shows the registered data in reverse chronological order.
3 Touch the audio file you want to play.
Starts audio playback. “DOWNLOAD” appears and flashes.
After playback ends, the screen returns to the data list.
Tip
During audio playback, press the [DISP] key to display the sender’s location information at the time the
audio file was recorded.
30
Page 31

Transmitting messages and images
JQ1YBG-ND1 Shinagaw
NEW
You can transmit data such as messages (text data) and images saved on the microSD
memory card inserted into the transceiver, to a local node, or a node or room on the
Internet. You can also create a new message and transmit it.
Tips
• For details on microSD memory cards, refer to “Using a microSD Memory Card” in the basic operating
manual.
• You can also transmit photos taken with the camera that is built into the optional speaker microphone
“MH-85A11U”. For details on how to take photos, refer to “Taking Picture (Snapshot Function” in the
operating manual.
Creating and transmitting messages to local nodes
1 Follow steps 1 to 3 in “Viewing text data in local nodes” on page 20 to display the
upload (transmission)/download (reception) select screen.
2 Touch [UPLOAD].
Displays the data type select screen.
NEWS STATION
UPLOAD
DOWNLOAD
3 Touch [MESSAGE].
Displays the data list.
4 Touch [NEW].
Displays the character input screen.
5 Touch [EDIT].
6 Enter a message.
31
JQ1YBG-ND1 Shinagaw
NEWS STATION
...
UPLOAD
...
VOICE
MESSAGE
PICT
NEW
JH1YPC 6/18
JQ1YBF 6/17
JQ1YBF 5/24
JQ1YBG2 5/11
Page 32

The characters you have just entered appear on the top part of the screen.
NEW
7 Press and hold the [BACK] key for over one second.
Displays the screen for confirming the entered message.
8 Touch [UPLOAD].
Starts message transmission.
After message transmission completes, the screen
returns to the data list.
Tip
On the character input screen, touch [MTXT] to select one of the 19 routine messages.
1 QRM 8 Good job 15
2 QRP 9 Good day 16 Pick me up
3 QRT 10 Good evening 17 Thank you
4 QRX 11 Good night 18 OK
5 QRZ 12 Send messages 19 urgent
6 QSY 13 Send pictures
7 Good morning 14 on my way
Good day
wait for you
32
Page 33

Transmitting saved messages or images to local nodes
1 Follow steps 1 to 2 in “Creating and transmitting messages to local nodes” on page
31 to display the data type select screen.
2 Touch [MESSAGE] or [PICT].
Displays the data list.
3 Touch the message or image you want to transmit.
4 Touch [UPLOAD] for MESSAGE. Touch [FWD] for PICT.
After data transmission completes, “Completed” appears and then the screen returns
to the data type select screen.
Creating and transmitting messages to nodes or rooms on the Internet
1 Display the menu list of the node or room on the Internet.
2 Touch [NEWS STATION].
Displays the upload (transmission)/download (reception) select screen.
3 Touch [UPLOAD].
Displays the data type select screen.
4 Follow steps 3 to 7 in “Creating and transmitting messages to local nodes” on page
31 to create and transmit a message.
Transmitting saved messages or images to nodes or rooms on the Internet
1 Follow steps 1 to 3 in “Creating and transmitting messages to nodes or rooms on the
Internet” on page 33 to display the data type select screen.
2 Follow steps 3 to 7 in “Creating and transmitting messages to local nodes” on page
31 to select and transmit data.
33
Page 34

Transmitting audio messages
JQ1YBG-ND1 Shinagaw
JQ1YBG-ND1 Shinagaw
You can transmit audio messages spoken into the microphone as data to a local node, or
node or room on the Internet.
Audio files are categorized into the following 2 types:
EMERGENCY: Emergency information. Depending on the node or room settings,
mandatory updates are supplied to connected nodes and rooms
in five-minute intervals for two hours starting from the initial
dissemination of the news.
NEWS STATION: Routine message. You can listen to the message anytime you want
as long as the message is not deleted from the node or room.
Transmitting emergency information to local nodes
1 Follow steps 1 to 2 in “Viewing text data in local nodes” on page 20 to display the
menu list of the local node.
2 Touch [EMERGENCY].
EMERGENCY
NEWS STATION
INT NEWS
3 While pressing the PTT, speak into [MIC].
Tip The maximum recording time is one minute.
4 Release the PTT after completing audio transmission.
After message transmission completes, “COMPLETED” appears and then the screen
returns to the menu list of the local node.
Transmitting routine voice messages to local nodes
1 Follow steps 1 to 3 in “Viewing text data in local nodes” on page 20 to display the
upload (transmission)/download (reception) select screen.
2 Touch [UPLOAD].
Displays the data type select screen.
NEWS STATION
UPLOAD
DOWNLOAD
34
Page 35

3 Touch [VOICE].
JQ1YBG-ND1 Shinagaw
JA1YOE-ROOM12345
4 While pressing the PTT, speak into [MIC].
Tip The maximum recording time is one minute.
NEWS STATION
...
VOICE
MESSAGE
PICT
UPLOAD
...
5 Release the PTT after completing audio transmission.
After message transmission completes, beep sounds and then the screen returns to
the data type select screen.
Transmitting emergency information to nodes or rooms on the Internet
1 Display the menu list of the node or room on the
Internet.
EMERGENCY
NEWS STATION
LOCAL NEWS
INT NEWS
2 Follow steps 2 to 5 in “Transmitting emergency information to local nodes” on page
34 to transmit a message.
Transmitting routine messages to nodes or rooms on the Internet
1 Follow steps 1 to 2 in “Creating and transmitting messages to nodes or rooms on
the Internet” on page 33 to display the upload (transmission)/download (reception)
select screen.
2 Follow steps 2 to 5 in “Transmitting routine voice messages to local nodes” on page
34 to transmit a message.
35
Page 36

WIRES-X Setting Mode Menus
WIRES-X setting mode list
Menu/Item Functions
1 RPT/WIRES FREQ
2 SEARCH SETUP
3 EDIT CATEGORY TAG Deleting registered nodes/rooms C1 to C5
4 REMOVE ROOM/NODE Deleting registered nodes/rooms
5 DG-ID Setting the DG-ID AUTO / 01 to 99
Setting the operating frequencies for repeaters/WIRES-X
Setting preset frequencies Depends on the transceiver version.
Setting the item order on the node
& room lists
(Bold items are default settings.)
MANUAL/PRESET
HISTORY / ACTIVITY
C1 to C5
1 to 20 in total in each category
Using the WIRES-X setting mode
Setting the operating frequencies for repeaters/WIRES-X
Select whether to set the frequency manually or use the preset (registered in advance)
frequency when connecting to a local node.
1 Press and hold the [DISP]key→Touch[WIRES-X]→[1 RPT/WIRES FREQ].
2 Rotate the DIAL to select [MANUAL] or [PRESET].
Every time the DIAL is rotated, the setting switches
between [MANUAL] and [PRESET].
MANUAL: Set the frequency every time you look for
a local node.
PRESET: Preset the frequency you use to look for
the local node.
3 Selecting [PRESET] and pressing the [DISP] key
displays the frequency select screen.
4 Rotate the DIAL to select the frequency you want to
preset.
Tips •Rotating the DIAL changes the frequency by the
increments specified in setting mode.
•Touching [BAND] switches the band of the preset
frequency.
Setting items
1 RPT/WIRES FREQ
MANUAL
1 RPT/WIRES FREQ
PRESET
: 145.375 MHz
5 Press the PTT.
Sets the frequency and returns the screen to the frequency display screen.
36
Page 37

Setting the item order on the node & room lists
You can select the criteria to sort the list of connection destinations on the Internet.
1 Press and hold the [DISP]key→Touch[WIRES-X]→[2 SEARCH SETUP].
2 Rotate the DIAL to select [HISTORY] or [ACTIVITY].
Every time the DIAL is rotated, the setting switches
between [HISTORY] and [ACTIVITY].
HISTORY: Displays the list sorted in order of the
connection destination that your station
most recently connected to.
ACTIVITY: Displays the list sorted in descending
order from the room with the most nodes
connected. Nodes come after rooms.
2 SEARCH SETUP
HISTORY
3 Press the PTT.
Sets the frequency and returns the screen to the frequency display screen.
Editing category names
You can name 5 categories where nodes and rooms are registered. Up to 16 alphanumeric
characters can be used for each category name.
For details, refer to “Registering a node or room” on page 16.
Deleting the registered nodes and rooms
You can delete nodes and rooms registered in the 5 categories.
1 Press and hold the [DISP]key→Touch[WIRES-X]→[4 REMOVE ROOM/NODE].
2 Rotate the DIAL to select the desired category, then
press the [DISP] key.
Displays the node and room lists.
4 REMOVE ROOM/NODE
C1:TOKYO AREA
C2:FISHING
C3 ---------------C4 ---------------C5 ----------------
3 Rotate the DIAL to select the node or room you want
to delete, then press the [DISP] key.
The confirmation message appears.
4 Touch [OK].
Deletes the selected node or room.
4 REMOVE ROOM/NODE
TOKYO AREA
JA1YOE-ROOM-A
JQ1YBG-ND
JA1YOE-ROOM12345
5 Press the PTT.
Sets the frequency and returns the screen to the frequency display screen.
37
Page 38

The DG-ID feature to access the WIRES-X node station
When accessing to the WIRES-X node station, the connecting node station may be
selected in accordance with the DG-ID setting of the node stations.
1 Press and hold the [DISP]key→Touch[WIRES-X]→[5 DG-ID].
2 Rotate the DIAL knob to select the DG-ID setting for
WIRES-X.
AUTO: Only open nodes, set to the DG-ID number
“00” may be connected.
01 to 99: Only nodes matching the set DG-ID
number may be connected.
Tips •
The default setting is “AUTO”.
•Itisrecommendedthat [5 DG-ID]besetto“AUTO”for
normal operation.
5 DG-ID
DG-ID: AUTO
3 Press the PTT.
Sets the frequency and returns the screen to the frequency display screen.
38
Page 39

Copyright 2019
YAESU MUSEN CO., LTD.
All rights reserved.
No portion of this manual may be
reproduced without the permission of
YAESU MUSEN CO., LTD.
YAESU MUSEN CO., LTD.
Tennozu Parkside Building
2-5-8 Higashi-Shinagawa, Shinagawa-ku, Tokyo 140-0002 Japan
YAESU USA
6125 Phyllis Drive, Cypress, CA 90630, U.S.A.
YAESU UK
Unit 12, Sun Valley Business Park, Winnall Close
Winchester, Hampshire, SO23 0LB, U.K.
1907-A
 Loading...