

Page 1

Istruzioni per l’uso - IT
Operating instructions - ENG
Bedienungsanleitung - DE
PTL 1015
Page 2

Indice
Consumo di energia - Conformità - Errori
sui pixel 3
Scheda tecnica del consumo di energia 3
Conformità 3
Errori sui pixel 3
Informazioni sulle speciche di progettazione
ecocompatibile degli alimentatori esterni ai sensi
della Direttiva 2009/125/CE 4
Sicurezza e destinazione d'uso 5
Alimentazione e batteria 5
Installazione e uso 5
Impianto di ricezione 6
Presa USB 6
Telecomando e batterie 6
Collegamento delle cue 6
Uso 6
Assistenza 6
Ambiente - Servizio assistenza 7
Riciclaggio di apparecchiature elettriche 7
Riciclaggio di carta e cartone 7
Riciclaggio di materie plastiche 7
Smaltimento delle batterie 7
Dotazione di fornitura - Panoramica 8
Dotazione di fornitura 8
Panoramica: Unità principale 8
Panoramica: Alimentatore presa sigari 9
Panoramica: Telecomando 10
Panoramica: Tasti dell’apparecchio 10
Alimentazione elettrica 11
Telecomando 11
Televisore 11
Indicazione di stato - processo di carica
- antenna 12
LED della batteria 12
LED di alimentazione 12
Collegamento dell'antenna 12
Prima installazione 13
Uso quotidiano 14
Tasti e funzioni importanti 14
Impostazione dello schermo. - Collegamento di dispositivi aggiuntivi 16
Collegamento di un televisore esterno 16
Dispositivi aggiuntivi collegati - Lettore
multimediale USB 17
Spina jack AV 17
Cue 17
Dispositivi di archiviazione USB 17
Lettore multimediale USB 17
Formati di le supportati 18
Menù principale 19
Programma/Modica Programma 19
Programma/EPG 20
IT 2
Programma/Disponi 20
Programma/LCN 20
Immagine /rapporto schermo 20
Immagine/Risoluzione 21
Ricerca canali/Ricerca automatica 21
Ricerca canali/Ricerca manuale 21
Ricerca stazione/Alimentazione antenna 21
Ora/Impostazioni ora 22
Ora/Fuso orario 22
Ora/Auto Standby 22
Opzioni/lingua OSD 22
Opzioni/lingua sottotitoli 22
Opzioni/lingua audio 22
Opzioni/Uscita digitale 22
Opzioni/Descrizione audio 23
Opzioni/Altoparlante interno 23
Sistema/Controllo parentale 23
Sistema/Cambio PIN 23
Sistema/Reset di fabbrica 23
Sistema/Informazione 23
Sistema/Aggiornamento software 23
USB/Multimedia 23
USB/Impostazioni Foto 23
USB/Impostazioni Film 24
Dati tecnici 24
Risoluzione dei problemi 25
Page 3

Consumo di energia - Conformità - Errori sui pixel
Scheda tecnica del consumo di energia
Marchio XORO
Identicatore del modello PTL 1015
Classe di ecienza energetica A
Diagonale dello schermo visibile 25,6 cm / 10,1“
Potenza assorbita
(Stato attivo, modalità Immagine “Normale”)
Consumo energia Consumo di energia 12 kWh/anno calcolato sulla base
Potenza assorbita
(modalità standby/modalità spenta)
Risoluzione dello schermo (sica) 1024 x 600 Pixel
Rapporto di luminanza di picco 90%
Piombo/Mercurio <2 mg / 0 mg
Conformità
Il fabbricante, MAS Elektronik AG, dichiara che il tipo di apparecchiatura radio XORO
PTL 1015 è conforme alla direttiva 2014/53/UE.
Il testo completo della dichiarazione di conformità UE è disponibile al seguente indirizzo Internet:
www.xoro.de/downloads
8,1 W
del consumo di un televisore in funzione per 4 ore al gior-
no per 365 giorni. Il consumo eettivo di energia dipende
dalle modalità d'uso del televisore.
0,45 W / (non disponibile)
Errori sui pixel
Gli errori sui pixel deniti nella seguente tabella (pixel chiari, pixel scuri, difetti di linea e dierenze di
luminosità) descrivono i difetti ammessi per tipo e numero, che sono esclusi dalla garanzia.
Pixel luminosi (Bright Dot) ≤ 2
Pixel scuri (Dark Dot) ≤ 3
Pixel chiari + scuri ≤ 3
IT 3
Page 4

Speciche di progettazione ecocompatibile per gli
alimentatori esterni
Informazioni sulle speciche di progettazione ecocompatibile degli alimentatori
esterni ai sensi della Direttiva 2009/125/CE
Nome o marchio del fabbricante, numero
di iscrizione nel registro delle imprese e
indirizzo del fabbricante
Identicativo del modello F18L10-120150SPAV
Tensione di ingresso 100 - 240 V
Frequenza di ingresso CA 50 Hz / 60 Hz
Tensione di uscita 12,0 V
Corrente di uscita 1,5 A
Potenza di uscita 18,0 W
Rendimento medio in modo attivo 86.1%
Rendimento a basso carico (10 %) 80.2%
Potenza assorbita nella condizione a vuoto 0,07 W
Marchio di fabbrica: XORO
Costruttore: MAS Elektronik AG
Weidegrund 3
21614 Buxtehude
Germania
Registro delle imprese presso il tribunale locale di
Amburgo HRB 74448
IT 4
Page 5

Sicurezza e destinazione d'uso
Il simbolo del lampo con la freccia all'interno del triangolo avverte l'utente della presenza
di tensione pericolosa su alcuni componenti esposti all'interno dell'involucro.
Il punto esclamativo all'interno del triangolo avverte l'utente della presenza di importanti
istruzioni per l’uso e la manutenzione (assistenza) in questo manuale che devono essere
seguite.
Alimentazione e batteria
• Il televisore portatile può funzionare solo con la tensione impressa sul retro.
• L'alimentatore in dotazione deve essere fatto funzionare solo con la tensione di rete impressa.
• Il cavo di collegamento dell'auto fornito in dotazione può essere utilizzato solo con la tensione
impressa.
• Il televisore portatile può essere alimentato solo con gli accessori in dotazione (alimentatore e
cavo di allacciamento dell'auto).
• Proteggere l'apparecchio dalle alte temperature (ad es. nei veicoli parcheggiati). Il campo di
temperatura di esercizio ammissibile è compreso tra 5° C e 37° C; umidità dell'aria < 90% (senza
condensa).
• Non sovraccaricare le prese di corrente e i cavi di prolunga poiché ciò può causare incendi o
scosse elettriche.
• Scollegare l'apparecchio dall'alimentazione elettrica se non deve essere utilizzato per un periodo
di tempo prolungato.
• La batteria installata nel televisore può essere sostituita solo dal servizio clienti XORO.
• Caricare la batteria almeno ogni 6 mesi per evitare una scarica profonda. Per motivi di sicurezza,
l'elettronica di ricarica dell'apparecchio non carica batterie molto scariche.
Installazione e uso
• Si prega di non appoggiare alcun oggetto sul cavo, in quanto ciò potrebbe causare la perdita
della funzione di protezione. Evitare di sottoporre i cavi a forti sollecitazioni, in particolare le prese
e le spine.
• Se volete estrarre la spina dalla presa, tirate sempre la spina e non il cavo. Altrimenti il cavo
potrebbe rompersi.
• Lo schermo LCD è fragile. Evitare qualsiasi sollecitazione meccanica sullo schermo.
• Questo apparecchio non deve essere posizionato vicino all'umidità e all'acqua. Non aerrare mai
apparecchio con le mani umide o bagnate.
• Proteggete l'apparecchio dall’umidità e dagli agenti atmosferici.
• Non esporre l'apparecchio e il telecomando ai raggi solari diretti. Questo compromette la funzione e potrebbe causare danni.
• Il televisore, l'alimentatore e la spina del cavo di allacciamento dell'auto si riscaldano durante il
funzionamento. Non posizionare gli apparecchi su superci sensibili al calore.
• Le aperture nell’involucro servono per la ventilazione per evitare il surriscaldamento dell'apparecchio. Queste devono essere sempre tenute libere. Evitare l'accumulo di calore sull'apparecchio.
• L’apparecchio non deve essere posizionato vicino a fonti di calore come forni o radiatori.
• Per una protezione supplementare dell'apparecchio durante un temporale o quando viene
lasciato incustodito per lunghi periodi di tempo: Scollegare la spina di rete dalla presa e la spina
dell'antenna dalla presa di allacciamento antenna/cavo. In questo modo si evitano danni dovuti a
fulmini/sovratensioni.
• Non inserire alcun oggetto nelle aperture dell'apparecchio, poiché in alcuni punti scorre corrente
e il contatto con questi punti può causare una scossa elettrica.
• Non collegare accessori non raccomandati dal produttore.
• Non posizionare l'apparecchio su una supercie instabile. L'apparecchio potrebbe subire danni
o feriti. Gli eventuali ssaggi devono essere montati solo in base alle informazioni fornite dal
IT 5
Page 6

Sicurezza e destinazione d'uso
produttore o devono essere acquistati presso il produttore stesso.
• Per la pulizia, scollegare l'apparecchio dalla presa di corrente e spegnerlo con l'interruttore
principale.
• Non usare detergenti liquidi o detergenti spray. L'apparecchio può essere pulito solo con un
panno umido.
• Tenere i piccoli accessori fuori dalla portata dei bambini in modo che non vengano ingoiati accidentalmente.
Impianto di ricezione
• Un'antenna esterna non deve essere installata vicino a linee elettriche o altri circuiti elettrici,
poiché il contatto con tali linee può essere fatale.
• Per evitare danni a cose o persone e per garantire un funzionamento corretto, fate installare
l'antenna esterna da una ditta specializzata.
• L’impianto di ricezione deve essere messo a terra in conformità alle norme.
Presa USB
• La presa USB del televisore non è adatta per la ricarica di apparecchi con batterie integrate (ad
es. telefoni, lettori MP3, computer tablet, ecc.).
• I dispositivi USB che richiedono una corrente superiore a 500 mA (0,5 A) violano le speciche
USB e potrebbero non essere riconosciuti dal televisore.
Telecomando e batterie
• Rimuovere e sostituire le vecchie batterie. Le vecchie batterie possono perdere e danneggiare il
telecomando.
• Rimuovere il liquido della batteria che perde con un panno. Evitare il contatto della pelle con il
liquido.
• In caso di ingestione della batteria o del liquido della batteria, consultare immediatamente un
medico.
• In caso di contatto con la pelle/gli occhi, lavare la pelle/gli occhi e consultare un medico.
• Si prega di tenere le batterie e il telecomando fuori dalla portata dei bambini.
Collegamento delle cue
• L'esposizione prolungata a livelli di volume elevati può causare una perdita temporanea o perma-
nente dell'udito quando si utilizzano le cue.
• Evitare livelli di volume elevati soprattutto per periodi di tempo prolungati.
Uso
• L’apparecchio è progettato per l’uso in abitazioni private.
• Ai bambini è consentito utilizzare l’apparecchio solo sotto la supervisione di un adulto.
• Il fumo di tabacco intenso danneggia l'elettronica dell'apparecchio e può portare a un visibile
deterioramento della qualità dell'immagine a causa di depositi nello schermo. I danni causati dal
fumo di tabacco non saranno coperti da garanzia.
Assistenza
• Non eettuare mai riparazioni da soli, lasciate sempre che se ne occupi personale qualicato.
• Possono essere utilizzati solo ricambi e accessori originali.
• L'apparecchio deve essere immediatamente spento se è stato esposto all'acqua o all'umidità; se
l'involucro, lo schermo, gli accessori o il cavo sono danneggiati; se l'apparecchio non funziona
correttamente; se sono entrati oggetti nell'involucro; se ci sono parti allentate all'interno dell'apparecchio; o se la batteria non può essere caricata correttamente.
IT 6
Page 7

Ambiente - Servizio assistenza
Riciclaggio di apparecchiature elettriche
Il prodotto è realizzato con materiali e componenti di alta qualità, questi sono riciclabili
e possono essere riutilizzati. Il simbolo del cassonetto barrato riportato sul prodotto e
sulla confezione signica che il prodotto non deve essere smaltito con i normali riuti
domestici.
Informarsi sulle norme vigenti a livello locale per lo smaltimento separato delle apparecchiature elettroniche. Osservare le norme locali e non smaltire i vecchi prodotti con i
normali riuti domestici. Smaltire correttamente i vecchi prodotti contribuisce alla tutela
dell'ambiente e della salute umana.
Riciclaggio di carta e cartone
Il simbolo del riciclaggio dei materiali sul cartone di imballaggio e sul manuale d'uso
indica che sono riciclabili. Non smaltire l’imballaggio con i riuti domestici.
Riciclaggio di materie plastiche
Il simbolo del riciclaggio dei materiali sulle parti in plastica signica che sono riciclabili.
Non smaltire la plastica con i riuti domestici.
Smaltimento delle batterie
Ogni consumatore è obbligato per legge a consegnare le batterie
in un punto di raccolta del proprio comune o a un rivenditore, in
modo che possano essere smaltite nel rispetto dell'ambiente.
È vietato lo smaltimento delle batterie nei riuti domestici!
Un simbolo chimico (Pb per il piombo, Hg per il mercurio, Cd per
il cadmio) sotto il cassonetto barrato indica che la batteria contiene più dello 0,0005% di mercurio, più
dello 0,004% di piombo o più dello 0,002% di cadmio.
Contattate il servizio clienti XORO
Saremo lieti di aiutarvi per le vostre domande inerenti il funzionamento o se si vericano problemi con
il vostro apparecchio.
Per telefono: +49 4161 - 800 24 24 (lun-ven, dalle 11.00 alle 17.00, tedesco/inglese)
Per Fax +49 4161 - 800 24 62
Per e-mail: support@ersservice.de
Indirizzo: ERS GmbH Elektronik Repair Service
Weidegrund 3/Halle1
21614 Buxtehude
Germania
IT 7
Page 8

Dotazione di fornitura - Panoramica
Dotazione di fornitura
Assicurarsi che le seguenti parti siano incluse nella confezione:
• Televisore portatile
• Telecomando
• Alimentatore
• Alimentatore presa sigari
• Antenna
• Cavo AV
Avvertenza:
Controllare la completezza degli accessori subito dopo l'acquisto. Se mancano degli accessori, si
prega di contattare direttamente il rivenditore presso il quale è stato acquistato l’apparecchio.
Panoramica: Unità principale
IT 8
Page 9

Panoramica
Panoramica: Alimentatore presa sigari
Posizio-
ne
1 MENU/OK/EXIT/CH/
2 OFF ON Interruttore generale
3 DC IN 12V Presa dell'alimentazione elettrica
4 ANTENNA Presa dell’antenna
5 HDMI OUT Uscita HDMI
6 Filettatura della vite (M6)
7 Basamento
8 USB Presa USB
9 EAR PHONE Uscita cue
10 AV OUT Uscita AV
11 Altoparlanti stereo
12 Visualizzazione dello stato di carica
13 Indicatore dello stato di funzionamento
14 Ricevitore per segnali di controllo remoto
15 Indicatore operativo
16 Massa
17 Polo positivo/tappo a vite per il portafusibili
Didascalia Dichiarazione
Pulsanti di controllo locale
VOL
IT 9
Page 10

Panoramica
Panoramica: Telecomando
POWER Accensione e spegnimento dell’apparecchio
Mute Silenziare il suono
GOTO Saltare a una specica posizione di riproduzione
RPT Attivare la modalità di ripetizione
SUB-T Richiamare i sottotitoli
SCREEN Visualizzare schermo/Modicare risoluzione HDMI
tt uu Ricerca di immagini in avanti/indietro
Itt uuI File precedente/successivo
AUDIO Cambia tracce audio
u|| Pausa/avvio della riproduzione
g Aprire il lettore multimediale USB/interrompere
lariproduzione
ROSSO Tasto funzione rosso
VERDE Tasto funzione verde
GIALLO Tasto funzione giallo
BLU/SLEEP Tasto funzione blu, impostare il timer di spegnimento
automatico
MENU Mostrare il menù principale
EXIT Uscire dal menù
▲/▼/◄/► Selezione degli elementi nei menù a video
OK/LIST Confermare la selezione, visualizzare la lista delle
stazioni
i Visualizzare informazioni
BACK Richiamare la stazione precedente (Indietro)
VOL+/VOL- Modicare il volume
EPG Mostrare la guida elettronica ai programmi
TXT Mostrare Teletext
CH Commutare la stazione
0-9 Inserimento numeri
TV/RADIO Commutazione tra modalità TV e radio
FAV Mostrare la selezione della lista dei preferiti
Panoramica: Tasti dell’apparecchio
MENU Mostrare il menù principale/Lettore multimediale:
Indietro
OK Confermare la selezione, visualizzare la lista delle
stazioni
EXIT / Uscire dal menù, accendere/spegnere l’apparecchio
(pressione lunga)
▲CH▼ Commutare stazione, selezionare elementi del menù
a video
◄VOL► Modicare il volume, selezionare elementi del menù
a video
OFF ON Interruttore generale meccanico.
Spegnere e riaccendere completamente
l'apparecchio.
IT 10
Page 11

Alimentazione elettrica
Telecomando
• Aprire il coperchio del vano batterie facendolo scorrere nella direzione della
freccia.
• Inserire le batterie (1,5V formato AAA) nel vano. Quando si inseriscono le
batterie fare attenzione alla corretta polarità(+/-). Fare riferimento alle marcature
riportate sul telecomando e sulle batterie.
• Riposizionare il coperchio del vano batterie.
Televisore
Far scorrere l'interruttore generale del televisore prima in
posizione OFF.
Collegare il televisore (presa DC IN 12V) ad una presa utilizzando l'alimentatore o ad una presa accendisigari per auto
utilizzando il cavo di allacciamento dell'auto.
Far scorrere l'interruttore generale in posizione ON per
accendere il televisore.
Avvertenza:
• La batteria incorporata viene caricata non appena il televisore viene alimentato. Non è possibile
interrompere il processo di carica con l'interruttore generale.
• Il televisore portatile può essere alimentato solo con gli accessori in dotazione (alimentatore e
cavo di allacciamento dell'auto).
• Il cavo di allacciamento per auto fornito in dotazione supporta tensioni di ingresso comprese tra
12 V - 24 V e genera una tensione di alimentazione stabile per il televisore. Se si utilizzano altri
cavi di collegamento, il televisore può subire gravi danni!
• La spia luminosa sul cavo di allacciamento dell'auto si accende quando è in grado di fornire correttamente l'alimentazione al televisore. Tenerlo presente 25se il cavo dell'auto non funziona
correttamente.
IT 11
Page 12

Indicazione di stato - processo di carica - antenna
I LED sul pannello frontale dell’apparecchio indicano lo stato di carica della batteria incorporata e lo
stato di funzionamento del televisore.
LED della batteria
Colore Signicato
ROSSO Il televisore è alimentato. Batteria in fase di carica.
VERDE Il televisore è alimentato. Batteria completamente carica.
“o” Il televisore non è alimentato. Alimentatore o cavo di allacciamento per auto non
Avvertenza:
Mentre si guarda la TV, lo stato di carica approssimativo della batteria viene visualizzato quando si
cambia canale o si preme il tasto i . Se il televisore è collegato all'alimentatore o al cavo di allacciamento dell'auto, non è possibile visualizzare il livello di carica.
LED di alimentazione
Colore Signicato
ROSSO L'interruttore generale è in posizione ON. Il televisore è in modalità standby (funzio-
Un processo di carica completo richiede circa 4 ore (interruttore generale in posizione
OFF) o circa 6 ore (interruttore generale in posizione ON).
collegati.
namento in standby).
Il televisore può essere acceso con il tasto
lungo il tasto EXIT/
VERDE L'interruttore generale è in posizione ON. Il televisore è acceso.
“o” L'interruttore generale è in posizione OFF, il televisore è scollegato dall'alimentazione
o la batteria è completamente scarica.
direttamente sul televisore.
del telecomando o tenendo premuto a
Collegamento dell'antenna
Collegare l'antenna in dotazione alla presa ANTENNA (vedi pagina 8).
Avvertenza:
L'antenna in dotazione non è la scelta migliore per ogni area di ricezione. Chiedete al vostro rivenditore locale informazioni per la scelta dell'antenna adatta.
IT 12
Page 13

Prima installazione
Dopo aver spinto l'interruttore generalein posizione ON, il LED di alimentazione si accende di verde.
Dopo un attimo sullo schermo compare Attendere seguito dalla schermata iniziale. Al termine dell’avvio viene visualizzato il menù di installazione.
Con i tasti freccia ▲/▼ si può passare da una voce di menù all'altra. Se una voce di menù è evidenziata, è possibile regolarla con i tasti ◄/►.
Lingua OSD
Selezionare la lingua in cui devono essere visualizzati i menù
a schermo.
Paese
Selezionare il Paese in cui si desidera utilizzare il televisore.
Alimentazione antenna
Se la vostra antenna (ad es. un'antenna interna con ampli-
catore senza alimentatore proprio) deve essere alimentata
dal televisore tramite il cavo dell'antenna, attivate questa
funzione.
Avvertenza:
Per l'antenna fornita, la tensione di alimentazione deve
essere abilitata.
Ricerca canali
Avviare la ricerca delle stazioni con il tasto OK . La ricerca
può durare diversi minuti. Se la ricerca non trova tutte le
stazioni, riposizionare l'antenna o utilizzare un'antenna più
potente e ricominciare la ricerca (vedi pagina 21).
Avvertenze:
• La ricerca può durare diversi minuti.
• Se la ricerca non trova tutte le stazioni, riposizionare l'antenna o utilizzare un'antenna più potente
e ricominciare la ricerca (vedi pagina 21)
• In alcuni Paesi (ad es. in Germania) non vengono trasmesse stazioni radio DVB-T/T2.
• Dopo essersi spostati in un'altra regione, è necessario eseguire nuovamente la scansione delle
stazioni.
IT 13
Page 14

Uso quotidiano
Tasti e funzioni importanti
Cambio stazione
Potete cambiare la stazione con i tasti CH▲▼. Potete anche
immettere il numero di stazione direttamente con i tasti 0-9 .
Elenco delle stazioni
Richiamare la lista delle stazioni premendo il tasto OK/LIST .
▲/▼ Selezionare la stazione
◄/► Commutare tra stazione radio e canale
TV.
OK Richiamare il canale selezionato.
EXIT Nascondere l’elenco delle stazioni
Avvertenza:
Leggere a pagina 19 la modalità in cui è possibile ordinare le stazioni.
TV/Radio
Se si desidera passare dalla stazione TV a quella radio, premere il tasto TV/RADIO.
Preferiti
Se avete creato liste di preferiti (vedi pagina 20), è possibile utilizzare il tasto FAV per accedere alle
liste dei preferiti.
◄/► Selezionare la lista dei preferiti
▲/▼ Selezionare la stazione
OK Richiamare la stazione selezionata
EXIT Nascondere la lista dei preferiti
Lingue Sottotitoli e suono
Premere il tasto SUB-T per aprire il menù della Lingua
sottotitoli. Aprire il menù lingua audio con il tasto
AUDIO.
▲/▼ Scegliere la lingua
OK Attivare la lingua selezionata
EXIT Nascondere il menù
Avvertenze:
• Alcune stazioni richiedono l'apertura del televideo e l'inserimento manuale del numero di pagina
per i sottotitoli.
• Selezionare o, se non si desidera più visualizzare i sottotitoli.
IT 14
Page 15

Uso quotidiano
Impostare il timer di spegnimento
Premere ripetutamente il tasto SLEEP per selezionare un tempo dopo il quale il televisore si spegnerà.
Televideo
Il televideo viene attivato con il tasto TXT .
0-9 Selezionare la pagina del televideo
▲/▼ Selezionare la pagina
precedente/successiva
◄/► Selezionare le sottopagine
TV/Radio Nascondere la visualizzazione del
televideo
EXIT Terminare la visualizzazione del
televideo
Muto/suono spento
Premere il tasto MUTE del telecomando per spegnere il suono. Premere nuovamente il tasto MUTE
per riaccendere il suono.
Modicare il volume
Utilizzare i tasti VOL+ / VOL- per modicare il volume.
Avvertenza:
Se viene emesso un suono digitale multicanale dall'uscita HDMI come bitstream, la regolazione del
volume del televisore non ha alcun eetto (vedi pagina 22)
Informazioni
Premere il tasto i per visualizzare varie informazioni sul programma corrente e sullo stato approssimativo di carica della batteria.
Avvertenze:
• L'indicatore della batteria non è disponibile mentre la batteria è in carica.
Guida elettronica ai programmi
Premere il tasto EPG per visualizzare la guida al programma.
▲/▼ Selezionare la trasmissione
◄/► Commutare stazione
GIALLO/BLU Sfogliare la descrizione della
trasmissione.
EXIT Nascondere EPG
IT 15
Page 16

Impostazione dello schermo. - Collegamento di dispositivi aggiuntivi
Mentre lo schermo integrato è attivo, il tasto SCREEN può
essere utilizzato per visualizzare il menù delle impostazioni
dello schermo.
LUMINOSITÀ/CONTRASTO/COLORE
Impostare i valori in base alle proprie esigenze.
LED-BL
Questa impostazione inuisce sulla luminosità dell'illuminazione a LED dello schermo e sul consumo di energia o sulla
durata della batteria.
Regolazione Signicato
ECO
NORMALE
FUORI
LINGUA
Cambia la lingua del menù di impostazione dello schermo.
RESET
Ripristina le impostazioni dello schermo ai valori predeniti in fabbrica.
Riduzione della luminosità dello schermo. Basso consumo energetico e lunga durata della batteria.
Luminosità media.
Massima luminosità, ad es. quando si utilizza il televisore all'a-
perto. In questa modalità la durata della batteria è più breve.
Collegamento di un televisore esterno
È possibile collegare il televisore portatile a un televisore più grande utilizzando un cavo HDMI o AV.
Uscita HDMI
Collegare l'uscita HDMI (vedi pagina 8) del televisore portatile con un ingresso HDMI di un altro
televisore. Fare riferimento al manuale del televisore per sapere come accedere all'ingresso HDMI.
Per il collegamento è necessario un cavo HDMI. Questo non è incluso nel televisore. Lo schermo
integrato e gli altoparlanti del televisore portatile si spengono automaticamente quando si utilizza una
connessione HDMI.
Avvertenza:
Leggi a pagina 10 e 21come cambiare la risoluzione HDMI.
Uscita AV
Collegare l'uscita AV OUT (vedi pagina 8) del televisore portatile con un ingresso AV di un altro
televisore. Fate riferimento al manuale del vostro televisore per sapere come accedere all'ingresso AV.
Avvertenze:
• Nota Pagina 20per regolare il rapporto d'aspetto con il televisore collegato.
• È possibile spegnere l'altoparlante incorporato nel televisore portatile. Vedi pagina 23.
• Per il collegamento è necessario il cavo AV fornito con il televisore portatile.
IT 16
Page 17

Dispositivi aggiuntivi collegati - Lettore multimediale
USB
Spina jack AV
Diametro: 3,5mm
Lunghezza: 14mm
Assegnazione del PIN
1. PIN: Collegamenti audio
2. PIN: Audio a destra
3. PIN: Video FBAS
4. PIN: Massa
Cue
È possibile collegare le cue stereo (spinotto a 3 pin) e la
maggior parte delle cue (spinotto a 4 pin, standard CTIA)
al televisore (Vedere pagina 8). Gli altoparlanti incorpo-
rati si spengono quando si collegano le cue.
Dispositivi di archiviazione USB
Collegare i dispositivi di archiviazione USB alla presa USB del televisore portatile (vedi pagina 8)
.
Avvertenze:
• Eettuare un backup di tutti i le su un dispositivo di memoria USB prima di collegarlo al televisore.
• Se il vostro dispositivo di memoria USB non viene più riconosciuto, il le system potrebbe essere
danneggiato. Controllare con la diagnostica su disco del vostro computer
• Il televisore potrebbe richiedere un certo tempo per riconoscere e far funzionare i dispositivi USB.
Durante questo tempo, il televisore può reagire con un ritardo agli ingressi del telecomando.
• Attualmente vengono venduti diversi dispositivi di archiviazione USB e non tutti soddisfano le
speciche dei dispositivi di archiviazione di massa USB. Se il dispositivo di archiviazione USB
non viene riconosciuto, provare con un altro dispositivo di archiviazione USB.
• Sono supportati dispositivi di archiviazione con stile di partizione "MBR" no a 2048GB (2TB).
• I dispositivi di archiviazione con lo stile di partizione "GPT" non possono essere utilizzati con il
televisore
Lettore multimediale USB
Aprire il lettore multimediale con il g pulsante.
Il lettore multimediale permette la riproduzione dei seguenti
tipi di le: Musica, foto e lm.
Con i tasti ◄/► selezionare il tipo di le desiderato e confer-
mare la selezione con il tasto OK .
Browser di le
▲/▼ Selezionare le/cartella
OK Aprire/riprodurre le/cartella
Riproduzione a schermo intero
►||| Avviare la presentazione (solo per i le immagine)
BLU Modicare vista (solo per le immagine)
BACK/MENU Navigazione alla cartella superiore
EXIT Tornare alla schermata di selezione
Riproduzione - generale
►►| Riprodurre il le successivo
|◄◄ Riprodurre il le precedente
►|| Mettere in pausa/riprendere la riproduzione
IT 17
Page 18

Lettore multimediale USB
STOP g Fermare la riproduzione
GOTO Saltare a una posizione di riproduzione specica (non durante la riproduzione
delle immagini)
RPT Ripetizione le/riproduzione casuale
i Visualizzare informazioni del le (non durante la riproduzione di musica)
Riproduzione - Foto
ROSSO Ingrandire o ridurre l’immagine
VERDE Rotazione dell'immagine di 90° in senso anti-orario
GIALLO Rotazione dell'immagine di 90° in senso orario
Riproduzione - Film
AUDIO Cambiare le tracce audio (solo per alcuni le video)
SUB-T Mostrare sottotitoli (solo per alcuni le video)
ROSSO Commutazione tra schermo intero e anteprima
Riprendere la riproduzione
Per alcuni formati di le, il televisore può salvare la posizione in cui si è interrotta la riproduzione l'ultima volta che è stata riprodotta.
Se il televisore è stato in grado di salvare l'ultima posizione di riproduzione, al riavvio della riproduzione visualizzerà la selezione Ultima pos./[EXIT] Annulla nella parte superiore dello schermo.
Ultima Pos.: Riprendere la riproduzione dalla posizione memorizzata.
[EXIT] Annulla: Annullare Riprendere la riproduzione e riprodurre il le dall'inizio.
La selezione tra le opzioni viene eettuata con il tasto ▲/▼, confermare la selezione con il tasto OK.
Formati di le supportati
Foto: JPEG, BMP (si consigliano risoluzioni adatte alla televisione, ad esempio 1280x720 o
1920x1080)
Musica: MP3
Video:
Codec video Risoluzione Prolo Container
MPEG1
MPEG2
MP4 1080P@30fps Simple Prole, Advanced Simple Prole
H.264 1080P@30fps Main Prole, High Prole @Level 4.2 AVI, MKV, MP4, TS
HEVC H.265 1080P@60fps Main10 Prole, High Tier @Level4.1 TS, MKV
1080P@30fps MP@HL MPEG, MPG, TS
AVI, MKV
@Level5
Avvertenze:
• GMC non è supportato.
• Bitrate: 40Mbit/secondo
• Rapporto di aspetto: 4/3, 16/9
• Con riserva di errori e modiche tecniche.
IT 18
Page 19
Menù principale
Premere il tasto MENU per visualizzare il menu principale.
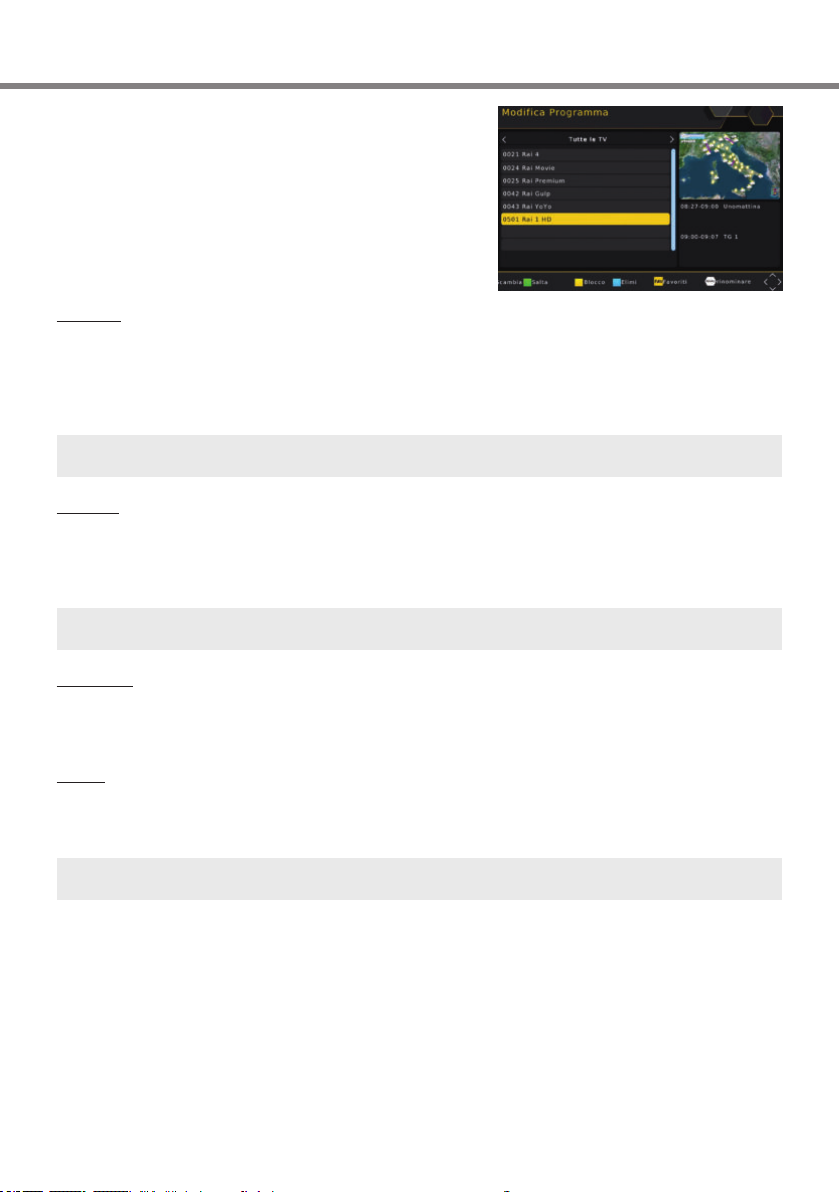
Programma/Modica Programma
Nel sottomenù avete la possibilità di ordinare o modicare le
stazioni trovate, come desiderate. Si può accedere a questo
menù solo se si inserisce il PIN corretto (default. 0 0 0 0 0
0, vedi pagina 23).
Quando si esce dalla modica della stazione, le modiche
vengono salvate.
Spostare
• Usare i tasti ▲/▼ per selezionare una stazione che si desidera spostare ad un altro numero di
programma.
• Premere il tasto ROSSO, verrà evidenziata la stazione da spostare.
• Usare i tasti ▲/▼ per selezionare la posizione in cui si vuole spostare la stazione evidenziata.
• Premere OK, la stazione verrà aggiunta alla lista delle stazioni nella posizione selezionata.
Avvertenza:
Le stazioni possono essere spostate solo se l'LCN è spento (vedi pagina 20).
Scambia
• Con i tasti ▲/▼ selezionare una stazione il cui numero di programma (LCN) volete scambiare
con un'altra stazione.
• Premere il tasto ROSSO.
• Con i tasti 0-9 inserire il numero di programma per lo scambio.
Avvertenza:
Lo swap è disponibile solo se l'LCN è acceso (vedi pagina 20).
Cancellare
• Con i tasti ▲/▼ selezionate la stazione che si desidera cancellare.
• Premere il tasto BLU, viene visualizzato un messaggio di sicurezza.
• Premere OK, la stazione evidenziata verrà cancellato
Blocco
• Con i tasti ▲/▼ selezionare la stazione che si desidera bloccare.
• Premere il tasto GIALLO, verrà evidenziata la stazione da bloccare.
• Premere nuovamente il tasto GIALLO per annullare il blocco.
Avvertenza:
Il televisore chiederà il PIN prima che si possa guardare un canale bloccato.
IT 19
Page 20

Menù principale
Salta
• Con i tasti ▲/▼ selezionate una stazione che si desidera saltare.
• Premere il pulsante VERDE, la stazione sarà contrassegnata per essere saltata.
• Premere il tasto VERDE, per rimuovere la spunta.
Avvertenza:
Le stazioni contrassegnate per il salto non possono essere selezionate con i tasti CH+/CH- .
Preferiti
Il televisore ha 8 gruppi di preferiti. È possibile assegnare
ogni stazione a qualsiasi gruppo preferito. Una stazione può
essere assegnata a diversi gruppi.
• Usare i tasti ▲/▼ per selezionare una stazione che si
desidera aggiungere a un gruppo preferito.
• Premere il pulsante FAV. Appare il menù Preferiti .
• Selezionare il gruppo di preferiti ▲/▼ a cui si vuole
aggiungere la stazione.
• Premere il tasto OK, il simbolo corrispondente appare davanti al gruppo preferito.
• Premere il tasto EXIT per chiudere il menù Preferiti
Avvertenza:
• Spegnere annulla la selezione di tutti i gruppi preferiti.
• Usare il tasto BACK per cambiare il nome del gruppo preferito selezionato.
Rinominare la stazione
Selezionare una stazione con i tasti ▲/▼ e premere il tasto BACK . Viene visualizzata la tastiera su
schermo. Con i tasti di navigazione ►/►/▲/▼ selezionare le lettere e confermare la lettera con il ta-
sto OK . Quando il nome della nuova stazione è completo, passare al campo OKe premere il pulsante
OK. La stazione prende quindi il nuovo nome.
Programma/EPG
Vedi pagina 15.
Programma/Disponi
Questa opzione permette di ordinare le stazioni secondo le speciche (LCN, ONID, nome, ecc.) all'interno della lista. L'ordine di selezione precedente è andato perso.
Programma/LCN
Alcuni fornitori DVB trasmettono informazioni LCN. Questi permettono al provider di generare una lista
di stazioni preassortite. Attivare LCN solo se il vostro fornitore supporta questa funzione.
Immagine /rapporto schermo
Questa impostazione determina il rapporto d'aspetto del vostro televisore e come i contenuti con un
diverso rapporto d'aspetto vengono adattati al vostro televisore.
Avvertenza:
È necessario modicare questa impostazione solo se si collega un televisore esterno. Per la schermata integrata, è ideale l'impostazione predenita 16:9 PillarBox .
IT 20
Page 21

Menù principale
Regolazione Signicato
4:3 Pan&Scan
4:3 Letterbox
16:9 PillarBox
16:9 Pan&Scan
Immagine/Risoluzione
Qui si denisce la risoluzione che viene emessa tramite l'uscita HDMI.
Avvertenze:
• Si prega di consultare anche il manuale del vostro televisore.
• Questa impostazione è attiva solo quando un televisore esterno è collegato via HDMI.
Ricerca canali/Ricerca automatica
Quando questa opzione è attivata, inizia la ricerca automatica. Vedi pagina 13.
Ricerca canali/Ricerca manuale
È possibile cercare stazioni speciche. A tal ne è necessario conoscere i parametri tecnici (frequenza o canale). Il
display della barra nella parte inferiore dello schermo indica
se è possibile trovare un segnale con i parametri impostati.
È inoltre possibile utilizzare il display della barra per allineare
l'antenna. Avviare la scansione manuale dei canali con il
tasto OK.
Per 4/3 persone. I contenuti che si discostano dal rapporto d'aspetto vengono
visualizzati a schermo intero, se possibile, senza distorsioni, ma con perdita di
informazioni.
Per 4/3 persone. I contenuti che si discostano dal rapporto d'aspetto vengono
visualizzati senza distorsioni, ma eventualmente con "barre nere".
Per 16/9 persone. I contenuti che si discostano dal rapporto d'aspetto vengono
visualizzati senza distorsioni, ma eventualmente con "barre nere".
Per 16/9 persone. Le trasmissioni 16/9 sono visualizzate a schermo intero e
non distorte. Le trasmissioni 4/3 vengono visualizzate senza distorsioni ma
ingrandite. Questa impostazione è particolarmente adatta per trasmissioni
"letterbox" 4/3 per ridurre in questo caso la visualizzazione delle "barre nere”.
Ricerca canali/Paese
Selezionare il Paese in cui si utilizza il televisore.
Ricerca stazione/Alimentazione antenna
Se la vostra antenna (ad es. un'antenna interna con ampli-
catore senza alimentatore proprio) deve essere alimentata
dal televisore tramite il cavo dell'antenna, attivare questa
funzione.
Ricerca canali/Filtra i servizi internet
Quando questa funzione è attivata, il televisore non memorizza le stazioni Internet durante la scansione dei canali.
Avvertenze:
• Il televisore non può essere collegato a Internet e quindi non visualizzare i canali Internet.
• Questa funzione non è supportata da tutti gli operatori di piattaforme DVB
IT 21
Page 22

Menù principale
Ricerca canali/Filtra i canali criptati
Quando questa funzione è attivata, il televisore non memorizza i canali criptati durante la scansione.
Avvertenza:
Il televisore non può visualizzare i canali criptati.
Ora/Impostazioni ora
Il televisore imposta automaticamente l'orologio non appena riceve una stazione che trasmette l'ora.
Anché il televisore possa calcolare correttamente l'ora, è necessario impostare il fuso orario corretto.
Regolazione Signicato
Automatico
Manuale
Ora/Fuso orario
Se è impostata Impostazione del fuso orario: Manuale è possibile impostare il fuso orario qui.
Ora/Auto Standby
Risparmio energetico secondo i requisiti di una direttiva UE. Il televisore si spegne dopo 3 ore se non
viene rilevata alcuna attività dell'utente.
Opzioni/lingua OSD
Selezionare la lingua in cui devono essere visualizzati i
menù a schermo.
Il televisore imposta automaticamente
il fuso orario.
È necessario impostare il fuso orario
da soli.
Opzioni/lingua sottotitoli
Selezionare la lingua preferita per i sottotitoli.
Opzioni/lingua audio
Selezionare la lingua preferita per le tracce audio.
Opzioni/Uscita digitale
Questa opzione determina il formato in cui il segnale audio è disponibile all'uscita HDMI:
Regolazione Signicato
PCM
RAW
Avvertenze:
• Se non si riesce a sentire il suono da un televisore esterno, selezionare l'impostazione PCM.
• Utilizzare il pulsante AUDIO per selezionare una traccia audio multicanale di una stazione TV o
un le video, se disponibile.
• Se si emette un audio multicanale dall'uscita HDMI come bitstream(RAW), il controllo del volume
del televisore non ha alcun eetto.
Audio digitale stereo.
Se una trasmissione televisiva ha una traccia audio multicanale supportata,
questo formato audio viene emesso tramite l'uscita HDMI. L'apparecchio collegato all'uscita HDMI deve essere in grado di gestire il suono multicanale.
IT 22
Page 23

Menù principale
Opzioni/Descrizione audio
Alcune stazioni televisive trasmettono una traccia audio separata per gli spettatori ipovedenti (descrizione audio). Questa impostazione determina il volume al quale il televisore mixa la descrizione audio
nella traccia audio principale.
Opzioni/Altoparlante interno
Questa impostazione consente di spegnere gli altoparlanti integrati nel televisore portatile.
Sistema/Controllo parentale
In questo menù è possibile impostare la classicazione in
base all'età per un programma radiofonico, dal quale l'immagine e l’audio vengono visualizzati solo dopo l'immissione
della password.
Sistema/Cambio PIN
Dopo aver attivato l'opzione, è necessario prima inserire il
vecchio PIN. Il PIN predenito è 000000. Il puntatore passa
automaticamente alla riga successiva. Inserire qui un nuovo
PIN a sei cifre. Dopo aver inserito il PIN, è necessario reinserirlo per motivi di sicurezza.
Avvertenza:
Se avete dimenticato il vostro PIN, potete usare il Super PIN per assegnare un nuovo PIN. Super-PIN:
888888
Sistema/Reset di fabbrica
Avete la possibilità di annullare tutte le impostazioni e le modiche caricando le impostazioni di fabbrica. Accendere l’opzione e inserire il PIN.
Avvertenze:
• Tutte le impostazioni vengono ripristinate. È quindi necessario eseguire nuovamente la ricerca.
• Le impostazioni dell'immagine e degli altoparlanti devono essere ripristinate separatamente.
Sistema/Informazione
Questa opzione consente di visualizzare informazioni su software e hardware.
Sistema/Aggiornamento software
Se necessario, il rmware più recente viene fornito all'indirizzo www.xoro.de insieme ad una guida
all'aggiornamento. Si prega di non installare il rmware che avete scaricato da altri siti Internet.
USB/Multimedia
Questa voce di menù apre il lettore multimediale (vedi pagina 18)
USB/Impostazioni Foto
Durata Foto
Le impostazioni determinano la durata di visualizzazione di una singola immagine durante una presentazione.
Modalità Foto
Le impostazioni determinano il modo in cui viene animata la transizione tra due immagini.
IT 23
Page 24

Menù principale - Dati tecnici
Rapporto schermo
Determina come vengono visualizzati i le di immagine.
Regolazione Signicato
Mantieni
Riuta
USB/Impostazioni Film
Carattere sottotitoli
Determina la dimensione dei caratteri dei sottotitoli nel lettore multimediale.
Sfondo sottotitoli
Denisce lo sfondo su cui vengono visualizzati i sottotitoli nel lettore multimediale.
Colore sottotitoli
Denisce il colore del carattere in cui vengono visualizzati i sottotitoli.
Dati tecnici
Dati generali
Alimentazione elettrica 12 V DC/1,5 A
Potenza assorbita 18 W (max.) / <0,5 W (Standby)
Dimensioni 245 x 160 x 29,3 mm
Peso (circa) 700 g (TV)/1000 g (TV, telecomando, alimentatore, antenna, cavo per auto,
AV cavo)
Batteria
Capacità (tipica) 7,4 V/3500 mAh
Tecnologia Li-Ion
Peso 130 g
Le immagini vengono visualizzate senza distorsioni.
Le immagini vengono adattate allo schermo, ma possono essere distorte.
Altoparlanti
Potenza Stereo (2x 1,2 W)
Schermo
Tecnologia TFT LCD con retroilluminazione LED
Sintonizzatore DVB-T/T2
Frequenza di ingresso 174-230 MHz, 470-858 MHz
Alimentazione antenna 5 V, max. 100 mA
Posizioni di memoria 400 stazioni
Avvertenza:
Con riserva di errori e modiche tecniche.
IT 24
Page 25

Risoluzione dei problemi
Sintomi Causa e soluzione
• Non tutte le stazioni
vengono trovate
• Nessuna ricezione
• Disturbi dell'immagine
con forti mosaici o artefatti, immagini congelate
Nessuna immagine su un
televisore collegato
Nessuna immagine sullo
schermo integrato
Lo schermo integrato è
troppo scuro
Audio assente
L'apparecchio USB non
viene riconosciuto
L'apparecchio mostra
l’orario sbagliato
La TV si spegne dopo
3 ore
L'immagine è troppo
piccola o distorta
La carica della batteria
richiede più tempo del
previsto
Il LED sul cavo di allacciamento dell'auto non si
accende. Il televisore non
è alimentato.
• Nessuna ricezione TV DVB-T/T2 nella vostra zona.
• Allineare correttamente l'antenna (vedi pagina 21).
• Ripetere la ricerca (vedi pagina 21).
• Acquistate un'antenna potente (vedi pagina 13).
• Se necessario, accendete l'alimentazione elettrica della vostra antenna
(vedi pagina 21, 13).
• HDMI: Controllare la risoluzione HDMI (pagina 10 (tasto SCREEN),
vedi pagina 21).
• AV OUT: È necessario un cavo adatto (vedi pagina 16).
• Lo schermo integrato viene spento quando si utilizza una connessione
HDMI.
• Modicare l'impostazione della retroilluminazione a LED (vedi pagina
16).
• Aumentare il volume (VOL +).
• HDMI: Tenere presente la pagina 22 per le impostazioni audio HDMI.
• AV OUT: È necessario un cavo adatto (vedi pagina 16).
• Gli altoparlanti integrati vengono disattivati quando si collegano le cue o
un dispositivo HDMI.
• Controllare che gli altoparlanti incorporati siano accesi (vedi pagina
23).
• Tenere presenti le note a pagina 17.
• Tenere presenti le note a pagina 22 (Impostazione del fuso orario).
• Vedi pagina 22 Impostazione "Auto Standby".
• Vedi pagina 20.
• Spegnere il televisore con l'interruttore generale per ridurre il tempo di
ricarica (vedi pagina 12).
• La tensione all'ingresso del cavo di allacciamento dell'auto è troppo alta
o troppo bassa.
• L'uscita del cavo di allacciamento dell'auto è sovraccarica o in cortocircuito. Scollegare il televisore dal cavo e controllare che il LED sia acceso.
Contattare il servizio clienti XORO.
• La punta del cavo di allacciamento dell'auto può essere svitata per il
controllo e la sostituzione del fusibile.
ATTENZIONE: Il fusibile può essere sostituito solo da uno con valori
identici. Il fusibile risponde solo in caso di sovraccarico estremo. In
caso di sostituzione di un fusibile difettoso, occorre quindi controllare
anche l'impianto elettrico del veicolo, il televisore e il funzionamento
generale del cavo di allacciamento del veicolo. Consultare un esperto
a riguardo.
IT 25
Page 26

Table of contents
Energy consumption - Conformity - Pixel
error 3
Energy consumption data sheet 3
Conformity 3
Pixel errors 3
Information on ecodesign requirements for
external power supplies pursuant to Directive
2009/125/EC 4
Safety and intended use 5
Power supply and rechargeable battery 5
Installation and handling 5
Receiving system 6
USB socket 6
Remote control and batteries 6
Connecting headphones 6
Use 6
Service case 6
Environment - Customer service 7
Recycling of electrical devices 7
Recycling of paper and cardboard 7
Recycling of plastics 7
Disposal of batteries 7
Scope of delivery - overview 8
Scope of delivery 8
Overview: Main unit 8
Overview: Vehicle power cable 9
Overview: Remote control 10
Overview: Device keys 10
Power supply 11
Remote control 11
Television 11
Status display - Charging process - Antenna 12
Battery LED 12
Power LED 12
Connecting the antenna 12
Initial installation 13
Daily operation 14
Important keys and functions 14
Screen setting - Connecting additional
devices 16
Connecting an external TV 16
Connecting additional devices - USB
media player 17
AV jack plug 17
Headphones 17
USB storage devices 17
USB media player 17
Supported le formats 18
Main menu 19
Channel/Edit channel list 19
Channel/EPG 20
EN 2
Channel/sort 20
Channel/LCN 20
Picture/aspect ratio 20
Picture/HDMI resolution 21
Channel search/automatic scan 21
Channel scan/manual scan 21
Channel scan/Antenna Power 21
Time/Time zone setting 22
Time/Time Zone 22
Time/Auto standby 22
Preferences/OSD language 22
Preferences/subtitle language 22
Preferences/audio language 22
Preferences/digital audio 22
Preferences/audio description 23
Preferences/Internal Speaker 23
System/parental control 23
System/ Set PIN 23
System/Restore factory default 23
System/information 23
System/Software Update 23
USB/XORO media player 23
USB/photo settings 23
USB/Subtitle settings 24
Technical data 24
Troubleshooting 25
Page 27

Energy consumption - Conformity - Pixel error
Energy consumption data sheet
Trademark XORO
Model identier PTL 1015
Energy eciency class A
Visible diagonal screen size 25.6 cm / 10.1“
Power consumption
(on-mode, LED-BL: Normal)
Annual energy consumption Energy consumption 12 kWh per year, based on the
Power consumption (standby / o-
mode)
Screen resolution (physical) 1024 x 600 pixels
Peak luminance ratio 90%
Lead / mercury <2 mg / 0 mg
Conformity
Hereby, MAS Elektronik AG declares that the radio equipment type XORO PTL1015
is in compliance with Directive 2014/53/EU.
The full text of the EU declaration of conformity is available at the following internet
address: www.xoro.de/downloads
8.1 W
power consumption of the television operating 4 hours
per day for 365 days. The actual energy consumption will
depend on how the television is used.
0.45 W / (not available)
Pixel errors
The pixel errors dened in the following table (bright or dark pixels, line defects and dierences in
brightness) describe the permitted defects in type and number, which are excluded from warranty.
Bright pixels (bright dot) ≤ 2
Dark pixels (dark dot) ≤ 3
Bright + dark pixels ≤ 3
EN 3
Page 28

Ecodesign requirements for external power supplies
Information on ecodesign requirements for external power supplies pursuant to
Directive 2009/125/EC
Manufacturer’s name or trade mark, commercial registration number and address
Model identier F18L10-120150SPAV
Input voltage 100 - 240 V
Input AC frequency 50 Hz / 60 Hz
Output voltage 12.0 V
Output current 1.5 A
Output power 18.0 W
Average active eciency 86.1%
Eciency at low load (10 %) 80.2%
No-load power consumption 0.07 W
Trademark: XORO
Manufacturer: MAS Elektronik AG
Weidegrund 3
21614 Buxtehude
Germany
Commercial Register at Hamburg Local Court HRB
74448
EN 4
Page 29

Safety and intended use
The lightning ash within a triangle is intended to alert the user to the presence of dangerous voltage of exposed conductive parts within the product's enclosure.
The exclamation mark within a triangle is intended to alert the user to the presence of
important operating and maintenance instructions (servicing) in this manual which must
be followed.
Power supply and rechargeable battery
• The portable TV may only be operated with the voltage printed on the back.
• The supplied power supply may only be operated with the mains voltage printed on it.
• The supplied vehicle power cable may only be used with the printed voltage.
• The portable television may only be powered using the accessories supplied (power supply and
vehicle power cable).
• Protect the device from high temperatures (e.g. in parked vehicles). The permissible operating
temperature range is between 5° C and 37° C, air humidity: < 90% (non-condensing).
• Do not overload sockets, extension cables or other cables as this may result in re or electric
shock.
• Disconnect the device from the power supply if it is not to be used for a longer period of time.
• The battery installed in the television may only be replaced by the XORO customer service.
• Charge the battery at least every 6 months to avoid deep discharge. For safety reasons, the
charging electronics of the device do not charge deeply discharged batteries.
Installation and handling
• Please do not place any objects on cables, as this could cause the protective function to be lost.
Avoid placing great strain on cables, especially on sockets and plugs.
• If you want to remove the plug out of the socket, always pull the plug and not the cable. Otherwise the cable could break.
• The LCD screen is fragile. Avoid any mechanical stress on the screen.
• This device must not be positioned near moisture or water. Never touch the device with wet or
damp hands.
• Protect the device from moisture and weather inuences.
• Do not expose the device and the remote control to direct sunlight. This impairs the function and
could lead to damage.
• The television, the power supply and the plug of the vehicle power cable heat up during operation. Do not place the devices on heat sensitive surfaces.
• The openings in the housing provide ventilation to prevent the unit from overheating. These openings must always be kept free. Avoid heat accumulation on the device.
• The device must not be positioned near heat sources such as ovens or heaters.
• For additional protection of the unit during a thunderstorm or when the unit is left unattended for
long periods of time: Unplug the power plug from the socket and the antenna connector from the
antenna/cable connection socket. This prevents damage due to lightning / overvoltage.
• Do not insert any objects into the openings of the unit, as current ows in some places and contact with these places may cause an electric shock.
• Do not connect any accessories not recommended by the manufacturer.
• Do not place the unit on an unstable surface. The device could be damaged or people injured.
Any xings should only be tted in accordance with the manufacturer information or should be
acquired from the manufacturer.
• For cleaning, unplug the appliance from the power outlet and switch o the appliance using the
main switch.
• Do not use liquid cleaners or cleaning sprays. The device may only be cleaned with a damp cloth.
• Keep small accessories out of the reach of children so that they are not accidentally swallowed.
EN 5
Page 30

Safety and intended use
Receiving system
• An outdoor antenna must not be installed near power lines or other electrical circuits, as contact
with such lines can be fatal.
• To avoid damage to property or persons and to ensure proper operation, have your outdoor
antenna installed by a specialist company.
• The receiving system must be earthed in accordance with the regulations.
USB socket
• The USB socket of the TV is not suitable for charging devices with built-in batteries (e.g. telephones, MP3 players, tablet computers, etc.).
• USB devices that require a current greater than 500 mA (0.5 A) violate the USB specications
and may not be recognized by the TV.
Remote control and batteries
• Remove and replace old batteries. Old batteries may leak and damage the remote control.
• Remove leaking battery uid with a cloth. Avoid skin contact with the liquid.
• If the battery or battery uid is swallowed, seek medical attention immediately.
• In case of skin/eye contact, rinse the skin/eyes with plenty of water and consult a doctor.
• Please keep batteries and the remote control away from children.
Connecting headphones
• Prolonged exposure to high volume levels can cause temporary or permanent hearing loss when
using headphones.
• Avoid higher volume levels, especially over long periods of time.
Use
• The device is designed for use in private households.
• Children may only use the device under adult supervision.
• Heavy tobacco smoke damages the electronics of the device and can lead to visible impairment
of the image quality due to deposits on the screen. Damages and impairments caused by tobacco smoke will not be repaired under warranty.
Service case
• Never carry out repairs yourself. Always leave this to qualied personnel.
• Only original spare parts and accessories may be used.
• The unit must immediately be taken out of operation if it has been exposed to water or moisture,
if the housing, screen, accessories or cables are damaged, if the unit is not functioning properly,
if objects have entered the housing, if there are loose parts inside the unit or if the battery cannot
be charged properly.
EN 6
Page 31

Environment - Customer service
Recycling of electrical devices
The product is made of high quality materials and components, these are recyclable and
can be reused. The crossed-out wheelie bin on the product and on the packaging means
that the product must not be disposed of with normal household waste.
Inform yourself about the applicable local regulations for the separate disposal of
electronic equipment. Observe local regulations and do not dispose of old products with
normal household waste. By disposing of old products correctly, you contribute to environmental protection and human health.
Recycling of paper and cardboard
The material recycling symbol on the packaging board and on the user manual indicates
that they are recyclable. Do not dispose of the packaging with normal household waste.
Recycling of plastics
The material recycling symbol on plastic parts means that they are recyclable. Do not
dispose of the plastics with normal household waste.
Disposal of batteries
Every consumer is legally obliged to hand in batteries at a collection point of his community or the retailers so that they can be
disposed of in an environmentally friendly way.
The disposal of batteries in household waste is prohibited!
A chemical symbol (Pb for lead, Hg for mercury, Cd for cadmium) under the crossed-out wheelie bin indicates that the battery
contains more than 0.0005% mercury, more than 0.004% lead or more than 0.002% cadmium.
Contact the XORO customer service
We will be happy to help you with questions on operation or if problems occur with your device.
By phone: +49 4161 - 800 24 24 (Mon-Fri, 11.00 a.m. to 5.00 p.m., German/English)
By fax: +49 4161 - 800 24 62
By e-mail: support@ersservice.de
Address: ERS GmbH Elektronik Repair Service
Weidegrund 3/Halle1
21614 Buxtehude
Germany
EN 7
Page 32

Scope of delivery - overview
Scope of delivery
Please make sure that the following parts are included in the packaging:
• Portable television
• Remote control
• Power supply
• Vehicle power cable
• Antenna
• AV cable
Note:
Check the completeness of the accessories immediately after purchase. If any accessories are missing, please contact the dealer from whom you purchased the device directly.
Overview: Main unit
EN 8
Page 33

Overview
Overview: Vehicle power cable
Item Labelling Comment
1 MENU/OK/EXIT/CH/
VOL
2 OFF ON Main switch
3 DC IN 12V Socket for power supply
4 ANTENNA Antenna socket
5 HDMI OUT HDMI output
6 Screw thread (M6)
7 Stand
8 USB USB socket
9 EAR PHONE Headphones output
10 AV OUT AV output
11 Stereo Speakers
12 Charge status display
13 Operating status display
14 Receiver for remote control signals
15 Power indicator
16 Ground
17 Positive pole/screw cap for the fuse holder
Local control keys
EN 9
Page 34

Overview
Overview: Remote control
POWER Switch device on/o
Mute Mute sound
GOTO Jump to a specic playback position
RPT Activate repeat mode
SUB-T Call up subtitles
SCREEN Display screen settings/change HDMI resolution
tt uu Picture search backwards/forwards
Itt uuI Previous/next le
AUDIO Change audio tracks
u|| Pause/start playback
g Open USB media player/stop playback
RED Red function key
GREEN Green function key
YELLOW Yellow function key
BLUE/SLEEP Blue function key, set sleep timer
MENU Show main menu
EXIT Exit menu
▲/▼/◄/► Select elements in on-screen menus
OK/LIST Conrm selection, display channel list
i Display information
BACK Recall previous channel (Back)
VOL+/VOL- Change volume
EPG Show Electronic Program Guide
TXT Show teletext
CH Switch channels
0-9 Numerical input
TV/RADIO Switch between TV and radio mode
FAV Show favourites list selection
Overview: Device keys
MENU Show main menu/media player: Back
LIST Conrm selection, display channel list
EXIT / Exit menu, switch on/o device (long
press)
▲CH▼ Switch channel, select elements in on-screen
menus
◄VOL► Change volume, select on-screen menu
items
OFF ON Mechanical main switch.
Completely switch device o and on.
EN 10
Page 35

Power supply
Remote control
• Open the battery compartment cover by sliding it in the direction of the arrow.
• Insert the batteries (1.5V size AAA) into the compartment. When inserting the
batteries, please ensure that the polarity (+/-) is correct. Refer to the markings
on the remote control and the batteries.
• Replace the battery compartment cover.
Television
First, slide the main switch of the TV to the OFF position.
Connect the TV ( DC IN 12V socket) to a wall outlet using
the power supply or to a car cigarette lighter socket using
the vehicle power cable.
Slide the main switch to the ON position to turn on the TV.
Note:
• The built-in battery is charged as soon as the TV is supplied with power. The charging process
cannot be interrupted with the main switch.
• The television may only be supplied with power using the accessories supplied (power supply or
vehicle power cable).
• The supplied vehicle power cable supports input voltages between 12 V - 24 V and generates
a stable supply voltage for the TV. If other connection cables are used, the television may be
seriously damaged!
• The indicator light on the vehicle power cable lights up when it can properly supply power to the
television. Please note page 25 if the vehicle power cable does not work correctly.
EN 11
Page 36

Status display - Charging process - Antenna
The LEDs on the front panel indicate the charging status of the built-in battery and the operating status
of the TV.
Battery LED
Colour Meaning
RED The television is supplied with power. Battery is charging.
GREEN The television is supplied with power. Battery is fully charged.
"O" TV is not supplied with power. Power supply or vehicle power cable not connected.
Note:
While you are watching TV, the approximate charging status of the battery is displayed when you
change channels or press the i key. If the TV is connected to the power supply or the vehicle power
cable, the charge level cannot be displayed.
Power LED
Colour Meaning
RED The main switch is in the ON position. The television is in standby mode (standby
A complete charging process takes about 4 hours (main switch in position OFF) or
approx. 6 hours (main switch in position ON).
operation).
The TV can be switched on with the
holding the EXIT/
GREEN The main switch is in the ON position. The TV is switched on.
"O" The main switch is in the OFF position, the TV is disconnected from the power supply
or the battery is completely discharged.
key directly on the TV.
key on the remote control or by pressing and
Connecting the antenna
Connect the supplied antenna to the ANTENNA socket (see Page 8).
Note:
The supplied antenna is not the optimal choice for every reception area. Ask your local dealer for
information on selecting the right antenna.
EN 12
Page 37

Initial installation
After sliding the main switch to the ON position, the power LED will rst light up green. After a moment,
Please wait followed by the start screen will appear on the screen. When the start process is complete, the installation menu is displayed.
You can use the arrow keys ▲/▼ to switch between the menu items. If a menu item is highlighted in
colour, you can adjust it with the keys ◄/►.
OSD language
Select the language in which the on-screen menus will be
displayed.
Country
Select the country in which you want to operate the television.
Antenna Power
If your antenna (e.g. an indoor antenna with amplier without
its own power supply) must be supplied with power from the
TV via the antenna cable, switch on this function.
Note:
Antenna Power must be switched on for the antenna that is
included in the package.
Channel search
Start the channel search with the OK key. The search
can take several minutes. If the search does not nd all
channels, reposition your antenna or use a more ecient
antenna and start the search again (see page 21).
Note:
• The search can take several minutes.
• If the search does not nd all channels, reposition your antenna or use a more ecient antenna
and start the search again (see page 21)
• In some countries (e.g. Germany) no DVB-T/T2 radio channels are transmitted.
• After moving to another region, you must run the channel scan again.
EN 13
Page 38

Daily operation
Important keys and functions
Channel switching
You can change the channel with the keys CH▲▼. You can
also enter the channel number directly using the 0-9 keys.
Channel list
Call up the channel list by pressing the OK/LIST key.
▲/▼ Select channel.
◄/► Switch between radio and television
channels.
OK Call up the selected channel.
EXIT Hide channel list.
Note:
For information on how to sort channels, see page 19.
TV/Radio
If you want to switch between TV and radio channels, press the TV/RADIO key.
Favourites
If you have created favourites lists (see page 20), you can use the FAV key to access the favourite
lists.
◄/► Select a favourites list
▲/▼ Select a channel
OK Call up the selected channel
EXIT Hide favourites list
Languages: Subtitles and audio
Press the SUB-T key to open the Subtitle Language
menu. Press the AUDIO key to open the Audio Language
menu.
▲/▼ Select language
OK Activate the selected language
EXIT Hide menu
Note:
• Some channels require you to open Teletext and enter the page number for the subtitles
manually.
• Select O if you no longer want subtitles to be displayed.
EN 14
Page 39

Daily operation
Set sleep timer
Press the SLEEP key repeatedly to select a time after which the TV will turn o.
Teletext
Teletext is activated with the TXT key.
0-9 Select teletext page
▲/▼ Select previous/next Page
◄/► Select subpages
TV/Radio Hide teletext display
EXIT End teletext display
Mute/sound o
Press the MUTE key on the remote control to turn o the sound. Press the MUTE key again to turn the
sound back on.
Change volume
Use the VOL+ / VOL- keys to change the volume.
Note:
If you output digital multi-channel audio from the HDMI output as bitstream, the volume control of the
TV will have no eect (see page 22)
Information
Press the i key to display various information about the current program and the approximate battery
charge status.
Note:
• The battery indicator is not available while the battery is charging.
Electronic Program Guide
Press the EPG key to display the program guide.
▲/▼ Select a programme
◄/► Switch channels
YELLOW/BLUE Scroll through the description
of the programme.
EXIT Hide EPG
EN 15
Page 40

Screen setting - Connecting additional devices
While the built-in screen is active, the SCREEN key can be
used to display the screen settings menu.
BRIGHTNESS/CONTRAST/COLOUR
Set the values according to your wishes.
LED-BL
This setting aects the brightness of the LED illumination of
the screen and the power consumption or battery life.
Setting Meaning
ECO
NORMAL
OUTDOOR
LANGUAGE
Changes the language for the screen settings menu.
RESET
Resets the screen settings to the factory defaults.
Connecting an external TV
You can connect the portable TV to a larger TV using an HDMI or AV cable.
Reduced screen brightness. Low energy consumption and long
battery life.
Medium brightness.
Maximum brightness, e.g. when using the TV outdoors. The
battery life is shorter in this mode.
HDMI output
Connect the HDMI output (see page 8) of the portable TV to an HDMI input of another TV. Refer
to the manual of your TV to nd out how to access the HDMI input. An HDMI cable is required for the
connection. This is not included with the television. The built-in screen and speakers of the portable TV
are automatically turned o when an HDMI connection is used.
Note:
See page 10 and 21 to learn how to change the HDMI resolution.
AV output
Connect the AV OUT output (see page 8) of the portable TV to an AV input of another TV. Refer to
the manual of your TV to nd out how to access the AV input.
Note:
• See page 20 to adjust the aspect ratio to the connected TV.
• You can turn o the speaker built into the portable TV. See page 23.
• The AV cable supplied with the portable TV is required for the connection.
EN 16
Page 41

Connecting additional devices - USB media player
AV jack plug
Diameter: 3.5mm
Length: 14mm
PIN assignment
1 PIN: Audio left
2 PIN: Audio right
3 PIN: Video FBAS
4 PIN: Ground
Headphones
You can connect stereo headphones (3-pin plug) and most
headsets (4-pin plug, CTIA standard) to the TV (see page
8). The built-in speakers are switched o when head-
phones are connected.
USB storage devices
Connect USB memory devices to the USB socket of the portable TV (see page 8).
Note:
• Make a backup of all les on a USB storage device before connecting it to the TV.
• If your USB storage device is no longer recognized, the le system may be damaged. Please
check it with the data carrier diagnostic of your computer.
• The TV may take some time to recognize USB devices and USB devices are ready for operation.
During this time, the television may react with a delay to inputs from the remote control.
• A variety of dierent USB storage devices are currently sold and not all of them meet the specications for USB mass storage devices. If your USB memory device is not recognized, please try
another USB memory device.
• Storage devices with "MBR" partition style up to 2048GB (2TB) are supported.
• Storage devices with "GPT" partition style cannot be used with the TV
USB media player
Open the media player with the g key.
The media player allows the playback of the following le
types: music, photo and lm.
Use the keys ◄/► to select the desired le type and conrm
your selection with the OK key.
File browser
▲/▼ Select le/folder
OK Open/playback le/folder
Full screen playback
►|| Start slide show (only for image les)
BLUE Change view (only for image les)
BACK/MENU Navigation to the parent folder
EXIT Return to the selection screen
EN 17
Page 42

USB media player
Playback - general
►►| Play next le
|◄◄ Play previous le
►|| Pause/resume Play
STOP g Stop playback
GOTO Jump to a specic playback position (not during image playback)
RPT File repeat/random playback
i Display le information (not during music playback)
Playback - photo
RED Enlarge or reduce the image
GREEN Rotation of the image by 90° counterclockwise
YELLOW Clockwise rotation of the image by 90°
Playback - lm
AUDIO Switching audio tracks (only for certain video les)
SUB-T Display subtitles (only for certain video les)
RED Switch between full screen and preview view
Resume playback
For some le formats, the TV can save the position where you stopped playback the last time you
played.
If the TV was able to save the last playback position, it will display the Last pos./[EXIT] Cancel
selection at the top of the screen when playback is restarted.
Last pos.: Resume playback from the stored position.
[EXIT] Cancel: Stop playback and playback le from
the beginning.
The selection between the options is made with the ▲/▼ keys, conrm your selection with OK.
Supported le formats
Photos: JPEG, BMP (we recommend resolutions suitable for television, e.g. 1280x720 or 1920x1080)
Music: MP3
Video:
Video codec Resolution Prole Container
MPEG1
MPEG2
MP4 1080P@30fps Simple Prole, Advanced Simple Prole
H.264 1080P@30fps Main Prole, High Prole @Level 4.2 AVI, MKV, MP4, TS
HEVC H.265 1080P@60fps Main10 Prole, High Tier @Level4.1 TS, MKV
Note:
• GMC is not supported.
• Bit rate: 40Mbit/sec.
• Aspect ratio: 4/3, 16/9
• Errors and technical changes reserved.
1080P@30fps MP@HL MPEG, MPG, TS
AVI, MKV
@Level5
EN 18
Page 43

Main menu
Press the MENU key to display the main menu.
Channel/Edit channel list
In the submenu you have the possibility to sort or edit the
found channels according to your wishes. You can only
access this menu if you enter the correct PIN (default: 0 0 0
0 0 0, See page 23).
When you exit channel editing, the changes are saved.
Move
• Use the ▲/▼ keys to select a channel that you want to
move to another program number.
• Press the RED key and the channel will be highlighted for moving.
• Use the ▲/▼ keys to select the location to which you want to move the highlighted channel.
• Press OK and the channel will be added to the channel list at the selected location.
Note:
Channels can only be moved if LCN is switched o (see page 20).
Swap
• Use the ▲/▼ keys to select a channel the program number (LCN) of which you want to exchange with another channel.
• Press the RED key.
• Use the 0-9 keys to enter the program number for the exchange.
Note:
Swap is only available if LCN is switched on (see page 20).
Delete
• Use the ▲/▼ keys to select a channel that you want to delete.
• Press the BLUE key, a security prompt is displayed.
• Press OK, the highlighted channel will be deleted
Lock
• Use the ▲/▼ keys to select a channel that you want to lock.
• Press the YELLOW key, the channel will be highlighted for locking.
• Press the YELLOW key again to cancel the lock.
Note:
The TV will ask for the PIN before a locked channel can be watched.
EN 19
Page 44

Main menu
Skip
• Use the ▲/▼ keys to select a channel that you want to skip.
• Press the GREEN key and the channel will be marked for skipping.
• Press the GREEN key again to remove the marking.
Note:
Channels marked for skipping cannot be selected using the CH+/CH- keys.
Favourites
The television has 8 groups of favourites. You can assign
each channel to any favourite group. A channel can be
assigned to several groups.
• Use the ▲/▼ keys to select a channel you want to add
to a favourite group.
• Press the FAV key. The Favourites menu appears.
• Select the favourites group from ▲/▼ to which you
want to add the channel.
• Press the OK key, the corresponding symbol appears in front of the favourite group.
• Press the EXIT key to close the Favourites menu.
Note:
• Switch o cancels the selection of all favourite groups.
• Use the BACK key to change the name of the selected favourite group.
Rename channel
Select a channel with the ▲/▼ keys and press the BACK key. The on-screen keyboard is displayed.
Use the navigation keys ◄/►/▲/▼ to select letters and conrm the letter with the OK key. When
the new channel name is complete, navigate to the OK eld and press the OK key. The channel then
receives the new name.
Channel/EPG
See page 15.
Channel/sort
This option allows you to sort the channels according to the specications (LCN, ONID, name, etc.)
within the list. As a result the previous sorting is lost.
Channel/LCN
Some DVB providers transmit LCN information. These allow the provider to generate a presorted
channel list. Only activate LCN if your provider supports this feature.
Picture/aspect ratio
This setting determines which picture format your TV uses and how content with a dierent aspect
ratio is adapted for your TV.
Note:
You only need to change this setting if you connect an external TV. For the built-in screen, the default
setting 16:9 PillarBox is optimal.
EN 20
Page 45

Main menu
Setting Meaning
4:3 Pan&Scan
4:3 Letterbox
16:9 PillarBox
16:9 Pan&Scan
Picture/HDMI resolution
Here you dene the resolution that is output via the HDMI output.
Note:
• Please also refer to the manual of your TV.
• This setting is only active when an external TV is connected via HDMI.
Channel search/automatic scan
When this option is activated, the automatic scan starts. See page 13.
Channel scan/manual scan
You can search for specic channels. To do this, you must know the technical parameters (frequency
or channel). The bar display at the bottom of the screen indicates whether a signal can be found with
the set parameters. You can also use the bar display to align your antenna. Start the manual channel
scan with the OK key.
For 4/3 TV. Contents deviating from the aspect ratio are displayed in full-screen
format if possible, undistorted, but with loss of information.
For 4/3 TV. Contents deviating from the aspect ratio are displayed undistorted
but possibly with "black bars".
For 16/9 TV. Contents deviating from the aspect ratio are displayed undistorted
but possibly with "black bars".
For 16/9 TV. 16/9 transmissions are displayed full-screen and undistorted. 4/3
transmissions are displayed undistorted but enlarged. This setting is particularly suitable for 4/3 "letterbox" transmissions to reduce the display of "black bars"
in this case.
Channel scan/country
Select the country in which you use the TV.
Channel scan/Antenna Power
If your antenna (e.g. an indoor antenna with amplier without
its own power supply) must be supplied with power from the
TV via the antenna cable, please enable this function.
Channel scan/Filter Internet Service
When this function is enabled, the TV will not store internet
channels during the channel scan.
Note:
• The TV cannot be connected to the internet and therefore cannot display internet channels.
• This function is not supported by all DVB platform
operators.
EN 21
Page 46

Main menu
Channel scan/Filter scrambled Channels
When this function is enabled, the TV will not store encrypted channels during the channel scan.
Note:
The TV cannot display encrypted channels.
Time/Time zone setting
The television automatically sets its clock as soon as a channel is received that transmits time. In
order for the TV to calculate the time correctly, the correct time zone must be set.
Setting Meaning
Auto
Manual
Time/Time Zone
If time zone setting: is set manually, you can set the
time zone here.
Time/Auto standby
Energy saving according to the requirements of an EU directive. The TV will turn o after 3 hours if no
user activity is detected.
Preferences/OSD language
Select the language in which the on-screen menus will be displayed.
Preferences/subtitle language
Select the preferred language for subtitles.
The TV sets the time zone automatically.
You must set the time zone yourself.
Preferences/audio language
Select the preferred language for audio tracks.
Preferences/digital audio
This option determines the format in which the audio signal
is available at the HDMI output:
Setting Meaning
PCM
RAW
Note:
• If you cannot hear sound from an external TV, please select the PCM setting.
• Please use the AUDIO key to select a multi-channel audio track of a TV channel or a video le, if
available.
• If you output multi-channel audio from the HDMI output as bitstream (RAW), the volume control
from the TV has no eect.
Digital stereo audio.
If a TV programme has a supported multi-channel audio track, this audio
format is output via the HDMI output. The device connected to the HDMI output
must be able to handle multi-channel audio.
EN 22
Page 47

Main menu
Preferences/audio description
Some television channels broadcast a separate audio track for visually impaired viewers (audio
description). This setting determines the volume at which the TV mixes the audio description into the
main audio track.
Preferences/Internal Speaker
This setting allows you to turn o the built-in speakers of the portable TV.
System/parental control
In this menu, you can set the age rating for a television programme from which the picture and sound
are only displayed after the PIN has been entered.
System/ Set PIN
After activating the option, you must rst enter the old PIN. The default PIN is 000000. The pointer
automatically jumps to the next line. Enter a new six-digit PIN here. After you have entered the PIN,
you must enter it again for security reasons.
Note:
If you have forgotten your PIN, you can use the Super PIN to
assign a new PIN. Super PIN: 888888
System/Restore factory default
You have the possibility to undo all settings and changes by
loading the factory settings. Call up the option and enter the
PIN.
Note:
• All settings are reset. You must then also perform the search run again.
• Image and speaker settings must be reset separately.
System/information
This option allows you to display information about software and hardware.
System/Software Update
If necessary, the latest rmware is provided on www.xoro.de together with an update guide. Please do
not install rmware that you have downloaded from other websites.
USB/XORO media player
This menu item opens the media player (see 18).
USB/photo settings
Display duration
The settings determine how long a single image is displayed during a slide show.
Transition eect
The settings determine how the transition between two images is animated.
Aspect ratio
Determines how image les are displayed.
EN 23
Page 48

Main menu - Technical data
Setting Meaning
Keep
Discard
USB/Subtitle settings
Font size
Determines the font size of subtitles in the media player.
Background
Denes the background on which subtitles are displayed in the media player.
Font colour
Denes the font colour in which subtitles are displayed.
Technical data
General data
Power supply 12 V DC/1.5 A
Power consumption 18 W (max.) / <0.5 W standby)
Dimensions 245 x 160 x 29,3 mm
Weight (approx.) 700 g (TV)/1000 g (TV, remote, power supply, antenna, vehicle cable,
AV-Cable)
Battery
Capacity (typical) 7.4 V/3500 mAh
Technology Li-Ion
Weight 130 g
Speakers
Power Stereo (2x1.3 W)
Images are displayed without distortion.
Images are adjusted to t the screen but may be distorted.
Screen
Technology TFT LCD with LED Backlight
DVB-T/T2 Tuner
Input frequency 174-230 MHz, 470-858 MHz
Antenna power supply 5 V, max. 100 mA
Memory locations 400 channels
Note:
Errors and technical changes reserved.
EN 24
Page 49

Troubleshooting
Symptoms Cause and solution
• Not all channels are
found
• No reception
• Image disturbances with
strong mosaics or artefacts, frozen images
No image on a connected
TV
No image on the built-in
screen
The built-in screen is too
dark
No sound
USB device is not recognized
Device shows the wrong
time
The TV switches o after
3 hours
Image is too small or
distorted
Charging the battery
takes longer than expected
The LED on the vehicle
power cable does not light
up. The TV is not supplied
with power.
• No DVB-T/T2 TV reception in your area
• Align the antenna correctly (see page 21).
• Repeat the scan (see page 21).
• Buy an ecient antenna (see page 13).
• If necessary, switch on the power supply for your antenna (see page
21, 13).
• HDMI: Check the HDMI resolution (page 10, SCREEN key, see page
21).
• AV OUT: You need a suitable cable (see page 16).
• The built-in screen is turned o when an HDMI connection is used.
• Change the setting of the LED backlight (see page 16 Page).
• Increase the volume (VOL +).
• HDMI: See page 22 for HDMI audio settings.
• AV OUT: You need a suitable cable (see page 16).
• The built-in speakers are switched o when headphones or an HDMI
device is connected.
• Check that the built-in speakers are turned on (see page 23).
• Please note the information on page 17.
• Please note the information on page 22 (time zone setting).
• See page 22, “Auto Standby" setting.
• See page 20.
• Switch o the TV with the main switch to reduce the charging time (see
page 12).
• The voltage at the input of the vehicle power cable is too high or too low.
• The output of the vehicle power cable is overloaded or short-circuited.
Disconnect the TV from the cable and check that the LED is lit. Contact
the XORO customer service.
• The tip of the vehicle power cable can be unscrewed for checking and
changing the fuse.
ATTENTION: The fuse may only be replaced by a fuse with identical
values. The fuse only responds in case of extreme overload. When
replacing a defective fuse, the vehicle electrical system, the television
and the general function of the vehicle power cable must therefore also
be checked. Consult a specialist.
EN 25
Page 50

Inhaltsverzeichnis
Energieverbrauch - Konformität - Pixelfehler 3
Datenblatt zum Energieverbrauch 3
Konformität 3
Pixelfehler 3
Informationen zu Ökodesign-Anforderungen an
externe Netzteile gemäß der Richtlinie 2009/125/
EG 4
Sicherheit und vorgesehene Verwendung 5
Stromversorgung und Akku 5
Aufstellung und Handhabung 5
Empfangsanlage 6
USB-Buchse 6
Fernbedienung und Batterien 6
Anschluss von Kopfhörern 6
Verwendung 6
Servicefall 6
Umwelt - Kundendienst 7
Wiederverwertung von Elektrogeräten 7
Wiederverwertung von Papier und Pappe 7
Wiederverwertung von Kunststoen 7
Entsorgung von Batterien 7
Lieferumfang - Übersicht 8
Lieferumfang 8
Übersicht: Hauptgerät 8
Übersicht: KFZ-Ladekabel 9
Übersicht: Fernbedienung 10
Übersicht: Gerätetasten 10
Stromversorgung 11
Fernbedienung 11
Fernseher 11
Zustandsanzeige - Ladevorgang - Antenne 12
Akku-LED 12
Power-LED 12
Antenne anschießen 12
Erstinstallation 13
Tägliche Bedienung 14
Wichtige Tasten und Funktionen 14
Bildschirmeinst. - Zusätzliche Geräte anschließen 16
Externen Fernseher anschließen 16
Zusätzliche Geräte anschl. - USB Media
Player 17
AV-Klinkenstecker 17
Kopfhörer 17
USB-Speichergeräte 17
USB Media Player 17
Unterstützte Dateiformate 18
Hauptmenü 19
Sender/Senderliste bearbeiten 19
Sender/EPG 20
Sender/Sortieren 20
Sender/LCN 20
Bildausgabe/Seitenverhältnis 20
Bildausgabe/HDMI-Auösung 21
Sendersuche/Autom. Suchlauf. 21
Sendersuche/Manueller Suchlauf 21
Sendersuche/Stromvers. für Antenne 21
Zeit/Zeitzoneneinstellung 22
Zeit/Auto Standby 22
Präferenzen/OSD-Sprache 22
Präferenzen/Untertitelsprache 22
Präferenzen/Tonspur 22
Präferenzen/Untertitelsprache 22
Präferenzen/Digital-Audio 22
Präferenzen/Audiobeschreibung 23
Präferenzen/Eingebaute Lautsprecher 23
System/Kindersicherung 23
System/PIN ändern 23
System/Auslieferzustand wiederherstellen 23
System/Informationen 23
System/Software aktualisieren 23
USB/XORO Media Player 24
USB/Fotoeinstellungen 24
USB/Untertiteleinstellungen 24
Technische Daten 24
Problembehebung 25
DE 2
Page 51
Energieverbrauch - Konformität - Pixelfehler
Datenblatt zum Energieverbrauch
Warenzeichen XORO
Modellkennung PTL 1015
Energieezienzklasse A
Sichtbare Bilddiagonale 25,6 cm / 10,1“
Leistungsaufnahme
(Ein-Zustand, Bildmodus “Normal“)
Energieverbrauch 12 kWh/Jahr, auf der Grundlage eines täglich vierstün-
Leistungsaufnahme
(Bereitschaftszustand / Aus-Zustand)
Bildschirmauösung (physikalisch) 1024 x 600 Pixel
Spitzenluminanzverhältnis 90%
Blei / Quecksilber <2 mg / 0 mg
Konformität
Hiermit erklärt die MAS Elektronik AG, dass der Funkanlagentyp XORO PTL 1015
der Richtlinie 2014/53/EU entspricht.
Der vollständige Text der EU-Konformitätserklärung ist unter der folgenden Internetadresse verfügbar:
www.xoro.de/downloads
8,1 W
digen Betriebs des Fernsehgerätes an 365 Tagen. Der
tatsächliche Energieverbrauch hängt von der Art der
Nutzung des Fernsehgerätes ab.
0,45 W / (nicht verfügbar)
Pixelfehler
Die in der folgenden Tabelle denierten Pixelfehler (Helle, Dunkle Pixel, Liniendefekte und Helligkeitsunterschiede) beschreiben die erlaubten Defekte in Art und Anzahl, welche von der Gewährleistung
ausgeschlossen sind.
Helle Pixel (Bright Dot) ≤ 2
Dunkle Pixel (Dark Dot) ≤ 3
Helle + Dunkle Pixel ≤ 3
DE 3
Page 52

Ökodesign-Anforderungen an externe Netzteile
Informationen zu Ökodesign-Anforderungen an externe Netzteile gemäß der Richtlinie 2009/125/EG
Name oder Handelsmarke des Herstellers,
Handelsregisternummer und Anschrift
Modellkennung F18L10-120150SPAV
Eingangsspannung 100 - 240 V
Eingangswechselstromfrequenz 50 Hz / 60 Hz
Ausgangsspannung 12,0 V
Ausgangsstrom 1,5 A
Ausgangsleistung 18,0 W
Durchschnittliche Ezienz im Betrieb 86.1%
Ezienz bei geringer Last (10 %) 80.2%
Leistungsaufnahme bei Nulllast 0.07 W
Handelsmarke: XORO
Hersteller: MAS Elektronik AG
Weidegrund 3
21614 Buxtehude
Deutschland
Handelsregister Amtsgericht Hamburg HRB 74448
DE 4
Page 53

Sicherheit und vorgesehene Verwendung
Das Blitzsymbol im Dreieck weist den Benutzer auf gefährliche Spannungen an einigen
freiliegenden Bauteilen im Inneren des Gerätes hin.
Das Ausrufezeichen im Dreieck weist den Benutzer auf wichtige Bedienungs- und
Wartungsanweisungen (Service) in diesem Handbuch hin, die unbedingt befolgt werden
sollten.
Stromversorgung und Akku
• Der tragbare Fernseher darf nur mit der auf der Rückseite aufgedruckten Spannung betrieben
werden.
• Das mitgelieferte Netzteil darf nur mit der aufgedruckten Netzspannung betrieben werden.
• Das mitgelieferte KFZ-Anschlusskabel darf nur mit der aufgedruckten Spannung betrieben werden.
• Der tragbare Fernseher darf nur über das mitgelieferte Zubehör (Netzteil und KFZ-Anschlusskabel) mit Strom versorgt werden.
• Schützen Sie das Gerät vor hohen Temperaturen (z.B. in geparkten Fahrzeugen). Der zulässige
Betriebs-Temperaturbereich liegt zwischen 5° C und 37° C; Luftfeuchte: < 90% (nicht kondensierend).
• Überlasten Sie keine Steckdosen, Verlängerungskabel oder sonstige Leitungen, da dies zu Bränden oder elektrischen Schocks führen kann.
• Trennen Sie das Gerät bei längerem Nichtgebrauch vom Stromnetz.
• Der im Fernseher eingebaute Akku darf nur durch den XORO-Kundendienst getauscht werden.
• Laden Sie den Akku mindestens alle 6 Monate auf, um Tiefentladung zu vermeiden. Die Ladeelektronik des Gerätes lädt aus Sicherheitsgründen tiefentladene Akkus nicht auf.
Aufstellung und Handhabung
• Stellen Sie bitte keine Gegenstände auf Kabel, da dadurch die Schutzfunktion verloren gehen
könnte. Vermeiden Sie große Belastungen von Kabeln, insbesondere an Buchsen und Steckern.
• Wenn Sie Stecker aus der Steckdose herausziehen wollen, ziehen Sie immer am Stecker und
nicht am Kabel. Das Kabel könnte ansonsten reißen.
• Der LCD-Bildschirm ist zerbrechlich. Vermeiden Sie jegliche mechanische Belastung des Bildschirms.
• Dieses Gerät darf nicht in der Nähe von Feuchtigkeit und Wasser positioniert werden. Fassen Sie
das Gerät niemals mit feuchten oder nassen Händen an.
• Schützen Sie das Gerät vor Feuchtigkeit und Witterungseinüssen.
• Setzen Sie das Gerät und die Fernbedienung nicht direkter Sonnenstrahlung aus. Dies beeinträchtigt die Funktion und könnte zu Schädigungen führen.
• Das Fernseher, das Netzteil sowie der Stecker des KFZ-Anschlusskabels erwärmen sich wäh-
rend des Betriebs. Stellen Sie die Geräte nicht auf wärmeempndlichen Oberächen.
• Die Önungen des Gehäuses dienen der Lüftung, damit das Gerät nicht überhitzt. Diese müssen
immer frei gehalten werden. Vermeiden Sie Hitzestau am Gerät.
• Das Gerät darf nicht in der Nähe von Hitzequellen, wie z.B. Öfen, Heizungen positioniert werden.
• Für zusätzlichen Schutz des Gerätes während eines Gewitters oder wenn es längere Zeit unbeaufsichtigt ist: Ziehen Sie den Netzstecker aus der Steckdose und den Antennenstecker aus
der Antennen-/Kabel-Anschlussbuchse. Dies verhindert Schäden aufgrund von Blitzschlag/Überspannung.
• In die Önungen des Gerätes dürfen keine Gegenstände eingeführt werden, da an einigen Stel-
len Strom ießt und der Kontakt mit diesen Stellen einen Stromschlag hervorrufen kann.
• Schließen Sie keine Zusatzgeräte an, die nicht vom Hersteller empfohlen sind.
• Stellen Sie das Gerät nicht auf eine instabile Fläche. Das Gerät könnte beschädigt oder Personen verletzt werden. Jegliche Befestigungen sollten nur nach den Herstellerinformationen
DE 5
Page 54

Sicherheit und vorgesehene Verwendung
angebracht werden oder von dem Hersteller bezogen werden.
• Ziehen Sie für die Reinigung den Netzstecker aus der Steckdose und schalten Sie das Gerät
über den Hauptschalter aus.
• Benutzen Sie keine Flüssigreiniger oder Reinigungssprays. Das Gerät darf nur mit einem feuchten Tuch gereinigt werden.
• Bewahren Sie kleine Zubehörteile außerhalb der Reichweite von Kindern auf, damit diese
nicht irrtümlich verschluckt werden.
Empfangsanlage
• Eine Außenantenne darf nicht in der Nähe von Stromleitungen oder sonstigen Stromkreisen angebracht werden, da der Kontakt mit solchen Leitungen tödlich enden kann.
• Um Sach- oder Personenschäden zu vermeiden und einen einwandfreien Betrieb zu gewährleisten, lassen Sie Ihre Außenantenne von einem Fachbetrieb installieren.
• Die Empfangsanlage muss den Vorschriften entsprechend geerdet sein.
USB-Buchse
• Die USB-Buchse des Fernsehers eignet sich nicht zum Auaden von Geräten mit eingebautem
Akku (z.B. Telefone, MP3-Player, Tablet Computer usw.).
• USB-Geräte, welche einen höheren Strom als 500 mA (0,5 A) benötigen, verletzten die USB-Spe-
zikationen und werden eventuell nicht vom Fernseher erkannt.
Fernbedienung und Batterien
• Entfernen und erneuern Sie alte Batterien. Alte Batterien können auslaufen und die Fernbedienung beschädigen.
• Austretende Batterieüssigkeit mit einem Tuch entfernen. Vermeiden Sie den Hautkontakt mit der
Flüssigkeit.
• Bei Verschlucken der Batterie oder Batterieüssigkeit suchen Sie sofort einen Arzt auf.
• Bei Haut-/Augenkontakt die Haut/Augen auswaschen und einen Arzt aufsuchen.
• Bitte halten Sie Batterien und die Fernbedienung von Kindern fern.
Anschluss von Kopfhörern
• Eine andauernde Belastung durch hohe Lautstärken kann bei Verwendung eines Kopfhörers zu
vorübergehendem oder dauerhaftem Gehörverlust führen.
• Vermeiden Sie höhere Lautstärken besonders über längere Zeiträume.
Verwendung
• Das Gerät ist für die Verwendung in Privathaushalten konzipiert.
• Kinder dürfen das Gerät nur unter der Aufsicht von Erwachsenen verwenden.
• Starker Tabakrauch beschädigt die Elektronik des Gerätes und kann durch Ablagerungen im Bildschirm zu sichtbaren Beeinträchtigungen der Bildqualität führen. Schäden und Beeinträchtigungen durch Tabakrauch werden nicht im Rahmen der Gewährleistung behoben.
Servicefall
• Führen Sie Reparaturen niemals selbst durch, überlassen Sie dies immer qualiziertem Personal.
• Es dürfen nur original Ersatz- und Zubehörteile verwendet werden.
• Das Gerät muss sofort außer Betrieb genommen werden, wenn es mit Wasser oder Feuchtigkeit
in Kontakt gekommen ist; das Gehäuse, der Bildschirm, Zubehör oder Kabel beschädigt sind;
das Gerät nicht ordnungsgemäß funktioniert; Gegenstände in das Gehäuse eingedrungen sind;
wenn sich lose Teile im Gerät benden oder der Akku nicht mehr korrekt geladen werden kann.
DE 6
Page 55

Umwelt - Kundendienst
Wiederverwertung von Elektrogeräten
Das Produkt wurde aus hochwertigen Materialien und Komponenten hergestellt, diese
sind recyclingfähig und können wiederverwendet werden können. Die durchkreuzte
Mülltonne auf dem Produkt und auf der Verpackung bedeutet, dass das Produkt nicht im
normalen Hausmüll entsorgt werden darf.
Informieren Sie sich über die vor Ort geltenden Bestimmungen zur separaten Entsorgung
elektronischer Geräte. Beachten Sie die örtlichen Bestimmungen und entsorgen Sie
keine alten Produkte mit dem normalen Hausmüll. Durch eine richtige Entsorgung alter
Produkte tragen Sie zum Umweltschutz und zur Gesundheit der Menschen bei.
Wiederverwertung von Papier und Pappe
Das Materialwiederverwertungssymbol auf dem Verpackungskarton und dem Benutzerhandbuch bedeutet, dass diese recyclingfähig sind. Entsorgen Sie die Verpackung nicht
mit dem normalen Hausmüll.
Wiederverwertung von Kunststoen
Das Materialwiederverwertungssymbol auf Kunststoteilen bedeutet, dass diese recyclingfähig sind. Entsorgen Sie die Kunststoe nicht mit dem normalen Hausmüll.
Entsorgung von Batterien
Jeder Verbraucher ist gesetzlich verpichtet, Batterien bei einer
Sammelstelle seiner Gemeinde oder im Handel abzugeben,
damit sie einer umweltschonenden Entsorgung zugeführt werden
können.
Das Entsorgen von Batterien im Hausmüll ist verboten!
Ein chemisches Symbol (Pb für Blei, Hg für Quecksilber, Cd für Kadmium) unter der durchgestrichenen Mülltonne bedeutet, dass die Batterie einen Anteil von mehr als 0,0005% Quecksilber, mehr als
0,004% Blei oder mehr als 0,002% Kadmium enthält.
Kontakt mit dem XORO-Kundendienst aufnehmen
Wir helfen Ihnen gerne bei Fragen zur Bedienung oder falls Probleme mit Ihrem Gerät auftreten.
Per Telefon: +49 4161 - 800 24 24 (Mo-Fr, 11.00 Uhr bis 17.00 Uhr, deutsch/englisch)
Per Fax +49 4161 - 800 24 62
Per E-Mail: support@ersservice.de
Adresse: ERS GmbH Elektronik Repair Service
Weidegrund 3/Halle1
21614 Buxtehude
Deutschland
DE 7
Page 56

Lieferumfang - Übersicht
Lieferumfang
Bitte vergewissern Sie sich, dass folgende Teile in der Verpackung enthalten sind:
• Tragbarer Fernseher
• Fernbedienung
• Netzteil
• KFZ-Anschlusskabel
• Antenne
• AV-Kabel
Hinweis:
Überprüfen Sie direkt nach dem Kauf die Vollständigkeit des Zubehörs. Sollte Zubehör fehlen, wenden
Sie sich bitte direkt an den Händler, beim dem Sie das Gerät erworben haben.
Übersicht: Hauptgerät
DE 8
Page 57

Übersicht
Übersicht: KFZ-Ladekabel
Position Beschriftung Erklärung
1 MENU/OK/EXIT/CH/
VOL
2 OFF ON Hauptschalter
3 DC IN 12V Buchse für die Stromversorgung
4 ANTENNA Antennenbuchse
5 HDMI OUT HDMI-Ausgang
6 Schraubgewinde (M6)
7 Standfuß
8 USB USB-Buchse
9 EAR PHONE Kopfhörerausgang
10 AV OUT AV-Ausgang
11 Stereo-Lautsprecher
12 Ladezustandsanzeige
13 Betriebszustandsanzeige
14 Empfänger für Signale der Fernbedienung
15 Betriebsanzeige
16 Masse
17 Plus-Pol/Schraubverschluss für den Sicherungshalter
Nahbedienungstasten
DE 9
Page 58

Übersicht
Übersicht: Fernbedienung
POWER Gerät ein-/ausschalten
Mute Ton stummschalten
GOTO Zu einer bestimmten Wiedergabeposition springen
RPT Wiederholungsmodus aktivieren
SUB-T Untertitel aufrufen
SCREEN Bildschirmeinst. anzeigen/HDMI-Auösung ändern
tt uu Bildsuchlauf rückwärts/vorwärts
Itt uuI Vorherige/nächste Datei
AUDIO Tonspuren wechseln
u|| Wiedergabe pausieren/starten
g USB Media-Player önen/Wiedergabe stoppen
ROT Rote Funktionstaste
GRÜN Grüne Funktionstaste
GELB Gelbe Funktionstaste
BLAU/SLEEP Blaue Funktionstaste, Sleep-Timer stellen
MENU Hauptmenü einblenden
EXIT Menü verlassen
▲/▼/◄/► Elemente im Bildschirmmenüs auswählen
OK/LIST Auswahl bestätigen, Senderliste anzeigen
i Informationen anzeigen
BACK Vorherigen Sender aufrufen (Zurück)
VOL+/VOL- Lautstärke ändern
EPG Elektronischen Programmführer einblenden
TXT Videotext einblenden
CH Sender umschalten
0-9 Zahleneingabe
TV/RADIO Umschalten zwischen TV- und Radiomodus
FAV Favoritenlistenauswahl einblenden
Übersicht: Gerätetasten
MENU Hauptmenü einblenden/Media Player: Zurück
OK Auswahl bestätigen, Senderliste anzeigen
EXIT / Menü verlassen, Gerät ein-/ausschalten (lange
drücken)
▲CH▼ Sender umschalten, Elemente im Bildschirmmenüs
auswählen
◄VOL► Lautstärke ändern, Elemente im Bildschirmmenüs
auswählen
OFF ON Mechanischer Hauptschalter.
Gerät komplett aus- und einschalten.
DE 10
Page 59

Stromversorgung
Fernbedienung
• Önen Sie den Batterienfachdeckel, indem Sie ihn in Pfeilrichtung aufschieben.
• Legen Sie die Batterien (1,5V Größe AAA) in das Fach ein. Achten Sie bitte
beim Einlegen der Batterien auf die richtige Polarität (+/-). Orientieren Sie sich
hierzu an den Markierungen auf der Fernbedienung und den Batterien.
• Legen Sie den Batterienfachdeckel wieder auf.
Fernseher
Schieben Sie den Hauptschalter des Fernsehers zunächst in
die Position OFF.
Verbinden Sie den Fernseher (Buchse DC IN 12V) unter
Verwendung des Netzteils mit einer Steckdose oder unter
Verwendung des KFZ-Anschlusskabels mit einem Zigarettenanzünderanschluss in einem KFZ.
Schieben Sie den Hauptschalter in Position ON, um den
Fernseher einzuschalten.
Hinweis:
• Der eingebaute Akku wird geladen, sobald der Fernseher mit Strom versorgt wird. Der Ladevorgang kann nicht mit dem Hauptschalter unterbrochen werden.
• Der Fernseher darf nur über das mitgelieferte Zubehör (Netzteil oder KFZ-Anschlusskabel) mit
Strom versorgt werden.
• Das mitgelieferte KFZ-Anschlusskabel unterstützt Eingangsspannungen zwischen 12 V - 24 V
und erzeugt daraus eine stabile Versorgungsspannung für den Fernseher. Bei Verwendung anderer Anschlusskabel kann der Fernseher schwer beschädigt werden!
• Die Kontrollleuchte am KFZ-Anschlusskabel leuchtet, wenn es den Fernseher ordnungsgemäß
mit Strom versorgen kann. Beachten Sie 25, falls das KFZ-Kabel nicht korrekt funktioniert.
DE 11
Page 60

Zustandsanzeige - Ladevorgang - Antenne
Die LEDs an der Gerätefront zeigen den Ladezustand des eingebauten Akkus und den Betriebszustand des Fernsehers an.
Akku-LED
Farbe Bedeutung
ROT Der Fernseher wird mit Strom versorgt. Akku wird geladen.
GRÜN Der Fernseher wird mit Strom versorgt. Akku ist vollständig aufgeladen.
"aus" Fernseher wird nicht mit Strom versorgt. Netzteil oder KFZ-Anschlusskabel nicht an-
Hinweis:
Während des Fernsehens wird Ihnen beim Senderwechsel oder nach dem Drücken der Taste i der
ungefähre Ladezustand des Akkus angezeigt. Ist der Fernseher mit dem Netzteil oder dem KFZ-Anschlusskabel verbunden, kann der Ladezustand nicht angezeigt werden.
Power-LED
Farbe Bedeutung
ROT Der Hauptschalter bendet sich in Position ON. Der Fernseher bendet sich im
Ein kompletter Ladevorgang dauert ca. 4 Stunden (Hauptschalter in Position OFF).
bzw. ca. 6 Stunden (Hauptschalter in Position ON).
geschlossen.
Standby-Modus (Bereitschaftsbetrieb).
Der Fernseher kann mit der
Drücken der Taste EXIT/
GRÜN Der Hauptschalter bendet sich in Position ON. Der Fernseher ist eingeschaltet.
“aus“ Der Hauptschalter bendet sich in Position OFF, der Fernseher ist von der Stromver-
sorgung getrennt oder der Akku ist komplett entladen.
- Taste auf der Fernbedienung oder durch längeres
direkt am Fernseher eingeschaltet werden.
Antenne anschießen
Verbinden Sie die mitgelieferte Antenne mit der Buchse ANTENNA (siehe Seite 8).
Hinweis:
Die mitgelieferte Antenne ist nicht für jedes Empfangsgebiet die optimale Wahl. Informieren Sie sich
im Fachhandel in Ihre Nähe zur Auswahl des passenden Antenne.
DE 12
Page 61

Erstinstallation
Nachdem Sie den Hauptschalter in Position ON geschoben haben, leuchtet zunächst die Power-LED
grün. Nach einem Augenblick erscheint Bitte warten gefolgt von dem Startbildschirm auf dem Bildschirm. Ist der Startvorgang abgeschlossen, wird das Installationsmenü angezeigt.
Mit den Pfeiltasten ▲/▼ können Sie zwischen den Menüpunkten wechseln. Wenn ein Menüpunkt
farblich hinterlegt ist, können Sie diesen mit den Tasten
◄/► anpassen.
OSD-Sprache
Wählen Sie aus, in welcher Sprache die Bildschirmmenüs
angezeigt werden sollen.
Land
Wählen Sie aus, in welchem Land Sie den Fernseher betreiben wollen.
Stromvers. für Antenne
Muss Ihre Antenne (z.B. eine Zimmerantenne mit Verstärker
ohne eigenes Netzteil) vom Fernseher über das Antennenkabel mit Strom versorgt werden, schalten Sie diese
Funktion ein.
Hinweis:
Für die mitgelieferte Antenne muss die Versorgungsspannung eingeschaltet sein.
Sendersuche
Starten Sie die Sendersuche mit der OK Taste. Der Suchlauf kann einige Minuten in Anspruch nehmen. Sollte der
Suchlauf nicht alle Sender nden, richtigen Sie Ihre Antenne
neu aus bzw. verwenden Sie eine leistungsfähigere Antenne
und starten Sie den Suchlauf erneut (siehe Seite 21).
Hinweise:
• Der Suchlauf kann einige Minuten in Anspruch nehmen.
• Sollte der Suchlauf nicht alle Sender nden, richtigen Sie Ihre Antenne neu aus bzw. verwenden
Sie eine leistungsfähigere Antenne und starten Sie den Suchlauf erneut (siehe Seite 21)
• In einigen Ländern (z.B. Deutschland) werden keine DVB-T/T2 Radiosender übertragen.
• Nach einem Umzug in eine andere Region müssen Sie den Sendersuchlauf erneut ausführen.
DE 13
Page 62

Tägliche Bedienung
Wichtige Tasten und Funktionen
Senderwechsel
Mit den Tasten CH▲▼ können Sie den Sender wechseln.
Über die Tasten 0-9 können Sie die Sendernummer auch
direkt eingeben.
Senderliste
Rufen Sie die Senderliste durch das Drücken der OK/LIST
Taste auf.
▲/▼ Sender auswählen.
◄/► Zwischen Radio- und Fernsehsendern
wechseln.
OK Aufrufen des ausgewählten Senders.
EXIT Senderliste ausblenden.
Hinweis:
Wie Sender sortiert werden können, lesen Sie ab Seite 19.
TV/Radio
Wenn Sie zwischen dem Fernseh- und Radiosendern wechseln möchten, dann drücken Sie die TV/
RADIO Taste.
Favoriten
Haben Sie Favoritenlisten angelegt (siehe Seite 20), können Sie mit der FAV Taste auf die Favoritenlisten zugreifen.
◄/► Favoritenliste auswählen
▲/▼ Sender auswählen
OK Aufrufen des ausgewählten Senders
EXIT Favoritenliste ausblenden
Sprachen: Untertitel und Ton
Das Menü Untertitelsprache önen Sie mit der Taste
SUB-T. Das Menü Tonspur önen Sie mit der Taste AUDIO.
▲/▼ Sprache auswählen
OK Aktivieren der ausgewählten Sprache
EXIT Menü ausblenden
Hinweise:
• Bei einigen Sendern müssen Sie den Videotext önen und die Seitenzahl für die Untertitel von
Hand eingeben.
• Wählen Sie aus, wenn Sie keine Untertitel mehr angezeigt bekommen wollen.
DE 14
Page 63

Tägliche Bedienung
Sleep-Timer stellen
Drücken Sie die Taste SLEEP mehrfach, um eine Zeit zu wählen, nach der sich der Fernseher abschaltet.
Videotext
Den Videotext aktivieren Sie über die TXT Taste.
0-9 Videotextseite auswählen
▲/▼ Vorherige/nächste Seite auswählen
◄/► Unterseiten auswählen
TV/Radio Videotextanzeige verstecken
EXIT Videotextanzeige beenden
Stummschaltung/Ton aus
Drücken Sie die MUTE Taste auf der Fernbedienung, um den Ton auszuschalten. Drücken Sie die
MUTE Taste erneut, um den Ton wieder anzuschalten.
Lautstärke ändern
Mit den Tasten VOL+ / VOL- ändern Sie die Lautstärke.
Hinweis:
Wenn Sie digitalen Mehrkanal-Ton über den HDMI-Ausgang als Bitstream ausgeben, hat die Lautstärkeregelung vom Fernseher keine Wirkung (siehe Seite 22)
Informationen
Drücken Sie die Taste i, um unterschiedliche Informationen zum aktuellen Programm und den ungefähren Akku-Ladezustand anzuzeigen.
Hinweise:
• Die Akkuanzeige ist nicht verfügbar, während der Akku geladen wird.
Elektronischer Programmführer
Drücken Sie die EPG Taste, um den Programmführer anzuzeigen.
▲/▼ Sendung auswählen
◄/► Sender umschalten
GELB/BLAU Durch die Sendungsbeschreibung
blättern.
EXIT EPG ausblenden
DE 15
Page 64

Bildschirmeinst. - Zusätzliche Geräte anschließen
Während der eingebaute Bildschirm aktiv ist, kann mit der
Taste SCREEN das Menü mit den Bildschirmeinstellungen
angezeigt werden.
HELLIGKEIT/KONTRAST/FARBE
Stellen Sie die Werte Ihren Wünschen entsprechen ein.
LED-BL
Diese Einstellung beeinusst die Helligkeit der LED-Beleuchtung des Bildschirms und den Energieverbrauch bzw.
die Akkulaufzeit.
Einstellung Bedeutung
ÖKO
NORMAL
OUTDOOR
SPRACHE
Ändert die Sprache für das Menü mit den Bildschirmeinstellungen.
RESET
Setzt die Bildschirmeinstellungen auf den Auslieferzustand zurück.
Externen Fernseher anschließen
Sie können den tragbaren Fernseher über ein HDMI- oder ein AV-Kabel mit einem größeren Fernseher verbinden.
Reduzierte Bildschirmhelligkeit. Geringer Energieverbrauch und
lange Akku-Laufzeit.
Mittlere Helligkeit.
Maximale Helligkeit, z.B. beim Einsatz des Fernsehers im Außenbereich. Die Akkulaufzeit fällt in diesem Modus kürzer aus.
HDMI-Ausgang
Verbinden Sie den HDMI-Ausgang (siehe Seite 8) des tragbaren Fernsehers mit einem HDMIEingang eines anderen Fernsehers. Lesen Sie im Handbuch Ihres Fernsehers nach, wie Sie den
HDMI-Eingang aufrufen. Für die Verbindung wird ein HDMI-Kabel benötigt. Dieses gehört nicht zum
Lieferumfang des Fernsehers. Der eingebaute Bildschirm sowie die Lautsprecher des tragbaren Fernsehers werden automatisch abgeschaltet, sobald eine HDMI-Verbindung verwendet wird.
Hinweis:
Lesen Sie auf Seite 10 und 21, wie Sie die HDMI-Auösung verändern können.
AV-Ausgang
Verbinden Sie den AV OUT-Ausgang (siehe Seite 8) des tragbaren Fernsehers mit einem AV-Eingang eines anderen Fernsehers. Lesen Sie im Handbuch Ihres Fernsehers nach, wie Sie den AV-Eingang aufrufen.
Hinweise:
• Beachten Sie Seite 20, um das Seitenverhältnis an den angeschlossenen Fernseher anzupassen.
• Sie können im tragbaren Fernseher eingebauten Lautspecher abschalten. Siehe Seite 23.
• Für die Verbindung wird das AV-Kabel aus dem Lieferumfang des tragbaren Fernsehers benötigt.
DE 16
Page 65

Zusätzliche Geräte anschl. - USB Media Player
AV-Klinkenstecker
Durchmesser: 3,5mm
Länge: 14mm
PIN-Belegung
1. PIN: Audio Links
2. PIN: Audio Rechts
3. PIN: Video FBAS
4. PIN: Masse
Kopfhörer
Sie können Stereo-Kopfhörer (3-poliger Stecker) und die
meisten Headsets (4-poliger Stecker, CTIA-Standard) mit
dem Fernseher verbinden (Siehe Seite 8). Die eingebauten Lautsprecher werden abgeschaltet, wenn ein Kopfhörer
angeschlossen wird.
USB-Speichergeräte
Verbinden Sie USB-Speichergeräte mit der USB-Buchse des tragbaren Fernsehers (siehe Seite 8)
.
Hinweise:
• Erstellen Sie eine Datensicherung aller Dateien auf einem USB-Speichergerät, bevor Sie dieses
mit dem Fernseher verbinden.
• Sollte Ihr USB-Speichergerät nicht mehr erkannt werden, ist evtl. das Dateisystem beschädigt.
Überprüfen Sie es bitte mit der Datenträgerdiagnose Ihres Computers.
• Der Fernseher benötigt evtl. einige Zeit, bis USB-Geräte erkannt und betriebsbereit sind. Während dieser Zeit kann der Fernseher verzögert auf Eingaben der Fernbedienung reagieren.
• Eine Vielzahl unterschiedlicher USB-Speichermedien wird zur Zeit verkauft und nicht alle ent-
sprechen den Spezikationen für USB-Massenspeichergeräte. Sollte Ihr USB-Speichergerät
nicht erkannt werden, probieren Sie bitte einen anderen USB-Speicher aus.
• Speichergeräte mit Partitionsstil "MBR" bis 2048GB (2TB) werden unterstützt.
• Speichergeräte mit dem Partitionsstil "GPT" können mit dem Fernseher nicht verwendet werden
USB Media Player
Önen Sie den Media Player mit der g Taste.
Der Media Player erlaubt die Wiedergabe folgender Dateitypen: Musik, Foto und Film.
Nutzen Sie die Tasten ◄/►, um dem gewünschten Dateityp zu wählen und bestätigen Sie Ihre Auswahl mit der OK
Taste.
Dateibrowser
▲/▼ Datei/Ordner auswählen
OK Datei/Ordner önen/wiedergeben
Vollbild-Wiedergabe
►|| Diashow starten (nur bei Bilddateien)
BLAU Ansicht ändern (nur bei Bilddateien)
BACK/MENU Navigation zu dem übergeordneten Ordner
EXIT Zurück zum Auswahlbildschirm
Wiedergabe - allgemein
►►| Nächste Datei wiedergeben
|◄◄ Vorherige Datei wiedergeben
DE 17
Page 66

USB Media Player
►|| Wiedergabe pausieren/fortsetzen
STOP g Wiedergabe beenden
GOTO Zu einer bestimmten Wiedergabeposition springen (nicht bei Bildwiedergabe)
RPT Dateiwiederholung/Zufallswiedergabe
i Dateiinformationen anzeigen (nicht bei Musikwiedergabe)
Wiedergabe - Foto
ROT Vergrößern bzw. verkleinern des Bildes
GRÜN Rotation des Bildes um 90° gegen den Uhrzeigersinn
GELB Rotation des Bild um 90° im Uhrzeigersinn
Wiedergabe - Film
AUDIO Tonspuren wechseln (nur bei bestimmten Videodateien)
SUB-T Untertitel anzeigen (nur bei bestimmten Videodateien)
ROT Umschalten zwischen Vollbild- und Vorschauansicht
Wiedergabe fortsetzen
Für einige Dateiformate kann der Fernseher die Position speichern, an der Sie beim letzten Abspielen
die Wiedergabe gestoppt haben.
Konnte der Fernseher die letzte Wiedergabeposition speichern, blendet er beim erneuten Starten der
Wiedergabe am oberen Bildschirmrand die Auswahl Letzte Pos./[EXIT] Abbrechen ein.
Letzte Pos.: Die Wiedergabe an der gespeicherten Position fortsetzen.
[EXIT] Abbrechen: Fortsetzen der Wiedergabe abbrechen und Datei von Anfang an
wiedergeben.
Die Auswahl zwischen den Optionen erfolgt mit den Taste ▲/▼, bestätigen Sie Ihre Auswahl mit OK.
Unterstützte Dateiformate
Fotos: JPEG, BMP (Wir empfehlen fernsehgerechte Auösungen z.B. 1280x720 oder 1920x1080)
Musik: MP3
Video:
Video Codec Auösung Prol Container
MPEG1
MPEG2
MP4 1080P@30fps Simple Prole, Advanced Simple Prole
H.264 1080P@30fps Main Prole, High Prole @Level 4.2 AVI, MKV, MP4, TS
HEVC H.265 1080P@60fps Main10 Prole, High Tier @Level4.1 TS, MKV
1080P@30fps MP@HL MPEG, MPG, TS
AVI, MKV
@Level5
Hinweise:
• GMC wird nicht unterstützt.
• Bitrate: 40Mbit/sek.
• Seitenverhältnis: 4/3, 16/9
• Irrtum und technische Änderungen vorbehalten.
DE 18
Page 67

Hauptmenü
Drücken Sie die Taste MENU, um das Hauptmenü anzuzeigen.
Sender/Senderliste bearbeiten
In dem Untermenü haben Sie die Möglichkeit, die gefundenen Sender Ihren Wünschen entsprechend zu sortieren
bzw. zu bearbeiten. Sie erhalten nur dann Zugang zu diesem
Menü, wenn Sie die richtige PIN eingeben (Standard: 0 0 0
0 0 0, siehe Seite 23).
Wenn Sie die Senderbearbeitung verlassen, werden die
Änderungen gespeichert.
Bewegen
• Wählen Sie mit den Tasten ▲/▼ einen Sender aus, welchen Sie auf eine andere Programm-
nummer verschieben wollen.
• Drücken Sie die ROTE Taste, der Sender wird für das Verschieben markiert.
• Wählen Sie mit den Tasten ▲/▼ den Platz aus, zu dem Sie den markierten Sender verschieben
wollen.
• Drücken Sie die OK, der Sender wird an dem gewählten Platz in die Senderliste eingefügt.
Hinweis:
Sender lassen sich nur bewegen, wenn LCN abgeschaltet ist (siehe Seite 20).
Swap
• Wählen Sie mit den Tasten ▲/▼ einen Sender aus, dessen Programmnummer (LCN) Sie mit
einem anderen Sender austauschen wollen.
• Drücken Sie die ROTE Taste.
• Geben Sie über die Tasten 0-9 die Programmnummer für den Austausch ein.
Hinweis:
Swap steht nur zur Verfügung, wenn LCN eingeschaltet ist (siehe Seite 20).
Löschen
• Wählen Sie mit den Tasten ▲/▼ einen Sender aus, den Sie löschen möchten.
• Drücken Sie die BLAUE Taste, eine Sicherheitsabfrage wird angezeigt.
• Drücken Sie die OK, der markierte Sender wird gelöscht
Sperren
• Wählen Sie mit den Tasten ▲/▼ einen Sender aus, den Sie sperren möchten.
• Drücken Sie die GELBE Taste, der Sender wird für das Sperren markiert.
• Drücken Sie die GELBE Taste erneut, um die Sperrung aufzuheben.
Hinweis:
Der Fernseher fragt nach der PIN, bevor ein gesperrter Sender angeschaut werden kann.
DE 19
Page 68

Hauptmenü
Überspringen
• Wählen Sie mit den Tasten ▲/▼ einen Sender aus, den Sie überspringen möchten.
• Drücken Sie die GRÜNE Taste, der Sender wird für das Überspringen markiert.
• Drücken Sie die GRÜNE Taste erneut, um die Markierung zu entfernen.
Hinweis:
Für das Überspringen markierte Sender lassen sich nicht über die Tasten CH+/CH- aufrufen.
Favoriten
Der Fernseher verfügt über 8 Favoritengruppen. Sie können
jeden Sender jeder Favoritengruppe zuordnen. Ein Sender
kann mehreren Gruppen zugeordnet werden.
• Wählen Sie mit den Tasten ▲/▼ einen Sender aus,
den Sie zu einer Favoritengruppen hinzufügen wollen.
• Drücken Sie die Taste FAV. Das Menü Favoriten wird
eingeblendet.
• Wählen Sie die Favoritengruppe aus ▲/▼, zu der Sie
den Sender hinzufügen wollen.
• Drücken Sie die Taste OK, vor der Favoritengruppe erscheint das entsprechende Symbol.
• Drücken Sie die Taste EXIT, um das Favoriten-Menü zu schließen.
Hinweis:
• Ausschalten hebt die Auswahl aller Favoritengruppen auf.
• Mit der Taste BACK können Sie den Namen der ausgewählten Favoritengruppe ändern.
Sender umbenennen
Wählen Sie mit den ▲/▼ Tasten einen Sender aus und drücken Sie die BACK Taste. Die Bildschirm-
tastatur wird eingeblendet. Wählen Sie mit den Navigationstasten ◄/►/▲/▼ Buchstaben aus und
bestätigen Sie den Buchstaben mit der OK Taste. Ist der neue Sendername komplett, dann navigieren
Sie zu dem OK-Feld und drücken Sie die OK Taste. Der Sender erhält dann den neuen Namen.
Sender/EPG
Siehe Seite 15.
Sender/Sortieren
Mit dieser Option können Sie die Sender nach den Vorgaben (LCN, ONID, Name usw.) innerhalb der
Liste sortieren. Die vorherige Sortierung geht dabei verloren.
Sender/LCN
Einige DVB-Anbieter übertragen LCN-Informationen. Diese erlauben es dem Anbieter, eine vorsortierte Senderliste zu erzeugen. Aktivieren Sie LCN nur, wenn Ihr Anbieter dieses Merkmal unterstützt.
Bildausgabe/Seitenverhältnis
Diese Einstellung bestimmt, welches Bildformat Ihr Fernseher verwendet und wie Inhalte mit abweichendem Seitenverhältnis für Ihren Fernseher angepasst werden.
Hinweis:
Sie müssen diese Einstellung nur verändern, wenn Sie einen externen Fernseher anschließen. Für
den eingebauten Bildschirm ist die Voreinstellung 16:9 PillarBox optimal.
DE 20
Page 69

Hauptmenü
Einstellung Bedeutung
4:3 Pan&Scan
4:3 Letterbox
16:9 PillarBox
16:9 Pan&Scan
Bildausgabe/HDMI-Auösung
Hier denieren Sie die Auösung, die über den HDMI-Ausgang ausgegeben wird.
Hinweise:
• Bitte beachten Sie auch das Handbuch Ihres Fernsehers.
• Diese Einstellungen ist nur aktiv, wenn ein externer Fernseher über HDMI angeschlossen wurde.
Sendersuche/Autom. Suchlauf.
Bei Aktivierung dieser Option startet die automatische Suche. Siehe Seite 13.
Sendersuche/Manueller Suchlauf
Sie können gezielt nach bestimmten Sendern suchen. Dazu müssen Ihnen die technischen Parameter
(Frequenz bzw. Kanal) bekannt sein. Die Balkenanzeige am unteren Bildschirmrand zeigt an, ob mit
den eingestellten Parametern ein Signal gefunden werden kann. Sie können mit Hilfe der Balkenanzeige auch Ihre Antenne ausrichten. Starten Sie den manuellen Sendersuchlauf mit der Taste OK
Für 4/3 Fernseher. Vom Seitenverhältnis abweichende Inhalte werden nach
Möglichkeit bildschirmfüllend dargestellt, unverzerrt, jedoch mit Informationsverlust.
Für 4/3 Fernseher. Vom Seitenverhältnis abweichende Inhalte werden unverzerrt aber ggf. mit "schwarzen Balken" dargestellt.
Für 16/9 Fernseher. Vom Seitenverhältnis abweichende Inhalte werden unverzerrt aber ggf. mit "schwarzen Balken" dargestellt.
Für 16/9 Fernseher. 16/9 Übertragungen werden bildschirmfüllend und unverzerrt dargestellt. 4/3 Übertragungen werden unverzerrt aber vergrößert dargestellt. Diese Einstellungen ist besonders für 4/3 "Letterbox"-Übertragungen geeignet, um die Anzeige von "schwarzen Balken" in diesem Fall zu reduzieren.
Sendersuche/Land
Wählen Sie hier, in welchem Land Sie den Fernseher verwenden.
Sendersuche/Stromvers. für Antenne
Muss Ihre Antenne (z.B. eine Zimmerantenne mit Verstärker
ohne eigenes Netzteil) vom Fernseher über das Antennenkabel mit Strom versorgt werden, schalten Sie diese
Funktion bitte ein.
Sendersuche/Internetsender ignorieren
Wird diese Funktion eingeschaltet, speichert der Fernseher
keine Internetsender während des Sendersuchlaufs ab.
Hinweise:
• Der Fernseher kann nicht mit dem Internet verbunden
werden und daher die Internetsender nicht anzeigen.
• Diese Funktion wird nicht von allen DVB-Plattformbetreibern unterstützt.
DE 21
Page 70

Hauptmenü
Sendersuche/Nur freie Sender speichern
Wird diese Funktion eingeschaltet, speichert der Fernseher keine verschlüsselten Sender während
des Sendersuchlaufs ab.
Hinweis:
Der Fernseher kann keine verschlüsselten Sender anzeigen.
Zeit/Zeitzoneneinstellung
Der Fernseher stellt seine Uhr automatisch, sobald ein Sender empfangen wird, der die Uhrzeit überträgt. Damit der Fernseher die Uhrzeit korrekt berechnen kann, muss die richtige Zeitzone eingestellt
werden.
Einstellung Bedeutung
Auto
Manuell
Zeit/Zeitzone
Wenn Zeitzoneneinstellung: Manuell eingestellt ist,
können Sie hier die Zeitzone festlegen.
Zeit/Auto Standby
Energiesparen nach Vorgabe einer EU-Richtlinie. Der Fernseher schaltet nach 3 Stunden ab, wenn
keine Benutzeraktivität festgestellt wird.
Präferenzen/OSD-Sprache
Wählen Sie aus, in welcher Sprache die Bildschirmmenüs
angezeigt werden sollen.
Der Fernseher bestimmt die Zeitzone
automatisch.
Sie müssen die Zeitzone selbst festlegen.
Präferenzen/Untertitelsprache
Wählen Sie die bevorzugte Sprache für Untertitel.
Präferenzen/Tonspur
Wählen Sie die bevorzugte Sprache für Tonspuren.
Präferenzen/Digital-Audio
Mit dieser Option bestimmen Sie, in welchem Format das Audio-Signal am HDMI Ausgang zur Verfügung steht:
Einstellung Bedeutung
PCM
RAW
Digitaler Stereo-Ton.
Wenn eine TV-Sendung über eine unterstützte Mehrkanal-Tonspur verfügt,
wird dieses Tonformat über den HDMI-Ausgang ausgegeben. Das am HDMIAusgang angeschlossene Gerät muss Mehrkanalton verarbeiten können.
DE 22
Page 71

Hauptmenü
Hinweise:
• Sollten Sie keinen Ton über einen externen Fernseher hören können, wählen Sie bitte die Einstellung PCM.
• Bitte benutzen Sie die AUDIO Taste, um eine ggf. verfügbare Mehrkanal-Tonspur eines Fernsehsenders oder eine Video-Datei zu wählen.
• Wenn Sie Mehrkanal-Ton über den HDMI-Ausgang als Bitstream (RAW) ausgeben, hat die Lautstärkeregelung vom Fernseher keine Auswirkung.
Präferenzen/Audiobeschreibung
Manche Fernsehsender übertragen eine separate Tonspur für sehbehinderte Zuschauer (Audiodeskription). Diese Einstellung legt fest, mit welcher Lautstärke der Fernseher die Audiodeskription in
die Haupt-Tonspur mischt.
Präferenzen/Eingebaute Lautsprecher
Mit dieser Einstellung können Sie die im tragbaren Fernseher eingebauten Lautsprecher abschalten.
System/Kindersicherung
In diesem Menü legen Sie fest, ab welcher Altersfreigabe für
ein Rundfunkprogramm Bild und Ton erst nach Eingabe der
PIN angezeigt werden.
System/PIN ändern
Nach dem Aktivieren der Option müssen zuerst die alte PIN
eingeben. Die Standard-PIN ist 000000. Der Zeiger springt
automatisch in die nächste Zeile. Geben Sie hier eine neue
sechsstellige PIN ein. Nach der Eingabe müssen Sie zur
Sicherheit noch mal die PIN eingeben.
Hinweis:
Sollten Sie Ihre PIN vergessen haben, können Sie die Super-PIN verwenden, um eine neue PIN zu
vergeben. Super-PIN: 888888
System/Auslieferzustand wiederherstellen
Sie haben die Möglichkeit, alle Einstellungen und Änderungen rückgängig zu machen, indem Sie die
Werkseinstellungen laden. Rufen Sie die Option auf und geben Sie die PIN ein.
Hinweise:
• Alle Einstellungen werden zurückgesetzt. Sie müssen dann auch den Suchlauf erneut durchführen.
• Bild- und Lautsprechereinstellungen müssen separat zurückgesetzt werden.
System/Informationen
Mit dieser Option können Sie Informationen über Software und Hardware anzeigen lassen.
System/Software aktualisieren
Falls nötig, wird aktuelle Firmware auf www.xoro.de zusammen mit einer Aktualisierungsanleitung
bereitgestellt. Bitte installieren Sie keine Firmware, welche Sie von anderen Internetseiten heruntergeladen haben.
USB/XORO Media Player
Dieser Menüpunkt önet den Media Player (siehe Seite 18).
DE 23
Page 72

Hauptmenü - Technische Daten
USB/Fotoeinstellungen
Anzeigedauer
Die Einstellungen bestimmt, wie lange ein einzelnes Bild während einer Diashow angezeigt wird.
Übergangseekt
Die Einstellungen bestimmt, wie der Übergang zwischen zwei Bildern animiert wird.
Seitenverhältnis
Bestimmt, wie Bilddateien angezeigt werden.
Einstellung Bedeutung
Beibehalten
Verwerfen
USB/Untertiteleinstellungen
Schriftgröße
Bestimmt die Schriftgröße von Untertiteln im Media-Player.
Hintergrund
Legt fest, auf welchem Hintergrund Untertitel im Media-Player angezeigt werden.
Schriftfarbe
Legt fest, in welcher Schriftfarbe Untertitel angezeigt werden.
Technische Daten
Allgemeine Daten
Spannungsversorgung 12 V DC/1, A
Leistungsaufnahme 18 W (max.) / <0,5 W (Standby)
Abmessungen 245 x 160 x 29,3 mm
Gewicht (ca.) 700 g (TV)/1000 g (TV, Fernb., Netzteil, Antenne, KFZ-Kabel, AV-Kabel)
Bilder werden unverzerrt dargestellt.
Bilder werden an den Bildschirm angepasst, dabei kann es jedoch zu Verzerrungen kommen.
Akku
Kapazität (typisch) 7,4 V/3500 mAh
Technologie Li-Ion
Gewicht 130 g
Lautsprecher
Leistung Stereo (2x 1,3 W)
Bildschirm
Technologie TFT LCD mit LED Backlight
DVB-T/T2 Tuner
Eingangsfrequenz 174-230 MHz, 470-858 MHz
Antennenversorgung 5 V, max. 100 mA
Speicherplätze 400 Sender
Hinweis:
Irrtum und technische Änderungen vorbehalten.
DE 24
Page 73

Problembehebung
Symptome Ursache und Lösung
• Es werden nicht alle
Sender gefunden
• Kein Empfang
• Bildstörungen mit starken
Mosaiken oder Artefakten, eingefrorene Bilder
Kein Bild auf einem angeschlossenen Fernseher
Kein Bild auf dem eingebauten Bildschirm
Der eingebaute Bildschirm ist zu dunkel
Kein Ton
USB-Gerät wird nicht
erkannt
Gerät zeigt die falsche
Uhrzeit
Der Fernseher geht nach
3 Stunden aus
Bild ist zu klein oder
verzerrt
Das Auaden des Akkus
dauert länger als erwartet
Die LED am KFZ-Anschlusskabel leuchtet
nicht. Der Fernseher wird
nicht mit Strom versorgt.
• Kein DVB-T/T2 TV-Empfang in Ihrer Gegend.
• Richten Sie die Antenne richtig aus (siehe Seite 21).
• Wiederholen Sie den Suchlauf (Siehe Seite 21).
• Kaufen Sie eine leistungsfähige Antenne (siehe Seite 13).
• Schalten Sie ggf. die Stromversorgung für Ihre Antenne ein (siehe Seite
21, 13), falls nötig.
• HDMI: Überprüfen Sie die HDMI-Auösung (Seite 10, SCREEN-Taste,
siehe Seite 21).
• AV OUT: Sie benötigen ein passendes Kabel (siehe Seite 16).
• Der eingebaute Bildschirm wird abgeschaltet, sobald eine HDMI-Verbindung verwendet wird.
• Ändern Sie die Einstellung für die LED-Hintergrundbeleuchtung (siehe
Seite 16).
• Erhöhen Sie die Lautstärke (VOL +).
• HDMI: Beachten Sie Seite 22 für die HDMI-Audio-Einstellungen.
• AV OUT: Sie benötigen ein passendes Kabel (siehe Seite 16).
• Die eingebauten Lautsprecher werden abgeschaltet, wenn ein Kopfhörer
oder ein HDMI-Gerät angeschlossen wird.
• Überprüfen Sie, ob die eingebauten Lautsprecher eingeschaltet sind
(siehe Seite 23).
• Bitte beachten Sie die Hinweise auf Seite 17.
• Bitte beachten Sie die Hinweise auf Seite 22 (Zeitzoneneinstellung).
• Siehe Seite 22, Einstellung "Auto Standby".
• Siehe Seite 20.
• Schalten Sie den Fernseher mit dem Hauptschalter aus, um die Ladezeit
zu verkürzen (siehe Seite 12).
• Die Spannung am Eingang des KFZ-Anschlusskabels ist zu hoch oder zu
niedrig.
• Der Ausgang vom KFZ-Anschlusskabel ist überlastet oder kurzgeschlossen. Trennen Sie den Fernseher vom Kabel und prüfen Sie, ob die LED
dann leuchtet. Kontaktieren Sie die XORO-Kundendienst.
• Die Spitze des KFZ-Anschlusskabels lässt sich zur Kontrolle und zum
Wechsel der Sicherung abschrauben.
ACHTUNG: Die Sicherung darf nur durch eine mit identischen Werten
ersetzt werden. Die Sicherung spricht nur bei extremer Überlastung
an. Beim Tausch einer defekten Sicherung muss daher auch das KFZBordnetz, der Fernseher und die allgemeine Funktion des KFZ-Anschlusskabels überprüft werden. Ziehen Sie einen Fachmann hinzu.
DE 25
Page 74

XORO by MAS Elektronik AG
Weidegrund 3
21614 Buxtehude
Deutschland
www.xoro.de
IT: V1.0
ENG: V1.0
DE: V1.2
FS: -
 Loading...