

Page 1

Alveo U50 Data Center
Accelerator Card Installaon
Guide
UG1370 (v1.6) June 4, 2020
Page 2

Revision History
Send Feedback
The following table shows the revision history for this document.
Section Revision Summary
Chapter 1: Introduction Updated the information.
Card Features Added new section.
Chapter 2: Card Interfaces and Details Added a caution.
Known Issues
Downgrading Packages Added information about downgrading to a beta platform.
Downgrading Packages Added information about downgrading to a beta platform.
XRT and Deployment Platform Installation Procedures on
RedHat and CentOS
XRT and Deployment Platform Installation Procedures on
Ubuntu
Running lspci Revised log file in step 2.
Running xbmgmt flash --scan Revised output, platform, and ID information in step 1.
Upgrading Packages Updated step 1 to include a link to chapter 4; removed steps
Upgrading Packages Updated step 1 to include a link to chapter 4; removed steps
Installing the Card Updated to add notes about UL Listed Servers and card
General Updated output logs.
Qualified Servers Updated the section and provided the web link to the
XRT and Deployment Platform Installation Procedures on
Ubuntu
General Updated to the Vitis™ unified software platform throughout.
Chapter 4: Installing the Deployment Software Replaced xbutil command with the new xbmgmt
Running xbmgmt flash --scan Replaced xbutil command with the new xbmgmt
Revision History
06/04/2020 Version 1.6
• Added a known issue about installing the U50 card
deployment package.
• Added a known issue about downgrading to a beta
platform.
02/27/2020 Version 1.5
Replaced steps 4, 6, 7, 8, and 9 to document the new
installation steps for U50. Replaced all mentions of zip files
with tar.gz.
Replaced steps 1, 2, 3, and the log file of step 6 to document
the new installation steps for U50. Replaced all mentions of
zip files with tar.gz.
2-6.
2-6.
01/07/2020 Version 1.4
handling.
12/18/2019 Version 1.3
qualified servers information.
Added a note about XRT installation.
10/31/2019 Version 1.2
Updated outputs throughout the document.
command for card flashing. Updated output logs.
command when scanning card. Updated output logs.
UG1370 (v1.6) June 4, 2020 www.xilinx.com
Alveo U50 Data Center Accelerator Card Installation Guide 2
Page 3
Revision History
Send Feedback
Section Revision Summary
Known Issues Added a link to Xilinx Answer Record 72766.
Added a known issue.
Appendix A: Changing XRT and Target Platform Versions Replaced xbutil command with the new xbmgmt
command for card flashing. Updated output logs.
09/18/2019 Version 1.1
General updates Updated sample outputs.
Chapter 2: Card Interfaces and Details Added card interface related information and updated
Known Issues Included a link to Xilinx Answer Record 71752.
08/05/2019 Version 1.0
Initial release N/A
images.
Added information about power.
UG1370 (v1.6) June 4, 2020 www.xilinx.com
Alveo U50 Data Center Accelerator Card Installation Guide 3
Page 4

Table of Contents
Send Feedback
Revision History...............................................................................................................2
Chapter 1: Introduction.............................................................................................. 6
Card Features...............................................................................................................................6
Minimum System Requirements...............................................................................................7
Qualified Servers......................................................................................................................... 8
Chapter 2: Card Interfaces and Details..............................................................9
Chapter 3: Card Installation Procedures.........................................................11
Safety Instructions.................................................................................................................... 11
Before You Begin.......................................................................................................................13
Installing the Card.....................................................................................................................15
Chapter 4: Installing the Deployment Software.........................................17
XRT and Deployment Platform Installation Procedures on RedHat and CentOS............. 18
XRT and Deployment Platform Installation Procedures on Ubuntu...................................21
UG1370 (v1.6) June 4, 2020 www.xilinx.com
Alveo U50 Data Center Accelerator Card Installation Guide 4
Chapter 5: Card Bring-Up and Validation........................................................26
Running lspci............................................................................................................................. 26
Running xbmgmt flash --scan................................................................................................. 27
xbutil validate............................................................................................................................ 28
Chapter 6: Next Steps.................................................................................................30
Chapter 7: Troubleshooting....................................................................................31
Known Issues.............................................................................................................................32
Appendix A: Changing XRT and Target Platform Versions....................35
RedHat and CentOS.................................................................................................................. 35
Ubuntu........................................................................................................................................36
Appendix B: Reverting the Card to Factory Image....................................38
Page 5

Appendix C: Creating a Vault Repository for CentOS...............................39
Send Feedback
Appendix D: Generating the xbmgmt flash --update Command...... 41
Appendix E: Additional Resources and Legal Notices..............................43
Xilinx Resources.........................................................................................................................43
Documentation Navigator and Design Hubs.........................................................................43
References..................................................................................................................................44
Please Read: Important Legal Notices................................................................................... 45
UG1370 (v1.6) June 4, 2020 www.xilinx.com
Alveo U50 Data Center Accelerator Card Installation Guide 5
Page 6
Introduction
Send Feedback
This document provides hardware and soware installaon procedures for the half-height, halflength Alveo™ U50 Data Center accelerator card and applies to Vis™ unied soware plaorm
release 2019.2 and later.
The Xilinx® Alveo™ U50 Data Center accelerator cards are peripheral component interconnect
express (PCIe®) Gen3 x16 compliant and Gen4 x8 compable cards featuring the Xilinx 16 nm
UltraScale+™ technology. The Alveo U50 card oers 8 GB of HBM2 to provide highperformance, adaptable acceleraon for memory-bound, compute-intensive applicaons
including database, analycs, and machine learning inference.
Chapter 1: Introduction
Chapter 1
Dierent system conguraons are available for running, developing, and debugging applicaons
on your Alveo accelerator cards:
• Running Applicaons: To run accelerated applicaons, install an Alveo card into a system as
described in Chapter 3: Card Installaon Procedures along with the required deployment
soware to support running applicaons as described in Chapter 4: Installing the Deployment
Soware.
• Developing Applicaons: To develop FPGA accelerated applicaons, it is necessary to install
both the deployment soware and the development soware. Development soware
installaon, described in Chapter 6: Next Steps, installs both a development target plaorm
and the Vis environment. This conguraon does not have an Alveo card installed and is
used for development along with debugging in emulaon modes.
• Running, Developing, and Debugging Applicaons: By installing the Alveo card along with
both the deployment and development soware on a single machine, you can congure a
system for developing and running accelerated applicaons. With the card installed,
developers can debug applicaons in both emulaon modes and on the hardware.
Card Features
UG1370 (v1.6) June 4, 2020 www.xilinx.com
Alveo U50 Data Center Accelerator Card Installation Guide 6
The Alveo U50 accelerator card features are listed below.
• UltraScale+™ XCU50 FPGA
• 8 GB HBM memory - two 4 gigabyte (GB) HBM memory stacks
○ 32 channels of 256 MB
Page 7
Chapter 1: Introduction
Send Feedback
• One gigabit (Gb) quad SPI ash memory for conguraon
• Ethernet networking interfaces
○ Two SFP-DD connectors support 4x10/25 GbE (ES3 card)
○ One QSFP28 connector supporng 100 GbE, 40 GbE, or 4x10/25 GbE (PQ card)
• JTAG and UART access through the maintenance connector
• 16-lane integrated Endpoint block for PCI Express connecvity
○ Gen3 x16 supporng to x1, x2, x4, x8, x16 lane conguraons
○ Single or dual Gen4 x8
• I2C bus
• Status LEDs
• Power management with system management bus (SMBus) voltage, current, and temperature
monitoring
• 75W PCIe slot power only
Note: The Alveo U50 card has separate power rails for FPGA fabric and HBM memory. Developers must
ensure their designs do not draw too much power for each rail. More informaon can be found in the
Known Issues table of the Alveo U50 Data Center Accelerator Card Installaon Guide (UG1370).
Minimum System Requirements
The minimum system requirements for running the Alveo™ U50 Data Center accelerator cards
are listed below:
Table 1: Minimum System Requirements
Component Requirement
Motherboard PCI Express® 3.0-compliant with one x16 slot.
System Power Supply 75W
Operating System Linux, 64-bit:
• Ubuntu 16.04, 18.04
• CentOS 7.4, 7.5, 7.6
• RHEL 7.4, 7.5, 7.6
System Memory For deployment installations, a minimum of 16 GB plus application memory
Internet Connection Required for downloading drivers and utilities.
Hard disk space Satisfy the minimum system requirements for your operating system.
requirements is required.
For development installations, a minimum of 64 GB of device memory is
required, but 80 GB is recommended.
UG1370 (v1.6) June 4, 2020 www.xilinx.com
Alveo U50 Data Center Accelerator Card Installation Guide 7
Page 8
Table 1: Minimum System Requirements (cont'd)
Send Feedback
Component Requirement
Licensing None required for application deployment.
For details on the acceptable environmental condions, see Alveo U50 Data Center Accelerator
Cards Data Sheet (DS965).
Qualified Servers
A list of servers on which Alveo cards are fully qualied on can be found here:
hps://www.xilinx.com/products/boards-and-kits/alveo/qualied-servers.html.
Chapter 1: Introduction
For the application development environment, see Vitis Unified Software
Platform Documentation: Application Acceleration Development (UG1393).
UG1370 (v1.6) June 4, 2020 www.xilinx.com
Alveo U50 Data Center Accelerator Card Installation Guide 8
Page 9
Chapter 2: Card Interfaces and Details
Send Feedback
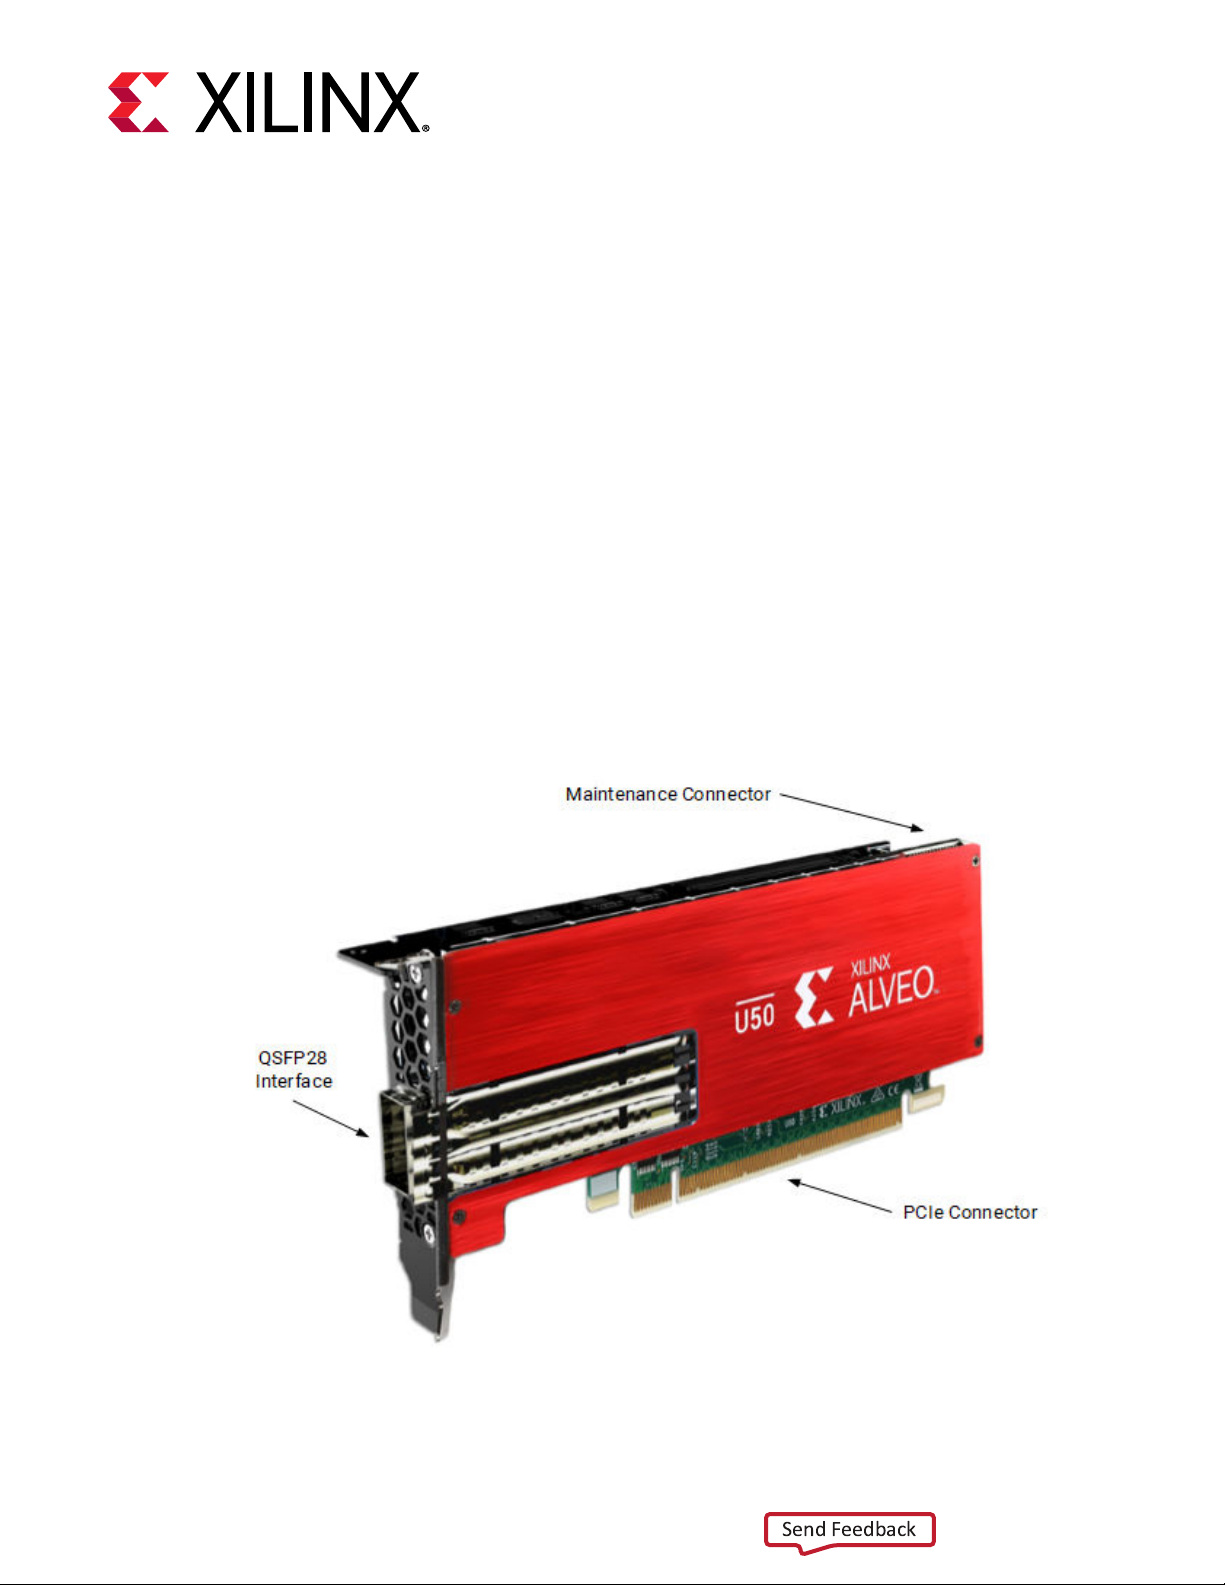
Card Interfaces and Details
The Alveo™ U50 accelerator card is available in a passive cooling conguraon and is designed
for installaon into a data center server where controlled air ow provides direct cooling to the
card. The card includes the following interfaces.
• A PCI Express® card connector
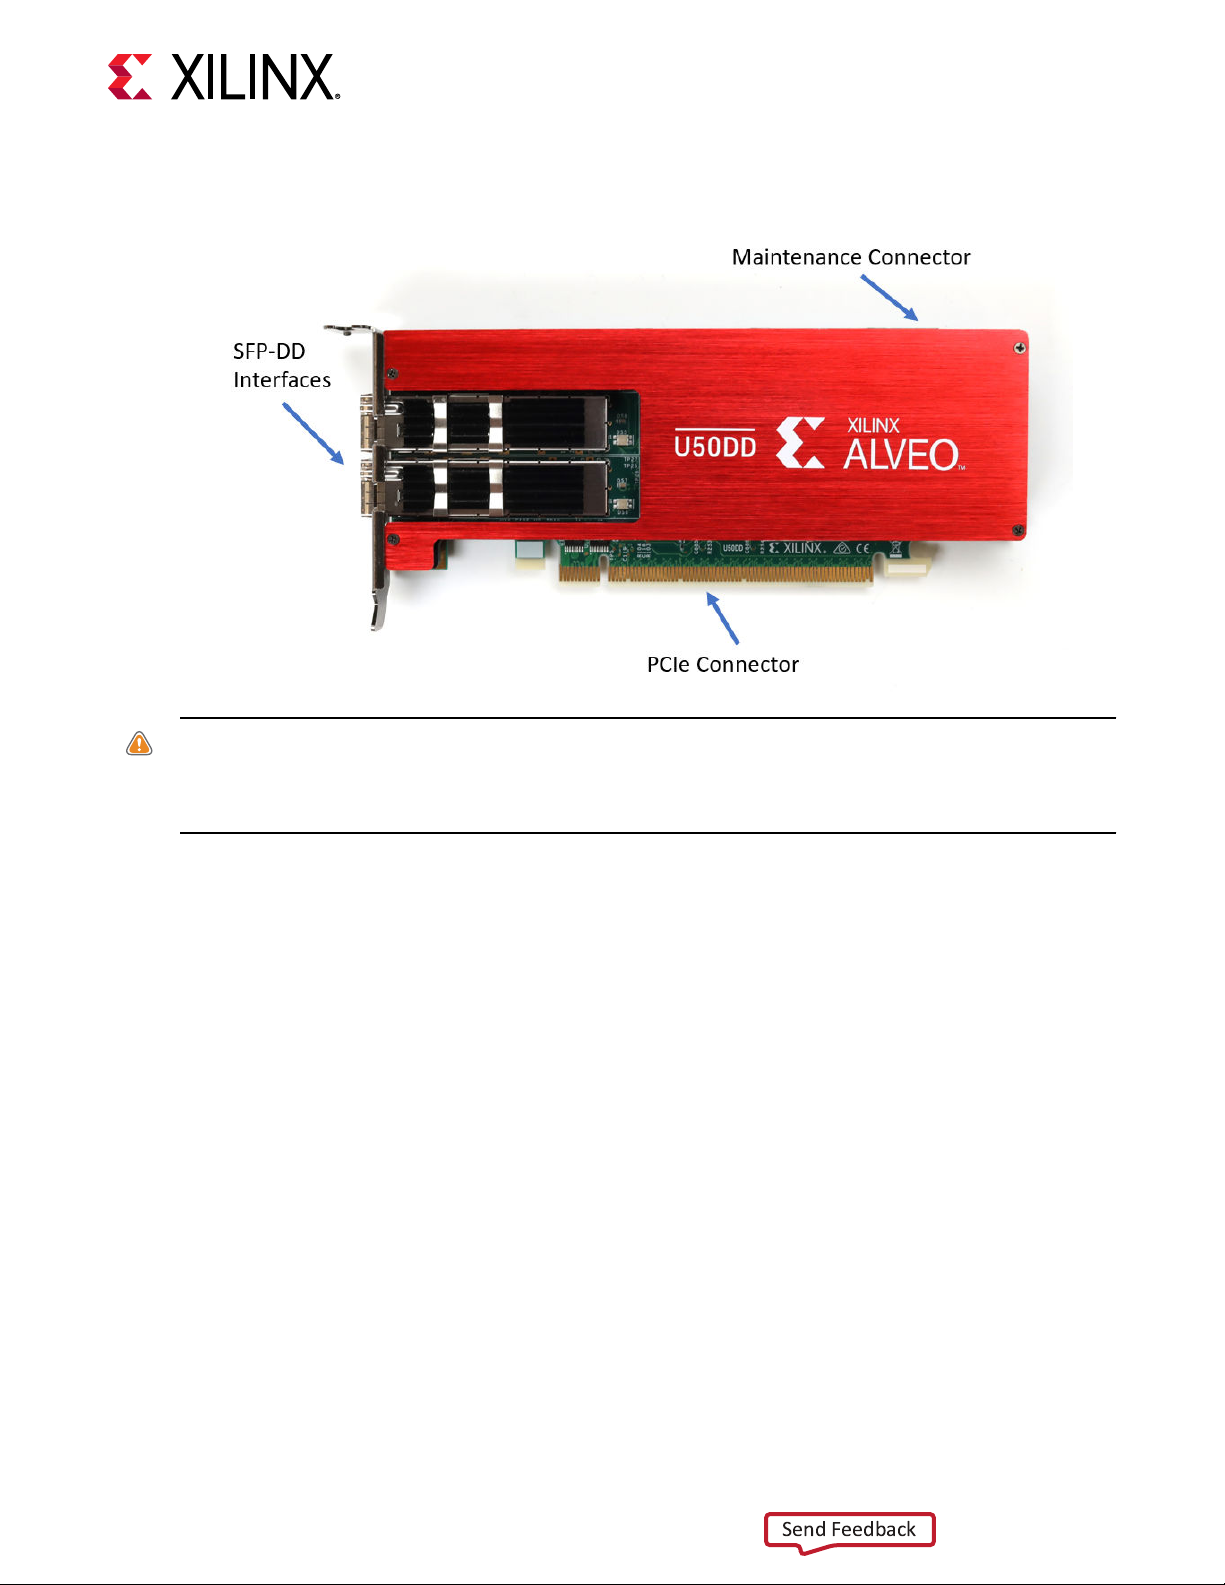
• The producon qualied (PQ) card has one QSFP interface and the Engineering sample (ES)
card has two SFP-DD interfaces
• Maintenance Connector
Chapter 2
Used to program the card in RTL ow through the programming cable. For more informaon
see the Alveo Programming Cable User Guide (UG1377).
Figure 1: Alveo U50 PQ Card with Half-Height Bracket
UG1370 (v1.6) June 4, 2020 www.xilinx.com
Alveo U50 Data Center Accelerator Card Installation Guide 9
Page 10
Chapter 2: Card Interfaces and Details
Send Feedback
Figure 2: Alveo U50DD ES Card with Half-Height Bracket
CAUTION! Alveo accelerator cards are designed to be installed into a data center server, where controlled air
ow provides direct cooling. If the cooling enclosure is removed from the card and the card is powered-up,
external fan cooling airow MUST be applied to prevent over-temperature shut-down and possible damage to
the card electronics. Removing the cooling enclosure voids the board warranty.
For card specicaons, dimensions, list of card features, and block diagram, see Alveo U50 Data
Center Accelerator Cards Data Sheet (DS965).
UG1370 (v1.6) June 4, 2020 www.xilinx.com
Alveo U50 Data Center Accelerator Card Installation Guide 10
Page 11
Chapter 3: Card Installation Procedures
Send Feedback
Card Installation Procedures
To reduce the risk of re, electric shock, or injury, always follow basic safety precauons.
CAUTION! You must always use an ESD strap or other anstac device when handling hardware.
ATTENTION! Il est fortement recommandé d'uliser un bracelet ESD ou autres disposifs anstaques.
VORSICHT! Beim Umgang mit Hardware müssen sie immer ein Erdungs Armband oder ein anderes
anstasches Gerät verwenden.
Chapter 3
Safety Instructions
Safety Information
To ensure your personal safety and the safety of your equipment:
• Keep your work area and the computer/server clean and clear of debris.
• Before opening the computer/system cover, unplug the power cord.
Dispositif de Sécurité
Pour assurer votre sécurité personnelle et la sécurité de votre équipement:
• Maintenez votre zone de travail et l'ordinateur/serveur propre et dégagé de débris.
• Avant d'ouvrir le capot de l'ordinateur/système, débranchez le cordon d'alimentaon.
Sicherheitsinformation
Um ihre persönliche Sicherheit und die Sicherheit ihrer Ausrüstung zu gewährleisten:
• Halten sie ihren Arbeitsbereich und den Computer / Server sauber und frei von Ablagerungen.
• Ziehen sie vor dem Öenen der Computer / Systemabdeckung das Netzkabel ab.
UG1370 (v1.6) June 4, 2020 www.xilinx.com
Alveo U50 Data Center Accelerator Card Installation Guide 11
Page 12

Chapter 3: Card Installation Procedures
Send Feedback
Electrostatic Discharge Caution
Electrostac discharge (ESD) can damage electronic components when they are improperly
handled, and can result in total or intermient failures. Always follow ESD-prevenon procedures
when removing and replacing components.
To prevent ESD damage:
• Use an ESD wrist or ankle strap and ensure that it makes skin contact. Connect the equipment
end of the strap to an unpainted metal surface on the chassis.
• Avoid touching the card against your clothing. The wrist strap protects components from ESD
on the body only.
• Handle the card by its bracket or edges only. Avoid touching the printed circuit board or the
connectors.
• Put the card down only on an anstac surface such as the bag supplied in your kit.
• If you are returning the card to Xilinx Product Support, place it back in its anstac bag
immediately.
Attention aux Décharge Électrostatique (ESD)
L'ESD peut endommager les composants électroniques lorsqu'ils sont mal manipulés, et peut
entraîner des défaillances totales ou intermientes. Suivez toujours les procédures de prévenon
contre les ESD lors du retrait et remplacement des composants.
Pour prévenir les dommages dus aux ESD:
• Ulisez une sangle de poignet ou de cheville an-ESD et assurez-vous qu'elle est en contact
avec la peau. Branchez l'extrémité du cable de la sangle à une surface métallique non peinte
du châssis et a la masse.
• Évitez de mere en contact la carte de circuit imprimé ou les connecteurs avec vos vêtements.
La sangle de poignet protège la carte ou connecteurs contre les ESD du corps seulement.
• Manipulez la carte uniquement par son support ou par ses bords. Évitez de toucher la carte de
circuit imprimé ou les connecteurs.
• Ne posez la carte de circuit imprimé ou les connecteurs que sur une surface anstaque telle
que le sac an-staque fourni avec la carte.
• Si vous retournez la carte a Xilinx, remeez-la dans son sac anstaque immédiatement.
Vorsicht Elektrostatische Entladung
UG1370 (v1.6) June 4, 2020 www.xilinx.com
Alveo U50 Data Center Accelerator Card Installation Guide 12
Elektrostasche Entladung (ESD) kann elektronische Bauteile beschädigen, wenn sie
unsachgemäß behandelt werden, und es kann zu totalen oder zeitweiligen Ausfällen kommen.
Befolgen sie beim Enernen und Austauschen von Komponenten stets die ESDSchutzmaßnahmen.
Page 13
Chapter 3: Card Installation Procedures
Send Feedback
So verhindern sie ESD-Schäden:
• Verwenden sie einen ESD-Handgelenk-oder Knöchelriemen und stellen sie sicher, dass er
Hautkontakt hat. Verbinden sie das Ende des Riemens mit einer unlackierten Metalloberäche
am Gehäuse.
• Berühren sie die Karte nicht mit ihrer Kleidung. Der Riemen schützt Komponenten nur vor
ESD am Körper.
• Fassen sie die Karte nur an der Halterung oder an den Kanten an. Berühren sie nicht die
Leiterplae oder die Anschlüsse.
• Legen sie die Karte nur auf einer anstaschen Oberäche ab, z.B. dem anstaschen Beutel
der mit dem Kit mitgeliefert wurde.
• Wenn sie die Karte an den Xilinx Product Support zurücksenden, legen Sie sie bie sofort
wieder in den anstaschen Beutel.
Before You Begin
IMPORTANT! Alveo™ cards are delicate and sensive electronic devices; equipment is to be installed by a
qualied technician only. This equipment is intended for installaon in a Restricted Access Locaon.
IMPORTANT! Les cartes Alveo™ sont des appareils électronique sensibles et fragiles; l'équipement doit être
installé par un technicien ceré seulement. Cet équipement est desné à être installé dans un lieu d'accès
restreint.
WICHTIG! Die Karten Alveo™ sind sensible und empndliche elektronische Geräte. Das Gerät darf nur von
einem qualizierten Techniker installiert werden. Dieses Gerät ist für die Installaon an einem Ort mit
begrenztem Zugang vorgesehen.
• Verify that the minimum card space is available to install your card. Card specicaons and
dimensions can be found in Alveo U50 Data Center Accelerator Cards Data Sheet (DS965).
• Determine if a half or full height bracket is necessary for the installaon. If the bracket needs
to be changed, do this before following the installaon steps.
• Check for card compability with the system. Also check for proper system requirements such
as power, bus type, and physical dimensions to support the card.
Related Informaon
Minimum System Requirements
Qualied Servers
Replacing the Bracket
UG1370 (v1.6) June 4, 2020 www.xilinx.com
Alveo U50 Data Center Accelerator Card Installation Guide 13
Page 14
Chapter 3: Card Installation Procedures
Send Feedback
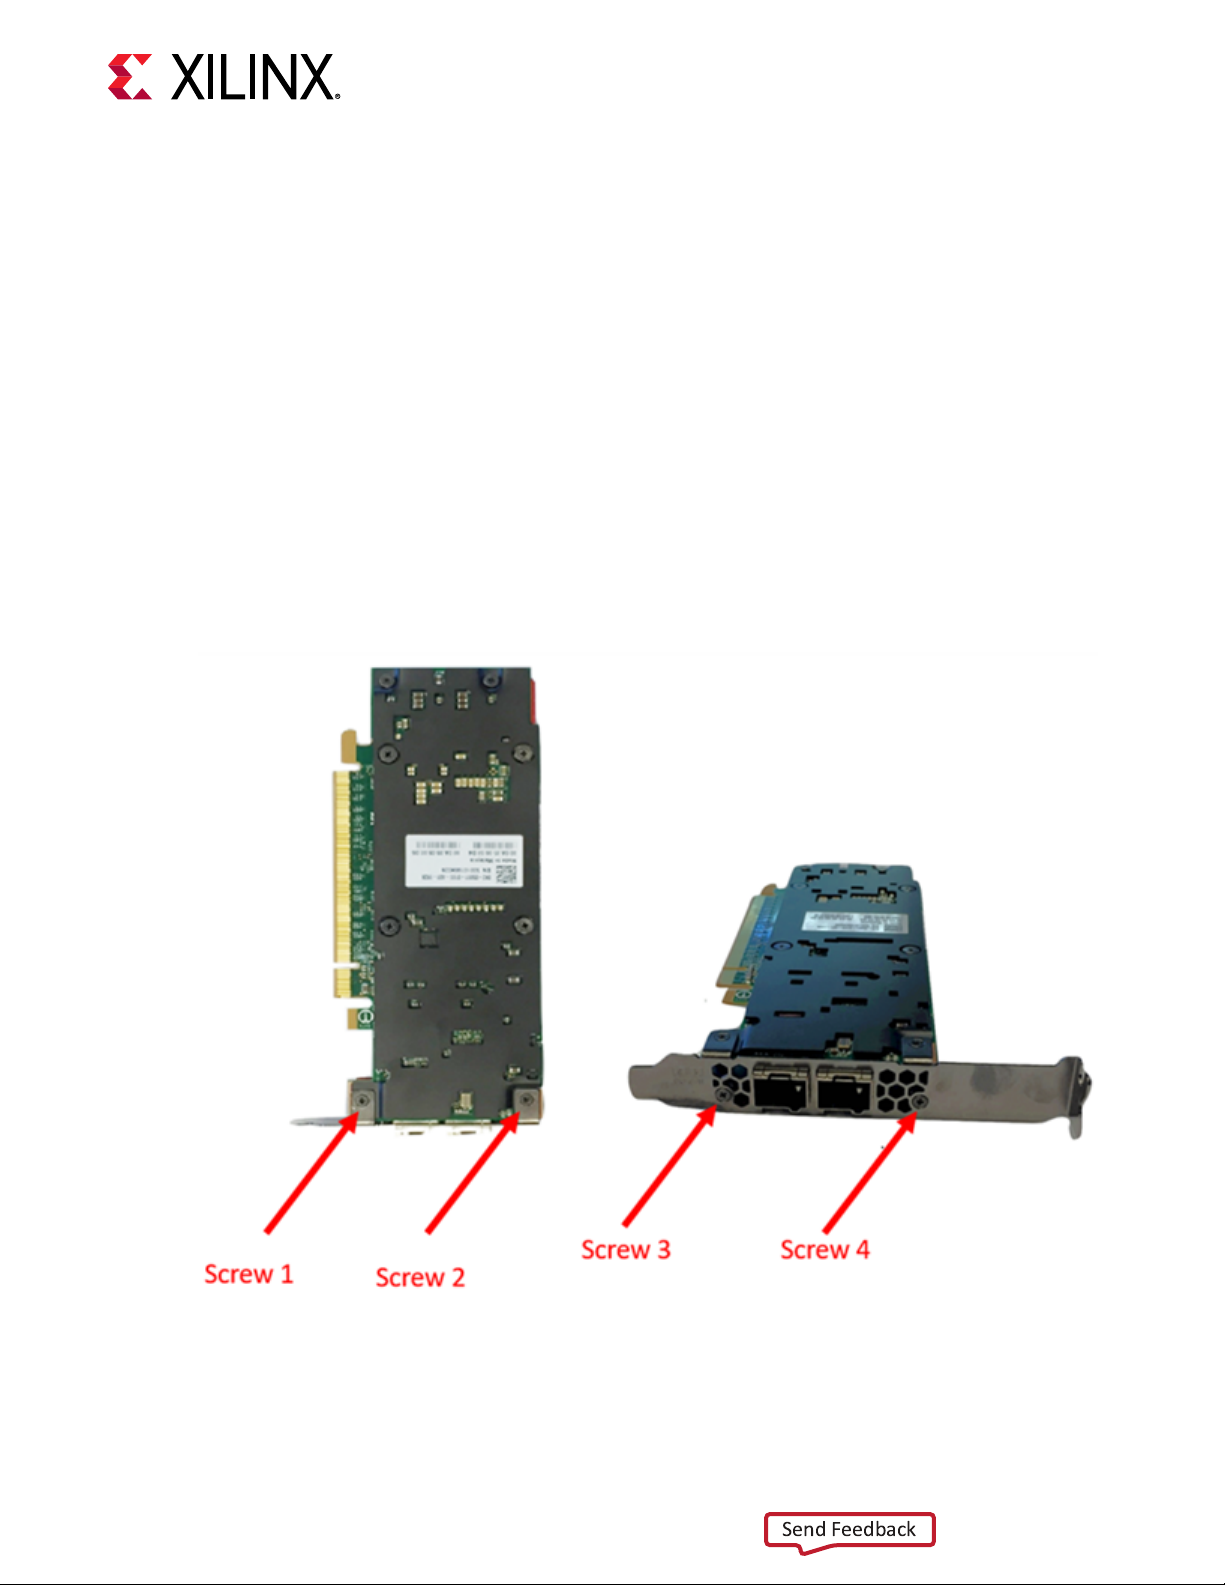
Replacing the Bracket
The Alveo U50 card can be used with either a full-height or half-height bracket. Depending on
your system, it may be necessary to switch between the full and half-height bracket on the card.
The bracket is secured to the card with four screws, as shown in the gure below. To replace the
bracket, follow the instrucons below.
1. Remove screws 1 and 2 from the card.
2. Remove screws 3 and 4 from the card.
3. Remove the bracket from the card.
4. Place the new bracket on the card and align it with the card's connectors and screw locaons.
5. Replace screws 1 and 2 on the new bracket.
6. Replace screws 3 and 4 on the new bracket.
Figure 3: Screw Locations on Bracket
UG1370 (v1.6) June 4, 2020 www.xilinx.com
Alveo U50 Data Center Accelerator Card Installation Guide 14
Page 15

Installing the Card
Send Feedback
The following procedure is a guide for the Xilinx® Alveo™ U50 Data Center accelerator card
installaon. Consult your computer documentaon for addional informaon.
Note: For use with UL Listed Servers or ITE.
If you encounter any issues during installaon, see Chapter 7: Troubleshoong and Known
Issues.
1. Shut down the host computer and unplug the power cord.
2. Open your computer by removing the casing.
3. If necessary, remove the adjacent PCIe® slot cover corresponding to the PCIe slot in which
you are installing the Alveo card.
4. Plug the Alveo card into the PCIe x16 slot on the motherboard.
Chapter 3: Card Installation Procedures
5. Re-install the computer casing.
6. Connect the power cord and turn on the computer.
WARNING! Do not power-on a passively cooled card without adequate forced airow across the card with
proper air ow direcon, otherwise the card can be damaged. This card can heat up aer use in the server. Use
cauon when handling. For more informaon, see Alveo U50 Data Center Accelerator Cards Data Sheet
(DS965).
7. To verify that the device has been installed correctly, enter the following Linux command in
the terminal:
$ sudo lspci -vd 10ee:
If the card is successfully installed and found by the operang system, a message similar to
the one below will be displayed.
This is a sample output for an installed Alveo U50 card:
65:00.0 Processing accelerators: Xilinx Corporation Device 5020
Subsystem: Xilinx Corporation Device 000e
Flags: bus master, fast devsel, latency 0, IRQ 135
Memory at 38bffc000000 (64-bit, prefetchable) [size=32M]
Memory at 38bffe000000 (64-bit, prefetchable) [size=128K]
Capabilities: [40] Power Management version 3
Capabilities: [48] MSI: Enable- Count=1/1 Maskable- 64bit+
Capabilities: [70] Express Endpoint, MSI 00
Capabilities: [100] Advanced Error Reporting
Capabilities: [1c0] #19
Capabilities: [1f0] Virtual Channel
Capabilities: [e00] Access Control Services
Kernel driver in use: xclmgmt
Kernel modules: xclmgmt
UG1370 (v1.6) June 4, 2020 www.xilinx.com
Alveo U50 Data Center Accelerator Card Installation Guide 15
Page 16

Chapter 3: Card Installation Procedures
Send Feedback
Note: If this card has previously been installed, the lspci output will be similar to the one shown in
Running lspci.
If you do not see a similar message, see Chapter 7: Troubleshoong.
UG1370 (v1.6) June 4, 2020 www.xilinx.com
Alveo U50 Data Center Accelerator Card Installation Guide 16
Page 17

Chapter 4: Installing the Deployment Software
Send Feedback
Chapter 4
Installing the Deployment Software
This chapter details the procedures for installing deployment soware on RedHat/CentOS and
Ubuntu operang systems. All soware installaons use standard Linux RPM and Linux DEB
packages and require root access.
Note: For those using RTL ow instead of the Vis™ applicaon acceleraon development ow, see the
Alveo U50 Data Center Accelerator Card User Guide (UG1371) for details on programming the card.
The deployment soware consists of the following soware packages:
• Xilinx® runme (XRT): XRT provides the libraries and drivers for an applicaon to run on
Alveo™ cards.
• Deployment plaorm: The deployment plaorm provides the base rmware needed to run
pre-compiled applicaons. It cannot be used to compile or create new applicaons. To create
new applicaons, install the development soware detailed in Chapter 6: Next Steps. While
you can also install the development soware on a machine with an installed card, doing so is
not necessary to run applicaons.
All installaon packages can be downloaded from the Geng Started tab of the respecve Alveo
card landing page:
• Alveo U50 Product Page
If you encounter any issues during installaon, see Chapter 7: Troubleshoong and Known
Issues.
IMPORTANT!
IMPORTANT! L'accès Root est requis pour toutes les installaons logicielles et rmware.
WICHTIG! Root-Zugri ist für alle Soware- und Firmware-Installaonen erforderlich.
Root access is required for all soware and rmware installaons.
UG1370 (v1.6) June 4, 2020 www.xilinx.com
Alveo U50 Data Center Accelerator Card Installation Guide 17
Page 18

Chapter 4: Installing the Deployment Software
Send Feedback
XRT and Deployment Platform Installation Procedures on RedHat and CentOS
Use the following steps to download and install the XRT and deployment plaorm using a .rpm
installaon package.
For details on upgrading or downgrading the XRT and deployment plaorm, see the related topic,
Changing XRT and Target Plaorm Versions.
IMPORTANT! The installaon packages referenced here are updated regularly and the le names frequently
change. If you copy and paste any commands from this user guide, be sure to update the placeholders in those
commands to match the downloaded packages.
IMPORTANT! Les packages d'installaon référencés ici sont mis à jour régulièrement et les noms de chier
changent fréquemment. Si vous copiez et collez des commandes de ce guide, veillez à mere à jour les espaces
réservés dans ces commandes pour qu'ils correspondent aux packages téléchargés.
WICHTIG! Die hier genannten Installaonspakete werden regelmäßig aktualisiert und die Dateinamen ändern
sich häug. Wenn Sie Befehle aus diesem Benutzerhandbuch kopieren und einfügen, müssen Sie die Platzhalter
in diesen Befehlen entsprechend den heruntergeladenen Paketen aktualisieren.
1. XRT installaon requires Extra Packages for Enterprise Linux (EPEL) and a related repository.
The inial setup depends on whether you are using RedHat or CentOS.
For Redhat:
a. Open a terminal window and enter the following command:
$ sudo yum-config-manager --enable rhel-7-server-optional-rpms
This enables an addional repository on your system.
b. Enter the following command to install EPEL:
$ sudo yum install -y https://dl.fedoraproject.org/pub/epel/epelrelease-latest-7.noarch.rpm
For CentOS:
• Enter the following command in a terminal window:
$ sudo yum install epel-release
This installs and enables the repository for Extra Packages for Enterprise Linux (EPEL).
UG1370 (v1.6) June 4, 2020 www.xilinx.com
Alveo U50 Data Center Accelerator Card Installation Guide 18
2. Run the following two commands to install kernel headers and kernel development packages.
Ensure that uname is surrounded by backcks ( `) and not single quotes ('):
$ sudo yum install kernel-headers-`uname -r`
$ sudo yum install kernel-devel-`uname -r`
Page 19

Chapter 4: Installing the Deployment Software
Send Feedback
Note: If these yum commands fail because they cannot nd packages matching your kernel version, set
up a Vault repository. For more informaon, see related topic, Creang a Vault Repository for CentOS.
3. Aer the above command completes, reboot your machine.
4. From the Geng Started tab of the Alveo U50 Product page, download the Xilinx® runme
(XRT) installaon package.
Download the Xilinx runme (XRT) installaon package le by selecng your OS and version,
then select the displayed XRT lename.
5. Install the XRT installaon package by running the following command from within the
directory where the installaon packages reside. <version> is the laer part of the
installaon package le name.
$ sudo yum install ./xrt_<version>.rpm
This will install the XRT and its necessary dependencies. Follow the instrucons when
prompted throughout the installaon.
6. From the Geng Started tab of the Alveo U50 Product Page, download and unpack the
deployment installaon tar.gz le.
Download the tar.gz le by rst selecng your OS and version, then clicking on the
displayed lename.
Unpack the tar.gz le into a single directory. The locaon of the directory is not important,
however the directory should not contain any other les.
7. Install the deployment packages. From within the directory where the installaon packages
were unpacked, run the following command. This will install all deployment packages.
sudo yum install ./*.rpm
The installaon of the deployment paron and rmware are located in the /opt/xilinx/
firmware directory and contains the named paron and rmware sub-directories. Aer
installing the deployment packages you will see the following message:
Partition package installed successfully.
Please flash card manually by running below command:
sudo /opt/xilinx/xrt/bin/xbmgmt flash --update --shell <shell_name>
Note: When installing 2019.1 or earlier deployment plaorm packages, the displayed instrucons use
the xbutil rather than the xbmgmt command to ash. Flashing with xbutil is being deprecated and
will not be supported in future releases. It is recommended to use the xbmgmt command to ash the
Alveo card.
8. Flash the rmware to the Alveo card using the command displayed in the output of the
previous step. It has the following format:
UG1370 (v1.6) June 4, 2020 www.xilinx.com
Alveo U50 Data Center Accelerator Card Installation Guide 19
sudo /opt/xilinx/xrt/bin/xbmgmt flash --update --shell <shell_name>
Page 20

Chapter 4: Installing the Deployment Software
Send Feedback
If the card has been upgraded, you will see a message similar to the following and no
addional installaon steps are necessary.
Status: shell is up-to-date
Card(s) up-to-date and do not need to be flashed.
If you have mulple cards installed or need to regenerate the command, follow the steps
given in the related topic Generang the xbmgmt ash --update Command.
9. You will be asked to conrm the update, as shown below. Type y and press the Enter key.
Status: shell needs updating
Current shell: <current_platform_name>
Shell to be flashed: <platform_to_be_flashed>
Are you sure you wish to proceed? [y/n]:
Flashing will take up to 10 minutes.
IMPORTANT! Do not enter Ctrl + c in the terminal while the rmware is ashing as this can cause the card to
become inoperable.
IMPORTANT! N'entrez pas Ctrl + c dans le terminal lorsque le micrologiciel clignote, car cela pourrait rendre la
carte inulisable.
WICHTIG! Geben Sie im Terminal nicht Strg + c ein, während die Firmware blinkt, da dies dazu führen kann,
dass die Karte nicht mehr funkoniert.
Successfully ashing a new card results in a message similar to the one shown below. If the
command returns Card Not Found, perform a cold reboot, and retry. Otherwise, see
Chapter 7: Troubleshoong.
Updating shell on card[0000:73:00.0]
INFO: ***Found 351 ELA Records
Enabled bitstream guard. Bitstream will not be loaded until flashing is
finished.
Preparing flash chip 0
Erasing flash.................
Programming flash.................
Cleared bitstream guard. Bitstream now active.
Successfully flashed Card[0000:73:00.0]
1 Card(s) flashed successfully.
Cold reboot machine to load the new image on card(s).
10. Cold boot your machine to load the new rmware image on the FPGA.
IMPORTANT! Be sure to fully power o the machine and then power it on again. The image will not boot from
ash if the machine is only rebooted.
UG1370 (v1.6) June 4, 2020 www.xilinx.com
Alveo U50 Data Center Accelerator Card Installation Guide 20
IMPORTANT! Assurez-vous d'éteindre complètement la machine, puis de la rallumer. L'image ash ne
démarrera pas si la machine n'est pas redémarrée.
WICHTIG! Schalten Sie das Gerät vollständig aus und wieder ein. Das Image startet nicht von Flash, wenn der
Computer nur neu gestartet wird.
Page 21

Chapter 4: Installing the Deployment Software
Send Feedback
11. Update the SC rmware by re-running the update command in the previous update step.
sudo /opt/xilinx/xrt/bin/xbmgmt flash --update --shell <shell_name>
To regenerate the command, follow the steps given in the related topic, Generang the
xbmgmt ash --update Command.
If the SC is up to date, you will see the following message and no addional upgrade steps
are necessary.
Status: shell is up-to-date
Card(s) up-to-date and do not need to be flashed.
If the SC needs updang it will report the following message.
Status: SC needs updating
Current SC: <current_sc_version>
SC to be flashed: <new_sc_version>
Are you sure you wish to proceed? [y/n]: y
Updang the SC rmware will take up to 2 minutes. Successful SC rmware update will result
in a message similar to the one shown below. The SC rmware will be updated and no cold
boot is required.
Updating SC firmware on card[0000:65:00.0]
Stopping user function...
INFO: found 4 sections
.............................
INFO: Loading new firmware on SC
................
Successfully flashed Card[0000:65:00.0]
1 Card(s) flashed successfully.
The installaon for deployment is now complete. You can go directly to Chapter 5: Card Bring-Up
and Validaon to validate the installaon.
Related Informaon
Changing XRT and Target Plaorm Versions
Generang the xbmgmt ash --update Command
Creang a Vault Repository for CentOS
XRT and Deployment Platform Installation Procedures on Ubuntu
UG1370 (v1.6) June 4, 2020 www.xilinx.com
Alveo U50 Data Center Accelerator Card Installation Guide 21
Note: When installing XRT on Ubuntu, if the 2015 version of pyopencl is installed on your system, you
must uninstall it. The XRT installaon will install the 2019 version of pyopencl and will return an error if
the 2015 version is installed. For more informaon, see Xilinx Answer Record 73055.
Page 22

Chapter 4: Installing the Deployment Software
Send Feedback
Use the following steps to download and install the XRT and deployment plaorm using a .deb
installaon package.
For details on upgrading or downgrading the XRT and deployment plaorm, see the related topic,
Changing XRT and Target Plaorm Versions.
IMPORTANT! The installaon packages referenced here are updated regularly and the le names frequently
change. If you copy and paste any commands from this user guide, be sure to update the placeholders in those
commands to match the downloaded packages.
IMPORTANT! Les packages d'installaon référencés ici sont mis à jour régulièrement et les noms de chier
changent fréquemment. Si vous copiez et collez des commandes de ce guide, veillez à mere à jour les espaces
réservés dans ces commandes pour qu'ils correspondent aux packages téléchargés.
WICHTIG! Die hier genannten Installaonspakete werden regelmäßig aktualisiert und die Dateinamen ändern
sich häug. Wenn Sie Befehle aus diesem Benutzerhandbuch kopieren und einfügen, müssen Sie die Platzhalter
in diesen Befehlen entsprechend den heruntergeladenen Paketen aktualisieren.
1. From the Geng Started tab of the Alveo U50 Product Page, download the Xilinx runme
(XRT) installaon package.
Download the Xilinx® runme (XRT) installaon package by rst selecng your OS and
version, then select the displayed XRT lename.
2. Install the XRT installaon package by running the following command from within the
directory where the installaon packages reside. <version> is the laer part of the
installaon package le name.
$ sudo apt install ./xrt_<version>.deb
This will install the XRT along with any necessary dependencies. Follow the instrucons
when prompted throughout the installaon.
3. From the Geng Started tab of the Alveo U50 Product Page, download and extract the
deployment installaon tar.gz le.
Download the tar.gz le by rst selecng your OS and version, then clicking on the
displayed lename.
Extract the tar.gz le into a single directory. The locaon of the directory is not important,
however the directory should not contain any other les.
4. Install the deployment packages. From within the directory where the installaon packages
were unpacked, run the following command. This will install all deployment packages.
sudo apt install ./*.deb
UG1370 (v1.6) June 4, 2020 www.xilinx.com
Alveo U50 Data Center Accelerator Card Installation Guide 22
Page 23

Chapter 4: Installing the Deployment Software
Send Feedback
The installaon of the deployment paron and rmware are located in the /opt/xilinx/
firmware directory and contain the named paron and rmware sub-directories. Aer
installing the deployment packages you will see the following message:
Partition package installed successfully.
Please flash card manually by running below command:
sudo /opt/xilinx/xrt/bin/xbmgmt flash --update --shell <shell_name>
Note: When installing 2019.1 or earlier deployment plaorm packages, the displayed instrucons use
the xbutil rather than the xbmgmt command to ash. Flashing with xbutil is being deprecated and
will not be supported in future releases. It is recommended to use the xbmgmt command to ash the
Alveo card.
5. Flash the rmware to the Alveo card using the command displayed in the output of the
previous step. It has the following format:
sudo /opt/xilinx/xrt/bin/xbmgmt flash --update --shell <shell_name>
If the card has been upgraded, you will see a message similar to the following and no
addional installaon steps are necessary.
Status: shell is up-to-date
Card(s) up-to-date and do not need to be flashed.
If you have mulple cards installed or need to regenerate the command, follow the steps
given in the related topic, Generang the xbmgmt ash --update Command.
6. You will be asked to conrm the update, as shown below. Type y and press the Enter key.
Status: shell needs updating
Current shell: <current_platform_name>
Shell to be flashed: <platform_to_be_flashed>
Are you sure you wish to proceed? [y/n]:
Flashing will take up to 10 minutes.
IMPORTANT! Do not enter Ctrl + c in the terminal while the rmware is ashing as this can cause the card to
become inoperable.
IMPORTANT! N'entrez pas Ctrl + c dans le terminal lorsque le micrologiciel clignote, car cela pourrait rendre la
carte inulisable.
WICHTIG! Geben Sie im Terminal nicht Strg + c ein, während die Firmware blinkt, da dies dazu führen kann,
dass die Karte nicht mehr funkoniert.
Successfully ashing a new card results in a message similar to the one shown below. If the
command returns Card Not Found, perform a cold reboot, and retry. Otherwise, see
Chapter 7: Troubleshoong.
UG1370 (v1.6) June 4, 2020 www.xilinx.com
Alveo U50 Data Center Accelerator Card Installation Guide 23
Updating shell on card[0000:73:00.0]
INFO: ***Found 351 ELA Records
Enabled bitstream guard. Bitstream will not be loaded until flashing is
finished.
Erasing flash........................
Programming flash........................
Page 24

Chapter 4: Installing the Deployment Software
Send Feedback
Cleared bitstream guard. Bitstream now active.
Successfully flashed Card[0000:65:00.0]
1 Card(s) flashed successfully.
Cold reboot machine to load the new image on card(s)
7. Cold boot the machine to load the new rmware image on the FPGA.
IMPORTANT! Be sure to perform a cold boot to fully power o the machine and then power it on again. The
image will not boot from ash if the machine is only rebooted.
IMPORTANT! Inier un démarrage a froid en appuyant sur le bouton d’alimentaon de la machine, puis
rallumer la machine. L’image ash ne démarrera pas sans un démarrage a froid.
WICHTIG! Führen Sie einen Kaltstart aus, indem Sie das Gerät vollständig aus und wieder einschalten. Das
Image startet nicht von Flash, wenn der Computer nur neu gestartet wird.
8. Update the SC rmware by re-running the update command in the previous update step.
sudo /opt/xilinx/xrt/bin/xbmgmt flash --update --shell <shell_name>
To regenerate the command, follow the steps given in the related topic, Generang the
xbmgmt ash --update Command.
If the SC is up to date, you will see the following message and no addional upgrade steps
are necessary.
Status: shell is up-to-date
Card(s) up-to-date and do not need to be flashed.
If the SC needs updang it will report the following message.
Status: SC needs updating
Current SC: <current_sc_version>
SC to be flashed: <new_sc_version>
Are you sure you wish to proceed? [y/n]: y
Updang the SC rmware will take up to 2 minutes. A successful SC rmware update will
result in a message similar to the one shown below. The SC rmware will be updated and no
cold boot is required.
Updating SC firmware on card[0000:65:00.0]
Stopping user function...
INFO: found 4 sections
.............................
INFO: Loading new firmware on SC
................
Successfully flashed Card[0000:65:00.0]
UG1370 (v1.6) June 4, 2020 www.xilinx.com
Alveo U50 Data Center Accelerator Card Installation Guide 24
1 Card(s) flashed successfully.
The installaon for deployment is now complete. You can go directly to Chapter 5: Card Bring-Up
and Validaon to validate the installaon.
Page 25

Related Informaon
Send Feedback
Changing XRT and Target Plaorm Versions
Generang the xbmgmt ash --update Command
Chapter 4: Installing the Deployment Software
UG1370 (v1.6) June 4, 2020 www.xilinx.com
Alveo U50 Data Center Accelerator Card Installation Guide 25
Page 26

Chapter 5: Card Bring-Up and Validation
Send Feedback
Card Bring-Up and Validation
Aer installing the XRT and deployment plaorm, the card installaon can be veried using the
following commands, which are explained in more detail below.
• lspci
• xbmgmt flash --scan
• xbutil validate
The lspci Linux command is used to validate the card as seen by the OS, as was done when
installing the card.
Chapter 5
The second and third commands use the Xilinx® xbmgmt and xbutil ulies, that are included
during the XRT package installaon. These ulies include mulple commands to validate and
idenfy the installed card(s) and report addional card details including memory, PCIe®, plaorm
name, and system informaon. See Vis Unied Soware Plaorm Documentaon: Applicaon
Acceleraon Development (UG1393) for a detailed list of commands.
Set the environment to use the ulies by running the following command. Note that the
command is dependent on the command shell you are using.
Use the following command in csh shell:
$ source /opt/xilinx/xrt/setup.csh
Use the following command in bash shell:
$ source /opt/xilinx/xrt/setup.sh
Related Informaon
Installing the Card
Running lspci
UG1370 (v1.6) June 4, 2020 www.xilinx.com
Alveo U50 Data Center Accelerator Card Installation Guide 26
Page 27

Chapter 5: Card Bring-Up and Validation
Send Feedback
1. Enter the following command:
$ sudo lspci -vd 10ee:
2. If the card is successfully installed and found by the operang system, you will see a message
similar to the one below. Note that for each card, there will be two physical funcons found:
one for management and one for user. See hps://xilinx.github.io/XRT/master/html/
plaorms.html for addional details.
65:00.0 Processing accelerators: Xilinx Corporation Device 5020
Subsystem: Xilinx Corporation Device 000e
Flags: bus master, fast devsel, latency 0
Memory at 38bff2000000 (64-bit, prefetchable) [size=32M]
Memory at 38bff4020000 (64-bit, prefetchable) [size=128K]
Capabilities: [40] Power Management version 3
Capabilities: [60] MSI-X: Enable+ Count=32 Masked Capabilities: [70] Express Endpoint, MSI 00
Capabilities: [100] Advanced Error Reporting
Capabilities: [1c0] #19
Capabilities: [e00] Access Control Services
Capabilities: [e10] #15
Capabilities: [e80] Vendor Specific Information: ID=0020 Rev=0
Len=010 <?>
Kernel driver in use: xclmgmt
Kernel modules: xclmgmt
65:00.1 Processing accelerators: Xilinx Corporation Device 5021
Subsystem: Xilinx Corporation Device 000e
Flags: bus master, fast devsel, latency 0, IRQ 183
Memory at 38bff0000000 (64-bit, prefetchable) [size=32M]
Memory at 38bff4000000 (64-bit, prefetchable) [size=128K]
Memory at 38bfe0000000 (64-bit, prefetchable) [size=256M]
Capabilities: [40] Power Management version 3
Capabilities: [60] MSI-X: Enable+ Count=32 Masked Capabilities: [70] Express Endpoint, MSI 00
Capabilities: [100] Advanced Error Reporting
Capabilities: [e00] Access Control Services
Capabilities: [e10] #15
Capabilities: [e80] Vendor Specific Information: ID=0020 Rev=0
Len=010 <?>
Kernel driver in use: xocl
Kernel modules: xocl
Running xbmgmt flash --scan
UG1370 (v1.6) June 4, 2020 www.xilinx.com
Alveo U50 Data Center Accelerator Card Installation Guide 27
Use the xbmgmt flash --scan command to view and validate the card's current rmware
version, as well as display the installed card details, including card BDF, plaorm name, and
mestamp.
1. Enter the following command:
$ sudo /opt/xilinx/xrt/bin/xbmgmt flash --scan
Page 28

Chapter 5: Card Bring-Up and Validation
Send Feedback
For each card in the server, you will see an output similar to the example below.
Card [0000:65:00.0]
Card type: u50
Flash type: SPI
Flashable partition running on FPGA:
xilinx_u50_gen3x16_xdma_201920_3,[ID=0xf465b0a3ae8c64f6],[SC=5.0.27]
Flashable partitions installed in system:
xilinx_u50_gen3x16_xdma_201920_3,[ID=0xf465b0a3ae8c64f6],[SC=5.0.27]
In this example, the BDF is 0000:65:00.0.
The name of the plaorm and associated ID, along with the SC rmware version, running on
the FPGA are found under Flashable partition running on FPGA while the ones
installed in the system are found under Flashable partitions installed in
system.
In the above output example, the plaorm on the FPGA and system are idencal; the
deployment plaorm is named xilinx_u50_gen3x16_xdma_201920_3, the ID is
0xf465b0a3ae8c64f6 and the SC version is 5.0.27. Note in these outputs, ID is the
mestamp and SC refers to the Satellite Controller.
2. Verify that the deployment plaorm version installed on the FPGA is idencal to that
installed on the system. You can do this by making sure the lines under Flashable
partition running on FPGA and Flashable partitions installed in
system are idencal.
If these versions do not match, see Chapter 7: Troubleshoong.
xbutil validate
The xbutil validate command validates the correct installaon by performing the following
set of tests:
1. Validates the device found.
2. Checks PCIe link status.
3. Runs a verify kernel on the card.
4. Performs the following data bandwidth tests:
a. DMA test - Data transfer between host and card memory through PCIe.
UG1370 (v1.6) June 4, 2020 www.xilinx.com
Alveo U50 Data Center Accelerator Card Installation Guide 28
b. Memory test - Data transfer between kernels and card memory.
The validate command has the format:
xbutil validate -d <card_bdf>
Page 29

Chapter 5: Card Bring-Up and Validation
Send Feedback
where -d is oponal and card_bdf is the BDF of the card to be validated. If -d is not specied,
the command will validate all cards in the system.
Run the validate command shown below:
$ /opt/xilinx/xrt/bin/xbutil validate
If the card was installed correctly, you will see a high-level summary of the tests performed
similar to the following output. If the output is not similar to the one shown below, see Chapter
7: Troubleshoong.
INFO: Found 1 cards
INFO: Validating card[0]: xilinx_u50_gen3x16_xdma_201920_3
INFO: == Starting AUX power connector check:
AUX power connector not available. Skipping validation
INFO: == AUX power connector check SKIPPED
INFO: == Starting PCIE link check:
INFO: == PCIE link check PASSED
INFO: == Starting SC firmware version check:
INFO: == SC firmware version check PASSED
INFO: == Starting verify kernel test:
INFO: == verify kernel test PASSED
INFO: == Starting DMA test:
Host -> PCIe -> FPGA write bandwidth = 11933.1 MB/s
Host <- PCIe <- FPGA read bandwidth = 11966.5 MB/s
INFO: == DMA test PASSED
INFO: == Starting device memory bandwidth test:
...........
Maximum throughput: 52428 MB/s
INFO: == device memory bandwidth test PASSED
INFO: == Starting PCIE peer-to-peer test:
P2P BAR is not enabled. Skipping validation
INFO: == PCIE peer-to-peer test SKIPPED
INFO: == Starting memory-to-memory DMA test:
M2M is not available. Skipping validation
INFO: == memory-to-memory DMA test SKIPPED
INFO: Card[0] validated successfully.
INFO: All cards validated successfully.
UG1370 (v1.6) June 4, 2020 www.xilinx.com
Alveo U50 Data Center Accelerator Card Installation Guide 29
Note: The DMA bandwidth can vary depending upon NUMA/anity.
Page 30

Next Steps
Send Feedback
What you have done so far allows you to deploy and run accelerated applicaons on your
system. Alveo™ Accelerated Soluons page provides informaon and links to available Xilinx and
third-party accelerated applicaons. These include video processing, nancial compung,
machine learning, and data analycs.
If you are an applicaon developer who wants to develop and deliver accelerated applicaons,
install the Vis™ soware plaorm. It allows you to develop, debug, and opmize accelerated
applicaons for Alveo cards. Installaon instrucons can be found in Vis Unied Soware
Plaorm Documentaon: Applicaon Acceleraon Development (UG1393).
Chapter 6: Next Steps
Chapter 6
For an overview of developing accelerated applicaons with Alveo™ with accompanying guided
examples, see hps://developer.xilinx.com/en/arcles/acceleraon-basics.html.
For complete details on the development ow and geng started in Vis, see Vis Unied
Soware Plaorm Documentaon: Embedded Soware Development (UG1400). For an introducon
to Vis methodology, see Vis Unied Soware Plaorm Documentaon (UG1416).
UG1370 (v1.6) June 4, 2020 www.xilinx.com
Alveo U50 Data Center Accelerator Card Installation Guide 30
Page 31

Troubleshooting
Send Feedback
The following table lists potenal issues, causes, and xes related to card installaon.
Table 2: Card Troubleshooting
Issue Potential Cause Fix
Card not found. Card not correctly installed. Reinstall the card following the
Card not compatible with server. Use qualified server. For system
Kernel version is incompatible. Run uname -r to check the kernel
lspci no longer recognizes the card.
XRT installation incomplete or
unsuccessful.
Deployment platform installation
incomplete or unsuccessful.
xbmgmt --flash returns the error:
Specified DSA is not
applicable
Card is overheating. Ensure that operating ambient
Missing dependent packages. Contact your Linux administrator.
Missing dependent packages. Contact your Linux administrator.
Correct type of deployment platform
package not installed.
Chapter 7: Troubleshooting
Chapter 7
installation instructions.
Check if the card shows up by typing
the following Linux command: lspci
-vd 10ee:
capabilities, see Alveo U50 Data Center
Accelerator Cards Data Sheet (DS965).
version. Ensure that the kernel version
matches the version listed for your OS
in Chapter 4: Installing the Deployment
Software.
conditions do not exceed specifications
and passive cards are in a system that
provides adequate airflow.
Install the correct type of deployment
platform package.
UG1370 (v1.6) June 4, 2020 www.xilinx.com
Alveo U50 Data Center Accelerator Card Installation Guide 31
Unable to install packages on RedHat
and CentOS.
When running xbutil the following
message is displayed:
Failed to open device:
0000:3b:00.0
INFO: Found total 1 card(s);
0 are usable.
Incorrect permissions for download
directory, for example, a /home/
directory.
Driver has not loaded successfully or
the card is not flashed successfully.
Download the packages to a directory
where root has read access (for
example, /tmp ). Use the full path to
the RPM package when installing. yum
will fail with a relative path to RPM
package.
Perform a cold reboot.
Page 32

Table 2: Card Troubleshooting (cont'd)
Send Feedback
Issue Potential Cause Fix
XRT package fails to install on
CentOS7.4, CentOS7.5, or CentOS7.6
Kernel development headers are
missing. The XRT package is missing a
dependency on kernel-devel and
kernel-headers.
Chapter 7: Troubleshooting
Manually install kernel-devel and
kernel-header with yum install:
$ sudo yum install kernelheaders-`uname -r`
$ sudo yum install kerneldevel-`uname -r`
Note: Do not run sudo yum upgrade.
This will update the kernel-headers to
an incompatible version.
Flashing the card does not complete
after 20 minutes.
Run time fails with following message:
Error: Failed to find Xilinx
platform
When installing the XRT, you see the
following message:
N: Can't drop privileges for
downloading as file '/root/
xrt_201802.2.1.79_16.04.deb'
couldn't be accessed by user
'_apt'. - pkgAcquire::Run
(13: Permission denied)
Known Issues
The following table lists known issues. See Xilinx Answer Record 71752 and Xilinx Answer
Record 71975 for addional known issues.
The flash operation has failed. Perform cold-reboot and then re-flash
Failed to source the setup.sh script. Source /opt/xilinx/xrt/setup.sh
This is caused by running sudo apt
install as root.
the card.
The XRT will install correctly, despite
the error. You can find more
information about this error on
AskUbuntu.
UG1370 (v1.6) June 4, 2020 www.xilinx.com
Alveo U50 Data Center Accelerator Card Installation Guide 32
Table 3: Known Issues
Area Description Comments/Recommendations
xbmgmt
General On CentOS 7.5, driver may not be
xbmgmt commands do not work. There
are no errors indicating this in output.
loaded properly after boot up (or
reboot).
Reinstall the XRT package.
After boot up (or reboot), run these
two commands to load the device
driver:
$ sudo rmmod xclmgmt
$ sudo modprobe xclmgmt
Page 33

Table 3: Known Issues (cont'd)
Send Feedback
Area Description Comments/Recommendations
Power The Alveo U50 card limits HBM power
to 7.8W and FPGA fabric power to 58W.
Exceeding these power limits can cause
system instability.
General The Alveo card has not trained to the
full expected PCI Express link width or
link speed. The output from xbutil
validate will look like the following:
$ INFO: Validating device[0]:
INFO: Checking PCIE link
status: FAILED WARNING: Device
trained to lower spec. Expect:
Gen3x16, Current: Gen2x16
General The card is not present when running
xbutil or lspci. The card may not
have been ready when the server
enumerated PCI Express.
General Alveo Data Center Accelerator Card -
U50DD ES3 Known Issues
General Card does not show up when running
lspci and the red LED on the card is
illuminated.
Chapter 7: Troubleshooting
To manage power consumption, review
design power usage and ensure that it
is within the power limits. Design
power estimates can be obtained using
the report_power Tcl command.
After implementing a design in the
Vivado® tools or in the Vitis™
environment, open the implementation
result, add the
set_operating_conditions design_power_budget 63 constraint,
and run report power. See Vivado
Design Suite User Guide: Power Analysis
and Optimization (UG907) for setting up
power analysis.
Actual application power consumption
can be obtained by monitoring the
12V/3V PEX and 12V/3V PEX current
measurements provided by the xbutil
query—which reports power
consumption at the input to the power
regulator.
For Vivado designs include the CMC IP
so that the system controller can
communicate with the device.
Ensure that the Alveo card is plugged
into a Gen 3x16 or 4x8 capable
slot.Then cold reboot and see if the
card trains to the correct settings.
Potential Fix: Warm Reboot the server,
Disable Fast Boot.
For U50DD known issues, see Xilinx
Answer Record 72766.
When card is first installed in server,
BIOS may not recognize the card
correctly and red LED on card is
illuminated, indicating an error.
Cold boot the server four times until
the blue LED on the card is illuminated,
indicating the card is successfully
running.
If the red LED is still illuminated,
disconnect the power to the sever for 5
minutes and repeat the step above.
UG1370 (v1.6) June 4, 2020 www.xilinx.com
Alveo U50 Data Center Accelerator Card Installation Guide 33
Page 34

Table 3: Known Issues (cont'd)
Send Feedback
Area Description Comments/Recommendations
Installation When installing the U50 deployment
package, the following message is
received:
Failed to create xsabin,
install is incomplete
Chapter 7: Troubleshooting
This error can occur if XRT is built from
GitHub sources without Vitis software
platform installed and XILINX_VITIS
set. Prior to building XRT from GitHub
sources, install the Vitis software
platform and set up the Vitis
Environment to resolve this issue. See
Vitis Unified Software Platform
Documentation (UG1416).
Installation
Unexpected card behavior when
downgrading to beta package.
When downgrading to a beta package,
it is necessary to factory reset all U50
cards installed on the system.
Downgrading to a beta package
without first factory resetting all U50
cards installed on the system can result
in unexpected behavior. For beta
package installation, follow the
installation steps in version 1.4 of the
Alveo U50 Data Center Accelerator Card
Installation Guide (UG1370).
UG1370 (v1.6) June 4, 2020 www.xilinx.com
Alveo U50 Data Center Accelerator Card Installation Guide 34
Page 35

Appendix A: Changing XRT and Target Platform Versions
Send Feedback
Appendix A
Changing XRT and Target Platform
Versions
The Alveo™ Data Center Accelerator card target plaorm revisions can change signicantly
between releases. To ensure a successful upgrade (or downgrade) of the Alveo card XRT and
plaorm, carefully follow the instrucons. Failure to adhere to these procedures can result in an
unstable installaon or other issues.
RedHat and CentOS
During upgrading, downgrading, or uninstalling, it can be useful to list the currently installed
Alveo packages. To list the currently installed deployment plaorm package, run the following
command in a Linux terminal:
$ yum list installed | grep xilinx
To list the currently installed XRT package, run the following command:
$ yum list installed | grep xrt
Upgrading Packages
You can upgrade the XRT and deployment plaorm on your Alveo card by following these steps.
Currently, both packages must be upgraded concurrently.
1. Download the desired XRT and deployment plaorm packages and follow installaon steps 5
through 10 in XRT and Deployment Plaorm Installaon Procedures on RedHat and CentOS.
Downgrading Packages
UG1370 (v1.6) June 4, 2020 www.xilinx.com
Alveo U50 Data Center Accelerator Card Installation Guide 35
Perform the following steps to downgrade plaorms.
1. Restore the card to the original manufacturing state by running the following command.
$ sudo /opt/xilinx/xrt/bin/xbmgmt flash --factory_reset
Page 36

Appendix A: Changing XRT and Target Platform Versions
Send Feedback
2. Remove the current XRT and shell versions.
$ sudo yum remove xrt
3. Cold reboot the system.
4. Follow the installaon procedures outlined in Chapter 4: Installing the Deployment Soware.
It is not recommended to downgrade to a beta version. However, if you must downgrade to a
beta package, it is necessary to rst factory reset all the U50 cards installed on the system.
Downgrading to a beta package without rst factory reseng all the U50 cards installed on the
system can result in unexpected behavior. For beta package installaon, follow the installaon
steps in version 1.4 of the Alveo U50 Data Center Accelerator Card Installaon Guide (UG1370).
Related Informaon
Reverng the Card to Factory Image
Uninstalling Packages
To completely uninstall the Alveo XRT and deployment plaorm packages, run the following
command in a Linux terminal. Uninstalling XRT also uninstalls the deployment plaorm.
$ sudo yum remove ./<xrt_package_name>
Note: Make sure that all of the plaorm packages are displayed in the output terminal aer running the
command. If not, manually list the packages using the list command at the beginning of this secon,
then delete the remaining packages using the remove command.
Ubuntu
During upgrading, downgrading, or uninstalling, it can be useful to list the currently installed
Alveo packages. To list the currently installed deployment plaorm package, run the following
command in a Linux terminal:
$ apt list –-installed | grep xilinx
To list the currently installed XRT package, run the following command:
$ apt list -–installed | grep xrt
UG1370 (v1.6) June 4, 2020 www.xilinx.com
Alveo U50 Data Center Accelerator Card Installation Guide 36
Upgrading Packages
You can upgrade the XRT and deployment plaorm on your Alveo card by following these steps.
Currently, both packages must be upgraded concurrently.
Page 37

Appendix A: Changing XRT and Target Platform Versions
Send Feedback
1. Download the desired XRT and deployment plaorm packages. Follow installaon steps 5
through 10 in XRT and Deployment Plaorm Installaon Procedures on Ubuntu.
Downgrading Packages
1. Restore the card to the original manufacturing state by running the following command.
$ sudo /opt/xilinx/xrt/bin/xbmgmt flash --factory_reset
2. Remove the current XRT and shell versions.
$ sudo apt remove xrt
3. Cold reboot the system.
4. Follow the installaon procedures outlined in Chapter 4: Installing the Deployment Soware.
It is not recommended to downgrade to a beta version. However, if you must downgrade to a
beta package, it is necessary to rst factory reset all the U50 cards installed on the system.
Downgrading to a beta package without rst factory reseng all U50 cards installed on the
system can result in unexpected behavior. For beta package installaon, follow the installaon
steps in version 1.4 of the Alveo U50 Data Center Accelerator Card Installaon Guide (UG1370).
Related Informaon
Reverng the Card to Factory Image
Uninstalling Packages
To completely uninstall the Alveo XRT and deployment plaorm packages, run the following
command in a Linux terminal. Uninstalling XRT also uninstalls the deployment plaorm.
$ sudo apt remove ./<xrt_package_name>
Note: Make sure that all of the target plaorm packages are displayed in the output terminal aer running
the command. If not, manually list the packages using the list command at the beginning of this secon,
then delete the remaining packages using the remove command.
UG1370 (v1.6) June 4, 2020 www.xilinx.com
Alveo U50 Data Center Accelerator Card Installation Guide 37
Page 38

Appendix B: Reverting the Card to Factory Image
Send Feedback
Reverting the Card to Factory
Image
The Alveo™ card can be reverted to factory (Golden) image. This requires that XRT 2019.2
release or later is installed on the same system as the Alveo accelerator card. The steps to revert
the card using this method are listed below.
Note: If using XRT 2019.1, follow the steps given in v2019.1 of Geng Started with Alveo Data Center
Accelerator Cards (UG1301).
Appendix B
1. Open a terminal window.
2. Run the following command.
$ sudo /opt/xilinx/xrt/bin/xbmgmt flash --factory_reset
3. Enter y to connue. The following message is displayed on compleon.
Shell is reset succesfully
Cold reboot machine to load new shell on card
4. Cold-reboot by power cycling the system to complete the reverng process.
5. Validate that the card has been reverted to factory image by running the following command.
$ sudo /opt/xilinx/xrt/bin/xbmgmt flash --scan
An output similar to the following is displayed.
Card [0000:65:00.0]
Card type: uxx
Flash type: SPI
Flashable partition running on FPGA:
xilinx_uxx_GOLDEN_x,[SC=x.x]
Flashable partitions installed in system: (None)
In the output above, under Flashable partition running on FPGA, note GOLDEN
in the name. This indicates that the card has successfully been reverted to factory image.
UG1370 (v1.6) June 4, 2020 www.xilinx.com
Alveo U50 Data Center Accelerator Card Installation Guide 38
Page 39

Appendix C: Creating a Vault Repository for CentOS
Send Feedback
Appendix C
Creating a Vault Repository for
CentOS
On CentOS, yum install kernel-headers always installs the latest version of the headers,
but might not match your kernel version. This causes the installaon of XRT to skip compilaon
of the driver modules and will silently fail. To correctly install XRT, you must create a vault
repository le that points to versions matching the kernel.
The following is an example repository for CentOS 7.4 created in the following le:
/etc/yum.repos.d/centos74.repo
# CentOS-Base-7.4.repo
#
# This repo is locked to 7.4.1708 version
#
# C7.4.1708
[C7.4.1708-base]
name=CentOS-7.4.1708 - Base
baseurl=http://vault.centos.org/7.4.1708/os/$basearch/
gpgcheck=1
gpgkey=file:///etc/pki/rpm-gpg/RPM-GPG-KEY-CentOS-7
enabled=1
[C7.4.1708-updates]
name=CentOS-7.4.1708 - Updates
baseurl=http://vault.centos.org/7.4.1708/updates/$basearch/
gpgcheck=1
gpgkey=file:///etc/pki/rpm-gpg/RPM-GPG-KEY-CentOS-7
enabled=1
[C7.4.1708-extras]
name=CentOS-7.4.1708 - Extras
baseurl=http://vault.centos.org/7.4.1708/extras/$basearch/
gpgcheck=1
gpgkey=file:///etc/pki/rpm-gpg/RPM-GPG-KEY-CentOS-7
enabled=1
[C7.4.1708-centosplus]
name=CentOS-7.4.1708 - CentOSPlus
baseurl=http://vault.centos.org/7.4.1708/centosplus/$basearch/
gpgcheck=1
gpgkey=file:///etc/pki/rpm-gpg/RPM-GPG-KEY-CentOS-7
enabled=1
[C7.4.1708-fasttrack]
name=CentOS-7.4.1708 - CentOSPlus
baseurl=http://vault.centos.org/7.4.1708/fasttrack/$basearch/
gpgcheck=1
gpgkey=file:///etc/pki/rpm-gpg/RPM-GPG-KEY-CentOS-7
enabled=1
UG1370 (v1.6) June 4, 2020 www.xilinx.com
Alveo U50 Data Center Accelerator Card Installation Guide 39
Page 40

Appendix C: Creating a Vault Repository for CentOS
Send Feedback
Note: For CentOS 7.5, create the repo le /etc/yum.repos.d/centos75.repo and add the above
content, replacing "7.4.1708" with "7.5.1804". Similarly, for CentOS 7.6, create the repo le /etc/
yum.repos.d/centos76.repo and add the above content, replacing "7.4.1708" with "7.6.1810".
UG1370 (v1.6) June 4, 2020 www.xilinx.com
Alveo U50 Data Center Accelerator Card Installation Guide 40
Page 41

Appendix D: Generating the xbmgmt flash --update Command
Send Feedback
Appendix D
Generating the xbmgmt flash -update Command
To ash the rmware installed in the system to the Alveo™ card, use the xbmgmt flash -update command.
The format of the xbmgmt flash --update command is:
sudo /opt/xilinx/xrt/bin/xbmgmt flash --update --shell <shell_name> --card
<card_bdf>
To obtain the necessary card_bdf and shell_name opons, run the following xbmgmt
flash --scan command. For more informaon, see Running xbmgmt ash --scan.
sudo /opt/xilinx/xrt/bin/xbmgmt flash --scan
You will see an output similar to the output below. In this example, the Flashable partition
running on FPGA does not match Flashable partitions installed in system,
implying that the Flashable partition running on FPGA needs to be updated using the
xbmgmt flash --update command.
Card [0000:65:00.0]
Card type: u200
Flash type: SPI
Flashable partition running on FPGA:
xilinx_u200_xdma_201830_1,[ID=0x000000005bece8e1],[SC=3.1]
Flashable partitions installed in system:
xilinx_u200_xdma_201830_2,[ID=0x000000005d1211e8],[SC=4.2.0]
• card_bdf: Species the BDF of the card to ash. In the above example, the BDF is
0000:65:00.0. This opon is only required if you have mulple cards installed on the
server.
• shell_name: Species the plaorm (formerly referred to as shell) that is used to ash the
card. The shell_name for ashing is provided under Flashable partitions
installed in system. In the above example, the shell_name is
xilinx_u200_xdma_201830_2.
UG1370 (v1.6) June 4, 2020 www.xilinx.com
Alveo U50 Data Center Accelerator Card Installation Guide 41
For the example output above, the xbmgmt flash command is:
sudo /opt/xilinx/xrt/bin/xbmgmt flash --update --shell
xilinx_u200_xdma_201830_2 --card 0000:65:00.0
Page 42

Appendix D: Generating the xbmgmt flash --update Command
Send Feedback
When the Alveo card is successfully ashed and cold rebooted, the xbmgmt flash --scan
output will show the same package informaon for both Flashable partition running
on FPGA and Flashable partitions installed in system.
If you have mulple cards installed on the server, you must run the xbmgmt flash command
separately for each card.
IMPORTANT! Use a separate
IMPORTANT! Ulisez une commande xbmgmt ash disncte pour faire asher chaque carte du système.
WICHTIG! Verwenden Sie einen separaten xbmgmt ash-Befehl, um jede Karte im System zu ashen.
xbmgmt flash
command to ash each card in the system.
UG1370 (v1.6) June 4, 2020 www.xilinx.com
Alveo U50 Data Center Accelerator Card Installation Guide 42
Page 43

Appendix E: Additional Resources and Legal Notices
Send Feedback
Appendix E
Additional Resources and Legal
Notices
Xilinx Resources
For support resources such as Answers, Documentaon, Downloads, and Forums, see Xilinx
Support.
Documentation Navigator and Design Hubs
Xilinx® Documentaon Navigator (DocNav) provides access to Xilinx documents, videos, and
support resources, which you can lter and search to nd informaon. To open DocNav:
• From the Vivado® IDE, select Help → Documentaon and Tutorials.
• On Windows, select Start → All Programs → Xilinx Design Tools → DocNav.
• At the Linux command prompt, enter docnav.
Xilinx Design Hubs provide links to documentaon organized by design tasks and other topics,
which you can use to learn key concepts and address frequently asked quesons. To access the
Design Hubs:
• In DocNav, click the Design Hubs View tab.
• On the Xilinx website, see the Design Hubs page.
Note: For more informaon on DocNav, see the Documentaon Navigator page on the Xilinx website.
UG1370 (v1.6) June 4, 2020 www.xilinx.com
Alveo U50 Data Center Accelerator Card Installation Guide 43
Page 44

References
Send Feedback
Vitis Documents
These documents provide supplemental material useful with this guide:
1. Vis Unied Soware Plaorm Documentaon: Applicaon Acceleraon Development (UG1393)
2. Vis Unied Soware Plaorm Documentaon (UG1416)
3. Vis Unied Soware Plaorm Documentaon: Embedded Soware Development (UG1400)
4. Vis 2020.1 Soware Plaorm Release Notes in the Vis Unied Soware Plaorm
Documentaon (UG1416)
5. Vis Applicaon Acceleraon Development Flow Tutorials (GitHub)
Alveo Documents
Appendix E: Additional Resources and Legal Notices
1. Alveo U50 Data Center Accelerator Cards Data Sheet (DS965)
2. Alveo Data Center Accelerator Card Plaorms User Guide (UG1120)
3. Alveo Programming Cable User Guide (UG1377)
Additional Xilinx Resources
1. Alveo Data Center Accelerator Card - Known Issues and General Informaon (Xilinx Answer
Record 71752)
2. Alveo Data Center Accelerator Card - U50DD ES3 Known Issues (Xilinx Answer Record
72766)
3. Xilinx licensing website: hps://www.xilinx.com/getproduct
4. Vis Developer Zone: hps://www.xilinx.com/products/design-tools/vis/vis-plaorm.html
5. Xilinx Community Forums: hps://forums.xilinx.com
6. Xilinx Third-Party End User License Agreement
7. End-User License Agreement
UG1370 (v1.6) June 4, 2020 www.xilinx.com
Alveo U50 Data Center Accelerator Card Installation Guide 44
Page 45

Appendix E: Additional Resources and Legal Notices
Send Feedback
Please Read: Important Legal Notices
The informaon disclosed to you hereunder (the "Materials") is provided solely for the selecon
and use of Xilinx products. To the maximum extent permied by applicable law: (1) Materials are
made available "AS IS" and with all faults, Xilinx hereby DISCLAIMS ALL WARRANTIES AND
CONDITIONS, EXPRESS, IMPLIED, OR STATUTORY, INCLUDING BUT NOT LIMITED TO
WARRANTIES OF MERCHANTABILITY, NON-INFRINGEMENT, OR FITNESS FOR ANY
PARTICULAR PURPOSE; and (2) Xilinx shall not be liable (whether in contract or tort, including
negligence, or under any other theory of liability) for any loss or damage of any kind or nature
related to, arising under, or in connecon with, the Materials (including your use of the
Materials), including for any direct, indirect, special, incidental, or consequenal loss or damage
(including loss of data, prots, goodwill, or any type of loss or damage suered as a result of any
acon brought by a third party) even if such damage or loss was reasonably foreseeable or Xilinx
had been advised of the possibility of the same. Xilinx assumes no obligaon to correct any
errors contained in the Materials or to nofy you of updates to the Materials or to product
specicaons. You may not reproduce, modify, distribute, or publicly display the Materials
without prior wrien consent. Certain products are subject to the terms and condions of
Xilinx's limited warranty, please refer to Xilinx's Terms of Sale which can be viewed at hps://
www.xilinx.com/legal.htm#tos; IP cores may be subject to warranty and support terms contained
in a license issued to you by Xilinx. Xilinx products are not designed or intended to be fail-safe or
for use in any applicaon requiring fail-safe performance; you assume sole risk and liability for
use of Xilinx products in such crical applicaons, please refer to Xilinx's Terms of Sale which can
be viewed at hps://www.xilinx.com/legal.htm#tos.
AUTOMOTIVE APPLICATIONS DISCLAIMER
AUTOMOTIVE PRODUCTS (IDENTIFIED AS "XA" IN THE PART NUMBER) ARE NOT
WARRANTED FOR USE IN THE DEPLOYMENT OF AIRBAGS OR FOR USE IN APPLICATIONS
THAT AFFECT CONTROL OF A VEHICLE ("SAFETY APPLICATION") UNLESS THERE IS A
SAFETY CONCEPT OR REDUNDANCY FEATURE CONSISTENT WITH THE ISO 26262
AUTOMOTIVE SAFETY STANDARD ("SAFETY DESIGN"). CUSTOMER SHALL, PRIOR TO USING
OR DISTRIBUTING ANY SYSTEMS THAT INCORPORATE PRODUCTS, THOROUGHLY TEST
SUCH SYSTEMS FOR SAFETY PURPOSES. USE OF PRODUCTS IN A SAFETY APPLICATION
WITHOUT A SAFETY DESIGN IS FULLY AT THE RISK OF CUSTOMER, SUBJECT ONLY TO
APPLICABLE LAWS AND REGULATIONS GOVERNING LIMITATIONS ON PRODUCT
LIABILITY.
UG1370 (v1.6) June 4, 2020 www.xilinx.com
Alveo U50 Data Center Accelerator Card Installation Guide 45
Page 46

Appendix E: Additional Resources and Legal Notices
Send Feedback
Copyright
© Copyright 2019-2020 Xilinx, Inc. Xilinx, the Xilinx logo, Alveo, Arx, Kintex, Spartan, Versal,
Virtex, Vivado, Zynq, and other designated brands included herein are trademarks of Xilinx in the
United States and other countries. OpenCL and the OpenCL logo are trademarks of Apple Inc.
used by permission by Khronos. PCI, PCIe, and PCI Express are trademarks of PCI-SIG and used
under license. AMBA, AMBA Designer, Arm, ARM1176JZ-S, CoreSight, Cortex, PrimeCell, Mali,
and MPCore are trademarks of Arm Limited in the EU and other countries. All other trademarks
are the property of their respecve owners.
UG1370 (v1.6) June 4, 2020 www.xilinx.com
Alveo U50 Data Center Accelerator Card Installation Guide 46
 Loading...