


Mi Induction Cooker
Руководство пользователя

Mi Induction Cooker User Manual ·01
Индукционная плита Mi, руководство пользователя ·12

Table of Contents
This product is for household use only.
Table of Contents |
01 |
Product Overview |
02 |
Control Panel |
02 |
Connect to Mi Home App |
03 |
Wi-Fi Indicator Status |
03 |
Reset Wi-Fi |
03 |
Quick Start Guide |
04 |
Control Panel Description |
04 |
Operating Instructions |
05 |
Daily Maintenance |
06 |
Important Safeguards |
07 |
Troubleshooting |
09 |
Fault Code |
10 |
Specification |
11 |
Declaration |
11 |
01

Product Overview |
Control Panel |
Removable Gasket |
4 |
|
1 |
|
3 |
|
2 |
Cooktop |
|
Surface |
|
Central Thermostat |
|
|
1 Control Knob/LED Display |
3 Menu Bu on |
Air Outlet |
|
|
Air Inlet |
2 Timer Bu on |
4 Power Indicator |
Control Panel
02
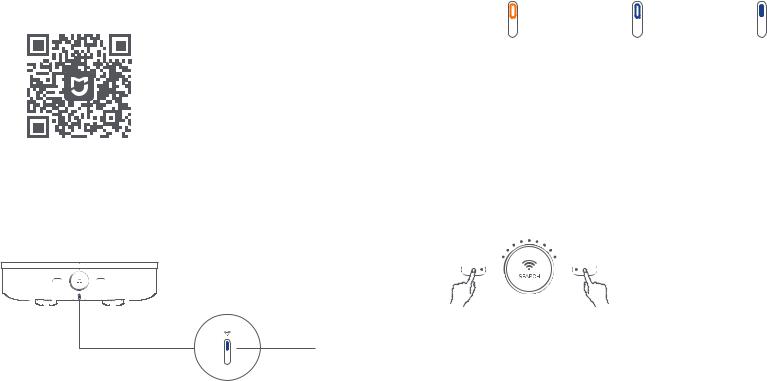
Connect to Mi Home App
Control your device and interact it with other smart home devices in Mi Home app.
1 . Download Mi Home app
Scan the QR code or go to app Store to download Mi Home app.
2. Add your device
Open Mi Home app, tap "+" on the upper right and follow prompts to add your device.
3. Connect your device
The blue Wi-Fi indicator light blinks to show that it is connecting. Once connected, the light remains blue.
Note: The device will appear on the homepage once added successfully.
|
|
|
|
|
TIMER |
MENU |
|
|
|
||||
|
|
|
|
|
|
|
|
|
|
|
|
|
|
|
|
|
|
|
|
|
|
|
|
|
|
|
|
|
|
|
|
|
|
|
|
|
|
|
|
|
|
|
|
|
|
|
|
|
|
|
|
|
|
|
|
 Wi-Fi Indicator
Wi-Fi Indicator Status
|
|
|
To be connected |
Connecting |
Connected |
|
|
|
Yellow light blinking |
Blue light blinking |
Blue light on |
|
|
|
Reset Wi-Fi
|
|
If the device cannot connect to your phone, |
|
|
press the "MENU" and the "TIMER" bu ons |
TIMER |
MENU |
simultaneously for 5 secs to reset. The yellow |
|
|
indicator light will blink to show that Wi-Fi has |
|
|
been reset successfully and you can recon- |
|
|
nect to the network. |
03

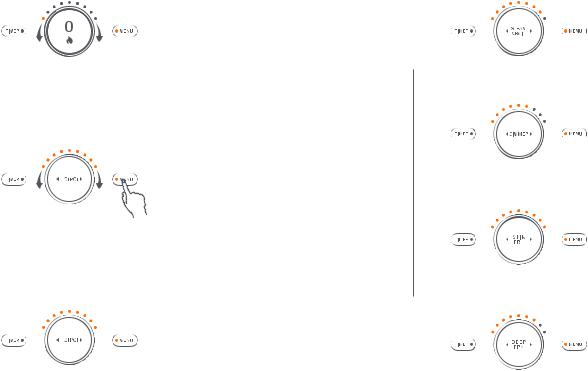
Quick Start Guide
Get started a er connected to power.
1. Turn the device on
A er connected to power, press and hold the Control Knob for 0.5 secs to turn the device on and enter standby mode.
Note: When on standby, the device defaults to power mode and is ready for cooking right away.
2. Select a mode
Using "HOTPOT " a s an example, t ap the "MENU" bu on and turn the control knob until you fin d " HOTP OT " m o d e , t h en p r e s s t o confirm. The unit will start cooking right away.
Note: Tap the "MENU"bu on again to exit mode selection.
3. Adjust the power
When cooking, turn the control knob to adjust the power.
4. Turn o a er cooking
A er cooking is finished, press and hold the control knob for 3 secs to enter "SLEEP" mode.
Note: Press and hold the control knob for 3 secs to enter "SLEEP" mode under any conditions.
Control Panel Description
The OLED display shows the current mode or status.
1.Power Mode
2.Menu Mode
3. Timer Mode
00 00
04
Operating Instructions
Power Mode
A er turned on, the cooker defaults to power mode for one hour. The power level can be adjusted according to your cooking needs. Turn the control knob slowly to adjust the power level by one at a time. Quickly turning it allows you to adjust the power level by ten at a time.
Menu Mode
Tap the "MENU" bu on to enter menu mode. Turn the control knob to browse through the menu and select a desired cooking mode. Turning the knob allows you to select in the following order: "HOTPOT, STEAM & BOIL, SIMMER, STIR FRY, DEEP FRY". Tap the control knob to begin cooking according to the selected mode.
Note: You can reconfigure the menu's functions in Mi
Home app.
1. HOTPOT
The default cooking time is 2 hours. Select a desired power level between 0-99 (Default is 99).
2. STEAM & BOIL
The default cooking time is 1 hour. Select a desired power level between 0-99 (Default is 80).
3. SIMMER
The default cooking time is 2 hours. Select a desired power level between 0-99 (Default is 60).
4. STIR FRY
The default cooking time is 1 hour. Select a desired power level between 0-99 (Default is 99).
5. DEEP FRY
The default cooking time is 2 hours. Select a desired power level between 0-99 (Default is 70).
05
Operating Instructions
|
Timer Mode |
|
1 . Before using the "TIMER ", confirm the |
00 00 |
current mode is correct. A er selecting the |
|
mode, press the "TIMER" bu on to enter timer |
|
mode. |
|
Note: The timer function can still be used when the heat is |
|
|
o . When the countdown timer ends, the alarm will sound, |
|
|
and the device enters standby mode. The timer can only be |
|
|
set under a specific cooking mode when the heat is on. |
|
|
2. Turn the control knob clockwise to adjust the |
|
01 45 |
countdown time, and press to confirm. Turn the |
|
knob slowly to adjust the time in 1-minute |
||
|
||
|
increment. Turn it quickly to adjust the time in |
|
|
10-minute increments. |
|
|
Note: The longest countdown time is 4 hours. The time is |
|
|
displayed in "hours" and "minutes". When the timer ends, |
|
|
the device turns the heat o and enters standby mode |
|
|
automatically. |
90 |
Adjust the power |
|
|
|
When the heat is on, turn the control knob to |
|
adjust the power. The power level is between |
|
0-99. |
|
Pause the device |
|
When the heat is on, press the control knob to |
PAUSE |
pause heating. Press again to restart heating. |
|
Note: A er the device is paused, it will automatically enter |
|
sleep mode a er 10 minutes if there is no subsequent opera- |
|
tion. |
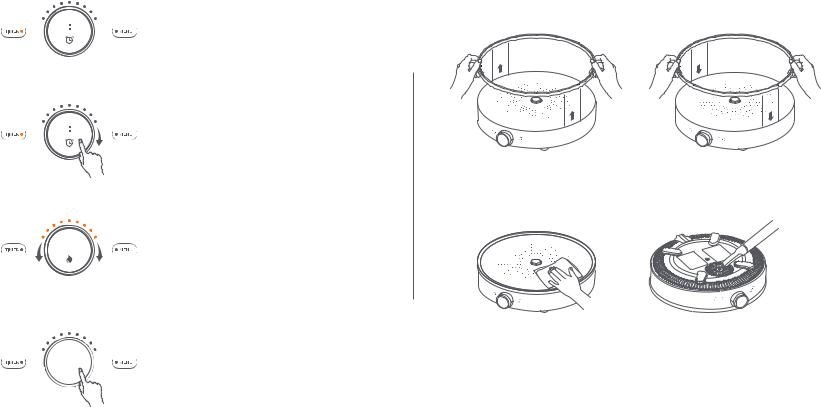
Daily Maintenance
It is important to turn the power o when the induction cooker is no longer in use. To avoid scalding, allow the device to cool down before performing the following operations.
1. Disassembling
Pull out the silicone gasket from both sides of the induction cooker.
3. Cleaning the cooktop
To ensure be er cooking and cleaner cooktop, you're recommended to use a so wet cloth with a mild detergent to wipe the cooktop a er cooking.
2. Installing
Align the silicone gasket with the groove beneath the cooktop, and insert into it.
4. Cleaning the air inlet/outlet
Use a so brush or mini vacuum cleaner to remove dust from the air inlet and outlet, or gently wipe them with a so cloth. It is recommended to clean every 6 months.
06
 Loading...