

Page 1
Page 2

© 2008 by Fuji Xerox Co., Ltd. All rights reserved.
Copyright protection claimed includes all forms and matters of copyrighted material and
information now allowed by statutory or judicial law or hereinafter granted, including without
limitations, material generated from the software programs which are displayed on the screen,
such as icons, screen displays, looks, etc.
®
Xerox
and all Xerox products mentioned in this publication are trademarks of Xerox
Corporation. Product names and trademarks of other companies are hereby acknowledged.
The information in this document is correct at the time of publication. Xerox reserves the right
at any time to change the information without notice. Changes and technical updates will be
added in subsequent editions of the documentation. For the latest information, go to
www.xerox.com
.
Products Subject To Ordinary Export Regulations
An export of this product is strictly limited in accordance with Laws concerning Foreign
Exchange and Foreign Trade of Japan and/or the export control regulations of the United
States. You must obtain, if you wish to export this product, any appropriate export license from
the Japanese Government or its agency and/or re-export approval from the U.S. Government
or its agency.
Products Subject To Supplementary Export Regulations
An export of this product is strictly limited in accordance with Laws concerning Foreign
Exchange and Foreign Trade of Japan and/or the export control regulations of the United
States. You must obtain, if you know the product is to be used, or was used for development,
manufacturing or use of any mass destructive weapons including nuclear weapon, chemical
weapon or biological weapon because of a dealing document such as legal contract or
information from the importer, any appropriate export license from the Japanese Government
or its agency and/or re-export approval from the U.S. Government or its agency.
Page 3

Table of Contents
1 Before Using the Machine .....................................................................7
Xerox Welcome Center ............................................................................7
Serial Number......................................................................................7
Conventions .............................................................................................8
Related Information Sources....................................................................8
2 Maintenance..........................................................................................11
Replacing Consumables ........................................................................11
Adding Toner to the Drum Cartridge..................................................12
Replacing the Drum Cartridge ...........................................................15
Cleaning the Machine.............................................................................17
Cleaning the Exterior .........................................................................17
Cleaning the Document Cover and Document Glass........................17
Cleaning the Film and Narrow Glass Strip.........................................18
Cleaning the Document Feeder Roller ..............................................18
Cleaning the Corotron Wire ...............................................................19
Moving the Machine ...............................................................................20
3 Using CentreWare Internet Services ..................................................23
Information Checklist ..............................................................................23
CentreWare Internet Services Environments .........................................24
CentreWare Internet Services Installation..............................................24
Installation Procedure........................................................................24
Network Communication Setup .........................................................24
Test Access .......................................................................................28
Standard Features - CentreWare Internet Services ...............................29
Interface Options ...............................................................................29
Services..................................................................................................30
Status ................................................................................................30
Jobs ...................................................................................................30
Scan ..................................................................................................31
Properties ..........................................................................................31
Support ..............................................................................................31
4 Job Status .............................................................................................33
Checking Current Jobs...........................................................................33
Deleting Jobs.....................................................................................33
Checking Completed Jobs .....................................................................34
Checking Error Information ....................................................................35
3
Page 4

5 Machine Status..................................................................................... 37
Checking the Machine Status ................................................................ 37
Checking the Status of Trays ................................................................. 37
Checking the Status of Consumables .................................................... 38
Machine Information............................................................................... 39
Downloading Software ........................................................................... 41
Printing the Configuration Report...........................................................41
Viewing the Total Number of Pages Made on the Machine...................42
6 Printer Environment Settings .............................................................43
TCP/IP (LPD or Port9100) .....................................................................43
Information Checklist ......................................................................... 43
TCP/IP (LPD or Port9100) Environments.......................................... 44
TCP/IP (LPD or Port9100) Installation...............................................44
USB Port ................................................................................................47
Information Checklist ......................................................................... 47
USB Port Environment ......................................................................47
USB Port Installation ......................................................................... 48
SNMP Configuration .............................................................................. 49
7 Scanner Environment Settings........................................................... 53
Scanning Overview ................................................................................53
Scanning with the Machine................................................................53
Setup Procedure ....................................................................................53
Network Communication Setup ......................................................... 53
Scanning Procedure..........................................................................55
Computer Setup ................................................................................56
Setting Up a Mailbox .............................................................................. 56
Creating a Mailbox............................................................................. 58
Setting the Scan Options................................................................... 59
Editing a Mailbox ...............................................................................63
Deleting a Mailbox ............................................................................. 63
8 Accounting and Securities..................................................................65
Overview of Account Administration ...................................................... 65
Users Controlled by Account Administration .....................................66
Enabling the Account Mode ...................................................................66
Managing User Accounts.......................................................................67
Creating/Editing a User Account .......................................................67
Deleting a User Account....................................................................69
Managing the Counters..........................................................................69
Setting Copy and Print Job Limits on a User Account.......................69
Viewing the Total Number of Copies or Prints for a User Account....71
Resetting the Total Number of Copies and Prints for All Users.........72
Changing the System Administrator Settings.........................................73
4
Page 5

IP Filtering (IP Address Restriction) .......................................................74
9 Problem Solving ...................................................................................75
Fault Clearance Procedure ....................................................................75
Machine Diagram (mimic)..................................................................76
Error Codes .......................................................................................78
Troubleshooting Table.......................................................................90
Paper Jams ............................................................................................94
E1: Paper Jam around the Fuser Unit and
inside the Left Side Cover..................................................................94
E2: Paper Jam inside the Left Side Cover.........................................96
E4: Paper Jam inside the Left Side Cover.........................................97
C1: Paper Jam in Tray 1....................................................................98
C2: Paper Jam in Tray 2....................................................................99
E3: Paper Jam in Tray 2 ....................................................................99
C3: Paper Jam in the Bypass Tray ..................................................100
A1/A2: Document Jams........................................................................ 101
Network-related Problems....................................................................102
Problem Solving Procedure.............................................................102
TCP/IP .............................................................................................102
CentreWare Internet Services .........................................................104
Scanning Services ...........................................................................105
Internet/Intranet Connection ............................................................106
Xerox Welcome Center ........................................................................107
Viewing/Editing Support Information ....................................................108
10 Appendix .............................................................................................109
System Settings ...................................................................................109
Entering the System Setting Mode ..................................................109
Configuring the System Settings .....................................................112
System Setting List ..........................................................................113
Document Sizes Detectable by the Document Feeder....................121
Specifications .......................................................................................122
Printable Area ..................................................................................125
Optional Accessories............................................................................125
11 Index ....................................................................................................127
5
Page 6
1 Before Using the Machine
Welcome to the Xerox family of WorkCentre products.
This System Administration Guide provides detailed information, technical
specifications, and procedures for using the integral features of the machine.
This chapter provides information which users should be aware of before using the
machine.
Xerox Welcome Center
If you need assistance during or after product installation, visit the Xerox website for
online solutions and support.
http://www.xerox.com/support
If you require further assistance, contact our experts at the Xerox Welcome Center. A
telephone number for the local representative may have been provided when the
product was installed. For convenience and future reference, please record the
telephone number in the space below.
Welcome Center or local representative telephone number:
#
Xerox US Welcome Center:1-800-821-2797
Xerox Canada Welcome Center:1-800-93-XEROX (1-800-939-3769)
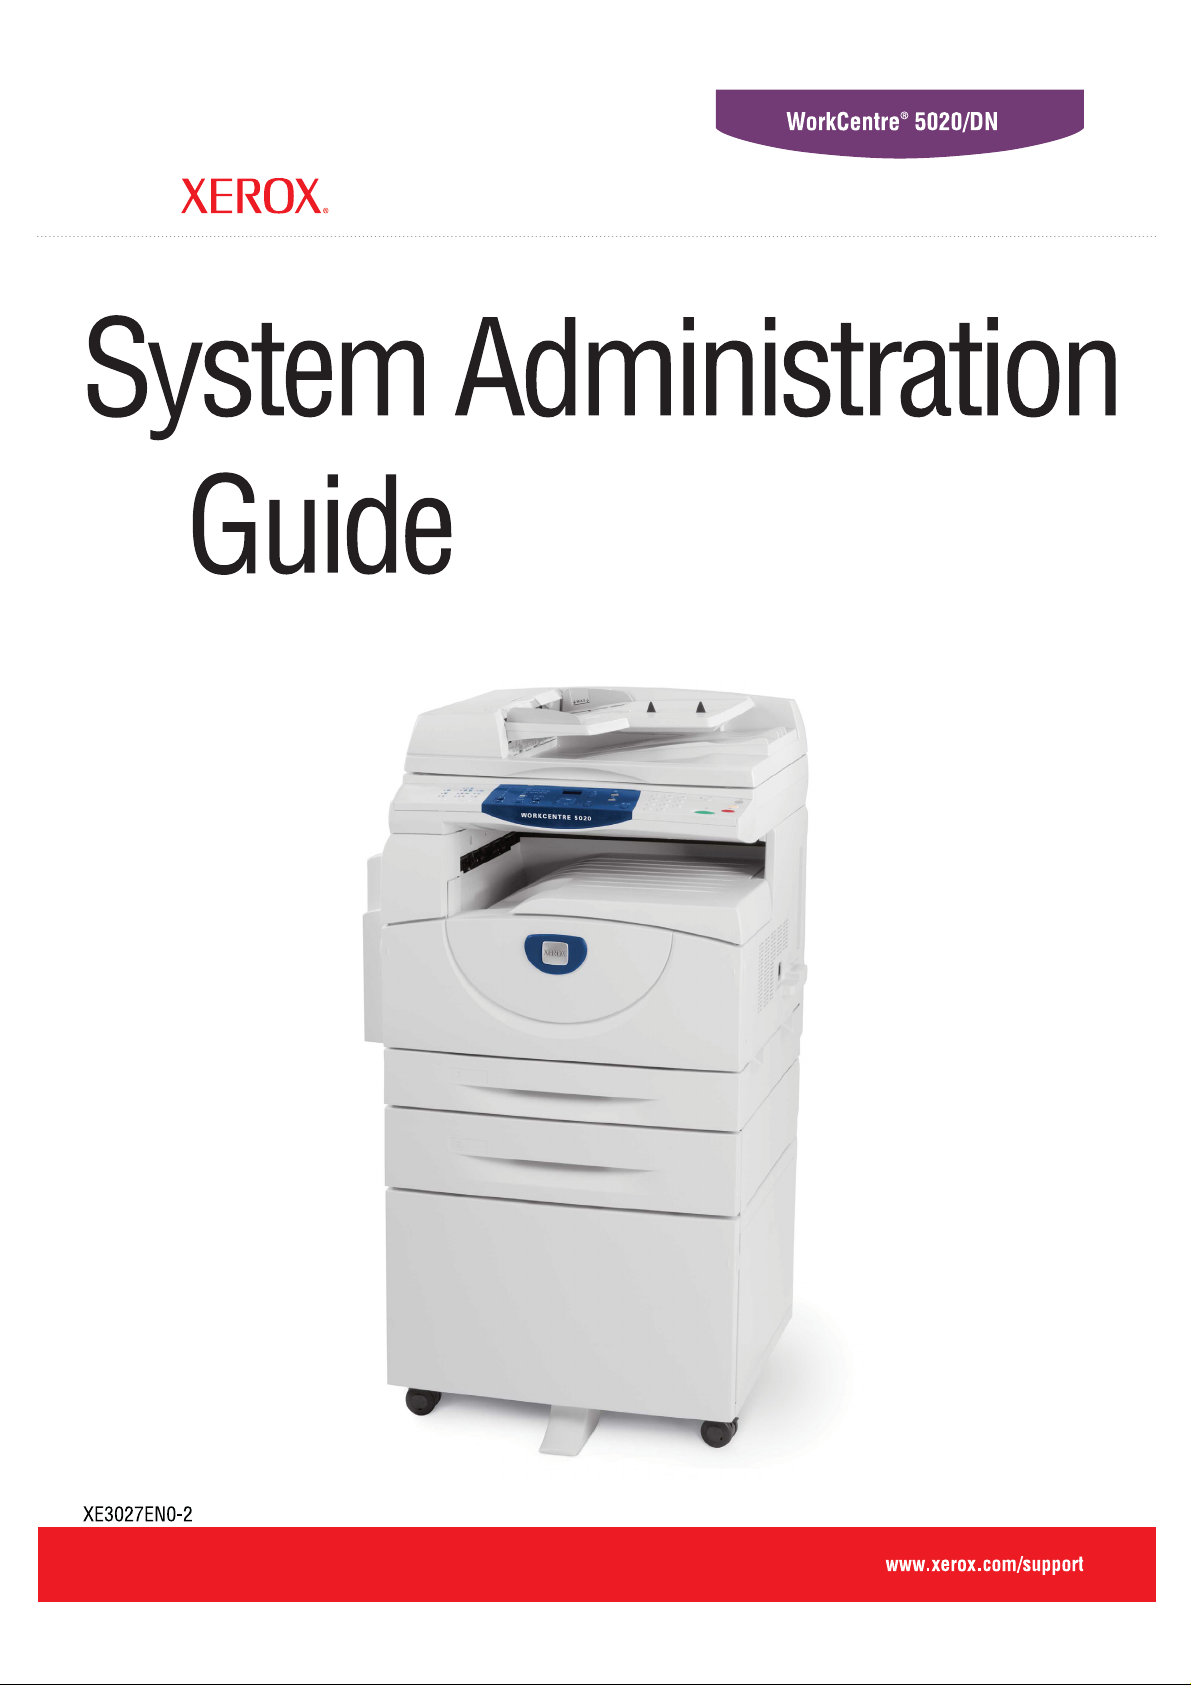
Serial Number
When you call the Welcome Center you will
need to provide the serial number which is
located inside of the Left Side Cover, as
shown in the diagram.
For your convenience, record the serial
number in the space below.
Serial Number:
Keep a record of any error codes. This
information helps us solve problems faster.
7
Page 7

1 Before Using the Machine
Conventions
This section describes the conventions that are used throughout this System
Administration Guide.
WARNING: indicates statements that alert you to the possibility of personal harm.
CAUTION: indicates statements that suggest the possibility of mechanical damage
NOTE: indicates additional information on operations or features.
" ": indicates cross-references within this guide and input text
[ ]: indicates the values and error codes that appear in the Display, and also
< >: indicates hardware buttons on the Control Panel of the machine and keys
This section also describes terms that are used throughout this System Asministration
Guide.
as a result of an action.
indicates the names of menus, windows, dialog boxes, buttons, and other
items displayed on a computer monitor.
on a computer keyboard.
• Orientation is used to mean the direction of images on the page. When the image is
upright, the paper (or other media) can be either long edge feed or short edge feed.
• LEF (Long Edge Feed)
Loading documents and paper with one of the long edges to be fed into the machine
first.
• SEF (Short Edge Feed)
Loading documents and paper with one of the short edges to be fed into the machine
first.
LEF Orientation
Paper feed direction
SEF Orientation
Paper feed direction
• Paper is synonymous with media, and is used interchangeably.
• Machine is synonymous with Xerox WorkCentre 5020/DN, and is used
interchangeably.
• Computer refers to a personal computer or workstation.
• System Administrator refers to a person who is responsible for maintaining the
machine, such as setting up the machine, installing the print drivers, and managing
software.
Related Information Sources
The following sources of information are available for the machine:
• WorkCentre 5020/DN User Guide
• WorkCentre 5020/DN System Administration Guide
• WorkCentre 5020/DN Installation Guide
8
Page 8

Related Information Sources
• WorkCentre 5020/DN Quick Use Guide
NOTE: Diagrams used in this System Administration Guide apply to a fully configured
machine and therefore may not exactly represent the configuration being used.
NOTE: All the screen shots used in this System Administration Guide are taken using
Windows XP.
9
Page 9

2 Maintenance
This chapter explains how to replace consumbles and how to clean the machine.
The following information is provided in this chapter:
Replacing Consumables – page 11
Cleaning the Machine – page 17
Moving the Machine – page 20
Replacing Consumables
The following consumables are manufactured to meet the specifications of the
machine.
Consumables/
Maintenance Part
Toner Bottle 106R01277 Approx. 6,300 pages *1
Drum Cartridge 101R00432 Approx. 22,000 pages *2 1 unit/box
*1: The value of the page yield provided above is in accordance with ISO/IEC 19752.
This value is based on using A4 LEF paper. The value is for reference only and will
vary depending on the conditions such as the print contents, dot coverage (area
coverage), paper size, paper type, copy/print density, output image type, and
machine usage environment.
*2: Based on the following conditions: (1) 1-sided copying (not printing), (2) average
number of pages copied at a time: 4 pages, (3) paper size: A4 LEF, (4) paper tray:
Tray 1, (5) output tray: Output Tray. These values are estimates and will also be
affected by other machine-usage conditions, such as how often the machine is
switched on and off. The degradation of image quality may occur even before the
machine stops when the Drum Cartridge reaches the end of its life.
Handling consumables/periodical replacement parts
• Do not store boxes of consumables/periodical replacement parts upright.
Product
Code
Page Yield Quantity/Box
2 unit/box
(per a bottle)
• Do not unpack consumables/periodical replacement parts before use. Avoid storing
consumables/periodical replacement parts in the following locations:
– In extreme temperature and humidity
– Near heat-generating devices
– In direct sunlight
– In dusty locations
• Use consumables only as directed on their packages.
• We recommend always having spare consumables available.
• When calling the Xerox Welcome Center to order consumables/periodic
replacement parts, have the product codes ready.
11
Page 10
2 Maintenance
• Use of consumables/periodic replacement parts that are not recommended by
Checking the status of consumables
If the Drum Cartridge needs to be replaced in the near future, or toner levels fall below
a certain threshold, the respective indicators on the Machine Diagram (mimic) light up.
If the Drum Cartridge needs to be replaced immediately, or the toner has run out,
respective error codes appear in the Display.
Xerox can impair quality and performance of the machine. Use only consumables/
periodic replacement parts that are specifically recommended by Xerox.
For more information on the Machine Diagram (mimic), refer to
(mimic) on page 76
.
NOTE: You can also check the status of consumables using CentreWare Internet
Serivces. For more information, refer to
page 38
.
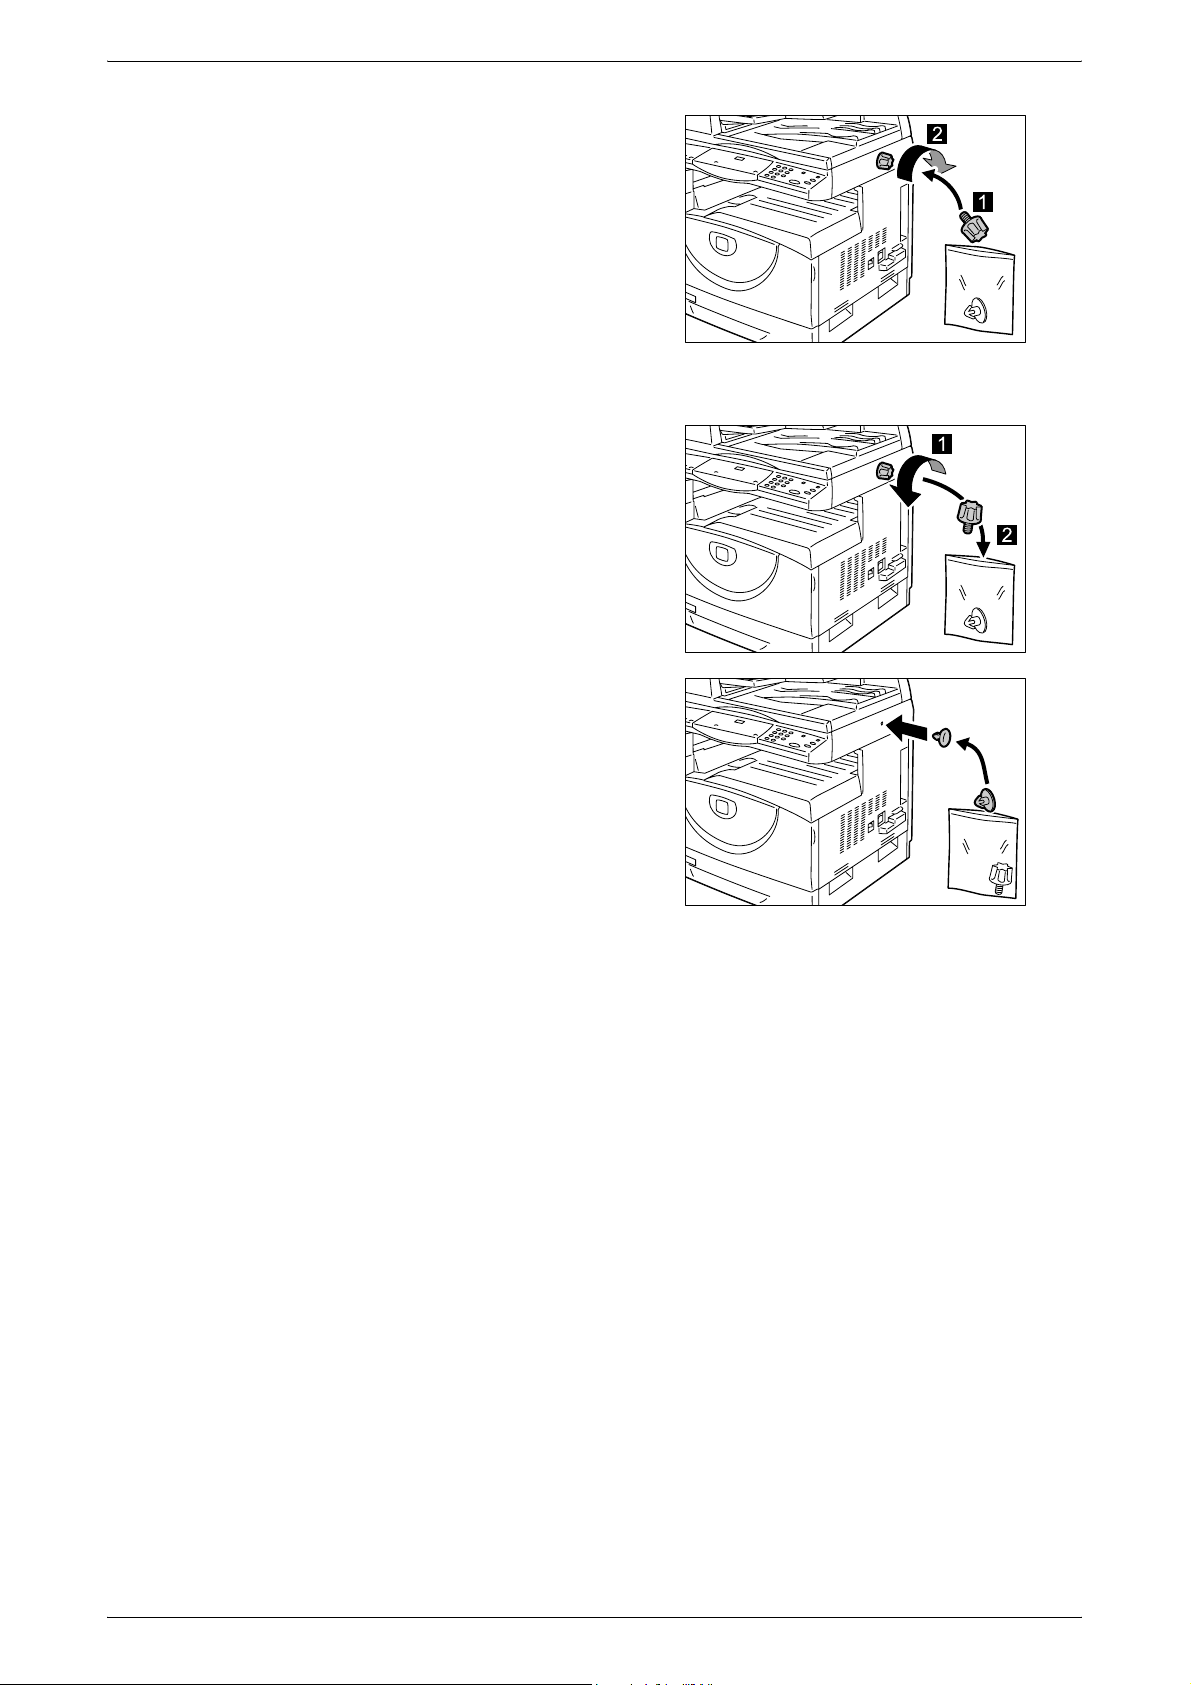
Adding Toner to the Drum Cartridge
The machine comes with one toner bottle. When the remaining toner becomes low, the
Toner indicator on the Machine Diagram (mimic) lights up. Order a new bottle of toner.
When the toner runs out in the Drum Cartridge, the error code [J1] appears in the
Display, the Toner indicator flashes, and the machine stops. Add a new bottle of toner
to the Drum Cartridge.
Error Code
- Lights up The remaining toner is low. Prepare a new
Machine Diagram
(mimic)
Machine Diagram
Checking the Status of Consumables on
Description/Remedy
bottle of toner.
NOTE: After the Toner indicator on the
Machine Diagram (mimic) lights up, the
machine allows you to copy/print
approximately 100 pages.*1
J1 Flashes Toner ran out. Add toner.
*1: The page yield after the Toner indicator on the Machine Diagram (mimic) lights up
is based on using A4 LEF paper. The value is an estimate and varies depending on
the conditions such as the print contents, dot coverage (area coverage), paper size,
paper type, copy/print density, output image type, and the machine usage
environment.
NOTE: If the error code [J1] appears in the Display, the six-digit error code [093-912]
is also displayed on CentreWare Internet Services. For information on how to view the
error history, refer to
Checking Error Information on page 35
.
12
Page 11
Replacing Consumables
NOTE: When the remaining toner becomes low, the machine may stop during printing
to display the error code. If this happens, add toner to continue copying or printing.
WARNING
• Use a broom or a wet cloth to wipe off spilled toner. Never use a vacuum cleaner
for the spills.
CAUTION
• Keep the Toner Bottle out of the reach of children. If a child accidentally swallows
toner, spit it out, rinse mouth with water, drink water and consult a physician
immediately.
• When adding toner to the Drum Cartridge, be careful not to spill the toner. In case
of any toner spills, avoid contact with clothes, skin, eyes and mouth as well as
inhalation.
• If toner spills onto your skin or clothing, wash it off with soap and water.
• If you get toner particles in your eyes, wash it out with plenty of water for at least
15 minutes until irritation is gone. Consult a physician if necessary.
• If you inhale toner particles, move to a fresh air location and rinse your mouth with
water.
• If you swallow toner, spit it out, rinse your mouth with water, drink plenty of water
and consult a physician immediately.
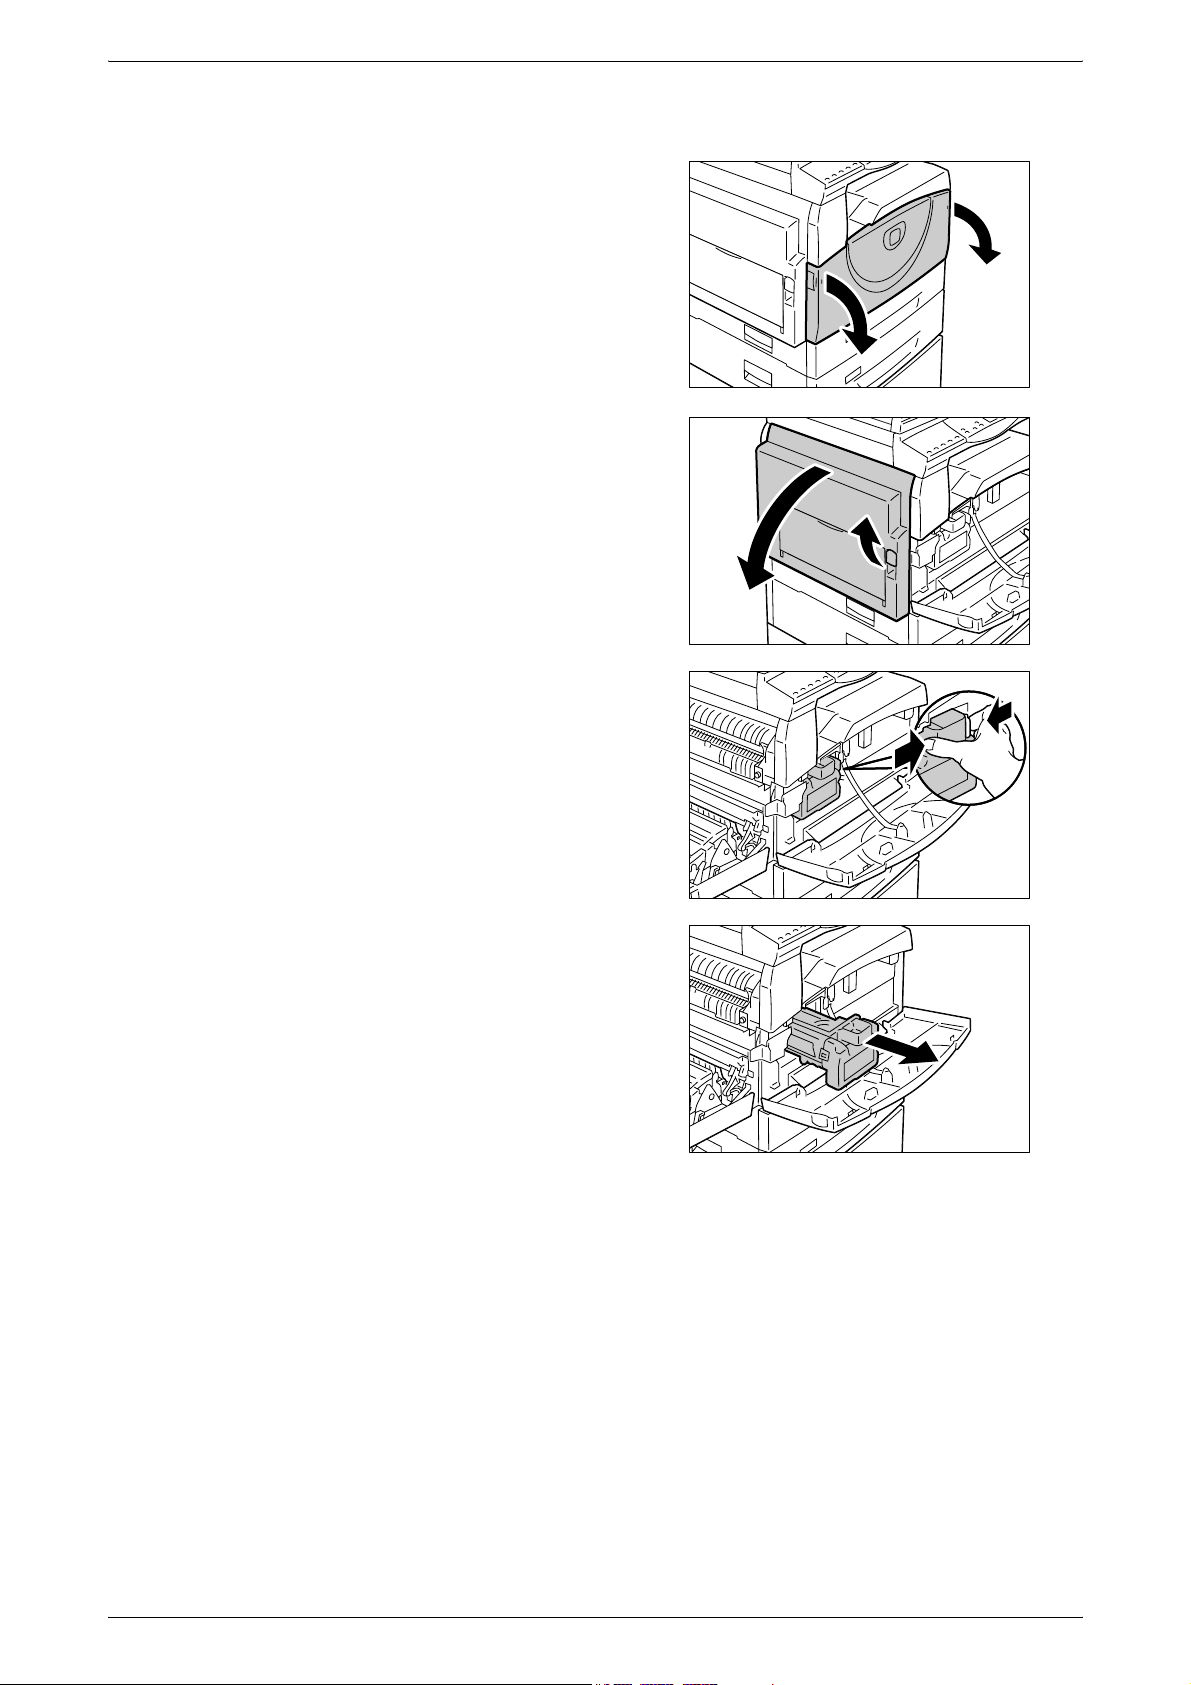
The following procedure describes how to add toner to the Drum Cartridge.
1.
Make sure that the machine is not
processing a job, and then open the
Front Cover.
2.
Pull up the Left Side Cover Latch to
open the Left Side Cover.
3.
Lightly press the orange tab to unlock
the Drum Cartridge.
13
Page 12

2 Maintenance
4.
Pull the Drum Cartridge out halfway.
NOTE: Do not touch the drum (blue roller)
when pulling out the Drum Cartridge.
5.
Take a new toner bottle out of the box.
6.
Shake the toner bottle well about 15
times.
7.
Position the toner bottle into the
opening on the Drum Cartridge, and
align the orange arrow of the toner
bottle with that of the Drum Cartridge.
8.
Turn the toner bottle around in a
clockwise direction once, and align the
two orange arrows again.
9.
Gently tap the toner bottle several
times to allow toner to be poured into
the Drum Cartridge.
Wait for 20 seconds, and tap it several
times to make sure that the toner bottle
has been emptied completely.
14
NOTE: Do not squeeze the toner bottle.
NOTE: Do not fill the Drum Cartridge with
more than a single bottle of toner at a time.
Page 13

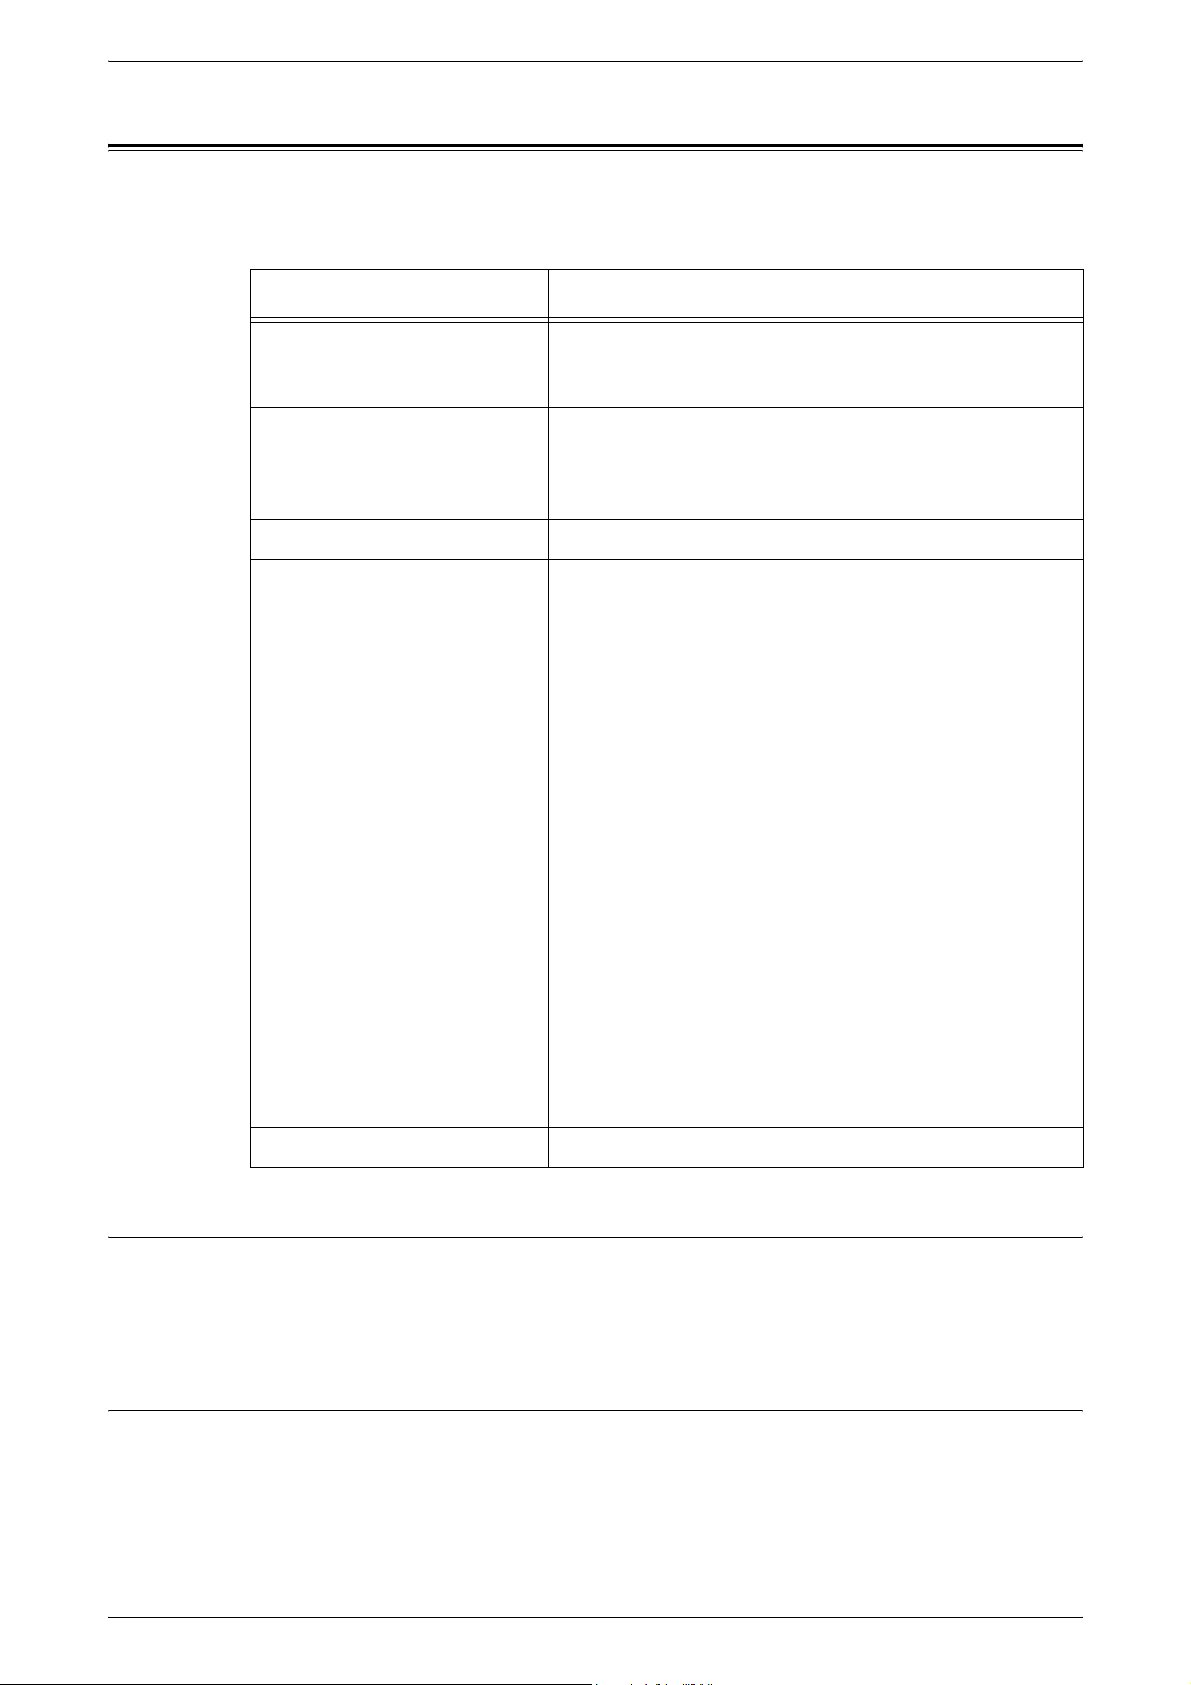
10.
Turn the toner bottle around in a
counter-clockwise direction until the
two orange arrows are aligned, and
remove the toner bottle from the Drum
Cartridge.
NOTE: Follow the instruction given on the
packaging for recycling the empty toner
bottle.
11.
Push in the Drum Cartridge until it locks into position.
12.
Close the Left Side Cover and the Front Cover.
Replacing the Drum Cartridge
The machine comes with a Drum Cartridge. The machine will alert by lighting up or
flashing the Drum Cartridge indicator on the Machine Diagram (mimic) before the Drum
Cartridge reaches the end of its life. Follow the instructions to order and replace with a
new Drum Cartridge. The machine will stop when the Drum Cartridge ends its life.
Replacing Consumables
Error Code
- Lights up The Drum Cartridge is near the end of its life. Prepare
J6 Flashes The Drum Cartridge is at the end of its life. It needs to
*1: Based on the following conditions: (1) 1-sided copying (not printing), (2) average
number of pages copied at a time: 4 pages, (3) paper size: A4 LEF, (4) paper tray:
Tray 1, (5) output tray: Output Tray. This value is an estimate and will also be
affected by other machine-usage conditions, such as how often the machine is
switched on and off. The degradation of image quality may occur even before the
machine stops when the Drum Cartridge reaches the end of its life.
NOTE: If the error code [J6] appears in the Display, the six-digit error code [091-913]
is also displayed on CentreWare Internet Services. For information on how to view the
error history, refer to
Machine Diagram
(mimic)
Checking Error Information on page 35
Description/Remedy
a new Drum Cartridge for replacement.
NOTE: After the Drum Cartridge indicator on the
Machine Diagram (mimic) lights up, the machine
allows you to copy/print approximately 5,000 pages.*1
be replaced with a new Drum Cartridge.
.
NOTE: The use of Drum Cartridges that are not recommended by Xerox may impair
quality and performance of the machine. Use only Drum Cartridges specifically
recommended by Xerox.
NOTE: Do not expose Drum Cartridges to direct sunlight or strong indoor fluorescent
light. Do not touch or scratch the surface of the Drum Cartridge. Doing so may lower
print quality.
NOTE: Replace the Drum Cartridge while the machine is switched on.
15
Page 14
2 Maintenance
The following procedure describes how to replace the Drum Cartridge.
1.
Make sure that the machine is not
processing a job, and then open the
Front Cover.
2.
Open the Left Side Cover.
3.
Lightly press the orange tab to unlock
the Drum Cartridge.
4.
Pull out the Drum Cartridge carefully.
NOTE: Do not touch the drum (blue roller)
when pulling out the Drum Cartridge.
5.
Take a new Drum Cartridge out of the
box, and remove the packaging.
6.
Insert the new Drum Cartridge halfway.
7.
Add toner.
For information on how to add toner, refer to
page 12
.
Adding Toner to the Drum Cartridge on
16
NOTE: A bottle of toner must be purchased separately when replacing the Drum
Cartridge.
8.
Push the Drum Cartridge in until it locks into position.
9.
Close the Left Side Cover and the Front Cover.
Page 15
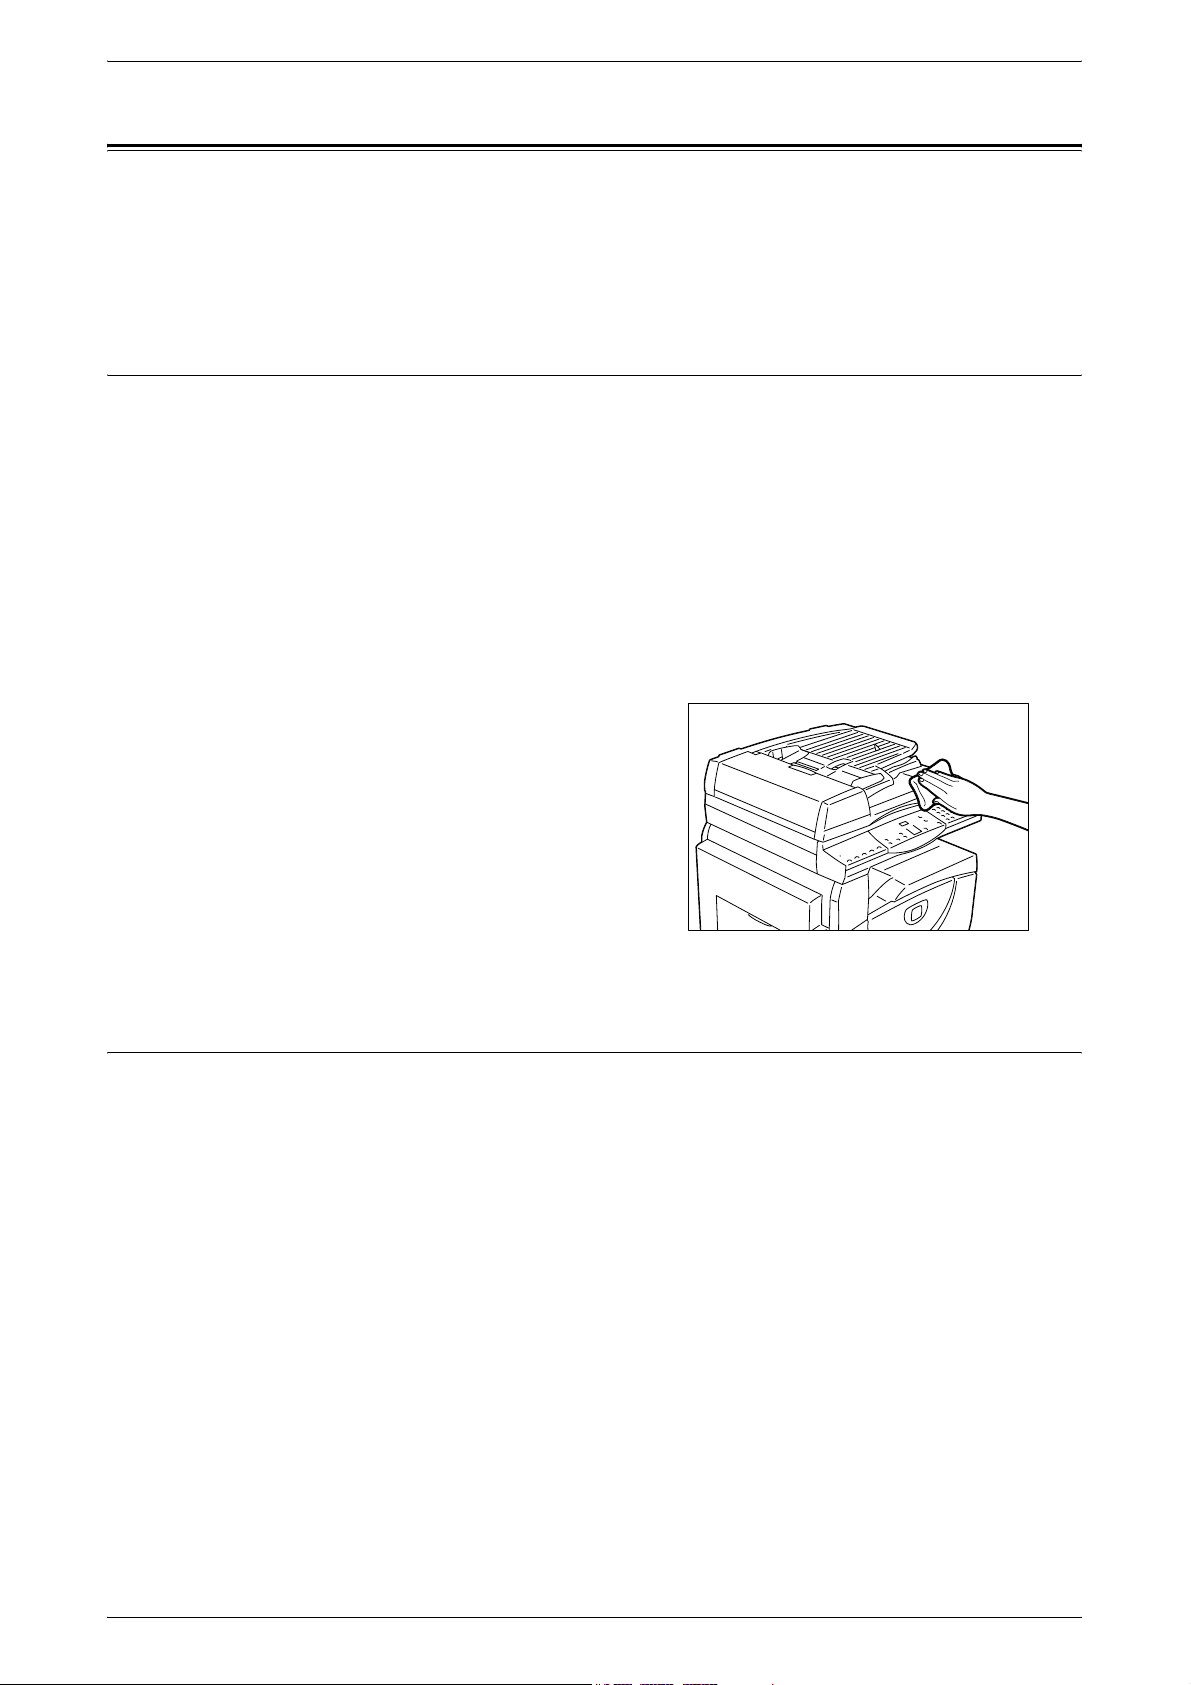
Cleaning the Machine
The cleaning instructions are specific to each part of the machine, such as the machine
exterior, Document Cover, Document Glass, Film, Narrow Glass Strip, Document
Feeder Roller, and Corotron Wire.
This section describes how to clean each component of the machine.
Cleaning the Exterior
The following describes how to clean the exterior of the machine.
NOTE: Always switch off the power to the machine, and unplug the power cord before
cleaning any part of the machine. Cleaning the machine with the power on may cause
an electric shock.
NOTE: Do not use any volatile liquids on the machine such as benzene and paint
thinner, or insect repellent as these may discolor, deform, or crack the machine
exterior.
Cleaning the Machine
NOTE: Cleaning the machine with an excessive amount of water may cause the
machine to malfunction, or damage documents being copied.
1.
Wipe the exterior with a soft cloth
moistened with water.
NOTE: Do not use cleaning agents other
than water or neutral detergent.
NOTE: If dirt does not come off easily,
gently wipe it with a soft cloth moistened
with a small amount of neutral detergent.
2.
Wipe off any excess water with a soft
cloth.
Cleaning the Document Cover and Document Glass
If the Document Cover and Document Glass are dirty, streaks or smears may appear
on copies, or the machine may not properly detect the size of the original documents.
The following procedure describes how to clean the Document Cover and the
Document Glass.
NOTE: Do not use benzene, paint thinner, or other organic solvents. Doing so might
damage paint or coating on plastic parts.
NOTE: Cleaning the machine with an excessive amount of water may cause the
machine to malfunction, or damage documents being copied.
17
Page 16
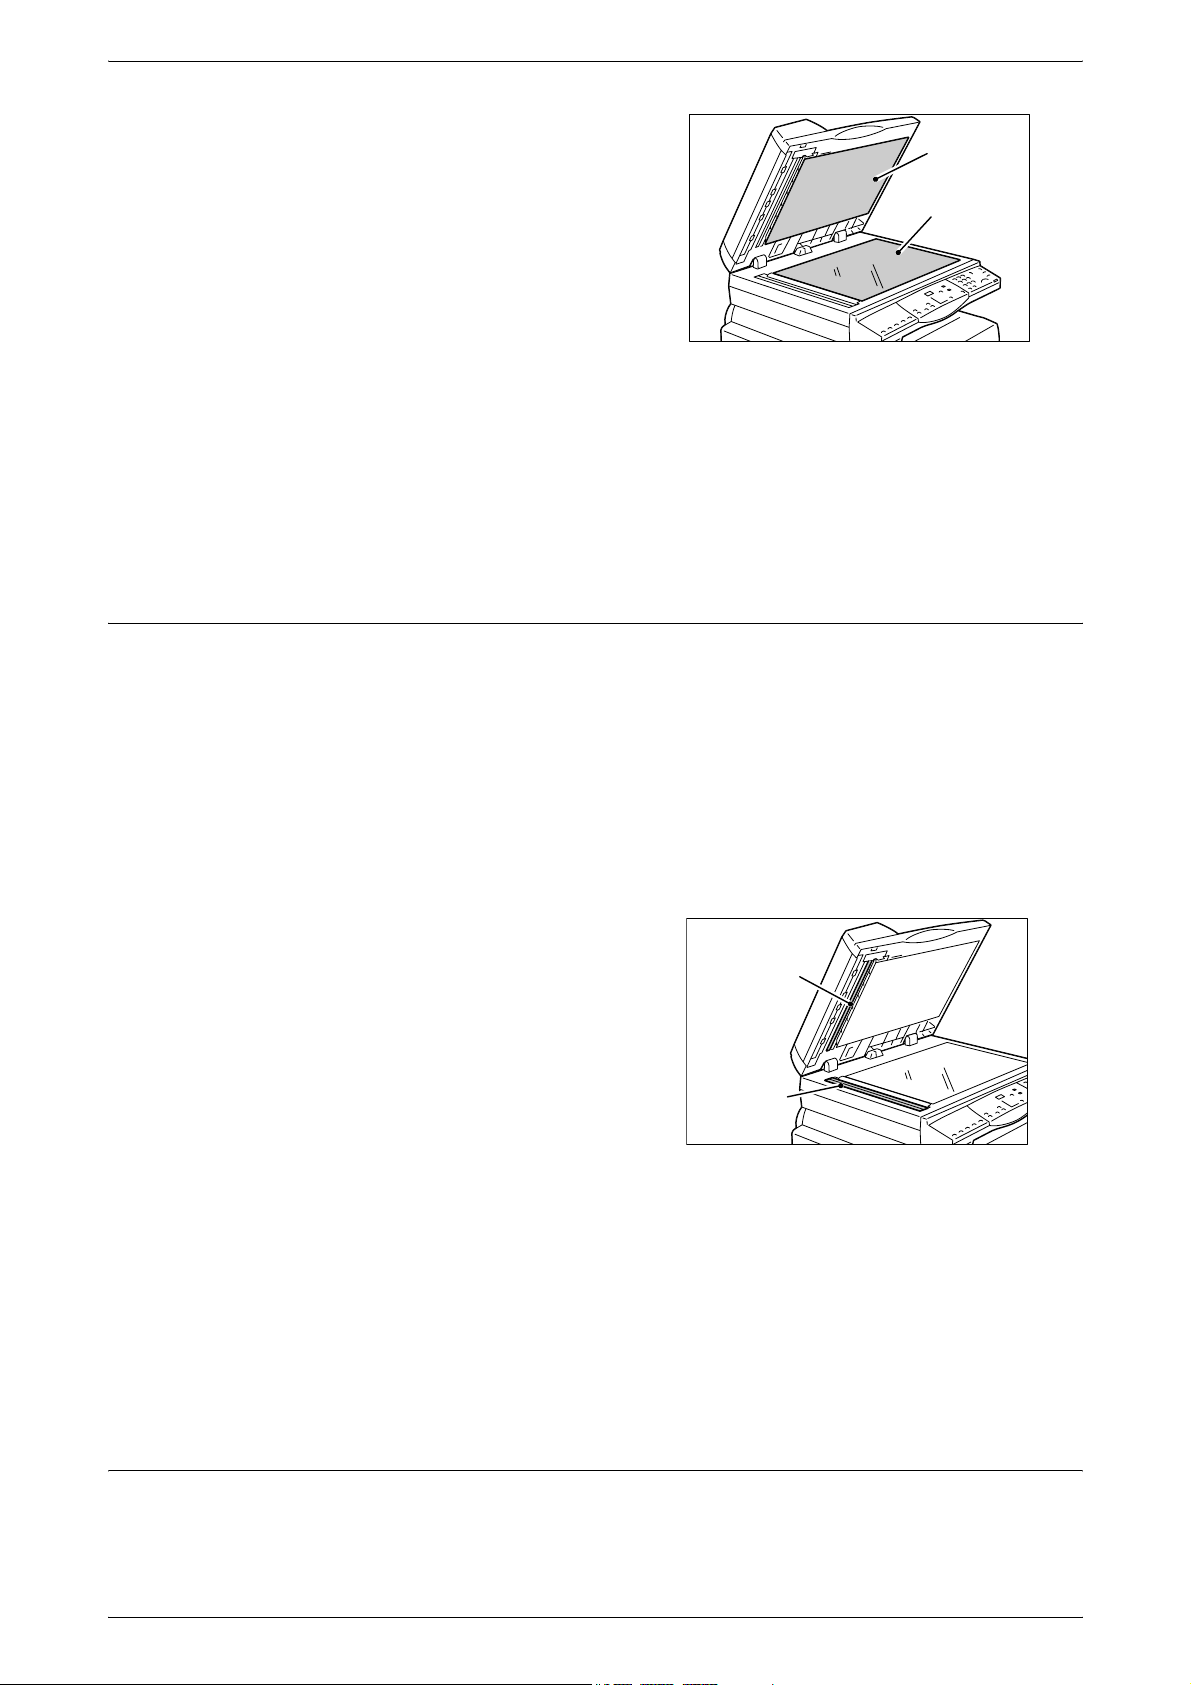
2 Maintenance
1.
Wipe the Document Cover with a soft
cloth moistened with water to remove
any dirt and then wipe it with a soft, dry
cloth.
NOTE: Do not use cleaning agents other
than water or neutral detergent.
NOTE: If dirt does not come off easily,
gently wipe it with a soft cloth moistened
with a small amount of neutral detergent.
2.
Wipe the Document Glass with a soft cloth moistened with water, and then wipe it
with a dry cloth.
NOTE: Do not use cleaning agents other than water or neutral detergent.
NOTE: If dirt does not come off easily, gently wipe it with a soft cloth moistened with a
small amount of neutral detergent.
Cleaning the Film and Narrow Glass Strip
Document
Cover
Document
Glass
If the Film and Narrow Glass Strip are dirty, streaks or smears may appear on copies,
and the machine may not properly detect the size of the original documents. To ensure
clean copies at all times, clean the Film and Narrow Glass Strip about once a month.
The following procedure describes how to clean the Film and Narrow Glass Strip.
NOTE: Do not use benzene, paint thinner, or other organic solvents. Doing so might
damage paint or coating on plastic parts.
NOTE: Cleaning the machine with an excessive amount of water may cause the
machine to malfunction, or damage documents being copied.
1.
Wipe the Film with a soft cloth
moistened with water, and then wipe it
with a dry cloth.
Film
NOTE: The Film can be damaged easily.
Do not clean the Film with an excessive
force.
Narrow
NOTE: Do not use cleaning agents other
Glass Strip
than water or neutral detergent.
NOTE: If dirt does not come off easily,
gently wipe it with a soft cloth moistened with a small amount of neutral detergent.
2.
Wipe the Narrow Glass Strip with a soft cloth moistened with water, and then wipe
it with a dry cloth.
NOTE: Do not use cleaning agents other than water or neutral detergent.
NOTE: If dirt does not come off easily, gently wipe it with a soft cloth moistened with a
small amount of neutral detergent.
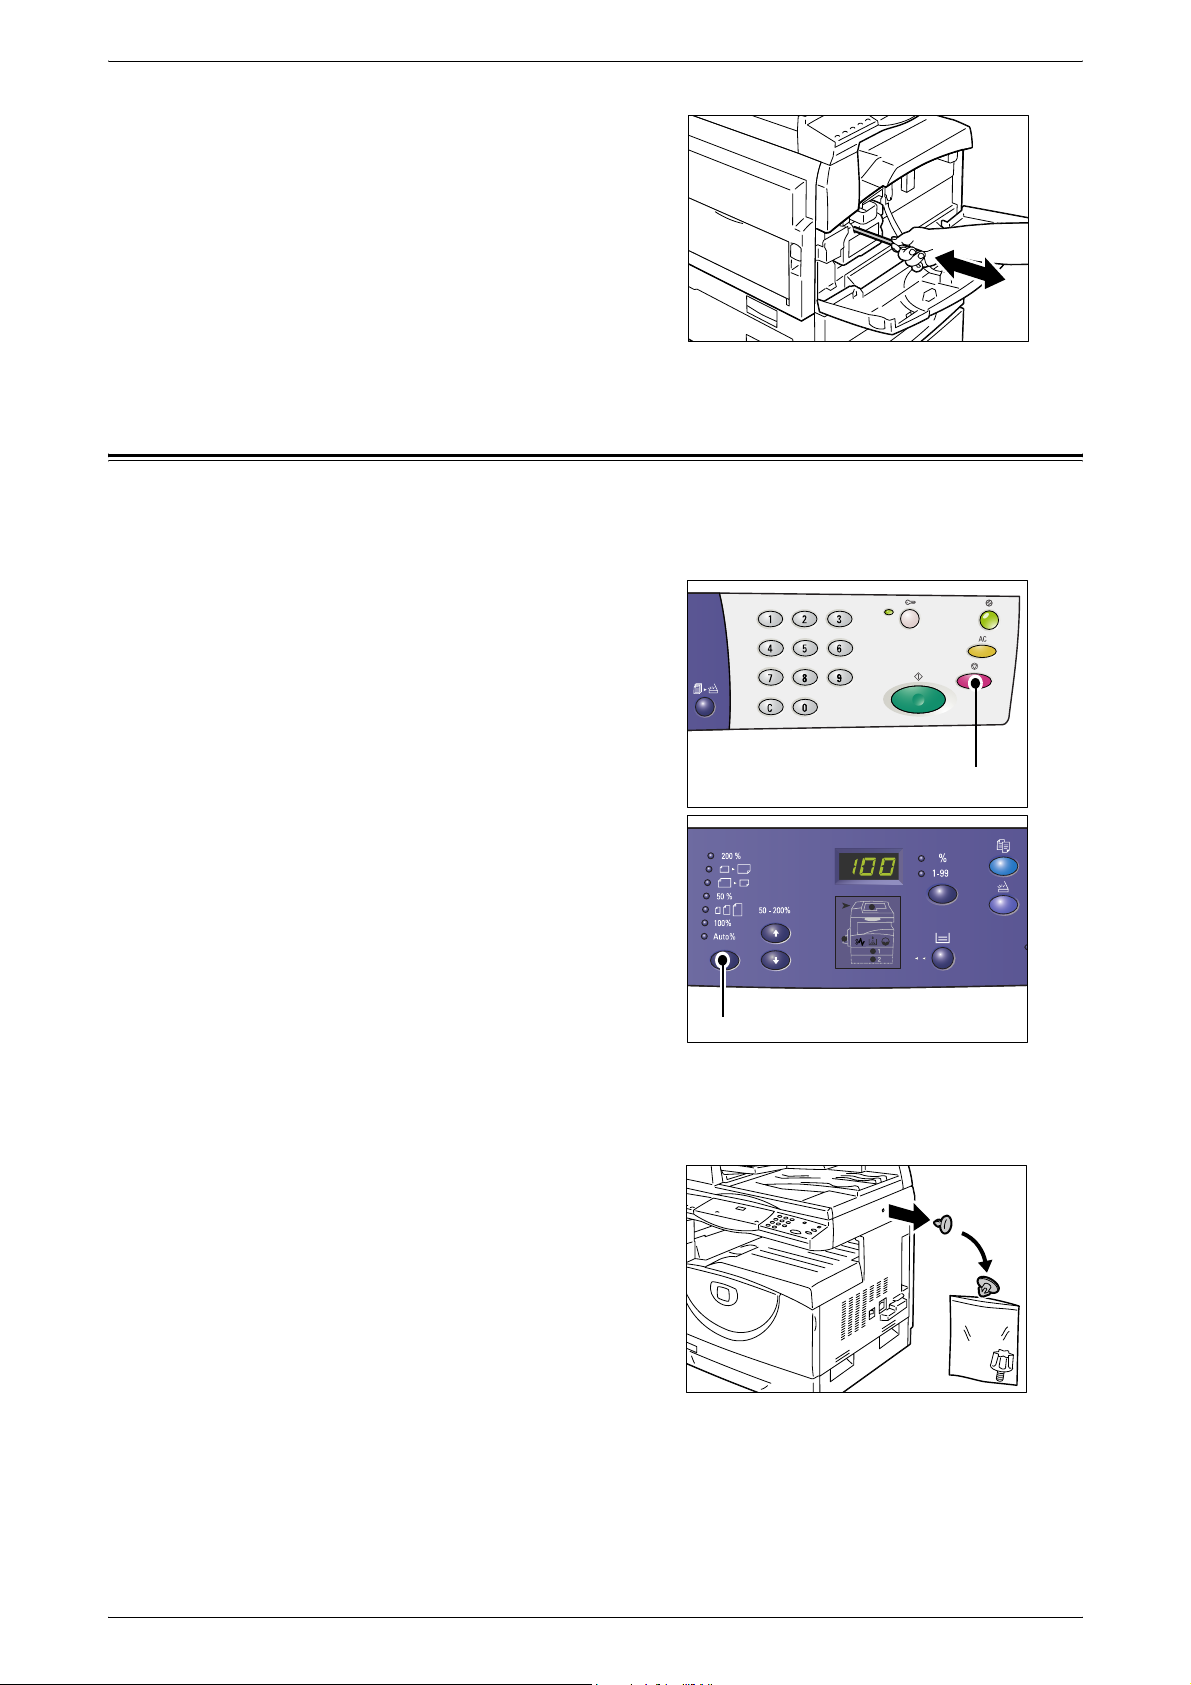
Cleaning the Document Feeder Roller
If the Document Feeder Roller is dirty, streaks or smears may appear on the output
copies, and may also result in paper jams. To ensure clean copies at all times, clean
the Document Feeder Roller about once a month.
18
Page 17

Cleaning the Machine
The following procedure describes how to clean the Document Feeder Roller.
NOTE: Do not use benzene, paint thinner, or other organic solvents. Doing so may
damage paint or coating on plastic parts.
NOTE: Cleaning the machine with an excessive amount of water may cause the
machine to malfunction, or damage documents being copied.
1.
Pull up the latch to open the Document
Feeder Cover completely.
2.
Turn the Document Feeder Roller to
clean it with a soft cloth moistened with
water.
NOTE: Do not use cleaning agents other
than water or neutral detergent.
NOTE: Use a firmly wrung cloth to avoid
water drops falling onto the machine. If
water gets into the machine, it may cause
the machine to malfunction.
NOTE: If dirt does not come off easily, gently wipe it with a soft cloth moistened with a
small amount of neutral detergent.
3.
Close the Document Feeder Cover until it clicks into place.
Cleaning the Corotron Wire
If any streaks, black lines, or smears appear on the output copies, cleaning the
Corotron Wire may help resolve the problem.
The following procedure describes how to clean the Corotron Wire.
1.
Open the Front Cover.
19
Page 18
2 Maintenance
2. Pull the Corotron Wire back and forth
several times.
3. Close the Front Cover.
Moving the Machine
This section describes how to move the machine to another location.
Before moving the machine, always secure the position of the scanner carriage.
1. Hold down the <Reduce/Enlarge>
button for four seconds, and while
holding down the <Reduce/Enlarge>
button, press the <Stop> button.
The scanner carriage moves to the
locked position.
While the scanner carriage is moving,
[run] appears in the Display. When the
carriage completely moves to the
locked position, [OFF] appears blinking
in the Display.
NOTE: While the scanner carriage is
locked, all indicators go off and no button is
available on the Control Panel, and the
machine does not process any jobs.
2. Switch off the machine.
NOTE: If the machine is switched off, all the scanned data stored in the mailboxes is
deleted. For information on how to switch off the machine, refer to the Product
Overview chapter in the User Guide.
<Reduce/Enlarge> button
<Stop> button
3. Remove the screw cover from the right
side of the machine.
20
Page 19
4. Attach and tighten the screw to the
machine to secure the position of the
scanner carriage.
5. Lift the machine and move it gently to another location.
6. Loosen the screw attached in Step 4,
and remove it from the machine.
Moving the Machine
7. Re-attach the screw cover removed in
Step 3 to the machine.
8. Switch on the machine.
NOTE: For information on how to switch on the machine, refer to the Product
Overview chapter in the User Guide.
21
Page 20
3 Using CentreWare Internet Services
This chapter explains how to enable and use CentreWare Internet Services for the
machine.
The following information is provided in this chapter:
Information Checklist – page 23
CentreWare Internet Services Environments – page 24
CentreWare Internet Services Installation – page 24
Standard Features - CentreWare Internet Services – page 29
Services – page 30
Information Checklist
Before enabling the CentreWare Internet Services feature, make sure that the following
items are available or have been performed.
Item By
An existing operational computer with TCP/IP Internet or intranet
accessibility is required. These procedures are not intended to install
the TCP/IP stack itself.
Obtain and record the following information:
• A unique IP address
• Gateway address
• Subnet mask
Refer to the Glossary in the User Guide for additional information
about the gateway address and subnet mask, if needed.
Test the machine to make sure that it is fully installed and functioning
correctly.
If problems are encountered during the installation of the machine, refer to
Internet Services in the Problem Solving chapter on page 104
Customer
Customer
Customer
.
CentreWare
23
Page 21

3 Using CentreWare Internet Services
CentreWare Internet Services Environments
CentreWare Internet Services uses the embedded HTTP Server that resides in the
machine. This allows communication with the machine through a web browser with
access to the Internet or an intranet. By entering the IP address of the machine as the
URL (Universal Resource Locator) in the browser, direct access to the machine is
available.
CentreWare Internet Services allows you to make not only the same basic settings as
from the Control Panel, but also more specialized settings for the machine.
User ID and Passcode
Many of the features available within Internet Services will require the System
Administrator login ID and passcode. By default, the user name is "11111" and the
passcode is not set. This ID and passcode can be changed or set by the System
Administrator. A user will only be prompted for the System Administrator login ID and
passcode once in a single browser session.
System Configuration
To use CentreWare Internet Services, you need to enable TCP/IP on the machine.
CentreWare Internet Services Installation
This section describes the settings required to use CentreWare Internet Services.
Installation Procedure
There are two stages required to enable CentreWare Internet Services.
Network Communication Setup
This requires the machine to be set up for CentreWare Internet Services.
Test Access
To make sure that CentreWare Internet Services has been set up correctly, you should
access CentreWare Internet Services.
Network Communication Setup
Initially, boot the CentreWare Internet Services port.
24
1.
Connect the machine to the network.
NOTE: The Ethernet cable is an RJ45 type and is not supplied by Xerox.
2.
Enter the System Setting Mode.
• If Copy Auditron is disabled
1) Hold down the <Log In/Out> button on the Control Panel for four seconds.
2) Enter the System Administrator's ID using the numeric keypad.
The letter [P] appears blinking in the Display.
Page 22

CentreWare Internet Services Installation
• If Copy Auditron is enabled
1) Log in to the machine under the System Administrator's ID.
2) Hold down the <Log In/Out> button on the Control Panel for four seconds.
The letter [P] appears blinking in the Display.
NOTE: The default System Administrator user ID is "11111".
NOTE: For more information on how to enter the System Setting Mode, refer to
Entering the System Setting Mode on page 109
refer to
3.
NOTE: The system setting menu number for enabling the CentreWare Internet
Services port is "124".
4.
5.
Accounting and Securities on page 65
Enter the menu number [124] using the numeric keypad.
Press the <Start> button to confirm the entered menu number.
Enter [1] using the numeric keypad to enable the CentreWare Internet Services
port.
• [0]: Disabled
. For information about Copy Auditron,
.
• [1]: Enabled (Default)
NOTE: If you choose not to change the value, press the <AC> button or the <Start>
button. The letter [P] appears blinking in the Display.
6.
Press the <Start> button to confirm the entered value.
The letter [P] appears blinking in the Display.
Next, establish TCP/IP.
NOTE: The machine does not support IPv6 addresses.
1.
Enter the menu number [102] using the numeric keypad.
NOTE: The system setting menu number for specifying a method for establishing an
IP address is "102".
2.
Press the <Start> button to confirm the entered menu number.
3.
Select an appropriate number from the following options to specify a method for
establishing an IP address, and enter the number using the numeric keypad.
• [0]: STATIC
• [1]: DHCP
• [2]: BOOTP
• [3]: RARP
• [4]: DHCP/Autonet (Default)
4.
Press the <Start> button to confirm the entered value.
NOTE: If you have selected [4] (DHCP/Autonet) in Step 3, print out the Configuration
Report to confirm that an IP address has been allocated and that it is a valid IP
address on your network. For information on how to print out the Configuration Report,
refer to
IP address, contact the network administrator.
NOTE: Use the DHCP server together with the Windows Internet Name Server
(WINS) server.
Printing the Configuration Report on page 41
. If the machine does not have an
25
Page 23

3 Using CentreWare Internet Services
If you have selected [0] (STATIC) in Step 3, proceed to Step 5 to configure the protocol
settings. Otherwise, proceed to Step 8.
5.
Using the numeric keypad, enter the IP address for the machine in the format
“xxx.xxx.xxx.xxx”.
The following table shows the system setting menu numbers for specifying the IP
address.
IP Address (xxx.xxx.xxx.xxx)
Menu Number 103 104 105 106
1) Enter the menu number [103], and then press the <Start> button to confirm the
entered menu number.
2) Enter a value for the first block of the IP address, and then press the <Start>
button to confirm the entered value.
3) Enter the menu number [104], and then press the <Start> button to confirm the
entered menu number.
1st block 2nd block 3rd block 4th block
4) Enter a value for the second block of the IP address, and then press the
<Start> button to confirm the entered value.
5) Enter the menu number [105], and then press the <Start> button to confirm the
entered menu number.
6) Enter a value for the third block of the IP address, and then press the <Start>
button to confirm the entered value.
7) Enter the menu number [106], and then press the <Start> button to confirm the
entered menu number.
8) Enter a value for the fourth block of the IP address, and then press the <Start>
button to confirm the entered value.
6.
Using the same method as in Step 5, enter the subnet mask.
The following table shows the system setting menu numbers for specifying the
subnet mask.
Subnet Mask (xxx.xxx.xxx.xxx)
1st block 2nd block 3rd block 4th block
Menu Number 107 108 109 110
7.
Using the same method as in Step 5, enter the gateway address.
26
The following table shows the system setting menu numbers for specifying the
gateway address.
Gateway Address (xxx.xxx.xxx.xxx)
1st block 2nd block 3rd block 4th block
Menu Number 111 112 113 114
NOTE: If you do not wish to set the gateway address, skip this step.
Page 24

8.
When you have finished establishing TCP/IP, press the <Log In/Out> button.
The machine exits the System Setting Mode.
NOTE: If you have changed any settings in the System Setting Mode, the machine will
reboot to register and enable the new settings. All scanned documents stored in
mailboxes will be deleted on the reboot.
NOTE: After the machine is rebooted, print a Configuration Report to confirm that the
the CentreWare Internet Services port is enabled and TCP/IP is correctly configured.
For information on how to print the Configuration Report, refer to
Configuration Report on page 41
NOTE: If you wish to use the IP Filtering feature, use CentreWare Internet Services to
register the IP addresses which are not allowed to access the machine. For more
information, refer to
TCP/IP Configuration
After accessing the CentreWare Internet Services home page, you can make detailed
settings for TCP/IP under [Connectivity] > [Protocols] > [TCP/IP] on the [Properties]
tab.
CentreWare Internet Services Installation
Printing the
.
IP Filtering (IP Address Restriction) on page 74
.
The following table shows the information fields and settings on the [TCP/IP] page.
Feature Setting Items
General Protocol Displays “Enabled”. This is a display-only
item.
Physical Connection Displays “Ethernet”. This is a display-only
item.
Host Name Enter the host name.
IP Address Resolution Set the method for obtaining the IP address
from the drop down menu to access the
following options.
• STATIC: The user will specify all the
addresses.
• DHCP: The address will automatically be
set via DHCP.
• BOOTP: The address will automatically be
set via BOOTP.
• RARP: The address will automatically be
set via RARP.
• DHCP/Autonet: The address will be
automatically set by Autonet via DHCP.
IP Address Enter the IP address allocated to the machine
in the xxx.xxx.xxx.xxx format.
Subnet Mask Enter the subnet mask in the xxx.xxx.xxx.xxx
format.
Gateway Address Enter the gateway address in the
xxx.xxx.xxx.xxx format.
Domain Name Domain Name Enter the domain name.
27
Page 25

3 Using CentreWare Internet Services
Feature Setting Items
DNS
Configuration
DHCP/DDNS Release Registration Allows DHCP resources to be released when
ZeroConfiguration
Networking
Obtain DNS Server
Address Automatically
Preferred DNS Server Enter the IP address for the DNS domain
Alternate DNS Server
1 - 2
Dynamic DNS
Registration
Generate Domain Search
List Automatically
Domain Name 1 - 3 Enter the domain names for the domain name
Connection Time-Out Specify the maximum time period allowed for
Self Assigned Address Allocates an IP address without using a DHCP
Allows you to enable or disable the automatic
setting of the DNS server address via DHCP.
primary server.
Enter the IP addresses for the DNS domain
alternate server 1 and 2.
Specify whether to enable dynamic DNS
server updates and/or to overwrite DNS
settings upon updates.
Select whether or not to automatically
generate the domain search list.
1 to 3.
searching domains.
the machine is powering down. This is a
display-only item and shows “Enabled”.
server. This check box is selected when [IP
Address Resolution] is set to [DHCP/Autonet].
This is a display-only item.
Test Access
Follow the steps below to access CentreWare Internet Services.
1.
2.
3.
The CentreWare Internet Services installation process is now completed.
If the test fails, refer to
on page 104
NOTE: If the Account Mode is enabled, you may be required to enter the user ID and
passcode (if one is set up). If you need assistance, contact the System Administrator.
At a client computer on the network, launch a web browser.
In the URL field, enter “http://” followed by the Internet address of the machine.
Then press the <Enter> key on the keyboard.
If you use the domain name to specify the Internet address, use the following
format.
http://myhost.example.com
If you use the IP address to specify the Internet address, use the following format.
http://xxx.xxx.xxx.xxx
Verify that the home page of CentreWare Internet Services is displayed.
CentreWare Internet Services in the Problem Solving chapter
.
28
Page 26

Standard Features - CentreWare Internet Services
Standard Features - CentreWare Internet Services
CentreWare Internet Services allows you to display, configure, and change the current
status or settings of the machine through a web browser on a computer instead of the
Control Panel of the machine.
Interface Options
The CentreWare Internet Services home
page contains four panels without visible
boundaries. You can change the left and right
panel sizes by dragging the boundary
between them.
Header Panel
Menu
Panel
Header Panel
Main Panel
Displays the header for all pages. The header
includes the CentreWare Internet Services
Logo
Panel
logo and the model of the machine. Just under
this panel on most pages is the tab bar which
corresponds to the five functions or page buttons. These are [Status], [Jobs], [Scan],
[Properties], and [Support]. You can navigate through the pages when you click the text
on each tab.
Logo Panel
Displays the company logo.
Menu Panel
Displays a navigation tree, listing the items available within each category, with the
currently displayed item highlighted.
Main Panel
Displays information and settings for the selected item within the current category
selected in the navigation tree in the menu panel.
For more information about each function, refer to the following:
Services – page 30
Status – page 30
Jobs – page 30
Scan – page 31
Properties – page 31
Support – page 31
29
Page 27
3 Using CentreWare Internet Services
Services
The services supported by CentreWare Internet Services are subdivided into the
following categories. The category is selected on the tab bar in the header panel.
Category Name Services
Status • General
Jobs • Active Jobs
Scan • Mailbox
Properties • Configuration Overview
•Trays
• Consumables
• Job History List
- Job History
• Error History
• Description
• General Setup
- Configuration
- Job Management
- Paper Tray Attributes
- Paper Size Settings
- Unit Settings
- Power Saver Settings
- Billing & Counters
• Connectivity
- Port Settings
- Physical Connections
- Protocols
• Services
- Printing
- Machine Software
• Accounting
- Accounting Configuration
• Security
- Authentication Configuration
- IP Filtering
- System Administrator Settings
Status
Jobs
30
Support • Support
This page allows you to check the status of the paper trays and consumables on the
machine. It also displays the machine information, IP address, and status.
For more information on this page, refer to
Machine Status on page 37
.
This page displays a list of active and completed jobs sent using the protocols, or from
the Control Panel of the machine. In addition to displaying details of the jobs, this page
also allows you to delete jobs.
For more information on this page, refer to
Job Status on page 33
.
Page 28

Scan
Services
This page allows you to create, edit, or delete mailboxes, and import scanned data to
a computer.
Properties
For more information on this page, refer to
This page allows you to view and set the machine properties. These include the
machine details and configuration, the CentreWare Internet Services settings, the port
settings, protocol settings, and emulation settings.
NOTE: Some settings with data entry use bytes as units of data volume. Each
character that you enter is one byte.
1.
Click [Properties] on the Main Panel on the home page.
2.
Select an item from the collapsible menu on the Menu Panel. To open each folder,
click “+” on its left side to expand and access the items beneath the folder.
3.
To change settings, use the drop-down list box, text boxes, and check boxes on
the page.
The default settings in the drop-down list box are indicated with an asterisk (*).
4.
After changes have been made, click [Apply].
• To cancel any changes you have made, click [Undo].
• To display the current machine settings, click [Refresh].
Scanner Environment Settings on page 53
.
Support
NOTE: If prompted, enter the System Administrator user ID and passcode, and click
[OK]. By default, the System Administrator user ID is "11111" and its passcode is not
set.
NOTE: Some settings will be available only after you restart CentreWare Internet
Services or after the machine is switched off and on.
NOTE: If the machine is switched off, all scanned data stored in the mailboxes will be
deleted.
This page provides support information for the machine, including a link for software
updates and contacts for technical support.
For more information, refer to
Viewing/Editing Support Information on page 108
.
31
Page 29

4Job Status
This chapter explains how to check current and completed jobs using CentreWare
Internet Services. It also provides information on how to delete jobs and view error
information.
The following information is provided in this chapter:
Checking Current Jobs – page 33
Checking Completed Jobs – page 34
Checking Error Information – page 35
Checking Current Jobs
This section describes how to display the list of active jobs being processed.
1.
Open your web browser, and enter the machine's IP address in the [Address] box
to access CentreWare Internet Services.
2.
Job Name
Displays the name of the job.
Owner
Displays the name of the client (user) that has sent the job.
Status
Displays the status of the job.
Type
Displays the type of job.
Quantity
Displays the number of sets that have been processed.
Deleting Jobs
On the [Active Jobs] page, you can delete jobs.
Click the [Jobs] tab.
The [Active Jobs] page is displayed.
NOTE: In some instances, the deletion of jobs might be ignored.
1.
Select the job, then click [Delete].
If you have selected the check boxes for more than one job, all those jobs will be
deleted.
NOTE: You can set whether to allow all users or only the System Administrator to
delete jobs under [Job Management] on the [Properties] tab. For more information,
refer to
Machine Information on page 39
.
33
Page 30

4 Job Status
Checking Completed Jobs
This section describes how to display a list of completed jobs.
1.
Open your web browser, and enter the machine's IP address in the [Address] box
to access CentreWare Internet Services.
2.
Click the [Jobs] tab.
3.
On the collapsible menu of the Menu Panel, click the [Job History List] folder, and
then [Job History] to view the list of completed jobs.
Job Name
Displays the name of the job.
Owner
Displays the name of the client (user) who sent the job.
Status
Displays the status of the job. The status includes [Completed], [Error], [Deleted],
[Shutdown], [Cancelled], [Aborted], and [Unknown].
Type
Displays the type of job.
Page Count
Displays the number of pages printed (printed jobs only).
Output Destination
Displays "Center Tray". For a scan job or an aborted job, "-" is displayed instead.
Host Interface
Displays the name of the host that has sent the job. If the host interface is unknown or
not specified, "-" is displayed.
Time Completed
Displays the date and time the job was completed.
34
Page 31

Checking Error Information
This section describes how to display a list of errors that have occurred.
1.
Open your web browser, and enter the machine's IP address in the [Address] box
to access CentreWare Internet Services.
2.
Click the [Jobs] tab.
3.
On the collapsible menu of the Menu Panel, click [Error History] to view the list of
errors.
Date & Time
Displays the date and time the error occurred.
Error Code
Displays the six-digit error code (***-***) of the error.
Checking Error Information
NOTE: Some six-digit error codes are displayed on the [Job History] page, but not on
the [Error History] page. Check also the error codes under [Status] on the [Job History]
page. For information on how to view the [Job History] page, refer to
Completed Jobs on page 34
.
Viewing the six-digit error code at the machine
If an error occurs, the two-digit error code, such as [C1] and [E2], appears in the Display
on the Control Panel of the machine.
To view the six-digit error code (***-***) in the Display, use the following procedure.
1.
While the two-digit error code appears in the Display, press the <Display Switch>
button.
The first three digits of the six-digit error code appears in the Display.
2.
Press the <Display Switch> button.
The second half of the six-digit error code appears in the Display.
3.
Press the <Display Switch> button.
The Display switches back to the two-digit error code.
Checking
35
Page 32

5 Machine Status
This chapter explains how to check the machine status, such as the paper trays,
consumables, and how to view general information about the machine. It also provides
information on how to download software, print a report, and view the current readings
of the machine counters.
The following information is provided in this chapter:
Checking the Machine Status – page 37
Checking the Status of Trays – page 37
Checking the Status of Consumables – page 38
Machine Information – page 39
Downloading Software – page 41
Printing the Configuration Report – page 41
Viewing the Total Number of Pages Made on the Machine – page 42
Checking the Machine Status
This section describes how to display the machine information, IP address, and status.
1.
Open your web browser, and enter the machine's IP address in the [Address] box
to access CentreWare Internet Services.
2.
Click the [Status] tab.
The [General] page is displayed.
This page also displays the [Refresh] and [Reboot Machine] buttons. Click the
[Refresh] button to display the latest information.
NOTE: If the machine is rebooted, all scanned data stored in the mailboxes will be
deleted.
Checking the Status of Trays
This section describes how to display the status of the paper trays.
1.
Open your web browser, and enter the machine's IP address in the [Address] box
to access CentreWare Internet Services.
2.
Click the [Status] tab.
3.
On the collapsible menu of the Menu Panel, click [Trays].
The [Trays] page is displayed.
Trays
Lists the available paper trays: Tray 1, Tray 2 (optional), and Bypass Tray.
NOTE: The trays displayed will depend on the machine configuration.
37
Page 33

5 Machine Status
Status
Displays the status of the paper trays as [Ready], [Empty], [Not Available], or
[Unknown].
NOTE: The status of the paper tray may be displayed as [Unknown] if the machine is
in the Power Saver mode.
Paper Remaining
Displays the status of paper loaded in the paper trays as [Paper Loaded] or [No Paper].
Paper Size
Displays the size of paper loaded in each tray.
Priority
Displays the priority set for each tray when Automatic Tray Switching is enabled. The
highest priority is number 1. The greater the number, the lower the priority.
Checking the Status of Consumables
Consumables
This section describes how to check the status of consumables.
The consumables menu displays the status of the Drum Cartridge and toner. The
status indicates when to replace the Drum Cartridge and to add toner to the Drum
Cartridge.
1.
Open your web browser, and enter the machine's IP address in the [Address] box
to access CentreWare Internet Services.
2.
Click the [Status] tab.
3.
On the collapsible menu of the Menu Panel, click [Consumables].
The [Consumables] page is displayed.
Toner Cartridges
Displays the status of toner as [OK], [Reorder], [Replace], or [Fault].
NOTE: If [Replace] is displayed, add toner to the Drum Cartridge.
NOTE: Once toner is added to the Drum Cartridge, the status will be displayed as
[Ready].
Drum Cartridges
38
Displays the status of the Drum Cartridge as [OK], [Reorder], [Replace], or [Fault]. It
also displays the remaining drum life in percentages.
NOTE: If [Replace] is displayed, replace the Drum Cartridge.
Page 34

Machine Information
This section describes how to view general information about the machine, such as the
serial number, memory capacity, and available printer language. It also provides
information on how to change the machine settings, such as paper size table and
Power Saver feature.
1.
Open your web browser, and enter the machine's IP address in the [Address] box
to access CentreWare Internet Services.
2.
Click the [Properties] tab.
3.
On the collapsible menu of the Menu Panel, click [Description] or
the [General Setup] folder.
4.
Configure the required settings.
5.
Click [Apply].
6.
If prompted, enter the System Administrator user ID and passcode, and click [OK].
NOTE: By default, the System Administrator user ID is "11111" and its passcode is not
set.
Machine Information
The following table lists the items that can be set.
Feature Setting items
Description Allows you to set and view information related to the
machine, such as the name and installation location of
the machine and the System Administrator’s e-mail
address.
• Machine Model
Displays the model of your machine.
• Serial Number
Displays the serial number of the machine.
• Machine Name
Enter the name of the machine.
• Location
Enter the location of the machine.
• Contact Person
Enter the name of the System Administrator.
• Administrator’s E-mail Address
Enter the e-mail address of the System
Administrator.
• Comment
Enter a comment on the machine.
39
Page 35

5 Machine Status
General Setup Configuration Displays information such as the memory capacity,
Feature Setting items
available printer language, and installed software.
•Memory
Displays the size of the installed memory, and
amount of memory used for each port/protocol.
•Available PDL
Lists the printer language used by the machine and
its version.
•Software
Displays the version of software (firmware) installed
on the machine.
Job Management • Job Deletion
Allows you to set whether to allow all users or only
the System Administrator to delete jobs.
Paper Tray
Attributes
Paper Size
Settings
•Trays
Lists the paper trays installed.
• Paper Size
Lists the paper size set for each tray.
•Priority
Allows you to set the priority for specified paper
trays.
Allows you to specify the paper size table. You can
select from [A/B Series (8K/16K)], [Inch Series
(8.5 x 13")], [Inch Series (8.5 x 13.4")], and [Inch
Series].
NOTE: Depending on the paper size table the machine
is programmed to use, the document sizes that can be
detected by the Document Feeder change. Refer to
Document Sizes Detectable by the Document Feeder
on page 121
Unit Settings Allows you to specify [Inches] or [Millimeters] as the
unit for entering document or scan sizes.
Power Saver
Settings
• Low Power Mode Time-Out
Allows you to specify the time-out period before the
machine enters the Low Power Mode from the last
user operation.
• Sleep Mode Time-Out
Allows you to specify the time-out period before the
machine enters the Sleep Mode from the last user
operation.
NOTE: You must specify a longer time period for the
Sleep Mode than for the Low Power Mode.
.
40
Page 36

Downloading Software
This section describes how to manually upgrade the machine’s software.
1.
Open your web browser, and enter the machine's IP address in the [Address] box
to access CentreWare Internet Services.
2.
Click the [Properties] tab.
3.
On the collapsible menu of the Menu Panel, click the [Services] folder, and then
the [Machine Software] folder.
4.
Configure required settings.
5.
Click [Apply].
6.
If prompted, enter the System Administrator user ID and passcode, and click [OK].
NOTE: By default, the System Administrator user ID is "11111" and its passcode is not
set.
Upgrades
Downloading Software
Upgrades
Specify whether the machine is to allow software downloads.
NOTE: To manually upgrade the machine software, Software Download must also be
set to [0] (Allow) in the System Setting Mode (menu number: 127). For more
information, refer to
System Settings on page 109
Manual Upgrade
Last Successful Upgrade
Displays the most recent version of the software.
Manual Upgrade
Specify the latest software file.
Printing the Configuration Report
This section describes how to print out the Configuration Report. The Configuration
Report lists the total number of prints, the machine's hardware configuration, network
information, and the status of various settings. Print this report to confirm the machine
configuration.
.
1.
On the Control Panel of the machine, hold down the <2> button for four seconds
or longer, and while holding down the <2> button, press the <Stop> button.
The Configuration Report is printed out.
2.
Read the Configuration Report to confirm the configuration of the machine.
41
Page 37

5 Machine Status
Viewing the Total Number of Pages Made on the Machine
This section describes how to display the current readings of the entire set of machine
counters.
1.
Open your web browser, and enter the machine's IP address in the [Address] box
to access CentreWare Internet Services.
2.
Click the [Properties] tab.
3.
On the collapsible menu of the Menu Panel, click [General Setup] >
[Billing & Counters] > [Usage Counters].
The [Usage Counters] page is displayed.
Total Impressions
Displays the total number of copies and prints.
Black Copied Impressions
Displays the total number of copies.
Black Printed Impressions
Displays the total number of prints.
Scanned Images Stored
Displays the total number of scanned images.
NOTE: You can also view the total number of copies and prints made on the machine
on the Control Panel of the machine in the System Setting Mode (menu number: 52).
For more information, refer to
System Settings on page 109
.
42
Page 38
6 Printer Environment Settings
This chapter describes how to set up the printing environment for the machine.
The following information is provided in this chapter:
TCP/IP (LPD or Port9100) – page 43
USB Port – page 47
SNMP Configuration – page 49
TCP/IP (LPD or Port9100)
This section explains how to set up the machine to print from a Windows computer
through LPD or Port9100. The following information is provided:
Information Checklist – page 43
TCP/IP (LPD or Port9100) Environments – page 44
TCP/IP (LPD or Port9100) Installation – page 44
Information Checklist
Before starting these procedures, make sure that the following items are available or
have been performed.
An existing operational network utilizing TCP/IP is required. These
procedures are not designed to install a network.
Obtain and record the following information:
• IP address
• Gateway address
• Subnet mask
• Host name
Refer to the Glossary in the User Guide for additional information about
the gateway address and subnet mask, if needed.
Test the machine to make sure that it is fully installed and functioning
correctly.
Install the print driver. Customer
If problems are encountered during machine setup, refer to
page 75
.
Item By
Customer
Customer
Customer
Problem Solving on
43
Page 39

6 Printer Environment Settings
TCP/IP (LPD or Port9100) Environments
System configuration
As the machine supports the LPD and Port9100 protocol, you can print directly from a
Windows computer.
When printing from Windows 2000/Windows XP/Windows Server 2003/Windows Vista
computers through the LPD port, use the OS standard LPR port.
When printing through Port9100, change the necessary settings on the computers.
The transport protocol for LPD and Port9100 can be TCP/IP.
You will also need to set up the IP address on the machine and the Windows
computers. For information on how to set up an IP address, refer to
Internet Services Installation on page 24
TCP/IP (LPD or Port9100) Installation
This section describes how to set up the machine to use the LPD and Port9100
protocols.
CentreWare
.
Installation Procedure
There are three stages to enable printing on the machine through LPD or Port9100.
Network Communication Setup
Enable the following ports using the Control Panel or CentreWare Internet Services.
• Printing through LPD: LPD port
• Printing through Port9100: Port9100 port
Computer Setup
This requires the computers in the networking environment to be configured to
communicate with the machine.
Test Print
A print job should be submitted to make sure that the machine has been installed and
configured correctly.
Network Communication Setup
This section describes how to set up the network communication parameters of the
machine.
44
1.
Confirm that an existing operational network utilizing TCP/IP is available.
2.
Confirm that the machine is set up for CentreWare Internet Services.
NOTE: For information on the settings required to use CentreWare Internet Services,
refer to
3.
CentreWare Internet Services Installation on page 24
Boot the LPD or Port9100 port using CentreWare Internet Services.
1) Open your web browser, and enter the machine's IP address in the [Address]
box to access CentreWare Internet Services.
2) Click the [Properties] tab.
3) Click the [Connectivity] folder, and then [Port Settings].
.
Page 40

TCP/IP (LPD or Port9100)
4) If you are using the Port9100 port, select the [Enabled] check box for
[Port9100]. If you are using the LPD port, select the [Enabled] check box for
[LPD].
NOTE: Confirm that the SNMP port is enabled. If not enabled, select the [Enabled]
check box for [SNMP]. For information on how to configure SNMP settings, refer to
SNMP Configuration on page 49
.
5) Click [Apply].
6) If prompted, enter the System Administrator user ID and passcode, and click
[OK].
NOTE: By default, the System Administrator user ID is "11111" and its passcode is not
set.
NOTE: You can also enable each port on the Control Panel of the machine in the
System Setting Mode. For more information, refer to
4.
Depending on your requirements, configure the LPD or Port9100 settings.
System Settings on page 109
.
1) Click the [Connectivity] folder, and then [Protocols] folder.
2) Click [LPD] or [Port9100].
3) Configure the required options.
The following table shows the information fields and settings on the [Port 9100] and
[LPD] pages.
Port Setting items Description
LPD General Protocol Displays whether the protocol is
enabled or disabled.
Physical Connection Displays "Ethernet".
Port Number Enter the port number within the range
of 1 to 65535.
Connection
Time-Out
Maximum Number of
Sessions
Port 9100 General Protocol Displays whether the protocol is
Physical Connection Displays "Ethernet". This is a display-
Port
Information
TCP Port Number Enter the port number for Port 9100.
Bidirectional Displays whether the bidirectional
Specify the connection time-out period
when transmission fails.
Enter the maximum number of
sessions.
enabled or disabled.
only item.
communication is enabled or disabled.
This is a display-only item.
Maximum
Connections per Port
End of Job Timeout Specify the connection time-out period
PDL Switching Displays whether the PDL Switching
Displays "8". This is a display-only item.
when transmission fails.
feature is enabled or disabled. This is a
display-only item.
45
Page 41

6 Printer Environment Settings
4) Click [Apply].
5) If prompted, enter the System Administrator user ID and passcode, and click
[OK].
NOTE: Click the [Reboot Machine] button when it is displayed. If the [Reboot
Machine] button fails to be displayed, click the [Status] tab and then click the [Reboot
Machine] button.
NOTE: If the machine is rebooted, all scanned data stored in the mailboxes will be
deleted.
Computer Setup
Install print drivers on each client computer that will be sending print jobs to the
machine, and map to the machine as a printer. Refer to the PCL Print Driver CD-ROM.
Test Prin t
To make sure that the machine has been installed on the network correctly, a test print
should be submitted from each client computer. Perform the following steps.
1.
Open a document on a client computer.
2.
Select the machine as the printer to which the selected document will be sent.
3.
Print the document on the machine and verify that it prints correctly.
4.
Make sure that the driver is installed on every computer that will be sending jobs
to the machine.
5.
Repeat the test for all computers that will be sending jobs to the machine.
The installation process is now complete.
If the test print fails, refer to
Problem Solving on page 75
.
46
Page 42
USB Port
This section explains how to set up the machine in a USB port environment. The
following information is provided:
Information Checklist – page 47
USB Port Environment – page 47
USB Port Installation – page 48
Information Checklist
Before starting the USB port installation procedures, make sure that the following items
are available or have been performed.
USB Cable Customer
USB Port
Item By
Test the machine to make sure that it is fully installed and functioning
correctly.
Install the print driver. Customer
NOTE: The installation procedures will install the machine on the USB port of the host
computer. The procedures are not intended to connect the host computer to other
computers.
NOTE: Use CentreWare Internet Services to set [Auto Eject Time]. Refer to
Communication Setup on page 48
If problems are encountered during the installation of the machine, refer to
Solving on page 75
NOTE: Do not connect the USB cable to the machine until instructed to do so.
USB Port Environment
System configuration
The machine can be connected directly to the USB port of a host computer. A
document file can be sent from the host computer via the USB port to the machine for
printing. Other computers can be connected via a network to the host computer. Each
computer has a queue that can hold a number of files.
Customer
USB Port
.
Problem
.
The document file is sent from the queue in the computer to the queue in the host
computer, and then onto the queue in the machine to be printed.
Target computers
The following computers support printing through the USB port.
• Windows 2000/Windows XP/Windows Server 2003/Windows Vista
47
Page 43

6 Printer Environment Settings
USB Port Installation
Follow these installation procedures for using the machine on a USB port.
Installation Procedure
There are three stages required to install the machine on a USB port.
USB Port Communication Setup
This requires the machine to be set up for USB port printing.
Computer Setup
This requires the computer to be configured to print to the machine.
Test Print
A print job should be submitted to make sure that the machine has been installed and
configured correctly.
USB Port Communication Setup
This section describes how to set up USB communication on the machine. The
following parameters can be set depending on your requirements. These setups must
be done without the USB cable connected.
This procedure is used to set up the USB communication parameters for the machine.
Perform the following steps using CentreWare Internet Services.
Initially, boot the USB port.
1.
Open your web browser, and enter the machine's IP address in the [Address] box
to access CentreWare Internet Services.
2.
Click the [Properties] tab.
3.
Click the [Connectivity] folder, and then [Port Settings].
4.
Select the [Enabled] check box for [USB] to enable the USB port.
NOTE: Confirm that the SNMP port is enabled. If not enabled, select the [Enabled]
check box for [SNMP]. For information on how to configure SNMP settings, refer to
SNMP Configuration on page 49
5.
Click [Apply].
6.
If prompted, enter the System Administrator user ID and passcode, and click [OK].
NOTE: By d e fault, the Sy s t e m Administr a tor user ID is " 11111" and its passcode is not
set.
.
48
NOTE: You can also enable the USB port on the Control Panel of the machine in the
System Setting Mode. For more information, refer to
Depending on your requirements, set [Auto Eject Time], which allows you to specify the
time when the paper will be automatically ejected from the machine if no data are sent
to the machine. Follow these steps.
1.
On the [Properties] tab, click the [Physical Connections] folder, and then [USB].
2.
Set [Auto Eject Time] within the range of 5 to 1275 seconds in 5 second
increments.
3.
Click [Apply].
System Settings on page 109
.
Page 44

4.
NOTE: Click the [Reboot Machine] button when it is displayed. If the [Reboot
Machine] button fails to be displayed, click the [Status] tab and then click the [Reboot
Machine] button.
NOTE: If the machine is rebooted, all scanned data stored in the mailboxes will be
deleted.
Computer Setup
Before starting Computer Setup, make sure that the USB cable is disconnected from
the computer.
Then perform the following steps.
1.
2.
3.
SNMP Configuration
If prompted, enter the System Administrator user ID and passcode, and click [OK].
Refer to the PCL Print Driver CD-ROM, and install the print drivers for the
machine on the computer that will be sending jobs to the machine.
Connect the USB cable to the machine and the computer.
Continue with
Test Print on page 49
.
Test Print
To make sure that the machine has been installed on the USB port correctly, submit a
test print from each client computer. Perform the following steps.
1.
Open a document on the computer.
2.
Select the machine as the printer.
3.
Print the document on the machine and verify that it prints correctly.
4.
Repeat the test for all computers that will be sending jobs to the machine.
The installation process is now complete.
If the test print fails, refer to
SNMP Configuration
This section describes how to configure the SNMP settings when accessing the
machine via SNMP.
1.
Open your web browser, and enter the machine's IP address in the [Address] box
to access CentreWare Internet Services.
Problem Solving on page 75
.
2.
Click the [Properties] tab.
3.
Click the [Connectivity] folder, and then [Port Settings].
4.
Select the [Enabled] check box for [SNMP] to enable the SNMP port.
5.
Click [Apply].
6.
If prompted, enter the System Administrator user ID and passcode, and click [OK].
NOTE: By default, the System Administrator user ID is "11111" and its passcode is not
set.
7.
On the collapsible menu of the Menu Panel, click the [Protocols] folder, and then
[SNMP Configuration].
49
Page 45
6 Printer Environment Settings
8.
Configure required settings.
The following table shows the items that can be set.
Setting Items Description
SNMP
Configuration
SNMP
Configuration
> Edit SNMP
v1/v2c
Properties
SNMP
Configuration
> Advanced
SNMP
Configuration
SNMP Properties [Edit SNMP v1/v2c
Properties] button
[Advanced] button Displays the [SNMP
Community
Names
Default Trap
Community
Name
System
Administrator's
Login ID
Trap Destination Adresses Displays a page that contains
IP Trap
Destination
Address
Traps TRAP Community
Community Name
(Read Only)
Community Name
(Read/Write)
TRAP Community
Name
System Administrator's
Login ID
IP Address Enter the IP address of the
UDP Port Number Enter the UDP port number of
SNMP Version Select the SNMP version of
Name
Trap to be Received Select the types of traps to
Displays the [SNMP
Configuration > Edit SNMP v1/
v2c Properties] page which
allows you to set the SNMP
v1/v2c properties.
Configuration > Advanced]
page that contains the [Add
UDP IP Address] and [Delete]
buttons.
Enter the community name
used for display.
Enter the community name
used for display and update.
Enter the trap notification
community name.
Enter the ID of the System
Administrator
the [Add UDP IP Address] and
[Delete] buttons.
• [Add UDP IP Address]
button
This button displays the
[SNMP Configuration] page.
• [Delete] button
Selecting a trap on the
[SNMP Configuration >
Advanced] page and
clicking this button deletes
the trap. You can select and
delete multiple traps at
once.
SNMP agent that you are
setting up to receive traps.
the SNMP agent.
the SNMP agent.
Enter the trap community
name of the SNMP agent.
receive from the SNMP agent.
50
9.
Click [Apply].
10.
If prompted, enter the System Administrator user ID and passcode, and click [OK].
Page 46

SNMP Configuration
NOTE: Click the [Reboot Machine] button when it is displayed. If the [Reboot
Machine] button fails to be displayed, click the [Status] tab and then click the [Reboot
Machine] button.
NOTE: If the machine is rebooted, all scanned data stored in the mailboxes will be
deleted.
51
Page 47

7 Scanner Environment Settings
This chapter explains how to set up Scanning Services in the supported environments.
The following information is provided in this chapter:
Scanning Overview – page 53
Scanning with the Machine – page 53
Setup Procedure – page 53
Network Communication Setup – page 53
Scanning Procedure – page 55
Computer Setup – page 56
Setting Up a Mailbox – page 56
Creating a Mailbox – page 58
Setting the Scan Options – page 59
Editing a Mailbox – page 63
Deleting a Mailbox – page 63
Scanning Overview
The machine provides Scanning Services. Documents that you want to convert into
electronic data can be scanned and stored int a mailbox. Stored documents can be
accessed from any computers on the network.
The stored scanned documents can be opened by any software application that can
view or edit TIFF/PDF files.
Scanning with the Machine
Scanning Services enables multiple users to use the machine to scan and store
documents. With the power of the local area network, multiple users can access the
machine and use it to scan documents.
Setup Procedure
This section describes the setup procedure to use the Scanning feature on the
machine.
Network Communication Setup
1.
Confirm that an existing operational network utilizing TCP/IP is available.
2.
Confirm that the machine is set up for CentreWare Internet Services.
NOTE: For information on the settings required to use CentreWare Internet Services,
refer to
CentreWare Internet Services Installation on page 24
.
53
Page 48

7 Scanner Environment Settings
3.
Confirm that the following ports are enabled:
• SNMP
• WebDAV (only when using Network Scanner Utility 3)
• SOAP (only when using Network Scanner Utility 3)
Follow these steps to enable the ports.
1) Open your web browser, and enter the machine's IP address in the [Address]
box to access CentreWare Internet Services.
2) Click the [Properties] tab.
3) Click the [Connectivity] folder, and then [Port Settings].
4) Select the check boxes to enable each port.
5) Click [Apply].
6) If prompted, enter the System Administrator user ID and passcode, and click
[OK].
NOTE: By d e fault, the Sy s t e m Administr a tor user ID is " 11111" and its passcode is not
set.
NOTE: You can also enable each port on the Control Panel of the machine in the
System Setting Mode. For more information, refer to
NOTE: For information on how to configure SNMP settings, refer to
Configuration on page 49
4.
Depending on your requirements, set [Port Number] and [Connection Time-out]
for WebDAV.
1) On the [Properties] tab, click the [Connectivity] folder and then the [Protocols]
folder.
2) Click [WebDAV].
3) Configure the required settings.
• Port Number - Specify the Web DAV port number.
• Connection Time-Out - Specify the connection time-out period when
transmission fails.
4) Click [Apply].
5) If prompted, enter the System Administrator user ID and passcode, and click
[OK].
NOTE: Click the [Reboot Machine] button when it is displayed. If the [Reboot
Machine] button fails to be displayed, click the [Status] tab and then click the [Reboot
Machine] button.
.
System Settings on page 109
SNMP
.
54
NOTE: If the machine is rebooted, all scanned data stored in the mailboxes will be
deleted.
Page 49

Target Computers
• Windows 2000/Windows XP/Windows Server 2003/Windows Vista
Setup Procedure
Data to Set Up Scan to
Mailbox
CentreWare Internet
Services
Mailboxes are created via
CentreWare
Internet Services
Network Scanner Utility 3 is
installed
Scanning Procedure
1.
From a workstation, open up a web browser (such as Internet Explorer), and then
enter the Internet address of the machine. If connected properly, you should see a
CentreWare Internet Services web page for your machine.
NOTE: If you use the IP address to specify the Internet address, use the following
format.
http://xxx.xxx.xxx.xxx
Install
Requirement
Required CentreWare Internet Services can be used to
Required For additional information, refer to
Optional This utility can be installed from the CD-ROM to
Comments
create/edit mailboxes and view scanned documents
stored in mailboxes.
Creating a Mailbox
on page 58
view/print scanned documents.
.
2.
Create mailboxes:
1) Click the [Scan] tab.
2) Click the [Create] button for a mailbox.
3) Enter the appropriate information.
4) Click on [Apply].
NOTE: If a passcode is set for a mailbox, users are prompted for the passcode when
they access the mailbox.
NOTE: For more information on how to create a mailbox, refer to
on page 58
3.
On the Control Panel, press the <Scan> button.
.
Creating a Mailbox
1) Select the mailbox number to which you want to store the scanned document.
2) Load a sample document into the Document Feeder or on the Document
Glass.
3) Press the <Start> button on the machine.
4.
Verify that the scanned document is in the mailbox:
1) Select the mailbox number to which the scanned document was stored.
2) Select [Document List].
55
Page 50

7 Scanner Environment Settings
Computer Setup
To retrieve scanned documents, install Network Scanner Utility 3 or activate
CentreWare Internet Services. For more information about the operating environment
for Network Scanner Utility 3 and the installation method, refer to the PCL Print Driver
CD-ROM. For more information on how to retrieve scanned documents to your
computer, refer to the User Guide.
Setting Up a Mailbox
This section describes the mailbox features that allow you to check, import, or delete
documents in the mailboxes displayed on the [Mailbox] page in CentreWare Internet
Services.
1.
Open your web browser, and enter the machine's IP address in the [Address] box
to access CentreWare Internet Services.
2.
Click the [Scan] tab.
The [Mailbox] page is displayed.
56
Mailbox icons
Clicking the icon of a registered mailbox displays the [Mailbox Document List] page for
the mailbox.
Mailbox Number
Displays the mailbox numbers. Clicking the number of a registered mailbox displays the
[Mailbox Document List] page for the mailbox.
Mailbox Name
Displays the names of mailboxes. Clicking the name of a registered mailbox displays
the [Mailbox Document List] page for the mailbox.
Number of Documents in this Mailbox
Displays the number of documents stored in each mailbox.
Page 51

Document List
Displays the [Mailbox Document List] page where you can set the document
processing settings for the selected mailbox.
Delete
Deletes the selected mailbox.
Edit
Displays the [Edit Mailbox] page, which allows you to edit the selected mailbox.
Create
Displays the [Mailbox Setup] page, which allows you to create the selected mailbox.
Mailbox Document List
The following shows the setting items available on the [Mailbox Document List] page.
Mailbox Number
Displays the number of the selected mailbox.
Setting Up a Mailbox
Mailbox Name
Displays the name of the selected mailbox.
Document Number
Displays the numbers of the documents.
Document Name
Displays the names of the documents.
Stored Date
Displays the dates on which the documents were stored.
Compression Format
Displays the compression formats of the documents.
Page Count
Displays the page counts of the documents.
Type
Displays the job type as “Scan”.
Retrieve
• Retrieve Page - Select whether or not to retrieve one page of the selected
document.
• Page Number - Enter the page number of the page to be retrieved.
• Retrieving Format - Specify the file format to be used when retrieving the page.
57
Page 52

7 Scanner Environment Settings
Creating a Mailbox
The following procedure explains how to create a mailbox for storing scanned
documents.
Scanned documents in mailboxes can be imported to computers via Network Scanner
Utility 3 or CentreWare Internet Services. For information on how to import the scanned
documents to a computer, refer to the User Guide.
You can create up to 99 mailboxes.
1.
Click the [Scan] tab on the Header Panel of the CentreWare Internet Services
home page.
The [Mailbox] page is displayed.
2.
Select an unassigned mailbox number from the displayed list, and click [Create].
The [Mailbox Setup] page is displayed.
3.
Configure the required settings.
Mailbox Number
Displays the number of the selected mailbox.
Mailbox Name
Specify the mailbox name. Enter a name (up to 20 characters) to be assigned to the
mailbox. Leave the text box blank if not setting a mailbox name.
Mailbox Passcode
Specify the passcode to the mailbox. Enter a passcode with up to 20 numerical
characters. Leave the text box blank if not setting a passcode.
NOTE: The passcode set here is specific to each mailbox, and differs from the user
information set under the [User Account Settings] page for the Account Administration
feature. For information about the Account Administration feature, refer to
and Securities on page 65
Retype Passcode
Re-type the passcode for verification.
Check Mailbox Passcode
Select whether and when the passcode for the mailbox is required. Select from [Off],
[Always], [At Scan Time], and [At Delete Time], referring to the table below.
Mailbox Operations
.
Passcode Required
Off Always
At Scan
Time
Accounting
At Delete
Time
58
Change Settings No Yes Yes Yes
Store Document No Yes Yes No
Delete Document No Yes No Yes
Display Document No Yes No Yes
4.
Click [Apply].
Page 53

Setting the Scan Options
After creating a mailbox, you can set the scan options for the mailbox.
The settings made here are valid and specific to the respective mailboxes. Thus, you
must set up the scan options for each mailbox.
NOTE: Before setting the scan options, create a mailbox in advance. For information
on how to create a mailbox, refer to
NOTE: Some mailboxes may require you to enter a passcode, depending on the
[Check Mailbox Passcode] setting on the [Mailbox Setup] page. For more information,
refer to
1.
2.
3.
Creating a Mailbox on page 58
Click the [Scan] tab on the Header Panel of the CentreWare Internet Services
home page.
The [Mailbox] page is displayed.
From the displayed list, select an existing mailbox number that you want to set the
scan options for, and click [Edit].
The [Edit Mailbox] page is displayed.
Under [Scan Settings], configure the required settings.
Creating a Mailbox on page 58
.
Setting Up a Mailbox
.
59
Page 54
7 Scanner Environment Settings
The following table lists the options available.
Parameter Value
When Document
Feeder is used
Original Orientation Specify the orientation of originals when
scanning a document from the Document
Feeder.
• [Sideways Images (Top to Left)]
• [Upright Images] (Default)
Original Size Specify the size of originals.
•[Auto]
• [A3 Landscape]
• [B4 Landscape]
• [A4 Portrait] (Default)
• [A4 Landscape]
• [B5 Portrait]
• [B5 Landscape]
• [A5 Portrait]
• [A5 Landscape]
• [Statement (5.5 x 8.5") Landscape]
• [Executive (7.25 x 10.5") Portrait]
• [Executive (7.25 x 10.5") Landscape]
• [Letter (8.5 x 11") Portrait]
• [Letter (8.5 x 11") Landscape]
• [8.5 x 13" Landscape]
• [8.5 x 13.4" Landscape]
• [Legal (8.5 x 14") Landscape]
• [Tabloid (11 x 17") Landscape]
• [8K Landscape]
• [16K Portrait]
• [16K Landscape]
•[Custom Size]
Specify the width (X) within the range of
100 - 432 mm (3.9 - 17.0 inches)*, and the
length (Y) within the range of 128 - 297 mm
(5.0 - 11.7 inches)*
*The measurement unit will depend on the
setting in [Unit Settings] on the [Properties]
tab.
2 Sided Scanning Specify whether to scan both sides of a
document.
• [1 Sided] (Default)
• [2 Sided]
• [2 Sided, Rotate Side 2]
60
Page 55

Parameter Value
Setting Up a Mailbox
When Document
Glass is used
Original Orientation Specify the orientation of originals when
scanning a document from the Document
Glass.
• [Sideways Images (Top to Left)]
• [Upright Images] (Default)
Original Size Specify the size of originals.
• [A3 Landscape] (Default)
• [B4 Landscape]
• [A4 Portrait]
• [A4 Landscape]
• [B5 Portrait]
• [B5 Landscape]
• [A5 Portrait]
• [A5 Landscape]
• [Statement (5.5 x 8.5") Landscape]
• [Executive (7.25 x 10.5") Portrait]
• [Executive (7.25 x 10.5") Landscape]
• [Letter (8.5 x 11") Portrait]
• [Letter (8.5 x 11") Landscape]
• [8.5 x 13" Landscape]
• [8.5 x 13.4" Landscape]
• [Legal (8.5 x 14") Landscape]
• [Tabloid (11 x 17") Landscape]
• [8K Landscape]
• [16K Portrait]
• [16K Landscape]
• [Custom Size]
Specify the width (X) within the range of
15 - 432 mm (0.6 - 17.0 inches)*, and the
length (Y) within the range of 15 - 297 mm
(0.6 - 11.7 inches)*.
*The measurement unit will depend on the
setting in [Unit Settings] on the [Properties]
tab.
Original Type Allows you to scan at optimum image quality by
selecting the type of the original document.
• [Photo & Text]
•[Text] (Default)
• [Photo]
Lighten / Darken Adjust the density in five levels.
• [Lighten +2]
• [Lighten +1]
• [Normal] (Default)
• [Darken +1]
• [Darken +2]
Background Suppression Specify whether to suppress background colors
when scanning.
Sharpness Adjust the sharpness in five levels.
• [Soften +2]
• [Soften +1]
• [Normal] (Default)
• [Sharpen +1]
• [Sharpen +2]
61
Page 56

7 Scanner Environment Settings
Resolution Specify the scan resolution for the documents
Reduce / Enlarge Preset % Select the preset enlargement/reduction ratio.
Parameter Value
to be scanned.
• [200 x 200 dpi] (Default)
• [300 x 300 dpi]
• [400 x 400 dpi]
• [600 x 600 dpi]
•[A3
JA5/11x17J5.5x8.5(50.0%)]
•[B4
JA5(57.7%)]
•[A3
JB5(61.2%)]
•[11x17
•[A3
• [8.5x14
•[B4
•[A3
•[A4
• [8.5x11
• [100%] (Default)
•[B4
•[A4
• [8.5x13
• [5.5x8.5
•[A4
• [5.5x8.5
•[B5
•[A5
•[A5
J8.5x11/8.5x11J5.5x8.5(64.7%)]
JA4/B4JB5(70.7%)]
J8.5x11/A3J8.5x13(78.5%)]
JA4/B5JA5(81.6%)]
JB4/A4JB5(86.6%)]
J8.5x11/A3J11x17(94.0%)]
JA4/11x17JA3(97.3%)]
JA3/B5JB4(115.4%)]
JB4/A5JB5(122.5%)]
JA3(127.3%)]
J8.5x11/8.5x11J11x17(129.4%)]
JA3/B5JB4(141.4%)]
J8.5x14(154.5%)]
JA3(163.2%)]
JB4(173.2%)]
JA3/5.5x8.5J11x17(200%]
Variable % Specify a desired enlargement/reduction ratio.
The value can be specified within the range of
50 - 200% in 1% increments.
Edge Erase Top & Bottom Allow you to erase unwanted marks from each
edge of scanned documents.
Set the top and bottom margins within the
range of 0 - 50 mm (0 - 2.0 inches)*.
(Default: 2mm/0.1 inches*)
*The measurement unit will depend on the
setting in [Unit Settings] on the [Properties]
tab.
Left & Right Allow you to erase unwanted marks from each
edge of scanned documents.
Set the left and right margins within the range of
0 - 50 mm (0 - 2.0 inches)*.
(Default: 2mm/ 0.1 inches*)
*The measurement unit will depend on the
setting in [Unit Settings] on the [Properties]
tab.
62
4.
Click [Apply].
Page 57

Editing a Mailbox
The following procedure explains how to change mailbox settings.
NOTE: Some mailboxes may require you to enter a passcode depending on the
[Check Mailbox Passcode] setting on the [Mailbox Setup] page. For more information,
refer to
1.
2.
3.
4.
Creating a Mailbox on page 58
Click the [Scan] tab on the Header Panel of the CentreWare Internet Services
home page.
The [Mailbox] page is displayed.
Select the mailbox you want to edit, then click [Edit].
The [Edit Mailbox] page is displayed.
Change the settings as necessary.
Click [Apply].
Deleting a Mailbox
The following procedure explains how to delete a mailbox.
Setting Up a Mailbox
.
You can delete a mailbox selected on the [Mailbox] page. Before deleting a mailbox,
you need to delete all the documents in that mailbox. If the documents are stored in the
mailbox, the mailbox cannot be deleted. For information on how to delete documents
in a mailbox, refer to the User Guide.
1.
Click the [Scan] tab on the Header Panel of the CentreWare Internet Services
home page.
The [Mailbox] page is displayed.
2.
Select the mailbox that you want to delete, and click [Delete].
A confirmation message is displayed.
3.
Click [OK].
63
Page 58

8 Accounting and Securities
The machine has an Account Administration feature that restricts the ability to use
functions and manages the use of each machine feature.
This chapter contains information for the System Administrator on the features used to
change the settings and on the setting procedures. It also provides information on how
to configure the IP Filtering feature.
The following information is provided in this chapter:
Overview of Account Administration – page 65
Enabling the Account Mode – page 66
Managing User Accounts – page 67
Managing the Counters – page 69
Changing the System Administrator Settings – page 73
IP Filtering (IP Address Restriction) – page 74
Overview of Account Administration
The Account Administration feature is used to prevent the machine from being used by
unauthorized users, impose different restrictions on individual users (accounts), and
track the total number of copies and prints for each account.
The Account Administration feature allows you to:
• Create, change, and delete up to 99 user accounts.
• Control access to the Copy feature.
• Control access to the Print feature.
• Set the copy and print job limits per user account.
• View the total number of copies or prints made by each user account.
Copy Auditron
The Copy Auditron feature tracks and counts copies made on the machine for each
user account. To enable this feature, refer to
If Copy Auditron is enabled, users must log in to the machine to access the Copy
feature. To login, users are prompted to enter their user ID and passcode. For
information on how to log in to the machine, refer to the User Guide.
Enabling the Account Mode on page 66
.
Print Auditron
The Print Auditron feature tracks and counts prints made on the machine for each user
account. To enable this feature, refer to
If Print Auditron is enabled, users must set the login information such as their user ID
and passcode in the print driver in advance to use the Print feature. For more
information, refer to the PCL Print Driver CD-ROM.
Enabling the Account Mode on page 66
.
65
Page 59

8 Accounting and Securities
NOTE: A user ID and passcode are only required for copy and print jobs. Users do not
need to enter a user ID and passcode to log in to the machine for a scan job. However,
if a passcode is set for a mailbox, users are prompted to enter the passcode for the
mailbox, regardless of whether or not the Account Mode is enabled.
Users Controlled by Account Administration
The following is an explanation of the different user types that are controlled by the
Account Administration feature.
Users are classified into the following three types. The Account Administration feature
restricts operations according to the user type.
• System Administrator
• Account Users
• General Users
System Administrator
This is a user who can enter the System Setting Mode and change the machine
settings.
A System Administrator uses a special user ID called a System Administrator ID.
Account Users
These are users who are registered with the machine.
When this type of user uses a service that is restricted, they must enter their user ID
and passcode.
General Users
These are users other than the System Administrator when the Account Mode is
disabled.
Enabling the Account Mode
This section describes how to enable the Account Mode using CentreWare Internet
Services.
At your Computer
1.
Open your web browser, and enter the machine's IP address in the [Address] box
to access CentreWare Internet Services.
66
2.
Click the [Properties] tab.
3.
Click the [Accounting] folder, and then [Accounting Configuration].
The [Accounting Configuration > Step 1 of 2] page is displayed.
4.
Select [Local Accounting] from the [Accounting Type] drop-down list.
Accounting Type
• Local Accounting
Performs account management using user information pre-registered on the
machine.
Page 60

Managing User Accounts
• Accounting Disabled
Does not perform account management on the machine.
NOTE: If [Accounting Disabled] is selected, [Auditron (Copy Service)] and [Auditron
(Print Service)] are disabled even if their check boxes are selected in Step 5.
5. Select the [Enabled] check box for each service for which you want to perform
account management.
Auditron (Copy Service)
Select this check box to enable the Copy Auditron feature.
Auditron (Print Service)
Select this check box to enable the Print Auditron feature.
NOTE: To enable Copy Auditron and/or Print Auditron, [Accounting Type] must be set
to [Local Accounting] in Step 4.
NOTE: To permit printing jobs that do not have a user name and passcode when Print
Auditron is enabled, select the [Enable] check box for [Non-account Print] under
[Security] > [Authentication Configuration] on the [Properties] tab.
6. Click [Apply].
7. If prompted, enter the System Administrator user ID and passcode, and click [OK].
NOTE: By default, the System Administrator user ID is "11111" and its passcode is not
set.
NOTE: Click the [Reboot Machine] button when it is displayed. If the [Reboot
Machine] button fails to be displayed, click the [Status] tab and then click the [Reboot
Machine] button.
NOTE: If the machine is rebooted, all scanned data stored in the mailboxes will be
deleted.
NOTE: The Account Mode can be configured also on the Control Panel of the
machine in the System Setting Mode (Menu Number: 351, 352, and 353). For more
information, refer to System Settings on page 109.
Managing User Accounts
This section describes how to register user account information, such as user IDs, user
names and passcodes, and to impose restrictions on the number of copy and print
pages allowed for each user. You can also change and reset the settings for each
account. Up to 99 users can be registered.
Creating/Editing a User Account
The following describes how to create a new user account and change the settings for
each account.
At your Computer
1. Open your web browser, and enter the machine's IP address in the [Address] box
to access CentreWare Internet Services.
67
Page 61

8 Accounting and Securities
2.
Click the [Properties] tab.
3.
On the collapsible menu of the Menu Panel, click the [Accounting] folder, and then
[Accounting Configuration].
The [Accounting Configuration > Step 1 of 2] page is displayed.
4.
Click [Next].
The [Authentication Configuration > Step 2 of 2] page is displayed.
5.
Enter the account number for which you want to register a user.
6.
Click [Edit].
The [User Account Settings] page is displayed, on which you can edit the account
configurations for the specified account number.
7.
Configure the required settings.
User Identification
• Account Number
Displays the specified account number.
• User Name
Enter a user name. You can enter up to 32 alphanumeric characters including
spaces.
• User ID
Enter a user ID. You can enter three numerical characters.
• Passcode
Enter a passcode for the user ID. You can enter 4 to 12 numerical characters. Leave
the text box blank if not setting a passcode.
• Retype Passcode
Re-enter the passcode for verification.
Feature Access
• Copy Service - Feature Access
Specify whether to limit access to the Copy feature. Select from [Free Access] and
[No Access to Copy Service].
• Print Service - Feature Access
Specify whether to limit access to the Print feature. Select from [Free Access] and
[No Access to Print Service].
Impressions / Limits
• Black Copy Limit
Set the maximum number of pages allowed for copying. You can enter a value
between 1 - 99,999.
68
• Black Print Limit
Set the maximum number of pages allowed for printing. You can enter a value
between 1 - 99,999.
8.
Click [Apply].
NOTE: A user ID, passcode, and copy/print job limit can be configured also on the
Control Panel of the machine in the System Setting Mode. For more information, refer
System Settings on page 109
to
.
Page 62

Deleting a User Account
At your Computer
The following describes how to delete all registered information for a selected user
account.
1.
Open your web browser, and enter the machine's IP address in the [Address] box
to access CentreWare Internet Services.
2.
Click the [Properties] tab.
3.
Click the [Accounting] folder, and then [Accounting Configuration].
The [Accounting Configuration > Step 1 of 2] page is displayed.
4.
Click [Next].
The [Authentication Configuration > Step 2 of 2] page is displayed.
5.
Enter the account number for which you want to delete the user information.
6.
Click [Edit].
The [User Account Settings] page is displayed.
Managing the Counters
7.
Click [Delete].
NOTE: You can also delete user information for a selected user account on the
Control Panel of the machine in the System Setting Mode (Menu Number: 601 to 699).
For more information, refer to
System Settings on page 109
Managing the Counters
The System Administrator can set a copy/print job limit on each user account, view the
total number of copies or prints made by each account, and also reset all counts for all
user accounts.
Setting Copy and Print Job Limits on a User Account
The following describes how to set the copy and print job limits on a user account on
the Control Panel of the machine or in CentreWare Internet Services.
When the total number reaches the upper limit set up by the System Administrator,
users cannot use the copy/print feature on the machine.
.
At Your Computer
You can set the copy and print job limits on a particular user account on the [User
Account Settings] page on CentreWare Internet Services.
For more information, refer to
At the Machine
To set the copy and print job limits on a user account, you must enter the System
Setting Mode.
The following procedure describes how to set a copy or print job limit on a particular
user account.
NOTE: If you change a copy or print job limit for a selected user account, the current
number of copies or prints made under the user account will be reset to “0”.
Impressions / Limits on page 68
.
69
Page 63

8 Accounting and Securities
1.
Enter the System Setting Mode.
The letter [P] appears blinking in the Display.
NOTE: For information on how to enter the System Setting Mode, refer to
System Setting Mode on page 109
2.
Enter the menu number using the numeric keypad, referring to the tables below.
To set a copy job limit for a user account
Menu
Number
801 to 899* Specify the maximum number of copy pages allowed for account numbers 1 to
99. Up to a maximum of 99,999 copies can be set for each account.
*: When entering the menu number, enter 8 plus the account number. For example, for
account number 45, enter "845" as the menu number.
To set a print job limit for a user account
Menu
Number
901 to 999* Specify the maximum number of print pages allowed for account numbers 1 to
99. Up to a maximum of 99,999 prints can be set for each account.
*: When entering the menu number, enter 9 plus the account number. For example, for
account number 45, enter "945" as the menu number.
.
Description
Description
Entering the
3.
Press the <Start> button to confirm the entered menu number.
The currently-set copy or print job limit for that particular account number appears
blinking in the Display.
NOTE: If the displayed value has more than three digits, the first half of the numerical
value appears in the Display. Press the <Start> button to reveal the second half of the
value in the Display.
4.
Set a new copy or print job limit using the numeric keypad.
5.
Press the <Start> button to confirm the new copy or print job limit.
The letter [P] appears blinking in the Display.
6.
Press the <Log In/Out> button.
The machine exits the System Setting Mode.
NOTE: If you have changed any settings in the System Setting Mode, the machine will
automatically reboot to register and enable the new settings. All scanned documents
stored in mailboxes will be deleted on the reboot.
70
Page 64

Managing the Counters
Viewing the Total Number of Copies or Prints for a User Account
The following describes how to view the total number of copies or prints made on each
user account.
At the Machine
To view the total number of copies or prints made on a user account, you must enter
the System Setting Mode.
1.
Enter the System Setting Mode.
The letter [P] appears blinking in the Display.
NOTE: For information on how to enter the System Setting Mode, refer to
System Setting Mode on page 109
2.
Enter the menu number using the numeric keypad, referring to the tables below.
To view the total number of copies for a user account
Menu
Number
401 to 499* Displays the current number of copies made under the account number 1 to
99.
*: When entering the menu number, enter 4 plus the account number. For example, for
account number 45, enter "445" as the menu number.
To view the total number of prints for a user account
Menu
Number
501 to 599* Displays the current number of prints made under the account number 1 to 99.
*: When entering the menu number, enter 5 plus the account number. For example, for
account number 45, enter "545" as the menu number.
.
Description
Description
Entering the
3.
Press the <Start> button to confirm the entered menu number.
The current number of copies or prints made under the selected account appears
in the Display.
NOTE: If the displayed value has more than three digits, the first half of the numerical
value appears in the Display. Press the <Start> button to reveal the second half of the
value in the Display.
4.
Press the <Log In/Out> button.
The machine exits the System Setting Mode.
71
Page 65

8 Accounting and Securities
Resetting the Total Number of Copies and Prints for All Users
The following describes how to reset the copy and print totals for all user accounts in a
single operation.
At the Machine
1.
Enter the System Setting Mode.
The letter [P] appears blinking in the Display.
NOTE: For information on how to enter the System Setting Mode, refer to
System Setting Mode on page 109
2.
Enter a menu number [398] using the numeric keypad.
3.
Press the <Start> button to confirm the entered menu number.
4.
Enter “0” using the numeric keypad.
5.
Press the <Start> button to confirm the entered value.
All counters for all user accounts are reset to “0”.
6.
Press the <Log In/Out> button.
The machine exits the System Setting Mode.
NOTE: If you have changed any settings in the System Setting Mode, the machine will
automatically reboot to register and enable the new settings. All scanned documents
stored in mailboxes will be deleted on the reboot.
.
Entering the
72
Page 66

Changing the System Administrator Settings
Changing the System Administrator Settings
This section describes the features that allow you to change the System Administrator’s
ID and passcode. The machine enters the System Setting Mode only when a correct
System Administrator’s ID is entered. By default, the System Administrator’s ID is set
to "11111", and its passcode is not set.
1.
Open your web browser, and enter the machine's IP address in the [Address] box
to access CentreWare Internet Services.
2.
Click the [Properties] tab.
3.
Click the [Security] folder, and then [System Administrator Settings].
4.
Configure the required settings.
Administrator's Login ID
Specify the System Administrator's ID with up to 32 alphanumeric characters.
NOTE: If the System Administrator's Login ID contains alphabetical characters, the
Login ID cannot be entered at the machine using the numeric keypad on the Control
Panel because only numerical characters can be entered.
Administrator's Passcode
Specify the System Administrator's passcode with up to 4 to 12 alphanumeric
characters. Leave the text box blank if not setting a passcode.
NOTE: If the System Administrator's passcode contains alphabetical characters, the
passcode cannot be entered at the machine using the numeric keypad on the Control
Panel.
Retype Administrator's Passcode
Re-enter the System Administrator's passcode for verification.
Maximum Login Attempts
Specify the number of System Administrator login attempts before a login failure is
reported. You can specify the number of attempts allowed in the range of 1 to 10.
Selecting “0” disables this feature.
5.
Click [Apply].
NOTE: Click the [Reboot Machine] button when it is displayed. If the [Reboot
Machine] button fails to be displayed, click the [Status] tab and then click the [Reboot
Machine] button.
NOTE: If the machine is rebooted, all scanned data stored in the mailboxes will be
deleted.
NOTE: You can also change the System Administrator user ID and passcode on the
Control Panel of the machine in the System Setting Mode (Menu Number: 600 and
700). For more information, refer to
System Settings on page 109
.
73
Page 67

8 Accounting and Securities
IP Filtering (IP Address Restriction)
The IP Filtering feature provides security to the machine, by allowing you to register the
IP addresses permitted to communicate with the machine. The IP addresses to be
filtered can be specified on CentreWare Internet Services.
To restrict access to the machine, perform the following procedure.
1.
Open your web browser, and enter the machine's IP address in the [Address] box
to access CentreWare Internet Services.
2.
Click the [Properties] tab.
3.
Click the [Security] folder, and then [IP Filtering].
4.
Configure the required settings.
IP Filtering
Select whether to enable the IP Filtering feature using IP addresses.
IP Filter Rule List
• Rule Number
Displays entry numbers 1 - 10 for IP addresses to be filtered.
• Source IP/Mask
Displays the range of the IP addresses in “IP address/prefix length” format.
Add
Displays the [Add IP Filter Rule] page, which allows you to configure the following
settings:
• Source IP Address
Enter an IP address from which to permit communication with the machine.
• Source IP Mask
Enter the mask address of the IP address in prefix length format.
Edit
Displays the [Edit IP Filter Rule] page, which allows you to edit the IP address selected
in [IP Filter Rule List].
Delete
Allows you to delete the address selected in [IP Filter Rule List].
74
5.
Click [Apply].
NOTE: Click the [Reboot Machine] button when it is displayed. If the [Reboot
Machine] button fails to be displayed, click the [Status] tab and then click the [Reboot
Machine] button.
NOTE: If the machine is rebooted, all scanned data stored in the mailboxes will be
deleted.
Page 68

9 Problem Solving
This chapter describes what needs to be done when a problem occurs with the
machine. It provides information on how to troubleshoot a problem by referring to the
Machine Diagram (mimic), Error Code Label, and Troubleshooting Table. It also
explains how to identify network-related machine problems and how to clear paper
jams.
The following information is provided in this chapter:
Fault Clearance Procedure – page 75
Paper Jams – page 94
A1/A2: Document Jams – page 101
Network-related Problems – page 102
Xerox Welcome Center – page 107
Viewing/Editing Support Information – page 108
Fault Clearance Procedure
When a problem is encountered when using the machine, follow each step to identify
the cause of the problem, then apply the suggested solution.
• Machine Diagram (mimic)
If any indicator is lit or flashing, refer to
• Error code in the Display
Check the error code shown in the Display. Most error codes are listed on the Error
Code Label. Refer to the Error Code Label for the error description, and apply the
suggested solution.
If the displayed error code is not listed on the Error Code Label, refer to
on page 78
If an error occurs, the six-digit error code (***-***) is also displayed on CentreWare
Internet Services. For information on how to view the error history, refer to
Error Information on page 35
NOTE: You can also view the six-digit error code (***-***) in the Display on the Control
Panel. For more information, refer to
on page 35
• Troubleshooting Table
If any problem persists after applying the suggested solution, refer to
.
.
.
Troubleshooting Table on page 90
appropriate solutions.
Machine Diagram (mimic) on page 76
Error Codes
Viewing the six-digit error code at the machine
. Diagnose the symptom, then apply the
.
Checking
• Assistance from the System Administrator
Alternatively, contact the System Administrator for assistance.
• Switching the machine on /off
In some cases, a problem can be solved by simply switching the machine off and
then on again. For information on how to switch the machine on and off, refer to the
User Guide.
75
Page 69

9 Problem Solving
NOTE: If the machine is switched off, all scanned data stored in the mailboxes will be
deleted.
• Network-related Problem
If the problem still persists, refer to
• Xerox Welcome Center
If a problem persists after applying all the suggested solutions, contact the Xerox
Welcome Center. For more information, refer to
page 107
.
Machine Diagram (mimic)
The Machine Diagram (mimic) consists of
the following indicators to display the
machine status.
Network-related Problems on page 102
Xerox Welcome Center on
.
Document Feeder Jam
The red indicator flashes when a document jams in the Document Feeder
or when the Document Feeder Cover is open.
For information on how to clear document jams in the Document Feeder,
refer to
Processor Jam
The red indicator flashes when a paper jam occurs in the machine. Check
the error code that appears in the Display. Refer to
page 78
Toner
The red indicator lights up when the amount of toner left in the Drum
Cartridge is low. Prepare a new toner bottle. No error code is displayed
at this point.
The red indicator flashes when toner runs out. Add toner into the Drum
Cartridge. The error code [J1] appears in the Display.
NOTE: If the error code [J1] appears in the Display, the six-digit error
code [093-912] is also displayed on CentreWare Internet Services. For
information on how to view the error history, refer to
Information on page 35
A1/A2: Document Jams on page 101
for the solution.
.
.
Error Codes on
Checking Error
76
For information on how to add toner into the Drum Cartridge, refer to
Adding Toner to the Drum Cartridge on page 12
.
Page 70

Fault Clearance Procedure
Replace Drum Cartridge
The red indicator lights up when the Drum Cartridge needs to be replaced
in the near future. Prepare a new Drum Cartridge. No error code is
displayed at this point.
The red indicator flashes when the Drum Cartridge needs to be replaced
immediately. Replace the Drum Cartridge with a new one. The error code
[J6] appears in the Display.
NOTE: If the error code [J6] appears in the Display, the six-digit error
code [091-913] is also displayed on CentreWare Internet Services. For
information on how to view the error history, refer to
Information on page 35
.
Checking Error
For information on how to replace the Drum Cartridge, refer to
the Drum Cartridge on page 15
Tray 1
The green indicator lights up when Tray 1 is selected.
The green indicator flashes when paper runs out in Tray 1 or when a
paper jam occurs in Tray 1.
For information on how to load paper in Tray 1, refer to the User Guide.
For information on how to clear paper jams in Tray 1, refer to
Jam in Tray 1 on page 98
Tray 2
The green indicator lights up when Tray 2 is selected.
The green indicator flashes when paper runs out in Tray 2 or when a
paper jam occurs in Tray 2.
For information on how to load paper in Tray 2, refer to the User Guide.
For information on how to clear paper jams in Tray 2, refer to
Jam in Tray 2 on page 99
NOTE: This indicator is only available when Paper Tray 2 (optional) is
fitted to the machine.
.
.
.
Replacing
C1: Paper
C2: Paper
Bypass Tray
The green indicator lights up when the Bypass Tray is selected.
For information on how to load paper in the Bypass Tray, refer to the User
Guide.
For information on how to clear paper jams in the Bypass Tray, refer to
C3: Paper Jam in the Bypass Tray on page 100
Document Present
The green indicator lights up when a document is loaded correctly in the
Document Feeder.
.
77
Page 71

9 Problem Solving
Error Codes
The following table shows the error codes that appear in the Display.
If an error occurs, the six-digit error code (***-***) is also displayed on CentreWare
Internet Services. For information on how to view the error history, refer to
Error Information on page 35
NOTE: You can also view the six-digit error code (***-***) in the Display on the Control
Panel. For more information, refer to
on page 35
NOTE: If the machine is switched off, all scanned data stored in the mailboxes will be
deleted.
Error Code
Checking
.
Viewing the six-digit error code at the machine
.
What appears
in the Display
A1 005-170
What appears
in CentreWare
Internet Services
005-171
005-172
005-920
Description Remedy
The document is jammed in the
Document Feeder.
Remove the jammed document
carefully.
• If the error occurred during a
copy job:
Check the output copies and
identify where the copy job
should be restarted. Reload
the unscanned pages in the
Document Feeder and press
the <Start> button to resume
the copy job.
• If the error occurred during a
scan job:
Reload all the pages in the
Document Feeder and press
the <Start> button to restart
the scan job.
For information on how to
remove the jammed document,
refer to
on page 101
A1/A2: Document Jams
.
78
A2 005-198
005-199
A5 005-305 The Document Feeder Cover is
062-300 The Document Cover is open. Close the Document Cover.
The size of the documents that
are loaded in the Document
Feeder is not supported, and
has resulted in a document jam.
open.
Remove the jammed document
carefully, and use the Document
Glass instead.
For information on how to
remove the jammed document,
refer to
on page 101
Close the Document Feeder
Cover.
A1/A2: Document Jams
.
Page 72

Error Code
Fault Clearance Procedure
What appears
in the Display
C0 024-965 When Automatic Tray Switching
C1 071-100 Paper is jammed in or around
What appears
in CentreWare
Internet Services
(menu number: 163) is enabled,
the selected tray runs out of
paper.
024-966 When Automatic Paper
Selection (menu number: 164) is
enabled, the machine is unable
to select a tray because none of
the trays are loaded with the
appropriate size of paper.
Tray 1.
Description Remedy
Load paper in the tray.
For information on how to load
paper in the trays, refer to the
User Guide.
Load a tray with the desired size
of paper.
For information on how to
change the size of paper in the
tray, refer to the User Guide.
The error code may appear
again if the paper size specified
in the print job is A4, B5,
8.5 x 11", or 16K and the paper is
loaded in the tray in the SEF
orientation. Reload the paper in
the tray in the LEF orientation.
Remove the jammed paper.
Check that the paper guides are
adjusted correctly. If Tray 1 has
run out of paper, load paper in
the tray.
For information on how to clear
paper jams in Tray 1, refer to
C1:
Paper Jam in Tray 1 on page 98
For information on how to
correctly adjust the paper guides,
refer to the User Guide.
For information on how to load
paper in Tray 1, refer to the User
Guide.
.
C2 072-100 Paper is jammed in or around
Tray 2.
Remove the jammed paper.
Check that the paper guides are
adjusted correctly. If Tray 2 has
run out of paper, load paper in
the tray.
For information on how to clear
paper jams in Tray 2, refer to
C2:
Paper Jam in Tray 2 on page 99
For information on how to
correctly adjust the paper guides,
refer to the User Guide.
For information on how to load
paper in Tray 2, refer to the User
Guide.
79
.
Page 73
9 Problem Solving
Error Code
What appears
in the Display
C3 002-910
What appears
in CentreWare
Internet Services
075-910
The Bypass Tray has run out of
paper.
Paper is jammed in the Bypass
Tray.
Description Remedy
Load paper in Bypass Tray, and
press the <Start> button to
resume the job.
For information on how to load
paper in the Bypass Tray, refer to
the User Guide.
Remove the jammed paper.
Check that the paper guides are
adjusted correctly, and press the
<Start> button to resume the job.
For information on how to clear
paper jams in the Bypass Tray,
refer to
Bypass Tray on page 100
C5 024-950 Tray 1 has run out of paper. Load paper in Tray 1.
For information on how to load
paper in Tray 1, refer to the User
Guide.
024-959 Tray 1 has been selected in a
print job; however, the size/
orientation of paper that is
loaded in Tray 1 does not match
the paper size/orientation of the
print job.
Load Tray 1 with the same sized
paper as specified in the print
job. Specify the correct size/
orientation of paper that is
loaded in Tray 1.
For information on how to reload
Tray 1 with a different sized
paper, refer to the User Guide.
For information on how to specify
the size and orientation of paper
that is loaded, refer to the User
Guide.
C3: Paper Jam in the
.
80
The error code may appear
again if the paper size specified
in the print job is A4, B5,
8.5 x 11", or 16K and the paper is
loaded in Tray 1 in the SEF
orientation. Reload the paper in
Tray 1 in the LEF orientation.
Page 74

Error Code
Fault Clearance Procedure
What appears
in the Display
C6 024-951 Tray 2 has run out of paper. Load paper in Tray 2.
What appears
in CentreWare
Internet Services
024-960 Tray 2 has been selected in a
print job; however, the size/
orientation of paper that is
loaded in Tray 2 does not match
the paper size/orientation of the
print job.
Description Remedy
For information on how to load
paper in Tray 2, refer to the User
Guide.
Load Tray 2 with the same sized
paper as specified in the print
job. Specify the correct size/
orientation of paper that is
loaded in Tray 2.
For information on how to reload
Tray 2 with a different sized
paper, refer to the User Guide.
For information on how to specify
the size and orientation of paper
that is loaded, refer to the User
Guide.
The error code may appear
again if the paper size specified
in the print job is A4, B5,
8.5 x 11", or 16K and the paper is
loaded in Tray 2 in the SEF
orientation. Reload the paper in
Tray 2 in the LEF orientation.
C7 024-958 The Bypass Tray has been
selected in a print job; however,
the size/orientation of paper that
is loaded in the Bypass Tray
does not match the paper size/
orientation of the print job.
Load the Bypass Tray with the
same sized paper as specified in
the print job. Specify the correct
size/orientation of paper that is
loaded in the Bypass Tray.
For information on how to load
paper in the Bypass Tray, refer to
the User Guide.
For information on how to specify
the size and orientation of paper
that is loaded, refer to the User
Guide.
The error code may appear
again if the paper size specified
in the print job is A4, B5,
8.5 x 11", or 16K and the paper is
loaded in the Bypass Tray in the
SEF orientation. Reload the
paper in the Bypass Tray in the
LEF orientation.
81
Page 75

9 Problem Solving
Error Code
What appears
in the Display
C8 003-963 When Automatic Paper
What appears
in CentreWare
Internet Services
Selection (menu number: 164) is
enabled, the machine is unable
to select a tray, because the
machine does not support the
paper size that was specified by
the job, or because none of the
trays are loaded with the
appropriate size of paper.
003-965 When Automatic Paper
Selection (menu number: 164) is
enabled, the selected tray runs
out of paper.
003-966 When Automatic Paper
Selection (menu number: 164) is
enabled, the machine is unable
to select a tray, because none of
the trays are loaded with the
appropriate size of paper.
Description Remedy
Press the <Stop> button to
cancel the job.
Take one of the following
actions:
• Press the <Variable Ratio>
button or the <Reduce/
Enlarge> button to specify the
zoom ratio within the range of
50 to 200%.
• Change the paper size.
For information on how to
change the size of paper in the
tray, refer to the User Guide.
Press the <Stop> button to
cancel the job. Load paper in the
tray.
For information on how to load
paper in the trays, refer to the
User Guide.
Press the <Stop> button to
cancel the job. Load a tray with
the desired size of paper.
For information on how to
change the size of paper in the
tray, refer to the User Guide.
E1 077-103
077-106
077-130
077-900
077-901
E2 071-101
077-903
Paper is jammed around the
Fuser Unit or inside the Left
Side Cover.
Paper is jammed in or around
Tray 1.
Remove the jammed paper.
For information on how to
remove the jammed paper
around the Fuser Unit or inside
the Left Side Cover, refer to
E1:
Paper Jam around the Fuser Unit
and inside the Left Side Cover on
page 94
Remove the jammed paper.
Check that the paper guides are
adjusted correctly.
For information on how to
remove the jammed paper in and
around Tray 1, refer to
.
E2: Paper
Jam inside the Left Side Cover
on page 96
For information on how to
correctly adjust the paper guides,
refer to the User Guide.
.
82
Page 76
Error Code
Fault Clearance Procedure
What appears
in the Display
E3 072-101
What appears
in CentreWare
Internet Services
077-904
Paper is jammed in or around
Tray 2.
Description Remedy
Remove the jammed paper.
Check that the paper guides are
adjusted correctly.
For information on how to
remove the jammed paper in and
around Tray 2, refer to
Jam in Tray 2 on page 99
For information on how to
correctly adjust the paper guides,
refer to the User Guide.
E4 072-105 Paper is jammed inside the Left
Side Cover.
Remove the jammed paper.
For information on how to
remove the jammed paper, refer
to
E4: Paper Jam inside the Left
Side Cover on page 97
E5 077-300 The Front Cover is open. Close the Front Cover.
077-301 The Left Side Cover is open. Close the Left Side Cover.
E6 077-305 The Access Cover 2 is open. Close the Access Cover 2.
E3: Paper
.
.
077-309 The Access Cover 1 is open. Close the Access Cover 1.
E8 003-500 When using the N-up feature,
the zoom ratio required to fit the
specified number of pages on a
sheet is outside the range of 50 200%.
003-501 When using the N-up feature,
there is a mismatch between the
orientation of the loaded
documents and the paper in a
tray.
003-502 There is a mismatch between
the orientation of the loaded
document and that of the paper
in a tray.
E9 003-795 The zoom ratio required to fit the
image on the paper under the
specified settings is outside its
range of 50 - 200%.
Press any button to clear the
error. Check the selected
options, and try again.
For information about the N-up
feature, refer to the User Guide.
Press any button to clear the
error. Check the selected
options, and try again.
For information about the N-up
feature, refer to the User Guide.
Press any button to clear the
error. Check the selected
options, and try again.
Press any button to clear the
error.
Take one of the following
actions:
• Press the <Variable Ratio>
button or the <Reduce/
Enlarge> button to specify the
zoom ratio within the range of
50 to 200%.
• Change the paper size.
For information on how to
change the size of paper in the
tray, refer to the User Guide.
83
Page 77

9 Problem Solving
Error Code
What appears
in the Display
H9 010-325 An internal communication error
J1 093-912 Out of toner. Add toner.
J3 091-912 The machine cannot correctly
J6 091-913 The Drum Cartridge needs to be
What appears
in CentreWare
Internet Services
occurred in the machine.
sense the connection to the
Drum Cartridge, or the Drum
Cartridge may not be installed at
all.
replaced.
Description Remedy
Switch the machine off and on. If
the error persists, contact the
Xerox Welcome Center.
For information on how to add
toner, refer to
the Drum Cartridge on page 12
If the Drum Cartridge is installed
in the machine, pull it out
halfway, and push it back in
again.
If the Drum Cartridge is not
installed in the machine at all,
install the recommended Drum
Cartridge.
For information on the Drum
Cartridge, refer to
Consumables on page 11
Replace the Drum Cartridge.
For information on how to
replace the Drum Cartridge, refer
to
Replacing the Drum Cartridge
on page 15
Adding Toner to
.
Replacing
.
.
J7 091-914
091-915
091-916
L9 016-756 The use of the service is
016-757 A wrong passcode was entered. Enter the correct passcode.
016-759 When Copy Auditron or Print
The Drum Cartridge is defective. Replace the Drum Cartridge.
restricted for a particular user
account.
Auditron is enabled on the
machine, the copy or print job
limit that has been set for a
particular user account has
been reached.
For information on the Drum
Cartridge, refer to
Consumables on page 11
For information on how to
replace the Drum Cartridge, refer
to
Replacing the Drum Cartridge
on page 15
Change the setting to permit the
user account to access the
service.
For more information, refer to
.
Feature Access on page 68
Press any button to clear the
error. Change the copy or print
job limit for the user account in
the System Setting Mode (menu
number: 801 to 899, 901 to 999).
The copy or print count for the
user account will be reset to "0"
by changing the job limit.
For more information, refer to
System Settings on page 109
Replacing
.
.
.
84
Page 78

Error Code
Fault Clearance Procedure
What appears
in the Display
n0 002-970 This error code appears after
n1 003-972 When copying documents, the
What appears
Description Remedy
in CentreWare
Internet Services
Press the <Start> button to
the paper jam, which occurred
during a copy job, has been
cleared.
number of pages that can be
stored in memory exceeded the
maximum (999 pages).
016-748 Memory is full. • If the error occurred during a
resume the copy job.
Press any button to clear the
error. Reload the unscanned
documents, and press the
<Start> button to resume
scanning the rest of the
documents.
copy job:
Delete unnecessary
documents in mailboxes.
Check the output copies and
identify where the copy job
should be restarted. Reload
the unscanned pages and
press the <Start> button to
resume the copy job.
• If the error occurred during a
scan job:
Delete unnecessary
documents in mailboxes or
lower the scan resolution, and
then try scanning again.
016-981 Memory is full. Delete unnecessary documents
in mailboxes.
Check the output copies and
identify where the copy job
should be restarted. Reload the
unscanned pages and press the
<Start> button to resume the
copy job.
016-982 Memory is full. Delete unnecessary documents
in mailboxes, and try copying
again.
To run a copy job without
deleting documents in
mailboxes, use the Document
Glass and select all of the
following copy options:
• Select <100%> in the
<Reduce/Enlarge> button.
• Select <Uncollate> in the
<Copy Output> button.
• Select <1
<2-sided> button.
• Select <Off> in the
<N-up/ID Card Copy> button.
J1 Sided> in the
85
Page 79

9 Problem Solving
Error Code
What appears
in the Display
n2 003-942 The size of the original
n3 027-452 The specified IP address
n4 016-500
What appears
Description Remedy
in CentreWare
Internet Services
documents was not detected by
the Document Feeder.
already exists.
Download failed to start after
016-502
062-500
116-220
016-741 Unable to move into the
switching to download mode.
downloading mode.
Press the <Stop> button to
cancel the job. Reload the
unscanned documents, and
press the <Start> button to
resume scanning the rest of the
documents.
Change the IP address.
For information on how to set the
IP address, refer to
CentreWare
Internet Services Installation on
page 24
Contact the Xerox Welcome
Center.
Check if Software Download
(menu number: 127) is set to [0]
(Allow) in the System Setting
Mode, and then try downloading
again.
For information on how to
configure the system settings,
refer to
page 109
.
System Settings on
.
016-742 The product ID in the
downloaded data is invalid.
016-743 The download files are not
supported.
016-744 An error occurred in the data
being downloaded.
016-745 An XPJL error occurred while
downloading.
Try downloading again.
Use the download files available
for the model of your machine.
Check if the connection between
the external device and the
machine is secure, and try
executing the operation again.
Try executing the job again.
Contact the Xerox Welcome
Center if the problem persists.
86
Page 80

Error Code
Fault Clearance Procedure
What appears
in the Display
n5 016-712 The specified document area is
What appears
Description Remedy
in CentreWare
Internet Services
too small.
016-776 An error occurred during image
conversion processing.
016-779 An error occurred during
conversion processing of the
scan image.
016-788 Failed to retrieve the file from
the web browser.
Select a higher resolution or a
larger scan area.
Retrieve the data via
CentreWare Internet Services.
Instruct scanning again.
Take one of the following
actions, and then try retrieving
again.
• Refresh the browser page.
• Restart the browser.
• Switch the machine off and
then back on, and try scanning
again.
87
Page 81

9 Problem Solving
Error Code
What appears
in the Display
n6 003-760 Incompatible features are
What appears
Description Remedy
in CentreWare
Internet Services
Check the selected options.
selected in the document scan
conditions.
016-701 An error occurred due to
insufficient memory for the PCL
decomposer.
016-702 A page compression error
occurred. The machine could
not compress any page due to
insufficient free space in the
buffer.
016-704 The mailboxes are full. Delete unnecessary documents
016-709 A report command error
occurred.
016-718 Unable to process PCL print
data due to insufficient memory.
Lower the resolution if possible.
Lower the resolution if possible.
from the mailboxes, and then try
printing again.
Contact the Xerox Welcome
center.
Take one of the following actions:
• Lower the resolution.
• Do not use the Multiple-Up or
2 Sided Print feature, and try
printing again.
016-719 Unable to process PCL print
data due to insufficient print
page buffer memory.
016-720 PCL print data contained a
command that could not be
processed.
016-721 An error occurred while printing
a job.
016-761 An image output error occurred. Lower the resolution if possible.
116-720 An error occurred during printing
due to insufficient memory.
Take one of the following actions:
• Lower the resolution.
• Do not use the Multiple-Up or
2 Sided Print feature, and try
printing again.
Check the print data, and then try
printing again.
Contact the Xerox Welcome
Center.
Close unused ports or delete
unnecessary data.
88
Page 82

Error Code
Fault Clearance Procedure
What appears
in the Display
n7 016-726 The printer language cannot be
n9 - An internal communication error
What appears
Description Remedy
in CentreWare
Internet Services
automatically selected.
016-749 The printer language received
from a print driver cannot be
printed on the machine.
016-762 The specified print language is
not supported on the machine.
016-799 The print data contains invalid
parameters.
024-747 An invalid print parameter
combination was set.
116-701 Unable to print double-sided due
to insufficient memory.
occurred in the machine.
Use the machine’s print driver. If
the problem persists, contact the
Xerox Welcome Center.
Use the machine’s print driver. If
the problem persists, contact the
Xerox Welcome Center.
Use the machine’s print driver. If
the problem persists, contact the
Xerox Welcome Center.
Check the print data and print
options, and try printing again.
Check the print data and print
options, and try printing again.
Switch the machine off and on. If
the error persists, contact the
Xerox Welcome Center.
Switch the machine off and on. If
the error persists, contact the
Xerox Welcome Center.
U0, U1, U2, U3,
U4, U6, U7, U8,
U9
- An internal error occurred in the
machine.
Switch the machine off and on. If
the error persists, contact the
Xerox Welcome Center.
89
Page 83

9 Problem Solving
Troubleshooting Table
If you are experiencing any difficulties using the machine, check the table below for the
recommended solutions.
Symptom Recommendation
The machine will not switch on.
An error is indicated on the Machine Diagram
(mimic).
The document will not feed through the
Document Feeder.
The machine does not accept documents into
memory.
All the indicators on the Control Panel are off.
(The <Power Saver> button is lit.)
Failed to run a print job.
z
Check the power cord.
z
Check that the Power Switch is pressed on
to the [ ] position.
z
Check that the AC outlet is supplying
voltage. Connect another appliance to the
outlet to verify the voltage supply.
z
If any indicators on the Machine Diagram
(mimic) are lit or flashing, apply the
appropriate solutions.
z
If an error code appears in the Display,
refer to the Error Code Label, and apply the
suggested solutions.
z
Check that the Document Feeder is not
overloaded. The Document Feeder can
hold up to 50 sheets.
z
Check that the document is fully inserted
into the Document Feeder.
z
Using a lint-free cloth, lightly wipe the
underside of the Document Cover.
z
Load the documents, and then check that
the side guides are not too tight.
z
If the document is curled, make sure to
straighten it before reloading it into the
Document Feeder.
z
If the memory is at its maximum capacity,
print and delete unnecessary files.
z
Press the <Power Saver> button on the
Control Panel to disable the Low Power
Mode or the Sleep Mode.
For information on the Low Power Mode
and the Sleep Mode, refer to the User
Guide.
For information on how to change the Low
Power Mode or Sleep Mode setting, refer to
Machine Information on page 39
z
Delete the print job, and run the print job
.
again.
z
Switch off the machine. Wait for five
seconds, then switch on the machine.
90
Page 84
Fault Clearance Procedure
Symptom Recommendation
A print job is sent to the machine correctly,
but the machine does not start printing.
Failed to print on the paper in the tray that
you selected.
“UnknownUser” is printed as a user name on
a banner sheet.
Damaged or deformed transparencies
Blank output
z
Make sure that the computer application
you are sending a print job from is working
correctly.
z
Make sure that the appropriate printer
cable is used.
z
Make sure that the printer cable is
connected securely.
z
Check to see if the size of paper loaded in a
tray matches the size of paper that you
specified in the print driver.
z
Print data is still being transmitted. The
machine does not start printing unless it
has received all the data. If printing a
graphic-intensive document, wait for a
while. Data transmission may take a while.
z
Check to see if the paper size that you
have specified in the print driver matches
the size of paper that is actually loaded in
the tray.
z
Make sure that paper is loaded correctly in
the tray.
z
If Print Auditron is disabled,
"UnknownUser" is printed as the user name
on the banner sheet. Specify the user ID in
the print driver to correct the banner sheet.
If Print Auditron is enabled, a three-digit
user ID is printed on a banner sheet.
For information on how to specify the user
ID in the print driver, refer to the PCL Print
Driver CD-ROM.
z
Transparencies can be loaded only in the
Bypass Tray.
z
Check that the document is loaded face up
in the Document Feeder.
z
Check that the document is placed face
down on the Document Glass.
z
If toner has recently been added to the
Drum Cartridge, it may not be dispersed
properly. Run the job again.
z
Check that the sealing tape has been
removed from the new Drum Cartridge.
z
Reinstall the Drum Cartridge.
z
Replace the Drum Cartridge.
z
Add toner if the toner indicator on the
Machine Diagram (mimic) flashes or the
error code indicating that toner needs to be
added appears in the Display.
91
Page 85

9 Problem Solving
Symptom Recommendation
Streaks, solid or dotted lines, or spots
Paper delivered to an Output Tray is curled,
and it is not properly stacked up.
Output is too light or too dark.
Output is too light.
Uneven print
Blurred images
Missing characters
Gloss variations (coining)
Light copies when scanning glossy, shiny, or
coated documents through the Document
Feeder.
z
Clean the Corotron Wire.
For information on how to clean the
Corotron Wire, refer to
Corotron Wire on page 19
z
Clean the Document Glass, the Narrow
Cleaning the
.
Glass Strip (the narrow strip of glass
located at the left hand side of the
Document Glass), the Document Feeder,
and the paper guides.
For information on how to clean the
machine, refer to
page 17
z
Check the quality of the document.
z
Run the job using the Document Glass.
z
If the machine has been idle for an
.
Cleaning the Machine on
extended period of time, if toner has
recently been added, or if the Drum
Cartridge has recently been replaced, run
the job again.
z
Load fresh paper.
z
Check the humidity in the location of the
machine.
z
Replace the Drum Cartridge.
z
Flip the paper stack over in the tray.
z
Rotate the paper stack head to toe in the
tray.
z
Set the density feature to a lighter or darker
setting.
z
Check the quality of the document.
z
Load fresh paper.
z
Run off more prints until the copy quality
improves.
z
Replace the Drum Cartridge.
z
Set the density feature to a darker setting.
z
If toner has recently been added to the
Drum Cartridge, toner may not be
dispersed properly. Run the job again.
z
Remove the Drum Cartridge, and shake it
gently (away from clothing and carpet).
NOTE: Shake the Drum Cartridge gently
without spilling toner.
z
Load fresh paper.
z
Replace the Drum Cartridge.
z
Load fresh paper.
z
Replace the Drum Cartridge.
z
Load fresh paper.
z
Replace the Drum Cartridge.
z
Check the quality of the document.
z
If the document has large areas of solid
density, adjust the density feature for the
contrast.
z
Use the Document Glass instead of the
Document Feeder.
92
Page 86

Fault Clearance Procedure
Symptom Recommendation
Ghosting (residual images)
Washout
Solid density variations
Image loss
Misfeeds in the Bypass Tray
Jams in the Document Feeder
Paper jams
Paper curl
z
Check the quality of the documents.
z
Feed the document SEF.
z
Check the quality of the documents.
z
If the image is lighter near the borders, set
the density feature to a darker setting.
z
Replace the Drum Cartridge.
z
Load fresh paper.
z
Check the quality of the documents.
z
Set the density feature to a lighter or darker
setting.
z
Replace the Drum Cartridge.
z
When copying a document from a larger
paper size to a smaller size, reduce the
image to fit onto the smaller paper size.
z
Set a slightly smaller document size (for
example, copy 90% instead of 100%).
z
Reload paper in the tray. Do not add paper
on top of the remaining paper in the tray.
Instead, remove the remaining paper from
the tray, place it on top of the new stack of
paper, align the edges, and then load the
paper stack in the tray.
z
Check that the paper guides are locked into
position against the paper.
z
Check that the settings for the Bypass Tray
are correct and match the paper size and
orientation specified on the Control Panel.
z
Open the Document Feeder and check that
no paper or objects are inside.
z
Check that the cover on the Document
Feeder is firmly closed.
Refer to
page 101
z
Use only recommended media.
z
Check that the paper is loaded correctly.
z
Flip the paper stack over in the tray.
z
Check that the paper guides are locked into
A1/A2: Document Jams on
for procedures.
position.
z
Do not use media that is torn, wrinkled, or
folded.
z
Load fresh paper.
Refer to
Paper Jams on page 94
for
procedures.
z
Check that the paper is loaded correctly.
Load paper in Tray 1 and Tray 2 seam side
up.
z
Load paper in the Bypass Tray seam side
down.
z
Load custom media in the Bypass Tray.
Refer to the User Guide for procedures.
93
Page 87
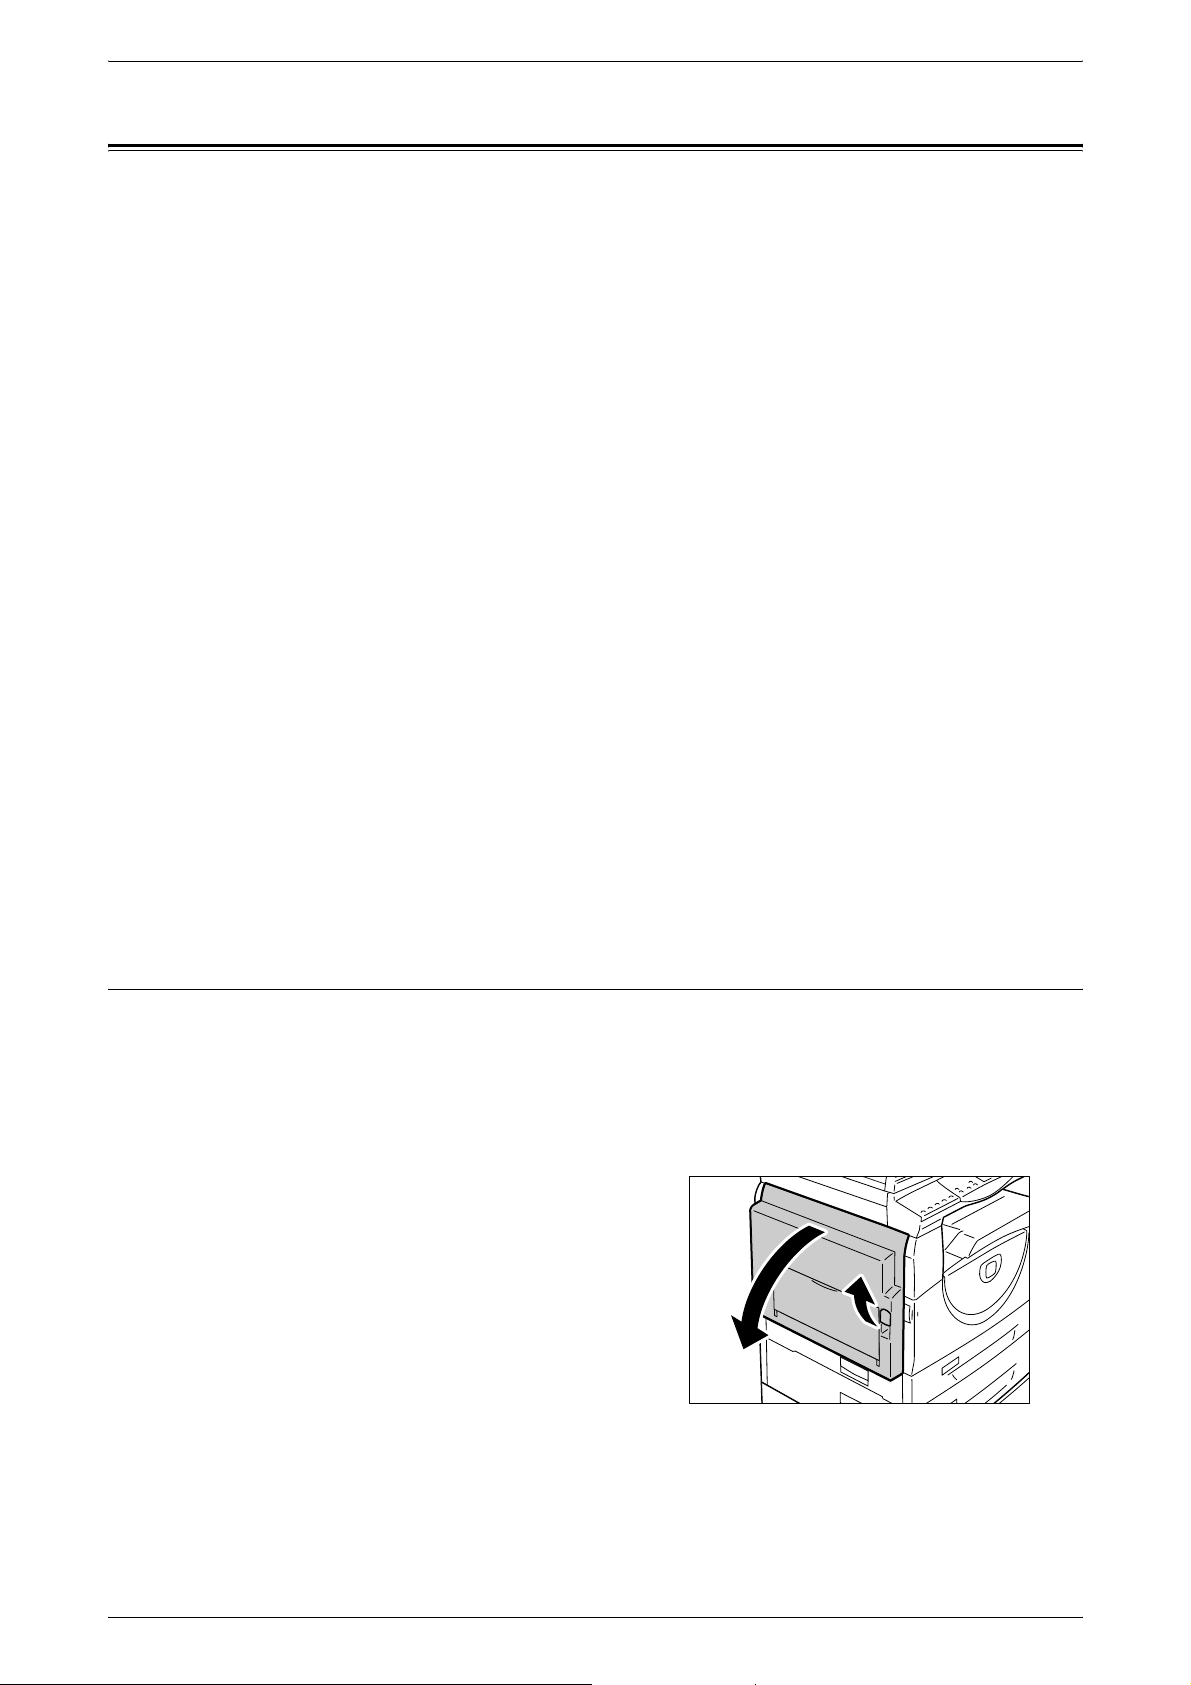
9 Problem Solving
Paper Jams
This section describes procedures to clear paper jams.
When paper jams in the machine, the machine stops, and the indicator on the Machine
Diagram (mimic) flashes. An error code also appears in the Display, which indicates
which procedures to take to remove the jammed paper.
Carefully remove the jammed paper without tearing it. Do not leave any pieces of paper
in the machine.
If a paper jam error code remains in the Display after you have removed the jammed
paper, it is possible that paper is jammed in another location in the machine or that
pieces of paper are still left in the machine. Check the Machine Diagram (mimic) and
the error code, and remove the jammed paper completely.
After removing the jammed paper, a copy job or print job resumes from the page where
the paper jam occurred.
NOTE: Identify the location of the paper jam first. Randomly pulling out the trays may
tear the jammed paper, and any torn pieces of paper remaining in the machine may
eventually cause the machine to malfunction.
NOTE: If there are any torn pieces of paper left in the machine, the error code remains
in the Display.
NOTE: Clear paper jams while the machine is switched on.
NOTE: Do not touch any parts inside the machine while clearing a paper jam unless
specifically instructed to do so.
NOTE: Six-digit error codes are also displayed on CentreWare Internet Services. For
information on how to view the error history, refer to
page 35
. For more information about error codes, refer to
Checking Error Information on
Error Codes on page 78
E1: Paper Jam around the Fuser Unit and inside the Left Side Cover
The following procedure describes how to clear paper jams around the Fuser Unit or
inside the Left Side Cover when an error code [E1] appears in the Display.
NOTE: Do not touch the transfer corotron wire when removing the jammed paper.
Touching the transfer corotron wire can possibly damage the wire itself, which may
require replacement or impair image quality.
1.
Lift up the Left Side Cover Latch gently
to open the Left Side Cover.
.
94
Page 88
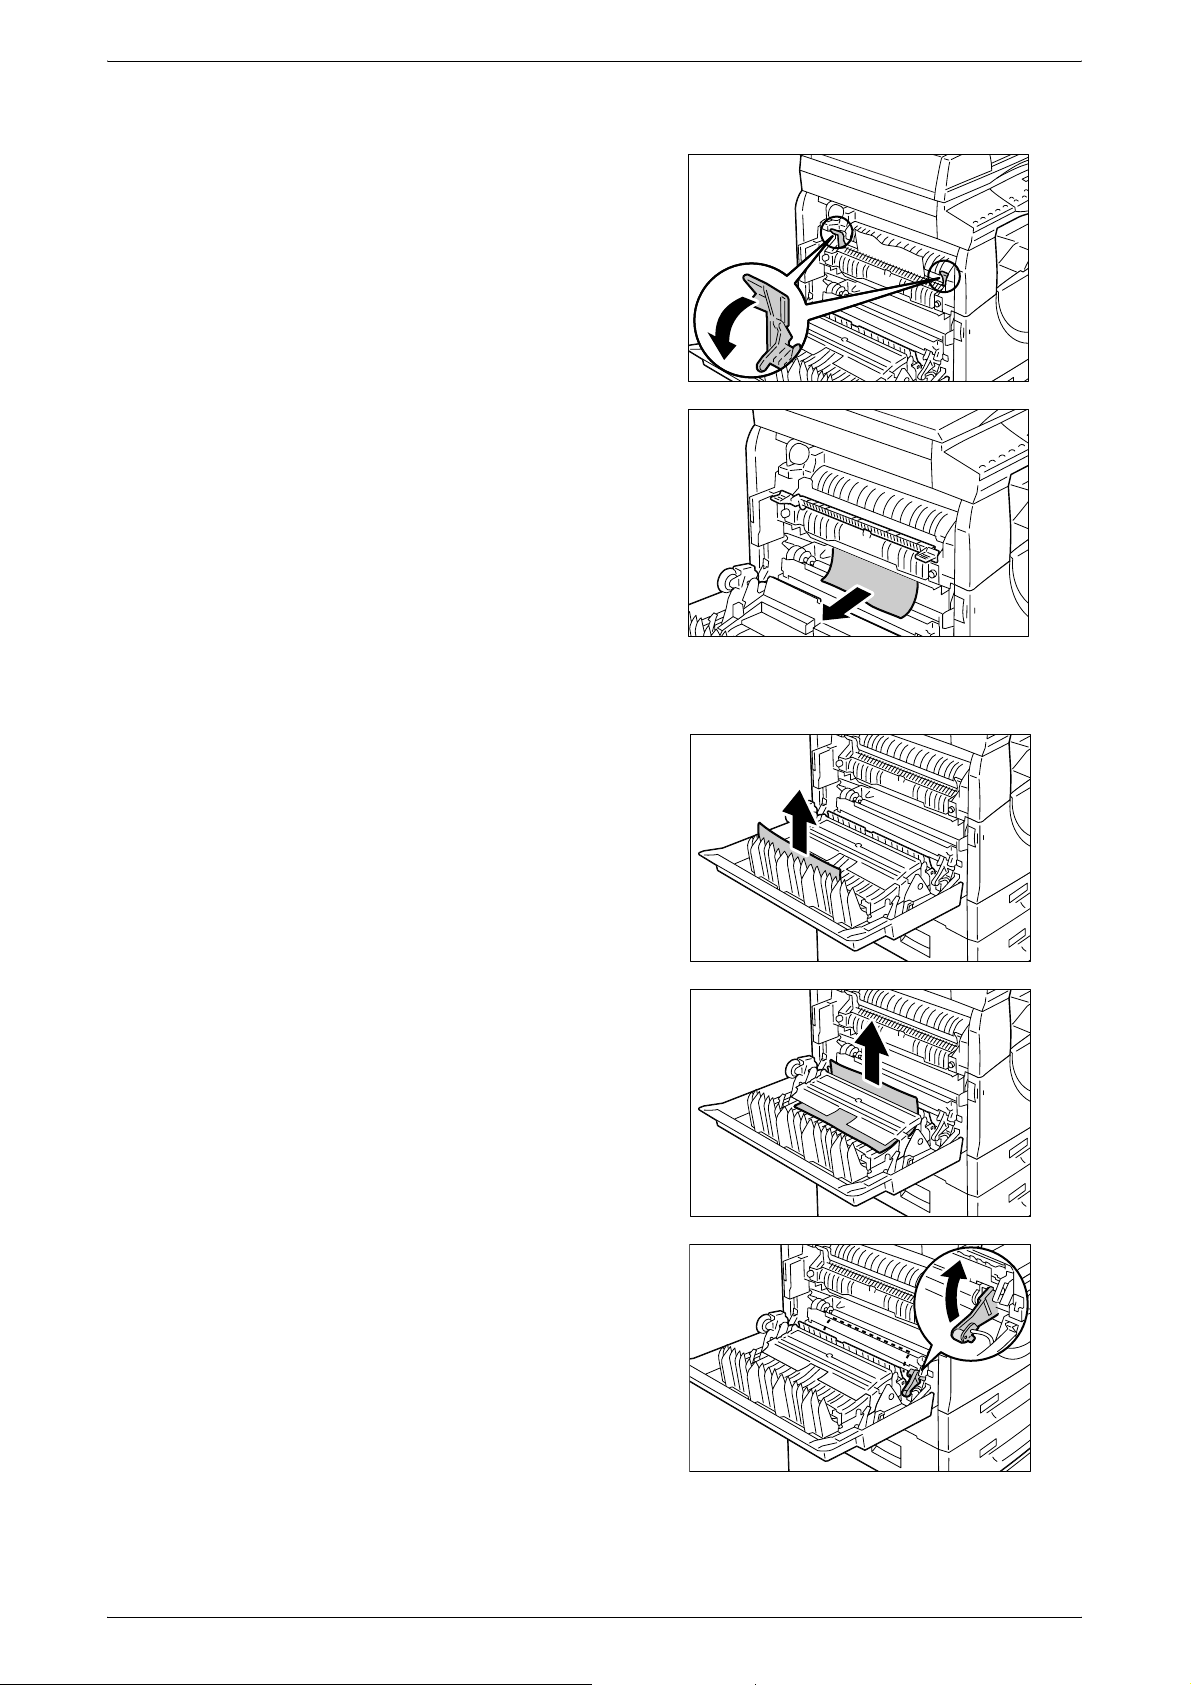
If the paper is jammed around the Fuser
1) Pull down the latches.
2) Remove the jammed paper.
NOTE: Do not leave any torn pieces of
paper inside the machine.
3) Return the latches back to their
original position.
4) Gently close the Left Side Cover.
Paper Jams
If the paper is jammed inside the Left Side Cover
1) If the paper is jammed in the
location shown in the diagram,
remove the jammed paper by
pulling it upwards.
2) If the paper is jammed in the
location shown in the diagram,
remove the jammed paper by
pulling it upwards.
3) If the paper is jammed in the
location shown in the diagram, and
if the edge of the jammed paper is
not accessible to be pulled out, pull
up the green lever, and remove the
jammed paper.
NOTE: If the paper is still jammed tightly,
even after pulling up the green lever, open
Access Cover 1. This may release the
jammed paper, allowing you to remove it.
4) Gently close the Left Side Cover.
95
Page 89

9 Problem Solving
E2: Paper Jam inside the Left Side Cover
The following procedure describes how to clear paper jams inside the Left Side Cover
when an error code [E2] appears in the Display.
1.
Hold the latch, and open Access Cover
1.
NOTE: This releases the tightly jammed
paper within the machine.
2.
Lift up the Left Side Cover Latch gently
to open the Left Side Cover.
3.
Remove the jammed paper.
NOTE: Do not leave any torn pieces of paper inside the machine.
1) If the paper is jammed in the
location shown in the diagram,
remove the jammed paper by
pulling it upwards.
2) If the paper is jammed in the
location shown in the diagram,
remove the jammed paper by
pulling it upwards.
96
Page 90

3) If the paper is jammed in the
location shown in the diagram, and
if the edges of the jammed paper is
not accessible to be pulled out, pull
up the green lever, and remove the
jammed paper.
4.
Gently close the Left Side Cover and
Access Cover 1.
E4: Paper Jam inside the Left Side Cover
The following procedure describes how to clear paper jams inside the Left Side Cover
when an error code [E4] appears in the Display.
1.
Hold the latch, and open Access Cover
1.
Paper Jams
2.
Hold the latch, and open Access Cover
2.
3.
Lift up the Left Side Cover Latch gently
to open the Left Side Cover.
97
Page 91

9 Problem Solving
4.
NOTE: Do not leave any torn pieces of paper inside the machine.
Remove the jammed paper.
1) If the paper is jammed in the
location shown in the diagram,
remove the jammed paper by
pulling it upwards.
2) If the paper is jammed in the
location shown in the diagram,
remove the jammed paper by
pulling it upwards.
3) If the paper is jammed in the
location shown in the diagram, and
if the edges of the jammed paper is
not accessible to be pulled out, pull
up the green lever, and remove the
jammed paper.
5.
Gently close the Left Side Cover,
Access Cover 2, and Access Cover 1.
C1: Paper Jam in Tray 1
The following procedure describes how to clear paper jams in Tray 1 when an error
code [C1] appears in the Display.
1.
Pull out Tray 1 toward you.
NOTE: Identify the location of the paper
jam first. Randomly pulling out the trays
may tear the jammed paper, and any torn
pieces of paper remaining in the machine
may eventually cause the machine to
malfunction.
98
2.
Remove the jammed paper.
NOTE: Do not leave any torn pieces of paper inside the machine.
3.
Check that the paper guides are adjusted correctly.
NOTE: If Tray 1 has run out of paper, load paper in the tray. For information on how to
load paper in Tray 1, refer to the User Guide
Page 92
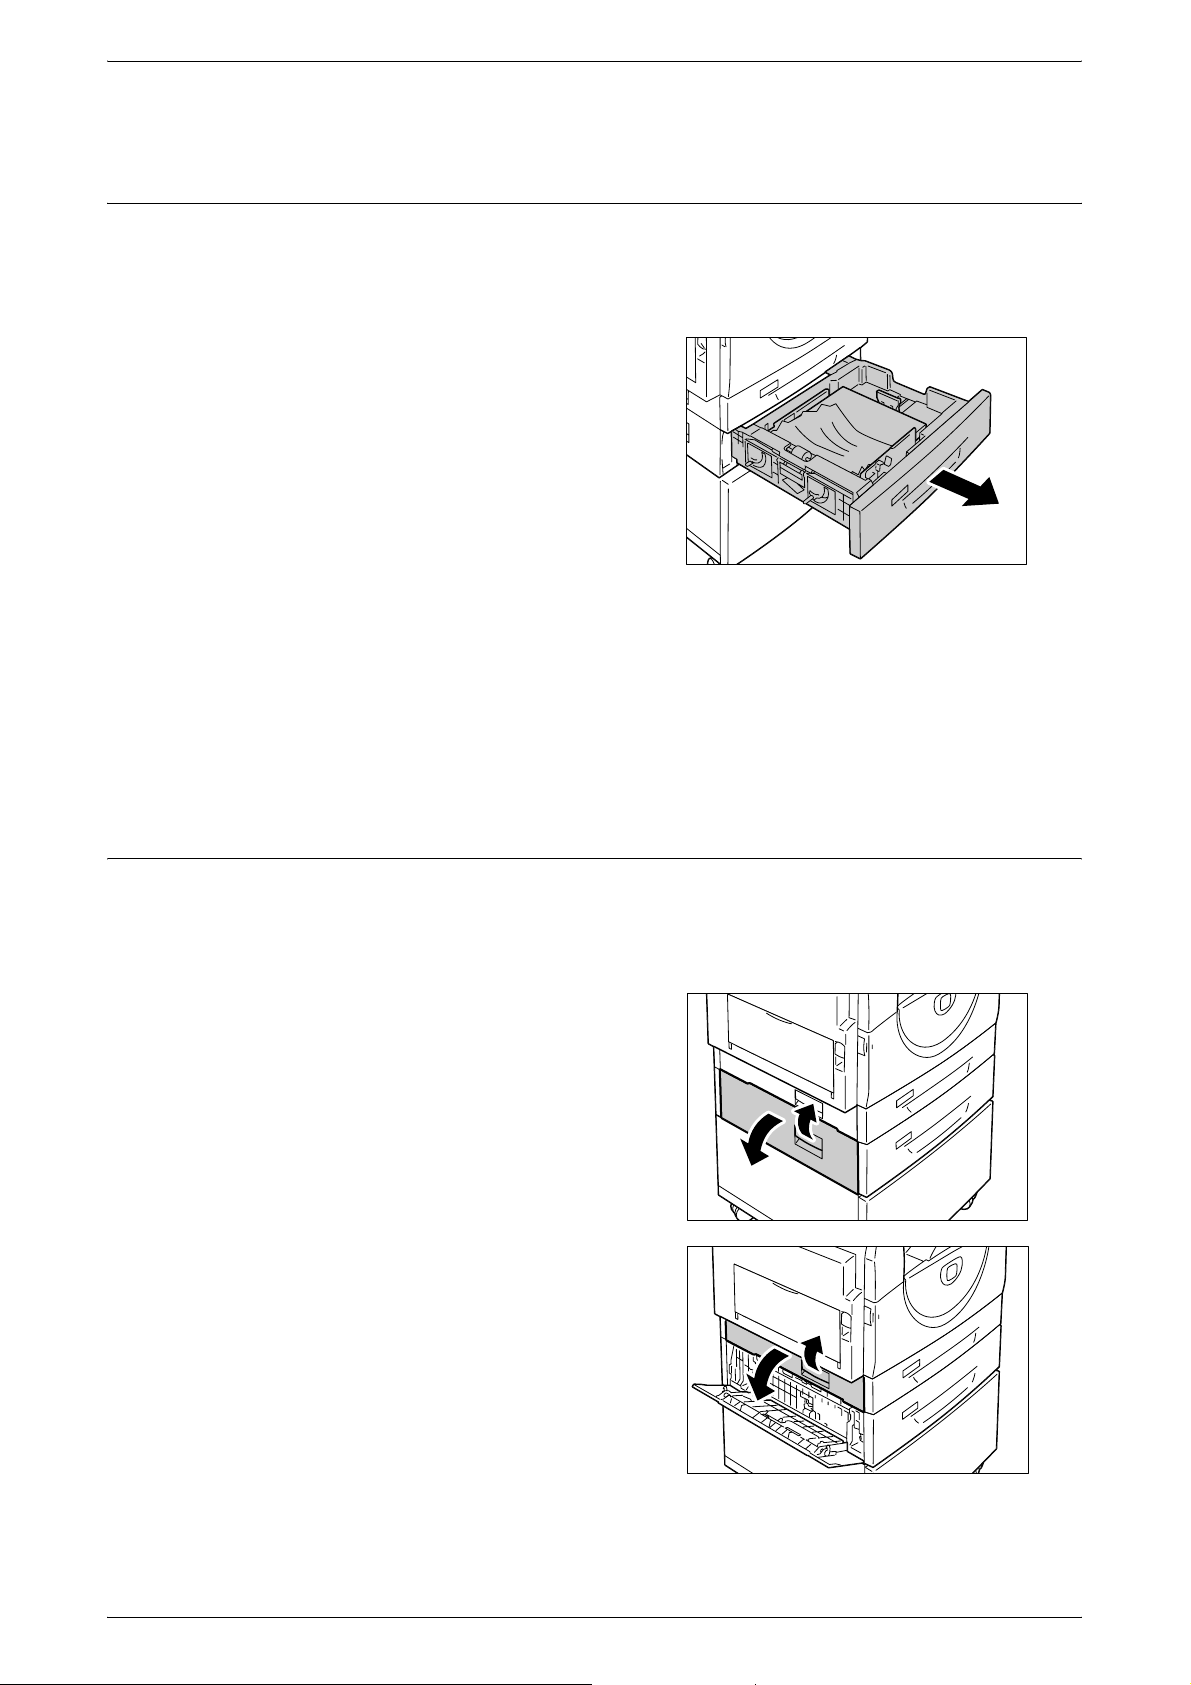
4.
Push Tray 1 gently back into position.
C2: Paper Jam in Tray 2
The following procedure describes how to clear paper jams in Tray 2 when an error
code [C2] appears in the Display.
NOTE: Paper Tray 2 is an optional accessory that can be used as Tray 2.
1.
Pull out Tray 2 toward you.
NOTE: Identify the location of the paper
jam first. Randomly pulling out the trays
may tear the jammed paper, and any torn
pieces of paper remaining in the machine
may eventually cause the machine to
malfunction.
2.
Remove the jammed paper.
NOTE: Do not leave any torn pieces of
paper inside the machine.
Paper Jams
3.
Check that the paper guides are adjusted correctly.
NOTE: If Tray 2 has run out of paper, load paper in the tray. For information on how to
load paper in Tray 2, refer to the User Guide.
4.
Push Tray 2 gently back into position.
E3: Paper Jam in Tray 2
The following procedure describes how to clear paper jams in Tray 2 when an error
code [E3] appears in the Display.
NOTE: Paper Tray 2 is an optional accessory that can be used as Tray 2.
1.
Hold the latch, and open Access Cover
2.
2.
Hold the latch, and open Access Cover
1.
99
Page 93
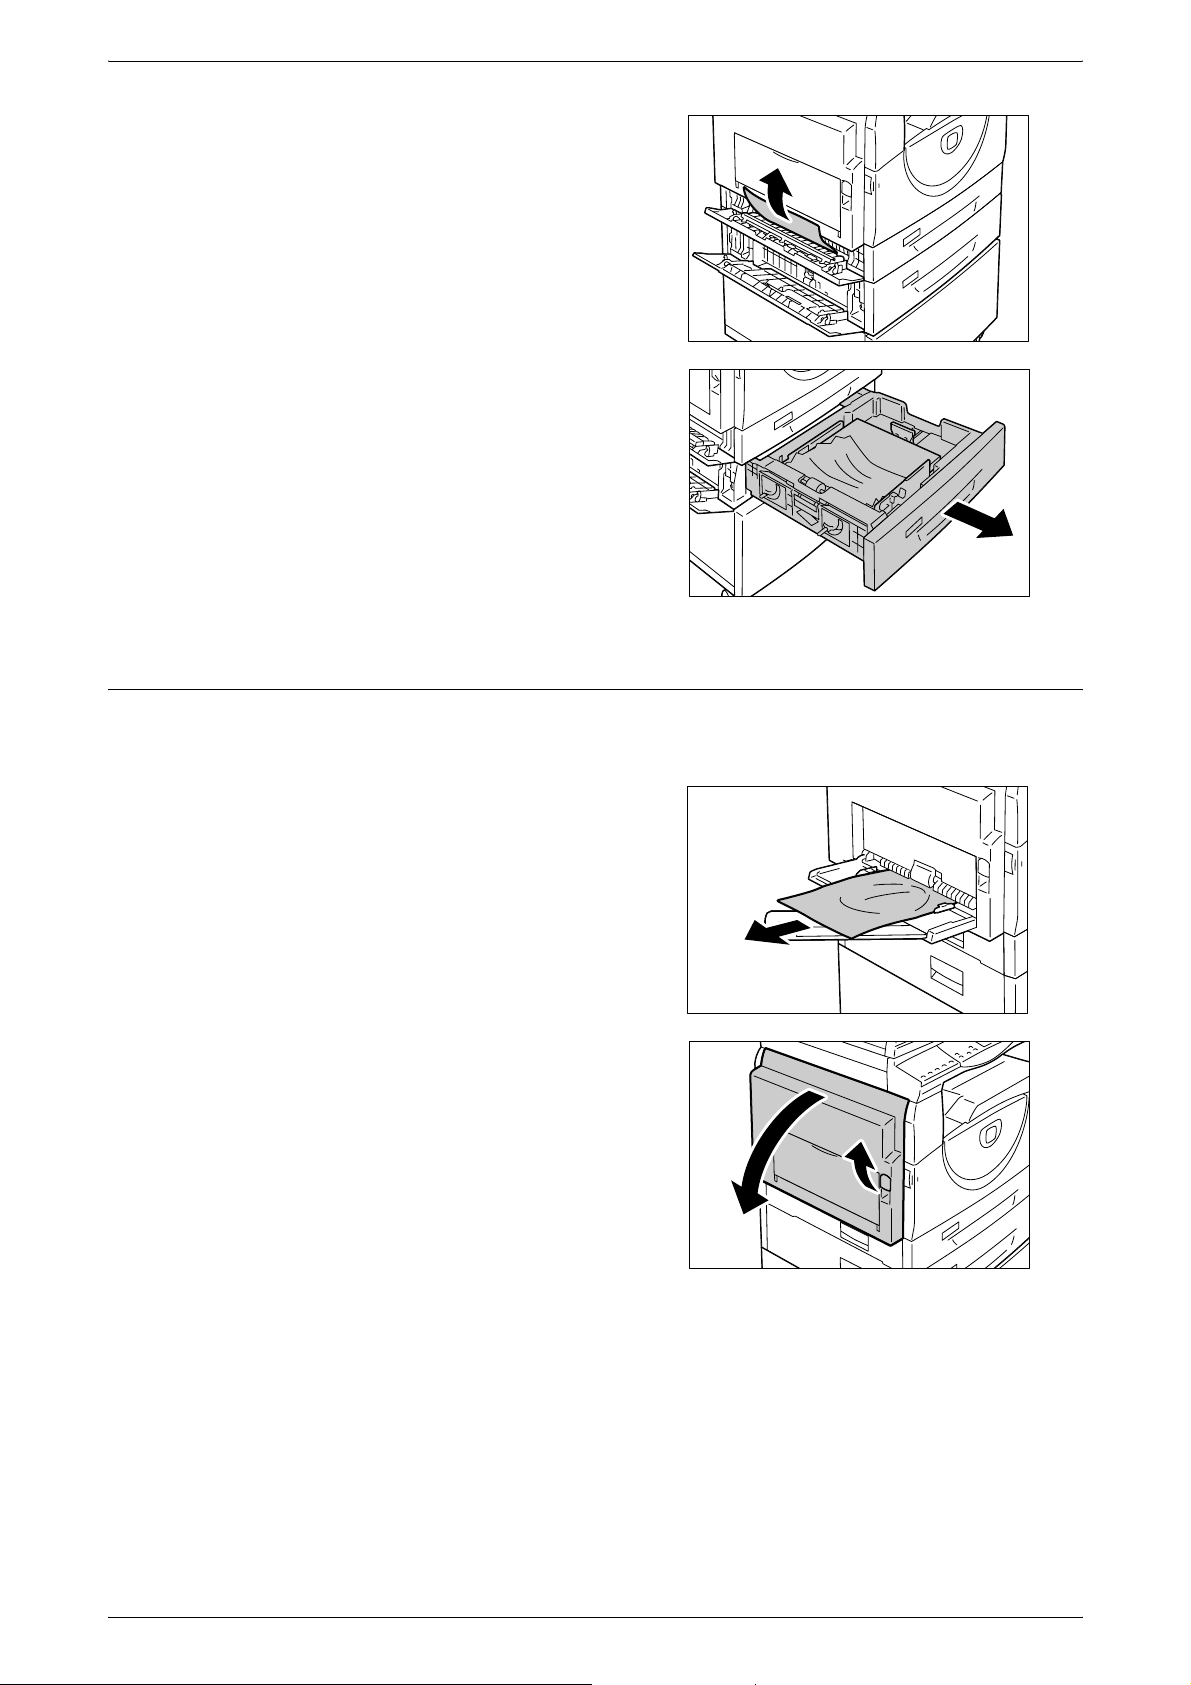
9 Problem Solving
3.
4.
NOTE: Do not leave any torn pieces of
paper inside the machine.
5.
If the jammed paper is accessible
through Access Cover 1, remove the
jammed paper.
Pull out Tray 2 toward you, and remove
the jammed paper.
Push Tray 2 gently back into position,
and close Access Cover 1 and Access
Cover 2.
C3: Paper Jam in the Bypass Tray
The following procedure describes how to clear paper jams in the Bypass Tray when
an error code [C3] appears in the Display.
1.
Check the feed slot of the Bypass Tray
to remove the jammed paper.
NOTE: Remove all the sheets from the tray.
NOTE: Do not leave any torn pieces of
paper inside the machine.
2.
Slide the Extension Flap back in, and
close the Bypass Tray.
3.
Pull up the Left Side Cover Latch to
open the Left Side Cover, and close the
Left Side Cover.
NOTE: Opening and closing the Left Side
Cover releases any tightly jammed paper
inside the machine. This reduces the
possibility of tearing the jammed paper
when you open the Bypass Tray in the
following step.
100
4.
Open the Bypass Tray, and slide out the Extension Flap.
5.
Fan the edges of the paper that you removed, and neatly align all four corners of
the paper.
6.
Insert the paper into the tray with the side to be copied or printed facing down.
For information on how to load paper in the Bypass tray, refer to the User Guide.
7.
Press the <Start> button to resume the job.
Page 94

A1/A2: Document Jams
If a document jams in the Document Feeder, the machine stops, and an error code [A1]
or [A2] appears in the Display. The Document Feeder Jam indicator on the Machine
Diagram (mimic) flashes.
The following procedure describes how to remove the jammed documents in the
Document Feeder.
1.
Pull up the latch to open the Document
Feeder Cover.
2.
Remove the jammed document.
A1/A2: Document Jams
Latch
NOTE: When the document jams tightly in
the Document Feeder Roller and cannot be
pulled out, pull it out from under the
Document Feeder Tray as shown in Steps 5
to 7.
3.
Close the Document Feeder Cover.
4.
If the error persists, or if you cannot find
any jammed documents, lift up the
Document Feeder Tray.
5.
Remove the jammed document from
under the Document Feeder Tray.
6.
Gently put the Document Feeder Tray
back to its original position.
7.
Make sure that the document is not
torn, wrinkled, or folded before loading
it again in the Document Feeder.
NOTE: Torn, wrinkled or folded documents may cause document jams. To copy such
documents, place them on the Document Glass.
101
Page 95
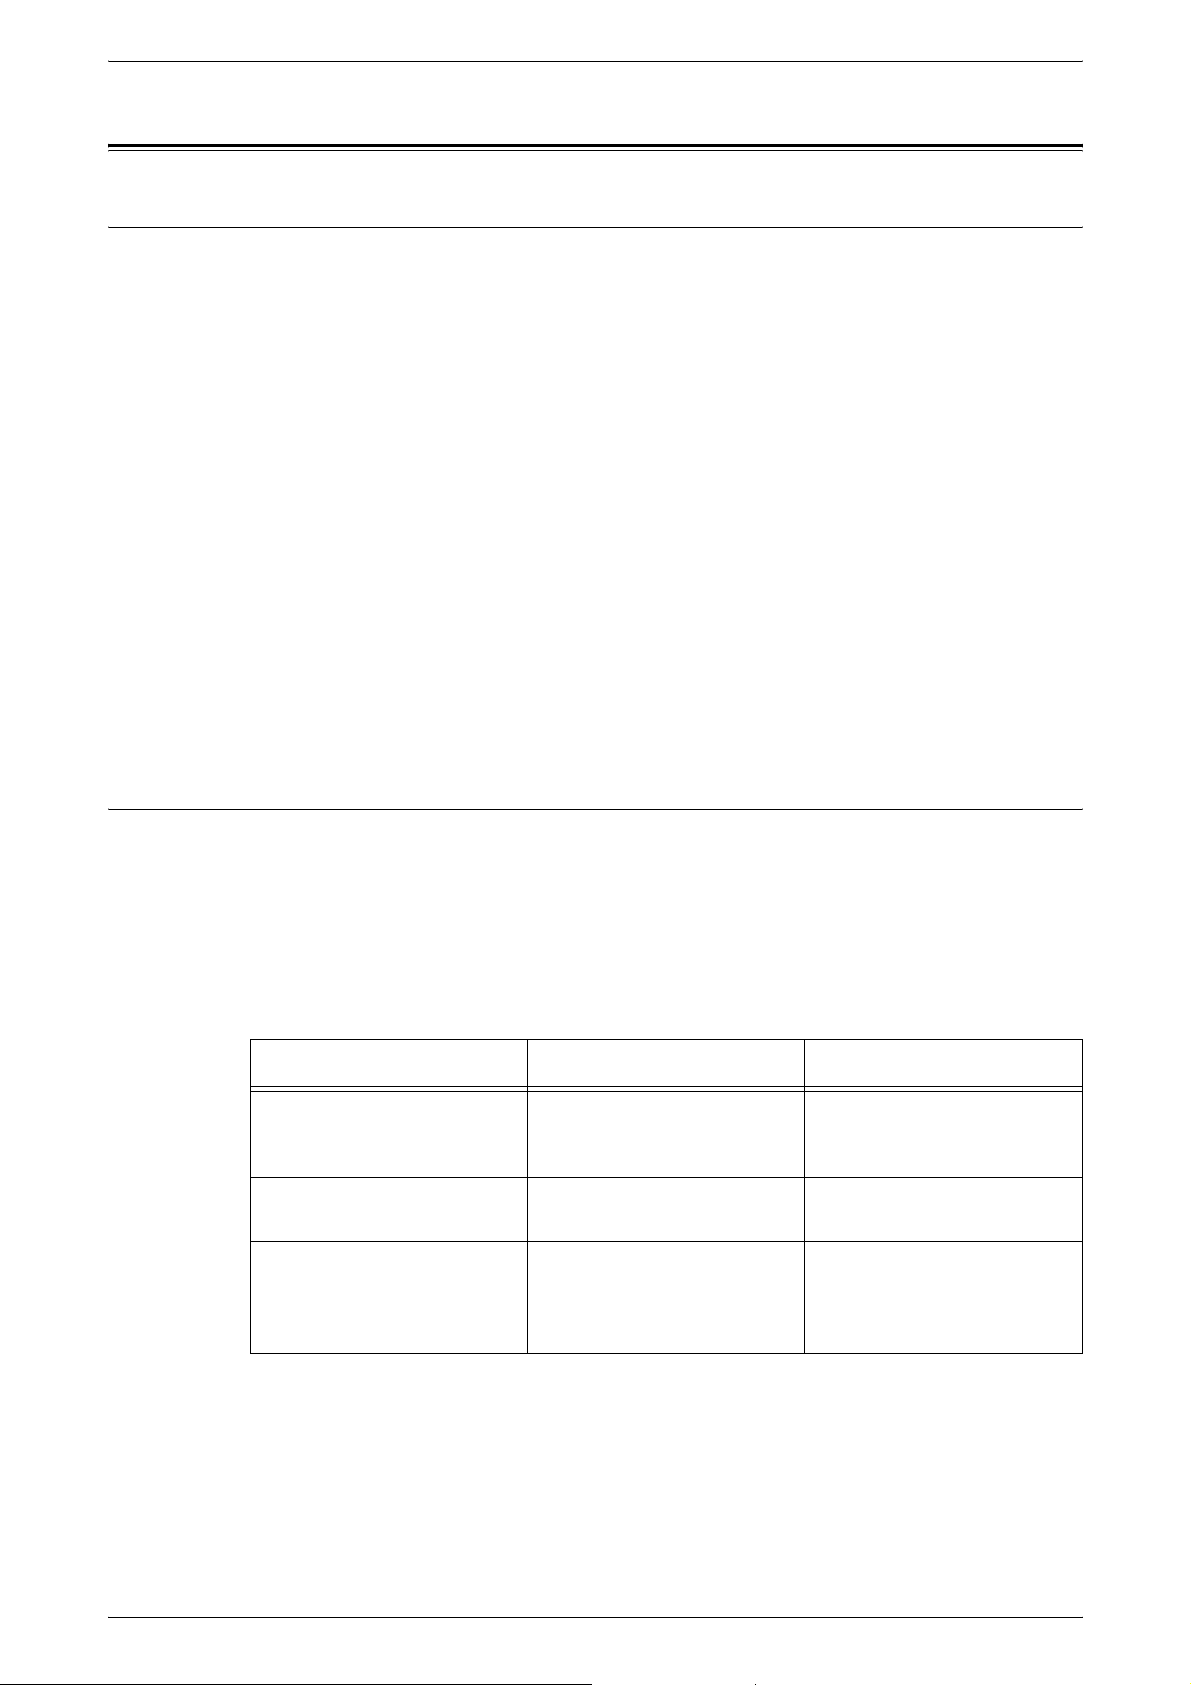
9 Problem Solving
Network-related Problems
Problem Solving Procedure
This section enables you to identify network-related machine problems. Use the
following steps to identify and solve a problem.
1.
Resolve any local copier problems first. Perform corrective action by referring to
Troubleshooting Table on page 90
the local copier functions are not operating correctly.
2.
Check that the machine has power and is switched on.
3.
Check that the network cable is connected to the machine.
4.
Check that the network cable is connected to the computer.
5.
Check that the correct print driver for the machine is selected on the computer.
6.
Check that the software application being used to send print jobs is set up
correctly.
. Do not attempt to resolve a network problem if
7.
8.
TCP/IP
This section explains the troubleshooting procedures and restrictions while using TCP/
IP.
Troubleshooting
The possible causes, confirmation methods, and actions are as follows.
When printing fails
The correct IP address is not
specified.
A fault occurred during print
processing.
If printing documents are not available from a computer, re-install the print driver
on the computer.
Call the local Xerox Welcome Center, where a representative will assist in the
diagnosis and solution of the problem.
Cause Confirmation Method Action
Check whether the IP
address of the machine is
correct.
Check the error code in the
Display on the Control Panel.
Specify the correct IP
address for the machine.
Switch the machine off and
on, and then retry printing.
102
The selected transport
protocol does not conform
with the client.
Check the selected transport
protocol on the Control Panel
or in CentreWare Internet
Services.
Select a transport protocol
conforming with the client.
Page 96

When the required printing result is not obtained
Cause Confirmation Method Action
Network-related Problems
Restrictions
The specified print language
is different from the print
language of the print data.
The print driver that
accompanies the machine is
not being used (a third party
print driver is being used).
Check the specified print
language and the print
language of the print data.
Check whether the print
driver that accompanies the
machine is selected.
Specify a print language
matching that of the print
data.
Select the print driver that
accompanies the machine. If
the print driver is not found,
install and select it. If a third
party print driver is used, you
may have unexpected
results.
This section explains the restrictions that apply while using TCP/IP.
Machine settings
• The IP address is a unique address administered system-wide. Consult with the
system administrator when setting the necessary parameters.
• The subnet mask and gateway settings may also be required, depending on the
networking environment. Consult with the system administrator when setting the
necessary parameters.
Client settings
• The IP address is a unique address administered system-wide. Consult with the
system administrator when setting the necessary parameters.
When the machine is switched off
The following actions take place when the machine is switched off.
All print data in the receiving buffer, including the data currently being printed, is
deleted. There is no print data on the machine when the machine is switched on.
However, if the machine is switched off immediately after a print request, the print
data may be stored on the client. In this case, the print request can be reissued when
the machine is switched on, and the print data is printed on the machine.
When printing
• Print requests cannot be received from a client if a print request from another client
is being processed.
• When the client IP address or computer name is changed:
When the client IP address or computer name is changed, the machine cannot
perform query processing and cancel processing. Switch the machine off and on
with the receiving buffer empty of print data.
NOTE: Stopping printing or forced deleting of print data in the machine receiving
buffer can be performed using CentreWare Internet Services. For more information,
refer to
Job Status on page 33
.
103
Page 97

9 Problem Solving
CentreWare Internet Services
This section explains the troubleshooting procedures while using CentreWare Internet
Services.
Troubleshooting
The possible causes, confirmation methods, and actions are as follows.
Problem Confirmation Method Action
Cannot access CentreWare
Internet Services.
The “please wait” message is
displayed.
Check if the machine is
switched on.
Print out the Configuration
Report to check if the
CentreWare Internet
Services port is activated.
Check if the Internet address
is correctly entered.
Check if the proxy server is
used.
– Wait for a while as instructed.
Switch on the machine.
Activate the CentreWare
Internet Services port.
Check the Internet address. If
Services cannot be
accessed, enter the IP
address to make the
connection.
Depending on the proxy
server, connections may not
be possible.
Set your browser so that it
will not try to access the
machine through a proxy
server.
If nothing happens, click the
[Refresh] button. If this does
not help, check that the
machine is working correctly.
The [Refresh] button is not
working.
Selecting menu in the left
frame does not change the
right frame connection.
The screen display is
distorted.
The latest information is not
displayed.
Clicking the [Apply] button
does not reflect the new
settings.
Clicking the [Apply] button
will display messages like
“the server has returned
ineffective or unrecognizable
response” or “no data”.
Cannot delete the job. – Wait for a while and then click
Check if you are using the
specified OS and browser.
– Change the window size of
– Click the [Refresh] button.
Check if the entered value is
correct.
Check if the user ID and
passcode are correct.
Use the specified OS and
browser.
the browser.
Enter the correct value. If the
entry is not valid, it will be
changed within the limit
automatically.
Enter the correct user ID and
passcode.
Reboot the machine.
the [Refresh] button.
104
Page 98

Scanning Services
This section explains the troubleshooting procedures and restrictions while using the
scan function.
Troubleshooting
The possible causes, confirmation methods, and actions are as follows.
Network-related Problems
Cause Confirmation Method Action
Restrictions
Cannot find the scanned
documents in the mailbox.
Cannot run a scan job. Check that mailboxes are not
Check that the machine is
switched on. All scanned
data in the mailboxes will be
deleted if the machine is
switched off.
full of scanned documents. A
mailbox has a limited
capacity to store scanned
documents.
Try scanning again.
Delete unnecessary
documents in mailboxes, and
try scanning again.
This section explains the restrictions that apply while using the scan function.
NOTE: For information on the network scan driver and Mailbox Viewer 3, refer to the
PCL Print Driver CD-ROM.
Using a network scan driver and Mailbox Viewer 3 simultaneously
A single computer using a network scan driver and Mailbox Viewer 3 simultaneously
cannot connect to the machine.
A maximum of 3 computers can retrieve a document from the machine simultaneously
using either a network scan driver or Mailbox Viewer 3.
Using TIFF files
TIFF files are compressed using the MMR or MH compression method. Software that
supports these compression methods is required to open TIFF files.
Write capacity limit
The maximum write capacity for a single page is 297 x 432 mm. The largest standard
size is A3 or 11 x 17 inches.
Number of stored document pages (mailbox)
The maximum number of document pages that can be written to a mailbox in a single
write operation is 999 pages. The maximum number also changes in response to the
size of the document and resolution.
When retrieving a document from a mailbox
If using a TWAIN compatible application or Mailbox Viewer 3 to import scanned data to
your computer, the stored documents will be deleted from the mailbox after they are
retrieved. If using CentreWare Internet Services, the stored documents will not be
deleted from the mailbox even after they are retrieved.
105
Page 99
9 Problem Solving
Internet/Intranet Connection
This section explains the troubleshooting procedures and restrictions while using
Internet and intranet connections.
Troubleshooting
The possible problems and actions are as follows.
When you cannot connect to the Internet/intranet
Problem Action
The IP address is not set
correctly.
The IP gateway address is
not set correctly.
The subnet mask is not set
correctly.
The network drops out or is
disconnected.
Cannot communicate due to
the load on the server
application.
Cannot connect due to proxy
server, firewall, or web server
access restrictions.
Check the IP address setting. If the IP address is not set
correctly, supply a fixed IP address, or use DHCP or Autonet
to assign an IP address.
Enter the correct IP gateway address if connected to a proxy
server or a web server through an IP gateway.
Enter the correct subnet mask that matches the operating
environment.
Check the network cable connections. A spanning tree
environment is recommended to construct a strong
environment against network interruptions.
Wait a while and try again.
Check if any of the following access restrictions are set.
• Address (port) restrictions
• SSL usage restrictions
• User access restrictions (including access privileges)
• Content blocking
• Scheme restrictions (for example, HTTP disable)
• Transfer data size restrictions
• Used method restrictions (for example, POST disable)
• HTTP header restrictions (for example, specific browsers)
• Time restrictions (for example, time-limited access)
NOTE: SSL is not supported on the machine.
106
When you cannot connect to a web server
Problem Action
The settings are not for using
the proxy server.
The settings are for using a
proxy server in a non-proxy
environment.
The proxy server address is
not set correctly.
The user name and/or
password are entered
incorrectly when proxy server
authentication is set.
In a proxy environment, the web server cannot be connected
without the proxy server settings. Enter the settings for using
the proxy server.
For environments where connecting via a proxy is not
required, such as connecting to an intranet, the settings
should not be set for using a proxy server.
When setting up a proxy server, the web server cannot be
connected if the proxy server address is not set correctly.
Enter the correct proxy server address.
Register the user name and password on the machine to
grant connection access to the proxy server.
Page 100

Restrictions
Xerox Welcome Center
This section explains the restrictions that apply while using Internet or intranet
connections.
Internet/Intranet connections
Connection to the Internet or an intranet depends on various settings, including the
destination web server, the used server application, proxy server, and firewall types.
When connecting to the Internet or an intranet using server application software, proxy,
or firewall supplied by another company, the following conditions are required.
• Windows 2000, Windows XP, Windows Server 2003 or Windows Vista operating
system
• Conformance with the following conditions:
– RFC2616: Hypertext Transfer Protocol HTTP/1.1
(Normal connections, SSL connections, Proxy authentication)
– RFC2617: HTTP Authentication: Basic and Digest Access Authentication
(Basic authentication support only, others are not supported)
– RFC2817: Upgrading to TLS Within HTTP/1.1
– RFC2818: HTTP Over TLS
Xerox Welcome Center
If you need any additional help on using your machine, you can:
1) Refer to the User Guide or this System Administration Guide.
2) Visit our Customer Web Site at www.xerox.com or contact the Xerox Welcome
Center.
Please have your serial number at hand when contacting Xerox.
The Welcome Center will want to know the following information: The nature of the
problem, the serial number of the machine, the error code (if any), as well as the name
and location of your company. Follow the steps below to look up the serial number of
the machine.
1.
Open your web browser, and enter the machine's IP address in the [Address] box
to access CentreWare Internet Services.
2.
Click the [Properties] tab.
3.
Click [Description].
Under [Serial Number], the serial number is displayed.
NOTE: The serial number is also located inside of the Left Side Cover. Refer to
Number on page 7
.
Serial
107
 Loading...