

Page 1

DocuSP Helpset
DocuSP 4.1
Page 2

Page 3

This is the DocuSP Help Library.
The DocuSP Help Library contains information on how to use the
DocuSP graphical user interface (GUI) features and functions for
setting up and printing jobs, setting up the printer, controlling
system-level preferences, and managing fonts, security,
accounting, and many other activities. Use the Help menus or
buttons located on the screens and dialogs to access addi tional
information as needed.
Throughout the Help Library, you will find cross-references and
links to other areas of the helpset . These links can be divided up
into 3 general categories:
• Links from lists at the beginnings of chapters: These links
are placed so that a user who is browsing through the Help
can quickly locate topics of inter est.
• Links from procedures to sub-routines: These links are
placed within ordered lists in order to break up long
procedures into several shorter ones. This also enables the
user to avoid working though subroutines that are not of
interest to him or to her. When you click these links, you will
need to click the back button on your browser to return to the
main procedure.
• More Information... links: These links are placed to take
nonessential information out of the main flow of the
procedures, and may be ignored at the user’s discretion.
Clicking these links will open a pop-up window which will
disappear when you click outside the pop-up window.
Product Name Book Name
-1
Page 4

-2
Product Name Book Name
Page 5

About DocuSP Print Services
The DocuSP Print Services software provides a graphi cal user
interface (GUI) to the printer management , job management, and
system administration functions of your Xerox printing system. In
addition, depending upon which DocuSP printer you have
purchased, the DocuSP GUI enables you to manage queues,
adjust color image quality, and control scan and copy functions.
The DocuSP Print Services Graphical User Interface
The DocuSP Print Services software enables you to use a
graphical user interface (GUI) to control all of the features and
functions for your Xerox printing system.
The GUI consists of windows, tabs, and dialogs that can be
accessed through buttons and menus. In addition, the user
interface displays status and error messages which provide
feedback on job processing.
Online Help is available through Help Conten ts or by select ing th e
Help buttons on the various dialogs. Additional information is
available through the customer documentation that is provided on
CD-ROM with your system.
Windows and Dialogs
The DocuSP Print Services GUI is designed to enable quick and
direct access to most types of dat a. Each management category
(Job Manager , Printer Manager, etc.) consists of a primary
manager window which displays a table of information
summarizing the category. For example, when you open the Job
Manager window, you will see a list of jobs and relevant
information about those jobs.
Use the following guidelines when working in windows and
dialogs:
• To open primary manager windows, select the desired icon on
• To view a different type of data within a service or manager
the left side of the DocuSP GUI.
window, select the tab of the topic you wish to view.
Product Name Book Name
• To view the properties of a listed item such a s a job or a q ueue
perform one of the following:
-1
Page 6

Menus
– Double-click the item.
– Right-click the item and choose [Properti es...].
– Select the item and click the [Properties...] icon from the
toolbar menu.
• To view more than one manager window at a time, open the
first window by selecting the icon, then right-click the icon of
the additional window you wish to view. The second manager
window appears in an additional window.
The DocuSP Print Services software c ont ains a number of menus
which enable you to quickly access information.
• The Logon, System, Printer, Setup, Administration , and
Help menus are located on the top of the interface and provide
direct access to global system- level and printer control
functions, and the help system.
• Pop-up menus enable you to control functionalit y at the job or
queue level and can be accessed by right-clicking or doubleclicking on a particular job or list item.
Job Manager
• Feature Access Buttons (FABS): DocuSP utilizes buttons,
called Feature Access Buttons, to enable you to set job
properties. FABs are available from within specific tabs. Once
property selections are made, your choices display on the
FAB. Individual FAB descriptions can be accessed throug h the
following link: DocuSP Feature Access Buttons (FABs)
The Job Manager enables you to perform a number of different
tasks at the job level. You can view all the jobs in the system,
including active and completed jobs, or you can display one of
several possible subsets of the jobs. The Job Manager also
enables you to perform operations on and select options for
individual or groups of jobs within the system.Job Manager is
accessed by selecting the Job Manager icon located on the left
side of the DocuSP GUI. You can access the Job Manager help set
through the following link:Job Management
-2
Product Name Book Name
Page 7

Queue Manager
Printer Manager
The Queue Manager enables you to create and enable new
queues in which to manage jobs prio r to prin ting and to cont rol the
flow of jobs to the printer. It also enables you to change the
properties of a queue and to change the job accept and release
status of a queue.
Queue Manager is accessed by selecting the Queue Manager
icon located on the left side of the DocuSP GUI.
The Printer Manager enables you to manage functions of the
printer. You can manage paper trays and paper stock, set global
finishing options, enable stack ing, identify stock siz e checking, set
unfinished offset stacking, and clear printer faults.
Printer Manager is accessed by selecting the Printer Manager
icon located on the left side of the DocuSP GUI. You can access
Printer Manager through the following link: Printer Manager
Color Manager
The Color Manager enables you to monitor and control all of the
color printing features of the system. Col or Management is a
process that attempts to match color across input, display, and
output devices by referencing their color reproduction to a known
standard using Internati onal Color Consortium (ICC) profiles.
Color management tools are used to convert between devicedependant RGB (Red, Green, Blue) and CMYK (Cyan, Magenta,
Yellow, Black) color sp aces to a device independent color spac e in
order to match colors by adjusting for differences between device
color gamuts. The Color Manager contai ns multipl e lev els of color
management, tailored for both novice and skilled user s.
Color Manager is accessed by selecting the Color Manager icon
located on the left side of the DocuSP GUI.
System Management and Configuration
System Management and Configuration includes information on
system controls, such as powering the system on and off. System
configuration operations include managing network gateways,
performing diagnostics, and setting system preferences.
Product Name Book Name
System management and configuration settings are accessed by
using the System and Setup menus located at the top of the
-3
Page 8

Printer Configuration
Administration
DocuSP GUI. You can access the System and Setup menus
through the following links: The System Menu, The Setup Menu
Printer Configuration functions are accessed using the DocuSP
Printer menu. Printer configuration includes information on
powering the printer on and off, setting the Power Saver mode,
and the selections made through Printer Switches. You can
access the Printer menu helpset through the following link: The
Printer Menu
The Administration functions of the DocuSP software enable a
System Administrator to control resources, fonts, accounti ng, and
billing. You can access the Administration menu helpset through
the following link: Administration.
NOTE: Billing is only applicable for monochrome products.
Printer Message Field
Button Guide
The Printer Message field at the top of the DocuSP Print Services
window displays status messages for the printer.
• OK saves all changes to a tab or dialog and closes the active
window.
• Apply saves all changes to a tab or dialog without closing the
window. You do not need to select Apply before selecting OK
to save changes.
• Cancel enables you to close a dialog or window without
saving changes.
• Close enables you to exit a dialog or window; changes you
have made are saved.
• Reset is available on some GUI screens. Reset enables you
to restore previous settings without leavi ng the GUI screen, in
the event that the changes you have made are incorrect.
-4
Product Name Book Name
Page 9

Keyboard Accessibility and Shortcuts
The DocuSP controller enables you access and control the
features and functions for your Xerox pri nting system using the
keyboard. You can navigate the system, activate fields within
various GUI screens, and select prin ting properties.
Using the keyboard to access the printing system
The following tables describe keyboard a ccessibility options and
shortcuts.
• Common Keyboard Shortcuts: Presents frequently used
keyboard shortcuts that are available throughout the user
interface.
• DocuSP Activation and Navigation Keys: Contains DocuSP
specific keystrokes that enable you to interact with the
components and features of the printing system.
• Mnemonics: Mnemonics are keyboard shortcuts using an
<Alt> and letter key combination that access commonly used
DocuSP features.
Common Keyboard Shortcuts
Keyboard Selection Action
Tab Navigates to the next available component.
Shift-Tab Navigates to the previous available component.
Control-Tab Navigates to the next available component even if the component accepts
the tab command. An example would be escaping from a table once a table
element becomes available.
Shift-Control-Tab Navigates to the previous available component even if the component
accepts the tab command. An example would be escaping from a table
once a table element becomes available.
Left Arrow Moves left one character or component.
Right Arrow Moves right one character or component.
Up Arrow Moves up one line or component.
Down Arrow Moves down one line or component.
Page Up Moves up one pane of information.
Page Down Moves down one pane of information.
Home Moves to the beginning of the data field. In a table, moves to the beginning
of the row.
Product Name Book Name
-5
Page 10
Keyboard Selection Action
End Moves to the end of the data field. In a table, moves to the last cell in a row.
Control-Enter or
Control-Return
Escape Exits a menu or dialog box without changes.
Spacebar Activates the component that has keyboard focus.
Activates the default command button.
DocuSP Navigation and Activation Keys
Contains DocuSP specific keystrokes that enable you to interact
with the components and features of the printing system.
Compon
ent T ype
Split
Pane
Mode
Indicator
Keyboard
Selection
F6 Moves the focus between the panes to the first available element in the
pane.
F8 Gives focus to the splitter bar. Arrow, Home and End keys can be used to
move the bar. Arrow keys give fine control of movement. The Home and
End keys effectively hide an entire pane from view.
Control-D Puts focus on the first mode indicator, from which you can display the tool-
tip. This can include one or more of the following modes: MICR, Secure,
Job Fault, Diagnostic, Remote Workflow, and Logging.
Action
Status
Area
Content
Area
Tab Pane Control-Up
FABs Control-Shift-
Control-P Pauses the printer on production printer systems. Pauses the printer and
Control-N Pauses the scanner on production printer systems.
Control-U Unload button
Control-A Clear All button. Available only on non-production printer systems.
Control-S Start button (Copy, Scan to Digital, and Print Services)
Arrow
Arrows Moves between tabs.
Control-Page UpMoves to the previous tab, preparing to enter the first available component
Control-Page
Down
Left Arrow /
Control-ShiftRight Arrow
scanner on non-production printer systems.
Puts focus at the selected tab.
in the tab.
Moves to the next tab, preparing to enter the first available component in
the tab.
Moves the focus between a FAB and the first available element within that
FAB.
-6
Product Name Book Name
Page 11
Compon
ent T ype
Tables Tab Moves focus one cell to the right. If the table cells are selected, the focus
Keyboard
Selection
should wrap, left to right, top to bottom and then back to the top of the
selected region.
Shift-Tab Moves focus one cell to the left. With cell selection, Shift-Tab behaves
similarly to Tab, but in the reverse order.
Return/Enter Move focus one cell down, row selection follows focus. At the bottom of a
table, focus wraps to the top of a column. If more than one cell is selected,
the focus moves to each selected column in turn and then repeat from the
beginning.
Action
Tables Shift-Return/
Shift-Enter
Up/Down
Arrow
Left/Right
Arrow
Page Up/
Page Down
Control-Page
Up/ ControlPage Down
Home/End Deselects the current selection. Moves the focus to first/last cell in a row
Move focus one cell up, row selection follows focus. At the top of a table,
focus wraps to the bottom of a column. If more than one cell is selected,
the focus moves to each selected column in turn and then repeat.
Deselects the current selection and moves the focus up/down one cell, reestablishing row selection in the focused cell row.
Deselects the current selection and moves the focus left/right one cell.
Deselects the current selection. When no vertical scrollbar is visible, it
moves the focus and the row selection to the last/first row in a table. The
focused cell remains in the same column that it originated. When a vertical
scrollbar is visible, it scrolls the table up/down one row and re-establishes
the selected row as the last/first visible row in the table. The focus is
moved, within its current column to the newly selected row.
Deselects the current selection. When the horizontal scrollbar is not visible,
it moves the focus to the first/last cell in the row and re-establishes the row
selection where the focused cell resides. When a horizontal scrollbar is
visible, it scrolls the table left/right to make the first incomplete displayed
column visible and places the focus in that column. Row selection is reestablished in the focused cell row.
and re-establishes the row selection in the focused cell row.
ControlHome/
Control-End
Control-A Select all rows in a table.
Product Name Book Name
Deselects the current selection. Moves the focus to first/last row in the
table within the same column where the focus originated and reestablishes the row selection.
-7
Page 12
Compon
ent T ype
Keyboard
Selection
Action
Tables Shift-Up
Arrow/
Shift-Down
Arrow
Shift-Page
Up/ ShiftPage Down
Control-Shift
Home/
Control-Shift
End
Spacebar Presents a popup menu, if one exists.
Control-Right
Arrow/
Control-Left
Arrow
Extend selection up/down one row in the table.
Extend selection up/down one "table page" at a time. When the vertical
scrollbar is not visible, it moves the focus and row selection to the last/first
row in the table. The focused cell remains in the same column in which it
originated. Row selection is established from the original row in which the
focus resided to the row in which the focus has been moved.
When a vertical scrollbar is visible, it scrolls the table up/down one row and
moves the focus within its current column to the newly visible row. Row
selection is established from the original row in which focus resided to the
row in which the focus has been moved.
Extend selection from the current row where focus resides to the
beginning/end of table. Focus does not move.
Move a table column where the focus resides right/left one column in the
table.
Shift-Up
Arrow/
Shift-Down
Arrow
Control-ShiftUp Arrow/
Control-ShiftDown Arrow
Extend selection up/down one row in table.
Sort column where the focus resides in ascending/descending order. This
assumes that the table has sorting activated.
-8
Product Name Book Name
Page 13

Compon
ent T ype
Keyboard
Selection
Action
Lists Up/Down
Arrow
Page Up/
Page Down
Home/End Moves the focus and selection to the first/last element in the list.
Control-A Select all elements in list.
Shift-Up
Arrow/
Shift-Down
Arrow
Shift-Page
Up/
Shift-Page
Down
Shift-Home/
Shift-End
Scrollbars
Up/Down
Arrow
Deselects the current selection and moves the focus up/down one element
re-establishing selection on the focused list element.
Deselects the current selection. When the vertical scrollbar is not visible, it
moves the focus and element selection to the last/first element in the list.
When a vertical scrollbar is visible, it scrolls the list up/down one row, and
moves the focus and element selection to the last/first visible element in
the list.
Extend selection and focus up/down one list element at a time.
Extend selection up/down one "page view" at a time. Focus moves to the
bottom/top of selection.
Extend selection to the top/bottom of the list. Focus moves to the top/
bottom of the list.
Scroll viewing window up/down one row at a time.
Pop Up
Menu
Pulldown
menu
Page Up/
Page Down
Home/End Scroll viewing window to the top/bottom of a displayed component, such as
Space/Enter Select the menu item with focus.
Up/Down
Arrow
Right Arrow If focus is a cascading menu element, it opens a cascading menu.
Left Arrow If focus is a cascading menu element, it closes a cascading menu.
Esc Exit pop-up menus.
Space/Down
Arrow
Up/Down
Arrow
Esc Exits the pull-down menu.
Scroll viewing window up/down one "page view" at a time.
a tree, table, or list.
Move focus to a previous/next menu item.
Activates the menu.
Moves focus and selects previous/next menu item.
Product Name Book Name
-9
Page 14

Compon
ent T ype
Keyboard
Selection
Action
Menu
Bar
Directory
Tree
F10 Activates the menu.
Up/Down
Arrow
Space/Enter Selects focused menu item.
Esc Exits the menu bar.
Up/Down
Arrow
Left/Right
Arrow
Page Up/
Down
Home/End Moves to the first/last element in the tree.
Control-Left
Arrow/
Control-Right
Arrow
Control-Page
Up/ ControlPage Down
Moves focus to previous/next menu item.
Moves focus and selection up/down one row in the directory tree.
Moves focus left/right one column in the directory tree. If a closed folder is
selected the right arrow opens the folder when it is not empty. If the folder
is open and selected, the left arrow closes the folder.
Moves up/down one page view. The first available component in view gets
the focus and selection.
Moves focus up/down one row in the directory tree.
Moves up/down one page view. The first available component in the view
gets focus and selection.
ControlHome/
Control-End
Spacebar Selects the element in the directory tree where the focus is activated.
Tool Tip Control-F1 Displays a tool tip if one is attached to the focused component.
Control-F!/
Esc
Moves to the first/last element in the tree.
Hides a tool tip.
Mnemonics
Mnemonics are keyboard shortcuts used to access commonly
used features using an <Alt> and letter key combination. Entries
marked with an asterisk (*) are second-level commands and are
only available after entering the first level. Using <Alt> closes an
open menu, which prevent s the use of an <Alt >-l etter combi nation
-10
Product Name Book Name
Page 15
within menus.
Alt + Letter Destination
Menus
L Top level of Logon menu
*L *Logon
*F *Logoff
M Top level of System menu
*P *Pause Processing
Ctrl-Shift-P is an accelerator combination, which does not require the user to
open the System menu.
*R *Resume Processing
Ctrl-Shift-R is an accelerator combination, which does not require the user to
open the System menu.
*D *Service Diagnostics
*S *Shutdown
Ctrl-Shift-S is an accelerator combination, which does not require the user to
open the System menu.
I Top level of the Printer menu
E Top level of the Setup menu
A Top level of the Administration menu
H Top level of the Help menu
Pathways
C Copy Service
S Scan to Digital Service
P Print Service
J Job Manager
Q Queue Manager
T Printer Manager
Content Area
R Reset button on Copy, Scan to Digital, and Print Services
B Build Job button on Copy, and Scan to Digital Services
O Continue Build Job buttons
N End Build Job button
Esc Cancel Build Job
Child
Window
Controls
Product Name Book Name
-11
Page 16

Alt + Letter Destination
O OK button
R Reset button
A Apply, Add insert, Add Exception, or Add Cover
H Help access
-12
Product Name Book Name
Page 17

Job Manager
Job Management
Job management allows you to perform job management tasks
including printing, proofing , holding, and forwarding jobs, and
changing job properties.
The Job Manager enables you to perform a number of different
tasks at the job level. You can view all the jobs in the system,
including current and completed jobs, or you can display one of
several possible subsets of the jobs. The Job Manager also
enables you to perform operations on, and select options for,
individual jobs or groups of jobs wit hin the system.Access Job
Manager by selecting the Job Manager icon located on the left
side of the DocuSP GUI.
The Job Manager Window
The Job Manager main window is composed of menus and tabs.
The tabs display jobs in the system in various states. Each tab —
Current or Completed — enables you to view a different type of
job. By changing the selection in the Queue drop-down menu, you
can filter the selection to view the jobs in all queues or just jobs
within a single queue.
NOTE: To rearrange the job data elements in the job list s (such as
Job ID, Type, etc.), select a column headi ng and drag it t o another
location in the column row.
• Current: The Current tab presents a list of active and inactive
jobs.
– Active Jobs: The Active Jobs field displays a list of all the
jobs that are currently being received, are in the queue
waiting to print, are printing, or are in the process of being
saved.
– Inactive Jobs: If a job is unable t o print because i t is being
held, or due to a fault or other error, it is automatically
moved to the Inactive Jobs field of the Current tab field.
Product Name Book Name
NOTE: Once a job is saved it is no longer an active job.
• Completed: The Completed tab lists a maximum of 500 jobs
-1
Page 18

that have been printed. Listed jobs beyond the 500 maximum
allowed are automatically deleted from the sys tem. The
maximum number of listed completed jobs may be lowered to
50 if the option to “Retain PDL files” is enabled. This option
allows you to change properties and then print jobs that have
completed printing and reside in the Completed tab. For
information about “Retain PDL files of the last 50 jobs” see
Setting the Job Policy.
NOTE: A utility called “setretainPDL” exists that enables you
to set the number of ret ai ned PDL’s from 1 to 100. Instructions
for using this util ity are provided in t he DocuSP Getting S tarted
Guide. Within the DocuSP GUI, the set ting is hard-coded to 50
PDL’ s. Dependi ng on the size of th e retai ned jobs and the size
of the internal hard drive on your sy stem, a lower value may be
more appropriate. Users employing the setretainPDL utility
should be aware that disk capacity monitoring is the
responsibility of the end user.
• Content menu: The Content menu contains job options that
are accessed frequently. The content menu is available
regardless of which tab is active.
– Job: The Job pull-down menu enables you to perform job
management tasks such as proofing, deleting, or holding
jobs, and releasing jobs to print. This menu also enables
you to set or change the job properties. All selections
within the Job pull-down menu are also available by rig htclicking a job in Job Manager or by selecting an icon from
the toolbar. For additional information on job menu
selections see Job Manager menus.
NOTE: The Job menu within the Completed tab displays only
Properties and Delete selections if the Retain PDL files is not
enabled.
– View: This tab is av ailable when you ar e withi n the Current
and Completed tabs. The View pull- down menu presents
the following selections:
– Job list display: You can determine the job list display
by selecting or deselecting job list t itles. If deselected,
the item is removed from the job list row.
– Show T oolbar: Selecting this option displays an
assortment of tools that correspond to common tasks.
– Hide Toolbar: This option, which is only available
when the toolbar is displayed, toggles the display of
the toolbar off.
– Select All Active: Highlights all currently active job s
within each tab.
– Select All Inactive: Highlights all currently inactive
jobs within each tab.
– Clear All: Deselects all jobs curr ently highlighted in the
-2
Product Name Book Name
Page 19

The Job Lists
Job list.
– Redisplay: This option refreshes the contents of the
job list.
– Toolbar: Toolbar icons enable you to access frequently
used features. Each tab contains specific toolbar
selections. Move the cursor over each icon to see a
description.
– Pause: Stops the printer from processing.
– Unload: If your system contains a stac ker, this allows you
to unload the stacker to remove completed output prior to
the stacker delivering the output when it is full.
– For Queue: Displays jobs for a selected queue. All
Queues displays all jobs on all queues.
The job lists display all of the jobs in the system. Each row
represents a job and contains information about that job. Job List
columns can be rearranged by selecting a column heading and
dragging it to another location in the col umn row. You can manag e
job list selections from the V iew pull-down menu within the Current
or Completed tabs.
Job Manager menus
The job lists display the follo wing i n formation by default:
• Job ID: The number identifier of the job assigned by the
system when the job is received.
• Queue: The name of the queue to which the job was sent.
• Job Name: The file name of the job.
• Sender: The logon user name of the person who sent the job
from the client or host. If the job is a Saved job, the sender is
listed as Reprint.
• Submission Time: The date and time the jo b was received by
the controller.
• Status: Shows the status of the job; for example, Receiving,
Ineligible, or Faulted.
The Job Manager menus enable you to perform job management
tasks such as forwarding, deleting, or holding jobs, and releasing
jobs to print. These menus also enable you to set or change the
job properties.
Product Name Book Name
The options followed by ellips es (...) open additional windows for
job management tasks. To access a Job menu, select a job and
perform one of the following:
-3
Page 20

• Right-click a job in the job list
• Click the Job pull-down menu
• Select an icon from the toolbar
The options vary based on which Job Management tab is active
and your printer configuration. The Job menus may contain the
following options.
• Properties: Opens a window containing a series of tabs that
display all of the current settings for the job. Many job
management tasks are performed by modifying the job
properties.
• Preview/Preview Range: Generates a preview look of the
job. This feature is available for PostScript, PDF, and TIFF
formats. A PostScript lic ense is required to access t his feature.
If a PostScript license is not present on the system, this menu
option is grayed out.
NOTE: VIPP and PPML jobs cannot be viewed using this
feature; if you attempt to view these job types, an error
message displays.
• Release: Allows the selected Held jo b to be pri nted. The j ob is
placed immediately after all printing or pending jobs.
• Hold: If a job has been submitted to print and you wish to
delay printing of the job, you can place th e job on hold. The job
will be moved to the Inactive Jobs list. When a job is held it
needs to process again befor e is can be pr inted. Print ing star ts
at the beginning of the job.
• Promote: Promoting a job enables you to move the selected
pending job above all other pending jobs in the queue. The
promoted job prints immediately after other previously
scheduled print jobs.
• Print Now: Interrupts a currently printing job to print the
selected job.
• Proof: Prints one copy of the job and retains the job in the
system for additional printing. Proof jobs will interrupt any
currently printing job.
• Forward: Allows you to forward a job from one DocuSP
system to a second DocuSP system.
• Move: Allows you to move a job to another queue.
• Delete: Terminates printing of the selected job and removes
the job from the system.
• Cancel: Terminates printing of the selected job and removes
the job from the system.
-4
NOTE: Selecting [Cancel] within the feature dialog windows
does not remove the job from the system.
• Sizing arrow buttons: The small arrow buttons located
immediately above the Inactive Jobs field all ow you to adjust
Product Name Book Name
Page 21

Job Properties Window
the size of the Active or Inac ti ve jobs f ield s. Cl ick t he up-arr ow
to increase the display size of the Inactive jobs field. You can
also left-click on the arrow bar to drag and set the desired siz e
of the field.
The Job Properties window contains Feature Access But tons
(FABs) that are incorporated within t abs and are designed to
adjust properties and expedite printing. For additional information
about FABs see DocuSP Feature Access Buttons (FABs).
To access job properties you can double-click a job, or select a job
and perform one of the following:
• Right-click a job and select [Properties...].
• Select [Properties...] from the Job pull-down menu.
• Select the [Properties... ] icon from the toolbar.
The Job Properties window contains the following selections:
• The Settings tab: Enables you to view settings for pages to
print, job format, print destination, job progress, and
Administrative Pages.
• The Stock Tab: Enables you to select stock properties for the
job.
• The Output Tab: Enables you to select sides imaged, output
location, finishing, collation, slip sheets, layout, options.
• The Image Quality Tab: Contains darkness, print quality,
resolution, color, and halftone options.
•
• The Image Edit Tab: Presents features that allow original
images to be modified for output. Selections are i mage shift
and rotation.
• The Special Pages Tab: Contains features that enable you to
create and edit exception pages, inserts, and covers.
• The Time Stamps Tab: View job submission details.
• The Faulted Tab: This tab becomes active when a job faults. A
job faults when it contains errors or when there is a problem
processing the job.
• The Ineligible Tab: This tab becomes active when a job
requires a resource to pri nt as programmed. An ineli gible job is
one that cannot be printed because it lacks a resource
required for printing.
Product Name Book Name
In addition to tabs and FABs, the Job Properties window contains
a Content panel that contains the following fields and buttons
which are available regardless of the tab se lected:
• Quantity: Displays the quantity of job sets to be printed.
-5
Page 22

• Job Name: Displays the job name. This field can be edited.
• Status: Details whether the job is printing, pending, faulted,
held, completed, or being saved. This field is read only.
Option conflict gray-out feature
In an effort to help prevent you from selecting conflicting features
on the same tab, DocuSP utilizes an option confl ict gray-out
feature. For example, if you select a Stapling/Finishing option of
“Staple,” the Output Location changes to a location that supports
your finishing selection. The Output Locat ion menu is grayed-out
until you select a finishing option that is supported by multiple
sources. This prevents the job from fau lting and prevent s you from
having to locate the conflicting features.
NOTE: Due to Java limitations this feature cannot gray-out
individual selections within a pull-down menu. Conflicts resulting
between tabs and within pull-down menus are detected using the
Programming Conflicts dialog. If a conflict occurs, the
Programming Conflicts di alog opens. The conflict i s described and
instructions are presented on how to resolve it .
Printing Jobs
Printing jobs and managing job properties
Job Manager is designed to give you easy access to printing jobs
and managing job properties.
For certain tasks you can sel ect more than one job by performing
one of the following:
• Press and hold down the <CTRL> (Control) key and select
each individual queue by left-clicking the mouse.
• To select multiple files that are adjacent to one another, press
and hold down the <SHIFT> key and select the first and last
file names that you want from the list. This highlights the first
and last file name lines and all lines in between.
You can perform the following tasks within Job Manager:
• Releasing a single job to print
• Changing Job Properties
• Renaming a job
-6
• Holding a print job
• Releasing a held job to print
• Pause and resume a job
Product Name Book Name
Page 23

• Deleting a job
• Cancelling a job
• Previewing a job
• Moving a job
• Forwarding a job
• Setting up a printing system name for job forwarding
• Print Now (interrupting a job to prin t another job)
• Printing a proof job
• Promoting a job
• Saving a job
• Printing a saved job
Releasing a single job to print
You can release a job for printing from the Current tab, or if the
Retain PDL option is enabled you can release jobs from the
Completed tab. See Multiple job submission if you want to submit
more than one job for printing.
To release a single job to print:
1. Open Job Manager.
2. Select a job and perform one of the following:
• Right-click the job and select [Release] from the menu.
• From the Job pull-down menu select [Release].
• Select the [Release] icon from the toolbar.
Multiple job submission
DocuSP allows you to submit and print multiple jobs. You can
perform Print, Proof, and Print Now options.
NOTE: While there is no hard limit to the amount of jobs that you
can submit, performance may be i mpact ed if you submit hund reds
of jobs.
To
To submit and print multiple jobs:
1. Open the Job Manager .
2. If desired, select the queue that you want to use to print the
selected jobs from the For Queue menu.
Product Name Book Name
3. Select multiple jobs by performing one of the followi ng:
• Press and hold down the <CTRL> (Cont rol) key and select
each individual job.
• To select multiple files that are adjacent to one another,
press and hold down the <SHIFT> key while choosing the
first and last file names you want to select. This highlights
-7
Page 24
the first and last file name lines and all lines i n between.
4. Right-click within the selected j obs and choose from the
following:
• Release: Prints the selected jobs.
• Proof: Prints one copy of each job and retai n s the jobs in
the queue for additional printing. Proof jobs interrupt any
currently printing job.
• Print Now: Interrupts any currently printing j obs to print the
selected jobs.
Changing Job Properties
You can modify the properties of jobs submitted to the DocuSP
controller by opening Job Manager and performing one of the
following:
• Double-click a particular job to open the Job Properties
window.
• Right-click a job and select [Properties...].
• Select a job and choose [Properties...] from the Job pull-down
menu.
• Select a job and click the [Properties...] icon from the toolbar.
Renaming a job
To rename a job:
1. Open Job Manager.
2. Double-click a job in the Active Jobs or Inactive Jobs fi eld. You
can rename Completed jobs if the Retain PDL Files of t he last
50 jobs is enabled. For additional information about Retain
PDL Files of the last 50 jobs see Setting the Job Policy.
3. Left-click at the beginning of the current name in the Job
Name field.
4. Use the <Delete> key to manually delete the name from the
Job Name fie ld.
5. Type the new job name, and select [OK], or continue setting
job properties.
Holding a print job
If a job has been submitted to print and you wish to delay printing
of the job, you can place the job on hold. When a job is held it
needs to process again before it can be printed. As a resul t, you
can change job properties when a job is in the held state.
-8
To hold a print job:
1. Open Job Manager.
Product Name Book Name
Page 25
2. Select the job you want to put on hold in the Acti ve or Inactive
Jobs list and perform one of the following:
• Right-click and choose [Hold] from the menu.
• From the Job pull-down menu select [Hold].
• Select the [Hold] icon from the toolbar.
If the job you held was in the Active Jobs list, the job is moved
to the Inactive Jobs list until further action is taken.
NOTE: Consider pausing jobs instead of holding jobs when
you need to make an adjustment, such as changing the toner .
When a job is held it needs to process again before it can be
printed. This is not the case when pausing the job
Releasing a held job to print
If a job has been put on hold and you now want to print the job,
you can release the job to print. When a job is held it needs to
process again before it can be printed. Printi ng starts at the
beginning of the job.
To release a held job to print:
1. Open Job Manager and select the Current tab.
2. From the Inactive Jobs li st, select a job and per form one of t he
following:
• Right-click the held job you want to print and choose
[Release] from the menu.
• From the Job pull-down menu select [Release].
• Select the [Release] icon from the toolbar.
Pause and resume a job
When a job is paused it stops the printing or scanning process.
Consider pausing the printer instead of holding jobs when you
need to make an adjustment, such as changing the t oner. Paused
jobs do not process again. When a job is held it needs to process
again before it can be printed.
To pause and resume a job:
1. From the Content menu select [ Pause] , which is locate d in t he
upper right corner of the main GUI screen.
2. To resume the printing process select [Resume].
•
Deleting a job
Product Name Book Name
Deleting a job removes the job from the system.
-9
Page 26
To delete a job:
1. Open Job Manager.
2. Click on a listed job.
3. Delete the job by performing one of the following:
• Right-click the job and select [Delete].
• Select a job and choose [Delete] form the Job menu.
• Select the [Delete] icon from the toolba r.
4. Select [Yes] to remove the job from the system.
Cancelling a job
Cancelling a job terminates printing of the selected job and
removes the job from the system.
To cancel a job:
1. Open Job Manager.
2. From the Current or Completed tab select a job and perform
one of the following:
• Select [Cancel] from the Job pull-down menu.
• Right-click the job and select [Cancel].
• Select the [Cancel] icon from the toolbar.
3. Select [Yes] to confirm your action.
NOTE: Selecting the [Cancel] button within the fea ture dialog
windows does not remove the job from the system.
Previewing a job
NOTE: A PostScript license is required to access this feature. If a
PostScript license is not present on the system, this menu option
is grayed out.
PostScript, PDF, and TIFF format jobs can be previewed prior to
submitting it to print. An entire job or a select range of pages can
be previewed. This allows you to view the job and make any
changes before the job is submitted for final printing.
NOTE: VIPP and PPML jobs cannot be viewed using this feature;
if you attempt to view these job types, an error message displays.
To preview a job:
-10
1. Open Job Manager and select the Current tab.
2. Select the PostScript, PDF, or TIFF format job you want to
preview from the Active or Inactive Jobs list.
3. Preview shows the entire job , while Pr eview Range al lows you
to select a range of pages to view. Select [Preview] or
[Preview Range] by:
Product Name Book Name
Page 27

• Right-clicking a job.
• Selecting a job and using the File pull-down menu.
• Selecting a job and using the toolbar ic on.
4. If Preview is selected, then the preview process begins (go to
Step 5). If Preview Range is selected perform the following:
a. Select [All] if you want to previ ew the entir e job. Thi s is the
default selection.
b. If you want to preview a range of pages, clear [Al l] and
enter the page range in the fields.
c. You can use the default size di splay or you can select a
size by clearing the [Default] checkbox. The following
fields become active:
– Select a unit of measure.
– Select a paper size from the pull-down menu. If
[Custom] is selected, you can enter values in the Width
and Height fields.
d. Click [OK] to exit the dialog window. The preview range
process begins.
5. Once the preview process is complete, the job you selected
displays in the Preview dialog window. Page icons display for
each page of the job. You can scroll to each p age or selec t the
page icon and go directly to that page.
You can perform the following actions by selecting from the
icons and menus located at the top of the Preview dialog
window . Move the cursor over each icon to get a description . If
more than one page is generated, you can select pages you
want to view by clicking a page icon located to the left of the
viewed image. The following options are available:
• Move to the first or last page of the job.
• Move to the previous or next page of the job.
• Enter a specific page number to view. Total job pages is
indicated to the right of the page number field.
• Select viewing options:
– Zoom percentages from the pull-down menu: 100%
reflects the actual size of the document.
– Actual Size: The view is shown as the actual size of the
document. The size percentage changes to 100%.
– Fit To Window: The image fits within the Preview
window . The size percentage changes to reflect the
current view.
– Fit To Width: The image fits the width of Preview
window . The size percentage changes to reflect the
current view.
Product Name Book Name
• Rotate the job left or ri ght.
-11
Page 28
6. Click [Close] to exit the Preview dialog window .
Moving a job
Moving a job allows you to place the job in another queue.
To move a job:
1. Open Job Manager and select the Current tab. You can move
Completed jobs if the Retain PDL Files of the last 50 jobs is
enabled. For additional information about Retain PDL Files of
the last 50 jobs see Setting the Job Policy.
2. Right-click a job and select [Move...] .
3. Select a queue from the list and click [OK]. The job is moved to
the selected queue.
Forwarding a job
Job forwarding allows you t o send a job f rom a DocuSP sys tem t o
another printing system.
To forward a job:
1. Open Job Manager and select the Current tab. You can
forward Completed jobs if the Retain PDL Files of the last 50
jobs is enabled. For additional information about Retain PDL
Files of the last 50 jobs see Setting the Job Policy.
2. You can forward an individual job or multiple jobs.
• To forward an individual job, right-click a job in the Active
or Inactive Jobs list and select [Forward...]. Alternatively,
you can click on a job and select [Forward...] from the Job
pull-down menu.
• To forward multiple jobs perform one of the following:
– Press and hold down the <CTRL> (Control) key and
select each individual job. Right-click within your
selection and select [Forward...].
– To select multiple jobs that are adjacent to one another,
press and hold down the <SHIFT> key while selecting
the first and last job names you want to select. This
highlights the first and last job name lines and all lines
in between. Right-clic k withi n yo ur s ele ction a nd sel ect
[Forward...].
3. From the Forward Job dialog window, select the job forward
location from the Printing Syst em Name pull-down menu. If the
printing system has not been defined s ee Setting up a p rinting
system name for job forwarding.
4. Type the Queue Name in the corresponding text field.
-12
5. If you want the job to remain on the initiating DocuSP system
after it is forwarded, select [Retain Job After Forwarding]. To
remove the job from the initiating queue after it is forwarded,
Product Name Book Name
Page 29

clear [Retain Job After Forwarding].
NOTE: There is no error recovery for forwarded jobs.
Therefore, if a network problem or connecti vity issue occurs
during Job Forwarding, the original system will not raise a
failure indicator. Because of thi s condition, it is best to retain a
copy of a critical job at the source system.
6. If desired, select [Job Ticket]. The Job Forwarding feature
allows you to include or exclude the Xerox Jo b Ti cket when the
job is forwarded to another printer. The benefit of this option is
to allow control over which job attributes are maintained
between the originating printer and the destination printer.
An example of when to include the job ticket would be when
forwarding to a DocuSP based printer at software level 3.x or
higher and the job has been programmed with a Xerox Job
Ticket or the job has been programmed with special
programming instructions such as exception pages or color
attributes.
Examples of when to exclude the job ticket are:
• when forwarding to a non-DocuSP based printer that does
not comprehend the XPIF job ticket format,
• when forwarding a job to a printer with a DocuSP version
of 2.x or earlier that does not comprehend the XPIF job
ticket format.
• the job contains PDL programming information such as
through setpagedevice commands within PostScript,
• when jobs include subset finishing,
7. Click [Forward]. The status of the job displays in the Forward
Status field.
NOTE: A job must be completely spooled before it can be
forwarded. Str eaming, Fast Reprint , and online jobs cannot be
forwarded. Jobs are “held” by the system and then forwarded
to the next device. If a job is eligible to be forwarded (i.e. the
job is not a streaming job, etc.), the Job Forwardi ng GUI
changes the job status to “Held” and a Job Forwarding dial og
opens; otherwise an error dialog is displayed.
The following are limitati ons a nd notes associated using the Job
Forwarding feature:
• There is no error recovery for forwarded jobs. Therefore, if a
network problem or connectivity issue occurs during Job
Forwarding, the original system will not raise a failure
indicator . Because of this c ondition, it is best t o retai n a copy of
a critical job at the source system.
Product Name Book Name
• Forwarding of jobs that require file referencing are not
supported by the Job Forwarding GUI; referenced images are
not accumulated and moved.
Examples of this type of file are:
-13
Page 30

– FreeFlow jobs (*.rdo)
– VIPP jobs
– GetTiff Macro jobs
– Fast Reprint Format (FRF) jobs
NOTE:These jobs can be successfully forwarded using
common mount points bet ween systems; i n this c ase, both
systems can “see” the mounted drive.
• IP numbers alone are not supported; a printing system name
is required. Job Forwarding uses the printer name to look up
the IP address of the receiving controller. The names and
addresses of the intended recei ving cont rollers must be i n the /
etc/hosts file of the sending controller when a name service is
not running.
• Job Forwarding is enabled automatically for the System
Administrator and the Operator.
• Jobs forwarded to systems without some features, for
instance, a job forwarded with binding, to a printer that does
not support binding, will display a job ticket error stating that
the function is not available on the receiving device.
• The controller does not al low the user to cancel the forwar ding
operation after it begins.
• Accounting is not supported. The forwarding controller does
not keep a record of forwarded jobs.
• Sp e cific resources, including f onts, forms, JDLs, JDEs and
TIFF images of a job, are not forwarded.
Setting up a printing system name for job forwarding
Prior to forwarding a job, a receiving printing system must be
defined by the System Administrator. Once the receiving printing
system is defined it can be edited and deleted.
To set up a printing system for job forwarding:
1. Open Job Manager and select the Current tab. You can
forward Completed jobs if the Retain PDL Files of the last 50
jobs is enabled. For additional information about Retain PDL
Files of the last 50 jobs see Setting the Job Policy.
2. Right-click a job in the Active or Inacti ve job list and select
[Forward...]. The Forward Job dialog window opens.
3. Click [Setup...].
-14
4. Click [Add...].
5. Enter the Printing System Name and Host Name or IP
Address in the appropriate fields.
Product Name Book Name
Page 31

NOTE: IP numbers alone are no t supported; a prin ting s ystem
name is required. Job Forwarding uses the printer name to
look up the IP address of the receiving controller. The names
and addresses of the intended recei ving controll ers must be in
the /etc/hosts file of the sending controller when a name
service is not running.
6. Select [Apply]. The printing system information displays in the
Printer Setup dialog window.
7. Click [Close] twice to exit the dial og windows and ret urn to the
Job Forward screen.
To edit and/or delete a printing system used for job forwarding:
1. Open Job Manager and select the Current tab. You can
forward Completed jobs if the Retain PDL Files of the last 50
jobs is enabled. For additional information about Retain PDL
Files of the last 50 jobs see Setting the Job Policy.
2. Right-click a job in the Active or Inacti ve job list and select
[Forward...]. The Forward Job dialog window opens.
3. Click [Setup...].
To delete a job forward printing system:
a. Right-click a printing system and select [Delete].
Alternatively, you can select a printing system name and
click the [Delete] button.
b. Confirm your action by clicking [Yes]. The printing system
is removed from the Printer Status dialog window.
To edit a job forwarding printing system:
a. Right-click a printing system and select [Edit...].
Alternatively, you can select a printing system name and
click the [Edit...] button.
b. Make changes and select [OK]. Your changes display in
the Printer Status dialog window.
4. Click [Close] twice to exit the dial og windows and ret urn to the
Job Forward dialog window.
Print Now (interrupting a job to print another job)
The Print Now feature allows you to in terrupt a job that i s currentl y
printing in order to print a different job or jobs. Afte r all Print Now
jobs have completed printing, the contr o ller resumes printing the
original interrupted job.
Product Name Book Name
To use Print Now:
1. Open Job Manager and select the Current tab.
2. Select a job and perform one of the following:
• Right-click the job and choose [Print Now] from the menu.
• From the Job pull-down menu choose [Print Now].
-15
Page 32

• Select the [Print Now] icon from the toolbar.
The selected job prints.
NOTE: A newly assigned Print Now job will not interrupt an
active Print Now job. The newest Pr int Now job is added to t he
end of the active interrupt jo b list . Any Print Now j obs requiri ng
unavailable resources (s uch as special medi a or finis hing), are
ineligible and will not be schedul ed as a Print Now job until the
resource is made available.
Promoting a job
Promoting a job enables you to move the selected pending job
above all other pending jobs in the queue. The promoted job pr ints
immediately after other previously scheduled print jobs. Consider
the following examples when promoting a job:
• Single-queue environment: The job you promote is placed
above all other pending jobs.
• Multi-queue environment: If 20 jobs are scheduled to print
from a different queue than the one you used to promote your
job, the job you promote will be the 21st job to print.
• A job must have a status of Pending before it can be
promoted.
1. Open Job Manager and select the Active Jobs tab.
2. Right-click the pending job you want to promote and choose
[Promote] from the menu.
NOTE: Consider using the Print Now feature i f you need t o pr int a
job immediately. See Print Now (interru pting a job to print another
job) for additional information.
Printing a proof job
This feature allows you to print a proof copy of a multi- copy job
while eliminating the need to resubmit the job to print once the
content and/or layout have been verified.
All job attributes apply to Proof jobs except the quantity. The
default print quantity f or Proof jobs i s 1 (one); howev er, the default
can be modified in system preferences by the System
Administrator.
NOTE: You can also set a queue to automatically print proof
copies of each job submitted to the queue.The current job is
interrupted at the en d of a page if pri nting has no t complet ed or on
a set boundary if the interrupted job is finished. Processing for
non-Print Now jobs in the queue is suspended until all Pri nt Now
jobs are printed.
-16
Product Name Book Name
Page 33

To proof one or more jobs:
1. Open Job Manager and select the Current tab.
2. In the Active or Inactive Jobs list select a job and perform one
of the following:
• Right-click the job and choose [Proof] from the menu.
• From the Job pull-down menu select [Proof].
• Select the [Proof] icon from the toolbar.
A proof of the selected job is printed. The job status changes
to “Proofed,” and it is placed in the Inactive Jobs list.
3. Once the proof is verified, you can release the remainder of
the job to print.
NOTE: A newly assigned Proof job will not interrupt a printi ng
Proof job. The newest Proof job is placed in the queue at the
end of the active Proof jobs. Any Proof jobs requiring
unavailable resources (s uch as special medi a or finis hing), are
ineligible and will not be scheduled as an interrupt Proof job
until the resource is made available.
Saving a job
To save a job:
1. Open the Job Manager .
2. Double-click the job you want to view from the Active or
Inactive Jobs list. You can save Completed jobs if the Retain
PDL Files of the last 50 jobs is enabled. For additional
information about Retain PDL Files of the last 50 jobs see
Setting the Job Policy.
3. Select the Settings tab.
4. Select the Destination FAB.
5. If [Print & Save] or [Save] is selected then the Save Locati on
fields become active. If a save location is not made available
by the System Administrator you can select a fo lder in which to
save your job.
NOTE: Verify the correct Save Location by either checking
with the System Administrator or by v iewing the Save Location
in Setup menu > System Preferences > Save tab. In some
cases, additional Save directories ar e created to save speci fic
jobs by user, by department, or by another categorization.
6. Click [Save Location...]. The Save Locatio n dialog window
opens.
Product Name Book Name
7. From the Directory menu select t he UNI X fil e system or media
location where the job is to be saved.
8. If necessary, select the save folder.
-17
Page 34

9. Once the complete pathway appears in t he Selection field click
[OK].
10. From the Save Format pull-down menu select from:
• Single-page TIFF: Saves each page in the job as an
individual TIFF file.
• Multi-page TIFF: Saves the ent ire job as a single TIFF file.
• PDF: Saves the job as a PDF (Portable Document
Format).
• Fast Reprint Format (FRF): Saves the job with
Decomposition completed, to facilitate faster reprinting of
the relatively larger color jobs.
11. If desired, make property adjustments and click [OK]. The job
is placed in the save location specified.
Using a Display Resolution Im age
Display Resolution Images (DRI’s) can be s aved with the print jo b
in order to facilitate editing and viewing of images within the job.
DRI’s are generally smaller files than full-resolution images and
will speed up viewing and editing of jobs.
The Settings tab
To use DRI’s, complete the following steps:
1. Open the Job Manager
2. Double-click a job in the Active Jobs list.
3. Select the Settings tab.
4. Select the Destination FAB.
5. Ensure that the checkbox for [Save DRI’s] is checked.
6. Select [OK] to save the selection(s), or conti nue setting job
properties.
NOTE: DRI’s are not meant to be and shoul d not be used to make
color or image quality assessments. When the Save DRI’s check
box is selected, the DRI’ s will be saved with the job and the overall
file size will be increased accordingly.
The Settings tab allows you to perform the following tasks:
• Use the Pages/Format F AB to sel ect p ages to print, job format
options and to view and edit job notes.
-18
• Use the Destination FAB to indicate whether you want to print
a job or save a job to reprint later.
• View print job progress by selecting the Job Progress FAB.
• Use Administrative Pages.
Product Name Book Name
Page 35

Using the Settings tab to set job properties
To use the settings tab:
1. Open the Job Manager .
2. Double-click the job you want to view from the Active or
Inactive Jobs list. You can access Completed jobs if the Retain
PDL Files of the last 50 jobs is enabled. For additional
information about Retain PDL Files of the last 50 jobs see
Setting the Job Policy.
3. Select the Settings tab.
4. Job Notes allow you to enter information that should be sent
along with the printed job. All users have view access to Job
Notes.
a. To view and edit job notes click [Job Notes…].
b. View or enter the desired inf ormation in t he following f ields:
• Sender Name: The name of the person who sent
the job. This field cannot be edited.
• User Id: The identification number of the user who
sent the job.
• Recipient Name: The name of the person who
receives the job. If you don’t know the name, you
may enter a recipient location.
• Source File: The path name to a file that was
referenced by the job ticket rather than being
directly submitted to the printer. For example, a
saved job ticket contains a reference to the saved
job file.
• Account Info: Allows sites that bi ll customers for
printer use to track account activity.
• Account Id: This field can contain an internal
billing number, a credit card number, or other
tracking or billing numbers.
• Additional Account Info: Can contain any
additional account information.
• Banner Page Message: Information you want to
be printed on the banner page of the print job.
• Start Message: Speci al instructions or information
for the print operator. The Start Message displays
on the Settings tab screen.
Product Name Book Name
c. Select [OK] to save the job notes and return to the Settings
tab.
5. Select the Pages/Format FAB.
a. To set the page range you want to print:
i. Printing all pages is enabled by default. If you want to
print a selected range of pages clear [Print All Pages].
-19
Page 36

ii. Enter a page range in the [From] and [To] fields.
iii. Select [OK] or continue setting job properties.
b. You can change the format of a document after it has been
submitted to the controller. For example, a change from
PostScript to ASCII may be desired in order to print the
PostScript commands.
NOTE:If you do not have a valid PostScr ipt license on the
system, PostScript is not displayed in the list of format
options.
NOTE:Do not attempt to change one page description
language (PDL) to another, such as PostScript to PCL.
This type of change may cause print errors since the PCL
decomposer cannot interpret the PostScript commands.
i. Choose a format from the Format pull-down menu. The
available options vary based on your printer
configuration.
ii. Select [OK], or continue setting job properties. Your
selection displays on the Pages/Format FAB.
c. If the PostScript, PDF, or ASCII job format is selected then
the [Setup...] button becomes active. Click [Setup...] to
access PostScript/PDF and ASCII options.
NOTE:If you do not have a valid PostScr ipt license on the
system, you will not be able to set PostScript options.
• PostScript/PDF: DocuSP enables VIPP users to
automatically load and access the required start string for
VIPP jobs. The initialization file can be established, by the
System Administrator, for a particular queue or on a perjob basis. More Information...
i. Select an initialization file from the pull-down menu. If
an initialization file i s not availabl e the default sel ection
is None.
ii. Select a Variable Data option:
• Disable Caching
• Enable Caching
More Information...
iii. Select an After Job Completion option:
• Delete Cached Objects
• Retain Cached Objects
• PDL Specif ied
-20
iv. If desired, select Substitute Images in the OPI field.
v. Select [OK].
• ASCII: If the job that you are printing is an ASCII job, you
Product Name Book Name
Page 37

must select the font used to print this job bef ore printing
can occur . The font name, orientation, and size must be
selected.
i. In the Fonts list, select the name of the fon t t o be used
when printing the ASCII job. If no font is selected , the
default font, Courier, is used.
ii. Select the image orientation from the Font Orientation
menu. If no choice is made, the job is printed as
portrait.
iii. Enter a font size by typing a value or using the spin
box. The range of available font sizes are displayed
below the spin box.
iv. Select [OK].
6. Use the Destination FAB to indicate whether you want to print,
print and save, or save a job to print later. Print is the default
selection (the job prints, but it is not saved).
Printing and/or saving a job:
a. Select [Print & Save] or [Save]. The Save location and
Save Format fields become active.
NOTE:Verify the cor rect Sav e Locat ion by ei ther c hecki ng
with the System Administrator or by viewing the Save
Location in Setup menu > System Preferen ces > Save tab.
In some cases, additional Save directories are created to
save specific jobs by user, by department, or by another
categorization.
b. Click [Save Location...]. The Save locati on dialog window
opens.
c. From the Directory menu select the UNIX file system or
media, location where the job is to be saved.
d. If necessary, select the save folder.
e. Once the complete pathway appears in the Selection field
click [OK].
f. From the Save Format pull-down menu select from:
– Single-page TIFF: Saves each page in the job as an
individual TIFF file.
– Multi-page TIFF: Sa ves the ent ire job a s a singl e TIFF
file.
– Fast Reprint Format (FRF): Saves the job with
Decomposition completed, to facil itate faster reprinting
of the relatively larger col or jobs.
g. If desired, select [Save DRI’s]. See Using a Display
Resolution Image for additional information.
h. If desired, select [Gather Now] to gather the components
for the DRI’s.
Product Name Book Name
-21
Page 38

i. Select [OK] or continue setting job properties.
7. The Job Progress FAB enables you to view the following job
progress information:
• Bytes Processed
• Images Processed
• Total Pages Saved/Printed
•Sets Completed
Job processing information i s updated at regular intervals and
at significant events:
• The main GUI and job dialogs are updated at 30 second
intervals.
• Upon user or system intervention on a specific job.
8. Select the Administrative Pages FAB. For more information
see Using job Administrative Pages.
9. Select [OK] or continue setting job properties.
Using job Administrative Pages
Administrative Pages are optional pages that print with the job.
Administrative Pages consist of the Banner Page and Error Page.
• Banner Page: The Banner Page is a break page that
prints at the beginn ing of each job. It provi des the following
information:
– Job name: S pecifies the name of the job and is used to
identify and track the job in the queue.
– Job sender: The name of the person who sent the job.
This field cannot be edited.
– Job recipient: The name of the person who wil l receive
the job. If you don’t know the name, you may enter a
recipient location.
– Banner page message: Information you want to be
printed on the banner page.
– Printing date and time
– Number of copies: The number of j ob copies that were
printed.
– Product name and current software version level
-22
– Account number: Can be a number used for billing
purposes.
– Job ID: The job identification set at the contr oller .
– Server and queue name
Product Name Book Name
Page 39

NOTE: You cannot change Banner Page selections If the System
Administrator has enabled Banner Pages with an override
designation.
NOTE: An Error Page prints with your job if it has been enable d by
the System Administrator . The Error Pag e contains job information
and errors or warnings generated as the job is processed.
To use Administrative pages:
1. Open Job Manager and select the Current tab. You can
access Completed jobs if the Retain PDL File s of the last 50
jobs is enabled. For additional information about Retain PDL
Files of the last 50 jobs see Setting the Job Policy.
2. In the Active or Inactive Jobs list select a job and perform one
of the following:
• Double-click a job.
• Right-click the job and choose [Pro perties...] from the
menu.
• From the Job pull-down menu select [Properties...].
• Select the [Properties... ] icon from the toolbar.
The Stock Tab
Using the Stock tab to set job properties
3. Select the Settings tab.
4. Select the Administrative Pages FAB.
5. Select [Banner Pages].
6. Select [OK], or continue setting job properties.
NOTE: Administrative Pages control s for def ault p ap er st ock, Sit e
Message, and font settings can be accessed through the Printer
Menu > Switches option. See Enabling Administrative Pages for
additional information.
The Stock tab contains stock and tray selections for your job.
Selections include the Size/Color and Type/Weight FABs.
The Stock tab allows you to perform the following tasks:
• Sp ecify a paper stock for a job.
• Program stock for a job using the Custom Stock option.
Product Name Book Name
To use the stock tab to set properties:
1. Open Job Manager.
2. Double-click a job in the Active or Inactive Jobs list. You can
access Completed jobs if the Retain PDL File s of the last 50
jobs is enabled. For additional information about Retain PDL
-23
Page 40

Files of the last 50 jobs see Setting the Job Policy.
3. Select the Stock tab. A graphical representative icon displays
stock characteristics.
4. Select a stock by performing one of the following:
• You can select a stock from the Name menu. If
Unspecified is selected, you can use the Size/Color FAB,
Type/Weight FAB, and if available, Coating FAB to select
stock properties. If a Named stock is selected, and the
stock attributes are changed, a temporary stock is not
created. The system searches for the stock as specified
when the job is released for printing. The j ob will not print
until the programmed stock is loaded or stock
programming is changed to a stock that is available to the
printer.
• To select a stock currently loaded on the printer, select
[Stock List...], choose the stock you want to use and click
[OK].
• Use the Size/Color FAB, Type/Weight FAB, and if
available, Coating FAB to select stock properties. If
[Custom] stock is selected from the Size menu, within the
Size/Color FAB, the width and Height fields become active .
The Output Tab
NOTE: Be sure the stock attributes you select are supported
on the printing system.
5. Select [OK], or continue setting job properties.
NOTE: Any custom entries must match the entry progra mmed
for the paper tray containing the custom paper.
The Output tab allows you to set output options for a part icular job.
The Output tab allows you to perform the followi ng tasks:
• Using the Basic Settings FAB you can set the sides imaged
and collation options.
• Using the Stapling/Finishing FAB you can set the following
options:
– Set stapling/finishing options for a job.
– Determine the output location for a job.
– Select the order in which the printed pages ar e delivered to
an output device.
-24
– Choose whether the print s will be delivered f ace up or face
down.
– Set offset stacking and subset output.
• Enable slip sheets using the Slip Sheets F AB.
Product Name Book Name
Page 41

• Set layout, or imposition options for a job using the Layout
FAB.
Using the Output tab to set job properties
To set job properties using the output tab:
1. Open Job Manager.
2. Double-click a job in the Active or Inactive Jobs list. You can
access Completed jobs if the Retain PDL File s of the last 50
jobs is enabled. For additional information about Retain PDL
Files of the last 50 jobs see Setting the Job Policy.
3. Select the Output tab.
4. Select the Basic Settings FAB to set the sides imaged and
collation.
a. Select a Sides Imaged option by moving the cursor over
the paper mimic icons and selecti ng the opti on you want t o
use. If [2 Sided] is selected, you can choose to [Rotate
Side 2].
b. Select a collation option:
• Collated: Documents are printed in sequential
page order and delivered as separate document
sets. For example, if you print three sets of a 3page document, the output is grouped in the
following page order: 1,2,3 1,2,3 1,2,3.
• Uncollated: Documents are printed in separate
sets of each p age. If you print 3 copies o f a 2-page
document, the output is grouped with three copies
of page 1 followed by three copies of page 2.
5. Choose the Stapling/Finishing FAB to set stapling, finishing,
offset, and output location options. See Using the Stapling/
Finishing FAB for more information.
6. Select the Slip Sheets FAB. See Using the Slip Sheets F AB for
more information.
7. Select the Layout FAB to control the placement, rotation,
cropping, and scaling of source document pages onto the
printed output. For a complete description of imposition
models see the section entitled Layout Styles.
8. Select (OK) or continue setting job properties. Your selections
display on the individual FABs.
Using the Stapling/Finishing FAB
Finishing is a general term referring to the processes, such as
stapling, binding, stitching, folding, and hole-punching, that are
typically performed on a job after it has fi nished printing. The
specific finishing opti ons that are available vary based on the
capabilities of your prin ter and any attached finishing units. If no
Product Name Book Name
-25
Page 42

finishing unit is available, the default setting is None.
To use the Stapling/Finishing FAB:
1. From the Stapling/Finishing pull-down menu select an option.
Move the cursor over the paper mimic icons to see a
description of each available selection and click the icon you
want to use.
NOTE: If a staple-related fini shing option is available, the
Staple Placement option becomes active. Use the Stitch
Placement option to modify the location of the stitches on the
finished set.
2. If your printer supports staple placement and if stapling is
selected, you can select a staple placement position.
a. Select [Staple Placement...]. The Staple Placement dialog
window opens.
b. The selected stock displa ys in the S tock Size field. You can
select from [inches] or [mm].
c. Use the slide bar to set staple placement.
d. Click [OK] once you have set the staple placement.
3. Select an Output Location where you want your print job to be
delivered. Available selections depend on your printer
configuration.
• System Specified: This is the default sele ction. The
system determines the most appropri ate desti nat ion of t he
given job.
• Top Tray: Used for simpler jobs that do not require
finishing or collated stacking. This tray is also used as the
purge destination.
• Main Tray: Used for most jobs that require stacking or
stapling.
• Bypass Transport: Jobs are passed thr ough to any
installed third-party finishing device.
NOTE:If you select a finishing option that conf licts with the
Output Location selection, the Output Location
automatically changes to a selection that can handl e your
finishing choice.
NOTE:Offset options are only available if the Output
Location selection can handle offset delivery.
4. Output order determines the order in which the printed pages
are delivered to an output device, either first to last or last to
first. Specifying the output order is important for certain types
of finishing. Select from the following:
-26
• System Specified: Allows the system to determine the
most appropriate order for the given job.
• 1 - N (Ascending): Printed pages are deli vered fir st to last
Product Name Book Name
Page 43

with the last page on top.
• N - 1 (Descending): Printed pages are delivered last to
first with the first page on top.
5. Output delivery determines whether the prints are delivered
face up or face down. Output delivery is useful for retrieving
the printed output in a specific order or for use with certain
types of finishing. Select from the following:
• System-specified: The system determines the most
appropriate delivery option fo r the job.
• Face Up: Printed documents are delivered face up.
• Face Down: Printed documents are delive red face down.
6. If desired, select an offset from the Offset pull-down menu:
• None: Offset is not per formed. This is the defaul t selection .
• Each Collated Set: The offset occurs bet we en each set
printed.
• Each Uncollated Stack: The offset occurs between each
stack printed.
• Each Set and Stack: The offset occurs between each set
and stack printed.
NOTE:Offset options are available only if the Output
Location selection can handle offset stacking.
Offset Subset inserts an offset within a stack (uncollated
set) after each specified p age number. Sel e ct [Offset
Subset] and set the Pages Per Subset value.
7. The Finishing checkbox becomes available for all Stapling/
Finishing selections except None. Select [Finishing] and set
Pages Per the Subset value.
Using the Slip Sheets FAB
Slip Sheets are pieces of paper or other media that are inserted
between document sets in a print job. Slip Sheets differ from job
inserts in that they sep arate one job set from another, while job
inserts separate pages of a job.
To use the Slip Sheets FAB:
1. Select the Slip Sheets FAB.
2. To use Slip Sheets select [Enable]. The Slip Sheet s Stock field
becomes active.
3. To Select a slip sheet stock perform the following:
Product Name Book Name
– Select [Properties...]. Select a stock from the Name
menu. Select [Unspecified] from the Name menu to set
custom stock properties. Make selecti ons from the
Size/Color FAB, Type/Weight FAB, and if available,
Coating FAB.
-27
Page 44

– You can select a stock and verify the characteristics of
the stock by selecting [Stock List...], selecting a stock,
and clicking [OK].
– Make stock selections directly fr om the Size/ C olor
FAB, Type/Weight FAB, and if available, Coating F AB.
4. Click [OK] to apply your changes and exit the dialog window.
NOTE: Ensure that the attributes you select are supported on
the printing system.
Setting Layout Styl es
The Layout feature enables you t o control t he placement, rot at ion,
cropping, and scaling of source document pa ges onto the printed
output. This process is commonly known as Imposition.
NOTE: The Layout Styles ignore page-level PostScript
programming, and various image spacing setti ngs will be applied
after imposition, and in some cases wil l provide unexpected and
inappropriate results. See Caveats for using the Layout feature.
To set layout styles:
1. Open the Job Manager .
2. Double-click the job you want to modify in the Active or
Inactive Jobs list.
3. Choose the Output tab.
4. Select the Layout FAB.
5. Select the desired layout styl e from the Layout S t yle pull- down
menu. The associated information icon presents layout style
tips. For a description of the available layout styles, see the
table for Layout Styles.
6. Select the Original Orientation corresponding to your desired
output:
• Portrait
• Landscape
7. Below the Layout Styl e pull-down menu, you may see three
radio buttons, depending upon your layout selection. Select
the radio button corresponding to your desired output:
• Select [Sequential] if the job is to be imposed normally.
• Select [Repeated] to impose multiple copies of the same
image on a page.
-28
• If desired, select [Alternating] to achieve a postcard
Product Name Book Name
Page 45

imposition.
8. If desired, click [Setup...] to open the Advanced Settings
window.
NOTE: You must be logged on to the controller as ‘operator’
or ‘System Administrator’ to edit the advanced settings.
a. To change the Reduce/Enlarge settings, select the radio
button for Custom underneath Reduce/Enl arge. Auto is the
default, and automatically scales the image(s) depending
upon which layout style you have chosen. Selecting
Custom enables you to scale the image(s) between 1%
and 1000%.
NOTE:Setting custom scaling can produce unexpected or
inappropriate results. For most applications, you should
leave the Auto button selected.
b. Select the checkbox under Margins to adjust them. You
can set margins between 0.01 inches and 2.00 inches.
See Gutter and Outside Margin for more information.
NOTE:If mm is selected under Units, the metric values will
be displayed instead of English values.
c. Set the Trim Size if you wish to leave bleed edges around
your images. You can select the radio button for “Smaller
Than Original Image” t o activat e the Wid th and Height s pin
boxes. See Bleed/Trim Size and Remove Image Bleed for
more information.
d. If desired, select the pull-down menu for Crop Marks and
select from the following options:
– None: prints no crop marks
– Front
– Back: appears only if Sides Imaged is set to 2
– Both Front and Back: appears only if Sides Imaged is
set to 2
See Crop Marks for more information.
e. If desired, select the units in [mm] or [inches].
f. When all settings have been made, select [OK]. Your
selections will be displayed in the text fie ld.
9. You may also set up a custom layout style, using an existing
layout and including all the specific advanced settings you
have chosen. To set up a custom template:
Product Name Book Name
a. Make all desired settings to your chosen la yout sty le, as in
steps 6-8 above.
b. Select [Save As...]. The Save As User-Defined Template
window opens.
c. Within the Template Name text field, enter a descriptive
-29
Page 46

name for the User-Defined Template. You may save a
template with the same name as a previously existing
user-defined template; in this case the newly saved
template overwrites the older one. However, you cannot
overwrite any of the preinstalled templates. If you try to do
so, an error message will appear.
NOTE:You must be logged on to the controller as
‘operator’ or ‘System Administrator’ to set up a custom
layout style.
10. Select [OK] to commit changes and exit the Layout Setup
window.
11. Select [OK], or continue setting job properties.
Setting Booklet options
To set booklet options:
1. Open the Job Manager .
2. Double-click the job you want to modify in the Active or
Inactive Jobs list.
3. Choose the Output tab.
4. Select the Layout FAB.
5. From the Layout Style pull-down menu select [Booklet], or
[Perfect Boo kl e t].
6. Select the Original Orientation corresponding to your desired
output:
• Portrait
• Landscape
7. If desired, click [Setup...] to open the Advanced Settings
window.
NOTE: You must be logged on to the controller as ‘operator’
or ‘System Administrator’ to edit the advanced settings.
a. To change the Reduce/Enlarge settings, select the radio
button for Custom underneath Reduce/Enl arge. Auto is the
default, and automatically scales the image(s) depending
upon which layout style you have chosen. Selecting
Custom enables you to scale the image(s) between 1%
and 1000%.
NOTE:Setting custom scaling can produce unexpected or
inappropriate results. For most applications, you should
leave the Auto button selected.
-30
b. Select a checkbox under Margins to adjust them. You can
set a Gutter Margin or an Outside Margin between 0.01
“and 2.00”. If your layout choice is Booklet, you may also
choose the signature shift opti on; however, this option is
Product Name Book Name
Page 47

not available for the Perfect Booklet layout. See Gutter and
Outside Margin for more information.
NOTE:If mm is selected under Units, the metric values will
be displayed instead of English values.
c. Set the Trim Size if you wish to leave bleed edges around
your images. You can select the radio button for “Smaller
Than Original Image” t o activat e the Wid th and Height s pin
boxes. See Bleed/Trim Size for more information.
d. Set the Bleed Mode to Custom if desired. The default
Bleed Mode is Bleed To Fold, but you can set a Custom
Bleed Mode between 0.00” and 2.00.” See Remove Image
Bleed for more information.
e. If desired, select the pull-down menu for Crop Marks and
select from the following options:
– None: prints no crop marks
– Front
– Back: appears only if Sides Imaged is set to 2
– Both Front and Back: appears only if Sides Imaged is
set to 2
See Crop Marks for more information.
f. If desired, select the units in [mm] or [inches].
g. When all settings have been made, select [OK]. Your
selections will be displayed in the text fie ld.
8. You may also set up a custom layout style, using an existing
layout and including all the specific advanced settings you
have chosen. To set up a custom template:
a. Make all desired settings to your chosen la yout sty le, as in
steps 6-8 above.
b. Select [Save As...]. The Save As User-Defined Template
window opens.
c. Within the Template Name text field, enter a descriptive
name for the User-Defined Template. You may save a
template with the same name as a previously existing
user-defined template; in this case the newly saved
template overwrites the older one. However, you cannot
overwrite any of the preinstalled templates. If you try to do
so, an error message will appear.
NOTE:You must be logged on to the controller as
‘operator’ or ‘System Administrator’ to set up a custom
layout style.
Product Name Book Name
9. Select [OK] to commit changes and exit the Layout Setup
window.
10. Select [OK], or continue setting job properties.
-31
Page 48

Layout Styles
Layout Selection Layout Example graphic
None No Graphic Shown
1 Up
Portrait orientation radio button selected
1 Up
Landscape orientation radio button selected
2 Up
Portrait orientation radio button selected.
Sequential radio button selected.
2 Up
Portrait orientation radio button selected.
Repeated radio button selected.
2 Up
Portrait orientation radio button selected.
Alternating radio button selected.
-32
Product Name Book Name
Page 49

Layout Selection Layout Example graphic
2 Up
Landscape orientation radio button selected.
Sequential radio button selected.
2 Up
Landscape orientation radio button selected.
Repeated radio button selected.
2 Up
Landscape orientation radio button selected.
Alternating radio button selected.
2 Up - Flip Right
Portrait orientation radio button selected
2 Up - Flip Right
Landscape orientation radio button selected
Product Name Book Name
-33
Page 50

Layout Selection Layout Example graphic
2 Up - Cut & Stack
Portrait orientation radio button selected
Sequential radio button selected
2 Up - Cut & Stack
Landscape orientation radio button selected
Sequential radio button selected
4 Up
Portrait orientation radio button selected.
Sequential radio button selected.
4 Up
Portrait orientation radio button selected.
Repeated radio button selected.
-34
Product Name Book Name
Page 51

Layout Selection Layout Example graphic
4 Up
Portrait orientation radio button selected.
Alternating radio button selected.
4 Up
Landscape orientation radio button selected.
Sequential radio button selected.
4 Up
Landscape orientation radio button selected.
Repeated radio button selected.
4 Up
Landscape orientation radio button selected.
Alternating radio button selected.
6up
Portrait orientation radio button selected.
Sequential radio button selected.
6 Up
Portrait orientation radio button selected.
Repeated radio button selected.
Product Name Book Name
-35
Page 52

Layout Selection Layout Example graphic
6 Up
Portrait orientation radio button selected.
Alternating radio button selected.
6 Up
Landscape orientation radio button selected.
Sequential radio button selected.
6 Up
Landscape orientation radio button selected.
Repeated radio button selected.
6 Up
Landscape orientation radio button selected.
Alternating radio button selected.
8 Up
Portrait orientation radio button selected.
Sequential radio button selected.
8 Up
Portrait orientation radio button selected.
Repeated radio button selected.
-36
Product Name Book Name
Page 53

Layout Selection Layout Example graphic
8 Up
Portrait orientation radio button selected.
Alternating radio button selected.
8 Up
Landscape orientation radio button selected.
Sequential radio button selected.
8 Up
Landscape orientation radio button selected.
Repeated radio button selected.
8 Up
Landscape orientation radio button selected.
Alternating radio button selected.
9 Up
Portrait orientation radio button selected.
Sequential radio button selected.
Product Name Book Name
-37
Page 54
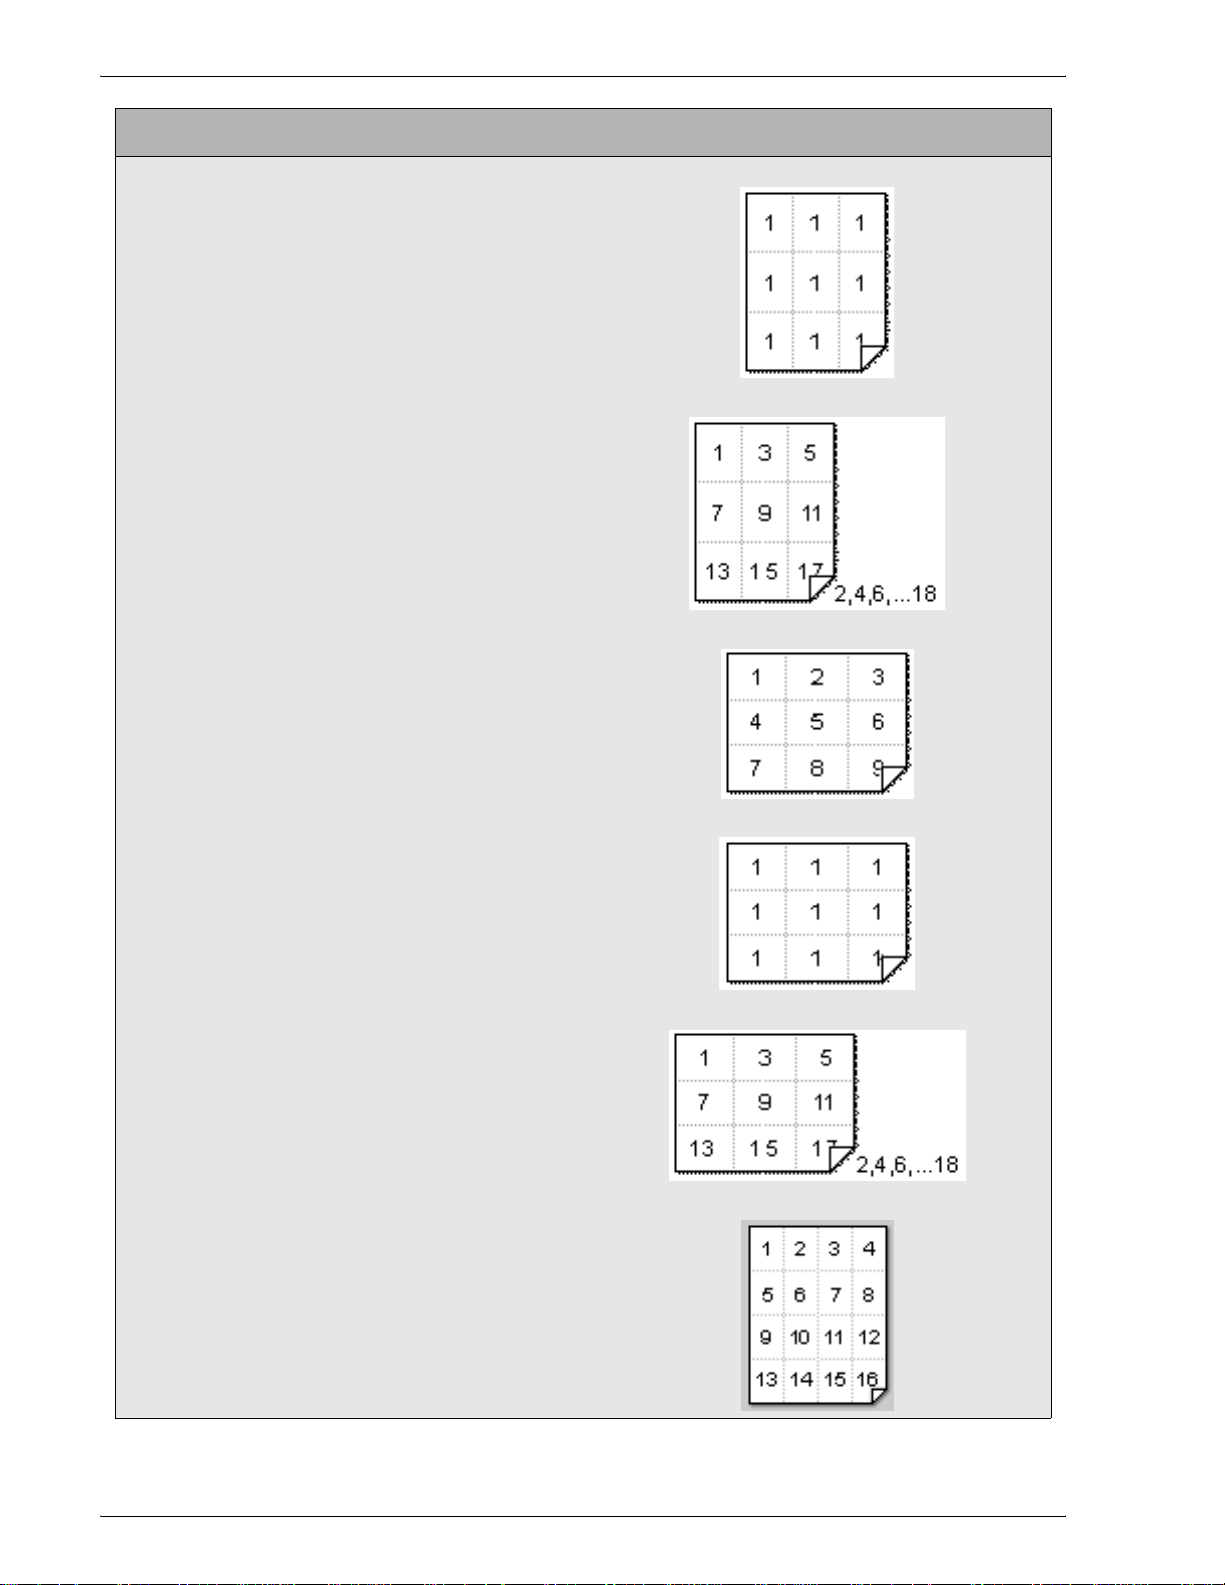
Layout Selection Layout Example graphic
9 Up
Portrait orientation radio button selected.
Repeated radio button selected.
9 Up
Portrait orientation radio button selected.
Alternating radio button selected.
9 Up
Landscape orientation radio button selected.
Sequential radio button selected.
9 Up
Landscape orientation radio button selected.
Repeated radio button selected.
9 Up
Landscape orientation radio button selected.
Alternating radio button selected.
16 Up
Portrait orientation radio button selected.
Sequential radio button selected.
-38
Product Name Book Name
Page 55

Layout Selection Layout Example graphic
16 Up
Portrait orientation radio button selected.
Repeated radio button selected.
16 Up
Portrait orientation radio button selected.
Alternating radio button selected.
16 Up
Landscape orientation radio button selected.
Sequential radio button selected.
16 Up
Landscape orientation radio button selected.
Repeated radio button selected.
16 Up
Landscape orientation radio button selected.
Alternating radio button selected.
Product Name Book Name
-39
Page 56

Layout Selection Layout Example graphic
Custom Multiple-up
Portrait orientation radio button selected
Standard radio button selected
Custom Multiple-up (Crop Marks)
Portrait orientation radio button selected
Print Crop Mar ks selected
Custom Multiple-up (Repeated)
Portrait orientation radio button selected
Repeated radio button selected
Custom Multiple-up (Repeated & Crop Marks)
Portrait orientation radio button selected
Repeated radio button selected
Print Crop Mar ks selected
-40
Product Name Book Name
Page 57

Layout Selection Layout Example graphic
Custom Multiple-up (Alternating)
Portrait orientation radio button selected
Alternating radio button selected
Custom Multiple-up (Alternating & Crop Marks)
Portrait orientation radio button selected
Alternating radio button selected
Print Crop Mar ks selected
Custom Multiple-up (Landscape)
Landscape orientation radio button selected
Standard radio button selected
Custom Multiple-up (Landscape & Crop Marks)
Landscape orientation radio button selected
Print Crop Mar ks selected
Custom Multiple-up (Landscape & Repeat)
Landscape orientation radio button selected
Repeated radio button selected
Product Name Book Name
-41
Page 58

Layout Selection Layout Example graphic
Custom Multiple-up (Landscape, Repeat, and
Crop Marks)
Landscape orientation radio button selected
Repeated radio button selected
Print Crop Mar ks selected
Custom Multiple-up (Landscape & Alternating)
Landscape orientation radio button selected
Alternating radio button selected
Custom Multiple-up (Landscape, Alternating, and
Crop Marks)
Landscape orientation radio button selected
Alternating radio button selected
Print Crop Mar ks selected
Booklet
Portrait orientation radio button selected.
Standard radio button selected.
-42
Product Name Book Name
Page 59

Layout Selection Layout Example graphic
Booklet
Landscape orientation radio button selected.
Standard radio button selected.
Perfect Booklet
Portrait orientation radio button selected
Standard radio button selected
Perfect Booklet
Landscape orientation radio button selected
Standard radio button selected
You may choose from the following styles, also known as
Imposition models:
NOTE: If you do not have a valid PostScript license on the
system, you will not be abl e to set PostSc ript opti ons for th ese
jobs.
• None: This is the default selection for the layout feature. This
model simply prints a 1:1 copy of the image.
Product Name Book Name
-43
Page 60

NOTE: This setting is set as the default so that if the user
does not select the layout feature, no imposition formatting is
applied.
• 1 Up More Information...
The 1 Up Layout Style ce nters the image on the output sheet.
It is differenti ated from the None layout style in that you can
access and adjust advanced settings with thi s layout style.
• 2 Up More Information...
The 2 Up Layout Style places two images on a single page.
You can impose page 1 and 2 on one sheet of paper by
selecting the Sequential option under Pages on Sheet Side, or
you can impose two of the same images on one sheet of paper
by selecting the Repeated option. The output can be singlesided or double-sided.
You may also select the Alternating option that imposes an
odd and even image on the front and the back (for example
image 1 on front and image 2 on back). The number of “ups”
chosen is determined by how many images are imposed. For
example, with 2 up chosen, image 1 is on the front with image
2 behind it, and image 3 is on the front with image 4 behind it.
• 2 Up - Flip Right More Information...
The 2 Up - Flip Right Imposition Model is used by customers
who wish to bind both ends of the output document and then
cut down the middle afterward. This model allows the ‘cut
edge’ to be the same on both finished booklets after binding
and cutting. The output can be single-sided or two-sided.
To illustrate how a 2 Up - Flip Right job is imposed, consider
an 8-page, 8.5”x11” job. You can out put to ledger and create
two 8-page booklets that are identical, or you can output to
letter and create two 5.5”x8.5” booklets that are identical. If
duplex is selected, you would have original page 1 printed
twice on side 1 of the first sheet, with the seco nd image 1
rotated 180 degrees relative t o the fi rst. Then, original page 2
would be printed in the same manner on side 2 of the first
sheet, and so on. Then, each end of the page could be bound
offline, and cut down the middle.
If you are printing images t hat go right to the edge along which
the cut takes place, you may need to adjust bleed and trim
settings in the Advanced Settings dialog.
• 2 Up - Cut & Stack More Information...
The 2 Up - Cut & Stack Imposition Model is used to create a
document which can be cut down the center and combined to
form one job. The output can be single-sided or two-sided.
-44
To illustrate how a 2 Up - Cut & S t ack job i s impo sed, consi der
an 8-page, 8.5”x11” job. If the output is Ledger-sized paper
(11”x17”), you have 4 original pages printing on two Ledger
sheets. Page 1 is on the right- front of output sheet 1, and page
Product Name Book Name
Page 61

2 is directly behind it on the back of sheet 1. Page 3 is on the
right-front of output s heet 2, and page 4 is directly behind it on
the back of sheet 2. Page 5 is inverted (rotated 180 degrees)
on the left front of sheet 1, and page 6 is dire ctly behind page
5 on sheet 1, image inverted. Page 7 prints in verted, on the left
front of sheet 2, and page 8 is directly behind it, also inverted.
The images imposed on the left side of the output sheet s are
inverted due to the nec essity of provid ing unif orm margins and
a uniform cut so that when they are married together and
bound, everything is in proper alignment . After cutting, and
prior to Perfect binding, the pages from the left side of the
output sheets are rotated 180 degrees and pl aced under the
pages from the right side of the output sheets.The same
imposition arrangements hold true if the out put is on 8.5”x11”
sheets, except that the images are scal ed to half size.
Notes:
– Scaling: auto-size, default scale (100%), or select
scale percentage
– The selected number of images pr ints, centered on t he
page.
– If the images are too large to fit on the selected stock,
the system faults the job with an error message.
– There is no white space between images.
– Crop marks, if selected, print s at the outside edges, not
between images, and can only be selectable when
auto-size is not selected.
– Bleed on the outside edges, within the imageable area
of the stock, prints appropr iately.
• 4 Up More Information...
The 4 Up Layout Style places four images on a single page.
You can impose pages 1-4 on one sheet of paper, or you can
impose four of the same images on one sheet of paper. The
output can be single-sided or double-sided.
You may choose the Alternating option that imposes an odd
and even image on the front and the back (for exampl e image
1 on front and image 2 on back). The number of “ups” chosen
will determine how many images are imposed. For example,
with 4 up chosen, you will achi eve image 1 on fr ont with i mage
2 behind it, image 3 on front wi th image 4 behind i t, image 5 on
front with image 6 behind it, and image 7 on front with image 8
behind it.
• 6 Up More Information...
Product Name Book Name
The 6 Up Layout Style places six images on a single page.
You can impose pages 1-6 on one sheet of paper, or you can
impose six of the same images on one sheet of paper. The
output can be single-sided or double-sided.
You may choose the Alternating option that imposes an odd
-45
Page 62

and even image on the front and the back (for exampl e image
1 on front and image 2 on back). The number of “ups” chosen
determines how many images are imposed. For example, wit h
6 up chosen, image 1 is on the front with image 2 behind it,
image 3 is on the front with image 4 behind it, image 5 is on
the front with image 6 behind it, image 7 is on the front with
image 8 behind it, image 9 is on the f ront with image 10 behind
it, and image 11 is on the front with image 12 behind it.
• 8 Up More Information...
The 8 Up Layout Style places eight images on a single page.
You can impose pages 1-8 on one sheet of paper, or you can
impose eight of the same images on one sheet of paper. The
output can be single-sided or double-sided.
You may choose the Alternating option that imposes an odd
and even image on the front and the back (for exampl e image
1 on front and image 2 on back). The number of “up s” chosen
determines how many images are imposed. For example, wit h
8 up chosen, image 1 is on the front with image 2 behind it,
image 3 is on the front with image 4 behind it, image 5 is on
the front with image 6 behind it, image 7 is on the front with
image 8 behind it, and so on for a total of 16 images.
• 9 Up More Information...
The 9 Up Layout Style places nine images on a single page.
You can impose pages 1-9 on one sheet of paper, or you can
impose nine of the same images on one sheet of paper. The
output can be single-sided or double-sided.
You may choose the Alternating option that imposes an odd
and even image on the front and the back (for exampl e image
1 on front and image 2 on back). The number of “up s” chosen
determines how many images are imposed. For example, wit h
9 up chosen, image 1 is on the front with image 2 behind it,
image 3 is on the fro nt with image 4 be hind i t, image 5is on the
front with image 6 behind it, image 7 i s on the fr ont wi th image
8 behind it, and so on for a total of 18 images.
• 16 Up More Information...
The 16 Up Layout Style places sixteen images on a single
page. You can impose pages 1-16 on one sheet of paper, or
you can impose sixteen of the same images on one sheet of
paper. The output can be single-sided or double-sided.
You may choose the Alternating option that imposes an odd
and even image on the front and the back (for exampl e image
1 on front and image 2 on back). The number of “up s” chosen
determines how many images are imposed. For example, wit h
16 up chosen, image 1 is on the front with image 2 behind it,
image 3 is on the front with image 4 behind it, image 5 is on
the front with image 6 behind it, image 7 is on the front with
image 8 behind it, and so on for a total of 32 images.
-46
• Custom Multiple - Up More Information...
Product Name Book Name
Page 63

The Custom Multiple Up Layout Style allows you to print two,
four, or more images on each single output sheet. The output
can be one-sided or two-sided.
The programmable options are:
– Original Size: Specify the size of the input PostScript/
PDF job
– Scale: factor by which each side of the original page
image is multiplied before being imposed
– Pages on Sheet Side options: Repeated, Sequential,
or Alternating
To illustrate how the Custom Multiple Up Layout St yle is
imposed, consider a simple 4-page i nput job. Each p age of the
original document can be printed multiple times on the Letter,
Legal, or Ledger output page, or you may pri nt multiple pages
on the output page. The scale factor that is chos en, along with
the size of the output page, determines the size of the
imposed image on the output page. You may also choose the
Alternating option that imposes the odd-numbered pages on
the rear of each segment of the final page. DocuSP arranges
the odd-numbered page images (1,3,5,…,N-1) in left-to-right,
top-to-bottom order on the front side of the output sheet. The
corresponding even-numbered page images (2, 4 ,6,…,N) are
imaged directly behind their respective preceding page image
number on the back side of the output sheet.
The output for Custom Multiple Up can be single-sided or
double-sided, although it must be double-sided when using the
Alternating option. You may also choose to print crop marks.
Notes:
– Scaling: auto-size, default scale (100%), or select
scale percentage
DocuSP creates an imposed image grid such that:
– Each box equals the specif ied origi nal size ad justed by
scale
– The grid includes as many boxes as fit on the Stock
Size in the specified orientation
– There is no white space between boxes
– The grid is centered on the page
– Crop marks, if selected, print at the outside edges of
the grid, not between image boxes.
– Bleed on the outside edges of the grid, within the
imageable area of the stock, print appropriately.
– If the Original Size is greater than the PDL page si ze,
the image is oriented in the lower left corner of each
box on the grid.
Product Name Book Name
– If the PDL page size is greater than the Original Size,
each box contains the image, cropped from the lower
-47
Page 64

left corner of the page.
– It is recommended that when creating a PS/PDF file,
you ensure that the PDL page size is the size of the
image to be imposed. When specifying the layout, you
must set the Original Size to the size of the image to be
imposed.
• Booklet More Information...
Notes:
– The Booklet layout style creates saddle signature
booklets. The output is always 2-sided, and there are
several user-programmable options.
– Original Size: Specifies the size of the input PostScript/
PDF job
– Scale: factor by which each side of the original page
image is multiplied before being imposed
– Signature Shift: selecting this checkbox enables the
system to compensate for image creep caused by
paper thickness and the binding process.
– Gutter margin: selecting this checkbox enables a spin
box by which you can select the amount of gutter
added to the margins of the booklet. The default is set
at 0.2.
To illustrate how a signature booklet is imposed, consider a
simple, 8-page job on Letter stock: Pa ge 1 is on the fro nt of
sheet 1 and Page 2 is on the bac k of shee t 1. Pag e 3 is on t he
front of sheet 2 and Page 4 is on the bac k of sheet 2. Page 5 i s
on the front of sheet 3 and Page 6 is on the back of sheet 3.
Page 7 is on the front of sheet 4 and Page 8 is on the back of
sheet 4. If you wanted to make this a signature bookle t, Page
8 would be placed (by the template) on the left side of the
landscape front of sheet 1 of the output stock, and Page 1
would be placed on the right side of the front of sheet 1. Page
7 would appear on the right side of the back of sheet 1 and
page 2 would be placed on the left side, rear of sheet 1. Page
6 would appear on the left side of the front of sheet 2 and page
3 would appear on the right side of the fron t of sheet 2 . Page 5
would appear on the right side of the rear of sheet 2 and page
4 would appear on the left side of the rear of sheet 2. The
booklet would be folded down the middle, and Page 1 would
be on the front of the booklet, with Pages 2 and 3 inside and
Page 4 on the back of the booklet.
• Perfect Booklet More Information...
The Perfect Booklet Layout Style is used to make signature
booklets. The output is always 2-sided, and there are several
user-programmable options:
-48
– Original Size: specifies the size of th e input PostScript/
PDF job
Product Name Book Name
Page 65

– Signature shift: selecting this checkbox compensates
for the natural drift of the image on the page as the
document is bound.
To illustrate how a Perfect Booklet is imposed, consider a
simple, 4-page job on Letter stock: Pa ge 1 is on the fro nt of
sheet 1 and Page 2 is on the bac k of shee t 1. Pag e 3 is on t he
front of sheet 2 and Page 4 is on the back of sheet 2. If we
wanted to make this a signature booklet, Page 4 would be
placed (by the template) on the lef t side of th e landsc ape front
of the output stock, and Page 1 would be placed on the right
side of the front. Page 2 would be place d on the lef t side o f the
back and Page 3 would be place d on the r ight side of t he back.
The booklet would be folded down the middle, and Page 1
would be on the front of the booklet, with Pages 2 and 3 inside
and Page 4 on the back of the booklet.
Notes:
– Scaling: auto-size, default scale (100%), or select
scale percentage
– If the images are too large to fit on the selected stock,
the system faults the job with an error message.
– There is no white space between the images in the
center spread.
– Crop marks, if selected, print at the outside edges, not
between images, and can only be selectable when
auto-size is not selected.
– Bleed image beyond the Original Size will pri nt both on
the outside edges and in the gutter when Signature
Shift is checked.
Advanced Settings for Layouts
•Gutter
More Information...
For all layout styles other than 1-Up, DocuSP provides the
ability to program the amount of white space, or gutter,
between imposed images. The user will specify one gutter
amount which will be applied in both the X and Y directions (if
there are enough images on the imposed page to warrant
gutter in both directions). This gutter amount will be relative to
the unscaled original document size. For example, ass ume an
original US Letter (8.5x11) document, programmed for 2-Up
imposition on US Letter output stock, with 50% reduction
scaling. If a gutter of 1” is programmed, since the original
document image will be reduced by 50%, the gutter will be
reduced by 50% as well, leaving an actual .5” gutter between
images. When crop marks are pr ogrammed in conjunction wi th
gutter, the marks will be placed along the exterior of the
imaged area on both sides of the gutter.
Product Name Book Name
-49
Page 66

• Outside Margin
More Information...
When custom multiple-up imposition is specified or when Auto
Size is selected, there will be the ability to specify the amount
of white space around the outside of the imposed output, or
outside margin. Like the gutter, the user will specify one
outside margin amount, which will be applied as the minimum
allowable amount of white space along the exterior of the
imaged area on all four sides. Depending on various factor s,
such as scale percentage, image size, gutter, there may exist
more outside margin than is programmed. Unlike gutt er, the
outside margin is the actual amount of white space on the
output sheet, and NOT relative to the unscaled original
document size. If the user programs an outside ma rgin of 1”,
there will exist at least 1” of white space on edge of all four
sides of the output sheet.
• Bleed/Trim Size
More Information...
For all layout styles, there will be the abil ity to specify the
existence of image bleed in the original document. If bleed is
specified, the user need to specify the trim size. The trim size
is the trim size of the original document , not the trim size of the
imposed image after reduction or enlargement. If the user
specifies a trim size greater than the automatically detected
original document size, the image will be centered within the
larger trim box. The existence of bleed and trim size will also
be used to place crop marks on the output sheet. Crop mark s,
when specified, will be placed around the edges of th e Trim
Box. When gutter and/or outside margin are spec ified along
with bleed, the bleed image wi ll appear wit hin the gutter a nd/or
outside margin white space, with the appropriate crop marks,
when applied.
-50
• Remove Image Bleed
More Information...
When bleed and trim size are programmed for signature-style
layouts (Saddle Stitch and Perfect Booklet), there will be the
ability to specify the amount of image bleed to remove along
the center fold line of the signature output sheet. The user will
be given two options on how to deal with the bleed along the
fold line (bleed mode); they can select Bleed to Fold or set a
custom bleed amount. When Bleed to Fold is selected, the
entire bleed area will be removed from the right edge of the
left-hand image and the entir e bleed area will be removed from
the left edge of the right -hand image, along the cen ter fold li ne.
This will have the effect of bringing the two image trim boxes
flush with each other along the fold. If custom bleed is
selected, there user c an speci fy manual ly the amount o f bleed
area to be removed from each image along the center fold
line, in effect moving each of the trim boxes inwards towards
Product Name Book Name
Page 67

the fold line by the specified amount. Important to note is that,
like gutter , the custom ble ed amount is relative t o the unscaled
original document size. Bleed for sig nature jobs and gutters
are mutually exclusive. If bleed is selected, gutter will not be
programmable. Signature shift, on the other hand, still will
selectable.
• Crop Marks
More Information...
In previous DocuSP releases, crop mark programming
consisted of enabling or disabling the feature.
DocuSP 4.1 introduces the ability to specify the output sides
on which to image crop marks. When one-sided printing is
selected, the user will be able to choose between printing no
crop marks and printing crop marks on the front side of the
output.
However , when two-sided printing is selected (duplex or headto-toe), the user will also be able to choose printing crop marks
on the back side of the output and pr inti ng crop mark s on both
sides of the output.
In addition, when a signature-style layout is selected, all four
crop mark options will be available, regardless of the user
programmed plex, since two-sided printing is implied and
overridden in the signature cases.
When auto-size is selected crop mar ks will not be avail able for
programming, as Auto-Size calculat es a reduce/enlarge value
which will automatically image to the edge of the output sheet
and crop marks are only placed along the exterior of th e
imaged output. The one exception to this rule is when an
outside margin is programmed in conjunction with auto-size R/
E. Since a border of white space is placed around the imaged
output, the imaged output will be automaticall y scaled to fit
within that border and crop marks will be placed within the
outside margin.
Caveats for using the Layout feature
• Job programming is applied after the pages are imposed.
These settings include Sides Imaged, Collation, Image Shift,
and Quantity. It is possible to program settings that create a
conflict with the layout settings. This may produce unexpected
or incorrect results when the images are imposed. For
instance, if you remove collation on a set of prints you wish to
impose as saddle signature, you get N copies of each page
next to each other instead of 1-N, 1-N, 1-N, etc. This may
create problems when the signature booklet is sent to the
Signature Booklet Maker.
Product Name Book Name
• All special page programming, such as inserts, covers, and
page exceptions, are ignored when using the Layout feature.
In addition, color management settings made at the job or
-51
Page 68
• The Layout feature is valid only for PostScript and PDF print
The Image Quality Tab
The Image Quality tab contains controls that allow you to make
image quality adjustments.
Setting job properties using the Image Quality tab
To use the Image Quality tab:
1. Open Job Manager.
queue level are not considered when usi ng layout. To perform
color corrections on imposed jobs, make your imposition
selections and then save the job as a reprint file. Then, you
can perform color corrections on the reprint file.
jobs and spooling queues. Any page-level PostScript
programming in the PDL is lost when the job is printing.
NOTE: If you do not have a valid PostScript license on the
system, you cannot set PostScript options.
2. Double-click a job in the Active or Inactive Jobs list.
3. Select the Image Quality tab.
4. Select the Image Adjustments FAB to adjust lightness,
contrast, saturation, and color cast settings. Once you have
edited these settings, s elect [Apply] . Your settings will be listed
on the FAB.
5. Select the Options FAB to access controls for Black Overprin t,
Anti-aliasing, and Trapping. Once you have edited these
settings, select [Apply]. Your settings will be listed on the FAB.
6. Select the User TRCs FAB. Any user TRCs that have been
created are accessible through the pull-down menu. You may
also view the curves by selecting [View Curves...]. Once you
have edited these settings, sel ect [Apply] . Your settings will be
listed on the FAB.
7. Select the Halftone FAB. You can select from the following:
• System Specified
• 200 Dot (Primary)
• 150 Dot
• 200 Line
-52
• 300 Line
• 600 Line
Once you have edited these settings, select [Apply]. Your
settings will be listed on the FAB.
8. Select the Source Color FAB to edit settings for RGB Color
Space, CMYK Color Space, and/or Gray Color Space. You
Product Name Book Name
Page 69

may make separate Source Color assignments within each
color space for the Images profile and the Text and Graphics
profile. Once you have edited these setti ngs, select [Apply].
Your settings will be listed on the FAB.
9. Select the Output Color FAB to edit settings for Output Color
Setup and Rendering; you may make separate output color
rendering assignments for images, text, and graphics. Once
you have edited these settings, select [Apply]. Your settings
will be listed on the FAB.
10. Select the Image Resample FAB to select an inter polation
method. Select from the following choices:
• System Specified
• Nearest Neighbor
• Bi-linear
•Smart
Once you have made your choice, select [Apply]. Your setting
will be listed on the FAB.
11. Select [OK] to save settings and exit the job properties tabset,
or [Apply] to save settings a nd continue setting job propert ies,
or [Cancel] to exit the tabset without saving your edited
settings.
The Image Edit Tab
Setting job properties using the Image Edit tab
The Image Edit tab contains Image Shift, and Rotation Feature
Access Buttons (FABs). Additional selections ar e available within
each FAB.
• The Image Shift FAB enables you to control where the page
image is printed on the page.
• The Rotation FAB allows you to turn the page images in a job.
To use the Image Edit tab:
1. Open Job Manager.
2. Double-click a job in the Active or Inactive Jobs list. You can
access Completed jobs if the Retain PDL File s of the last 50
jobs is enabled. For additional information about Retain PDL
Files of the last 50 jobs see Setting the Job Policy.
3. Select the Image Edit tab.
4. Select the Image Shift FAB to adjust the location on a pag e
where printing occurs. The procedure to shift an image varies
Product Name Book Name
-53
Page 70

based on whether you are p rinting on a one-sided or two-sided
page. The Summary field displays stock and size imaged
details.
a. For 1 Sided jobs the Shift Option is set to Independent.
–
Select the desired unit of measure.
The Summary field displays stock settings.
When selecting the horizont al (X) image s hift , enter
a positive number to move the image away from
the left side of the paper. Enter a negative number
to move the image away from the right side of the
paper.
When selecting the vertical (Y) image shif t, enter a
positive number to move the image upward or a
negative number to move the image down.
Use the Center option to bring both the X and Y
values back to zero (no shift).
i. Select [OK] or continue setting job properties.
b. Shifting the image on a two-sided job:
The software does not automatically adjus t the image shif t
for two-sided jobs. You must enter the specific
requirements for a two-sided job.
i. The tab contains a mimic of a printed p age that reflect s
the image shift changes you can make. Sel ect from the
following:
– Independent: Select an independent vertic al or
horizontal shift for both sides 1 and 2.
– Mirror: The horizontal and vertic al image shift for
both sides move in opposite directions from each
other. Mirror is best used for two sided jobs.
– Mirror X only: The horizontal shift for both sides
moves in opposite directions. The vertical shift for
both sides remains independent.
– Mirror Y only: The vertical shi ft for both sides
moves in opposite directions. The horizontal shift
for both sides remains independent.
– Tandem: The horizontal and vertical shift move in
the same direction for both sides.
– Tandem X only: The horizontal shift for both sides
moves in the same direction. The vertical shift
remains independent for both sides.
-54
– Tandem Y only: The vertical shift for both sides
moves in the same direction. The horizontal shift
remains independent for both sides. Tandem is
best used for head-to-toe jobs.
Product Name Book Name
Page 71

ii. Select the desired unit of measure.
iii. Using the X and Y axis, enter shift values. More
Information...
When selecting the horizontal ( X) image shift, enter a
positive number to move the image away from the left
side of the paper. Enter a negative number to move the
image away from the right side of the paper.
When selecting the vertical (Y) image shif t, enter a
positive number to move the image upward and a
negative number to move the image down.
Use the Center option to bring both the X and Y values
back to zero (no shift).
Your selections display on the Image Shift FAB and
within the Summary field.
NOTE:This task list describes the shift behavior on side
one. The shift behavior of side two is determined by the
Shift Option selected.
5. Set rotation by selecting the Image Rotati on FAB: Use rotation
to turn a page image 180 degrees from its current position (0
degrees represents no rotation). You may need to rotate a
page image so that it prints properly when processed by a
finishing device (for example, to allow for ri ght-side stitching or
binding). In some instances, you may only be able to select
rotation on the job ticket.
Choose 180 degrees (or 0 degrees if the page is already
rotated).
6. Select (OK) or continue setting job properties. Your selections
display on the individual FABs.
Selecting Color Options for a job
Selecting the Source Color
To select the Source Color, complete the following steps:
1. Double-click on the job in Active Jobs list. You can access
Completed jobs if the Retain PDL Files of the last 50 jobs is
enabled. For additional information about Retain PDL Files of
the last 50 jobs see Setting the Job Policy.
2. Select the Image Quality tab.
3. Select the Source Color FAB.
4. If you wish to use the RGB Color S pace, select the pull-down
menu under that heading for Images Profile. Choose from the
following:
Product Name Book Name
• Adobe RGB
-55
Page 72

•sRGB
• Xerox Consistent Color Mode RGB
• Xerox Consistent Color Mode RGB, Gamma = 1
You may also set the Text and Graphics Profile differently than
the Images Profile. Within the pull-down are the sa me options
as listed above.
5. If you wish to use the CMYK Color S pace, sel ect the pull-down
menu under that heading for Images Profile. Choose from the
following:
• Commercial CMYK
• DocuColor 2000 CMYK
• DocuColor 6000 CMYK
• FOGRA Gloss Coated CMYK
• FOGRA Matte Coated CMYK
• FOGRA Uncoated CMYK
• iGen3 Coated CMYK
• SWOP Coated CMYK
You may also set the Text and Graphics Profile differently than
the Images Profile. Within the pull-down are the sa me options
as listed above.
6. If you wish to use the Gray Color Space, select the pull-down
menu under that heading for Images Profile and make your
selection.
You may also set the Text and Graphics Profile differently than
the Images Profile. Within the pull-down are the sa me options
as listed above.
7. Select [OK] to save settings and exit the job properties tabset,
or [Apply] to save settings a nd continue setting job propert ies,
or [Cancel] to exit the tabset without saving your edited
settings.
Halftone Screen
Halftone Screen refers to the pattern of dots or lines of varying
sizes applied to an image of varying tones, or same sized dots
applied to a tint of color.
Within the Halftone FAB you will observe a drop-box menu for
halftones. If this drop-box is left alone, the “System Specified”
halftone screen will be applied. However, you may click on this
box to receive further options.
-56
Product Name Book Name
Page 73

NOTE: In the following list, you will see the halftone options
described in numerical terms. The numbers refer to the screen
frequencies of the various dot screen and line screen patterns
described. It is important to note that a higher-valued screen
frequency does not necessarily produce a better result. Also, the
novice user is encouraged to accept the default setting, as this
setting is designed to produce the best general results of the
available settings.
These options include:
• System Specified: provides a halftone screen that is
optimized for your printer. For the DC2045/2060, the default or
system specified halftone screen is a 200 dot screen.
• 150 dot: a low frequency dot screen halftone
• 200 dot: this mid frequency dot screen is one of the
recommended settings for the DC 2045/2060.
• 200 line: as mentioned above, this mid frequency line screen
halftone is the recommended and default setting for this
printer.
• 300 line: this upper mid frequency lin e screen half tone may be
useful for certain types of images.
• 600 line: this high frequency line s creen halft one is useful only
for specific tex t types.
These options will determine how the printer will handle hal ftones.
More Information...The general differences between the
various kinds of halftone screens are as follows:
– Dot Screen Halftone: Dot scr eening provides a
rosette type pattern t o the screen, which is a commonl y
desired screen pattern. The dot screen halft one makes
seeing artifacts and patterns in a large halftone much
less likely. However, when two straight line areas meet
one another, slight jags may be v isi ble. A dot screen is
particularly usef ul for larg e gradients and ot her shading
areas likely to produce visible lines from a line screen
pattern.
– Line Screen Halftone: A line screen provides a linear
dot pattern. The line screen halftone makes seeing
artifacts and patterns in a large halftone more likely
compared to a dot screen. However, when two straight
lines adjoining halftone areas meet, then the linear
nature of the screen avoids the jagged border areas
that are more often found in a dot screen pattern.
Product Name Book Name
– Stochastic Screens: Stochastic screening uses
randomly placed dots i nstead of th e traditi onal half tone
dots aligned along designated screen angles. The
concept of stochastic screening is that dots placed
randomly will not cause moire patterns. Howeve r,
completely random positioni ng does not work well . The
-57
Page 74

stochastic screen prevents screening interference
patterns, but it can cause graini ness and other visual
artifacts. Therefor e, stochastic screening as
implemented by your Xerox color printer uses a
complex algorithm to determine the optimum
placement of dots in order to appear random while
reducing graininess. This “random” arrangement of
dots means there is no “direction” to the screen; and
therefore no screen angle exists. The variable spacing
of the dots means there is no fixed spacing, and
therefore there is no screen frequency. So, without
frequency or angle, there is no possibility of moire
between the four process-color screens, or even of
moire from patterns within an image.
Setting the Ha lftone Screen
To set the halftone screen within Job Manager , complete the
following steps:
1. Open the Job Manager .
2. Double-click a job in the Active or Inactive Jobs list. You can
access Completed jobs if the Retain PDL File s of the last 50
jobs is enabled. For additional information about Retain PDL
Files of the last 50 jobs see Setting the Job Policy.
3. Select the Image Quality Tab.
4. Select the Halftone FAB.
5. From the Halftone drop-box, select the desired setting
according to your system. For most jobs, you will wa nt to
accept the default, “System Specified” setting.
6. If desired, enter halft one information in the field provided.
7. Select [OK] to accept the changes and exit the job propert ies
tabset, or [Apply ] to commit change s without exiting the dial og.
If you do not wish to retain your changes, select [Cancel] to
exit without saving changes.
Setting Image Resample, or Interpolation, options
DocuSP provides the user with the ability to select an
interpolation, or image resample, method in order to achieve
maximum Image Quality at the desired RIP performance.
Interpolation is defined as the process of est imat ing a value of a
function between two known values. In the Image Interpolation
context, the function of known values is the input image, and the
estimated values are the values calculat ed for the output image.
Image interpolation attempts to produce a smooth transition
between adjacent samples rather than simply replicat ing pixels
(which would result in “blocky ” images).
-58
The interpolation methods that may be selected (in addit ion to the
system specified setting) include:
Product Name Book Name
Page 75

• Bi-Linear Interpolation: A method used to scale image data
(pixels) from one resolution to another. The replacement pixel
in the scaled image is calculated using a weighted sum of the
four nearest pixel values in the source image. This method
offers higher quality than Nearest Neighbor Interpolation.
• Nearest Neighbor Interpolation: A method used to scale
image data (pixels) from one resolution to ano ther. The output
pixel value is simply the value of the input pixel closest to the
output location. Nearest neighbor interpolation is the highest
speed interpolation on DocuSP.
• Smart Interpolation: A method used to scale image data
(pixels) from one resolution to anot her. This interpolation
method automatically chooses between bi-linear interpolation
and filtered interpolation based on the input image
characteristics. Smart interpolation is the highest quality
interpolation available on DocuSP.
• Filtered Interpolation (within “Smart Interpolation”): A
method used to scale image data (pixels) from one resolution
to another. The output pixel is calculated by pas sing the
neighborhood of the input pixel through the filter to det ermine
the output pixel. DocuSP uses a filter dynamically determined
by the frequency of the output halftone and the input image
characteristics. Filtered Interpolation is used as part of the
Smart Interpolation option in DocuSP.
To select an interpolation method, perform the following steps:
1. Open Job Manager.
2. Double-click a job in the Active or Inactive Jobs list. You can
access Completed jobs if the Retain PDL File s of the last 50
jobs is enabled. For additional information about Retain PDL
Files of the last 50 jobs see Setting the Job Policy.
3. Select the Image Quality tab.
4. Select the Image Resample FAB.
5. Select the radio button next to the Interpolati on method you
wish to employ.
6. Select [OK] to commit changes and exit the job properties
tabset, or select [Apply] to save current changes and continue
making changes.
Setting up a Destination Profile
To set up a Destination Profile, complete the following steps:
1. Open Job Manager.
2. Double-click a job in the Active or Inactive Jobs list. You can
access Completed jobs if the Retain PDL File s of the last 50
jobs is enabled. For additional information about Retain PDL
Files of the last 50 jobs see Setting the Job Policy.
Product Name Book Name
3. Select the Image Quality tab.
-59
Page 76

4. Select the Output Color FAB.
5. Within the Output Color FAB, select the Output Color Setup
pull-down menu. Select from the following choices:
• System Specified
• Bright White
• Monochrome CMYK
• Non-White
•White
• XEROX_DC2000
• XEROX_DC2000-Heavy_GCR
• XEROX_DC2000-Light_GCR
6. Select [OK] to commit changes and exit the job properties
tabset, or select [Apply] to save current changes and continue
making changes.
For more information on specific out put or destination pro files, and
to use Gray Component Removal (GCR) profiles, select Using
Gray Component Removal.
Setting up Job Rendering
Occasionally , the requested colors in an image are outside a given
printer’s “gamut” and cannot be exactly reproduced. Rendering
provides color mapping between the image’s “Sour ce” gamut and
the printer’s own gamut.
To set up Job Rendering, complete the following steps:
1. Open Job Manager.
2. Double-click a job in the Active or Inactive Jobs list. You can
access Completed jobs if the Retain PDL File s of the last 50
jobs is enabled. For additional information about Retain PDL
Files of the last 50 jobs see Setting the Job Policy.
3. Select the Image Quality tab.
4. Select the Output Color FAB.
5. Choose between the following options shown under
Rendering:
a. Rendering for all Data: selecting this opt ion enables a
single pull-down menu. Within this menu are five
Rendering options that have relative strengths and
weaknesses based upon their intended output. These
options are:
-60
– Saturation: Optimizes the rendering of business
graphics, such as charts and graphs.
– Perceptual: optimizes the rendering of photographic
images.
– Relative Colorimetric: Al so optimi zed for r endering of
Product Name Book Name
Page 77

spot color and logos. This transformation, however,
uses additional information, such as hue and
saturation, specified in the source profile to select the
most appropriate value within the printer gamut.
– Absolute Colorimetric: Optimized for renderi ng to
spot color and logos by identifying the cl osest value
within the printer gamut.
– Pure (for Text): Optimized for rendering of text and
line art. The “Pure” intent attempts to subdue halftone
textures, thus increasing the visibility of small text.
b. Rendering for Specific Data: select ing this option
enables you to choose different rendering options for
images, text, and graphics. For inst ance, you might choose
Perceptual for the images, Pure for the text, and Relative
Colorimetric for the graphics, in ord e r to optimize each
output type appropriately.
6. Select [OK] to commit changes and exit the job properties
tabset, or select [Apply] to save current changes and continue
making changes.
Setting Image Quality options
The Options F AB in the Job Properti es :Image Quality tab cont ains
controls for the following options:
• Trapping
– an image processing technique used to compensate for
misregistration in a print engine or press. Misregistration
results in white gaps and shifted hues.
– can be set by selecting the corresponding check box
• Black Overprint
– an Image Quality enhancement process performed during
RIP that prevents the background of a black object f rom
being removed. With the black being print ed over the other
color layers, any misregistration in the print engine or
press will not result in white gaps.
– can be set by selecting the corresponding check box
• Anti-Aliasing
– a method for reducing the jagged appearance (caused by
rasterization) of curves and diagonal lines. Anti-Aliasing
enhances the smoothness of such curves and lines.
– can be set by selecting the corresponding check box
Product Name Book Name
• Print as Grayscale
– not technically an Image Quality option, this opt ion can be
selected if the user wishes to proof a job or to view their
job’s layout in a printed form.
– can be set by selecting the corresponding check box
-61
Page 78

Making Image Adjustments
The Image Adjustments FAB in the Job Properties: Image Quality
FAB contains the following settings:
• Lightness
– controls the relative brightness of the color in the printer’s
gamut
– can be set to the desired level +/-100 units using the spin
box
• Contrast
– controls the difference of tonal gradation bet ween the light
and dark values within an image in the printer’s gamut
– can be set to the desired level +/-100 units using the spin
box
• Saturation
– controls the strength or purity of the color in the printer’s
gamut
– can be set to the desired level +/-100 units using the spin
box
• Color Cast
these adjustments provide the user the ability to decrease
or increase the amount of any single color. Moving the
slider bar toward any one color increases the amount of
that color by decreasing the amount of its complementary
color.
These adjustments are:
– Cyan versus Red
– Magenta versus Green
– Yellow versus Blue
Settin g Up Trapping
To set up Trapping,
1. Within Job Manager or Queue Manager, select [Properties...]
from the right-click menu.
2. Select the Image Quality tab
3. Select the Options FAB.
4. Within the Trapping Setup area, you may select pixel values
for the width and height parameters, from 1 to 20 pixels.
-62
NOTE: The default setting is 1 pixel in both direct ions.
5. If you wish to use vector over image trapping, select the
checkbox for [Image/Vector Trapping].
6. Select [OK] to accept the trapping settings, or [Cancel ] to
Product Name Book Name
Page 79

If you are setting the trap width for a queue, you may choose to
set this option for ov erride by se lecti ng the [Overr ide] c heck box in
the Color Properties tab.
The Special Pages Tab
The Special Pages tab contains features that enable you to
manage exception pages, cover pages, and page inserts.
reject changes. More Information...
Usage Advice:
– Generally, a trapping zone above 4 pixels is visually
obvious and not pleasing to the eye. A higher value
should be considered carefully; however, the ability to
set a higher trap zone has been included to give the
user control over individual images that have been
poorly trapped individually.
– Two direction parameters are included because the
feed direction has a marginal effect on image quality.
However , in nearly all cases, the user would set these
two values the same.
• Exception pages enable you to set special characteristics for
specific pages within a job.
• Cover pages add a finished appearance to jobs and are
typically used for bound, st apled, or stitched jobs.
• A page insert is a blank piece of paper, or other media, that is
inserted between printed pages in a job.
Special pages information is availabl e by viewing the column
headings within each Special Pages FAB.
Creating exception pages
Exception pages enable you to set special characteristics for
specific pages within a job.
To create exception pages:
1. Open Job Manager.
2. Double-click a job in the Active or Inactive Jobs list. You can
access Completed jobs if the Retain PDL File s of the last 50
jobs is enabled. For additional information about Retain PDL
Files of the last 50 jobs see Setting the Job Policy.
3. Select the Special Pages tab.
Product Name Book Name
4. Choose the Exceptions FAB.
5. To create a new exception page click the [Add Exceptions...]
button. The Job Exceptions dialog opens.
-63
Page 80

NOTE: To add an exception page to an existing one, rightclick the exception page and select [Add Pages...].
6. Enter a page range for the exception p ages in the [From] and
[To] fields.
NOTE: When creating more than one exception page for a
job, be sure that the page ranges do not conflict. For example,
if you set an exception page on page 12 you cannot enter
page 12 on any other exception pages for that job. If a page
conflict occurs an error d ialog window opens n otifying y ou that
an invalid page range was specifi ed. Enter a valid page range
to continue.
7. Choose the Stock tab to select stock characteristics:
• Select a stock from the Name menu. Select [Unspecified]
from the Name menu to set custom stock properties. Make
selections from the Size/Color F AB, T ype/W eight F AB, and
if available, Coating FAB.
• You can select a stock and verify the characteristics of the
stock by selecting the [ Stock List...], selecting a stock, and
clicking [OK].
• Make selections directly from the Size/Color FAB, Type/
Weight FAB, and if available, Coating FAB. If [Custom] is
selected from the Size menu, within the Size/Color FAB,
the Width and Height fields become active.
NOTE:Be sure the attributes you select are supported on
the printing system.
8. From the Output tab select [1 Sided], or [2 Sided]. If [2 Sided]
is selected, you can choose to [Rotate Side 2].
9. Select the Image Edit tab to set image shift options.
10. Select image quality options. See The Image Quality Tab for
additional information.
11. Select the PostScript/PDF tab and select from:
• Disable Caching
• Enable Caching
• PDL Specif ied
12. After you have completed setting exception p age properties
click [Add Exception].
13. Click [Close] to exit the dialog window. Exception page
information displays on the exception page list and F AB.
-64
Editing an exception page
To edit an exception page:
1. Open Job Manager.
2. Double-click a job in the Active or Inactive Jobs list. You can
Product Name Book Name
Page 81

access Completed jobs if the Retain PDL File s of the last 50
jobs is enabled. For additional information about Retain PDL
Files of the last 50 jobs see Setting the Job Policy.
3. Select the Special Pages tab.
4. Choose the Exception Pages FAB.
5. Double-click the exception page you want to edit and make
any changes. Alternatively, you can right-click an exception
page and select [Edit...].
6. Select [OK].
Deleting an exception page
To delete an exception page:
1. Open Job Manager.
2. Double-click a job in the Active or Inactive Jobs list. You can
access Completed jobs if the Retain PDL File s of the last 50
jobs is enabled. For additional information about Retain PDL
Files of the last 50 jobs see Setting the Job Policy.
3. Select the Special Pages tab.
4. Choose the Exception Pages FAB.
5. Right-click an exception page and select [Delete] or [Delete
All]. The exception page is removed for m the list.
Creating inserts
Job inserts differ from slip sheets in that they separate pages of a
job while slip sheets separate one job from another. Inserts may
also be preprinted stock or forms.
NOTE: Inserts may not be programmed for a job with cover s if the
inserts affect the cover printing. For example, inserts are not
allowed between pages printed on the front and back of a cover.
An insert request takes precedence over an exception page
request. When two or more special pages are programmed
(covers, inserts, or exce ption pages) image ordering confl ict s may
occur. Verify that programmed options do not conflict.
To create inserts:
1. Open Job Manager.
2. Double-click a job in the Active or Inactive Jobs list. You can
access Completed jobs if the Retain PDL File s of the last 50
jobs is enabled. For additional information about Retain PDL
Files of the last 50 jobs see Setting the Job Policy.
Product Name Book Name
3. Select the Special Pages tab.
4. Choose the Inserts FAB.
5. To create a new insert click the [Add Inserts...] button. The
Inserts dialog window opens.
-65
Page 82

NOTE: To add an insert to an existing one, right-c lick the
insert and select [Add Pages...].
6. Enter the page number where you want the insert pl aced in
the [After Page] field.
7. Enter the number of insert pages you want to place in that
location using the [Insert Pages] field.
8. Choose stock characteristics:
• Select a stock from the Name menu. Select [Unspecified]
from the Name menu to set custom stock properties. Make
selections from the Size/Color F AB, T ype/W eight F AB, and
if available, Coating FAB.
• You can select a stock and verify the characteristics of the
stock by selecting the [ Stock List...], selecting a stock, and
clicking [OK].
• Make selections directly from the Size/Color FAB, Type/
Weight FAB, and if available, Coating FAB. If [Custom] is
selected from the Size menu, within the Size/Color FAB,
the Width and Height fields become active.
NOTE:Be sure the attributes you select are supported on
the printing system.
9. After you have completed setting insert page properties click
the [Add Insert] button.
10. Clic k [Close] to exit the dialog window. Insert page information
displays on the insert page list and FAB.
Editing inserts
To edit inserts:
1. Open Job Manager.
2. Double-click a job in the Active or Inactive Jobs list. You can
access Completed jobs if the Retain PDL File s of the last 50
jobs is enabled. For additional information about Retain PDL
Files of the last 50 jobs see Setting the Job Policy.
3. Select the Special Pages tab.
4. Choose the Inserts FAB.
5. Double-click the insert you want to edit and make any
changes. Alternatively, you can right-click an insert and select
[Edit...].
6. Select [OK].
-66
Product Name Book Name
Page 83

Deleting inserts
To delete job inserts:
1. Open Job Manager.
2. Double-click a job in the Active or Inactive Jobs list. You can
access Completed jobs if the Retain PDL File s of the last 50
jobs is enabled. For additional information about Retain PDL
Files of the last 50 jobs see Setting the Job Policy.
3. Select the Special Pages tab.
4. Choose the Inserts FAB.
5. Right-click on an insert and select [Delete] or [Delete All]. The
insert is remove d fo rm the lis t.
Creating cover pages
Covers add a finished appearance to jobs and are typically used
for bound, stapled, or stitched jobs. Covers are programmed as
part of a print job; therefore, any printing required on the cover
pages must be submitted as part of the job.
To create cover pages:
1. Open Job Manager.
2. Double-click a job in the Active or Inactive Jobs list. You can
access Completed jobs if the Retain PDL File s of the last 50
jobs is enabled. For additional information about Retain PDL
Files of the last 50 jobs see Setting the Job Policy.
3. Select the Special Pages tab.
4. Choose the Covers FAB.
5. Choose [Add Front Cover...], or [Add Back Cover...]. The
Covers Properties tabset opens.
6. Select [Make the Front and Back Cover t he Same] if you need
to program the same characteristics for both the front and
back covers. Otherwise, the paper stock and sides printed
characteristics must be independent ly programmed for each
cover within the job.
7. From the Print On pull-down menu select the location where
you want the cover to print:
• Inside Only
• Outside Only
• Both Sides
Product Name Book Name
8. Choose stock characteristics:
• Select a stock from the Name menu. Select [Unspecified]
from the Name menu to set custom stock properties. Make
selections from the Size/Color F AB, T ype/W eight F AB, and
Coating FAB.
-67
Page 84

• You can select a stock and verify the characteristics of the
stock by selecting the [ Stock List...], selecting a stock, and
clicking [OK].
• Make selections directly from the Size/Color FAB, Type/
Weight F AB, and Coating F AB. If [Cust om] is selected from
the Size menu, within the Size/Color FAB, the Width and
Height fields become active.
NOTE:Be sure the attributes you select are supported on
the printing system.
9. After you have completed setting cover page properties click
the [Add Cover] button.
10. Clic k [Close] to exit the di alog window . Cover page infor mation
displays on the cover page list and FAB.
Editing a cover page
To edit a cover page:
1. Open Job Manager.
2. Double-click a job in the Active or Inactive Jobs list. You can
access Completed jobs if the Retain PDL File s of the last 50
jobs is enabled. For additional information about Retain PDL
Files of the last 50 jobs see Setting the Job Policy.
3. Select the Special Pages tab.
4. Choose the Covers FAB.
5. Double-click the cover you want to edit and make any
changes. Alternatively, you can right-click a cover and select
[Edit...].
6. Select [OK].
Deleting a cover page
To delete a cover page:
1. Open Job Manager.
2. Double-click a job in the Active or Inactive Jobs list. You can
access Completed jobs if the Retain PDL File s of the last 50
jobs is enabled. For additional information about Retain PDL
Files of the last 50 jobs see Setting the Job Policy.
3. Select the Special Pages tab.
4. Choose the Covers FAB.
5. Right-click a cover and select [Delete] or [Delete All]. The
cover is remov e d fo rm th e lis t.
-68
Product Name Book Name
Page 85
The Time Stamps Tab
View a time stamp to see the submission time of a job, the time
the job started and finished processi ng, the time the job started
and completed printing, and the tot al time the job was suspended.
Viewing a time stamp
To view a time stamp:
1. Open Job Manager.
2. Double-click the job you want to view.
3. Select the Time Stamps tab.
• Submission Time: The time that the job was submitted
and accepted by the controller.
• Processing Start Time: The time that the controller
started to process the job.
• Print Start Time: The time the job started printing.
• Total Print Suspend Time: The time the job was
suspended while printing.
The Faulted Tab
Clearing a faulted job
• Completion Time: The amount of time the job took to
complete.
• Processing End Time: The time the controller finished
processing the job.
• Print End Time: The time the job finished printing.
• Total Processing Suspend Time: The time the job was
suspended while being processed (decomposed).
4. Select [OK] to close the dialog window.
The Faulted tab contains job fault clear ance in formati on. A f aulted
job may contain errors which cause it not to print, to print with
errors, or to print onl y a cover sheet. Th is tab is unavail able unless
a job has faulted.
Job faults appear in the Printer Status field of the DocuSP Print
Services window. An exclamation point (!) appears next to the job.
Product Name Book Name
To clear a faulted job:
1. Perform one of the following:
• In the Printer Status field of the DocuSP Print Services
window , double-click the faulted message.
• Open the Job Manager and double-click the faulted job in
-69
Page 86

The Ineligible Tab
Clearing an ineligible job
the Inactive Jobs list.
2. The Job Properties dialog opens with the Faulted tab selected.
The tab displays details of the fault along with clearance
instructions. Follow the instructions to clear the fault. The
scroll bar allows you to display instructions that are not visible.
3. If more than one fault has occurred, select [Nex t Fault] and
follow the instructions for that fault.
4. Select [OK] when all faults are cleared.
An ineligible job is one that cannot print because it lacks a
resource required for printing.
Look at the Current tab in the Job Manager to i dent ify an ine ligi ble
job. These jobs are listed at the bot tom of the dialog i n the Inactive
list.
To clear an ineligible job:
1. Open the Job Manager and select the Current tab.
2. Double-click the ineligible job. The Job Properties Ineligible
tab displays. It cont ains a list of the resources needed for the
job.
3. Load the needed resources. When t he system detect s that th e
resources are available, the job is automati cally scheduled to
print. For example, if t he job requires blue stock, the job starts
to print when blue stock is added in the printer and
programmed into the Printer Manager.
4. Select [OK] to close the dialog window.
-70
Product Name Book Name
Page 87

Using the Print Service
Print Service menus
Print Service
The Print Service allows you to print, print and sav e, or save a job
to a local or network destination.
Use the Print Service to p ri nt job s t hat h ave not bee n submi tted t o
the print system. Jobs can be located on a local or, if available,
network drive.
The Print Service menus enab le you to perfor m print management
tasks such as printing, proofing, and Print Now.
Job properties can be accessed by double-clicking a job.
The Print Service menu contains the following options which can
be accessed by right-clicking a job, select ing the File menu, or
using the toolbar:
To access the Print Service menu, select a job and perform one of
the following:
• Right-click a job
• Select the File menu
• Select an icon from the toolbar
The following options are available:
• Print: Places the selected job in J ob Manager whe re it ca n
be accessed for printing.
• Print Now: Interrupts a currently printing job to print the
selected job.
• Proof: Prints one copy of the job and retains the job in the
queue for additional printing. Proof jobs interrupt any
currently printing job.
• Print Selected: Places multiple jobs in Job Manager
where they can be accessed for printing.
Product Name Book Name
• Proof Selected: Prints one copy of each job and retains
the jobs in the queue for additional printing. Proof jobs
interrupt any currently prin ting job.
• Print Now Selected: Interrupts any currently printing jobs
-1
Page 88

to print multiple selected jobs.
• Preview/Preview Range: Generates a previ ew look of t he
job. A PostScript license is required to acces s this fea ture.
If no PostScript license is available on your system, this
menu item is grayed out. See Previewing a job for
additional information.
NOTE:VIPP and PPML jobs cannot be viewed using this
feature; if you attempt to view these job types, an error
message displays.
• Editor: Along with viewing a job prior to printing, you can
choose to edit PDF format jobs by removing, adding, and/
or shifting images, as well as makin g changes to selected
job ticket settings. See Editing a saved job for more
information.
• Delete: Removes the selected job from the system.
• Move: Allows you to move a job to another queue.
• Copy: A job may be copied to another location within the
file system.
The View menu
Using the Print Service
The Print Service View menu contains the following selections:
• Show Toolbar/Hide Toolbar: display or hide toolbar option
buttons. Toolbars consist of buttons that are used for
frequently accessed features . To hide the Toolbar select [Hide
Toolbar] from the View pull-down menu.
• Select All: Highlights all jobs currently displayed in Job list.
• Clear All: Deselects all job s currently highlighted in the Job
list.
• Redisplay: Updates the Job list to reflec t the latest selections
and specifications. The display may not automati cally update
when new selections are made from the menus.
This section provides instructions on reprinting saved jobs and
sample jobs.
-2
Saved jobs
Jobs that have been saved to the controller with a destination of
Save can be stored and reprinted at a later time.
Product Name Book Name
Page 89

Reprinting a job
To reprint a saved job:
1. Open the Print Service.
2. From the Directory menu select t he UNI X fil e system or media
location where the job is saved.
3. Select the folder that contains the saved job.
NOTE: Verify the correct Save Location by checking with the
System Administrator or by viewing the Save Location in
Setup menu > System Preferences > Save tab. In some
cases, additional Save directories ar e created to save speci fic
jobs by user, by department, or by another categorization.
4. Once the correct Save directory displays, all Saved jobs will
appear in the file list on the right. You can filter the list of jobs
by selecting a specific file type in the File Filter pull-down
menu. The available choi ces are: Job Ticket, PostScript, PCL,
TIFF, ASCII, PDF, and All.
NOTE: If you do not have a valid PostScript license on the
system, you will not see PostScript in the list of format options.
The default viewing is by Job Ticket because this is the file
type that is used to reprint the entire job. Selecting other file
types does not give you the entire job. For example, if you
select a TIFF file type, the system prints out only the TIFF
image. Selecting the PostScript or PCL file prints the job with
any parameters that have been set up on the system.
NOTE: If you do not have a valid PostScript license on the
system, you will not see PostScript in the list of format options.
5. Perform one of the following steps to access job propert ies
and print the selected job. See Multiple job submission if you
want to submit more than one job at a time.
• Double-click the job.
• Right-click the job and select [Print].
• Select a job and choose the [Print] icon from the toolbar.
6. Enter the number of jobs you want to print in t he Quantity field .
7. If desired, change the job name.
8. If desired, select a different queue using the Queue menu.
9. If desired, make job property adjustments and then select
[Print].
Product Name Book Name
10. The Infor ma ti on dialog window displays which job was
submitted. Click [OK] to exit the dialog window.The job is
placed in Job Manager where it can be accessed to view job
progress or change job properties.
11. Click [Close] to exit the Properties dialog window.
-3
Page 90

Multiple job submission
DocuSP allows you to submit and print multiple jobs that have
been saved to the Print Ser vice. You can perform Print, Proof, a nd
Print Now options on up to 25 jobs at one time.
To perform a multiple job submission:
1. Open the Print Service.
2. Use the Directory menu to locate the Save directory on your
system.
3. Select the folder that contains saved jobs.
4. Select multiple jobs by performing one of the followi ng:
• Press and hold down the <CTRL> (Cont rol) key and select
each individual job.
• To select multiple files that are adjacent to one another,
press and hold down the <SHIFT> key while choosing the
first and last file names you want to select. This highlights
the first and last file name lines and all lines i n between.
NOTE: While there is no hard limit to the amount of jobs that
you can submit, performance may be impacted if you submit
hundreds of jobs.
5. Right-click within the selected j obs and choose from the
following:
• Print Selected: Prints the selected jobs.
• Proof Selected: Prints one copy of each job and retains
the jobs in the queue for additional printing. Proof jobs
interrupt any currently prin ting job.
• Print Now Selected: Interrupts any currently printing jobs
to print the selected jobs.
6. Select the queue that you want to use to print the selected jobs
and select [OK].
7. The Job Progress dialog window opens showing you the print
status of each job you select ed. You can cancel the process at
any time by selecting [Cancel].
NOTE: Canceling does not cancel jobs that have been, or are
currently being processed, but it does prevent any
unprocessed jobs from being submitted.
8. The jobs are placed in Job Manager where they can be
accessed for printing. Select [OK] to exit the Job Progress
dialog window.
-4
Product Name Book Name
Page 91

Previewing a job
NOTE: A PostScript license is required to access this feature. If a
PostScript license is not present on the system, this menu option
is grayed out.
PostScript, PDF, and TIFF format jobs can be previewed prior to
submitting it to print. An entire job or a select range of pages can
be previewed. This allows you to view the job and make any
changes before the job is submitted for final printing.
NOTE: VIPP and PPML jobs cannot be viewed using this feature;
if you attempt to view these job types, an error message displays.
1. Open the Print Service.
2. Use the Directory menu to locate the Save directory on your
system.
3. Select the folder that contains saved jobs.
4. Select the PostScript, PDF, or TIFF format job you want to
preview.
5. Preview shows the entire job , while Pr eview Range al lows you
to select a range of pages to view. Select [Preview] or
[Preview Range] by:
• Right-clicking a job.
• Selecting a job and using the File pull-down menu.
• Selecting a job and using the toolbar ic on.
6. If Preview is selected, then the preview process begins (go to
Step 7). If Preview Range is selected perform the following:
a. Select [All] if you want to previ ew the entir e job. Thi s is the
default selection.
b. If you want to preview a range of pages, clear [Al l] and
enter the page range in the fields.
c. You can use the default size di splay or you can select a
size by clearing the [Default] checkbox. The following
fields become active:
– Select a unit of measure from [inches] or [mm].
– Select a paper size from the pull-down menu. If
[Custom] is selected, you can enter values in the Width
and Height fields.
d. Click [OK] to exit the dialog window. The preview range
process begins.
7. Once the preview process is complete, the job you selected
displays in the Preview dialog window. Page icons display for
each page of the job. You can scroll to each p age or selec t the
page icon and go directly to that page.
Product Name Book Name
You can perform the following actions by selecting from the
-5
Page 92

icons and menus located at the top of the Preview dialog
window . Move the cursor over each icon to get a description . If
more than one page is generated, you can select pages you
want to view by clicking a page icon located to the left of the
viewed image. The following options are available:
• Move to the first or last page of the job.
• Move to the previous or next page of the job.
• Enter a specific page number to view. Total job pages is
indicated to the right of the page number field.
• Select viewing options:
– Zoom percentages from the pull-down menu: 100%
reflects the actual size of the document.
– Actual Size: The view is shown as the actual size of the
document. The size percentage changes to 100%.
– Fit To Window: The image fits within the Preview
window . The size percentage changes to reflect the
current view.
– Fit To Width: The image fits the width of the Preview
window . The size percentage changes to reflect the
current view.
• Rotate the job left or ri ght.
8. Click [Close] to exit the Preview dialog window .
Editing a saved job
A PDF job may be edited. For instance, the page order can b e
changed, pages can be removed from the job, pages can be
duplicated within the job, and additional pages can be imported
into the job from other saved PDF jobs.
1. Open the Print Service.
2. Use the Directory menu to locate the Save directory on your
system.
3. Select the folder that contains saved jobs.
4. Right-click the PDF job you want to edit and select [Editor...].
5. You may view the job and scroll through the pages using the
arrow buttons.
6. Make your selections, and then select [OK] to save the edited
job. Within the File Menu, the options a re as fol lows:
• Information: Use this option to gain information on the job.
-6
The information dialog contai ns seven fields that provide
the following information:
– Title: contains the job name.
– Author: contains the name of the document sender.
– Path: contains the director y path in which the file
Product Name Book Name
Page 93

resides.
– Producer: this field will cont ai n “DocuSP,” since the
DocuSP Controller is the producer of the file.
– Created: contains the da te that the f ile was created.
– Modified: if the file was modified, the date of the
modification is included in this field.
– File size: details the size of t he PDF file.
• Import: Pages from one saved job can be import ed into the
job that is currently open in the Document Editor.
• Save: Use this option to save the edited job.
• Save As: If desired, the edited job may be saved under a
different name in order to avoid overwriting the current job.
• Exit: Closes the Document Editor window. Within the Edit
Menu, the options are as follows:
• Undo: Use this option to undo the last action.
• Renumber: This option enables you to change the page
order of the job.
• Delete: This option, when selected, enabl es you to delete
one or more page(s) from the job.
NOTE: Importing of images is only available from other PDF jobs.
Importing pages from one saved job to another
Within the Document Editor, pages from one saved PDF format
job may be imported into another.
1. Open the Print Service.
2. Use the Directory menu to locate the Save directory on your
system.
3. Select the folder that contains saved jobs.
4. Right-click the PDF job you want to edit and select [Editor...].
5. From the File Menu, select [ Import ]. The Import dia log win dow
opens. Alternatively, you can make Import selections directly
within the main Document Editor window.
6. Within the Import dialog box, select the fil e that contains the
pages you want to import.
7. Select [OK].
8. If desired, select the page range you want to import in the
Import area of the main Document Editor window. You can
also select to import All Pages.
Product Name Book Name
9. Select the location within the active job where the import
pages will be placed. Options include [Before] and [After],
where you can select a specific page befor e or aft er where the
imported pages appear.
-7
Page 94

10. Select [OK]. After the job is edited, you may choose to save
the job, to rename and save the job, and/or to exit the
application.
Moving a job
Moving a job allows you to place the job in another queue.
1. Open the Print Service.
2. Use the Directory menu to locate the Save directory on your
system.
3. Select the folder that contains saved jobs.
4. Right-click the job and select [Move...].
5. Within the directory pane, select the location where the job is
to be moved and select [OK]. The Moving Files dialog shows
you the status of the job process.
6. After the job is moved, select [OK].
NOTE: Moving a job using the Print Service differs from moving a
job using the Job Manager. For addi tional information see: Job
Manager > Moving a job.
Copying a job
A job may be copied to another location within the file system.
1. Open the Print Service.
2. Use the Directory menu to locate the Save directory on your
system.
3. Right-click a job and select [Copy...].
4. Within the directory pane, select the location where the job is
to be moved and select [OK]. The Copying Files di alog shows
you the status of the job process.
5. After the job is copied, select [OK].
Saving FRF jobs to a CD
To save FRF jobs to a CD, you will create a directory on the
DocuSP controller, save the FRF image file to that directory, and
copy the file from the controller to the CD.
To save the FRF jobs to a CD:
1. Open a terminal window:
-8
a. Place the cursor on the desktop (outside the DocuSP
application window).
b. Right-click to open the Workspace Menu.
c. Select [Tools] to open the Tools menu.
d. Select [Terminal]. A Terminal window will open.
Product Name Book Name
Page 95

NOTE: Place the cursor inside the Terminal window to
activate the window. When the window is active, the prompt
will blink. The window must be active to type in the window.
2. Create a directory to store the FRF file.
a. Type cd /export/home/xrxusr and press [Enter].
b. Type mkdir cd_image and press [Enter].
3. Determine the location of the files to be placed on the CD.
a. Open the Print Service
b. Click on the directory containing the files to be saved.
c. The path to the directory will be listed at the bottom of the
screen.
4. Create the file to be written to the CD.
NOTE: It is important to note that the file size of the FRF file
created in this step should be less than what can be written to
the CD-R or CD-RW media.
a. Go to the directory where the FRF file will be created.
b. Type cd /export/home/xrxusr/cd_image and press
[Enter].
c. Run the mkisofs command to create the image file to be
written to the CD: Type mkisofs -l -r -o your_file_name /
var/spool/xerox and press [Enter].
NOTE: The “-o your_file_name” option in the mkisofs
command defines the name of the file to be written. Give the
file a meaningful name. It will be created in the directory from
which the mkisofs command is run.
NOTE: The “/var/spool/xerox” directory in the mkisofs
command is the location chosen while looking at the Print
Services screen. See step 3 above.
5. Place a blank CD-R or CD-RW in the CDRW Drive.
6. Write to the CD with the cdrw command:
a. Type cd /export/home/xrxusr/cd_image and press [Enter].
b. Type cdrw -l -i image_file_name and press [Enter].
c. You will see a series of messages:” ...writing track,”
“...finalizing,” “. ..done.” The CD will automatically eject
upon completion.
7. Close the Terminal window.
Product Name Book Name
a. Right-click on the banner, or left-click on the icon on the
top left of the Terminal window.
b. From the menu, select [Close].
-9
Page 96

Printing jobs saved to a CD
To print jobs saved to a CD, perform the following:
1. Insert the CD into the DocuSP controller.
2. Open the Print Services.
3. In Directory, select [CD-RW1] from the pull-down menu. Job
files from the DC are now displayed.
4. Select the desired job and move it to t he appropriate queue f or
printing.
-10
Product Name Book Name
Page 97

Queue Management
Queue management involves creating and enabling queues to
hold jobs prior to being printed and to help manage the flow of jobs
through the printing system. The Queue Manager can also be
used to change the properties of a queue or to change the job
accept and release status of a queue.
When you select the Override option for any queue property, that
selection will apply to any jobs submitted to that queue and will
take precedence over any property selections made in the Job
Manager or programmed into the job. See Understanding the
Override Option for addition al information.
About the Queue Manager
The Queue Manager window displays all of the queues available
on the printer. Each queue can be thought of as a virtual printer
which has unique characteristics that are defin ed when the queue
is created. The queue list di splays t he name, prior ity, and state for
any queues available at the system.
Queue Manager Main Window
Queue Manager is accessed by selecting the Queue Manager
icon located on the left si de of the DocuSP GUI. The main window
will display the following:
• Queue: Name of the queue.
• Priority: Each queue for the printer is assigned a priority. The
priority informs the system the order in which the queues
should be processed. A queue’s priority setting can be set
between 1 (highest priority) and 100 (lowest priority). The
default priority setting is 50.
• Accept: The column display will either be Yes or No. If Yes is
displayed the queue is enabled to accept new jobs for pr inting.
If No is displayed the queue is prevented from accepting new
jobs for printing.
• Release: The column dis play will ei ther b e Yes or No. If Yes is
displayed the queue will automatically print incoming jobs. If
No is displayed the queue can only pri nt if it is manually set to
release or if the queue status is changed.
Product Name Book Name
-1
Page 98

Queue Properties
The Queue Properties dialog enables you to view and specify
parameters that are used as default settings to process all jobs
submitted to the queue. You can access queue properties by
performing one of the following:
• Double-click a queue.
• Select a queue and choose [Properties...] form the Queue
menu.
• Right-click a queue and select [Properties...].
• Select a queue and click the [Properties...] toolbar icon.
The Queue Properties dialog contains the following tabs:
– The Settings Tab: Contains job properties settings
including input, job destinatio n, and Administrative Pages.
– The Stock Tab: Presents stock and tray choices for your
print job using FABs. You can also select your stock from
the Stock List.
– The Output Tab: Contains features used for to determine
job output options.
Content Menu
– The Image Edit Tab: Presents features that allow original
images to be modified for output.
– The PDL Settings Tab: Page Description Language (PDL)
settings determine how PostScript and PDF jobs sent to
the queue are decomposed (ripped), or prepared for
printing. PDL Settings FABs are PostScript/PDF, TIFF,
PCL, ASCII, and if available, LCDS.
NOTE: If you do not have a valid PostScript license on the
system, you will not see PostScript in the list of format options.
The content menu is accessible at all times regardless of the tab
selected. Content menu features consist of the following:
• Quantity: Select a quantity to indicate the number of job sets
that will be printed for all jobs sent to this queue unless a
different quantity is spec if ied in the j ob, it s elf. Select a number
between 1 and 65,500.
• Override: When you select the Overrid e option for any queue
property, that selection wil l appl y to any jobs submitted to that
queue and will take precedence over any property selections
made in the Job Manager or programmed into the job.
-2
• Queue Name: The Queue Name field is read-only when
viewing queue properties. I f you are creating a new queue the
field is editable. Spaces are not permi tted in queue names.
• Printer Name: Displays the name of the printer.
Product Name Book Name
Page 99

Queue Menu
• Priority: Each queue for the printer is assigned a priority. The
priority informs the system the order in which the queues
should be processed. A Queue’s priority setting can be
between 1 (highest priority) and 100 (lowest priority). The
default priority setting is 50.
When you right-click on a queue, or use the Queue pull-down
menu the following options display:
• Properties: View and modify the properties of an existing
queue.
• New: Creates a new queue.
• Delete: Delete an existing queue.
• Accept Jobs: Enables the queue to accept new jobs.
• Do Not Accept Jobs: Prevents the queue from accepting new
jobs for print.
• Release Jobs: Sets the queue to automati cally send incoming
jobs to print.
• Do Not Release Jobs: Prevents the qu eue from automaticall y
releasing jobs to print. Jobs can only print once they are
manually set to release or if the queue status is changed.
• Administrative Pages controls: Administrative Pages
consist of the Banner Page and Error Page. Different
Administrative Pages can be enabled for each queue, or one
Administrative Page can be created for a group of queues.
• Set as Default: A default queue can be select ed for j obs
initiated through the Copy, Scan, and Print Services.
You can select more than one queue to Delete, Accept Jobs, Do
Not Accept Jobs, Release Jobs, and Do Not Release Jobs by
performing one of the following:
• Press and hold down the <CTRL> (Control) and select each
individual queue.
• To select multiple queues that are adjacent to one another,
press and hold down the <SHIFT> key while selecti ng the fi rst
and last file names you want to select. This highlights the first
and last queue name lines and all lines in between.
View m enu
Product Name Book Name
The View pull-down menu contains the following choices:
• Show T oolbar: Select ing this option displays an assortment of
icons that correspond to common tasks.
-3
Page 100

Creating New Queues
Understanding the Override Option
• Hide Toolbar: This option, which is only available when the
toolbar is displayed, will toggle the display of the toolbar off.
• Select All: Highlights all of the queues in the queue list.
• Clear All: Clears all selected (highl ighted) queues in the
queue list.
• Redisplay: Refreshes the queue list display.
Before jobs can be printed, they must be submitted to the printer
through a print queue. The function of a queue is to manage the
flow of print jobs through the control ler to the printer.
Before you create a queue and begin making property selections
for it, you must understand the Override option. When you select
the Override option for any queue property, that selection will
apply to any jobs submitted to that queue and will take
precedence over any property selections made in the Job
Manager or programmed into the job.
The override option works in the hierarchy shown below. For
example, any Exception Page se ttings (p riorit y 2) will override a ny
Job Ticket set ti ngs (priority 3). Any Queue Property override
settings take precedence over all other property features.
1. Queue overrides
2. Exception page programming
3. Job ticket settings
4. Submission print protocol (lp, lpr, nprint) settings
5. PDL Level options (setpagedevice & PCL options)
6. Queue defaults
Creating and Enabling a Queue
You can create a single queue through which all jobs will be
submitted to a printer, or you can create several different queues
that possess distinct properti es.
NOTE: Each option on this dialog contains an over ride setting.
Select Override if you want the queue settings to take precedence
over any attributes programmed with individu al jobs.
-4
The limit for the number of queues that can be created on a
DocuSP system is 250. However, the number of possible
AppleTalk connections is 128, and it is inadvisable to use a large
Product Name Book Name
 Loading...