

Page 1

Xerox Document Services Platform Series
Common Controller
System Guide
701P38837
DocuSP 3.6
August, 2002
Page 2

Xerox Corporation
Global Knowledge and Language Services
800 Phillips Road
Building 845-17S
Webster, New York 14580
© 2002 by Xerox Corporation. All rights reserved.
Copyright protection claimed includes all forms and matters of copyrighted material
and information now allowed by statutory or judicial law hereinafter granted including
without limitation, material generated from the software programs that are displayed
on the screens such as styles, templates, icons, screen displays, looks, and so on.
Printed in the U.S.A., U.K., and France.
XEROX®, XEROX Europe®, and XEROX Canada Limited®, The Document
Company, the stylized X, and all names identifying numbers used in connection with
Xerox products mentioned in this publication are trademarks of XEROX
CORPORATION. All non-Xerox brands and product names are trademarks of their
respective companies. Other company trademarks are also acknowledged.
While the information in this Guide is correct at the time of publication, Xerox reserved
the right at any time to change the information without notice. Changes are made
periodically to this document. Changes and technical updates will be added in
subsequent editions.
Page 3

Table of Contents
1. Introduction 1-1
About this guide 1-1
Contents 1-1
Conventions 1-2
Customer Support Number 1-2
2. Gateway Configuration 2-1
Internet Services (HTTP) Gateway Configuration 2-1
Simple Network Management Protocol (SNMP) Configuration 2-2
Configuration variables 2-3
Printer and job messages 2-4
SNMP MIB Support 2-4
NDS Setup 2-6
3. Backup and Restore 3-1
Backup 3-1
Restore 3-2
Xerox Backup & Restore (XBR) Utility for a DP100/115/135/180 EPS System 3-3
Backing up a System 3-3
Restoring a System 3-4
4. Security and Network Setup 4-1
Access and Secu rity 4-1
Changing the logon level 4-2
Overview of Security 4-3
Roles and responsibilities 4-3
New security features 4-5
SYSTEM GUIDE i
Customer responsibility 4-3
Xerox responsibility 4-4
Page 4

TABLE OF CONTENTS
Using scripts to enhance security features 4-7
The configure-xdss scri pt 4-8
Disable LP Anonymous Printing 4-8
DigiPath and Decomposition Services 4-8
Remote shell internet service 4-9
The disable-security script 4-9
The enable-ftp and disable-ftp scripts 4-9
The enable-security script 4-9
Secure Solaris file permissions 4-10
Delete and Secure User Accounts 4-10
Disallow all users for at, cron and batch commands 4-10
Disable unnecessary internet services daemons 4-11
Remote Diagnostics 4-12
Disabling secure name service databases: 4-12
Multicast routing 4-13
Securing the sendmail daemon 4-13
Securing the network parameters 4-13
Restricting NFS port monitor 4-13
Disabling remote login to CDE 4-14
Disabling DocuSP as a router 4-14
Security warning banners 4-14
Example of /etc/inetd.conf file after security edits 4-14
Helpful Security tips 4-19
5. Printing 5-1
First In/First Out (FIFO) Printing 5-1
Controller settings for limited FIFO scheduling/printing 5-1
Enable/Disable FIFO Job Scheduling 5-2
ASCII and PCL Printing Utility 5-4
ii SYSTEM GUIDE
Impact on DocuSP printers 5-4
setpclontrol Utility 5-5
Set lp/lprcopycount utility 5-6
Page 5

TABLE OF CONTENTS
Socket Gateway Configuration Utility: setVPSoption 5-7
TIFF Orientation 5-8
MICR Enablement 5-8
Using VIPP 5-9
Paper Trays 5-9
Printing hints 5-9
6. Finishing 6-1
Subset Finishing 6-1
Creating jobs to use subset finishing 6-2
Subset Offset (Page Level Jog) 6-2
PCL Offset/Separator/Subset Finishing command 6-3
PCL Paper Source Command 6-4
Mixed Stacking 6-4
Additional finishing information 6-5
7. Fonts 7-1
How to choose fonts 7-1
Fonts 7-1
Resident Fonts 7-2
Non Resident Fonts 7-5
Font substitution 7-6
TIFF files 7-6
TIFF overview 7-7
Performance considerations 7-7
Supported TIFF tags 7-7
8. Accounting and Billing 8-1
Accounting 8-1
Billing 8-2
SYSTEM GUIDE iii
Auto exporting accounting log 8-1
Accounting exported values 8-1
Billable Events 8-2
Billing Meters 8-3
Page 6

TABLE OF CONTENTS
9. Troubleshooting 9-1
Calling for service 9-1
Declared faults 9-1
Printer fault 9-2
Job fault 9-2
Undeclared faults 9-2
Client problems 9-3
Windows problems 9-3
Macintosh problems 9-3
DigiPath problems 9-4
GUI problems 9-4
Print Quality problems 9-5
Font problems 9-5
Inoperable system problems 9-6
Job flow problems 9-6
Job Integrity problems 9-8
PDL problems 9-8
PostScript problems 9-8
TIFF problems 9-9
PDF problems 9-9
Restore password 9-10
Restart DocuSP software without rebooting 9-11
Productivity and perform anc e proble ms 9-11
Problems when saving a job 9-12
Printing system logs 9-12
all_jobs_log 9-12
system_log 9-12
Rebooting and restarting 9-14
Loading XDJC/Unix 9-15
Configuring XDJC/Unix 9-16
iv SYSTEM GUIDE
status_log 9-13
ep_exception_log and ep_primary_log 9-13
Page 7

TABLE OF CONTENTS
Output files 9-17
Properly ejecting a diskette from the Diskette drive on a DocuSP workstation9-17
10. Hints and Tips 10-1
General 10-1
Disabling the Solaris 8 Scre en Saver 10-1
Common Desktop Environment (CDE) Front Panel Removal and
Workaround 10-1
Color Systems 10-2
General Comments 10-2
Time used to generate the PDL 10-2
Time used to transfer PDL 10-2
Time required to RIP PDL 10-3
Time required to print PDL 10-3
Job Submission Hints 10-3
Number of Images 10-3
Ethernet 10-3
Gateways 10-3
Job submission order 10-4
Job RIP Hints 10-4
Variable data 10-4
Image Quality 10-5
Job Printing Hints 10-6
Skipped Pitches 10-6
XJDC Hints and Tips 10-7
PCI Channel Interface PWB Trace Capture Procedure 10-8
Perform a Trace 10-8
Export the trace file to floppy 10-9
SYSTEM GUIDE v
Page 8

TABLE OF CONTENTS
vi SYSTEM GUIDE
Page 9

About this guide
1. Introduction
The System Guide provides the information needed to perform
system administration tasks for configuring and maintaining the
Xerox Document Services Platform (DocuSP) for printing
systems.
NOTE: The Xerox Client Software will be delivered on a floppy
for version 3.6.
This guide is inte nded for Network an d System Administrators
responsible for setting up and maintaining Xerox printers with
DocuSP software. U sers should have an understanding of the
Sun workstation and be familiar with Solaris 2.x and basic UNIX
commands. This includes the use of text editors suc h as vi or
textedit and the ability to maneuver within the Solaris
environment. The System Administrator is expected to have a
working knowledge of Local Area Networks (LANs),
communication protocols, and the applicable client platforms to
assist them in a customer site setup.
Contents
In general, this document covers information about the DocuSP
that is not covered in the on-line help or other available guides.
The following list describes the contents of this guide:
• Simple N etwo rk M anage ment Proto col Co nfigur atio n (SNM P)
• Backup and Restore
• Security and Network Setup
•Printing
• Finishing
•Fonts
Common Controller 1-1
Page 10

Introduction System Guide
• Accounting and Billing
• Troubleshooting
• Hints and Tips
Conventions
This guide includes the following conventions
• Angle brackets - Variable information that is displayed on
your screen is enclosed within angle brackets ; for example,
“Unable to copy <filename>.”
• Square brackets - Names of options you select are shown in
square brackets; for example, [OK] and [Cancel].
• Notes are hints that help you perform a task or understand
the text. Notes are found in the following format:
NOTE: This is an example of a note.
Customer Support Number
To place a customer service call, dial the direct TTY number for
assistance. The number is 800-735-2988.
1-2 Common Controller
Page 11

2. Gateway Configuration
Setting up the HTTP and SNMP gateways cannot be
accomplished through the graphical user interface and must be
set using the gwConfig utility through a UNIX Terminal window.
The IPP gateway is configured using the DocuSP interface.
Internet Services (HTTP) Gateway Configuration
Perform the following to configure the HTTP gateway:
1. Start the configuration utility. Type
./gwConfig
1..
NOTE: Refer to the instructions in the section, IPP Gateway
Configuration for information about starting the configuration.
2. Perform the following to set up the Internet Services (HTTP)
Gateway:
Enter the name of the gateway to be configured:
Internet Services
Configure the Internet Services Gateway? [Y/N]
y
Enter name: Value data
Printer URL: http://<controller name>.<domain
name>.com
NOTE: Use the IP address of the controller if there is no
domain name. For example, http://52.126.255.255.com
3. A confirmation message of the entered value displays.
Confirm that the entry is correct and enter y for yes.
4. Continue with this process for every value to be configured.
5. When all of the desired values have been configured, press
<Enter> at the Enter Name: [Value Data line].
6. When asked to accept the values and update the
Common Controller 2-1
configuration, enter y for yes.
Page 12

Gateway Configura tio n Sys tem Guid e
7. The configuration utility exits.
8. When complete, close the Terminal window and select
System, Restart on the DocuSP user interface.
Simple Network Management Protocol (SNMP) Configuration
To configure the SNMP configuration, follow the instructions for
configuring the HTTP Gateway in the previous section.
SNMP provides you with th e status of network device s. If you are
familiar with SNMP manager, you may want to configure the
SNMP gateway using gwConfig and the information that follows.
NOTE: SNMP requires a standard FlexLm l icense. The System
Administrator m us t enable SNMP in License Manager.
Xerox recommends the following third–party SNMP software
mangers:
• IBM Network Printer Manager (NT)
• TNG Unicenter (NT)
• HP OpenView (UNIX, NT)
• Xerox CentreWare (UNIX, NT)
NOTE: The SNMP manager (HP OpenView) may have a
number of requests into DocuSP for information. Some of the
requested information may not be a s upported data set on
DocuSP. Therefore, the SNMP client/manager displays "no
value...etc".
NOTE: You can have more th an one SNM P manager running a t
the same time.
2-2 Common Controller
Page 13
System Guide Gateway Configura tio n
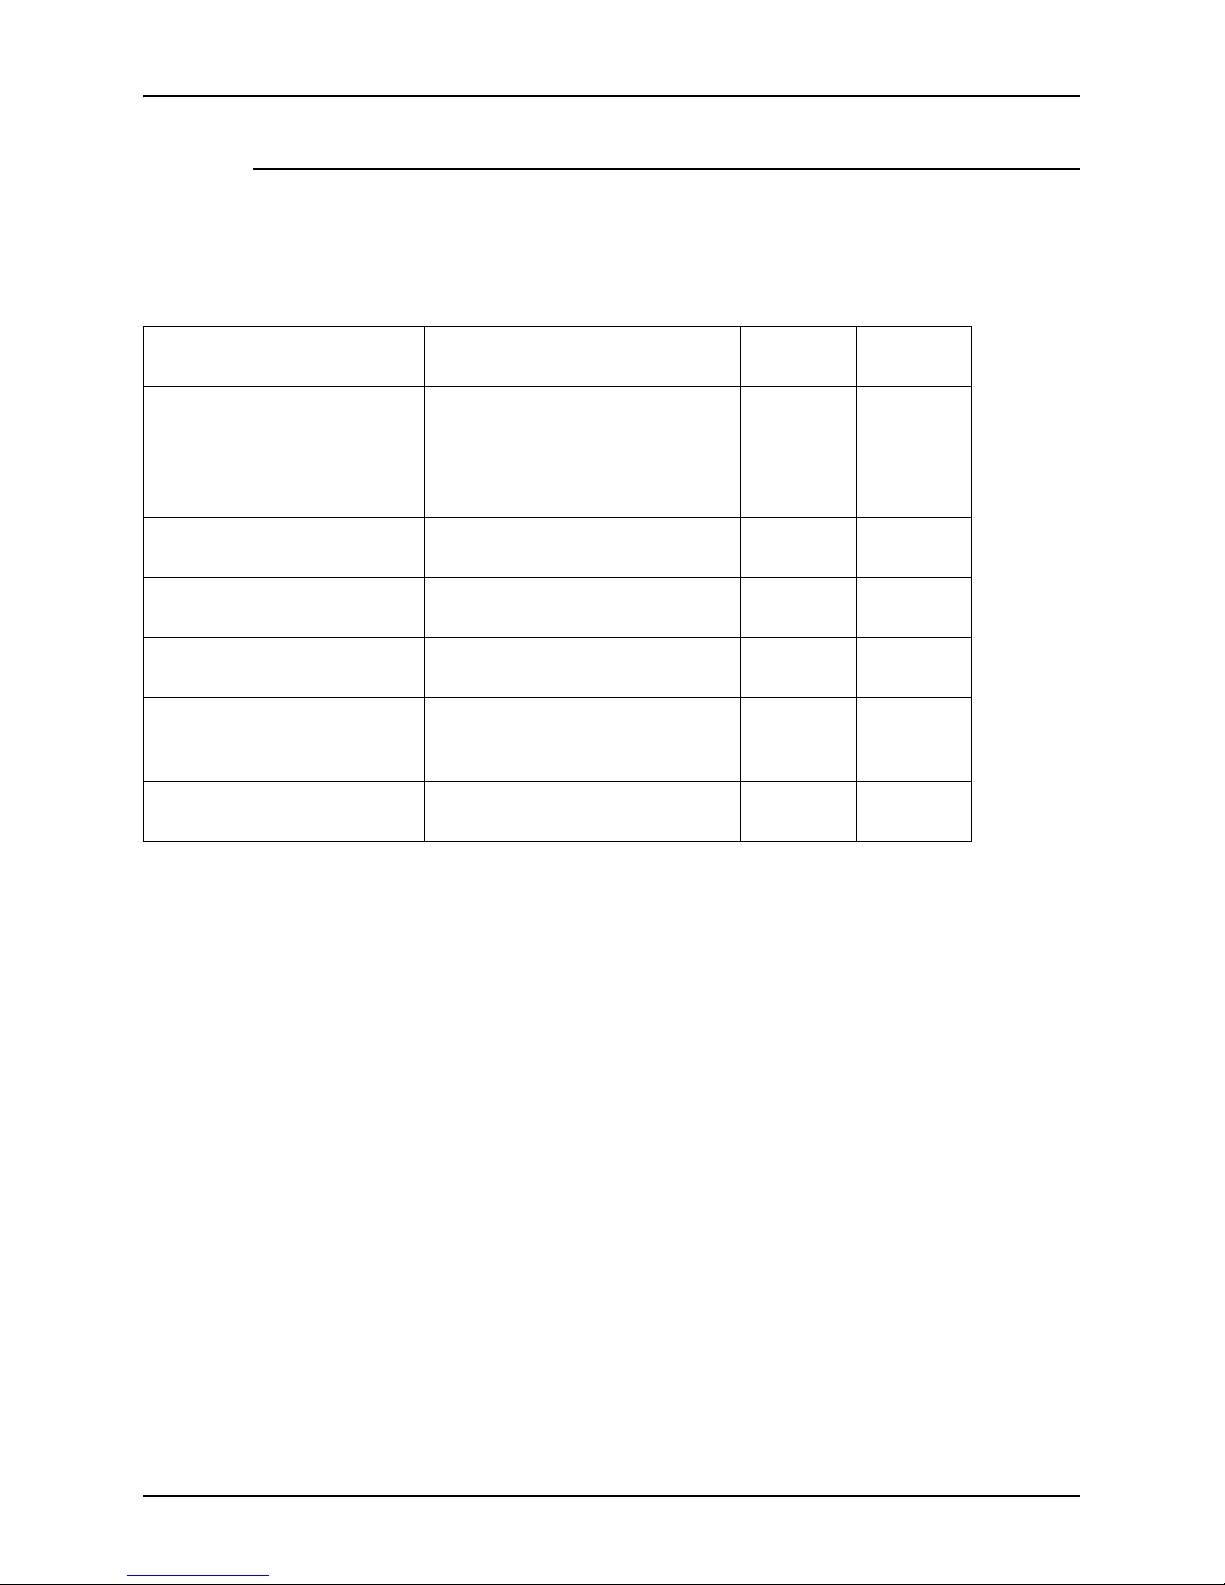
Configuration variables
Of the many parameters that are available for SNMP
configuration, only the ones of common interest to Xerox
customers are shown in the following table:
Table 2-1.
Value
Parameter Name Description
CommandLine Turn on/off the following flags:
–l: logging to
SNMP_DEBUG_LOG
–w: logging to window
Printer operator The name of the printer operator String
Printer administrator The name of the printer
administrator
Printer administrator location The location of the office of the
printer administrator
Printer administrator Phone The telephone number for
contacting the printer
administrator
Printer location The location of the printer String
Range
(0...127)
String
(0...127)
String
(0...127)
String
(0...127)
(0...127)
Enter the following CommandLine varia bles:
-l: -w:
Default
Value
<empty>
<empty>
<empty>
<empty>
<empty>
An example of SNMP gateway configuration for the parameters
shown is:
SNMP Gateway Configuration File Section
Data:Entry Name Entry ValueCommandLine: -l wPrinter Operator: Janet Jones Printer
Administrator: William Webster Printer
Administrator Location: Room 409
Printer Administrator Phone: 122-0001 Printer
Location: Room 444
Common Controller 2-3
Page 14

Gateway Configura tio n Sys tem Guid e
Printer and job messages
SNMP can broadcast messages about the printer and the jobs
on the system. Printer messages may an nounce that the printer
is idle, printing, or out of paper. Job messages announce that
jobs are pending, processing, or completed. Other job related
information may include the job owner’s name, the job quantity,
the job identifier, etc.
NOTE: ”Forwarding” is not a job state that is broadcast by the
controller; therefore, job forwarding information will not be
displayed by the SNMP job managers.
The information that is displayed at an SNMP Manager may not
always reflect the exact status of a job or printer on the DocuSP
Controller. Those Managers that do not support loading of
Management Information Bases (M IBs) will only display the
printer and job status that they support.
SNMP MIB Support
DocuSP 3.0 SNMP MIB file uses the Xerox Common
Management Interface (XCMI) version 4.0. The following lists the
MIB files included for v ersion 4.0:
• rfc1213 - RFC1213-MIB (MIB-II)
• rfc2790 - HOST-RESOURCES-MIB (XCMI rev 000817)
• rfc2790t - HOST-RESOURCES-TYPES (XCMI rev 000815)
• rfc1759 - Printer-MIB (XCMI rev 000818)
• rfc2707 - Job-Moni toring-MIB (Printer Working Group)
• 02common - XEROX-COMMON-MIB
• 06gentc - XEROX-GENERAL-TC
• 07gen - XEROX-GENERAL-MIB
• 10hosttc - XEROX-HOS T-RESOURCES-EXT-TC
• 11hostx - XEROX-HOST-RESOURCES-EXT-MIB
• 15prtxtc - XEROX-PRINTER-EXT-TC
• 16prtx - XEROX-PRINTER-E XT-MIB
• 21rsrctc - XEROX-RESOURCES-TC
• 22rsrc - XEROX-RESOURCES-MIB
• 40jobtc - XEROX-JOB-MONITORING-TC
• 41jobmon - XEROX-JOB-MO NITORING-MIB
2-4 Common Controller
Page 15

System Guide Gateway Configura tio n
• 42jobmtc - XEROX-SIMPLE-JOB-MGMT-TC
• 43jobma n - XER O X -S I M PLE -JOB-MGMT-MIB
• 50commtc - XEROX-COMMS-ENGINE-TC
• 51comms - XEROX-COMMS-ENGINE-MIB
• 52conftc - XEROX-COMMS-CONFIG-TC
• 53config - XEROX -C OMMS-CONFIG-MIB
• 58svctc - XEROX-SERVICE-MONITORING-TC
• 59svcmon - XEROX-SERVICE-MONITORING-MIB
• 93pidtc - XEROX-PRODUCT-ID-TC
The following is a listing of MIBs that are supported:
• RFC 1213 MIB fi le
– The system Group
– The Interface Group
– The at (addre ss translation) Group
– The ip Group
– The icmp Group
– The tcp Group
– The udp Group
– The snmp Group
• Host Resource MIB file
– The System Group
– The Storage Gr oup
– The Device Group
• Printer MIB file
– The General Printer Group
– The Input Group
– The Extended Input Group
– The Input Media Group
Common Controller 2-5
– The Output Group
– The Extended Output Group
– The Output Features Group
– The Marker Group
– The Marker Supplies Group
Page 16

Gateway Configura tio n Sys tem Guid e
– The Marker Colorant Group
– The Media Path Group
– The Interpreters Group
– The Channels G r oup
– The Console Group
– The Alerts Groups
• Xerox General MIB file (uses only the 06gentc and 07gen
files)
– The xcmGen Base Group
– The xcmGen Trap Client Group
– The xcmGen Trap View Group
NOTE: The other files in Xerox General MIB are not supported.
NDS Setup
When using Novell Netware, a preferred server needs to be set
for environments where there is more than one server on the
network. If you are running NDS in an environment with more
than one NDS server, to ensure optimal operation, you should
specify a preferred server. To do this, perform the following steps
(you will need to know your NDS Tree, Context, and Preferred
Server Names):
1. Type
su root
1.and enter password when you are prompted.
2. Type
cd /opt/XRXnps/XRXnwqsgw/bin/
3..
4. Type
./QServerSetup
5. and select the return key.
6. Select the approp ri a te option:
2-6 Common Controller
• If there is already an existing NDS QServer Setup that
you wish to add a Preferred server name to, select choice
2.
• If you are crea ting a anew NDS QServer Setup with a
preferred serv er name, select choice 1.
Page 17

System Guide Gateway Configura tio n
7. Select choice 4 to list the current setups to make sure your
preferred server was added successfully.
8. Restart the DocuSP software.
NOTE: If logging is enabled, you can check /opt/XRXnps/log/
QServer.Debug.Log to make sure that connection is made with
the Preferred s erver. Ensure that jobs can be submitted from
Netware and properly received and printed.
Common Controller 2-7
Page 18

Gateway Configura tio n Sys tem Guid e
2-8 Common Controller
Page 19

3. Backup and Restore
Software configuration information and customer specific files
should be backed up to a safe location, either to tape or to a
remote server on a regular basis. It is valuable to back up a
system to a remote location when upgrades of hardware are
performed.
Software conf iguration information should be saved when the
system has been installed and all queues an d printers have b een
set up. Also, when any printer or queue properties are changed.
The Configuration utility provided with the DocuSP software will
backup all of the DocuSP configuration files in the /opt/XRXnps/
configuration directory. This includes the preferences settings,
printer set up, and queue set up files.
If a software upgrade or new software installation is required, a
representative will perform the software installation. In each
case, certain portions of the system config uration will need to be
restored or reentered by the customer.
Backup
The following information should also be backed up on a regular
basis or when the DocuSP controller has been modified:
• Customized scripts installed by th e customer
• Unique third–party software and relat ed data, or Xerox–
developed solutions and related data
• DNS, NIS, or NIS+ files
• Jobs saved to the DocuSP controller using the Save Feature
• Non–Xerox supplied Sun patches
• Customized links to directories
• Continuous Feed custom imposition files
• Continuous Feed custom print mark files
In addition, it is recommended that the System Administrator
document the following informatio n:
Common Controller 3-1
Page 20

Backup and Restore System Guide
• Any soft fonts that have been loaded on the system
• Contents of the hosts and hosts.equiv files
• The allowable users
• Any customer–specific passwords
NOTE: In the event of a software upgrade or install by Xerox,
Xerox is not responsibl e f or th e rest or ati o n o f th e a bove i tems to
the DocuSP controller.
NOTE: It is highly recommended that a complete system image
be backed up to tape or a remote location on a regular basis.
Having a current system image stored separate from the
DocuSP controller will ensure that in the event of a failure of the
system or the hard disks, the system can be easily restored.
Refer to the appr opriate SUN documentation for additional
information on saving a system image.
Restore
If only a software upgrade is performed on the DocuSP
controller, the system configuration information will typically be
retained.
During the upgrad e, the Xerox Cu stomer Service R epresentative
will provide a hardcopy of the system configuration information,
such as the contents of the /etc/hosts and /etc/hosts.equiv files,
the list of user names from the /etc/passwd file, and gateway
information from any installed optional gateways. If any
information needs to be recreated, the hardcopy will assist the
System Administrator in restoring the system. Any customized
software, saved files, or unique third–party information will have
to be restored by the System Administrator.If a hardware
installation is performed and there is n o system image saved, the
System Administ rator will have to rest ore or re-enter, at a
minimum, all of the information included on the hardcopy output
provided by the Xerox Customer Service Representative.
3-2 Common Controller
Page 21

System Guide Backup and Restore
Xerox Backup and Restore (XBR) Utility for a DP100/115/135/180 EPS
System
Backing up a System
To backup a system, use a DocuPrint EPS controller with a QIC
tape drive, at least 3 tapes (maybe up to 6 QIC tapes), and the
XBR floppy.
NOTE: The most common reason for backup procedure failure
is a bad tape. Restart the backup process with a new tape. The
system has to be shutdown before the backup operation can be
performed.
1. Open a Terminal window.
2. In the terminal window, log in as root.
3. At the command prompt, type
init 0
4. and press Enter.
5. At the Ok prompt, type
boot -s
6.. Steps 3 and 4 first shut down the system, then rebo ot it in
single-user mode.
7. Enter the root password.
8. Insert the XBR flopp y in the disk drive an d a blank tap e in the
tape drive.
9. At the command-line prompt, type
mkdir /a
10..
11.Type
mount /dev/diskette /a
12. and press <Enter>. This command causes UNIX to
access the diskette drive (/dev/diskette) through the /a
directory.
13.Type
cd /a
Common Controller 3-3
14..
Page 22

Backup and Restore System Guide
15.Type
./xbr
16. but don’t forget the “.” before the “/”
17.Type
backup
18. and as the system asks fo r a new tape, remove the
current tape, label it and insert a new tape (each tape takes
about 20 to 25 minutes to fill). After inserting a new tape, type
yes
19.. The system may ask for a tape it has already used (for
example volume 2 a gain) ; ignore the numb er it gi ves you and
label the tape with t he next number in the sequence. This
problem is cause d by the underlying UNIX utility t hat is being
called multiple times (each time it is called, it starts off at the
beginning of the tape numbering sequence and not at the
number with which it left off).
20.After the backup is complete, restart the system by typing
reboot
21. and pressing Enter.
Restoring a System
Before you begin to restore the system, locate the CD labeled
"Solaris 8 CD (1 of 2)" from which to run the Operating System.
You will also need a system to restore to (with a QIC tape drive),
the XBR floppy, all the backup tapes that were made by the
previous procedure, the CD-ROM labeled "Solaris 8 CD (1 of 2)".
To restore the system, perform the following:
1. Insert the "Solaris 8 CD (1 of 2)" CD-ROM, the first tape, and
the XBR floppy into the system.
2. Open a Terminal window.
3. In the Terminal window, login as root.
4. At the command prompt, type
init 0
6. At the "ok" prom pt, type
boot -s
3-4 Common Controller
5. and press <Enter>.
7.
Page 23

System Guide Backup and Restore
8. Once the system reboots, login as root.
9. Create a directory; type
mount /dev/diskette /a
10.
11.T ype cd
/a
12.
13.Type
./xbr
14. (don’t forget the "." and "/")
15.Type
restore
16.
17.Answer
y
18. for yes to the question that comes up.
19.The system will then reboot.
20.Insert each tape as they are asked for and Press <Enter>.
21.Repeat the previous step twice.
22.The system will reboot. Login as root.
23.As the system requests a new tape, enter the next tape in the
sequence into the drive.
24.The system will display a message when the restore is
complete. To restart the system, type
reboot
25. and press <Enter>.
Common Controller 3-5
Page 24

Backup and Restore System Guide
3-6 Common Controller
Page 25

4. Security and Network Setup
This section provides you with information on security re garding
the DocuSP controller and the Solaris Operating System
including access, changing logon levels, and enhancements of
the Solaris OS. Also included are general guidelines to security
related proced ures that can be implemented to improv e security
of the DocuSP controller and the Solaris OS.
Access and Security
UNIX accounts are defined during the installation process:
• root: has super user access to the workstation. The initial
password for this account is set during installation of the
operating system and should be obtained from the Xerox
service personnel.
NOTE: For security reasons, the root account password
should be changed as soon as the Xerox service personnel
have completed the installation.
• The Xerox user name is the account fro m which the Xerox
software runs. Use the Xerox user passw ord for this acco unt.
Contact your Customer Service Represent ative if this is
unknown.
• ftp: an account to permit some clients to retrieve their
software from the DocuSP controller using the TCP/IP
communication protocol. This accou nt will be set to Read
Only access to the /export/home/ftp directory
• Pxrxsvc: the account for remote diagnostics by Xerox
service personnel. The DocuSP controller is accessed using
PPP communications via a modem.
NOTE: The user and group identifications, uid and gid, for the
Xerox accounts that are listed above cannot be arbitrarily
changed in the password and group files to new values because
the software is based on the proper access to the Xerox supplied
files.
Common Controller 4-1
Page 26

Security and Network Setup System Guide
To allow non–root user command line client s to submit jobs to
the DocuSP controller, the Sun workstation needs two pieces of
information in its database:
• Users must be listed in the password database.
• The client worksta tions need t o be described as trusted ho sts
for the user account. This allows remote operation
commands at the DocuSP controller from a client
workstation, such as rcp, without the requirement for
supplying a password. Set the /etc/hosts.equiv file to trust all
known workstations by setti ng the last li ne in the file to a plus
sign, or, if tighter security is required, list the names of the
trusted host machines in the /etc/hosts.equiv file.
It is not necessary for the user to have the following on the
DocuSP controller:
• Network home directory.
• Meaningful home directory at the DocuSP controller.
• An enabled password.
• The same user identification (uid) as used for the client
workstation account.
• The same group i dentification (gid) as used for the client
workstation account.
NOTE: For more information about UNIX security, please
consult the man page or hosts.equiv and the Sun
documentation.
To set up a user account at the DocuSP controller, it is
suggested that the admintool, which runs in the CDE (Common
Desktop Environment), be used.
Changing the logon level
The DocuSP software defaults to the Walk Up User access level
when the DocuSP s oftware is starte d.
To log into the DocuSP as the System Administrator or Trusted
User, perform the following:
1. Select [System] from the DocuSP Print Services window.
2. Select [Logon]. The Logon dialo g is displ a yed.
3. Select the Trusted User or System Administrator access level
4-2 Common Controller
and enter the correct password.
Page 27

System Guide Security and Network Setu p
The initial passwords for Trusted User and System
Administrator can be obtained from your Xerox Service
Representative
NOTE: The various system passwords need to be changed
as soon as an install is complete. It is also advised that you
should have a process in place for changing the passwords
on a regular basis.
NOTE: The System Administrator should verify access to the
Xerox applicatio n for all levels before the service installation
personnel leave the site.
NOTE: To maintain security, it is recommended that any
restricted access login be terminated as soon as the session
has been comple ted.
Overview of Security
The purpose of the security section is to provide information on
security regarding the DocuSP controller and the Solaris
Operating System. This section explains the new DocuSP
Security Script feature that allows security for the system a gainst
unauthorized access and modification. The information in this
section about securit y include proced ures and scripts tha t can be
used to improve security of the DocuSP controller and the
Solaris OS. The following information is also a compilation of
security concerns that have been raised by DocuSP customers.
Roles and responsibil it ie s
The following sections de tail the roles and responsibilities in
setting and maintaining the security of the DocuSP controller.
Customer responsibility
The customer has the prim ary responsibility for maintaining the
security of the network within the customer’s site. It is important
that network security is continuously monitored and maintained,
and that appropriate security policies are established and
followed.
Common Controller 4-3
Page 28

Security and Network Setup System Guide
The procedures outlined in this document assume a basic
knowledge of UNIX, the vi editor, and general computing
concepts. It is expected that the n etwork administrator or system
administrator responsible for network security understands the
base commands (cd, chmod, cp, grep, kill, ln, ls, man, more, ps,
etc.), and the UNIX direct ory path and filena me structures shown
in this document.
There is information within the text and in the appendix sections
for reference to those who may not use this knowledge often. If
you have been given administration privileges to devices
covered by these procedures and do not have sufficient training,
seek assistance from someone with thes e skills.
The DocuSP product operates on the default Solaris OS
configuration and some additional Solaris patches required by
DocuSP. Several scripts are used to provide additional security
for the DocuSP. Not all scripts are public knowledge, only those
that are public are defined in this document and these can be
performed by the customer.
It is the responsibility of the customer to implement any security
changes to this default configuration to obtain the level of
security they require. This includes: monitoring security bulletins
issued by Sun Microsystems, obtaining and installing security
patches, and modification of the Solaris OS to implement
security measures. The customer is also responsibl e for
documenting and testing the im plemented changes to ensure
that there is no impact to the current workflow.
Xerox responsibility
Xerox is committed to providing a level of security which will
allow the DocuSP controller to be a good network citizen in the
response to current security intrusions. Additional security
beyond this remains the responsibility of the customer.
4-4 Common Controller
Page 29

System Guide Security and Network Setu p
Xerox is constantly evaluating the security of the DocuSP
controller and the Sun Solaris operating environment. Xerox is
committed to providing the latest Solaris security patches
provided by Sun Microsystems in each major DocuSP release.
The DocuSP development team will also add Solaris security
patches in between major release cycles. All OS security
patches for application s adde d dur ing a sta ndar d DocuSP i nstall
will be included, even if the application code is not normally used
by DocuSP users. Security patches for applications not loaded
by a standard DocuSP install will not be evaluated or included.
Only the version of a patch impacting security will be included; if
a security patch has a newer version that is not security related
then this patch will not be updated to the newer version. Any
security patch that is determined to have a negative impact to
DocuSP operation will not be added (this is expected to be a
very rare event).
When the DocuSP software and system was installed, Xerox
provided a default root password for the UNIX environment. In
addition, default passwords may have been created for the
DocuSP Trusted User and System Administrator login levels.
Xerox strongly recommends that the customer change these
passwords from the de fault settings since the u ltimate securi ty of
the printing system resides with the customer.
NOTE: Please be aware that the Xerox Customer Support
Personnel must have access to the new root password for
service and support. It is the customer’s responsibility to ensure
that the root password is available for them.
New security features
In this release of DocuSP, the Xerox DocuSP Security Script has
been included with the DocuSP software. When invoked, the
script implements changes to the Solaris Operating Environment
to secure the system against unauthorized access and
modification.
The Xerox DocuSP Security Script is based on Sun
Microsystems’ Blueprint white papers as well as previous
security scripts developed by Xerox for the DocuSP.
The Xerox DocuSP Security Script is run by the Xerox service
representative when the DocuSP software is installed or
upgraded.
Common Controller 4-5
Page 30

Security and Network Setup System Guide
This document details each service impacted by the script so
that customers can make informed decisions about whether this
script meets the security requirem ent s of thei r envir on m ent .
Some customers may find that some features disabled by this
script, such as telnet and ftp, ar e required in their environment.
How to re-enable each individual service is not discussed in this
document. If further assistance is required, please contact the
Customer Support Center.
NOTE: Security changes are not saved during an installation or
upgrade of the Do cuSP software. When a software install or
upgrade is performed, the Xerox Service Representative runs
the security script at the completion of the installation. Any
adjustments made to the security features b y the customer prior
to the installat ion or upgrade need to be made again.
The following list documents the Sun Solaris services that are
disabled when the Xerox DocuSP Security Script is run:
• ftp (must be enabled for DigiPath and Continuous Feed
systems)
• telnet
• echo
• Discard
•Daytime
• Chargen
•Time
•Name
•Finger
•Uucp
•Talk
• Comsat
• Exec
•Dtspc
• Rpc.rusersd
• Rpc.sprayed
•Rpc.rwalld
• Kems_server
• Rquotad
4-6 Common Controller
Page 31

System Guide Security and Network Setu p
• Rlogon
•TNAME
• Rstatd
• Sadmin
•Fs
• Amiserv
•Rpc.cmsd
• Tooltalk databa se ser ver
• KCMS profile ser v er
• Anonymous ftp
• Remote diagnostics
• Removal of + from the hosts.equiv file
• Anonymous lp
•NFS server services
• Nuucp account disabled
• Listen account disabled
• Password entry locked for bin, sys, adm, uucp, nobody,
noaccess, nobody4, and anonymous
• Disallow all users for at, cron, and batch
• Bwfns (no longer required for DigiPa th)
Solaris services disabled: S40l lc 2, S47 asp pp (r e mote
diagnostics ), S70uucp, S711dap.client (LDAP daemon),
S72autoinstall, S72slpd, S74xntpd, S80spc, S90wbem,
S15nfs.server (NFS Server; must be enabled for DigiPath),
S76snmpdx, S77dmi, and S80mipagent
NOTE: The new scripts are explained in gr eater detail later in
this document.
Using scripts to enhance security features
The Xerox DocuSP Security Script (XDSS) is comprise d of
several scripts to that are located in the /opt/XRXnps/bin
directory. These scripts enhance security features and must be
run when you are logged in as root. This section explains the
public scripts t hat are available and the features they include.
Common Controller 4-7
Page 32

Security and Network Setup System Guide
The configure-xdss script
During the DocuSP installation, the configure-xdss script will run.
A question, "Do y ou wish to enable Docu SP Securit y" is asked a t
the prompt. When answered with a
y
for yes, additional prompts concerning security features will
follow. This section explains the options available when you
have chosen to enable the DocuSP Security feature.
Disable LP Anonymous Printing
You can select if you wish to disable anonymous prin ting on all
existing LP printer queues that are associated with the DocuSP
virtual printers. Select
y
for yes to disable this printing option.
DigiPath and Decomposition Services
DigiPath serves as a transferring station for files to the DocuSP
server. The DigiPath configuration will ask two questions.
1. Do you want to disable DigiPath? If you answer "yes", both
F TP and th e bwnfs daemon are di sabled. The bwnf s daemon
is not required by DigiPath when Net Agent is being used to
share files that have been saved on the DocuSP Controller.
2. If the answer to que stion 1 is “N o”, you are pr ompted wi th the
question, “Do you want to disable DigiPath Decomp
services?” If you answer “Yes”, the nfs.server and bw nfs
daemons will be disabled. When nfs.server is disab led, no
directory can be made available for other systems to mount
using UNIX NFS. Any third-party application that uses
MaestroNFS requires the bwnfs daemon to be e nabled. Both
XPert Label software and also DigiPath Decomp Services
use MaestroNFS and thus require a “No” answer to this
question.
NOTE: Before answering yes to this question, ensure that the
save repository is not normally shared and that other work flows
or third party applications do not require this capability.
When DigiPath is enabled, the ftp and NFS servers work
correctly.
4-8 Common Controller
Page 33

System Guide Security and Network Setu p
Remote shell internet service
If you are using the print command line client, you will need to
use the remote shell internet service to transfer files to the
DocuSP server. However, if you are not using the print
command line cli e nt, it is strongly recommended th at t he r em ote
shell internet service is disabled.
NOTE: If the remote shell internet service is disabled, it is
strongly recommend ed that it remain d isabled. If you ar e unsure
whether to enabl e or disable this feat ure, you should disable it.
The disable-security script
To disable security, run the disable-security script. Disablesecurity restores the system to the state it was before configurexdss was run.
The enable-ftp and disable-ftp scripts
FTP services may disable if DocuSP security is enabled. You
must have FTP enabled to install any client software, or when
using a Continuous Feed system. To temporarily enable the F TP
services to load client software, run the enable-ftp command.
Once client software has been install ed, you must ru n disable-ftp
to disable the FTP services again.
NOTE: In order to implement the full set of security options,
configure-xdss should be run rather than enable-security.
NOTE: If enhanced security is enabled on a DocuSP
Continuous Feed system, ft p must be en abled by either DigiPath
or using the enable-ftp script.
The enable-security script
When you run the enable-security script, various security related
changed to the Solaris Operating Environment are i mplemented.
All of the changes that are made when this script is run can be
reverted by running the disable-security script. The enablesecurity script implements the following:
• Securing Solaris file permissions
• Deleting and securing user accounts
Common Controller 4-9
Page 34

Security and Network Setup System Guide
• Disallowing all users for at, cron, and batch commands
• Disabling unnecessary solaris services
• Disabling bwnfs daemon
• Disabling unnecessary internet services daemon
• Securing name service cache daemon
• Multicast routing
• Hide OS and host information
• Securing sendmail daemon
• Securing network parameters
• Disabling executable stacks
• Restricting NFS port monitor
• Disabling remote logins to CDE
• Preventing the DocuSP from acting as a router
• Enabling security warning banners
Secure Solaris file permissions
The fix-modes command is run with the '-s' option to secure file
permissions for Solaris only. When this command is run, a file
called /var/sadm/install/content.mods is left. Do not delete this
file, it contains valuable information needed by fix-modes to
revert the changes to the system file permissions.
Delete and Secure User Accounts
When the security script is enabled, the nuucp and listen
accounts are deleted. Also, the passwords for the following
accounts are locked; bin, sys, adm, lp, uucp, nobody, noaccess
and nobody4.
Disallow all users for at, cron and batch commands
When security is enabled, all users are blocked from using the
at, cron, and batch commands by creating the files /etc/cron.d/
cron.allow and etc/cron.d/at.allow.
Disable Unnecessary Solaris Services
Solaris services that are not required for DocuSP are disabled
when security has been enabled. The following services are
disabled:
4-10 Common Controller
Page 35

System Guide Security and Network Setu p
• S4011c2: Class II logical link control driver
• S47asppp: Asynchronous PPP link manager. This service
is re-enabled via enable-remote-diagnostics command.
• S70uucp: UUCP server
• S711dap.client: LDAP daemon to cache server and client
information for NIS lookups.
• S72autoinstall: Script executed during stub JumpStart or /
AUTOINSTALL JumpStart
• S72slpd: Service Location Protocol daemon
• S74xntpd: Network Time Protocol daemon
• S80spc: SunSoft Print Client daemon
• S90wbem: CIM Bo ot Manager : Disabl es WBEM cl ients fr om
accessing DocuSP server.
The following services from /etc/rc3.d directory are
disabled:
• S15nfs.server: NFS Server. Disable ability to export
DocuSP server file systems. This service is enabled if
DigiPath and Decomp Services are enabled.
• S76snmpdx: Sun Solstice Enterp rise Master Agent. So laris
SNMP services are disab led. Th is do es no t pre vent D ocuSP
SNMP services from operatin g.
• S77dmi: Sun Solstice Enterprise DMI Service Provider
• S80mipagent: Mobile IP agent
Disable unnecessary internet services daemons
The following internet services that are found in the /etc/
inetd.conf file are disabled when security is enabled.
• ftp: File transfer protocol server. This does not prevent you
from using ftp from the DocuSP server to another host that is
running an FTP server.
• telnet: DARPA TELNET protocol server.
• echo: Echoes back any character sent. Used mainly for
testing.
• discard: Discards everything sent.
• daytime: Displays the date and time.
• chargen: Sends revolving pattern of ASCII characters.
• time: Outdated time service
Common Controller 4-11
Page 36

Security and Network Setup System Guide
• name: Obsolete IEN-116 name service
• finger: Remote user information server
• uucp: Used by UUCP over IP".
• talk: server ta lk program
• comsat: Biff server - mail notification daemon
• exec: Remote execution server. Used by rexec(1) command
• login: Remote login server. Used by the rlogin(1) command
• dtspc: CDE Subprocess Control Service
• rpc.rusersd: Network username server
• rpc.sprayd: Spray server, records the packets sent by the
spray (IM) command
• rpc.rwalld: Network rwall server
• kcms_server: KCMS library service daemon, allows the
KCMS library to access profiles on remote machines
• rquotad: Remote quota server. Used by the quota(1M)
command to display user quotas for remote file systems
• sadmind: Distributed system administration daemon.
• fs: Xfont server. Used by CDE to render fonts
• amiserv: RPC Smart Card Interface
• Rpc.cmsd: Calendar manager service daemon
Remote Diagnostics
The disable-remote diagnostics removes the asppp daemon
which is required for service representatives to log into the
system when using a modem. Running enable-remote
diagnostics will undo the disable daemon.
Disabling secure name service data bas es:
The following databases are disabled when Security is invoked:
• passwd(4)
• group(4)
• exec_attr(4)
• prof_attr(4)
• user_attr(4)
4-12 Common Controller
Page 37

System Guide Security and Network Setu p
Multicast routing
Multicast is used to send data to many systems at the same time
while using one address. It is recommended to disable this
feature when security is enabled.
Hide OS and host information
When security is enabled, the ftp and telnet banners are set to
null. Also, the sendmail banner is modified to not provide any
OS host information.
Securing the sendmail daemon
When security is enabled, sendmail is forced to perform only
outgoing mail. No incoming mail will be accepted.
Securing the network parameters
When security is enabled, network parameters are secured. For
additional information, view the /e tc/init.d/nddconfig file as well
as Sun’s document, Solaris Operatin g Environment Settings for
Security.
Disabling executable stacks
When security is enabled, the system stack is non-executable.
This is done so security exploitation programs cannot take
advantage of the Solaris OE kerne l executable system sta ck and
cannot attack the system. To ensure that these system stacks
are not executable, ensure that the following lines are added to
the /etc/system/fP file:
[set noexer_user_stack=1]
[set noexer_user_stack_log=1]
Restricting NFS port monitor
The NFS server normally accepts requests from any port
number. The NFS Server can be altered to process only those
requests from privileged ports. To restrict access, add the
following entry into the /etc/system file:
[set nfssrv:nfs_protmon=1]
Common Controller 4-13
Page 38

Security and Network Setup System Guide
Disabling remote login to CDE
Ensure that all remote logins are prohibited to CDE on the
DocuSP by installing the appropriate /etc/dt/config/Xaccess file.
Disabling DocuSP as a router
To prevent the DocuSP server from being used a router, create
an empty file, /etc/notrouter.
Security warning banners
When security is enabled, security warning banners are
displayed when a user logs in or telnets into the DocuSP server.
This message explains that only authorized users should be
using the system. Any others face the possibility of being
monitored by law enforcement officials.
Example of /etc/inetd.conf file after security edits
#ident "@(#)inetd.conf1.2796/09/24 SMI"/*
SVr4.0 1.5*/
#
#
# Configuration file for inetd(1M). See
inetd.conf(4).
#
# To re-configure the running inetd process,
edit this file, then
# send the inetd process a SIGHUP.
#
# Syntax for socket-based Internet services:
# <service_name> <socket_type> <proto> <flags>
<user> <server_pathname> <args>
#
# Syntax for TLI-based Internet services:
#
# <service_name> tli <proto> <flags> <user>
<server_pathname> <args>
#
# Ftp and telnet are standard Internet
services.
#
ftp stream tcp nowait root /
4-14 Common Controller
Page 39

System Guide Security and Network Setu p
usr/sbin/in.ftpdin.ftpd
telnet stream tcp nowait root /
usr/sbin/in.telnetdin.telnetd
#
# Tnamed serves the obsolete IEN-116 name
server protocol.
#
###name dgram udp wait root /
usr/sbin/in.tnamedin.tnamed
#
# Shell, login, exec, comsat and talk are BSD
protocols.
#
###shell stream tcp nowait root /
usr/sbin/in.rshdin.rshd
login stream tcp nowait root /
usr/sbin/in.rlogindin.rlogind
###exec stream tcp nowait root /
usr/sbin/in.rexecdin.rexecd
###comsatdgram udp wait root /
usr/sbin/in.comsatin.comsat
###talk dgram udp wait root /
usr/sbin/in.talkdin.talkd
#
# Must run as root (to read /etc/shadow); "-n"
turns off logging in utmp/wtmp.
#
###uucp stream tcp nowait root /
usr/sbin/in.uucpdin.uucpd
#
# Tftp service is provided primarily for
booting. Most sites run this
# only on machines acting as "boot servers."
#
#tftp dgram udp wait root /
usr/sbin/in.tftpdin.tftpd -s /tftpboot
#
# Finger, systat and netstat give out user
information which may be
# valuable to potential "system crackers."
Many sites choose to disable
# some or all of these services to improve
security.
#
###fingerstream tcp nowait nobody /
usr/sbin/in.fingerdin.fingerd
Common Controller 4-15
Page 40

Security and Network Setup System Guide
#systat stream tcp nowait root /
usr/bin/ps ps -ef
#netstat stream tcp nowait root /
usr/bin/netstat netstat -f inet
#
# Time service is used for clock
synchronization.
#
###time stream tcp nowait root
internal
###time dgram udp wait root
internal
#
# Echo, discard, daytime, and chargen are used
primarily for testing.
#
###echo stream tcp nowait root
internal
###echo dgram udp wait root
internal
###discardstream tcp nowait root
internal
###discarddgram udp wait root
internal
###daytimestream tcp nowait root
internal
###daytimedgram udp wait root
internal
###chargenstream tcp nowait root
internal
###chargendgram udp wait root
internal
#
#
# RPC services syntax:
# <rpc_prog>/<vers> <endpoint-type> rpc/
<proto> <flags> <user> \
# <pathname> <args>
#
# <endpoint-type> can be either "tli" or
"stream" or "dgram".
# For "stream" and "dgram" assume that the
endpoint is a socket descriptor.
# <proto> can be either a nettype or a netid or
a "*". The value is
# first treated as a nettype. If it is not a
4-16 Common Controller
Page 41

System Guide Security and Network Setu p
valid nettype then it is
# treated as a netid. The "*" is a short-hand
way of saying all the
# transports supported by this system, ie. it
equates to the "visible"
# nettype. The syntax for <proto> is:
#
*|<nettype|netid>|<nettype|netid>{[,<nettype|ne
tid>]}# For example:
# dummy/1tli rpc/circuit_v,udpwaitroot /
tmp/test_svctest_svc
#
# Solstice system and network administration
class agent server
###100232/10tli rpc/udp wait root /usr/sbin/
sadmind sadmind
#
# Rquotad supports UFS disk quotas for NFS
clients
#
###rquotad/1tli rpc/datagram_vwait root /usr/
lib/nfs/rquotadrquotad
#
# The rusers service gives out user
information. Sites concerned# with security
may choose to disable it.
#
###rusersd/2-3tli rpc/datagram_v,circuit_vwait
root /usr/lib/netsvc/rusers/rpc.rusersd
rpc.rusersd
#
# The spray server is used primarily for
testing.
#
###sprayd/1tli rpc/datagram_vwait root /usr/
lib/netsvc/spray/rpc.spraydrpc.sprayd
#
# The rwall server allows others to post
messages to users on this machine.
#
###walld/1 tli rpc/datagram_vwait
root /usr/lib/netsvc/rwall/rpc.rwalldrpc.rwalld
#
# Rstatd is used by programs such as perfmeter.
#
###rstatd/2-4tli rpc/datagram_v wait root /
Common Controller 4-17
Page 42

Security and Network Setup System Guide
usr/lib/netsvc/rstat/rpc.rstatd rpc.rstatd
#
# The rexd server provides only minimal
authentication and is often not run
#
#rexd/1 tli rpc/tcp wait root /usr/
sbin/rpc.rexd rpc.rexd
#
# rpc.cmsd is a data base daemon which manages
calendar data backed# by files in /var/spool/
calendar
#
#
# Sun ToolTalk Database Server
#
#
# UFS-aware service daemon
#
#ufsd/1 tli rpc/* wait root /
usr/lib/fs/ufs/ufsdufsd -p
#
# Sun KCMS Profile Server
#100221/1tli rpc/tcp wait root /usr/
openwin/bin/kcms_serverkcms_server
#
# Sun Font Server
#fs stream tcp wait nobody
/usr/openwin/lib/fs.autofs
#
# CacheFS Daemon
#100235/1 tli rpc/tcp wait root /usr/lib/fs/
cachefs/cachefsd cachefsd
#
# Kerbd Daemon
#kerbd/4 tli rpc/ticlts wait
root /usr/sbin/kerbd kerbd
#
# Print Protocol Adaptor - BSD listener
#printer stream tcp nowait
root /usr/lib/print/in.lpdin.lpd
dtspc stream tcp nowait root /usr/dt/bin/dtspcd
/usr/dt/bin/dtspcd
xaudio stream tcp wait root /usr/openwin/
bin/Xaserver Xaserver -noauth -inetd
100068/2-5 dgram rpc/udp wait root /usr/dt/bin/
rpc.cmsd rpc.cmsd
4-18 Common Controller
Page 43

System Guide Security and Network Setu p
###100083/1 tli rpc/tcp wait root /usr/dt/bin/
rpc.ttdbserverd /usr/dt/bin/rpc.ttdbserverd
536870916/1 dgram rpc/udp wait root /opt/
SUNWvts/bin/vtsk /opt/SUNWvts/bin/vtsk
Helpful Security tips
Most of the files and processe s modified in thi s document have a
corresponding man page that describes, in considerable detail,
their functionality. It is good practice to read the man pages on
each item to get a n und ersta ndin g of th e pr ocess be ing modi fied
to ensure ahead of time if your workflow may be effected. The
following is an example of a man page command.
#man hosts.equiv<RETURN>
Additional information can be found in the Solaris Answerbook.
The Solaris Answerbook can be found online at almost every
University web page. A search for Answerbook should return
hundreds of sites.
If you are unfamiliar with the vi editor, you can use the GUI
based editor /usr/openwin/bin/textedit. To launch the editor login
as root enter the following:
#/usr/openwin/bin/textedit & <RETURN>
Textedit leaves a backup of the modified file in the same
directory. This backup file will have a % after the name. This file
can be deleted if you have already backed up the original file.
Always document and backup all files that you modify in case
some unforeseen problem. Example:
#cp /etc/inet/inetd.conf /etc/inet/
inetd.conf.orig <RETURN>
If, for whatever reason, the DocuSP controller will not boot up
after your modifications, you can restore the software to its
original configuration by booting to single user mode. This is
done by typing in
boot -s
from the ok> prompt. You will b e p rompted for the root
password. Upon login as root, you can copy the original files
back. Example:
#cp /etc/inet/inetd.conf.orig /etc/inet/
inetd.conf <RETURN>
Common Controller 4-19
Page 44

Security and Network Setup System Guide
In order to determine what security options have been
implemented in the past, whenever configure-xdss is run, it logs
all of the actions int o the /opt/XRXnp s/log/xdss_log.txt. View th is
file to view options that have been implemented.
4-20 Common Controller
Page 45

5. Printing
The following information will help you understand how to enable
and print using FIFO printing. The various printin g u t ilities that
are available are also outlined in this section as well as using
TIFF orientation, MICR, and VIPP.
First In/First Out (FIFO) Printing
When jobs are printed in the same order in which they are
received, this is FIFO printing. The Queue must also have the
Release status set to Yes.
Controller settings for limited FIFO scheduling/printing
To set up the system to perform in a FIFO manner, perform the
following:
1. Logon as System Administrator.
2. In DocuSP Print Services window, select [Options:
Preferences: Job Policy: Resources Required] and then
select [System Fault].
3. In DocuSP Print Services window, select [Options:
Preferences: Font Site Policy: Use Substitute Font] then
select [Yes].
4. Set up one queue as the FIFO queue.
5. When FIFO is critical, set the release status of all other
queues to [No] and only submit jobs to the FIFO queue.
Important information about FIFO:
• To preserve the FIFO Job Scheduling order, set the release
status of the FIFO queue to No in Queu e Manager, and do
not hold an individual job in Job Manager.
Common Controller 5-1
Page 46

Printing System Guide
• If FIFO is desired dynamically, all jobs must be submitted
from a single client to a single qu eue with a re lease status se t
to [Yes]. All other queu es must have the release status set to
No.
• If the queue that is set to use FIFO is not currently releasing
jobs to the printer, then the jobs may no t appear in t he correct
FIFO order. Select [Job Manager] and then select the
Options menu. Select [Redisplay] to view the jobs in correct
FIFO order.
NOTE: Some error conditions within the printer can cause a job
to fault becaus e there is no recovery operation that the operator
can perform. These jobs are dropped out of the sequence,
destroying the original FIFO order. The controller is not designed
to wait for corrective action by an operator for a faulted job
before advancing to the next job which has already been
scheduled and is displaying a ‘Waiting for Printer’ status.
Enable/Disable FIFO Job Scheduling
To enable or disable FIFO job scheduling, perform the following:
1. Open a Terminal Window.
2. Log in as root.
3. At the #, type the following
cd /opt/XRXnps/bin
4.and press <Enter>.
5. Type
./setfifomode
6. and press <Enter>.
7. Respond as appropriate to the following prompts:
‘This script is being run as root’
if the user is not logged in as root, the following message will
appear:
‘You must be root to run this script!’
The script will exit.
’Currently FIFO Job Scheduling is off’
’Do you wish to enable FIFO Job Scheduling? (y/
n)
5-2 Common Controller
• If FIFO Job Scheduling is not enabled, the following will
appear:
Page 47

System Guide Printing
• Enable FIFO Job Scheduling by typing
y
• for yes, or
n
• for no.
The following messages will appear:
‘Enabling FIFO Job Scheduling’
’You will need to Restart the DocuSP Software
for changes to take effect’
•If
n
• for no is entered, the following will appear:
‘No Change Made’
• If FIFO Job Scheduling has previously been enabled, the
following will appear:
‘Currently FIFO Job Scheduling is on’
’Do you wish to disable FIFO Job Scheduling?
(y/n)’
• Disable FIFO Job Scheduling by typing
y
• for yes.
The following message will appear:
‘Disabling FIFO Job Scheduling’
’You will need to Restart the DocuSP Software
for changes to take effect’
•If
n
• for no is entered, the following will app ear:
‘No Change Made’
8. In the DocuSP Print Services, select [System] and select
[Restart] to complete either enabling or disabling the Limited
FIFO Job Scheduling option.
With FIFO Job Scheduling enabled, the Controller will schedule
jobs for printing in the order that Job ID’s are assigned to
incoming jobs. Therefore, if Job ID 2 completes its “Receiving
Data” status and goes “Pending” before Job ID 1, Job ID 1 will
still be scheduled for print before Job ID 2.
Common Controller 5-3
Page 48

Printing System Guide
With FIFO Job Scheduling disabled, the Con troller will schedule
the jobs for pri nt as soon as they comp lete their “Receiving Data”
status in Job Manager. Therefore, Job ID 2 will be scheduled for
print before Job ID 1 if Job ID 2 goes “Pending” before Job ID 1.
The following table illustrates an example of FIFO Job
Scheduling.
Table 5-1.
Event
Sequence Job ABC Job XYZ
1 Received, assigned
Job ID 1
2 “Receiving Data” Received, assigned
Job ID 2
3 Still “Receiving Data” “Receiving Data”
4 Still “Receiving Data” “Pending” Job 2 prints
5 “Pending” Still “Pending” Job 1 prints
Limited FIFO
Enabled
first
Limited FIFO
Disabled
first
ASCII and PCL Printing Utility
ASCII printing within various environments results in output that
is not always formatted as desired. Unfortunately, there is no
"standard" method for printing ASCII files. ASCII is a character
set and is not a Page Description Language. Therefore, ASCII
files do not contain format commands nor is there a de facto
standard for ASCII formatting. How ever, users often have the
requirement to match a specific format. The utility below helps
enable this formatting flexibility along with the feature in Queue
Manager that en ables the ability to select the default document
format.
Impact on DocuSP printers
The DocuSP software automatically wraps ASCII files with a
predefined set of PostScript code and sends the data through
the PostScri pt decomposer. Unfortunately, this predefined
formatting does not always meet customer ASCII printing needs
and there are no "knobs" to change the formatting within
PostScript.
5-4 Common Controller
Page 49

System Guide Printing
As an alternative, ASCII files can be identified as PCL and sent
through the PCL decomposer. The PCL decomposer does
provide some additional capabilities that can be used to print
ASCII files as desired.
To force ASCII files to use the PCL decomposer, change the file
format in Job Manager. This can also be done by changing the
queue default document property from ASCII to PCL.
setpclontrol Utility
The setpclcontrol utility offers the following user controls:
You may set the site default for the PCL decomposer line
termination. Se tting these options allows both native PCL files
and ASCII streams forced through the PCL decomposer to be
conditioned with various combinations of carriage returns (CR),
line feeds (LF), and form feeds (FF). Mainframe and UNIX
environments typi cally requite some form of CR/LF/FF
adjustment.
This utility allows you to set a custom paper size to map to the
PCL escape sequence <esc>&|101A (which denotes “print on
custom stock size”). HP printers generally respond to this
command by imaging an area of 11.7 x 17.7 inches and then
printing the image, centered, on whatever stock is supplied by
the operator. The setpclcontrol utility allows you to specify a
single image and paper size to correspond with this escape
sequence.
NOTE: This control does not affect ASCII data streams.
Syntax of the utility:
setpclcontrol -t option where ‘option’ equals one of the following:
0 - CR=CR; LF=LF; FF=FF (default)
1 - CR=CR-LF; LF=LF; FF=FF
2 - CR=CR; LF=CR-LF; FF=CR-FF
3 - CR=CR-LF; LF=CR-LF; FF=CR-FF
The following is an e xample of an adjusted line termination
setting for a UNIX ASCII environment:
docusp_printer% su root
Password:
# cd /opt/XRXnps/bin/
# ./setpclcontrol -t 3
PLEASE RESTART DOCUSP TO APPLY SETTING.
Notes and Cautions:
Common Controller 5-5
Page 50

Printing System Guide
• This utility changes the PCL decomposer default line
termination. This utility should not be used in a mixed PCL
and ASCII environment. This is because PCL data streams
can include another line termination escape sequence. Such
a job will change the line termination setting again (possibly
without the user's knowledge).
• The process is the same to set the l ine termination v alue
back to the default.
• This change may be erased upon an upgrade.
• Mainframe users typically require a setting of "3". However,
trial and error may be required.
• Mainframe applications often have the ab ility to change line
termination settings. An adjustment at the mainframe is
always more desirable than using this utility.
Set lp/lprcopycount utility
The setlpcopycount utility allows th e DocuSP customer to modify
the behavior of how the lp/lpr gateway should handle a copy
count of one. Begi nning with DocuSP version 1.41.06, the
default setting ignores a copy count of one placed on the job by
the lp/lpr submission protocol. This allows the internal copy
count set by the PDL to take precedence. The following utility
allows a customer to return the DocuSP to its original behavior:
either imply a copy count of one when no ne is specifi ed or honor
a copy count of one if specified on the command line. This copy
count of one will take precedence over the copy count set by the
PDL.
Syntax of the utility:
setlpcopycount -f option
0 - Specifies that LP will set a copy count of
1 if received.
1 - Specifies that LP will ignore a copy count
of 1 if received.(default)
No option will display current setting
Example:
docusp_printer% su root
Password:
# cd /opt/XRXnps/bin/
# ./setlpcopycount -f 0
5-6 Common Controller
Page 51

System Guide Printing
Socket Gateway Configuration Utility: setVPSoption
This utility allows you to configure the two por ts of the Socket
Gateway to either remove the echo commands (VPS) or leave
the data unaltered (NONVPS).
If you are a DT61xx or DT65/75/90 non-LCDS customer,
configure both ports as NONVPS. DP1xxxEPS and DT 75/90
customers using LCDS need to decid e wheth er to config ure one
or both ports as V PS. If a port is not being used, it is
recommended to set the port to NONVPS.
The Socket Gate way allows two ports to be configured at one
time. Regardless of the port number assigned on the Socket
Configuration Utility, the socket port configured on the first port
will always be Port 1, and the second line is always Port 2. Both
ports will are set as VPS upon installation.
Syntax of the utility:
setVPSoption -1<option> -2<option>
0 - Specifies Port 1
1 - Specifies Port 2
option -VPS(default) or NONVPS
An example of the utility is as follows:
docusp_printer% su root
Password:
# cd /opt/XRXnps/bin
# ./setVPSoption -1VPS -2NONVPS
This sets Port 1 as VPS and Port 2 as NONVPS)
# ./setVPSoption -1VPS
This sets Port1 as VPS and leaves Port 2 unaltered.
# ./setVPSoption -2NONVPS
This leaves Port 1 unaltered and sets Port 2 as NONVPS.
Restart the DocuSP software after setting this option.
Common Controller 5-7
Page 52

Printing System Guide
TIFF Orientation
The DocuSP Save Feature stores TIFF images in d i fferent
orientations on the DocuTech/DocuPrint 75/90 and the
DocuTech 61XX. This is done by design to optimize productivity
and allow for the different finishing requirements of the print
engines controlled by the DocuSP software.
• DocuTech 61xx -- The DocuTech 61xx finishes the trail edge
of the pages and orients the image appropriately.
• DocuTech/DocuPrint 75/90 -- The DocuTech/DocuPrint 75/90
finishes the lead edge of the pages and orients the image
properly.
This difference can result in PostScript/VIPP files that call
Decomposition Service TIFFs being incompatible across the
different platform. The imported TIFFs may print with a different
orientation relative to the PostS cript image.
MICR Enablement
Magnetic Ink Character Recognition Definition (MICR) is a
standard character set which, when printed with magnetic ink,
allows machine recognition of the characters. This is commonly
used in banking for account numbers, routing codes and
amounts on checks. On Xerox MICR printers, the complete
page is printed w ith magne tic toner and the ch aracter istics of the
MICR fonts allow on ly the MICR chara cters to be comp rehended
by MICR readers. MI CR printing is val ued by customers because
it allows creation of documents that can be mechanically
processed and magnetically read by MICR equipment.
MICR fonts are available on a separate floppy. Fonts include:
PCL, PostScript and LCDS. A separate floppy is used to allow
you to control MICR font usage. The supplied soft fonts can be
loaded or deleted using Administration's font installation on the
DocuSP GUI.
NOTE: Only 300 dpi mode is supported for MICR printing.
5-8 Common Controller
Page 53

System Guide Printing
Using VIPP
To specify a job as a VIPP job, a start string is required. The
required start string can be automati ca l ly add ed usin g DocuSP
functionality. This can be completed usi ng the Command Line
Client, Queue Manager, and Job Properties.
To implement the VIPP Start feature, perform the following:
1. Copy the VIPP startup file into /var/spool/XRXnps/vipp and
then restart DocuSP. The file must exist in this directory and
cannot be changed. However, you can set a symbolic link to
other locations.
NOTE: The startup file must end with a l owerca se .in i extensi on.
2. In Queue Manager, create a print queue named VIPP.
Change the default document format from ASCII to
PostScript. If this is not done, all VIPP jobs will be run as
ASCII unless the data file begins with “%!”.
Paper Trays
Printing hints
3. Select the PDF/PostScript tab, and select [Start File].
Browse to the startup file and select this file.
For the DocuPrint 90 only, when running a job requiring more
than one color, seize, or weight of paper, use the trays in a Tray
1/Tra y 3 and then T ray 2/T ray 4 seq uence for optima l speed. For
example, Tray 1 would contain 8 1/2 x11 inch white paper, and
Tray 3 would have 8 1/2x11inch yellow paper for a job. Using
Tray 1/Tray 2 or Tray 3/Tray 4 combinations will slow the
process.
If you compress the resolution of embedded bitmap object at the
application level, you can produce smaller pdf files. This will
allow your job to transf er across the net faster, would require less
DFE spool/disk space, and may process faster.
Common Controller 5-9
Page 54

Printing System Guide
5-10 Common Controller
Page 55

Subset Finishing
6. Finishing
The following section contains information about how to use
subset finishing and mixed stacking on a printing job.
The finishing information below does not apply to Continuous
Feed (CF) systems. For CF systems, the finishing configuration
is defined at the CF (STAMPA) Controller. CF imposition files
are used to impose documents for printing in conjunction with
specific CF finishing configurations.
Subset finishing is the capability to use different types of finishing
(or no finishing) within the same job. The ability to finish subsets
independently is a critical feature for many variable data
applications
This product allows more than one type of finishing within a
single PostScript job. The supported finishing options and the
output locations that can be used vary depending upon the
printer type. The finishin g op tion s and deli ver y locations are the
following:
DocuTech 61xx:
• Portrait stitch
• Landscape stitch
• Dual Stitch
• Right Portrait Stitch
• Right Landscape Stitch
• Right Dual Staple
•Bind
• Right Bind
NOTE: The DT 61xx printers allow Short Edge Feed (SEF) only
in paper tray 3, 4, and 5. The short edges of the stocks range
from approximately 10 inches to 14 inches (254mm to 300mm).
Common Controller 6-1
Page 56

Finishing System Guide
Creating jobs to use subset finishing
It is important that jobs intended to be printed using subset
finishing be enabled with the following:
• PostScript code (using the “setpagedevice” operator)
• Variable Data Intelligent PostScript PrintWare (VIPP) version
2.0 or later.
NOTE: The Xerox Production Print Services (XPPS) client
software does not support subset finishing at this time.
Subset finishing can also be performed at the DigiPath
workstation through the Document Scan and Make Ready
application.
Subset Offset (Page Level Jog)
The printer has the ability to offset on a page level. This support
allows VIPP to be uti lized for of fset type ap plications. This ability
allows jobs to be sent as one larger file with page level offset
commands.
The term “Jog” is used to initiate an offset behavior.
• setpagedevice jog 0 (The offset command is “OFF”)
• setpagedevice jog 3 (The offset command is “ON”)
A job with a multiple copy count with a “jog 3” should force
offsets between each distinct set. A job with a copy count of 1
can contain “jog 0” or “jog 3” on a page by page basis. The
system will alternate offsets between each alternating jog 3 and
jog 0 command.
The following information should be considered when using the
“Jog” command:
• The first jog command on a page will be honored and all
others will be ignored.
• Multiple cases of jog 3 without the corresponding job 0’s will
be ignored.
• The Printer Manager’s setting of offset “ON” or “OFF” should
6-2 Common Controller
not impact the action of the PDL level jog commands. For
example, if the Pri nt er Mana ger’s offset is set to “O FF” a nd a
job has a jog 3, then the sets should be offset from one
another.
Page 57

System Guide Finishing
• The DT/DP 75/90 allows subset offsets to the top tray.
However, the 61xx is not mechanically capable of jogging to
the top tray.
PCL Offset/Separator/Subset Finishing command
The use of the PCL separator command, <ESC>&l1T, in
combination with DocuSP queue defaults enables subset
finishing for PCL jobs. The PCL separator command defines
offset segments of a job. PCL does not commonly support
finishing; however, the use of the PCL separator command
allows offset segments of a job to be finished based on the
finishing default set on the queue. For example, if the queue
default is portrait stitch, all segments of a job where the PCL
separator command has been used will be stitched.
The placement guidelines are as follows:
• Current Page Offset: If the current page is to be offset from
the previous page, then the PCL separator command must
be placed on the current page before any image data.
Placement should be within the job/page control section or
before.
• Next Page Offset: If the next page in the document is to be
offset from the current page, the PCL separator command
must be placed at the end of the current page after any
image items.
Access the Offset stacki ng switch by opening Printer Manager
and selecting the Stacking tab an d the n sele ct [Offset Stacking].
To enable offset stacking for collated or uncollated jobs, select
the enable chec kbox. Both buttons are located under the
collated stacking and uncollated stacking sections.
The following inform ation shoul d be consid ered when us ing PCL
separator command:
• The offset switch in Printer Manager in the DocuSP software
must be set to ON. If th e offse t switch is set to OFF and a job
with the PCL separator command is received, the sets will not
offset when the job is printed.
• Multiple uses of the PCL separator command within a job will
be honored.
• Multiple uses of the PCL separator command on a page will
be ignored.
Common Controller 6-3
Page 58

Finishing System Guide
• All finishin g limitatio ns and restrictio ns at the printe r will apply
to a subset segment.
PCL Paper Source Command
Use the PCL Paper So urce com mand <esc & 1 # H> to progr am
a PCL print job to use a specif ic paper. The PCL decompos er on
the DocuSP Controller reads the paper source command and,
using the PCL Paper Sources option in the Queue Properties,
maps the command to the ap pr op ri a te pap er. The number code
corresponds to the following PCL Paper Source Programmed in
Queue Properties.
To program the PCL Paper Source, use the following guidelines:
• Standard: <ESC>&11H
• Manual Paper Feed: <ESC>&13H
Mixed Stacking
• Manual Envelope Feed: <ESC>&13H
• Lower: <ESC>&14H
• Large Capacity: <ESC>&15H
• Envelope Feed: <ESC>&16H
Mixed stacking allows all completed jobs with different finishing
to accumulate in the stacker until it is full or until the operator
empties it.
The types of finishing that can be mixed include stitching,
binding, and unfinished. The mixed stack can also include
banner pages. The stacker can hold between 12 and 18
subsets of different types of finishing in the stacker before
unloading.
Mixed stacking is ena bled upon installation b ut can be di sabled if
you choose to do so. If you wish to have it enabled at a later
date, a Xerox Service Representative must assist you.
6-4 Common Controller
Page 59

System Guide Finishing
Additional finishing information
The DocuSP is unable to dual staple 3-hole punched stock. If
dual staple is selected when using pre-drilled paper, improper
registration will occur. Select to single staple the job, or print on
non-drilled stock and manually punch the holes after finishing of
dual staple is complete.
Common Controller 6-5
Page 60

Finishing System Guide
6-6 Common Controller
Page 61

7. Fonts
The following information explains how to use and choose fonts
for a job. It also covers various resident and non-resident fonts
and their availability.
How to choose fonts
Although document source f iles can specify almost any image on
a printed page, images that contain letters, numb ers,
punctuation, and symbols are common enough to require a
special mechanism for dealing with them , similar to movable
type. This mechanism is the font. The DocuSP controller
supports Adobe PostScript Type 1 and Type 3 fonts, PCL
scalable and bitmap fonts, and TrueType fonts.
Fonts
The most importan t thing to remember is that the font used to
create a document must also be available to the DocuSP
controller.
NOTE: DocuSP supports the euro character. Most font families
include the euro character.
At the DocuSP controller, a font can exist in three forms:
Resident fonts A resident font is an in ternal font that is permanently stored on
the DocuSP controller and is always available.
Soft fonts A soft, or optional, fonts are a typeface that are loaded as
needed at the DocuSP controller. This allows the DocuSP
controller to be customized with special fonts, such as logos, or
other special font applications.
Common Controller 7-1
Page 62

Fonts System Guide
Downloaded font When a font is downloaded with a document, all the font
requirements are embedded in the actual source file. If this font
is not available at the DocuSP controller, the downloaded
information is u sed to pr ocess and p rint th e document . Altho ugh
is useful, it also creates a much larger file size.
Resident Fonts
The DocuSP controller comes with a wide variety of fonts that
are available when creating a document.
NOTE: If you are unsure of the availability of a font, always
consult with your print organization management to determine
which fonts are currently loaded on the DocuSP cont roller.
PostScript Resident Fonts
The PostScript Type 1 typeface families listed in Table 7–1 are
scalable, which means that all point sizes are supported, even
intermediate point sizes. These include the typef aces that make
up the LaserWriter IINTX basic font set, plus additional Type 1
fonts supplied by Xerox.
Table 7-1. Fonts
Font Family Stresses and weights
ACaslon Italic, Regular, Semi Bold, Semi Bold Italic
AGaramond Bold, Bold Italic, Italic, Regular
Americana Americana, Extra Bold
AvantGarde Book, Book Oblique, Demi, Demi Oblique
AdobeSans MM
AdobeSerif MM
Albertus Italic, Light, MT
Americana ExtraBold, Regular
AntiqueOlive Bold, Compact, Italic, Roman
Apple Chancery
Arial BoldItalicMT, Bol dM T, ItalicMT, MT
Barmeno Bold, Extra Bold, Medium, Regular
Blackoak --Bodoni Bold, BoldItalic, Italic, Poster, Poster
Compressed
Bookman Demi, Demi Italic, Light, Light Italic
Carta ---
7-2 Common Controller
Page 63

System Guide Fonts
Table 7-1. Fonts
Font Family Stresses and weights
Chicago --Clarendon Bold, Light
CooperBlack Regular, Italic, ThirtyThreeBC, ThirtyTwoBC
Coronet --Courier Courier, Bold, Oblique, Bold Oblique, Regular
Eurostile Regular, Bold, Bold Extended Two, Extended
Two
Formata Italic, Medium, Medium Italic, Regular
Garamond Light, Light Italic, Bold, Bold Italic
Geneva --GillSans Bold, BoldCondensed, BoldItalic, Condensed,
ExtraBold, Italic, LightItalic
Goudy Regular, Bold, BoldItalic, ExtraBold, Italic
Helvetica Helvetica Black, Black Oblique, Bold, Bold
Oblique, Oblique, Light, Light Oblique,
Condensed, Condensed Bold, Condensed
Bold Oblique, Condensed Oblique, Narrow,
Narrow Bold, Narrow Bold Oblique, Narrow
Oblique
HoeflerText Black, BlackItalic, Italic, Ornaments, Regular
Joanna Regular (MT), Bold, BoldItalic, Italic
Kaufmann --Korinna Bold, Kursiv Bold, Kursiv Regular, Regular
LetterGothic Regular, Bold, BoldSlanted, Slanted
Liithos Black, Regular
LubalinGraph Book, BookOblique, Demi, DemiOblique
Marigold --MonaLisa–Recut --Monaco --New Century Schoolbook Roman, Bold, Italic, Bold Italic
NewYork --Optima Bold, BoldItalic, Italic
Oxford --Palatino Roman, Bold, Italic, Bold Italic
Parisian --ParkAvenue ---
Common Controller 7-3
Page 64

Fonts System Guide
Table 7-1. Fonts
Font Family Stresses and weights
Poetica SuppOrnaments
StempelGaramond Bold, BoldItalic, Italic, Roman
Symbol --Tekton Tekton, Bold
Times Bold, Bold Italic, Italic, Roman
TimesNewRomanPS Bold Italic MT, Bold MT, Italic MT, MT
Trajan Bold
Univers Regular, Bold, BoldExt, BoldExtObl,
BoldOblique, Condensed, CondensedBold,
CondensedBoldOblique, CondensedOblique,
Extended, Light, LightOblique, Oblique
Wingdings --Woodtype Ornaments Two
XeroxLogoTypes --ZapfChancery Medium Italic
ZapfDingbats ---
PCL resident fonts
There are three types of PCL 5e resident fonts that are
permanently loaded at the DocuSP controller:
• Scalable Intellifont typefaces
• LaserJet IV bitmap typefaces
• Typefaces that match the TrueType fonts as shown in Table
7–4.
NOTE: These are the same internal typ efaces t hat ar e provi ded
with the HP LaserJ et 4 printer.
Table 7-2. PCL Resident Fonts
Font Family Typefaces
Albertus Extra Bold, Medium
Arial Regular, Bold, Italic, Bold Italic
Antique Olive Antique Olive, Bold, Italic
CG Times CG Times, Bold, Bold Italic, Italic
CG Omega CG Omega, Bold, Bold Italic, Italic
Clarendon Condensed
Coronet ---
7-4 Common Controller
Page 65

System Guide Fonts
Table 7-2. PCL Resident Fonts
Font Family Typefaces
Courier Courier, Bold, Bold Italic, Italic
Garamond Antiqua, Halbfett, Kursiv, Kursiv Halbfett
Letter Gothic Letter Gothic, Bold, Italic
Marigold --Times New Regular, Bold, Bold Italic
Symbol --Wingdings --Univers Medium, Medium Condensed, Medium
Condensed Italic, Medium Italic, Bold, Bold
Italic, Bold Condensed, Bold Condensed Italic
Table 7-3. PCL 5e resident bitmap fonts
Font Family Typefaces
Line Printer 16.67 pitch 8.5
point
Arial Bold, Bold Italic, Italic
Times New, New Bold, New Bold Italic, New Italic
Symbol --Wingding c om parable Tidbits
Portrait, Landscape
Non Resident Fonts
There may be many fonts available in y our application th at are
not resident at the DocuSP controller. There are two options for
using non-resident fonts to create a document:
• Downloaded fonts
If you expect to create a document using fonts that are
available on your workstation but not available at the DocuSP
controller, your application may automatically download the
font when the job is sent to the printer. Fonts downloaded in
this manner ar e consider ed "tempo rary" and are delete d from
the DocuSP controller as soon as the job is printed.
Common Controller 7-5
NOTE: Refer to your application documen tation for more
information on downloading fonts in your document.
If you are using a font in your application that has the same
name as a resident font but is a different version, it must be
downloaded with the job. The DocuSP controller will use the
downloaded font rather than the resident font.
Page 66

Fonts System Guide
NOTE: Marking a font for "permanent" downloading in your
application is not suppo rt ed.
• Optional or soft fonts
Downloading fonts each time you print will increase the size
of the file and r esult in a longer transm ission time. If your print
jobs regularly require a font that is not a resident font, you
may request to have it installed as an optional font at the
DocuSP controller. Your printing organization's font policy
should give you the specific information you need to request
a special font.
Font substitution
A document may require a font that is not available at the
DocuSP controller an d has not been downloaded with the source
file. When the requested font is not available, font substitution
will take place.
TIFF files
PostScript fonts
A single default font, set by the System Administrator in the
DocuSP software, will be substituted for any font requirements
that cannot be met at the DocuSP controller. A message will be
printed to confirm that a substitution has taken place.
PCL 5e fonts
Another type of substitution occurs for PCL fonts. If a requested
PCL font is not available, the DocuSP controller will determine
which available font best matches the requested on e and
perform the substituti on. Any PCL stre am that does n ot have any
fonts specified in the file will have the default font programmed in
the “PCL font” section for the corresponding queue in Queue
Management.
This section discusses the TIFF tags supported by the DocuSP
software and the guidelines for printing TIFF files to achieve the
optimum performance.
7-6 Common Controller
Page 67

System Guide Fonts
TIFF overview
The purpose of this section is to pr ovide you w ith i nfo rmation for
creating TIFF files that can be submitted to the DocuSP
controller and to provide information about the type of TIFF files
that will increase printer producti vi ty.
Prior to DocuSP 3.1, the controller utilized a conversion tool
(TIFF to PostScript) to process and print TIFF files. A native
TIFF decomposer has now been im plemented to directly proc ess
TIFF files for printing. This improves the TIFF printing
performance for certain types of files. Decomposer level
adjustments are also now available for th e TIFF decomposer at
the Queue level.
NOTE: Multipage TIFF files are now supported. Single TIFF
files can now contain multiple TIFF images to be processed and
printed.
Performance considerations
Optimum performance ca n be achi e ved fo r p ri n ting TIFF fi les by
following the guidelines listed below:
• Use CCITT Group 4 compression for speed.
• Use a resolu ti on of 600 dpi to eliminate the need to scale th e
image.
• Use a TIFF orientation tag value of 8 to el iminate the need to
rotate the image.
• Use single strip image data to eliminate ad ditional imag e data
manipulations.
• Use a value of 1 for Fill Order to eliminate additional image
data manipula tions.
Supported TIFF tags
Below is a list of the TIFF tags supported by the DocuSP
software.
Compression
– Default = 1
– DocuSP supports values of 1 (unc ompressed), 2 (CCITT
T4 Option
Common Controller 7-7
Modified Huffman RLE, 32773 (PackBits), 3 (CCITT Group
3), and 4 (CCITT Group 4).
Page 68

Fonts System Guide
– Default = 0
– This is used to determine CCITT Group 3 one or two
dimensional coding.
Fill Order
– Default = 1
– DocuSP supports values of 1 and 2.
Image Width and Image Length
– Default = none; values must be supplied.
Orientation
– Default = 1
– DocuSP supports values of 1, 3, 6, and 8. Values of 2, 4, 5,
and 7 are treated as if they were 1, 3, 6, and 8 respectively.
Photometric Interpretation
– Default = none; value must be supplied.
– DocuSP supports bi-l evel values of 0 and 1 only.
Resolution Units
– Default = 2
– DocuSP supports values of 2 (inc hes) and 3 (centi meters)
Rows Per Strip
– Default = none
– DocuSP supports single and multiple strip images.
NOTE: Strips and tiles cannot be intermixed within the s ame
TIFF file.
Strip Byte Counts and Strip Offsets
– Default = none; values must be supplied if the image data is
organized into strips.
– DocuSP supports single and multiple strip images.
X and Y Resolution
– Default = none
– Values must be supplied for printing.
Tile Width, Tile Length, Tile Offsets, Tile Byte Counts
– Default = none
– Values must be supplied if image data is organized into tiles.
7-8 Common Controller
Page 69

Accounting
Auto exporting accounting log
8. Accounting and Billing
The following sections explain the various accounting log
versions that are available. It also lists the billing meters for each
region and an explanation of each meter.
The Accounting function will automati c ally export and purge the
accounting data when the database reaches 80% full. This will
protect data from being overwritten when the log previously ran
out of space. This option is performed automatically and saved
in a designated path for the default file location is: /export/home/
xrusr/accountingexportfiles directory.
NOTE: When purging, the oldest entry is purged first.
Accounting exported values
The Accounting feature tracks all jobs that have been processed
and printed, enabling your site to charge for use of the Xerox
printing system.
There are four di fferent versions supported for exporting the
customer acco unting log. Version 2, Version 3, Version 3.1 and
Version 4.
• V ersion 2: This is the most common vers ion that is suppor ted
for the DocuSP printing system. If this version is selected to
be exported, it will not include any new accounting entries.
• Version 3: This version will export all entries that are new
and old and zero and non-zero values. Additionally, entries
will be exported that are not viewable on the GUI. These
entries are: Channel Idle Time, Initial JDL, Initial JDE, DJDE
Records Read, and Lines Printed.
Common Controller 8-1
Page 70

Accounting and Billing System Guide
• Version 3 .1: This version will export all entries that are new
and old and zero and non-zero valu es. This vers ion is similar
and includes the same exported valu es as V ersion 3. V ersion
3.1 also includes the following fields:
– Interrupt Status: Options are Interrupt and Interrupted.
– Job Source: Indicates the Gateway through which the job
was submitted.
– RIP Interrupt Time: This value displays how long the job
was suspended in the ripping status if the job was
interrupted by a “Print Now” job.
• Version 4.0: This version is simi lar and includ es all t he sam e
values as V e rsion 3.1. H owever , it also incl udes the exp orted
value for Trapping. The number displayed will be the total
number of page s trapped within a job.
Billing
Billable Events
NOTE: For Continuous Feed (CF) printing systems, the DocuSP
billing meters are not maintained. For CF systems, billing meters
are maintained within the print en gine. For additiona l information,
contact a Xerox Service Representative.
Xerox billable events include the following:
• Administration pages, such as the banner page or error page
• Internal reports, such as billing reports or accounting reports
• All completed sets and stacks
• Sample jo bs
• Any partial sets that are generated by a programming
conflict, a PDL error, or when a job is cancelled by the
operator during printing
• Blank sides created as part of the job
Administration pages and sample jobs will be billed as 1-sided
sheets.
Billable events do not include the following:
8-2 Common Controller
Page 71

System Guide Accounting and Billing
• Blank sides inserted by the system; for example, the last
page of an odd-numbered 2-sided job.
• Sheets purged by the system for fault recovery or image
quality adjustment
• Any partial sets generated when the system fault recovery
forces the job to be saved or cancelled during printing.
• Slip sheets
Billing Meters
Tab le 8-1.
Market
Region Billing Meters for Region
Region 1
(USCO)
Region 2 (RX
UK)
Meter A: T otal impressions to an output
destination including Administration
Pages.
Meter B: Total impressions for each
image of the job up to and including the
last sheet of the 10th set. Does not
include Administration Pages.
Meter 1: T otal impressions to an output
destination including Administration
Pages.
Meter 2: Total impressions printed on
sheets wider than 9”. Includes
Administration Pages.
Meter 3: Total impressions for sets 11-
18. Begins counting with the fist image
in set 11 and stops after the last image
in set 18. Does not include
Administration Pages.
Meter 4: Total impressions in set 19 of
every document printed. Does not
include Administration Pages.
Region 5
(XCI)
Common Controller 8-3
Meter A: T otal impressions to an output
destination including Administration
Pages.
Page 72

Accounting and Billing System Guide
Tab le 8-1.
Market
Region Billing Meters for Region
Region 6
(FX)
Meter 1: T otal impressions to an output
destination including Administration
Pages.
Meter 2: Total impressions for each
image of the job up to and including the
last sheet of the 10th set. Does not
include Administration Pages.
8-4 Common Controller
Page 73

Calling for service
9. Troubleshooting
This section covers the various faults that you may encounter.
Declared faults are those that display a message to indicate a
problem. Undeclared faults are pr oblems that you may
encounter that do not display a message or visual on the G UI.
Before calling the C ustome r Se rvice Sup port Center, ensure you
have read this information and have tried the corrective actions
described in this document. If the problem persists, gather the
necessary information and call the appropriate Customer
Service Suppo rt Cen ter ph one nu mber. Your site representati ve
can supply you with the telephone number for the Customer
Service Support Center in your area.
Declared faults
The Xerox Welcome Center number is (800-821-2797)
Before calling for service, make no te of:
• Print/job fault messages, that appear on the system
controller.
• Status messages that appear on the printer control console.
• Indicator lights that may or may not be lit.
• Status codes that appear in the message display of the tape
drive control panel if there is a tape drive problem.
Your call is answered by a representative who will ask you for
your equipment serial number, ensure that you have this
available at the time of the call.
The following topics cover the various declared faults that you
may encounter on your system.
Common Controller 9-1
Page 74

Troubleshooting System Guide
Printer fault
An indicator will appear on the DocuSP GUI when a printer fault
occurs and the Printer Faults window will display. The Printer
Faults window will display all existing printer faults. Select a fault
to open the Fault Clearance window and proceed to clear the
fault by following the instructions i n the Printer Faults Clearance
window.
NOTE: Closing the Printer Faults Clearance window does not
clear the fault.
Job fault
A job will fault if a requirement of the job can not be met. All
faulted jobs will be displayed in the Faulted Jobs window.
Selecting Jobs Faults will display the Job Fault Clea rance
window. Follow the instructions on the window to clear the job
fault. To avoid common job faults, ensure that the paper that is
programmed for the job is available and that the finishing
programmed is acceptable and available.
Undeclared faults
The following are possible undeclared faults that you may
encounter:
• Client Problems: Client problems include job submi ssion
problems with no message displayed at the client
workstation.
• Graphical User Interface (GUI) problems: GUI icons or
windows do not appear correctly, do not appear correctly, do
not operate correctly, or disappear suddenly.
• Print quali ty: The outpu t from the pr inte r contains image
defects such as deletions, problem s with lines, missing
images, smudges, shading, or text problems.
• Font problems: Th e output from the printer contains font
defects, such as incorrect character spacing, jagged
characters, text runs off the page, or sentences run into each
other.
9-2 Common Controller
Page 75

System Guide Troubleshooting
• Inoperable system: The inoperable system has experienced
an unrecoverable software error due to a job or operator
action.
• Job flow: Jobs sent from the client are not received at a
printer queue.
• Job integrity: The output from the printer is not as expected.
Such as missing pages, missing data, incorrect page
orientation, incorrectly ordered sets, or job attribute
inconsistencies.
• PDL problem isolation: Questions that a System
Administrator may ask the job submitters when they are
experiencing problems with printing.
• Process problems: A process was followed incorrectly or
unintentionally.
• Productivity and performance: The job takes an excessive
amount of time to complete.
• Save problems: A job was submitted from a client with a
Client problems
Client problems are handled differently depending on the client
platform used.
Windows problems
A job is submitted from a Windows client and is not received by
the printer queue.
If the Xerox Document Submission client application does not
run properly or the job cannot be submitted to a queue, perform
the following:
1. The user must exit the Xerox Document Submission and
2. Verify the user is logged on to the appropriate file serve r.
Save destination, but the job is not saved.
Windows applications
3. Restart the Xerox Document Submission software at the
Macintosh problems
A job is submitted from a Macintosh client and the printer queues
cannot be viewed.
Common Controller 9-3
client workstation.
Page 76

Troubleshooting System Guide
If the Macintosh client cannot view any printer queues from the
Chooser, perform the following:
1. Verify that the Apple Ta lk network, is up and that there is at
least one route r on the network.
2. If there is no router on the Apple Talk network, jobs cannot be
submitted through the Apple Talk gateway. When a router
becomes available, reboot the controller to submit jobs
through the Apple Talk gateway.
If there is a router on the Apple Talk network, delete the “/opt/
XRXnps/bin/atports” file at the controller and reboot.
NOTE: You must be logged in as the root user to delete this file.
DigiPath problems
A job is submitted from a DigiPath client and does not print.
If the message, “Warning: cannot open the file xdms/
<filename>.gf/<filename >. tif. Sele ct OK to con tinue or can cel to
stop the print j ob.” is displayed, perform the following:
1. Place the queu e on hold that th e DigiPath jobs are being sen t
to. Do this by changing the accept status to “no”.
2. Wait until all jobs have completed printing.
3. Purge the /var/spool/XRXnps/var/spool/data/xdms directory.
GUI problems
If any of the modules of the DocuSP do not function or if you
cannot use Exit to restart the system, perform the following:
• If any of the DocuSP icons disappears or does not respond,
restart that module.
• If the GUI open s with a blac k blan k backgrou nd and the lab el
names of the modules do not ap pear correctly, perform the
following:
1. Determine if the /opt/XRXnps/XRXservui/data/locale/
<locale*>/resources directory exists.
2. Determine if the file /opt/XRXnps/XRXservui/data/
ui.mn.config file exists.
setenv XAPPLRESDIR/opt/XRXnps/XRXservui/data/
locale/<locale>resources
9-4 Common Controller
3. If the above files do not exist, set the XAPPLRESDIR
environment variable by enteri ng the following:
Page 77

System Guide Troubleshooting
NOTE: The “Locale” is the locale of your server.
– en_US for U.S. English
– in_UK for U.K. English
– fr for French
– es for Spanish
– de for German
– it for Italian
– ja for Japanese
Print Quality problems
An image quality problem exists if a job has been submitted
successfully, but does not print correctly.
NOTE: If Image Quality parameters are changed, the DocuSP
software must be restarted for the change to take affect.
NOTE: The Image Quality default settings are optimized for the
printer. If changes ar e made, the factory installed defaults can
be restored by selecting [Defaults]. Selecting [Reset] sets the
Image Quality parameters to the most recently applied setting.
To determine the print quality problem and possibly fix the
problem, perform the following :
1. Retrieve the error page if one was printed.
2. Submit the job to a draft PostScript printer if one is available
to determine if the master is valid.
3. Ensure that the jobs are sent to the correct queue.
4. Ensure that a v alid PDL is used.
5. If the problem still exists, recreate the job with a different print
driver and resubmit the job to the printer.
Font problems
A font problem ex ists when incorrect printed fonts have
character spacing, jagged characters, text running off the page,
or sentences running into each other.
To determine and fix the font problem, perform the fo llowing:
1. Determine if the font is being downloaded with the job.
Common Controller 9-5
Page 78

Troubleshooting System Guide
NOTE: If a downloaded font is not found, font substitution
occurs and an error page is printed.
2. If the font is not being downloaded with the job, determine if
the font is loaded on the server by vie wing the Fonts module
of the DocuSP.
3. If jagged char acters ar e seen, d etermine if ther e is a sc alable
option available for that font and whether the user selected
that option.
4. For incorrect character or text that runs off the page,
determine if the document was created with one driver and
printed with another driver.
5. If you are comparing prints from a proof printer, ensure that
the same PDL file was used to make the prints on both
printers.
6. If small fonts are printing ragged, change the default font
renderer in Print Manager from the “Adobe Type Manager” to
the “Font Solution”.
Inoperable system problems
If the system is inoperable due to a software, job, or operator
error, use another system and perform the following:
1. Telnet using another system into the controller and use the
su
1. command to become the root user.
2. At the # prompt, type:
sync; sync; halt
and press <Enter>.
3. At the ok prompt, type
boot
NOTE: Pressing <Stop> and <A> may result in lost in forma tion
is a job is currently being received by the system. Jobs would
need to be resent.
Job flow problems
If a job is submitted to a printer but does not print, this is a job
flow problem.
9-6 Common Controller
Page 79

System Guide Troubleshooting
Determine the status of the printer , printer queue an d ensure that
the queue is set to release jobs.
If the file system is out of disk space, perform the following:
• Open a terminal window and enter
df -k
• to determine which partition is full.
• If the /var/spool/XRXnps/outQ partition is full, go to the
DocuSP GUI. Open [Preferences] and th en [Job Policy]. Set
the system to small partitions or large partitions to avoid
saturating the outQ.
• If the /opt partition is full, delete unnecessary files and
compress and move any core files that are in the /opt/
XRXnps/corefiles directory.
• If the /var/spool partition is full, determine the size of the /var/
spool/XRXnps/inQ directory. If a job is larger than half the
size of the directory, delete the job and restart the Xerox
software.
If the job is small, store it on a server and resubmit the job
from the client.
Delete any faulted, ineligible, or held jobs that are no longer
needed. Also, delete any comple ted jobs in the /o pt/XRXnp s/
log/errorLogs directory.
• If any other partition is full, free space on the partition by
deleting any un necessary files.
• If only one job is in the printer queue, cancel the job and
resubmit as smaller files.
If the job is in PostScript, ASCII, or TIFF format and the job
status is “processing”, perform the following:
1. Hold the job.
2. Resubmit the job to a draft PostScript printer to determine if
the master is corrupted. If the job prints without problems,
contact the Customer Support Center.
NOTE: If a job that is known to be without faults has been
submitted and will not print, shut down and restart the DocuSP
software.
If an active job has a status of “printing” or “waiting for the
printer” and will not print and there a re no faults or messages
displayed, perform the following:
Common Controller 9-7
Page 80

Troubleshooting System Guide
1. Open the print er door . If a messag e appears in t he faults an d
messages frame, then the communication with the printer is
working.
2. Restart the DocuSP software. If the problem still persists,
contact the Customer Support Center.
Job Integrity problems
If the job does not print as expected (missing pages, missing
data, incorrect page orientation, incorrectly ordered sets, job
attribute inconsistencies), perform the follow ing:
1. Check the job properties to ensure proper programming.
2. Check for any queue override attributes that may be
conflicting with the job programming.
3. If the job is PCL or PostScr ipt, check for job ticket info rmation
that may have created a problem with the job. Make ch anges
and resubmit the job.
PDL problems
If a problem exist s wit h a PD L job , the Syst em Ad min istrator can
ask the job submitter specific questions to identify the problem.
Possible questions that may help are the following:
• What printer driver was used to create the file?
• What application was used to create the file?
• Do all applications create this file format?
• Have you tried to use a different printer driver? If not, do so
to conclude if it also creates problems.
• Has the file printed previously on a di ffere nt printer?
• Was the file recreated and resubmitted?
• Have you checked to see if the destination queue is
accepting files? Were the resources adequate?
• Did this file or a similar file print on a previously installed
version of the system software?
PostScript problems
The following questions may be helpful to ask when trying to
isolate a PostScript problem:
• What printer driver was used to create the file?
9-8 Common Controller
Page 81

System Guide Troubleshooting
• What client/application was used to create the file?
• W as the file recreated and resubmitted with a differ ent driver?
What was the result?
• Is there a printed PostScript error page, and what errors were
listed?
• Is the queue faulted, or is it accepting jobs?
• Did this file or a similar file print on a previously installed
version of the system software?
• Will the job print on any other PostScript printers?
• Does the PostScript file distill properly using Acrobat
Distiller?
TIFF problems
The following questions may be helpful to ask when trying to
isolate a TIFF problem:
• Is the file a true TIFF, or is it a TIFF wrapped in a PostScript
wrapper?
• Did the PostS cript err or page li st the error as “Decom position
Task Failed” to indicate that the tags and compression
formats of this file are not supported?
• What type of client and application were used to submit the
file?
• Can the TIFF image be viewed using any software package?
• Does the error page list errors such as “image mask”,
“Xeroximage” or “image” to indic ate that the FTP
transmission of the file has cor r upted the TIFF image d ata?
• If the file has an orientation problem, has an attempt been
made to change the orientation usin g the Xerox Client
Software print command orient ation switch?
• What compression format was used to compress the file?
• What dots per inch (dpi) resolution was used or intended for
the file?
PDF problems
The following questions may be helpful to ask when trying to
isolate a PDF problem:
• Was the PDF created from the original PostScript using the
Common Controller 9-9
latest version of Adobe’s PDF Distiller?
Page 82

Troubleshooting System Guide
• Does the original PostScript file print correctly?
• Will all of the pages of the job open with Adobe Acrobat?
• What application and/or PDF software created the PDF file?
• With the printer’s error pages turned on, does the printer
produce a PostScript error page?
• Has the file been redi stilled again using a newer PostScript?
• Are all of the document fonts do wnloaded and included within
the job?
• What was used to create the PDF? PDF Writer or Adobe’s
PDF Distiller?
Restore password
To restore the default password if a Trusted User or System
Administrator forgets the system password, perform the
following:
1. Open a terminal window.
2. Logon as the root user by typing
su
3. and select <Enter>.
Enter the the password and select <enter>
4. At the prompt (#), enter the following:
cd /opt/XRXnps/XRXui61XX/data
5. and select <Enter>.
6. Type:
ls -la
7. and select <enter>.
8. Delete the files “.npw” and “.sum” by typing
rm .npw .sum
9. and selecting <senter>.
10.Open the System menu and select [Logon]. Select the
desired user type and enter the password. Select <OK>.
1 1.An error message will display , “A problem was detected in the
9-10 Common Controller
password file.” Se lect < OK> an d ret ype the de fault pa sswo rd
again and select <OK>.
Page 83

System Guide Troubleshooting
12.A message will display in the main window which reads,
“Missing password file recreated .”
13.Select on the “missing password file” recreated message. A
pop-up window will display the service code C03-501.
Another message will be displayed which reads, “The
missing password file has been recreated. All current
passwords are now valid. Contact the System Administrator
to install Trused user an d System Administrator passw ords.”
Select [Reset].
Restart DocuSP software without rebooting
If [Exit] is accide ntally select ed fr om t he Xe rox so ftware, per form
the following to start the software without rebooting the
controller:
Open a terminal window and enter the following:
.openwin-init
Productivity and performance problems
If a job takes longer to process than anticipated and a
performance problem is suspected, perform the following to
check the system:
1. Check the job status in the Job Manager window.
2. If the job status is Hold, select [Release] to process the job.
3. If the job is Rippi ng, check the performance meter. If the
CPU activity is high, the decomposer is working. If this is not
true, restart the DocuSP software.
4. Submit the job to a draft printer to determine if the master is
valid.
5. Check the time on the decom poser that is w orking on the job.
For example, if the job is a PostScript job, type the following
in a Terminal Window:
ps -ae|grep ps_cdf
The system will return a time value along with the process ID
of the PostScript decomposers that are running. Wait, then
repeat the command. If the time displayed is increasing, then
the job is Ripping.
ps -ae|grep pcl_cdf
Common Controller 9-11
For a PCL job, type:
Page 84

Troubleshooting System Guide
For a TIFF job, type:
ps -ae|grep tiff_cdf
6. If problems still per sist, contact the Custo mer Sup port Cente r.
Problems when saving a job
If a job was submitted from a client with a save destination, but is
not saved, perform the following:
1. Ensure that the banner and error pages are enabled,
2. Submit the job for printing.
3. Check the error page for the words “OFFENDING
COMMAND”. The words after this will instruct what to do to
fix the file.
Printing system logs
System logs gather information to recover various system
problems.
Logs are used to gather second level information on the
operation of the system. These should only be used when
directed by this guide or but the Customer Support Center. All
logs are found in the /opt/XRXnps/log directory. The most recent
entry is at the bottom of the file.
all_jobs_log
The all_jobs_log con tains i nformati on about th e status of variou s
tasks associated with processing a job, such as decomposing,
marking, and printing.
The format of the file is as follows:
Logging Module /t# Absolute Time /t# Job ID /t#
Message
system_log
The system_log contains information about general high level
system events such as the initialization o f software or the starting
of a process.
9-12 Common Controller
Page 85

System Guide Troubleshooting
The format of the file is as follows:
Logging Module /t# Absolute Time /t# Message
status_log
The status_log contains information about the attributes of a job
once it has been accepted and tracked by the system.
The attribute information found in this file is as follows (the
sequence and attributes displa yed var y wit h the job):
Logging Module /t# Sender Name /t# Data Size /
t# Document Name /t# Document Format /t# Job ID
/t# Virtual Printer Name /t# Message /t# Time /
t# Network Protocol /t# Assigned Physical
Printer /t# Plex /t# Plex Requested /t#
Disposition
ep_exception_log and ep_primary_log
These logs contain a list of faults. The ep_exception_log
contains a listing of all logged faults. The ep_primary_log
contains exceptions that are the primary cause of the problem.
The format of these files is as follows:
Logging Module /t# Absolute Time /t#
Microseconds /t# Instance ID:Module TD /t#
Exception ID /t# Service Code
Printing the System logs
You print th e System logs to help you gather information and
recover from various system problems.
To print the logs:
1. Open a Terminal window and log in as “root”.
2. Change directory to the log directory by entering the following
command:
cd /opt/XRXnps/log
3. Enter the following command:
print -p <que_name> <log_name>
4. Press <Enter>.
Common Controller 9-13
Ensure that you know and substitute the name of the queue
that you are printing to and the log name you are printing to.
Page 86

Troubleshooting System Guide
Printing the Accounting log
Print the Accounting log to gather information and recover from
various accounting pr oblems. Eit her the entire A ccounting log or
a portion of the log may be printed.
Rebooting and restarting
Recovery procedures th roug hout t his gu ide in struct you t o eith er
reboot or restart the software.
To reboot the system and perform a file system check, perform
the following:
1. Place your mouse cursor in the background outside of the
DocuSP Print Services window.
2. Right-click and select [Programs].
3. Select [Terminal].
4. Put your mouse cursor in the window and type:
su
5. Select <Enter>.
6. Type in your root password.
7. Select <Enter>. A # symbol displays.
NOTE: When entering text, do so in lower-case because
UNIX is a case sensitive system.
8. Type:
sync; sync; halt
9.
10.Select <Enter>. The system will reboot.
11.A Program Terminated message and an Ok prompt display.
Type
boot -s
12.At the Ok prompt, type
boot -s
13.Select <Enter>. The system will reboot.
14.When you recieve the following message, “Type Ctrl-d to
9-14 Common Controller
proceed with a normal startup, (or give root password for
system maintenance).” Type the root password again.
Page 87

System Guide Troubleshooting
15.Select <Enter>. The prompt (#) will display. The system will
prompt you to perform a File Check.
16.Type
fsk -y
17. and select <Enter>.
18.Select the <Ctrl> and <d> keys on your keyboard at the same
time to complete the boot.
NOTE: This procedure performs the file check and takes
about one minute. The # symbol appears again.
If there are problems starti ng the software, che ck the console
window for messages.
Loading XDJC/Unix
The Xerox Job Description Compiler is loaded by entering the
following on the command line:
/opt/XRXnps/bin/XDJC [-option[,option...]]
<filename> ...
The filename is the name of the JSL fil e that is to be compiled.
The JSL filename is required to terminate with the suffix .jsl or
.JSL. The filename may contain path information.
Many options may be specified and shown in the above
example. The option may be specified in any order and are 3character abbreviati ons. A list of the availa bl e opt i ons and their
abbreviations are as follows:
• REPlace / NOReplace : Replace or backup e xisting PDL
object files
• DISplay / NODisplay: Display or suppress XDJC messages
• PRInt / NOPrint Generate: JSL compila tion listing always or
only when errors/warnings occur
• TRUncate / NOTruncate: Truncate or accept JSL source
lines after 72 characters
• LABel / NOLabel: Generate or suppress 128-byte Xerox
standard label
• COMpile / SCAn: Compile with output or scan only
• SINglebyte / DOUblebyte: Use singlebyte or doublebyte
code and printer carriage control translation files
Common Controller 9-15
Page 88

Troubleshooting System Guide
• Vx: LPS P DL version number, x = 10, 2, 35, 3615, 37, 38, 39,
40, 50, 3A, M10
• PAPersizes: Papersize to use for PDL VM10, s = USLEGAL
/ USLETTER / A4
• DATed = d: Date format, d = US / EUROPEAN
• PAGinate = p: Lines per page, n = 0, 5 to 999 (0 means no
pagination)
• OUTpath=p: Base directory for output files, p = <path>,
default is current directory (Note that ~ is not supported.)
Configuring XDJC/Unix
The configuration file, CONFIG.TXT foun d in the directory /opt/
XRXnps/bin/, contains default parameters for the invocation of
XDJC. The text file can be edited using any simple text editor.
The first line of the configuration file must not be edited; it
contains XDJC version information. Each subsequent line
contains a single option ; any text followin g the first word, and any
invalid options , are ignored. Options may be repeated or
contradicted on following lines; the last option specified overrides
previous options. The follow in g sam pl e conf ig ur ation file is
provided:
XDJC VM10 PDL Compiler
REPLACE
NODISPLAY
PRINT
TRUNCATE
LABEL
COMPILE
SINGLEBYTE
VM10
PAPERSIZE=USLETTER
DATE=US
PAGINATE=60
OUTPATH =/opt/XRXnps/resources/lcds
9-16 Common Controller
Page 89

System Guide Troubleshooting
Output files
Upon compilation of a JSL source file, the XDJC generates the
following:
• JSL source listing file
<filename>.lst or <filename>.LST
The filename is the name of the JSL file, excluding path
information. The case of the file ex tension corresponds with
the case of the file extension of the JSL source file.
• Resource list in g file
<filename>.rsc or <filename>.RSC
The filename is the name of the JSL file, excluding path
information. The case of the file ex tension corresponds with
the case of the file extension of the JSL source file.
• Zero or more PDL object files of types
.JDL .CME .IDR .LIB .PDE .STK .TST
All filenames are in upper case and are written to the
directory <outpath>/VM10 where outpath is the output path
specified. Files are overwritten if the REPLACE option is
selected; otherwise they are renamed to $xx where xx is t he
first two characters of the file type.
• a log file containing messages displayed to the screen
XDJC.LOG
The log file is written to the directory in which XDJC/Unix is
installed and is appended at each invocation of XDJC.
Properly ejecting a diskette from the Diskette drive on a DocuSP
workstation
Several problems can arise if you use the eject button on the
floppy disk without first selecting Ejct in the software.
To properly and safely eject a floppy diskette (or other
mountable, removable media) perform the following:
1. Select [Setup] and then [Configuration]. The Setup
2. Select the Peripherals tab.
3. Right-click on the dri ve entitled “floppy0.”
Common Controller 9-17
Configuration window displ ays.
Page 90

Troubleshooting System Guide
4. From the right-click menu, select [Eject/Unload]. This
dismounts the floppty media, and protects the platform from
damage caused by attempting to eject the media manually.
5. Select [OK] to close the “Removable Media Manager”
window.
6. Now use the floppy eject button to eject the floppy diskette.
9-18 Common Controller
Page 91

General
10. Hints an d Tips
Disabling the Solaris 8 Screen Saver
To disable the Solaris 8 Screen Saver:
1. Open a Terminal window.
2. Type the following path:
cd /usr/openwin/bin
3..
4. Type
dtpower
5..
6. Select Yes from the Scheme Confirmation window that
opens. The Power Saver screen is displayed.
7. From the Current Power Saver Scheme pull-down menu,
select Disable.
8. Select OK, and close the Terminal window.
Common Desktop Environment (CDE) Front Panel Removal and
Workaround
The purpose of this pr ocedure is to describe the ste ps necessary
to restore the Fron t Panel Display Tool Bar on the Common
Desktop Environment. This feature was removed from the
3.11.04 software but was present in the 3.10.00 software. To
bring this panel back, perform the following steps:
1. Open a Terminal window.
2. Login as root.
3. Edit /usr/dt/app-defaults/C/Dtwm.
Common Controller 10-1
Page 92

Hints and Tips System Guide
4. Change the following line to “True:”
Dtwm*useFrontPanel:False
5. Reboot the system. The CDE front panel will return.
Color Systems
General Comments
The time required to process a job can depend on various
influences. The time requir ed to pr oce ss a job is made up of 4
components:
• Time for a client workstation to generate the Page
Description Language (PDL, i.e. PostScript, HP-PCL, TIFF,
etc.).
• T ime to tr ansfer the job PDL across the net and be marked as
received by the DocuSP.
• Time required to RIP the PDL to produce the bit maps that
the print engine can use.
• T ime required to wri te the RIPped bit ma ps to the print engine
and generate paper.
Time used to generate the PDL
These components is strongly influenced by the speed of the
client workstation, the print driver being used by the application,
and the complexity of the pa ges to be printed.
Time used to transfer PDL
These components is influenced by the speed of the network
connection between the client workstation and the DocuSP. It is
also impacted by the number of workstations on the network, by
the configuration of the net (i.e. number and speed of the
gateways and routers and by the number of simultaneous
network connections that DocuSP has to manage). Finally it is
impacted by the complexity of the pages being printed (i.e. the
size of the PDL files being transferred).
10-2 Common Controller
Page 93

System Guide Hints and Tips
Time required to RIP PDL
These components are influen ced by the eff iciency of the PDL to
be RIPped, the complexity of the pages being RIPped, the
number and resolution of images inc l uded, and the medi a/color
space transforms being performed on the data before imaging/
printing.
Time required to print PDL
These components are influenced by the media being used and
the paper path through the IOT. Whether the printing is face up
or down, simplex or duplex, all one size or a mix of sizes to be
drawn from different trays all mak e a difference. In addition, the
complexity of the pages and therefore the number o f Image
Quality Adjustments that the DC 2045/2060/6060 print engine
makes during a job also impact the final performance of the
printer as it generates paper.
Job Submission Hints
Number of Images
The number and resolution of the images that are embedded
within a job will be a big driver of the PDL size and therefore PDL
generation time, data transfer, spool and RIP performance.
Minimizing the number and/or resolution of embedded images
will improve performance.
Ethernet
To keep the network from becoming over loaded with jobs when
several clients are simultaneously submitting and printing, it is
important to have a fairly fast ether net (100 Bast T or faster).
Gateways
If a user has all of the DocuSP gateways installed and active,
performance will be less than expe c ted because the work
required to monitor each added gateway and potential client
connection will consume a small p ortion of the available CPU
band width. If this is a problem, you may wish to remove
gateways not being used (i.e. lpr, IPP, SNMP, HTTP Novell,
Appletalk or Token Ring), keeping only those that are needed.
Common Controller 10-3
Page 94

Hints and Tips System Guide
Job submission order
Job submission order can impact per fo rm a nce . It is suggest ed
that a job with many pages to be RIPped and a large number of
copies should be subm itted at the e nd of the say if p ossible. With
the printer paused, the job can then RIP over night. That job will
then start printing the beginning of the next day and while it is
printing, the DocuSP can process a complex/difficult job t hat
takes a long time to RIP. As long as the previous job is still
printing when the next jo b finishes RIPp ing, the Doc uSP can RIP
still another job to get even further ahead. In this way, the print
engine itself will never be idle waiting for a hard job to finish RIP.
Job RIP Hints
If using the default media/color settings that are pre-loaded on
the DFE, the DocuSP can use built in color space
transformations to accelerate RIP performance. If you do any of
the following, the color space transformation will probably take
more time and the RIP will be slower:
• Define own media
• Include input or output ICC color profiles in the PDL file
• Change any of the system color settings (i.e. saturation,
lightness, color adjustments for C,M,Y or K, emulation mode,
etc.)
NOTE: In general, RGB and LAB color space transformations
are slower th an CMYK transformations. If the input images of a
job can be created in CMYK color space then the DocuSP will be
able to proces s the job more efficiently.
Variable data
Variable data job construction is also an important driver of RIP
performance. Jobs that are con structed wi th a single under lay or
background plane and a small number of variable text or image
overlays will run very efficiently. If the same job is constructed
with the underlay constr ucted from seve ral distinct ob jects which
the DocuSP is aske d t o co m posite on the fly then the job w ill not
be able to take advantage of the DocuSP variable data
performance enhancement. In that case it may RIP significantly
shower than the more efficiently constructed job.
10-4 Common Controller
Page 95

System Guide Hints and Tips
For cases where the background/underlay of the variable data
job is composed of 2 or 3 relatively static objects it is suggested
to have the application create each static combination of objects
as a differe nt underlay. This will be more ef ficient than having the
DocuSP perform the composition. When creating variable
objects to be overlaid on fixed underlays or backgrounds, it is
also important to ensur e that the ob jects are pr oper ly cropp ed or
bounded and at the lowest acceptable resolution. The DocuSP
can compose 2 vari able data objects o f 2 in ches by 2 i nches and
300 dots/inch resolution about 10-20 times faster than it could if
the same objects were 600 dpi and 8.5x11 inches.
Image Quality
Generally the image quality of a DocuSP/DC 2045/2060/6060
system will be above average and the Image Quality (IQ)
enhancements filters provided within DocuSP will be
unnecessary. If you wish to improve output IQ, the DocuSP
provides sepa rate controls for enabling Anti Aliasing, Trapping,
and Intelligent Black Overprint. Disabling all 3 of these IQ filters
will improve performance. If you are printing only a small number
of copies, the expected increase in RIP time will be visible as a
significant fracti on of th e total job pr ocessing ti me. When printi ng
documents with a large a number of copies, then the majority of
the processing time will be devoted to the actual printing and the
RIP performance decrease will be less visible (a smaller fraction
of the total job time). You should examine the DocuSP printed
output with the IQ enhancing filters enabled and disabled and
decide then whether the IQ improvement is worth the
performance drop for his particular job scenario.
On DC 2045/2060/6060 there are certain scenarios where the
printer will cycle down and do an Image Quality (IQ) adjustment.
The % area coverage of the page (i.e. amount of image/text
written on the page) also effects the number of IQ Adjustments
that the printer will make. A standard letter size page (8.5x11
inches) is about 21.6x27.9 cm or about 603.5 square cm. If the
text and images written to a page cover more than about 250
square cm (about 40% of the page), then the print engine will
automatically generate IQ Adjustments. If you find that a
particular document seems to take a long time to print because
of IQ adjustments, impr ove performa nce by simpli fying the pag e.
For example, the text and images on the page might be
downsized to cover less than 40% of the viewable area of the
paper and the performance may improve because the printer
does fewer IQ Adjustments.
Common Controller 10-5
Page 96

Hints and Tips System Guide
The DC 2045/2060/6060 print engine will also perform IQ
adjustments if a difficult job is being proce ssed and RIP falls
behind the print output. If this occurs, the print engine will cycle
down for a few seconds while the RIP catches up and then it will
perform an IQ adjus tment which will take anywhere from 5-95
seconds. During the IQ adjustment, the prin ter will not print
anything. However, the RIP will continue and be slightly ahead.
As soon as the printer finishes the IQ adjustment it will print all of
the RIPped pages and catch up wit h the printer.
Job Printing Hints
The DC 6060 print engine cycles down on certain operations
such as on tray/bank switches or between jobs. Each cycle may
take 10-40 seconds to complete before the print engine is ready
to print again. To avoid unnecessary print engine cycling, you
can perform the following:
• Disable finishing, slip-sheets and offset stacking.
• Disable banner sheets when making multiple copies of a job.
• Avoid media tray switches by constructing the job to use only
a single size, color, weight paper and by ensuring before
running a job that the currently active tray has enough media
loaded to print the entire job.
Skipped Pitches
To stop the cycle of skipped pitches and cycle the print engine
down, perform one of the following to improve the overall job
performance:
1. Process the job in N-1 order rather than 1-N order. This will
force the job to be completely ri pped before the print engine
is started up. When the print engine starts it will consume
pages at 60 ppm until all pages are printed.
10-6 Common Controller
Page 97

System Guide Hints and Tips
2. The other alternative is counter intuitive. The user could
pause the printer ( the green but ton on th e DocuSP GU I) un til
a large number of pages in the job have been RIPped. If the
user then resumes the printer at the right time (some time
before the whole job is RIPped), the print engine will print all
of the queued pages and the controller will simultaneously
finish ripping the r emainder o f the job. To do this successfully,
the user will need to watch and compute the rate that
DocuSP is ripping a t. If he kno ws ho w many page s are in th e
job, then knowing that the printer will generate paper at 60
ppm, he can compu te how far from the end of the job to
release the printer so that RIP and print finish at the same
time.
XJDC Hints and Tips
• If the config file needs to be changed, modify the /opt/
XRXnps/XRXXJDC/data/CONFIG.TXT file. Otherwise, the
default setting in the CONFIG.TXT file will take effect.
• An example for the syntax /opt/XRXnps/bin/XJDC filename
would be: /opt/XRXnps/bin/XJDC /home/XDJCtest/
BASIC.JSL where the filename is represented by /home/
XJDCtest/BASIC.JSL
• The output files are stored under the OUTPATH directory
which is specified in either /opt/XRXnps/bin /CONFIG.TXT file
or command line. For ex ample, if OUTPATH is /opt/XRXnps/
temp/, then all the output files are put in the directory of /opt/
XRXnps/temp.
• JSL source file s can be ed ited usin g the text edit comm and or
UNIX vi command. "textedit" is avail a bl e with the softwar e
release. T o invoke the editor, bring up a Terminal window and
<Enter> "textedit". For example, open a terminal shell and on
the command line, type: textedit BASIC.JSL or vi
BASIC.JSL
• During the XJDC compilation, if an error is encoun tered, the
compiler will print the error report to printer. Ensure the first
available queue is PostScript queue.
Common Controller 10-7
Page 98

Hints and Tips System Guide
PCI Channel Interface PWB Trace Capture Procedure
Load the PCI Chan nel Interface PWB Trace command when
software is insta lled and the PCI Channel Interface PWB PWB is
detected. This procedure is usually performed at the request of
Software Engineering or as part of a SPAR package.
Perform a Trace
To start the trace, perform the following:
1. Login as Administrator.
2. Select [System - Online Manager].
3. Select:
• Channel Gateway - Enable
• Input Device - Online
• Input Control - Start
4. Submit a job from the host.
5. After the job is completely received by the Controller, select
Input Control - End.
6. Open a Terminal window.
7. Type
cd /opt/XRXnps/XRXgrpset/bin
8. and press <Enter>.
9. Type
./dspTrc > FileName.txt
10. and press <Enter>.
11.Type
ls -l
12. and press <Enter> to see the new file and the file size.
13.If the file size is greater than 1.44 MB, type
compress FileName.txt
10-8 Common Controller
14. and press <Enter>. If the file size is less than 1.44 MB, go
to “Export the trace file to floppy".
Page 99

System Guide Hints and Tips
Export the trace file to floppy
To export the trace file to a floppy, perform the following:
1. Insert a blank, formatted floppy into the floppy drive.
2. Type
volrmmount -i
3.and press <Enter>.
4. If you used the "compress" c ommand above, type
cp FileName.txt.Z /floppy/floppy0
5. and press <Enter>. If you did not use the "compress"
command above, type
cp FileName.txt /floppy/floppy0
6. and press <Enter>.
7. Type
eject
8. and press <Enter>.
Common Controller 10-9
Page 100

Hints and Tips System Guide
10-10 Common Controller
 Loading...