

Page 1

Xerox DocuPrint
4850/4890/92C
NPS/IPS
Troubleshooting Guide
721P90201
Version 8.0
October 2002
Page 2

Xerox Corporation
701 S. Aviation Boulevard
El Segundo, CA 90245
©2002 by Xerox Corporation. All rights reserved.
Copyright protection claimed includes all forms and matters of copyrightable
material and information now allowed by statutory or judicial law or hereinafter
granted, including without limitation, material generated from the software
programs which are displayed on the screen, such as icons, screen displays,
looks, etc.
Printed in the United States of America.
Publication number: 721P90201
Xerox® and all Xerox products mentioned in this publication are trademarks of
Xerox Corporation. Products and trademarks of other companies are also
acknowledged.
Changes are periodically made to this document. Changes, technical
inaccuracies, and typographic errors will be corrected in subsequent editions.
Page 3

Table of contents
Safety . . . . . . . . . . . . . . . . . . . . . . . . . . . . . . . . . . . . . . . . . . . . . . . . . v
Laser safety . . . . . . . . . . . . . . . . . . . . . . . . . . . . . . . . . . . . . . . . . . . . . . . . v
Ozone information: U. S. only . . . . . . . . . . . . . . . . . . . . . . . . . . . . . . . . . .vi
Operation safety: U. S. . . . . . . . . . . . . . . . . . . . . . . . . . . . . . . . . . . . . . . .vi
Operation safety: Europe . . . . . . . . . . . . . . . . . . . . . . . . . . . . . . . . . . . . vii
Warning markings . . . . . . . . . . . . . . . . . . . . . . . . . . . . . . . . . . . . . vii
Electrical supply . . . . . . . . . . . . . . . . . . . . . . . . . . . . . . . . . . . . . . viii
Ventilation . . . . . . . . . . . . . . . . . . . . . . . . . . . . . . . . . . . . . . . . . . . viii
Operator accessible areas . . . . . . . . . . . . . . . . . . . . . . . . . . . . . . viii
Maintenance . . . . . . . . . . . . . . . . . . . . . . . . . . . . . . . . . . . . . . . . . .ix
Before cleaning your product . . . . . . . . . . . . . . . . . . . . . . . . . . . . .ix
CE mark: Europe only . . . . . . . . . . . . . . . . . . . . . . . . . . . . . . . . . . . . . . . .ix
Radio and telecommunications equipment directive (Europe only) . . . . . x
For further information . . . . . . . . . . . . . . . . . . . . . . . . . . . . . . . . . . . . . . . .xi
Introduction . . . . . . . . . . . . . . . . . . . . . . . . . . . . . . . . . . . . . . . . . . . xiii
About this guide . . . . . . . . . . . . . . . . . . . . . . . . . . . . . . . . . . . . . . . . . . . . xiii
Contents . . . . . . . . . . . . . . . . . . . . . . . . . . . . . . . . . . . . . . . . . . . . xiii
Conventions . . . . . . . . . . . . . . . . . . . . . . . . . . . . . . . . . . . . . . . . . xiv
Related publications . . . . . . . . . . . . . . . . . . . . . . . . . . . . . . . . . . . . . . . . xv
1. Calling for service . . . . . . . . . . . . . . . . . . . . . . . . . . . . . . . . . . . . . . 1-1
Information to have on hand when calling for service . . . . . . . . . . . . . . 1-1
Enabling and disabling the modem for remote service . . . . . . . . . . . . . 1-2
2. Troubleshooting Xerox Client Software installation. . . . . . . . . . . 2-1
3. Troubleshooting a Novell implementation . . . . . . . . . . . . . . . . . . 3-1
4. Clearing paper misfeeds and jams. . . . . . . . . . . . . . . . . . . . . . . . . 4-1
Clearing a feeder tray fault . . . . . . . . . . . . . . . . . . . . . . . . . . . . . . . . . . 4-1
Frequent misfeeds . . . . . . . . . . . . . . . . . . . . . . . . . . . . . . . . . . . . . . . . . 4-3
Clearing paper jams . . . . . . . . . . . . . . . . . . . . . . . . . . . . . . . . . . . . . . . 4-5
Job recovery . . . . . . . . . . . . . . . . . . . . . . . . . . . . . . . . . . . . . . . . 4-8
Printer jam clearance areas . . . . . . . . . . . . . . . . . . . . . . . . . . . . 4-9
Clearing paper jams from areas 1 and 1A . . . . . . . . . . . . . . . . 4-10
Clearing paper jams from areas 2 and 2A . . . . . . . . . . . . . . . . 4-12
Clearing paper jams from area 3 . . . . . . . . . . . . . . . . . . . . . . . 4-14
Troubleshooting Guide iii
Page 4

Table of contents
Clearing paper jams from area 4 . . . . . . . . . . . . . . . . . . . . . . . 4-15
Clearing paper jams from area 5 . . . . . . . . . . . . . . . . . . . . . . . 4-18
Clearing paper jams from areas 6 and 6A . . . . . . . . . . . . . . . . 4-20
Clearing paper jams from area 7 . . . . . . . . . . . . . . . . . . . . . . . 4-22
Clearing paper jams from area 8 . . . . . . . . . . . . . . . . . . . . . . . 4-24
Clearing paper jams from area 9 . . . . . . . . . . . . . . . . . . . . . . . 4-25
Adjusting dual stacker tray scuffer arms . . . . . . . . . . . . . . . . . . 4-26
Clearing stitcher/stacker paper jams (areas A and B) . . . . . . . 4-27
Clearing bypass transport paper jams (4890/92C only) . . . . . . 4-28
5. Optimizing print quality. . . . . . . . . . . . . . . . . . . . . . . . . . . . . . . . . . 5-1
Adjusting print quality . . . . . . . . . . . . . . . . . . . . . . . . . . . . . . . . . . . . . . 5-1
Product features that affect PostScript print quality . . . . . . . . . . . . . . . 5-2
Proprietary PostScript extensions . . . . . . . . . . . . . . . . . . . . . . . 5-2
Device-dependent operators . . . . . . . . . . . . . . . . . . . . . . . . . . . 5-3
Gray shading—setscreen and setcolorscreen . . . . . . . . . 5-3
Gray shading—settransfer and transfer function . . . . . . . 5-4
Smooth curves—setflat . . . . . . . . . . . . . . . . . . . . . . . . . . 5-5
Invisible strokes—0 setlinewidth . . . . . . . . . . . . . . . . . . . 5-5
Scan conversion—fill, eofill, and stroke . . . . . . . . . . . . . . 5-5
6. Resolving printer problems . . . . . . . . . . . . . . . . . . . . . . . . . . . . . . 6-1
7. Resolving system problems . . . . . . . . . . . . . . . . . . . . . . . . . . . . . . 7-1
iv Troubleshooting Guide
Page 5
Laser safety
Safety
WARNING
Adjustments, use of controls, or performance of procedures
other than those specified herein may result in hazardous
light exposure.
The Xerox DocuPrint printers are certified to comply with the
performance standards of the U.S. Department of Health,
Education, and Welfare for Class 1 laser products. Class 1 laser
products do not emit hazardous radiation. The DocuPrint printers
do not emit hazardous radiation because the laser beam is
completely enclosed during all modes of customer operation.
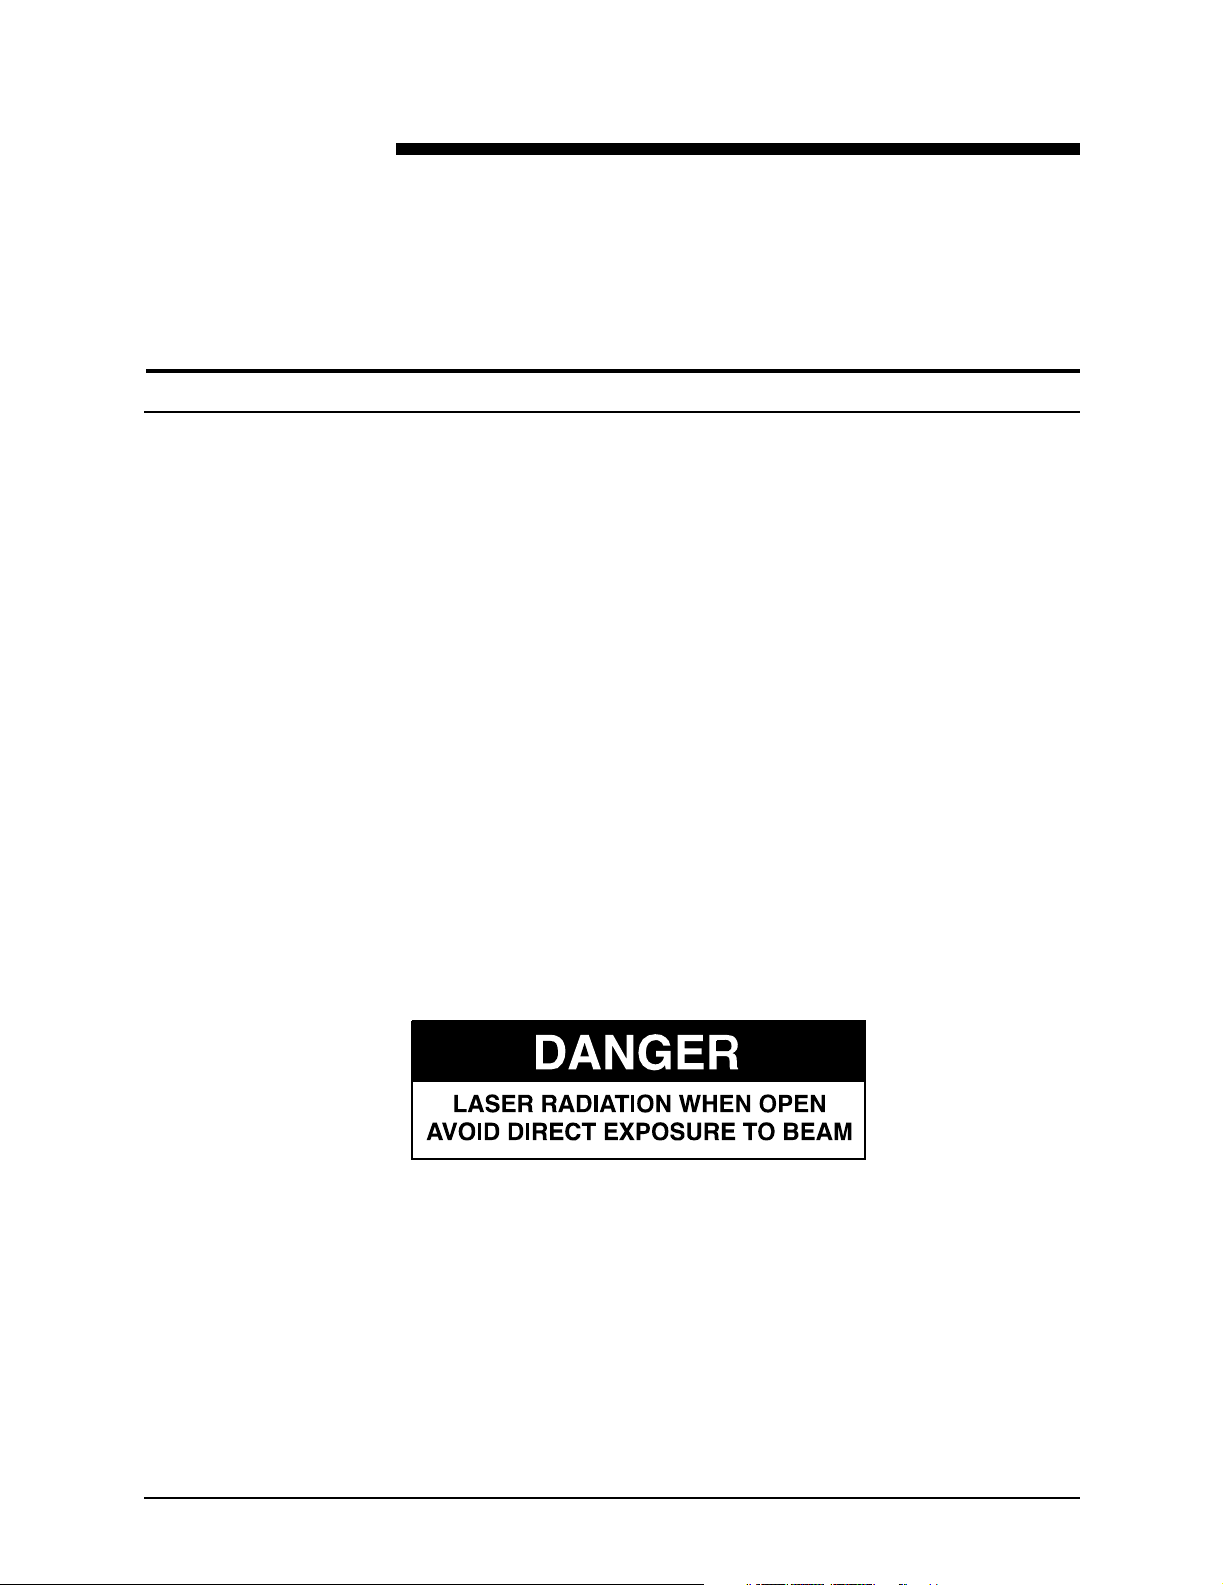
The laser danger labels on the system are for Xerox service
representatives and are on or near panels or shields that must
be removed with a tool.
DO NOT REMOVE LABELED PANELS OR PANELS NEAR
LABELS. ONLY XEROX SERVICE REPRESENTATIVES HAVE
ACCESS TO THESE PANELS.
Troubleshooting Guide v
Page 6

Safety
Ozone information: U. S. only
This product produces ozone during normal operation. The
amount of ozone produced depends on copy volume. Ozone is
heavier than air. The environmental parameters specified in the
Xerox installation instructions ensure that concentration levels
are within safe limits. If you need additional information
concerning ozone, call 1-800-828-6571 to request the Xerox
publication 600P83222,
Operation safety: U. S.
Your Xerox equipment and supplies have been designed and
tested to meet strict safety requirements. They have been
approved by safety agencies, and they comply with
environmental standards. Please observe the following
precautions to ensure your continued safety.
OZONE
.
WARNING
Improper connection of the equipment grounding conductor
may result in risk of electrical shock.
• Always connect equipment to a properly grounded electrical
outlet. If in doubt, have the outlet checked by a qualified
electrician.
• Never use a ground adapter plug to connect equipment to an
electrical outlet that lacks a ground connection terminal.
• Always place equipment on a solid support surface with
adequate strength for its weight.
• Always use materials and supplies specifically designed for
your Xerox equipment. Use of unsuitable materials may result
in poor performance and may create a hazardous situation.
• Never move either the printer or the printer controller without
first contacting Xerox for approval.
• Never attempt any maintenance that is not specifically
described in this documentation.
• Never remove any covers or guards that are fastened with
screws. There are no operator-serviceable areas within these
covers.
• Never override electrical or mechanical interlocks.
vi Troubleshooting Guide
Page 7
• Never use supplies or cleaning materials for other than their
intended purposes. Keep all materials out of the reach of
children.
• Never operate the equipment if you notice unusual noises or
odors. Disconnect the power cord from the electrical outlet
and call service to correct the problem.
If you need any additional safety information concerning the
equipment or materials Xerox supplies, call Xerox Product Safety
at the following toll-free number in the United States:
1-800-828-6571
For customers outside the United States, contact your local
Xerox representative or operating company.
Operation safety: Europe
Safety
This Xerox product and supplies are manufactured, tested and
certified to strict safety regulations, electromagnetic regulations
and established environmental standards.
Any unauthorised alteration, which may include the addition of
new functions or connection of external devices, may impact the
product certification.
Please contact your Xerox representative for more information.
Warning markings
All warning instructions marked on or supplied with the product
should be followed.
This WARNING alerts users to areas of the product where there
is the possibility of personal damage.
This WARNING alerts users to areas of the product where there
are heated surfaces, which should not be touched.
Troubleshooting Guide vii
Page 8

Safety
Electrical supply
This product shall be operated from the type of electrical supply
indicated on the product’s data plate label. If you are not sure
that your electrical supply meets the requirements, please
consult your local power company for advice.
WARNING
This product must be connected to a protective earth circuit. This
product is supplied with a plug that has a protective earth pin.
This plug will fit only into an earthed electrical outlet. This is a
safety feature. Always connect equipment to a properly grounded
electrical outlet. If in doubt, have the outlet checked by a qualified
electrician.
To disconnect all electrical power to the product, the disconnect
device is the power cord. Remove the plug from the electrical
outlet.
Ventilation
Slots and opening in the enclosure of the product are provided
for ventilation. Do not block or cover the ventilation vents, as this
could result in the product overheating.
This product should not be placed in a built-in installation unless
proper ventilation is provided, please contact your Xerox
representative for advice.
Never push objects of any kind into the ventilation vents of the
product.
Operator accessible areas
This product has been designed to restrict operator access to
safe areas only. Operator access to hazardous areas is restricted
with covers or guards, which would require a tool to remove.
Never remove these covers or guards.
viii Troubleshooting Guide
Page 9

Maintenance
Any operator product maintenance procedures will be described
in the user documentation supplied with the product. Do not
carry out any maintenance on the product, which is not
described in the customer documentation.
Before cleaning your product
Before cleaning this product, unplug the product from the
electrical outlet. Always use materials specifically designated for
this product, the use of other materials may result in poor
performance and may create a hazardous situation. Do not use
aerosol cleaners, they may be flammable under certain
circumstances.
Safety
CE mark: Europe only
January 1, 1995: Council Directive 73/23/EEC, amended by
Council Directive 93/68/EEC, approximation of the laws of the
member states related to low voltage equipment.
January 1, 1996: Council Directive 89/336/EEC, approximation
of the laws of the member states related to electromagnetic
compatibility.
March 9, 1999: Council Directive 99/5/EC, on radio equipment
and telecommunications terminal equipment and the mutual
recognition of their conformity.
A full declaration of conformity, defining the relevant directives
and referenced standards, can be obtained from your Xerox
representative.
In order to allow this equipment to operate in proximity to
Industrial, Scientific and Medical (ISM) equipment, the external
radiation for the ISM equipment may have to be limited or special
mitigation measures taken.
This is a Class A product. In a domestic environment this product
may cause radio frequency interference, in which case the user
may be required to take adequate measures.
Shielded interface cables must be used with this product to
maintain compliance with Council Directive 89/36/EEC.
Troubleshooting Guide ix
Page 10

Safety
Radio and telecommunications equipment directive (Europe only)
Certification to 1999/5/EC Radio Equipment and
Telecommunications Terminal Equipment Directive:
This Xerox product has been self-certified by Xerox for panEuropean single terminal connection to the analog public
switched telephone network (PSTN) in accordance with Directive
1999/5/EC.
The product has been designed to work with the national PSTNs
and compatible PBXs of the following countries:
Austria Germany Luxembourg Sweden
Belgium Greece Netherlands Switzerland
Denmark Iceland Norway United Kingdom
Finland Ireland Portugal
France Italy Spain
In the event of problems, contact your local Xerox representative
in the first instance.
This product has been tested to, and is compliant with, TBR21, a
specification for terminal equipment for use on analog switched
telephone networks in the European Economic area.
The product may be configured to be compatible with other
country networks. Please contact your Xerox representative if
your product needs to be reconnected to a network in another
country. This product has no user-adjustable settings.
NOTE: Although this product can use either loop disconnect
(pulse) or DTMF (tone) signaling, it should be set to use DTMF
signaling. DTMF signaling provides reliable and faster call setup.
Modification or connection to external control software, or to
external control apparatus not authorized by Xerox, invalidates
its certification.
x Troubleshooting Guide
Page 11

For further information
For more information on Environment, Health and Safety in
relation to this Xerox product and supplies, please contact the
following customer help lines:
Europe:+44 1707 353434
USA:1 800 8286571
Canada:1 800 8286571
Safety
Troubleshooting Guide xi
Page 12

Safety
xii Troubleshooting Guide
Page 13

About this guide
Introduction
This guide describes how to solve some specific problems that
may occur when you are using the Xerox DocuPrint 4850/4890/
92C NPS/IPS.
This guide is designed for Xerox DocuPrint 4850/4890/92C NPS/
IPS operators.
Users should have an understanding of printer controller
operations.
Before using this guide, become familiar with its contents and
conventions.
Contents
This section lists the contents of this guide:
• Chapter 1, “Calling for service,” describes the information to
have on hand when calling for support service.
• Chapter 2, “Troubleshooting Xerox Client Software
installation,” provides solutions to common problems with
software installation.
• Chapter 3, “Troubleshooting a Novell implementation,”
describes some ways to troubleshoot a Novell
implementation by viewing log messages.
• Chapter 4, “Clearing paper misfeeds and jams,” illustrates
how to clear paper misfeeds and jams from various parts of
the paper path.
• Chapter 5, “Optimizing print quality,” discusses methods of
checking and improving print quality.
• Chapter 6, “Resolving printer problems,” describes printerrelated problems other than paper jams, and suggests
corrective actions.
Troubleshooting Guide xiii
Page 14

Introduction
Conventions
• Chapter 7, “Resolving system problems,” describes various
system problems and suggests corrective actions.
An index is provided at the back of the guide.
This guide uses the following conventions:
•
All caps and angle brackets:
of keys are shown in all caps within angle brackets (for
example, press <ENTER>).
•
Angle brackets:
specified argument in the command syntax, appears in angle
brackets (for example, List Fonts <Pattern>).
•
Bold:
shown in bold (for example, enter
•
The word “enter” within procedures:
of keying in data and pressing <ENTER> (for example,
enter y).
•
Italics:
example, the
Print Jobs
•
Quotation marks:
appear in quotes (for example, “USLetter”).
•
Vertical bars:
separated by vertical bars (for example, Set Time <Time |
Remote Host Name | IP Address>).
Within procedures, text and numbers that you enter are
Document and library names are shown in italics (for
).
Variable information, or the position of a
Xerox DocuPrint NPS/IPS Guide to Managing
Keywords you can enter as arguments
Alternatives to specified arguments are
Within procedures, the names
privilege operator
The two-step process
).
xiv Troubleshooting Guide
Page 15

Introduction
NOTE: Notes are hints that help you perform a task or
understand the text.
Cautions alert you to an action that could damage hardware or
software.
Warnings alert you to conditions that may affect the safety
of people.
Related publications
The Xerox DocuPrint NPS/IPS documentation set includes the
documents listed below.
CAUTION
WARNING
NOTE: For a list of IBM reference manuals for IPDS printing,
refer to the Solutions Guide for IPDS Printing.
•
Guide to Configuring and Managing the System
•
Guide to Managing Print Jobs
•
Guide to Performing Routine Maintenance
•
Guide to Submitting Jobs from the Client
•
Guide to Using Page Description Language
•
Installation Planning Guide
•
System Overview Guide
•
Troubleshooting Guide
•
Solutions Guide for IPDS Printing
•
Decomposition Service and Tools Guide
•
Glossary
•
Master Index
•
Customer Information Quick Reference Card
s
•
Printer Controller Commands Quick Reference Card
•
Operator Quick Reference Card
•
Submitting your Jobs from Macintosh Quick Reference Card
•
Submitting your Jobs from UNIX & DOS Quick Reference
Card
xv Troubleshooting Guide
Page 16

Introduction
•
Submitting your Jobs from Windows NT 4.0 (QuickPrint)
Quick Reference Card
•
Submitting your Jobs Using Windows NT 4.0 Drivers Quick
Reference Card
The documentation set also includes an electronic version, the
DocuPrint NPS/IPS Interactive Customer Documentation CD.
xvi Troubleshooting Guide
Page 17

1. Calling for service
Before calling your customer service support center, make sure
you have read this chapter and have tried the corrective actions
described here. If the problem persists, gather the necessary
information and call the customer support center.
Information to have on hand when calling for service
To report hardware or software problems in the United States,
call the following number:
1-800-822-2979
For customers outside the United States, call your local service
representative.
Before calling, make note of the following:
• Status code numbers and messages that appear on the
controller screen and the printer console
• Indicator lights that are lit
• Name of your printer: DocuPrint 4850 or 4890 or 92C NPS/
IPS
• Serial number for your printing system (located on the frame
inside the printer, behind the door to feeder trays 1 and 2)
• Problems you are having with the system.
Additional information you may wish to note prior to calling
includes:
• An explanation of how output differs from what was expected.
• An assessment of whether the symptoms follow a pattern or
occur randomly.
• A list of special conditions that may be related to the
problems:
– New applications
– Changes made to the software
Troubleshooting Guide 1-1
Page 18

Calling for service
– Recent service performed
– Previous conditions under which the application has
printed properly.
Give this information to a customer service representative, who
will discuss the information and give you an estimated time of
arrival or assist you over the phone to resolve the problem.
Enabling and disabling the modem for remote service
Your system may be set up to use Sixth Sense Technology—a
remote communication capability. Sixth Sense Technology is a
suite of tools that allow service personnel to connect with a
system and evaluate its performance. The service representative
can troubleshoot problems remotely, transfer, apply, and remove
patches remotely, and, if an on-site call is required, arrive with
the solution to fix the problem.
An external modem allows your system to be accessed by
remote service technicians.
You may be instructed to enable the modem so that the
technician can dial into your system. Follow this procedure:
1. Stop all printing and queueing during the remote service
session.
2. Follow the instructions of your service representative to
enable the modem.
3. When the remote service session is complete, disable the
modem.
4. Resume printing and queueing.
Refer to the
“Using utility commands” chapter, for more information on the
commands used for remote service.
If security is a concern, you can turn off the modem, or you can
physically disconnect the cable from the system when it is not
being used.
Guide to Configuring and Managing the System
CAUTION
,
Depending on the commands used by the technician, the printer
may start up during the remote service session. You should not
attempt to operate the system or perform any tasks at the printer
while remote service is in process.
1-2 Troubleshooting Guide
Page 19

2. Troubleshooting Xerox Client Software installation
Xerox Client Software is downloaded from the printer controller
to a network client workstation to enable a print command. Refer
to the
information.
If you are unable to install the Xerox Client Software, or if you
install it and all requests submitted fail, try the following:
• Make sure the Xerox Client print command does not conflict
Guide to Submitting Jobs from the Client
with the local print command on the client system. To verify
this, at the prompt (or on a new shell window prompt, for Sun
clients), enter print. You should see the usage message for
the Xerox Client print command.
If not, make sure that the environment variable path includes
the subdirectory /usr/xerox/nps/client/bin and /usr/bin before
the subdirectory containing the local print command. Also,
resolve any print command aliases that might be set in
the.cshrc file.
for more
If you see the message “Server or Directory Unreachable”
after executing a print command, perform the following steps:
1. If the printer controller software is newly installed, verify
that queuing has started at the printer controller.
2. At the client, verify the host file exists and contains the
printer controller name and TCP/IP address.
3. Verify the network connections between the printer
controller and the client. Enter
name>;
IP address>
controller is the same as the one in the host file on the
client.
4. Check for hardware problems.
if that fails,
. Verify that the TCP/IP address of the printer
enter ping <Printer Controller TCP/
ping <Printer Controller
Troubleshooting Guide 2-1
Page 20

Troubleshooting Xerox Client Software installation
• Verify that the cconf file (/usr/xerox/nps/client/cconf) contains
the default printer controller name that most recently
performed the client installation. Try submitting requests to
another printer controller by using the server override switch
in the print command.
• If you are unable to install the software, make sure the client
hard disk meets the minimum requirements. Otherwise, you
may run out of disk space during the installation, and you
may get misleading error messages.
The following table provides a reference to error messages that
may display during installation of Xerox Client Software.
Table 2-1. Xerox Client Software installation error messages
Error message Description
Installation not complete. Problems may have
occurred during the transfer of files. Please verify
that all files have been transferred and contact your
system administrator for assistance.
Usage: <Printer__Controller__Name> or
Usage: instsun4 <Printer__Controller__Name> or
Usage: instsun3 <Printer__Controller__Name> or
Usage: instult <Printer__Controller__Name>
The attempt to communicate to the
<Print__Controller__Name> has failed. Make sure
the name <Print__Controller__Name> is correct.
Make sure your /etc/hosts file contains correct
information. Make sure the machine is operational
and is in the network mode.
Problems may have occurred in ftp to the Print
Server. Verify disk space. If the problem still exists,
contact your system administrator for assistance.
Problems may have occurred in setting permissions
for the executables. You have to be at the super user
level to install. Please contact your system
administrator for assistance.
Appears if any of the client files are missing at
the end of installation.
Appears when the Printer Controller Name is
not used as the argument to the installation
commands. The <Printer__Controller__Name>
is the name of the Printer Controller that the
installation commands use to install the Client
Software.
UNIX clients only. Indicates that the installation
script’s attempt to communicate with the Printer
Controller has failed.
UNIX clients only. Indicates problems occurred
while using ftp to the Printer Controller to
retrieve client files.
UNIX clients only. Indicates that the installation
script’s attempt to set permissions for the
executables in
/usr/xerox/client/nps/bin has failed.
Problems may have occurred in making the
commands available. Please contact your system
administrator.
Unable to set permission for dir <path>. You have to
be at the super user level to install. Contact your
system administrator for assistance.
UNIX clients only. Indicates that the attempt to
copy the executables in /usr/xerox/client/nps/bin
to
/usr/bin has failed.
UNIX clients only. Indicates that the attempt to
set permission for the client directory structure
has failed. Make sure that you are executing the
installation script at the super user level.
2-2 Troubleshooting Guide
Page 21

3. Troubleshooting a Novell
implementation
The tables in this chapter describe some ways to troubleshoot a
Novell implementation from the log messages that appear in the
var/log/DocuPrint.
The following table describes how to troubleshoot PSERVER
problems.
Table 3-1. PSERVER problems
Problem Probable Cause Resolution
Log message says there
is a problem locating a
NetWare server.
Log message says there
is an error in connecting
to the file server.
NPS/IPS is not getting SAP packets
for the server.
• There is a basic connectivity or
routing problem.
• The framing type has been set
incorrectly during installation.
• The file server name has been set
incorrectly during installation.
NPS/IPS is getting SAP packets with
information about the server, but
cannot communicate with it.
• There is a basic connectivity or
routing problem.
• NPS/IPS has an incorrect network
number.
If there is an external connectivity
problem:
• Check Novell file server
console screen for messages.
• Check that the server is
running and connected to the
network.
If it is an incorrect framing type or
server name, your Xerox service
representative must change the
configuration on the printer
controller.
If there is an external connectivity
problem:
• Check Novell file server
console screen for messages.
• Check that the server is
running and connected to the
network.
If it is an incorrect network
number, your Xerox service
representative must change the
configuration on the printer
controller.
Troubleshooting Guide 3-1
Page 22

Troubleshooting a Novell implementation
Table 3-1. PSERVER problems (Continued)
Problem Probable Cause Resolution
Log message says there
is a failure to log in.
Log message indicates
failure to login and
password settings are
correct.
Log message says "Error
finding queue."
Password problem.
• Server does not accept
unencrypted logins
• NPS/IPS does not have the
correct password.
A PSERVER with the printer's
PSERVER name is running on the file
server or on another machine (this
could even be another NPS/IPS
configured to use the same PSERVER
name). The file server should only
have a PSERVER defined with the
same name as the printer’s
PSERVER, there should not be an
instance of PSERVER running under
that PSERVER definition.
Queue not created. At the file server, create the
If the server is not properly
configured, enter SET ALLOW
UNENCRYPTED
PASSWORDS=ON at the server
console.
If NPS/IPS has the wrong
password, your Xerox service
representative must change the
password.
Stop the PSERVER instance.
queue, set up the printer for the
PSERVER and be sure it will
service the appropriate queue.
Log message says
"Netware PServer
<name> not found.”
Log message says that
there was an error
attaching to the queue.
The PSERVER has not been defined
on the file server.
NPS/IPS does not have access to the
queue.
Define a PSERVER with the
correct name on the file server
and restart the system.
Ensure that there is a printer
defined for the PSERVER on the
file server and that the printer is
defined to service the desired
queue.
3-2 Troubleshooting Guide
Page 23

Troubleshooting a Novell implementation
The following table describes troubleshooting RPRINTER
problems.
Table 3-2. RPRINTER problems
Problem Probable Cause Resolution
Log message says:
• "Cannot locate any
Netware print server
from the net."
• "Requested server
<name> not
responding.”
NPS/IPS is not getting SAP packets
advertising the print server.
• There is a basic connectivity or
routing problem.
• The incorrect framing type has
been set.
• The print server is not running. For
RPRINTER, there must be a
PSERVER running on the file
server with the name specified to
NPS/IPS at installation time.
If there is an external connectivity
problem: PSERVER should work
when it is repaired.
If it is an incorrect framing type,
your Xerox service representative
must change the configuration on
the printer controller.
If print server is not running, start
one.
Troubleshooting Guide 3-3
Page 24

Troubleshooting a Novell implementation
3-4 Troubleshooting Guide
Page 25

4. Clearing paper misfeeds and jams
Paper jams and misfeeds can be greatly reduced or eliminated if
you use the correct type of paper under the right conditions.
Refer to
selection and care.
Clearing a feeder tray fault
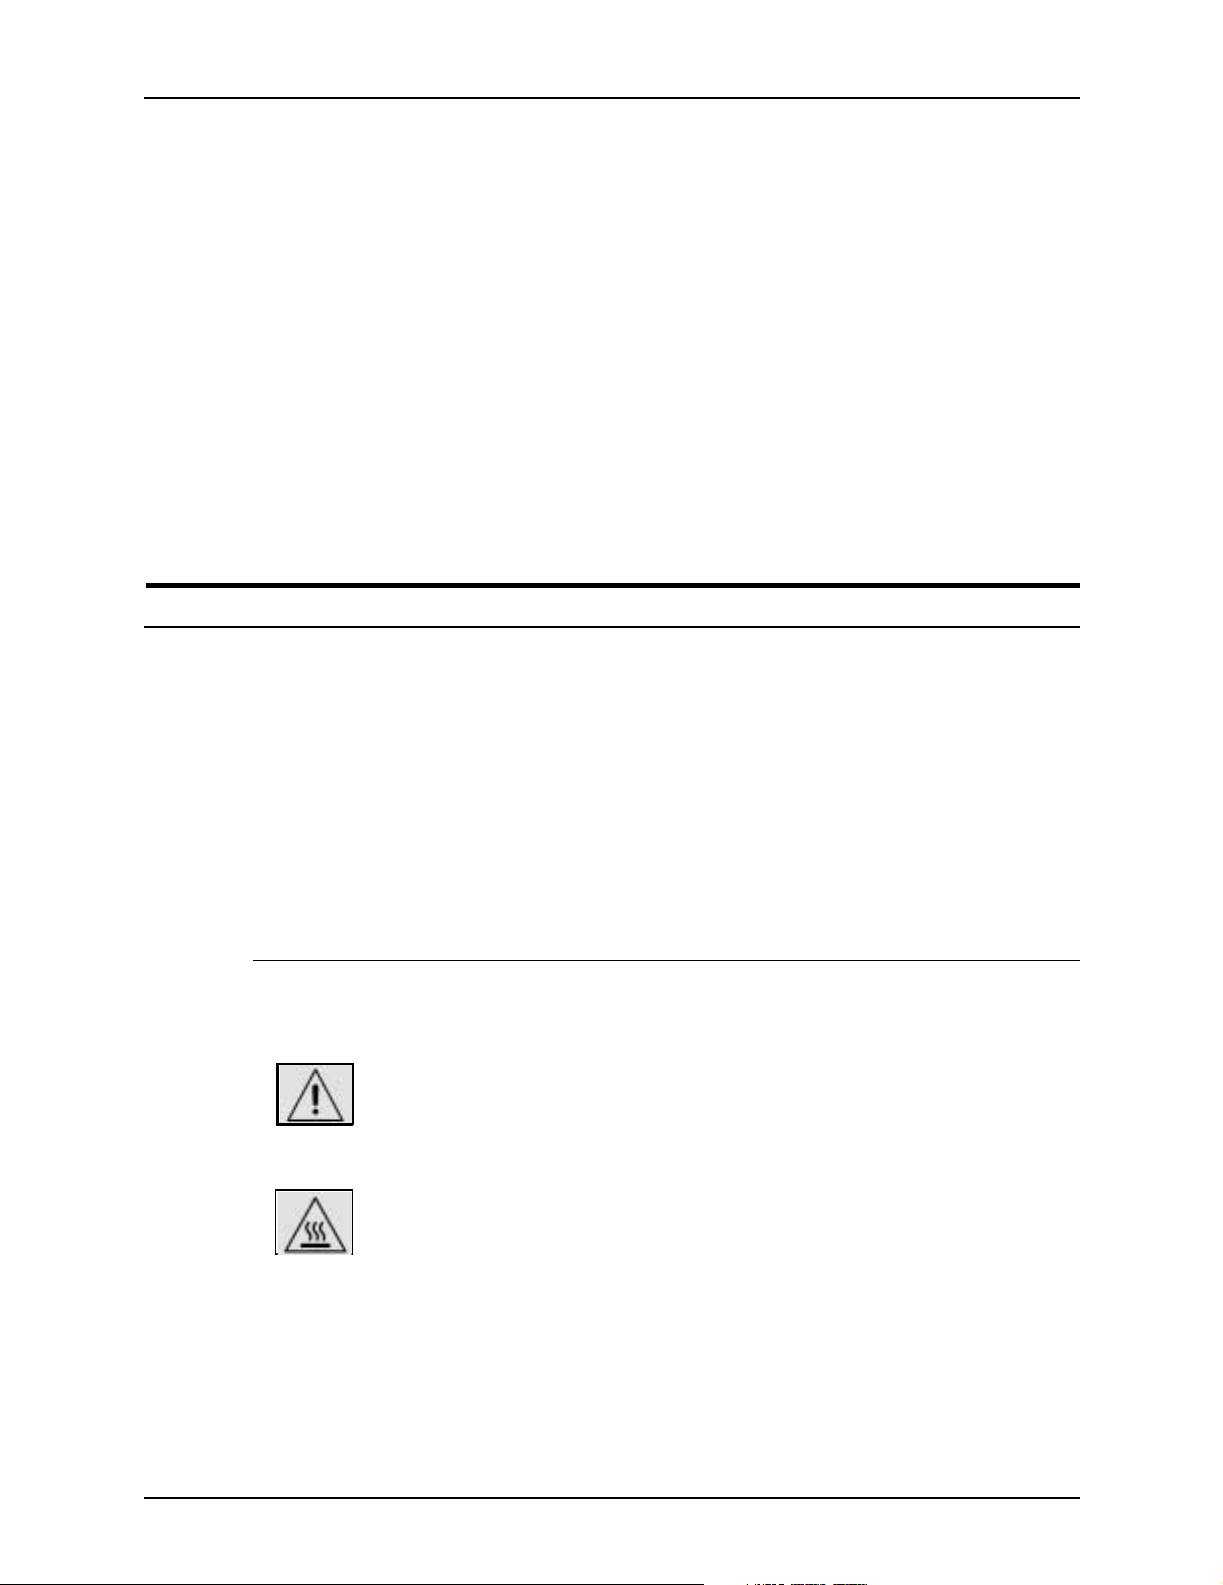
When paper is misfed from the paper trays, complete the
following steps:
1. Go to the paper tray indicated by the message and graphic
displays of the printer console.
2. Press the Tray Unlock button on the front left of the paper tray.
Helpful Facts About Paper
for information on paper
Troubleshooting Guide 4-1
Page 26

Clearing paper misfeeds and jams
3. When the Ready To Open indicator is lit, pull the bar up and
out to open the tray. Pull the tray all the way out for best
results.
4. Press the green lever to unlatch the paper feeder assembly.
4-2 Troubleshooting Guide
Page 27

Clearing paper misfeeds and jams
5. Remove and discard any partially fed paper. Make sure that
the paper supply is neatly stacked and that the stack is not
higher than the MAX line on the length guide. Make sure
that the length guide is firmly touching the back edge of the
stack.
Frequent misfeeds
6. Latch the paper feeder assembly by pressing the green dot
until the assembly clicks into place.
7. Slide the tray back into the printer until the tray latches and
press the Continue button to resume printing.
8. Discard any pages sent to the sample tray or unused stacker
tray when the paper jam was detected.
Frequent misfeeds may be caused by a glazed feed belt. A
glazed belt is the most common cause of one tray misfeeding
more than another tray when the same kind of paper is used.
(Glazing is caused by a buildup of the chemicals found on most
papers.)
If you suspect that the belt is glazed, try cleaning it with film
remover that is obtained from your service representative.
Troubleshooting Guide 4-3
Page 28
Clearing paper misfeeds and jams
Clean the feed belt only to correct misfeeds, not as routine
maintenance. Because the belt is rubber, frequent cleaning dries
it out and makes it fail prematurely..
1. Clear any misfeeds that have occurred, but do not latch the
paper feeder assembly. If necessary, unlatch it by pressing
down on the bright green lever on the right side of the paper
tray.
CAUTION
2. Lightly moisten a lint-free towel with film remover and
thoroughly wipe the outside surface of the feed belt in the
same direction as the ribs on the belt. (Wiping from side to
side might pull the belt off its track.) Allow a few seconds for
the film remover to evaporate.
4-4 Troubleshooting Guide
Page 29

Clearing paper misfeeds and jams
3. Latch the paper feeder assembly by pressing down on the
bright green dot. Slide the paper tray completely back into the
printer
Operate the system as usual. If you continue to experience
misfeeds, place a service call.
Clearing paper jams
Paper sometimes jams as it leaves the feeder trays or moves
through the paper path. You must clear the paper jam before you
can continue to print. The two illustrations below show the areas
along the paper path in which jams may occur.
Figure 4-1. Areas along the simplex paper path
Troubleshooting Guide 4-5
Page 30

Clearing paper misfeeds and jams
Figure 4-2. Areas along the duplex paper path
Jam display on
printer console
In the event of a jam, the printer console displays the following
information:
• The message display describes the areas of the printer you
must check and clear.
• The graphic display shows the location of the jams and the
doors you open to access them.
4-6 Troubleshooting Guide
Page 31

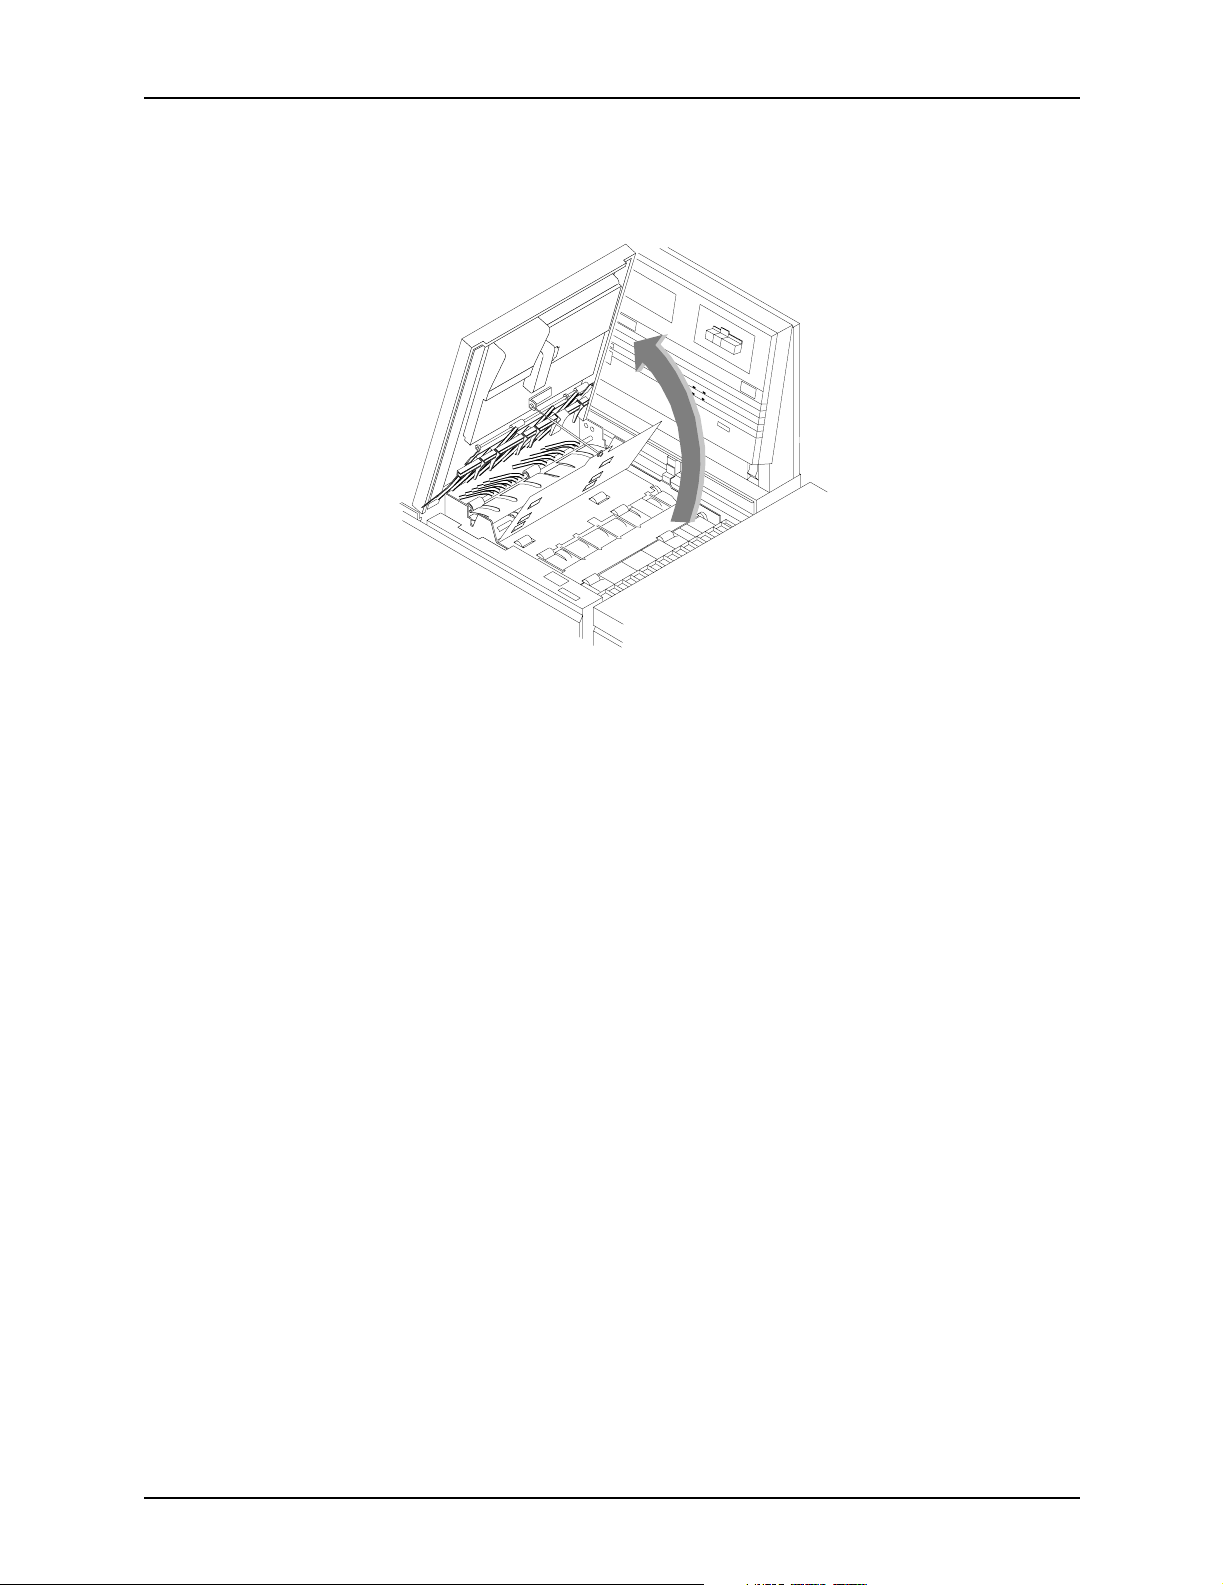
Clearing paper misfeeds and jams
Interior labels
Figure 4-3. Message and graphic displays on the printer
console
1. Message display
2. Graphic display
Message labels are located inside of the printer at the point of
need.
Troubleshooting Guide 4-7
Page 32

Clearing paper misfeeds and jams
Figure 4-4. Message labels inside the printer
Job recovery
Checking job
integrity following
a paper jam
Each handle, lever, or knob you use to clear a paper jam is bright
green and marked with an arrow indicating the direction it moves.
When a paper jam occurs in the printer, clear only the area or
areas indicated by the message and graphic displays.
There is a slightly possibility of duplicate or missing pages when
a paper jam occurs while a job prints. For that reason, you
should check the job’s integrity once the job has been printed, at
least the sheets before and after the jam.
Follow this procedure:
1. The printer offsets the first sheet printed following a paper
jam. Locate that sheet.
2. Check the sheets immediately before and after the offset
sheet to see if there are any missing or duplicated sheets in
the job.
3. Check the output for data missing from the pages.
4-8 Troubleshooting Guide
Page 33

Printer jam clearance areas
The following figure shows all areas of the printer paper path.
NOTE: This diagram contains the jam clearance areas for both
the dual stacker (areas 8, 8A, and 9) and the stitcher/stacker
(areas A and B). The purpose of the diagram is to give you an
overall perspective of the locations of all of the printer areas
relative to each other. Note that an actual printer cannot have
both a dual stacker and a stitcher/stacker.
Clearing paper misfeeds and jams
6
5
4
77
1
3
2
22
6A
3
4
2A2A
1A91A
8
A
Figure 4-5. Overview of all printer jam areas
B
Troubleshooting Guide 4-9
Page 34

Clearing paper misfeeds and jams
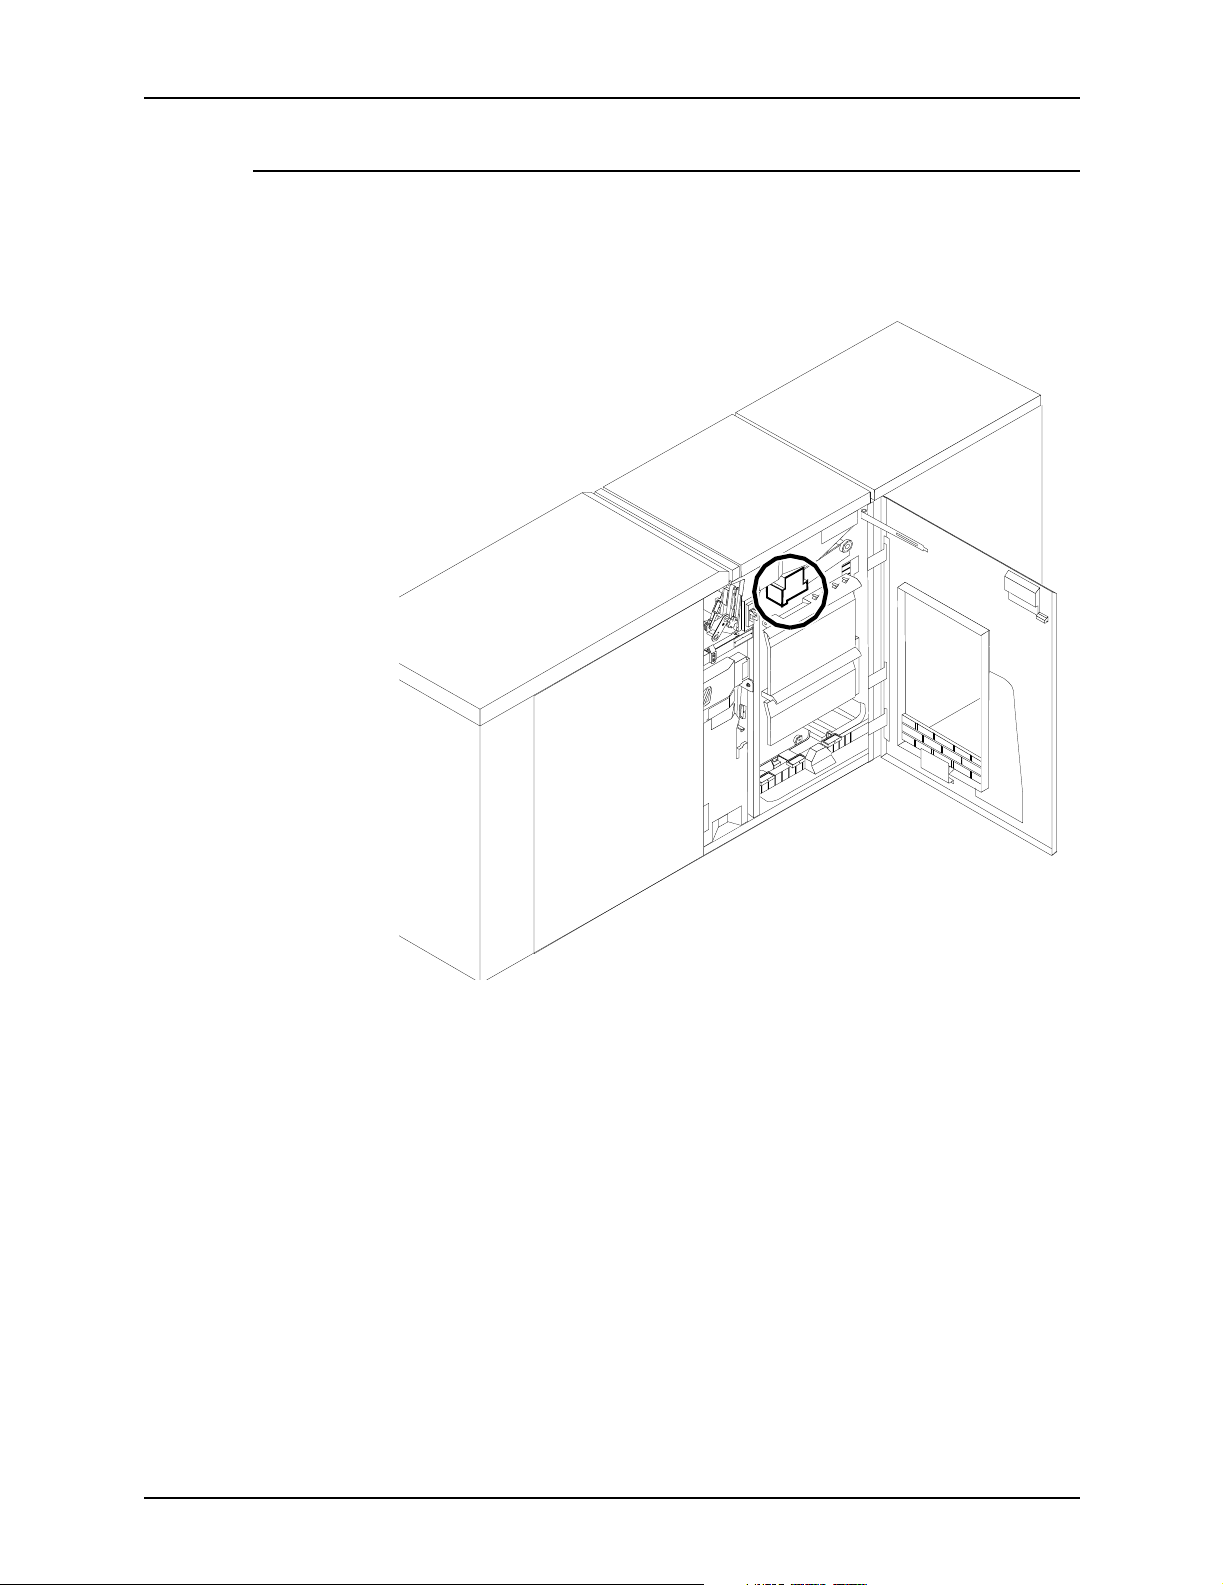
Clearing paper jams from areas 1 and 1A
To clear paper jams from areas 1 and 1A:
1. Open the middle door and locate area 1.
Area 1
2. Remove and discard any paper that you find in the areas
indicated.
Area 1
3. Close the door.
4-10 Troubleshooting Guide
Page 35

Clearing paper misfeeds and jams
4. Open the high-capacity feeder front door and locate area 1A.
Area 1A
5. Remove and discard any paper that you find in area 1A.
6. Close the door and press the Continue button to resume
printing.
Troubleshooting Guide 4-11
Page 36

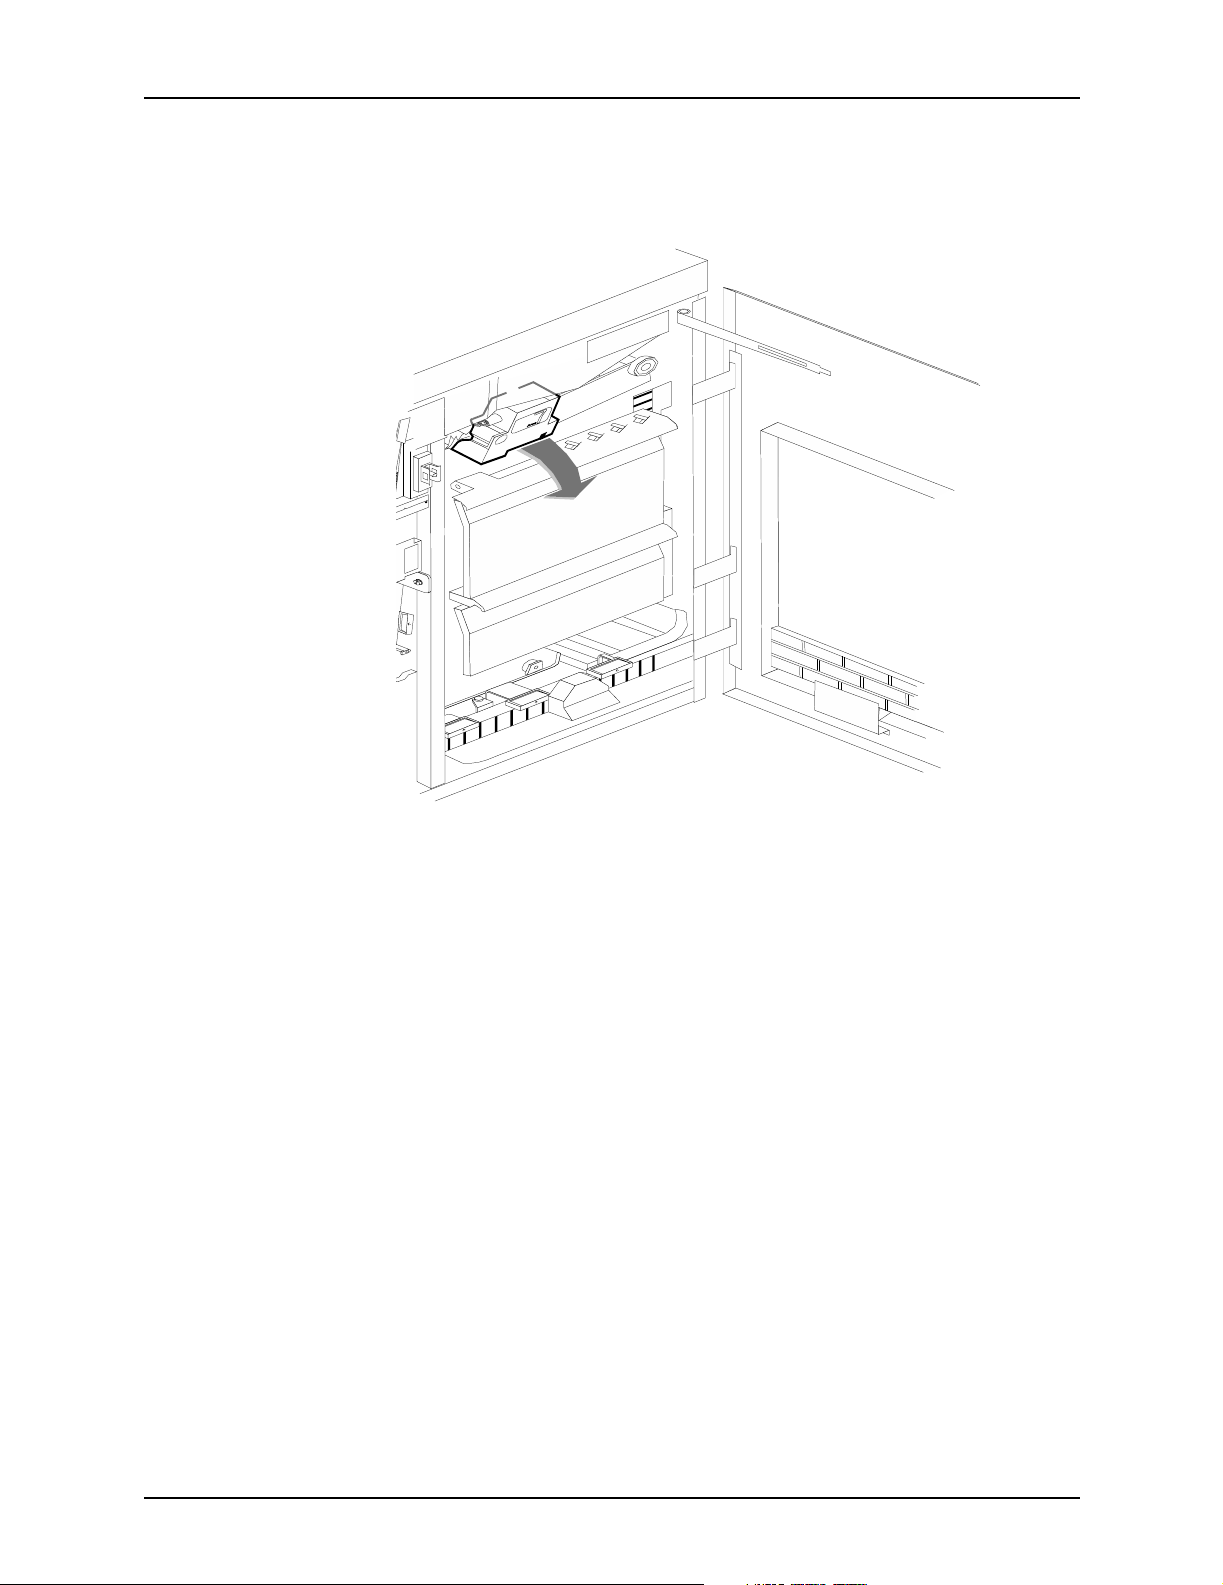
Clearing paper misfeeds and jams
Clearing paper jams from areas 2 and 2A
To clear paper jams from areas 2 and 2A:
1. Open the middle door and locate area 2.
2. Lift the three green handles one by one. Each time you lift a
handle, remove and discard any paper you find beneath the
open section.
3. Lower the handles and close the door.
4-12 Troubleshooting Guide
Page 37

Clearing paper misfeeds and jams
4. Open the high-capacity feeder front door and locate area 2A.
5. Lift the green handle. Remove and discard any paper that you
find in this area.
6. Lower the handle, close the door, and press the Continue
button to resume printing.
Troubleshooting Guide 4-13
Page 38

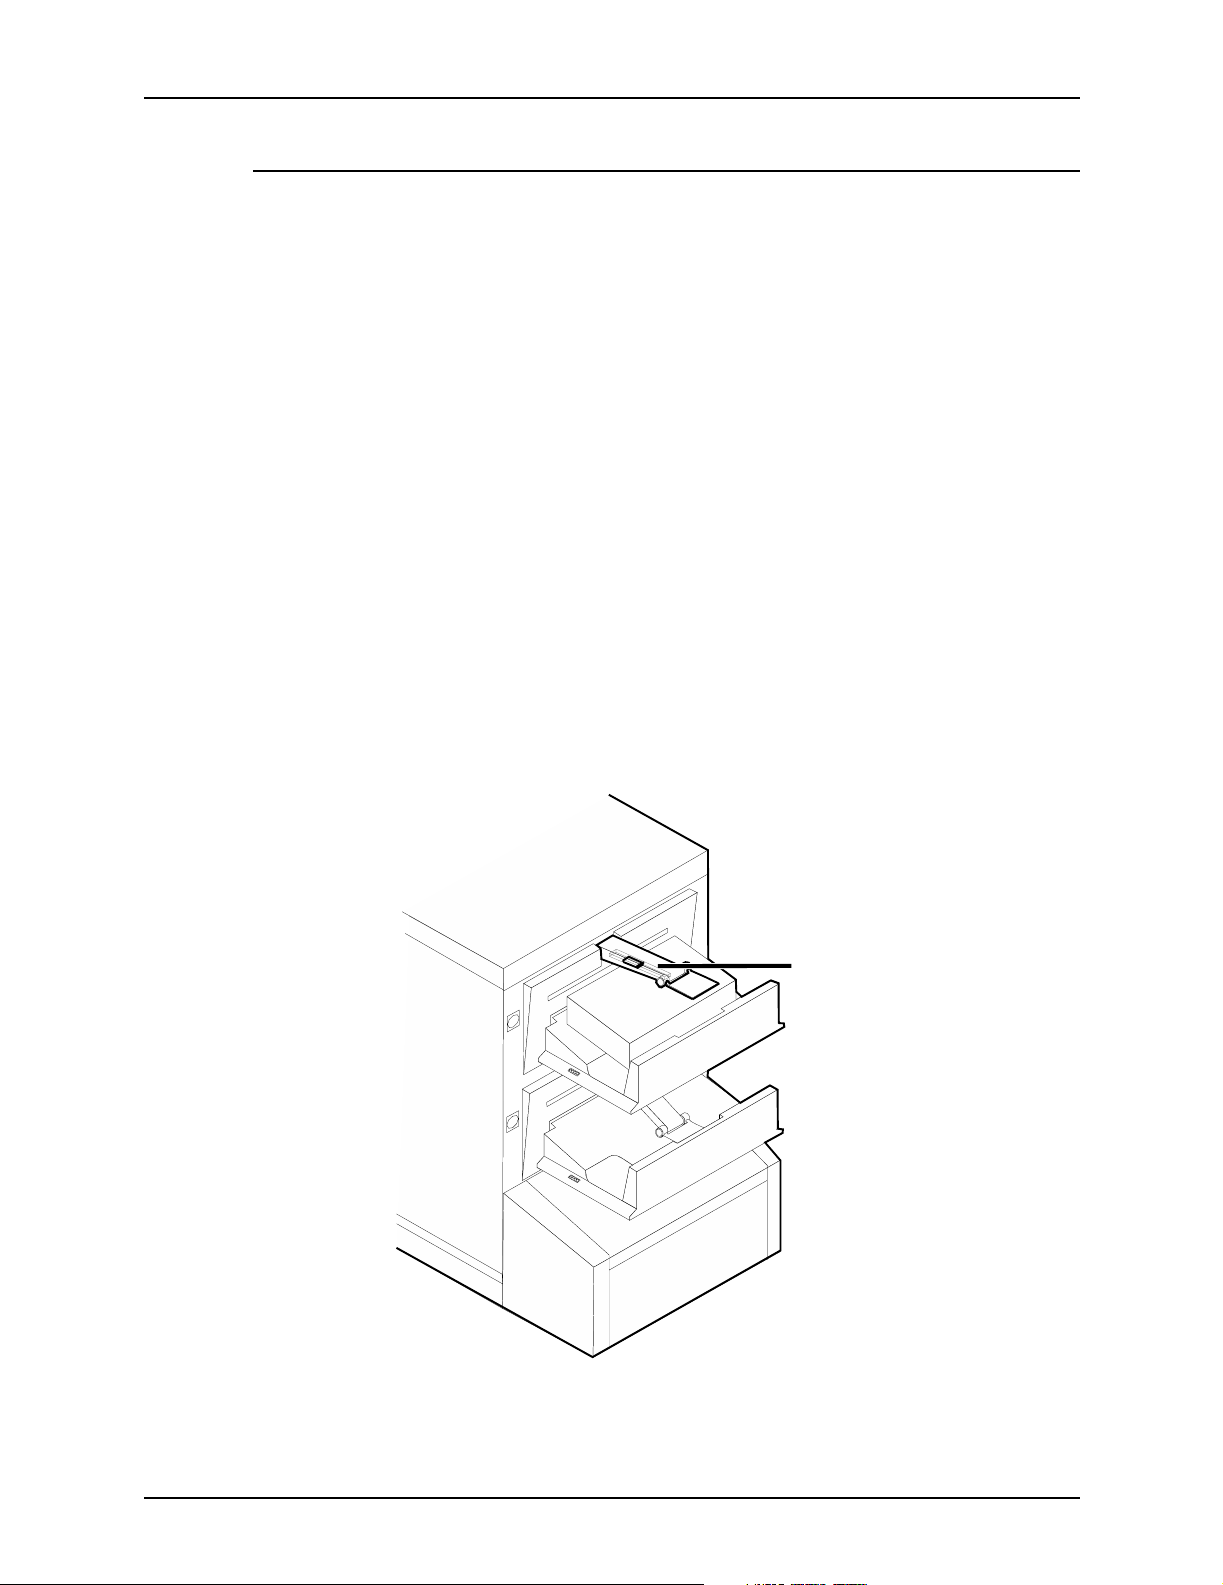
Clearing paper misfeeds and jams
Clearing paper jams from area 3
Follow these steps to clear jams in area 3.
1. Open the middle door and locate area 3.
2. Push and hold the green handle to the right (in the direction
of the arrow marked on it).
3. Remove and discard any paper that you find in this area.
4. Release the handle, close the door, and press the Continue
button to resume printing.
4-14 Troubleshooting Guide
Page 39

NOTE: When paper jams occur in areas 3 through 5, three
extra blank sheets are sent through the printer to ensure that
the fuser is clean. These sheets are sent to the top tray and
should be discarded. You are not charged for these sheets.
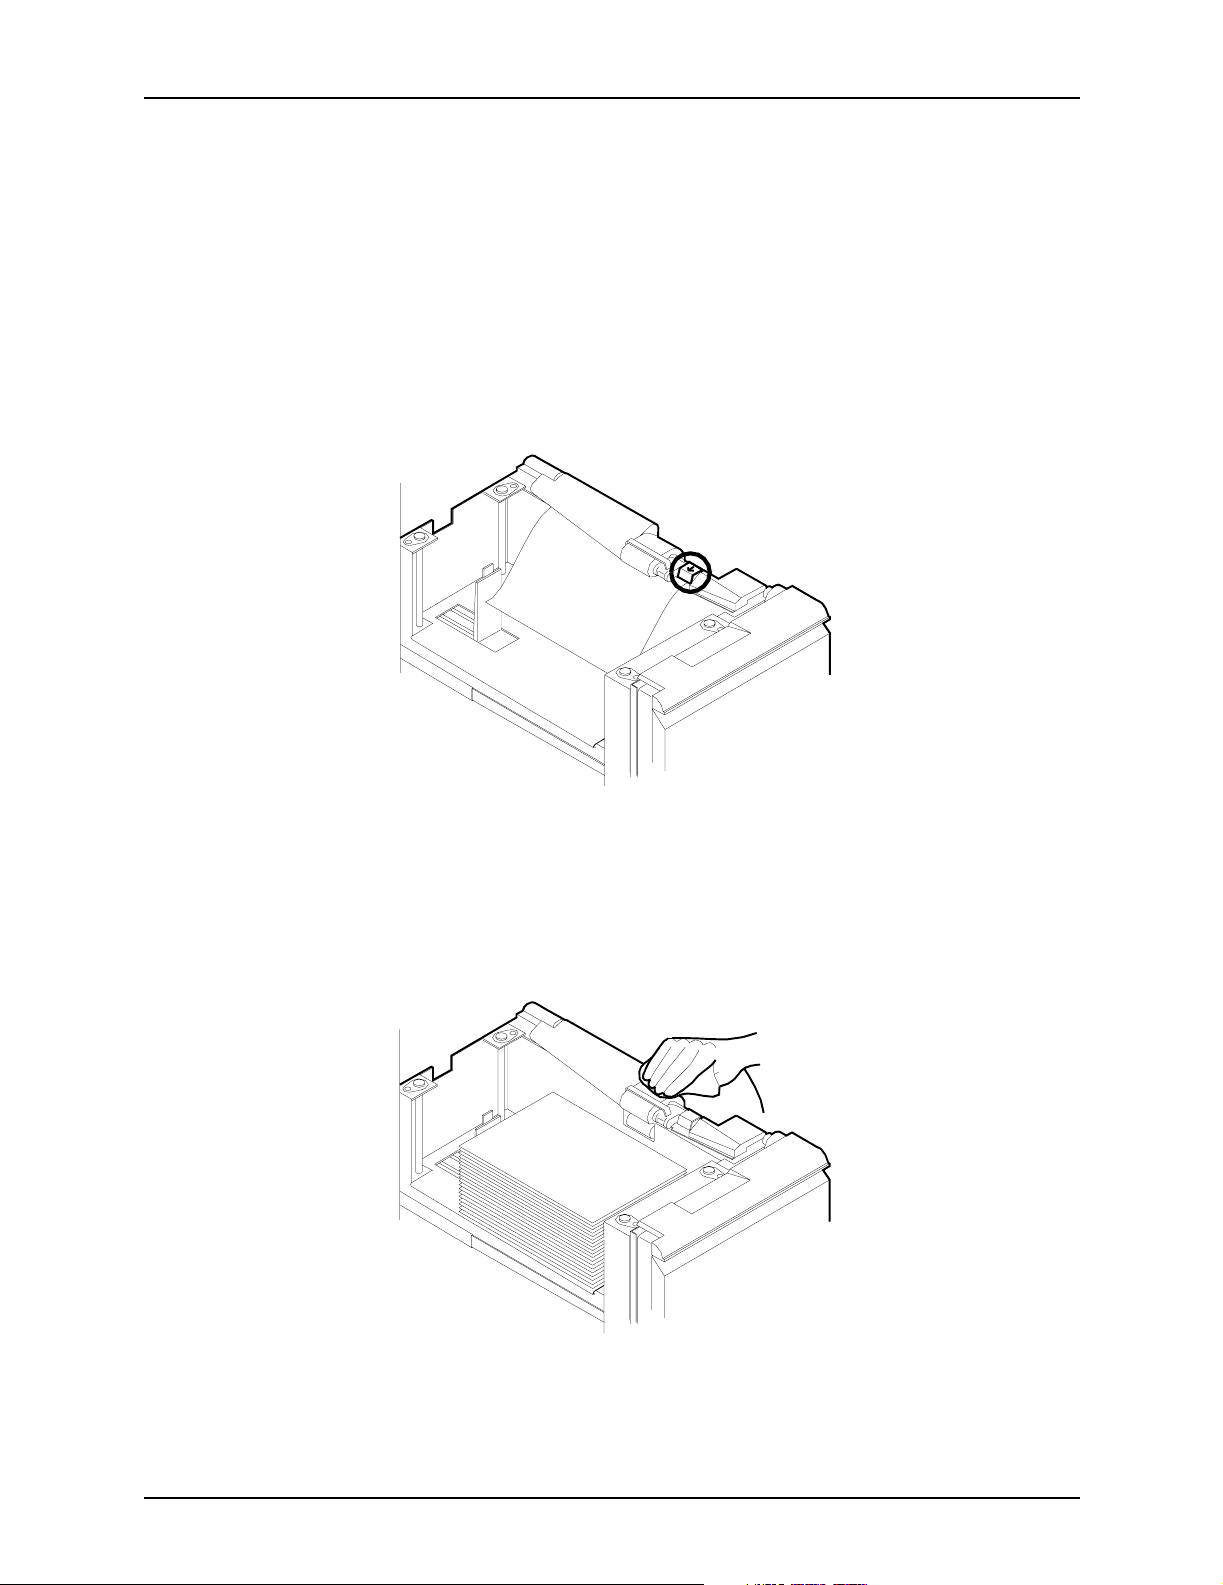
Clearing paper jams from area 4
Follow these steps to clear jams from area 4.
The laser safety label located on the inside left front door of
the printer advises you that the panel below it must not be
removed, except by a service representative.
1. Open the middle and left doors and locate area 4. Remember
to clear the jam in area 5 first, if you are directed to clear both
areas.
Clearing paper misfeeds and jams
WARNING
Troubleshooting Guide 4-15
Page 40

Clearing paper misfeeds and jams
2. With your left hand, move and hold the green latch to the right
(the direction of the arrow marked on it). With your right hand,
pull out the large green handle until the fuser unit latches in
the fully open position.
Take care not to touch any parts in this area. They may be
hot enough to cause burns.
3. Raise the small green handle at the front of the fuser
assembly.
WARNING
4. Remove and discard any paper that you find in this area.
CAUTION
Do not use a sharp object to remove paper wrapped around the
fuser rolls. Attempting to do so could damage the roller and
require its replacement.
5. Return the small green handle to its original position.
4-16 Troubleshooting Guide
Page 41

Clearing paper misfeeds and jams
6. Push down on the green release latch, and slide the fuser
unit back into the printer until it latches into the closed
position.
7. Close the doors (left one first) and press the Continue button
to resume printing.
Troubleshooting Guide 4-17
Page 42
Clearing paper misfeeds and jams
Clearing paper jams from area 5
Follow these steps to clear jams in area 5.
1. Open the middle door and locate area 5.
2. If paper is caught in the rollers between areas 4 and 5, first
turn the green knob in the direction of the arrow marked on it.
This ensures that the paper has completely moved into area
5, where you can remove it without tearing it.
4-18 Troubleshooting Guide
Page 43

Clearing paper misfeeds and jams
3. Push and hold the green handle to the left (in the direction of
the arrow marked on it). Remove and discard any paper that
you find there.
4. Release the green handle.
5. Close the door and press the Continue button to resume
printing.
Troubleshooting Guide 4-19
Page 44

Clearing paper misfeeds and jams
Clearing paper jams from areas 6 and 6A
Follow these steps to clear jams in areas 6 and 6A.
1. Area 6 (under cover)
2. Area 6a
3. Stacker
4-20 Troubleshooting Guide
Page 45
Clearing paper misfeeds and jams
1. Open the printer’s top cover. Remove and discard any paper
that you find in this area.
2. Close the top cover.
3. Open the top cover of the high-capacity feeder (area 6a).
(Open the top cover of the stacker, too, if the printer console
message display indicates it needs to be opened.)
4. Remove and discard any sheets under the high-capacity
feeder cover. If the printer console message display also
indicates a problem in the output module, remove and discard
those sheets as well.
5. Close the top covers and press the Continue button to
resume printing.
Troubleshooting Guide 4-21
Page 46
Clearing paper misfeeds and jams
Clearing paper jams from area 7
Area 7 of the paper path is used only during duplex printing.
1. Open the middle door and locate area 7.
4-22 Troubleshooting Guide
Page 47
Clearing paper misfeeds and jams
2. Pull the block-shaped set separator toward you and hold it in
that position.
3. Remove and discard any paper in the duplex tray.
4. Return the set separator to its upright position.
5. Close the door and press the Continue button to resume
printing.
Troubleshooting Guide 4-23
Page 48

Clearing paper misfeeds and jams
Clearing paper jams from area 8
If your printer has a stitcher/stacker, see the “Correcting stacker
problems” chapter.
1. Open the top cover of the output module, as indicated on the
graphic display of the printer console.
2. Remove and discard any paper that you find in this area.
3. Lower the top cover and press the Continue button to resume
printing.
4-24 Troubleshooting Guide
Page 49

Clearing paper jams from area 9
If your printer has a stitcher/stacker, see the “Correcting stacker
problems” chapter.
1. Open the right door and locate the green handle on the upper
right side of area 9.
Clearing paper misfeeds and jams
2. Pull the green handle down and to the left (in the direction of
the arrow marked on it) to hold the assembly open while you
remove and discard any paper that you find in this area.
3. Return the handle to its original position and close the door.
4. Press the Continue button to resume printing.
Troubleshooting Guide 4-25
Page 50
Clearing paper misfeeds and jams
Adjusting dual stacker tray scuffer arms
Paper jams can occur when the paper does not stack smoothly
in the stacker trays. If some papers stack well while others do
not, the scuffer arms may need to be adjusted.
NOTE: The scuffer arm weights on some printers are bolted in
place. These must be adjusted by a service representative.
The adjustable weights are located on the underside of the
scuffer arms, on a track down the center. To adjust them:
1. Slide the weight right or left along its track under the scuffer
arm.
• If the paper is driven too far up the outside edge of the
tray, move the weight toward the machine.
• If the paper is not driven far enough into the tray, move the
weight away from the machine.
NOTE: For lightweight paper move the weight toward the
machine; for heavyweight paper move the weight away from
the machine.
1
1. Scuffer arm
4-26 Troubleshooting Guide
Page 51

Clearing paper misfeeds and jams
Clearing stitcher/stacker paper jams (areas A and B)
Follow these steps to clear stitcher/stacker jams in areas A and
B.
1. Open the top cover of the stitcher/stacker and locate area A
in the center.
Area A
2. Remove and discard the paper under the paper guide. The
paper guide is a spring-loaded, heavy wire form guide that
pops up when you open the cover.
3. Locate the side cover of area B on the right.
4. Push the cover to the right (in the direction of the large green
arrow at the front of the cover) to open it.
Troubleshooting Guide 4-27
Page 52

Clearing paper misfeeds and jams
5. Remove only the set of pages leaving the stitcher/stacker at
the right, and place it on the output in the stacker tray. Do not
remove any other pages from this area.
NOTE: The pages were compiled by the stitcher/stacker into
a set (stapled or not), but something prevented the set from
being delivered to the stacker. You put the set in the stacker
tray because the system has counted it as completed.
6. Close the side and top covers.
7. Press the Continue button to resume printing.
Clearing bypass transport paper jams (4890/92C only)
To clear bypass transport paper jams:
1. Verify that a sheet is caught between the bypass transport
and the finishing device. If a sheet is there, remove it and
discard it.
2. Open the top cover of the bypass transport by lifting upward
on the recessed handle.
3. Remove and discard any paper that you see in the bypass
transport.
4. Grasp the handle again and slide the top cover to the right.
This exposes the remainder of the bypass transport paper
path.
4-28 Troubleshooting Guide
Page 53

Clearing paper misfeeds and jams
5. Remove and discard any paper that you see.
6. Push the cover back to the left and close it tightly. The cover
snaps shut.
7. Press the Continue button on the printer console to resume
printing.
8. Discard any pages sent to the sample tray when the jam was
detected.
Troubleshooting Guide 4-29
Page 54

Clearing paper misfeeds and jams
4-30 Troubleshooting Guide
Page 55

5. Optimizing print quality
This chapter discusses methods of checking and improving print
quality.
NOTE: One way to test print quality is to print a sample
document. For information on printing sample documents, refer
to The Guide to Configuring and Managing the System.
Adjusting print quality
The system maintains optimal print quality by monitoring the
print quality while printing. If the print quality would be adversely
affected, the printer automatically runs a Print Quality
Adjustment (PQA) before printing the next document. The printer
also automatically runs a PQA if it has been idle for a period of
time. (The default period is eight hours, but the service
representative can customize the time period.)
When the printer requires a PQA, the printer console displays a
“HOUSING NOT READY” message. It also displays one of two
messages indicating the state of the dry ink housing:
• Ready
• Black or color housing not ready
NOTE: If either the black or the color housing is not ready, the
system runs a PQA before printing the next document, whether
that document is black only or highlight color.
You do not have to wait until the printer automatically runs a
PQA. You can run PQAs routinely so as to limit the number of
printer-requested PQAs.
You can start a PQA anytime. A PQA takes 2 to 20 minutes. If
you use the color housing daily and keep it in a stable
environment, a PQA usually takes 2 to 5 minutes.
Troubleshooting Guide 5-1
Page 56

Optimizing print quality
Access level Administrator or operator
Syntax PQA
Arguments None
If a PQA command is issued on an NPS/IPS system with a
bypass transport installed, the trailing sheet is sent to the bypass
transport, but the test patterns are not.
Example
PS–op>pqa
DocuPrint manual PQA submitted as document number: (N)
Manually running a PQA
Product features that affect PostScript print quality
You can improve the appearance of your documents by being
aware of potential problems created through the use of
proprietary PostScript extensions and device-dependent
operators.
Proprietary PostScript extensions
PostScript masters that use proprietary printer features may
cause appearance inconsistencies between different PostScript
printers. Some PostScript printers contain proprietary PostScript
extensions. For example, some versions of the Apple Macintosh
PostScript driver download encrypted proprietary image
“smoothing” operators to Apple LaserWriters. The downloaded
PostScript code uses the product operator to determine if it is
being used on a LaserWriter. If not, the proprietary code is
bypassed by doing a flushfile. This allows the PostScript master
to print on non–LaserWriter products. As a result, PostScript
masters generated on a Macintosh with Apple proprietary
features may produce output that varies between LaserWriter
and non–LaserWriter PostScript printers.
5-2 Troubleshooting Guide
Page 57

Device-dependent operators
Some PostScript operators result in device-dependent PostScript
files. “Device dependence” means that devices having different
output characteristics may produce different-looking output even
though they use the same software. This section documents the
most serious examples of device dependence. The
Language Reference Manual,
graphics state operators that are considered device-dependent.
Gray shading—setscreen and setcolorscreen
The PostScript operators setscreen and setcolorscreen control
the PostScript halftone software that simulates various intensity
levels of gray and color inks. Since each PostScript product may
have a different default halftone definition, the halftone patterns
and gray scale range may differ also. Because setscreen is
inherently device dependent (especially when used for pattern
fills), PostScript masters look different on almost every different
model of PostScript printer.
Optimizing print quality
PostScript
second edition, lists all of the
The operators are also used to perform pattern fills, since
PostScript Level 1 does not have a pattern fill operator.
(PostScript Level 2 has pattern fill operators.) As stated in the
PostScript Language Reference Manual
“Remember that everything pertaining to halftones is, by
definition, device-dependent. In general, when an application
provides its own halftone specifications, it sacrifices portability.
Associated with every device is a default halftone definition that
is appropriate for most applications.”
In addition to the device-dependent nature of halftoning, a spot
function is used by
the order of pixel darkening in the halftone cell. When two pixels
have the same spot function value, their ordering values are
determined arbitrarily. Duplicate spot function values are very
common. In fact, almost all the various default spot functions
generate duplicate values. Therefore, different PostScript
implementations yield different halftone patterns, resulting in
visual differences in the output.
setscreen
and
, first edition,
setcolorscreen
to determine
Troubleshooting Guide 5-3
Page 58

Optimizing print quality
Gray shading—settransfer and transfer function
The PostScript operators settransfer and setcolortransfer are
used to change the procedure for mapping perceived color
values in the output of the print device into specified color values
in the PostScript master. PostScript devices use an internal
transfer array or procedure that takes into account the printing
characteristics of their marking engines in order to produce
levels of color.
Transfer functions are called by the setcmykcolor, setbsbcolor,
setrgbcolor, and setgray operator before processing of the
desired color level that is specified in the master. The transfer
function takes a value from the stack and leaves another value
on the stack for each color component (red, green, blue, and
gray).
The PostScript language provides a scheme for overwriting the
internal transfer function of a printing device by providing the
settransfer
Xerox PostScript devices do not allow you to overwrite their
internal transfer function.
and
setcolortransfer
operators. However, some
Typically, a master tries to replace the internal transfer function
with a null transfer function such as:
{}
settransfer
{} {} {} {}
If either of the above procedures is successful, the transfer
functions return the same color levels that are passed to them
without modifying or mapping the level. On printers which do not
allow the overwriting of the transfer function, the
operator does not affect the mapping of gray values between the
output of the print device and specified levels of color.
NOTE:
four color components (red, green, blue, and gray) to the same
value. The
individually.
Settransfer
, or
setcolortransfer
actually sets the transfer functions for all
setcolortransfer
settransfer
operator sets the transfer functions
5-4 Troubleshooting Guide
Page 59

Smooth curves—setflat
Optimizing print quality
PostScript masters that use the PostScript operator
produce inconsistent output across different PostScript printers.
setflat
operators use cubic Bezier control points to define the curve
shape. These curves can be rendered from straight line
segments. Normally the line segments are so short that the
curve appears smooth. The
the length of the straight line segments. As stated in the
PostScript Language Reference Manual
flatness parameter is large enough to cause visible straight line
segments to appear, the result is unpredictable.
graphics state parameter whose effect is device-dependent. It
should not be used in a page description that is intended to be
device-independent.”
Invisible strokes—0 setlinewidth
PostScript masters that use the PostScript operator
are not consistent across different PostScript printers.
setlinewidth
setlinewidth
that is one pixel wide. On devices whose dot size is small, singlepixel-width lines may be invisible.
controls curve rendering smoothness. PostScript curve
setflat
controls the width of a stroked line. When
is executed with an input of zero, it produces a line
operator indirectly controls
, second edition, “If the
setflat
Setflat
setlinewidth
sets a
Scan conversion—fill, eofill, and stroke
Scan conversion algorithms are implementation-dependent, so
different PostScript printers paint (“turn on”) different dots,
resulting in output differences. For filled circles, PostScript
printers differ in the dots they paint at the edge of the circle; thus,
some printers produce slightly larger circles than others. For
large circles this is not noticeable, but for small circles, it is.
Sections 2.2 and 6.5 of the
Manual
states that scan conversion details are not part of the PostScript
standard.
, second edition, discuss scan conversion. Section 6.5
PostScript Language Reference
Troubleshooting Guide 5-5
Page 60

Optimizing print quality
5-6 Troubleshooting Guide
Page 61

6. Resolving printer problems
This chapter describes printer-related problems other than paper
jams, and suggests corrective actions. (Refer to “Clearing paper
misfeeds and jams” for information on paper jams.)
Symptom Probable cause Action
Printed sets are not stitched. Stitcher/stacker is out of wire
(fault code L152), or is
jammed (fault code L172), or
stitching head has
malfunctioned (various fault
codes).
Printing stops and the printer
console displays a message
indicating that an incorrect
paper size is loaded in a
feeder tray.
The number displayed in the
Wire Percentage indicator of
the printer console begins to
flash, and the message
STITCHER LOW ON WIRE
appears when you start a new
print job.
Incorrect paper size or a
damaged sheet.
Stitching wire has decreased
to a percentage
predetermined by the service
representative.
If you have completed Advanced
Customer Training (ACT), follow the
recommended procedures to correct
the problem. If not, contact your
supervisor or your service
representative. Until the problem is
fixed you can continue printing without
stitching the output.
• Check the paper in the indicated
tray.
• If the paper is not the correct size,
load the correct size paper.
If the paper size is correct, press
the Continue button to resume
printing.
If you have completed Advanced
Customer Training (ACT), follow the
recommended procedures to correct
the problem. If not, contact your
supervisor or your service
representative. You can continue
printing, but the stitcher may run out of
wire.
One percent of the wire will stitch
about 300 sets (maximum).
Printer console displays the
message
OFFSET FAILED, SET IN
OUTPUT BIN NOT OFFSET,
but the printed sheets in the
stitcher/stacker tray are offset
normally.
Faulty component in the
offsetting mechanism of the
stitcher.
• Clear the message by pressing
the Continue button on the printer
console.
• Call customer service support for
further assistance.
Troubleshooting Guide 6-1
Page 62

Resolving printer problems
Symptom Probable cause Action
Paper does not stack evenly in
the dual stacker trays.
Scuffer arm weights are out of
adjustment.
If printer has adjustable weights under
the scuffer arms, slide them to the right
or the left. (Refer to “Clearing paper
misfeeds and jams” chapter in this
guide.)
If the weights are bolted in place, ask
your service representative to adjust
them.
6-2 Troubleshooting Guide
Page 63

7. Resolving system problems
This chapter describes various system problems and suggests
corrective actions.
NOTE: The syntax for the actions listed is for CLI users. If using
the GUI, refer to the online help for equivalent procedures.
Symptom Probable cause Action
Blank display: pressing a
key fails to restore image.
NOTE: If you have a
SunBlade 1000, the
monitor takes one minute
to display following restart.
Do not restart the system
while waiting for the
monitor to display.
The first job to print after a
reboot or a diagnostics
session takes 30 to 60
seconds longer than usual.
User says a job is not
printing.
Monitor is powered off;
brightness and contrast
controls are misadjusted;
or there’s a more serious
problem.
This is normal operation. No action is needed. Subsequent jobs should
The jobs is ineligible due to
unavailable resource.
Queueing is stopped. • Enter Show Status.
The virtual printer is
stopped.
1. Make sure that the monitor is powered
on.
2. Make sure that the brightness and
contrast controls (if available) are turned
far enough to the left to brighten the
screen.
3. If the monitor is powered on and controls
are turned to the left, call the service
representative.
print without a delay.
• Enter List Documents Ineligible.
• Load the appropriate resource.
• Enter the Start Queueing command.
• Enter List Virtual Printers.
• Enter Start Virtual Printer
<printer_name>.
The jobs are held. • Enter List Documents Held.
• Release the job if appropriate.
The job never arrived. • Enter List Documents All.
• Ask the user to resend. If the job still does
not arrive, consult with the network or
workstation administrator.
Troubleshooting Guide 7-1
Page 64

Resolving system problems
Symptom Probable cause Action
No jobs appear to be
printing.
Queueing or printing may
be stopped.
Scheduling policy may be
First Come First Served
(FCFS) and the next job
may be ineligible.
Possible system problem • Enter Print Sample Document to see if
Printer controller is not
communicating with the
network. (Does not apply
to channel-attached host.)
Printer controller is off or
needs to be restarted.
• Enter Show Status.
• Enter Start Queueing or Printing.
• Enter Show Scheduling Policy to
determine current setting.
• If scheduling policy is FCFS and the next
job is ineligible, no jobs will print. Either
load the media the job is waiting for, or
Set Scheduling Policy to
ResourceMatch so the next eligible job
prints.
jobs can print from the controller to the
printer.
• If the sample document does not print,
there may be a system problem.
• Ping the printer controller; check the
cabling/connections.
• Reconnect the network cable. Use the
network diagnostics to check the network
devices.
• Check the printer controller operation.
• Restart the printer controller.
User cannot send a job
from a workstation.
The workstation is not
communicating with the
network.
For TCP/IP: Printer
controller host name and
address are not in the
workstation hosts file.
• Ping the printer controller or another
workstation. Look at the workstation
network cable.
• Reconnect the network cable.
• View the workstation hosts file.
• Add the printer controller name and
address to the hosts file.
7-2 Troubleshooting Guide
Page 65

Symptom Probable cause Action
Resolving system problems
Job prints on the wrong
paper, or is otherwise not
as expected.
Job prints correctly on the
right media, but an error
message on the trailer
page indicates a media
error.
Paper in the tray and tray
settings do not match.
Job has a job ticket and
specified virtual printer has
SkipJTPreScan set to
True. (Does not apply to
IPDS.)
Job has attributes from
some other source (DSC,
embedded from job ticket,
etc.)
User error in entering print
options from the client
workstation.
There are PostScript
setpagedevice operators in
the job that specify the
media to use, and the job
submission method or
virtual printer specified
other media.
• Check the trays and Enter Show Status.
• Change paper in the tray or set the
correct paper type using Set Tray.
• Enter List Virtual Printers.
• Send to another virtual printer with
SkipJTPreScan set to False.
• Enter Show Document Attributes.
• Resend if necessary. Enter Change
Document Attributes to specify desired
attributes.
• Ensure that “Fit to Paper” or an
equivalent selection is not selected in
user print driver.
• Enter Show Document Attributes.
• Resend if necessary using correct
options, or enter Change Document
Attributes to specify the desired
attributes.
• Enter Show Document Attributes to
view the requested media and compare
with output. Then check the PostScript
code of the file. You can enter Examine
Document, but it may be easier to do this
from a user workstation.
• If the job has printed as desired, do
nothing. If you want the job to print using
the media set by the setpagedevice
operators, do not use a job submission
method that creates a job ticket, or use a
virtual printer with SkipJTPreScan set to
True, and no media attributes.
Troubleshooting Guide 7-3
Page 66

Resolving system problems
Symptom Probable cause Action
The IPDS host receives a
Not Ready message from
the DocuPrint NPS/IPS.
If a virtual printer is
specified for a job, and the
virtual printer properties
are changed, then the
virtual printer stops and
sends a not ready
message to the host.
Queueing has stopped.
The job pool manager
cannot accept any jobs
when queuing has
stopped.
The IPDS job is not
selected for printing
because printing has
stopped.
Out of paper condition 1. Enter Show Status.
1. Enter Show Status to ensure there is no
other problem. If you have a stoppage
due to the status shown, correct the
problem status.
2. Enter List Virtual Printer or Show IPDS
Virtual Printer to see if the virtual printer
is stopped.
3. Enter Start Virtual Printer <vpname>.
1. Enter Show Status to determine if
printing is stopped.
2. Enter Start Queueing.
1. Enter Show Status to determine if
printing is stopped.
2. Enter Show IPDS Status to determine if
IPDS printing is stopped.
3. Enter Start Printing or Start IPDS
Printing.
2. Reload the paper tray.
Restarting the
system
after an error
condition when
printing an IPDS
job
To restart the system after you have cleared an error condition:
1. Drain the printer at the host. (Follow procedures for your host
system.)
2. In an MVS environment, cancel the FSS (Functional
Subsystem), which automatically drains the printer.
3. Restart the Printer Controller.
4. Restart the printer at the host.
7-4 Troubleshooting Guide
Page 67

Index
A
area 3, clearing paper jams 4-14
area 4, clearing paper jams 4-15–4-17
area 5, clearing paper jams 4-18–4-19
area 7, clearing paper jams 4-22–4-23
area 8, clearing paper jams 4-24
area 9, clearing paper jams 4-25
areas 1 and 1A, clearing paper jams 4-10
4-11
areas 2 and 2A, clearing paper jams 4-12
4-13
areas 6 and 6A, clearing paper jams 4-20
4-21
areas A and B, clearing stitcher/stacker tray
paper jams 4-27–4-28
B
bypass transport, clearing paper jams 4-28
4-29
C
CE mark ix
clearing
bypass transport paper jams 4-28–4-29
feeder trays 4-1–4-5
paper jams
area 3 4-14
area 4 4-15–4-17
area 5 4-18–4-19
area 7 4-22–4-23
area 8 4-24
area 9 4-25
areas 1 and 1A 4-10–4-11
areas 2 and 2A 4-12–4-13
areas 6 and 6A 4-20–4-21
stacker tray paper jams 4-26
stitcher/stacker tray paper jams (areas A
and B) 4-27–4-28
conventions xiv
–
–
–
D
device-dependent operators 5-3
documentation xv
E
eofill 5-5
error condition, restarting printer 7-4
error messages, Client Software installation
2-2
F
feeder trays, clearing faults 4-1–4-5
fill 5-5
flushfile 5-2
G
glazing 4-3
–
gray shading
setcolorscreen 5-3
setscreen 5-3
settransfer function 5-4
transfer function 5-4
H
hard disk, Xerox Client Software
requirements 2-2
I
invisible strokes, setlinewidth 5-5
L
laser safety v
M
messages
Client Software installation 2-2
paper jams 4-6
modem
enable 1-2
Troubleshooting Guide
INDEX-1
Page 68

INDEX
N
Novell implementation, troubleshooting 3-1
3-3
O
operation safety, Europe vii–ix
operation safety, U. S. vi–vii
ozone production information vi
P
paper
clearing jams
area 3 4-14
area 4 4-15–4-17
area 5 4-18–4-19
area 7 4-22–4-23
area 8 4-24
area 9 4-25
areas 1 and 1A 4-10–4-11
areas 2 and 2A 4-12–4-13
areas 6 and 6A 4-20–4-21
bypass transport 4-28–4-29
stacker tray 4-26
stitcher/stacker tray (areas A and B)
4-27–4-28
jams
graphic display 4-6
message display 4-6
misfeeds, frequent 4-3
types 4-1
PostScript, proprietary extensions 5-2
PQA
automatic 5-1
manually running 5-2
print quality 5-1
Print Quality Adjusting,
printer problems 6-1
printers
restarting 7-4
printing
quality
monitoring 5-1
quality, features affecting 5-2
problems
printer 6-1
stacker 6-1
see
PQA
procedures
–
feed belt, cleaning 4-4–4-5
paper trays, clearing misfeeds 4-1–4-3
printers, restarting 7-4
product operator 5-2
PServer problems 3-1
publications xv
R
Ready To Open indicator 4-2
remote service 1-2
requirements, hard disk 2-2
RPrinter problems 3-3
S
safety
hotline numbers vii
laser v
operation vi–ix
SAP packets 3-1
scanconversion 5-5
scuffer arms 4-26
server override switch, Xerox Client print
command 2-2
service call, required information 1-1
setbscolor 5-4
setcmykcolor 5-4
setcolorscreen 5-3
setflat 5-5
setgray 5-4
setlinewidth 5-5
setrgbcolor 5-4
setscreen 5-3
settransfer 5-4
smooth curves 5-5
stacker
problems 6-1
stacker tray, clearing paper jams 4-26
stitcher/stacker
tray, clearing paper jams (areas A and B)
4-27–4-28
stroke 5-5
system problems 7-1
INDEX-2
Troubleshooting Guide
Page 69

T
transfer 5-4
transfer functions 5-4
Tray Unlock button 4-1
troubleshooting
Novell implementation 3-1–3-3
Xerox Client Software installation 2-1–2-2
X
Xerox Client print command 2-1
Xerox Client Software, troubleshooting installation 2-1–2-2
Troubleshooting Guide
INDEX-3
Page 70

 Loading...