

Page 1

August 2010
05-0805-000
Xerox DocuMate 3920
User’s Guide
Page 2

Design © 2010 Xerox Corporation. All rights reserved. XEROX®, XEROX and Design® and DocuMate® are trademarks of Xerox
Corporation in the United States and/or other countries.
Content © 2010 Visioneer, Inc. All rights reserved. The Visioneer brand name and OneTouch® logo are registered trademarks of
Visioneer, Inc.
Copyright protection claimed includes all forms of matters of copyrightable materials and information now allowed by statutory or
judicial law or hereinafter granted, including without limitation, material generated from the software programs which are displayed
on the screen such as styles, templates, icons, screen displays, looks, etc.
Reproduction, adaptation, or translation without prior written permission is prohibited, except as allowed under the copyright laws.
Adobe®, Adobe® Acrobat®, Adobe® Reader®, and the Adobe® PDF logo are registered trademarks of Adobe Systems
Incorporated in the United States and/or other countries. The Adobe PDF logo will appear in this product’s software, and full access
to Adobe software features is only available if an Adobe product is installed on your computer.
ZyINDEX is a registered trademark of ZyLAB International, Inc. ZyINDEX toolkit portions, Copyright © 1990-1998, ZyLAB
International, Inc.
Document Version: 05-0805-000 (August 2010).
All Rights Reserved. All other products mentioned herein may be trademarks of their respective companies.
Information is subject to change without notice and does not represent a commitment on the part of Visioneer. The software
described is furnished under a licensing agreement. The software may be used or copied only in accordance with the terms of such an
agreement. It is against the law to copy the software on any medium except as specifically allowed in the licensing agreement. No
part of this document may be reproduced or transmitted in any form or by any means, electronic or mechanical, including
photocopying, recording, or information storage and retrieval systems, or translated to another language, for any purpose other than
the licensee's personal use and as specifically allowed in the licensing agreement, without the express written permission of
Visioneer.
Restri cted Rights Legend
Use, duplication, or disclosure is subject to restrictions as set forth in contract subdivision (c)(1)(ii) of the Rights in Technical Data and
Computer Software Clause 52.227-FAR14. Material scanned by this product may be protected by governmental laws and other
regulations, such as copyright laws. The customer is solely responsible for complying with all such laws and regulations.
Changes are periodically made to this document. Changes, technical inaccuracies, and typographic errors will be corrected in
subsequent editions.
Page 3

Table of Contents
Welcome
What’s in the Box . . . . . . . . . . . . . . . . . . . . . . . . . . . . . . . . . . . . . . . . . . . . . . . . . . . . . . . . . . . . . . . . . . . . . . . . .8
Setup Requirements . . . . . . . . . . . . . . . . . . . . . . . . . . . . . . . . . . . . . . . . . . . . . . . . . . . . . . . . . . . . . . . . . . . . . . .9
Network Requirements . . . . . . . . . . . . . . . . . . . . . . . . . . . . . . . . . . . . . . . . . . . . . . . . . . . . . . . . . . . . . . .9
Computer Requirements . . . . . . . . . . . . . . . . . . . . . . . . . . . . . . . . . . . . . . . . . . . . . . . . . . . . . . . . . . . . .9
Documentation . . . . . . . . . . . . . . . . . . . . . . . . . . . . . . . . . . . . . . . . . . . . . . . . . . . . . . . . . . . . . . . . . . . . . .9
Internet Communication Features . . . . . . . . . . . . . . . . . . . . . . . . . . . . . . . . . . . . . . . . . . . . . . . . . . . . . . . 10
The Xerox DocuMate 3920 Scanner . . . . . . . . . . . . . . . . . . . . . . . . . . . . . . . . . . . . . . . . . . . . . . . . . . . . . . 11
1Scanner Setup
Unpack and Assemble the Scanner . . . . . . . . . . . . . . . . . . . . . . . . . . . . . . . . . . . . . . . . . . . . . . . . . . . . . . . 14
Connecting the Cables . . . . . . . . . . . . . . . . . . . . . . . . . . . . . . . . . . . . . . . . . . . . . . . . . . . . . . . . . . . . . . . . . . 15
Using the Scanner Control Panel . . . . . . . . . . . . . . . . . . . . . . . . . . . . . . . . . . . . . . . . . . . . . . . . . . . . . . . . . 17
Summary of the Menu Options . . . . . . . . . . . . . . . . . . . . . . . . . . . . . . . . . . . . . . . . . . . . . . . . . . . . . . . . . . 19
Using the LCD Soft Keyboard . . . . . . . . . . . . . . . . . . . . . . . . . . . . . . . . . . . . . . . . . . . . . . . . . . . . . . . . . . . . 22
Adding the Scanner to the Network . . . . . . . . . . . . . . . . . . . . . . . . . . . . . . . . . . . . . . . . . . . . . . . . . . . . . . 23
Networking Error Messages . . . . . . . . . . . . . . . . . . . . . . . . . . . . . . . . . . . . . . . . . . . . . . . . . . . . . . . . . 25
Adding the Email Server Information . . . . . . . . . . . . . . . . . . . . . . . . . . . . . . . . . . . . . . . . . . . . . . . . . . . . . 26
Setting the Default Scan Function . . . . . . . . . . . . . . . . . . . . . . . . . . . . . . . . . . . . . . . . . . . . . . . . . . . . . . . 29
2 Loading Documents to Scan
Scanning from the Automatic Document Feeder (ADF) . . . . . . . . . . . . . . . . . . . . . . . . . . . . . . . . . . . . 32
Scanning from the Flatbed Glass . . . . . . . . . . . . . . . . . . . . . . . . . . . . . . . . . . . . . . . . . . . . . . . . . . . . . . . . . 34
3Copying
Scanning to a Printer . . . . . . . . . . . . . . . . . . . . . . . . . . . . . . . . . . . . . . . . . . . . . . . . . . . . . . . . . . . . . . . . . . . . 36
Scan Options for Copying . . . . . . . . . . . . . . . . . . . . . . . . . . . . . . . . . . . . . . . . . . . . . . . . . . . . . . . . . . . . . . . . 37
Setting the Default Copy Options . . . . . . . . . . . . . . . . . . . . . . . . . . . . . . . . . . . . . . . . . . . . . . . . . . . . . . . . 41
Information Messages When Copying . . . . . . . . . . . . . . . . . . . . . . . . . . . . . . . . . . . . . . . . . . . . . . . . . . . . 42
Copy Specifications . . . . . . . . . . . . . . . . . . . . . . . . . . . . . . . . . . . . . . . . . . . . . . . . . . . . . . . . . . . . . . . . . . . . . 43
4E-mail
Scanning to E-mail . . . . . . . . . . . . . . . . . . . . . . . . . . . . . . . . . . . . . . . . . . . . . . . . . . . . . . . . . . . . . . . . . . . . . . 46
Scan Options for E-mailing . . . . . . . . . . . . . . . . . . . . . . . . . . . . . . . . . . . . . . . . . . . . . . . . . . . . . . . . . . . . . . 48
Setting the Default E-mail Options . . . . . . . . . . . . . . . . . . . . . . . . . . . . . . . . . . . . . . . . . . . . . . . . . . . . . . . 52
Using the Address Book . . . . . . . . . . . . . . . . . . . . . . . . . . . . . . . . . . . . . . . . . . . . . . . . . . . . . . . . . . . . . . . . . 53
Information Messages When E-mailing . . . . . . . . . . . . . . . . . . . . . . . . . . . . . . . . . . . . . . . . . . . . . . . . . . . 54
E-mail Specifications . . . . . . . . . . . . . . . . . . . . . . . . . . . . . . . . . . . . . . . . . . . . . . . . . . . . . . . . . . . . . . . . . . . . 56
5Filing
Xerox DocuMate 3920
User’s Guide
3
Page 4

Scanning to a Folder . . . . . . . . . . . . . . . . . . . . . . . . . . . . . . . . . . . . . . . . . . . . . . . . . . . . . . . . . . . . . . . . . . . . 58
Scan Options for Filing . . . . . . . . . . . . . . . . . . . . . . . . . . . . . . . . . . . . . . . . . . . . . . . . . . . . . . . . . . . . . . . . . . 60
Setting the Folder Template . . . . . . . . . . . . . . . . . . . . . . . . . . . . . . . . . . . . . . . . . . . . . . . . . . . . . . . . . . . . . 63
Creating a New Folder . . . . . . . . . . . . . . . . . . . . . . . . . . . . . . . . . . . . . . . . . . . . . . . . . . . . . . . . . . . . . . . . . . . 65
Information Messages When Filing . . . . . . . . . . . . . . . . . . . . . . . . . . . . . . . . . . . . . . . . . . . . . . . . . . . . . . 66
Filing Specifications . . . . . . . . . . . . . . . . . . . . . . . . . . . . . . . . . . . . . . . . . . . . . . . . . . . . . . . . . . . . . . . . . . . . . 68
6Faxing
Fax Settings . . . . . . . . . . . . . . . . . . . . . . . . . . . . . . . . . . . . . . . . . . . . . . . . . . . . . . . . . . . . . . . . . . . . . . . . . . . . 70
Configuring the Fax Settings from the Scanner . . . . . . . . . . . . . . . . . . . . . . . . . . . . . . . . . . . . . . 70
Configuring the Fax Settings Remotely . . . . . . . . . . . . . . . . . . . . . . . . . . . . . . . . . . . . . . . . . . . . . . 73
Scanning to Fax . . . . . . . . . . . . . . . . . . . . . . . . . . . . . . . . . . . . . . . . . . . . . . . . . . . . . . . . . . . . . . . . . . . . . . . . . 74
Scan Options for Faxing . . . . . . . . . . . . . . . . . . . . . . . . . . . . . . . . . . . . . . . . . . . . . . . . . . . . . . . . . . . . . . . . . 77
Setting the Default Fax Options . . . . . . . . . . . . . . . . . . . . . . . . . . . . . . . . . . . . . . . . . . . . . . . . . . . . . . . . . . 79
Using the Phone Book . . . . . . . . . . . . . . . . . . . . . . . . . . . . . . . . . . . . . . . . . . . . . . . . . . . . . . . . . . . . . . . . . . . 80
Managing the Fax Phone Book . . . . . . . . . . . . . . . . . . . . . . . . . . . . . . . . . . . . . . . . . . . . . . . . . . . . . 80
Information Messages When Faxing . . . . . . . . . . . . . . . . . . . . . . . . . . . . . . . . . . . . . . . . . . . . . . . . . . . . . 85
Fax Specifications . . . . . . . . . . . . . . . . . . . . . . . . . . . . . . . . . . . . . . . . . . . . . . . . . . . . . . . . . . . . . . . . . . . . . . . 87
7 Managing the Scanner Remotely
Accessing the Scanner . . . . . . . . . . . . . . . . . . . . . . . . . . . . . . . . . . . . . . . . . . . . . . . . . . . . . . . . . . . . . . . . . . . 90
Installing the Network Management Tool . . . . . . . . . . . . . . . . . . . . . . . . . . . . . . . . . . . . . . . . . . . 90
Using the Network Management Tool . . . . . . . . . . . . . . . . . . . . . . . . . . . . . . . . . . . . . . . . . . . . . . 92
Accessing the Scanner from a Web Browser . . . . . . . . . . . . . . . . . . . . . . . . . . . . . . . . . . . . . . . . . 94
Using the Embedded Web Page . . . . . . . . . . . . . . . . . . . . . . . . . . . . . . . . . . . . . . . . . . . . . . . . . . . . . . . . . . 95
Menu Options . . . . . . . . . . . . . . . . . . . . . . . . . . . . . . . . . . . . . . . . . . . . . . . . . . . . . . . . . . . . . . . . . . . . . 95
Administrative Settings Options . . . . . . . . . . . . . . . . . . . . . . . . . . . . . . . . . . . . . . . . . . . . . . . . . . . . 96
Account Management . . . . . . . . . . . . . . . . . . . . . . . . . . . . . . . . . . . . . . . . . . . . . . . . . . . . . . . . . . . . . . . . . . 97
Basic Settings . . . . . . . . . . . . . . . . . . . . . . . . . . . . . . . . . . . . . . . . . . . . . . . . . . . . . . . . . . . . . . . . . . . . . 97
Account List . . . . . . . . . . . . . . . . . . . . . . . . . . . . . . . . . . . . . . . . . . . . . . . . . . . . . . . . . . . . . . . . . . . . . . . 98
Configuring the Shortcut Buttons . . . . . . . . . . . . . . . . . . . . . . . . . . . . . . . . . . . . . . . . . . . . . . . . . . . . . . . 101
Scanning Using the Shortcut Buttons . . . . . . . . . . . . . . . . . . . . . . . . . . . . . . . . . . . . . . . . . . . . . .103
Managing the Scanner Address Book . . . . . . . . . . . . . . . . . . . . . . . . . . . . . . . . . . . . . . . . . . . . . . . . . . . . 104
Managing E-mail Addresses . . . . . . . . . . . . . . . . . . . . . . . . . . . . . . . . . . . . . . . . . . . . . . . . . . . . . . . 105
Managing E-mail Groups . . . . . . . . . . . . . . . . . . . . . . . . . . . . . . . . . . . . . . . . . . . . . . . . . . . . . . . . . . 106
Filing Manager . . . . . . . . . . . . . . . . . . . . . . . . . . . . . . . . . . . . . . . . . . . . . . . . . . . . . . . . . . . . . . . . . . . . . . . . 108
Server Setup . . . . . . . . . . . . . . . . . . . . . . . . . . . . . . . . . . . . . . . . . . . . . . . . . . . . . . . . . . . . . . . . . . . . . . 108
8 Maintenance
Safety Precautions . . . . . . . . . . . . . . . . . . . . . . . . . . . . . . . . . . . . . . . . . . . . . . . . . . . . . . . . . . . . . . . . . . . . . 112
Clearing Paper Jams . . . . . . . . . . . . . . . . . . . . . . . . . . . . . . . . . . . . . . . . . . . . . . . . . . . . . . . . . . . . . . . . . . . 113
Cleaning the Scanner . . . . . . . . . . . . . . . . . . . . . . . . . . . . . . . . . . . . . . . . . . . . . . . . . . . . . . . . . . . . . . . . . . 114
4
Xerox DocuMate 3920
User’s Guide
Page 5

Table of Contents
Cleaning the Automatic Document Feeder . . . . . . . . . . . . . . . . . . . . . . . . . . . . . . . . . . . . . . . . . 114
Cleaning the Scanner Glass . . . . . . . . . . . . . . . . . . . . . . . . . . . . . . . . . . . . . . . . . . . . . . . . . . . . . . . . 115
Cleaning the LCD-display . . . . . . . . . . . . . . . . . . . . . . . . . . . . . . . . . . . . . . . . . . . . . . . . . . . . . . . . . . 116
Replacing the ADF Pad Assembly . . . . . . . . . . . . . . . . . . . . . . . . . . . . . . . . . . . . . . . . . . . . . . . . . . . . . . . 117
Replacing the Roller Assembly . . . . . . . . . . . . . . . . . . . . . . . . . . . . . . . . . . . . . . . . . . . . . . . . . . . . . . . . . . 121
Xerox DocuMate 3920 Scanner Specifications . . . . . . . . . . . . . . . . . . . . . . . . . . . . . . . . . . . . . . . . . . .123
Xerox DocuMate 3920 Parts List . . . . . . . . . . . . . . . . . . . . . . . . . . . . . . . . . . . . . . . . . . . . . . . . . . . . . . . . 124
A Appendix
Safety Introduction . . . . . . . . . . . . . . . . . . . . . . . . . . . . . . . . . . . . . . . . . . . . . . . . . . . . . . . . . . . . . . . . . . . . 126
EMC . . . . . . . . . . . . . . . . . . . . . . . . . . . . . . . . . . . . . . . . . . . . . . . . . . . . . . . . . . . . . . . . . . . . . . . . . . . . . . . . . . 127
Operational Safety Information . . . . . . . . . . . . . . . . . . . . . . . . . . . . . . . . . . . . . . . . . . . . . . . . . . . . . . . . 128
Electrical Information . . . . . . . . . . . . . . . . . . . . . . . . . . . . . . . . . . . . . . . . . . . . . . . . . . . . . . . . . . . . . . . . . . 129
Warning - Electrical Safety Information . . . . . . . . . . . . . . . . . . . . . . . . . . . . . . . . . . . . . . . . . . . . 129
Electrical Supply . . . . . . . . . . . . . . . . . . . . . . . . . . . . . . . . . . . . . . . . . . . . . . . . . . . . . . . . . . . . . . . . . . 129
Disconnect Device . . . . . . . . . . . . . . . . . . . . . . . . . . . . . . . . . . . . . . . . . . . . . . . . . . . . . . . . . . . . . . . . 129
Emergency Power Off . . . . . . . . . . . . . . . . . . . . . . . . . . . . . . . . . . . . . . . . . . . . . . . . . . . . . . . . . . . . . . . . . . 130
Maintenance Information . . . . . . . . . . . . . . . . . . . . . . . . . . . . . . . . . . . . . . . . . . . . . . . . . . . . . . . . . . . . . . 131
Product Safety Certification . . . . . . . . . . . . . . . . . . . . . . . . . . . . . . . . . . . . . . . . . . . . . . . . . . . . . . . . . . . . 132
Regulatory Information . . . . . . . . . . . . . . . . . . . . . . . . . . . . . . . . . . . . . . . . . . . . . . . . . . . . . . . . . . . . . . . . 133
Certifications in Europe . . . . . . . . . . . . . . . . . . . . . . . . . . . . . . . . . . . . . . . . . . . . . . . . . . . . . . . . . . . 133
Compliance Information . . . . . . . . . . . . . . . . . . . . . . . . . . . . . . . . . . . . . . . . . . . . . . . . . . . . . . . . . . . . . . . 134
Product Recycling & Disposal: USA & Canada . . . . . . . . . . . . . . . . . . . . . . . . . . . . . . . . . . . . . . . 134
European Union . . . . . . . . . . . . . . . . . . . . . . . . . . . . . . . . . . . . . . . . . . . . . . . . . . . . . . . . . . . . . . . . . . 134
Illegal Copies . . . . . . . . . . . . . . . . . . . . . . . . . . . . . . . . . . . . . . . . . . . . . . . . . . . . . . . . . . . . . . . . . . . . . . . . . . 135
USA . . . . . . . . . . . . . . . . . . . . . . . . . . . . . . . . . . . . . . . . . . . . . . . . . . . . . . . . . . . . . . . . . . . . . . . . . . . . . . 135
Canada . . . . . . . . . . . . . . . . . . . . . . . . . . . . . . . . . . . . . . . . . . . . . . . . . . . . . . . . . . . . . . . . . . . . . . . . . . 136
Other Countries . . . . . . . . . . . . . . . . . . . . . . . . . . . . . . . . . . . . . . . . . . . . . . . . . . . . . . . . . . . . . . . . . . . 137
EH&S Contact Information . . . . . . . . . . . . . . . . . . . . . . . . . . . . . . . . . . . . . . . . . . . . . . . . . . . . . . . . . . . . . 138
Index
Xerox DocuMate 3920
User’s Guide
5
Page 6

Table of Contents
6
Xerox DocuMate 3920
User’s Guide
Page 7

Welcome
This chapter includes:
• What’s in the Box on page 8
• Setup Requirements on page 9
• Internet Communication Features on page 10
• The Xerox DocuMate 3920 Scanner on page 11
Your new Xerox scanner can quickly scan single-sided or double-sided stacks of documents with the
Automatic Document Feeder (ADF), or single items on the Flatbed glass. With this scanner you can
scan documents and send them electronically to a file server, email message, printer, fax machine, FTP
site, or website directly from the scanner. The scanner can also be connected to a computer for
scanning from software applications.
Important:
• There is no default administrator password. When you access the management options from the
LCD panel, or from the scanner’s embedded web page, you will get prompted for a user name and
password. Press or click “Login” to continue setting up the scanner features as described in the
sections. You may want to add a username and password to prevent users from changing the
scanner settings.
• To use the Fax and Copy functions, you need to connect the scanner to a USB InkJet or Laser
printer that supports PCL. Please visit the information page for your scanner at
www.xeroxscanners.com for more information.
• To use the Filing function your user account must have privileges to write to the server. Setup of
the server, and user account privileges, are outside the scope of this document. Please contact
your IT department or network administrator for this information.
• To use the Email function you must have the email server information. Setup of the email server,
and user account privileges, are outside the scope of this document. Please contact your IT
department or network administrator for this information.
Xerox DocuMate 3920
User’s Guide
7
Page 8

Welcome
Power Supply Xerox DocuMate 3920 Scanner
Power Cord
(North American Style)
USB Cable
Power Cord
(European Style)
Power Cord
(United Kingdom Style)
Telephone
Cord
Windows™
Installation Disc
Quick Install Guide Technical
Support Card
What’s in the Box
Before proceeding, check the contents of the box. If items are missing or damaged, contact the dealer
where you purchased the scanner.
8
Xerox DocuMate 3920
User’s Guide
Page 9

Setup Requirements
Network Requirements
To send emails from the scanner:
•TCP/IP Network
• An SMTP and an optional POP3 server
To save documents to a folder on a server via the intranet:
• FTP, HTTP, HTTPS, or CIFS protocol environment
Computer Requirements
These requirements are for installing the Network Management Tool on a local computer.
IBM-compatible Pentium 4 PC, or AMD equivalent with:
• A CD-ROM drive
• An available Universal Serial Bus (USB) port
•Microsoft
Windows 7
The scanner is compatible with Service Pack 3 for Windows XP and Service Pack 1 for Windows
Vista.
• Windows XP: Minimum of 512 megabytes (MB) of internal memory (RAM)
Windows Vista and 7: Minimum of 1 gigabyte (GB) of internal memory (RAM)
• 350 MB minimum of free hard disk space
®
Windows® operating system: Windows XP (Service Pack 1 and 2), Windows Vista, or
Welcome
A VGA or SVGA Monitor
The recommended settings for your monitor are:
• Color quality of 16-bit or 32-bit
• Resolution set to at least 800 x 600 pixels
Refer to your Windows documentation for instructions on setting the color quality and resolution for
the monitor.
Documentation
The following documentation is provided with your scanner:
• Quick Install Guide—Abbreviated installation instructions.
• Scanner User’s Guide—On the Installation Disc; contains detailed installation, scanning,
configuration, and maintenance information.
Xerox DocuMate 3920
User’s Guide
9
Page 10
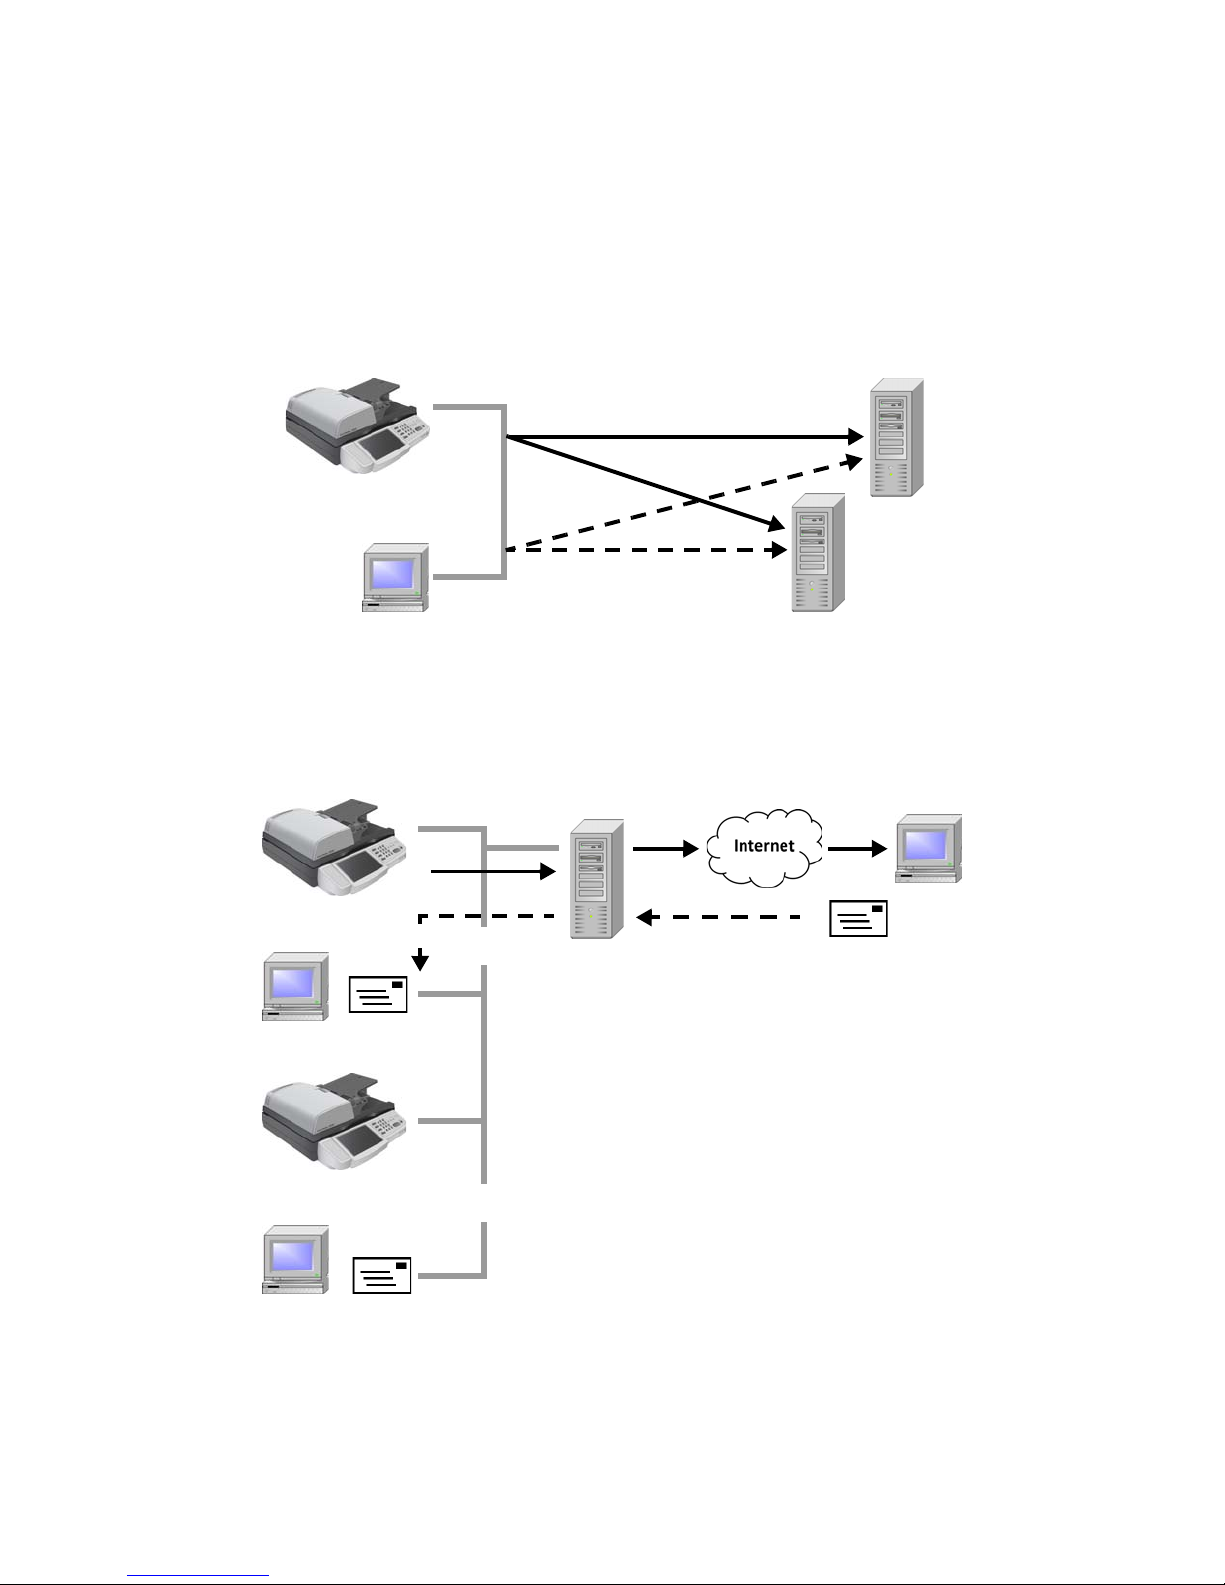
Welcome
Xerox DocuMate 3920
PC
FTP, HTTP,
HTTPS servers
CIFS servers
(Windows)
PC
PC
PC
E-mail Server
≈
≈
Xerox DocuMate 3920
Xerox DocuMate 3920
Internet Communication Features
Scan to Folder—Through the intranet with FTP (File Transfer Protocol), HTTP (Hypertext Transfer
Protocol), HTTPS (a secure way of using HTTP), or CIFS (Common Internet File System), the scanner
allows you to save scanned document directly to a designated server or a personal computer on the
network in a standard PDF, JPEG, TIFF, or MTIFF file format.
Scan to E-Mail—When you send an e-mail to someone via the scanner, the scanner uses SMTP (Simple
Mail Transfer Protocol) to transfer your outgoing e-mails to your SMTP mail server, and then send these
e-mails to your recipients through the internet. The document is first scanned and converted to a
standard PDF, JPEG, TIFF, or MTIFF (Multi-page TIFF) file format and then transmitted to remote
recipients simultaneously as an e-mail attachment.
10
Xerox DocuMate 3920
User’s Guide
Page 11
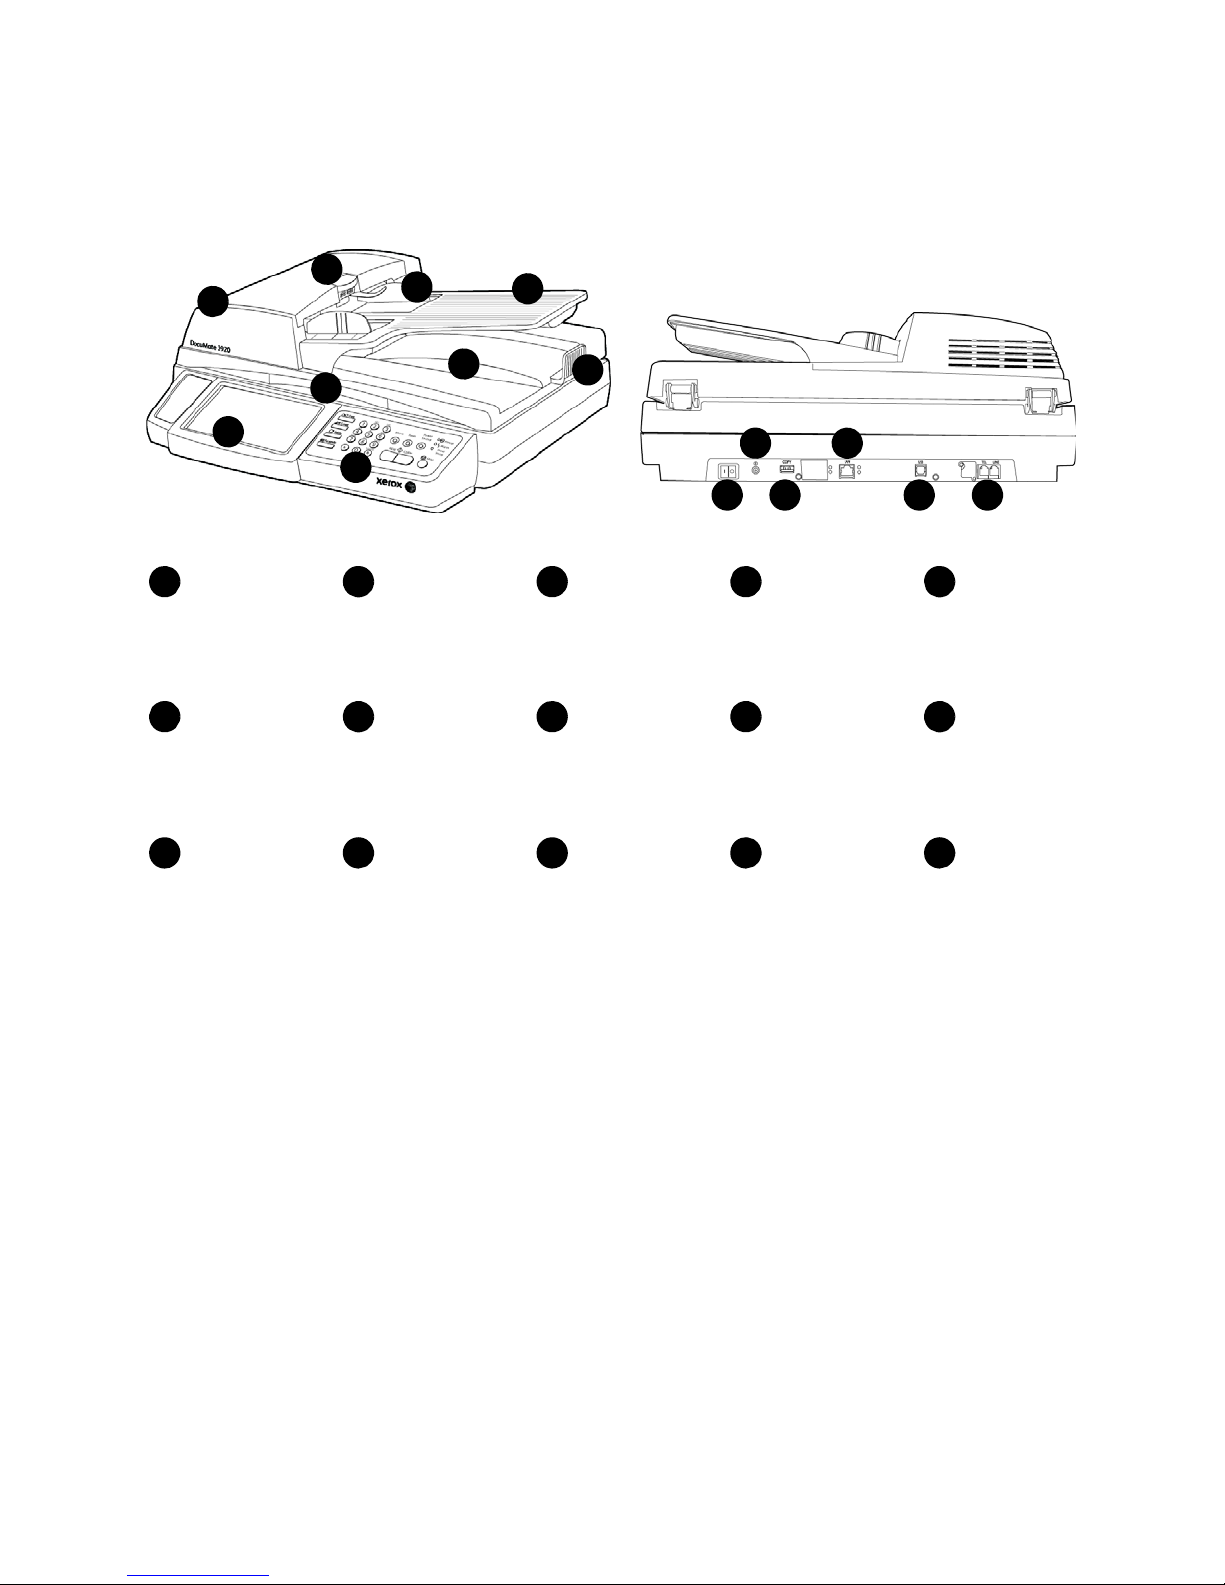
The Xerox DocuMate 3920 Scanner
3
Paper Guides
Scanner Lid
Input Tray LCD Touch Screen
41
5
2
ADF Cover Release Automatic
Document Feeder
(ADF)
8
6 7
1
2
3
4
5
6
7
8
Output TrayControl Panel Paper Stop Power Switch
Power Jack Printer Connection
Port
9
9
10
11
10
11
12
12
13
14 15
13 14 15
Network
Connection Port
PC Connection
Port
Telephone Line
Connection Port
Welcome
Input Tray—Holds documents in the Automatic Document Feeder (ADF) for scanning.
Paper Guides—Adjust to support various document widths.
ADF Cover Release—Lift to open the ADF.
Automatic Document Feeder (ADF)—Feeds paper through the scanner.
LCD Touch Screen—Shows the scanner settings. Touch the screen to input scan batch requirements,
configure destinations, and configure the server settings.
Scanner Lid—Lift lid to place an item on the flatbed glass for scanning.
Scanner Lock—Located underneath the scanner lid. Unlock the scanner before using the scanner.
Lock it again when moving the scanner from one location to another.
Control Panel—Scanning controls.
Xerox DocuMate 3920
User’s Guide
11
Page 12

Welcome
Output Tray—Holds documents after being scanned through the Automatic Document Feeder.
Paper Stop—Holds documents in the output tray. Adjusts to support various document lengths.
Power Switch—Turns the power on and off.
Power Jack—Connects the power cord to the scanner.
Printer Connection Port—Connect a USB cable to a printer and to the COPY port to use the Copy
function and to receive faxes.
Network Connection Port—Connect a network cable to the LAN port to use the Filing and Email
functions.
PC Connection Port—Connect a USB cable to a computer and to the USB port to scan from a
computer.
Telephone Line Connection Port—To use the scanner as a regular fax machine, connect a telephone
cord to the LINE port and to an “RJ-11” telephone jack in a wall or switch. The TEL port should be
ignored since a handset is not provided with this scanner.
12
Xerox DocuMate 3920
User’s Guide
Page 13

Scanner Setup
This chapter includes:
• Unpack and Assemble the Scanner on page 14
• Connecting the Cables on page 15
• Using the Scanner Control Panel on page 17
• Summary of the Menu Options on page 19
• Using the LCD Soft Keyboard on page 22
• Adding the Scanner to the Network on page 23
• Adding the Email Server Information on page 26
• Setting the Default Scan Function on page 29
Note that you do not need to setup network access if you are using the scanner for Faxing, Copying,
and local computer scanning. You only need to specify the network settings if you are going to use the
scanner to send emails or save files to a server.
NOTE: If you wish to return to factory default settings, simply press and hold the Clear button for
over 5 seconds. All the values in the Management and Administrative Settings will be changed
back to factory defaults.
1
Xerox DocuMate 3920
User’s Guide
13
Page 14
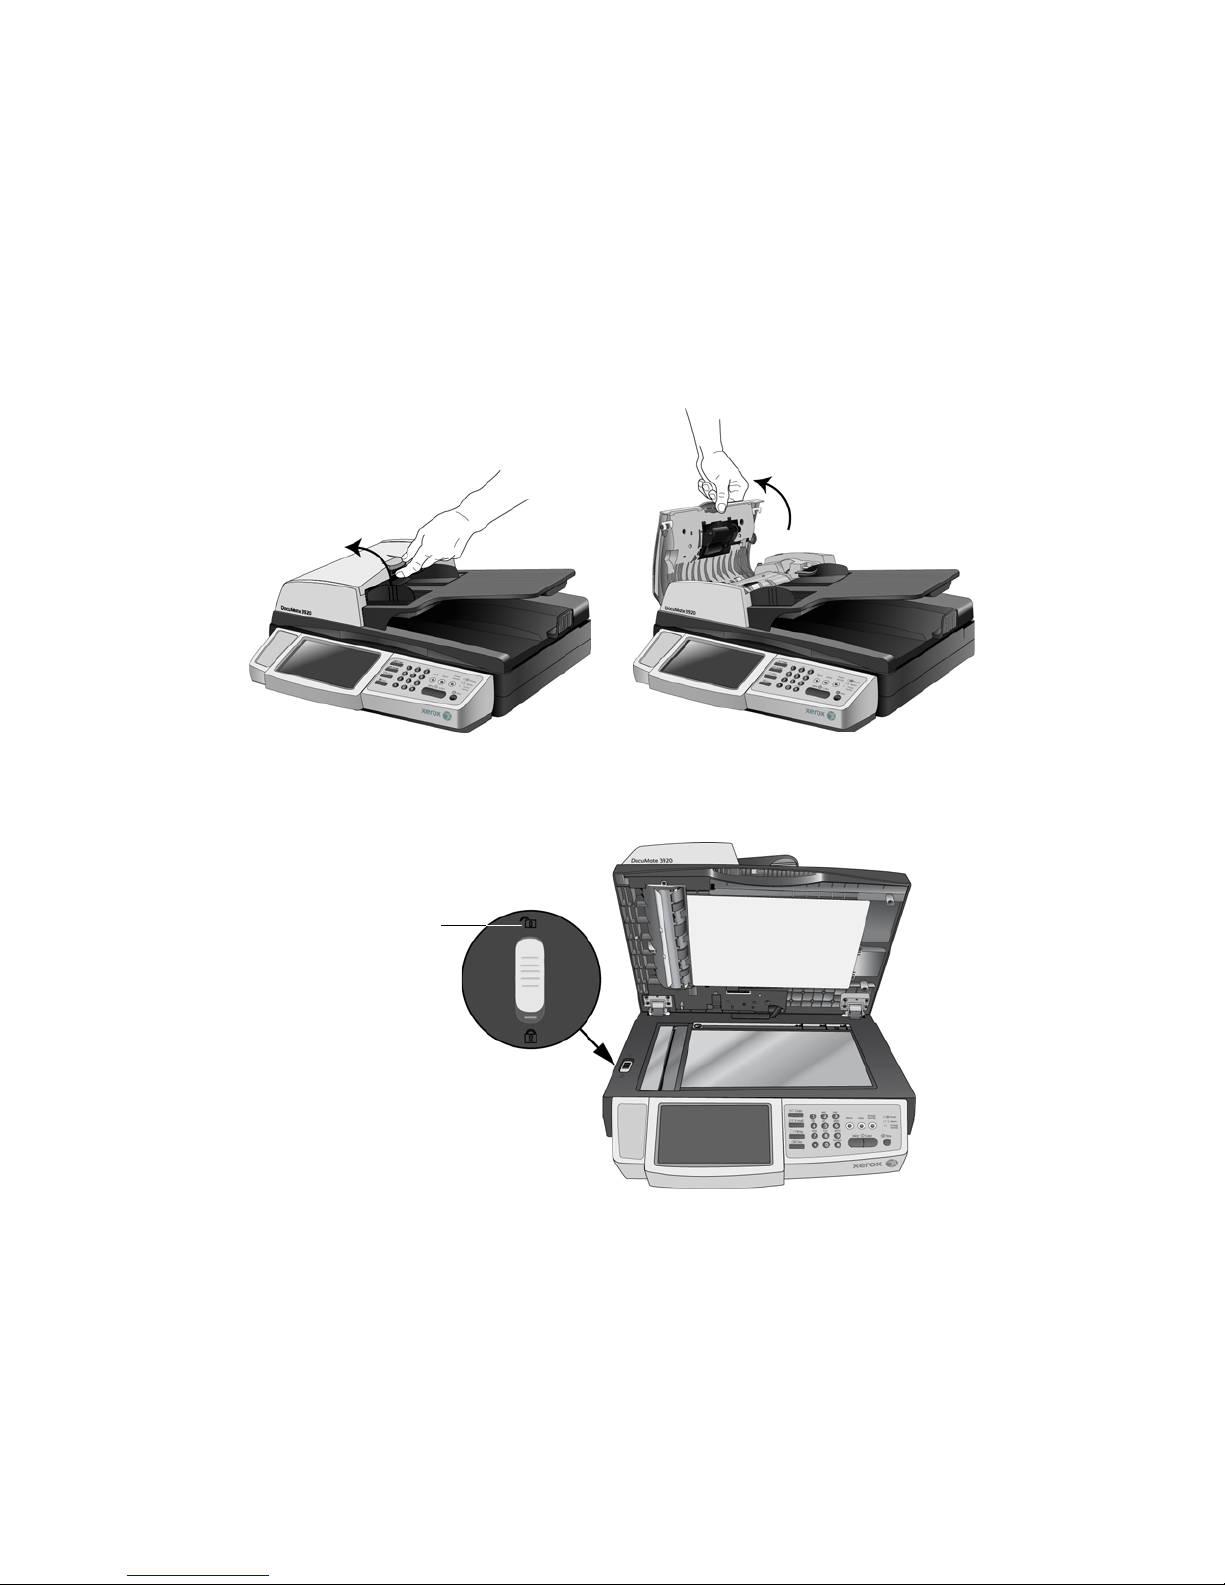
Unpack and Assemble the Scanner
Unlocked position
1. Remove all shipping tape from the top and bottom of the scanner.
2. Open the ADF cover and carefully remove any foam particles that may have gotten inside the
Automatic Document Feeder, then close the cover.
3. Lift the scanner lid and slide the locking tab to its unlocked position. The scanner will not scan
when locked.
14
Xerox DocuMate 3920
User’s Guide
Page 15
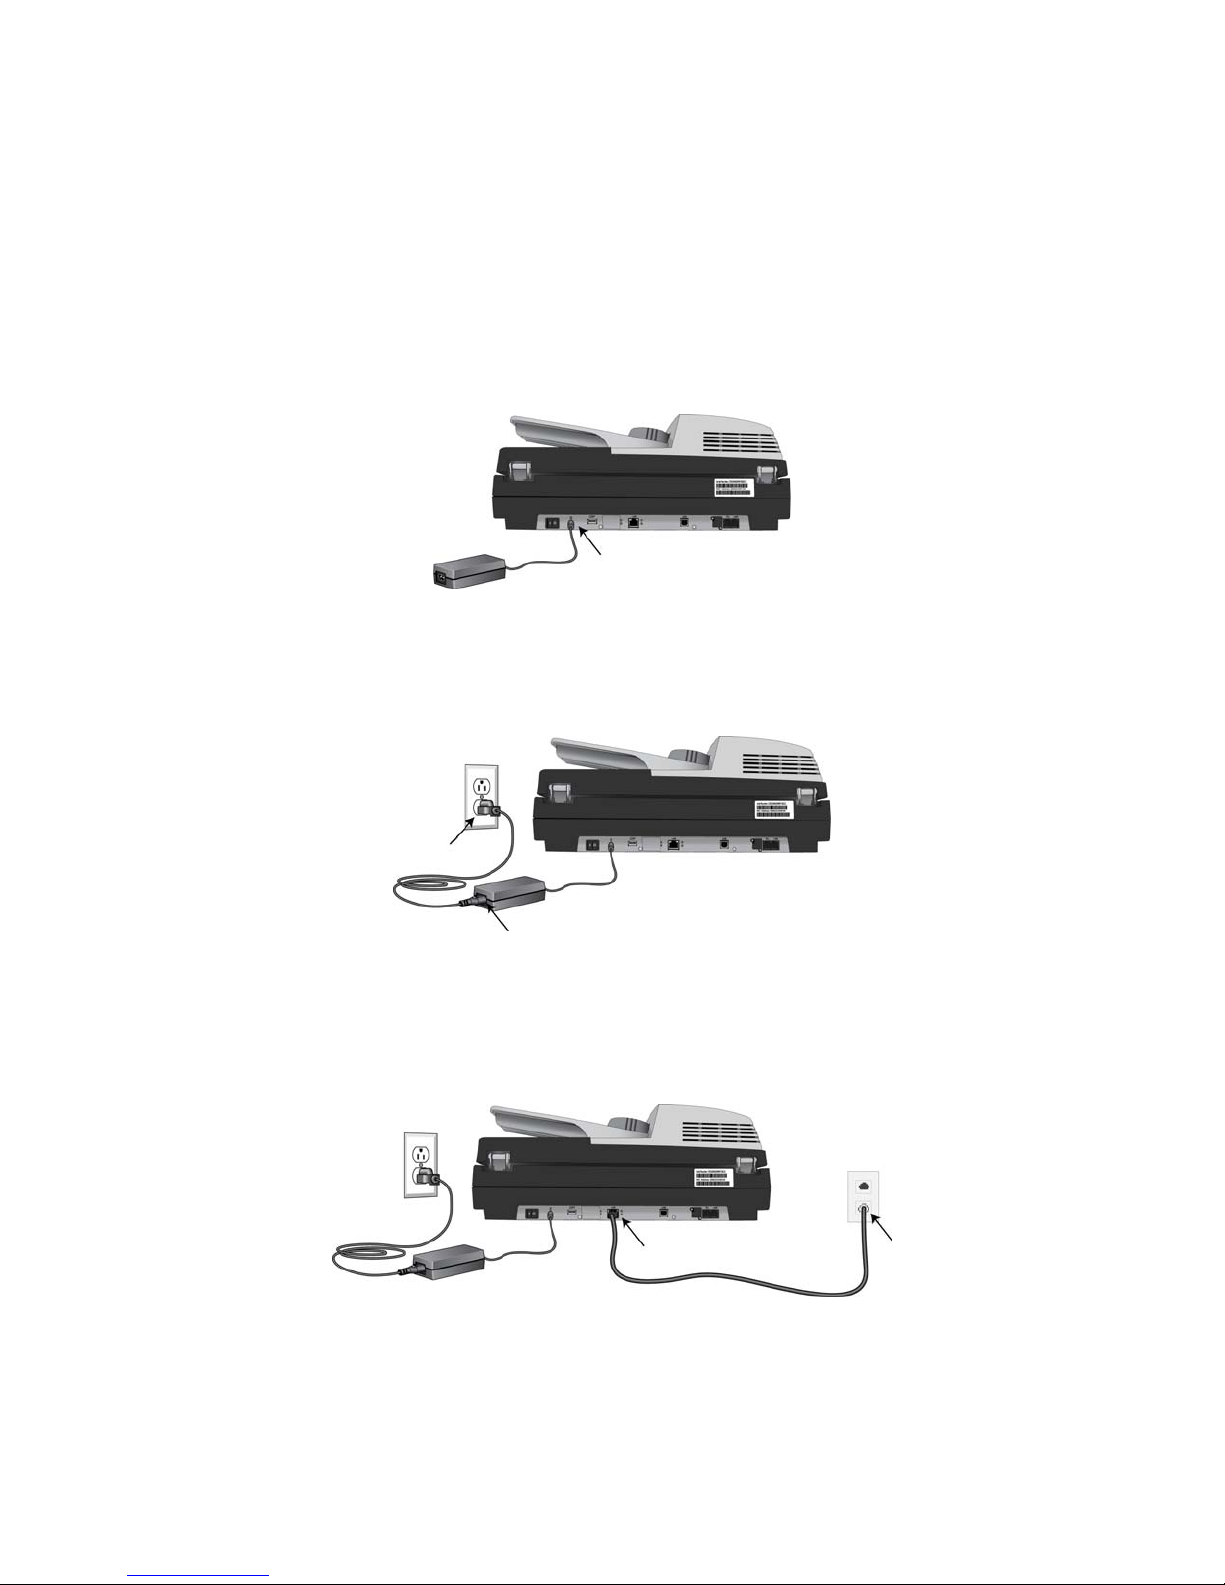
Connecting the Cables
Connecting the Power Cable
1. Press the power switch to the “O” position to turn off the scanner.
2. Plug the power supply into the power jack on the scanner.
NOTE: Only use the power supply (HEG75-S240320-7L made by HiTron) included with your scanner.
Connecting any other type of power supply may damage your scanner, and will void its warranty.
3. Plug the power cord into the power supply and into a wall outlet.
Connecting the Ethernet Cable
1. Connect one end to the LAN port at the back of the scanner.
2. Connect the other end of your Ethernet LAN cable to an available port on your Ethernet Hub or
wall.
Connecting the Telephone Line
1. Plug one end of the telephone line to the LINE jack at the right end of the rear panel.
Xerox DocuMate 3920
User’s Guide
15
Page 16
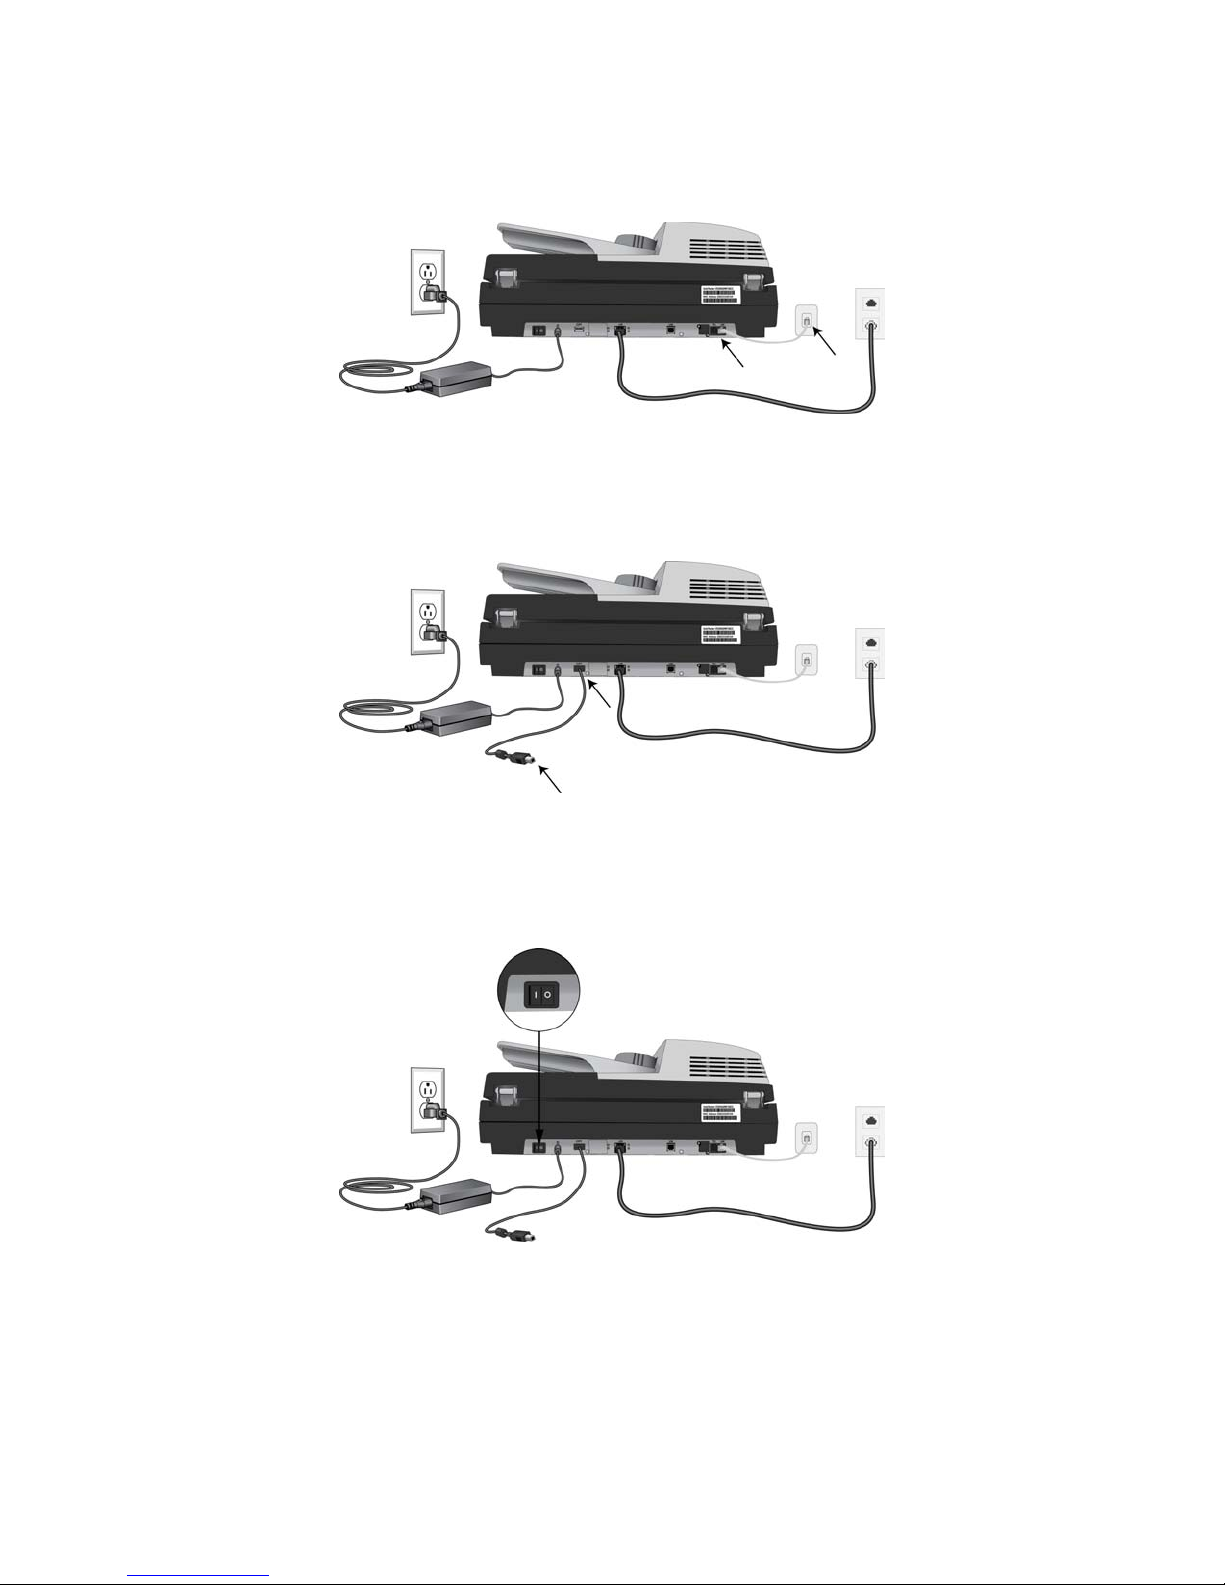
2. Plug the other end of telephone line to the “RJ-11” telephone jack provided by the telephone
company.
Connecting the Printer Cable
1. Connect one end of the printer cable (USB cable) to the printer.
2. Connect the other end to the COPY port at the rear of the scanner.
Turn on th e Po w er
Press the power switch to the “|” position to turn on the scanner. After showing the boot up message,
the LCD screen displays the preset ready status.
16
Xerox DocuMate 3920
User’s Guide
Page 17
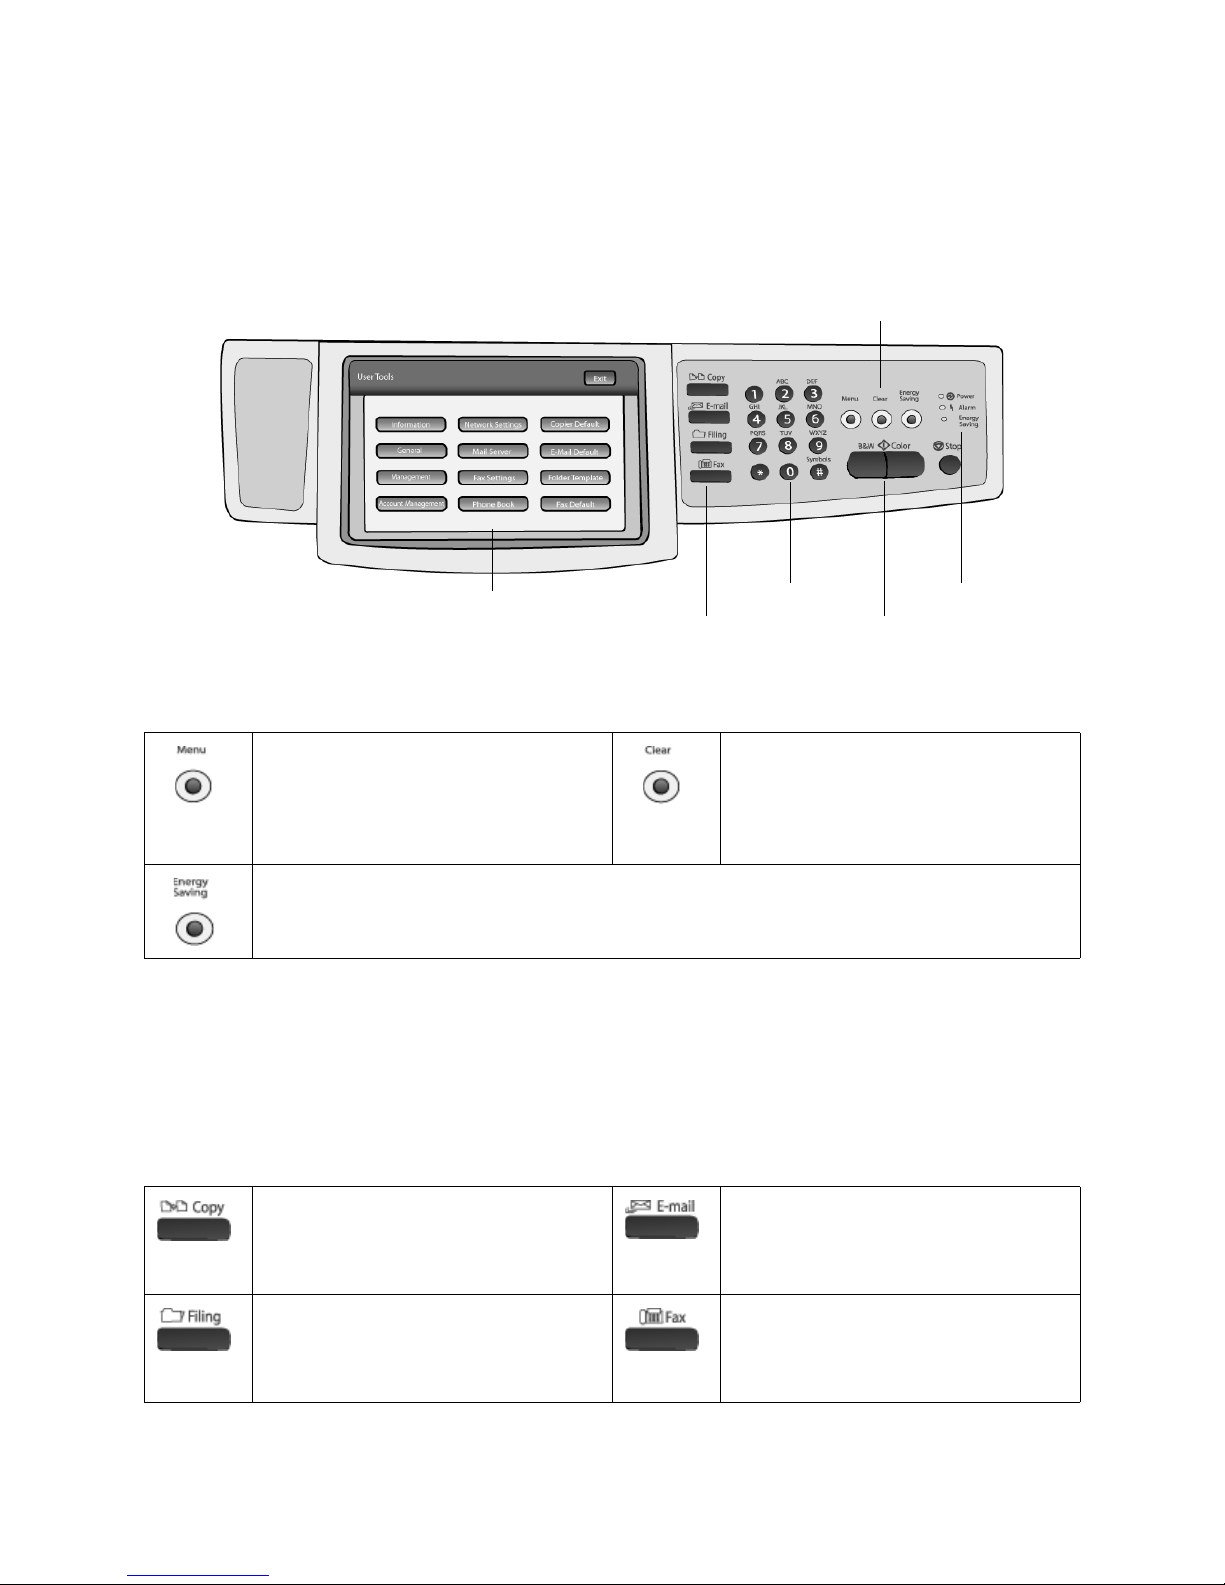
Using the Scanner Control Panel
LCD touch screen
Function keys
Numeric keys
Control keys
Status LEDs
Configure keys
Configure keys—Use these keys to set the scanner options and configure the function keys using the
LCD touch screen.
Menu—Press to access the options to
configure the scanner. Please refer to
Summary of the Menu Options on
page 19.
Energy Saving—Press to enter the power saving mode.
Clear—Press to clear the current function
settings and return the function to the
default settings. Press the button for over
5 seconds to return the scanner to the
factory default settings.
LCD touch screen—Use to view the scanner information, manage the scanner options, set the
function defaults, add phone numbers, set server information for filing, and so on.
Function keys—Press one of the function keys to select that mode for scanning. Pressing a function
key displays that function on the LCD touch screen. Use the touch screen to configure the scan settings
for that function prior to scanning, or leave the default options and press B&W or Color to initiate
scanning.
Copy—Enables the scanning to a printer
function.
You can only scan in Black & White when
copying.
Filing—Enables scanning to a file server,
through the intranet, using FTP, HTTP,
HTTPS, or CIFS.
E-mail—Enables the scanning to email
function. Use the LCD touch screen to
specify the email address(es) to receive
the scanned image.
Fax —Enables the scan and send to a fax
machine function.
You can only scan in Black & White when
fax ing .
Xerox DocuMate 3920
User’s Guide
17
Page 18
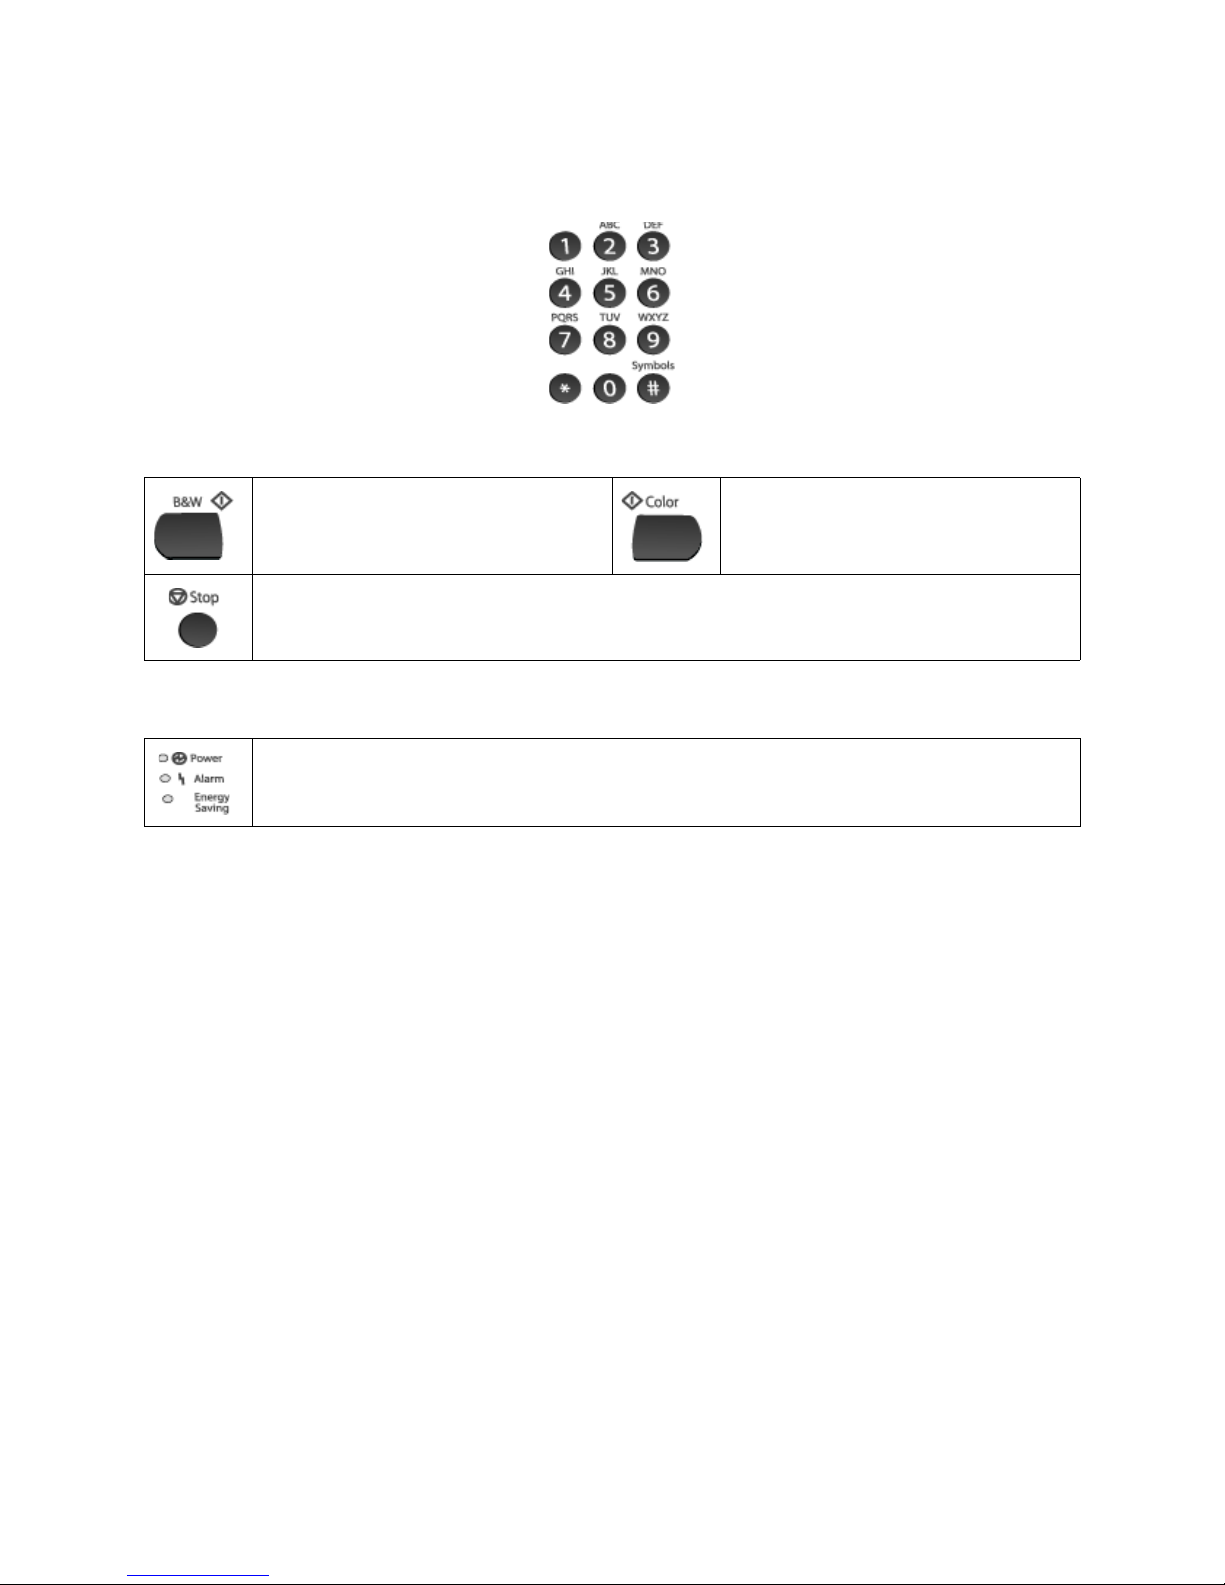
Numeric keypad—Use this keypad to enter destination phone numbers for faxing or set the number
of copies to be printed.
Control keys—Press to start or stop scanning.
B&W—Press to start copying, e-mailing,
filing, or faxing in Black&White mode.
Stop—Press to stop scanning.
Status LEDs—Indicates the hardware status.
Power—Indicates that the power is on and ready for scanning.
Alarm—Indicates hardware and transmission errors.
Energy Saving—Indicates that the scanner is in low-power mode.
Color—Press to start emailing or filing in
Color mode.
18
Xerox DocuMate 3920
User’s Guide
Page 19
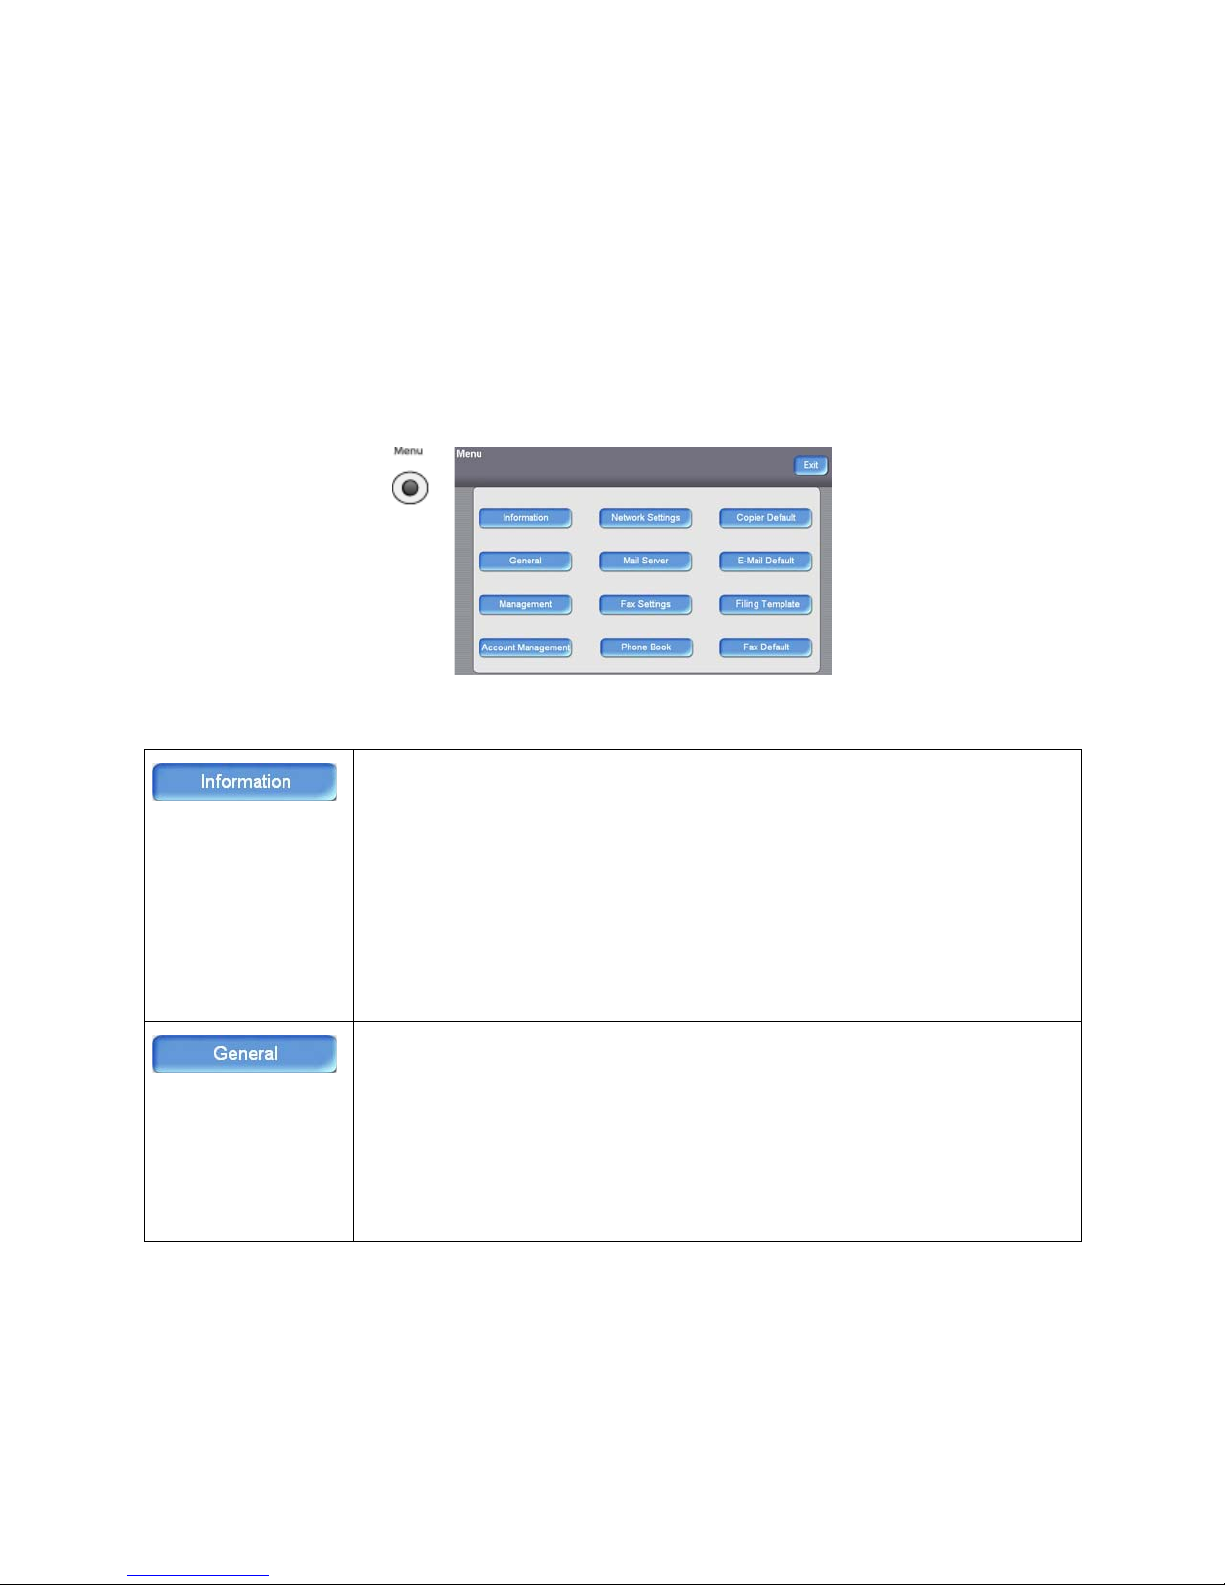
Summary of the Menu Options
This section briefly describes each of the options in the menu. In the following table, it is indicated if
detailed configuration information is available, and which section contains the instructions for
configuring that feature.
Press the Menu button on the scanner to show the Menu options on the LCD screen.
Press this button to display information about the scanner.
• Device Information—This is the scanner hardware information, serial number,
and MAC address. The MAC address is also on a sticker on the back of the
scanner, this MAC address identifies the scanner on the network.
• Firmware Version—This is the current hardware and software version of the
scanner.
• Page Count—Displays the total number of scans completed and a breakdown of
each type.
Menu Map—Touch “Print” to print out all the menu items and their values.
Usage Report—Touch “Print” to print out the counter information.
Press this button to change the general information about the scanner.
• Machine Name—You can change the scanner’s display name so that when you
view all scanners on your network, each one appears in the list with the name
you specify here.
• Country Code—Select the code for the country you live in so that you can send
and receive faxes.
• Time Zone—Select the time zone for the area you live.
• Date/Time—Set the date and time for the scanner.
Xerox DocuMate 3920
User’s Guide
19
Page 20

Press this button to create an administrator account for the scanner, and specify additional scanner defaults.
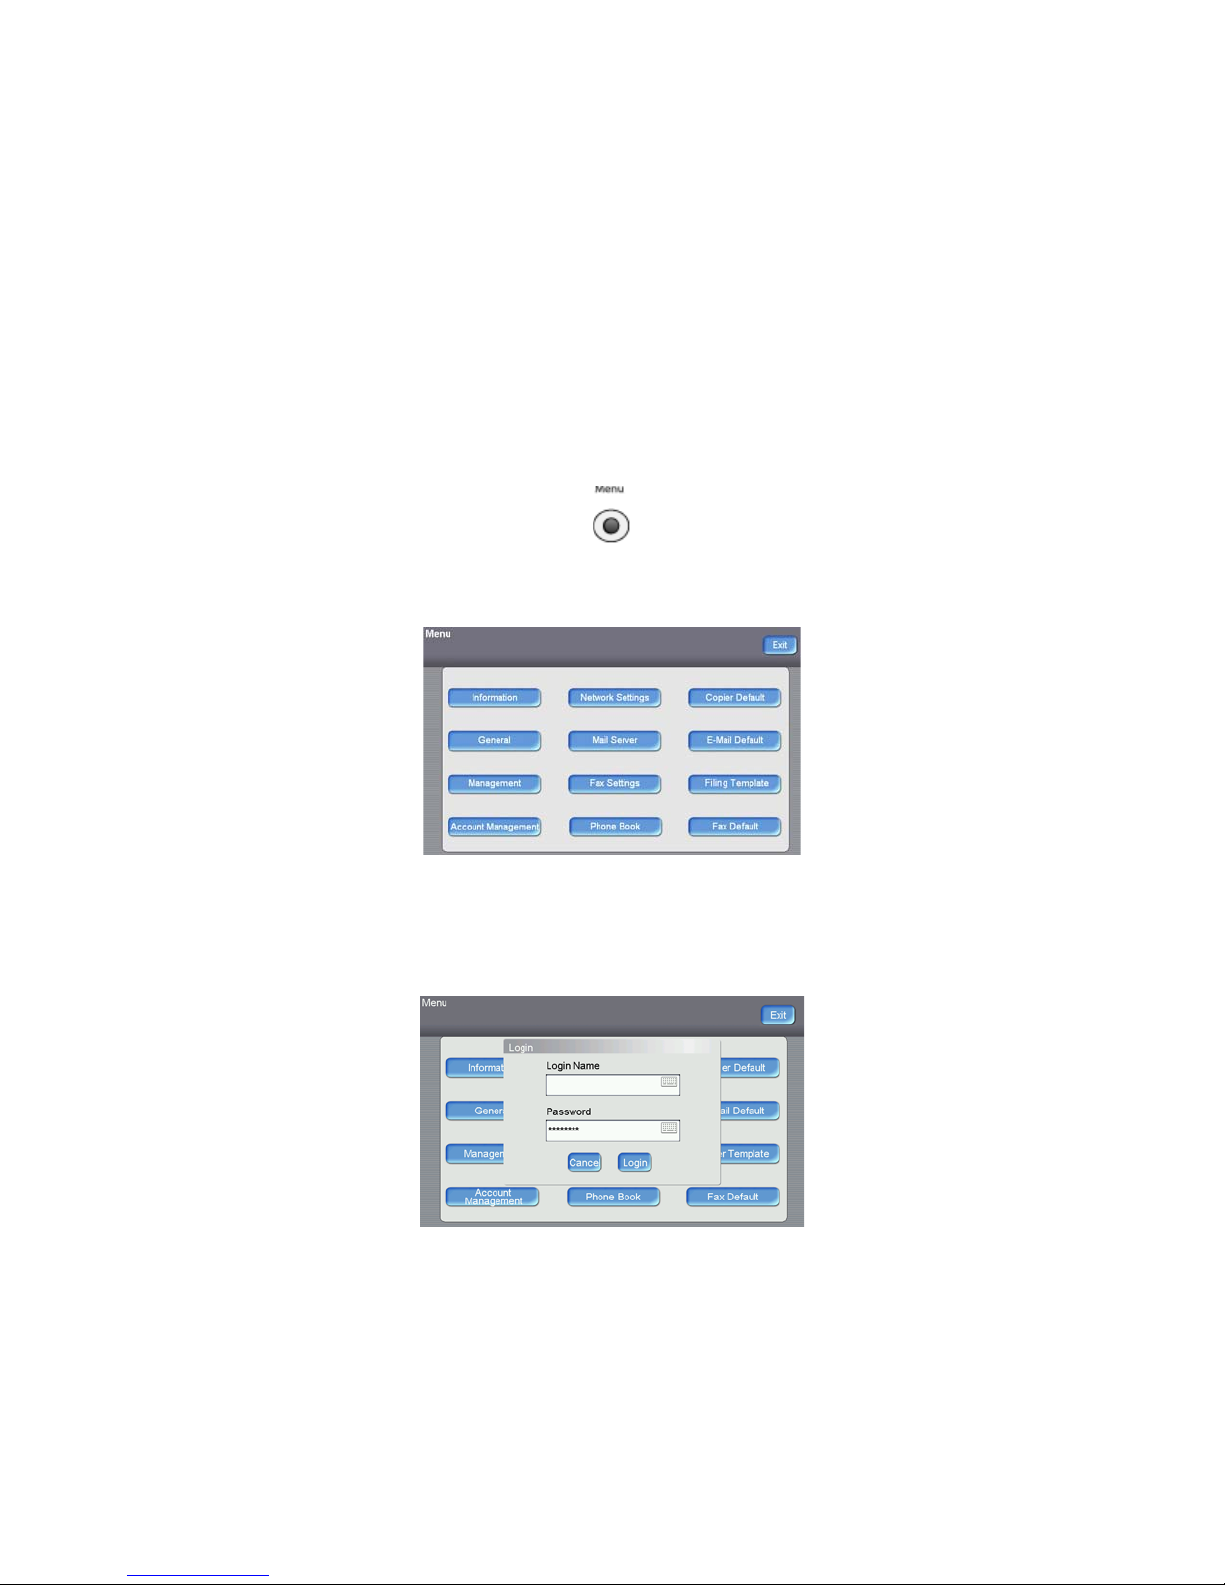
You will be prompted to login when you press the Management button, simply press
“Login” to continue. There is no default administrator password for the scanner.
Administrator Profile tab—press the keyboard icon, next to each field, to open the
LCD panel soft keyboard and fill in each field.
• Login Name—Input a login name for accessing the scanner’s management
options. After inputting a login name, when you press an LCD Menu option and
you are prompted to input a login name, this is the login name you will need to
use. Up to 32 characters are allowed in this field, and the field is case-sensitive.
• Password—Input a password for the login name you specified. Up to 8
characters are allowed in this field, and the field is case-sensitive.
• Email Address—Input an email address for the administrator of the scanner.
When there are errors or warnings, the scanner will send the information to the
email address you specify here. Up to 64 characters are allowed in this field, and
the field is case-sensitive.
Device Management tab—use this tab to manage the following options:
• Add “To” Address After Sending—When this option is enabled, the email
address specified in the “To” field is automatically added to the address book
when scanning is complete.
• Add Folder After Filing—When this option is enabled, the folder name you
specify is added to the server when the scanned document is sent when
scanning is complete.
• Language—Press the down arrow and select a display language, for the LCD-
panel, from the options in the list.
• Default Mode—Press the down arrow and select a default scan mode. Please
refer to
Setting the Default Scan Function on page 29 for detailed
information about this function.
• Energy Saver—When this option is enabled, you can choose how long the
machine will be idle before it automatically enters the energy saving mode. The
default is 15 minutes.
• Energy Saver (Timer)—Press the down arrow to select an option from the list.
• System Auto Reset (Timer)—This is the amount of time before the LCD panel
changes back to the Default Mode. Press the down arrow and select an option
from the list.
20
Xerox DocuMate 3920
User’s Guide
Page 21
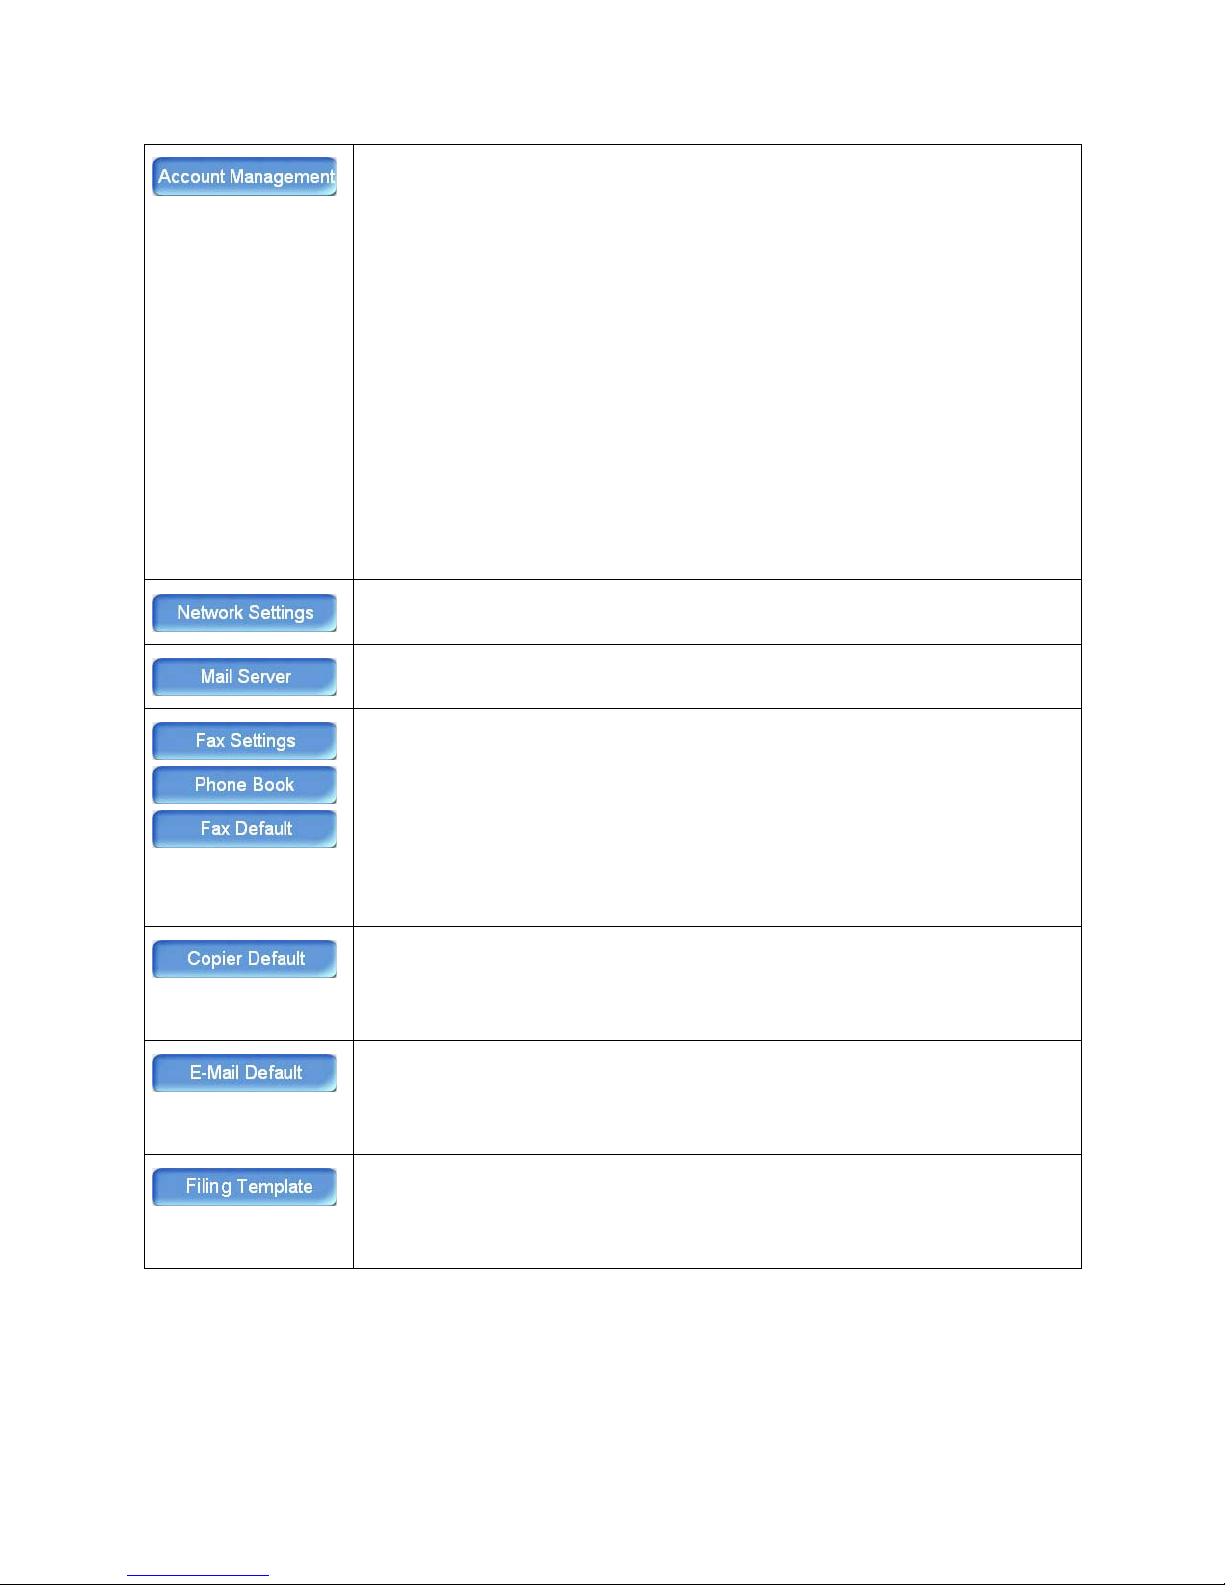
Press this button to select what type of authentication to use for the users accessing
the scanner.
Authentication type—Select the authentication type for account management.
• None—No user authentication is used when scanning. The credentials you input
when configuring the Mail Server and Filing Template are used when scanning.
• Local—The scanner is the authentication type, and the user and password
entered in the Account management are saved in the scanner memory.
Note that you can only create user accounts, and specify user privileges, using
the imbedded web page. Access the web page through the Network
Management tool or from Internet Explorer or Firefox by typing the scanner’s IP
address in the web address field.
• HTTP / LDAP / SMTP—Select one of these options to have the user input their
server credentials to use the scanner settings.
Server Information, IP, or URL—Input the server IP address or URL address of the
authentication server you selected. Touch anywhere in the URL or IP field to bring up
the soft keyboard on the LCD screen to enter the needed text.
Port #—Input the port number for the HTTP, LDAP, or SMTP server you selected.
Please refer to
adding your scanner to the network.
Please refer to
configuring scan to E-mail.
Please refer to the section
for these options.
• Fax Settings—Select this option to setup your scanner to send and receive
fax es.
• Phone Book—Select this option to create and add phone numbers to a phone
book for sending the faxes.
• Fax Defa ult—Select this option to specify the default scan settings when
sending faxes.
Please refer to the section
for these options.
• Copier Default—Select this option to specify the default scan settings when
scanning to a printer.
Please refer to the section
for these options.
• E-Mail Default—Select this option to specify the default scan settings when
scanning and sending to an Email message.
Please refer to the section
these options.
• Filing Template—Select this option to specify the default server to send the
scanned file to, and specify the default scan settings when sending the file.
Adding the Scanner to the Network on page 23 for instructions for
Adding the Email Server Information on page 26 for instructions on
Faxing on page 69 for detailed configuration instructions
Copying on page 35 for detailed configuration instructions
E-mail on page 45 for detailed configuration instructions
Filing on page 57 for detailed configuration instructions for
Xerox DocuMate 3920
User’s Guide
21
Page 22

Using the LCD Soft Keyboard
The blank field Soft keyboard icon
Use the soft keyboard when you need to enter text into a field on the LCD screen. A soft keyboard icon
next to a blank field indicates that you can access the keyboard to input text specific to the field. When
entering numbers you can use the numeric keypad on the scanner or the soft keyboard.
1. Whenever there is a soft keyboard icon shown in a blank field, touch anywhere in the blank field to
open the soft keyboard.
The soft keyboard is displayed on the LCD touch screen.
2. Press the KB Switch button to cycle through the keyboards 3 views (lower-case letters with
common symbols, upper-case letters with common symbols, and number keypad with additional
symbols).
Backspace—press this key to remove any characters you have entered.
Enter—press this key to change the cursor position to the next line.
Return—saves the information you entered and closes the soft keyboard.
22
Xerox DocuMate 3920
User’s Guide
Page 23
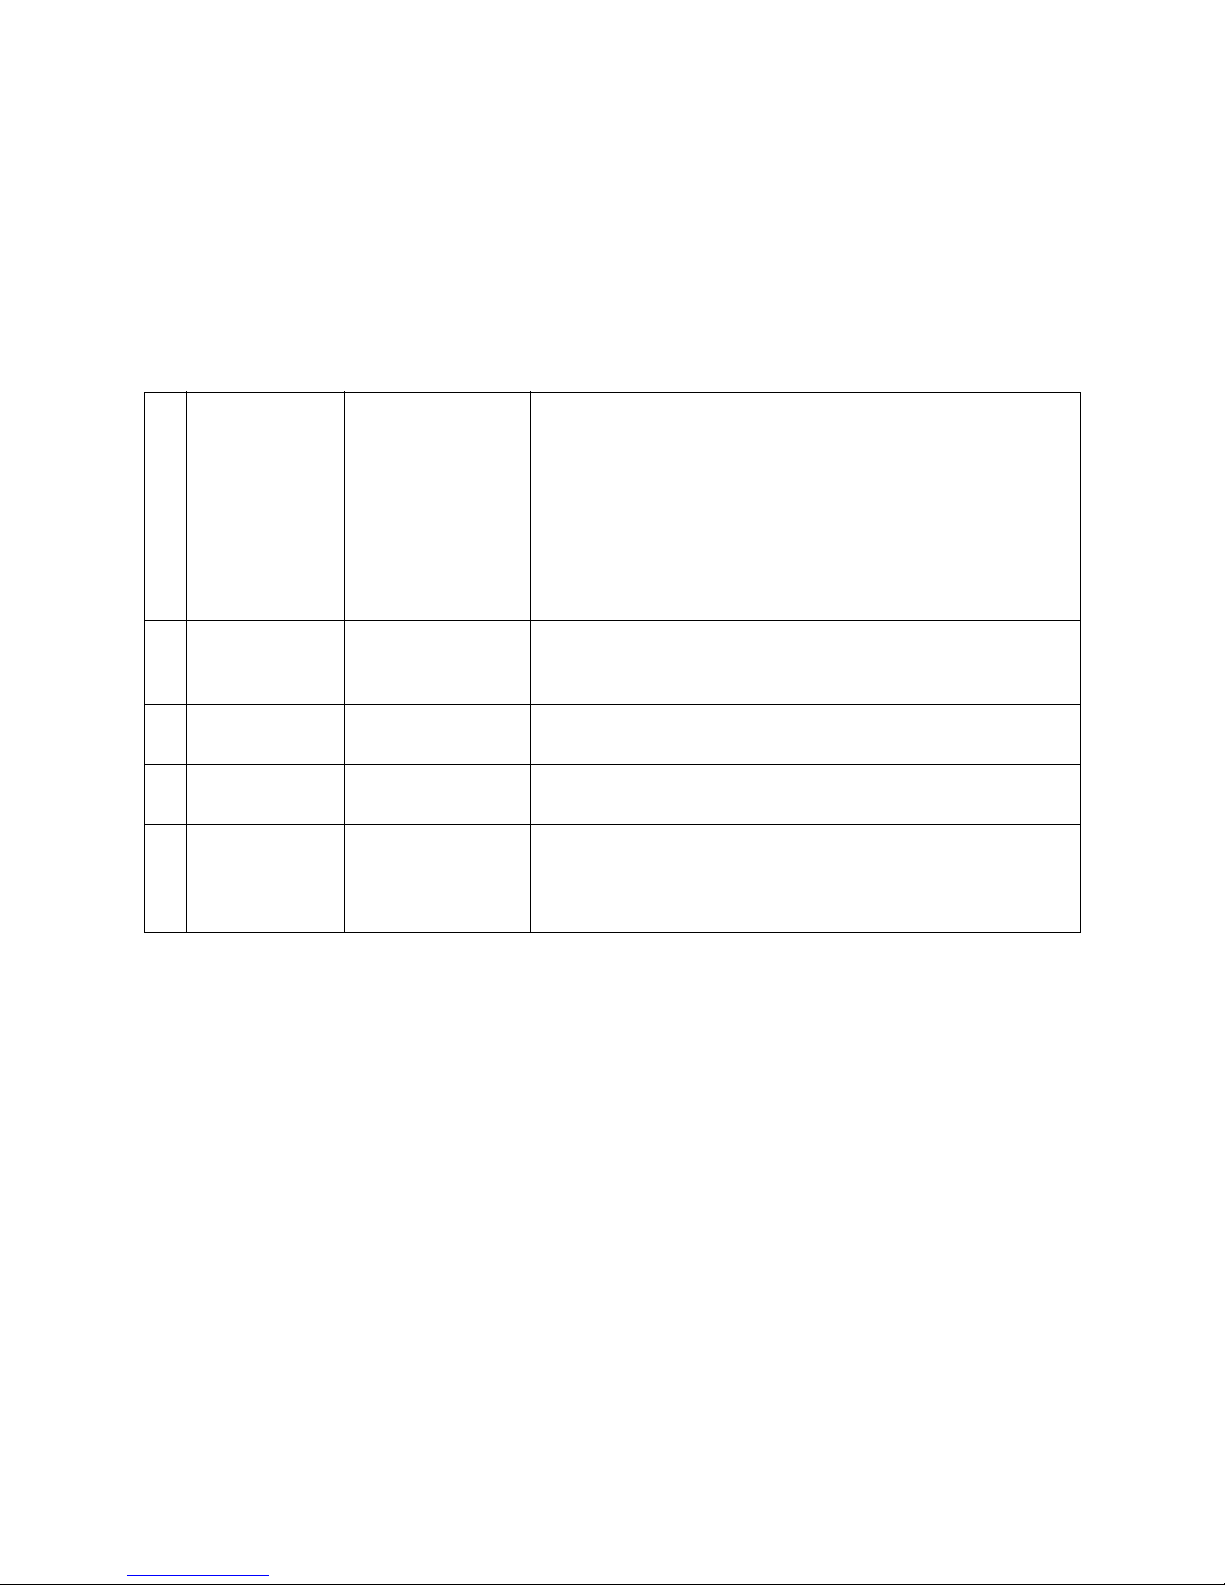
Adding the Scanner to the Network
You will need the following information to configure the scanner on the network, please contact your
network administrator for this information. You may want to print this page, fill in the table, and keep it
for a reference as you will need this to proceed with the rest of the instructions in this section.
1 DHCP Enable: Choose ON to
obtain the IP / Subnet / Gateway
addresses automatically from the DHCP
server.
2 IP Address:
3 Subnet Mask: 888 . 888 . 888 .
4 Gateway IP: 888 . 888 . 888 .
5 DNS Server:
888 . 888 . 888 .
888
888
888
888 . 888 . 888 .
888
With DHCP (Dynamic Host Configuration Protocol), a host is
automatically given a unique IP address each time it connects
to a network. Only turn on this option if a DHCP server is available on your network.
The IP/Subnet/Gateway address fields will automatically fill
after power cycling the scanner. Note that each time you powercycle the scanner, a new IP address may be assigned to the
scanner.
This option is turned off by default.
An IP (Internet Protocol) address uniquely identifies a host connection to an IP network. If you manually input an IP address in
this field, it does not change when the scanner is power-cycled.
The subnet mask address assigned by your network administrator or by the DHCP server.
The gateway IP address assigned by your network administrator
or by the DHCP server.
The DNS (Domain Name System) server identifies hosts via
names instead of IP addresses. If the DNS server is available on
your network, you can enter the domain name instead of numbers for the IP address.
Please note that the section Adding the Email Server Information on page 26 also contains a table of
data required for setting the scanner to send email messages. You will need to get the information
listed in that table from your network administrator as well.
Xerox DocuMate 3920
User’s Guide
23
Page 24

1. Press the Menu button on the scanner.
The LCD touch screen displays the following menu.
2. Press the Network Settings button on the LCD touch screen.
3. In the Network Settings menu, either input your network parameters in each field, or press ON
under “DHCP Enable”.
To fill in the fields manually, press the keyboard icon next to each input field. This displays the
soft-keyboard for you to enter the information.
If you turned on DHCP, an IP address will automatically be assigned when you power cycle the
scanner.
4. Press OK when you are finished. Power cycle the scanner when the LCD screen displays the
message “Reboot the machine.”
When the scanner is on again, you will be able to access the network from the scanner, and you will be
able to configure the scanner remotely from a computer on the network.
24
Xerox DocuMate 3920
User’s Guide
Page 25
Networking Error Messages
Message Action
The connection has failed.
Please check network settings.
The address is invalid.
Please check network settings.
Network is down.
Please check network settings.
Network is unreachable.
Please check network settings.
Connection aborted by the server.
Please check network settings.
Connection reset by the server.
Please check network setting.
Connection timed out.
Please check network setting.
Unable to reach the destination host.
Please check network settings.
Failed to connect mail server.
Please check network environment.
Connection error.
Please check network environment.
Ping the IP address of the scanner from another PC in a
DOS prompt. For example, type “Ping 10.1.20.144” in a DOS
prompt. If the scanner has no response, then perform the
following steps.
1. Check if the RJ-45 connector is firmly plugged-in.
2. Check the Ethernet cable.
3. Check the scanner’s IP address.
4. Check the destination IP address.
5. Check Subnet Mask.
6. Check Gateway IP.
Check network environment.
Failed to create socket for DHCP Check IP address of DHCP server or contact your network
Failed to search DHCP server.
Failed to get IP from DHCP server.
Failed to renew IP from DHCP server.
administrator for further help.
Xerox DocuMate 3920
User’s Guide
25
Page 26
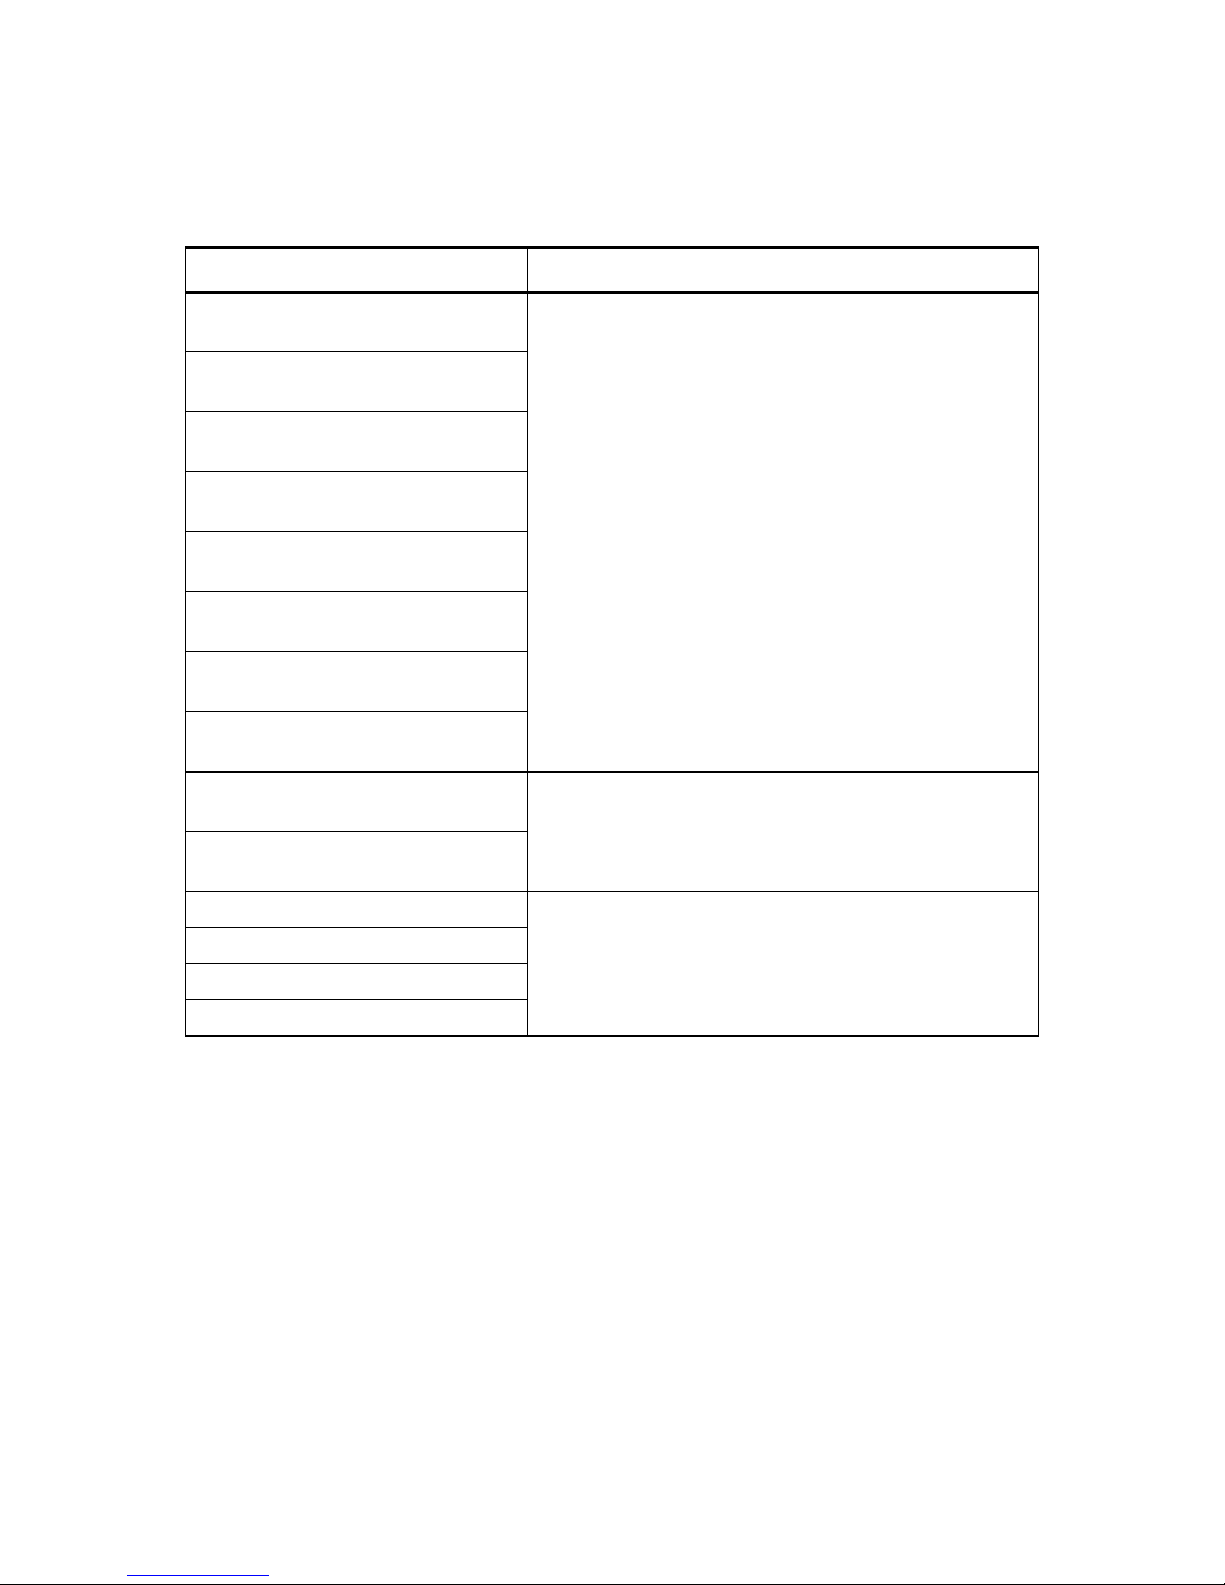
Adding the Email Server Information
You will need the following information to configure the scanner to send emails, please contact your
network administrator for this information. You may want to print this page, fill in the table, and keep it
for a reference as you will need this to proceed with the rest of the instructions in this section.
1 E-mail Address: Note that this will be the default “From” address when sending
2 E-mail Password:
emails from the device. A dedicated email address for the scanner that has permission to send emails through the server, and
the password for that email address.
3 SMTP Server:
888 . 888 . 888 .
888
4 SMTP Port: The port number of your SMTP mail server.
5 Authentication
Method:
6 Login Name: After selecting either the SMTP or POP3 authentication method,
7 Password:
8 POP3 Server:
9 POP3 Port: The port number of your POP3 server.
10 LDAP Server:
11 LDAP Port: The port number of your LDAP server.
12 Login Name: Input the login name and password to access the LDAP server.
SMTP or POP3
888 . 888 . 888 .
888
888 . 888 . 888 .
888
SMTP (Simple Mail Transfer Protocol) is the mail server information you need to send emails from the scanner. This is the main
communication protocol used to send and receive emails on the
internet. Input the IP address of the server or the URL name.
You will have to select SMTP or POP3 as the authentication
method for sending emails, and input the login credentials.
you will need to input the login-name and password for the
selected authentication method.
POP3 (Post Office Protocol 3) is a service that stores and sends
emails for various machines that are not always connected to
the internet. Emails are held in POP3 until you log on. You only
need this information if you select POP3 as the authentication
method. Input the IP address of the server or the URL name.
LDAP (Lightweight Directory Access Protocol) enables users to
access directories and address books directly from external networked devices to simplify document distribution.
13 Password:
14 Base DN: Input the Base DN (Distinguished Name) for the LDAP server.
26
Xerox DocuMate 3920
User’s Guide
Page 27
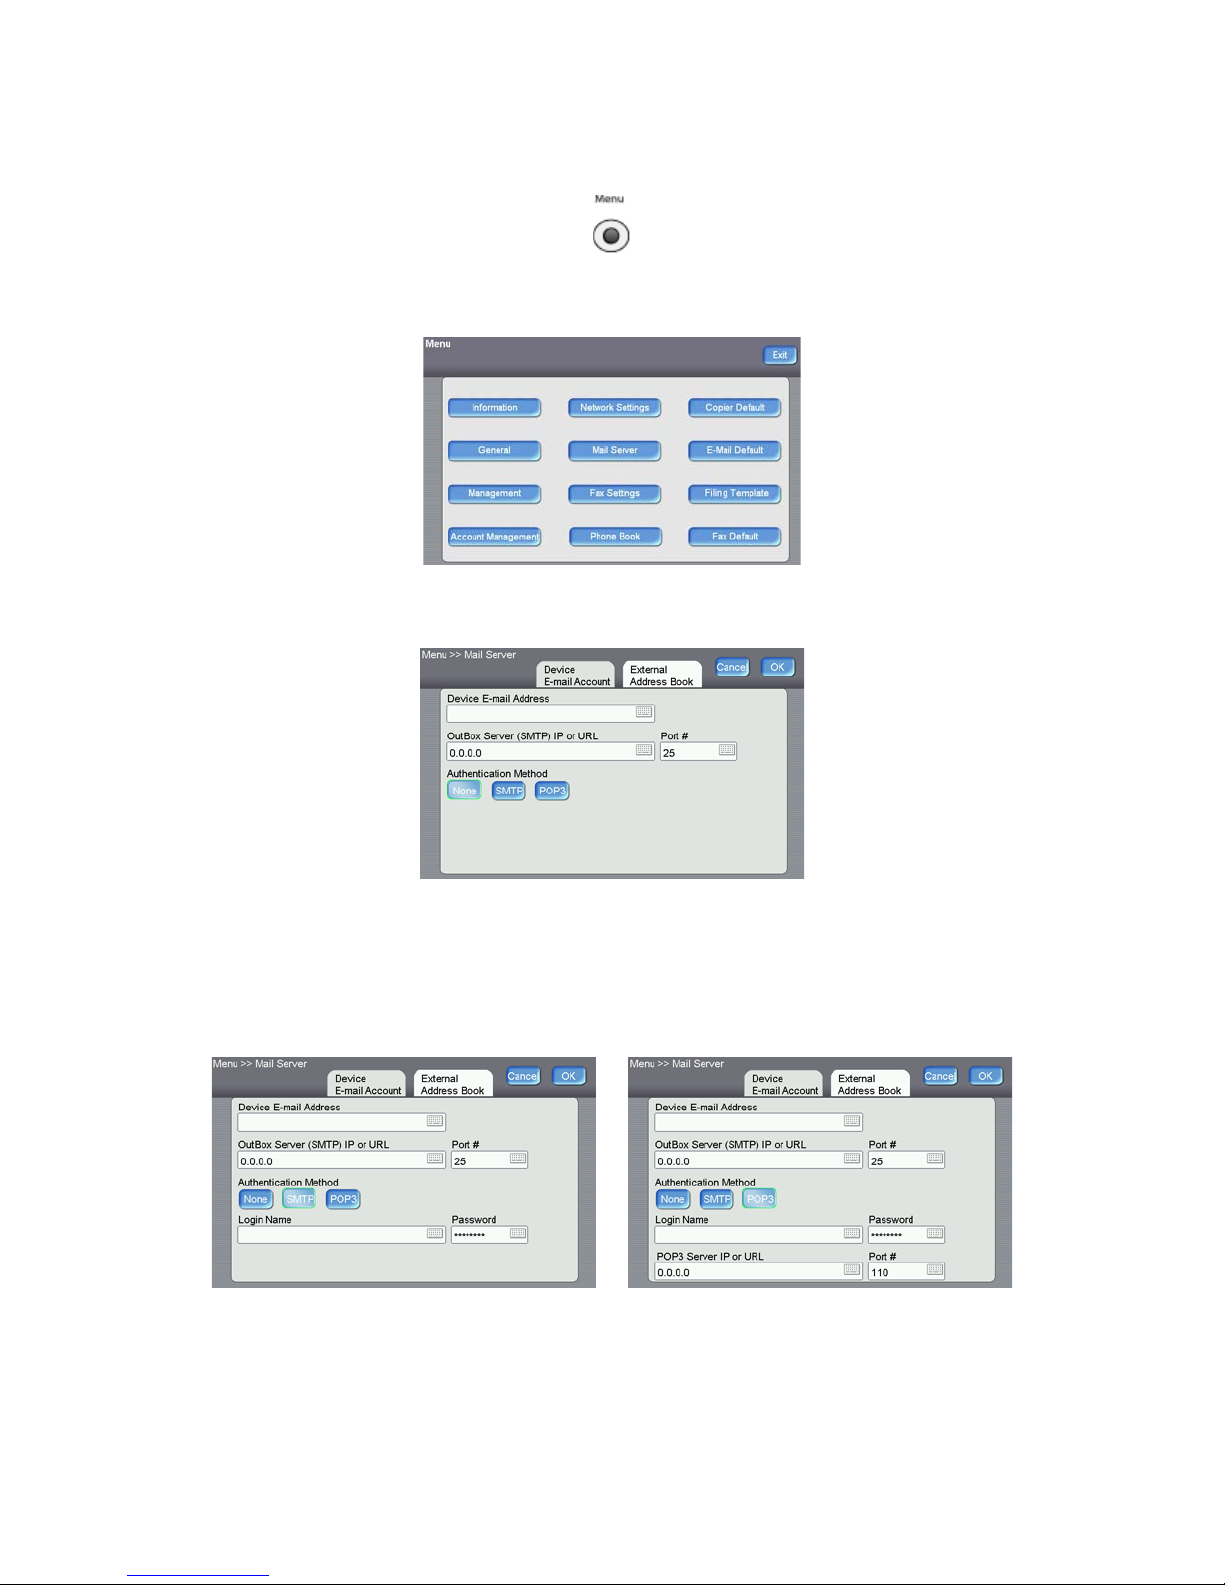
1. Press the Menu button on the scanner.
SMTP Authentication POP3 Authentication
The LCD touch screen displays the following menu.
2. Press the Mail Server button on the LCD touch screen.
3. Fill in each field with the appropriate information on the Device E-mail Account tab.
Select SMTP or POP3 as the authentication method for the SMTP server, and fill in the
appropriate information for that authentication.
Xerox DocuMate 3920
User’s Guide
27
Page 28
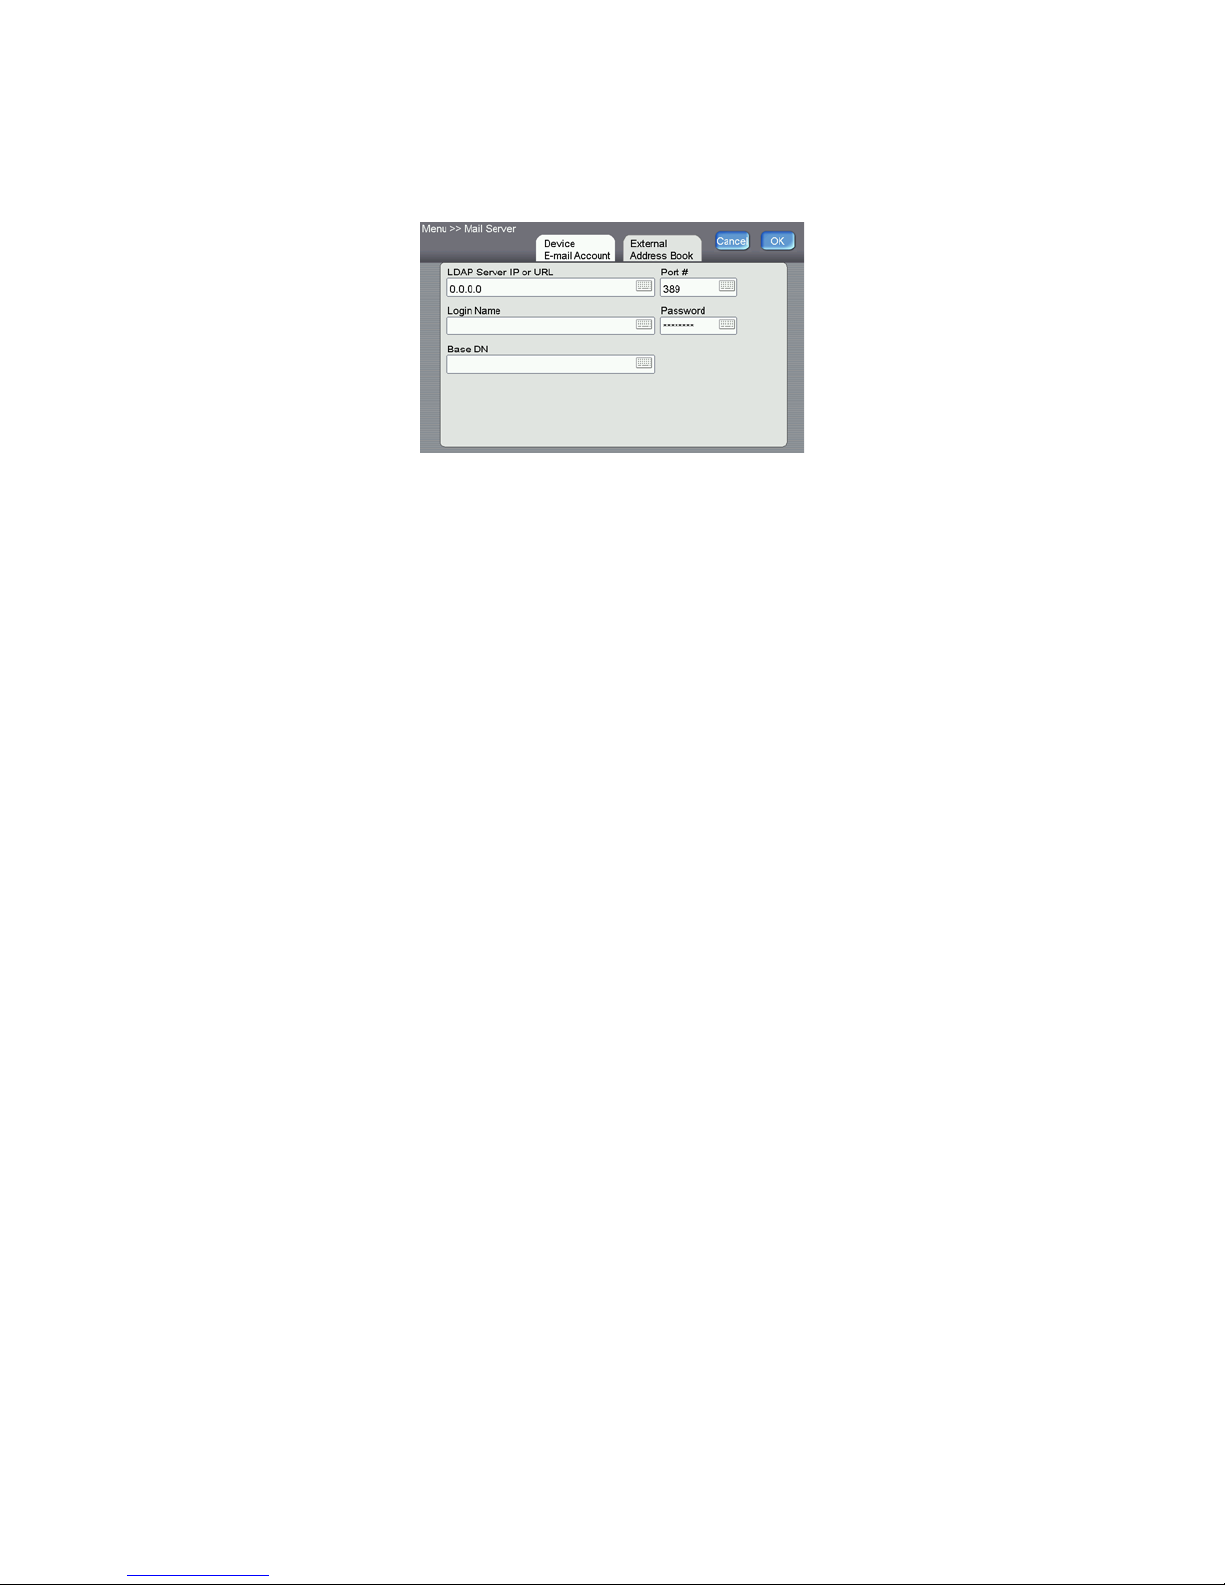
4. If you want to access an LDAP server address book, press the External Address Book tab to fill in
the information about your network LDAP server.
• The login name and password are case-sensitive and can be up to 28 characters.
• LDAP search specifications:
The scanner supports two types of authentication, simple and anonymous login to the LDAP
server. If your LDAP server supports anonymous login, and you want to use anonymous login,
do not input “anonymous” as the user name and password, leave the fields blank instead.
The scanner will display a maximum of 100 match results in a single search.
5. Press OK when you are done configuring the E-mail options.
28
Xerox DocuMate 3920
User’s Guide
Page 29
Setting the Default Scan Function
The initial default scanning function is e-mail. This means that each time the scanner is power cycled,
when the scanner comes out of power saving mode, or when the scanner has been sitting idle without
scanning, the LCD screen will switch back to the e-mail scanning function automatically. You might
want to change the default scan mode if you are not using the email function, or if you use a different
scanning function more often than email.
1. Press the Menu button on the scanner.
The LCD touch screen displays the following menu.
2. Press the Management button on the LCD touch screen.
3. Press Login on the password prompt screen. There is no default username and password set for
the scanner management options.
Xerox DocuMate 3920
User’s Guide
29
Page 30
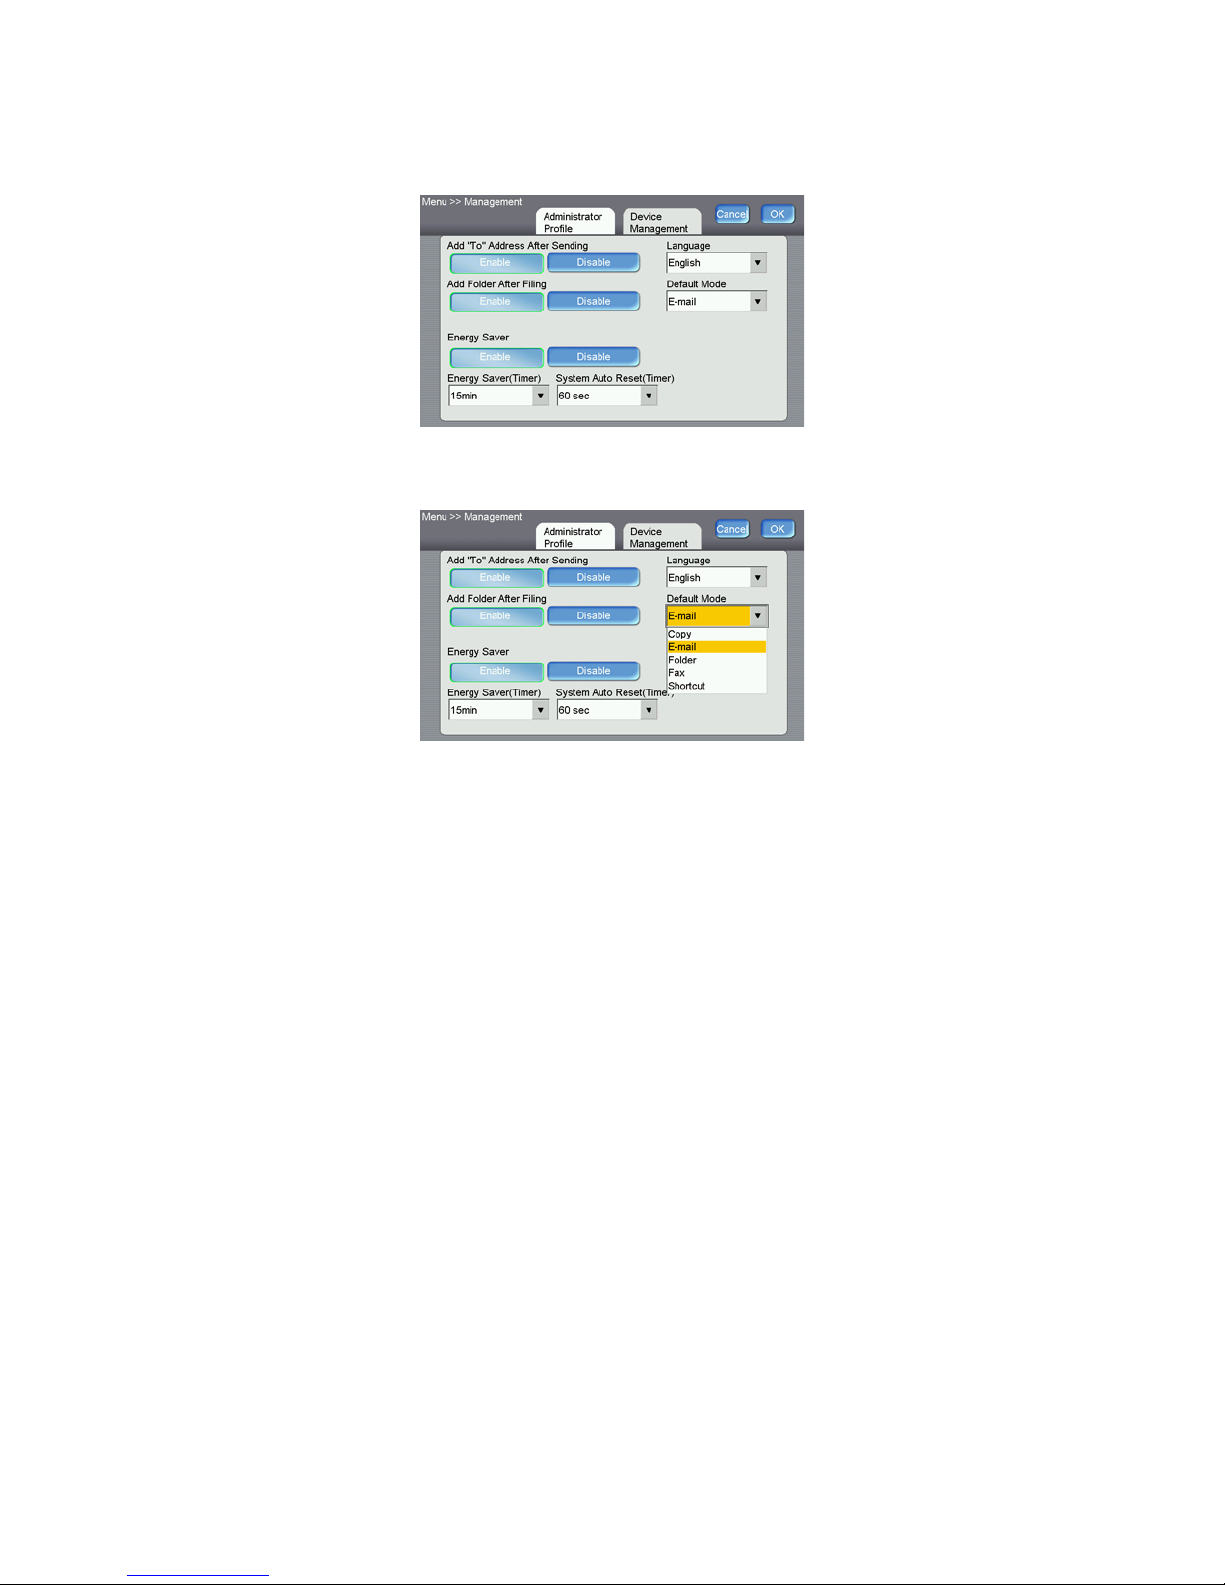
4. Press the Device Management tab.
5. Press the down arrow in the Default Mode field to show the options list.
6. Press one of the function names in the list to select that option as the default scan mode.
If you select the Shortcut option, the scanner LCD will display 6 shortcut buttons. These buttons
are configured using the scanner’s embedded webpage. Note that the other scanning mode
defaults can be configured using the scanner LCD options or through the embedded web page.
7. Press OK to save the changes and return to the LCD menu options.
8. Press Exit to close the Menu screen.
9. Power cycle the scanner to save the changes. When the scanner is back on, the default mode will
now be the option you selected in the Device Management screen.
30
Xerox DocuMate 3920
User’s Guide
Page 31

Loading Documents to
2
Scan
This chapter includes:
• Scanning from the Automatic Document Feeder (ADF) on page 32
• Scanning from the Flatbed Glass on page 34
NOTE: Always remove any staples or paper clips from documents before inserting them into the
scanner. Staples and paper clips can jam the feed mechanism and scratch the internal
components. Also remove any labels, stickers, or Post-It™ notes that may come off during the
scanning process and get stuck in the scanner. Misuse as described here will void your scanner’s
warranty.
Xerox DocuMate 3920
User’s Guide
31
Page 32

Scanning from the Automatic Document Feeder
(ADF)
1. Prepare the pages before loading them into the scanner, this helps to prevent multiple-page
feeding and paper jams.
• If the edges of the paper are curled or folded, flatten them as much as possible.
• Fan the edges of the paper to make sure none of the pages are stuck together.
2. Adjust the paper guides for the width of the paper being scanned.
3. Adjust the Paper Stop at the back of the scanner for the length of the paper.
32
Xerox DocuMate 3920
User’s Guide
Page 33

4. Load the stack of documents face up, with their tops into the Automatic Document Feeder.
-
Xerox DocuMate 3920
User’s Guide
33
Page 34

Scanning from the Flatbed Glass
You can scan small paper, plastic cards, books, and other items that can not be scanned through the
Automatic Document Feeder.
1. Remove any paper in the Automatic Document Feeder.
The scanner automatically detects if paper is in the Automatic Document Feeder and will scan
pages in it. You must remove these pages prior to scanning if you want to scan from the Flatbed.
2. Lift the scanner cover and place an item face down on the glass.
3. Align the item with the arrow on the reference frame then close the cover.
34
Xerox DocuMate 3920
User’s Guide
Page 35

Copying
This chapter includes:
• Scanning to a Printer on page 36
• Scan Options for Copying on page 37
• Setting the Default Copy Options on page 41
• Information Messages When Copying on page 42
• Copy Specifications on page 43
To use the Copy function, you need to connect the scanner to a USB InkJet or Laser printer that
supports PCL.
Make sure the printer is connected and turned on before turning on the scanner. The scanner will
detect a printer during the power-up cycle only.
3
Xerox DocuMate 3920
User’s Guide
35
Page 36

Scanning to a Printer
1. Place your document face up in the ADF or face down on the flatbed glass.
2. Press the Copy button on the scanner.
3. The LCD touch screen displays the copying options.
4. Select the options you want to use for the documents you are scanning on the Basic, Image Edit,
and Advanced Copy tabs.
Note that any settings you change here are not permanently saved. The next time the copy
function is used, the default copy options will be displayed in the LCD screen.
The next section describes each feature in detail.
5. Use the numeric keypad on the scanner to set the number of copies you want printed.
6. Press the B&W or Color button on the scanner to start scanning.
The scanner starts scanning and sends the image to the attached printer.
36
Xerox DocuMate 3920
User’s Guide
Page 37

Scan Options for Copying
Basic Settings
Option Description
Reduce/Enlarge
(A default value cannot
be assigned)
Paper Tray
(A default value cannot
be assigned)
Paper Size Select the size of the paper you are scanning from the list.
Image Density The image density can be adjusted within a range of 7 levels using the control panel.
Select the scaling percentage by touching the Switch button. Change this setting only
if the items you are scanning will not fit on the pages that are in the printer.
Choices are:
• 100% (there is no scaling)
• 25% / 50% / 78% (Legal -> Letter) / 127% (Letter -> Legal) / 200%
• Fit to Page (selecting this option decreases the size to about 93% of the
original)
•Variable
Variable means selecting your scaling percentage in a one percent increment
from 25%~400% using the Up-arrow and Down-arrow keys.
Sets which paper tray, in the printer, will be used for the current scan job.
Choices are:
• Auto (Selects the paper tray automatically)
• MP (Multi-purpose tray)
Choices are:
• A4 / Letter / A5 / B5 / Legal
Note that Legal size is available only when scanning from the ADF.
Increasing the value makes the printouts darker, decreasing the value makes the
printouts lighter. Press the left or right arrows to adjust the level.
Copy Mode Choose the focus of your copy result.
• Speed—this is the default option and is a blend of the other two options in
regards to speed and image clarity.
• Te x t—choose this option if you are making copies of text documents. This
option prints the fastest of these options.
• Photo—choose this option if your document contains pictures for clearer
graphic quality. This option prints slower than the others.
Xerox DocuMate 3920
User’s Guide
37
Page 38

Image Edit Settings
Option Description
Erase Border Sets the width of the border you want removed from the image.
Choices are:
•0 / 0.25 / 0.5 / 0.75 / 1.0 inches
or
•0 / 6 / 13 / 19 / 25 mm
Margin Adjustment The “Margin Adjustment” option will move the copy image to the right and/or to the
bottom; depending on the “Right” and “Bottom” parameters.
Choices are:
•0 / 0.25 / 0.5 / 0.75 / 1.0 inches
or
•0 / 6 / 13 / 19 / 25 mm
Unit Choose the unit of measurement you want to use.
Choices are:
•Inches or MM (millimeter)
Advanced Copy Settings
Option Description
Collate Choose the order you want your copies to be placed in.
• Sort (e.g. pages 1,2,3 / 1,2,3 / 1,2,3)
• Stack (e.g. pages 1,1,1 / 2,2,2 / 3,3,3).
38
Xerox DocuMate 3920
User’s Guide
Page 39

Option Description
1 to 1 Sided
2 to 1 Sided
1 to 1 Sided 2 to 1 Sided
Long Edge to Long Edge
Turn your documents from long-
edge binding to long-edge binding.
Short Edge to Long Edge
Turn your documents from short-edge
binding to long-edge binding.
Note: The selection of orientation varies depending on the type of duplex printing.
Duplex Availability of Orientation
1 to 1 sided All options are unavailable.
2 to 1 sided All options are available.
Duplex Choose one of these types to use when printing duplex. First, verify that your printer
includes a duplex option.
Choices are:
• 1 to 1 Sided—Copy single-sided originals onto one side of one sheet of paper.
• 2 to 1 Sided—Copy double-sided originals onto one side of one sheet of paper.
Example:
Orientation Specify how you want to bind your duplex printing. First, verify that your printer
includes a duplex option.
Choices are:
• Long Edge to Long Edge—Long Edge means documents are to be bound, or
flipped, on the long edge of paper.
• Short Edge to Long Edge—Short Edge means documents are to be bound, or
flipped, on the short edge of paper.
Xerox DocuMate 3920
User’s Guide
39
Page 40

Option Description
Long Edge: /
Short Edge:
/
2-in 1 4-in 1(landscape) 4-in-1(portrait)
Orientation (Cont’d) Examples:
N-Up (Paper Saving) Use this setting to print multiple pages of a document onto a single sheet of paper,
and to set the sequence of the page images on each sheet of paper.
• 1-in-1 means one page will be printed on a single sheet of paper.
• 2-in-1 means two pages will be printed on a single sheet of paper as illustrated.
• 4-in-1 (landscape) means four pages will be printed on a single sheet of paper in
rows from left to right, top to bottom as illustrated.
• 4-in-1 (portrait) means four pages will be printed on a single sheet of paper in
columns from top to bottom, left to right as illustrated.
Stamp You can specify a word to appear as a stamp on the scanned documents.
(Note: In the Stamp field, there is a small “Soft Keyboard” icon shown at the upperright corner. Touch anywhere on the Stamp field to bring up the soft keyboard to
enter your stamp characters.)
Example:
40
Xerox DocuMate 3920
User’s Guide
Page 41

Setting the Default Copy Options
You can set the default copy options for the scanner. This way, whenever you want to scan to the
printer, the most commonly used settings are already configured. Please refer to the previous section
for the list of options you can set as a default. Note that the list indicates when a feature cannot be
assigned a default value.
To access the Copier Default template from the scanner:
1. Press the Menu button on the scanner.
2. Press the Copier Default button on the LCD touch screen.
3. Change the settings as needed on the Basic, Image Edit, and Advanced Copy tabs.
4. Press OK on the LCD screen to save these settings.
To access the Copier Default template from the scanner:
1. Input the scanner’s IP address in the URL field of your web browser, or open it from the Network
Management Tool.
2. When the embedded web page opens, click on the Copier Default link on the left side of the page.
3. Change the settings as needed, and then click the Update button to send the changes to the
scanner.
4. Power cycle the scanner.
Please refer to Managing the Scanner Remotely on page 89 for detailed information about accessing
and navigating the scanner options remotely.
Xerox DocuMate 3920
User’s Guide
41
Page 42

Information Messages When Copying
Message Action
ADF paper empty Press the OK button. Reload your documents into the auto document feeder and try
again.
ADF cover open Close the ADF door and press the OK button.
Flatbed cover open Close the scanner lid. Remove any paper from the ADF and press the OK button.
Flatbed Light Check Power cycle the scanner.
If the code still appears, contact your nearest dealer.
Calibration Error Power cycle the scanner.
If the code still appears, contact your nearest dealer.
Error_Flatbed Home
Position
Error_Pick Up Roller • If this occurs while previewing, split your multi-page document into smaller
Home sensor error Power cycle the scanner.
Lamp error Power cycle the scanner.
ADF paper jam ADF paper jam.
Lock error Scanning unit is locked.
Check printer cable or
status
Detect printer error 1. Turn off the scanner.
Paper size not supported Please set the supported paper size to the tray of the printer. HLT and * are not sup-
Power cycle the scanner.
If the code still appears, contact your nearest dealer.
batches and try again.
• If this occurs while scanning, the pick up roller may not work properly. Contact
your nearest dealer for a replacement.
If the code still appears, contact your nearest dealer.
If the code still appears, contact your nearest dealer.
Open the ADF cover and remove the paper from the ADF.
If the code still appears, power cycle the scanner.
If the code still appears, contact your nearest dealer.
1. Turn off your scanner.
2. Find the lock switch underneath the scanner lid, to one side of the flatbed glass,
and unlock the machine.
3. Turn the scanner back on.
4. If the code still appears, contact your nearest dealer.
1. Check if the printer cable has been correctly connected.
2. Check if the printer is turned on.
3. Restart the scanner and your printer.
4. If the message still appears, contact your nearest dealer.
2. Turn off the printer.
3. Turn on the printer.
4. Turn on the scanner.
ported.
42
Xerox DocuMate 3920
User’s Guide
Page 43

Copy Specifications
Copy Port USB 2.0 Host Rev 2.0
Printer Language PCL5c. PCL5e
Multi-Copy Speed
Speed mode
Multiple Copies (Copy count) Up to 99
Copy Print Resolution 600 x 600 dpi
Original Size ADF Scans—U.S. Legal size 8.5”x14”
Copy Size Up to Legal
Density Control 1~7 levels (lightest to darkest)
Var iable 25% ~ 400%, in 1% increments
Paper Supply A4, U.S. Letter, A5, B5, U.S. Legal
Scaling Option 100%(Default)
Edge Erase 0/ 6/ 13/ 19/ 25 mm
Margin Shift (right, bottom) 0/ 6/ 13/ 19/ 25 mm
Paper saving (N-Up) 1 in 1, 2 in 1, 4 in 1 (landscape), 4 in 1 (portrait)
Collate Sort/Stack
Duplex 1–1 / 2-1
Orientation for Duplex Long Edge to Long Edge, Short Edge to Long Edge
32 CPM(type B) (copies per minute)
Flatbed Scans—Maximum 8.5”x11.7”
70% (A4->A5)
78% (Legal->Letter)
86% (A4->B5)
115% (B5-> A4)
127% (Letter-> Legal)
141% (A5-> A4)
98% (Fit to Page)
Xerox DocuMate 3920
User’s Guide
43
Page 44

44
Xerox DocuMate 3920
User’s Guide
Page 45

E-mail
This chapter includes:
• Scanning to E-mail on page 46
• Scan Options for E-mailing on page 48
• Setting the Default E-mail Options on page 52
• Using the Address Book on page 53
• Information Messages When E-mailing on page 54
• E-mail Specifications on page 56
When connected to an ethernet network and an SMTP server, the scanner allows you to transmit
documents to your e-mail as an attachment. With a touch of the e-mail key and the selection of your
recipients' e-mail addresses, the documents are first scanned and converted into an image file, and
then transmitted to remote recipients within minutes.
To use the E-mail option, the scanner must already be set up to work on the network, and have the Mail
Server options configured in the scanner. Please refer to the Scanner Setup chapter for further details
on Adding the Scanner to the Network and Adding the Email Server Information.
4
Xerox DocuMate 3920
User’s Guide
45
Page 46

Scanning to E-mail
1. Place your document face up in the ADF or face down on the flatbed glass.
2. Press the E-mail button on the scanner.
3. The LCD screen displays the E-mail options.
4. Press anywhere in the To field to show the soft-keyboard on screen so you can input destination
E-mail address(es). Press the Cc or Bcc buttons to input E-mail addresses for those fields.
5. Press Return on the soft-keyboard to return to the main E-mail screen.
Instead of inputting the E-mail address manually, you can select email address(es) from the
scanner’s address book.
1. Touch the Address Book icon on the E-mail main screen.
46
Xerox DocuMate 3920
User’s Guide
Page 47

2. The following Address Book screen displays.
3. Touch an e-mail address to select it. The selected one will be highlighted. (You can touch
another address for multiple selections.)
4. Touch OK to return to the E-mail main screen.
6. Select the options you want to use for the documents you are scanning on the Basic, E-mail
Options, and Scan Options tabs.
Note that any settings you change here are not permanently saved. The next time the email
function is used, the default email options will be displayed in the LCD screen.
The next section describes each feature in detail.
7. Press the B&W or Color button on the scanner to start scanning.
Note that if Multi-Level(gray) is enabled, on the Scan Options tab, pressing the B&W button on
the scanner will send a grayscale image.
The scanner starts scanning and sends the image to the email address you specified.
NOTE:
• If you make a mistake during the process, press the Stop button on the scanner to cancel the
scan.
• The scanner allows you to send the scanned documents to multiple e-mail addresses. After
inputting the first e-mail address, simply press the enter key, on the soft keyboard, to type
another address in the next line.
• Up to 64 characters can be entered in the File Name of Attachment, “To”, “From”, “Reply to”,
“Subject”, and the “Text” fields.
• If you wish to scan a multi-page document and convert it to a single image file, choose your
output file format to be MTIFF or PDF.
• If you want to scan multiple pages from the flatbed, or more than one set of 50 pages from the
ADF, press the Bind button first. After the first flatbed or ADF scan finishes, you will be prompted
to bind to the next scan. Place the next page on the flatbed, or document batch in the ADF, and
press Bind to continue. After you are done scanning all pages in the document, choose End to
close the dialog box.
Xerox DocuMate 3920
User’s Guide
47
Page 48

Scan Options for E-mailing
Basic Settings
Option Description
To / Cc / Bcc
(A default value cannot
be assigned)
Address Book Icon
(A default value cannot
be assigned)
Subject Press anywhere in the field to display the soft keyboard. Input the subject you want to
Original Doc. Press the button, on the LCD panel, repeatedly to cycle through the three options.
Resolution Choose your default resolution for the scanned document. The higher the resolution,
Select To, Cc, or Bcc, then press anywhere in the field to open the soft keyboard so you
can enter the destination email address.
Press the address book icon to show the address book on the LCD screen. Select the
email address from the list that you want and then press OK.
have in the email message, then press Return to return to the email options screen.
You can input a maximum of 64 characters for the subject field.
• Simplex: If your original is a single-sided document, choose Simplex to scan your
documents only on one side.
• Duplex(long): If your original is a double-sided document which is bound along
the long edge of paper, choose Duplex(Long) to scan your document on the
front and the back side.
• Duplex(short): If your original is a double-sided document which is bound along
the short edge of paper, choose Duplex(Short) to scan your document on the
front and the back side.
the greater the detail for the scanned image. High resolution settings take longer to
scan and produce larger file sizes.
Choices are:
• 75 / 100 / 150 / 200 / 300 / 400 / 600 dpi
Note: If you are scanning duplex (two-sided) paper, the resolution for color or gray
scanning have a maximum option of 300 dpi.
48
Xerox DocuMate 3920
User’s Guide
Page 49

Option Description
Paper Size Select the size of the paper you are scanning from the list.
Choices are:
• A4 / Letter / A5 / B5 / Legal
Note that Legal size is available only when scanning from the ADF.
Image Density The image density can be adjusted within a range of 7 levels using the control panel
or from the scanner's Web Page. Increasing the value makes your scanned image
darker and decreasing the value makes your scanned image lighter.
Bind
(A default value cannot
be assigned)
Multi-batch document scanning from the ADF or Multi-page scanning from the flatbed can be enabled. Press the Bind button when you want to scan more than 50
pages from the ADF or more than one page from the flatbed. After scanning the 1st
batch or 1st page, a dialog box will pop up asking if you wish to Bind or End. Choose
Bind to scan the next batch or page or choose End to stop scanning.
E-mail Options
Option Description
File Name of Attachment
The file name of your scanned document without a file extension. If you have not
entered a value in the box, the system will set a default file name.
From
(A default value cannot
be assigned)
Reply To
(A default value cannot
be assigned)
Te xt
(A default value cannot
be assigned)
File Separation Limit the file size of the attachment of each outgoing message to avoid the size limi-
Enter the “From” address of your outgoing e-mail from the scanner. If an e-mail can
not be sent, notification is returned to this address. If the administrator has not set
the device’s e-mail account in the Mail Server settings, you can enter the e-mail
address here. This is the “From” address in your e-mail when you receive an email from
the scanner.
Enter a “Reply to” address if you want to specify a reply address that is different from
the “From” address. Up to 60 characters can be entered in the field. To enter the
address, you can touch anywhere on the “Reply To” field to bring up the soft keyboard
to type the address.
Type your e-mail message here. To enter the text, you can press anywhere on the
“Text” field to bring up the soft keyboard to type the text.
tation of SMTP servers.
Choices are:
• 1MB / 3MB / 5MB / 10MB / 30MB / Unlimited
Xerox DocuMate 3920
User’s Guide
49
Page 50

Option Description
Add Text File
(A default value cannot
be assigned)
Select this option to have a log file (*.log) attached to the email message. This log file
describes the scanned image attachment (resolution, color mode, file format, page
numbers, and so on.)
Scan Options
Option Description
Color Color documents to be sent via E-mail from the scanner.
Options:
1. File Format: PDF, JPEG, TIFF, MTIFF (Multi-page TIFF)
Note: Choose MTIFF or PDF when you need to scan multi-page documents and
convert it to a single image file.
2. Compression Level: Low, Medium, High
(If TIFF or MTIFF is selected as a file format, the compression Level is defined as
Raw only.)
Black&White Multi-Level (Gray): Choose “ON” if you wish to make gray copies or OFF to make a
B&W (single-bit) copy.
• If you choose ON from Multi-Level (Gray), the file formats include PDF, JPEG,
TIFF, and MTIFF. If TIFF or MTIFF is selected as your file format, the
compression Level is limited to Raw only.
• If you choose OFF from Multi-Level (Gray), the file formats include PDF, TIFF,
and MTIFF. The compression Level of MTIFF or TIFF includes G3, G4, and Raw.
Options:
1. Multi-Level (Gray): ON, OFF
2. File format: PDF, TIFF, MTIFF(Multi-page TIFF)
3. Compression Level: Low, Medium, High
File Formats
PDF PDF (Portable Document Format) is a very popular file format used by Adobe. You can
view PDF files using Adobe Acrobat or Adobe Reader.
TIFF/MTIFF TIFF (The Tagged-Image File Format) is a flexible bitmap image format supported by
virtually all paint, image-editing, and page-layout applications. Also, virtually all desktop scanners can produce TIFF images.
JPEG JPEG (Joint Photographic Experts Group) compression provides the best results with
continuous-tone color and the smallest file size.
50
Xerox DocuMate 3920
User’s Guide
Page 51

Option Description
The following is an example of file size based on selected scanning options and file format.
Color: A4 @ 200 dpi TIFF (10 MB) / PDF (53 KB) / JPEG (212 KB)
B&W: A4 @ 200 dpi TIFF (100 KB) / PDF (20 KB) / JPEG (5 MB)
Xerox DocuMate 3920
User’s Guide
51
Page 52

Setting the Default E-mail Options
You can set the default email options for the scanner. This way, whenever you want to scan and send
an email, the most commonly used settings are already configured. Please refer to the previous section
for the list of options you can set as a default. Note that the list indicates when a feature cannot be
assigned a default value.
To access the E-mail Default template from the scanner:
1. Press the Menu button on the scanner.
2. Press the E-Mail Default button on the LCD touch screen.
3. Change the settings as needed on the Default E-Mail Options and Default Scan Options tabs.
4. Press OK on the LCD screen to save these settings.
To access the E-Mail Default template from the scanner:
1. Input the scanner’s IP address in the URL field of your web browser, or open it from the Network
Management Tool.
2. When the embedded web page opens, click on the E-Mail Default link on the left side of the page.
3. Change the settings as needed, and then click the Update button to send the changes to the
scanner.
4. Power cycle the scanner.
Please refer to Managing the Scanner Remotely on page 89 for detailed information about accessing
and navigating the scanner options remotely.
52
Xerox DocuMate 3920
User’s Guide
Page 53

Using the Address Book
The scanner has an internal address book that can store up to 2000 email addresses and 100 email
groups. Touch the Address Book icon on the E-mail main screen to display the Address Book screen.
To select a group address:
1. On the Address Book screen, touch the Group tab to display the following Group screen.
2. Touch a group to select it and then touch OK to return to the E-mail main screen. (You can touch
another group to select multiple groups)
To search an e-mail address or a group:
1. On the Address Book main screen, touch Search to display the following
E-mail Search screen.
2. Choose your search type. (All means to search the addresses in the
current Address Book of the scanner. LDAP means to search the
addresses from an external address book on an LDAP server.)
3. Enter your search string via the soft keyboard.
4. Touch the Search button to start searching.
Please refer to Managing the Scanner Address Book on page 104 for instructions on setting up the
scanner’s address book. The section Adding the Email Server Information on page 26 contains
instructions on setting the scanner access to an LDAP server.
Xerox DocuMate 3920
User’s Guide
53
Page 54

Information Messages When E-mailing
Message Action
Sequence error Reboot the machine, and try again later. If the error is still there, con-
tact your nearest dealer.
Device internal failure Reboot the machine, and try again. If the error is still there, contact
your nearest dealer.
Failed to connect mail server Contact your network administrator for further help.
Failed to get response from mail
server.
SMTP server is empty.
Please specify SMTP server in the
Menu options.
SMTP server address is wrong.
Please check SMTP server.
Unpredicted error Power cycle the scanner.
Insufficient System Storage Contact your network administrator for further help.
Mail server doesn’t support SMTP ser-
vice extension
Mail server doesn’t support SMTP
login authentication.
SMTP login error Check your login user name and password.
Mailbox Unavailable Make sure the “To” address is correct.
Processing Error Contact your network administrator for further help.
Temporary authentication failure Contact your network administrator for further help on the mail server’s
Command error Reboot the machine, and try again. If the error is still there, contact
Parameters or argument error Check if the Device Name is valid. The Device Name can be found in
Command parameters not implemented
Authentication requires Contact your network administrator on mail server’s authentication
Mailbox unavailable Check “To” address.
User not local Check “To” address.
Service unavailable Contact your network administrator for further help.
Contact your network administrator or nearest dealer for further help.
Please specify the IP address of the SMTP server by pressing the Menu
button on the panel.
Check the IP address of the SMTP server.
Contact your network administrator or nearest dealer for further help.
Contact your network administrator for further help.
Contact your network administrator to turn on the SMTP login option.
authentication mechanism.
Choose SMTP authentication for E-mail security or turn off the mail
server’s authentication and try again.
your nearest dealer.
Menu>General.
Check “From” address.
Check “To” address.
Contact your network administrator for further help.
Check if the Device Name is valid. The Device Name can be found in
Menu>General.
Or you may contact your network administrator for further help.
mechanism.
Choose SMTP authentication for E-mail security or turn off the mail
server’s authentication and try again.
54
Xerox DocuMate 3920
User’s Guide
Page 55

Message Action
Mail server does not support SMTP
service extension
Exceeded storage allocation Check “To” address.
Mailbox name is not allowed Check “To” address.
Mail action has not been taken Check “To” address.
Connection error Check network environment.
The transaction has failed Contact your network administrator for further help.
POP3 server address is wrong Check the IP address of the POP3 server.
Failed to connect POP3 server Contact your network administrator for help.
Fai l e d to login P OP3 server Check the login name and password.
LDAP server login error Check the login name and password.
LDAP server IP error Check the IP address of the LDAP server. Or contact your network
LDAP port error Check if the port number is correct.
LDAP user password error Check if the password is correct.
Contact your network administrator for further help.
Check mailbox storage allocation.
Contact your network administrator for further help.
Check if email attachment size is larger than the mailbox quota.
administrator for help.
Xerox DocuMate 3920
User’s Guide
55
Page 56

E-mail Specifications
Protocol SMTP, MIME,
Mail Sever Authentication SMTP-AUTH, POP3
File format
B/W (single bit)
Gray (8 bit)
Color (24 bit)
Compression Method
Compression Level Low / Medium / High
Supported Resolution 75, 100, 150, 200, 300, 400, 600 dpi
Default Resolution 200 dpi
Address Book Capacity
Max. Address
No. of Address in Each Group
Multiple Recipients allowed Ye s
Supported Mail Server Lotus Mail Server 5.0
Supported LDAP Server Windows 2003 Active Directory with SFU(Service for Unix)
Supported Mail Application Microsoft Outlook 2000
PDF, TIFF, M-TIFF
PDF, JPEG, TIFF, M-TIFF
PDF, JPEG, TIFF, M-TIFF
B/W
RAW, G3, G4
Gray
JPEG
Color
JPEG
2000
Group
100
99
MS Exchange Server 2000/2003
RedHat 7.0 SendMail
MAC Mail Server in OS 9.04
Windows Server 2000 + MS Exchange 5.5
Lotus Notes R5
Microsoft Outlook Express 5.0
Microsoft Outlook Express 6
Eudora 4.3.2J
Lotus Notes R5
MAC built-in MAIL Application
56
Xerox DocuMate 3920
User’s Guide
Page 57

Filing
This chapter includes:
• Scanning to a Folder on page 58
• Scan Options for Filing on page 60
• Setting the Folder Template on page 63
• Creating a New Folder on page 65
• Information Messages When Filing on page 66
• Filing Specifications on page 68
The scanner allows you to send the scanned documents to a server or a personal computer’s file folder
over the intranet with FTP (File Transfer Protocol), HTTP (Hypertext Transfer Protocol), HTTPS (a secure
way of using HTTP), or CIFS (Common Internet File System). The scan-to-folder feature off-loads the
mail server from handling large attachments.
The scanner must already be set up to work on the network. Please refer to the Scanner Setup chapter
for further details on “Adding the Scanner to the Network”.
5
Xerox DocuMate 3920
User’s Guide
57
Page 58

Scanning to a Folder
1. Place your document face up in the ADF or face down on the flatbed glass.
2. Press the Filing button on the scanner.
3. The LCD screen displays the Filing options.
4. Choose a folder to save your scanned image.
• Or you can use the Up-arrow or Down-arrow button to scroll through the list.
• Or you can display the most frequently used folder list by touching the Show All button.
The next section describes each feature in detail.
5. Press the B&W or Color button on the scanner to start scanning.
Note that if Multi-Level(gray) is enabled, on the Scan Options tab, pressing the B&W button on
the scanner will send a grayscale image.
The scanner starts scanning and sends the image to the folder you specified.
58
Xerox DocuMate 3920
User’s Guide
Page 59

NOTE:
• If you make a mistake during the process, press the Stop button on the scanner to cancel the
scan.
• If you want to scan multiple pages from the flatbed, or more than one set of 50 pages from the
ADF, press the Bind button first. After the first flatbed or ADF scan finishes, you will be prompted
to bind to the next scan. Place the next page on the flatbed, or document batch in the ADF, and
press Bind to continue. After you are done scanning all pages in the document, choose End to
close the dialog box.
Xerox DocuMate 3920
User’s Guide
59
Page 60

Scan Options for Filing
Basic Settings
Option Description
Original Doc. Press the button, on the LCD panel, repeatedly to cycle through the three options.
• Simplex: If your original is a single-sided document, choose Simplex to scan your
documents only on one side.
• Duplex(long): If your original is a double-sided document which is bound along
the long edge of paper, choose Duplex(Long) to scan your document on the
front and the back side.
• Duplex(short): If your original is a double-sided document which is bound along
the short edge of paper, choose Duplex(Short) to scan your document on the
front and the back side.
Resolution Choose your default resolution for the scanned document. The higher the resolution,
the greater the detail for the scanned image. High resolution settings take longer to
scan and produce larger file sizes.
Choices are:
• 75 / 100 / 150 / 200 / 300 / 400 / 600 dpi
Note: If you are scanning duplex (two-sided) paper, the resolution for color or gray
scanning have a maximum option of 300 dpi.
Paper Size Select the size of the paper you are scanning from the list.
Choices are:
• A4 / Letter / A5 / B5 / Legal
Note that Legal size is available only when scanning from the ADF.
Image Density The image density can be adjusted within a range of 7 levels using the control panel
or from the scanner's Web Page. Increasing the value makes your scanned image
darker and decreasing the value makes your scanned image lighter.
Bind
(A default value cannot
be assigned)
60
Xerox DocuMate 3920
User’s Guide
Multi-batch document scanning from the ADF or Multi-page scanning from the flatbed can be enabled. Press the Bind button when you want to scan more than 50
pages from the ADF or more than one page from the flatbed. After scanning the 1st
batch or 1st page, a dialog box will pop up asking if you wish to Bind or End. Choose
Bind to scan the next batch or page or choose End to stop scanning.
Page 61

Server Options
Option Description
Login Name If you are a registered user, and there is a different login name displayed on the
Server Options screen, please enter your own login name here.
Password Enter your password for the name you input in the Login Name field.
Scan Options
Option Description
Color Color documents to be sent from the scanner.
Options:
1. File Format: PDF, JPEG, TIFF, MTIFF (Multi-page TIFF)
Note: Choose MTIFF or PDF when you need to scan multi-page documents and
convert it to a single image file.
2. Compression Level: Low, Medium, High
(If TIFF or MTIFF is selected as a file format, the compression Level is defined as
Raw only.)
Xerox DocuMate 3920
User’s Guide
61
Page 62

Option Description
Black&White Multi-Level (Gray): Choose “ON” if you wish to make gray copies or OFF to make a
B&W (single-bit) scan.
• If you choose ON from Multi-Level (Gray), the file formats include PDF, JPEG,
TIFF, and MTIFF. If TIFF or MTIFF is selected as your file format, the
compression Level is limited to Raw only.
• If you choose OFF from Multi-Level (Gray), the file formats include PDF, TIFF,
and MTIFF. The compression Level of MTIFF or TIFF includes G3, G4, and Raw.
Options:
1. Multi-Level (Gray): ON, OFF
2. File format: PDF, TIFF, MTIFF(Multi-page TIFF)
3. Compression Level: Low, Medium, High
File Formats
PDF PDF (Portable Document Format) is a very popular file format used by Adobe. You can
view PDF files using Adobe Acrobat or Adobe Reader.
TIFF/MTIFF TIFF (The Tagged-Image File Format) is a flexible bitmap image format supported by
virtually all paint, image-editing, and page-layout applications. Also, virtually all desktop scanners can produce TIFF images.
JPEG JPEG (Joint Photographic Experts Group) compression provides the best results with
continuous-tone color and the smallest file size.
The following is an example of file size based on selected scanning options and file format.
Color: A4 @ 200 dpi TIFF (10 MB) / PDF (53 KB) / JPEG (212 KB)
B&W: A4 @ 200 dpi TIFF (100 KB) / PDF (20 KB) / JPEG (5 MB)
62
Xerox DocuMate 3920
User’s Guide
Page 63

Setting the Folder Template
You can set the default folder options for the scanner. This way, whenever you want to scan and send a
server, the most commonly used settings are already configured. Please refer to the previous section
for the list of options you can set as a default. Note that the list indicates when a feature cannot be
assigned a default value.
To access the Folder Template from the scanner:
1. Press the Menu button on the scanner.
2. Press the Folder Template button on the LCD touch screen.
3. Change the settings as needed on the Server Settings and Scan Options tabs.
4. Press OK on the LCD screen to save these settings.
To access the Filing Template from the scanner:
1. Input the scanner’s IP address in the URL field of your web browser, or open it from the Network
Management Tool.
2. When the embedded web page opens, click on the Filing Template link on the left side of the
page.
3. Change the settings as needed, then click the Update button to send the changes to the scanner.
4. Power cycle the scanner.
Please refer to Managing the Scanner Remotely on page 89 for detailed information about accessing
and navigating the scanner options remotely.
Xerox DocuMate 3920
User’s Guide
63
Page 64

Option Description
Targ et U RL Choose the type of protocol of your filing server in the first field.
Choices include FTP, HTTP, CIFS, HTTPS.
Enter the target URL in the second field. You can enter either the domain name or the
IP address with the directory path. Note that the directory will be varied due to different protocols. The route starts from the root directory in FTP, HTTP, HTTPS, and CIFS.
For example, ftp://, http://, and file:\\, https://.
Important note:
You must use this CIFS filing format, file:\\IP\computer name\folder name, to set CIFS
URL.
Port # Enter the port number for the server where you want to store your scanned document.
Default values: ftp:21, http:80, CIFS:139, https:443
If the default value is different from the real case, input the correct port number in
this field. Touch anywhere on the “Port” field to bring up the soft keyboard to enter
the text.
File Name The file name of your scanned document without a file extension. If you have not
entered a value in the box, the system will set a default file name.
Report to e-mail Enter an e-mail address if you wish to send the filing report to an e-mail.
Create a Subfolder Choose ON to enable the server to create a subfolder when sending the scanned
image to the destination server. (Check if you are authorized to write under the destination server.)
64
Xerox DocuMate 3920
User’s Guide
Page 65

Creating a New Folder
Before sending your document to a destination server, you should set up a few folders first to speed up
the process. However, you can create new folders using the LCD touch screen when you are scanning.
When you input the folder you want to create into the LCD screen, the folder is created on the server
when scanning is complete.
To create a new folder:
If the folder you want to save the scanned documents to is not in the current Folder list, add a new one
by touching the Add New Folder button.
1. Press the Filing button on the scanner to display the Filing options on the LCD touch screen.
2. Press the new folder icon on the LCD touch screen.
The New Folder screen displays the server and scanning parameters that are the same as the
options in the folder Folder Template except the Folder Name.
Please refer to Filing Manager on page 108 for instructions on setting up the scanner to send to a filing
server.
Xerox DocuMate 3920
User’s Guide
65
Page 66

Information Messages When Filing
Message Action
Can not create a subfolder Make sure you have privileges to create folders on the server.
Device internal failure Reboot the machine, and try later. If the error is still there, contact your
nearest dealer.
Failed to connect FTP server Make sure the FTP server is not shut downing and the port number is
correct. If the error is still there, contact your FTP server administrator.
Unpredicted error Contact your network administrator for further help.
FTP login name error Check your login name and try again
FTP password incorrect Check your password and try again
FTP can’t enter this directory Make sure you have privileges to enter this directory.
FTP can’t check file existed or not Make sure you have privileges to browse this directory.
FTP can’t change data transfer type Contact your server administrator for further help.
FTP store file error Make sure you have privileges to store files on the server.
Insufficient storage space in system Verify the FTP server has enough free storage space to save the file and
contact your server administrator.
File name not allowed Change the file name to meet the naming convention of the FTP
server’s OS.
FTP permission denied Make sure your account has sufficient privileges to write files to the
server.
CIFS (User level) can not make subdirectory
CIFS Network share name incorrect Check the folder directory and make sure it follows the UNC, such as
Failed to connect CIFS Check if the server supports CIFS(SMB) connection.
CIFS Computer name error Make sure the computer name in the directory is correct.
CIFS dialect negotiation failed The CIFS may not support PC NETWORK PROGRAM 1.0 dialect.
CIFS (User level) login fail Check the login name and password and try again.
CIFS fail to create file Make sure you have full control privileges on the network.
CIFS send data error Contact your network administrator for help.
CIFS failed to send file attribute Make sure you have full control privileges on the network.
HTTP unauthorized This HTTP server needs authorization. Make sure your account has the
Failed to connect HTTP Check Server IP and HTTP port. Make sure they are correct. Or, check
HTTP Resource not found The server can’t save the files, contact your server administrator for
HTTP Forbidden This action is forbidden on the current server. This is not unauthorized
Unpredicted error Power cycle the scanner and try again. Contact your server administra-
HTTP MKCOL method not allowed Contact your server administrator to change permissions on this privi-
HTTP MKCOL method not implemented
The account does not have access to create subdirectories.
\\Computer\Share\directory.
correct authorization credentials.
whether the server supports HTTP connection.
help.
but forbidden.
tor or nearest dealer for further help.
lege.
The target HTTP server does not support MKCOL to create the directory.
Create the directory on the server in advance.
66
Xerox DocuMate 3920
User’s Guide
Page 67

Message Action
HTTP PUT method not allowed Contact the server administrator to change permissions for this privi-
lege.
HTTP internal server error Contact your server administrator for further help.
HTTP PUT method not implemented The server does not use the HTTP PUT method. The scanner can’t save
the file to this server, contact your system administrator for help.
HTTP server unavailable Contact your server administrator for help.
HTTP server does not support HTTP
version 1.1
The server does not support HTTP version 1.1 (the type the scanner
uses), contact your server administrator for help.
Xerox DocuMate 3920
User’s Guide
67
Page 68

Filing Specifications
Protocol FTP, HTTP, HTTPS, CIFS
File format
B/W (single bit)
Gray (8 bit)
Color (24 bit)
Compression Method
Compression Level Low / Medium / High
Supported Resolution 75, 100, 150, 200, 300, 400, 600 dpi
Default Resolution B/W: 200 dpi
Most Used Folders 5
No. of Filing Folders 50
PDF, TIFF, M-TIFF
PDF, JPEG, TIFF, M-TIFF
PDF, JPEG, TIFF, M-TIFF
B/W
Raw, G3, G4
Gray
JPEG
Color
JPEG
Gray: 200 dpi
Color: 200 dpi
68
Xerox DocuMate 3920
User’s Guide
Page 69

Faxing
This chapter includes:
• Fax Settings on page 70
• Scanning to Fax on page 74
• Scan Options for Faxing on page 77
• Setting the Default Fax Options on page 79
• Using the Phone Book on page 80
• Information Messages When Faxing on page 85
• Fax Specifications on page 87
With the built-in fax modem and a telephone line, the scanner is able to transmit your scanned
document to a remote fax machine just like a regular fax machine. With a printer attached, the scanner
can also receive faxes. You need to connect the scanner to a USB InkJet or Laser printer that supports
PCL to receive faxes. Make sure the printer is turned on before turning on the scanner. The scanner will
detect the printer during the power on cycle only.
6
Xerox DocuMate 3920
User’s Guide
69
Page 70

Fax Settings
Before you can send or receive faxes with this scanner, you have to configure the scanner’s fax settings.
You can access these settings from the scanner’s LCD touch screen, or from the scanner’s embedded
web page using the Network Management Tool or through a web browser.
Configuring the Fax Settings from the Scanner
Fax S e ttings
Option Description
ID Enter the ID of the scanner. Up to 32 characters can be entered. Normally, you can
enter your company name in this field. Touch anywhere on the “ID” field to bring up
the soft keyboard to type your text. The text in this field as well as the station number
(telephone number of the scanner), the scanner’s clock including date and time, the
receiving fax number, and page index will be printed at the top of all outgoing faxes
as header information.
Station Number Enter the telephone number of the scanner. The Station Number is the phone number
of the line connected to the built-in modem and the Station Number should be a
value not more than 20 characters. The “+” (plus) and “ ” (blank space) are supported.
The value of the station number will be printed as part of the fax header information
of all outgoing faxes.
Touch anywhere on the “Station Number” field to bring up the soft keyboard to type
your number.
Select Line Select to use the device’s fax telephone line as a direct outside line (PSTN line) or as
an extension (PABX line).
Choices are: Outside, Extension
Monitor Control Turn on Monitor Control to have the scanner monitor the telephone line during faxing.
Typ e1 monitors the telephone line until the DIS (Digital Identification Signal) is
detected. Type2 monitors the telephone line during communication.
PSTN Access No. Enter the number to access the PSTN (Pubic Switched Telephone Network) line if your
device’s fax telephone line is used as an extension.
For example, enter 0 or 9 in the field via the soft keyboard.
70
Xerox DocuMate 3920
User’s Guide
Page 71

Option Description
Redial Sets the number of redial attempts if the number dialed is busy.
Choices are: 0, 1, 2, 3, 4, 5, 6, 7, 8, 9, 10 (The Redial value 0 indicates no redial.)
Redial Interval The redial interval setting selects the number of minutes between each redial if the
number dialed is busy.
Choices are: 1, 2, 3, 4, 5, 6 minutes
Ring Response Lets you set the number of times the phone rings before the fax answers.
Choices are: 1 ring, 5, 10, 15, 20 seconds
Sound Volume Use the arrow keys to adjust the sound volume during fax communication.
Choices are: 0, 1, 2, 3
Fax O ptions
Option Description
Add Phone # Choose ON then the new fax number will be automatically included in the Phone
Book after sending the fax finishes.
Choices are: ON, OFF
Transmission Report Select this option if you want to print the fax transmission report. This report lists the
time and date of transmission and whether the transmission was successful (OK). If
you select Yes, a report will be printed after each transmission. If you select Error, the
report will only be printed when a fax fails to transmit.
Choices are: Yes, No, Error only
Fit to Page Choose Enable to have incoming faxes scaled down to fit on the printer paper. If this
setting is disabled, an incoming fax image that is larger than the printer paper is split
across multiple pages.
Choices are: Enable, Disable
Detect Dial Tone Choose Enable to allow this scanner to wait for and detect a dial tone before proceed-
ing with dialing. If you are using the scanner on the same line as your phone, turn on
the detect dial tone setting. This will prevent the scanner from sending a fax while
someone is on the phone.
Choices are: Enable, Disable
Detect Busy Tone Choose Enable to allow this scanner to detect a busy tone when sending a fax.
Choices are: Enable, Disable
(The default setting varies based on country code.)
Xerox DocuMate 3920
User’s Guide
71
Page 72

Option Description
Manual Receive Choose Enable to use the Manual Receive fax function or Disable to use the auto
receive fax function. When Manual Receive is enabled, and there is an incoming fax,
and the machine starts ringing you need to press the Start button, in the Fax working
mode, to receive and print the fax.
Choices are: Enable, Disable
ECM Mode Choose Enable to use “ECM Mode”. The Error Correction Mode function helps this
scanner to improve communication in areas where telephone line conditions are poor.
Choices are: Enable, Disable
Printing Size Select the size of the paper in the printer you have attached for the faxes you receive.
Report Print You can print the following types of reports:
• Activity Report: Select to print a report showing the latest record, of up to 50
communications, between the sending and receiving fax machines. (The default
setting is to print a record of every 50 communications between sending and
receiving fax machines.) The report may contain information and results which
are useful for troubleshooting problems.
• Broadcast Report: Select to print the group transmission report.
• Transmission Report: Select to print the latest transmission report, to check if
the transmission result is successful, disregarding which selection you have
chosen in the Transmission Report option.
Cancel Fax Jobs
Option Description
Delete If you want to cancel a previously set delayed fax, touch the Cancel Fax Job tab to dis-
play the Cancel Fax Job screen. Touch the fax job you want to cancel and then touch
the Delete button to cancel the fax job.
72
Xerox DocuMate 3920
User’s Guide
Page 73

Configuring the Fax Settings Remotely
Open your web browser and type in the scanner’s IP address in the URL field, then press enter on your
keyboard. The web page will connect and display the scanner’s embedded web page in the browser
window.
Click on the Fax Settings link on the left side of the page to open the window for configuring the Fax
options.
• Click on the down arrow next to Add Phone # and select On or Off from the menu.
When this option is turned on, any phone number that is input at the scanner is automatically
added to the scanner’s phone book when sending is complete.
Note that this is the only Fax Setting option that is not available from the LCD touch screen. All
other options in this window are accessible from the scanner and are described, in detail, in the
previous section.
Please refer to Managing the Scanner Remotely on page 89 for detailed information about accessing
and navigating the scanner options remotely.
Xerox DocuMate 3920
User’s Guide
73
Page 74

Scanning to Fax
1. Place your document face up in the ADF or face down on the flatbed glass.
2. Press the Fax button on the scanner.
3. The LCD touch screen displays the Fax options.
4. Enter the fax number with the numeric keypad on the control panel.
5. You can also select multiple fax numbers at one time. To enter the next fax number, press the
Down-arrow key, at the right of the Phone Number field, after finishing entering the first fax
number.
6. Instead of inputting the phone number manually, you can select phone numbers from the
scanner’s phone book.
74
Xerox DocuMate 3920
User’s Guide
Page 75

• Touch the Phone Book icon on the Fax main screen.
• The following Phone Book screen displays.
• Touch an option to select it. The selected one will be highlighted. (You can touch another
number for multiple selections.)
•Touch OK to return to the Fax main screen.
7. Select the options you want to use for the documents you are scanning on the Basic and More
Settings tabs.
Note that any settings you change here are not permanently saved. The next time the fax
function is used, the default fax options will be displayed in the LCD screen.
The next section describes each feature in detail.
8. Press the B&W button on the scanner to start scanning.
The scanner starts scanning and sends the image as a fax to the number you specified.
Xerox DocuMate 3920
User’s Guide
75
Page 76

NOTE:
• If you make a mistake during the process, press the Stop button on the scanner to cancel the
scan.
• Up to 20 characters can be entered in the Fax Number field and some characters such as “-” and
“P” (a 2-second pause) are supported.
• When entering a phone number from the numeric keypad, include any PSTN access number
(number to access the public telephone line, usually a 9 or 0), area codes, and the telephone
number.
• The machine allows broadcast faxing. This means it allows you to send the scanned documents
to multiple fax numbers. After entering your first fax number, press the Down Arrow button on
the LCD-screen to enter your next fax number in the next line. Up to 200 fax numbers can be
entered and broadcasted at one time.
• If you want to scan multiple pages from the flatbed, or more than one set of 50 pages from the
ADF, press the Bind button first. After the first flatbed or ADF scan finishes, you will be prompted
to bind to the next scan. Place the next page on the flatbed, or document batch in the ADF, and
press Bind to continue. After you are done scanning all pages in the document, choose End to
close the dialog box.
76
Xerox DocuMate 3920
User’s Guide
Page 77

Scan Options for Faxing
Basic Settings
Option Description
Phone number field
(A default value cannot
be assigned)
Phone Book Icon
(A default value cannot
be assigned)
Original Doc.
(A default value cannot
be assigned)
Quality Set default quality type.
Use the numeric keypad on the control panel to input the phone number you want to
receive the fax. Press the up or down arrow button, next to the field, to input or view
additional numbers.
Press the phone book icon to show the scanner’s phone book on the LCD screen.
Select the phone numbers from the list that you want and then press OK.
Press the button, on the LCD panel, repeatedly to cycle through the three options.
• Simplex: If your original is a single-sided document, choose Simplex to scan your
documents only on one side.
• Duplex(long): If your original is a double-sided document which is bound along
the long edge of paper, choose Duplex(Long) to scan your document on the
front and the back side.
• Duplex(short): If your original is a double-sided document which is bound along
the short edge of paper, choose Duplex(Short) to scan your document on the
front and the back side.
Choices are: Standard, *Fine, Extra Fine, Photo
• Standard (200 x 100 dpi): Suitable for most typed originals.
• Fine (200 x 200 dpi): Good for small print.
• Extra Fine (200 x 400 dpi): Good for small print or artwork and transmits slower
than Fine resolution.
• Photo (200 x 200 dpi): Use when the original has varying shades of gray.
Note: Faxes are sent in the specified resolution if that resolution is supported by the
receiving fax machine.
Paper Size Select the size of the paper you are scanning from the list.
Choices are:
• A4 / Letter / Legal
Note that Legal size is available only when scanning from the ADF.
Xerox DocuMate 3920
User’s Guide
77
Page 78

Option Description
Image Density The image density can be adjusted within a range of 7 levels using the control panel
or from the scanner's Web Page. Increasing the value makes your scanned image
darker and decreasing the value makes your scanned image lighter.
More Settings
Option Description
Send Later (Date/
Time)
(A default value cannot
be assigned)
Polling Reception Sets the default status of polling reception. Choose ON to use the scanner to poll
Overseas Mode Sets the default overseas mode. Choose ON to avoid transmission problems when fax-
Enter the specific date and time you wish to send the fax via the soft keyboard. This
frees you from the need to manually start the transmission.
other machines. Polling is the process of retrieving faxes from another fax machine.
ing overseas.
78
Xerox DocuMate 3920
User’s Guide
Page 79

Setting the Default Fax Options
You can set some default fax options for the scanner. This way, whenever you want to scan and send a
fax, the most commonly used settings are already configured. Please refer to the previous section for
the list of options you can set as a default. Note that the list indicates when a feature cannot be
assigned a default value.
To access the Fax Default template from the scanner:
1. Press the Menu button on the scanner.
2. Press the Fax Default button on the LCD touch screen.
3. Change the settings as needed on the Fax Default screen.
4. Press OK on the LCD screen to save these settings.
To access the Fax Default template from the scanner:
1. Input the scanner’s IP address in the URL field of your web browser, or open it from the Network
Management Tool.
2. When the embedded web page opens, click on the Fax Default link on the left side of the page.
3. Change the settings as needed, and then click the Update button to send the changes to the
scanner.
4. Power cycle the scanner.
Please refer to Managing the Scanner Remotely on page 89 for detailed information about accessing
and navigating the scanner options remotely.
Xerox DocuMate 3920
User’s Guide
79
Page 80

Using the Phone Book
The scanner has an internal phone book that can store up to 200 phone numbers. Touch the Phone
Book icon on the Fax main screen to display the Phone Book screen.
• Touch a name or a group shown in the screen. Touch another phone number or group to send the
fax to multiple people or groups.
• If the receiving name of the phone number group does not appear on the screen, you can find the
name by touching the Characters button for a quick search.
• Or you can touch the Frequent or the Recent button to show the 10 most frequently used or 10
recently used names of phone numbers or groups.
Managing the Fax Phone Book
With the Fax Phone Book, you can send your scanned documents simultaneously to multiple fax
machines at one time. The Fax Phone Book allows you to create up to 200 phone numbers and 20
phone groups.
You can manage the phone book locally at the scanner, using the control panel and LCD touch screen,
or remotely using the embedded web page phone book. You will need the scanner’s IP address to
access it through the Network Management Tool or web browser.
80
Xerox DocuMate 3920
User’s Guide
Page 81

Manage the Phone Book from the Scanner
Phone Numbers
1. Press the Menu button on the scanner to display the menu options on the LCD touch screen.
2. Press the Phone Book button on the LCD touch screen to view the phone book options on the LCD
screen.
3. Press the Program button to open the screen to program the names and phone numbers.
4. Press anywhere in the Name field to show the soft keyboard to input the name you want to
associate with the phone number you want to program. Press Return when you are finished.
5. Press anywhere in the Phone Number field to show the soft keyboard. You can input the phone
number using the soft keyboard or the numeric keypad on the scanner. Press Return when you are
finished.
6. When you are done programming phone numbers. Press OK to close the Phone Book.
Xerox DocuMate 3920
User’s Guide
81
Page 82

Phone Groups
1. Press the Menu button on the scanner to display the menu options on the LCD touch screen.
2. Press the Phone Book button on the LCD touch screen to view the phone book options on the LCD
screen.
3. Press the Group Dial tab.
4. Press the Program button to open the screen to program the group.
5. Press anywhere in the Group Name field to show the soft keyboard to input the name you want to
associate with the phone number you want to program. Press Return when you are finished.
6. When you are done programming the phone groups. Press OK to close the Phone Book.
82
Xerox DocuMate 3920
User’s Guide
Page 83

Manage the Phone Book Remotely
Open your web browser and type in the scanner’s IP address in the URL field, then press enter on your
keyboard. The web page will connect and display the scanner’s embedded web page in the browser
window.
Please refer to Managing the Scanner Remotely on page 89 for detailed information about accessing
and navigating the scanner options remotely.
Managing Phone Numbers
1. Click on the Phone Book Manager link on the left side of the window.
2. Fill in the names and phone number fields as needed.
3. Click the Update button to send the information to the scanner.
4. Power cycle the scanner so you can access the updated phone book from the scanner.
To edit or delete names from the phone book, simply make your changes in the phone book manager
fields then click Update to send the information to the scanner.
Xerox DocuMate 3920
User’s Guide
83
Page 84

Managing Phone Groups
1. From the Phone Book Manager screen, click on the Phone Group link to manage the phone
groups.
2. Click a group number button to open the following Add a New Group Set screen.
3. Enter the name of the group, and select group members on the right sie of the screen, then add
them to the group by clicking the <- button.
4. Click Add to save your settings and return to the Phone Group List screen.
5. Click the Update button to send the information to the scanner.
6. Power cycle the scanner so you can access the updated phone book from the scanner.
84
Xerox DocuMate 3920
User’s Guide
Page 85

Information Messages When Faxing
Message Action
Please note that when a problem occurs during faxing, only the “Communication Error” will be shown in the
LCD-display. The information codes which indicate possible causes will only be shown in the Fax Activity Report.
To print the Fax Activity Report, simply select “Yes ” or “Error only”, in the “Transmission Report” option, when
you press the “Menu” button and choose Fax Settings and then Options in succession
0 Fax is done & OK.
0200 Error occurs, but cause is unknown since your fax machine has not received a fax message from the
remote fax machine.
Check the remote fax machine and then try again.
0201 No Dial Tone
Occurs when “Detect Dial Tone” is enabled and there is no dial tone detected.
0202 1. Your fax machine receives an invalid fax message from the remote fax machine. Please try
again or use another line.
2. The line quality is poor. Please try again or use another line.
3. If the error still occurs, please call your service support.
0203 No fax response.
The remote modem or fax modem has not sent a fax message within the specified time.
Check the remote fax machine and then try again.
0204 Destination line is busy.
Wait a few seconds, then try again.
0205 User has cancelled the job during scanning or transmission.
0207 1. Your fax machine received an invalid fax message from the remote fax machine. Please try
again or use another line.
2. The line quality is poor. Please try again or use another line.
3. If the error still occurs, please call your service support.
0209 The remote fax machine may be disconnected.
Check the remote fax machine and then try again.
0212 1. Your fax machine received an invalid fax message from the remote fax machine. Please try
again or use another line.
2. The line quality is poor. Please try again or use another line.
3. If the error still occurs, please call your service support.
0213 Your fax machine received an invalid fax message from the remote fax machine.
Please try again or use another line.
0215 Your fax machine received an invalid fax message from the remote fax machine.
Please try again or use another line.
0225 The line quality is poor. Please try again or use another line.
0226 1. Your fax machine received an invalid fax message from the remote fax machine. Please try
again or use another line.
2. The line quality is poor. Please try again or use another line.
3. If the error still occurs, please call your service support.
0229 1. Your fax machine received an invalid fax message from the remote fax machine. Please try
again or use another line.
2. The line quality is poor. Please try again or use another line.
3. If the error still occurs, please call your service support.
Xerox DocuMate 3920
User’s Guide
85
Page 86

Message Action
0230 1. Your fax machine received an invalid fax message from the remote fax machine. Please try
again or use another line.
2. The line quality is poor. Please try again or use another line.
3. If the error still occurs, please call service.
0234 Memory Full
1. Check if the printer is connected. If the printer is not connected, the scanned image will be
stored in the scanner’s memory.
2. Your printer may have an error. Check and resolve the problems.
3. Check if there are “Send Later” jobs. These jobs are waiting in the scanner’s memory to be
transmitted later. Send these transmissions immediately to free memory in the scanner.
4. The amount of system memory is not enough to process the scanning job.
Press “Start” to send the pages successfully scanned or “Stop” to abort the job.
Try rescanning using a lower resolution or try sending fewer pages at once.
0237 1. Your fax machine received an invalid fax message from the remote fax machine. Please try
again or use another line.
2. The line quality is poor. Please try again or use another line.
3. If the error still occurs, please call your service support.
0238 1. Your fax machine received an invalid fax message from the remote fax machine. Please try
again or use another line.
2. The line quality is poor. Please try again or use another line.
3. If the error still occurs, please call your service support.
86
Xerox DocuMate 3920
User’s Guide
Page 87

Fax Specifications
Compatibility ITU-T G3 (ECM)
Modem Speed 33.6K
Resolution Receive(dpi)—200x100, 200x200, 200x400 dpi
Compression MH, MR, MMR
Transmission Speed Approximately 3 seconds (*1)
Page Memory 2.0 MB in Flash
Speed Dial 200 sets
Error Correction Mode Yes
Contrast Control 7 Levels
Monitor Speaker Ye s
Busy Tone Detection Ye s
Redial Automatic / Manual
Immediate Transmission N/A
Memory Transmission Ye s
Send(dpi)—200x100, 200x200
Xerox DocuMate 3920
User’s Guide
87
Page 88

88
Xerox DocuMate 3920
User’s Guide
Page 89

Managing the Scanner
7
Remotely
This chapter includes:
• Accessing the Scanner on page 90
• Using the Embedded Web Page on page 95
• Account Management on page 97
• Configuring the Shortcut Buttons on page 101
• Managing the Scanner Address Book on page 104
• Filing Manager on page 108
Most of the scanner’s features can be configured locally at the scanner using the LCD touch screen.
After setting up the scanner on the network, you can manage the same scanner settings remotely,
through a web browser or using the Network Management Tool.
The Administrator Settings are secured with a password. There is no default password for these
options, you can create a password later. Note that these settings cannot be configured locally at the
scanner, they can only be configured remotely using the scanner’s embedded web page, as described
later in this chapter:
• User Account Management
• Define The Shortcut Buttons
• E-Mail Address Book Manager
• Filing Manager
Xerox DocuMate 3920
User’s Guide
89
Page 90

Accessing the Scanner
To access the scanner through a web browser, simply type the scanner’s IP address into the browser’s
URL field. You can also use the Network Management Tool utility to access the scanner on the network.
When you use this utility, you do not need to know the scanner’s IP address. The utility will search and
display all Xerox DocuMate 3920 scanners on the network.
The Network Management Tool is located on the installation disc you received with the scanner.
When you access the scanner remotely, the scanner’s embedded web page is displayed on your
computer. This web page contains the same feature options as the LCD panel, as well as the ability to
create user accounts and configure shortcut buttons.
Installing the Network Management Tool
1. Start Microsoft Windows and make sure that no other applications are running.
2. Insert the installation disc into your computer’s CD-ROM drive.
3. The Select Language window opens. Click the drop-down menu arrow and select the language to
use. Click OK.
4. The disc’s Main Menu window opens.
NOTE: If the disc does not start, check the following:
• Make sure the disc drive’s door is completely shut.
• Make sure the disc was inserted in the drive in the proper direction (label side up).
To launch the disc manually:
• Open the Windows options for your computer’s disc drives.
• Double-click the icon for your CD-ROM drive.
• The Installation menu for the disc should now open.
If the menu does not open:
• From the list of files on the disc, double-click the file named frontend.exe.
90
Xerox DocuMate 3920
User’s Guide
Page 91

5. On the Main Menu, select Install Products.
6. Make sure the box for the Network Management Tool is selected.
NOTE: The software provided with your scanner may differ slightly from the list shown in the window.
7. Click Install Now.
8. Follow the on-screen instructions to complete the software installation.
Xerox DocuMate 3920
User’s Guide
91
Page 92
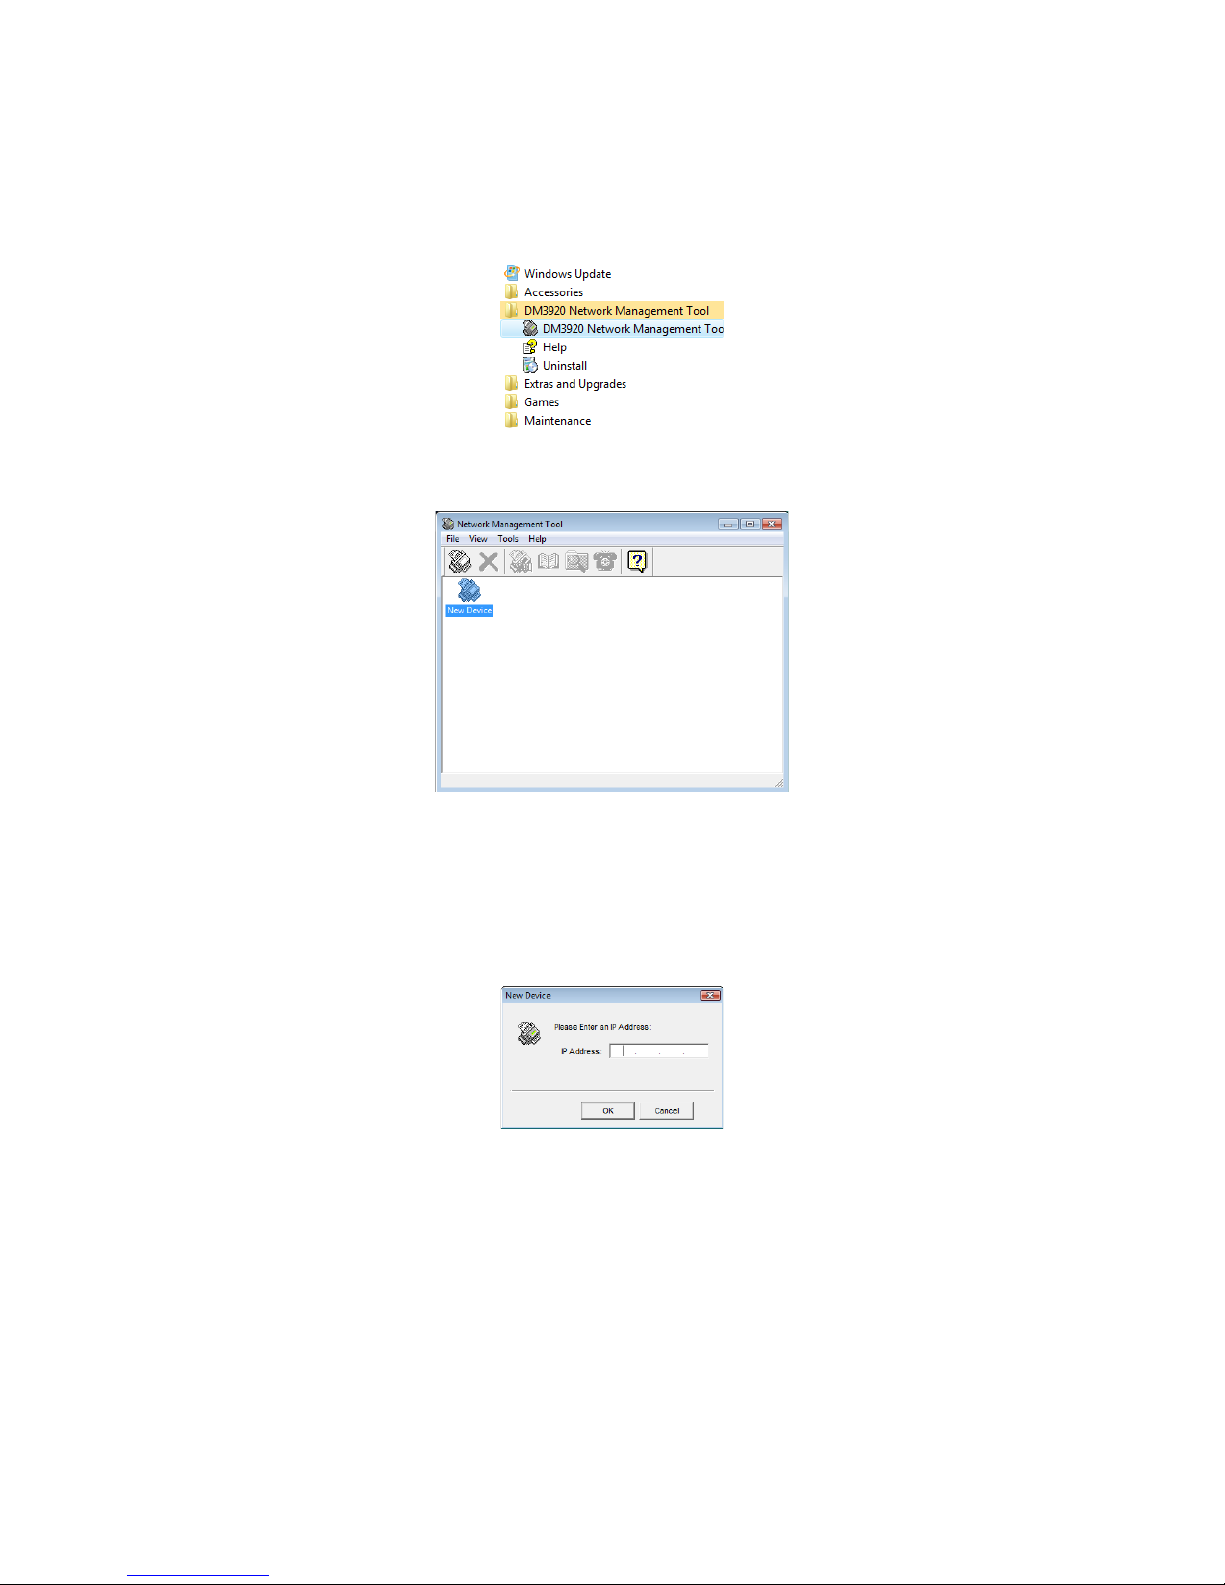
Using the Network Management Tool
1. Launch the DM3920 Network Management Tool from the Windows Programs menu.
2. The main window opens. When the utility is first installed, the window will be empty of devices.
3. Click on File to open the file menu. Select one of the following methods to add a scanner to the
utility list.
•New Device—Click on this option to open the following prompt to input the scanner’s IP
address. Enter the IP address then click on OK to add the scanner to the Network
Management Tool utility.
92
Xerox DocuMate 3920
User’s Guide
Page 93

• Search All Devices—Select this option to search your network for any connected Xerox
DocuMate 3920 scanners.
Select the computer’s network card from the Network Adapter list then click on the Search
button.
When searching is complete, all Xerox DocuMate 3920 scanner’s on your network will be
displayed in the list. Select the scanners you want to configure then click the Add button.
The Xerox DocuMate 3920 scanners will now be in the Network Management Tool main
window.
Xerox DocuMate 3920
User’s Guide
93
Page 94

4. Double-click on the device icon to launch the scanner’s embedded web page.
NOTE: the Sun Java Runtime Environment is needed to view the scanner’s web page. When you
connect to the web page, you will see a status message at the top of the page Connecting... Please
wait. Wait for the window to refresh and display the scanner’s web page. If this message does not
disappear, you may need to install the Sun Java Runtime Environment. Please click on the link in the
web page to download and install the Java Runtime Environment.
Accessing the Scanner from a Web Browser
You can use Microsoft’s Internet Explorer (version 5 or later), Netscape Communicator (version 6 or
later), or Mozilla’s Firefox to access the scanner’s embedded web page.
1. Launch your internet browser.
2. In the URL field, type in the scanner’s IP address, and then press the enter key on your keyboard.
3. The scanner’s embedded web page will now display in your web browser.
94
Xerox DocuMate 3920
User’s Guide
Page 95

Using the Embedded Web Page
The options in the scanner’s embedded web page mirror the options you configure using the scanner’s
LCD touch screen. This section refers to navigating through the web page options. Please refer to the
chapter specific instructions for detailed information about configuring these options and how to use
them.
Important!
• Changes you make in the scanner’s web page are not saved to the scanner until you click
the Update button in the web interface.
Menu Options
• Information—Click this link to display information about the scanner.
This is the scanner hardware information, serial number, and MAC address, as well as the scanner
firmware and software version. The MAC address is also on a sticker on the back of the scanner,
this MAC address identifies the scanner on the network.
Page Count—Displays the total number of scans completed and a breakdown of each type. Click
the Clear button to reset the count.
• General—Click this link to change the general information about the scanner.
Machine Name—You can change the scanner’s display name so that when you view all scanners
on your network, each one appears in the list with the name you specify here.
Date/Time—Set the date and time for the scanner.
Time Zone—Select the time zone for the area you live.
Country Code—Select the code for the country you live in so that you can send and receive faxes.
• Network Settings—
for adding your scanner to the network.
Please refer to Adding the Scanner to the Network on page 23 for instructions
Xerox DocuMate 3920
User’s Guide
95
Page 96

• Mail Server—Please refer to Adding the Email Server Information on page 26 for instructions on
configuring scan to E-mail.
• Copier Default—Please refer to the section Copying on page 35 for detailed configuration instructions
for these options.
• E-Mail Default—Please refer to the section E-mail on page 45 for detailed configuration instructions for
these options.
• Filing Template—Please refer to the section Filing on page 57 for detailed configuration instructions for
these options.
• Fax D e fault / Fax Settings / Phone Book Manager—Please refer to the section Faxing on page 69
for detailed configuration instructions for these options.
Administrative Settings Options
• Management—This option is the only one of the Administrator options that can be configured at
either the scanner or through the scanner’s embedded web page. Please refer to the menu
description on page 20.
• Account Management—Please refer to Account Management on page 97.
• Address Book Manager—Please refer to Managing the Scanner Address Book on page 104.
• Filing Manager—Please refer to Filing Manager on page 108.
• Shortcut—Please refer to Configuring the Shortcut Buttons on page 101.
96
Xerox DocuMate 3920
User’s Guide
Page 97

Account Management
The access to the Account Management section is blocked by the administrator password. It is
recommended that an administrator create a password before changing the default settings to the
secure network environment of the workplace. This chapter is specifically targeted to the persons who
are responsible for the administration of the scanner.
1. Click on the Account Management link.
2. Click on Login when you are prompted to input a user name and password. If you have previously
set an administrator password, using the LCD panel, input the correct information here then click
on Login.
Basic Settings
After changing the authentication method, and creating user accounts, power cycle the scanner for the
data to refresh to the scanner. A user is then required to input a login name and password to use the
scanner.
Xerox DocuMate 3920
User’s Guide
97
Page 98

Item Description
Type Choose your preferred authentication type for account management.
• None—no account management will be applied.
• Local—uses the scanner as the authentication type, and the name and
password entered in the Account Management are saved in the scanner
memory.
• HTTP / LDAP / SMTP—uses an HTTP, LDAP, or SMTP server as the
authentication type.
Server Information IP
or URL
Port # Enter the port number if you choose HTTP, LDAP, or SMTP as your authenticating
Assign the URL of the authenticating SMTP, HTTP or LDAP server. Touch anywhere on
the URL field to bring up the soft keyboard to enter the text.
server.
Default values are: HTTP:80, CIFS:139, HTTPS:443
After you have selected an authentication method, you will need to add the user account information
to the Account List.
Account List
Once you have chosen either Local, SMTP server, LDAP server, or HTTP server as your security type. You
need to set each local user’s login name and password.
1. To create a new account, click the Account List link to open the Account List dialog box.
98
Xerox DocuMate 3920
User’s Guide
Page 99

2. Click the New Account button to open the New Account dialog box.
3. Set up your user name and password respectively in the Name and Password fields. The name and
password are case-sensitive and up to 64 characters can be entered in the Name field and up to
16 characters can be entered in the Password field. Fill the Description field if necessary.
4. Define the user’s privileges for using the scanner.
Function—Click to select the name of the function the user is allowed to access.
For example, the administrator allows a user to perform the Copy, E-mail, and Filing functions, but
does not allow Fax scanning.
5. Click Update to save the settings to the scanner and return to the Account List screen.
Copy Account
If you want to permit other users to use the same privileges as a currently defined user, simply select
the account from the account list and then click the Copy Account button to open the Copy Account
screen. You only need to give a new name and password for the new user without changing any other
settings. Click Update to save the settings or Cancel to return to the Account Management screen
without saving any changes.
Xerox DocuMate 3920
User’s Guide
99
Page 100

Edit
If you want to edit a current local user, choose the account from the account list and then click the Edit
button to open the Edit Account screen. Modify the account options as needed and then click Update
to save the settings, or Cancel to return to the Account Management screen without saving any
changes.
Delete
If you want to delete a current local user, select the account from the account list and click the Delete
button. A confirmation message appears to confirm your deletion. Click OK to confirm or Cancel to
exit. Click Update to save the settings or Cancel to return to the Account Management screen without
saving any changes.
100
Xerox DocuMate 3920
User’s Guide
 Loading...