

Page 1

Page 2

Microsoft and Windows NT are trademarks or registered trademarks of Microsoft Corporation in the U.S. and other
countries.
NetWare is a registered trademark of Novell, Inc. in the United States and other countries.
Adobe, Acrobat, PostScript, and Adobe PostScript 3 are trademarks of Adobe Systems Incorporated.
EtherTalk, Macintosh, and Mac OS are registered trademarks of Apple Computer, Inc.
PCL, HP-GL, and HP-GL/2 are registered trademarks of Hewlett-Packard Corporation.
RSA and BSAFE are either registered trademarks or trademarks of RSA Security Inc. in the U.S.
and/or other countries.
All product/brand names are trademarks or registered trademarks of the respective holders.
Permission has been obtained from Microsoft Corporation for use of software screen shots.
For information on license, refer to About License.
The data saved in the hard disk of the machine may be lost if there is any problem in the hard disk. Fuji
Xerox is not responsible for any direct and indirect damages arising from or caused by such data loss.
Fuji Xerox is not responsible for any breakdown of machines due to infection of computer virus or
computer hacking.
Important
(1) This manual is copyrighted with all rights reserved. Under the copyright laws, this manual may not be copied or
modified in whole or part, without the written consent of the publisher.
(2) Parts of this manual are subject to change without prior notice.
(3) We welcome any comments on ambiguities, errors, omissions, or missing pages.
(4) Never attempt any procedure on the machine that is not specifically described in this manual. Unauthorized
operation can cause faults or accidents. Fuji Xerox is not liable for any problems resulting from unauthorized
operation of the equipment.
An export of this product is strictly controlled in accordance with Laws concerning Foreign Exchange and Foreign
Trade of Japan and/or the export control regulations of the United States.
XEROX, THE DOCUMENT COMPANY, Ethernet, CentreWare, and the stylized X are registered trademarks of Xerox
Corporation. All Xerox and Fuji Xerox product names are either registered trademarks or trademarks of Xerox Corporation
and Fuji Xerox Co., Ltd.
DocuWorks is a trademark.
Page 3

Table of Contents
Table of Contents ........................................................................................................ 1
1 Before Using the Machine ........................................................................................ 9
Preface ...................................................................................................................... 10
Using This Guide ....................................................................................................... 11
Guides Supplied.................................................................................................... 11
Organization of this Guide .................................................................................... 11
Conventions .......................................................................................................... 13
Safety Notes .............................................................................................................. 14
Electrical Safety .................................................................................................... 14
Machine Installation .............................................................................................. 16
Operational Safety ................................................................................................ 19
Consumable.......................................................................................................... 21
Regulation ................................................................................................................. 22
Radio Frequency Emissions (Class B) ................................................................. 22
Regulatory Information for RFID ........................................................................... 22
Product Safety Certification (CB) .......................................................................... 22
Table of Contents
Environment .............................................................................................................. 23
About License ............................................................................................................ 24
RSA BSAFE.......................................................................................................... 24
Heimdal................................................................................................................. 24
LAMA .................................................................................................................... 24
JPEG Code ........................................................................................................... 25
Libcurl ................................................................................................................... 25
FreeBSD ............................................................................................................... 25
OpenLDAP............................................................................................................ 26
Legal Notice............................................................................................................... 29
2 Product Overview .................................................................................................... 31
Machine Components................................................................................................ 32
Power On / Off........................................................................................................... 39
Powering On ......................................................................................................... 39
Powering Off ......................................................................................................... 39
Circuit Breaker ........................................................................................................... 40
Power Saver mode .................................................................................................... 41
Changing the Power Saver Mode Change Interval............................................... 41
Exiting the Power Saver Mode.............................................................................. 44
Control panel ............................................................................................................. 45
Customizing the Control Panel ............................................................................. 47
Web Applications .................................................................................................. 48
3 Setting up the Network Controller ......................................................................... 49
1
Page 4

Preparations ...............................................................................................................50
Installation Procedure.................................................................................................50
Configuration on the Machine ................................................................................50
Step 1 Entering System Administration Mode .......................................................50
Step 2 Entering the System Administrator UserID and Passcode .........................50
Step 3 Selecting the Operation Mode from the System Administrator Menu ........51
Step 4 Setting an IP address .................................................................................51
Configuration on the Computer ..................................................................................54
4 Copy ..........................................................................................................................55
Copying Procedure.....................................................................................................56
Step 1 Loading Documents ...................................................................................56
Step 2 Selecting Features .....................................................................................58
Step 3 Entering the Quantity..................................................................................59
Step 4 Starting the Copy Job .................................................................................59
Step 5 Confirming the Copy Job in the Job Status ................................................60
Operations during Copying.........................................................................................61
Stopping the Copy Job ..........................................................................................61
Changing the Number of Copies ...........................................................................62
Interrupting the Copy Job ......................................................................................62
General Settings.........................................................................................................63
Reduce/Enlarge (Making Enlarged/Reduced Copies) ...........................................63
Paper Supply (Selecting the Paper for Copying) ...................................................66
Output Color (Selecting the Color to Copy) ...........................................................69
Original Type (Selecting the Document Type) .......................................................73
Copy Output (Outputting by Specifying Finishing) .................................................73
Multiple-Up (Copying Multiple Sheets onto One Sheet) ........................................73
Lighten/Darken (Adjusting the Copy Density) ........................................................73
Image Quality .............................................................................................................74
Original Type (Selecting the Document Type) .......................................................74
Image Options (Lighten/Darken, Sharpness, Saturation) ......................................76
Image Enhancement (Background Suppression/Contrast) ...................................76
Color Effects (Selecting Image Quality).................................................................77
Color Balance (Adjusting Color Balance) ..............................................................78
Color Shift (Adjusting Color Tone) .........................................................................78
Gloss Level (Enhancing Gloss of the Document) ..................................................79
Layout Adjustment......................................................................................................80
Book Copying (Copying Facing Pages onto Separate Sheets) .............................80
2 Sided Book Copy (Making 2 Sided Copies of Facing Pages).............................82
Original Size (Specifying the Scan Size for the Document)...................................83
Mixed Sized Originals (Scanning Different Size Documents Simultaneously) ......84
Original Orientation (Specify the Orientation of Loaded Documents) ....................85
Edge Erase (Erasing Edges and Margin Shadows of the Document) ...................85
Image Shift (Shifting the Image Copy Position) .....................................................87
Image Rotation
2
Page 5

Table of Contents
(Making Copies with the Image Rotated Vertically or Horizontally) ...................... 89
Invert Image (Making Reversed Copies of Images).............................................. 90
Original Orientation (Specify the Orientation of Loaded Documents) ................... 91
2 Sided Copying (Making 2 sided Copies) ............................................................ 91
Output Format ........................................................................................................... 93
Booklet Creation (Creating a Booklet) .................................................................. 94
Covers (Attaching a Cover to Copies) .................................................................. 97
Transparency Separators
(Inserting Blank Sheets between Transparencies) ............................................... 99
Multiple-Up (Copying Multiple Sheets onto One Sheet) ..................................... 100
Poster (Making Enlarged Copies Spread over Multiple Sheets)......................... 101
Repeat Image (Making Multiple Copies on One Sheet)...................................... 102
Annotation (Adding Stamp/Date/Page Number to Copies) ................................. 103
Watermark (Printing Control Number on Background) ....................................... 110
Tab Margin Shift (Copying on Tab Paper) .......................................................... 113
Output Orientation (Specifying Face Up or Down).............................................. 114
Folding (Outputting Bi-Folded paper).................................................................. 115
Preset Repeat Image (Making Multiple Copies on a Single Sheet) .................... 115
2 Sided Copying (Making 2-sided Copies).......................................................... 116
Copy Output (Outputting by Specifying Finishing) .............................................. 116
ID Card Copying (Copying Both Sides of an ID Card) ........................................ 118
Job Assembly .......................................................................................................... 119
Build Job
(Making Copies of Documents with Different Settings in a Single Operation) .... 119
Sample Set (Checking the Finished Output of the Copy) ................................... 122
Combine Original Sets (Adding Originals) .......................................................... 123
Delete Outside/Delete Inside
(Deleting Outside or Inside of the Selected Area when Copying)....................... 124
Stored Programming (Calling a Stored Program for Build Job) .......................... 126
5 Scan ........................................................................................................................ 127
Scanning Procedure ................................................................................................ 128
Step 1 Loading Documents................................................................................. 128
Step 2 Selecting Features................................................................................... 130
Step 3 Starting the Scan Job .............................................................................. 132
Step 4 Confirming the Scan Job in the Job Status ............................................. 133
Step 5 Saving the Scanned Data........................................................................ 133
Stopping the Scan Job ............................................................................................ 134
General Settings ...................................................................................................... 135
Scanning Color (Selecting the Color to Scan) .................................................... 135
2 Sided Originals (Scanning Both Sides of a Document) ................................... 136
Original Type (Select the Document Type)......................................................... 137
Image Quality .......................................................................................................... 138
Photographs (Scanning a Color Photograph) ..................................................... 138
Image Options (Adjusting Scan Density and Contrast)....................................... 138
Image Enhancement (Erasing the Background Color of Documents/Adjusting
3
Page 6

contrast)...............................................................................................................139
Shadow Suppression (Suppressing the Document Background)........................140
Color Space (Specifying Color Space) ................................................................140
Layout Adjustment....................................................................................................141
Scan Resolution (Specifying a Scanning Resolution)..........................................141
2 Sided Originals (Scanning Both Sides of a Document) ....................................141
Book Scanning (Scanning Facing Pages onto Separate Sheets) .......................142
Original Size (Specifying an Original Size) ..........................................................143
Mixed Size Originals (Scanning Different Size Documents Simultaneously) ......144
Edge Erase (Erasing Edges and Margin Shadows in the Document) .................145
Reduce/Enlarge (Specifying a Scanning Ratio)...................................................146
Output Format ..........................................................................................................147
Image Compression (Specifying an Image Compression Ratio) .........................147
6 Stored Programming..............................................................................................149
Stored Programming Overview ................................................................................150
Registering/Deleting/Renaming Stored Programs ...................................................151
Registering Stored Programs ..............................................................................152
Registering Stored Program (Build Job) ..............................................................153
Deleting Stored Programs ...................................................................................154
Entering/Changing Stored Program Name ..........................................................154
Assigning/Changing Icons for Stored Programs..................................................155
Calling Stored Programs ..........................................................................................156
7 Paper and Other Media ..........................................................................................157
Paper Types .............................................................................................................158
Supported Paper Weight and Quantity ................................................................158
Loading Paper ..........................................................................................................162
Loading Paper in the Trays 1 to 2........................................................................163
Loading Paper in the Tray 3 ................................................................................164
Loading Paper in the Tray 4 ................................................................................165
Loading Paper in the Tray 5 (Bypass) .................................................................166
Loading Tab Paper in the Tray 5 (Bypass) ..........................................................167
Loading Paper in the Tray 6 (High Capacity).......................................................168
Loading Paper in the Tray 6 (A3+ High Capacity) ...............................................169
Loading Tab Paper in the Tray 6 (A3+ High Capacity) ........................................170
Loading Paper in the Tray 8 (Interposer).............................................................171
Loading Tab Paper in the Tray 8 (Interposer)......................................................171
Facilitating Feeding of Heavyweight Paper Loaded in Tray 6
(A3+ High Capacity).............................................................................................172
Changing the Paper Size for the Trays ....................................................................173
Changing the Paper Size for the Trays 1 to 2......................................................173
Changing the Paper Size for the Trays 3.............................................................174
Changing the Paper Size for the Tray 4 ..............................................................175
Changing the Paper Size for the Tray 6 (High Capacity).....................................176
4
Page 7

Table of Contents
Changing the Paper Size for the Tray 6 (A3+ High Capacity) ............................ 178
Changing Paper Settings......................................................................................... 179
8 System Settings..................................................................................................... 183
System Settings Procedure ..................................................................................... 184
Step 1 Entering System Administration Mode .................................................... 184
Step 2 Entering the System Administrator UserID and Passcode ...................... 184
Step 3 Selecting the Operation Mode from the System Administrator Menu...... 185
Step 4 Selecting an Item from the [System Settings] Screen ............................. 185
Step 5 Setting the Feature .................................................................................. 186
Step 6 Exiting System Administration Mode ....................................................... 186
System Settings Menu List ...................................................................................... 187
Entering Text ........................................................................................................... 193
Common Settings .................................................................................................... 194
Machine Clock/Timers ........................................................................................ 195
Audio Tones........................................................................................................ 198
Screen/Button Settings ....................................................................................... 200
Paper Tray Settings ............................................................................................ 203
Image Quality Adjustment ................................................................................... 211
Reports ............................................................................................................... 214
Maintenance ....................................................................................................... 215
Watermark .......................................................................................................... 216
Other Settings ..................................................................................................... 217
Copy Mode Settings ................................................................................................ 224
General Settings Tab - Features Allocation ........................................................ 225
Preset Buttons .................................................................................................... 225
Copy Defaults ..................................................................................................... 226
Copy Control ....................................................................................................... 231
Original Size Defaults ......................................................................................... 237
Reduce/Enlarge Presets ..................................................................................... 238
Custom Colors .................................................................................................... 238
Annotation - Create Stamps................................................................................ 239
Scan Mode Settings ................................................................................................ 240
General Settings Tab .......................................................................................... 241
Scan Defaults...................................................................................................... 242
Original Size Defaults ......................................................................................... 243
Output Size Defaults ........................................................................................... 244
Reduce/Enlarge Presets ..................................................................................... 244
Other Settings ..................................................................................................... 245
Network Controller Settings ..................................................................................... 247
Network Settings ................................................................................................. 247
System Administrator Settings ................................................................................ 249
System Administrator Login ID ........................................................................... 249
System Administrator’s Passcode ...................................................................... 250
5
Page 8

Maximum Login Attempts ....................................................................................251
Login Setup/Auditron Administration ........................................................................252
Create/Check User Accounts ..............................................................................253
Reset User Accounts ...........................................................................................256
System Administrator’s Meter (Copy Jobs) .........................................................257
User Details Setup...............................................................................................257
Passcode Entry from Control Panel.....................................................................258
Login Setup/Auditron Mode .................................................................................258
9 Job Status ...............................................................................................................261
Job Status Overview ................................................................................................262
Checking Current/Pending Jobs...............................................................................263
Checking Completed Jobs .......................................................................................264
Handling Error Terminations ....................................................................................265
10 Machine Status .......................................................................................................267
Overview of Machine Status.....................................................................................268
Machine Status.........................................................................................................269
Machine Information ............................................................................................269
Paper Tray ...........................................................................................................271
Overwrite Hard Disk.............................................................................................271
Billing Meter/Print Report .........................................................................................272
Billing Meter .........................................................................................................272
User Account Billing Meter ..................................................................................273
Print Report/List ...................................................................................................275
Supplies....................................................................................................................278
Faults........................................................................................................................279
11 Authentication and Auditron Administration ......................................................281
Overview of Authentication.......................................................................................282
Users Controlled by Authentication .....................................................................282
Types of Authentication .......................................................................................282
Features Controlled by Authentication.................................................................283
Overview of Auditron Administration ........................................................................284
Authentication and Auditron Administration .........................................................284
Manageable Features and Services ....................................................................284
12 Maintenance............................................................................................................285
Replacing Supplies...................................................................................................286
Replacing Toner Cartridges .................................................................................287
Replacing the Waste Toner Container.................................................................289
Replacing Drum Cartridge R1
(for customers having a spot maintenance contract)...........................................291
Replacing Drum Cartridge R2/R3/R4
(for customers having a spot maintenance contract)...........................................294
6
Page 9

Table of Contents
Replacing the Staple Cartridge for C-Finisher or
C-Finisher with Booklet Maker ............................................................................ 298
Replacing the Booklet Staple Cartridge for C-Finisher with Booklet Maker
or D2-Finisher with Booklet Maker...................................................................... 299
Replacing the Staple Cartridge for D2-Finisher with Booklet Maker ................... 301
Emptying Punch Scrap Container for C-Finisher or
C-Finisher with Booklet Maker ............................................................................ 303
Emptying the Punch Scrap Container for D2-Finisher with Booklet Maker......... 304
Replacing the Staple Scrap Container for D2-Finisher with Booklet Maker........ 305
Cleaning the Machine .............................................................................................. 307
Cleaning the Exterior .......................................................................................... 307
Cleaning the Document Cover and Document Glass ......................................... 307
Cleaning the Film Section and Document Feeder Glass .................................... 308
Cleaning Document Feeder Rollers.................................................................... 309
Executing Calibration............................................................................................... 310
Printing a Report/List ............................................................................................... 315
13 Problem Solving .................................................................................................... 317
Troubleshooting ....................................................................................................... 318
Machine Trouble ...................................................................................................... 320
Image Quality Problems .......................................................................................... 324
Trouble during Copying ........................................................................................... 329
Unable to Copy ................................................................................................... 329
The Copy Result is not What was Expected....................................................... 330
Error Codes ............................................................................................................. 334
Other Errors ........................................................................................................ 343
Paper Jams ............................................................................................................. 344
Paper Jams in the Trays 1 to 2 ........................................................................... 345
Paper Jams in the Tray 3 .................................................................................... 345
Paper Jams in the Tray 4 .................................................................................... 346
Paper Jams in the Tray 5 (Bypass)..................................................................... 346
Paper Jams in the Tray 5 (Bypass) when A3+ High Capacity Tray is installed .. 347
Paper Jams in the Tray 6 (High Capacity) .......................................................... 348
Paper Jams in the Tray 6 (A3+ High Capacity)................................................... 350
Paper Jams in the Transfer Module.................................................................... 353
Paper Jams in the Bottom Left Cover ................................................................. 354
Paper Jams in the Bottom Right Cover............................................................... 355
Paper Jams in the Output Tray ........................................................................... 357
Paper Jams in the C-Finisher or the C-Finisher with Booklet Maker .................. 357
Paper jams in the D2-Finisher with Booklet Maker ............................................. 370
Document Jams ...................................................................................................... 381
Stapler Faults .......................................................................................................... 384
Staple Jams in the Staple Cartridge for C-Finisher or
C-Finisher with Booklet Maker ............................................................................ 385
Staple Jams in the Booklet Staple Cartridge
7
Page 10

for C-Finisher with Booklet Maker or D2-Finisher with Booklet Maker ................386
Staple Jams in the Staple Cartridge for D2-Finisher with Booklet Maker ............388
Staple Cartridge Taken Off from Unit for D2-Finisher with Booklet Maker...............390
Solving Curled Output ..............................................................................................392
14 Appendix .................................................................................................................393
Specifications ...........................................................................................................394
Printable Area...........................................................................................................402
List of Options ..........................................................................................................403
Notes and Restrictions .............................................................................................404
Notes and Restrictions on the Use of the Machine..............................................404
Notes and Restrictions on Interrupting Job..........................................................404
Index ...............................................................................................................................405
8
Page 11

1 Before Using the Machine
This chapter contains descriptions about how to use this document, as well as
cautions on using the product safely and legally.
z
Preface .......................................................................................................10
z
Using This Guide ........................................................................................11
z
Safety Notes ...............................................................................................14
z
Regulation................................................................................................... 22
z
Environment................................................................................................ 23
z
About License ............................................................................................. 24
z
Legal Notice................................................................................................ 29
Page 12

1 Before Using the Machine
Preface
Before Using the Machine
1
Thank you for selecting the Fuji Xerox DocuColor 6075II/5065II.
This guide provides all the necessary copy/print/scan operating procedures,
maintenance information like how to clear paper jams, daily care, setting various items,
and precautions.
This guide assumes that the operator has a basic knowledge of the operating
environment of the personal computer in use, networking environments, and how to
operate a personal computer.
Please read this guide thoroughly to obtain the best performance on this product. After
reading this guide, be sure to keep it handy for quick reference. It will be useful in case
you forget how to perform operations or if a problem occurs with the machine.
For instructions on configuring your network environment, refer to the Network
Administrator Guide. For information about optional accessories for the printer
functionality, also refer to the guide provided with each optional accessory.
Since the machine is equipped with anti-counterfeit features, in some rare cases,
certain kinds of documents may be unable to copy.
May 2007
Fuji Xerox
In this manual, safety instructions are preceded by the symbol .
Always read and follow the instructions before performing the required procedures.
The equipment is certified by NEMKO in compliance with [IEC60950-1 (AS/NZS
3260)]. The equipment is manufactured under an ISO 9001 Quality System. The
equipment is also certified in compliance with applicable standards by various
national bodies.
The equipment was tested and is certified by the New Zealand Ministry of
Commerce in conformance with CISPR publ. 22 (AS/NZISS CISPR22:2002) which
relates to radio frequency interference regulations, and also complies with the
Australian Communication Authority requirements.
NOTE: Machines intended for use in South Korea and Taiwan have been certified
separately in compliance with their requirements.
Any unauthorized alteration, which includes the addition of new functions or the
connection of external devices, may impact this certification.
Contact your local Xerox representative for a list of approved accessories.
10
Page 13

Using This Guide
Using This Guide
This section describes the organization of this guide.
Guides Supplied
We provide the following guides for optimum usage of the machine.
Included Manuals
Several manuals are included with this product. They are referred to as accompanying
manuals.
These accompanying manuals include descriptions on configurations and operation of
the product.
The below manuals are included with the machine.
User Guide (This Document)
This guide describes all the necessary steps for copy/print/scan, clearing paper jams,
daily care, setting the various items and safety information.
USER DOCUMENTATIONS for Network Controller
A guide to installing print driver, configuring the Network Controller. This manual is
included in the Network Controller.
Before Using the Machine
1
Guides for Optional Accessories
Optional accessories are also available for the machine. User Guides are provided with
the optional accessories exclusively for the DocuColor 6075II/5065II. These User
Guides are referred to as "guides for optional accessories". Guides for optional
accessories are provided in two forms, printed or as On-line Help.
Guides for optional accessories describe all the necessary steps for operating optional
accessories and installing software.
Organization of this Guide
This guide consists of the following chapters.
1 Before Using the Machine
Describes how to use this document, as well as cautions on using the product safely
and legally.
2 Product Overview
Describes basic information such as identifying the major components, how to switch
the machine on and off, how to use the touch screen, and how to set the power saver
feature.
3 Setting up the Network Controller
Describes how to configure the Network Controller.
4 Copy
Describes the basic operations and features of copying.
11
Page 14

1 Before Using the Machine
5 Scan
Describes the basic operations and features of scanning.
Before Using the Machine
1
6 Stored Programming
Describes the stored programming features that enables to record a series of
operations.
7 Paper and Other Media
Describes the types of paper that can be used on the machine, precautions when
handling paper, and how to load paper in trays.
8 System Settings
Describes how to use the system settings.
9 Job Status
Describes the job status feature.
10 Machine Status
Describes the machine status feature.
11 Authentication and Auditron Administration
The machine has an authorization feature to restrict use of features of the machine, as
well as administration features to monitor usage statuses.
12 Maintenance
Describes procedures for replacing supplies, cleaning the machine, calibration, and
printing reports/lists.
13 Problem Solving
Describes troubles that may occur with the machine and their solutions.
14 Appendix
Describes the specifications, printable area, ESC/P emulation, PDF direct print,
optional accessories list, and cautions/restrictions.
12
Page 15
Conventions
z
z
z
z
Using This Guide
In this document, “computer” refers to a personal computer or workstation.
The following icons are used in this guide.
Important Indicates important information that you should read.
Note Indicates additional information on operations or features.
The following conventions are used in this guide:
" " : The cross-reference is within this guide.
" " : Refers to names of CD-ROM, features, and touch screen
messages and input text.
[ ] : Refers to folders, files, applications, button or menu names
displayed in the touch screen, as well as the names of menus,
commands, windows, or dialog boxes displayed on the
computer screen and their buttons and menu names.
< > button: Indicates a hardware button on the computer.
< > key: Indicates a key on the keyboard of the computer.
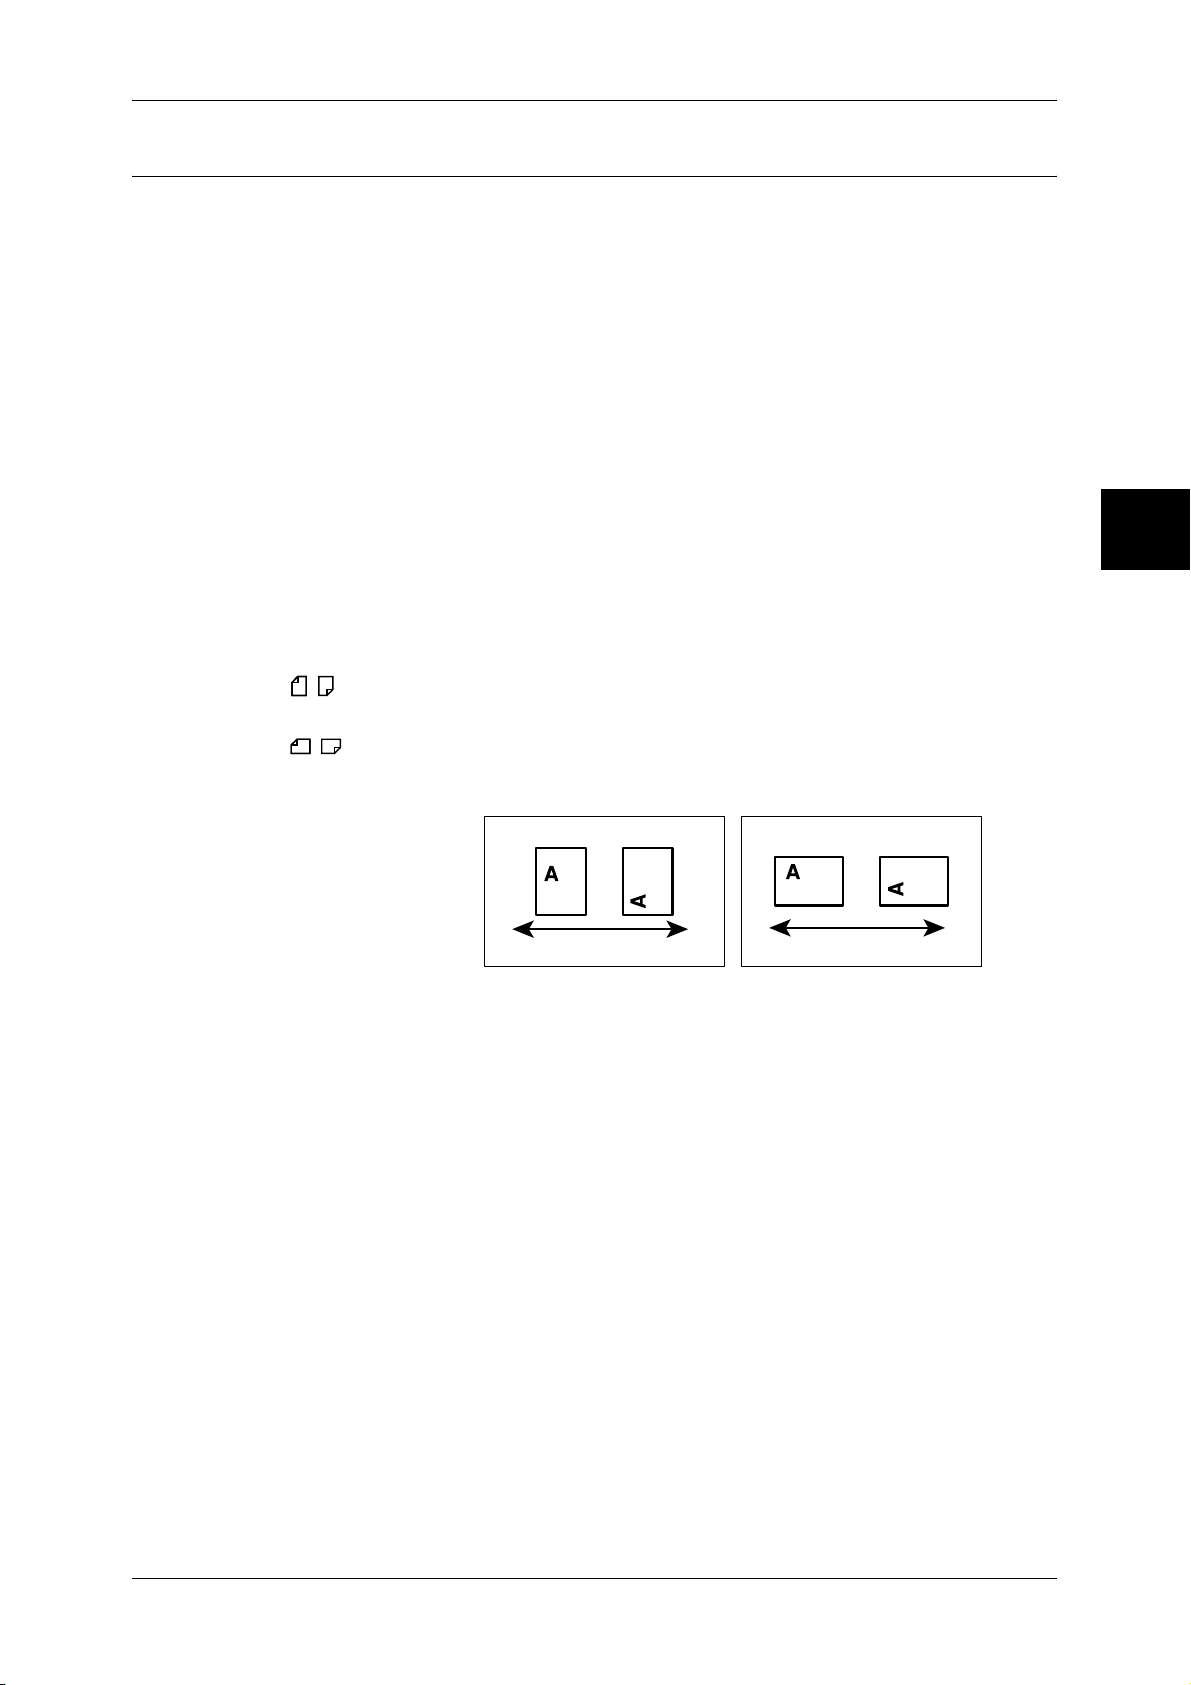
Orientation of documents or paper is described in this guide as follows:
Before Using the Machine
1
, ,Long Edge Feed (LEF): Loading with one of the long edges of the document
or paper.
, ,Short Edge Feed (SEF): Loading with one of the short edges of the document
or paper.
LEF Orientation SEF Orientation
Paper feed direction
Paper feed direction
13
Page 16

1 Before Using the Machine
j
Safety Notes
Before Using the Machine
1
Before using this product, read "Safety Notes"carefully for safety use.
This product and recommended supplies have been tested and found to comply with
strict safety requirements including safety agency approvals and compliance with
environmental standards. Follow the following instructions for safety use..
WARNING
Any unauthorized alteration including an addition of new functions or connection to
external devices may not be covered by the product warranty. Contact your local Fuji
Xerox representative for more information.
Follow all warning instructions marked on this product. The warning marks stand for the
followings:
Used for item that if not followed strictly, can lead death or severe or
fatal injuries and the possibility to do it is comparatively high.
Used for items that if not followed strictly, can lead to severe or fatal
injuries.
Used for items that if not followed strictly, can cause injuries to user or
damages to machine.
A symbol for items to pay attention to when handling machine.
Follow instructions carefully to use machine safely.
Electrical Safety
This product shall be operated by the electrical supply as indicated on the product's
data plate label. Consult your local power company to check if your electrical supply
meets the requirements.
Caution Flammable Explodable Electric
shock
Heated
surface
Moving
ect
ob
A symbol for prohibited items. Follow instructions carefully to avoid
any dangerous acts.
Prohibited No fire Do not
touch
Do not use
in bathroom
Do not
tear down
Keep away
from wet
Never touch
with wet hand
A symbol for items that must be performed. Follow instructions
carefully to carry out these essential tasks.
Instructions Unplug Ground/
Earth
Pinched
fingers
14
Page 17
Safety Notes
WARNING: Connect this product to a protective earth circuit.
This product is supplied with a plug that has a protective earth pin. The plug
fits only into an earthed electrical outlet. This is a safety feature. If the plug
doesn't fit to the outlet, contact an electrician to replace the outlet to avoid risk
of electric shock. Never use an earthed adapter plug to connect the product to
the electrical outlet that has no earth connection terminal.
Improper connection of a grounding conductor may cause electric shock.
Plug the power cord directly into a grounded electrical outlet. To prevent
overheat and a fire accident, do not use an extension cord, a multi-plug
adaptor or a multiple connector. Consult your local Fuji Xerox representative
to check if an outlet is grounded.
Connect this product to a branch circuit or an outlet that has larger capacity
than the rated ampere and voltage of this product. See the data plate on the
rear panel of this product for its rated ampere and voltage.
Never touch the power cord with wet hands. It may cause electric shock.
Do not place an object on the power cord.
Always keep the plug connection free of dust. The dusty and damp
environment may bring about minute electric current in a connector. It may
generate heat and eventually cause a fire accident.
To avoid the risk of electric shock and a fire accident, only use the power cord
supplied with this product or the ones designated by Fuji Xerox.
The power cord is exclusive use for this product. Do not use it for any other
product.
Do not damage or alter the power cord. Damage and alteration may generate
heat and eventually cause electric shock or a fire accident.
If the power cord is damaged or insulated wires are exposed, contact your local
Fuji Xerox representative for its replacement. Do not use a damaged or
uninsulated cord to avoid the risk of electric shock and a fire accident.
Before Using the Machine
1
When cleaning this product, switch off the product and its switchboard (branch
circuit). Access to a live machine interior may cause electric shock.
Do not unplug or re-plug this product with the switch on. Plugging and
unplugging a live connector may deform the plug and generate heat, and
eventually cause a fire accident.
Hold the plug not the cord when unplugging this product, or it may damage the
cord and cause electric shock or a fire accident.
Switch off and unplug the product when it is not used over weekends or long
holidays. It may cause deterioration of insulations and eventually electric
shock or a fire accident.
15
Page 18
Before Using the Machine
1
1 Before Using the Machine
Once a month, switch off this product and check if
z
the power cord is plugged firmly into an electrical outlet;
z
the plug is not excessively heated, rusted or bent;
z
he plug and electrical outlet are free of dust; and
z
the power cord is not cracked or worn down.
Once you notice any unusual condition, switch off and unplug this product first
and contact your local Fuji Xerox representative.
Machine Installation
Do not locate this product where people might step on or trip over the power
cord. Friction or excessive pressure may generate heat and eventually cause
electric shock or a fire accident.
Never locate this product in the following places:
z
Near radiators or any other heat sources
z
Near volatile flammable materials such as curtains
z
In the hot, humid, dusty or poorly ventilated environment
z
In the place receiving direct sunlight
z
Near cookers or humidifiers
Locate this product on the level and sturdy surface that can withstand a weight
of 550 Kg. Otherwise, if tilted, the product may fall over and cause injuries.
Locate this product in a well-ventilated area. Do not obstruct ventilation
openings of the product. Poor ventilation may cause overheat and a fire
accident.
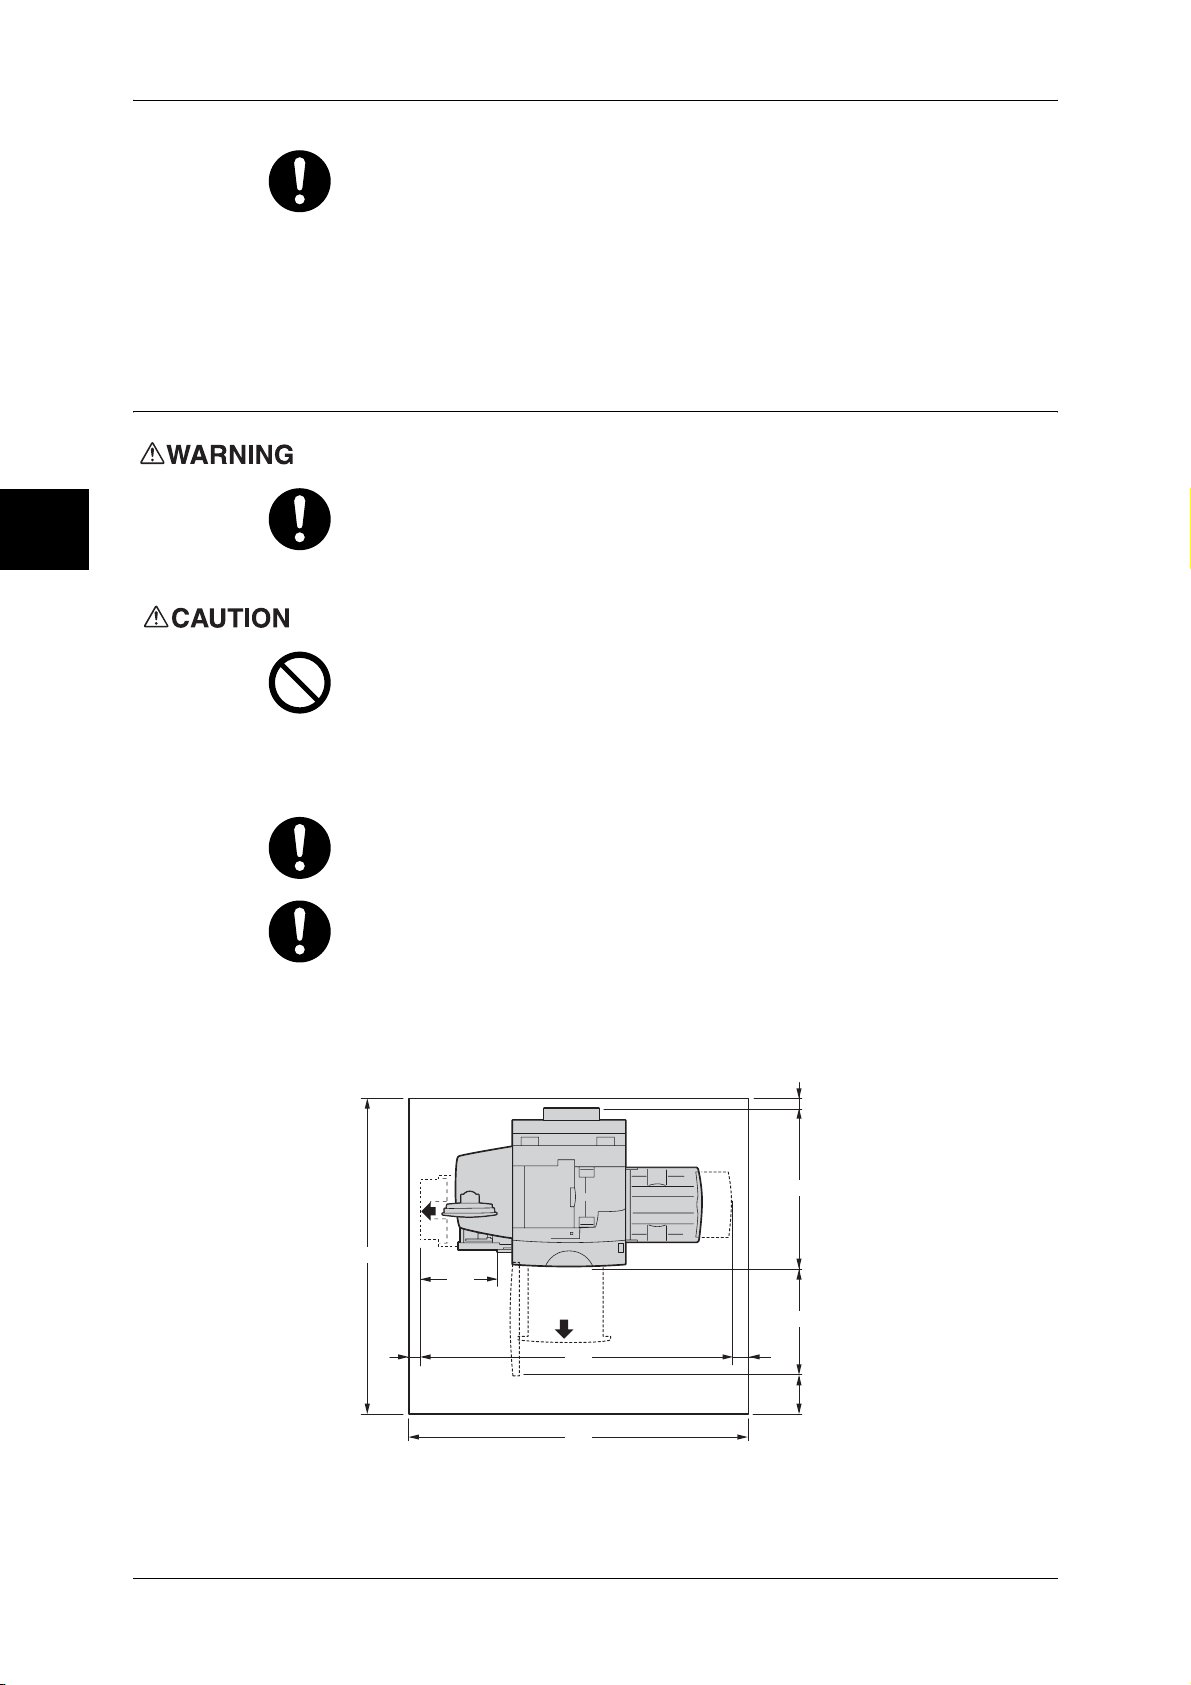
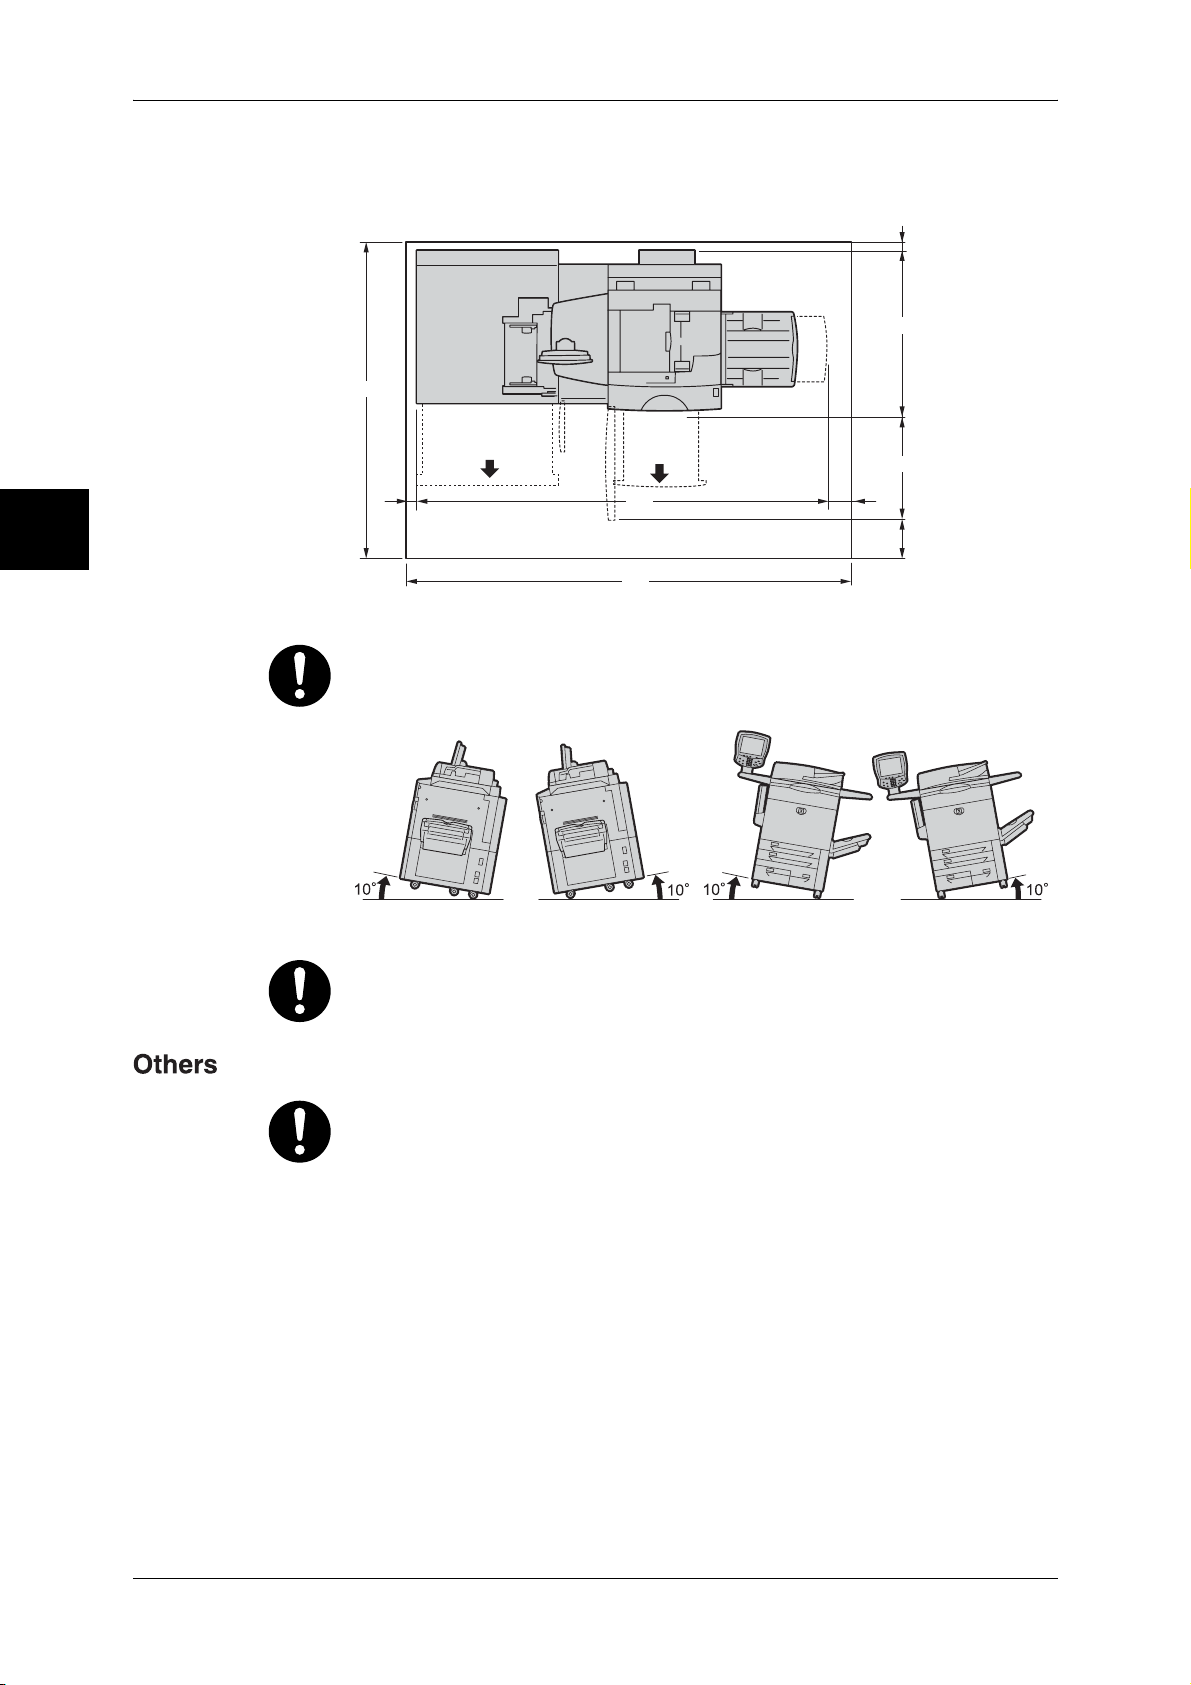
Keep the minimum clearance as follows for ventilation and an access to the
power plug. Unplug the product if an abnormal condition is noted.
Main unit
20
915
1855
469
597
20
1574
80
323
(Unit:mm)
16
1674
Page 19
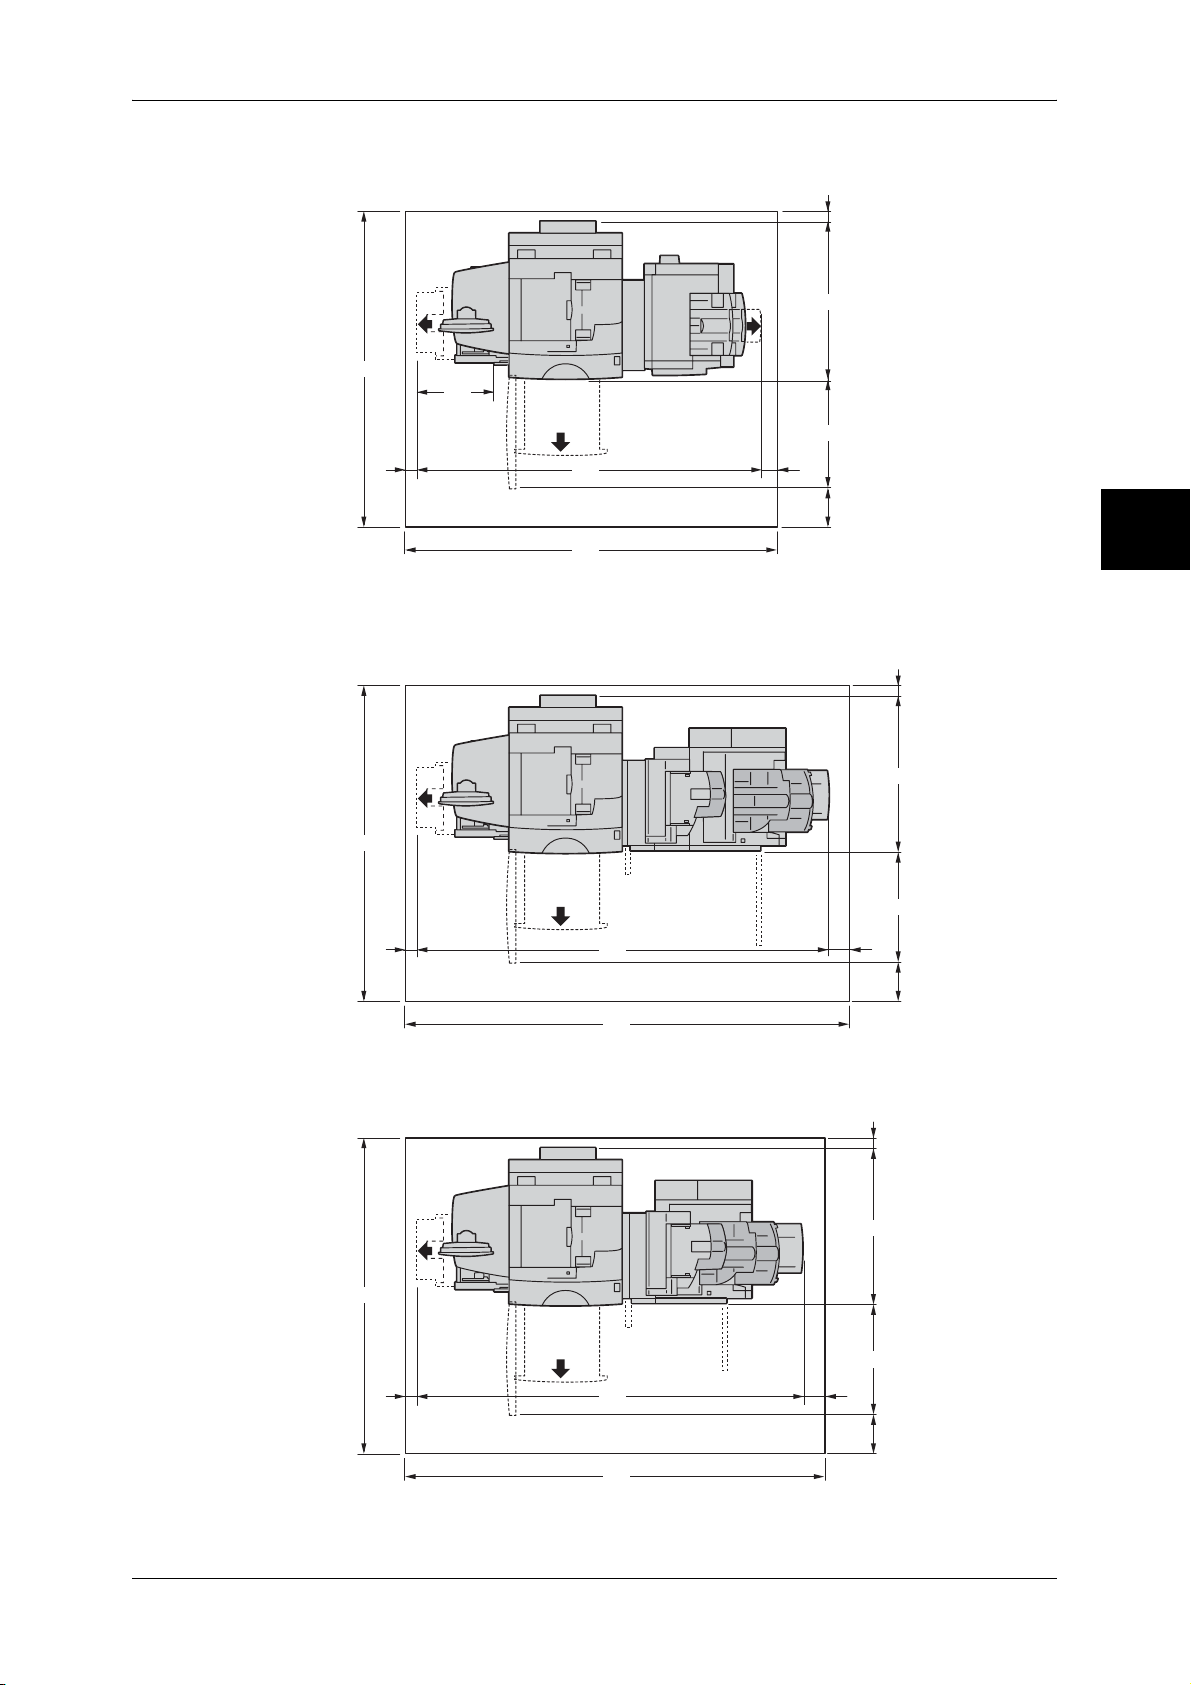
When C-Finisher with Booklet Maker (optional) is installed
Safety Notes
20
915
1855
469
597
20
2096
2196
80
323
(Unit:mm)
When folding unit D2 (optional) is installed to D2-Finisher with Booklet
Before Using the Machine
1
20
915
1855
20
2425
2525
When D2-Finisher with Booklet Maker is installed
1855
20
2225
597
80
323
(Unit:mm)
20
915
597
80
2325
323
(Unit:mm)
17
Page 20
1 Before Using the Machine
When A3+ High Capacity Tray (optional) is installed
Before Using the Machine
20
915
1855
597
1
20
2045
2145
80
323
(Unit:mm)
Do not incline the product at more than 10 degree angle. Otherwise, it may fall
over and cause injuries.
Front
Back
Left
Right
Always lock the wheels of this product after installation. Otherwise, it may fall
over or slide and cause injuries.
18
To keep this product in a good performance and condition, always use it in the
following environment:
z
Temperature: 10 - 32 °C
z
Humidity: 15 - 85 %
When the product is left in a chilly room and the room is rapidly warmed up by
heater, dew condensation may form inside the product and cause a partial
deletion on printing.
Page 21
Operational Safety
The operator's product maintenance procedures are described in the customer
documentation supplied with this product. Do not carry out any other
maintenance procedures not described in the documentation.
This product features safety design not to allow operators access to hazard
areas. The hazard areas are isolated from operators by covers or protectors
which require a tool to remove. To prevent electric shock and injuries, never
remove those covers and protectors.
To avoid the risk of electric shock and a fire accident, switch off and unplug the
product promptly in the following conditions, then contact your local Fuji Xerox
representative.
z
z
z
z
z
z
z
The product emits smoke or its surface is unusually hot.
The product emits unusual noise or odor.
The power cord is cracked or worn down.
A circuit breaker, fuse or any other safety device is activated.
Any liquid is spilled into the product.
The product is soaked in water.
Any part of the product is damaged.
Safety Notes
Before Using the Machine
1
Do not insert any object into slots or openings of this product.
Do not place any of the followings on the product:
z
Liquid container such as flower vases or coffee cups
z
Metal parts such as staples or clips
z
Heavy objects
If liquid is spilled over or metal parts are slipped into the product, it may cause
electric shock or a fire accident.
Do not use conductive paper such as carbonic paper or coated paper. When
paper jam occurs, it may cause short-circuit and eventually a fire accident.
When cleaning this product, use the designated cleaning materials exclusive
to it. Other cleaning materials may result in poor performance of the product.
Never use aerosol cleaners, or it may catch fire and cause explosion.
Never play the CD-ROM supplied with the product on an audio player. Always
use a CD-ROM player. Otherwise, large sound may damage audio players or
your ears.
Laser Safety
CAUTION: Any operations or adjustments not stated in the operation manual
may cause hazardous light exposure and eventually burn injuries or loss of
eyesight.
This product has been tested and found to comply with the Class 1 Laser
Equipment requirements defined by the international standard IEC60825 and
has no light exposure hazard. The product has no hazardous light emission as
it features light protection components and covers to shut in all light beam
during operation and maintenance.
Always follow all warning instructions marked on or supplied with this product.
To avoid the risk of burn injuries and electric shock, never touch the area with
the "High Temperature" or "High Voltage" marks on.
19
Page 22
Before Using the Machine
1
1 Before Using the Machine
Keep electrical and mechanical safety interlocks active. Keep the safety
interlocks away from magnetic materials. Magnetic materials may accidentally
activate the product and cause injuries or electric shock.
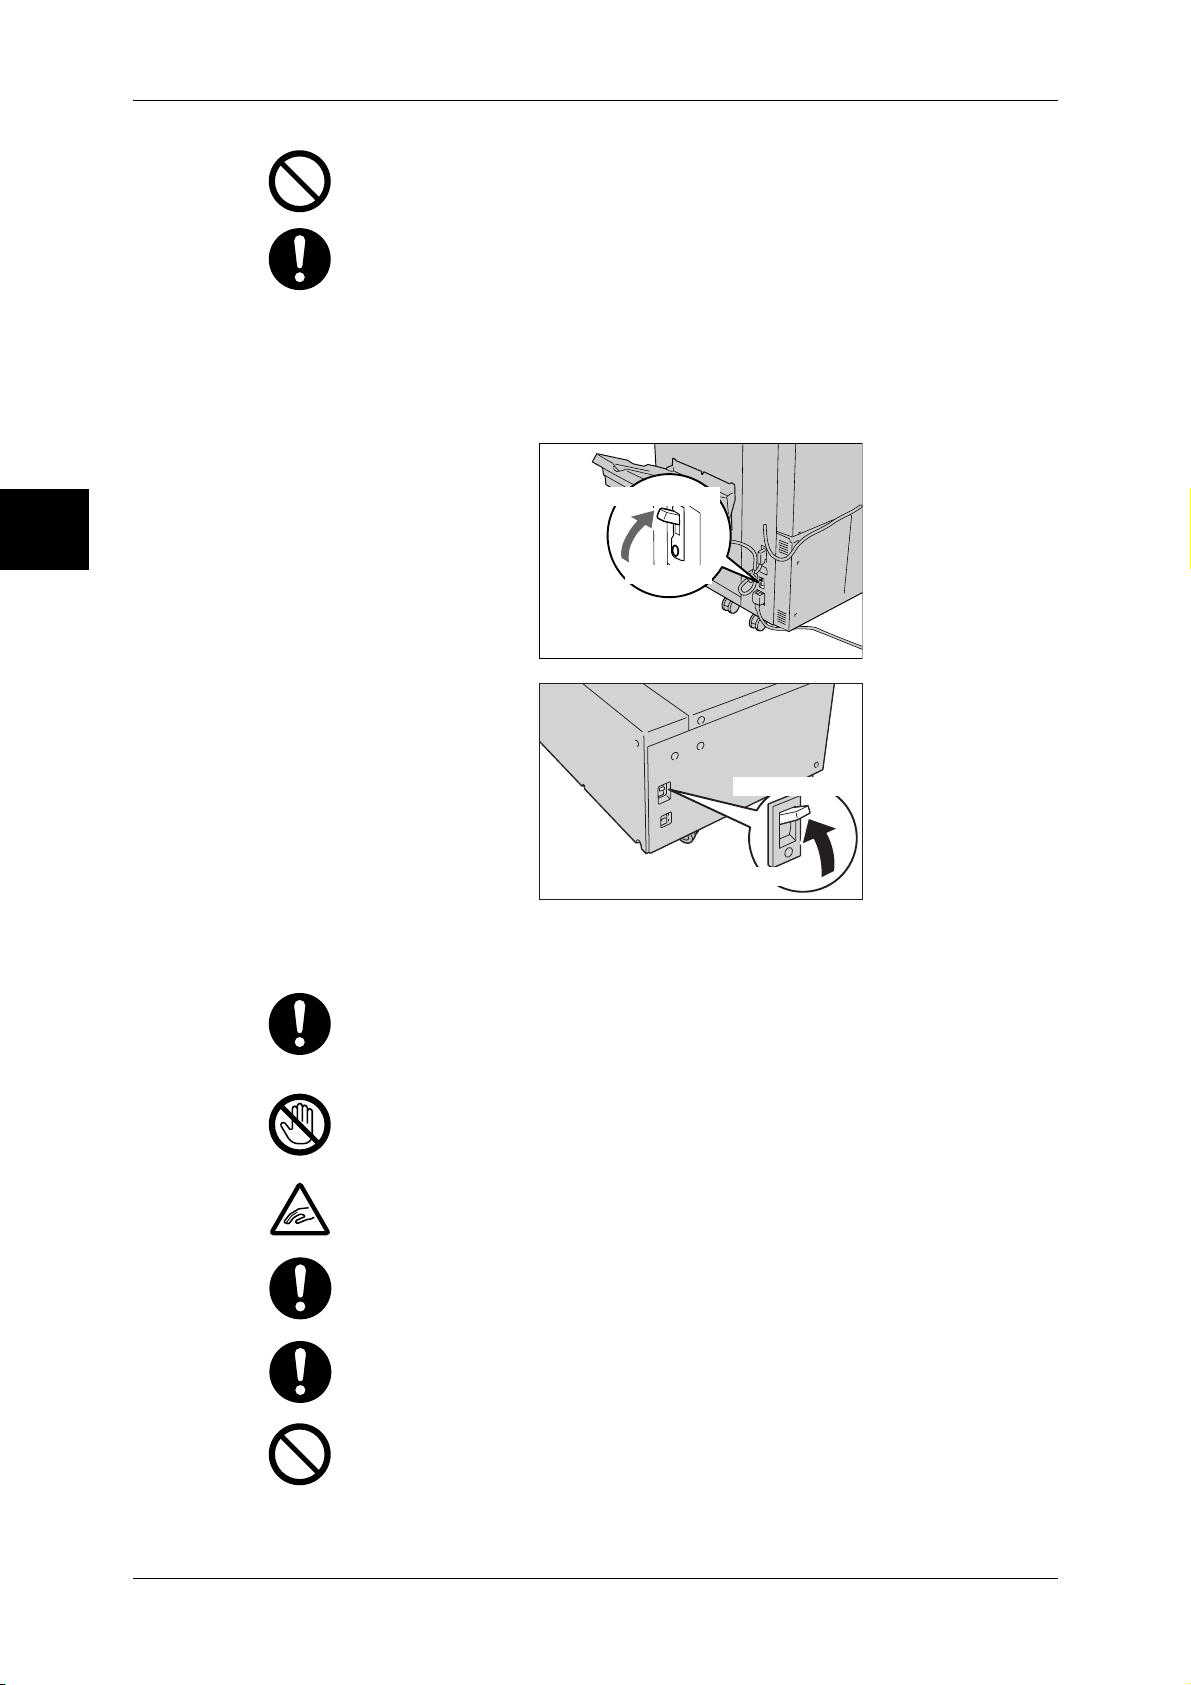
A circuit breaker is embedded in this product. If current leakage occurs, the
circuit breaker automatically cuts off power circuit to prevent electric shock and
a fire accident. The circuit breaker is normally ON ("|"). Check once a month if
the circuit breaker works properly in accordance with the following procedures:
1) Press the TEST button. The breaker switch is turned Off ("O"). (This
means that the breaker is OK.)
2) Return the breaker switch to On ("|").
Breaker switch
TEST button
Breaker switch
TEST button
If the circuit does not work properly, contact your local Fuji Xerox
representative.
Do not attempt to remove a paper jammed deeply inside the product,
particularly a paper wrapped around a fuser or a heat roller. Otherwise, it may
cause injuries or burns. Switch off the product promptly and contact your local
Fuji Xerox representative.
Never touch the paper output area of the finisher during operation. It may
cause injuries.
Be careful in removing jammed staples.
Be careful not to get injured by waste staples when detaching a staple dust
box.
Waste staples may come out with output paper. Be careful not to get injured
by the staples.
20
Never touch safety interlocks. When a front cover is open, safety interlocks
become activated to stop the machinery. Do not apply pressure on safety
interlocks with a coin or screwdriver. Otherwise, the machinery may become
activated and cause injuries.
Page 23
Safety Notes
Do not staple punched holes of paper. Sharp points of a staple may cause
injuries.
Consumable
Do not apply excessive force to hold thick document on the platen glass. It may
break the glass and cause injuries.
To move this product to another location, contact your local Fuji Xerox
representative.
Ventilate well during extended operation or mass copying. It may affect the
office air environment due to odor such as ozone in a poorly ventilated room.
Provide proper ventilation to ensure safety and comfort of the office
environment.
Store all consumables in accordance with the instructions given on its package
or container.
Use a broom or a wet cloth to wipe off spilled toner. Never use a vacuum
cleaner for the spills. It may catch fire by electric sparks inside the vacuum
cleaner and cause explosion. If you spill a large volume of toner, contact your
local Fuji Xerox representative.
Never throw a toner cartridge into an open flame. Remaining toner in the
cartridge may catch fire and cause burn injuries or explosion.
If you have a used toner cartridge no longer needed, contact your local Fuji
Xerox representative for its disposal.
Before Using the Machine
1
Keep the toner cartridges out of the reach of children. If a child accidentally
swallows toner, spit it out, rinse mouth with water, drink water and consult a
physician immediately.
When replacing the toner cartridges, be careful not to spill the toner. In case of
any toner spills, avoid contact with clothes, skin, eyes and mouth as well as
inhalation.
If toner spills onto your skin or clothing, wash it off with soap and water.
If you get toner particles in your eyes, wash it out with plenty of water for at
least 15 minutes until irritation is gone. Consult a physician if necessary.
If you inhale toner particles, move to a fresh air location and rinse your mouth
with water.
If you swallow toner, spit it out, rinse your mouth with water, drink plenty of
water and consult a physician immediately.
21
Page 24

Before Using the Machine
1
1 Before Using the Machine
Regulation
Radio Frequency Emissions (Class B)
This product has been tested and found to comply with the limits for a Class B digital
device, pursuant to the International Standard for Electromagnetic Interference (CISPR
Publ. 22) and Radiocommunications Act 1992 in Australia/New Zealand. These limits
are designed to provide reasonable protection against harmful interference in a
residential installation. This product generates, uses and can radiate radio frequency
energy and, if not installed and used in accordance with the instructions, may cause
harmful interference to radio communications. However, there is no guarantee that
interference will not occur in a particular installation. If this product does cause harmful
interference to radio or television reception, which can be determined by turning this
product off and on, the user is encouraged to try to correct the interference by one or
more of the following measures:
z
Reorient or relocate the receiving antenna.
z
Increase the separation between this product and the receiver.
z
Connect this product into an outlet on a circuit different from that to which the
receiver is connected.
z
Consult the dealer or an experienced radio/TV technician for help.
Changes and modifications to this product not specifically approved by Fuji Xerox may
void the user’s authority to operate this product.
Regulatory Information for RFID
This product contains Radio Frequency Identification system device (RFID) and it is
certified in compliance with applicable local laws and/or regulations.
Product Safety Certification (CB)
This product has been tested and found to comply with IEC60950-1:ed.1 and certified
by NEMKO.
NEMKO : IEC60950-1:ed. 1
22
Page 25

Environment
Environment
z
Emissions of dust, ozone and styrene from this product have been tested and found
to comply with the Eco Mark criteria on chemical emission for copiers. According to
the test procedures defined by German Blue Angel RAL-UZ62: 2002, the test was
performed under the condition of monochrome copying, using the toner type
DocuColor 6075II/5065II Toner (Black) that is recommended for this product.
z
For environmental protection and efficient use of resources, Fuji Xerox reuses
returned toner cartridges to make recycle parts, recycle materials or energy
recovery.
z
Proper disposal is required for drums and toner cartridges no longer needed. Do
not open drum and toner cartridge containers. Return them to your local Fuji Xerox
representative.
z
Dead rechargeable batteries that are removed from disposed machines are
precious resources. Fuji Xerox reuses those batteries to make recycle materials and
energy recovery. Return them to your local Fuji Xerox representative.
z
For recovery of scarce resources, Fuji Xerox reuses the rechargeable batteries used
in this product after the product is returned. Those batteries can be reused to make
recycle materials and energy recovery.
Before Using the Machine
1
23
Page 26

1 Before Using the Machine
About License
Before Using the Machine
RSA BSAFE
This product includes RSA BSAFE® Cryptographic software from RSA Security Inc.
1
Heimdal
Copyright (c)2000 Kungliga Tekniska Högskolan (Royal Institute of Technology,
Stockholm, Sweden). All rights reserved.
Redistribution and use in source and binary forms, with or without modification, are
permitted provided that the following conditions are met:
1. Redistributions of source code must retain the above copyright notice, this list of
conditions and the following disclaimer.
2. Redistributions in binary form must reproduce the above copyright notice, this list of
conditions and the following disclaimer in the documentation and/or other materials
provided with the distribution.
3. Neither the name of the Institute nor the names of its contributors may be used to
endorse or promote products derived from this software without specific prior written
permission.
THIS SOFTWARE IS PROVIDED BY THE INSTITUTE AND CONTRIBUTORS ''AS
IS'' AND ANY EXPRESS OR IMPLIED WARRANTIES, INCLUDING, BUT NOT
LIMITED TO, THE IMPLIED WARRANTIES OF MERCHANTABILITY AND FITNESS
FOR A PARTICULAR PURPOSE ARE DISCLAIMED. IN NO EVENT SHALL THE
INSTITUTE OR CONTRIBUTORS BE LIABLE FOR ANY DIRECT, INDIRECT,
INCIDENTAL, SPECIAL, EXEMPLARY, OR CONSEQUENTIAL DAMAGES
(INCLUDING, BUT NOT LIMITED TO, PROCUREMENT OF SUBSTITUTE GOODS
OR SERVICES; LOSS OF USE, DATA, OR PROFITS; OR BUSINESS
INTERRUPTION) HOWEVER CAUSED AND ON ANY THEORY OF LIABILITY,
WHETHER IN CONTRACT, STRICT LIABILITY, OR TORT (INCLUDING
NEGLIGENCE OR OTHERWISE) ARISING IN ANY WAY OUT OF THE USE OF THIS
SOFTWARE, EVEN IF ADVISED OF THE POSSIBILITY OF SUCH DAMAGE.
LAMA
24
LZMA SDK 4.21 Copyright (c) 1999-2005 Igor Pavlov (2005-06-08)
http://www.7-zip.org/
LZMA SDK 4.22 Copyright (c) 1999-2005 Igor Pavlov (2005-06-10)
http://www.7-zip.org/
Page 27

JPEG Code
Libcurl
About License
Our printer software uses some of the codes defined by the Independent JPEG Group.
COPYRIGHT AND PERMISSION NOTICE
Copyright (c) 1996 - 2006, Daniel Stenberg, <daniel@haxx.se>.
All rights reserved.
Permission to use, copy, modify, and distribute this software for any purpose with or
without fee is hereby granted, provided that the above copyright notice and this
permission notice appear in all copies.
THE SOFTWARE IS PROVIDED "AS IS", WITHOUT WARRANTY OF ANY KIND,
EXPRESS OR IMPLIED, INCLUDING BUT NOT LIMITED TO THE WARRANTIES OF
MERCHANTABILITY, FITNESS FOR A PARTICULAR PURPOSE AND
NONINFRINGEMENT OF THIRD PARTY RIGHTS. IN NO EVENT SHALL THE
AUTHORS OR COPYRIGHT HOLDERS BE LIABLE FOR ANY CLAIM, DAMAGES
OR OTHER LIABILITY, WHETHER IN AN ACTION OF CONTRACT, TORT OR
OTHERWISE, ARISING FROM, OUT OF OR IN CONNECTION WITH THE
SOFTWARE OR THE USE OR OTHER DEALINGS IN THE SOFTWARE.
Except as contained in this notice, the name of a copyright holder shall not be used in
advertising or otherwise to promote the sale, use or other dealings in this Software
without prior written authorization of the copyright holder.
Before Using the Machine
1
FreeBSD
This product contains the part of FreeBSD codes.
The FreeBSD Copyright
Copyright 1994-2006 The FreeBSD Project. All rights reserved.
Redistribution and use in source and binary forms, with or without modification, are
permitted provided that the following conditions are met:
Redistributions of source code must retain the above copyright notice, this list of
conditions and the following disclaimer.
Redistributions in binary form must reproduce the above copyright notice, this list of
conditions and the following disclaimer in the documentation and/or other materials
provided with the distribution.
25
Page 28

Before Using the Machine
1
1 Before Using the Machine
THIS SOFTWARE IS PROVIDED BY THE FREEBSD PROJECT ''AS IS'' AND ANY
EXPRESS OR IMPLIED WARRANTIES, INCLUDING, BUT NOT LIMITED TO, THE
IMPLIED WARRANTIES OF MERCHANTABILITY AND FITNESS FOR A PARTICULAR
PURPOSE ARE DISCLAIMED. IN NO EVENT SHALL THE FREEBSD PROJECT OR
CONTRIBUTORS BE LIABLE FOR ANY DIRECT, INDIRECT, INCIDENTAL, SPECIAL,
EXEMPLARY, OR CONSEQUENTIAL DAMAGES (INCLUDING, BUT NOT LIMITED TO,
PROCUREMENT OF SUBSTITUTE GOODS OR SERVICES; LOSS OF USE, DATA, OR
PROFITS; OR BUSINESS INTERRUPTION) HOWEVER CAUSED AND ON ANY
THEORY OF LIABILITY, WHETHER IN CONTRACT, STRICT LIABILITY, OR TORT
(INCLUDING NEGLIGENCE OR OTHERWISE) ARISING IN ANY WAY OUT OF THE USE
OF THIS SOFTWARE, EVEN IF ADVISED OF THE POSSIBILITY OF SUCH DAMAGE.
The views and conclusions contained in the software and documentation are those of the
authors and should not be interpreted as representing official policies, either expressed or
implied, of the FreeBSD Project.
OpenLDAP
Copyright 1998-2006 The OpenLDAP Foundation All rights reserved.
Redistribution and use in source and binary forms, with or without modification, are
permitted only as authorized by the OpenLDAP Public License.
A copy of this license is available in the file LICENSE in the top-level directory of the
distribution or, alternatively, at <http://www.OpenLDAP.org/license.html>.
OpenLDAP is a registered trademark of the OpenLDAP Foundation.
Individual files and/or contributed packages may be copyright by other parties and/or
subject to additional restrictions.
This work is derived from the University of Michigan LDAP v3.3 distribution. Information concerning this software is available at <http://www.umich.edu/~dirsvcs/ldap/ldap.html>.
This work also contains materials derived from public sources.
Additional information about OpenLDAP can be obtained at <http://www.openldap.org/>.
---
Portions Copyright 1998-2006 Kurt D. Zeilenga.
26
Portions Copyright 1998-2006 Net Boolean Incorporated.
Portions Copyright 2001-2006 IBM Corporation.
All rights reserved.
Redistribution and use in source and binary forms, with or without modification, are
permitted only as authorized by the OpenLDAP Public License.
---
Page 29

Portions Copyright 1999-2005 Howard Y.H. Chu.
Portions Copyright 1999-2005 Symas Corporation.
About License
Portions Copyright 1998-2003 Hallvard B. Furuseth.
All rights reserved.
Redistribution and use in source and binary forms, with or without modification, are
permitted provided that this notice is preserved.
The names of the copyright holders may not be used to endorse or promote products
derived from this software without their specific prior written permission. This software
is provided ''as is'' without express or implied warranty.
---
Portions Copyright (c) 1992-1996 Regents of the University of Michigan.
All rights reserved.
Redistribution and use in source and binary forms are permitted provided that this
notice is preserved and that due credit is given to the University of Michigan at Ann
Arbor. The name of the University may not be used to endorse or promote products
derived from this software without specific prior written permission. This software is
provided ''as is'' without express or implied warranty.
------------------------------------------
The OpenLDAP Public License
Version 2.8, 17 August 2003
Before Using the Machine
1
Redistribution and use of this software and associated documentation ("Software"),
with or without modification, are permitted provided that the following conditions are
met:
1. Redistributions in source form must retain copyright statements and notices,
2. Redistributions in binary form must reproduce applicable copyright statements and
notices, this list of conditions, and the following disclaimer in the documentation
and/or other materials provided with the distribution, and
3. Redistributions must contain a verbatim copy of this document..
The OpenLDAP Foundation may revise this license from time to time.
Each revision is distinguished by a version number. You may use this Software under
terms of this license revision or under the terms of any subsequent revision of the
license.
THIS SOFTWARE IS PROVIDED BY THE OPENLDAP FOUNDATION AND ITS
CONTRIBUTORS ''AS IS'' AND ANY EXPRESSED OR IMPLIED WARRANTIES,
INCLUDING, BUT NOT LIMITED TO, THE IMPLIED WARRANTIES OF MERCHANTABILITY AND FITNESS FOR A PARTICULAR PURPOSE ARE DISCLAIMED. IN NO
EVENT SHALL THE OPENLDAP FOUNDATION, ITS CONTRIBUTORS, OR THE
AUTHOR(S) OR OWNER(S) OF THE SOFTWARE BE LIABLE FOR ANY DIRECT,
INDIRECT, INCIDENTAL, SPECIAL, EXEMPLARY, OR CONSEQUENTIAL DAMAGES (INCLUDING, BUT NOT LIMITED TO, PROCUREMENT OF SUBSTITUTE
GOODS OR SERVICES; LOSS OF USE, DATA, OR PROFITS; OR BUSINESS
INTERRUPTION) HOWEVER CAUSED AND ON ANY THEORY OF LIABILITY,
27
Page 30

Before Using the Machine
1
1 Before Using the Machine
WHETHER IN CONTRACT, STRICT LIABILITY, OR TORT (INCLUDING NEGLIGENCE OR OTHERWISE) ARISING IN ANY WAY OUT OF THE USE OF THIS
SOFTWARE, EVEN IF ADVISED OF THE POSSIBILITY OF SUCH DAMAGE.
The names of the authors and copyright holders must not be used in advertising or
otherwise to promote the sale, use or other dealing in this Software without specific,
written prior permission. Title to copyright in this Software shall at all times remain with
copyright holders.
OpenLDAP is a registered trademark of the OpenLDAP Foundation.
Copyright 1999-2003 The OpenLDAP Foundation, Redwood City, California, USA. All
Rights Reserved. Permission to copy and distribute verbatim copies of this document
is granted.
28
Page 31

Legal Notice
Legal Notice
Copying or printing certain documents may be illegal in your country. Penalties of fines
or imprisonment may be imposed on those found guilty. The following are examples of
items that may be illegal to copy or print in your country.
z
Currency
z
Banknotes and checks
z
Bank and government bonds and securities
z
Passports and identification cards
z
Copyright material or trademarks without the consent of the owner
z
Postage stamps and other negotiable instruments
This list is not inclusive and no liability is assumed for either its completeness or
accuracy. In case of doubt, contact your legal counsel.
Before Using the Machine
1
29
Page 32

Page 33

2 Product Overview
This chapter describes basic operation about the machine, such as the names
of each component, switching on and off of the machine, and the operation of
the touch screen and power saving settings.
z
Machine Components ................................................................................. 32
z
Power On / Off ............................................................................................ 39
z
Circuit Breaker ............................................................................................ 40
z
Power Saver mode ..................................................................................... 41
z
Control panel ..............................................................................................45
Page 34

Product Overview
2
2 Product Overview
Machine Components
This section describes the main components and their functions of the DocuColor
6075II/5065II (hereinafter called “the machine”).
32
Page 35

Machine Components
No. Component Function
1 Control panel Consists of operation buttons, LED indicators, and a touch screen.
Refer to "Control panel" (P.45).
2 Duplex automatic
document feeder
3 Document glass Originals are loaded.
4 Power switch Switches the power of the machine on/off.
5 Toner cover Open this cover to access the insides of the machine to replace the
6 Front cover Open this cover to access the insides of the machine to clear paper
7 Tray 1, 2, 3, 4 Load paper here.
8 Bottom left cover Open this cover to access the insides of the machine to clear paper
9 Locking casters Used for locking the wheels of the machine. Lock these casters after
10 Tray 6 (optional) Load paper here.
11 Tray 6 top cover Move the Tray 6 to the left and then open the top cover to clear paper
12 Tray 5 (bypass) Used for loading non-standard paper (thick-stock paper, and other
13 Tray 5 (bypass) top cover Open this cover to access the insides of the machine to clear paper
This automatically feeds 2 sided originals from a stack.
toner cartridge.
jams or replace supplies.
jams.
If the Tray 6 is installed in the machine, move the Tray 6 to the left first.
moving the machine to its installation site.
jams.
special media) that cannot be loaded in the Trays 1 to 4, and 6.
jams.
Product Overview
2
14 scanner connector Use to connect a scan cable for the Network Controller.
15 Ethernet connector Use to connect a network cable.
16 Control panel (on the right) This control panel is installed to the right of the machine.
It consists of operation buttons, LED indicators, and a touch screen.
Refer to "Control panel" (P.45).
33
Page 36

Product Overview
2
2 Product Overview
34
Page 37

Machine Components
No. Component Function
17 Left cover The left cover slightly opens when the top cover is opened. Open this
cover widely to clear paper jams.
18 Top cover Open this cover to access the insides of the machine to clear paper
jams.
19 <Confirmation> indicator This indicator lights to confirm that the document is loaded correctly.
20 Document guides Use this guides to align the edges of the document.
21 Document feeder tray Load documents here.
22 Document output tray Receives scanned documents.
23 Document stopper Used when copying or scanning large size documents such as A3.
Open the stopper rightward when using it.
24 Output tray Receives documents.
Two types of trays are available: a normal output tray and an optional
offset stacking tray.
Note • When paper whose size is less than A4 is output from the machine with
an offset catch tray, push in the extension flap.
25 Circuit breaker This breaker automatically turns the machine off when a current leakage
is detected.
Product Overview
2
26 Bottom right cover Open this cover to access the insides of the machine to clear paper
jams.
If a finisher is installed in the machine, open the front cover of the
finisher first.
27 Waste toner container
cover
28 Waste toner container Used to collect waste toner.
29 Fuser Fuses the printed image on the paper by fusing the toner. Do not touch
30 Lever Used to draw out the transfer unit.
31 Transfer unit Transfers toner images on the drum to paper. Open this cover to access
32 Drum cartridges A drum cartridge comprises of photosensitive elements. Drum cartridges
33 Toner cartridges Four toner (image forming powder) cartridges are provided: Black (K1,
Open this cover to access the insides of the machine to replace the
waste toner container.
this unit as it is extremely hot.
the insides of the machine to clear paper jams.
are arranged in order R1, R2, R3 and R4 from the left as you face the
main body.
K2), Cyan (C), Magenta (M) and Yellow (Y).
35
Page 38

2 Product Overview
A3+ high capacity tray
4
Product Overview
2
5
No. Component Function
1 A3+ High Capacity Tray
(Tray 6)
2 High Capacity Tray Unit This unit carries sheets of paper fed from the High Capacity Tray or the
3
2
1
Load paper stock here.
When the loaded tray is closed, the tray position is automatically
adjusted in the front/back direction based on the center of paper.
Tray 5 (bypass) to the machine. Open the cover to access the inside of
the machine to clear paper jams.
3 Tray 5 (bypass) This tray is used for loading non-standard paper (thick-stock paper, and
other special media) that cannot be loaded in the Tray 1, 2, 3, or 4.
4 Tray 5 (bypass)
top cover
5 Circuit breaker This breaker automatically turns the machine off when a current leakage
Open this cover to access the inside of the machine to clear paper jams.
is detected.
36
Page 39

C-Finisher, C-Finisher with Booklet Maker
Machine Components
1
9
8
7
No. Component Function
2
3
4
Product Overview
5
6
2
1 Punch scrap container Collects the scraps from the puncher. Draw out the box when throwing
the dust away.
2 10 bin sorter
(C-Finisher with Booklet
Maker with 10-bin sorter
only)
3 Output tray Receives documents.
4 Exit cover Open this cover to access the insides of the machine to clear paper
5 Finisher tray Receives documents.
6 Staple cartridge Staples are stored. Remove this cartridge to replace staples or clear
7 Booklet tray
(C-Finisher with Booklet
Maker only)
8 Front cover Open this cover to access the insides of the machine to clear paper or
9 Booklet unit
(C-Finisher with Booklet
Maker only)
10 Booklet staple cartridge Two staple cartridges for saddle stitch are installed. Remove this
Documents can be delivered to the selected bins. This sorter has a
maximum capacity of 100 sheets of paper (P paper) per bin.
jams.
staple jams.
Receives documents, when folding is selected in the Booklet Creation.
staple jams, replace staples, or throw punch dust away.
This unit is for folding documents in half and stapling the folded
documents.
cartridge to replace staples or clear staple jams.
Note • The C-Finisher and the C-Finisher with Booklet Maker are optional. In this manual, the C-
Finisher or the C-Finisher with Booklet Maker is abbreviated as “finisher”.
37
Page 40

Product Overview
2
2 Product Overview
D2-Finisher with Booklet Maker
14
13
12
1
2
11
10
8
9
3
4
5
6
7
No. Component Function
1 Interposer (Cover/
Transparency separator
tray)
2 De-curl button Press this button to decurl copied paper.
3 Output tray Receives copies when you select [Automatic sorting], [Collated],
4 Finisher tray Receives copies when you select stapled, punched and Z-folded copies.
5 Booklet output tray Receives copies when you select Bi-Fold or Bi-Fold + Stapling.
6 Booklet output tray button Press this button to deliver booklets to removal position.
7 Right cover Open to clear paper jam; replace staples or clear jammed staples; or
8 Staple cartridges for
booklet
9 Staple cartridge This cartridge contains staples. Remove this cartridge to replace staples
10 Punch scrap container Collects the scraps from the puncher. Open throw away the scraps.
Load Papers for covers or transparency separators. Papers loaded here
will not be used for copying or printing.
[Uncollated] or normal copy.
replace the scraps from the puncher.
There are two staple cartridges for booklet. Remove these cartridges to
replace staples and clear staple jams.
and clear staple jams.
11 Tri-Fold output tray Receives copies when you select Tri-Fold in or Tri-Fold out.
12 Tri-Fold output tray button Press this button to open Tri-Fold output tray.
13 Left cover Open this cover to access the inside of the machine to clear paper jams.
14 Staple cartridge storage
Staple cartridge for replacement can be stored.
space
Note • The D2-Finisher with Booklet Maker is optional. In this manual, the D2-Finisher with Booklet
Maker is abbreviated as "finisher".
38
Page 41

Power On / Off
Switch on the power before operating the machine.
The machine is ready for operation within 150 seconds after the power is switched on.
The time may vary depending on the machine configuration.
Turn the machine off at the end of the day or when it is not in use for a long period of
time. Also, use [Power Saving] feature when not in use for a while to reduce the power
consumption.
Important • Switching off the power of the machine may cause loss of data being processed.
For information about power saving feature, refer to "Power Saver mode" (P.41).
Powering On
The procedure for turning on the power is as follows.
1
Open the cover and press the
power switch to the [ | ] position to
turn the power on.
Note • The “Please wait...” message
Power On / Off
Product Overview
2
indicates that the machine is
warming up. The machine
cannot be used while it is
warming up.
Powering Off
The procedure for turning the power off is as follows.
Important • Switching off the power of the machine during data processing stored in the memory may
1
Before turning the power off, make sure that all copy or print jobs have completely
finished. Also, make sure that the Online indicator is not lit.
Important • Never turn the power off in the following instances:
2
Press the power switch to the [ ] position.
Important • Power off processing is performed internally on the machine for about 30 seconds after the
Note • Before you turn the power back on after turning it off, first make sure that it has been more
cause loss of data being processed.
• While data is being received
• While jobs are being printed
• While jobs are being copied
• While a scan is being executed
power switch is turned off. Therefore, do not unplug the power cord from the power outlet
immediately after turning the power switch off.
than 30 seconds after the touch screen went out.
39
Page 42

Product Overview
2
2 Product Overview
Circuit Breaker
The machine is provided with circuit
breakers.
In the event of a current leakage,
the breakers will automatically cut
off the power circuit to prevent any
leakage or fire from occurring.
The circuit breaker is normally
pressed to the upper side,
respectively, as shown in the figure
on the right.
If the circuit breakers are pressed to
the lower sides, respectively,
unusual conditions may occur.
Please contact our Customer
Support Center.
Breaker switch
TEST button
40
Page 43

Power Saver mode
The machine is installed with a Power Saver feature that will automatically cut off the
electricity to the machine if no copy or print data is received for a certain duration.
The Power Saver feature has two modes, [Low Power mode] and [Sleep mode].
The machine enters the [Low Power mode] after the preset time has elapsed if the
machine is left unused for a fixed period of time. The machine then enters the [Sleep
mode] if a further preset time elapses.
Low Power Mode
(
Power consumption: 221.6 W)
In this mode, the power to the control panel and fuser unit is lowered to save power.
The touch screen goes out, and the <Power Saver> button on the control panel lights.
To use the machine, press the <Power Saver> button. The <Power Saver> button goes
out to indicate that the Power Saver feature is cancelled.
Power Saver mode
Product Overview
Sleep Mode
Power consumption: 92.2W)
(
In this mode, the power is lowered more than in the Low Power mode.
The touch screen goes out, and the <Power Saver> button on the control panel lights.
To use the machine, press the <Power Saver> button. The <Power Saver> button goes
out to indicate that the Power Saver feature is cancelled.
Changing the Power Saver Mode Change Interval
The procedure for setting the Power Saver feature is as follows.
To activate the Power Saver feature, set the Sleep Mode button to Enabled, and set
both the times until the activation of Low Power Mode and Sleep Mode.
Note • The time to activation of Low Power Mode and Sleep Mode can each be specified in 1
minute increments, from 1 to 240 minutes.
1
Press the <Log In/Out> button.
2
<Log In/Out>
button
41
Page 44

Product Overview
2
2 Product Overview
2
Enter the system administrator
UserID with the numeric keypad or
a keyboard displayed by pressing
[Keyboard], and select [Confirm].
Note • The default system
3
Select [System Settings].
administrator UserID value is
"11111". When using the
authentication manager
feature, a Passcode is
required. The default
Passcode value is "x-admin".
4
Select [System Settings].
5
Select [Common Settings].
42
Page 45

6
Select [Machine Clock/Timers].
7
Select [Auto Power Saver], and
select [Change Settings].
Power Saver mode
Product Overview
2
8
Using [ ] [ ], configure a power
saver mode migration time in 1
minute increments.
From Last Selection to Low Power Mode
Set the time to move to the [Low Power Mode] after the last operation.
Note • The default for [From Last Selection to Low Power Mode] is [15] minutes. The Low Power
Mode cannot be disabled.
From Last Selection to Sleep Mode
Set the time to move to the [Sleep Mode] after the last operation.
Note • The default for [From Last Selection to Sleep Mode] is [60] minutes. Configure the [From
Last Selection to Sleep Mode] time to be longer than the [From Last Selection to Low Power
Mode] time.
9
Select [Save].
10
Select [Close] repeatedly until the [System Settings] screen is displayed.
11
Select [Exit] to exit the System Administration mode.
43
Page 46

2 Product Overview
Exiting the Power Saver Mode
The following describes how to exit the Power Saver mode.
The Power Saver mode is exited in the following instances:
z
Pressing the <Power Saver> button
z
Receiving data
1
Press the <Power Saver> button.
Product Overview
2
<Power Saver>
button
@@
44
Page 47

Control panel
The following describes the names and functions of components on the control panel.
Control panel
Product Overview
2
@@
@@
No. Component Function
1 Touch screen This display displays messages required for operation and buttons for
various features. You can directly touch the touch screen to instruct
operations in screens and set features.
2 <Copy>
<Custom 2>
<Custom 3>
3 <All Services> Used to display the [All Services] screen.
Used to call a custom feature.
For information about registering a feature with a button, refer to "Screen/
Button Settings" (P.200).
In text descriptions, this button is indicated as the <All Services> button.
You can change the features that appear in the [All Services] screen.
For more information, refer to "Screen/Button Settings" (P.200).
45
Page 48

Product Overview
2
2 Product Overview
No. Component Function
4 <Power Saver> If the machine is not operated for a while, the machine's power
consumption is lowered to enter the Power Saver mode. In the Power
Saver mode, this button is lit. To cancel the Power Saver mode, press
this button again.
In text descriptions, this button is indicated as the <Power Saver>
button.
5 <Clear All> Returns the statuses of all displayed services to their default values.
The machine will be reset to the state after it is turned on.
In text descriptions, these buttons are indicated as the <Clear All>
button.
6 <Interrupt> Select this button to temporarily stop a continuous copy job or printing to
give another job higher priority. During an interrupt,
the Interrupt indicator is lit. Pressing the Interrupt button again cancels
the interrupt and the previous operation is resumed.
In text descriptions, this button is indicated as the <Interrupt> button.
7 <Stop> Press this button to stop the current copy job or communications.
In text descriptions, this button is indicated as the <Stop> button.
8 <Start> Press this button to start copying or scanning.
In text descriptions, this button is indicated as the <Start> button.
9 Numeric keypad Press these buttons to enter the number of copies, passcodes and other
numerical values.
In text descriptions, these buttons are indicated as the "numeric
keypad".
10 <Speed Dial> This button cannot be used.
11 <C> (Clear) Press this button if you have entered a wrong numerical value with the
numeric keypad.
In text descriptions, this button is indicated as the <C> button.
12 <Dial Pause> This button cannot be used.
13 <Log In/Out> When this button is pressed, if in System Administration mode, or Login
Setup/Auditron Administration is in effect, the UserID input screen is
displayed.
In text descriptions, this button is indicated as the <Log In/Out> button.
14 <Machine Status> Pressing this button allows you to confirm the machine status, meters
and the state of supplies, and print reports.
In text descriptions, this button is indicated as the <Machine Status>
button.
15 <Review> Press this button to open the Review screen. In this screen, you can
check a list of the status of copy and scan features whose settings have
changed from the defaults.
In text descriptions, these buttons are indicated as the <Review> button.
16 <Job Status> Pressing this button allows you to confirm or cancel currently executing
or completed jobs, or to confirm or print saved documents.
In text descriptions, this button is indicated as the <Job Status> button.
17 Brightness dial Adjusts the brightness of the touch screen. Use this dial to adjust the
brightness of touch screen when it is too dark to read.
18 <Job in Memory> indicator This indicator lights when data is stored in the machine's memory.
19 <Online> indicator This indicator lights when data is being transmitted from this machine or
received from a client.
46
Page 49

Customizing the Control Panel
You can customize the <Custom> buttons and items on the [All Services] screen.
Assigning a Feature to Custom Buttons
By assigning a feature to Custom buttons (<Copy>, <Custom 2>, and <Custom 3>),
you can switch to that feature without returning to the [All Services] screen.
The factory default settings for these buttons are, "Copy" for the 1st button, and none
for the 2nd and 3rd buttons.
For about procedure to assign features, refer to "Screen/Button Settings" (P.200).
Attach the labels included in this product when you have changed the assignment. If
you have used a feature for which no label is provided, use a blank label and write down
the feature using a permanent marker and attach it to the appropriate Custom button.
Customizing the [All Services] Screen
You can customize the types of features and the location of buttons on the [All
Services] screen.
The following shows the factory default settings.
For about procedure to assign features, refer to "Screen/Button Settings" (P.200).
Note • When the feature is not available the button will not be displayed. Also, if the feature is
unavailable due to hardware problems, the button will be grayed out.
z
Copy
z
Network Scanning
z
Web Applications
z
Stored Programming
z
Setup Menu
Control panel
Product Overview
2
Assigning Features to <Custom> Buttons
Assign features to the <Custom> buttons on the control panel: Custom 1 to Custom 3.
By assigning features to the <Custom> buttons, you can switch to the features without
returning to the [All Services] screen. If you do not want to assign any feature to a
button, select [Not Set].
As the factory defaults, [Copy] is assigned to the <Copy> button and no feature is
assigned to the <Custom 2> or <Custom 3> button. The features assigned to the
buttons are selected from the features displayed on the [All Services] screen and
[Language].
Attach the labels included in this product when you have changed the assignment. If
you have used a feature for which no label is provided, use a blank label and write down
the feature using a permanent marker, and then attach the label to the appropriate
button.
47
Page 50

Product Overview
2
2 Product Overview
Changing feature screen
You can customize the setting screen for the following features on the [All Services]
screen.
z
Copy
z
Network Scanning
For information about change settings, refer to "General Settings Tab - Features Allocation" (P.225) and
"General Settings Tab" (P.241).
Web Applications
If you select [Web Applications] on the [All Services] screen, the screen for the Network
Controller appears.
For information on how to operate Web Applications, refer to USER DOCUMENTATIONS for the
Network Controller.
1
Select [Web Applications].
The screen on the right appears.
48
Page 51

3 Setting up the Network
Controller
This chapter describes how to configure the Network Controller.
z
Preparations ............................................................................................... 50
z
Installation Procedure ................................................................................. 50
Page 52

3 Setting up the Network Controller
Preparations
Prepare the following item to install the machine when using a TCP/IP protocol.
z
TCP/IP network environment
Setting up the Network Controller
Installation Procedure
Configuration on the Machine
To assign an IP address, it is necessary to be in the System Administration mode.The
following describes the configuration procedure for assigning an IP address.
Step 1 Entering System Administration Mode
1
Press the <Log In/Out> button.
3
Step 2 Entering the System Administrator UserID and Passcode
To enter System Administration mode, enter the system administrator UserID. If you
are using the authentication feature, a Passcode may be required.
It is recommended to change the system administrator UserID and the Passcode immediately after
installing the machine.
1
Enter the UserID with the numeric
keypad or a keyboard displayed by
selecting [Keyboard], and select
[Confirm].
Note • The default UserID value is
“11111”. When using the
Authentication feature, a
Passcode is required. The
default Passcode value is “xadmin”.
<Log In/Out>
button
50
Page 53

Installation Procedure
Step 3 Selecting the Operation Mode from the System Administrator Menu
1
Select [System Settings].
Step 4 Setting an IP address
1
Select [System Settings].
Setting up the Network Controller
2
Select [Network Controller
Settings].
3
51
Page 54

3 Setting up the Network Controller
Setting up the Network Controller
3
Select [Network Settings].
3
1) Select [Ethernet Setting] and then select [Change Settings].
2) Select [TCP/IP - Get IP Address] and then select [Change Settings].
3) Select one from [DHCP], [BOOTP] or [Manual]. If you select anything other than
[Manual], proceed to Step 4.
52
4) Select [TCP/IP - IP Address] and then select [Change Settings].
Note • Enter the IP address in the format “xxx.xxx.xxx.xxx”. The "xxx" should be a numeric value in
the range from 0 to 255. However, the range between 224.XXX.XXX.XXX through
255.XXX.XXX.XXX, and 127.XXX.XXX.XXX cannot be set.
• When you made an entry mistake, press the <C> (clear) button and enter again.
• When you move to the next value without entering all 3 digits, select [save/select next].
5) Select [Save].
6) Configure [TCP/IP - Subnet Mask] and [TCP/IP - Gateway Address] as above.
Note • Enter the gateway address in the format “xxx.xxx.xxx.xxx”. The "xxx" should be a numeric
value in the range from 0 to 255. However, the range between 224.XXX.XXX.XXX through
255.XXX.XXX.XXX, and 127.XXX.XXX.XXX cannot be set.
Page 55

Installation Procedure
• Specify the subnet mask by a combination of the numbers 0, 128, 192, 224, 240, 248, 252,
254, and 255. However, you cannot use 0 between non-zero values.
• If you do not want to set the gateway address, enter "0.0.0.0".
7) Select [Frame Type] and then select [Change Settings].
4
Select [Close] repeatedly until the [System Settings] screen is displayed.
5
Select [Exit].
6
After the machine is restarted, print out a settings list to confirm that the Network
Setting is configured.
For information about how to print a setting list, refer to "System Setting List" in "Print Report/List"
(P.275).
Setting up the Network Controller
3
53
Page 56

3 Setting up the Network Controller
Configuration on the Computer
The following describes the configuration procedure for the computer.
In order to print from the machine, the computer needs to have the print driver installed.
Setting up the Network Controller
3
For information about the driver installation procedure, refer to USER DOCUMENTATIONS for the
Network Controller.
54
Page 57

4 Copy
This chapter describes the [Copy] screen and copy features.
z
Copying Procedure ..................................................................................... 56
z
Operations during Copying .........................................................................61
z
General Settings ......................................................................................... 63
z
Image Quality.............................................................................................. 74
z
Layout Adjustment ...................................................................................... 80
z
Output Format............................................................................................. 93
z
Job Assembly ...........................................................................................119
Page 58

Copy
4
4 Copy
Copying Procedure
This section describes the basic copy procedures. The following shows the reference
section for each procedure.
Step 1 Loading Documents.........................................................................................................56
Step 2 Selecting Features............................................................................................................58
Step 3 Entering the Quantity.......................................................................................................59
Step 4 Starting the Copy Job.......................................................................................................59
Step 5 Confirming the Copy Job in the Job Status .....................................................................60
Step 1 Loading Documents
There are two methods for loading documents:
Document feeder
z
Single sheet
z
Multiple sheets
Document glass
z
Single sheet
z
Bound documents, such as books
Document Feeder
The document feeder (250 sheets) supports single and multiple sheet documents with
sizes from 140 x 210 mm (A5, A5 , 5.5 x 8.5 inches, 5.5 x 8.5 inches ) to 297 x 432
mm (A3, 11 x 17 inches).
The document feeder (250 sheets) automatically detects standard size documents. For
non-standard size documents, input the size in the [Original Size] field.
For information on document sizes that can be detected automatically, and for information about
entering document sizes, refer to "Original Size (Specifying the Scan Size for the Document)" (P.83).
Note • The standard document sizes that can be auto-detected depend on the [Paper Size
The document feeder (250 sheets) accepts the following number of sheets.
Document type (weight)
Lightweight paper (38 - 49 g/m2)
Plain paper (50 - 80 g/m
Heavyweight paper
(81 - 128 g/m2)
Heavyweight paper
(129 - 200 g/m
Settings] in the System Administration mode. For information about paper size settings, refer
to "Paper Size Settings" (P.219).
Number of
sheets
250
2
)
2
)
250
150
100
56
For information about copying documents of mixed size, refer to "Mixed Sized Originals (Scanning
Different Size Documents Simultaneously)" (P.84).
Important • Place folded or creased documents on the document glass to avoid paper jams in the
document feeder.
• 2 sided scanning of lightweight paper (38 - 49 g/m
2
) is not supported.
Page 59

1
Remove any paper clips and
staples before loading the
documents.
2
Adjust the movable document
guides to match the size of the
document loaded.
Note • When loading a large
document such as A3,
up the document feeder
tray and open the
document stopper rightward.
3
Place the document face up (the
face of 2 sided document up) in the
center of the document feeder.
Note • The <Confirmation> indicator
lights up when the document
is loaded correctly.
When loading the document in the
document feeder, you can set timing for
lifting up the document feeder tray. For
more information, refer to "Document
Feeder Tray Elevation" (P.223).
Copying Procedure
pick
Copy
Document Glass
On the document glass, you can place a single sheet, or a book or other similar
document up to 297 x 432 mm (A3, 11 x 17 inches).
The document glass automatically detects standard size documents. For non-standard
size documents, input the size in the [Original Size] field.
For information about entering document sizes, refer to "Original Size (Specifying the Scan Size for the
Document)" (P.74).
Note • The standard document sizes that can be auto-detected depend on the [Paper Size
1
Open the document cover.
Important • Check that the screen of the
2
Place the document face down,
and align it against the top left
corner of the document glass.
4
Settings] in the System Administration mode. For information about paper size settings, refer
to "Paper Size Settings" (P.219).
control panel is displayed
correctly and then load the
document. When the
document is loaded before the
screen is displayed, the
machine may not properly
detect document sizes.
3
Close the document cover.
Note • When a standard size
document is placed on the
document glass, the size of
the document is displayed in
the message area.
57
Page 60

4 Copy
Step 2 Selecting Features
You can select the features from the [Copy] tab.
Note • Features displayed may vary depending on the model you are using.
• To use the Login Setup feature or Auditron Administration feature, you need a UserID and
Passcode, or just a UserID. Ask the system administrator for the UserID and Passcode.
1
Press the <All Services> button.
<All Services>
button
@@
2
Select [Copy].
Copy
4
3
If the previous settings still remain,
press the <Clear All> button.
4
Select the features to set from each
tab as necessary.
For information about each of these
features, refer to the following sections.
"General Settings" (P.63)
"Image Quality" (P.74)
"Layout Adjustment" (P.80)
"Output Format" (P.93)
"Job Assembly" (P.119)
<Clear All>
button
@@
58
Page 61

Step 3 Entering the Quantity
You can enter up to 9,999 for the number of copies.
1
Enter the number of copies using
the numeric keypad. The number
of copies entered appears on the
upper right of the display.
2
If you enter an incorrect value,
press the <C> button and enter the
correct value.
Copying Procedure
Numeric keypad
<C> button
Copy
Step 4 Starting the Copy Job
1
Press the <Start> button.
Important • If the document has been set
in the document feeder, do not
hold down the document while
it is being conveyed.
• Copies cannot be made when
copying restriction code is
detected.
Note • If a problem occurs, an error
message appears in the touch
screen. Solve the problem in
accordance with the message.
• You can set the next job during copying.
If you have more documents
If you have another document, select the [Next Original] on the touch screen while
the current document is being scanned. You can scan multiple documents for later
output.
2
Select [Next Original] while scanning is in progress.
4
@@
<Start> button
Note • When using the document feeder, load the next document after the machine has finished
scanning the first document.
• When the above screen is displayed and no operation is performed during a certain period
of time, the machine automatically assumes that there are no more documents.
59
Page 62

4 Copy
3
Load the next document.
CAUTION
Do not apply excessive force to hold thick document on the platen glass. It may break
the glass and cause injuries.
4
Press the <Start> button. If you have more documents, load the next document and
press the <Start> button.
5
When all documents have been scanned, select [Last Original].
Copy
4
Step 5 Confirming the Copy Job in the Job Status
1
Press the <Job Status> button.
2
Confirm the job status. The job type
to be displayed can be selected
from [All Jobs], [All Printing Jobs],
[All Non-printing Jobs], and
[Mailbox Transfer Jobs].
Note • Select [ ] to display the
previous screen and select
[ ] to display the next screen.
<Job Status>
button
60
Page 63

Operations during Copying
This section describes available operations during copying. The following shows the
reference section for each feature.
Stopping the Copy Job ............................................................................................................... 61
Changing the Number of Copies................................................................................................ 62
Interrupting the Copy Job........................................................................................................... 62
Stopping the Copy Job
To cancel copying, follow the procedure below.
1
Press either [Stop] on the touch
screen or the <Stop> button on the
Control Panel.
2
Select [Stop].
Operations during Copying
When the screen in Step 1 does not appear
1
Press the <Job Status> button.
2
Select the job to cancel, and then
select [Stop].
@@
<Stop> button
Copy
4
<Job Status>
button
61
Page 64

4 Copy
Changing the Number of Copies
You can change the number of copies that is set initially during scanning or copying the
document.
1
Press either [Stop] on the touch
screen or the <Stop> button on the
Control Panel.
Copy
4
2
Select [Change Quantity...].
3
Set the number of copies with the
numeric keypad. The new quantity
must include the number of copies that have already been printed. When reducing the
quantity, you cannot enter a number less than the number of copies that have already
been printed.
4
Press the <Start> button.
Note • You can set the values greater than the number of copies that have already copied. If you
set the same value as the number of copies that have already copied, the copy job is not
executed.
Interrupting the Copy Job
You can temporarily suspend the current continuous copy job to give another job higher
priority.
1
Press the <Interrupt> button.
Note • The interrupt indicator lights to
indicate that the machine is in
the job interrupt mode.
@@
<Stop> button
@@
2
Load the interrupt document and set features if necessary.
3
Set the number of copies with the numeric keypad.
4
Press the <Start> button.
5
After you have finished making the interrupt copy, press the <Interrupt> button.
Note • The interrupt indicator goes out to indicate the interrupt is cancelled.
• Remove the interrupt document from the document glass when using the document glass.
6
Press the <Start> button. The suspended copy job is resumed.
<Interrupt> button
62
Page 65

General Settings
You can set the basic features on the [General Settings] screen. The following shows
the reference section for each feature.
Reduce/Enlarge (Making Enlarged/Reduced Copies)................................................................ 63
Paper Supply (Selecting the Paper for Copying) ....................................................................... 66
Output Color (Selecting the Color to Copy) .............................................................................. 69
Original Type (Selecting the Document Type).......................................................................... 73
Copy Output (Outputting by Specifying Finishing)................................................................... 73
Multiple-Up (Copying Multiple Sheets onto One Sheet)........................................................... 73
Lighten/Darken (Adjusting the Copy Density) .......................................................................... 73
1
On the [All Services] screen, select
[Copy].
2
Select features on the [General
Settings] screen that appears first.
General Settings
Copy
Reduce/Enlarge (Making Enlarged/Reduced Copies)
You can select a ratio from preset standard copy ratios. You can also enter a ratio
directly.
1
Select a copy ratio, or specify a
value.
Entering the Ratio
Touch the window displaying a
value, and then use the numeric
keypad or the [ ] and [ ] buttons
to specify a ratio within the range of
25 to 400% in 1% increments.
100%
Copies are made at the same size as the original document.
4
Auto%
The copy ratio is automatically set based upon the document and paper sizes, and the
document is copied to fit in the selected paper.
Note • If you select [Auto%], specify a value other than [Auto] for [Paper Supply].
63
Page 66

4 Copy
Ratio (3rd to 5th Buttons)
Select from preset ratios.
You can change the indicated ratios. For information about the setting procedures, refer to "Reduce/
Enlarge - Button 3-5" (P.225).
[More...]
Display the [Reduce/Enlarge] screen.
Refer to "When [Proportional %] is Selected" (P.64) or "When [Independent X-Y%] is Selected" (P.65).
When [Proportional %] is Selected
You can select a ratio from preset standard copy ratios. You can also enter a ratio
directly.
1
Select a copy ratio, or specify a
value.
Copy
4
100%
Copies are made at the same size as the original document.
Auto%
The copy ratio is automatically set based upon the document and paper sizes specified
in [Paper Supply], and the document is copied to fit in the specified size.
Note • If you select [Auto%], specify a value other than [Auto] for [Paper Supply].
Presets %
Select from preset ratios.
You can change the indicated ratios. For more information, refer to "Reduce/Enlarge Presets" (P.238).
Copy All (Full Screen)
The document is copied at a slightly reduced size to prevent image loss at the edge of
the original. If this option is selected, a check mark is added.
Important • If you select [Copy All], when you do not want to erase the edges of the document, set the
amount of edge erase to 0 mm. Note that if the amount is set to 0 mm, the edges of the
copied document may get dirty or the image loss may occur.
Entering the Ratio
Touch the window displaying a value, and then use the numeric keypad or the [ ] and
[ ] buttons to specify a ratio within the range of 25 to 400% in 1% increments.
64
Page 67

When [Independent X-Y%] is Selected
You can specify different length and width ratios to scale the height and width
independently.
1
Select any item.
Auto%
Copies are made with the height
and width ratios set automatically to
match the paper size. If this option
is selected, a check mark is added.
Copy All X-Y%
The length and width ratios are set
automatically to match the paper size and the document is copied at a slightly reduced
size to prevent image loss at the edge of the original. If this option is selected, a check
mark is added.
General Settings
Width X%/Length Y%
Set the length and width ratios within the range from 25 to 400% in 1% increments.
XY
You can simultaneously change the numerical values of the height and width by the
same amount.
When [Calculator %] is Selected
You can specify a different size for the height and width.
If you specify both the original document size and the copy size, the copy ratios for the
length and width are calculated automatically within the range from 25 to 400%
according to the sizes that you entered.
1
Enter the value for the original
document width in [Original Size] of
[X] (width) using the numeric
keypad, and select [Next].
2
Enter the value for the copy size
width in [Copy Size] of [X] (width)
using the numeric keypad, and
select [Next].
3
In the same way, enter the original
document length value and copy
size length value in the [Original
Size] and [Copy Size] of [Y]
(length), and select [Next].
Note • To change the copy ratios you have entered, select [Next], move the mark, and enter the
new values.
Copy
4
65
Page 68

4 Copy
X: width Y: length
The automatically calculated ratios based on the values entered in [Original Size] and
[Copy Size] are displayed.
Original Size
Set the length and width of the original size from 1 to 999 mm in 1 mm increments.
Copy Size
Set the length and width of the copy size from 1 to 999 mm in 1 mm increments.
Paper Supply (Selecting the Paper for Copying)
You can select the tray loaded with the copy paper you want to use.
1
Select the paper tray from [Paper
Supply].
Copy
4
Auto Paper
Based on the original document size and set ratios, the machine automatically selects
the tray loaded with the appropriate paper.
Note • If you select [Auto], specify a value other than [Auto %] for [Reduce/Enlarge].
Trays (2nd to 5th Buttons)
Select from preset paper trays.
You can change the paper trays to display. For information about the setting procedures, refer to "Preset
Buttons" (P.225).
[More...]
Displays the [Paper Supply] screen.
Refer to "[Paper Supply] Screen" (P.67).
66
Page 69

[Paper Supply] Screen
You can select a paper tray that does not appear on the [General Settings] screen.
1
Select the paper tray.
Paper Tray
You can select paper from the 5
trays. When you select [Auto], the
machine automatically selects the
tray loaded with the appropriate
paper, based on the original
document size and set ratios, and
makes copies. Selecting [Tray 5
(Bypass)] opens the [Tray 5
(Bypass)] screen.
Paper Size
General Settings
Displays the size of paper that is loaded in the tray.
Paper Type
Displays the type of paper that is loaded in the tray.
Size Detection
Displays the paper size detection method. This item appears only when [Other
Attributes] is set to [Size Detection] for [Customize Paper Supply Screen] under the
[System Settings] screen.
[Tray 5 (Bypass)] Screen
If you want to make copies on paper that cannot be loaded in the Trays 1 to 4, or 6, use
the Tray 5 (bypass).
1
Select the paper size and the paper
type.
Note • Select [ ] to return to the
previous screen or [ ] to
move to the next screen.
Paper Size
Select from [Auto Size Detect],
[Standard Size], and [Custom Size
(Variable Size)].
When [Auto Size Detect] is
selected, the paper size is identified automatically.
Note • [Auto Size Detect] can only detect standard sizes.
Copy
4
Paper Type
Select the paper type.
67
Page 70

4 Copy
When [Standard Size] is Selected
Select the paper size from standard sizes and select the paper type.
1
Select [Standard Size].
2
Select the paper size and paper
type.
Note • Select [ ] to return to the
previous screen or [ ] to
move to the next screen.
When [Custom Size (Variable Size)] is Selected
Copy
4
Set the X (width) within the range from 148 to 488 mm and the Y (height) within the
range from 100 to 330 mm in increments of 1 mm.
Important • If the X (width) of non-standard size paper is less than 140 mm, documents may not be
printed properly.
1
Enter the paper size using [ ],
[ ], [ ], and [ ].
2
Select the paper type.
Note • Select [ ] to return to the
previous screen or [ ] to
move to the next screen.
68
Page 71

Output Color (Selecting the Color to Copy)
You can set the output color to use when copying.
Note • If output color restrictions have been set, there are restrictions on which colors are available
for copying. For information about output color restrictions, refer to "Account Limit" (P.254).
1
Select the color to use from [Output
Color]
Auto Detect
The machine automatically
determines the color of the original
document and makes copies in full
color if the original document is
color and in a single color (black) if
the document is black-and-white.
Note • The machine may make copies in black and white in the case of the following documents. In
this case change the level at which the machine distinguishes documents (5 levels) in
reference to "Output Color Recognition" (P.211).
- Colored area is very small
- In light color
General Settings
Copy
Color
Copies are made in full color using all the four colors of toner: yellow, magenta, cyan,
and black.
Black
The machine makes copies in black and white regardless of the colors in the original
document.
Dual Color (Red/Black)
The machine makes copies of color documents in two preset colors.
You can change the colors to display. For information about the setting procedures, refer to "Dual Color
- Target Area Color" (P.226) and "Dual Color - Non-target Area Color" (P.227).
Single Color (Red)
The [Output Color - Color] screen is displayed.
Refer to "[Output Color - Color] Screen" (P.72).
[More...]
Display the [Output Color] screen.
4
69
Page 72

4 Copy
[Output Color] Screen
You can make color settings for full color, dual color, and single color.
1
Select [More...].
2
Select the desired output color type
for copying.
Auto Detect
The machine automatically
determines the color of the original
document and makes copies in full
color if the original document is
color and in a single color (black) if
the document is black-and-white.
Color
Copies are made in full color using all the four colors of toner: yellow, magenta, cyan,
and black.
Copy
4
Black
The machine makes copies in black and white regardless of the colors in the original
document.
Dual Color
The document is separated into specified source colors and unspecified colors and
then copied in the specified dual colors. If you select [Dual Color], you can set the
following items:
z
Source Color
The [Source Color] screen is displayed.
Refer to "[Source Color] Screen" (P.71).
z
Target Area Color
The [Target Area Color] screen is displayed.
Refer to "[Target Area Color] Screen" (P.71).
z
Non-target Area Color
The [Non-target Area Color] screen is displayed.
Refer to "[Non-target Area Color] Screen" (P.72).
Single Color
The [Output Color - Color] screen is displayed.
Refer to "[Output Color - Color] Screen" (P.72).
70
Page 73

[Source Color] Screen
Select the color to scan (extract) from the document.
1
Select [Dual Color].
2
Select [Source Color].
3
Select [Other than Black] or [Color].
4
If you selected [Color], select the
color to scan.
General Settings
Other than Black
Colors other than black are
scanned.
Color
From 6 predetermined colors, you
can specify single or multiple colors
to scan.
[Target Area Color] Screen
You can change the color that was extracted by [Source Color] to one of the 7
predetermined colors and 6 custom colors. From the displayed [Target Area Color]
screen, select a color.
For information about how to set custom colors, refer to "Custom Colors" (P.238).
1
Select [Dual Color].
2
Select [Target Area Color].
Copy
4
71
Page 74

4 Copy
3
Select a color.
[Non-target Area Color] Screen
You can change a color that was not extracted to one of the 7 fixed colors and 6 custom
colors. From the displayed [Non-target Area Color] screen, select one color.
For information about how to set custom colors, refer to "Custom Colors" (P.238).
1
Select [Dual Color].
2
Select [Non-target Area Color].
Copy
3
Select a color.
4
[Output Color - Color] Screen
The machine makes copies in the single specified color regardless of the colors in the
document.
You can select a color from 6 predetermined colors and 6 custom colors. From the
displayed [Output Color - Color] screen, select a color.
For information about how to set custom colors, refer to "Custom Colors" (P.238).
1
Select [Single Color].
72
Page 75

2
Select [Color].
3
Select a color.
Original Type (Selecting the Document Type)
This function works exactly as the [Color Effects] in the [Output Format] screen. For
more information, refer to "Color Effects (Selecting Image Quality)" (P.77).
General Settings
Copy Output (Outputting by Specifying Finishing)
This function works exactly as the [Copy Output] in the [Output Format] screen. For
more information, refer to "Copy Output (Outputting by Specifying Finishing)" (P.116).
Multiple-Up (Copying Multiple Sheets onto One Sheet)
This function works exactly as the [Multiple-Up] in the [Output Format] screen. For more
information, refer to "Multiple-Up (Copying Multiple Sheets onto One Sheet)" (P.100).
Lighten/Darken (Adjusting the Copy Density)
You can adjust the copy density to one of 7 levels. Copying is darker when you move
[ ] to the left and lighter when you move it to the right.
Note • [Lighten/Darken] of the [General Settings] screen and [Lighten/Darken] of [Image Options] in
the [Image Quality] screen are the same.
1
Use [ ] and [ ] to select from 7
density levels.
Copy
4
73
Page 76

4 Copy
Image Quality
On the [Image Quality] screen, you can configure the document image quality features.
The following shows the reference section for each feature.
Original Type (Selecting the Document Type)...........................................................................74
Image Options (Lighten/Darken, Sharpness, Saturation) ...........................................................76
Image Enhancement (Background Suppression/Contrast) .........................................................76
Color Effects (Selecting Image Quality).....................................................................................77
Color Balance (Adjusting Color Balance)..................................................................................78
Color Shift (Adjusting Color Tone)............................................................................................78
Gloss Level (Enhancing Gloss of the Document).......................................................................79
1
On the [All Services] screen, select
[Copy]
2
Select the [Image Quality] tab and
then select a feature on the [Image
Quality] screen that appears.
Copy
4
If color reproducibility is poor, perform Calibration. For information about calibration, refer to
"Executing Calibration" (P.310).
Original Type (Selecting the Document Type)
When making copies of photographs, text and other documents, you can make copies
at the image quality corresponding to each type of document. Copies of the document
can be reproduced at a more faithful image quality by selecting the document type that
matches the document.
1
Select [Original Type].
2
Select the document type.
74
Page 77

Image Quality
Auto
This item sets [Output Color] of the [General Settings] screen according to the
document type preset in the System Administration mode.
For information about the auto setting of [Original Type], refer to "Copy Defaults" (P.226).
Photo & Text
Select when making copies of documents containing both text and photos. The
machine automatically distinguishes the text and photo areas and sets the appropriate
image quality for each area of the document. For photo areas, specify the photo type
from [Printed Original], [Photograph], and [Photocopy].
z
Printed Original
Select when photo areas of the document is printed matter such as a pamphlet.
z
Photograph
Select when photos have been pasted on document. This prevents the copy from
being reproduced bluish.
z
Photocopy
Select this item for documents that are copies or prints made on a color copier such
as the DocuColor 6075II/5065II. This prevents colors from being reproduced faint.
Text
Copy
Select this item to make sharp copies of text. Sharp copies of graphs, illustrations, etc.
are also made in this mode.
z
Normal Text
Select this item for printed documents, inked text documents, etc.
z
Light Text
Select this item for documents with light image density such as a document written
in pencil, to increase the copy density.
z
Lightweight originals
Select this option to reduce blurs of tracing paper documents or to suppress
background shadows of lightweight documents.
Note • Whether [Lightweight originals] is displayed depends on the specifications. For information
about the display method, refer to "Original Type - Lightweight Originals" (P.233).
Photo
Select this item for making copies of photos. In the same way as for Photo & Text,
specify the photo type from [Printed Original], [Photograph], and [Photocopy].
Map
Select this item for making copies of documents that have text on colored backgrounds
such as maps.
4
75
Page 78

4 Copy
Image Options (Lighten/Darken, Sharpness, Saturation)
You can make copies with adjusting the copy density, sharpness and color saturation.
Note • [Lighten/Darken] of [Image Options] and [Lighten/Darken] of [Copy] are the same.
• If [Lighten/Darken], [Sharpness] or [Saturation] is selected when the Color Effects is set, the
values set in the Color Effects are cleared.
1
Select [Image Options].
2
Adjust with [ ] and [ ].
Lighten/Darken
You can select from seven copy
density levels between [Lighten]
and [Darken].
The copy color density increases the
nearer the level is to [Darken] and
the copy color density decreases the
nearer the level is to [Lighten].
Copy
4
Sharpness
You can select from five sharpness levels between [Soften] and [Sharpen].
The nearer the level is to [Sharpen], the sharper the contours of images. The nearer
the level is to [Soften], the softer the contours of images.
Saturation
You can select from five color saturation levels between [Vivid] and [Pastel].
The brightness of color in documents increases the nearer the level is to [Vivid] and the
brightness of color in documents decreases the nearer the level is to [Pastel].
Image Enhancement (Background Suppression/Contrast)
When copies are made with [Black] of [Output Color], the background color of
documents such as newspapers and colored paper documents is erased.
When making copies with [Full Color], [Dual Colors], or [Single Color] of [Output Color],
the background of white documents is erased.
Note • When [Document Type] is set to [Photo], the [Auto Exposure] feature does not work.
1
Select [Image Enhancement].
2
Select [Background Suppression]
and [Contrast]. Adjust contrast with
[] and [].
76
Background Suppression
z
No Suppression
Scans the document
backgrounds with no filtering.
z
Auto Suppression
When copies are made with
[Black] of Output Color, the background color of documents such as newspaper and
colored paper documents is erased.
Page 79

When copies are made with [Color], [Dual Color], or [Single Color] of [Output Color],
the background of white documents is erased.
Contrast
z
Auto Correction
This setting sharpens the image by adjusting the brightness and hue of the original.
z
Manual Contrast
You can select from 5 contrast levels between [More Contrast] and [Less Contrast].
The nearer the level is to [More Contrast], the greater the difference between light
parts and dark parts as light parts become lighter and dark parts become darker.
[Less Contrast] contrasts decrease the difference between light and dark area.
Color Effects (Selecting Image Quality)
If you select an image quality of [Image Quality Preset], the [Auto Exposure], [Lighten/
Darken/Contrast], [Sharpness/Color Saturation], [Color Shift], and [Color Balance]
settings are automatically adjusted and copies are made at a quality that matches the
images.
Note • If the settings of other image quality features are changed after selecting an image quality in
[Image Quality Preset], the Color Effects setting will return to its default (state of nothing
being selected).
Image Quality
Copy
1
Select [Color Effects].
2
Select the image quality.
Normal
Copies are made with the [Auto Exposure], [Lighten/Darken/Contrast], [Sharpness/
Color Saturation], [Color Shift], and [Color Balance] settings at their defaults.
Lively
The color saturation is raised to reproduce images that appear fresher and livelier.
Bright
Reproduces images that have a brighter appearance with enhanced contrast. Select
this item to make copies of documents such as posters that are intended to attract
people's attention.
4
Warm
Reproduces colors that have a slightly low density as brighter and warmer colors with
more dominant red in them. Select this item when, for example, you wish skin to appear
pinker or subdued warm colors to have more warmth.
77
Page 80

4 Copy
Cool
Reproduces blue colors that appear even clearer. Select this item, for example to make
water or sky bluer or to reproduce subdued cold colors more clearly.
Shadow Suppression
This setting supresses document.
Color Balance (Adjusting Color Balance)
The strength of the four colors (yellow, magenta, cyan, and black) can be adjusted in 7
levels for each of their low, medium, and high density ranges.
Note • If [Color Balance] is selected when the Color Effects is set, the values set in the Image
Quality Preset are cleared.
1
Select [Color Balance].
2
Select the button for the color you
want to adjust.
3
Use [ ] and [ ] to adjust the color
Copy
balance for each density.
4
Low Density
Use this item to adjust the strength
of the low density.
Medium Density
Use this item to adjust the strength of the medium density.
High Density
Use this item to adjust the strength of the high density.
Color Shift (Adjusting Color Tone)
The tone of color documents can be adjusted to make subtle changes to the overall
tone of the document. You can adjust the tone 2 levels at a time by moving the bar to
the left or right.
The bottom bar of the [Color Shift] screen indicates the tone of the document and the
upper bar indicates the tone after adjustment. If you select a color shift button, you can
move the lower bar to change the overall tone of the document to the tone of the upper
bar.
For example, if Y (yellow) on the lower bar is moved to the left towards R (red) on the
upper bar, the yellow in fruit becomes reddish to give an apple a riper-looking tone. This
changes all colors. For example, R (red) becomes more M (magenta) and G (green)
becomes more Y (yellow).
If Y (yellow) on the lower bar is moved to the right towards G (green) on the upper bar,
the yellow in fruit becomes greener. This changes all colors. For example, M (magenta)
becomes more R (red) and R (red) becomes more Y (yellow).
Note • Confirm that [Full Color] is selected in [Output Color] of the [General Settings] screen. Tone
adjustment is not available when [Output Color] is set to [Black].
• If [Color Shift] is selected when Color Effects is set, the values set in the Color Effects are
cleared.
78
Page 81

1
Select [Color Shift].
2
Select the color shift buttons.
Gloss Level (Enhancing Gloss of the Document)
This feature lowers the copying speed to add a glossy touch to the output.
The following paper can be used for the gloss level feature:
Plain paper, recycled paper, side 2 paper, heavyweight paper 1 (106 - 176 g/m
heavyweight paper 1 (side 2), coated paper (106 - 176 g/m
and punched paper.
Note • A setting must be made in the System Administration mode to display [Gloss Level] in the
[Image Quality] tab. For more information, refer to "Gloss Level" (P.223).
• When you use the Build Job features, [Gloss Level] can be set to each set of the job. In this
case, the copy procedure may pause due to adjustment of the machine when changing the
settings. In addition, the document is divided into chapters at the positions where the gloss
level changes.
Image Quality
2
2
), coated paper 1 (side 2),
),
Copy
4
1
Select [Gloss Level].
2
Select [Normal] or [Enhanced].
79
Page 82

4 Copy
Layout Adjustment
On the [Layout Adjustment] screen, you can configure features for scanning
documents.
The following shows the reference section for each feature.
Book Copying (Copying Facing Pages onto Separate Sheets) ...................................................80
2 Sided Book Copy (Making 2 Sided Copies of Facing Pages) .................................................82
Original Size (Specifying the Scan Size for the Document).......................................................83
Mixed Sized Originals (Scanning Different Size Documents Simultaneously) .........................84
Edge Erase (Erasing Edges and Margin Shadows of the Document).........................................85
Image Shift (Shifting the Image Copy Position).........................................................................87
Image Rotation (Making Copies with the Image Rotated Vertically or Horizontally)...............89
Invert Image (Making Reversed Copies of Images) ...................................................................90
Original Orientation (Specify the Orientation of Loaded Documents).......................................91
2 Sided Copying (Making 2 sided Copies).................................................................................91
1
On the [All Services] screen, select
[Copy].
Copy
2
Select the [Layout Adjustment] tab
and then select a feature on the
[Layout Adjustment] screen.
4
Book Copying (Copying Facing Pages onto Separate Sheets)
The Book Copying feature allows you to copy facing pages of a document on separate
sheets of paper in page order. This feature is useful if you need to make separate
copies from facing pages of bound documents such as a booklet.
Note • You cannot use the document feeder with this feature.
• Non-standard sized documents will not be separated into two accurately.
• When you want to make copies in page order, select [Face Down] from [Output Orientation]
in the [Output Format] tab.
1
Select [Book Copying]
2
Select any item.
80
Off
The document is not copied as a
bound document.
Page 83

Layout Adjustment
Left Page then Right
Copies are made from the left page of facing pages in a document starting from the left
page.
Right Page then Left
Copies are made from the right page of facing pages in a document starting from the
right page.
Top Page then Bottom
Copies are made from the top page of facing pages in a document starting from the top
page.
Both Pages
Copies are made of both pages of facing paper in page order.
Left Page Only
Copies are made of the left page only. You can select this item when [Left Page then
Right] or [Right Page then Left] is selected.
Right Page Only
Copies are made of the right page only. You can select this item when [Left Page then
Right] or [Right Page then Left] is selected.
Top Page Only
Copies are made of the top page only. You can select this item when [Top Page then
Bottom] is selected.
Bottom Page Only
Copies are made of the bottom page only. You can select this item when [Top Page
then Bottom] is selected.
Binding Erase
Erases the shadow from the center section of the document. You can set the binding
erase width within the range from 0 to 50 mm in 1mm increments.
Copy
4
81
Page 84

4 Copy
2 Sided Book Copy (Making 2 Sided Copies of Facing Pages)
You can assign pages when making copies of facing pages in a bound document so
that pages face each other in the same way as the document. You can also specify the
start page and the end page from the left and right facing pages.
Note • Non-standard sized documents will not be separated into two accurately.
1
Select [2 Sided Book Copy].
2
Select any item.
Off
The document is not copied as a 2
sided book copy.
Left Page then Right
Copy
Copies are made of both pages from the left page of facing pages in a document
starting from the left page.
4
Right Page then Left
Copies are made of both pages from the right page of facing pages in a document
starting from the right page.
Top Page then Bottom
Copies are made of both pages from the top page of facing pages in a document
starting from the top page.
Start Page & End Page
Displays the [2 Sided Book Copy - Start Page & End Page] screen.
Refer to "[2 Sided Book Copy - Start Page & End Page] Screen" (P.82).
Binding Erase
Erases the shadow from the center section of the document. You can set the binding
erase width within the range from 0 to 50 mm in 1mm increments.
[2 Sided Book Copy - Start Page & End Page] Screen
You can set the copy start page and end page.
1
Select [Start Page] and [End
Page].
82
Start Page
Select the copy start page from the
following items.
Page 85

z
[Left Page]/[Right Page]
You can select these items when [Left Page then Right] or [Right Page then Left] is
selected.
z
[Top Page]/[Bottom Page]
You can select these items when [Top Page then Bottom] is selected.
End Page
Select the copy end page from the following items.
z
[Left Page]/[Right Page]
You can select these items when [Left Page then Right] or [Right Page then Left] is
selected.
z
[Top Page]/[Bottom Page]
You can select these items when [Top Page then Bottom] is selected.
Original Size (Specifying the Scan Size for the Document)
Layout Adjustment
You can set the scan size for the document.
Specify the size of the document when scanning non-standard size documents or when
making copies at a size different from that of the currently loaded document.
When a document size is specified, it is scanned at the specified size regardless of the
size of the loaded document. This feature allows you to copy the document with adding
or deleting the margin.
1
Select [Original Size].
2
Select the size of the document.
If you select a non-standard size,
specify values for the X and Y
directions.
Auto Size Detect
Scan sizes are detected
automatically. The machine can
auto-detect the following paper
sizes.
Document feeder Document glass
Auto-detectable sizes B5, B5 , B4, A5, A5 , A4,
A4 , A3, 8.5x11", 8.5x11" ,
11x17", Kai16 , Kai8
B6, B6 , B5, B5 , B4, A6,
A5, A5 , A4, A4 , A3,
8.5x11", Kai16, Kai16 , Kai8
Copy
4
Note • If the document size cannot be detected, a screen to input the document size appears.
• Auto-detectable sizes vary depending on the settings made for [Auto Tray Switching] in the
System Administration mode. For more information about [Auto Tray Switching], refer to
[Common Settings] of "6 System Settings" in the Administrator Guide.
Standard Size
Select a document size from a list of 17 pre-configured types.
83
Page 86

Copy
4
4 Copy
You can change the indicated document sizes. For more information, refer to "Original Size Defaults"
(P.237).
Variable Size
Enter the desired scan size when scanning non-standard size documents or when
making copies at a size different from that of the currently loaded document. Set the
size in the document glass X (horizontal) direction within the range 15 to 432 mm and
in the Y (vertical) direction within the range 15 to 297 mm in 1 mm increments. The
scale on the outside of the document glass is a useful reference for specifying the
document size.
Important • When the document is loaded on the document feeder, the base point in the Y (height)
direction is the center of the edge. If you specify 100 mm, the scan size becomes from 50
mm above to 50 mm below the center of the document.
Mixed Sized Originals (Scanning Different Size Documents Simultaneously)
When using the document feeder, you can simultaneously scan different size
documents and make copies onto paper that matches the respective sizes of the
documents. You can also specify the size of the paper to make copies on so that copies
are made on the same size of paper.
Important • Confirm that the orientation of the first sheet of the document and the [Original Orientation]
setting of the [Layout Adjustment] screen are the same.
• Be sure to load A5 documents vertically.
• When loading a B5 size document with A3 or A4 size documents in a vertical direction, place
the B5 document also in a vertical direction.
• The recommended document size combinations are A4 portrait and A3 landscape, or B5
portrait and B4 landscape. If the combination of the document sizes is not our
recommendation, the documents can be fed at an angle may not be copied properly.
Note • [Original Orientation] is set in reference to the direction set for the first page of the document.
Load the rest of the document from the second page onwards in the same direction as that
of the first page of the document.
1
Select [Mixed Sized Originals]
2
Select [On] or [Off].
Off
Select this item when all documents
are of the same size.
On
When documents of different sizes
are copied, the machine
automatically detects the size of
each document.
84
Page 87

Layout Adjustment
Original Orientation (Specify the Orientation of Loaded Documents)
In order to identify the top of the document, the orientation of the set document must
be configured.
Note • If the [Original Orientation] differs from the actual document orientation, then the machine
may incorrectly detect the head of the document.
Upright Images
Select this item when placing the top of the document facing the inner side of the
document glass or document feeder.
Sideway Images
Select this item when placing the top of the document facing the left side of the
document glass or document feeder. Be sure to select [Sideway Images] when the top
of the document is placed facing the left side (horizontal text).
Edge Erase (Erasing Edges and Margin Shadows of the Document)
When you make copies with the document cover open or make copies from a book,
black shadows sometimes appear along the edges and center margin of the paper. If
this happens, you can make copies with the shadows erased.
Important • Confirm that the orientation of the document and the [Original Orientation] setting of the
[Layout Adjustment] screen are the same.
Note • For 2-sided documents, the same border erase amount is set for the top and bottom sides.
• If you set [Reduce/Enlarge], the edge erase dimensions will be reduced or enlarged in
proportion to the ratio you configured.
1
Select [Edge Erase].
2
Make the necessary settings.
Normal
The border erase amount is set to 2
mm for the top and bottom, and left
and right. If you do not want to
erase the edges, set each value to
0 mm.
Border Erase
Shadows at the top/bottom/left/right
of the document, or shadows in the center of documents such as booklets or
documents with facing pages, are erased. Border Erase allows adjustment of the erase
amount for each edge or center (gutter) individually.
Copy
4
Edge Erase
Shadows at the top/bottom/left/right of the document, or shadows in the center of
documents such as booklets or documents with facing pages, are erased. Standard
Edge Erase allows adjustment of the erase amount for top, bottom, left, right, or center
(gutter) individually.
85
Page 88

4 Copy
Margin Erase
Shadows at the top/bottom/left/right of the document, or shadows in the center of
documents such as booklets or documents with facing pages, are erased. Standard
Edge Erase allows adjustment of the erase amount for top/bottom, left/right, or center
(gutter) individually.
Erase Value
You can erase only the necessary amount.
z
Top & Bottom Edges
Shadows at the top and bottom of the document are erased. Edges at the top and
bottom are erased in accordance with the direction that the document was loaded.
You can set the edge erase width within the range from 0 to 50 mm in 1 mm
increments.
z
Left & Right Edges
Shadows on the left and right of the document are erased. Edges on the left and right
are erased in accordance with the direction that the document was loaded. You can
set the edge erase width within the range from 0 to 50 mm in 1 mm increments.
z
Binding Erase
Copy
Shadows in the center of documents such as booklets or documents with facing
pages are erased. You can set the binding erase width within the range from 0 to 50
mm in 1 mm increments.
4
Original Orientation (Specify the Orientation of Loaded Documents)
In order to identify the top of the document, the orientation of the set document must
be configured.
Note • If the [Original Orientation] differs from the actual document orientation, then the machine
may incorrectly detect the head of the document.
z
Upright Images
Select this item when placing the top of the document facing the inner side of the
document glass or document feeder.
z
Sideway Images
Select this item when placing the top of the document facing the left side of the
document glass or document feeder. Be sure to select [Sideway Images] when the
top of the document is placed facing the left side (horizontal text).
Side 2
This item is available only when [Standard Edge Erase] is selected. You can select
whether to apply the same deletion widths to Sides 1 and 2.
z
Same as Side 1
The same deletion widths are applied to Sides 1 and 2.
z
Opposite to Side 1
The deletion widths are mirrored on Side 1 and 2.
86
Page 89

Image Shift (Shifting the Image Copy Position)
Copies can be made with the document image position shifted to the left, right, top, or
bottom of the paper or with the document center shifted to the center of the paper. You
can also make copies with a margin added to the top, bottom, left, or right. When
making 2 sided prints, you can set the shift positions for both Side 1 and Side 2.
Important • Confirm that the orientation of the document and the [Original Orientation] setting of the
[Layout Adjustment] screen are the same.
Note • The image shift amount is set in accordance with the paper. Even if you set copies to be
enlarged or reduced in Reduce/Enlarge, the image shift amount is not affected.
1
Select [Image Shift].
2
Select any item.
No Shift
The position of the document image
is not shifted.
Layout Adjustment
Auto Center
The center of the document is
shifted to match the center of the
paper.
Margin Shift
You can set the margin amount. Set the top & bottom, and left & right values within the
range from 0 to 50 mm in 1mm increments.
z
Side 1
Displays the [Image Shift - Side 1] screen.
Refer to "[Image Shift - Side 1] Screen" (P.88).
z
Side 2
Displays the [Image Shift - Side 2] screen.
Refer to "[Image Shift - Side 2] Screen" (P.88).
Mirror Shift
Select this item when you want the positioning of Side 2 to match the positioning of
Side 1.
Original Orientation (Specify the Orientation of Loaded Documents)
In order to identify the top of the document, the orientation of the set document must
be configured.
Note • If the [Original Orientation] differs from the actual document orientation, then the machine
may incorrectly detect the head of the document.
z
Upright Images
Copy
4
Select this item when placing the top of the document facing the inner side of the
document glass or document feeder.
z
Sideway Images
Select this item when placing the top of the document facing the left side of the
document glass or document feeder. Be sure to select [Sideway Images] when the
top of the document is placed facing the left side (horizontal text).
87
Page 90

Copy
4
4 Copy
[Image Shift - Side 1] Screen
You can set the image shift of Side 1.
1
Select any item.
No Shift
The position of the document image
is not shifted.
Auto Center
The center of the document is
shifted to match the center of the
paper.
Corner Shift
The document image is shifted to
the edges or corners of the paper.
You can select from 8 shift
directions.
When adjusting the margin amount,
set the top and bottom, and left and
right values within the range from 0
to 50 mm in 1 mm increments.
Variable Shift
You can set the margin amount. Set
the top and bottom, and left and
right values within the range from 0
to 50 mm in 1mm increments.
[Image Shift - Side 2] Screen
You can set the image shift of Side 2.
No Shift
The position of the document image is not shifted.
Auto Center
The center of the document is shifted to match the center of the paper.
Corner Shift
88
The document image is shifted to the edges or corners of the paper. You can select
from 8 shift directions.
Page 91

Layout Adjustment
When adjusting the margin amount, set the top and bottom, and left and right values
within the range from 0 to 50 mm in 1 mm increments.
Variable Shift
You can set the margin amount. Set the top and bottom, and left and right values within
the range from 0 to 50 mm in 1mm increments.
Image Rotation (Making Copies with the Image Rotated Vertically or Horizontally)
If the orientation of the paper currently loaded in the tray differs from that of the
document that is loaded, the machine automatically rotates the document image to
make copies with the document and paper orientations matched. You can also select
where to use as a reference for image rotation if documents are of mixed orientations.
The image rotation feature can only be used to make copies to paper of A4 and 8.5 x
11 inches or smaller.
1
Select [Image Rotation].
2
Select any item.
Copy
Off
Copies of documents are made as
they are, even if they are orientated
differently.
Always On
The document image is automatically rotated so that the orientation of the document
matches that of the paper.
On during Auto
The document image is automatically rotated so that the orientation of the document
matches that of the paper when [Auto %] of [Reduce/Enlarge] or [Auto Paper] of [Paper
Supply] is selected.
Rotation Direction
Displays the [Image Rotation - Rotation Direction] screen.
Refer to "[Image Rotation - Rotation Direction] Screen" (P.90).
4
89
Page 92

4 Copy
[Image Rotation - Rotation Direction] Screen
You can set the reference position for rotation.
1
Select [Rotation Direction].
2
Select any item.
Staple Position
When the finisher is installed,
[Staple Position] is displayed. If
documents are of mixed
orientations, images will be rotated
to match the stapling edge based
on the staple feature settings.
Portrait Original - Left Edge
If documents are of mixed orientations, images will be rotated so that the top edge of a
landscape document is aligned with the left edge of a portrait document.
Copy
Portrait Original - Right Edge
4
If documents are of mixed orientations, the image will be rotated so that the top edge
of a landscape document is aligned with the right edge of a portrait document.
Invert Image (Making Reversed Copies of Images)
Copies can be made with the left and right sides of the document image reversed or
the colors reversed in Output Color of the document image.
Note • When Output Color is set to Black or Single Color, the density (contrast) is reversed for black
and white.
• When Output Color is set to Full Color, the complementary colors are reversed.
• When [Negative Image] and [Edge Erase] are set simultaneously, the edge erase area turns
to white.
1
Select [Invert Image]
2
Select any item.
Mirror Image
The left and right sides of the
document image are reversed.
Negative Image
90
The density (contrast) of the
document image is reversed.
Page 93

Layout Adjustment
Original Orientation (Specify the Orientation of Loaded Documents)
In order to identify the top of the document, the orientation of the set document must
be configured.
Note • If the [Original Orientation] differs from the actual document orientation, then the machine
may incorrectly detect the head of the document.
1
Select [Original Orientation].
2
Select [Upright Images] or
[Sideways Images] in accordance
with the orientation of the
document loaded.
Upright Images
Select this item when placing the
top of the document facing the inner
side of the document glass or
document feeder.
Sideway Images
Select this item when placing the top of the document facing the left side of the
document glass or document feeder. Be sure to select [Sideway Images] when the top
of the document is placed facing the left side (horizontal text).
2 Sided Copying (Making 2 sided Copies)
Copies of 1 sided and 2 sided documents can be made on one side or both sides.
Important • Confirm that the orientation of the document and the [Original Orientation] setting of the
[Layout Adjustment] screen are the same.
1
Select [2 Sided Copying].
2
Select any item.
1 1 Sided
Makes a copy of a 1 sided
document on one side of the paper.
1 2 Sided
Makes a copy of a 1 sided
document on both sides of the
paper.
Copy
4
2 2 Sided
Makes a copy of a 2 sided document on both sides of the paper.
2 1 Sided
Makes a copy of a 2 sided document on one side of the paper.
91
Page 94

4 Copy
Originals
z
Head to Head
Select this item when the first and second sides of the document are of the same
orientation.
z
Head to Toe
Select this item when the first and second sides of the document are of the opposite
orientation. This appears when [2 - 2 Sided] or [2 - 1 Sided] is selected.
Copies
z
Head to Head
Select this item when you want the orientation of the first and second sides of the
copy to be the same as that of the document.
z
Head to Toe
Select this item when you want the orientation of the first and second sides of the
copy to be the opposite of that of the document. This appears when [1 - 2 Sided] or
[2 - 2 Sided] is selected.
Copy
4
Original Orientation (Specify the Orientation of Loaded Documents)
In order to identify the top of the document, the orientation of the set document must
be configured.
Note • If the [Original Orientation] differs from the actual document orientation, then the machine
may incorrectly detect the head of the document.
z
Upright Images
Select this item when placing the top of the document facing the inner side of the
document glass or document feeder.
z
Sideway Images
Select this item when placing the top of the document facing the left side of the
document glass or document feeder. Be sure to select [Sideway Images] when the
top of the document is placed facing the left side (horizontal text).
92
Page 95

Output Format
On the [Output Format] screen, you can configure features for outputting documents.
The following shows the reference section for each feature.
Booklet Creation (Creating a Booklet)....................................................................................... 94
Covers (Attaching a Cover to Copies) ....................................................................................... 97
Transparency Separators (Inserting Blank Sheets between Transparencies)............................. 99
Multiple-Up (Copying Multiple Sheets onto One Sheet)......................................................... 100
Poster (Making Enlarged Copies Spread over Multiple Sheets).............................................. 101
Repeat Image (Making Multiple Copies on One Sheet) .......................................................... 102
Annotation (Adding Stamp/Date/Page Number to Copies) ..................................................... 103
Watermark (Printing Control Number on Background) .......................................................... 110
Tab Margin Shift (Copying on Tab Paper) .............................................................................. 113
Output Orientation (Specifying Face Up or Down)................................................................. 114
Folding (Outputting Bi-Folded paper) ..................................................................................... 115
Preset Repeat Image (Making Multiple Copies on a Single Sheet) ......................................... 115
2 Sided Copying (Making 2-sided Copies).............................................................................. 116
Copy Output (Outputting by Specifying Finishing)................................................................. 116
ID Card Copying (Copying Both Sides of an ID Card)........................................................... 118
Output Format
Copy
1
On the [All Services] screen, select
[Copy]
2
Select the [Output Format] tab and
then select a feature on the [Output
Format] screen.
4
93
Page 96

4 Copy
Booklet Creation (Creating a Booklet)
The machine can copy pages laid out so as when multiple-page sheets are overlaid
and folded along the center (gutter), a booklet is created in page order. You can also
set the binding shift and attach a cover when binding documents.
When the C-Finisher with Booklet Maker is installed, [Folding Only] or [Fold & Staple]
becomes available.
Important • Confirm that the orientation of the document and the [Original Orientation] setting of the
[Layout Adjustment] screen are the same.
Note • If the number of pages in the booklet is not a multiple of four, the remaining pages will be
blank pages.
• If [Auto] is set for [Paper Supply], a tray specified in [Auto Paper Off] is automatically
selected. Change the settings if necessary. For more information, refer to "Auto Paper Off"
(P.232).
1
Select [Booklet Creation].
2
Select any item.
Copy
4
Off
Booklet Creation is not applied to
copies.
On - Create Booklet
Copies are made to enable left
binding or top binding.
On - Right Bind Create Booklet
Copies are made to enable right binding.
On - Do not create Booklet
You can output the copies of scanned documents as they are by specifying Fold &
Staple Options. Select this item when you do not need a document to be copied in page
order.
Covers
You can make copies with a cover attached.
z
No Covers
No cover is added.
z
Blank Covers
94
A blank sheet of paper is attached as the cover.
z
Font Cover - 2 Sided
The first and second pages of the original are used as the cover.
z
Front & Back Covers - Print Outside
The first page of the original is used as the outer page of the cover.
z
Last Page on Back Cover
The last page of the original is used as the back cover of the booklet. Select the
check box to use the last page as the back cover. When using [Divide Output] to
separate booklets, the cover will be made on the last page of the last subset.
Page 97

Output Format
Note • Depending on the number of pages in the original, a blank sheet may be inserted before the
last page.
Binding Shift
Displays the [Booklet Creation - Binding Shift] screen.
Refer to "[Booklet Creation - Binding Shift] Screen" (P.95).
Divide Output
Displays the [Booklet Creation-Divide Output ] screen.
Refer to "[Booklet Creation - Divide Output] Screen" (P.95).
Fold & Staple Options
Displays the [Booklet Creation-Fold & Staple Options] screen.
Refer to "[Booklet Creation- Fold & Staple Options] Screen" (P.96).
Paper Tray Settings
Displays the [Booklet Creation-Covers-Paper Tray Settings] screen.
Select the tray to use from [Main Body Tray] and [Covers Tray]. Select trays with paper
of the same size and orientation for the copy paper and the cover.
When [Bypass...] is selected, the [Tray 5 (Bypass)] screen appears. Refer to "[Tray 5 (Bypass)] Screen"
(P.67).
Copy
[Booklet Creation - Binding Shift] Screen
You can specify a ratio within the range from 0 to 50mm in 1 mm increments.
1
Use [ ] and [ ] to specify a
binding shift value.
[Booklet Creation - Divide Output] Screen
When you have a large number of originals, the originals are divided to create subsets
to reduce the thickness of each booklet. The machine folds copies in half, and piles
them up to form a booklet. This feature can be set to from 1 to 50 pages in 1 page
increments.
Note • When specifying [Folding], set the dividing number of sheets in the range from 1 to 15.
4
95
Page 98

4 Copy
1
Select [On].
2
Set the number of copies using [ ]
and [ ] or with the numeric
keypad.
[Booklet Creation- Fold & Staple Options] Screen
When the C-Finisher with Booklet Maker is installed, [Folding Only] or [Fold & Staple]
becomes available.
1
Select any item.
Copy
4
No Fold & Staple
No Finishing is carried out.
Folding Only
Outputting copies folded in half.
The number of copies that can be
folded is 5. When the number is
more than 5, the document is divided by every 5 sheets.
Fold & Staple
The copies are folded in half and stapled at the center.
The number of copies that can be treated is 2 to 15.
96
Page 99

Covers (Attaching a Cover to Copies)
You can make copies with a cover attached.
The front cover can be output before the first page of the document on a different type
of paper (e.g. colored paper or heavyweight paper).
Important • When you select this feature, if the number of the document pages exceeds the maximum
that the machine can scan, the document already scanned cannot be printed. In this case,
cancel the job following the message displayed. The number of the document pages that
can be scanned is 999 pages per job. For multiple jobs, the total numbers are about 1,500
pages for color documents or about 6,000 pages for black and white documents, if the
document size is A4 (Xerox standard document). This figure could be used only as a
guide, since the maximum number of the document pages depends on the types, sizes and
direction of the document.
Note • This feature does not appear for some models. An optional package is necessary. For more
information, contact our Customer Support Center.
• When making 2 sided copies, copies are made on both sides of the top cover/back cover in
accordance with the page order of the document.
• If [Auto] is set for [Paper Supply], a tray specified in [Auto Paper Off] is automatically
selected. Change the settings if necessary. For more information, refer to "Auto Paper Off"
(P.232).
1
Select [Covers].
2
Select any item.
Output Format
Copy
Front Cover
Setting front cover for the first page can be done.
z
No Covers
A cover is not attached.
z
Blank Covers
A blank sheet of paper is attached as the cover.
z
Printed Cover - Print Outside
The document is copied on the external sides of front cover from the first page.
Select when you want to copy only on the external side of the front cover.
z
Printed Cover - Print Inside
The document is copied on the internal sides of front cover from the first page. Select
when you want to copy only on the internal side of the front cover.
4
97
Page 100

4 Copy
z
Printed Cover - 2 Sided
The document is copied to the both sides of cover from the first page. Select when
you want to copy on both sides.
Back Cover
Setting back cover for the last page can be made. When attaching a back cover, you
need to scan a document corresponding to the back cover first.
z
No Covers
A cover is not attached.
z
Blank Covers
A blank sheet of paper is attached as the cover.
z
Printed Cover - Print Outside
Copies one document applicable to a back cover on the external side of the back
cover.
z
Printed Cover - Print Inside
Copies one document applicable to a back cover on the internal side of the back
cover.
Copy
z
Printed Cover - 2 Sided
4
Copies two documents applicable to a back cover on the both sides of the back
cover.
Paper Tray Settings
Displays the [Covers - Paper Tray Settings] screen.
Select the paper tray to use from [Front Cover Tray], [Back Cover Tray] and [Main Body
Tray]. When pasting image to the cover, select trays with paper of the same size and
orientation for the text and the cover.
Front Cover
Select the tray to be used for the front cover sheet.
Back Cover
Select the tray to be used for the back cover sheet.
Main Body
Select the tray to be used for the body sheet.
98
 Loading...