

Page 1

Xerox DocuColor 4
Administrator Guide
701P31413
August 1999
THE DOCUMENT COMPANY
XEROX
Page 2

1999, Xerox Corporation. All rights reserved.
Copyright protection claimed includes all forms and matters of
copyrightable material and information now allowed by statutory or judicial law or hereinafter granted, including without limitation, material generated from the software programs which are
displayed on the screen such as styles, templates, icons, screen
displays, looks, etc.
XEROX
Xerox
®
, The Document Company®, the stylized X, and all
®
product names and product numbers mentioned in this
publication are trademarks of XEROX CORPORATION. Other
company trademarks are also acknowledged.
Changes are periodically made to this document. Technical updates will be included in subsequent editions.
Printed in the United States of America.
Page 3

Table of Contents
Table of Contents ............................................................................................i
Preface...........................................................................................................v
Certifications ................................................................................................. 9
Types of Manuals ..........................................................................................xi
Network Administration Features ................................................................xiii
Before You Begin ......................................................................................... xiv
Printer/Copier Control Panels..................................................................... xvii
1. Connecting to the Network
1.1 The printer/copier on the network.............................................................. 2
1.2 Stages of installation on the network ........................................................ 3
1.3 Quick path to installation........................................................................... 5
1.4 Before You Proceed ................................................................................ 11
1.5 Ethernet cable connection ...................................................................... 12
1.6 Token Ring Connection .......................................................................... 14
1.7 Parallel cable connection........................................................................ 15
2. Performing Setup from the Printer Control Panel
2.1 Initial Setup ............................................................................................. 18
2.2 Using the printer control panel ................................................................ 19
2.2.1 Activity lights .............................................................................. 19
2.2.2 Display window .......................................................................... 20
2.2.3 Buttons ....................................................................................... 21
2.3 Setting up the Print Functions ................................................................. 22
2.3.1 Top-level menus......................................................................... 22
2.3.2 Main Printer Setup Menus.......................................................... 23
2.3.3 System Setup ............................................................................. 24
2.3.4 Printer Setup .............................................................................. 26
2.3.5 PostScript Setup......................................................................... 27
2.3.6 PCL Setup.................................................................................. 28
2.4 Specifying network information ............................................................... 29
2.4.1 I/O Port Setup ............................................................................. 30
2.4.2 Ethernet...................................................................................... 30
2.4.3 Parallel Port Setup ..................................................................... 30
i
Page 4

2.5 Specifying network protocol options ....................................................... 31
2.5.1 Network Protocol Setup.............................................................. 32
2.6 Network Services Setup.......................................................................... 34
2.6.1 NDS Setup ................................................................................. 34
2.6.2 Bindery Setup............................................................................. 37
2.6.3 SMB Setup ................................................................................. 39
2.7 Printing information pages ...................................................................... 41
2.8 If you have difficulty printing .................................................................... 43
2.9 Setup from Copier Control Panel
3. Performing Setup from WebSetup
3.1 Setup from WebSetup ............................................................................. 46
3.1.1 System Setup ............................................................................. 48
3.1.2 Network Setup............................................................................ 51
3.1.3 Restarting the printer/copier ....................................................... 64
4. Setting up Network Servers
4.1 Setting up the DocuColor 4 LP/CP on an IPX network ........................... 66
4.2 Tips for experts-IPX networks ................................................................. 67
4.2.1 Overview of IPX printing to the DocuColor 4 LP/CP................... 67
4.3 Configuring a NetWare server for printing ............................................... 69
4.3.1 Configuring an NDS connection ................................................. 69
4.3.2 Setting up an NDS connection ................................................... 71
4.3.3 Setting the NetWare 4.x bindery context..................................... 79
4.3.4 Setting up a DocuColor 4 LP/CP print queue for bindery ........... 82
4.4 Setting up NetWare Windows clients for printing..................................... 86
4.5 Setting up DocuColor 4 LP/CP on a TCP/IP network with Windows NT 4.0 87
4.6 Tips for experts-Windows NT 4.0 with TCP/IP........................................ 88
4.7 Configuring a Windows NT 4.0 server for the DocuColor 4 LP/CP ......... 89
4.7.1 Adding the DocuColor 4 LP/CP to the TCP/IP network.............. 90
4.7.2 Installing the DocuColor 4 LP/CP as a shared PostScript printer/
copier ......................................................................................... 92
4.7.3 Setting up an another printer/copier ........................................... 93
ii
Page 5

4.8 Configuring Windows NT 4.0 clients....................................................... 94
4.9 Using AppleTalk with Windows NT 4.0 ................................................... 95
4.10 Token Ring Support for DocuColor 4 LP/CP........................................... 96
5. About copy Configuration
5.1 Displaying the Tools Screen .................................................................... 98
5.1.1 Displaying the Tools screen ....................................................... 99
5.1.2 Closing the Tools screen .......................................................... 100
5.2 Configuration Settings List.................................................................... 101
5.3 Changing the configuration................................................................... 104
5.3.1 Basic method for changing the configuration ........................... 105
5.4 Setting up, changing, or removing the user's pass code ....................... 106
5.5 Changing the pass code of the system administrator............................ 108
5.6 Adjusting the color balance................................................................... 110
....................................................................................................................
6. Administering the printer/copier
6.1 Administrator functions.......................................................................... 114
6.2 Maintaining optimal DocuColor 4 LP/CP performance ......................... 116
6.3 Troubleshooting the printer/copier......................................................... 117
6.3.1 Troubleshooting during Setup from the Control Panel.............. 117
6.3.2 When an error message appears ............................................. 122
Appendix
A Menu Help ............................................................................................ 124
A1 Graphical Printer Control Panel Overview................................ 124
B Available Options.................................................................................. 125
B.1 Upgrade options....................................................................... 125
B.2 Installing a hard disk drive........................................................ 127
B.3 Installing additional memory..................................................... 129
B.4 Installing a Token Ring card ..................................................... 133
B.5 Token Ring Installation from Control Panel .............................. 136
Index .............................................................................................................. 137
iii
Page 6

Preface
Thank you for purchasing the DocuColor 4.
This guide is intended for anyone who is responsible for integrating the DocuColor 4 LP/
CP into a business environment that includes networked personal computers. After the
DocuColor 4 LP/CP and client workstations are set up, as described in the User Guide
and the Setup Guide, individual users can print to the DocuColor 4 LP/CP as a highperformance color PostScript printer. Additionally, the DocuColor 4 CP can be used as a
copier.
August, 1999
Caution on Copying
Copying certain documents may be illegal in your country.
Penalties of fines or imprisonment may be imposed on those found guilty of
this. The following are exampes of tiems that may be illegal to copy in your
country.
• Currency
• Banknotes and cheques
• Bank and government bonds and securities
• Passports and identification cards
• Copyright material or trademarks without the consent of the owner
• Postage stamps and other negotiable instruments
This list in not inclusive and no liability is assumed for either its completeness or accuracy. In case of doubt, contact legal counsel.
iv
Page 7

Certifications
Certifications . . . in Europe
The CE marking that is applied to this product symbolizes Xerox Europe
Declaration of Conformity with the following applicable Directives of the
European Union as of the dates indicated:
January 1, 1995: - Council Directive 73/23/EEC amended by Council Directive 93/68/EEC, approximation of the laws of the member states related to
low voltage equipment.
January 1, 1996: - Council Directive 89/336/EEC, approximation of the laws
of the member states related to electromagnetic compatibility.
A full declaration, defining the relevant Directives and references standards,
can be obtained from your Xerox Europe representative.
This is a Class A product. In a domestic environment this product may
cause radio interference in which case the user may be required to take
adequate measures.
WARNING
Changes or modifications to this equipment not specifically approved by
Xerox Europe may void the user's authority to operate this equipment.
Shielded cables must be used with this equipment to maintain compliance
with the EMC Directive (89/336/EEC).
WARNING
In order to allow this equipment to operate in proximity to Industrial,
Scientific and Medical (ISM) equipment, the external radiation from ISM
equipment may have to be limited or special mitigation measures taken.
v
Page 8

Radio Frequency
NOTE: This equipment has been tested and found to comply with the limits for a Class A
digital device, pursuant to Part 15 of the FCC Rules. These limits are designed to provide
reasonable protection against harmful interference when the equipment is operated in a
commercial environment. This equipment generates, uses, and can radiate radio frequency
energy and, if not installed and used in accordance with the instruction manual, may
cause harmful interference to radio communications. Operation of this equipment in a
residential area is likely to cause harmful interference, in which case the user will be
required to correct the interference at his own expense.
Changes or modifications to this equipment, not specifically approved by the Xerox Corporation may void the user's authority to operate this equipment.
Shielded cables must be used with this equipment to maintain compliance with FCC regulations.
Energy Star Compliance
Energy Star
Xerox Corporation designed this product to comply with the guidelines of the ENERGY
STAR program of the Environmental Protection agency. As an ENERGY STAR Partner,
Xerox has determined that this copier model meets the ENERGY STAR guidelines for
energy efficiency.
Environmental Choice
Terra Choice Environmental Services, Inc., of Canada has verified that this Xerox product conforms to all applicable Environmental Choice EcoLogo requirements for minimized impact to the environment.
Auto power- off Feature
To save the pwoer consumption, this product has a auto power-off feature which enables
th product to automatically enter the power-off mode if the product remains idle for 15
minutes (default setting).
For detailed information, see "About Configuration".
vi
Page 9

Electrical Safety
Use the power cord supplied with your Xerox printer/copier.
Do not use a ground adaptor plug to connect the printer/copier to a power source recep-
tacle that lacks a ground connection terminal.
Plug the power cable directly into a properly grounded electrical outlet. Do not use an
extension cord. If you do not know whether an outlet is grounded, ask an electrician to
check the outlet.
WARNING: You may get a severe electrical shock if you do not connect the grounding
conductors properly.
• Do not place the printer/copier where people may step on the power cable.
Do not place objects on the power cable.
• Do not override or disable electrical or mechanical interlocks.
• Do not obstruct the ventilation openings. These openings are provided to
prevent overheating of the printer/copier.
WARNING: Do not push objects into slots and openings on the copier. Making a contact with the voltage point or shorting out a part could result in fire or electrical shock.
If you notice unusual noises or odors, switch off the printer/copier power immediately.
Disconnect the power cable from the electrical outlet. Call an authorized Xerox service
representative to correct the problem.
If any of the following conditions occur, switch off the printer/copier power immediately, disconnect the power cable, and call an authorized Xerox service representative.
• The power cable is damaged or frayed.
• Liquid is spilled into the printer/copier.
• The printer/copier is exposed to water.
• Any part of the printer/copier is damaged.
Disconnect Device
DocuColor 4 LP (Printer only)
The power cord is the disconnect device for this printer. The power cord is attached to
the printer as a plug-in device at the back of the printer. In the event it is necessary to
remove all electrical power from the printer, disconnect the power cord from the power
receptacle at the back of the printer.
DocuColor 4 CP
The power cord is the disconnect device for this printer/copier. The power cord is attached to the scanner as a plug-in device that services both the printer and scanner. In
the event it is necessary to remove all electrical power from the printer/copier, disconnect the power to the scanner.
vii
Page 10

Laser Safety
CAUTION: Use of controls or adjustments or performance of procedures other than those
specified herein may result in hazardous radiation exposure.
This equipment complies with safety standards. With specific regard to laser safety, the
equipment complies with performance standards for laser products set by government
agencies as a Class 1 laser product. It does not emit hazardous light; the beam is totally
enclosed during all modes of customer operation and maintenance.
When performing various operator functions, you may see laser warning labels. These
labels are for the service mode and are placed on or near panels or shields that require a
tool for removal. These panels are not permanently removed.
Maintenance Safety
• Do not attempt any maintenance procedure that is not specifically described
in the documentation supplied with your printer/copier.
• Do not use aerosol cleaners. The use of supplies that are not approved
may cause poor performance and could create a dangerous condition.
• Use the supplies and cleaning materials only as directed in this manual.
Keep all of these materials out of the reach of children.
• Do not remove the covers or guards that are fastened with screws. There
are no parts that you can maintain or service behind these covers.
• Do not perform any maintenance procedures unless you have been trained
to do them by a Xerox representative or a procedure is specifically described in one of the printer/copier manuals.
viii
Page 11

Operational Safety
Your Xerox printer/copier and supplies were designed and tested to meet strict safety
requirements. These include safety agency examination, approval, and compliance with
established environmental standards.
Your attention to the following safety guidelines will help ensure the continued safe
operation of your printer/copier.
• Use the materials and supplies specifically designed for your printer/
copier. The use of unsuitable materials may result in poor performance
and possibly a hazardous situation.
• Follow all warnings and instructions marked on, or supplied with, the
printer/copier.
• Place the printer/copier in a room that provides adequate space for venti-
lation and servicing.
• Place the copier printer/copier on a level, solid surface (not on a thick pile
carpet).
• Do not place the printer/copier near a heat source.
• Do not place the printer/copier in direct sunlight.
• Do not place the printer/copier in line with the cold air flow from an air
conditioning system.
• Do not put containers of coffee or other liquids on the printer/copier.
• Do not block or cover the slots and openings on the printer/copier. With-
out adequate ventilation, the printer/copier may overheat.
• Do not attempt to override electrical or mechanical interlock devices. Be
careful when working in areas identified with this warning symbol. These
areas may be very hot and could cause personal injury.
If you need any additional safety information concerning the printer/copier or materials,
contact your authorized Xerox dealer.
ix
Page 12

Ozone Safety
This product will produce ozone during normal operation. The ozone produced is heavier
than air and is dependent on copy volume. Providing the correct environmental parameters
as specified in the Xerox installation procedures will ensure that the concentration levels
meet safe limits.
If you need additional information about ozone, please request the Xerox publication
Ozone (part number 600E74140) by calling 1-800-828-6571 in the United States and
Canada.
x
Page 13

Types of Manuals
This manual is part of the set of DocuColor 4 LP/CP documentation that includes the
following manuals for users and system administrators:
Setup Guide
This guide contains procedures from unpacking the printer/copier, confirming simple operations, troubleshooting and routine care of the printer/copier.
Administrator Guide (this manual)
This guide explains basic configuration and administration of the DocuColor
4 LP/CP for the supported platforms and network environments. It also includes guidelines for setting up Windows NT
vide PCL and PostScript printing services to clients.
User Guide
This guide describes how to install software to enable users to print to the
DocuColor 4 LP/CP. Specifically, it describes installation of PCL and
PostScript printer/copier drivers, printer/copier description files, and other
user software provided on the DocuColor 4 LP/CP User Software CD. It also
explains how to connect each user to the network, and how to set printing
options and print to the DocuColor 4 LP/CP from Windows
computers.
®
and NetWare servers to pro-
®
and Mac OS
Screens Displayed
Actual screens may not be identical to those shown in this manual.
In the following cases, please refer to the associated manual.
ll Cannot print.
ll An error message is displayed.
ll To add another computer that is to use the printer/copier.
ll To print with color adjustments.
ll To change the network environment.
ll To view the settings list or a list of fonts installed.
Administrator Guide
Setup Guide
User Guide
xi
Page 14

About this Manual
This manual includes guidelines on the following topics:
• Basic configuration of the DocuColor 4 LP/CP to support printing over AppleTalk,
TCP/IP, and IPX (Novell) networks
• Setting up a parallel port connection
• Configuring Novell and Windows NT servers to provide DocuColor 4 LP/CP printing
services
• Administering network printing
• Using the DocuColor 4 LP/CP in mixed network environments
• Installing the hard disk drive, additional memory, or alternate language EPROM's
The network guidelines in this manual are not intended to replace the services of an
experienced network engineer.
Conventions
Certain conventions are used to convey special meanings in this manual, as follows:
indicates a particularly important item.
indicates a supplied item.
indicates a referenced item.
Bold is used to show menus or menu items as they are displayed on the control panel of the
printer/copier.
xii
Page 15

Network Administration Features
DocuColor 4 LP/CP software offers several important features that affect you as a network or printer/copier administrator:
• Direct (native) support of NDS with NetWare 4.x
• NetWare 4.x can also be supported in bindery emulation.
NDS is an abbreviation for either Novell Directory Services or NetWare Directory
Services. The two names are used interchangeably.
• Simultaneous NetWare 4.x and NetWare 3.12 connections supported
One NetWare 4.x NDS tree and up to eight NetWare 3.12 bindery servers (or NetWare
4.x servers in bindery emulation mode) can be connected to the DocuColor 4 LP/CP.
• Fiery WebTools (Status, WebSpooler, WebDownloader, WebLink, and WebSetup)
Fiery WebTools allow you to manage the DocuColor 4 LP/CP from the Internet or from
your company’s intranet.
• Job tracking
Job Logs list all jobs sent to the printer.
• Support for PCL and PostScript
PCL, and PostScript are standard with the DocuColor 4 LP/CP. PostScript 3 fonts are
also included.
PCL is not available on Mac OS computers.
• Support for Windows (SMB) printing
Windows printing, also known as SMB (Server Message Block) printing, allows you to
print on TCP/IP networks using built-in Microsoft networking support and without additional network software. Printing using SMB allows you to print from your computer
to a particular connection (Hold, Print, or Direct) on the DocuColor 4 LP/CP.
xiii
Page 16

Before You Begin
Before using the DocuColor 4 LP/CP, follow these general steps:
Confirm that the system administrator has completed printer/copier Setup as described in the this manual.
Find out what printer/copier defaults the administrator specified in Setup.
These default settings can affect the results of your print jobs. Check with your
administrator or operator for information on these default settings.
Confirm that the user software is installed correctly on your workstation, as described in the User Guide.
Find out what your access privileges are.
Your system or site administrator may or may not have set a password on the
printer/copier. If a password has been set, it will be required to perform job management with WebSpooler or printer/copier setup with WebSetup.
Levels of access and control
The DocuColor 4 LP/CP can be password protected, providing a level of control for printer/copier administrators. The password determines whether a
user can modify Setup options, and whether a user has control over print
jobs in the WebSpooler queues, or copiy jobs from the scanner.
By default there is no printer password. Once an Administrator password has
been set, users are required to enter it to access Setup menus or to access the
WebSetup screens.
The copier has a factory preset password for the System Administrator of
9999. For security reasons, the System Sdministrator should change this
password as soon as possible. This Administrator password restricts access
to copier configuraiton ssettings. For more information see section 5 of this
guide.
xiv
Page 17

Print connections
If your DocuColor 4LP has a hard disk drive, you can print to the Print Hold
queues as well as the Direct connection. If your DocuColor 4LP does not
have a hard disk drive, only the Direct connection is available for printing.
All docuColor 4 CP products include a hard drive.
Direct connection
Jobs sent to the DocuColor 4 LP/CP Direct connection remain at the sending
workstation until the DocuColor 4 LP/CP is ready to print. They are transmitted to the printer and processed as soon as any prior job is finished printing.
Jobs sent to the Direct connection appear in the display of current jobs in
WebSpooler, but they cannot be selected for reprinting, moving, or deletion,
providing a measure of security for sensitive files. If you plan to download
fonts to the DocuColor 4 LP/CP via the network, you must download them to
the Direct connection.
You cannot use the Direct connection for lpr printing over TCP/IP. You can,
however, use this connection for downloading fonts.
Queues
Print queues (Print queue and Hold queue) are available on the printer/copier.
A queue is a storage area on the printer’s hard disk that is reserved for print
jobs. Queues are particularly useful when many print jobs are being sent to
the printer. When a job is printed to the Print queue or the Hold queue, it is
stored on the DocuColor 4 LP/CP hard disk rather than the user’s hard disk,
quickly freeing up the user’s workstation.
• Print queue - Files sent to the Print queue are spooled to the printer’s
hard disk drive. The DocuColor 4 LP/CP prints jobs from the Print queue
in the order in which they were received.
• Hold queue - Files sent to the Hold queue remain on the printer’s hard
disk drive until they are printed or deleted using WebSpooler. (For more
information see the User Guide.)
• Printed queue - The Printed queue is a job storage area on the DocuColor
4 LP/CP disk; it contains the most recent jobs printed from the Print queue.
The Printed queue makes it convenient to reprint those jobs. A Setup option enables this queue and determines the maximum number of jobs retained in it at any given time. Reprinting jobs in this queue requires
WebSpooler and an Administrator password, if one has been set.
xv
Page 18

Password
You can implement a password on the printer/copier as a means of controlling access to DocuColor 4 LP/CP functions. The Change Password option,
which enables you to set or change the Administrator password, can be set in
the System Setup menus, or it can be set in WebSetup screens. Once set,
users must enter the password in order to access the printer’s Setup menus,
to access WebSetup screens, and to use Administrator controls of
WebSpooler.
Also, copier password limits access to the machine. See Section 5 for more
detailed information.
Fiery WebTools
Fiery WebTools, software that allows you to remotely manage your printer/
copier and print jobs via the Internet or your company’s intranet, come preinstalled on the DocuColor 4 LP/CP. Fiery WebTools are supported on Mac
OS, Windows 95/98, and Windows NT 4.0 computers. To enable use of Fiery
WebTools, you must do the following in Setup:
• Set Enable TCP/IP to Yes.
• Set an IP address for the DocuColor 4 LP/CP.
• Enter a TCP/IP gateway address and subnet mask, if they are used.
The WebDownloader is not available on Mac OS computers.
Control level scenarios
Printer/Copier access and control features are described below. Choose the
scenario that best matches your site requirements.
It is recommended that you set an Administrator password to prevent unauthorized changes to system settings.
No designated administrator
All users have access to all printer functions. On the copier, the
Administrator password is always enabled.
A designated administrator
Only an administrator has access to all system functions, including
configuration Setup, clearing the job log and printed queues, formatting
the printer’s hard disk, performing color calibration, and managing all
jobs from remote workstations via WebSpooler.
xvi
Page 19

Wordless Printer Control Panel
This section describes the wordless control panel.
Worded Printer Control Panel
The printer worded control panel described throughout the documentation
is displayed here.
Activity Lights
The activity lights indicate the status of the printer/copier. They are described in the table below. The table shows the light displayed on the worded
control panel as well as the one found on the wordless control panel.
Wordless Control Panel
Light
Worded Control
Panel Light
Indicates:
Online LED - On when the printer is online (ready
to accept and process new jobs), and off when the
printer is offline or the power is off.
Data LED - Blinking when receiving, processing or
printing data and off in Power Save mode, when
the printer is offline, or the power is off.
Message LED - On when the printer requires a
service call. Blinking when the printer requires
operator intervention (e.g., load paper).
xvii
Page 20
Printer Display Window
The LCD window on the control panel displays status messages.
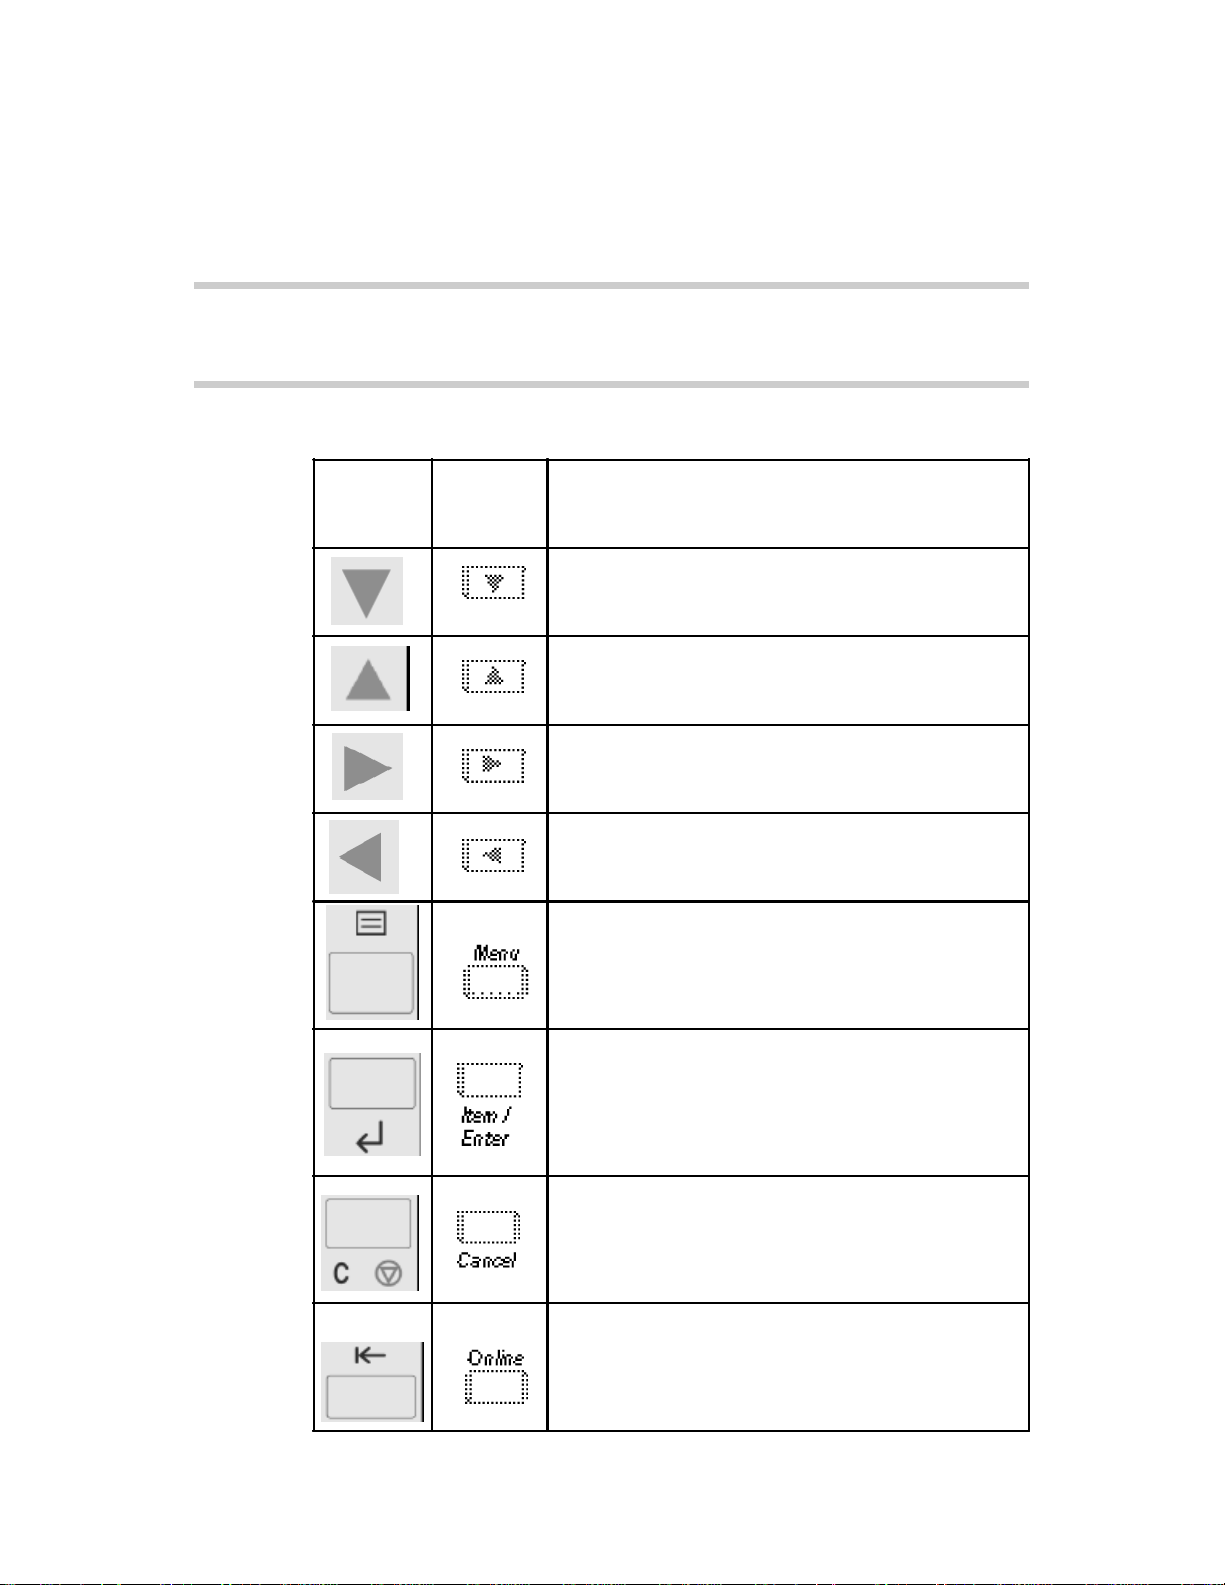
Printer Buttons
The buttons and their functions are described here.
Wordless
Control
Panel
Button
Worded
Control
Panel
Button
Indicates:
Down arrow - In a fixed-length list, takes you to the
next item in the list. When entering numbers or text,
decrements to the next number or character. Hold
down the button to decrement rapidly.
Up arrow - In a fixed-length list, takes you to the
previous item in the list. When entering numbers or
text, increment to the previous number or character.
Hold down the button to increment rapidly.
Right arrow - When entering numbers or text,
advances the cursor.
Left arrow - When entering numbers or text,
backspaces and deletes
Menu button - From Ready or Power Saver mode,
enters the setup menus. In Setup menu, advances
from one menu to the next. From a setup menu
option, returns to the previous setup menu.
Item/Enter button - Accepts an option and advances
to the next choice. When the printer is in Ready
mode, pressing takes the printer offline.
xviii
Cancel button - In Setup menus, exits menus entirely,
returning to Ready. While printing, Cancel stops
printing or processing the current job.
Online button - From Ready or Power Saver mode,
enters Online (Menu) mode. From Online (Menu)
mode, pressing returns to offline.
Page 21
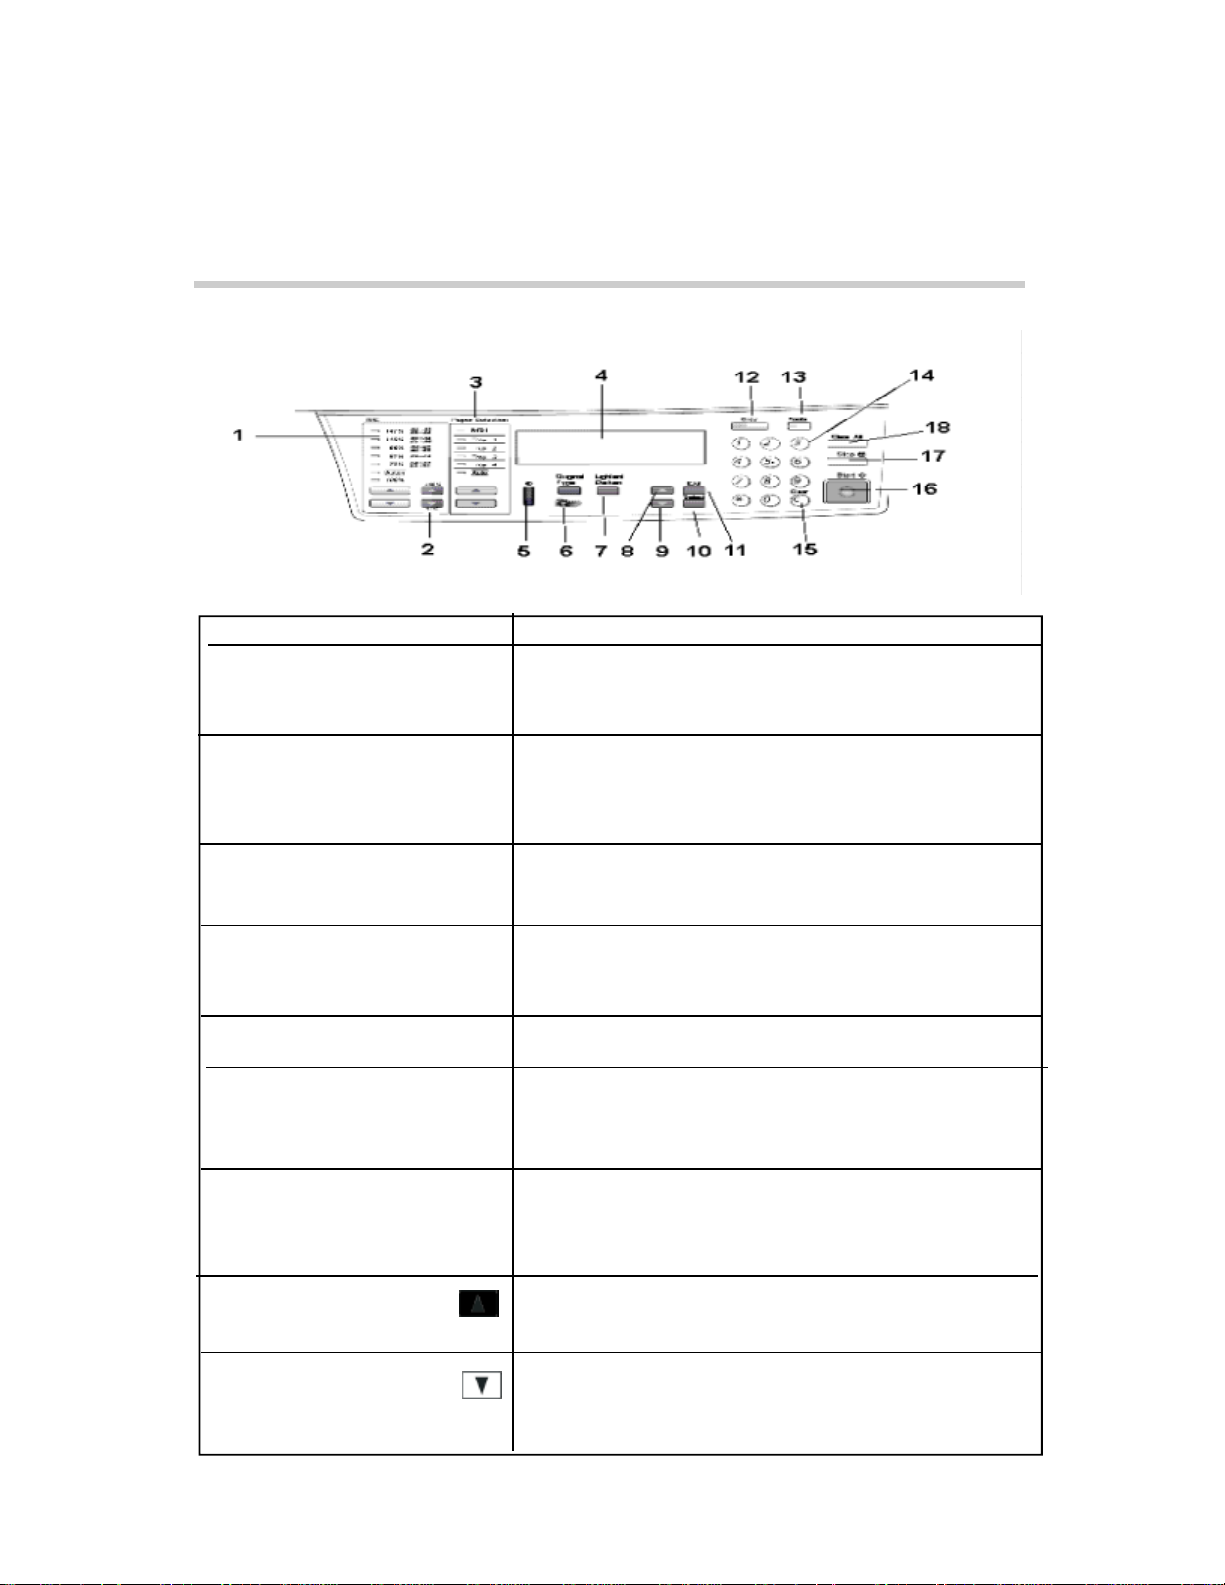
Copier control panel
Name Description
(1) [Reduce/Enlarge] buttons
Use the buttons to select a zoom ratio from the list, or use
[Auto] for automatic selection. The selected zoom ratio
indicator lights.
(2) [Zoom] buttons
(3) [Paper Supply] buttons
(4) Display
(5) Contrast
(6) [Original Type] button
(7) [Lighten Darken] button
(8) (previous) button
Use the buttons to adjust the zoom ratio between 50% and
200% with 1% increments. The selected zoom ratio appears on the display.
Use the buttons to select a paper tray. The selected paper
tray indicator lights and its size appears on the display.
The display indicates the state of various settings as well
as the machine.
Use it to adjust the contrast of the display.
Use this button to select an image quality of the document.
When you press this button, the color mode selection
screen appears on the display.
Use this button to adjust the copy density. When you press
this button, the copy density selection screen appears on
the display.
Use this button to select the previous item in relation to the
current item.
(9) (next) button
Use this button to select the next item in relation to the
current item.
xix
Page 22

Name Description
(10) [Select] button
(11) [Exit] button
(12) [Copy] button
(13) [Tools] button
(14) Numeric buttons
(15) “C”button
(16) [Start] button
(17) [Stop] button
(18) [Clear All] button
Use this button to set (confirm) selection of a function.
Use this button to cancel the selected function. Also, inthe Tools
screen where there are multiple levels of selections, pressing this
button moves one level up the hierarchy.
Use this button to switch to the copy mode.
Use this button to confirm or change functions/settings of the
machine. When you press this button, the Tools screen appears on
the display.
Use these buttons to enter number of copies or a pass code. Also,
use them when you need to enter a number at a function setting.
Use this button to return the entered number to 1. Also, when you
are entering a pass code, pressing this button deletes the last
character.
Use this button to start copying.
Use this button to stop the copy operation being under way.
Use this button to reset the machine and return all settings to their
default values (that is, when the power is turned on).
xx
Page 23

Connecting
to the
Network
This chapter summarizes the stages in setting up a Xerox DocuColor 4 LP/
CP and includes diagrams that refer you to other chapters or other manuals
for completing your installation.
Page 24

1
1.1 The printer/copier on the network
The built-in 10BaseT/100BaseT Ethernet interface on the DocuColor 4 LP/
CP supports the following network protocols:
• AppleTalk
• TCP/IP (the lpr, nbt, and http protocols)
TCP/IP stands for Transmission Control Protocol/Internet Protocol. The
lpd protocol is the standard TCP/IP printing protocol. The nbt protocol
supports Windows (SMB) printing. The http protocol is commonly used
for Web pages on the Internet and on intranets.
• IPX/SPX (Novell)
IPX/SPX stands for Internetwork Packet Exchange/Sequenced Packet Exchange.
These protocols (rules that enable computers on a network to communicate
with each other) are supported on the Windows and Mac OS, and can run
concurrently on the same Ethernet cable. Workstations that use other protocols can print through a server that uses one of the protocols mentioned, or
they can print to the DocuColor 4 LP/CP parallel port.
When you add a DocuColor 4 LP/CP to a network, it is assumed that a network administrator will have already installed a network cabling system and
connected workstations and servers.
• Token Ring
Xerox Corporation provides as an option the Token Ring Card. Token Ring
can operate at 4 or 16 Mbps.
The Token Ring is mounted internally and connects to the PCI port on the
EFI controller.
Configuring the Token Ring is accomplished using the Control Panel.
2
Page 25

1.2 Stages of installation on the
network
Installation can be performed by a network or printing administrator. The
stages of a successful installation are:
• Physically connecting the DocuColor 4 LP/CP to a functioning network
Prepare a network node for the DocuColor 4 LP/CP- network cable and
route it to the location where the DocuColor 4 LP/CP will be installed, and
attach the cable to the network interface of the DocuColor 4 LP/CP.
See page 5 for details.
• Configuring network servers
When network servers are required, you need to configure those servers
to provide client access to the DocuColor 4 LP/CP as a color PostScript or
PCL printer/copier.
1
See Chapter 4 for information on configuring network servers in Windows
environments.
• DocuColor 4 LP/CP Setup
Configure the DocuColor 4 LP/CP for your particular printing and network environment.
See Chapter 2 for details.
• Client setup
Install the files needed for printing, install additional user software, and
connect the client to the DocuColor 4 LP/CP over the network. These steps
are described in the User Guide.
• System administration
Monitor and maintain system performance and troubleshoot problems that
arise.
See Chapter 6 and the User Guide for details.
3
Page 26
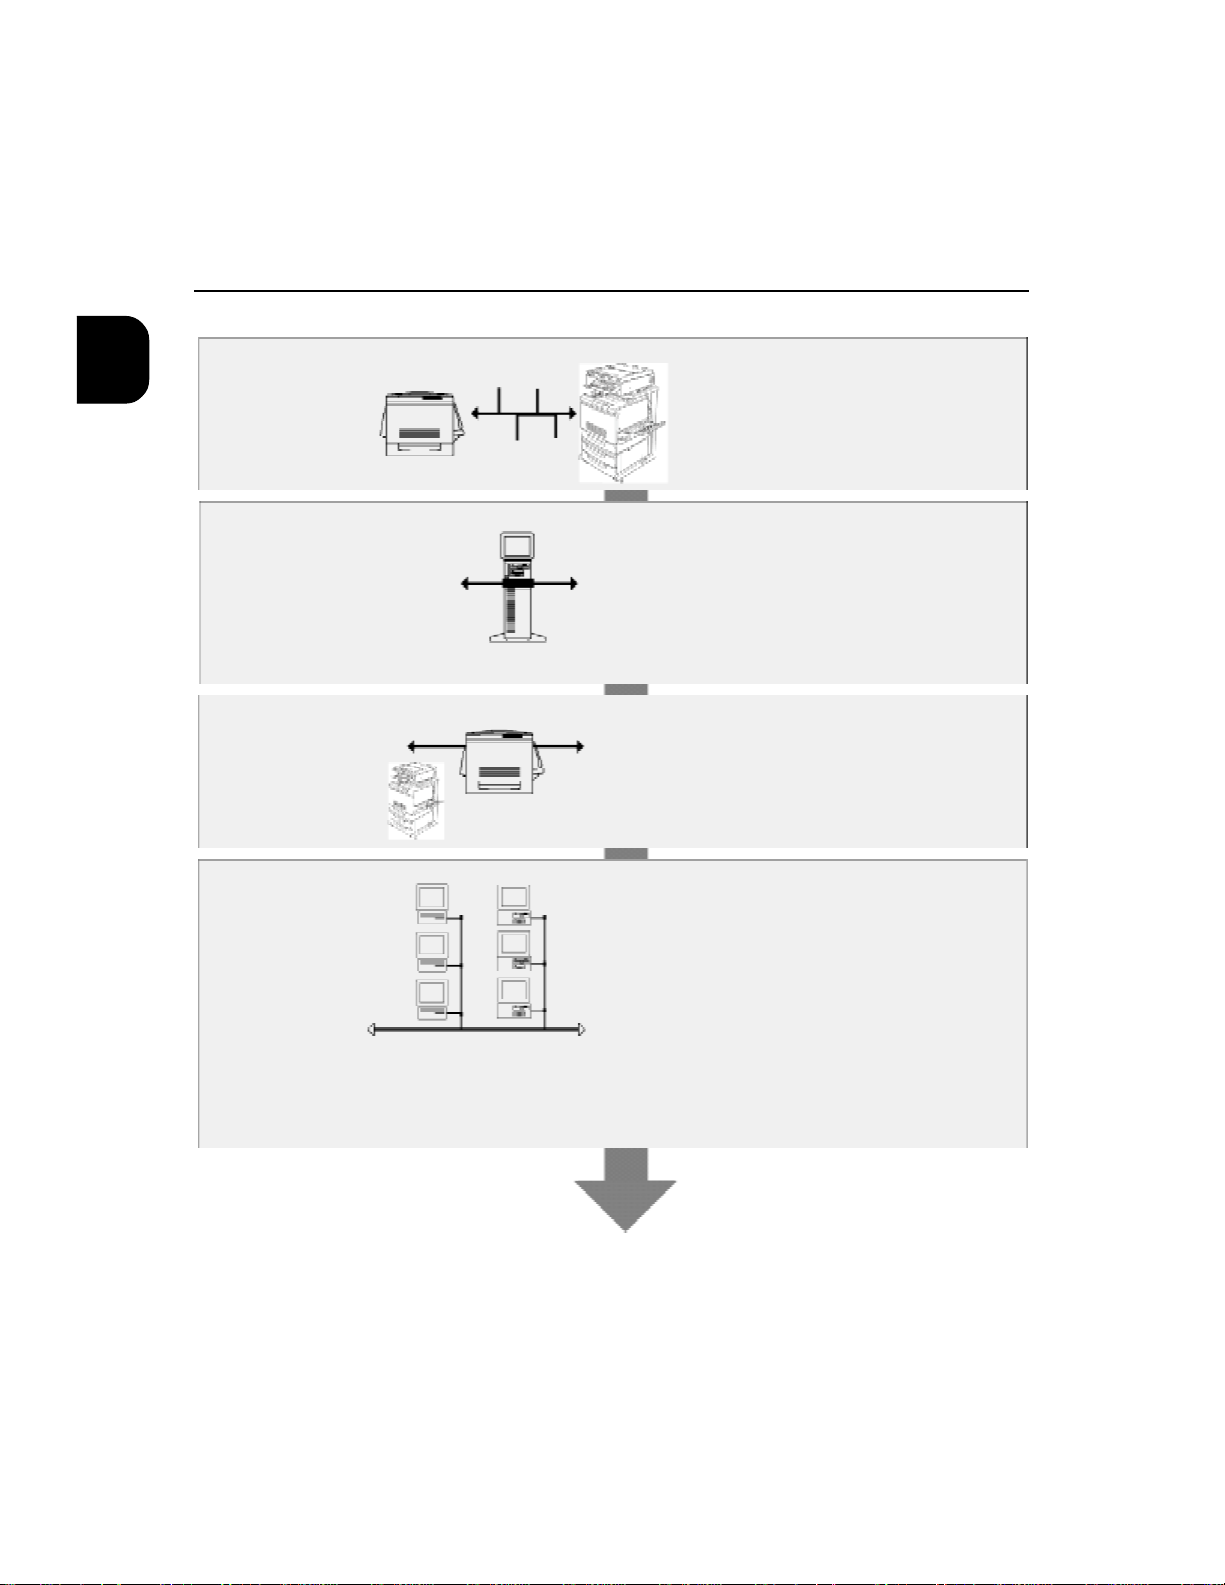
1.2 Stages of installation on the network
Summary of DocuColor 4 LP/CP network installation
1
CONNECTION
DocuColor 4 LP/CP
NETWORK
SERVER
CONFIGURATION
DocuColor 4 LP/CP
PRINTER
SETUP
CLIENT
SETUP
MacOS Windows
Network Server
Prepare a network node.
Connect the DocuColor 4 LP/
CP to the network.
Configure Windows NT and IPX
(Novell) servers to specify
DocuColor 4 LP/CP print queues
and DocuColor 4 LP/CP users.
No special configuration or
AppleShare server is required.
From the DocuColor 4 LP/CP control panel, configure System Setup,
Printer Setup, Network Setup, PS
Setup, and PCL Setup.
At each workstation that will
print to the DocuColor 4 LP/CP:
Install the appropriate printer/copier drivers and
printer/copier description files, and connect to
one or more print connections.
For computers that will use the WebTools, install an Internet browser.
Verify the DocuColor 4 LP/CP in the list of printers and run a test print.
DocuColor 4 LP/CP available on the
network
4
Page 27

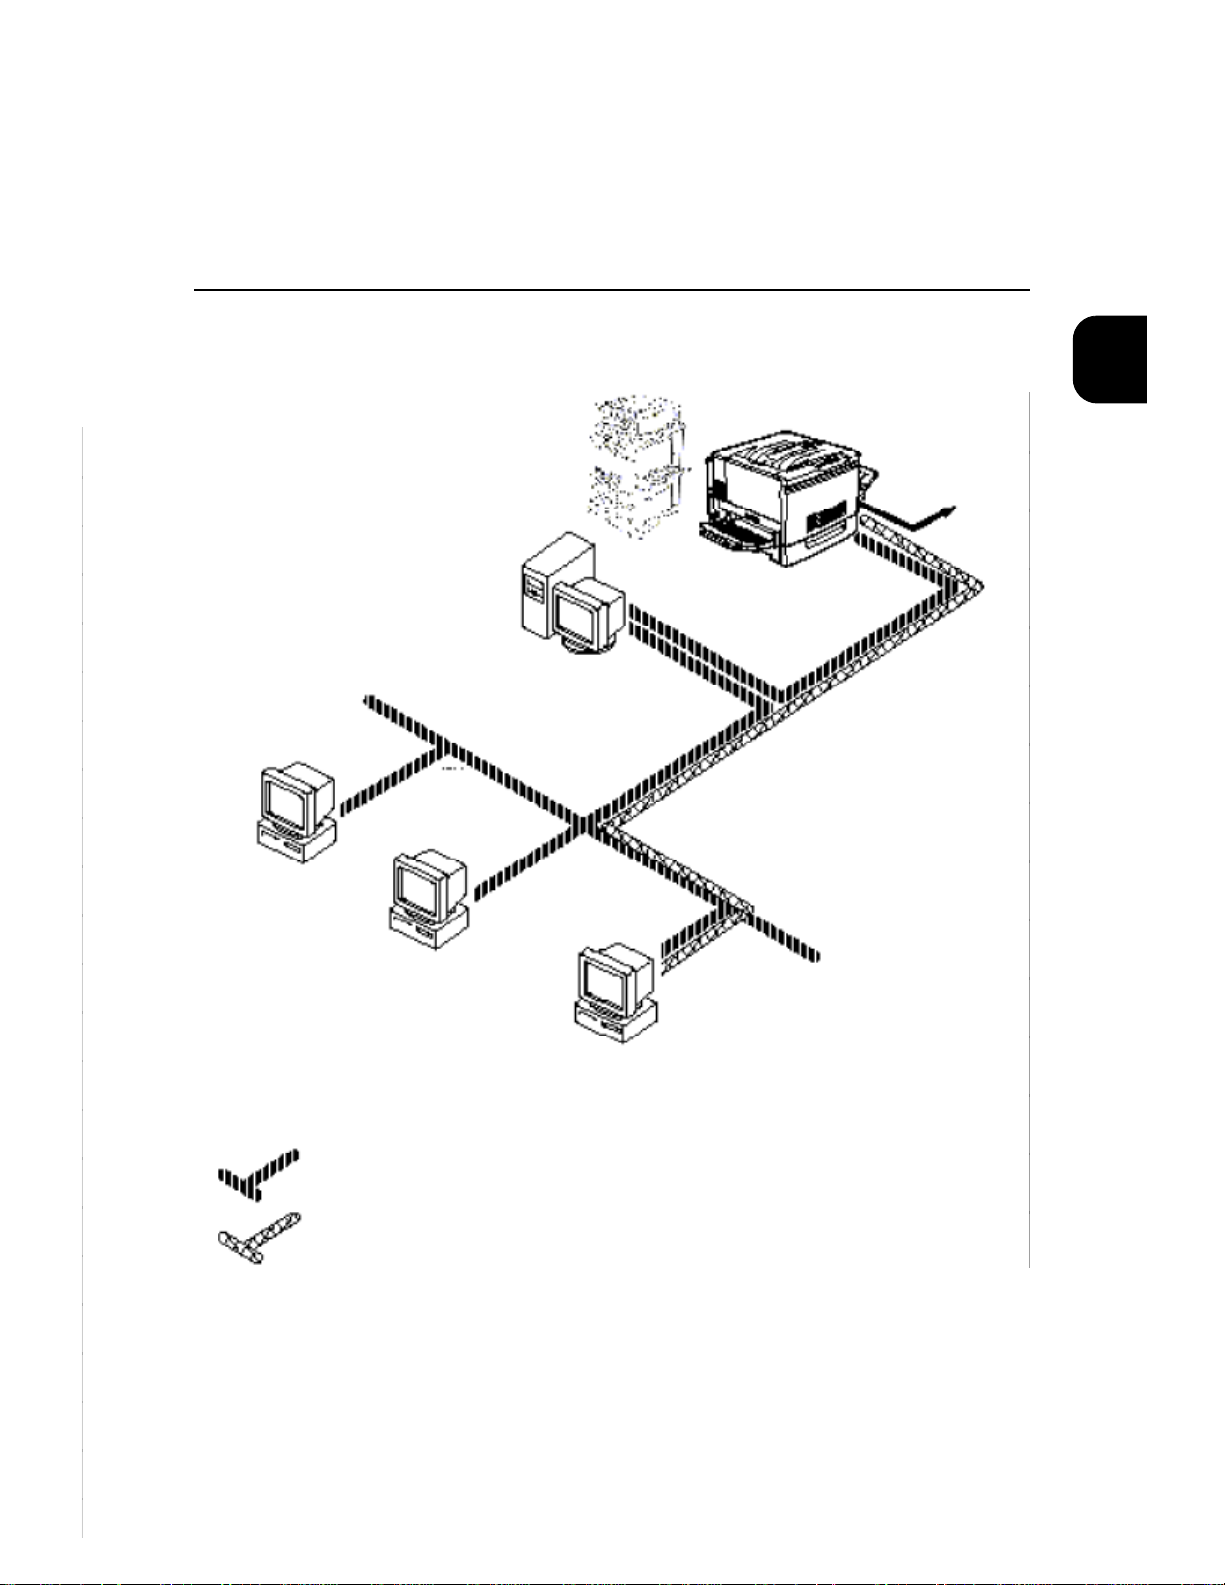
1.3 Quick path to installation
The diagrams in the following pages show typical systems that can be used
for printing and for using Fiery WebTools. To use the diagrams, find the
page with your preferred platform and network type. Then look up the setup
procedures in the pages and books referred to in the keys.
The diagrams describe devices that use the supported networking protocols.
They are logical diagrams and are not intended to describe the physical arrangement (topology) of devices on the network. A variety of physical arrangements is possible with each logical arrangement. For example, twisted
pair Ethernet networks commonly use a star configuration around a hub,
rather than a bus arrangement. The design of physical networks is beyond
the scope of this manual.
If the network uses more than one protocol or more than one type of workstation, combine the setups listed for each component of your system. Note
that multiple protocols (shown in the diagrams as parallel lines) can run on
the same cable. A solid connection from the DocuColor 4 LP/CP with an
arrow indicates that other supported network types can be operational at the
same time.
1
The protocols used in these diagrams are indicated as follows:
IPX (Novell)
AppleTalk
TCP/IP
Parallel
Other
5
Page 28
1.3 Quick path to installation
Mac OS environment with AppleTalk
1
Key to setup:
1 Mac OS computer User Guide
2 DocuColor 4 LP/CP Setup Chapter 2
Another supported
protocol
DocuColor 4 LP/CP
2
AppleTalk
MacOS computer
1
MacOS computer
1
MacOS computer
1
AppleTalk
protocol
6
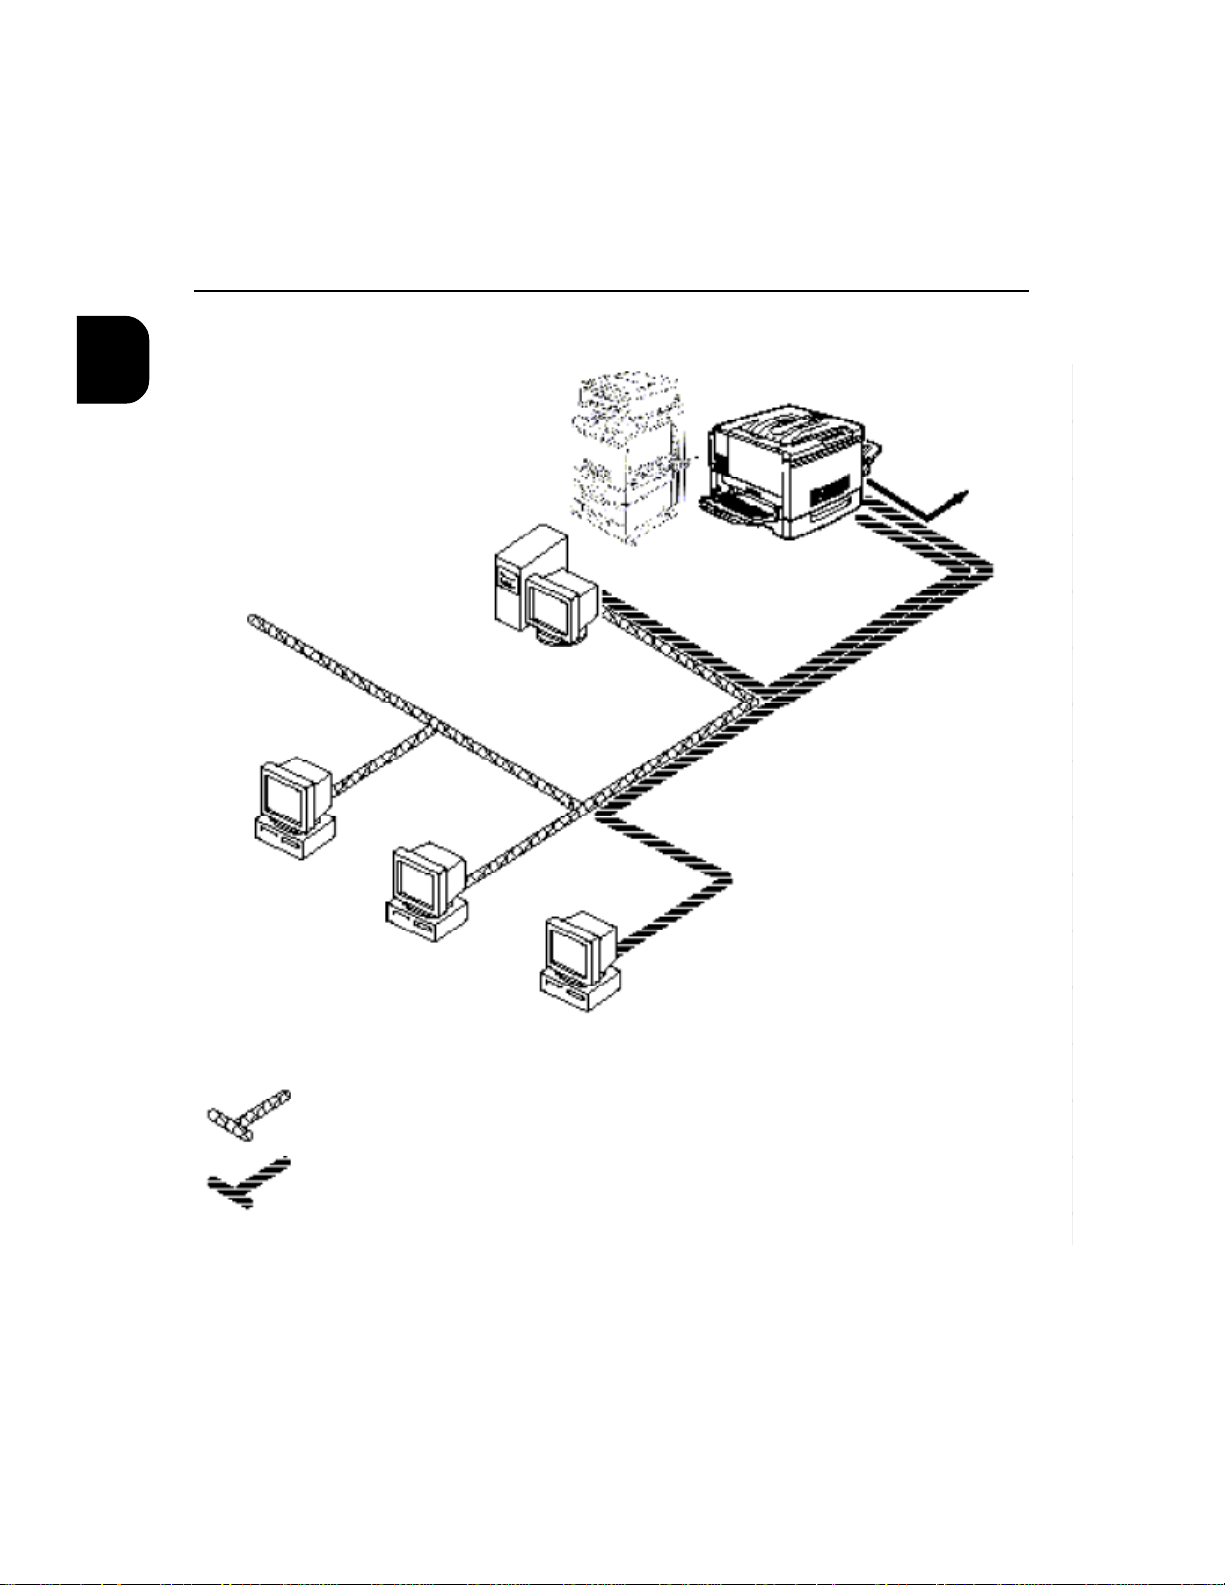
Page 29
Windows computers in a Novell environment
Key to setup:
1 NetWare server Chapter 4
2 DocuColor 4 LP/CP Setup Chapter 2
3 NetWare client Chapter 4
4 Windows computer User Guide
NetWare Server
1
1.3 Quick path to installation
1
Another
supported
protocol
DocuColor 4 LP/CP
2
IPX
SPX
Windows computer:
Netware client
3
IPX protocol
SPX protocol
Windows
computer:
Netware client
3
Windows
computer:
Netware client
running SPX
3
7
Page 30
1.3 Quick path to installation
Windows NT Server environment
1
Key to setup:
1 Windows NT server Chapter 4
2 DocuColor 4 LP/CP Setup Chapter 2
3 Windows NT client Chapter 4
Windows NT
Workstation
or Windows NT
Server
acting as print
server
LAN with
NETBEUI, etc.
Windows computer:
3
1
DocuColor 4 LP/CP
2
TCP/IP (pdl) for
SPX
printing
TCP/IP for Fiery
WebTools
Another
supported
protocol
Windows computer:
3
Windows NT Workstation
computer
NETBEUI or other protocol
available on the clients and
the server
TCP/IP protocol
or Windows NT Server
with TCP/IP loaded
3
8
Page 31

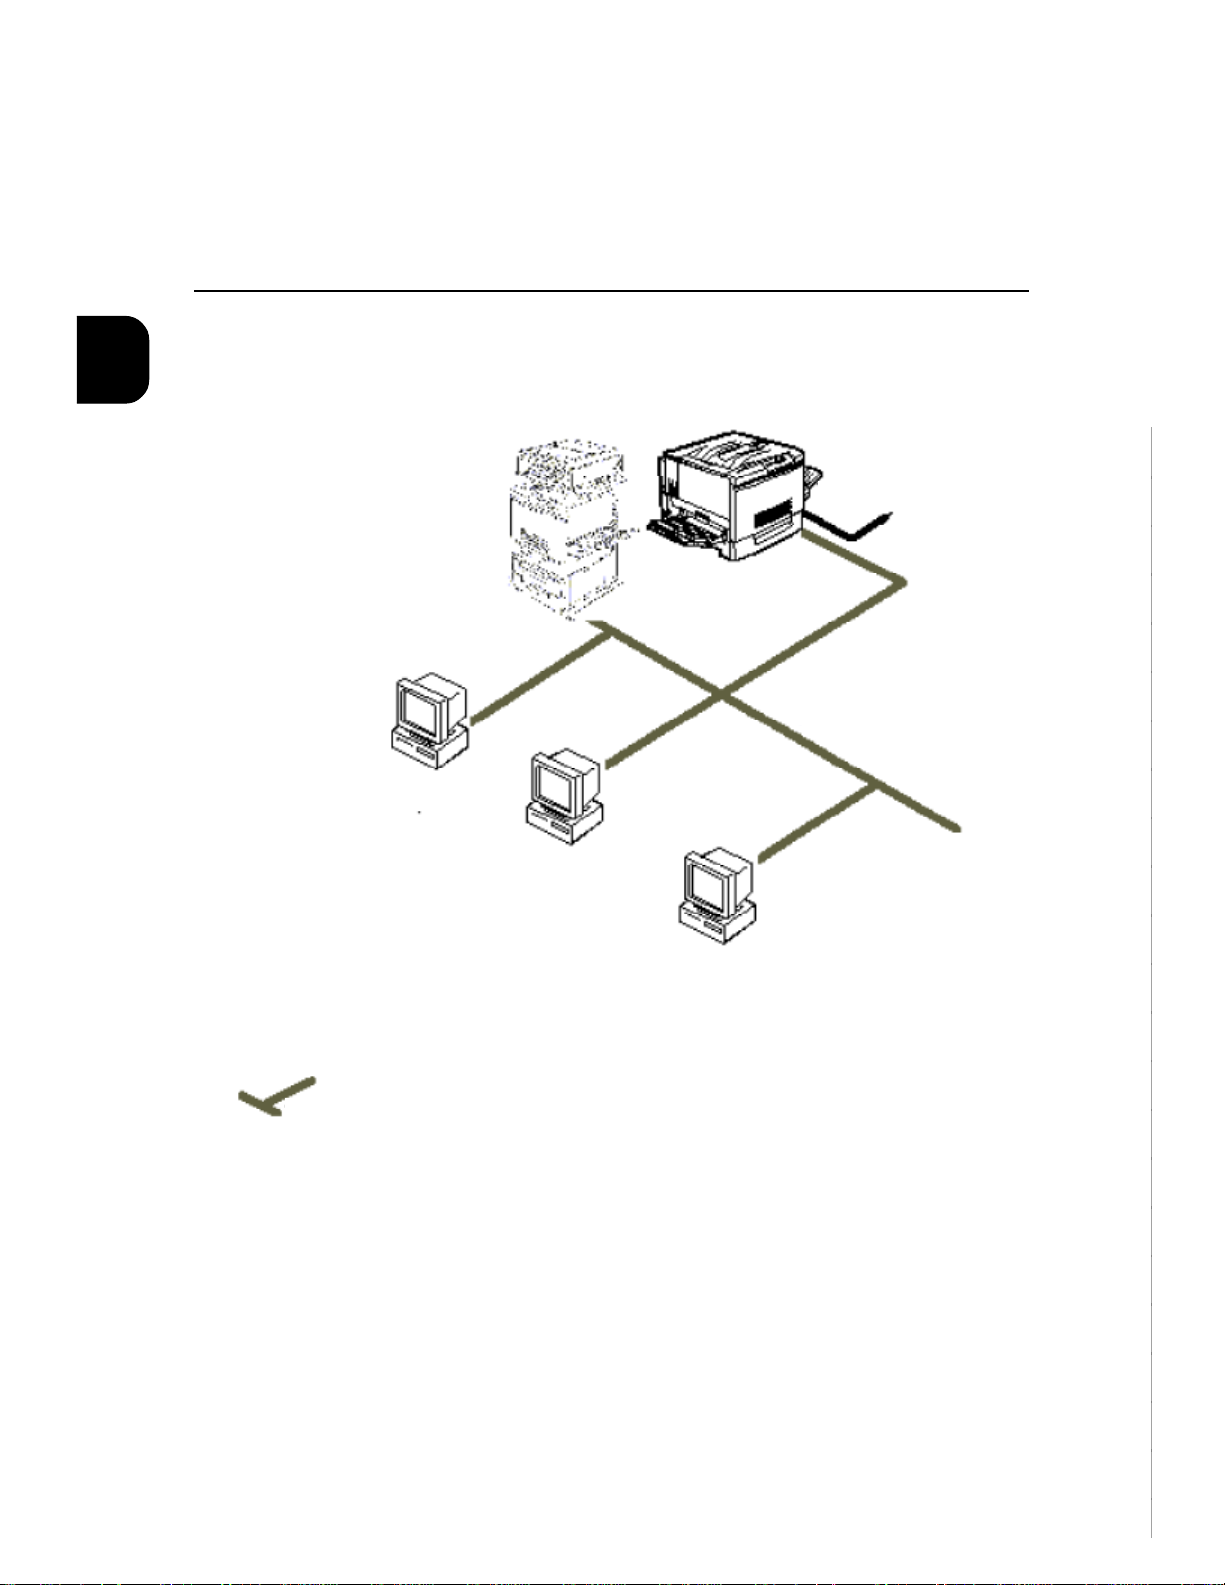
Windows computers using Windows (SMB) printing
Key to setup:
1 Windows computer User Guide
2 DocuColor 4 LP/CP Setup Chapter 2
1.3 Quick path to installation
1
Another
supported
protocol
DocuColor 4 LP/CP
2
Widows computer
1
TCP/IP protocol
Widows computer
1
Widows computer
1
9
Page 32

1.3 Quick path to installation
DocuColor 4 LP/CP parallel port connection
1
Key to setup:
1 DocuColor 4 LP/CP Setup Chapter 2
2 Windows computer User Guide
With the parallel port enabled,
the DocuColor 4 LP/CP can
accept and print jobs sent to
its parallel port.
A supported
DocuColor 4 LP/CP
1
Parallel
PC workstation,
server or laptop
2
network protocol.
Parallel input
Protocol not directly
supported on
DocuColor 4 LP/CP
The rest of this chapter and the next cover installation as performed on the
DocuColor 4 LP/CP itself. This chapter describes the physical network connections and summarizes DocuColor 4 LP/CP Setup and other administrative functions available from the control panel.
10
Parallel cable is an options with DocuColor 4 CP. The Cable can be purchased from Xerox. Request Part # 98 4330.
Page 33

1.4 Before You Proceed
To prepare for DocuColor 4 LP/CP configuration:
The following steps should be completed before you configure the DocuColor
4 LP/CP and the workstations that will print to the it. A service technician
will have performed some initial installation.
Print a test page to make sure the DocuColor 4 LP/CP printer/copier is
functioning normally.
“Printing information pages” on page 41.
With the DocuColor 4 LP/CP turned off, connect the network cable to
the DocuColor 4 LP/CP, as described in the next section.
The network should already be installed and operational.
1
Prepare network servers to share DocuColor 4 LP/CP user software and
to enable networked users to print to the DocuColor 4 LP/CP, and proceed
to Setup.
Chapters 2, 3 and 4 for details.
11
Page 34

1.5 Ethernet cable connection
The DocuColor 4 LP/CP supports Ethernet cabling of three types:
1
• Thinnet (thin coaxial Ethernet cable or 10Base2)
Uses an external transceiver to attach to the AUI (attachment unit interface) connector on the Ethernet interface of the DocuColor 4 CP.
• Thicknet (thick coaxial Ethernet cable or 10Base5)
Connects directly to the AUI connector on the Ethernet interface of the
DocuColor 4 LP/CP.
• Unshielded Twisted Pair (UTP), defined as Category 5 for use with
100BaseT or defined as Category 3 or Category 5 for use with 10BaseT
Uses an 8-pin RJ-45 connector that plugs into the RJ-45 socket on the
DocuColor 4 LP/CP.
Unshielded Twisted Pair is also used for Token Ring.
The 100BaseT type supported by the DocuColor 4 LP/CP is 100BaseTX, also
known as Fast Ethernet. If an Ethernet hub is used, it must be a 100BaseTX
hub. The term “100BaseT” is used in this manual to refer to 100BaseTX.
Back view of the DocuColor 4 LP
12
10/100BaseT connector for
twisted pair Ethernet connection
AUI connector for thicknet
Ethernet connection
Parallel connector
Page 35

Back view of the DocuColor 4 CP
10/100BaseT connector for
twisted pair Ethernet connection
AUI connector for thicknet
Ethernet connection
Mini Sub Parallel connector
1.5 Ethernet cable connection
1
Firewire between scanner and
printer
Shut down the printer/copier before attaching the DocuColor 4 LP to any
network device. Do not attach cables to more than one Ethernet connector;
only one Ethernet connection can be made at any one time.
13
Page 36

1
1.5 Ethernet cable connection
Token Ring Support with DocuColor 4 LP/CP
The DocuColor 4 LP/CP supports Token Ring networks with the optional
token ring adapter card;
Token Ring PCI PCBA Part# 45000052
Token Ring supports: AppleTalk, TCP/IP, and IPX networks simultaneously.
Fiery WebTools, WebSpooler, and Web Downloader are also accessible from
the token ring environment.
Printing types supported: IPX/SPX, SMB, TCP/IP, LPR
All configurations for the above printing methods are the same as 10/100
based networks setup, only IP subnets within their respective segments will
change according to the particular LAN configurations.
Token Ring Installation
Be sure machine is turned off and power is unplugged! Also be sure to
properly ground yourself, as you will be working with sensitive electrostatic
equipment. Facing the front of the machine, pull off the right side panel
located near the existing Ethernet port on the rear of the machine. Insert the
Token Ring board, in the respective PCI slot. Secure the board with the two
screws provided with the card. Close the cover, and boot the system. Go
into systems setup, I/O Port Setup, and disable Ethernet, and enable Token
Ring. Ethernet must be turned off, and should not run simultaneously with
Token Ring. Configure token ring port speed, 4, 16, or auto detect. Proceed
with your local LAN configuration setup.
14
To use thicknet cable:
With the DocuColor 4 LP/CP turned off, connect the thicknet cable
connector to the AUI connector on the back of the DocuColor 4 LP/CP.
Press on the latch to lock the connector.
Configure network servers for printing and then proceed to “Setting up
the Print Functions”.
To use UTP cable for 100BaseT or 10BaseT:
With the DocuColor 4 LP/CP turned off, connect the RJ-45 cable
connector to the RJ-45 socket on the back of the DocuColor 4 LP/CP.
Configure network servers for printing and then proceed to “Setting up
the Print Functions”.
Page 37

1.6 Parallel cable connection
In addition to receiving print jobs over Ethernet, the DocuColor 4 LP/CP can
accept print jobs from a Windows computer through its high-speed, bi-directional parallel port. This connection is advantageous for portable computers and for workstations that use dedicated networks using protocols other
than AppleTalk, TCP/IP, or IPX.
The parallel port connection can be active at the same time as the network
ports.
To use parallel cable:
With the DocuColor 4 LP/CP and the Windows computer turned off, attach
the parallel cable to the parallel port of the DocuColor 4 LP/CP.
The illustration on pages 12 and 13 for the location of the parallel port.
1
Connect the other end of the cable to the parallel port on the Windows
computer.
Turn on the computer and the DocuColor 4 LP/CP.
Proceed to “Setting up the Print Functions”.
To print to the parallel port, you need to set up the parallel port
connection (see “Parallel Port Setup").
For information on setting up printing to the parallel port, see the User
Guide.
Parallel cable is an optional item for DocuColor 4 CP. It is a mini
Centronics cable available from Xerox as part number 98S4330.
15
Page 38

1
16
Page 39

Performing
Setup from
the Printer
Control
Panel
The control panel on the top of the printer enables you to set options and
view the status of the printer and print jobs.
This chapter provides information about:
• Using the printer control panel
• Setting up the printer for parallel printing
• Setting up the printer for network printing
• Printing information pages
• What to do if you have difficulty printing
Page 40

2
2.1 Initial Setup
Initial printer setup for network printing must be performed at the printer
control panel. When network communication settings have been established,
additional Setup options can also be specified from a client computer using
WebSetup. WebSetup provides remote access to the printer’s setup menu
options System Setup, Network Setup, and Printer Setup in a graphical
user interface.
For information on setting up the printer/copier for WebTool access see the
procedures described in the User Guide.
For instructions on how to use WebSetup to configure printer/copier setup
options, see Chapter 3.
18
Page 41

2.2 Using the printer control panel
This section describes the functions of the printer control panel, illustrated
below:
2
2.2.1 Activity lights
The activity lights indicate the status of the printer/copier.
This light: Indicates:
Online
Data
Error
Online LED On when the printer/copier is online
(ready to accept and process new jobs), and off when
the printer/copier is offline or the power is off.
When the printer/copier is offline, you can-
not print.
Data LED Blinking when receiving, processing or
printing data and off in Power Save mode, when the
printer/copier is offline, or the power is off.
Message LED On when the printer/copier requires
a service call. Blinking when the printer/copier requires operator intervention (e.g., load paper).
19
Page 42

2
2.2 Using the printer control panel
2.2.2 Display window
The LCD window on the control panel displays status messages.
For more information on the display window, see Chapter 2 of the User Guide.
20
Page 43

2.2.3 Buttons
This button: Indicates:
2.2 Using the printer control panel
Down arrow In a fixed-length list, takes you to the
next item in the list.When entering numbers or text,
decrements to the next number or character. Hold
down the button to decrement rapidly.
Up arrow In a fixed-length list, takes you to the
previous item in the list. When entering numbers or
text, increment to the previous number or character.
Hold down the button to increment rapidly.
Right arrow When entering numbers or text, advances the cursor.
2
Menu
Menu /
Enter
Cancel
Online
Left arrow When entering numbers or text, backspaces and deletes.
Menu button From Ready or Power Saver mode,
enters the Setup menus. In Setup menus, advances from
one menu to the next. From a setup menu option, returns to the previous setup menu.
Item/Enter button Accepts an option and advances
to the next choice. When the printer is in Ready mode,
takes the printer offline.
Cancel button In Setup menus, exits menus entirely,
returning to Ready. While printing, Cancel stops printing or processing the current job.
Online button From Ready or Power Saver mode,
enters Online (Menu) mode. From Online (Menu)
mode, returns to Offline.
21
Page 44

2
2.3 Setting up the Print Functions
This section describes how to set up the printer/copier using the printer control panel. After you set up the printer/copier the first time, you may later
need to change setup information. For example, your network may change,
or you may decide not to print a start page when you turn on the printer/
copier. To change the printer setup at any time, follow the procedures outlined in this section.
To set up the printer/copier, turn on the machine and press the Menu button
when the message READY or POWER SAVER ON appears in the display
window.
•To advance through the list of Setup menus, press the Menu button.
•To view submenus, press the Item/Enter button.
•To accept a displayed option, press the Item/Enter button.
Before you change the setup, it’s a good idea to print the current Configuration page, in case you need to restore the original settings later. For information on printing a Configuration page and other pages, see “Printing information pages” on page 42.
2.3.1 Top-level menus
When the printer/copier is not processing or printing a job, the control panel
displays READY or POWER SAVER MODE. To view the top-level menu
choices, press the Menu button. When you do so, you will cycle through
these choices.
At this screen: Press Item/Enter:
CHECK AND PRINT
PRINT PAGES FROM LIST
After you check one copy, prints remaining
copies or processed jobs stored on the printer/
copier disk. For details, see the User Guide.
Displays the printer’s resident pages.
22
Page 45

2.3 Setting up the printer/copier
At this screen: Press Item/Enter:
RESETS
SYSTEM SETUP
NETWORK SERVICES SETUP
VISUALCAL
COLOR ADJUSTMENT
to
• With CLEAR LOG/QUEUES displayed,
clears the Job Log and all print queues.
• With FORMAT DISK displayed, formats the
hard disk.
• With RESET COLOR displayed, resets
printer’s color calibration to factory settings.
• With RESTORE DEFAULTS displayed, re-
turns all modifiable settings to their defaults.
• With RESTART PRINTER displayed,
reboots (restarts) the printer/copier.
The Setup menus enable you to specify information about the printer/copier and to set a
password to limit access to printer Setup menus.
(For more information, see “Main Printer Setup
menus” below.)
Allows you to calibrate the printer’s color production. For information on VisualCal color
calibration see the User Guide.
Allows you to adjust the density and brightness
of Dry Ink. For information on Color Adjustment see the User Guide.
2
PANEL LANGUAGE
Allows you to select a language for control
panel pages and Fiery WebTools. See Section A.6 of Setup Guide.
2.3.2 Main Printer Setup Menus
The following table lists the main Setup menus and their functions (for a
complete list of top-level menus, see page 22).
I/O PORT SETUP, NETWORK PROTOCOL SETUP, and NETWORK
SERVICEs SETUP appear only for networked printers.
Choose: To specify: See:
SYSTEM SETUP
System settings for the printer/copier; set
or change the administrator password
used to limit access to the Setup menus.
page 24
23
Page 46

2.3 Setting up the printer/copier
Choose: To specify: See:
PRINTER SETUP
Printer settings
page 26
2
PS SETUP
PCL SETUP
I/O PORT SETUP
NETWORK PROTOCOL SETUP
NETWORK SERVICES SETUP
2.3.3 System Setup
This section describes first-time setup if no password has been set.
SYSTEM SETUP
To advance to the PRINTER NAME screen, press Item/Enter.
PRINTER NAME
[DEFAULT PRINTER NAME]
Use this option to give the printer/copier a name. The printer/copier name
can be up to 16 characters.
PostScript settings for the printer/
copier.
PCL settings for the printer/copier
Settings for the network and/or par-
allel connections to the printer/
copier
Settings for the network protocols
Settings for the printing services
page 27
page 28
page 30
page 32
page 35
24
PRINT START PAGE
YES/NO [NO]
Use this option to specify whether the printer/copier should print a start page
when it restarts to verify that it is working properly. The Start page contains
such information as: printer name, enabled network protocols, amount of
memory installed, and options installed on the printer/copier.
PUBLISH PRINTD Q
YES/NO [YES]
Use this option to enable recently printed jobs to be stored on the printer.
The Printed queue makes it convenient to reprint those jobs.
Page 47

2.3 Setting up the printer/copier
JOBS TO SAVE
1-99 [10]
This option appears only if PUBLISH PRINTED Q is set to YES. Use this
option to specify the number of jobs to be stored in the Printed Queue.
POWER SAVER (M)
30 MIN/60 MIN/120 MIN/180 MIN[30 MIN]
Use this option to select the length of time during which there is no printer/
copier activity before the DocuColor 4 LP/CP/CP/CP switches to Power Saver
mode. Full power mode is automatically restored when the printer/copier
receives a network print job or any button on the printer or printer or copier
control panel is pressed. Also refer to the copier password. Note that the
scanner has its own power saver setting that is independent of the printer.
The copier and printer have separate energy saver selections. Refer to sections 5.2 to set copier power saver.
CHANGE PASSWORD
YES/NO [NO]
Use this option to set or change the administrator password for the printer/
copier. In most cases, only the system administrator should have access to
this password.
When you select YES in the CHANGE PASSWORD screen, you are prompted
to enter the new password. Also refer to the copier password. Note that the
scanner has its own Administrator password independent of the printer.
2
NEW PASSWORD
To enter a new password use the up arrow button to scroll through characters
and the right arrow button to move from left to right, from character to character. To delete a character, use the left arrow button. The password can be
any combination of letters and numbers up to 16 characters. When you are
finished, press the Item/Enter button. Also refer to the copier password.
Note that the scanner has it's own Administrator password independent of
the printer.
25
Page 48

2
2.3 Setting up the printer/copier
VERIFY PASSWORD
To verify a new or existing password, you must enter the password again. If
you make a mistake, you will be prompted to enter the password again. Note
that the scanner has its own Administrator password independent of the
printer.
The Copier and Printer have separate passwords. Refer to section 5.4 and
5.5 to set the copier password for user and system administrator.
2.3.4 Printer Setup
The Printer Setup options set the printer’s page description language (PDL),
paper size, and specify the ability to print under low Dry Ink conditions.
PRINTER SETUP
To advance to the PAGE DESC LANG screen, press Item/Enter.
PAGE DESC LANG
PS/PCL/AUTO [AUTO]
Use this option to select a default page description language for your printer.
If you select AUTO, the printer will automatically detect and interpret the
page description language used by the file.
DEFAULT PAPER
LETTER/A4 [A4]
Use this option to specify the default paper size to print on. Information pages
from the PRINT PAGES FROM LIST menu (Menu Help, Configuration page,
Test Pattern, PS or PCL Font list, Job Log and Test page) are printed on the
default paper size set here.
DRY INK LOW
CONTINUE/STOP [CONTINUE]
Use this option to specify the behavior of the printer/copier when Dry Ink in
a cartridge is low. Select CONTINUE to print even when Dry Ink is low;
select STOP to stop printing when the Dry Ink is low. If Stop is selected and
a print job is sent while Dry Ink is low, the printer/copier error light flashed.
When the Dry Ink has been replaced, the job is printed.
26
Replace Dry Ink soon after the Dry Ink Low/Replace [Dry Ink color] message appears.
Page 49

2.3.5 PostScript Setup
The PostScript setup menus enable you to set PostScript printing options.
PS SETUP
To proceed, press Item/Enter.
PRINT TO PS ERR
YES/NO [NO]
Use this option to specify whether to print the portion of a print job processed before a PostScript error is encountered. Select YES to print the portion of the job that was processed and a description of the PostScript error,
which may help you troubleshoot the error; select NO to cancel printing when
a PostScript error is encountered.
2.3 Setting up the printer/copier
2
COVER PAGE
YES/NO [NO]
Use this option to specify whether a Cover (job summary) page will be printed
at the end of each print job. Select YES to print a page with the name of the
user who sent the job, the document name, the number of pages printed, and
the status of the job.
If a PostScript error occurred and PRINT TO PS ERR is set to YES, the
error message will be printed on the Cover page, along with the job status.
27
Page 50

2.3 Setting up the printer/copier
2.3.6 PCL Setup
The PCL Setup menus enable you to set PCL printing options on PCL jobs
sent to the printer without formatting instructions.
2
PCL is available only when printing from Windows computers.
PCL SETUP
To proceed, press Item/Enter.
The PCL Setup options in this section apply to unformatted ASCII text files.
DEF ORIENTATION
LANDSCAPE/PORTRAIT [PORTRAIT]
Use this option to specify the default orientation of the print job on the paper. Select PORTRAIT to print text across the short dimension on a Portrait
orientation page; LANDSCAPE to print text across the long dimension on a
Landscape page.
FORM LENGTH
5-128 [60 LINES]
Use this option to specify the number of lines of text per page to print.
Form length varies according to the orientation of the paper.
28
Page 51

2.3 Setting up the printer/copier
The next setting and the remaining settings in this section apply to ASCII
text files on a per job basis.
FONT NUMBER
0-45 [0]
Use this option to specify which PCL font to print. For a complete list of
available PCL fonts and their corresponding font numbers see Appendix B of
the User Guide.
PITCH (CHAR/IN)
0.44-99.99 [10.00]
Use this option to specify the pitch, or number of fixed-space, PCL characters per horizontal inch to print.
FONT SIZE (PT)
4.0-999.75 [12.00]
Use this option to specify the point size of the font to print.
2
SYMBOL SET
ISO-4, ISO-6, ISO-11, ISO-15, ISO-17, ISO-21, ISO-60, ISO-69, PC-8, WIN
3.0, ROMAN-8, WIN-L1, WIN-L2, WIN-L5, DESKTOP, PS TEXT, PC-8TK,
PC 852, PC 850, PC-8DN, ISO L1,ISO L2, ISO L5, LEGAL [PC-8]
Use this option to specify the PCL Symbol set to print.
A symbol set is a specific set of symbols provided by a font. In general, each
set is designed with a unique application in mind. The PC-8 symbol set, for
example, was designed to support US IBM PC applications.
VisualCal color calibration and Color Adjustment screens, which appear
next in the sequence of screens, are described in the User Guide.
29
Page 52

2.4 Specifying network information
2.4.1 I/O Port Setup
The I/O Port Setup menus allow you to specify and set up the printer port
type, including Ethernet or parallel port.
2
I/O PORT
SETUP
To advance to the next screen, press Item/Enter.
2.4.2 Ethernet
ETHERNET
OFF/ON [ON]
Select ON to enable Ethernet network communication.
ETHERNET SPEED
AUTO DETECT/1O TWISTED PAIR/10 AUI/100 [AUTO DETECT]
Select AUTO DETECT to automatically detect the speed at which data can
be transferred over the Ethernet network, or optionally specify the speed
and cabling of your Ethernet network.
2.4.3 Parallel Port Setup
In addition to receiving print jobs over Ethernet, the printer can receive print
jobs from a computer through the high speed parallel port.
30
PARALLEL PORT
OFF/ON [ON]
Use this option to enable printing through the parallel port.
I/O TIMEOUT
0-300 SECONDS [30 SECONDS]
If parallel port is set to ON, use this option to specify how long the printer
waits without receiving data from the parallel port before deciding that the
current job is complete. During the timeout, the printer cannot receive new
jobs through the parallel port, but it continues to receive network print jobs.
Page 53

IGNORE EOF
YES/NO [YES]
If PARALLEL PORT is set to ON, use this option to specify that the printer/
copier should ignore end-of-file (EOF) messages in a file. To print PostScript
files in binary format (not ASCII), this option must be set to YES. When this
option is set to YES, the printer uses the value you entered for the parallel
port timeout to determine when it has reached the end of the file.
2
31
Page 54

2
2.5 Specifying network protocol
options
2.5.1 Network Protocol Setup
Network Protocol Setup options are used to specify and setup TCP/IP
Ethernet, AppleTalk, and IPX (Novell) network protocols.
NETWORK PROTOCOL
SETUP
Press Item/Enter to proceed.
TCP/IP Ethernet (DocuColor 4 CP only function)
Enable Auto IP - Yes/No - AUTOIP is the module that handles automatic
TCP/IP configuration for the system
Enable DHCP - Yes/No
Enable BootP - Yes/No
Enable Rarp - Yes/No
32
AUTOIP
AUTOIP is the module that handles automatic TCP/IP configuration for the
system. It uses a set of standard discovery protocol - RARP, BOOTP and
DHCP.
RARP
RARP, reverse address resolution protocol, is specified in RFC 903. It is an
ancient protocol for a client to query for its IP address. The RARP server
maintains a database of eazch client's IP address and its hardware address.
When the client boots up, it sends the RARP server its hardware address, and
the server returns the clients IP address in the reply.
RARP protocol only works for clients on the same segment as the RARP
server. (Very few machines use this protocol)
BOOTP
Given the little information RARP provides, a new protocol, BOOTP, specified in RFC 1542, was designed to allow clients to query for more information. In addition to the IP address ,a client may request additional information through the use of BOOTP options (RFC 2132). The administrator sets
up a database on the BOOTP server so that the server can return the requested
information along with the IP address of the client.
Option may be unanaswered if the server doesn't have the information in its
database. With the help of BOOTP relay agents, BOOTP can work across
segments. The client just talks to the agent on its segment and the agent will
be the relay to the actual BOOTP server.
Page 55

2.5 Specifying network protocol options
DHCP
DHCP, or dynamic host configuration protocol (specified in RFC 2131), is
an extension to BOOTP that allows dynamic allocation of IP addresses .
Unlike BOOTP or RARP where cleints get the IP address once and for all,
DHCP assigns "leases" to the assigned IP addresses. The client is required to
renew its lease with the server in order to keep its address. If a lease expires,
the DHCP server reclaims the address and is free to assign it to another client. Other than this, DHCP works that same way as BOOTP. They share the
same packet structure and options. DHCP can also work across segments by
using DHCP relay agent, whic is really just a BOOTP relay agent. DHCP is
widely used by Windows machines.
TCP/IP Setup
TCP/IP-ETHERNET
YES/ NO [NO]
Select YES if you have a TCP/IP network connected to the printer/copier
over Ethernet cabling.
2
For more information on setting up TCP/IP printing using Ethernet, see Chapter
4.
The following options are displayed only if TCP/IP-Ethernet is set to YES.
ETH. IP ADDRESS
[127.000.000.001]
Use the arrow buttons to assign the printer/copier an Ethernet IP address.
Press Item/Enter to accept your selection.
ETH. SUBNET MASK
[255.255.255.000]
This option lets you modify the subnet mask for printing with TCP/IP over
Ethernet. The subnet mask is set to 255.255.255.000 by default. If you set
the IP address and you need to set the subnet mask, enter one of the following values:
• 255.000.000.000 if the IP address starts with a number less than 128
• 255.255.000.000 if the IP address starts with a number from 128 through
191
• 255.255.255.000 if the IP address starts with a number greater than 191
33
Page 56

2
2.5 Specifying network protocol options
On the LCD and in the descriptive text, the terms IPX, IPX (Novell), and
NetWare are used somewhat interchangeably. In fact, IPX refers to the network protocol, NetWare to the network operating system software that uses
IPX protocols; Novell has created and trademarked this network operating
system.
For more information on setting up Novell printing see “Setting up the
DocuColor 4 LP/CP on an IPX network".
Novell Frame Types
The next screens enable you to select the Ethernet frame type used for communication between your NetWare file server (or NetWare file servers if
you connect to more than one) and the printer.
SELECT NOVELL
FRAME TYPES
Press Item/Enter to advance to the Novell frame type screens.
ETHERNET 802.3
YES/NO [NO]
Select YES to enable Ethernet 802.3
ETHERNET 802.2
YES/NO [NO]
Select YES to enable Ethernet 802.2.
ETHERNET II
YES/NO [NO]
Select YES to enable Ethernet II.
ETHERNET SNAP
YES/NO [NO]
Select YES to enable Ethernet SNAP.
34
Page 57

2.6 Network Services Setup
The Network Services Setup menus allow you to establish network services
for your printer.
NETWORK SERVICES SETUP
To advance to the ENABLE PSERVER screen, press Item/Enter.
ENABLE PSERVER
YES/NO [NO]
This screen does not appear if Novell is not enabled.
Select YES if you have a Novell network connected to the printer and if you
have already configured a NetWare printer, a print server, and one or more
print queue objects for print jobs. Pserver allows you to enter the names of
the Novell objects that are concerned with printing to the DocuColor 4 LP/
CP.
Pserver is a program on the printer that services all the Novell print queues
that are assigned to this printer. If you select YES to enable Pserver, you can
proceed to configure NetWare Directory Services (NDS) and/or Bindery services.
2.6.1 NDS Setup
ENABLE NDS
YES/NO [NO]
NetWare Directory Services (NDS) is used with Netware 4.x. Select YES to
enable NDS.
2
The following screen appears only if NDS is enabled.
CHANGE SETTINGS?
YES/NO [NO]
Select YES to specify or change NDS settings.
NDS TREE
Use the up and down arrows to select a tree from the NDS tree list and press
Item/Enter. If you select a tree for which earlier NDS settings exist, the following alert screen appears:
35
Page 58

2
2.6 Network Services Setup
NEW TREE DELETES
BINDERY SETUP
This alert message warns you that your previous Bindery settings if any will
be deleted.
DEL BIND SETUP?
YES/NO [NO]
Select YES if you wish to delete Bindery settings.
LOGIN TO BROWSE?
YES/NO [NO]
Select YES if a login is required to browse the NDS tree. Navigation trees
enable you to find the login object for the file server on the NDS tree you
wish to log in to. Select NO if a login is not required for browsing.
FIND LOGIN
OBJECT
If you selected YES in the previous screen, you may start to browse. Press
Item/Enter.
[CURRENT PATH]
Use the up and down arrows to scroll through options. To display objects
below the level of the selected object, press Item/Enter.
The current path of the previously selected object appears in the top line of
the LCD display. The first item in the scrollable Object list appears in the
second line. Use the arrow buttons to browse the NDS objects listed in the
display.
The ".." option moves you up one level on the tree; pressing Item/Enter puts
the previous second line object on the top line and displays the next lower
level object on the tree on the second line. When you see the login object in
the second line, press Item/Enter. From any screen, press Item/Enter to
accept an object, or Menu to escape.
LOGIN OBJECT
Use the up and down arrow buttons to select a login name and press Item/
Enter.
36
ENTER PASSWORD
Use the arrow buttons to enter the password. Press Item/Enter to accept the
password.
Page 59

2.6 Network Services Setup
BROWSE TREE TO
PRINT SERVER
To begin navigating to the Print Server, press Item/Enter.
[NDS TREE NAME]
The NDS tree name appears in the top line of the LCD display. The first item
at a level below the tree name appears in the second line. Use the arrow buttons to browse the NDS objects listed in the display. Press Item/Enter to
accept an object.
[CURRENT PATH]
The current path of the previously selected object appears in the top line of
the LCD display. The first item in the list of objects at the next level down
appears in the second line. Use the arrow buttons to browse the NDS objects
listed in the display.
2
After choosing an object, press Item/Enter to display the next lower level
objects. Choose ‘..’ and press Item/Enter to go up the tree. When you see
the name of the print server, press Item/Enter and PRINT SERVER will
appear in the first line indicating that the listed entry has been chosen.
PRINT SERVER
Use the up and down arrow buttons to scroll through the list of available
print servers. After selecting a server, press Item/Enter. If the print server
login requires a password, the ENTER PASSWORD screen appears. If a
password is not required, the PRINT Q SEARCH screen appears.
ENTER PASSWORD
Use the arrow buttons to enter the password. Press Item/Enter to accept the
password.
PRINT Q SEARCH
ENTIRE NDS TREE/SUBTREE [ENTIRE NDS TREE]
Press Item/Enter if you want the printer to search the entire NDS tree for the
print queue object. Use the arrow buttons to designate a subtree object. The
printer will search for queues below this object. Press Item/Enter.
37
Page 60

2.6 Network Services Setup
BROWSE TO PRINT
Q SUBTREE ROOT
This message is displayed if you selected SUBTREE in the previous screen.
To advance to the NDS browse screens, and browse to the print queue root,
press Item/Enter.
2
Navigate the NDS objects as before. Press Item/Enter to display objects below the level of the selected object in the previous screen’s second line.
When you see the print queue subtree object in the second line, press Item/
Enter. In the next screen, scroll to display “.” in the second line and press
Item/Enter to end your search.
PRINT Q ROOT
The selected object is displayed. Press Item/Enter to accept.
2.6.2 Bindery Setup
The following screens are used for Bindery setup. Be sure that the printer is
connected to the network and that you have already configured one or more
Netware 3.x file servers with a print server and a print queue for print jobs.
Note that you can also configure Netware 4.x servers to run in Bindery emulation mode, but you cannot add a 4.x server running in emulation mode that
is on the tree you selected in NDS Setup.
For more information on setting up printing using Novell NetWare, see "onfiguring a NetWare server for printing".
38
The NetWare server must be running. You need a login name, and a password, if one has been set.
ENABLE BINDERY
YES/NO [YES]
Use this option to enable bindery emulation services.
Page 61

2.6 Network Services Setup
BINDERY SETTINGS
VIEW/CHANGE/SKIP/REMOVE FSERVER [VIEW]
Use the up and down arrow buttons to scroll through menu options. Select
VIEW to display a list of Novell file servers already connected to the printer.
Select CHANGE to display a list of all available servers in order to add one
or change the print server setting. Select REMOVE FSERVER to display a
list of connected servers that you can disconnect. Select SKIP to skip bindery options and advance to the POLLING INT screen.
CONNECTED SERVRS
After you choose VIEW in the BINDERY SETTINGS screen, use the up and
down arrow buttons to view the list of connected servers. Press Item/Enter
to skip the remaining bindery options and proceed to the POLL INT screen.
REMOVE FSERVER
After you choose REMOVE FSERVER in the BINDERY SETTINGS screen,
use the up and down arrow buttons to scroll through the connected servers.
After selecting a server to remove, press Item/Enter. The POLL INT screen
is displayed next.
2
AVAILABLE SERVERS
After you choose CHANGE in the BINDERY SETTINGS screen, use the up
and down arrow buttons to scroll through a list of all available servers. After
selecting a server to add or modify, press Item/Enter. If a password is required to login to the server, the FILE SERVR LOGIN screen is displayed.
FILE SERVR LOGIN
SUPERVISOR
Use the up and down arrow buttons to scroll through options: SUPERVISOR, ADMINISTRATOR, or ENTER LOGIN NAME. Press Item/Enter to
accept an option.
ENTER LOGIN NAME
[GUEST]
This screen is displayed only if ENTER LOGIN NAME is selected as file
server login. Use the arrow buttons to enter the login name. Press Item/En-
ter to accept the password.
SERVER PASSWORD
Use the arrow buttons to enter the password.
39
Page 62

2
2.6 Network Services Setup
PRINT SERVER
[LIST]
Use the up and down arrow buttons to scroll through the list of print servers
defined for the selected file server. After selecting a print server, press Item/
Enter. If a password is required to log in, the PSERVER PASSWORD screen
is displayed.
PSERVER PASSWORD
Use the arrow buttons to enter the password. Press Item/Enter to accept the
password. If fewer than eight file servers are connected, the ANOTHER FS?
screen is displayed. If the maximum number of file servers are connected,
the POLL INT (SEC) screen is displayed.
ANOTHER FS?
YES/NO [YES]
Select YES to redisplay a list of available servers you may connect to. Select
NO to stop adding file servers and display the POLLING INT screen. You
can connect the printer to a maximum of eight Novell files servers at once.
Polling interval
POLL INT (SEC)
1-999 [15]
Use the up and down arrow buttons to specify the interval, in seconds, at
which the printer communicates with the Novell server.
If you select a short interval, the amount of network traffic increases; this
may slow down other network jobs.
2.6.3 SMB Setup
Server Message Block (SMB) is a point-to-point file sharing and printing
protocol, and the default printing method of most Windows applications.
SMB runs on top of TCP/IP and does not require IPX. When file and printer
sharing for Microsoft clients is enabled, SMB can be run on Windows 95/98
and Windows NT.
For information on setting up SMB printing from your computer, see the
User Guide.
40
Page 63

2.6 Network Services Setup
ENABLE SMB
YES/NO [NO]
Use this option to enable network communication using SMB.
USE NAME SERVER
YES/NO [NO]
Select YES to designate a specific WINS (Windows Internet Name Server)
server as an SMB server. You will then be prompted to enter this server’s IP
address.
NAME SERVER IP
[127.000.000.001]
Use the arrow buttons to enter the IP address of the WINS server you wish to
use.
2
SERVER NAME
Use the arrow buttons to enter a name for the printer (SMB server).
SERVER COMMENT
Use the arrow buttons to enter a comment about the printer (SMB server).
This name will identify the printer in the Windows Network Neighborhood.
For example, “Production use only.” Once set, this comment will appear in
the second line of the LCD when the SERVER COMMENT screen is displayed. When the printer is selected on a client machine, the server comment
will appear under the Details section of the Server information window.
DOMAIN NAME
Enter the workgroup or domain you want the DocuColor 4 LP/CP to appear
in. Lowercase letters are not allowed.
Use the arrow buttons to enter the domain name or workgroup of the printer
(SMB server).
41
Page 64

2
2.7 Printing information pages
There are several pages that reside in the printer’s ROM that you can print
from the control panel. This section contains instructions for printing these
pages.
Page: Description:
PRINT CONFIGURATION
PAGE
A page that gives the current device configuration
and lists the selected options for all Setup menus
PRINT TEST PATTEN
JOB LOG
PCL FONT LIST
MENU HELP
PS FONT LIST
TEST PAGE
A page that includes a test pattern used for engine
diagnostic purposes.
A list of the most recently printed jobs.
For information about using the WebSpooler to view
and manipulate jobs in the Job Log, see the User
Guide.
The Job Log is available only on printers with a hard
disk drive.
A list of PCL fonts resident on the printer
A one-page overview of the control panel, its
components, and how they work, including a
list of top-level menus and a brief explanation
of each menu
A list of PostScript fonts resident on the printer
A Test page that enables you to confirm that the printer
is properly connected.
This page includes samples of color so you can
troubleshoot printing problems as well as such information as: printer name, enabled network protocols and amount of memory.
42
You can print an information page before you set up the DocuColor 4 LP/CP
or at other times from the READY or the POWER SAVE ON screen.
Page 65

To print an information page:
Turn on the machine and allow it to warm up.
Messages appear on the control panel as the DocuColor 4 LP/CP runs
through its power-up tests.
From the READY screen, press the Menu button on the printer control
panel until the message PRINT PAGES is displayed.
Press the Item/Enter button to display the name of the first information
page.
Press the up and down arrow buttons until you see the page you would
like to print, and then press Item/Enter.
2.7 Printing information pages
2
The DocuColor 4 LP/CP prints your selection.
43
Page 66

2.8 If you have difficulty printing
If you have difficulty printing, check the printer status, use the table below
to try and resolve the problem, and try printing again.
2
None of the control
panel lights are on, and
nothing appears in the
LCD.
The data light neither
blinks nor stays on
constantly (it stays off)
when a print job is sent
over the network or the
parallel connection, or
a copy job is sent from
a DocuColor 4 CP.
The power switch has not
been turned on.
The power cord is not securely attached.
There is no power to the
electrical outlet itself.
The interface cable is not
connected properly.
Either the printer driver
is not installed, or the
computer has not been
correctly set up.
Check the power
switch.
For more information,
see the Setup Guide.
Check the power cord.
For more information,
see the Setup Guide.
Check and see if the
outlet is turned on.
Make sure the network or
parallel cable connector is
properly attached.For
more information, see the
Setup Guide.
Check the settings on
the host computer. For
more information, see
the Setup Guide.
44
Page 67

Performing
Setup from
WebSetup
Fiery WebSetup provides remote access to the printer’s Setup menu options.
You can use Fiery WebSetup to remotely view and modify the current configuration of your printer/copier. Almost all of the options in System Setup,
Network Setup, and Printer Setup can be set using WebSetup.
Before you can access the Fiery WebTools you must complete the following:
• Initial printer/copier setup, specifically, setting the IP address, as well as
its subnet mask and gateway address, if they are used.
• Client setup, specifically, enabling network communication, and installa-
tion of a recommended browser.
Page 68

3.1 Setup from WebSetup
To access WebSetup you need an Internet browser and the IP address or
DNS name of the DocuColor 4 LP/CP.
To access Fiery WebSetup:
Start your Internet browser application.
Enter the IP address or the DNS name of the DocuColor 4 LP/CP in the
URL line of your browser.
3
Get the IP address or DNS name of the printer/copier from your network
administrator.
46
The DocuColor 4 LP/CP home page appears. The individual Fiery
WebTools are listed on the left. To display information about a particular
tool, click the question mark next to its name.
Page 69

3.1 Setup from WebSetup
Click WebSetup.
If a password has been set, you are prompted to enter it before you can
access WebSetup.
3
The options that you can specify from Fiery WebSetup are grouped into
three categories: System Setup, Network Setup, and Printer Setup. These
are described in the following sections.
If you change a Setup option, the Cancel and Save buttons flash when
you click to select another Setup category. You must click either Save
or Cancel before you can proceed to another Setup category or exit Fiery
WebSetup.
• Click Save to save a change made to a setting.
• Click Cancel to cancel a change.
47
Page 70

3
3.1 Setup from WebSetup
3.1.1 System Setup
In System Setup, you specify settings from two tabs: the System Setup tab
and the Password tab.
To set System Setup options:
• Click the System Setup button.
48
System Setup tab
The options that you can set from the System Setup tab are described
below.
System Name The default name of the printer appears in this text
field. Edit the default name here. This is the name you should enter when
you configure a connection to the printer over AppleTalk.
Print Start Page Select this option to print a start page each time the
printer/copier is restarted.
Page 71

3.1 Setup from WebSetup
Enable Printed Queue Using a DocuColor 4 CP or, if your DocuColor
4LP has a hard disk drive installed, select this option to create a storage
location on the hard disk for the most recent print jobs. Users with
Administrator privileges can use the WebSpooler to reprint jobs in the
printed queue without sending those jobs again.
Jobs Saved in Printed Queue specify the number of jobs (from 1-
99) to be saved in the Printed Queue.
Password tab
From the Password tab you can set an Administrator password or change
the existing one for the printer only. Once an Administrator password
has been set, users will be prompted for this password when they attempt
to access WebSetup or WebSpooler.
Changing this password does not affect the copier administrator
password.
3
49
Page 72

3
3.1 Setup from WebSetup
To set or change the Administrator password:
• Click the Password tab.
Enter New Password To set a new password, enter a password in
the Enter New Password text field.
50
Page 73

Verify Password To verify a new password, enter the same password
in the Verify New Password text field as you have entered in the Enter
New Password text field.
You can also enter or change the Administrator password in the System
Setup menus on the printer’s control panel. By default no password is
set on the DocuColor 4 LP/CP. It is recommended that a password be set
to protect the printer/copier from accidental or incorrect changes to
printer/copier Setup settings.
3.1.2 Network Setup
In Network Setup, you specify settings from four tabs: Port Setup, Protocol
Setup, PServer Setup, and Service Setup.
3.1 Setup from WebSetup
3
To set Network Setup options:
• Click the Network Setup button.
51
Page 74

3
3.1 Setup from WebSetup
The Port Setup tab is the first tab displayed in Network Setup. After
setting all the options in the Port Setup tab, click the next tab and continue
to specify settings until you have made settings for all relevant options
in the Network Setup category.
Port Setup tab
The options that you can set from the Port Setup tab are described below.
Enable Ethernet Enable this option if the DocuColor 4 LP/CP is to
be connected to an Ethernet network.
Transmission Speed Select Auto Detect if your network
environment is mixed, or select the speed (10 Mbps or 100 Mbps) of the
network to which the DocuColor 4 LP/CP is attached.
Enable Parallel Port Enable this option if you want to print through
the parallel port. You can connect a single Windows computer to the
parallel port and print directly to the DocuColor 4 LP/CP.
Enabling the parallel port does not conflict with Ethernet communication
with the DocuColor 4 LP/CP.
Ignore EOF Character Available only if Enable Parallel Port is
enabled, this option specifies that the DocuColor 4 LP/CP should ignore
end-of-file (EOF) messages. Enabling this option is required to print
PostScript files in binary format (not ASCII); under normal circumstances,
this option should not be enabled. When this option is enabled, the
DocuColor 4 LP/CP uses the parallel port timeout value to determine
when the end of the file has been reached.
52
Page 75

3.1 Setup from WebSetup
Protocol Setup tab
The options that you can set from the Protocol Setup tab are described
below.
3
The DocuColor 4 LP/CP can accept jobs via TCP/IP, AppleTalk, and IPX/
SPX simultaneously. To configure the DocuColor 4 LP/CP, choose each
protocol and enter the settings for that protocol.
Enable on Ethernet Enable this option if you have a TCP/IP network
connected to the DocuColor 4 LP/CP over Ethernet cabling.
You must enable TCP/IP for Ethernet to use the Fiery WebTools over
Ethernet.
IP Address Enter the DocuColor 4 LP/CP IP address for Ethernet.
The DocuColor 4 LP/CP is shipped with the IP address set to the loopback
address (127.000.000.001), which is an internal address used for network
checking. If you plan to print with TCP/IP, you must first assign the
DocuColor 4 LP/CP a unique network IP address.
For information about setting up printing with TCP/IP, see “Network
Protocol Setup” on page 32.
53
Page 76

3
3.1 Setup from WebSetup
Subnet Mask If you need to set the subnet mask, enter one of the
following values:
• 255.0.0.0 if the IP address starts with a number less than 128
• 255.255.0.0 if the IP address starts with a number from 128 through
191
• 255.255.255.0 if the IP address starts with a number greater than 191
Be sure to confirm the subnet mask setting with your network
administrator before proceeding. In some cases the required setting may
be different from those listed.
Gateway If your TCP/IP network has a gateway, and users outside
the gateway plan to print to the DocuColor 4 LP/CP using TCP/IP, enter
the gateway address here. By default, the loopback address,
127.000.000.001, is set. Obtain the correct gateway address from your
network administrator.
Enable AppleTalk Enable this option if you have an AppleTalk
network connected to the DocuColor 4 LP/CP. This setting enables the
DocuColor 4 LP/CP to communicate over AppleTalk networks.
Select Zone The DocuColor 4 LP/CP searches the network for
AppleTalk zones in your network segment. Scroll through the list to select
the AppleTalk zone in which you want the DocuColor 4 LP/CP to appear.
If your segment has only one zone, the DocuColor 4 LP/CP is assigned
to that zone automatically.
If no AppleTalk zone can be found, your network may have no defined
zones, or else the network cable has not been connected Choose OK.
Refer to "Before You Proceed".
Select Frames Click the Select Frames button to specify IPX frames
used with NetWare. See your network administrator to verify which frame
type to choose.
In the IPX Frames dialog box, select frames and use the Add and Remove
buttons to specify the selected frames.
54
Page 77

3.1 Setup from WebSetup
PServer Setup tab
IPX (Novell NetWare) options are set in the PServer Setup tab.
3
You can modify both NetWare 3.x (Bindery) and NetWare 4.x (NDS)
configurations from Fiery WebSetup. Select the Enable NDS option if
your network uses NetWare 4.x in native mode. Click Bindery Setup if
your network uses NetWare 3.x or uses NetWare 4.x in bindery emulation
mode.
If your network uses both NDS and Bindery, set up NDS first. Setting up
NDS after Bindery will overwrite Bindery Setup. If your network uses both
NDS and Bindery, including using NetWare 4.x servers in bindery
emulation, the DocuColor 4 LP/CP cannot service NDS and bindery
emulation servers on the same NDS tree.
55
Page 78

3.1 Setup from WebSetup
PServer Setup (NetWare Services)
The Enable PServer mode option must be turned on if you have a Novell
server connected. You can, however, change the PServer polling interval
and then modify either Bindery Setup or NDS Configuration.
To set Enable PServer mode you must first specify an IPX frame type.
This option is located in the Protocol Setup tab.
3
PServer Setup (NDS Configuration)
In initial setup, the DocuColor 4 LP/CP was connected to the network
and an NDS directory tree, with a Printer, a Print Server, and one or more
Print Queue objects. You can make any changes to that setup through
WebSetup. To modify NDS Setup you may need permission to browse
the NDS tree. If access to the Print Server is restricted, you’ll need a
login password.
Note that the terms NetWare server, Novell server, and IPX server are in
common use and are used here interchangeably to mean the server on an
IPX network running Novell NetWare networking software.
• Enable NDS
NDS has already been enabled. Uncheck this box only to remove NDS
support.
• Change Trees...
Click to open the Add NDS Tree window.
56
• Add NDS Tree
You can have only one NDS tree, so the following process is required
to change trees:
Select the current NDS tree and click Remove.
Select the new NDS tree and click Add.
Page 79

3.1 Setup from WebSetup
Your new NDS tree selection automatically overwrites any
previous tree selection. If you change the NDS tree selection and
there are also current Bindery settings, you are alerted that they
will be deleted. If you continue with NDS Setup, you can replace
Bindery settings afterwards. To exit NDS Setup, choose Cancel.
Click OK.
The Select login user window appears.
• Select Login User
Select the User Login object from the display in the Select Login
User window.
Enter a password if necessary.
Click OK.
The Select print server window appears.
• Select Print Server
Select the print server from the display in the Select Print Server
window.
Enter a password if necessary.
Click OK.
The Select Print Queue Root window appears.
• Select Print Queue Root
3
Select the print queue root from the display in the Select Print
Queue Root window.
Enter a password if necessary.
Click Finish.
The NDS Configuration window reappears, showing the new
settings.
57
Page 80

3
3.1 Setup from WebSetup
• Enter Print Server Password
Enter the Print Server password (if required).
Click OK to return to the WebSetup window.
PServer Setup (Bindery Setup)
Use Bindery Setup if you have already configured one or more bindery
servers (file servers running NetWare 3.x or NetWare 4.x in bindery
emulation) with a Print Server and a Print Queue for DocuColor 4 LP/CP
jobs. Before entering bindery settings, be sure the DocuColor 4 LP/CP is
connected to the network and the NetWare file server is running. You’ll
need a login name, and, if access to the file server or print server is
restricted, you’ll need a login password.
The terms NetWare server, Novell server, and IPX file server are in
common use and are used here interchangeably to mean the server on
an IPX network running Novell NetWare networking software.
Because you can set up more than one Novell server to handle DocuColor
4 LP/CP print jobs, Bindery Setup allows you to add or delete new file
server connections and view the connections you have selected. The
options are:
• Bindery Setup...
Click the Bindery Setup button to display the Add Connections
Window.
• Add Connections
Click the server you want to add.
Click Add.
Enter your user name and password.
Click OK.
58
The Add Server password window appears.
Enter your name and password.
Page 81

3.1 Setup from WebSetup
Click OK.
The Add Server window shows a list of print servers you can add.
• Add Server
Select a print server from the list on the left.
Enter a password if a password is required.
Click Finish.
You return to the main Novell Setup dialog box.
Click OK.
Service Setup tab
The Service Setup tab is used to set Windows Printing Service options.
Windows Printing Service enables the Microsoft SMB protocol, which
supports peer-to-peer printing, also known as Windows (WINS) or SMB
printing.
3
59
Page 82

3
3.1 Setup from WebSetup
Enable Windows Printing Service Enable this option to enable
SMB (Server Message Block), the file and printer sharing protocol built
into Windows. Enabling SMB allows the DocuColor 4 LP/CP to be listed
on the network so that Windows clients can print to a particular print
connection without any other networking software. For information on
how to set up a Windows client for Windows printing, see the User Guide.
Windows (SMB) printing runs over TCP/IP, so TCP/IP must be configured
on the DocuColor 4 LP/CP and on all workstations that use Windows
printing.
Server Name The server name is the name that will appear on the
network. It can be the same name as the server name assigned in Server
Setup.
Lowercase letters are not allowed.
Server Comment - Server comments (optional) can contain information
about the printer/copier.
Domain or Workgroup - Enter the workgroup or domain you want the
DocuColor 4 LP/CP to appear in.
Lowercase letters are not allowed.
Use WINS Server Select to use a WINS name server. Broadcasts
from SMB devices cannot be routed beyond their original network
segment without a WINS name server. Setting up the WINS name server
is outside the scope of this manual. To find out if a name server is available,
contact your network administrator.
IP Address Enter the IP address of the WINS Server (if available).
60
The Enable LPD Printing Service and Enable Web Services options are
not in effect for the DocuColor 4 LP/CP.
Page 83

3.1 Setup from WebSetup
Printer Setup tab
The Printer setup tab is used to specify the printer’s default page
description language (PDL), paper size, and the ability to print under
low Dry Ink condition.
3
Page Desc. Language Specify a default page description language
for your printer. If you select AUTO, the printer will automatically detect
and interpret the page description language used by the file.
Default Paper Size Specify the default paper size to print on.
Information pages from the PRINT PAGES FROM LIST menu (Menu
Help, Configuration page, PS or PCL Font list, and Test page) are printed
on the default paper size set here.
Dry Ink Low Specify the behavior of the printer when Dry Ink in a
cartridge is low. Select continue to print even when Dry Ink is low; select
STOP to stop printing when the Dry Ink is low. If Stop is selected and a
print job is sent while Dry Ink is low, the printer/copier error light comes
on. When the Dry Ink has been replaced, the job is printed.
61
Page 84

3
3.1 Setup from WebSetup
PS Setup tab
The PS Setup tab is used to specify PostScript printing options.
62
Print to PS Error Specify whether the DocuColor 4 LP/CP should
print the available portion of a print job when it encounters a PostScript
error. Select Yes to print the portion of the job that was processed before
the error occurred; select No to cancel the job entirely whenever a
PostScript error is encountered.
Cover Page Specify whether the DocuColor 4 LP/CP prints a cover
(job summary) page at the end of each print job. If you select Yes, each
print job is followed by a page containing the name of the user who sent
the job, the document name, the server name, the time the job was printed,
the number of pages printed, and the status of the job. If a PostScript
error occurs, and the Print to PS Error option is set to Yes, an error message
takes the place of the job status.
Page 85

3.1 Setup from WebSetup
PCL Setup tab
The options that you can set from the PCL Setup tab are described below.
The PCL Setup options in this section apply to unformatted ASCII text
files.
PCL is available only when printing from Windows computers.
3
Form Length (Lines) Specify the number of lines of text per page
to print.
Form length varies according to the orientation of the paper.
Font Number Specify which PCL font to print. For a complete list of
available PCL fonts and their corresponding font numbers see the
Appendix of the User Guide.
63
Page 86

3
3.1 Setup from WebSetup
Pitch (char/inch) Specify the pitch, or number of fixed-space, PCL
characters per horizontal inch to print.
Font Size Specify the point size of the font to print.
Default Orientation Specify the default orientation of the print job
on the paper. Select Portrait to print text across the short dimension on a
Portrait orientation page; Landscape to print text across the long
dimension on a Landscape page.
PCL Symbol Set Specify the PCL Symbol set to print. A symbol set
is a specific set of symbols provided by a font. In general, each set is
designed with a unique application in mind. The PC-8 symbol set, for
example, was designed to support US IBM PC applications.
3.1.3 Restarting the printer/copier
When you have finished specifying settings from Fiery WebSetup, click Save,
and then close the Fiery WebSetup window by clicking the × in the top right
corner of the window. The Reboot window appears asking if you want to
reboot the printer/copier. Select Yes to reboot the printer/copier and initialize the new settings.
64
Page 87

Setting up
Network
Servers
This chapter describes environments that typically include one or more network servers-Novell NetWare servers and Windows NT 4.0 servers that will
share printing to the DocuColor 4 LP/CP. It describes setting up servers that
use IPX/SPX or TCP/IP protocols for communicating with the DocuColor 4
LP/CP. In addition, it includes some guidelines for setting up direct communication from Windows NT 4.0 workstations, where a network server is optional. The chapter also outlines the requirements for network clients to print
to the DocuColor 4 LP/CP and to run the Fiery WebTools. If your network is
based on Windows NT 4.0, skip to page 89.
Setting up a NetWare environment correctly requires the cooperation of the
Novell network administrator. You must have administrator privileges on
the network to create new NDS or bindery objects.
Page 88

4
4.1 Setting up the DocuColor 4 LP/CP
on an IPX network
The software built into the DocuColor 4 LP/CP supports the following network operating environments:
• NetWare 4.x Novell Directory Services (NDS)
• NetWare 3.x Bindery services
• Servers running NetWare 4.x in bindery emulation mode
The term “bindery server” is used to refer to a Novell file server running
NetWare 3.x, or running NetWare 4.x in emulation mode. The term “NDS” is
used to describe components of a NetWare operating system running
NetWare 4.x in native mode.
NetWare clients print to the DocuColor 4 LP/CP through the Novell network
server. Server setup and client network setup are outlined here. Client printing setup and printing is described in the User Guide.
The DocuColor 4 LP/CP can accept jobs concurrently from NetWare, Windows NT 4.0, and AppleShare servers, as well as jobs sent directly from Windows or Windows NT. NetWare clients on Mac OS or Windows NT 4.0 computers can print via the NetWare server. The DocuColor 4 CP also accepts
concurrent copy jobs.
The DocuColor 4 LP/CP can receive print jobs from NetWare clients over
the Ethernet network topologies. During DocuColor 4 LP/CP setup, you select the frame type that will be used for communication between the
DocuColor 4 LP/CP and network servers. Frame type refers to the format of a
communications packet; frame types are specified in a startup file when the
NetWare server (or any other workstation) loads its network drivers.
66
Page 89

4.2 Tips for experts IPX networks
The following information is all that experienced network administrators
need.
A DocuColor 4 LP/CP with IPX connections has these characteristics:
• Both NetWare 3.x and NetWare 4.x are supported directly. NetWare 4.x is
also supported through bindery emulation.
• A minimum connection to the DocuColor 4 LP/CP consists of a NetWare
file server, a NetWare print server, and a NetWare queue.
• A single directory tree (for NetWare 4.x) and up to eight bindery servers
can be configured simultaneously.
• The DocuColor 4 LP/CP looks for print jobs on one NetWare print server
per bindery server.
• Each print server can store jobs for any queue on the DocuColor 4 LP/CP.
4
4.2.1 Overview of IPX printing to the DocuColor 4 LP/CP
NetWare file servers support the creation of print queues, which are storage
areas for print jobs. When a client on a remote computer decides to print, the
job is directed to a print queue on the NetWare file server and spooled to the
NetWare server disk, freeing up the client workstation.
The queues on the NetWare server must be named to match the Direct connection and the Print, and Hold queues on the DocuColor 4 LP/CP. The
NetWare queue names should be given an extension corresponding to the
DocuColor 4 LP/CP queue, as follows:
xjdirect
xjhold
xjprint
The extension names must be in all lowercase and must be in English.
Print and Hold queues are available only on printers with an optional hard
disk drive.
67
Page 90

4
4.2 Tips for experts-IPX networks
There is no need to rerun Setup when adding or removing a NetWare queue;
however you should initialize these settings by turning the printer/copier off
and on after a queue is created or removed.
When the DocuColor 4 LP/CP is configured to connect to a NetWare server,
it polls the NetWare server for jobs in each of its queues. If jobs are found,
they are transferred over the network to the matching connection: Print to
Print, Hold to Hold, Direct to Direct. While a job is processed and printed, a
record of the job is being created. You can access the Job Log containing
these records at any time.
68
Page 91

4.3 Configuring a NetWare server for
printing
The following sections explain how to set up a NetWare file server so that
networked users can print to the DocuColor 4 LP/CP from their workstations, and the DocuColor 4 LP/CP can obtain print jobs from the NetWare
server.
For each NetWare file server that you configure, follow these general steps.
More detail is provided in subsequent sections.
• Make sure the server is connected to a functioning IPX network.
• Log in from a PC connected to the NetWare file server. With Novell 3.x,
log in as the Supervisor; or with NDS or Novell 4.x, log in as Admin.
• For NetWare 4.x installations, set up an NDS connection (see page 71).
• For NetWare 4.x in emulation mode, set the bindery context (see page
75).
• For NetWare 3.x and for NetWare 4.x in bindery emulation, set up a file
server, a print server, and a print queue for the DocuColor 4 LP/CP (see
page 82).
4
With bindery services, you can route all DocuColor 4 LP/CP print jobs
through the same NetWare file server, or you can configure more than one
file server to handle DocuColor 4 LP/CP jobs.
The functions you perform on the Novell server, on the DocuColor 4 LP/CP,
and on the client workstation, are summarized in the following tables. The
first table applies to NDS connections, the second to bindery connections.
Complete the operations in the left column, then the center column, then the
right column.
4.3.1 Configuring an NDS connection
Abbreviations:
FS = file server
PS = print server
PQ = print queue (on the NetWare server)
69
Page 92

4.3 Configuring a NetWare server for printing
4
On NDS FS:
In NETADMIN:
Create NDS PQs
Create NDS printer/
copier and assign
PQs
Create PS and assign
the printer/copier
Configure users of
the PQs
On DocuColor 4 LP/CP
printer control panel:
I/O PORT SETUP
Ethernet Setup
NETWORK PROTOCOL SETUP
IPX/SPX Setup-select frame
type(s)
NETWORK SERVICE SETUP
PServer Setup and NDS Setup
Select Root
Browse to select PS
Specify PQ search root (op
tional)
Set Polling Interval
Configuring a bindery connection
On Bindery FS:
In PCONSOLE:
Select NetWare FS
(up to 8)
For each FS:
Configure PS
Configure PQ
Configure users of
the PQ
On DocuColor 4 LP/CP
printer control panel:
I/O PORT SETUP
Ethernet Setup
NETWORK PROTOCOL SETUP
IPX/SPX Setup-select frame
type(s)
NETWORK SERVICE SETUP
PServer Setup and Bindery
Setup
Add FS (up to 8)
Set Polling Interval
On client workstation:
Install user software
For printing:
Connect client to PQ(s) that
you set up on the NetWare FS
(associated with the PS selected
in NDS Setup)
On client workstation:
Install user software
For printing:
Connect client to PQ(s) that
you set up on the NetWare FS
(associated with the PS selected
in Bindery Setup)
70
Page 93

4.3 Configuring a NetWare server for printing
4.3.2 Setting up an NDS connection
In NDS, all NetWare entities (objects) are organized in a hierarchical tree
structure. Objects have a name, properties, and a context which defines the
location of the object in the directory tree. For the DocuColor 4 LP/CP you
are mainly concerned with defining a printer, a print server object and one or
more print queue objects. Objects are created in NetWare administrator programs (PCONSOLE or NETADMIN which are text-based, or NetWare Administrator, which has a graphical user interface and context-sensitive help).
The top-level tree object is known as the [Root] object. The name of the
[Root] object is also the name of the tree. Below the [Root] are other objects:
either containers (which consist of other objects) or leaf objects (which do
not contain other objects). Access to objects is controlled by rights that are
defined as properties of each object. Rights are established by network administrators.
4
The procedures that follow work with all versions of NetWare 4.x. With NetWare
4.11 or later, you can combine the procedures using the Print Services Quick
Setup dialog box.
The following procedures describe creating container objects in a Novell
structure using the NetWare Administrator utility on Windows 95 or Windows NT. This utility, NWADMIN95.exe, is generally located on the
\PUBLIC\WIN95\ directory of the SYS volume. To define new objects, launch
the utility and log in to the Novell directory tree as the Administrator.
The next three sections describe the procedures for defining a print queue
(or queues), printer, and print server object.
71
Page 94

4
4.3 Configuring a NetWare server for printing
To create an NDS print queue:
Browse to the NDS container where the print queue will be located. Select
a container object.
This is the NDS container you will select later in Network
Setup>Pserver> NDS setup.
72
Choose Create from the Object menu.
In the New Object dialog box, select Print Queue and click OK.
Page 95

4.3 Configuring a NetWare server for printing
In the Create Print Queue dialog box, select Directory Service Queue
and select the volume where the print queue object will be located. Enter
a name for the queue in the Print Queue name text box. Select the Define
additional properties check box and click Create.
See page 67 for queue naming conventions.
4
If your printer does not have a hard disk drive, you can define a Direct
connection only. If your printer/copier has a hard disk drive installed (All
DocuColor 4 CPs have hard disks), repeat this step to create two additional
queues (Print and Hold), to print to.
In the dialog box that appears, select the name of the user you would
like to allow to print to the connection or queue from the Users list, and
click Add. Repeat this step for each user. When you have finished adding
users, click OK.
73
Page 96

4
4.3 Configuring a NetWare server for printing
To create an NDS printer/copier and assign a queue to the printer/
copier:
Choose the NDS container that contains the print queue. Choose Create
from the Object menu.
In the New Object dialog box that appears, choose Printer and click
OK.
Enter a name for the printer/copier, check the Define additional
properties check box and click Create.
74
Page 97

4.3 Configuring a NetWare server for printing
This is the NDS print server name you will select later in Network Setup>
PServer>NDS setup.
Choose assignments and click Add.
4
In the next step you will assign a print connection and/or print queues to
the printer object you have created.
Choose the direct connection from the Available Objects list and click
OK.
75
Page 98

4
4.3 Configuring a NetWare server for printing
If you have defined additional queues for this printer, select the print
queue name from the Print queues list, and click Add. Repeat this step
for each connection. When you have finished, click OK.
To create an NDS Print server:
Choose the NDS container that contains the printer and print queue
objects. Choose Create from the Object menu.
76
Page 99

4.3 Configuring a NetWare server for printing
Select Print Server and click OK.
Enter a name for the print server, check the Define additional properties
check box and click Create.
Click assignments and click Add.
4
77
Page 100

4
4.3 Configuring a NetWare server for printing
Choose a printer/copier from the Available Objects list and click OK.
In the dialog box that appears, select the name of the user you would like to
allow to print to the print server from the Users list, and click Add. Repeat
this step for each user. When you have finished adding users, click OK.
The remaining Setup can be performed on the DocuColor 4 LP/CP, or
can be performed using the WebSetup WebTool.
78
A general outline of the steps follows; for more detailed information on
setting up the Print Functions from the control panel, see page 22.
 Loading...