

Page 1

User Guide
English
653-00561A-EN
CXP3535 Color Server
for DocuColor 3535
version 1.0
www.creo.com
Page 2

Page 3

CXP3535 Color Server for DocuColor 3535
version 1.0
User Guide
Page 4

This Page is Intentionally Left Blank
Page 5

Copyright
Trademarks
Copyright © 2002 Creo Inc. All rights reserved.
No copying, distribution, publication, modification, or incorporation of this document, in whole or part, is
permitted without the express written permission of Creo. In the event of any permitted copying, distribution,
publication, modification, or incorporation of this document, no changes in or deletion of author attribution,
trademark legend, or copyright notice shall be made.
No part of this document may be reproduced, stored in a retrieval system, published, used for commercial
exploitation, or transmitted, in any form by any means, electronic, mechanical, photocopying, recording, or
otherwise, without the express written permission of Creo Inc.
This document is also distributed in Adobe Systems Incorporated's PDF (Portable Document Format). You may
reproduce the document from the PDF file for internal use. Copies produced from the PDF file must be
reproduced in whole.
. . . . . . . . . . . . . . . . . . . . . . . . . . . . . . . . . . . . . . . . . . . . . . . . . . . . . . . . . . . . . . . . . . . . . . . . . . . . . . . . . . . . . . . . . . . . . . . . . . . .
The Creo wordmark, Creo logo, and the names of the Creo products and services referred to in this document are
trademarks of Creo Inc.
Adobe, Acrobat, the Acrobat logo and PDF are registered trademarks of Adobe Systems Inc., and are registered in
the US Patents and Trademark Office and may be registered in other jurisdictions.
Apple, AppleTalk, AppleShare, EtherTalk, LocalTalk, Macintosh, and Laserwriter are trademarks of Apple
Computer Inc.
Microsoft, Microsoft Windows NT, Microsoft Windows 2000, Microsoft Windows 98, Microsoft Windows XP,
Microsoft Windows ME and Windows are trademarks or registered trademarks of Microsoft Corp.
Xerox is a registered trademark of Xerox Corp.
Other brand or product names are the trademarks or registered trademarks of their respective owners.
. . . . . . . . . . . . . . . . . . . . . . . . . . . . . . . . . . . . . . . . . . . . . . . . . . . . . . . . . . . . . . . . . . . . . . . . . . . . . . . . . . . . . . . . . . . . . . . . . . . .
FCC Compliance
The Creo equipment referred to in this document complies with the requirements in Part 15 of FCC Rules for a
Class A computing device. Operation of the Creo equipment in a residential area may cause unacceptable
interference to radio and TV reception, requiring the operator to take whatever steps are necessary to correct the
interference.
. . . . . . . . . . . . . . . . . . . . . . . . . . . . . . . . . . . . . . . . . . . . . . . . . . . . . . . . . . . . . . . . . . . . . . . . . . . . . . . . . . . . . . . . . . . . . . . . . . . .
Limitation of Liability
The product, software or services are being provided on an "as is" and "as available" basis. Except as may be stated
specifically in your contract, Creo Inc. expressly disclaims all warranties of any kind, whether express or implied,
including, but not limited to, any implied warranties of merchantability, fitness for a particular purpose and noninfringement.
You understand and agree that Creo Inc. shall not be liable for any direct, indirect, incidental, special,
consequential or exemplary damages, including but not limited to, damages for loss of profits, goodwill, use, data
or other intangible losses (even if Creo has been advised of the possibility of such damages), resulting from: (i)
the use or the inability to use the product or software; (ii) the cost of procurement of substitute goods and
services resulting from any products, goods, data, software, information or services purchased; (iii) unauthorized
access to or alteration of your products, software or data; (iv) statements or conduct of any third party; (v) any
other matter relating to the product, software, or services.
Page 6

Patents
The text and drawings herein are for illustration and reference only. The specifications on which they are based
are subject to change. Creo Inc. may, at any time and without notice, make changes to this document. Creo Inc.,
for itself and on behalf of its subsidiaries, assumes no liability for technical or editorial errors or omissions made
herein, and shall not be liable for incidental, consequential, indirect, or special damages, including, without
limitation, loss of use, loss or alteration of data, delays, or lost profits or savings arising from the use of this
document.
.. . . . . . . . . . . . . . . . . . . . . . . . . . . . . . . . . . . . . . . . . . . . . . . . . . . . . . . . . . . . . . . . . . . . . . . . . . . . . . . . . . . . . . . . . . . . . . . . . . . .
This product is covered by one or more of the following U.S. patents:
RE37,376
4,456,924
4,500,919
4,558,302
4,743,091
4,992,864
5,049,901
5,079,721
5,081,617
5,103,407
5,111,308
5,113,249
5,122,871
5,124,547
5,132,723
5,150,225
5,153,769
5,155,782
5,157,516
5,208,818
5,208,888
5,247,174
5,249,067
.. . . . . . . . . . . . . . . . . . . . . . . . . . . . . . . . . . . . . . . . . . . . . . . . . . . . . . . . . . . . . . . . . . . . . . . . . . . . . . . . . . . . . . . . . . . . . . . . . . . .
Creo Inc.
3700 Gilmore Way
Burnaby, B.C., Canada
V5G 4M1
Tel: 1-604-451-2700
Fax: 1-604-437-9891
http://www.creo.com
.. . . . . . . . . . . . . . . . . . . . . . . . . . . . . . . . . . . . . . . . . . . . . . . . . . . . . . . . . . . . . . . . . . . . . . . . . . . . . . . . . . . . . . . . . . . . . . . . . . . .
653-00561A-EN
June 26, 2003
5,283,140
5,291,273
5,323,248
5,325,217
5,339,176
5,343,059
5,355,446
5,359,451
5,359,458
5,367,360
5,384,648
5,384,899
5,412,491
5,412,737
5,420,702
5,420,722
5,459,505
5,473,733
5,481,379
5,488,906
5,497,252
5,508,828
5,509,561
5,517,359
5,519,852
5,526,143
5,532,728
5,561,691
5,568,595
5,576,754
5,579,115
5,592,309
5,594,556
5,600,448
5,608,822
5,615,282
5,625,766
5,636,330
5,649,220
5,650,076
5,652,804
5,680,129
5,691,823
5,691,828
5,696,393
5,699,174
5,699,740
5,708,736
5,713,287
5,742,743
5,764,374
5,764,381
5,771,794
5,785,309
5,802,034
5,813,346
5,818,498
5,854,883
5,861,904
5,861,992
5,875,288
5,894,342
5,900,981
5,934,196
5,942,137
5,946,426
5,947,028
5,958,647
5,966,504
5,969,872
5,973,801
5,986,819
5,995,475
5,996,499
5,998,067
6,003,442
6,014,471
6,016,752
6,031,932
6,043,865
6,060,208
6,063,528
6,063,546
6,072,518
6,090,529
6,096,461
6,098,544
6,107,011
6,112,663
6,115,056
6,121,996
6,130,702
6,134,393
6,136,509
6,137,580
6,147,789
6,158,345
6,159,659
6,164,637
6,180,325
6,181,362
6,181,439
6,186,068
6,189,452
6,191,882
6,204,874
6,208,369
6,214,276
6,217,965
6,252,522
6,260,482
6,266,080
6,266,134
6,267,054
6,268,948
6,283,589
6,295,076
6,299,572
6,318,266
6,340,817
6,352,816
6,353,216
6,366,339
6,371,026
6,377,739
6,387,597
6,396,422
6,396,618
6,407,849
6,414,755
6,422,801
6,435,091
Page 7

Environment Management System (EMS)
EMS Overview
Creo is committed to the Environment Management System (EMS). According to this policy, we are
committed to keeping customers and service engineers informed about the principles of handling
company products with an emphasis on environmental conservation.
The Triple-R principles are
reduce, reuse, and recycle.
Any item that can be recycled should be recycled and any item that can be reused should be reused, to
reduce the quantities of trash that municipalities must handle.
Recycling
Used items such as paper, plastic, electronic parts, and glass – should be sent for recycling.
Packaging Materials
Packaging materials will be kept at the customer’s premises. For disposal, they should be sent to a plant
for paper, carton, and wood recycling.
End of Product Life
When the product reaches its end of life, it should be sent for recycling to a recognized company in each
country.
Page 8

This Page is Intentionally Left Blank
Page 9

Contents
1 Welcome 1
Welcome to the CXP3535 Color Server User Guide ..................................................................................2
User Guide Purpose .................................................................................................................................. 2
Who Should Use This Guide ..................................................................................................................... 2
Chapter Content and Description ............................................................................................................. 3
Product Overview ..................................................................................................................................... 4
Composition...................................................................................................................................... 6
Features............................................................................................................................................. 6
Supported Formats .......................................................................................................................... 10
Workflow ........................................................................................................................................ 10
Data Flow ........................................................................................................................................ 12
CXP3535 Color Server Network Printers...........................................................................................13
2 Getting Started 15
Powering Up .......................................................................................................................................... 16
CXP3535 Color Server in the Start Menu ......................................................................................... 16
Test Page................................................................................................................................................ 17
The CXP3535 Color Server Workspace ................................................................................................... 19
Workspace Items ............................................................................................................................. 20
Shut Down and Power Off...................................................................................................................... 29
3 Setting Up Client Workstations 31
Default Network Printers on PC and Macintosh Clients ........................................................................... 32
Defining a Printer on PC Client Workstations .......................................................................................... 33
Defining a Printer - Windows NT 4.0................................................................................................ 33
Defining a Printer - Windows 98 ...................................................................................................... 35
Defining a Printer - Windows 2000 and ME ..................................................................................... 38
Defining a Printer - Windows XP ...................................................................................................... 42
Creating PostScript Files on the PC................................................................................................... 46
Copying PPD from PC ...................................................................................................................... 55
Printing from a PC ........................................................................................................................... 55
Defining a Printer on Macintosh Client Workstations .............................................................................. 57
Setting the Network Printer for Macintosh OS 9............................................................................... 57
Setting the Network Printer for Macintosh OS X (10.2) .................................................................... 59
Printing from a Macintosh ............................................................................................................... 63
LPR Printing with the CXP3535 Color Server ........................................................................................... 65
Setting up an LPR Printer in Windows NT 4.0 ................................................................................... 65
Setting up an LPR Printer in Windows 2000/XP ................................................................................ 72
Windows NT/2000/XP Command Line ............................................................................................. 80
Setting up an LPR Printer in Macintosh OS X (10.2) .......................................................................... 81
Setting up an LPR printer in Mac OS 9 (using the Choose Spire Over IP utility).................................. 86
Page 10

viii CXP3535 Color Server User Guide
Printing from Linux .......................................................................................................................... 94
Defining a Printer on Unix Client Workstations ................................................................................ 98
Novell NDS Setup and Configuration ...................................................................................................... 99
Defining Novell NDS Printer Queues in the Novell NDS Tree ........................................................... 100
Configuring IPX Printing ................................................................................................................ 114
Installing the Printer Drivers on a Novell Client Using the Adobe PS Application ............................. 116
Defining the CXP3535 Color Server as a Novell NDS Client ............................................................ 117
4 Working on the CXP3535 Color Server 121
Introduction ......................................................................................................................................... 122
Printing from the CXP3535 Color Server............................................................................................... 122
Importing Files............................................................................................................................... 122
Reprinting Files .............................................................................................................................. 124
Setting Job Parameters on the CXP3535 Color Server........................................................................... 126
Job Parameters Window ................................................................................................................ 126
The Print Settings Tab.................................................................................................................... 128
The Paper Stock Tab ...................................................................................................................... 140
The Print Quality Tab ..................................................................................................................... 144
The Color Tab................................................................................................................................ 152
The Imposition Tab ........................................................................................................................ 168
The Services Tab ............................................................................................................................ 188
The Finishing Tab........................................................................................................................... 200
Slip Sheet ...................................................................................................................................... 203
The Exception Tab ......................................................................................................................... 214
Adjusting Job Parameters Post-RIP ........................................................................................................ 221
5 Working from the Client Workstation 223
Introduction ......................................................................................................................................... 224
Printing from Client Workstations......................................................................................................... 224
Using Hot Folders .......................................................................................................................... 225
Setting PPD Parameters from Client Workstations................................................................................. 232
PPD Parameters ............................................................................................................................. 232
Spire Web Center................................................................................................................................. 240
The Web Viewer............................................................................................................................ 241
Downloads .................................................................................................................................... 246
Links.............................................................................................................................................. 247
6 Workflows & Tools 249
Introduction ......................................................................................................................................... 250
High-Resolution (APR) Workflow .......................................................................................................... 250
APR (Automatic Picture Replacement)............................................................................................ 251
OPI (Open Prepress Interface)......................................................................................................... 252
APR and OPI File Formats............................................................................................................... 252
Setting the High-Resolution File Path ............................................................................................. 252
Page 11

Contents ix
Preparing to Print Using APR or OPI ............................................................................................... 254
Printing with APR or OPI ................................................................................................................ 255
Organizing High-Resolution Files.................................................................................................... 256
Sample Job: Printing a Brochure Using the APR Workflow.............................................................. 256
VI (Variable Information) Workflow....................................................................................................... 257
Using Creo Variable Print Specification to Print a VI Job ................................................................. 259
VI Document Formats .................................................................................................................... 259
Creo Variable Print Specification (VPS) ........................................................................................... 262
Organizing VI Elements.................................................................................................................. 264
CXP3535 Color Server Job Parameters and VI Jobs......................................................................... 264
Imposition Workflow ............................................................................................................................ 266
Editing Imposition Jobs .................................................................................................................. 267
Color Workflow.................................................................................................................................... 268
CXP3535 Color Server Color Formats............................................................................................. 268
The Gradation Tool........................................................................................................................ 269
The Calibration Tool ...................................................................................................................... 281
The Spot Color Editor .................................................................................................................... 307
PDF Workflow ...................................................................................................................................... 311
Export as PDF2Go .......................................................................................................................... 314
PDF Optimization........................................................................................................................... 315
Printing PrePress Files - Graphic Art Port (GAP)...................................................................................... 315
Importing GAP Files ....................................................................................................................... 315
Supporting Graphic Arts Port (GAP) Files........................................................................................ 316
Gap File Structure .......................................................................................................................... 316
Scan Back Workflow............................................................................................................................. 317
7 Managing Jobs 319
Overview .............................................................................................................................................. 320
Queue Manager ................................................................................................................................... 320
The In Process Queue..................................................................................................................... 322
The In Print Queue......................................................................................................................... 323
Queue Manager Status Panel Information...................................................................................... 325
Job Batching Workflow.................................................................................................................. 326
Reordering Jobs in Queues............................................................................................................. 327
Suspending and Resuming Queues ................................................................................................ 328
Handling Jobs in Queues................................................................................................................ 328
Aborting a Running Job ................................................................................................................. 329
Moving Waiting Jobs to Storage .................................................................................................... 330
Deleting Jobs ................................................................................................................................. 331
Viewing and Editing the Job Parameters ........................................................................................ 332
Storage Folder ...................................................................................................................................... 332
Storage Folder Status Panel Information......................................................................................... 334
Handling Jobs in the Storage Folder ............................................................................................... 334
Submitting Jobs ............................................................................................................................. 335
Duplicating Jobs ............................................................................................................................ 335
Archiving and Retrieving Jobs ........................................................................................................ 336
Page 12

x CXP3535 Color Server User Guide
Viewing the Job History ................................................................................................................. 339
Filtering the List ............................................................................................................................. 339
Export a Job as InSite............................................................................................................................ 348
Job Preview & Editor............................................................................................................................. 349
The Job Editor Tabs ....................................................................................................................... 350
The Job Editor Buttons................................................................................................................... 353
Viewing Pages in the Job Editor ..................................................................................................... 354
Editing RTP Jobs ............................................................................................................................ 359
Previewing and Editing PDL Jobs.................................................................................................... 367
Job Ticket Report.................................................................................................................................. 368
Thumbnail Window.............................................................................................................................. 370
Managing Disk Space ........................................................................................................................... 371
8 Administering the System 373
The Administration Window................................................................................................................. 374
General Setup ...................................................................................................................................... 375
Changing the Server Name............................................................................................................ 376
Changing the Date & Time ............................................................................................................ 378
Selecting the User Interface Language ........................................................................................... 379
Setting the Default Unit of Measurement ...................................................................................... 380
Enable Test Page ........................................................................................................................... 381
Resource Manager ............................................................................................................................... 382
Virtual Printers............................................................................................................................... 382
Fonts ............................................................................................................................................. 386
High-Res........................................................................................................................................ 396
VI Elements ................................................................................................................................... 397
Profile Manager............................................................................................................................. 399
User Defined Imposition Template ................................................................................................. 406
Network Setup ..................................................................................................................................... 408
IPX Printing.................................................................................................................................... 409
TCP/IP Setup.................................................................................................................................. 411
AppleTalk Setup ............................................................................................................................ 412
Preferences .......................................................................................................................................... 413
Color - Spire Spot Color Dictionary ................................................................................................ 414
Color - Calibration Methods .......................................................................................................... 415
Color - Emulations......................................................................................................................... 416
Accounting/Message Viewer Log Setup ......................................................................................... 418
System Disks.................................................................................................................................. 419
Alert Messages .............................................................................................................................. 419
Pre-RIP Preview.............................................................................................................................. 420
Default Archiving Path................................................................................................................... 421
PDF Optimization........................................................................................................................... 422
OPI ................................................................................................................................................ 422
Default Paper Size ......................................................................................................................... 423
Print Queue Manager .................................................................................................................... 425
Remote Tools Setup....................................................................................................................... 426
Page 13

Contents xi
ATS ............................................................................................................................................... 431
Utilities ................................................................................................................................................. 432
View Configuration ....................................................................................................................... 432
Configuration Backup and Restore................................................................................................. 435
9 Job Accounting 439
Job Accounting Overview ..................................................................................................................... 440
Viewing the Accounting Information ............................................................................................. 440
Managing the Accounting Information ................................................................................................. 442
Reordering Columns ...................................................................................................................... 442
Resizing Columns .......................................................................................................................... 443
Filtering the Information by Date ................................................................................................... 444
Sorting the Information ................................................................................................................. 445
Accounting / Message Viewer Log Setup .............................................................................................. 446
Exporting the Accounting Report.......................................................................................................... 446
Printing the Accounting Report............................................................................................................. 447
10 System Messages 449
Overview .............................................................................................................................................. 450
The Alerts Window............................................................................................................................... 450
System Disks Threshold Message ................................................................................................... 451
Job History ........................................................................................................................................... 452
The Message Viewer............................................................................................................................. 454
Managing Messages............................................................................................................................. 455
Reordering Columns ...................................................................................................................... 455
Resizing Columns .......................................................................................................................... 455
Filtering the Messages by Type....................................................................................................... 456
Sorting the Message List ................................................................................................................ 457
Printing the Message List ............................................................................................................... 457
Pop-up Messages ................................................................................................................................. 458
A Reinstalling your CXP3535 Color Server 459
Overview .............................................................................................................................................. 460
Reinstalling the Operating System......................................................................................................... 462
Reinstalling the Creo Application .......................................................................................................... 464
The Configuration Wizard (If configuration backup is available) ............................................................ 468
Restoring the Backed Up Configuration ......................................................................................... 468
Restoring the Factory Defaults Configuration ................................................................................. 473
The Configuration Wizard (if recovery fails or is unavailable) ................................................................. 476
Choosing the Configuration Type .................................................................................................. 476
Setting the Language..................................................................................................................... 477
Configuring the Host Name ........................................................................................................... 478
Setting the Date and Time ............................................................................................................. 481
Setting the Default Measurement Units ......................................................................................... 483
Page 14

xii CXP3535 Color Server User Guide
Configuring the IP Address ............................................................................................................ 484
Configuring the Apple Talk Zone ................................................................................................... 486
Completing the Configuration....................................................................................................... 488
Changing the Operator Name and Password ................................................................................. 491
Installing and Configuring Novell Client for Spire ........................................................................... 492
Configuring the McAfee VirusScan ................................................................................................ 496
Importing a File and Performing a Test Print................................................................................... 503
Shutting Down and Powering Off.................................................................................................. 503
Glossary 505
Index 517
Page 15

Welcome
Welcome to the CXP3535 Color Server User Guide.............................2
User Guide Purpose ............................................................................2
Who Should Use This Guide................................................................2
Chapter Content and Description........................................................3
Product Overview................................................................................4
Page 16

2 Chapter 1 – Welcome
Welcome to the CXP3535 Color Server User Guide
Welcome to your CXP3535 Color Server User Guide.
The CXP3535 Color Server is a powerful, comprehensive color server
providing high throughput and print predictability to digital workflows. In
combination with the Xerox DocuColor 3535 Printer, the CXP3535 Color
Server effectively addresses the growth of on-demand printing needs and
delivers the best output quality available.
Throughout this guide, we look forward to supporting you all the way
from first time setup and configuration to print.
User Guide Purpose
This user guide will help you operate the CXP3535 Color Server. It can also
be used as a reference guide for questions or procedures. Study this user
guide to take full advantage of the many unique and advanced features of
the CXP3535 Color Server.
Who Should Use This Guide
This user guide is for CXP3535 Color Server operators and system
administrators. This guide explains how you can quickly and easily print
from the CXP3535 Color Server or from a client workstation. Step-by-step
procedures are included for new and occasional CXP3535 Color Server
users. Detailed information is provided for users who require in-depth
knowledge of the CXP3535 Color Server.
Page 17

Chapter Content and Description 3
Chapter Content and Description
Chapter Contents Description
Chapter 1 Welcome This chapter introduces the guide and the
CXP3535 Color Server features and workflows.
Chapter 2 Getting Started This chapter explains how to power up the
CXP3535 Color Server and provides
explanations about the CXP3535 Color Server
workspace and main windows.
Chapter 3 Setting up Client Workstations This chapter explains how set up PC and
Macintosh client workstations and how to
configure LPR printing. It also explains how to
setup and configure Novell NDS.
Chapter 4 Working on the CXP3535
Color Server
Chapter 5
Working from the Client
Wo r ks t a t io n
Chapter 6
Chapter 7
Wor kf lo w s a nd Tool s
Managing Jobs This chapter explains how to manage jobs in the
This chapter explains how to import jobs and set
job parameters from the CXP3535 Color Server.
It also explains how to reprint files from the
Storage Folder and how to adjust job parameters
post RIP.
This chapter lists the methods for printing from
client workstations, explains how to set job
parameters using the PPD and shows how to
monitor jobs from client workstations.
This chapter describes the CXP3535 Color Server
printing workflows: High Resolution (APR and
OPI), VI, Imposition, Color and PDF.
This chapter also provides information on
printing pre-press files using the graphic art port
(GAP).
Queue Manager and in the Storage Folder. It
also explains
how to export jobs to an InSite
server and how to use the Job Preview & Editor
tool and the job Thumbnail window. A section
about managing disk space is also provided.
Page 18

4 Chapter 1 – Welcome
Chapter Contents Description
Chapter 8
Chapter 9
Chapter 10
Appendix A
Appendix B
Administrating the System This chapter explains how to administrate your
Job Accounting This chapter provides details about managing
System Messages
Reinstalling the System This chapter describes the two methods for
Adding and External SCSI
Device
Product Overview
system using the Administration window
utilities.
job accounting using the Accounting window.
This chapter describes the various alerts and
error messages. This chapter also provides
explanations about viewing messages in the Job
History, Message Viewer, and Alerts windows.
reinstalling your CXP3535 Color Server
software by complete overwrite or by system
partition.
This chapter describes how to add and external
SCSI device to the CXP3535 Color Server.
The CXP3535 Color Server is an on-demand pre-press system that uses
Creo Spire advanced pre-press technologies, to drive a Xerox DocuColor
3535 Printer.
As an optimal digital color solution for printers, the CXP3535 Color Server
enables you to print from PC, Macintosh, and UNIX client workstations.
The CXP3535 Color Server processes image files in PDL formats (for
example, PostScript, PDF, and Variable Information), using RIP (Raster
Image Processor) technology. The system converts image files into a
suitable RTP (Ready-To-Print) format for direct, high-quality digital
printing. The CXP3535 Color Server also streamlines the printing process
by allowing printing with preset workflows.
In combination with the Xerox DocuColor 3535 Printer, the CXP3535
Color Server enables casual users to produce professional-quality, fullcolor, finished documents quickly and easily, production of both black
and white and color jobs: flyers, brochures, pamphlets, dummy catalogs,
short-run trials, and print-on-demand publications. When installed as a
Page 19

Product Overview 5
fast, network printer with the CXP3535 Color Server, the Xerox
DocuColor 3535 Printer, prints and copies up to 35 color or monochrome
pages per minute Xerox DocuColor 3535 Printer.
The CXP3535 Color Server combines RIP functionalities, automation,
control tools and special hardware development capabilities with PC
architecture. Users can scan, copy, print and load paper all at once.
CXP3535 Color Server for Xerox DocuColor 3535 Printer
Page 20

6 Chapter 1 – Welcome
Composition
The CXP3535 Color Server is a dedicated Creo platform running in a
Windows 2000 environment.
The CXP3535 Color Server includes:
• Creo hardware, including the interface board
• X-Rite Calibration device
• Software, including:
Creo Application Software
Windows 2000 Professional Operating System
The latest version of Adobe Acrobat
Ultimate InSpire Software
Features
The CXP3535 Color Server provides the following main features:
• Creating jobs in RTP format
Using the CXP3535 Color Server, RTP files can be created and stored
on the CXP3535 Color Server itself. This enables the user to print RTP
data at any time without further processing.
• Powerful document printing capabilities
In combination with the Xerox DocuColor 3535 Printer, the CXP3535
Color Server enables complete printing and processing of documents,
including the production of covers and pages on different paper
stocks.
• Enhanced job editing
The CXP3535 Color Server enables the user to edit jobs, both pre- and
post-RIP. Pre-RIP editing includes full Adobe Acrobat functionality
including: deletion, extraction, rotating, adding, and cropping of
pages. Post-RIP editing includes deleting job pages and merging pages
from different jobs to a new job. This minimizes the need to re-RIP
jobs.
Page 21

Product Overview 7
• RIP - Adobe Postscript Level III and Extreme Certified technologies
The CXP3535 Color Server uses the industry-standard Adobe RIP,
with enhancements for Continuous Tone and Linework. Data are
processed separately as Continuous Tone and Vector Data layers for
increased efficiency and merged during printing.
• Ready-to-Print Job Preview and Editing
The CXP3535 Color Server enables the user to preview RTP jobs up to
pixel levels to see all job details and to verify job quality and content
post-RIP. It is also possible to view a thumbnail list of job pages, or the
actual raster pages.
• Job Management
The CXP3535 Color Server enables the user to monitor job progress
during all stages of printing. Among other functions, you can promote,
demote, delete, monitor the import process, and estimate when a job
will be fully imported. You can also abort jobs during RIPing or
printing, as well as archive and retrieve jobs.
• Enhanced Text and Line Art Quality – FAF (Full Auto Frame)
The CXP3535 Color Server enables the user to choose superior text
quality using the Creo proprietary algorithm. This function enhances
the quality of diagonal lines, borders, blends, and small text. The Creo
anti-aliasing causes blends to appear smooth with no banding and
diagonal lines to appear crisp without jagged edges (do not use this
option with VI jobs).
The user may also choose superior image quality with the Creo
proprietary smooth scale algorithm. This function improves the
quality of images containing various resolutions (such as images taken
from the Internet).
• Trapping
The CXP3535 Color Server uses the well-known Creo algorithm to
trap job information easily. The FAF algorithm has been tailored for
digital printing.
• Imposition
The CXP3535 Color Server offers a full suite of Imposition functions,
based on the well-known Ultimate Imposition engine. On the
CXP3535 Color Server, imposition is robust with user-friendly
operation. And only the CXP3535 Color Server enables imposition of
Variable Information jobs.
Page 22

8 Chapter 1 – Welcome
• Color Management
The CXP3535 Color Server has a number of color management tools
and utilities that will help you to improve the quality of your jobs. The
CXP3535 Color Server enables you to modify color on-the-fly, even
for images that have already been RIPped. This functionality includes
application of brightness and contrast adjustments, as well as changes
to image gradation and calibration.
• Variable Information Printing
The CXP3535 Color Server enables processing of Creo Variable Print
Specification and Xerox VIPP file formats and PPML for efficient VI
(Variable Information) processing and printing. Repeated elements
are RIPped once and cached, so there is no need to continually re-RIP
them. The CXP3535 Color Server also provides easy management of
VI elements, including previewing, deleting and updating. The
CXP3535 Color Server also offers imposition for VI jobs, the only
digital solution in the industry with this capability.
• Creo Workflow Extenders
This is a set of Adobe Photoshop and QuarkXPress software plug-ins
and extensions that facilitate printing with the CXP3535 Color Server.
These extensions are located in the shared
CXP3535 Color Server or on CD #3 supplied with the CXP3535 Color
Server software kit.
Utilities folder on the
• Job Batching
In order to prevent cycling down, the CXP3535 Color Server streams
several jobs into a single batch to prevent the printer from cycling
down between jobs.
• Web Viewer
The CXP3535 Color Server Web Viewer provides online Spire
information and can be accessed from client workstations. The user
may view the CXP3535 Color Server queues, Storage folder and Alerts
window, for remote job monitoring. In addition, the Spire Web Center
enables the user to download remote client tools, utility applications,
color profiles, and print drivers or view Spire related documentation.
• Gallop
The CXP3535 Color Server Gallop workflow enables the user to begin
printing a defined number of pages before the entire job has been
RIPped. This enables you to print and RIP concurrently.
Printed pages can then be deleted automatically to free disk space.
Page 23

Product Overview 9
• Hot Folders
For every published virtual printer, a hot folder is automatically
created to enable the users to easily submit PDL jobs to the CXP3535
Color Server. To use the hot folders, simply drag and drop your jobs
onto the required hot folder.
• Integrated Preflight Check
The CXP3535 Color Server Preflight check enables you to perform a
preflight check of key job components, before a job is sent for
processing. This feature detects missing job components all at once,
saves inefficient processing time with constant error / failed messages
and consequently shortens the correction cycle dramatically. The
following key job components are checked:
Fonts
Hi-resolution images
Spot colors
• Graphic Arts Port
The Graphic Arts Port (GAP) on the CXP3535 Color Server connects
with other Creo workflow systems, including Brisque™ workflow
software and Prinergy® workflow management, and opens the server
to popular graphic arts file formats, such as TIFF, TIFF/IT and CT/
LW, so you can redirect urgent jobs from offset to digital printing, or
proof offset jobs on a digital printer.
• Spire Spot Color Editor
The CXP3535 Color Server enables you to tune your spots according
to your personal requirements. In addition, you may create custom
spot colors with fixed CMYK values according to your personal
requirements.
• PDF2Go
CXP3535 Color Server contains a built in proofing tool - the PDF2GO
port. The PDF2Go port converts RTP files to standard PDF files, which
can then be easily submitted by email for proofing, shortening the
approval cycle significantly.
• Mixed Media Documents
CXP3535 Color Server provides you with the ability to create finished
documents with mixed media types; you may add inserts, tabs and
covers to your job, and collect a truly finished product from the
printer, eliminating the need to separately prepare and combine the
finishing material.
Page 24

10 Chapter 1 – Welcome
• Admin Remote Tool
The CXP3535 Color Server Remote Admin utility, enables the system
administrator to connect, view, operate and perform administration
actions on the CXP3535 Color Server from his client workstation. The
remote connection password secured.
Supported Formats
The CXP3535 Color Server supports the following file formats:
• PostScript (composite or pre-separated files)
• PDF
• EPS
• Creo VPS (Variable Print Specification)
• VIPP (Variable Data Intelligent PostScript Params)
• PPML (Personalized Print Markup Language)
• GAP (Graphic Art Port) files (file formats from various prepress
systems, for example Brisque job and TIFF / IT)
Workflow
• Creo CT & LW
• JPG, TIFF
The CXP3535 Color Server receives and processes files from the following
client workstations:
• Macintosh: running Mac OS 8.5.x or higher and Mac OS X (10.1 and
higher).
• PC: running Windows 98 / ME / Windows NT 4.0 / 2000 / and XP
• UNIX Workstations and Servers
Page 25
Product Overview 11
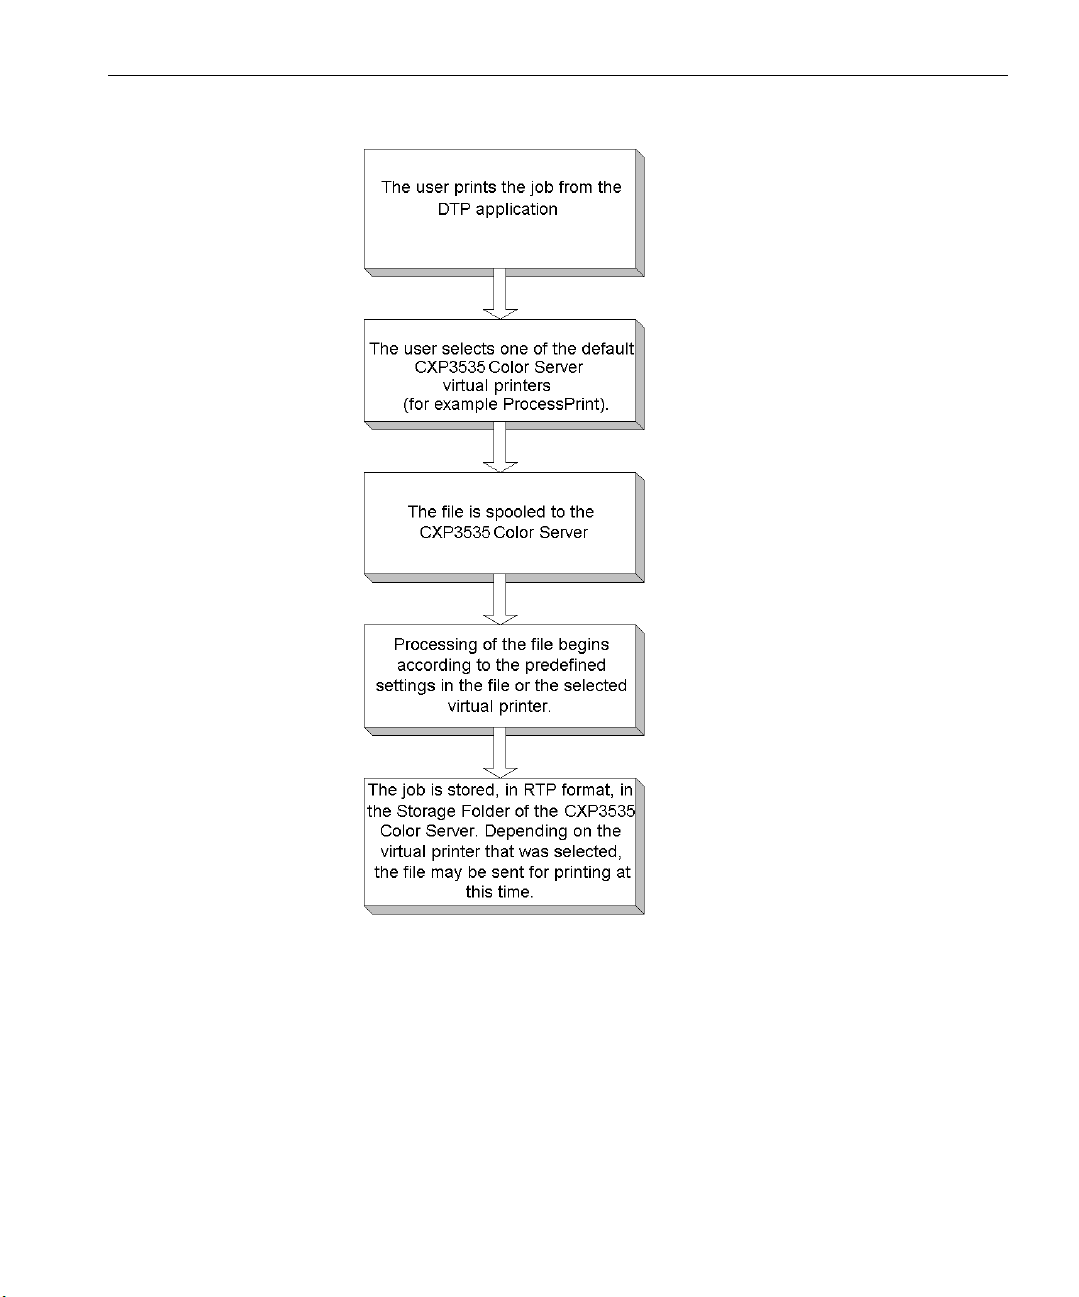
The CXP3535 Color Server basic workflow is as follows:
Page 26
12 Chapter 1 – Welcome
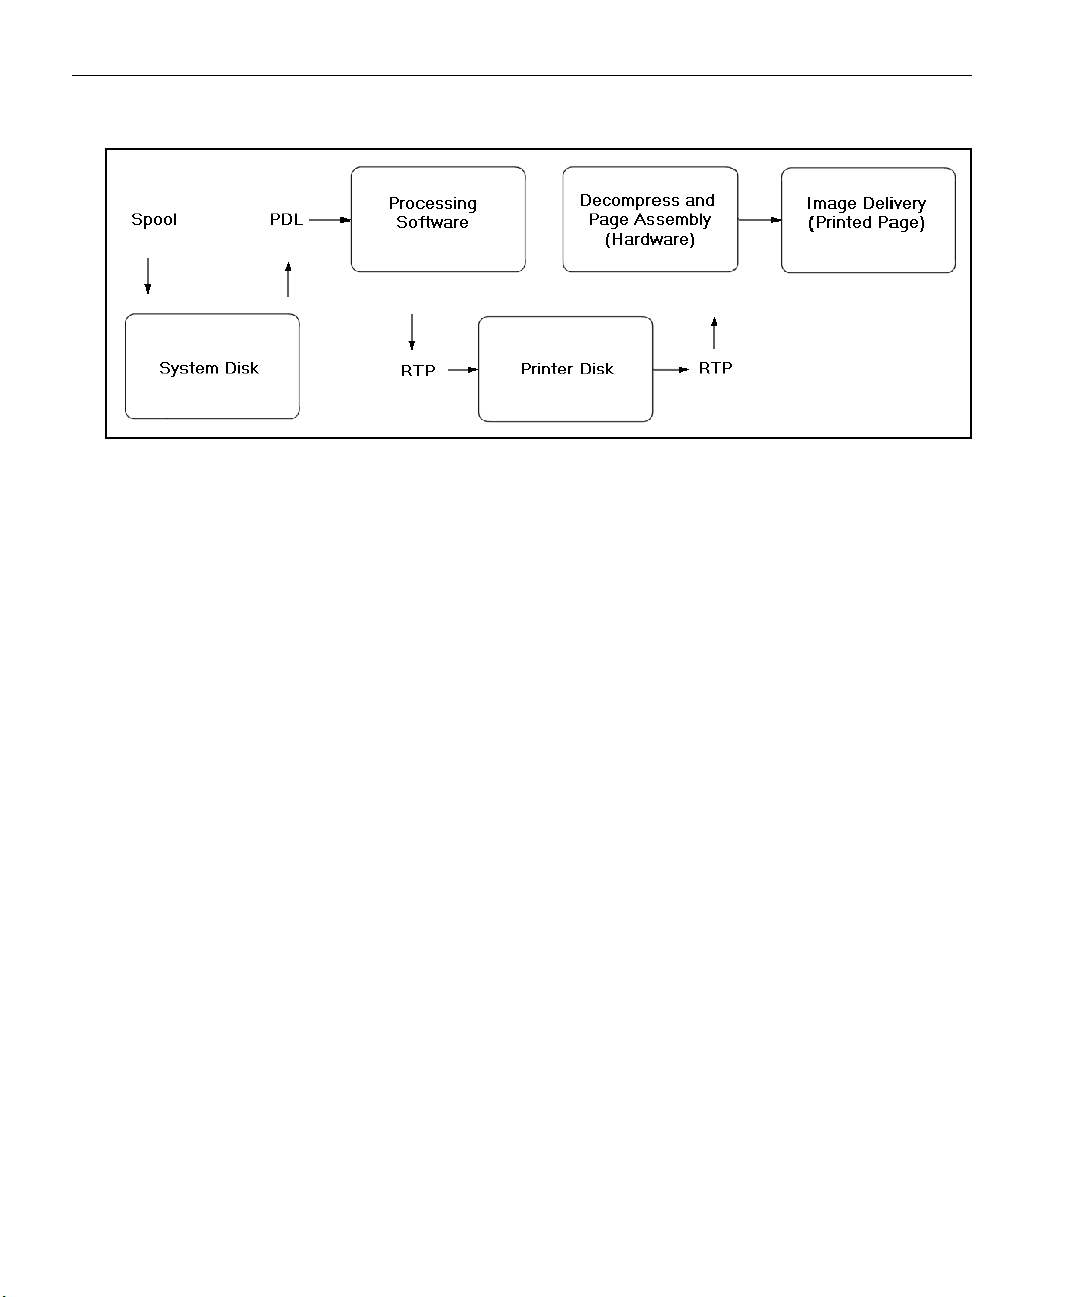
Data Flow
The CXP3535 Color Server data flow is as follows:
1. The input file arrives at the CXP3535 Color Server from either a client
workstation, local hard disk, or external media and is submitted to the
Process queue.
2. The processing sub-system produces an RTP job from the input file.
3. The RTP job is stored on an image disk.
4. When printing starts, the RTP job elements on the disk are
decompressed and merged to the correct location on the page. This is
done using Creo hardware.
5. The image delivery sub-system converts the RTP information into the
print engine format.
6. The image delivery sub-system transmits the page information to the
print engine.
7. The page data is delivered to the Print Engine and the job is printed.
Page 27

Product Overview 13
CXP3535 Color Server Network Printers
For Macintosh and PC networks, the CXP3535 Color Server provides
three default network printers, known also as virtual printers.
Virtual printers are a function used for automating workflows, which then
define job streaming. They contain preset workflows that are automatically
applied to all print jobs processed with that virtual printer. There is no
need to reset job settings for each job, thus increasing printing efficiency.
Note: The job (print) parameters set in the job (from the client) override the
parameters set in the virtual printer.
The three default virtual printers are:
• SpoolStore
Files are spooled directly to the Storage Folder and await operator
processing. You can only import PDL files (such as: PS, PDF, VIPP,
VPS) to the spool store, not RIPped - RTP files.
• ProcessPrint
Files sent to this virtual printer are processed and printed directly to
the Xerox DocuColor 3535 Printer via the CXP3535 Color Server.
• ProcessStore
Files sent to this virtual printer are automatically processed and stored
in RTP format. After processing, the files are stored in the
of the CXP3535 Color Server until the print operator re-
Folder
submits them for printing.
With printing workflows tailored to your job requirements, the CXP3535
Color Server enables you to:
Storage
• Define new virtual printers
• Choose from which virtual printer to print
For information on defining and editing virtual printers, see Virtual Printers on
page 382.
Page 28

This Page is Intentionally Left Blank
Page 29

Getting Started
Powering Up.....................................................................................16
Test Page ..........................................................................................17
The CXP3535 Color Server Workspace..............................................19
Shut Down and Power Off ................................................................29
Page 30
16 Chapter 2 – Getting Started
Powering Up
To power up the CXP3535 Color Server:
Important: You should always power up the CXP3535 Color Server first, and
then power up the Xerox DocuColor 3535 Printer.
1. Switch on the monitor.
2. Click the Power button on the front panel of the CXP3535 Color
Server.
The power LED on the front panel lights-up. The Windows 2000
System starts and a test page is printed.
Note: If the CXP3535 Color Server is already powered up, open the
workspace using the Start menu (as described in the following section).
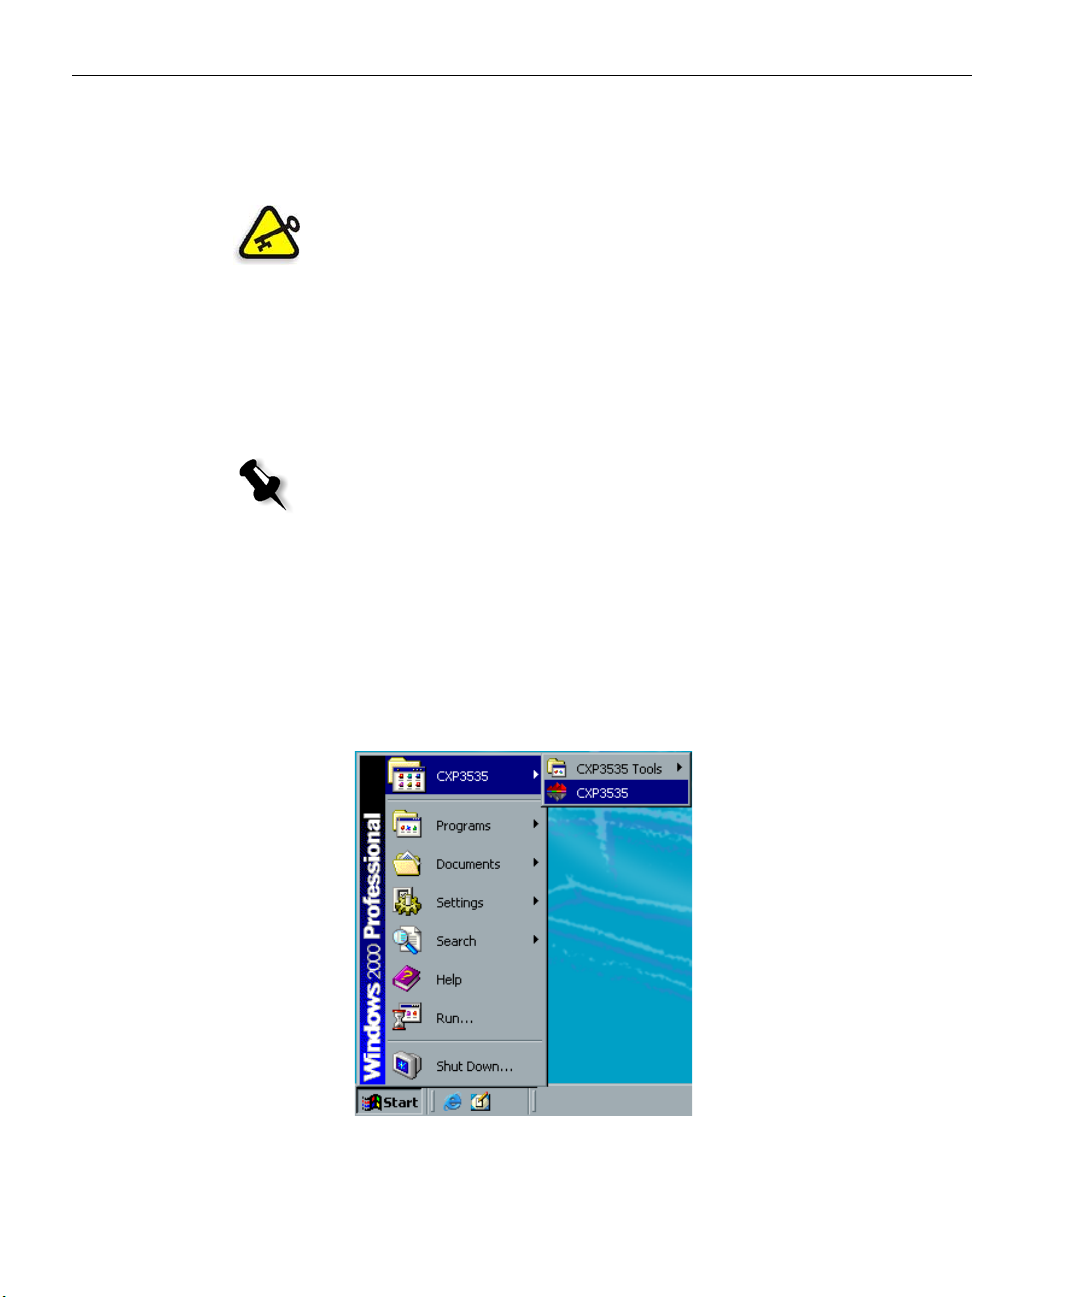
CXP3535 Color Server in the Start Menu
The CXP3535 Color Server program group appears in the Windows Start
menu.
To open the CXP3535 Color Server workspace:
Click the Start button and follow the path CXP3535>CXP3535.
¾
Page 31

Test Page 17
The CXP3535 Color Server splash appears followed by the CXP3535
Color Server workspace.
Test Page
The first time you power on your CXP3535 Color Server a test page is
printed automatically. After the test page is printed, the First Time
Configuration wizard appears to enable you to set the CXP3535 Color
Server configuration.
For details see the CXP3535 Color Server Technical Manual.
This test page will also be printed each time the CXP3535 Color Server is
powered on or restarted.
You may change this default setting in the Administration window. For details
see Enable Test Page on page 381.
Page 32

18 Chapter 2 – Getting Started
The test page includes the following information:
• Date
• CXP3535 Color Server information:
Spire Version
Server Name (host name)
Last Calibration Date
Note: The first time the system is powered on, this information is N/A
(unavailable).
• Print engine information:
Software version: displays the connected Xerox DocuColor 3535
Printer version.
• Network Setup:
Enable DHCP
IP Address
Subnet Mask
Gateway
AppleTalk Zone
IPX Tree Name
IPX Context Name
Page 33

The CXP3535 Color Server Workspace 19
The CXP3535 Color Server Workspace
After the CXP3535 Color Server is powered up, the CXP3535 Color Server
workspace automatically appears. The workspace area items are described
on the following page.
1
2
3
6
7
4
5
Page 34

20 Chapter 2 – Getting Started
Workspace Items
The following table shortly describes the workspace area items. Further
details are provided in the following sections and throughout the guide.
Item Name Description
1 Menu Bar Includes the workspace menus. For details see Menu Bar on
page 20.
2 Status Panel Includes the
In Storage pane and the DFE & Printer Animation. For details
Logo Pane, In Process pane, In Print pane and the
see Status Panel on page 21.
3 Pathways Panel Enables you to open / close workspace windows. For details see
Pathways Panel on page 25.
4 Queue Manager Consists of the
In Process and In Print queues. For details see
Queue Manager on page 25.
5 Job Thumbnail Enables you to view a thumbnail of RTP jobs. For details see
Job Thumbnail on page 26.
6 Storage Folder Stores RTP jobs. For details see Storage Folder on page 27.
7 Alerts window Lists all the error messages that were generated during the
workflow. For details see Alerts Window on page 28.
Menu Bar
The Menu bar (item number 1) includes the Job, Selection, Tools, Control
Help menus. Click on a menu name to open the corresponding drop-
and
down menu.
Page 35

The CXP3535 Color Server Workspace 21
Status Panel
The Status panel (item number 2) includes the Logo Pane, In Process
pane, In Print pane and the Storage Folder pane.
For further information see Queue Manager Status Panel Information on
page 325 and Storage Folder Status Panel Information on page 334.
The
DFE & Printer Animation is displayed on the right of the Status panel
and presents an animation of the DFE and Printer in their current
configuration (basic configuration or optional configuration, with a
finisher tray).
DFE Animation
Printer Animation
In addition, to the right of the printer animation, messages regarding the
printer operation mode and status are displayed.
Printer operation messages such as
Sleep mode appear in green. See the above graphic. Printer status messages
such as
Finisher tray is full, Paper Jam, Door open and Out of paper,
Printing, Ready, Low power mode and
appear in red. See the following example.
Note: When the Xerox DocuColor 3535 Printer is used for copying pages, the
message Copier Mode appears in red and the printer animation presents the
copying action. As long as the printer is in this state, the In Print queues freezes
and you cannot print jobs.
The DFE Monitor
Clicking the DFE Animation opens the DFE Monitor window. This
window displays information regarding disk space, network details and
connected virtual printers.
Page 36

22 Chapter 2 – Getting Started
The Disk Usage tab enables you to view the free and used disk space details
in the User and Printer disks.
The
Network tab enables you to view the network details such as Host
name, IP address, etc.
Page 37

The CXP3535 Color Server Workspace 23
The Virtual Printers tab enables you to view the defined virtual printers
and their published status.
The Printer Monitor
Clicking the Printer Animation, opens the Printer Monitor window. The
Printer Monitor window enables you to view information related to the
printer resources such as paper stock, connected devices and consumables
status.
The
Paper Stock tab displays the details of the paper stock in each tray and
also shows if this tray is ready or empty.
Page 38

24 Chapter 2 – Getting Started
The Finisher tab displays the details of connected finishing devices.
The
Consumables tab displays the status of the CMYK toner and drum,
waste toner container and fuser.
Page 39

The CXP3535 Color Server Workspace 25
Pathways Panel
The Pathways panel (item number 3) buttons enables you to open / close
the following workspace windows: the Queue Manager, the Storage
Folder, the Thumbnail window, and the Alerts window
. These workspace
windows are explained in the following sections. In addition, you may also
open/close the Administration window.
For further information on the Administration window, see The Administration
Window on page 374.
Queue Manager
The lower area of the Queue Manager (item number 4)consists of the In
Process
processed successfully, it moves to the upper area - the
waits to be printed, or the file moves to the
queue, which lists the files to be processed. After a file has been
In Print queue and
Storage Folder for future
printing (depending on the job flow). Failed jobs and jobs that cannot be
successfully RIPped also move to the
For further details see Queue Manager on page 320.
Storage Folder.
Page 40

26 Chapter 2 – Getting Started
Job Thumbnail
The Job Thumbnail window (item number 5) enables you to view a small
image representation (thumbnail) of RTP jobs, to help you identify them
before printing. It also indicates the job’s title, the file type, the print range,
the number of copies you have specified to print the job, the sequential
number of the current displayed page, and additional details regarding
imposition, paper stock and orientation. This enables you to view some of
the job parameters while previewing the job.
For further details see Thumbnail Window on page 370.
Page 41

The CXP3535 Color Server Workspace 27
Storage Folder
RTP jobs are stored in, and reprinted from, the Storage Folder (item
number 6).
The
Storage Folder also contains files that:
• Have completed printing
• Were aborted during processing or printing
• Failed to complete processing or printing
• Were imported or downloaded directly from a client workstation to
the
Storage Folder.
• The Storage Folder also holds PDL files (for example, PostScript files
that were spooled directly to the
For further details, see Storage Folder on page 332.
Storage Folder).
Page 42

28 Chapter 2 – Getting Started
Alerts Window
Any time the system emits an Error type message, the message appears in
the Alerts window (item number 7), which lists all the error messages that
were generated during the workflow. You may specify whether you would
like the Alert window to launch automatically on a new error, or upon user
selection.
For further information see The Alerts Window on page 450.
Page 43

Shut Down and Power Off 29
Shut Down and Power Off
To shut down and power off the CXP3535 Color Server:
1. In the CXP3535 Color Server workspace, from the Job menu select
Exit
.
Or:
Click the
Color Server workspace.
The CXP3535 Color Server workspace closes and you are returned to
the Windows desktop.
Note: If there are jobs that are being processed or printed a message will be
displayed.
2. Verify that the Spire icon has disappeared from your taskbar.
close button in the top right hand corner of the CXP3535
Taskbar with Spire logo
3. From the Windows desktop, select Start>Shut Down.
4. In the Shutdown window, select Shut down.
5. When the Windows shutdown is complete, switch off the monitor.
6. On the CXP3535 Color Server, click the Power button behind the
Taskbar without Spire logo
front door.
The power LED on the front panel goes off.
Page 44

This Page is Intentionally Left Blank
Page 45

Setting Up Client
Workstations
Default Network Printers on PC and Macintosh Clients .....................32
Defining a Printer on PC Client Workstations.....................................33
Defining a Printer on Macintosh Client Workstations.........................57
LPR Printing with the CXP3535 Color Server .....................................65
Novell NDS Setup and Configuration.................................................99
Page 46

32 Chapter 3 – Setting Up Client Workstations
Default Network Printers on PC and Macintosh Clients
For Macintosh and PC networks, the CXP3535 Color Server provides
three default network printers, known as virtual printers: ProcessPrint,
ProcessStore and SpoolStore.
Virtual printers contain preset workflows that are automatically applied to
all print jobs processed with that virtual printer. There is no requirement
to reset job settings for each job. This functionality results in greatly
increased printing efficiency.
Note: The job (print) parameters set in the job override the parameters set in the
virtual printer.
The CXP3535 Color Server enables you to select which virtual printer to
print to. It also allows you to define new virtual printers, with printing
workflows tailored to your specific job requirements.
For more information see Virtual Printers on page 382 and CXP3535 Color
Server Network Printers on page 13.
An additional default network printer is provided for Macintosh networks.
• Fontdownloader
This is a special network printer used with Macintosh clients to
download fonts. The FontDownLoader enables you to send fonts to
the CXP3535 Color Server to be used later in printed jobs. It is not
possible to send files via the FontDownLoader, only fonts.
Page 47

Defining a Printer on PC Client Workstations 33
Defining a Printer on PC Client Workstations
PC client workstations with the following operating systems installed, can
print to the CXP3535 Color Server: Windows 98/ME and Windows NT
4.0/2000 and XP. The CXP3535 Color Server network printers are defined
using the Windows Add Printer Wizard - Network Printers.
Note: When adding a new CXP3535 Color Server network printer to a client
workstation, there is no need to install the CXP3535 Color Server PPD and Adobe
PS printer driver separately. They are installed automatically through the
Windows Add Printer Wizard.
Defining a Printer - Windows NT 4.0
To define a CXP3535 Color Server Network Printer through the
Windows Add Printer Wizard:
1. On your Windows desktop, click the Start button and follow the path
Settings>Printers.
2. Double-click the Add Printer icon.
The Add Printer Wizard appears.
3. Select Network Printer Server and click Next.
4. Browse through the network for the CXP3535 Color Server and
double-click the server name.
Page 48

34 Chapter 3 – Setting Up Client Workstations
A list of the network printers is displayed.
Note: The CXP3535 Color Server is provided with three network printers:
ProcessPrint, ProcessStore and SpoolStore.
5. Select one of the network printers (for example, ProcessPrint), and
click
OK.
6. If you want to set this printer as the default printer on your computer,
Yes . Otherwise, select No.
select
7. Click Next.
8. Click Finish to complete the setup.
The CXP3535 Color Server network printer is now successfully
installed.
9. Repeat the above process to install additional network printers.
To define a CXP3535 Color Server Network Printer through the
Network Neighborhood:
1. Browse to the required network printer.
2. Double-click the network printer icon.
A Printers message appears.
Page 49

Defining a Printer on PC Client Workstations 35
3. Click Yes to setup the printer.
The network printer is defined on your PC client workstation.
4. Repeat the above process to install additional network printers.
5. From the Printers list, select the CXP3535 Color Server and click
Next.
Defining a Printer - Windows 98
Note: When adding a new CXP3535 Color Server network printer to a client
workstation, there is no need to install the CXP3535 Color Server PPD and Adobe
PS printer driver separately. They are installed automatically through the
Windows>Add Printer Wizard.
To define a CXP3535 Color Server network printer through the
Windows Add Printer Wizard:
1. On your Windows desktop, click the Start button, and follow the path
Settings>Printers.
2. Double-click the Add Printer icon.
The Add Printer Wizard appears.
3. Click Next.
The following window appears.
Page 50

36 Chapter 3 – Setting Up Client Workstations
4. Select Network printer and click Next.
The following window appears.
5. Type the network path or the queue name of your printer. If you
don’t know the exact name, click
Browse to view the available
network printers.
6. Select one of the network printers (for example, ProcessPrint).
7. Click OK.
.
Page 51

Defining a Printer on PC Client Workstations 37
8. Click Next.
The following window appears.
9. If you want to set this printer as the default printer on your computer,
Yes. Otherwise, select No.
select
10. Click Next.
11. Select Yes to print a test page.
The CXP3535 Color Server network printer is now successfully
installed.
12. Click Finish to complete the setup.
13. Repeat the above process to install additional network printers.
To define a CXP3535 Color Server Network Printer through the
network neighborhood:
1. Browse to the required network printer.
2. Double-click the network printer icon.
The Add Printer Wizard appears and the network printer is defined
on your PC client workstation.
3. Repeat the above process to install additional network printers.
Page 52

38 Chapter 3 – Setting Up Client Workstations
Defining a Printer - Windows 2000 and ME
Note: When adding a new CXP3535 Color Server network printer to a client
workstation, there is no need to install the CXP3535 Color Server PPD and Adobe
PS printer driver separately. They are installed automatically through the
Windows Add Printer Wizard.
To define a CXP3535 Color Server network printer though the
Windows Add Printer Wizard:
1. On your Windows desktop, click the Start button and follow the path
Settings>Printers.
2. Double-click the Add Printer icon.
The Add Printer Wizard appears.
3. Click Next.
The following window appears.
4. Select Network printer.
5. Click Next.
Page 53

Defining a Printer on PC Client Workstations 39
The following window appears.
6. Select Type the printer name, or click Next to browse for a printer.
7.
Type the exact name of the printer in the Name box.
Or:
Click
Next to browse for a printer.
Page 54

40 Chapter 3 – Setting Up Client Workstations
The following window appears.
8. Select one of the network printers (for example, ProcessPrint).
9. Click Next.
10. If you want to set this printer as the default printer on your computer,
select
Yes . Otherwise, select No.
11. Click Next.
Page 55

Defining a Printer on PC Client Workstations 41
The following window appears.
12. Click Finish to complete the setup.
The CXP3535 Color Server network printer is now successfully
installed.
13. Repeat the above process to install additional network printers.
To define a CXP3535 Color Server network printer through Network
Neighborhood:
1. Browse to the required network printer.
2. Double-click the network printer icon.
A Printers message appears.
3. Click Yes to setup the printer.
The network printer is defined on your PC client workstation.
4. Repeat the above process to install additional network printers.
Page 56

42 Chapter 3 – Setting Up Client Workstations
Defining a Printer - Windows XP
Note: When adding a new CXP3535 Color Server network printer to a client
workstation, there is no need to install the CXP3535 Color Server PPD and Adobe
PS printer driver separately. They are installed automatically through the
Windows Add Printer Wizard.
To define a CXP3535 Color Server network printer though the
Windows Add Printer Wizard:
1. On your Windows desktop, click the Start button and follow the path
Printers and Faxes.
The Printer and Faxes window appears.
2. From the Printer Tasks, select Add a printer.
The Add Printer Wizard appears.
3. Click Next.
Page 57

Defining a Printer on PC Client Workstations 43
The Local or Network Printer window appears.
4. Select A network printer, or a printer attached to another computer
and click Next.
Page 58

44 Chapter 3 – Setting Up Client Workstations
The Specify a Printer window appears.
5. Select Browse for a printer and click Next.
The Browse for Printer window appears.
Page 59

Defining a Printer on PC Client Workstations 45
6. Browse to the CXP3535 Color Server and double-click it to display the
list of network printers.
7. Select the printer you wish to setup and click Next.
The Default Printer window appears.
8. If you want to set this printer as the default printer on your computer,
Yes. Otherwise, select No.
select
9. Click Next.
Page 60

46 Chapter 3 – Setting Up Client Workstations
The following window appears.
10. Click Finish to close the wizard.
The CXP3535 Color Server network printer is added to your printer
list.
To define a CXP3535 Color Server network printer in Windows XP
through the Network:
1. Browse to the required network printer.
2. Double-click on the network printer icon.
The network printer is defined on your PC client workstation.
3. Repeat the above process to install additional network printers.
Creating PostScript Files on the PC
The following procedures describe how to create PostScript files using the
CXP3535 Color Server from the client workstation. This is useful when
you are not connected to the CXP3535 Color Server and you need to
distribute jobs for printing on the CXP3535 Color Server remotely or on
external media. These files can then be imported to the CXP3535 Color
Server for printing.
Page 61

Defining a Printer on PC Client Workstations 47
To create a PostScript File:
1. Open a job in your DTP application (for example, Microsoft Word),
and from the
File menu, select Print.
The Print window appears.
2. Select the Print to File check box.
3. Click OK.
A PostScript file is now created.
Page 62

48 Chapter 3 – Setting Up Client Workstations
To define a Print-to-File printer locally:
1. Start the Adobe PostScript Driver application (the application is
available on CD#3 in the
Utilities folder, or at Adobe's Web site at
www.adobe.com).
The Welcome window appears.
2. Click Next.
The End User License Agreement window appears.
Page 63

Defining a Printer on PC Client Workstations 49
3. Read the License Agreement and click Accept.
The following window appears.
4. Select It is directly connected to your computer (Local Printer), and
Next.
click
The following window appears.
5. Select the FILE: Local Port and click Next.
Page 64

50 Chapter 3 – Setting Up Client Workstations
The following window appears.
Note: The next step is to configure the printer with the CXP3535 Color
Server PPD. The CXP3535 Color Server PPD (CXP3535.ppd).
6. Click Browse.
The Browse for Printer window appears.
7. Click the Network button and browse to your CXP3535 Color Server.
Page 65

Defining a Printer on PC Client Workstations 51
The Map Network Drive window appears.
8. Locate the CXP3535 Color Server and double click on the server icon.
Then, double-click the
Utilities folder.
9. Click OK.
The Browse for Printer window appears.
10. Double click the PPD folder and select the CXP3535 Color Server
CXP3535.ppd.
PPD:
Page 66

52 Chapter 3 – Setting Up Client Workstations
11. Click OK.
The following window appears.
12. From the Printers list, select the CXP3535 Color Server printer, and
Next.
click
13. Select Not Shared and click Next.
Page 67

Defining a Printer on PC Client Workstations 53
The following window appears.
14. Type a name for the printer which you will be able to identify on the
client workstation, for example
CXP3535_ProcessStore.
15. Select Yes (Recommended) if you want to print a test page or select
No, then click Next.
16. Click Install to install the Print to file printer with the CXP3535 Color
Server PPD. When prompted to configure the printer, click
then click
17. Select Yes .
18. Click Next.
Next.
Yes and
Page 68

54 Chapter 3 – Setting Up Client Workstations
The Printer Properties window appears.
19. Configure the printer according to your specifications and then
OK.
click
20. Click Finish to complete the setup.
The printer appears in the Printers window.
You are now ready to print *.ps and *.prn files. Once printed, these
files can be imported and printed on the CXP3535 Color Server.
Page 69

Defining a Printer on PC Client Workstations 55
Copying PPD from PC
It is necessary to use the CXP3535 Color Server PPD to create PS files to
send to the CXP3535 Color Server. The CXP3535 Color Server PPD
should therefore be copied and distributed to the customer.
To copy the PPD from the CXP3535 Color Server for distribution on a
diskette or by e-mail:
1. On the Windows desktop, double-click the Network Neighborhood/
My Network Places icon.
2. Browse to the location of the CXP3535 Color Server station (for
example,
3. Select the CXP3535 Color Server and its Utilities folder.
4. Select the required PPD folder (the default PPD is English).
CXP3535).
Printing from a PC
5. Copy the CXP3535.ppd file to a diskette or send it by e-mail to the
customer.
To print from a PC:
1. Open the file you would like to print, in the corresponding application
(for example open a PDF file in Adobe Acrobat).
2. From the File menu, select Print.
The Print window appears.
Page 70

56 Chapter 3 – Setting Up Client Workstations
3. From the Name list, select the required CXP3535 Color Server
network printer (for example, Spire_ProcessPrint).
4. If required, click the Properties button and modify the job
parameters.
Note: Any changes to the printer parameters override the parameters of the
selected virtual printer, unless the virtual printer was specified the Override
PPD Parameters options was selected.
Printer's Default indicates that the value is taken from settings of the
selected virtual printer on the CXP3535 Color Server.
5. Click OK.
6.
Click OK in the Print window.
The file is sent to the CXP3535 Color Server.
Page 71

Defining a Printer on Macintosh Client Workstations 57
Defining a Printer on Macintosh Client Workstations
The CXP3535 Color Server can print to Macintosh client workstations
running Macintosh OS 9 and OS X (10.2).
You can also submit jobs using the CXP3535 Color Server virtual printers
over a TCP/IP protocol. This connection enables a significantly higher
spooling speed.
For further details, see Spire Over TCP/IP on page 88.
Setting the Network Printer for Macintosh OS 9
To set up a CXP3535 Color Server network printer on Macintosh OS 9:
1. Copy the CXP3535 Color Server PPD file to the Printer Descriptions
folder on your client workstation.
For further details, see the procedure To copy the CXP3535 Color Server
PPD: on page 86.
2. From the Apple menu, select Chooser.
3. Select LaserWriter and browse through the network to the CXP3535
Color Server.
Page 72

58 Chapter 3 – Setting Up Client Workstations
4. Select one of the CXP3535 Color Server's network printers (for
example,
CXP3535_ProcessStore) and click Create.
The following status indicator appears.
5. The system should automatically locate the CXP3535 Color Server
PPD and configure the printer. If it does not, click
Select PPD.
6. From the list of Printer Descriptions, select CXP3535.ppd.
7. Click the Select button.
Page 73

Defining a Printer on Macintosh Client Workstations 59
The printer is now set as a CXP3535 Color Server network printer.
If you have the Desktop Printer Spooler extension enabled, a printer
icon appears on the desktop.
Note: This icon can be used when downloading PS files to the CXP3535
Color Server.
8. Repeat the above process to install additional network printers.
Setting the Network Printer for Macintosh OS X (10.2)
To set up a CXP3535 Color Server network printer on Macintosh OS X:
1. Copy the CXP3535 Color Server PPD file to the Library>Printers>PPDs
folder on your client workstation.
For further details, see the procedure To copy the CXP3535 PPD: on
page 81.
2. From the Go menu, select Applications.
Page 74

60 Chapter 3 – Setting Up Client Workstations
3. Open the Utilities folder.
4. Double-click the Print Center icon.
The Printer List window appears.
Page 75

Defining a Printer on Macintosh Client Workstations 61
5. Click the Add Printer button.
The following window appears.
6. Select AppleTalk as the connection type and the required AppleTalk
zone.
Note: If you would like to use the LPR protocol instead, see the procedure
To Configure an LPR Printer on page 84.
7. Browse to the CXP3535 Color Server.
8. Open the Printer Model pop-up menu and select Other.
Page 76

62 Chapter 3 – Setting Up Client Workstations
9. Browse to the folder to which you have copied the CXP3535.ppd and
select it.
10. Click the Choose button to assign the CXP3535.ppd to the selected
CXP3535 Color Server network printer.
The following window appears.
Page 77

Defining a Printer on Macintosh Client Workstations 63
11. Click the Add button to add the new printer to the printer list.
The new printer is displayed in the Printer List window.
Printing from a Macintosh
To print from a Macintosh computer:
1. Open the file you would like to print, in the corresponding application
(for example open a Word document in Microsoft Word).
2. From the File menu, select Print.
The Print window appears.
Page 78

64 Chapter 3 – Setting Up Client Workstations
3. From the Printer list, select the required printer (for example,
Color_ProcessPrint).
4. To set job parameters, click General and from the pop-up menu,
select one of the Printer Specific Options.
A window similar to the one shown below appears.
5. Adjust the printer options as required.
Note: Printer's Default indicates that the value is taken from the currently
selected virtual printer.
The PPD parameters are divided up into five Printer Specific Options in the
drop-down menu.
6. After modifying the job settings, click Print.
The file is sent to the CXP3535 Color Server.
Page 79

LPR Printing with the CXP3535 Color Server 65
LPR Printing with the CXP3535 Color Server
This section covers the procedures for setting up and configuring an LPR /
TCP/IP printer from the following computers:
• Windows NT 4.0
• Windows 2000/XP
• Windows NT/2000/XP Command Line
• Mac OS X (10.2)
• Mac OS 9 (using the Choose Spire Over IP utility)
• Linux
• AIX and UNIX command line
Setting up an LPR Printer in Windows NT 4.0
The following procedure describes how to configure an LPR printer in
Windows NT 4.0 for printing to the CXP3535 Color Server.
The following items must be installed and configured on the Windows NT
4.0 computer (Server or Workstation version) before you begin:
1. TCP/IP protocol.
Page 80

66 Chapter 3 – Setting Up Client Workstations
2. Microsoft TCP/IP Printing service.
3. Latest Adobe PS Printer Driver (you can install this from the
CXP3535 Color Server
the latest version free from www.adobe.com
D:\Utilties\PC utilities, or you can download
).
4. CXP3535 PPD (PostScript Printer Driver) copied to your client
workstation (the PPD is located in the
D:\Utilities\PPD folder on the
CXP3535 Color Server).
To define an LPR Printer
1. From the Start menu on the Windows desktop, select
Settings>Printers.
Page 81

LPR Printing with the CXP3535 Color Server 67
2. In the Printer window, from the File menu, select Server Properties.
3. Select the Port tab, and then click the Add Port button.
4. From the list of Available Printer Ports, select LPR Port, and click the
New Port button.
5. Type the exact name of the CXP3535 Color Server (this box is case-
sensitive), for example,
providing lpd:
box.
OPAL5 in the Name or address of server
Page 82

68 Chapter 3 – Setting Up Client Workstations
6. Type the exact name of the network printer you want to print to (you
can view the exact name of the printer on the CXP3535 Color Server,
under:
the printer name is
7. Click OK.
8. Click Close in the Printer Ports window.
Admin>Resource Manager>Virtual Printers). In this example
OPAL5_ProcessPrint.
The new LPR port is now defined on your computer.
9. Click OK in the Print Server Properties window.
10. Define the LPR printer using the Adobe PostScript Printer driver
application. See the following procedure.
To define an LPR Printer using the Adobe PostScript Driver:
1. Start the Adobe PostScript Driver Application (you can install this
from the
D:\Utilties\Utilities\PC Utilities on the CXP3535 Color
Server, or you can download the latest version free from
www.adobe.com
2. In the Welcome window click Next.
).
The End User License Agreement window appears.
3. Read the license agreement, and then click Accept.
Page 83

LPR Printing with the CXP3535 Color Server 69
4. Select Install a new PostScript Printer, and then click Next.
5. In the Printer Connection Type window, select It is directly connected
to your computer (Local Printer)
, and then click Next.
6. Select the LPR port you defined earlier, for example,
OPAL5_ProcessPrint LPR, and then click Next.
7. The next step is to configure the printer with the CXP3535 Color
Server PPD (make sure that you have copied this to your computer,
or that you have access to the CXP3535 Color Server on your
network).
8. In the Select Printer Model window, click Browse.
The Browse for Printer window appears.
Page 84

70 Chapter 3 – Setting Up Client Workstations
9. Locate the CXP3535 Color Server PPD, and then select the CXP3535
Color Server PPD:
10. Click OK.
11. In the Select Printer Model window, select the CXP3535, and then
click
Next.
12. In the Sharing window, select Not Shared, and then click Next.
CXP3535.ppd.
The following window appears.
13. Type a name for the printer that you will be able to identify on your
computer, for example
OPAL5_ProcessPrint LPR. You can also keep
the original name of the printer.
14. If you want to set this printer as the default printer on your computer,
Yes . Otherwise, select No.
select
15. Select Yes (Recommended) if you want to print a test page. Otherwise,
No.
select
Page 85

LPR Printing with the CXP3535 Color Server 71
16. Click Next.
17. In the Setup Information window, click Install to install the LPR
printer with the CXP3535 Color Server PPD.
18. When prompted to configure the printer, click Yes.
19. Click Next.
20. In the Printer Configuration window, select Ye s when prompted to
configure the printer now.
21. Click Next.
The CXP3535 Properties window appears.
22. Configure the printer according to your specifications, and then click
OK.
23. In the Setup Complete window click Finish to complete the setup.
The new LPR printer is now listed with your other printers on the
Windows NT computer, and you are now ready to print to the
CXP3535 Color Server using the LPR.
Page 86

72 Chapter 3 – Setting Up Client Workstations
Setting up an LPR Printer in Windows 2000/XP
The following procedure describes how to configure an LPR printer in
Windows 2000/XP for printing to the CXP3535 Color Server.
The following items must be installed and configured on the Windows
2000/XP computer before you begin:
1. TCP/IP protocol
2. Latest Adobe PS Printer Driver (you can install this from the
d:\utilties\Utilities\PC utilities on the CXP3535 Color Server or you
can download the latest version free from www.adobe.com
3. CXP3535 PPD (PostScript Printer Driver) copied to your client
workstation (the PPD is located in the d:\utilities\PPD\ folder on the
CXP3535 Color Server).
To define an LPR Printer (Windows XP):
1. From the Start menu on the Windows desktop, select
Settings>Printers and Faxes.
2. In the Printers and Faxes window, from the File menu, select Server
Properties.
).
Page 87

LPR Printing with the CXP3535 Color Server 73
3. Select the Port tab, and then click the Add Port button.
4. From the list of Available Printer Ports, select Standard TCP/IP Port,
and then click the
5. Click Next.
New Port button.
6. Type the exact name of the CXP3535 Color Server (this box is case-
sensitive), for example,
7. Type a name for the printer that you will be able to identify on your
computer, for example,
OPAL5 in the Printer Name or IP Address: box.
OPAL5ProcessPrint LPR.
Page 88

74 Chapter 3 – Setting Up Client Workstations
8. Click Next.
The following window appears.
9. Select Custom in the Device Type option, and then click Settings.
Page 89

LPR Printing with the CXP3535 Color Server 75
10. Select the following options:
• Protocol: LPR
• LPR Settings:
• Queue Name: type the exact name of the network printer you
want to print to (you can view the exact name of the printer on
the CXP3535 Color Server, under:
Manager>Virtual Printers
is
OPAL5_ProcessPrint.
). In this example the Printer name
Admin>Resource
• LPR Byte Counting Enabled: selected.
11. Click OK and then click Next.
The following window appears.
12. Click Finish.
Page 90

76 Chapter 3 – Setting Up Client Workstations
13. Click Close in the Printer Ports window.
The new Standard TCP/IP Printer Port is now defined on your
computer.
14. Click Close in the Print Server Properties window.
15. Define the TCP/IP Printer using the Adobe PostScript Printer Driver
application. See the following procedure.
To define an LPR Printer using the Adobe PostScript Driver:
1. Start the Adobe PostScript Driver Application (you can install this
from the
D:\Utilties\Utilities\PC Utilities on the CXP3535 Color
Server, or you can download the latest version free from
www.adobe.com
2. In the Welcome window, click Next.
3. The End User License Agreement window appears, read the license
agreement, and then click
4. Select Install a new PostScript Printer, and then click Next.
).
Accept.
Page 91

LPR Printing with the CXP3535 Color Server 77
5. In the Printer Connection Type window, select It is directly connect
to your computer (Local Printer)
, and then click Next.
The following window appears.
6. Select the Standard TCP/IP port you defined earlier on, for example,
OPAL5_ProcessPrint LPR, and then click Next.
7. The next step is to configure the printer with the CXP3535 Color
Server PPD (make sure that you have copied this to your computer,
or that you have access the CXP3535 Color Server on your network).
8. In the Select Printer Model window, click Browse.
The Browse for Printer window appears.
9. Locate the CXP3535 Color Server PPD, and then select the CXP3535
Color Server PPD:
10. Click OK.
CXP3535.ppd.
Page 92

78 Chapter 3 – Setting Up Client Workstations
11. In the Select Printer Model window, select the CXP6K3_6, and then
click
Next.
12. In the Sharing window, select Not Shared, and then click Next.
13. Type a name for the printer that you will be able to identify on your
computer, for example,
OPAL5_ProcessPrint LPR. You can also keep
the original name of the printer.
14. If you want to set this printer as the default printer on your computer,
select
Yes . Otherwise, select No.
15. Select Yes (Recommended) if you want to print a test page. Otherwise,
No.
select
16. Click Next.
17. In the Setup Information window, click Install to install the LPR
printer with the CXP3535 Color Server PPD.
18. When prompted to configure the printer, click Yes.
19. Click Next.
20. In the Printer Configuration window, select Yes when prompted to
configure the printer now.
Page 93

LPR Printing with the CXP3535 Color Server 79
21. Click Next.
The CXP3535 Properties window appears.
22. Configure the printer according to your specifications, and then click
OK.
23. In the Setup Complete window, click Finish to complete the setup.
The new LPR printer is now listed with your other printers on the
Windows NT computer, and you are now ready to print to the
CXP3535 Color Server using the LPR.
Page 94

80 Chapter 3 – Setting Up Client Workstations
Windows NT/2000/XP Command Line
You can also submit PostScript, PDF or VPS files for printing to the
CXP3535 Color Server using the following commands in the Window
command line. The following procedure is suitable for Windows NT,
2000, or XP computers.
Note: All PostScript files should be created using the CXP3535 Color Server PPD
(CXP3535.ppd)
1. From the Start menu, click Run.
2. Ty pe cmd, and then click OK.
3. Locate the directory that contains the file(s) you want to print.
4. Type the following at the command line (all commands, server name,
and printer name are case-sensitive):
lpr –S <server name> -P <virtual printer name> -ol
<file name>
and then press ENTER.
For example:
lpr –S OPAL3 –P OPAL3_ProcessPrint –ol brochure.ps
Your file is printed to the CXP3535 Color Server using the LPR
command.
Page 95

LPR Printing with the CXP3535 Color Server 81
Setting up an LPR Printer in Macintosh OS X (10.2)
Before you define a network printer you need to install the CXP3535 Color
Server PPD to your Macintosh.
Copying the CXP3535 Color Server PPD
To copy the CXP3535 PPD:
1. From the Go menu, select Connect to Server.
The Connect to Server window appears.
2. Browse to the required CXP3535 Color Server.
3. Click the Connect button.
Page 96

82 Chapter 3 – Setting Up Client Workstations
The following window appears.
4. Select Guest and click the Connect button.
The following window appears.
5. Select the Utilities folder, and click OK.
Utilities folder is mounted on your desktop.
The
6. Double-click the Utilities folder on your desktop.
Page 97

LPR Printing with the CXP3535 Color Server 83
7. Double-click the PPD folder.
8. Copy the CXP3535.ppd from the CXP3535 Color Server to your
Macintosh hard disk.
Tip: It is recommended that you copy the PPD by dragging and dropping
from the CXP3535 Color Server to the Library>Printers>PPDs folder on
your Macintosh.
Page 98

84 Chapter 3 – Setting Up Client Workstations
Configuring an LPR Printer
To configure an LPR Printer:
1. Follow the procedure “To set up a CXP3535 Color Server network
printer on Macintosh OS X” on page 59, until step 5.
2. In the Printer List window, select LPR Printers using IP as the
connection type.
3. In the LPR Printer's Address box, type the TCP/IP address or
hostname of the CXP3535 Color Server. See the following example.
4. Clear the Use Default Queue on Server check-box.
Page 99

LPR Printing with the CXP3535 Color Server 85
5. In the Queue Name box, type the full name of the CXP3535 Color
Server network printer, for example
CXP7_ProcessPrint (case-
sensitive).
6. From the Printer Model pop-up menu, select Other.
7.
Browse to the folder to which you have copied the CXP3535.ppd and
select it.
8. Click the Choose button to assign the CXP3535.ppd to the selected
CXP3535 Color Server network printer.
The following window appears.
Page 100

86 Chapter 3 – Setting Up Client Workstations
9. Click the Add button to add the new printer to the printer list.
The new printer is displayed in the Printer List window.
Setting up an LPR printer in Mac OS 9 (using the Choose Spire Over IP utility)
Before setting up a CXP3535 Color Server network printer, you need to
install the CXP3535 Color Server PPD on the Macintosh workstation.
Copying the Spire PPD
To copy the CXP3535 Color Server PPD:
1. From the Apple menu, select Chooser.
2. Select AppleShare and browse the network to where the CXP3535
Color Server is configured.
 Loading...