

Page 1

Splash RPX-i Color Server
Job Management Guide
Page 2

© 2006 Electronics for Imaging, Inc. The information in this publication is covered
under Legal Notices for this product.
45054818
05 May 2006
Page 3

7
7
9
9
13
18
19
20
20
ONTENTS
ONTENTS
C
C
CONTENTS
NTRODUCTION
I
Terminology and conventions
About this document
SING
THE
U
Starting the Splash RPX-i
The Splash RPX-i interface
PLASH
S
RPX-
3
8
I
10
Administrator status 10
Utility toolbar
Changing the toolbar display 12
Start/Stop button
Print queues
Print queue column headings 16
Preview window
Status indicators
Splash RPX-i main menus
Job Settings
Default job settings
Editing default job settings 25
Managing raster files
RIP-While-Print 27
RIP-While-Receive 27
11
14
25
26
RIP-Across-Jobs 27
Instant Reprint 27
Print Consecutive Jobs 27
Page 4

30
40
42
48
48
CONTENTS
Checking job errors
Preflight 28
Color PostFlight 29
A
DVANCED
Tray Alignment
Tray alignment features 33
Print Info
Configuring Print Info 34
Enabling Print Info Strip 35
Secure Access
Using Secure Access at client workstations 37
F
EATURES
4
28
OF
THE
S
PLASH
RPX-
I
30
34
36
Printing with Secure Access 37
Setting up Users 38
Accounts 39
Screening Preferences
Job Log Options
Imposition
Imposition settings 44
Printing a booklet 46
Color management tools
OT
OLDERS
H
F
Supported file formats
Drop-printing using Drop Folders
Hot Folders
AND
Printing to Drop Folders 50
IRTUAL
V
RINTERS
P
43
47
49
51
Creating Hot Folders 51
Managing Hot Folders 52
Printing to Hot Folders 54
Sharing Hot Folders 55
Page 5

72
86
87
87
88
CONTENTS
Virtual Printers
Setting up Virtual Printers on client computers 56
GA File Converter
PLASH
S
RPX-
Set Builder
Printing a document set with Set Builder 73
Setting finishing options 75
Managing Set Builder jobs 76
Duplex and odd-length jobs 76
Previews 76
Errors in Set Builder document sets 76
I
RODUCTION
P
EATURES
F
5
56
67
73
Mixed Media
Mixed Media types 79
Printing Tabs 85
Schedule Job
Job Error
Resume Printing
Restart Printing
PLASH
S
ERVER
S
Using Splash Server Remote
Splash Server Remote functions 91
Administrator connections 92
User connections 92
R
77
87
EMOTE
89
Page 6

93
94
96
99
CONTENTS
CAN
S
Setting up mailboxes
Scanning from the copier
Using Splash Remote Scan
Configuring Splash Remote Scan 97
Retrieving a scan 97
EB
W
UEUE
Q
Using the Web Queue Manager
Managing jobs in the Print queue 102
Downloading installers and files from the Web Queue Manager
Splash Installer Downloads 103
ANAGER
M
6
97
100
103
PLASH
S
Print queue column headings
Main menus
Print queue Jobs menu
Job Log information
NDEX
I
RPX-
I
S
ERVER
M
ENUS
104
104
105
109
110
111
Page 7

NTRODUCTION
I
Terminology and conventions
INTRODUCTION
This document describes job management features of the Splash RPX-i Color Server for
Apple Mac OS and Microsoft Windows computers. The Splash RPX-i Color Server is a
high-end Color Publishing Print Solution for use on Power Mac OS G5 platforms.
Splash user software enables Mac OS or Windows computers to send print jobs across an
appropriate network to the Splash RPX-i Color Server, which processes the jobs and sends
them to the copier. If you are unfamiliar with your platform’s procedures for printing or
integrating printers within the network environment (Windows 2000/XP/Server 2003,
AppleTalk, UNIX, Novell, and Microsoft TCP/IP), see the documentation that accompanies
your computer system.
7
This document uses the following terminology and conventions.
Term or convention Refers to
Copier DocuColor 240/250
Fiery Fiery Network Controller
Mac OS Mac OS 9, Mac OS X
Splash RPX-i Splash RPX-i Color Server
Titles in italics
Windows Windows 2000, Windows XP, Windows Server 2003
Other documents in this set
Page 8

INTRODUCTION
About this document
This document describes the Splash RPX-i server interface, functions, and job management
options. The following topics are covered:
•Splash RPX-i user interface
•Advanced features of Splash RPX-i
•Production features of Splash RPX-i
•Splash Server Remote
•Drop folders, Hot Folders, Virtual Printers, and the GA File Converter
•Web Queue Manager
•Splash Remote Scan
8
Page 9
USING THE SPLASH RPX-I
SING THE SPLASH RPX-I
U
This chapter provides an introduction to the Splash RPX-i server graphical user interface and
its basic functions.
Starting the Splash RPX-i
In order for you to use the Splash RPX-i server, it must be connected to the Fiery by Direct
Connect or Network Connect. With Direct Connect, the Splash RPX-i is always connected
to the Fiery. If you are using Network Connect, use the following procedure to configure the
connection. Ask your network administrator for the IP address of the Fiery.
For more information about Direct Connect and Network Connect, see Getting Started.
9
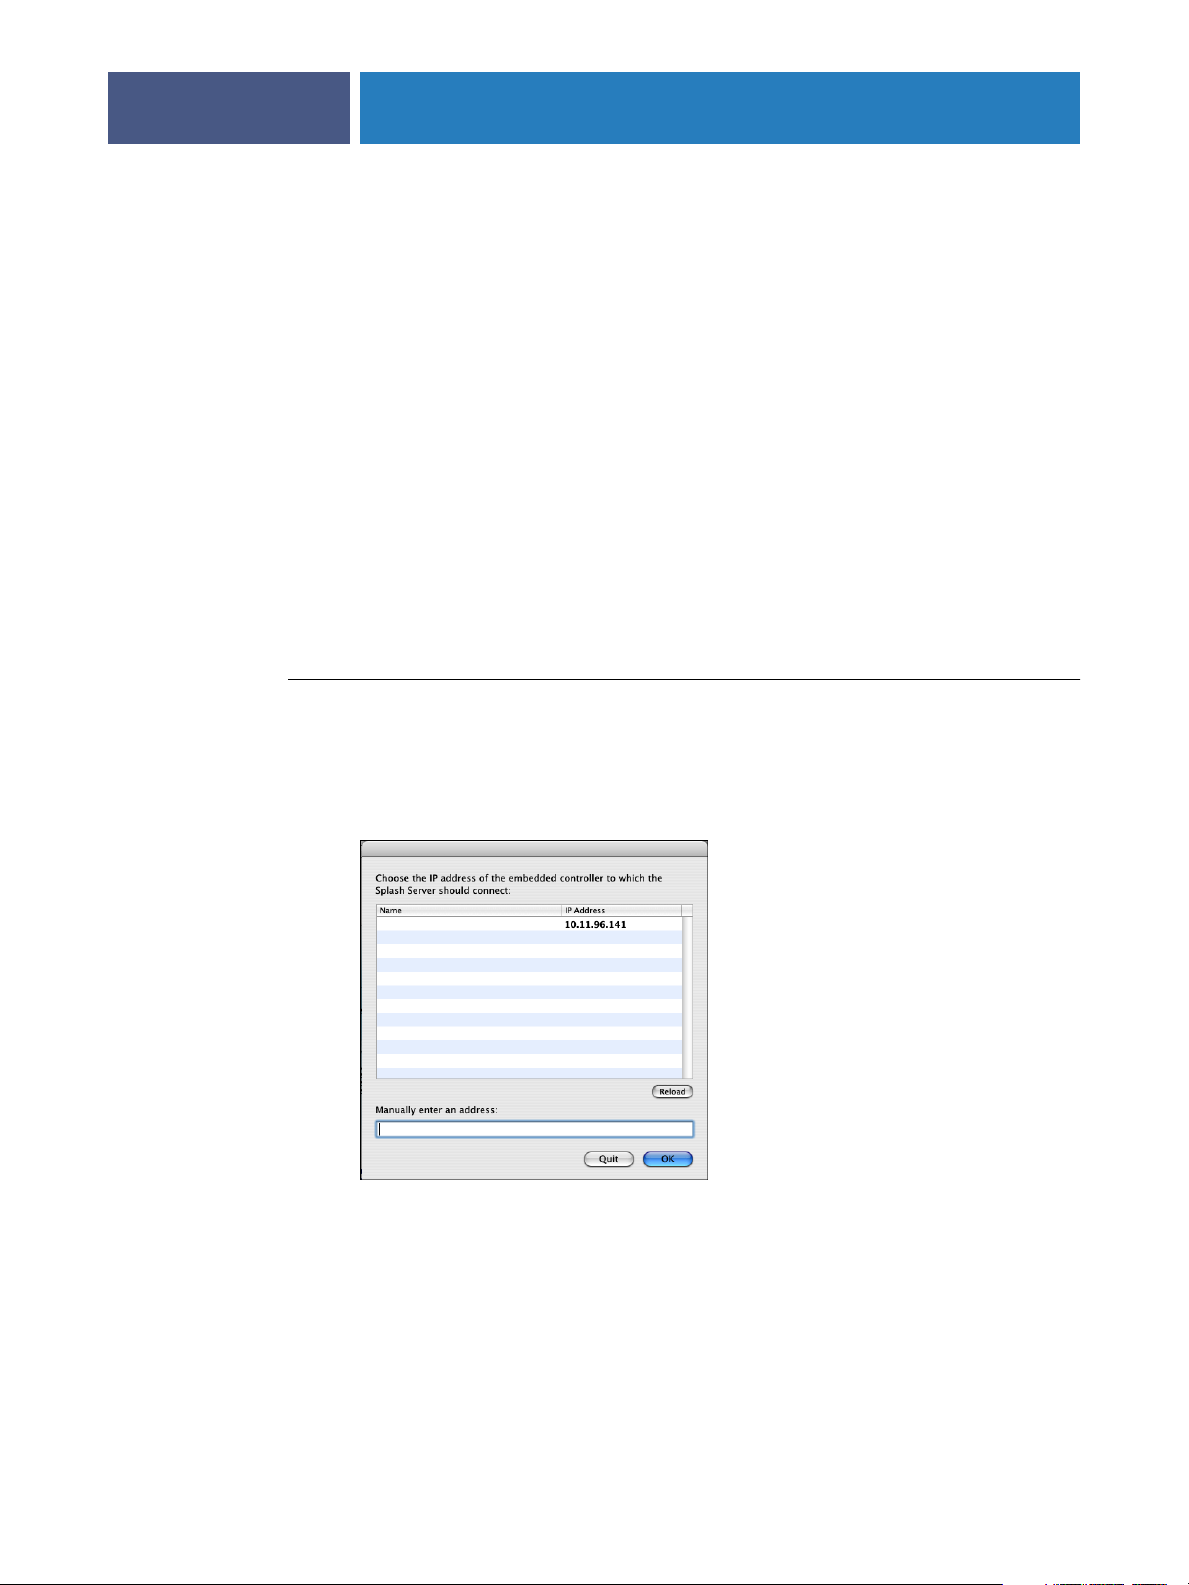
TO CONNECT TO THE FIERY
1 Click the Splash Server icon in the Dock at the bottom of the Splash RPX-i Macintosh desktop,
or double-click the Splash Server icon in the Applications : Splash Folder.
NOTE: The Dock appears when you roll your mouse to the bottom of the screen.
2 If the Fiery that you want to connect to is listed in the Controller Connection window, select
the name and IP address in the list and click OK.
3 If the Fiery that you want is not listed, type its IP address in the “Manually enter an IP
address” text field and click OK.
The Splash RPX-i main window opens.
To quit the Splash RPX-i application, return to the main window and press Command+Q,
or choose Quit Splash Server from the Splash Server menu.
Page 10
USING THE SPLASH RPX-I
The Splash RPX-i interface
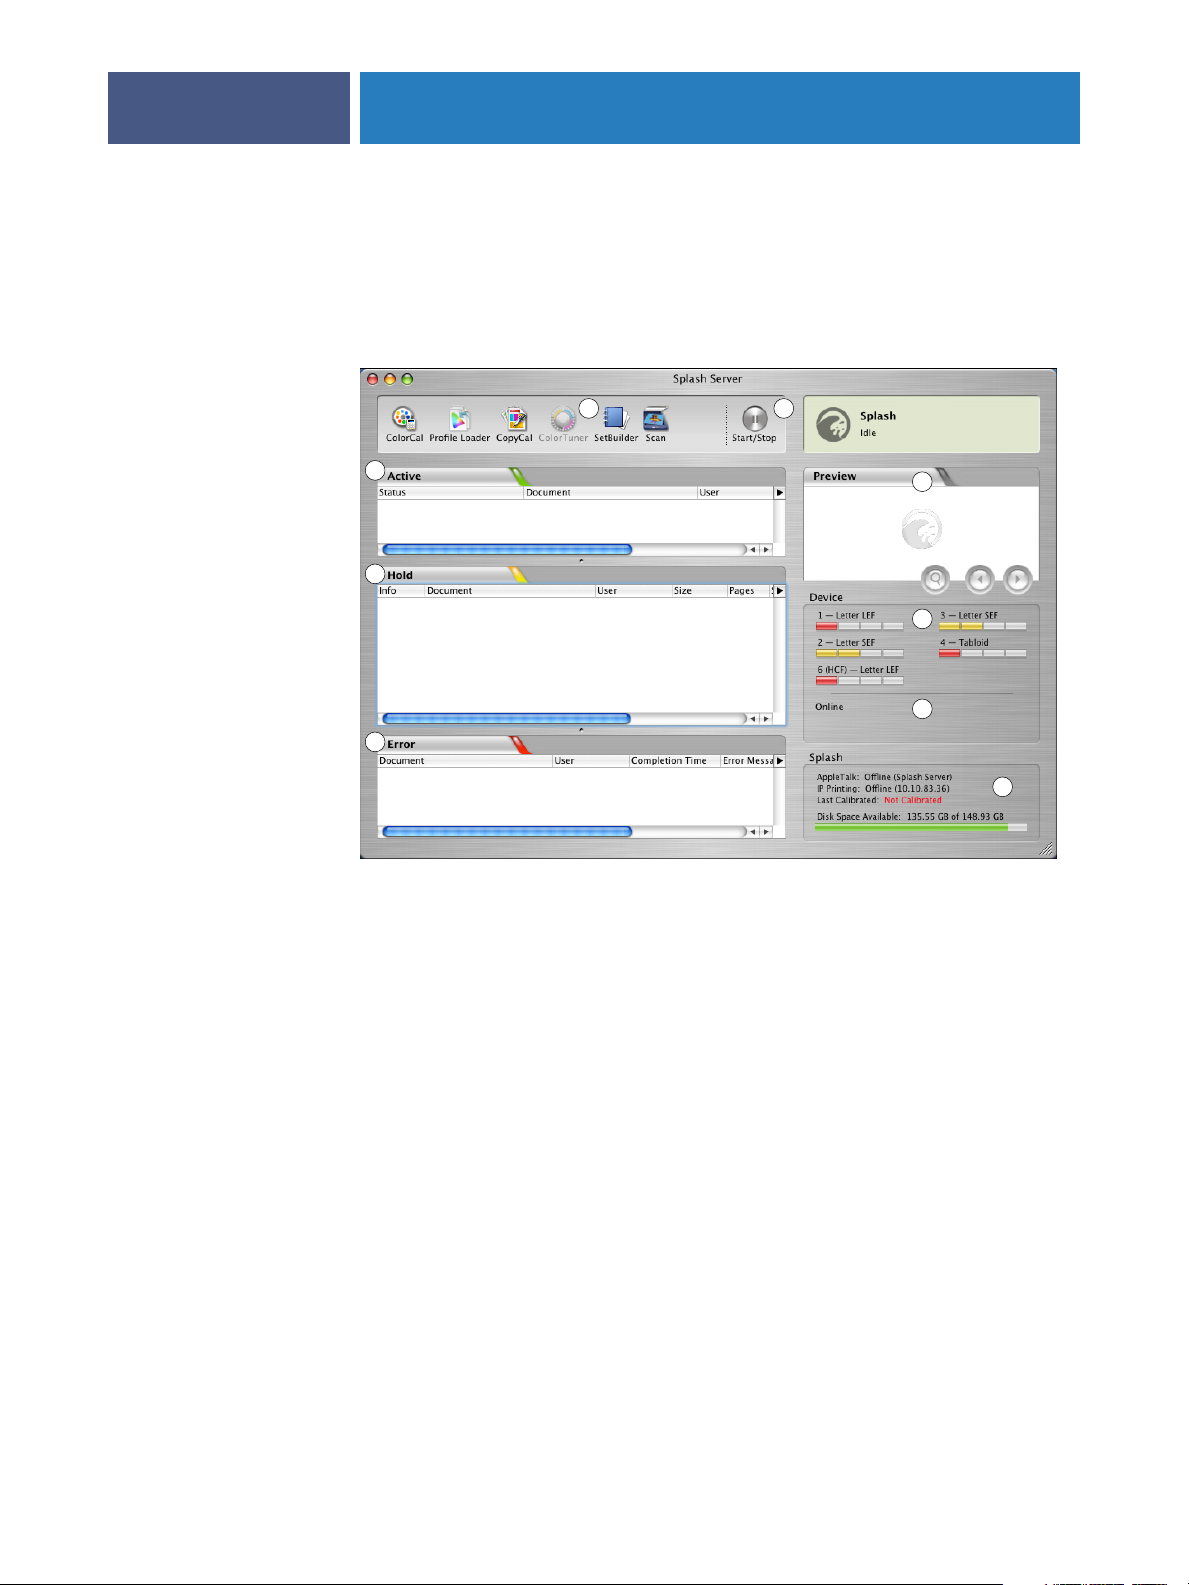
When you start the Splash RPX-i application and connect to the Fiery, the main window
appears. The main window displays information about managing print queues, administering
server functions, and controlling the jobs in the print queues.
10
1 Splash RPX-i toolbar
2 Start/Stop button
3 Active queue
4 Hold queue
5 Error queue
6 Preview window
7 Trays
8 Device status
9 Splash Server status
1
3
4
5
2
6
7
8
The following sections describe each component of the Splash RPX-i interface.
Administrator status
9
To log on to the Splash RPX-i with Administrator privileges, choose Server:Login and type
the Administrator password. By default, the password is blank.
Set a password to protect the Splash RPX-i settings against unauthorized changes. For more
information, see the Configuration Guide.
NOTE: Logging on to the Splash RPX-i with Administrator privileges allows you to change the
Splash RPX-i preferences and settings and use all the utilities. If you do not log on with
Administrator privileges, some functions are unavailable.
Page 11
USING THE SPLASH RPX-I
Utility toolbar
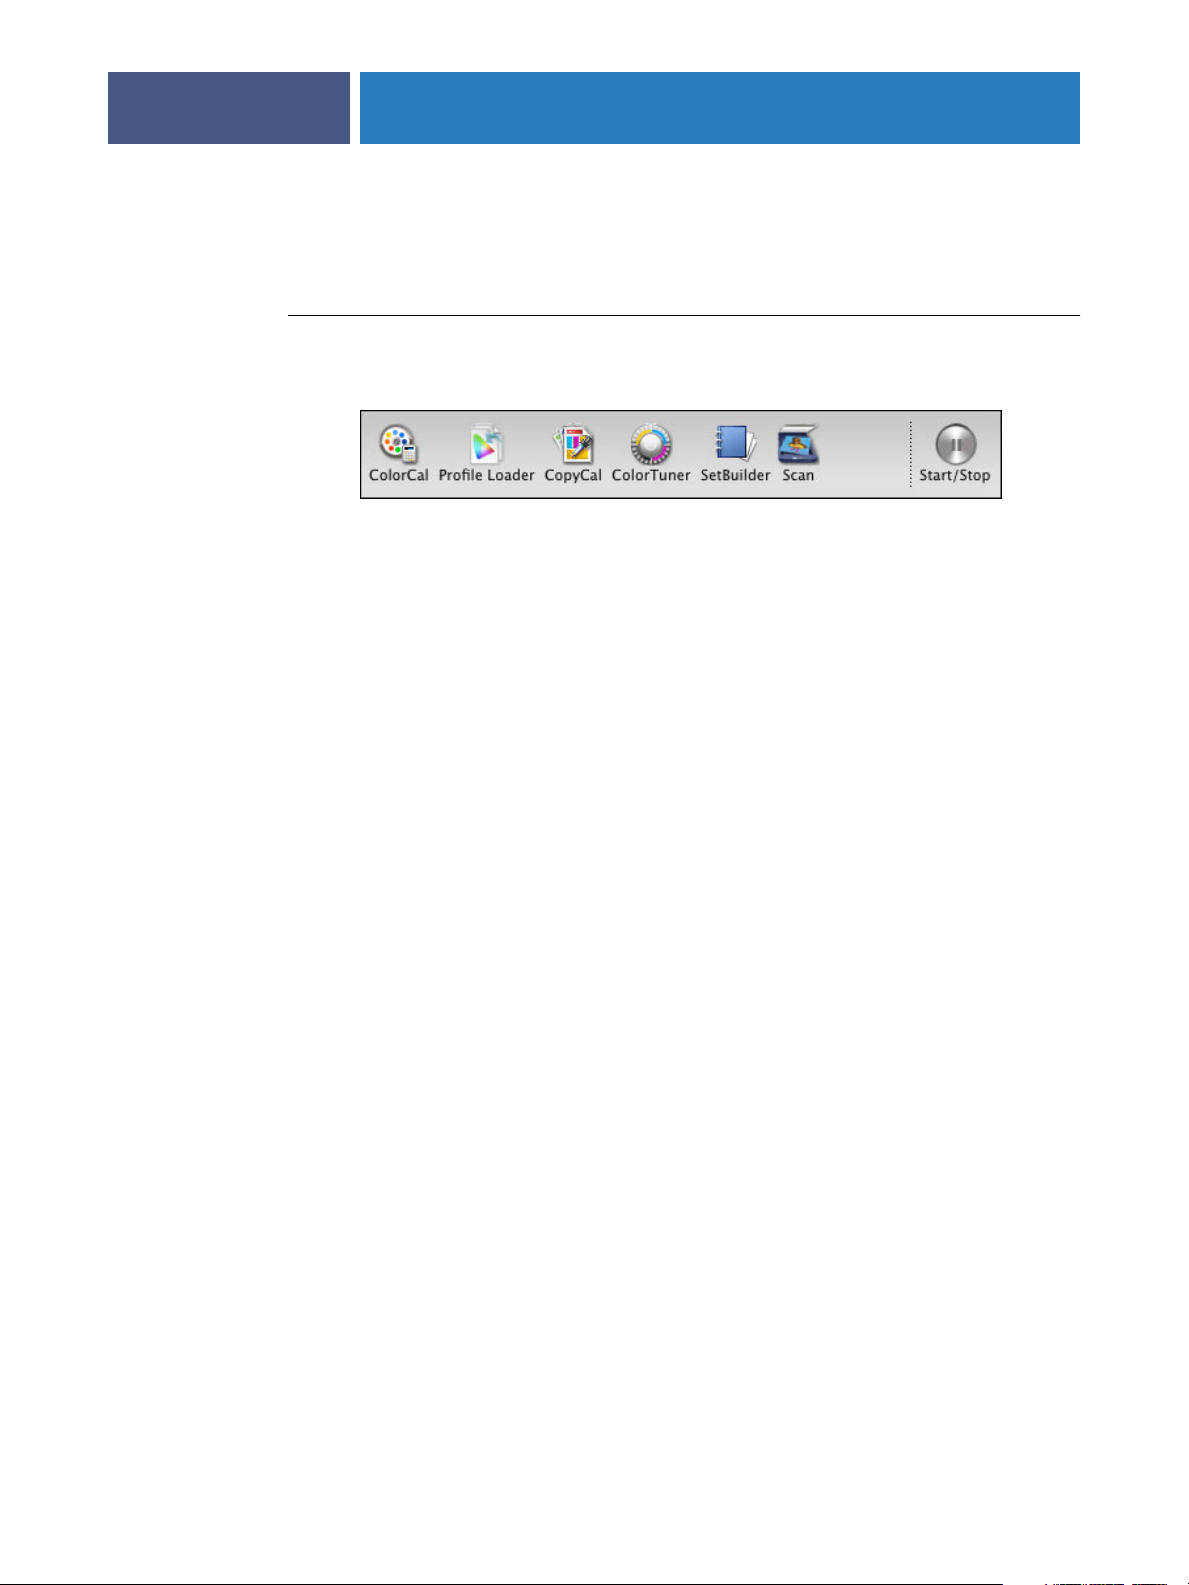
The Splash RPX-i utility toolbar allows you to access Splash applications and utilities.
TO USE THE TOOLBAR
•To open any of the utilities displayed in the toolbar, click the utility button.
The default toolbar displays buttons for the following utilities:
• ColorCal allows you to perform color calibration. For more information, see the
• Profile Loader allows you to add ICC profiles. For more information, see the Color Guide.
• CopyCal allows you to create color profiles that simulate the output of any color printer.
11
Color Guide.
For more information, see the Color Guide.
• ColorTuner allows you to edit the color output of a RIPped job before all the copies are
printed. For more information, see the Color Guide.
• Set Builder allows you to combine several jobs, printing them as a single, collated
document. For more information, see page 73.
• Scan allows you to scan jobs directly from the Splash RPX-i. A separate Adobe Photoshop
plug-in allows you to scan with Photoshop. For more information, see page 93.
You can add buttons for the following utilities and features:
• Spot Color Editor allows you to add and delete spot colors, as well as change the value
output for any spot color. For more information, see the Color Guide.
• Color Profiles allows you to select color profiles. Includes a link to Profile Loader.
For more information, see the Color Guide.
• Mixed Media allows you to specify different paper types and trays for individual pages or
ranges of pages within a single job. For more information, see page 77.
• Schedule allows you to set a time to print a job and then have the job automatically print
at that time. For more information, see page 86.
• Preflight checks jobs spooled at the Splash RPX-i for printing errors before the job is
processed. For more information, see page 28.
• Color PostFlight outputs input colors as a tint of a specific primary output color depending
on what type of job and what type of color the input is. For more information, see page 28
and the Color Guide.
Page 12
USING THE SPLASH RPX-I
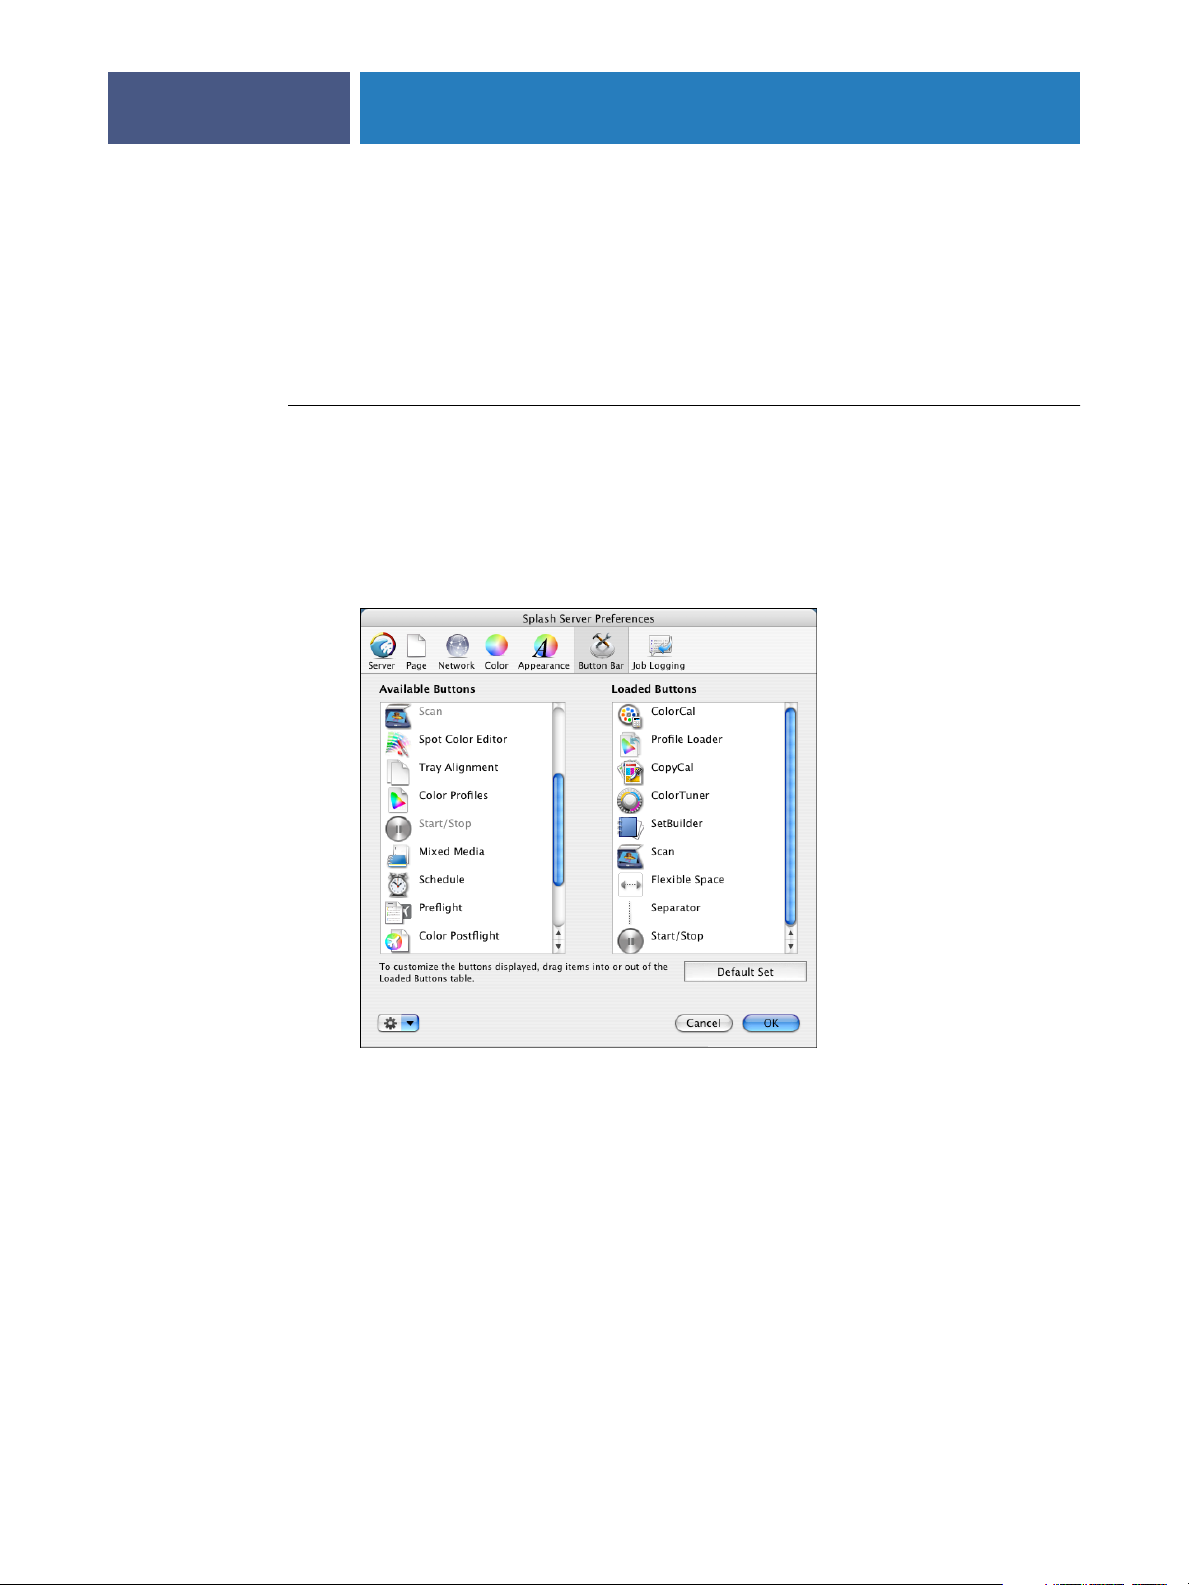
Changing the toolbar display
You can change the toolbar display by adding or removing buttons in Splash RPX-i
Preferences.
For more information about setting preferences, see the Configuration Guide and the
Color Guide.
TO CHANGE THE TOOLBAR DISPLAY
1 Choose Preferences from the Splash Server menu.
2 Click Button Bar.
3To add or remove buttons from the toolbar, drag them to or from the Loaded Buttons list.
4 Click OK.
12
Page 13

USING THE SPLASH RPX-I
Start/Stop button
The Start/Stop button allows you to start and stop processing files.
These actions are global, and will start or stop all print jobs currently on the Splash RPX-i.
Client workstations can send print jobs to the Splash RPX-i while processing is stopped. Jobs
sent via Print and Save or Print and Delete are spooled to the startup disk and appear in the
Active queue. To control client printing, you can configure the Splash RPX-i to spool and
hold all incoming print jobs, allowing the administrator to review jobs and determine job
priorities.
If a print job is listed in the Active queue when server processing is halted, the Splash RPX-i
stops all jobs at the first logical stopping point and leaves them in the Active queue, except for
currently RIPping or printing jobs, which may return to the Hold queue. Job order is not
affected by this option.
13
TO START AND STOP JOB PROCESSING
1To start or resume processing, click the Start/Stop button or choose Server>Start Processing.
The logo background to the right of the button changes from red to green.
2To stop processing all jobs currently on the Splash RPX-i, click Start/Stop, or choose Stop
Processing from the Server menu.
The logo background to the right of the button changes from green to red.
Page 14

Print queues
The print queues in the main window display the Active, Hold, or Error status of all
spooled jobs.
• Active queue displays the currently processing print job and jobs awaiting automatic
• Hold queue lists print jobs that the server has processed and jobs queued to Process and
• Error queue lists print jobs that failed to print, either partially or completely.
Preferences for job processing that determine whether a job is sent to the Active queue or the
Hold queue are set in the Splash RPX-i Server Preferences and in the File Handling print
options. For more information, see the Configuration Guide and the Printing Guide.
When you set up a Hot Folder, you specify settings for job processing on the Extras tab.
Job management of the print queues is described in the following procedures.
USING THE SPLASH RPX-I
processing.
Hold or Process and Save.
14
TO RESIZE A PRINT QUEUE
•To resize a print queue, click the tab that separates it from another queue and drag
up or down.
NOTE: You cannot resize a queue to hide another queue.
TO SELECT JOBS IN A PRINT QUEUE
•To select a job in one of the print queues, click the job.
•To select multiple jobs consecutively, click one job, press Shift, and click multiple jobs in
the queue.
•Press Command and click to select multiple non-consecutive jobs.
If a selected job has a preview image, it appears in the Preview window of the main window.
TO MOVE JOBS BETWEEN QUEUES
•To print a job in the Hold queue, drag the job to the Active queue.
•To move a job to the Hold queue, drag the file from the Active or Error queues. You can also
select a job in the Active queue and choose Hold from the Jobs menu.
•To resume processing of a job in the Hold queue, drag the job to the Active queue, choose
Remove Hold from the Jobs menu, or press Command+R while the job is selected.
Page 15

USING THE SPLASH RPX-I
TO REORDER JOBS IN THE ACTIVE QUEUE
• Reorder jobs in the Active queue by dragging them to a new position within the queue.
Moving jobs in the Active queue allows you to reschedule jobs for RIPping or printing
without putting them on Hold.
Reordering jobs in the Active queue does not affect the current state of the job. Once a job
begins printing or RIPping, it continues to do so until it finishes or is placed on Hold.
When the currently RIPping job finishes and moved to the Print Pending stage, the job in the
Active queue that is Pending (highest in the queue) begins RIPping, and so on through all the
jobs in the Active queue.
TO DELETE A JOB
•To delete a job from the Hold or Error queues, select the job and press Delete.
A dialog box prompts you to confirm this action. If image files are saved, you are asked to
delete the entire job or just the saved image.
15
•To delete a job that is currently processing in the Active queue, select the job, drag it to the
Hold queue, and then choose Delete Job from the Jobs menu. Or you can select the job and
press the Delete key on the keyboard.
You can also delete jobs by dragging them to the Trash icon on your Mac OS desktop. Jobs in
the Active queue cannot be dragged to the Trash.
NOTE: If you attempt to delete multiple jobs and some jobs have saved rasters while others do
not, a dialog box prompts you to delete the job or the images, as described previously. If you
choose to delete images, the raster files are deleted from those jobs with raster files and the
other files remain unchanged.
TO ACCESS PRINT QUEUE JOB OPTIONS
1 Select a job in any print queue and click the arrow button on the upper-right side of
the queue.
You can also access the options from the Jobs menu.
2 Click an option to choose it.
3To edit job settings, click Edit Jobs.
For more information about print queue job options, see page 109. For more information
about job settings, see page 20 and the Printing Guide.
Page 16
USING THE SPLASH RPX-I
Print queue column headings
To modify the column headings in the print queues, use the following procedure.
TO MODIFY PRINT QUEUE COLUMN HEADINGS
•To resize or reposition a column heading in the Active, Hold, or Error queues, click the column
heading and drag right or left.
•To add a column heading, click the arrow to the right of the queue, select Add Column, and
select from the list of possible headings.
•To change a column, Control-click an existing column heading and choose from the list of
possible headings.
•To delete a column heading, Control-click the column heading and choose Remove Column.
For a list of all the available print queue column headings and a brief description of each,
see page 104.
The following section provides additional information about specific print queue column
headings.
16
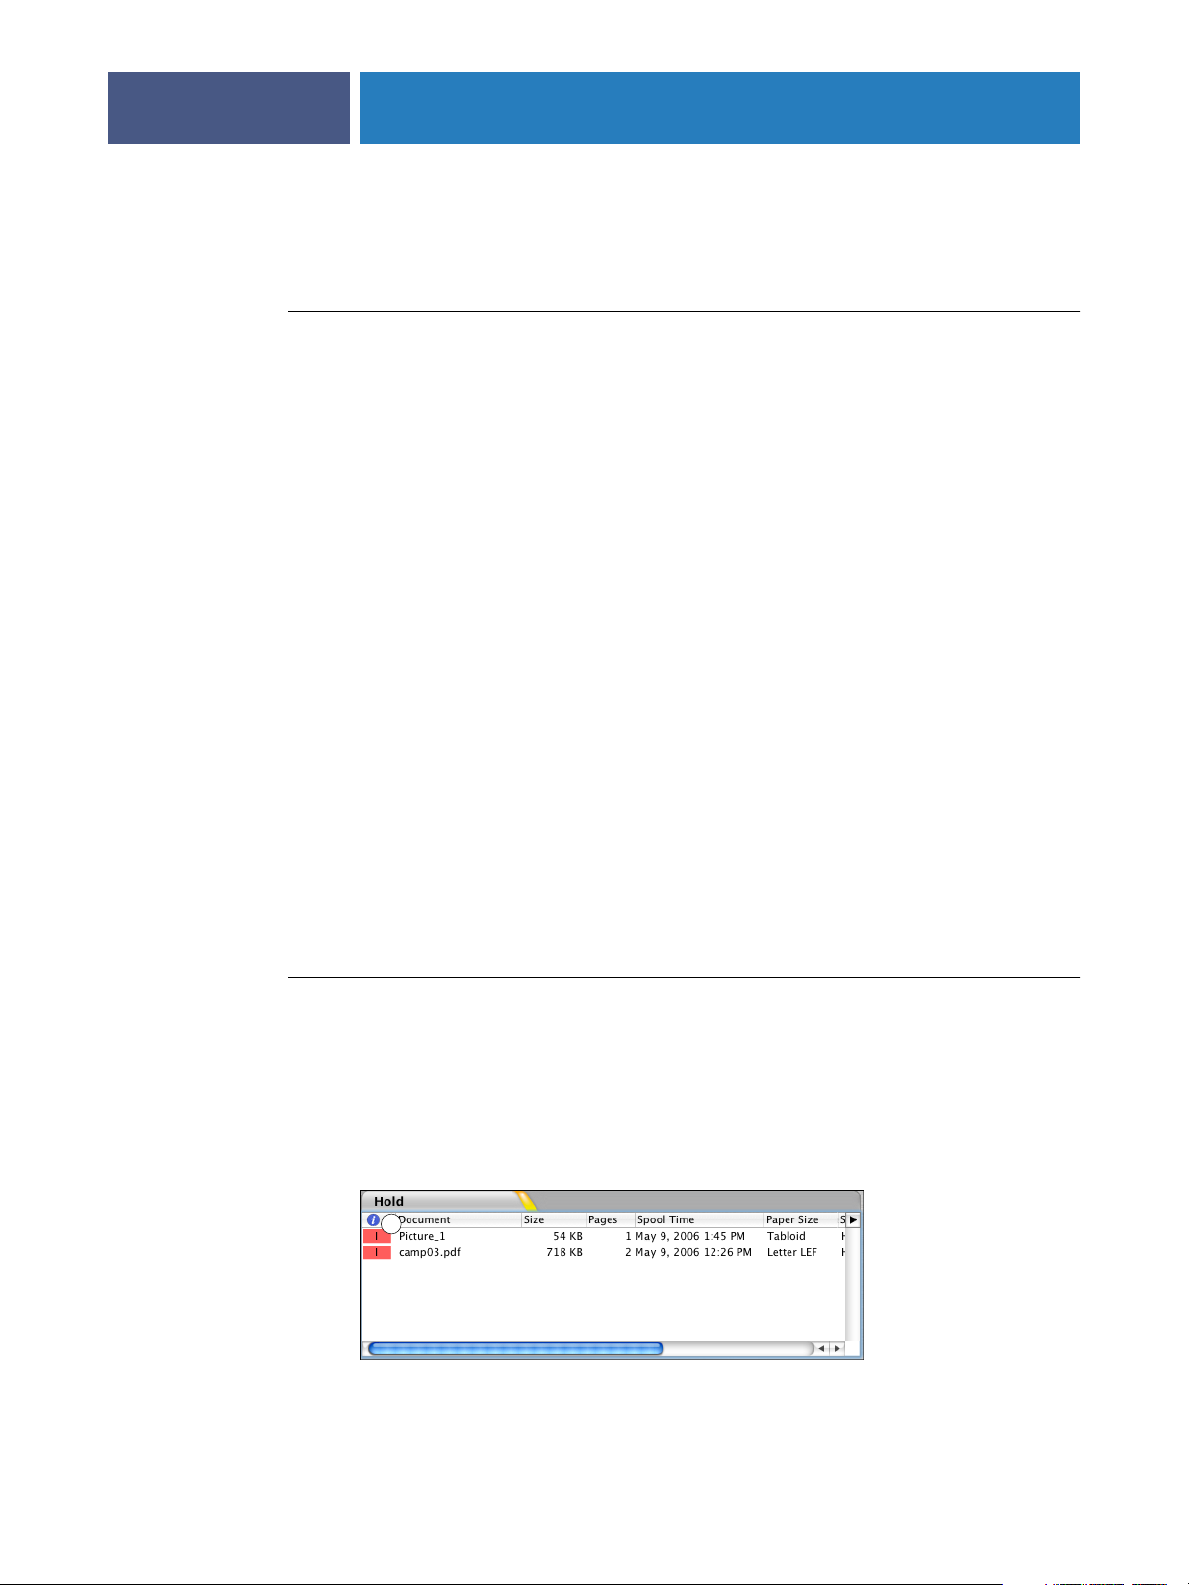
Info–Basic
1Info-Basic icons
Info field
On the Splash RPX-i server interface, the leftmost column in the Hold queue acts as a job
information field.
The Info field has two display options:
• Info–Basic displays a symbol that indicates the job’s print status.
• Info–Detailed displays symbols that indicate the job’s print status, with different color
background.
TO SELECT AN INFO FIELD DISPLAY OPTION
•To toggle from one option to the other, control-click the Info column heading, and then
choose Info–Basic or Info–Detailed from the menu that appears.
In the Active queue, the Rip and Print status of a job is available in the Status field. When a
job moves to the Error queue, the reason the job failed to print appears in the Error Message
field.
1
• I: Has Saved Rasters (Image)
•T: Will Apply Color Tuning When Run (Tuning)
Page 17

Info–Detailed
1Info-Detailed icons
USING THE SPLASH RPX-I
• P: Has Preflight Report
• R: RIPped (previously processed)
• S: Receiving From Network (Spooling)
•Blank: Fully Received, Not Processed
• Clock Symbol: Job scheduled to print at a later time
NOTE: For Info–Basic jobs for which more than one status condition applies, the field
displayed is according to the hierarchy listed previously. For example, for a job with saved
rasters and a preflight report, “I” is displayed in the Info field.
1
17
The Info–Detailed displays six columns of color icons that indicate the progress of a job.
• I: Saved Raster, prints without reRIPping, symbol is Purple if it has saved rasters,
blank if not.
•T: Applies Color Tuning When Run, symbol is Magenta if it applies Color Tuner,
blank if not.
• P: Preflight Report, symbol is Gray if there is a report, blank if not.
• R: RIPped (previously processed), symbol is Yellow if processed, blank if not.
• S: Received/Receiving from network, symbol is Blue if received, half-filled blue
if receiving.
• Clock Symbol: scheduled to print at a later date.
NOTE: More than one Info–detailed field can be displayed at a time.
Page 18
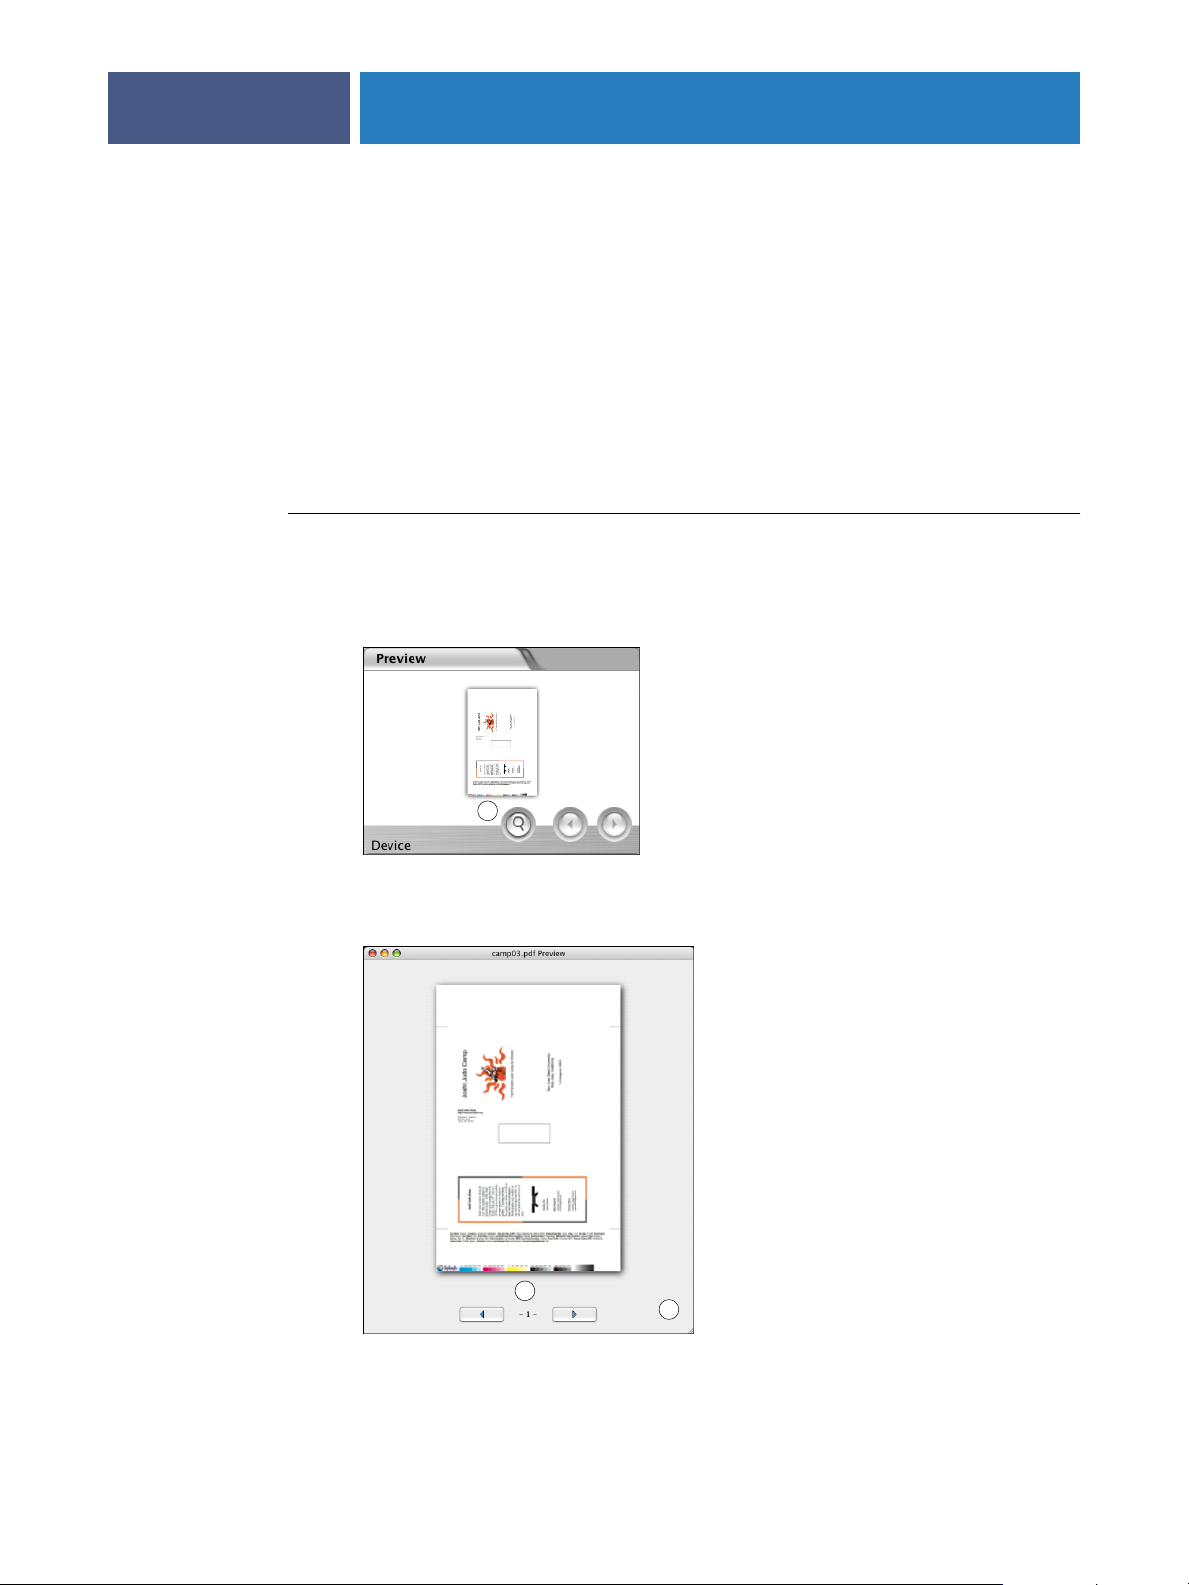
Preview window
1 Magnifying glass icon
USING THE SPLASH RPX-I
Jobs RIPped at the Splash RPX-i include a preview image for each page of the job. If a job has
not been RIPped, the preview is unavailable. Previews are automatically stored for all pages
when a job is RIPped.
The Preview window is a fixed size and is not movable from within the main Splash RPX-i
server interface. However, clicking the resize button to the left of the Preview window allows
you to open a new Preview window that is not attached to the main window. You can move
and resize the new Preview window. The Preview window also displays the page number of
the thumbnail image.
TO PREVIEW A JOB
1 Select a processed job in the Active, Hold, or Error queues.
2 In the Preview window, click the magnifying glass icon.
18
1Use arrows to page
through document
2 Resizing handle
1
3 In the larger view of the preview, use the arrows to page through the document. Resize the
window by dragging the bottom right corner
1
.
2
Page 19
USING THE SPLASH RPX-I
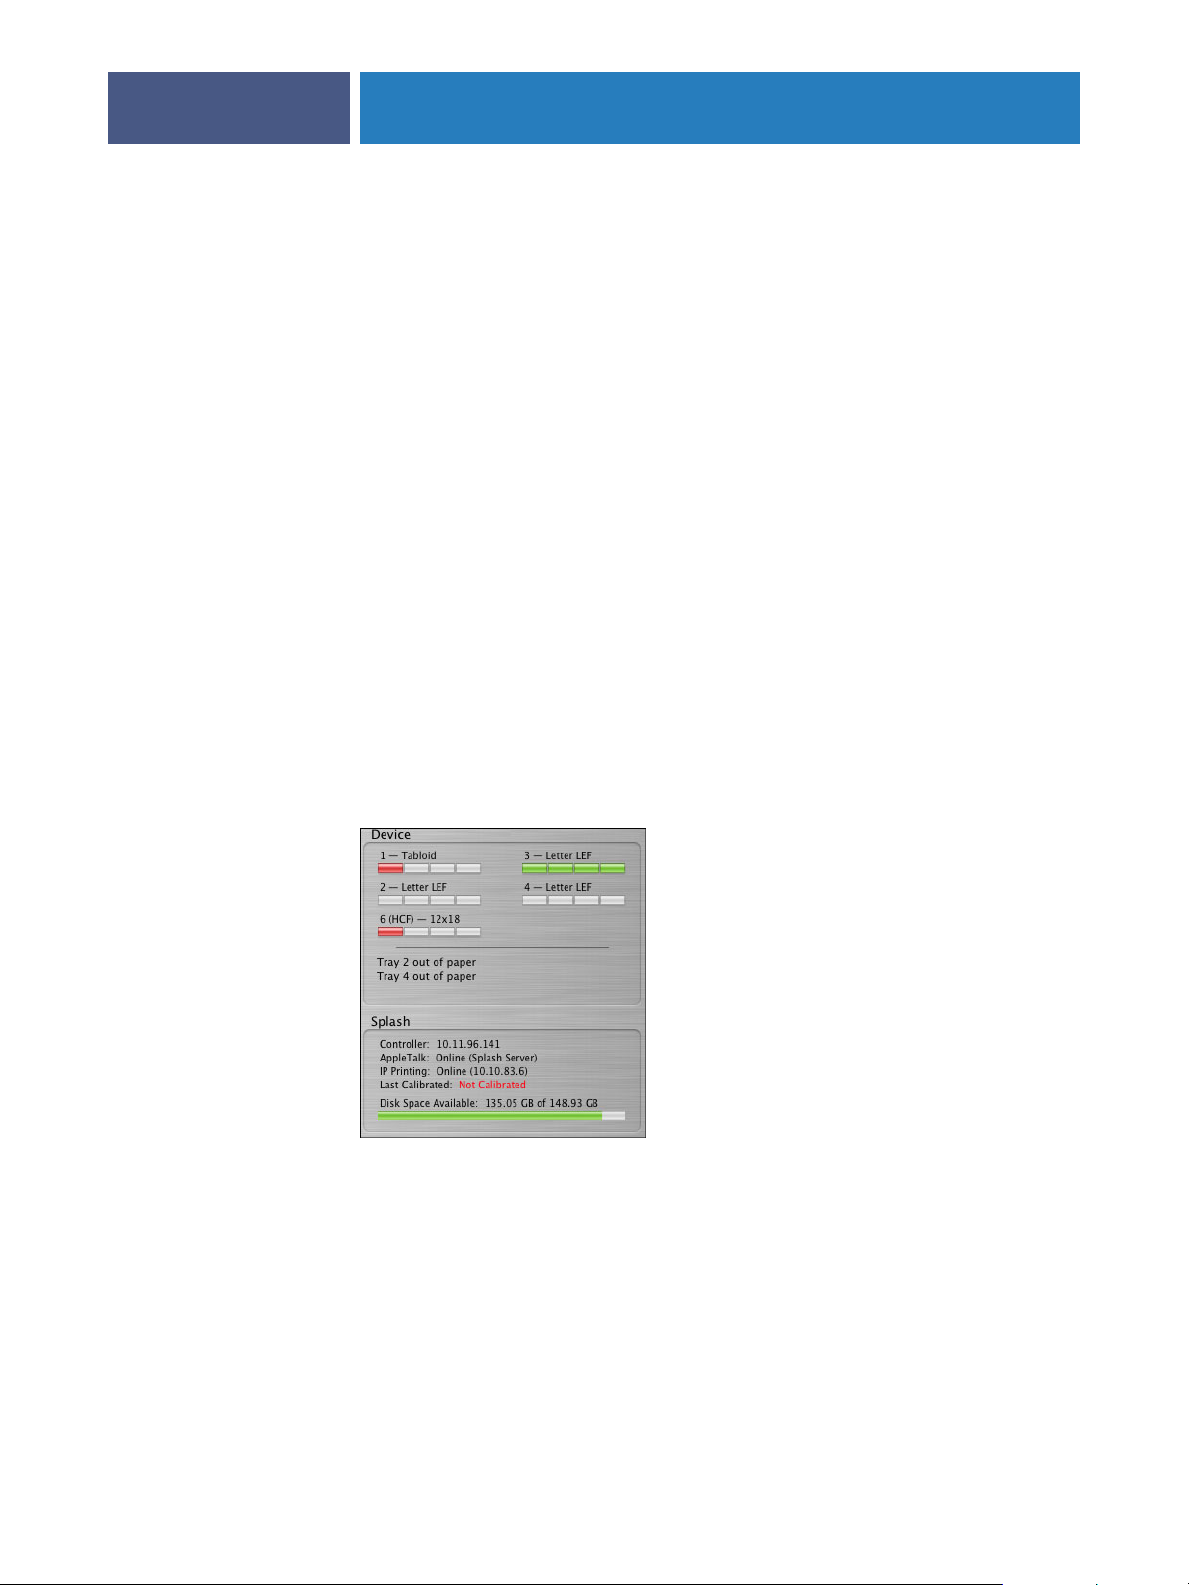
Status indicators
Information about the status of the copier trays and the Splash RPX-i is displayed in the
lower-right side of the Splash RPX-i server interface.
• Device displays the status of the printer, including up to three error conditions or
warnings. The installed paper trays are also displayed, showing the paper sizes they
accommodate. The type of paper installed in the copier may be viewed by dragging the
cursor over the tray status bar. It also shows the amount of paper currently in each tray:
–Display bars are green if trays of greater than 50% full.
–Display bars are yellow if trays are between 25% and 50% full.
–Display bars are red if trays are 25% or less full.
The Device status also displays copier out of paper, paper jam, and low toner information.
• Splash displays Splash RPX-i status, network activity, server status (Idle, Stopped, or
Processing), the date of the last calibration, and available hard disk space. It also displays
the connection status for the AppleTalk and LPR network, the AppleTalk name, and the
IP address.
19
Last Calibrated displays the date and time the ColorCal calibration utility was last run.
Disk Space Available shows the available space on the Splash RPX-i hard disk, both
numerically and visually.
Page 20
USING THE SPLASH RPX-I
Splash RPX-i main menus
The following menus are displayed on the Splash RPX-i: Apple, Splash Server, File, Edit,
Server, Profiles, Jobs, and Windows.
NOTE: If you do not log on with Administrator privileges, some commands in each menu
may be disabled or View only. Also, some commands are functions of Mac OS and are not
applicable to the Splash RPX-i.
For a description of the menus, see page 105.
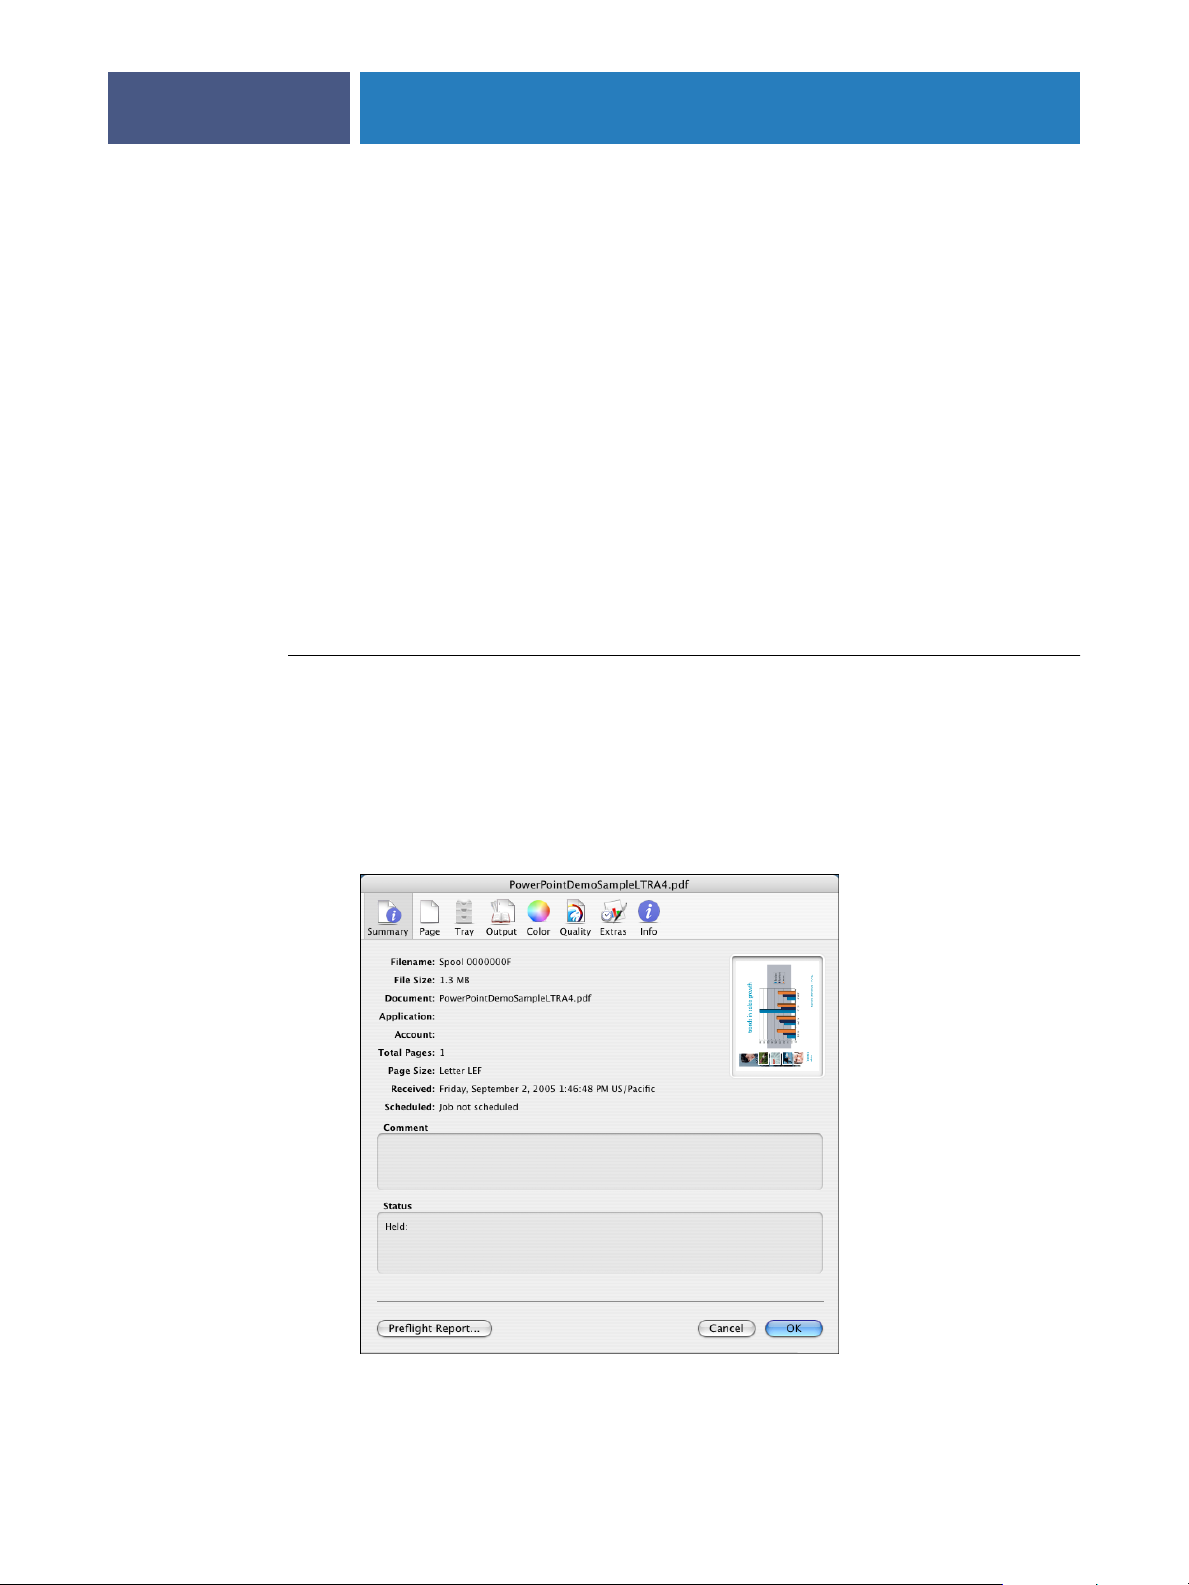
Job Settings
The Job Settings dialog box allows you to view the options for jobs in the Hold or Error
queues and revise them.
For information about the specific job settings, see the Color Guide and Printing Guide.
20
TO EDIT JOB SETTINGS
1To open the Job Settings dialog box, double-click the job in the queue or select the job and
choose Edit Job from the Jobs menu.
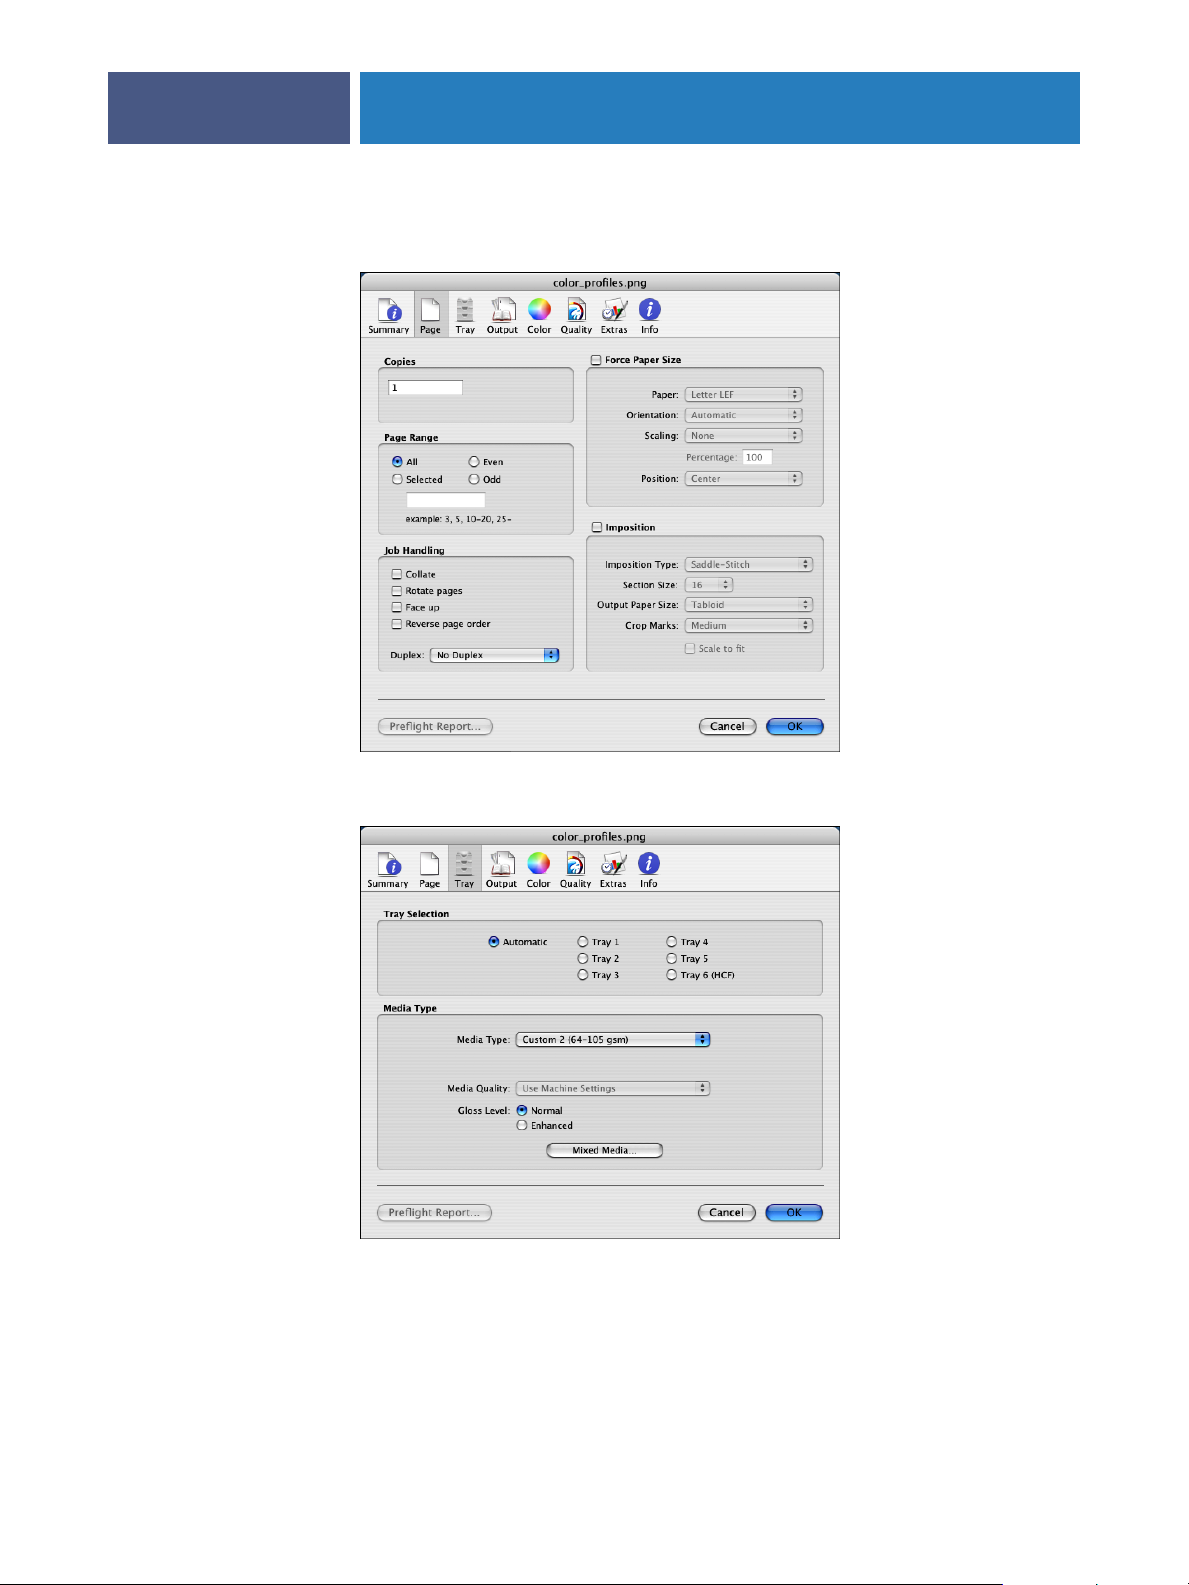
2 Click the tabs in turn to edit the job settings.
Summary displays job details. If a Preflight report has been run, the Preflight Report button is
enabled and you can click it to access the report. A preview of the job is also displayed.
Page 21
USING THE SPLASH RPX-I
Page displays page handling options.
21
Tray displays tray and media handling options.
Page 22
USING THE SPLASH RPX-I
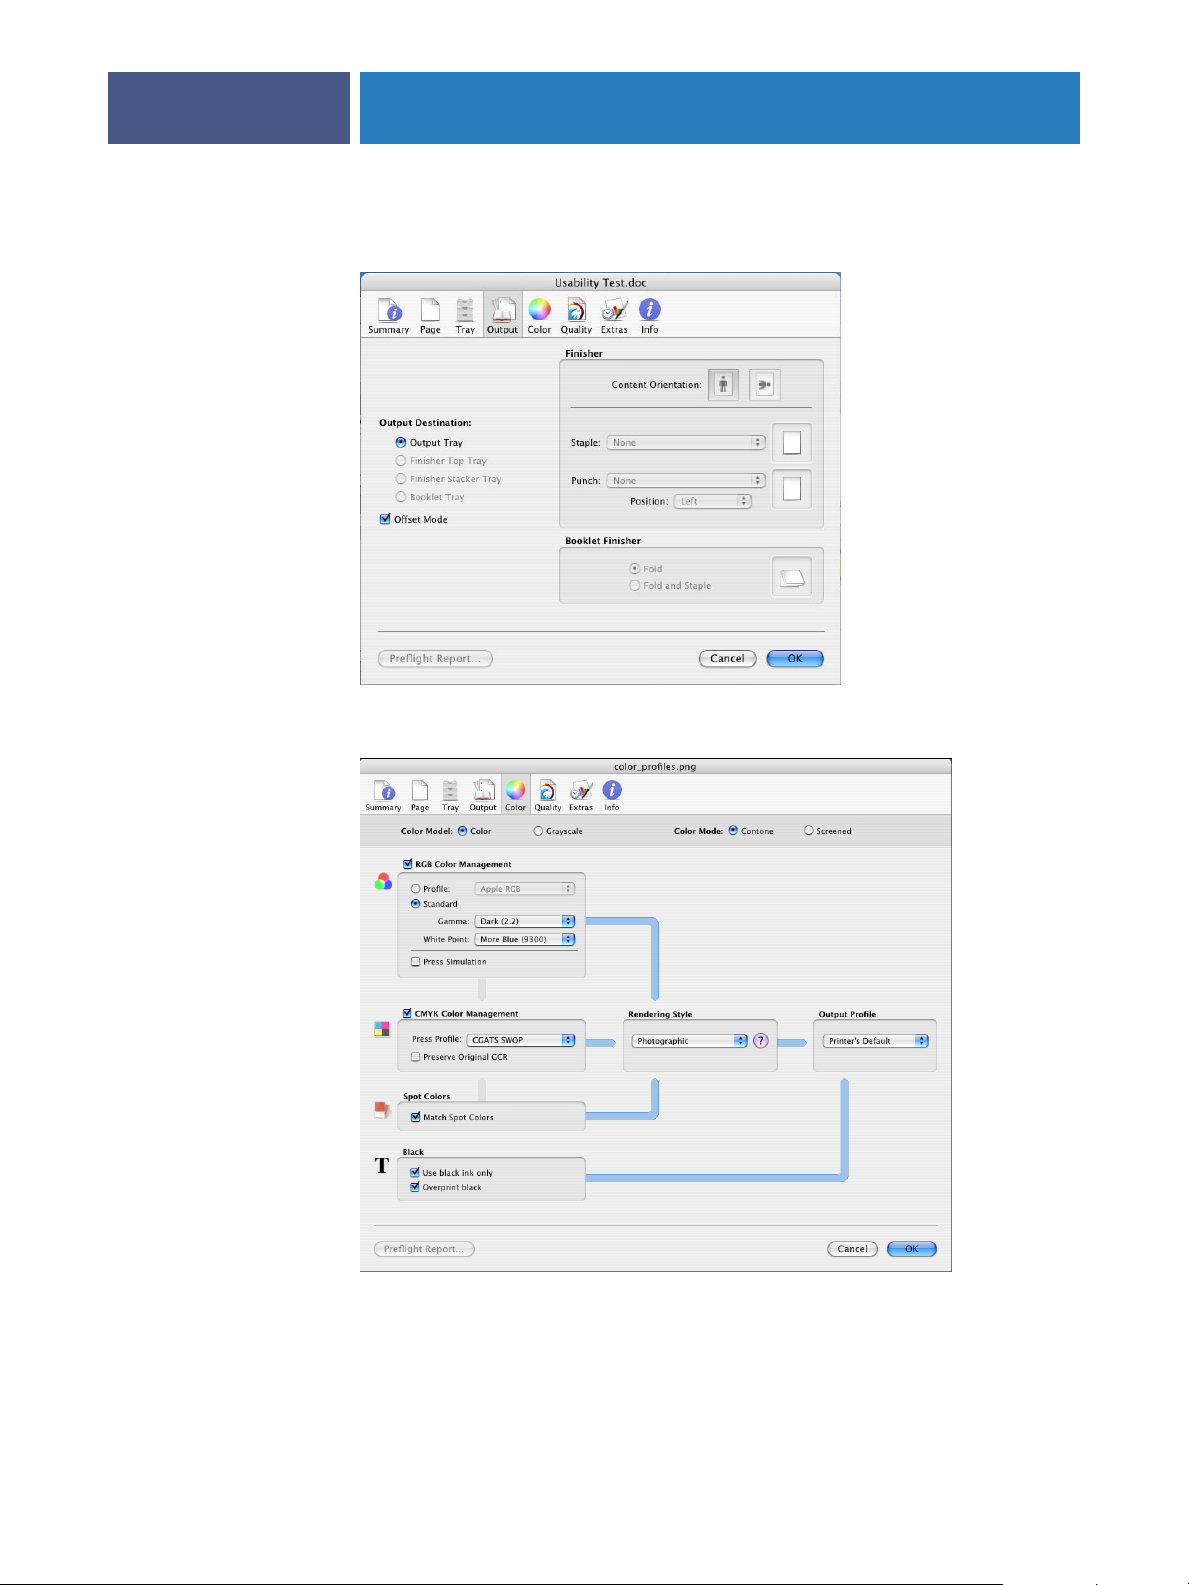
Output displays finishing options.
22
Color displays color handling options.
Page 23
USING THE SPLASH RPX-I
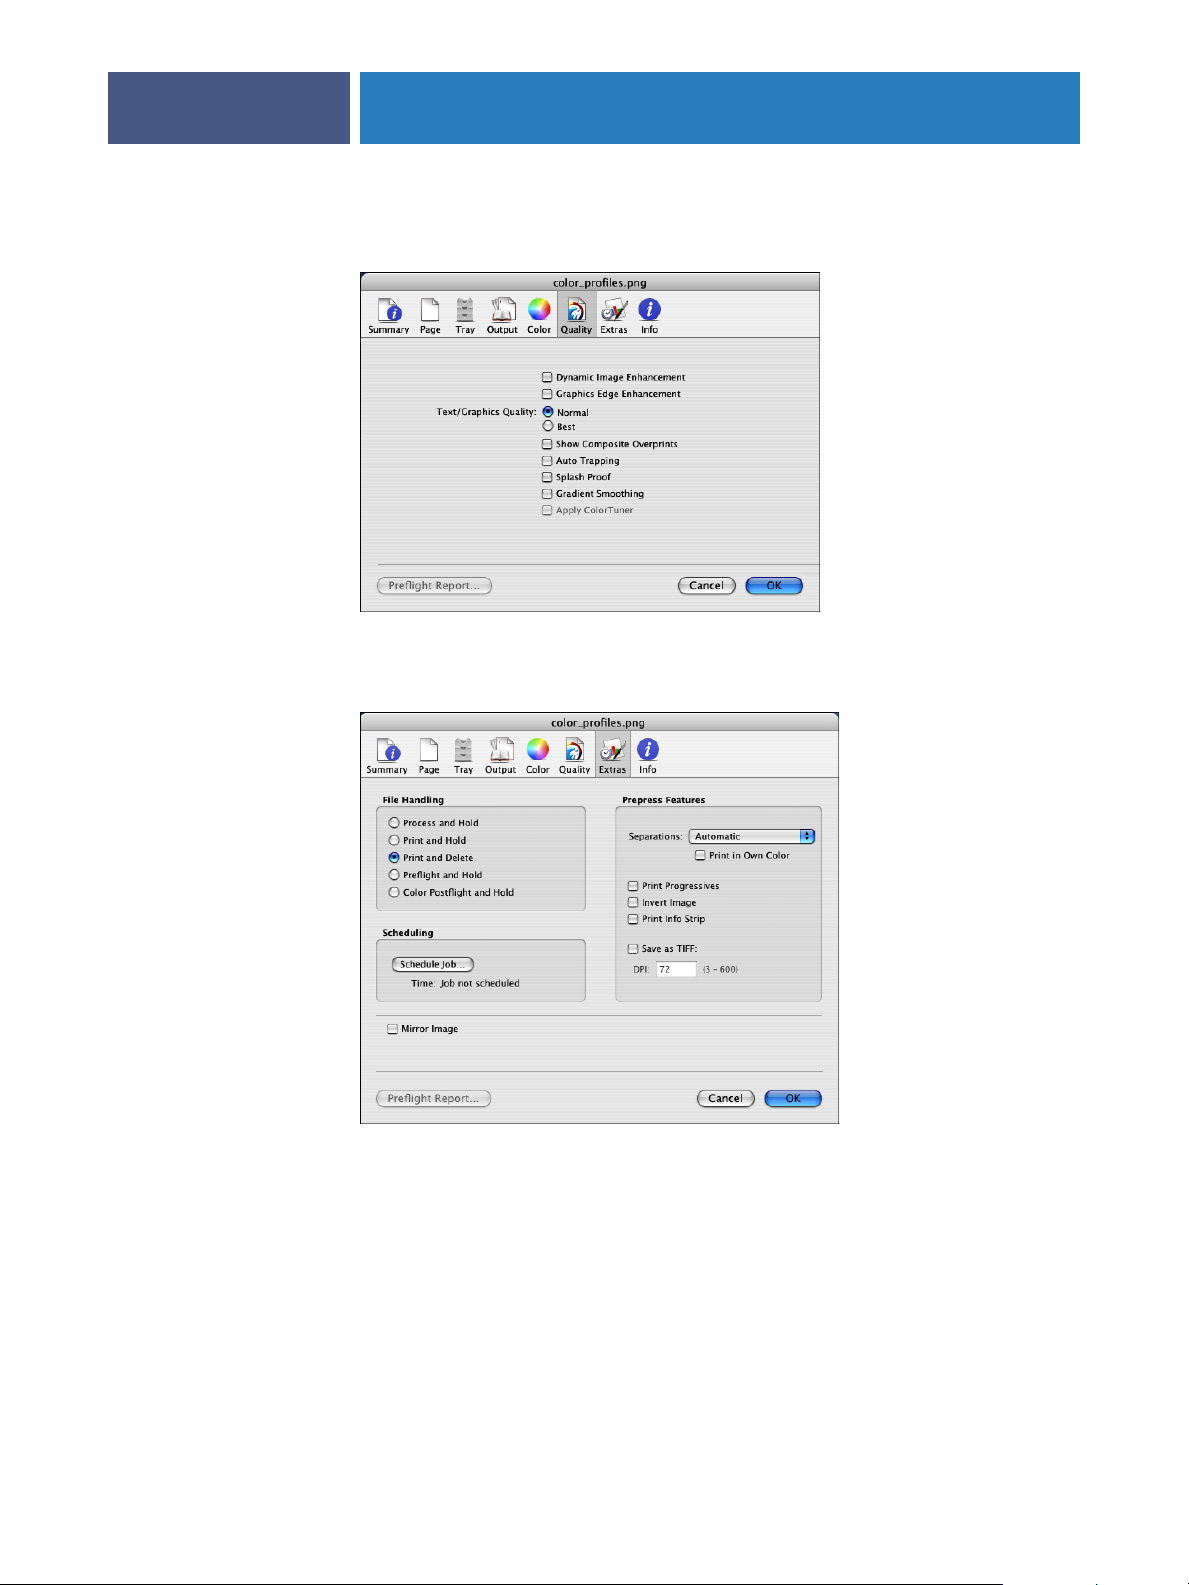
Quality allows you to set text and graphic printing options.
Extras displays settings for file handling and prepress features. It also allows you to
schedule jobs.
23
Page 24

USING THE SPLASH RPX-I
Info displays job details.
24
Page 25

USING THE SPLASH RPX-I
Default job settings
Default job settings allow you to set default print options for jobs that are not sent with a
Splash PPD, or for jobs that are sent with specific job options set to printer’s default. The
settings include all color correction and printing modes, as well as paper types. The Default
Job Settings dialog box appears when you choose Edit Defaults from the Jobs menu.
NOTE: You must log on with Administrator privileges to modify the default job settings.
Editing default job settings
The following procedure explains how to edit default job settings.
TO CUSTOMIZE DEFAULT JOB SETTINGS
1 Choose Edit Defaults from the Jobs menu.
The Default Job Settings dialog box appears.
2 Click the Page, Tray, Output, Color, Quality, and Extras tabs, and specify the settings on each.
25
3 Click OK to save your settings.
The Splash RPX-i applies the default job settings in the following situations:
•To graphics files (EPS, TIFF, TIFF/IT, CT/NLW, PSD, PDF, PDF-X1/a, ExportPS, and
PDF2Go formats) or PostScript files that are placed in the Drop Folder or dragged to the
Active or Hold queues.
•To graphics files received from a client on a TCP/IP network.
Default job settings for PostScript printing
The default job settings are set at the Splash RPX-i. For jobs that are not sent with a
Splash RPX-i PPD, default job settings are applied. Job defaults are applied to jobs from the
following sources:
•Jobs from UNIX clients
•Mac OS jobs using non-Splash PPDs
•Windows 2000/XP/Server 2003 jobs using non-Splash PPDs
•Jobs from clients with print options specified as printer’s default
Page 26

USING THE SPLASH RPX-I
Managing raster files
Raster files can be saved using the File Handling job options: Process and Hold, Print and
Hold, or Color Postflight and Hold. Jobs with saved raster files can be reprinted without
reRIPping, depending on the Splash RPX-i server preferences and job options selected. For
example, calibration does not require reRIPping. When a job is edited in such a way as to
require reRIPping, you are warned that this causes the raster files associated with the job to be
deleted. You must confirm or cancel the edits.
The following options require reRIPing:
• Page: Page Range, Duplex, Force Paper Size, Scaling, Rotate, Staple, and Imposition
options (If Imposition: Step and Repeat is selected, changing the Number of Copies causes
the file to reRIP.)
• Tray: Tray Selection, Paper Type Selection
• Color: All options
• Quality: All options
26
• Extras: Process and Hold, Color Postflight and Hold, Separations, Single Page Separations,
Progressives, Invert Image, Auto Grayscale Detect, Print Control Strip, Save as TIFF,
Mirror Image, and Print Info Strip
• Info: User name and Job Comment, if the Print Info option is enabled for the job
Editing the Splash RPX-i server preferences does not cause jobs to be reRIPped. Some jobs
may require that you delete the raster file and reRIP the file in order to have preference
changes take effect.
TO DELETE RASTER FILES
• Select the job and choose Delete Job from the Jobs menu, or click Delete.
If any of the files selected have raster files, a dialog box prompts you to cancel, delete the
image file only, or delete the entire job. You can also delete raster files by dragging the spool
file to the Trash icon on your Mac OS desktop. Both spool and raster files are deleted with no
warning message.
Page 27

USING THE SPLASH RPX-I
27
RIP-While-Print
Automatic RIP-While-Print reduces print wait time by ensuring that the Splash RPX-i is
never idle while jobs are present. RIP-While-Print tracks all print jobs, including jobs that are
in transit to the Splash RPX-i, and directs Adobe CPSI (Configurable PostScript Interpreter)
processing of jobs, where the currently processing job has the highest priority.
RIP-While-Receive
Automatic RIP-While-Receive reduces print wait time by ensuring that the Splash RPX-i is
never idle while print jobs are present. RIP-While-Receive tracks all print jobs, including jobs
that are in transit to the Splash RPX-i, and directs CPSI processing. The currently processing
job has the highest priority and is completed first, regardless of whether another job has been
spooled completely.
NOTE: In environments where very large jobs are printed, consider disabling RIP-While-
Receive to allow small jobs to print before large jobs finish spooling. Use the server preference
on the network pane to disable RIP-While-Receive.
If an error occurs, a job is moved to the Error queue when spooling finishes. You can restart
the job when the error is corrected. It is not necessary to resend the job from the client.
RIP-Across-Jobs
The Splash RPX-i automatically begins RIPping a second job as soon as the first job finishes
RIPping. It does not wait for the first job to finish printing.
Instant Reprint
Instant Reprint allows RIPped files to print repeatedly without RIPping the job for each
repetition. Jobs with an “I” shown in the Print queue Info–Detailed field print without
reRIPping.
NOTE: Instant Reprint is a Splash RPX-i server function and requires no action from the user.
Changing some job settings might cause the job to reRIP. For a list of these settings, see
page 26.
Print Consecutive Jobs
The Splash RPX-i starts printing the next available job immediately. The Splash RPX-i does
not require the copier to cycle down before printing the next job. But if a job does not become
available within 30 seconds, the Splash RPX-i cycles down the copier.
Page 28

USING THE SPLASH RPX-I
Checking job errors
The Splash RPX-i provides two ways of checking for job errors before printing: Preflight and
Color PostFlight. You can find out if errors exist in a file by using Preflight. To identify the
elements in the file that are causing the problem, use Color PostFlight.
Preflight
The Preflight feature allows you to examine jobs before they print for potential problems, and
produces a viewable and printable text report. Potential problems include the following:
•PostScript errors
•Missing fonts and font substitutions
• Color mode of each item (RGB, CMYK, Spot) in the file
•Page size
•Spot colors not defined by the Splash Server
28
TO SCREEN A JOB FOR POTENTIAL ERRORS
1 Select the job in the print queue and choose Preflight from the Jobs menu.
The job is moved to the Active queue for preflight processing, then moved back to the Hold
queue when processing is complete.
2 Choose Show Preflight from the Jobs menu.
The Preflight Results dialog box appears.
3 Click Print to print a hardcopy report.
4 Click OK to exit.
You can now use the Preflight report to identify and fix any errors.
Page 29

USING THE SPLASH RPX-I
Color PostFlight
The Color Postflight feature allows you to determine where any problems are. When you run
a Color Postflight check, a color-coded printout of the file is produced.
TO RUN A POSTFLIGHT CHECK
• Select the job in the Print queue and choose Color Postflght from the Jobs menu.
• Select the job in the print queue and click the Color Postflight icon in the toolbar.
• With the job open, select Postflight and Hold on the File Handling tab of the printer driver.
The job is moved to the Active queue for preflight processing and printing, and then moved
back to the Hold queue when processing and printing are complete. As the job is processing,
a preview of the Postflight is displayed in the Preview window.
In the printed Postflight of the job, all CMYK data (text, graphics, and images) prints in cyan,
all RGB data prints in Red, all Spot data prints in yellow, and all grayscale data prints in
grayscale.
29
If you decide to convert one mode of color data to another, for instance, CMYK to Spot color,
use the Color Tuner application. For more information about Color Tuner, see the
Color Guide.
Page 30

ADVANCED FEATURES OF THE SPLASH RPX-I
ADVANCED FEATURES OF THE SPLASH RPX-I
This chapter describes some of the advanced job management tools provided on the
Splash RPX-i. These features include the following:
•Tray Alignment
•Print Info/Control Strip
•Secure Access
• Screening Preferences
•Job Log Options
•Imposition
30
Tray Alignment
Tray Alignment allows you to set vertical and horizontal print offsets that result in the
accurate alignment of print margins and crop marks, for either single-sided jobs or duplex
jobs. The offsets are different for Side 1/simplex and Side 2. When you first open the Tray
Alignment dialog box, Side 1 is automatically selected. Align side 1, and then align Side 2.
Tray Alignment supports the configuration of individual offsets for each tray. You can send
duplex jobs in automatic duplex mode to any tray or manually send duplex jobs to Tray 5
for paper stocks that cannot automatically duplex.
NOTE: Align Side 1 to correct small offsets that occur during normal printing. If offsets for
Side 1 are greater than a few pixels, service the copier. Clipping can occur with large offsets.
Page 31

ADVANCED FEATURES OF THE SPLASH RPX-I
TO SET TRAY ALIGNMENT
1 Choose Tray Alignment from the File Menu.
2 Click Side 1 and select a tray.
The paper size and media type is selected automatically, except for Tray 5. You must enter the
paper size and media type for Tray 5.
31
3 Click Test Job to print a Test Page.
4Follow the instructions on the page to measure and enter the offset values in Feed Direction
and Cross Direction.
5 Click Verify Job and examine the printed target.
6 If the printed target is out of alignment, adjust the values.
7 Repeat steps 4 through 6, as necessary.
8 Click Update when the correct alignment is achieved.
Page 32

ADVANCED FEATURES OF THE SPLASH RPX-I
9To align for a duplex job, click Side 2.
10 Select a tray and a binding edge.
32
The paper size and media type is selected automatically, except for Tray 5. You must enter
paper size and media type for Tray 5.
11 Repeat steps 3 through 8.
Page 33

ADVANCED FEATURES OF THE SPLASH RPX-I
33
Tray alignment features
The following features in the Tray Alignment dialog box allow you to configure and print
both simplex and duplex jobs.
• Test Pattern: Helps determine the offset values needed to center the output on a simplex
page and to properly align both sides of a duplex job. Select a tray for a simplex job, or
select a tray and a binding edge for a duplex job, and then click Test Job. A test pattern is
printed using the offset values of “0” pixels for both the vertical and horizontal offsets. The
test pattern contains instructions for determining the correct offset values, depending on
whether you are performing alignment for Side 1 (simplex) or Side 2 (duplex). For
simplex, measure the target with a ruler and figure out the adjustment, or make a visual
judgement of whether the output on the target is centered. For duplex, you must align the
patterns on both sides of the pages with each other.
• Verification Pattern: Displays the effects of the entered offset values. After you enter
the horizontal and vertical offset values, verify the results by clicking Verify Job. The
verification target prints, using the offset values that you entered. Review the printed
target. If it is not properly centered or aligned, adjust the values.
NOTE: To update the offset values without printing a verification target, select the appropriate
tray and binding edge and click Update.
• Specify Offsets: The minimum Offset Value is -999 and the maximum is +999. If you
enter an offset that would cause a particular page size to print the margins outside the print
area, the margin is automatically changed to the maximum value. For example, the left
margin is -70 pixels. If you enter a value of -100 for the alignment offset, the margin is
changed to -70 for the duplex job. The Tray Alignment setting remains -100. If no offset
value is entered for a tray, the default alignment offset value is set to zero.
NOTE: If the Tray Alignment for Side 2 on the printer is extremely out of alignment, the test
pattern target may produce a false match and the verify target will not line up at 0, 0. In this
case, adjust the offsets manually until the verify target lines up at 0, 0.
Page 34

Print Info
ADVANCED FEATURES OF THE SPLASH RPX-I
The Print Info feature allows you to print an information strip on a job. This assists in
tracking job settings used on different outputs of the same file and routing output back to the
originator. The information is printed on the top or bottom of the page, depending on the
location selected, and on every page of the job. When you set up Print Info preferences, you
can enable the Control Strip. The Control Strip is a set of color control patches on the edge of
the output.
Configuring Print Info
The configuration of Print Info determines content and location of the Print Info Strip.
To enable the Print Info Strip for a job, see page 35.
•To configure Print Info, choose Print Info from the Server menu.
The Print Info dialog box appears.
34
Page Handling allows you to use the Promote Page Size option to print the job on the next
largest paper size available. Although the job is printed centered on the page, it is not scaled
to the new paper size. If “Use Tray 5 if needed” is selected and there is no paper available
(or the paper large enough) in Trays 1-4, the job prints to the Tray 5 page size.
NOTE: Selecting Force Paper Size from Job Options overrides this feature.
Page 35

ADVANCED FEATURES OF THE SPLASH RPX-I
Crop Marks prints crop marks around the original image paper size of the job. If the Invert
35
option is selected and there is no room on the page to print the crop marks outwardly, the
crop marks are drawn into the page. If Invert is not selected and there is no room on the page
to print crop marks outwardly, crop marks do not print.
Info Strip allows you to set the location where the Print Info Strip prints (top or bottom of
page), and the font size of the type.
NOTE: The Control Strip prints at the bottom of the page regardless of the Info Strip position
setting.
Print Preferences allow you to specify what information is printed on the Info Strip.
The defaults are User Name, Job Name, Job Comment, and Date and Time of RIP.
NOTE: Only the preferences you select are printed. If you do not select a preference in
Print Preferences, a placeholder is not printed on the page.
Control Strip allows you to enable the Control Strip and to specify options for it, including
Color Patches, Gray Balance, EPS file (name of file), and Height. The Control Strip image
overwrites the job image if it occupies the same part of the page, and the Control Strip does
not print on paper sizes smaller than Letter.
NOTE: The Splash RPX-i provides a standard Control Strip. This control strip can be replaced
with any other EPS formatted file.
Enabling Print Info Strip
To enable Print Info Strip on a job-by-job basis from the Splash RPX-i or a client workstation,
you must edit Job Options.
TO ENABLE PRINT INFO STRIP ON A JOB
1 Double-click the job in the Hold queue or select the job and choose Edit Job from the
Jobs menu.
The Job Options dialog box appears.
2 Select the Extras tab.
3 Select Print Info Strip in the Prepress Features section.
4 Click OK.
5Drag the job from the Hold queue to the Active queue for printing.
NOTE: You can also enable Print Info Strip in the Default Job Settings: Extras tab.
Page 36

ADVANCED FEATURES OF THE SPLASH RPX-I
Secure Access
Secure Access allows you to limit who can print to the Splash RPX-i by defining combinations
of user names, passwords, and account numbers that must be entered and verified before a job
prints. You can also use Secure Access without the verification feature to improve job logging,
by requiring user names and account numbers before a job is printed.
Secure Access accounts are established and managed at the server. Users are prompted for the
required information at their workstation. Validation of the information, if required, is
performed by the Splash RPX-i. If the information is not valid, users are prompted to re-enter
the correct information before the job is printed.
TO START SECURE ACCESS
1 Log on with Administrator privileges and choose Secure Access from the Server menu.
2 Click Enable Secure Access.
36
3 Select the required options, and then select Verify to indicate which options are to be
verified.
You can choose to verify User, Password, and Account Number.
NOTE: If you select Password, you must select User, and select Verify for both settings.
With Password cleared, you can choose whether to verify User or not.
When the Verify option is cleared, the Splash RPX-i processes any job for which the selected
information appears. The User and Account Number are output to the Job Log file.
NOTE: Files placed in the Drop folder or a Hot Folder, or dragged to one of the print queues,
always produce an error when Secure Access is enabled, unless you also select Exempt Drop
Folder Jobs. If this option is selected, the files print, regardless of the Secure Access settings.
Page 37

ADVANCED FEATURES OF THE SPLASH RPX-I
4Type an error message.
When a user incorrectly enters Secure Access information at a client workstation, the
Splash RPX-i returns an error message at the workstation. Edit this error message to provide
specific contact information for users of a particular server. The maximum number of
characters allowed in the Error Message and E-mail Address fields is 255 characters.
Using Secure Access at client workstations
When Secure Access is configured at the Splash RPX-i, users must install the Secure Access
print driver provided with the Splash RPX-i. For installation instructions, see Getting Started
and the Printing Guide.
Printing with Secure Access
Printing using the Secure Access printer driver is the same as printing with the standard driver,
except that the driver prompts you for the Secure Access information. For applications that
provide their own print dialog box, such as QuarkXpress and InDesign, you must select the
printer button to be prompted for Secure Access information.
37
Page 38

ADVANCED FEATURES OF THE SPLASH RPX-I
Setting up Users
The Users feature allows you to set up users with Secure Access or set up scan mailboxes.
For more information about setting up scan mailboxes, see page 94.
TO SET UP USERS
1 Choose Users from the Server menu.
38
2 In the Identity pane, click “+” to add a new user.
3Type the required information in the Name, Password, and Verify fields.
A maximum of 24 characters is allowed in the User field. A maximum of 8 characters is
allowed in the Password field. An unlimited number of users can be added to the Users list.
However, if you try to enter a duplicate User, a warning dialog box asks if you want to
override an existing user.
4 Click OK.
5To change the name or password for a user, select the user name in the Identity pane and edit
the information.
6To remove a user from the list, select the user name and click “-”.
Page 39

ADVANCED FEATURES OF THE SPLASH RPX-I
Accounts
Use Accounts to set up print accounts for use with Secure Access.
TO SET UP ACCOUNTS
1 Choose Accounts from the Server menu.
39
2 Click “+” to add a new account.
3 Enter an account name and description, if required.
A maximum of 32 characters is allowed in the Account field. A maximum of 100 characters is
allowed in the Description field.
NOTE: Use alphanumeric characters only for Account names.
The account description allows you to provide more information about the account than
can be stored in the account name. The account description is not required and is not used
elsewhere by Secure Access.
4 Click OK.
5To edit account information, select the account name and change the information in the
Number and Description fields.
6To remove an account, select the account name and click “-”.
Page 40

ADVANCED FEATURES OF THE SPLASH RPX-I
Screening Preferences
The Screening Preferences feature allows you to select screening methods, create custom
screens, specify lines per inch, and create sets of screening preferences. You can then switch
between common screening configurations without specifying the details each time.
TO SET SCREENING PREFERENCES
1 Choose Screening Preferences from the Server menu.
40
2 Click New to create a new set of screen preferences.
The Screen Preferences dialog box appears.
Page 41

ADVANCED FEATURES OF THE SPLASH RPX-I
3 Make the appropriate selections and click OK.
Frequency and Angle are standard halftone terms. Spot Function is the PostScript code that
defines the halftone. To edit this, click Custom.
NOTE: Entering incorrect PostScript code can result in incorrect output and PostScript errors.
The name you assigned to the set of screen preferences is displayed in the list of Screen
Preferences sets.
4To modify a Screen Preferences set, select the name in the list and click Edit, Duplicate,
or Delete.
41
Page 42

ADVANCED FEATURES OF THE SPLASH RPX-I
Job Log Options
If Job Logging is enabled, you can print or export the Job Log. The log is a tab-delimited text
file that can be imported into Microsoft Excel or other spreadsheet applications.
You must enable Job Logging in the Splash RPX-i Server Preferences. For information about
setting Job Logging preferences, see the Configuration Guide.
When you have enabled Job Logging, you can print a Job Log at any time.
TO PRINT AND EXPORT THE JOB LOG
1 Choose Print Log from the File menu.
The Print Job Log dialog box appears.
42
2 Select the Paper Tray, Sort By criterion, and whether to print from the last printed report
or all entries.
3 Click OK.
The Job Log is processed and printed.
4To export the log, choose Export Log from the File menu.
If the log is successfully exported to the computer desktop, a message appears confirming that
export was successful.
You can open the log directly from the desktop or choose to export it to a spreadsheet
application.
For information about the types of information displayed in the Job Log, see page 110.
NOTE: You can print a scan job history report from the copier.
Page 43

ADVANCED FEATURES OF THE SPLASH RPX-I
Imposition
The Imposition feature allows you to rearrange the printing page order of a job to output
booklets. In some cases, this feature uses paper more efficiently for printing multiple copies of
small documents.
TO SPECIFY IMPOSITION SETTINGS
1 Select the job in the Hold or Error print queue.
2 Choose Edit Jobs from the Jobs menu.
3 Click the Page tab.
43
4 Select Imposition and specify the imposition settings.
5 Click OK.
Page 44

ADVANCED FEATURES OF THE SPLASH RPX-I
44
Imposition settings
The imposition settings are described as follows:
• Saddle Stitch and Perfect Bound print two pages of a document together on a single larger
sheet, which can then be folded section by section to form booklets. The two options
differ in the number of pages printed in each section. Using Saddle Stitch, the number
of pages in a section is selectable and usually multiple output sheets are folded together.
Perfect Bound prints four original document pages in a single section, which means that
each output sheet is folded separately.
Select Saddle Stitch to print jobs that will be stapled or stitched with thread through the
center or into the spine. Select Perfect Bound to print jobs that will be folded, cut, and
glued along the back spine into a cover or binding. Most large trade books and larger
magazines use this technique.
• Nested Saddle Stitch and Nested Perfect Bound print four pages of a document together
on a single larger sheet, which can then be folded section by section to form booklets, and
cut along one edge. The two options differ in the number of pages printed in each section.
Using Nested Saddle Stitch, the number of pages in a section is selectable and usually
multiple output sheets are folded together. Nested Perfect Bound prints eight original
document pages in a single section, which means that each output sheet is folded
separately.
Select Nested Saddle Stitch to print jobs that will be stapled or stitched with thread
through the center or into the spine. Select Nested Perfect Bound to print jobs that will be
folded, cut, and glued along the back spine into a cover or binding. Most large trade books
and larger magazines use this technique.
• Signature prints two pages of the job, in order, on a single-sided tabloid sheet. This is
always 2-up. Pages 1 and 2 print on the first tabloid sheet and pages 3 and 4 print on a
second tabloid page. If Duplex is selected, pages 3 and 4 print on the back side of the first
sheet. Odd-numbered jobs print the last page with a blank opposite it.
• Step and Repeat and 2-up Imposition print multiple copies of a single page on the same
output page. Step and Repeat prints as many copies of the page as will fit on the selected
output page size. It supports duplexing, but not collation. 2-Up Imposition prints two
copies of the page on the selected output page size. It supports duplexing and collation.
• Section Size defines the number of pages to print in a Saddle-Stitch layout. This feature is
enabled only when Saddle-Stitch is selected.
• Output Paper Size allows you to specify the correct size for different imposition type
settings. For proper results with Saddle Stitch, Perfect Bound, and Signature, the output
paper size must be at least twice as large as the original page size defined for printing. For
example, for a Letter page, select Tabloid. For A4, select A3. For more information, see
“Determining the original page size” on page 45.
Page 45

ADVANCED FEATURES OF THE SPLASH RPX-I
• Scale to Fit allows you to scale the imageable output to fit on the selected page size.
Scaling preserves the aspect ratio, so the output page may not be completely filled. Scale to
Fit becomes available when an Imposition Type is selected (Saddle-Stitch, Perfect Bound,
Nestled Saddle-Stitch, Nestled Perfect Bound, or Signature).
• Crop Marks print only if there is room for them on the page. The imposed pages print
centered on the output sheet. If there is room to place full or partial crop marks, the crop
marks are added. To ensure that crop marks print, choose a page size that is more than
twice as large as the original page size defined for printing.
Crop marks are always printed for Step and Repeat, and the size of the crop marks is taken
into account when determining how to fit the most possible copies onto the page. Crop
mark settings have the following measurements:
– Very Short: 0.1 inch (2.5 mm)
– Short: 0.2 inch (5 mm)
– Medium: 0.3 inch (7.5 mm)
– Long: 0.4 inch (10 mm)
45
– Very Long: 0.5 inch (12.5 mm)
Determining the original page size
For 2-Up imposition, the original page size used is always the one selected in Page Setup
(or the equivalent) when printing. Turn off the application registration marks or crop marks.
For Step and Repeat, Saddle Stitch, Signature, and Perfect Bound imposition, if the
application registration marks or crop marks are not enabled when printing, or the
application does not support registration marks or crop marks, the original page size is the one
selected in Page Setup. If the application registration marks or crop marks are enabled, the
original page size is the size of the actual document, which in many applications can be
different from the page size selected in Page Setup.
Jobs created in pre-press applications (such as Quark XPress, InDesign, and Photoshop) and
sent without crop marks cause an error message saying that there are no crop marks.
Setting application registration marks
For Step and Repeat, Saddle Stitch, Perfect Bound, Nested Saddle Stitch, and Nested Perfect
Bound, enable registration marks or crop marks from the application, whenever possible.
In general, the imposition software recognizes the input page size more precisely when the
application generates the registration marks. For Step and Repeat, using the application
registration marks or crop marks increases the number of copies printed on a single sheet.
For more information about imposition and other print options, see the Printing Guide.
Page 46

ADVANCED FEATURES OF THE SPLASH RPX-I
Printing a booklet
The following steps are necessary to print a booklet from Mac OS or Windows clients or at
the Splash RPX-i.
TO PRINT A BOOKLET
1 Select Print for the document, or select the job in the Hold queue and choose Edit Jobs from
the Jobs menu.
2 Select the Page pane of the printer or job properties (Splash Features on a Mac OS computer
or on the Splash RPX-i) and set the following options.
• Imposition: On
• Imposition Type: Perfect Bound or Saddle Stitch
• Section Size: Select for Saddle Stitch
• Output Paper Size: Select page size
• Scale to Fit: Enable if original page size is too large to fit half of the output page size
46
• Duplex: Short Edge Binding
• Crop Marks: Specify the size of the crop marks or none
3 Select the Output pane and set the following options.
• Output: Booklet Tray
• Fasten Mode: Fold or Fold and Staple
4 Click OK.
5 Close the printer or job properties and print the document.
Page 47

ADVANCED FEATURES OF THE SPLASH RPX-I
Color management tools
The Splash RPX-i provides advanced color management tools. For more information about
the following features, see the Color Guide:
• Color Cal offers a set of calibration tools for the copier and scanner.
• Spot Color Editor allows you to add and delete spot colors, as well as change the value
output for any particular spot color.
• CopyCal creates profiles that allow the Splash RPX-i to emulate the output of any color
printer.
• ColorTuner allows you to edit the output color of RIPped pages before printing all copies of
the job.
• Profiles provides profiles and options for handling profiles.
47
Page 48

HOT FOLDERS AND VIRTUAL PRINTERS
HOT FOLDERS AND VIRTUAL PRINTERS
You can print to the Splash RPX-i from the Splash RPX-i server computer or from any client
workstation with an AppleTalk or TCP/IP network connection.
This chapter describes the following ways of sending files to the Splash RPX-i:
•Drop-print to the Splash RPX-i Drop Folder.
•Drop-print to a Splash RPX-i Hot Folder.
•Print to a Splash RPX-i Virtual Printer.
•Drop-print to the Splash RPX-i GA File Converter Drop Folder.
This chapter also describes using the GA File Converter to convert certain graphic file formats
to PostScript or EPS and submit the converted jobs for processing through a Hot Folder.
48
You can also set up the Splash RPX-i as a printer on a client and use the Splash RPX-i printer
files to set print options. For more information, see the Printing Guide.
Supported file formats
The Splash RPX-i prints Acrobat PDF, TIFF, EPS, TIFF/IT, PDF-X1/a, CT-NLW, PSD,
DCS 2.0, Export PostScript, PDF2GO, and PostScript Level 1, 2, and 3 files. The
Splash RPX-i supports the importing of these data file formats.
Direct processing of PostScript, PDF, TIFF, EPS, and DCS 2.0 files is supported. The TIFF/
IT, PDF-X1/a, CT-NLW, Export PS, PDF2GO, and PSD formats are processed after
conversion by the GA File Converter that starts when the Splash RPX-i is started.
NOTE: The GA File Converter must be enabled in Splash Server>Preferences>Server.
For more information about setting preferences, see the Configuration Guide.
Supported Graphic file formats are EPS, Monochrome EPS, DuoTone EPS, TriTone EPS,
QuadTone EPS, RGB EPS, Index EPS, LAB EPS, CMYK EPS, Grayscale EPS, Black and
White EPS, TIFF, Black and White TIFF, RGB TIFF, Index TIFF, Grayscale TIFF, and
CMYK TIFF.
Page 49

HOT FOLDERS AND VIRTUAL PRINTERS
Drop-printing using Drop Folders
Use drop-printing to print PostScript files, as opposed to using a PostScript file download
utility. The following Drop Folder options allow you to drop-print files.
NOTE: If a spooled file is not located on the Splash RPX-i hard disk, the Splash RPX-i cannot
print it. Copy the original file to the hard disk.
• Drop Folder handles direct processing of PostScript, PDF, TIFF, EPS, and DCS 2.0 files
as they are sent or dragged to the Drop Folder. You can also print PDF files that are
password-protected in Adobe Acrobat. To do so, enter the password in the PDF Password
field of the Edit Doc Info pane in the Job Options dialog box.
GA File Converter preferences allow you to select a specific Drop Folder and change the
job options to reflect all jobs sent to that Drop Folder. For GA File Converter preferences,
see page 68.
• Hot Folders allows you to create a particular set of pre-selected print options that are
applied to every file that is submitted to that Hot Folder. You can create multiple hot
folders and submit any Postscript, TIFF, EPS, PDF, or DCS 2.0 file to them.
49
Create and delete Hot Folders by choosing Hot Folders from the Server menu. For more
information, see page 51. Any number of Hot Folders can be created with no limitation
other than available hard disk space. If file sharing is enabled, folders are automatically
shared when created.
Hot Folders co-exist with the Drop Folder. Drop Folder ensures compatibility for previous
releases and allows you to avoid forcing a set of job options on dropped jobs. Windows and
Mac OS download applications for the Drop Folder are automatically created when you start
the Splash RPX-i.
• GA File Converter Drop Folder supports direct processing of TIFF/IT, CT--NLW,
PDF2GO, Export PS, and PSD files sent to the GA File Converter Drop Folder. TIFF/IT
files version P1 and P1 8.8 are supported, assuming all three forks of the file (FP, CT, and
LW ) are provided. The three forks can be provided in any order. By default, the output
PostScript file is placed in the Drop Folder for processing. However, a preference in the
GA File Converter allows you to select a different input and output folder. This allows use
of Hot Folder for graphic arts files.
TIFF/IT, CT-NLW, PSD, or PDF-X1/a files may produce processing errors if they are
dragged to the Splash RPX-i queues or placed in the Drop Folder.
NOTE: All files copied to the Drop Folder are copied to the Splash RPX-i hard disk. If a file
cannot be printed, it is moved to the Splash Folder:Unprintable Files folder. The Unprintable
Files folder is automatically created by the Splash RPX-i when it receives a file that fails to
print.
Page 50

HOT FOLDERS AND VIRTUAL PRINTERS
If you drop-print a PostScript file that was created with Splash RPX-i software, the
Splash RPX-i uses the print options selected at the printer driver for the job. If the PostScript
file was not created with Splash RPX-i software, the Splash RPX-i applies default print
options. To apply specific options to all jobs, create a hot folder (see “Hot Folders” on
page 51).
Printing to Drop Folders
A Drop Folder is set up in the Splash RPX-i server computer Public folder when the
Splash RPX-i server software is installed. When the Splash RPX-i is running, you can print to
the Drop Folder over the network. The following procedures also apply for printing to the GA
File Converter Drop Folder.
For printing to a Hot Folder, see page 54.
TO ACCESS A DROP FOLDER FROM A WINDOWS COMPUTER
1 Click to Start and choose Run.
50
2 In the Open field, type two backslashes and the IP address of the Splash RPX-i, and click OK.
For example: \\10.10.257.1
The contents of the Splash RPX-i Public folder are displayed.
3Drag and drop the files you want printed to the Drop Folder or the GA File Converter
Drop Folder.
For convenience, you can create a shortcut of any Drop Folder you print to regularly and
place it on the Windows desktop.
TO ACCESS A DROP FOLDER FROM A MAC OS COMPUTER
1 Choose Connect to Server from the Go menu.
2 In the Server address field, type the IP address of the Splash RPX-i.
3 Click Connect and log on as Guest.
4 Select the Splash volume from the list of volumes on the Splash RPX-i server computer and
click OK.
5Drag and drop the files that you want printed to the Drop Folder or GA File Converter Drop
Folder.
For convenience, you can make an alias of any Drop Folders you use regularly and place it on
the Mac OS desktop.
Page 51

Hot Folders
HOT FOLDERS AND VIRTUAL PRINTERS
Hot Folders is a utility that allows you to store and reuse frequently used print options when
printing PostScript and PDF files on the Splash RPX-i. With Hot Folders, you can do
the following:
•Create special folders (Hot Folders) that assign specific print settings and print queues
to jobs.
•Print jobs to the Splash RPX-i by dragging and dropping them onto hot folders at the
Splash RPX-i server computer or from your desktop via File Sharing.
Hot Folders allows you to create multiple drop folders, each with an assigned set of print
options that are applied to all jobs placed in the folder. This allows you to control print
options and process a series of jobs with common printer driver options.
For any job placed in a Hot Folder, the options associated with the Hot Folder override any
options included in the job. A job created with the Splash RPX-i printer driver might specify
Duplex, Long Edge Bind, but if it is dropped into a folder for which Duplex is set to None,
the job does not print as Duplex.
51
Creating Hot Folders
Hot Folders are created in the Splash:Hot Folders folder. Folders may be shared via AppleTalk
for Mac OS clients and via SMB for Windows clients. Hot Folders do not replace existing
drop folders.
TO CREATE HOT FOLDERS
1 Choose Hot Folders from the Server menu.
2 Click New.
A new folder icon appears.
3 Enter a name for the Hot Folder.
This is the name the client selects at the client workstation.
4 Click OK.
Page 52

HOT FOLDERS AND VIRTUAL PRINTERS
5 Click Edit to configure print options for the Hot Folder.
52
6 Enter the settings for each tab.
7 Click OK.
Managing Hot Folders
The following options allow you to modify Hot Folders:
Edit allows you to edit the printer driver options of existing Hot Folders.
Rename allows you to change the name of a Hot Folder.
Delete allows you to select individual Hot Folders and delete them.
TO EDIT HOT FOLDERS
1 Choose Hot Folders from the Server menu.
2 Select the Hot Folder that you want to edit from the list that appears.
3 Click Edit.
The Job Options dialog box appears, allowing you to change the options.
4 Click OK.
Page 53

HOT FOLDERS AND VIRTUAL PRINTERS
NOTE: If the options for a Hot Folder are being edited, the exact set of options that is applied
is dependent on when the job finishes copying to the Hot Folder and when the editing is
completed. Jobs placed in a Hot Folder before the editing starts use the old options. Jobs
placed in the folder after the editing is completed use the new options. If a job is placed in the
folder while editing is in progress, an undefined set of options is attached.
TO RENAME HOT FOLDERS
1 Choose Hot Folders from the Server menu.
2 Select the Hot Folder you want to rename.
3 Click Rename.
4Type the new name for the Hot Folder.
5 Click OK.
The maximum number of characters allowed in the Rename field is 31. If you have not
created any Hot Folders, the Rename option is unavailable.
53
NOTE: When you rename a Hot Folder, the old folder is automatically deleted and the new
one created.
TO DELETE HOT FOLDERS
1 Choose Hot Folders from the Server menu.
2 Select the Hot Folder you want to delete.
3 Click Delete.
4 Click OK.
NOTE: If you try to move a Hot Folder from the Splash folder on the Splash RPX-i server
computer, or drag it to the Trash icon, it is not deleted. As part of the uninstall process of the
Splash RPX-i Installer, Hot Folders are deleted.
Users at client workstations can view Hot Folders, but they cannot make changes to the folder
or files. For more information about configuring the Splash RPX-i for file sharing, see the
Configuration Guide.
Page 54

HOT FOLDERS AND VIRTUAL PRINTERS
Printing to Hot Folders
The following file formats are supported for Hot Folders:
•PostScript
• PDF
• TIFF
• EPS
• DCS 2.0
•JPEG
NOTE: The Hot Folders feature does not work with file types handled by the GA File
Converter. Any such files placed in a Hot Folder are moved to the Unprintable Files folder.
When a Hot Folder is created and published on the network, users at client workstations
connect to the Splash RPX-i and drag their file to the desired Hot Folder.
54
TO ACCESS A HOT FOLDER ON A WINDOWS COMPUTER
1 Click Start and choose Run.
2 In the Open field, type two backslashes and the IP address of the Splash RPX-i and click OK.
For example: \\10.10.257.1
The contents of the Splash RPX-i Public folder are displayed.
3 Double-click the Hot folders volume.
4Drag and drop the files that you want printed to the desired Hot Folder.
For convenience, you can create a shortcut of any Hot Folders you print to regularly and place
it on the Windows desktop.
Page 55

HOT FOLDERS AND VIRTUAL PRINTERS
TO ACCESS A HOT FOLDER FROM A MAC OS COMPUTER
1 Choose Connect to Server from the Go menu.
2 In the Server address field, type the IP address of the Splash RPX-i.
3 Click Connect and log on as Guest.
4 Select the Splash Server volume from the list of volumes on the Splash RPX-i server computer,
and click OK.
5 Double-click to open the Hot Folders folder.
6Drag and drop the files you want printed to the desired Hot Folder.
For convenience, you can make an alias of any Hot Folders you use regularly and place it on
the Mac OS desktop.
Sharing Hot Folders
You share Hot Folders over the network by enabling Personal File Sharing on the RPX-i
Macintosh. Personal File Sharing is enabled by default when you install the Splash RPX-i
Server Software. The procedure below is only necessary if File Sharing has been disabled.
55
TO SHARE HOT FOLDERS
1 Choose System Preferences from the Apple menu.
2 Click Sharing in the Internet & Network section.
3 Click Personal File Sharing.
4 Quit System Preferences.
Page 56

HOT FOLDERS AND VIRTUAL PRINTERS
Virtual Printers
When enabled, the Virtual Printers option sets up your Hot Folders as individual print queues
on the network. Users can then print to these queues from whatever applications they are
using, and the Hot folders print options are applied to the job.
To set up Virtual Printers, you must do the following:
•Create a Hot Folder with custom job options.
•Enable Virtual Printers on the Splash RPX-i.
•Install the Splash RPX-i printer driver on your client computer.
For more information, see the Printing Guide.
• Configure the Virtual Printer on your client computer.
TO ENABLE VIRTUAL PRINTERS ON THE SPLASH RPX-I
1 Choose Preferences in the Splash Server menu.
56
2 On the Network tab, select Virtual Printers and Enterprise Networking and click OK.
All Splash Hot Folders are now published as Virtual Printers on your network.
Setting up Virtual Printers on client computers
Once the Splash Hot Folders have been published as Virtual Printers, they can be configured
as printers on client computers. Before setting up a Virtual Printer on a client computer, make
sure you have the following information:
• The DNS name and the IP address of the Splash RPX-i
• The name of the Hot Folder that you want to set up as a Virtual Printer
NOTE: You must install the Splash RPX-i printer driver on the client computer.
Virtual Printers can be set up on Windows 2000/XP/Server 2003, Mac OS X v10.2/10.3, and
Mac OS 9 computers.
Page 57

HOT FOLDERS AND VIRTUAL PRINTERS
Setting up Virtual Printers on Windows computers
The following procedure describes setting up a Virtual Printer on a Windows XP computer.
The procedure is similar on Windows 2000/Server 2003, with some differences in
terminology and user interface.
TO SET UP A VIRTUAL PRINTER ON A WINDOWS COMPUTER
1 Click Start, choose Settings, and then choose Printers and Faxes (or Printers).
2 Under Printer Tasks, click Add a printer to open the Add Printer Wizard, and then click Next.
3 Click Local printer or stand-alone network printer, clear the “Automatically detect and install
my Plug and Play printer” option, and then click Next.
4 Click Create a new port, and then select Standard TCP/IP Port.
5 Click Next and provide the following information:
•In the field for Name or address of server providing LPD, type the IP address of the
Splash RPX-i.
57
•In the field for Name of printer or print queue on that server, type the name of the
Hot Folder that you are configuring as a Virtual Printer.
Hot Folder names are case sensitive, and must be entered exactly the same as the original.
6 In the TCP/IP Printer Port wizard screen, click Next to configure your port.
7 Click Custom and select Settings.
8 In the Port Settings window, click LPR for Protocol, enter the Hot Folder name in the queue
name field, and click OK.
NOTE: Hot Folder names are case sensitive, and must be entered exactly the same as the
original.
9 Click Next and then click Finish to exit the Printer Port Wizard.
10 Select the Splash RPX-i from the list of manufacturers and printers.
If you have not installed the printer driver previously, follow the instructions for installing a
printer driver detailed in the Printing Guide.
11 Click Next.
12 Choose whether to designate this printer as the default printer, share it, print a test page.
13 Click Next in each window.
14 Click Finish.
You can now print to the newly configured Virtual Printer using the specific Hot Folder
job options.
Page 58

HOT FOLDERS AND VIRTUAL PRINTERS
Setting up Virtual Printers on Mac OS X v10.4 computers
Set up Virtual Printers on Mac OS X v10.4 computers in any of the following ways:
•Default browser
• LPD connection
•AppleTalk
TO SET UP A VIRTUAL PRINTER ON A MAC OS V10.4 COMPUTER USING DEFAULT BROWSER
1 Choose Go>Utilities>Printer Setup Utility.
2 In the Printer List window, click Add.
3 Select Default Browser.
4 Select the Splash Server: <Hot Folder name> printer name with a Bonjour connection.
The name appears in the Name field, and the appropriate PPD file for the Splash RPX-i is
automatically selected. If it is not selected, proceed to step 5.
58
5 In the Print Using list, select Splash, and then select the Splash RPX-i printer driver.
6 Click Add.
The Virtual Printer appears in the list of printers.
You can now print to the newly configured Virtual Printer using the specific Hot Folder
job options.
Page 59

HOT FOLDERS AND VIRTUAL PRINTERS
TO SET UP A VIRTUAL PRINTER ON A MAC OS V10.4 COMPUTER USING THE LPD CONNECTION
1 Choose Go>Utilities>Printer Setup Utility.
2 In the Printer List window, click Add.
3 Click the IP Printer icon.
The IP Printer pane appears.
4 Select Line Printer Daemon - LPD from the Protocol list.
5Type the IP address of the Splash RPX-i.
The IP address appears in the Name field as you type in the Address field.
6Type the Hot Folder name in the Queue field.
59
7 In the Print Using list, select Splash, and then select the Splash RPX-i printer driver.
If you have configured Secure Access printing at the Splash RPX-i, select the PPD file for
Secure Access printing.
8 Click Add.
The Virtual Printer appears in the list of printers.
You can now print to the newly configured Virtual Printer using the specific Hot Folder
job options.
Page 60

HOT FOLDERS AND VIRTUAL PRINTERS
TO SET UP A VIRTUAL PRINTER ON A MAC OS V10.4 COMPUTER USING APPLETALK
1 Choose Go>Utilities>Printer Setup Utility.
2 In the Printer List window, click Add.
3 Click the Default Browser or IP Printer icon.
NOTE: Use this procedure if the Splash RPX-i is in a different AppleTalk zone than your
computer. If it is in the same zone, the Splash RPX-i is displayed as a default browser.
Follow the procedure on page 58.
60
4 Click More Printers.
A dialog box appears, listing other connections.
5 Select AppleTalk from the connection list.
The AppleTalk pane appears.
6 Select the AppleTalk zone for the Splash RPX-i from the list.
The AppleTalk printers in the specified zone appear in the list. The Virtual Printers that are
configured at the Splash RPX-i also appear in the list.
Page 61

HOT FOLDERS AND VIRTUAL PRINTERS
NOTE: Virtual Printers are linked to Hot Folders. The names of the Virtual Printers appear as
<printer name:Hot Folder name> in the Name list.
7 Select the Splash Server: <Hot Folder name> name in the Name list.
8 In the Printer Model list, select Splash, and then select the Splash RPX-i printer driver.
If you have configured Secure Access printing at the Splash RPX-i, select the PPD file for
Secure Access printing.
61
9 Click Add.
The Virtual Printer appears in the printer list.
You can now print to the newly configured Virtual Printer using the specific Hot Folder
job options.
Page 62

HOT FOLDERS AND VIRTUAL PRINTERS
Setting up Virtual Printers on Mac OS X v10.3 and earlier computers
Set up Virtual Printers on Mac OS X v10.3 and earlier computers in any of the following
ways:
•AppleTalk
• LPD/LPR connection
•Rendezvous
TO SET UP A VIRTUAL PRINTER ON MAC OS V10.3 AND EARLIER USING APPLETALK
1 Choose Utilities from the Go menu.
NOTE: If you are using Mac OS X v10.2.x, select Applications and then Utilities to access the
Print Center.
2 Start Printer Setup Utility or Print Center.
3 Click Add.
62
4 Select AppleTalk from the connection list.
5 Select the AppleTalk zone for the Splash RPX-i from the zone list.
The Virtual Printers that are configured at the Splash RPX-i appear in the list.
NOTE: Virtual Printers are linked to Hot Folders. The names of the Virtual Printers appear as
<printer name:Hot Folder name> in the Name list.
6 Select the Splash Server: <Hot Folder name> name in the Name list.
7 In the Printer Model list, select Splash, and then select the Splash RPX-i printer driver.
If you have configured Secure Access printing at the Splash RPX-i, select the PPD file for
Secure Access printing.
8 Click Add.
You can now print to the newly configured Virtual Printer using the specific Hot Folder
job options.
Page 63

HOT FOLDERS AND VIRTUAL PRINTERS
TO SET UP A VIRTUAL PRINTER ON MAC OS V10.3 AND EARLIER USING LPD/LPR
1 Choose Utilities from the Go menu.
NOTE: If you are using Mac OS X v10.2.x, select Applications and then Utilities to access the
Print Center.
2 Start Printer Setup Utility or Print Center.
3 Click Add.
4 Select IP Printing from the connection list.
5 Select LPD/LPR from the Printer Type list.
6Type the IP address of the Splash RPX-i in the Printer Address field.
7Type the Hot Folder name in the Queue Name field.
63
8 In the Printer Model list, select Splash, and then select the Splash RPX-i printer driver.
If you have configured Secure Access printing at the Splash RPX-i, select the PPD file for
Secure Access printing.
9 Click Add.
The Virtual Printer appears in the printer list.
You can now print to the newly configured Virtual Printer using the specific Hot Folder
job options.
Page 64

HOT FOLDERS AND VIRTUAL PRINTERS
TO SET UP A VIRTUAL PRINTER ON MAC OS V10.3 AND EARLIER USING RENDEZVOUS
1 Choose Utilities from the Go menu.
NOTE: If you are using Mac OS X v10.2.x, select Applications and then Utilities to access the
Print Center.
2 Start Printer Setup Utility or Print Center.
3 Click Add.
4 Select Rendezvous from the connection list.
64
5 Select the Splash Server: <Hot Folder name> printer name.
6 In the Printer Model list, select Splash, and then select the Splash RPX-i printer driver.
If you have configured Secure Access printing at the Splash RPX-i, select the PPD file for
Secure Access printing.
7 Click Add.
The Virtual Printer appears in the printer list.
You can now print to the newly configured Virtual Printer using the specific Hot Folder
job options.
Page 65

HOT FOLDERS AND VIRTUAL PRINTERS
Setting up Virtual Printers on Mac OS 9 computers
Virtual Printers are set up n Mac OS 9 computers using the LPR connection.
TO SET UP A VIRTUAL PRINTER ON A MAC OS 9 COMPUTER
1 Choose Applications>Utilities>Desktop Printer Utility.
65
2 Select LaserWriter 8 and Printer (LPR).
Page 66

HOT FOLDERS AND VIRTUAL PRINTERS
3For the PPD file, click Change and select the Splash RPX-i printer description.
4For the LPR Printer Selection, click Change to open the Internet Printer dialog box.
5 In the Printer Address field, type the IP address of the Splash RPX-i. In the Queue field, type
the name of the Hot Folder you want to add as a Virtual Printer.
6 Click Verify to verify the IP address.
7 Click OK, then click Create.
8Type a name for the Virtual Printer and click OK.
66
We recommend that you name the Virtual Printer the same as the Hot Folder on the
Splash RPX-i.
You can now print to the newly configured Virtual Printer using the specific Hot Folder
job options.
Page 67

HOT FOLDERS AND VIRTUAL PRINTERS
GA File Converter
The GA File Converter allows you to print the most popular pre-press file formats, without
requiring the application in which they were created. Pre-press format files are created by
imagesetters and pre-press proofing systems. Print these files on the Splash RPX-i for proofing
and pre-flight purposes by converting them to PS or EPS files. The GA File Converter must
be used with Hot Folders. The input folder for a file that you are converting must be linked to
a Hot Folder.
The following formats can be converted by the GA File Converter:
• TIFF-IT
• CT/LW
• CT/NLW
• PSD
• PDF2GO
67
•ExportPS
• PDF-X1/a
TO ENABLE THE GA FILE CONVERTER
1 Open the Splash Server Preferences.
2 On the Server tab, click GA File Converter, and then click OK.
The GA File Converter icon appears in the Splash RPX-i server computer Dock.
For more information about setting Splash RPX-i server preferences, see
the Configuration Guide.
Page 68

HOT FOLDERS AND VIRTUAL PRINTERS
TO CONFIGURE THE GA FILE CONVERTER
NOTE: Before configuring the GA File Converter, create the Hot Folder that you want to use
for the file conversion. To create a Hot Folder, see page 51.
1 Click the GA File Converter icon in the Splash RPX-i server computer Dock.
2 Choose Preferences from the GA File Converter menu.
68
3 Click the Conversion Options tab, and specify the settings that you want.
The Conversion settings are as follows:
Resolution: The default is 200 dpi. Increase the resolution for printing smoother line art.
Anti-aliasing: The default is Nearest Neighbor. For highest quality output, select Bi-linear.
Compression: The default is Lossless. For highest quality output, select None.
The default settings are designed to provide the fastest printing results possible. Changing
these settings can result in increased RIPping and printing time. We recommend that you
only change these settings if you are printing line art that requires high-resolution printing.
Page 69

HOT FOLDERS AND VIRTUAL PRINTERS
4 Click the Output Options tab.
The Output Options settings are as follows:
69
Output Format: The default is PostScript.
Use Scaling: Type a percentage in the Scale image by field. The default is Off. To scale the
image, specify scaling through the print options for the Hot Folder for faster printing.
Orientation: The default is Same as original. To change the orientation, you can also use the
Force Page Size print option for the Hot Folder.
5 Select Output Options.
6 Click the Folder Options tab.
Page 70

HOT FOLDERS AND VIRTUAL PRINTERS
7 Click Add.
8 In the Name field, type a name to link the Input folder and the Hot Folder that you are going
to use.
70
To create a Hot Folder, see “Creating Hot Folders” on page 51.
NOTE: Names are limited to 255 characters. Special characters are not recommended.
9 Click Set to create an Input (Watch) folder and browse to the location in which you want to
save this folder.
NOTE: If you save the Input folder in the GA File Converter Hot Folders in the Public folder,
it will be shared to both Mac and Windows clients.
10 Click New Folder to create an Input folder in the location that you have chosen.
11 Type a name for the new folder.
12 In the Finder window, select the newly created Input Folder and click Choose.
You are returned to the Add Folders window.
Page 71

HOT FOLDERS AND VIRTUAL PRINTERS
13 Click Set to create an Output folder.
14 Select the Hot Folder you created earlier as the Output folder.
15 Browse to the location of the Hot Folder, select the Hot Folder, and then click Choose.
By default, Hot Folders are placed in the Public folder on the Splash RPX-i server computer.
16 In the Add Folders window, click OK, and then click OK in the Folder Options tab.
You can now use the Input folder you created to convert files. The converted files are output
to the Hot Folder you specified and are printed with the print options defined for that folder.
To print to the Input folder, drag and drop the files you want converted. If the Input folder
has been created in the Public folder and shared over the network, users on client computers
can drag and drop their files into the Input folder.
71
Page 72

SPLASH RPX-I PRODUCTION FEATURES
SPLASH RPX-I PRODUCTION FEATURES
The Splash RPX-i offers features particularly useful in a production printing environment.
The production printing features for the Splash RPX-i include the following:
•Set Builder
•Mixed Media
• Schedule
•Job Error
•Resume Printing
72
Page 73

Set Builder
SPLASH RPX-I PRODUCTION FEATURES
The Set Builder feature allows you to gather a series of documents and collate them as a single
document set. You can then print the set using a standard set of finishing options, such as
Copies, Collate, Staple, Rotate, and Duplex. Set Builder combines documents from multiple
applications and platforms, freeing you from piecing documents together into a single
application at the client workstation.
The Set Builder user interface is list-based, allowing you to add individual jobs to a document
set and arrange the order of the jobs within the document.
The Set Builder main window displays available jobs in the Hold and Error queues. For jobs
in the Available jobs list, you have the option to Add, Duplicate, or Edit the print job options.
The options in the Document Set Options dialog box allow you to set Job Handling options
globally (for example, Staple, Duplex, Insert Blank Pages). Click Edit Doc Info to edit
information such as the Document Title, User ID, Password, and Account.
73
Printing a document set with Set Builder
The following procedure describes how to create and print a document set with Set Builder.
TO CREATE A DOCUMENT SET WITH SET BUILDER
1 Choose Set Builder:New Set from the File menu, or click the Set Builder icon in the toolbar.
The Set Builder dialog box appears.
2 Select a job from the Available Jobs list and click Add.
The job moves to the Document Set Jobs list.
Page 74

SPLASH RPX-I PRODUCTION FEATURES
NOTE: When you select a job in the Document Set Jobs list, the Add button changes to
Remove, allowing you to delete the job.
3 Reorder the jobs by dragging them up or down in the Document Set Jobs list.
4 Click Options.
The Options dialog box appears, allowing you to select the finishing options for this
document set.
74
5 Click Page and Output to set the finishing options on each pane.
6 Click Document Info to edit the Document and User ID fields.
NOTE: If Secure Access is selected at the server, you must type information in the Password
and Account fields. When the document set is printed, this information is applied to every
job that is part of the set.
7 Click OK.
Page 75

SPLASH RPX-I PRODUCTION FEATURES
Your document set now appears in the Hold queue. When you move it to the Active queue to
print it, its status changes to Assembling. The components of the document set RIP and save
image files, but not print. When the components have all RIPped, the document set status
changes to Printing, and the set begins to print.
TO EDIT A DOCUMENT SET
1 Choose Set Builder:Open Set from the File menu.
2 Select the document set in the list and click Open.
The main Set Builder window opens.
3 Click Options and change job settings as desired.
4 Click OK.
Setting finishing options
Certain finishing options, such as the number of copies printed and the output tray used, are
applied to the entire document set. These finishing options override the equivalent settings in
the Edit Job dialog box for all jobs that are part of the document set, and include the
following:
75
• Copies
•Duplex
•Insert Blank Pages
•Staple
• Collate
•Rotate Pages
•Punch
•Punch Position
•Offset Mode
•Output Destination
Page 76

SPLASH RPX-I PRODUCTION FEATURES
76
Managing Set Builder jobs
In the Set Builder dialog box, you can select options to manage the sets you create.
• Remove removes a job from the list of jobs in the Document Set Jobs list.
• Duplicate duplicates a selected job in the list of Available Jobs. Clicking Duplicate
automatically opens the Job Options dialog box for the new job. Click Edit Doc Info in
the Info pane of the Job Options dialog box to change the Name, User ID, Password,
Account, or Comment fields.
• Edit opens the Job Options dialog box. Edit the job print options here, or double-click the
job in the Available Jobs list.
• Preview displays the previews for any selected job in Available Jobs or Document Set Jobs.
Duplex and odd-length jobs
When you select Duplex printing for a document set, the total number of pages in any
component job in the document set is “padded” so it has an even number of images (sides),
if the Insert Blank Pages option is enabled.
For example, a document set composed of a five-page job, a four-page job, and a three-page
job, prints a total of seven sheets, with the back side of the third and seventh sheet left blank.
With the Insert Blank Pages option disabled, the document prints a total of six sheets.
Previews
The Preview window only previews jobs that have been RIPped. The arrow keys move from
page to page within a job, but do not cross from job to job, even in the Document Set Jobs
list. To see the entire preview of a document set, select the first job in the Document Set Jobs
list and click the right arrow. Scroll through the job until the page number stops
incrementing. Select a second job and repeat until you have scrolled through the entire
document set.
Errors in Set Builder document sets
If an error occurs in any component of a document set, the entire document set fails to print.
To reprint the document set, correct the error and re-release the document set. Only the jobs
that previously caused the error re-RIP.
Page 77

Mixed Media
Mixed Media allows you to print a single job on different types of paper and to different
paper trays.
TO USE MIXED MEDIA
1 Choose Mixed Media from the Jobs menu or the Tray tab of the Job Settings dialog box.
SPLASH RPX-I PRODUCTION FEATURES
77
Page 78

SPLASH RPX-I PRODUCTION FEATURES
2To specify media for a particular item, drag the icon into the Mixed Media Settings list and
select the settings.
78
You can specify media for the following: Chapter, Page Range, Blank Sheet, Tab Page, Tab
Insert, Tab Shift, Front Cover, and Back Cover.
When the icon for the item is selected, the available settings are displayed in the right pane
of the Mixed Media window.
3 Make changes and click Apply.
All of the settings are displayed in the Mixed Media Settings list.
4 Click OK.
Page 79

SPLASH RPX-I PRODUCTION FEATURES
79
Mixed Media types
This section describes Mixed Media types.
Chapter
Specify a page as the start of a chapter. Chapter starts must print on the front side of a duplex
page if the document or page range containing it is duplex. If required, a blank second side
is inserted automatically to make the chapter start on the front side of the duplex page.
In the Chapter Start Page field, type the page number on which you want chapters to start.
On client computers, you can enter more than one page number for the chapter starts.
Page 80

SPLASH RPX-I PRODUCTION FEATURES
Page Range
Specify a page range to print on a particular media type.
•Type the page number of the page range in the Page Range fields.
•Select Duplex or No Duplex.
•Select a Media Type.
•Select a Tray.
80
Blank Sheet
Specify a blank sheet to be inserted before or after the selected page.
•Type page number and select either Before or After the page.
•Select a Media Type.
•Select a Tray.
Page 81

SPLASH RPX-I PRODUCTION FEATURES
Tab Page
Specify a page of the document to be printed on the body of a tab sheet. You can also add
selected text and image on the tab.
NOTE: Tab Page is not available from client computers.
• Click Tab Setup to set up the Tab Attributes which are applied to all the tabs used in the
document.
•In the Tab Setup dialog window, specify number of tabs in a set, tab page size, tray, media
type, and specify whether to apply same text attributes for all tabs.
•In the Tab Setup dialog window, click Tab Attributes to specify rotation of the text on the
tab, alignment, font type, size, and color, and see a preview of how the text will appear on
the tab.
NOTE: For information about Tab Setup, see “Printing Tabs” on page 85.
•In the main Mixed Media window, with the Tab Page selected in the Mixed Media Types,
specify the page, the tab text, and a tab image. Click Tab Attributes to customize attributes
for the selected Tab Page.
81
Page 82

SPLASH RPX-I PRODUCTION FEATURES
Tab Insert
Specify a tab sheet to be inserted in the document and the text and image to be printed on
the tab.
•Type page number and specify before or after the page.
•Specify tab text.
•Specify tab image (see the following section).
•Specify Tab Attributes (see “Tab Page” on page 81.
82
Tab Image
To add a tab image, drag an image file from the desktop to the Tab Image box.
Supported file types are PDF, EPS, JPEG, TIFF.
Any size image can be accepted and will be scaled to fit the roughly 1/4-inch by 1/2-inch area,
if there is text entered in the Tab Text field. If the Tab Text field is left blank, the image area
expands to an area 1/4-inch high and as wide as the tab.
NOTE: Smaller images process more quickly. For quality results with the shortest processing
time, use a 300 dpi or higher image, designed to fit the available space.
Page 83

SPLASH RPX-I PRODUCTION FEATURES
Tab Shift
Specify an existing page of a document to be shifted so that part of the page prints on the tab
and the other part prints on the body of the tab sheet.
•Type the page number for the Tab Shift.
NOTE: No default Tab Attributes are specified for Tab Shift. The contents of the tab are
determined solely by the contents of the original application document.
83
Page 84

SPLASH RPX-I PRODUCTION FEATURES
Front Cover and Back Cover
Specify the first page of the document as a front cover, and the back page as a back cover.
• Choose Plex Mode to specify which side of the covers get printed, Print Front, Print Back,
or Print Both.
•If Print Both is selected, then Long Edge Binding or Short Edge Binding must be specified
in the Duplex menu.
•Select media type.
•Select tray.
84
NOTE: The Splash RPX-i constrains many invalid combinations of media type and duplex.
The client does not apply these constraints. If the Splash RPX-i receives a job which specifies
an invalid duplex and media type combination, it changes the duplex setting to None and
retains the selected media type.
Page 85

SPLASH RPX-I PRODUCTION FEATURES
Printing Tabs
Print the job to the Splash RPX-i using the Send and Hold option along with any other
desired options such as number of copies.
You can initiate tab printing from the Splash RPX-i or from the Splash Server Remote.
TO PRINT TABS
1 Select the job in the Hold queue.
2 Choose Mixed Media from the Jobs menu.
3 Click Tab Setup and define the attributes of the tabs used in the job, including
•Number of tabs in a set
•Tab page size
•Tray
•Media Type
85
•Default tab attributes
NOTE: To set default tab attributes, select Apply same text attributes for all tabs and click
Tab Attributes.
4 Click OK.
5 In the main Mixed Media window, drag Tab Insert, Tab Page, or Tab Shift to the list.
6 Select the item that you want to specify settings for.
Page 86

7Type the page number and specify the other settings.
For information about Tab Insert, see page 82.
For information about Tab Page, see page 81.
For information about Tab Shift, see page 83.
8 After specifying settings, click Apply to save changes.
9 Repeat steps 6 through 8 for all tabs in the job.
10 Click OK to close the Mixed Media dialog.
11 Release the job from the Hold queue.
NOTE: If you print using Tab Stock 1 as the media type for tabs, you must use single reverse
collated tabs. If you print using Tab Stock 2 as the media type for tabs, you must use single
collated tabs.
Schedule Job
SPLASH RPX-I PRODUCTION FEATURES
86
Schedule Job allows you to set a time and date to print a job.
TO SCHEDULE A JOB
1 Select a job in the Hold or Error queue and choose Schedule Job from the Jobs menu.
2 Select Schedule job and choose a date and time.
3 Click OK.
A clock icon appears in the Info-Detailed column next to the job name in the Hold queue.
Page 87

SPLASH RPX-I PRODUCTION FEATURES
Job Error
If a job in the Active queue cannot print due to the copier status, an error message is displayed
and an alert sounded. The job is suspended and moved to the Error queue so that the next
job can print. You can specify how long an error message is displayed and can turn off the
sound alert in the Server tab of the Splash Server Preferences. For more information, see the
Configuration Guide.
Resume Printing
Resume Printing allows you to resume printing a job that has been suspended and moved to
the Error queue. When you select Resume Printing, the job prints from where it left off.
For a collated document, printing resumes at the start of the set.
TO RESUME A PRINT JOB
• Select the suspended job in the Error queue and select Resume Printing from the Jobs menu.
87
Restart Printing
Restart Printing reprints the job from the beginning, regardless of the error condition of any
previous print.
TO RESTART A PRINT JOB
• Select your job and drag it to the Active queue.
Page 88

SPLASH SERVER REMOTE
SPLASH SERVER REMOTE
The Splash Server Remote allows you to view and manage the Splash RPX-i from a remote
Mac OS X workstation. It is intended as an administrative tool. Most features are available
when you log on with Administrator privileges. If you are not logged on with Administrator
privileges, you can view server status, print queues, and job options.
To use the Splash Server Remote application, you must first install the software on a
Mac OS X v10.4 computer.
NOTE: Splash Server Remote is only supported on Mac OS X v.10.4.
For more information about installing Splash Server Remote and connecting to a
Splash RPX-i, see Getting Started.
88
Page 89

SPLASH SERVER REMOTE
Using Splash Server Remote
Splash Server Remote provides the same interface as that on the Splash RPX-i server
computer. It makes most of the features of the Splash RPX-i available for remote
administrators.
When Splash Server Remote is running, you can switch the connection to a different
Splash RPX-i using the Connect to Server menu selection in the Splash Server Remote menu.
The same choices for connections are available in the Connect to Server menu selection in the
Splash Server Remote interface.
TO USE SPLASH SERVER REMOTE
1 Click the Splash Server Remote icon on the Mac OS X client computer desktop.
89
2 Select Connect to Server in the Splash Server Remote menu.
Page 90

SPLASH SERVER REMOTE
3 Select the Splash RPX-i you want to connect to in the list of Available Splash Servers, or type
the Splash RPX-i IP address in the IP address field, and click Connect.
90
You can view jobs as guest, or log on with Administrator privileges to perform administrative
functions.
NOTE: The following illustration shows the Splash Server Remote application when you log
on with Administrator privileges.
Page 91

SPLASH SERVER REMOTE
91
Splash Server Remote functions
You can access Splash RPX-i as a guest or administrator. The following table shows what
functions and settings of the Splash RPX-i are available remotely for administrator or guest
access, and what functions are unavailable under any circumstances.
Administrator functions Guest functions Functions not available
Change Preferences
Print Configuration Page
Create Document Sets
Start/Stop processing
Create Hot Folders
Change Secure Access settings
Create/delete Users
Create/delete Accounts
Change print Info settings
Change Screening Preferences
Change Color Profiles
Change Color Profile Sets
Change Output Profiles
Delete Color Profiles
Edit Job Options
Delete Jobs
Schedule Jobs
Change/create Mixed Media
settings for jobs
Hold jobs
Remove a hold on jobs
Preflight jobs
Color Postflight jobs
Show Preflight for jobs
Restart processing a job
Resume processing a job
Apply defaults to a job
Edit the default settings for jobs
Clear Color Tuner from a job
Apply Color Tuner sets to a job
Move jobs around in all queues
Move jobs to the Active queue
View Preferences
Access Remote Scan (if installed
on client computer in the
Applications folder)
View Hot Folders
View Secure Access settings
View Screening Preferences
View Color Profiles
View Color Profile Sets
View Output Profiles
View Job Options for all jobs
View Schedule Job settings
View Mixed Media settings
Move jobs around in the Hold
and Error print queues
ColorCal
Profile Loader
CopyCal
Color Tuner
Import/Export/Delete Colot
Tuner Sets
Spot Color Editor
Import/Export Color Profiles
Export Log
Tray Alignment
Page 92

SPLASH SERVER REMOTE
92
Administrator connections
An unlimited number of administrators can be connected to a Splash RPX-i through Splash
Server Remote.
Multiple administrators, both local and remote, can make changes to the same dialogs and
settings at the same time.The last change made is the one that is applied.
User connections
An unlimited number of users can be connected through Splash Server Remote.
NOTE: When you have approximately 20 users on a 10 Mbit network, 40 users on a 100 Mbit,
or 50 users on a 1 Gbit network, server performance is impacted by 20 percent. We
recommend that you keep the number of connections low to avoid affecting Splash RPX-i
performance.
Users not logged on with Splash RPX-i Administrator privileges can view the main server
interface, job options, and preferences, but cannot make any changes. When a dialog box
appears, the OK button appears dimmed and a message informs users that they cannot save
changes until they log on with Administrator privileges.
Page 93

SCAN
SCAN
The Scan feature enables the Splash RPX-i to operate as a high-resolution color scanner.
Scan allows you to scan printed images in CMYK, RGB, or Grayscale.
You can set up mailboxes on the Splash RPX-i and initiate scans at the copier control
panel that you send to the mailboxes. You can then retrieve scans from the copier to the
Splash RPX-i, and retrieve scans over the network to client Windows and Mac OS
computers, using the Splash Remote Scan application or the Splash Remote Scan TWAIN
plug-in module.
NOTE: Scan mailboxes can also be set up on the Fiery when the Splash RPX-i is connected to
the network. You can retrieve scans from any mailbox through the Splash RPX-i or the Fiery,
regardless of which system was used to originally create the mailbox.
93
For information about installing the Splash Remote Scan software, see Getting Started.
Page 94

SCAN
Setting up mailboxes
A number of default scan mailboxes are set up on the Fiery. When the Splash RPX-i is
connected to the Fiery, a default SplashColorCal template is created on the Fiery for
calibration.
You can set up more scan mailboxes through the Splash RPX-i interface by creating users.
Those templates can be modified and deleted by deleting and modifying the user account on
the Splash RPX-i.
The default mailboxes on the Fiery are as follows:
• (color)
• (grayscale)
•(SplashColorCal)
The SplashColorCal mailbox is for Splash RPX-i calibration and should always be used for
Splash RPX-i calibration.
94
• (ColorCal)
The ColorCal mailbox is for the Fiery, and should not be used for Splash RPX-i
calibration.
To set up custom mailboxes on the Splash RPX-i, use the following procedure.
TO SET UP SCAN MAILBOXES
1 Choose Users from the Server menu.
2 In the Identity pane, click “+” to set up a new mailbox.
3Type the required information in the Name and Password fields. Retype the Password in the
Verify field.
Page 95

SCAN
4 Click the Scanning tab.
5 Select Allow scanning.
95
6 Select the desired options and click OK.
NOTE: These settings become the default settings for this mailbox. You can temporarily
change the settings at the copier for each scan. To change the defaults permanently, edit them
in the Scanning tab.
In the list of users, a checkmark is displayed in the Scan column for the mailbox you have
set up.
7To change the name or password for a mailbox, select the mailbox name in the Identity pane,
and edit the information.
The maximum number of characters allowed in the User field is 24. The maximum numbers
of characters allowed in the Password field is eight. You can add an unlimited number of
mailboxes to the Users list. However, if you try to enter a duplicate mailbox, a warning dialog
box appears, asking if you want to override an existing mailbox.
8To remove a mailbox from the list, select the mailbox name and click “-”.
Page 96

SCAN
Scanning from the copier
Scan jobs can only be initiated at the copier control panel. Scan jobs are sent to one of the
default Mailbox/Job Templates or custom Mailbox/Job Templates. Using Splash Remote
Scan, you can retrieve the scan jobs at the Splash RPX-i or over the network from client
Mac OS and Windows computers.
NOTE: You can print a scan job history report from the copier.
To scan an image to a mailbox, use the following procedure.
TO SCAN AN IMAGE
1 On the copier control panel, press the All Services button.
2 On the copier LCD screen, press Network Scanning.
3 Select the Mailbox that you want to use from the list in the Basic Scanning pane.
4 Specify specific scan settings and click Save for each pane.
96
5 Place the image you want to scan on the copier glass or place it in the automatic document
feeder (ADF).
6Press the green Start button on the control panel.
To scan multiple documents, repeat these steps for each scan. You can retrieve all of the
scanned images from the client workstation.
For more information about scanning features and settings, see the documentation that
accompanies your copier.
Page 97

SCAN
Using Splash Remote Scan
With the Splash Remote Scan application and the TWAIN plug-in module, you can retrieve
scan files on the Splash RPX-i or remotely by accessing a mailbox. You can open the scan file
in Splash Remote Scan or in a host application, such as Photoshop, and save the file to a
location of your choice.
Configuring Splash Remote Scan
The first time you start Splash Remote Scan, you must configure the connection to the
Splash RPX-i. Before you configure the connection, you must have the correct IP address.
Make sure the Splash RPX-i is registered in a Domain Name Server (DNS) on your network.
When you open Splash Remote Scan, the Scan Configuration dialog box opens. For
instructions on configuring the connection to the Splash RPX-i for the first time, see Getting
Started.
Complete instructions on configuring and modifying the connection to the Splash RPX-i are
provided in Remote Scan Help.
97
If you have previously configured a connection to the Splash RPX-i, it appears in the main
Splash Remote Scan window, and you can immediately start to initiate a scan or retrieve any
scans initiated at the copier control panel, and use the Remote Scan Help.
Retrieving a scan
After you scan a document at the copier to a selected mailbox, you can retrieve the scan from
the Splash RPX-i or from a computer on the network.
Instructions for using the Splash Remote Scan application and TWAIN plug-in module are
provided in Remote Scan Help. The following topics in Help are not applicable to Splash
Remote Scan:
• Scans cannot be initiated from Splash Remote Scan. Scanning is initiated at the copier
control panel. For more information, see “Scanning from the copier” on page 96.
• Scans cannot be sent to the multiple locations as described in the Remote Scan Help.
Page 98

SCAN
TO RETRIEVE AND SEND A SCAN FILE
1 On the Splash RPX-i server computer, click Scan in the toolbar or choose Scan from the
File menu.
On a client computer, start the Splash Remote Scan application, or open the TWAIN compliant
application, such as Photoshop or Acrobat.
If you opened the TWAIN-compliant application, select Splash Remote Scan as the
import device.
2 Select the Splash RPX-i in the Configuration dialog box and click OK.
3Type the name of the mailbox to which you scanned the file at the copier.
NOTE: Using guest as a mailbox name gets you access to both guest_color and guest_grayscale.
4 Click Refresh.
All scan jobs in the selected mailbox are displayed.
5 Select the scan you want to save and click Send.
98
6 In the Send dialog box, select Save to Disk and browse to the location where you want to save
the file.
7 Choose either PDF or JPEG from the File Format list.
NOTE: Choosing JPEG for multipage documents results in one file per page. Selecting PDF
generates a single document containing all pages.
8 Click Send to save the file.
Page 99

WEB QUEUE MANAGER
WEB QUEUE MANAGER
The Web Queue Manager installed with the Splash RPX-i server software allows remote users
on a TCP/IP network to view and control print jobs at the Splash RPX-i.
With Web Queue Manager, you can perform the following functions:
•Review the status of print jobs sent to the Splash RPX-i.
•Hold print jobs.
•Release held print jobs.
•Review and change print options for a job in the Print queue.
For information about configuring the Splash RPX-i to allow remote users to connect to it,
see the Configuration Guide.
99
Page 100

WEB QUEUE MANAGER
Using the Web Queue Manager
The following procedure describes how to manage jobs remotely using the Web Queue
Manager.
TO USE THE WEB QUEUE MANAGER
1 Start your web browser application (Safari or Microsoft Internet Explorer).
2 In the Web browser, enter the IP address for the Splash RPX-i.
Contact your administrator for the IP address.
The Web Queue Manager appears in the browser application window.
100
A list of jobs waiting to print at the Splash RPX-i appears, along with information about the
printer and any errors that might have occurred at the printer.
 Loading...