

Page 1

Scan Out
Services
DocuColor 250
User Guide
Part number
June 2005
Page 2

Prepared by:
Xerox Corporation
Global Knowledge and Language Services
800 Phillips Road, Bldg. 0845-17S
Webster, New York 14580-9791
USA
©2005 by Xerox Corporation. All rights reserved.
Copyright protection claimed includes all forms and matters of copyrightable material and information now allowed by statutory judicial law
or hereinafter granted, including without limitation, material generated from the software programs which are displayed on the screen such
as icons, screen displays, looks, etc.
Printed in the United States of America.
XEROX® and all Xerox product names mentioned in this publication are trademarks of XEROX CORPORATION. Other company
trademarks are also acknowledged.
PANTONE is a registered trademark of Pantone, Inc.
Changes are periodically made to this document. Changes, technical inaccuracies, and typographic errors will be corrected in subsequent
editions.
Page 3

Table of Contents
Introduction
About this guide . . . . . . . . . . . . . . . . . . . . . . . . . . . . . . . . . . . . . . . . . . . . . . . . . . . . . vii
Contents . . . . . . . . . . . . . . . . . . . . . . . . . . . . . . . . . . . . . . . . . . . . . . . . . . . . . . vii
Conventions . . . . . . . . . . . . . . . . . . . . . . . . . . . . . . . . . . . . . . . . . . . . . . . . . . .viii
Documentation . . . . . . . . . . . . . . . . . . . . . . . . . . . . . . . . . . . . . . . . . . . . . . . . . . . . . . .ix
DocuColor 250 . . . . . . . . . . . . . . . . . . . . . . . . . . . . . . . . . . . . . . . . . . . . . . . . . .ix
DocuSP 50.xx . . . . . . . . . . . . . . . . . . . . . . . . . . . . . . . . . . . . . . . . . . . . . . . . . . .ix
1 Overview
About the Scan Out Feature. . . . . . . . . . . . . . . . . . . . . . . . . . . . . . . . . . . . . . . . . 1-1
Setup for the Scan Out. . . . . . . . . . . . . . . . . . . . . . . . . . . . . . . . . . . . . . . . . . . . . 1-1
Hardware Requirements . . . . . . . . . . . . . . . . . . . . . . . . . . . . . . . . . . . . . . . 1-1
Software Requirements . . . . . . . . . . . . . . . . . . . . . . . . . . . . . . . . . . . . . . . . 1-2
HTTP Gateway License. . . . . . . . . . . . . . . . . . . . . . . . . . . . . . . . . . . . . . . . 1-2
2 Using Scan Services
Accessing the Web Scan Services Application . . . . . . . . . . . . . . . . . . . . . . . . . . 2-1
Using the Scan Folders and Templates Page . . . . . . . . . . . . . . . . . . . . . . . . . . . 2-3
3 Creating Templates and Folders
Creating a Scan Template and Folder . . . . . . . . . . . . . . . . . . . . . . . . . . . . . . . . . 3-1
4 Scanning Documents
Accessing the Template List. . . . . . . . . . . . . . . . . . . . . . . . . . . . . . . . . . . . . . . . . 4-1
Using the Scanning Services Touch Screen . . . . . . . . . . . . . . . . . . . . . . . . . . . . 4-3
Initiating a Scan . . . . . . . . . . . . . . . . . . . . . . . . . . . . . . . . . . . . . . . . . . . . . . . . . . 4-4
Scanning using the Document Handler . . . . . . . . . . . . . . . . . . . . . . . . . . . . 4-5
Scanning from the Document Glass . . . . . . . . . . . . . . . . . . . . . . . . . . . . . . 4-6
Retrieving your Scanned Images . . . . . . . . . . . . . . . . . . . . . . . . . . . . . . . . . . . . . 4-7
5 Managing Templates and Folders
Listing Templates and Folders . . . . . . . . . . . . . . . . . . . . . . . . . . . . . . . . . . . . . . . 5-1
Editing Templates. . . . . . . . . . . . . . . . . . . . . . . . . . . . . . . . . . . . . . . . . . . . . . . . . 5-2
Basic Scanning . . . . . . . . . . . . . . . . . . . . . . . . . . . . . . . . . . . . . . . . . . . . . . 5-4
File Format . . . . . . . . . . . . . . . . . . . . . . . . . . . . . . . . . . . . . . . . . . . . . 5-4
Color Mode . . . . . . . . . . . . . . . . . . . . . . . . . . . . . . . . . . . . . . . . . . . . . 5-5
2 Sided Originals . . . . . . . . . . . . . . . . . . . . . . . . . . . . . . . . . . . . . . . . 5-6
Original Type . . . . . . . . . . . . . . . . . . . . . . . . . . . . . . . . . . . . . . . . . . . 5-6
DocuColor 250 Scan Out Services iii
Page 4

Image Quality. . . . . . . . . . . . . . . . . . . . . . . . . . . . . . . . . . . . . . . . . . . . . . . . 5-6
Lighten / Darken . . . . . . . . . . . . . . . . . . . . . . . . . . . . . . . . . . . . . . . . . 5-7
Contrast . . . . . . . . . . . . . . . . . . . . . . . . . . . . . . . . . . . . . . . . . . . . . . . 5-7
Auto-Exposure . . . . . . . . . . . . . . . . . . . . . . . . . . . . . . . . . . . . . . . . . . 5-7
Sharpness . . . . . . . . . . . . . . . . . . . . . . . . . . . . . . . . . . . . . . . . . . . . . 5-7
Scan Options . . . . . . . . . . . . . . . . . . . . . . . . . . . . . . . . . . . . . . . . . . . . . . . . 5-8
Scan Resolution . . . . . . . . . . . . . . . . . . . . . . . . . . . . . . . . . . . . . . . . . 5-8
Scan Size . . . . . . . . . . . . . . . . . . . . . . . . . . . . . . . . . . . . . . . . . . . . . . 5-8
Reduce / Enlarge . . . . . . . . . . . . . . . . . . . . . . . . . . . . . . . . . . . . . . . . 5-9
2 Sided Originals . . . . . . . . . . . . . . . . . . . . . . . . . . . . . . . . . . . . . . . . 5-9
Mixed Size Originals . . . . . . . . . . . . . . . . . . . . . . . . . . . . . . . . . . . . . . 5-9
Output Format . . . . . . . . . . . . . . . . . . . . . . . . . . . . . . . . . . . . . . . . . . . . . . 5-10
Document Object Name . . . . . . . . . . . . . . . . . . . . . . . . . . . . . . . . . . 5-10
Image File Name . . . . . . . . . . . . . . . . . . . . . . . . . . . . . . . . . . . . . . . 5-10
Duplicate Document Name Policy . . . . . . . . . . . . . . . . . . . . . . . . . . 5-11
Job Log . . . . . . . . . . . . . . . . . . . . . . . . . . . . . . . . . . . . . . . . . . . . . . . 5-11
Copying Templates and Folders. . . . . . . . . . . . . . . . . . . . . . . . . . . . . . . . . . . . . 5-12
Renaming Templates and Folders . . . . . . . . . . . . . . . . . . . . . . . . . . . . . . . . . . . 5-13
Deleting Templates and Folders. . . . . . . . . . . . . . . . . . . . . . . . . . . . . . . . . . . . . 5-15
Managing Your Scanned Images. . . . . . . . . . . . . . . . . . . . . . . . . . . . . . . . . . . . 5-17
Downloading your Images . . . . . . . . . . . . . . . . . . . . . . . . . . . . . . . . . . . . . 5-17
Deleting your Images. . . . . . . . . . . . . . . . . . . . . . . . . . . . . . . . . . . . . . . . . 5-18
6 Administrator Functions
Listing All Templates and Folders . . . . . . . . . . . . . . . . . . . . . . . . . . . . . . . . . . . . 6-1
Setting Template Defaults . . . . . . . . . . . . . . . . . . . . . . . . . . . . . . . . . . . . . . . . . . 6-2
Basic Scanning . . . . . . . . . . . . . . . . . . . . . . . . . . . . . . . . . . . . . . . . . . . . . . 6-4
File Format . . . . . . . . . . . . . . . . . . . . . . . . . . . . . . . . . . . . . . . . . . . . . 6-4
Color Mode . . . . . . . . . . . . . . . . . . . . . . . . . . . . . . . . . . . . . . . . . . . . . 6-5
2 Sided Originals . . . . . . . . . . . . . . . . . . . . . . . . . . . . . . . . . . . . . . . . 6-6
Original Type . . . . . . . . . . . . . . . . . . . . . . . . . . . . . . . . . . . . . . . . . . . 6-6
Image Quality. . . . . . . . . . . . . . . . . . . . . . . . . . . . . . . . . . . . . . . . . . . . . . . . 6-7
Lighten / Darken . . . . . . . . . . . . . . . . . . . . . . . . . . . . . . . . . . . . . . . . . 6-7
Contrast . . . . . . . . . . . . . . . . . . . . . . . . . . . . . . . . . . . . . . . . . . . . . . . 6-7
Auto-Exposure . . . . . . . . . . . . . . . . . . . . . . . . . . . . . . . . . . . . . . . . . . 6-8
Sharpness . . . . . . . . . . . . . . . . . . . . . . . . . . . . . . . . . . . . . . . . . . . . . 6-8
Scan Options . . . . . . . . . . . . . . . . . . . . . . . . . . . . . . . . . . . . . . . . . . . . . . . . 6-9
Scan Resolution . . . . . . . . . . . . . . . . . . . . . . . . . . . . . . . . . . . . . . . . . 6-9
Scan Size . . . . . . . . . . . . . . . . . . . . . . . . . . . . . . . . . . . . . . . . . . . . . 6-10
Reduce / Enlarge . . . . . . . . . . . . . . . . . . . . . . . . . . . . . . . . . . . . . . . 6-10
iv DocuColor 250 Scan Out Services
Page 5

Output Format . . . . . . . . . . . . . . . . . . . . . . . . . . . . . . . . . . . . . . . . . . . . . . 6-11
Restoring Default Settings . . . . . . . . . . . . . . . . . . . . . . . . . . . . . . . . . . . . . . . . . 6-14
Maintaining the Scan Service Disk. . . . . . . . . . . . . . . . . . . . . . . . . . . . . . . . . . . 6-15
Setting Scan Job Deletion Options . . . . . . . . . . . . . . . . . . . . . . . . . . . . . . 6-15
Cleaning the Scan Service Disk. . . . . . . . . . . . . . . . . . . . . . . . . . . . . . . . . 6-17
7 Appendix
GNU Lesser General Public License . . . . . . . . . . . . . . . . . . . . . . . . . . . . . . . . . . 7-1
Preamble . . . . . . . . . . . . . . . . . . . . . . . . . . . . . . . . . . . . . . . . . . . . . . . . . . . 7-1
Terms and Conditions for Copying, Distribution and Modification . . . . . . . . . . . . 7-3
2 Sided Originals . . . . . . . . . . . . . . . . . . . . . . . . . . . . . . . . . . . . . . . 6-10
Mixed Size Originals . . . . . . . . . . . . . . . . . . . . . . . . . . . . . . . . . . . . . 6-11
Document Object Name . . . . . . . . . . . . . . . . . . . . . . . . . . . . . . . . . . 6-12
Image File Name . . . . . . . . . . . . . . . . . . . . . . . . . . . . . . . . . . . . . . . 6-12
Duplicate Document Name Policy . . . . . . . . . . . . . . . . . . . . . . . . . . 6-12
Job Log . . . . . . . . . . . . . . . . . . . . . . . . . . . . . . . . . . . . . . . . . . . . . . . 6-13
Checking System Disk Properties . . . . . . . . . . . . . . . . . . . . . . . . . . 6-17
Deleting Scan Files . . . . . . . . . . . . . . . . . . . . . . . . . . . . . . . . . . . . . . 6-17
Index
DocuColor 250 Scan Out Services v
Page 6

vi DocuColor 250 Scan Out Services
Page 7

About this guide
Contents
Introduction
This document provides information on how to use the Scan Out
feature for the DocuColor 250 with DocuSP 50.xx DFE (Digital Front
End).
Before using this documentation, become familiar with its contents and
conventions.
This guide contains the following:
• “Introduction” (this chapter) provides information about how to use
the guide; describes the conventions used; and gives references to
other sources of information relevant to the system.
• Chapter 1, “Overview,” provides an overview of the system; and
identifies the licensing, hardware, and software requirements.
• Chapter 2, “Using Scan Services,” provides information on how to
access the Web Scan Services Application and gives an overview
of its components.
• Chapter 3, “Creating Templates and Folders,” provides step-bystep instructions on creating templates and folders.
• Chapter 4, “Scanning Documents,” provides step-by-step
instructions on how to initiate and complete a scan job, and how to
retrieve your scanned images.
• Chapter 5, “Managing Templates and Folders,” provides step-bystep instructions on editing and managing templates and managing
image files.
• Chapter 6, “Administrator Functions,” provides information on
setting template defaults, maintaining the scan service disk, and
setting scan job deletion options.
• Chapter 7, “Appendix,” provides the terms and conditions of the
GNU Lesser General Public License (LGPL ).
• An index is provided at the end of this document.
DocuColor 250 Scan Out Services vii
Page 8

Introduction
Conventions
This guide uses the following conventions:
• Initial capital and square brackets: Names of buttons on the user
interface are shown with an initial capital and within square brackets
(for example, click [Close]).
• Bold: Names of folders, tabs, dialog boxes, and screens are shown
in bold. (for example, the Image Quality tab).
• Italics: Document and library names are shown in italics (for
example, the Xerox DocuPrint NPS/IPS Guide to Managing Print
Jobs).
NOTE: Notes are hints that help you perform a task or understand the
text.
CAUTION: Cautions alert you to actions that could damage hardware
or software, or cause loss of data.
WARNING: Warnings alert you to conditions that may affect the safety
of people.
viii DocuColor 250 Scan Out Services
Page 9

Documentation
DocuColor 250
Documentation
This section lists related publications.
Information for the Xerox DocuColor 250 is available in the following
publications:
• Training and Information CD (TICD) – This CD contains a multinational, interactive presentation designed to help you learn about
the functions and features available on the DocuColor 250/240. It
includes sections on Getting Started, How-Tos, Tutorials,
Maintenance, and Troubleshooting.
• Quick Start Guide – This hardcopy document provides detailed
instructions in setting up the DocuColor 250/240 for everyday use.
The Quick Start Guide includes instructions on changing paper
attributes, replacing toner cartridges, and other detailed information
that you might need to begin using your DocuColor 250/240 quickly.
DocuSP 50.xx
Information for DocuSP 50.xx is available in the following publications:
• DocuSP System Guide – This guide contains detailed information
on how to manage DocuSP, as well as instructions on how to set up
new user accounts, and how to maintain the system disk.
• DocuSP On-line Help – The DocuSP help system is available from
the DocuSP user interface.
• Color Management Guide – This guide contains information on
setting up and managing color profiles, and on obtaining uniform
color between DocuSP and the output device.
DocuColor 250 Scan Out Services ix
Page 10

Introduction
x DocuColor 250 Scan Out Services
Page 11

1 Overview
About the Scan Out Feature
The Xerox DocuColor 250 has an integrated scanner that supports a
Scan Out feature, which allows you to scan documents using scan job
templates stored on the DocuSP DFE (Digital Front End). Up to 250
templates can be stored on the DocuSP.
You can create scan job templates, manage your templates and
folders, and retrieve and manage your image files from your
workstation via DocuSP’s Web Scan Services Application.
Scanned images are transferred to image repositories, or folders, on
the DocuSP where they are stored. Using the Web Scan Services
Application you can access your folders and download your scanned
images to your local workstation.
NOTE: Users with User and Operator access rights may access only
their own templates and folders. System Administrators may access all
templates and folders.
Setup for the Scan Out
The following hardware, software, and licensing requirements must be
met before the DocuColor 250 with DocuSP Scan Out feature is
operational.
Hardware Requirements
• DocuColor 250
• DocuSP DFE with Secondary Network Interface Card (Single
Gigabit Ethernet Card) installed
• Cross-over cable to connect the DocuColor 250 to the DocuSP DFE
secondary NIC port
• Networked workstation
DocuColor 250 Scan Out Services 1-1
Page 12

Overview
Software Requirements
• DocuSP version 50.xx or above is required to manage the scan job
templates and image repository.
• Web browser – minimum version requirements:
Version
Internet
Platform
Explorer
Mozilla Firefox
Mozilla
Firefox
Netscape Safari
PC 6 1.7.8 1.0.4
Mac 1.6 1.0.4 7.1
UNIX
• Web Scan Services Application – This application is installed on the
DocuSP when the Xerox representative installs the DocuSP
software.
NOTE: DocuSP includes use of GNU source and object code, which is
subject to the terms of the GNU GPL. Please review the GNU GPL
terms and conditions to understand the restrictions under this license.
See “GNU Lesser General Public License” on page 7-1. For more
information on GNU, please go to http://www.gnu.org/licenses/gpl.txt.
HTTP Gateway License
Before the Internet Services Gateway can be enabled for the Scan Out
feature, the HTTP gateway must be licensed. The license is installed
and the gateway is enabled by the Xerox representative as part of the
DocuSP software installation.
7.1
(Mac OS
10.4)
1.03
1-2 DocuColor 250 Scan Out Services
Page 13
2 Using Scan Services
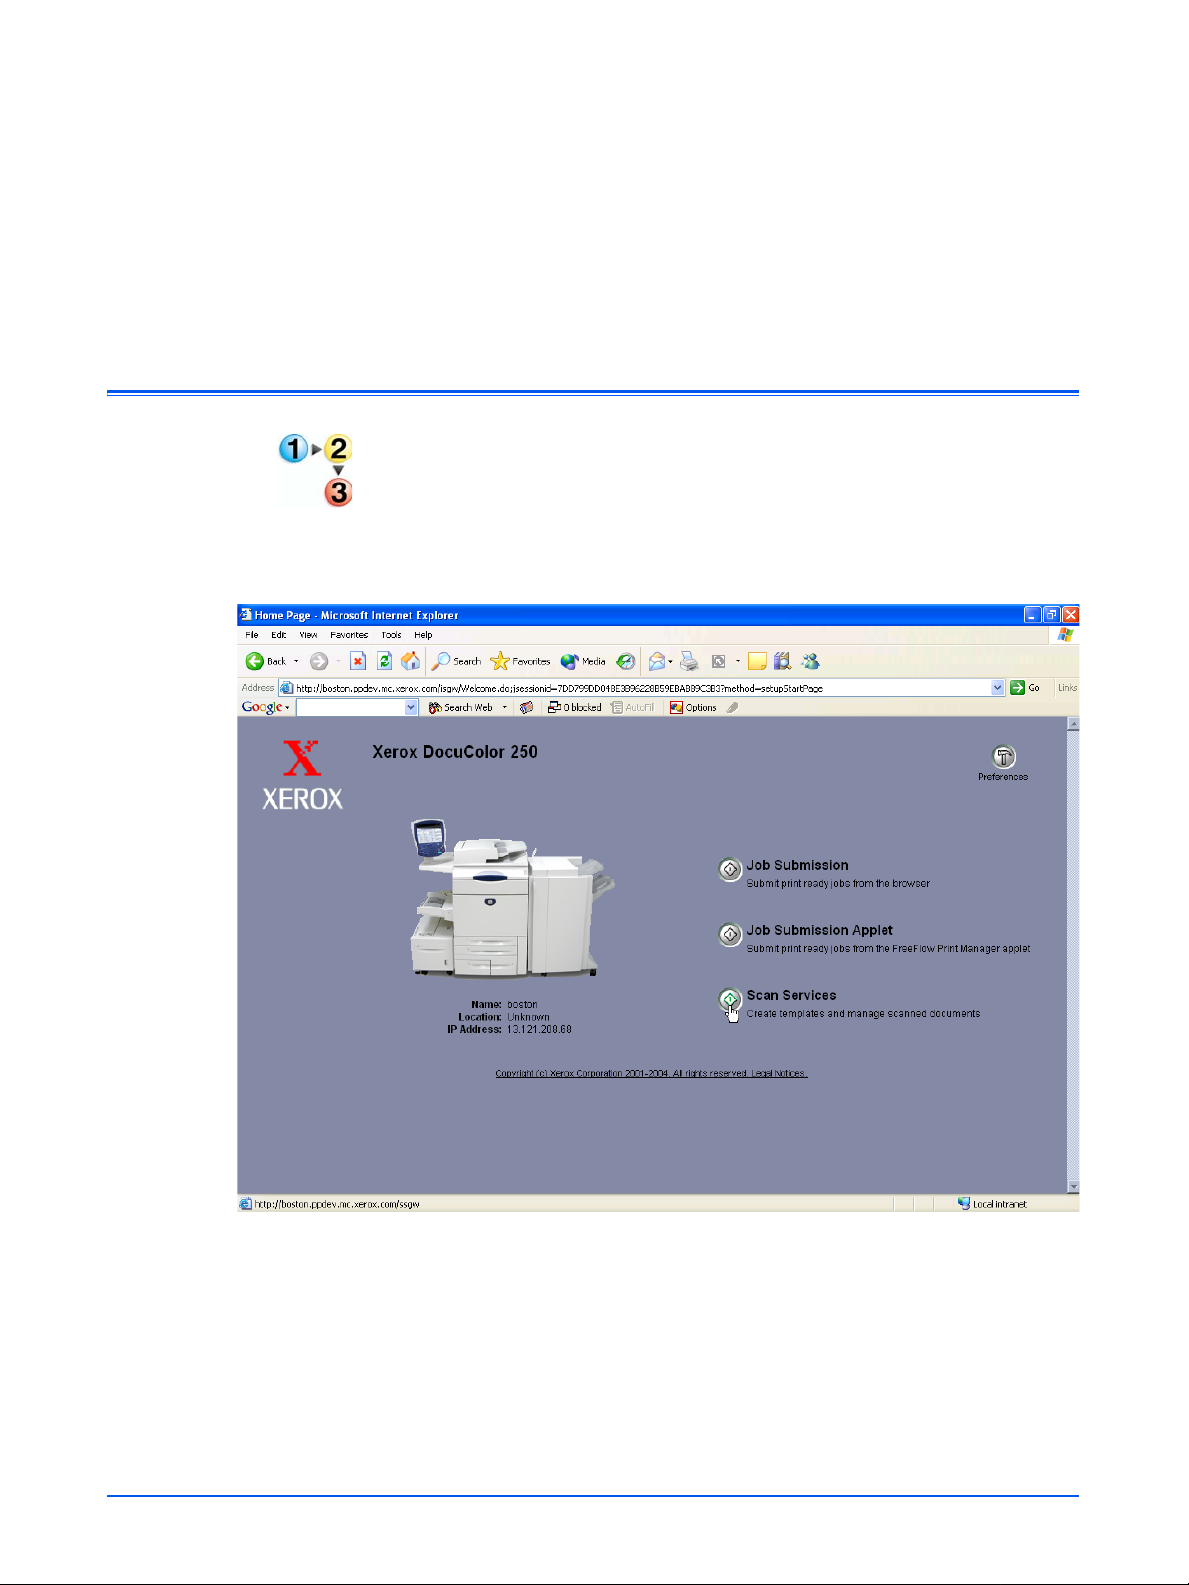
Accessing the Web Scan Services Application
At your workstation
1. Launch a Web browser such as Internet Explorer.
2. Enter the IP Address or hostname of the DocuSP DFE.
The DocuColor 250 Internet Services Home Page displays.
3. Click the [Scan Services] button.
DocuColor 250 Scan Out Services 2-1
Page 14
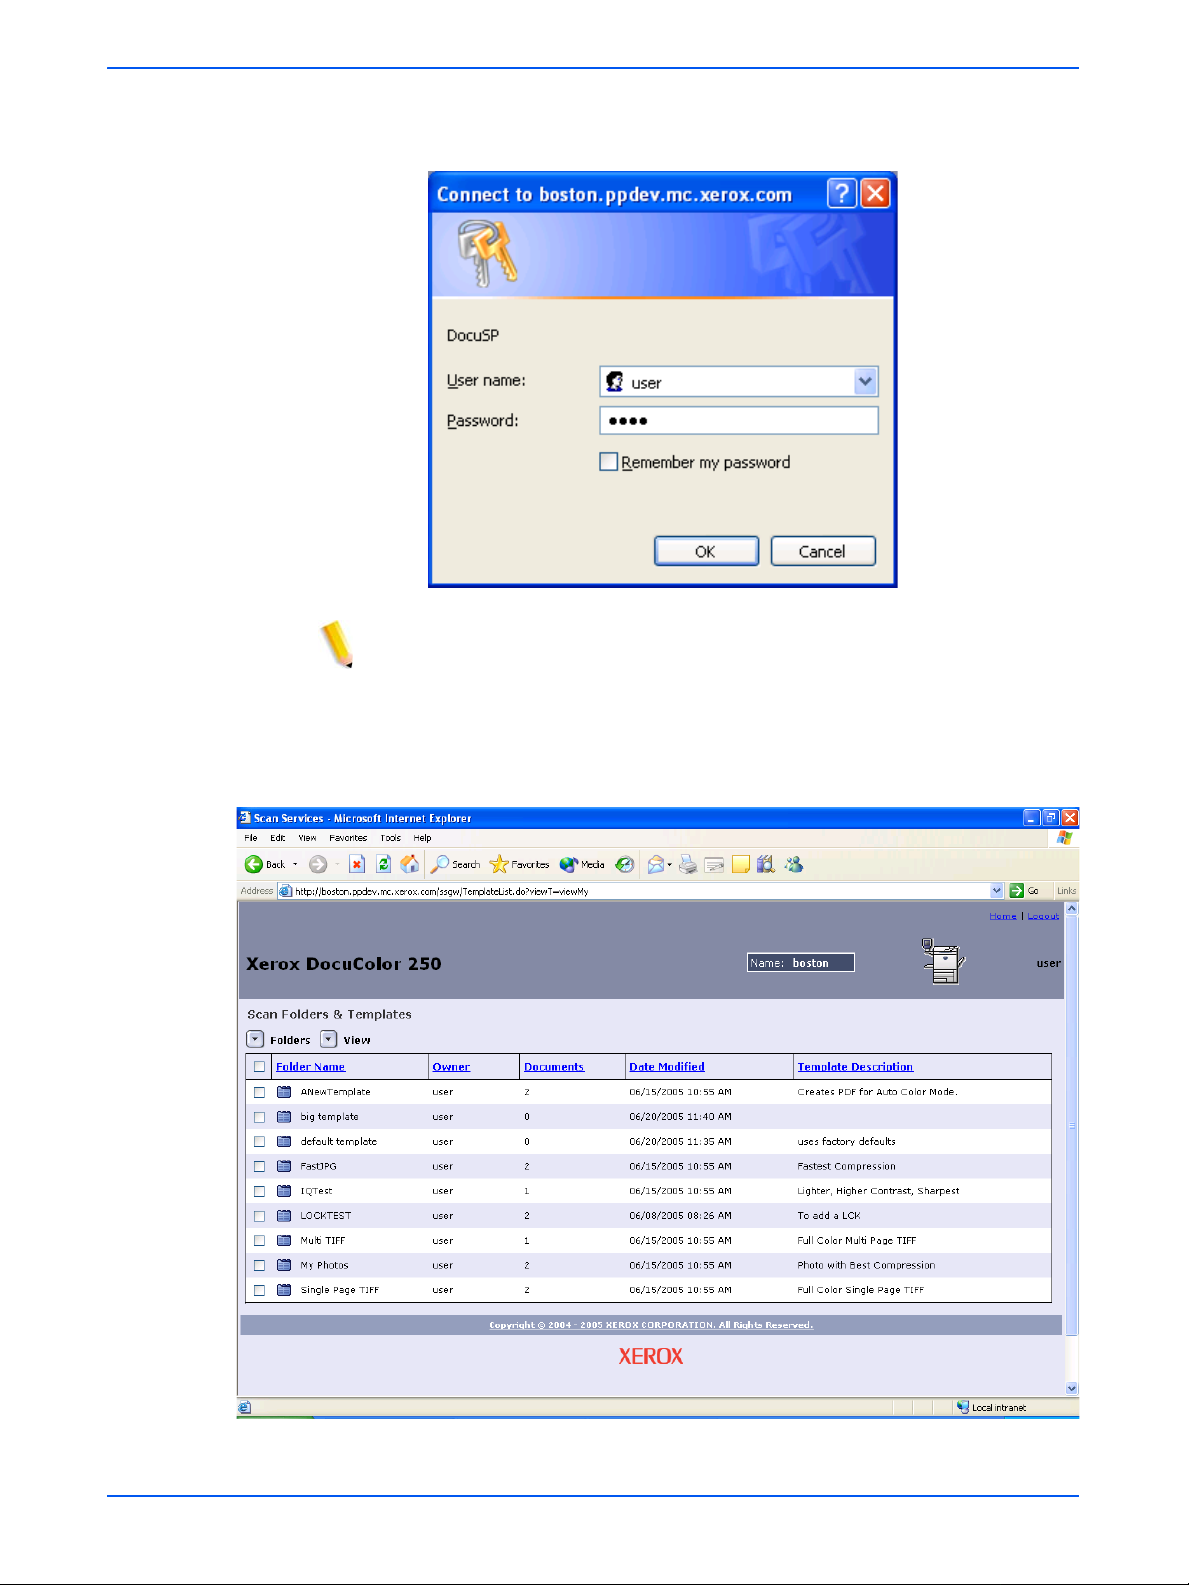
Using Scan Services
4. At the login screen enter the user name and password of an
existing DocuSP account.
NOTE: You must have a DocuSP account to use this service. If yo u do
not have an account, ask your system administrator to set one up.
5. Click [OK].
The DocuSP Web Scan Services Application opens, displaying all
Scan Folders and Templates created by the logged in user.
2-2 DocuColor 250 Scan Out Services
Page 15
Using the Scan Folders and Templates Page
NOTES:
• After 15 minutes of inactivity you will be prompted to log in again.
• For users with User and Operator access rights, only templates and
folders created by the user currently logged in are displayed. Users
with Administrator access rights have access to all templates and
folders.
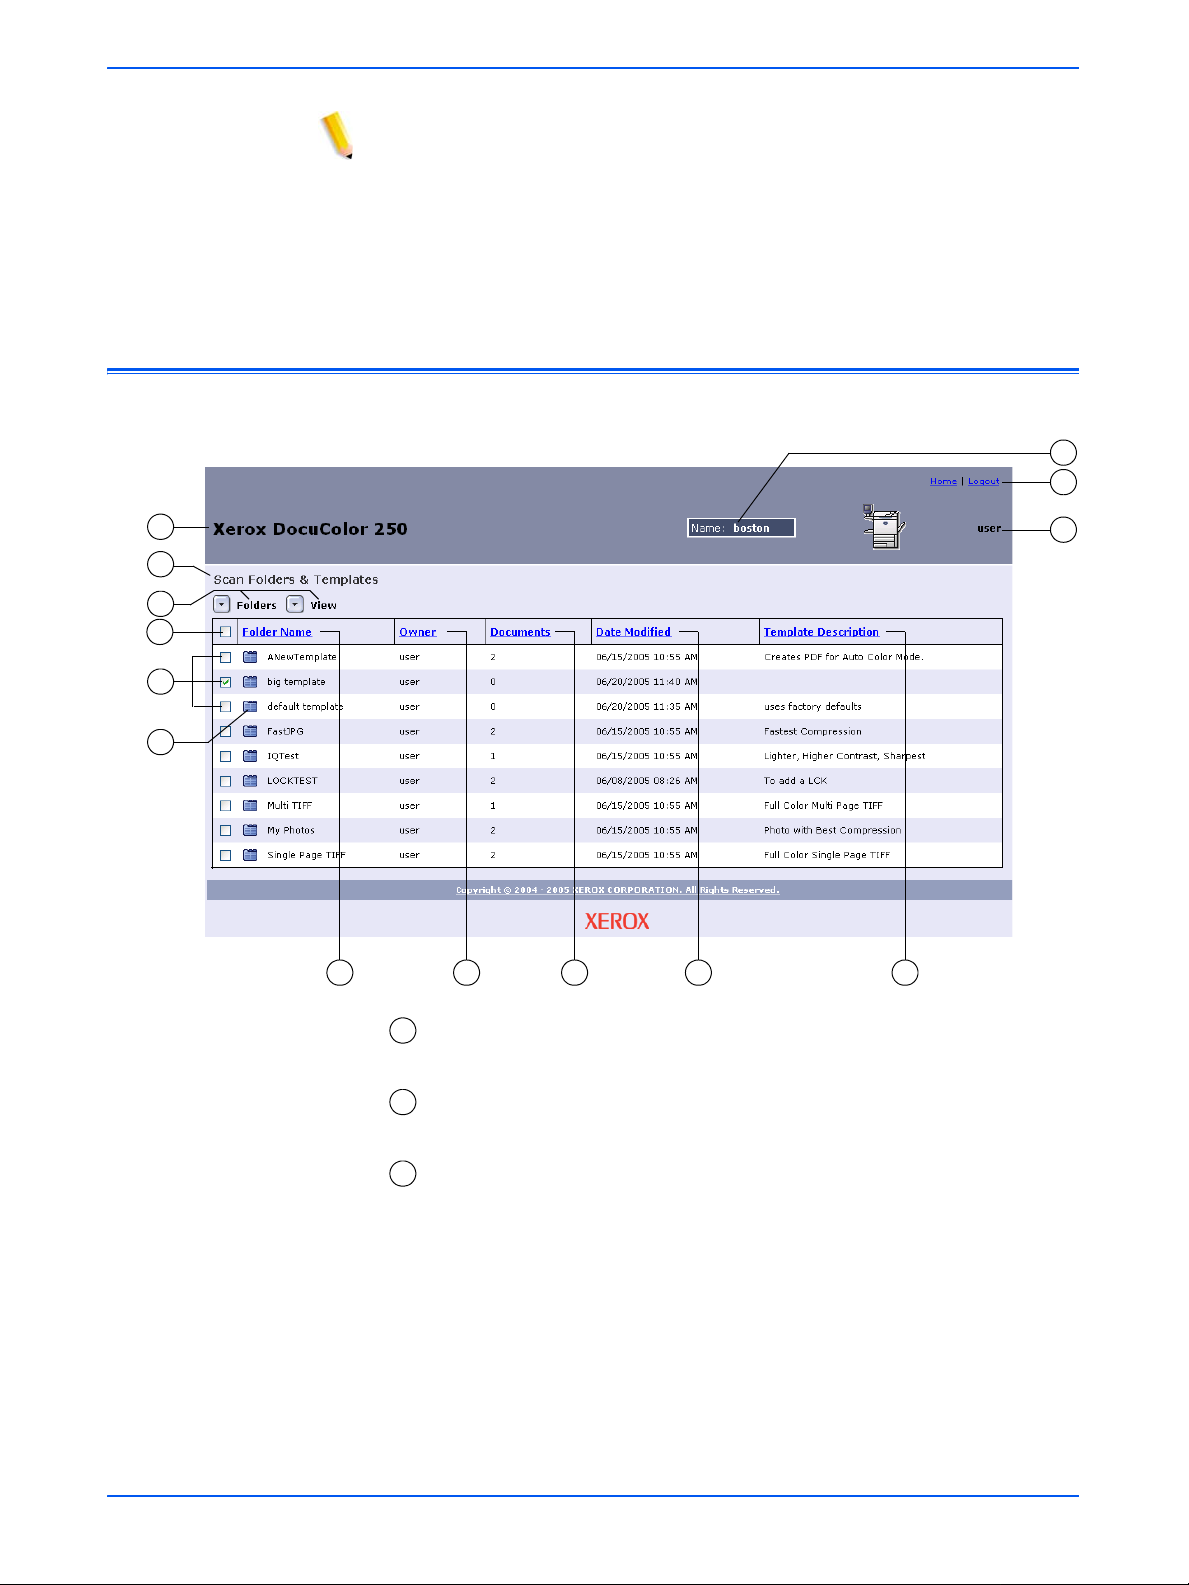
Using the Scan Folders and Templates Page
12
13
1
2
3
4
5
6
7 8 9
– Machine model – The model name of the machine from which
1
10
11
14
you initiate your scan jobs.
– Current folder – As you navigate through your folders, the folder
2
location displays here.
– Drop-down menus:
3
Folders menu
• Open Folder
•Edit Template
• New Template and Folder
• Copy Template and Folder
• Rename Template and Folder
• Delete Template and Folder
DocuColor 250 Scan Out Services 2-3
Page 16

Using Scan Services
View menu
• My Folders*
• View All*
• Redisplay – refreshes the template list
* These options appear for users with Administrator access
rights. For more information see page 6-1.
Document menu
• Open Folder*
• Save As
•Delete
*This option appears for sub-folders, or Document Folders, of
scan jobs containing multiple image files.
– Select All checkbox – Mark this checkbox to select all templates
4
or folders.
– Template / Folder selection checkboxes – Mark a checkbox to
5
select an individual template or folder.
– Template / Folder / Document icon
6
– Template / Folder
– Document Folder
– Folder Name (Template Name) – Lists template folders by name.
7
Clicking on this link changes the sort order of your templates.
Clicking repeatedly toggles between ascending and descending
order. By de fault, templates are listed by folder name in ascending
order.
– Owner – Lists templates by the DocuSP user name of the
8
template creator. For users with Administrator access rights,
clicking the link sorts templates in All Folders view by owner in
ascending alphabetical order . Clicking again sorts in descending
order. The default order is ascending.
– Documents – Displays the number of scan documents within the
9
template folder. Clicking this link sorts your template folders
according to the number of documents present within the folder.
The default order is ascending, with the fewest number of
documents listed first.
– Date Modified – Shows the date and time of the last template
10
modification. Clicking the link lists the templates in chronological
order. The default order list s oldest dates first. Clicking again sorts
by most recent date and time.
– Template Description – Shows the template description as
11
entered by the user during template creation or modification.
Clicking the link sorts the templates alphabetically by the first
word of the Template Description. The default order is ascending.
2-4 DocuColor 250 Scan Out Services
Page 17

Using the Scan Folders and Templates Page
– Server name – The name of the DocuSP server to which you are
12
logged in.
– Navigation links
13
• Home – returns you to the DocuColor 250 home page without
logging you out.
• Logout – logs you out of the Web Scan Services Application
and returns you to the DocuColor 250 home page.
• Preferences* – opens the Preferences pop-up window for setting template defaults.
* This link appears only for users with Administrator access
rights.
– User Name – The name of the user which is currently logged in to
14
the Web Scan Services Application.
DocuColor 250 Scan Out Services 2-5
Page 18

Using Scan Services
2-6 DocuColor 250 Scan Out Services
Page 19

3 Creating Templates and
Folders
Using the Web Scan Services Application at your workstation you can
create and manage your scan job templates, their corresponding
folders, and your scanned images.
Creating a Scan Template and Folder
To create a template and folder:
1. From a Web browser, access the Web Scan Services Application
and log on using an existing DocuSP account (see page 2-1).
The Scan Folders and Templates list displays.
NOTES:
• For information on setting up DocuSP accounts, refer to the
DocuSP System Guide.
• Except for accounts with Administrator access rights, only
templates and folders created by the user currently logged in are
displayed.
DocuColor 250 Scan Out Services 3-1
Page 20
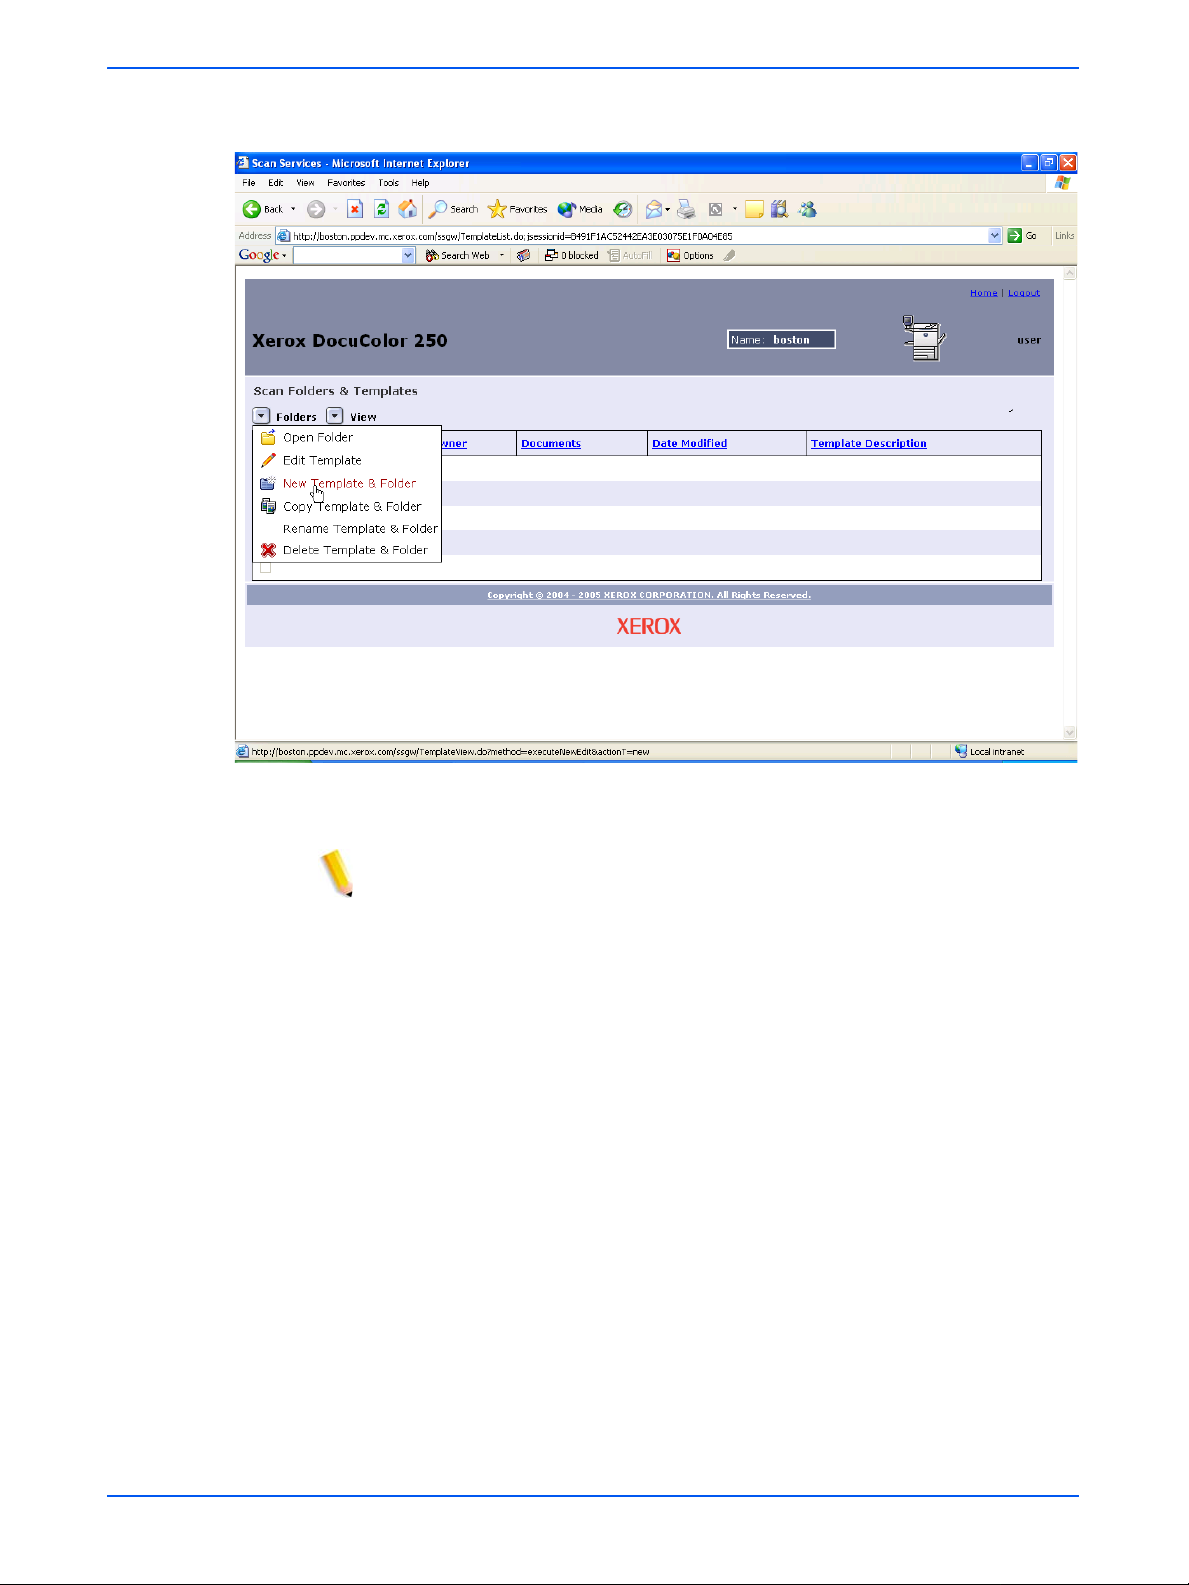
Creating Templates and Folders
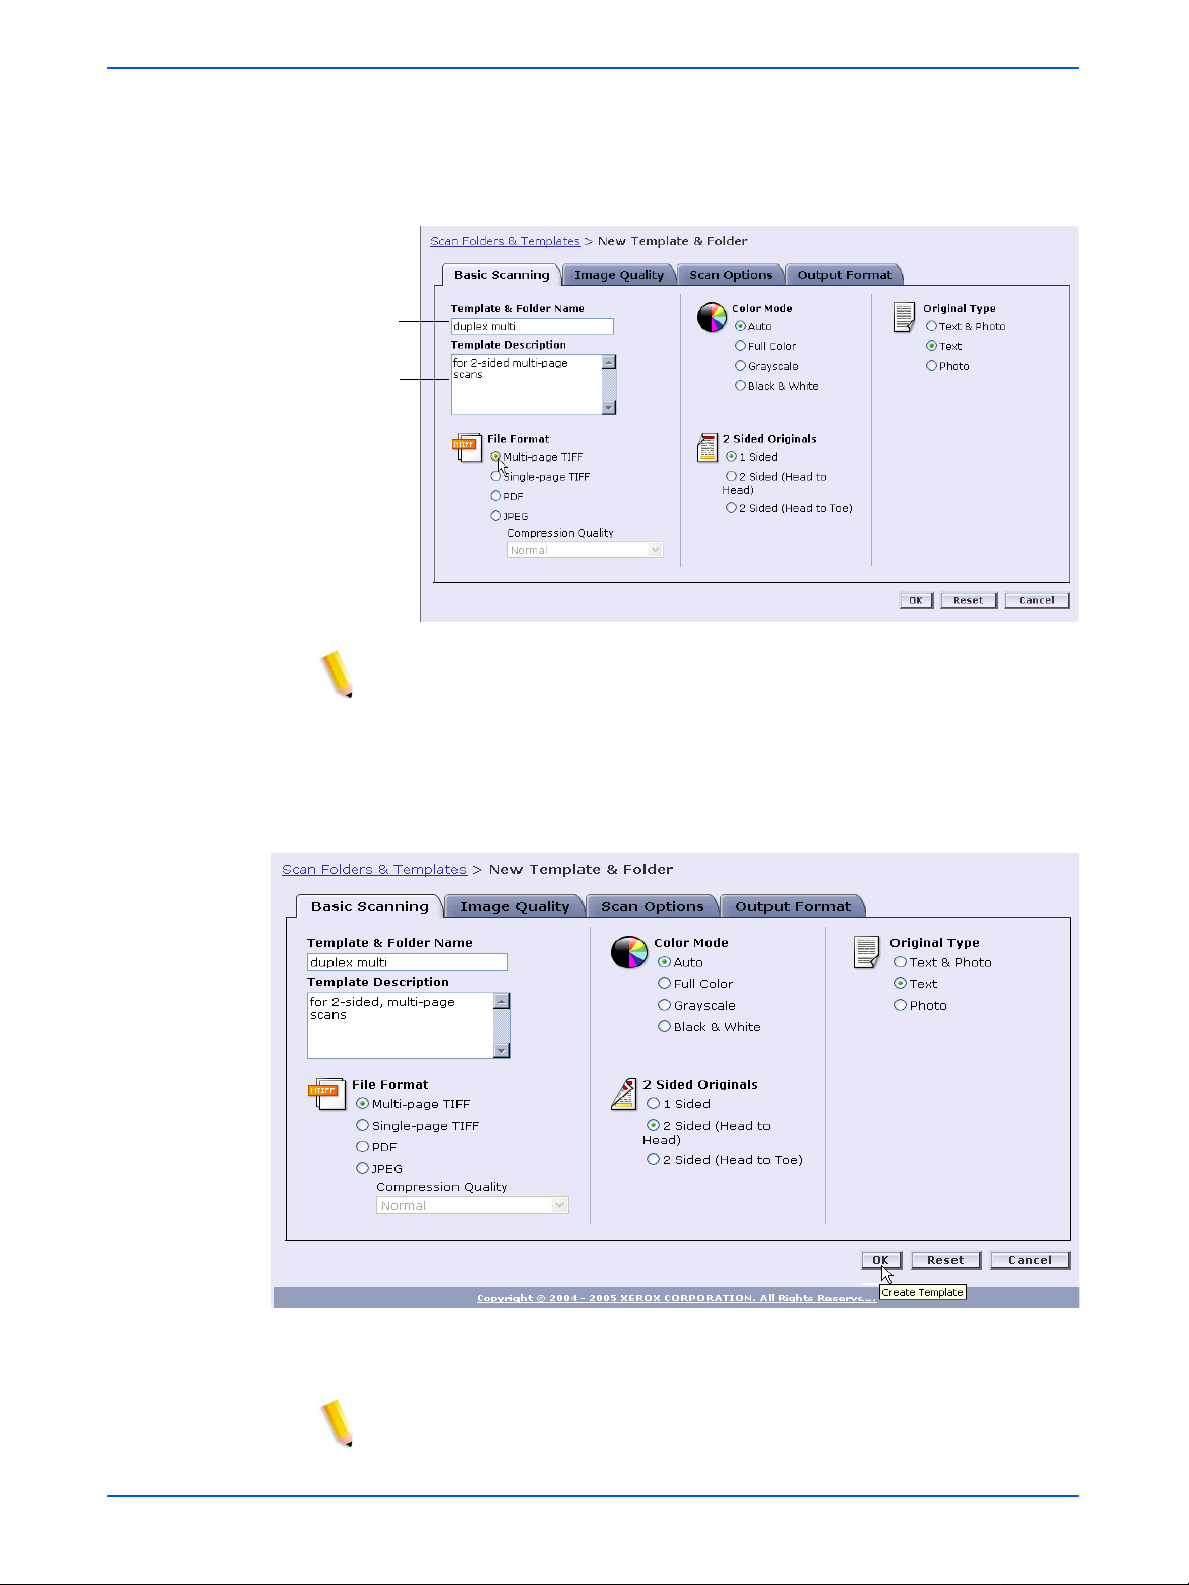
2. From the Folders menu, select New Template & Folder.
3. On the Basic Scanning tab, enter a name in the Template and
Folder Name field.
NOTES:
• The template name must be unique. If a template exists with the
name that you select, you are prompted to choose a different name.
• Template names may consist of up to 24 alpha numeric characters,
which may include spaces and underscores.
3-2 DocuColor 250 Scan Out Services
Page 21
Enter Name
Enter
Description
Creating a Scan Template and Folder
4. If you wish, you can add a description for your template in the
Template Description field. A template description is helpful for
determining the best template for your job without having to open
the template to see its properties.
NOTE: Noting the output file format in the Template Description may be
helpful in determining which template to use, as this property is not
visible at the DocuColor 250.
5. Select the settings for your template. See “Editing Templates” on
page 5-2 for more information.
6. Click [OK].
The template and its corresponding folder are created and display
in the Scan Folders & Templates list.
NOTE: You must refresh the template list at the DocuColor 250 for
newly-created templates to appear in its display.
DocuColor 250 Scan Out Services 3-3
Page 22

Creating Templates and Folders
3-4 DocuColor 250 Scan Out Services
Page 23
4 Scanning Documents
Once you have created a template you may initiate a scan job at the
DocuColor 250.
Accessing the Template List
To access the template list at the DocuColor 250:
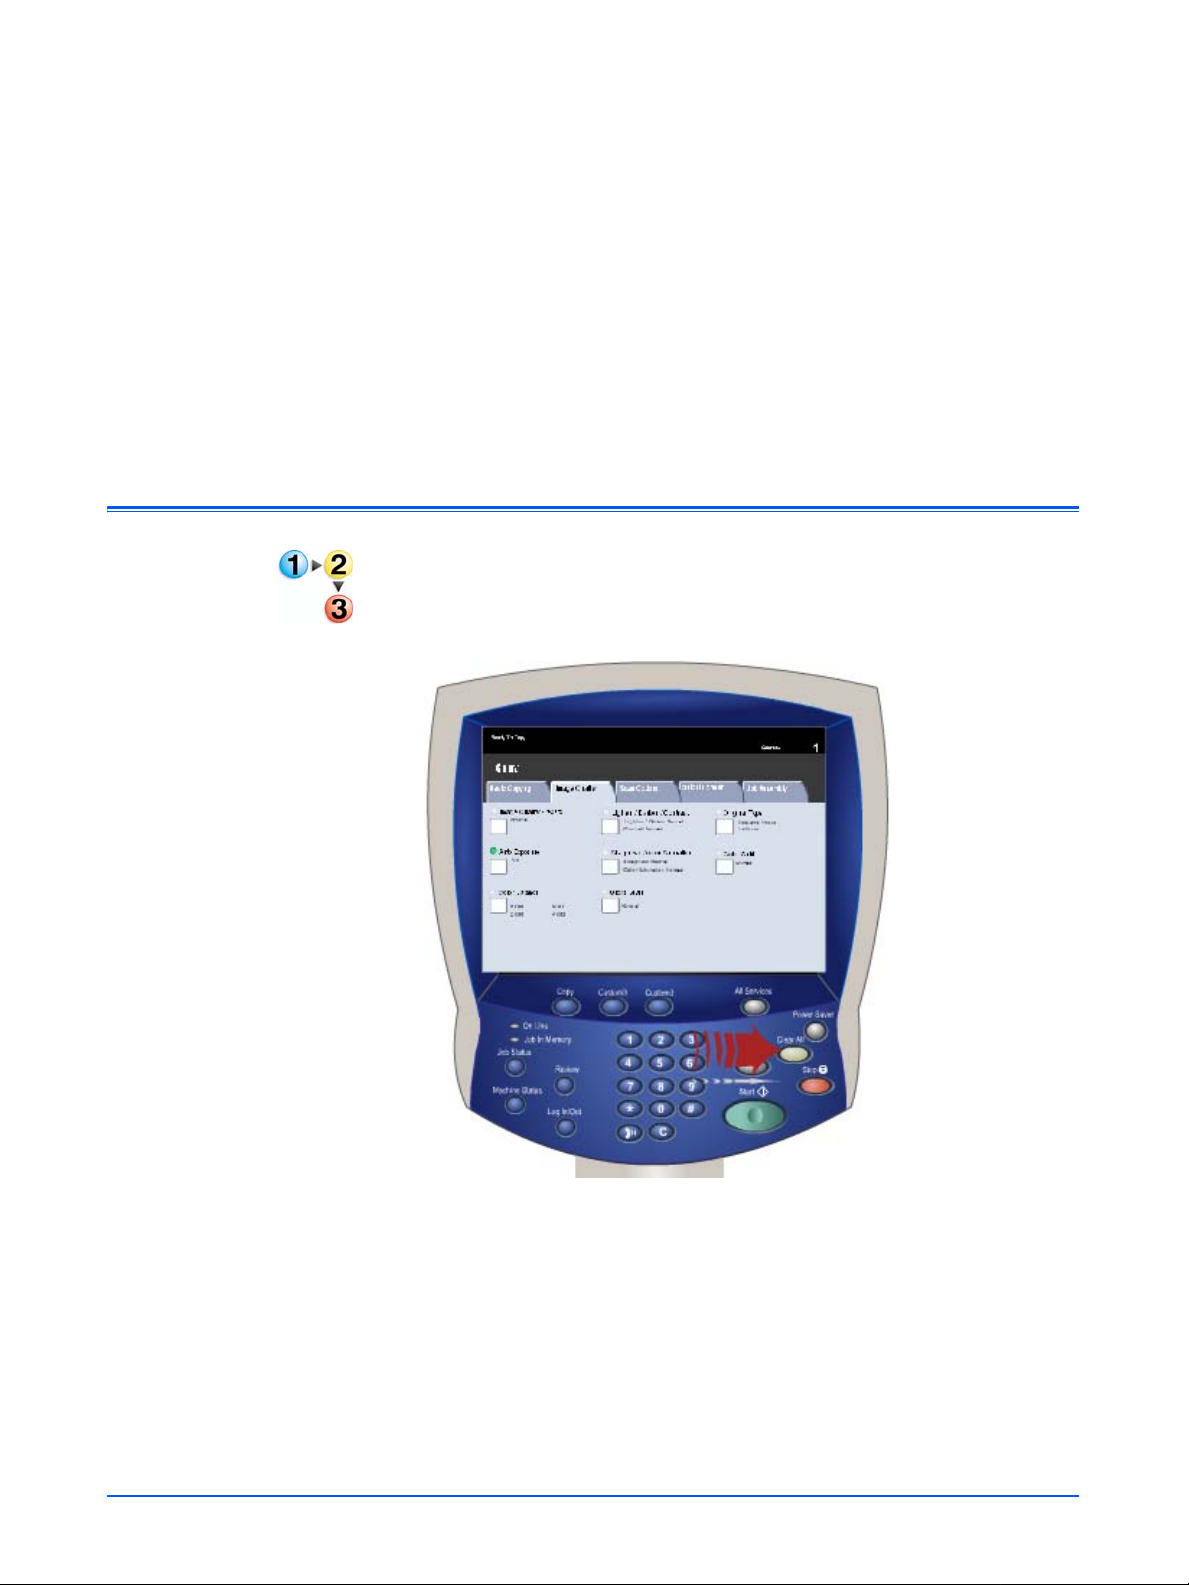
1. Press the [Clear All] button on the Control Panel to clear any
selections made by a previous user.
DocuColor 250 Scan Out Services 4-1
Page 24
Scanning Documents
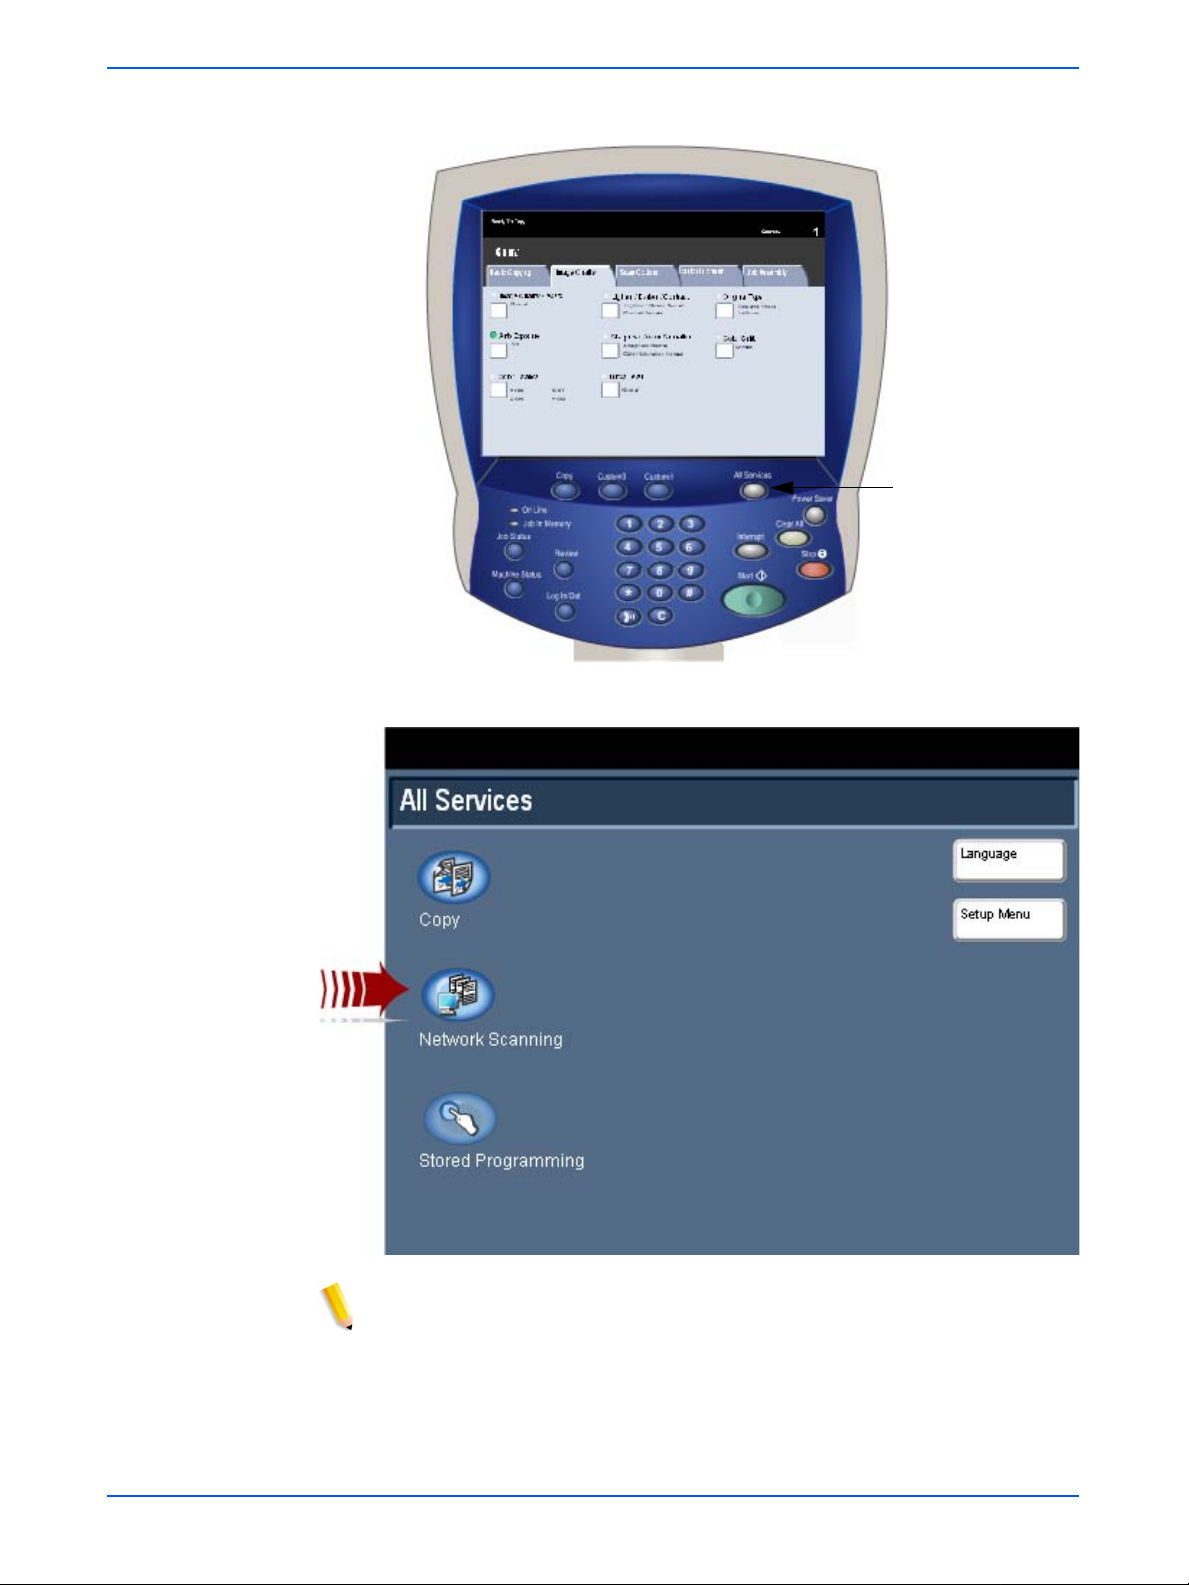
2. Press the [All Services] button on the Control Panel.
All Services
3. Touch the [Network Scanning] button on the touch screen.
NOTE: After several seconds of inactivity, the screen returns to copy
mode, and you must perform steps 2 and 3 again.
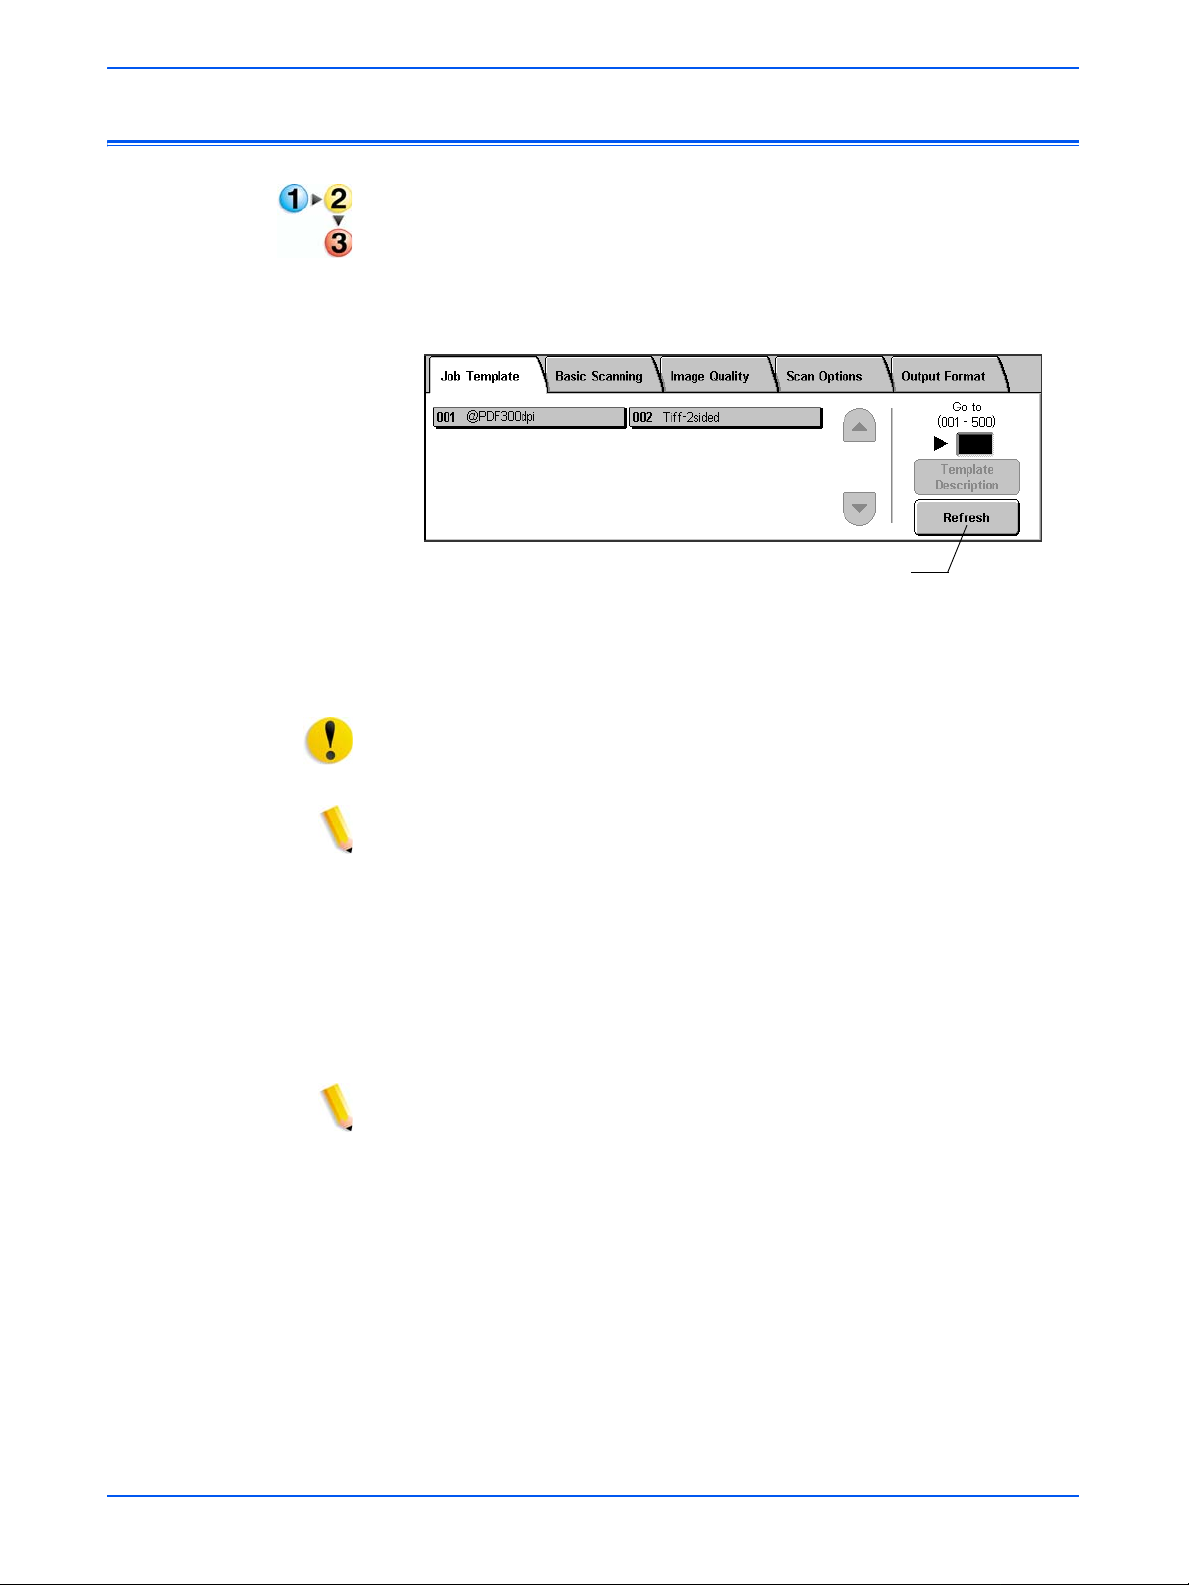
The template list displays on the Job Template tab.
4-2 DocuColor 250 Scan Out Services
Page 25
Using the Scanning Services Touch Screen
Using the Scanning Services Touch Screen
3
4
5
1
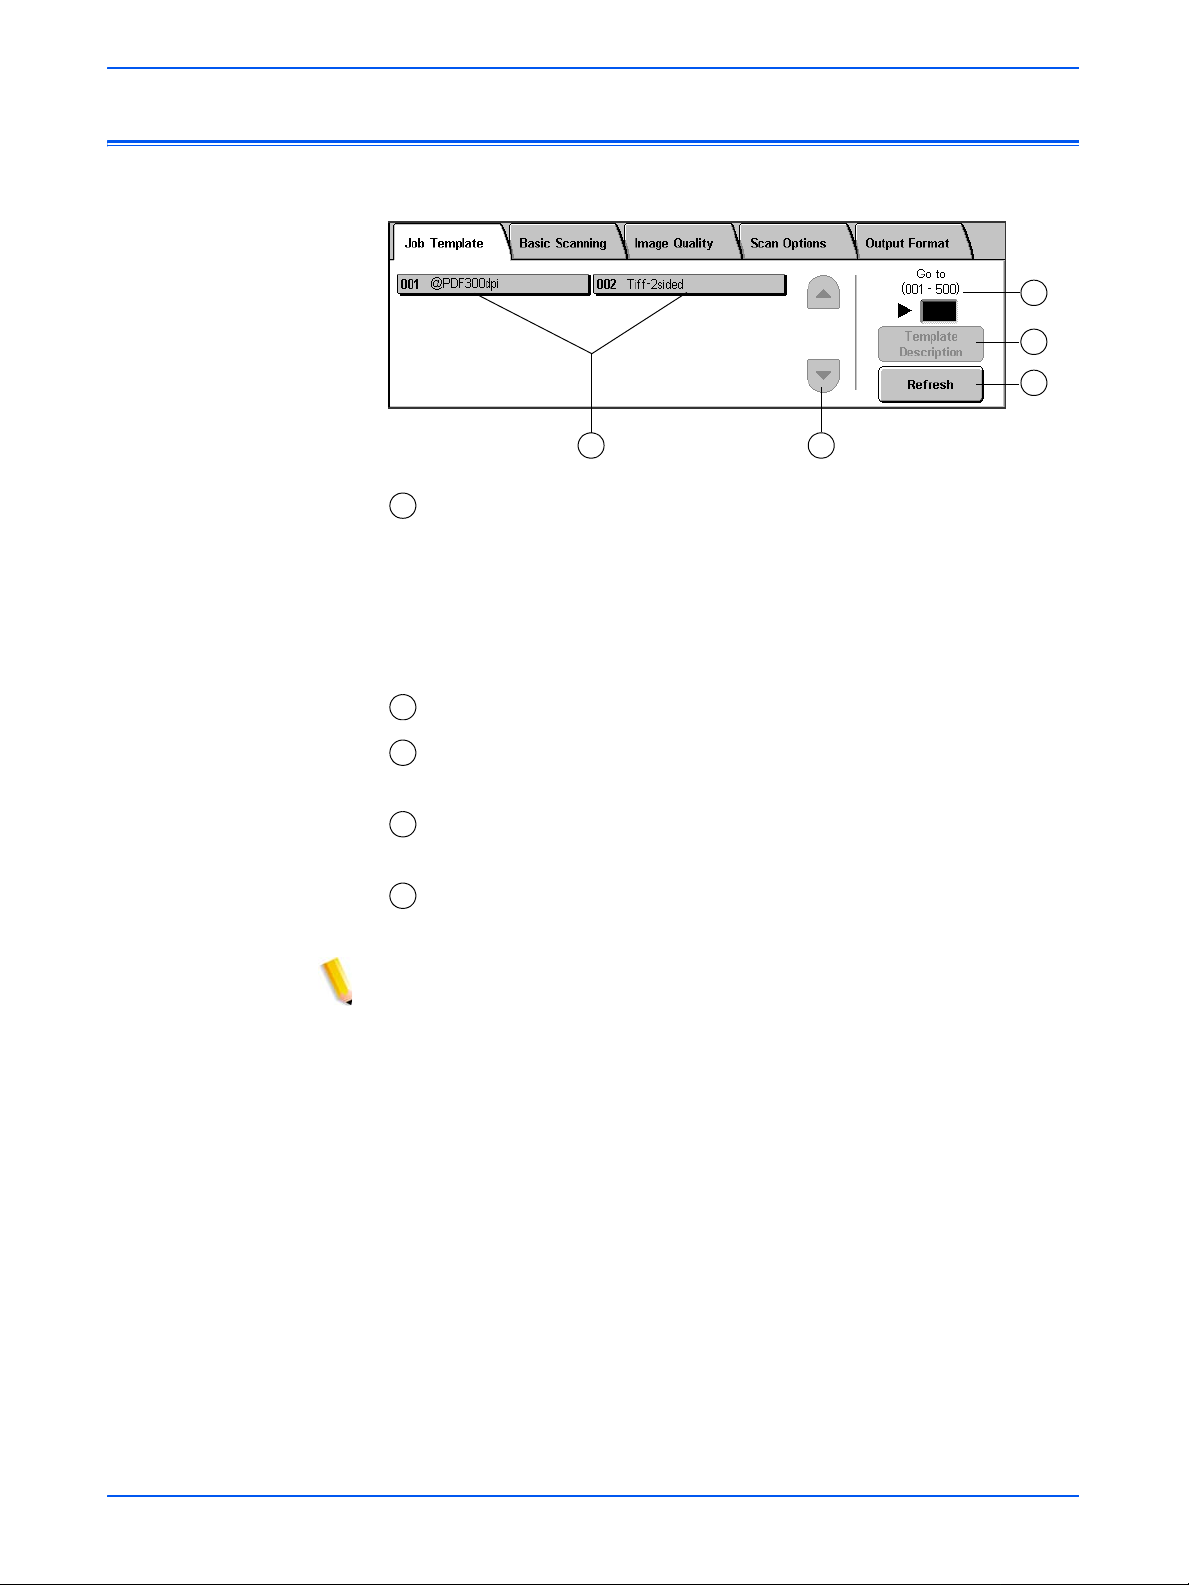
– Template list – Scan templates display here. The three-digit
1
2
number to the left of the template name is not part of the template.
These numbers are assigned sequentially to the current list of
templates, and so the number assigned to a template may change as
templates are added or deleted. You may enter these numbers in the
Go to box to advance to a particular template without having to scroll
through the list.
– Scroll bar – Use to scroll through the template list.
2
– Go to 001 - 250 – Enter a template number to display that
3
template immediately in the template list.
– Template Description – Touch this button to see the template
4
description.
– Refresh – Touch this button to refresh the template list to include
5
any new templates or modifications to existing templates.
NOTES:
• The four scan job properties tabs correspond to those in the Web
Scan Services Application.
• You may not be able to modify some op tions at the Docu Color 25 0.
If you need to modify a setting that is unavailable, you must edit the
template from the Web Scan Services Application.
• Templates with names longer than 20 characters are truncated on
the DocuColor 250 Touch Screen. Once a truncated template name
is selected, the entire template name displays at the top of the
Touch Screen.
DocuColor 250 Scan Out Services 4-3
Page 26
Scanning Documents
Initiating a Scan
To initiate your scan job:
1. If necessary, refresh the template list. This is important if you have
just created or modified the template you plan to use.
To refresh the template list, touch the [Refresh] button on the Touch
Screen.
Refresh button
2. From the list of templates, select a template of which you are the
owner, that has the appropriate settings for the scan job you wish to
initiate.
CAUTION: Be sure that you select a template created under your own
account. If you select another user’s template you may not be able to
retrieve your images from the Web Scan Services Application.
NOTE: You should always use a template that contains the attributes
that you need for your scan job. However, you may need to change
some of the scan settings for the current job. Some settings cannot be
modified at the DocuColor 250. In such cases, you can do one of the
following:
• edit the existing template (see page 5-2).
• copy the template whose attributes resemble what you need, then
make minor changes to the new template (see page 5-12).
• create a new template with the necessary attributes (see page 3-1).
NOTE: Remember, after a brief period of inactivity, the screen returns
to copy mode, and you must perform steps 2 and 3 on page 4-2 again.
3. Remove any staples and paper clips from the documents to be
scanned.
4. To scan using the Document Handler, continue to “Scanning using
the Document Handler” below.
To scan from the Document Glass go to “Scanning from the
Document Glass” on page 4-6.
4-4 DocuColor 250 Scan Out Services
Page 27

Scanning using the Document Handler
5. Load your original documents into the Document Handler long-edge
feed, with the first page on top.
Initiating a Scan
6. Press the [Start] button on the Control Panel.
Scanning begins.
7. Remove your documents from the DocuColor 250.
DocuColor 250 Scan Out Services 4-5
Page 28

Scanning Documents
Scanning from the Document Glass
5. Place your original document on the Document Glass.
6. Press the [Start] button on the Control Panel.
Scanning begins.
7. To scan more documents, touch [Next Original].
8. Remove the previous document from the glass, and place the next
document on the Document Glass.
9. Touch [Start] on the Touch Screen.
Repeat steps 7 through 9 for additional originals.
10. After scanning the last original, touch [Last Original].
11. Remove the last document from the Document Glass.
The job is output to the DocuSP.
4-6 DocuColor 250 Scan Out Services
Page 29

Retrieving your Scanned Images
To retrieve your images at your workstation:
1. From your Web browser, access the Web Scan Services
Application and log on (see page 2-1).
2. Select a folder from the list by marking its checkbox.
Retrieving your Scanned Images
3. From the Folders menu, select Open Folder.
4. If the selected output file format is Single-page TIFF or JPEG your
images are stored in a Document Folder within the template folder.
In this case, from the Document menu, select Open Folder.
DocuColor 250 Scan Out Services 4-7
Page 30

Scanning Documents
5. Select the file you want from the image and job log files by marking
the appropriate checkbox.
NOTE: Files must be downloaded individually.
6. Select Save As from the Document menu.
7. At the File Download dialog, click [Save].
4-8 DocuColor 250 Scan Out Services
Page 31

Retrieving your Scanned Images
8. Browse to the location to which you want to save the file.
9. Rename the file if desired.
10. Click [Save].
DocuColor 250 Scan Out Services 4-9
Page 32

Scanning Documents
4-10 DocuColor 250 Scan Out Services
Page 33

5 Managing Templates and
Folders
In addition to creating templates and folders, you can perform the
following functions:
• List
• Edit*
• Copy
• Rename
• Delete
*Edit applies only to templates. You cannot edit folders.
NOTE: Users with User or Operator access rights may only access and
manage their own templates and folders. Users with Administrator
access rights may access and manage all templates and folders.
Listing Templates and Folders
Each time you log on to the Web Scan Services Application, the Scan
Folders and Templates list displays. The list also displays upon
completion of edit, copy, rename, and delete functions.
NOTE: Users with User or Operator access rights can only see their
own templates and folders.Users with Administrator access rights may
list all templates and folders.
DocuColor 250 Scan Out Services 5-1
Page 34

Managing Templates and Folders
Editing Templates
You can edit templates through the Web Scan Services Application.
Modifications to a template will apply to all future scans.
NOTES:
• You must refresh the template list the DocuColor 250 for template
• You cannot edit temp lates from the DocuColor 250. However, when
To edit a template
modifications to take effect.
you invoke a template for a scan job you may change some of the
settings. The settings are used for that job only, and are recorded in
the scan log file (.xst), if the template is set to save Job Log files
(see pages 5-10 and 5-11). The template remains unaltered.
1. Log on to the Web Scan Services Application to access the
Folders and Templates list.
2. Mark the checkbox next to the template you wish to edit.
3. From the Folders menu, select Edit Template.
The following four template properties tabs display:
• Basic Scanning
• Image Quality
• Scan Options
• Output Format
Scan
5-2 DocuColor 250 Scan Out Services
Page 35

Properties tabs
Editing Templates
OK – Saves changes and redisplays the template list.
Reset – Discards changes and refreshes the current properties page.
Cancel – Discards all changes and redisplays the template list.
4. Edit your template as necessary according to the way you want
your scan jobs set up.
5. Click [OK].
NOTE: Users with User or Operator access rights can only edit their
own templates and folders. Users with Administrator access rights may
edit all templates and folders.
DocuColor 250 Scan Out Services 5-3
Page 36

Managing Templates and Folders
Basic Scanning
On the Basic Scanning tab, select from the following options:
• File Format
• Color Mode
• 2 Sided Originals
• Original Type
NOTE: The Template & Folder Name field cannot be altered.
File Format
The following output file formats are available:
• Multi-page TIFF
• Single-page TIFF
• PDF
• JPEG
NOTE: File format may not be modified at the DocuColor 250.
Multi-page TIFF
This option saves the scan job as a single file containing multiple
images.
5-4 DocuColor 250 Scan Out Services
Page 37

Editing Templates
Single-page TIFF
This option scans each page of the document and saves it as a
separate TIFF file, resulting in multiple image files. These are stored
together on the DocuSP in a sub-folder called a Document Folder.
NOTE: Do not use the Color Mode option “Auto” with this file format.
Selecting Color Mode option “Auto” causes a conflict error message.
PDF
This option saves the scan job as a single, multi-page PDF file.
JPEG
This option scans each page of the document and saves it as a
separate JPEG file, resulting in multiple image files. These are stored
together on the DocuSP in a sub-folder called a Document Folder.
When JPEG is selected, the Compression Quality drop-down list
becomes available. The following options are available:
• Fastest
• Fast
• Normal
• Good
• Best
• Fastest allows you to save your files faster , an d off ers a smaller file
size, however image quality is reduced. Best offers better image
quality , however saving your files ta kes longer , and the file sizes are
larger.
Color Mode
Select the color option you want for your scan job output. Color Mode
options are:
• Auto (can be used only with PDF)
• Full Color
• Grayscale
• Black & White (cannot be used with JPEG)
NOTE: This option may not be modified at the DocuColor 250.
DocuColor 250 Scan Out Services 5-5
Page 38

Managing Templates and Folders
2 Sided Originals
2 Sided Original options are:
• 1 Sided
• 2 Sided (Head to Head)
• 2 Sided (Head to Toe)
Original Type
Select the option that best describes the content on the original.
Original Type options are:
• Text & Photo
• Text
• Photo
NOTE: This option may only be modified at th e DocuColor 250 if PDF is
selected as the output file format.
Image Quality
On the Image Quality tab, make selections for the following options:
• Lighten / Darken
• Contrast
• Auto Exposure
• Sharpness
5-6 DocuColor 250 Scan Out Services
Page 39

Editing Templates
Lighten / Darken
This option yields lighter or darker scanned images.
Contrast
You can increase or decrease the contrast between light areas and
dark areas of your scan job output based on the contrast of your
original. Contrast options are:
• Higher
• High
• Normal
• Low
• Lower
Auto-Exposure
Auto-Exposure optimizes your scan job image quality automatically.
Options are:
• On – Optimizes image quality automatically.
• Off – The Auto-Exposure function is inactive.
• Lead Edge – Auto-exposure is based on examining only the first
few lines of the leading edge of the document.
• Full Page – Auto-exposure is based on examining the entire page
by prescanning each page first.
Sharpness
The Sharpness setting lets you soften lines that appear harsh in your
originals, or sharpen lines that appear blurry in your originals.
Sharpness options are:
• Sharper
• Sharp
• Normal
• Soft
• Softer
DocuColor 250 Scan Out Services 5-7
Page 40

Managing Templates and Folders
Scan Options
On the Scan Options tab, make selections for the following options:
• Scan Resolution
• Scan Size
• Reduce / Enlarge
• 2 Sided Originals
• Mixed Size Originals
Scan Resolution
Set the Scan Resolution you want for your scan jobs. Higher resolution
settings will yield larger file sizes. Scan Resolution options are:
• Best
• 200
• 300
• 400
• 600
Scan Size
Select the Scan Size for the scan input document. Scan Size options
include Auto Size Detect, 17 standard input sizes, and a Custom size
option.
Selecting Custom activates the X and Y spin boxes for manual size
entry. The following ranges are available for X and Y:
•X – 1 to 17 inches
•Y – 1 to 14 inches
5-8 DocuColor 250 Scan Out Services
Page 41

Editing Templates
Reduce / Enlarge
Select a Reduce / Enlarge ratio. Options are:
• Preset
• Variable
• Auto %
Preset
Preset options are 100% and 12 other preset ratios.
Variable
Variable enables manual entry of a Reduce / Enlarge ratio. The
available range is from 25% to 400%.
Auto %
Auto % fits the image to one of the standard preset output sizes.
2 Sided Originals
2 Sided options are:
• 1 Sided
• 2 Sided (Head to Head) – Flips on long edge, like a book
• 2 Sided (Head to Toe) – Flips on short edge, like a calendar
Mixed Size Originals
Select Mixed Size Originals when your scan job consists of multiple
original sizes. You can set the output to a single size or to duplicate the
original sizes. Mixed Size Originals can be used with any of the Scan
Size settings.
DocuColor 250 Scan Out Services 5-9
Page 42

Managing Templates and Folders
Output Format
On the Output Format tab, make selections for the following options:
• Document Object Name
• Image File Name
• Duplicate Document Name Policy
• Job Log
NOTE: The Template Owner field is unavailable. It may not be altered.
Document Object Name
Enter a name of up to 32 characters for your scan job documents. This
name applies to the Document Folder for Single-page TIFF and JPEG
jobs, and to the document output files for PDF and Multi-page TIFF
jobs. Each scan job using the template will use the Document Object
Name and, depending on your Duplicate Document Name Policy
setting, may be followed by a sequential number (see page 5-11).
Image File Name
Enter a name for your image files. Files are named using the name you
specify here.
NOTE: PDF and Multi-page TIFF jobs do not reside in Document
Folders, and are named in the Document Object Name field. The Image
File Name does not apply to these output file formats, and therefore any
entry in this field is ignored.
5-10 DocuColor 250 Scan Out Services
Page 43

Editing Templates
Duplicate Document Name Policy
Select a Duplicate Document Name Policy for file naming. Duplicate
Document Name Policy determines how new images are handled with
respect to existing documents with the same file name. Options are:
• Overwrite Existing Document
• Append Images to Existing Document
• Enforce Unique Names
• Auto Generate New Name
Overwrite Existing Document
This option causes a new document to overwrite, or replace, an existing
document with the identical name with which the new file is to be
named. If no such document exists, the file is added, using the
assigned name.
Append Images to Existing Document
This option does not replace the existing document, but saves the new
images to the end of it. If no such document exists, the file is added
using the assigned name.
NOTE: This option may be used with Single-page TIFF and JPEG
output file formats only.
Enforce Unique Names
This option requires a new file name; it does not allow replacing or
appending new images to existing documents of the same name. If no
document exists with the name to be assigned to the new document,
the document is created. If such a document already exists, the output
document is not created.
Auto Generate New Name
The file name is automatically generated based on the name entered in
the Document Name and Image File Name fields. Multiple documents
using the same template are given sequential names
sequential number.
Example:
Where Document Name specified in the template is “flower ,” Documen t
Folders of jobs scanned with that template are named “flower,”
“flower001,” “flower002,” etc.
, followed by a
Job Log
Select an option for whether to save a Job Log upon scan completion.
Options are:
• Delete Log
• Save with Document
DocuColor 250 Scan Out Services 5-11
Page 44

Managing Templates and Folders
Copying Templates and Folders
You can copy an existing template and folder. Copied templates and
folders may be renamed and edited. They may be treated as any other
template and folder.
NOTE: When copying a template and folder, only the template and the
folder where the images will be stored are copied. Existing scan job
images are not copied.
To copy a template and folder:
1. Log on to the Web Scan Services Application to access the
Folders and Templates list.
2. Mark the checkbox next to the template you wish to copy.
3. From the Folders menu, select [Copy Template and Folder].
4. In the Template and Folder Name field on the Basic Scanning
tab, enter a name for your new template and folder.
Scan
NOTE: By default “Copy of” is added to the original template name .
5-12 DocuColor 250 Scan Out Services
Page 45

Renaming Templates and Folders
5. If desired, enter a description for the new template in the Template
Description field.
6. Edit the new template as you wish.
7. Click [OK].
The Templates List displays showing the copied folder.
Renaming Templates and Folders
You can rename templates and their folders. Folders are automatically
given the same name as their corresponding template when you
rename the template. Folders cannot be named separately from
templates.
To rename a template and folder:
1. Log on to the Web Scan Services Application to access the
Folders and Templates list.
Scan
DocuColor 250 Scan Out Services 5-13
Page 46

Managing Templates and Folders
2. Mark the checkbox next to the template you wish to rename.
3. From the Folders menu, select [Rename Template and Folder].
4. At the prompt, enter a new name for the template.
5. Click [OK].
5-14 DocuColor 250 Scan Out Services
Page 47

Deleting Templates and Folders
The Templates List displays showing the renamed folder.
Deleting Templates and Folders
If you find that you no longer need or use a template, you can delete the
template and folder . Periodically deleting unused templates and fold ers
helps free up disk space on DocuSP.
CAUTION: When deleting a template and folder, all folder contents are
also deleted.
To delete a template and folder:
1. Log on to the Web Scan Services Application to access the
Folders and Templates list.
2. Mark the checkbox next to the template you wish to delete.
Scan
DocuColor 250 Scan Out Services 5-15
Page 48

Managing Templates and Folders
3. From the Folders menu, select [Delete Template and Folder].
4. At the confirmation prompt, Click [OK].
The Templates List displays.
5-16 DocuColor 250 Scan Out Services
Page 49

Managing Your Scanned Images
Scanned image files and job logs are stored in image repositories
called folders on the DocuSP DFE. The folder name is the same as the
template you used for your scan job.
Once you have completed your scan, you may download your scanned
images or delete them.
NOTE: Scanned images are set to expire af ter a time interval se t by the
system administrator. Images stored in image repositories on the
DocuSP DFE beyond the expiration time are subject to deletion during
automatic disk cleanup.
Downloading your Images
You can download your scanned images and job logs from the
repository.
Managing Your Scanned Images
To download your files:
1. Log on to the Web Scan Services Application to access the
Folders and Templates list.
2. Mark the checkbox for the folder with the name of the template you
used for your scan job.
3. Locate your image files.
NOTE: Depending on your output settings the files may be in a sub-
folder called a Document Folder. If your images are in a Document
Folder, you must open the folder and then download your image files
one at a time. You cannot download an entire folder.
4. Select the file you wish to download.
5. From the Document menu, select [Save As].
Scan
DocuColor 250 Scan Out Services 5-17
Page 50

Managing Templates and Folders
6. At the File Download dialog, click [Save].
7. Browse to the location on your workstation to which you want to
8. Click [Save].
save the file.
Deleting your Images
When you have downloaded your images, or are otherwise finished
with them, you should delete your images and job logs from the
DocuSP repository to help optimize disk storage space.
NOTE: Keep in mind that Disk Maintenance settings for the DocuSP
may include the periodic automatic deletion of scan jobs. When scan
jobs are deleted, all associated images are also deleted.
To delete your files:
1. Log on to the Web Scan Services Application to access the
Folders and Templates list (see page 2-1).
2. Mark the checkbox for the folder with the name of the template you
used for your scan job.
3. Locate the folders or files you wish to delete.
NOTE: Depending on your output settings the image files may be in a
sub-folder called a Document Folder (shown below). You can delete
individual files or folders, or you can delete multiple files or folders at
one time.
Scan
5-18 DocuColor 250 Scan Out Services
Page 51

Mark to
select all.
Managing Your Scanned Images
4. Select the folders or files you wish to delete. If you want to delete all
of the folders or files, mark the checkbox next to Name at the top of
the list.
5. From the Document menu, select [Delete].
6. At the prompt, click [OK], or click [Cancel] to abandon file deletion.
DocuColor 250 Scan Out Services 5-19
Page 52

Managing Templates and Folders
5-20 DocuColor 250 Scan Out Services
Page 53

6 Administrator Functions
Users with Administrator access rights have access to all of the
templates, folders, and files of all users. Administrators may edit, copy,
rename, or delete the templates, folders, and files of all users.
Administrators may also set default template preferences for all users.
Listing All Templates and Folders
Users with Administrator access rights may view their own templates
and folders only, or those of all users. “View All” is enabled by default.
To select a view for templates and folders
1. From your Web browser, access the DocuColor 250 Internet
Services Home Page and log on to the Web Scan Services
Application using a DocuSP account with Administrator access
rights (see page 2-1).
2. From the View menu:
•Select View All to display templates and folders for all users,
OR
•Select My Folders to display your own templates and folders
only.
DocuColor 250 Scan Out Services 6-1
Page 54

Administrator Functions
Setting Template Defaults
Users with Administrator accounts on DocuSP may set or change
default properties for new scan templates.
NOTE: Templates created before template defaults were changed are
unaffected when template default properties are changed.
To edit the default settings for templates
1. From your Web browser, access the Web Scan Services
Application and log on using a DocuSP account with Administrator
access rights (see page 2-1).
2. Select the Preferences link.
Preferences link
6-2 DocuColor 250 Scan Out Services
Page 55

The Preferences pop-up page displays.
Setting Template Defaults
3. Set template defaults for Basic Scanning, Image Quality, Scan
Options, and Output Format on the respective tabs (see pages 6-
4 through 6-11).
4. Click [OK].
NOTE: To restore the factory default template preferences, click the
[Reset Xerox Defaults] button.
DocuColor 250 Scan Out Services 6-3
Page 56

Administrator Functions
Basic Scanning
On the Basic Scanning tab, select the following defaults for new
templates:
• File Format
• Color Mode
• 2 Sided Originals
• Original Type
NOTE: The Template & Folder Name and Template Description
fields cannot be altered. Defaults cannot be set for these fields.
File Format
The following output file formats are available:
• Multi-page TIFF
• Single-page TIFF
• PDF
• JPEG
The default file format is PDF.
Multi-Page TIFF
This option saves the scan job as a single file containing multiple
images.
6-4 DocuColor 250 Scan Out Services
Page 57

Setting Template Defaults
Single-Page TIFF
This option scans each page of the document and saves it as a
separate TIFF file, resulting in multiple image files. These are stored
together on the DocuSP in a sub-folder called a Document Folder.
NOTE: Do not use the Color Mode option “Auto” with this file format.
Selecting Color Mode option “Auto” causes a conflict error message.
PDF
This option saves the scan job as a single, multi-page PDF file.
JPEG
This option scans each page of the document and saves it as a
separate JPEG file, resulting in multiple image files. These are stored
together on the DocuSP in a sub-folder called a Document Folder.
When JPEG is selected, the Compression Quality drop-down list
becomes available. The following options are available:
• Fastest
• Fast
• Normal
• Good
• Best
Fastest allows you to save your files faster, and offers a smaller file
size, however image quality is reduced. Best offers better image
quality, however saving your files takes longer, and the file sizes are
larger.
The default setting is Normal.
Color Mode
Select the color option you want for your scan job output. Color Mode
options are:
• Auto (can be used only with PDF)
• Full Color
• Grayscale
• Black & White (cannot be used with JPEG)
The default setting is Auto.
DocuColor 250 Scan Out Services 6-5
Page 58

Administrator Functions
2 Sided Originals
2 Sided Original options are:
• 1 Sided
• 2 Sided (Head to Head)
• 2 Sided (Head to Toe)
The default setting is 1 Sided.
Original Type
Select the option that best describes the content on the original.
Original Type options are:
• Text & Photo
• Text
• Photo
The default setting is Text.
6-6 DocuColor 250 Scan Out Services
Page 59

Image Quality
Setting Template Defaults
On the Image Quality tab, make selections for the image quality
defaults for new templates:
• Lighten / Darken
• Contrast
• Auto Exposure
• Sharpness
Lighten / Darken
This option sets template defaults for lighter or darker scanned images.
The default setting is Normal.
Contrast
You can increase or decrease the contrast between light areas and
dark areas of your scan jobs based on the contrast of your original.
Contrast options are:
• Higher
• High
• Normal
• Low
• Lower
The default setting is Normal.
DocuColor 250 Scan Out Services 6-7
Page 60

Administrator Functions
Auto-Exposure
Auto-Exposure optimizes your scan job image quality automatically.
Options are:
• On – Optimizes image quality automatically.
• Off – The Auto-Exposure function is inactive.
• Lead Edge – Auto-exposure is based on examining only the first
few lines of the leading edge of the document.
• Full Page – Auto-exposure is based on examining the entire page
by prescanning each page first.
The default setting is Off.
Sharpness
The Sharpness setting lets you soften lines that appear harsh in your
originals, or sharpen lines that appear somewhat blurry in your
originals. Sharpness options are:
• Sharper
• Sharp
• Normal
• Soft
• Softer
The default setting is Normal.
6-8 DocuColor 250 Scan Out Services
Page 61

Scan Options
Setting Template Defaults
On the Scan Options tab, select the following defaults for new
templates:
• Scan Resolution
• Scan Size
• Reduce / Enlarge
• 2 Sided Originals
• Mixed Size Originals
Scan Resolution
Set the Scan Resolution you want for your templates. Higher resolution
settings will yield larger file sizes. Scan Resolution options are:
• Best
• 200
• 300
• 400
• 600
The default setting is 200.
DocuColor 250 Scan Out Services 6-9
Page 62

Administrator Functions
Scan Size
Select a default Scan Size for the scan input document. Scan Size
options include Auto Size Detect, 17 standard input sizes, and a
Custom size option.
Selecting Custom activates the X and Y spin boxes for manual size
entry. The following ranges are available for X and Y:
•X – 1 to 17 inches
•Y – 1 to 14 inches
The default setting is Auto Size Detect.
Reduce / Enlarge
Select a Reduce / Enlarge ratio default for all templates. Options are:
• Preset
• Variable
• Auto %
The default setting is Preset, 100%.
Preset
Preset is the default setting. Preset options are 100% and 12 other
preset ratios.
The default setting is 100%.
Variable
Variable enables manual entry of the Reduce / Enlarge ratio. The
available range is from 25% to 400%.
The default setting is 100%.
Auto %
Auto % fits the image to one of the standard preset output sizes.
The default setting is Photo 2L - 5 x 7”.
2 Sided Originals
Options are:
• 1 Sided
• 2 Sided (Head to Head) – Flips on the long edge, like a book
• 2 Sided (Head to Toe) – Flips on the short edge, like a calendar
The default setting is 1 Sided.
6-10 DocuColor 250 Scan Out Services
Page 63

Mixed Size Originals
Select Mixed Size Originals when your scan job consists of multiple
original sizes. You can set the output to a single size or to duplicate the
original sizes. Mixed Size Originals can be used with any of the Scan
Size settings.
The default setting is Off.
Output Format
On the Output Format tab, select the following defaults for new
templates:
• Document Object Name
• Image File Name
• Duplicate Document Name Policy
• Job Log
Setting Template Defaults
NOTE: The Template Owner field is unavailable. It may not be altered.
DocuColor 250 Scan Out Services 6-11
Page 64

Administrator Functions
Document Object Name
Enter a default document object name up to 32 characters. This name
applies to the Document Folder for Single-page TIFF and JPEG jobs,
and to the document output files for PDF and Multi-page TIFF jobs.
Each scan job using the template will use the Document Object Name
and, depending on your Duplicate Document Name Policy setting, may
be followed by a sequential number (see page 6-12).
The default setting for Document Object Name is DOC.
Image File Name
Enter a name for your image files. Files are named using the name you
specify here.
NOTE: PDF and Multi-page TIFF jobs do not reside in Document
Folders, and are named in the Document Object Name field. The Image
File Name does not apply to these output file formats, and therefore any
entry in this field is ignored.
Duplicate Document Name Policy
Select a Duplicate Document Name Policy template default for file
naming. Duplicate Document Name Policy determines how new images
are handled with respect to existing documents with the same file name
located within the folder where the new document is to be stored.
Options are:
• Overwrite Existing Document
• Append Images to Existing Document
• Enforce Unique Names
• Auto Generate New Name
The default setting is Auto Generate New Name.
Overwrite Existing Document
This option causes a new document to overwrite, or replace, an existing
document with the identical name with which the new file is to be
named. If no such document exists, the file is added, using the
assigned name.
Append Images to Existing Document
This option does not replace the existing document, but saves the new
images to the end of it. If no such document exists, the file is added
using the assigned name.
NOTE: This option may be used with Single-page TIFF and JPEG
output file formats only.
6-12 DocuColor 250 Scan Out Services
Page 65

Setting Template Defaults
Enforce Unique Names
This option requires a new file name. It does not allow replacing or
appending new images to existing documents of the same name. If no
document exists with the name to be assigned to the new document,
the document is created. If such a document already exists, the output
document is not created.
Auto Generate New Name
The file name is automatically generated based on the name entered in
the Document Name and Image File Name fields. Multiple documents
using the same template are given sequential names
sequential number.
, followed by a
Example:
Where Document Name specified in the template is “flower ,” Documen t
Folders of jobs scanned with that template are named “flower,”
“flower001,” “flower002,” etc.
Job Log
Set the template default for the Job Log upon scan completion. Options
are:
• Delete Log
• Save with Document
The default setting is Save with Document.
DocuColor 250 Scan Out Services 6-13
Page 66

Administrator Functions
Restoring Default Settings
To reset the defaults to the original Xerox settings, select the Restore
Xerox Defaults button on the Preferences pop-up page.
Restore Xerox Defaults button
6-14 DocuColor 250 Scan Out Services
Page 67

Maintaining the Scan Service Disk
Setting Scan Job Deletion Options
To optimize disk space on the DocuSP, set the scan job deletion options
appropriate for your site.
The Scan Job Options on the DocuSP are:
• Retain until Manually Deleted
• Automatically Delete
Time Period options for Automatic Deletion are:
• Hours – 1 to 720 (default: 120)
• Days – 1 to 30 (default: 30)
The default setting is Automatically Delete, 120 hours.
NOTE: For more information, see the DocuSP System Guide.
Maintaining the Scan Service Disk
To set Scan Job Options:
1. On the DocuSP, double-click the Disk Full Warning icon .
Disk Full Warning icon
DocuColor 250 Scan Out Services 6-15
Page 68

Administrator Functions
The System Preferences dialog displays.
2. Select scan jobs for automatic or manual deletion.
3. For Automatic Deletion, specify a time interval.
4. Click [OK].
6-16 DocuColor 250 Scan Out Services
Page 69

Cleaning the Scan Service Disk
When any of the partitions of the DocuSP System Disk are out of
normal usage range, the [Scan Files] and [Clean Disk] buttons become
active.
Checking System Disk Properties
To check system disk properties:
On DocuSP, double-click the Disk Full Warning icon .
The System Disk Properties dialog displays.
Maintaining the Scan Service Disk
Deleting Scan Files
To delete scan files:
1. On the System Disk Properties dialog, click the [Scan Files] button.
Scan Files button
DocuColor 250 Scan Out Services 6-17
Page 70

Administrator Functions
2. On the Disk Usage - Scan Files dialog, select a user.
In this example, user account
“sa” is selected.
3. Select a template folder, and then select a scan job, or Document
Folder.
In this example, template “ImageTest,” and scan job
(Document Folder) “JPEG2.XSM“ are selected.
4. Select the files you want to delete.
5. Click [Delete].
NOTES:
• When you want to delete an entire folder and its contents , you must
first delete all files within the folder. Once the files are deleted, the
folder is deleted automatically.
• You cannot delete template folders.
6-18 DocuColor 250 Scan Out Services
Page 71

7 Appendix
GNU Lesser General Public License
Version 2.1, February 1999
Copyright (C) 1991, 1999 Free Software Foundation, Inc.
51 Franklin St, Fifth Floor, Boston, MA 02110-1301 USA
Everyone is permitted to copy and distribute verbatim copies of this
license document, but changing it is not allowed.
[This is the first released version of the Lesser GPL. It also counts as
the successor of the GNU Library Public License, version 2, hence the
version number 2.1.]
Preamble
The licenses for most software are designed to take away your freedom
to share and change it. By contrast, the GNU General Public Licenses
are intended to guarantee your freedom to share and change free
software--to make sure the software is free for all its users.
This license, the Lesser General Public License, applies to some
specially designated software packages--typically libraries--of the Free
Software Foundation and other authors who decide to use it. You can
use it too, but we suggest you first think carefully about whether this
license or the ordinary General Public License is the better strategy to
use in any particular case, based on the explanations below.
When we speak of free software, we are referring to freedom of use,
not price. Our General Public Licenses are designed to make sure that
you have the freedom to distribute copies of free software (and charge
for this service if you wish); that you receive source code or can get it if
you want it; that you can change the software and use pieces of it in
new free programs; and that you are informed that you can do these
things.
To protect your rights, we need to make restrictions that forbid
distributors to deny you these rights or to ask you to surrender these
rights. These restrictions translate to certain responsibilities for you if
you distribute copies of the library or if you modify it.
For example, if you distribute copies of the library, whether gratis or for
a fee, you must give the recipients all the rights that we gave you. You
DocuColor 250 Scan Out Services 7-1
Page 72

Appendix
must make sure that they, too, receive or can get the source code. If
you link other code with the library, you must provide complete object
files to the recipients, so that they can relink them with the library after
making changes to the library and recompiling it. And you must show
them these terms so they know their rights.
We protect your rights with a two-step method: (1) we copyright the
library, and (2) we offer you this license, which gives you legal
permission to copy, distribute and/or modify the library.
To protect each distributor , we want to make it very clear that there is no
warranty for the free library. Also, if the library is modified by someone
else and passed on, the recipients should know that what they have is
not the original version, so that the original author's reputation will not
be affected by problems that might be introduced by others.
Finally, software patents pose a constant threat to the existence of any
free program. We wish to make sure that a company cannot effectively
restrict the users of a free program by obtaining a restrictive license
from a patent holder. Therefore, we insist that any patent license
obtained for a version of the library must be consistent with the full
freedom of use specified in this license.
Most GNU software, including some libraries, is covered by the ordinary
GNU General Public License. This license, the GNU Lesser General
Public License, applies to certain designated libraries, and is quite
different from the ordinary General Public License. We use this license
for certain libraries in order to permit linking those libraries into non-free
programs.
When a program is linked with a library, whether statically or using a
shared library, the combination of the two is legally speaking a
combined work, a derivative of the original library . The or dinary General
Public License therefore permits such linking only if the entire
combination fits its criteria of freedom. The Lesser General Public
License permits more lax criteria for linking other code with the library.
We call this license the "Lesser" General Public License because it
does Less to protect the user's freedom than the ordinary General
Public License. It also provides other free software developers Less of
an advantage over competing non-free programs. These
disadvantages are the reason we use the ordinary General Public
License for many libraries. However, the Lesser license provides
advantages in certain special circumstances.
For example, on rare occasions, there may be a special need to
encourage the widest possible use of a certain library, so that it
becomes a de-facto standard. To achieve this, non-free programs must
be allowed to use the library. A more frequent case is that a free library
does the same job as widely used non-free libraries. In this case, there
is little to gain by limiting the free library to free software only, so we use
the Lesser General Public License.
In other cases, permission to use a particular library in non-free
programs enables a greater number of people to use a large body of
free software. For example, permission to use the GNU C Library in
non-free programs enables many more people to use the whole GNU
7-2 DocuColor 250 Scan Out Services
Page 73

Terms and Conditions for Copying, Distribution and Modificatio n
operating system, as well as its variant, the GNU/Linux operating
system.
Although the Lesser General Public License is Less protective of the
users' freedom, it does ensure that the user of a program that is linked
with the Library has the freedom and the wherewithal to run that
program using a modified version of the Library.
The precise terms and conditions for copying, distribution and
modification follow. Pay close attention to the difference between a
"work based on the library" and a "work that uses the library". The
former contains code derived from the library, whereas the latter must
be combined with the library in order to run.
Terms and Conditions for Copying, Distribution and
Modification
0. This License Agreement applies to any software library or other
program which contains a notice placed by the copyright holder or other
authorized party saying it may be distributed under the terms of this
Lesser General Public License (also called "this License"). Each
licensee is addressed as "you".
A "library" means a collection of software functions and/or data
prepared so as to be conveniently linked with application programs
(which use some of those functions and data) to form executables.
The "Library", below, refers to any such software library or work which
has been distributed under these terms. A "work based on the Library"
means either the Library or any derivative work under copyright law:
that is to say, a work containing the Library or a portion of it, either
verbatim or with modifications and/or translated straightforwardly into
another language. (Hereinafter , translation is inclu ded without limitation
in the term "modification".)
"Source code" for a work means the preferred form of the work for
making modifications to it. For a library, complete source code means
all the source code for all modules it contains, plus any associated
interface definition files, plus the scripts used to contro l compilation and
installation of the library.
Activities other than copying, distribution and modification are not
covered by this License; they are outside its scope. The act of running a
program using the Library is not restricted, and output from such a
program is covered only if its contents constitute a work based on the
Library (independent of the use of the Library in a tool for writing it).
Whether that is true depends on what the Library does and what the
program that uses the Library does.
1. You may copy and distribute verbatim copies of the Library's
complete source code as you receive it, in any medium, provided that
you conspicuously and appropriately publish on each copy an
appropriate copyright notice and disclaimer of warranty; keep intact all
DocuColor 250 Scan Out Services 7-3
Page 74

Appendix
the notices that refer to this License and to the absence of any
warranty; and distribute a copy of this License along with the Library.
You may charge a fee for the physical act of transferring a copy, and
you may at your option offer warranty protection in exchange for a fee.
2. Y o u may modify your copy or copies of the L ibrary or any portion of it,
thus forming a work based on the Library, and copy and distribute such
modifications or work under the terms of Section 1 above, provided that
you also meet all of these conditions:
a) The modified work must itself be a software library.
b) You must cause the files modified to carry prominent notices
stating that you changed the files and the date of any change.
c) You must cause the whole of the work to be licensed at no
charge to all third parties under the terms of this License.
d) If a facility in the modified Library refers to a function or a t able of
data to be supplied by an application program that uses the facility,
other than as an argument passed when the facility is invoked, then
you must make a good faith effort to ensure that, in the event an
application does not supply such function or table, the facility still
operates, and performs whatever part of its purpose remains
meaningful.
(For example, a function in a library to compute square roots has a
purpose that is entirely well-defined independent of the application.
Therefore, Subsection 2d requires that any application-supplied
function or table used by this function must be optional: if the
application does not supply it, the square root function must still
compute square roots.)
These requirements apply to the modified work as a whole. If
identifiable sections of that work are not derived from the Library,
and can be reasonably considered independent and separate
works in themselves, then this License, and its terms, do not apply
to those sections when you distribute them as separate works. But
when you distribute the same sections as part of a whole which is a
work based on the Library, the distribution of the whole must be on
the terms of this License, whose permissions for other licensees
extend to the entire whole, and thus to each and every part
regardless of who wrote it.
Thus, it is not the intent of this section to claim righ ts or contest your
rights to work written entirely by you; rather, the intent is to exercise
the right to control the distribution of derivative or collective works
based on the Library.
In addition, mere aggregation of another work not based on the
Library with the Library (or with a work based on the Library) on a
volume of a storage or distribution medium does not bring the other
work under the scope of this License.
3. You may opt to apply the terms of the ordinary GNU General Public
License instead of this License to a given copy of the Library. To do this,
you must alter all the notices that refer to this License, so that they refer
7-4 DocuColor 250 Scan Out Services
Page 75

Terms and Conditions for Copying, Distribution and Modificatio n
to the ordinary GNU General Public License, version 2, instead of to
this License. (If a newer version than version 2 of the ordinary GNU
General Public License has appeared, then you can specify that
version instead if you wish.) Do not make any other change in these
notices.
Once this change is made in a given copy , it is irreversib le for that copy,
so the ordinary GNU General Public License applies to all subsequent
copies and derivative works made from that copy.
This option is useful when you wish to copy part of the code of the
Library into a program that is not a library.
4. You may copy and distribute the Library (or a portion or derivative of
it, under Section 2) in object code or executable form under the terms of
Sections 1 and 2 above provided that you accompany it with the
complete corresponding machine-readable source code, which must be
distributed under the terms of Sections 1 and 2 above on a medium
customarily used for software interchange.
If distribution of object code is made by offering access to copy from a
designated place, then offering equivalent access to copy the source
code from the same place satisfies the requirement to distribute the
source code, even though third parties are not compelled to copy the
source along with the object code.
5. A program that contains no derivative of any portion of the Library,
but is designed to work with the Library by being compiled or linked with
it, is called a "work that uses the Library". Such a work, in isolation, is
not a derivative work of the Library, and therefore falls outside the
scope of this License.
However, linking a "work that uses the Library" with the Library creates
an executable that is a derivative of the Library (because it contains
portions of the Library), rather than a "work that uses the library". The
executable is therefore covered by this License. Section 6 states terms
for distribution of such executables.
When a "work that uses the Library" uses material from a header file
that is part of the Library, the object code for the work may be a
derivative work of the Library even though the source code is not.
Whether this is true is especially significant if the work can be linked
without the Library, or if the work is itself a library. The thre shold for this
to be true is not precisely defined by law.
If such an object file uses only numerical parameters, data structure
layouts and accessors, and small macros and small inline functions (te n
lines or less in length), then the use of the object file is unrestricted,
regardless of whether it is legally a derivative work. (Executables
containing this object code plus portions of the Library will still fall under
Section 6.)
Otherwise, if the work is a derivative of the Library, you may distribute
the object code for the work under the terms of Section 6. Any
executables containing that work also fall under Section 6, whether or
not they are linked directly with the Library itself.
DocuColor 250 Scan Out Services 7-5
Page 76

Appendix
6. As an exception to the Sections above, you may also combine or link
a "work that uses the Library" with the Library to produce a work
containing portions of the Library, and distribute that work under terms
of your choice, provided that the terms permit modification of the work
for the customer's own use and reverse engineering for debugging
such modifications.
You must give prominent notice with each copy of the work that the
Library is used in it and that the Library and its use are covered by this
License. You must supply a copy of this License. If the work during
execution displays copyright notices, you must include the copyright
notice for the Library among them, as well as a reference directing the
user to the copy of this License. Also, you must do one of these things:
a) Accompany the work with the complete corresponding machinereadable source code for the Library including whatever changes
were used in the work (which must be distributed under Sections 1
and 2 above); and, if the work is an executable linked with the
Library, with the complete machine-readable "work that uses the
Library", as object code and/or source code, so that the user can
modify the Library and then relink to produce a modified executable
containing the modified Library. (It is understood that the user who
changes the contents of definitions files in the Library will not
necessarily be able to recompile the application to use the modified
definitions.)
b) Use a suitable shared library mechanism for linking with the
Library. A suitable mechanism is one that (1) uses at run time a
copy of the library already present on the user's computer system,
rather than copying library functions into the executable, and (2) will
operate properly with a modified version of the library, if the user
installs one, as long as the modified version is interface -compatible
with the version that the work was made with.
c) Accompany the work with a written offer, valid for at least three
years, to give the same user the materials specified in Subsection
6a, above, for a charge no more than the cost of performing this
distribution.
d) If distribution of the work is made by of fering access to copy from
a designated place, offer equivalent access to copy the above
specified materials from the same place.
e) Verify that the user has already received a copy of these
materials or that you have already sent this user a copy.
For an executable, the required form of the "work that uses the Library"
must include any data and utility programs needed for reproducing the
executable from it. However , as a special exception, the materials to be
distributed need not include anything that is normally distributed (in
either source or binary form) with the major components (compiler,
kernel, and so on) of the operating system on which the executable
runs, unless that component itself accompanies the executable.
It may happen that this requirement contradicts the license restrictions
of other proprietary libraries that do not normally accompany the
7-6 DocuColor 250 Scan Out Services
Page 77

Terms and Conditions for Copying, Distribution and Modificatio n
operating system. Such a contradiction means you cannot use both
them and the Library together in an executable that you distribute.
7. You may place library facilities that are a work based on the Library
side-by-side in a single library together with other library facilities not
covered by this License, and distribute such a combined library,
provided that the separate distribution of the work based on the Library
and of the other library facilities is otherwise permitted, and provided
that you do these two things:
a) Accompany the combined library with a copy of the same work
based on the Library, uncombined with any other library facilities.
This must be distributed under the terms of the Sections above.
b) Give prominent notice with the combined library of the fact that
part of it is a work based on the Library, and explaining where to find
the accompanying uncombined form of the same work.
8. You may not copy, modify, sublicense, link with, or distribute the
Library except as expressly provided under this License. Any attempt
otherwise to copy, modify, sublicense, link with, or distribute the Library
is void, and will automatically terminate your rights under this License.
However, parties who have received copies, or rights, from you under
this License will not have their licenses terminated so long as such
parties remain in full compliance.
9. You are not required to accept this License, since you have not
signed it. However, nothing else grants you permission to modify or
distribute the Library or its derivative works. These actions are
prohibited by law if you do not accept this License. Therefore, by
modifying or distributing the Library (or any work based on the Library),
you indicate your acceptance of this License to do so, and all its terms
and conditions for copying, distributing or modifying the Library or
works based on it.
10. Each time you redistribute the Library (or any work based on the
Library), the recipient automatically receives a license from the original
licensor to copy, distribute, link with or modify the Library subject to
these terms and conditions. Y ou may not impose any furthe r restrictions
on the recipients' exercise of the rights granted herein. You are not
responsible for enforcing compliance by third parties with this License.
11. If, as a consequence of a court judgment or allegation of patent
infringement or for any other reason (not limited to patent issues),
conditions are imposed on you (whether by court order, agreement or
otherwise) that contradict the conditions of this License, they do not
excuse you from the conditions of this License. If you cannot distribute
so as to satisfy simultaneously your obligations under this License and
any other pertinent obligations, then as a consequence you may not
distribute the Library at all. For example, if a patent license would not
permit royalty-free redistribution of the Library by all those who receive
copies directly or indirectly through you, then the only way you could
satisfy both it and this License would be to refrain entirely from
distribution of the Library.
DocuColor 250 Scan Out Services 7-7
Page 78

Appendix
If any portion of this section is held invalid or unenforceable under any
particular circumstance, the balance of the section is inten ded to apply,
and the section as a whole is intended to apply in other circumstances.
It is not the purpose of this section to induce you to infringe any patents
or other property right claims or to contest validity of any such claims;
this section has the sole purpose of protecting the integrity of the free
software distribution system which is implemented by public license
practices. Many people have made generous contributions to the wide
range of software distributed through that system in reliance on
consistent application of that system; it is up to the author/donor to
decide if he or she is willing to distribute software through any other
system and a licensee cannot impose that choice.
This section is intended to make thoroughly clear what is believed to be
a consequence of the rest of this License.
12. If the distribution and/or use of the Library is restricted in certain
countries either by patents or by copyrighted interfaces, the original
copyright holder who places the Library under this License may add an
explicit geographical distribution limitation excluding those countries, so
that distribution is permitted only in or among countries not thus
excluded. In such case, this License incorporates the limitation as if
written in the body of this License.
13. The Free Software Foundation may publish revised and/or new
versions of the Lesser General Public License from time to time. Such
new versions will be similar in spirit to the present version, but may
differ in detail to address new problems or concerns.
Each version is given a distinguishing version number. If the Library
specifies a version number of this License which applies to it and "any
later version", you have the option of following the terms and conditions
either of that version or of any later version published by the Free
Software Foundation. If the Library does not specify a license version
number, you may choose any version ever published by the Free
Software Foundation.
14. If you wish to incorporate parts of the Library into other free
programs whose distribution conditions are incompatible with these,
write to the author to ask for permission. For software which is
copyrighted by the Free Software Foundation, write to the Free
Software Foundation; we sometimes make exceptions for this. Our
decision will be guided by the two goals of preserving the free status of
all derivatives of our free software and of promoting the sharing and
reuse of software generally.
NO WARRANTY
15. BECAUSE THE LIBRARY IS LICENSED FREE OF CHARGE,
THERE IS NO WARRANTY FOR THE LIBRARY, TO THE EXTENT
PERMITTED BY APPLICABLE LAW. EXCEPT WHEN OTHERWISE
STATED IN WRITING THE COPYRIGHT HOLDERS AND/OR OTHER
PARTIES PROVIDE THE LIBRARY "AS IS" WITHOUT WARRANTY
OF ANY KIND, EITHER EXPRESSED OR IMPLIED, INCLUDING , BUT
NOT LIMITED TO, THE IMPLIED WARRANTIES OF
MERCHANT ABILITY AND FITNESS FOR A P ARTICULAR PURPOSE.
7-8 DocuColor 250 Scan Out Services
Page 79

Terms and Conditions for Copying, Distribution and Modificatio n
THE ENTIRE RISK AS TO THE QUALITY AND PERFORMANCE OF
THE LIBRARY IS WITH YOU. SHOULD THE LIBRARY PROVE
DEFECTIVE, YOU ASSUME THE COST OF ALL NECESSARY
SERVICING, REPAIR OR CORRECTION.
16. IN NO EVENT UNLESS REQUIRED BY APPLICABLE LAW OR
AGREED TO IN WRITING WILL ANY COPYRIGHT HOLDER, OR
ANY OTHER PARTY WHO MAY MODIFY AND/OR REDISTRIBUTE
THE LIBRARY AS PERMITTED ABOVE, BE LIABLE TO YOU FOR
DAMAGES, INCLUDING ANY GENERAL, SPECIAL, INCIDENTAL OR
CONSEQUENTIAL DAMAGES ARISING OUT OF THE USE OR
INABILITY TO USE THE LIBRARY (INCLUDING BUT NOT LIMITED
TO LOSS OF DATA OR DATA BEING RENDERED INACCURATE OR
LOSSES SUSTAINED BY YOU OR THIRD PARTIES OR A FAILURE
OF THE LIBRARY TO OPERATE WITH ANY OTHER SOFTWARE),
EVEN IF SUCH HOLDER OR OTHER PARTY HAS BEEN ADVISED
OF THE POSSIBILITY OF SUCH DAMAGES.
END OF TERMS AND CONDITIONS
DocuColor 250 Scan Out Services 7-9
Page 80

Appendix
7-10 DocuColor 250 Scan Out Services
Page 81

Index
Numerics
2 Sided Originals 5-6, 5-9, 6-6, 6-10
A
Administrator functions 6-1
All Services button
Append Images to Existing Document
Auto %
Auto Generate New Name
Auto-Exposure
5-9, 6-10
4-2
5-11, 6-13
5-7, 6-8
B
Basic Scanning tab 5-4, 6-4
C
Cancel button 5-3
Clear All button
Color Mode
Color Mode, restrictions
Compression Quality
Contrast
copying templates and folders
5-7, 6-7
4-1
5-5, 6-5
5-5
5-5, 6-5
5-12
5-11, 6-12
Document Handler, scanning from
Document menu
Document Object Name
downloading
image files
restrictions
Duplicate Document Name Policy
2-4, 4-7
5-10, 6-12
5-17
5-17
E
editing templates 5-2
Enforce Unique Names
5-11, 6-13
F
File Format 5-4, 6-4
File Format, restrictions
folders
copying
deleting
listing
renaming
Folders menu
5-12
5-15
5-1, 6-1
5-13
2-3, 5-2
5-4, 5-5, 5-6, 5-11
G
Go to 001 - 250 4-3
4-5
5-11, 6-12
D
H
defaults, setting 6-2
deleting
image files
scan files
templates and folders
Document Folder
Document Glass, scanning from
DocuColor 250 Scan Out Services I-1
5-18
6-17
5-15
4-7
4-6
hardware requirements 1-1
I
Image File Name 5-10, 6-12
Page 82

Index
image files
deleting
downloading
expiration time
Image Quality
Auto-Exposure
Contrast
Lighten / Darken
Sharpness
Image Quality tab
5-18
4-7, 5-17
5-17
5-7, 6-8
5-7, 6-7
5-7, 6-7
5-7, 6-8
5-6, 6-7
J
Job Log 5-11, 6-13
Job Template tab
JPEG file format
4-2
5-5, 6-5
L
Last Original button 4-6
Lighten / Darken
listing templates and folders
5-7, 6-7
5-1, 6-1
M
Mixed Size Originals 5-9, 6-11
Multi-page TIFF
5-4, 6-4
P
PDF file format 5-5, 6-5
Preferences
Preset
properties tabs
6-14
5-9, 6-10
5-2
R
Reduce / Enlarge 5-9, 6-10
Auto %
Preset
Variable
Refresh button
renaming templates and folders
requirements
hardware
software
Reset button
Restore Xerox Defaults
restrictions
Append Images to Existing Document
Color Mode
downloading files
File Format
Original Type
template
user
6-10
6-10
6-10
4-3, 4-4
5-13
1-1
1-2
5-3
6-14
5-5
5-17
5-4, 5-5, 5-6, 5-11
5-6
5-2, 5-4
2-3, 3-1, 5-1, 5-3
5-11
N
Network Scanning button 4-2
Next Original button
4-6
O
Original Type 5-6, 6-6
Original Type, restrictions
originals, 2 sided
Output Format
Document Object Name
Duplicate Document Name Policy
Image File Name
Job Log
Output Format tab
Overwrite Existing Document
I-2 DocuColor 250 Scan Out Services
5-6, 5-9, 6-6, 6-10
6-13
5-10, 6-11
5-6
5-10, 6-12
5-11, 6-12
5-10, 6-12
5-11, 6-12
S
scan files, deleting 6-17
Scan Folders and Templates page, description
scan job options, setting
Scan Options
2 Sided Originals
Mixed Size Originals
Reduce / Enlarge
Scan Resolution
Scan Size
Scan Options tab
Scan Resolution
scan service disk
cleaning
maintaining
Scan Size
5-8, 6-10
5-8, 6-9
5-8, 6-9
6-17
6-15
5-8, 6-10
6-15
5-9, 6-10
5-9, 6-11
5-9, 6-10
5-8, 6-9
2-3
Page 83

scanning from
Document Glass
Document Handler
Sharpness
Single-page TIFF
software requirements
system disk properties
5-7, 6-8
4-6
4-5
5-5, 6-5
1-2
6-17
T
template defaults, setting 6-2
Template Description
template list
Template Owner field
template properties tabs
template restrictions
templates
accessing
copying
creating
deleting
editing
listing
renaming
2-2, 4-3
at the DocuColor 250
using Web Scan Services Application
5-12
3-1
5-15
5-2
5-1, 6-1
5-13
2-4, 3-3, 4-3, 5-13
5-10
5-2
5-2, 5-4
Index
4-1
2-2
U
user restrictions 2-3, 3-1, 5-1, 5-3
V
Variable 5-9, 6-10
View menu
2-4, 6-1
W
Web Scan Services Application, accessing 2-1
DocuColor 250 Scan Out Services I-3
Page 84

Index
I-4 DocuColor 250 Scan Out Services
 Loading...