

Page 1

Xerox DigiPath Production Software
System Administrator Guide
701P38674
Version 3.0
September 2002
Page 2

Xerox Corporation
Global Knowledge and Language Services
800 Phillips Road - Bldg. 845-17S
Webster, NY 14580
Copyright © 1996-2002 Xerox Corpo rati on. All righ ts res erv ed. XER OX®, The Doc ume nt Comp an y® and all
identifying numbers used in connection with the Xerox products mentioned in this publication are trademarks of
XEROX CORPORATION. Copyright protection clai med includes all forms and matters of copyrightable material and
information now allowed by statutory or judicial law or hereinafter granted, including without limitations, material
generated from the software programs which are displayed on the screen such as styles, templates, icons, screen
displays looks, etc.
While every care has been taken in the preparation of this material, no liability will be accepted by Xerox Corporation
arising out of any inaccuracies or omissions.
Printed in the United States of America.
Xerox®, Xerox Canada Ltd®, Xerox Limited®, and all Xerox products mentioned in this publication are trademarks of
Xerox Corporation. Other company trademarks are acknowledged as follows:
Adaptec®, the Adaptec logo, SCSlSelect®, and EZ-SCSI® are trademarks of Adaptec, Inc.
Adobe PDFL - Adobe PDF Library Copyright © 1987-2002 Adobe Systems Incorporated. Adobe®, Acrobat®, the
Acrobat logo, Acrobat Exchange®, Distiller®, and PostScript® are registered trademarks of Adobe Systems
Incorporated.
Copyright 1987 - 2001 Adobe Systems Incorporated and its licensors. All rights reserved.
Autologic® is a registered trademark of Autologic Information International, Inc.
Compaq® and QVision® are registered United Staten Patent and Trademark Office, for Compaq Computer
Corporation.
DEC, DEC RAID, and Redundant Array of Independent Disks are registered trademarks of Digital Equipment
Corporation.
Dundas - This software contains material that is (c) 1997-2000 DUNDAS SOFTWARE LTD., all rights reserved.
Hummingbird NFS Maestro® is a registered trademark of Hummingbird Communications, Ltd.
Imaging Technology provided under license by Accusoft Corporation.
ImageGear © 1996-2001 by AccuSoft Corporation. All Rights Reserved.
Intel® and Pentium® are registered trademarks of Intel Corporation.
Novell® and NetWare® are registered trademarks of Novell, Inc. in the United States and other countries.
Oracle® is a registered trademark of Oracle Corporation Redwood City, California.
Outside In® Viewer Technology © 1992-2000 IntraNet Solutions Chicago, Inc. All rights reserved.
TMSSequoia - ScanFix® Image Optimizer Copyright © TMSSEQUOIA, Inc. 1991-2000. All rights reserved.
SonyTM and Storage by SonyTM are trademarks of Sony.
Stellent - Outside In® Viewer Technology© 1992-2002 Stellent Chicago, Inc. All rights reserved.
StorageViewTM is a trademark of CMD Technology, Inc.
TextBridge® is a Registered Trademark of ScanSoft, Inc.
TIFF® is a registered trademark of Aldus Corporation.
WindowsTM , Windows NTTM , Windows 2000 Professional, Windows 2000 Professional Server, and Internet
Explorer are trademarks of Microsoft Corporation; Microsoft® and MS-DOS® are registered trademarks of Microsoft
Corporation.
This product includes software developed by the Apache Software Foundation.
All non-Xerox brands and product names are trademarks or registered trademarks of their respective companies.
Changes are periodically made to this document. Changes, technical inaccuracies, and typographical
errors will be corrected in subsequent editions.
Page 3

SYSTEM ADMINISTRATOR GUIDE TABLE OF CONTENTS
Table of contents
Notices and Certifications. . . . . . . . . . . . . . . . . . . . . . . . . . . . . . . . vii
Approvals and certification . . . . . . . . . . . . . . . . . . . . . . . . . . . . . . . . . . . vii
60HZ, 115V . . . . . . . . . . . . . . . . . . . . . . . . . . . . . . . . . . . . . . . . . vii
50HZ, 220V-240V . . . . . . . . . . . . . . . . . . . . . . . . . . . . . . . . . . . . . vii
Radio frequency emissions . . . . . . . . . . . . . . . . . . . . . . . . . . . . . . . . . . .viii
USA . . . . . . . . . . . . . . . . . . . . . . . . . . . . . . . . . . . . . . . . . . . . . . .viii
Canada . . . . . . . . . . . . . . . . . . . . . . . . . . . . . . . . . . . . . . . . . . . . .viii
Europe 50HZ, 220V-240V equipment . . . . . . . . . . . . . . . . . . . . . viii
Safety . . . . . . . . . . . . . . . . . . . . . . . . . . . . . . . . . . . . . . . . . . . . . . . . .ix
Operational safety . . . . . . . . . . . . . . . . . . . . . . . . . . . . . . . . . . . . . . . . . . .ix
General safety . . . . . . . . . . . . . . . . . . . . . . . . . . . . . . . . . . . . . . . . . . . . . . xi
Maintenance safety . . . . . . . . . . . . . . . . . . . . . . . . . . . . . . . . . . . . . . . . .xiii
About this guide. . . . . . . . . . . . . . . . . . . . . . . . . . . . . . . . . . . . . . . . xv
Audience . . . . . . . . . . . . . . . . . . . . . . . . . . . . . . . . . . . . . . . . . . . . . . . . .xvi
How to recognize important information . . . . . . . . . . . . . . . . . . . . . . . . xvii
Conventions . . . . . . . . . . . . . . . . . . . . . . . . . . . . . . . . . . . . . . . . xvii
Flag icons . . . . . . . . . . . . . . . . . . . . . . . . . . . . . . . . . . . . . . . . . . xviii
Related information . . . . . . . . . . . . . . . . . . . . . . . . . . . . . . . . . . . . . . . . .xix
DigiPath documentation . . . . . . . . . . . . . . . . . . . . . . . . . . . . . . . .xix
Scanner documentation . . . . . . . . . . . . . . . . . . . . . . . . . . . . . . . . xx
DigiPath scanner . . . . . . . . . . . . . . . . . . . . . . . . . . . . . . . . xx
DocuImage 620S scanner . . . . . . . . . . . . . . . . . . . . . . . . . xx
Xerox Production Printing Services . . . . . . . . . . . . . . . . . . . . . . . xx
Xerox solutions . . . . . . . . . . . . . . . . . . . . . . . . . . . . . . . . . . . . . . .xxi
Third party software . . . . . . . . . . . . . . . . . . . . . . . . . . . . . . . . . . .xxi
Windows 2000 related information . . . . . . . . . . . . . . . . . . . . . . . xxii
Windows 2000 Online Help . . . . . . . . . . . . . . . . . . . . . . . xxii
Windows 2000 Web site . . . . . . . . . . . . . . . . . . . . . . . . . xxii
Getting Help online . . . . . . . . . . . . . . . . . . . . . . . . . . . . . . . . . . . . . . . . xxiii
Using a Help menu . . . . . . . . . . . . . . . . . . . . . . . . . . . . . . . . . . . xxiii
Using Help in a dialog box . . . . . . . . . . . . . . . . . . . . . . . . . . . . . xxiii
Ordering additional materials and supplies . . . . . . . . . . . . . . . . . . . . . .xxiv
Obtaining additional support . . . . . . . . . . . . . . . . . . . . . . . . . . . . . . . . . xxv
X-PRESS FAX . . . . . . . . . . . . . . . . . . . . . . . . . . . . . . . . . . . . . . xxv
DigiPath FAQ Xerox web site . . . . . . . . . . . . . . . . . . . . . . . . . . . xxv
Xerox Welcome Center . . . . . . . . . . . . . . . . . . . . . . . . . . . . . . . xxvi
I
Page 4

TABLE OF CONTENTS SYSTEM ADMINISTRATOR GUIDE
1. About DigiPath. . . . . . . . . . . . . . . . . . . . . . . . . . . . . . . . . . . . . . . .1 - 1
Product overview . . . . . . . . . . . . . . . . . . . . . . . . . . . . . . . . . . . . . . . . . 1 - 2
Understanding DigiPath networking . . . . . . . . . . . . . . . . . . . . . 1 - 3
Powering up the hardware and starting DigiPath . . . . . . . . . . . . . . . . 1 - 4
Logging into Document Library (DL) applications . . . . . . . . . . . 1 - 5
Ending the current DigiPath session . . . . . . . . . . . . . . . . . . . . 1 - 5
Hardware components . . . . . . . . . . . . . . . . . . . . . . . . . . . . . . . . . . . . 1 - 6
Software components . . . . . . . . . . . . . . . . . . . . . . . . . . . . . . . . . . . . . 1 - 8
Virus protection recommendations . . . . . . . . . . . . . . . . . . . . . . . . . . 1 - 11
Protecting DigiPath from virus contamination . . . . . . . . . . . . . 1 - 11
2. Setting up a DigiPath system . . . . . . . . . . . . . . . . . . . . . . . . . . . .2 - 1
3. Windows 2000 and network conf igurations . . . . . . . . . . . . . . . .3 - 1
Understanding and using Windows 2000 . . . . . . . . . . . . . . . . . . . . . . 3 - 2
Performing basic Windows 2000 administrative functions . . . . 3 - 2
Creating shortcuts . . . . . . . . . . . . . . . . . . . . . . . . . . . . . 3 - 2
Adding Windows printers . . . . . . . . . . . . . . . . . . . . . . . . 3 - 2
Adding and configuring users and groups . . . . . . . . . . . 3 - 3
Setting up shared folders, files, and printers . . . . . . . . . 3 - 3
Adding or removing network services . . . . . . . . . . . . . . 3 - 3
Preparing to shut down the Makeready workstation . . . . . . . . . . . . . . 3 - 4
Checking for connected users . . . . . . . . . . . . . . . . . . . . . . . . . 3 - 5
Notifying users connected to the workstation . . . . . . . . . . . . . . 3 - 6
Disconnecting users connected to the remote workstation . . . 3 - 7
Updating the Emergency Repair Disk . . . . . . . . . . . . . . . . . . . . . . . . . 3 - 8
Using Hummingbird NFS products with DigiPath . . . . . . . . . . . . . . . . 3 - 9
Using Hummingbird to mount UNIX hosts . . . . . . . . . . . . . . . 3 - 10
Configuring the DocuSP Decomposition Service . . . . . . . . . . . . . . . 3 - 12
Information for the DocuSP administrator . . . . . . . . . . . . . . . 3 - 14
Using the Event Viewer . . . . . . . . . . . . . . . . . . . . . . . . . . . . . . . . . . . 3 - 16
4. Hardware maintena nce . . . . . . . . . . . . . . . . . . . . . . . . . . . . . . . . .4 - 1
Using a scanner with DigiPath . . . . . . . . . . . . . . . . . . . . . . . . . . . . . . 4 - 2
Maintaining the DigiPath scanner . . . . . . . . . . . . . . . . . . . . . . . 4 - 2
Maintaining the DocuImage 620S scanner . . . . . . . . . . . . . . . . 4 - 3
Moving and reinstalling the DocuImage 620S . . . . . . . . 4 - 3
Registering the scanner . . . . . . . . . . . . . . . . . . . . . . . . . 4 - 4
Using a magneto-optical drive (MOD) . . . . . . . . . . . . . . . . . . . . . . . . . 4 - 8
Sony 9.1 GB magneto-optical disk . . . . . . . . . . . . . . . . . . . . . 4 - 10
Formatting the Sony 9.1 GB MOD platter . . . . . . . . . . 4 - 11
Using DigiPath 1.2/2.x MODs with DigiPath 3.0 . . . . . 4 - 13
Optical media compatibility information . . . . . . . . . . . . . . . . . 4 - 14
Using a Redundant Array of Independent Disks (RAID) . . . . . . . . . . 4 - 15
Understanding RAID levels . . . . . . . . . . . . . . . . . . . . . . . . . . 4 - 16
Understanding the DigiPath RAID device configurations . . . . 4 - 18
II
Page 5

SYSTEM ADMINISTRATOR GUIDE TABLE OF CONTENTS
Using the 100 GB RAID . . . . . . . . . . . . . . . . . . . . . . . . . . . . . 4 - 19
Using the Enterprise Storage Manager . . . . . . . . . . . . 4 - 19
Shutting down the 100 GB RAID system . . . . . . . . . . . 4 - 20
Powering on the 100 GB RAID system . . . . . . . . . . . . 4 - 21
Using the 150 GB RAID . . . . . . . . . . . . . . . . . . . . . . . . . . . . . 4 - 22
Using StorageView . . . . . . . . . . . . . . . . . . . . . . . . . . . 4 - 22
Using the internal and external tape drives . . . . . . . . . . . . . . . . . . . . 4 - 23
Sony AIT 100 autoloading tape drive . . . . . . . . . . . . . . . . . . . 4 - 25
Loading the Sony AIT tape magazine . . . . . . . . . . . . . 4 - 27
Unloading the Sony AIT tape magazine . . . . . . . . . . . 4 - 29
Cleaning the Sony AIT tape drive heads . . . . . . . . . . . 4 - 30
Tape media compatibility information . . . . . . . . . . . . . . . . . . . 4 - 31
5. Backup and restore . . . . . . . . . . . . . . . . . . . . . . . . . . . . . . . . . . . .5 - 1
Digipath backup strategy . . . . . . . . . . . . . . . . . . . . . . . . . . . . . . . . . . . 5 - 2
Backup devices . . . . . . . . . . . . . . . . . . . . . . . . . . . . . . . . . . . . 5 - 3
TR5 . . . . . . . . . . . . . . . . . . . . . . . . . . . . . . . . . . . . . . . . 5 - 4
Sony AIT . . . . . . . . . . . . . . . . . . . . . . . . . . . . . . . . . . . . 5 - 4
Backup and restore software . . . . . . . . . . . . . . . . . . . . . . . . . . 5 - 6
Understanding the various backup types . . . . . . . . . . . . . . . . . 5 - 7
Selecting and implementing a backup strategy . . . . . . . . . . . . 5 - 9
Backup media . . . . . . . . . . . . . . . . . . . . . . . . . . . . . . . . . . . . . 5 - 12
Backing up the DigiPath System . . . . . . . . . . . . . . . . . . . . . . . . . . . . 5 - 13
Backing up DigiPath cabinets . . . . . . . . . . . . . . . . . . . . . . . . . 5 - 14
Backing up the DigiPath workstation . . . . . . . . . . . . . . . . . . . 5 - 17
Disconnecting remote users . . . . . . . . . . . . . . . . . . . . 5 - 17
Closing any open applications . . . . . . . . . . . . . . . . . . . 5 - 18
Stopping the DigiPath services and applications . . . . . 5 - 19
Performing the backup . . . . . . . . . . . . . . . . . . . . . . . . . 5 - 20
Restarting the DigiPath applications and services . . . . 5 - 23
Restoring the DigiPath system . . . . . . . . . . . . . . . . . . . . . . . . . . . . . 5 - 24
Restoring a DigiPath workstation . . . . . . . . . . . . . . . . . . . . . . 5 - 26
Restoring DigiPath cabinets . . . . . . . . . . . . . . . . . . . . . . . . . . 5 - 29
6. System administration . . . . . . . . . . . . . . . . . . . . . . . . . . . . . . . . .6 - 1
Security recommendations . . . . . . . . . . . . . . . . . . . . . . . . . . . . . . . . . 6 - 2
Using the Library Administration Tool . . . . . . . . . . . . . . . . . . . . . . . . . 6 - 3
Logging into the Library Administration Tool . . . . . . . . . . . . . . 6 - 4
Managing multiple servers . . . . . . . . . . . . . . . . . . . . . . . . . . . . 6 - 5
User and group administration . . . . . . . . . . . . . . . . . . . . . . . . . . . . . . 6 - 6
Managing user accounts . . . . . . . . . . . . . . . . . . . . . . . . . . . . . 6 - 7
Adding a user account . . . . . . . . . . . . . . . . . . . . . . . . . . 6 - 7
Editing the properties of a user account . . . . . . . . . . . 6 - 10
Deleting a user account . . . . . . . . . . . . . . . . . . . . . . . . 6 - 12
Managing groups . . . . . . . . . . . . . . . . . . . . . . . . . . . . . . . . . . 6 - 13
Adding a group . . . . . . . . . . . . . . . . . . . . . . . . . . . . . . 6 - 13
III
Page 6

TABLE OF CONTENTS SYSTEM ADMINISTRATOR GUIDE
Editing the properties of a group . . . . . . . . . . . . . . . . . 6 - 15
Deleting a group . . . . . . . . . . . . . . . . . . . . . . . . . . . . . 6 - 16
Configuring remote DigiPath servers . . . . . . . . . . . . . . . . . . . . . . . . 6 - 17
Configuring remote DigiPath servers . . . . . . . . . . . . . . . . . . . 6 - 18
Adding a remote DigiPath server . . . . . . . . . . . . . . . . . . . . . . 6 - 18
Re-establishing a remote DigiPath server connection . . . . . . 6 - 20
Enabling or disabling a remote DigiPath server connection . . 6 - 21
Removing a remote DigiPath server . . . . . . . . . . . . . . . . . . . . 6 - 22
Connecting to a multiple DL servers . . . . . . . . . . . . . . . . . . . . 6 - 23
Configuring a DSM client to connect to a DL server . . . . . . . . 6 - 23
Configuring th e DigiPath database and cabinet creation location . . . 6 - 24
Specifying the location of the local database . . . . . . . . . . . . . 6 - 25
Specifying the cabinet location . . . . . . . . . . . . . . . . . . . . . . . . 6 - 27
Specifying the local drives . . . . . . . . . . . . . . . . . . . . . . 6 - 27
Adding network drives . . . . . . . . . . . . . . . . . . . . . . . . . 6 - 28
Deleting network drives . . . . . . . . . . . . . . . . . . . . . . . . 6 - 28
Using document conversion . . . . . . . . . . . . . . . . . . . . . . . . . . . . . . . 6 - 29
Document conversion error log . . . . . . . . . . . . . . . . . . . . . . . 6 - 29
Scheduling document conversion . . . . . . . . . . . . . . . . . . . . . . 6 - 30
Defragmenting cabinets . . . . . . . . . . . . . . . . . . . . . . . . . . . . . . . . . . 6 - 35
Using the DocuTech Tape Tool . . . . . . . . . . . . . . . . . . . . . . . . . . . . . 6 - 38
Using WFTPDPro to FTP objects from DocuTech . . . . . . . . . . . . . . 6 - 41
Working with a Remote File Server . . . . . . . . . . . . . . . . . . . . . . . . . . 6 - 42
Setting up a remote file server . . . . . . . . . . . . . . . . . . . . . . . . 6 - 44
Connecting to a remote file server . . . . . . . . . . . . . . . . . . . . . 6 - 46
Creating a cabinet . . . . . . . . . . . . . . . . . . . . . . . . . . . . 6 - 47
Performance considerations . . . . . . . . . . . . . . . . . . . . . . . . . . 6 - 48
7. Managing cabinets. . . . . . . . . . . . . . . . . . . . . . . . . . . . . . . . . . . . .7 - 1
Working with cabinets . . . . . . . . . . . . . . . . . . . . . . . . . . . . . . . . . . . . . 7 - 2
Creating cabinets using the Library Administration Tool . . . . . 7 - 3
Editing cabinet properties and attributes . . . . . . . . . . . . . . . . . 7 - 7
Deleting a cabinet . . . . . . . . . . . . . . . . . . . . . . . . . . . . . . . . . . . 7 - 9
Purging the contents of a cabinet . . . . . . . . . . . . . . . . . . . . . . 7 - 10
Copying and moving cabinets . . . . . . . . . . . . . . . . . . . . . . . . 7 - 11
Copying and moving cabinets within a server . . . . . . . 7 - 11
Copying and moving cabinet between servers . . . . . . 7 - 11
8. Defining attribute sets. . . . . . . . . . . . . . . . . . . . . . . . . . . . . . . . . .8 - 1
Why define attributes? . . . . . . . . . . . . . . . . . . . . . . . . . . . . . . . . . . . . . 8 - 2
Considerations for defining attributes . . . . . . . . . . . . . . . . . . . . . . . . . 8 - 3
Why should I backup before defining attributes? . . . . . . . . . . . . . . . . 8 - 6
Identifying the various attribute types . . . . . . . . . . . . . . . . . . . . . . . . . 8 - 7
Identifying the default attributes . . . . . . . . . . . . . . . . . . . . . . . . . . . . . 8 - 8
Using attribute sets . . . . . . . . . . . . . . . . . . . . . . . . . . . . . . . . . . . . . . 8 - 11
Creating an attribute set . . . . . . . . . . . . . . . . . . . . . . . . . . . . . 8 - 12
IV
Page 7

SYSTEM ADMINISTRATOR GUIDE TABLE OF CONTENTS
Editing an existing attributes set . . . . . . . . . . . . . . . . . . . . . . . 8 - 14
Deleting an attribute set . . . . . . . . . . . . . . . . . . . . . . . . . . . . . 8 - 15
Applying an attribute set to a cabinet . . . . . . . . . . . . . . . . . . . 8 - 15
Using attributes . . . . . . . . . . . . . . . . . . . . . . . . . . . . . . . . . . . . . . . . . 8 - 16
Adding an attribute . . . . . . . . . . . . . . . . . . . . . . . . . . . . . . . . . 8 - 17
Editing an attribute . . . . . . . . . . . . . . . . . . . . . . . . . . . . . . . . . 8 - 21
Deleting an attribute . . . . . . . . . . . . . . . . . . . . . . . . . . . . . . . . 8 - 23
Using attribute groups . . . . . . . . . . . . . . . . . . . . . . . . . . . . . . . . . . . . 8 - 24
Creating an attribute group . . . . . . . . . . . . . . . . . . . . . . . . . . . 8 - 25
Deleting an attribute group . . . . . . . . . . . . . . . . . . . . . . . . . . . 8 - 26
Renaming an attribute group . . . . . . . . . . . . . . . . . . . . . . . . . 8 - 27
Adding an attribute to a group . . . . . . . . . . . . . . . . . . . . . . . . 8 - 28
Removing an attribute from a group . . . . . . . . . . . . . . . . . . . . 8 - 29
Using objects across cabinets . . . . . . . . . . . . . . . . . . . . . . . . . . . . . . 8 - 30
Copying or moving objects across cabinets . . . . . . . . . . . . . . 8 - 33
Using a custom catalog map file . . . . . . . . . . . . . . . . . . . . . . . 8 - 35
Saving a custom catalog map file . . . . . . . . . . . . . . . . 8 - 36
Opening a custom catalog map file . . . . . . . . . . . . . . . 8 - 37
9. Production printi ng administration . . . . . . . . . . . . . . . . . . . . . . .9 - 1
Understanding DigiPath production printing . . . . . . . . . . . . . . . . . . . . 9 - 2
Production printing via TCP/IP (UNIX) . . . . . . . . . . . . . . . . . . . 9 - 3
Production printing via IPX/SPX (Novell NetWare) . . . . . . . . . 9 - 4
Setting up production printers . . . . . . . . . . . . . . . . . . . . . . . . . . . . . . . 9 - 5
Adding a production printer . . . . . . . . . . . . . . . . . . . . . . . . . . . 9 - 6
Modifying a production printer . . . . . . . . . . . . . . . . . . . . . . . . . 9 - 9
Setting the default production printer . . . . . . . . . . . . . . . . . . . 9 - 10
Removing a production printer . . . . . . . . . . . . . . . . . . . . . . . . 9 - 11
Displaying Job Setup . . . . . . . . . . . . . . . . . . . . . . . . . . . . . . . 9 - 12
Specifying the DocuJob Converter directory . . . . . . . . . . . . . . . . . . . 9 - 13
Configuring Network Agent . . . . . . . . . . . . . . . . . . . . . . . . . . . . . . . . 9 - 15
Retrieving print jobs from a DocuSP controller . . . . . . . . . . . . 9 - 17
Creating a network agent save queue . . . . . . . . . . . . . 9 - 18
Enabling job status from the DocuSP controller . . . . . 9 - 23
DigiPath workstation configuration . . . . . . . . . . . . . . . 9 - 24
Enabling the network agent service . . . . . . . . . . . . . . . 9 - 26
Creating a production printer . . . . . . . . . . . . . . . . . . . . 9 - 26
Enabling the network agent notification message . . . . 9 - 27
IQI Enhance . . . . . . . . . . . . . . . . . . . . . . . . . . . . . . . . . . . . . . 9 - 28
Setting up the Document Centre . . . . . . . . . . . . . . . . . . . . . . 9 - 30
Configuring the WFTPD Pro software . . . . . . . . . . . . . 9 - 30
Configuring the FTP server . . . . . . . . . . . . . . . . 9 - 31
Creating the Document C ent re user
for the FTP server . . . . . . . . . . . . . . . . . . . . . . . 9 - 33
Creating a Document Centre template . . . . . . . . . . . . 9 - 35
Configuring the Document Centre directory . . . . . . . . 9 - 36
V
Page 8

TABLE OF CONTENTS SYSTEM ADMINISTRATOR GUIDE
Enabling the network agent service . . . . . . . . . 9 - 39
Adding the Document Centr e pr i nte r to the Di g i Path
workstations . . . . . . . . . . . . . . . . . . . . . . . . . . . . . . . . . 9 - 39
PDF Location . . . . . . . . . . . . . . . . . . . . . . . . . . . . . . . . . . . . . 9 - 40
Setting up the Remote Print Service (RPS) . . . . . . . . . . . . . . . . . . . 9 - 43
Setting up a virtual printer for the CreoScitex . . . . . . . . . . . . . . . . . . 9 - 45
Print job manager options . . . . . . . . . . . . . . . . . . . . . . . . . . . . . . . . . 9 - 47
Extended Connectivity Print Job Management (EC-PJM) . . . 9 - 47
Resolving production printing problems . . . . . . . . . . . . . . . . . . . . . . 9 - 48
Resolving TCP/IP problems . . . . . . . . . . . . . . . . . . . . . . . . . . 9 - 48
Resolving Novell NetWare problems . . . . . . . . . . . . . . . . . . . 9 - 49
Viewing the Event Viewer . . . . . . . . . . . . . . . . . . . . . . . . . . . . 9 - 50
Cleaning up print file problems . . . . . . . . . . . . . . . . . . . . . . . . 9 - 51
A. Data Migration . . . . . . . . . . . . . . . . . . . . . . . . . . . . . . . . . . . . . . . .A - 1
B. Quick Print . . . . . . . . . . . . . . . . . . . . . . . . . . . . . . . . . . . . . . . . . . .C - 1
C. Configuring the Adaptec SCSI adapters . . . . . . . . . . . . . . . . . . .D - 1
VI
Page 9

Notices and Certifications
Approvals and certification
For the UK, this product is serviced under a BS5750 Quality
system accepted by the British Standards Institution.
60HZ, 115V
The equipment is listed by the Underwriters Laboratories,
UL1950, certified by C anadian Sta ndards Associat ion, CSA2 2.2,
No. 1950.
50HZ, 220V-240V
The equipment is certified by the British Standards Institution,
IEC950 (EN60950). The equipment is manufactured under a
BS5750 Quality system accepted by the British Standards
Institution. The equipment is also certified in compliance with
applicable standards by various national bodies.
SYSTEM ADMINISTRATOR GUIDE VII
Page 10

NOTICES AND CERTIFICATIONS XEROX DIGIPATH PRODUCTION SOFTWARE
Radio frequency emissions
USA
This equipment gener ates, uses and ca n radiate rad io frequency
energy. It may cause radio interference to ra dio co mmuni cat ions
if not installed according to the installation instructions.
The equipment complies with the limits for a Class A computing
device as documented in Subpart J, Part 15 of the FC C rules
which are designed to provide reasonable protection against
such interference when operated in a commercial environment.
Operation of this equipment in a resident ial area is li kely to cause
interference. In such cases, the user is responsible for the
expense of correcting the interference.
Canada
The equipment does not excee d the class A limi ts for rad io noise
emissions from a digital apparatus as documented in the radio
interference regulations of the Canadian Department of
Communications.
Cet appareil numérique est conforme aux limites d'émission de
bruits radioélec triques pour les appareils de classe A stipulées
dans le Réglement sur le brouillage radioélectriques du ministére
des Communications du Canada.
Europe 50HZ, 220V-240V equipment
The equipment was tested and is certified in conformance with
the European commission directive 82/499/ECC and VDE
0871/0875, class B wh ich relat es to radi o frequen cy interfe rence.
This equipment is certified, manufactured and tested in
compliance with strict safety and radio frequency interference
regulations.
VIII SYSTEM ADMINISTRATOR GUIDE
Page 11

Operational safety
Safety
Your Xerox equipment and supplies were design ed and tested to
meet strict safety requirements. These include safety agency
examination, approval and compliance with established
environmental standards.
Attention to the following notes ensures the continued safe
operation of your equipm en t.
If you need any additional safety information concerning the
equipment or materials, contact your local representative.
Always connect the equipment to a properly grounded power
source receptacle. If in do ub t, ha ve the re cep t acle checke d by a
qualified electrician.
D
WARNING
Improper connection of the equipment grounding conductor
can result in electrical shock.
Always follow all warnings and instructions marked on, or
supplied with, the equipment.
Always locate the equipment on a solid su pport surface (not on
a thick pile carpet) with adequate strength for the weight of the
machine.
Always exercise care in moving or relocating the equipment.
SYSTEM ADMINISTRATOR GUIDE IX
Page 12

SAFETY XEROX DIGIPATH PRODUCTION SOFTWARE
Always place the equipment in an area which provides
adequate room area for ventilation and servicing.
Always use the materials and supplies specifically designed for
your Xerox equipm ent . U se of unsuitable materials m ay re sul t in
poor performance and possibly, a hazardous situation.
Never use a ground adaptor plug to connect the equipment to a
power source receptacle that lacks a ground connection
terminal.
Never attempt any maintenance function that is not specifically
described in this documentation.
Never obstruct ventilation openings. These are provide d to
prevent overheating.
Never remove covers or guards that are fastened with screws.
There are no operator serviceable areas within these covers.
Never install the equipment near a radiator or any other heat
source.
Never override or “cheat” electrical or mechanical interlock
devices.
Never push objects of any kind into the ventilation openings.
Never operate the equipment if you notice unusual noises or
odors. Disconnect the power cord from the power source
receptacle and call your customer service engineer to correct the
problem.
X SYSTEM ADMINISTRATOR GUIDE
Page 13

XEROX DIGIPATH PRODUCTION SOFTWARE SAFETY
General safety 0
WARNING
D
Never look directly at the scanner light. It may cause
discomfort to your eyes. Always keep the document handler
down on the document glass when you use the scanner.
Always follow all warnings and instructions marked on or
supplied with the product.
Never locate the scanner where people ma y walk on th e system
power cable. Do not place objects on the system power cable.
Never use this pro duct near water, wet locations, or outdoors.
Never put containers of coffee or other liquids on the product.
Never push objects of any kind into the slots of the scanner as
they may touch dangerous voltage points or short out parts that
could result in a risk of fire or electric shock.
SYSTEM ADMINISTRATOR GUIDE XI
Page 14

SAFETY XEROX DIGIPATH PRODUCTION SOFTWARE
Always switch off the system power, unplug this product from
the wall outlet, and call a Xerox Service Representative under
the following conditions:
• When the power cord is damaged or frayed.
• If liquid has been spilled into the product.
• If the product has been exposed to water.
• If the product is producing any unusual noises or odors.
• If the prod uct has been dropped or the cabinet is dama ged.
WARNING
D
This product is equipped with a 3-wire grounding type plug.
A 3-wire plug is a plug having a third (grounding) pin. This
type of plug will fit into a grounding-type power outlet. This
is a safety feature.
WARNING
D
To avoid risk of an el ec tri cal shock, contact your electrician
to replace the recept acle, if you are unable to insert the plug
into the outlet.
Never use a ground adapter plug to connect the product to a
power source receptacle that lacks a ground connection
terminal.
Never place the product in a built-i n installation unless proper
ventilation is provided.
Never push objects of any kind into the slots of the product, as
they may touch dangerous voltage points or short out parts that
could result in a risk of fire or electric shock.
XII SYSTEM ADMINISTRATOR GUIDE
Page 15

XEROX DIGIPATH PRODUCTION SOFTWARE SAFETY
Maintenance safety
Always follow the cleaning instructions in the Xerox DocuImage
620S Preventive Maintenance Guide for proper care and
maintenance of the product.
Never attempt any maintenance function that is not specified in
the Xerox DocuImage 620S Pr eve ntive Ma i nte na nce Gui d e .
Always unplug this product from the wall outlet before cleaning.
Never use supplies or cleaning materials for othe r tha n their
intended purposes.
Always keep all materials out of the reach of c hildren.
SYSTEM ADMINISTRATOR GUIDE XIII
Page 16

SAFETY XEROX DIGIPATH PRODUCTION SOFTWARE
XIV SYSTEM ADMINISTRATOR GUIDE
Page 17

About this guide
The Xerox DigiPath Production Software System Administrator
Guide provides information on configuring, customizing, and
maintaining your entire DigiPath system.
This book also includes:
• instructions for implementing file system maintenance,
database maintenance, and b ackup strategies
• instructions for creating, modifying, and restricting DigiPath
user accounts
• instructions for set ti ng u p an d co nfi g ur in g p ro du cti on pr in ter s
and all optional DigiPath hardware
• detailed instructions for using all the functions in the Library
Administration Tool and the Printer Setup applications
This chapter expl ains the in formation foun d in this gu ide, how the
information is organized, and helps you to get the most out of
this guide by:
• identifying the audience and the basic skills required to use
this guide effectively
• explaining the standard conventions and cues that highlight
important information
• listing related documentation you may find helpful
• listing available online Help systems
• providing information on ordering additional materials and
supplies
• providing information on obtaining additional information
SYSTEM ADMINISTRATOR GUIDE XV
Page 18

ABOUT THIS GUIDE XEROX DIGIPATH PRODUCTION SOFTWARE
Audience
The Xerox DigiPath Production Software System Administrator
Guide is a comprehensive reference manual intended for site
administrators and advanced DigiPath operators. Many of the
procedures described in this guide require you to log on to a
computer or net w ork as an administrator with administrative
privileges. Also, many of the maintenance tasks described in this
guide require a solid understand i ng of hardware components,
networks, and operating systems associated with DigiPath.
This guide assumes you are familiar wit h the Wi nd ow s 2 00 0
Server and Professional operating systems, standard
communication protocols, basic networking terms, and
production printer connections. You should also have a working
knowledge of the following:
• IBM-compatible personal c omputers
• Local area networks (LANs)
• Token ring networks
• Novell operating system
• DocuTech Network Support Services
• Xerox Publishing Printers
• Magneto-optical drives (MODs)
• Redundant Arrays of Independent Disks (RAIDs)
XVI SYSTEM ADMINISTRATOR GUIDE
Page 19

XEROX DIGIPATH PRODUCTION SOFTWARE ABOUT THIS GUIDE
How to recognize important information
The following sections provide the conventions and flag icons
that are used in the Xerox DigiPath Production Software System
Administrator Guide.
Conventions
The Xerox DigiPath Production Software System Administrator
Guide uses the conventions listed in Table 1 to help you
recognize information.
Table 1. Conventions
Convention Description
<CAPS in angle
brackets>
<Angle brackets> Variable information is enclosed in angle brackets
[Square brackets] Names of options you select, including toolbar
Bold
Italics Titles of documents and manuals that provide
Within procedures, the names of keys to press are
displayed in capital letters and enclosed in angle
brackets (for example, press <ESCAPE>).
Keyboard combinations are represented by the plus
sign (+) between names of keys (for example, press
<CONTROL+C> to copy).
(for example, select <filename>).
buttons and buttons in dialog boxes, are enclosed in
square brackets (for examp le, select [Close]).
Menu commands are also displayed in square
brackets, with the menu name appearing first, then a
colon, followed by the option name (for example,
select [File: Close]).
Text you should enter exactly as it appears is
displayed in bold (for example, enter test1.rdo).
additional information on the current topic are
displayed in italics (for example, the DigiPath
System Administrator Guide).
SYSTEM ADMINISTRATOR GUIDE XVII
Page 20

ABOUT THIS GUIDE XEROX DIGIPATH PRODUCTION SOFTWARE
Flag icons
The Xerox DigiPath Production Software System Administrator
Guide uses the following flag icons to help you recognize
important information:
NOTE: The NOTE symbol and text in italics indicate that there is
E
important or supplemental information for a task or procedure.
CAUTION
B
The CAUTION symbol and text in italics indicate that you may
lose data or damage equipment if care is not taken when
performing the task or procedure following the caution.
WARNING
D
The WARNING symbol and bold text indicate that you may
cause personal injury or death if care is not taken when
performing the task or procedure following the warning.
A
1. The step-by-step icon id entifi es the beg innin g of a procedu re.
XVIII SYSTEM ADMINISTRATOR GUIDE
Page 21

XEROX DIGIPATH PRODUCTION SOFTWARE ABOUT THIS GUIDE
Related information
This section lists additional materials you may need, or will find
helpful, when using your DigiPath system.
To order the Xerox documentation listed below, or for additional
information on Xerox solutions, contact your Xerox
representative.
DigiPath documentation
For more information on DigiPath, refer to the following
publications:
• User Guide section of the online Help system
• Xerox DigiPath Production So ftware Custome r Software
Release Document
• Xerox DigiPath Production Software Physica l Installation
Planning Gu ide
• Xerox DigiPath Production Software Customer Training
Program
For more information on the training program, contact your
Customer Training Specialist (CTS).
SYSTEM ADMINISTRATOR GUIDE XIX
Page 22

ABOUT THIS GUIDE XEROX DIGIPATH PRODUCTION SOFTWARE
Scanner documentation 0
DigiPath scanner 0
For more information on the DigiPath Scanner, refer to the
DigiPath scanner online Help system.
DocuImage 620S scanner 0
For more information on the DocuImage 620S, refer to the
following publications:
• Xerox DocuImage 620S Preventive Maintenance Guide
• Xerox DocuImage 620S Installation Guide
• Xerox DocuIma ge 620S User Guide
• Xerox DocuImage 620S Problem Solving Guide
Xerox Production Printing Services
For more information on the Xerox Production Printing Services
and Network Server products, refer to the following publications:
• Site Configuration Guide
• Using Xerox Production Printing Services
• Problem Solving Guide
• Xerox Document Services Platform Series
• Xerox DocuPrint Publishing Series
• Xerox DocuTech Network Support Services
• Xerox DocuTech Publishing Series
XX SYSTEM ADMINISTRATOR GUIDE
Page 23

XEROX DIGIPATH PRODUCTION SOFTWARE ABOUT THIS GUIDE
Xerox solutions 0
For more information on Xerox software solutions that can be
integrated into a DigiPath system, refer to the following
materials:
• Xerox DocuJob Converter customer documentatio n,
including the Software Release Document
• Xerox Extended Connectivity - Print Job Ma nager (EC-PJM)
customer documentation, including the Software Release
Document
• DocuSP customer documentation, including the Software
Release Document
Third party software
For additional information about third party software and
hardware, refer to the following materials:
• Compaq Professional Worksta tion PW800 0 Re ference Gui de
• Adobe Acrobat documentation (included on the DigiPath
CD-ROM)
• Hummingbird NFS documentation (included on the DigiPath
CD-ROM)
• TapeWare documentation (included on the DigiPath
CD-ROM)
• Sony MO Disk Unit User Guide
• Adaptec AHA-2940Ultra / 2940Ultra Wide PCI-to-UltraSCSI
Host Adapter with SCSISelect User’s Guide
• Compaq P1210 Color Monitor User’s Guide
• AIT Autoloader Unit User Guide
SYSTEM ADMINISTRATOR GUIDE XXI
Page 24

ABOUT THIS GUIDE XEROX DIGIPATH PRODUCTION SOFTWARE
Windows 2000 related information
Microsoft provides users and administrators with several
different resources to support the Windows 2000 environment.
Some of these resources inclu de web sites a nd online Hel p. The
following sections describe these sources and tell you how to
find and use t hem.
Windows 2000 Online Help
Windows 2000 Server and Professional includes extensive
online Help for all aspects of the operating systems. Most likely,
the online Help will be your primary source for information.
Administrative procedures , from adding u sers and managing
groups to installing Windows printers, can be found in the online
Help files. Furthermore, most Windows applications also contain
their own online Help system, containing information that is
specific to the application.
To access online Help, select [Start: Help] from the Windows
task bar. If you are looking for help wi thin a specific applic ation,
use the options availab le f ro m the Hel p me nu wit hin tha t
application.
Windows 2000 Web site
Microsoft has a Windows 2000 World Wide Web site that
contains the latest Windows 2 000 news and information about
upgrades. The URL for this site is:
http://www.microsoft.com/Windows2000/
XXII SYSTEM ADMINISTRATOR GUIDE
Page 25

XEROX DIGIPATH PRODUCTION SOFTWARE ABOUT THIS GUIDE
Getting Help online
This section des cribes the type of Help available online for the
DigiPath software.
Using a Help menu
All DigiPath applications, with the exception of the Scan and
Print application, provide a Help menu.
Select the Contents tab to browse for the desired topic in the
Help system.
Select the Index tab to scroll an alphabetical index of Help
topics.
Select the Search tab to search for all t opics fo r information on a
specific feature or function.
Using Help in a dialog box
Most dialog boxes in the DigiPath system provide the standard
Windows Help button [?] in dialog and message boxes. This
button is displayed in the title bar of the dialog, next to the close
button, [X].
This button provides context-sensitive Help, so you can select it,
then click in the dialog on the field or option for which you need
Help. A Help window opens, displaying information for the
selected field or option.
SYSTEM ADMINISTRATOR GUIDE XXIII
Page 26

ABOUT THIS GUIDE XEROX DIGIPATH PRODUCTION SOFTWARE
Ordering additional materials and supplies
DigiPath provides yo u with all the resour ces you ne ed to op erate
and maintain the system; however, you may order additional
materials or supplies.
To reorder the scanner registration documents or the training
disks, or to order screen finder tools, refer to the Xerox Supplies
Resource Catalog (610P18158) or contact your Xerox
representative.
To order cleaning supplies for the DocuImage 620S scanner,
refer to the DocuImage 620S Preventative Maintenance Guide.
XXIV SYSTEM ADMINISTRATOR GUIDE
Page 27

XEROX DIGIPATH PRODUCTION SOFTWARE ABOUT THIS GUIDE
Obtaining additional support 0
This section describes where yo u can obt ain ad di tio nal D igiPa th
support.
X-PRESS FAX 0
Customers can obtain additional DigiPath support documents,
including solutions to common work process problems and hints
and tips for enabling optimal use of the equipment, from Xerox
C&TS Electronic Services.
Call X-PRESS at 1-800-979-9709 and request document
number 12300 to receive a complete index of the documented
DigiPath solutions, along with co mplete instr uctions for using the
X-PRESS fax system.
DigiPath FAQ Xerox web site
A DigiPath FAQ (Frequently Asked Questions) Xerox web site is
A
available for customers. T o access the DigiPath FAQ Xerox web
site:
1. Go to http://www.xerox.com from your web browser.
2. Search on the word “digipath”.
3. Find the appropriate DigiPath link.
• DigiPath Professional Production Software
• DigiPath Scanner
• DigiPath Xpress Production Software
4. Select Support under the appropriate DigiPath link.
5. Under the FAQ heading, select the desired topic link to
displays the FAQ for that topic.
SYSTEM ADMINISTRATOR GUIDE XXV
Page 28

ABOUT THIS GUIDE XEROX DIGIPATH PRODUCTION SOFTWARE
Xerox Welcome Center 0
If your machine is down or you cannot solve a problem and you
are located within North America, call 1-800-821-2797 for the
Xerox Welcome Center.
XXVI SYSTEM ADMINISTRATOR GUIDE
Page 29

1. About DigiPath
This chapter provides a brief introduction to the DigiPath
Production Software system.
Topics covered in this chapter include:
• a product overview
• DigiPath networking
• instructions for powerin g up the DigiPath worksta tion platform
and hardware optio ns
• descriptions of hardware and software components, both
required and optional
• recommendations for protecting your DigiPath system from
virus contamination
SYSTEM ADMINISTRATOR GUIDE 1-1
Page 30

ABOUT DIGIPATH XEROX DIGIPATH PRODUCTION SOFTWARE
Product overview 1
The Xerox DigiPath Production So ftware has the following
applications:
• Xerox DigiPath Professional Production Software is a
network-based image capture and retrieval system. It allows
you to create electronic images by scanning hardcopy
documents. You can then assemble the electronic images
into digital documents; edit and enhance those digital
documents; store, catalog and retrieve the digital documents;
and submit the digital documents to print to produce high
quality output.
• Xerox DigiPath Xpress Production Software provides the
most direct path between job submission and job completion.
Using a simple, copier-like interface, Dig iPath Xpress
enables you to scan, store, and print jobs quickly.
NOTE: None of the applications included in the DigiPath
E
Xpress package provide the ab ility to view RDO files. The
DigiPath Xpress package is used primarily for scanning
documents, managing files, and printing files. The DigiPath
Xpress package cannot be used to edit scanned files.
1-2 SYSTEM ADMINISTRATOR GUIDE
Page 31

XEROX DIGIPATH PRODUCTION SOFTWARE ABOUT DIGIPATH
Understanding DigiPath networking 1
A DigiPath workstation uses networking for a variety of
purposes. Some of the functions DigiPath allows you to perform
by communicating over a network include the following:
• production printing to a networked Xerox production printer
• accessing and modifying imported objects on a remote
workstation in a multiple client/server environment
• mounting UNIX drives to use Xerox products such as
DocuJob Converte r and DocuSP Decomposition Services
DigiPath systems support Ethernet and Token Ring networks
and use two main protocols for network communication: TCP/IP
and IPX/SPX. Also, the NFS protocol is used to enable the
mounting of UNIX drives.
SYSTEM ADMINISTRATOR GUIDE 1-3
Page 32

ABOUT DIGIPATH XEROX DIGIPATH PRODUCTION SOFTWARE
Powering up the hardware and starting DigiPath 1
This section contains instructions for powering up the DigiPath
workstation platform and hardware options.
It is very important you power up the hardware components in
A
E
the order presented below.
1. If there is a scanner attac hed to the DigiPath workstation,
power up the scanner.
2. If there is a Windows printer attached to the DigiPath
workstation, powe r up the printer.
3. If there is a Magneto-Optical Drive (MOD) attached to the
DigiPath workstation, power up the MOD.
NOTE: If there is an optical disk in the MOD drive when the
drive is powered up, the startup time for the MOD is shorter.
4. If there is a RAID attached to the DigiPath workstation, power
up the RAID.
E
E
E
NOTE: Do not power off the RAID unless you are moving the
RAID to another workstation.
5. If there is an external tape drive attached to the DigiPath
workstation, power up the tape driv e.
6. Power up the monitor.
7. Power up the workstation processor (CPU).
8. Log in to the network.
NOTE: It is recommended that you wait 2 - 5 minutes after
logging in to the network before loggin g into the DigiPath
applications.
9. To open the DigiPath applications, select [Start: Programs:
Xerox DigiPath P roduction Software: <selec t the appropriate
DigiPath application>] from the Windows desktop.
NOTE: All DigiPath applications are found in the DigiPath
program group.
1-4 SYSTEM ADMINISTRATOR GUIDE
Page 33

XEROX DIGIPATH PRODUCTION SOFTWARE ABOUT DIGIPATH
Logging into Document Library (DL) applications 1
To log into DigiPath Document Library applications :
A
1. Select [Start: Programs: Xerox DigiPath Produ ction Software]
and select the ap propriate DigiP ath Document Li brary
application. The Login dialog box opens.
2. Enter the appropriate User name, Password, and DigiPath
server.
3. Select [OK].
Ending the current DigiPath session 1
To protect files from unauthorized access, and to enable access
to the network server, end your DigiPath session when you have
finished using the system.
To end a DigiPath session:
A
1. Exit all DigiPath applications.
E
2. To exit Windows 2000, select [Start: Shut Down] from the
Windows desktop. A confirmation dialog box appears.
3. Choose the desired Shut Down option from the confirmati on
dialog box.
NOTE: For more information on the Shut Down options, refer
to your Windows documentation.
4. Select [Yes].
SYSTEM ADMINISTRATOR GUIDE 1-5
Page 34

ABOUT DIGIPATH XEROX DIGIPATH PRODUCTION SOFTWARE
Hardware components 1
Table 1-1 lists the required hardware components for a DigiPath
client and server platform.
Table 1-1. DigiPath client and server workstation required hardware components
Hardware component Description
Compaq Workstation PW8000 The DigiPath Production Software client platform. This system allows
for optimum performance and provides uniformity for service and
installation.
• For Document Library server configuration: Compaq W8000
2.2 GHz with dual CPUs, 1.5 GB of memory, and Windows 2000
Server operating system
• For Document Scan and Makeready w/Document Library
client configuration, Document Scan and Makeready
w/Document Library client/server configuration, and
DigiPath Xpress configurations: Compaq W8000 1.7 GHZ
with single CPU,1 GB of memory, and Windows 2000
Professional operating system
Compaq P1210 DigiPath Production Software supports the 22-inch color,
high-resolution monitor.
1-6 SYSTEM ADMINISTRATOR GUIDE
Page 35

XEROX DIGIPATH PRODUCTION SOFTWARE ABOUT DIGIPATH
Table 1-2 lists the optional hardware components available with
DigiPath.
Table 1-2. Optional hardware components
Hardware component Description
DigiPath Production Scanner A Xerox color scanner that interfaces with a PC workstation.
Xerox DocuImage 620S A hig h res olu tion flatb ed sc ann er requir ed for high speed black and
white image scanning. The scanner is fitted with a document handler
or an optional, manual, platen cover.
Sony Magneto-optical drive
(MOD)
Redundant Array of
Independent Disks (RAID)
Sony AIT Autoloader tape drive This multi-tape drive is used for high capacity backup needs, such as
Exabyte Eliant 8mm/8505 tape
drive
Local draft printers Refer to the Xerox DigiPath Production Software Customer Software
Production printers Refer to the Xerox DigiPath Production Software Customer Software
Token ring kit This optional NIC allows you to use the Token Ring network adapter
This is an optical storage device that allows for up to 9.1 GB of local
document storage and retrieval. Two MOD devices may be
connected to one DigiPath Production Software workstation.
This mass storage device (100, 150, or 300 GB capacity) allows for
the largest capacity local storage. Two RAID devices may be
connected to one DigiPath Production Software workstation.
backing up the RAID devices.
This tape drive is used with the DocuTech Tape Tool for extended
storage DocuJob migration.
Release Document, Version 3.0 for a list of local printers that are
currently supported by the DigiPath Production Software system.
Release Document, Version 3.0 for a list of production printers that
are currently supported by the DigiPath Production Software system.
in place of the integrated Ethernet NIC.
SYSTEM ADMINISTRATOR GUIDE 1-7
Page 36

ABOUT DIGIPATH XEROX DIGIPATH PRODUCTION SOFTWARE
Software components 1
This section provides descripti ons of mo st of the software
applications associated with the DigiPath configurations,
including third party applications.
Table 1-3 shows which software applications are required,
optional, not available, or for Administrative use only with a
Document Library server configuration, a Document Scan and
Makeready with Document Library client configuration, a
Document Scan and Makeready with Document Library
client/server configuration, or with a DigiPath Xpress
configuration.
Table 1-3. DigiPat h soft ware
Document
Scan and
Software application
Document
Library server
configuration
Document Scan
and Makeready
w/Document
Library client
configuration
Makeready
w/Document
Library
client/server
configuration
DigiPath
Xpress
configuration
Document Scan &
Makeready
Scanner Support
Scan and Print
Quick Print
Printer Administration
DigiPath File Manager
DigiPath Rescue Administrative
Job Manager
Document Library Administrative
DocuTech Tape Tool Administrative
not available required required not available
not available required required required
not available required required required
Administrative
use only
Administrative
use only
Administrative
use only
use only
Administrative
use only
use only
use only
required required required
required required required
required required required
not available required not available
required required required
required * required not available
not available required not available
Library Search
1-8 SYSTEM ADMINISTRATOR GUIDE
Administrative
use only
required * required not available
Page 37

XEROX DIGIPATH PRODUCTION SOFTWARE ABOUT DIGIPATH
Table 1-3. DigiPat h soft ware
Document
Scan and
Software application
Document
Library server
configuration
Document Scan
and Makeready
w/Document
Library client
configuration
Makeready
w/Document
Library
client/server
configuration
DigiPath
Xpress
configuration
Batch Tool Administrative
use only
Library Administration Tool Administrative
use only
Network Agent Administrative
use only
* These options are only accessible with a Document Library
Server.
required * required not available
required * required not available
required * required required
SYSTEM ADMINISTRATOR GUIDE 1-9
Page 38

ABOUT DIGIPATH XEROX DIGIPATH PRODUCTION SOFTWARE
Table 1-4 shows which third party applications are required,
optional, or not available with a Document Library server
configuration, a Document Scan and Makeready wit Document
Library client configuration, a Document Scan and Makeready
with Document Library client/server configuration, or with a
DigiPath Xpress configuration.
Table 1-4. Third party applications provided with DigiPath
Document
Scan and
Document Scan
and Makeready
Document
Library server
Software application
Adobe Acrobat 5.0.5 required required required required
Hummingbird NFS 7.0 optional optional optional optional
configuration
w/Document
Library client
configuration
Makeready
w/Document
Library
client/server
configuration
DigiPath
Xpress
configuration
Autologic StorageView 2.3 optional optional opt ional option al
WFTPD Pro 3.0 optional optional optional optional
Yosemite TapeWare 6.3
SP1
Adobe Photoshop 7.0 not available optional optional optional
Microsoft Windows 2000
Server (with SP2)
Microsoft Windows 2000
Professional (with SP2)
required required required required
required not available not available not available
not available required required required
1-10 SYSTEM ADMINISTRATOR GUIDE
Page 39

XEROX DIGIPATH PRODUCTION SOFTWARE ABOUT DIGIPATH
Virus protection recommendations 1
This section describes the recommended procedures for
protecting your DigiPath system from virus contamination.
Protecting DigiPath from virus contamination 1
Xerox takes special precautions to ensure the software is
shipped free from computer virus contamination. It is strongly
recommended that you invest in a virus detection software
application to protect your DigiPath system from viruses.
Computer viruses are best detected by virus detection and
control application software that is accepted by the PC industry.
Some of the virus detection and control applications available to
and widely-used by the PC industry include:
• Norton Anti-Virus by Symantec
E
E
• McAfee VirusScan by Network Associates, Inc.
NOTE: To ensure maximum protection from new viruses,
update or upgrade your virus detection software frequently.
It is strongly recommended that you follow these guidelines to
keep your DigiPath system decontaminated :
• On a regular basis (at least weekly), run virus detection
software on all DigiPath workstations.
• In the event yo u find a virus on a DigiPath works tation, do not
remove the virus. Instead, cancel the virus detection, then
back up the entire hard drive.
NOTE: This is to protect your data in the event of corruption
during the course of the virus removal.
You can then remove the virus using the pro cedures supp lied
with your virus protection softw are.
SYSTEM ADMINISTRATOR GUIDE 1-11
Page 40

ABOUT DIGIPATH XEROX DIGIPATH PRODUCTION SOFTWARE
1-12 SYSTEM ADMINISTRATOR GUIDE
Page 41

2. Setting up a DigiPath system
This chapter contains a list of the procedures you must perform
after installing the DigiPath system.
This chapter assumes that a Xero x representative has performed
the installation of all hardware and software necessary to run the
DigiPath system.
SYSTEM ADMINISTRATOR GUIDE 2-1
Page 42

SETTING UP A DIGIPATH SYSTEM XEROX DIGIPATH PRODUCTION SOFTWARE
Table 2-1 lists the procedures necessary for setting up a
DigiPath system after the system is installed and provides a brief
overview of each procedure.
NOTE: These procedures should be performed in the order in
E
which they are presented in Table 2-1. The actual instructions for
the procedures are found in other documents or in other
chapters of this book.
Table 2-1. Procedures for setting up a DigiPath system
Procedure Overview
1. Creating DigiPath user accounts The Users tab, in the Library Administration T ool, allows you to
create, modify, and delete DigiPath user accounts for users
accessing Document Library applications. User accounts must
be activated to allow a user to access Document Library
applications from a local workstation.
For infor mation on c reating user accounts, refer to Chapter 6,
System administration.
2. Creating DigiPath groups
3. Setting the database location The System tab, in the Library Administration Tool, is used to
4. Setting the cabinet creation
location for local users
The Users tab, in the Library Administration T ool, allows you to
create, modify, and delete DigiPath groups. User groups define
a group of users. When creating a new cabinet, you can assign
read, write, and administrator rights to various users and user
groups. When many users need to access a specific cabinet, it
is quicker to assign user access rights to that cabinet if the
users are all members of the same group.
For information on creating groups, refer to Chapter 6, System
administration.
specify on which local drive a cabinet database is stored.
The database stores information such as:
• cabinet name
• description of the cabinet
• attributes and attribute sets for the cabinet
• location of the cabinet
• documents stored within the cabinet
For information on setting the database location, refer to
Chapter 6, System administration.
The System tab, in the Library Administration Tool, is used to
set up and modify drives on which local users can create
cabinets. By default, users have the ability to create cabinets
on all local drives.
For information on setting the cabinet creation location for local
users, refer to Chapter 6, System administration.
2-2 SYSTEM ADMINISTRATOR GUIDE
Page 43

XEROX DIGIPATH PRODUCTION SOFTWARE SETTING UP A DIGIPATH SYSTEM
Table 2-1. Procedures for setting up a DigiPath system
Procedure Overview
5. Creating cabinets The Cabinet and Attributes tab, in the Library Administration
Tool, allows you to manage cabinets, including:
• adding a cabinet
• defining the properties and attributes of a cabinet
• deleting a cabinet
• purging the contents of a cabinet
When you create a cabinet, the access rights you define are
critical. If you do not assign Read or Write permissions to
users for the cabinet, those users will not be able to view the
cabinet when they use Document Li brary.
For information on creating cabinets, refer to Chapter 7,
Managing cabinets.
6. Creating new attributes, attribute
groups, and attribute sets
7. Scheduling the conversion of
documents
Use the Cabinet and Attributes tab, in the Library
Administration Tool, to:
• create new custom attributes
• modify existing attributes
• delete attributes
• create user defined attribute groups
• create new attribute sets
Attribute sets are applied to cabinets when they are created.
Attribute sets allow you to apply the same attributes and
attribute groups to several cabinets. By doing so, you can
easily create the same properties for several cabinets.
For information on creating new attributes, attribute groups,
and attribute sets, refer to Chapter 8, Defining attribute sets.
NOTE: Do not use the attribute set file dgpminimal.set located
in the e:\digipath directory when assigning an attribute set file
to a cabinet or creating a new set file.
The Conversion tab, in the Library Administration Tool, allows
you to schedule document conversions in all Document Library
applications on a “per server” basis. Once converted,
documents are viewable in the Document Library preview
pane.
For information on using and scheduling document
conversions, refer to Chap ter 6, Syst em admi ni st ra tio n.
8. Setting up remote access The Servers tab, in the Library Administration Tool, allows you
to configure connections between remote servers, including
Document Library servers in a multiple server environment.
For information on configuring remote servers, refer to Chapter
6, System administration.
SYSTEM ADMINISTRATOR GUIDE 2-3
Page 44

SETTING UP A DIGIPATH SYSTEM XEROX DIGIPATH PRODUCTION SOFTWARE
2-4 SYSTEM ADMINISTRATOR GUIDE
Page 45

3. Windows 2000 and network configurations
This chapter describes some of the Wi ndows 2000 fun ctions and
network configurations used with DigiPath.
Topics covered in this chapter include:
• a brief description of some of the basic Windows 2000
procedures you may need to perform
• instructions for preparing to shutdown the workstation
• instructions for updating the Emergency Repair Disk
• a description of the Hummingbird products included on the
DigiPath Production Software CD-ROM and instructions for
configuring Hummingbird for use with DigiPath
• instructions for configuring the DocuSP decomposition
service
E
• instructions on using the Event Viewer
NOTE: You are strongly advised to obtain a de dicated W indows
2000 Administration Guide.
SYSTEM ADMINISTRATOR GUIDE 3-1
Page 46

WINDOWS 2000 AND NETWORK CONFIGURATIONS XEROX DIGIPATH PRODUCTION SOFTWARE
Understanding and using Windows 2000 3
This guide assumes you have a working knowledge of the
Windows 2000 Professional and Server operating systems and
does not contain basic Wi ndows 2000 pr ocedures, unless they
are part of a DigiPath-specific procedure.
Performing basic Windows 2000 administrative functions 3
NOTE: This section does not provide the instructions for
E
performing the basic Windows 2000 administrative functions.
Refer to your Windo ws 2000 documentation for more
information.
In addition to the DigiPath-specific administrative functions you
will perform, you may also need to know how to perf orm the
common Windows 2000 administrative functions listed below.
Creating shortcuts 3
Y ou can create a shortcut to an application or file; allowing you to
open the applic ation or file direc tly from the Windows desktop.
Adding Windows printers 3
To add a local Windows printer, refer to the printer kit instructions
packaged with your printer.
3-2 SYSTEM ADMINISTRATOR GUIDE
Page 47

XEROX DIGIPATH PRODUCTION SOFTWARE WINDOWS 2000 AND NETWORK CONFIGURATIONS
Adding and configuring users and groups 3
All DigiPath users and groups should be created using the
DigiPath Library Administration Tool (LAT) application.
When creating users in LA T, you have the option to also create a
local (Windows 2000) account for the user. If you delete the
DigiPath user in LAT, you must also delete the local user using
Windows 2000 User Manager.
For more information on creating DigiPath users, refer to
Chapter 8, System Administration.
NOTE: The Windows 2000 User Manager is used to create
E
Windows 2000 user accounts and groups. The User Manager
can be accessed by selecting [Start: Settings: Control Panel:
Administrative Tools: Computer Mana gement] from th e Wind ows
desktop, expanding the System Tools, and expanding Local
Users and Groups.
E
Setting up shared folders, files, and printers 3
Windows 2000 allows you to set up shared folders, files, and
printers that can be accessed from other Windows 2000
workstations.
NOTE: The DigiPath File Manager applic atio n can a lso be use d
to set up shared folders and files.
Adding or removing network services 3
From the Network and Dial-up Connections, you can add,
remove, or change the properties for network services on the
workstation. The Network and Dial-up Connections can be
accessed by selecting [Start: Settings: Network and Dial-up
Connections] from the Windows desktop.
SYSTEM ADMINISTRATOR GUIDE 3-3
Page 48

WINDOWS 2000 AND NETWORK CONFIGURATIONS XEROX DIGIPATH PRODUCTION SOFTWARE
Preparing to shut down the Makeready workstation 3
For the most part, shutting down the Makeready workstation is
the same as shutting down any other Windows 2000
workstation. However, because of the Document Library cabinet
system and the ability to access the Document Library cabinets
from a remote workstation, there are some precautions you must
take before shutting down a Makeready workstation.
The most important thing to do before shutting down a
Makeready workstation is make sure no one else is connected to
the workstation and, possibly, using local cabinets. If you shut
down the workstation while someone is remotely accessing local
cabinets, the remote user could lose data and experience
problems with their workstation.
CAUTION
B
If you shut down the Makeready workstation and rec eive a
message such as “still connected to a user; do you want to
disconnect?,” select [No]. To properly shut down the local
workstation and avoi d problems with the remote workstati on, you
must have the connected user exit the application that is using
the cabinet system and then you must disconnect the remote
workstation from the local workstation.
The following sections describe how to check for connected
users, notify them that the workstation is going to be shut down,
and then disconnect them from the remote workstation.
3-4 SYSTEM ADMINISTRATOR GUIDE
Page 49

XEROX DIGIPATH PRODUCTION SOFTWARE WINDOWS 2000 AND NETWORK CONFIGURATIONS
Checking for connected users 3
To check for connected users:
A
1. Select [Start: Settings: Control Panel] from the Windows
desktop. The Control Panel opens.
2. Double-click on the [Administrative Tools] icon.
3. Double-click on the [Computer Management] icon.
4. Expand the [System Tools] console tree.
a. Expand the [Shared Folders] folder.
b. Highlight [Sessions].
Figure 3-1. User Sessions
If any users are connected to the workstation, the na me of
their host machine, the resources they are using on the
workstation, and other details are listed in the righ t
window frame.
5. If no other machine is connected to the workstation, it i s safe
to shut down the system. To shut down the workst ation, re fer
to the procedure “Ending the current DigiPath session” on
page 1-5.
Otherwise, continue wit h “No ti fyi ng users connected to the
workstation” on page 3-6.
SYSTEM ADMINISTRATOR GUIDE 3-5
Page 50

WINDOWS 2000 AND NETWORK CONFIGURATIONS XEROX DIGIPATH PRODUCTION SOFTWARE
Notifying users connected to the workstation 3
To notify connected users to close any files or applications they
A
are currently using and disconnect from the works tation:
1. Select [Start: Programs: Accessories: Command Prompt]
from the Windows desktop. The Command Prom pt windows
opens.
2. At the prompt, type the following command:
net send <destination> <message>
The <destination> is either the name of the connected
computer or an asterisk (*), which sends the message to
every computer within the current workgroup. The
<message> should tell the user or users to close any
applications or files they may have open on the workstation.
3. Press <Enter> to send the message to the specified
destination.
4. Close the Command Prompt window.
5. Continue with the pr ocedure “Di sconnecting us ers connected
to the remote workstation” on page 3-7.
3-6 SYSTEM ADMINISTRATOR GUIDE
Page 51

XEROX DIGIPATH PRODUCTION SOFTWARE WINDOWS 2000 AND NETWORK CONFIGURATIONS
Disconnecting users connected to the remote workstation 3
After connected users have notified you that they have
A
disconnected, or after giving the users a reasonable amount of
time (10 minutes or so) to save any files and disconnect from the
database, disconnect the remote workstation by completing the
following:
1. From the Comput er Managemen t console, h ighlight Sessio ns
and select [Action: Disconnect All Sessions].
2. Select [Yes] in the confirmation message box that displays.
All connected users are disconnected from the local
workstation. It is now safe to shut down the Makeready
workstation.
3. To shut down the workstation, refer to th e pr o cedure “Ending
the current DigiPath session” on page 1-5.
SYSTEM ADMINISTRATOR GUIDE 3-7
Page 52

WINDOWS 2000 AND NETWORK CONFIGURATIONS XEROX DIGIPATH PRODUCTION SOFTWARE
Updating the Emergency Repair Disk 3
When DigiPath Production Soft ware is installed, the Emergency
Repair Disk is updated to reflect the most recent configuration.
You may need to occasionally update the Emergency Repair
Disk if you make changes to the DigiPath workstation
configuration, such as the following:
• Add, delete, or change user accounts and u ser informa tion or
configuration
• Install new software or hardware
• Change or remove network drive mappings
To update the Emergency Repair Disk for a DigiPath
A
workstation:
1. Locate the Emergency Repair Disk for the workstation and
have it ready for use.
2. Select [Start: Programs: Accessories: System Tools: Backup]
from the Wind ows desktop. The Backup utility opens.
3. Select the [Emergency Repair Disk] button on the Welcome
tab. The Emergency Repair Diskette dialog box opens.
4. Insert the Emergency Repair Disk into the floppy drive and
select [OK].
The Emergency Repair Disk is refo rmatted and then upd ated
with the new repair information. This process may take
several minutes.
5. Select [OK] at the message informing you that the
Emergency Repair Disk was saved successfully.
6. Remove the Emergency Repair Disk from the floppy drive
and place it in a secure storage area.
7. Select [File: Exit] to close the Backup utility.
3-8 SYSTEM ADMINISTRATOR GUIDE
Page 53

XEROX DIGIPATH PRODUCTION SOFTWARE WINDOWS 2000 AND NETWORK CONFIGURATIONS
Using Hummingbird NFS products with DigiPath 3
Along with the software, the documentation for both
Hummingbird NFS Maestro server and client is provided on the
DigiPath Production Software CD-ROM. Table 3-1 lists the
available PDF document files and their location on the DigiPath
Production Software CD-ROM.
NOTE: If using Hummingbird NFS with DigiPath 3.0, both the
E
Table 3-1. Hummingbird NFS documentation on CD-ROM
Document Title CD-ROM Location and File Name
NFS Maestro - Client User’s Guide <CD-ROM drive>:\nfs\maestro\nfsma32.pdf
Host Explorer User’s Guide <CD-ROM drive>:\nfs\maestro\heuser32.pdf
Hummingbird NFS Maestro server and client third par ty software
applications are required for all DigiPath 3.0 configurations.
NFS Maestro Server for Windows <CD-ROM drive>:\nfs\server\nfssrv.pdf
Hummingbird Basic Language Guide <CD-ROM drive>:\nfs\maestro\hbasic.pdf
Hummingbird Applications Guide <CD-ROM drive>:\nfs\maestro\hbapps.pdf
SYSTEM ADMINISTRATOR GUIDE 3-9
Page 54

WINDOWS 2000 AND NETWORK CONFIGURATIONS XEROX DIGIPATH PRODUCTION SOFTWARE
Using Hummingbird to mount UNIX hosts 3
The following procedure provides instructions for mounting a
UNIX host from a DigiPath workstation. By doing this, you can
use UNIX-based Xerox product s, such as DocuJob Converter
and DocuSP Decompos it io n Ser v i ces.
NOTE: This section does not provide instructions for configuring
E
DocuJob Converter to use the Hummingbird authentication
daemon. Refer to the documentation provided with that product
for more information. The procedure to configure the DocuSP
Decomposition Service follows this section.
To mount a UNIX host from a DigiPath workstation:
A
1. From the DigiPath workstation, log in as the administrator.
NOTE: If the installation site is running DNS, then go to step
E
3.
2. Add UNIX hosts using the following procedure:
a. Select [Start: Programs: Hummingbird Connectivity V7.0:
Accessories: Host Editor] from th e Windows desktop. The
Host Editor opens.
b. Select the [+] button.
c. Enter the IP address of the host (a DJC or DocuSP
server, for example) to which you are connecting.
d. Select [Add Name].
e. Enter the name of the machine you are connecting to and
select [OK].
f. Select [OK].
g. Select [File: Exit] to exit the Host Editor application.
h. Select [Yes] to save the changes to Hosts.
3. Connect to the UNIX server.
a. Select [Start: Programs: Hummingbird Connectivity V7.0:
Maestro Client]. The NFS Network Access dialog box
opens.
b. Select the [Register] tab.
c. Enter the user name and password for the account that
you created on the host.
3-10 SYSTEM ADMINISTRATOR GUIDE
Page 55

XEROX DIGIPATH PRODUCTION SOFTWARE WINDOWS 2000 AND NETWORK CONFIGURATIONS
NOTE: The Username and Password must be identical
E
to the Username and Password of the host account.
These items are case sensitive.
d. Select [Register].
e. Select [OK] to confirm.
f. Select the [Connect] tab.
The next available drive is displayed in the Drive field.
You can select any available drive.
g. In the Network Path text box, e nter th e networ k path. Us e
the following syntax:
\\<host name>\ /<exported_directory_name>
If you do not rememb er the compl ete path to the expo rted
directory, select [Browse]. In the Browse Network
Connection di alog, locate the makeready host and
double-click on it to expand it. Select the share point
related to the exported directory, then select [OK]. The
complete path of the exported directory displays in the
Network Path text box.
h. Mark the check box for [Persistent connection] to ensure
the connection is reestablished when the system is
restarted or the user logs out of Windows 2000.
i. Select [Connect].
j. In the HCLNet confirmation dialog that displays, confirm
the network mapping by selecting [OK].
k. Select [Exit].
The DigiPath workstation is now connected to the proper
directory on the UNIX server. The directory should be
visible and accessible through Windows Explorer and
DigiPath software applications as a network drive.
SYSTEM ADMINISTRATOR GUIDE 3-11
Page 56

WINDOWS 2000 AND NETWORK CONFIGURATIONS XEROX DIGIPATH PRODUCTION SOFTWARE
Configuring the DocuSP Decomposition Service 3
DocuTech 61XX production printers, with a DocuSP print server,
have a function cal led Decomp osition Serv ice ( decom p ser vice) .
This service converts each page of a print job file to a TIFF file.
Using Document Scan and Makeready, TIFF files can be
imported into an RDO .
Before a DigiPath workstation can be used to submit jobs to the
Decomposition Service, both the DocuSP print server and the
DigiPath workstat ion must be con figured to d irect the output from
the Decomposition Service back to the DigiPath workstation .
Hummingbird NFS M aestro Se rver softwar e must be configur ed,
as detailed in the previous section, “Usi ng Hummingbird to
mount UNIX hosts,” to accomplish this task.
NOTE: For additional information on Decomposition Service, on
E
the DocuTech 6135 or on the DocuTech 6180 printers, refer to
the documentation provided with those production printers.
A
E
At the DigiPath workstation, perform the following steps:
1. If necessary, define a directory where the decomposed jobs
will be automatically downloaded (the decomp directory). Use
DigiPath File Manager to create a Decomp downl oa d
directory on the DigiPath workstation local hard drive.
For example: e:\digipath\decomp
NOTE: Note the location and name of this directory. The
directory name is case sensitive.
2. Select [Start: Settings: Control Panel]. The Control Panel
opens.
3. Select [HummingbirdNFS Server]. The NFS Maestro Server
Status dialog box opens.
4. Select [Exported File systems].
5. In the Exported File System field, type in the local Decomp
download directo ry. Or, use the [Bro wse] bu tton to bro wse for
the directory.
3-12 SYSTEM ADMINISTRATOR GUIDE
Page 57

XEROX DIGIPATH PRODUCTION SOFTWARE WINDOWS 2000 AND NETWORK CONFIGURATIONS
6. Clear the [Restrict Access to Hosts] check box.
7. Select [Insert].
8. Select the [Name Mapping] tab.
9. In the User Name for Non-mapped Access field, type the
administrator name for the DigiPath system.
10.In the Group Name for Non-mapped Access field, enter the
group(s) you want to have access.
11.Select the [General] tab. Under Permissions, mark the
[NTFS] check box.
12.Select [OK] to close the dialog box.
13.Select [Close] to close the Control Panel.
14.Select [Start: Programs: Hummingbird Connectivity V7.0:
NFS Maestro Server: NFS Maestro Server Status] from the
Windows desktop. The NFS Maestro Server Status dialog
box opens.
15.Select [Exports]. The Current Exports dialog box opens.
16.Select one of the following options if the newly created local
decomp directory:
• does not appear in the Exports dialog box, proceed to
Step 17.
• appears in the Exports dialog box, advance to Step 19.
17.Select [Reload].
18.Select [OK] to confirm reload.
19.Select [Close] to close the Current Exports dialog box.
20.Select [Close] to close the NFS Maestro Ser ver Statu s dialog
box.
SYSTEM ADMINISTRATOR GUIDE 3-13
Page 58

WINDOWS 2000 AND NETWORK CONFIGURATIONS XEROX DIGIPATH PRODUCTION SOFTWARE
Information for the DocuSP administrator 3
Supply the following information to the DocuSP System
A
Administrator to set up the Decompo sition Service queue:
1. Log in as a DocuSP super user.
2. Create a decomposition service queue using the following
steps:
a. Specify a queue name of <dgphost>decomp, where
<dgphost> is the host name of your DigiPath work station.
b. Specify a queue destinatio n of save as an override
parameter for the jobs it receives.
c. Specify a save location of /var/spool/<dgphost>, where
<dgphost> is the host name of your DigiPath work station.
3. Open the Ter minal application and complete the following:
a. Log in as root.
b. While logged in as root, create and save location mkdir
/var/spool/<dgphost>
c. Set the permissions chmod 777 /var/spool/
/var/spool/<dgphost>
3-14 SYSTEM ADMINISTRATOR GUIDE
Page 59

XEROX DIGIPATH PRODUCTION SOFTWARE WINDOWS 2000 AND NETWORK CONFIGURATIONS
4. NFS-mount the save location directory (in step 2c) onto the
directory you exported on the DigiPath workstation. In a
DocuSP command tool, type the following command:
mount <dgphost>:/<drive>/<dir> /var/spool/<dgphost>
where
• <dgphost> is the host name of your DigiPath workstation,
• <drive> is the drive letter of the decomp output directory
created on the DigiPath workstation, and
• <dir> is the full pat h of the de comp outp ut director y on the
DigiPath workstation.
NOTE: All of the above variables are case sensitive.
E
For example, if your Digi Path workstation ho st name is DGP1
and you exported the directory <DigiPath
directory>:\DigiPath\Decomp, the command should be:
mount DGP1:/<DigiPath drive>/DigiPath/Decomp
/var/spool/DGP1
E
E
5. You can make the NFS mount point permanent using the
vfstab command.
NOTE: If you choose not to make a mount point permanent,
rebooting the DocuSP server causes the mount point to be lost.
The mount command will need to be executed a ga in.
This completes the configuration of the DocuSP server and the
DigiPath workstatio n. You can now submit jobs to the DocuSP
Decomposition queue and the output will be sent tot he defined
directory on your DigiPath workstation.
NOTE: For additional information on submitting jobs to the
DocuSP Decomposition queue and using the output of the
Decomposition service, refer to the User Guide section of the
online help.
SYSTEM ADMINISTRATOR GUIDE 3-15
Page 60

WINDOWS 2000 AND NETWORK CONFIGURATIONS XEROX DIGIPATH PRODUCTION SOFTWARE
Using the Event Viewer 3
Use the Event Viewer to view the Windows 2000 event logs.
NOTE: For more information on reading and interpreting the
E
event log, refer to your Windows 2000 documentation.
To access the Event Viewer:
A
1. Select [Start: Settings: Control Panel] from the Windows
desktop.
2. Select [Administrativ e Tools].
3. Select [Event Viewer]. The Event Viewer opens. See Figure
3-2.
Figure 3-2. Event Viewer
4. Expand [Event Viewer] in the console tree to view the
different events.
3-16 SYSTEM ADMINISTRATOR GUIDE
Page 61

XEROX DIGIPATH PRODUCTION SOFTWARE WINDOWS 2000 AND NETWORK CONFIGURATIONS
Table 3-2 lists and desc ribes the th ree types of events
displayed in the Event Viewer.
Table 3-2. Types of events
Event Description
Application Collects messages from Windows 2000 applications
Security Tracks success and failure audits
System Records errors, warnings, and information events of the
system
5. To view an event log, select t he appropr iat e even t. The e vent
log displays in the right frame.
NOTE: You should save t he W in dows 200 0 even t lo gs to f ile
E
once every two months and keep these log files for
approximately one year. After savi ng the logs to file, you can
then clear them from the Event Viewer.
It is important to save event logs as they may be needed in
the future for diagnosing problems.
Table 3 -3 provides the Wind ows 2000 log files to which
DigiPath writes event data.
Table 3-3. Windows 2000 log files
Log file Log file path
Application log c:\winnt\system32\config\AppEvent.Evt
Security log c:\winnt\system32\config\SecEvent.Evt
System log c:\winnt\system32\config\SysEvent.Evt
6. Select [Log: Exit] to close the Event Viewer.
SYSTEM ADMINISTRATOR GUIDE 3-17
Page 62

WINDOWS 2000 AND NETWORK CONFIGURATIONS XEROX DIGIPATH PRODUCTION SOFTWARE
3-18 SYSTEM ADMINISTRATOR GUIDE
Page 63

4. Hardware maintenance
This chapter provides procedures necessary for maintaining the
DigiPath hardware.
Topics covered in this chapter include:
• maintaining a scanner
• maintaining a Magneto-optical drive (MOD)
• maintaining a Redundant Array of Independent Disks (RAID)
• maintaining internal and external tape drives
SYSTEM ADMINISTRATOR GUIDE 4-1
Page 64

HARDWARE MAINTENANCE XEROX DIGIPATH PRODUCTION SOFTWARE
Using a scanner with DigiPath 4
The following secti ons provide inform ation a bout main taining th e
DigiPath Production scanner and the DocuImage 620S scanner.
Maintaining the DigiPath scanner 4
DigiPath provides a Scanner Support application for performing
system tests and maintenance procedures on the DigiPath
Scanner. These procedures include, but are not limited to,
scanner configuration, resetting scanning counters, keeping a
record of all scanner faults and events, and tools for
troubleshooting, setting up, and calibra ting the scann er.
To access the DigiPath Scanner Support application:
A
1. Select [Start: Programs: Xerox DigiPath Produ ction Software:
Scanner Support (DigiPath Scanner)] from the Windows
desktop. The Scanner Support dial og box op ens. See Figur e
4-1.
Figure 4-1. Scanner Support dialog box
For more information on using the Scanner Support application,
refer to the DigiPath scanner integrated Help system.
4-2 SYSTEM ADMINISTRATOR GUIDE
Page 65

XEROX DIGIPATH PRODUCTION SOFTWARE HARDWARE MAINTENANCE
Maintaining the DocuImage 620S scanner 4
The following sections identify two basic maintenance
procedures y ou may be required to perform on the Xerox
DocuImage 620S scanner. For further information regarding
regular maintenance for the DocuImag e 620S, refer to th e Xerox
DocuImage 620S User Documentation.
Moving and reinstalling the DocuImage 620S 4
NOTE: For a more detailed description of the steps in the
E
following procedure, refer to the Installation Guide found in the
Xerox DocuImage 620S User Documentation.
WARNING
D
The scanner weighs 50 pounds (23 kg) and the document
handler weighs 28 pounds (12.7 kg). To prevent personal
injury or equipment damage, you should seek assistance
when moving the scanner and when removing or installing
the document handler.
A
E
To move the Xerox DocuImage 620S after it is installed:
1. Make sure the scanner is turned off, and then unplug the
power cord.
2. Power off the PC.
3. If necessary, disconnect the SCSI cable from the back of the
scanner.
4. Remove the document handler from the scanner.
5. Secure the movable parts in the scanner by reinstalling the
packing screws removed during the scanner installation.
NOTE: To perform this step, go into scanner support and
select the [Position scan bar for shipping] option under the
Tools drop-down menu.
SYSTEM ADMINISTRATOR GUIDE 4-3
Page 66

HARDWARE MAINTENANCE XEROX DIGIPATH PRODUCTION SOFTWARE
6. Before moving the scanner to its new location, follow the
same procedures for the initial installation to make sure the
surface on which the scanner will be place d is le vel.
7. Move the scanner to its new location.
8. Remove the packing screws from the scanner.
9. Reinstall the document handler on top of the scanner.
10.Plug the scanne r power cord into an ac ceptable power
source and reconnect the SCSI cable to the scanner.
NOTE: Make sure the PC and scanner are off before
E
connecting the SCSI cable.
11.Perform the scanner registration procedure found in the
following section.
Registering the scanner 4
E
Register the scanner every time you remove or replace the
document handler, or if images appear shifted off the page after
scanning.
When you register the scanner, the parameters for scanning are
captured. The scanner identifies the position of the registration
documents, compares that position to the do cument, an d makes
the necessary adjustment.
To register the scanner, you need ten registration documents,
part number 82E83 71. These docum ents have an X in th e upper
right and lower right corners of the page, and they come in an
envelope with your DigiPath software setup.
If an error occurs during registration, acknowledge the error and
begin the process again. If you continue to have trouble, call
your Xerox representative for assistance.
NOTE: If you have a document handler attached to your
scanner, register both the document glass and the document
handler.
The registration process lasts approximately 10 seconds for the
document glass and approxi mately 30 seconds for the document
handler.
4-4 SYSTEM ADMINISTRATOR GUIDE
Page 67

XEROX DIGIPATH PRODUCTION SOFTWARE HARDWARE MAINTENANCE
To register and set up the scan ning paramete rs for the document
A
glass and document handler:
1. Select [Start: Programs: Xerox DigiPath Produ ction Software:
Scanner Support (DocuImage 620S)] from the Windows
desktop. The Scanner Support dial og box op ens. See Figur e
4-2.
Figure 4-2. Scanner Support dialog box
NOTE: The information in the System Configuration area of
E
SYSTEM ADMINISTRATOR GUIDE 4-5
the above Figure may be different than the information that
displays on your screen.
2. Select [Tools: Options: Document Handler] from the menu
bar. Validate that there is a c heck mark besid e Document
Handler.
Page 68

HARDWARE MAINTENANCE XEROX DIGIPATH PRODUCTION SOFTWARE
3. Select [Tools: Scanner Registration] from the Scanner
Support menu bar. The Customer Scanner Registration
dialog box opens. See Figure 4-3.
Figure 4-3. Customer Scanner Registration dialog box
4. To register the Document Glass:
a. Mark the [Document Glass] radio button in the
Registration Mode area.
b. Place one of the scanner registration documents face
down on the document glass.
The long edge of the document with XS must be parallel
to the left edge of the glass. Slide th e top of the d ocument
securely into the left corner notch at the rear registration
guide. Make sure the document does not move when
closing the document handler or manual platen cover.
c. Select [Start] from the Customer Registration dialog box.
The registratio n process begins. When the tes t is
complete, a message appears in the message bar at the
bottom of the Cus tomer Scanner Registration dialog box.
4-6 SYSTEM ADMINISTRATOR GUIDE
Page 69

XEROX DIGIPATH PRODUCTION SOFTWARE HARDWARE MAINTENANCE
5. To register the Document Handler:
NOTE: If you have a manual platen cover instead of a
E
document handler, skip to step 7.
a. Mark the [Do cument Handler] radio button in the
Registration Mode area.
b. Remove the single registrat i on docu m ent from the
document glass and place 10 of the scanner registration
documents all together face up on the document handler.
Follow the directions on the screen for proper placement
and orientation of the documents. Make sure the ready
light on the document handler is illuminated.
c. Select [Start] from the Customer Registration dialog box.
The registratio n process begins. When the tes t is
complete, a message appears in the message bar at the
bottom of the Cus tomer Scanner Registration dialog box.
6. Remove the scanner registration documents from the
document handler.
7. Select [Close] to close the Customer Scanner Registration
dialog box.
8. Select [System Information: Exit] to close the Scanner
Support window.
SYSTEM ADMINISTRATOR GUIDE 4-7
Page 70

HARDWARE MAINTENANCE XEROX DIGIPATH PRODUCTION SOFTWARE
Using a magneto-optical drive (MOD) 4
As an option, DigiPath Production Software supports the use of
up to two magneto-optical drives (MODs) for mass storage of
objects. A MOD offe rs you the abilit y to transf er Digi Pa th
documents and images to a relatively inexpensive medium, an
optical disk, for online and offline storage. After the stored
information is taken o ffline, you can easily restore t he optical disk
to online status and access the information.
CAUTION
B
When using a MOD with DigiPath Production Software, users
must be sure the optical disk is mounted and online before
moving data to it. Similarly, users must also offline the optical
disk before removing it from the drive. Failing to perform either of
these steps may result in either a loss of data or incorrect data in
the Document Library cabinet system.
E
DigiPath Production Software 3.0 supports the following MOD
devices:
• Sony 9.1 GB MOD (can be purchase d with Di g i Path
Production Software)
• Sony 5.2 GB MOD
• Sony 2.6 GB MOD
NOTE: Previous versions of DigiP ath Production Software
supported the 650MB Sony MOD and 1.3 GB MODs. These
devices are no longer supported by DigiPath Production
Software.
4-8 SYSTEM ADMINISTRATOR GUIDE
Page 71

XEROX DIGIPATH PRODUCTION SOFTWARE HARDWARE MAINTENANCE
Table 4-1 lists the currently supported MOD devices and
identifies their optical disk capacity and compatibility.
Table 4-1. Supported MOD devices and their compatibility
DigiPath
Production
MOD Device
Optical Disk
Capacity
Software Image
Capacity*
Compatible Optical Disks
and Read/Write Capability
Sony 9.1 GB 9.1 GB
(4.55 GB per side)
Sony 5.2 GB 5.2 GB
(2.6 GB per side)
Sony 2.6 GB 2.6 GB
(1.3 GB per side)
* The storage capacity of an optical disk depends upon the average size of the images
being stored. Assuming that a 600 dpi letter-size image is compressed at an average ratio
of 25:1, each image page would require approximately 168 KB of space. The number of
images listed in this column is based on an average of 168 KB per image.
4 GB 650 MB (read only)
1.3 GB (read only)
2.3 GB (read/write)
2.6 GB (read/write)
5.2 GB (read/write)
9.1 GB (read/write)
30952 650 MB (read only)
1.3 GB (read only)
2.3 GB (read/write)
2.6 GB (read/write)
5.2 GB (read/write)
15476 650 MB (read only)
1.3 GB (read/write)
2.3 GB (read/write)
2.6 GB (read/write)
CAUTION
B
Due to a low-level formatting incompatibility between the XDOD
3.X Corel SCSI drivers and the Windows 2000 drivers, any
optical disk data created with XDOD 3.X running on Windows 3.1
is not accessible from DigiPath Production Software 3.0 running
under Windows 2000.
SYSTEM ADMINISTRATOR GUIDE 4-9
Page 72

HARDWARE MAINTENANCE XEROX DIGIPATH PRODUCTION SOFTWARE
Sony 9.1 GB magneto-optical disk 4
The MOD for DigiPath 3.0 is the Sony 9.1 GB drive. In the past
DigiPath/XDOD supported five different MOD drives:
• Sony model SMO-S501 —- 650 MB
• Sony model SMO-S521 — 1.3 GB
• Sony model CMO-R54 0- 40 — 2.6 GB
• Pinnacle Micro Sierra MOD — 1.3 GB
• Sony model RM)-5551 — 5.2 GB
All the MODs use 5.25 inch optical media. The difference
between MODs is in the storage capacity as shown above. The
650 MB and 1.3 GB optical disks can be used only as read only
devices with the new MOD drive. There is a hardware limitati on
that prevents writing to the 650 MB optical disks with the new
drive.
4-10 SYSTEM ADMINISTRATOR GUIDE
Page 73

XEROX DIGIPATH PRODUCTION SOFTWARE HARDWARE MAINTENANCE
Formatting the Sony 9.1 GB MOD platter 4
The 9.1 GB MOD platter can store 4.5 5 GB per side. The platter
must be manually turned over to access the opposite side.
NOTE: Use this procedure to format the 9.1, 5.2, 2.6, and 2.3
E
A
MODs.
Before you can use a MOD platter, it must be partitioned and
formatted. Use the following procedure to prepare the MOD for
use:
1. Place a blank 9.1 GB platter in the MOD drive. Be sure that
the side you wish to prepare is face up.
2. Select [Start: Settings: Control Panel] from the Windows
desktop.
3. Double-click on the [Administrative Tools] icon.
4. Double-click on the [Computer Management] icon. The
Computer Manageme nt conso l e ope ns.
5. Expand the [Storage] console tree.
6. Highlight the [Disk Management] folder.
7. Select the MOD.
8. Select [Action: All tasks: Format] from the main menu.
9. Enter the volume label for the MOD in the Volume label text
box.
10.Select [FAT] as the file system from the File System
drop-down list box.
11.Select [default] as the allocation unit size from the Allocation
unit size drop-down list box.
SYSTEM ADMINISTRATOR GUIDE 4-11
Page 74

HARDWARE MAINTENANCE XEROX DIGIPATH PRODUCTION SOFTWARE
12.Select [OK].
13.Select [OK] if a warning message appears stating that
formatting will erase all data on the volume. The formatting
may take several minutes.
The Status field indicates that the MOD is being formatted
and includes the percentage of formatting complete. When
the formatting is complete, the MOD status ind icates th at the
MOD is healthy.
14.Eject the MOD platter from the drive and turn it over so the
second side is face u p. Re in ser t t he platter into the driv e an d
repeat steps 2 through 13.
15.Close the Computer Management console.
4-12 SYSTEM ADMINISTRATOR GUIDE
Page 75

XEROX DIGIPATH PRODUCTION SOFTWARE HARDWARE MAINTENANCE
Using DigiPath 1.2/2.x MODs with DigiPath 3.0 4
To mount a DigiPath 1.2/2.x MOD with DigiPath 3.0:
A
1. Place the DigiPath 1.2/2.x MOD in the MOD drive.
2. Select [Start: Programs: Xerox DigiPath Produ ction Software:
Document Library] from the Windows desktop.
3. Select [Cabinet: Mount] to mount the MOD.
For more information on mounting MODs, refer to the User
Guide section of the online Help system.
SYSTEM ADMINISTRATOR GUIDE 4-13
Page 76

HARDWARE MAINTENANCE XEROX DIGIPATH PRODUCTION SOFTWARE
Optical media compatibility information 4
Table 4-2 lists the optical media capacity for DigiPath 3.0 and
optical drives previously supported by DigiPath.
Table 4-2. Optical media compatibility
Optical Drive MOD Platter Capacity Can read from platter Can write to platter
Sony 650 MB 650 MB yes yes
Sony 1.3 GB 650 MB yes yes
Sony 1.3 GB 1.3 GB yes yes
Pinnacle 1.3 GB 650 MB yes yes
Pinnacle 1.3 GB 1.3 GB yes yes
Sony 2.6 GB 650 MB yes no
Sony 2.6 GB 1.3 GB yes yes
Sony 2.6 GB 2.6 GB yes yes
Sony 5.2 GB 650 MB yes no
Sony 5.2 GB 1.3 GB yes yes
Sony 5.2 GB 2.6 GB yes yes
Sony 5.2 GB 5.2 GB yes yes
Sony 9.1 GB 650 MB yes no
Sony 9.1 GB 1.3 GB yes no
Sony 9.1 GB 2.6 GB yes yes
Sony 9.1 GB 5.2 GB yes yes
Sony 9.1 GB 9.1 GB yes yes
4-14 SYSTEM ADMINISTRATOR GUIDE
Page 77

XEROX DIGIPATH PRODUCTION SOFTWARE HARDWARE MAINTENANCE
Using a Redundant Array of Independent Disks (RAID) 4
As an option, Digi Path Productio n Software suppor ts the use of a
Redundant Array of Independent Disks (RAID) for mass storage
of objects. A RAID device is an array of two or more relatively
small, inexpensive SCSI hard disks organized to function as if
they were a single, large disk drive. The hard disks are contained
in an enclosure called the RAID cab inet and are manage d by the
RAID device controller. The RAID cabinet for the 100 GB RAID is
capable of holding up to seven SCSI hard disks and the RAID
cabinet for the 150 GB RAI D is capa ble of hol ding up to ten SCSI
hard disks. DigiPath Production Software supports a
configuration using one or two RAID cabinets.
The device controller and management software, included with
the RAID system, manage all internal aspects and operation of
the device and make RAID operations transparent to the
attached computer. From the computer and user viewpoi nts, th e
RAID device appears to be a single, large disk rather than
several, small disks.
SYSTEM ADMINISTRATOR GUIDE 4-15
Page 78

HARDWARE MAINTENANCE XEROX DIGIPATH PRODUCTION SOFTWARE
Understanding RAID levels 4
Often, part of the total available capacity for the disk array is
devoted to storing the extra check data needed to detect and
correct errors. D iffer ent schemes exis t for writing a ctual data an d
for writing check data to the disk array. Referred to as the RAID
level, these schemes use a variety of techniques, such as those
described in Table 4-3.
Table 4-3. RAID level techniques
Technique Description
Mirroring Writes the same data to more than one disk in the array
Parity bits Stores extra bits with the actual data to assist in detecting
and correcting errors
Striping Distributes consecutive data block sequences across the
disk array
4-16 SYSTEM ADMINISTRATOR GUIDE
Page 79

XEROX DIGIPATH PRODUCTION SOFTWARE HARDWARE MAINTENANCE
Table 4-4 lists and describes the available RAID levels.
Table 4-4. RAID Level
RAID level Description
Level 3 RAID Level 3 uses one entire disk (sometimes referred to
as a parity disk) for storing the check data for a group of
disks. The actual data is striped across the other data
disks in the array. When reading or writing data in the
array, all disks are accessed simultaneously, which allows
for only one data transfer at a time. This data configuration
is optimal for many small data transfers.
Level 5 RAID Level 5 uses the equivalent of one entire disk for
storing check data but distributes the check data over all
the disks in the array. When reading or writing data in the
array, only two disks are accessed simultaneously, which
allows for multiple simultaneous data transfers. This data
configuration is preferable for large data transfers.
Level 3/5 The RAID Level 3/5 data configuration is adaptive,
combining the advantages of both Level 3 and Level 5 data
configurations. Based upon the data transfer size, RAID
Level 3/5 determines which data storage scheme to use.
Level 3/5 incorporates both data striping, so that data is
written across the array of disks, and parity bits, which
eliminate the possible slowdown associated with a
dedicated parity disk. Because of the composition of
DigiPath Production Software application data, RAID Level
3/5 is optimal for both data transfer rates and efficient use
of disk space.
E
NOTE: In general, the check data on a R AID device r educes the
probability of losing actual data. However, just as with any mass
storage device, such as a hard drive, you should regularly back
up the data stored on the RAID device.
SYSTEM ADMINISTRATOR GUIDE 4-17
Page 80

HARDWARE MAINTENANCE XEROX DIGIPATH PRODUCTION SOFTWARE
Several RAID levels exist; however, currently, no RAID device is
capable of supporting all RAID levels. Table 4-5 provides the
RAID levels used in the DigiPath supported RAID devices.
Table 4-5. DigiPath supported RAID devices
RAID RAID Level
100 GB RAID Uses RAID Level 5 data configuration with moving parity
150 GB RAID Uses RAID Level 5 data configuration with moving parity
Understanding the DigiPath RAID device configurations 4
Table 4-6 describes the RAID system configurations supported
by the DigiPath Production Software.
Table 4-6. RAID system configur at ions
E
RAID device System configuration
100 GB RAID This RAID device has the following hardware:
• Seven 18.0 GB SCSI hard disks per cabinet
• Two redundant RAID device controllers
150 GB RAID This RAID device has the following hardware:
• Ten 18.0 GB SCSI hard disks per cabinet
• Two redundant RAID device controllers
The RAID system is configured as one virtual disk or drive.
NOTE: Because part of the disk array is used to store check
data, the space a vai labl e for storing actual da ta files is not eq ua l
to the total size of all the drives.
4-18 SYSTEM ADMINISTRATOR GUIDE
Page 81

XEROX DIGIPATH PRODUCTION SOFTWARE HARDWARE MAINTENANCE
Using the 100 GB RAID 4
This section provides instructions for using the Enterprise
Storage Manager software with the 100 GB RAID device,
shutting down the 100 GB RAID device, and powering up the
100 GB RAID device.
Using the Enterprise Storage Manager 4
The Enterprise Storage Manager (ESM) software i s included
with the 100 GB RAID system. This software is used to
configure, operate, monitor, and troubleshoot the RAID system.
The ESM software is what your Xerox service representative
uses to create the RAID volume and to configure the RAID
controller for use with DigiPath Production Software.
In general, you should not change any of the settings for your
RAID system using the ESM software. However, you may need
to access the ESM software to view the RAID configuration or for
troubleshooting information if you ever call customer support
with a problem.
B
A
CAUTION
You should not change the settings or configuration of the RAID
device unless instructed to d o so by a Xe rox customer support or
service representative. Doing so may result in loss of data or
incompatibility with the DigiPath Production Software.
To access the ESM software:
1. Select [Start: Programs: Enterprise Storage Manager] from
the Windows desktop.
For more information on how to use the ESM software, refer
to the online Help files or to your RAID documentation.
SYSTEM ADMINISTRATOR GUIDE 4-19
Page 82

HARDWARE MAINTENANCE XEROX DIGIPATH PRODUCTION SOFTWARE
Shutting down the 100 GB RAID system 4
Use the follo wing proced ure if you have to t emporarily sh ut down
the RAID system.
To shut down the RAID system:
A
1. Close and exit all applications to end all activity to the RAID
system.
2. Select [Start: Programs: Enterprise Storage Manager:
SC5230 Storage Window] to start ESM. The SC5320
Management dialog box opens.
a. Select the [SCSI Radial] button.
b. Select [OK].
c. Select the RAID drive letter.
d. Select [OK].
3. Select [Storage: Controller : Co nfi g ur atio n: Save ] fro m the
SC5230 Storage Window to save the current RAID
configuration. Save the configuration to a file name of your
choice.
4. Select [Yes] in the ESM warning message.
5. Shut down the RAID device controller.
a. Select [Storage: Controller: Shutdown] from the SC5230
Storage Window menu and confirm.
b. Select [File: Exit] from the SC523 0 Storage Wind ow menu
to exit ESM.
6. Select [Start: Shut Down] from the Windows desktop to shut
down the workstation.
7. Power off the workstation.
8. Power off the RAID system.
4-20 SYSTEM ADMINISTRATOR GUIDE
Page 83

XEROX DIGIPATH PRODUCTION SOFTWARE HARDWARE MAINTENANCE
Powering on the 100 GB RAID system 4
To power on the RAID system:
A
1. Power on the RAID system.
NOTE: It takes several minutes for the RAID controller to
E
power on and reach the ready stat e. If you power on the
workstation before the RAID controller reaches the ready
state, the workstation will not detect the RAID system.
2. Power on the workstation.
The workstation should automatically detect the RAID, which
is now ready for us e.
SYSTEM ADMINISTRATOR GUIDE 4-21
Page 84

HARDWARE MAINTENANCE XEROX DIGIPATH PRODUCTION SOFTWARE
Using the 150 GB RAID 4
This section provides instructions for using the StorageView
software to monitor the 150 GB RAID system.
Using StorageView 4
The StorageView software is included with the RAID system.
This software is used to configure, operate, monitor, and
troubleshoot the 150 GB RAID system. The StorageView
software is what your Xerox service representative uses to
create the RAID volume and to configure the RAID controller for
use with DigiPath Production S oftware.
In general, you should not change any of the settings for your
RAID system using the StorageView software. However, you
may need to access the StorageView software to view the RAID
configuration or for troubleshooting information if you ever call
customer support with a problem.
B
A
E
CAUTION
You should not change the settings or configuration of the RAID
device unless instructed to d o so by a Xe rox customer support or
service representative. Doing so may result in loss of data or
incompatibility with the DigiPath Production Software.
To access the StorageView software:
1. Select [Start: Autologic StorageView: StorageView] from the
Windows desktop. The StorageView application opens.
For more information on how to use the StorageView
software, refer to the St orag eV iew o nli ne Hel p files or to yo ur
RAID documentation.
NOTE: For procedures on shutting down and powering on the
150/300 GB RAID system, refer to the RAID device
documentation.
4-22 SYSTEM ADMINISTRATOR GUIDE
Page 85

XEROX DIGIPATH PRODUCTION SOFTWARE HARDWARE MAINTENANCE
Using the internal and external tape drives 4
DigiPath Producti on Software uses the inter nal tap e drives listed
in Table 4-7 and external tape drives listed in Table 4-8 for
backing up the system.
NOTE: Refer to Chapter 7, Backup an d restore, for procedures
E
Table 4-7. Supported DigiPath internal tape drives
Internal tape drive Description
TR5 This internal tape drive, which is included with the Compaq
on backing up the DigiPath system using the tape drives.
Workstation PW8000, is used to back up the workstation hard drive.
The TR5 internal tape drive has an expected data transfer rate of 60
MB per minute and uses tapes with a maximum capacity of 10 GB
uncompressed, or 20 GB compressed. The tape drive performance
and tape capacity of the internal tape drives allow you to complete a
full backup of the hard drive in a reasonable amount of time, using
only one or two tapes.
NOTE: Because of the large capacity of the RAID device, using one
of the internal tape drives to back up the RAID would require
numerous tapes and many hours. Therefore, it is strongly
recommended that you purchase and use the optional Sony AIT tape
drive for backup of a RAID system.
8 mm Exabyte Eliant/8505 The Exabyte Eliant/8505 8 mm tape drive is an optional unit. It is
used with DocuTech Tape Tool to manipulate DocuTech Extended
Storage Tapes.
NOTE: If you have a previous version of the Exabyte tape drive, part
Number 98K27531C, and are having problems reading tapes,
contact your Xerox Service Representative. The part number is
displayed on a nameplate on the rear of the tape drive unit.
SYSTEM ADMINISTRATOR GUIDE 4-23
Page 86

HARDWARE MAINTENANCE XEROX DIGIPATH PRODUCTION SOFTWARE
Table 4-8 lists and describes the external tape drive supported
by DigiPath.
Table 4-8. DigiPath external tape drive
External tape drive Description
AIT The Sony AIT tape drive is an optional external drive that can be used to
backup the 100 GB or 150 GB devices. The AIT drive has an expected data
transfer rate of 1360 MB per minute and a maximum data transfer rate of 720
MB per minute with 2:1 compression. The AIT drive supports the following
tape lengths:
• 25/50 GB tape
• 35/70 GB tape
• 50/100 GB tape
The maximum capacity of each tape is 50, 70, and 100 GB with a 2:1
compression and 25, 35, and 50 GB native.
NOTE: Although the AIT tape drive is capable of 2:1 compression, these
results are not likely with DigiPath data. The TIFF images in the RDO
documents are already highly compressed; therefore little gain is realized
from the AIT tape drive’s compression algorithm.
Instead of using a driver, the Sony AIT tape drive is controlled by the
TapeWare software installed on the DigiPath workstation.
The following sections pr o v id e de ta il e d i nstructions for using the
external AIT tape drive when backing up the DigiPath system.
4-24 SYSTEM ADMINISTRATOR GUIDE
Page 87

XEROX DIGIPATH PRODUCTION SOFTWARE HARDWARE MAINTENANCE
2
Sony AIT 100 autoloading tape drive 4
Sony AIT tape magazine
1
Figure 4-4. Sony AIT tape magazine
Figure 4-4 shows the tape release button and write protect tab
on the Sony AIT tape magazine.
• (1) Release button — Press this button to remove tapes
from the magazine.
• (2) Write protect tab — Slide the tab to the left to
write-protect the tapes in the magazine. This tab inhibits
writing to the tape s, regardless of wh ether the ta pe cartridges
are individually write-protected.
SYSTEM ADMINISTRATOR GUIDE 4-25
Page 88

HARDWARE MAINTENANCE XEROX DIGIPATH PRODUCTION SOFTWARE
Figure 4-5. The numerical positions of tapes in the magazine
Figure 4-5 shows the slot number assignments for tapes when
they are loaded in the magazi ne. For example, when you use the
select tape slot four, you are selecting the tape in po sitio n four i n
the Figure above. For DigiPath, tapes can be loaded in any
order.
4-26 SYSTEM ADMINISTRATOR GUIDE
Page 89

XEROX DIGIPATH PRODUCTION SOFTWARE HARDWARE MAINTENANCE
1
Advanced Intelligent Tapes (AIT)
2
B
A
Figure 4-6. AIT cartridge
Figure 4-6 shows the AIT cartridge and its components. An AIT
tape cartridge is capable of storing 50/100GB of data.
CAUTION
Do not open the tape lid or attempt to disassemble the tape
cartridge.
• (1) Tape lid — Protects the medium when the tape is not in
the drive.
• (2) Write-protect tab — Slide to the left to enable writing and
erasure. Slide to the right to write-protect the tape.
Loading the Sony AIT tape magazine 4
The AIT tape drive uses a magazine of four tapes to backup up
to 200 GB of data. The magazine automatically rotates the tape
cartridges in one dir ection onl y. To load the magazine:
1. Hold the magazine upright. Insert two tapes in the bottom
slot. See Figure 4-7.
SYSTEM ADMINISTRATOR GUIDE 4-27
Page 90
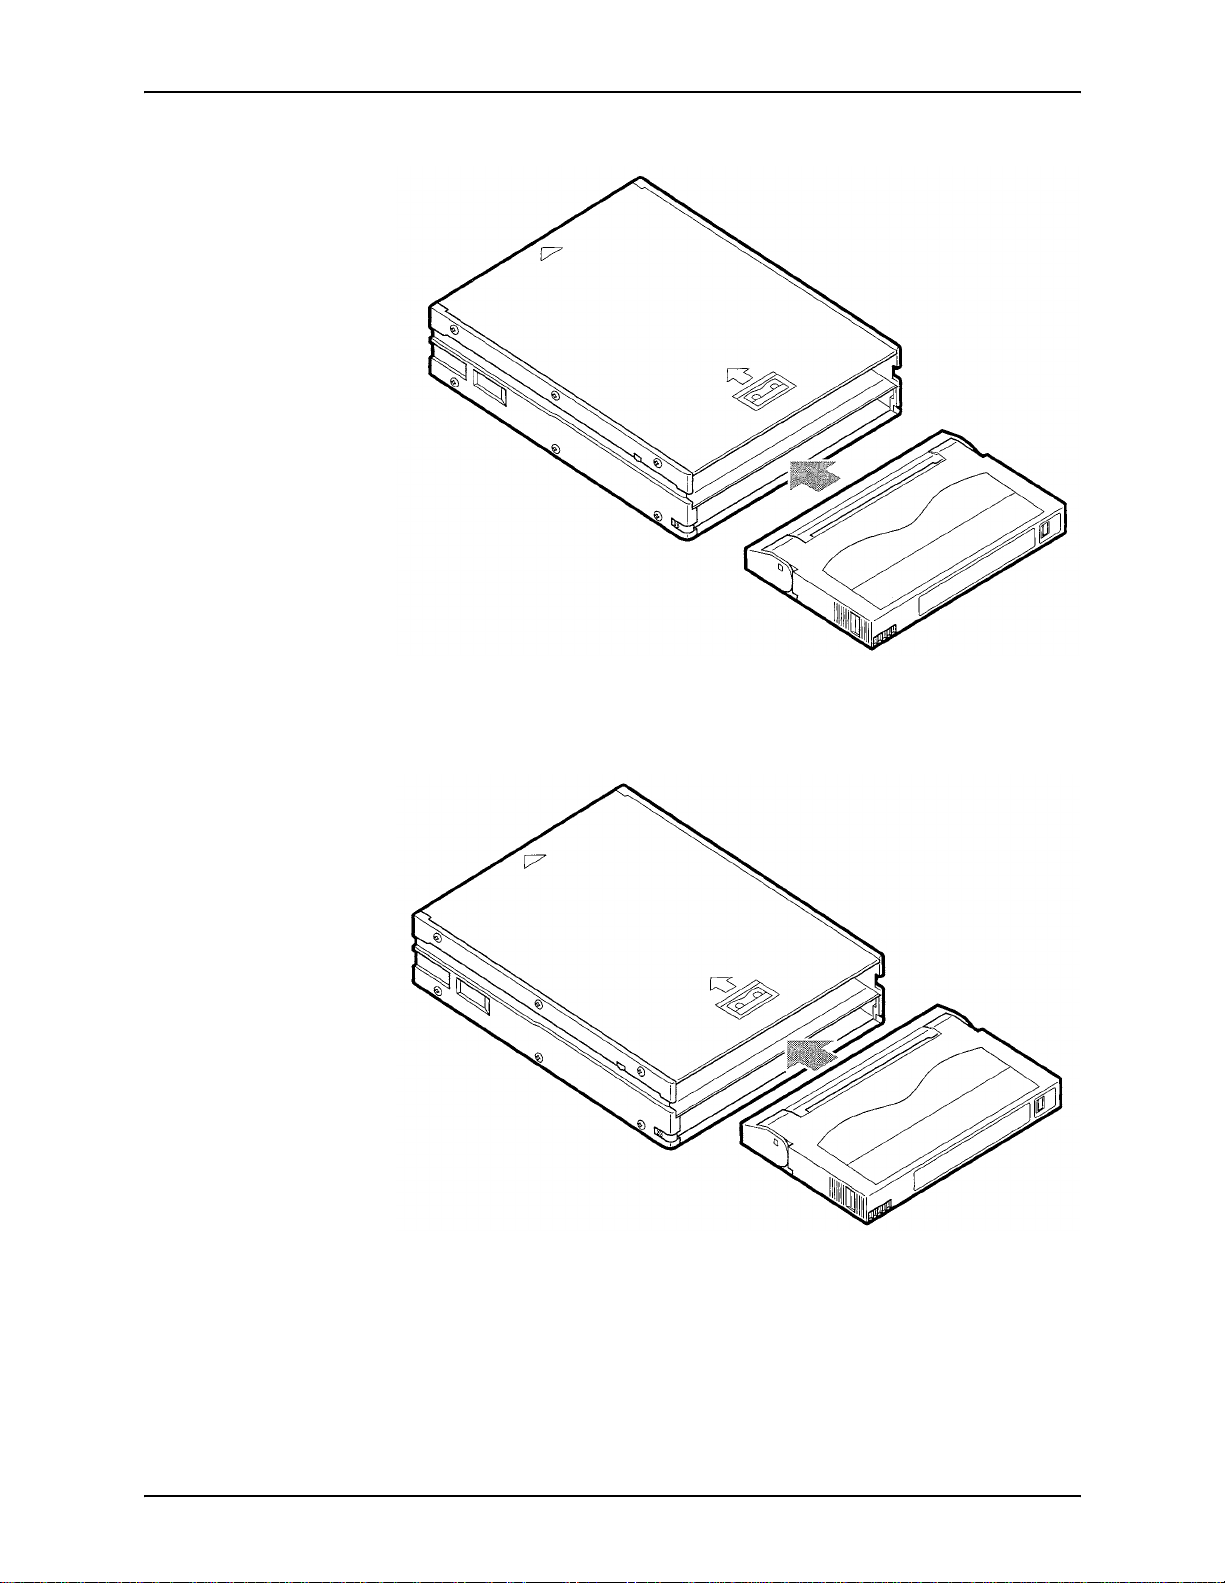
HARDWARE MAINTENANCE XEROX DIGIPATH PRODUCTION SOFTWARE
Figure 4-7. Insert two tapes into the bottom slot
2. Insert two tapes into the top slot. See Figure 4-8.
Figure 4-8. Insert two tapes into the top slot
3. Insert the loaded magazine into the AIT drive.
4-28 SYSTEM ADMINISTRATOR GUIDE
Page 91

XEROX DIGIPATH PRODUCTION SOFTWARE HARDWARE MAINTENANCE
Unloading the Sony AIT tape magazine 4
The tape magazine empties from the bottom slot.
A
1. Hold the magazine in one hand with the open end tilted
slightly downward.
2. Press the release button on the lower left side of the
magazine. See Figure 4-4. The first tape slides out and the
second tape slides into the first p osition. The th ird ta pe drop s
to the bottom slot.
3. Press the release button and the second tape slides out.
4. Press the release button and the third tape slides out.
5. Grasping the open end of the magazine in one hand, briskly
tap the closed end of the tape drive against your open palm
one time. See Figure 4-9. The fourth tape drops into the
bottom slot.
Figure 4-9. Tap the magazine against your palm to drop
the fourth tape to the bottom slot
6. Tilt the open end of the magazine downward and press the
release button. The fourth tape slides out.
SYSTEM ADMINISTRATOR GUIDE 4-29
Page 92

HARDWARE MAINTENANCE XEROX DIGIPATH PRODUCTION SOFTWARE
Cleaning the Sony AIT tape drive heads 4
Clean the heads of the Sony AIT tape drive regularly to maintain
reliable performance. The AIT tape drive displays the message
“CleanReq” when cleaning is necessary. Use the following
procedure to clean the heads:
1. If the tape magazine is in the drive, eject it.
A
2. Load the cleaning cartridge into tape position 1 of the tape
magazine, as sh own in Figure 4-5. If necessary, remove the
first tape and insert the cleaning cartridge in its place.
NOTE: You can load the cleaning cartridge into any
E
position, but it is faster to load it into position 1.
3. Insert the loaded tape ma ga zin e in to the dri ve.
4. Push the <SELECT> button on the tape drive until the
cleaning cartridge is sel ect ed.
5. Push the <ENTER> button on the drive.
6. The following message sequence displays:
• “Load Tape”
• “Cleaning in Process”
• “Unload Tape 1 ”
•“Ready”
7. Eject the magazine, remove the cleaning tape, and store the
cleaning tape in it’s case until it is needed again.
4-30 SYSTEM ADMINISTRATOR GUIDE
Page 93

XEROX DIGIPATH PRODUCTION SOFTWARE HARDWARE MAINTENANCE
Tape media compatibility information 4
Table 4-9 lists the ability of the DocuTech T ape Tool, offered with
DigiPath, to interact with information stored on previously
supported tape media.
Table 4-9. Tape media compatibility
Can read from
Xerox Legacy Product Tape Drive
DocuTech Extended Storage
(DES)
DocuT ech Offline File Storage
(DTOFS)
DocuTech Internal tape drive Exabyte model 98K27531C yes yes
Exabyte model 98K27531C yes yes
Exabyte model 98K27531C yes yes
tape
Can write to
tape
SYSTEM ADMINISTRATOR GUIDE 4-31
Page 94

HARDWARE MAINTENANCE XEROX DIGIPATH PRODUCTION SOFTWARE
4-32 SYSTEM ADMINISTRATOR GUIDE
Page 95

5. Backup and restore
This chapter provides information and procedures for
maintaining, backing up, and restoring the files and information
stored on a DigiPath system. A DigiPath system includes a
DigiPath Document Library server or a Document Scan and
Makeready/Document Li brary server a nd any of its comp onent s.
The topics covered in this chapter include:
• a strategy for backing up and restoring a DigiPath system
• instructions for backing up a DigiPath system
• instructions for restoring a DigiPath system
SYSTEM ADMINISTRATOR GUIDE 5-1
Page 96

BACKUP AND RESTORE XEROX DIGIPATH PRODUCTION SOFTWARE
Digipath backup strategy 5
Backing up your DigiPath system is an important and necessa ry
function. Should the DigiPath system exp erience an internal hard
drive or RAID system failure, accidental file deletion, or another
catastrophic event, a successful backup of data minimizes the
amount of lost data. Using a successful and efficient backup
strategy reduces the amount of time required to restore the
system to a fully operational state once the necessary hardware
repairs are made.
The DigiPath Rescue application is used to backup and restore
DigiPath cabinets, including user information, registry settings,
documents, and cabine t attribute s, to a specifie d directory on th e
machine’s hard drive.
The TapeWare software is used to backup and restore the
following:
• DigiPath workstation/server hard drive to the internal TR5
tape drive
• 100/150 GB RAIDs to the external Sony AIT tape drive
The following sections provi de in fo rm ation on the backup
devices, the backup and restore software, the various backup
types, and backup strategies.
5-2 SYSTEM ADMINISTRATOR GUIDE
Page 97

XEROX DIGIPATH PRODUCTION SOFTWARE BACKUP AND RESTORE
Backup devices 5
Table 5-1 lists the diff erent backup devices an d what each devi ce
is used to backup.
Table 5-1. Backup devices
Device Used to back up
TR5 tape drive • Compaq PW8000
• Compaq AP550/1 GHZ
• Compaq AP550/733
Sony AIT tape drive 100 GB, 150 GB RAIDs
The following sections provide information on each of the backup
devices.
SYSTEM ADMINISTRATOR GUIDE 5-3
Page 98

BACKUP AND RESTORE XEROX DIGIPATH PRODUCTION SOFTWARE
TR5 5
Use the TR5 tape drive to backup up to 27 GB of data on the C,
D, and E drives. A full backup, usi ng a minimum of 2 tapes, takes
approximately 3.75 hours. A full backup, using a maximum of 3
tapes, takes approximately 7.5 hours.
The TR5 tape drive has the following uncompressed and
compressed backup rates:
• 10 GB uncompressed data at a backup rate of 60 MB/minute
• 20 GB compressed data at a backup rate of 120 MB/minute
Sony AIT 5
The Sony AIT tape drive is used to backup one or two 100/150
GB RAID devices.
The Sony AIT tape drive supports two tape lengths: a 25/50 GB
(170 meter) tape and a 35/70 GB (230 meter) tape. These two
tapes have the following backup rates:
E
• 25 GB (170 meter) or 35 GB (230 meter) uncompressed data
have a backup rate of 180 MB/minute
• 50 GB (170 meter) or 7 0 GB (230 meter) compressed data
have a backup rate of 360 MB/minute
Table 5-2 provides the approximate time it takes to complete a
full backup using the minimum and maximum number of tapes.
NOTE: The job data on a RAID is highly compressed during a
backup; therefore, so little additional compression can be
achieved by using the compression algorithms in the Sony AIT
tape drive firmware.
5-4 SYSTEM ADMINISTRATOR GUIDE
Page 99

XEROX DIGIPATH PRODUCTION SOFTWARE BACKUP AND RESTORE
Table 5-2. Sony AIT full backup time
T apes
(minimum)
RAID
configuration Storage
1 x 100 GB 100 GB 2 3 4.63 hours 9.26 hours
1 x 150 GB 150 GB 3 5 6.94 hours 13.89 hours
2 x 100 GB 200 GB 3 6 9.26 hours 18.52 hours
1 x 100 GB and
1 x 150 GB
2 x 150 GB 300 GB 5 9 13.89 hours 27.78 hours
2 x 18 GB (internal) 36 GB 1 2 1.7 hours 3.4 hours
250 GB 4 8 11.57 hours 23.15 hours
35/70 GB
(230 meter)
T apes
(maximum)
35/70 GB
(230 meter)
Full backup
time
(minimum)
Full backup
time
(maximum)
SYSTEM ADMINISTRATOR GUIDE 5-5
Page 100

BACKUP AND RESTORE XEROX DIGIPATH PRODUCTION SOFTWARE
Backup and restore software 5
Table 5-3 lists and describes the two software programs used to
backup and restore the DigiPath system.
Table 5-3. Backup and restore software
Backup and
restore software Description
DigiPath Rescue Backs up and restores DigiPath cabinets, including a cabinet’s
documents and/or attributes, to a specified directory on the workstation
hard drive
TapeWare Ba ck s up and resto r es the followi ng :
• DigiPath workstation/server hard drive to the internal TR5 tape
drive
• 100/150 GB RAIDs to the external Sony AIT tape drive
NOTE: For more information on using the TapeWare software
application, refer to the TapeWare documentation.
5-6 SYSTEM ADMINISTRATOR GUIDE
 Loading...