

Page 1

Driving your business to new levels of productivity
DIGIPATH
REFERENCE
GUIDE
Production Publishing System
DOCUMENT PREPARATION | FEEDING | OUTPUT | FINISHING | DOCUMENT MANAGEMENT
Page 2

Page 3

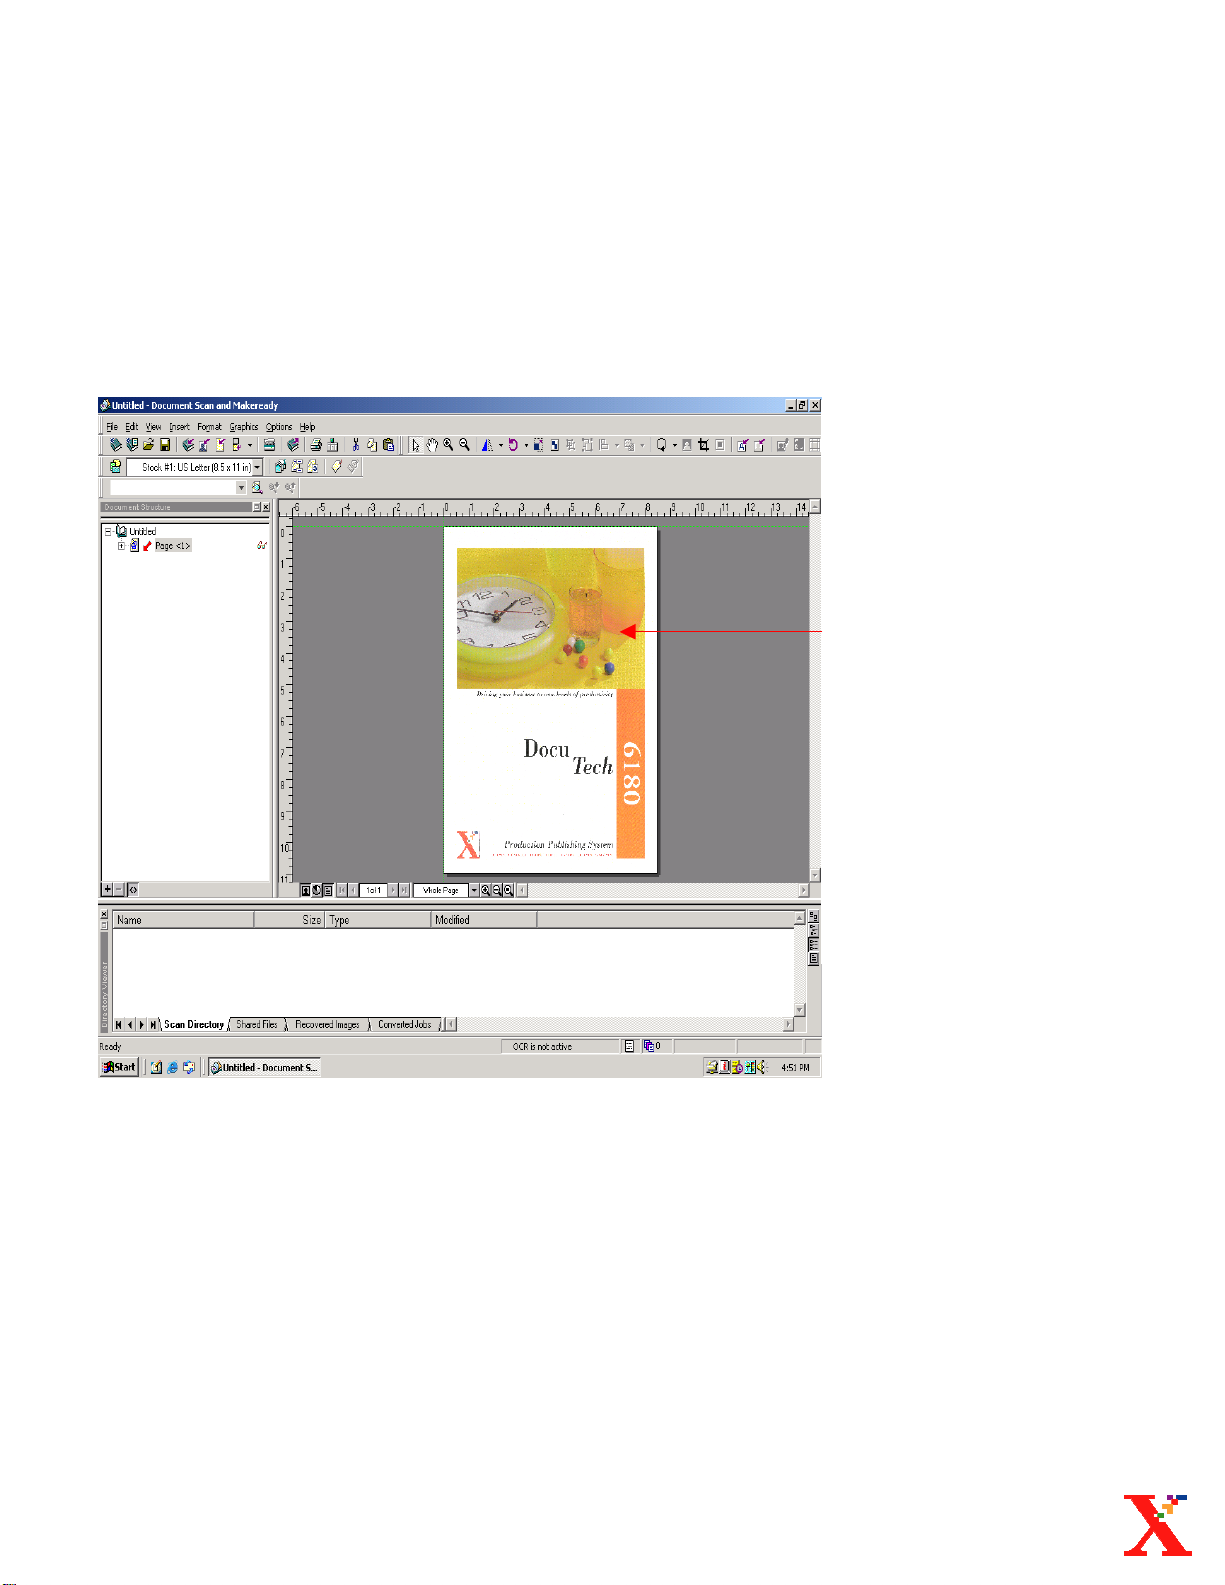
Opening Document Sca
n
& Makeready
Page 4
Document
Scan & Makeready
Opening Document
Scan & Makeready
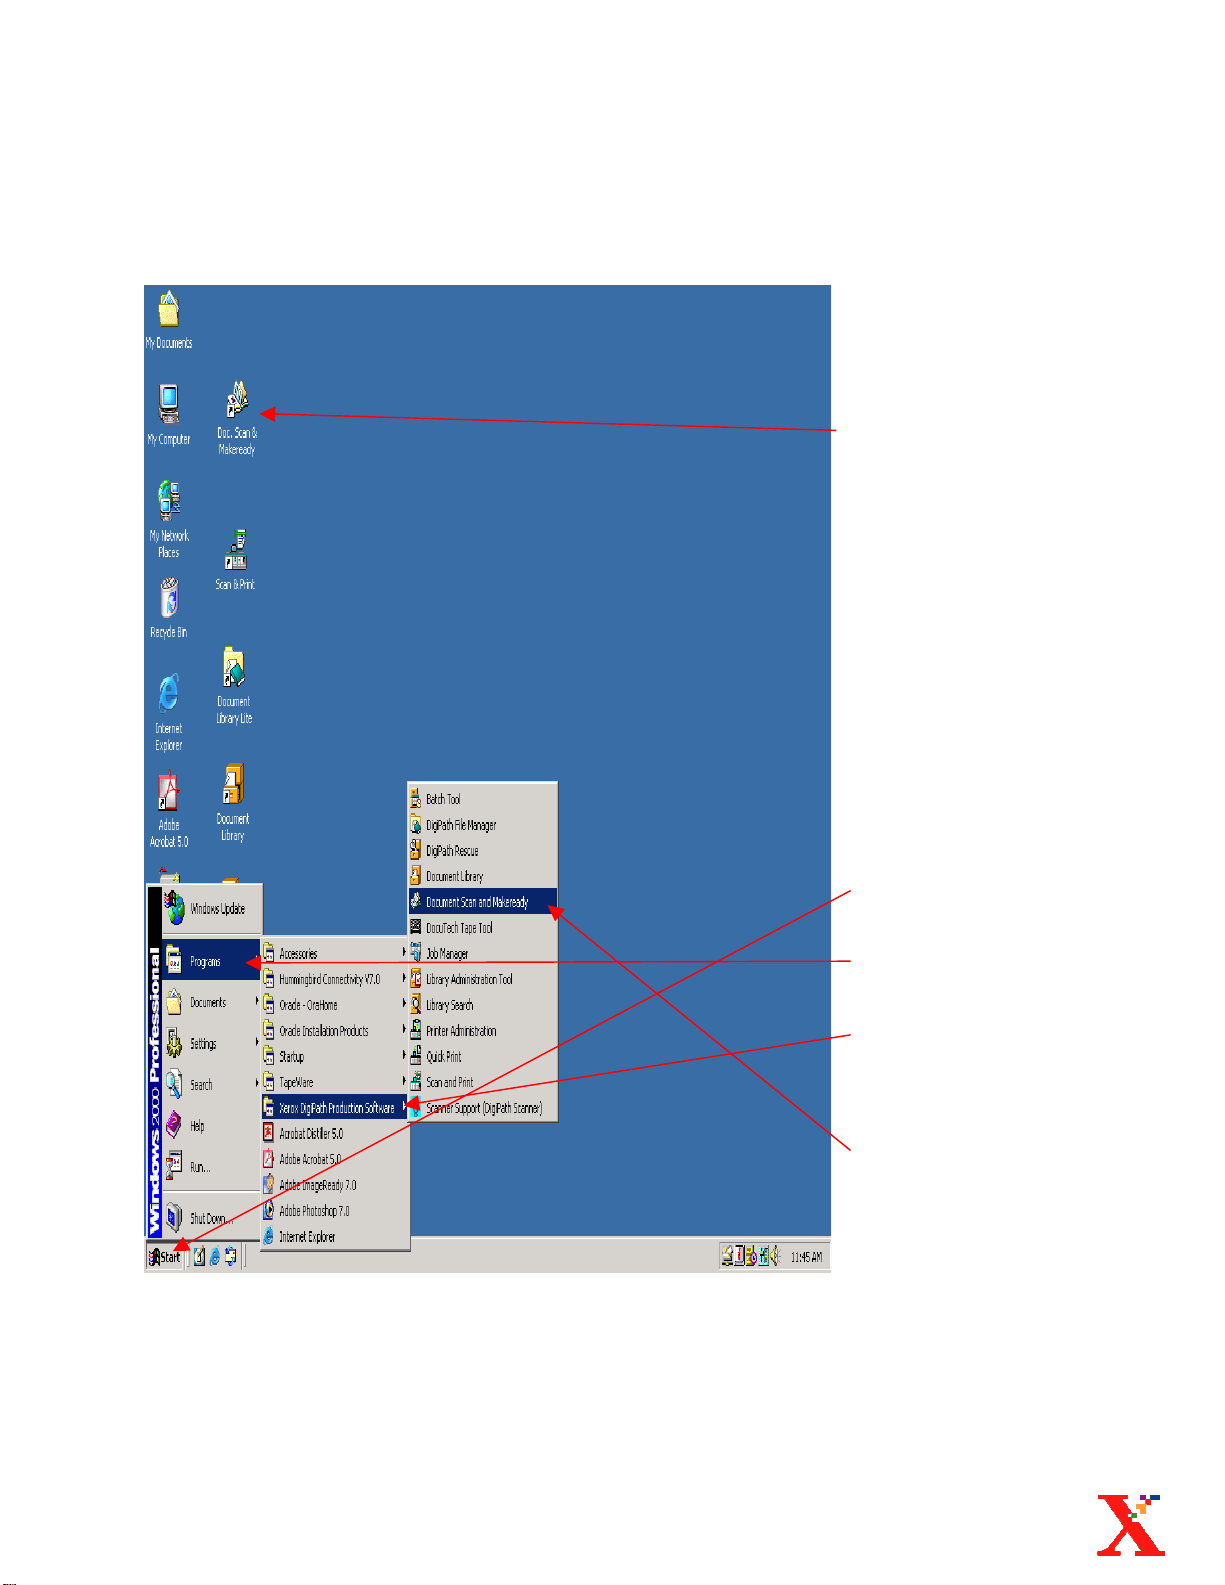
1. Double click, with the
left mouse button, on
the Doc. Scan &
Makeready icon.
Or
1. Select Start.
♦ Select Programs.
♦ Select Xerox Digipath
Production Software.
♦ Select Document Scan
& Makeready.
Digipath 3.0 Reference Guide: Document Scan & Makeready pg. 1
Page 5

Digipath 3.0 Reference Guide
Page 6

Scanning Black & Whit
e
Originals
Page 7
Scanning Black & White Originals
Opening the
Scan Window
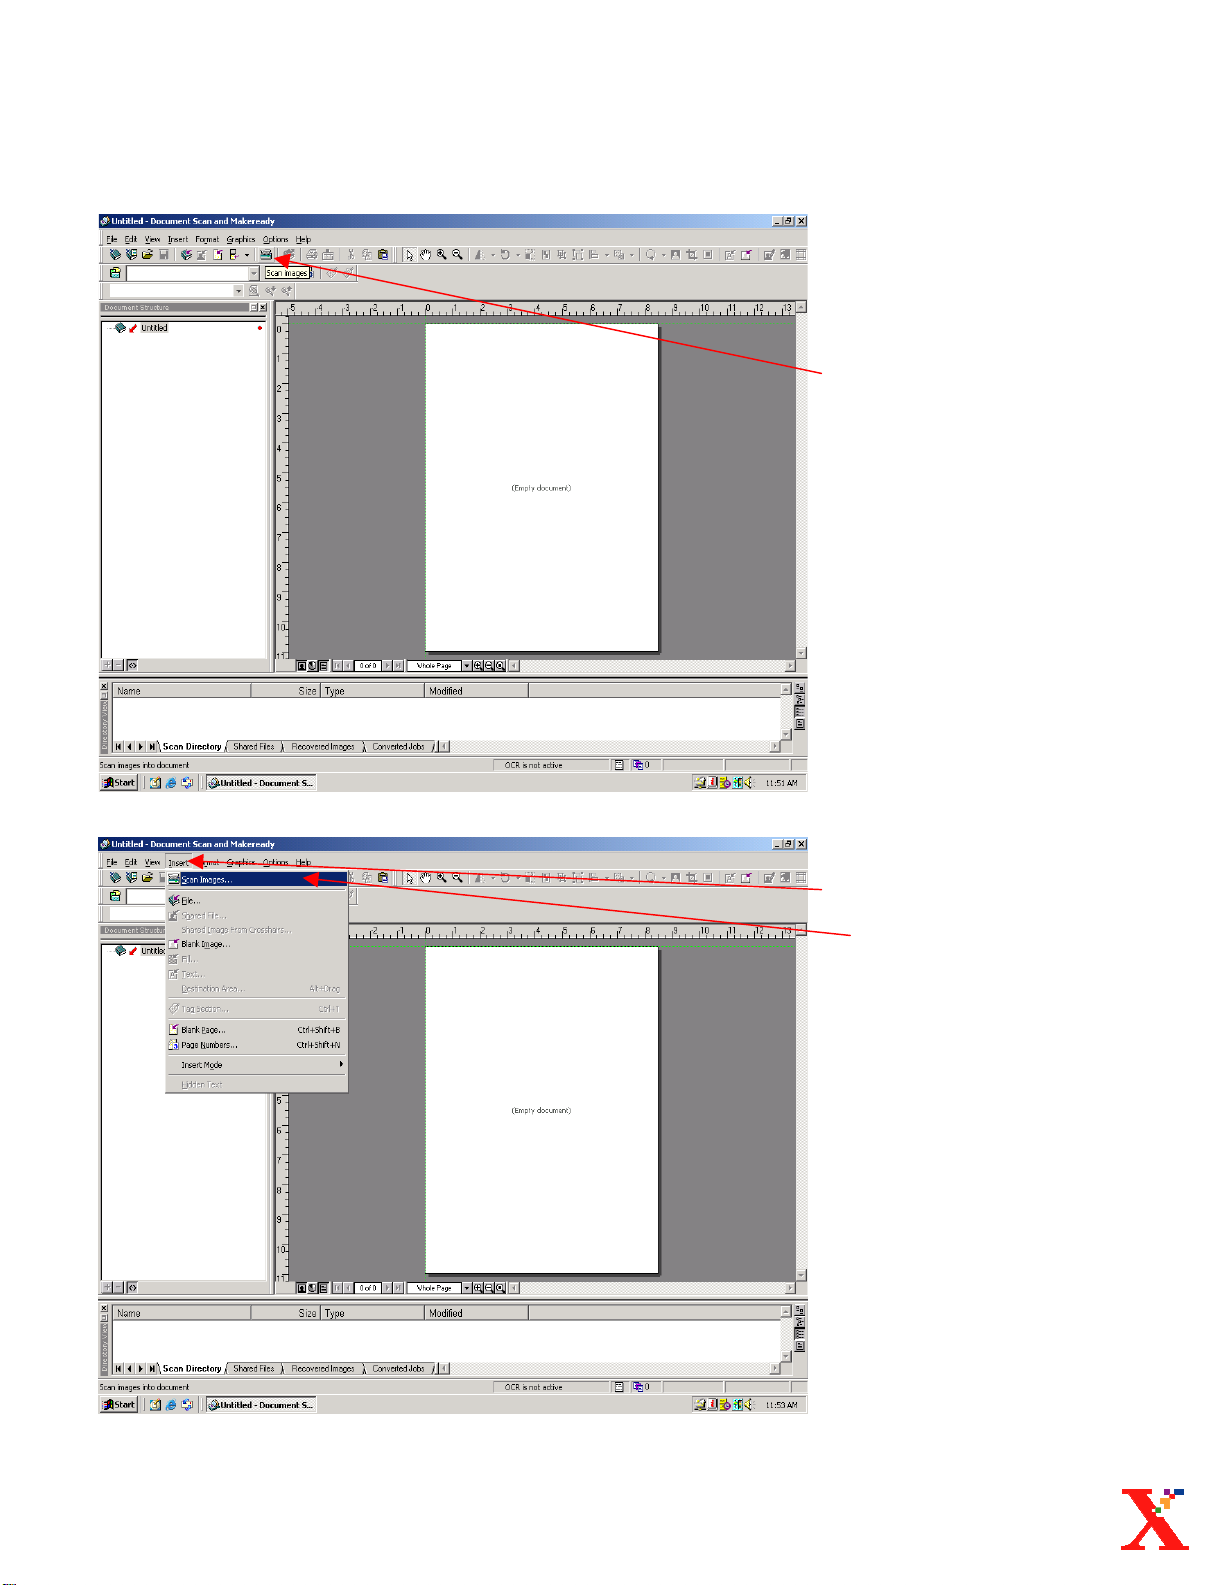
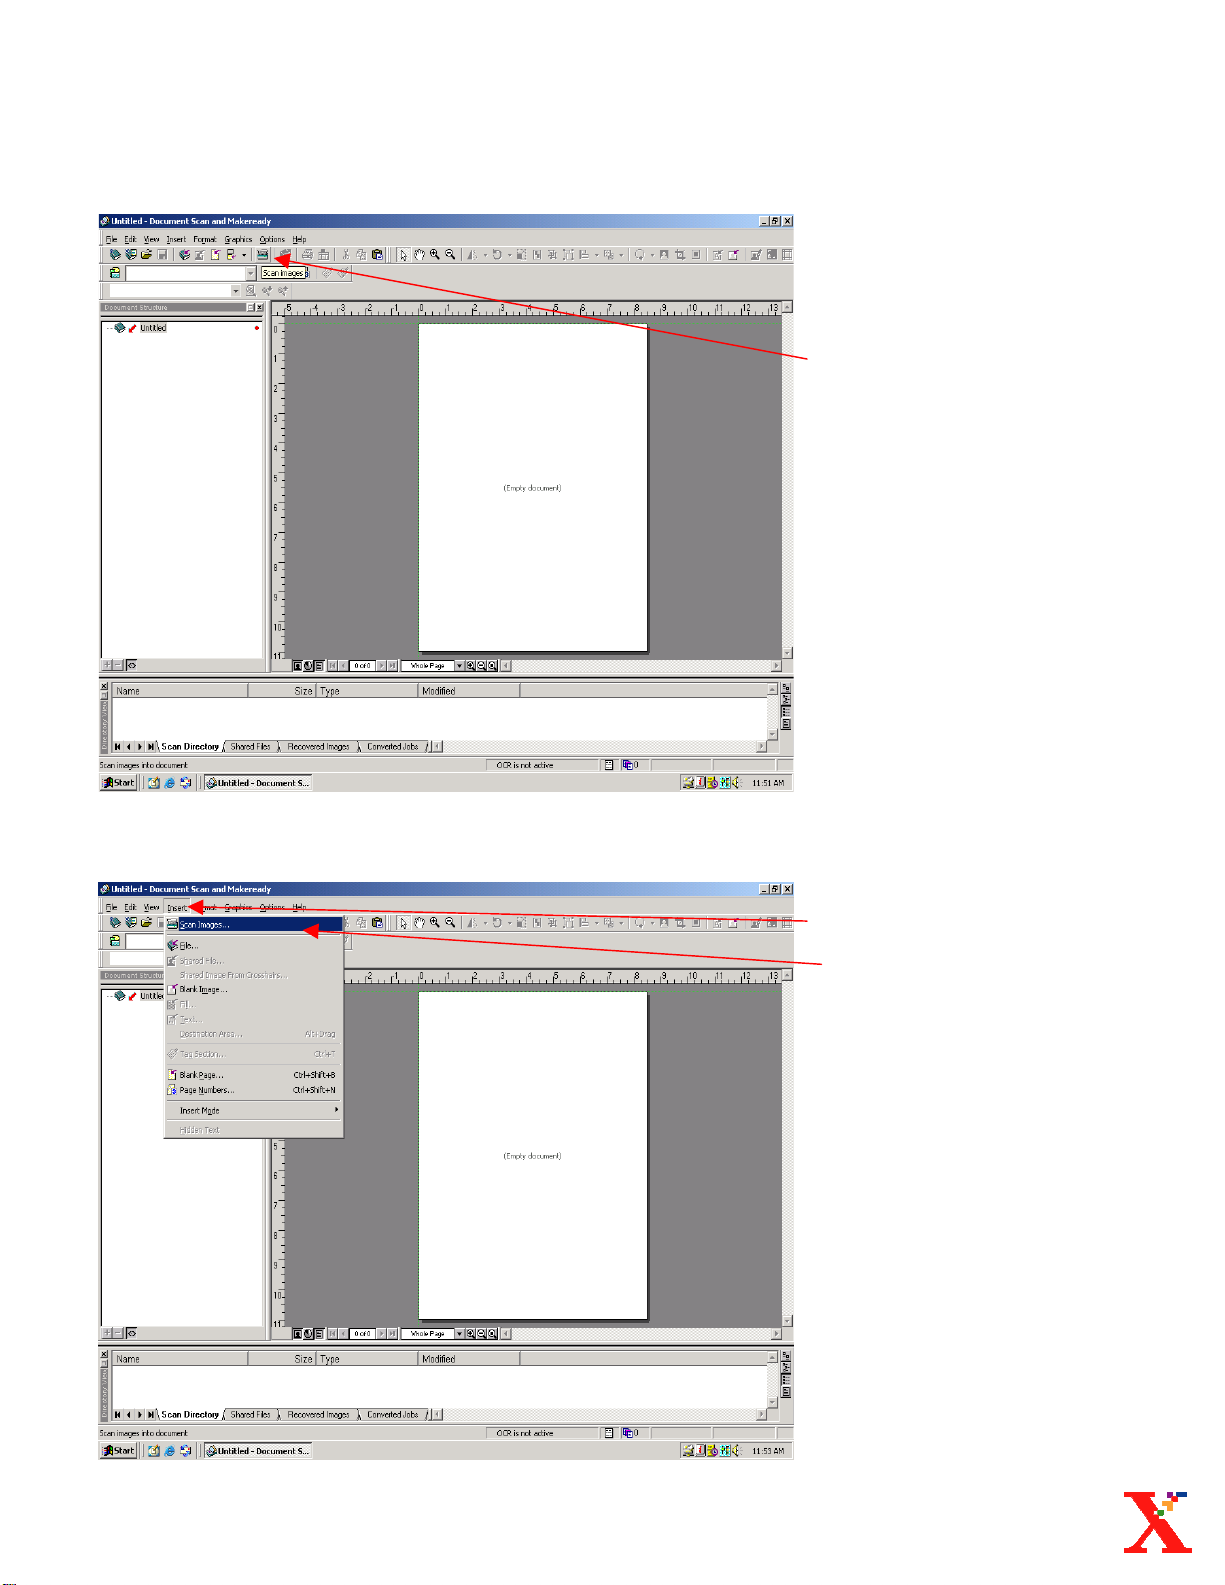
1. To open the Scanner
window select the Scan
Images icon.
Or
1. Select: Insert.
Select: Scan Images.
Digipath 3.0 Reference Guide: Scanning B&W originals pg. 1
Page 8
Scanning Black & White Originals
Scanning Selections
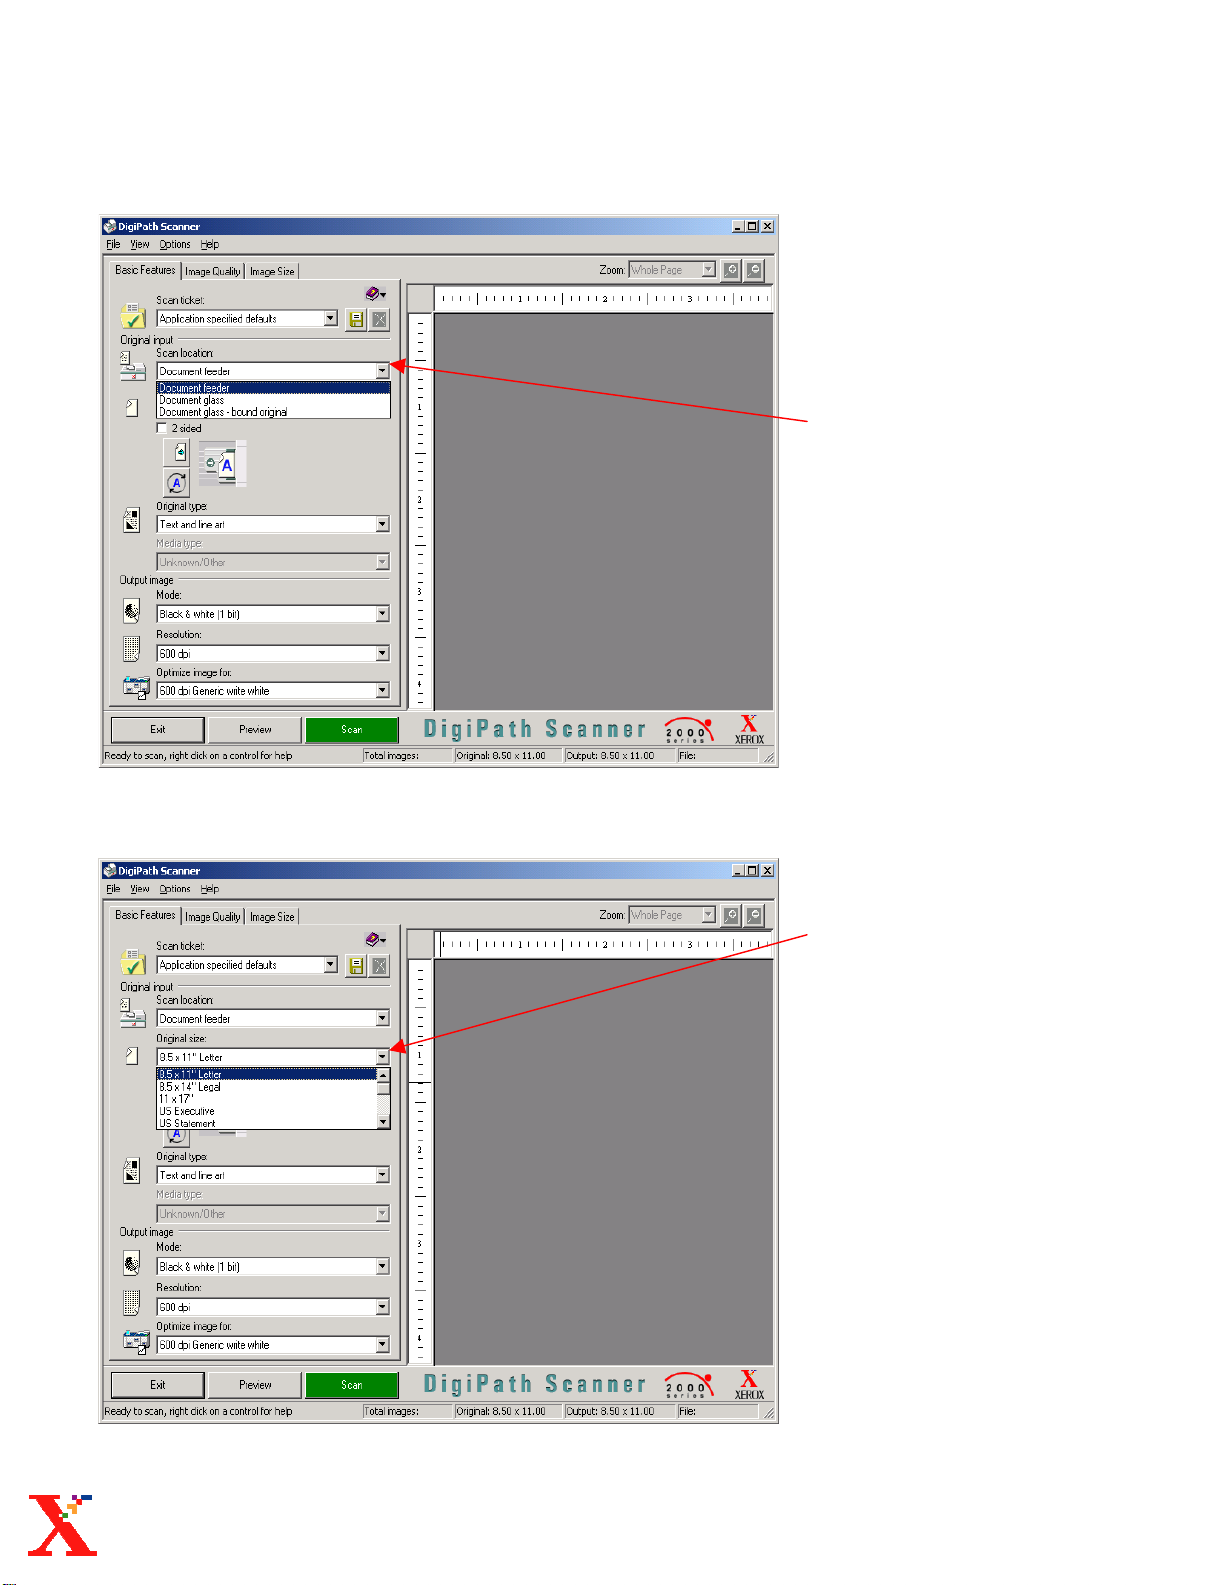
2. Select the Scan Location
for your original
document.
3. Select the Original size.
Digipath 3.0 Reference Guide: Scanning B&W originals pg.2
Page 9
Scanning Black & White Originals
Scanning Selections
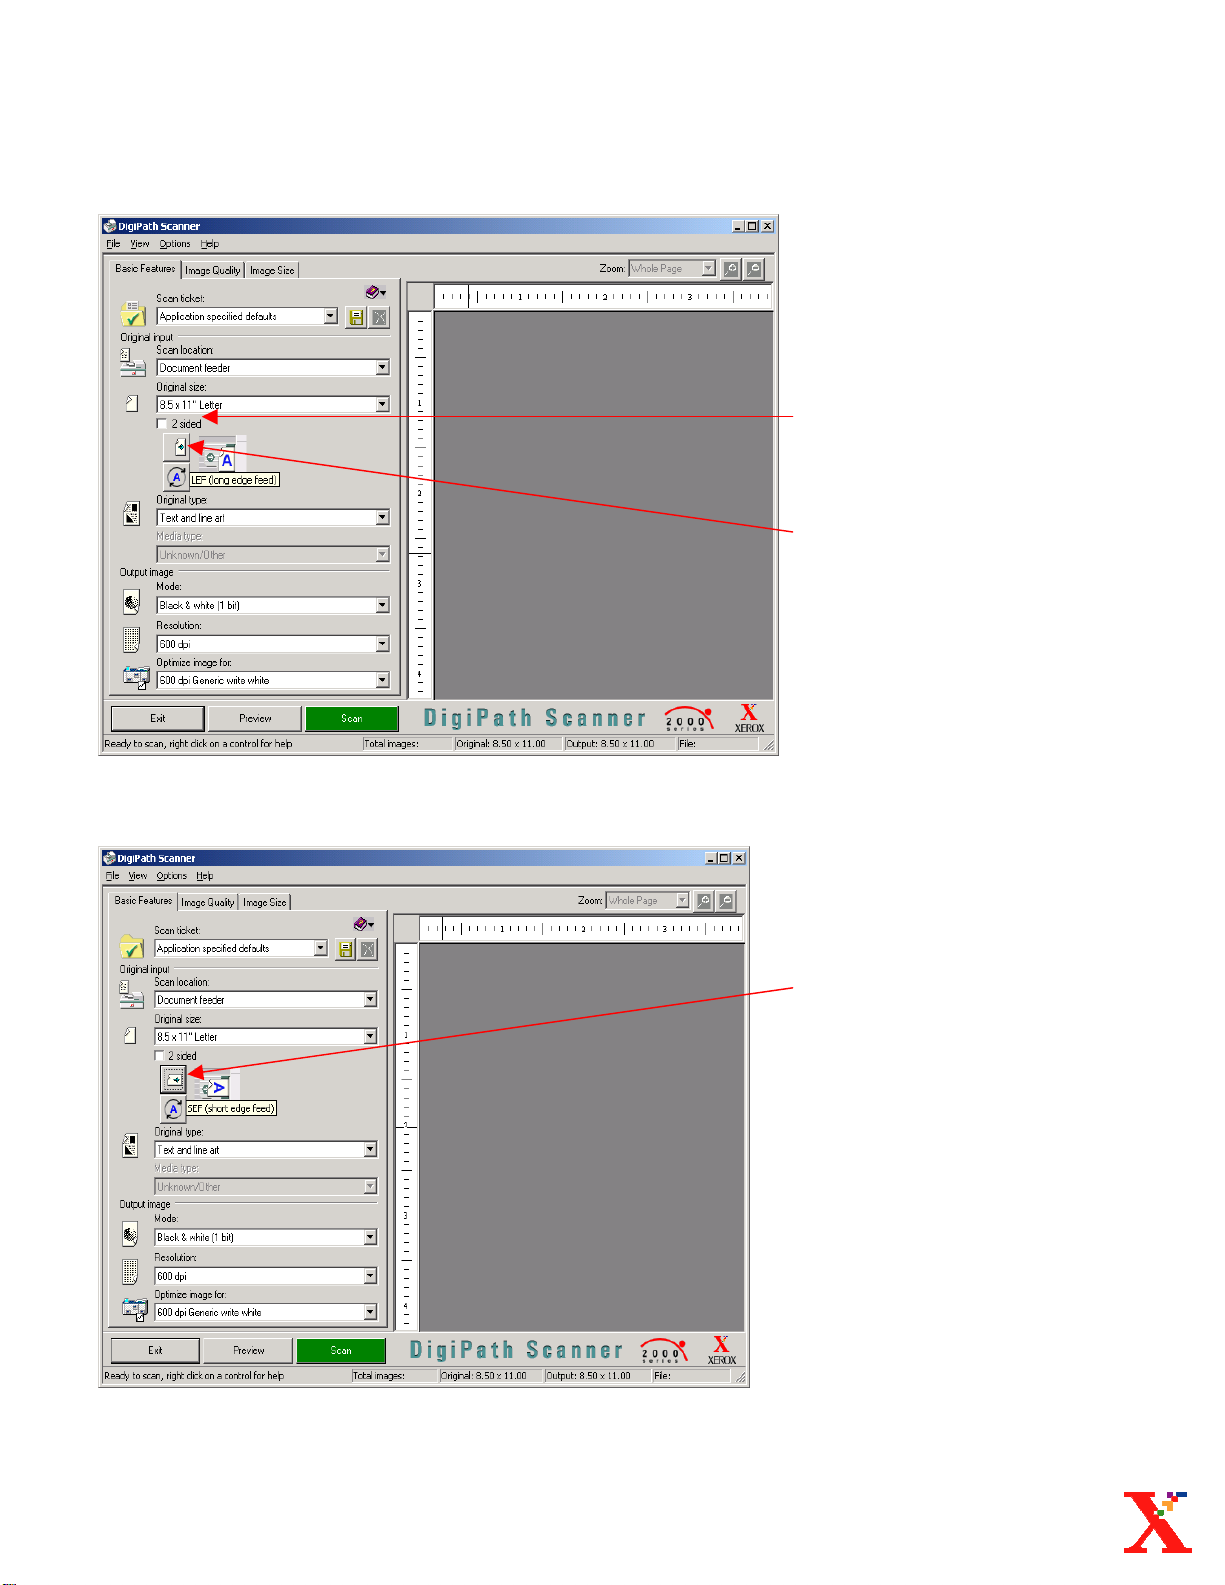
4. Select the 2 sided box
if the original documents
are 2 sided.
5. Select Long Edge Feed
(LEF) if the originals are
being fed into the
document feeder with the
long edge first.
Or
5. Select Short Edge Feed
(SEF) if the documents
are being fed into the
document feeder with the
short edge first.
Digipath 3.0 Reference Guide: Scanning B&W originals pg.3
Page 10
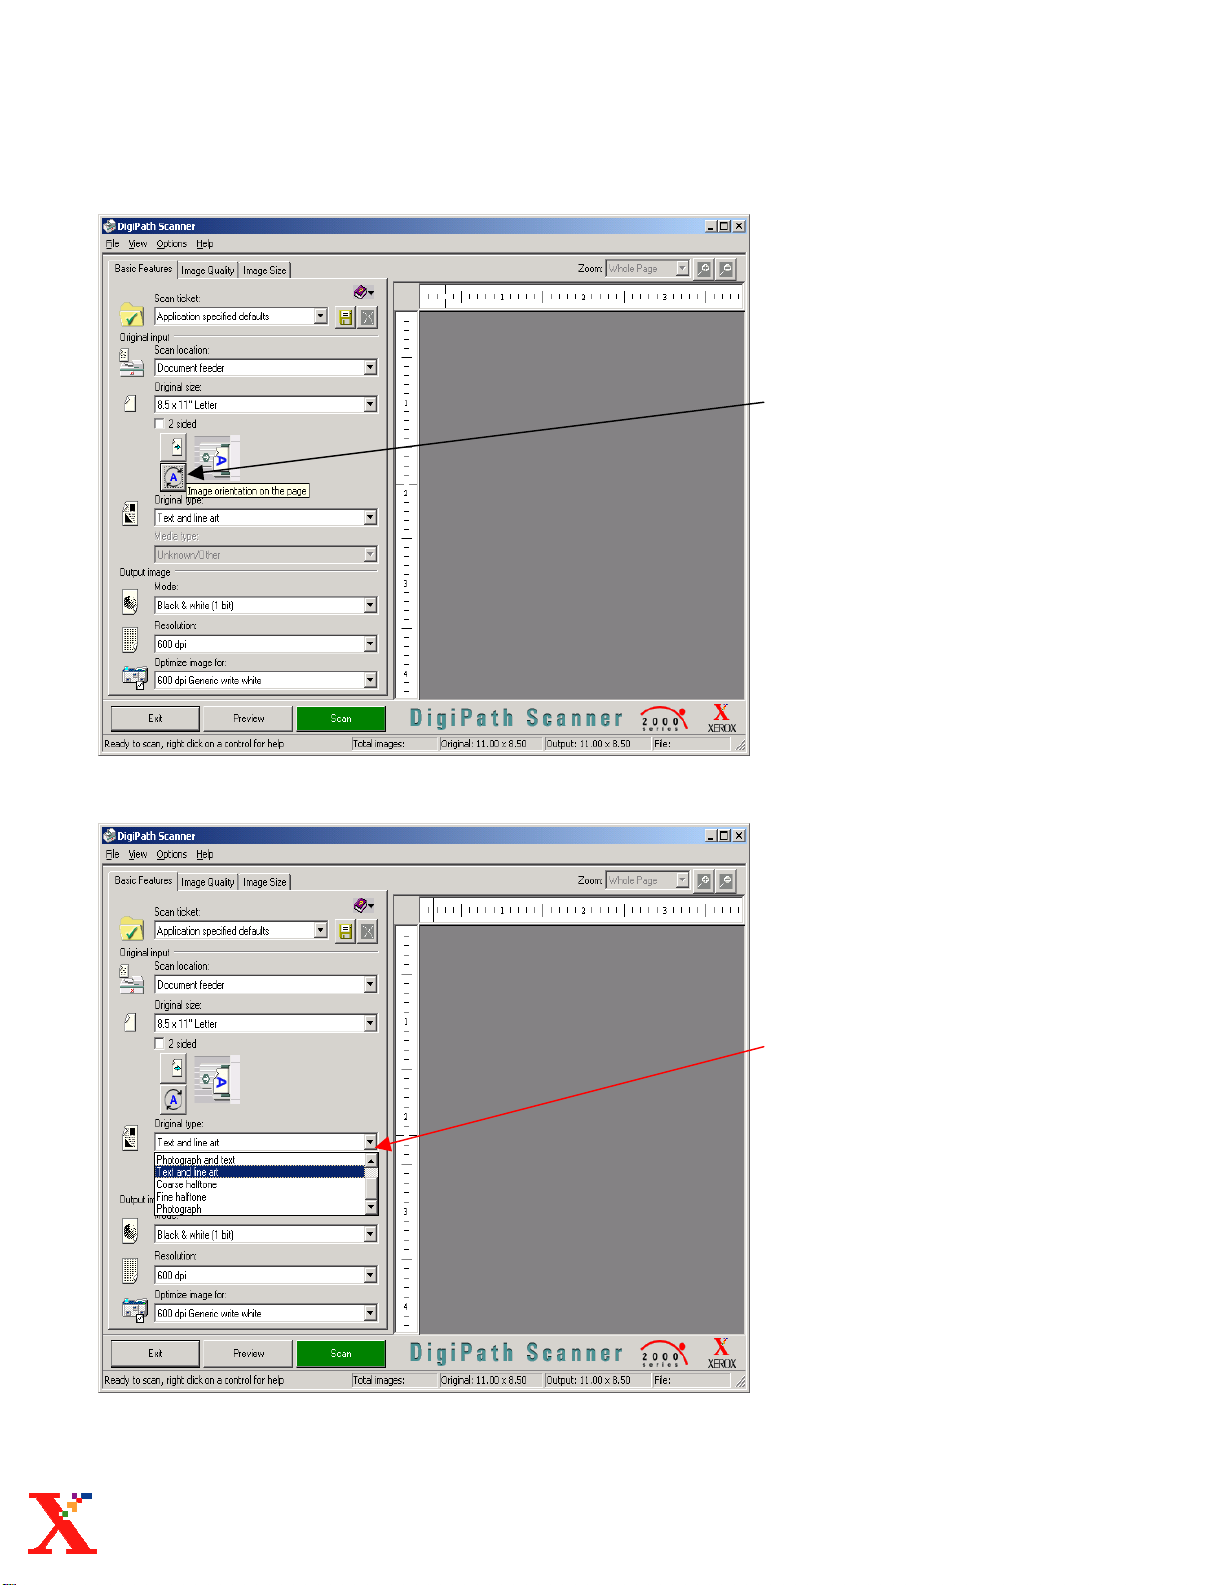
Scanning Black & White Originals
Scanning Selections
• You may change the image
orientation on the output
page using the Image
Orientation button.
(optional)
Digipath 3.0 Reference Guide: Scanning B&W originals pg.4
6. Select the Original Type of
your document.
Page 11
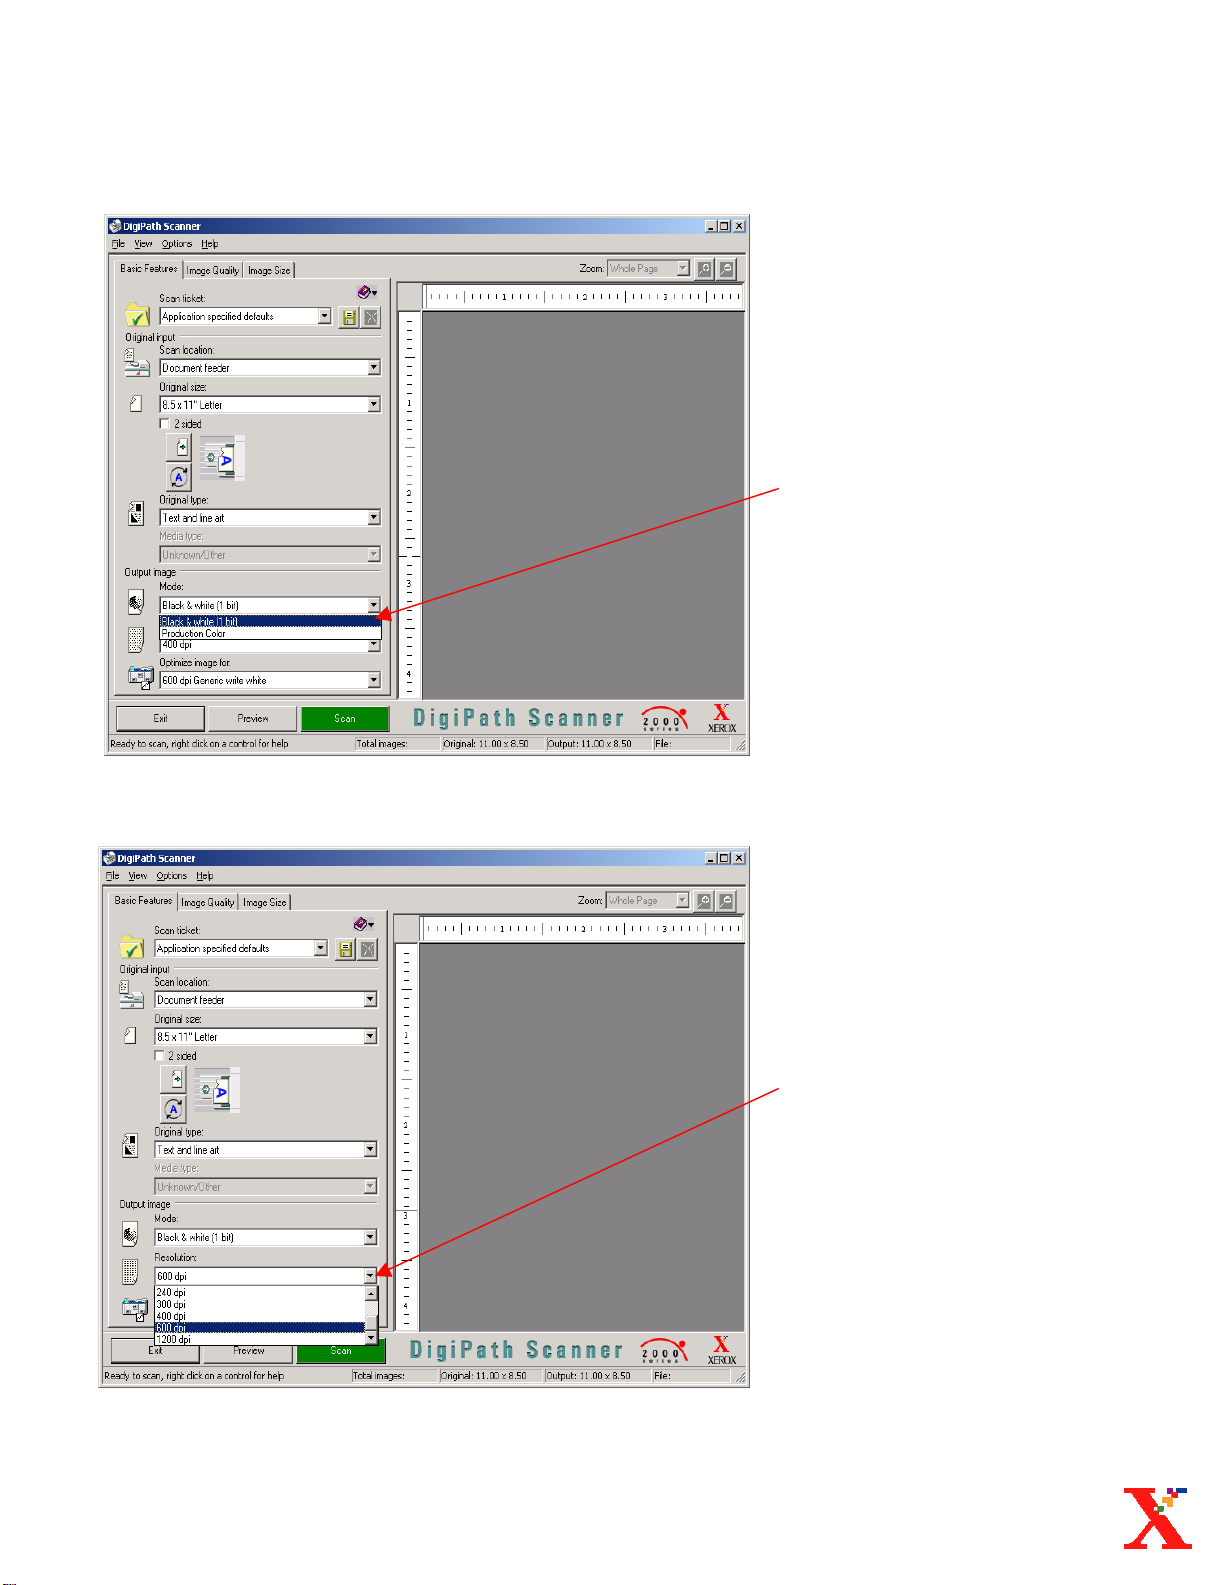
Scanning Black & White Originals
Scanning Selections
7. Select Black & White
(1 bit) in the Output
Image Mode.
8. Select the appropriate
Output Image Resolution.
Digipath 3.0 Reference Guide: Scanning B&W originals pg.5
Page 12

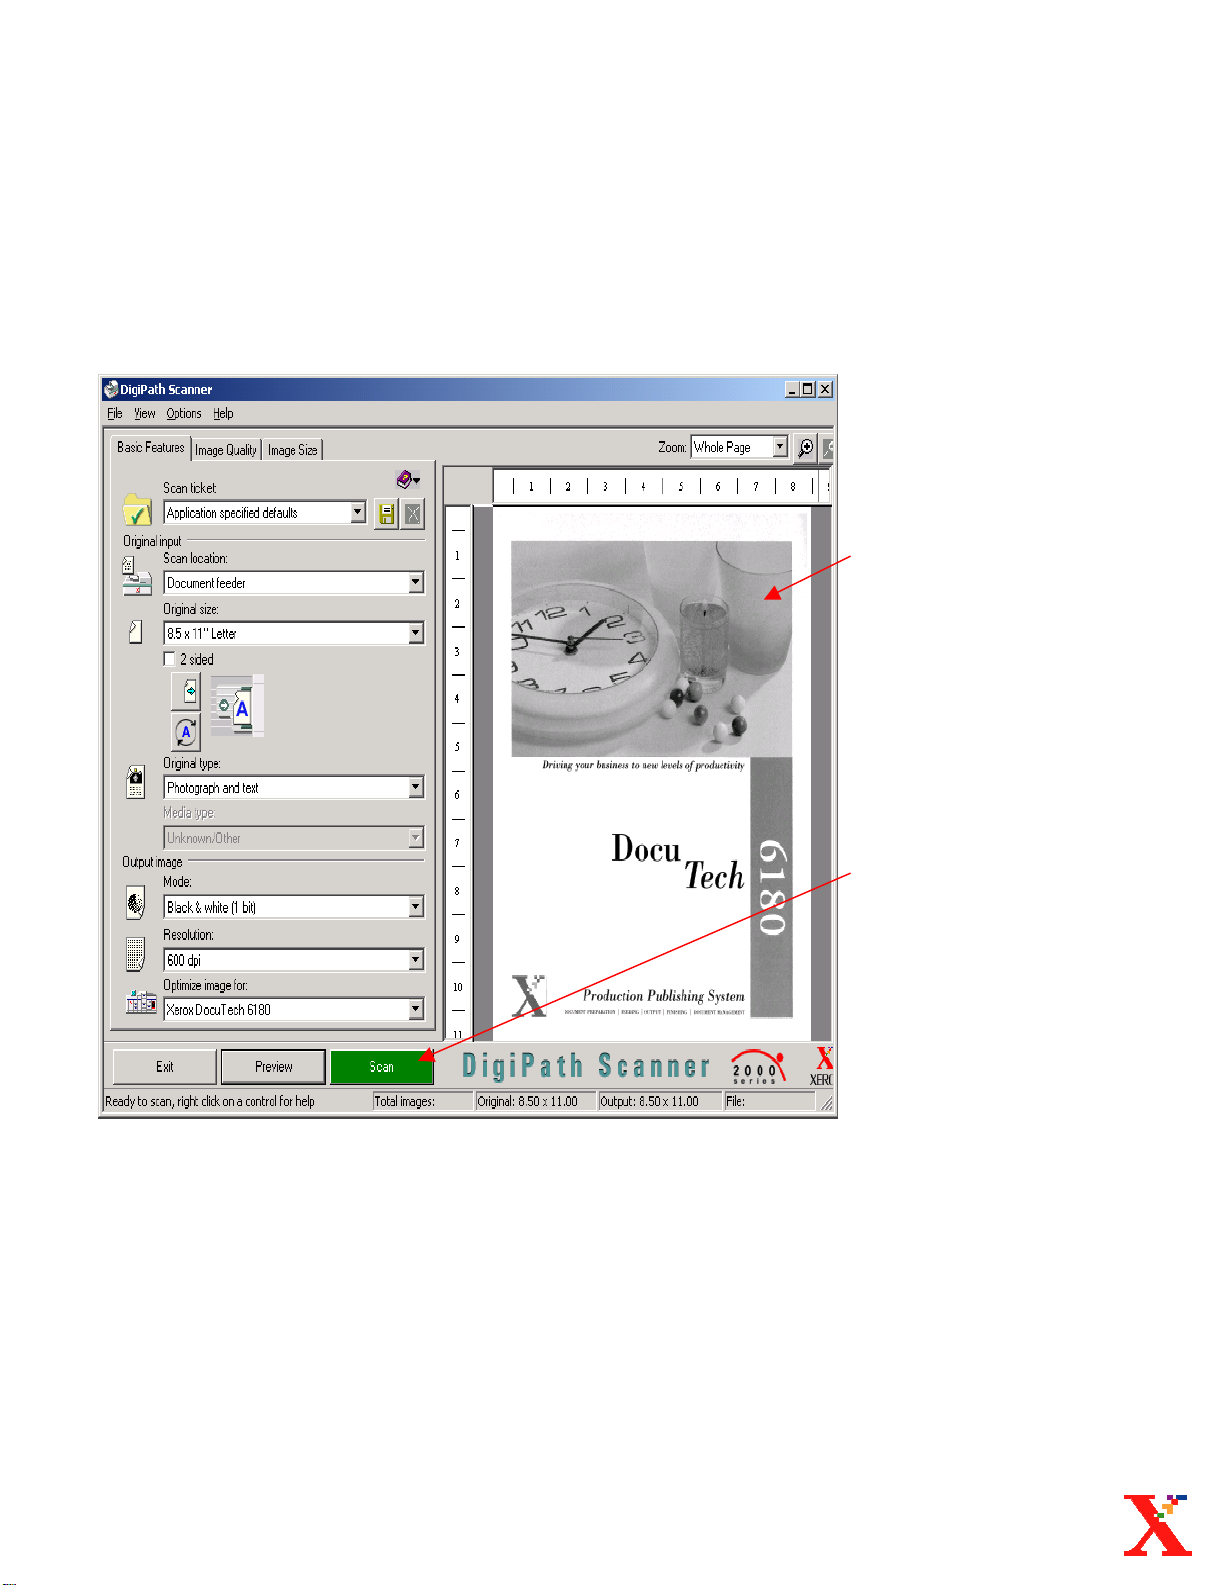
Scanning Black & White Originals
Scanning selections
9. Select a printer to
Optimize your image
for.
Digipath 3.0 Reference Guide: Scanning B&W originals pg.6
• Select Preview to view
a sample of your
image. (optional)
Page 13
Scanning Black & White Originals
Scanning
Selections
• Your image in the
Preview Window.
Note: You must put the
previewed original back in
the document feeder
before selecting SCAN.
10. Select Scan to scan
your images into
Doc. Scan &
Makeready.
Digipath 3.0 Reference Guide: Scanning B&W originals pg.7
Page 14
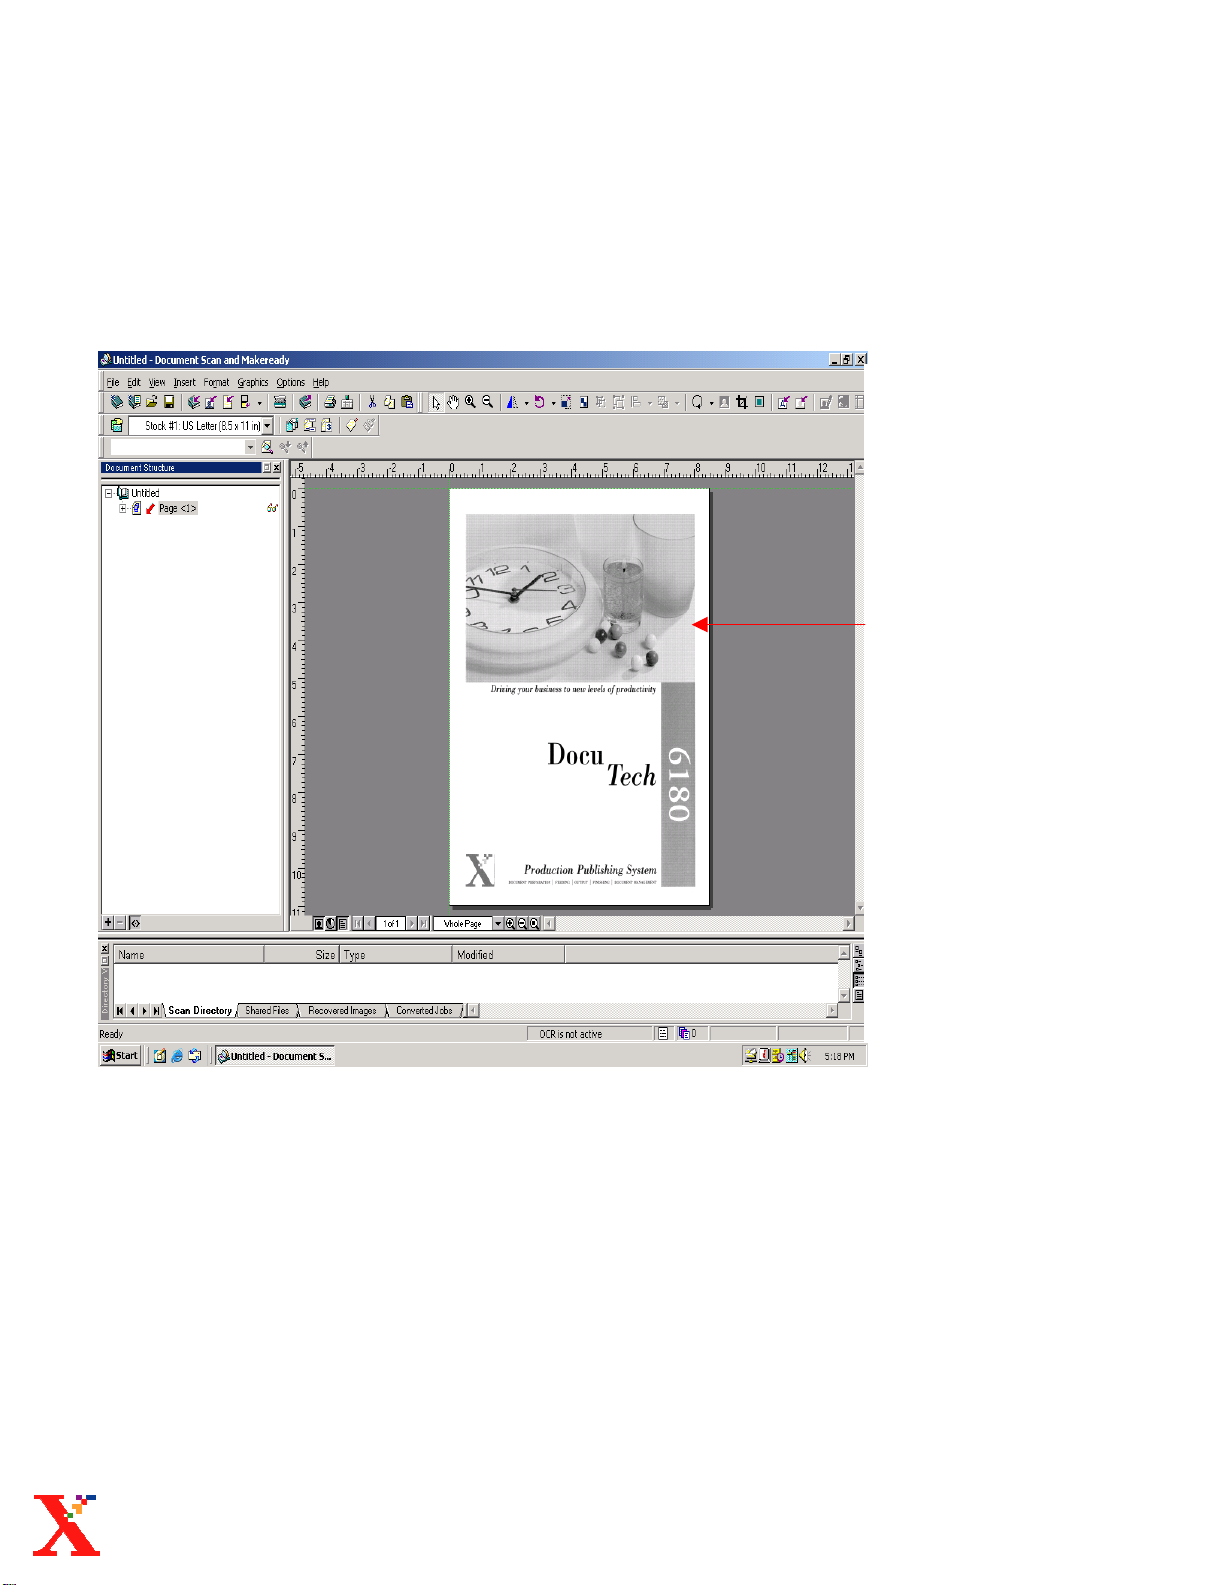
Scanning Black & White Originals
Document Scan
& Makeready
• The scanned image.
Digipath 3.0 Reference Guide: Scanning B&W originals pg.8
Page 15

Scanning Color Original
s
Page 16
Scanning Color Originals
Opening the
Scan Window
1. Select the Scan
Images icon.
Or
1. Select: Insert
Select: Scan Images.
Digipath 3.0 Reference Guide: Scanning Color originals pg.1
Page 17
Scanning Color Originals
Scan selections for
Color originals
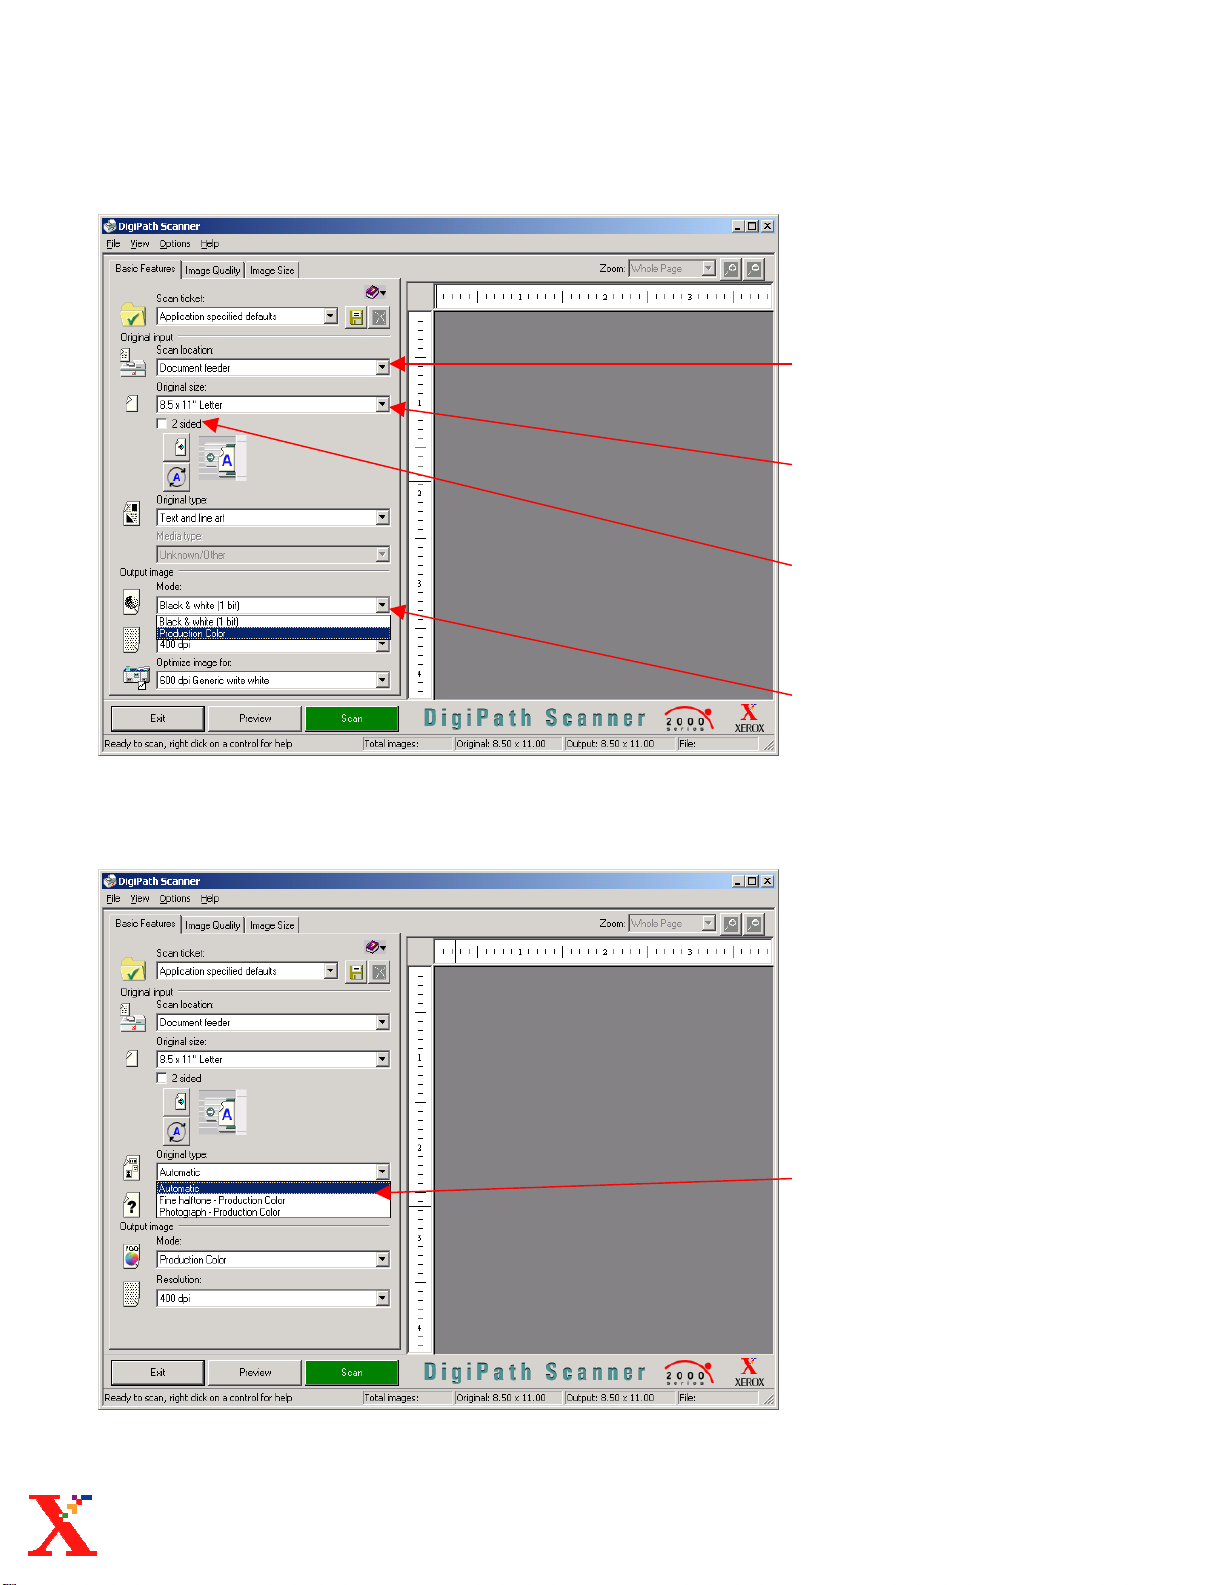
2. Select the Scan location.
3. Select the Original size.
4. Select 2 sided if the
originals are 2 sided.
5. Select Production Color.
6. Select the Original type.
Digipath 3.0 Reference Guide: Scanning Color originals pg.2
Page 18
Scanning Color Originals
Scan selections for
Color originals
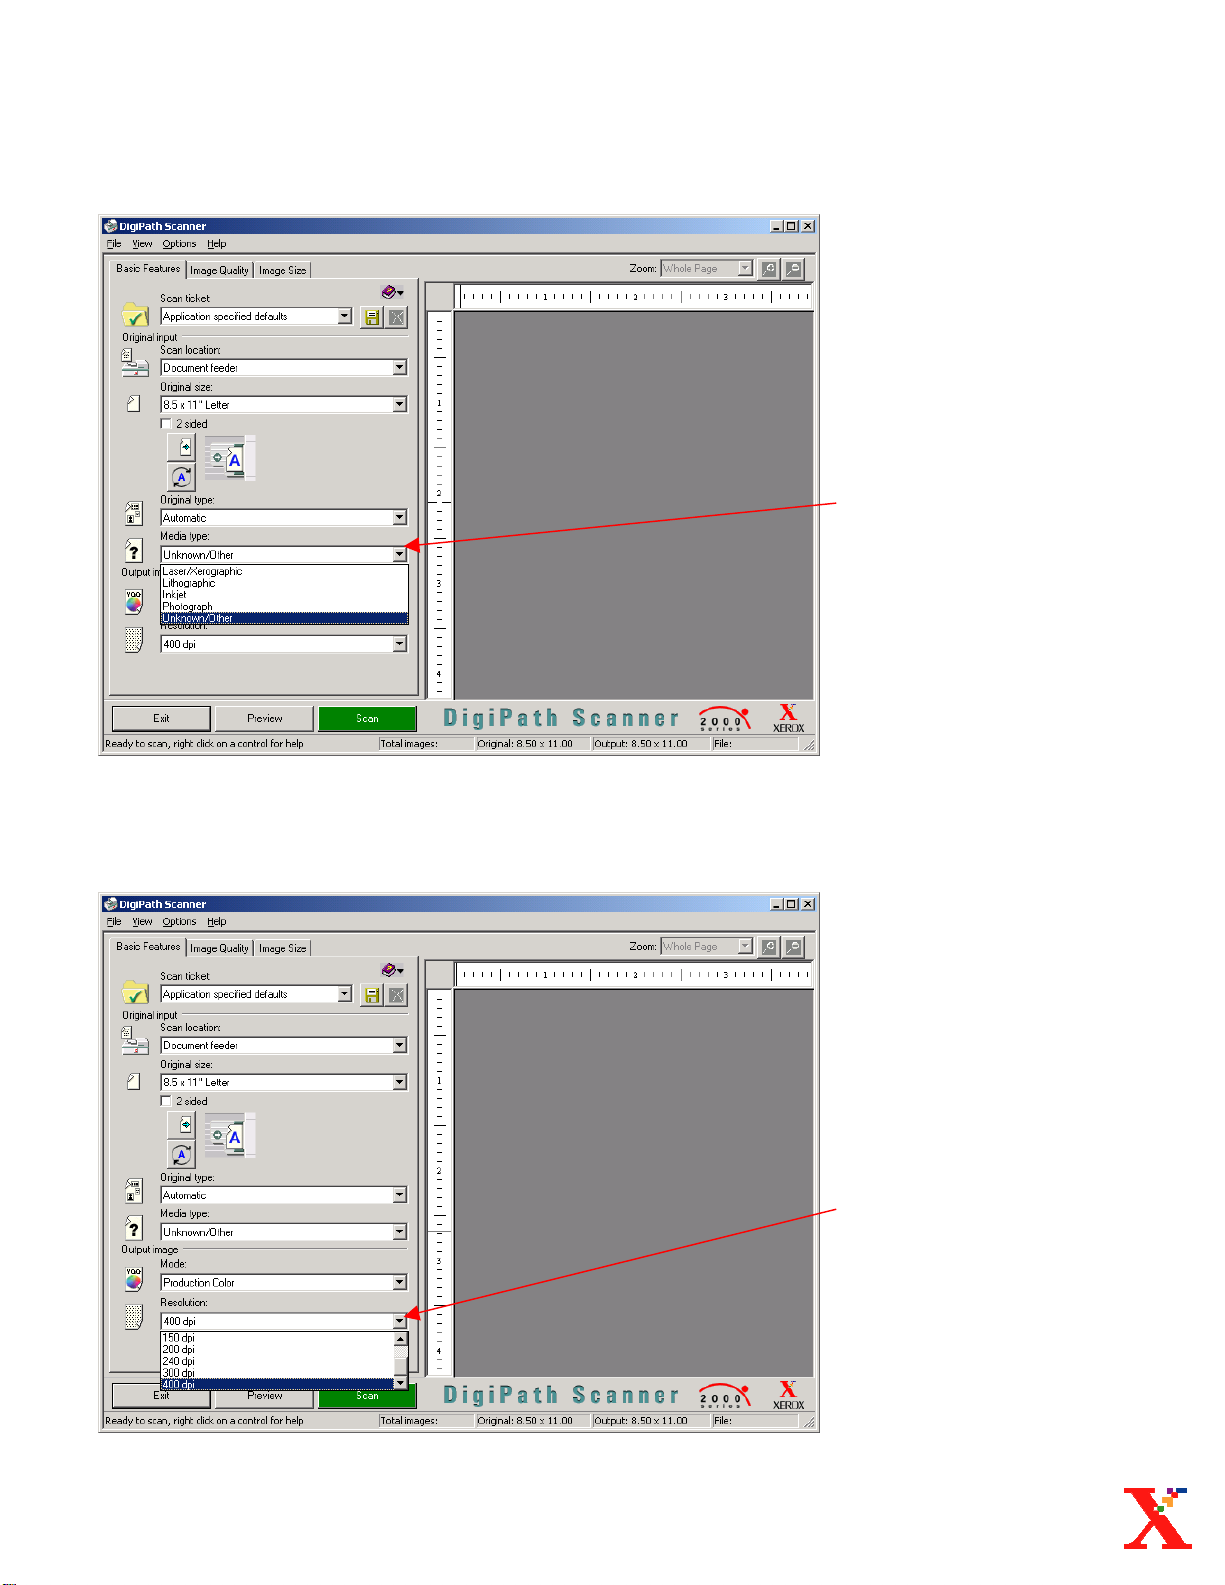
7. Select the Media type
of the original
document.
8. Select the scanner
output Resolution.
Digipath 3.0 Reference Guide: Scanning Color originals pg.3
Page 19
Scanning Color Originals
Scan selections for
Color originals
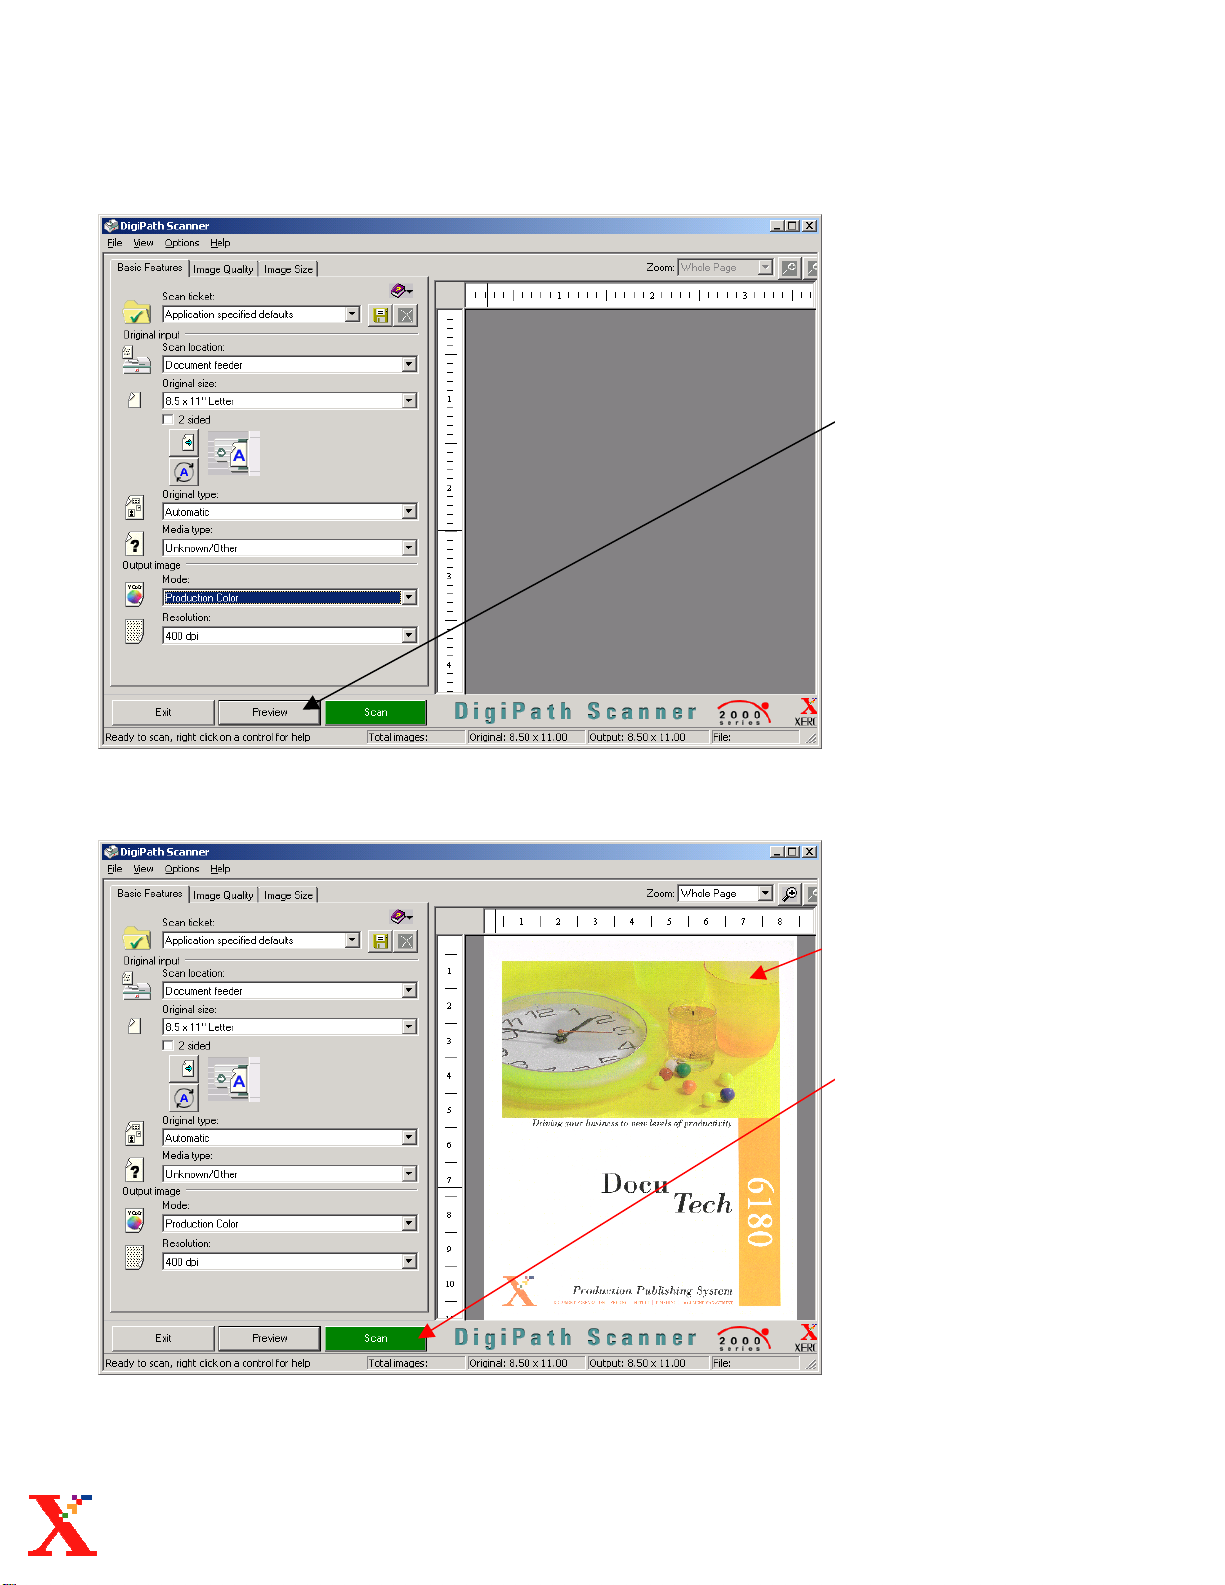
• Select Preview to view
a sample of your
image. (Optional)
• Your image in the
preview window.
9. Select Scan to scan
images into
Document Scan &
Makeready.
Note:
previewed original(s) back
in the document feeder
before selecting SCAN.
You must put the
Digipath 3.0 Reference Guide: Scanning Color originals pg.4
Page 20
Scanning Color Originals
Document Scan &
Makeready
• Scanned Image
Digipath 3.0 Reference Guide: Scanning Color originals pg.5
Page 21

Digipath 3.0 Reference Guide
Page 22

Format Paper Stoc
k
Page 23
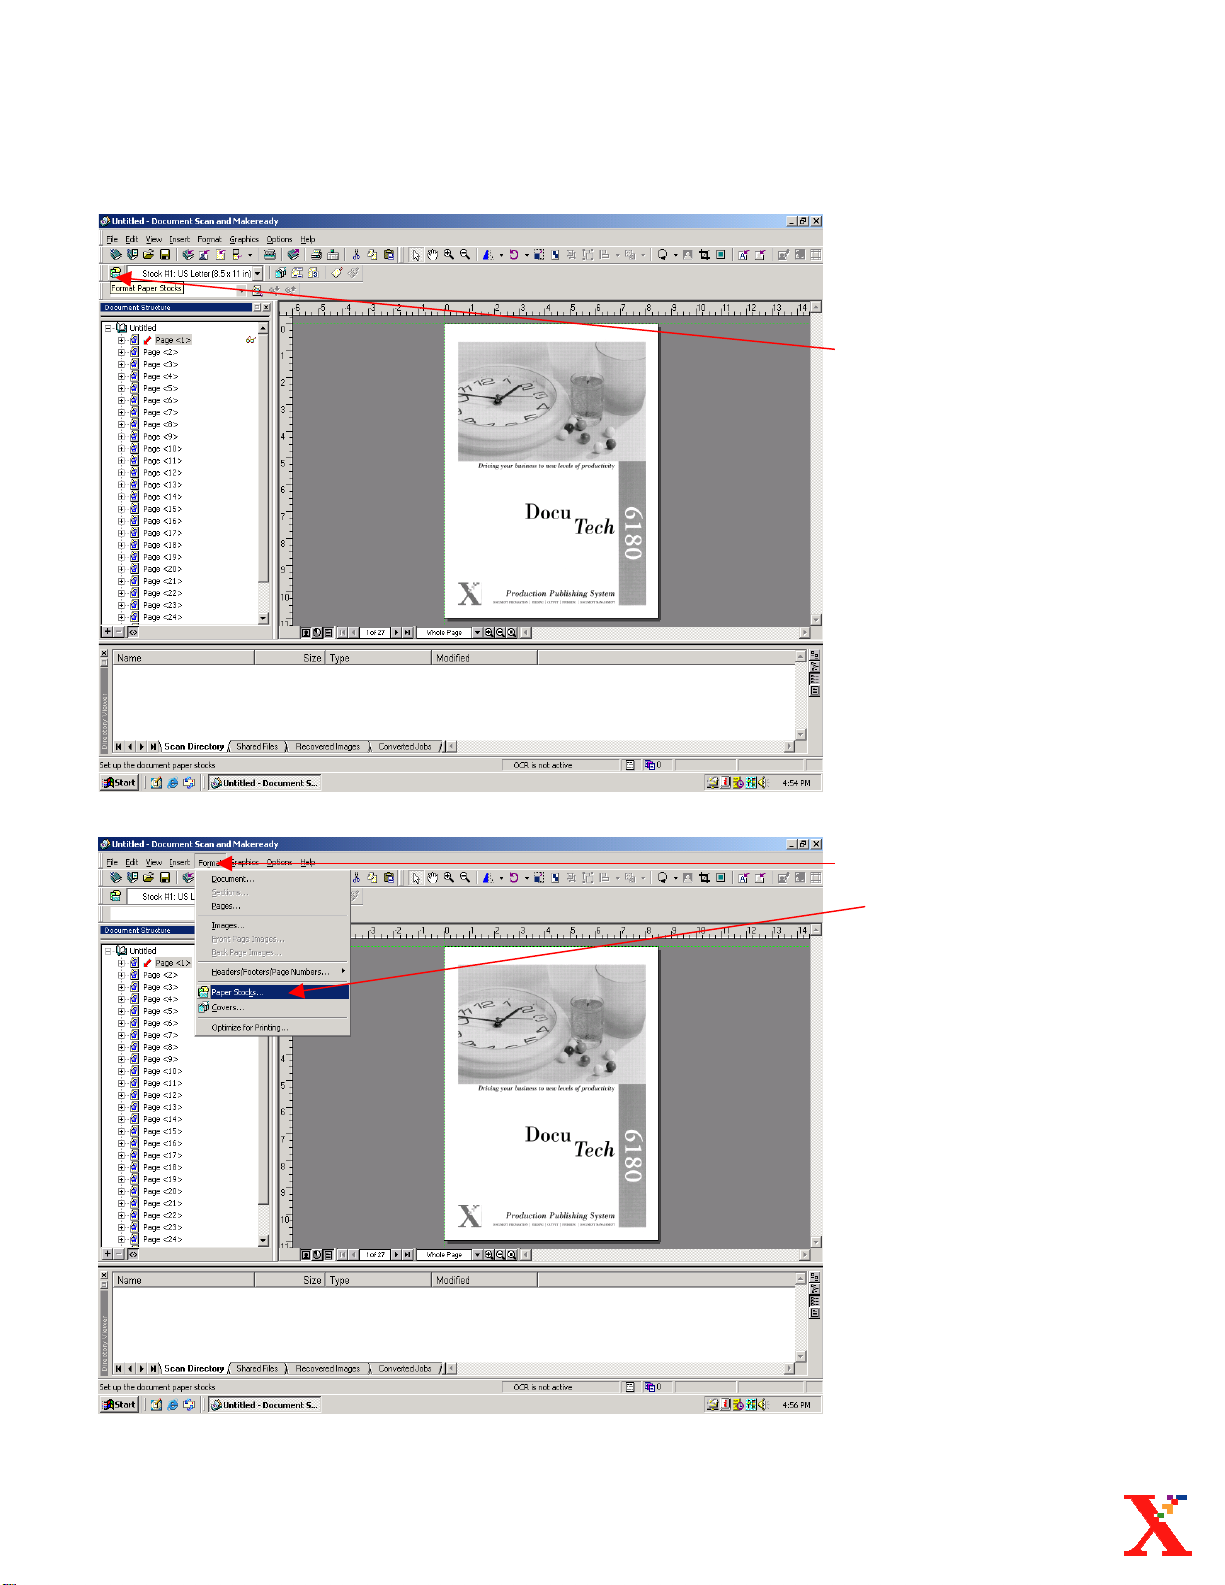
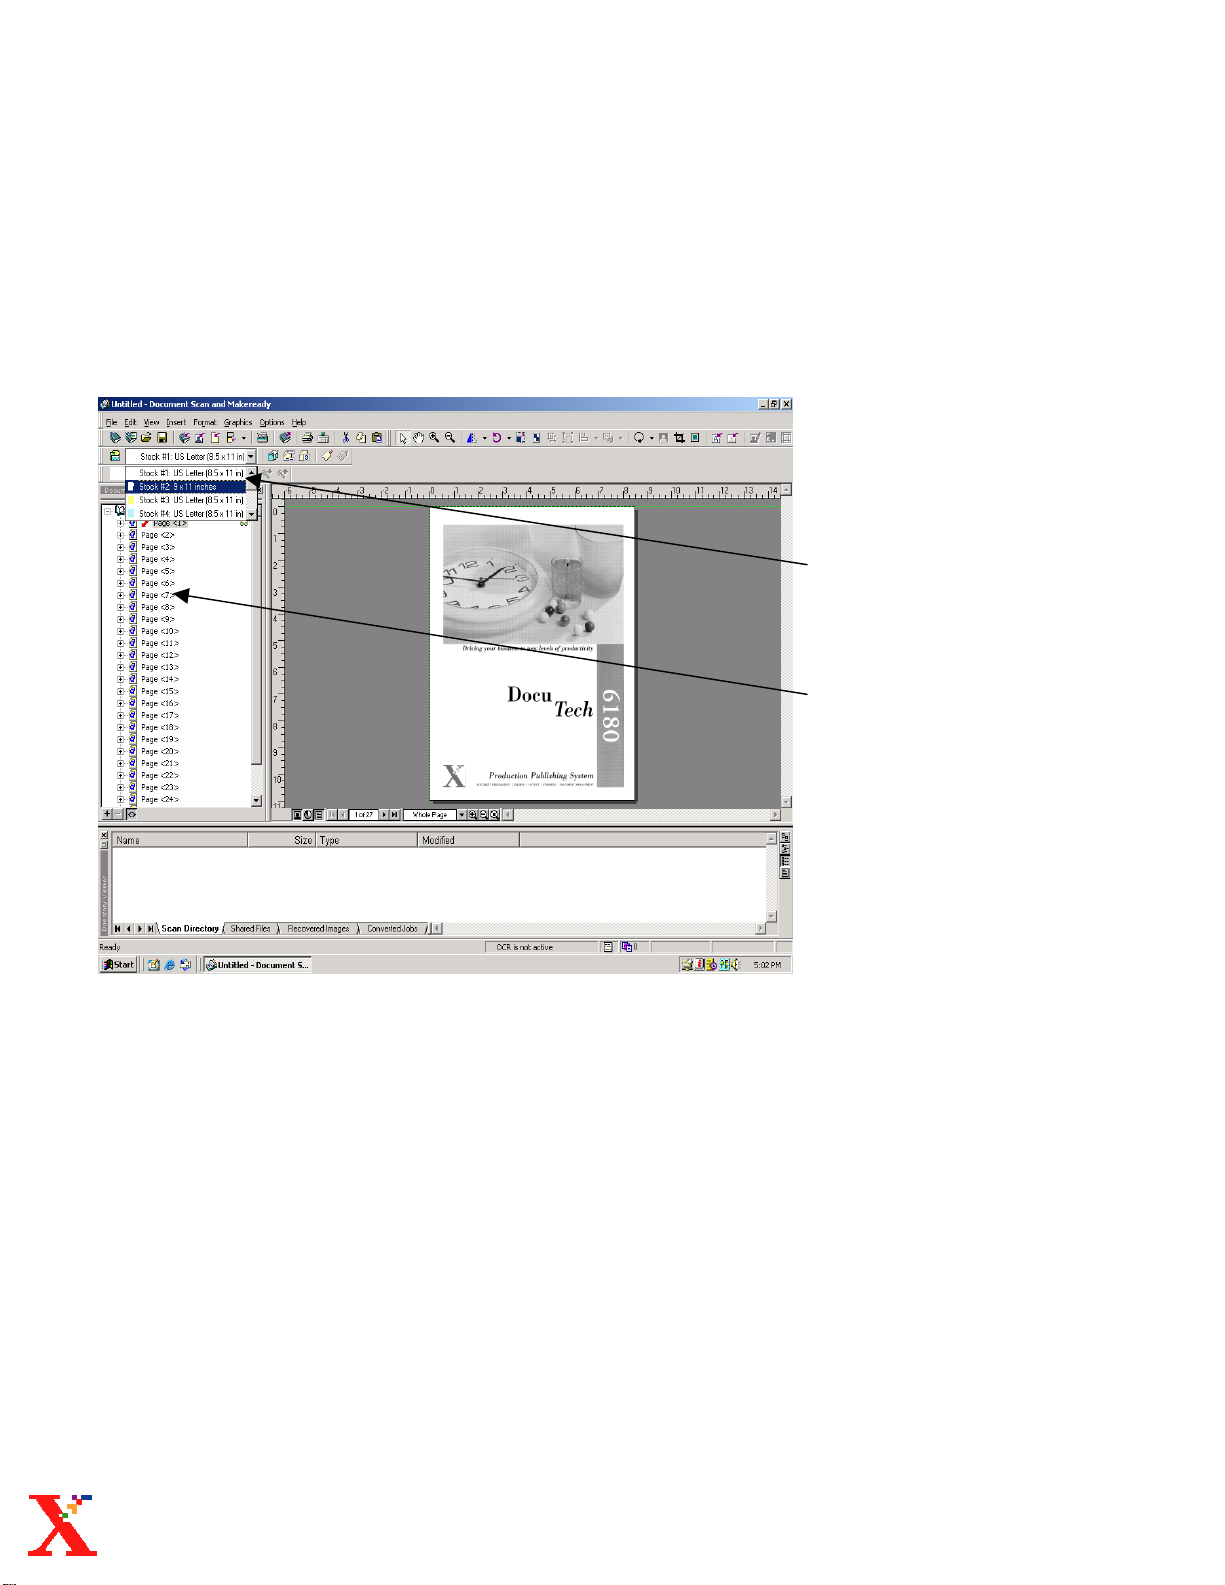
Format Paper Stock
Formatting Paper
Stocks
1. Select the Format
Paper Stock icon.
Or
1. Select: Format
Select: Paper Stocks
Digipath 3.0 Reference Guide: Format Paper Stock pg.1
Page 24
Format Paper Stock
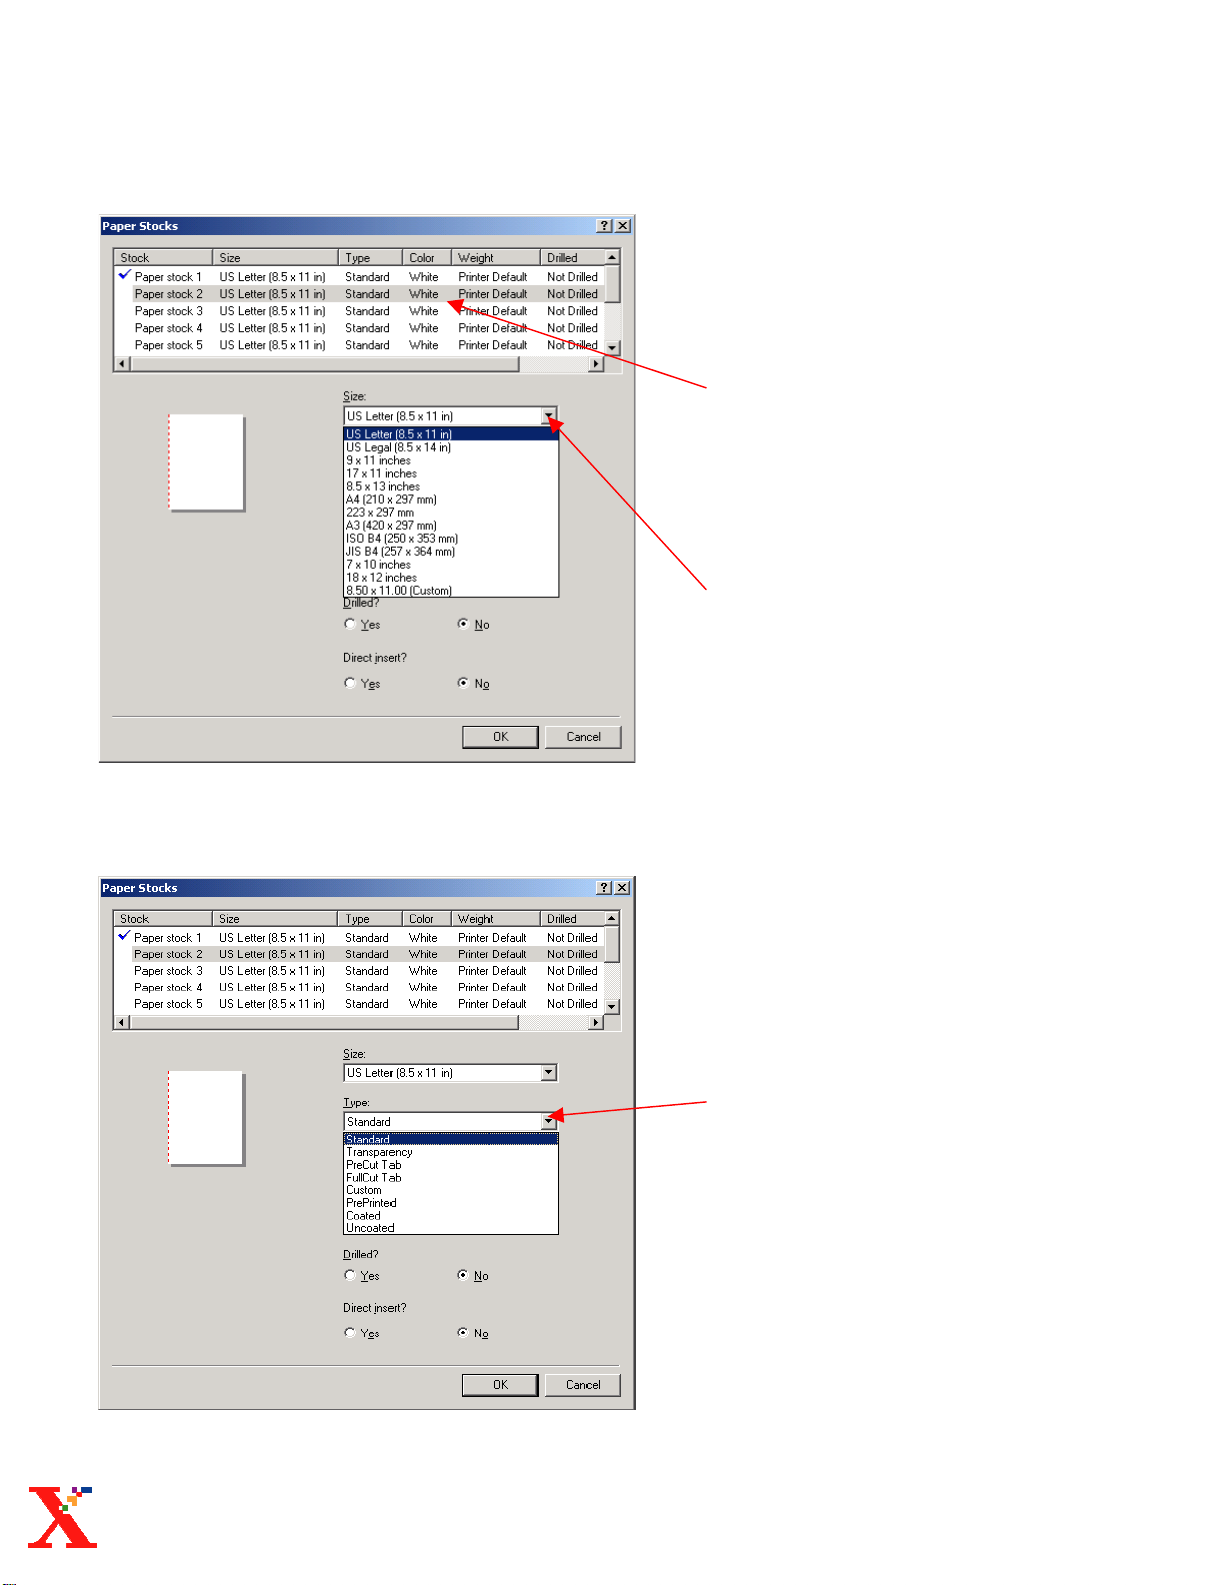
Formatting Paper
Stocks
2. Highlight a Paper stock.
Note: Paper stock #1 will be the
default paper stock for
your document
3. Select a Paper stock size.
Digipath 3.0 Reference Guide: Format Paper Stock pg.2
4. Select the Type of paper
Page 25
Format Paper Stock
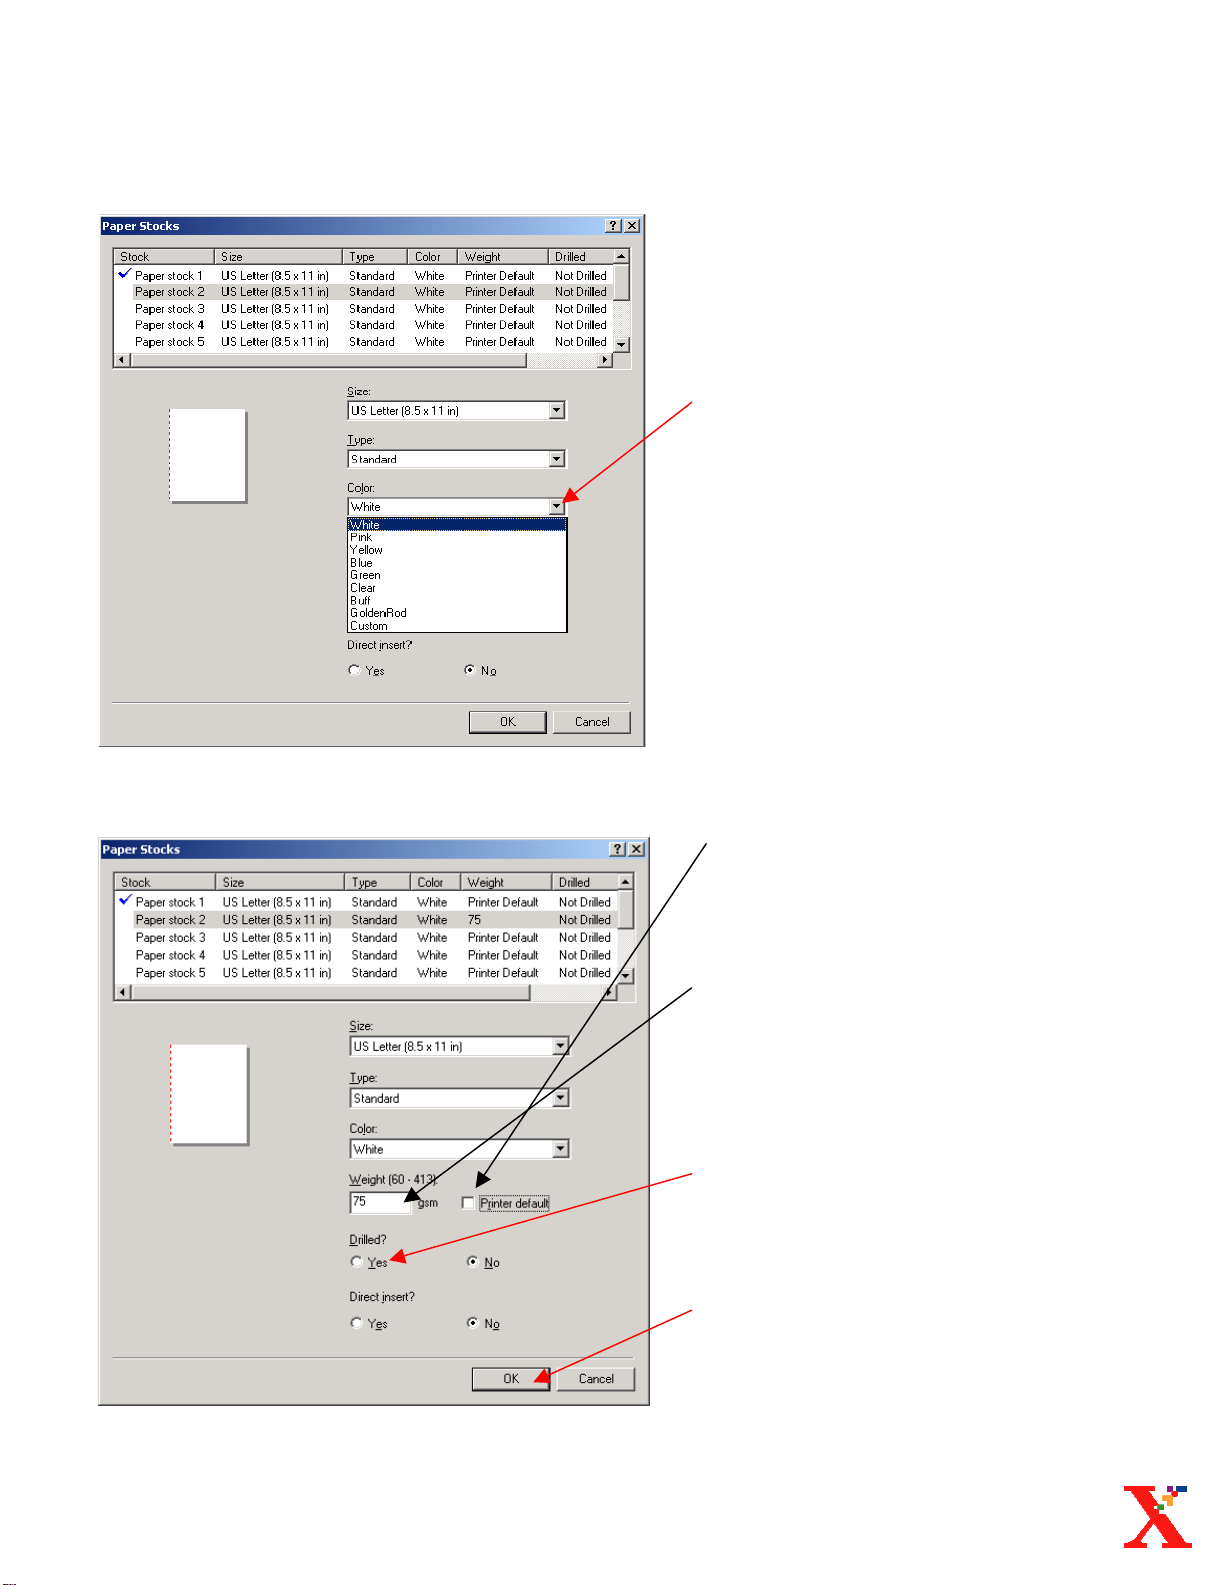
Formatting Paper Stocks
5. Select the Color of paper.
• The “Printer default” paper
weight is 75 gsm. This box
will automatically be checked
by default.
• To use paper weight other
than the printer default
uncheck the box and enter a
paper weight (gsm) in the
Weight box.
6. Select yes if the paper
stock is drilled paper.
7. Select Ok
Digipath 3.0 Reference Guide: Format Paper Stock pg.3
Page 26
Format Paper Stock
Paper Stock
Shortcut Menu
• Format: Paper Stock
programs the paper
stock shortcut menu.
• The short cut menu
allows you to change
your images to a
particular paper stock.
Digipath 3.0 Reference Guide: Format Paper Stock pg.4
Page 27

Format Cover
s
Page 28
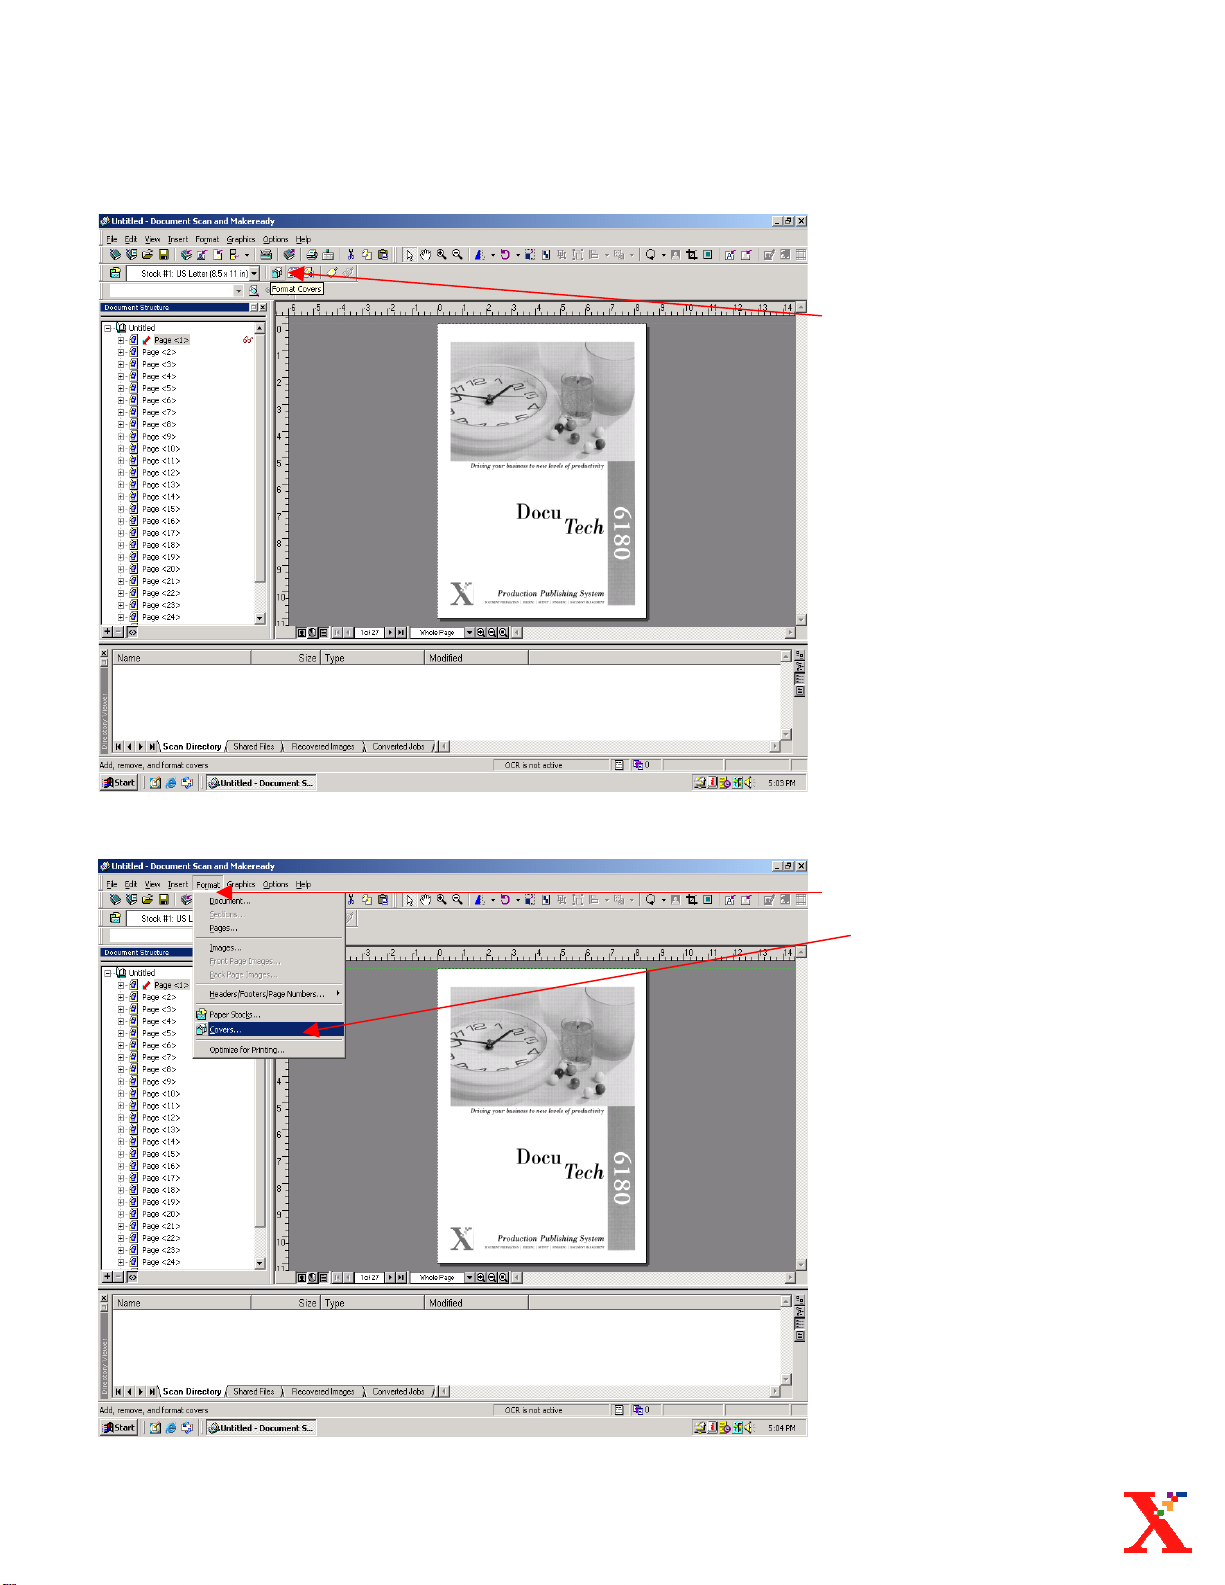
Format Covers
Formatting Covers
1. Select the
Format Covers icon.
Or
1. Select: Format
Select: Covers
Digipath 3.0 Reference Guide: Format Covers pg.1
Page 29
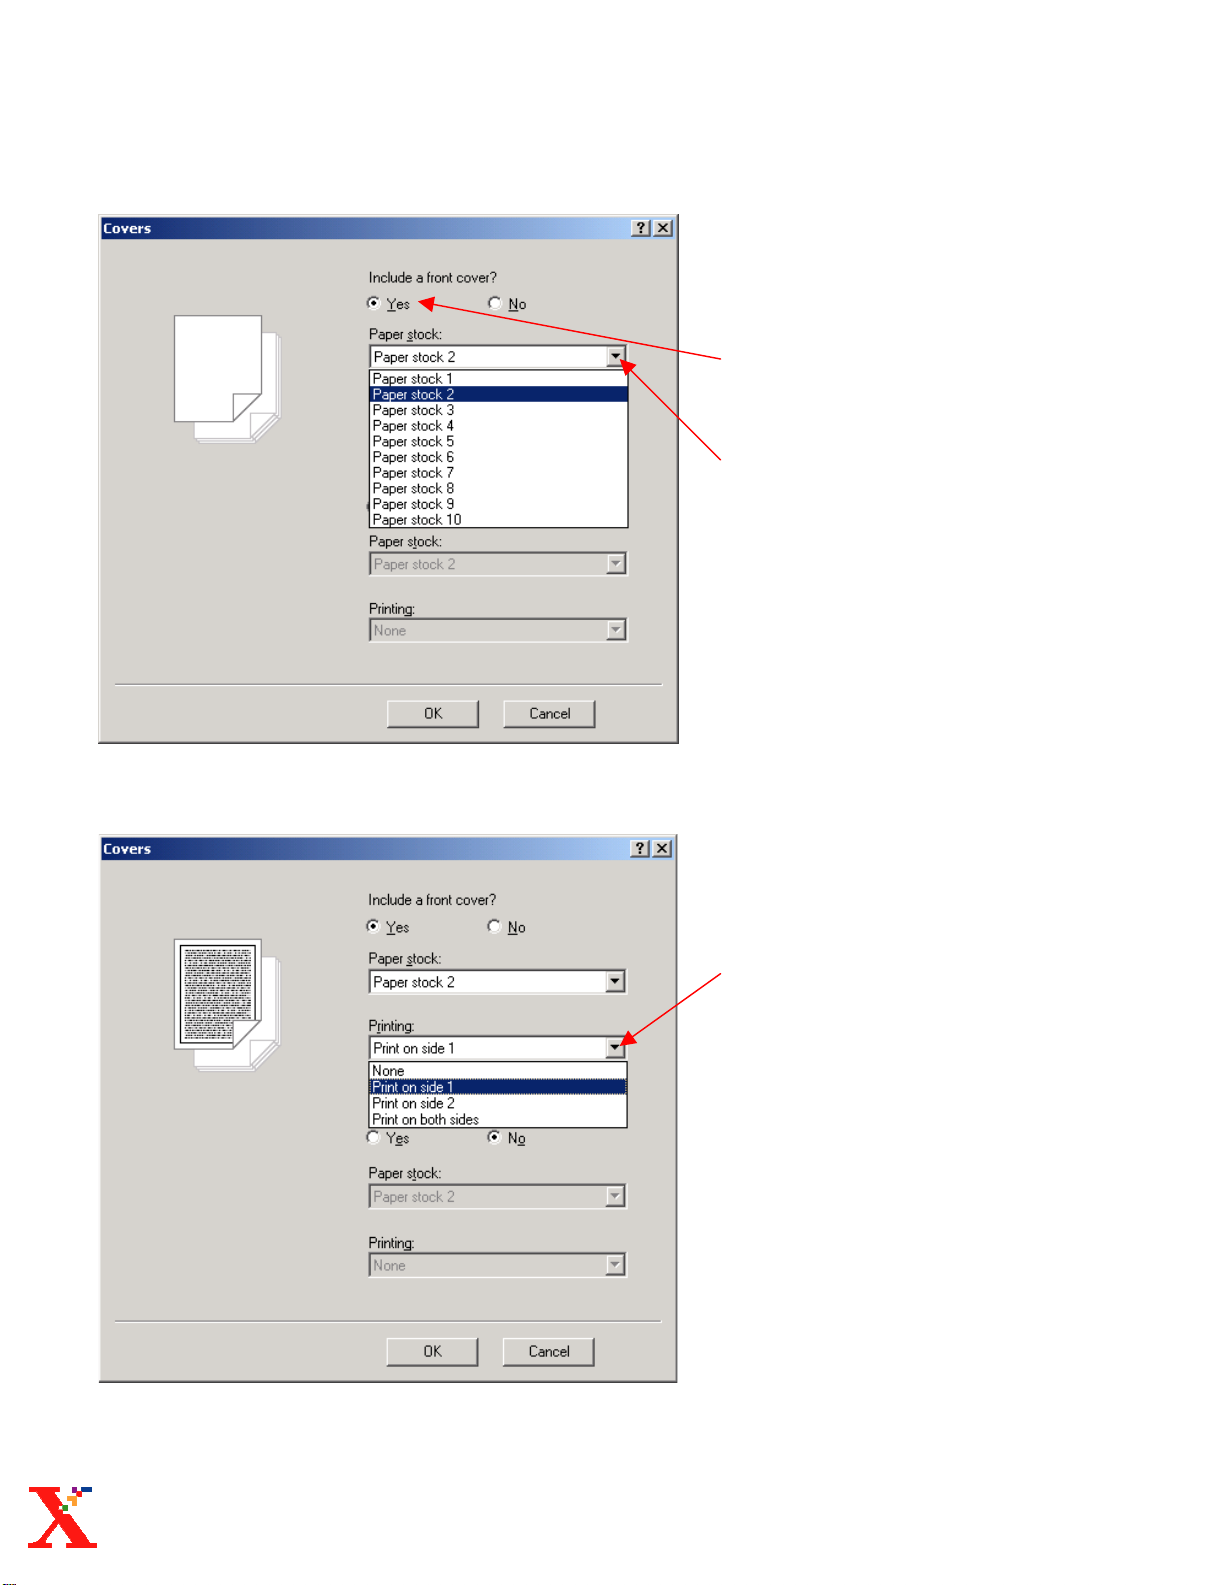
Format Covers
Formatting Front
Covers
2. Select Yes to program a
Front Cover.
3. Select a Paper stock.
Digipath 3.0 Reference Guide: Format Covers pg.2
4. Select how you want the
print to appear on the Front
Cover.
Page 30
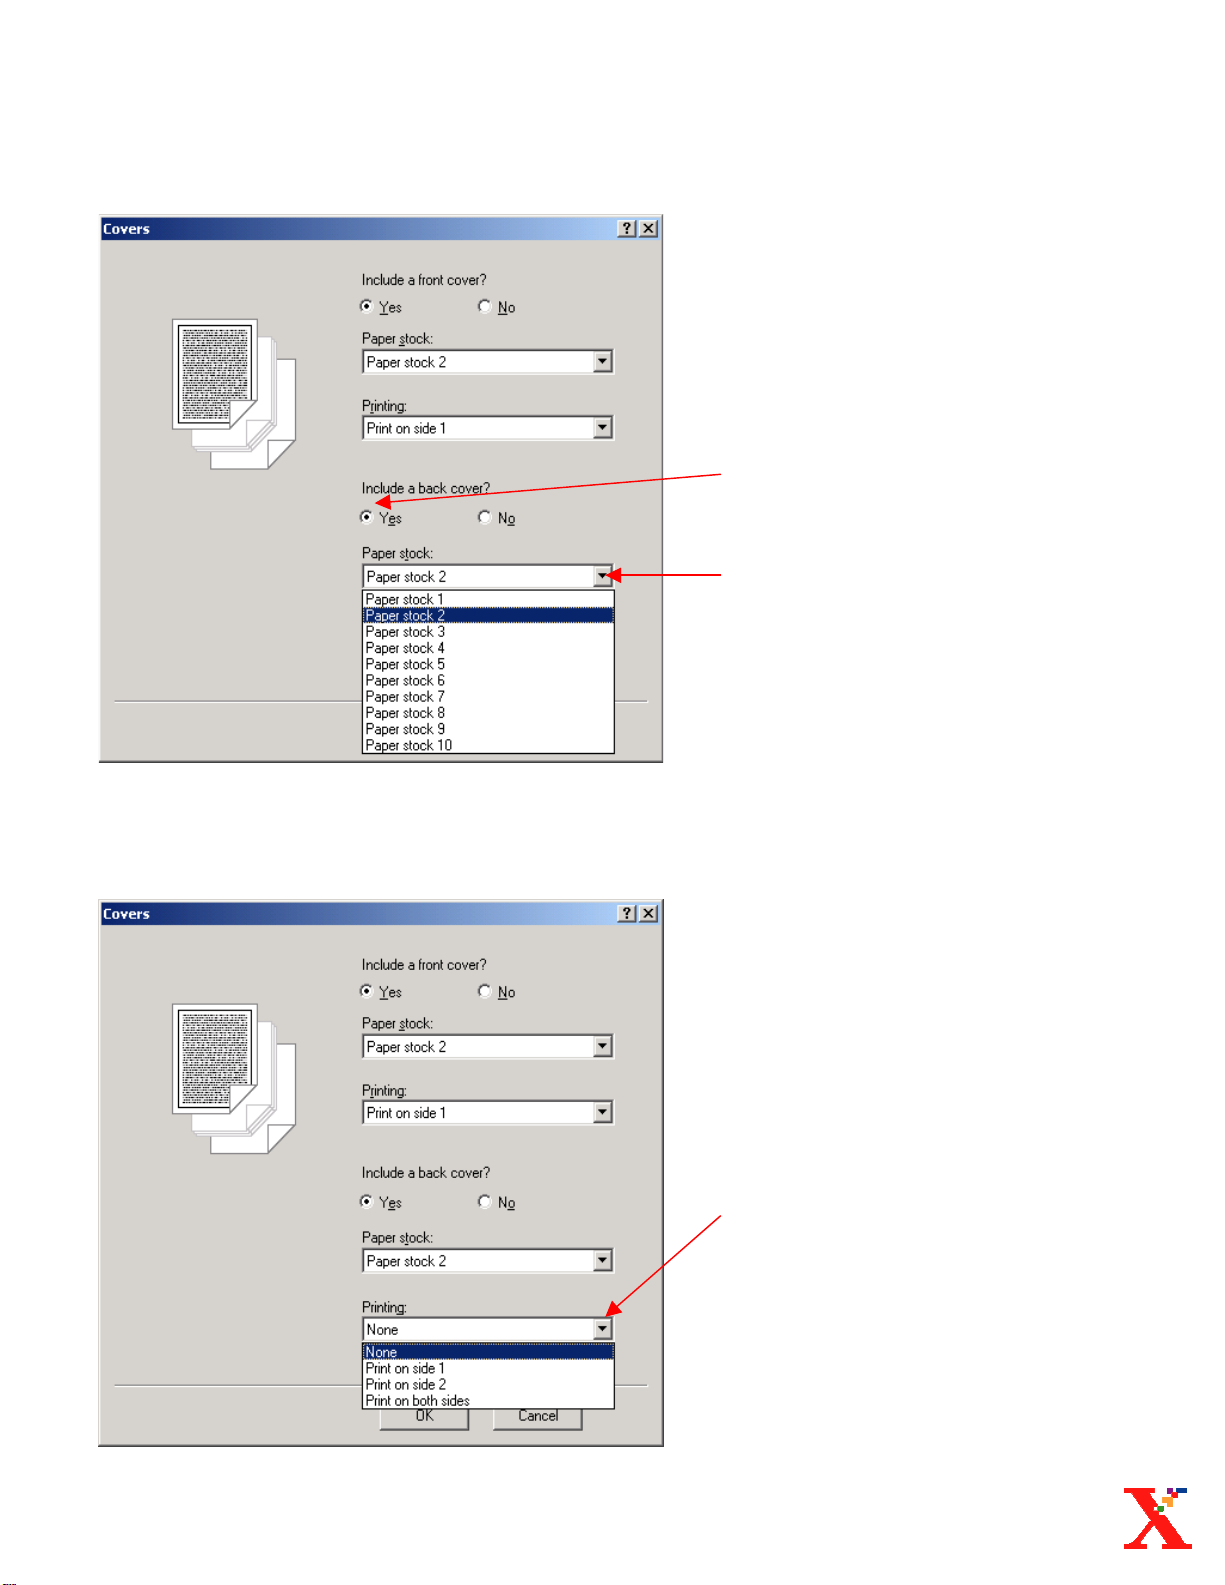
Format Covers
Formatting Back Covers
5. Select Yes to program a
Back Cover.
6. Select a Paper stock.
7. Select how you want the
print to appear on your Back
Cover.
Digipath 3.0 Reference Guide: Format Covers pg.3
Page 31

Format Covers
Formatting Covers
8. Select Ok.
Digipath 3.0 Reference Guide: Format Covers pg.4
Page 32

Direct Insert
s
Page 33

Direct Insert
• Scan your document(s) or
open a document from the
hard drive.
Format Paper Stock
1. Select Format Paper
Stock icon.
Or
1. Select: Format
Select: Paper Stock.
Digipath 3.0 Reference Guide: Direct Inserts pg.1
Page 34

Direct Insert
Format Paper Stock
2. Highlight a Paper Stock
other than Paper stock #1.
• Paper Stock # 1 cannot be
programmed for Direct
Insert stock.
3. Select:
• Paper Size
• Paper Type
• Paper Color
4. Select Direct Insert.
5. Select Ok.
6. Type a custom name for
the Direct Insert stock.
• Use this custom name when
you program the paper tray
at the printer.
7. Input an Order Count.
Digipath 3.0 Reference Guide: Direct Inserts pg.2
8. Choose whether to count
or skip page numbers with
Direct Insert stock.
9. Select Ok.
Page 35

Direct Inserts
Format Paper Stock
• Direct Insert paper stock.
10. Select Ok.
Insert Options
11. Select the
Insert Icon arrow to
access the Insert sub
menu or select
Insert: Insert Mode
•
Insert Before
the image before a page
ordinal in the structure
window.
Insert After
•
image after a page ordinal
in the structure window.
– Inserts
– Inserts the
Digipath 3.0 Reference Guide: Direct Inserts pg.3
Page 36

Direct Insert
Insert Blank Page
12. Select: Insert
Select: Blank Page.
13. Select
Number of pages.
14. Select
Direct Insert Page.
• The Direct Insert
Stock will automatically
appear in the Paper
Stock window.
15. Select Ok.
Digipath 3.0 Reference Guide: Direct Inserts pg.4
Page 37

Direct Insert
Direct Insert
• Direct Insert page.
Digipath 3.0 Reference Guide: Direct Inserts pg.5
Page 38

Digipath 3.0 Reference Guide
Page 39

Production Prin
t
Page 40

Production Print
Production Print
1. Select the
Production Print icon.
Or
1. Select: File
Select: Production Print
Digipath 3.0 Reference Guide: Production Print pg.1
Page 41

Production Print
Printer Settings
2. Select a Printer.
DO NOT SELECT
•
DELETE PRINTER!!!
3. Select Job Setup.
Imaging & Job Setup
4. Select All Pages.
5. Select number of copies.
6. Select Orientation.
Digipath 3.0 Reference Guide: Production Print pg. 2
Page 42

Production Print
Imaging & Job Setup
7. Select Sides imaged.
8. Select Collated or
Uncollated.
9. Select Output area.
Digipath 3.0 Reference Guide: Production Print pg.3
Page 43

Production Print
Imaging & Job Setup
10. Select Finishing.
11. Select
12. Select Ok to print.
Ok to Print.
Digipath 3.0 Reference Guide: Production Print pg. 4
13. Select Ok to exit
Production Print.
Page 44

Production Print
Paper Stocks
(Optional)
Programming Paper
Stocks in Production
Print.
1. Select Paper Stocks
tab.
2. Select a Paper Stock
to program.
3. Program:
• Weight
(only for Color printing)
• Color
• Stock type
• Size
• Drilled
Covers
(Optional)
Programming Covers in
Production Print
1. Select Covers tab.
2. Select type of Cover.
Digipath 3.0 Reference Guide: Production Print pg.5
Page 45

Production Print
Covers
Programming Covers
in Production Print
3. Select Paper stock
for the Front cover.
4. Select Printing for
the Front Cover.
5. Select Paper Stock
for the Back Cover.
6. Select Printing for
the Back Cover.
Chapter Start &
Inserts
(Optional)
Blank Page Inserts
1. Input a page ordinal
number to insert a
blank page after.
2. Input Blank page
insert quantity.
Digipath 3.0 Reference Guide: Production Print pg. 6
3. Select Paper stock.
4. Select Add.
Page 46

Production Print
Special Pages
(Optional)
Page setup for
2 sided printing.
1. Select Special Pages
tab.
2. Input page range.
3. Select Paper Stock.
4. Select Sides imaged.
5. Select Add.
Subset Finishing
(Optional)
Imaging & Job Setup tab
1. Select Subset Finishing.
2. Input page range.
3. Select Finishing.
4. Select Add.
5. Select Ok.
Digipath 3.0 Reference Guide: Production Print pg.7
Page 47
Production Print
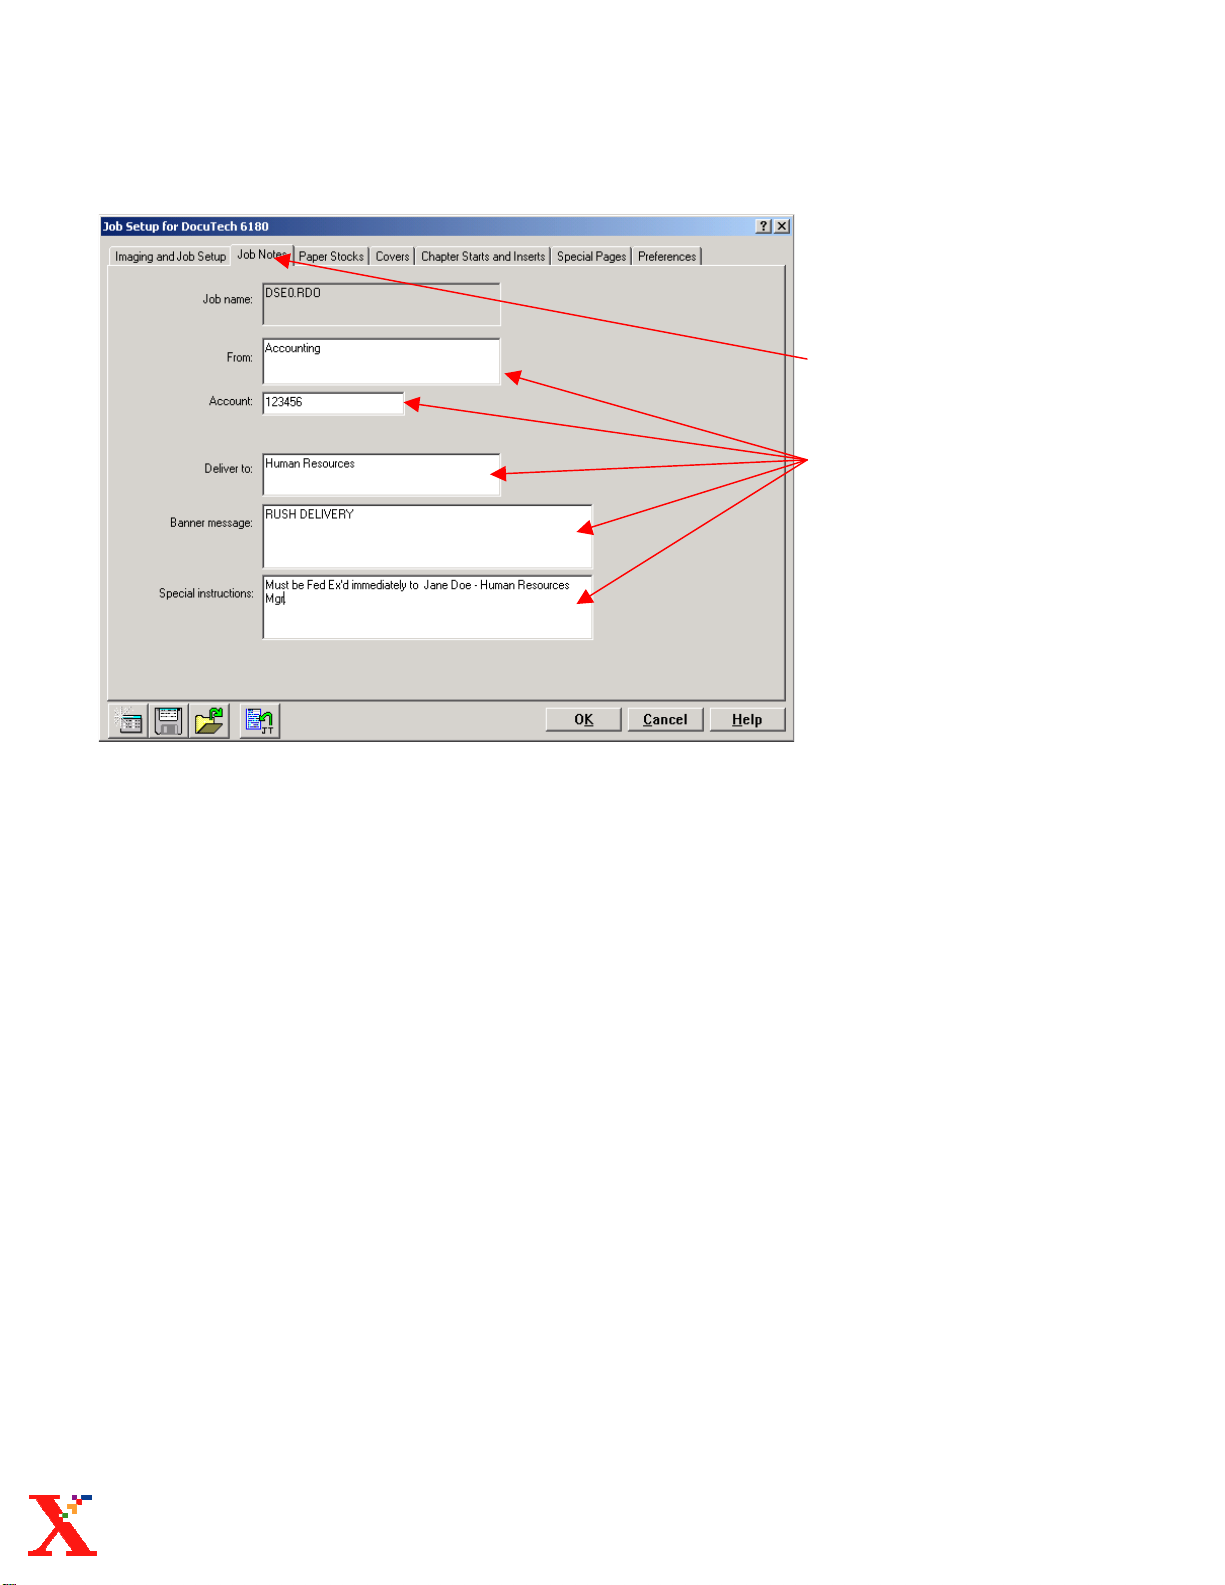
Job Notes
(Optional)
1. Select the Job Notes
tab.
2. Type Job Notes
information into boxes.
Digipath 3.0 Reference Guide: Production Print pg. 8
Page 48

Job Ticket
s
Page 49

Job Tickets
Production Print
1. Select the
Production Print icon.
Or
1. Select File:
Select: Production Print.
Digipath 3.0 Reference Guide: Job Tickets pg.1
Page 50

Job Tickets
Printer Settings
2. Select a Printer.
3. Select Job Setup.
Job Setup
4. Select all Job Setup
information.
5. Select the
Save Job Ticket icon.
Digipath 3.0 Reference Guide: Job Tickets pg. 2
Page 51

Job Tickets
Saving Job Tickets
6. Select the drop menu
button.
7. Select the D drive.
•
Note
: You may need to
create a Job Tickets
folder if the D drive
does not have one.
• Select Create Folder
• Name the folder
Job Tickets.
8. Double click the
left mouse button to
open the Job Tickets
folder.
Digipath 3.0 Reference Guide: Job Tickets pg.3
Page 52
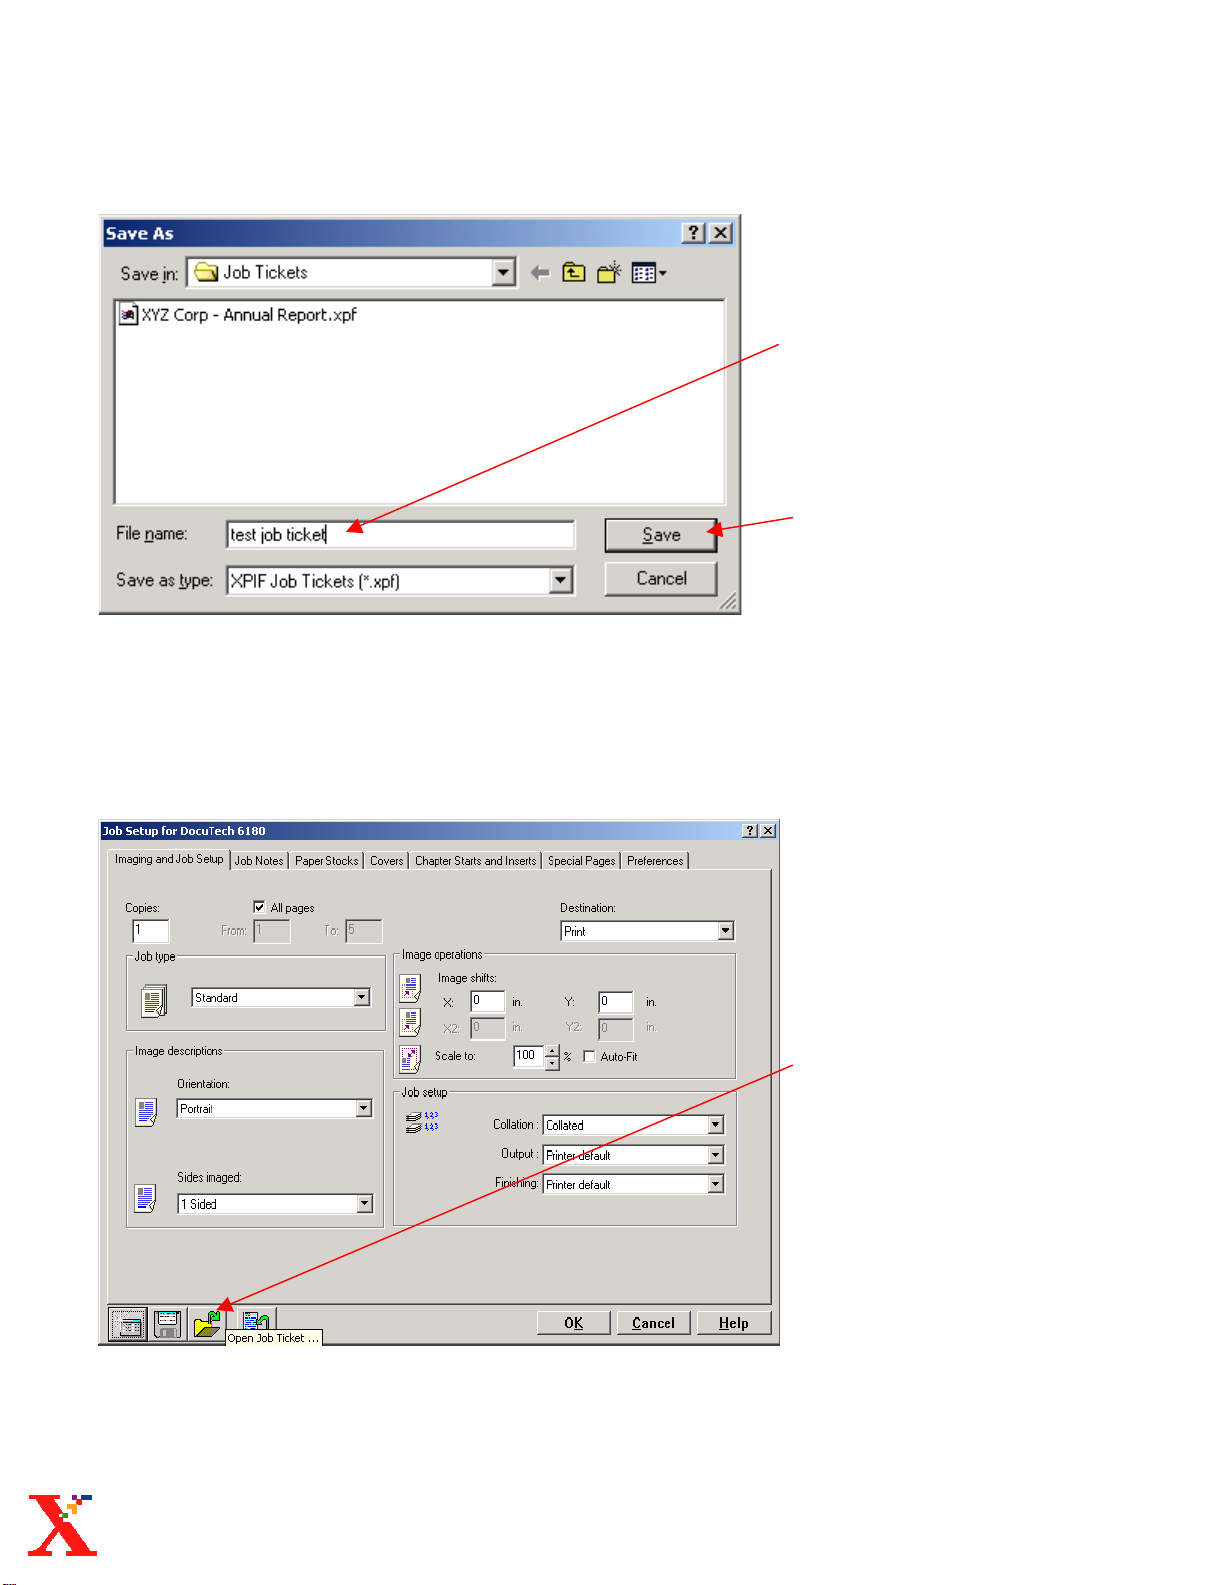
Job Tickets
Saving Job Tickets
9. Type a name for the
Job Ticket in the File
Name box.
10. Select Save.
Applying Job Tickets
1. Select the Open Job
Ticket icon.
Digipath 3.0 Reference Guide: Job Tickets pg. 4
Page 53

Job Tickets
Applying Job Tickets
2. Select a Job Ticket.
3. Select Open.
• Saved Job Ticket
information in the Job
Setup window.
Printing
• Select OK,
• Select Ok at the Printer
Settings window.
Digipath 3.0 Reference Guide: Job Tickets pg.5
Page 54

Job Tickets
j
Saving Job Ticket
Information Into
The Document.
1. Select the “Save Job
Ticket information
into the document”
icon.
• This feature will allow
you to save
information with the
document on the hard
drive.
ob ticket
Digipath 3.0 Reference Guide: Job Tickets pg. 6
Page 55

Sav
e
Page 56

Save
Saving Documents
1. Select File:
Select: Save As.
2. Select the drop menu.
3. Select the D drive.
Digipath 3.0 Reference Guide: Save pg.1
Page 57

Save
Saving Documents
4. Type a file name in the
box.
5. Select Save.
Digipath 3.0 Reference Guide: Save pg.2
• Saved RDO file.
Page 58

Save as Pd
f
Page 59

Save As Pdf
Save As Pdf
1. Select File:
Select: Save As.
2. Select the D drive.
3. Type a File name in the
box.
4. Select Pdf Files.
5. Select Save.
Digipath 3.0 Reference Guide: Save As Pdf pg.1
Page 60

Save As Pdf
Pdf Export Options
6. Select the Quality drop menu.
7. Select a Pdf quality.
•
Note
: The higher the
resolution quality the larger
the Pdf file size.
Digipath 3.0 Reference Guide: Save as Pdf pg.2
Page 61
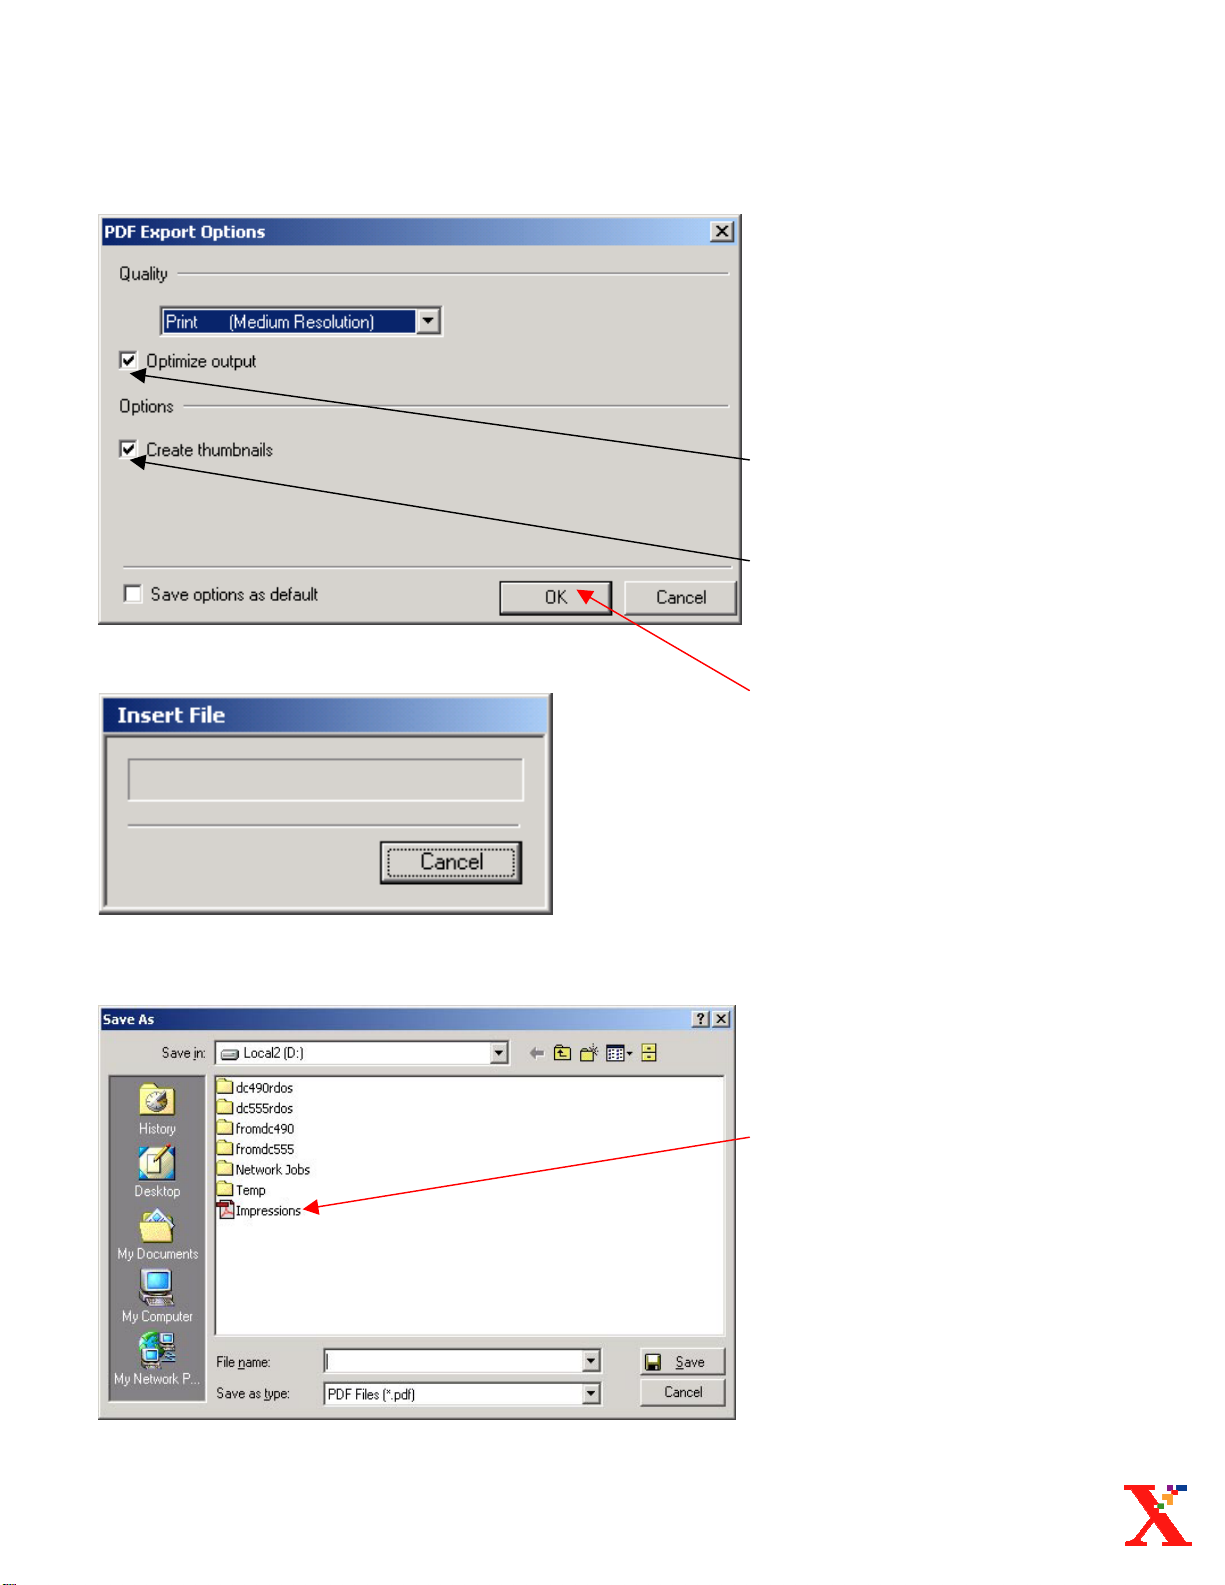
Save As Pdf
Pdf Export Options
(Optional)
Note: These options will
increase the Pdf file
size.
• Check this box to Optimize
your Pdf files output.
• Check this box to Create
Pdf thumbnails of your
document(s).
8. Select Ok.
• The Pdf file.
Digipath 3.0 Reference Guide: Save As Pdf pg.3
Page 62

Digipath 3.0 Reference Guide
Page 63

Saving to Docume
nt
s
Library Cabinet
Page 64

Saving to Document
Library Cabinets
Save
1. Select: File:
Select: Save As
2. Select the Cabinet icon.
Digipath 3.0 Reference Guide: Saving to DL Cabinets pg.1
Page 65

Saving to Document
Library Cabinets
Save
3. Select a Cabinet.
Note
: To create a Cabinet
refer to the Document
Library section of
this manual.
4. Type a name for the
document in the file
name box.
5. Select File type.
6. Select Ok.
• The document saved to a
cabinet.
• Selecting this icon will
switch you to the Windows
File system.
Digipath 3.0 Reference Guide: Saving to DL Cabinets pg.2
Page 66

Digipath File Manage
r
Page 67

Digipath File Manager
Opening Digipath
File Manager
1. Double click on the
Digipath File Manager
icon with the left mouse
button.
Or
1. Select Start.
♦ Select Programs.
♦ Select Xerox Digipath
Production Software.
♦ Select Digipath File
Manager.
Digipath 3.0 Reference Guide: Digipath File Manager pg.1
Page 68

Digipath File Manager
File Manager
• Use the Digipath File
Manager software to
manage files in the Digipath.
• DO NOT DELETE
My Computer or Windows
Explorer.
2. Select the D drive.
3. Left click once on a
document.
files from
Digipath 3.0 Reference Guide: Digipath File Manager pg.2
4. Right click once in the
window to bring up the
short cut menu.
5. Use the shortcut menu to
manipulate a document.
Page 69

Digipath File Manager
Create a Directory
1. Select the Create
Directory icon.
2. Type a name for the
Directory.
3. Select Ok.
Digipath 3.0 Reference Guide: Digipath File Manager pg.3
Page 70

Digipath File Manager
Directories
• Accounting directory.
• Other directories on
the D drive.
Digipath 3.0 Reference Guide: Digipath File Manager pg.4
• Double click with the
left mouse button on a
directory to view it’s
content.
• Directory content.
Page 71

Document Librar
y
Page 72

Document Library
Opening Document
Library
1. Select the Document
Library icon.
Or
1. Select Start.
♦ Select Programs.
♦ Select Xerox Production
Software.
♦ Select Document Library.
Digipath 3.0 Reference Guide: Document Library pg.1
Page 73

Document Librar
y
Managing Files in
Document Library
1. Select a Cabinet.
• Contents of the Cabinet.
2. Highlight a document in
the Cabinet.
3. Right click on the
document with the
mouse.
4. Select from the menu to
manipulate a document.
• You may also use the
icons on the tool bar to
manipulate a document in
Document Library.
Digipath 3.0 Reference Guide: Document Library pg.2
Page 74

Document Library
Refresh
• You MUST refresh the
window if you make any
changes to Document
Library.
1. Select View.
2. Select Refresh.
Creating Basic
Library Cabinets
1. Select the Create Cabinet
icon.
Digipath 3.0 Reference Guide: Document Library pg.3
Page 75

Document Library
Creating Basic
Library Cabinets
2. Type a name for the
cabinet.
3. Input a description.
(optional)
4. Uncheck
• DO NOT leave this box
checked!
5. Select User Access to
the Cabinet.
• Everyone:
for those who have rights
on your network to the
Document Library.
• Digipath Name
Access for the Digipath.
In this example Demo is
the name of the Digipath.
6. Select Ok.
Content Indexing
User Access
: User
Digipath 3.0 Reference Guide: Document Library pg.4
• Cabinet creation.
Page 76

Document Library
Creating Basic
Library Cabinets
7. Select View.
8. Select Refresh.
• New Library Cabinet.
Digipath 3.0 Reference Guide: Document Library pg.5
Page 77

Document Library
Creating Folders
1. Select Create Folder
icon.
2. Select View.
3. Select Refresh.
Digipath 3.0 Reference Guide: Document Library pg.6
Page 78

Document Library
Creating Folders
• New folder.
4. Type a name for the
folder in the box.
• Named folder.
• To save documents to
a cabinet or folder
see Saving to
Document Library
Cabinets section of
this book.
Digipath 3.0 Reference Guide: Document Library pg.7
Page 79

Digipath 3.0 Reference Guide
Page 80

Quick Prin
t
Page 81

Q
uick Print
Opening Quick Print
1. Select the Quick Print
icon.
Or
1. Select Start.
♦ Select Programs.
♦ Select Xerox Digipath
Production Software.
♦ Select Quick Print.
Digipath 3.0 Reference Guide: Quick Print pg.1
Page 82

Quick Print
Quick Printing from
Windows File System
2. Select File System.
3. Select the D drive.
Digipath 3.0 Reference Guide: Quick Print pg.2
4. Double click with the left
mouse button on
a directory.
Page 83

Quick Print
Quick Printing from
Windows File System
5. Select a File Type.
6. Select a document in
the directory.
7. Select Job Setup.
8. Select number of copies.
9. Select Job Type.
10. Select Sides imaged.
11. Select Collation.
12. Select Output.
13. Select Finishing.
14. Select Ok.
Digipath 3.0 Reference Guide: Quick Print pg.3
Page 84

Quick Print
Quick Printing from
Windows File System
15. Select Print.
Quick Printing
from Cabinets
1. Select Cabinet.
2. Select a Cabinet.
Digipath 3.0 Reference Guide: Quick Print pg.4
Page 85

Quick Print
Quick Printing
From Cabinets
3. Select a File Type.
4. Select a document.
5. Select Job Setup.
6. Select number of copies.
7. Select Job type.
8. Select Orientation.
9. Select Sides imaged.
10. Select Collation.
11. Select Output.
12. Select Finishing.
13. Select Ok.
Digipath 3.0 Reference Guide: Quick Print pg.5
Page 86

Quick Print
Quick Printing
from Cabinets
14. Select Print.
Quick Printing Multiple
Files from Cabinets
• Perform steps 1 – 13 in
Quick Printing from
Cabinets for each file.
14. Select Multiple file job.
15. Select Add for each file.
• Repeat steps 1-15 for
each file.
16. Select Print to print the
multiple jobs.
Digipath 3.0 Reference Guide: Quick Print pg.6
Page 87

Q
uick Print
Quick Printing Multiple
Files from the
Windows File System
• Perform steps 1-13, for
each file, in Quick Printing
from the Windows File
System section of this
manual
15. Select Multiple file job.
16. Select Add for each file.
17. Select Print.
Digipath 3.0 Reference Guide: Quick Print pg.7
Page 88

Digipath 3.0 Reference Guide:
Page 89

Scan and Prin
t
Page 90

Scan & Print
Opening
Scan & Print
1. Select the Scan & Print
icon.
Or
1. Select Start.
♦ Select Programs.
♦ Select Xerox Digipath
Production Software.
♦ Select Scan & Print.
Digipath 3.0 Reference Guide: Scan & Print pg.1
Page 91

Scan & Print
Scan & Print
for Black & White
Documents
2. Select Arrow for extra
features menu.
3. Select a Printer.
Digipath 3.0 Reference Guide: Scan & Print pg.2
4. Select Printer Options
5. Select number of copies.
6. Select how the original
images are sided.
7. Select Black & White.
Page 92
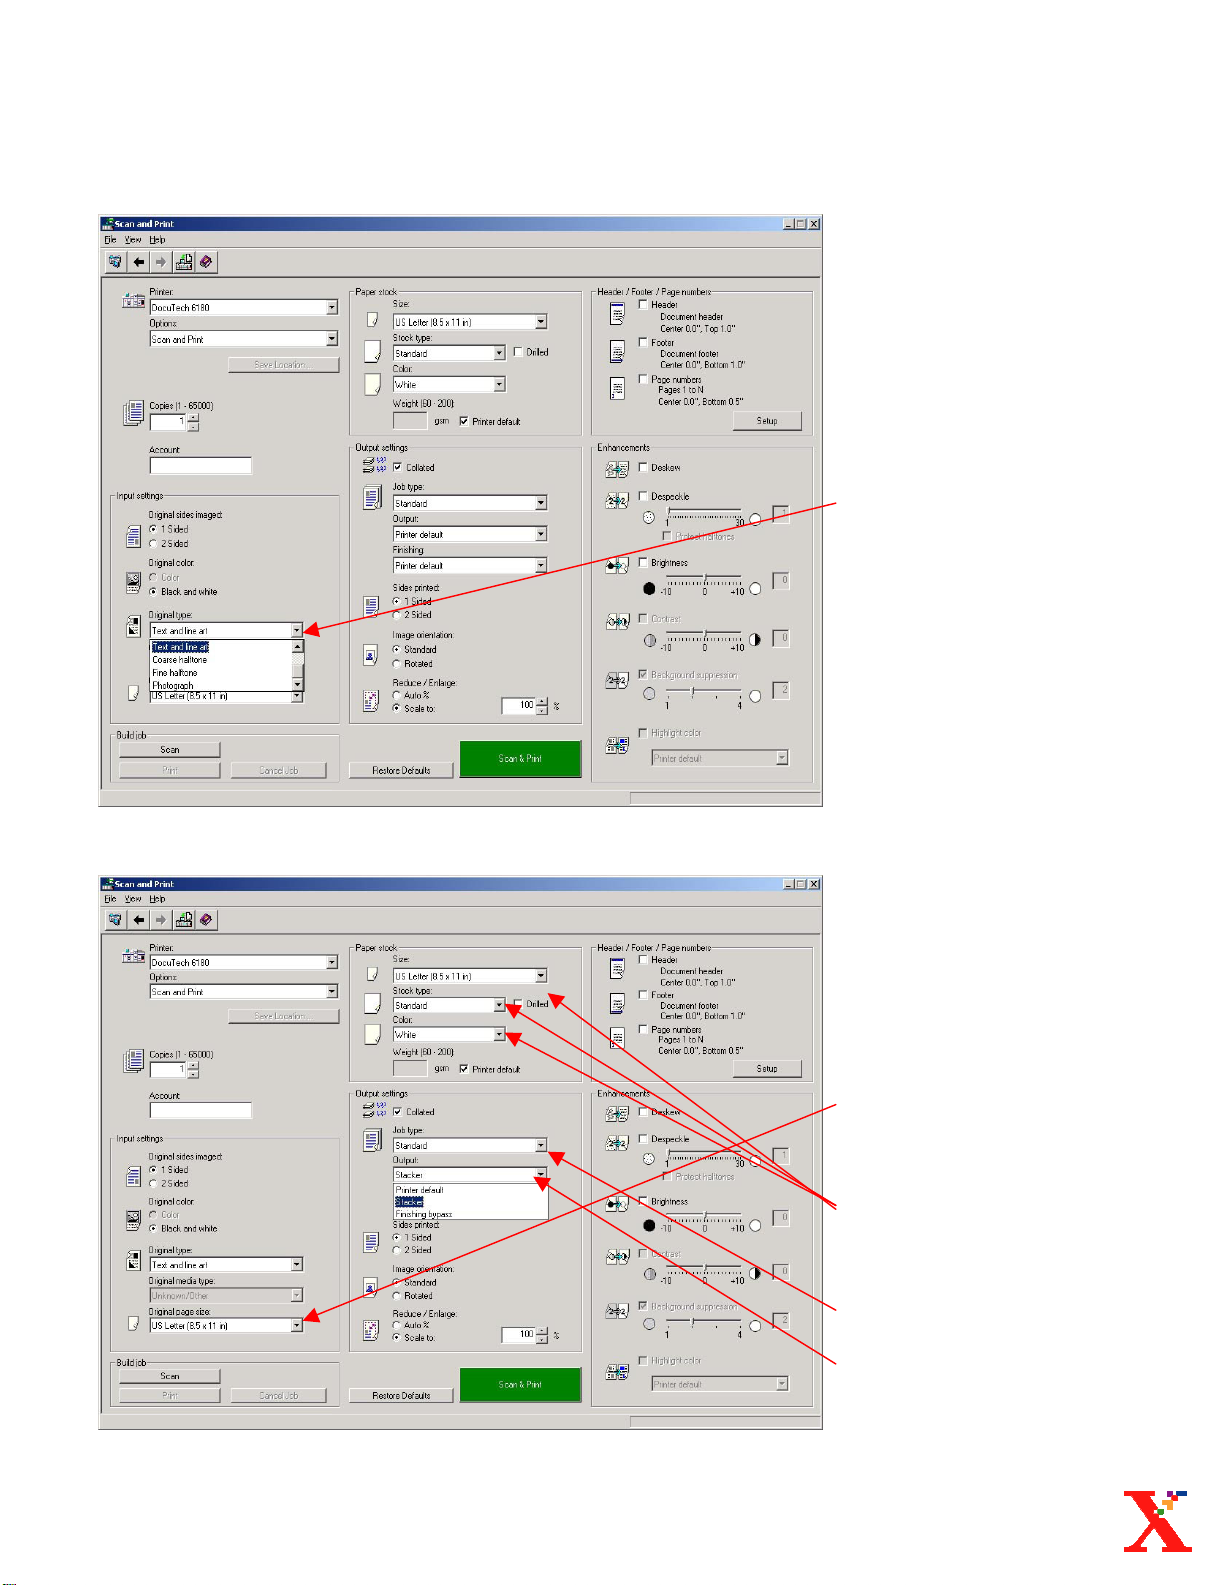
Scan & Print
Scan & Print
For Black & White
Documents
8. Select Original type.
9. Select original paper
size.
10. Select paper stock
to print on.
11. Select Job type.
12. Select Output.
Digipath 3.0 Reference Guide: Scan & Print pg.3
Page 93

Scan & Print
Scan & Print
for Black & White
Documents
13. Select Finishing.
14. Select Reduce/Enlarge
(optional)
15. Program Header/
Footers/ Page
Numbers. (optional)
16. Program Enhancements.
(optional)
17. Select Scan & Print.
• Build Job: Use scan if
originals exceed feeder
capacity.
• Select Print after all
documents have been
scanned.
Digipath 3.0 Reference Guide: Scan & Print pg.4
Page 94

Enhanc
e
Page 95

Enhance
Despeckle
• Despeckle will remove
specks from the image.
1. Select Graphic.
2. Select Enhance.
3. Select Custom.
Digipath 3.0 Reference Guide: Enhance pg.1
Page 96

Enhance
Despeckle
4. Select Despeckle.
5. Select the Speckle size.
• Note: Choosing a larger
speckle size may delete
periods, colons and other
punctuation in a text
document.
• Protect halftones will
prevent halftone images
from being altered.
6. Select Apply to options.
7. Select Ok.
• Despeckled image.
Digipath 3.0 Reference Guide: Enhance pg.2
Page 97

Enhance
Deskew
• Skewed image.
1. Select Graphics.
2. Select Enhance.
3. Select Custom.
Digipath 3.0 Reference Guide: Enhance pg.3
Page 98

Enhance
Deskew
4. Select Deskew.
5. Select the acceptable
degree of skew.
6. Select the pages to
apply the deskew
option to.
7. Select Ok.
Digipath 3.0 Reference Guide: Enhance pg.4
• Deskewed image.
Page 99

Enhance
Darken
• Light image.
1. Select Graphics.
2. Select Enhance.
3. Select Custom.
Digipath 3.0 Reference Guide: Enhance pg.5
Page 100

Enhance
Darken
4. Select Darken.
5. Select pixel darken
value.
6. Select which pages to
darken.
7. Select Ok.
Digipath 3.0 Reference Guide: Enhance pg.6
• Darkened image.
 Loading...