


Xerox DigiPath Production
Software
Web Viewing and Submission Client User Guide
701P34365
Version 2.0
June 1, 2000

Prepared by:
Xerox Corporation
Global Knowledge & Languag e Servi ces
800 Phillips Road - Bldg. 845-17S
Webster, NY 14580-9791
USA
© 2000 Xerox Corporation. All rights reserved.
Copyright protection claimed includes all forms and matters of copyrightable material and information now
allowed by statutory or judicial law or hereinafter granted, including without limitation, material generated
from the software programs that are displayed on the screen such as styles, templates, icons, screen
displays, looks, etc.
Printed in the United States of America.
Xerox®, Xerox Canada Ltd.®, Xerox Europe®, The Document Company®, the stylized X, and all Xerox
products mentioned in this book are trademarks of Xerox Corporation. Other company trademarks are also
acknowledged, including:
Adaptec®, the Adaptec logo, AHA®, SCSISelect®, and EZ-SCSI® are trademarks of Adaptec, Inc.
Adobe®, Acrobat®, the Acrobat logo, Acrobat Exchange®, Distiller®, and PostScript® are registered
trademarks of Adobe Systems Incorporated.
Autologic® is a registered trademark of Autologic Information International, Inc.
Centura™ is a trademark and SQLBase® is a registered trademark of Centura Software Corporation.
Compaq®, QVision®, and Deskpro® are registered United States Patent and Trademark Office, for
Compaq Computer Corporation.
DEC, DEC RAID, Redundant Array of Independent Disks, Enterprise Storage Manager, and ESM are
registered trademarks of Digital Equipment Corporation.
Hewlett-Packard®, HP LaserJet 4V®, and HP LaserJet 4MV® are registered trademarks of Hewlett-
Packard Company.
Hummingbird NFS Maestro® is a registered trademark of Hummingbird Communications, Ltd.
Imaging Technology, including Image Gear and portions of this program, are provided under license by
AccuSoft Corporation. © 1997 AccuSoft Corporation. All rights reserved.
Intel® and Pentium® are registered trademarks of Intel Corporation.
Microsoft®, MS-DOS®, Windows®, Windows NT®, and Internet Explorer are either registered trademarks
or trademarks of Microsoft Corporation in the United States and/or other countries.
MGA Millennium™ is a trademark of Matrox Graphics, Inc.
Novell® and NetWare® are registered trademarks of Novell, Inc. in the United States and other countries.
Oracle® is a registered trademark and Oracle8i™ is a trademark of Oracle Corporation.
Portions Copyright © 1993 Soft Horizons. All rights reserved.
Sony™ and Storage by Sony™ are trademarks of Sony.
StorageView™ is a trademark of CMD Technology, Inc.
TextBridge® is a registered trademark of ScanSoft, Inc.
Changes are periodically made to this document. Changes, technical inaccuracies, and typographical
errors will be corrected in subsequent editions.

It’s ille gal . . . USA
A
It’s illegal to make prints of these documents
Congress, by statute, has forbidden the copying of the following
subjects under certain circumstances. Penalties of fines or
imprisonment may be imposed on those guilty of making such
copies.
1. Obligations or Securities of the United States Government,
such as:
• Certificates of indebtedne ss
• United States Bonds
• National Bank Currency
• Treasury Notes
• Coupons from bonds
• Federal Reserve Note s
• Federal Reserve Bank Not es
• Fractional Notes
• Silver Certificates
• Certificates of Deposit
• Gold Certificates
• Paper Money
• Bonds and obligations of certain agencies of the
government, such as FHA, etc.
WEB VIEWING AND SUBMISSION CLIENT USER GUIDE 3

IT’S ILLEGAL TO MAKE PRINTS OF THESE DOCUMENTS XEROX DIGIPATH PRODUCTION SOFTWARE
• Bonds
NOTE: U.S. Savings Bonds may be photographed only
E
E
E
for publicity purp oses in conne ction wi th the campai gn for
the sale of such bonds.
• Internal Revenue Stamps
NOTE: If necessary to copy a legal document on which
there is a canceled revenue stamp, this may be done,
provided the reproduction of the document is performed
for lawful purposes.
• Postage Stamps, canceled or not cancel ed
NOTE: For philatelic purposes, Postage Stamps may be
photographed, provided the reproduction is in black and
white, and is less than 3/4 or more than 1-1/2 times th e
linear dimensions of the original.
• Postal Money Orders
E
E
• Bills, Checks, or Drafts for Money, drawn by or upon
authorized officers of the United States.
• Stamps and other representatives of value, of whatever
denomination, which have been or may be issued under
any Act of Congress.
2. Adjusted Compensation Certificates for Veterans of World
Wars
3. Obligations or Securities of any Foreign Government, Bank,
or Corporation
4. Copyrighted material, unless permission of the copyright
owner has been obtained or the copying falls with in the “fair
use” or library reproduction rights provisions of the copyright
law.
NOTE: Further information on these provisions may be
obtained from the Copyright Office, Library of Congress,
Washington, D.C. 20559. Ask for Circular R21.
5. Certificates of Citizenship or Naturalization
NOTE: Foreign Naturalization Certificates may be
photographed.
4WEB VIEWING AND SUBMISSION CLIENT USER GUIDE

XEROX DIGIPATH PRODUCTION SOFTWARE IT’S ILLEGAL TO MAKE PRINTS OF THESE DOCUMENTS
6. Passports
NOTE: Foreign passports may be photographed.
E
7. Immigration Papers
8. Draft Registration Cards
9. Selective Service Induction Papers, whi ch bear any of the
following information:
• Registrant’s earnings or income
• Registrant’s previous military service
• Registrant’s dependency status
• Registrant’s physical or mental condition
• Registrant’s court record
NOTE: U.S. Army and Navy discharge certificates may be
E
photographed.
10.Badges, Identification Cards, Passes, or insignia carried by
Military, Naval personnel, or by members of the various
Federal Departments and Bureaus, such as FBI or Treasury,
unless the phot ograph is ordered by head of such
department or bureau.
11.Copying the following is also prohibited in certain states:
• Automobile Licens es
• Driver Licenses
• Automobile Certificates of Title
The above list is not all inclusive, and no liability is as sumed for
its completeness or accuracy. In case of doubt, consult your
attorney.
WEB VIEWING AND SUBMISSION CLIENT USER GUIDE 5

IT’S ILLEGAL TO MAKE PRINTS OF THESE DOCUMENTS XEROX DIGIPATH PRODUCTION SOFTWARE
It’s ille gal . . . Canada
Parliament, by statu te, has forbi dden the copyi ng of the foll owing
A
subjects under certain circumstances. Penalties of fines or
imprisonment may be imposed on those guilty of making such
copies.
1. Current bank notes or current paper money
2. Obligations or securities of a government or bank
3. Exchequer bill paper or re ven ue pape r
4. The public seal of Canada or of a province, or the seal of a
public body or authority in Canada, or of a court of law
5. Proclamations, orders, regulations or appointments, or
notices thereof (with intent to falsely cause same to purport to
have been printed by the Queen’s Printer for Canada, or the
equivalent printer for a province)
6. Marks, brands, seals, wrappers, or designs used by or on
behalf of the Government of Canada or of a province, the
government of a state other than Canada or a department,
board, commission, or agency established by the
Government of Cana da or of a pr ovince or of a government of
a state other than Canada
7. Impressed or adhesive stamps used for the purpose of
revenue by the Gove rnmen t of Cana da or of a pro vin ce or by
the government of a state other than Canada
8. Documents, registers, or records kept by the public officials
charged with the d uty of making or issu ing certified copies
thereof, where the copy falsely purports to be a certified copy
thereof
9. Copyrighted material or trademarks of any manner or kind
without the consent of the copyright or trademark owner
The above list is provided for your convenience and assistance,
but it is not all inclusive and no liability is assumed for its
completeness or accuracy. In case of doubt, consult your
solicitor.
6WEB VIEWING AND SUBMISSION CLIENT USER GUIDE

User work flows
This chapter identifies the expected work flow for clients of your
Web Vi ewing and Submission (WVS) system an d then describes
each step in the work flow.
The following work flows are described:
• Basic user work flow
• Advanced user work flow
Topics covered in this chapter include:
• using the basic user work flow
• accessing the home page
• logging in to the WVS server
• requesting a user account
E
• requesting feedback
• accessing the main page
• browsing colle ctions
• searching for documents
• using a document on the WVS server
• submitting a new print job to the WVS server
• using the advanced user wo rk flow
• submitting a multi-file job
• managing web queues
• managing submitted jobs
• managing user jobs
• configuring th e DigiPath upload helper
Record your WVS home page URL: ______________________
NOTE: If you do not already have the URL for the WVS home
page, you will need to contact your Serve r Administrator.
WEB VIEWING AND SUBMISSION CLIENT USER GUIDE 7

USER WORK FLOWS XEROX DIGIPATH PRODUCTION SOFTWARE
Using the basic user workflow 0
When you arrive at your WVS site, you must first log in before
arriving at the WVS site, usin g a def ined login or the An onymous
login.
NOTE: Regardless of the access rights associated with a login,
E
a user is automatically logged off after 30 minutes of inactivity.
You can locate documents with the browse or search utility, and
can then perform functions based on your assigned access
rights.
For example, if a you are not assigned the Job Submission
access right, you will not see the [Job Submit] selection on the
Navigation Ba r.
For more information regardin g User Access Rights refer to
Chapter 6, User administration.
E
At the WVS site, you can:
• View the contents of the document.
This function is available for the following file types: RDO,
URL, TIFF, PostScript, JPEG, GIF, TXT, or other image
formats supported by a browser or browser plug-in.
Examples of files supported by browser plug-ins are PDF
(Adobe Acrobat file) and DOC (word processing program
file).
• Submit a request to print the RDO, TIFF, PostScript, or PCL
file to any Xerox production printer supported in DigiPath 2.0.
NOTE: You can submit print requests if the WVS server
administrator has given you printing privileges.
• Add a new document to a collection (Provided you are given
access rights to the collections by your Server Administrator.)
• Add a URL to a collection (Provided you are given access
rights to the collections by your Server Administrator.)
• View the properties of the document
• Download the document to a local or network drive
• Update an exi st ing document
8WEB VIEWING AND SUBMISSION CLIENT USER GUIDE
XEROX DIGIPATH PRODUCTION SOFTWARE USER WORK FLOWS
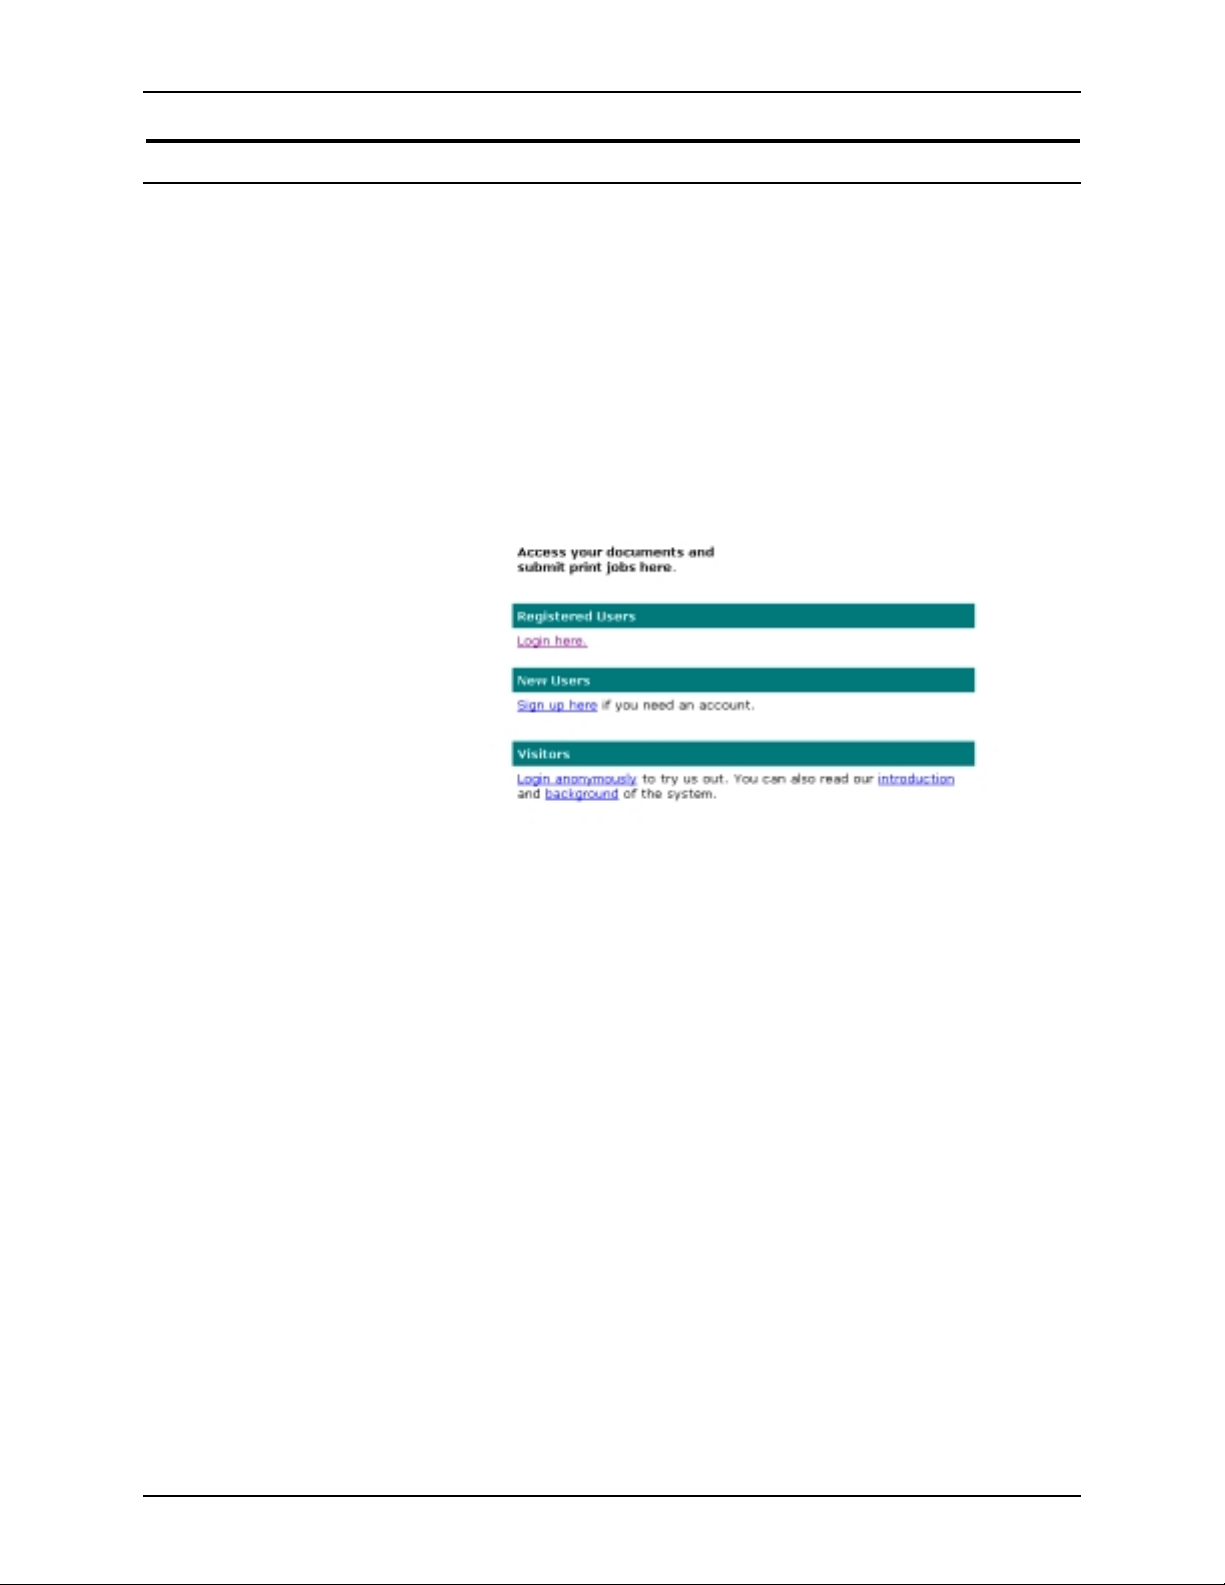
Accessing the Home page 0
The Home page provides an introduction to Internet printing
technology.
The Home page allows you to log in as a registered user or
visitor to WVS and request a user account.
To display the Home page:
A
1. Double-click on your web browser icon to go to Web Viewing
and Submission (WVS). The Xerox DigiPath Production
Software Web Viewing and Submission Home pa ge opens.
See Figure 1.
Figure 1. Home page
WEB VIEWING AND SUBMISSION CLIENT USER GUIDE 9

USER WORK FLOWS XEROX DIGIPATH PRODUCTION SOFTWARE
2. Table 1lists and describes the WVS Home page options.
Table 1. WVS Home page options
Home page option Description
Registered Users Allows you to log in to the system with your user name and password. Then
you can access documents based on the access rights given to you by the
WVS Server Administrator.
New Users Allows you to request a user account onli ne.
Visitors Allows you to log in as an Anonymous user, provides an introduction to the
system, and describes the background of the system.
Download section Allows you to download the following software:
• Microsoft Internet Explorer 5.0 browser
• Netscape Na vigator 4.0 browser
• Adobe Acrobat Reader
Feedback Allows you to send a message to your Server Administrator.
The following sections provide detailed procedures for these
options.
10 WEB VIEWING AND SUBMISSION CLIENT USER GUIDE

XEROX DIGIPATH PRODUCTION SOFTWARE USER WORK FLOWS
Logging in to the WVS workstation 0
The WVS system requires a user account to log in to the WVS
system to ensure system security. The user account allows you
to access the WVS web site in dif feren t ways, dependin g on your
needs. For example, you may only ne ed to view documents that
exist on a particular location on the server. Or, you may need to
print documents that reside on the server and upload files onto
the server.
Your WVS server administrator assigns you a user account and
defines your system access rights.
If you do not have a user accoun t and wish to access the WVS
web site, you may access it as a guest with the Anonymous
account. The Anonymous account allows you to log in to the
system with limited permissions assigned by the WVS server
administrator.
The following sections provide detailed instructions for logging in
to the WVS system as a registered user or as an Anonymous
user.
WEB VIEWING AND SUBMISSION CLIENT USER GUIDE 11
USER WORK FLOWS XEROX DIGIPATH PRODUCTION SOFTWARE
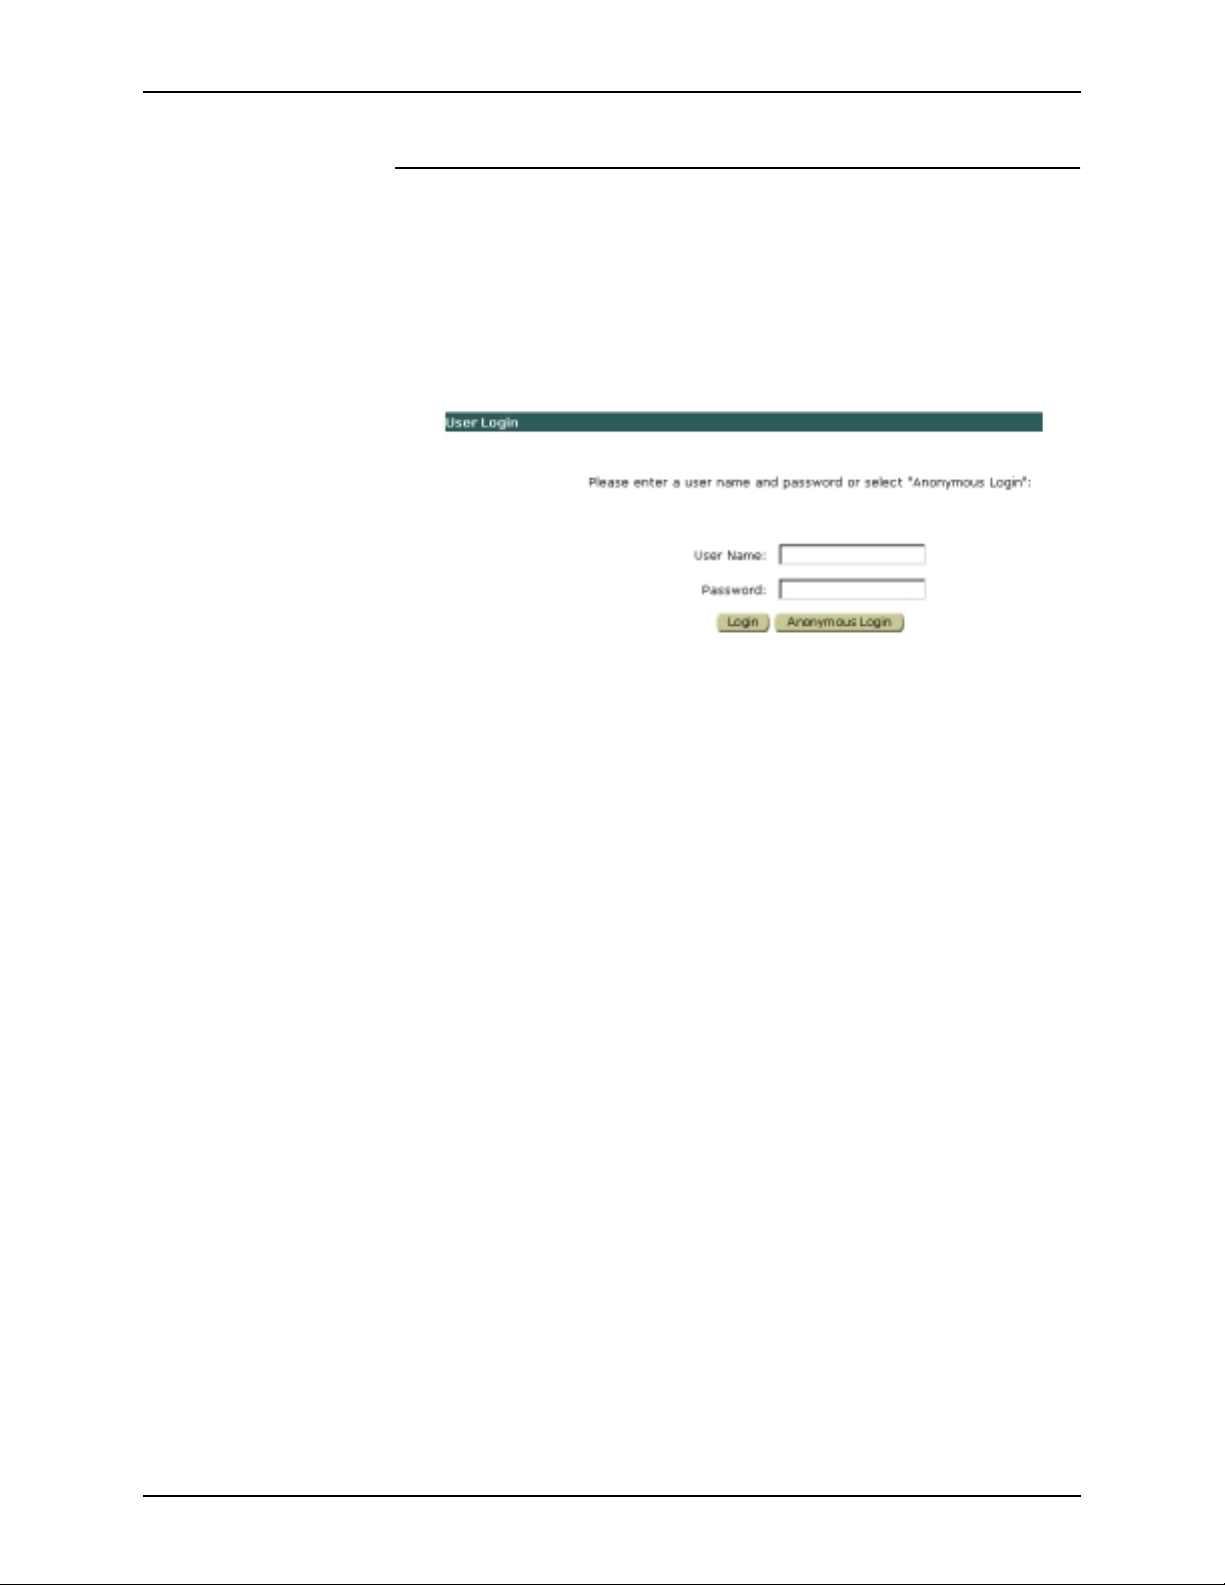
Logging in as a registered user 0
To log in to the WVS server as a registered use r :
A
1. Double-click on your browser icon to open the Web Viewing
and Submission (WVS) home page. The Home page opens.
2. Select [Login here] from the Re gistered Users section. The
User Login page opens. See Figure 2.
E
E
E
Figure 2. User Login page
3. Enter your user name in the User Name text box.
NOTE: Remember the following regarding user names.
• A user name can be assigned to an individual or to a
group of individuals.
• Your user name is case-sensitive.
4. Enter your password in the Password text box.
NOTE: Your password is case-sensitive.
5. Select [Login]. The Main page opens.
NOTE: The Search or Browse Collection page appears
depending on how your Serv er Admin istrato r config ured your
workstation.
12 WEB VIEWING AND SUBMISSION CLIENT USER GUIDE

XEROX DIGIPATH PRODUCTION SOFTWARE USER WORK FLOWS
Logging in as an Anonymous user 0
The user access rights assigned to the Anonymous Login are
determined by your WVS Server Administrator.
To log in to the WVS workstation as an Anonymous user:
A
1. Double-click on your browser icon to open the Web Viewing
and Submission (WVS) home page. The Home page opens.
2. Select [Login Anonymously] from the Visitors section. The
User Login page opens.
3. Select [Anonymous Login]. Th e Main page o pens with limi ted
access rights.
WEB VIEWING AND SUBMISSION CLIENT USER GUIDE 13
USER WORK FLOWS XEROX DIGIPATH PRODUCTION SOFTWARE
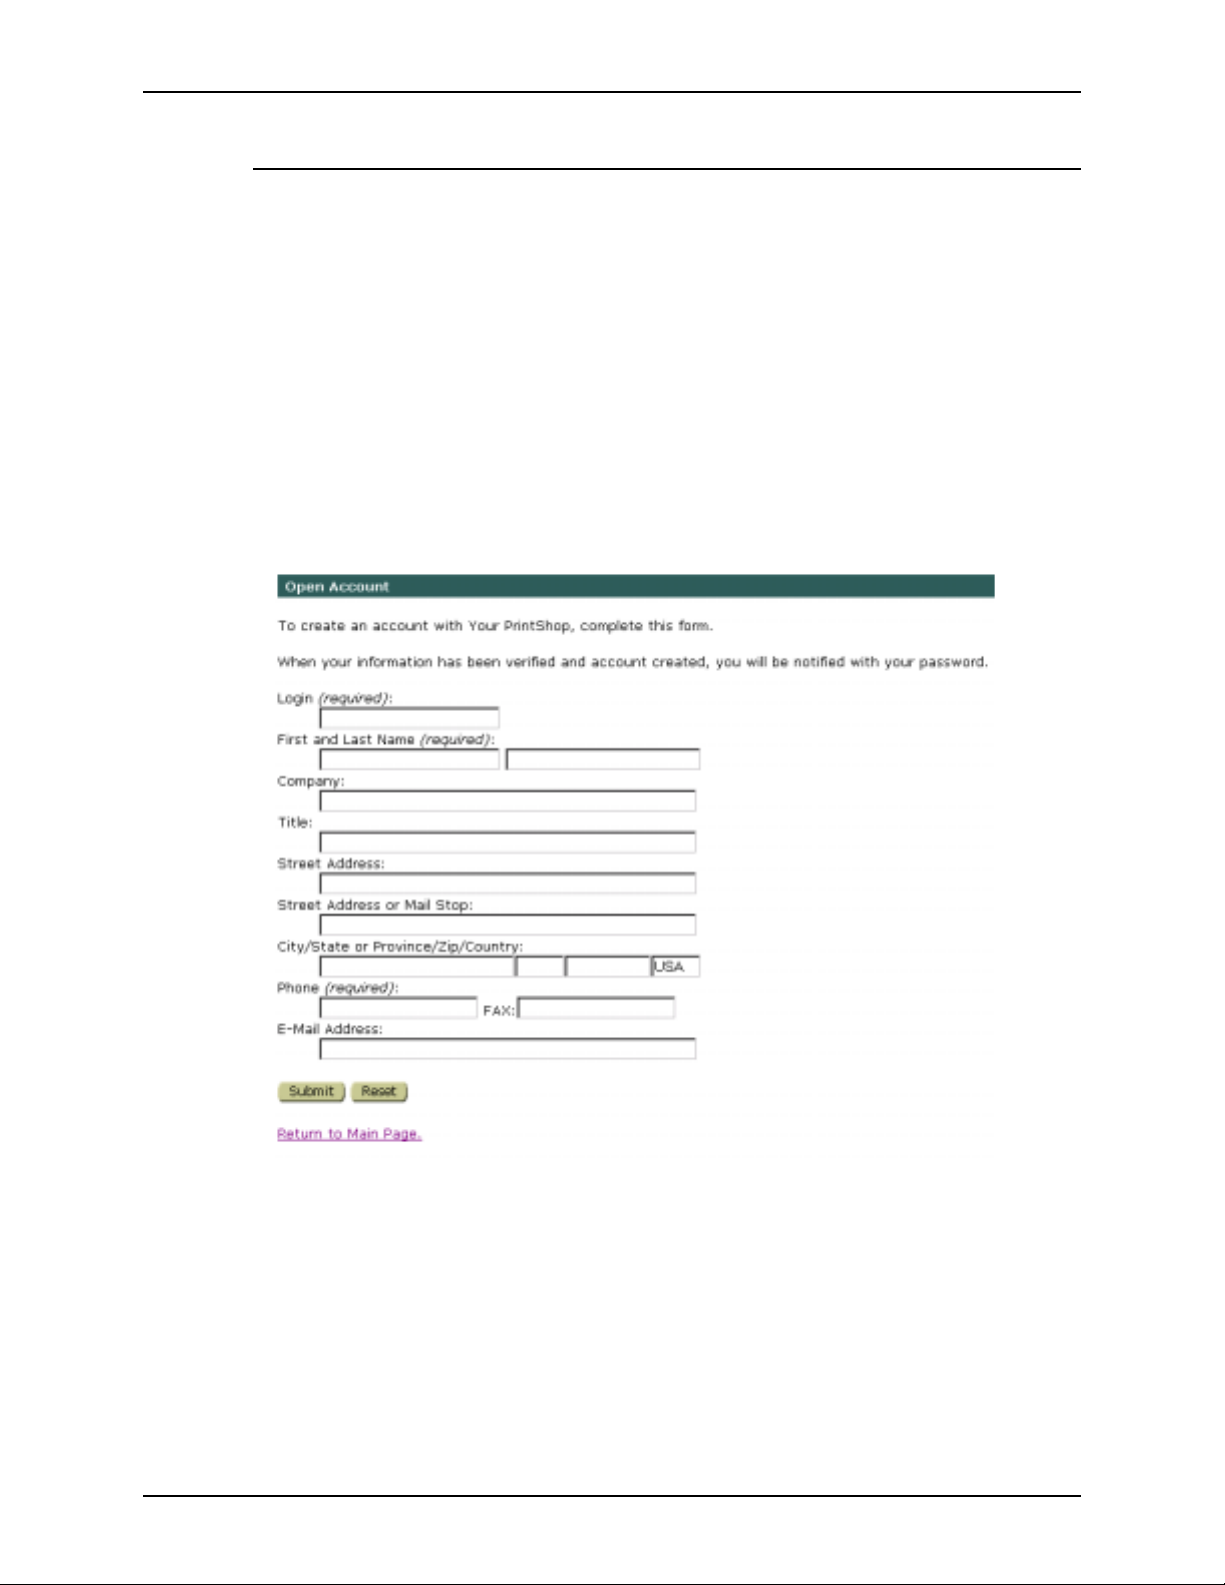
Requesting a User Account 0
If you need to request a user account, you can manually phone
or electronically e-mail the WVS server administrator.
New users are ass igned user names a nd passwor ds thro ugh the
new user signup applic a ti on whi c h is av ai l able t hrou gh the WVS
Home page.
To request a New User Account:
A
1. Double-click on your browser icon to open the Web Viewing
and Submission (WVS) home page.
2. Select [Sign up here] in the New Users section. The Open
Account page opens. See Figu r e 3.
Figure 3. Open Account page
3. Enter the appropriate information.
NOTE: To submit a message to the WVS Server
E
14 WEB VIEWING AND SUBMISSION CLIENT USER GUIDE
Administrator, select [Feedback] and enter the appropriate
information.
4. Select [Submit] to submit the request to the Server
Administrator.

XEROX DIGIPATH PRODUCTION SOFTWARE USER WORK FLOWS
The Account Request Received page opens and displays a
message saying you will be contacted by phone to confirm
your information, get your payment inf ormation, and es tablish
your password.
When you submit a new user request, the WVS system
generates a disabled user account. Your WVS Server
Administrator assigns you a user name, password, access
rights, and enables your account.
5. Select [Return to Main Page] to go back to the Home page.
WEB VIEWING AND SUBMISSION CLIENT USER GUIDE 15
USER WORK FLOWS XEROX DIGIPATH PRODUCTION SOFTWARE
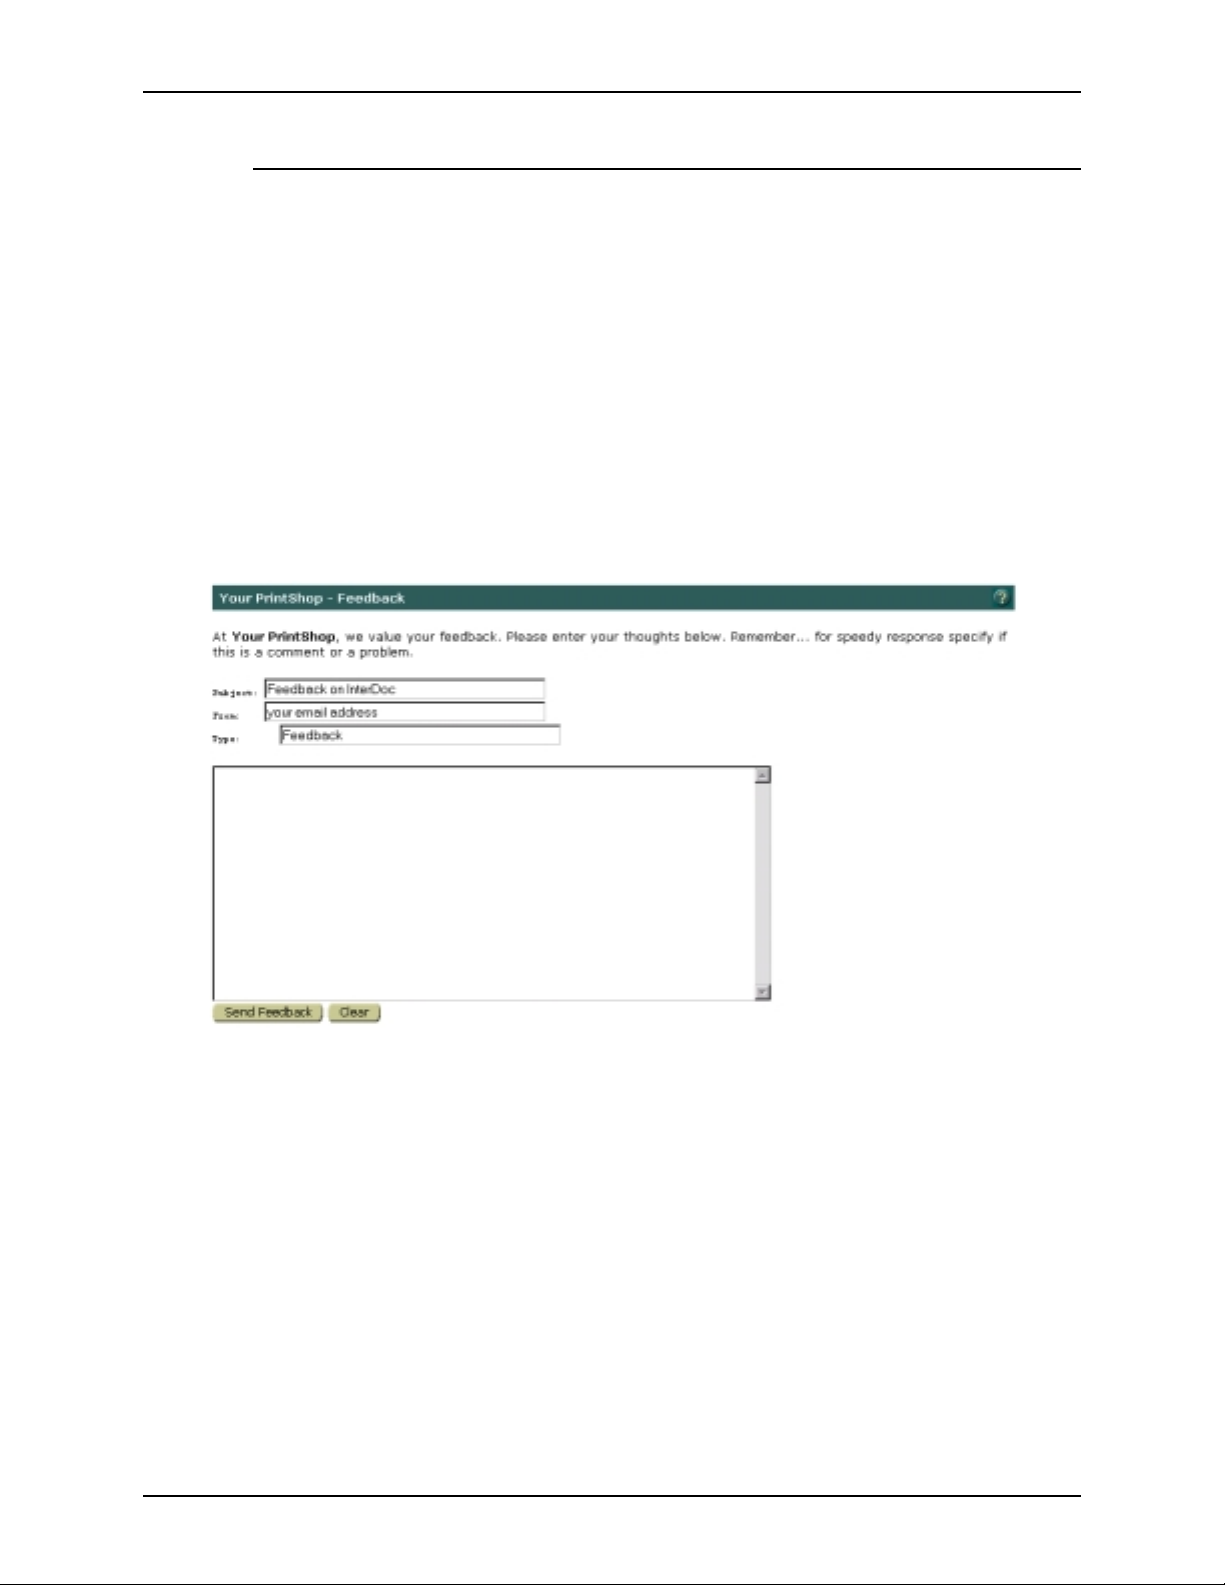
Sending feedback to the administrator 0
Use the Feedback page allows to send a message to your
Server Administrator. This page allows you to submit feedback to
the Print Shop in ad dition to i nformatio n submitted w ith indivi dual
jobs. You can send feedback from any page that has the
[Feedback] button.
To send feedback to your WVS Server Administrator:
A
1. Double-click on your browser icon to open the Web Viewing
and Submission (WVS) home page.
2. Scroll to the bottom of the page and select [Feedback], if
available. The Your Print Shop-feedback page opens. See
Figure 4.
Figure 4. Your Print Shop-feedback page
3. Enter text in various fields.
a. Enter the subject of the message in the subject text box.
b. Enter your e-mail address in the From text box.
c. Enter the type of message in the Type text box.
d. Enter the text of the message in the text box message
area.
4. Select [Send Feedback] to submit the message. The Mail
Received message page opens.
5. Select [Return to Main page] to return to the Home page.
16 WEB VIEWING AND SUBMISSION CLIENT USER GUIDE

XEROX DIGIPATH PRODUCTION SOFTWARE USER WORK FLOWS
Reading the Introduction to the DigiPath system 0
To read the Introduction to the DigiPath system:
A
1. Double-click on your browser icon to open the Web Viewing
and Submission (WVS) home page.
2. Select [introduction] in the Visitors section. The Intro duct io n
to Electronic Job Submissi on page opens.
3. Read the Introduction page.
4. Select the browser [Back] button to return to the Home page.
Reading the background of the system 0
To read the background of the DigiPath system:
A
1. Double-click on your browser icon to open the Web Viewing
and Submission (WVS) home page.
2. Select [background] in the Visitors section. The Background
page opens
3. Read the Background page.
4. Select the browser [Back] button to return to the Home page.
WEB VIEWING AND SUBMISSION CLIENT USER GUIDE 17

USER WORK FLOWS XEROX DIGIPATH PRODUCTION SOFTWARE
Accessing the Main Page 0
Depending on how your WVS Server Admin i strator configured
your system, the Browse Collection page or the Search page
appears as the Main page.
The Web V iewing an d Submissio n (WVS) page s are divide d into
three or more frames:
• The top frame contains Navigation Bar options as specified
by the WVS Server Administrator.
• The middle frame displays Web Viewing and Submission
(WVS) content , functions, and dialog boxes . The content
varies depending on the option you select or on the text you
enter.
• The bottom frame di splays th e W eb V iewi ng and S ubmissi on
(WVS) copyright and trademark information. The Server
Administrator ca n customize this information.
A
To access the main page:
1. Double-click on your browser icon to open the Web Viewing
and Submission (WVS) home page. The Home page opens.
2. Log in to your WVS workstation.
For more information on logging in to the WS workstation,
refer to “Logging in to the WVS workstat ion” on page 1 1 .
18 WEB VIEWING AND SUBMISSION CLIENT USER GUIDE

XEROX DIGIPATH PRODUCTION SOFTWARE USER WORK FLOWS
Using the Navigation Bar 0
Access the pages for the major WVS functions by selecting the
options on the Navigation Bar on the Home page. Table 2 lists
and describes the Navigation Bar options.
NOTE: The options you see on the Navigation Bar are
E
dependent on the access rights defined for you by the Server
Administrator.
Table 2. Navigation Bar options
Navigation Bar option Description
Main Displays the Home page.
Search Displays the Search page. Use this page to locate one or more docum ents
matching specified search criteria.
Browse Displays the Browse Collection page. Depending on your access privileges,
the Browse page provides access to a number of functions, including viewing
a document, adding a new document or URL to a collection, downloading a
document, printing a document, updating an existing document, searching
documents within collections, and locking and unlocking a document.
Job Submit Displays the Job Submission page. Depending on the selections of your
administrator, the Job Submission page provides access to a number of
functions, including submitting a new job, ordering reprints, getting the status
of a job, and submitting a revised job.
Help Displays the WVS Help system in a separate browser window.
Login Displays the User Login page. Use this page to login as a registered user
with assigned privileges or as an Anonymous user with default privileges.
WEB VIEWING AND SUBMISSION CLIENT USER GUIDE 19
USER WORK FLOWS XEROX DIGIPATH PRODUCTION SOFTWARE
Browsing collections 0
A collection is a group of related documents and URLs.
Collections help you narrow searches for documents stored on
the server. you can browse through the collections to see the
documents and URLs in each collection and then view, print,
download, or display the properties of the desired document.
The Search option allow s you to search for docume nts within the
collection.
NOTE: You must have access rights to Browse Collections
E
assigned by t he WVS Server Administrator.
To browse collections:
A
1. Double-click on your browser icon to open the Web Viewing
and Submission (WVS) home page. The Home page opens.
2. Log in to your WVS workstation.
For more information on logging in to the WS workstation,
refer to “Logging in to the WVS workstat ion” on page 1 1 .
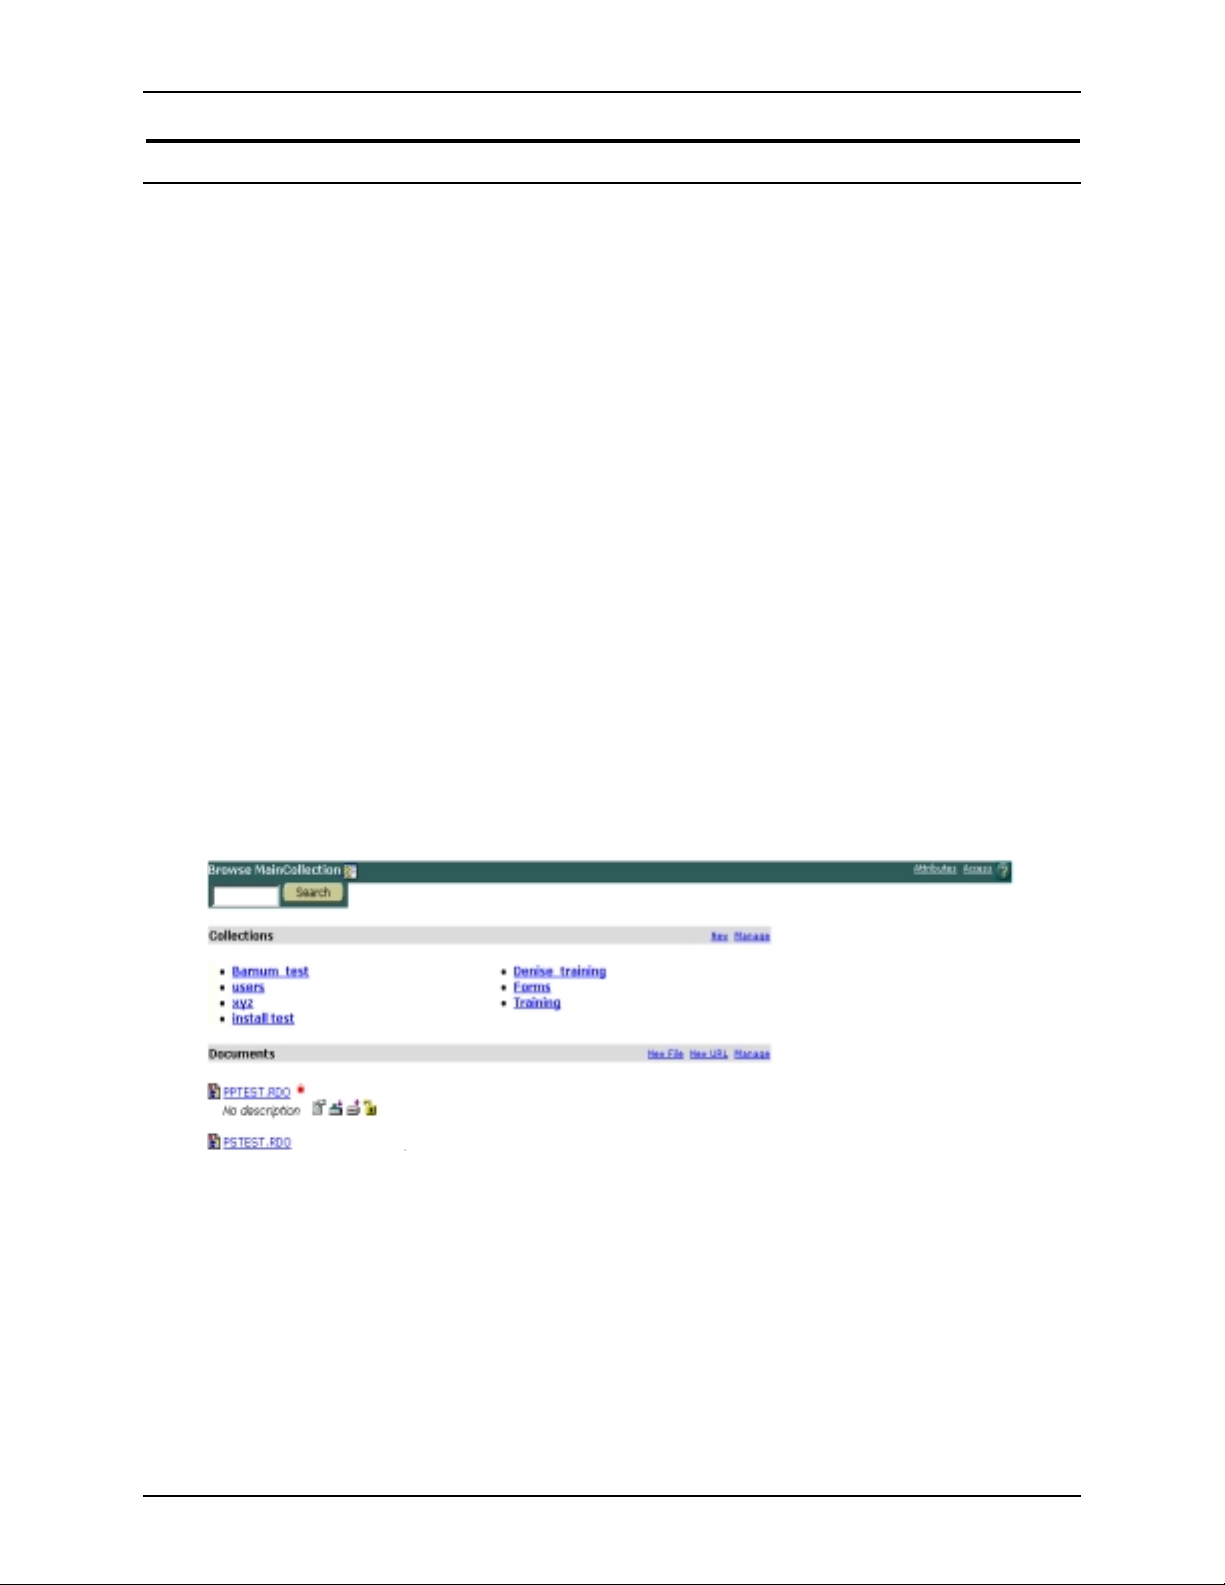
3. If the Browse Collection page does not appear, select
[Browse] on the Naviga ti on Bar. The Browse Collection page
opens. See Figure 5.
Figure 5. Browse Collection page
The Browse MainCollection page contains:
• A Collections area that lists all collections.
• A Documents area that lists all documents in the selected
collection.
NOTE: You only see the collections to which you have
E
20 WEB VIEWING AND SUBMISSION CLIENT USER GUIDE
access.

XEROX DIGIPATH PRODUCTION SOFTWARE USER WORK FLOWS
Using the Collection Tree frame 0
The Collection Tree frame provides a hierarchical view of the
main collection and subcollection .
To display the Collection Tree:
A
1. Select the [View Collection Tree] icon button located next to
the Browse Collection line. The Collection Tree appears in
the left frame. See Figure 6.
Figure 6. Collection Tree
E
2. To navigate the Collection Tree, select the following options:
• To view subcollections, select the [+] symbol next to the
collection.
• To hide subcollections, select the [-] symbol next to the
collection.
• To select a collection, highlight the collection name.
3. Select the [x] button to close the Collection Tree.
NOTE: For more information on using the Collection Tree, refer
to the online Help system.
WEB VIEWING AND SUBMISSION CLIENT USER GUIDE 21

USER WORK FLOWS XEROX DIGIPATH PRODUCTION SOFTWARE
Searching for documents 0
The Search page all ows you to locate docu ments using specified
search criteria. You can search all documents or limit the search
to a particular collection on the WVS server.
The search results are displayed in a list of documents and their
corresponding attributes.
NOTE: Your ability to search collections, configure search
E
Accessing the Search page 0
results, and define domains depends on the access rights
assigned to you by your WVS Server Administrator.
This section relates to the [S ear ch ] opt io n on the Navigation Bar
on the Main page.
A
To access the Search page:
1. Double-click on your browser icon to open the Web Viewing
and Submission (WVS) home page. The Home page opens.
2. Log in to your WVS workstation. The Main page opens.
3. If the Search page does not appear, select [Search] on the
Navigation Bar. The Search page opens. See Figure 7.
Figure 7. Search page
22 WEB VIEWING AND SUBMISSION CLIENT USER GUIDE

XEROX DIGIPATH PRODUCTION SOFTWARE USER WORK FLOWS
In the Search page, you can enter a simple search string in the
text box provided. The appli cation compares this search string to
the properties of objects on the server and re turns all matche s in
the form of a results list.
The search string can consist of up to 512 characters, including
text, logical operators (for example, “or,” “and,” and “not”),
parentheses, and wildcard characters (*). Wildcard characters
are automatically applied at the beginning and end of an entry in
the Search Criteria text bo x. For exam pl e , a sea rch on dog may
return objects having attribut e values of dogs, dogma, and
devildog.
NOTE: Relational opera tors (for e xample, = , <, and >) in the text
E
string are not supported in this version of WVS.
You may also enter a date range to be used in additio n to or
instead of the text search, if the Search page is configured that
way . The date m ust be entered in the format MM/DD/YYYY. If the
date range is left blank, all document dates are searched.
Table 3 lists and describes the search option buttons at the
bottom of the Search page.
Table 3. Search optio ns
Search
Option Description
Search Starts the search.
Domain Allows you to search a particular DigiPath host, if
available.
Configure Allows you to select the properties that display in the
search results list.
WEB VIEWING AND SUBMISSION CLIENT USER GUIDE 23

USER WORK FLOWS XEROX DIGIPATH PRODUCTION SOFTWARE
Selecting the search domain 0
To select the search domain:
A
1. Double-click on your browser icon to open the Web Viewing
and Submission (WVS) home page. The Home page opens.
2. Log in to your WVS workstation. The Main page opens.
3. Select [Search] on the Navigation Bar. The Search page
opens.
4. Select [Domain]. The Search Domain page opens. See
Figure 8.
Figure 8. Search Domain page
5. Mark the check box(es) next to the host workstation(s) in
which you want to search.
6. Select [Save] to save the changes and return to the Search
page.
24 WEB VIEWING AND SUBMISSION CLIENT USER GUIDE

XEROX DIGIPATH PRODUCTION SOFTWARE USER WORK FLOWS
Configuring the search properties 0
To configure the search properties:
A
1. Double-click on your browser icon to open the Web Viewing
and Submission (WVS) home page. The Home page opens.
2. Log in to your WVS workstation. The Main page opens.
3. Select [Search] on the Navigation Bar. The Search page
opens.
4. Select [Configure]. The Search Configuration page opens.
See Figure 9.
Figure 9. Search Configuration page
5. Mark the check box(es) next to the properties you want to
appear in the search results list.
6. Select [Save] to save the changes and return tot he Search
page.
WEB VIEWING AND SUBMISSION CLIENT USER GUIDE 25

USER WORK FLOWS XEROX DIGIPATH PRODUCTION SOFTWARE
Searching for a document 0
To search for a document:
A
1. Highlight a collection in the Please select a collection to
Search list box on the Search page.
• To search the entire database, select [All Documents].
• To search subcollections, mark the Search S ubcollections
check box.
2. Enter one or more text str ings in the Please enter your search
criteria text box.
NOTE: The search string entered in the text box is compared
E
to the properties of documents on the serv er. The search
returns all matches in the form of a results list.
3. If a date field is ava ilable, enter the date range. The form at for
the date should be mm/dd/yyyy. If the date range is left
blank, all document dates are searched.
E
4. Select [Search] to start the search.
Displaying the Search Results list 0
When the search is complete, the documents matching the
search criteria are displayed in a search results list.
NOTE: The properties displayed for each object are determined
by the selection you made using the [Configure] option on th e
Search page.
26 WEB VIEWING AND SUBMISSION CLIENT USER GUIDE

XEROX DIGIPATH PRODUCTION SOFTWARE USER WORK FLOWS
Using documents in collections on the WVS server 0
NOTE: Your ability to perform the following functions depends
E
Function Description
View Displays the contents of the document on the screen.
on the access rights assigned to you by your WVS Server
Administrator.
When you browse or search collections and find the desired
document, you can select the document and perform one or
more of the following functions described in Table 4.
Table 4. Document functions
The View function is available only for the following file types: RDO, URL, TIFF,
PostScript, JPEG, GIF, TXT, and other image formats supported by the browser or
a browser plug-in. Examples of file types supported by browser plug-ins are PDF
(Adobe Acrobat file), DOC (word processing program file), or PPT (MS PowerPoint
file).
Properties Displays the available properties for the document.
Download Saves the object to a local or network drive by downloading it.
Update Updates an existing document with the latest version.
Lock and Unlock Locks and unlocks a document to block or allow access to other users.
Print Submit Submits a request to print RDO, TIFF, PDF, PostScript, or PCL files to any Xerox
production printer supported in DigiPath 2.0 connected to the network.
If the [Print Submit] button is not available, there are either no printers defined in
WVS or you do not have access privileges to a production printer.
NOTE: You can also use the Print function in your web browser to print the actual
web page curr entl y dis pla yed. You should refer to the docum ent atio n pr ovid ed wit h
the browser. Please note that this function is capable of printing only the current
web page or frame, not the selected document.
The following sections provide detailed instruction for using
documents in collections on the WVS server.
WEB VIEWING AND SUBMISSION CLIENT USER GUIDE 27

USER WORK FLOWS XEROX DIGIPATH PRODUCTION SOFTWARE
Viewing a document 0
NOTE: Your ability to perform the following functions depends
E
on your access rights assigned to you by your WVS Server
Administrator.
The View page is used to view single pages or thumbnails of a
document. Table 5 lists and describes the available View page
functions.
Table 5. View Page functions
Function Description
Download Allows you to download a file from a collection.
Print Submit Allows you to print the document to a specified
printer.
E
Document
Settings
Thumbnails Allows you to view a thumbnail version of the
Properties Allows you to view the document settings.
NOTE: The View function is available only for the following file
types: RDO, URL, TIFF, PostScript, JPEG, GIF, TXT, and other
image formats that are supported by the browser or a browser
plug-in. Examples of file types sup ported by browser plug-i ns are
PDF (Adobe Acrobat file), DOC (word-processing program file),
or PPT (MS PowerPoint fi le).
Other file types available from WVS must be downloaded.
Allows you to customize document viewing and
conversion options.
document.
28 WEB VIEWING AND SUBMISSION CLIENT USER GUIDE

XEROX DIGIPATH PRODUCTION SOFTWARE USER WORK FLOWS
To view a document:
A
1. Select a document from a search results list or from a
collection.
2. Select [View].
• If the document is not an RDO, further instructions are
displayed on the screen for viewing the document. Refer
to the Conversion options section in the System
Administration chapter later in this manual, f or additional
information.
• If the document is an RDO and at least the first page has
been converted. The first p age is di splayed i n the V iewing
frame. Since the document is an RDO, the document
structure is visible.
• If the document is an RDO and the first page has not
been converted, you receive a message indicating that
the pages or thumbnails for the document are not
available. The me ssage includes the f ollowing
information:
E
E
– The amount of time necessary to convert an image to
a viewable format. Th is is based on the default viewi ng
format, JPG or PDF.
NOTE: This message applies to one image. For
multiple images per page, the conversion rate is
considerably slower. There may also be a sev ere
negative performance effect if several users are
converting documents simultaneously.
– The number of images in the current document.
– The option to convert the current page or to cancel the
operation.
If you choose to wait while the page is converted, the
converted page appears in the Viewing frame. Since the
document is an RDO, the document str uctu re is visible.
3. Select the document link to view the object.
NOTE: Once a document is displaye d in t he View page, you
can use the browser Print function to print the document one
page at a time. This is not recomme nded . It is reco mme nded
that you download the document first, then print the
document using the local app lication.
WEB VIEWING AND SUBMISSION CLIENT USER GUIDE 29

USER WORK FLOWS XEROX DIGIPATH PRODUCTION SOFTWARE
For RDOs, the following viewing options are enabled:
• Displaying thumbnails
• Viewing the structure, as well as individual pages
• Customizing the viewing opti on s
NOTE: To cancel any action, select the [Back] icon button from
E
the web browser toolbar.
30 WEB VIEWING AND SUBMISSION CLIENT USER GUIDE

XEROX DIGIPATH PRODUCTION SOFTWARE USER WORK FLOWS
Viewing document properties 0
NOTE: Your ability to view the properties of a document
E
depends on the access rights assigned to you by your WVS
Server Administrator.
To view the properties of a document:
A
1. Select a document from a search results list or from a
collection.
2. Select the [Attributes] icon next to the document name. The
Attributes page ope ns and displays p roperties of t he selected
document.
3. Select [Done].
NOTE: To cancel any action, select the [Back] icon button from
E
the web browser toolbar.
WEB VIEWING AND SUBMISSION CLIENT USER GUIDE 31

USER WORK FLOWS XEROX DIGIPATH PRODUCTION SOFTWARE
Downloading a file 0
Use the Download page to send a single file to your local
system.
NOTE: Your ability to download a file depends on the access
E
rights assigned to you by your WVS Server Administrator.
To download a file to your local system:
A
1. Select a document from a search results list or from a
collection.
2. Select the [Downl oad] ic on next t o t he do cument na me i n the
Documents area.
3. If the document to be downloaded is an RDO, specify
whether you want all pages downloade d or only a range of
pages.
a. Select the [All Pages] radio button or select the [From
Pages] radio button.
E
E
b. Enter the Starting Page and Ending Page for the desired
range of pages.
4. Select [Next].
NOTE: You may be asked whether you want to create
thumbnail images for the document to be downloaded.
5. Specify the location to which the file is to be downloaded.
6. Select [Download a File].
7. Select [Submit]. The Browse page opens and displays with
the downloaded document.
NOTE: To cancel any action, select the [Back] icon button from
the web browser toolbar.
32 WEB VIEWING AND SUBMISSION CLIENT USER GUIDE

XEROX DIGIPATH PRODUCTION SOFTWARE USER WORK FLOWS
Updating a document 0
NOTE: Your ability to update an existing document in a
E
A
E
collection with a newer version depends on the access rights
assigned to you by your WVS Server Administrator.
To update a document already in a collection with the latest
version:
1. Select a document from a search results list or from a
collection.
2. Select the [Update] icon from the Documents area. The
UpdateFile page opens.
3. The path name information for the file to be updated should
appear in the pathname text box. If it does not, type in the
filename (including the full pathname) of the file to upload.
NOTE: If you do not know the exact pathname, select
[Browse] to locate the file you want to upload.
E
4. Select [Upload a File]. The Browse page ope ns and displ ays
with the updated version of the document.
NOTE: To cancel any action, select the [Back] icon button from
the web browser toolbar.
WEB VIEWING AND SUBMISSION CLIENT USER GUIDE 33

USER WORK FLOWS XEROX DIGIPATH PRODUCTION SOFTWARE
Locking and unlocking a document 0
NOTE: Your ability to lock and unlock a document depends on
E
the access rights assigned to you by your WVS Server
Administrator.
Locking a document 0
To lock a document:
A
1. Select a document from a search results list or from a
collection.
2. Select the [Lock] icon next to the document you want to lock.
Unlocking a document 0
To unlock a document:
A
1. Select a document from a search results list or from a
collection.
2. Select the [Unlock] icon next to the document you want to
unlock.
Submitting a job to print 0
NOTE: Your ability to submit a job to print depends on the
E
access rights assigned to you by your WVS Server
Administrator.
To submit a job for printing:
A
1. Select a document from a search results list or from a
collection.
2. Select the [Print] icon next to the document you want to print.
3. Select the appropria te pr i nte r.
4. If required, enter the password.
5. View and/or modify the job ticket as needed.
6. Select [Submit] to submit the print job. The Job Sent page
opens and confirms that the print job has been submitted.
34 WEB VIEWING AND SUBMISSION CLIENT USER GUIDE

XEROX DIGIPATH PRODUCTION SOFTWARE USER WORK FLOWS
Submitting new print jobs to the WVS server 0
If you have the Job Submit option on your Navigation Bar, you
can submit print jobs to your WVS server along with a set of
instructions for final production output.
To display the Job Submission page:
A
1. Double-click on your browser icon to open the Web Viewing
and Submission home page.
2. Log in to your WVS workstation.
3. Select [Job Submit] on the Navigation Bar. The Job
Submission page opens. See Figure 10.
Figure 10. Job Submission page
WEB VIEWING AND SUBMISSION CLIENT USER GUIDE 35

USER WORK FLOWS XEROX DIGIPATH PRODUCTION SOFTWARE
Table 6 lists and describes the Job Submit functions.
Table 6. Job Submit funct ions
Function Description
Submit a New Job Allows you to submit a print-ready file to the WVS server using a standard or
advance job ticket.
Order Reprints Allows you to order reprints of files they have submitted previously for print.
Get Status of a Job Allows you to check the status of a submitted previously job.
Submit a Revised
Job
E
Allows you to submit a revised job, using a job they have submitted previously
for order information or specifications.
NOTE: Submitting a job does not send the job directly to a
printer. It submits the job to the server (or Print Shop) for
production.
The following sections provide detailed instructions for
submitting new print jobs to the WVS server.
36 WEB VIEWING AND SUBMISSION CLIENT USER GUIDE

XEROX DIGIPATH PRODUCTION SOFTWARE USER WORK FLOWS
Submitting a new job 0
The Submit a new job option allows the you to submit a
print-ready file (i.e., PostScript) to the WVS server.
NOTE: The job appears in the Administer User Jobs portion of
E
A
administration alo ng with the assi gned jo b numb er an d job ticket
information.
To submit a new job:
1. Select [Job Submit] on the Navigation Bar. The Job
Submission page opens.
2. Select [Submit a New Jo b]. The Job Submission page op en s
and displays a number of fields that provide instructions for
various processing opti ons.
Your Job Submit level depends on the access r igh ts assi gn ed to
you by your Server Administrator. Table 7 lists and describes the
levels of job submit.
Table 7. Job Submit
Level of Job Submit Description
Standard job submit Allows you to assign basic properties to your
job. For more information, see “Submitting a
standard job ticket” on page 38.
Advanced job submit Provides an advanced job ticket that allows you
to assign detailed properties to your job. For
more information, see “Submitting an advanced
job ticket” on page 41.
WEB VIEWING AND SUBMISSION CLIENT USER GUIDE 37

USER WORK FLOWS XEROX DIGIPATH PRODUCTION SOFTWARE
Submitting a standard job ticket 0
To submit a standard job ticket:
A
1. Select [Job Submit] from the Navigation Bar.
2. Select [Submit A New Job]. The standard Job Specification
page opens. See Figure 11.
E
Figure 11. Standard Job Specification page
3. Enter the job title in the Job Title text box. Use a maximum of
35 characters.
NOTE: The job title is required.
4. Select the appropriate paper stock options.
• Select the color of paper stock from the paper stock color
drop-down list.
• Select the paper size from the paper size drop-down list.
• Select the type of paper stock from the paper st ock type
drop-down list.
5. Select the desired imaging and finishing options.
• Select Single Sided, Double Sided, or Head-to-toe from
the drop-down list.
• Select Portrait or Landscape fr om the drop-down list.
• Select the fin i shing option from the drop-down list.
38 WEB VIEWING AND SUBMISSION CLIENT USER GUIDE

XEROX DIGIPATH PRODUCTION SOFTWARE USER WORK FLOWS
6. Enter special instru ctions for pri nting an d fini shin g your jo b in
the Special Instructions text box.
7. Select [Submit Job Specifications]. If you do not wish to
submit the job ticket, select [Reset to Defaults] to reset to the
default settings, or select [Feedback] to send a feedback
message to your Server Administrator. The Order
Specifications page opens.
8. Enter the desired order options.
• Enter the date you want the job request printed in the
Required by Date text box.
• Enter the number of copies you want in the Copies text
box.
• Enter the PO number to which you want to bill your print
job in the Bill to PO text box.
9. Enter special instructions in the Special Instructions text box.
10.Enter Delivery information, as needed.
• Select the method of deli very from the Method dr op-down
list.
• Select to whom to deliver the completed job from the
Deliver To drop-down list.
• Complete the deli ver y ad dr ess i nf or m ation in the address
area.
WEB VIEWING AND SUBMISSION CLIENT USER GUIDE 39

USER WORK FLOWS XEROX DIGIPATH PRODUCTION SOFTWARE
11. Select [Add files and submit order]. The Send Files page
opens.
Table 8 lists and describes the available Send Files methods.
Table 8. Send File Methods
Send File Method Description
Transmit File via your Web
Browser
Transmit Files via the
DigiPath Upload Helper
Transmit Files via other
means
Uploads the file using your web browser.
(Either Netscape Navigator or Microsoft
Internet Explorer.)
Uploads multiple files.
NOTE: If your browser does not support file
uploads, you need to configure the launch
helper. The [Download a helper] selection is
available on the main Job Submit page. To
install the Upload Helper, see “Configuring
DigiPath Launch Helper” on page 60.
Delivers the selected file on some other
media, such as tape, CD-ROM, or diskette.
12.Select [Transmit File via your Web Browser]. The Send Files
page opens.
13.Enter the file name in the Pathname of file text box. Or , select
[Browse] to locate the document you wish to submit.
14.Select [Submit] to send the file to your print shop. The job
Receipt confirmation page opens.
15.Print the job Receipt confirmation page for your r ec ords.
16.Select [Return to Job Submission Menu] to return to the Job
Submission page.
40 WEB VIEWING AND SUBMISSION CLIENT USER GUIDE

XEROX DIGIPATH PRODUCTION SOFTWARE USER WORK FLOWS
Submitting an advanced job ticket 0
CAUTION
B
Whenever you make changes to a job ticket page, be sure to
select [Save Tab] before selecting another tab so that your
changes are stored. Otherwise, when you select another tab,
your modifications are lost.
To submit an advance job ticket:
A
1. Select [Job Submit] from the Navigation Bar.
2. Select [Submit A New Job]. The advanced Job Specification
page opens. See Figure 12.
Figure 12. Advanced Job Submission page
WEB VIEWING AND SUBMISSION CLIENT USER GUIDE 41

USER WORK FLOWS XEROX DIGIPATH PRODUCTION SOFTWARE
3. Select each of the following Job Ticket tabs and assign the
printing attributes to your job.
• [Notes] — Basic account and job information
• [Description] — Assigns general job attributes
• [Covers] — Assigns attributes to covers
• [Stocks] — Defines stock types to be used for the job
NOTE: To define the custom type of paper stock, mark
E
the [Custom Type] radio button and enter the custom type
of paper stock in the custom field text box.
• [Inserts] — Defines attributes and placement of chapter
• [Special] — Assigns attributes to special pages such as
tabs
• [Color/Position] — Sets image shifts and assigns hig hlight
color attributes
E
NOTE: For more information on the advanced job ticket
options, refer to the online Help system.
4. Select [Submit]. A job submittal summary page opens.
5. Record your Job ID number _______________________.
42 WEB VIEWING AND SUBMISSION CLIENT USER GUIDE

XEROX DIGIPATH PRODUCTION SOFTWARE USER WORK FLOWS
6. Select [Transfer] to transfer the file in which you want to print.
The Send Files page opens.
Table 9 lists and describes the available Send Files methods.
Table 9. Send File Methods
Send File Method Description
Transmit File via your
Web Browser
Transmit Files via the
DigiPath Upload Helper
Transmit Files via other
means
Uploads the file using your web browser.
(Either Netscape Navigator or Microsoft
Internet Explorer.)
Uploads multiple files.
NOTE: If your browser does not support file
uploads, you need to configure the launch
helper. The [Download a helper] selection is
available on the main Job Submit page. To
install the Upload Helper, see “Configuring
DigiPath Launch Helper” on page 60.
Delivers the selected file on some other
media, such as tape, CD-ROM, or diskette.
7. Select [Transmit File via your Web Browser]. The Send Files
page opens.
8. Enter the pathname of the file in the Pathname of file text
box. Or, select [Browse] to locate the document you wish to
submit.
9. Select [Submit] to send the file to your print shop. The job
Receipt confirmation page opens.
10.Print the job Receipt confirmation page for your r ec ords.
11. Select [Return to Job submission Menu] to return to the Job
Submission page.
WEB VIEWING AND SUBMISSION CLIENT USER GUIDE 43

USER WORK FLOWS XEROX DIGIPATH PRODUCTION SOFTWARE
Ordering reprints 0
The Ordering Repri nts option allows you to order repri nt s of fi le s
you submitted previously for print.
To order reprints of a job:
A
1. Select [Job Submit] on the Navigation Bar. The Job
Submission page opens.
2. Select the [Job List] link in the [Order Reprints] section to
view a list of your submitted jobs. The Order Reprints page
opens. See Figure 13.
NOTE: If you know the job number of the job you want to
E
reprint, enter the job number in the [Job ID] text box and
select the [Order Repri nts] butto n.
3. Select the link for the desired job from the list under the Job
Title column. The Order Reprints page opens and displays
with the information for the selected job.
Figure 13. Order Reprints page
4. Complete the infor ma ti on requ est ed on the form .
5. Select [Submit Order]. A job Receipt confirmation page
opens after the order is submitte d.
6. Print the job Receipt confirmation page for your records.
7. Select [Return to Job Submission Menu] to return to the Job
Submission page.
44 WEB VIEWING AND SUBMISSION CLIENT USER GUIDE

XEROX DIGIPATH PRODUCTION SOFTWARE USER WORK FLOWS
Checking job status 0
The Get Status of Job op tion allows yo u to check on the stat us of
a submitted previously job.
NOTE: Your WVS Server Administrator may not use this
E
function. Contact your administrator for details.
To check the status of a previously submitted job:
A
1. Select [Job Submit] on the Navigation Bar. The Job
Submission page opens.
2. Select the [Job List] link in the [Get Status of Job] section to
display a list of your submitted jobs. The Job Status page
opens. See Figure 14.
NOTE: If you know the job number of the job you want to
E
check the status, enter the job number in the [By Job ID] text
box and select the [Get Status] button.
Figure 14. Job Status page
NOTE: When moving a job to a release queue, the status of
E
WEB VIEWING AND SUBMISSION CLIENT USER GUIDE 45
the job displays as “New” on the Job Status page. If you
change the status of a job using the Review/Update Delivery
Information page, the status of the job will still displ ay a s
“New” in the Job Status page.
3. Select the link for the desired job from the list under the Job
Title column. The Detailed Job Status page opens.
4. Print the Detailed Job Status page for your records.
5. Select [Return to Job Submission Menu] to return to the Job
Submission page.

USER WORK FLOWS XEROX DIGIPATH PRODUCTION SOFTWARE
Submitting a revised job 0
The Submit a Revised Job option allows you t o sub mit a revise d
job using a job you submitted previously.
To submit a revised job:
A
1. Select [Job Submit] from the Navigation Bar. The Job
Submission page opens.
2. Select the [Job List] link the [Submit a Revised Job] section to
display a list of your submitted jobs. The Submit a Revised
Job page ope ns.
NOTE: If you know the job number of the job you want to
E
revise, enter the job number in the [By Job ID] text box and
select the [Submit Revised Job] button.
E
E
Figure 15. Submit a Revised Job page
3. Select the link for the desired job from the list under the Job
Title co lu m n. Th e Job Sp eci fi cat ion page opens and disp lays
with the information for the selected job.
4. Enter the new Job Title, paper stock information,
imaging/finishing options, and special instructions.
NOTE: The job title is required.
5. Select [Submit Job Specifications]. The Order Specifications
page opens.
6. Enter order options, special instructions, and delivery
information, as appropriate.
7. Select [Add files and submit order]. The Send File page
opens.
NOTE: Select [Submit order with no fil e changes] if there are
no changes to the file.
46 WEB VIEWING AND SUBMISSION CLIENT USER GUIDE

XEROX DIGIPATH PRODUCTION SOFTWARE USER WORK FLOWS
8. Select [Transmit File via your Web Browser] link. The Send
File page opens.
9. Enter the file name with full path. Or, select [Browse] to locate
the document you wish to submit.
10.Select [Submit]. The job Receipt confirmation page opens.
11 . Print the job Receipt confirmation page for your records.
12.Select [Return to Job Submission Menu] to return to the Job
Submission page.
WEB VIEWING AND SUBMISSION CLIENT USER GUIDE 47

USER WORK FLOWS XEROX DIGIPATH PRODUCTION SOFTWARE
Using the advanced user work flow 0
This section provides detailed instructions for using the
advanced user workflow including submitting a multi-file job,
managing web q ueues, managi ng submitted jobs, and managi ng
user jobs.
Submitting a multi-file job 0
You cannot directly upload an RDO from Job Subm ission. RDOs
are complex (multi-ob ject) files. The upl oad function is a bro wser
function, and browsers are unable to handle complex objects as
single objects.
The DigiPath Launch Helper i s used to submit a m ulti- object fi le.
For more information on installing an d configuring the DigiPath
Launch Helper , refe r to “Configuri ng Digi Path Launch Helper ” on
page -60.
A
When objects are submitted, they are added to the your home
collection.
To submit a multi-file job:
1. Log in to the WVS workstation.
2. Select [Job Submit] on the Navigation Bar.
3. Select [Submit a New Job].
4. Enter the Job Title name in the Job Title text box.
5. Select [Submit Job Specifications]. The Order Specification
page opens.
• If you have the advanced job ticket, select each tab and
complete the appropriate information.
• If you have the standard job ticket, enter the appropriate
information.
6. Select [Submit]. The job submittal summary page opens.
7. Record your Job ID number _______________________.
8. Select [Transfer]. The Send Files page opens.
48 WEB VIEWING AND SUBMISSION CLIENT USER GUIDE

XEROX DIGIPATH PRODUCTION SOFTWARE USER WORK FLOWS
9. Select [Transmit Files via the DigiPath Upload Helper]. This
option allows you to upload multiple files.
a. Select [Launch Helper]. The DigiPath FIle Upload dialog
box opens.
b. Add the files you wish to upload.
c. Select [Send Files].
d. Select [OK]. When the transfer is complete, a message
box appears.
e. Select [OK].
10.After uploading the files, select [Confirm Order], or the job is
not submitted. The Job Receipt Confirmation page opens.
NOTE: The files transferred are placed in the users home
E
collection on the WVS server.
11. Select [Browse] from the Navi ga ti on Bar.
12.Select the collection name. The documents appear in your
home collection.
13.Select the job name, and select the [Print Submit] icon.
WEB VIEWING AND SUBMISSION CLIENT USER GUIDE 49

USER WORK FLOWS XEROX DIGIPATH PRODUCTION SOFTWARE
Managing Web Queues 0
Use the Job Queues/Manager page to configure and manage
web queues.
To display the Web Queues page:
A
1. Log in to the WVS server as the Printer Administrator.
2. Select [Web Job/Queue Manager] on the Navigation Bar.
3. Select [Queues] from the Web Job/Queue Manager menu.
The Job Queue/Manager page opens. See Figure 16.
Figure 16. Job/Queue Manager page
A table presents information about configured queues, including:
• Queue
• Printer Queue Name/Print Server
• Printer Model /Server Type
• Protocol
• Items in Queue
• Password protected
• Description
To sort the list, select the table heading for the column you want
to sort. For example, select the Queues table heading to sort the
list alphabetically by Queue name.
The following sections provide detailed procedures for
configuring and managing web queues.
50 WEB VIEWING AND SUBMISSION CLIENT USER GUIDE

XEROX DIGIPATH PRODUCTION SOFTWARE USER WORK FLOWS
Viewing a web queue configuration 0
To view a web queue configuration:
A
1. Select [Web Job/Queue Manager] on the Navigation Bar on
the WVS server.
2. Select [Queues] from the Web Job/Queue Manager menu.
The Job Queue/Manager page opens.
3. Select the link in the Queue column for the desired web
queue. The Edit a We b Queue page opens.
Figure 17. Edit a Web Queue page
4. Modify the configuration settings.
5. Select [Save] to save the changes and return to the Job
Queue/Manager page.
WEB VIEWING AND SUBMISSION CLIENT USER GUIDE 51

USER WORK FLOWS XEROX DIGIPATH PRODUCTION SOFTWARE
Viewing a list of jobs in the queue 0
To view a list of jobs in the queue:
A
1. Select [Web Job/Queue Manager] on the Navigation Bar.
2. Select [Queues] from the Web Job/Queue Manager menu.
The Job Queue/Manager page opens.
3. Select the Items in Queue that correspond to the web queue
for which you want to obtain a list of jobs. The Job Release
page opens. See Figure 18.
Figure 18. Job Release Queue page
4. A table of jobs in the web queue displays, together with
various job det ails and delivery information.
52 WEB VIEWING AND SUBMISSION CLIENT USER GUIDE

XEROX DIGIPATH PRODUCTION SOFTWARE USER WORK FLOWS
Viewing the queue status of a printer 0
To view the queue status of a printer:
A
1. Select [Web Job/Queue Manager] on the Navigation Bar.
2. Select [Queues] from the Web Job/Queue Manager menu.
The Job Queue/Manager page opens.
3. Select the Print Queue Name/Print Server This provides a
listing of jobs submitted to the printer. You can then view the
current status of jobs in the print er queue. See Figure 19.
Figure 19. Printer/Queue status page
WEB VIEWING AND SUBMISSION CLIENT USER GUIDE 53

USER WORK FLOWS XEROX DIGIPATH PRODUCTION SOFTWARE
Managing submitted jobs 0
The Job Release Queues page allows you to manage jobs on
the WVS server. You can delete jobs, re lease them, move them
to another print web queue, or transfer them to another web
server.
To manage submitted jobs in the web queue:
A
1. Select [Web Job/Queue Manager] on the Navigation Bar.
2. Select [Queues] from the Web Job/Queue Manager menu.
The Job Queue/Manager page opens.
3. Select the Items in Q ueue numb er for the desired que ue. The
Job Release Queue page opens.
The following secti ons provide detai led instructions for managing
submitted jobs.
Releasing a job 0
A
A
A
To release a job to a web queue:
1. Mark the check box next to the job you want to release.
2. Select [Release]. The job is released to the queue on the
print server and is removed from the WVS server.
Moving a job 0
To move a job from the current web queue to another web
queue:
1. Select the queue from which you want to move the job(s)
from the drop-down list box.
2. Mark the check box next to the job(s) you want to move.
3. Select [Move]. The job(s) is removed from the current queue
and placed in the destination queue.
Deleting a job 0
To delete a job from a web queue:
1. Mark the check box next to the job(s) you want to delete.
2. Select [Delete]. A confirmation message opens.
3. Select [OK] in the confirmation box to remove the job from
the queue. Otherwise, select [Cancel] to cancel the
operation.
54 WEB VIEWING AND SUBMISSION CLIENT USER GUIDE

XEROX DIGIPATH PRODUCTION SOFTWARE USER WORK FLOWS
Transferring a job 0
To transfer a job from the current web queue to another web
A
queue:
1. Select the queue from which you want to transfer the job(s)
from the drop-down list box.
2. Mark the check box next to the job(s) you want to transfer.
3. Select [T ransfe r]. The j ob(s ) transfe rs from the current queue
and is placed in the destination queue.
Viewing the job ticket 0
To view the job ticket of a submitted job:
A
1. Select the [Job Ticket] icon next to the Job ID of the job in
which you want to view the job ticket. The job ticket opens.
2. Modify the job ticket, if appropriate.
3. Select [Done] to submit modified job ticket. A Job Submittal
Summary page opens.
WEB VIEWING AND SUBMISSION CLIENT USER GUIDE 55

USER WORK FLOWS XEROX DIGIPATH PRODUCTION SOFTWARE
Reviewing/updating the delivery information 0
To review and/or update the delivery information of a submitted
A
job:
1. Select the [Delive ry T ruck] ic on next to t he Job ID of the job in
which you want to review and/or update the delivery
information. The Review/Update Delivery Information page
opens. See Figure 20.
E
Figure 20. Review/Update Delivery Information page
2. Review and/or update the delivery information, if appropriate.
NOTE: If updating the status of a job that has been moved
from a release queue to another release queue, the status
will remain as “New” on the Job Stat us page even though you
have updated the status of the j ob. The upda ted stat us of th e
job displays correctly on the Job Release Queue page.
3. Select [Save].
4. Select the [Job Release Queue] link to return to the Job
Release Queue p age.
56 WEB VIEWING AND SUBMISSION CLIENT USER GUIDE

XEROX DIGIPATH PRODUCTION SOFTWARE USER WORK FLOWS
Changing the headings of the Job Submission queue 0
To change the headings of the job submission queue:
A
1. Select the [Job Submission Queue] link. The Administrator
Display Options page opens. See Figure 21.
Figure 21. Administer Display Options page
2. In the User information area:
a. Mark the check box next to the options you wi sh to display
for the selected queue.
b. Select [Save].
3. In the Delivery Information area:
a. Mark the check box next to the options you wi sh to display
for the selected queue.
b. Select [Save]. The Job Relea se Queu e pag e ope ns and
displays the selected options.
WEB VIEWING AND SUBMISSION CLIENT USER GUIDE 57

USER WORK FLOWS XEROX DIGIPATH PRODUCTION SOFTWARE
Managing user jobs 0
Use the User an d Number of Jobs pa ge to manage user jobs.
This page contains informa tion ab out each use r and the numb er
of jobs submitted to the queues .
To manage user jobs:
A
1. Select [Web Job/Queue Manager] from the Navigation Bar.
2. Select [User Jobs] f rom the Web Job/Queue M ana ge r me nu.
The User and number of Jobs page opens. See Figure 22.
Figure 22. User and Number of Jobs page
3. To sort by user name, select [User]; to sort by number of jobs,
select [Number of Jobs].
4. Select the specific user and/or job number combination to
display detailed information about the user’s jobs. The Users
Jobs page opens.
5. Mark the user’s job in which you wish to view detailed
information.
6. Select the Job ID link. The Print Job Details page opens.
7. Print or export the detailed job information.
8. Select [User Jobs] on the menu Administration Menu to
return to the User and Number of Jobs page.
58 WEB VIEWING AND SUBMISSION CLIENT USER GUIDE

XEROX DIGIPATH PRODUCTION SOFTWARE USER WORK FLOWS
Deleting user jobs 0
To delete user jobs:
A
1. Select [Web Job/Queue Manager] from the Navigation Bar.
2. Select [User Jobs] f rom the Web Job/Queue Manager menu.
The User and number of Jobs page opens.
3. Mark the user’s job in which you wish to delete.
4. Select [Delete]. A confirmation message appears.
5. Select [OK] to delete the user’s job.
WEB VIEWING AND SUBMISSION CLIENT USER GUIDE 59

USER WORK FLOWS XEROX DIGIPATH PRODUCTION SOFTWARE
Configuring DigiPath Launch Helper 0
If your browser does not support file uploads, you need to
configure the la unch help er . Th e [Downlo ad a helpe r] selectio n is
available on the Job Submission page.
The DigiPath upload helper is an application that allows users to
upload multiple files through the Job Submit function. It also
allows you to submit RDO files through Job Submission.
Files downloaded via the upload helper are placed in a
collection. The files submitted are associated with one job ticket
but print as se parate jobs.
To configure the launch helper:
1. Select [Job Submit] on the Navigation Bar.
A
2. Select [download a helper] from the main Job Submission
page under the Submit a New Job option. The Download
Xerox Web Viewing and Submission Helper Application
opens.
Figure 23. Browser list from launch helper
The following sections provide detailed instructions for installing
and configuring the DigiPath Launch Helper for use with
Microsoft Internet Explorer and Netscape Navigator.
60 WEB VIEWING AND SUBMISSION CLIENT USER GUIDE

XEROX DIGIPATH PRODUCTION SOFTWARE USER WORK FLOWS
Using the DigiPath Launch Helper with Microsoft Internet Explorer 0
To install and configure the DigiPath Launch Helper for use with
A
Microsoft Internet Explorer:
1. Select [Microsoft Internet Explorer (4.x or higher) on
Windows 95 or NT 4.0] link.
2. Select [Print] from the browser toolbar to print the page of
instructions to a local printer.
3. Select [Download the 32-bi t Help er ].
4. Select [Save this file to disk]. Note the file name. If it is not
fileup.exe, you need to change it on the next screen. The
Save As dialog box opens.
a. Create the directory [c:\upload helper] and type the file
name fileup.exe.
b. Select [Save].
5. Select [Close] in the Download Complete message box.
6. Follow the instructions under the [Configuring MS Internet
Explorer to use the DigiPath Helpe r Application] head ing from
the pages you printed in Step 4.
7. Follow the instructions under the [Testing the Dig iPath
Upload Helper Application configuration] heading from the
pages you printed in step 2 to test the configuration. Submit
at least three fi le s th rough the Job Subm it function. For more
information on submitting multiple files, refer to “Submitting a
multi-file job” on page 48.
WEB VIEWING AND SUBMISSION CLIENT USER GUIDE 61

USER WORK FLOWS XEROX DIGIPATH PRODUCTION SOFTWARE
Using the DigiPath Launch Helper with Netscape Navigator 0
To install and configure the DigiPath Launch Helper for use with
A
Netscape Navigator:
1. Select [Netscape Navigator on Windows (Win 3.x, Win95, or
WinNT)] link.
2. Select [Print] from the browser toolbar to print the page of
instructions to a local printer.
3. Select [Download the 32-bi t Help er ].
4. Select [Save this file to disk]. Note the file name. If it is not
fileup.exe, you need to change it on the next screen. The
Save As dialog box opens.
a. Create the directory [c:\upload helper] and type the file
name fileup.exe.
b. Select [Save].
5. Select [OK] in the Download Complete message box.
6. Follow the instructions under the [Configuring Netscape
Navigator to use the DigiPath Helper Application] heading
from the pages you printed in Step 4.
7. Follow the instructions under the [Testing the Dig iPath
Upload Helper Application configuration] heading from the
pages you printed in step 2 to test the configuration. Submit
at least three fi le s th rough the Job Subm it function. For more
information on submitting multiple files, refer to “Submitting a
multi-file job” on page 48.
62 WEB VIEWING AND SUBMISSION CLIENT USER GUIDE

XEROX DIGIPATH PRODUCTION SOFTWARE USER WORK FLOWS
WEB VIEWING AND SUBMISSION CLIENT USER GUIDE 63

 Loading...