

Xerox CopyCentre 133, CopyCentre C123, CopyCentre C128, WorkCentre 133, WorkCentre M123 User Guide
...Page 1
CopyCentre WorkCentre WorkCentre Pro
PostScript® User Guide
604P18089
Page 2

Prepared by:
The Document Company Xerox
GKLS European Operations
Bessemer Road
Welwyn Garden City
Hertfordshire
AL7 1HE
ENGLAND
© 2005 by Fuji Xerox Co., Ltd. All rights reserved.
Copyright protection claimed includes all forms and matters of copyrighted material and information now
allowed by statutory or judicial law or hereinafter granted, including without limitations, material generated
from the software programs which are displayed on the screen, such as icons, screen displays, looks etc.
®
Xerox
, The Document Company®, the digital X® and all Xerox products mentioned in this publication are
trademarks of Xerox Corporation. Product names and trademarks of other companies are hereby
acknowledged.
The information in this document is correct at the time of publication. Xerox reserves the right at any time
to change the information without notice. Changes and technical updates will be added in subsequent
editions of the documentation. For the latest information go to www.xerox.com
.
Page 3

Table of Contents
1 Checking the PostScript® Kit Contents .....................................7
2 Operation with Windows 95/98/Me............................................9
About the Software ............................................................................9
Bundled Software .............................................................................. 9
Hardware/Software Requirements .................................................... 9
Computer System .............................................................................10
Basic Software ..................................................................................10
Installing the Adobe PostScript Printer Driver ..................................10
Installation Procedure ...................................................................... 10
If you click Disagree in the License Agreement ................................11
Printer Driver Properties ..................................................................11
Configuration Tab Settings .............................................................. 12
Settings .............................................................................................12
Options Tab Settings ....................................................................... 14
Settings .............................................................................................14
Output Settings Tab Settings .......................................................... 15
Job Type ...........................................................................................15
Settings .............................................................................................16
How to Use Help ..............................................................................16
3 Operation with Windows NT 4.0..............................................17
About the Software ..........................................................................17
Bundled Software ............................................................................ 17
Hardware/Software Requirements .................................................. 18
Computer System .............................................................................18
Basic Software ..................................................................................18
Installing the Adobe PostScript Printer Driver ..................................18
Installation Procedure ...................................................................... 18
If you click Disagree in the License Agreement ................................19
Device Options and Print Settings ...................................................19
Device Settings Tab Settings .......................................................... 20
Settings .............................................................................................20
Configuration Tab Settings .............................................................. 21
Settings .............................................................................................21
Advanced Tab Settings ................................................................... 22
Settings .............................................................................................23
Output Settings Tab Settings .......................................................... 24
Job Type ...........................................................................................25
Settings .............................................................................................26
How to Use Help ..............................................................................26
Xerox WorkCentre/WorkCentre Pro 123/128/133 PostScript® User Guide 3
Page 4

4 Operation with Windows 2000, Windows XP and
Windows Server 2003 ............................................................. 27
About the Software ..........................................................................27
Bundled Software .............................................................................27
Hardware/Software Requirements ...................................................28
Computer System ............................................................................. 28
Basic Software ................................................................................. 28
Installing the Printer Driver ..............................................................28
Installation Procedure ......................................................................28
Device Options and Print Settings ...................................................30
Device Settings Tab Settings ...........................................................31
Settings ............................................................................................ 31
Configuration Tab Settings ...............................................................32
Settings ............................................................................................ 32
Advanced Options Dialog Box Settings ...........................................33
Settings ............................................................................................ 34
Output Settings Tab Settings ...........................................................35
Job Type ...........................................................................................36
Settings ............................................................................................ 37
How to Use Help ..............................................................................37
5 Operation on Macintosh Computers........................................ 39
About the Software ..........................................................................39
Bundled Software .............................................................................39
Hardware/Software Requirements ...................................................40
Computer System ............................................................................. 40
Basic Software ................................................................................. 40
Installing the Adobe PostScript Printer Driver .................................40
Installation Procedure (Mac OS 9.x or earlier) .................................40
Setting the Printer Driver (Mac OS 9.x or earlier) ............................41
Installation Procedure (Mac OS X) ...................................................43
Installation Procedure ....................................................................... 43
Adding a Printer (Mac OS X) ............................................................43
Procedure ......................................................................................... 43
Printer options .................................................................................. 45
Options ............................................................................................45
Printer Specific Options Settings ......................................................45
For Mac OS 9.x and earlier .............................................................. 45
For Mac OS X ...................................................................................46
Settings ............................................................................................ 47
Printer Driver Settings ......................................................................47
Settings ............................................................................................ 48
Installing the Screen Fonts ..............................................................49
6 Appendix .................................................................................51
Cautions and Limitations .................................................................51
Troubleshooting ................................................................................51
Print operation .................................................................................. 51
4 Xerox WorkCentre/WorkCentre Pro 123/128/133 PostScript® User Guide
Page 5

7 Index........................................................................................53
Xerox WorkCentre/WorkCentre Pro 123/128/133 PostScript® User Guide 5
Page 6

6 Xerox WorkCentre/WorkCentre Pro 123/128/133 PostScript® User Guide
Page 7

1 Checking the PostScript® Kit Contents
The devices and components of the kit are described below.
If any of the following are missing, contact the Xerox Welcome Center.
License Agreement
PostScript Program ROM
This ROM makes PostScript printing
possible with the printer.
PostScript Logo Seal
1 PostScript Driver Library CD-ROM
Includes the PostScript drivers and screen
fonts.
This seal accompanies printers
compatible with PostScript.
Xerox WorkCentre/WorkCentre Pro 123/128/133 PostScript® User Guide 7
Page 8

1 Checking the PostScript® Kit Contents
8 Xerox WorkCentre/WorkCentre Pro 123/128/133 PostScript® User Guide
Page 9

2 Operation with Windows 95/98/Me
The following information can be found in this chapter:
• About the Software
– Bundled Software
– Hardware/Software Requirements
• Installing the Adobe PostScript Printer Driver
– Installation Procedure
• Printer Driver Properties
– Configuration Tab Settings
– Options Tab Settings
– Output Settings Tab Settings
• How to Use Help
About the Software
This section describes the software for Windows 95, Windows 98, and Windows Me included
on the PostScript Driver Library CD-ROM.
Bundled Software
The following items are included on the enclosed CD-ROM.
Adobe PostScript Printer Driver (ver.4.5.3) and PPD files - Adobe PostScript driver and PPD
files (for Windows 95/98/Me).
ATM (Adobe Type Manager)(ver.4.0) - Helps you to install typefaces and activate and manage
your fonts.
Adobe Screen Fonts (TrueType/PostScript) - Includes 136 screen fonts (19 TrueType fonts
and 117 PostScript fonts), which are compatible with the printer fonts. ATM is used to install the
PostScript screen fonts. When using these fonts to print, it is recommended that you use the
Adobe PostScript (4.5.3) printer driver.
Adobe Acrobat Reader - Allows you to view and print PDF files on all major computing
platforms.
Hardware/Software Requirements
The minimum system requirements for the Windows 95/Windows 98/Windows Me printer driver
are described below.
Xerox WorkCentre/WorkCentre Pro 123/128/133 PostScript® User Guide 9
Page 10

2 Operation with Windows 95/98/Me
Computer System
Personal computer in which the Windows 95/Windows 98/Windows Me OS can operate.
Basic Software
Windows 95, Windows 98 or Windows Me
Installing the Adobe PostScript Printer Driver
Install Adobe PostScript 4.5.3 printer driver onto Windows 95, Windows 98 or Windows Me by
following the procedure below.
This section describes how to install the printer driver for Windows 98, as an example.
It is possible to cancel installation of the printer driver by clicking [Cancel] in the dialog box
displayed during installation. You can also click [Back] to ignore the settings in that dialog box
and return to the previous dialog box.
Installation Procedure
1. Start Windows 98.
2. On the Start menu, point to Settings and click [Printers].
3. In the Printers window, double-click [Add Printer].
4. Click [Next].
5. Select how the printer is connected to the computer and click [Next].
Select [Local printer] when the printer is connected directly to the computer.
Otherwise, select [Network printer]. The following is an example of a local printer.
NOTE: When you select [Network printer], specify the path to the printer in the
network path or queue name box.
6. Insert the PostScript Driver Library CD-ROM in your CD-ROM drive.
7. Click [Have Disk].
8. Enter “Drive Name:\English\PrinterDriver\win9x_Me” in the “Copy manufacturer’s
files from:” box and click [OK].
In this guide, we have used “E:” as the CD-ROM drive. If you are using a different
drive for the CD-ROM, specify accordingly.
NOTE: Click [Browse] to specify a folder on the CD-ROM.
9. Select your printer model from the Printers list and click [Next].
10. Select the port that you are using and click [Next].
11. Type a name for the printer and specify whether you want to use the printer as the
default printer, then click [Next].
12. Specify whether or not to print a test page, then click [Finish].
Installation begins.
10 Xerox WorkCentre/WorkCentre Pro 123/128/133 PostScript® User Guide
Page 11

13. Read the End User License Agreement and click [Agree].
If you click [Disagree], see If you click Disagree in the License Agreement on
page 11 for details.
14. Confirm that a printer has been added in the Printers window.
This completes installation of the printer driver. Remove the CD-ROM from the
drive.
See Printer Driver Properties on page 11 to configure the printer.
Store your CD-ROM in a safe place.
If you click Disagree in the License Agreement
Click [No] to return to the operation and continue.
Click [Yes] to cancel the installation. A printer is added to the Printers window, but the printer
driver is not installed properly.
When you right-click the printer and click [Properties] from the menu, the Re-installation tab is
added to the printer driver properties dialog box. Follow the directions on that tab.
When you finish reinstalling the printer driver, see Printer Driver Properties on page 11 to set up
the printer.
2 Operation with Windows 95/98/Me
Printer Driver Properties
This section describes printer specific settings included in the printer driver properties.
• Configuration Tab
• Options Tab
• Output Settings Tab
NOTE: You can also refer to Help for explanations of these settings. See How to Use
Help on page 16 for details about how to use Help.
To view the printer driver properties, select the printer icon in the Printers window, then click
[Properties] on the File menu.
NOTE: This guide uses the screens for WorkCentre M128 but the features of the other
products are the same as WorkCentre M128.
Xerox WorkCentre/WorkCentre Pro 123/128/133 PostScript® User Guide 11
Page 12
2 Operation with Windows 95/98/Me
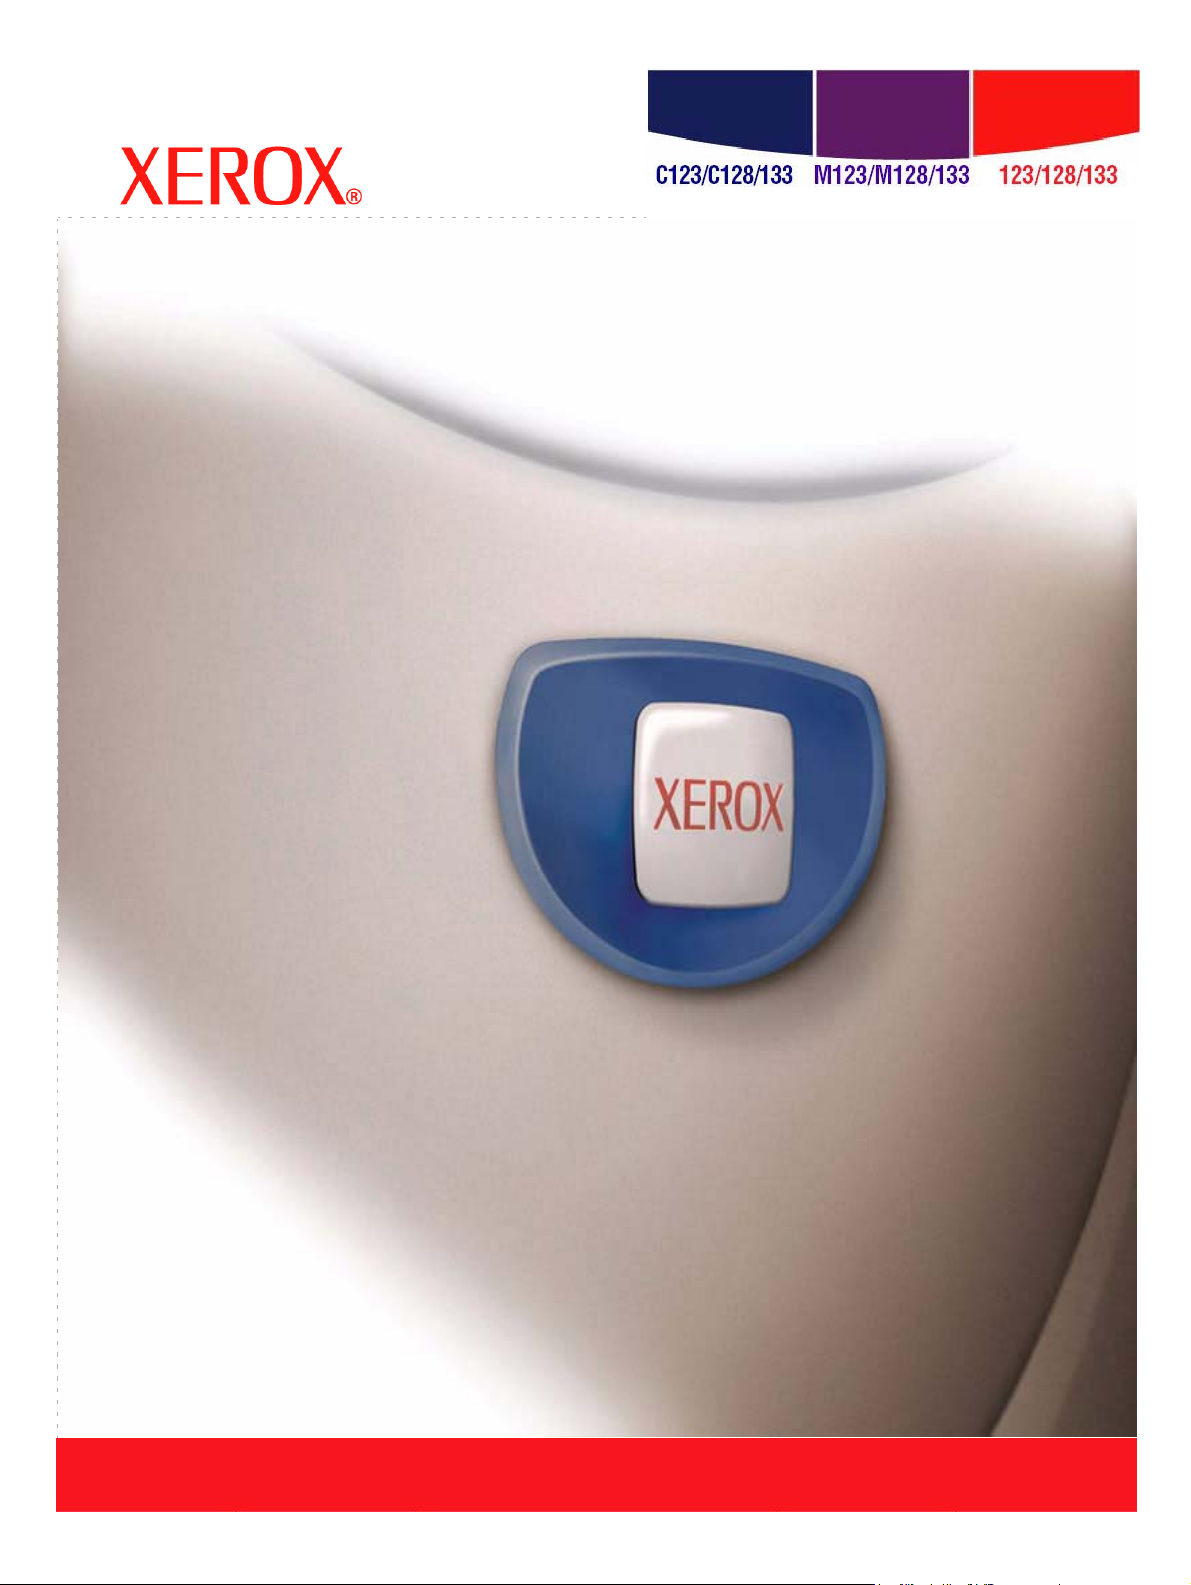
Configuration Tab Settings
This section describes the settings of the Configuration tab.
Select the function that you want to set in the Features List and change the settings in the
Change box below.
Settings
NOTE: You can restore defaults by clicking [Restore Defaults].
NOTE: The settings that can be selected vary depending on which options have been
installed. Change these settings only after confirming that the option settings are
complete. See Options Tab Settings on page 14.
Image Enhancement - Specifies whether or not to use the Image Enhancement function.
Selecting [On] smooths out boundaries when printing. This reduces jagged edges by artificially
increasing the resolution of the image. When printing a bitmapped image composed of coarse
halftone dots, smooth color gradation is impossible in certain situations. In this case, select [Off].
Draft Mode - Specifies whether or not to reduce the amount of toner used when printing drafts.
When [On] is selected, the overall printed color becomes lighter. This is best for printing
documents when high print quality is not necessary.
Print Mode - Specifies whether to give priority to the print speed or the image quality.
Stapling - Specifies whether or not to staple printed documents and the position of the staple.
You can staple 2 to 50 sheets of 80 g/m
2
or lighter paper.
12 Xerox WorkCentre/WorkCentre Pro 123/128/133 PostScript® User Guide
Page 13

2 Operation with Windows 95/98/Me
NOTE: You cannot use staples in the following situations.
– When anything other than Finisher Tray is selected for Output Destination in the
Advanced tab.
– When Job Offset is selected.
Bypass Feed Orientation - Specifies the paper orientation when printing from the bypass tray.
When feeding the short edge of the paper first, select [Landscape]. When feeding the long edge
of the paper, select [Portrait].
Offset Stacking - The position of individual jobs or sets of copies are shifted to either side of
the output tray to enable easy separation.
Feed Separators from - Specifies the paper tray that transparency dividers are to be fed from.
When [Auto] is selected, the tray set on the machine is used as the feed destination.
Print on Separators - Specifies whether or not to print on the transparency dividers as well as
the transparency.
Paper Type (Separators) - Specifies a paper type for the transparency divider.
Collated - Selects whether to collate a multiple-page file per set when they are printed.
Halftone - Select the halftone settings for printing.
Select [Fine Dots] for the small size halftone dot commonly used in PostScript.
Select [Thick Dots] for coarser dots than the Fine Dots setting.
Select [Type 3] for the same halftone setting that is used in PCL.
Custom Paper Auto Orientation - Specifies whether or not to correct the orientation of the
custom paper.
Substitute Tray - Specifies what action to take when the paper for the print size is not loaded
in the machine.
Use Printer Settings - Use the printer settings. The settings can be confirmed on
the control panel.
Display Message - Display paper supply messages on the control panel. Printing
is impossible until paper is supplied.
Use Nearest Size (Adjust to Fit) - Selects the nearest paper size and automatically
adjusts the image size as necessary.
Use Nearest Size (No Zoom) - Selects the nearest paper size and prints the same
size as the image.
Use Larger Size (Adjust to Fit) - Selects paper larger than the original and
automatically adjusts the image size as necessary.
Use Larger Size (No Zoom) - Selects paper larger than the original and prints the
same size as the image.
Feed from Bypass Tray - Feed from bypass tray.
Print Mixed Size Originals - Controls the orientation of the second-side image when printing
double-sided.
Available Printer Memory - Enter the amount of usable printer memory (in KB) in the Edit box.
Usually, it is not necessary to change this.
Available Font Cache - Enter the amount of memory available for the font cache (in KB) in the
Edit box. Usually, it is not necessary to change this.
Account Mode - Specifies if all users or only System Administrators can change authentication
related settings.
Xerox WorkCentre/WorkCentre Pro 123/128/133 PostScript® User Guide 13
Page 14
2 Operation with Windows 95/98/Me
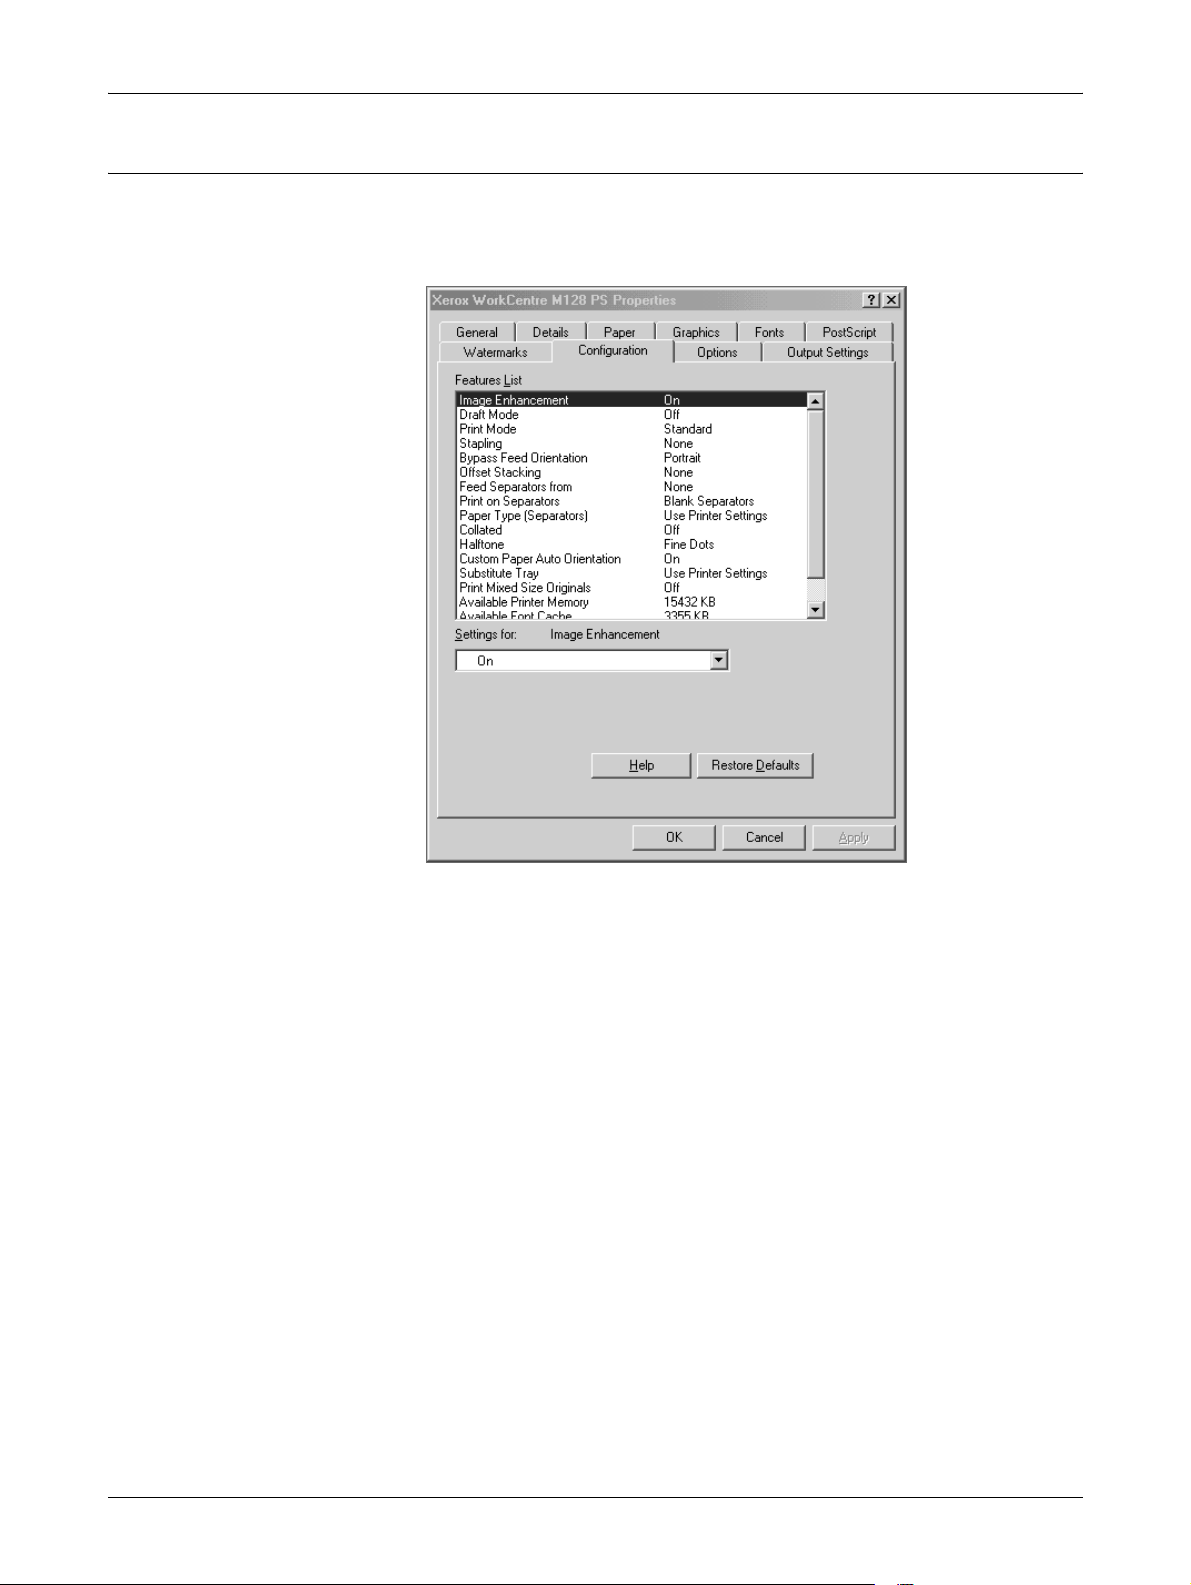
Options Tab Settings
This section describes the settings in the Options tab.
Select the items in Hardware Options and change them in the Change box below. To use this
function, it is necessary to make appropriate settings in this tab.
Settings
NOTE: You can restore defaults by clicking [Restore Default].
Hard Disk - Specifies whether or not the Hard Disk (optional) is installed. If it is, set to
[Available].
Tray Options - Specifies the paper tray type installed on the machine.
When [2-Tray Unit] is selected, Tray 3 and Tray 4 can be used.
When [2-Tray Unit (High Capacity)] is selected, Tray 3 and Tray 4 can be used as the high
capacity feeder.
Finisher - Specifies if the Finisher (optional) is installed. If it is, set to [Available].
Paper Size Setting - Specifies the paper size group for different areas to enable the selection
of paper size common to that location.
Switch Paper Size (8K/16K) - Indicate your language preference to enable the set of 8K and
16K paper size that is best suited to your needs.
Memory - Specify the amount of printer memory.
14 Xerox WorkCentre/WorkCentre Pro 123/128/133 PostScript® User Guide
Page 15
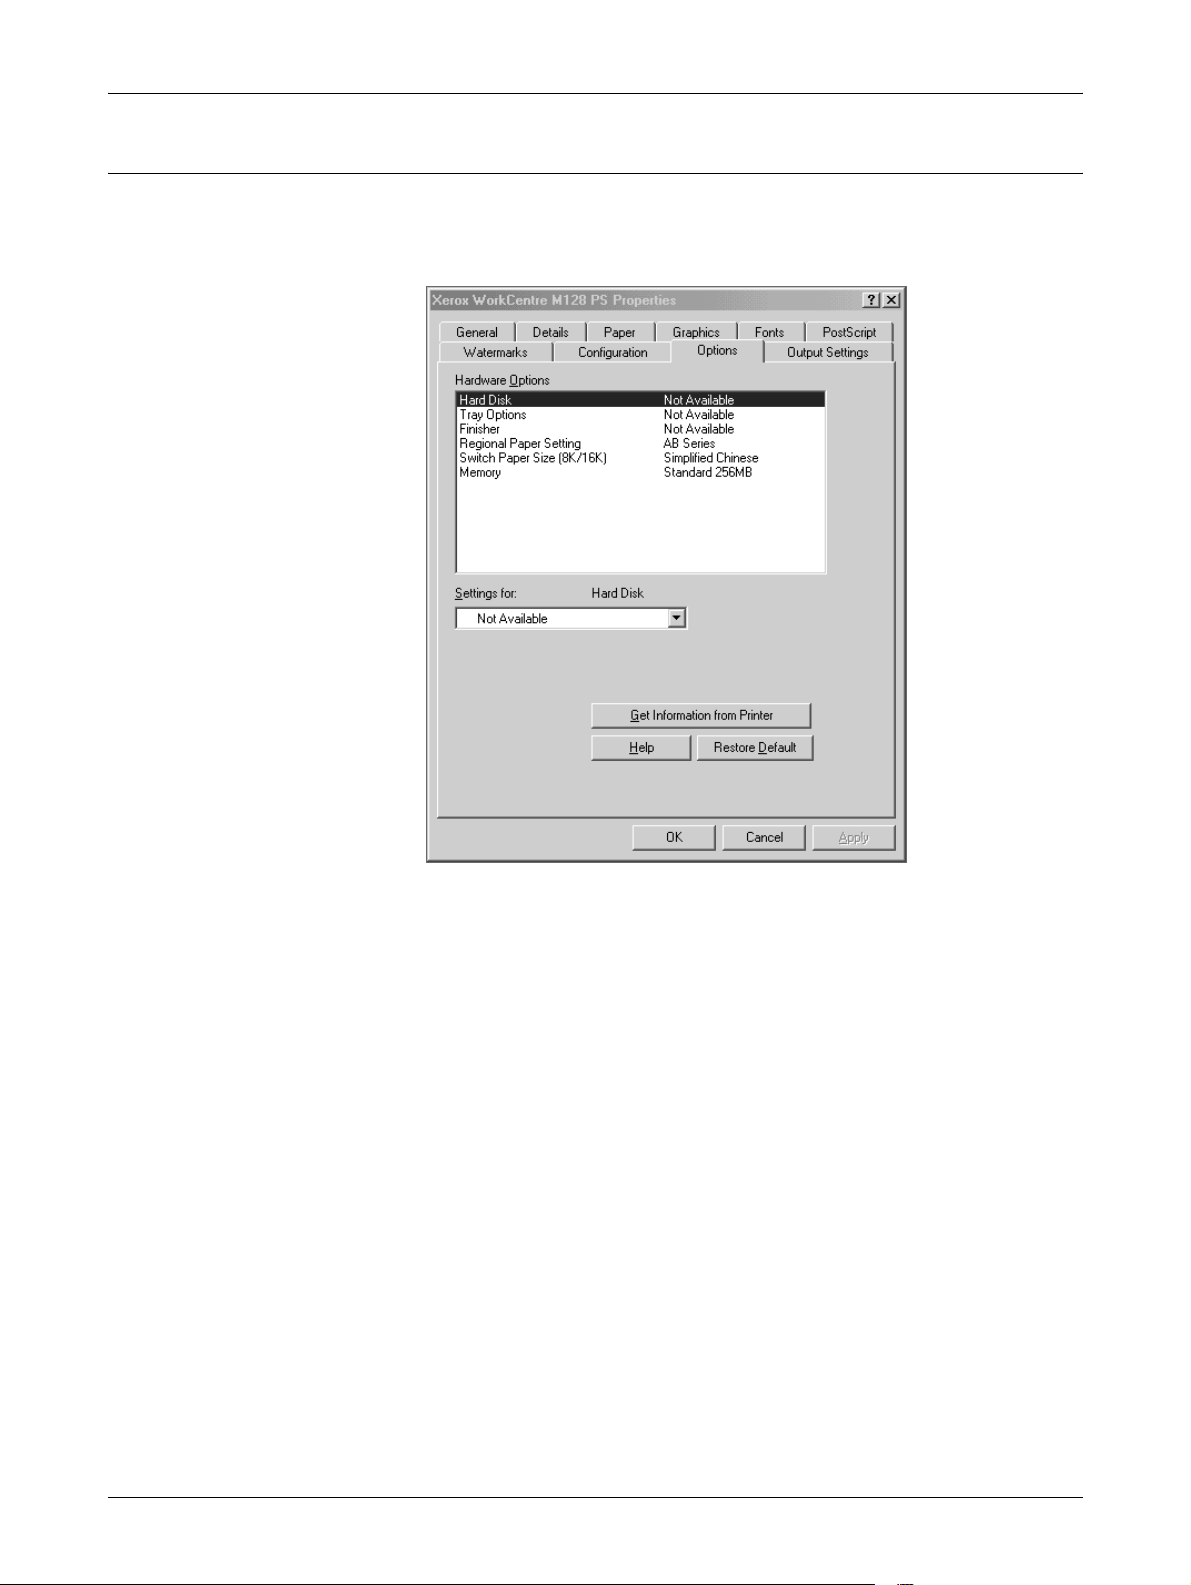
Output Settings Tab Settings
This section describes the settings in the Output Settings tab.
2 Operation with Windows 95/98/Me
Job Type
NOTE: You can restore defaults by clicking [Restore Defaults].
You can specify the print function for Secure Print, Sample Print, and Delayed Print.
Secure Print temporarily stores print jobs in the printer, and then prints them when print
instructions are received from the control panel.
Sample Print outputs only one copy when multiple copies are specified. If there is no problem,
the remaining sets can be printed.
Delayed Print temporarily stores print jobs in the printer, and then prints them at the scheduled
time.
To use Secure Print, Sample Print, or Delayed Print feature, input the User ID and password for
Print Type in the Configuration tab. The password entered appears as asterisks(*).
Normal Print - Select when you do not want to output secure prints, sample prints, or delayed
prints.
Secure Print - Select when you want to output secure prints.
Sample Print - Select when you want to output sample prints.
NOTE: The Collated setting must be selected in the Page Setup tab, under the
application's File menu, when using Job Type.
Delayed Print - Select when you want to output delayed prints.
See the On-line Help for details on the operation of the printer.
Xerox WorkCentre/WorkCentre Pro 123/128/133 PostScript® User Guide 15
Page 16

2 Operation with Windows 95/98/Me
User ID - Displays the User ID for Job Type. The user ID displayed is the User ID specified on
the Configuration tab. This option can only be selected when the setting on the Configuration
tab has been completed. This is a display-only item and cannot be changed here.
Password - Displays password for Secure Print password specified in the Configuration tab.
Each digit that you enter appears as an asterisk (*). This option can only be selected when the
setting on the Configuration tab has been completed. This is a display-only item and cannot be
changed here.
Retrieve Document Name - Select the method of specifying the document name. If you have
selected Auto Retrieve, the valid document name can be up to 24 alphanumeric characters.
Document Name - When “Enter Document Name” is selected in the Retrieve Document Name
list, a document name up to 24 alphanumeric characters can be specified.
Start Print Time - Specifies the time that a Delayed Print job will be printed. Place the cursor in
the hour or minute box and press the up or down triangle to specify the start time. You can also
set the time by entering the time directly into in the boxes. The default setting is 00:00.
Settings
Output Size - Selects the size of the paper used for output. The output is automatically enlarged
or reduced, depending on the paper size selected here and the paper size selected in the Paper
tab.
For example, when you select [B5] in Paper Size on the Paper tab, and select [A4] as the Output
Size, the output is automatically enlarged and printed.
When you select [None], the job is printed based on the Paper Size selected in the application.
Banner Sheet - Specifies whether or not to add a banner sheet to printed output.
When [Use Printer Settings] is selected, the printer settings are used.
When [Printer Start Page] is selected, outputs the banner sheet using the start-sheet.
E-mail Job Confirmation - Specifies whether or not to use the Mail Notify feature to notify the
end of the print job via e-mail. Default is [Off].
E-Mail Address - Specifies the e-mail address for the Mail Notify feature.
Display warning message about Output Settings - When printing, the printer driver checks
whether the Output Size setting conflicts with other settings.
When this is activated, a dialog box appears if there is a conflict during printing. Check the
content of the dialog box and resolve the conflicting function to continue printing.
When this is inactive, no conflict dialog box appears, but the conflicting setting is automatically
resolved and printing continues.
Image Rotation (180deg) - Set the checkbox to rotate the prints by 180°. Default is [Off].
How to Use Help
The following describes how to use Help.
1. Click and a ? mark appears next to the pointer. You can then click items for
which you need explanations, opening a pop-up window that contains relevant
information. Click inside the pop-up window to close it.
2. Click [Help], an explanation of the current tab appears as Help information.
16 Xerox WorkCentre/WorkCentre Pro 123/128/133 PostScript® User Guide
Page 17

3 Operation with Windows NT 4.0
The following information can be found in this chapter:
• About the Software
– Bundled Software
– Hardware/Software Requirements
• Installing the Adobe PostScript Printer Driver
– Installation Procedure
• Device Options and Print Settings
– Device Settings Tab Settings
– Configuration Tab Settings
– Advanced Tab Settings
– Output Settings Tab Settings
• How to Use Help
About the Software
This section describes the software for Windows NT 4.0 that is included on the
PostScript Driver Library CD-ROM.
Bundled Software
The following items are included on the CD-ROM.
Adobe PostScript Printer Driver (ver. 5.2.2) and PPD files - Adobe PostScript driver
and PPD files (for Windows NT 4.0).
ATM (Adobe Type Manager)(ver. 4.0) - Helps you to install typefaces and activate
and manage your fonts.
Adobe Screen Fonts (TrueType/PostScript) - Includes 136 screen fonts (19
TrueType fonts and 117 PostScript fonts), which are compatible with the printer fonts.
ATM is used to install the PostScript screen fonts. When using these fonts to print, it is
recommended that you use the Adobe PostScript (5.2.2) printer driver.
Adobe Acrobat Reader - Allows you to view and print PDF files on all major computing
platforms.
Xerox WorkCentre/WorkCentre Pro 123/128/133 PostScript® User Guide 17
Page 18

3 Operation with Windows NT 4.0
Hardware/Software Requirements
The minimum system requirements for the Windows NT 4.0 printer driver are described
below.
Computer System
Personal computer in which the Windows NT 4.0 OS can operate.
Basic Software
Windows NT Workstation 4.0/Windows NT Server 4.0 (Service Pack 6a or later)
Installing the Adobe PostScript Printer Driver
Install the Adobe PostScript 5.2.2 printer driver onto Windows NT by following the
procedure below.
It is possible to cancel installation of the printer driver by clicking [Cancel] in the dialog
box displayed during installation. You can also click [Back] to delete the settings in that
dialog box and return to the previous dialog box.
Installation Procedure
1. Start Windows NT 4.0.
NOTE: Log on as a Power User group member or an Administrator. Refer to the
Windows NT 4.0 documentation for details about the Power User group.
2. On the Start menu, point to Settings and click [Printers].
3. In the Printer window, double-click [Add Printer].
4. Select how the printer is connected to the computer and click [Next]. Select [My
Computer] if the printer is connected directly to the computer or to the network in
the TCP/IP(LPD) environment. Select [Network printer server] in other cases. The
following is an example of a local printer.
NOTE: Specify the target printer in the Connect to Printer dialog box if you selected
[Network printer server].
5. Select the port you are using and click [Next].
6. Insert the PostScript Driver Library CD-ROM in the CD-ROM drive.
7. Click [Have Disk].
8. Enter “Drive Name:\English\PrinterDriver\NT40” in the “Copy manufacturer’s files
from:” box and click [OK].
In this guide, we have used “E:” as the CD-ROM drive. If you are using a different
drive for the CD-ROM, specify accordingly.
NOTE: Click [Browse] to specify a folder on the CD-ROM.
18 Xerox WorkCentre/WorkCentre Pro 123/128/133 PostScript® User Guide
Page 19

3 Operation with Windows NT 4.0
9. Select your printer model from the Printers list and click [Next].
10. Enter the printer name, specify if you want to use the printer as the default printer,
and click [Next].
11. Select [Not shared] and click [Next].
We recommend that you install the driver on each computer with the procedure
appropriate to the Operating System.
12. Specify whether or not to print a test page, then click [Finish].
Installation begins.
13. Read the End User License Agreement and click [Agree].
When you click [Disagree], see If you click Disagree in the License Agreement on
page 19 for details.
14. Confirm that the printer has been added in the Printers window.
This completes installation of the printer driver. Remove the CD-ROM from the drive.
See Device Options and Print Settings on page 19 to configure the printer.
Store your CD-ROM in a safe place.
If you click Disagree in the License Agreement
Click [No] to return to step 13 and continue the operation.
Click [Yes] to cancel the installation. A printer is added in the Printers window, but the
printer driver is not installed properly.
Select the printer and click [Properties] on the File menu. The Re-installation tab is
added to the printer driver properties dialog box. Follow the directions on that tab.
When you finish reinstalling, see Device Options and Print Settings on page 19 to set
up the printer.
Device Options and Print Settings
This section describes printer specific settings for printer driver properties and
document presets.
• Installable Options in the Device Settings Tab
• Configuration Tab
• Printer Specific Sections in the Device Settings of the Advanced Tab
• Output Settings Tab
NOTE: You can also refer to Help for explanations of these settings. See How to Use
Help on page 26.
To view the Device Settings or Configuration tabs, select the printer icon in the Printers
window, then click Properties on the File menu.
Xerox WorkCentre/WorkCentre Pro 123/128/133 PostScript® User Guide 19
Page 20

3 Operation with Windows NT 4.0
To view the Advanced or Output Settings tabs, select the printer icon in the Printers
window, then click Document Defaults on the File menu.
NOTE: This guide uses the screens for WorkCentre M128 but the features of the other
products are the same as WorkCentre M128.
Device Settings Tab Settings
This describes Installable Options in the Device Settings tab. To print correctly, it is
necessary to make appropriate settings in this tab.
Select the items in Installable Options and change the settings in the Change Setting
box at the bottom of the tab.
Settings
Memory - Specifies the amount of printer memory.
Hard Disk - Specifies whether or not the Hard Disk (optional) is installed. If it is, set to
[Available].
Tray Options - Specifies the paper tray type installed on the machine.
When [2-Tray Unit] is selected, Tray 3 and Tray 4 can be used.
When [2-Tray Unit (High Capacity)] is selected, Tray 3 and Tray 4 can be used as the
high capacity feeder.
Finisher - Specifies if the Finisher (optional) is installed. If it is, set to [Available].
Regional Paper Setting - Specifies the paper size group for different areas to enable
the selection of paper size common to that location.
20 Xerox WorkCentre/WorkCentre Pro 123/128/133 PostScript® User Guide
Page 21

Switch Paper Size (8K/16K) - Indicate your language preference to enable the set of
8K and 16K paper size that is best suited to your needs.
Configuration Tab Settings
This section describes the settings of the Configuration tab.
3 Operation with Windows NT 4.0
Settings
NOTE: You can restore defaults by clicking [Restore Defaults].
Account Mode - Specifies if all users or only System Administrators can change
authentication related settings.
Detailed User Settings - Sets the authentication information.
Use Default User Settings - The values set in this feature are used as the
authentication parameters.
– Specify Job Owner Name - Select how to specify User ID.
– Job Owner Name - Enter a User ID.
– Password - Enter the Password for the User ID.
– Account ID - Enter an Account ID.
– Billing ID - Enter a User ID for Charge Print.
– Password - Enter the Password for the Billing ID.
Prompt User for Settings - Select this feature to display the [Enter User Details]
dialog-box each time you start printing. The user is then required to enter
authentication information such as their User ID.
Xerox WorkCentre/WorkCentre Pro 123/128/133 PostScript® User Guide 21
Page 22

3 Operation with Windows NT 4.0
– Display Previous User Details - Check the box to store the user details entered
in the [Enter User Details] dialog-box, and display the details in the box as a
default next time.
– Hide User_ID(***) - Check the box to specify whether a user ID is to be displayed
or hidden when it is entered.
– Hide Account ID(***) - Check the box to specify whether an account ID is to be
displayed or hidden when it is entered.
High Speed Printing - Set this feature to make improvements in print speed, when
using an application that generates PostScript directly.
Get Information from Printer - Clicking [Get Information from Printer] when the
machine is used as a network printer verifies the printer option installation state using
the print port to which the printer is connected, and reflects this in the Hardware Options
setting.
Advanced Tab Settings
This section describes the settings of Printer Features in the Advanced tab.
Select the items from Printer Features under Document Options of the Advanced tab
and change the settings in the Change Setting box at the bottom of the tab.
NOTE: The settings that can be selected vary depending on which options have been
installed. Change these settings only after confirming that the option settings are
complete. See Device Settings Tab Settings on page 20.
22 Xerox WorkCentre/WorkCentre Pro 123/128/133 PostScript® User Guide
Page 23

Settings
3 Operation with Windows NT 4.0
Output Destination - Specifies the output destination.
NOTE: The items that can be selected vary according to whether the optional side tray
kit or finisher has been installed.
Offset Stacking - The position of individual jobs or sets of copies are shifted to either
side of the output tray to enable easy separation.
Feed Separators from - Specifies the paper tray that transparency dividers are to be
fed from. When [Auto] is selected, the tray set on the machine is used as the feed
destination.
Print on Separators - Specifies whether or not to print on the transparency dividers as
well as the transparency.
Paper Type (Separators) - Specifies a paper type for the transparency divider.
Stapling - Specifies whether or not to staple printed documents and the position of the
staple. You can staple 2 to 50 sheets of 80 g/m
2
or lighter paper.
NOTE: You cannot use staples in the following situations.
– When anything other than Finisher Tray is selected as the Output Destination in
the Advanced tab.
– When Job Offset is selected.
Bypass Feed Orientation - Specifies the paper orientation when printing from the
bypass tray. When feeding the short edge of the paper first, select [Landscape]. When
feeding the long edge of the paper, select [Portrait].
Print Mode - Specifies whether to give priority to the print speed or the image quality.
Halftone - Specifies the halftone settings for printing.
Select [Fine Dots] for the small size halftone dot commonly used in PostScript.
Select [Thick Dots] for coarser dots than the Fine Dots setting.
Select [Type 3] for the same halftone setting that is used in PCL.
Image Enhancement - Specifies whether or not to use the Image Enhancement
function. Selecting [On] smooths out boundaries when printing. This reduces jagged
edges by artificially increasing the resolution of the image. When printing a bitmapped
image composed of coarse halftone dots, smooth color gradation is impossible in
certain situations. In this case, select [Off].
Draft Mode - Specifies whether or not to reduce the amount of toner used when
printing drafts. When [On] is selected, the overall printed color becomes lighter. This is
best for printing documents when high print quality is not necessary.
Custom Paper Auto Orientation - Specifies whether or not to correct the orientation
of the custom paper.
Xerox WorkCentre/WorkCentre Pro 123/128/133 PostScript® User Guide 23
Page 24

3 Operation with Windows NT 4.0
Substitute Tray - Specifies what action to take when the paper for the print size is not
loaded in the machine.
Use Printer Settings - Use the printer settings. The settings can be confirmed on
the control panel.
Display Message - Display paper supply messages on the control panel. Printing
is impossible until paper is supplied.
Use Nearest Size (Adjust to Fit) - Selects the nearest paper size and automatically
adjusts the image size as necessary.
Use Nearest Size (No Zoom) - Selects the nearest paper size and prints the same
size as the image.
Use Larger Size (Adjust to Fit) - Selects paper larger than the original and
automatically adjusts the image size as necessary.
Use Larger Size (No Zoom) - Selects paper larger than the original and prints the
same size as the image.
Feed from Bypass Tray - Feed from bypass tray.
Print Mixed Size Originals - Controls the orientation of the second-side image when
printing double-sided.
Output Settings Tab Settings
This section describes the settings in the Output Settings tab.
NOTE: You can restore defaults by clicking [Restore Defaults].
24 Xerox WorkCentre/WorkCentre Pro 123/128/133 PostScript® User Guide
Page 25

Job Type
3 Operation with Windows NT 4.0
You can specify the print function for Secure Print, Sample Print, and Delayed Print.
Secure Print temporarily stores print jobs in the printer, and then prints them when print
instructions are received from the control panel.
Sample Print outputs only one copy when multiple copies are specified. If there is no
problem, the remaining sets can be printed.
Delayed Print temporarily stores print jobs in the printer, and then prints them at the
scheduled time.
To use Secure Print, Sample Print, or Delayed Print feature, input the User ID and
password for Print Type in the Configuration tab. The password entered appears as
asterisks(*).
Normal Print - Select when you do not want to output secure prints, sample prints, or
delayed prints.
Secure Print - Select when you want to output secure prints.
Sample Print - Select when you want to output sample prints.
NOTE: The Collated setting must be selected in the Page Setup tab when using Print
Type.
Delayed Print - Select when you want to output delayed prints.
See the On-line Help for details on the operation of the printer.
User ID - Displays the User ID for Job Type. The user ID displayed is the User ID
specified on the Configuration tab. This option can only be selected when the setting
on the Configuration tab has been completed. This is a display-only item and cannot
be changed here.
Password - Displays the password for Secure Print as specified in the Configuration
tab. Each digit entered appears as an asterisk (*). This option can only be selected
when the setting on the Configuration tab has been completed. This is a display-only
item and cannot be changed here.
Retrieve Document Name - Select the method for specifying the document name. If
you have selected Auto Retrieve, the valid document name can be up to 24
alphanumeric characters.
Document Name - When “Enter Document Name” is selected in the Retrieve
Document Name list, a document name up to 24 alphanumeric characters can be
specified.
Start Print Time - Specifies the time that a Delayed Print job will be printed. Place the
cursor in the hour or minute box and press the up or down triangle to specify the start
time. You can also set the time by entering the time directly into in the boxes. The
default setting is 00:00.
Xerox WorkCentre/WorkCentre Pro 123/128/133 PostScript® User Guide 25
Page 26

3 Operation with Windows NT 4.0
Settings
Banner Sheet - Specifies whether or not to add a banner sheet to the printed output.
When [Use Printer Settings] is selected, the printer settings are used.
When [Print Start Page] is selected, outputs the banner sheet using the start-sheet.
E-mail Job Confirmation - Specifies whether or not to use the Mail Notify feature to
notify the end of the print job via e-mail. Default is [Off].
E-Mail Address - Specifies the e-mail address for the Mail Notify feature.
Image Rotation (180deg) - Set the checkbox to [On] to rotate the prints by 180°.
Default is [Off].
How to Use Help
The following describes how to use Help.
1. Click and a ? mark appears next to the pointer. You can then click items for
which you need explanations, opening a pop-up window that contains relevant
information. Click inside the pop-up window to close it.
2. Click [Help], an explanation of the current tab appears as Help information.
26 Xerox WorkCentre/WorkCentre Pro 123/128/133 PostScript® User Guide
Page 27

4 Operation with Windows 2000,
Windows XP and Windows Server 2003
The following information can be found in this chapter:
• About the Software
– Bundled Software
– Hardware/Software Requirements
• Installing the Printer Driver
– Installation Procedure
• Device Options and Print Settings
– Device Settings Tab Settings
– Configuration Tab Settings
– Advanced Options Dialog Box Settings
– Output Settings Tab Settings
• How to Use Help
About the Software
This section describes the software for Windows 2000, Windows XP and Windows
Server 2003 included with the PostScript Driver Library CD-ROM.
Bundled Software
The following items are included on the CD-ROM and are necessary when using the
printer on Windows 2000, Windows XP and Windows Server 2003.
Microsoft PostScript 5 Driver and PPD files - Microsoft PostScript 5 Driver and PPD
files (for Windows 2000, Windows XP and Windows Server 2003).
Adobe Acrobat Reader - Allows you to view and print PDF files on all major computing
platforms.
Xerox WorkCentre/WorkCentre Pro 123/128/133 PostScript® User Guide 27
Page 28

4 Operation with Windows 2000, Windows XP and Windows Server 2003
Hardware/Software Requirements
The minimum system requirements for the Windows 2000, Windows XP and Windows
Server 2003 printer driver are described below.
Computer System
Personal computer in which the Windows 2000/Windows XP/Windows Server 2003 OS
can operate.
Basic Software
• Windows 2000 Professional
• Windows 2000 Server
• Windows 2000 Advanced Server
• Windows XP Professional Edition
• Windows XP Home Edition
• Windows Server 2003
Installing the Printer Driver
Install MS PostScript 5 printer driver onto Windows 2000, Windows XP and Windows
Server 2003 by following the procedure below.
This section described how to install the printer driver for Windows 2000, as an
example.
NOTE: It is possible to cancel installation of the printer driver by clicking [Cancel] in
the dialog box displayed during installation. You can also click [Back] to delete the
settings in that dialog box and return to the previous dialog box.
NOTE: If you want to set up Port 9100, refer to the System Administration Guide.
Installation Procedure
1. Start Windows 2000.
NOTE: Log on as a Power User group member or an Administrator. Refer to the
Windows 2000 documentation for details about the Power User group.
2. On the Start menu, point to Settings and click [Printers].
3. In the Printers window, double-click [Add Printer].
4. Click [Next].
5. Select how the printer is connected to the computer and click [Next].
Select [Local printer] if the printer is connected directly to the computer or to the
28 Xerox WorkCentre/WorkCentre Pro 123/128/133 PostScript® User Guide
Page 29

4 Operation with Windows 2000, Windows XP and Windows Server 2003
network in the TCP/IP(LPD) environment. Otherwise, select [Network printer]. The
following is an example of a Local printer.
NOTE: When you select [Local printer], deselect the “Automatically detect and install
my Plug and Play printer” check box.
NOTE: Specify the target printer in the Connect to printer dialog box if you selected
[Network printer].
6. Select the port you are using and click [Next].
When the printer is connected in the TCP/IP(LPD) environment:
1) Click [Create a new port].
2) Select Standard TCP/IP Port in the Type list and click [Next].
3) Click [Next].
4) Enter the IP address of the printer in Printer Name or IP Address, then click
[Next].
Click [Finish] in the dialog box that will be displayed.
7. Insert the PostScript Driver Library CD-ROM in the CD-ROM drive.
8. Click [Have Disk].
9. Enter “Drive Name:\English\PrinterDriver\win2000” in the “Copy manufacturer’s
files from:” box and click [OK].
In this guide, we have used “E:” as the CD-ROM drive. If you are using a different
drive for the CD-ROM, specify accordingly.
NOTE: Click [Browse] to specify a folder on the CD-ROM.
10. Select your printer model from the Printers list and click [Next].
11. Enter the printer name, set whether you want to use it as the default printer, and
click [Next].
12. Select [Do not share this printer] and click [Next].
We recommend that you install the driver on each computer with the procedure
appropriate to the Operating System.
13. Specify whether or not to print a test page, then click [Next].
14. After confirming the settings displayed, click [Finish].
NOTE: If the dialog box “Digital Signature Not Found” appears, click [Yes] to continue
the installation.
Installation begins.
15. Confirm that the printer has been added in the Printers window.
This completes the installation of the printer driver. Remove the CD-ROM from the
drive.
See Device Options and Print Settings on page 30 to configure the printer.
Store your CD-ROM in a safe place.
Xerox WorkCentre/WorkCentre Pro 123/128/133 PostScript® User Guide 29
Page 30

4 Operation with Windows 2000, Windows XP and Windows Server 2003
Device Options and Print Settings
This section describes printer specific settings for printer driver properties. For other
items, refer to the Help.
• Installable Options in the Device Settings Tab
• Configuration Tab
• Printer Specific Sections in Printer Features of the Advanced Options Dialog Box
• Output Settings Tab
NOTE: You can also refer to Help for explanations of these settings. See How to Use
Help on page 37.
To view the Device Settings or Configuration tabs, select the printer in the Printers
window, then click [Properties] on the File menu.
To view the Advanced Options dialog box, select the printer in the Printers window,
then click [Printing Preferences] on the File menu. Click [Advanced] in the Layout
screen.
To view the Output Settings tab, select the printer in the Printers window, then click
[Printing Preferences] on the File menu.
NOTE: This guide uses the screens for WorkCentre M128 but the features of the other
products are the same as WorkCentre M128.
30 Xerox WorkCentre/WorkCentre Pro 123/128/133 PostScript® User Guide
Page 31

4 Operation with Windows 2000, Windows XP and Windows Server 2003
Device Settings Tab Settings
This section describes Installable Options in the Device Settings tab. To print correctly,
it is necessary to make the appropriate settings in this tab.
Select the items in Installable Options and change the settings in the menu that
appears on the right.
Settings
Memory - Specifies the amount of printer memory.
Hard Disk - Specifies whether or not the Hard Disk (optional) is installed. If it is, set to
[Available].
Tray Options - Specifies the paper tray type installed on the machine.
When [2-Tray Unit] is selected, Tray 3 and Tray 4 can be used.
When [2-Tray Unit (High Capacity)] is selected, Tray 3 and Tray 4 can be used as the
high capacity feeder.
Finisher - Specifies if the Finisher (optional) is installed. If it is, set to [Available].
Paper Size Setting - Specifies the paper size group for different areas to enable the
selection of paper size common to that location.
Switch Paper Size (8K/16K) - Indicate your language preference to enable the set of
8K and 16K paper size that is best suited to your needs.
Xerox WorkCentre/WorkCentre Pro 123/128/133 PostScript® User Guide 31
Page 32

4 Operation with Windows 2000, Windows XP and Windows Server 2003
Configuration Tab Settings
This section describes the settings of the Configuration tab.
Settings
NOTE: You can restore defaults by clicking [Restore Defaults].
Account Mode - Specifies if all users or only System Administrators can change
authentication related settings.
Detailed User Settings - Sets the authentication information.
Use Default User Settings - The values set in this feature are used as the
authentication parameters.
– Specify Job Owner Name - Select how to specify User ID.
– Job Owner Name - Enter a User ID.
– Password - Enter the Password for the User ID.
– Account ID - Enter an Account ID.
– Billing ID - Enter a User ID for Charge Print.
– Password - Enter the Password for the Billing ID.
Prompt User for Settings - Select this feature to display the [Enter User Details]
dialog-box each time you start printing. The user is then required to enter
authentication information such as their User ID.
– Display Previous User Details - Check the box to store the user details entered
in the [Enter User Details] dialog-box, and display the details in the box as a
default next time.
32 Xerox WorkCentre/WorkCentre Pro 123/128/133 PostScript® User Guide
Page 33

4 Operation with Windows 2000, Windows XP and Windows Server 2003
– Hide User_ID(***) - Check the box to specify whether an account ID is to be
displayed or hidden when it is entered.
– Hide Account ID(***) - Check the box to specify whether an account ID is to be
displayed or hidden when it is entered.
High Speed Printing - Set this feature to make improvements in print speed, when
using an application that generates PostScript directly.
Get Information from Printer - Clicking [Get Information from Printer] when the
machine is used as a network printer verifies the printer option installation state using
the print port to which the printer is connected, and reflects this in the Hardware Options
setting.
Advanced Options Dialog Box Settings
This section describes the settings of the Advanced Options dialog box displayed when
clicking Advanced in the Layout tab.
Select the items from Printer Features and change them on the menu displayed to the
right.
Xerox WorkCentre/WorkCentre Pro 123/128/133 PostScript® User Guide 33
Page 34

4 Operation with Windows 2000, Windows XP and Windows Server 2003
Settings
Output Destination - Specifies the output destination.
NOTE: The items that can be selected vary according to whether the optional side tray
kit or finisher has been installed.
Offset Stacking - The position of individual jobs or sets of copies are shifted to either
side of the output tray to enable easy separation.
Feed Separators from - Specifies the paper tray that transparency dividers are to be
fed from. When [Auto] is selected, the tray set on the machine is used as the feed
destination.
Print on Separators - Specifies whether or not to print on the transparency dividers as
well as the transparency.
Paper Type (Separators) - Specifies a paper type for the transparency divider.
Stapling - Specifies whether to staple printed documents and the position of the staple.
You can staple 2 to 50 sheets of 80 g/m
2
or lighter paper.
NOTE: You cannot use staples in the following situations.
– When anything other than Finisher Tray is selected as the Output Destination in
the Advanced tab.
– When Job Offset is selected.
Bypass Feed Orientation - Specifies the paper orientation when printing from the
bypass tray. When feeding the short edge of the paper first, select [Landscape]. When
feeding the long edge of the paper, select [Portrait].
Print Mode - Specifies whether to give priority to the print speed or the image quality.
Halftone - Specifies the halftone settings for printing.
Select [Fine Dots] for the small size halftone dot commonly used in PostScript.
Select [Thick Dots] for coarser dots than the Fine Dots setting.
Select [Type 3] for the same halftone setting that is used in PCL.
Image Enhancement - Specifies whether to use the Image Enhancement function.
Selecting [On] smooths out boundaries when printing. This reduces jagged edges by
artificially increasing the resolution of the image. When printing a bitmapped image
composed of coarse halftone dots, smooth color gradation is impossible in certain
situations. In this case, select [Off].
Draft Mode - Specifies whether or not to reduce the amount of toner used when
printing drafts. When [On] is selected, the overall printed color becomes lighter. This is
best for printing documents when high print quality is not necessary.
Custom Paper Auto Orientation - Specifies whether or not to correct the orientation
of the custom paper.
Substitute Tray - Specifies what action to take when the paper for the print size is not
loaded in the machine.
Use Printer Settings - Use the printer settings. The settings can be confirmed on
the control panel.
34 Xerox WorkCentre/WorkCentre Pro 123/128/133 PostScript® User Guide
Page 35

4 Operation with Windows 2000, Windows XP and Windows Server 2003
Display Message - Display paper supply messages on the control panel. Printing
is impossible until paper is supplied.
Use Nearest Size (Adjust to Fit) - Selects the nearest paper size and automatically
adjusts the image size as necessary.
Use Nearest Size (No Zoom) - Selects the nearest paper size and prints the same
size as the image.
Use Larger Size (Adjust to Fit) - Selects paper larger than the original and
automatically adjusts the image size as necessary.
Use Larger Size (No Zoom) - Selects paper larger than the original and prints the
same size as the image.
Feed from Bypass Tray - Feed from bypass tray.
Print Mixed Size Originals - Controls the orientation of the second-side image when
printing double-sided.
Output Settings Tab Settings
This section describes the Output Settings tab.
NOTE: You can restore defaults by clicking [Restore Defaults].
Xerox WorkCentre/WorkCentre Pro 123/128/133 PostScript® User Guide 35
Page 36

4 Operation with Windows 2000, Windows XP and Windows Server 2003
Job Type
You can specify the print function for Secure Print, Sample Print, and Delayed Print.
Secure Print temporarily stores print jobs in the printer, and then prints them when print
instructions are received from the control panel.
Sample Print outputs only one copy when multiple copies are specified. If there is no
problem, the remaining sets can be printed.
If there is no problem, the remaining sets are printed.
Delayed Print temporarily stores print jobs in the printer, and then prints them at the
scheduled time.
To use Secure Print, Sample Print, or Delayed Print feature, input the User ID and
password for Print Type in the Configuration tab. The password entered appears as
asterisks(*).
Normal Print - Select when you do not want to output secure prints, sample prints, or
delayed prints.
Secure Print - Select when you want to output secure prints.
Sample Print - Select when you want to output sample prints.
NOTE: The Collated setting must be selected in the Page Setup tab when using Print
Type.
Delayed Print - Select when you want to output delayed prints.
See the On-line Help for details on the operation of the printer.
User ID - Displays the User ID for Job Type. The user ID displayed is the User ID
specified on the Configuration tab. This option can only be selected when the setting
on the Configuration tab has been completed. This is a display-only item and cannot
be changed here.
Password - Displays the password for Secure Print as specified in the Configuration
tab. Each digit entered appears as an asterisk (*). This option can only be selected
when the setting on the Configuration tab has been completed. This is a display-only
item and cannot be changed here.
Retrieve Document Name - Select the method for specifying the document name. If
you have selected Auto Retrieve, the valid document name can be up to 24
alphanumeric characters can be specified.
Document Name - When “Enter Document Name” is selected in the Retrieve
Document Name list, a document name up to 24 alphanumeric characters.
Start Print Time - Specifies the time that a Delayed Print job will be printed. Place the
cursor in the hour or minute box and press the up or down triangle to specify the start
time. You can also set the time by entering the time directly into in the boxes. The
default setting is 00:00.
36 Xerox WorkCentre/WorkCentre Pro 123/128/133 PostScript® User Guide
Page 37

Settings
Banner Sheet - Specifies whether or not to add a banner sheet to the printed output.
When [Use Printer Settings] is selected, the printer settings are used.
When [Print Start Page] is selected, outputs the banner sheet using the start-sheet.
E-mail Job Confirmation - Specifies whether or not to use the Mail Notify feature to
notify the end of the print job via e-mail. Default is [Off].
E-Mail Address - Specifies the e-mail address for the Mail Notify feature.
Image Rotation (180deg) - Set the checkbox to [On] to rotate the prints by 180°.
Default is [Off].
How to Use Help
The following describes how to use Help.
1. Click and a ? mark appears next to the pointer. You can then click items for
which you need explanations, opening a pop-up window that contains relevant
information. Click inside the pop-up window to close it.
4 Operation with Windows 2000, Windows XP and Windows Server 2003
2. Click [Help], an explanation of the current tab appears as Help information.
Xerox WorkCentre/WorkCentre Pro 123/128/133 PostScript® User Guide 37
Page 38

4 Operation with Windows 2000, Windows XP and Windows Server 2003
38 Xerox WorkCentre/WorkCentre Pro 123/128/133 PostScript® User Guide
Page 39

5 Operation on Macintosh Computers
• About the Software
– Bundled Software
– Hardware/Software Requirements
• Installing the Adobe PostScript Printer Driver
– Installation Procedure (Mac OS 9.x or earlier)
– Setting the Printer Driver (Mac OS 9.x or earlier)
– Installation Procedure (Mac OS X)
– Adding a Printer (Mac OS X)
• Options
– Printer Specific Options Settings
– Printer Driver Settings
• Installing the Screen Fonts
About the Software
This section describes the Macintosh software that is included on the PostScript Driver
Library CD-ROM.
NOTE: When using AppleTalk protocol to print from Macintosh, set the EtherTalk port
to Enable on the control panel.
Bundled Software
Insert the CD-ROM and double-click the WorkCentre-PS icon to display the Window.
The following items are contained in the folder:
Adobe PostScript Printer Driver (ver. 8.7.0, and 8.8) and PPD files - Adobe
PostScript driver and PPD files (for Macintosh).
PPD Installer - The PPD file installer for Mac OS X, 10.2.
Adobe Screen Fonts - Contains 117 PostScript fonts and 19 TrueType fonts, which
are standard for PostScript 3 printers. In addition, 37 PostScript fonts for the Central
European (CE) character set are included.
ATM (Adobe Type Manager) (ver. 4.5.2) - Helps you to install typefaces and activate
and manage your fonts.
Adobe Acrobat Reader - Allows you to view and print PDF files on all major computing
platforms.
Xerox WorkCentre/WorkCentre Pro 123/128/133 PostScript® User Guide 39
Page 40

5 Operation on Macintosh Computers
Hardware/Software Requirements
The minimum system requirements for the Macintosh printer driver and the utility are
described below.
Computer System
•Macintosh
• Power Macintosh
Basic Software
• For Adobe PostScript 8.7 - Mac OS 8.5 and 8.5.1
• For Adobe PostScript 8.8 - Mac OS 8.6 through 9.2.2
• For PPD Installer - Mac OS X 10.2
NOTE: When using Mac OS X, launch the Classic environment to run the
applications.
Installing the Adobe PostScript Printer Driver
This section describes how to install the Adobe printer driver and how to set the printer
driver for this machine. There are two steps to install the printer driver. Firstly, use the
installer enclosed on the CD-ROM to install the printer to the Macintosh. Then,
configure the printer driver according to the printer used.
Installation Procedure (Mac OS 9.x or earlier)
This section describes the procedures for installing the Adobe PostScript printer driver.
As an example, here is the procedure to install Adobe PostScript 8.8.
1. Insert the PostScript Driver Library CD-ROM in the CD-ROM drive.
The WorkCentre-PS icon appears on the desktop.
2. Double-click [WorkCentre-PS].
3. Double-click the [PrinterDriver] folder depending on your printer model, and then
the “Adobe PostScript 880” folder.
4. Double-click [Adobe PostScript Installer 8.8].
5. When the Installer opens, click [Continue].
6. Read through the license agreement carefully and if you have no objections to it,
click [Accept].
Read the Read Me displayed, then click [Continue].
7. Confirm the Install Location and change it if necessary, then click [Install].
Installation begins.
40 Xerox WorkCentre/WorkCentre Pro 123/128/133 PostScript® User Guide
Page 41

8. When the dialog box showing installation has completed appears, click [Restart]
or [Quit].
This completes the installation.
Proceed to Setting the Printer Driver (Mac OS 9.x or earlier) on page 41 to continue.
Setting the Printer Driver (Mac OS 9.x or earlier)
When you finish installing the Adobe PostScript printer driver, set the PostScript Printer
Description (PPD) file for this machine to the printer driver.
The printer driver controls the functions of this machine based on the information in the
PPD file.
NOTE: This guide uses the screens for WorkCentre M128 as examples.
1. Make sure that the machine is on.
2. Check that the machine’s EtherTalk port is set to Enable.
You can check the EtherTalk settings in the System Settings List. See User Guide
for details about how to print the System Settings List.
5 Operation on Macintosh Computers
3. On the Apple menu select [Chooser], then click [Adobe PS].
4. Select your printer from the Select a PostScript Printer list box, which appears to
the right of the Chooser, then click [Setup].
This automatically searches for the printer and sets the PPD file.
If the search for the PPD file is not automatically performed:
(1) Click [Select PPD].
Xerox WorkCentre/WorkCentre Pro 123/128/133 PostScript® User Guide 41
Page 42

5 Operation on Macintosh Computers
(2) Select your printer model in the list, then click [Select].
The PPD file for this machine is set.
5. Click [Configure] to set the options.
See Options on page 45 for details about the options.
NOTE: You can change the print settings after you install the printer driver.
NOTE: To use the options, it is necessary to set Configure. Always set this according
to the configuration of your machine. Also, Installable Options will usually be set
automatically according to the bi-directional communications of this machine. You do
not have to change the settings.
6. Click [OK]. Click [OK] once more in the screen displayed.
7. Close the Chooser.
42 Xerox WorkCentre/WorkCentre Pro 123/128/133 PostScript® User Guide
Page 43

Installation Procedure (Mac OS X)
Install the PostScript Printer Description (PPD) file for the Mac OS X into the Mac OS
X v10.2.x Macintosh.
This section describes how to install the PPD file on a Mac OS X v10.2.4, as an
example.
NOTE: The printer driver does not need to be installed on the Mac OS X. It uses the
Adobe PostScript driver that is provided with the Operating System.
NOTE: This guide uses the screens for WorkCentre M128 as examples.
Installation Procedure
Insert the PostScript Driver Library CD-ROM in the CD-ROM drive.
1.
The WorkCentre-PS icon appears on the desktop.
2. Double-click [WorkCentre-PS].
The WorkCentre-PS window opens.
3. Open the [Mac OS X] folder.
5 Operation on Macintosh Computers
The Mac OS X window opens.
4. Double-click [PPD Installer].
The installer starts and the Authenticate window opens.
5. Enter the Administrator’s user name and password, then click [OK].
The License screen opens.
6. Read through the license agreement carefully and if you have no objections to it,
click [Accept].
7. Confirm the Install Location and change it if necessary, then click [Install].
8. When the dialog box showing installation has completed appears, click [Quit].
This completes the installation.
Proceed to Adding a Printer (Mac OS X) on page 43 to continue.
Adding a Printer (Mac OS X)
After the PPD file has been installed, set the PPD file for the printer driver, and then
add the printer.
The printer driver controls the printer functions based on the information in the PPD file.
As an example, this section describes how to add a printer on a Mac OS X v10.2.4.
NOTE: This guide uses the screens for WorkCentre M128 as examples.
Procedure
1. Make sure that the machine is on.
Xerox WorkCentre/WorkCentre Pro 123/128/133 PostScript® User Guide 43
Page 44

5 Operation on Macintosh Computers
2. Check that the machine’s port is set to Enable.
– When using AppleTalk, set the EtherTalk port to Enable.
– When using IP Printing, set the LPD port to Enable.
You can check the EtherTalk and LPD settings in the System Settings List. See the
User Guide for details about how to print the “System Settings List.”
3. Start [Print Center].
NOTE: You can find Print Center in the Utilities folder in the Applications folder.
4. When the Printer List screen opens, click [Add].
5. Select the protocol used to connect the printer.
When using AppleTalk
®
1. Select [AppleTalk] from the menu, and specify the zone for the printer being used.
2. Select the printer you are using from the list.
3. Select [Auto Select] from Printer Model.
4. Click [Add].
44 Xerox WorkCentre/WorkCentre Pro 123/128/133 PostScript® User Guide
Page 45

5 Operation on Macintosh Computers
When using IP Printing
1. Select [IP Printing] from the menu, and enter the IP address for the printer being
used in Printer’s Address.
2. Select [Xerox] from Printer Model, and select the printer to be used.
3. Click [Add].
This completes the addition of a printer.
Printer options
1. Click [Printers] on the Print Center menu bar.
2. Select Show Info.
3. Select [Installable Options], and select the options that are installed on the printer.
See Options on page 45 or details about the options.
Options
This section describes the Configure in the Chooser and the Printer Specific Options of
the printer driver.
Printer Specific Options Settings
For Mac OS 9.x and earlier
This section describes Installable Options for operating systems earlier than Mac OS
9.x.
NOTE: Usually, Installable Options are automatically set according to the bidirectional
communications of this machine. You do not have to change the settings.
Xerox WorkCentre/WorkCentre Pro 123/128/133 PostScript® User Guide 45
Page 46
5 Operation on Macintosh Computers
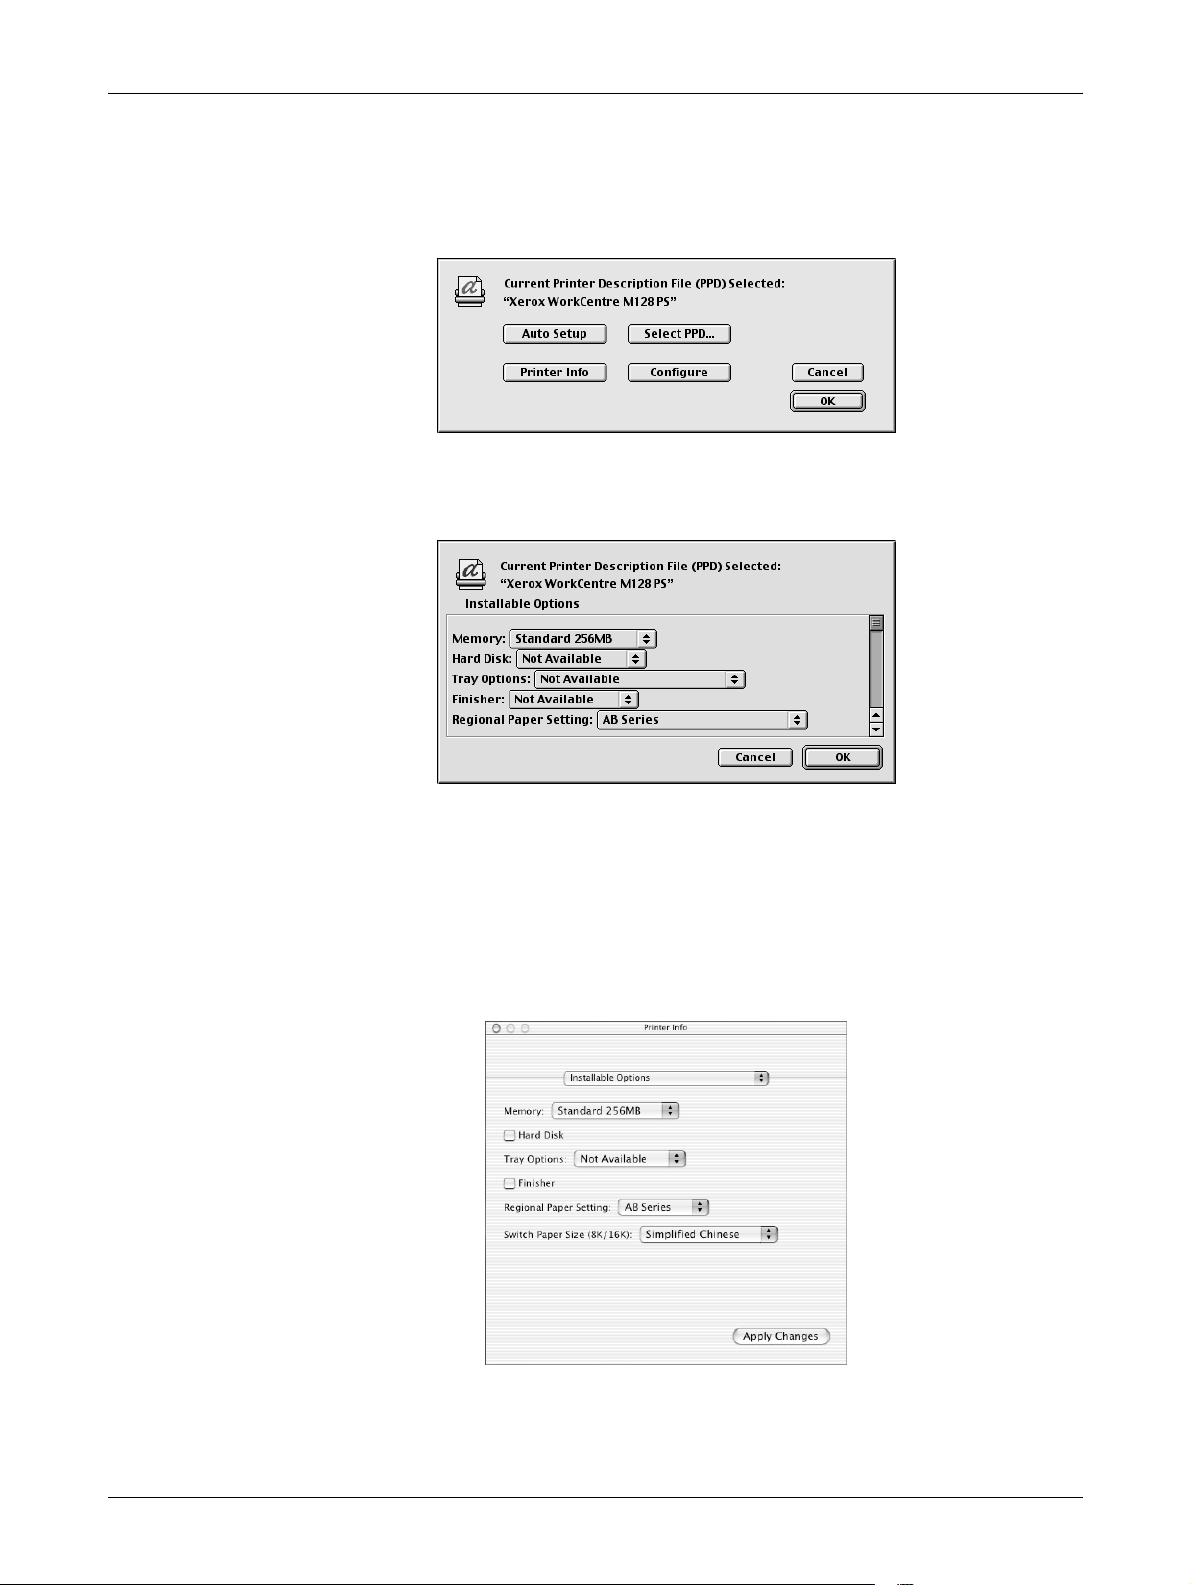
1. Select the printer using the Chooser and click [Setup].
The Current Printer Description File (PPD) Selected dialog box appears.
2. Click [Configure].
The Installable Options list appears.
3. Set the option menu items in Installable Options, and click [OK].
For Mac OS X
This section describes Installable Options for Mac OS X.
1. Click [Printers] on the Print Center menu bar, and select [Show Info].
2. Select [Installable Options], and select the options that have been installed on the
printer.
46 Xerox WorkCentre/WorkCentre Pro 123/128/133 PostScript® User Guide
Page 47
Settings
5 Operation on Macintosh Computers
Memory - Specifies the amount of printer memory.
Hard Disk - Click the checkbox on or off to indicate whether or not a Hard Disk is
installed on the machine.
Tray Options - Sets the tray installed on the machine.
When [2-Tray Unit] is selected, Tray 3 and Tray 4 can be used.
When [2-Tray Unit (High Capacity)] is selected, Tray 3 and Tray 4 can be used as the
high capacity feeder.
NOTE: This item is displayed in Mac OS X only.
Finisher - Click the checkbox on or off to indicate whether or not a Finisher is installed
on the machine.
Paper Size Setting - Specifies the paper size group for different areas to enable the
selection of paper size common to that location.
Switch Paper Size (8K/16K) - Indicate your language preference to enable the set of
8K and 16K paper size that is best suited to your needs.
Printer Driver Settings
This section describes Printer Specific Options, used to set the printer driver.
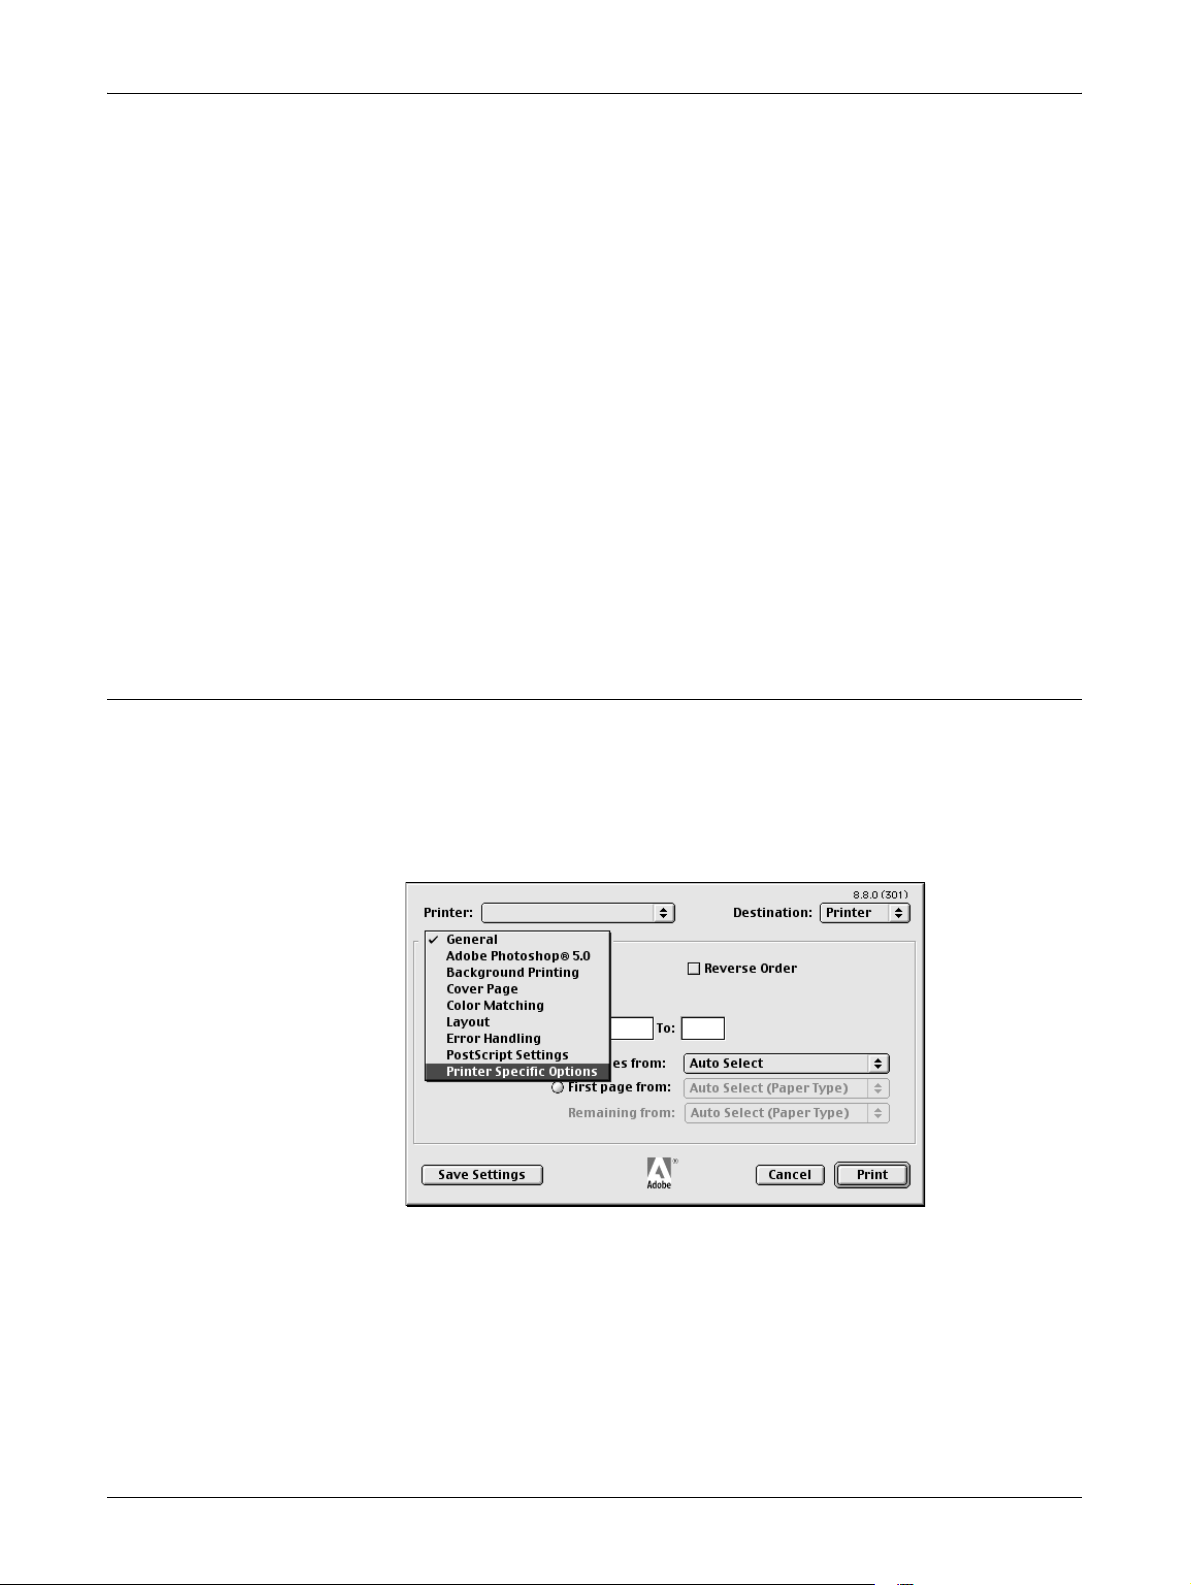
1. On the File menu of the application, click [Print].
The Print dialog box appears.
2. Select [Printer Specific Options].
Xerox WorkCentre/WorkCentre Pro 123/128/133 PostScript® User Guide 47
Page 48

5 Operation on Macintosh Computers
3. Specify the functions that you want to set.
Settings
This section describes the settings in the Printer Specific Options list.
The settings that can be selected vary depending on which options have been installed.
Make these settings after specifying the installed options in Configure. See Printer
Specific Options Settings on page 45.
Output Destination - Specifies the output destination.
NOTE: The items that can be selected vary according to whether the optional side tray
kit or finisher has been installed.
Offset Stacking - The position of individual jobs or sets of copies are shifted to either
side of the output tray to enable easy separation.
Collated - Selects whether to collate a multiple-page file per set when they are printed.
This function is enabled when the printer Hard Drive kit is installed.
Feed Separators from - Specifies the paper tray that transparency dividers are to be
fed from. When [Auto] is selected, the tray set on the machine is used as the feed
destination.
Print on Separators - Specifies whether or not to print on the transparency dividers as
well as the transparency.
Paper Type (Separators) - Specifies a paper type for the transparency divider.
Stapling - Specifies whether to staple printed documents and the position of the staple.
You can staple 2 to 50 sheets of 80 g/m
2
or lighter paper.
NOTE: You cannot use staples in the following situations.
– When anything other than Finisher Tray is selected for Output Destination in the
Advanced tab.
– When Job Offset is selected.
Bypass Feed Orientation - Specifies the paper orientation when printing from the
bypass tray. When feeding the short edge of the paper first, select [Landscape]. When
feeding the long edge of the paper, select [Portrait].
48 Xerox WorkCentre/WorkCentre Pro 123/128/133 PostScript® User Guide
Page 49

5 Operation on Macintosh Computers
Paper Type (Bypass Tray) - Specifies a paper type for the transparency divider.
Print Mode - Specifies whether to give priority to the print speed or the image quality.
Halftone - Specifies the halftone settings for printing.
Select [Fine Dots] for the small size halftone dot commonly used in PostScript.
Select [Thick Dots] for coarser dots than the Fine Dots setting.
Select [Type 3] for the same halftone setting that is used in PCL.
Image Enhancement - Specifies whether or not to use the Image Enhancement
function. Selecting [On] smooths out boundaries when printing. This reduces jagged
edges by artificially increasing the resolution of the image. When printing a bitmapped
image composed of coarse halftone dots, smooth color gradation is impossible in
certain situations. In this case, select [Off].
Draft Mode - Specifies whether or not to reduce the amount of toner used when printing
drafts. When [On] is selected, the overall printed color becomes lighter. This is best for
printing documents when high print quality is not necessary.
Custom Paper Auto Orientation - Specifies whether or not to correct the orientation
of the custom paper.
Substitute Tray - Specifies what action to take when the paper for the print size is not
loaded in the machine.
Use Printer Settings - Use the printer settings. The settings can be confirmed on
the control panel.
Display Message - Display paper supply messages on the control panel. Printing
is impossible until paper is supplied.
Use Nearest Size (Adjust to Fit) - Selects the nearest paper size and automatically
adjusts the image size as necessary.
Use Nearest Size (No Zoom) - Selects the nearest paper size and prints the same
size as the image.
Use Larger Size (Adjust to Fit) - Selects paper larger than the original and
automatically adjusts the image size as necessary.
Use Larger Size (No Zoom) - Selects paper larger than the original and prints the
same size as the image.
Print Mixed Size Originals - Controls the orientation of the second-side image when
printing double-sided.
Installing the Screen Fonts
This section explains how to install the fonts in the Screen Font folder.
It is recommended that all other applications are closed before installing the fonts.
Otherwise, a warning message appears between steps 5 and 6.
1. Start Macintosh and insert the PostScript Driver Library CD-ROM into the CD-
ROM drive.
Xerox WorkCentre/WorkCentre Pro 123/128/133 PostScript® User Guide 49
Page 50

5 Operation on Macintosh Computers
2. Double-click the [WorkCentre-PS] icon followed by the Screen Font folder and
then the [PS3 Fonts Installer].
3. When the Installer window appears, click [Continue].
The license agreement dialog appears.
4. Read through the agreement carefully and if you have no objections to it, click
[Accept].
The PS3FontsInstaller dialog box appears.
5. You may select [Easy Install] or [Custom Install].
Easy Install - installs all the fonts provided in the Screen Font folder.
Custom Install - installs the selected fonts only. Simply click on the disclosure
triangle beside the four categories of fonts to display the fonts in each category and
then check the fonts to be installed. For example, the diagram below shows that
Arial CE of the CE TrueType fonts is selected.
A warning message will appear if you did not quit all other applications before
performing the font installation.
6. Click [Install].
The installation of the fonts begins.
After the installation, you have to restart your Macintosh before the fonts can be used.
Store your CD-ROM in a safe place.
50 Xerox WorkCentre/WorkCentre Pro 123/128/133 PostScript® User Guide
Page 51

6Appendix
Cautions and Limitations
Troubleshooting
See the User Guide for error codes and error messages displayed on the control panel.
See the User Guide for how to deal with paper jams.
Print operation
The printer driver allows you to make selections to print on custom paper and postcards
using duplex and/or the stapling feature to the Finisher Tray. However, these features
cannot be used when printing on custom paper or postcards.
You can feed custom paper from the bypass tray only. However, when you select
custom paper, the Paper Source selection does not change to Manual Feed
automatically. Please select Manual Feed yourself.
Xerox CopyCentre/WorkCentre/WorkCentre Pro 123/128/133 PostScript® User Guide 51
Page 52

6 Appendix
52 Xerox CopyCentre/WorkCentre/WorkCentre Pro 123/128/133 PostScript® User Guide
Page 53

7 Index
A
Adobe Acrobat Reader 39
Adobe PostScript Printer Driver (ver. 5.2.2)
17
Adobe PostScript Printer Driver (ver. 8.5.1,
8.7.0, and 8.8)
Adobe PostScript Printer Driver (ver.4.5.3)
Adobe Type Manager
Advanced Options Dialog Box
Advanced Tab
22
39
9
9, 17, 39
33
C
Configuration Tab 11, 21, 32
D
Device Settings Tab 20, 31
E
error codes 51
error messages
51
S
Screen Fonts 39
W
Windows 2000 27
Windows 95
Windows 98
Windows Me
Windows NT 4.0
Windows Server 2003
Windows XP
10
10
10
17
27
27
M
Macintosh 39
O
Options Tab 11
Output Settings Tab
11, 24
P
PostScript Driver Library 7
PostScript Logo Seal
PostScript Program ROM
PPD
9, 17, 27, 39
PPD Installer
Printer Specific Options Settings
Xerox WorkCentre/WorkCentre Pro 123/128/133 PostScript® User Guide 53
39
7
7
47
Page 54

 Loading...