

Page 1

DocuColor 2006
Getting Started
The Document Company
XEROX
Page 2

©2001 Xerox Corporation. All rights reserved.
Copyright protection claimed includes all forms and matters of
copyrightable material and information now allowed by statutory or
judicial law or hereinafter granted, including without limitation, material
generated from the software programs that are displayed on the
screen such as styles, templates, icons, screen displays, looks, etc.
®
, The Document Company®, the digital X®, and all Xerox product
Xerox
names and product numbers mentioned in this publication are
registered trademarks of Xerox Corporation. Xerox Canada is a
licensee of all the trademarks. Other company brands and product
names may be trademarks or registered trademarks of their respective
companies and are also acknowledged.
Changes are periodically made to this document. Technical updates
will be included in subsequent editions.
Printed in the United States of America.
Page 3
Xerox Corporation reserves the right to change this information without
notice, and makes no warranty, express or implied, with respect to this
information. Xerox shall not be liable for any loss or damage, including
consequential or special damages, resulting from the use of this information,
even if loss or damage is caused by Xerox negligence or other fault.
For the latest information, go to www.xerox.com.
Safety Notes
Your DocuColor 2006 and its supplies have been designed and tested to
meet strict safety requirements. These include safety agency examination
and approval, and compliance with established environmental standards.
Please read the following instructions carefully before operating the
DocuColor 2006.
Safety Notes, Compliances
Certifications, and other notices
Failure to follow the recommendations in this section may result in personal
injury or rescinding of the machine maintenance agreement.
WARNING
An improper connection to the DocuColor 2006 grounding conductor can
result in electrical shock. Always connect the copier to a properly grounded
wall outlet. If in doubt, have the outlet checked by a qualified electrician.
Never use an extension cord between the copier power cord and an electrical
outlet.
Do not allow anything to rest on the power cord.
Do not place the DocuColor 2006 where people may step on the power cord.
Follow all warnings and instructions that are marked on or supplied with the
DocuColor 2006.
Never override or "cheat" electrical or mechanical interlock devices.
Always locate the DocuColor 2006 on a solid support surface with adequate
strength for the weight of the copier.
Do not use the DocuColor 2006 near water, wet locations, or outdoors.
Xerox DocuColor 2006
iii
Page 4

Safety Notes, Compliances, Certifications, and other notices
Never push objects of any kind into the slots in the covers, as they may touch
dangerous voltage points or short out parts that could result in a risk of fire or
electric shock.
The DocuColor 2006 is designed to prevent user access to unsafe areas and
to ensure that the device will not operate with the covers opened. Never
attempt any maintenance function that is not specified in the Xerox DocuColor
2006 User Information.
Never remove any covers or guards that require a tool for removal, unless
you are instructed to do so. Ensure that you read all Warnings and Cautions,
and follow each step in the instructions exactly as they are written.
Never attempt any activity that is not specified in the Xerox DocuColor 2006
User Information, or on the User Interface, or that is not specifically directed
by an authorized Xerox Representative.
Do not look directly at the exposure lamps. The exposure lamps are not
harmful but they are very bright and may cause discomfort. It is
recommended that the Scanner Cover be closed when the DocuColor 2006 is
in use.
Never operate the DocuColor 2006 if unusual noises or odors are detected.
Disconnect the power cord from the wall outlet and call Xerox Service to
correct any problems.
Maintenance Safety
Refer to these instructions as needed in order to ensure the safe operation
of the Printer Copier.
Always use materials that are supplied or approved by Xerox. Use of other
materials may result in poor performance and could create a hazardous
situation.
Do not use aerosol cleaners. Follow the instructions in the Xerox DocuColor
2006 User Information for the appropriate cleaning methods.
Never use supplies or cleaning materials for purposes other than what they
were intended. Keep all supplies and cleaning materials out of the reach of
children.
Never place coffee or other liquids on the copier.
Never spill liquid of any kind on the copier.
The DocuColor 2006 is equipped with an energy-saving device to conserve
power when the machine is not in use.
iv
Xerox DocuColor 2006
Page 5

Safety Notes, Compliances, Certifications, and other notices
Unplug the DocuColor 2006 from the wall outlet and refer servicing to
qualified service personnel under the following conditions:
• When the power cord is damaged or frayed
• If liquid has been spilled into the DocuColor 2006
• If the DocuColor 2006 has been exposed to rain or water
• If the DocuColor 2006 is producing unusual noises or odors
If the system does not work or continues to malfunction after following the
Problem Solving procedures in the Xerox DocuColor 2006 User Information,
call your local Xerox Service Representative.
For additional safety information concerning the DocuColor 2006 or Xerox
supplied materials, call the following toll-free number:
1-800-828-6571
Ozone Safety
The DocuColor 2006 produces ozone during normal operation. The ozone
produced is heavier than air, and the quantity is dependent on the copy/print
volume. Providing the correct environmental parameters, as specified in
Xerox installation procedures, ensures that the concentration levels meet safe
limits for Ozone depleting substances per the US Clean Air Act (1990) and
the 1987 Montreal Protocols.
If additional information concerning ozone is needed, request the Xerox
publication, Ozone, 600P83222, by:
• Calling 1-800-828-6571
• Contacting your local Xerox representative
Laser Safety
Using the controls or adjustments, or performing any procedures other than
those specified herein, may result in a hazardous exposure to laser radiation
exposure.
This equipment complies with safety standards. With specific regard to laser
safety, the equipment complies with performance standards for laser products
set by government agencies as a Class I laser product and does not emit
hazardous lights, the beam is totally enclosed during all modes of customer
operation and maintenance.
.
Xerox DocuColor 2006
v
Page 6
Safety Notes, Compliances, Certifications, and other notices
Safety Notes
FCC
This equipment has been tested and found to comply with the limits for a
Class A digital device, pursuant to Part 15 of the FCC Rules. These limits
are designed to provide reasonable protection against harmful interference
when the equipment is operated in a commercial environment. This
equipment generates, uses, and can radiate radio frequency energy and, if
not installed and used in accordance with the instruction manual, may cause
harmful interference to radio communications. Operation of this equipment
in a residential area is likely to cause harmful interference in which case the
user will be required to correct the interference at his own expense
Changes or modifications to this equipment not specifically approved
by the Xerox Corporation may void the user’s authority to operate this
equipment.
Shielded cables must be used with this equipment to maintain compliance
with FCC regulations.
European Union
The CE marking applied to this product symbolises XEROX Limited
Declaration of Conformity with the following applicable Directives of the
European Union as of the dates indicated:
January 1, 1995:
Council Directive 73/23/EEC amended by Council Directive
93/68/EEC, approximation of the laws of the member states related to
low voltage equipment.
vi
Xerox DocuColor 2006
Page 7
Safety Notes, Compliances, Certifications, and other notices
January 1, 1996:
Council Directive 89/336/EEC, approximation of the laws of the
member states related to electromagnetic compatibility.
A full declaration, defining the relevant directives and referenced
standards can be obtained from your XEROX Limited representative or
by contacting:
• Environment, Health and Safety,
• XEROX Limited,
• PO Box 17,
• Bessemer Road,
• Welwyn Garden City,
• Hertfordshire
• AL7 1HE
• ENGLAND.
• Tel Number +44 (0) 1707 353434
WARNING
This product is certified manufactured and tested in compliance with strict
safety and radio frequency interference regulations. Any unauthorized
alteration which, includes the addition of new functions or the connection of
external devices, may impact this certification. Please contact your local
XEROX Limited representative for a list of approved accessories.
WARNING
In order to allow this equipment to operate in proximity to Industrial, Scientific
and Medical (ISM) equipment, the external radiation from the ISM equipment
may have to be limited or special mitigation measures taken.
Xerox DocuColor 2006
vii
Page 8
Safety Notes, Compliances, Certifications, and other notices
WARNING
This is a Class A product. In a domestic environment this product may
cause radio frequency interference in which case the user may be required
to take adequate measures.
Changes or modifications to this equipment not specifically approved by Fuji
Xerox Environmental Health and Safety or Xerox Corporation Environmental
Health and Safety may void the user’s authority to operate this equipment.
Shielded cables must be used with this equipment to maintain compliance
with the Radio Communications Act of 1992.
Documentation conventions
The following conventions are used through out the customer documentation.
WARNING
Warnings alert you to operations that could cause personal injury.
CAUTION
Cautions alert you to operations that may cause damage to the machine.
Notes contain additional information, explanations, and helpful suggestions.
Keypoints provide techniques or shortcuts.
viii
Xerox DocuColor 2006
Page 9

Table of contents
1. Setting up the Docucolor 2006.............................................................................1-1
Preparing for the installation .....................................................................................1-1
Selecting a location...................................................................................................1-1
Space requirements for the DocuColor 2006 Printer ................................................1-2
Space requirements without the optional Sorter/Stacker.......................................1-2
Space requirements with the optional Sorter/Stacker............................................1-3
Checking the installation components.......................................................................1-4
Setting up the 2 Tray Module....................................................................................1-5
Unpacking the Printer ...............................................................................................1-9
Printer installation ...................................................................................................1-19
Installing the Duplex Tray........................................................................................1-27
Loading paper in the paper tray ..............................................................................1-35
Installing the Scanner Stand ...................................................................................1-39
Installing the Scanner .............................................................................................1-45
Installing the Document Feeder ..............................................................................1-49
Installing the Sorter/Stacker....................................................................................1-55
Adding memory to the Printer .................................................................................1-73
Adding memory to the Scanner...............................................................................1-79
2. Getting to know the DocuColor 2006...................................................................2-1
Printer, Front View ....................................................................................................2-1
Printer, Rear View.....................................................................................................2-2
Printer, Internal View.................................................................................................2-3
Printer Control Panel.................................................................................................2-4
Scanner and Document Feeder components ...........................................................2-5
Scanner Control Panel..............................................................................................2-7
Accessories...............................................................................................................2-9
Accessories ordering information ..........................................................................2-9
Supplies reorder numbers.......................................................................................2-10
Xerox DocuColor 2006
ix
Page 10

Table of contents User Documentation
3. Network Setup .......................................................................................................3-1
Installing the Token Ring Network card ....................................................................3-1
Windows 95/98 .........................................................................................................3-5
Before you begin ...................................................................................................3-5
Installing the print driver .......................................................................................3-5
Windows 2000 ..........................................................................................................3-7
Before you begin ...................................................................................................3-7
Installing the print driver .......................................................................................3-7
Windows NT 4.0........................................................................................................3-9
Before you begin ...................................................................................................3-9
Installing the print driver .......................................................................................3-9
Macintosh OS .........................................................................................................3-11
Before you begin .................................................................................................3-11
Installing the print driver .....................................................................................3-11
Setting up the DocuColor 2006 Chooser.............................................................3-11
x
Xerox DocuColor 2006
Page 11
Setting up the DocuColor 2006
1
This chapter contains the hardware installation instructions only. To install the printer
driver software, go to the Installing your user software chapter. To install to the
network, go to the appropriate chapter for your operating system.
Preparing for the installation
Before you begin the installation of your Xerox DocuColor 2006, read this
entire section. You must locate an appropriate site for the installation of the
DocuColor 2006. Reading this section assists you with the decision making
process.
Selecting a location
WARNING
The wall outlet must be rated for 115 or 240 volts. It must also be protected
for at least 15 amps for 115 volts, or 8 amps for 240 volts. If you are in
doubt about a power source, ensure that a qualified electrician checks the
outlet.
Do not connect any other devices to the wall outlet designated for the Xerox
DocuColor 2006.
Install the Xerox DocuColor 2006 in a location that meets the following
conditions:
• The DocuColor 2006 has a designated wall outlet.
• The power cord cannot be stepped on, or be a tripping hazard.
• The location has a level, stable surface.
DO NOT install the DocuColor 2006 in a location that has any of the following
conditions:
• In direct sun light • Near an air conditioner or heater
• In a dusty place • Near an open flame
• In a windy place • Near water
• Where it might be subject to
vibration
• Where abrupt changes in temperature or humidity occur
Xerox DocuColor 2006 1-1
• Near a magnetic field
Page 12
1. Setting up the DocuColor 2006 Preparing for the installation
L
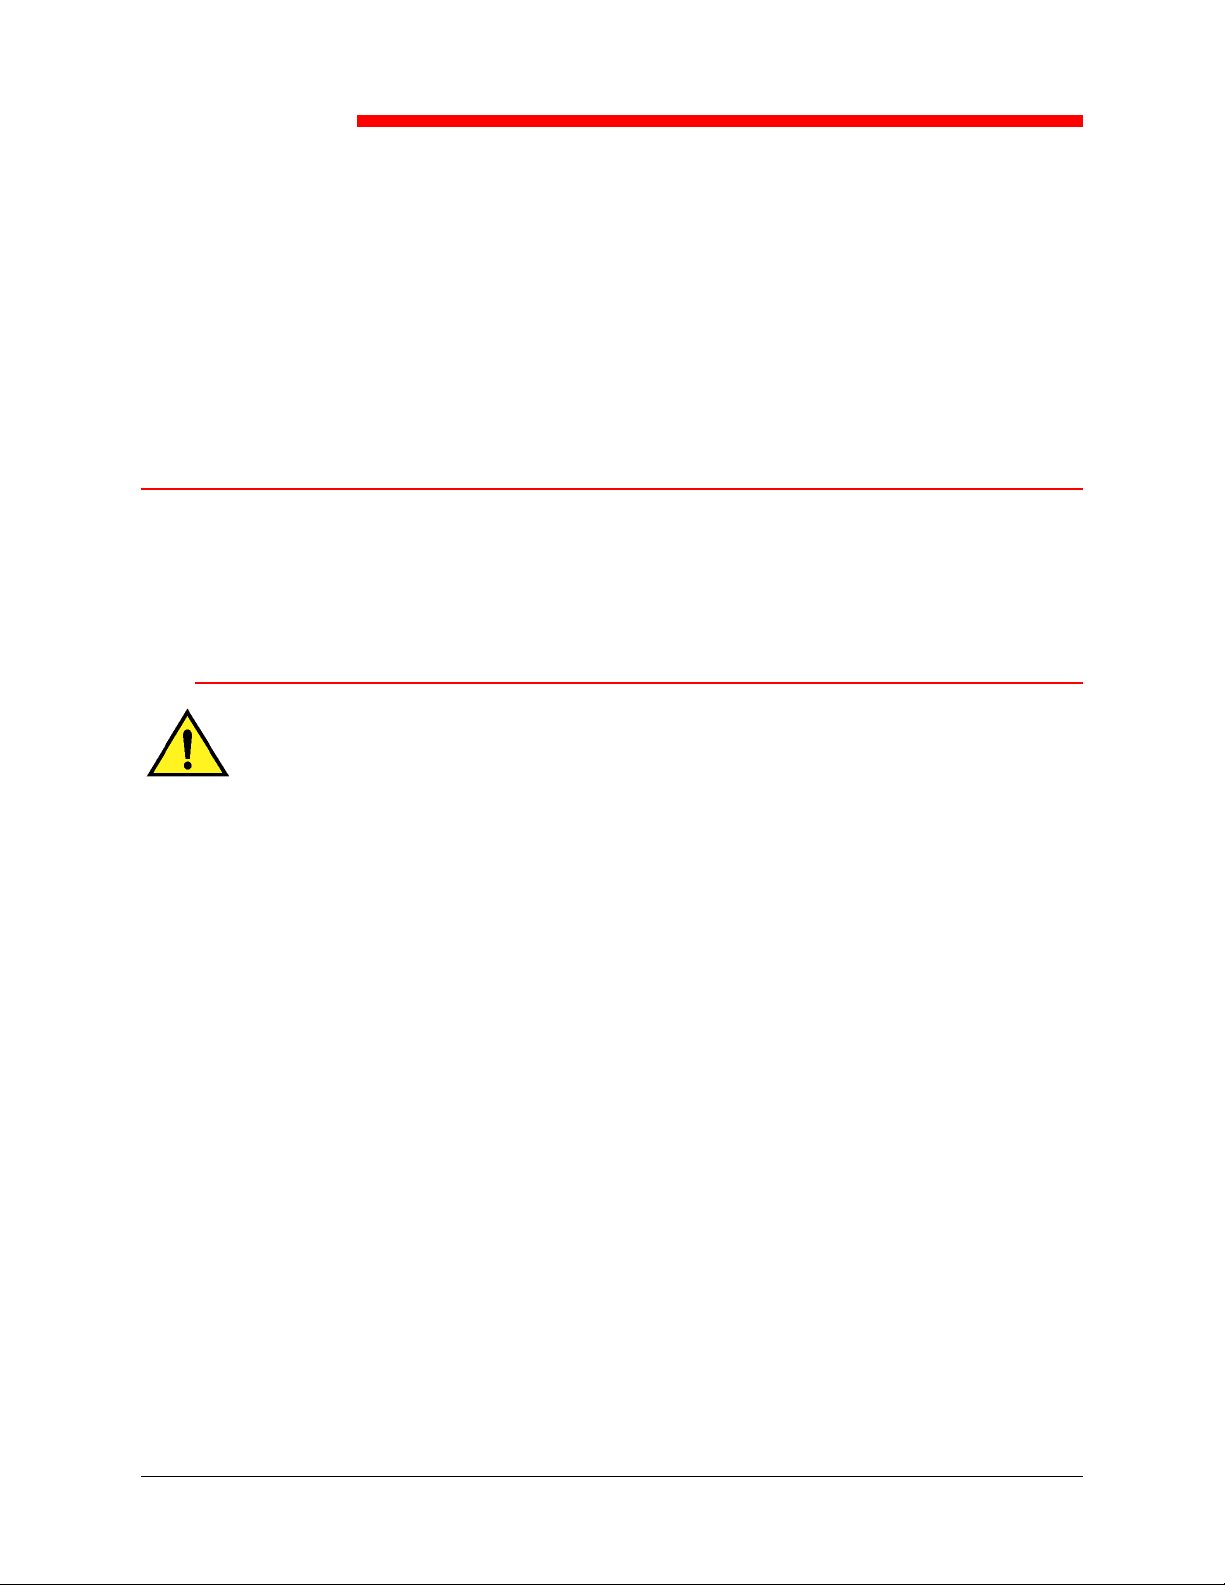
Space requirements for the DocuColor 2006 Printer
CAUTION
The Xerox DocuColor 2006 has ventilation grilles on the side and rear, which
must remain unobstructed for safe operation. The Printer should be located
at least 6 and 1/2 inches (165 mm) from the wall. Obstructing the grilles
could present a fire hazard.
Using the space requirements illustrated below ensures that the Printer has
the ventilation it requires. It also ensures that you have the space needed for
replacing the supplies.
Space requirements without the optional Sorter/Stacker
The following illustration is a top view of the printer.
6.5 Inches 165 mm
18 Inches
457.2 mm
63 Inches
1600 mm
36 Inches 914.4 mm
23 Inches
584.2 mm
67 Inches
1702 mm
301000B-WO
0
1-2 Xerox DocuColor 2006
Page 13
Preparing for the installation 1. Setting up the DocuColor 2006
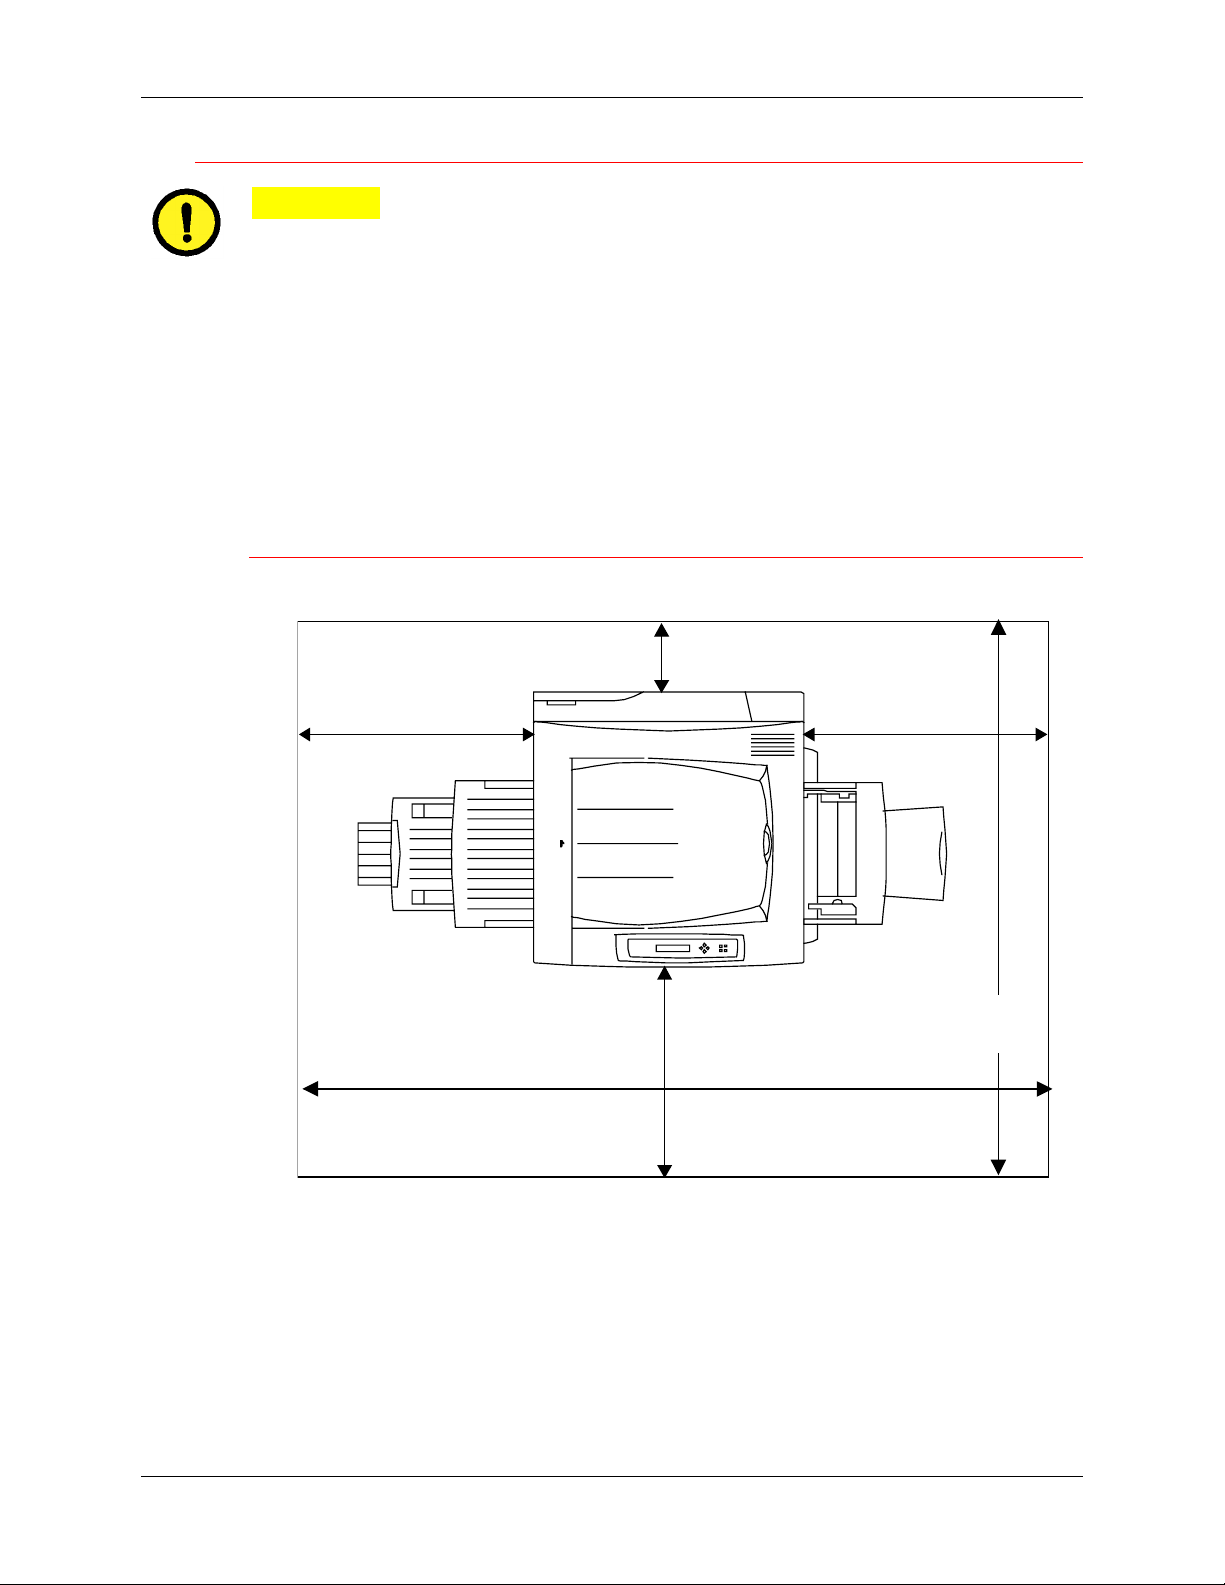
Space requirements with the optional Sorter/Stacker
The following illustration shows the dimensions for the largest configuration of
the copier/printer, which includes a Duplex Module and Sorter/Stacker.
6.5 inches
165 mm
22.75 inches
578 mm
67 inches
1702 mm
36 inches
14.4 mm
36 inches
914.4 mm
81 inches
2057 mm
23 inches
584.2 mm
Xerox DocuColor 2006 1-3
Page 14

1. Setting up the DocuColor 2006 Preparing for the installation
Checking the installation components
Ensure that all of the components you ordered are available before you begin
the installation. All of the components are listed below.
• Printer
• Scanner
• Scanner Stand
• Duplex Tray (optional)
• 2 Tray Module (optional)
You may need a phillips head and a flat blade screwdriver in order to
perform the installation of the DocuColor 2006.
Following the instructions ensures that the DocuColor 2006 components are
installed in the following order:
1. 2 Tray Module, if ordered
2. Printer
3. Duplex Tray, if ordered
4. Scanner Stand
5. Scanner
6. Accessories, if ordered
7. Client Software (customer installed)
The first step
If the DocuColor 2006 was installed for you, go to Chapter 2. Getting to know
the Xerox DocuColor 2006.
If you ordered the optional 2 Tray Module, go to the Installing the 2 Tray
Module procedure.
If you do not have a 2 Tray Module, go to the Upacking the Printer procedure.
1-4 Xerox DocuColor 2006
Page 15
Installing the 2 Tray Module 1. Setting up the DocuColor 2006
L
Setting up the 2 Tray Module
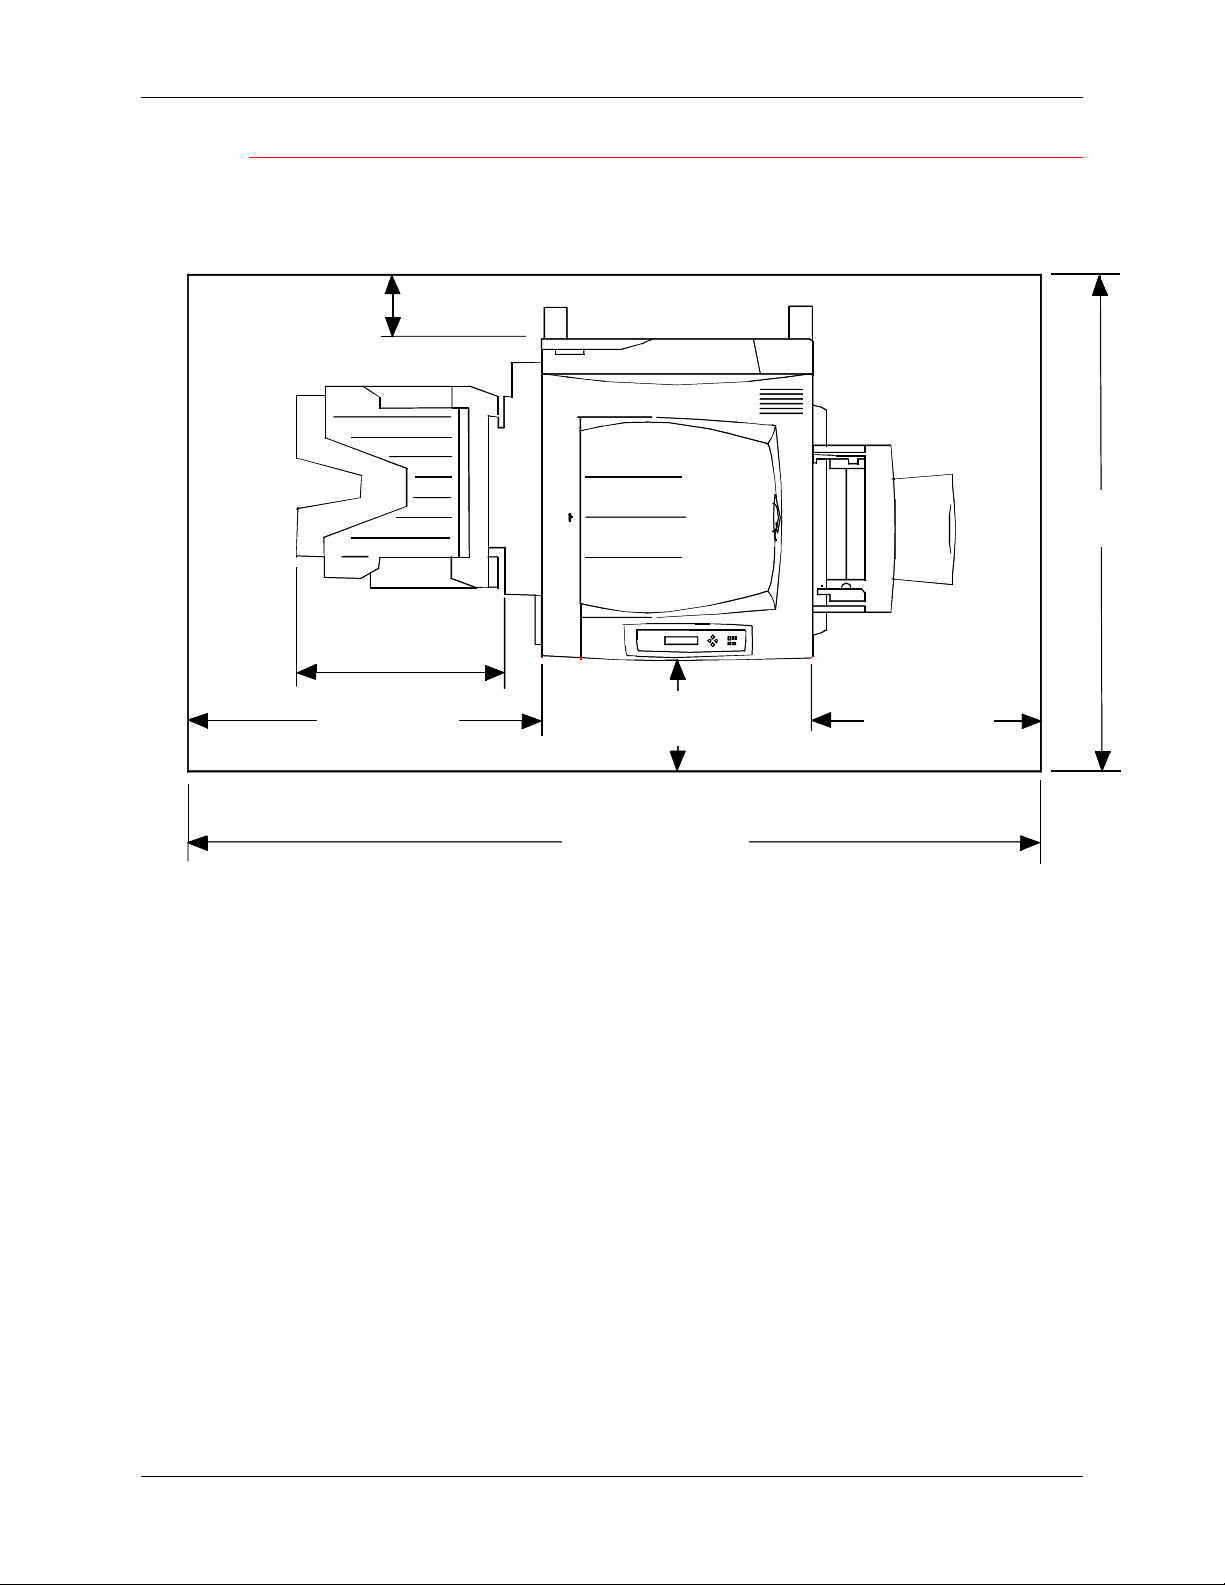
To install the 2 Tray Module, perform the following steps.
WARNING
You will need at least two people to remove it from the carton.
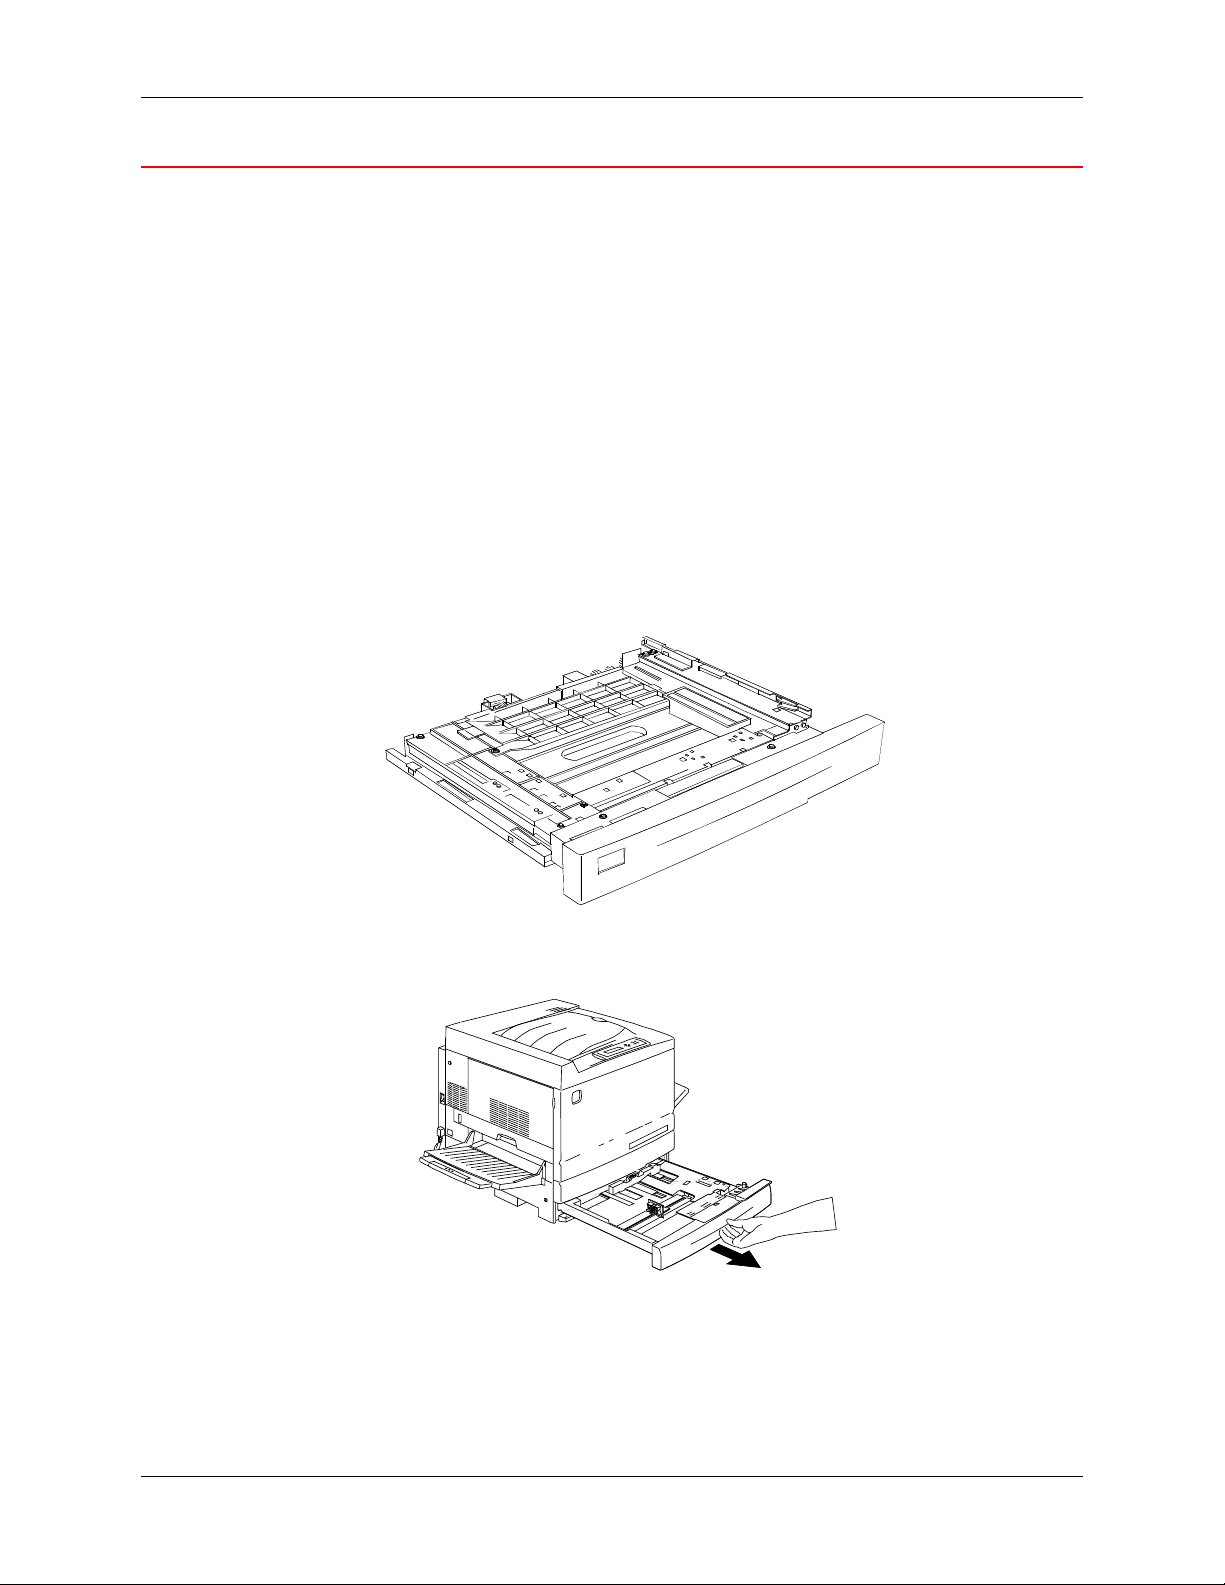
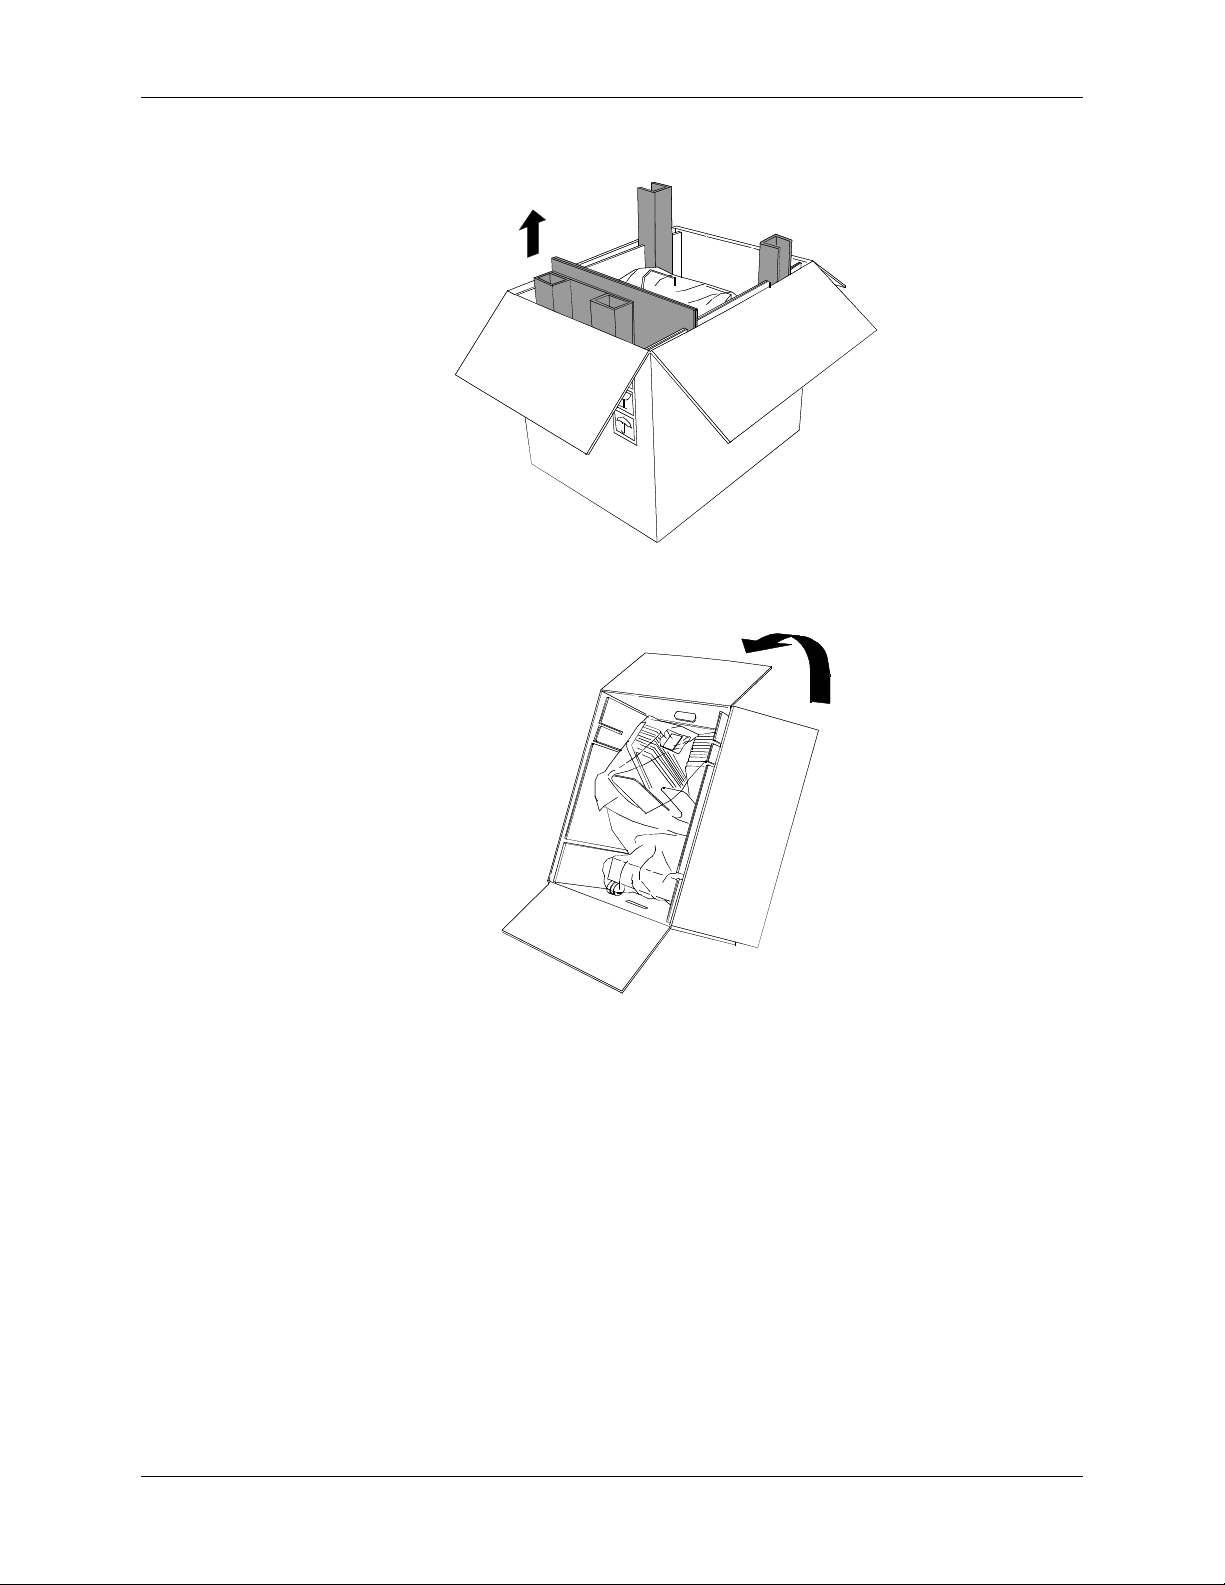
1. Open the 2 Tray Module carton.
2. Remove the styrofoam and the plastic wrap from the top of the 2 Tray
Module.
3. With a person on each side of the box, grasp the crossbars in the
locations indicated by the labels.
0301098a
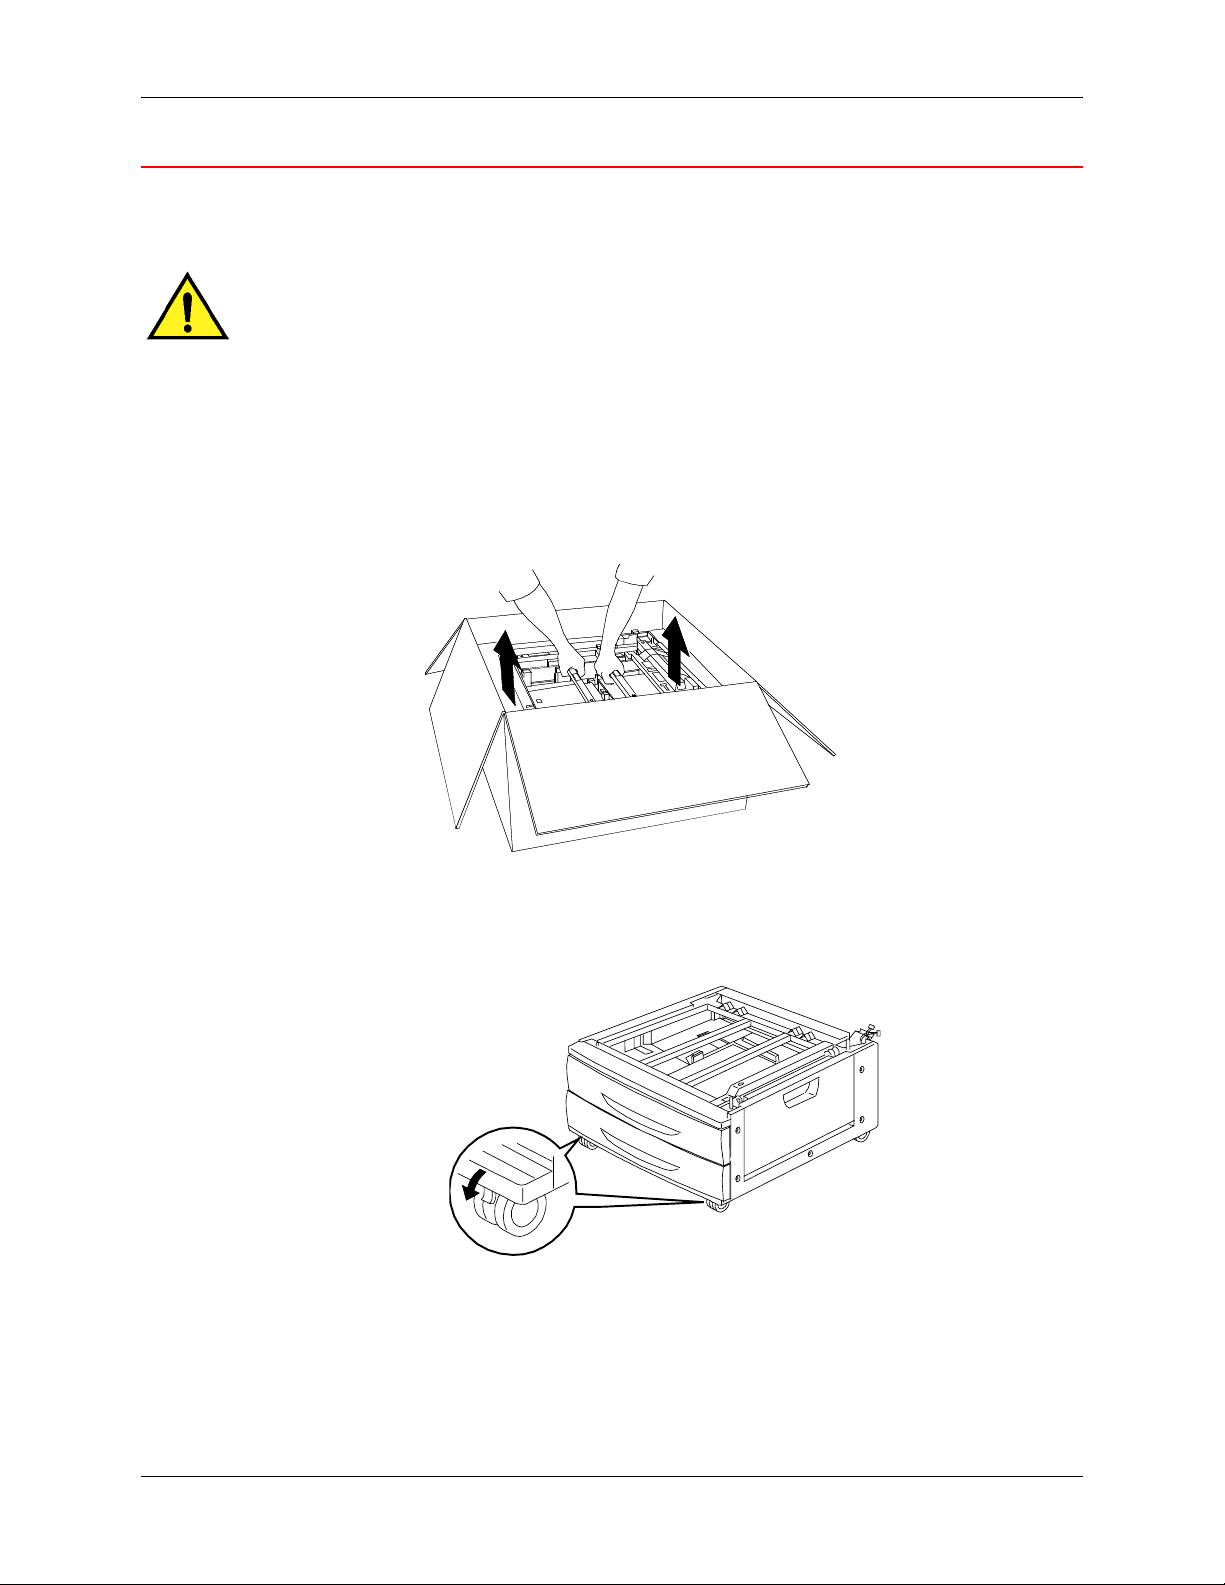
4. Lift the 2 Tray Module from the box and place it the selected location.
5. Lock the front casters as shown below.
301007B-WO
0
Xerox DocuColor 2006 1-5
Page 16
1. Setting up the DocuColor 2006 Installing the 2 Tray Module
L
0
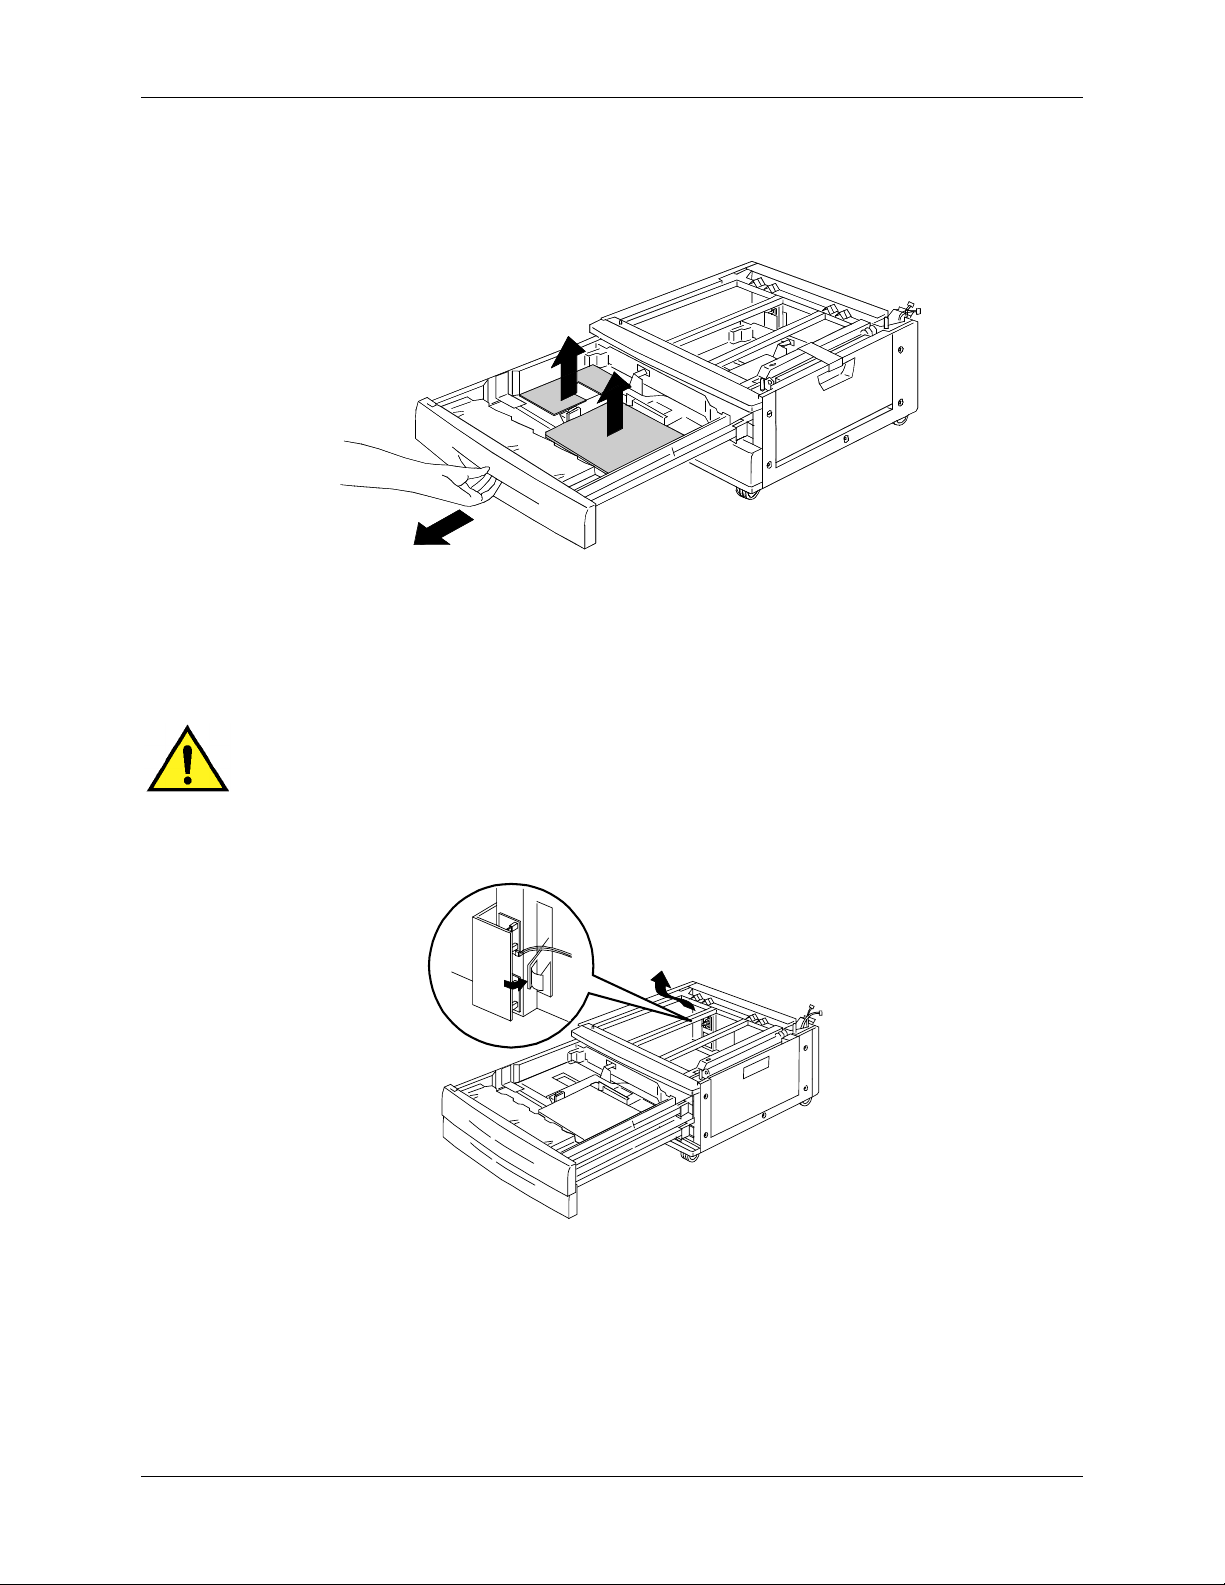
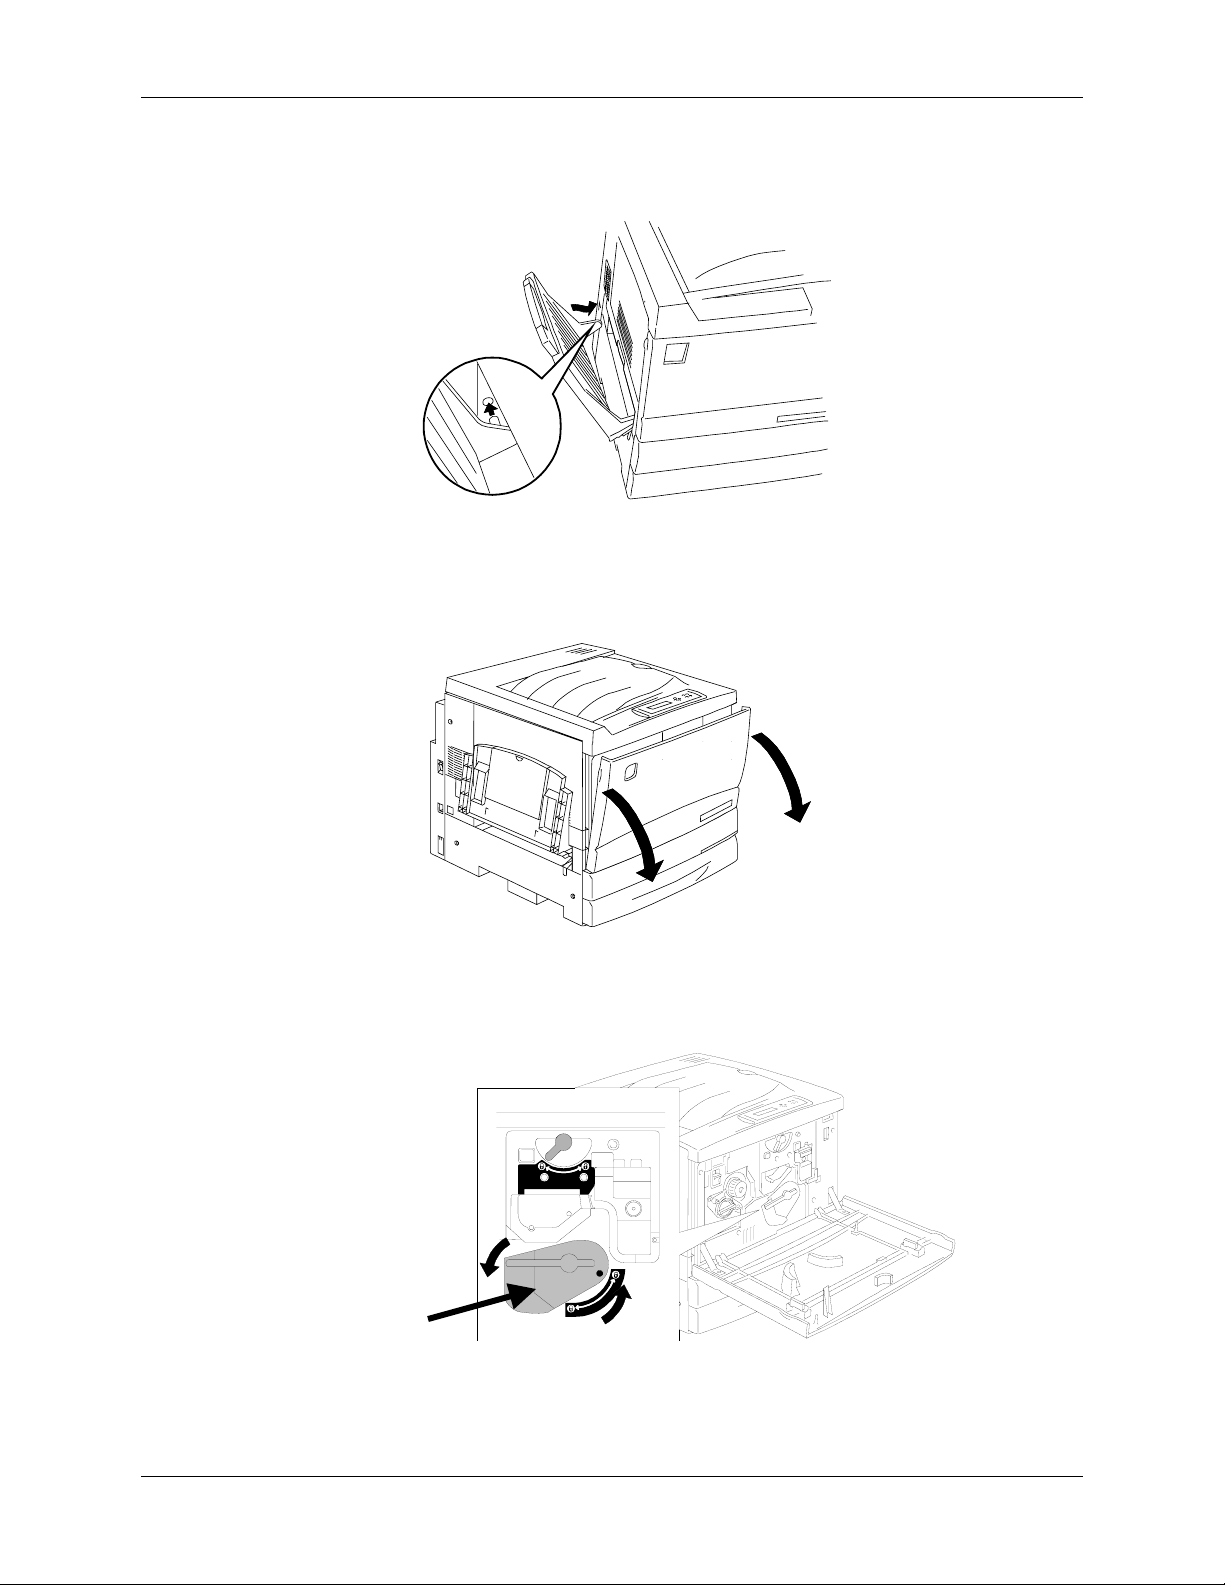
6. Remove all the tape from the outside of the 2 Tray Module.
7. Pull the top paper tray open until it stops, and remove the packing
shown below.
0301008a
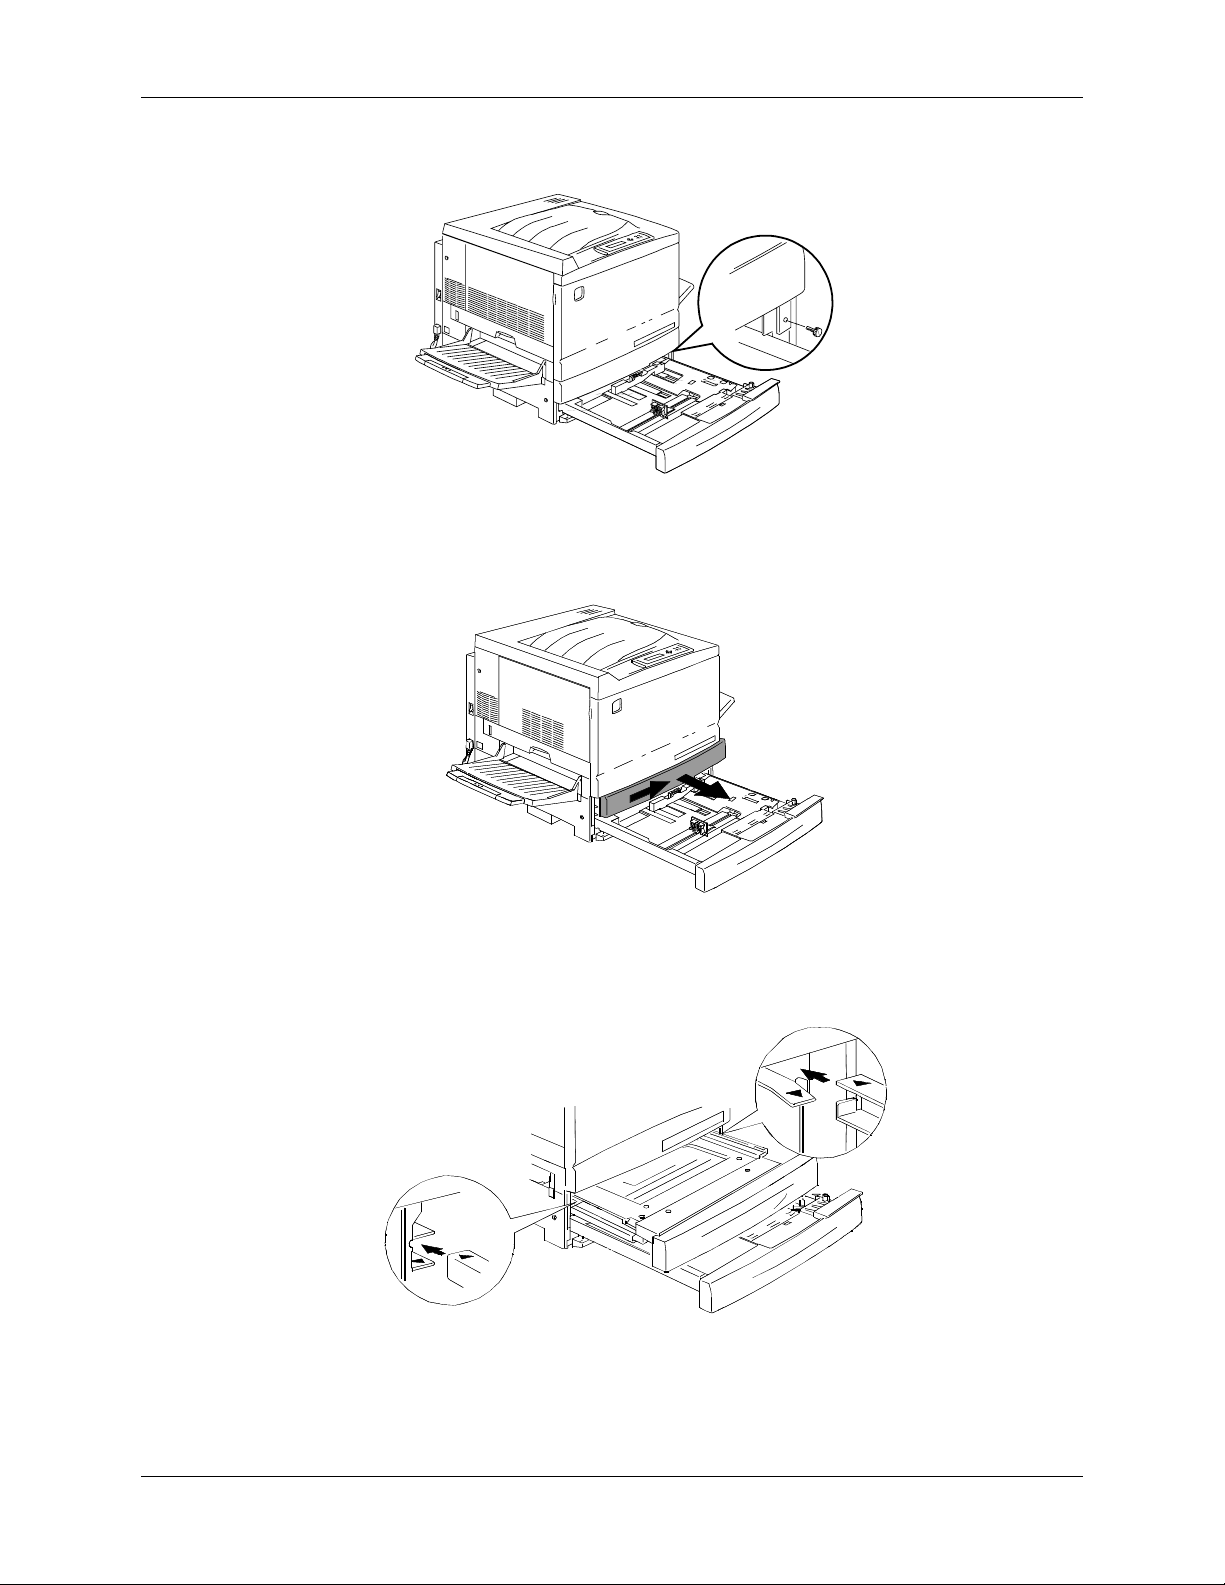
8. Close the top tray and repeat step 7 for the lower paper tray.
9. Open both the paper trays.
WARNING
Use care when removing the packing from connectors and wire harnesses.
10. Remove the cardboard protector from the rear post shown below.
301009B-WO
11. Close the two paper trays.
1-6 Xerox DocuColor 2006
Page 17
Installing the 2 Tray Module 1. Setting up the DocuColor 2006
L
L
0
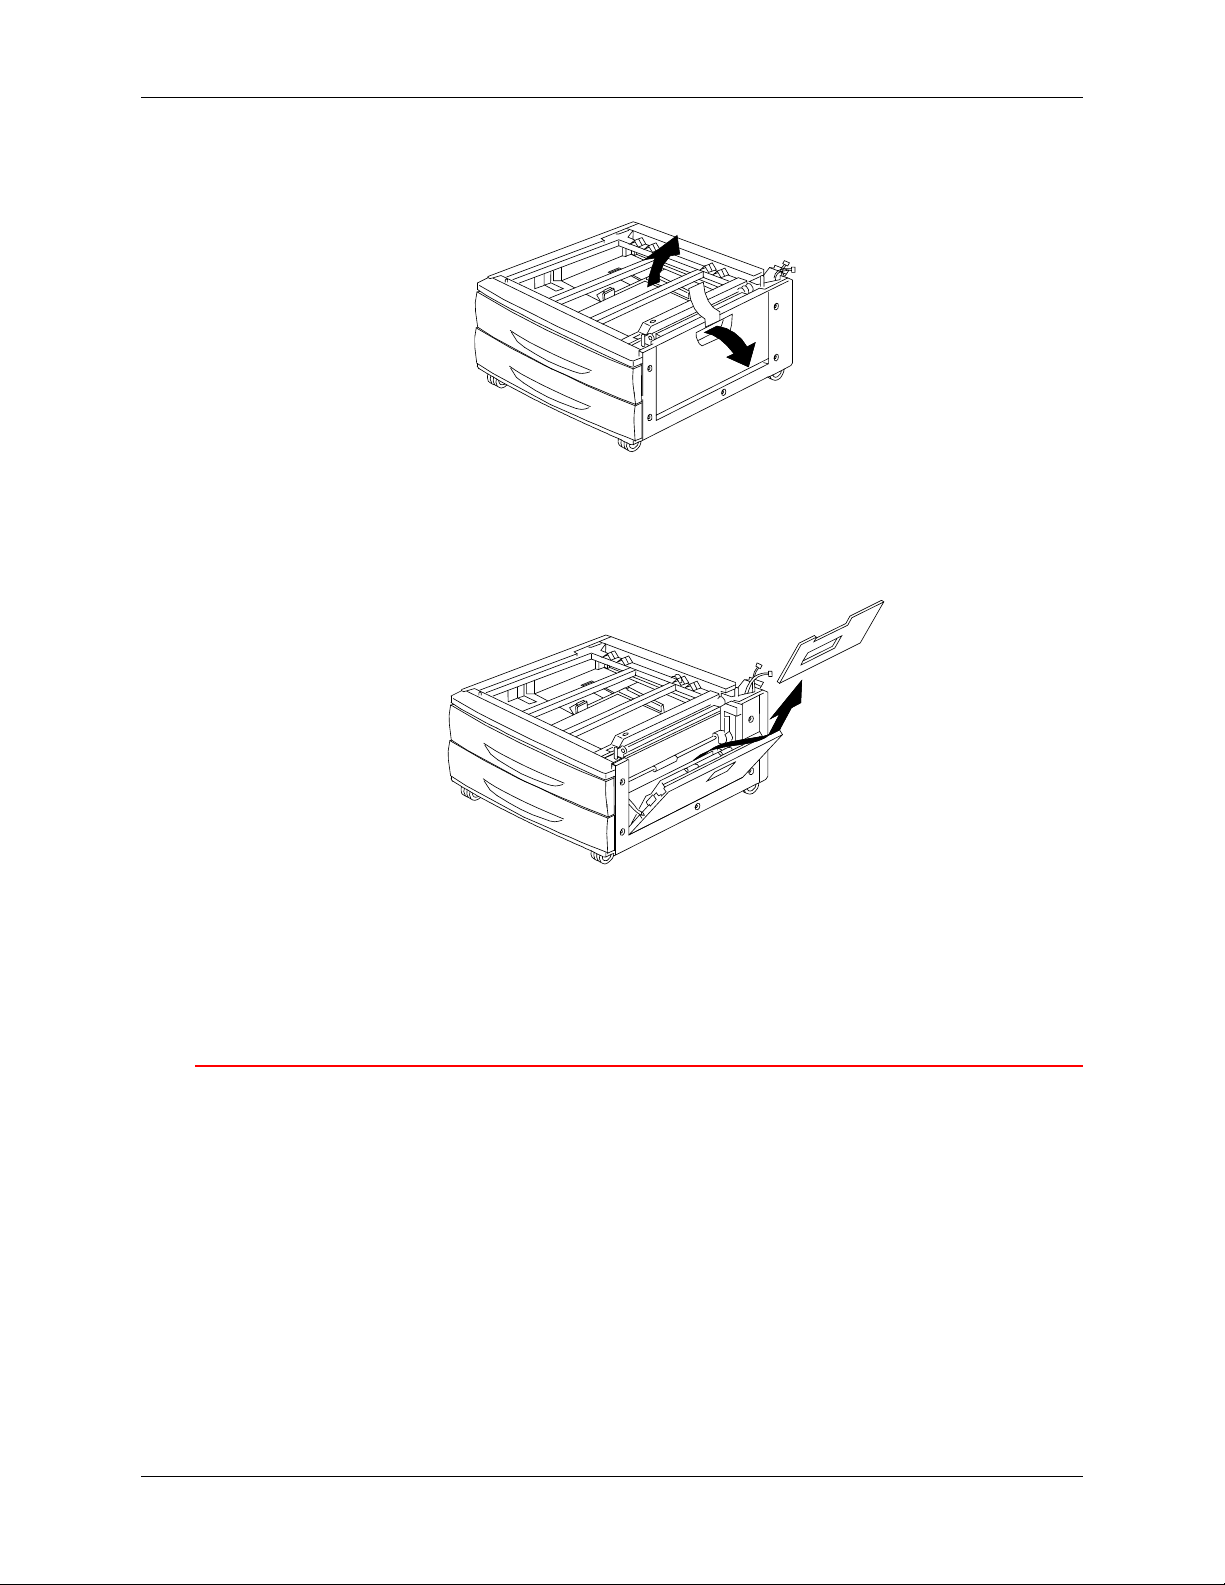
12. Remove the tape from the paper feed area access door, and then open
the door.
301010B-WO
0
13. Remove the cardboard packing shown below.
14. Close the paper feed area access door.
The next step
Go to the Unpacking the Printer procedure in this section.
301011B-WO
Xerox DocuColor 2006 1-7
Page 18

1. Setting up the DocuColor 2006 Installing the 2 Tray Module
1-8 Xerox DocuColor 2006
Page 19
Unpacking the Printer 1. Setting up the DocuColor 2006
Unpacking the Printer
Read all the steps before performing this procedure. There are decisions to
make before removing the Printer from the packing.
1. Remove the four cardboard supports and the Styrofoam packing from
the top of the Printer.
2. Remove the cardboard tray from the top of the Printer and place in a
safe place, out of the way of the installation.
The cardboard tray contains the following items:
• One Copy/Print Cartridge box
• Four Dry Ink boxes (Yellow, Cyan, Magenta, and Black)
• CD package containing two CDs
• Getting Started Guide
• Recommended Materials List
• Power cord
• Output Tray
3. Pull the plastic wrap that is around the Printer, down around the pallet
and away from the bottom of the Printer.
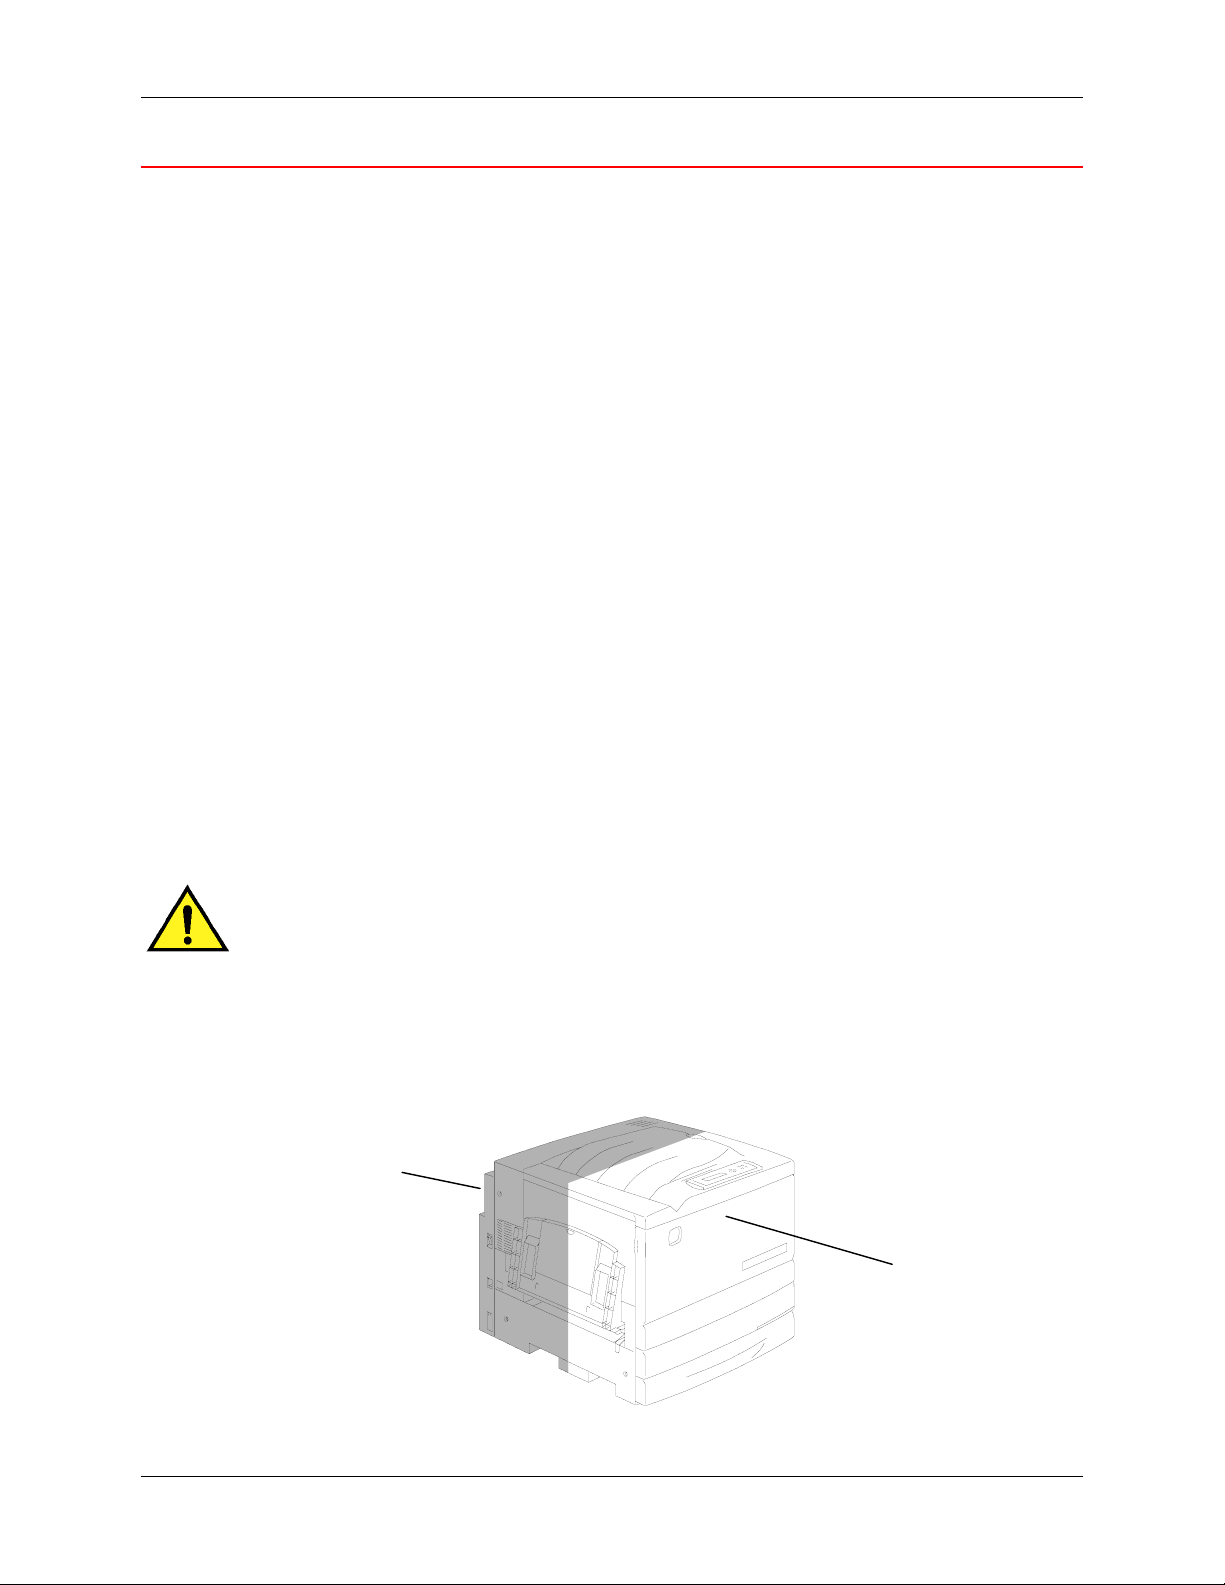
4. Before lifting the Printer from the pallet, read all the Warnings and
Cautions starting below and continuing on the next page.
WARNING
The Printer weighs 153 pounds (69.5 kg) without the dry ink or print/copy
cartridges installed. ALWAYS USE FOUR PEOPLE TO LIFT THE
PRINTER.
Ensure that you keep the Printer LEVEL. Please note that the rear of the
Printer is heavier than the front.
REAR
FRONT
301013
Xerox DocuColor 2006 1-9
Page 20
1. Setting up the DocuColor 2006 Unpacking the Printer
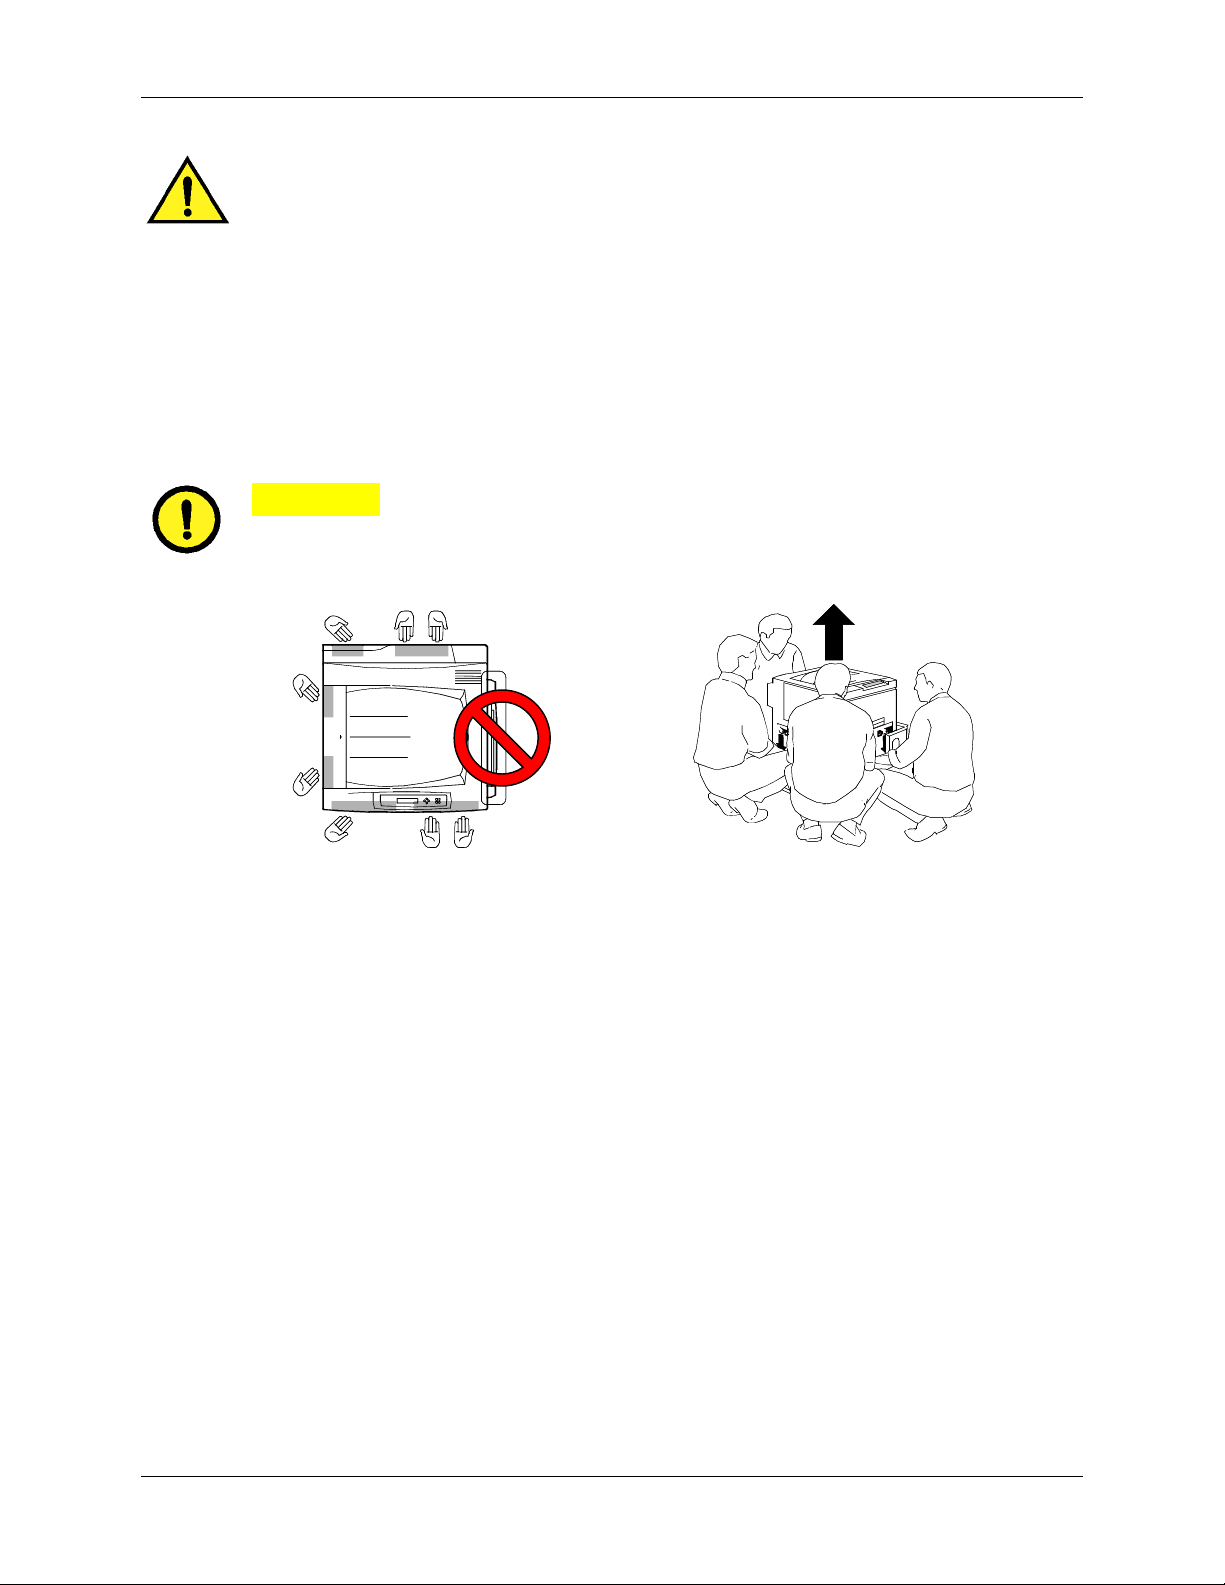
WARNING
Ensure that you have a firm footing and bend your knees to avoid possible
back injuries. When lifting the Printer, face the machine and grip the
recessed areas shown in the illustration below.
NEVER lift the Printer by gripping any other area. The Printer could fall and
cause injuries.
5. With a person at each corner, place your hands inside the plastic wrap,
in the positions shown below.
CAUTION
DO NOT lift or support the Printer by the Bypass Tray that is located on the
right-hand side.
0301014a 0301199
6. Carefully, lift the Printer from the pallet.
7. Perform one of the following steps:
• If you are installing the Printer on the optional 2 Tray Module, go to
step 8 on the next page.
• If you did not order the 2 Tray Module, skip step 8 and go to step 9.
1-10 Xerox DocuColor 2006
Page 21
Unpacking the Printer 1. Setting up the DocuColor 2006
L
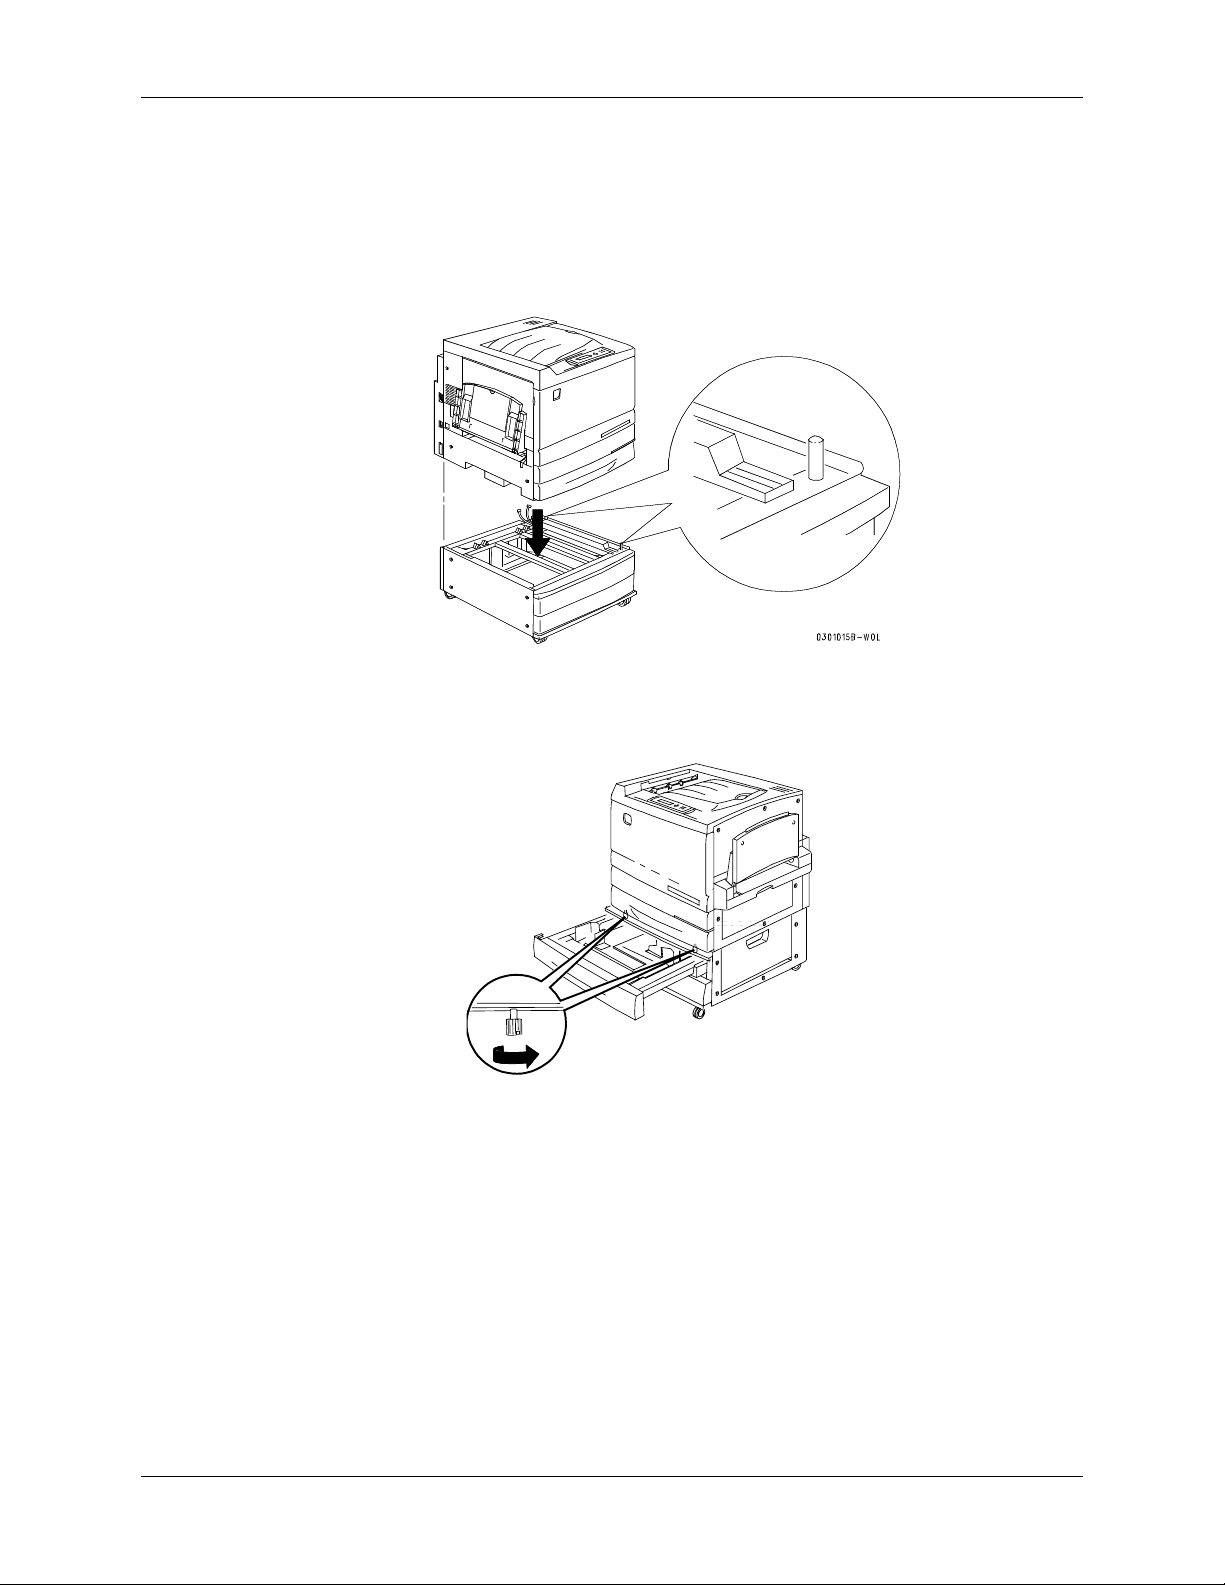
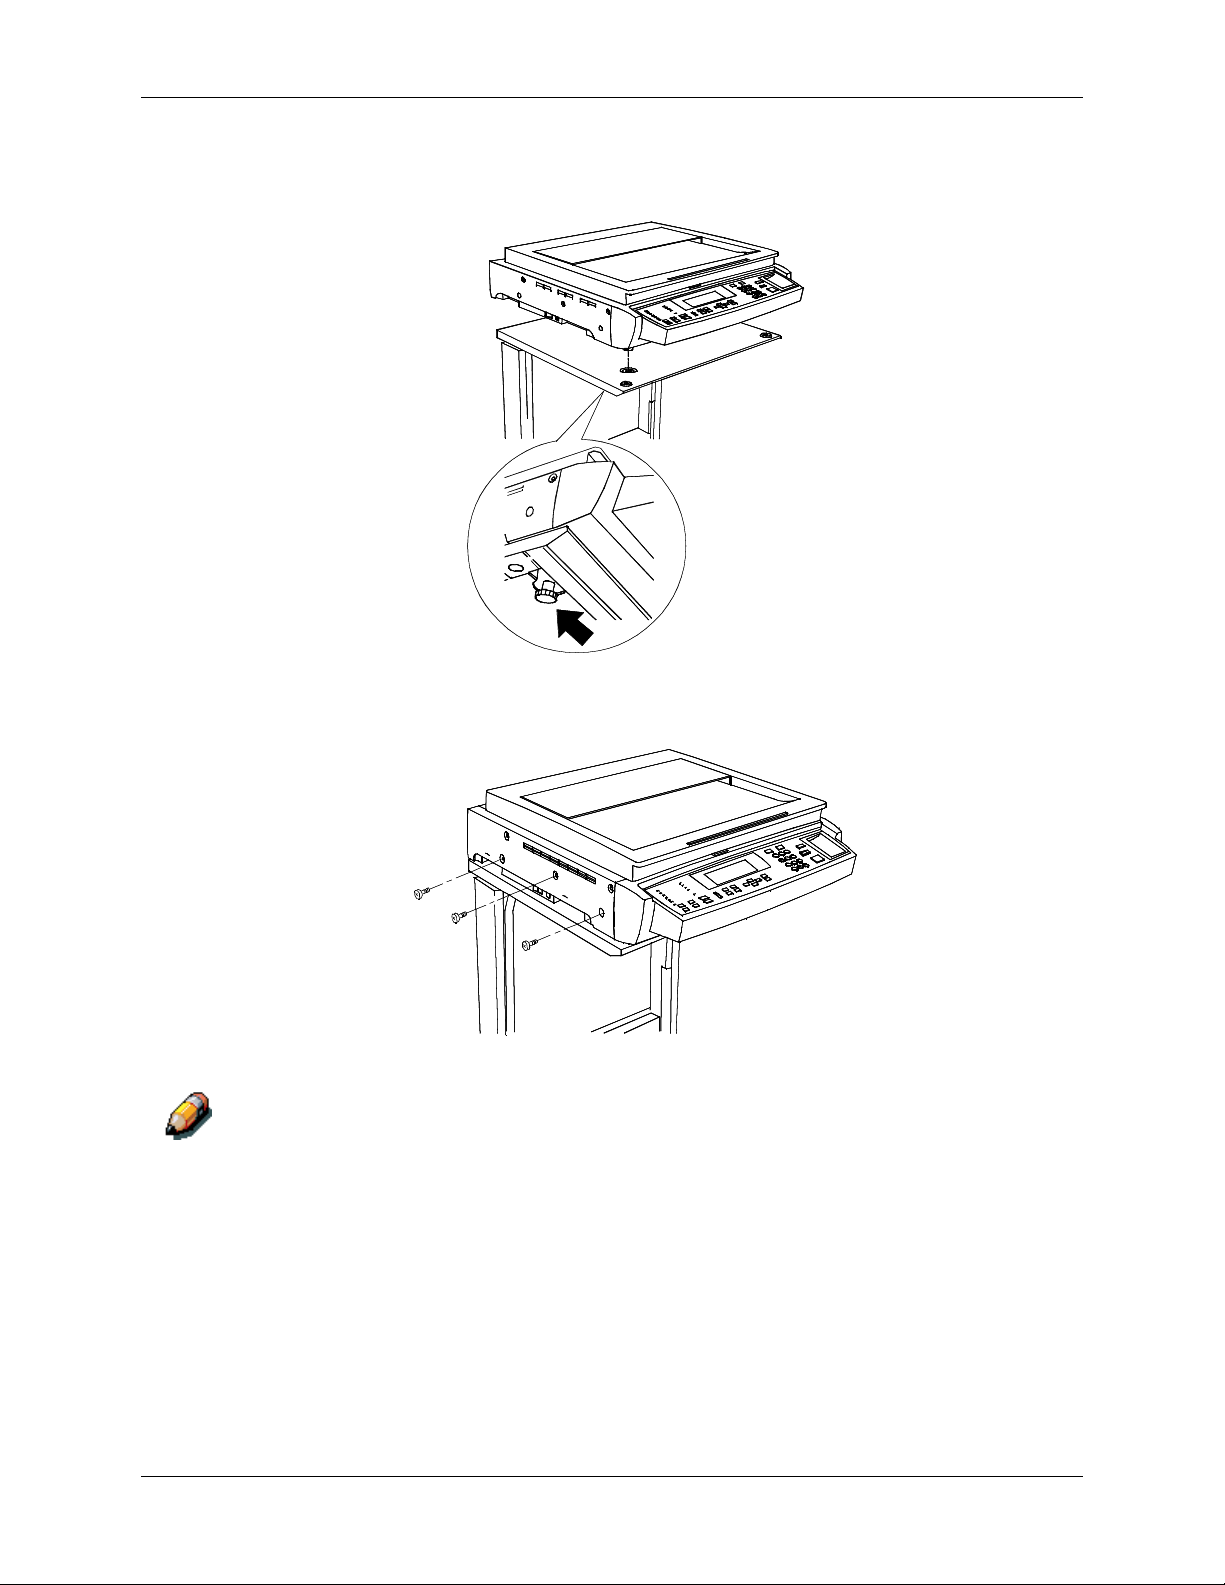
8. Place the Printer on the 2 Tray Module:
a. Align the two pins in the 2 Tray Module with the corresponding
holes in the Printer. Aligning the left rear covers of the two devices
will assist you in aligning the pins. Aligning the pins and the left
rear covers is shown below.
b. Partially open Paper Tray 2, and tighten the two thumbscrews
shown below. Do not over tighten the thumbscrews.
301016B-WO
0
c. Close Paper Tray 2.
Xerox DocuColor 2006 1-11
Page 22
1. Setting up the DocuColor 2006 Unpacking the Printer
L
L
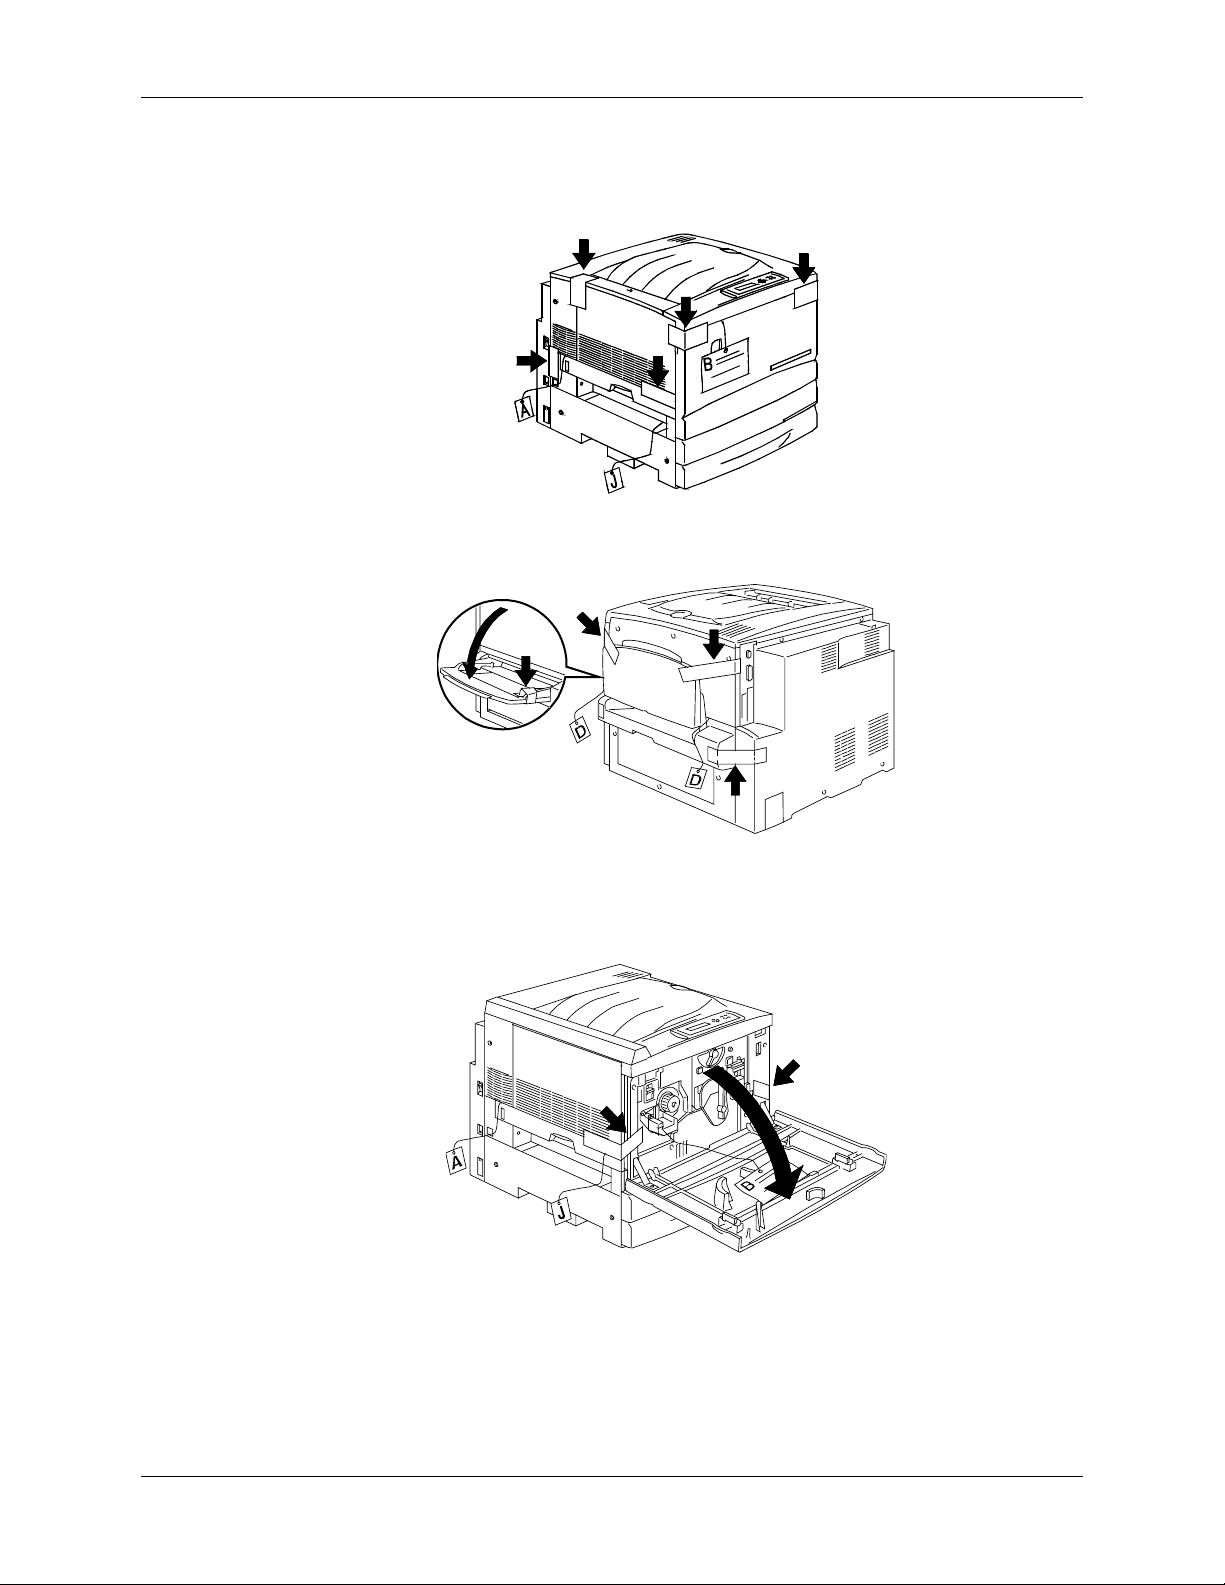
9. Remove all the tape from the exterior of the Printer:
a. Left side
b. Right Side
c. Inside the Front Cover
301018A-WO
0
301019B-WO
0
1-12 Xerox DocuColor 2006
Page 23
Unpacking the Printer 1. Setting up the DocuColor 2006
L
L
L
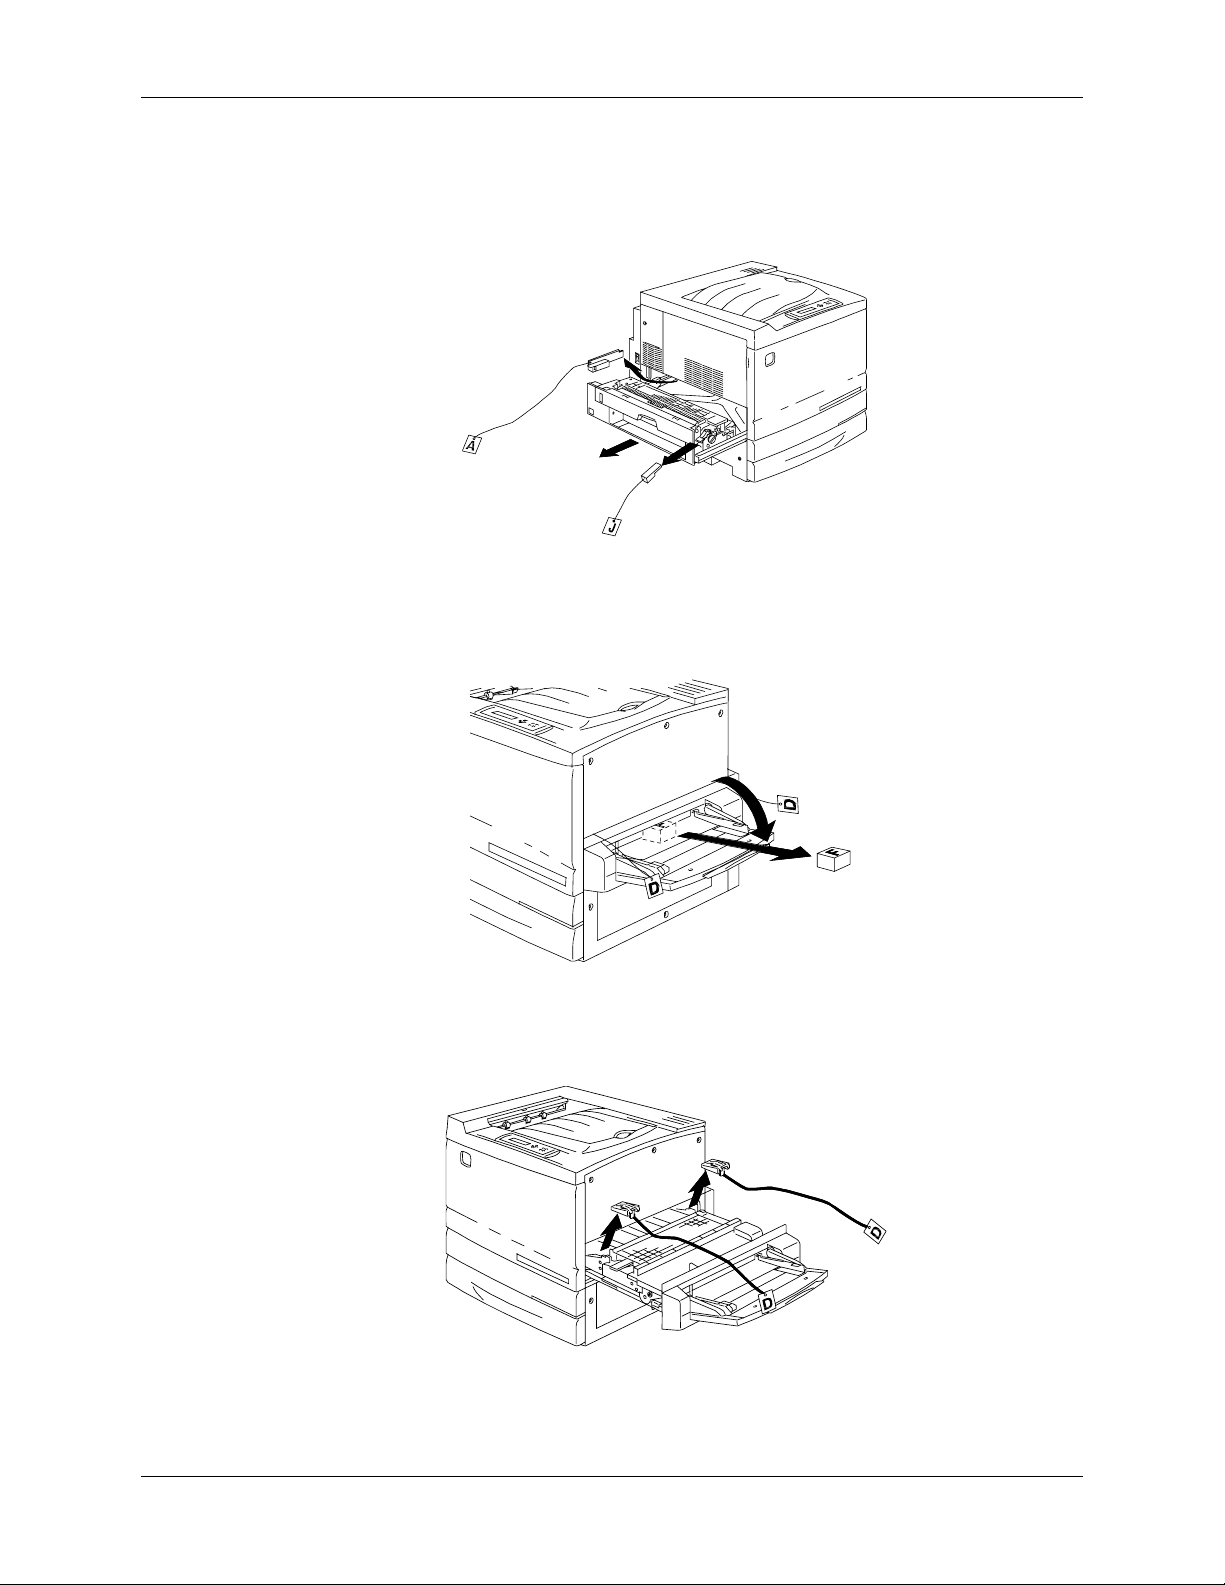
10. Remove all the internal packing from the Printer by performing steps a
through m.
a. Remove the spacer labeled B.
301025B-WO
0
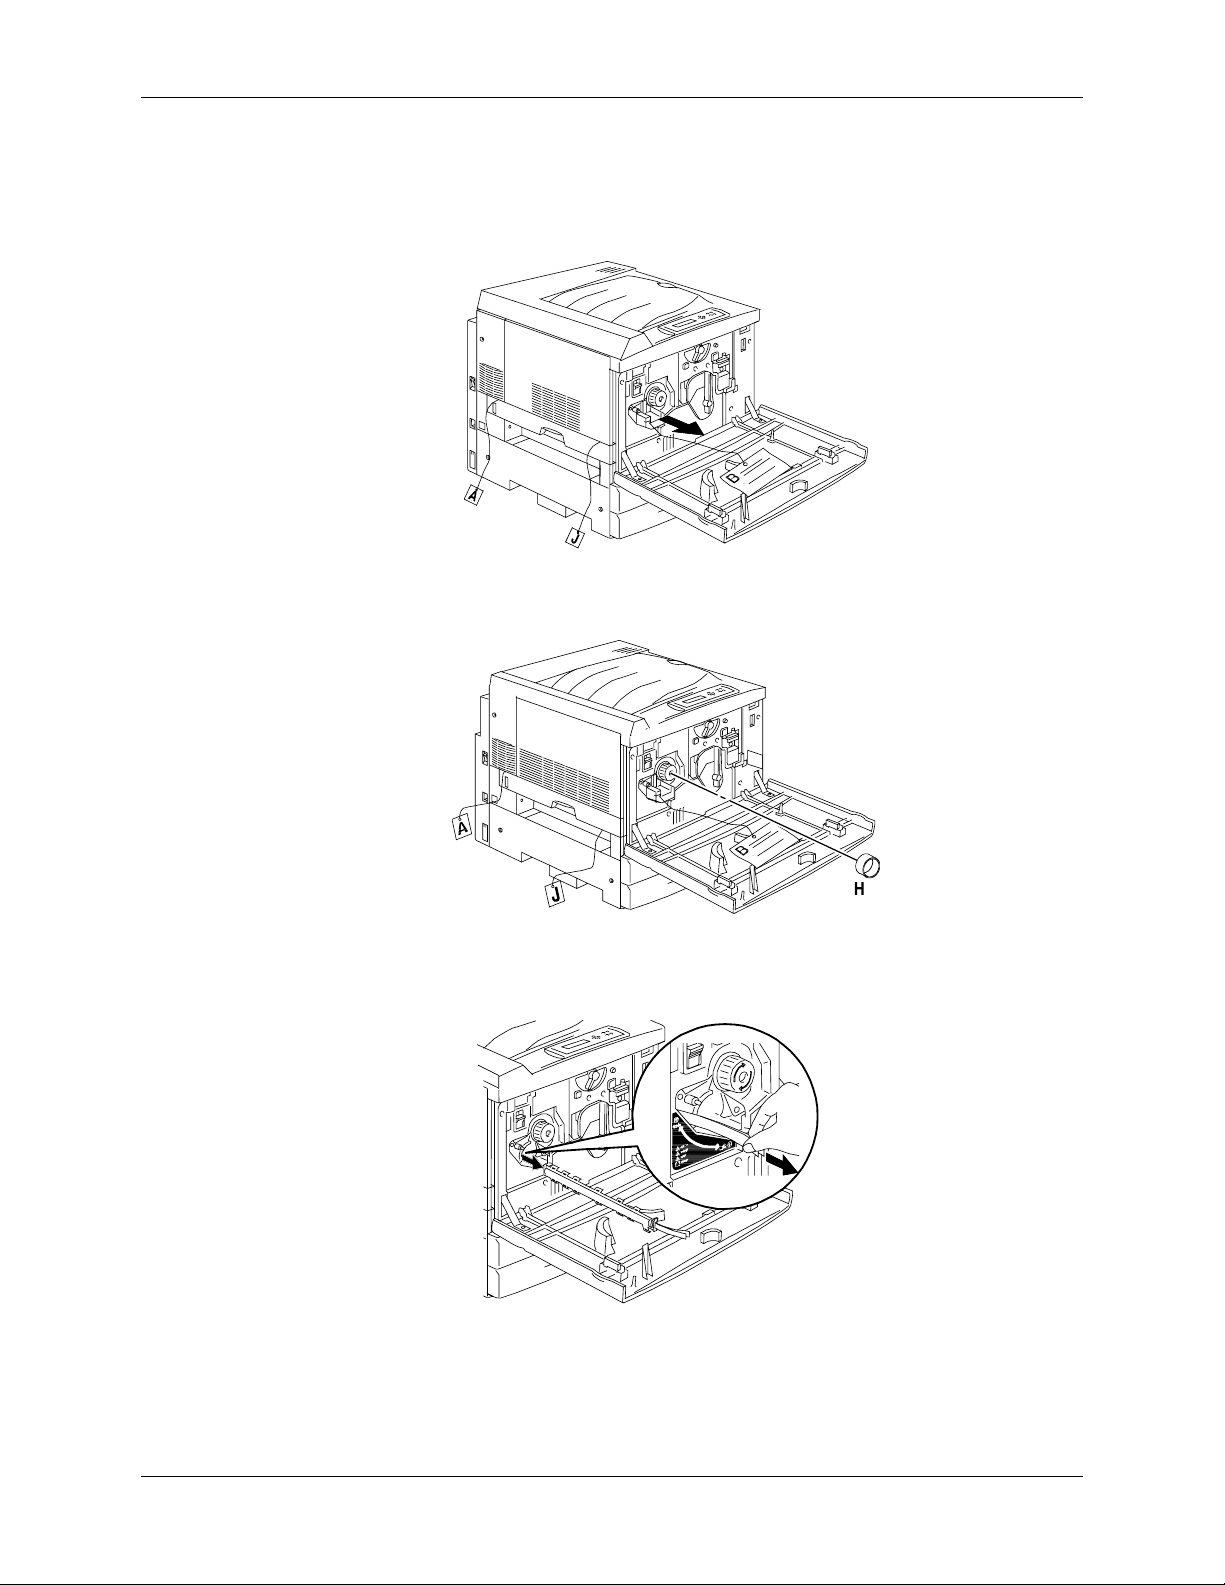
b. Remove the cardboard collar from the knob shown below.
301245A-WO
0
c. Pull the narrow strip labeled G from the Dry Ink chamber.
301026B-WO
0
Xerox DocuColor 2006 1-13
Page 24
1. Setting up the DocuColor 2006 Unpacking the Printer
L
0
L
L
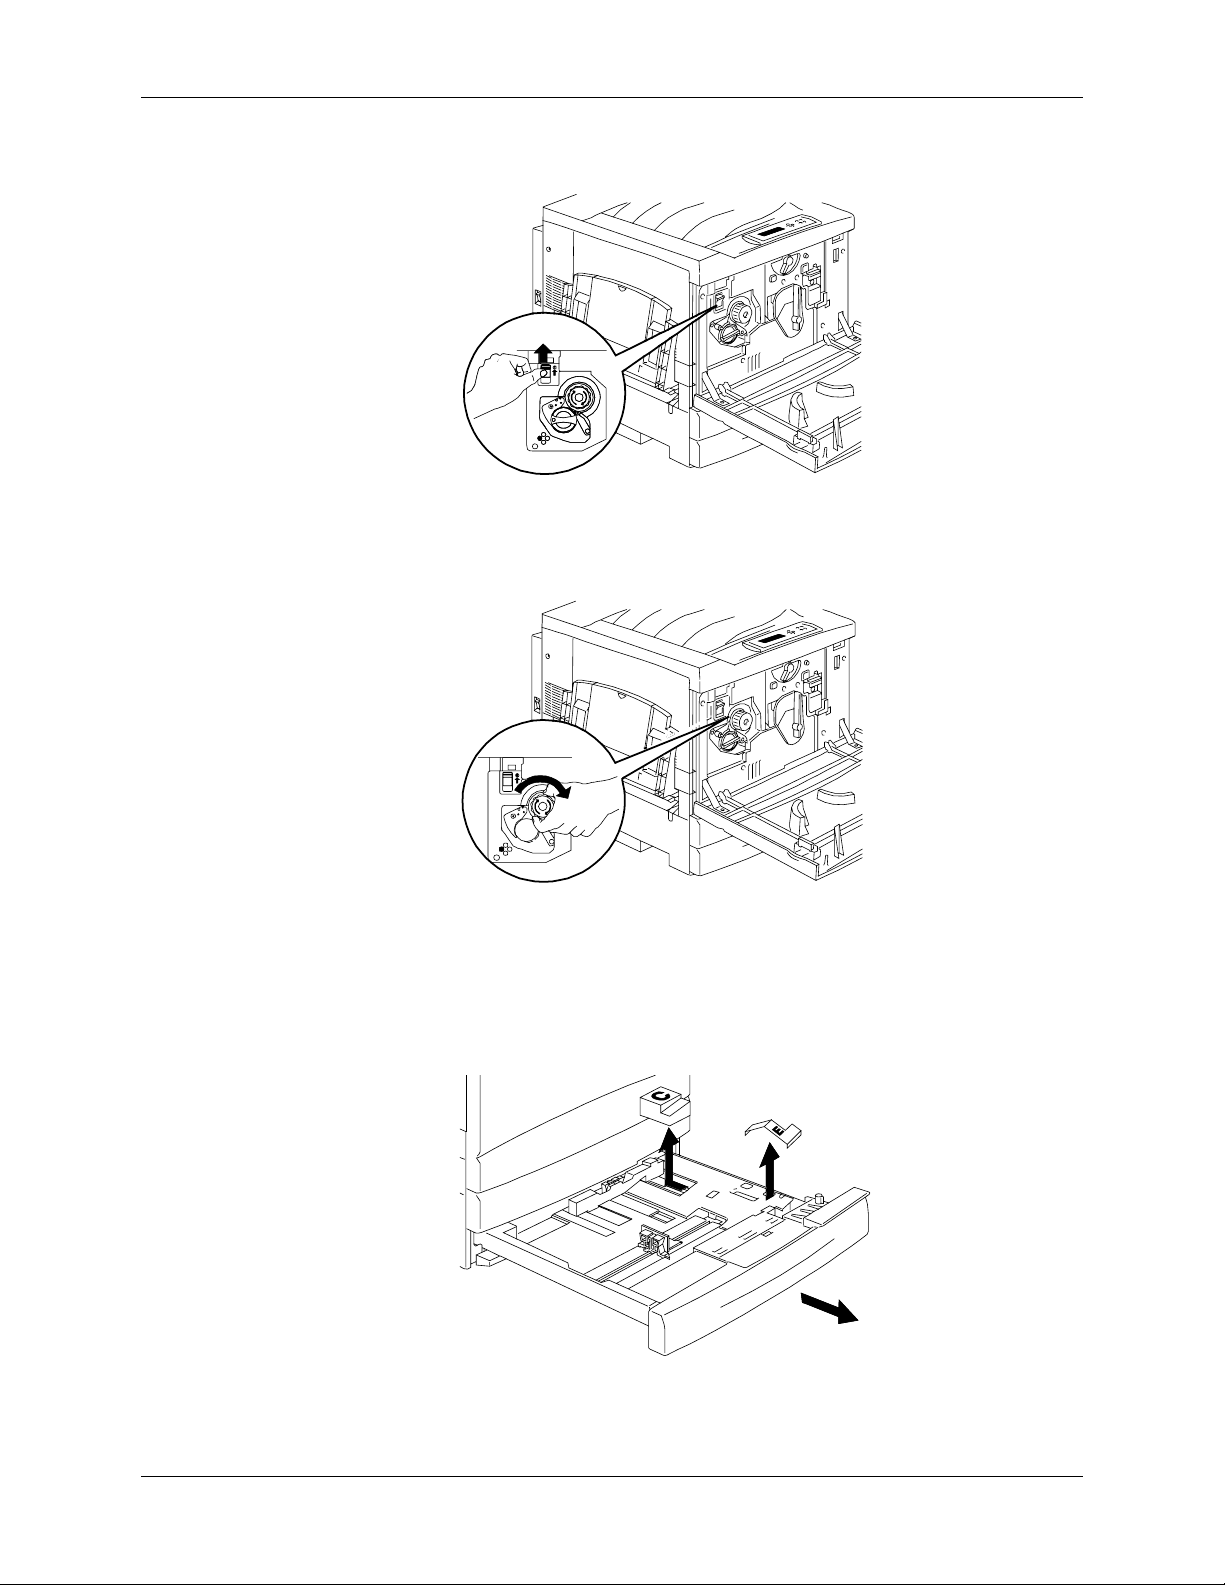
d. Press the Anti-rotation button to release the rotating chambers.
0
301027C-WO
e. Turn the knob in the direction of the arrow, until it stops.
The next strip labeled G is visible.
301028C-WO
f. Repeat steps c through e until all four of the strips labeled G are
removed from the Dry Ink carrousel.
g. Pull open Paper Tray 1 until it stops. Remove the two spacers
labeled C and E, shown below.
301023B-WO
0
1-14 Xerox DocuColor 2006
Page 25
Unpacking the Printer 1. Setting up the DocuColor 2006
L
L
L
h. Close the Paper Tray 1.
i. Gently pull the Fuser area open and remove the spacers labeled A
and J.
301022C-WO
0
j. Close the Fuser area.
k. Open the Bypass Tray and remove the spacer labeled F.
301020B-WO
0
l. Gently pull the Bypass Tray in order to open the Bypass Transport,
and remove the two spacers labeled D.
301021B-WO
0
m. Close the Bypass Transport and Bypass Tray.
Xerox DocuColor 2006 1-15
Page 26
1. Setting up the DocuColor 2006 Unpacking the Printer
L
L
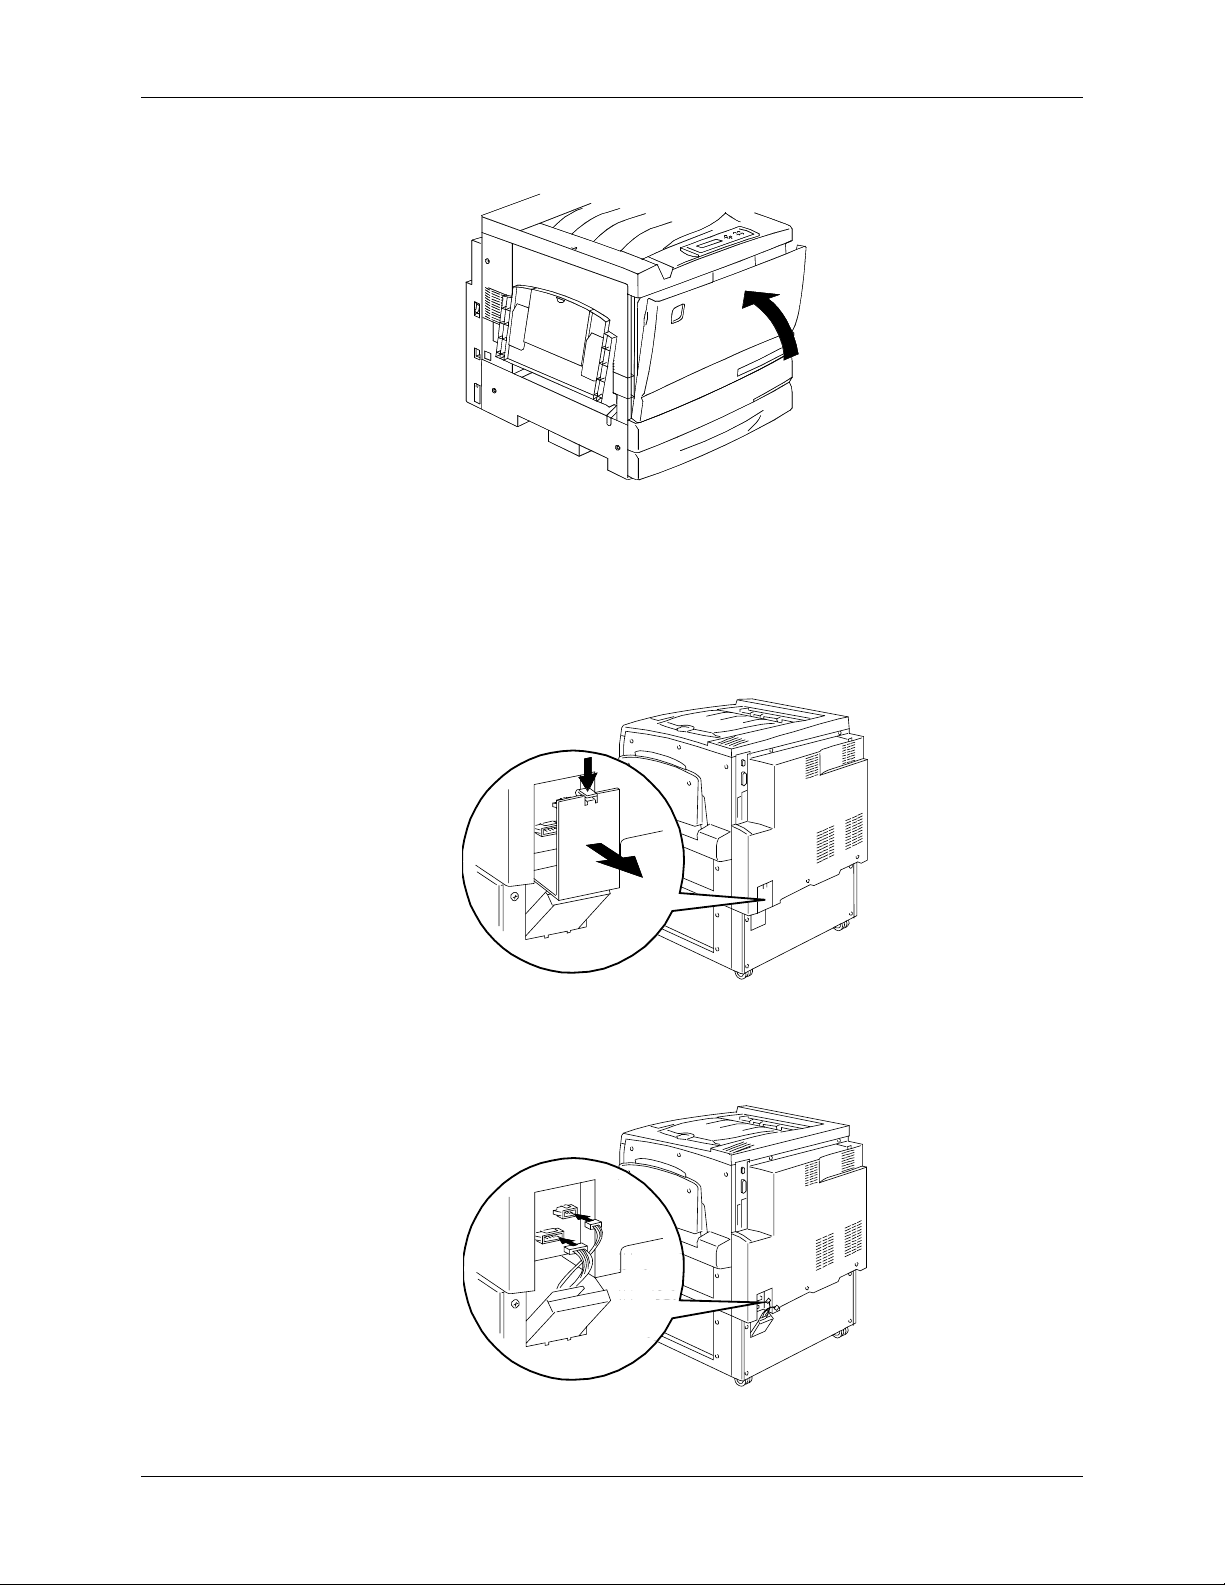
11. Close the Front Cover.
301077b
12. If you do not have a 2 Tray Module, go to the next procedure Printer
Installation.
If you installed the Printer on the 2 Tray Module, perform the following
steps:
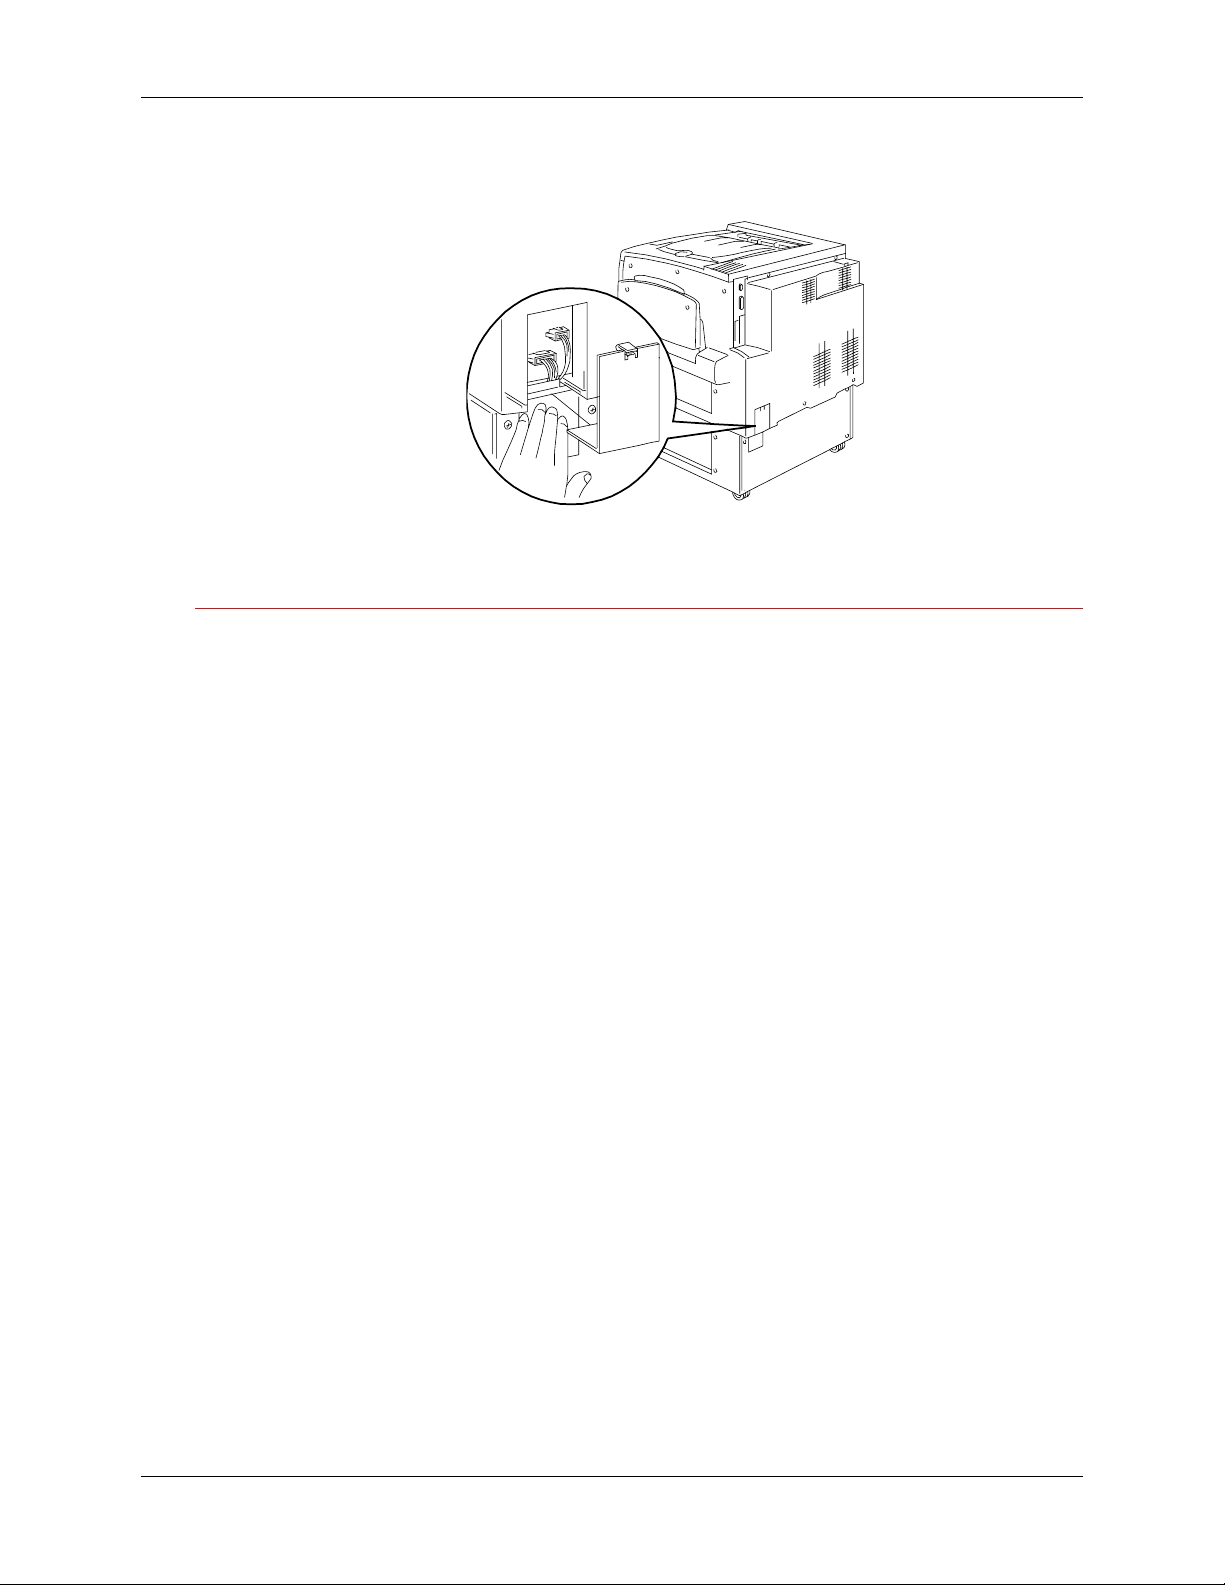
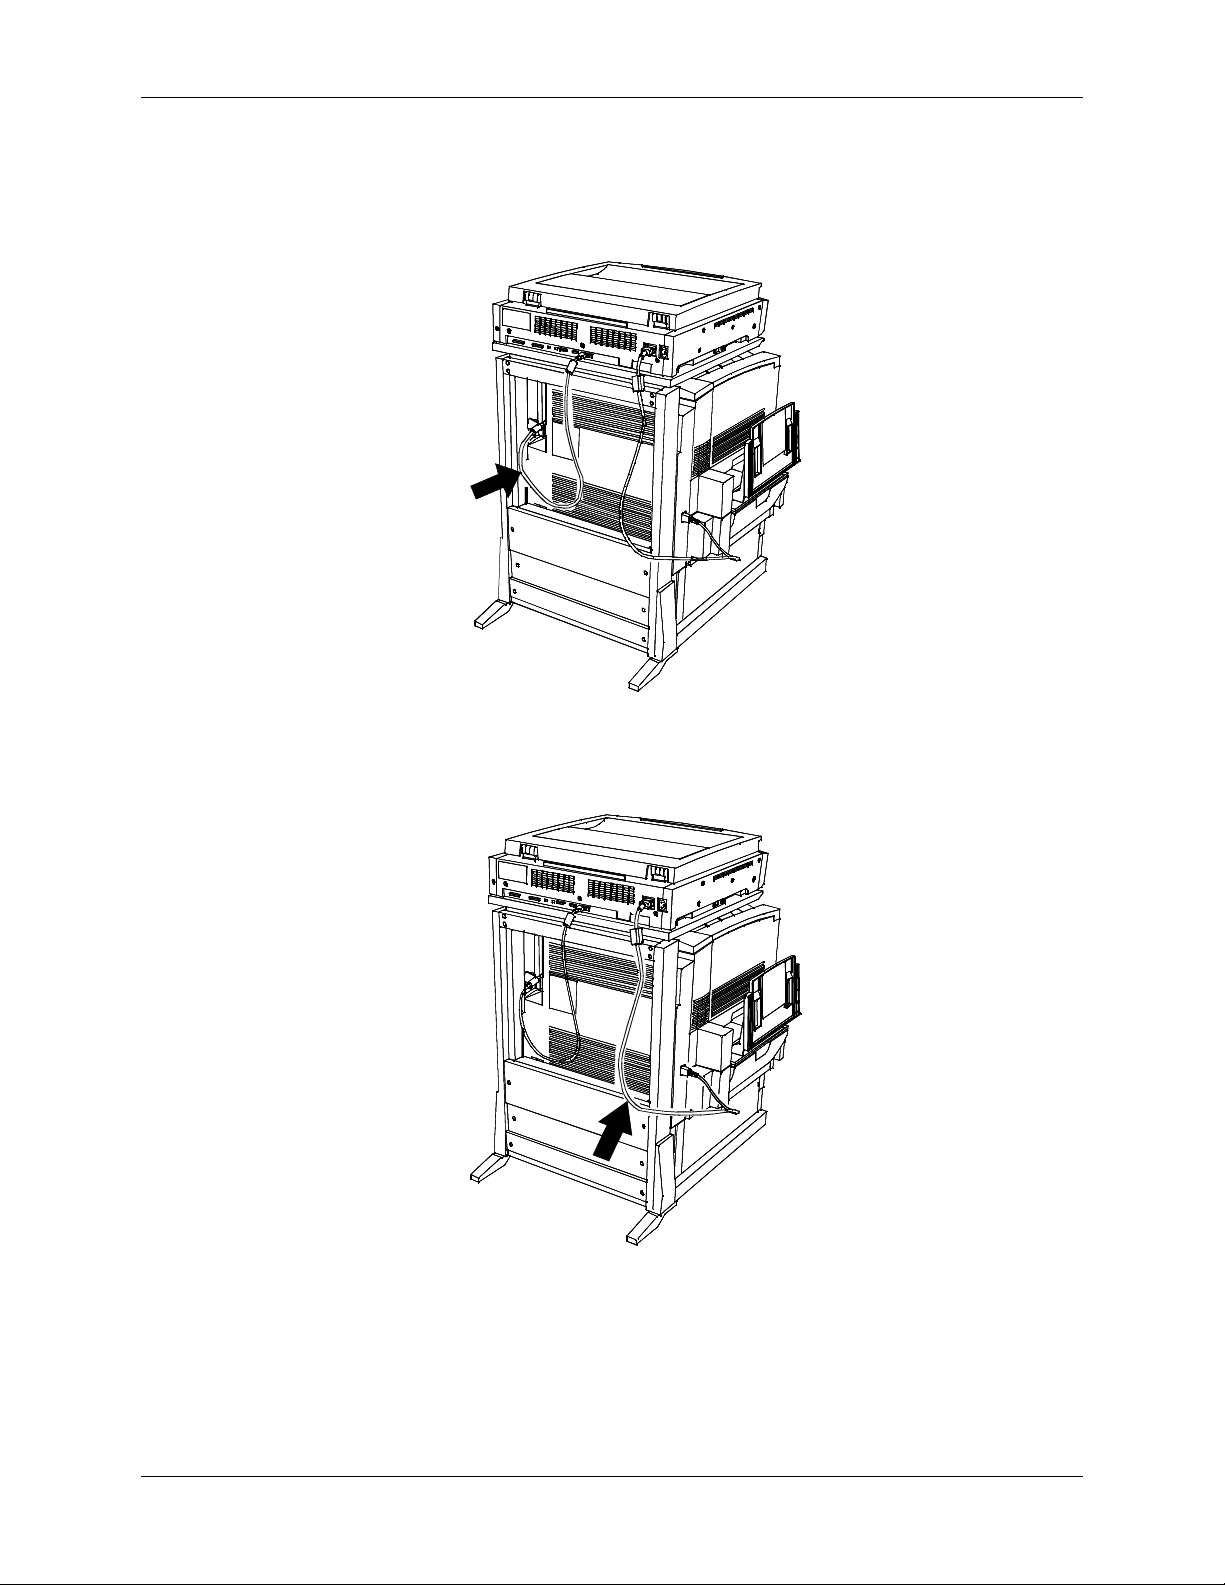
a. Remove the small cover from the rear of the Printer.
301029A-WO
0
b. Connect the two small connectors from the 2 Tray Module into the
jacks in the Printer.
301030A-WO
0
1-16 Xerox DocuColor 2006
Page 27
Unpacking the Printer 1. Setting up the DocuColor 2006
L
c. While holding the cover on the 2 Tray Module closed, align the
small cover to the plastic rails, and slide it into the Printer.
301136A-WO
0
The next step
Go to the Printer installation procedure.
Xerox DocuColor 2006 1-17
Page 28

1. Setting up the DocuColor 2006 Unpacking the Printer
1-18 Xerox DocuColor 2006
Page 29
Printer installation 1. Setting up the DocuColor 2006
L
L
Printer installation
Perform this procedure after the Printer is unpacked, and placed in a suitable
location.
• If you have not performed the Preparing for the installation procedure in
this section, do it now.
• If the Printer is still in the original packing, go to the Unpacking the
Printer procedure.
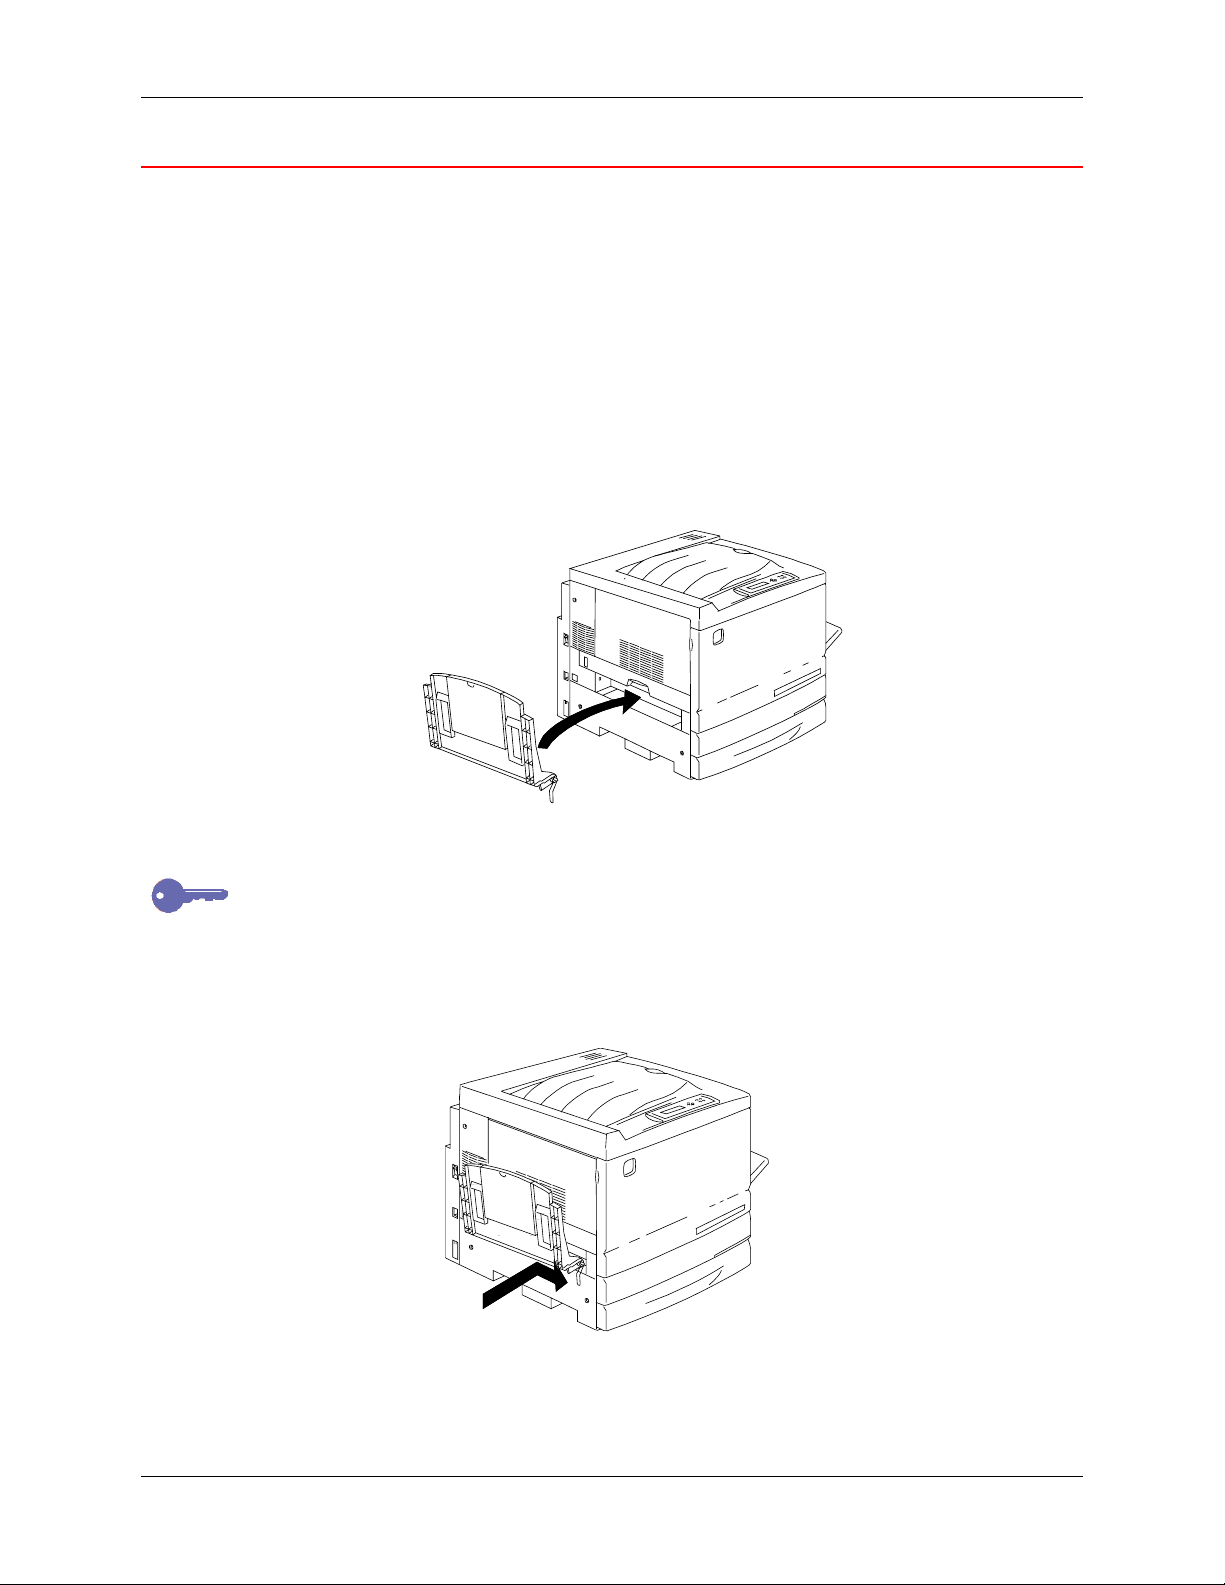
1. Locate the Output Tray in the cardboard tray removed from the top of
the printer. Install the tray by performing steps a through c.
a. Standing on the left-hand side of the Printer, hold the Output Tray
as shown.
301031B-WO
0
30130a
Do not place the metal spring into the hole. Ensure that the metal spring
extends down against the outside of the cover.
b. Place the right-hand arm of the tray into the corresponding hole as
shown.
301032B-WO
0
301032b
Xerox DocuColor 2006 1-19
Page 30
1. Setting up the DocuColor 2006 Printer installation
L
L
0
A
c. Place the left-hand arm of the tray into the corresponding hole as
shown.
301033B-WO
0
301033b
2. Install the Copy Print Cartridge:
a. Open the Front Cover of the Printer.
301034B-WO
301034b
b. Rotate the yellow lever A in the direction of the arrows, until the dot
is aligned with the Unlocked symbol.
301034b
1-20 Xerox DocuColor 2006
Page 31

Printer installation 1. Setting up the DocuColor 2006
L
3. Rotate the yellow lever B in the direction of the arrow until the dot is
aligned with the Unlocked symbol.
B
301035B-WO
0
301035b
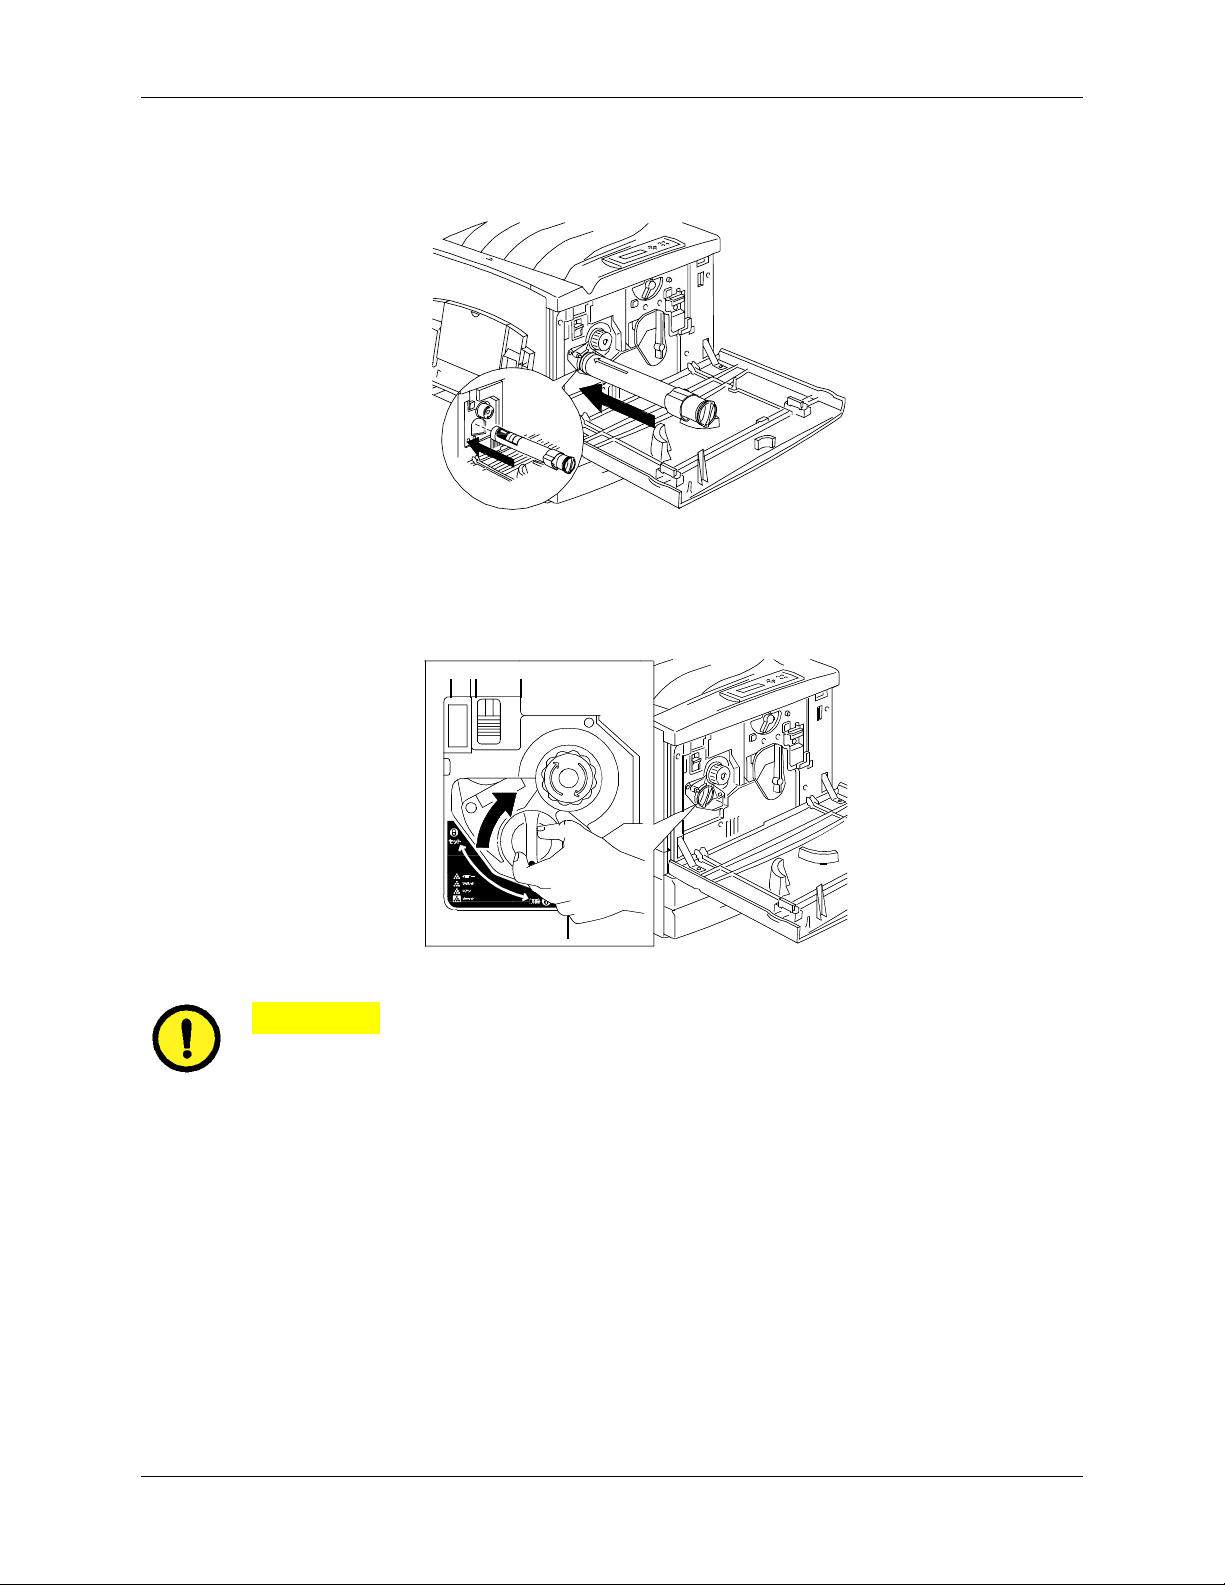
4. Install the Copy/Print Cartridge:
a. Remove the Copy/Print Cartridge from the box.
b. Tear open the notched end of the silver protective bag and remove
the cartridge.
301081b
CAUTION
DO NOT touch the blue surface of the drum. If the drum is scratched, or
contaminated with oil from your hand, the output can be degraded.
Xerox DocuColor 2006 1-21
Page 32

1. Setting up the DocuColor 2006 Printer installation
c. Hold the cartridge by the strap. While keeping the cartridge level,
remove the foam wrapper.
301036c
d. Holding the cartridge by the handle, align the guide with the Printer
rail.
0301037C -WOL
e. Push the cartridge all the way into the Printer until it snaps into
place.
f. Rotate lever B in the direction of the arrow until the dot is aligned
with the Locked symbol.
B
301038b
1-22 Xerox DocuColor 2006
Page 33

Printer installation 1. Setting up the DocuColor 2006
L
A
If lever B will not move to the Locked position, ensure that the cartridge is all
the way into the Printer.
g. Rotate lever A in the direction of the arrow until the dot is aligned
with the Locked symbol.
301039b
5. Install the Dry Ink Cartridges:
Each Dry Ink Cartridge chamber is designated by a specific color. Ensure
that the correct Dry Ink Cartridge is installed into the corresponding color on
the chamber.
The Dry Ink box and packing can be used to ship old cartridges back to your
supplier for recycling.
a. Locate the correct Dry Ink Cartridge box for the color of the current
chamber.
b. Remove the Dry Ink Cartridge from the box.
c. Shake the cartridge seven or eight times as shown below.
301040A-WO
0
Xerox DocuColor 2006 1-23
301040a
Page 34
1. Setting up the DocuColor 2006 Printer installation
d. With the arrow visible on the top of the cartridge, insert the
cartridge into the Printer as far as it will go.
301041c
e. Use the handle on the end of the cartridge to rotate the cartridge in
the direction of the arrow. Ensure that the dot on the cartridge is
aligned with the Locked symbol as shown.
301119b
CAUTION
Ensure that the cartridge is in the Locked position. If the cartridge is NOT in
the Locked position, Dry Ink can spill into the Printer.
1-24 Xerox DocuColor 2006
Page 35
Printer installation 1. Setting up the DocuColor 2006
L
0
L
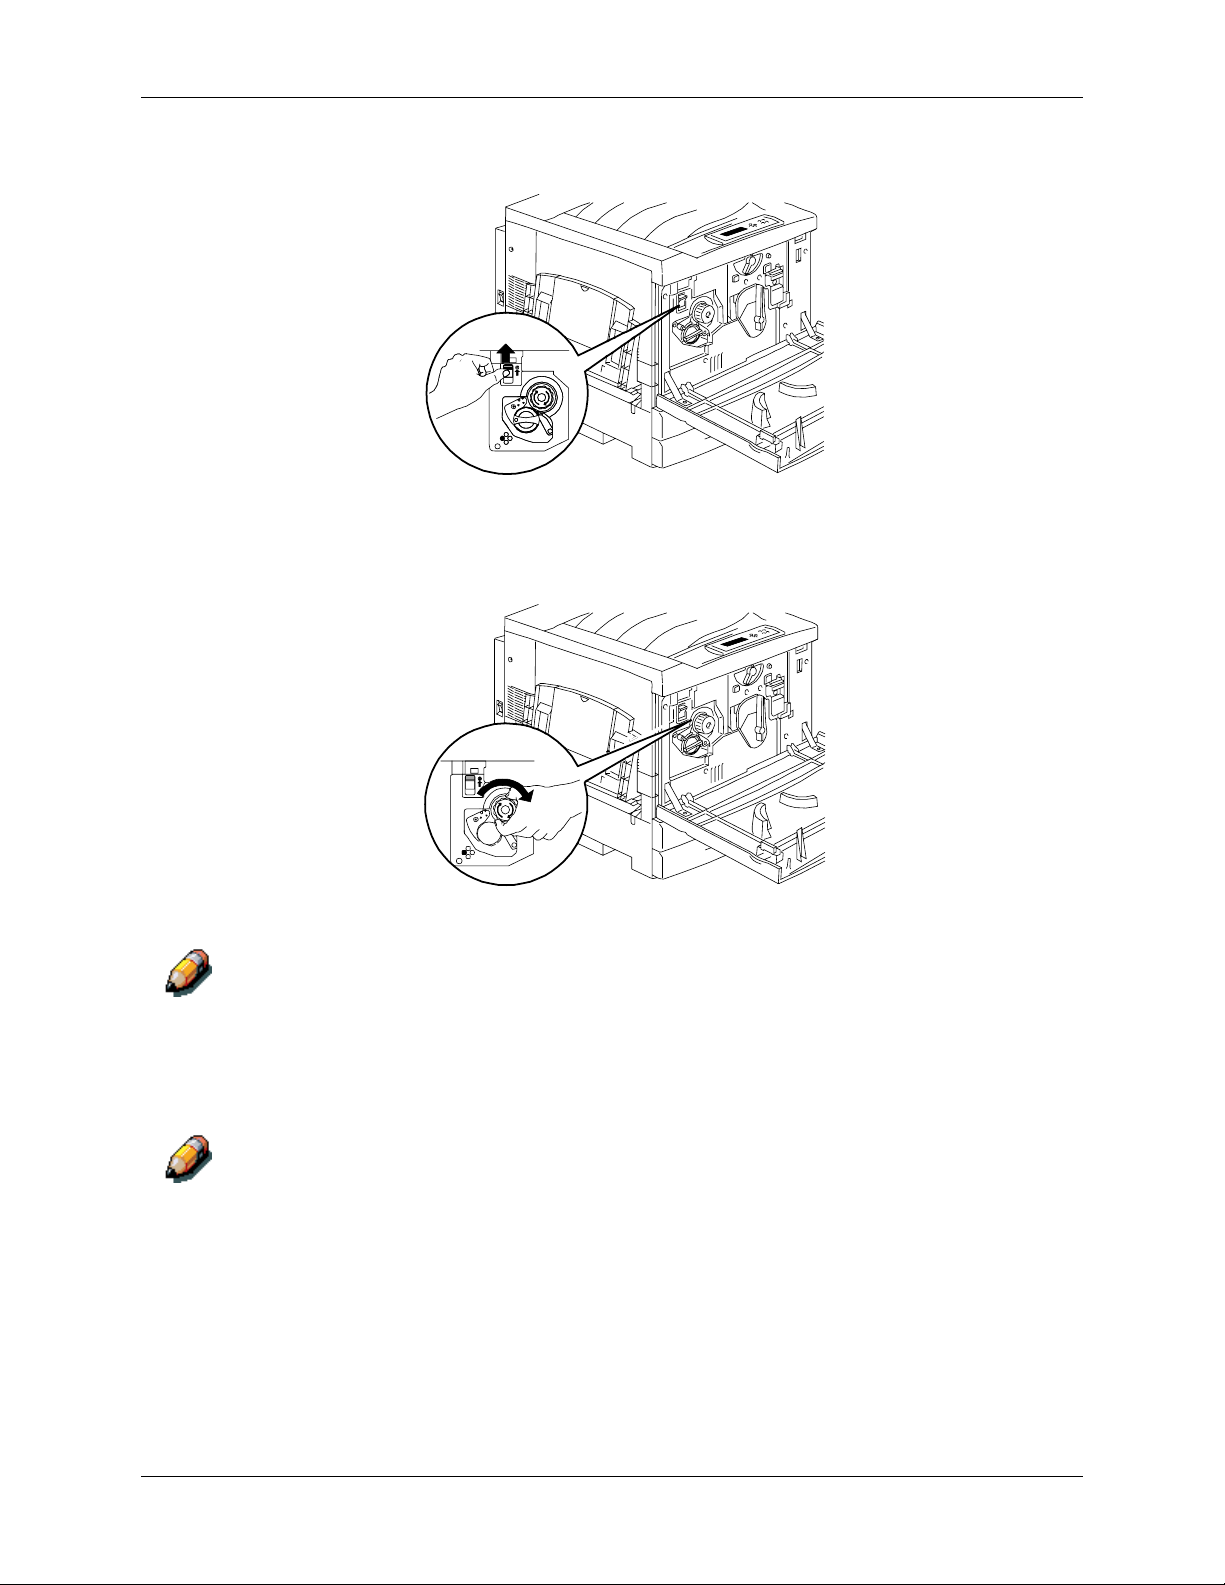
f. Press and release the Anti-rotation button.
0
301027C-WO
301027c
g. Rotate the knob in the direction of the arrow until it stops at the
next chamber.
301028C-WO
301038c
If the Dry Ink Cartridge is not in the Printer all the way, the knob will not
rotate.
6. Repeat step 5 for the three remaining Dry Ink Cartridges.
Rotate the carrousel again to ensure that the last cartridge is in the Printer all
the way.
Xerox DocuColor 2006 1-25
Page 36
1. Setting up the DocuColor 2006 Printer installation
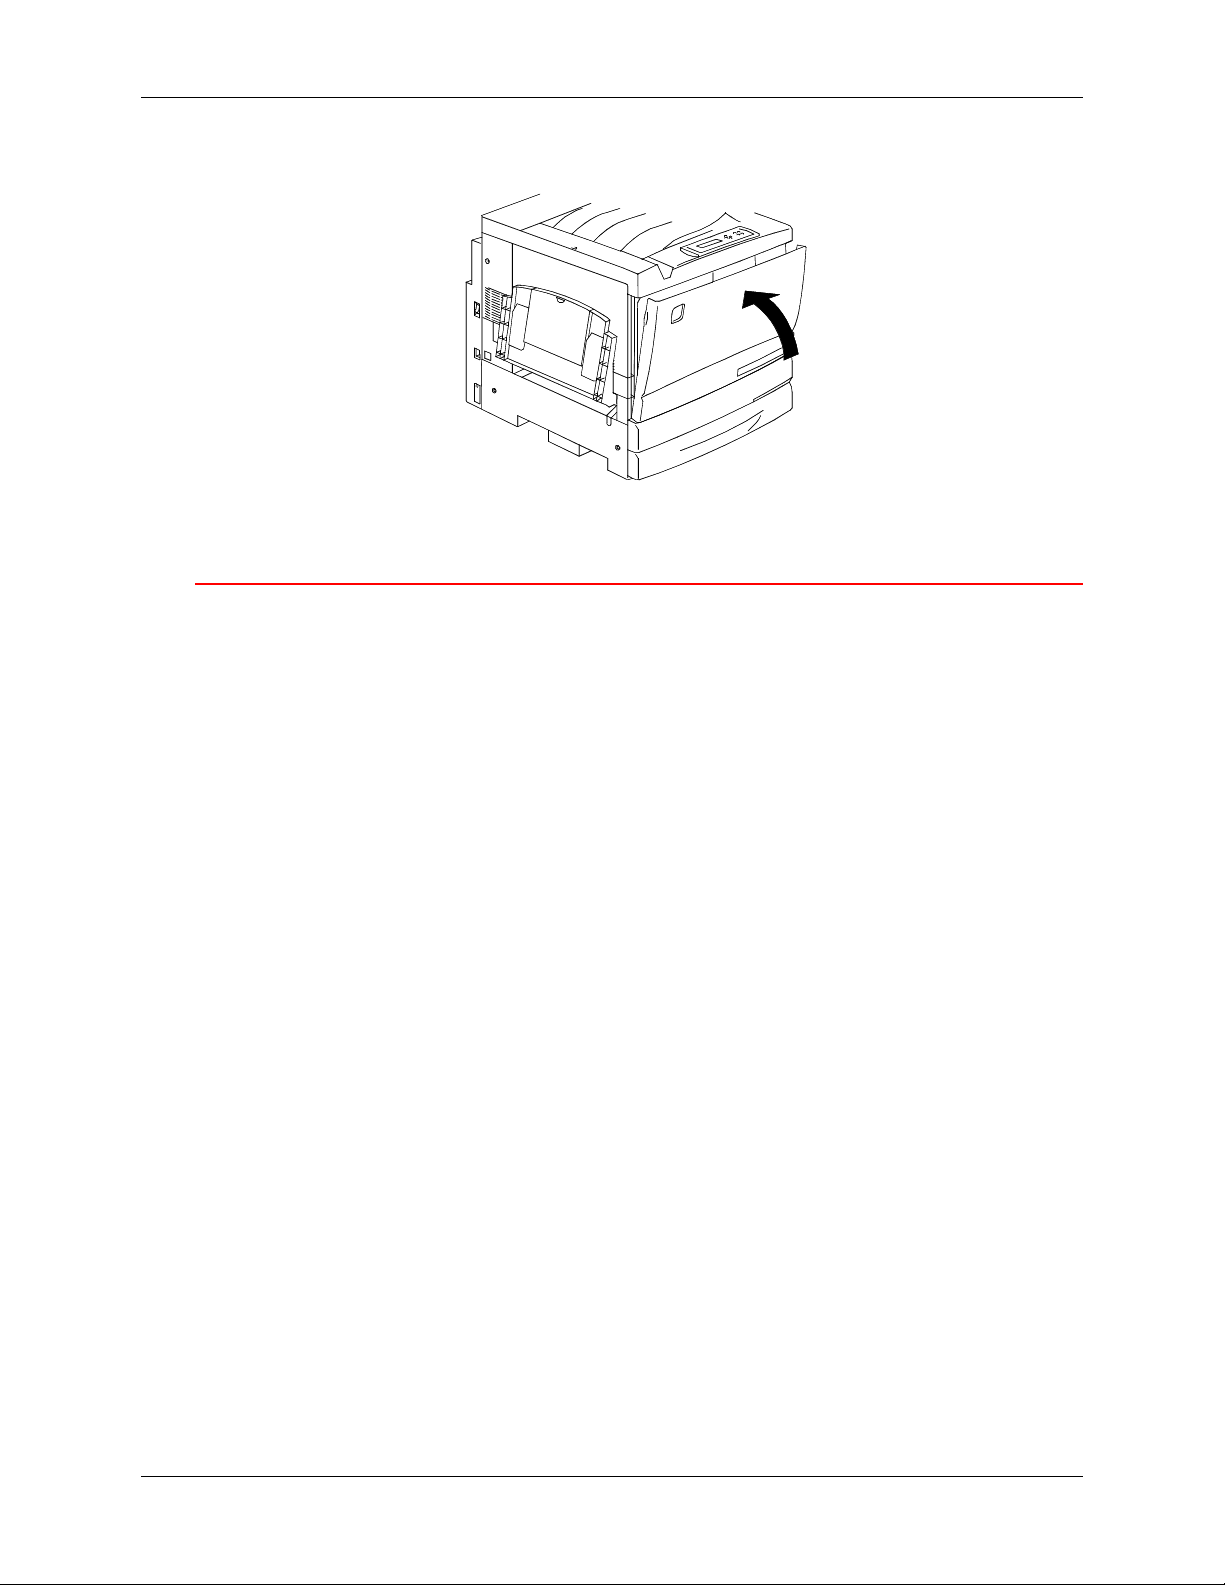
7. Close the Printer Front Cover.
301077b
The next step
If you have ordered the optional Duplex Tray, go to the Installing the Duplex
Tray procedure.
If you do not have a Duplex Tray, go to Loading paper in the Paper Tray
procedure.
1-26 Xerox DocuColor 2006
Page 37
Installing the Duplex Tray 1. Setting up the DocuColor 2006
L
Installing the Duplex Tray (optional)
The Duplex Tray enables the DocuColor 2006 to print two-sided output.
1. Open the Duplex Tray box and remove the contents:
• Duplex Tray
• Upper Inverter
• Lower Inverter
• Two Thumb Screws
• Small Connector Cover with cutout
• Special Tool
2. Remove the Duplex Tray from the plastic wrap.
a. Remove the packing from the tray
b. Ensure that all the packing is removed from the tray.
3. Open Paper Tray 1.
301128A-WO
0
301043b
301128a
Xerox DocuColor 2006 1-27
Page 38
1. Setting up the DocuColor 2006 Installing the Duplex Tray
L
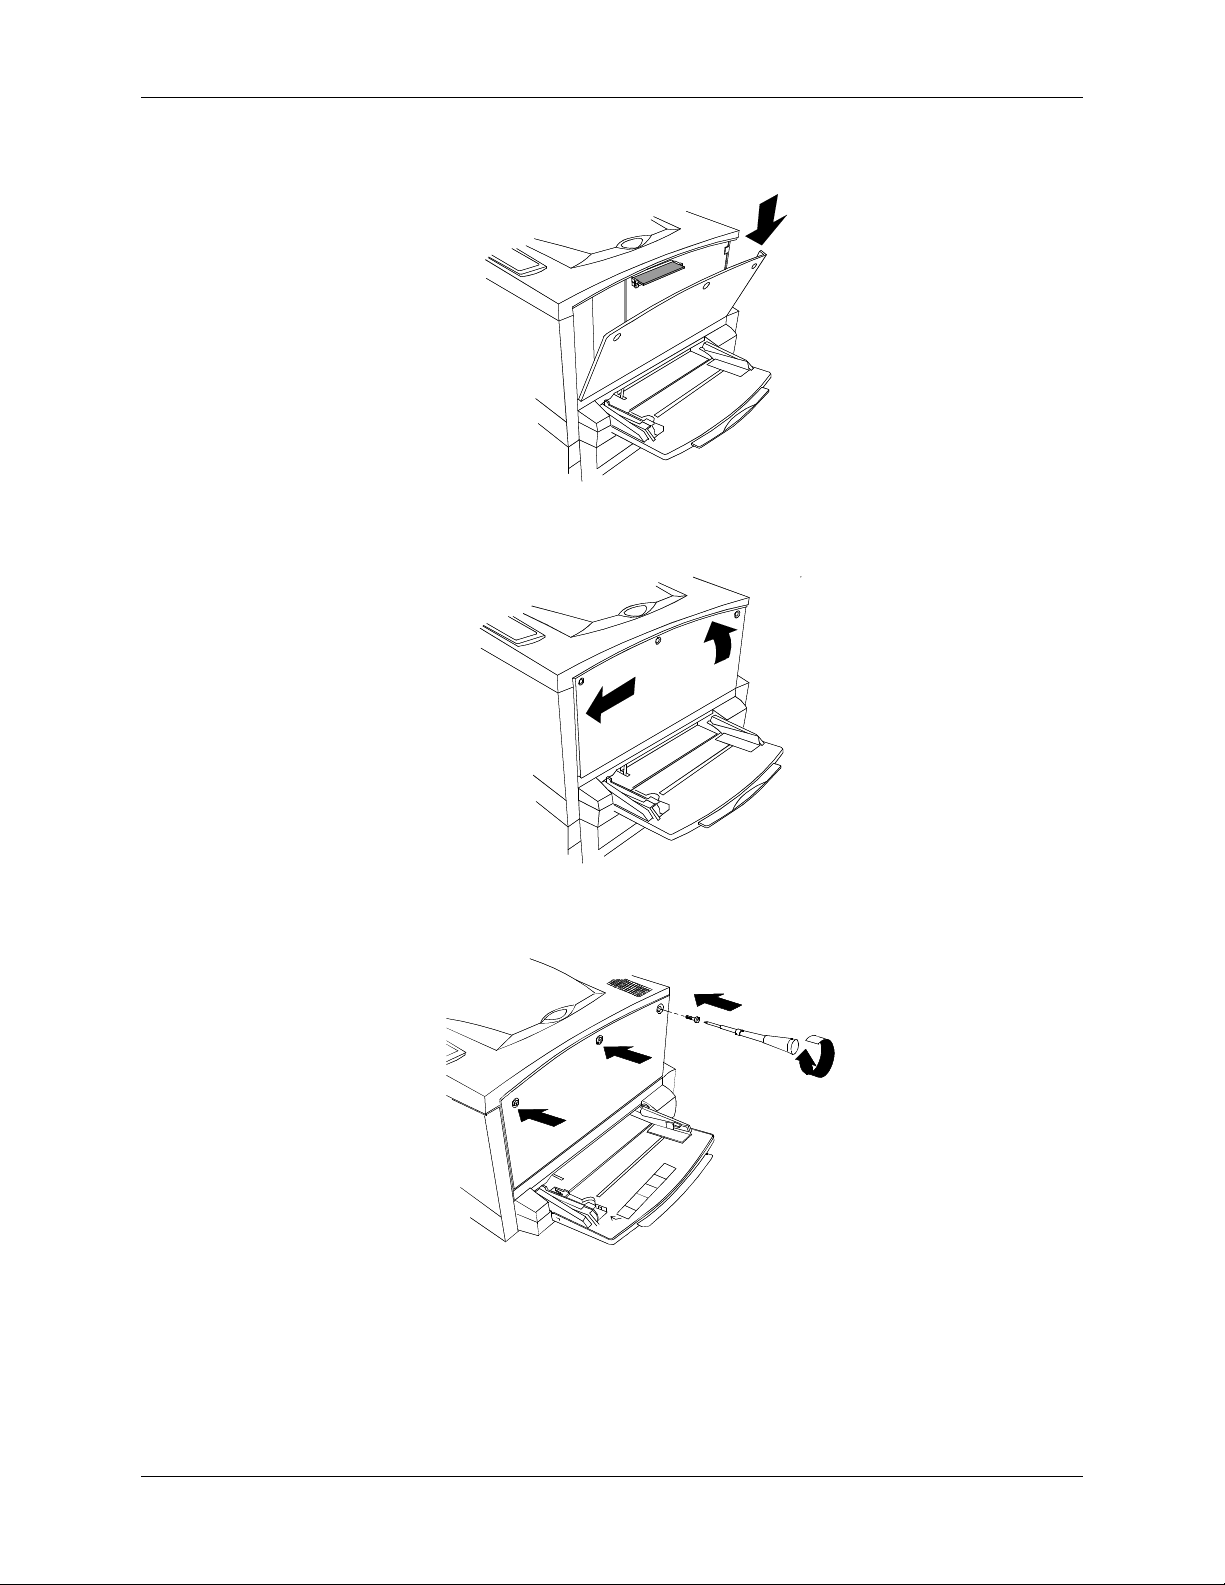
4. Using a phillips head screwdriver, remove the screw shown below.
301050B-WO
0
301050b
5. To remove the cover, shift it to the right then pull it away from the
Printer. Discard the cover.
6. Install the Duplex Tray:
a. Align the rails on the tray with the rails in the Printer.
b. Partially close the Duplex Tray and the paper tray.
301051b
301052b
1-28 Xerox DocuColor 2006
Page 39

Installing the Duplex Tray 1. Setting up the DocuColor 2006
L
7. Install the Lower Inverter:
a. Gently squeeze the sides of the Output Tray toward each other in
order to remove the tray from the Printer.
301053B-WOL
0
301053b
c. Using a screwdriver, remove the two screws from lower left-hand
cover of the Printer as shown below.
301054B-WO
0
301054b
d. Remove the cover by shifting it to the right then pulling it away from
the Printer. Discard the cover.
301055a
Xerox DocuColor 2006 1-29
Page 40

1. Setting up the DocuColor 2006 Installing the Duplex Tray
e. Close the Inverter Tray and Paper Tray 1.
8. Using the Special Tool from the contents of the Printer carton, remove
the two small covers from the left-hand side of the Printer. Discard the
two covers.
301204a
9. Remove the Access Cover located on the lower left-hand side of the
Printer. DO NOT discard this cover.
301056d
1-30 Xerox DocuColor 2006
Page 41

Installing the Duplex Tray 1. Setting up the DocuColor 2006
L
0
L
0
CAUTION
Ensure that the small connector and cable on the left-hand side of the Lower
Inverter are pulled back out of the way.
10. Install the Lower Inverter as shown below.
SMALL
CONNECTOR
AND CABLE
301057B-WO
301057b
The Lower Inverter does not install flush with the Printer covers.
a. Install the two thumbscrews from the contents of the box.
301058B-WO
301058a
Xerox DocuColor 2006 1-31
Page 42

1. Setting up the DocuColor 2006 Installing the Duplex Tray
L
0
L
0
L
0
b. Connect the small connector from the Lower Inverter to the small
jack located at the rear of the left-hand side of the Printer.
301059a
301059A-WO
f. Reinstall the small Access Cover.
11. Install the Upper Inverter:
a. Install the Upper Inverter into the Printer as shown.
301060b
301060B-WO
301061b
301061B-WO
1-32 Xerox DocuColor 2006
Page 43

Installing the Duplex Tray 1. Setting up the DocuColor 2006
L
L
b. Connect the tiny connector on the rear of the Upper Inverter to the
small jack in the access hole, as shown below.
301132A-WO
0
301062b
g. Install the new Connector Cover with the cutout into the access
hole, guiding the wires through the cutout in the cover.
301133A-WO
0
301063b
CAUTION
Use caution if you must rearrange the tiny wires on the connector in order to
close the Connector Cover.
Xerox DocuColor 2006 1-33
Page 44

1. Setting up the DocuColor 2006 Installing the Duplex Tray
L
0
L
12. Reinstall the Output Tray.
301064B-WO
301064b
13. Connect the power cord to the Printer and the wall outlet.
The next step
Go to the Loading the paper in the paper tray procedure.
301071B-WO
0
0301070b
1-34 Xerox DocuColor 2006
Page 45

Loading paper in the paper tray 1. Setting up the DocuColor 2006
L
Loading paper in the paper tray
Refer to the Recommended Materials List for details about the paper
requirements for the DocuColor 2006.
1. From the front of the Printer, pull the paper tray out of the Printer as far
as it will go.
301128A-WO
0
301128a
If you are loading paper in the 2 Tray Feeder paper trays, skip step 2. It is
not necessary to press down on the metal plate in Tray 2 or Tray3.
2. Press down on the metal plate in the tray until it latches.
301066B-WOL
0
301066b
Xerox DocuColor 2006 1-35
Page 46

1. Setting up the DocuColor 2006 Loading paper in the paper tray
L
3. Pinch the Horizontal and Vertical Paper Guides and move them away
from the center of the tray as far as they will go.
301067B-WOL
0
301067b
4. Place the right edge of the paper stack against the right metal edge and
under the front right-hand side paper tab as shown below.
5. Ensure that the paper stack does not cover the MAX guideline.
301068B-WO
0
301068b
To avoid jams, load paper with the long edge against the side of the tray
when possible.
6. Adjust the two Paper Guides so that they lightly touch the edges of the
paper stack.
0301101a 301102a
1-36 Xerox DocuColor 2006
Page 47

Loading paper in the paper tray 1. Setting up the DocuColor 2006
Moving the guides too tight against the paper stack can cause a jam.
7. Ensure that the vertical Paper Guide is aligned with the appropriate
paper size mark on the bottom of the tray.
Automatic paper size detection cannot occur if the vertical Paper Guide is
out of position.
8. Push the paper tray firmly into the Printer.
301065b
9. If there are additional paper trays installed in your DocuColor 2006,
repeat this procedure until all the trays are loaded with the desired paper
stock.
The next step
Go to the section Installing the Scanner Stand.
Xerox DocuColor 2006 1-37
Page 48

1. Setting up the DocuColor 2006 Loading paper in the paper tray
1-38 Xerox DocuColor 2006
Page 49
Installing the Scanner Stand 1. Setting up the DocuColor 2006
Installing the Scanner Stand
You will need a phillips head screwdriver to perform this installation
1. Open the Scanner Stand carton.
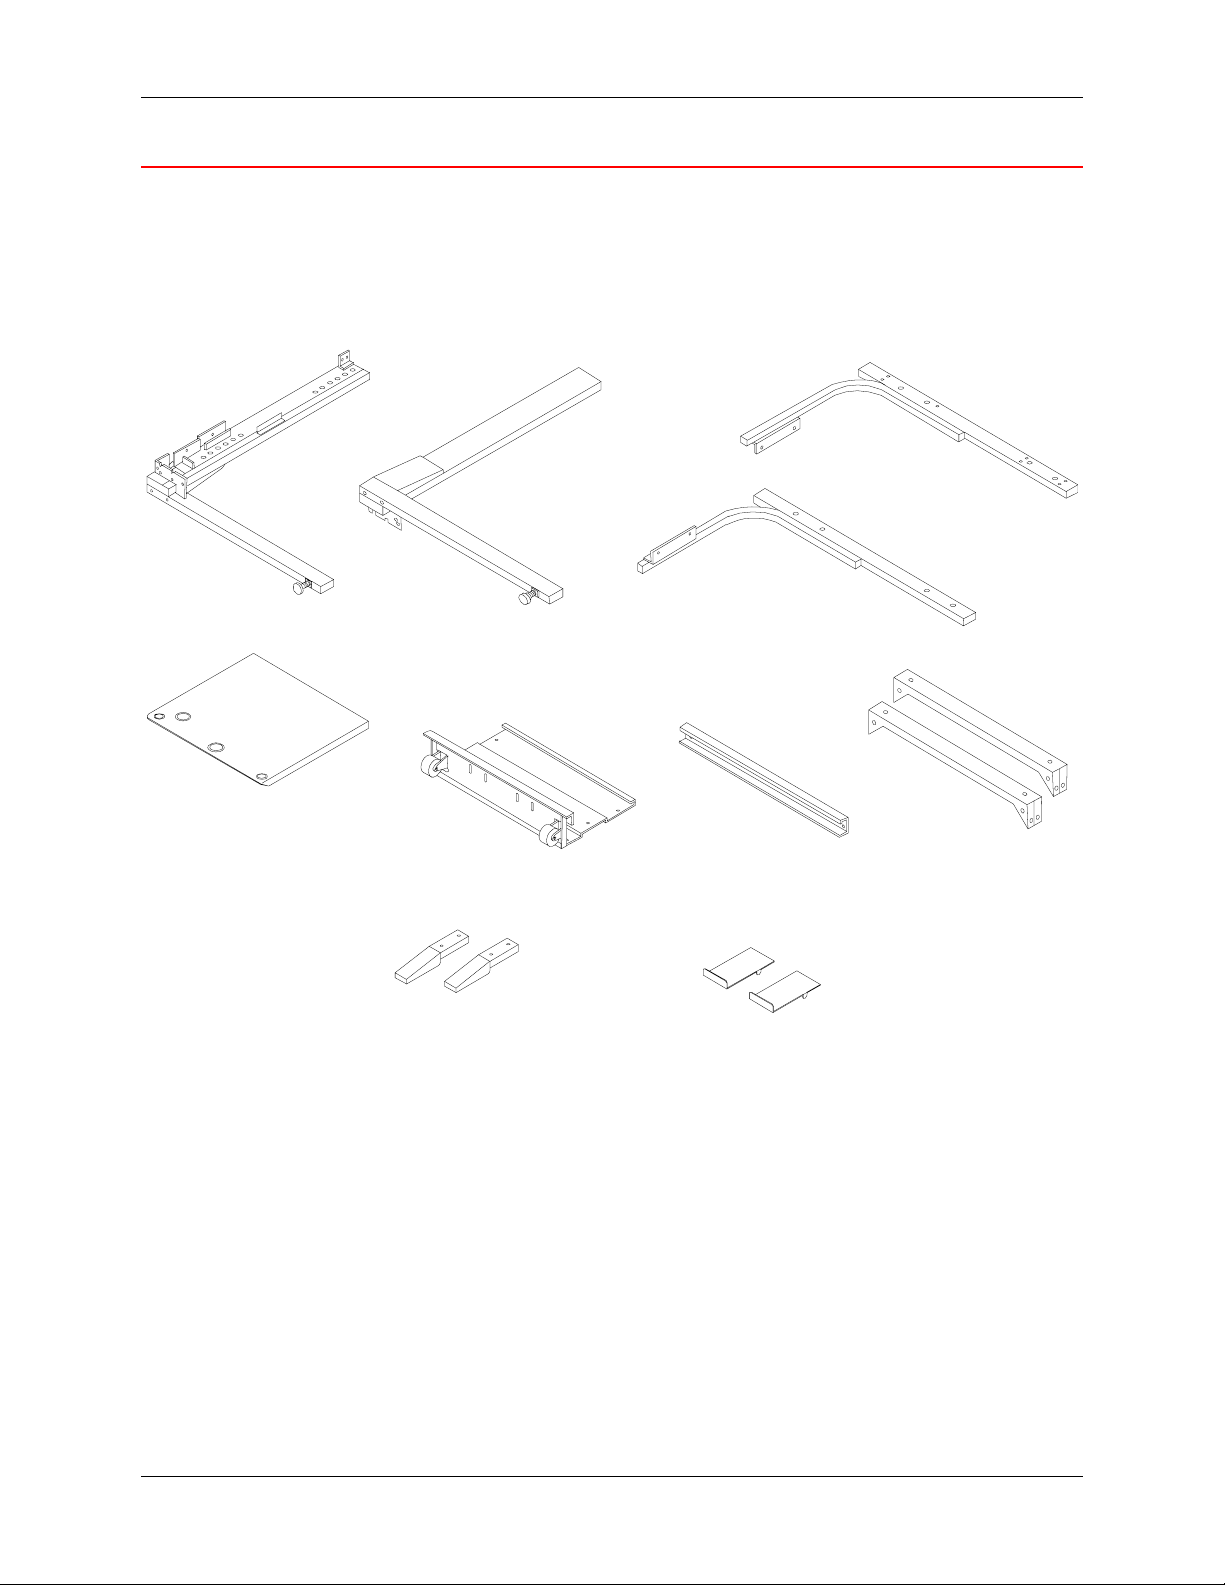
2. Ensure that the following parts are included in the carton:
3.
5.
1.
9.
6.
2.
7.
4.
10.
8.
301012a
1. Right Leg 6. Rear/Bottom Plate with casters
2. Left Leg 7. Spacer Bar
3. Right Support 8. 2 Braces
4. Left Support 9. 2 Stabilizing Feet
5. Table Top 10. 2 Bumpers
6mm Allen Wrench, not shown
32 Screws, not shown
8 Allen Screws with washers, not shown
Xerox DocuColor 2006 1-39
Page 50

1. Setting up the DocuColor 2006 Installing the Scanner Stand
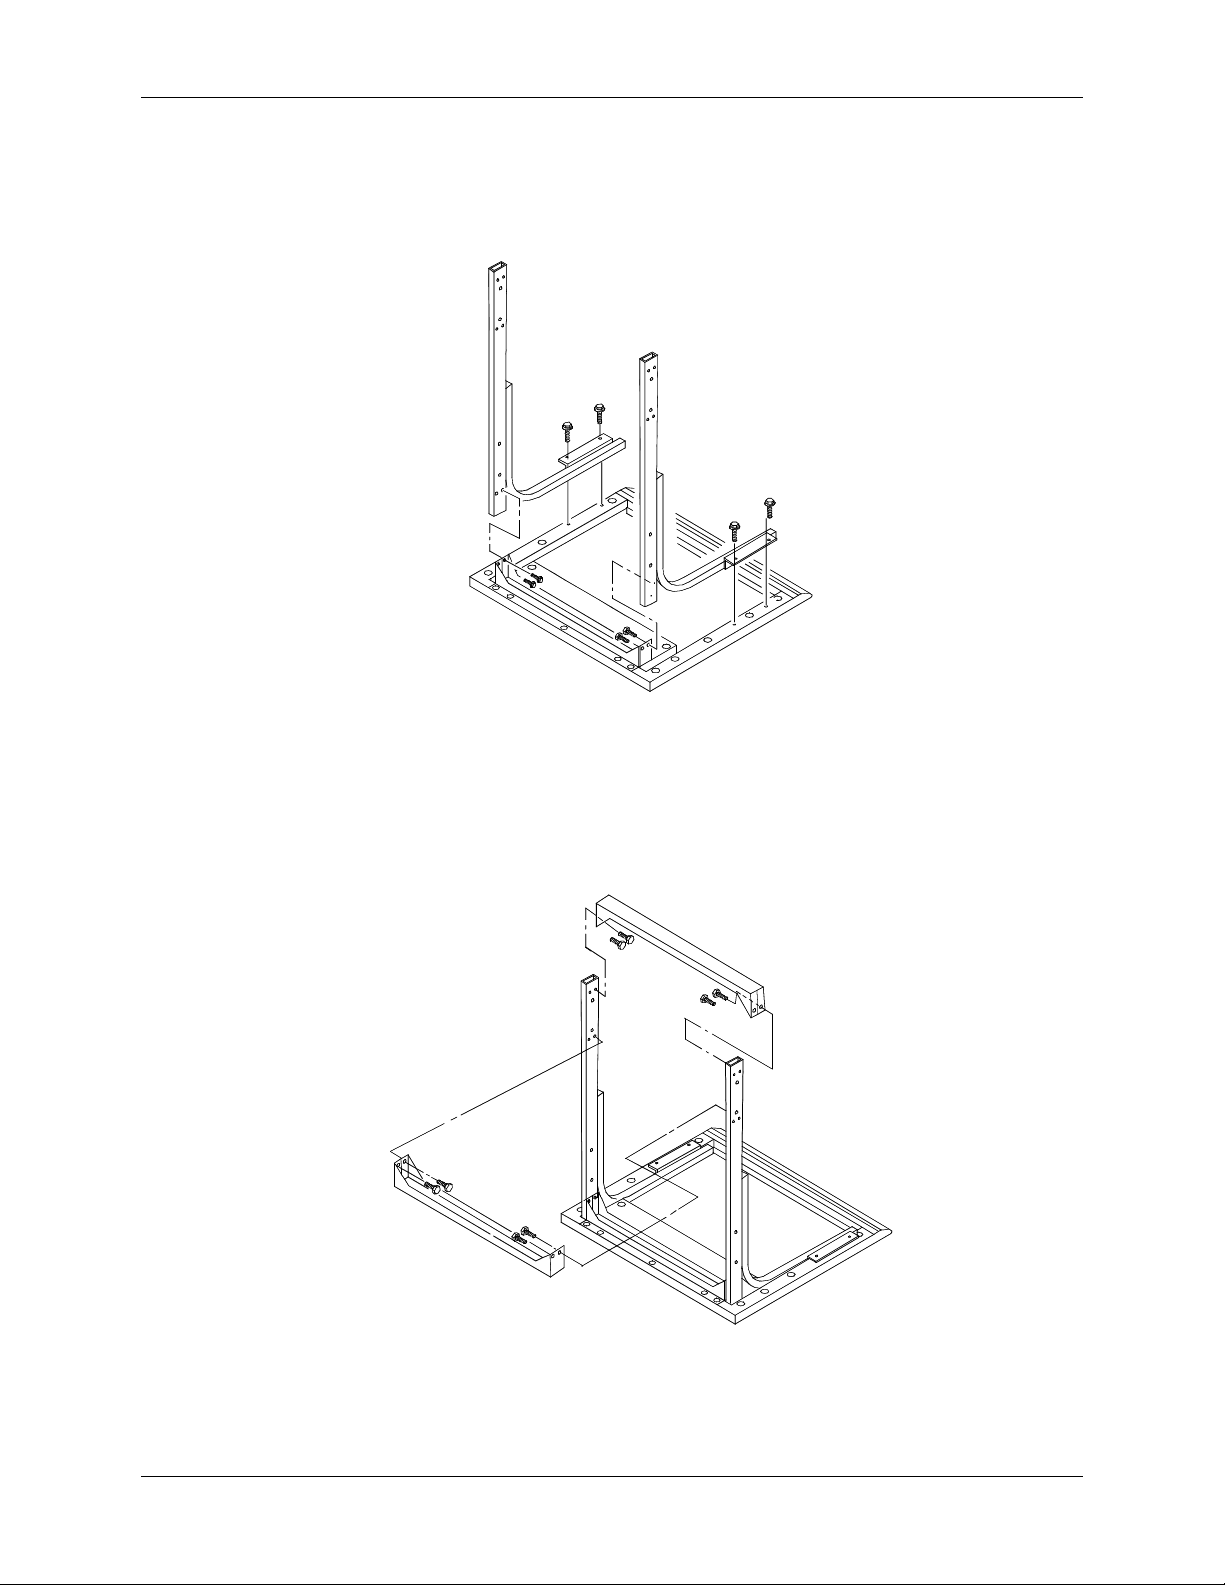
3. Attach the Left Leg and Right Leg to the Rear/Bottom Plate using eight
screws as shown below.
301143a
4. Install the Spacer Bar between the tops of the two legs using four
screws. You have just completed the Lower Assembly.
301151a
5. Turn the Lower Assembly over.
6. Install the two Stabalizing Feet, using four screws as shown.
301130a
1-40 Xerox DocuColor 2006
Page 51
Installing the Scanner Stand 1. Setting up the DocuColor 2006
7. Place the table top face-down on the floor.
a. Place the Left Support and the Right Support into the table top and
install the two screws. This is the Upper Assembly
301202
b. Install four screws through the supports and into the top of the
table.
c. Install the two braces into the positions shown below.
301137
Xerox DocuColor 2006 1-41
Page 52

1. Setting up the DocuColor 2006 Installing the Scanner Stand
8. Turn the Upper Assembly over, and slide it into the legs of the Lower
Assembly until it stops.
301140a
9. Attach the two assemblies together using eight Allen Screws and the
Allen Wrench.
301139a
10. Install the two Bumpers into the rear slots of the bottom plate.
301141a
1-42 Xerox DocuColor 2006
Page 53

Installing the Scanner Stand 1. Setting up the DocuColor 2006
11. Move the Scanner Table around the Printer as shown.
301152a
Xerox DocuColor 2006 1-43
Page 54

1. Setting up the DocuColor 2006 Installing the Scanner Stand
The next step
Go to the Installing the Scanner procedure.
1-44 Xerox DocuColor 2006
Page 55

Installing the Scanner 1. Setting up the DocuColor 2006
Installing the Scanner
1. Open the Scanner carton.
2. Ensure that the following items are in the carton.
• Scanner
• Power cord
• Printer interface cable
• Power cable
3. Remove the plastic from the top of the Scanner and push it down the
side of the carton away from the Scanner.
4. With a person on each side of the box, place your hands inside the
plastic and under the Scanner.
301049a
5. Lift the Scanner from the box and place it on the Scanner Stand.
6. Ensure that the front Scanner feet are placed into the round recessed
areas on the top front of the Scanner Stand.
301045a
Xerox DocuColor 2006 1-45
Page 56
1. Setting up the DocuColor 2006 Installing the Scanner
7. Tighten the thumbscrew, shown below, in order to secure the Scanner to
the stand.
301046a
8. Remove the three screws from the right-hand side of the Scanner.
301132a
Please store these screws in a safe place, or tape them to the rear of the
Scanner Stand. The screws lock the Scanner Drive into a secure position.
You will need them if the Scanner has to be moved.
1-46 Xerox DocuColor 2006
Page 57
Installing the Scanner 1. Setting up the DocuColor 2006
9. Connect the Scanner cables by performing the following steps:
a. Install one end of the Interface Cable to the rear of the Scanner,
and the other end to the left-hand side of the Printer.
301131a
b. Connect the power cable between the Printer and the Scanner as
shown.
301228a
Xerox DocuColor 2006 1-47
Page 58

1. Setting up the DocuColor 2006 Installing the Scanner
c. Connect the Scanner power cord to the wall outlet and to the rear
of the Scanner.
301080
The next step
Go to the Installing the Document Feeder procedure.
1-48 Xerox DocuColor 2006
Page 59

Installing the Document Feeder 1. Setting up the DocuColor 2006
Installing the Document Feeder
The Document Feeder enables you to make copies from a stack of
originals. Up to 30 originals of 75 gsm paper may be placed in the Document
Feeder at a time.
WARNING
The Document Feeder weighs 24 pounds (11kg). Take extreme care when
handling the feeder.
1. Check the contents of the kit for the following parts:
• Feeder Assembly
• Exit Tray
• Two Knobs
2. Ensure that the Scanner power is OFF, and that the power cord is
disconnected.
301125a
3. Raise the Document Glass Cover.
030
1220A
-WOL
Xerox DocuColor 2006 1-49
Page 60

1. Setting up the DocuColor 2006 Installing the Document Feeder
4. Using both hands, lift the cover straight up and remove. This cover may
be discarded.
301222a
5. Use a screwdriver to loosen and remove the two small covers shown
below. Discard the covers and screws.
030
1223A
-WOL
1-50 Xerox DocuColor 2006
Page 61

Installing the Document Feeder 1. Setting up the DocuColor 2006
6. To install the Document Feeder perform the following steps:
WARNING
The Document Feeder weighs 24 pounds (11kg). Use extreme care when
handling the feeder.
a. Remove the protective packing from the front edge of the
Document Feeder.
0
3301227A
-W O L
b. From the back of the Scanner, align the holes in the Document
Feeder hinges to the alignment posts on the Scanner.
0
301229A-WOL
Xerox DocuColor 2006 1-51
Page 62

1. Setting up the DocuColor 2006 Installing the Document Feeder
c. Using both hands, push the Document Feeder toward the front of
the Scanner. This secures the Feeder to the posts.
0301230A-WOL
d. Install the two knobs from the kit and tighten.
0301230a
-W O L
1-52 Xerox DocuColor 2006
Page 63

Installing the Document Feeder 1. Setting up the DocuColor 2006
7. Connect the cable to the back of the Scanner and tighten the two
screws.
0
301249A
-WOL
8. Install the Exit Tray.
0301250A
-W O L
301250a
9. Reconnect the power cord, and switch ON the Scanner.
301085a
Xerox DocuColor 2006 1-53
Page 64

1. Setting up the DocuColor 2006 Installing the Document Feeder
The next step
If you are installing the optional Sorter/Stacker, go to the Installing the
Sorter/Stacker procedure. Otherwise, go to the Printing the Test Page
procedure.
1-54 Xerox DocuColor 2006
Page 65

Installing the Sorter/Stacker 1. Setting up the DocuColor 2006
Installing the Sorter/Stacker
The Sorter/Stacker is an optional accessory for the Xerox DocuColor 2006.
It attaches to the left side of the unit and consists of 10 bins and a high
capacity bin. Xerox service personnel or installation personnel or the
customer may install it.
The Sorter/Stacker functions are available to copy jobs only. Sorting
functions are not available to print jobs.
1. Ensure that there is adequate space for the unit to the left of the
copier/printer. The Sorter/Stacker dimensions are as follows:
Width 17.2 inches (437mm)
Height 28 inches (710 mm)
Depth 19.1 inches (484 mm)
An additional 14 inches (356 mm) must be allowed to the left of the
Sorter/Stacker to enable jam clearance
Xerox DocuColor 2006 1-55
Page 66

1. Setting up the DocuColor 2006 Installing the Sorter/Stacker
2. Review the Sorter/Stacker components before installing the unit.
1
4
5
2
3
1 Sorter bins
2 High capacity bin
3 Attachment plate
4 Jam clearance cover
5 Connector cord
1-56 Xerox DocuColor 2006
Page 67

Installing the Sorter/Stacker 1. Setting up the DocuColor 2006
Unpacking the Sorter/Stacker
Read all the steps before performing this procedure.
1. Open the box. Remove the instruction sheet.
2. Remove the plastic bag with the new connector cover.
Xerox DocuColor 2006 1-57
Page 68
1. Setting up the DocuColor 2006 Installing the Sorter/Stacker
3. Remove the cardboard inserts that hold the unit in place. Move any
plastic away from the bottom wheels of the Sorter/Stacker.
4. Gently tip the box so the Sorter/Stacker is standing on its wheels
1-58 Xerox DocuColor 2006
Page 69

Installing the Sorter/Stacker 1. Setting up the DocuColor 2006
CAUTION
When rolling an unattached Sorter/Stacker, hold the unit from the inboard
side, not the bins. Do not press down on the attachment plate as this may
cause the unit to tip.
5. Carefully roll the Sorter/Stacker out of the box.
6. Remove the plastic wrapping from around the Sorter/Stacker.
Xerox DocuColor 2006 1-59
Page 70

1. Setting up the DocuColor 2006 Installing the Sorter/Stacker
7. Remove the tape and cardboard from the inboard side of the
Sorter/Stacker.
0303006A-W O L
8. Remove the cardboard from the top of the Sorter/Stacker. Remove the
cardboard protector and tape from the sorting bins. Remove the strap
around the high capacity bin. Remove any tape or cardboard from the
outboard side of the Stacker/Sorter.
9. Open the cover and remove any packing material inside it.
1-60 Xerox DocuColor 2006
Page 71
Installing the Sorter/Stacker 1. Setting up the DocuColor 2006
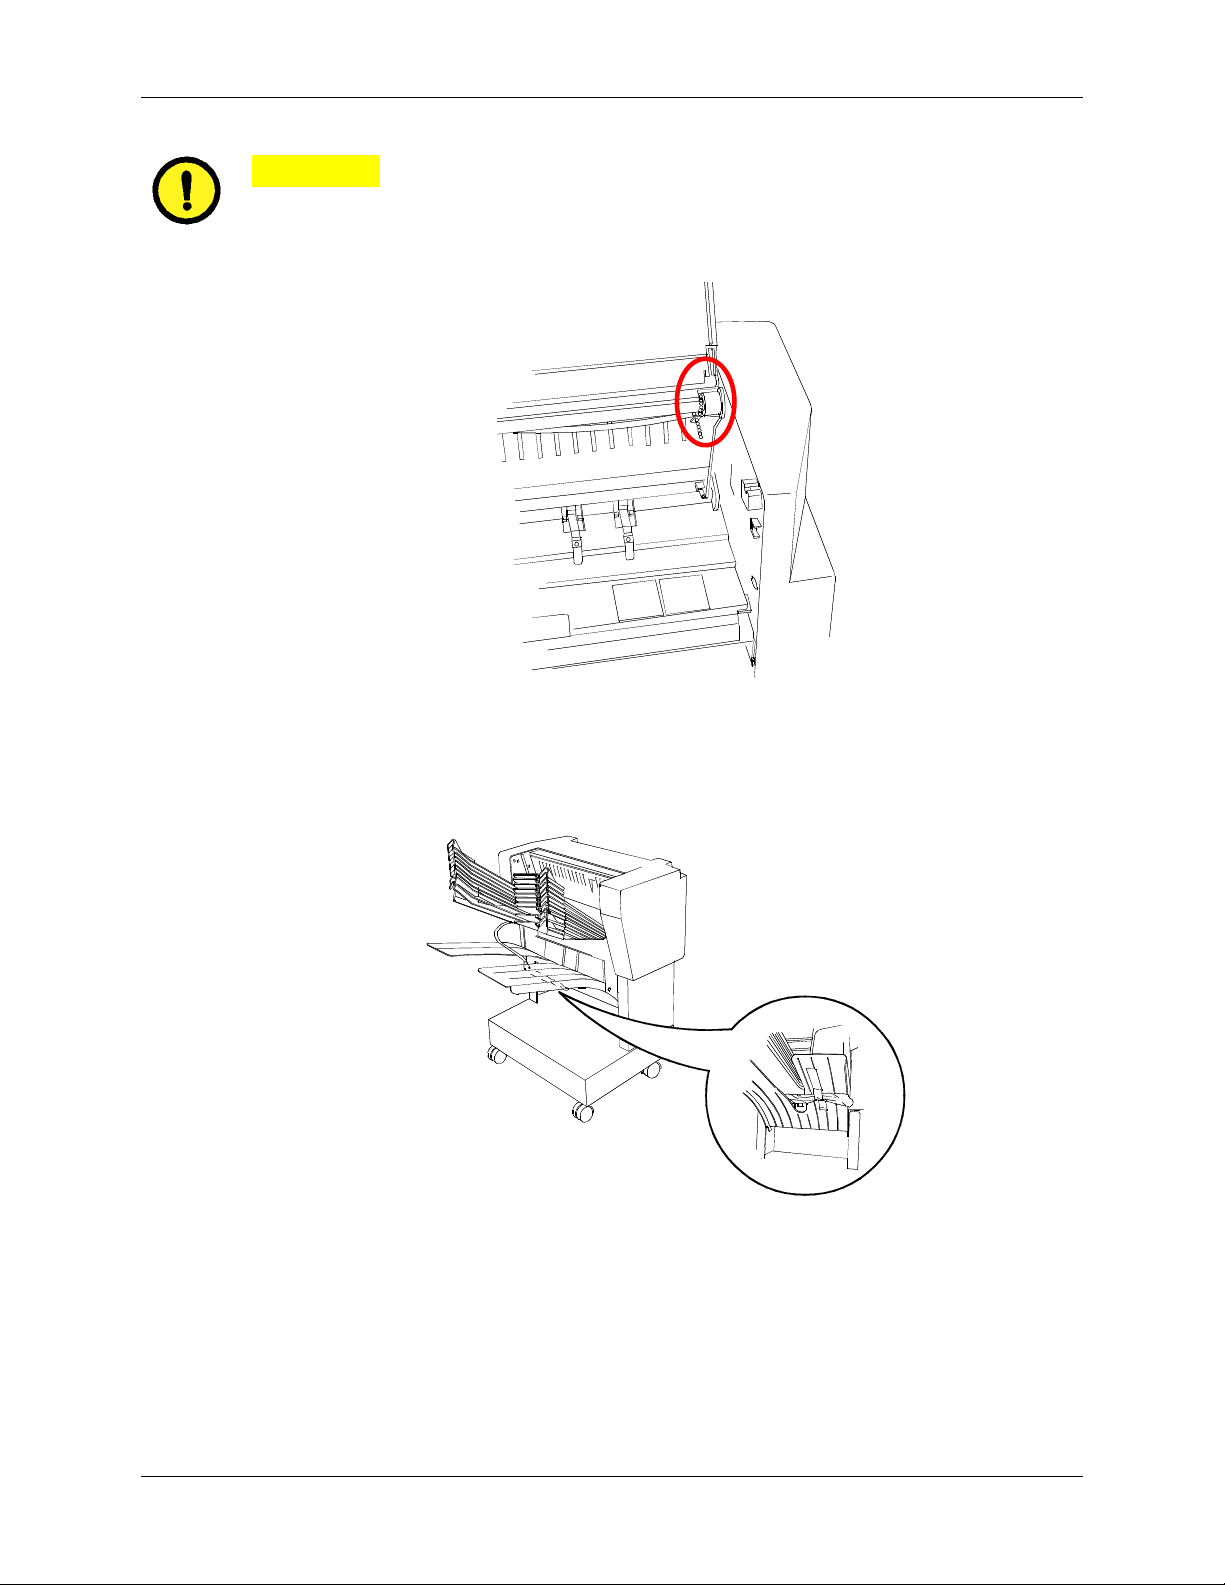
CAUTION
Do not remove the plastic tie wrap on the metal roller under the jam
clearance cover. The tie wrap holds a sensor wire out of the way, as
illustrated in the figure below.
10. Remove the tape that is holding the connector cord in place. Keep the
cord wrapped to protect the connector.
11. Ensure that any remaining tape is removed from the unit.
Xerox DocuColor 2006 1-61
Page 72
1. Setting up the DocuColor 2006 Installing the Sorter/Stacker
Connecting the Sorter/Stacker
Read all the steps before performing this procedure.
CAUTION
Ensure that the power is off on the copier/printer before you begin to install
the Sorter/Stacker.
1. Switch off the copier/printer.
2. Remove the output tray from the copier/printer.
3. At the Sorter/Stacker, extend the attachment plate.
CAUTION
Do not press down on the attachment plate as this may cause the unit to tip.
1-62 Xerox DocuColor 2006
Page 73

Installing the Sorter/Stacker 1. Setting up the DocuColor 2006
4. Perform one of the following:
• If the DocuColor 2006 does not have the optional duplex tray,
ensure that the vertical edge of the spacer plate is positioned to the
right, near the vertical edge of the attachment plate. No icon should
be visible in the spacer plate cut out. Proceed to step 5.
• If the DocuColor 2006 has the optional duplex tray, remove the
spacer plate using the two thumbscrews. Position the plate so its
vertical edge is to the left and thumbscrews align with the holes in
the base of the extension. Ensure that the duplex tray icon is visible
in the spacer plate cut out. Tighten the thumbscrews.
Xerox DocuColor 2006 1-63
Page 74

1. Setting up the DocuColor 2006 Installing the Sorter/Stacker
5. Align the Sorter/Stacker with the left side of the DocuColor 2006 so the
thumbscrews on the plate align with the holes in the left cover of the
copier/printer. The upper horizontal edges of the alignment plate should
fit under Jam Clearance Area 5.
6. Tighten the thumbscrews on the front and rear of the alignment plate.
1-64 Xerox DocuColor 2006
Page 75

Installing the Sorter/Stacker 1. Setting up the DocuColor 2006
7. Remove the connector cover that is below the power plug on the left
side of the copier/printer.
8. Remove the protective plastic wrap from the Sorter/Stacker cord and
connector.
9. Plug in the connector.
Xerox DocuColor 2006 1-65
Page 76

1. Setting up the DocuColor 2006 Installing the Sorter/Stacker
CAUTION
Be careful not to squeeze or disconnect any of the wires or the connecting
cord with the cover in the following step.
10. Remove the new connector cover from its wrapping. Holding the cord to
the left cut out side of the opening, place the lower edge into the opening
and push the new cover up and into place.
1-66 Xerox DocuColor 2006
Page 77

Installing the Sorter/Stacker 1. Setting up the DocuColor 2006
11. Slide the Sorter/Stacker to the right into position.
Xerox DocuColor 2006 1-67
Page 78

1. Setting up the DocuColor 2006 Installing the Sorter/Stacker
The next step
Go to the Printing the Test Page procedure.
1-68 Xerox DocuColor 2006
Page 79

Printing the Test Page 1. Setting up the DocuColor 2006
L
0
Switching on the power
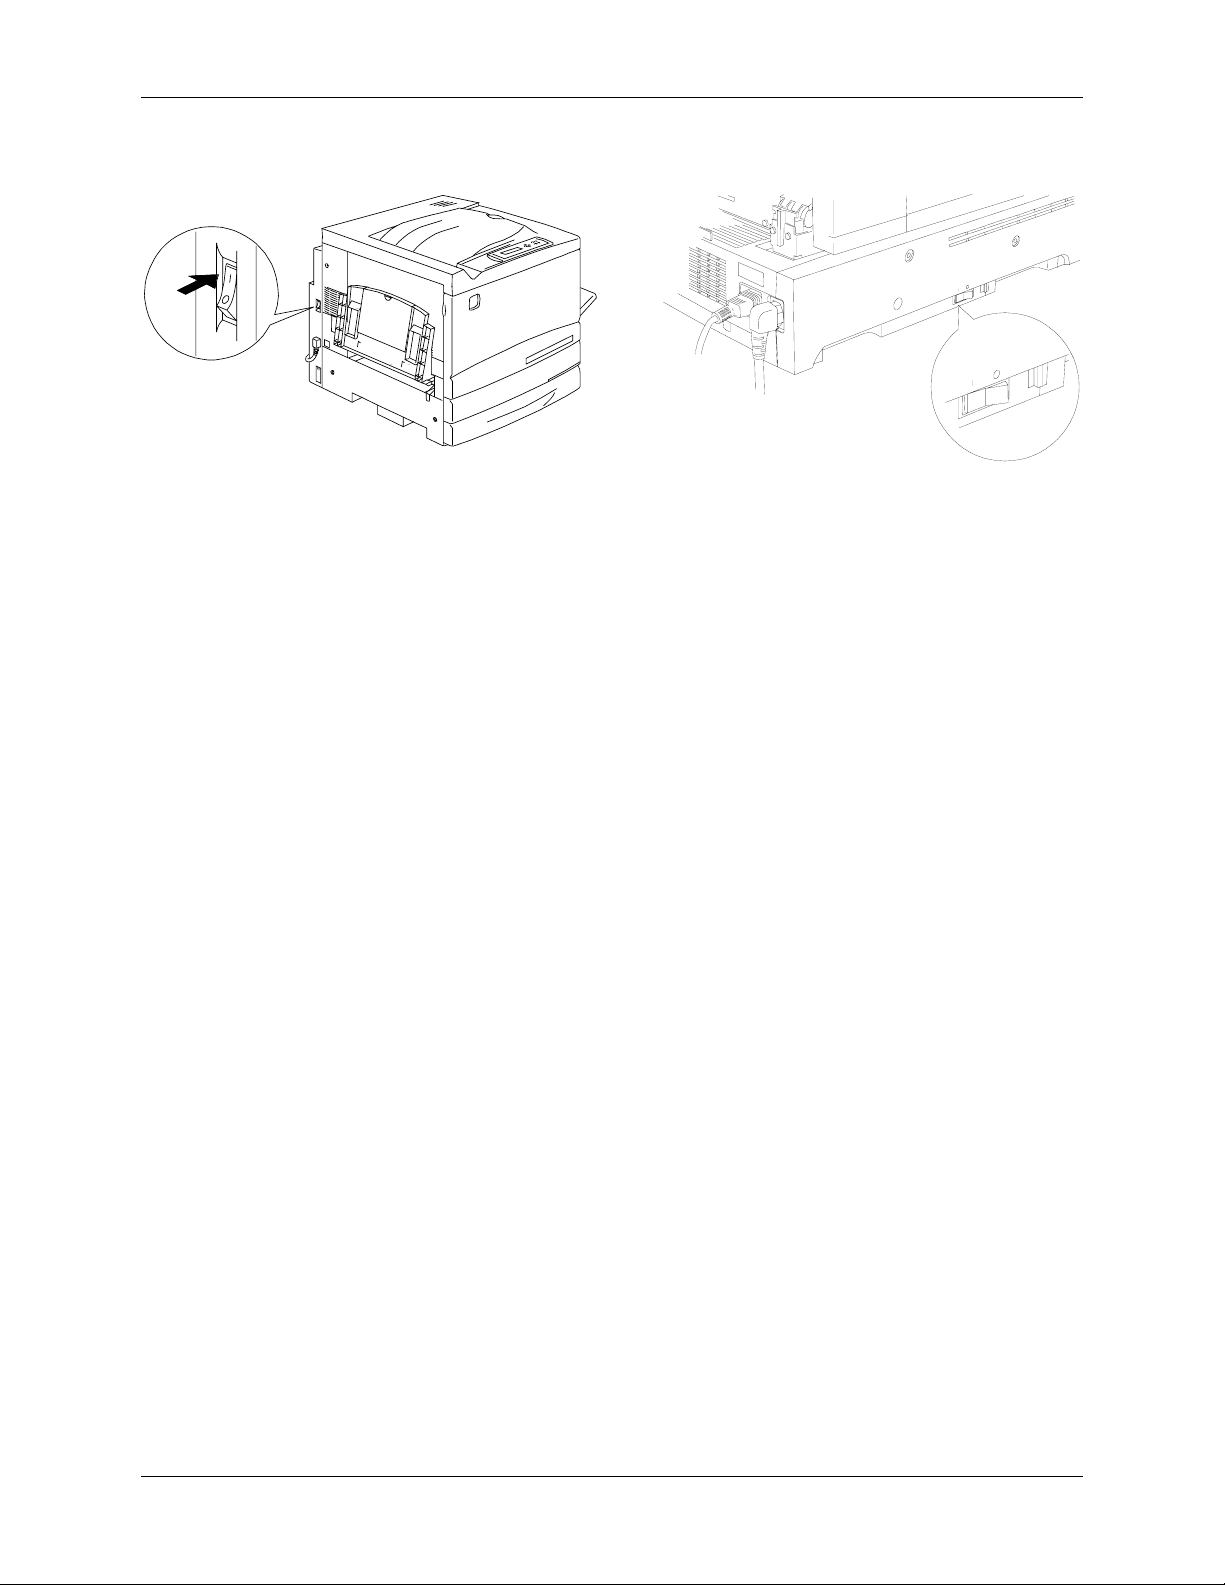
1. Press the I on the ON/OFF button on the Printer.
301072A-WO
2. Press the I on the ON/OFF button on the left-hand side of the Scanner.
0
301232A
-WOL
0301232a
The DocuColor 2006 performs a registration setup, then after a few moments
messages indicating the Scanner is ready are displayed on the Printer
Control Panel and on the Scanner Control Panel.
Xerox DocuColor 2006 1-69
Page 80
1. Setting up the DocuColor 2006 Printing the Test Page
Switching off the power
1. Ensure that the READY message is displayed on the two Control
Panels.
Do not switch off the power if any other message is displayed. There may
be a problem, or if the DocuColor 2006 is networked, it may be receiving
data.
2. Press the 0 on the ON/OFF button on the Scanner only.
301086
The Scanner controls the power for the Printer, therefore it is not necessary
to switch off the power on the Printer.
1-70 Xerox DocuColor 2006
Page 81

Printing the Test Page 1. Setting up the DocuColor 2006
Printing a test page from the Printer Control Panel
Print the test page in order to ensure that the Printer is functioning. An
original document is not required. The test page can be generated from the
Printer Control Panel.
For a quick overview of the wordless Control Panel, refer to the Getting to
know the DocuColor 2006 chapter.
101
0
0
101
0010
C/
301150a
Item/Enter button
1. Ensure that READY is displayed on the Printer Control Panel screen
2. Press the Printer Menu button repeatedly until the message PRINT
PAGES FROM LIST is displayed on the Control Pane screen.
3. Press the Item/Enter button.
PRINT CONFIGURATION appears on the Control Panel.
4. Press the up arrow button until PRINT TEST PAGE appears on the
Control Panel.
5. Press the Item/Enter button.
PROCESSING JOB FROM TRAY 1 is displayed.
After a moment the test page is delivered to the Output Tray on the top
of the Printer.
Xerox DocuColor 2006 1-71
Page 82

1. Setting up the DocuColor 2006 Printing the Test Page
Making a test copy from the Scanner
For a quick overview of the Scanner Control Panel, refer to Getting to know
the DocuColor 2006.
Copy button Start button
301003
1. Ensure that READY is displayed on the Printer Control Panel screen.
2. Lift the Scanner cover and place an original on the Document Glass.
3. Press the Copy button to enter Copy mode.
4. Press the Start button on the Scanner Control Panel.
After a moment the copy is delivered to the Output Tray on the top of the
Printer.
5. Remove the original from the Document Glass.
The next step
Perform one of the following steps:
• If you are adding memory to the Printer, go to the Adding memory to the
Printer procedure.
• If you are adding memory to the Scanner, go to the Adding memory to
the Scanner procedure.
• If you are not adding memory, go to Getting to know the DocuColor
2006.
1-72 Xerox DocuColor 2006
Page 83

Adding memory to the Printer 1. Setting up the DocuColor 2006
L
Adding memory to the Printer
You will need a phillips head screwdriver to perform this procedure.
CAUTION
• Protect the memory card from static electricity by keeping it in the anti-
static bag until you are ready to install it.
• Handle the card by the top or side edges only. Do not touch the card
components or the gold connector edge.
• Avoid placing the card near magnetic devices, such as a pc monitor.
• Avoid exposing the card to direct sunlight, high temperatures, or
humidity.
1. Switch OFF the power to the Printer and to the Scanner.
301073A-WO
0
301186
2. Remove the three screws from the upper right-hand side panel of the
Printer.
301083
Xerox DocuColor 2006 1-73
Page 84
1. Setting up the DocuColor 2006 Adding memory to the Printer
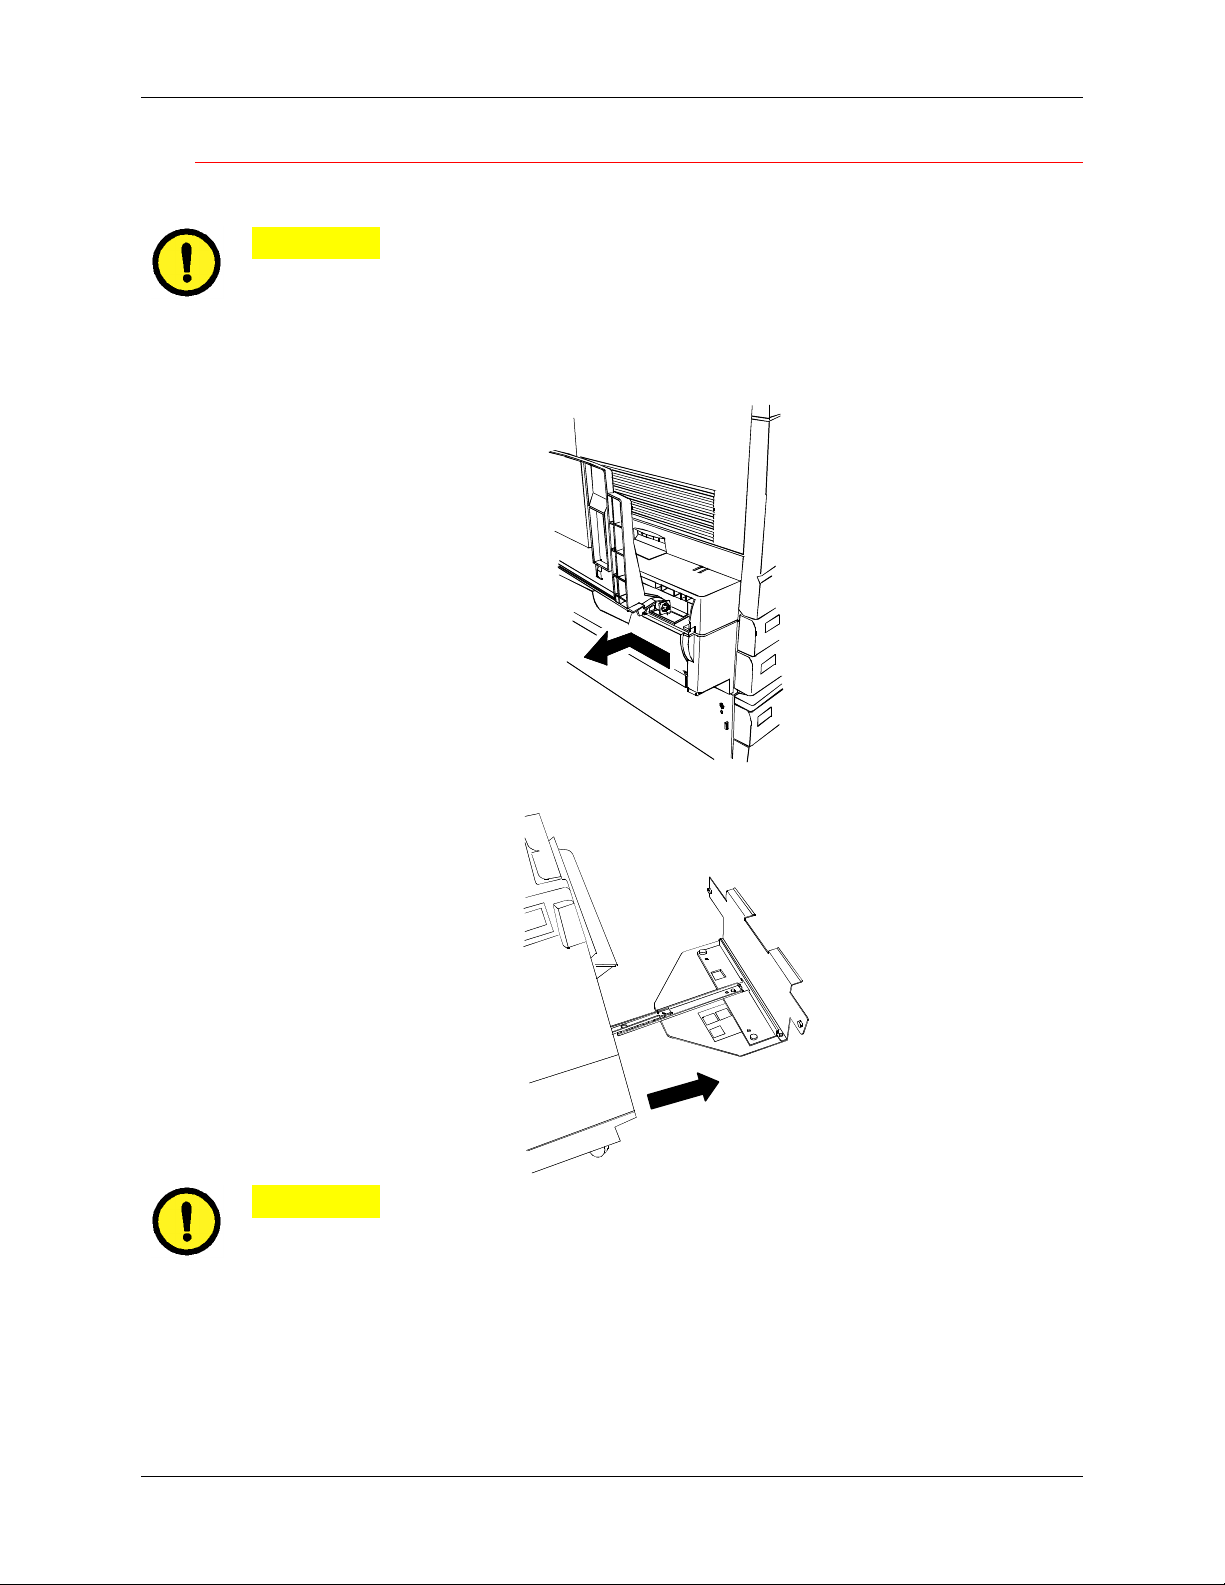
3. Slide the panel to the left and lift to remove. The memory card slots are
located behind the panel.
301210 301211a
• The upper slot contains the 64MB memory card, already installed
• The lower slot is empty.
4. If you are replacing the 64MB memory card with one or two memory
cards, go to step 6. If you are adding another memory card to the
existing 64MB memory, perform step 5.
5. Remove the additional memory card from the anti-static bag.
301214a
a. Slide the card into the lower slot below the 64MB memory card.
b. Using your thumbs, press the card into the slot until it clicks.
03010
63A-WOL
301233a
c. Go to step 7.
1-74 Xerox DocuColor 2006
Page 85
Adding memory to the Printer 1. Setting up the DocuColor 2006
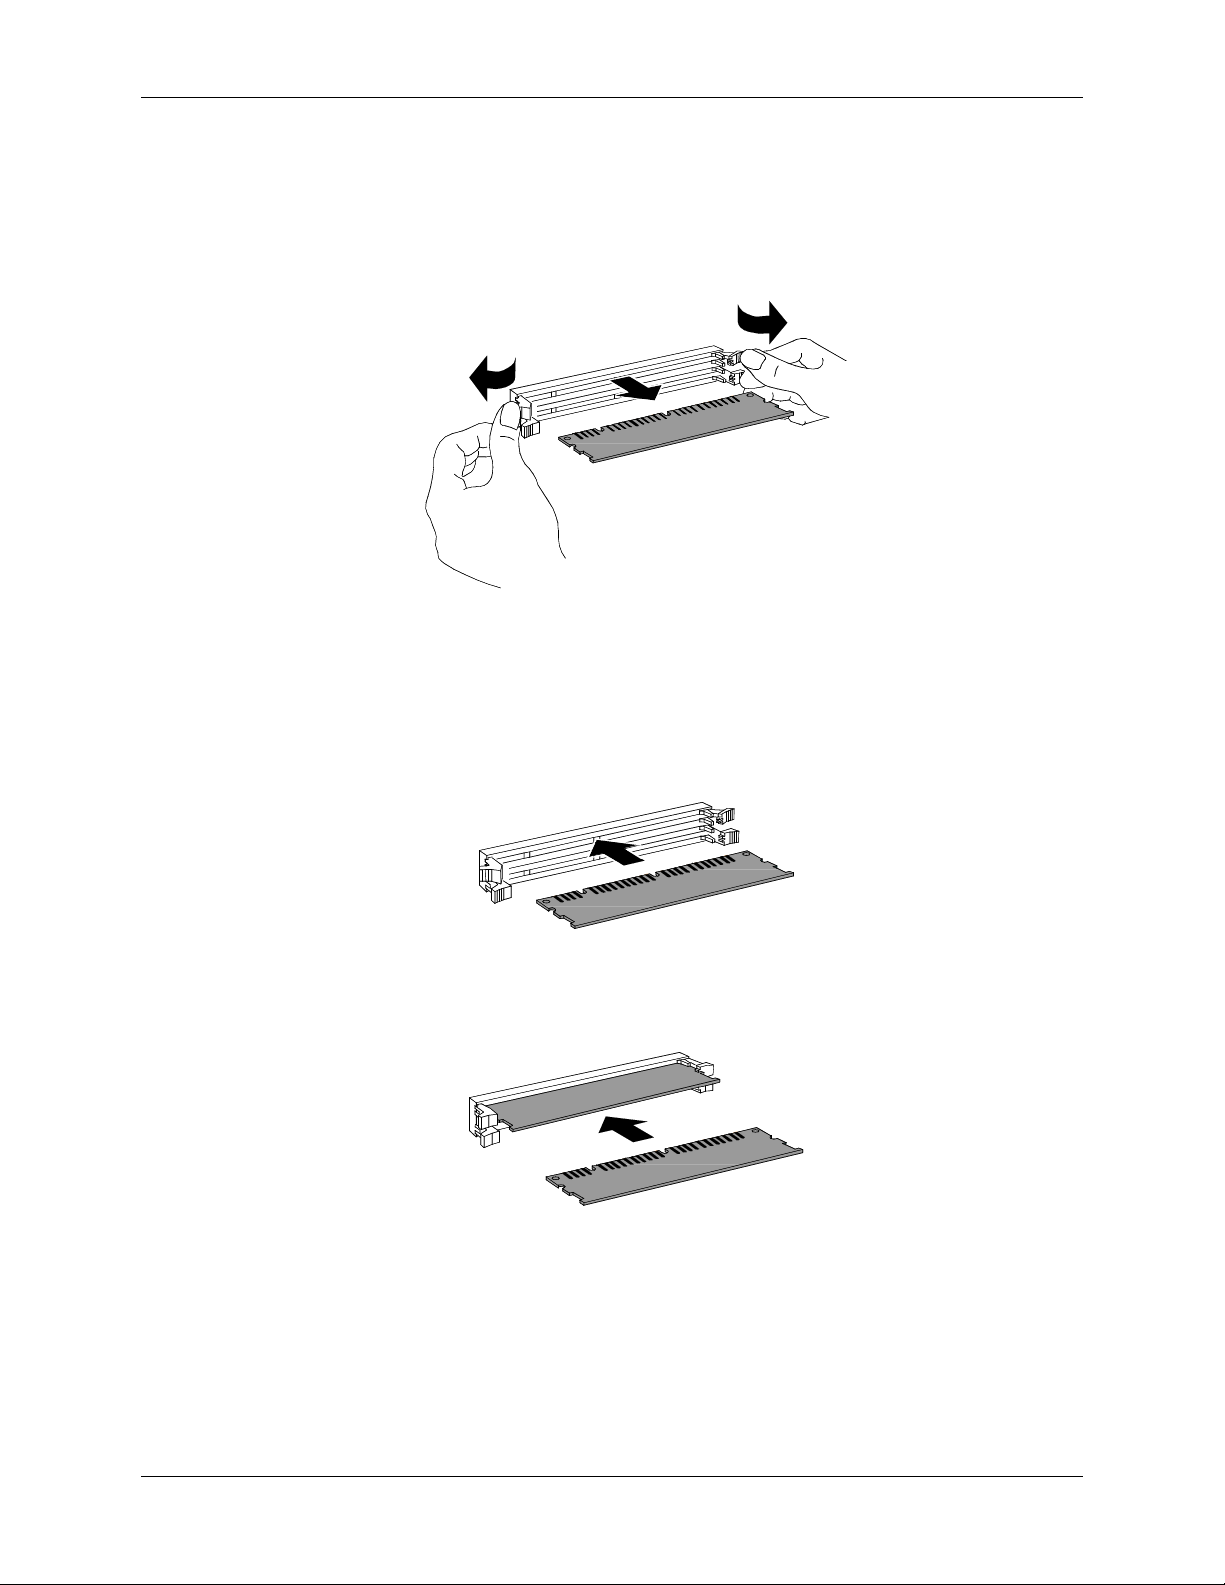
6. To replace the 64MB memory card perform the following steps:
a. In order to remove the 64 MB memory card press against the two
clips on the sides of the card slot with your thumbs.
b. When the clips are pushed back, remove the 64MB card.
301212a
c. Remove the new memory card from the anti-static bag.
d. Place the 64 MB memory card in the anti-static bag.
e. Slide the new memory card into the upper slot.
f. Using your thumbs, press the card into the slot until it clicks.
301213a
g. If you are installing a second card, slide it into the lower slot and
press it into place.
301214a
Xerox DocuColor 2006 1-75
Page 86
1. Setting up the DocuColor 2006 Adding memory to the Printer
7. Insert the left-hand side Printer panel into place as shown below.
301215a
8. Press the panel closed and slide it to the left.
9. Reinstall the three screws into the side panel.
301216
301070
1-76 Xerox DocuColor 2006
Page 87
Adding memory to the Printer 1. Setting up the DocuColor 2006
L
0
10. Switch ON the Printer and the Scanner power.
0
301232A
0301072a
301072A-WO
0301232a
-WOL
11. After a few moments, READY is displayed on the control panel.
Xerox DocuColor 2006 1-77
Page 88

1. Setting up the DocuColor 2006 Adding memory to the Printer
The next step
Perform one of the following steps:
• If you are adding memory to the Scanner, go to Adding memory to the
Scanner procedure.
• If you are not installing memory to the Scanner, go to the Getting to
know the Xerox DocuColor 2006 section.
1-78 Xerox DocuColor 2006
Page 89

Adding memory to the Scanner 1. Setting up the DocuColor 2006
Adding memory to the Scanner
The Scanner memory card enables 2-Side copying.
You will need a flat blade screwdriver to perform this procedure.
CAUTION
• Protect the memory card from static electricity by keeping it in the anti-
static bag until you are ready to install it.
• Handle the card by the top or side edges only. Do not touch the
memory card components or the gold connector edge.
• Avoid placing the memory card near magnetic devices, such as a pc
monitor.
• Avoid exposing the memory card to direct sunlight, high temperatures,
or humidity.
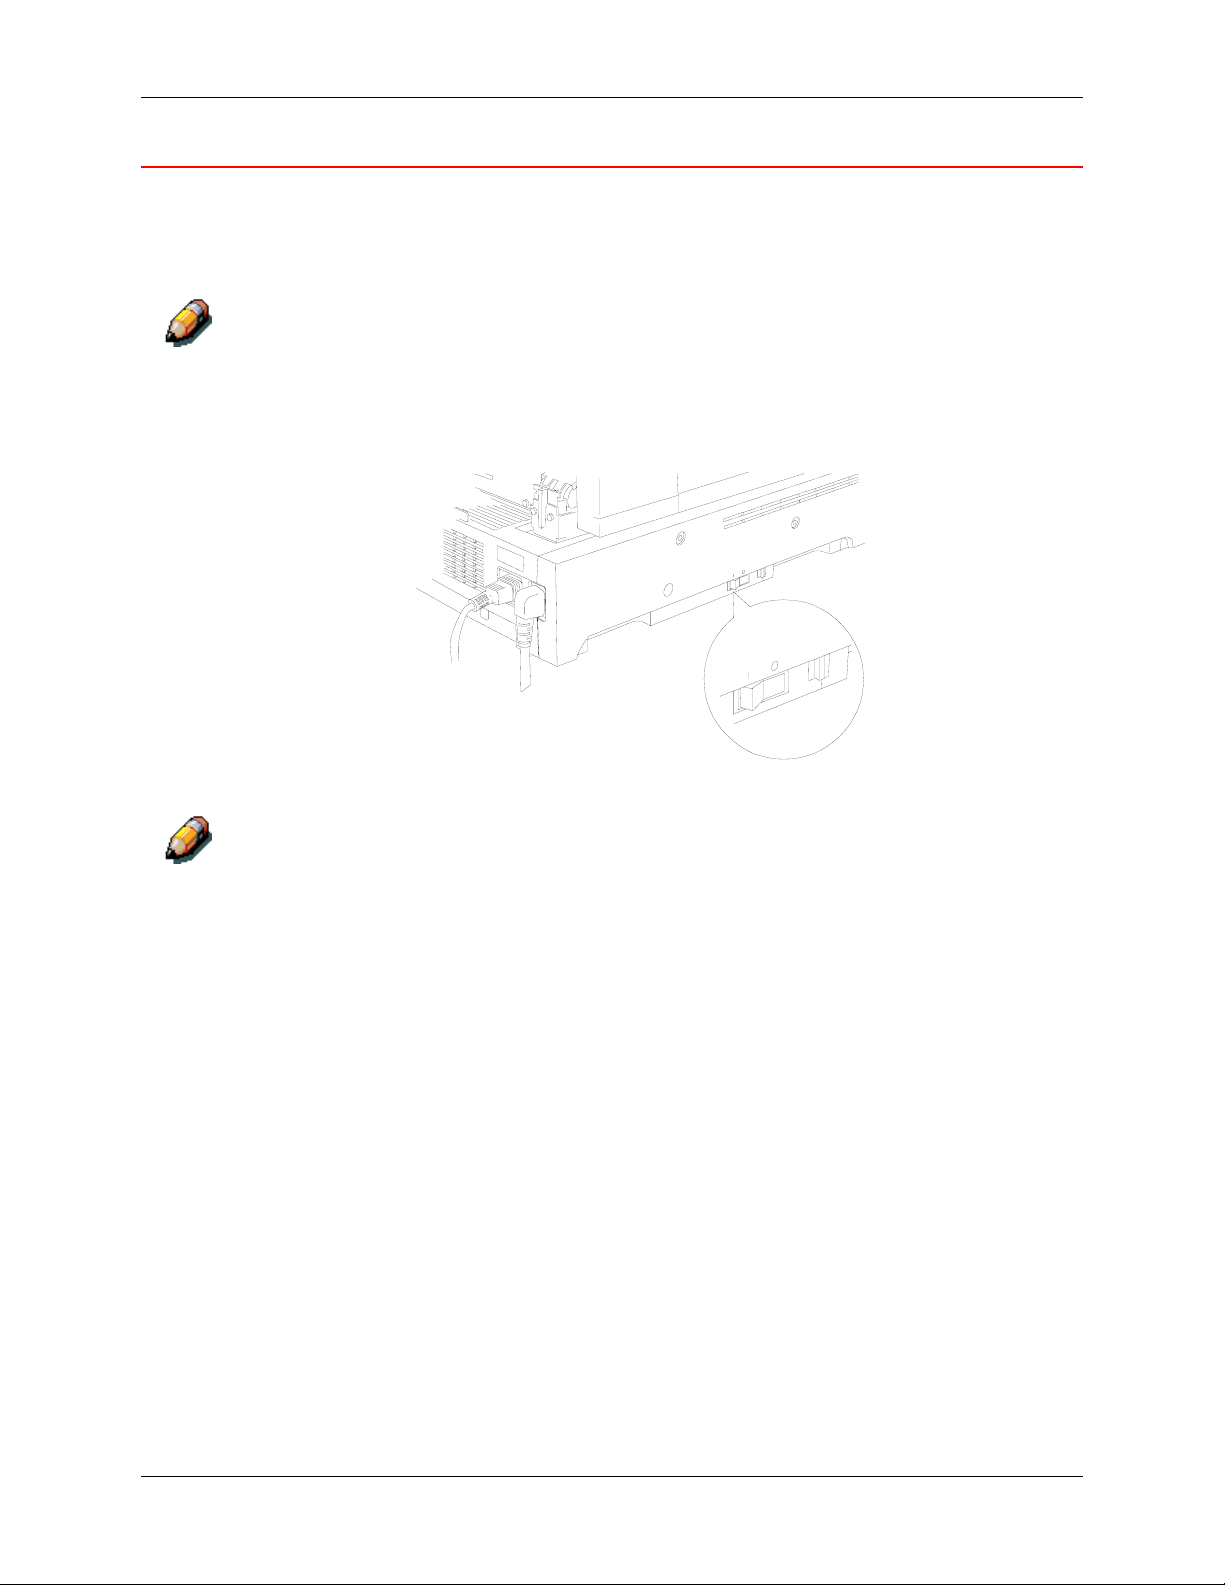
1. Switch OFF the power to the Scanner.
2. Locate the access cover on the left side of the Scanner.
301125
301219a
Xerox DocuColor 200 6 1-79
Page 90

1. Setting up the DocuColor 2006 Adding memory to the Scanner
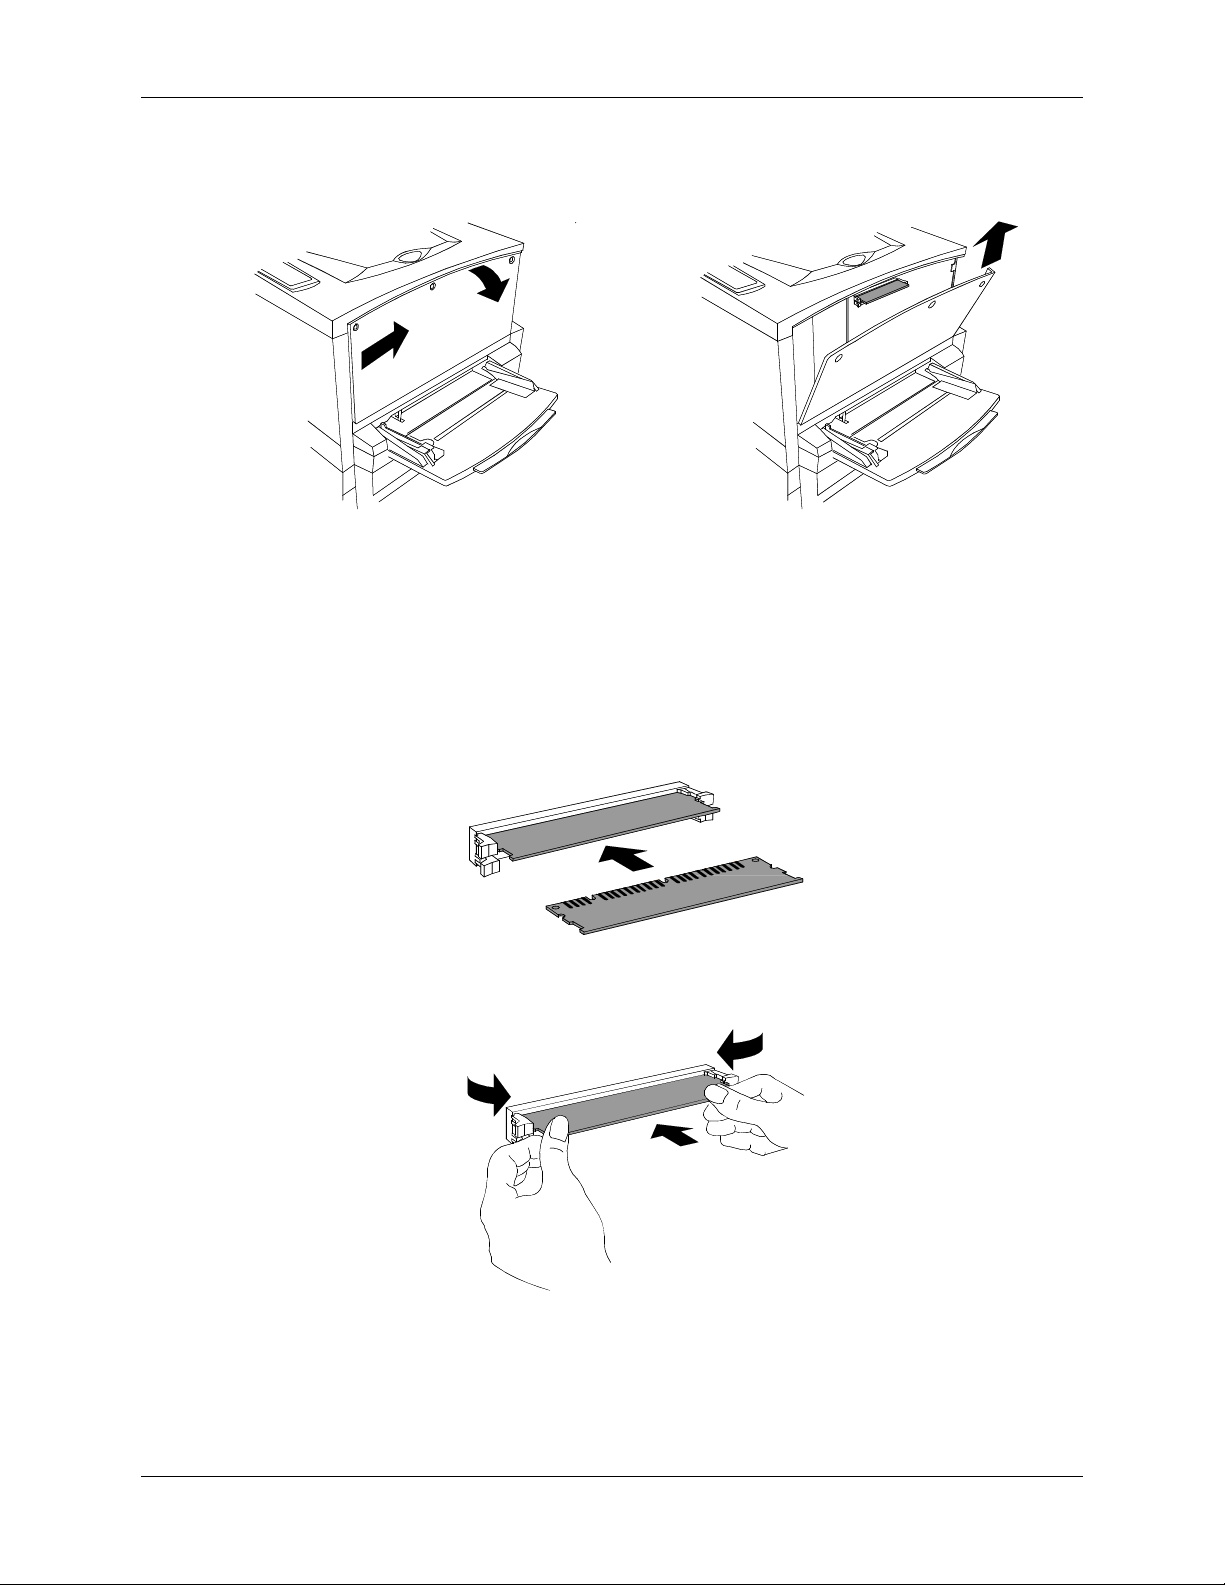
3. Press the latch toward the right, and remove the access cover from the
Printer.
301206
4. Remove the memory card from the anti-static bag.
301207
5. Align the card to the rails in the access slot, then push the memory card
into the Scanner as far as it will go.
301208
1-80 Xerox DocuColor 2006
Page 91

Adding memory to the Scanner 1. Setting up the DocuColor 2006
6. Align the screws on the end of the memory card to the holes in the rear
Printer cover.
7. Use a screw driver to tighten the screws.
301209
8. Replace the access cover and switch ON the power.
301085
9. After a few moments, READY is displayed on the printer control panel.
Xerox DocuColor 2006 1-81
Page 92

1. Setting up the DocuColor 2006 Adding memory to the Scanner
The next step
Go to the Getting to know the Xerox DocuColor 2006 section.
1-82 Xerox DocuColor 2006
Page 93

L
2
Getting to know the DocuColor 2006
4
3
2
1
Printer, Front View
5
10
6
301074B-WO
0
7
8
9
1. Paper Tray 1 – place paper supply here
2. Duplex Tray – option that allows two-sided printing
3. Front Cover – open to access the Dry Ink Cartridges and the Copy/Print
Cartridge
4. Control Panel – use to access the Printer menus and to view messages
5. Printer Output Top Tray – the prints are delivered here
6. Paper Stop – use to stop oversized prints from being pushed out of the
Output Tray. The Paper Stop is adjustable up to 17 x 11 inch (B4)
paper.
7. Top Right-hand Cover – open to add additional memory
8. Bypass Tray – use for transparencies, envelopes, postcards, or other
stock
9. Bypass Transport – open to access paper jams
10. Paper Feed Area – open to access paper jams
Xerox DocuColor 2006 2-1
Page 94

2. Setting up the DocuColor 2006 Getting to know the DocuColor 2006
L
TFSGI
P
12
11
Printer, Rear View
11. Scanner power connector –provides power to the Scanner
12. Scanner interface connector – provides interface to the Scanner
13. Area 4 access cover – open to access paper jams
13
14
15
16
301075B-WO
14. Printer Side Output Tray – copies are delivered to this tray
15. Printer Power Switch – use to switch OFF and ON the Printer power
16. Printer power cord connector – connect the Printer power cord here
2-2 Xerox DocuColor 2006
Page 95

Getting to know the DocuColor 2006 2. Setting up the DocuColor 2006
L
0
19
20
18
Printer, Internal View
17. Dry Ink Carrousel access – the four Dry Ink Cartridges are installed
one at a time, through this opening
17
21
22
23
301076B-WO
18. Fuser jam clearance area – the Fuser applies heat to the Dry Ink in
order to adhere it to the paper
19. Anti-rotation button – use to release the Dry Ink Carrousel in order to
remove and replace the Dry Ink Cartridges
20. Lever B – use to lock the Print/Copy cartridge in position
21. Print/Copy Cartridge – use to transfer copy/print image to media
22. Knob – use to manually turn the carrousel in order to access the Dry Ink
Cartridges
23. Lever A – the Copy/Print Cartridge is accessed through here
Xerox DocuColor 2006 2-3
Page 96
2. Setting up the DocuColor 2006 Getting to know the DocuColor 2006
9
1
010
0101
0010
8
7
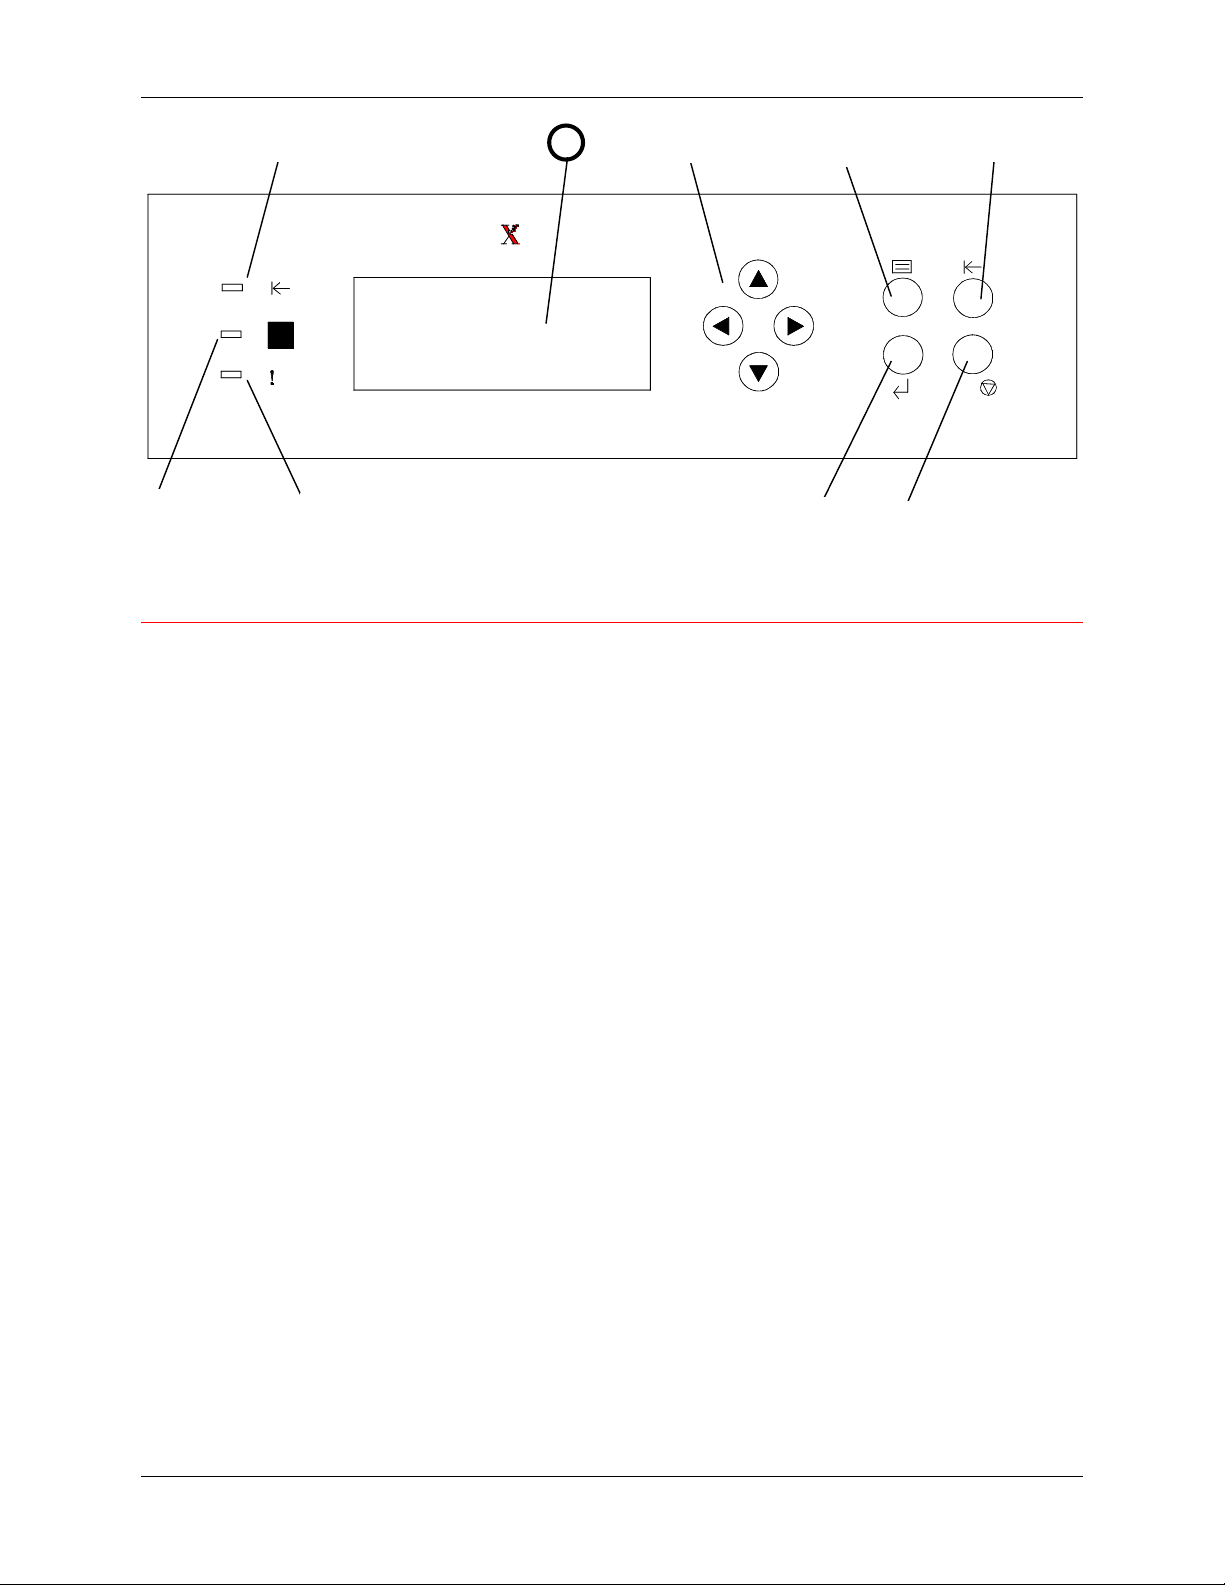
Printer Control Panel
1. Control Panel Screen – use to view the system status, menu options,
problem messages, and fault codes.
1
2
3
6
5
4
C/
301150a
2. Arrow buttons – use to view listed options in a menu.
3. Menu button – use to step through the Printer menus
4. Off-line button – use this button to change the system status from on-line
to off-line and back again.
5. Clear/Stop button – use this button to stop a procedure and to return
the menu READY.
6. Item/Enter button – use this button to select options displayed on the
screen.
7. Error Indicator – this indicator is lit when an error has occurred
8. Processing Indicator – this indicator is lit when Printer is processing a
job
9. On-line Indicator – this indicator is lit when the system is on-line.
2-4 Xerox DocuColor 2006
Page 97
Getting to know the DocuColor 2006 2. Setting up the DocuColor 2006
3
1
6
4
301146a
5
2
301129a
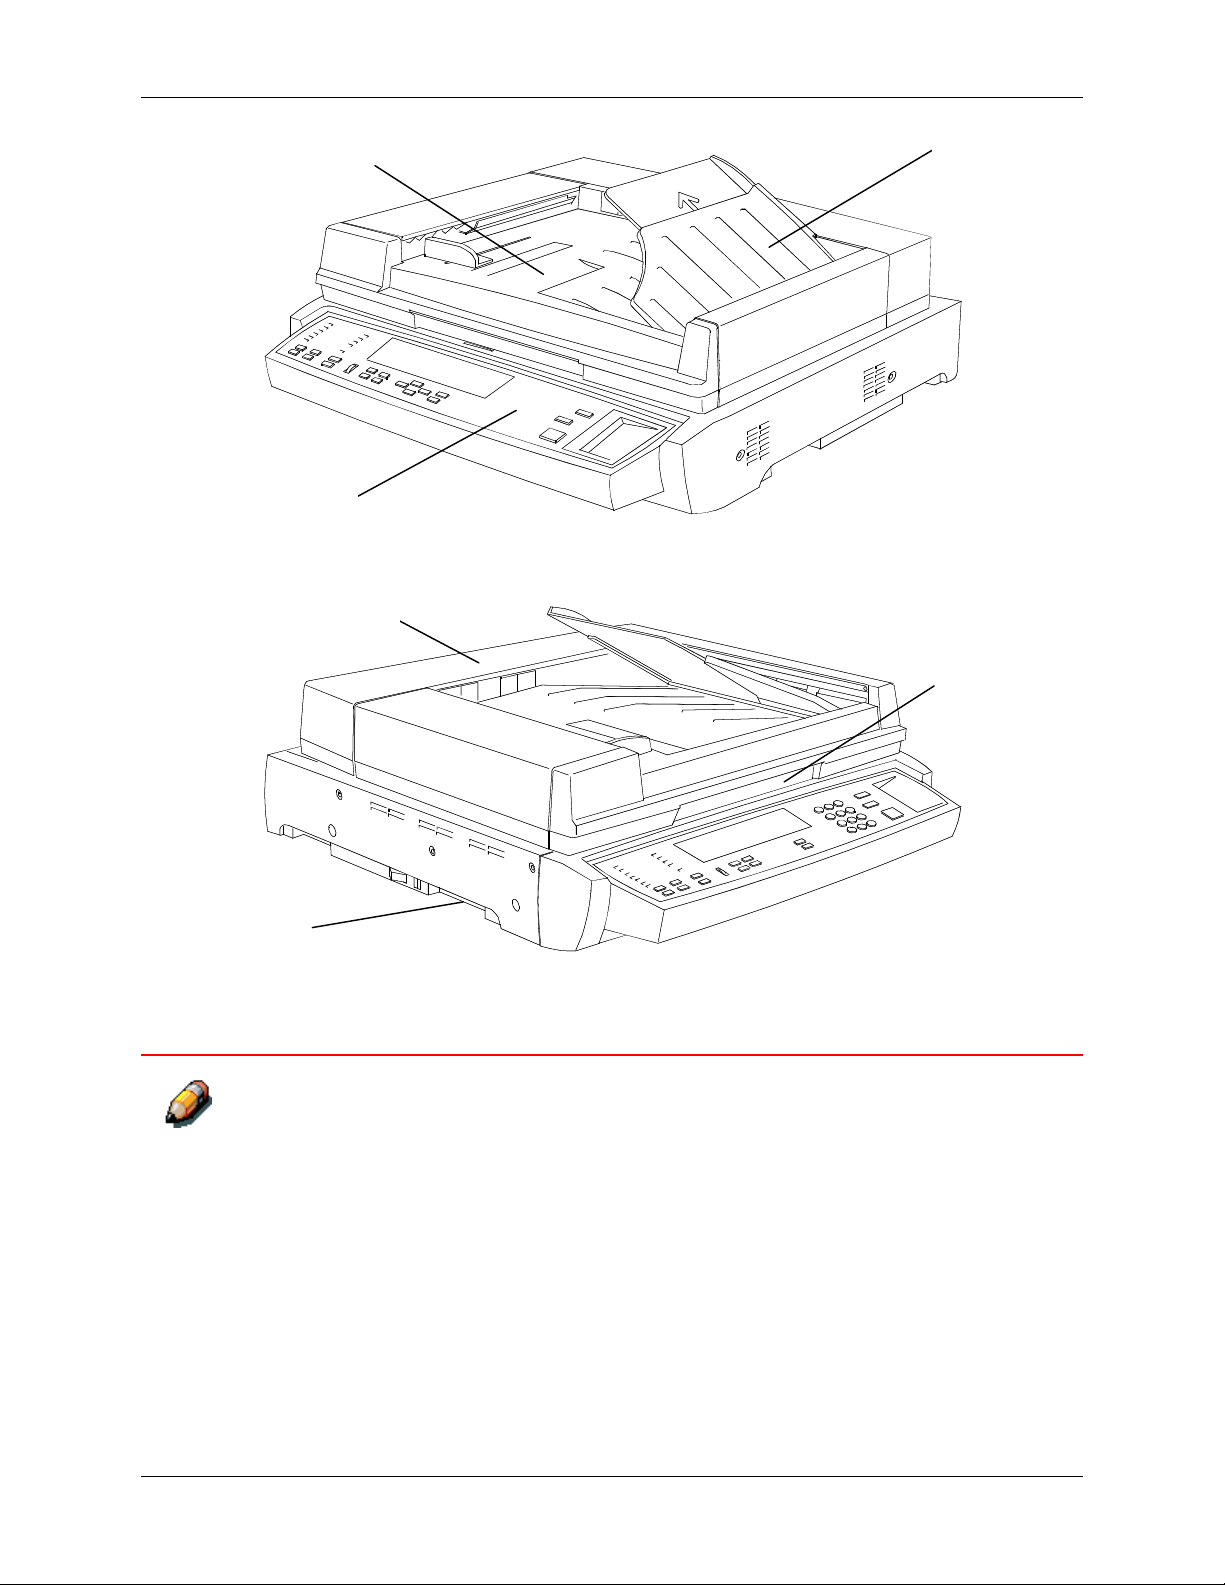
Scanner and Document Feeder components
The Document Feeder is an option. Its components are illustrated and
described by numbers 3 through 6.
1. Scanner Control Panel – use to access the DocuColor 2006 features
and options
2. Memory Expansion slot – provided for the 1 to 2 Side Copy option
3. Document Input Tray – place the originals to be scanned here
4. Original Exit Tray – scanned originals are delivered here
5. Document Cover handle – use to access the Document Glass
6. Access cover – raise to access the feed rollers and to clear jams
Xerox DocuColor 2006 2-5
Page 98

2. Setting up the DocuColor 2006 Getting to know the DocuColor 2006
7
8
9
0301221A-WOL
7. Document Cover without Document Feeder – raise to access the
Document Glass
8. Registration corner – place the top right-hand corner of your original
here
9. Document Glass – supports the original for scanning
2-6 Xerox DocuColor 2006
Page 99

Getting to know the DocuColor 2006 2. Setting up the DocuColor 2006
17 18
19
1213141516
Scanner Control Panel
1. Control Panel Screen – use to view the system status, menu options,
problem messages, and fault codes
20
1 2
1011
9
3 4 5
7
68
0301149A -WOL
2. Copy button – use to change the system from the on-line mode to
copying mode
3. Tools button – provides access to the administration features
4. Clear All button – use to clear the selected option and reset the system
to the defaults
5. Stop button – use to stop the copying process
6. Start button – use to start the copying process
7. Number buttons – use to enter copy quantity and passwords
8. Exit button – use to return to the previously displayed screen message
9. Select button – use to save the currently selected features and options
10. Menu Arrow buttons – use to view listed options in a menu
11. Advanced Features button – use to access the Output, Erase, 2-sided,
and 2 up features
12. Quality Adjustment – use to access the quality adjustment screen in
order to change the Sharpness and the Color Level of the copies
13. Contrast Dial – use to lighten or darken the Control Panel Screen
14. Paper Supply Arrow buttons – use to select the desired paper tray
15. Zoom Arrow buttons – use to select Reduce/Enlarge from 25-400%
Xerox DocuColor 2006 2-7
Page 100

2. Setting up the DocuColor 2006 Getting to know the DocuColor 2006
16. Reduce/Enlarge Arrow buttons – use to select one of the preset
reduction or enlargement settings
17. Reduce/Enlarge indicators – indicates which setting is currently
selected
18. Paper Supply indicators – indicates which paper tray is currently
selected
19. Color Mode button – use to access color mode options
20. Lighten/Darken button – use to lighten or darken the output
2-8 Xerox DocuColor 2006
 Loading...