

Page 1

December 2013
Issue 1.1
Connect to:
or use with
User Guide
Fuji Xerox
(v1.1) f
Salesforce
Page 2

Date
Issue
Description
Fuji Xerox Australia
101 Waterloo Road
North Ryde NSW 2113
For technical queries please contact the Fuji Xerox Australia Customer Care Centre on:
1800 064 678
©2013 Fuji Xerox Australia Pty Limited. All rights reserved.
Xerox and the sphere of connectivity design are trademarks or registered trademarks of Xerox
Corporation in the U.S. and/or other countries.
Note: By using this document you acknowledge that you have read and agree to the terms
and conditions in the Fuji Xerox Connect to: for use with Salesforce Software Licence
Agreement.
Updates
This document is subject to continual updating and improvement. You are strongly advised to check
the Fuji Xerox web-site to ensure that you have the most recent version:
http://www.fujixerox.com.au/
Issue History
May 2013 1.0 First issue
Dec 2013 1.1 Minor updates
Page 3

Contents
Introduction ................................................................................................................................................................................ 5
Overview ....................................................................................................................................................................................... 5
Help Desk ..................................................................................................................................................................................... 5
Installation and other configurations ............................................................................................................................... 6
How to Install Connect to: for use with Salesforce ................................................................................................ 6
Salesforce Versions Supporting the API Functionality ........................................................................................... 6
User Interface ............................................................................................................................................................................ 7
Logging in as Salesforce User .......................................................................................................................................... 7
Searching Files or Accounts ...................................................................................................................................... 11
Accounts Page ............................................................................................................................................................... 13
Files Page ......................................................................................................................................................................... 18
Settings Page ................................................................................................................................................................. 21
Logging in as Admin ........................................................................................................................................................ 23
Logout ................................................................................................................................................................................... 24
Troubleshooting................................................................................................................................................................. 25
Fuji Xerox Connect to: (v1.1) for use with Salesforce User Guide Page 3
Page 4

Fuji Xerox Connect to: (v1.1) for use with Salesforce User Guide Page 4
Page 5

Introduction
This guide provides information on the installation procedure for the Fuji Xerox Connect to: (v1.1) for
use with Salesforce. It also includes detailed information for users about the functionalities of this
application.
Overview
Salesforce is the world’s leading CRM and sales enablement application, with high penetration in the
Asia-Pacific region. Fuji Xerox Connect to: assists Fuji Xerox customers in streamlining their CRM
based document processes, without need for a PC.
Help Desk
For further support and assistance, please visit the support website in your country at:
http://www.fujixerox.com/eng/support/
Fuji Xerox Connect to: (v1.1) for use with Salesforce User Guide Page 5
Page 6

Installation and other configurations
Connect to:
Connect to:
This section provides information on how to install the Fuji Xerox Connect to: for use with Salesforce
application on the multifunction devices (MFDs).
How to Install Connect to: for use with Salesforce
To install Connect to: for use with Salesforce plug-in on an MFD, you must perform the following
steps:
1. Download the .exe file (for
compatible PC.
2. Double-click the .exe file to begin installation.
3. Enter the serial number and licence details on the licensing screen and click Install.
After the installation is complete, a confirmation message regarding successful installation of
Fuji Xerox Connect to: Installer for use with Salesforce is displayed.
4. Follow the procedure explained in the
v1.1 User Guide
to install the Connect to: for use with Salesforce plug-in on the desired MFD.
for use with Salesforce
Fuji Xerox
) from the FXA website to a
Installer for use with Salesforce
Salesforce Versions Supporting the API Functionality
The Fuji Xerox Connect to: for use with Salesforce requires API functionality. As per the
Developerforce community guidelines, the following versions of Salesforce are enabled with API
access:
• Enterprise Edition
• Unlimited Edition
• Developer Edition
The API package is not available for the following editions:
• Personal Edition
• Group Edition
• Professional Edition*
If you are an existing Salesforce customer and want to upgrade to either Enterprise or Unlimited
Edition, contact your account representative.
[*Certified partner applications, such as the PE version of the Excel Connector, are granted an API token after
they complete a security review. This API token is sometimes referred to as a "Client ID". API requests identified
with a certified partner application's API token are allowed to operate with Professional Edition organizations.]
For Enterprise, Unlimited and Developer Editions, you only need to Edit your profile and select the
checkbox for API.
Fuji Xerox Connect to: (v1.1) for use with Salesforce User Guide Page 6
Page 7
User Interface
This section describes the help information required for the Salesforce User to work on the
application.
Logging in as Salesforce User
This section describes how to access the Connect to: for use with Salesforce user interface as a
Salesforce User and the available functionalities for Salesforce Users.
Note: Following are the prerequisites to access user interface of the Connect to: for use
with Salesforce:
• The MFD must be compatible with the Connect to: for use with Salesforce –
ApeosPort Device, XCP-enabled Authentication module and Internet connectivity.
To have access to Internet (and so to Salesforce portal), the MFD must either be
connected directly to Internet, for instance via ADSL service, or be configured to
use a corporate proxy server with no authentication or with Basic Authentication.
That implies some common proxy servers like Squid (used in FXA) are not
supported. However, there are workarounds to this issue, for example, creating
exceptions for particular MFDs (IP addresses) and websites.
• The Connect to: for use with Salesforce must be installed on the MFD.
To log in to the Connect to: for use with Salesforce user interface as a Salesforce User:
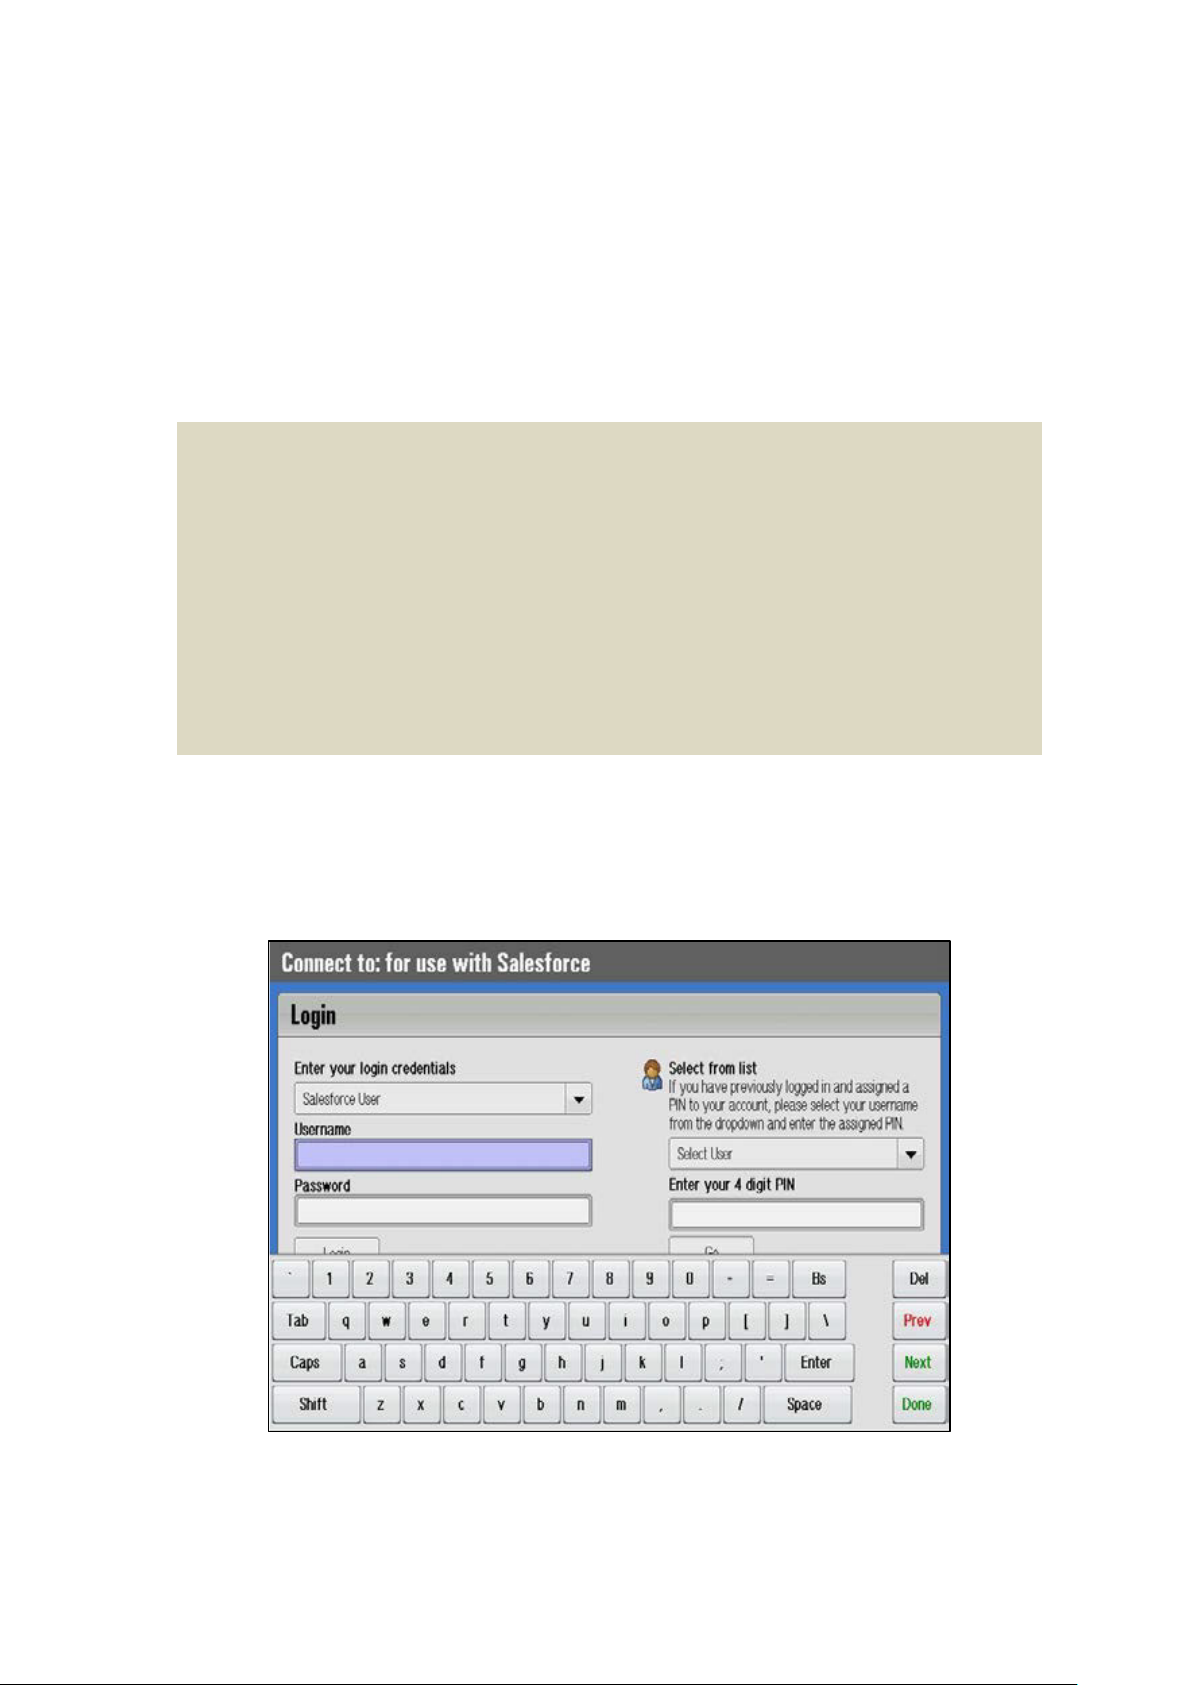
1. On the Connect to: for use with Salesforce login screen, select Salesforce User in the first
Login
dropdown list under the
section:
Figure 1
Fuji Xerox Connect to: (v1.1) for use with Salesforce User Guide Page 7
Page 8
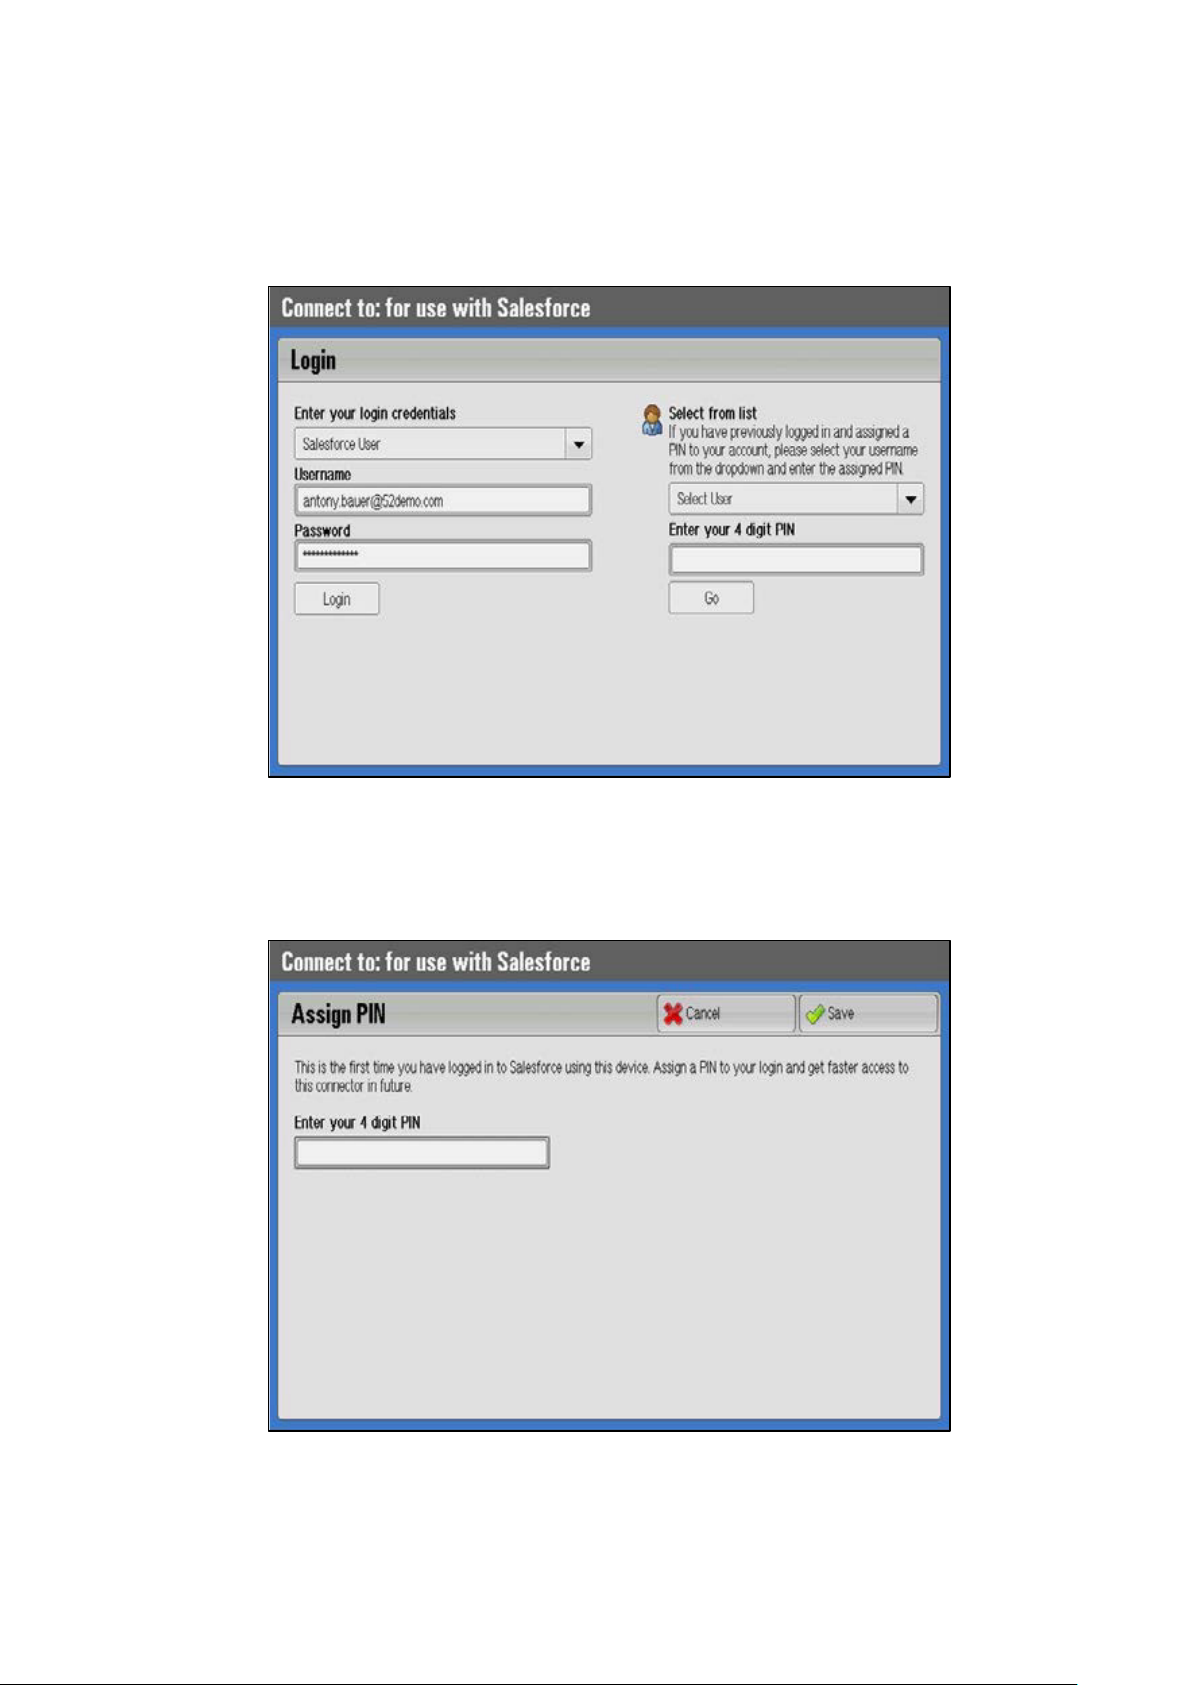
2. Type Username and Password in the respective fields, and then click Login. To type these
details, you must use the alphanumeric keyboard that pops up from bottom of the screen
when you click inside the fields. The standard device keyboard is disabled after you open the
login page.
The following screen is displayed:
Figure 2
Figure 3
Fuji Xerox Connect to: (v1.1) for use with Salesforce User Guide Page 8
Page 9

3. Assign a PIN to your username for fast access from next login onwards or skip this to
Figure 5
proceed.
a. If you do not want to assign a PIN to your username now, click Cancel. You can
assign a PIN any time from the
Settings
page. The home page (with the Home tab
open by default) is displayed:
Figure 4
b. If you want to assign a PIN to your user name, enter a four-digit numeric PIN of your
choice in the Enter your 4 digit PIN field using the numeric keyboard that pops up
when you click inside the field. To close the keyboard, either press Done or click
anywhere outside the field. Click Save.
Fuji Xerox Connect to: (v1.1) for use with Salesforce User Guide Page 9
Page 10

This action ensures that you do not need to enter all those details in
Figure 6
3
when you log in to the Connect to: for use with Salesforce using this device next
time (second time onwards). Instead, you select your username from the Select
Username dropdown list, enter the assigned PIN in the Enter your 4 digit PIN field,
and click Go to log in, as shown in the Assigned PIN Login section in the screenshot
below:
Step 2
and
Step
Note:
• If your password has changed but you remember your valid PIN, you cannot log in with
your PIN. You must have to log in with your username and the changed password. The
password will be updated, and from next login onwards, you can login with your PIN.
• The PIN is discarded after three consecutive invalid attempts. In that case, users must
login with their assigned username and password and assign a new PIN to their
usernames. The user must register as a new member.
The home page is displayed as shown in
You can see Recent Files and Recent Accounts listed on the page. The Last Modified:
DD/MM/YYYY (date) is mentioned against the corresponding files.
Click Refresh List to update the list.
Note: The recent files or accounts are displayed in seven rows for screen resolution of 600
pixels and in five rows for screen resolution of 480 pixels.
Step 3 a
.
Fuji Xerox Connect to: (v1.1) for use with Salesforce User Guide Page 10
Page 11

You can perform the following three actions on this page:
• Scan New File: Click this button to scan a file to the Files page.
• Scan to Account: Click this button to scan a document to an existing account.
• Refresh List: Click the this button placed at the bottom right corner to refresh the list of files
and accounts displayed on the home page.
Searching Files or Accounts
You can search for specific files or accounts on any of the pages of the Connect to: for use with
Salesforce.
1. Click Search on the home page of the Connect to: for use with Salesforce application.
The following screen is d
isplayed:
Fi
gure 7
2. Select either Accounts or Files from the Select Type dropdown list.
Fuji Xerox Connect to: (v1.1) for use with Salesforce User Guide Page 11
Page 12

3. Type the name of the file or account (based on the selection in
• Your search term should not start with either of these two special characters, (*) and (?).
Account/Filename text box.
Step 1
) in the Enter the
The following screenshot displays the search for files (with the search term as
Figure 8
scan*
):
Note:
• Your search term must have two or more characters.
4. Click Search.
The search results are displayed:
Figure 9
Fuji Xerox Connect to: (v1.1) for use with Salesforce User Guide Page 12
Page 13

Note:
• If you search for
search for
• The maximum number of files, accounts or documents that can be displayed in the
search results is 200.
files
accounts
, the search results are displayed in the Files tab.
, the search results are displayed in the Accounts tab. If you
Accounts Page
Note: The maximum size of document to be scanned from the Accounts tab is 5 MB.
1. Click the Accounts tab from the home page of the application to open the
displayed below):
Accounts
page (as
Figure 10
The Account names are alphabetically arranged over a number of pages. You can navigate
to the desired page using the Start, Previous, Next and End buttons.
Fuji Xerox Connect to: (v1.1) for use with Salesforce User Guide Page 13
Page 14

2. Click a specific account to see the documents or attachments inside.
Figure 11
The documents or attachments are listed alphabetically irrespective of the file types.
You can perform the following three actions on the
• Scan Existing Document
• Print
• Scan New Document
Accounts
page:
Fuji Xerox Connect to: (v1.1) for use with Salesforce User Guide Page 14
Page 15

Scan Existing Document
Figure 12
1. Click the scan icon placed on the right of a document to scan it.
Scan Existing Document
The
screen is displayed:
You can modify the following customizations before you scan the file:
• File Format: Select the appropriate output format for the scanned document out of
the available formats. The supported formats are
• Colour Mode: Select the appropriate colour settings for the scanned output from the
available modes, such as
• Resolution: Select the appropriate resolution from the dropdown list.
• 2 Sided/1 Sided: Select the appropriate paper duplexing type, 2-Sided or 1-Sided.
• Orientation: Select the appropriate paper orientation, portrait or landscape.
2. Click Scan to scan the file. Click Cancel (on the top right part of the page) if you do not want
to scan it.
Auto, Black & White, Colour
PDF, JPEG, TIFF
and
Gray Scale
and
.
DocuWorks
.
Fuji Xerox Connect to: (v1.1) for use with Salesforce User Guide Page 15
Page 16

Note: The print option is enabled only for the ready-to-print file types which include
Text, PDF, JPEG, TIFF
and DW.
1. Click the print icon placed on the right of the file to print it.
The
Print Document
screen is displayed:
Figure 13
You can modify the following customizations before you print the document:
• Copies: Specify the number of print copies by using the + or – sign.
Note: The maximum copies limit for print is 9999.
• Colour Mode: Select the appropriate colour settings for the scanned output from the
available modes, such as
• 2 Sided/1 Sided: Select the appropriate paper duplexing type, 2-Sided or 1-Sided.
• Orientation: Select the appropriate paper orientation, portrait or landscape.
Note: The
Therefore, the icon looks disabled on the print page.
Auto, Black & White, Colour
landscape
feature is disabled for print.
and
Gray Scale
.
2. Click Print to print the document. Click Cancel if you do not want to print it.
Fuji Xerox Connect to: (v1.1) for use with Salesforce User Guide Page 16
Page 17

Scan New Document
1. Click Scan New Document to scan a file or a document placed on the tray of the MFD (and
not available in the Connect to: for use with Salesforce portal). The following screen is
displayed:
Figure 14
You can modify the following customizations before you scan the document:
• File Format: Select the appropriate output format for the scanned document out of
the available formats. The supported formats are
• Colour Mode: Select the appropriate colour settings for the scanned output from the
available modes, such as
• Resolution: Select the appropriate resolution from the dropdown list.
• 2 Sided/1 Sided: Select the appropriate paper duplexing type, 1-Sided or 2-Sided.
• Orientation: Select the appropriate paper orientation, portrait or landscape.
2. Type a name in the Document Name field, and a description for the document in the
Document Description field. These are mandatory fields.
3. Click Scan to scan the document. Click Cancel if you do not want to scan it.
Auto, Black & White, Colour
PDF, JPEG, TIFF
and
Gray Scale
and
DocuWorks
.
.
Fuji Xerox Connect to: (v1.1) for use with Salesforce User Guide Page 17
Page 18

Files Page
Note: The maximum size of file to be scanned from the Files tab is 38 MB.
1. Click the Files tab on the Connect to: for use with Salesforce home page to open the
page (as displayed below):
Figure 15
Files
You can view the list of existing files arranged chronologically with the latest on the top.
You can perform the following three actions on the
• Scan Existing File
• Print
• Scan New File
Files
page:
Fuji Xerox Connect to: (v1.1) for use with Salesforce User Guide Page 18
Page 19

Scan Existing File
Figure 16
1. Click the scan icon placed on the right of the file or attachment to scan it.
Scan Existing File
The
screen is displayed:
2. You can modify the following customizations before you scan the file:
• File Format: Select the appropriate output format for the scanned document out of
the available formats. The supported formats are
• Colour Mode: Select the appropriate colour settings for the scanned output from the
available modes, such as
• Resolution: Select the appropriate resolution from the dropdown list.
• 2 Sided/1 Sided: Select the appropriate paper duplexing type, 2-Sided or 1-Sided.
• Orientation: Select the appropriate paper orientation, portrait or landscape.
3. Click Scan to scan the file. Click Cancel if you do not want to scan it.
Auto, Black & White, Colour
PDF, JPEG, TIFF
and
and
Gray Scale
DocuWorks
.
.
Fuji Xerox Connect to: (v1.1) for use with Salesforce User Guide Page 19
Page 20

Files
The Print option on the
procedure of how to print from the
Scan New File
1. Click Scan New File to scan a file placed on the tray of the MFD (and not available in the
Connect to: for use with Salesforce portal). The following screen is displayed:
page works in the same way as that on the
Files
page, refer to the
Print
section.
Accounts
page. For detailed
Figure 17
You can modify the following customizations before you scan the document:
• File Format: Select the appropriate output format for the scanned document out of
the available formats. The supported formats are
• Colour Mode: Select the appropriate colour settings for the scanned output from the
available modes, such as
• Resolution: Select the appropriate resolution from the dropdown list.
• 2 Sided/1 Sided: Select the appropriate paper duplexing type, 2-Sided or 1-Sided.
• Orientation: Select the appropriate paper orientation, portrait or landscape.
2. Type a file name in the File Name field, and a description for the file in the File Description
field.
3. Click Scan to scan the file. Click Cancel if you do not want to scan it.
Auto, Black & White, Colour
PDF, JPEG, TIFF
and
Gray Scale
and
.
DocuWorks
.
Fuji Xerox Connect to: (v1.1) for use with Salesforce User Guide Page 20
Page 21

Settings Page
As a Salesforce user, you can either create a new login PIN or change your existing login PIN from the
Settings
page.
1. Click the Settings tab on the Connect to: for use with Salesforce home page.
The following
screen is displayed:
Figure 18
2. Enter a new PIN in the New PIN field using the numeric keyboard that pops up when you
click inside the field.
Figure 19
Fuji Xerox Connect to: (v1.1) for use with Salesforce User Guide Page 21
Page 22

3. Re-enter the same PIN in the Confirm New PIN field.
Figure 20
4. Click Save.
The following screen confirming successful change of your PIN is displayed:
Fuji Xerox Connect to: (v1.1) for use with Salesforce User Guide Page 22
Page 23

Logging in as Admin
This section describes how to access the Connect to: for use with Salesforce user interface as Admin
and the available functionalities for Admin.
To log in to the Connect to: for use with Salesforce user interface as Admin:
1. Select Admin in the dropdown box under Login:
Figure 21
2. Enter the Username and Password in the corresponding fields and click Login.
The following screen is displayed:
Figure 22
Fuji Xerox Connect to: (v1.1) for use with Salesforce User Guide Page 23
Page 24

3. Enter the new licence key in the New Licence Key field and re-enter the same key in the
Confirm New Licence Key field.
Note: The Licence key should be alphanumeric containing the special character '-'.
4. Click Save.
The licence key for a specific user gets activated.
Logout
To log out of the Connect to: for use with Salesforce:
1. Click Logout on the top right corner of the screen.
The application is closed and the
Services
Figure 23
home page of the MFD is displayed.
Fuji Xerox Connect to: (v1.1) for use with Salesforce User Guide Page 24
Page 25

Troubleshooting
While performing a task on the MFD, if the message ‘Invalid device admin credentials.
Please contact your Administrator’ is displayed, what should I do?
Is it mandatory to provide a description for a document or file that I am uploading on
the Salesforce website?
This section lists a few problems that users might face while working with the Connect to: for use
with Salesforce and their probable solutions.
Problem:
Solution
have changed. To avoid this, your System Administrator must log in to the system as an administrator
with updated Admin credentials. After successful login, these new credentials are captured or
updated. So, from next login onwards, the Connect to: will communicate to the MFD with the new
credentials. Hence, there won’t be any issue while scanning a document or doing any other activity.
: This message is displayed when the admin credentials (KO credentials) entered for an MFD
Problem:
Solution
like the following:
When you revise that specific document or file with more than one page from the Connect to: for use
with Salesforce in JPEG format, the scan will fail and a message 'Document upload failed' will be
displayed. However, the first document will be revised successfully and user can check the updated
document or file in Salesforce website.
: Yes, it is mandatory to provide a description. If you do not do so, it would lead to a problem
Fuji Xerox Connect to: (v1.1) for use with Salesforce User Guide Page 25
 Loading...