


Version 1.0
December 2020
702P08571
Xerox
®
EC70 Color Copier/Printer
User Guide

© 2020 Xerox Corporation. All rights reserved. Xerox®, Xerox and Design®, EC70, SMARTsend®, Scan to PC Desktop®,
MeterAssistant
Print Driver
®
Adobe
PostScript
®
Apple
®
, and Macintosh®are trademarks or registered trademarks of Apple Inc. in the U.S. and other countries.
OS
Google Cloud Print
®
, SuppliesAssistant®, Xerox Secure Access Unified ID System®, Xerox Extensible Interface Platform®, Global
®
, and Mobile Express Driver®are trademarks of Xerox Corporation in the United States and/or other countries.
, Adobe PDF logo, Adobe®Reader®, Adobe®Type Manager®, ATM™, Flash®, Macromedia®, Photoshop®, and
®
are trademarks or registered trademarks of Adobe Systems, Inc.
, Bonjour®, EtherTalk™, TrueType®, iPad®, iPhone®, iPod®, iPod touch®, AirPrint®and the AirPrint Logo®, Mac®, Mac
™
web printing service, Gmail™webmail service, and Android™mobile technology platform are trademarks
of Google, Inc.
®
HP-GL
, HP-UX®, and PCL®are registered trademarks of Hewlett-Packard Corporation in the United States and/or other
countries.
®
IBM
and AIX®are registered trademarks of International Business Machines Corporation in the United States and/or other
countries.
®
McAfee
, ePolicy Orchestrator®, and McAfee ePO™are trademarks or registered trademarks of McAfee, Inc. in the United
States and other countries.
Microsoft
®
, Windows Vista®, Windows®, Windows Server®, and OneDrive®are registered trademarks of Microsoft
Corporation in the United States and other countries.
Mopria is a trademark of the Mopria Alliance.
PANTONE
UNIX
Linux
Wi-Fi CERTIFIED Wi-Fi Direct
®
and other Pantone, Inc. trademarks are the property of Pantone, Inc.
®
is a trademark in the United States and other countries, licensed exclusively through X/ Open Company Limited.
®
is a registered trademark of Linus Torvalds.
®
is a trademark of the Wi-Fi Alliance.

Table of Contents
1 Safety ..........................................................................................................................................9
Notices and Safety.. .... .... ........................... .... .... .... ....................... .... .... .... ............................. 10
Electrical Safety ................................ ................................... .... ............................... .... .... .... ... 11
General Guidelines ................................. ................................... ................................... .... 11
Power Cord ...................... ................................... .... .... ........................... .... .... .... .............. 11
Emergency Power Off............ ................................... .... ................................... ................. 12
Electrical Supply.................... .... ................................... ................................... ................. 12
Operational Safety............................. ................................... ................................... .............. 13
Operational Guidelines.. ....................................... ................................... .... ..................... 13
Ozone Release ................ .... .... ........................... .... .... .... ........................... .... .... ............... 13
Printer Location ........................ .... .... .... ........................... .... .... ............................... .... ..... 13
Printer Supplies .................. .... .... .... ....................... .... .... .... ............................... .... ............ 14
Maintenance Safety................................. ................................... .... ............................... .... .... 15
Printer Symbols ............................ .... .... .... ....................... .... .... .... ........................... .... .... ........ 16
Environmental, Health, and Safety Contact Information ............................ .... ........................ 17
2 Getting Started........................................................................................................................19
Parts of the Printer................. ................................... .... .... ........................... .... .... .... .............. 20
Front View ............................ .... ................................... .... ................................... ............. 20
Document Feeder ....................... ................................... .... ................................... .... .... ... 21
Paper Trays.......... .... .... .... ....................... .... .... .... ........................... .... .... .......................... 21
Internal Components...................... ................................... ................................... .... .... ... 22
Rear View ............ .... .... .... ....................... .... .... .... ........................... .... .... .......................... 22
Control Panel ........................... ................................... ................................... .... .............. 23
Telephone and Fax Connection Option ................ .... .... ........................... .... .... .... .............. 24
Printer Information . .... .... ........................... .... .... .... ....................... .... .... .... ............................. 25
Optional Devices.............. ................................... ................................... .... ............................ 26
Feeding Devices ........... .... ............................... .... .... .... ....................... .... .... .... .................. 26
Finishing Devices ............ .... .... ........................... .... .... .... ........................... .... .... .... ........... 26
Required Finishing Accessory. .... .... .... ............................... .... ................................... ......... 27
Installation and Setup ...................... ................................... .... ............................... .... .... .... ... 29
Before Using the Printer .................... .... .... ............................... .... .... ........................... .... . 29
Installation and Setup Overview .................................. ................................... ................. 29
Physical Connection .......... ................................... ................................... .... ..................... 30
Power Options................ .... .... ............................... .... ................................... .................... 30
Assigning a Network Address ........ .... .... .... ........................... .... .... .... ....................... .... .... . 34
Using CentreWare Internet Services ............... ................................... ............................... 34
Getting Additional Information... ................................... ................................... ..................... 36
3 Services and Functions...........................................................................................................37
Xerox®EC70 Color Copier/Printer
User Guide
3

Table of Contents
Printing................................ ................................... ................................... ............................ 38
Printing Overview .... .... .... .... ........................... .... .... ................................... .... ................... 38
Saving a Set of Commonly Used Printing Options in Windows................... .... .... .... ........... 38
Saving a Set of Commonly Used Printing Options for Macintosh .... .................................. 39
Printing Features. .... .... .... ............................... .... ................................... ........................... 39
Copying .................... ................................... ................................... ................................... .... 45
Basic Copying ...... .... .... .... ....................... .... .... .... ........................... .... .... .......................... 45
Advanced Copying.................................. ................................... ................................... ... 62
Scanning ....................... .... .... ........................... .... .... .... ....................... .... .... .... ...................... 67
Scanning Overview... .... .... ....................... .... .... .... ........................... .... .... .......................... 67
Loading Original Documents... ........................... .... .... .... ........................... .... .... ............... 67
Storing a Scan to a Folder ........ ................................... ................................... .... .............. 68
Scanning to a Network File Repository ....................... .... .... ........................... .... .... .... ....... 74
Scanning to an Email Address ...... ................................... ................................... .............. 74
Scanning to a Computer ............... .... .... .... ....................... .... .... .... ........................... .... .... . 76
Scanning to a Home Directory ...... .... .... ........................... .... .... .... ........................... .... .... . 76
Storing to a USB Flash Drive .......................... ................................... .... ........................... 77
Setting Scan Options ... ........................... .... .... ............................... .... .............................. 77
Faxing......................... .... ............................... .... .... ........................... .... .... .... ......................... 80
Fax Overview ...... .... .... ................................... ................................... .... ........................... 80
Loading Original Documents... ........................... .... .... .... ........................... .... .... ............... 80
Sending a Fax................... ................................... ................................... .... ..................... 81
Server Fax ................ .... .... ........................... .... .... .... ........................... .... .... ...................... 82
Sending an Internet Fax.................................... ................................... ............................ 83
Faxing from Your Computer ....... .... .... ........................... .... .... .... ....................... .... .... .... .... 83
Receiving Faxes....................... ................................... .... .... ........................... .... .... .... ....... 84
Selecting Fax Settings ......................... ................................... .... ................................... ... 84
Adding Address Book Entries........... .... ................................... ................................... .... ... 87
Creating Fax Comments........................ .... ............................... .... .... .... ....................... .... . 89
4 Paper and Media ....................................................................................................................91
Supported Media ...... .... ................................... .... ................................... ............................... 92
Recommended Media ........... .... ................................... ................................... ................. 92
General Media Loading Guidelines........... .... .... ........................... .... .... .... ......................... 92
Printing or Copying on Labels........... .... .... .... ........................... .... .... ................................. 92
Printing or Copying on Glossy Paper . ................................... ....................................... ...... 92
Media That Can Damage Your Printer ............. .... .... ........................... .... .... .... .................. 93
Paper Storage Guidelines ................ ................................... ................................... .... .... ... 93
Paper Types and Weights Accepted in Trays...................... .... .... ........................... .... .... .... 94
Tray Capabilities ............................... .... .... ........................... .... .... .... ....................... .... .... . 95
Loading Media............................ ................................... ................................... ..................... 97
Loading Paper in Trays 1–4 .............................. ................................... .... .... ..................... 97
Loading Paper in Tray 5 (Bypass) ........................... .... .... .... ....................... .... .... .... ........... 98
Loading Envelopes in Tray 5 (Bypass) .................... .... .... .... ............................... .... ............ 99
Loading Paper in the High Capacity Feeder ............................ ................................... .... . 100
Loading Paper in the Oversized High Capacity Feeder ....... .... .... ........................... .... .... .. 100
Loading Paper in the Post-Process Inserter ............................ .... ............................... .... .. 101
4
Xerox®EC70 Color Copier/Printer
User Guide

Table of Contents
5 Maintenance ........................................................................................................................ 103
General Precautions .......................... ................................... .... ............................... .... .... .... . 104
Billing and Usage Information .. .... ....................... .... .... .... ............................... .... ................. 105
Cleaning the Printer ................................. ................................... .... ............................... .... .. 106
Cleaning the Document Glass and Document Cover......................... .... .......................... 106
Cleaning the Exterior .............................. ................................... ................................... . 106
Ordering Supplies........................ .... .... .... ............................... .... ................................... ....... 107
Consumables .............. .... .... .... ....................... .... .... .... ............................... .... ................. 107
When to Order Supplies ...................... ................................... ................................... .... . 107
Routine Maintenance Items .... ................................... ................................... .... ................... 109
Replacing the Toner Cartridges............................... .... .... .... ........................... .... .... ......... 109
Replacing the Fuser.. .... .... ........................... .... .... ........................... .... .... .... .................... 110
Replacing the Waste Toner Container............. ................................... .... ......................... 112
Replacing the Drum Cartridges..... .... ................................... ................................... ........ 113
Replacing the Charge Corotron ........... ................................... ................................... .... . 116
Recycling Supplies....... .... ................................... .... ............................... .... .... .... ................... 117
6 Troubleshooting ................................................................................................................... 119
General Troubleshooting .... ........................... .... .... ............................... .... ............................ 120
Printer Does Not Turn On ............ ................................... .... ................................... .... .... . 120
Printing Takes Too Long ................... .... .... .... ........................... .... .... ............................... 120
Printer Resets or Turns Off Frequently...... .... .... .... ........................... .... .... ........................ 120
2-Sided Printing Problems ....................... ................................... ................................... . 121
Scanner Error ...... .... .... ................................... .... ................................... ......................... 121
Paper Jams .................................... ................................... ................................... .... ............ 122
Minimizing Paper Jams ... ............................... .... ................................... ......................... 122
The Printer Pulls Multiple Sheets Together... .... ............................... .... ............................ 122
Paper Jam Message Stays On. ........ .... ............................... .... .... ............................... .... .. 123
Media Misfeeds .................... ................................... .... ................................... ............... 123
Clearing Paper Jams .............................. ................................... ................................... .. 123
Clearing Jams in the C/Z Folder............................. ................................... ...................... 125
Print Quality Problems......................... .... .... .... ....................... .... .... .... ........................... .... ... 133
Copy and Scan Problems .... .... ............................... .... .... .... ....................... .... .... .... ................ 134
Fax Problems ................................. ................................... ................................... .... ............ 135
Problems Sending Faxes................................. ................................... ............................. 135
Problems Receiving Faxes............................... .... ................................... ......................... 135
Getting Help .............. .... .... .... ....................... .... .... .... ........................... .... .... ........................ 137
Locating the Serial Number.... .... ........................... .... .... ................................... .............. 137
Control Panel Messages . .... .... ............................... .... ................................... .... .............. 137
Alerts....................... .... .... ........................... .... .... .... ....................... .... .... .... .................... 137
Web Resources..... .... .... .... ....................... .... .... .... ........................... .... .... ........................ 138
A Specifications........................................................................................................................ 139
Printer Configurations ................. .... .... .... ............................... .... ................................... ....... 140
Standard Features............. ................................... ................................... .... ................... 140
Xerox®EC70 Color Copier/Printer
User Guide
5

Table of Contents
Physical Specifications . ................................... ................................... .... .... .......................... 141
Base Unit......................... ................................... .... .... ........................... .... .... .... ............ 141
Base Unit, High Capacity Feeder, Interface Module, and Standard Finisher. .................... 141
Base Unit and Business Ready Finisher and Booklet Maker with a 2-Tray Oversized
High Capacity Feeder ............ .... .... ................................... ................................... ........... 141
Environmental Specifications ........................ ................................... ................................... . 142
Temperature and Relative Humidity ... ................................... .... ............................... .... .. 142
Electrical Specifications............................ ................................... .... ............................... .... .. 143
Performance Specifications .............................. ................................... ................................. 144
Resolution........... .... .... ................................... ................................... ............................. 144
Print Speed . ................................... .... ............................... .... .... ........................... .... .... .. 144
B Regulatory Information...................................................................................................... 145
Basic Regulations..................... .... .... .... ....................... .... .... .... ............................... .... .......... 146
United States FCC Regulations........................... .... .... ............................... .... .... ............. 146
Canada........ .... ................................... ................................... ................................... .... . 146
Certifications in Europe ........................ .... .... .... ....................... .... .... .... ........................... 146
European Union Lot 4 Imaging Equipment Agreement Environmental
Information.................. ................................... ................................... .... .... ................... 147
Germany.................. .... .... ........................... .... .... .... ....................... .... .... .... .................... 149
Turkey RoHS Regulation ........................... .... .... ........................... .... .... .... ....................... 149
Eurasian Economic Community Certification ............. .... .... .... ........................... .... .... ...... 149
Wireless Compliance .... .... ............................... .... .... .... ....................... .... .... .... ................ 149
Copy Regulations ................................. .... ............................... .... .... ........................... .... .... .. 151
United States.... .... ....................... .... .... .... ............................... .... ................................... 151
Canada........ .... ................................... ................................... ................................... .... . 152
Other Countries................................. .... .... ........................... .... .... .... ....................... .... ... 153
Fax Regulations.... ....................... .... .... .... ............................... .... ................................... ....... 154
United States.... .... ....................... .... .... .... ............................... .... ................................... 154
Canada........ .... ................................... ................................... ................................... .... . 155
European Union............. .... .... .... ........................... .... .... ................................... .............. 156
New Zealand . ....................... .... .... .... ............................... .... ................................... ....... 157
South Africa........ .... ................................... ................................... ................................. 158
Safety Certification ................................... ................................... ................................... .... . 159
Material Safety Data Sheets .................. .... .... .... ........................... .... .... ............................... 160
C Recycling and Disposal ....................................................................................................... 161
All Countries ...... .... .... ................................... ................................... ................................... . 162
North America ... .... .... ................................... ................................... ................................... . 163
European Union.. ............................... .... ................................... ................................... ........ 164
Domestic or Household Environment .... .... ........................... .... .... .... ....................... .... ... 164
Professional or Business Environment.............. .... .... .... ....................... .... .... .... ................ 164
Collection and Disposal of Equipment and Batteries.. .... .... ............................... .... .......... 164
Battery Symbol .... .... .... ........................... .... .... ............................... .... .... ........................ 165
Battery Removal ................................. ................................... ................................... .... . 165
Other Countries.......... .... .... .... ....................... .... .... .... ........................... .... .... ........................ 166
6
Xerox®EC70 Color Copier/Printer
User Guide

Table of Contents
D Business Ready Finisher and Booklet Maker.................................................................. 167
Overview of Business Ready Finisher and Booklet Maker............. .... .... .... ....................... .... ... 168
Identifying the Components . .... .... ........................... .... .... .... ........................... .... .... ............. 169
Maintenance ................................ ................................... .... .... ............................... .... .... ..... 170
Replacing Staples in the Main Stapler Unit .... ................................... .... .......................... 170
Replacing Staples in the Booklet Maker Component ......................... .... .......................... 171
Emptying the Hole Punch Waste Container ........... .... ................................... .................. 172
Troubleshooting................... .... ................................... ................................... ...................... 174
Clearing Jams in the Finisher at Position 3a ...................... .... .... ........................... .... .... .. 174
Clearing Jams in the Finisher at Position 3c ..................... ................................... ............ 175
Clearing Jams in the Finisher at Position 3d ...................... .... .... ........................... .... .... .. 176
Clearing Jams in the Finisher at Position 4 .......... .... .... ............................... .... .... ............ 177
Clearing Jams in the Booklet Tray ....... ................................... ................................... .... . 178
Xerox®EC70 Color Copier/Printer
User Guide
7

Table of Contents
8
Xerox®EC70 Color Copier/Printer
User Guide

1
Safety
This chapter contains:
• Notices and Safety........... ................................... ................................... .... .... ........................... . 10
• Electrical Safety .......... .... .... ........................... .... .... .... ....................... .... .... .... ............................. 11
• Operational Safety.......................... .... .... .... ............................... .... ................................... ......... 13
• Maintenance Safety... .... ................................... ................................... ................................... ... 15
• Printer Symbols ...... .... .... .... ............................... .... ................................... .................................. 16
• Environmental, Health, and Safety Contact Information............................. .... ............................ 17
The printer and the recommended supplies are designed and tested to meet strict safety
requirements. Attention to the following information ensures the continued safe operation of the
®
Xerox
printer.
Xerox®EC70 Color Copier/Printer
User Guide
9

Safety
Notices and Safety
Before you operate the printer, carefully read the following instructions. To ensure the continued safe
operation of the printer, refer to these instructions.
The Xerox
requirements include safety agency evaluation and certification, and compliance with
electromagnetic regulations and established environmental standards.
The safety and environment testing and performance of this product have been verified using Xerox
materials only.
®
printer and supplies are designed and tested to meet strict safety requirements. Safety
WARNING: Unauthorized alterations, which can include the addition of new functions or
connection of external devices, can affect the product certification. For details, contact your
®
Xerox
representative.
®
10
Xerox®EC70 Color Copier/Printer
User Guide

Safety
Electrical Safety
Before you operate the printer, carefully read the following instructions. To ensure the continued safe
operation of the printer, refer to these instructions.
®
Xerox
safety agency evaluation and certification, and compliance with electromagnetic regulations and
established environmental standards.
The safety and environment testing and performance of this product have been verified using Xerox
materials only.
GGeenneerraall GGuuiiddeelliinneess
printer and supplies are designed and tested to meet strict safety requirements. These include
WARNING: Unauthorized alterations, which can include the addition of new functions or
connection of external devices, can affect the product certification. For details, contact your
®
Xerox
WARNING:
• Do not push objects into slots or openings on the printer. Touching a voltage point or
representative.
shorting out a part could result in fire or electric shock.
®
• Do not remove the covers or guards that are fastened with screws unless you install
optional equipment and are instructed to do so. Power off the printer when you perform
these installations. Disconnect the power cord to remove the covers and guards to install
optional equipment. Except for user-installable options, there are no parts that you can
maintain or service behind these covers.
The following are hazards to your safety:
• The power cord is damaged or frayed.
• Liquid is spilled into the printer.
• The printer is exposed to water.
• The printer emits smoke, or the surface is unusually hot.
• The printer emits unusual noise or odors.
• The printer causes a circuit breaker, fuse, or other safety device to activate.
If any of these conditions occur, do the following:
1. Power off the printer immediately.
2. Disconnect the power cord from the electrical outlet.
3. Call an authorized service representative.
PPoowweerr CCoorrdd
Use the power cord supplied with your printer.
• Plug the power cord directly into a properly grounded electrical outlet. Ensure that each end of the
cord is connected securely. If you do not know if an outlet is grounded, ask an electrician to check
the outlet.
Xerox
®
EC70 Color Copier/Printer
User Guide
11

Safety
WARNING: To avoid risk of fire or electrical shock, do not use extension cords, power
strips, or power plugs for more than 90 days. When a permanent outlet receptacle
cannot be installed, use only one factory-assembled extension cord of the appropriate
gauge for each printer or multifunction printer. Always adhere to national and local
building, fire, and electrical codes regarding length of cord, conductor size, grounding,
and protection.
• Do not use a ground adapter plug to connect the printer to an electrical outlet that does not have
a ground connection terminal.
• Verify that the printer is plugged into an outlet that provides the correct voltage and power. If
necessary, review the electrical specification of the printer with an electrician.
• Do not place the printer in an area where people can step on the power cord.
• Do not place objects on the power cord.
• Do not plug or unplug the power cord while the power switch is in the On position.
• If the power cord becomes frayed or worn, replace it.
• To avoid an electrical shock and damage to the cord, grasp the plug when you unplug the power
cord.
The power cord is attached to the printer as a plug-in device on the back of the printer. If it is
necessary to disconnect all electrical power from the printer, disconnect the power cord from the
electrical outlet.
EEmmeerrggeennccyy PPoowweerr OOffff
If any of the following conditions occur, power off the printer immediately and disconnect the power
cord from the electrical outlet. To correct these problems:
• The equipment emits unusual odors or makes unusual noises.
• The power cable is damaged or frayed.
• A wall panel circuit breaker, fuse, or other safety device has been tripped.
• Liquid is spilled into the printer.
• The printer is exposed to water.
• Any part of the printer is damaged.
Contact an authorized Xerox service representative.
EElleeccttrriiccaall SSuuppppllyy
The electrical supply for the device meets the requirements stated on the data plate on the rear of
the device. If you are not sure that your electrical supply meets the requirements, consult your local
electricity provider or a licensed electrician.
WARNING: The device connects to a grounded electrical circuit. The device is supplied with a
grounded electrical plug that fits into a grounded electrical outlet. The power cord plug only
fits into a grounded electrical outlet. The power cord design is a safety feature. If you are
unable to insert the power cord plug into your electrical outlet, consult your local electricity
provider or a licensed electrician. Always connect the device to a properly grounded electrical
outlet.
12
Xerox®EC70 Color Copier/Printer
User Guide

Safety
Operational Safety
The printer and supplies are designed and tested to meet strict safety requirements. These include
safety agency examination, approval, and compliance with established environmental standards.
Your attention to the following safety guidelines helps to ensure the continued, safe operation of the
printer.
OOppeerraattiioonnaall GGuuiiddeelliinneess
• While the printer is printing, do not remove the paper source tray that is selected using either the
print driver or Control Panel.
• Do not open the doors when the printer is printing.
• Do not move the printer when it is printing.
• Keep hands, hair, neckties, and so on, away from the exit and feed rollers.
• Covers, which require tools for removal, protect the hazard areas within the printer. Do not remove
the protective covers.
• Ensure that the rear right cover is attached. Open this cover when you connect an interface cable.
OOzzoonnee RReelleeaassee
This printer produces ozone during a normal operation. The amount of ozone produced depends on a
copy volume. Ozone is heavier than air and is not produced in amounts large enough to harm anyone.
Install the printer in a well-ventilated room.
For more information in the United States and Canada, go to www.xerox.com/environment.
PPrriinntteerr LLooccaattiioonn
• Place the printer on a level, solid, non-vibrating surface with adequate strength to hold the weight
of the printer. To find the weight for the printer configuration, refer to Physical Specifications.
• Do not block or cover the slots or openings on the printer. These openings are provided for
ventilation and to prevent overheating of the printer.
• Place the printer in an area where there is an adequate space for operation and servicing.
• Place the printer in a dust-free area.
• Do not store or operate the printer in a hot, cold, or humid environment.
• Do not place the printer near a heat source.
• Do not place the printer in direct sunlight to avoid an exposure to light-sensitive components.
• Do not place the printer where it is exposed directly to the cold air flow from an air conditioning
system.
• Do not place the printer in locations susceptible to vibrations.
Xerox
®
EC70 Color Copier/Printer
User Guide
13

Safety
PPrriinntteerr SSuupppplliieess
• Store all supplies in accordance with the instructions given on the package or container.
• Keep all supplies away from the reach of children.
• Never throw toner, print or drum cartridges, or toner containers into an open flame.
• When you handle supplies, avoid skin or eye contact. Eye contact can cause irritation and
inflammation.
• Do not attempt to disassemble supplies, which can increase the risk of skin or eye contact.
Caution: Use of non-Xerox supplies is not recommended. The Xerox Warranty and the Service
Agreement do not cover damage, malfunction, or degradation of performance caused by use
of non-Xerox supplies, or the use of Xerox supplies not specified for the printer.
VVaaccuuuumm CClleeaanneerr UUssee ffoorr TToonneerr SSppiillllss
Use a broom or wet cloth to wipe off the spilled toner. To minimize generation of dust particles,
sweep or wipe slowly. Avoid using a vacuum. If you have to use a vacuum, ensure that the unit is
designed to contain combustible dusts. Ensure that the vacuum includes an explosion rated motor
and non-conductive hose.
14
Xerox®EC70 Color Copier/Printer
User Guide

Safety
Maintenance Safety
The Xerox®printer and supplies are designed and tested to meet strict safety requirements. Safety
requirements include safety agency evaluation and certification, and compliance with
electromagnetic regulations and established environmental standards. Refer to these instructions to
ensure the continued safe operation of the printer. For details, contact your Xerox
• Follow all warnings and instructions marked on, or supplied with, the product, options, and
supplies.
• Do not attempt any maintenance procedure that is not described in the documentation supplied
with the printer.
• Always exercise care when you move or relocate the printer. Contact your Xerox
to arrange the relocation of the printer.
• Never throw toner, print or drum cartridges, or toner containers into an open flame.
WARNING: Before cleaning the printer, unplug it from the electrical outlet.
Do not use aerosol cleaners. Aerosol cleaners can cause explosions or fires when used on
electromechanical equipment.
The metallic surfaces in the fuser area are hot. To avoid personal injury, use caution.
®
representative.
®
representative
Do not attempt to remove paper that is jammed deeply inside the product. Switch off the
product promptly and contact your local Xerox
®
representative.
Do not apply excessive force on the document glass.
Do not override any electrical or mechanical interlock devices.
Xerox
®
EC70 Color Copier/Printer
User Guide
15
Safety
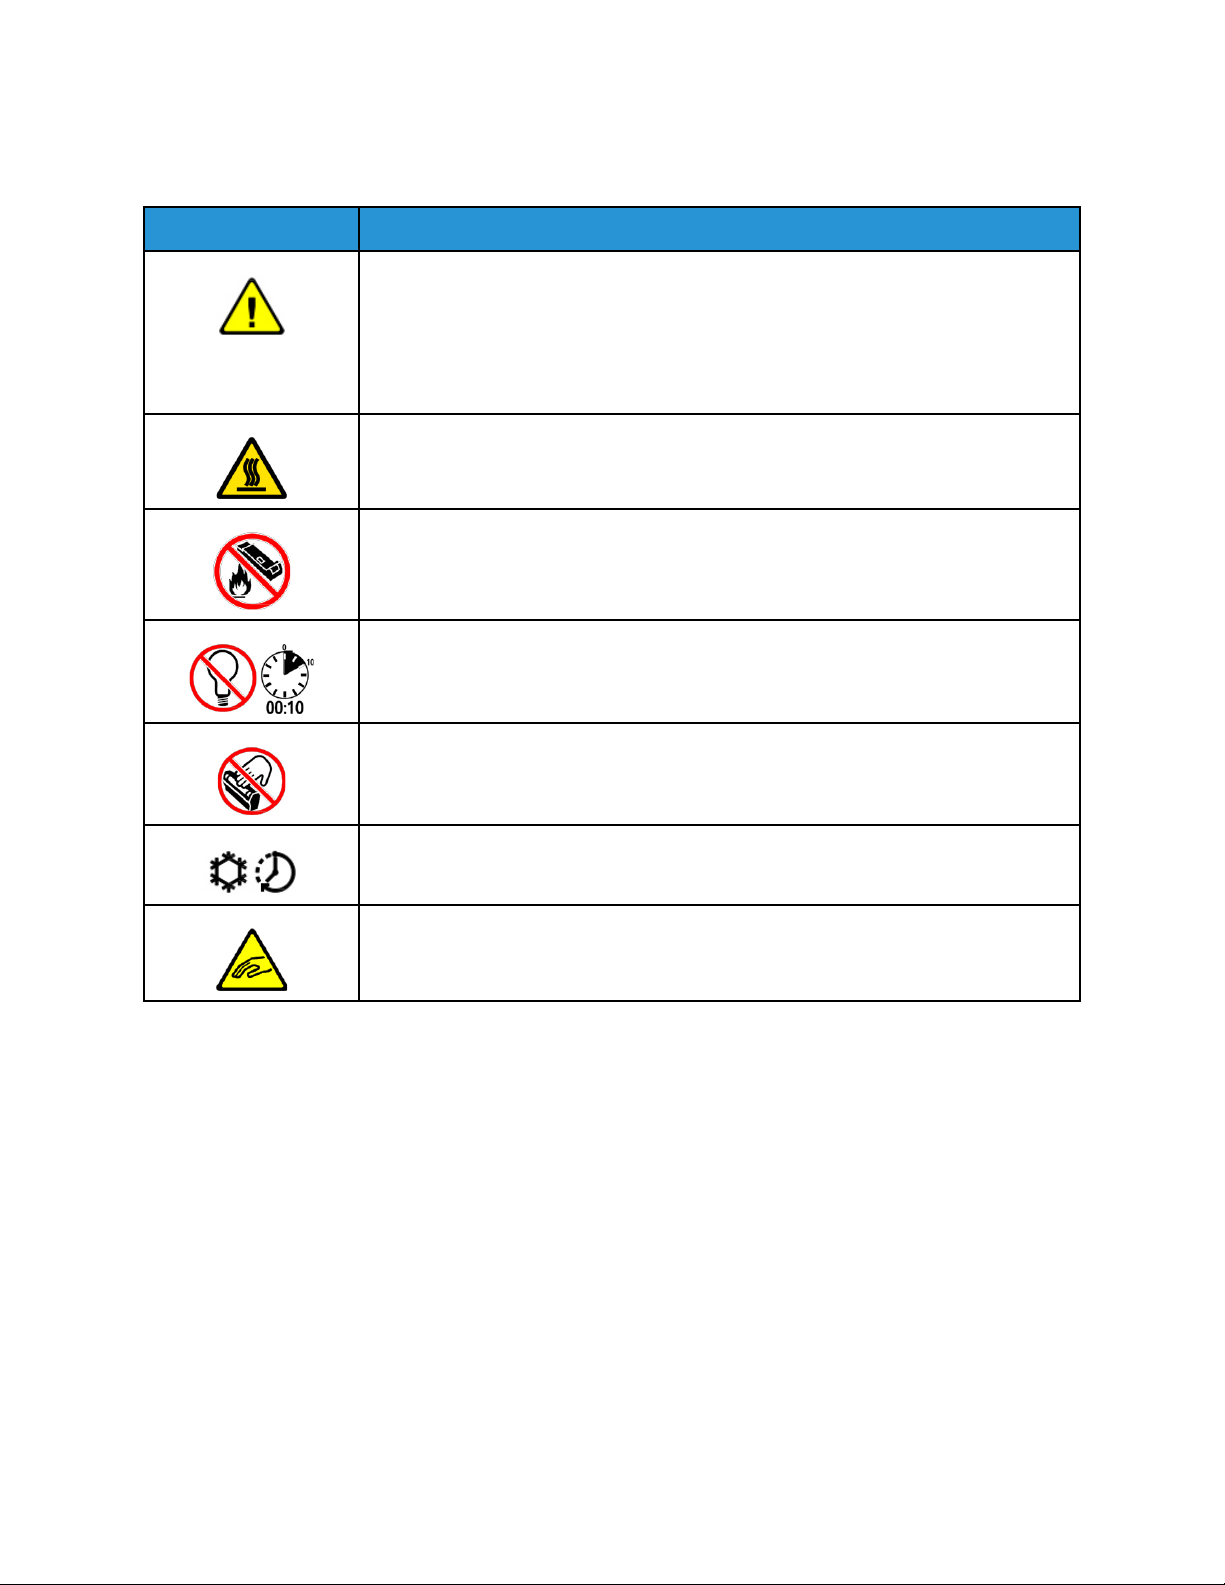
Printer Symbols
Symbol Description
WARNING or CAUTION:
To ignore this warning could cause serious injury or even death.
To avoid a personal injury, use caution.
To avoid a property damage, use caution.
WARNING:
Hot surface on or in the printer. To avoid a personal injury, use caution.
Do not burn the waste container.
Do not expose the drum cartridge to light for more than 10 minutes.
Do not touch the drum cartridge.
Hot surface. Wait the indicated time before handling.
WARNING:
Moving parts. To avoid a personal injury, use caution.
For a complete list of Printer Symbols, refer to www.xerox.com/support.
16
Xerox®EC70 Color Copier/Printer
User Guide

Safety
Environmental, Health, and Safety Contact Information
For more information on Environment, Health, and Safety in relation to this Xerox product and
supplies, contact: United States and Canada: 1-800-ASK-XEROX (1-800-275-9376)
For product safety information in the United States and Canada, go to www.xerox.com/environment.
Xerox
®
EC70 Color Copier/Printer
User Guide
17

Safety
18
Xerox®EC70 Color Copier/Printer
User Guide

2
Getting Started
This chapter contains:
• Parts of the Printer.......................... ................................... ................................... ..................... 20
• Printer Information .................. .... .... ............................... .... ................................... .................... 25
• Optional Devices........... .... .... .... ............................... .... ................................... ........................... 26
• Installation and Setup ........................... .... ................................... ................................... .... ...... 29
• Getting Additional Information.... .... .... ........................... .... .... ................................... ................ 36
Xerox®EC70 Color Copier/Printer
User Guide
19

Getting Started
Parts of the Printer
FFrroonntt VViieeww
1. Control Panel
2. USB Port
3. Stylus
4. Tray 5 (Bypass)
5. Paper Trays 1–4
6. Duplex Automatic Document Feeder
7. Power On/Off Button
8. Front Cover
9. Main Power Switch (located behind front
cover)
20
Xerox®EC70 Color Copier/Printer
User Guide
DDooccuummeenntt FFeeeeddeerr
Getting Started
1. Document Feeder Tray
2. Document Guides
Note: The Document Glass is located under the Top Cover and is used for scanning, faxing, and
copying. Used for single pages or paper that cannot be fed using the Document Feeder.
3. Confirmation Indicator
4. Top Cover
PPaappeerr TTrraayyss
For more feeding options, refer to Feeding Devices.
PPaappeerr TTrraayyss 11 aanndd 22
Trays 1 and 2 are identical. Each tray has a capacity of 520 sheets of 75 g/m2(20 lb.) paper. The
operator pulls out the trays for loading. The trays accommodate paper weights from 64–300 g/m
(18 lb. bond–80 lb. cover) and are fully adjustable for all stock sizes in the range 182 x 140–330 x 488
mm (7.2 x 5.5–13 x 19.2 in.). All stock types, such as pre-formatted paper and letterhead, can be used
except envelopes. You can load stock either long-edge feed or short-edge feed, portrait or landscape.
PPaappeerr TTrraayyss 33 aanndd 44
Tray 3 holds up to 870 sheets of A4 (8.5 x 11 in.) paper.
Tray 4 holds up to 1140 sheets of A4 (8.5 x 11 in.) paper.
2
TTrraayy 55 ((BByyppaassss))
The Tray 5 (Bypass) is a paper tray on the left side of the machine and can be folded away when not
in use. It accommodates all types of stock in a range of sizes between 182 x 140–330 x 488 mm (7.2
x 5.5–13 x 19.2 in.). The Tray 5 (Bypass) has a capacity of approximately 250 sheets of 20 lb. (75 g/
2
m
) bond paper or a maximum stack height of 0.4.
®
Xerox
EC70 Color Copier/Printer
User Guide
21
Getting Started
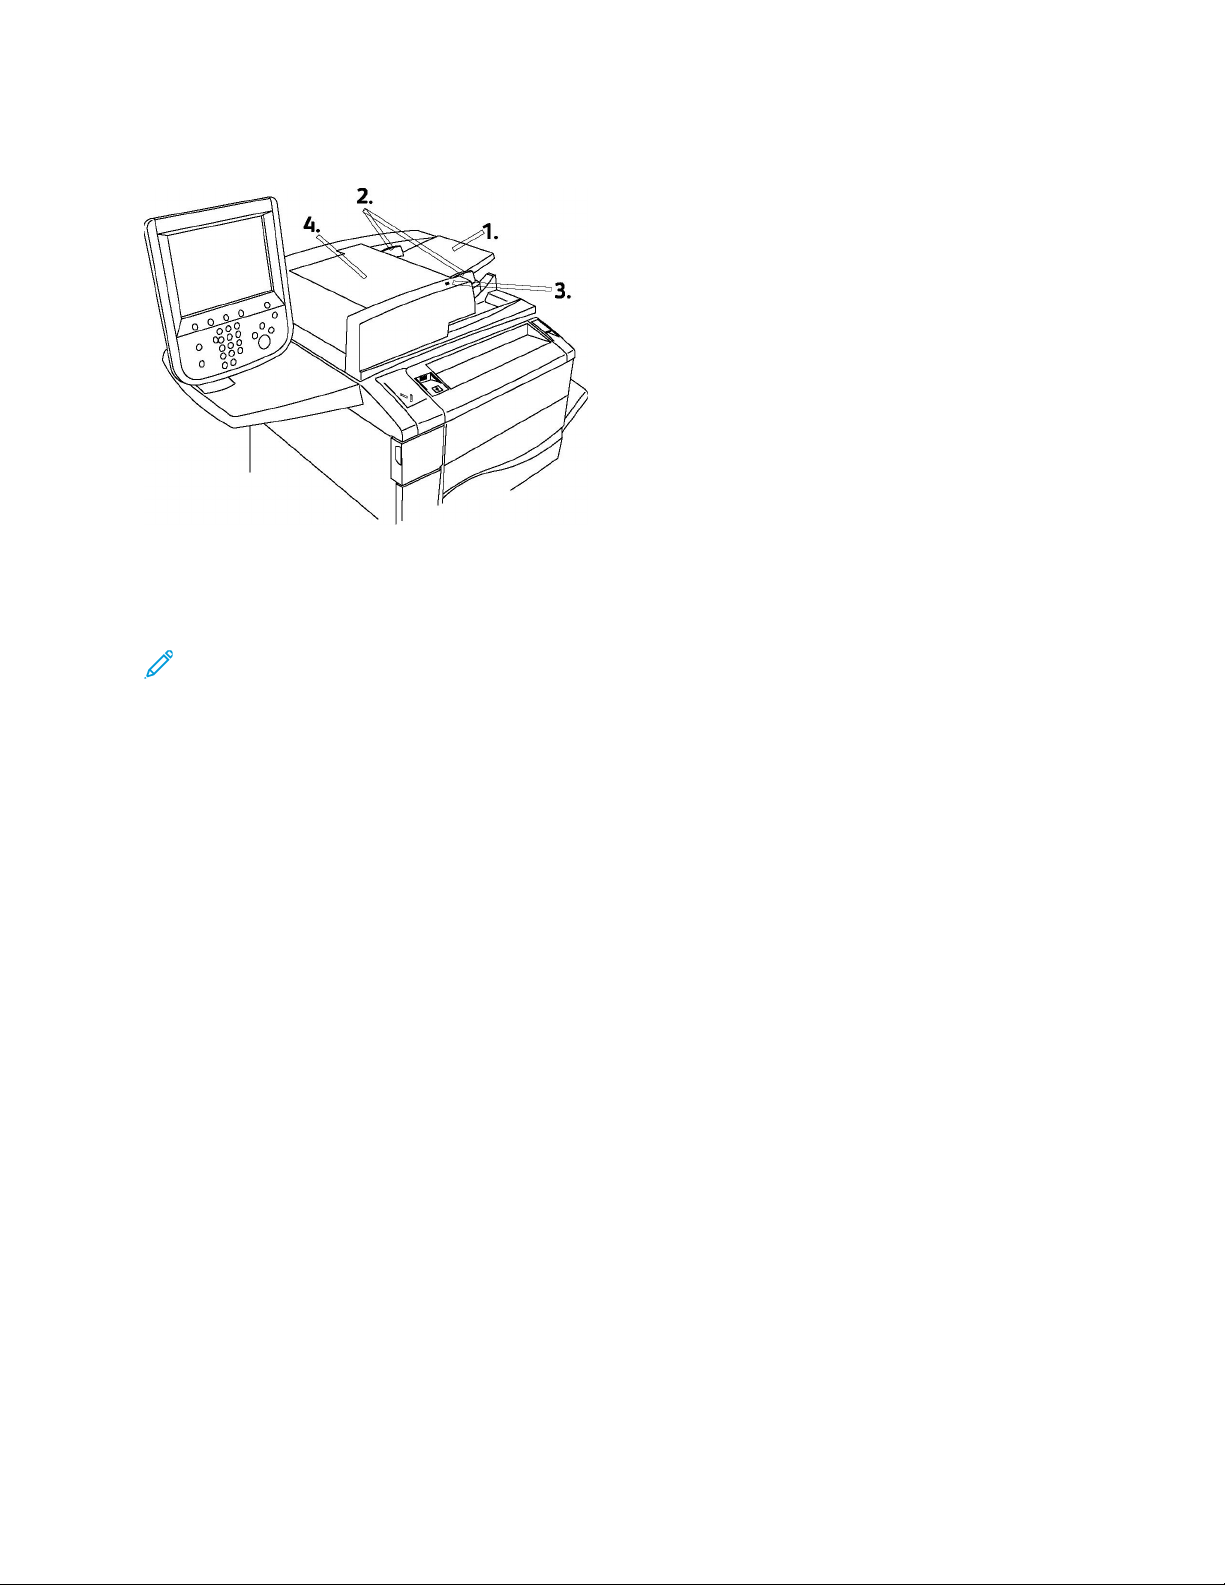
IInntteerrnnaall CCoommppoonneennttss
1. Toner Cartridges
2. Drum Cartridges
3. Main Power Switch
The Main Power Switch is one of three power switches or buttons to turn on. For information on
starting up the machine, refer to Switching On the Printer.
4. Fuser Unit
5. Waste Toner Container
RReeaarr VViieeww
1. Output Tray
2. Power Cord
22
Xerox®EC70 Color Copier/Printer
User Guide
3. Ground Fault Interrupt Switch
Getting Started
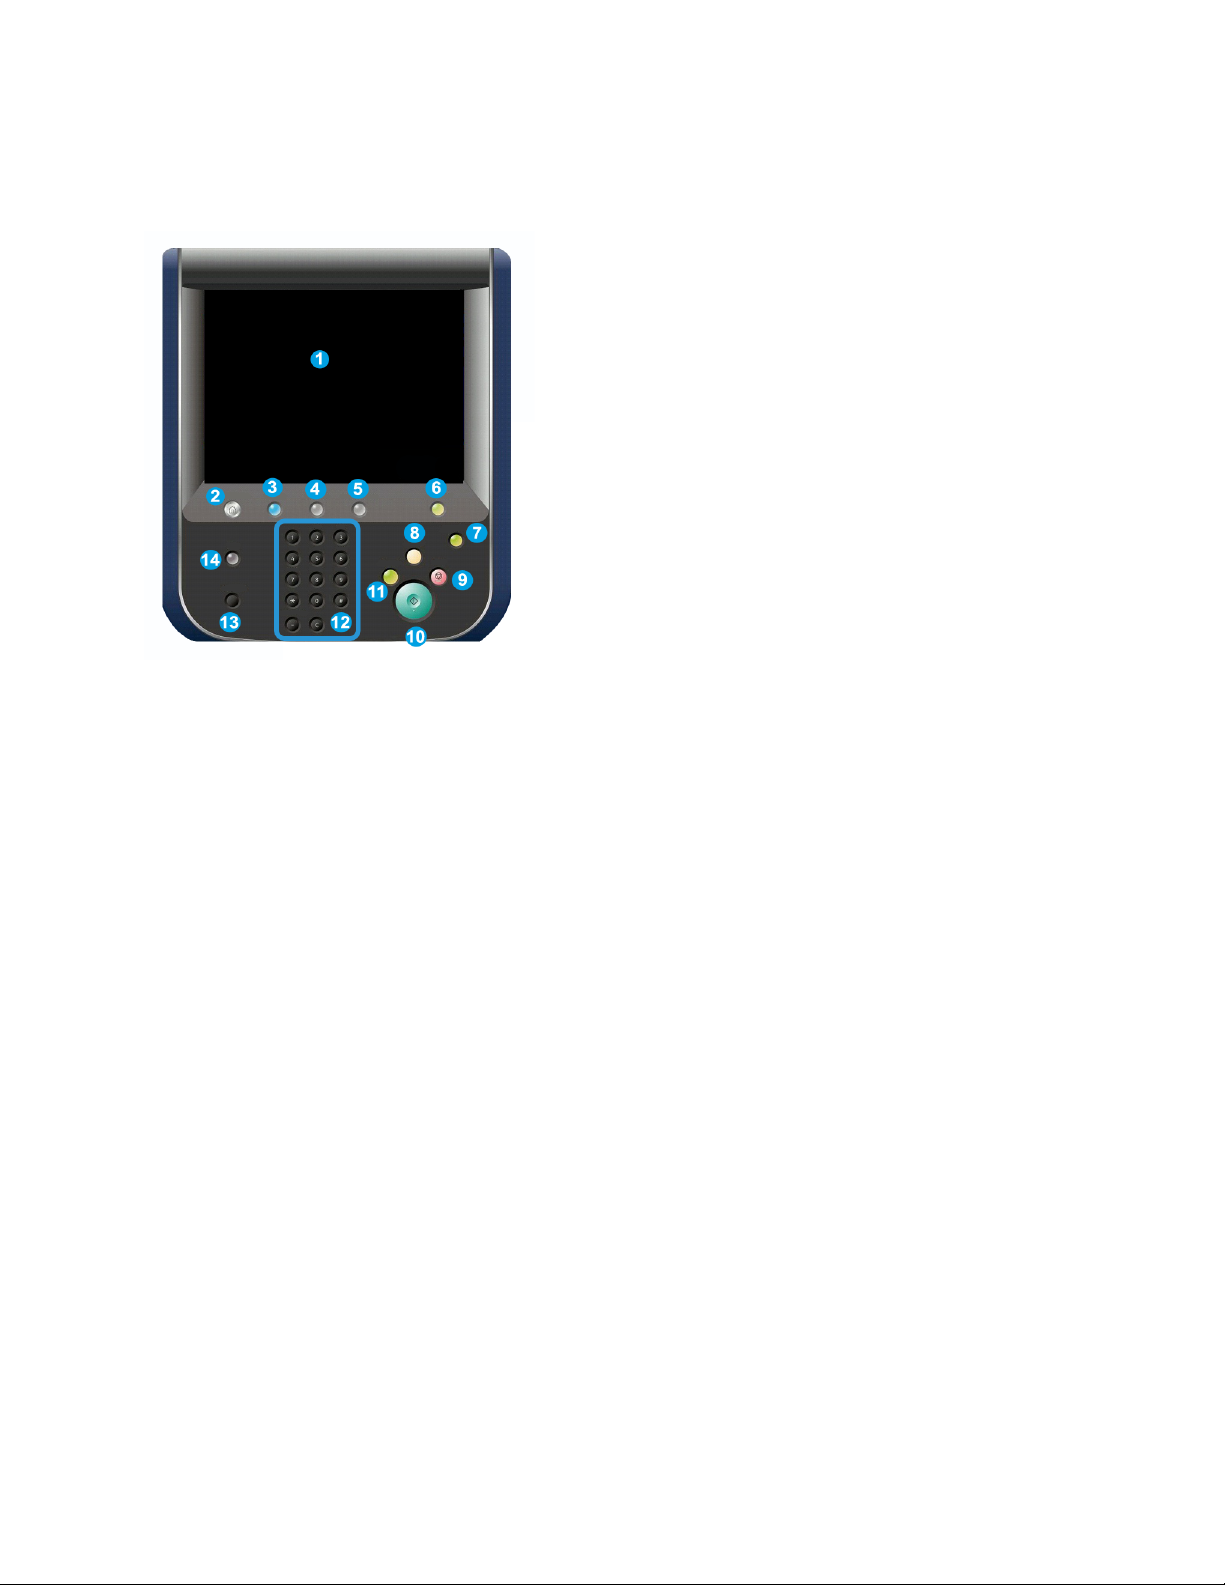
CCoonnttrrooll PPaanneell
The control panel contains a touch screen, pathway buttons, a keypad, and feature buttons.
1. Touch Screen: Allows you to select all the available programming features. The touch screen
displays fault clearance procedures and general machine information.
2. Services Home: Allows access to the All Services screen, where all features, such as copy and fax,
that are installed on the machine can be viewed and programmed.
3. Services: Takes you to the last service screen that was accessed.
4. Job Status: Displays job progress information on the touch screen.
5. Machine Status: Displays the status of the machine on the touch screen.
6. Log In/Out: Provides password-protected access to the System Administration menu that is used
to adjust the defaults of the machine.
7. Energy Saver Button: If the Energy Saver option is selected, the machine immediately enters an
energy saving mode. If there are any jobs in the queue, a second pop-up window appears.
8. Clear All: If this button is pressed once, it resets the default settings and displays the first screen
for the current pathway. If the button is pressed twice, it resets all the features to their machine
default settings.
9. Stop: Temporarily stops the current job. Follow the message to cancel or resume your job.
10. Start: Starts the job.
11. Interrupt: Temporarily stops the current job to allow a priority job to run.
12. Keypad buttons: Used to type letters or numbers when entering values or a password.
13. Language: Used to change the touch screen language and keyboard settings.
14. Help: Accesses the Online Help system.
Xerox
®
EC70 Color Copier/Printer
User Guide
23
Getting Started
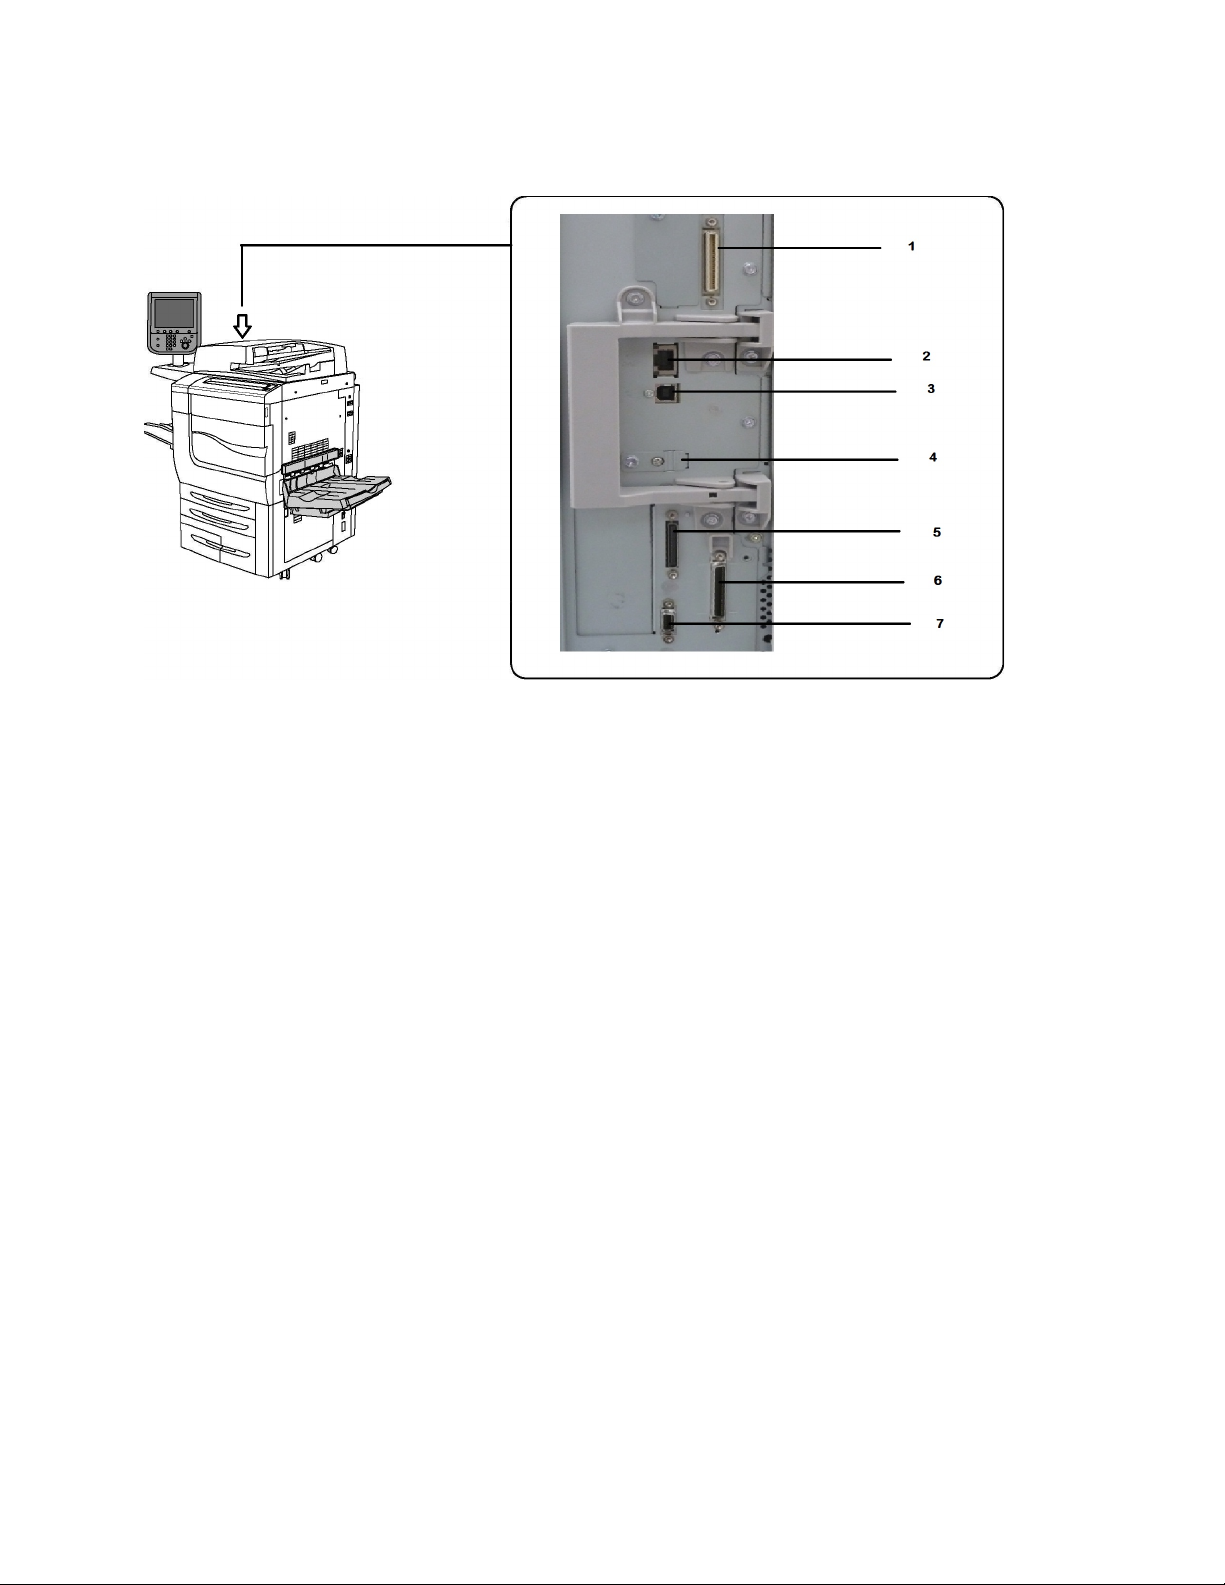
TTeelleepphhoonnee aanndd FFaaxx CCoonnnneeccttiioonn OOppttiioonn
1. Digital Front End Video Select Switching
Circuit (DFE VSEL)
2. Ethernet Connection
3. A to D Connection
4. Fax Connection (port is covered unless fax
option is purchased)
5. Control Panel Connection
6. DADF Connection
7. Foreign Device Interface Connection
24
Xerox®EC70 Color Copier/Printer
User Guide

Getting Started
Printer Information
The printer provides status information from the touch screen on the Control Panel and in printed
reports. Usage and billing information are also available from the touch screen. For details, refer to
Billing and Usage Information.
Xerox
®
EC70 Color Copier/Printer
User Guide
25

Getting Started
Optional Devices
FFeeeeddiinngg DDeevviicceess
These optional input devices are compatible with the printer.
HHiigghh CCaappaacciittyy FFeeeeddeerr
The Tray 1, High Capacity Feeder (HCF) provides a 2000 sheet,
letter-size (A4) input feeding source for Tray 6.
OOvveerrssiizzeedd HHiigghh CCaappaacciittyy FFeeeeddeerr
The Tray 1 Oversized High Capacity Feeder (OHCF) is an
alternative to the High Capacity Feeder. It feeds an oversized
stock up to 330 x 488 mm (13 x 19 in.) paper. Each tray
holds 2000 sheets of standard weight paper.
FFiinniisshhiinngg DDeevviicceess
The printer is compatible with any of the following finishing devices.
OOffffsseett CCaattcchh TTrraayy
The Offset Catch Tray (OCT) is an output tray that can hold up to 500 sheets of paper and allows
each set or stack to be offset from the previous to enable easy separation.
26
Xerox®EC70 Color Copier/Printer
User Guide

BBuussiinneessss RReeaaddyy FFiinniisshheerr
The Business Ready finisher supports hole punching and stapling.
The Right Top Tray is used for the stacked output, and can receive up to
500 sheets of paper. The Stacker is used for offset or stapled output which
includes 2/3 hole punched output. It can hold up to 3000 sheets.
BBuussiinneessss RReeaaddyy FFiinniisshheerr wwiitthh BBooookklleett MMaakkeerr
The Business Ready finisher with booklet maker supports hole
punching, stapling, and booklet making.
Getting Started
The Right Top Tray is used for the stacked output, and can receive up to
500 sheets of paper. The Right Center Tray is used for offset or stapled
output. It can hold up to 1500 sheets. Both trays are used for hole-punched
output which includes 2/3 hole punched output. The Bottom Finisher Tray is
used for receiving saddle-stapled booklets.
CCZZ FFoolldd UUnniitt
The optional folder enables you to create publications that feature bi-fold, C-fold, Z-fold, and
Engineering Z-fold.
RReeqquuiirreedd FFiinniisshhiinngg AAcccceessssoorryy
Based on the type of finishing device, use the following accessory.
Xerox
®
EC70 Color Copier/Printer
User Guide
27

Getting Started
VVeerrttiiccaall TTrraannssppoorrtt MMoodduullee
The vertical transport module acts as a communication device. It provides
a vertical transport path between the printer output location and the input
to the finishing device.
The vertical transport module is required for use with the Business Ready Finisher
and the Business Ready Finisher with Booklet Maker.
28
Xerox®EC70 Color Copier/Printer
User Guide

Getting Started
Installation and Setup
BBeeffoorree UUssiinngg tthhee PPrriinntteerr
XXeerrooxx WWeellccoommee CCeenntteerr
If you need assistance during or after the product installation, visit the Xerox website for online
solutions and support www.xerox.com/office/worldcontacts.
If you require further assistance, contact our experts at the Xerox Welcome Center:
• Xerox US Welcome Center: 1-800-821-2797
• Xerox Canada Welcome Center: 1-800-93-XEROX (1-800-939-3769)
Note: A local representative telephone number is provided when the product is installed. For
convenience and future reference, record the telephone number.
When contacting Xerox, the Welcome Center needs the following information:
• the nature of the problem
• the serial number of the printer
• the fault code, if any
• the name and location of your company
To learn the serial number of the printer, follow these steps:
1. On the Control Panel, press Machine Status.
2. The Machine Information tab appears. The serial number appears on the left side of the touch
screen.
Note: If the serial number cannot be read from the printer touch screen, you can find the
serial number on the machine frame, inside the lower left cover of the printer.
If you need any additional help to use the printer:
• Refer to this User Guide.
• Contact the Key Operator.
• Visit our Customer website at www.support.xerox.com/support, enter Xerox Color EC70
Printer in the Search or Choose field and select the required documentation or contact the
Xerox Welcome Center.
IInnssttaallllaattiioonn aanndd SSeettuupp OOvveerrvviieeww
Before you can use the printer, you have to:
1. Ensure that the printer is connected correctly and switched on.
2. Install software print drivers and utilities.
Xerox
®
EC70 Color Copier/Printer
User Guide
29
Getting Started
3. Configure the software.
Note: Instructions for installing the print drivers, utilities, and setting up the network are
provided in the System Administrator Guide. Locate the System Administrator Guide at
www.xerox.com/support. In the Search field, enter Xerox Color EC70 Printer, then
select the needed documentation.
PPhhyyssiiccaall CCoonnnneeccttiioonn
You can connect to the printer over a network. Connect to a functioning and dedicated fax telephone
line for the optional fax. Communication cables are not included with the printer, and ensure that
they are purchased separately.
To connect the printer physically:
1. Connect the power cable to the printer, and plug it into an electrical outlet.
2. Connect one end of a Category 5 or better Ethernet cable to the Ethernet port on the left side of
the printer. Connect the other end of the cable to your network drop.
3. If the fax option is installed, connect to a functioning telephone line using a standard RJ11 cable.
PPoowweerr OOppttiioonnss
SSwwiittcchhiinngg OOnn tthhee PPrriinntteerr
The printer has three power switches:
• The Ground Fault Interrupt Switch is on the right side of the printer and near the power cord. At
installation and setup, ensure that this switch is in the On position.
• The Main Power Switch is located behind the front cover door. Verify that this switch is also in the
On Position. Do not use this switch to turn the printer on and off for general purposes.
30
Xerox®EC70 Color Copier/Printer
User Guide

Getting Started
• The Power On/Off Button is on the right side of the top front panel. This is the power button you
use to turn the printer on and off as workflow requires.
Switching On Main Power
Main printer power controls the main power switch. Main power is left on for a normal printer
operation. When a cable connects to the printer, when the printer is cleaned, or when a complete
restart is required, the main power is switched off.
Caution: To avoid damage to the printer hard drive and to prevent a printer malfunction, press
the main power switch before powering on the printer.
Caution: To avoid damage to the printer hard drive and to prevent a printer malfunction, after
powering on the main power, wait a few seconds before pressing the main power switch to
power off the printer.
To turn on the main printer power:
Xerox
®
EC70 Color Copier/Printer
User Guide
31

Getting Started
1. Open the front cover.
2. Press the Main Power Switch to the On position.
3. Close the front cover.
General Power On
To turn the printer On:
1. Check that the Main Power Switch, located inside the front cover, is turned On.
2. Press the Power On/Off button, on the right side of the top front panel.
Note: The entire powering-up process, from power-on through a completed self test, takes
approximately 3 minutes. Certain functions of the machine, such as copying, are available
before other functions, such as printing.
32
Xerox®EC70 Color Copier/Printer
User Guide

Getting Started
SSwwiittcchhiinngg OOffff tthhee PPrriinntteerr
Switching Off Main Power
Main printer power controls the main power switch. Main power is left on for a normal printer
operation. When a cable connects to the printer, when the printer is cleaned, or when a complete
restart is required, the main power is switched off.
Note: Before unplugging the power cord, power off the main power. Unplugging the power
cord with the main power on can damage the printer internal hard drive or cause a printer
malfunction.
Note: After you power on the printer, wait a few seconds before you power off the main power.
If you power off the main power too quickly after you power on the printer power, damage can
occur to the printer internal hard drive or cause a printer malfunction.
Note: After you press the printer On/Off power button, wait a few seconds before you power
off the main power. If you power off the main power too quickly after you press the printer On/
Off power button, damage can occur to the printer internal hard drive or cause a printer
malfunction. After you power off the printer, wait until the control panel touch screen goes
dark. Wait 10 seconds, then power off the main power.
Note: While a job is processing, or while the Energy Saver button is blinking, do not power off
the main power. If you power off the main power while the printer is active, damage can occur
to the printer internal hard drive or cause a printer malfunction.
To turn off the main power switch:
1. Open the front cover.
2. Press the Main Power Switch to the Off position.
Xerox®EC70 Color Copier/Printer
User Guide
33

Getting Started
3. Close the front cover.
General Power Off
Note: Before powering off the printer, wait 5 seconds after any active job completes.
To turn off the printer, press the Power On/Off button. This is the method used to turn the printer on
and off for general purposes. Do not use the main power switch.
If the Energy Saver option is selected, the machine immediately enters an energy saving mode. If
there are any jobs in the queue, a second pop-up screen appears.
Note: To reactivate the printer when it is in Energy Saver mode, press the Energy Saver button.
PPoowweerr SSaavveerr
When the printer is inactive for a preset time, the Power Saver mode reduces the power consumption
of the printer.
After a preset time has elapsed, the printer enters power-saving mode. If no jobs are sent to the
printer for an additional preset time, it then enters Sleep Mode. The touch screen is dark and the
Power Saver button is lit in both modes.
To return the printer to a normal operation, press the Power Saver button. Receipt of a job or accessing the printer using CentreWare Internet Services also cancels Power Saver mode.
AAssssiiggnniinngg aa NNeettwwoorrkk AAddddrreessss
If the network uses a DHCP server, the printer automatically acquires a network address. To assign a
static IP address, configure DNS server settings, or configure other TCP/IP settings. Refer to the
System Administrator Guide at www.xerox.com/support. Enter Xerox Color EC70 Printer in the
Search or Choose field and select the required documentation.
UUssiinngg CCeennttrreeWWaarree IInntteerrnneett SSeerrvviicceess
CentreWare Internet Services provides access to the Embedded Web Server of the printer. CentreWare
Internet Services enables you to manage, configure, and monitor the printer using a Web browser on
a network computer.
CentreWare Internet Services enables you to:
34
Xerox®EC70 Color Copier/Printer
User Guide

Getting Started
• Access printer status, configuration, and security settings
• Check supplies status from your computer
• Access job accounting records to allocate printing costs and plan supplies purchases
• Retrieve scanned document files stored in the printer
Note: The Embedded Web Server is required to enable some printer capabilities. Unless your
system administrator has unlocked the printer, to access the settings, log in as an
administrator.
CentreWare Internet Services requires the following:
• A Web browser and a TCP/IP connection between the printer and the network in Windows,
Macintosh, or UNIX environments.
• JavaScript enabled in the Web browser. If JavaScript is disabled, a warning message appears and
CentreWare Internet Services does not function properly.
• TCP/IP and HTTP enabled on the printer.
For details, refer to the System Administrator Guide at www.xerox.com/support. Enter Xerox Color
EC70 Printer in the Search or Choose field, then select the required documentation.
FFiinnddiinngg tthhee IIPP AAddddrreessss ooff tthhee PPrriinntteerr
To use CentreWare Internet Services, the IP address of the printer is required. If you do not know the
IP Address, print the configuration report. In the Communication Settings section, the IP address of
the printer appears.
To print the configuration report:
1. At the control panel, press the Machine Status button.
2. Touch the Machine Information tab, then touch Print Reports.
3. Touch Printer Reports, touch Configuration Report, then press the green Start button on the
control panel.
4. After the report prints, touch Close.
AAcccceessssiinngg CCeennttrreeWWaarree IInntteerrnneett SSeerrvviicceess
1. Ensure that the printer is connected correctly and switched on.
2. Open a web browser.
3. In the address field of the web browser, type the IP address of the printer.
The CentreWare Internet Services Welcome page appears.
Xerox
®
EC70 Color Copier/Printer
User Guide
35

Getting Started
Getting Additional Information
For more information about the printer and its capabilities, refer to the following sources:
• Recommended Media List: For the United States, www.xerox.com/printer-supplies/recommended-
paper/enus.html
• User Guide (PDF) Software and Documentation: www.xerox.com/support. Enter Xerox Color
EC70 Printer in the Search or Choose field and select the required documentation.
• Online Support Assistant, driver downloads, and Technical support:: www.xerox.com/support
• Ordering Supplies: www.xerox.com/Supplies
36
Xerox®EC70 Color Copier/Printer
User Guide

3
Services and Functions
This chapter contains:
• Printing.. .... ....................... .... .... .... ........................... .... .... ................................... ....................... 38
• Copying ................................. .... ............................... .... .... .... ........................... .... .... .................. 45
• Scanning....................... .... ................................... ................................... ................................... 67
• Faxing.................................. ................................... ................................... .... ............................ 80
Xerox®EC70 Color Copier/Printer
User Guide
37

Services and Functions
Printing
This chapter contains an overview of printing from different operating systems and a brief description
of many of the key printing features supported by the printer.
For detailed feature descriptions and instructions on how to use the print drivers, access the print
driver help by clicking Help (?) button at the bottom-left side of the print driver dialog.
PPrriinnttiinngg OOvveerrvviieeww
1. Select the appropriate media. Ensure that the media that you want to use is loaded in the tray.
If the media is not loaded, load it in the tray, then select an option on the control panel touch
screen.
2. Press the Machine Status button.
3. To view the current paper settings, touch Tools→Group→Setup→Paper Tray Attributes.
a. To specify the paper attributes, from the list, touch Paper tray, or if available, touch Paper
Catalog.
b. Touch Change Settings, then select your settings for the paper type, size, and color.
c. Touch Save.
4. In your software application, click File, then click Print.
5. Select your printer from the list.
6. To access the print driver settings, select Properties for Windows or Xerox Features for
Macintosh. Depending on your application, the title of the button varies.
7. Modify the print driver settings as necessary, then click OK.
8. To send the job to the printer, click Print.
SSaavviinngg aa SSeett ooff CCoommmmoonnllyy UUsseedd PPrriinnttiinngg OOppttiioonnss iinn
WWiinnddoowwss
You can define and save a set of printing options, so that you can apply them quickly to future print
jobs.
To save a set of printing options:
1. With the document open, in your application, click File, then click Print.
2. Select the printer, then click Properties.
3. In the Properties window, click the tabs, then click the required settings.
4. At the bottom of the Properties window, click Saved Settings, then click Save As.
5. Type a name for the set of printing options that you chose, then click OK.
The set of options is saved and the name that you specified appears in the list.
6. To print using these options, select the name from the list.
38
Xerox®EC70 Color Copier/Printer
User Guide

Services and Functions
SSaavviinngg aa SSeett ooff CCoommmmoonnllyy UUsseedd PPrriinnttiinngg OOppttiioonnss ffoorr
MMaacciinnttoosshh
You can define and save a set of options, so that you can apply them quickly to future print jobs.
To save a set of printing options:
1. With the document open in your application, click File, then click Print.
2. Select your printer from the Printer list.
3. From the Print menu, select the required printing options.
4. Click the Presets menu, then click Save As.
5. Type a name for the printing options, then click OK.
The set of options is saved and appears in the Presets list.
6. To print using these options, select the name from the list.
PPrriinnttiinngg FFeeaattuurreess
MMeeddiiaa TTyyppeess ffoorr AAuuttoommaattiicc 22--SSiiddeedd PPrriinnttiinngg
The printer can print automatically a 2-sided document on the supported paper. Before you print a 2sided document, verify that the paper type and weight are supported. Paper weights in the range of
60–256 g/m
The following paper types can be used for automatic 2-sided printing:
• Plain
• Letterhead
• Heavyweight
• Recycled
• Bond
• Pre-printed
• Gloss
• Punched
The following paper and media cannot be used for 2-sided printing:
• Reload (paper previously laser-printed or copied)
• Envelopes
• Labels
²
can be used for automatic 2-sided printing.
• Any die-cut special paper, such as business cards
PPrriinnttiinngg aa 22--SSiiddeedd DDooccuummeenntt
Options for automatic 2-sided printing are specified in the print driver. Application settings for
portrait or landscape orientation are used.
®
Xerox
EC70 Color Copier/Printer
User Guide
39

Services and Functions
You can specify the page layout for 2-Sided Printing, which determines how the printed pages turn.
These settings override the application page orientation settings.
For Portrait:
2-Sided Print or 2-Sided, Flip on Short Edge
For Landscape:
2-Sided Print or 2-Sided Print, Flip on Short Edge
SSeelleeccttiinngg tthhee PPaappeerr ttoo UUssee
When you send your print job to the printer, you can choose from the following options to select the
paper:
• Allow the printer to select which paper to use automatically based on the document size, paper
type, and paper color that you select.
• Select a specific tray loaded with the needed paper.
• If available, select a specific paper stock from the Paper Catalog.
PPrriinnttiinngg MMuullttiippllee PPaaggeess ttoo aa SSiinnggllee SShheeeett ((NN--UUpp))
When you print a multiple-page document, you can print more than one page on a single sheet of
paper. Print one, two, four, six, nine, or 16 pages per side.
CCoolloorr CCoorrrreeccttiioonn
The Color Correction options provide simulations of different color devices. Automatic is the
recommended correction for general image processing. Based on the operating system and print
driver type, different color reference models are supported and can vary.
BBooookklleettss
With 2-sided printing, you can print a document in the form of a small booklet. Create booklets for
any paper size that is supported for 2-sided printing. The driver reduces each page image
automatically, and prints four page images per sheet of paper, two on each side. The pages are
printed in the correct order so that you can fold and staple the pages to create the booklet.
Note: You can create a booklet using A4, Letter, A3, or Tabloid-sized paper.
40
Xerox®EC70 Color Copier/Printer
User Guide

Services and Functions
Some print drivers enable you to specify the gutter and creep.
• Gutter: Specifies the horizontal distance in points between the page images. A point is 0.35 mm
(1/72 in.).
• Creep: Specifies how much the page images are shifted outward in 10ths of a point. This feature
compensates for the thickness of the folded paper, which otherwise would cause the page images
to shift slightly outward when folded. You can select a value from 0–1 point.
If the printer includes a finisher with a booklet maker, you can use the features of that device for
more robust booklet making capabilities.
CCoovveerr PPaaggeess
A cover page is the first or last page of a document. You can choose a different paper source for the
cover page than for the body of a document. For example, use your company letterhead for the first
page of a document, or use heavyweight paper for the first and last pages of a report.
• Use the applicable paper tray as the source for printing cover pages.
• Verify that the cover page is the same size as the paper used for the rest of your document. If a
different size is specified in the printer driver than the tray selected as a cover page source, the
cover prints on the same paper as the rest of the document.
The following options are available for cover pages:
• No Covers: Prints the first and last pages of your document from the same tray as the rest of your
document.
• Front Only: Prints the first page on paper from the specified tray.
• Back Only: Prints the last page on paper from the specified tray.
• Front and Back: Same: Front and back cover pages print from the same tray using blank or preprinted paper.
• Front and Back: Different: Front and back cover pages print from different trays. The front cover
can be pre-printed, but the back cover requires blank or pre-printed paper only. If you require
printing on the back page, use an exception page.
IInnsseerrtt PPaaggeess
An insert is a separator page that can be inserted after a print job, between copies of a print job, or
between individual pages of a print job. Select the tray that contains the needed insert paper.
Select an option:
®
Xerox
EC70 Color Copier/Printer
User Guide
41

Services and Functions
• Insert Options: To insert a separator page after a job, select After Pages. To insert a separator
page before a job, select Before Pages.
• Insert Quantity: This option specifies the number of pages to insert at each location.
• Page(s): This option specifies the location, either a page or a range of pages, to place the inserts.
Separate individual pages or page ranges with commas. Specify page ranges with a dash. For
example, to add inserts after pages 1, 6, 9, 10, and 11, type 1, 6, 9–11.
• Paper: This option displays the Use Job Settings default size, color, and type of paper to use for
the insert pages.
• Job Settings: This option displays the paper attributes for most of the document.
EExxcceeppttiioonn PPaaggeess
You can specify the characteristics of pages in the print job that differ from the settings used for most
of the print job.
For example, your print job contains 30 pages that print on standard-sized paper, and two pages that
print on a different size of paper. In the Add Exceptions window, set the characteristics of the two
exception pages, then select the alternate paper size to use.
• Page(s): Specify the location to place the inserts. For a location, you can enter a page or range of
pages. Separate individual pages or page ranges with commas. Specify ranges with a dash. For
example, to add inserts after pages 1, 6, 9, 10, and 11, type 1, 6, 9–11.
• Paper: The Paper field displays the Use Job Settings default size, color, and type of paper to use
for the exception pages.
• 2-Sided Printing: Allows you to choose the needed 2-sided printing option.
• Job Settings: Displays the attributes of the paper for most of the document.
SSccaalliinngg
To reduce or enlarge your printed page images, select a scaling value between 1 and 999 percent.
The default value is 100 percent.
WWaatteerrmmaarrkkss
A watermark is additional text that can be printed across one or more pages. For example, terms like
Draft and Confidential, which you stamp on a page before distribution, can be inserted as a
watermark.
You can:
42
Xerox®EC70 Color Copier/Printer
User Guide

Services and Functions
• Create a watermark.
• Edit an existing watermark text, color, density, location, and angle.
• Place a watermark on either the first page or every page in a document.
• Print a watermark in the foreground or background or blend with the print job.
• Use a picture for the watermark.
• Use a time stamp for the watermark.
Note: Not all applications support watermark printing.
CCrreeaattiinngg aanndd SSaavviinngg CCuussttoomm SSiizzeess
You can print a custom-size paper from Tray 1, Tray 2, Tray 3, Tray 4, and Tray 5 (Bypass). Custom-size
paper settings are saved in the print driver and are available to select in all the applications.
JJoobb CCoommpplleettiioonn NNoottiiffiiccaattiioonn
You can choose to be notified when your job is done printing. A message appears in the lower right
corner of the computer screen with the name of the job and the name of the printer where it was
printed.
Note: This feature is only available when the printer is connected to the computer through a
network. It is not supported in all operating systems.
SSeeccuurree PPrriinntt JJoobbss
After you select the user identification and enter the passcode at the printer control panel, the Secure
Print job type allows you to print a job.
SSaammppllee SSeettss
The Sample Set job type allows you to send a multiple-copy job, print a sample copy of the job, and
hold the remaining copies of the job at the printer. After you review the sample copy, you can release
or delete the remaining copies.
DDeellaayyeedd PPrriinnttiinngg
A print job can be delayed for up to 24 hours from the original job submission time. Enter when you
want the job to print. Use either a 12-hour format or a 24-hour format.
SSaavviinngg PPrriinntt JJoobbss ttoo tthhee PPrriinntteerr
The Store File in Folder job type stores a print job in a folder in the printer. You can print the job from
the printer control panel. The job is not deleted automatically after printing. You can delete the file
manually at the printer control panel.
Xerox
®
EC70 Color Copier/Printer
User Guide
43

Services and Functions
FFoollddiinngg
If the printer is equipped with a finisher, you can make prints using the folding option. The option
folds the prints in half ( single or bi-fold) or in thirds (C-fold or Z-fold types). The folding option is
selected from the print driver.
These fold types are available:
• Single Fold (Bi-Fold)
• C-Fold
• Z-Fold
• Z-Fold Half Sheet
The Single Fold (Bi-Fold) option is available only with a Booklet Maker Finisher. The C-Fold and Z-
Fold options are available only with the C/Z Folder.
Note: To use the folding option, a short-edge feed (SEF) document orientation is required.
Select a paper tray that contains SEF stock.
PPrriinnttiinngg ffrroomm aa UUSSBB FFllaasshh DDrriivvee
PDF, JPG, TIFF, and XPS files can be printed directly from a USB Flash Drive using the Media Print Text feature.
Note: System Administrator enables the print from USB option.
Note: The USB port and the optional Media Card Reader cannot be used at the same time. If
present, remove the cable for the Media Card Reader before using the USB port on the printer
control panel.
PPrriinnttiinngg ffrroomm aa MMeeddiiaa CCaarrdd RReeaaddeerr
JPEG, TIFF, DCF 1.0 JPEG, and TIFF files can be printed directly from a Compact Flash card inserted in
the optional Media Card Reader.
Note: Ensure that a USB Flash Drive is not present in the USB port located on the left side of
the top front panel.
44
Xerox®EC70 Color Copier/Printer
User Guide

Services and Functions
Copying
BBaassiicc CCooppyyiinngg
To make copies:
1. To remove previous copy settings, at the control panel, press the yellow Clear All button.
2. Load the original document.
• Use the document glass for single copies or paper that cannot be fed using the document
feeder.
• Use the document feeder for multiple or single pages.
3. Touch Copy.
4. Use the alphanumeric keypad to enter the number of copies.
The number of copies appears on the touch screen.
• To correct the number of copies entered, on the alphanumeric keypad, press the C button,
then reenter the number.
• To stop a copy job, press the red Stop button. To continue the job, touch Resume. To cancel
the job, touch Cancel.
5. If needed, change the copy settings.
For details, refer to Basic Settings.
6. To start your copy job, press the green Start button.
DDooccuummeenntt GGllaassss
• Lift the document feeder cover and place the original facedown, toward the back-left corner of the
document glass.
• The original aligns to the matching paper size printed on the edge of the glass.
• The document glass accepts paper sizes from 15 x 15–297 x 432 mm (0.59 x 0.59–11.6 x 17 in.).
• The document glass automatically detects standard paper sizes.
Caution: When you scan a bound document, do not attempt to force the document feeder
cover closed. Doing so can damage the document feeder cover.
®
Xerox
EC70 Color Copier/Printer
User Guide
45

Services and Functions
DDuupplleexx AAuuttoommaattiicc DDooccuummeenntt FFeeeeddeerr
Insert originals face up, with page 1 on top. The duplex automatic document feeder scans both sides
of 2-sided documents at the same time.
• The confirmation indicator illuminates when the originals are loaded correctly.
• Adjust the paper guides so they fit against the originals.
• The Duplex Automatic Document Feeder automatically detects standard paper sizes.
• The Duplex Automatic Document Feeder accommodates the original paper weights from 38–128
• The Duplex Automatic Document Feeder accommodates the originals from 85 x 125–297 x 432
• The Duplex Automatic Document Feeder accommodates approximately the weight of 130 sheets
2
g/m
.
mm (3.3 x 4.9–11.7 x 17 in.).
of 80 g/m
2
quantity of paper.
BBaassiicc SSeettttiinnggss
The Copy tab appears when the touch screen Copy button is touched. Use the Copy tab to change
the following basic settings:
• Selecting Color or Black and White Copies
• Reducing or Enlarging the Image
• Selecting the Tray to Use for Copies
• Specifying 2-Sided Originals or Copies
• Collated Copies
• Uncollated Copies
• Stapling Copies
• Hole Punching Copies
Selecting Color or Black and White Copies
If the original document contains color, you can create copies in full color, in single color, in dual
color, or in black and white.
To select the output color:
46
Xerox®EC70 Color Copier/Printer
User Guide

Services and Functions
1. At the control panel, touch Copy.
2. Touch the required output color:
• Auto Detect: This option detects the color content in the original document. If the original
document is a color document, the output is in full color. If the original document is a black
and white document, the output is in black only.
• Color: This option uses all four printing colors: cyan, magenta, yellow, and black, to produce
full-color copies.
• Black and White: This option copies in black and white only. Colors in the original document
are converted to shades of gray.
• Dual Color: This option allows you to separate the colors of the original document into two
groups of colors for copying. The Source Color is extracted from the original document, then
replaced by the Target Area Color. This option replaces the rest of the colors with the NonTarget Area Color that you select.
• Single Color: This option allows you to copy in one of six preset or custom colors.
• More: This option allows you to change preset or custom colors.
Reducing or Enlarging the Image
To reduce or enlarge the image:
1. At the control panel, touch Copy.
2. To reduce or enlarge the image proportionally, do one of the following:
• Touch the plus (+) and minus (-) icons.
• Touch More, then touch the plus (+) and minus (-) icons.
3. To reduce or enlarge the image proportionally by a preset amount, such as to fit a particular
paper size:
a. Touch More.
b. Touch Proportional %, then touch one of the Preset % buttons.
c. To center the image on the page, touch Auto Center. Touch Save.
d. To perform a minor adjustment, select Slight Reduction Improved Fit.
4. To reduce or enlarge the width and length of the image by different percentages:
a. Touch More, then touch Independent X-Y%.
b. To scale the width or X axis of the image, for Width percentage touch the plus (+) and minus
(-) icons.
c. To scale the length or Y axis of the image, for Length percentage touch the plus (+) and
minus (-) icons.
d. To center the image on the page, touch Auto Center.
5. Touch Save.
Selecting the Tray to Use for Copies
The printer automatically selects the paper tray to use for copying based on system administrator
settings. To use a different paper type for copying on letterhead, colored paper, or different paper
sizes, select the paper tray that is loaded with the required paper.
To select the tray to use:
1. At the control panel, touch Copy.
2. For Paper Supply, touch the required tray.
®
Xerox
EC70 Color Copier/Printer
User Guide
47

Services and Functions
3. To use another tray:
• Touch More.
• Touch the required tray in the list.
• Touch Save.
Specifying 2-Sided Originals or Copies
Use the document feeder or the document glass to copy one or both sides of a 2-sided original.
Other options are available in 2-sided copying:
• 1→1: Scans only one side of the original documents, and produces 1-sided copies.
• 1→2: Scans only one side of the original documents, and produces 2-sided copies.
• 2→1: Scans both sides of the original documents, and produces 1-sided copies.
• Rotate Side 2: Rotates the image on side two of a 2-sided copy by 180 degrees.
To copy both sides of a 2-sided original:
1. At the control panel, touch Copy.
2. Touch 2-Sided Copying.
3. For 2-Sided Copying, touch 2-Sided.
4. Press the green Start button.
Note: When using the document glass for 2–sided copying, when it is time to place the
next document on the glass, a message appears.
The document feeder automatically copies both sides of a 2-sided original document.
Collated Copies
You can collate multi-page copy jobs automatically. For example, when making three 1-sided copies
of a six-page document, the copies are printed in this order:
One, two, three, four, five, six; one, two, three, four, five, six; one, two, three, four, five, six
To choose collated copies:
1. At the control panel, touch Copy.
2. Touch Copy Output.
3. Touch Collated.
4. Touch Save.
Uncollated Copies
Uncollated copies are printed in this order:
1, 1, 1, 2, 2, 2, 3, 3, 3, 4, 4, 4, 5, 5, 5, 6, 6, 6
1. To choose uncollated copies:
a. On the control panel touch screen, touch Copy.
b. Touch Copy Output.
c. Touch Uncollated.
d. Touch Save.
48
Xerox®EC70 Color Copier/Printer
User Guide

Services and Functions
2. To choose uncollated copies with separators:
a. On the Copy Output screen, touch Uncollated with Separators.
b. To choose the tray loaded with separator pages, touch Separator Tray, select a tray, then
touch Save.
Offset Stacking
To choose Offset Stacking:
1. On the control panel touch screen, touch Copy.
2. Touch Copy Output.
3. Touch Offset Stacking, then select the type of offset that you want to use.
4. If Paper Supply appears, select the required paper supply tray.
5. Touch Save until you return to the Copy tab.
Stapling Copies
If the printer has a finisher installed, copies can be stapled automatically.
To select stapling:
1. At the control panel, touch Copy.
2. Touch Copy Output.
3. On the Staple screen, touch One Staple, Two Staples, or Four Staples for your selected page
orientation.
For each orientation, the screen shows the location where staples are placed on the page.
Note: The stapling options vary, depending on the paper feed orientation, short edge, or
long edge. If the required stapling option is unavailable, touch Paper Supply, then choose
the appropriate tray.
Hole Punching Copies
If the printer has an appropriate finisher installed, copies can be hole-punched automatically.
Note: Hole punch options depend on paper size and feed orientation. The paper can be fed
from a tray with the paper loaded for short-edge feed or long-edge feed. If the required hole
punch option is unavailable, touch Paper Supply, then choose the tray containing the paper
with the correct orientation.
1. Touch Copy on the control panel.
2. Touch Copy Output.
3. For Hole Punch, select the required hole punch type and location from the list.
Note: Printer configuration varies the hole punch settings.
4. Touch Save.
IImmaaggee QQuuaalliittyy AAddjjuussttmmeennttss
Use the Image Quality tab to change the following image quality settings:
®
Xerox
EC70 Color Copier/Printer
49
User Guide

Services and Functions
• Specifying the Original Type
• Adjusting the Darkness, Sharpness, and Saturation
• Automatically Suppressing Background Variations
• Adjusting the Contrast
• Selecting Color Effect
• Adjusting the Color Balance
• Adjusting the Color Shift
• Adjusting the Gloss Level
Specifying the Original Type
The printer optimizes the image quality of the copies based on the type of images in the original
document and how the original was created.
To specify the original type:
1. On the control panel touch screen, touch Copy, then touch the Image Quality tab.
2. Touch Original Type.
3. In the Original Type window:
a. From the first column, select the content type of the original document.
b. If known, select how the original was produced.
c. Touch Save.
Adjusting the Darkness, Sharpness, and Saturation
You can lighten or darken copies and adjust the sharpness and saturation.
To adjust these image options:
1. On the control panel touch screen, touch Copy, then touch the Image Quality tab.
2. Touch Image Options.
3. In the Image Options window:
• To lighten or darken the image, touch the Lighten/Darken pointer, then move it toward
Lighten or Darken.
• To sharpen or soften the image, touch the Sharpness pointer, then move it toward Sharpen
or Soften.
• To make the image colors more or less vivid, touch the Saturation pointer, then move it
toward Vivid or Pastel.
4. Touch Save.
Automatically Suppressing Background Variations
When you are using originals printed on thin paper, text or images printed on one side of the paper
can be seen on the other side of the paper. To minimize the visibility of background colors in your
copies, use Auto Suppression.
Note: The printer may not reproduce low densities when Auto Suppression is selected. Turn
Auto Suppression off to achieve better output in these cases.
To change this setting:
50
Xerox®EC70 Color Copier/Printer
User Guide

Services and Functions
1. On the control panel touch screen, touch Copy, then touch the Image Quality tab.
2. Touch Image Enhancement.
3. Under Suppress Background, touch Auto Suppression.
4. Touch Save.
Adjusting the Contrast
Contrast is the difference between light and dark areas in an image. To reduce or increase the
contrast of the copies:
1. On the control panel touch screen, touch Copy, then touch the Image Quality tab.
2. Touch Image Enhancement.
3. Do one of the following:
• To adjust the contrast automatically, touch Auto Contrast.
• Touch Manual Contrast, touch the Contrast pointer, then move it toward More or Less.
4. Touch Save.
Selecting Color Effects
To adjust the color results for color originals, use Color Effects presets. For example, you can adjust
the copy colors to be warmer or cooler.
To select a color preset:
1. On the control panel touch screen, touch Copy, then touch the Image Quality tab.
2. Touch Color Effects.
3. Touch the required color preset. The sample images show how the colors are adjusted.
4. Touch Save.
Adjusting the Color Balance
If you have a color original, you can adjust the balance of the printing colors between cyan, magenta,
yellow, and black before you copy the document.
To adjust the color balance:
1. On the control panel touch screen, touch Copy, then touch the Image Quality tab.
2. Touch Color Balance.
3. To adjust the density levels of all four colors:
a. In the Color Balance screen, select Basic Color.
b. To adjust the level for each color, touch the pointer, then move it toward the plus (+) or
minus (-) icons.
4. To adjust the highlight, mid-tone, and shadow density levels by color:
a. Touch Advanced Color.
b. Touch the required color.
c. To adjust the levels for highlights, mid-tones, and shadows, touch the pointer, then move it
toward + or - icons.
5. Touch Save.
®
Xerox
EC70 Color Copier/Printer
User Guide
51

Services and Functions
Adjusting the Color Shift
If you have a color original, you can adjust the hue of the copy colors.
Note: This feature is only available when the output color is set to Auto Detect or Color.
1. On the control panel touch screen, touch Copy, then touch the Image Quality tab.
2. Touch Color Shift.
The Original Color bar represents the colors of the original document.
The Copy Color bar represents the copy colors.
3. To select the required color shift, for the required hue, touch the plus (+) and minus (-) icons.
4. Touch Save.
Adjusting the Gloss Level
Gloss level enables you to specify the paper gloss level as normal or enhanced.
Note: This feature does not apply to all paper types.
To adjust the gloss level:
1. Touch Copy.
2. Touch Image Quality.
3. Touch Gloss Level.
4. Touch Normal or Enhanced, then touch Save.
LLaayyoouutt AAddjjuussttmmeennttss
To change the following settings, use the Layout Adjustment tab:
• Book Copying
• 2-Sided Book Copying
• Specifying the Original Size
• Erasing the Edges of a Copy
• Shifting the Image
• Rotating the Image
• Inverting the Image
• Specifying the Orientation of the Original
52
Xerox®EC70 Color Copier/Printer
User Guide

Services and Functions
Book Copying
You can copy the left or right page, or both pages, of a bound document onto a single sheet of paper.
Use the document glass to make copies from books, magazines, or other bound documents. Do not
place bound originals in the document feeder.
Note:
• This feature and 2-Sided Book Copying cannot be activated simultaneously.
• Non-standard size documents are not separated into two pages accurately.
To copy pages from a book or other bound document:
Note: Place the facing pages of a bound document on the document glass in a horizontal
orientation, as shown on the touch screen.
1. On the control panel touch screen, touch Copy, then touch the Layout Adjustment tab.
2. Touch Book Copying, then touch On.
3. To copy both pages of an open book in page order, touch Both Pages.
To specify the Binding Edge Erase amount, the space between the image area and the binding,
touch the plus (+) and minus (-) icons.
4. To copy only the left page of an open book, touch Left Page Only.
To specify the Binding Edge Erase amount, the space between the image area and the binding,
touch the plus (+) and minus (-) icons.
5. To copy only the right page of an open book, touch Right Page Only.
To specify the Binding Edge Erase amount, the space between the image area and the binding,
touch the plus (+) and minus (-) icons.
6. Touch Save.
2-Sided Book Copying
This feature allows you to make 2-sided copies of facing pages of the original bound document.
Note:
• This feature and Book Copying cannot be activated simultaneously.
• Use the document glass to make copies from books, magazines, or pamphlets. Do not place
bound originals in the document feeder.
• Non-standard size documents are not separated into two pages accurately.
To copy pages from a book or other bound document:
1. On the control panel touch screen, touch Copy, then touch the Layout Adjustment tab.
2. Touch 2-Sided Book Copying. On the next screen, touch On.
3. To specify the copy start page and copy end page, touch Starting and Ending Page.
• For Starting Page, touch Left Page or Right Page.
• For Ending Page, touch Left Page or Right Page.
4. To specify the Binding Edge Erase amount, the space between the image area and the binding,
touch the plus (+) or minus (-) icons.
5. Touch Save.
®
Xerox
EC70 Color Copier/Printer
User Guide
53

Services and Functions
Specifying the Original Size
To specify the original size so that the correct area is copied:
1. On the control panel touch screen, touch Copy, then touch the Layout Adjustment tab.
2. Touch Original Size.
3. To pre-scan the first page of the originals to determine the area to copy, touch Auto Detect.
• If the area to be copied matches a particular paper size, touch Manual Size Input and then
touch the required paper size.
• To view the entire list, touch the scroll arrows.
4. If the original contains pages of different sizes, touch Mixed Size Originals.
5. Touch Save.
Erasing the Edges of a Copy
By specifying the amount to erase on the right, left, top, and bottom edge, you can erase content
from the edges of your copies.
To erase edges on copies:
1. On the control panel touch screen, touch Copy, then touch the Layout Adjustment tab.
2. Touch Edge Erase.
3. To erase all the edges by the same amount, touch All Edges, then touch the plus (+) or minus (-)
icons.
4. To specify different amounts for the edges, touch Individual Edges.
For each edge, touch the plus (+) or minus (-) icons.
5. If you select 2-sided copies, to specify the amount to erase from each edge on Side 2, touch the
plus (+) or minus (-) icons, or touch Mirror Side 1.
6. To cancel edge erase, touch Print to Edge.
7. To specify orientation of the original document as you place it in the document feeder or on the
document glass:
a. Touch Original Orientation.
b. Touch either Upright Image or Sideways Image (top to left).
c. Touch Save.
8. Touch Save.
Note: If preset values such as Hole Punch Erase or Header/Footer Erase were previously
saved, you can touch the preset in the lower-left corner of the window.
54
Xerox®EC70 Color Copier/Printer
User Guide

Services and Functions
Shifting the Image
You can change the placement of the image on the copy page. This is useful if the image size is
smaller than the page size.
For image shift to work, position the originals correctly. For details, refer to Basic Copying.
• Document feeder: position originals faceup, left (long) edge that enters the feeder first.
• Document glass: position originals facedown, in the back-left corner of the document glass, long
edge to the left.
To change image placement:
1. On the control panel touch screen, touch Copy, then touch the Layout Adjustment tab.
2. Touch Image Shift.
3. To center the image on the page, touch Auto Center.
4. To shift the image to one of the edges or corners of the paper, touch Corner Shift.
5. To specify the position of the image, touch Margin Shift.
6. To specify the amount of Up/Down and Left/Right shift for Side 1, touch the plus (+) or minus (-)
icons.
7. If you select 2-sided copies, to specify the amount to erase from each edge on Side 2, touch the
plus (+) or minus (-) icons, or touch Mirror Side 1.
8. To specify orientation of the original as you place it in the document feeder or on the document
glass:
a. Touch Original Orientation.
b. Touch either Upright Image or Sideways Image (top to left).
c. Touch Save.
9. Touch Save.
Note: If preset values were previously saved, select the preset in the lower-left corner of
the window.
Rotating the Image
If the orientation of the paper that is loaded in the selected tray differs from the orientation of the
original document, the printer automatically rotates the image to fit on the paper.
1. On the control panel touch screen, touch Copy, then touch the Layout Adjustment tab.
2. Touch Image Rotation, then select from the following:
• To have the printer automatically rotate an original image to align with the orientation of the
paper in the tray, touch Always On.
• If Auto Paper Select or Auto percent is selected, to have the printer automatically rotate an
original image to align with the orientation of the paper in the tray, touch On during Auto.
• To cancel rotation, touch Off.
3. Touch Save.
Xerox
®
EC70 Color Copier/Printer
User Guide
55

Services and Functions
Inverting the Image
Originals when printed as mirror images, reflects each image left to right on the page. Originals when
printed as negative images, the positive image is printed as a negative.
To invert images:
1. On the control panel touch screen, touch Copy, then touch the Layout Adjustment tab.
2. To mirror images, touch Invert Image, then touch Mirror Image.
The default is Normal Image, which does not mirror the images.
3. To create negative images, touch Negative Image.
The default is Positive Image, which does not print the image as a negative.
4. Touch Save.
OOuuttppuutt FFoorrmmaatt AAddjjuussttmmeennttss
To make the following changes, use the Output Format tab:
• Creating Booklets
• Including Covers
• Page Layout
• Creating Posters
• Folding
• Adding Annotations
• Adding Watermarks
• ID Card Copy
• Tab Margin Shift
Creating Booklets
Print the copies in the form of a booklet. To print two images per side of each printed page, reduce
the page images. Then, fold the pages and staple them manually, or with the appropriate finisher.
Crease and staple the copies automatically.
Note: In this mode, the printer does not print the copies until it has scanned all the originals.
To create a booklet:
1. On the control panel touch screen, touch Copy, then touch the Output Format tab.
2. Touch Booklet Creation, then under Booklet Options, touch On.
3. Touch Original Input, then touch 1-Sided Originals, 2-Sided Originals, or 2-Sided Rotate Side 2.
4. For Folding, if a finisher with booklet making capabilities is installed, select Off, Fold Only, or Fold
and Staple.
5. To compensate for the thickness of the booklet, you can add margins in the center binding area:
a. Touch Binding Shift, then touch the plus (+) or minus (-) icons to set the shift.
b. Touch Save.
56
Xerox®EC70 Color Copier/Printer
User Guide

Services and Functions
6. To add covers, touch Covers, then touch Blank Cover, Print on Both or 1-Sided Covers Print
Outside.
a. Touch the tray loaded with cover paper and the tray loaded with main body paper.
b. Touch Save.
c. To print the copy of the last original page on the back cover for Blank Cover and Print on
Both, touch Last Page on Back Cover, then touch Save.
7. To subdivide a large booklet into subsets, touch Divide Output, then touch On.
8. To enter the number of sheets for each subset, touch the plus (+) or minus (-) icons, then touch
Save.
9. To enable Offset Stacking:
Note: Offset Stacking places each stack of printed pages slightly to the left or right of the
previous stack for easier separation.
a. Touch Output/Offset.
b. Touch Center Tray Upper or Center Tray Lower. For automatic fold, touch Right Middle
Tray.
Note: Based on the finisher installed, specific selections vary.
c. Touch Offset Stacking, then touch System Default, No Offset, Offset Per Set or Offset Per
Job, then touch Save.
10. If necessary, select Auto Image Positioning, then select Off or On.
11. Touch Save.
Including Covers
To add covers to a copy job, select different trays for the first and last page. Those trays can be
loaded with heavier stock, color, or pre-printed paper. The covers can be blank or printed.
Note: The paper used for the covers have to be of the same size as the paper used for the rest
of the document.
To select the type of covers and the tray to use for the cover paper:
1. On the control panel touch screen, touch Copy, then touch the Output Format tab.
2. Touch Covers.
3. Touch the appropriate option for your front cover and back cover.
4. To include both a front and back cover that use the same tray and printing options:
a. To select a printing option for each cover, select Blank Cover, Print on Side One, Print on
Side Two, or Print on Both.
b. Touch the tray to use for the covers, then touch the tray to use for the main body.
5. To include only a front cover or only a back cover:
a. To select a printing option for each cover, select Blank Cover, Print on Side One, Print on
Side Two, or Print on Both.
b. Touch the tray to use for the covers, then touch the tray to use for the main body of the
document.
®
Xerox
EC70 Color Copier/Printer
User Guide
57

Services and Functions
6. Touch Save.
Page Layout
You can copy multiple original pages onto one side of a sheet of paper. The size of the page images is
reduced proportionally to fit on the selected paper.
To copy multiple pages on a sheet:
1. On the control panel touch screen, touch Copy, then touch the Output Format tab.
2. Touch Page Layout.
3. Touch Pages per Side.
4. To select the number of original pages for each sheet of paper, touch 2 Pages, 4 Pages, or 8
Pages.
For four Pages Up or eight Pages Up, touch the required Reading Order.
5. To change the orientation of the copies:
a. Touch Original Orientation.
b. Touch Upright Images, or Sideways Images.
c. Touch Save.
6. To repeat the same image on a page, touch Repeat Image.
7. Touch 2 Times, 4 Times, or 8 Times.
8. To calculate automatically the number of times to repeat vertically or horizontally, touch Auto
Repeat.
The automatic calculation of the number of times an image is repeated vertically or horizontally
is based on document size, paper size, and the enlarge or reduction ratio.
9. To specify the number of times to repeat the image vertically or horizontally, touch Variable
Repeat, then touch the plus or minus buttons.
You can repeat an image between 1 to 23 times vertically (columns), and between 1 to 33 times
horizontally (rows).
• To arrange the images evenly on the page, touch Evenly Spaced.
• To arrange the images with no space between them, touch Side by Side.
10. To change the orientation of the copies, touch Original Orientation, then touch Upright Images
or Sideways Images, then touch Save.
Creating Posters
You can create a large size copy of an original, fitting it to more than one sheet of paper. You then
reassemble the pages into a poster and tape them together.
To create a poster:
1. On the control panel touch screen, touch Copy→Copy Output→Uncollated.
2. Touch Poster.
3. Touch Output Size, then touch the required size of the poster.
4. To select the width and length enlargement percentages independently, touch Enlargement %,
then touch the plus (+) or minus (-) icons. To set the width and length proportionally, touch Lock
X-Y%.
5. To select the paper tray, touch Paper Supply, touch the required tray, then touch Save.
58
Xerox®EC70 Color Copier/Printer
User Guide

Services and Functions
Adding Annotations
Annotations, such as page numbers and the date, can be added automatically to copies.
To add annotations:
1. On the control panel touch screen, touch Copy, then touch the Output Format tab.
2. Touch Annotations.
Inserting a Comment
To insert a comment:
1. Touch Comment, then touch On.
2. On the next window, from the list of stored comments, touch the comment that you want to
insert.
3. To create a comment, touch an available comment, then touch Edit.
4. Use the touch-screen keyboard to enter the new comment, then touch Save.
5. To select which pages the comment appears on:
a. Touch Apply To.
b. Touch First Page Only, All Pages, or All Pages Except First.
c. Touch Save.
6. To select the location of the comment on the page, touch Position, then touch the required
location.
7. Touch Save twice.
Inserting the Current Date
To insert the current date:
1. Touch Date, then touch On.
2. Touch the format to use for the date.
3. To select which pages the date appears on:
a. Touch Apply To.
b. Touch First Page Only, All Pages, or All Pages Except First.
c. Touch Save.
4. To select the position of the date stamp on the page, touch Position, then select the required
position.
5. Touch Save twice.
Inserting Page Numbers
To insert page numbers:
1. Touch Page Numbers, then touch On.
2. To enter the starting page number, touch the plus (+) or minus (-) icons.
3. To select which pages the page number appears on:
a. Touch Apply To.
®
Xerox
EC70 Color Copier/Printer
59
User Guide

Services and Functions
b. Touch All Pages or All Pages Except First.
c. Touch Save.
4. To select the position of the page numbers on the page, touch Position, then select the required
position.
5. Touch Save twice.
Inserting a Bates Stamp
To insert a Bates Stamp:
1. Touch Bates Stamp, then touch On.
2. Touch an existing stored prefix to use for the Bates Stamp.
a. To create a prefix, touch an available prefix, then touch Edit.
b. Use the touch-screen keyboard to enter the new prefix, then touch Save.
3. To enter the starting page number, touch the plus (+) or minus (-) icons.
4. To select which pages the Bates Stamp appears on:
a. Touch Apply To.
b. Touch All Pages or All Pages Except First, then touch Save.
5. To select the position of the Bates Stamp on the page, touch Position. Touch the required
position, then touch Save.
6. To specify the number of digits, touch Number of Digits.
a. To select the minimum number of digits necessary, touch Auto Assign, then touch Save.
b. To select a specific number of digits, touch Manual Assign, then touch the plus (+) or minus
(-) icons. to insert up to nine leading zeros. Touch Save.
7. Touch Save.
Specifying the Original Orientation
To specify the Original Orientation:
1. Specify the original orientation as you place it in the document feeder or on the document glass.
2. Under Original Orientation, touch either Upright Images or Sideways Images.
Changing the Annotation Format
To change the format used for annotations:
1. Touch Format and Style.
2. To select the font point size, touch the plus (+) or minus (-) icons.
3. Select the required font color.
4. To select the placement of the annotations on the second side when printing two-sided copies,
touch Same as Side 1 or Mirror Side 1.
5. Touch Save.
60
Xerox®EC70 Color Copier/Printer
User Guide

Services and Functions
Adding Watermarks
You can add a watermark beneath the original image on the copies. Information such as
predetermined text, date and time, and the printer serial number can be added.
1. On the control panel touch screen, touch Copy, then touch the Output Format tab.
2. Touch Watermark.
3. To add a control number, touch Control Number, touch Add.
To select the starting number, touch the plus or minus buttons.
4. Touch Save.
5. To add a stored watermark, touch Stored Watermarks, then touch On.
Touch a stored watermark in the list, then touch Save.
6. To print the current date and time on the copies, touch Date & Time, touch Add, then touch
Save.
7. To print serial number of the printer on the copies, touch Serial Number, touch Add, then touch
Save.
8. To make the watermark visible on copies used as originals, touch Watermark Effect, then touch
Embossed or Outline, then touch Save.
9. Touch Save.
ID Card Copy
This feature allows you to copy both sides of a small original, such as an identification card, onto the
same side of a page.
1. Open the document feeder and place the card in the upper left hand corner of the document
glass.
2. Close the document feeder, touch Copy on the touch screen, then touch the Output Format tab.
Note: Place the card slightly away from the top left corner of the document glass to
capture the whole image of the card.
3. Touch ID Card Copy, touch On, then touch Save.
4. To scan side one, press the green Start button.
5. To scan side two, turn the card over without changing its location on the document glass, then
touch Start on the touch screen.
Both sides of the card then print onto the same side of a sheet of paper.
Tab Margin Shift
Note: You can only use the Tab Margin Shift option with Tray 5 (Bypass). Load the paper into
Tray 5 with the copy side face up and the tabbed edge trailing.
1. On the control panel touch screen, touch Copy, then touch the Output Format tab.
2. Touch Tab Margin Shift.
®
Xerox
EC70 Color Copier/Printer
User Guide
61

Services and Functions
3. Choose from the following options:
• To change the amount of shift required, use the Shift Value arrow buttons on the touch
screen.
The Shift to Tab option prints the edge of the original document image onto the tab of the
tabbed stock.
• To change the amount of shift required, use the Shift Value arrow buttons on the touch
screen.
The Shift All options print the entire original document image onto the tabbed stock.
4. To specify options for both shift options, press the Tab Stock button.
5. From the menu, specify the Tab Quantity, Tab Stock Size, Tab Stock Type, and the Tab Stock
Paper Tray
6. Touch Save.
AAddvvaanncceedd CCooppyyiinngg
To change the following settings, use the Job Assembly tab:
• Building a Job
• Printing a Sample Copy
• Combining Original Sets
• Delete Outside/Delete Inside
• Storing a Program
BBuuiillddiinngg aa JJoobb
Use the build job feature to produce complex copy jobs that include different original documents that
require different copy settings. Each segment can have different copy settings. After all segments are
programmed and scanned, the page images are stored temporarily in the printer. The complete copy
job prints.
To build a copy job with multiple segments:
1. On the control panel touch screen, touch Copy.
2. Program and scan the first segment:
a. For the first segment, place the original documents in the document feeder or on the
document glass.
b. For the first segment, touch the required copy settings.
c. Touch the Job Assembly tab.
d. Touch Build Job, touch On, then touch Save.
e. To scan the first set of original documents, press the green Start button.
The Copy screen appears on the touch screen.
3. Program and scan more segments.
a. For the next segment, place the original documents in the document feeder or on the
document glass, then touch Next Original.
62
Xerox®EC70 Color Copier/Printer
User Guide

Services and Functions
b. When printing 2-sided jobs, to set the start page of the next 2-sided segment, touch Chapter
Start, then choose from the following:
• Off: The first page of the next segment prints on the next available side.
• On: The first page of the next segment prints on side one of a new sheet of paper.
• Pages per Side-New Page: If the first segment has an odd number of pages, the second
segment starts on side one. If the first segment has an even number of pages, the second
segment starts on side two.
c. Touch Save.
d. Touch Change Settings.
e. Select the required segment settings, then touch Save.
f. To scan the next set of original documents, press the green Start button.
4. For each segment that you want to copy, repeat step three.
5. When all segments are scanned, on the Copy screen, touch Last Original.
The entire copy job prints.
Note: Because all the segments print as one job, options such as covers or booklet creation
apply to the entire job.
Building Job Options
To select Build Job options:
1. On the control panel touch screen, touch Copy, then touch the Job Assembly tab.
2. Touch Build Job, then touch On. Choose from the following.
• Copy Output: Select Paper Supply, Stapling, Collation, and Offset Stacking options, then
touch Save.
• Booklet Creation: Select the required settings, then touch Save. For details, refer to Creating
Booklets.
• Covers: Select the required settings, then touch Save. For details, refer to Including Covers.
• Annotations: Select the required settings, then touch Save. For details, refer to Adding
Annotations.
• Segment Separators: Refer to step 3.
• Watermarks: Select the settings, then touch Save. For details, refer to Adding Watermarks.
• Face Up/Down Output: Touch the Output Format tab, select the required orientation, then
touch Save.
3. To insert separator pages between segments, touch Segment Separators, then choose from the
following:
• No Separators: Separators are not inserted. Touch Save.
• Blank Separators: Blank separators are inserted. To specify the quantity of separators, touch
the plus (+) or minus (-) icons, then touch Save.
• 1-Sided Separators Side 1 Only: The first page of the loaded documents is copied on the
front side of a separator. Touch Save.
• 1-Sided Separators Side 2 Only: The first page of the loaded documents is copied on the
back side of a separator. Touch Save.
• 2-Sided Separators: The first two pages of the loaded documents are copied onto each side
of a separator. Touch Save.
4. Touch Save.
Xerox
®
EC70 Color Copier/Printer
User Guide
63

Services and Functions
PPrriinnttiinngg aa SSaammppllee CCooppyy
For complex copy jobs, before printing multiple copies, you can print a test copy. The sample copy
feature prints a single copy and holds the remaining copies. After inspection of the sample, you can
use the same settings to print the remaining copies, or you can cancel the remaining copies.
Note: The sample copy is counted as part of the total quantity selected. For example, when
copying a book, if you enter 3 copies, the first printed copy of the book is the sample copy. The
remaining two copies are held until you delete or release them for printing.
To print the sample copy:
1. On the control panel touch screen, touch Copy, then touch the required copy settings.
2. Touch the Job Assembly tab.
3. Touch Sample Job, then touch On.
4. Touch Save.
5. Press the green Start button.
The sample set prints.
Printing Remaining Copies or Deleting the Job
To print the remaining copies or delete the job:
1. To print the remaining copies of the job, touch Start, or press the green Start button.
2. If the sample copy is unsatisfactory, touch Delete.
CCoommbbiinniinngg OOrriiggiinnaall SSeettss
If the number of originals exceeds the capacity of the document feeder, you can combine the sets
into one job.
To combine original sets:
1. On the control panel touch screen, touch Copy.
2. On the control panel, touch the required copy settings, then enter the number of copies using the
alphanumeric keypad.
3. Touch the Job Assembly tab, then touch Combine Original Sets.
4. Touch On, then touch Save.
5. Place the first set of original documents in the document feeder.
6. On the control panel, press the green Start button.
Copying begins and the Copy screen appears.
7. Scan additional sets:
a. Place the original documents for the next set in the document feeder.
b. On the Copy screen, touch Next Original.
c. On the touch screen, touch Start, or press the green Start button.
Copying continues.
8. For each additional set, repeat step 6.
64
Xerox®EC70 Color Copier/Printer
User Guide

Services and Functions
9. After the final set finishes, on the Combine Original Sets screen, touch Last Original.
The final copies print.
10. To cancel the job, touch Delete.
DDeelleettee OOuuttssiiddee oorr DDeelleettee IInnssiiddee
This feature allows you to delete everything inside or outside a specified rectangular area. Up to three
areas can be defined for deletion.
To select the areas to delete:
1. On the control panel touch screen, touch Copy, then touch the Job Assembly tab.
2. Touch Delete Outside/Delete Inside.
3. To delete everything outside the specified area when copying:
a. Touch Delete Outside.
b. The area defines the rectangle formed between the points as shown on the touch screen.
Touch Area 1, then touch each coordinate on the touch screen. To enter the coordinate
values for X1, X2, Y1, and Y2, use the alphanumeric keypad on the control panel. When all
values are entered, touch Save.
c. To apply the deleted area to 2-sided copying, for Originals, touch Both Sides, Side 1 Only, or
Side 2 Only.
d. Touch Save.
e. To define more areas, select Area 2 or Area 3.
4. To delete everything inside the specified area when copying:
a. Touch Delete Inside.
b. The area defines the rectangle formed between the points as shown on the touch screen.
Touch Area 1, then touch each coordinate on the touch screen. To enter the coordinate
values for X1, X2, Y1, and Y2, use the alphanumeric keypad on the control panel. When all
values are entered, touch Save.
c. To apply the deleted area to 2-sided copying, for Originals, touch Both Sides, Side 1 Only, or
Side 2 Only.
d. Touch Save.
e. To define more areas, select Area 2 or Area 3.
SSaavviinngg CCooppyy SSeettttiinnggss
To use a combination of copy settings for future jobs, save the settings with a name, then retrieve the
settings for later use with other jobs.
To save the current copy settings:
1. On the control panel touch screen, touch Copy.
2. Touch the Job Assembly tab, then touch Stored Programming.
Note: The Stored Programming option for Build Job takes effect from Job Segment 2 and
forward.
Xerox
®
EC70 Color Copier/Printer
User Guide
65

Services and Functions
3. To enter a name for the saved settings, use the touch screen keyboard.
4. Touch Save.
FFoollddiinngg
If your machine is equipped with a Booklet Maker Finisher or the optional C/Z Folder, you can make
copies using the folding option. This option folds your prints in half such as Single fold or Bi-fold or in
thirds such as C-fold or Z-fold types. You can select folding options on the Output Format tab.
Note: To use the folding option, ensure that the orientation of documents is short-edge feed
(SEF). Ensure to select a paper tray that contains SEF stock.
Fold Types
These fold types are available:
• Single Fold (Bi-Fold)
• C-Fold
• Z-Fold
• Z-Fold Half Sheet
Note: The Single Fold (Bi-Fold) option is available only with a Booklet Maker Finisher. The C-
Fold and Z-Fold options are available only with the C/Z Folder.
The overall configuration of the printer depends on the specific stapling, covers, and collation options
on the Folding page.
Note: To create booklets with booklet formatting, use the Booklet Creation feature. Folding
does not apply the same characteristics to the page.
66
Xerox®EC70 Color Copier/Printer
User Guide

Services and Functions
Scanning
SSccaannnniinngg OOvveerrvviieeww
Note: Enable scanning before use. For details, refer to the System Administrator Guide.
Scanning is an optional printer feature that provides several methods for scanning and storing an
original document. The scanning procedure used with the printer differs from the desktop scanners.
Because the printer is connected to a network rather than directly to a single computer, you select a
destination for the scanned image at the printer.
The scanning feature allows you to scan a document and store the image to any of the following
destinations:
• Folder on the hard drive of the printer
• Document repository on a network server
• Email address
• Windows computer
• Home directory
• USB flash drive
• Computer using the Network Scan Utility
• Application using TWAIN or WIA
Note: Print, copy, and fax jobs can print while you are scanning original documents or
downloading files from the hard drive of the printer.
Note: The printer connects to a network to retrieve a scan file.
LLooaaddiinngg OOrriiggiinnaall DDooccuummeennttss
All scanning tasks begin with loading the original document in the printer. Use the document glass for
single page jobs, or originals that do not feed through the document feeder. Use the document
feeder for multiple or single page jobs.
DDooccuummeenntt GGllaassss
Lift the document feeder cover and place the original facedown, toward the back-left corner of the
document glass.
Xerox
®
EC70 Color Copier/Printer
User Guide
67

Services and Functions
Caution: When scanning a bound document, do not attempt to force the document feeder
cover closed. Doing so damages the document feeder cover.
DDuupplleexx AAuuttoommaattiicc DDooccuummeenntt FFeeeeddeerr
1. Insert originals face up, with page 1 on top.
2. The confirmation indicator illuminates when the originals are loaded correctly.
3. Adjust the paper guides so they fit against the originals.
SSttoorriinngg aa SSccaann ttoo aa FFoollddeerr
The simplest scanning method is to store a scanned file to a folder. A document scanned at the
printer is stored as a file to a folder on the printer hard drive. Then you can print, or copy the stored
file to the computer using a Web browser and the Embedded Web Server.
Folders are accessible to all users unless protected with a password. For details, refer to Creating a
Folder.
Note: To enable this feature, contact your system administrator.
68
Xerox®EC70 Color Copier/Printer
User Guide

Services and Functions
SSccaannnniinngg ttoo aa FFoollddeerr
To store a scanned file to a folder:
1. Load the original on the document glass or in the document feeder.
2. Press the Services Home button.
3. On the touch screen, touch Store to Folder.
4. Touch the required folder. If a password is required, enter the password using the alphanumeric
keypad, then touch Confirm on the touch screen.
5. To change any of the scan settings, use the four menus at the bottom of the touch screen: Color
Scanning, 2-Sided Scanning, Original Type, and Scan Presets. For details, refer to Setting Scan
Options.
6. Press the green Start button. The Store to Folder progress screen appears on the touch screen.
When the scan is complete, the touch screen re-displays the Store to Folder tab. The file is stored to
the folder on the hard drive of the printer. You can print the file then or retrieve it to the computer
using CentreWare Internet Services.
PPrriinnttiinngg SSttoorreedd FFiilleess aatt tthhee PPrriinntteerr
To print a file stored to a folder at the printer:
1. Press the Services Home button.
2. On the touch screen, touch Send from Folder.
3. Touch the required folder. If a password is required, enter the password using the alphanumeric
keypad, then touch Confirm on the touch screen.
4. In the file list, touch the required file. To print multiple files, touch them in succession.
5. Touch Print.
6. If necessary, select the following options such as Paper Supply, 2-Sided Printing, or Output.
7. To set the number of copies, touch Print Quantity, then enter the required quantity using the
alphanumeric keypad.
8. Touch Print.
Note: To view a thumbnail preview of the file, from the List section, select Thumbnail.
AAddddiittiioonnaall SSeenndd ffrroomm FFoollddeerr OOppttiioonnss
Viewing an Enlarged File Preview
To view an enlarged file preview:
1. In the Send from Folder view, touch the required file in the file list.
2. Touch File Details. Use the icons at the top of the page to enlarge the view. Touch the scroll
buttons to examine the enlarged preview.
3. To rotate the preview, touch the Rotate View button until you reach the orientation you want.
Note: Rotating the preview does not rotate the printed output.
®
Xerox
EC70 Color Copier/Printer
User Guide
69

Services and Functions
4. When finished, touch Close.
Viewing a Summary of File Information
To view a summary of file information:
1. In the Send from Folder view, touch the required file in the file list.
2. Touch Review.
3. When finished, touch Close.
Deleting a File
To delete a file:
1. While in the Send from Folder view, touch the file to be deleted.
2. Touch Delete twice.
Changing a File Name
To change a file name:
1. In the Send from Folder view, touch the required file in the file list.
2. Touch File Details.
3. Touch Change File Name.
4. To enter the new name, use the touch screen keyboard.
5. Touch Save, then touch Close.
Accessing Job Flow Settings
To access Job Flow Settings:
1. If Job Flow Sheets are created, touch Job Flow Settings.
The Job Flow Sheet linked to the folder appears.
2. To change the Job Flow settings, touch Create/Change Link or Select Job Flow Sheet.
Note: If Send from Folder is not enabled, contact your System Administrator. For details, refer
to the System Administrator Guide at www.xerox.com/support. Enter Xerox Color EC70
Printer in the Search field, then select the required documentation.
UUssiinngg JJoobb FFllooww SShheeeettss
For a file stored in a folder, Job Flow Sheets allow you to execute a series of registered actions, such
as Send as Fax or Print. The System Administrator creates the Job Flow Sheets. The printer stores the
Job Flow sheets, where the user links them to a stored file. For details, refer to the System
Administrator Guide.
PPrriinnttiinngg SSttoorreedd FFiilleess UUssiinngg CCeennttrreeWWaarree IInntteerrnneett SSeerrvviicceess
1. Launch the Web browser.
70
Xerox®EC70 Color Copier/Printer
User Guide

Services and Functions
2. Type the printer IP address into the Web browser address bar, then to open CentreWare Internet
Services, click Enter.
Note: If you do not know the printer IP address, refer to Finding the IP Address of the
Printer.
3. Click the Scan tab.
4. In the Scan navigation pane at the left of the page, click Folder.
5. In the Folder list, click the required folder. If necessary, enter the folder password, then click
Apply.
The Folder: List of Files page appears.
6. Select the required file.
7. Scroll the page to see the Print File section.
8. As needed, make selections from the printing options such as Paper Supply, Output Destination,
Quantity, 2-Sided Printing, Staple, Hole Punch, or Batch Print.
9. Click Print File.
RReettrriieevviinngg SSccaannnneedd FFiilleess ttoo YYoouurr CCoommppuutteerr UUssiinngg CCeennttrreeWWaarree
IInntteerrnneett SSeerrvviicceess
To retrieve the stored files by copying them from the printer folder to the computer hard drive:
1. Launch the Web browser.
2. Type the printer IP address into the Web browser address bar, then to open CentreWare Internet
Services, click Enter.
Note: If you do not know the printer IP address, refer to Finding the IP Address of the
Printer.
3. Click the Scan tab.
4. In the Scan navigation pane at the left of the page, click Folder.
5. In the Folder list, click the required folder. If necessary, enter the folder password, then click
Apply.
The Folder: List of Files page appears.
Note: If necessary, scroll down to see all files.
6. Select the required file.
7. Scroll down to reveal Retrieving Format. From the Retrieving Format menu, click the required file
format. As needed, select options for the file format using the check boxes and menus. Options
vary by file format.
8. Click Retrieve.
9. On the Retrieve Files from Folder page, click the link to the selected file.
10. Click Save, select the required storage location, then click Save.
11. If a stored file is no longer needed, select the required file. In the upper right corner of the page,
click Delete. When prompted, click OK.
®
Xerox
EC70 Color Copier/Printer
User Guide
71

Services and Functions
Additional File Retrieve Options
To retrieve a stored file, the following options are available:
1. To retrieve a single page of a multiple-page document, for Retrieve Page, select the Enabled
check box. Type the page number in the Page Number field.
2. To add a thumbnail view when using XPS format, for Add Thumbnail, select the Enabled check
box.
3. To apply MRC High Compression to PDF and XPS format files, for MRC High Compression, select
the Enabled check box . Select the required quality from the Quality menu.
4. To create a searchable-text PDF or XPS file:
a. Select the Enabled check box next to Searchable Text.
b. From the Language of the Original menu, select the language.
c. To apply Text Compression, from the Text Compression menu, select Enabled.
CCrreeaattiinngg aa FFoollddeerr
Creating a Folder Using the Touch Screen of the Printer
To create a folder using the touch screen of the printer:
1. At the control panel, press the Machine Status button.
2. Touch the Tools tab, then under Setup & Calibration→Setup→Features, touch Create Folder.
3. Touch an Available folder.
4. To assign a password to the folder:
a. Under Check Folder Passcode, touch On.
b. Use the alphanumeric keypad to enter the password.
c. Touch Save.
5. Assign folder attributes:
a. Touch Folder Name.
b. Use the touch screen keyboard to enter the name, then touch Save.
c. Touch Delete Files After Retrieval, touch Yes or No, then touch Save.
d. Touch Delete Expired Files, touch Yes or No, then touch Save.
e. Touch Link Job Flow Sheets to folder, then touch Cut Link or Create Change Link.
f. If you want the job to start automatically, select Auto Start.
6. Touch Close three times to return to the Tools tab.
Creating a Folder Using CentreWare Internet Services
To create a folder using CentreWare Internet Services:
1. Launch the Web browser.
72
Xerox®EC70 Color Copier/Printer
User Guide

Services and Functions
2. Type the printer IP address into the Web browser address bar, then press Enter to open
CentreWare Internet Services.
Note: If you do not know the printer IP address, refer to Finding the IP Address of the
Printer.
3. Click the Scan tab.
4. In the Scan navigation pane at the left of the page, click Folder.
5. In the Folder list, click Create next to an Available folder.
Note: If necessary, scroll the page to see available folders.
6. Assign folder attributes:
• Folder Name: Type the name.
• Delete Files After Print or Retrieve: Select Set or Clear.
• Delete Expired Files: Select Set or Clear.
7. To assign a password to the folder:
• In the Folder Passcode field, type the password.
• In the Retype Passcode field, retype the password.
• In the Check Folder Passcode menu, select Always, Save, or Print/Delete.
The folder is now available for use. Its contents are stored on the hard drive of the printer. The
folder appears on the touch screen of the printer, and in the folder list in CentreWare Internet
Services.
DDeelleettiinngg aa FFoollddeerr
Caution: Files in the folder are deleted.
Deleting a Folder Using the Printer Touch Screen
To delete a folder using the printer touch screen:
1. At the control panel, press the Machine Status button.
2. Touch the Tools tab, then under Setup & Calibration→Setup→Features, touch Create Folder.
3. Touch the required folder. If a password is required, enter the password using the alphanumeric
keypad, then touch Confirm on the touch screen.
4. Touch Delete Folder, then touch Delete.
Deleting a Folder Using CentreWare Internet Services
To delete a folder using CentreWare Internet Services:
1. Launch the Web browser.
2. Type the printer IP address into the Web browser address bar, then press Enter to open
CentreWare Internet Services.
Note: If you do not know the printer IP address, refer to Finding the IP Address of the
Printer.
3. Click the Scan tab.
®
Xerox
EC70 Color Copier/Printer
User Guide
73

Services and Functions
4. In the Scan navigation pane at the left of the page, click Folder. If necessary, scroll the page to
see available folders.
5. In the Folder list, click Delete for the folder to be deleted.
Note: Before deleting the folder, delete all files in the folder.
6. Click OK to confirm that you want to delete the folder. If necessary, enter the folder password,
then click Apply.
SSccaannnniinngg ttoo aa NNeettwwoorrkk FFiillee RReeppoossiittoorryy
You scan to a network file repository, a feature of Network Scanning. Documents you scan are sent to
a document repository on a network server, configured by the system administrator. A template, also
created by the system administrator, defines the scan settings and the destination of the scanned
image.
Note: To scan to a network file repository, configuration is required. Contact your system
administrator.
Note: Create templates using the Embedded Web Server. For details, refer to the System
Administrator Guide.
To use the scan to a network file repository feature:
1. Load the original documents on the document glass or in the document feeder.
2. At the control panel, press the Services Home button.
3. Touch Network Scanning.
4. Touch the needed template.
5. To override the template scan settings:
• For scanning options, use the four menus at the bottom of the touch screen: Color Scanning,
2-Sided Scanning, Original Type, and Scan Presets. For details, refer to Setting Scan Options.
• For additional scanning options, use the three tabs at the top of the touch screen. For details,
refer to Additional Scanning Options.
6. Press the green Start button.
SSccaannnniinngg ttoo aann EEmmaaiill AAddddrreessss
To send scanned documents as attachments to email, scan to an email address.
Note: The System Administrator enables this feature.
To send a scanned image to an email address:
1. Load the original on the document glass or in the document feeder.
2. At the control panel, press the Services Home button.
3. Touch Email.
74
Xerox®EC70 Color Copier/Printer
User Guide

Services and Functions
4. Specify the recipient using one of these methods:
• Touch New Recipient. Use the touch screen keyboard to enter the complete email address,
touch Add, then touch Close.
• Touch Address Book. Touch the required recipient, then touch To.
5. To add additional recipients to the list, repeat step 4. When all recipients are added to the list,
touch Close.
6. A default subject is provided for the email. To change the subject, touch Subject. Use the touch
screen keyboard to enter the new subject, then touch Save.
7. To change any of the scan settings, touch the four menus at the bottom of the control panel:
Color Scanning, 2-Sided Scanning, Original Type, and Scan Presets. For details, refer to Setting
Scan Options.
8. Press the green Start button.
SSeettttiinngg EEmmaaiill OOppttiioonnss
You can override the template settings created by your System Administrator, and change the
following email settings:
• File Name
• File Format
• Reply To
• Read Receipts
Changing the File Name or Replying to Email Options
To change the File Name or Reply to Email options:
1. At the printer control panel, press the Services Home button.
2. Touch Email, then touch the Email Options tab.
3. Touch File Name or Reply to. Use the touch screen keyboard to delete or modify the text.
4. Touch Save.
Changing the File Format
To change the file format:
1. At the printer control panel, press the Services Home button.
2. Touch Email, then touch the Email Options tab.
3. Touch File Format, then select the required file type. You can describe each file format when
selected.
4. To accept the file format, touch Save.
Requesting a Read Receipt
To request a read receipt:
Note: The System Administrator enables this feature.
1. At the printer control panel, press the Services Home button.
2. Touch Email, then touch the Email Options tab.
Xerox
®
EC70 Color Copier/Printer
User Guide
75

Services and Functions
3. Touch Read Receipts, then touch On.
4. Touch Save.
SSccaannnniinngg ttoo aa CCoommppuutteerr
The Scan to Computer feature allows you to scan a document to your computer.
Note: To enable this feature, contact your system administrator.
To use the Scan to Computer feature:
1. Load the original on the document glass or in the document feeder.
2. At the printer control panel, press the Services Home button.
3. Touch Scan to PC.
4. Touch Transfer Protocol, then touch FTP, SMB, or SMB (UNC Format), then touch Save.
5. Touch Server, Save in, User Name, and Password. For each setting, using the touch screen
keyboard, enter the data. Touch Save.
Note: If the server name was stored previously, touch Address Book, touch the required
server, touch Add, then touch Close.
6. To change any of the scan settings, touch the four menus at the bottom of the touch screen:
Color Scanning, 2-Sided Scanning, Original Type, and Scan Presets. For details, refer to Setting
Scan Options.
7. Press the green Start button.
8. Access the scanned image at the computer.
SSccaannnniinngg ttoo aa HHoommee DDiirreeccttoorryy
The Scan to Home feature allows you to scan a document to your home directory. The System
Administrator defines the network location of the home directory.
Note: The System Administrator enables this feature.
To use the Scan to Home feature:
1. Load the original on the document glass or in the document feeder.
2. At the printer control panel, press the Services Home button.
3. Touch Network Scanning.
4. Touch the template created by your System Administrator.
5. The template defines the scan settings and the destination of the image. To change any of the
scan settings, touch the four menus at the bottom of the touch screen: Color Scanning, 2-Sided
Scanning, Original Type, and Scan Presets. For details, refer to Setting Scan Options.
6. Press the green Start button.
For details, refer to the System Administrator Guide.
76
Xerox®EC70 Color Copier/Printer
User Guide

Services and Functions
SSttoorriinngg ttoo aa UUSSBB FFllaasshh DDrriivvee
The Store to USB feature allows you to scan a document to a USB Flash Drive using the USB port on
the left side of the front printer panel.
Note: To enable this feature, contact your system administrator.
Note: When the Media Reader option is connected, you cannot use this feature.
To use the Store to USB feature:
1. Load the original on the document glass or in the document feeder.
2. Insert a USB Flash Drive in the USB port on the left side of the front printer panel. The USB
Device Detected window appears.
3. Touch Store to USB.
4. Touch Save in.
5. Touch the required folder. To move down one directory level, touch Next. To move up one
directory level, touch Previous.
6. To select the storage location, touch Save.
7. To change any of the scan settings, touch the four menus at the bottom of the touch screen:
Color Scanning, 2-Sided Scanning, Original Type, and Scan Presets. For details, refer to Setting
Scan Options.
8. To change any of the additional scanning options, use the three tabs at the top of the touch
screen. For details, refer to Additional Scanning Options.
9. To scan the original and store the file, press the green Start button.
10. Touch the Services Home button, then remove the USB Flash Drive.
11. To print files stored on a USB Flash Drive, refer to Printing from a USB Flash Drive.
Caution: Do not remove the USB Flash Drive while a file is being stored. Damage to stored
files can occur. Before powering off the printer, remove the USB Flash Drive.
SSeettttiinngg SSccaann OOppttiioonnss
SSccaann SSeettttiinnggss
Scanning can be adjusted using optional settings. After you select the required scanning method, use
the four menus at the bottom of the control panel touch screen to change the following scan
settings:
• Color Scanning: Overrides automatic detection. Set to Auto Detect, Color, Black & White, or
Grayscale.
• 2-Sided Scanning: Choose from one side, two sides, or two sides with second side rotated.
• Original Type: Choose from Photo and Text, Text, or Photo.
• Scan Presets: Choose from Sharing and Printing, Archival Record, OCR, High-Quality Printing, or
Simple Scan.
To change the scan settings:
Xerox
®
EC70 Color Copier/Printer
User Guide
77

Services and Functions
1. At the printer control panel, press the Services Home button.
2. Touch the required scan method.
3. Touch the required settings in the four menus at the bottom of the touch screen.
AAddddiittiioonnaall SSccaannnniinngg OOppttiioonnss
Additional scanning options allow precise control of the scanning process. Many of these optional
settings override the automatic settings. Instructions on the touch screen describe the use of these
options.
After you select the required scanning method, use the tabs along the top of the touch screen to
change the following scanning options:
• Advanced Settings
• Layout Adjustment
• Filing Options
AAddvvaanncceedd SSeettttiinnggss
Advanced settings allow you to control Image Options, Image Enhancements, Scan Resolution, File
Size, Photographs, and Shadow Suppression.
To use Advanced Settings:
1. At the printer control panel, press Services Home.
2. Touch the required scan method.
3. Touch the Advanced Settings tab.
4. Touch the required setting.
• Image Options: Select Lighten/Darken or Sharpness/Soften.
• Image Enhancement: To hide the background color or contrast, touch Background Auto
Suppression.
• Resolution: Choose 200–600 dpi.
• Quality/File Size: Choose from good image quality with small file size, higher image quality
with larger file size, or highest image quality with largest file size.
• Photographs: Enhances the appearance of scans of photographic originals. Ensure that the
color scanning is set to Color.
• Shadow Suppression: To hide the background color, touch Auto Suppression and for color
scanning, touch Image Bleed.
LLaayyoouutt AAddjjuussttmmeenntt
Layout adjustment provides additional settings for original orientation, original size, edge erase, Book
Scanning, and Reduce/Enlarge.
1. At the printer control panel, press Services Home.
2. Touch the required scan method.
3. Touch the Layout Adjustment tab.
78
Xerox®EC70 Color Copier/Printer
User Guide

Services and Functions
4. Touch the required setting:
• Original Orientation: Select Upright Images or Sideways Images.
• Original Size: Select Auto Detect, Manual Size Input, or Mixed Size Originals.
• Edge Erase: Select All Edges, Print to Edge, Individual Edges or a Preset created previously.
To enter the value, use the plus (+) or minus (-) icons.
• Book Scanning: Select Left Page then Right, Right Page then Left, or Top Page then
Bottom. To enter the Binding Edge Erase value, use the plus (+) or minus (-) icons.
• Reduce/Enlarge: Select Proportional %, a Preset, or Enter Output Size. To enter the value,
use the plus (+) or minus (-) icons.
FFiilliinngg OOppttiioonnss oorr EEmmaaiill OOppttiioonnss
If a file name exists already, Filing Options or Email Options provide additional settings for naming
images, choosing image formats, adding meta data, and behavior.
To use Filing Options:
1. At the printer control panel, press Services Home.
2. Touch the required scan method.
3. Touch the Filing Options tab.
4. Touch the required setting:
• File Name: Enter a filename prefix.
• File Format: Select PDF (image Only or Searchable), PDF/A (Image Only or Searchable),
Multi-page TIFF, TIFF (1 file per page), JPEG (1 file per page), or XPS (Image Only or
Searchable). For fast web view, select Compression Method, MRC High Compression or
Optimize.
• Meta Data: Assign descriptive meta data to a scanned image.
• File Name Conflict: Select Do Not Save, Rename New File, Overwrite Existing File, Add to
Existing Folder, or AddDateStamp to File Name.
• Login Name: Enter Login Name if necessary.
• Password: Enter password if necessary.
Xerox
®
EC70 Color Copier/Printer
User Guide
79

Services and Functions
Faxing
FFaaxx OOvveerrvviieeww
Faxing is an optional feature of your multifunction printer. It can be configured in various different
ways to offer you the most convenient method for faxing an original document.
• Embedded Fax: A document is scanned at the multifunction printer and sent directly to a fax
machine.
• Server Fax: A document is scanned at the multifunction printer and sent over an Ethernet network
to a fax server. The fax server then sends the fax to a fax machine.
• Internet Fax: You can scan a document at the multifunction printer and email it to a recipient.
• Faxing from your Computer: Use the settings in the print driver to send the current print job as a
fax.
Note: The System Administrator enables the fax capability before use. For details, refer to the
System Administrator Guide.
LLooaaddiinngg OOrriiggiinnaall DDooccuummeennttss
Except for Faxing from the Computer, all fax transmissions begin with loading the original document
at the multifunction printer.
• Use the document glass for single page jobs or for originals that do not feed through the
document feeder.
• Use the document feeder for multiple or single page jobs.
DDooccuummeenntt GGllaassss
Lift the document feeder cover and place the original facedown, toward the back-left corner of the
document glass as shown.
Caution: When scanning a bound document, do not attempt to force the document feeder
cover closed. Doing so damages the document feeder cover.
80
Xerox®EC70 Color Copier/Printer
User Guide

DDuupplleexx AAuuttoommaattiicc DDooccuummeenntt FFeeeeddeerr
Insert originals face up. Adjust the paper guides so they fit against the originals.
SSeennddiinngg aa FFaaxx
To send a fax using the Embedded Fax function of the multifunction printer:
Services and Functions
1. Load the original document on the document glass or in the document feeder.
2. At the control panel, press Services Home.
3. Touch Fax.
4. To enter manually the recipient fax number, perform one of the following:
• Enter the fax number using the alphanumeric keypad, then touch Add.
• Touch New Recipients. Enter the number use the touch screen keyboard, touch Add, then
touch Close.
5. To use a number stored previously in the Address Book:
a. Touch Address Book.
b. Select an option from the menu.
c. Touch the arrows to scroll through the list.
d. Touch the required address.
e. Touch Add, then touch Close.
Note: To use the address book, ensure that the addresses are entries in the Address Book.
For details, refer to Adding Address Book Entries.
Note: When you are viewing the list of individual addresses in the Address Book, you can
perform Chain Dial. For details, refer to Using Chain Dial.
6. To include a cover page:
a. Touch Cover Page, then touch Print Cover Page.
b. To add a comment that was created previously, touch Comments. For Recipient's Comment
or Sender's Comment, touch an available comment, then touch Save. For details, refer to
Creating Fax Comments.
c. Touch Save.
7. Adjust fax options if necessary. For details, refer to Selecting Fax Settings.
®
Xerox
EC70 Color Copier/Printer
User Guide
81

Services and Functions
8. Press the green Start button. When all pages are scanned, the printer scans the pages and
transmits the document.
IInnsseerrttiinngg PPaauusseess iinn FFaaxx NNuummbbeerrss
Some fax numbers require one or more pauses during the dialing sequence. To insert a pause in a fax
number:
1. Use the alphanumeric keypad to enter the fax number.
2. To insert a pause, press the Dial Pause button on the control panel, represented by a hyphen, in
the required location.
3. Continue to enter the fax number.
SSeerrvveerr FFaaxx
Scan a document using the Server Fax, and send it to a fax server on the network. The fax server then
sends the fax over a telephone line to a fax machine.
Note: Before use, enable the Server Fax service, and configure the fax server.
Note: Server Fax cannot be used together with the Embedded Fax feature. When Server Fax is
in use, the touch screen Fax button activates Server Fax.
Note: Server Fax cannot be used together with the Internet Fax feature. When Server Fax is in
use, the touch screen Internet Fax button does not appear.
SSeennddiinngg aa SSeerrvveerr FFaaxx
1. Load the original on the document glass or in the document feeder.
2. At the control panel, touch Services Home.
3. Touch Fax.
4. Enter the number using the alphanumeric keypad, then touch Add.
5. Touch New Recipients, enter the number using the touch screen keyboard, touch Add, then touch
Close.
6. To use a number stored previously in the Address Book:
a. Touch Address Book.
b. Touch the arrows to scroll through the list.
c. Select the required address.
d. Touch Add, then touch Close.
7. Adjust fax options if necessary. For details, refer to Selecting Fax Settings.
8. Press the green Start button. When all pages are scanned, the printer scans the pages and
transmits the fax document.
82
Xerox®EC70 Color Copier/Printer
User Guide

Services and Functions
SSeennddiinngg aann IInntteerrnneett FFaaxx
If an SMTP email server is connected to the network, you can send a document to an email address.
This feature eliminates the need for a dedicated telephone line. When you send an Internet fax, the
document is scanned and sent to an email address.
Note: Before you use the feature, enable the Internet Fax service, and configure an SMTP
server. For details, refer to the System Administrator Guide at www.xerox.com/support. Enter
Xerox Color EC70 Printer in the Search field, then select the required documentation.
To send an Internet fax:
1. Place the original document on the document glass or in the document feeder.
2. On the printer touch screen, touch Services Home, then touch Internet Fax.
3. Touch New Recipient.
4. To enter the email address of the recipient, perform one of the following:
• Enter the address using the touch screen keyboard, then touch Add. Repeat for each recipient,
then touch Close.
• To select the required address from the list, touch Address Book, then touch Add. When you
have added all recipients, touch Close.
5. Adjust fax options if necessary. For details, refer to Selecting Fax Settings.
6. Press the green Start button. The printer scans the pages. After all pages are scanned, the printer
sends the document as an email attachment.
FFaaxxiinngg ffrroomm YYoouurr CCoommppuutteerr
When you use the print driver, a document stored on the computer can be sent as a fax.
Note: To fax from the computer, the System Administrator enables the fax installed in the
multifunction printer.
1. In your software application, click File, then Print.
2. Select the printer from the list.
3. To access the print driver settings, select Properties or Preferences (Windows), or Xerox Features
for Macintosh. The title of the button varies depending on your application.
4. To select printer features:
• For Windows, click the Paper/Output tab.
• For Macintosh, click Copies and Pages, then click Xerox Features.
5. Click the Job Type menu, then click Fax.
6. Click Add Recipients.
7. Enter the name of the recipient and fax number. If necessary, complete the additional
information.
8. If needed, click the Cover Sheet tab, choose an option, then click OK.
9. If needed, click the Options tab, choose your options, then click OK.
10. Click OK.
®
Xerox
EC70 Color Copier/Printer
User Guide
83

Services and Functions
11. To send the fax:
• For Windows, click OK.
• For Macintosh, click Print.
For details, click the Help button in the Fax window.
RReecceeiivviinngg FFaaxxeess
The System Administrator configures the printer to receive and print a fax using the Embedded Fax,
Server Fax, and Internet Fax. For more information, refer to the System Administrator Guide at www.
xerox.com/support. Enter Xerox Color EC70 Printer in the Search or Choose field and select
the required documentation.
SSeelleeccttiinngg FFaaxx SSeettttiinnggss
SSeettttiinngg 22--SSiiddeedd FFaaxxiinngg
1. On the control panel touch screen, touch Fax.
2. Touch 2 Sided Scanning, then touch the required option such as 2 Sided or 2 Sided, Rotate Side
2.
SSeelleeccttiinngg tthhee OOrriiggiinnaall TTyyppee
1. On the control panel touch screen, touch Fax.
2. Touch Original Type, then touch the required option such as Text, Photo and Text, or Photo.
SSeettttiinngg tthhee FFaaxx RReessoolluuttiioonn
1. On the control panel touch screen, touch Fax.
2. Touch Resolution, then touch the required option:
• Standard 200x100 dpi
• Fine 200 dpi
• Super Fine 400 dpi
• Super Fine 600 dpi
Note: For Server Fax, touch Standard or Fine.
AAddjjuussttiinngg LLaayyoouutt
Layout settings allow you to adjust the original size, set page scanning for book faxing, and reduce or
enlarge the fax image.
Lighten or Darken
1. On the control panel touch screen, touch Fax.
2. Touch the Layout Adjustment tab, then touch Lighten/Darken.
3. Adjust the settings to lighten or darken the fax.
4. Touch Save.
84
Xerox®EC70 Color Copier/Printer
User Guide

Services and Functions
Adjusting the Original Size
1. On the control panel touch screen, touch Fax.
2. Touch the Layout Adjustment tab, then touch Original Size.
3. Select one of the following options:
• Auto Detect: To identify standard-size originals automatically.
• Manual Size Input: For manual definition of the scan area using standard paper dimensions.
• Mixed Size Originals: For scanning originals of different standard sizes.
4. Touch Save.
Book Faxing
1. On the control panel touch screen, touch Fax.
2. Touch the Layout Adjustment tab, then touch Book Faxing.
3. Select one of the following options:
• Touch Off (Default).
• For Left Page then Right, touch Both Pages, Left Page Only, then touch Right Page Only.
• For Right Page then Left, touch Both Pages, Left Page Only, then touch Right Page Only.
• For Top Page then Bottom, touch Both Pages, Top Page Only, then touch Bottom Page
Only.
4. Touch Save.
Reduce or Enlarge
1. On the control panel touch screen, touch Fax.
2. Touch the Layout Adjustment tab, then touch Reduce/Enlarge.
3. Touch a Preset percentage, or touch the plus (+) or minus (-) icons to specify a variable
percentage.
4. Touch Save.
FFaaxx OOppttiioonnss
The Fax Options tab contains options that allow you to specify how the fax is transmitted.
Note: With the exception of Priority Send or Delay Start, these settings are not available for
Server Fax.
To adjust these settings:
1. On the control panel touch screen, touch Fax, then touch the Fax Options tab.
Xerox
®
EC70 Color Copier/Printer
User Guide
85

Services and Functions
2. Select the required option and settings, then touch Save.
• Confirmation Options: To print a report after each fax transmission, touch On, or for no
report, touch Off.
• Starting Rate: G3 Auto, Forced 4800 bps.
• Priority Send/Delay Start: For Priority Send, select Off or On. For Delay Start, select Off or
On. Touch Specific Time, then touch the required settings.
• Transmission Header Text: Touch Off or Display Header.
• Recipient Print Sets: Touch One Set or Multiple Sets, then touch the plus (+) or minus (-)
icons to set the quantity.
• Pages per Side: To set the quantity, touch On, then touch the plus (+) or minus (-) icons. Or
to disable the option, touch Off.
• Remote Folder: This feature enables you to send a file directly to a folder on a remote fax
machine. To enable or disable the feature, for Send to Folder, select On or Off. Use the
Folder Number and Folder Passcode fields to enter the remote fax machine information
using the alphanumeric keypad.
• F Code: To enable or disable F Code as the file transmission method, select On or Off. When
you enable F Code, use the alphanumeric keypad or touch screen keyboard to enter the
password in the Folder Password field.
MMoorree FFaaxx OOppttiioonnss
To set more optional fax settings, do the following:
1. On the control panel touch screen, touch Fax, then touch the More Fax Options tab.
2. Select the required option and the required settings, then touch Save.
Note: These settings are not available for Server Fax.
• Remote Polling: Select Off or Poll a Remote Device. Use the Remote Folder feature to
retrieve files stored on a remote fax machine.
• Store for Polling: To make available for remote printing fax documents that are stored in the
printer, select Store for Free Polling or Store for Secure Polling, then select the required
folder and file. Or to disable the option, select Off.
• On-Hook (Manual Send/Receive): For Manual Send, touch On-Hook, then touch Manual
Send. Use the touch screen keyboard to enter the destination and passcode. For Manual
Receive, touch On-Hook, then touch Manual Receive. Press the green Start button.
IInntteerrnneett FFaaxx OOppttiioonnss
To set additional Internet fax options, do the following:
1. On the touch screen, touch Internet Fax, then touch the Internet Fax Options tab.
86
Xerox®EC70 Color Copier/Printer
User Guide

Services and Functions
2. Select the required option and the required settings, then touch Save.
Note: For details, refer to the System Administrator Guide.
• Acknowledgement Report: For Confirmation Options, select Off or Print report after each
fax transmission. To request a read receipt from the fax server of the recipient to be sent to
the sender, select Read Receipts. The read receipt indicates the result of the transmission.
The recipient server is required to support the MDN standard.
• Internet Fax Profile: Select TIFF-S for A4, 210 x 297 mm (8.5 x 11 in.) original documents
with standard or fine resolution. Select TIFF-F or TIFF-J for A3, 297 x 420 mm (11 x 17 in.)
original documents with superfine resolution.
• Pages per Side: To set the quantity, touch On, then touch the plus (+) or minus (-) icons. Or
to disable the option, touch Off.
• Starting Rate: Select from G3 Auto, Forced 4800 bps, or G4 Auto.
• Transmission Header Text: Touch Off or Display Header.
AAddddiinngg AAddddrreessss BBooookk EEnnttrriieess
The address book can store email, server, fax, and Internet fax addresses. Addresses can be stored for
individuals, or groups that contain multiple individuals.
Note: Address Book entries can also be managed in CentreWare Internet Services. For details,
refer to the System Administrator Guide at www.xerox.com/support. Enter Xerox Color EC70
Printer in the Search field, then select the required documentation.
AAddddiinngg aann IInnddiivviidduuaall AAddddrreessss
1. At the control panel, press the Machine Status button.
2. On the touch screen, touch the Tools tab.
3. Touch Setup and Calibration, touch Setup, then touch Add Address Book Entry.
4. On the next screen, touch an available address in the scroll list.
5. Touch Address Type, touch the required address type, then touch Save. Each address book type
requires different settings.
6. Touch each needed item in the list, enter the information using the alphanumeric keypad or
touch screen keyboard, then touch Save.
7. When all the required settings are configured, to complete the address book entry, touch Save.
DDeelleettiinngg aann IInnddiivviidduuaall AAddddrreessss
1. At the control panel, press the Machine Status button.
2. On the touch screen, touch the Tools tab.
3. Touch Setup and Calibration, touch Setup, then touch Add Address Book Entry.
4. On the next screen, touch the needed address in the scroll list.
5. Touch Delete Entry, then touch Delete to confirm.
®
Xerox
EC70 Color Copier/Printer
87
User Guide

Services and Functions
AAddddiinngg aa GGrroouupp
Create a group to send a fax to multiple individuals. Groups can include both previously stored
individuals and group entries.
Note: Configure individual entries before groups can be defined.
1. At the control panel, press the Machine Status button.
2. On the touch screen, touch the Tools tab.
3. Touch Setup and Calibration, touch Setup, then touch Create Fax Group Recipients.
4. On the next screen, touch an available group in the scrolling list.
5. On the next screen, touch the Group Name field, use the touch screen keyboard to enter a name
for the group, then touch Save.
6. Touch the Speed Dial field, then use the alphanumeric keypad to enter the Speed Dial number
for the required individual.
7. Touch Add to this Group.
8. Repeat steps 6 and 7 until all individuals are added to the group.
9. When all entries are added, touch Save, then touch Close.
DDeelleettiinngg aa GGrroouupp
1. At the control panel, press the Machine Status button.
2. On the touch screen, touch the Tools tab.
3. Touch Setup and Calibration, touch Setup, then touch Create Fax Group Recipients.
4. On the next screen, touch the required group in the scrolling list.
5. Touch Delete, then touch Delete to confirm.
UUssiinngg CChhaaiinn DDiiaall
Chain Dial adds two or more fax numbers together into a single number to create a single fax
recipient telephone number. For example, an area code or extension number can be stored separately
from the rest of the telephone number. Access Chain Dial from the Address Book.
1. On the control panel touch screen, touch Fax.
2. Touch Address Book.
3. From the menu, touch List all public entries.
4. Touch Chain Dial.
5. To add numbers, perform one of the following:
• From the list, touch a speed dial entry. Use the scroll arrows if necessary.
• Use the alphanumeric keypad to enter a number.
• Touch the keyboard button, use the touch screen keyboard to enter a number, then touch
Save.
6. Touch Add.
The numbers are added in the recipients list.
88
Xerox®EC70 Color Copier/Printer
User Guide

Services and Functions
7. Touch Save.
The combined number appears as a single recipient in the recipients list.
8. Touch Close.
The fax is ready to send.
CCrreeaattiinngg FFaaxx CCoommmmeennttss
1. At the control panel, press the Machine Status button.
2. On the touch screen, touch the Tools tab.
3. Touch Setup, then touch Add Fax Comment.
4. On the next screen, touch an available comment in the scroll list.
5. On the touch screen keyboard, enter up to an 18 character comment, then touch Save.
6. Touch Close. The comment is ready to use.
Xerox
®
EC70 Color Copier/Printer
User Guide
89

Services and Functions
90
Xerox®EC70 Color Copier/Printer
User Guide

4
Paper and Media
This chapter contains:
• Supported Media ....... .... .... .... ........................... .... .... .... ........................... .... .... .......................... 92
• Loading Media.. ....................... .... .... .... ........................... .... .... ................................... ................ 97
The printer is designed to be used with a variety of media types. To ensure the best print quality and
to avoid jams, follow the guidelines in this section. For best results, use Xerox printing media specified
for the printer.
Xerox®EC70 Color Copier/Printer
User Guide
91

Paper and Media
Supported Media
RReeccoommmmeennddeedd MMeeddiiaa
A complete list of recommended media types is available at:
• http://www.xerox.com/printer-supplies/recommended-paper/enus.html.
• http://www.xerox.co.uk/printer-supplies/printer-papers/engb.html. Select Colour Presses and select
the appropriate Production device.
GGeenneerraall MMeeddiiaa LLooaaddiinngg GGuuiiddeelliinneess
When loading paper and media in the appropriate trays, follow these guidelines:
• Fan paper before loading it in the paper tray.
• Do not overfill the paper trays. Do not load paper above the maximum fill line in the tray.
• Adjust the paper guides to fit the paper size.
• Use only paper envelopes. Print envelopes one-sided only. Use Tray five to print an envelope and
set Media Type to Heavyweight two.
• Ensure that the correct paper type is selected on the touch screen of the printer after loading
paper in a tray.
PPrriinnttiinngg oorr CCooppyyiinngg oonn LLaabbeellss
Labels can be printed from Tray 1, Tray 2, Tray 3, Tray 4, and Tray 5 (Bypass).
When you print on labels, adhere to the following guidelines:
• Rotate stock frequently. Long periods of storage in extreme conditions can cause labels to curl and
jam in the printer.
• Use labels designed for laser printing.
• Do not use vinyl labels.
• Do not use dry gum labels.
• Print only on one side of the sheet of labels.
• Do not use any sheet where labels are missing. It damages the printer.
• Store unused labels flat in their original packaging. Leave the sheets of labels inside the original
packaging until ready to use. Return any unused sheets of labels to the original packaging and
reseal it.
• Do not store labels in dry or humid conditions or hot or cold conditions. Storing them in extreme
conditions cause print quality problems or cause them to jam in the printer.
PPrriinnttiinngg oorr CCooppyyiinngg oonn GGlloossssyy PPaappeerr
Glossy paper can be printed from Tray 1, Tray 2, Tray 3, Tray 4, and Tray 5 (Bypass).
When you print on glossy paper, adhere to the following guidelines:
92
Xerox®EC70 Color Copier/Printer
User Guide

Paper and Media
• Do not open sealed packages of glossy paper until you are ready to load them into the printer.
• Store glossy paper flat in the original packaging.
• Before you load the glossy paper, remove all other paper from the tray.
• Load only the amount of glossy paper you plan to use. Remove the unused portion from the tray
when you are finished printing. Replace the unused portion in the original wrapper and seal for
later use.
• Rotate stock frequently. Long periods of storage in extreme conditions can cause glossy paper to
curl and jam in the printer.
MMeeddiiaa TThhaatt CCaann DDaammaaggee YYoouurr PPrriinntteerr
The printer is designed to use various paper and media types for print jobs. However, some media can
cause poor output quality, increased paper jams, or damage to the printer.
Do not use the following:
• Rough or porous media
• Inkjet paper
• Paper that has been photocopied
• Paper that has been folded or wrinkled
• Paper with cutouts or perforations
• Stapled paper
• Envelopes with windows, metal clasps, side seams, or adhesives with release strips
• Padded envelopes
• Plastic media
PPaappeerr SSttoorraaggee GGuuiiddeelliinneess
To contribute to optimum print quality, you can provide good storage conditions for the paper and
other media.
• Store paper in dark, cool, and relatively dry locations. Most paper is susceptible to damage from
ultraviolet and visible light. The sun and fluorescent bulbs emit ultraviolet light, which can damage
the paper.
• The intensity and length of exposure to visible light on paper is reduced as much as possible.
• Maintain constant temperatures and relative humidity.
• Avoid storing paper in attics, kitchens, garages, or basements. These spaces are more likely to
collect moisture.
• Store paper flat, either on pallets, cartons, shelves, or in cabinets.
• Avoid having food or drinks in the area where paper is stored or handled.
• Do not open sealed packages of paper until you are ready to load them into the printer. Leave
stored paper in the original packaging. The paper wrapper usually contains an inner lining that
protects the paper from moisture loss or gain.
®
Xerox
EC70 Color Copier/Printer
User Guide
93

Paper and Media
• Some specialty media is packaged inside resealable plastic bags. Store the media inside the bag
until you are ready to use it. Keep unused media in the bag and reseal it for protection.
PPaappeerr TTyyppeess aanndd WWeeiigghhttss AAcccceepptteedd iinn TTrraayyss
When you load media in a paper tray, refer to the following chart for the paper types and weights
that are accepted in each of the feeder paper trays available. Depending on the media you plan to
use, select the appropriate tray.
Note: The Oversize High Capacity Feeder (OHCF) provides the best feeding performance,
especially for coated media.
You can select Paper Type weight range in one of two ways:
• Select the Paper Type from the following table and apply the proper weight range using the
options available from the Control Panel screen, or
• Select Other Media Selection and select the specific media weight range from the available list
on the Control Panel screen. Some features such as Printing Reports or Auto Tray Switching can be
limited.
Note: To define the image-quality setting with a different paper weight range to optimize
image quality, refer to the Paper Tray Settings in the System Administrator Guide.
Paper Trays Accepted Types and Weights
All Trays Other Media Selection
All Trays (cont.)
All Trays (cont.)
Plain (64–79 g/m
Plain Reloaded (64–79 g/m
Recycled (64–79 g/m
Hole Punched (64–79 g/m
Pre-Printed
Letterhead
Other Type
Heavyweight 1 (106–128 g/m
HW 1 Reloaded (106–128 g/m
Heavyweight 2(177–220 g/m
HW 2 Reloaded (177–220 g/m
Heavyweight 3 (221–256 g/m
HW 3 Reloaded (221–256 g/m
Hole Punched HW 1 (106–128 g/m
Hole Punched HW 2 (177–220 g/m
Hole Punched HW 3 (221–256 g/m
Coated 1 (106–128 g/m
Coated 1 Reloaded (106–128 g/m
2
)*
2
)*
2
)*
2
)*
2
)*
2
2
)
2
2
)
2
2
)*
)*
)
)
2
)*
2
)
2
)
2
)*
94
Xerox®EC70 Color Copier/Printer
User Guide

Paper Trays Accepted Types and Weights
Coated 2 (151–176 g/m2)*
Paper and Media
All Trays (cont.)
Trays 5, 6, 7, OHCF
Coated 2 Reloaded (151–176 g/m
Labels (106–128 g/m
2
)*
Heavyweight Labels (177–220 g/m
2
Tab Stock (106–128 g/m
HW Tab Stock (177–220 g/m
X-HW Tab Stock (221–256 g/m
Custom Type 1 (64–79 g/m
Custom Type 2 (64–79 g/m
Custom Type 3 (64–79 g/m
Custom Type 4 (64–79 g/m
Custom Type 5 (64–79 g/m
Heavyweight 4 (257–300 g/m
HW 4 Reloaded (257–300 g/m
)*
2
)
2
)
2
)
2
)
2
)
2
)
2
)
2
)
2
)
Hole Punched HW 4 (257–300 g/m
Coated 3 (221–256 g/m
2
)*
Coated 3 Reloaded (221–256 g/m
X-HW Labels (221–256 g/m
2
)*
2
)*
2
)
2
)
2
)*
Tray 5 Transparency
Transfer (129–150 g/m
X-HW Tab Stock (257–300 g/m
2
)*
2
)
Note: *Media weight for the Paper Type displayed on the user interface is limited. To optimize
image quality, change the weight range. Refer to the Paper Tray Settings in the System
Administrator Guide.
TTrraayy CCaappaabbiilliittiieess
• Trays 1 and 2 can each hold up to 500 sheets of 90 g/m2paper.
• Trays 1, 2, 3, and 4 can accept all paper from 60–220 g/m
• Tray 1 can accommodate paper sizes from SRA3, (5.5 x 8.5–12 x 18 in.).
• Tray 2 can accommodate paper sizes from A3, (5.5 x 8.5–11 x 17 in.).
• Tray 3 can hold up to 870 sheets of 90 g/m
2
paper.
• Tray 3 can accommodate paper sizes that include A4, (8.5 x 11 in.), (7.25 x 10.5 in.), and B5.
• Tray 4 can hold up to 1140 sheets of 90 g/m
2
paper.
2
.
Xerox
®
EC70 Color Copier/Printer
User Guide
95

Paper and Media
• Tray 4 can accommodate paper sizes that include A4, (8.5 x 11 in.), (7.25 x 10.5 in.), and B5.
96
Xerox®EC70 Color Copier/Printer
User Guide

Paper and Media
Loading Media
LLooaaddiinngg PPaappeerr iinn TTrraayyss 11––44
To load paper:
Note: Do not open all trays at once. The printer can topple forward, possibly causing injury.
Note: Do not load paper above the maximum fill line. Doing so can cause paper jams.
1. Pull the paper tray out towards you until it stops.
2. Before you load paper into the paper trays, fan the edges to separate any sheets of paper that
are stuck together. It reduces the possibility of paper jams.
3. If necessary, move the paper tray guides further out to load the new paper. To adjust the side
and front guides, pinch the guide lever on each guide and slide the guides to their new position.
To secure the guides in position, release the levers.
4. Load the paper against the left-hand side of the tray.
5. Adjust the guides so they touch the edges of the stack.
6. Push the tray completely into the printer.
Xerox
®
EC70 Color Copier/Printer
User Guide
97

Paper and Media
7. If you have changed the media type, select an option on the Control Panel touch screen:
• To choose paper size, type, or color, touch Paper Supply.
• To choose a specific paper stock, touch Paper Catalog.
8. Touch Save and Confirm.
9. If you have not changed the media type, to retain the previous settings, touch Cancel.
LLooaaddiinngg PPaappeerr iinn TTrraayy 55 ((BByyppaassss))
Use the bypass tray for various media types and custom sizes. It is intended primarily for small
quantity jobs using special media. The bypass tray is on the left-hand side of the printer. A tray
extension is provided to accommodate larger paper. After loading paper in the bypass tray, ensure
that the tray settings on the touch screen match the paper size and type loaded.
Tray Capabilities
• Tray 5 can hold up to 250 sheets of 90 g/m
• Tray 5 can accept paper from 64–300 g/m
• Tray 5 can accommodate paper sizes from SRA3, (4 x 6–13.2 x 19.2 in.).
To load paper in Tray 5 (Bypass Tray):
2
2
.
paper.
Note: Do not load paper or media above the maximum fill line.
1. Open Tray 5 and pull out the extension tray for larger sizes. If already opened, remove any paper
that is a different size or type.
2. Move the width guides to the edges of the tray.
3. Insert the paper either long-edge or short-edge first, face up. Larger paper sizes can be fed only
short-edge first. Load punched paper with holes to the right. Load labels and transparencies face
up with top edge towards the front of the tray.
98
Xerox®EC70 Color Copier/Printer
User Guide

Paper and Media
4. Adjust the width guides until they just touch the edges of the stack.
5. If necessary, select an option on the Control Panel touch screen:
• To choose paper size, type, or color, touch Paper Supply.
• To choose a specific paper stock, touch Paper Catalog.
6. Touch Save and Confirm.
7. If you have not changed the media type, to retain the previous settings, touch Cancel.
LLooaaddiinngg EEnnvveellooppeess iinn TTrraayy 55 ((BByyppaassss))
Tray 5 accepts Monarch and Commercial 10 envelopes with paper weights of 75–90 g/m2.
To load envelopes in Tray 5 (Bypass):
1. Insert envelopes in Tray 5 (Bypass) long-edge feed (LEF) with the flaps open and at the trailing
edge.
2. Adjust the guides until they touch the edges of the stack.
3. Choose the envelope size on the touch screen of the printer, then touch Confirm.
If the envelope size does not appear, touch Change Settings. Select HeavyWeight 2 as the
Media Type and Custom Size.
To enter the envelope size, use the + and - symbols. Touch Save.
Note: To prevent jams, do not load more than 30–50 envelopes in the bypass tray.
Note: Never use envelopes with windows or metal clasps because they can damage the
printer. Damage caused by the use of unsupported envelopes is not covered under the
Xerox warranty, service agreement, or Total Satisfaction Guarantee. The Total Satisfaction
Guarantee is available in the United States and Canada. Coverage can vary outside these
areas. For more details, contact your local representative.
• Successful envelope printing depends on the quality and construction of the envelopes. If the
necessary results are not achieved, try another envelope brand.
• Maintain constant temperatures and relative humidity.
• Store unused envelopes in their original packaging to avoid the excess moisture or dryness, which
can affect print quality and cause wrinkling. Excessive moisture can cause the envelopes to seal
before or during printing.
• Do not use padded envelopes.
• When you print on envelopes, some wrinkling or embossing can occur.
®
Xerox
EC70 Color Copier/Printer
User Guide
99

Paper and Media
LLooaaddiinngg PPaappeerr iinn tthhee HHiigghh CCaappaacciittyy FFeeeeddeerr
The optional High Capacity Feeder (HCF) is intended for use primarily as a large quantity feeder and
accommodates A4 (8.5 x 11 in.) Long Edge Feed (LEF) stock. The High Capacity Feeder can hold
paper of weights from 64–220 g/m
sheets of 75 g/m
Note: Stock can be loaded long-edge feed (LEF) only.
Note: Do not load paper or media above the maximum fill line.
1. Slowly pull out the tray toward you until it stops.
2. Fan the sheets before you load them into the tray.
3. Load and register the stack of paper or media against the right side of the tray.
4. Move the paper guide so that it just touches the edges of the stack.
5. After stock is loaded into the High Capacity Feeder, a pop-up window appears that asks you to
change or confirm the type and size of the stock. The tray is not ready for use until you change or
confirm the size and type of stock.
6. If you have changed the media type, on the control panel touch screen, select an option:
• To choose the paper size, type, or color, touch Paper Supply.
• To choose a specific paper stock, touch Paper Catalog.
2
(20 lb.) paper.
2
(18 lb. bond–80 lb. cover), and can hold a maximum of 2000
7. Touch Save, then touch Confirm.
8. If did not change the media type, touch Confirm.
LLooaaddiinngg PPaappeerr iinn tthhee OOvveerrssiizzeedd HHiigghh CCaappaacciittyy FFeeeeddeerr
The optional Oversized High Capacity Feeder (OHCF) provides an alternative to the HCF. The OHCF
feeds oversized stock up to SRA, 330 x 488 mm (13 x 19 in.) paper, 64–300 g/m
cover) stock. Each tray holds 2000 sheets of standard weight paper. The OHCF can be either a 1-tray
or a 2-tray feeder.
Note: Do not load paper or media above the maximum fill line.
Note: The paper weight switches work in conjunction with the blowers in the trays. The blowers
help control environmental conditions in the paper trays and ensure optimum feed capability.
1. Slowly pull out the tray toward you until it stops.
2
(18 lb. bond–110 lb.
100
Xerox®EC70 Color Copier/Printer
User Guide
 Loading...