


Version 1.0
February 2013
702P00982
Xerox® Color C75 Press
Quick Start Guide

©2012 Xerox Corporation. All rights reserved. Xerox®, and Xerox and Design® are
trademarks of Xerox Corporation in the United States and/or other countries.
BR4006

Table of Contents
1 Product overview........................................................................................1-1
User Interface (UI)..............................................................................................................1-2
Power on/off...........................................................................................................................1-3
Two power switches...............................................................................................1-3
Power on.....................................................................................................................1-3
Power off....................................................................................................................1-4
2 Copy................................................................................................................2-1
Basic copy using the document feeder.......................................................................2-1
Basic copy using the document glass..........................................................................2-2
3 Where to find help....................................................................................3-1
Help on the World Wide Web..........................................................................................3-1
Print server customer documentation.........................................................................3-1
4 Paper and other media...........................................................................4-1
Loading paper in trays 1, 2, and 3.................................................................................4-1
Loading paper in the Bypass tray (Tray 5).................................................................4-2
5 Replacing consumable supplies...........................................................5-1
Ordering supplies.................................................................................................................5-1
Replacing a toner cartridge..............................................................................................5-2
Quick Start Guide
iXerox® Color C75 Press

Table of Contents
Xerox® Color C75 Pressii
Quick Start Guide

1
Product overview
This machine is a full color/black and white copier and network printer that operates at
a speed of 75 copies/prints per minute.
Quick Start Guide
1-1Xerox® Color C75 Press
Product overview
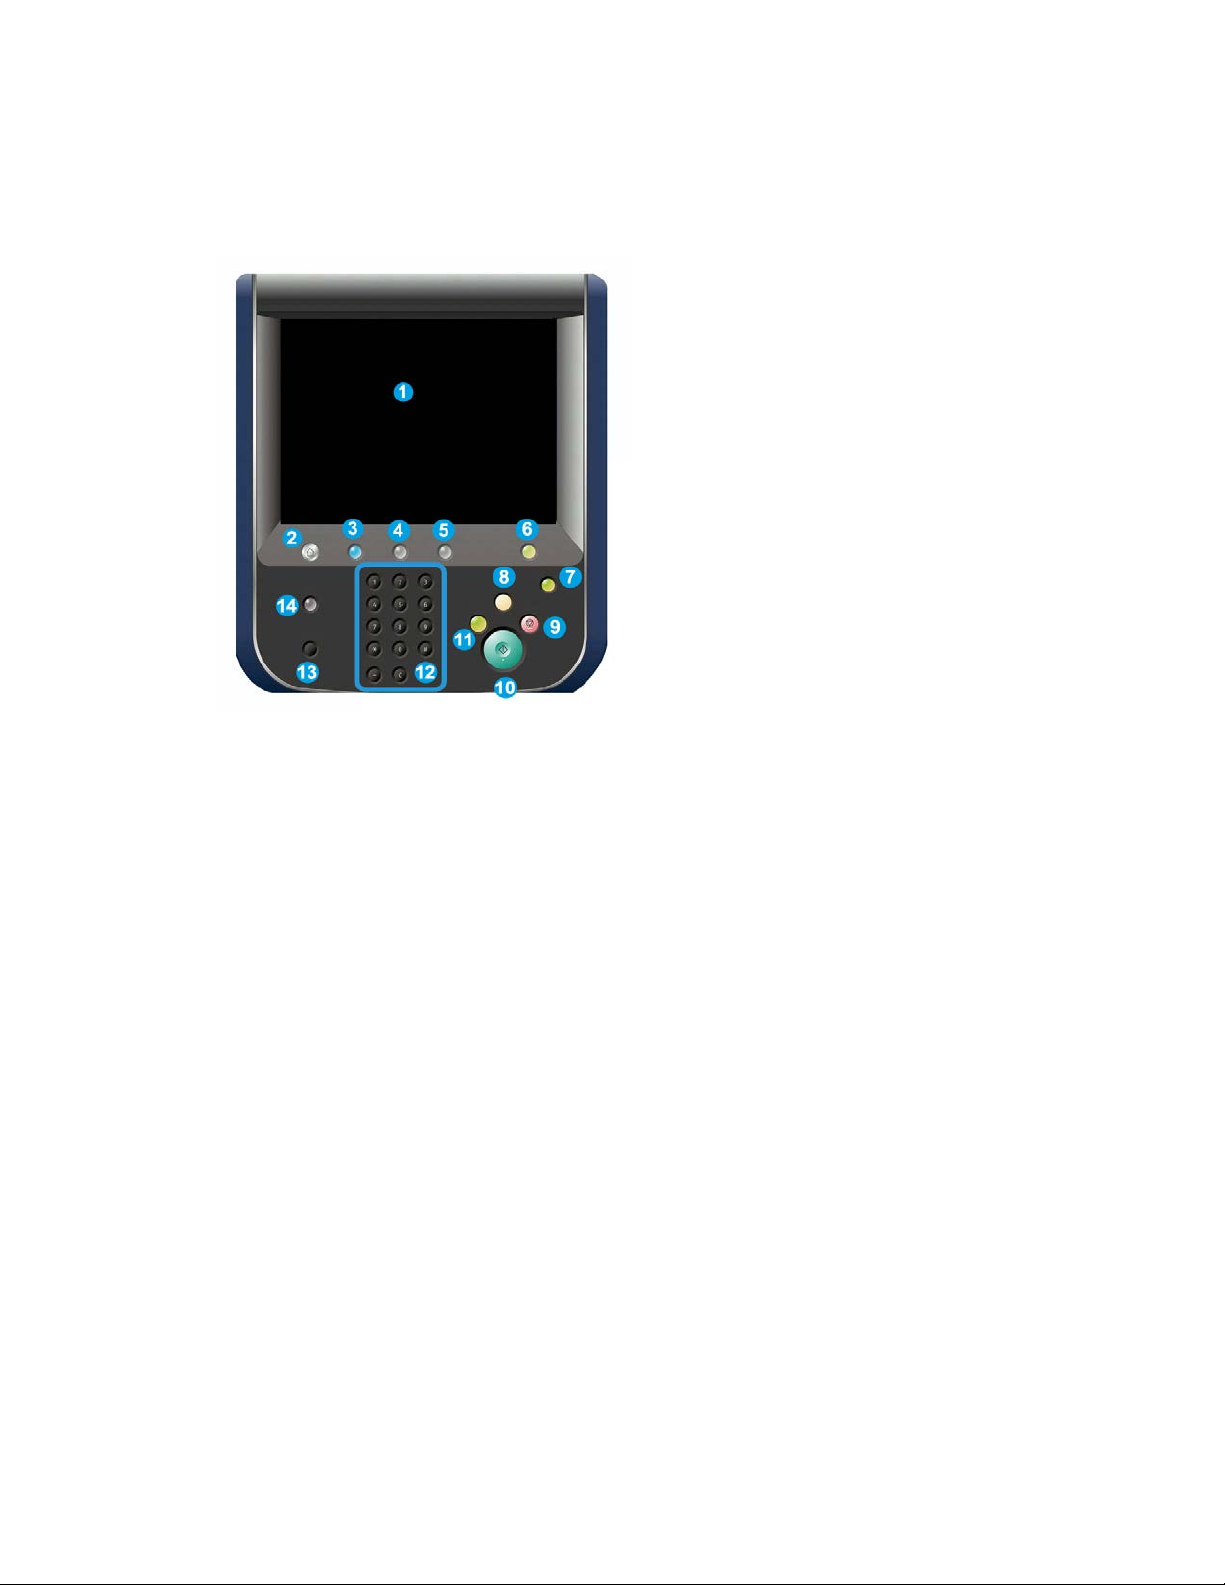
User Interface (UI)
1. Touch screen
2. Services Home
3. Services
4. Job Status
5. Machine Status
6. Log In/Out
7. Energy Saver
8. Clear All
9. Stop
10. Start
11. Interrupt
12. Keypad
13. Language
14. Help
Xerox® Color C75 Press1-2
Quick Start Guide
Power on/off
Two power switches
Product overview
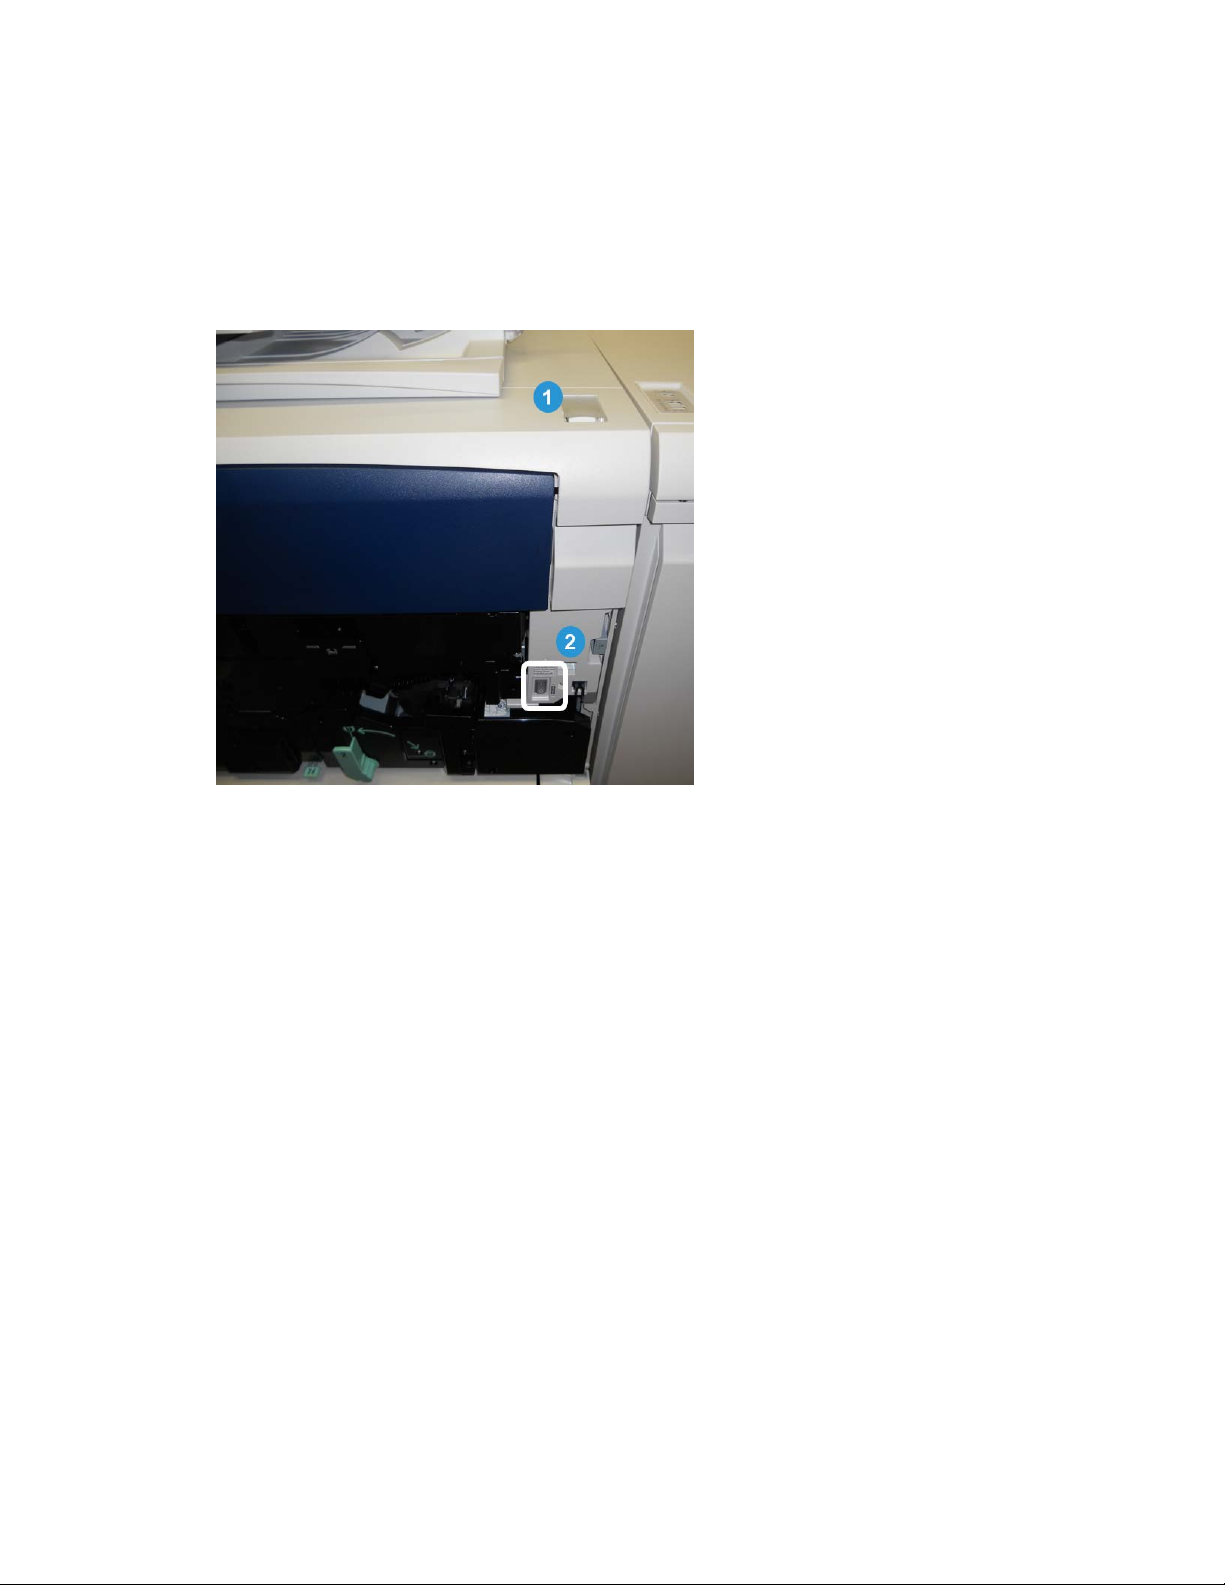
The machine has two power switches:
1. Power switch: Use this switch to turn on or turn off the machine.
2. Main power switch: This switch is located behind the front door/cover. It is used
mainly by the Xerox Service Representative when servicing the machine. In rare
problem solving cases, you may be directed to power off the machine with this
switch.
Important
Always power off the Power Switch first and then power off the Main Power Switch.
Power on
After turning the power on, the machine takes approximately 3 minutes to warm up
before you can start making copies.
Quick Start Guide
1-3Xerox® Color C75 Press
Product overview
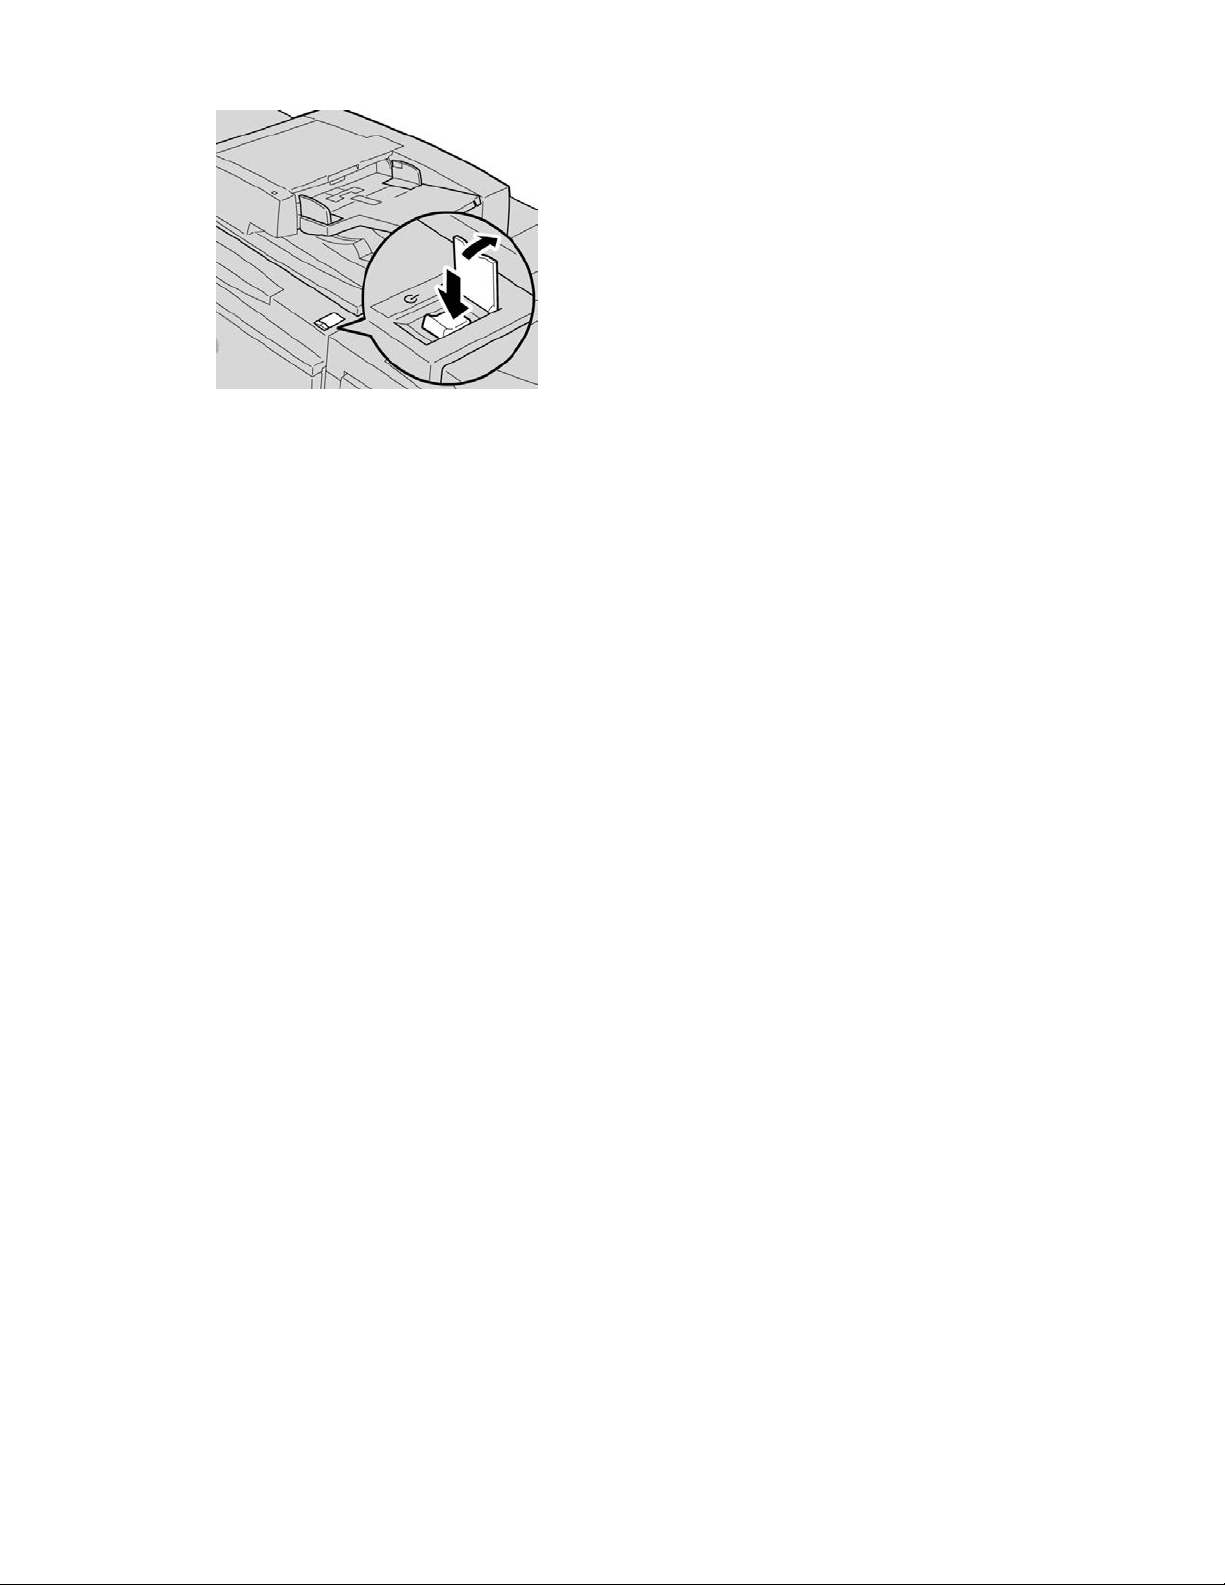
1. Open the cover.
2. Press the power switch to the On position.
The Please wait... message indicates that the machine is warming up. The machine
cannot be used while it is warming up.
Power off
1. Press the power switch to the Off position.
2. Verify that the UI display is turned off completely, before turning on the machine
again.
Xerox® Color C75 Press1-4
Quick Start Guide

2
Copy
Basic copy using the document feeder
1. Adjust the movable document guides to their widest position.
2. Load the documents face up with the first page on top and with the headings toward
the back or left of the machine.
The confirmation indicator lights to show that the documents are loaded correctly.
3. Press the Services Home button.
4. Select Copy on the Services Home screen.
5. From the Copy screen, select the desired features/options.
2-1Xerox® Color C75 Press
Quick Start Guide

Copy
• Reduce/Enlarge
• Paper Supply
• Output Color
• Copy Output
• 2-Sided Copying
• Original Type
• Lighten/Darken
The features displayed on the main Copy screen vary depending on how the main
Copy screen is configured by the administrator.
6. Enter the quantity.
7. Press Start.
Basic copy using the document glass
1. Open the document feeder.
2. Place the document face down by aligning it as shown in the illustration.
3. Press the Services Home button.
4. Select Copy on the Services Home screen.
5. From the Copy screen, select the desired features/options.
• Reduce/Enlarge
• Paper Supply
Xerox® Color C75 Press2-2
Quick Start Guide

• Output Color
• Copy Output
• 2-Sided Copying
• Original Type
• Lighten/Darken
The features displayed on the main Copy screen vary depending on how the main
Copy screen is configured by the administrator.
6. Enter the quantity.
7. Press Start.
Copy
Quick Start Guide
2-3Xerox® Color C75 Press

Copy
Xerox® Color C75 Press2-4
Quick Start Guide

3
Where to find help
Help on the World Wide Web
Xerox on the World Wide Web: For system support, user help, customer documentation,
and service support, go to www.xerox.com and click the Contact Us link for specific
contact information/telephone numbers in your area.
Note
You can get the latest customer documentation updates for your product by going to
www.xerox.com. Be sure to periodically check this website for the latest information on
your product.
It may be helpful to know your machine serial number before calling for support. The
machine serial number is shown on the Machine Information tab: Machine Status >
Machine Information.
Print server customer documentation
Supporting customer documentation for your print server is on a CD/DVD and is shipped
with the print server. You or your System Administrator should print these documents,
after the installation is complete.
Quick Start Guide
3-1Xerox® Color C75 Press

Where to find help
Xerox® Color C75 Press3-2
Quick Start Guide

Paper and other media
Loading paper in trays 1, 2, and 3
Note
A paper jam may occur if a tray is opened while it is being used to feed stock.
1. Select the appropriate paper stock for your print job.
2. Pull out the tray slowly until it stops.
3. Open the ream of paper with the seam side facing up.
4. Fan the sheets before loading them into the tray.
5. Load and align the edge of the paper against the left edge of the tray.
4
Paper can be loaded either in the LEF/portrait or SEF/landscape direction.
6. Adjust the paper guides by pressing in the guide release and carefully moving the
Edge Guide until it lightly touches the edge of the material in the tray.
Do not load materials above the MAX line located on the rear Edge Guide.
7. Gently push in the tray until it comes to a stop.
If enabled by your System Administrator, the Paper Tray settings screen may be
displayed on the UI.
Quick Start Guide
4-1Xerox® Color C75 Press

Paper and other media
8. If changes have been made to the paper tray, select the Change Settings button;
otherwise, proceed to the next step.
a) Make the desired selections for Paper Type/Paper Weight, Paper Size, and Paper
Color.
b) If necessary, make the desired changes to paper curl and alignment adjustment.
Note
Refer to the System Administration Guide for detailed information on the paper
curl and alignment adjustment options.
c) Select Save until you are returned to the tray settings window.
9. Select Confirm to close the window.
Loading paper in the Bypass tray (Tray 5)
1. Gently extend the Bypass tray (Tray 5) as necessary to accommodate the paper.
2. Hold the center of the paper guides and slide them to the desired paper size.
3. Select the appropriate paper stock for your print job.
4. Open the ream of paper with the seam side facing up.
5. Fan the sheets before loading them into the tray.
6. Insert the paper or media into the tray until it stops.
Xerox® Color C75 Press4-2
Quick Start Guide

Paper and other media
7. Adjust the paper guides so that they touch the edges of the stack.
If enabled by your System Administrator, the Paper Tray settings screen may be
displayed on the UI.
8. If changes have been made to the paper tray, select the Change Settings button;
otherwise, proceed to the next step.
a) Make the desired selections for Paper Type/Paper Weight, Paper Size, and Paper
Color.
b) If necessary, make the desired changes to paper curl and alignment adjustment.
Note
Refer to the System Administration Guide for detailed information on the paper
curl and alignment adjustment options.
c) Select Save until you are returned to the tray settings window.
9. Select Confirm to close the window.
Quick Start Guide
4-3Xerox® Color C75 Press

Paper and other media
Xerox® Color C75 Press4-4
Quick Start Guide

5
Replacing consumable supplies
Ordering supplies
Xerox supplies, paper, and throughput material can be ordered from Xerox by going to
www.xerox.com and clicking on either the Contact Us link for specific contact
information/telephone numbers in your area or by clicking on the Supplies and
entering/selecting your specific machine information (product family and model type).
Store supply items and Xerox parts in their original packages in a convenient location.
Note
Always refer to www.xerox.com for the latest Customer Replaceable Units (CRUs) part
numbers.
The following items are consumables for this machine. It is recommended that you have
a supply of these items available to eliminate downtime when they need to be replaced.
Customer Replaceable Units (CRUs)
Toner/dry ink cartridges
• Black Toner Cartridge; reorder quantity: 2/box
• Cyan Toner Cartridge; reorder quantity: 1/box
• Magenta Toner Cartridge; reorder quantity: 1/box
• Yellow Toner Cartridge; reorder quantity: 1/box
Quick Start Guide
5-1Xerox® Color C75 Press

Replacing consumable supplies
Customer Replaceable Units (CRUs)
Drum cartridges
• Black Drum Cartridge; reorder quantity: 1/box
• Cyan Drum Cartridge; reorder quantity: 1/box
• Magenta Drum Cartridge; reorder quantity: 1/box
• Yellow Drum Cartridge; reorder quantity: 1/box
Other CRUs
• Toner Waste Bottle; reorder quantity: 1/box
• Fuser Module; reorder quantity: 1/box
Replacing a toner cartridge
Warning
Replace a toner cartridge while the machine is ON. Before replacing a cartridge, ensure
that the machine is given time to cool down. Failure to do so may result in burns to the
skin if certain parts of the machine are touched.
1. Open the toner cover, located just above the machine front door/cover.
2. Lay paper on the floor before removing the cartridge. This will allow any excess toner
to fall on the paper.
Xerox® Color C75 Press5-2
Quick Start Guide

Replacing consumable supplies
3. Grasp the handle of the color indicated in the message.
4. Remove the toner cartridge by gently pulling it straight out. Be careful to not get
toner on clothing.
5. Dispose the old toner cartridge as normal office waste or recycle the cartridge.
6. Remove the new toner cartridge from its packaging.
7. Gently tilt the new cartridge up and down and then left and right to redistribute the
toner.
8. Install the new toner cartridge by aligning the arrows on the cartridge evenly with
the printer, and gently sliding the cartridge into the machine until you hear a click.
Quick Start Guide
5-3Xerox® Color C75 Press

Replacing consumable supplies
9. Close the toner cover. If the cover does not close completely, make sure the cartridge
is in the lock position and is installed into the appropriate toner location.
Caution
Never use a vacuum cleaner when cleaning up spilled toner. It can cause a small
explosion as the toner fills the vacuum cleaner and creates sparks. Use a broom,
brush, or a cloth moistened with a neutral detergent.
Xerox® Color C75 Press5-4
Quick Start Guide

Index
C
Copy 2-1
Customer Replaceable Units (CRUs) 5-1
D
Document feeder
basic copying using the document feeder
2-1
Document glass
basic copying using the document glass
2-2
H
Help 3-1
on the Print server customer
documentation CD/DVD 3-1
on the World Wide Web 3-1
O
loading paper in Trays 1, 2, and3 4-1
Power
power switch
power button
power on
power off
R
Replacing consumable supplies
Replacing a toner cartridge 5-2
T
Trays
loading paper in Tray 5 (Bypass)
loading paper in Tray5 (Bypass) 4-2
loading paper in Trays 1, 2, and3 4-1
U
User Interface (UI) 1-2
Ordering supplies
Customer Replaceable Units (CRUs) 5-1
P
Paper
loading paper in the Bypass tray (Tray 5)
4-2
W
World Wide Web help
www.xerox.com 3-1
Quick Start Guide
iXerox® Color C75 Press

Index
Xerox® Color C75 Pressii
Quick Start Guide


 Loading...