

Page 1

Version 1.0
February 2013
702P01129
Simple Image Quality Adjustment
Tool
Installation and Adjustments Guide
Page 2

©2013 Xerox Corporation. All rights reserved. Xerox® and Xerox and Design® are
trademarks of Xerox Corporation in the United States and/or other countries.
FreeFlow® is a trademark of Xerox Corporation in the United States and/or other
countries. Product status, build status, and/or specifications are subject to change without
notice.
Microsoft, Windows, Windows XP, Windows Vista, Internet Explorer, and Word are
registered trademarks of Microsoft Corporation in the United States and/or other
countries.
Fiery® and PrintMe® are registered trademarks of Electronics For Imaging, Inc. GBC
and AdvancedPunch™ are trademarks or registered trademarks of General Binding
Corporation.
®
Page 3

Table of Contents
1 SIQA software installation.....................................................................1-1
Installing the SIQA software on a PC..........................................................................1-1
Setting up communication between the SIQA application and the print
engine.................................................................................................................................1-5
Setting up and running SIQA software on an EX Print Server..............1-5
Setting up and running SIQA software on a PC via an EX Print
Server or Integrated Fiery Color Server...................................................1-7
Setting up and running SIQA software on a PC when a FreeFlow
Print Server is installed...................................................................................1-8
2 Auto Alignment Adjustment.................................................................2-1
3 Density Uniformity Adjustment..........................................................3-1
Installation and Adjustments Guide
iSimple Image Quality Adjustment Tool
Page 4

Table of Contents
Simple Image Quality Adjustment Toolii
Installation and Adjustments Guide
Page 5

1
SIQA software installation
The Simple Image Quality Adjustment (SIQA) software is used to perform the Auto
Alignment Adjustment and Density Uniformity Adjustment procedures.
Important
Without the installation of the SIQA software, the aforementioned procedures cannot
be performed.
The SIQA software installation process consists of the following:
1. Installing the SIQA software on a PC.
2. Setting up communication between the SIQA software application and the print
engine. This varies depending on the print server attached to your machine and
whether or not a third-party PC is being used.
Installing the SIQA software on a PC
The following requirements must be met before installing the SIQA software:
• A client PC with an operating system (OS) of Windows Vista®, Windows® XP, or
Windows 7.
- If using a Xerox® EX Print Server, Powered by Fiery® (standalone), the SIQA
software may be installed on it.
- If using a Xerox® Integrated Fiery® Color Server, the SIQA software must be
installed on a separate Windows-based PC.
- If using a Xerox®FreeFlow® Print Server, a separate Windows-based PC must
be used for installing the SIQA software.
• The SIQA software either on a USB drive or a DVD.
• The SIQA background PDF file which resides either on the USB drive or the DVD.
1. Connect the USB drive or insert the DVD into the targeted PC.
Installation and Adjustments Guide
1-1Simple Image Quality Adjustment Tool
Page 6
SIQA software installation
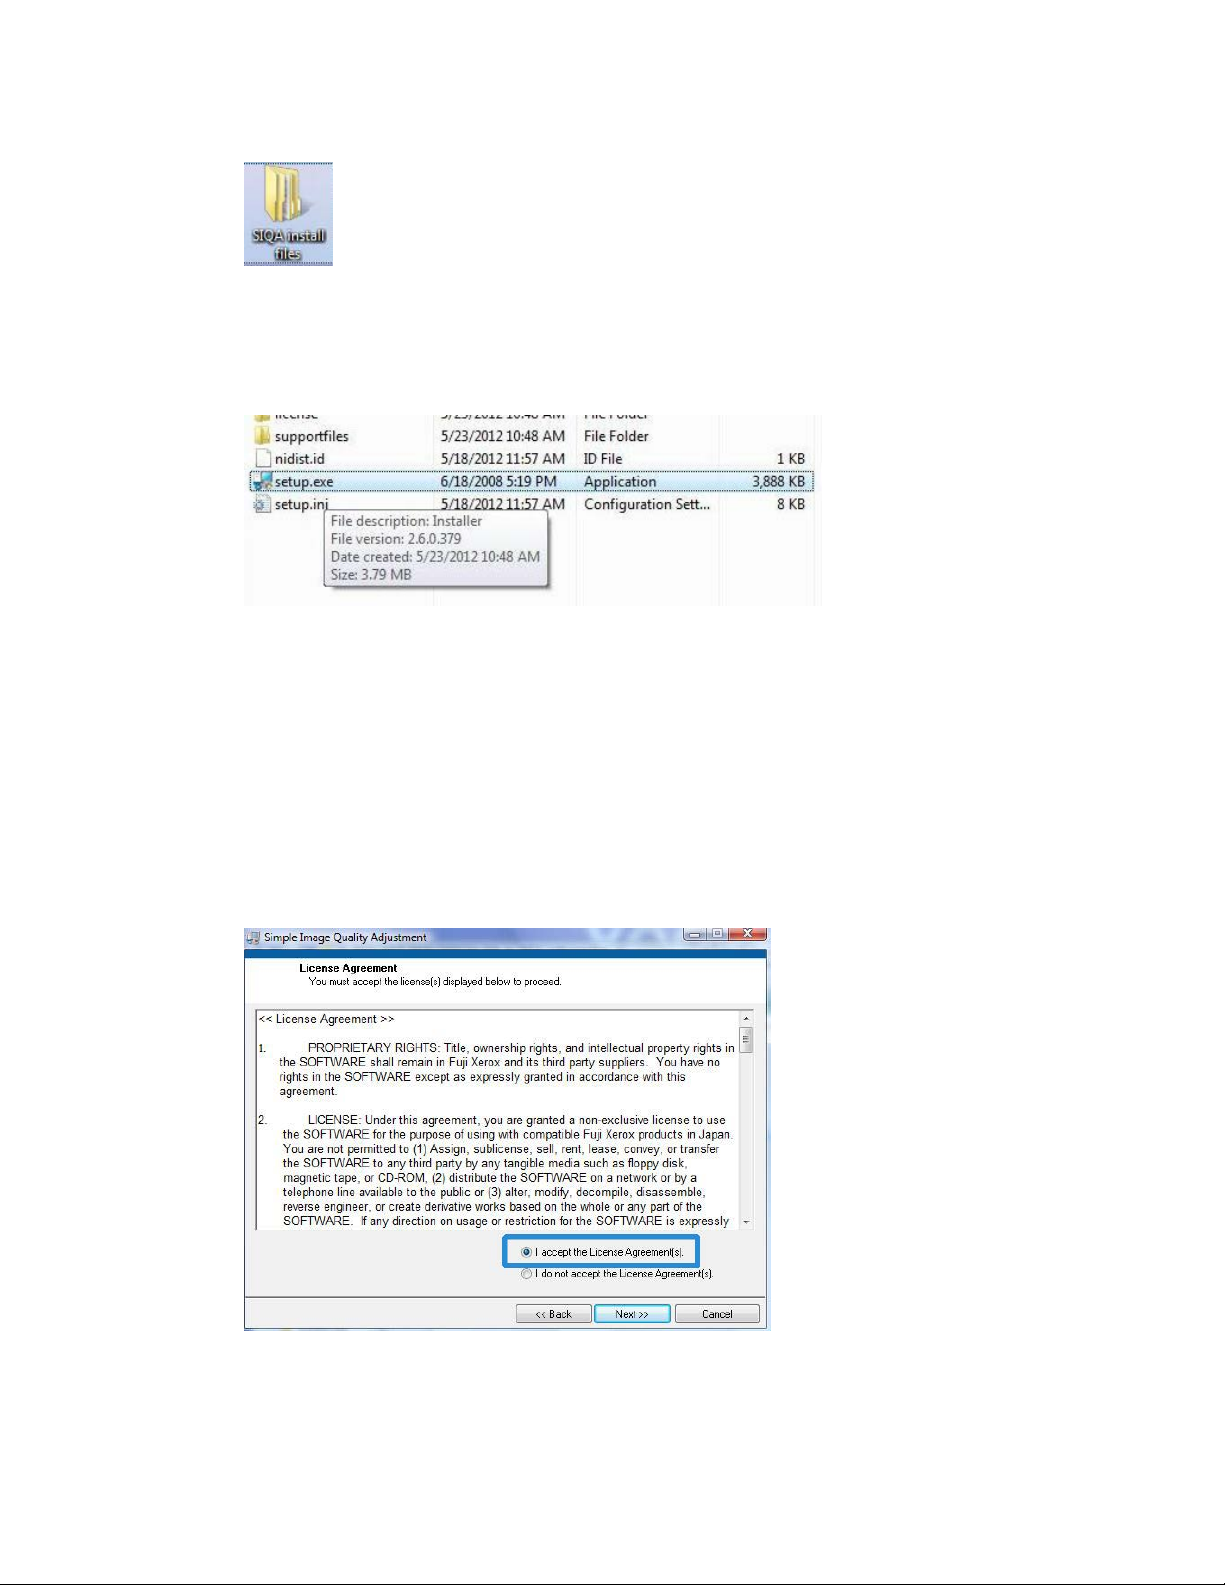
2. On the removable media, locate and open the SIQA install files folder.
3. Copy the SIQA_Software files folder onto the PC or server desktop.
4. Open the SIQA_Software files folder on the desktop.
5. Locate and double-click on the setup.exe file.
The PC may display a message stating: It is strongly recommended that you exit all
programs before running this installer. Applications that run in the background, such
as virus-scanning utilities, might cause the installer to take longer than average to
complete.
a) Select Next to continue the installation process.
b) Select Next to continue.
The License Agreement message is displayed.
6. Select the I accept the License Agreement(s) radio button.
7. Select Next to continue.
Simple Image Quality Adjustment Tool1-2
Installation and Adjustments Guide
Page 7
SIQA software installation
The Start Installation window is displayed.
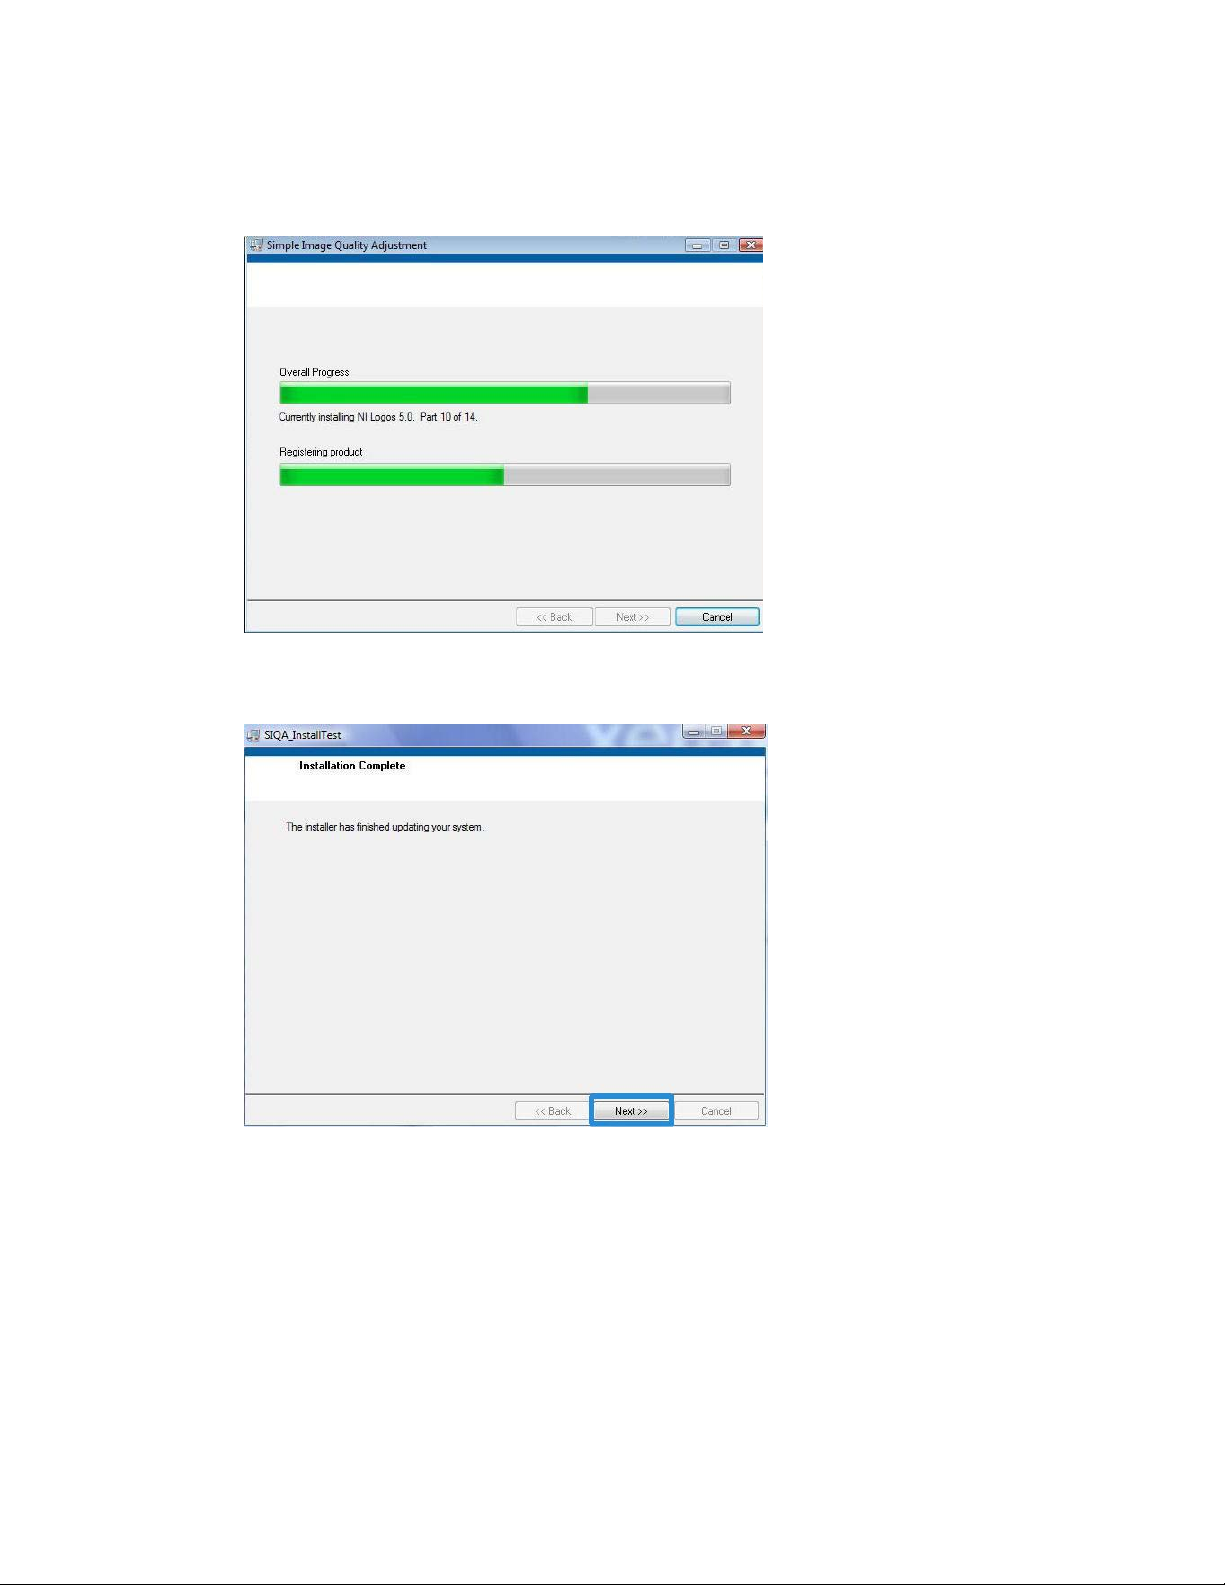
8. Select Next to continue.
A progress window is displayed as the software continues the installation process.
9. At the Installation Complete window, select Next.
Installation and Adjustments Guide
1-3Simple Image Quality Adjustment Tool
Page 8

SIQA software installation
10. Select OK when the Message window is displayed.
11. If prompted, select Restart to reboot the PC and complete the installation process.
If not prompted, go to step 13.
12. Upon completion of the PC reboot, enter a user name and password, if required.
13. If necessary, close the any open folders.
14. Create a SIQA shortcut onto the PC desktop:
a) Click the Start button and select Program > Simple Image Quality Adjustment >
SIQA.
b) Left-click the SIQA icon and drag it to the desktop.
Simple Image Quality Adjustment Tool1-4
Installation and Adjustments Guide
Page 9
SIQA software installation
Setting up communication between the SIQA application and the print engine
Setting up communication between the SIQA software application and the print engine
varies depending on the print server that is attached to the machine and whether or not
a third-party PC is being used. The procedures provided here include:
• Setting up and running SIQA software on an EX Print Server (Fiery standalone)
• Setting up and running SIQA software on a third-party PC via an EX Print Server or
an Integrated Fiery Color Server
• Setting up and running SIQA software on a third-party PC when a FreeFlow Print
Server is installed
Setting up and running SIQA software on an EX Print Server
1. Ensure that the cross-over Ethernet cable is installed and connected between the EX
Print Server and the print engine.
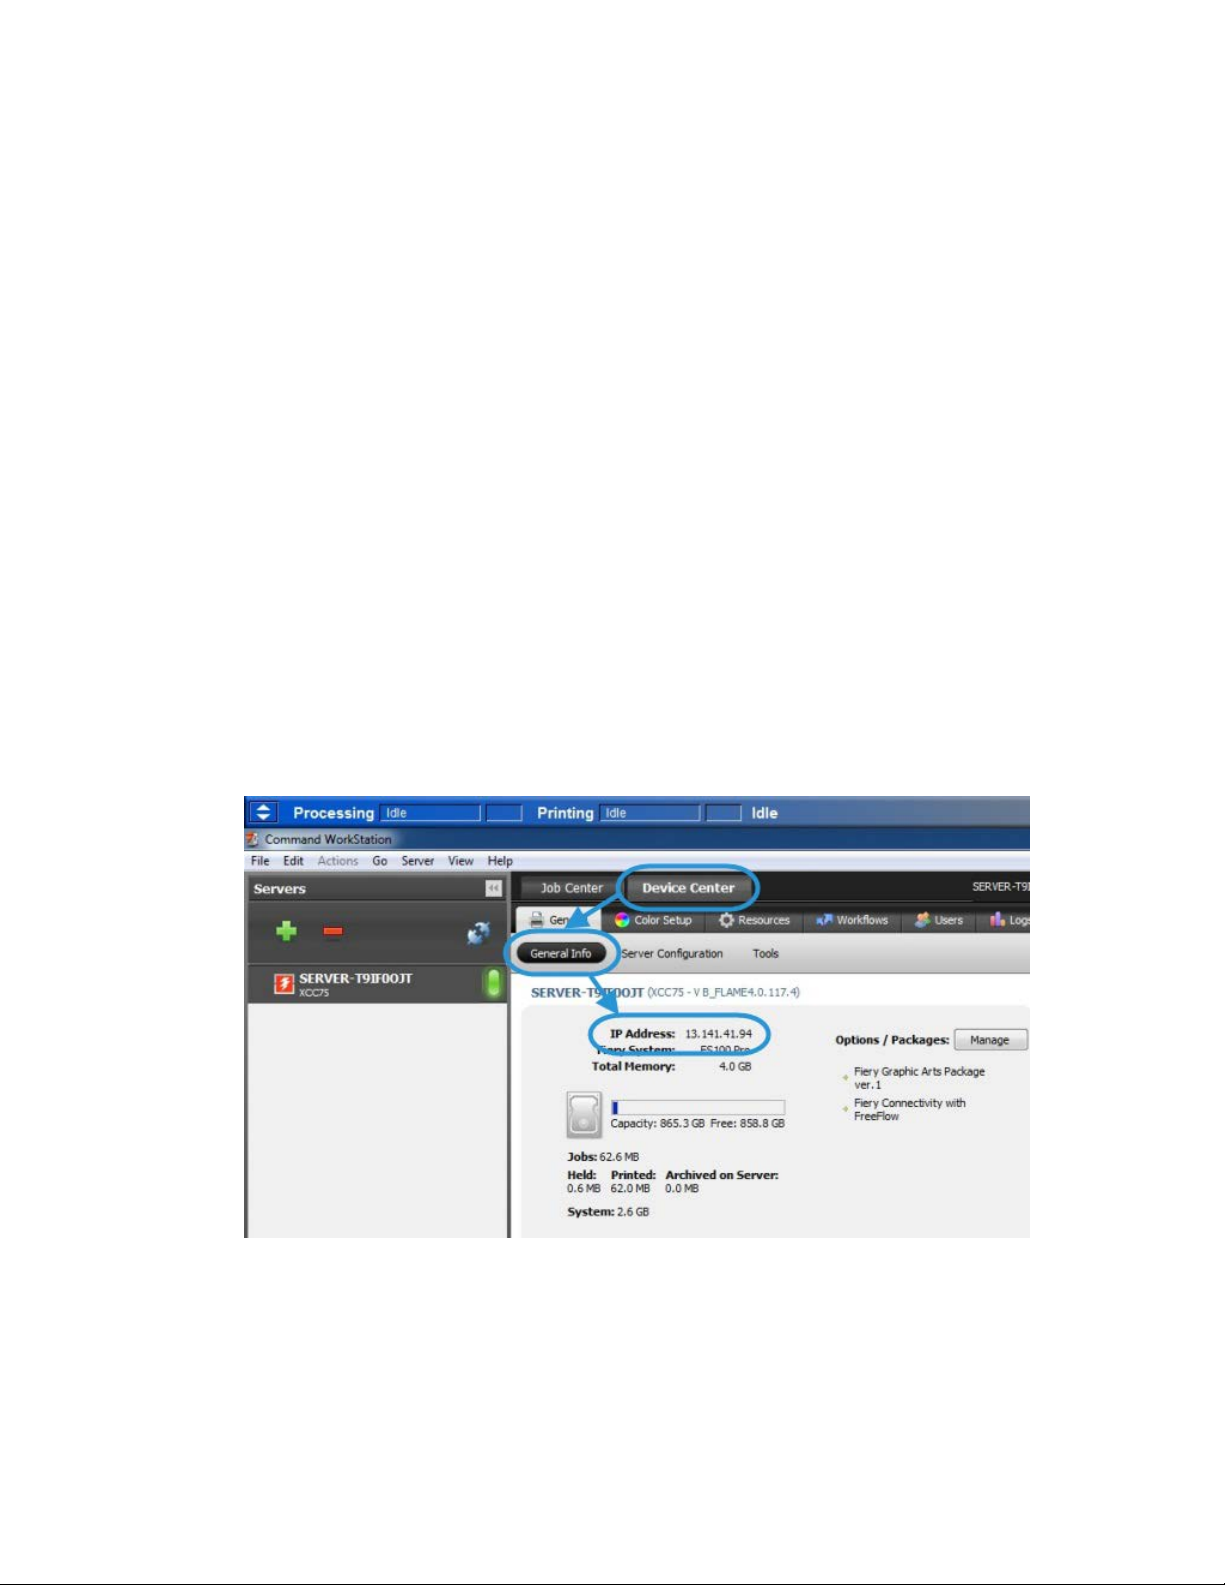
2. From the EX Print Server locate the print server IP address by selecting Command
Workstation > Device Center > General Info.
3. Record the print server IP address.
4. From the print server desktop, double-click the SIQA icon.
An Input_Address window is displayed.
Installation and Adjustments Guide
1-5Simple Image Quality Adjustment Tool
Page 10

SIQA software installation
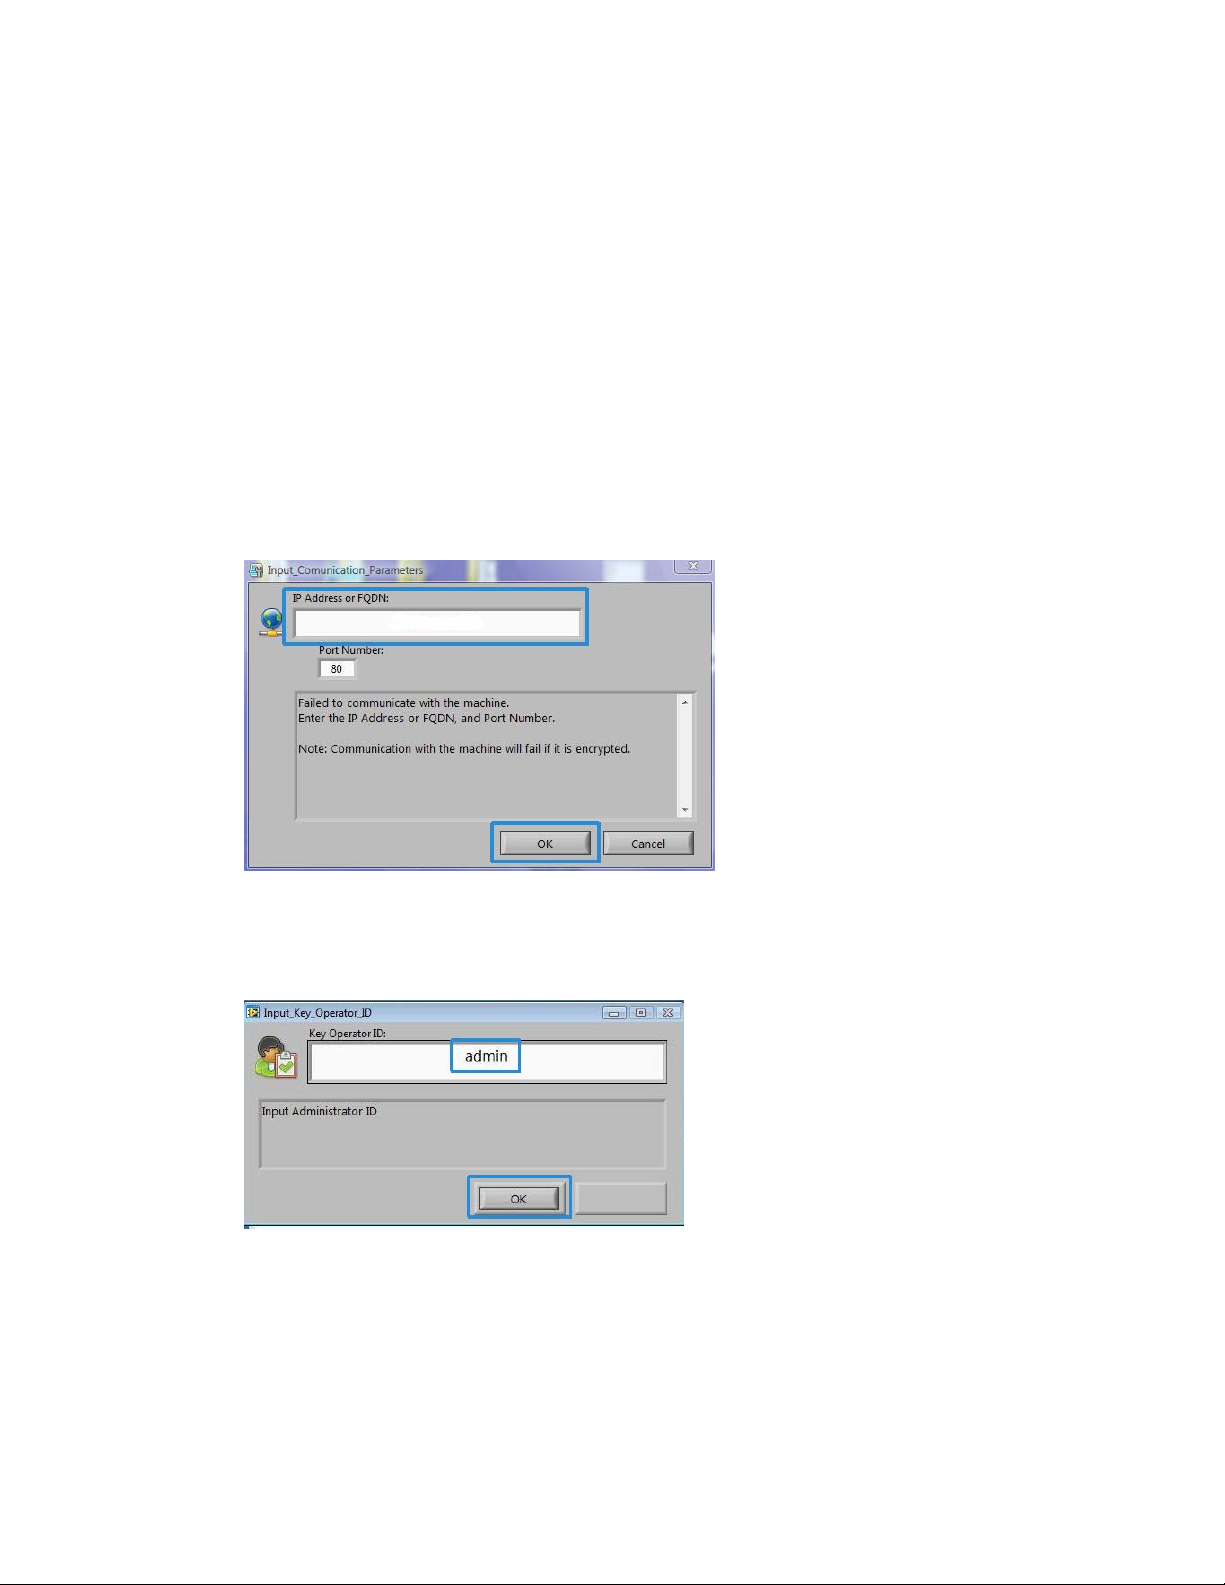
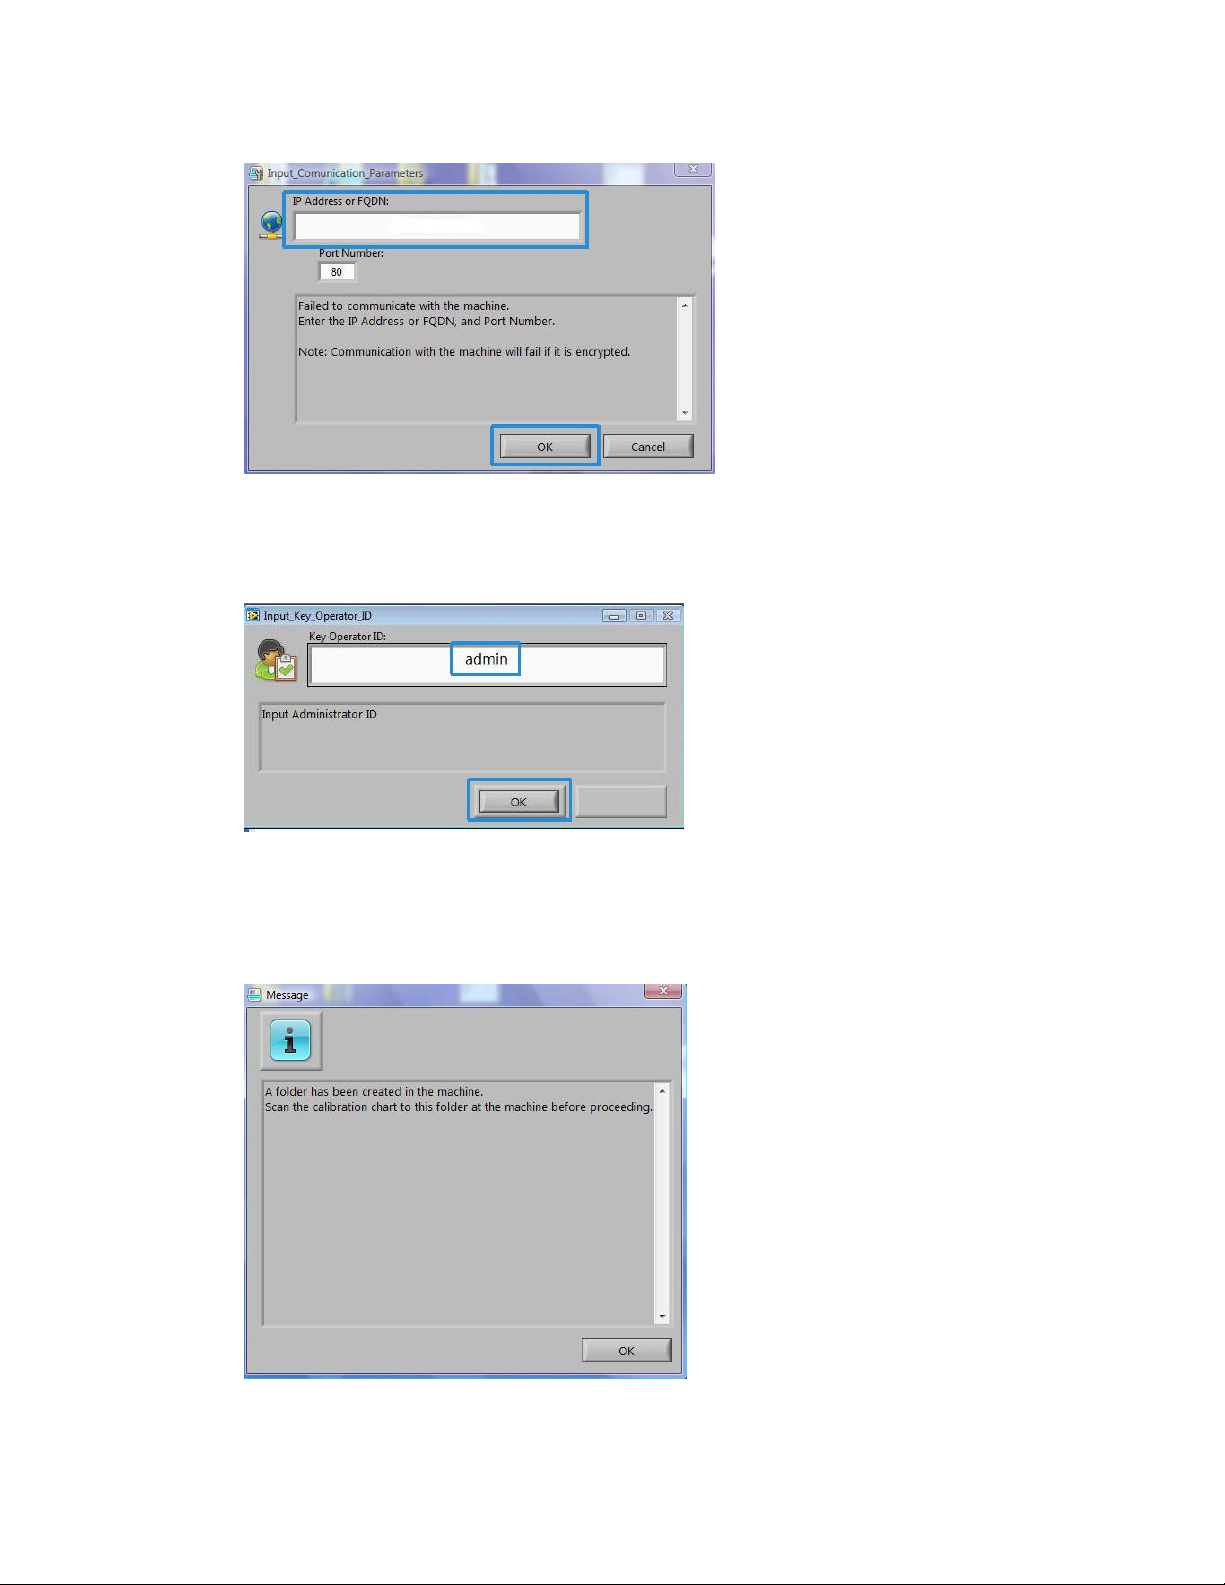
5. Enter the print server IP address and select OK.
An Input_Key_Operator_ID window is displayed.
6. Enter the key operator ID as admin and select OK.
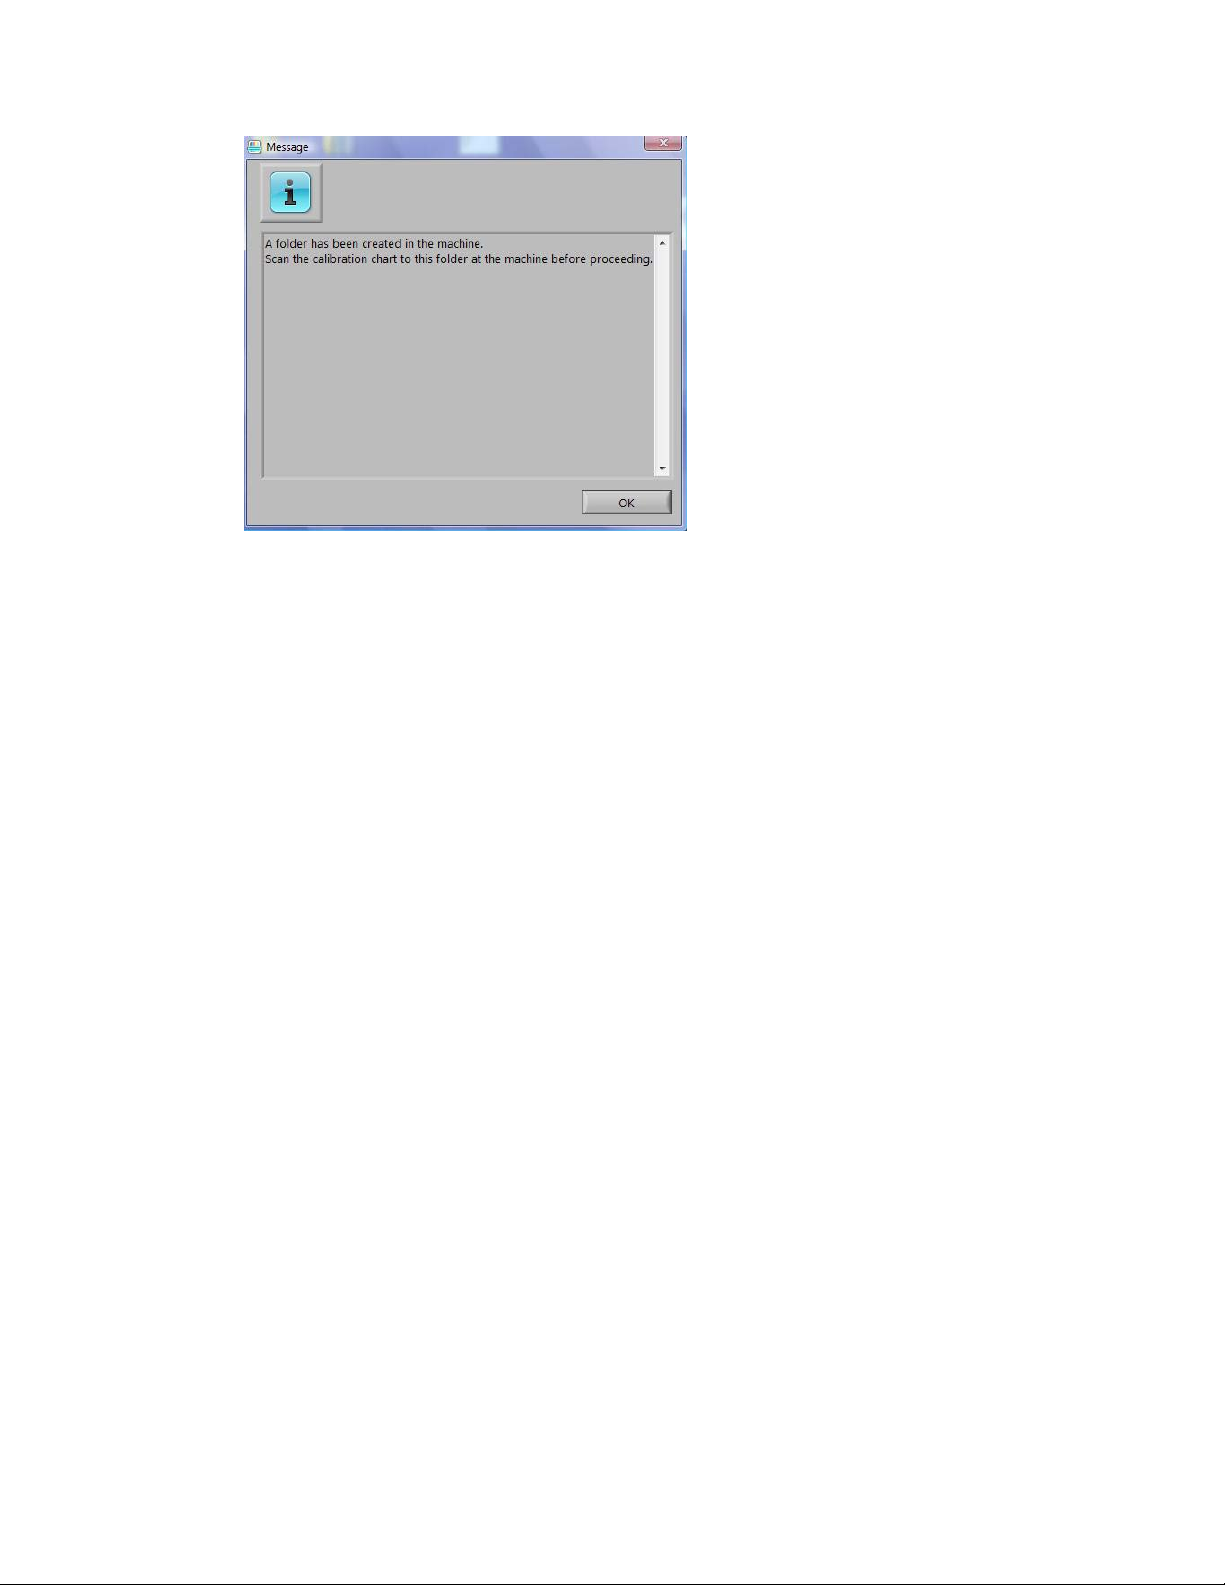
A folder will be created on the print engine hard drive saying: A folder has been
created in the machine. Scan the calibration chart to this folder at the machine before
proceeding.
Simple Image Quality Adjustment Tool1-6
Installation and Adjustments Guide
Page 11
SIQA software installation
7. Select OK.
The main SIQA window is displayed. The Auto Alignment Adjustment and/or Density
Uniformity Adjustment procedures may now be performed.
Setting up and running SIQA software on a PC via an EX Print Server or Integrated Fiery Color Server
1. Ensure that the cross-over Ethernet cable is installed and connected between the
print server and the print engine.
2. From the print server, access and record the IP address of the EFI server.
3. From the PC desktop, double-click the SIQA icon.
An Input_Address window is displayed.
4. Enter the print server IP address and select OK.
An Input_Key_Operator_ID window is displayed.
5. Enter the key operator ID as admin and select OK.
A folder will be created on the print engine hard drive saying: A folder has been
created in the machine. Scan the calibration chart to this folder at the machine before
proceeding.
Installation and Adjustments Guide
1-7Simple Image Quality Adjustment Tool
Page 12
SIQA software installation
6. Select OK.
The main SIQA window is displayed. The Auto Alignment Adjustment and/or Density
Uniformity Adjustment procedures may now be performed.
Setting up and running SIQA software on a PC when a FreeFlow Print Server is installed
1. Ensure that the hub is installed and that the three Ethernet cables are connected to
the following:
• One cable from the wall drop to the hub
• One cable from the hub to the FreeFlow Print Server
• One cable from the hub to the print engine
2. At the print engine UI record the machine’s IP address by selecting Machine Status
> Machine Information.
3. From the PC desktop, double-click the SIQA icon.
An Input_Address window is displayed.
Simple Image Quality Adjustment Tool1-8
Installation and Adjustments Guide
Page 13
4. Enter the print server IP address and select OK.
An Input_Key_Operator_ID window is displayed.
5. Enter the key operator ID as admin and select OK.
SIQA software installation
A folder will be created on the print engine hard drive saying: A folder has been
created in the machine. Scan the calibration chart to this folder at the machine before
proceeding.
Installation and Adjustments Guide
1-9Simple Image Quality Adjustment Tool
Page 14

SIQA software installation
6. Select OK.
The main SIQA window is displayed. The Auto Alignment Adjustment and/or Density
Uniformity Adjustment procedures may now be performed.
Simple Image Quality Adjustment Tool1-10
Installation and Adjustments Guide
Page 15

2
Auto Alignment Adjustment
Use this procedure to correct misalignment of the printed output. The Auto Alignment
Adjustment uses a new application called Simple Image Quality Adjustment (SIQA),
and it allows the user to easily and quickly make adjustments and correct any
misalignment on the output.
The procedure requires the installation of the SIQA (Simple Image Quality Adjustment)
application on a Windows® PC.
Note
If your print server is a Windows-based PC, the SIQA application may be installed on it;
otherwise a third-party PC is required. Contact the Customer Support Center for more
information.
This procedure also requires the black background pattern file which can be found in
the SIQA install folder.
1. Record the IP address; this will be used later in the procedure.
Installation and Adjustments Guide
2-1Simple Image Quality Adjustment Tool
Page 16

Auto Alignment Adjustment
a) If connected to a FreeFlow Print Server, obtain the IP address from the print engine
UI by selecting Machine Status > Machine Information. Record the IPv4 IP
address.
b) If connected to a standalone EX Print Server, obtain the print server IP address
either from the configuration sheet or by selecting Command Workstation >
Device Center > General.
c) If connected to an Integrated Fiery Color Server, obtain the print server IP address
from the configuration sheet.
2. Print the SIQA Doc Background test pattern, which will be used during the registration
adjustments.
Simple Image Quality Adjustment Tool2-2
Installation and Adjustments Guide
Page 17
Auto Alignment Adjustment
This pattern is a PDF file called SIQA Doc Background and is located in the SIQA
install folder.
Print the file with the following information:
• For the Xerox North America (XNA) market, print the file on 11 x 17 in. media,
2-sided. The gsm is not important, but a higher gsm results in longer tool life.
• For the Xerox European (XE) market, print the file on A3 media, 2-sided. The gsm
is not important, but a higher gsm results in longer tool life.
3. From the print engine (machine) UI, login as administrator.
a) Press the Log In/Out button on the control panel.
b) Enter the system administrator ID.
The default ID is admin, and the default password is 1111.
c) Select Enter.
4. Press the Machine Status button on the UI.
5. Select the Tools tab.
Installation and Adjustments Guide
2-3Simple Image Quality Adjustment Tool
Page 18
Auto Alignment Adjustment
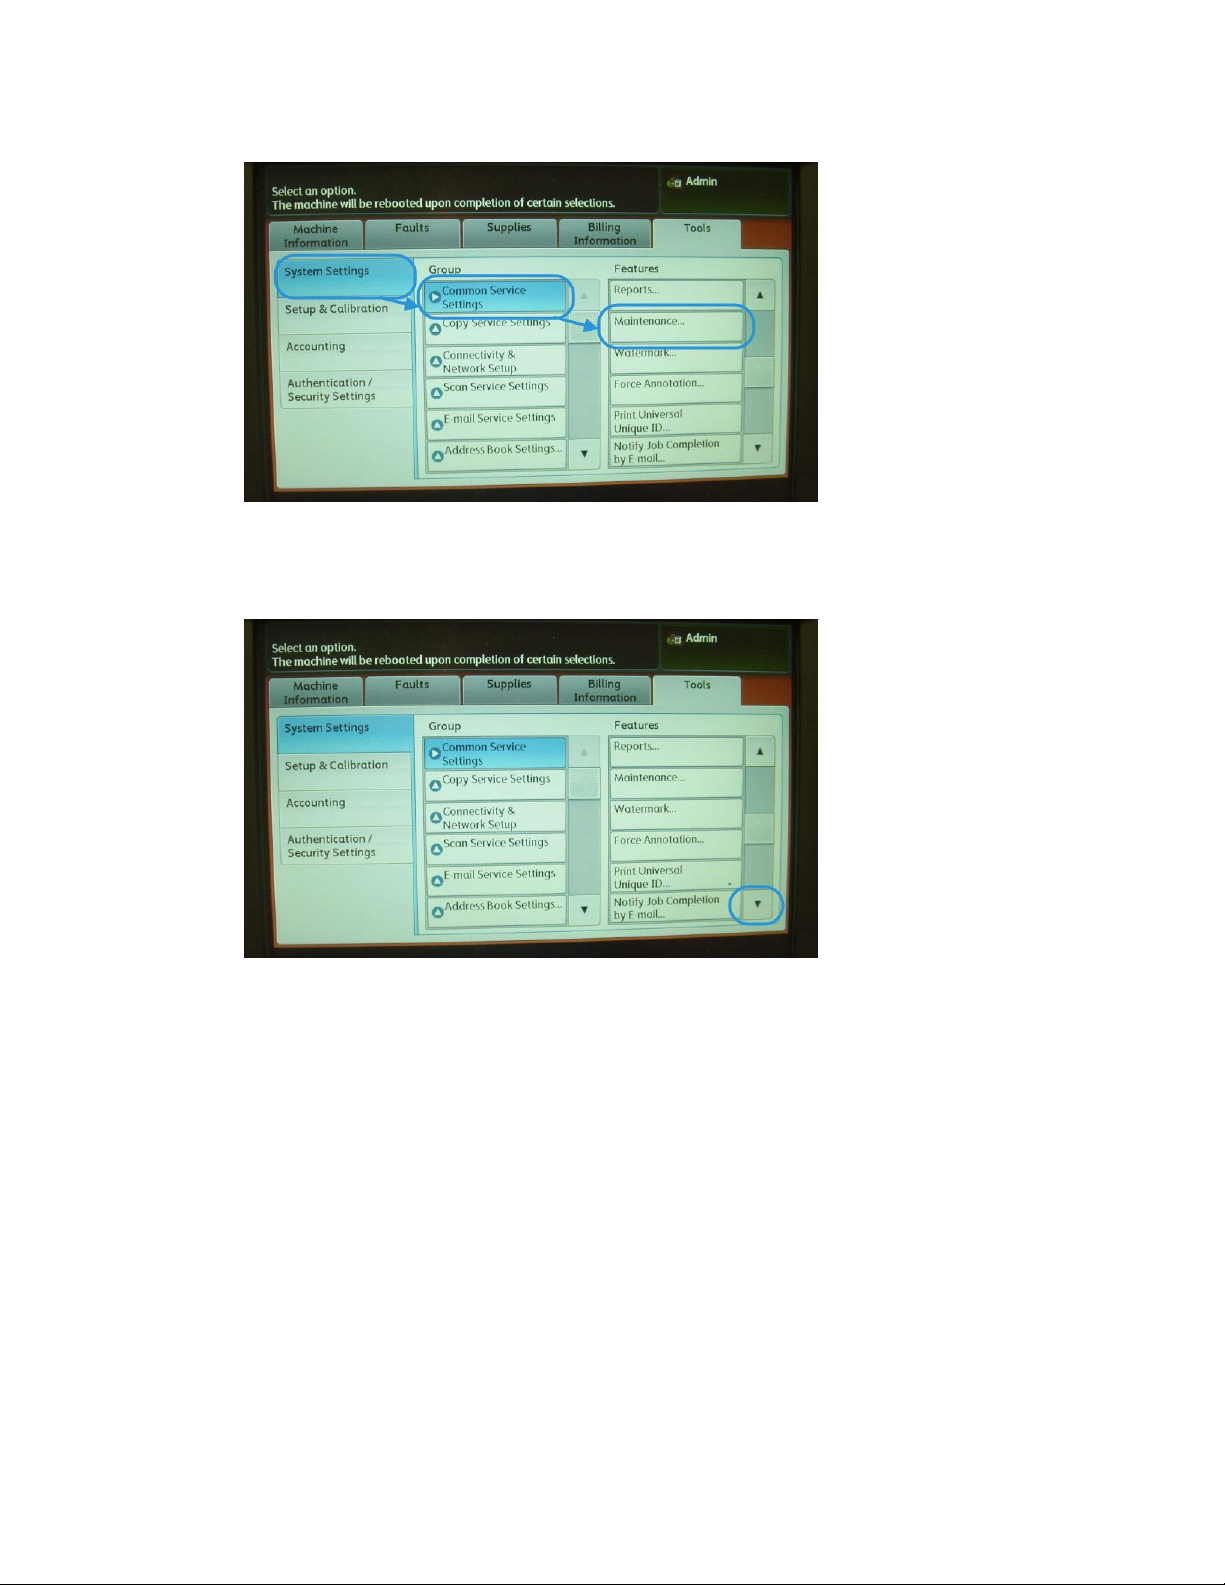
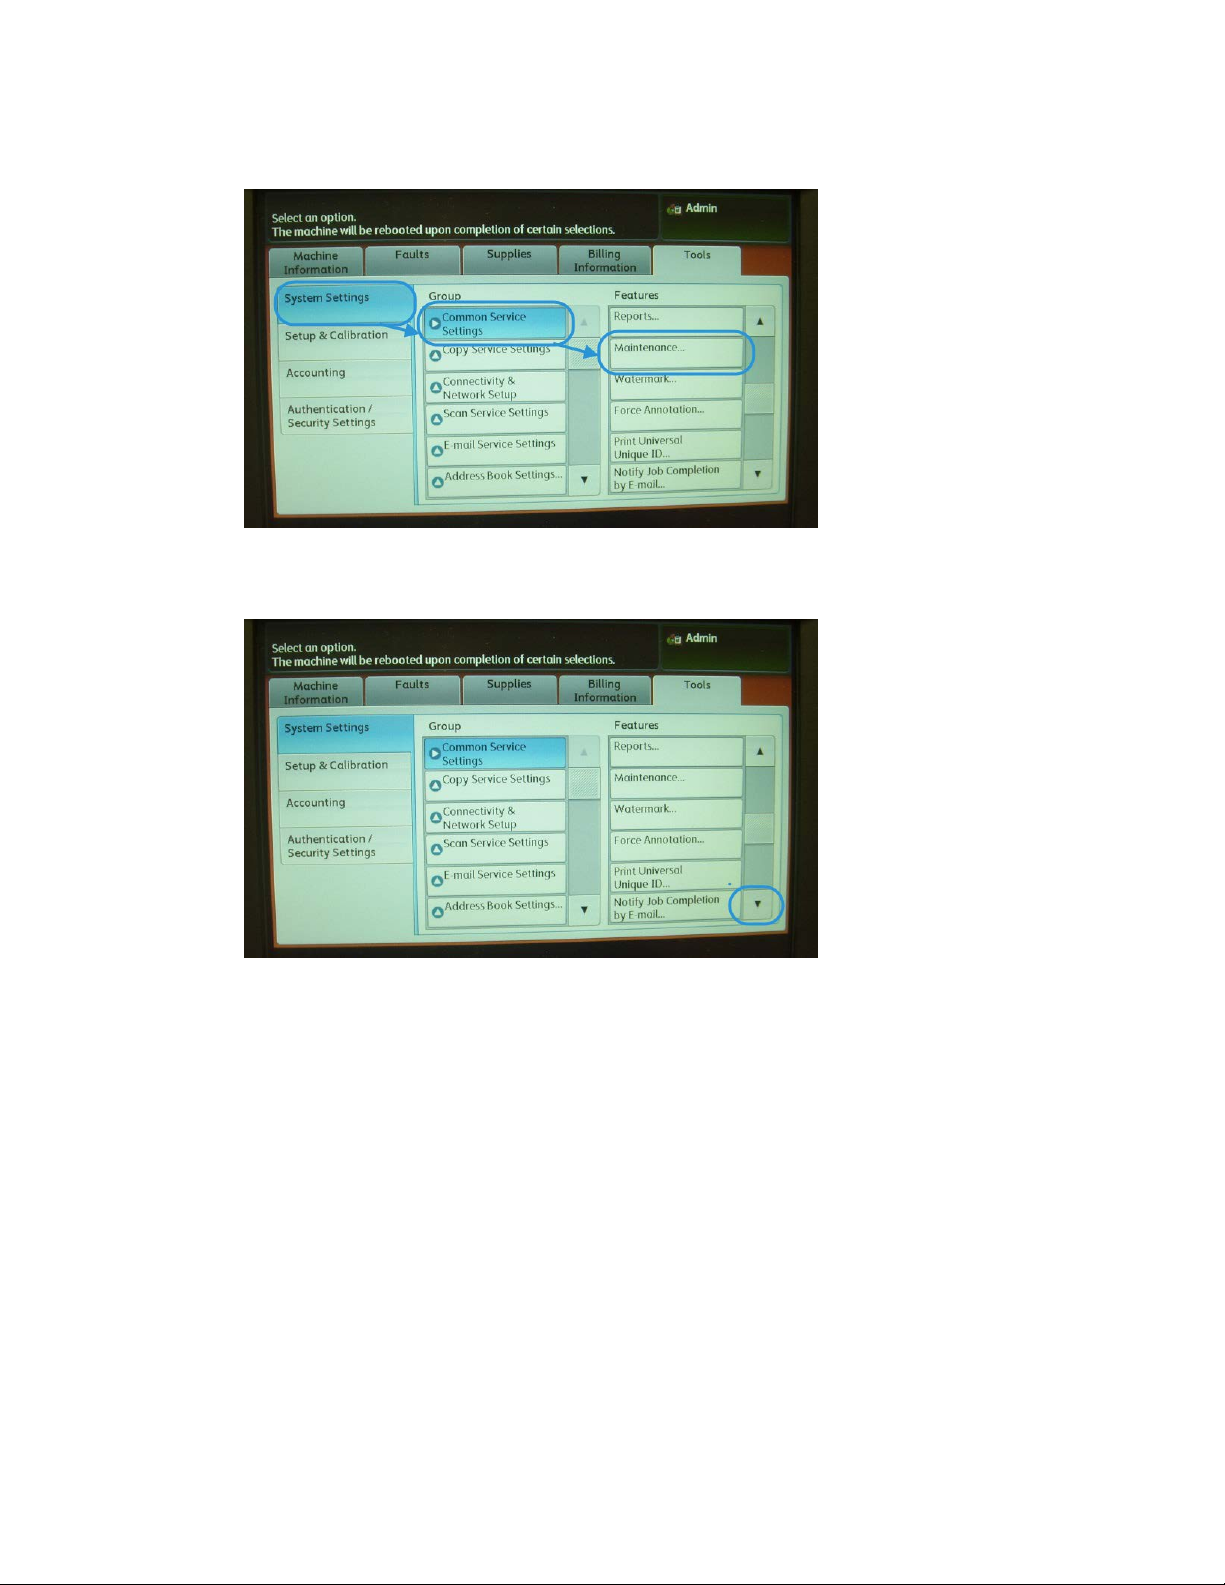
6. Select System Settings > Common Service Settings > Maintenance.
The Maintenance screen is displayed.
7. Using the down button, scroll to the next Maintenance page/screen.
Simple Image Quality Adjustment Tool2-4
Installation and Adjustments Guide
Page 19
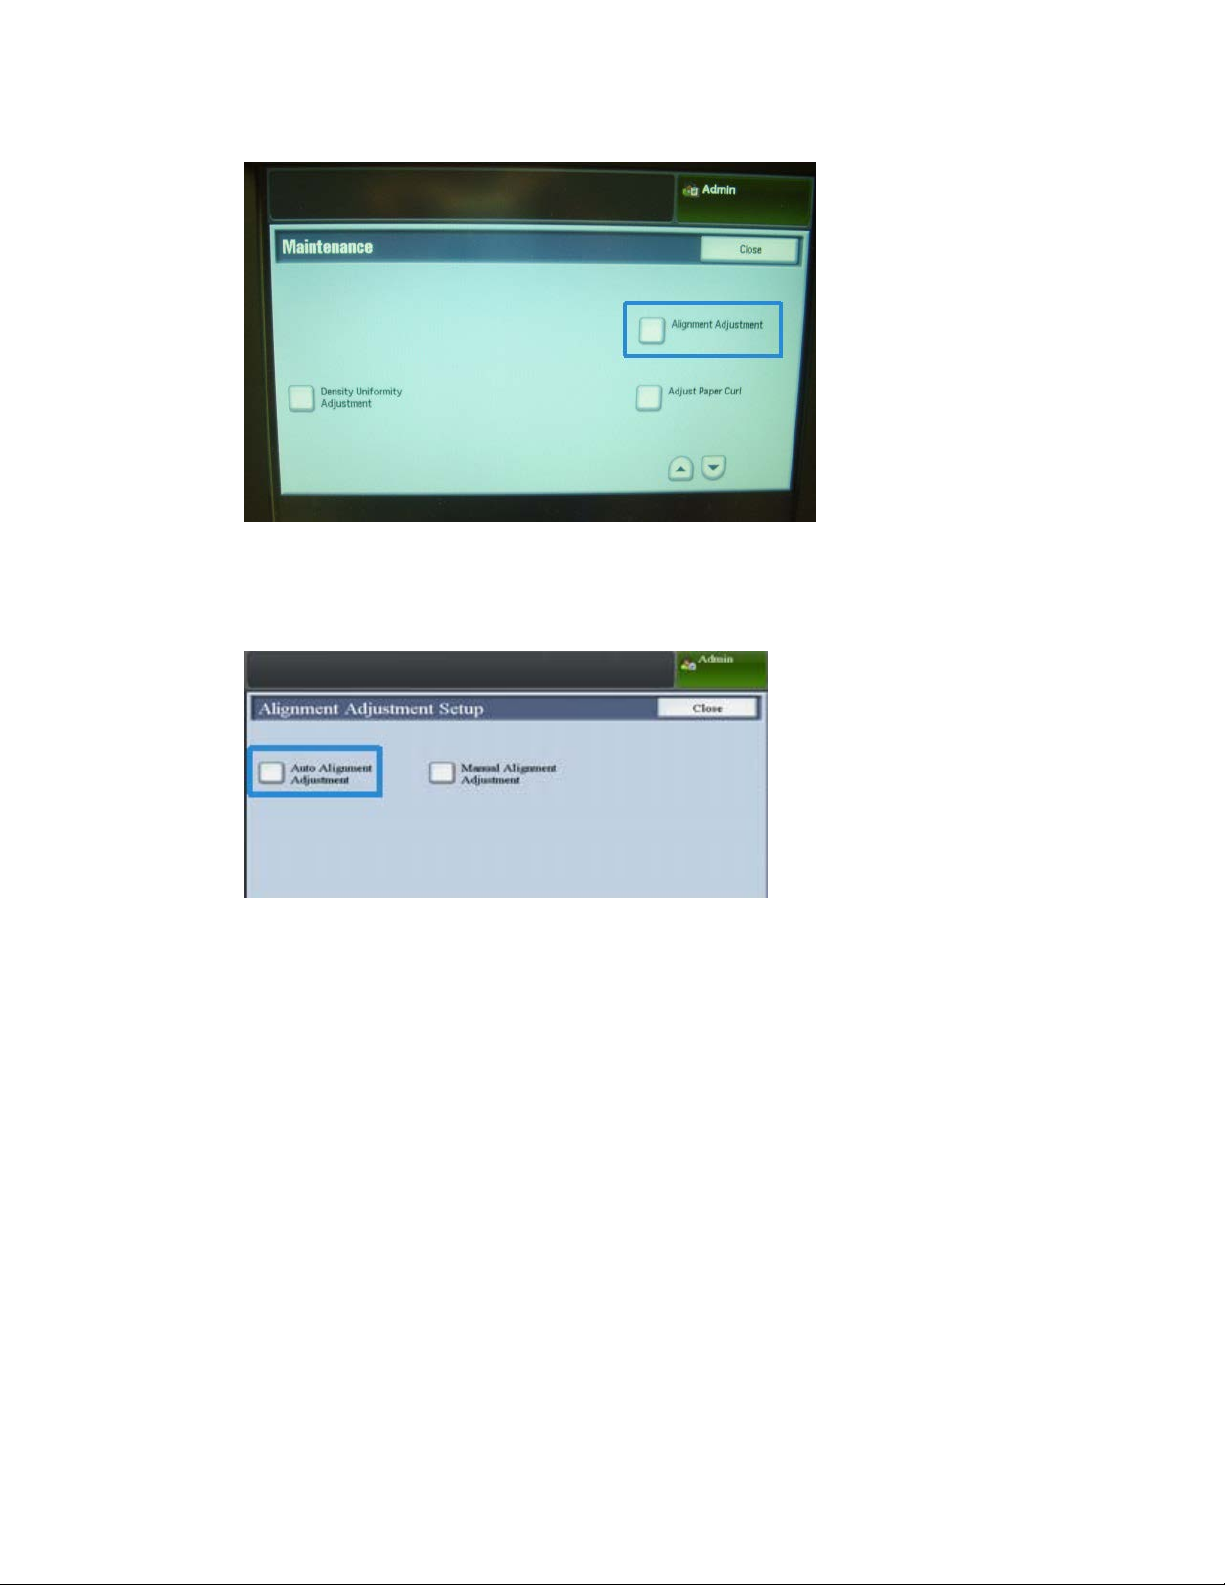
8. Select Alignment Adjustment.
The Alignment Adjustment screen displays.
9. Select Auto Alignment Adjustment.
Auto Alignment Adjustment
The Auto Alignment Adjustment screen displays.
Installation and Adjustments Guide
2-5Simple Image Quality Adjustment Tool
Page 20
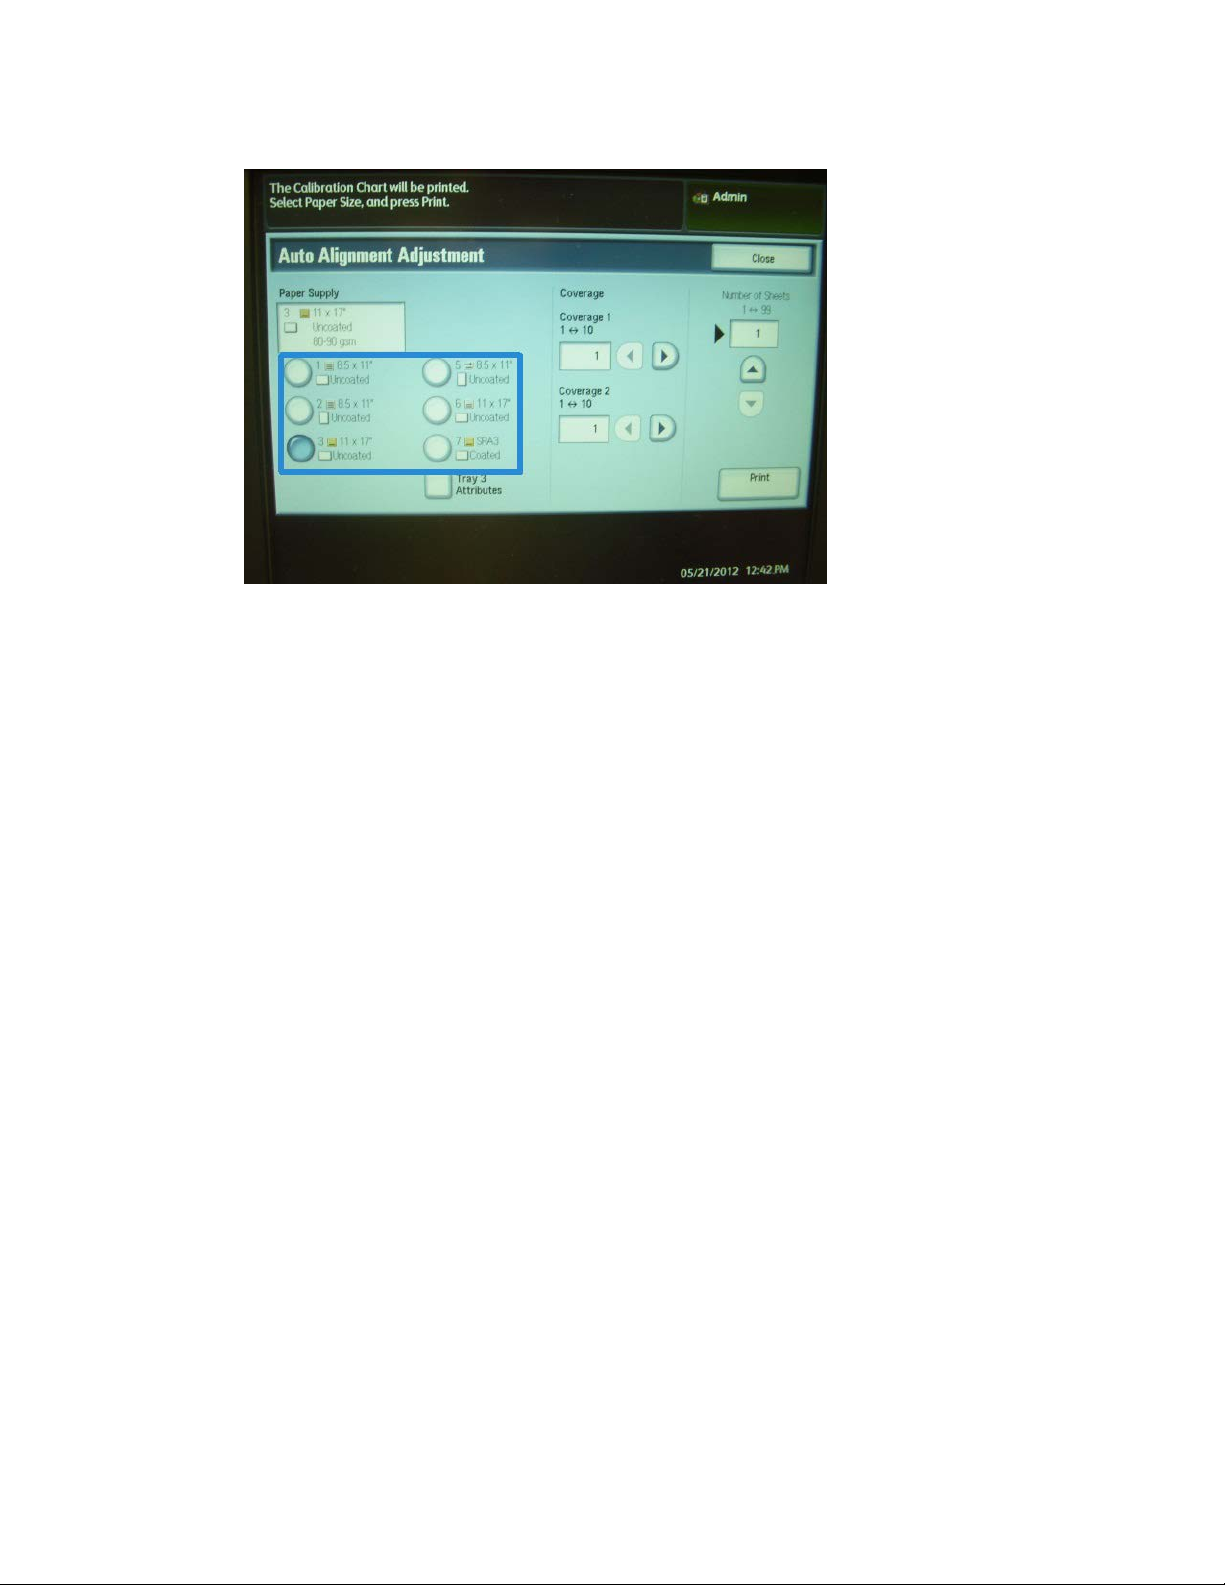
Auto Alignment Adjustment
10. Select the desired target tray for the adjustment.
11. If necessary, select the area coverage.
Area coverage can be one of the factors that changes the alignment. By adjusting a
specific area coverage level, you set the value from 1 to 10. As the value goes higher,
the area coverage will be higher accordingly. However for most cases, setting value
1 is fine. Furthermore, you can select a different setting for side 1 and side 2 of the
print.
12. Select the number of sample sheets.
With multiple samples, the software uses the average values for the adjustment; this
means the variation between the sheets is reduced.
For 8.5 x 11 (A4), the paper needs to be in the SEF direction.
13. Select Print.
The sample chart is printed.
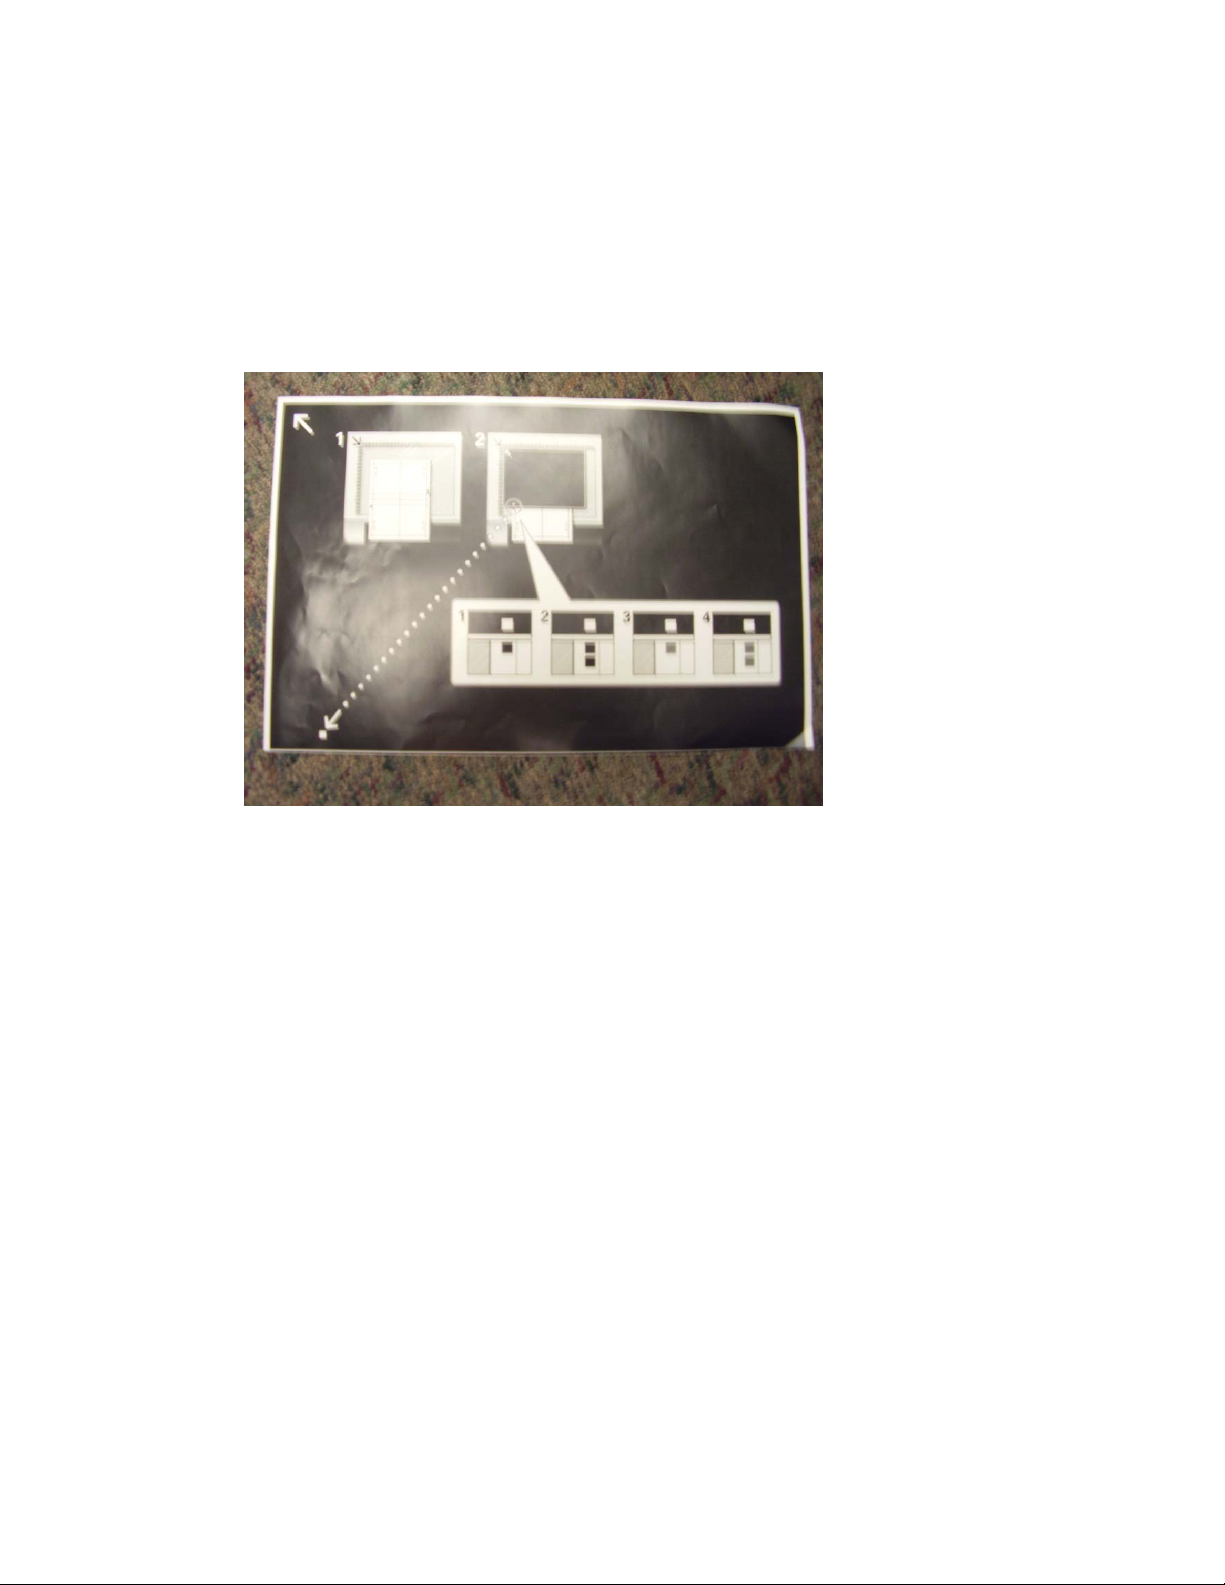
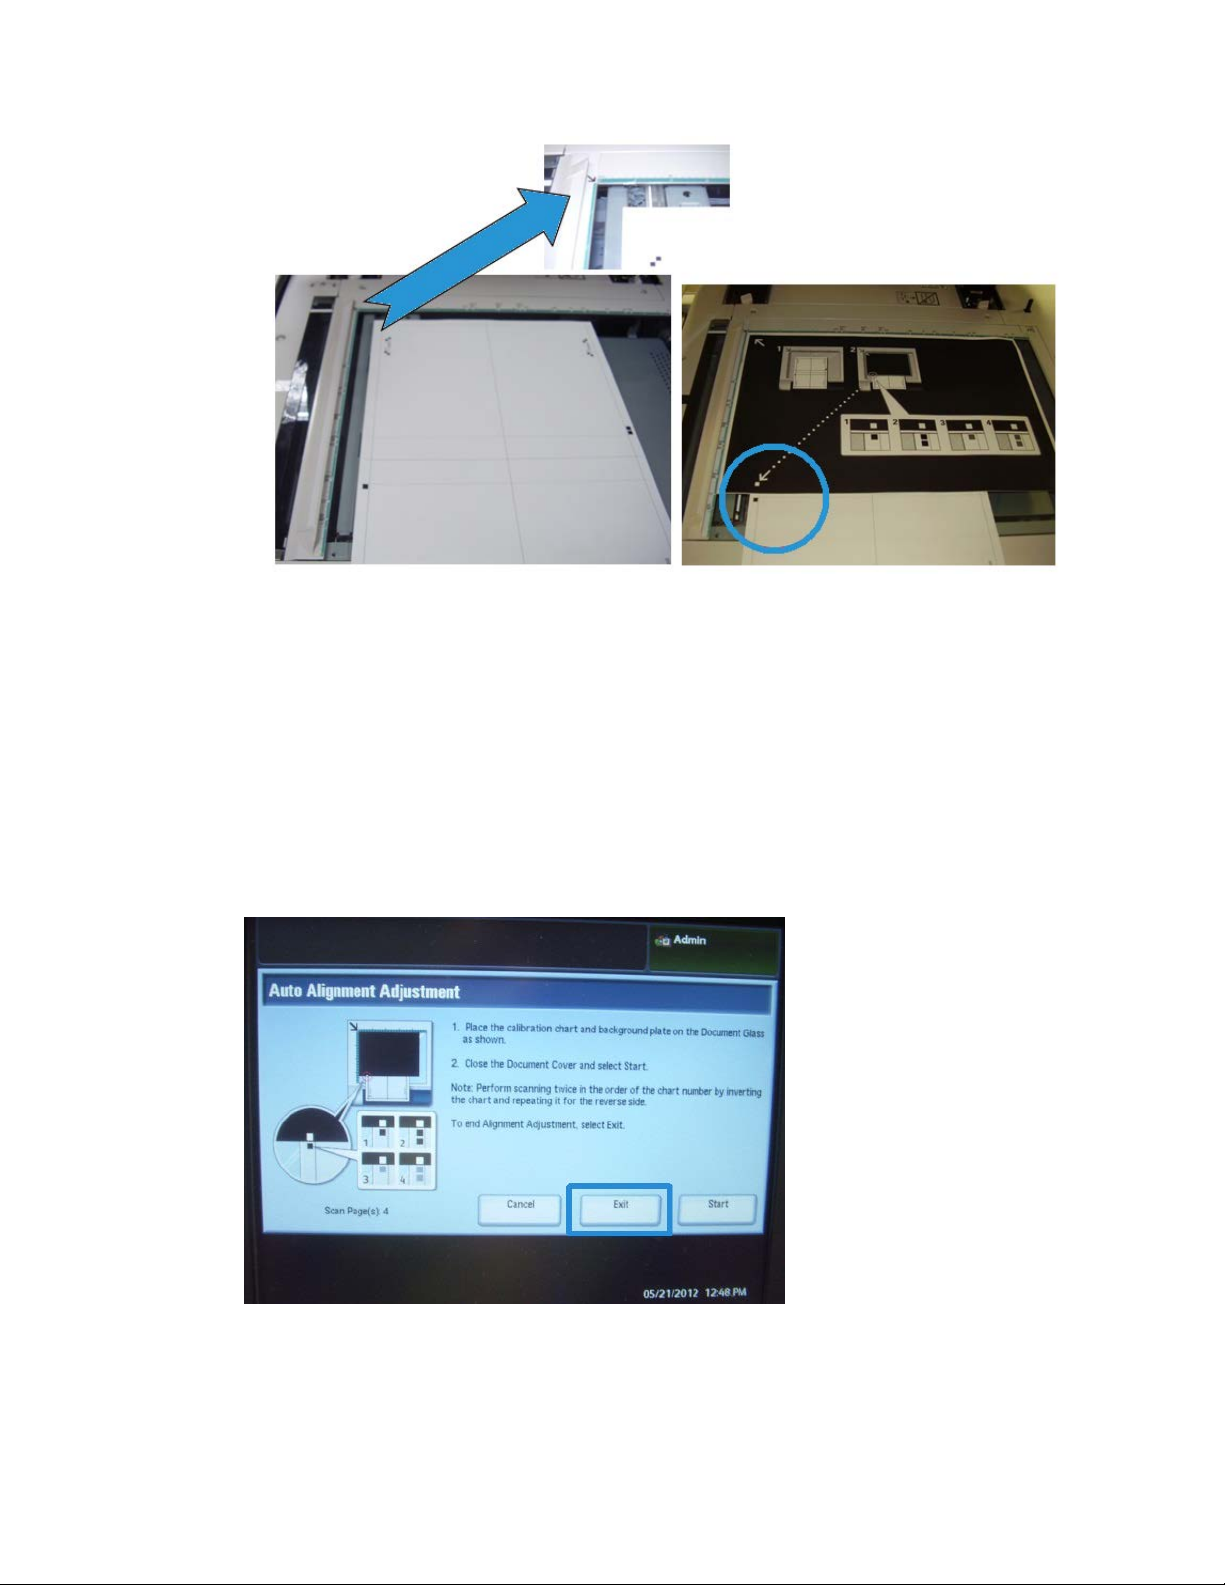
14. To correct the misalignment, scan the 4 sides of sample chart, lead edge and trail
edge for each front and back side. Follow the instructions on the UI.
a) The test pattern must NOT be placed against the registration edge (minimum of
20mm) and not skewed more than 15 degrees.
Ensure there is space between the document glass edge and the test pattern.
Simple Image Quality Adjustment Tool2-6
Installation and Adjustments Guide
Page 21
Auto Alignment Adjustment
b) Cover the pattern with a black background paper for contrast.
Cover with black paper and align the white mark with the test print mark.
The order of scanning in not mandatory; the color coded side helps the user know
which side to scan.
15. Scan each of the four sides as per the UI instructions.
16. If using multiple samples, repeat the scanning process.
17. After scanning four times, an Exit button appears on the UI. Select Exit and the
scanning process completes.
18. Remove the test print and the black background paper from the document glass.
Installation and Adjustments Guide
2-7Simple Image Quality Adjustment Tool
Page 22
Auto Alignment Adjustment
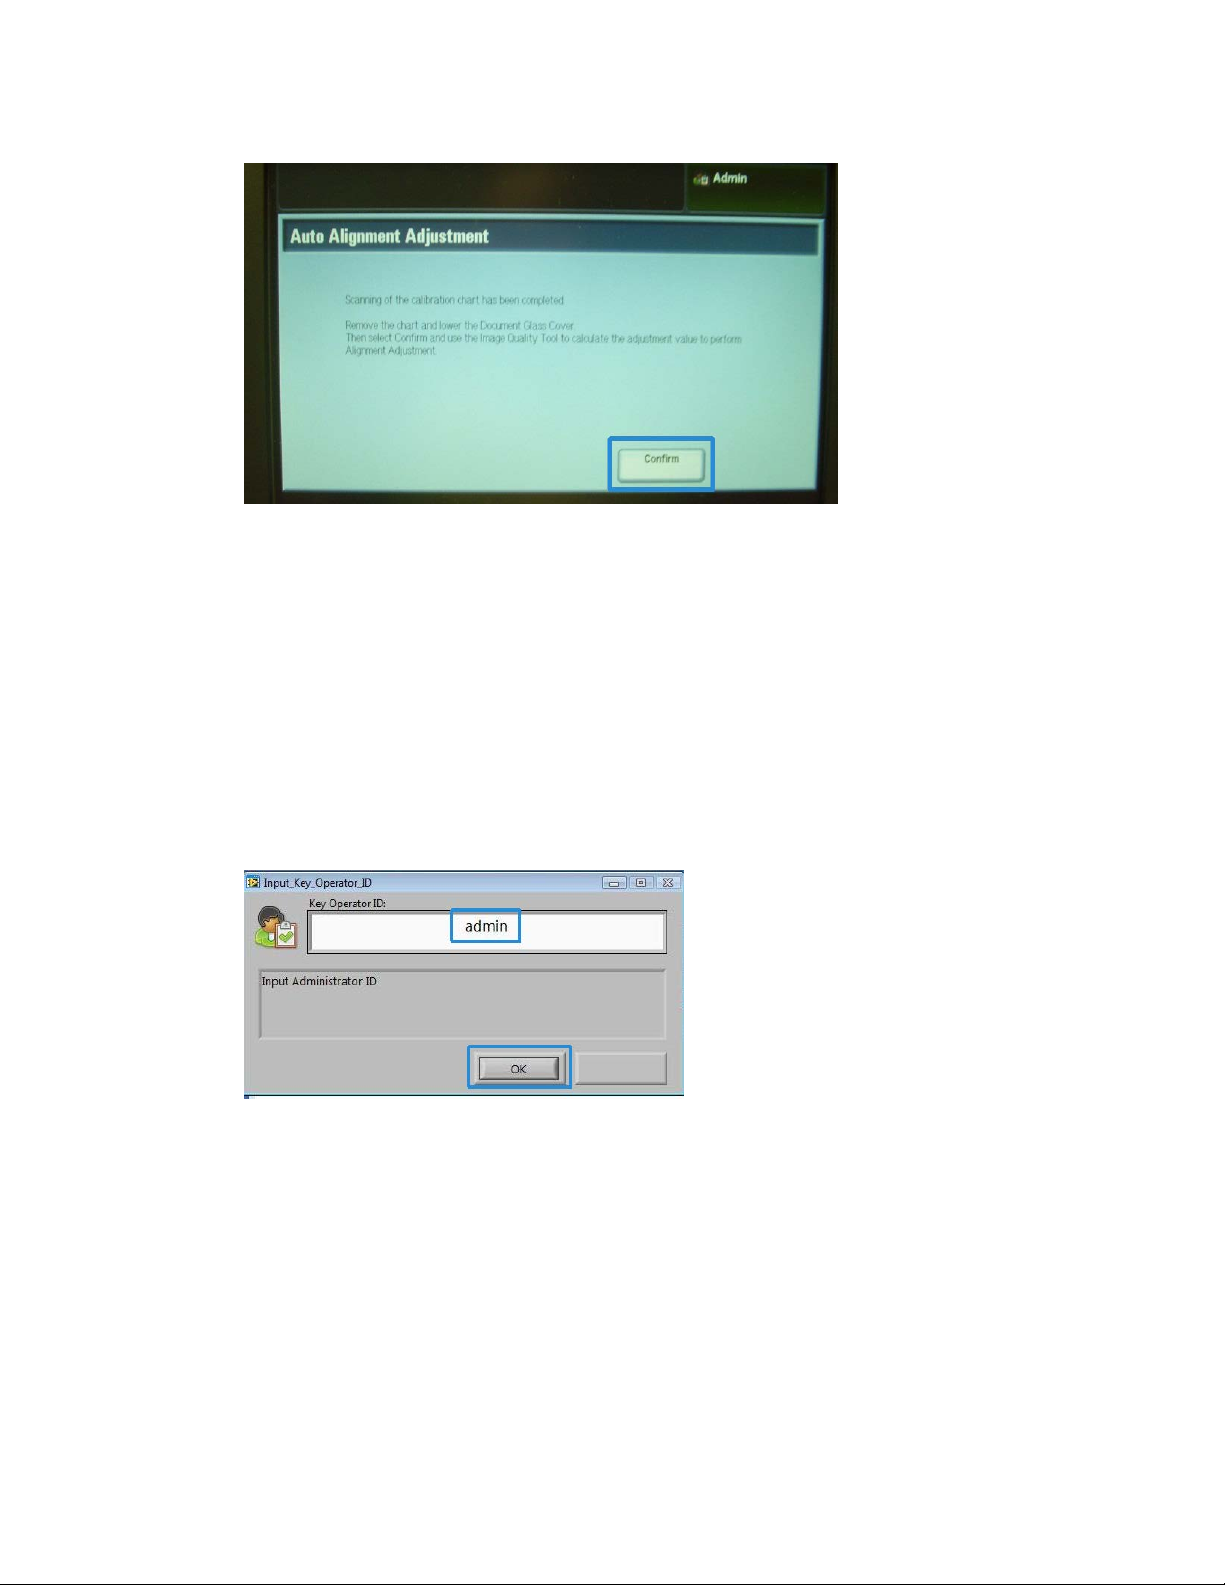
19. On the machine UI, select Confirm to send the data to the print engine’s folder.
20. Go to the Windows PC where the SIQA application was installed.
21. From the Windows PC desktop, start the SIQA application by double-clicking it.
The Input_Key_Operator_ID screen is displayed.
Note
If the SIQA application fails to launch/open, go to the Problem Solving chapter in
the System Administration Guide for information and instructions on resolving the
problem.
22. Enter the key operator ID.
The ID password is admin.
23. Select OK (Start).
The Simple Image Quality Adjustment screen is displayed.
Simple Image Quality Adjustment Tool2-8
Installation and Adjustments Guide
Page 23
Auto Alignment Adjustment
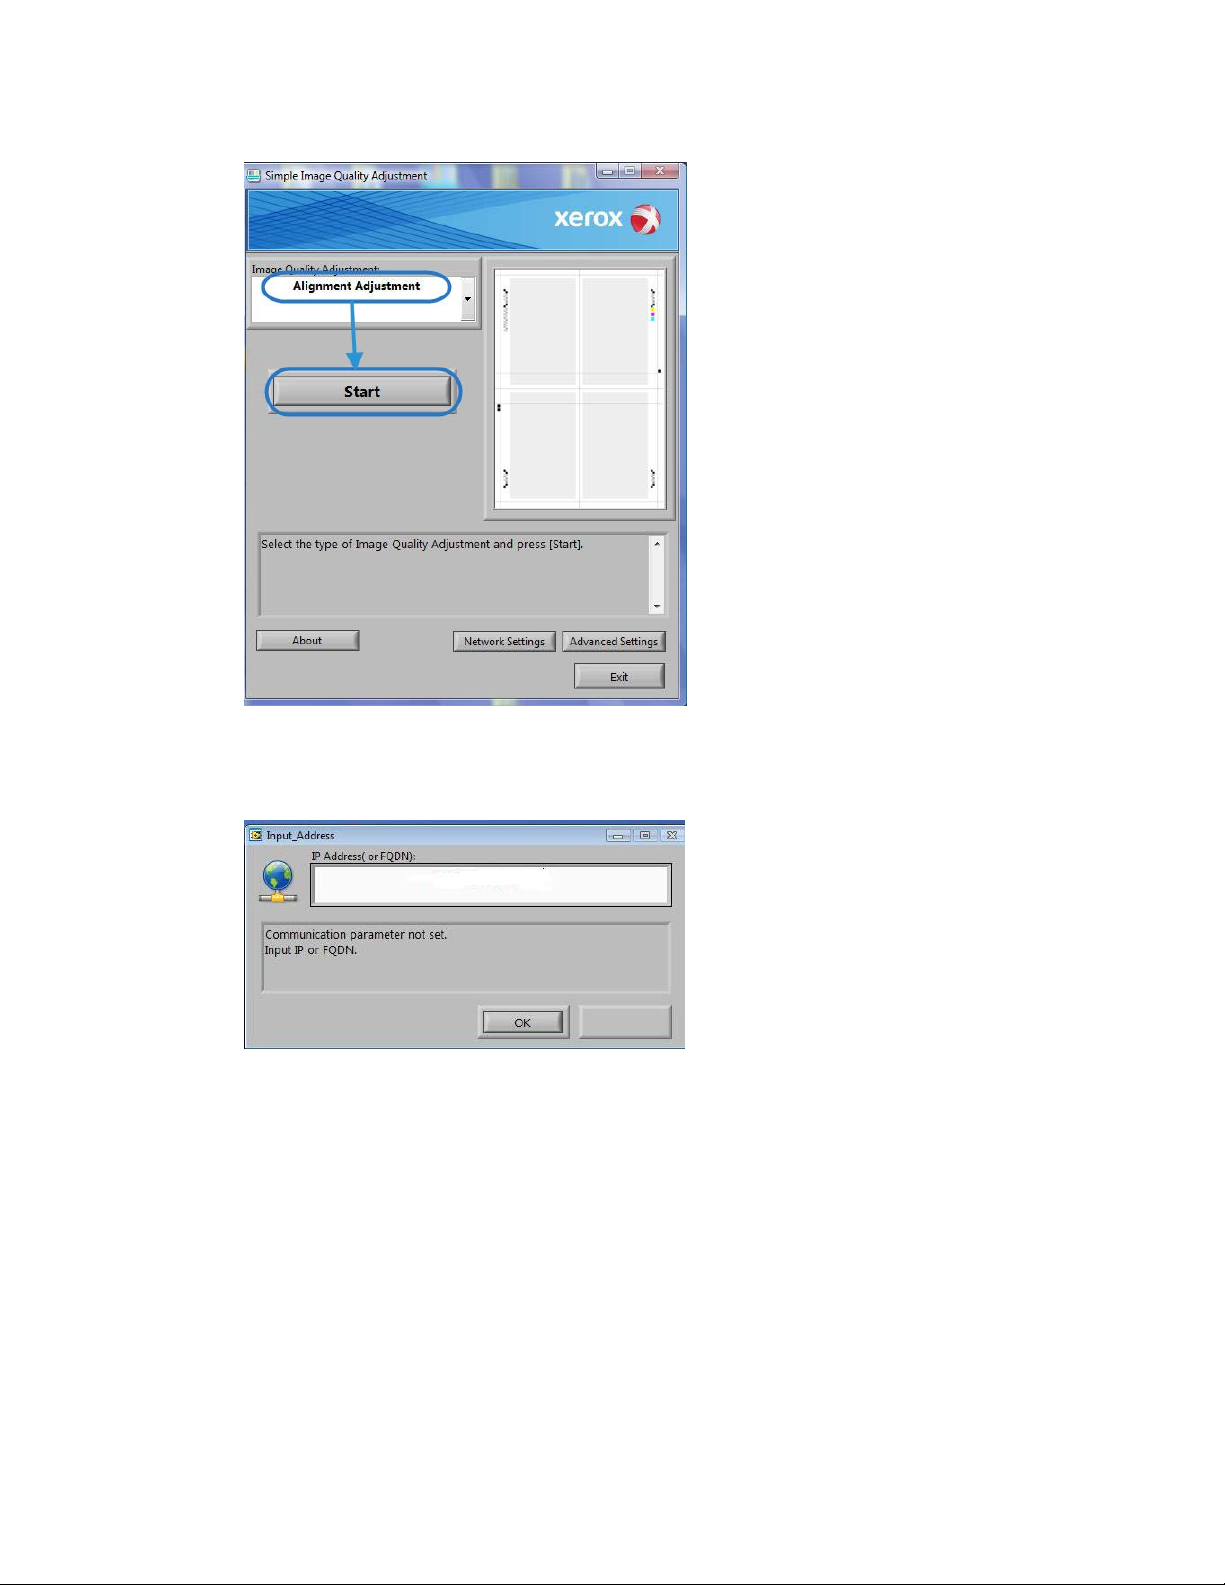
24. From the pull-down menu, select Auto Alignment Adjustment, and then select Start.
If the Input Address screen is displayed, confirm or enter the IP Address of the
machine.
Note
If the SIQA application is communicating to the machine that is connected to either
a FreeFlow Print Server or a Fiery EFI Integrated Print Server, enter the IP address
that appears on the Machine Status > Machine Information screen.
25. Select OK (Start).
The scanned image data from the printer folder/Mail Box is accessed and read by
the SIQA application. The SIQA application analyzes the data and automatically
calculates the adjustment values.
Installation and Adjustments Guide
2-9Simple Image Quality Adjustment Tool
Page 24
Auto Alignment Adjustment
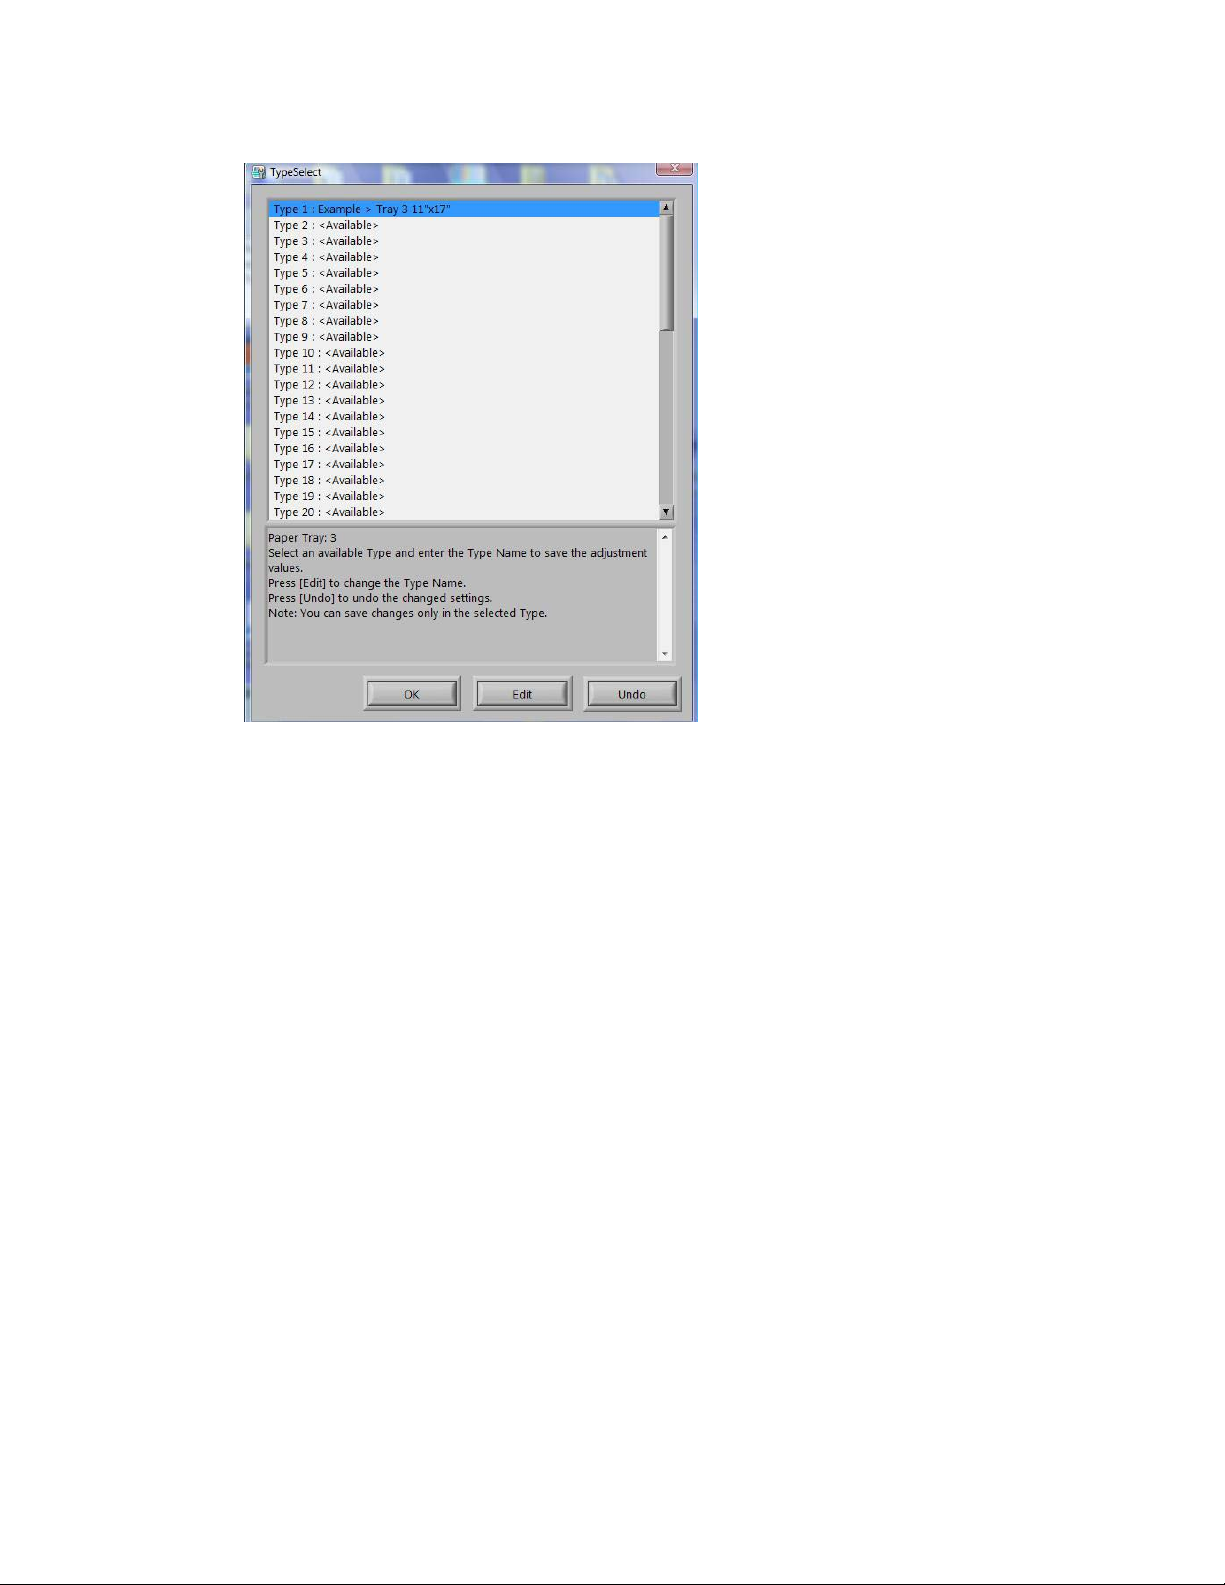
26. From the TypeSelect window, perform the following:
a) Select the line you want to save as a profile. There are 50 profiles available.
b) Select where to save the calculated adjustment values. In the example, Type 1
was selected, and then using the Edit button, it was renamed to Example > Tray
3 11”x17”.
27. Select OK.
If you saved the calculated values to the new Type, enter the TypeName first. It is
recommended to include the tray name, paper size, or paper type, so you can see
that the adjustment is for a specific tray and paper.
28. Select OK (at the TypeName window).
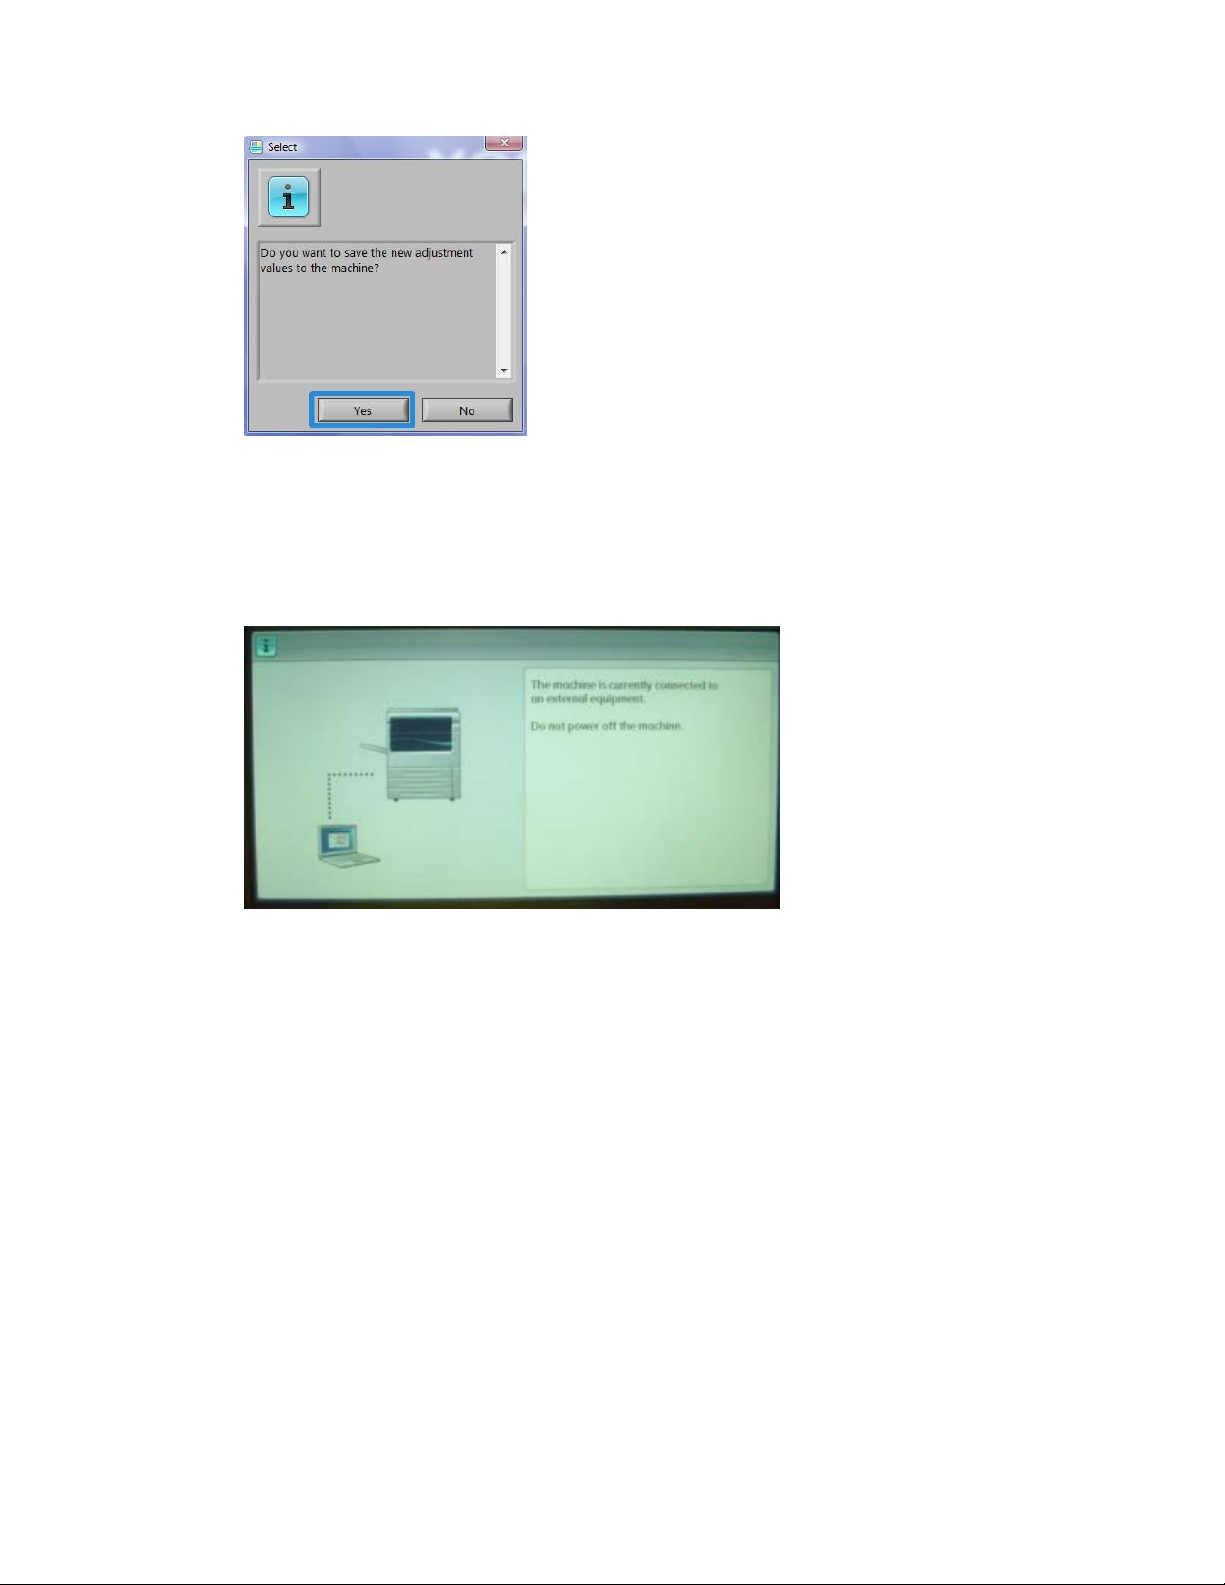
The Select screen displays the message: Do you want to save the new adjustment
values to the machine?
Simple Image Quality Adjustment Tool2-10
Installation and Adjustments Guide
Page 25
Auto Alignment Adjustment
29. Select Yes to apply the new adjustment values/parameters.
The values are written into the machine’s NVM. The machine’s UI displays the
message: The machine is currently connected to an external equipment. Do not power
off the machine.
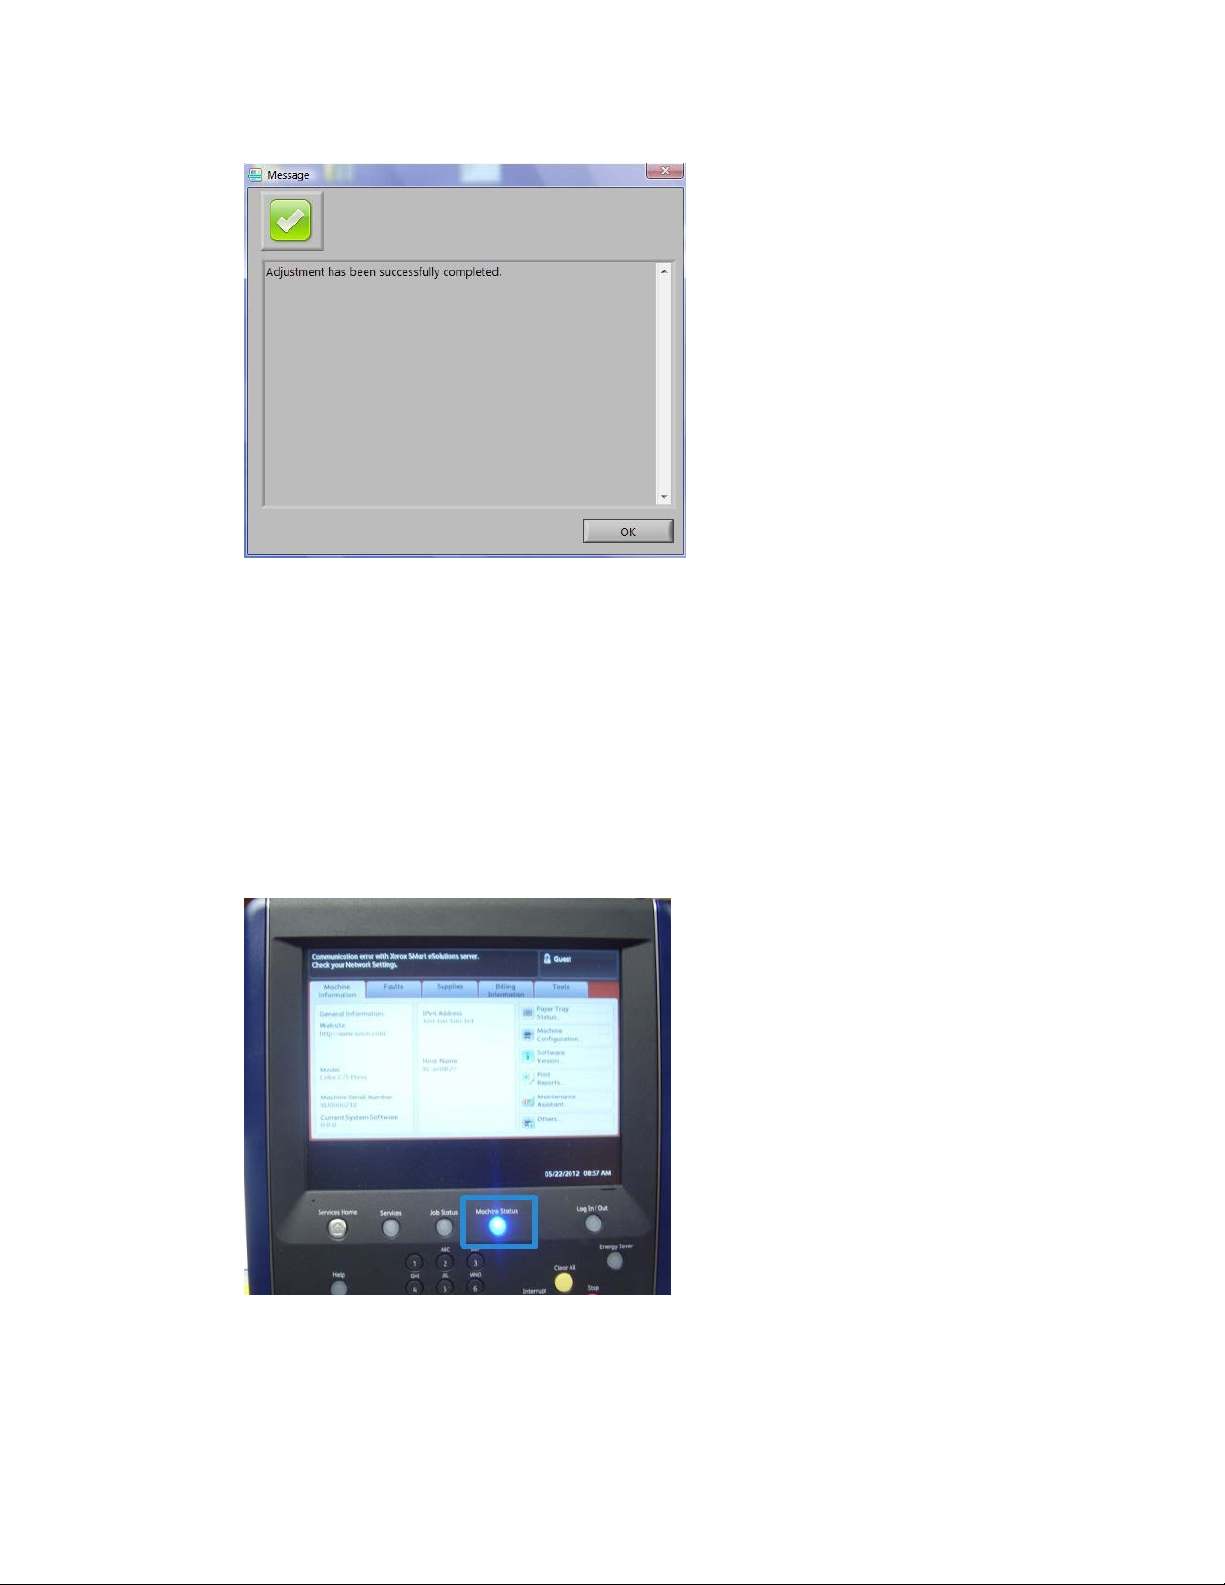
Upon completion, the SIQA application displays the Message screen: Adjustment
has been successfully completed.
Installation and Adjustments Guide
2-11Simple Image Quality Adjustment Tool
Page 26
Auto Alignment Adjustment
30. Select OK to close the message.
Note
The remaining steps in this procedure are to verify the profile adjustment.
31. From the print engine (machine) UI, login as administrator.
a) Press the Log In/Out button on the control panel.
b) Enter the system administrator ID.
The default ID is admin, and the default password is 1111.
c) Select Enter.
32. Press the Machine Status button on the UI.
33. Select the Tools tab.
Simple Image Quality Adjustment Tool2-12
Installation and Adjustments Guide
Page 27
Auto Alignment Adjustment
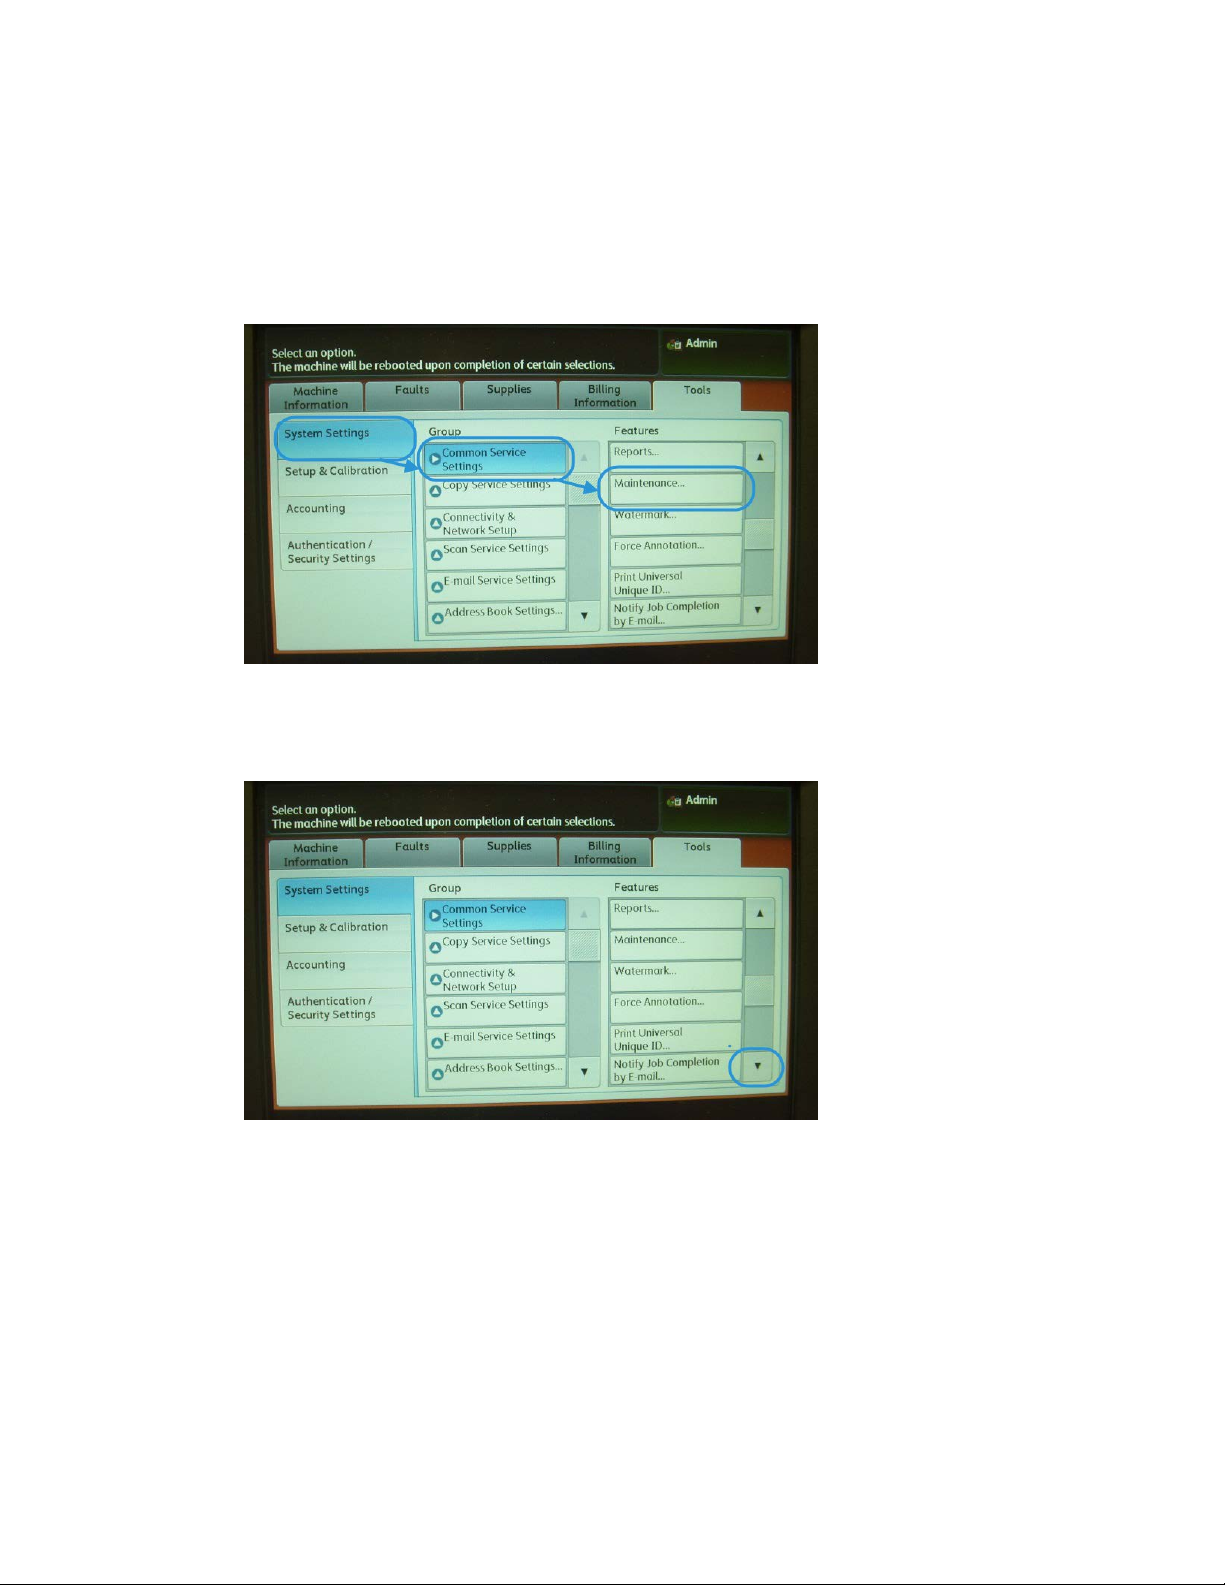
34. Select System Settings > Common Service Settings > Maintenance.
The Maintenance screen is displayed.
35. Using the down button, scroll to the next Maintenance page/screen.
Installation and Adjustments Guide
2-13Simple Image Quality Adjustment Tool
Page 28

Auto Alignment Adjustment
36. Select Alignment Adjustment.
The Alignment Adjustment screen displays.
37. Select Manual Alignment Adjustment.
Selecting Manual Alignment Adjustment allows you to test the result by printing
the corrected sample.
38. Select the saved profile that was created earlier in this procedure.
39. Select Change Settings.
Simple Image Quality Adjustment Tool2-14
Installation and Adjustments Guide
Page 29
Auto Alignment Adjustment
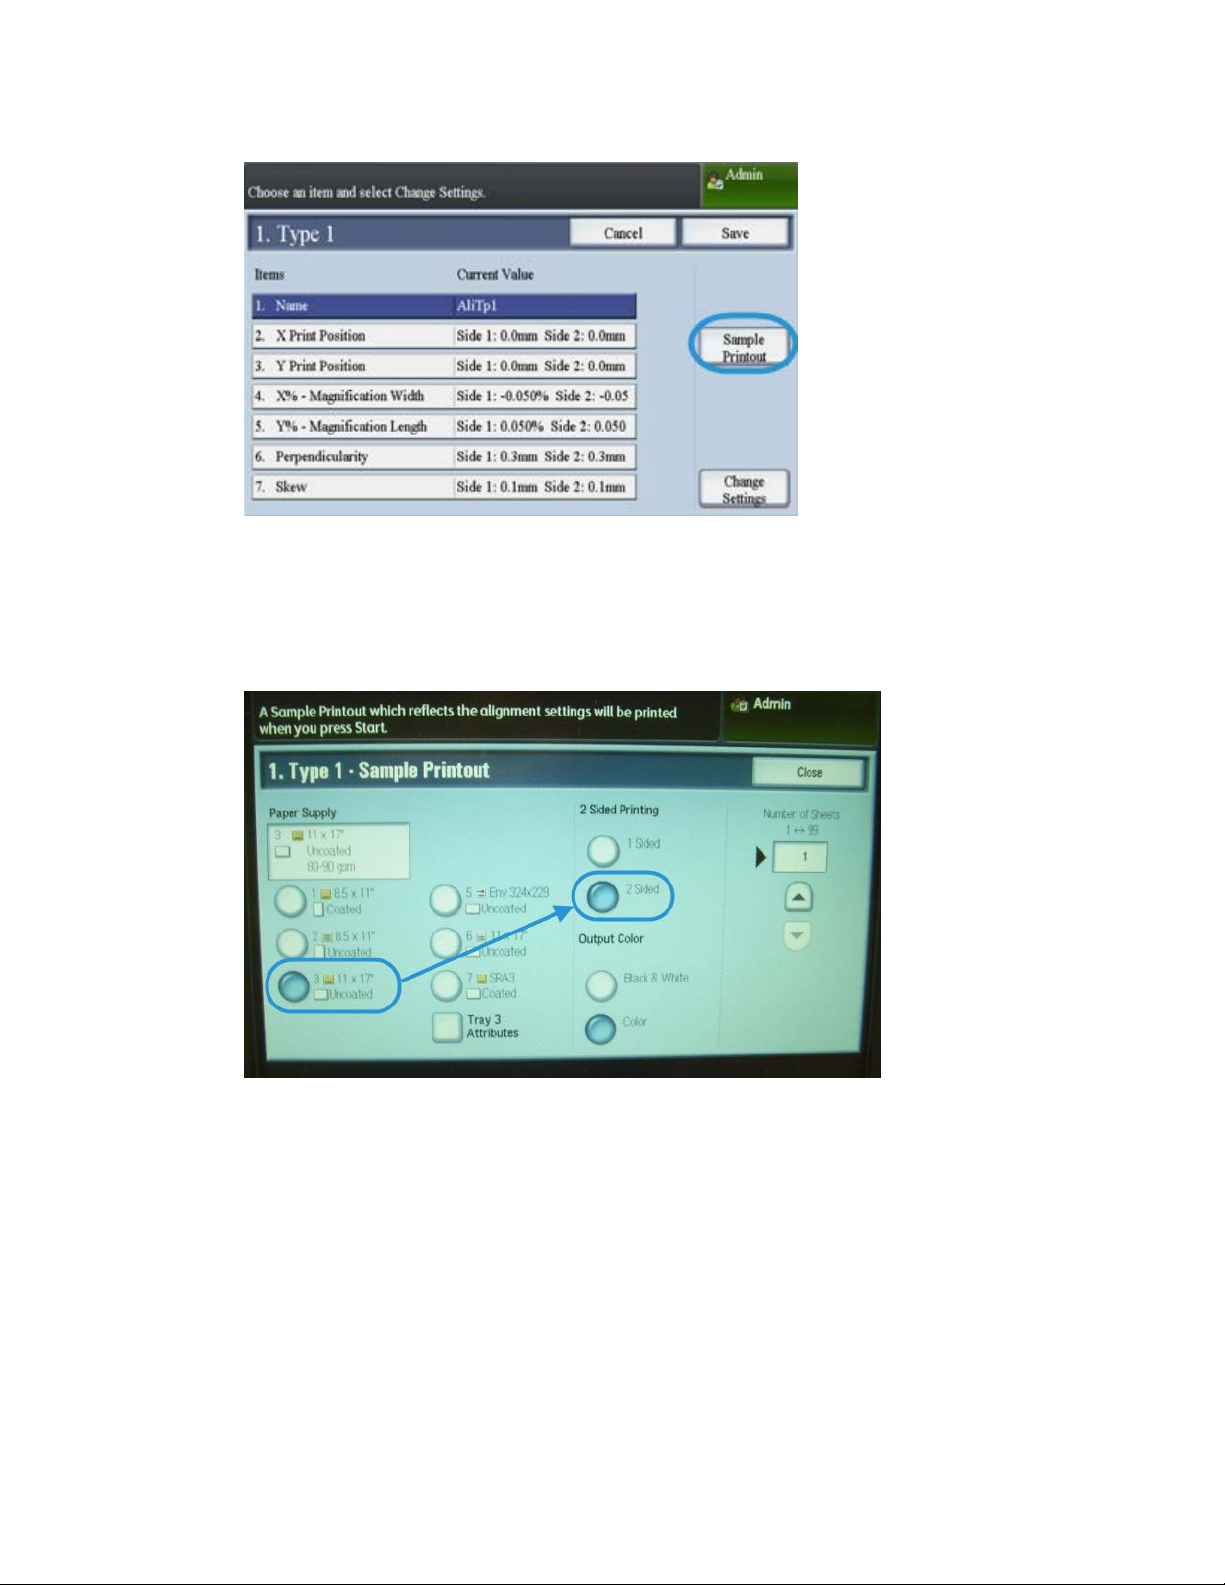
40. Select Sample Printout.
This prints the corrected sample chart.
41. Select the specific tray that contains the media which matches the profile you created
earlier in this procedure.
42. Ensure 2 Sided is selected.
Installation and Adjustments Guide
2-15Simple Image Quality Adjustment Tool
Page 30
Auto Alignment Adjustment
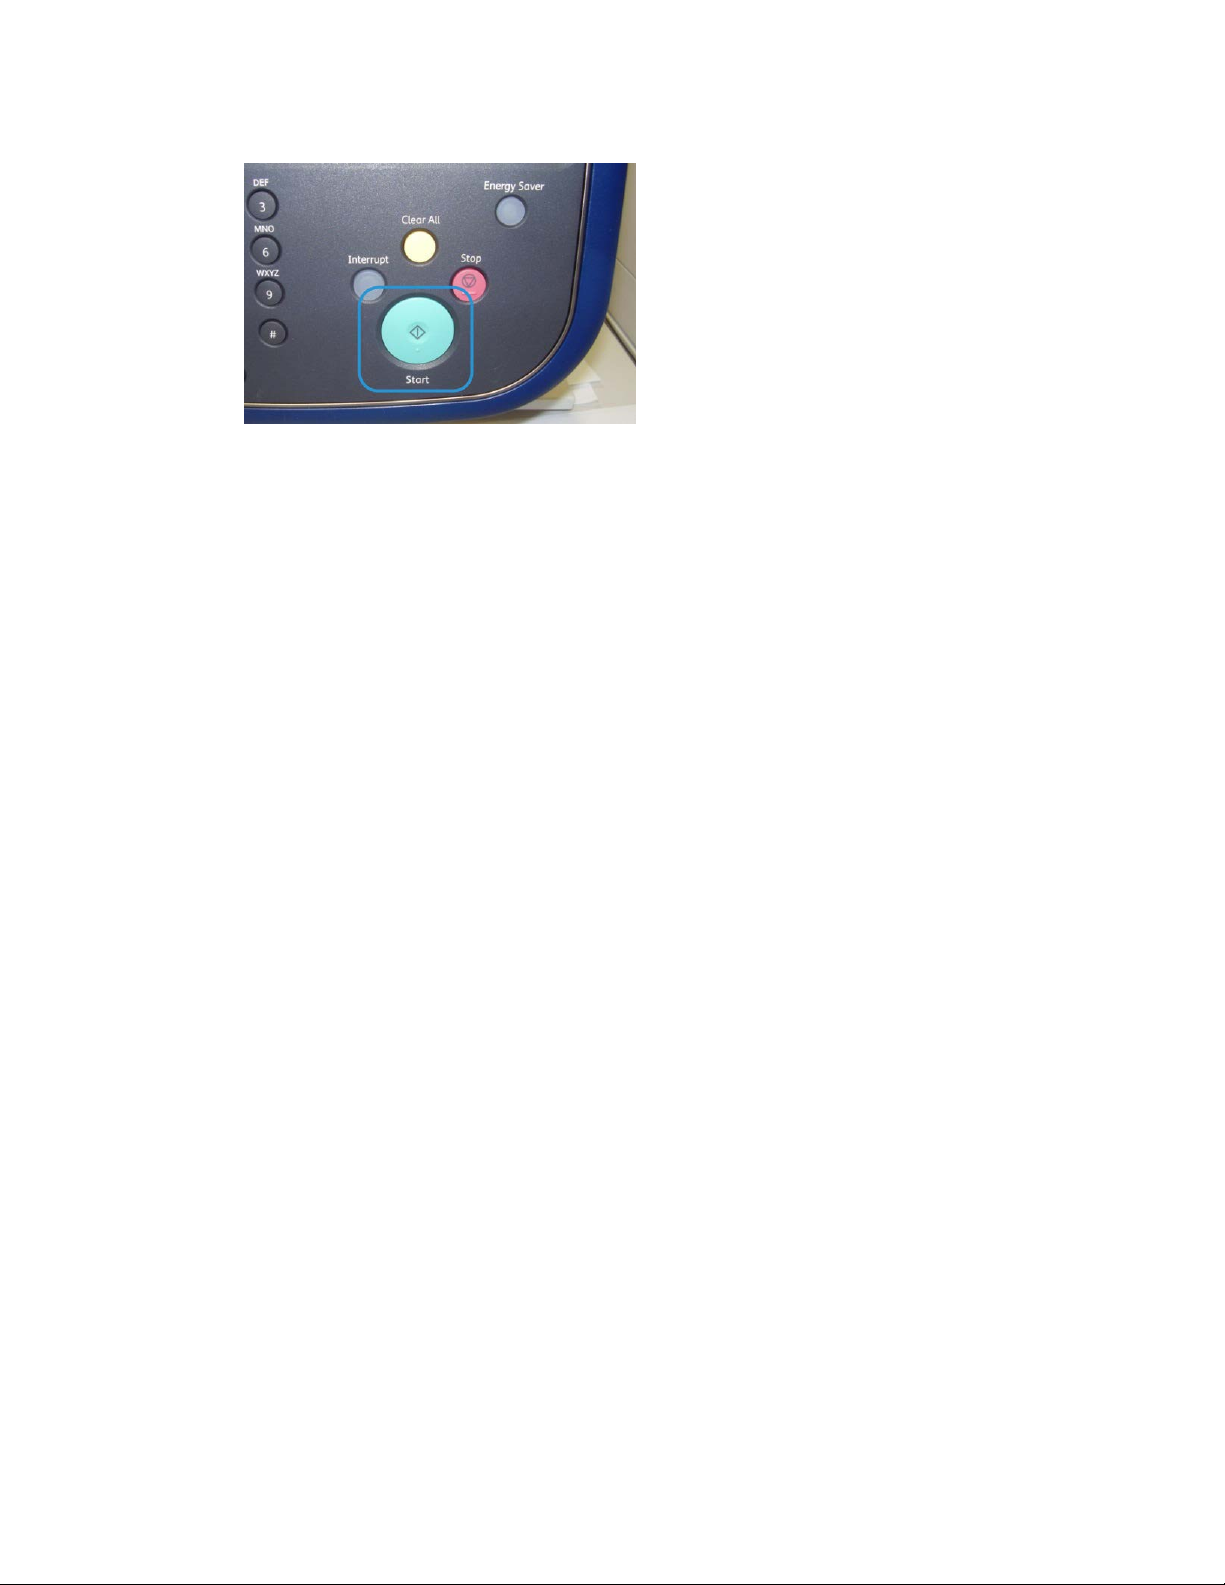
43. Press Start on the control panel.
44. Retrieve the printed sample chart and check it for alignment.
• If the alignment if okay, you are done and you can exit Administrator mode.
• If the alignment is not okay, repeat the steps in this procedure.
Simple Image Quality Adjustment Tool2-16
Installation and Adjustments Guide
Page 31

3
Density Uniformity Adjustment
Use this feature to correct image quality on the output when that image quality is not
consistent throughout the entire output; for example, the image quality is lighter (faded)
or heavier (thicker) on the left/right sides of the output (inboard/outboard). This feature
uses a new application called Simple Image Quality Adjustment (SIQA), and it allows
the user to easily and quickly make adjustments and correct these image quality issues.
The procedure requires the installation of the SIQA (Simple Image Quality Adjustment)
application on a Windows® PC.
Note
If your print server is a Windows-based PC, the SIQA application may be installed on it;
otherwise a third-party PC is required. Contact the Customer Support Center for more
information.
1. Record the IP address; this will be used later in the procedure.
Installation and Adjustments Guide
3-1Simple Image Quality Adjustment Tool
Page 32

Density Uniformity Adjustment
a) If connected to a FreeFlow Print Server, obtain the IP address from the print engine
UI by selecting Machine Status > Machine Information. Record the IPv4 IP
address.
b) If connected to a standalone EX Print Server, obtain the print server IP address
either from the configuration sheet or by selecting Command Workstation >
Device Center > General.
c) If connected to an Integrated Fiery Color Server, obtain the print server IP address
from the configuration sheet.
2. From the print engine (machine) UI, login as administrator.
a) Press the Log In/Out button on the control panel.
Simple Image Quality Adjustment Tool3-2
Installation and Adjustments Guide
Page 33
Density Uniformity Adjustment
b) Enter the system administrator ID.
The default ID is admin, and the default password is 1111.
c) Select Enter.
3. Press the Machine Status button on the UI.
4. Select the Tools tab.
5. Select System Settings > Common Service Settings > Maintenance.
The Maintenance screen is displayed.
6. Using the down button, scroll to the next Maintenance page/screen.
Installation and Adjustments Guide
3-3Simple Image Quality Adjustment Tool
Page 34
Density Uniformity Adjustment
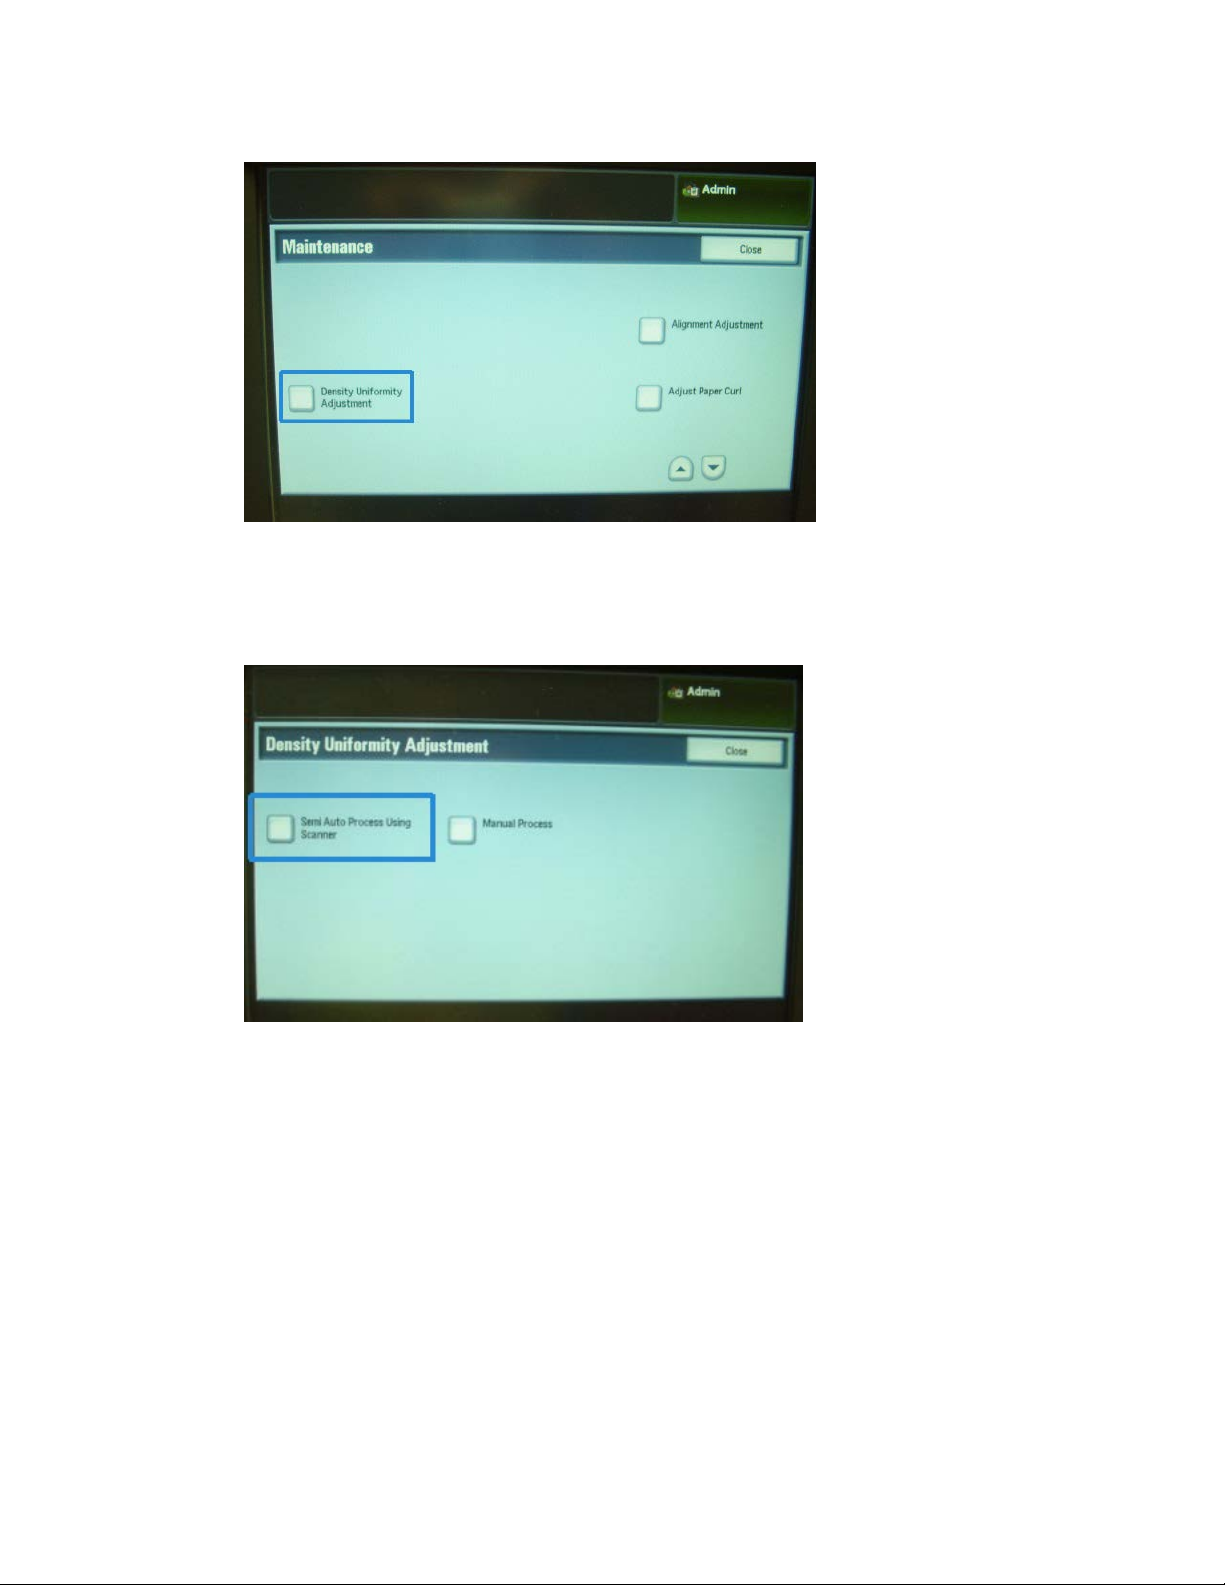
7. Select Density Uniformity Adjustment.
The Density Uniformity Adjustment screen is displayed.
8. Select Semi Auto Process Using Scanner.
Simple Image Quality Adjustment Tool3-4
Installation and Adjustments Guide
Page 35
Density Uniformity Adjustment
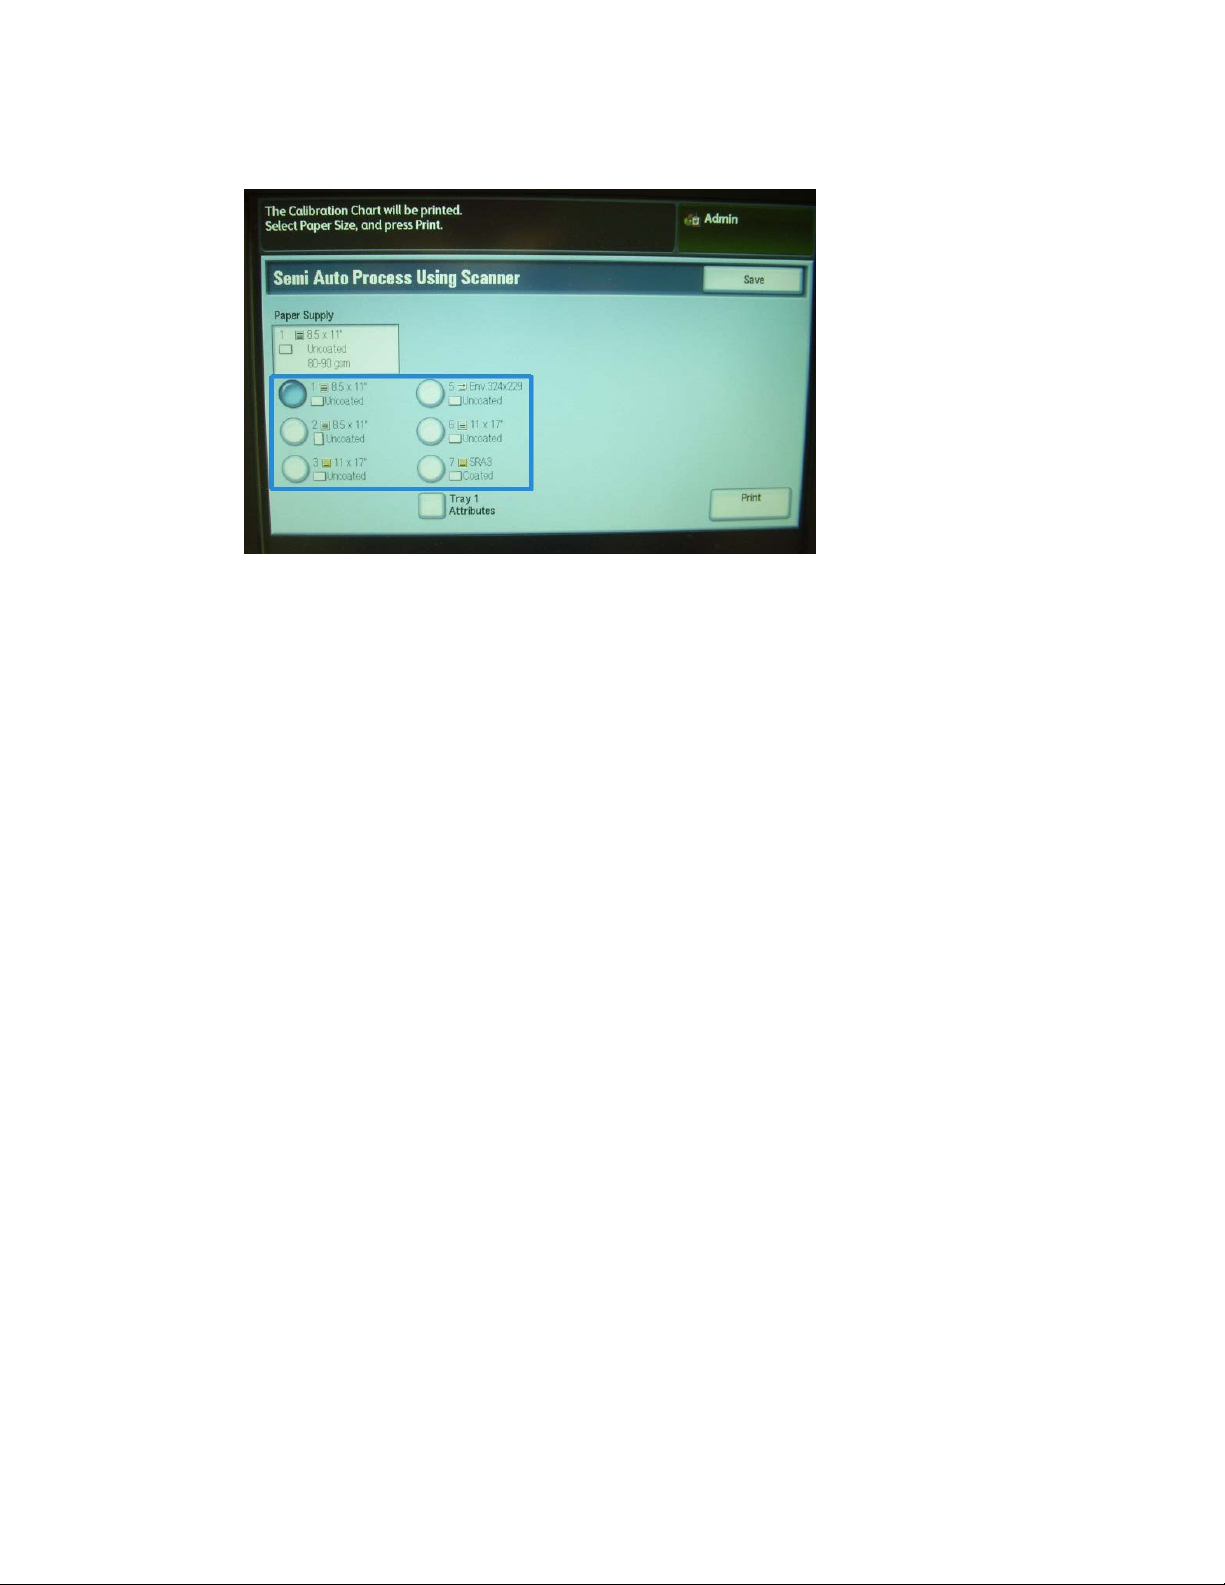
9. From the Semi Auto Process Using Scanner screen, select the desired target tray that
will be used for the adjustment.
10. Select Print.
Two test patterns are printed; one is printed using CMYK mode, and the other is
printed using RGB mode.
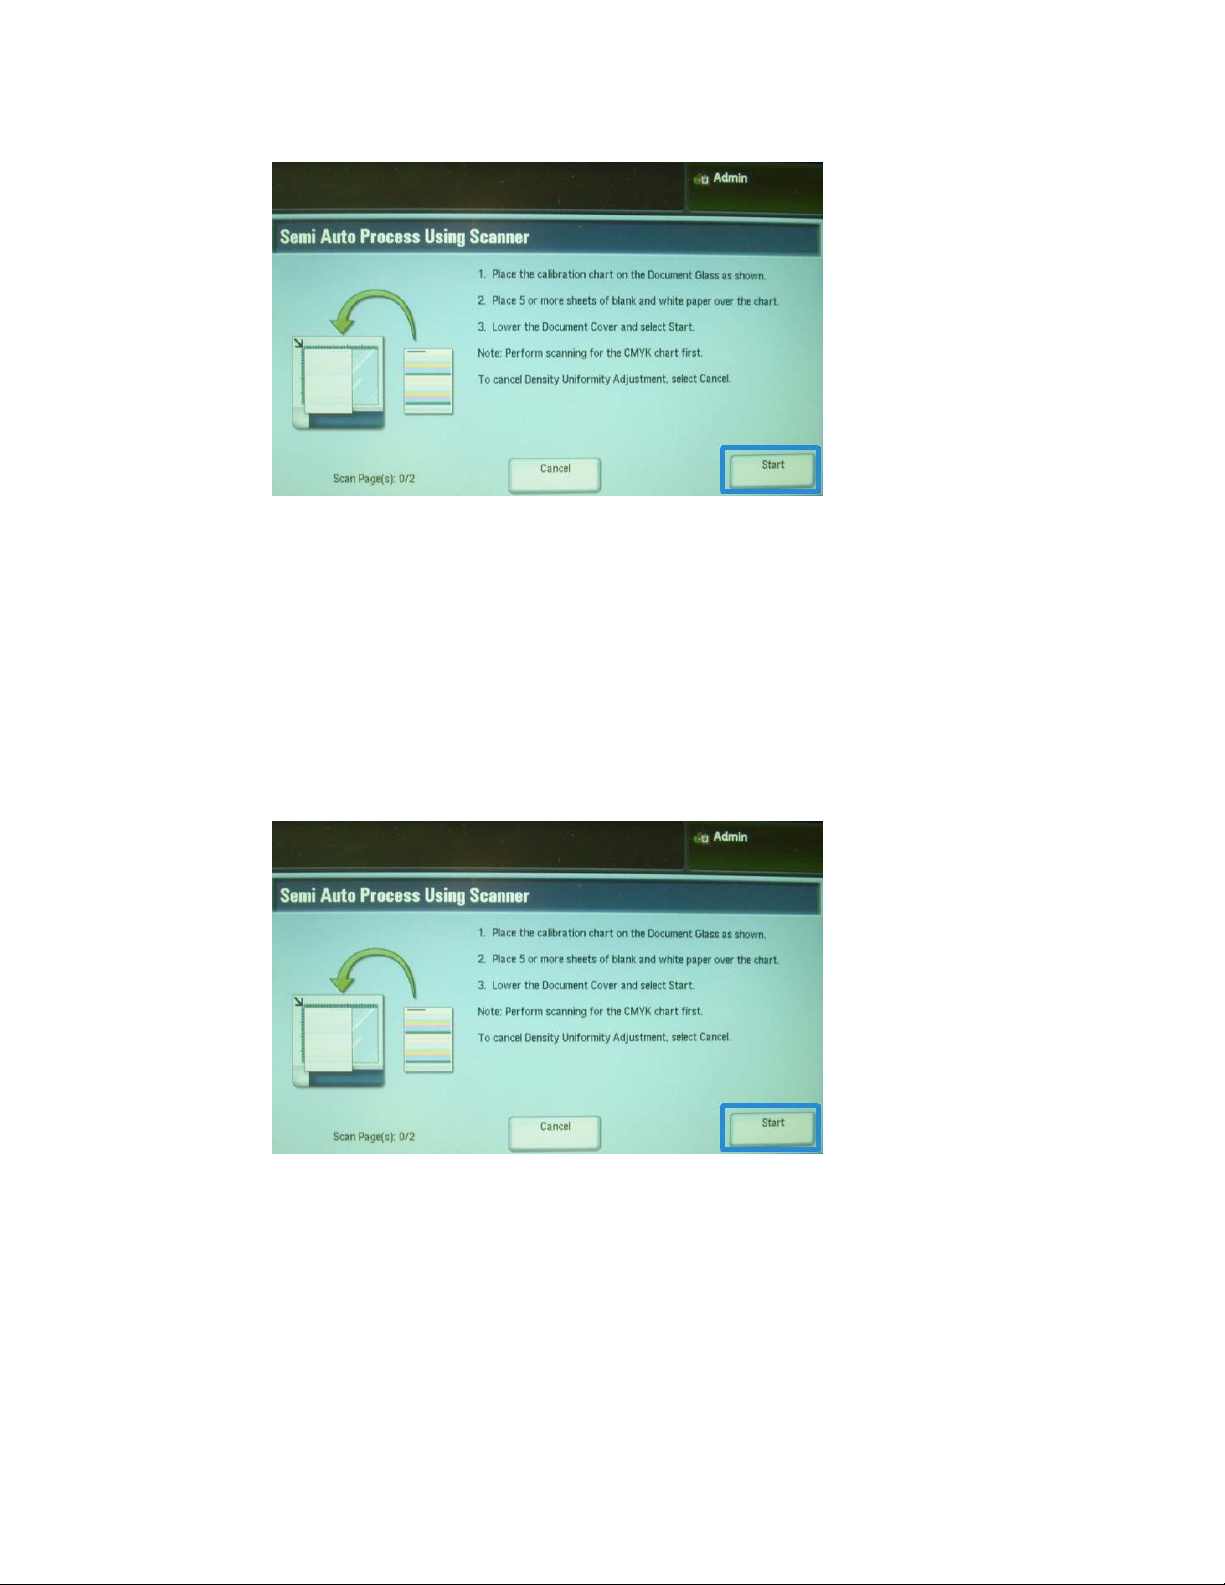
11. Retrieve the two printed test patterns and return to the machine’s UI.
The Semi Auto Process Using Scanner screen displays instructions starting the
adjustment process.
12. Follow the instructions on the UI to scan the first test pattern.
Important
Always scan the CMYK test pattern first.
a) Place the CMYK test on the document glass, as shown in the illustration on the
UI.
b) Place five or more sheets of blank, white paper over the text pattern.
These blank sheets of paper ensure that there is not any “see-through” effect on
the printed output.
c) Lower the document cover.
Installation and Adjustments Guide
3-5Simple Image Quality Adjustment Tool
Page 36
Density Uniformity Adjustment
d) Select Start from the UI.
e) Retrieve the CMYK copies from the output tray.
13. Scan the second, RGB test pattern.
a) Place the RGB test on the document glass, as shown in the illustration on the UI.
b) Place five or more sheets of blank, white paper over the text pattern.
These blank sheets of paper ensure that there is not any “see-through” effect on
the printed output.
c) Lower the document cover.
d) Select Start from the UI.
e) Retrieve the RGB copies from the output tray.
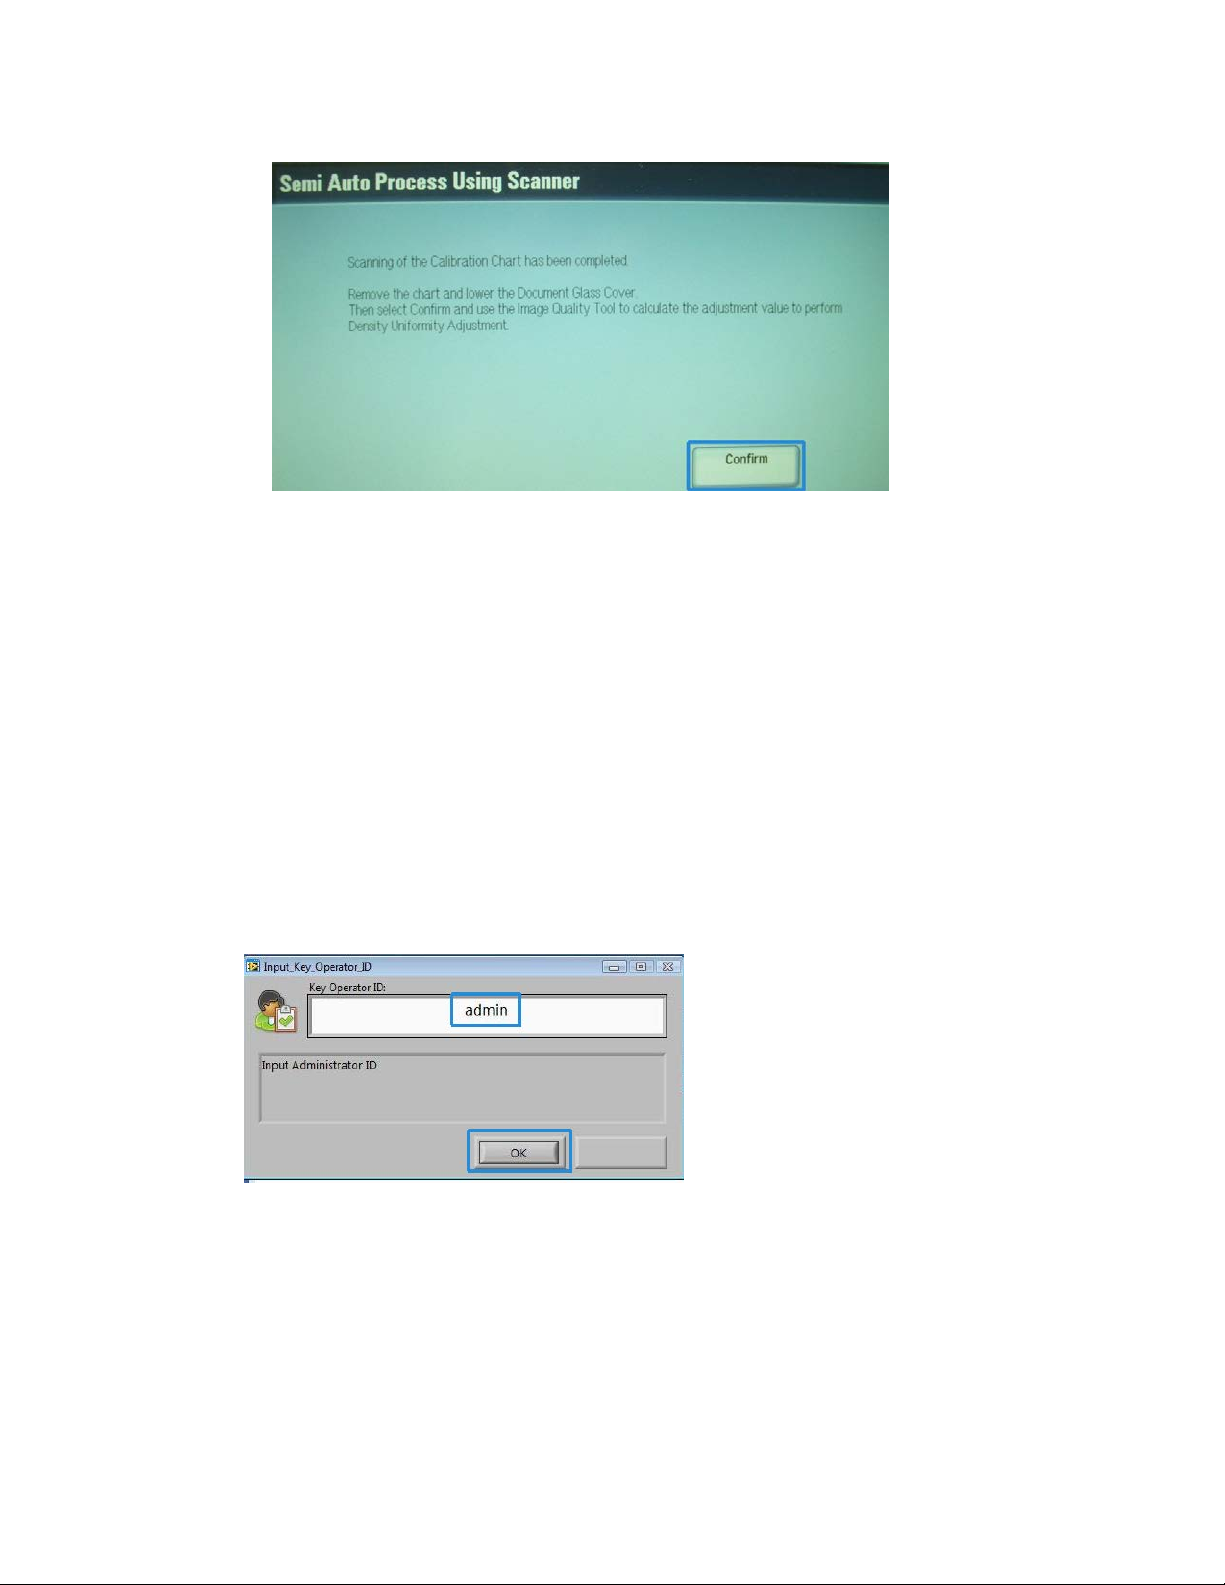
14. Follow the instructions shown on the machine’s UI.
a) Remove the chart (test pattern) from the document glass.
b) Lower the document cover.
Simple Image Quality Adjustment Tool3-6
Installation and Adjustments Guide
Page 37
Density Uniformity Adjustment
c) Select Confirm.
The scanned data is sent to the machine’s folder (Mail Box). The SIQA application
(Image Quality Tool) will read and analyze this data in order to calculate the
adjustment value and perform the adjustment.
15. Go to the Windows PC where the SIQA application was installed.
16. From the Windows PC desktop, start the SIQA application by double-clicking it.
The Input_Key_Operator_ID screen is displayed.
Note
If the SIQA application fails to launch/open, go to the Problem Solving chapter in
the System Administration Guide for information and instructions on resolving the
problem.
17. Enter the key operator ID.
The ID password is admin.
18. Select OK (Start).
The Simple Image Quality Adjustment screen is displayed.
Installation and Adjustments Guide
3-7Simple Image Quality Adjustment Tool
Page 38
Density Uniformity Adjustment
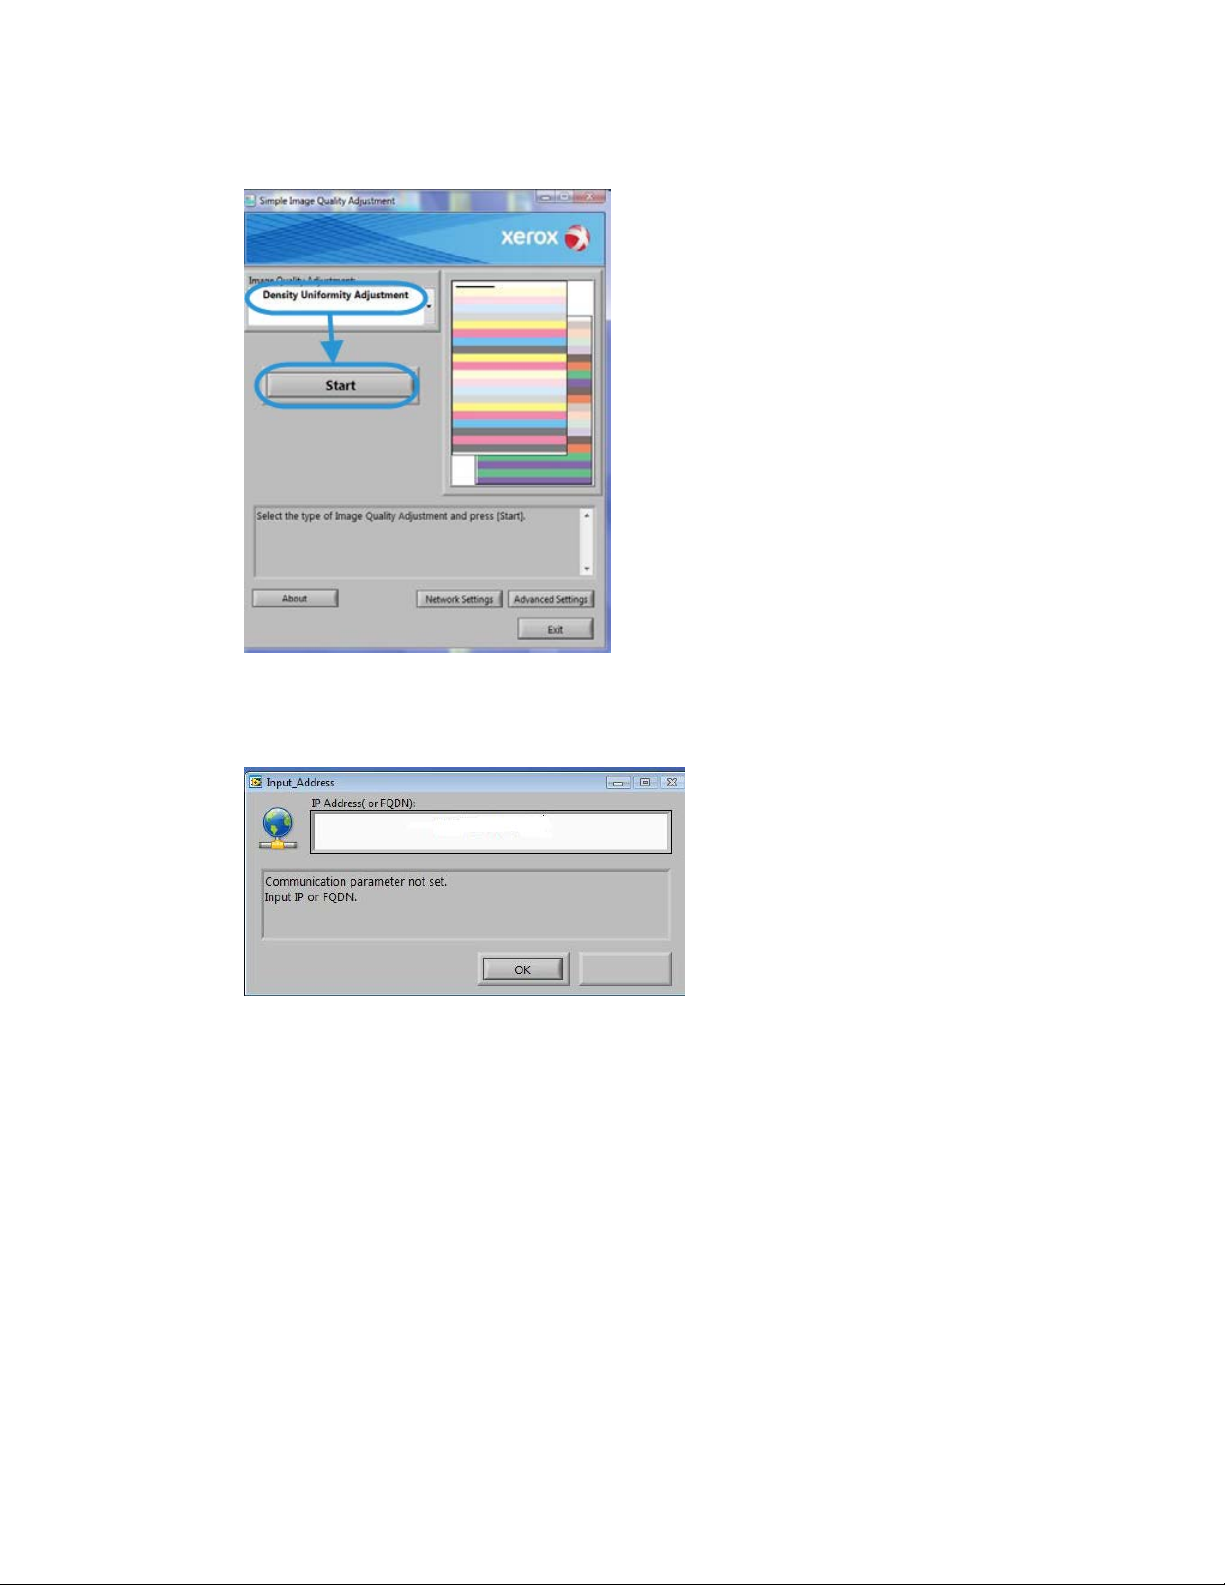
19. From the pull-down menu, select Density Uniformity Adjustment, and then select
Start.
If the Input Address screen is displayed, confirm or enter the IP Address of the
machine.
Note
If the SIQA application is communicating to the machine that is connected to either
a FreeFlow Print Server or a Fiery EFI Integrated Print Server, enter the IP address
that appears on the Machine Status > Machine Information screen.
20. Select OK (Start).
The scanned image data from the printer folder/Mail Box is accessed and read by
the SIQA application. The SIQA application analyzes the data and automatically
calculates the required adjustment values.
Note
Several screens are displayed while the analysis and calculation processes occur. Be
patient.
Simple Image Quality Adjustment Tool3-8
Installation and Adjustments Guide
Page 39
Density Uniformity Adjustment
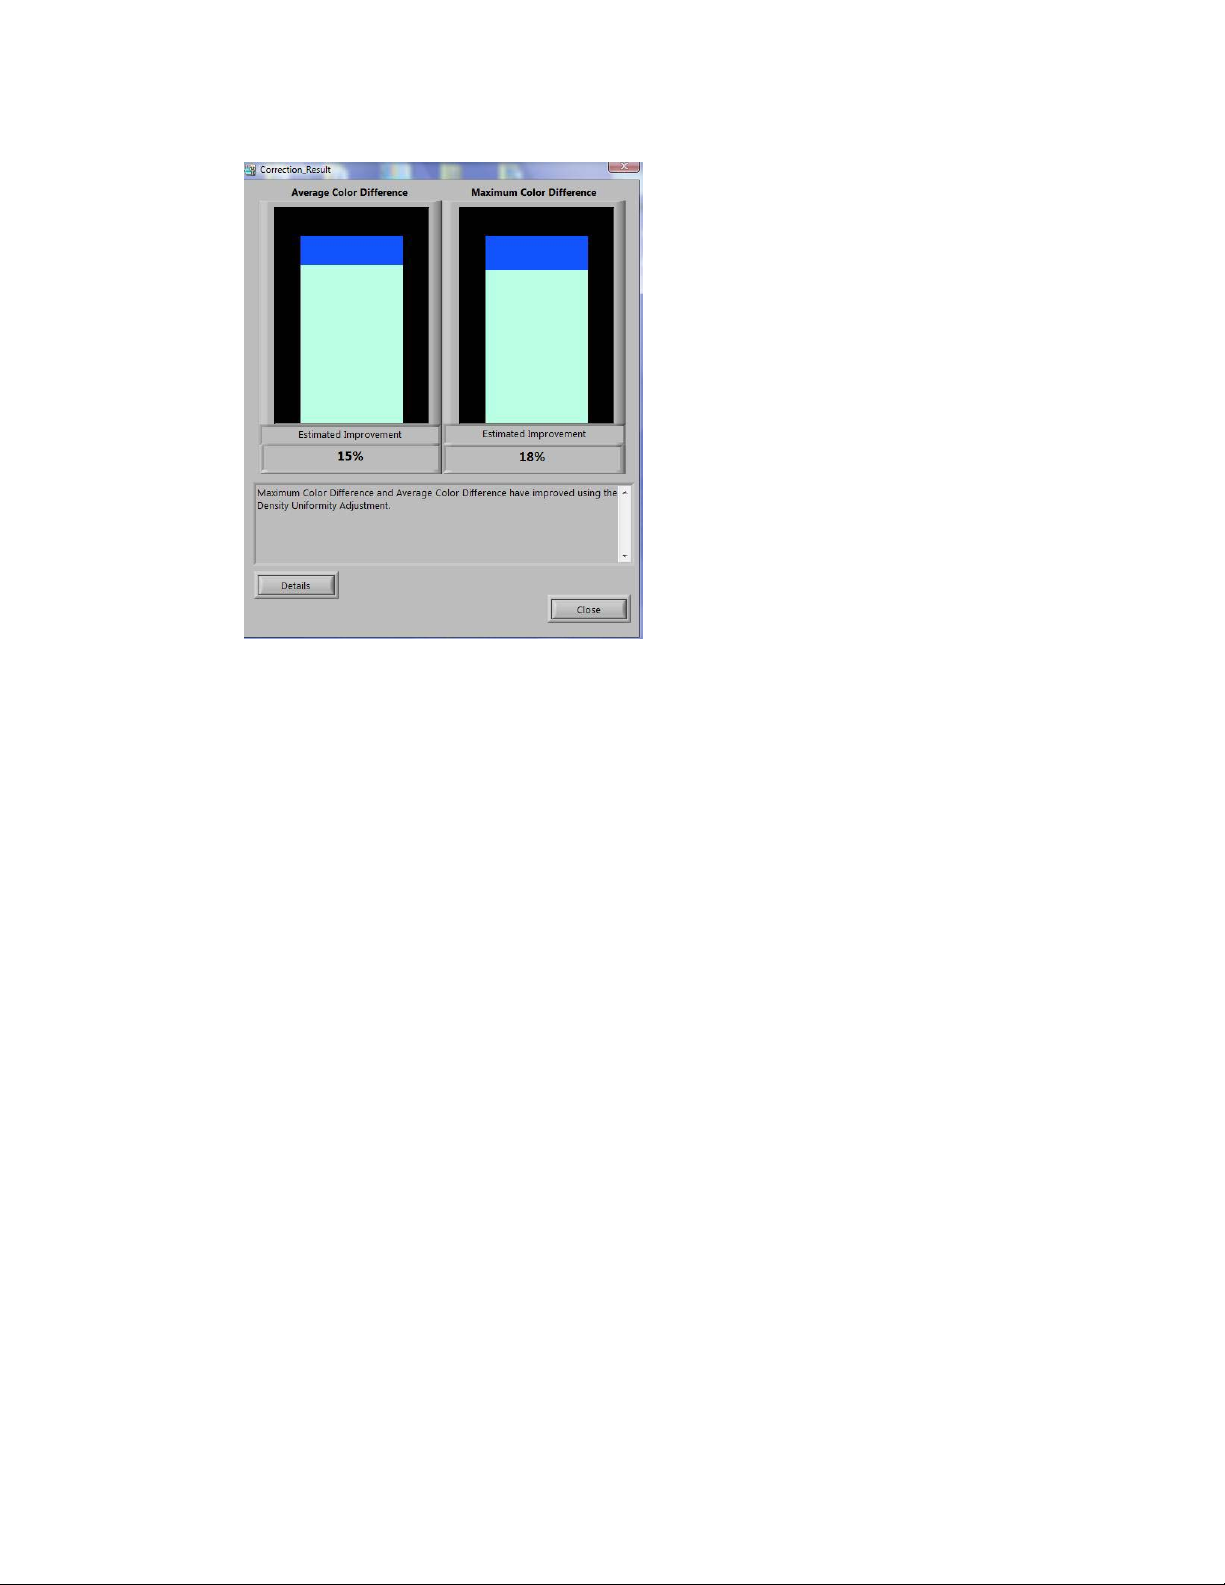
21. Review the information provided on the Correction Results screen.
This screen is displayed after the analysis and calculation processes finish.
The Correction Results information displays the possible improvement to correct
inboard-to-outboard density variation.
Installation and Adjustments Guide
3-9Simple Image Quality Adjustment Tool
Page 40
Density Uniformity Adjustment
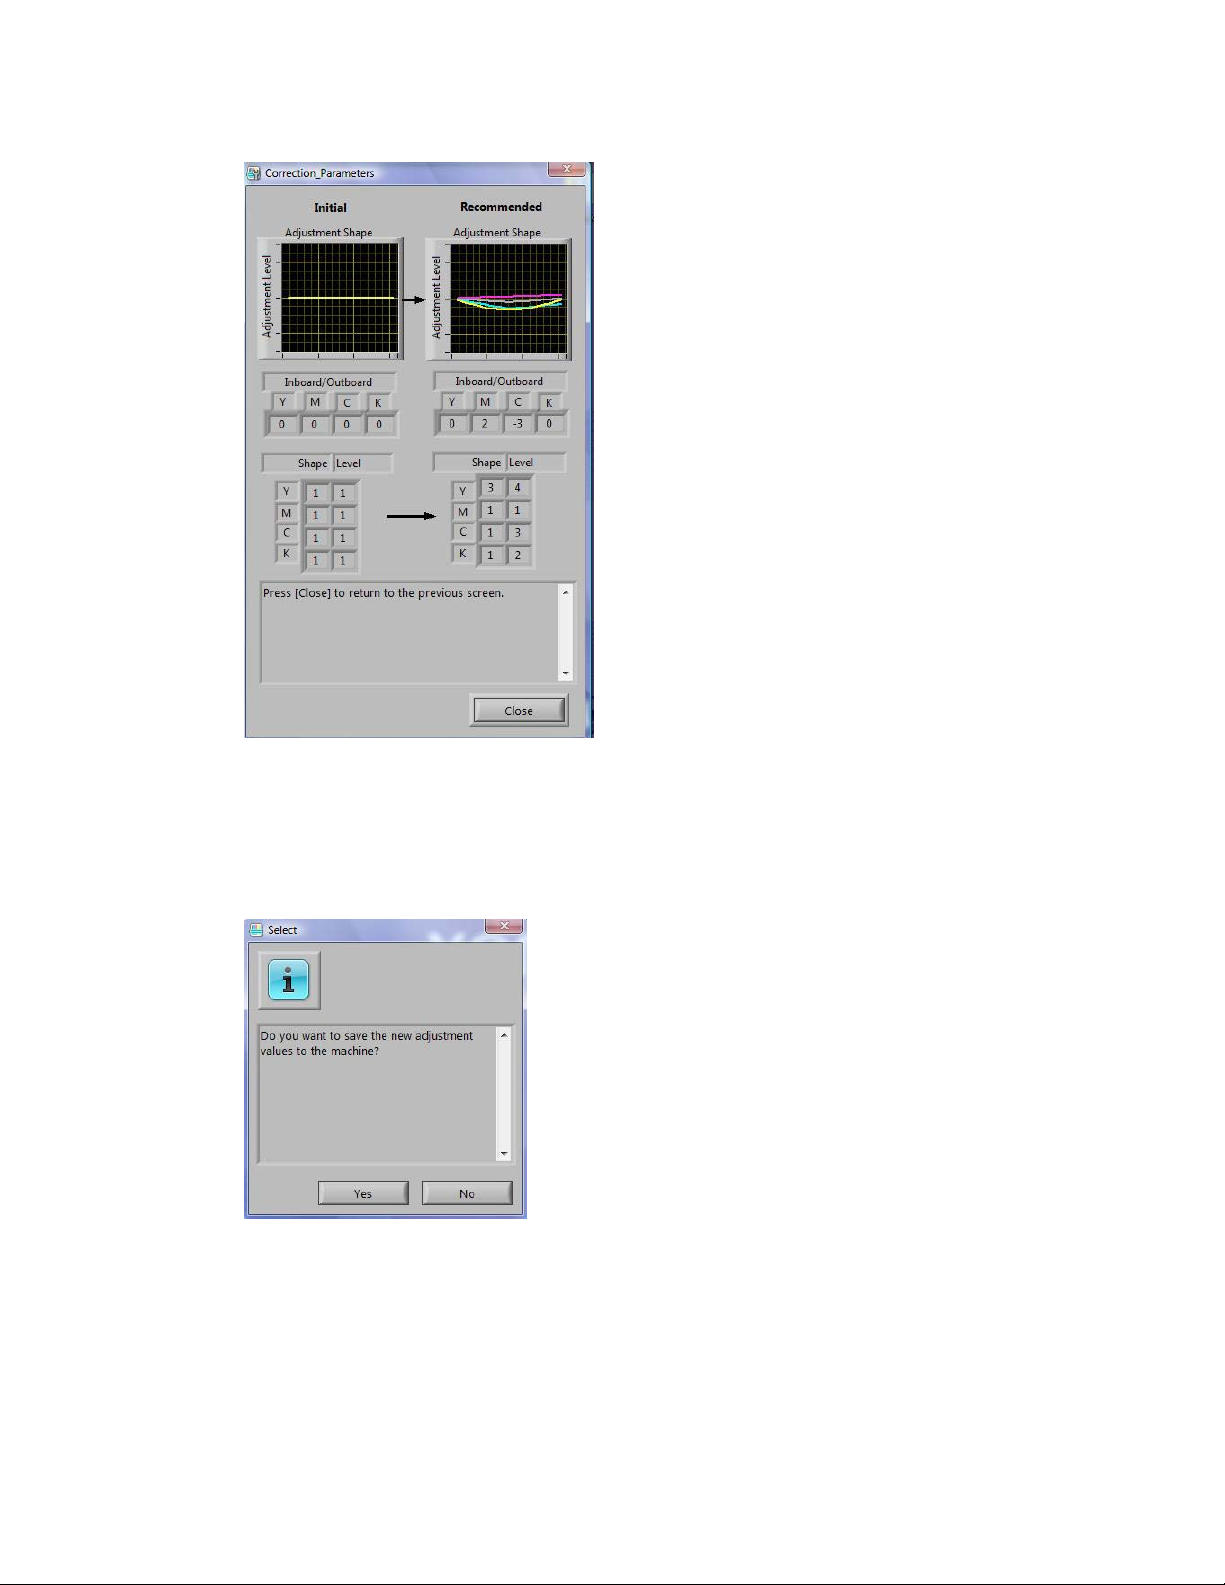
22. Select Details to review the information on the Correction Parameters screen.
23. Select Close two times to exit the Correction Parameters and Correction Results
screens.
The Select screen displays the message: Do you want to write the new parameters
into the machine?
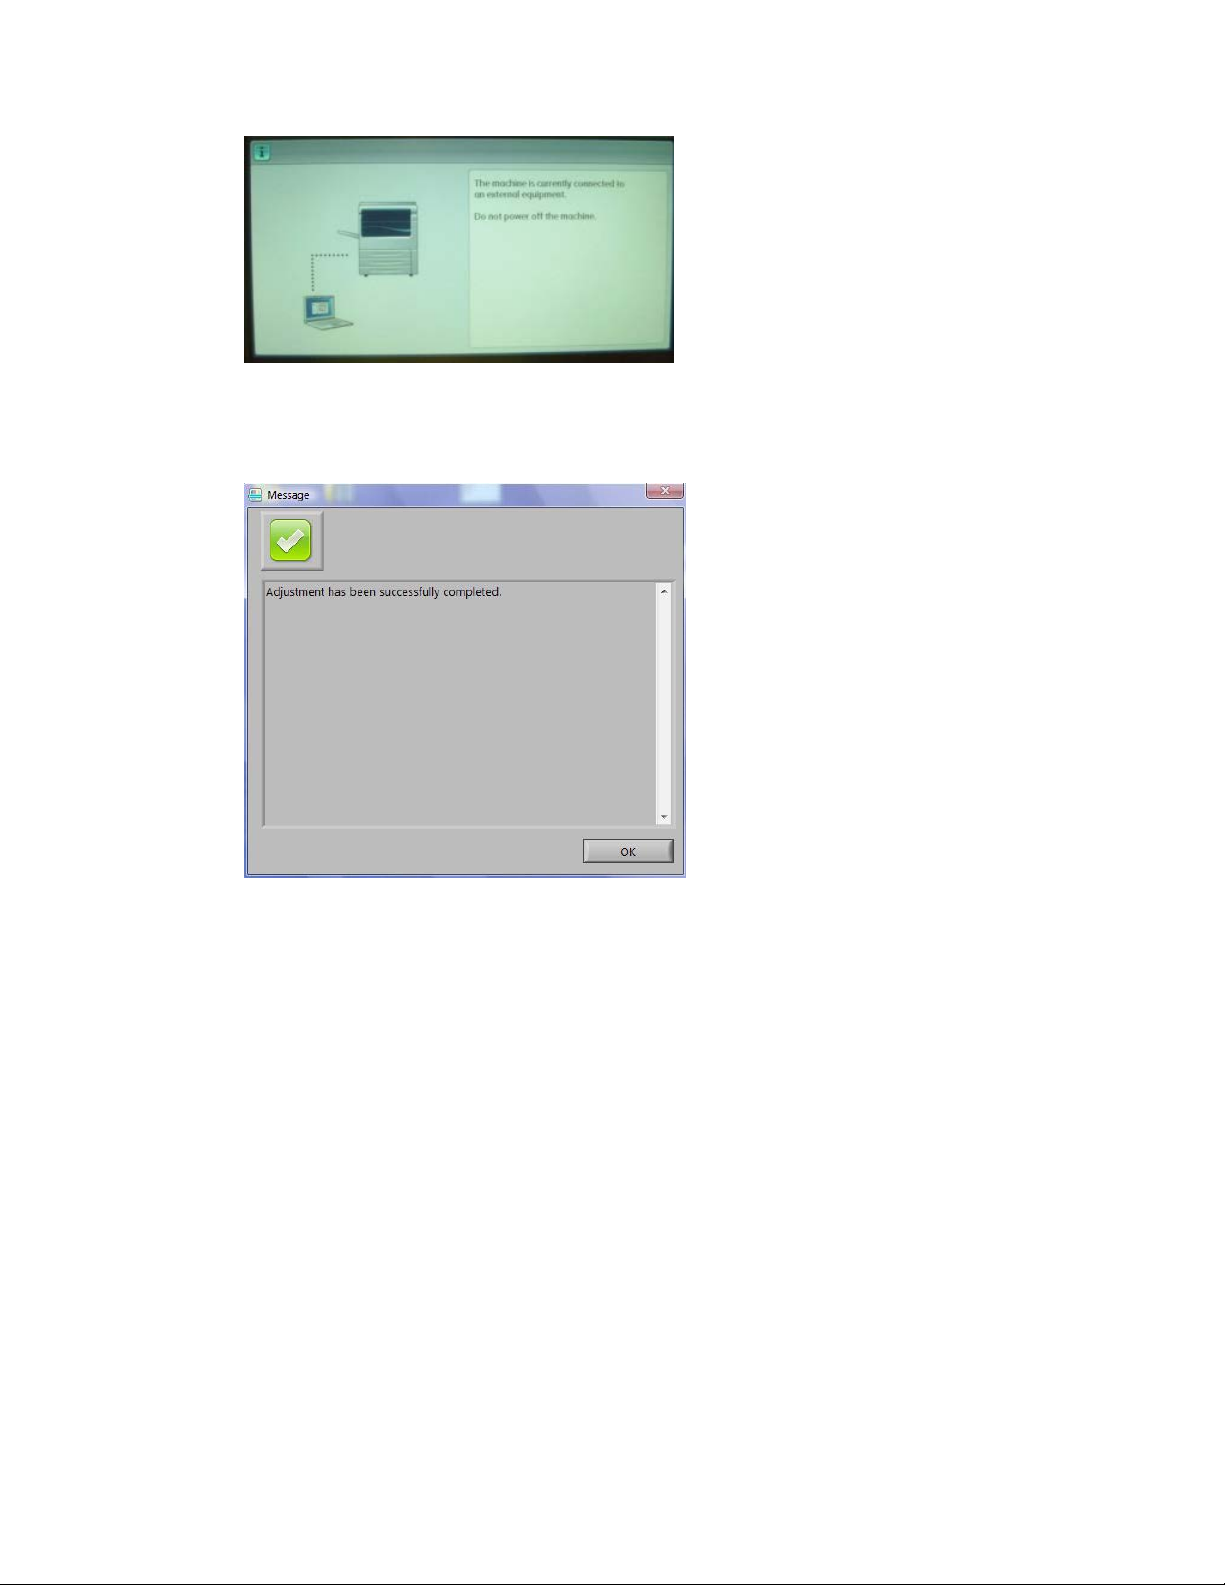
24. Select Yes to apply the new adjustment values/parameters.
The values are written into the machine’s NVM. The machine cycles up and down 4
to 8 times to allow each ROS to initialize to the new values. The machine’s UI displays
the message: The machine is currently connected to an external equipment. Do not
power off the machine.
Simple Image Quality Adjustment Tool3-10
Installation and Adjustments Guide
Page 41
Density Uniformity Adjustment
Upon completion, the SIQA application displays the Message screen: Adjustment
completed.
25. Select OK to close and exit the SIQA application.
The adjustment may be verified by rerunning the test patterns and performing all
the previous steps in this procedure.
Installation and Adjustments Guide
3-11Simple Image Quality Adjustment Tool
Page 42

Density Uniformity Adjustment
Simple Image Quality Adjustment Tool3-12
Installation and Adjustments Guide
Page 43

Page 44

 Loading...