

Page 1
Visual Reference Guide
Xerox CX Print Server
Powered by Creo Color Server Technology
for the Xerox Color 550/560 Printer
653-01727A-EN
Page 2
1
2
3
4
5
12VDC
POWER
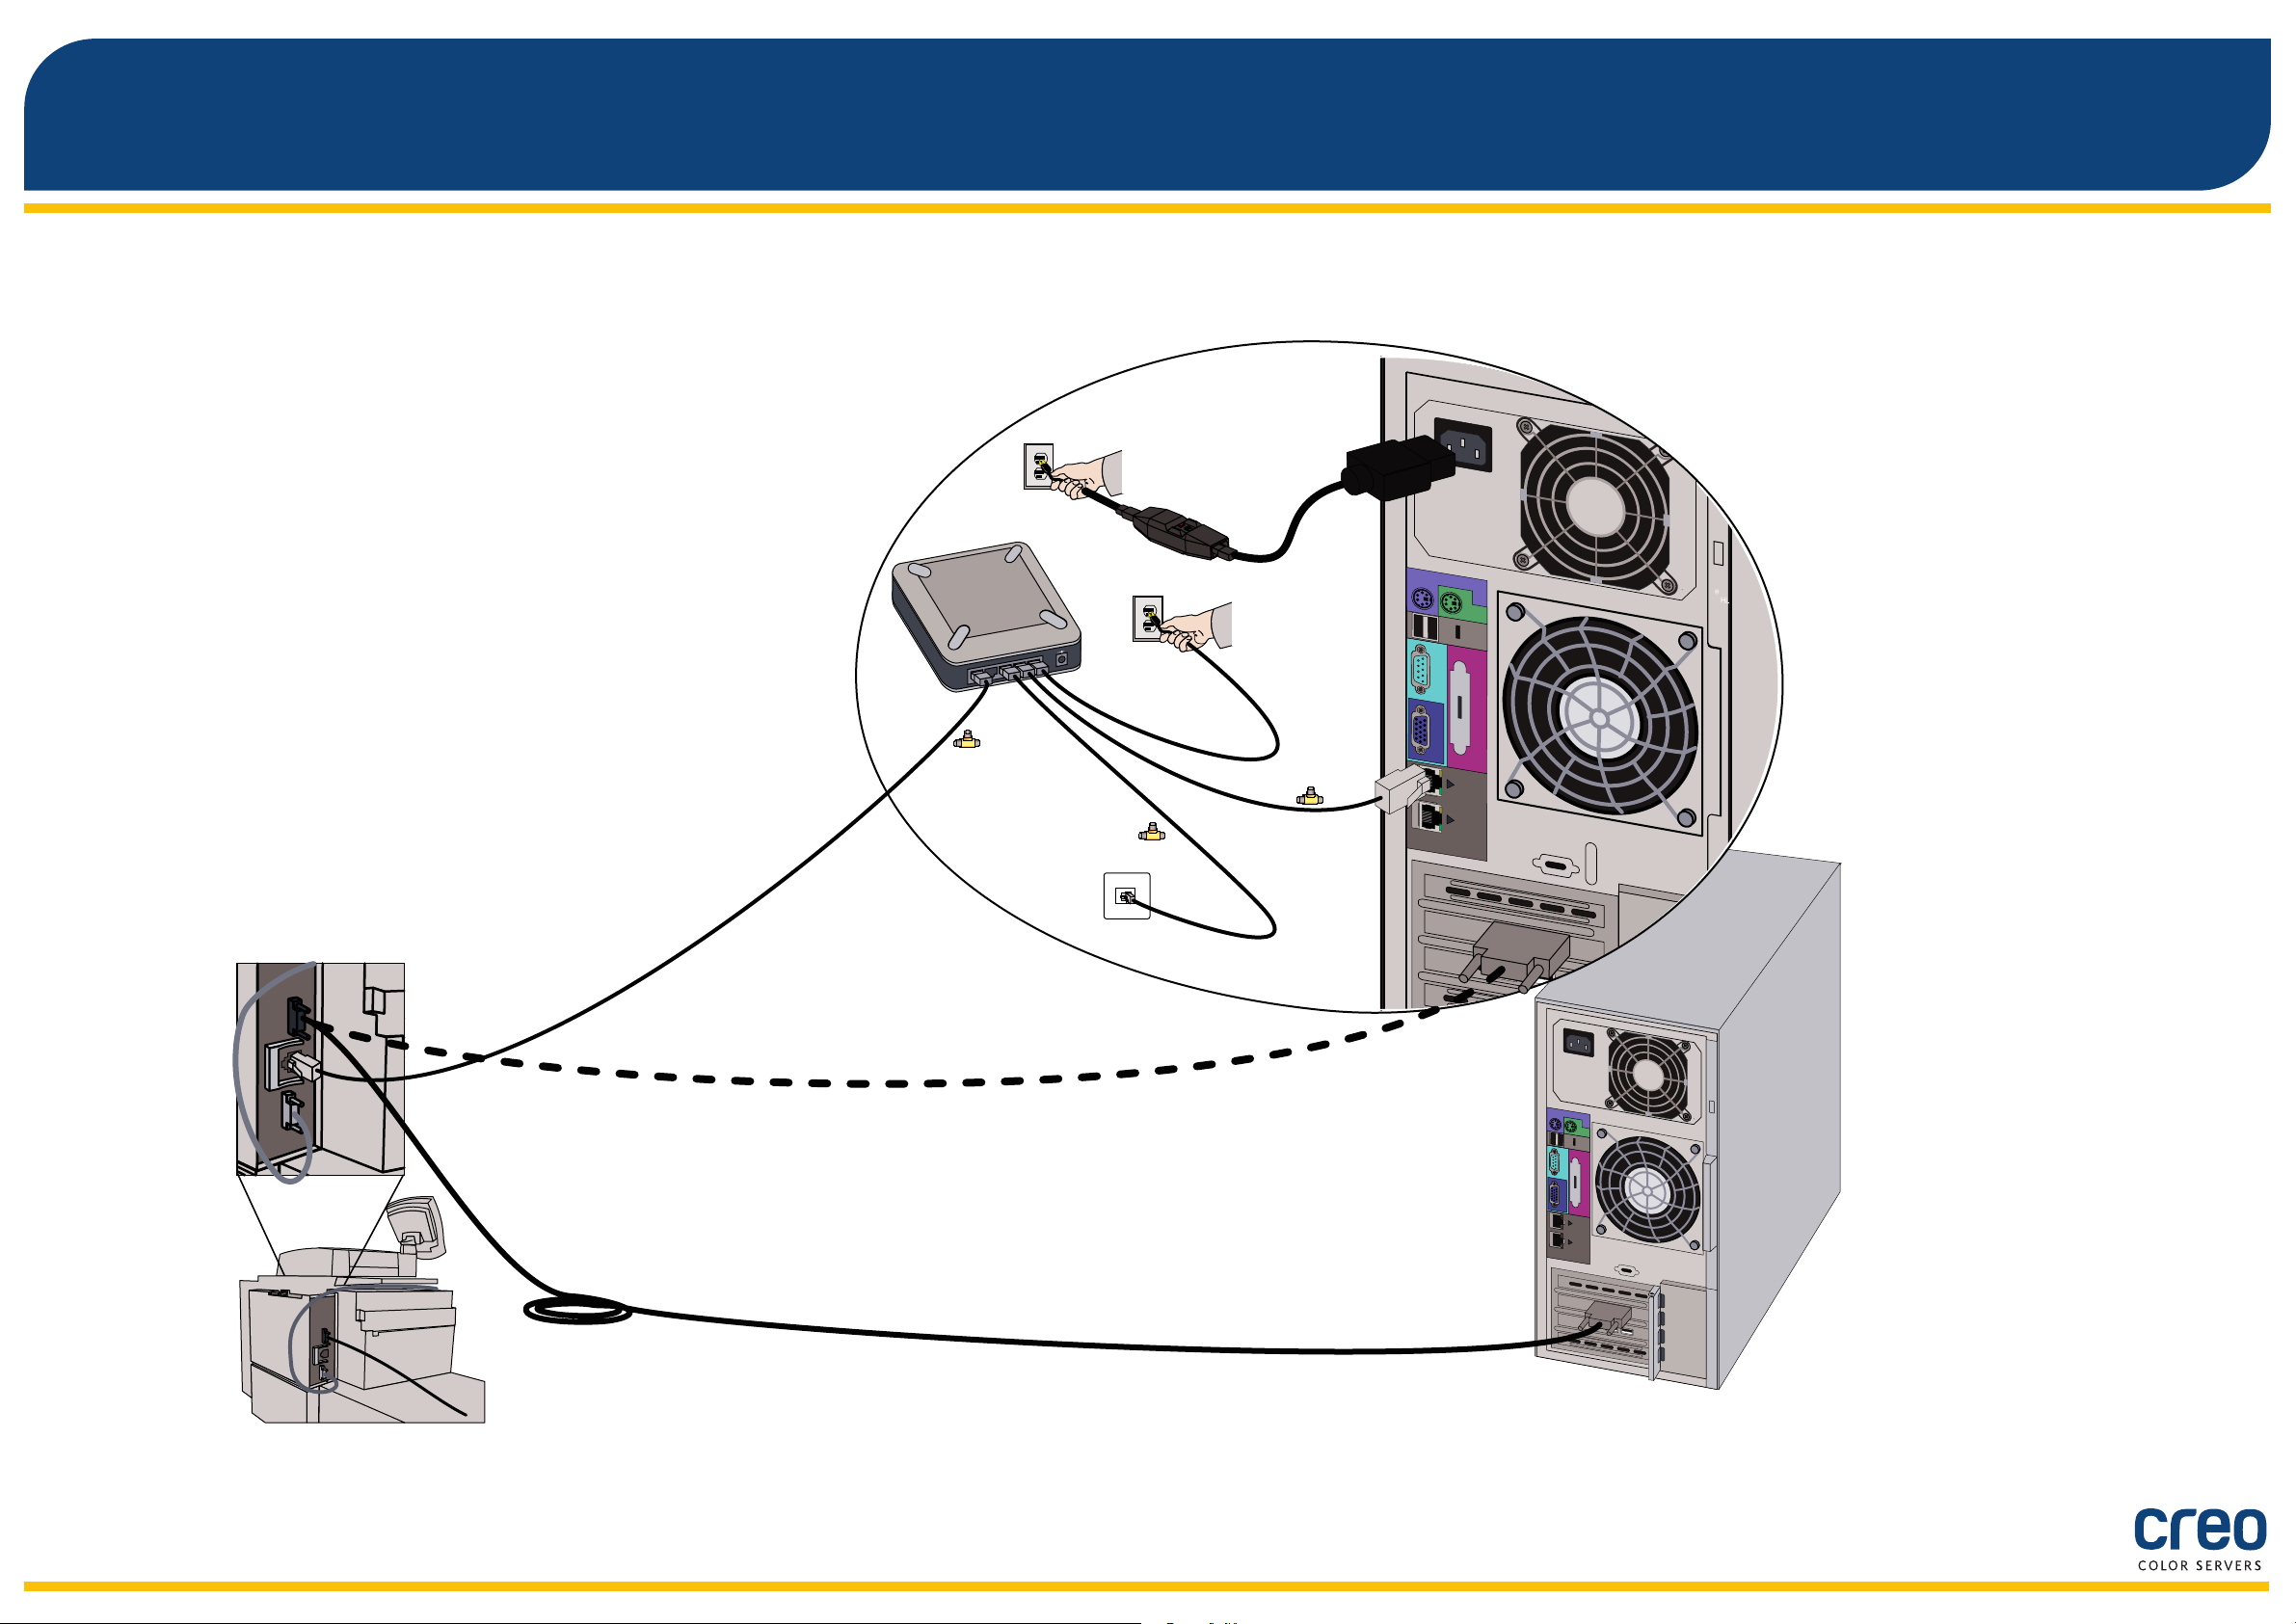
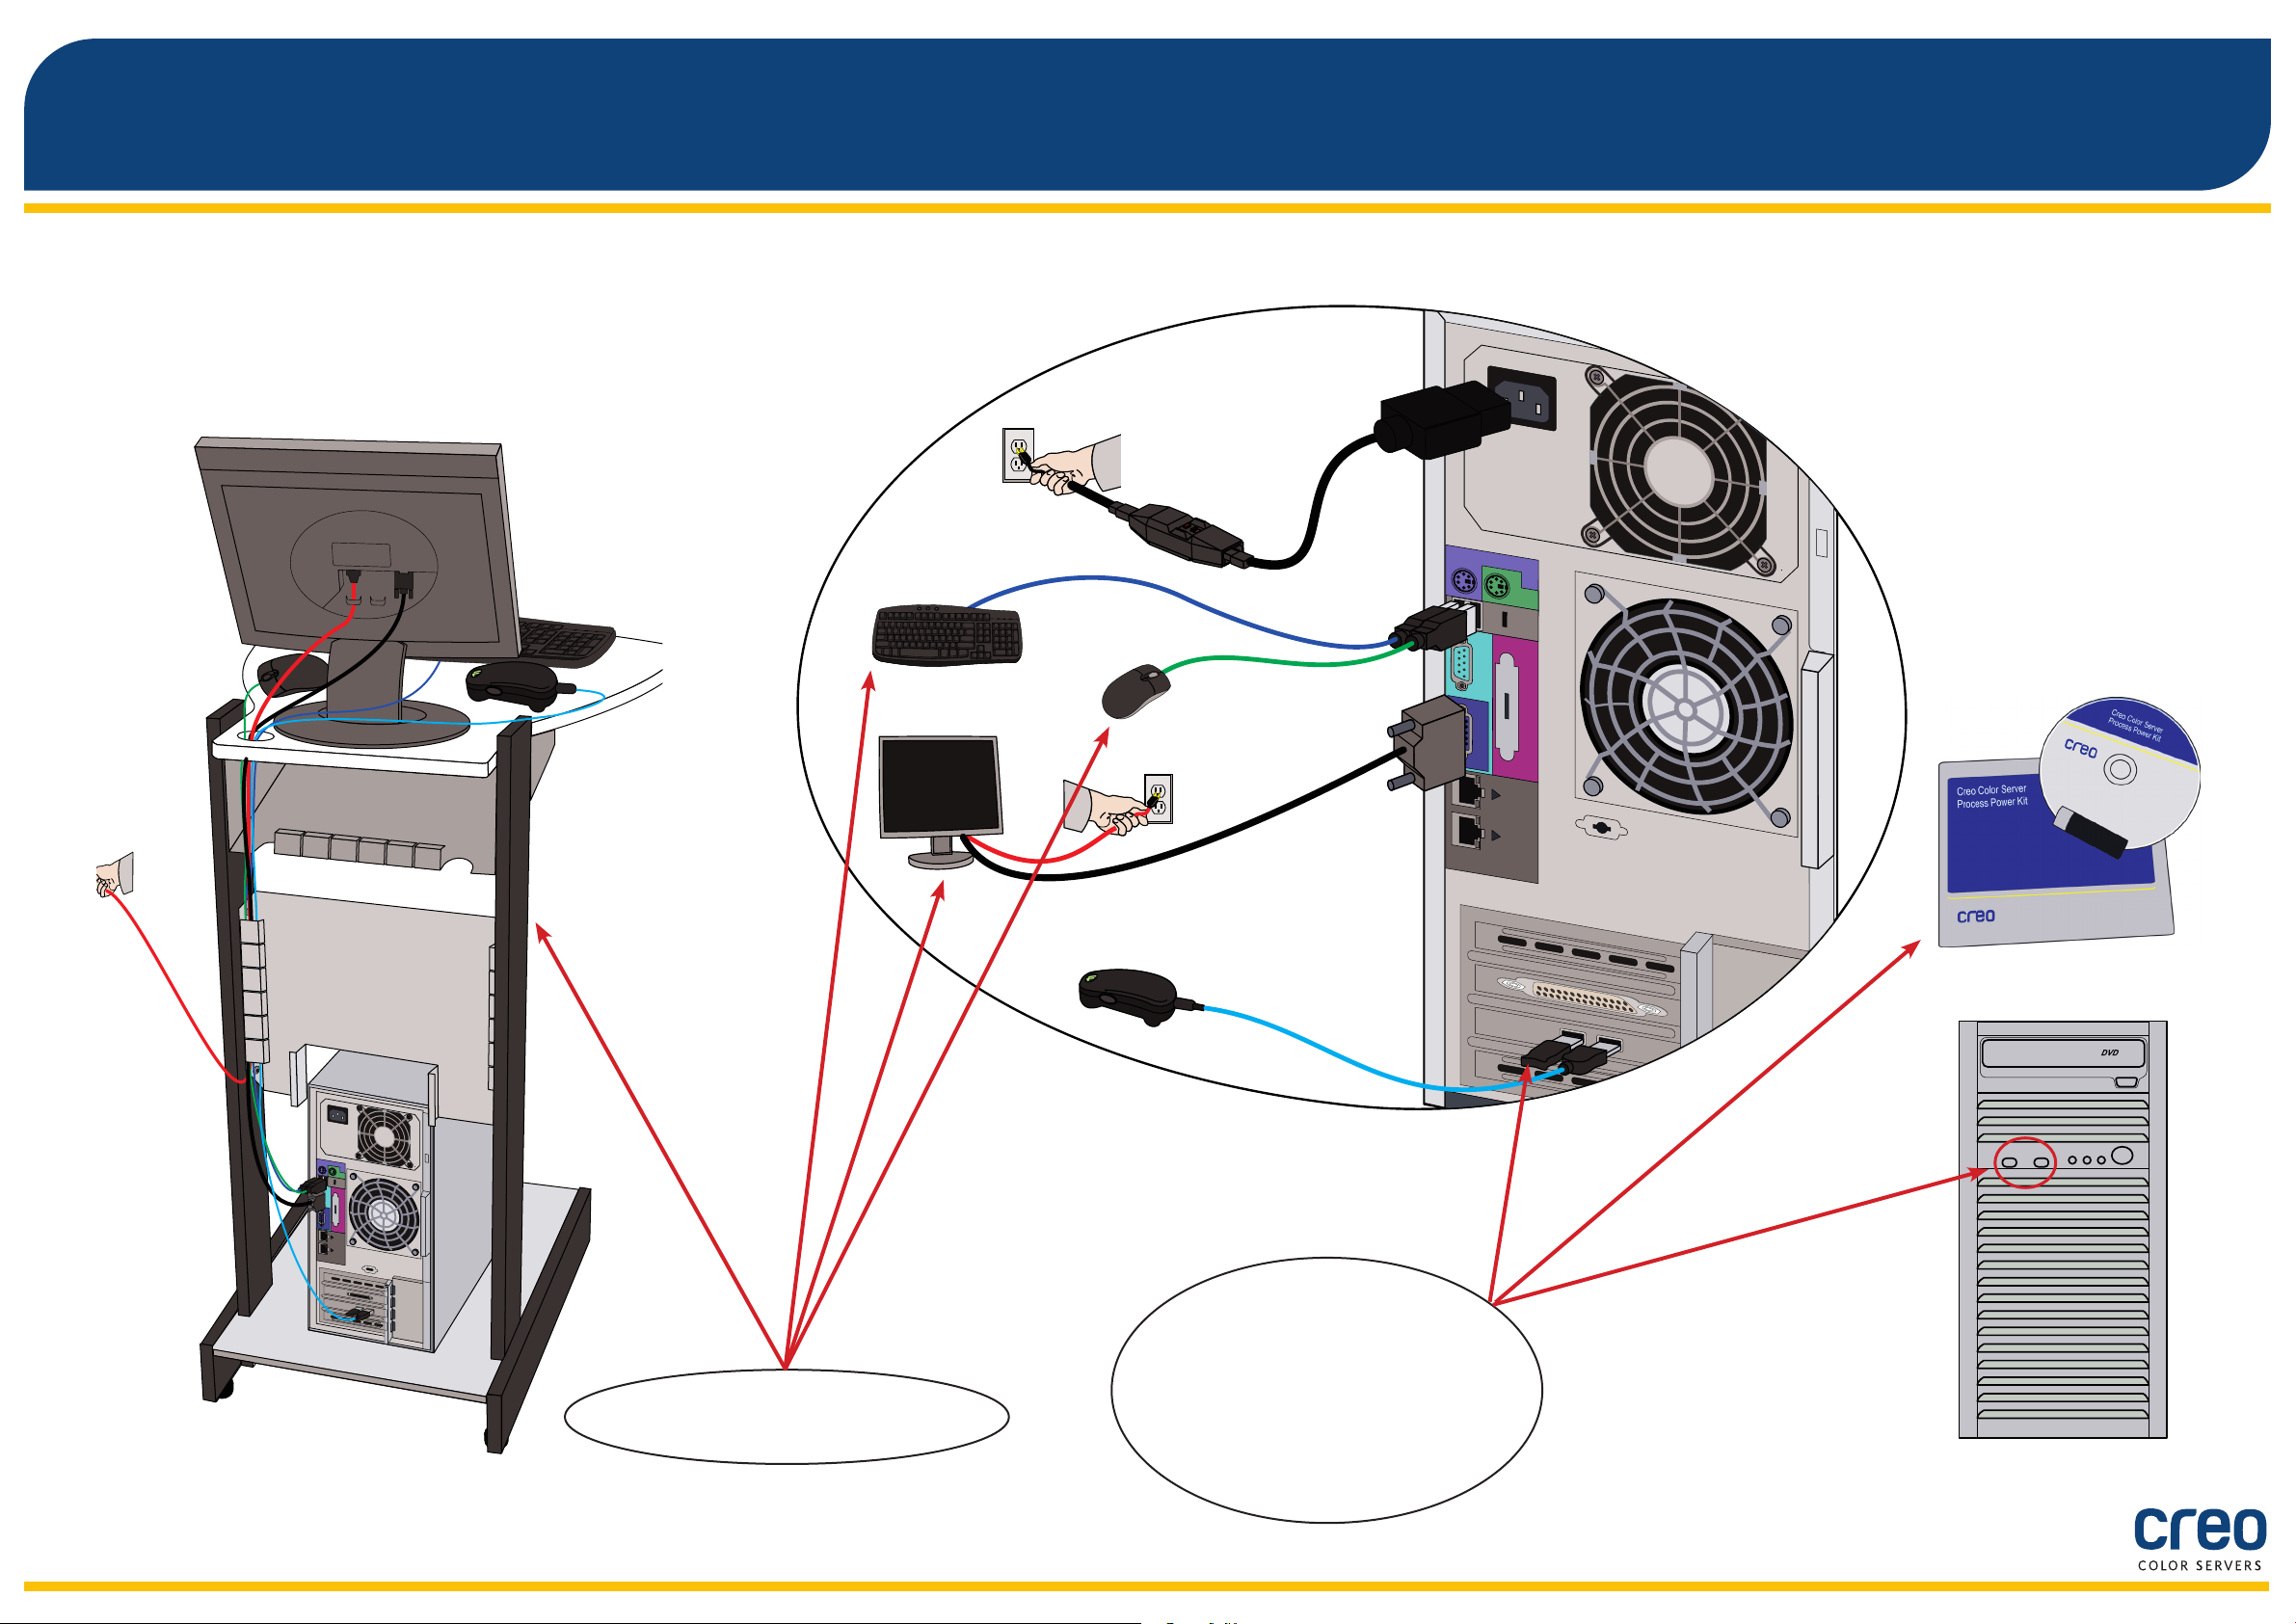
Cable connections for the CX print server computer
CX print server
Xerox color 550/560 printer
2
Page 3
Optional kits for the CX print server
The CX print server provides four optional kits each of which requires a USB dongle.
Professional Power Kit
Creative Power Kit
Peripheral Equipment Kit
3
Imposition Power Kit*
* The Imposition Power Kit should be installed by the customer.
Page 4
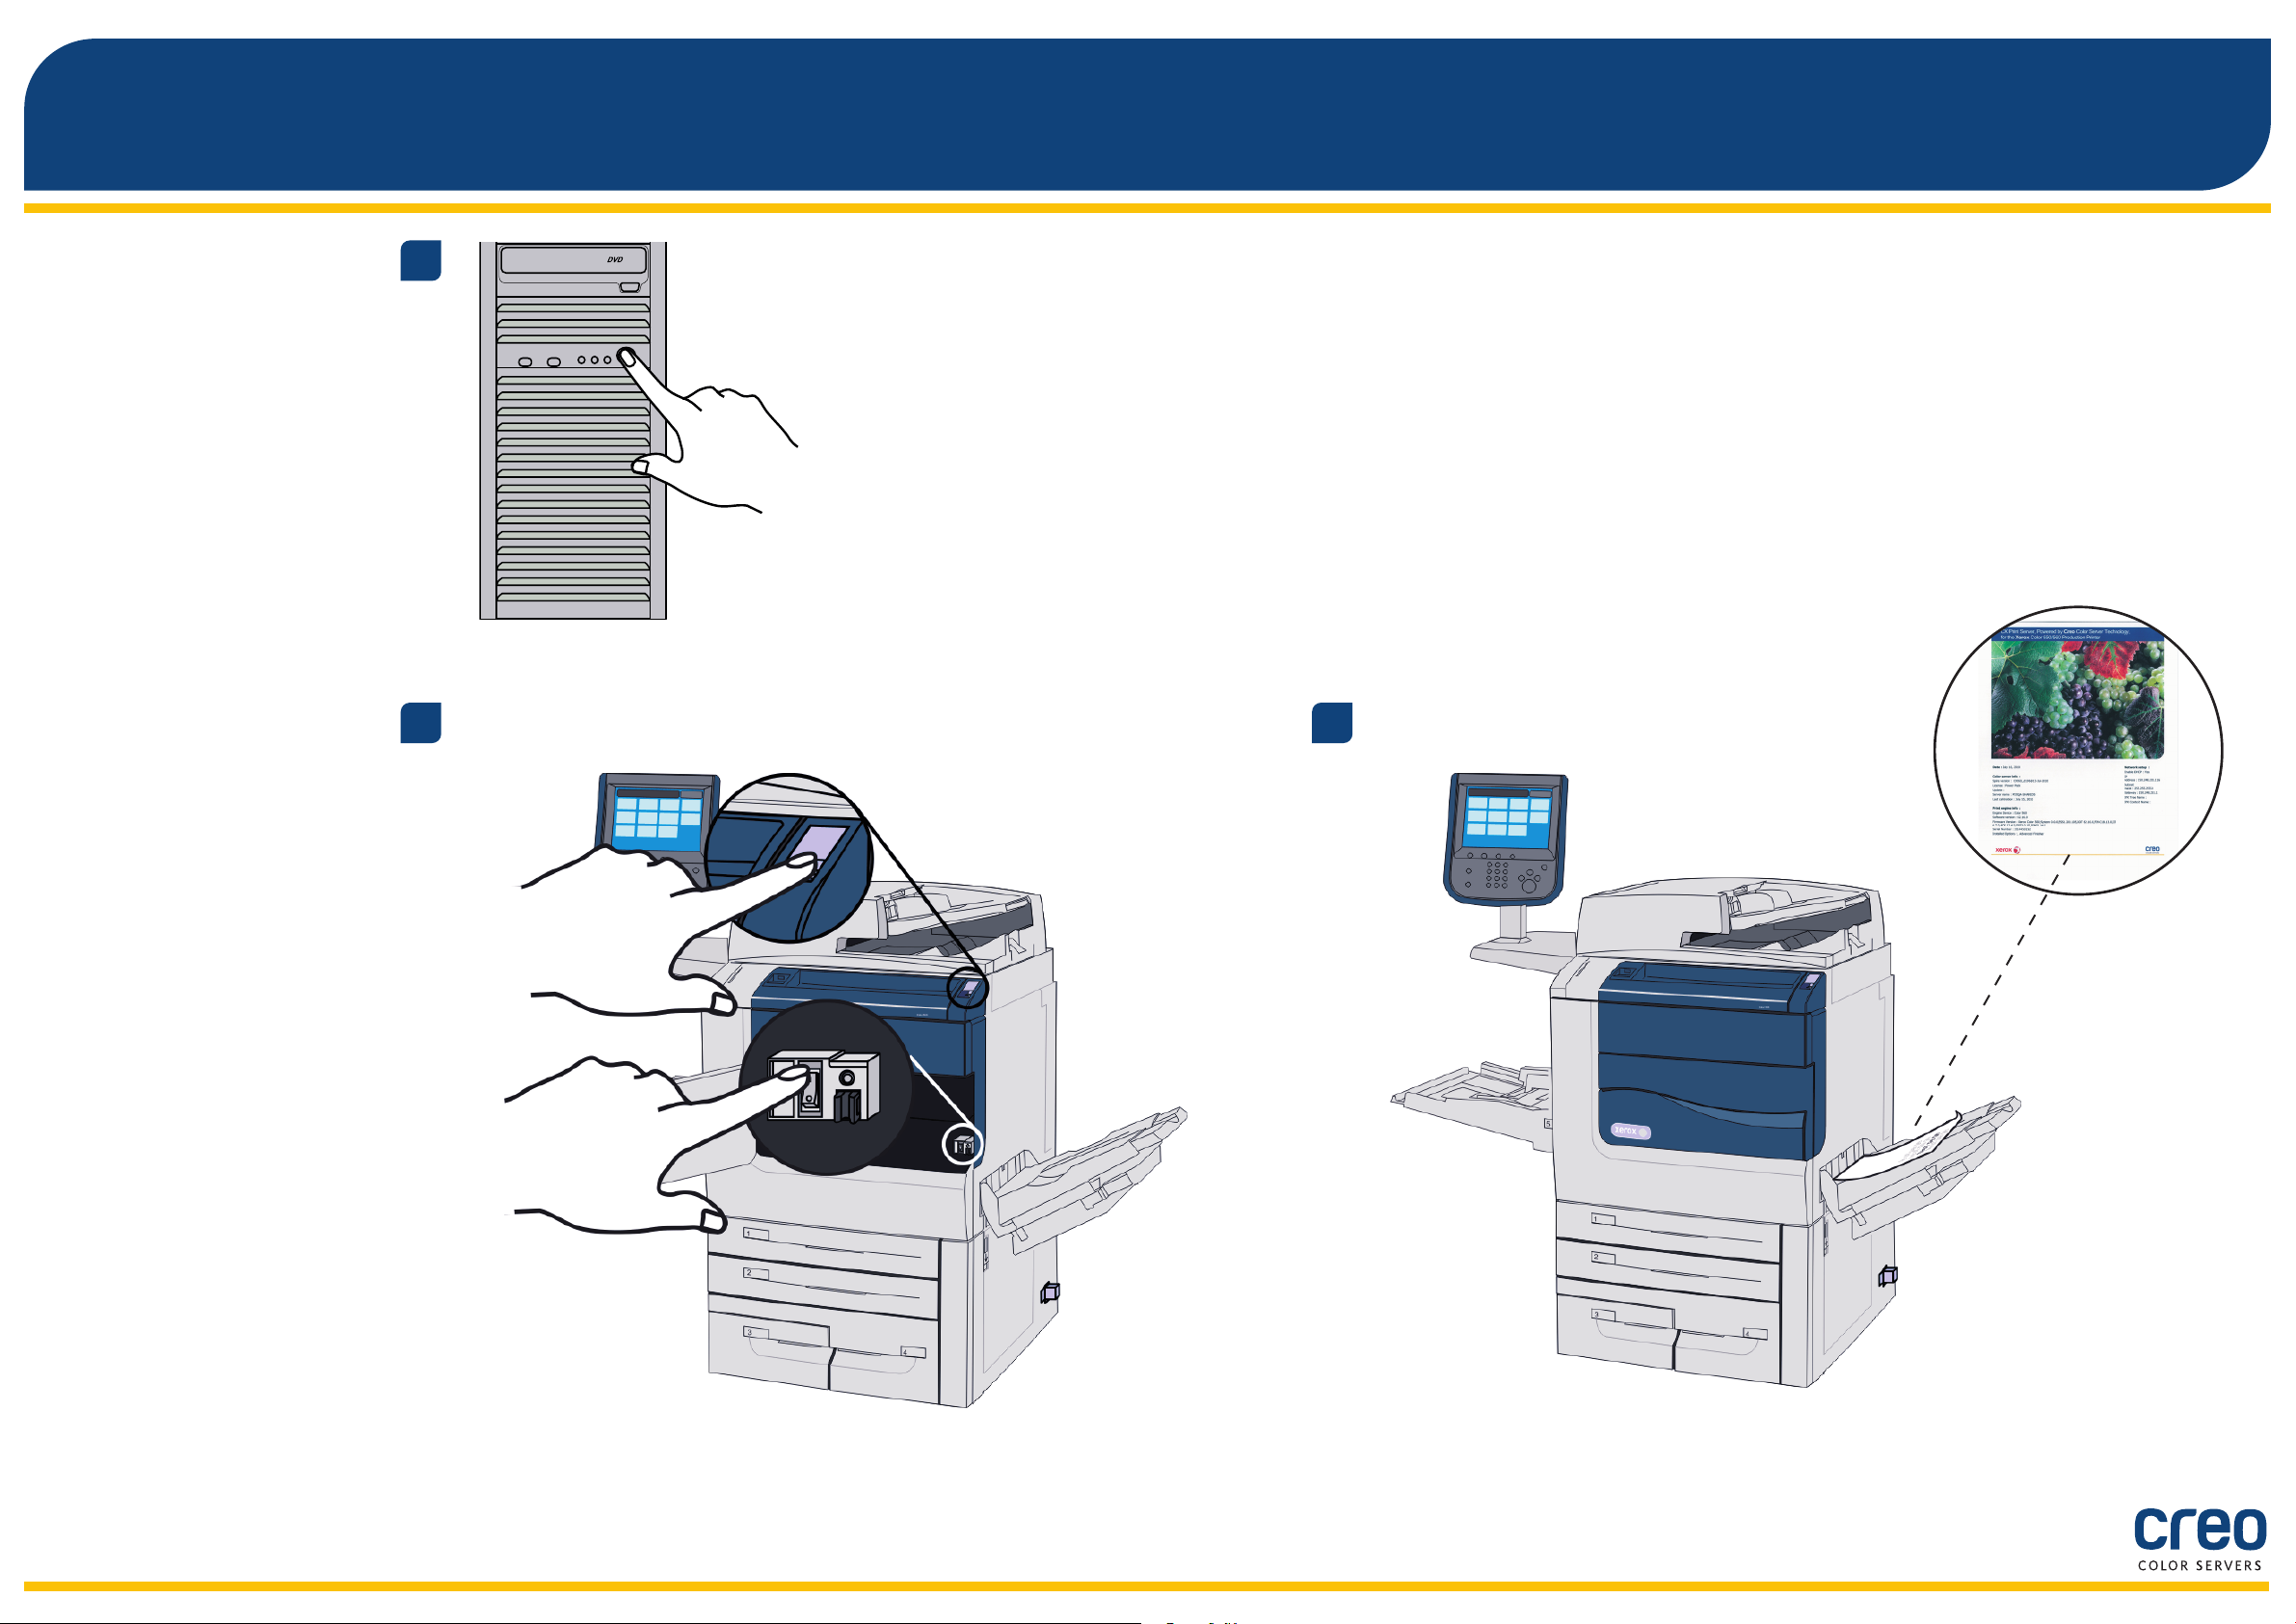
Turning on the CX print server and turning on the printer
1
2
3
4
Page 5
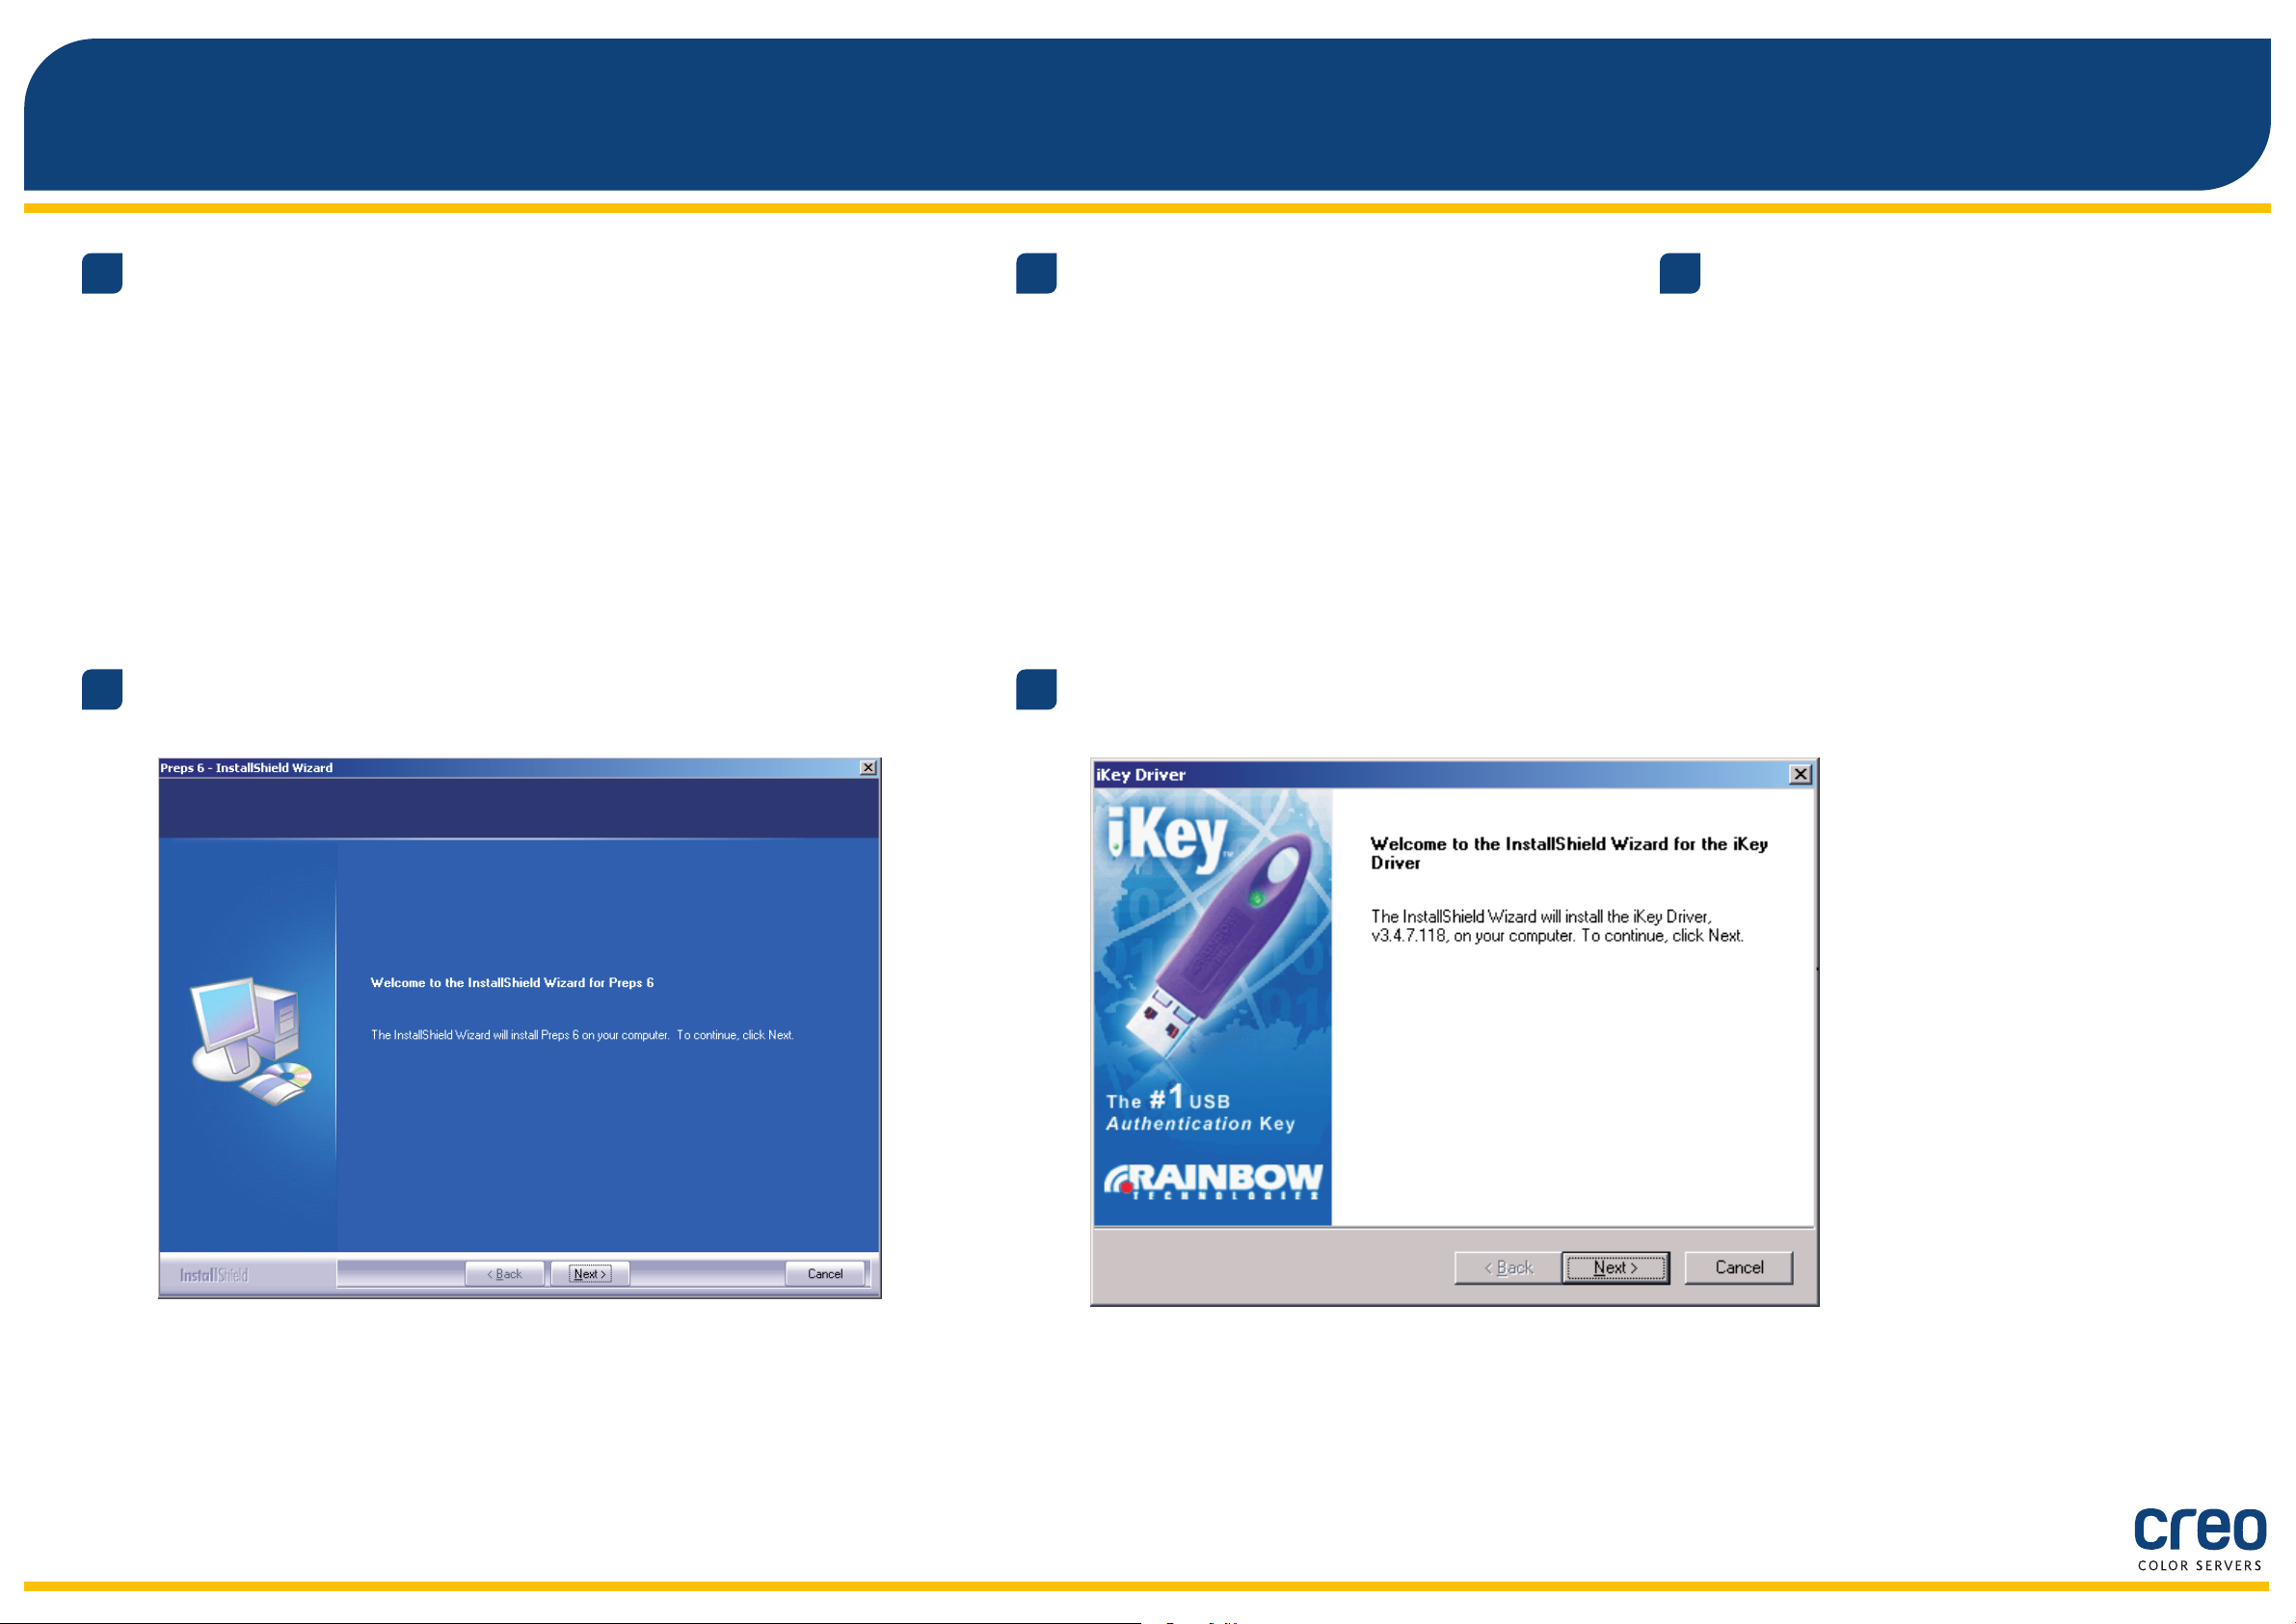
Installing the Imposition Power Kit
Log onto your computer as an Administrator.
1
Click Install and follow the onscreen instructions until the
4
installation is complete.
Obtain the software files. The Preps_6-0-0_
2
Win_Installer.exe file is available on the DVD.
When the iKey driver Window appears, type your license key to
5
complete the installation.
Insert the DVD, and double-click the .exe file.
3
5
Page 6

Setting up a network printer - Windows Server 2008/2003/XP
This procedure applies to Windows Server 2008, Windows Server 2003, and XP.
Select Start > Settings >
1
Printers and Faxes.
Double-click Add Printer.
2
In the Add Printer Wizard, click Next.
3
Select Network printer,
4
and then click Next.
5
Type the CX print server name, or
click Next and locate the server.
In the Shared printers area, double-click the
6
server name to display the list of network printers.
7
Select one of the network printers, for
example—ProcessPrint—and then click Next.
8
Select whether you want this to be the
default printer, and then click Next.
9
Click Finish to complete the setup.
Note:When you add a network printer,
the Print Driver software is installed on
your computer.
6
Page 7
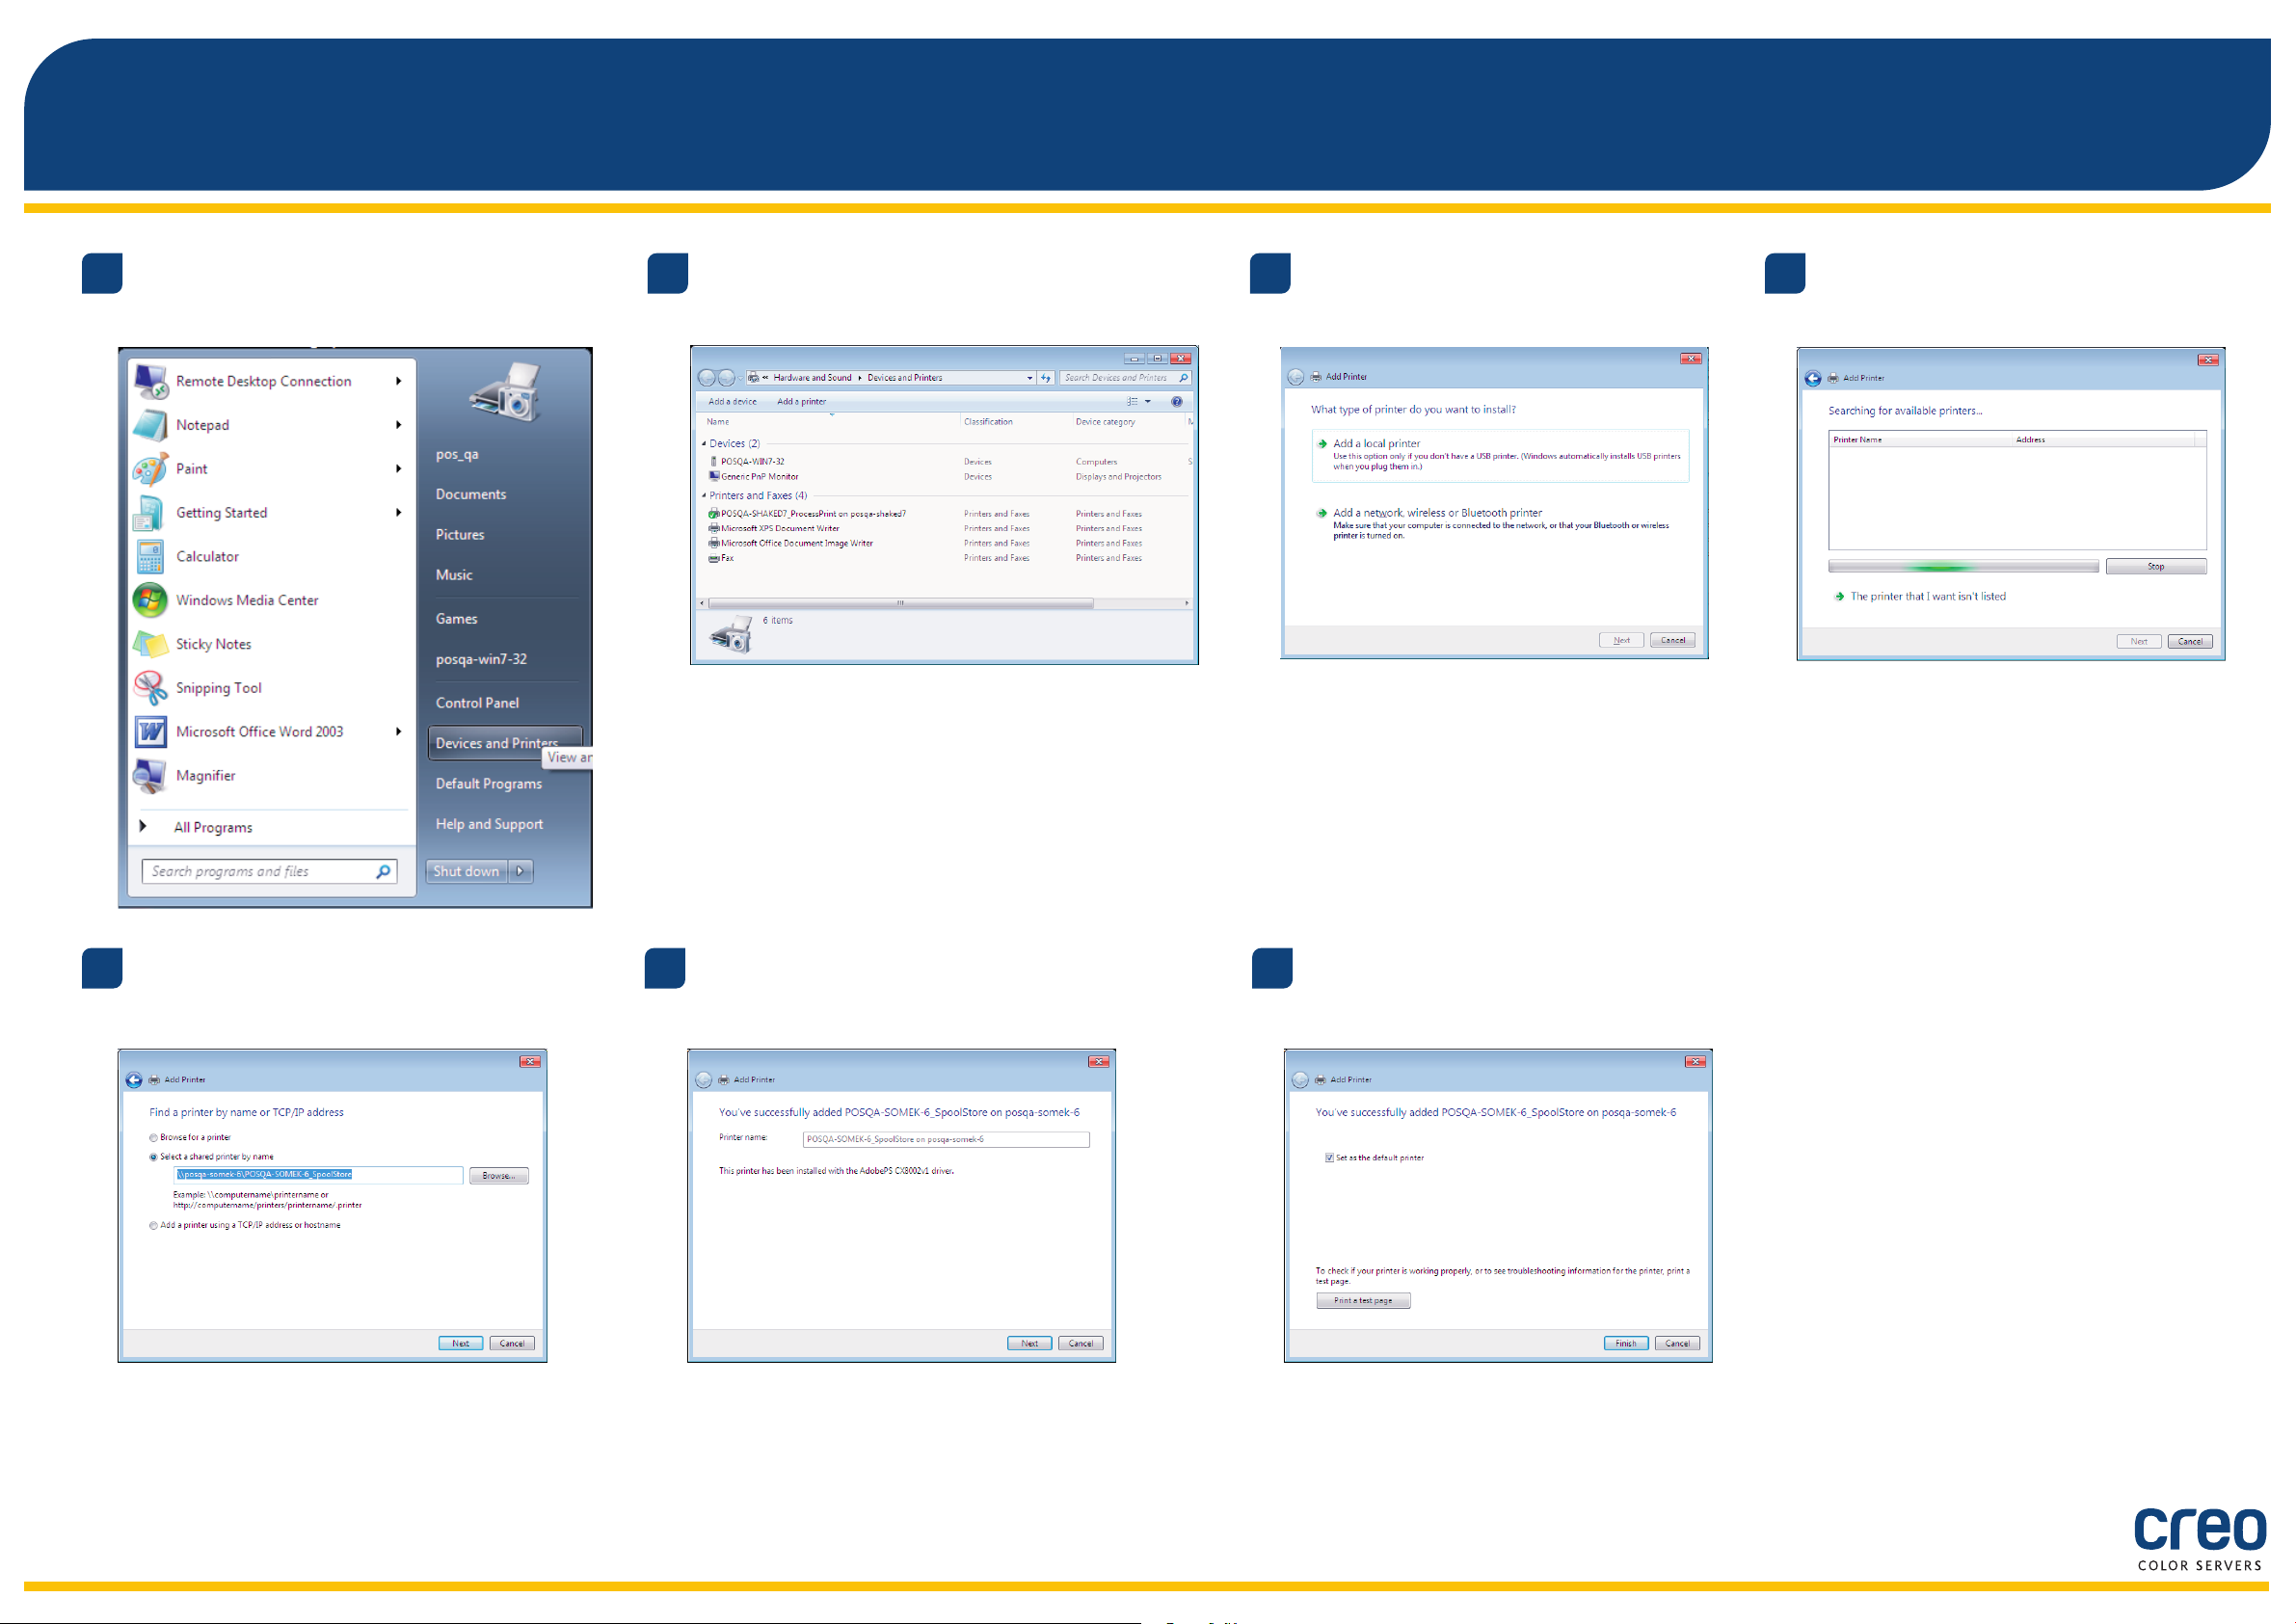
Setting up a network printer - Windows 7/Vista
This procedure applies to Windows 7 and Vista.
From the Start menu, select
1
Devices and Printers.
Select Add a printer.
2
In the Add Printer wizard select Add a
3
network, wireless or Bluetooth printer.
Select The printer that I
4
want isn’t listed.
5
In the Select a shared printer by name box,
type the CX print server name, and click Next.
6
Click Next.
7
Select whether you want this to be the default printer,
and then click Finish to complete the setup.
Note:When you add a network printer, the Print
Driver software is installed on your computer.
7
Page 8
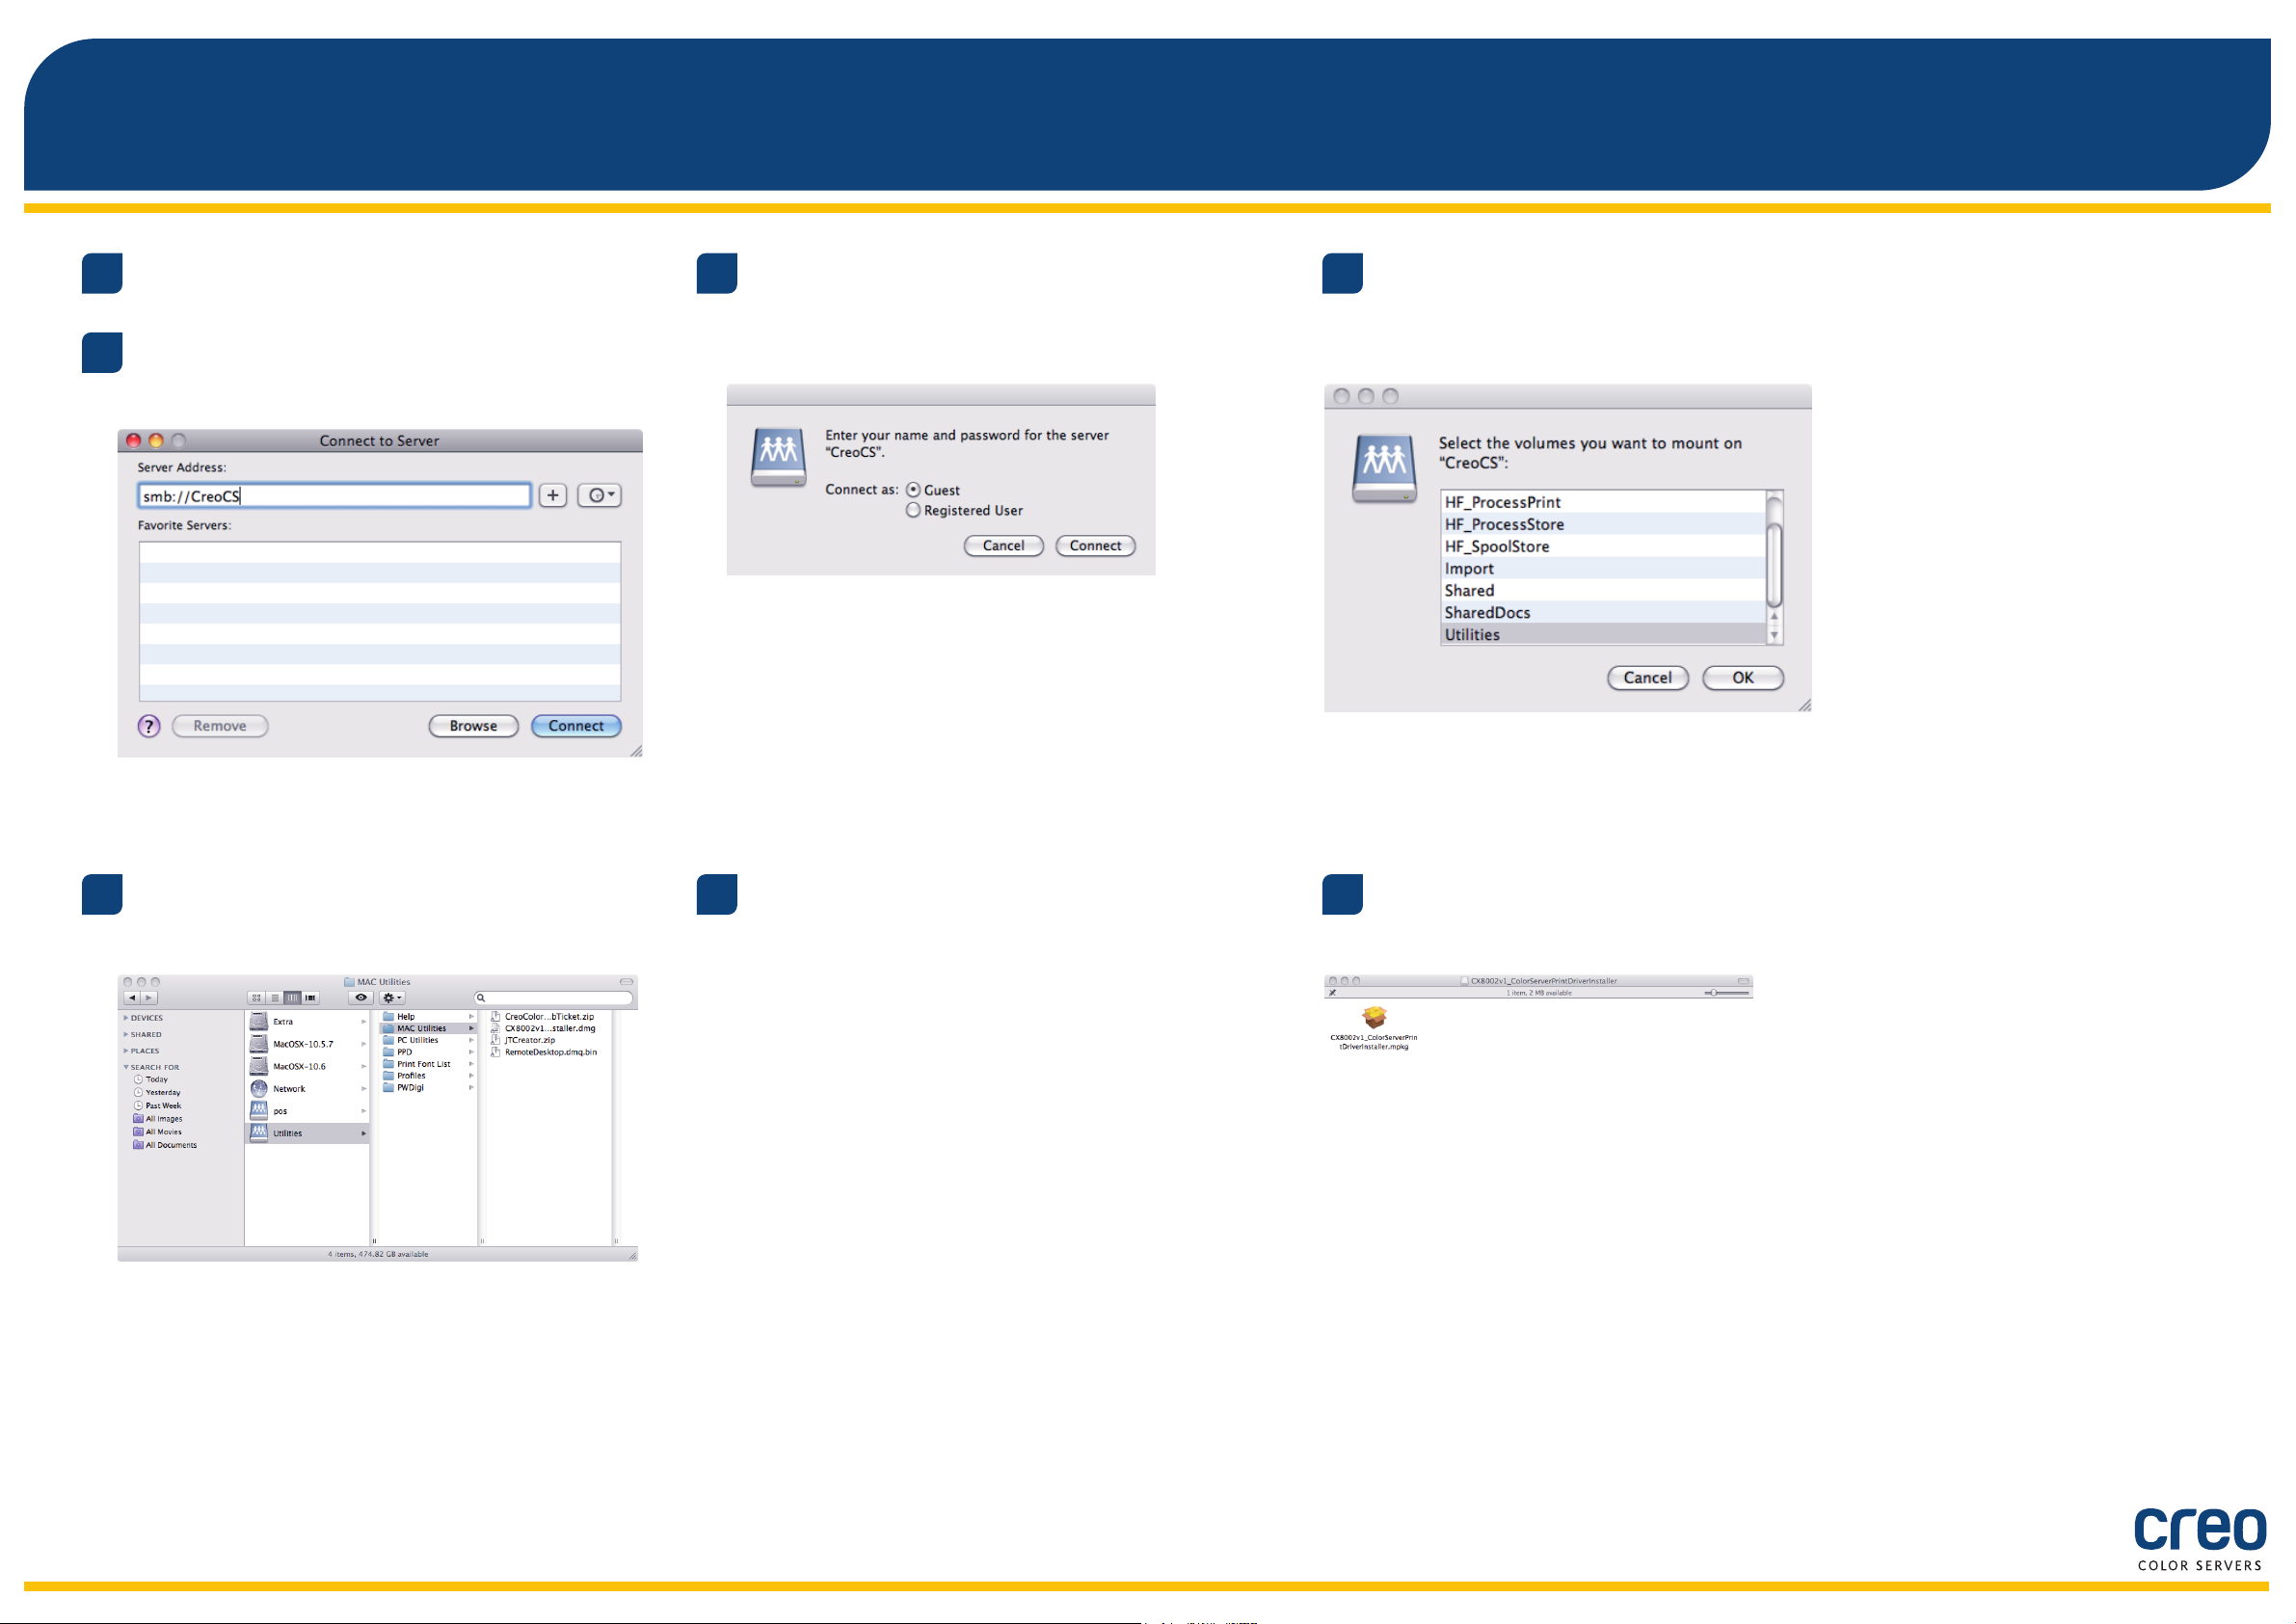
Installing the Print Driver software on Mac OS X 10.6.x
Choose Go > Connect to Server.
1
In the Server Address box, type your
2
server address, and click Connect.
Select Guest and then click Connect.
3
4
Select Utilities, and click OK.
5
Select the Mac Utilities folder.
6
Double-click the relevant
ColorServerPrintDriverInstaller.dmg file.
7
Double-click the relevant
ColorServerPrintDriverInstaller.mpkg file.
8
Page 9

Installing the Print Driver software on Mac OS X 10.6.x (cont.)
Click Continue.
8
In the Software License Agreement
9
window, click Continue.
Click Agree to agree to the terms and
10
continue with the installation procedure.
11
Click Install.
12
Type your name (if necessary) and password,
and click OK.
13
Click Close.
The Print Driver software is installed.
9
Page 10
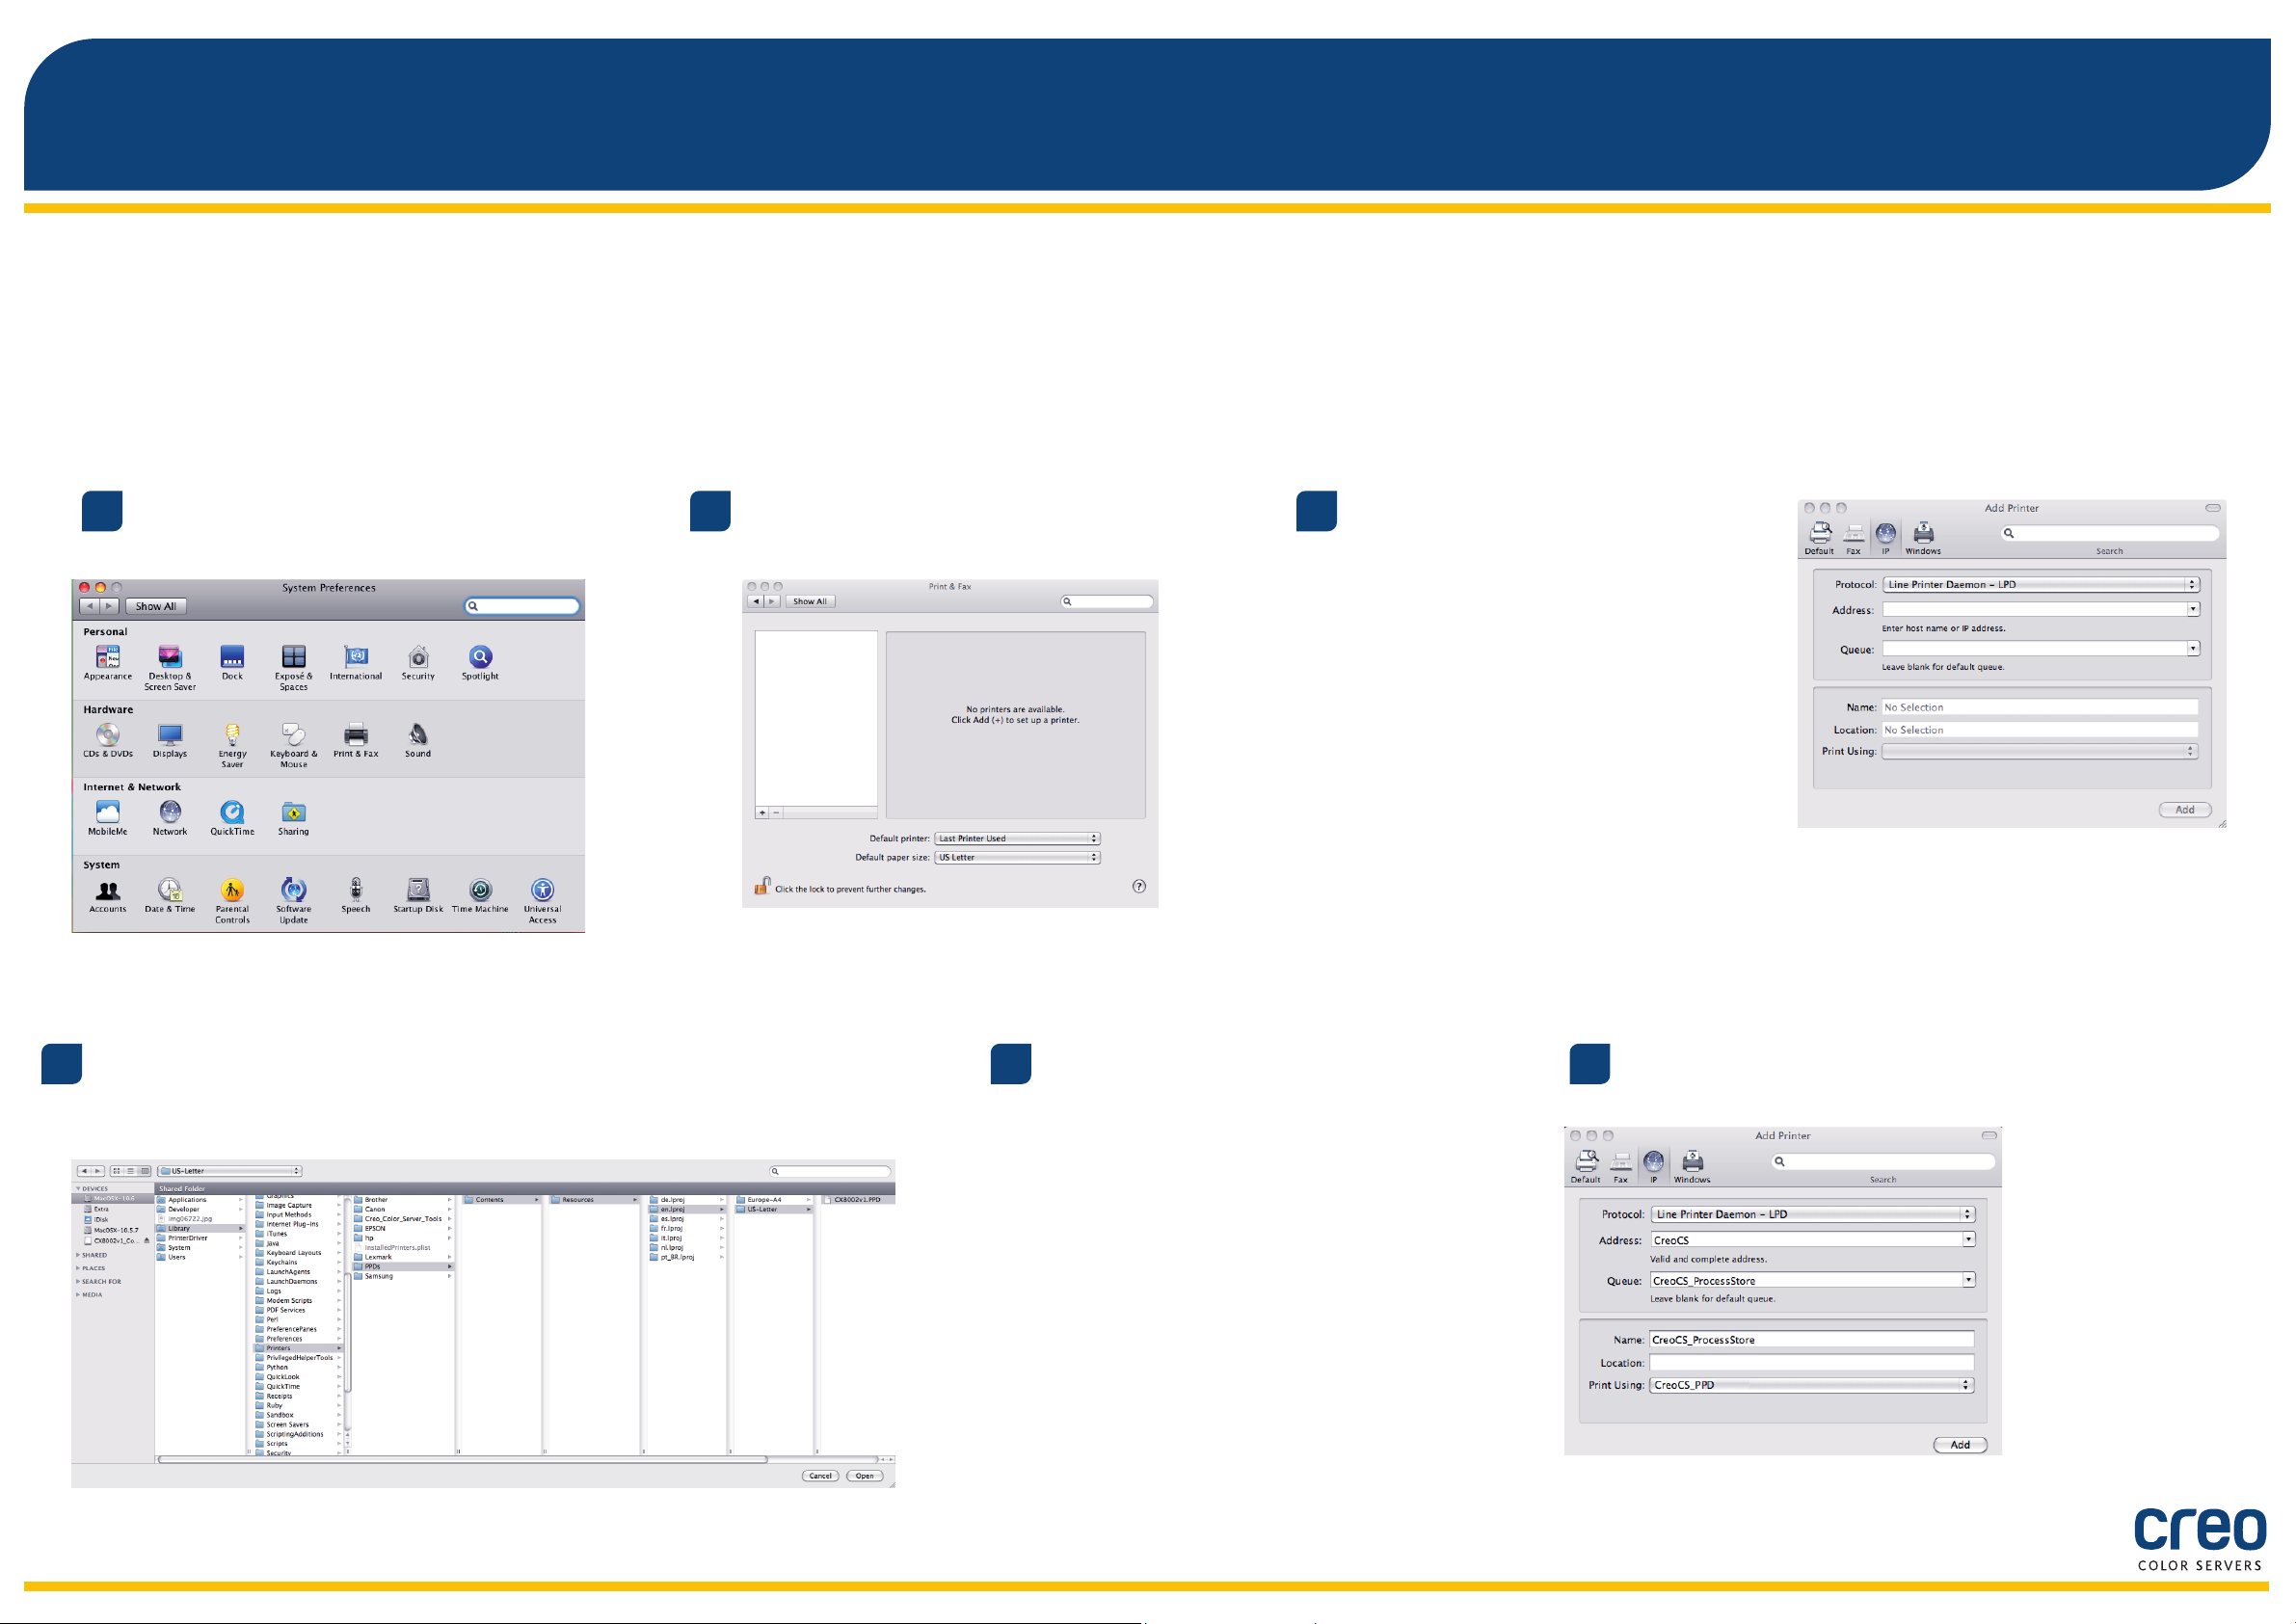
Defining a printer with the Print Driver software in Mac OS X 10.6.x
During the installation of the Print Driver software, the PPD file is automatically copied to your computer.
Requirements:
Have the following information available before performing this procedure:
The IP address and computer name of your CX print server•
The name of the virtual printer that you want to use with the Print Driver software•
On your Mac computer, open the System
1
Preferences window and double-click Print & Fax.
Locate the en.lproj folder in Library/Printers/PPDS/Contents/Resources;
4
select either the Europe-A4 or US-Letter folders, and then select the PPD file.
In the Print & Fax window, click the Add (+) button.
2
Click Open.
5
In the Add Printer window, enter the
3
following information:
In the • Address box, type the host name
(or IP address) of your CX print server.
In the Queue box, type the name of the
CX print server and the exact name of the
virtual printer that you want to use with
the Print Driver software—for example—
CreoCS_Process.
In the • Name box, type exactly the same
name as in the Queue box.
In the • Print Using list, select Other.
6
Click Add.
10
The new printer is added.
Page 11

Defining a printer with the Print Driver software in Mac OS X 10.6.x (cont.)
In the Print & Fax window, select the
7
printer and click Open Print Queue.
Click Printer Setup.
8
Click Utility, and then click Open Printer Utility.
9
In the Enable Enhanced User Interface
10
list, make sure that On is selected.
In the Server Hostname box, type
11
the IP address of the server.
Click Apply.
12
Close the Printer Utility dialog box.
13
Click OK.
14
Close all printer windows.
15
11
Page 12

For more information about Creo Branded Products, contact your local representative or visit
www.creoservers.com.
Americas
42-06A Bell Blvd.
Box 101
Bayside, NY 11361, USA
T.+1.866.793.4178
info-us@creoservers.com
Israel
Ha’Tnufa 7 St.
P.O. Box 10193
Petach Tikva 49002, Israel
T.+972.3.916.7222
F.+972.3.928.6000
info@creoservers.com
EMEA and Asia Pacific
Rue Général de Gaulle 62
B-1310 La Hulpe, Belgium
T.+32.2.352.2878
F.+32.2.357.3111
info-eu@creoservers.com
 Loading...