

Page 1

February 2009
701P49575
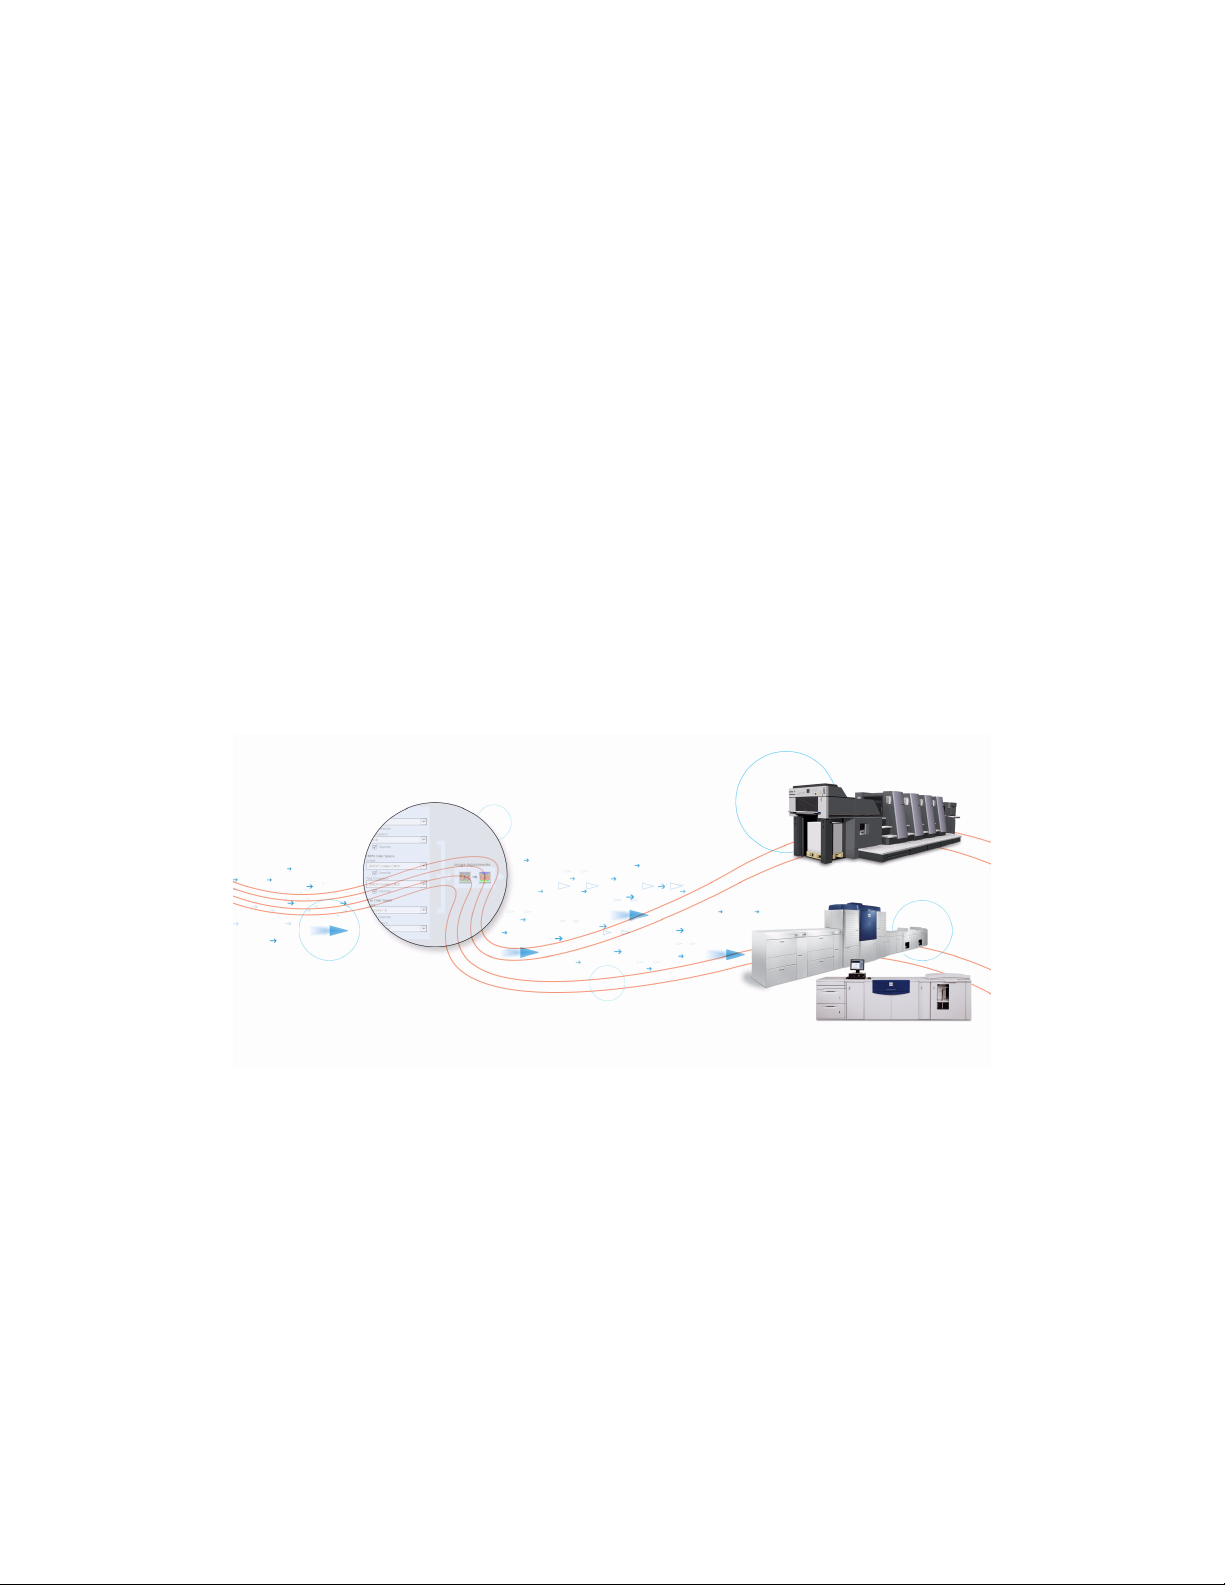
FreeFlow® Print Server
Color Handbook
Page 2

©2009 Xerox Corporation. All rights reserved. Xerox and the sphere of connectivity design, and
FreeFlow® are trademarks of Xerox Corporation in the United States and/or other countries.
Adobe® and the Adobe logo, InDesign®, Illustrator®, PageMaker®, Photoshop®, Acrobat®,
Distiller®, and the Acrobat logo are either registered trademarks or trademarks of Adobe
Systems Incorporated in the United States and/or other countries.
PANTONE® is a registered trademark of Pantone, Inc.
Document Version: February 2009
Page 3

Table of Contents
1 Introduction . . . . . . . . . . . . . . . . . . . . . . . . . . . . . . . . . . . . . . . . . . . 1-1
About this guide . . . . . . . . . . . . . . . . . . . . . . . . . . . . . . . . . . . . . . . . . . . . . . . . . . . . . . . . . . . 1-1
Contents . . . . . . . . . . . . . . . . . . . . . . . . . . . . . . . . . . . . . . . . . . . . . . . . . . . . . . . . . . . . . . 1-1
Multi-media program for FreeFlow® Print Server. . . . . . . . . . . . . . . . . . . . . . . . . . . . 1-2
Summary . . . . . . . . . . . . . . . . . . . . . . . . . . . . . . . . . . . . . . . . . . . . . . . . . . . . . . . . . . . . . 1-2
Where: . . . . . . . . . . . . . . . . . . . . . . . . . . . . . . . . . . . . . . . . . . . . . . . . . . . . . . . . . . . . 1-2
What: . . . . . . . . . . . . . . . . . . . . . . . . . . . . . . . . . . . . . . . . . . . . . . . . . . . . . . . . . . . . . 1-2
Typographical conventions . . . . . . . . . . . . . . . . . . . . . . . . . . . . . . . . . . . . . . . . . . . . . . . . 1-4
2 Xerox FreeFlow® Print Server Overview. . . . . . . . . . . . . . . . . . 2-1
ConfidentColorTechnology . . . . . . . . . . . . . . . . . . . . . . . . . . . . . . . . . . . . . . . . . . . . . . . . 2-1
Consistent Results through Superior Color Calibration . . . . . . . . . . . . . . . . . . . 2-2
Built-in printer profiles . . . . . . . . . . . . . . . . . . . . . . . . . . . . . . . . . . . . . . . . . . . . . 2-3
Dynamic DeviceLink profiles. . . . . . . . . . . . . . . . . . . . . . . . . . . . . . . . . . . . . . . . 2-3
RGB file handling . . . . . . . . . . . . . . . . . . . . . . . . . . . . . . . . . . . . . . . . . . . . . . . . . . . . . . 2-4
Color standards: evolving to meet changing needs . . . . . . . . . . . . . . . . . . 2-4
Every Object Type is Optimized . . . . . . . . . . . . . . . . . . . . . . . . . . . . . . . . . . . . . . . . 2-5
Smart technology tends to the details. . . . . . . . . . . . . . . . . . . . . . . . . . . . . . . . . . 2-5
Spot colors . . . . . . . . . . . . . . . . . . . . . . . . . . . . . . . . . . . . . . . . . . . . . . . . . . . . . . . . . . . . 2-6
Fine-tune the results to your satisfaction. . . . . . . . . . . . . . . . . . . . . . . . . . . . . . . . . . . . 2-7
Color tuning down to the page level . . . . . . . . . . . . . . . . . . . . . . . . . . . . . . . . 2-7
Automatic Image Enhancement . . . . . . . . . . . . . . . . . . . . . . . . . . . . . . . . . . . 2-7
3 Calibration . . . . . . . . . . . . . . . . . . . . . . . . . . . . . . . . . . . . . . . . . . . . 3-1
Background . . . . . . . . . . . . . . . . . . . . . . . . . . . . . . . . . . . . . . . . . . . . . . . . . . . . . . . . . . . . . . . 3-1
When and How Often to Calibrate. . . . . . . . . . . . . . . . . . . . . . . . . . . . . . . . . . . . . . . . . . 3-1
Three Input Methods:. . . . . . . . . . . . . . . . . . . . . . . . . . . . . . . . . . . . . . . . . . . . . . . . . . . . . . 3-2
1. Calibrating with a spectrophotometer . . . . . . . . . . . . . . . . . . . . . . . . . . . . . . . 3-2
2. Calibrating using a scanner . . . . . . . . . . . . . . . . . . . . . . . . . . . . . . . . . . . . . . . . . . 3-6
Points to Remember . . . . . . . . . . . . . . . . . . . . . . . . . . . . . . . . . . . . . . . . . . . . . . . . . . . . . . . 3-6
4 Adjusting Color . . . . . . . . . . . . . . . . . . . . . . . . . . . . . . . . . . . . . . . . 4-1
TRC editing. . . . . . . . . . . . . . . . . . . . . . . . . . . . . . . . . . . . . . . . . . . . . . . . . . . . . . . . . . . . . . . . 4-1
The User TRCs window . . . . . . . . . . . . . . . . . . . . . . . . . . . . . . . . . . . . . . . . . . . . . . . . 4-1
User TRC menus . . . . . . . . . . . . . . . . . . . . . . . . . . . . . . . . . . . . . . . . . . . . . . . . . . . . . . 4-2
Opening the User TRCs Edit window . . . . . . . . . . . . . . . . . . . . . . . . . . . . . . . . . . . 4-2
Adjusting Color Balance. . . . . . . . . . . . . . . . . . . . . . . . . . . . . . . . . . . . . . . . . . . . . . . . . . . . 4-3
Background . . . . . . . . . . . . . . . . . . . . . . . . . . . . . . . . . . . . . . . . . . . . . . . . . . . . . . . . . . . 4-3
Color Balance Examples . . . . . . . . . . . . . . . . . . . . . . . . . . . . . . . . . . . . . . . . . . . . . . . 4-5
Adjusting color balance using slide bars. . . . . . . . . . . . . . . . . . . . . . . . . . . . . 4-5
Using Advanced Preview to identify color for adjustment. . . . . . . . . . . . 4-5
Saving and re-using Tone Reproduction Curves (TRCs) . . . . . . . . . . . . . . 4-7
Adjusting color with Tone Reproduction Curves (TRCs) . . . . . . . . . . . . . . 4-9
Points to Remember . . . . . . . . . . . . . . . . . . . . . . . . . . . . . . . . . . . . . . . . . . . . . . . . . . 4-11
Going Further . . . . . . . . . . . . . . . . . . . . . . . . . . . . . . . . . . . . . . . . . . . . . . . . . . . . . . . . 4-11
Automatic Image Enhancement . . . . . . . . . . . . . . . . . . . . . . . . . . . . . . . . . . . . . . . . . . 4-13
Color Handbook 3
Page 4

Table of Contents FreeFlow Print Server
Background . . . . . . . . . . . . . . . . . . . . . . . . . . . . . . . . . . . . . . . . . . . . . . . . . . . . . . . . . . 4-13
Points to Remember . . . . . . . . . . . . . . . . . . . . . . . . . . . . . . . . . . . . . . . . . . . . . . . . . 4-14
Spot Color Editing . . . . . . . . . . . . . . . . . . . . . . . . . . . . . . . . . . . . . . . . . . . . . . . . . . . . . . . . 4-15
Background . . . . . . . . . . . . . . . . . . . . . . . . . . . . . . . . . . . . . . . . . . . . . . . . . . . . . . . . . . 4-15
Spot color processing . . . . . . . . . . . . . . . . . . . . . . . . . . . . . . . . . . . . . . . . . . . . . 4-16
PANTONE® colors. . . . . . . . . . . . . . . . . . . . . . . . . . . . . . . . . . . . . . . . . . . . . . . . 4-16
Limitations . . . . . . . . . . . . . . . . . . . . . . . . . . . . . . . . . . . . . . . . . . . . . . . . . . . . . . . 4-17
About the Spot Color List window . . . . . . . . . . . . . . . . . . . . . . . . . . . . . . . . . . . . . 4-17
About the Spot Color Editor window . . . . . . . . . . . . . . . . . . . . . . . . . . . . . . . . . . 4-18
Points to Remember . . . . . . . . . . . . . . . . . . . . . . . . . . . . . . . . . . . . . . . . . . . . . . . . . 4-19
5 Color Management Workflows. . . . . . . . . . . . . . . . . . . . . . . . . . .5-1
What is Color Management?. . . . . . . . . . . . . . . . . . . . . . . . . . . . . . . . . . . . . . . . . . . . . . . 5-1
Use the Color Default settings . . . . . . . . . . . . . . . . . . . . . . . . . . . . . . . . . . . . . . . . . 5-2
About Xerox color gamut . . . . . . . . . . . . . . . . . . . . . . . . . . . . . . . . . . . . . . . . . . . . . . 5-2
Understanding the FreeFlow Color Paths . . . . . . . . . . . . . . . . . . . . . . . . . . . . . . . . . . . 5-3
Device Link Emulation Path . . . . . . . . . . . . . . . . . . . . . . . . . . . . . . . . . . . . . . . . . . . . 5-3
ICC Standard Path . . . . . . . . . . . . . . . . . . . . . . . . . . . . . . . . . . . . . . . . . . . . . . . . . . . . 5-4
Custom Color Workflows. . . . . . . . . . . . . . . . . . . . . . . . . . . . . . . . . . . . . . . . . . . . . . . . . . . 5-5
CMYK Workflow . . . . . . . . . . . . . . . . . . . . . . . . . . . . . . . . . . . . . . . . . . . . . . . . . . . . . . . . . . . 5-7
About the CMYK tab . . . . . . . . . . . . . . . . . . . . . . . . . . . . . . . . . . . . . . . . . . . . . . . . . . 5-7
Establishing your Default CMYK Standard . . . . . . . . . . . . . . . . . . . . . . . . . . . . . . 5-7
Sample CMYK Workflows . . . . . . . . . . . . . . . . . . . . . . . . . . . . . . . . . . . . . . . . . . . . . . 5-9
Printing with your default CMYK Source Profile. . . . . . . . . . . . . . . . . . . . . . 5-9
Changing your CMYK Rendering . . . . . . . . . . . . . . . . . . . . . . . . . . . . . . . . . . 5-10
Using Direct CMYK to maximize color from your printer . . . . . . . . . . . . 5-11
Matching another press (CMYK). . . . . . . . . . . . . . . . . . . . . . . . . . . . . . . . . . . 5-12
Points to Remember . . . . . . . . . . . . . . . . . . . . . . . . . . . . . . . . . . . . . . . . . . . . . . . . . 5-14
RGB Workflow . . . . . . . . . . . . . . . . . . . . . . . . . . . . . . . . . . . . . . . . . . . . . . . . . . . . . . . . . . . . 5-15
About the RGB tab . . . . . . . . . . . . . . . . . . . . . . . . . . . . . . . . . . . . . . . . . . . . . . . . . . . 5-15
Source Profile and Rendering Options . . . . . . . . . . . . . . . . . . . . . . . . . . . . . . . . . 5-15
Using Embedded Profiles . . . . . . . . . . . . . . . . . . . . . . . . . . . . . . . . . . . . . . . . . . . . . 5-16
Sample RGB Workflows . . . . . . . . . . . . . . . . . . . . . . . . . . . . . . . . . . . . . . . . . . . . . . . 5-16
Professional Photo workflows (RGB) . . . . . . . . . . . . . . . . . . . . . . . . . . . . . . . 5-16
Consumer Photo workflow (RGB) . . . . . . . . . . . . . . . . . . . . . . . . . . . . . . . . . . 5-17
Points to Remember . . . . . . . . . . . . . . . . . . . . . . . . . . . . . . . . . . . . . . . . . . . . . . . . . 5-18
Gray Color and Monochrome Workflows. . . . . . . . . . . . . . . . . . . . . . . . . . . . . . . . . . . 5-19
About the Gray tab . . . . . . . . . . . . . . . . . . . . . . . . . . . . . . . . . . . . . . . . . . . . . . . . . . . 5-19
Printing Gray Color . . . . . . . . . . . . . . . . . . . . . . . . . . . . . . . . . . . . . . . . . . . . . . . . . . . 5-19
Printing Gray in RGB, when R=G=B . . . . . . . . . . . . . . . . . . . . . . . . . . . . . . . . . . . . 5-19
Printing RGB and CMYK as Black and White . . . . . . . . . . . . . . . . . . . . . . . . . . . 5-20
Sample Grayscale workflows . . . . . . . . . . . . . . . . . . . . . . . . . . . . . . . . . . . . . . . . . . 5-20
Using Gray Color Embedded Profiles . . . . . . . . . . . . . . . . . . . . . . . . . . . . . . 5-21
Printing with Gray Color settings . . . . . . . . . . . . . . . . . . . . . . . . . . . . . . . . . . 5-21
Printing RGB Gray (R=B=G) using Black-Only . . . . . . . . . . . . . . . . . . . . . . . 5-22
Printing Color as Black and White . . . . . . . . . . . . . . . . . . . . . . . . . . . . . . . . . 5-22
Points to Remember . . . . . . . . . . . . . . . . . . . . . . . . . . . . . . . . . . . . . . . . . . . . . . . . . 5-24
Spot Color Workflow. . . . . . . . . . . . . . . . . . . . . . . . . . . . . . . . . . . . . . . . . . . . . . . . . . . . . . 5-24
About the Spot tab . . . . . . . . . . . . . . . . . . . . . . . . . . . . . . . . . . . . . . . . . . . . . . . . . . . 5-24
Sample Spot Color workflows . . . . . . . . . . . . . . . . . . . . . . . . . . . . . . . . . . . . . . . . . 5-25
Printing the Spot Color Swatch Book. . . . . . . . . . . . . . . . . . . . . . . . . . . . . . . 5-25
Using Preflight to identify Spot Colors . . . . . . . . . . . . . . . . . . . . . . . . . . . . . 5-27
4 Color Handbook
Page 5

FreeFlow Print Server Table of Contents
Using View Report to identify missing Spot Colors. . . . . . . . . . . . . . . . . 5-30
Adding a custom color to the server’s Spot Color List . . . . . . . . . . . . . . 5-31
Adjusting a color on the server’s Spot Color List . . . . . . . . . . . . . . . . . . . 5-35
Advanced Color Matching. . . . . . . . . . . . . . . . . . . . . . . . . . . . . . . . . . . . . . . . . . . . . . . . . 5-41
Laying a Foundation for Color Matching . . . . . . . . . . . . . . . . . . . . . . . . . . . . . . 5-41
Advanced Color Matching using Profiling Software . . . . . . . . . . . . . . . . . . . . 5-41
Standardizing Color to Match Prepress Color Management . . . . . . . . . . . . 5-42
Sample Color Matching Workflows . . . . . . . . . . . . . . . . . . . . . . . . . . . . . . . . . . . . 5-43
Using the same CMYK Source and Relative Colorimetric . . . . . . . . . . . 5-43
Using profiling software. . . . . . . . . . . . . . . . . . . . . . . . . . . . . . . . . . . . . . . . . . 5-43
Setting the server to use prepress color definitions . . . . . . . . . . . . . . . . 5-45
Points to Remember . . . . . . . . . . . . . . . . . . . . . . . . . . . . . . . . . . . . . . . . . . . . . . . . . . 5-46
Color Workflow considerations . . . . . . . . . . . . . . . . . . . . . . . . . . . . . . . . . . . . . . . . . . . . 5-47
When to apply RGB Emulation . . . . . . . . . . . . . . . . . . . . . . . . . . . . . . . . . . . . . . . . 5-47
Importing a source profile . . . . . . . . . . . . . . . . . . . . . . . . . . . . . . . . . . . . . . . . . . . . 5-48
Adding ICC Profiles to the DFE . . . . . . . . . . . . . . . . . . . . . . . . . . . . . . . . . . . 5-48
6 Other Image Quality Considerations . . . . . . . . . . . . . . . . . . . . 6-1
Image Interpolation “Smart” Selection . . . . . . . . . . . . . . . . . . . . . . . . . . . . . . . . . . . . . 6-1
Key uses . . . . . . . . . . . . . . . . . . . . . . . . . . . . . . . . . . . . . . . . . . . . . . . . . . . . . . . . . . . . . . 6-2
Low Resolution Images . . . . . . . . . . . . . . . . . . . . . . . . . . . . . . . . . . . . . . . . . . . . 6-2
Very High Resolution Images. . . . . . . . . . . . . . . . . . . . . . . . . . . . . . . . . . . . . . . 6-2
Smart Interpolation. . . . . . . . . . . . . . . . . . . . . . . . . . . . . . . . . . . . . . . . . . . . . . . . 6-2
Trapping . . . . . . . . . . . . . . . . . . . . . . . . . . . . . . . . . . . . . . . . . . . . . . . . . . . . . . . . . . . . . . . . . . 6-3
Anti-aliasing. . . . . . . . . . . . . . . . . . . . . . . . . . . . . . . . . . . . . . . . . . . . . . . . . . . . . . . . . . . . . . . 6-4
PDF/X . . . . . . . . . . . . . . . . . . . . . . . . . . . . . . . . . . . . . . . . . . . . . . . . . . . . . . . . . . . . . . . . . . . . . 6-4
About PDF/X . . . . . . . . . . . . . . . . . . . . . . . . . . . . . . . . . . . . . . . . . . . . . . . . . . . . . . . . . . 6-4
Accepting and using PDF/X files . . . . . . . . . . . . . . . . . . . . . . . . . . . . . . . . . . . . . . . 6-5
Creating a PDF/X file. . . . . . . . . . . . . . . . . . . . . . . . . . . . . . . . . . . . . . . . . . . . . . . 6-5
About the PDF/X tab . . . . . . . . . . . . . . . . . . . . . . . . . . . . . . . . . . . . . . . . . . . . . . . . . . 6-6
Commercial Offset workflow (PDF/X) . . . . . . . . . . . . . . . . . . . . . . . . . . . . . . . 6-6
Limitations . . . . . . . . . . . . . . . . . . . . . . . . . . . . . . . . . . . . . . . . . . . . . . . . . . . . . . . . 6-7
Other considerations. . . . . . . . . . . . . . . . . . . . . . . . . . . . . . . . . . . . . . . . . . . . . . . 6-7
7 Xerox FreeFlow® Print Server Color Workflow. . . . . . . . . . . . 7-1
Rendering Intent summary. . . . . . . . . . . . . . . . . . . . . . . . . . . . . . . . . . . . . . . . . . . . . . . . . 7-1
Color Workflow Using Standard ICC Profiles . . . . . . . . . . . . . . . . . . . . . . . . . . . . . . . . 7-1
How are the Color Settings defined? . . . . . . . . . . . . . . . . . . . . . . . . . . . . . . . . . . . 7-1
Most Popular RGB Settings . . . . . . . . . . . . . . . . . . . . . . . . . . . . . . . . . . . . . . . . . . . . 7-2
Most Popular CMYK Settings . . . . . . . . . . . . . . . . . . . . . . . . . . . . . . . . . . . . . . . . . . . 7-2
Most Popular Grayscale Processing (not illustrated) . . . . . . . . . . . . . . . . . . . . . 7-2
Most Popular Spot Color Processing . . . . . . . . . . . . . . . . . . . . . . . . . . . . . . . . . . . . 7-3
PDL color management (embedded profiles) . . . . . . . . . . . . . . . . . . . . . . . . . . . 7-3
Color Handbook 5
Page 6

Table of Contents FreeFlow Print Server
6 Color Handbook
Page 7

Introduction
About this guide
The Color Handbook is designed to inform you about the features and operation of the
FreeFlow® Print Server to help you achieve the best color from your printer as quickly as
possible.
While this document was developed using v7 software, the concepts contained within
apply to other software releases.
This guide contains information about the following topics:
• Benefits and features of the FreeFlow® Print Server
• Description of calibration including when and how often to calibrate.
• Custom and built-in color profiles
• Color Management controls for objects within a page
• Spot color editing
• Automatic Image Enhancement
• Descriptions of the different color paths in the FreeFlow® Print Server
• Customizing the color workflow.
1
Contents
• Chapter 1 Introduction
Describes the purpose and conventions of the guide.
• Chapter 2 Xerox FreeFlow® Print Server Overview
Describes the new features of the FreeFlow® Print Server with ConfidentColor technology.
•Chapter 3 Calibration
Provides information on when and how to perform calibration on the FreeFlow® Print
Server.
• Chapter 4 Adjusting Color
Describes the use of the different color editing tools on the FreeFlow® Print Server.
• Chapter 5 Color Management Workflows
Describes the different workflows and provides procedures and examples of these
workflows.
• Chapter 6 Other Image Quality Considerations
Describes additional FreeFlow® Print Server tools such as Smart Interpolation, trapping,
anti-aliasing and printing PDF/X files.
• Chapter 7 Xerox FreeFlow® Print Server Color Workflows
Displays a graphic of the FreeFlow® Print Server Workflow.
Color Handbook 1-1
Page 8
Introduction FreeFlow Print Server
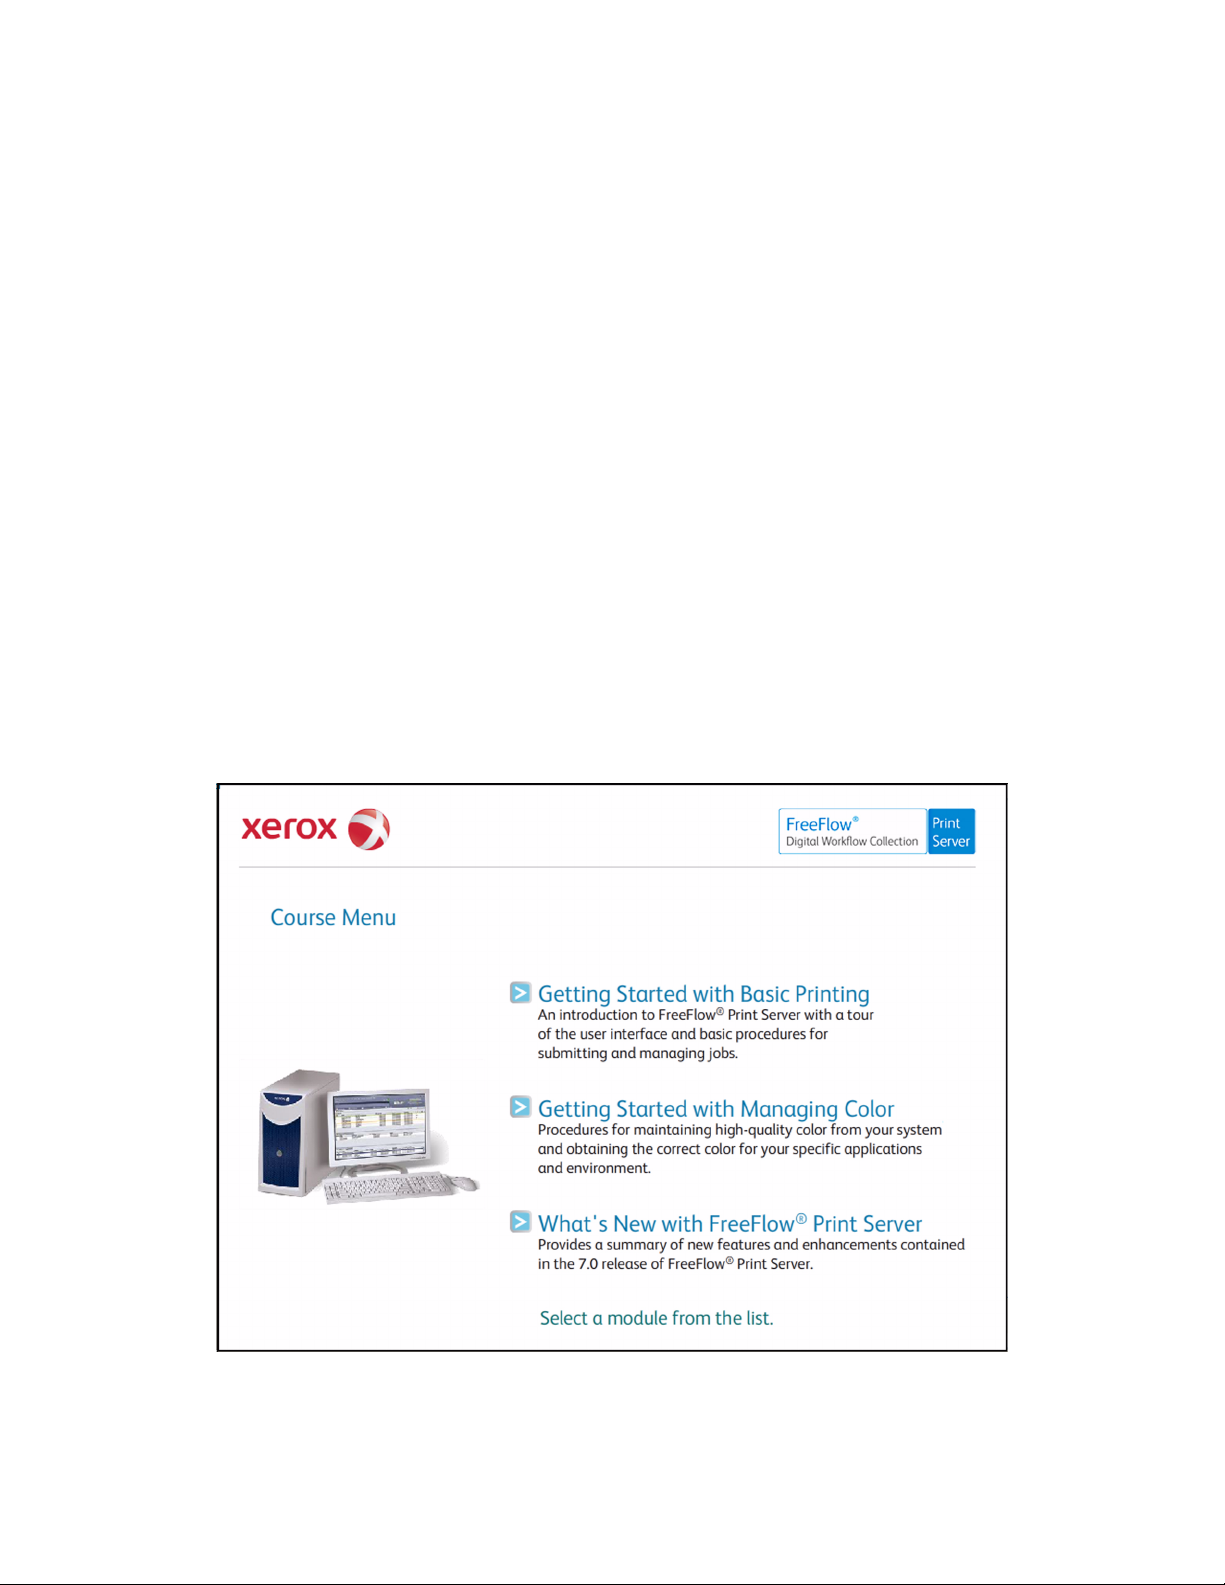
Multi-media program for FreeFlow® Print Server
Summary
Xerox is now offering a new resource designed to help you learn the basic operation of the
FreeFlow® Print Server to get you printing as quickly as possible with your new Xerox printing
system. If you are a new user or have not used the FreeFlow® Print Server much, the Getting
Started resource is the perfect place for you to start!
This one hour program will kick start your learning!
Where:
Getting Started is multi-media based and available for download from www.xerox.com/
freeflowgettingstarted.
The multimedia version will also be available on the “Customer Documentation” CD-ROM.
Inside the folder named “Getting Started FreeFlow® Print Server Multi-media Program”
What:
Getting Started with the FreeFlow® Print Server covers topics including:
1-2 Color Handbook
Page 9
FreeFlow Print Server Introduction
Basic Printing
• Print Server Tour and Job Flow
•How to Submit Jobs
• How to Manage Jobs
• How to Customize your Screen
Managing Color
•Calibrating Color for your System
• Color Management Flow
• Adjusting Color Balance
What’s New with FreeFlow® Print Server 7.0:
• Changes to the User Interface
• New Features
• Enhanced Features
• Performance Improvements
How Long?
Getting Started with the FreeFlow® Print Server will take approximately one hour to complete.
At the end there are exercises that you can print and take to your system so you’ll be able to
start using the FreeFlow® Print Server to print and manage basic jobs quickly!
Color Handbook 1-3
Page 10

Introduction FreeFlow Print Server
Typographical conventions
This guide uses the following conventions:
• Select [option] - Within procedures, the term select can represent various methods of
launching a feature; the option to be selected is enclosed in square brackets.
• To open a drop-down menu, move the cursor to the menu name or to the drop-down
arrow and press the left mouse button once. For example, select [System].
• To choose a menu item, move the cursor to the item, press the left mouse button to
highlight the item, then release the left mouse button. For example, select [Logon].
• To choose an icon or row and open the associated window, move the cursor to the item
and double click. For example, double click [upper tray] on the Feeders window to open
the next level window.
• Select [option > option] - Multiple options are separated by an arrow, with the name of the
drop-down menu appearing first, followed by the menu item name. For example, select
[System > Logon].
• In a Portable Document Format (PDF) file displayed on a workstation, blue text identifies a
link to other information in the file. Select the specified text to activate the link. For
example, refer to Typographical conventions in this guide.
In a hard copy version of the PDF file, the link is printed as non-black text. Locate the
specified section title in your document.
Note
This icon identifies notes. A note is a paragraph (separate from the body text) containing
related information that merits emphasis.
1-4 Color Handbook
Page 11
Xerox FreeFlow® Print Server Overview
2
ConfidentColorTechnology
From preflight to press, the Xerox FreeFlow® Print Server with ConfidentColor Technology gives
you the power to manage color and quality—with ease, speed, and confidence.
Built-in and transparent controls optimize color for great results, right out of the box. Or refine
server settings with hands-on flexibility. The user-friendly interface puts high-level control at
your fingertips, so you can fine-tune for individual preferences or compensate for less-thanperfect files.
Whether you’re starting out in digital color or already delivering color-critical jobs, this sleek,
simple, and smart print server can help you get the job done. It makes easy work out of both
traditional CMYK and digital-age RGB workflows (including emulations), so you can move jobs
between offset and digital workflows. And programmable queues allow you to easily customize
your setup once, consistently giving you the results you need.
This is the print server to count on for the most creative—and most critical—customers. Yours.
Color Handbook 2-1
Page 12
Xerox FreeFlow® Print Server Overview FreeFlow Print Server
Consistent Results through Superior Color Calibration
To meet the specialized needs of digital production environments, ConfidentColor Technology
draws on a strong color heritage to take calibration to the next level. Thanks to a unique,
patented calibration technology, the FreeFlow® Print Server provides superior image quality—
every time.
This technology moves beyond traditional density control to provide true gray-balance
calibration. So in addition to individual color levels, the FreeFlow® Print Server analyzes CMY
combinations from highlight through shadow, refining curves to assure neutral balance. You can
count on exceptionally smooth transitions, and skin tones that are rendered with incredible
accuracy.
For long print-on-demand and variable data jobs, the FreeFlow® Print Server shines with
outstanding consistency. It allows you to calibrate in the middle of the run—without the need
to restart the job. And when it’s time to reprint, Fast Reprint Format (FRF) assures that the job
will run with the current calibration for superior and consistent results.
Calibration yields predictability over time. But to get the “right” color, you need to account for
how color is defined upstream, and how output can be matched across digital and offset
devices. That’s where ICC color management comes in and where ConfidentColor Technology
provides a powerful toolset for ease and efficiency.
2-2 Color Handbook
Page 13
FreeFlow Print Server Xerox FreeFlow® Print Server Overview
Built-in printer profiles
Under most circumstances, the FreeFlow® Print Server automatically delivers consistency and
quality using its built-in profile representing general printer characteristics. Several Gray
Component Replacement (GCR) options are included and optimized for each Xerox digital color
press. Default GCR settings provide for efficient toner usage while still yielding high-quality skin
tones and excellent highlight colors. Optional settings allow you to fine-tune toner usage for
your own desired balance between image stability and smoothness.
Dynamic DeviceLink profiles
DeviceLink profiles are a snap when you need the control to emulate output from another
digital printer or even an offset press. When you use a custom-loaded profile, the FreeFlow®
Print Server dynamically creates a look-up table in real time to link the source and destination
profiles. By building these tables only as they’re needed and used, the FreeFlow® Print Server
efficiently uses disk resources. DeviceLink technology also preserves the K (black) information
that’s lost in traditional ICC color conversion. So with the FreeFlow® Print Server, you get
output that more clearly matches the original intent.In addition, DeviceLink provides the final
component necessary for unifying offset and digital color workflows by giving you the same
option with RGB data. The FreeFlow® Print Server does this by passing RGB data through your
selected CMYK device emulations, producing the closest reproducible output for both RGB and
CMYK.
Dynamic
DeviceLink
Profile
DeviceLink technology on the FreeFlow® Print
Server connects your source and destination
profiles. So you can output to a digital or offset
press—even split a run—and get the same results.
Color Handbook 2-3
Page 14
Xerox FreeFlow® Print Server Overview FreeFlow Print Server
RGB file handling
ConfidentColor Technology also gives special attention to optimizing RGB color. Leave your files
defined as RGB and let the Print Server produce the best possible color on your printer—without
an intermediate and limiting CMYK conversion. By delaying conversion of RGB files to the last,
possible point in the workflow, the FreeFlow® Print Server gives you the richest colors.
Note
Digital photography in your workflow? RGB images are more accurate with ConfidentColor
Technology. Since files are converted at the Print Server, CMYK is defined for the output
device, using its full gamut of colors.
RGB converted to CMYK at the file
source
RBG converted to CMYK at the
FreeFlow® Print Server
Color standards: evolving to meet changing needs
Press-to-press variability in a traditional offset color workflow—and even with today’s digital
output devices—makes standardization an ongoing challenge.
SWOP and FOGRA standards developed for traditional offset are a start, but they can be
limiting in the digital world where a broader range of colors can be produced. To bridge the gap
between older standards and newer device gamuts—without changing workflow upstream—
Xerox first developed “SWOP Plus” and “FOGRA Plus” to help digital output devices produce
better color with standard print files.
Today’s new and emerging standards, such as Gracol and ISO Coated, are more in keeping with
actual capabilities and provide more realistic targets for both offset and digital presses.
The FreeFlow® Print Server with ConfidentColor Technology accommodates all of these
standards to give you the functionality you need.
2-4 Color Handbook
Page 15
FreeFlow Print Server Xerox FreeFlow® Print Server Overview
Every Object Type is Optimized
Within any given page, you can have a combination of contone data such as photographs,
vector graphics, and text in both RGB and CMYK. Optimizing for only one object type—or
compromising to accommodate all types—can result in less-than-optimal printing.
To get the best results, you need a way to focus attention on each object and tailor its
treatment.
The FreeFlow® Print Server automatically recognizes what object type is being processed and
treats it in the way that will maintain the highest possible quality. So when you send even a
single page that contains several different elements, it will recognize which parts of the page
are text, which parts contain graphics, and which parts contain images—and then treat each
accordingly.
• Separate color-management controls allow you to manually manipulate object types. For
example, saturate your line work while preserving the integrity of images.
• Color overprints are honored and trapping is optimized for your printer so that overlapping
text, graphics, and/or images yield desirable and expected results.
• Anti-aliasing of text and graphics uses special processing to smooth the rasterization of
curves and diagonal lines.
The beauty of all of this? You end up with beautiful results, automatically.
Smart technology tends to the details.
Page content comes in various encodings and compression types, and images can vary greatly
in resolution. The FreeFlow® Print Server makes easy work of these challenges, taking into
account both the type of printer being used and human visual perception.
Xerox Multi-Mode Compression dynamically adapts to compress objects for easier file
management without compromising image quality. It preserves sharp edges and fine detail in
text and line work, while optimizing the compression of contone images on the same page.
Xerox Smart Interpolation uses sophisticated, context-based calculations to scale content up
or down to match printer resolution.
These and other patented technologies help assure that the details you began with are the
details you output.
Color Handbook 2-5
Page 16

Xerox FreeFlow® Print Server Overview FreeFlow Print Server
Spot colors
With ConfidentColor Technology on the FreeFlow® Print Server, your spot colors will be exactly
what you expect.
When a spot color is identified in a file, the Print Server uses PANTONE®-licensed CMYK
formulas defined for each Xerox digital printer family to preserve the color and fully utilize the
rich gamut available. Because spot colors are processed independently, they’re preserved
regardless of other settings or adjustments made for RGB and CMYK.
Standard formulas can be modified through the Print Server’s Spot Color Editor to meet your
needs or preferences. For example, you can match a reference print or object using swatch
books printed for your digital press as a guide. You also have the ability to create your own
named spot colors for customized workflows.
ConfidentColor Technology preserves spot colors when they’re used in tints and sweeps, as well
as by calculating tints in an independent LAB space. When you lighten a spot using the Print
Server’s tint control, the hue will hold true, giving you more creative control while assuring
consistency.
Whether applied to simple graphics, sophisticated multi-color sweeps, or multi-tone images, the
FreeFlow® Print Server produces spot colors with predictable results.
Note
ConfidentColor Technology does
wonders for your spot colors, putting
control and creativity at your fingertips.
Tints are automatically calculated in an
independent LAB space to maintain
hue, delivering predictable screens,
sweeps, and multi-tone images.
10%
80%
70%
20%
30%
2-6 Color Handbook
PANTO NE®
7469 CS
40%
60%
50%
Page 17
FreeFlow Print Server Xerox FreeFlow® Print Server Overview
Fine-tune the results to your satisfaction
Color tuning down to the page level
While most print servers force you to apply the same color settings to a document in its entirety,
with the FreeFlow® Print Server, you have the flexibility to make adjustments to the entire
document or at page level.
• Image quality features can be customized to each individual page, including color profiles,
anti-aliasing, and trapping.
• With Tone Reproduction Curve (TRC) control, operators can manipulate CMYK separations
independently and with extreme precision.
• In a save/reprint workflow, images do not have to be re-RIPped to apply these corrections.
The FreeFlow® Print Server has several levels of color control built in, so images can be
corrected at the print server when adjusting the source files isn’t practical.The resulting output
quality is optimized because each page is treated exactly as needed.
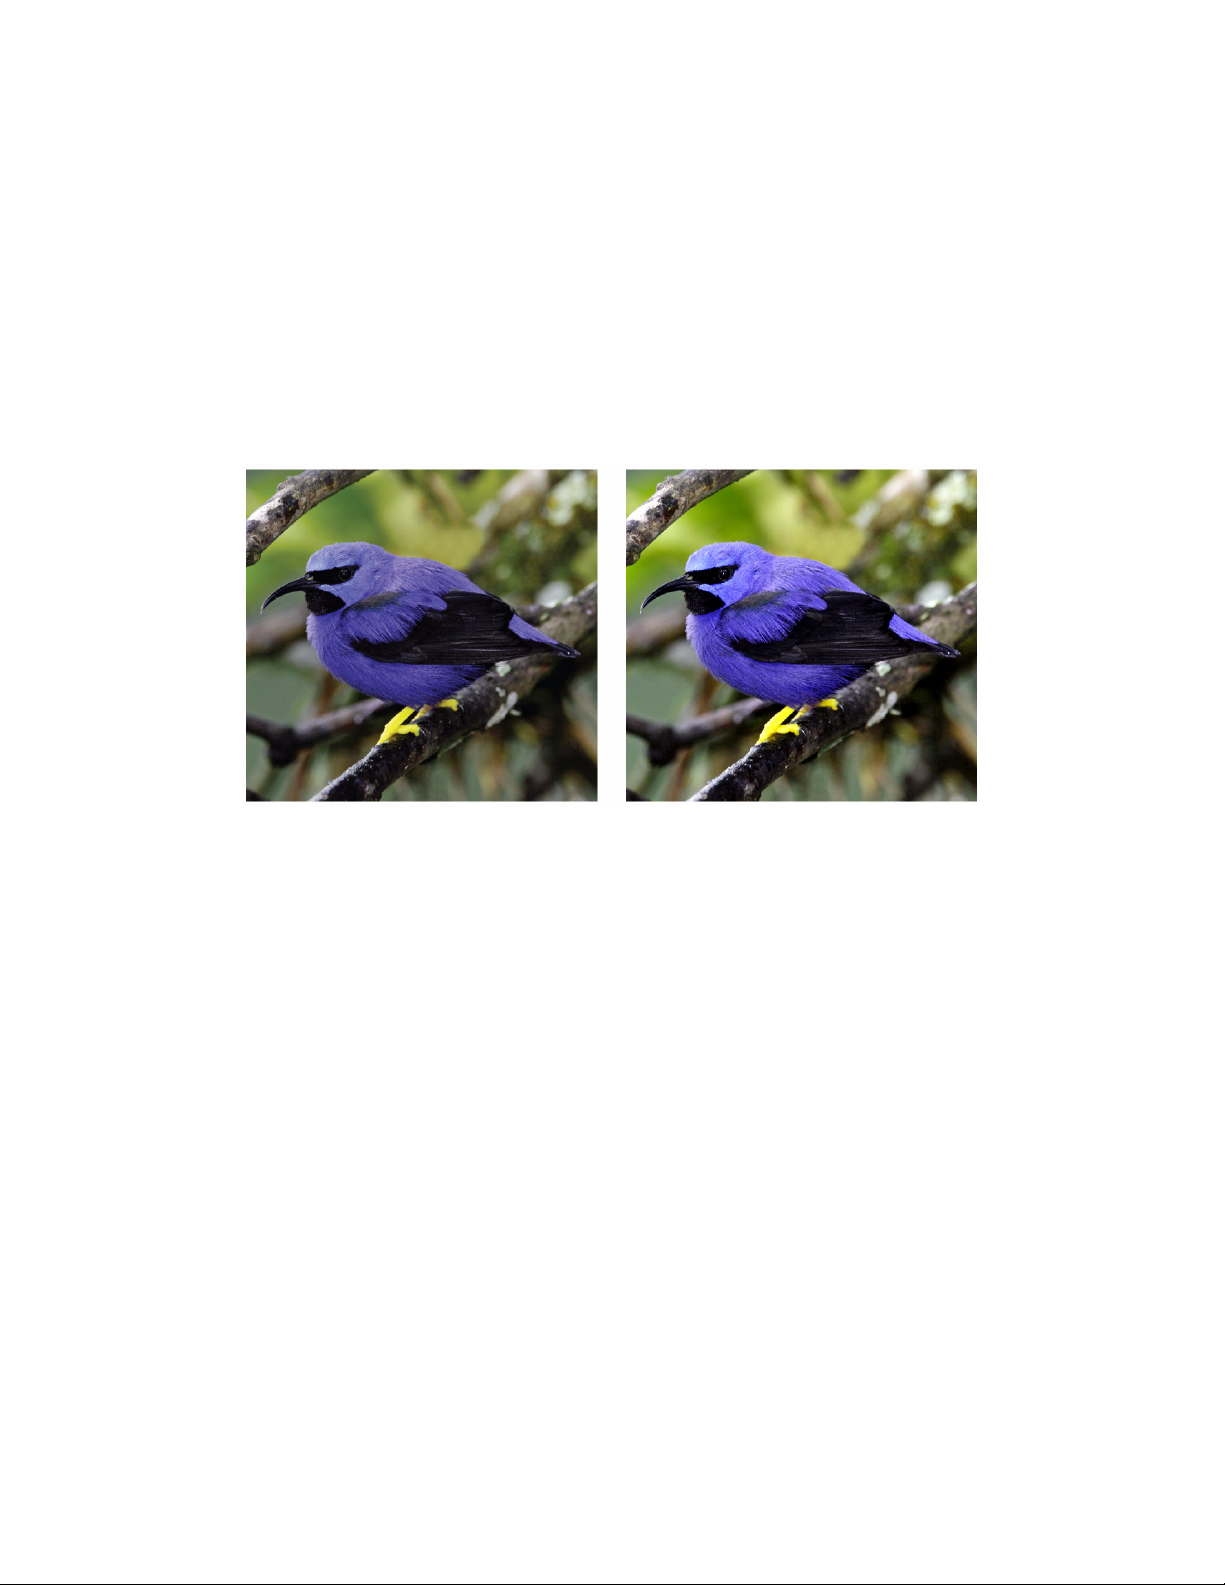
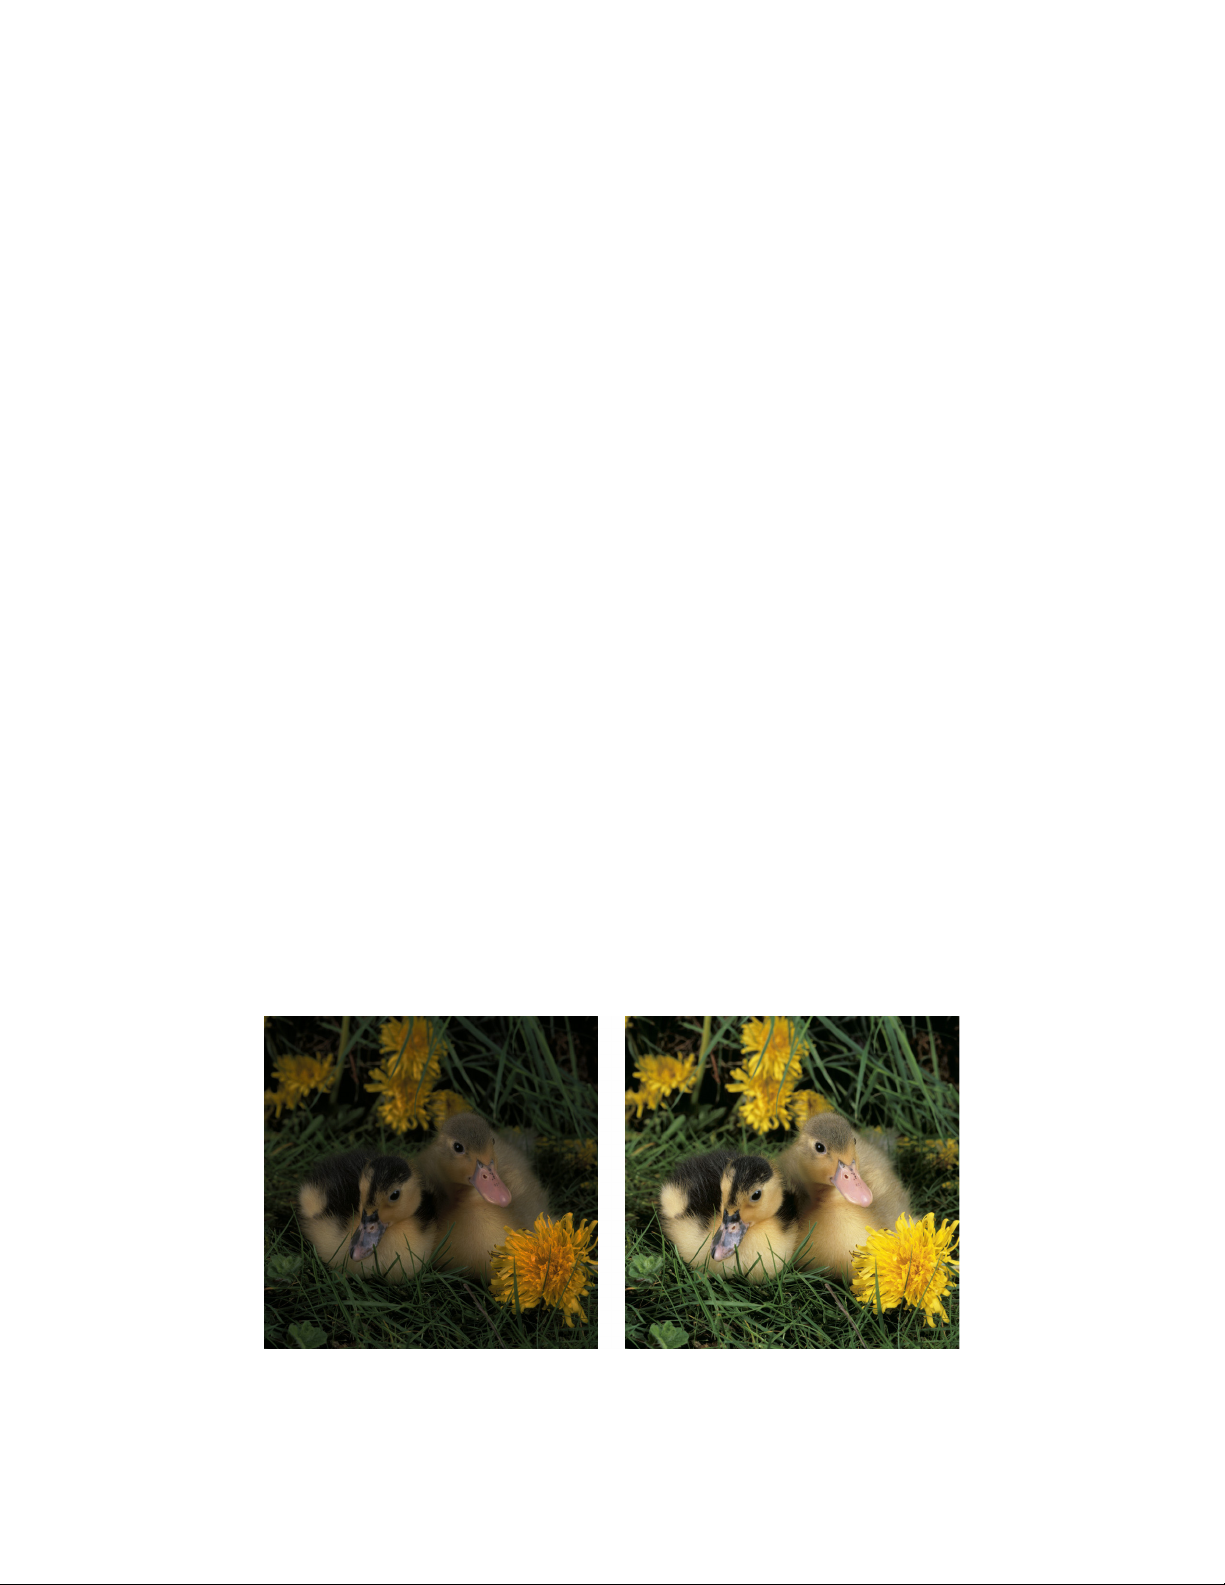
Automatic Image Enhancement
Through its Automatic Image Enhancement (AIE) feature, the FreeFlow® Print Server enables
“one click” photo enhancements for exposure, sharpening, saturation, red-eye reduction, and
more. Use it to compensate for underexposure or overexposure. Bring details out of the
shadows. Saturate colors flattened by ambient light. And more. With AIE, you can make quick
and simple modifications to photo applications while maintaining the integrity of the rest of
the document. You’ll get better results when using lower-quality images, without timeconsuming or expensive prepress processes. You can even adjust AIE to target your preferences
with custom color controls.
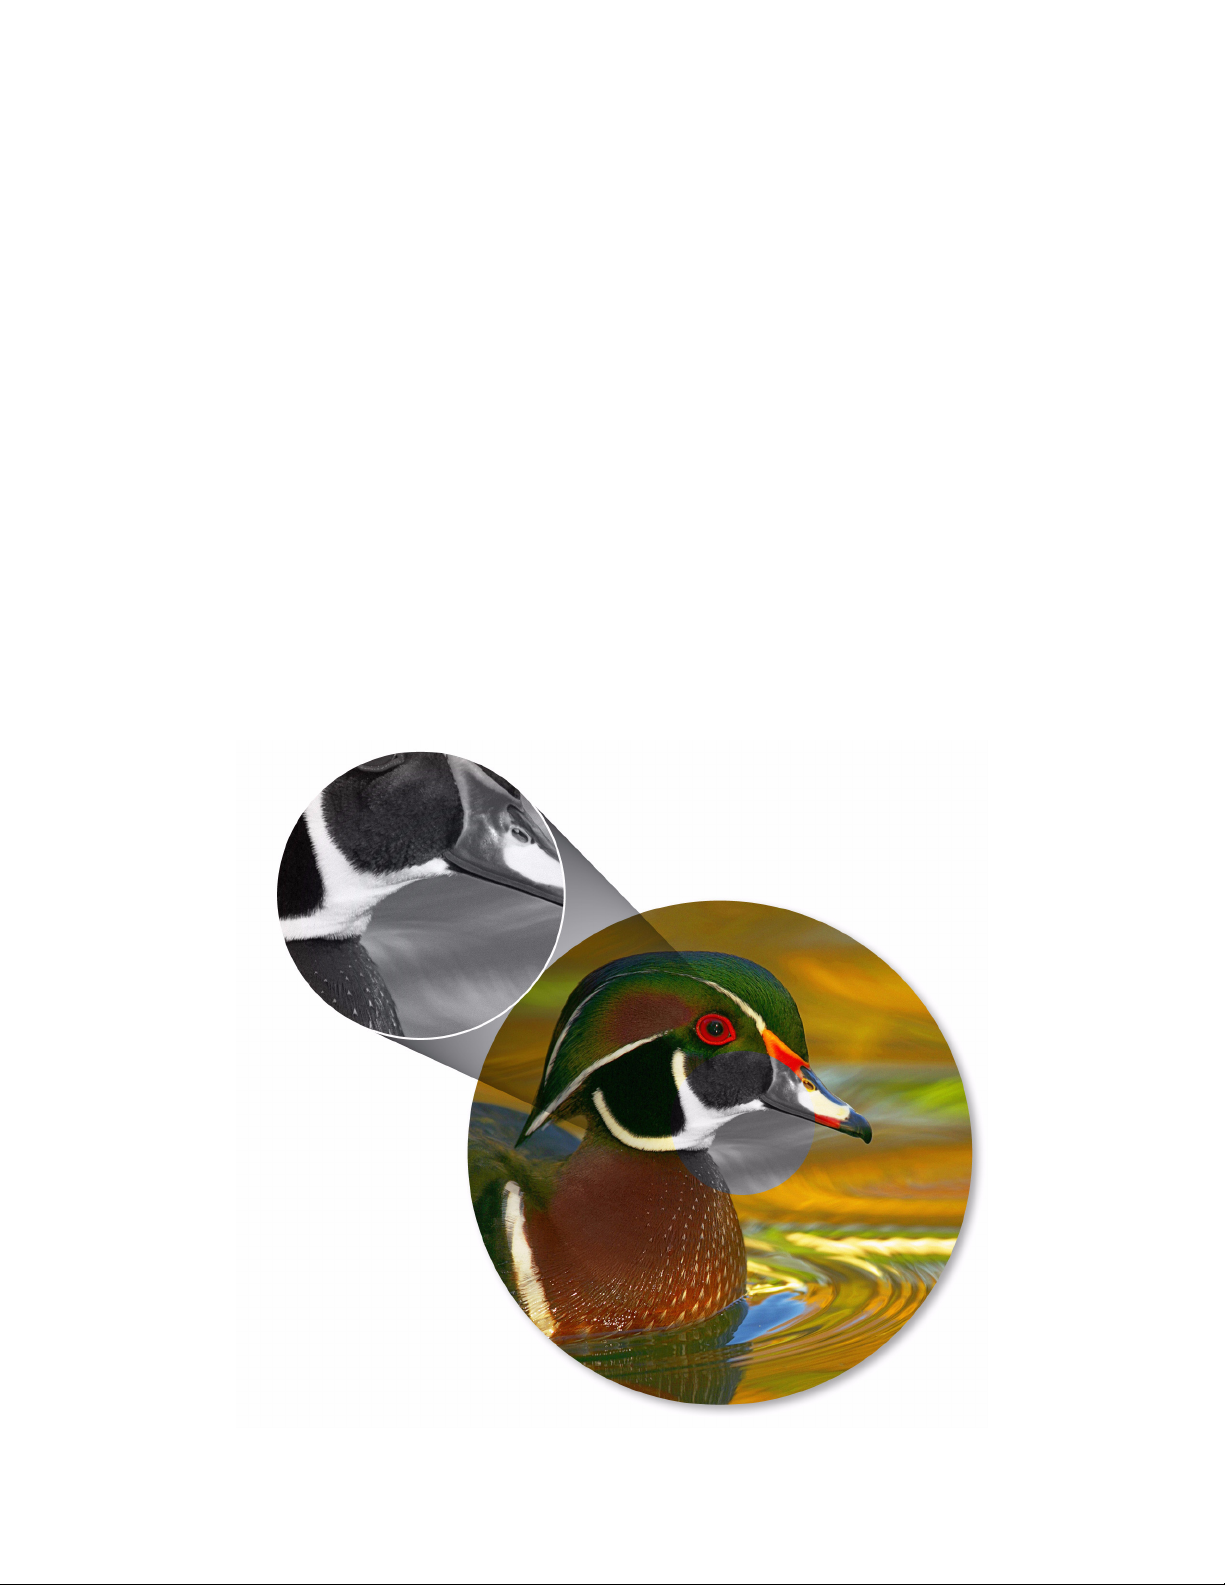
Note
Put more life into less-than-perfect images with Automatic Image Enhancement (AIE) on
the FreeFlow® Print Server. It’s ideal for jobs featuring amateur or candid photography, or
images clipped from Web pages or compressed in emails.
Before AIE After AIE
Color Handbook 2-7
Page 18

Xerox FreeFlow® Print Server Overview FreeFlow Print Server
2-8 Color Handbook
Page 19

Calibration
3
Background
To meet the specialized needs of digital production environments, ConfidentColor Technology
draws on a strong color heritage to take calibration to the next level. Thanks to a unique,
patented calibration technology, the FreeFlow® Print Server provides superior image quality--every time.
This technology moves beyond traditional density control to provide true gray-balance
calibration. So in addition to individual color levels, the FreeFlow® Print Server analyzes CMY
combinations from highlight through shadow, refining curves to assure neutral balance. You can
count on exceptionally smooth transitions, and skin tones that are rendered with incredible
accuracy.
When and How Often to Calibrate
Calibrating your system is the easiest way to manage your color output. It’s quick and it
effectively removes any color variations that occur over time. Color calibration ensures
consistent quality for all print jobs. If you do nothing more that calibrate frequently and print
with the default color settings on your server, you will achieve high-quality color output.
A printer may drift from its original color output due to general use, changes in temperature
and humidity, and changes in paper. When you calibrate, you bring the printer back to its
original quality output.
How often should you calibrate? You’ll need to get a feel for the best frequency for your specific
printer. Each printer is different. In general, if you are printing high volumes of color, you’ll
probably find it beneficial to calibrate once each day. At a minimum, you should calibrate at
least once a week.
It is also a good practice to calibrate after your printer has been serviced, and some customers
like to calibrate after a major change of stock. After performing a few calibrations, you’ll be able
to see how far your printer has drifted from the last calibration. This will help you determine the
best frequency for your environment.
You should calibrate on your most commonly used stock, or a centerline stock that has a midrange weight and coating for your type of printing. You may need to check with your key
operator or supervisor to see what stock is typically used.
To calibrate your system, you first print a spectrum of color on a page. This is called a target.
The target is printed using the printer’s current settings for color.
Color Handbook 3-1
Page 20
Calibration FreeFlow Print Server
Next you scan the target using either a spectrophotometer or your scanner, depending on your
system. This is called “measuring the target”. The spectrophotometer or scanner reads the color
on the target and feeds the values to the print server.
Then the print server generates calibration data. This data represent a mathematical formula
that the color data will process through. Finally, you click the Accept or OK button. This instructs
the system to accept the calibration data and adjust itself to the new formula. The actual
calibration takes only a few minutes.
Three Input Methods:
With the FreeFlow® Print Server, there are three different procedures for color calibration.
Which one you use depends on your printer model and options.
1. Hand-held spectrophotometer. You should follow the procedure first described below.
2. Off-the-glass / off-the-copier method (Xerox 700). If you do not have a spectrophotometer,
you should follow the procedure for calibrating using a scanner.
3. The final method is a an in-line automatic method. Gen4 has a standard in-line
spectrophotometer standard while iGen3 and DC8000 have optional in-line
spectrophotometers.
The in-line automatic method does not require a manual procedure to perform calibration.
Following are the calibration procedures using a spectrophotometer and a scanner.
1. Calibrating with a spectrophotometer
Use this procedure if your system has a spectrophotometer. If your system does not have a
spectrophotometer, follow the 2. Calibrating with a scanner procedure.
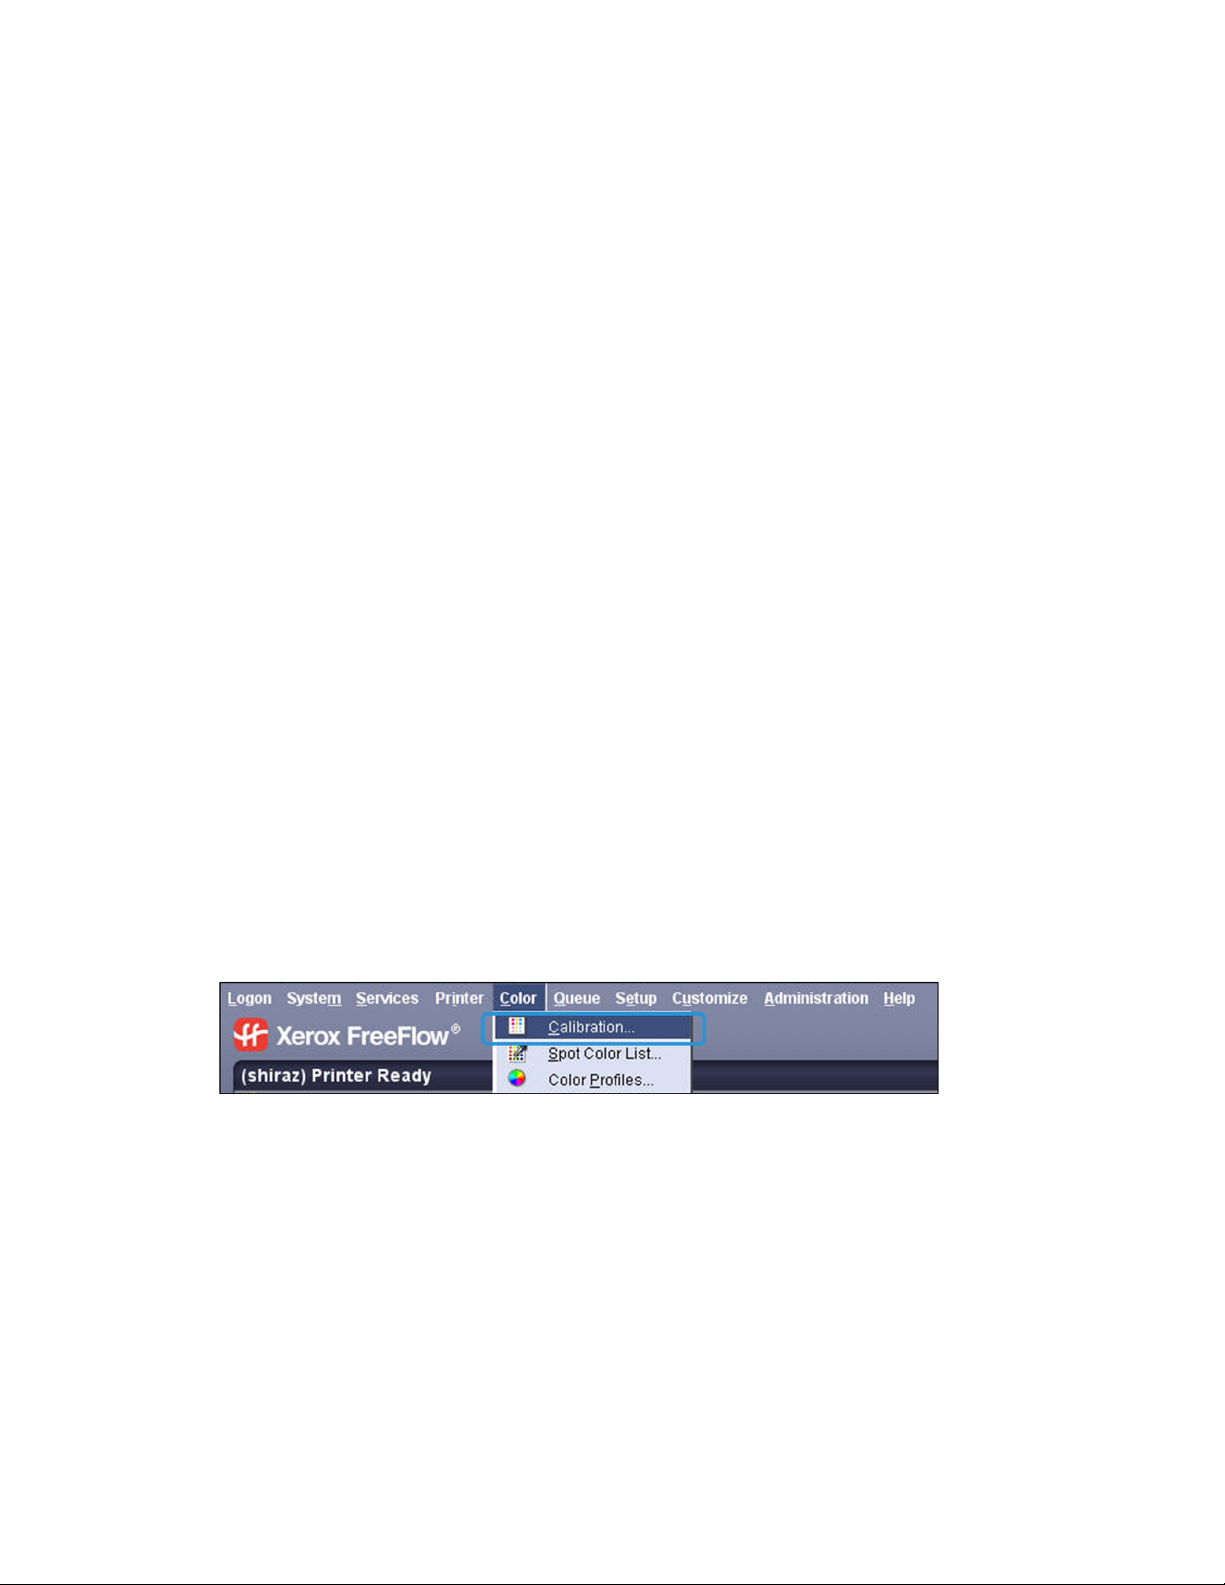
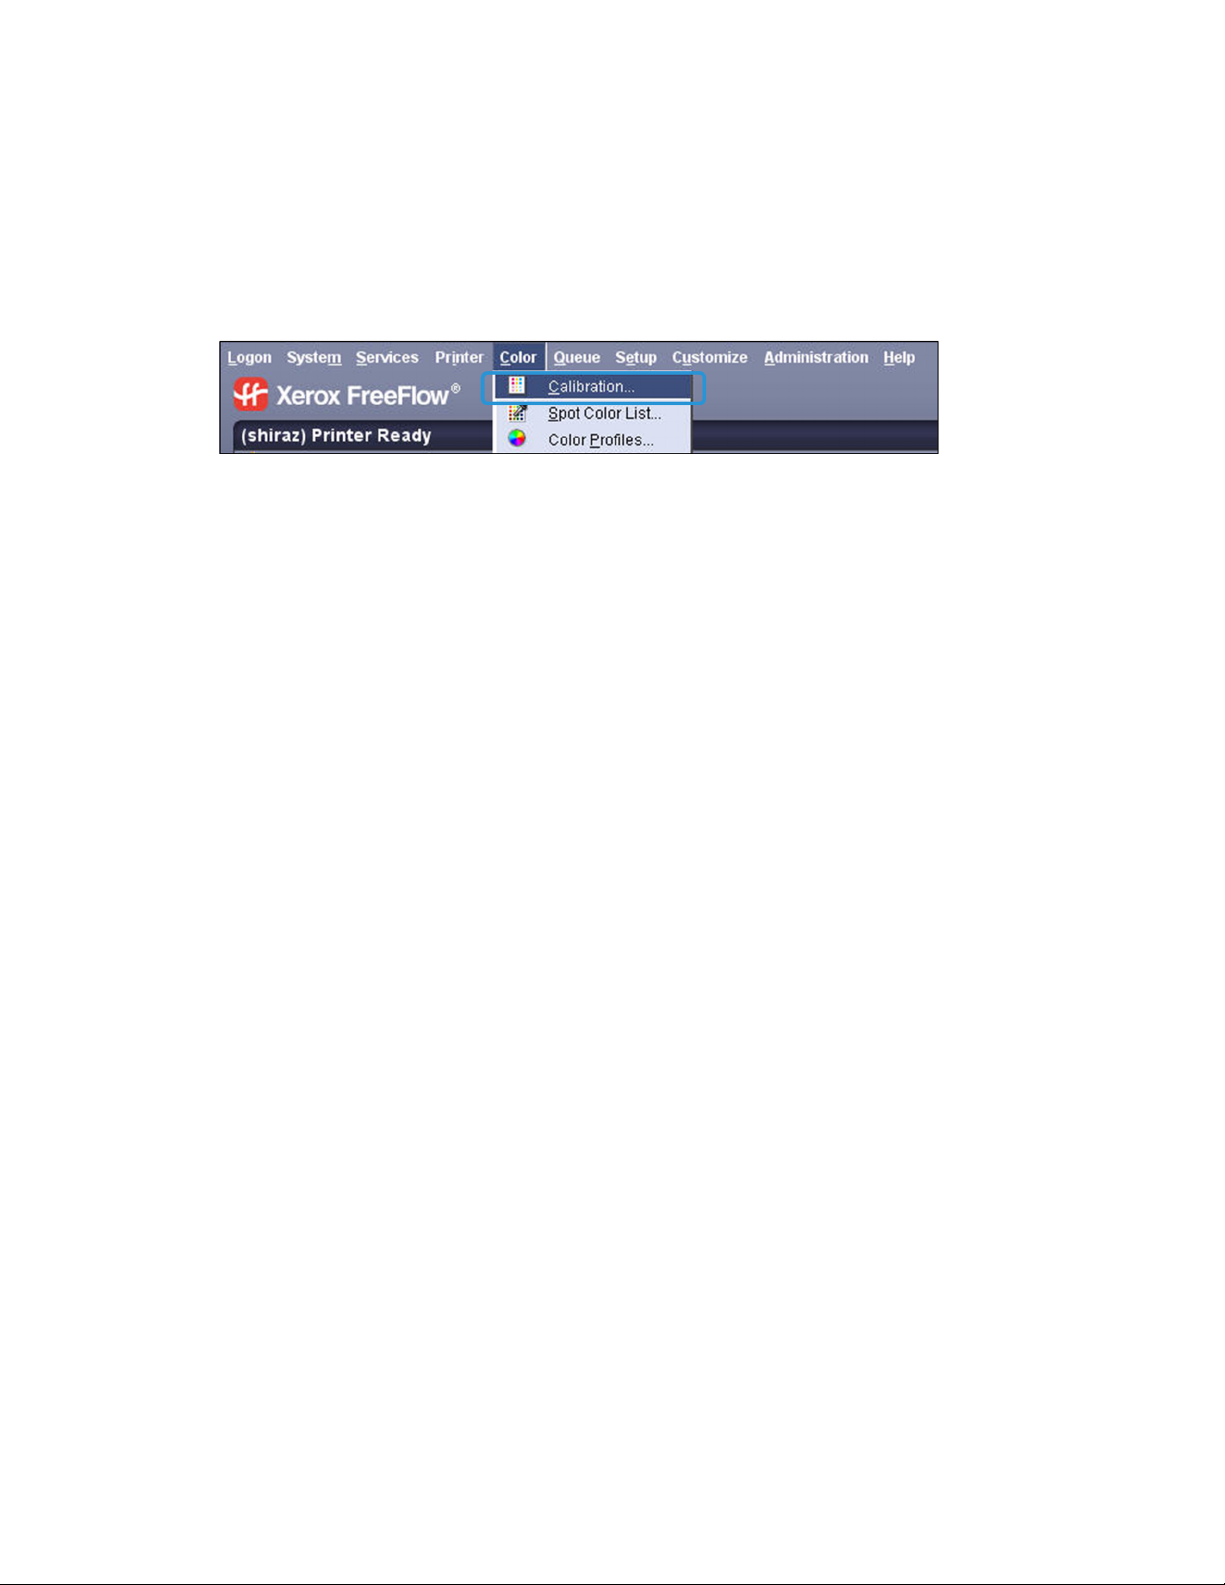
1. At FreeFlow® Print Server, select [Calibration] from the Color drop-down menu.
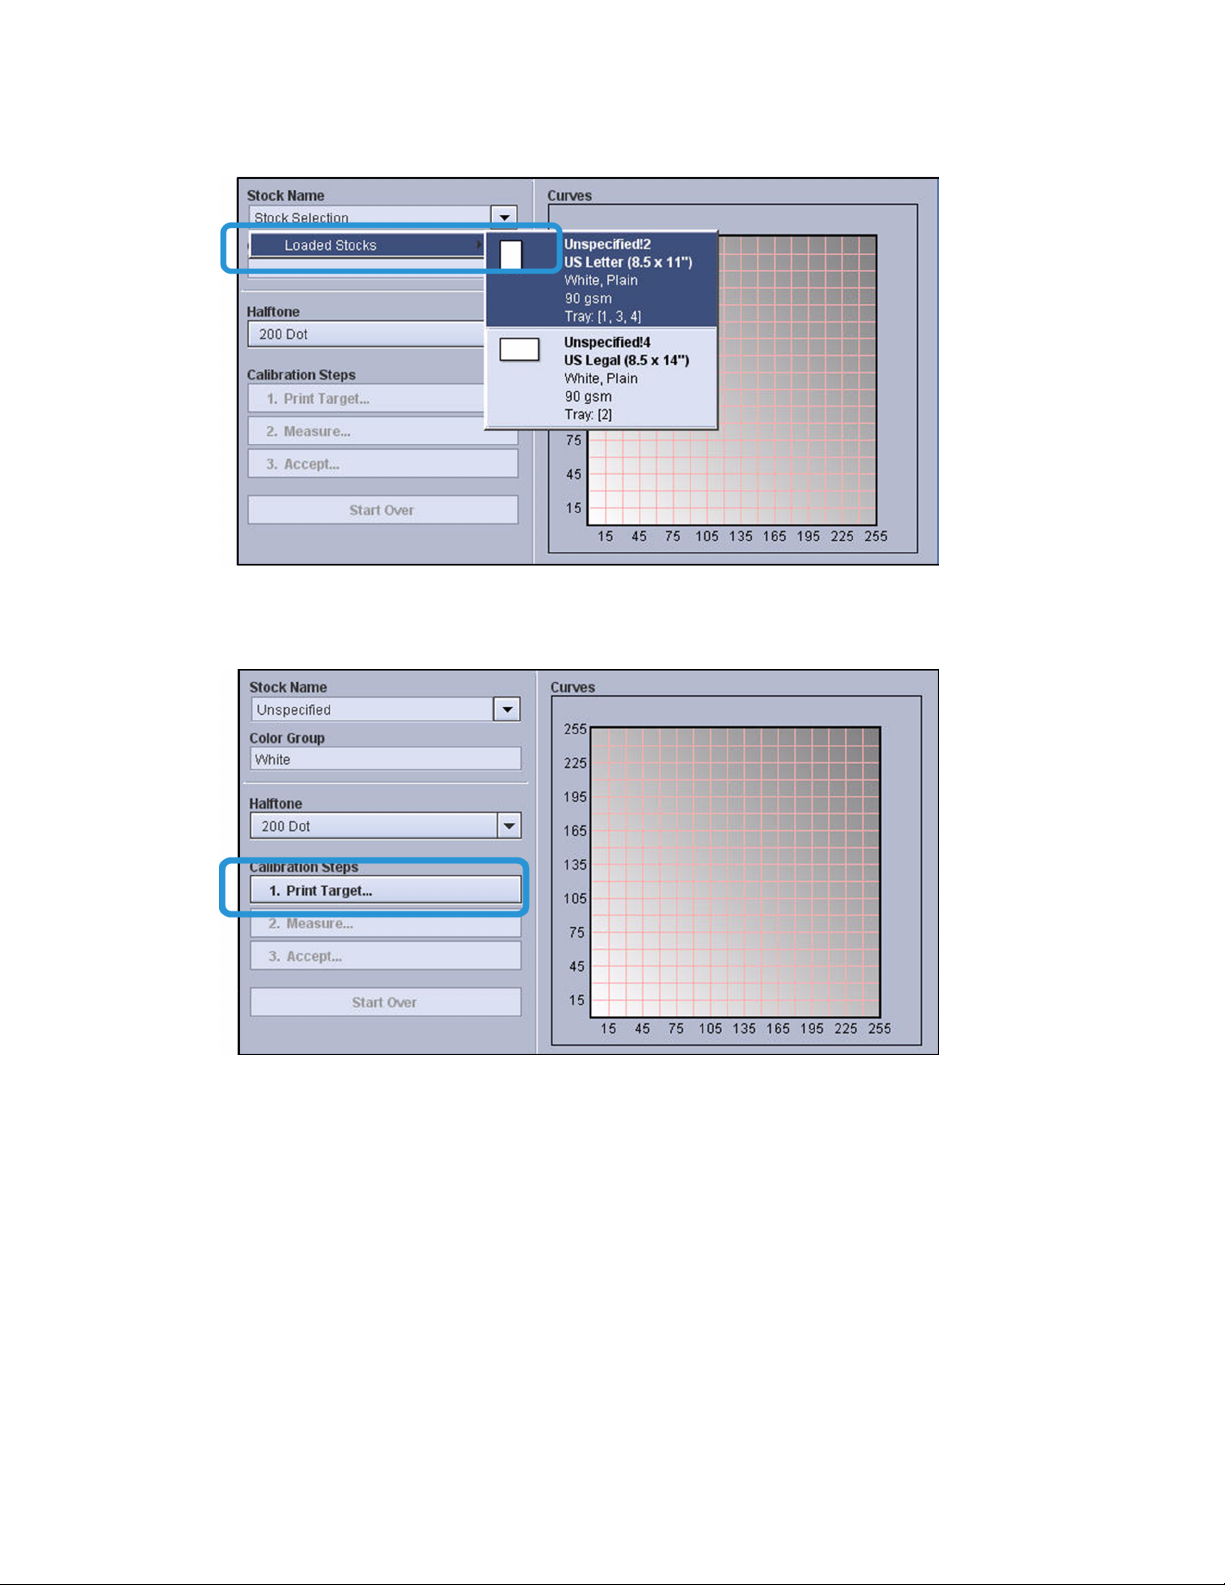
2. From the Stock Name field, select the loaded stock that you want to calibrate on.
Note
This should be the paper you use most often. If you use a variety of stocks, you can use a
“centerline stock”, which means a stock that is mid-range in terms of weight and coating.
3-2 Color Handbookk
Page 21
FreeFlow Print Server Calibration
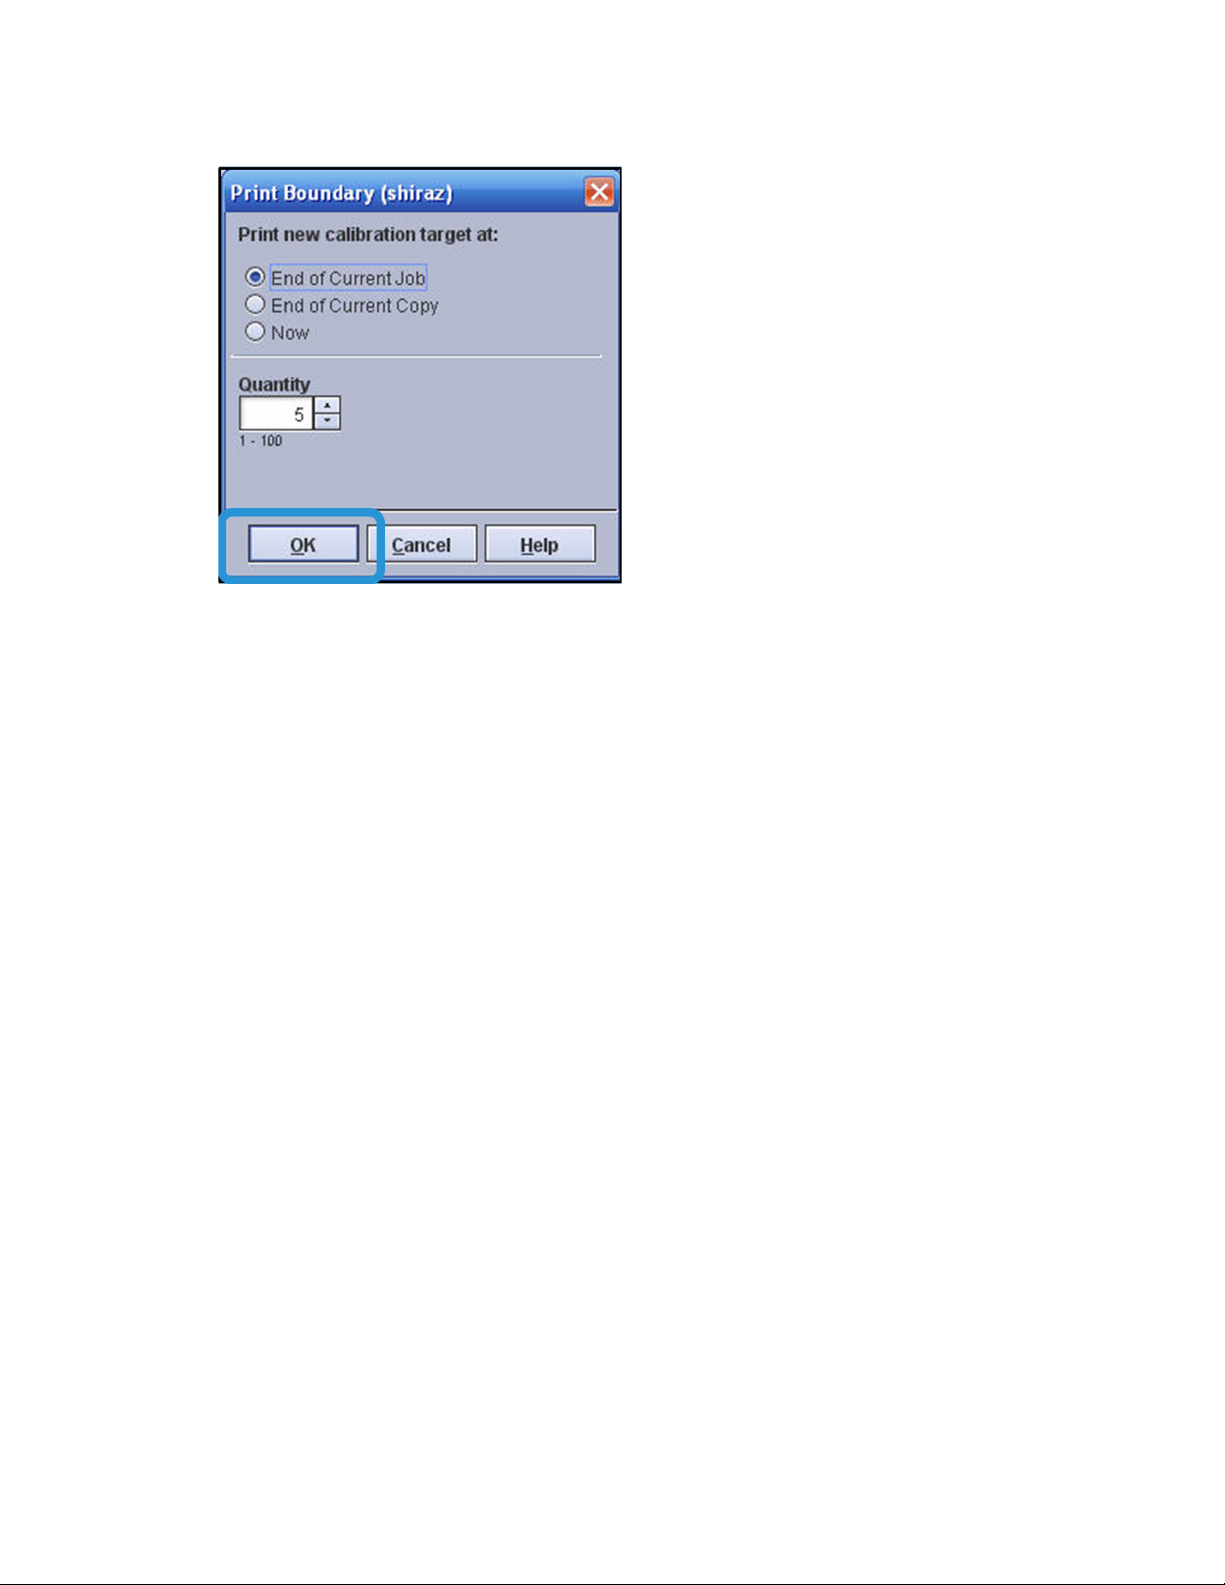
3. After setting the paper, click [Print Target].
• A dialog box opens to give you the option to print at the end of the current copy, the
current job or immediately:
Color Handbook 3-3
Page 22
Calibration FreeFlow Print Server
• Generally, you won’t be printing when you calibrate, but if a long job is running and the
color appears to be drifting, you can request to print the target before the job
completion. This way the job is paused and you can correct the color quality for the rest
of the run.
• This box also lets you select more that one target to print. The default is 5, because it is
generally best to let the printer warm up on a few prints and use the last one. You
should leave it set for 5, and use the 5th print for the target to scan.
4. Click [OK] to the dialog box.
5. Collect the printed targets, and discard the first 4 that printed. Retain the 5th or last one
that printed.
6. Click [Measure] on the Calibration screen.
7. Click [Follow instructions] on the Measurement Instruction screen that opens. Then when
ready, click [Next] to follow the instructions.
Note
When you first perform a calibration, you should select Follow instructions for help. After
completing a few calibrations, you may want to select Skip detailed instructions.
Note
The steps for measuring the target vary for different spectrophotometers, but generally
you’ll have to draw the instrument over the target so it can read the color on the page.
When you are done scanning the target, the system performs calculations and then a
Calibration Complete message pops up on the server screen.
8. When the Calibration Complete message pops up on the server screen, click [OK].
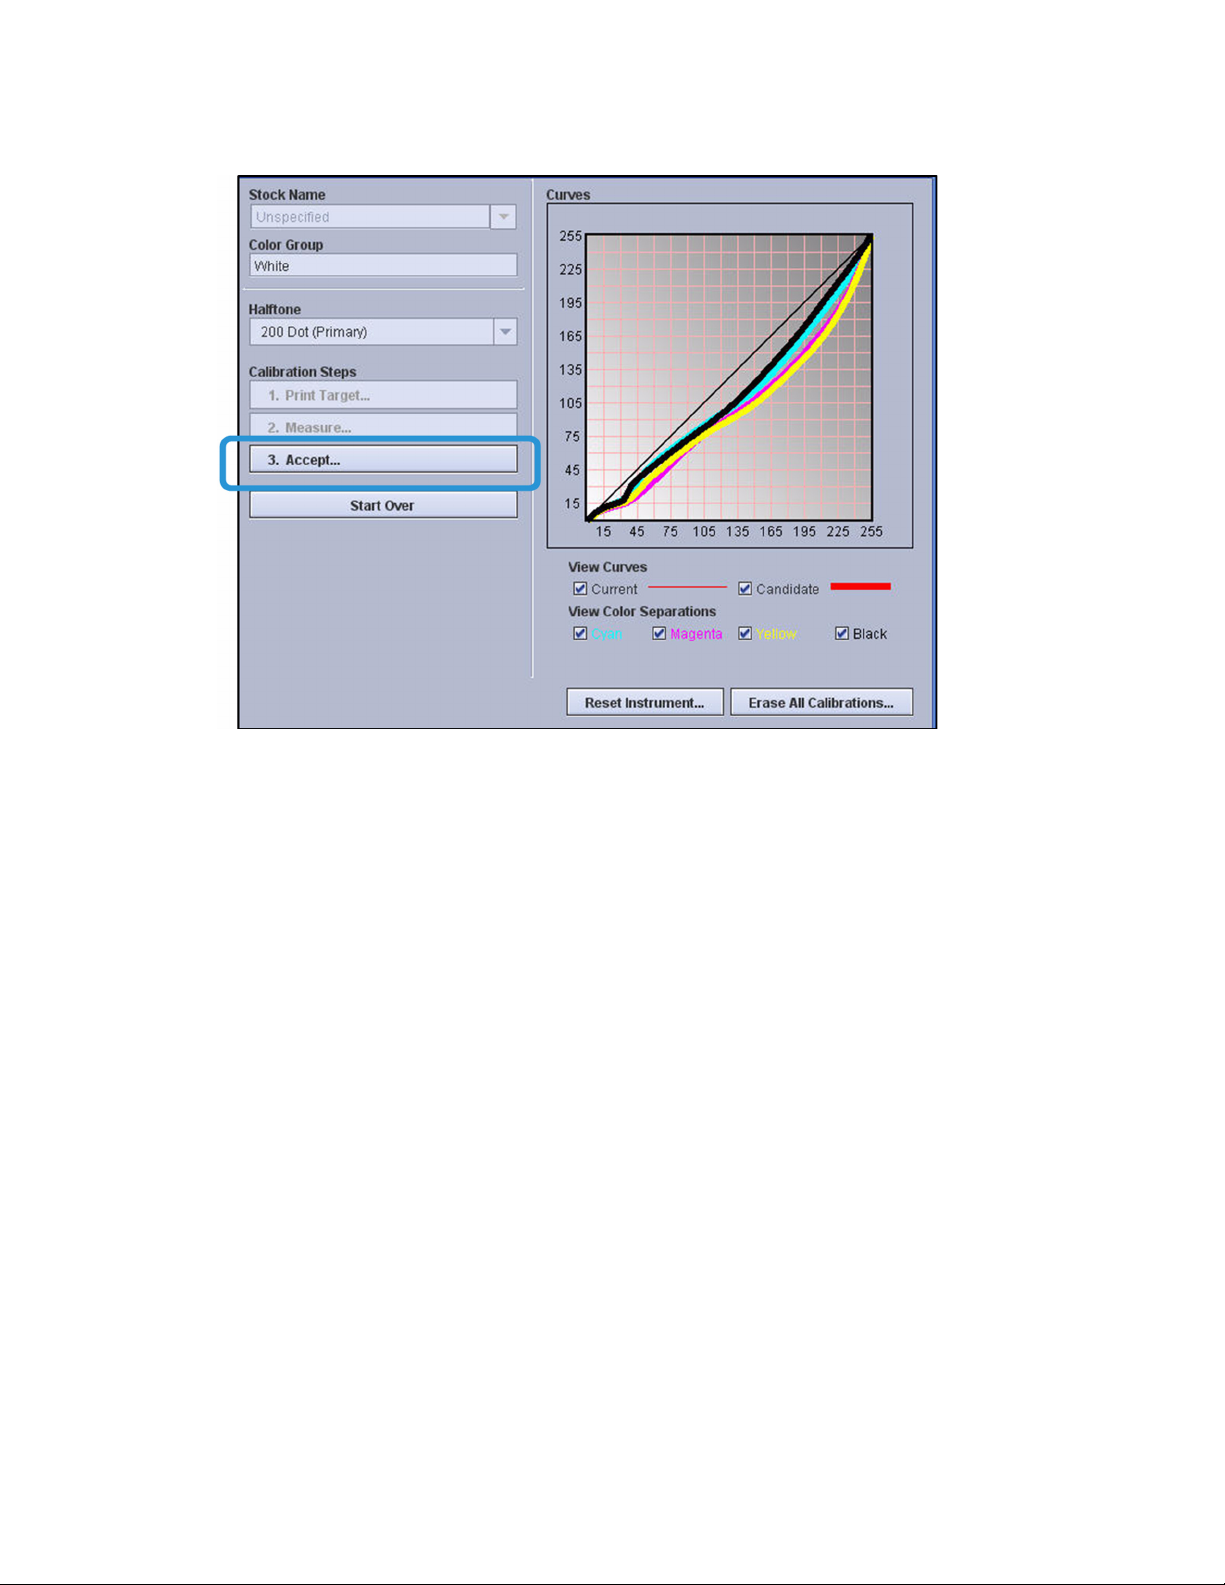
The calculation results display on a graph. This graph shows the mathematical curves that
will be used to adjust your printer’s data.
3-4 Color Handbookk
Page 23
FreeFlow Print Server Calibration
Note
You can compare the thin lines for each color with the thick lines. The new curve, taken from
a calculation on the target, is shown by the thick lines. The thin lines show the previous
calibration curve. If the new curves align perfectly with curves from the previous calibration,
then the system is holding steady with consistent output. If this happens every time you
calibrate, you do not need to calibrate as often. You will get a sense of how much the
system is changing between calibrations. Also, you will see a general shape to the curves,
and become familiar with the pattern over time. The curves should be generally smooth,
without bumps.
9. Click [Accept] to apply the new calibration data, and then [OK] to the dialog box that
opens.
This completes the calibration.
Color Handbook 3-5
Page 24
Calibration FreeFlow Print Server
2. Calibrating using a scanner
Use this procedure if your system does not have a spectrophotometer. The procedure begins at
the FreeFlow® Print Server and then moves to the User Interface on the printer.
1. At FreeFlow® Print Server, select [Calibration] from the Color drop-down menu.
2. Select the Loaded Stock that you want to calibrate on. This should be the paper you use
most often. If you use a variety of stocks, use a centerline stock, which is mid-range in terms
of weight and coating.
3. Change the Halftone Option only if you want to calibrate on a different halftone from the
default. For this practice, leave the default value as it is in the field.
4. Click [Start Calibration].
5. A measurement instruction sheet prints along with a calibration target and a test page.
6. Follow the instruction sheet to scan the target.
7. Retrieve the test page that prints out.
8. Return to FreeFlow® Print Server and click [OK] if the test page is acceptable.
Click [Cancel] if the test page is not acceptable.
Points to Remember
As you work with your printer, remember that color calibration is the foundation of good color
management. It’s the single most important thing you can do to maintain quality.
3-6 Color Handbookk
Page 25
Adjusting Color
4
TRC editing
The User TRCs window
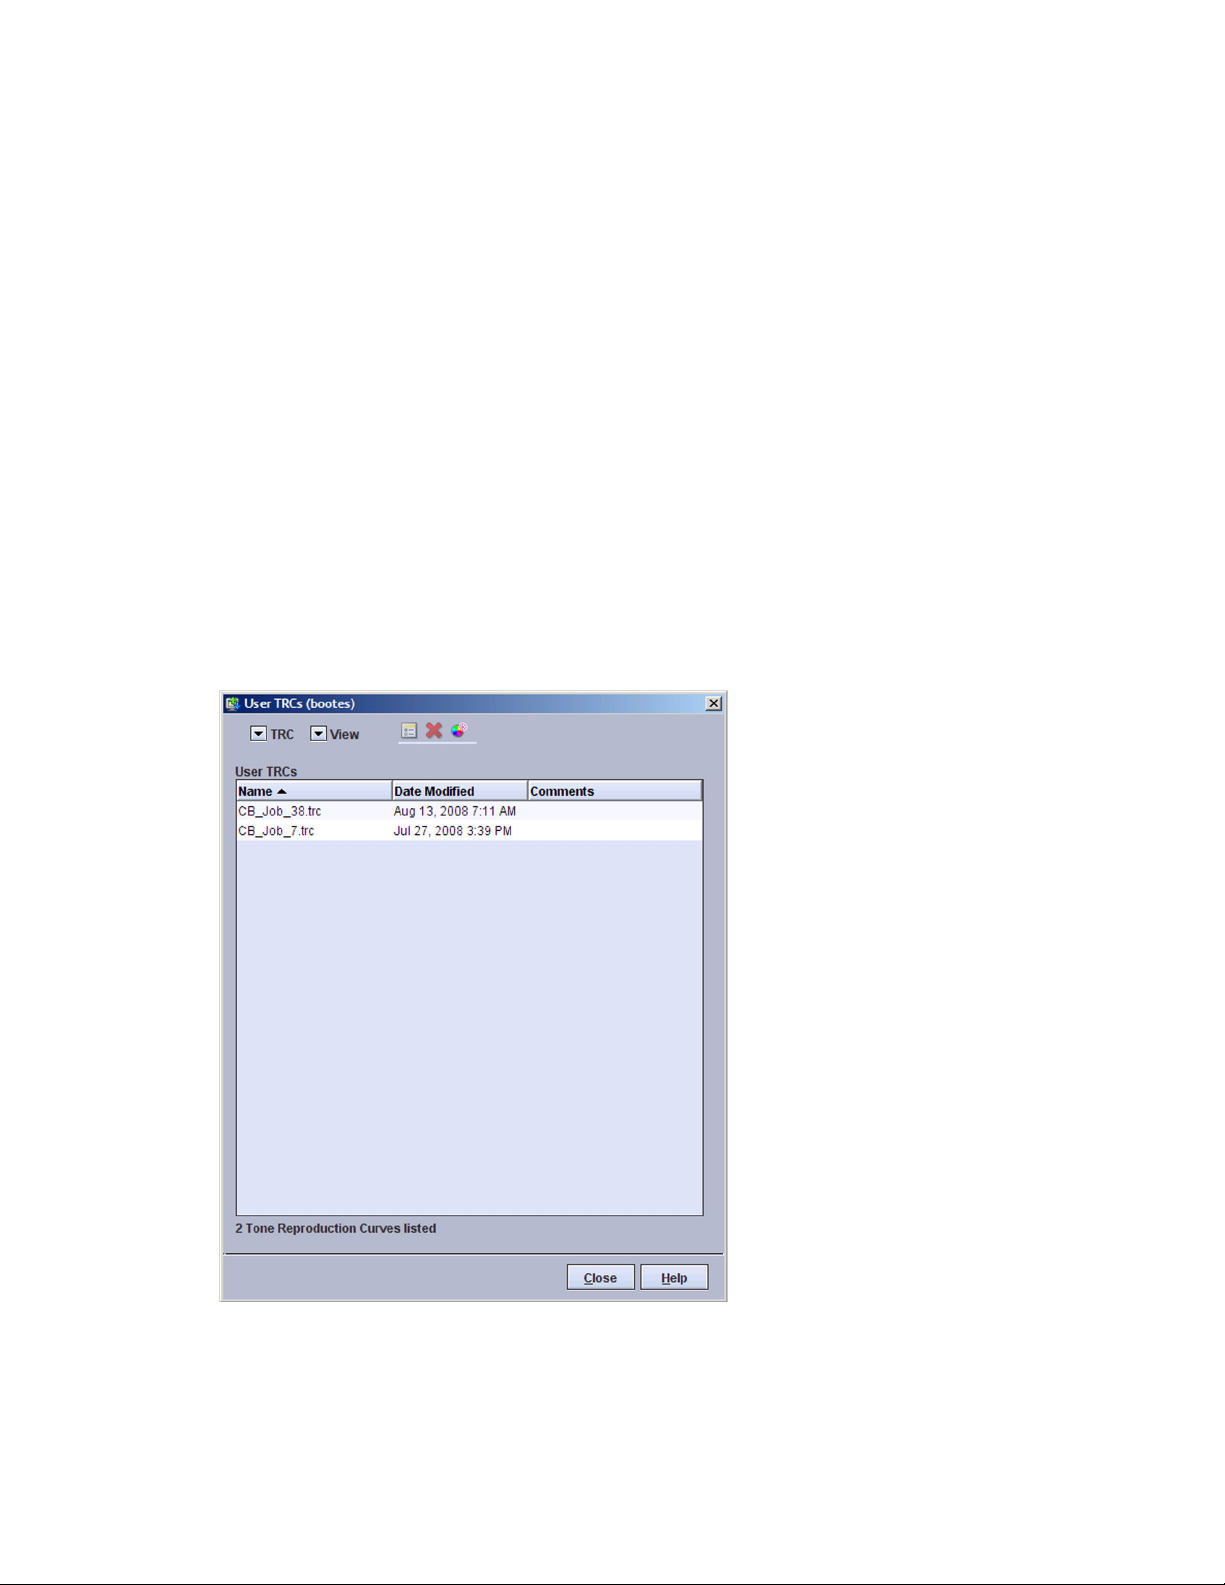
The User TRCs window enables you to manage all custom Tone Reproduction Curves (TRCs).
You can import, export, delete, copy, print, and create new and edit existing TRCs. The New and
Edit functions are best used with a specific job as the only valid test of a color adjustment is a
proof print.
The table listing of TRCs can be sorted by either name or the file modified date by clicking the
column heading.
Color Handbook 4-1
Page 26

Adjusting Color FreeFlow Print Server
User TRC menus
Selecting [Color > User TRCs] will display a list of available TRCs. Within the TRC menu, which
appears when you right-click on a TRC, or alternatively by accessing a pull down menu, are the
following selections:
• Edit...: The selected TRC can be edited using this selection.
• Copy...: The selected TRC opens in the Edit/Preview window. A copy must be saved with a
different name prior to or after editing.
• Delete: Selecting this option will delete the TRC.
• Print...: The selected TRC can be printed using this selection.
• New...: To create a new User TRC you may choose this option.
• Import...: A User TRC may be imported from another FreeFlow® Print Server using this
option.
• Export...: A User TRC can be exported to another FreeFlow® Print Server using this option.
• Redisplay: This menu option enables you to refresh the display.
Opening the User TRCs Edit window
User TRCs can be applied to a job or page to adjust the color output of a specific job. They can
also be applied to a queue to adjust the color for all jobs in the queue.
The User TRCs Edit window can be opened by using one of the following methods:
Changes made to User TRCs using any of the methods listed below appear in all the other
methods.
• From the Home Screen: Double-click a job, select the Image Quality tab and the Color
Adjustments FAB. From the Adjustment Type menu, select a User TRC and click [Edit /
Preview].
• From the Services menu: Select [Services > Print From File]. Select the Image Quality tab
and the Color Adjustments FAB. From the Adjustment Type menu, select a User TRC and
click [Edit / Preview].
• From the Queue menu: Select [Queue > Queue Manager]. Double-click a queue, select the
Image Quality tab and the Color Adjustments FAB. From the Adjustment Type menu,
select a User TRC and click [Edit / Preview].
• From the Color menu: Select [Color > User TRCs] and double-click a User TRC.
In this dialog, TRCs can be selected, edited, and previewed but cannot be applied to a job, page,
or queue.
4-2 Color Handbook
Page 27
FreeFlow Print Server Adjusting Color
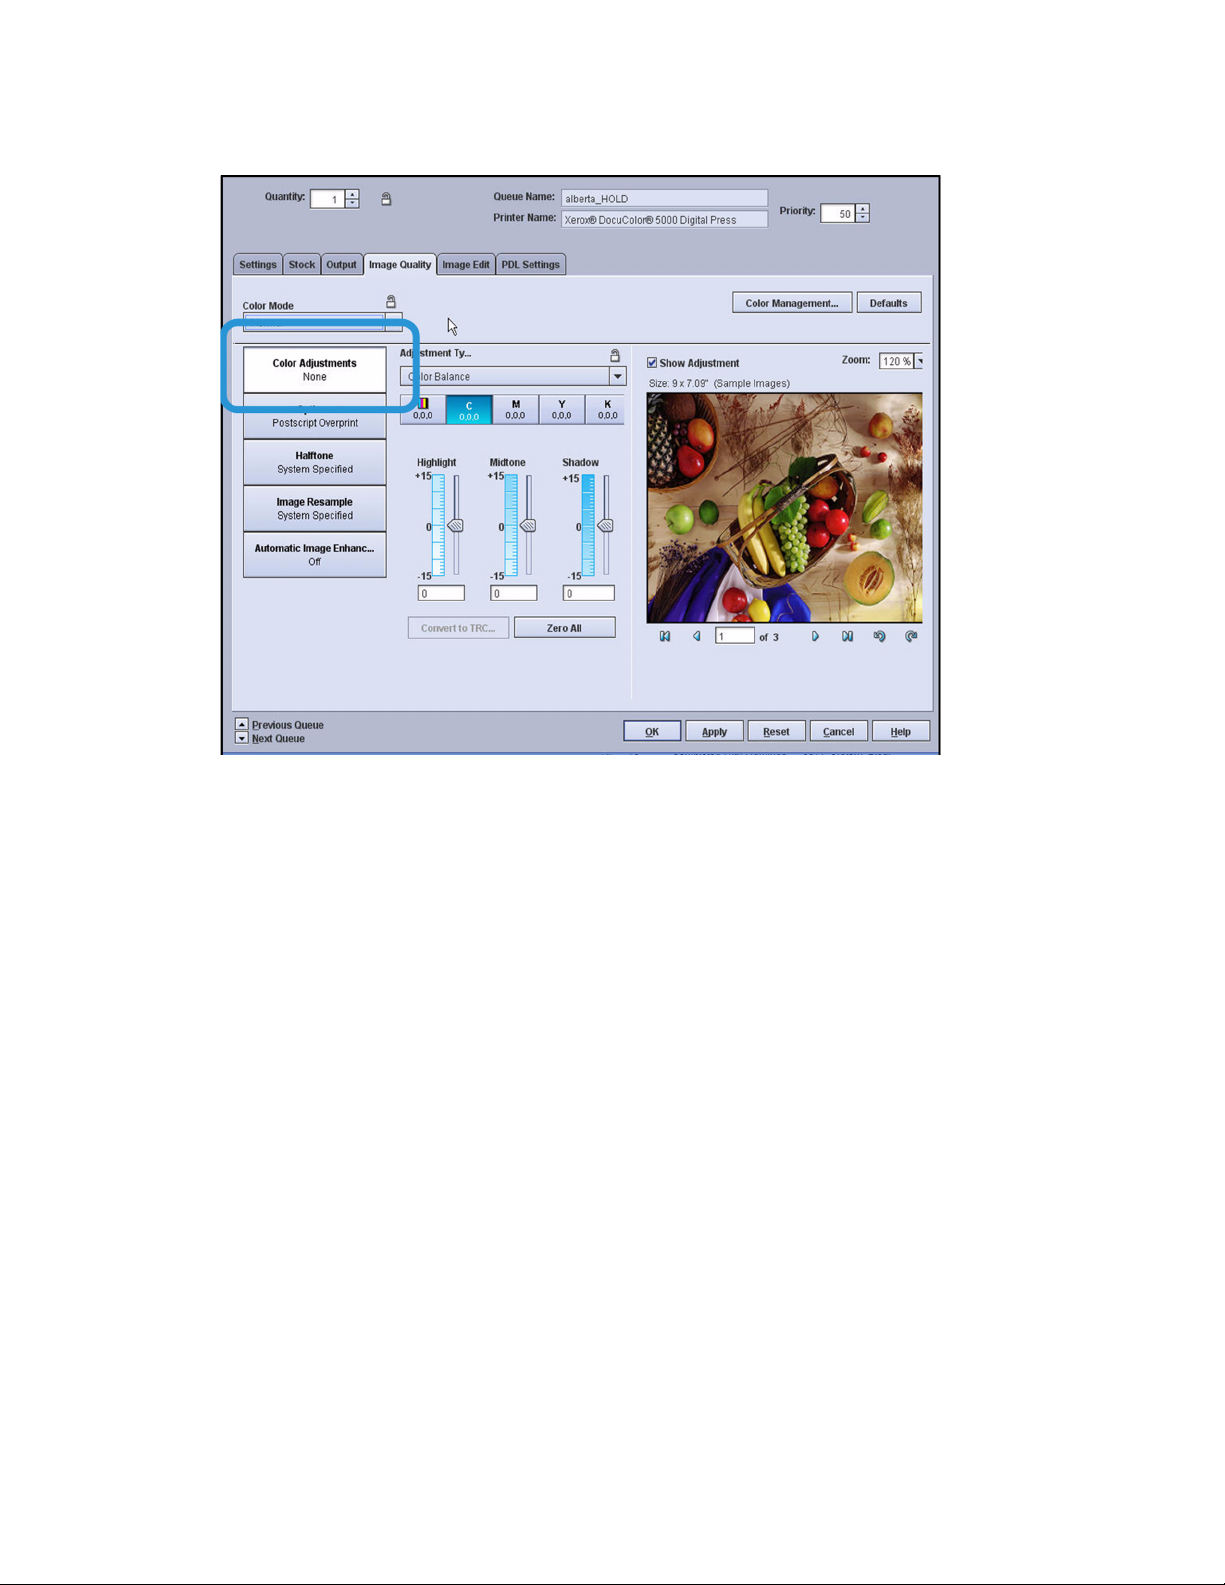
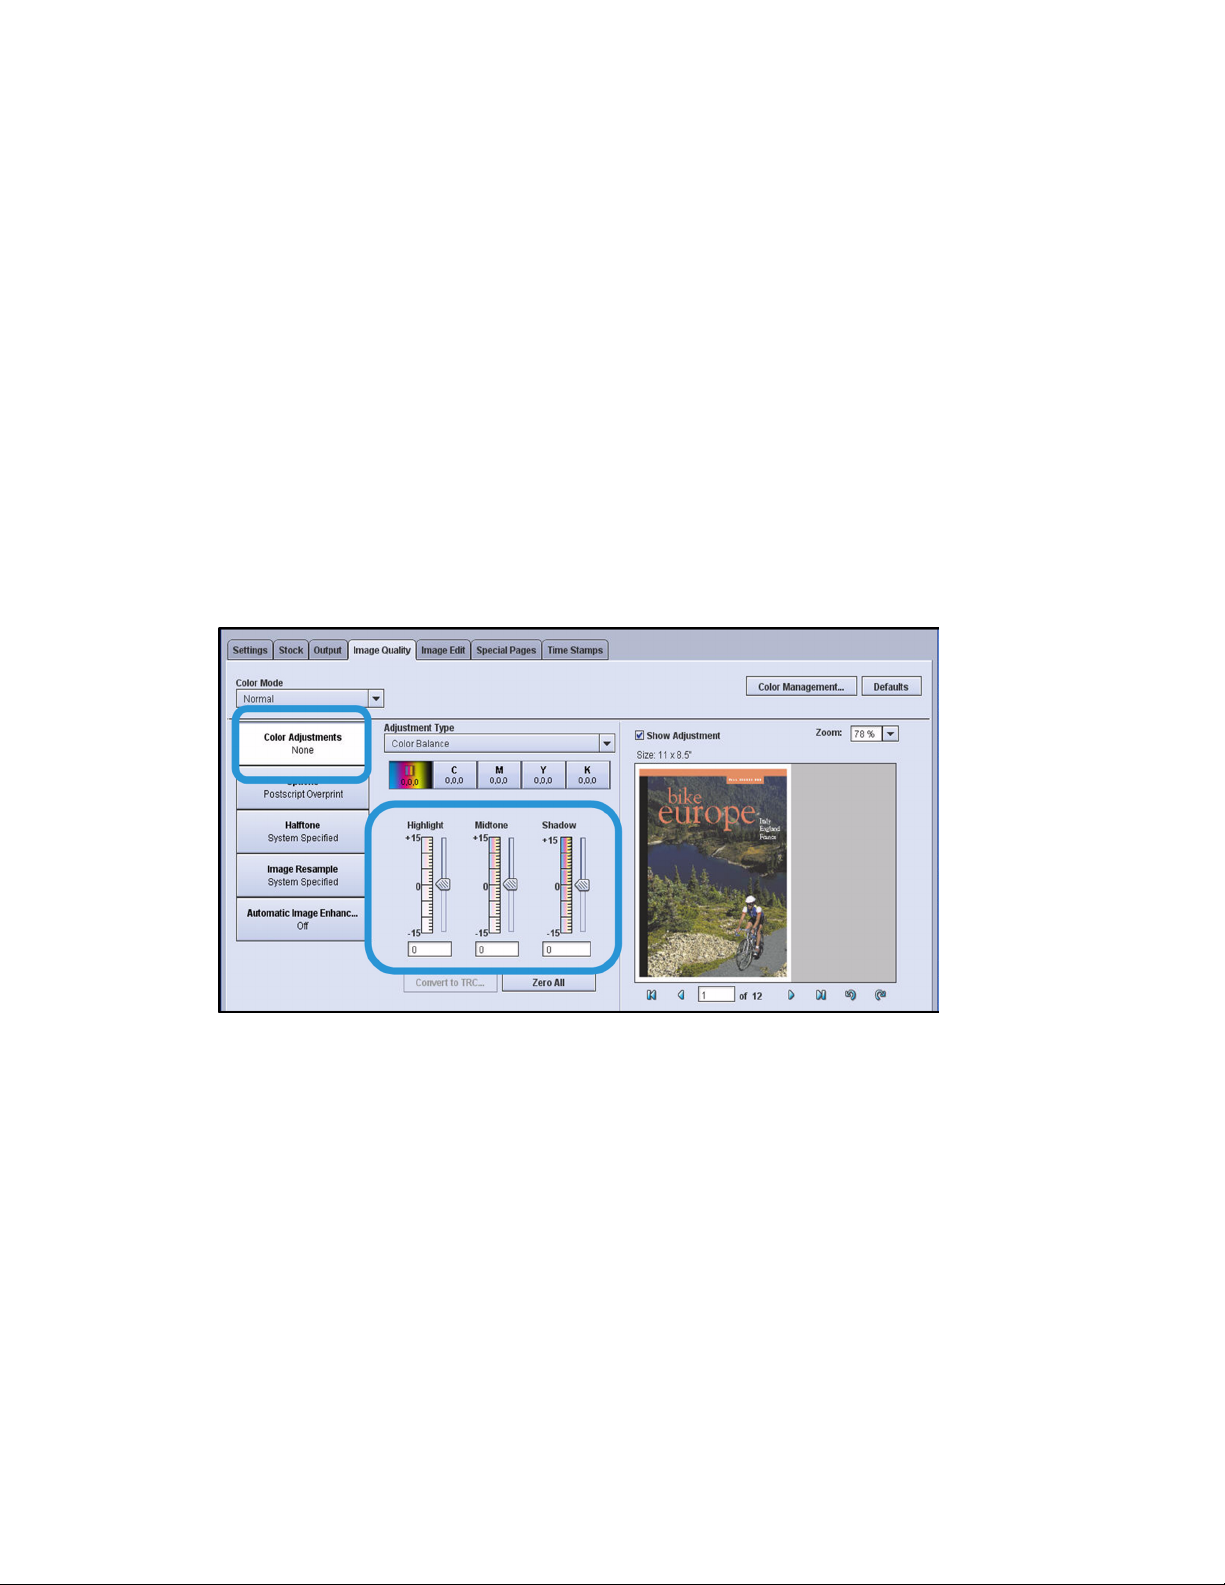
Adjusting Color Balance
Background
Colors, other than Spot Colors, can be adjusted using the Color Adjustment function on the
server. These include CMYK and RGB colors. As with Spot Color adjustment, settings can be
changed for an entire queue, a particular job, or a page within a job. The Color Adjustment
function is available from the Image Quality tab for a queue or for a job. For an individual page,
you can adjust color from the Special Pages tab, under Job Properties.
Color Handbook 4-3
Page 28
Adjusting Color FreeFlow Print Server
Generally you should set your standard color flow for a queue; that is: Source Profile, Rendering,
and Destination Profile. Once you set color flow for queues, color adjustments can then be
made on individual jobs or pages within a job.
There are two ways to adjust color. The first option, Color Balance lets you change the balance
of colors using a slide bar for each CMYK color. You can modify highlights, midtones, and
shadows for cyan, magenta, yellow, black, or for all colors together. As you make changes by
increasing and decreasing color, using the slide bars, you can see the effect on one of several
stock images when the modification is made at the queue level. When you are adjusting an
individual job, you can view the changes right on a representation of your job file.
The second method for adjusting color, New TRC, lets you to create a detailed Tone
Reproduction Curve (TRC). The TRC screen provides you with a graph showing the color balance
for all colors. You can select a curve for all colors or select a curve for a particular CMYK color,
and drag it to form a new curve. When you do this, the color changes and you can see the effect
of your changes on a graphic display. With TRC you have many points of control, allowing you
to accurately modify color in small increments. This method is generally used by operators who
are experienced with adjusting color.
If you use the Color Balance slide bar method to adjust color, you can click a Convert to TRC
button to convert the values to a TRC. You can then name the TRC and reuse it for other queues
or other documents.
Remember that Spot Color is not affected by these adjustments, but can be changed using the
Spot Color Editor.
4-4 Color Handbook
Page 29
FreeFlow Print Server Adjusting Color
Color Balance Examples
Adjusting color balance using slide bars
Adjust the color for a job using slide bars on the Color Adjustment screen. While you will be
adjusting color for an individual job, the process is exactly the same to adjust color balance for
a queue.
1. Double-click on a job to open Job Properties.
2. Click the [Image Quality] tab.
3. Select [Color Adjustments] on the Image Quality tab. This is the top selection on the left.
4. To adjust color, you first select the color you want to change above the three slide bars. The
options for selecting a color to adjust are (from left to right) All Colors, C, M, Y and K. After
selecting the color, you move the slide bars up to increase the percentage of a color and
down to decrease the percentage of a color. There are three slide bars giving you the
option to adjust the color in Highlight areas, Midtone areas, and Shadow areas of the
image.
5. Notice that beneath the image are controls to rotate the image and page through the
document. If you are adjusting color for a multi-page job, you will probably want to page
through the job to see the effect of changes on all pages. You can also zoom in and out on
the image using the Zoom control above the image.
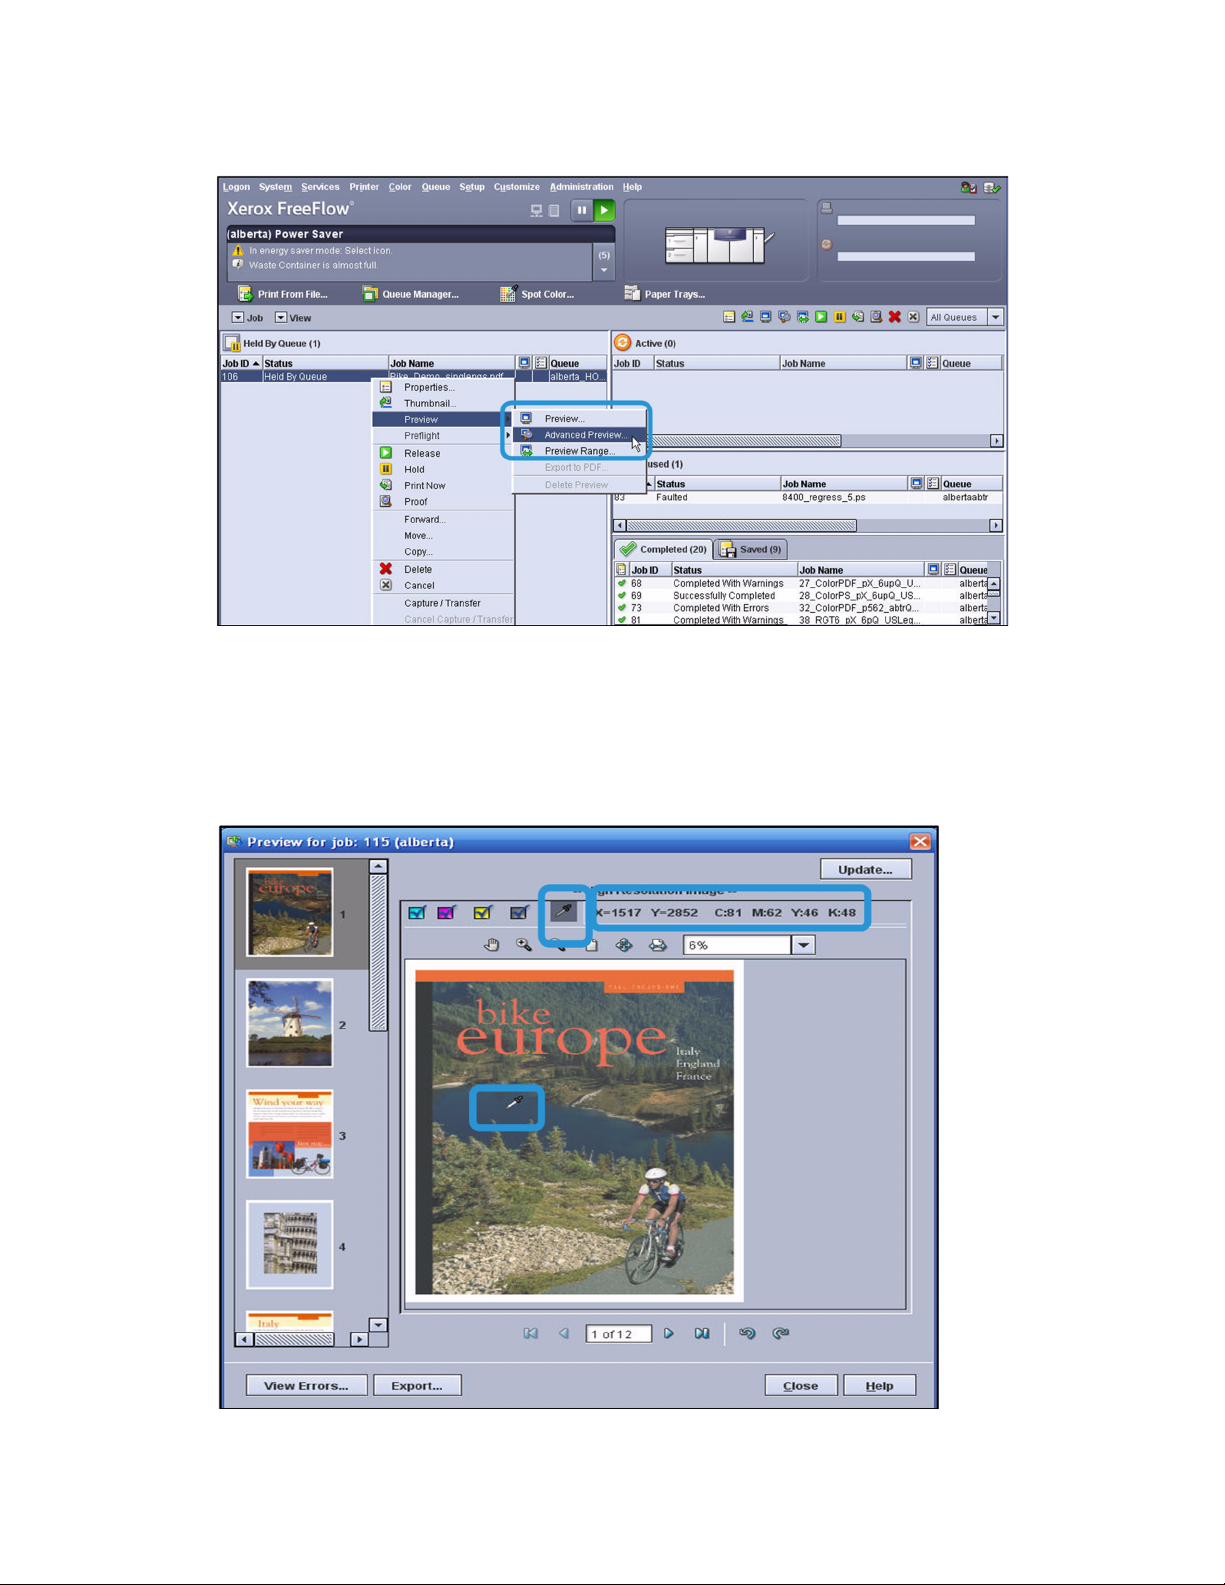
Using Advanced Preview to identify color for adjustment
Advanced Preview is useful for identifying the CMYK color components on different areas of an
image. When you run Advanced Preview, a high resolution image of the file is created and
displayed. You can then click an eye dropper icon and move it over the image using your mouse.
The CMYK color under the eyedropper is displayed at the top of the screen. Knowing the CMYK
composition of areas of an image can help you adjust color by knowing how much to increase
or decrease CMYK components to achieve a certain look.
1. Right-click on a job and select [Preview > Advanced Preview].
Color Handbook 4-5
Page 30
Adjusting Color FreeFlow Print Server
2. When the job opens in Advanced Preview, click the eye dropper icon and move your mouse
pointer over the image. The pointer becomes a small eyedropper that you can move. Notice
that as you move the eye dropper to different locations on the image, the CMYK values
change at the top of the screen. You can see the color components at any point on the
image.
4-6 Color Handbook
Page 31

FreeFlow Print Server Adjusting Color
Saving and re-using Tone Reproduction Curves (TRCs)
A TRC is simply a graphic representation of your color adjustment. You can save your color
adjustments for reuse in the future on the same queue or different queues, or to apply to
another job. The save process involves converting the adjustment to a TRC, naming the TRC and
clicking OK. After saving, the new TRC appears in the Adjustment Type drop-down menu at the
top of the Color Adjustment screen.
1. Right-click on a job and select [Preview > Advanced Preview].
2. Use the slide bars on the Color Adjustment screen to adjust the color balance on the job.
3. When the color balance is properly adjusted, click the [Convert to TRC] button, under the
slide bars.
4. In the Name field at the top of the screen, enter the name for the new TRC. In this example
it is called “NewTRC”.
Color Handbook 4-7
Page 32

Adjusting Color FreeFlow Print Server
5. Click [OK] to save this TRC.
6. On the Color Adjustment screen, view and select your new TRC in the Adjustment Type
drop-down menu.
Note
Saved TRCs can be selected and reused for all jobs and queues
4-8 Color Handbook
Page 33

FreeFlow Print Server Adjusting Color
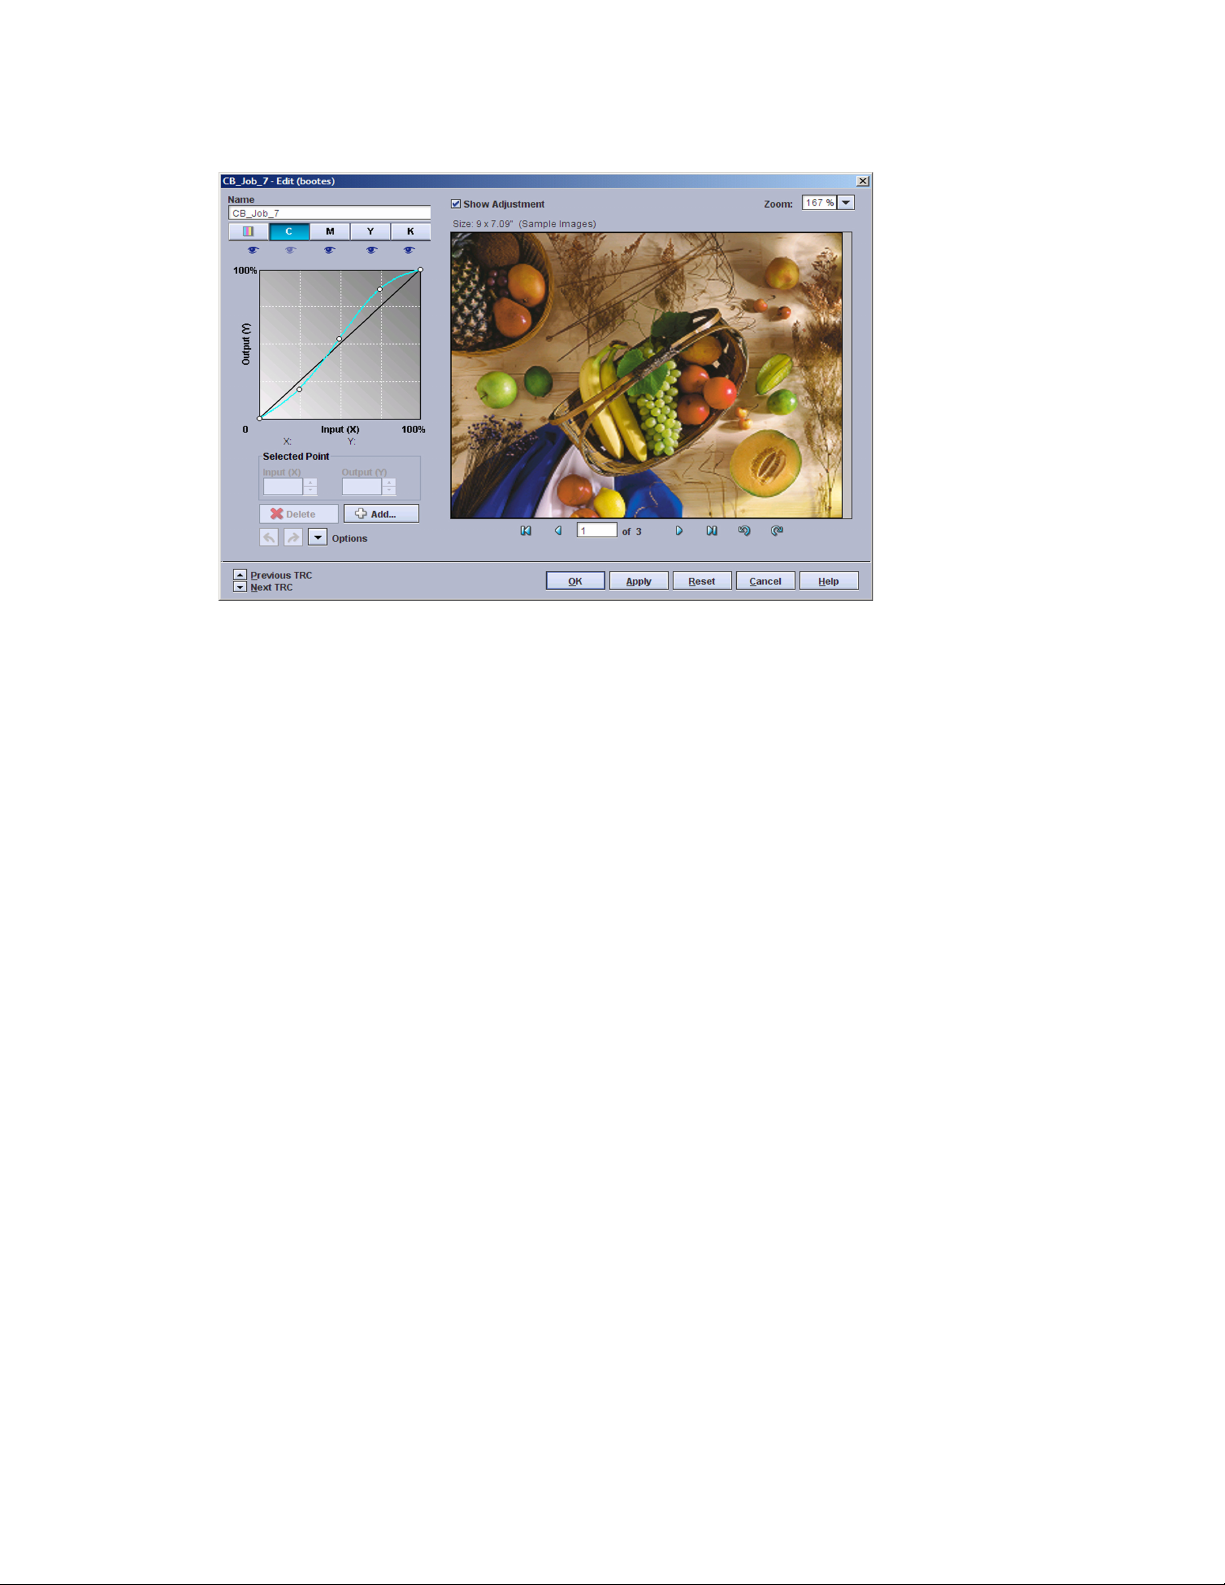
Adjusting color with Tone Reproduction Curves (TRCs)
Another way to adjust color balance is to work directly with Tone Reproduction Curves (TRCs).
This method accomplishes the same adjustments as the sliding bars, but is a little more
technical and generally used by more experienced operators. With TRCs, lines on a graph
represent color. To make adjustments, you grab a point on each color line with your mouse
pointer, and drag it to a new location. As with the sliding bars, you can select All Colors or
individual CMYK colors.
1. Select a TRC from the Adjustment Type drop-down menu.
2. To adjust color using a TRC, you first select one ofbuttons above the graph to adjust all
colors, or one specific color.
3. Select a point on the TRC and then drag that point to a new location on the graph. You can
also click a point and then increase or decrease the X and Y values beneath the graph. Note
that the bottom left area of the graph represents highlights and the upper right area
represents shadows. Midtones are represented in-between the two. The gradual shading on
the graph from light on the bottom left to dark on the upper right is used to show this.
Color Handbook 4-9
Page 34

Adjusting Color FreeFlow Print Server
4. Click on the dot on the lower left of the curve, indicated by the lower arrow, to adjust colors
in highlight areas.
5. Click on the dot on the center of the curve to adjust the color in the highlight area of the
image.
6. Click on the dot on the upper right of the curve, indicated by the upper arrow to adjust in
shadows areas.
7. You can reset the TRC to its original form, prior to your recent adjustments. To do this, click
the [Options] drop-down menu and select [Default All Curves].
Note
Next to the Options menu, there are two small arrows that Undo and Redo the actions, one
step at a time.
4-10 Color Handbook
Page 35

FreeFlow Print Server Adjusting Color
Points to Remember
• Remember you do not need to adjust your standard color flow settings on the Color
Management screen to fix individual jobs.
• Color Adjustment does not affect Spot Color, just RGB and CMYK color. If you are
attempting to adjust a color and it is not responding, it may be a Spot Color. You can run
Preflight to verify that it is a Spot Color, and then use the Spot Color editor to make
changes to it.
• To save a color adjustment, it must be in TRC format. However, you can create your color
adjustment using slide bars and then easily convert the adjustment to a TRC for saving.
Going Further
When attempting to adjust individual colors, it is useful to use the color wheel below to
determine which CMYK value to change to affect a given color. If you want to decrease the
intensity of a color, you can increase the intensity of the color opposite it – its complementary
color. For example, to decrease the intensity of blue, you would increase yellow. Conversely, to
increase the intensity of a color, you should decrease its complementary color.
Color Handbook 4-11
Page 36

Adjusting Color FreeFlow Print Server
Note that each color is made from the two colors adjacent to it. For example, Blue is made from
a combination of Cyan and Magenta. Red is made from a combination Yellow and Magenta. So
another way to change a color is to change its component colors. To make Red darker, you can
increase the amount of Yellow and Magenta. To make Red lighter, you can decrease the amount
of Yellow and Magenta.
4-12 Color Handbook
Page 37

FreeFlow Print Server Adjusting Color
Automatic Image Enhancement
Background
Along with Color Adjustments, Automatic Image Enhancement or AIE is another useful
function on your Image Quality tab for each queue. AIE will automatically analyze and enhance
your RGB and Grayscale images. Like the other color management functions, you can set AIE to
work on a queue, a selected job or a page within a job.
AIE has three main settings: Off, Normal, and Custom. When turned Off it is set to not work. In
Normal mode, AIE works to complete all checks, except Noise Reduction, and it then adjusts
images if needed. In general, Normal Mode provides the best default settings for the best photo
images.
In Custom mode, you select specific items for AIE to check and enhance. You have individual
settings for eight adjustments. These are the adjustments and their definitions:
Contrast refers to the visual distance between light and dark areas. If you select Contrast High
AIE ensures that the final image stretches out the levels of gray as much as possible to make
subtle detail visible without loosing detail in the highlights and shadows. Contrast Low delivers
an image with levels of gray close together, bringing both dark areas and light areas closer to
the midtones. In both cases, AIE determines exactly what adjustment, if any, is needed to
achieve your preferred appearance.
Saturation refers to the vividness or dullness of colors in an image. Saturation High delivers an
image with intense, vibrant colors and Saturation Low delivers an image with subdued colors.
Sharpness refers to the crisp appearance of an image. Sharpness High ensures that an image
has a sharp appearance while Sharpness Low produces an image with a softer appearance. AIE
Color Handbook 4-13
Page 38

Adjusting Color FreeFlow Print Server
may sharpen, blur or leave the image alone, depending on the characteristics of the original
image.
Exposure impacts the lightness or darkness of an image. This is a historical term from the
photography field, where exposing a film to more light results in a lighter image. Exposure High
indicates that you would like images to be lighter than is typical while Exposure Low indicates
that you would like the images to be darker than is typical.
Color Balance adjusts hue to achieve neutral white and grays. When Color Balance is turned On,
AIE determines if it is advantageous and safe to adjust the balance of colors in the image.
When Color Balance is Off, AIE will not adjust the hue of the images.
The Noise Reduction filter reduces grain or noise in an image resulting in a smoother
appearance. The noise filter is turned off by default, except for iGen printers. When this filter is
on, AIE determines if removing noise from an image is beneficial. When turned Off, noise will
not be removed from the image.
Shadow Detail lightens and increases contrast in shadow areas to make detail in those areas of
the image more visible. When turned on, enhancement of shadow detail will occur only if an
analysis of the image determines that it is advantageous and safe. Increasing shadow detail
might not be safe when enhancing a photo taken with a high ISO setting, resulting in high noise
levels in shadow areas. Also, it might not be safe when a photo is taken using a high camera
compression setting that results in rectangular artifacts being introduced by the camera
compression. AIE automatically checks for these conditions and adjusts the image if needed.
Red Eye Reduction locates and removes red retro-reflection from the pupils of human eyes. This
filter ensures that the image is analyzed to determine if removing red from a human being is
needed. The decision is made partially on the size of the eye. When red eye reduction is Off, AIE
will not check or remove red eye.
By turning on these settings, you are not directing AIE to make changes, but requesting the sort
of appearance you would like to have. AIE automatically determines if changes are needed, and
what changes to make.
AIE is especially useful for applications with images such as catalogs, yearbooks, photo
directories, newsletters, calendars and greeting cards. Since it works automatically, AIE can add
value without incurring the extra production time that is usually associated with traditional
photo manipulation.
Points to Remember
• AIE is especially useful for applications with images and photos such as catalogs,
yearbooks, photo directories, newsletters, calendars and greeting cards.
• Many customers don’t want photos adjusted, except for Red Eye Reduction, the most useful
setting. If you also find this the most useful of the eight, you can create a special queue to
handle photos and set AIE to Custom with only Red Eye Reduction enabled.
• Since AIE performs an analysis of every RGB image, processing time is longer when this
setting is used. You can create a special purpose queue for photo applications, and direct
selected jobs to it, to avoid affecting all jobs with longer processing.
4-14 Color Handbook
Page 39

FreeFlow Print Server Adjusting Color
Spot Color Editing
Background
Spot colors are specific named colors that are processed separately by the print server to help
ensure that the printed output color matches a physical standard reference color.
Spot colors are simulated in the printed output by mixing specific amounts of cyan (C),
magenta (M), yellow (Y), and black (K) process colors. The print server displays CMYK recipes for
spot colors in the Spot Color List window.
There is a Spot Color List onthe server, located under the Color menu, showing all standard
Pantone colors. The Spot Color List also shows any custom colors that have been added to the
server. For the server to be able to optimally match a document designer’s intent, the color
name must be in this list.
However, every spot color in a file has both a name and also an alternative color space
definition. The alternative color definition is usually CMYK, but it could be RGB. If FreeFlow®
Print Server does not find a Spot Color name in this list, the server will automatically use the
alternative color definition to process the color. Also, the server will use the standard color
settings for that color space. Since the alternative color definition is generic, it does not always
achieve the best color on your printer. To ensure that the best color gets printed for Spot Colors,
you may need to occasionally add a custom color to this list. You may also want to edit a color if
you are not satisfied with it.
For both adding new Spot Colors and editing existing ones, it is helpful to print a Swatch Book of
the Spot Color List. You can then compare the swatches to sample printed pages to identify a
color. Once you identify a color, you can use its formula to add a new color or to adjust its
balance to your color preference. To print the Swatch Book, you simply click the Print Swatch
Book button on the Spot Color screen.
Color Handbook 4-15
Page 40

Adjusting Color FreeFlow Print Server
The easiest way to identify Spot Color jobs is to Preflight the incoming job. This can be done at
the queue level — for all jobs entering a queue, or performed upon each job. Configuring a
queue-level Preflight is done on the Settings tab in the Preflight pane. For a single job, you rightclick the job and select Preflight > Setup. You simply check Spot Colors and Report as Error and a
preflight check will flag any job with named colors.
Spot color processing
When spot color processing is enabled, and a color recipe has been defined on the print server
with exactly the same name as the spot color defined in the file, the color is printed using the
CMYK color recipe on the print server. No source profile, rendering intent, destination profile, or
user TRC is applied to the spot color.
If no matching color name is found in the spot color list, or when spot color processing is
disabled, the spot color is rendered using an alternate color space (CMYK or RGB) defined in the
input file. Any source profile, rendering intent, destination profile, or user TRC applied to the rest
of the color path is also applied to the spot color.
In some cases you may wish to disable spot color processing. For example:
• If a job contains spot colors for text, graphics, and images you may wish to disable spot
color processing to avoid the text and graphic spot color looking different from the image
spot color.
• If a job contains spot color data adjacent to CMYK or RGB data that should match, you
may wish to disable spot color processing so that both are processed in the CMYK or RGB
color space.
PANTONE® colors
PANTONE® is one color reference system for spot colors. Recipes for printing PANTONE® spot
colors on coated and uncoated paper stocks are included in the Spot Color List.
4-16 Color Handbook
Page 41

FreeFlow Print Server Adjusting Color
If you edit a PANTONE® color, it retains the same name, but it is re-categorized as a custom
color. The original recipe for the PANTONE® color is always retained, and you can revert to the
original recipe and PANTONE® category at any time.
Limitations
There are many variables in process reproduction of colors generated by the FreeFlow® Print
Server, any one of which may affect the quality of the spot color simulation, including:
• type of paper used•effective final resolution
•dot structures and halftones
• non-Xerox toner or colorant
The FreeFlow® Print Server supports spot color simulation for text and graphics. It does not
support spot color processing for images.
About the Spot Color List window
The Spot Color List window organizes your PANTONE® and custom spot colors, and allows you
to create, modify, delete, and print spot colors.
You can access functions to manage spot colors by right-clicking any spot color, or by selecting a
color in the list and then using the buttons in the Spot Color List window.
If the spot color list has been updated with a halftone profile, you can remove profile updates
from the PANTONE® colors by selecting Defaults. If halftone profile updates have not been
applied to the spot color list, the Defaults button does not appear.
Color Handbook 4-17
Page 42

Adjusting Color FreeFlow Print Server
The Spot Color List control changes which spot color types are displayed in the list. The choices
are:
•All
•PANTONE Coated
•PANTONE Uncoated
• Custom - only colors that you created (New Color) or PANTONE® colors that you modified
(Modified Color) are displayed.
You can find a particular color in the list by typing part of its name in the Find Color field, then
selecting Find Next. Entries in the Find Color field are not case sensitive.
The list of spot colors can be sorted by clicking any of the labeled headings. The headings are:
• Custom Color (icon) - displays icons to indicate colors that you created (New Color) or
PANTONE® colors that you modified (Modified Color).
• Color Name - the name of the spot color.
• CMYK - the numerical values corresponding to the respective values of Cyan, Magenta,
Yellow, and Black for each spot color.
• Preview (unlabeled) - an approximation of each spot color.
About the Spot Color Editor window
The Spot Color Editor window allows you to select from an array of color variations to change
the cyan, magenta, yellow and black (C, M, Y, and K) values of a spot color recipe.
The center color in the diagram in the window shows the current spot color. Color variations are
arranged around the center color along a line for each process color. Along each line, each color
4-18 Color Handbook
Page 43

FreeFlow Print Server Adjusting Color
varies from its neighbor by the percentage selected in the Color Variations list. Medium (5%
increments) is the default selection. As you get closer to the desired color, you may wish to
adjust the color variation increments for finer control.
When you place the pointer over one of the colors, the C, M, Y, and K values of the color are
displayed and the Adjusted color swatch temporarily shows that color. When you click any color
that color becomes the new center color from which new color variations are generated.
When editing an existing color you can select Reset to change the Adjusted C, M, Y, and K
values back to the Original values.
By selecting Print Sample... you can print the adjusted spot color along with its variations to help
you match the printed output to your desired color. Selecting OK applies the adjustments to the
spot color without printing. Selecting Cancel closes the Spot Color Editor window without
applying any changes.
Points to Remember
• If you need to do a lot of Spot Color matching, you can set a queue to automatically run
Preflight for all jobs submitted to it. Remember to select the Spot Colors checkbox on
Preflight setup, so that all Spot Colors are identified for jobs and listed in the Preflight
report.
• After running Preview or printing a job, you can click View Report on the Job Properties
screen to see any Spot Colors that are not listed on the server. Unless these are added to
the server list, they will be processed with their alternative CMYK or RGB definitions in the
file.
• If you are having trouble matching Spot Colors to other colors on a page or within a
document, you can Disable Spot Color on the Spot Color tab on the Color Management
screen:
Color Handbook 4-19
Page 44

Adjusting Color FreeFlow Print Server
Disabling Spot Color instructs the server to use the alternative color definitions in a job file.
This will usually standardize the colors. If you do this, you should carefully review how all
Spot Colors in the printed document have been affected.
• When you edit a standard Pantone Spot Color to match a preferred look or a standard, the
color will remain changed for all jobs that call for that color. The Spot Color List is a system
resource, not an individual queue resource. This means that the modified color will be
applied to all jobs that call for it, no matter what queue they go through. Therefore, you
may need to periodically return modified Spot Colors to their original Pantone standard to
meet the requirements of new jobs.
4-20 Color Handbook
Page 45

Color Management
5
Workflows
What is Color Management?
Color Management is the process of matching color across different input and output devices
by referencing color reproduction standards using International Color Consortium (ICC) profiles.
Color Management tools are used to assist with matching color for printing. Color Management
tools can include hardware devices such as spectrophotometers and colorimeters, and software
such as color profiles, Tone Reproduction Curves (TRCs), and color space transformations.
Devices such as the spectrophotometer measure the printed output of a printer; this data is
then used to calibrate the printer and/or create appropriate TRCs which can adjust for any color
matching problems caused by the printer itself.
Color matching software is used to convert between device dependent RGB and CMYK color
spaces to a device independent color space in order to match colors by adjusting for differences
between device color gamuts.
For most jobs, the default color settings of the Color Management window provide optimal
quality and the optimal color output required.
Color Handbook 5-1
Page 46

Color Management Workflows FreeFlow Print Server
Use the Color Default settings
The Color Management Flow feature of the print server is designed to automatically use the
default color settings and options. While the color default settings will provide optimal color
output for the majority of jobs, the Custom Color Workflows section of this chapter describes
some custom workflows you can follow to fine tune the system and produce a particular color
output.
About Xerox color gamut
The Xerox press is a digital alternative to the offset press. The specifications developed by the
Graphic Communications Association (GRACoL) are used to ensure color consistency between
color design choices in the workflow of offset printing devices.
5-2 Color Handbook
Page 47

FreeFlow Print Server Color Management Workflows
Understanding the FreeFlow Color Paths
Jobs can take one of the following color image paths through the Xerox FreeFlow® Print Server:
• Device Link Emulation Path
• ICC Standard Path
The image path is the way in which a source profile becomes mapped to the destination profile
of the printer CMYK. The path used is determined by the source space selected.
Device Link Emulation Path
The system identifies a source profile, a destination profile, and a rendering intent to create one
device link profile. Device Link profiles provide increased color quality of prints by performing
more accurate color transformations, maintaining pure colors, and preserving black.
When a preinstalled source profile, destination profile, and rendering intent are selected, the
FreeFlow® Print Server uses a proprietary enhanced path look up table to translate the color
data that provides a faster RIP and preserves the K channel for CMYK source files. This path also
enables R=G=B to print as 100%K. This feature allows you to generate a direct color mapping
from the CMYK source to destination and create a custom 4x4 conversion or a direct color
mapping from RGB source to destination to create a custom 3x4 transformation.
If your file contains an embedded profile but the profile is not included on the DFE, the
standard ICC translation path will be used.
The CMYK or RGB source color
space defines the intended
destination device of each object
(e.g., sRGB monitor or GRACoL
offset press).
When possible, program the job to follow the Device Link Emulation image path, as it offers the
highest quality color outcome for incoming color.
The objects are then converted to
Direct CMYK through a 3x4 or 4x4
transformation. This conversion is
determined by the rendering intent
and Destination Profile selected.
Any color adjustments (TRCs) are
applied to the final color.
Color Handbook 5-3
Page 48

Color Management Workflows FreeFlow Print Server
ICC Standard Path
A job that contains an embedded source profile that is being honored but the profile cannot be
located by the press (either the profile is not loaded on the DFE or the profile setting is not
selected) will follow the ICC Standard image path.
Jobs that follow this path undergo a color transformation to an independent color space before
the color transformation to the Print Server CMYK space. Jobs originated in RGB or CMYK color
spaces are transformed using a translation table (ICC profile) into the Direct CMYK color space.
For CMYK incoming data, pure black is not preserved.
Note
L*a*b* objects are converted directly to Direct CMYK using the destination profiles through
the ICC path. No source space is used with L*a*b* objects.
The process followed when an object in the file is converted through the ICC standard path is:
The CMYK or RGB source color
space defines the intended
destination device of each object
(e.g., sRGB monitor or GRACoL
offset press).
Each object is converted to a
device independent profile
connection space (XYZ color
space on FreeFlow® Print
Server)
Note
If you have a file with an embedded source space that is not loaded on the DFE and would
like to use the Device Link Emulation image path, import an ICC profile to the DFE and then
select the profile as the source. To import a source file, refer to Importing a source profile.
Note
Workflows with tagged CMYK data on an
incoming file, or that use a loaded output
profile as a source CMYK profile, provide good
color matching to custom printers that are not
covered by the included source profiles.
The objects are then converted to Direct
CMYK using the destination profile. The
details of this conversion are determined
by the rendering intent and Destination
Profile selected.
Any color adjustments (TRCs) are applied
to the final color.
5-4 Color Handbook
Page 49

FreeFlow Print Server Color Management Workflows
Custom Color Workflows
While the default color settings of the Color Management feature on the print server provide
the color output needed for most jobs, the following are examples of color workflow situations
where specific color settings other than the defaults can be selected for the queue virtual printer
to produce a particular outcome.
Note
Make sure the press operator has run the Color Maintenance Tool and that it is up-to-date
for optimal color accuracy and the best color output results.
To select a workflow whose settings you want to adjust, open the Color Management window:
1. At the Queue Properties or Job Properties window, select the Image Quality tab.
2. Select the Color Management button from the Image Quality window. The window
displays a color data flow diagram in the top area of the window and the RGB, CMYK, Gray,
Spot and PDF/X color space options in the bottom area.
Color Handbook 5-5
Page 50

Color Management Workflows FreeFlow Print Server
The color data flow diagram represents
the flow or path color data will take when
processed by the system. The diagram
reflects the current state of the color space
settings.
Place the mouse cursor over this
area to display a tool tip that
describes what color data is being
applied at this point.
Each tab identifies the color space or mode
that represents a set of colors. The dialog
box contains the color space’s associated
options and settings.
The system’s built-in destination
files are listed under the
Destination Profile box which
converts and transforms the
source color space selected.
5-6 Color Handbook
Page 51

FreeFlow Print Server Color Management Workflows
CMYK Workflow
About the CMYK tab
The CMYK tab appears in the Color Management window. It can be accessed by selecting the
Color Management button on the Image Quality tab of Print From File, Saved Job, job, and
queue Properties dialogs.
The tab is divided into two areas: CMYK Color Space and CMYK Rendering Intent. Each area has
a checkbox that can be selected to use embedded profile or rendering information in the job or
cleared to ignore embedded information.
If the tab is viewed from a queue Properties dialog, one or two override icons are available at
the top of the tab. Click the override icon to lock (override) or unlock the settings in the tab.
When an override icon is locked the settings associated with the override take precedence over
what has been programmed in the job.
The CMYK Color Space area contains two menus: Images and Text / Graphics. The CMYK
Rendering Intent area contains three menus: Images, Text, and Graphics. These menus allow
separate adjustments to be made to allow the system to perform specific optimizations for
CMYK.
In the CMYK Color Space area, selecting Direct CMYK in both the Images and Text / Graphics
menus bypasses any Rendering Intent and Destination Profile settings.
Establishing your Default CMYK Standard
For incoming CMYK color, your default Source Profile may be set to SWOP or GRACoL. Changing
your Source Profile from this default, to another setting, lets you modify your CMYK color
standard to either match a local or regional standard or to just achieve the look you want for
richer or different color. After learning about the options, you may choose to leave this setting
at its default, but you should understand the options available.
SWOP is a standard in the printing industry, and stands for Specifications for Web Offset
Publications. SWOP is often a default because it is the dominate industry standard for CMYK
printing. SWOP provides a faithful rendition of the color because many source applications use
SWOP to create the color, such as Adobe InDesign®. If a document or graphic is created using
Adobe InDesign®, then by using the SWOP Source Profile, the same standard is used to
interpret the color data. This provides a faithful rendering of the colors.
Color Handbook 5-7
Page 52

Color Management Workflows FreeFlow Print Server
GRACoL is a newer standard for offset presses. GRACoL has the same color balance as SWOP
but also has a larger gamut of colors, and therefore provides richer color. GRACoL actually
allows you to use more of the capabilities of the Xerox printer.
What is standard for CMYK Source in one country may differ from the standard in another
country. For example ISO Coated v2 is a standard option that is popular in Europe. In Japan,
Japan Color is the standard. You will need to understand what standards are typically used in
your shop as well as your geographic region and market.
Once you understand the options, you do not have to use only one standard for the entire
system. Color management is set for each queue, so if you have want different settings for
different clients or applications, you can easily create and set different standards for individual
queues.
Along with changing your standard Source Profile, you may also want to try a different
Rendering for Images. The CMYK default for rendering is Relative Colorimetric. This option
maps any incoming colors that are outside the CMYK gamut to the closest mathematical value
within the printer’s gamut of colors. However, If an image has a range of dark shades of a color
that are all outside the printer’s gamut, all the shades could be mapped to a single point, and
the distinction in shading will be lost.
To maintain the distinction for darker shades, and preserve dark color and shadow details, you
might change to Perceptual for the Images setting. Perceptual maintains a relative value for
points that are outside the gamut, when they are redefined within the gamut.
You can achieve the richest colors for your particular Xerox printer using the Direct CMYK Source
Profile option for text and graphics. This setting is sometimes called “pass through mode”
because it instructs the server to perform no color conversion. This leaves the CMYK as it came
in, and prints the color as if the color were created for your printer. The result is to maximize the
color by fully using the color capability of the printer, without regard for a standard. So this
setting gives you the boldest color, but the resulting color will probably not match the color
output of other printers.
It’s important to remember that the system is designed to provide consistent results with your
color settings, so these settings should not be changed on a daily or weekly basis or changed for
individual jobs. These settings establish a standard that should be left in place to achieve a
consistent look and feel to your digital color output. After the standard is established, individual
jobs can be adjusted using the Color Adjustment and Spot Color functions on the server.
5-8 Color Handbook
Page 53

FreeFlow Print Server Color Management Workflows
Sample CMYK Workflows
Printing with your default CMYK Source Profile
1. Select [Queue Manager] from the Queue drop-down menu.
2. Double-click on the <server name>_Hold queue to open Queue Properties.
3. Select [Color Management] on the Image Quality tab.
4. On the Color Management screen, notice that the CMYK tab is open on the bottom of your
screen. Also, notice the default settings on the left of the tab, in the CMYK Color Space
column. The default may be either SWOP or GRACoL.
Note
Note which CMYK Source Profile your server is set to as a standard. Notice that there are
two settings, one for Images, and another for Text / Graphics. The left side of this tab is for
setting the CMYK Source Profile, while the right side of the tab is for setting color Rendering
Intent.
Color Handbook 5-9
Page 54

Color Management Workflows FreeFlow Print Server
5. Submit a job to the queue and print it using these default settings.
Changing your CMYK Rendering
“Rendering” means how your server manages any colors that have a definition outside the
CMYK gamut. There are two main options: Relative Colorimetric and Perceptual. Relative
Colorimetric is your CMYK Images default. This option maps any incoming colors that are
outside the printer CMYK gamut to the closest mathematical value within the printer gamut of
colors. However, if an image has a range of dark shades of a color that are all outside the printer
gamut, all the shades will be mapped to a single point, and the distinction in shading will be
lost. To maintain distinction for darker shades, and preserve dark color and shadow details, you
might change to Perceptual for the Images setting. Perceptual maintains a relative value for
points that are outside the gamut, when they are redefined within the gamut.
1. Select [Queue Manager] from the Queue drop-down menu.
2. Double-click on a queue to open Queue Properties.
3. Select [Color Management] on the Image Quality tab.
4. Change your default setting for Images, under CMYK Rendering Intent, from Relative
Colorimetric to Perceptual.
5-10 Color Handbook
Page 55

FreeFlow Print Server Color Management Workflows
5. Leave the CMYK Source Profile setting at the default value.
6. Print the job using the CMYK Rendering Intent setting of Perceptual for Images.
You won’t always see a difference, because the CMYK data is already in a compressed
gamut space. However, you may see that Perceptual better maintains the distinction for
darker shades, and preserves dark color and shadows. In general, your CMYK Rendering
Intent default provides the best results, and you don’t have to be concerned with changing
the setting.
Note
Note that because the Perceptual option compresses data, it can produce images that are
more flat, and less glossy. This can also be a reason for using this setting — to achieve a
less glossy look. Later in this course, you will see that the Perceptual setting is more
important for RGB color, because RGB color space has a greater number of color points that
need to be redefined into the printer’s gamut. Generally, you should leave the Rendering
settings for Text and Graphics at their default. Relative Colorimetric will not give the boldest
black for text rendering, but Pure or Saturation will. The selection of Pure (for Text) avoids
half-toning your text. This setting results in the printer using more solid ink coverage for a
bold look.
Using Direct CMYK to maximize color from your printer
You can achieve the richest colors for your particular Xerox printer using the Direct CMYK Source
Profile option for Text / Graphics. This setting is sometimes called “pass through mode” because
it instructs the server to perform no color conversion. This leaves the CMYK as it came in, and
prints the color as if the color were created for your printer. The result is to maximize the color
by fully using the color capability of the printer, without regard for a standard.
1. Select [Queue Manager] from the Queue drop-down menu.
2. Double-click on a queue to open Queue Properties.
3. Select [Color Management] on the Image Quality tab.
4. Select [Direct CMYK] for your CMYK Source Profile for Tex t / G ra ph ic s . Note that when you
use Direct CMYK, rendering is by-passed. You can see this on the flow chart when you select
this option.
Color Handbook 5-11
Page 56

Color Management Workflows FreeFlow Print Server
5. Print your job using Direct CMYK.
Note
It is recommended that you use Direct CMYK for text and graphics only. For Images, Direct
CMYK for may cause image distortion or blocking, or over saturation.
Note
Note that while Direct CMYK delivers the richest colors from your printer, these colors may
not match the color output from other presses. While you create a bold look with this
setting, you will sacrifice having a standard that matches color output between or among
presses.
Matching another press (CMYK)
There are two common ways to match another press:
• Matching an industry standard
• Matching a specific press
For both methods of matching, it is recommended to use a paper loaded in the paper tray
similar to the one the job is trying to match.
Setting up or creating a Press Matching queue
To match an industry standard press or a specific press, follow these steps:
1. Select the [CMYK] tab at the bottom of the Color Management window.
5-12 Color Handbook
Page 57

FreeFlow Print Server Color Management Workflows
2. If you want to match an industry standard press:
Select one of the following source spaces from the Color Space Images and Te x t/ G r a ph i c s
pull down menus on the DFE (or import the source space if it is not currently loaded on the
DFE. Refer to Importing a source profile):
• GRACoL matching - (default on North America systems) yields a very good match to
the GRACoL 2006 coated industry standard.
• FOGRA matching - select ISO Coated V2 to match the FOGRA industry standard.
• Japan matching - select Japan Coated 2001.
• SWOP Coated CMYK - select to match SWOP standards.
• US Sheetfed Coated CMYK - select to match this standard.
If you want to match a specific press:
Load the press’s manufacturer profile as a source or create a custom profile on the press
you would like to match. Use or create the profile on the paper type (or equivalent) to be
used.
Note
If the CMYK files are sent directly to the press to match without passing through any
emulations (i.e. the ICC path) or color adjustments at the RIP, the press's manufacturer
profile can be loaded onto the FreeFlow® Print Server and selected as a source. If the press
CMYK output has been customized to provide an appearance that does not conform to any
particular industry standard, create a custom profile on the press to match. The custom
destination profile on the other press will need to be made using a third party profiling tool
such as Monaco or Profile Maker. For information on how to load a source profile, refer to
Importing a source profile.
3. From the Rendering Intent Graphics pull down menu, select [Saturation]. Saturation maps
colors very accurately and looks very similar to Relative Colorimetric for CMYK except that
Saturation preserves 100%K. 100%K is mapped to 100%K which means that the job’s
100% blacks will not be halftoned when printed.
4. For the most uniform color between text, images and graphics, select [Saturation] from the
Text pull down.
5. From the Destination profile pull down, select [Use Stock Profile].
6. If your file contains RGB and CMYK elements, select the RGB tab to access the RGB
Emulation On/Off area and set RGB Emulation to [ON]. The system will process RGB
images through the CMYK color management path.
Color Handbook 5-13
Page 58

Color Management Workflows FreeFlow Print Server
Points to Remember
• You can set different standards for different queues. This lets you customize your
workflow by routing similar jobs to pre-defined queues by job type or by customer. For
example, if one of your customers prefers a traditional flat look, you may want to create a
special queue for that customer and set it to the SWOP standard. This could achieve the
color the customer prefers because it provides a faithful rendering from the color source.
Other queues could be set to GRACoL to achieve a rich color for all other customers.
• Set your standard so that you do not have to change it. It is recommended that you take
time to establish your standard settings so that you do not have to change them to fix
individual jobs. To adjust color for specific jobs, use the Color Adjustment function which is
available on the Image Quality tab for each job.
5-14 Color Handbook
Page 59

FreeFlow Print Server Color Management Workflows
RGB Workflow
About the RGB tab
The RGB tab appears in the Color Management window. It can be accessed by selecting the
Color Management button on the Image Quality tab of Print From File, Saved Job, job, and
queue Properties dialogs.
The tab is divided into two areas: RGB Color Space and RGB Rendering Intent. Each area has a
checkbox that can be selected to use embedded profile o rendering information in the job or
cleared to ignore embedded information.
If the tab is viewed from a queue Properties dialog, one or two override icons are available at
the top of the tab. Click the override icon to lock (override) or unlock the settings in the tab.
When an override icon is locked the settings associated with the override take precedence over
what has been programmed in the job.
The RGB Color Space area contains two menus: Images and Text / Graphics. The RGB Rendering
Intent area contains three menus: Images, Text, and Graphics. These menus allow separate
adjustments to be made to allow the system to perform specific optimizations for RGB.
The RGB Emulation area lets you control emulation processing. The default setting for RGB
Emulation is Off. When On, RGB processing follows the CMYK path, as reflected in the data flow
diagram. If you are trying to match an industry standard and your file contains RGB and CMYK
input, turn RGB emulation on so your RGB and CMYK elements will match. Also turn RGB
emulation on if you have a document that contains RGB and CMYK data and want all of the
data to match. The RGB data will get converted to CMYK via the CMYK color space chosen in
the CMYK tab. When RGB Emulation is set to On:
• The RGB Rendering Intent adjustments are unavailable since the RGB emulation is enabled
via the auto-generation of RGB-to-CMYK DeviceLink ICC profiles and image adjustment is
applied on the Lab color space.
• Some settings are unavailable in the Image Quality tab.
Source Profile and Rendering Options
The Source Profile default setting for RGB color is sRGB. This setting is the default because it is
used by most Microsoft® applications as well as digital cameras.
Generally offset printers have converted to CMYK color in prepress, so you don’t often see RGB
in offset environments. However, you will see RGB coming from jobs in the corporate world,
where Microsoft® applications are predominately used. You’ll also see RGB color coming in
various photo applications such as calendars, yearbooks and posters.
Your top four choices in the Source Profile menu are industry standards. These include Adobe
RGB, used by many photo professionals, as well as Apple RGB and Color Match RGB. As an
alternative to sRGB, you can use these other non-default options if you know that they match
the source of your color files or if you just prefer their look. XCC RGB is similar to sRGB, but more
flat. You can use this setting if you want to flatten out the look of your printing.
For RGB, the Rendering Intent defaults to Perceptual. Perceptual preserves a lot of the detail
when colors are compressed to the printer gamut. So you should keep the Perceptual default as
Color Handbook 5-15
Page 60

Color Management Workflows FreeFlow Print Server
the best rendering option. Note that FreeFlow Print Server’s Perceptual rendering for RGB is
specifically designed for pictorial printing and produces the best results for photos.
Using Embedded Profiles
Sometimes a source profile is defined in a job file. When a job file does have a built-in profile,
you can easily instruct the server to apply the built-in profile. To use an embedded profile, you
simply check the Use Embedded Profile box.
The use of embedded profiles are special cases and you will usually only use these settings only
when requested by customers or document creators.
Note that FreeFlow® Print Server uses Device Link technology. With this technology, a Device
Link is automatically created that provides a shortcut to go from source color space to output
color space. Device Link speeds up the print color processing. However, when embedded profiles
are used, a Device Link cannot be created, so processing will be slower. For CMKY, Device Link
“preserves K” or preserves the black channel.
Black can sometimes get muddied with other colors, and Device Link keeps your black color pure
for CMYK color, when an embedded profile is not used.
Sample RGB Workflows
Professional Photo workflows (RGB)
If a file contains RGB data, select the RGB workflow for the best professional photographic
results. The press will honor the embedded RGB profiles, matching the intent of the
photographer/designer. If there are no RGB embedded profiles in the file, the press defaults to
using sRGB.
If there are no embedded profiles in the file but the source space in which the photos were
created is known, import the source space and select it on the queue.
5-16 Color Handbook
Page 61

FreeFlow Print Server Color Management Workflows
Note
For more information on how to import source profiles, refer to Importing a source profile in
this chapter.
For uniform appearance between images, text and graphics, follow these steps:
1. From the Color Management window, select the [RGB] tab at the bottom.
2. From the Color Space Images and Te x t / Gr a p h ic s pull down lists, select the correct profile.
3. From the Rendering Intent Images and Text and Graphics pull down menus, select
[Perceptual] as the RGB profile source.
4. Select [Use Stock Profile] from the Destination Profile pull down list.
The selected RGB profile is applied to the RGB elements in the job.
Consumer Photo workflow (RGB)
For a job that contains lower quality images such as poor exposure, noise, or people with red eye
in the images, enable the Automatic Image Enhancement feature. This tool examines each
image and attempts to provide a preferred output.
To enable the AIE feature:
1. Open the queue associated with the file, or the Job Properties window, and select the
[Image Quality] tab.
2. Select the [Automatic Image Enhancement] button.
3. From the Automatic Image Enhancement pulldown list, select [Normal] for the best
outcome with most low quality images.
Note
If the Normal setting does not provide the needed results, select the Custom setting from
the Automatic Enhancement list.
4. Select the [Setup] button. The Custom Image Preferences dialog box displays.
5. Adjust the color controls and select [OK].
Color Handbook 5-17
Page 62

Color Management Workflows FreeFlow Print Server
Points to Remember
• The RGB default setting, sRGB, works well for all office applications and jobs containing
photos.
• The only reason to change from the sRGB default is to match the color intent of document
designers or creators, who may request a specific look. Popular options are Adobe RGB,
Apple RGB and Color Match RGB. You can set special purpose queues to these options for
quickly managing of jobs when they arrive at the server.
• When the designer or creator of a file embeds an RGB profile, you can select Use
Embedded Profile and by-pass the server’s Source Profile. However, processing with
embedded profiles will taker longer than using the server’s profile. Generally, it is better to
use the matching Source Profile on the server than to use the embedded profile. For
example, if a document is created with Color Match content and has an embedded profile,
processing will be faster through a queue set to use the Color Match Source Profile than
through a queue set to use the embedded Color Match profile.
• If a document has mixed color content from different sources that used embedded profiles,
you will need to use the embedded profile option. The color as defined in the embedded
profiles will directly match the original color intent, but a single Source Profile on the server
will not be able to match the multiple sources.
5-18 Color Handbook
Page 63

FreeFlow Print Server Color Management Workflows
Gray Color and Monochrome Workflows
About the Gray tab
The Gray tab appears in the Color Management window. It can be accessed by selecting the
Color Management button on the Image Quality tab of Print From File, Saved Job, job, and
queue Properties dialogs. The tab contains a single area, Gray Color Space. The area has a
checkbox that can be selected to use embedded profile or embedded rendering information in
the job or cleared to ignore embedded information.
If the tab is viewed from a queue Properties dialog, an override icon is available at the top of
the tab. Click the override icon to lock (override) or unlock the settings for the tab. When the
override icon is locked, the settings associated with the override take precedence over what has
been programmed in the job.
The Gray Color Space area contains two menus: Images and Text / Graphics. These menus allow
separate adjustments to be made to allow the system to perform specific optimization for Gray.
Printing Gray Color
When the color content of a file is defined as gray color space, then the file will print in
monochrome. The Gray tab on the Color Management screen lets you adjust the Source Profile
for Gray color.
Your settings on the Gray tab determine the contrast between black and white for the printing.
The Gamma 2.2 option produces more contrast than Gamma 1.8.
Generally, the default works best. However, you can change this setting to match another
monochrome printer or to match a personal preference that works for your images
Printing Gray in RGB, when R=G=B
RGB files have gray color defined in them when red, green and blue colors are set to be equal.
When this type of job is printed normally, you will be using color toners to produce the gray. You
Color Handbook 5-19
Page 64

Color Management Workflows FreeFlow Print Server
can set Rendering Intent to instruct the printer to use only black when R=G=B in a file. This will
save on the color toner and avoid click charges for color, when only gray is being produced.
Printing RGB and CMYK as Black and White
Occasionally, you will want to save on printing costs, by printing color jobs, or even selected
color pages, in Black and White. Printing files in monochrome that are defined in CMYK, RGB or
Spot color is different from printing in Gray color. With Gray color, the color definitions are in the
job file. However, with Black and White printing, you instruct the server to ignore any color
definitions in the file and print using only black color. The Gray tab on the Color Management
screen affects printing for only Gray color when it is defined in a file. To set Black and White
printing for a color file, you select Grayscale, under Color Mode, on the Queue Properties tab.
Sample Grayscale workflows
Grayscale-only files or images follow this workflow. The defaults should accommodate most
jobs. However, if the output does not look as expected, make sure the source selected is the one
in which the file was created.
The CMYK or K only values are passed directly
through the DFE with no color
transformations.
Any color adjustments (TRCs) are applied to
the final color.
5-20 Color Handbook
Page 65

FreeFlow Print Server Color Management Workflows
Using Gray Color Embedded Profiles
1. Select the Gray tab at the bottom of the Color Management window.
2. For best output, select the [Use Embedded Profile] checkbox.
3. If the profile is not embedded, from the Images and Tex t / G ra p h i c s pull down menus, select
the source profile in which the file was created.
4. For the Destination Profile, select [Use Stock Profile].
Printing with Gray Color settings
1. Select [Queue Manager] from the Queue drop-down menu.
2. Double-click on the queue to open Queue Properties.
3. Click the [Image Quality] tab.
4. Select [Color Management] on the Image Quality tab.
5. On the Color Management screen, click the [Gray] tab.
6. Under Images, select either Gamma 1.8 or Gamma 2.2. Gamma 2.2 produces more
contrast than Gamma 1.8
Color Handbook 5-21
Page 66

Color Management Workflows FreeFlow Print Server
Printing RGB Gray (R=B=G) using Black-Only
When gray is defined in an RGB file by using equal amounts of red, green and blue color, the
output for graphics and images will be visually gray. However, color toner is used to produce this
gray. You can set Rendering Intent to use only black ink to print this gray. This avoids using color
toner and the associated color click charges when printing RGB gray. Any color pages in the file
will print in color, and not be affected.
1. Select [Queue Manager] from the Queue drop-down menu.
2. Double-click on the queue to open Queue Properties.
3. Click the [Image Quality] tab.
4. Select [Color Management] on the Image Quality tab.
5. On the Color Management screen, click the [RGB] tab.
6. Select [Pure (for text)] for all Rendering Intent (Images, Text and Graphics)
Printing Color as Black and White
To save printing expense for large color jobs, you can set them to print in Black and White.
Whether the file is defined in CMYK, RGB or Spot color, or a combination of these, the job will
5-22 Color Handbook
Page 67

FreeFlow Print Server Color Management Workflows
print in monochrome. In this workflow example, we select pages of a color job to print in Black
and White, but leave the front and back pages in color as you might do to create an attractive
front and back cover.
1. Double-click on the job to open Job Properties.
2. Select the [Special Pages] tab.
3. Click the [Exception Page] icon.
4. Set a page range that includes all pages except the front and back covers. For example, for
a 12 page booklet select pages 2 – 11.
5. Set these pages to print in Black and White. This allows the front and back pages to be
printed in color.
Use the Color Mode drop-down menu to select [Grayscale] for printing in Black and White.
Note
Note that you can set the Color Mode to print in Black and White for a queue as well as for
an individual job.
Color Handbook 5-23
Page 68

Color Management Workflows FreeFlow Print Server
6. Release the job to print.
Points to Remember
• Use the Gray tab on the Color Management screen to adjust contrast for Grayscale
printing. Options on this tab only affect Gray color when the gray is defined in the job file.
• When an RGB file has gray defined with R=G=B, the output will be visually gray, but color
toner is used to print the file. To use black-only toner, set all Rendering to Pure.
• Gamma 2.2 option produces more contrast than Gamma 1.8.
• Use the Color Mode setting on the Image Quality tab to set Black and White printing for a
job defined with RGB, CMYK or Spot color.
Spot Color Workflow
About the Spot tab
The Spot tab appears in the color Management window. It can be accessed by selecting the
Color Management button on the Image Quality tab of Print From File, Saved Job, job, and
queue Properties dialogs.
If the tab is viewed from a queue Properties dialog, one or two override icons are available at
the top of the tab. Click the override icon to lock (override) or unlock the settings in the tab.
When an override icon is locked the settings associated with the override take precedence over
what has been programmed in the job.
5-24 Color Handbook
Page 69

FreeFlow Print Server Color Management Workflows
Spot Color Processing can be Enabled or Disabled. When the color path is disabled, the
alternative color space is used instead of the spot colors. The Print Server honors all PANTONE®
and spot colors that are defined in the spot color table. The spot colors in PostScript and PDF
files can be specified by the PostScript setcustomcolor operators as well as the separation and
DeviceN color operators. The alternative color spaces get utilized in case the spot color is not
found in the spot color table.
As an example of why this feature can be valuable, consider the following scenario: you may
want to print a document that contains spot color text, graphics, and images. When you view
the document on screen, the spot color data is honored. When the document is printed,
however, the colors can look very different from what was seen on screen. The Print Server does
not support spot color processing for images. You might prefer to disable spot color processing
and eliminate this problem.
An additional example is if you have spot color objects and CMYK objects next to each other
and they are supposed to match. If you disable spot color processing the spot color data will go
through the CMYK path and the objects will look the same.
Sample Spot Color workflows
By default, Spot Color Processing is enabled. Using this path, the spot color will not be processed
through color management. For a spot color to follow the Spot Color path, the name in the file
needs to be identical to the name on the DFE. If the spot color is not printing correctly, check
that the name of the color is accurate. If the name is incorrect, change the name in the source
file or PDF.
If you need the spot color to follow the alternate CMYK color path because your file contains
other types of data and you want a uniform appearance, disable Spot Color Processing:
1. From the Color Management window, select the [Spot] tab at the bottom of the window.
2. Select [Disabled].
Printing the Spot Color Swatch Book
You can print the Spot Color Swatch Book. Once printed, you can hold this book of PANTONE®
colors next to printed documents to visually identify Spot Colors for matching or editing on the
server. You can also pass the Swatch Book to document designers in your pre-press
Color Handbook 5-25
Page 70

Color Management Workflows FreeFlow Print Server
environment. With this book, designers can better match their spot color design to the spot
colors produced on your printer.
1. Set your queue to print on 8.5 x 11 inch (A4) coated paper as a default. If you want more
than one copy of the Swatch Book, you should set the default Quantity to the number you
want.
2. From the Color drop-down menu, select [Spot Color List] or click the [Spot Color] shortcut
if it is set on your display.
3. At the bottom of the Spot Color List that opens, click the [Print Swatch Book] button.
4. Select your queue and under Typ e, select [PANTONE® Coated].
5-26 Color Handbook
Page 71

FreeFlow Print Server Color Management Workflows
5. When the book completes printing, collect this reference document and review its content.
Note
Notice that the Swatch Book provides a color sample of each color in the Spot Color List.
Once you identify a color using the Swatch Book, you can go to the Spot Color List to find
the CMYK formula for the color.
Using Preflight to identify Spot Colors
When working with a document to adjust color, you need to know which color in the document
is Spot Color. The Preflight function provides a useful report that identifies standard
PANTONE® Spot Color as well as any custom Spot Color. Once you identify a Spot Color, you
can use the editor to adjust its look. You can also add any custom color to the server’s Spot Color
List. A custom color must be in the Spot Color List for you to be able to adjust the color
independently from the rest of the page. Preflight can be set to run for all jobs entering a queue,
or for individual jobs.
1. Submit a job to a queue set to hold jobs.
2. Right-click on the job in the Held By Queue area and select [Preflight > Setup].
Color Handbook 5-27
Page 72

Color Management Workflows FreeFlow Print Server
3. Check the [Spot Colors] box to request that Preflight identifies Spot Colors.
Note
Note that you can request that Spot Color be reported as an error as well. When you
request that it be reported as an error, a warning icon (yellow triangle) will show in the
Preflight status area on the job information line. In addition, you can make a selection to
hold jobs with reported errors or allow then to be processed.
5-28 Color Handbook
Page 73

FreeFlow Print Server Color Management Workflows
4. Right-click on the job again and select [Preflight > Preflight].
When Preflight is complete, a checkmark appears in the Preflight Status area of the job
information:
5. Right-click on the job once again and select [Preflight > View Report].
Note
Notice that there is a summary of the Spot Colors at the front of the report. In this
example, the summary below shows that 51 instances of Spot Colors were identified on 9
pages.
Color Handbook 5-29
Page 74

Color Management Workflows FreeFlow Print Server
Note
A detailed listing of the Spot Colors found on each page follows the summary. Note that
standard Spot Colors have “PANTONE” in the name, while custom named Spot Colors will
have a name assigned by the designer, without “PANTONE” in it. In this example, on page 1
of the document, you can see the custom Spot Color named “rich black”. Page 3 has a
number of standard Spot Colors.
6. Click [Print Report] on the bottom of the window. This provides you with a hard copy of
this information for later use in working with the color.
Using View Report to identify missing Spot Colors
When a job is printed and there are Spot Colors in the file that are not listed on the server, the
job will have a status of Completed with Warnings. When you see this status, you can view the
error report for the job to identify the name and location of any missing colors. If you want to
check for possible missing colors prior to printing, you can run Preview, which will RIP the file
and generate a report of any colors not listed on the server.
1. Right-click a job in the Held By Queue area and select [Preview].
2. When Preview opens, close it and double-click on the job to open Job Properties.
3. Click [View Report] on the upper right of the screen.
5-30 Color Handbook
Page 75

FreeFlow Print Server Color Management Workflows
4. Note the names of any missing Spot Colors in the job file. In this example, “rich black” is
listed as not supported.
Adding a custom color to the server’s Spot Color List
Add a custom Spot Color to the server. If the server’s list does not have a particular custom color
in it, that color will still print, but it will print using a CMYK formula embedded in the file. This
formula can often deliver an acceptable look, but it may not match the document designer’s
intent. If you want to exactly match the intended look of a custom Spot Color, you must add its
Color Handbook 5-31
Page 76

Color Management Workflows FreeFlow Print Server
name and formula to the Spot Color List. An exact match is often important when printing
company logos and other unique colors that are associated with an organization’s identity.
1. From the Color drop-down menu, select [Spot Color List] or click the [Spot Color] shortcut
if it displays on your server.
The Spot Color List opens.
2. Before you add a new custom Spot Color, check to make sure it is not already listed on the
server. In this example, “rich black” color is identified in the job. Enter “rich black” in the
Find Color field and click Find Next to verify that rich black is not currently listed as a Spot
Color on the server. If the color is already listed, you will not need to add it.
3. On the Spot Color screen, click [New Color].
The Spot Color Editor opens.
5-32 Color Handbook
Page 77

FreeFlow Print Server Color Management Workflows
4. In the Color Name field, enter the exact name of the color as shown on the Preflight report.
In this example, “rich black” is the Color Name. In order for the server to find and process
the color, the name in the job file must exactly match the name in the server list. Your
Prefight report will always identify the correct name in the file.
Color Handbook 5-33
Page 78

Color Management Workflows FreeFlow Print Server
Note
The next step is to add the CMYK formula for the new custom color. There are two ways to
obtain the formula:
a. You can ask the designer or creator of the color for the custom CMYK formula.
b. You can obtain an accurate printed sample of the color and try to match it to a
standard PANTONE® color using your Swatch Book. This will give you a starting point
that you can use to begin to edit the color to match.
5. For this example, assume that you contact the creator of the color and he tells you the
formula for rich black is: C = 0; M = 0; Y=0; and K = 100.
6. Enter these values in the Adjusted area.
5-34 Color Handbook
Page 79

FreeFlow Print Server Color Management Workflows
7. Click [OK] to save the color and add it to the Spot Color List. Any job that uses this custom
color will now use the formula from the list. This new custom color will not be affected by
other color balance or TRC adjustments.
8. Now search for your color to verify that it was added to the server. Select [Custom] on the
first drop-down menu at the top of the Spot Color List. You should see rich black in the list.
Adjusting a color on the server’s Spot Color List
You can adjust both regular PANTONE® Spot Colors and custom Spot Colors if you need to
better match a standard or to achieve a preferred look. The Spot Color Editor shows you the
original color in the center of a wheel, and lets you select different variations of this color by
selecting options around the center.
In this sample workflow, we assume that the Spot Color PANTONE® 279 C is used throughout a
product brochure, and your customer wants to better match this Spot Color to their logo. A
sample of the logo color is shown below. First, select the Spot Color and then match it to the
logo standard.
1. From the Color drop-down menu, select [Spot Color List] or click the [Spot Color] shortcut
if it displays on your server.
The Spot Color List opens.
Color Handbook 5-35
Page 80

Color Management Workflows FreeFlow Print Server
2. Search for PANTONE 279 C.
a. Select [PANTONE® Coated] in the Spot Color List field at the top of your screen.
b. Enter PANTONE 279 C in the Find Color field.
c. Click [Find Next].
3. With PANTONE 270 C selected, click [Edit Color]. The Spot Color Editor opens.
5-36 Color Handbook
Page 81

FreeFlow Print Server Color Management Workflows
4. Compare the sample logo color shown below to the PANTONE 279 C color wheel, and click
the closest match.
Note
The editor’s ring or wheel provides a point-and-click method for adjusting color. The current
color is in the center position of the wheel, and is surrounded by 16 color variations. The
variations are placed in concentric rings around the center color, and organized by 4 vectors
(one each for C,M,Y and K). Each vector has 2 steps with more of the particular process
color, and 2 variations with less of the process color.
Color Handbook 5-37
Page 82

Color Management Workflows FreeFlow Print Server
Note
When you select a color match by clicking one of the circles around the center, the selected
color immediately moves to the center and new options are displayed around the newly
selected color. You can continue to refine the selection by selecting closer and closer
matches.
5. If you would like to see finer or coarser variations in the color options shown on the wheel,
select a different increment in the Color Variations drop-down menu. You can select Super
Fine, Fine, Medium or Course for the variation in color between the smaller circles as they
move away from the center. Try this now to become familiar with the settings.
Note
Note that when you hover your mouse pointer over a color circle, its CMYK values appear in
a tool tip. In addition, hovering over a circle causes its color to temporarily populate the
Adjusted color swatch. This gives you a side-by-side comparison of the original color and
the adjusted color, without having to commit to clicking on a circle.
6. Continue to click the color options in the surrounding circles and adjust the color variations
to finer if needed. When you think you have the best match, click [Print Sample] to print
your last best match. The printout shows your last best match in the center of the wheel
with the last set of surrounding options.
7. Hold the printout next to the sample of color that you want to match to visually compare
them for further adjustments. The print is labeled for matching the Spot Color Selector
screen and also has convenient numbers in the circles that match the screen.
5-38 Color Handbook
Page 83

FreeFlow Print Server Color Management Workflows
8. If you want to select a new color circle based on the printout, you can use the numbers on
the printout to locate the correct circle on your edit screen and click it, or enter the number
in the Best Match field.
9. If you want to continue to refine the color, you can continue to edit, by clicking [Edit Color]
and print another sample by clicking [Print Sample].
10. Click [Done Editing] when you are done editing and have found the best match. This closes
the Spot Color Selector window and returns you to the Spot Color List.
11. The edited color now displays under Custom colors, with the new formula that you selected.
The icon on the left of the line indicates that this color has been modified. Search now for
the modified color to view it in the list.
Color Handbook 5-39
Page 84

Color Management Workflows FreeFlow Print Server
12. To change a modified Spot Color back to its original PANTONE® standard, you right-click
the custom color in the list and select [Revert]. This returns the color to its original formula
and removes it from the Custom area of the list.
5-40 Color Handbook
Page 85

FreeFlow Print Server Color Management Workflows
Advanced Color Matching
Laying a Foundation for Color Matching
Often, a common goal for color management is standardizing color across all presses in a shop.
If this is your goal, you should use the Relative Colorimetric option for all Rendering on all
presses that you want to match. You should set Relative Colorimetric for all types of content:
Images, Text and Graphics. This setting ensures that your color output from a Xerox printer will
match your other presses.
Keep in mind that you will be sacrificing some richness in color output to achieve the
consistency across presses. For example, with Text set to Pure, the text output will be a richer,
deeper black, compared to using Relative Colorimetric. However, with Relative Colorimetric, the
text color you create will match from all presses using this setting.
So the foundation step in establishing color matching is to set a common Relative Colorimetric
rendering on all presses that you want to match. Remember that these color flow settings are
made on each queue, so you can also have other queues set to achieve other color
management objectives. Beyond this foundation step, you can achieve advanced color
matching using profiling software.
Advanced Color Matching using Profiling Software
To advance to the next level of color matching, you can use software to profile another press
and then load that profile onto FreeFlow® Print Server. This enables your Xerox system to
match the color of an offset press or another printer.
Third-party software is required to create a profile of another device, for example X-Rite
Monaco Profiler® or a similar package. A target is run on the other press and then read by the
software to create a profile. The profile is then loaded onto FreeFlow® Print Server as a Source
Profile and you provide it with a name. Once loaded, the profile name shows up as a CMYK
Color Space option on the color management menus – for both Images and Text/Graphics.
Generally you will want to set the profile on a selected queue, so that all jobs coming to the
queue will be printed with the same color as the other profiled press.
Color Handbook 5-41
Page 86

Color Management Workflows FreeFlow Print Server
Standardizing Color to Match Prepress Color Management
If your company performs color management upstream in the production process, you will not
need to adjust color settings at the server. For example, if you use a prepress color management
system such as ORIS, files can arrive at the print server with color fully defined for your printer.
When this prepress color work has already been done for your printer, you should use Direct
CMYK for both Images and Text/Graphics.
Direct CMYK passes the CMYK through the server with no color conversion. This leaves the
CMYK as it came in, and prints the color as if the color were created for this printer.
5-42 Color Handbook
Page 87

FreeFlow Print Server Color Management Workflows
Sample Color Matching Workflows
This sample workflow describes how to print a document using default settings on two or more
presses. We then set the color to match between the presses using the same CMYK Color Space
Settings and Relative Colorimetric Rendering Intent.
Using the same CMYK Source and Relative Colorimetric
1. Print a job on your Xerox printer using a color flow default queue.
2. Print the same color job on one or more other presses, also using the color defaults.
3. Mark your output as “default settings” and critique the color matching between the
presses.
4. Double-click on the queue used to open Queue Properties.
5. Select [Color Management] on the Image Quality tab.
6. On the Color Management screen, select [Relative Colorimetric] for CMYK Rendering
Intent for Images and Tex t / G ra ph ics .
7. Also set Relative Colorimetric on the other color press(es) that you used in Step 2 above.
8. Select the same Source Profile for all presses.
9. Print the same document again with these new settings on all printers.
10. Mark the output as “Relative Colorimetric” and critique the color matching between the
presses.
11. The color output should more closely match with Relative Colorimetric as your rendering
intent.
Using profiling software
This sample workflow loads the profile of another press onto the server, and selects the loaded
profile as a Source Profile to match the color of the another press. The sample assumes that 3rd
party software is used to create the profile of another press.
Color Handbook 5-43
Page 88

Color Management Workflows FreeFlow Print Server
1. Load the CD or Removable Disk containing the profile into the drive on FreeFlow® Print
Server.
2. From the Color drop-down menu, select [Color Profiles]:
3. From the Profile drop-down menu, select [Add].
4. From the Look In drop-down menu, select the CD or Removable Disk.
5. Double click the profile file name to select it in the Files area on the right.
6. Select the [Add as Source Profile] radio button.
Note
The name that you assign to this profile will appear in the drop-down menus for Source
Profiles under CMYK Color Space on the Color Management screen.
7. Enter a Profile Name for this profile you are adding.
Note
For this example, the profile name is “MyProfile”.
8. On the Image Quality tab for the queue you are using, click the [Color Management]
button.
9. On the Color Management screen, select [Relative Colorimetric] for CMYK Rendering
Intent for Images and Te x t / Grap h ic s . This lays the foundation for color matching, and
should be done for all presses that you want to match.
10. Using the Source Profile drop-down menus, under CMYK Color Space, select the name of
the profile that you just loaded and named.
11. Submit the same color job to both the profiled press and the queue on FreeFlow® Print
Server that you set to use the new profile.
5-44 Color Handbook
Page 89

FreeFlow Print Server Color Management Workflows
12. Retrieve the printed jobs from both presses and critique the color matching between them.
There should be a very close match in color output.
Note
To obtain the best color with this type of workflow, you will need to print a set of targets on
your Xerox printer and then measure these targets on you color management system. This
procedure aligns the two systems so that the color intent, as defined up-stream in pre-press,
will best match the color output at the printer.
Setting the server to use prepress color definitions
Color management can be handled entirely in the pre-press process, using a color management
system such as CGS Oris™. If you have jobs that are going through a color management process
prior to arriving at the server, you can set a queue to bypass color management on the server.
To do this, you use Direct CMYK as a Source Profile setting. Direct CMYK is called “pass through
mode” because it instructs the server to perform no color conversion. With this mode, the printer
simply prints the color as it is defined in the incoming job file.
1. Print a sample color image or document directly on your printer using your regular default
settings.
2. Open the Color Management screen on the queue on the server.
Note
Notice that the CMYK color flow, shown at the top of your screen, changes as you select
Direct CMYK. The arrows, indicating the flow, now by-pass Rendering and Destination
Profile. When you use Direct CMYK, the settings for CMYK Rendering Intent and
Destination Profile are not used.
3. Select [Direct CMYK] for your CMYK Source Profile for both Images and Tex t / G rap h ics .
Color Handbook 5-45
Page 90

Color Management Workflows FreeFlow Print Server
4. If you have a pre-press color management system, submit a color profiling target from this
system.
5. Collect the printed targets and measure them on your color management system to
produce a Destination Profile of your printer.
6. After profiling your Xerox press for the color management system, pass the sample color
image or document through the color management system and submit it to the queue set
for Direct CMYK on the Xerox printer. Compare the new print to the first print, prior to
profiling.
Points to Remember
• Often print shops have different sensitivity to color matching. For some companies, color
matching is critical because of the need to mix work between digital printers and offset
presses or the need to shift applications from one press to another. Other companies are
satisfied with their current level of color matching, and do not need to use advanced
techniques. You should analyze your workflow to determine the importance of color
matching in your environment and then define the queues and color management settings
that best meet your needs.
• Note that you can set FreeFlow® Print Server to match RGB color as well. When you set
RGB Emulation for a queue or a job, you will be processing RGB color data through your
CMYK profiles. When the Emulation is set on, this accomplishes a consistent look for all RGB
jobs. You set RGB Emulation on the RGB tab on the Color Management screen:
5-46 Color Handbook
Page 91

FreeFlow Print Server Color Management Workflows
Color Workflow considerations
Before selecting a color workflow for the job, consider whether your job will require a source
profile to be imported onto the DFE as well as when to apply RGB emulation. In this section you
will learn:
• How to load a source profile onto the DFE for the job’s best color output
• How and when to enable or disable RGB Emulation from the Color Management window.
When to apply RGB Emulation
Use RGB emulation if you have a mixed document (both RGB and CMYK data) and want to
have all the objects match each other or to match a specific industry standard or another press.
All of the images are converted to the correct CMYK profile and have the same appearance.
1. To enable RGB emulation, open the Queue or Job Properties window.
2. To enable RGB emulation, open the Queue or Job Properties window.
3. Select [Image quality > Color Management] and the [RGB] tab.
4. Select RGB Emulation [ON]. The system will process and emulate RGB images as CMYK.
When enabled, the settings are locked.
5. Select [Use Stock Profile] from the Destination Profile list.
The RGB values in the file are
converted through the selected
RGB Source to the selected
CMYK source using the Device
Link Emulation Path.
These CMYK values are then converted
through the selected destination CMYK
and rendering intent, again using the
Device Link Emulation Path.
Any color adjustments (TRCs) are
applied to the final color.
Color Handbook 5-47
Page 92

Color Management Workflows FreeFlow Print Server
Importing a source profile
If the file requires a profile but the file is not embedded with a profile, and the profile is not
loaded on the system, follow these steps to add a new source profile onto the print server.
Adding ICC Profiles to the DFE
1. From the FreeFlow application window, select the Color menu and select [Color Profiles >
Profile > Add].
2. Select the new profile from the Profile list and select the Load button. The profile’s property
window displays.
3. In the Add Profile Properties window, select [Add as Source Profile] from the top portion of
the window.
4. In the Profile Name field, enter the profile name. Select [OK]. The profile is imported into
the system where it will now display in the Color Profiles list.
5. To use the profile in your job, open the Queue Manager or Job Properties window.
6. Locate your queue, select the [Image Quality] tab and select the [Color Management]
button.
7. At the bottom of the Color Management window, select the tab that corresponds to the
type of profile imported (for example, CMYK or RGB).
8. Select the profile from the Images and Te x t/ G r a ph i c s pull down menu.
9. Select [OK] to save the changes.
5-48 Color Handbook
Page 93

Other Image Quality
6
Considerations
Image Interpolation “Smart” Selection
Every computer, screen or printer needs to take images and interpret the pixels and lay them on
a page or screen. The FreeFlow® Print Server has a very unique feature called “smart”
interpolation. When selected, this allows you to resample an incoming image to render the
image better than what normally would otherwise be possible.
Color Handbook 6-1
Page 94

Other Image Quality Considerations FreeFlow Print Server
Key uses
Low Resolution Images
A very low resolution image (72dpi) will often show “blocky” look when printed. FreeFlow Smart
Interpolation evaluates this low resolution image and uses an intelligent algorithm to make the
low resolution look much better to the eye.
Very High Resolution Images
A high resolution (4800dpi) may create so small a level of detail that the original looks flawed
when printed. For example, inspection of a 4800 dpi violin string, may show that the string
becomes too small due to the high resolution. FreeFlow “Smart” interpolation will adjust for this
design mistake and the violin string will look thicker.
Smart Interpolation
A method used to scale image data (pixels) from one resolution to another. This interpolation
method automatically chooses between bi-linear interpolation and filtered interpolation based
on the input image characteristics (namely, image size, print resolution, scale factor, etc.). Smart
interpolation is the highest quality interpolation available on FreeFlow® Print Server.
6-2 Color Handbook
Page 95

FreeFlow Print Server Other Image Quality Considerations
Trapping
When two objects with different colors are placed adjacent or atop of each other, an effect
called haloing can appear around the object where a white or light-colored outline is visible
around the objects. Trapping eliminates these halos by introducing an intermediate color
between the objects. Trapping can be enabled to trap overlapping text and graphics objects, or
text/graphics/image objects overlapping image objects.
Trapping is a well-established in the commercial printing market and can be performed in a
number of different places in the workflow. Documents can be trapped in creation applications
(Adobe Illustrator), page layout packages (Quark Xpress), and standalone trapping packages, all
available for use at a PC or MacIntosh. These packages all output a print file which has trapping
objects embedded in the file.
However, since trapping is a correction that depends on the characteristics of the marking
process (i.e. the printer), it is a good practice done as close to the marking process as possible.
That said, it is often easier to manage at the desktop
FreeFlow® Print Server trapping uses a Xerox patented technology that accounts the type of
printer being used and human visual perception.
Color Handbook 6-3
Page 96

Other Image Quality Considerations FreeFlow Print Server
Anti-aliasing
Anti-aliasing is a method for reducing the jagged appearance (caused by rasterization) of
curves and diagonal lines. To adjust for this design problem, imaging will be performed at a
higher resolution than that of the FreeFlow® Print Server followed by sub-sampling to printer
resolution. In the case of black lines, this operation results in the replacement of some pixels
with gray. The result is a curve or line that looks smooth since the grays and blacks are
integrated by the human visual system.
6-4 Color Handbook
Page 97

FreeFlow Print Server Other Image Quality Considerations
PDF/X
About PDF/X
PDF/X is a subset of PDF that has been designed to allow for reliable interchange of prepress
data. There are two types of PDF/X jobs that can be submitted:
• PDF/X-1a jobs must have all fonts embedded and all color objects must be either spot color
or CMYK
• PDF/X-3 jobs accept attached calibrated RGB colors and ICC source profiles.
For the print server to process PDF/X files, the source colors in the file must be in the DeviceRGB
or DeviceCMYK color space, or in the ICC-based color space with an RGB variant. Colors in other
spaces will not have the Output Intent profile applied to them.
In a PDF/X-1a or PDF/X-3 file, the Output Intent profile is used to specify the printed ICC profile
that was used to prepare the file. If the file was prepared using a profile for another printer or
some industry standard CMYK color space like SWOP Coated CMYK, that profile will then be
applied before the destination printer profile for the Xerox printer is applied. If Disable RGB
emulation for PDF/X jobs is not selected, then RGB colors will also have the Output Intent profile
applied.
PDF/X processing can be enabled or disabled for a queue or a job.
Accepting and using PDF/X files
Using PDF/X files helps to ensure jobs are high-quality, print-ready files. When validating and
proofing a PDF/X job before transmission, you will also discover other quality issues, such as low
resolution images.
When files are sent to you, preflight the files to ensure they are:
• Compliant with the appropriate version of PDF/X
• Created with the correct characterized printing conditions
• Trim and bleed are correct for the job
• Resolution of images is correct
Creating a PDF/X file
The default PDF/X settings in color management prepare a PDF/X file for SWOP standards
(printing on coated stock through a web offset press). If you are preparing a file to print
through a different press workflow, you must create a custom PDF/X settings file.
How to create a PDF/X file in Adobe Acrobat 8 Pro®
Color Handbook 6-5
Page 98

Other Image Quality Considerations FreeFlow Print Server
In Adobe Acrobat, use the Preflight Tool or the Save dialog box to convert a PDF file to a PDF/X.
1. Select [File: Export].
2. From the Convert to PDF/X dialog box, select the [PDF/X-1a] option.
3. If Trapping is used on colors contained in the file, set Trapping to [True]. Otherwise, set to
[False].
4. Set the output condition to the recommended printing standard.
5. If the file can not be saved as PDF/X, an error message displays informing you to use the
Preflight Tool.
6. Open the PDF file and select [Advanced: Preflight].
7. Select [Options: convert to current PDF to PDF/X] or click on the Convert Current PDF to
PDF/X button at the bottom of the dialog.
How to create a PDF/X file in other Adobe® applications
You can save or export a PF/X file in InDesign®, Illustrator® or Photoshop®.
1. From InDesign®, select [File: Export] and [Format: Adobe PDF].
From Illustrator®, select [File: Save As] and [Format: Adobe PDF].
From Photoshop®, select [File: Save As] and [Format: Photoshop PDF].
2. Name the file and specify the location.
3. Select [Save]. In InDesign®, the Export Adobe PDF dialog box opens and in Photoshop®
and Illustrator®, the Save Adobe PDF dialog box displays.
4. Select a PDF/X preset file from the Adobe PDF Preset menu.
5. Select [Save PDF].
About the PDF/X tab
The PDF/X tab is in the color Management window. It can be accessed by selecting the Color
Management button on the Image Quality tab of Print From File, Saved Job, job, and queue
Properties dialogs.
If the tab is viewed from a queue Properties dialog, one or two override icons are available at
the top of the tab. Click the override icon to lock (override) or unlock the settings in the tab.
When an override icon is locked the settings associated with the override take precedence over
what has been programmed in the job.
PDF/X processing can be enabled by selecting Process as PDF/X. When enabled, the Output
Intent profile specified in a PDF/X job will be applied. Some settings on the CMYK and RGB tabs
will be ignored as they are incompatible with PDF/X. PDF jobs that are not PDF/X compliant will
print normally using the color settings specified in the Color Management window.
If Disable RGB Emulation for PDF/X Jobs is selected, the Destination Profile will only be applied
to Device CMYK colors.
The Queue Mode must be set to normal to enable PDF/X support. When the Queue Mode is set
to Grayscale, Xerox Consistent Color, or the native device color option, the PDF/X controls are
automatically cleared and are not available.
6-6 Color Handbook
Page 99

FreeFlow Print Server Other Image Quality Considerations
Commercial Offset workflow (PDF/X)
The Commercial Offset workflow is used for commercial print jobs. Work intended for output on
digital presses relies on receiving robust digital content files to print. PDF/X is an application
standard and file format designed to provide reliable pre-press data exchange.
The FreeFlow® Print Server supports the PDF/X-1a (CMYK color spaces only) standards. Select
and use the PDF/X workflow when you have a file that is PDF/X compliant. Make sure that your
pre-press workflow (including Trapping, Imposition and RIPping) is PDF/X compliant for both
proofing and final print.
Since creating a valid PDF/X file requires certain settings, always confirm the PDF presets and
preflight profiles required for the job.
Perform a Preflight and Preview of the PDF/X file for final print
Once you have a PDF/X file, you can use the Preflight and Preview features to verify that the file
is ready for printing.
In InDesign or Acrobat, check the status of fonts and images, and preview color separations,
transparency flattener effects and overprinting on the screen. If preflighting shows that there is
a transparency the PDF/X format cannot support, flatten the transparency in Acrobat 8.
If the PDF/X file contains an embedded ICC color profile, a proof may be generated using that
profile as the emulation target. This provides a representation of what the customer produced
in the proof they created immediately before sending the job to you.
For files created in InDesign®, Illustrator® or Photoshop®:
• Verify that all fonts used in the job are available on the system. All fonts must be
embedded.
• Check that links to images are current.
• Update links to high resolution images for best results when flattening transparencies.
• For PDF/X-1a files, ensure that all images are in CMYK or spot colors.
• Specify the standard minimum image resolution allowed for the final output device.
• Check that the Bleed and Trim values, and other page specifications, are correct.
PDF/X limitations and considerations
Limitations
• The output intent profile must be present in the DestOutputProfile key or the job will fault.
• The OutputContentIdentifier entry in the OutputIntent dictionary must be present and
must have a value that can be used as a filename or the output intent profile will not be
applied.
• Source colors in the PDF/X file must be in one of the following color spaces:
•DeviceRGB
•DeviceCMYK
• ICCBased with an RGB variant
• DeviceN or Separation if the components are a subset of C, M, Y, and K
Color Handbook 6-7
Page 100

Other Image Quality Considerations FreeFlow Print Server
Other considerations
• RGB emulation is automatically enabled. It can be disabled by selecting Disable RGB
Emulation for PDF/X Jobs in the PDF/X tab of the Color Management window.
• Color space profiles are treated differently for RGB and CMYK:
• For colors in the DeviceRGB color space, color space profiles selected under the RGB tab
are applied.
• For colors in the DeviceCMYK color space, color space profiles selected under the CMYK
tab are ignored; the output intent profile replaces it.
• Rendering intents for both RGB and CMYK are ignored for PDF/X.
• For RGB, the Use Embedded Profile check box is ignored if an ICCBased 3-component RGB
profile is embedded.
• For CMYK, the Use Embedded Profile check box is honored. An embedded ICCBased profile
and output intent profile cannot both be used. If the checkbox is checked, the 4component ICCBased profile is applied. If the check box is cleared, the output intent profile
is applied.
6-8 Color Handbook
 Loading...