

Xerox AltaLink B8045, AltaLink B8055, AltaLink B8065, AltaLink B8075, AltaLink B8090 CONFIGURATION GUIDE
Page 1

Version 3.0
December 2020
702P08579
Xerox
®
AltaLink
®
Series Smart Card
Installation and Configuration Guide
Page 2

©2020 Xerox Corporation. All rights reserved. Xerox®, Xerox and Design®, AltaLink®, WorkCentre®, FreeFlow®, SMARTsend®,
Scan to PC Desktop
Interface Platform
®
, MeterAssistant®, SuppliesAssistant®, Xerox Secure Access Unified ID System®, Xerox Extensible
®
, Global Print Driver®, and Mobile Express Driver®are trademarks of Xerox Corporation in the United
States and/or other countries.
®
Adobe
, Adobe PDF logo, Adobe®Reader®, Adobe®Type Manager®, ATM™, Flash®, Macromedia®, Photoshop®, and
PostScript
Apple
OS
HP-GL
®
are trademarks or registered trademarks of Adobe Systems, Inc.
®
, Bonjour®, EtherTalk™, TrueType®, iPad®, iPhone®, iPod®, iPod touch®, AirPrint®and the AirPrint Logo®, Mac®, Mac
®
, and Macintosh®are trademarks or registered trademarks of Apple Inc. in the U.S. and other countries.
®
, HP-UX®, and PCL®are registered trademarks of Hewlett-Packard Corporation in the United States and/or other
countries.
Microsoft
®
, Windows Vista®, Windows®, Windows Server®, and OneDrive®are registered trademarks of Microsoft
Corporation in the United States and other countries.
Wi-Fi CERTIFIED Wi-Fi Direct
®
is a trademark of the Wi-Fi Alliance.
Page 3

Table of Contents
1 Introduction...............................................................................................................................5
Introduction .............. ..... ..... ...................... ..... ...................... ..... ..... ...................... ..... ..... ......... 6
Supported Printers ................. ..... ...................... ..... ..... ...................... ..... ..... ................. ..... . 6
Minimum Software Levels . ..... ...................... ..... ..... ..... ............ ..... ..... ..... ..... ............ ..... ..... . 6
Smart Card Feature Overview .......... ..... ..... ..... ................. ..... ..... ...................... ..... .................... 7
Authentication... ..... ..... ................. ..... ..... ..... ................. ..... ..... ..... ................. ..... ..... ........... 7
Hold All Jobs ... ..... ..... ............ ..... ..... ..... ................. ..... ..... ..... ...................... ..... ................... 7
Email Signing and Encryption........ ..... ..... ..... ................. ..... ..... ..... ................. ..... ..... ........... 7
Supported Card Readers... ...................... ..... ..... ................. ..... ..... ..... ................. ..... ..... ..... .. 8
Supported Card Types.... ..... ...................... ..... ..... ................. ..... ..... ..... ................. ..... ..... .... 8
Documentation and Support.. ..... ...................... ..... ..... ...................... ..... ...................... ..... ..... .. 9
2 Preparation...............................................................................................................................11
Preparation Overview ..... ..... ..... ..... ................. ..... ..... ..... ................. ..... ..... ...................... ..... ... 12
Configuration Checklist . ..... ................. ..... ..... ...................... ..... ...................... ..... ..... .............. 13
3 Installation...............................................................................................................................15
Installation Overview ............... ..... ..... ..... ................. ..... ..... ..... ................. ..... ..... ..... ............... 16
Hardware Installation ... ..... ................. ..... ..... ...................... ..... ........................... ..... .............. 17
Connect the USB Smart Card Reader to the Printer . ..... ...................... ..... ...................... ... 17
Software Configuration....... ..... ..... ................. ..... ..... ..... ................. ..... ..... ..... ................. ..... ... 20
Accessing Administration and Configuration Settings.... ..... ..... ...................... ..... .............. 20
Enter the Smart Card Enablement Key ..... ..... ..... ..... ................. ..... ..... ...................... ..... ... 20
Configuring the Smart Card ........ ..... ..... ..... ..... ............ ..... ..... ..... ...................... ..... ................. 23
Configure Smart Card Authentication ....................... ..... ...................... ..... ..... ................. . 23
Enable NTP Service . ..... ...................... ..... ..... ...................... ..... ..... ................. ..... ..... ..... .... 25
Configure Alternate Authentication ..... ..... ................. ..... ..... ..... ................. ..... ..... ..... ....... 26
Certificate Validation ..... ..... ..... ..... ..... ............ ..... ..... ..... ................. ..... ..... ..... ................... 28
Configure Transport Layer Security (TLS)...... ..... ..... ..... ............ ..... ..... ..... ..... ............ ..... .... 32
Configure Certificate Validation.. ..... ..... ................. ..... ..... ...................... ..... ..................... 33
Configure Smart Card Inactivity Timer.. ................. ..... ..... ..... ................. ..... ..... ................ 35
Configure Acquiring Logged-In Email Addresses for Users . ..... ..... ...................... ..... .......... 36
Printing Features................ ..... ..... ...................... ..... ..... ..... ............ ..... ..... ..... ................. ..... .... 54
Configure Hold All Jobs ................. ..... ..... ...................... ..... ........................... ..... .............. 54
Configure Secure Print Driver Defaults.......................... ..... ...................... ..... ..... ............... 55
Configure the Print Driver..... ..... ...................... ..... ...................... ..... ..... ...................... ..... . 57
Confirm the Installation.. ..... ...................... ..... ...................... ..... ..... ...................... ..... ..... ....... 60
Using the Smart Card........ ..... ........................... ..... ...................... ..... ..... ................. ..... ..... ..... 61
4 Troubleshooting......................................................................................................................63
Xerox®AltaLink®Series Smart Card
Installation and Configuration Guide
3
Page 4

Table of Contents
Troubleshooting.................... ..... ...................... ..... ...................... ..... ..... ..... ............ ..... ..... ..... . 64
Fault Clearance ........................... ..... ...................... ..... ..... ................. ..... ..... ..... ................. ..... 65
Locating the Serial Number. ..... ..... ..... ............ ..... ..... ..... ..... ............ ..... ..... ..... ................... 65
Troubleshooting Tips... ..... ..... ................. ..... ..... ..... ................. ..... ..... ..... ................. ..... ..... ...... 66
During Installation... ..... ..... ..... ................. ..... ..... ...................... ..... ...................... ..... ..... ... 66
After Installation ............... ..... ..... ...................... ..... ........................... ..... ...................... ... 66
4
Xerox®AltaLink®Series Smart Card
Installation and Configuration Guide
Page 5

1
Introduction
This chapter contains:
• Introduction ................. ..... ..... ...................... ..... ...................... ..... ..... ...................... ..... ..... ..... ..... 6
• Smart Card Feature Overview . ................. ..... ..... ...................... ..... ...................... ..... ..... ................ 7
• Documentation and Support ..... ..... ........................... ........................... ..... ..... ................. ..... ..... ... 9
Xerox®AltaLink®Series Smart Card
Installation and Configuration Guide
5
Page 6
Introduction
Introduction
The Smart Card solution brings an advanced level of security to sensitive information. Organizations
can restrict access to the walk-up features of a Xerox
®
multifunction printer. This practice ensures that
only authorized users are able to print, copy, scan, email, and fax information.
After validation, you are logged in to the Xerox
®
printer for all walk-up features. For added security,
the functions are tracked.
This guide explains how to install and configure the Smart Card solution. The guide identifies the
resources and equipment required for a successful installation.
Note: Depending on the printer model and software version you are using, the configuration
instructions can vary.
For more information, contact your local Xerox Representative.
SSuuppppoorrtteedd PPrriinntteerrss
• Xerox®AltaLink®Series B8045/8055/8065/8075/8090 Multifunction Printers
• Xerox
• Xerox
• Xerox
• Xerox
®
AltaLink®Series C8030/8035/8045/8055/8070 Multifunction Printers
®
WorkCentre®EC7856/7836 Multifunction Printers
®
AltaLink®B8145/B8155/B8170 Multifunction Printers
®
AltaLink®C8130/C8135/C8145/C8155/C8170 Multifunction Printers
MMiinniimmuumm SSooffttwwaarree LLeevveellss
Printer Minimum Printer Software Version
Xerox®AltaLink®B8045/8055/8065/8075/8090
Multifunction Printer
®
Xerox
Multifunction Printer
Xerox
Multifunction Printer
Xerox
C8170 Multifunction Printer
Xerox
Printer
AltaLink®C8030/8035/8045/8055/8070
®
AltaLink®B8145/B8155/B8170
®
AltaLink®C8130/C8135/C8145/C8155/
®
WorkCentre®EC7856/7836 Multifunction
To identify the software version on your printer, at the control panel, touch Device, then touch About.
The software version number appears.
100.008.037.03831
100.xxx.037.03830
105.xxx.009.34422
105.xxx.009.34422
073.xxx.167.17200
6
Xerox®AltaLink®Series Smart Card
Installation and Configuration Guide
Page 7

Introduction
Smart Card Feature Overview
AAuutthheennttiiccaattiioonn
Xerox offers the Smart Card authentication feature. This authentication enables users who possess
smart cards to use the card for network authentication at the multifunction printer. Smart cards
contain user identity certificates and public and private keys. This certificate enables the
multifunction printer to perform a Kerberos authentication to the Windows active domain controller
that issued the identity certificate.
The Smart Card feature was developed to support smart cards and has been extended to support PIV,
CAC, Gemalto IDPrime MD, and other smart cards. This document describes the configuration
settings for these smart cards.
The multifunction printer determines automatically which type of smart card is inserted in the card
reader. The multifunction printer uses the appropriate software libraries to communicate with the
specific card. Authentication settings are configured on the multifunction printer, according to the
network infrastructure.
HHoolldd AAllll JJoobbss
The Xerox Hold All Jobs feature ensures that jobs are held securely at the multifunction printer. Jobs are available for release only after you authenticate at the printer. The printer holds the jobs for a specified time until they are released. It is not necessary to enter a Secure Print PIN to use this feature.
To use the Hold All Jobs feature, configure the print driver to pull the user name alias from the Smart
Card certificate or Windows operating system. Refer to Configure the Print Driver.
This feature provides the following benefits:
• Banner Pages are not required to separate jobs, which reduces waste.
• You can manage your held jobs more efficiently. You can select only the jobs that you want to
print, and delete older versions of documents that you no longer want to print.
• Confidential jobs are held in the queue for the owner to release them, rather than the documents
waiting in the output tray to be picked up.
EEmmaaiill SSiiggnniinngg aanndd EEnnccrryyppttiioonn
With Smart Card authentication, the multifunction printer has full access to the public and private
keys of the user. The printer can use these keys to sign and encrypt emails.
You can sign an email payload through the Smart Card with your private key. This action enables
other users to validate the signature with your public key, which they can obtain from you or from
LDAP. This validation assures the recipient that the content is original and was not compromised in
transit.
You can encrypt an email payload with your public key through the Smart Card or LDAP, then send
the encrypted email to the user. This option offers the benefit that, while in transit through the
infrastructure, no one can decipher the contents of the email. After the email is in your Inbox, you
can decrypt the email with your private key, making the payload readable again.
®
Xerox
Installation and Configuration Guide
AltaLink®Series Smart Card
7
Page 8

Introduction
SSuuppppoorrtteedd CCaarrdd RReeaaddeerrss
The customer is responsible for providing a card reader for each Xerox®multifunction printer. Most
Chip Card Interface Device (CCID)-compliant card readers can be used, but not all card readers are
validated. It is recommended that you use the Indentive SCR3310 v2.0 smart card reader.
SSuuppppoorrtteedd CCaarrdd TTyyppeess
Customers are responsible for purchasing and configuring the access cards. The following card types
are supported:
• CAC
• PIV
• Gemalto IDPrime MD
Other card types function with the Smart Card solution, but they are not validated.
8
Xerox®AltaLink®Series Smart Card
Installation and Configuration Guide
Page 9

Introduction
Documentation and Support
For information about your Xerox®multifunction printer, the following resources are available:
• A System Administrator Guide provides detailed instructions and information about connecting
your printer to the network and installing optional features. This guide is intended for system
administrators.
• A User Guide provides detailed information about all the features and functions on your printer.
This guide is intended for general users.
Most answers to your questions are provided by the support documentation supplied for your printer.
Alternatively, you can contact Xerox Technical Support or access the Xerox website at www.xerox.com.
®
Xerox
Installation and Configuration Guide
AltaLink®Series Smart Card
9
Page 10

Introduction
10
Xerox®AltaLink®Series Smart Card
Installation and Configuration Guide
Page 11

2
Preparation
This chapter contains:
• Preparation Overview ........ ..... ..... ..... ................. ..... ..... ..... ................. ..... ..... ...................... ..... .... 12
• Configuration Checklist ..... ..... ..... ...................... ..... ..... ...................... ..... ...................... ..... ..... .... 13
Xerox®AltaLink®Series Smart Card
Installation and Configuration Guide
11
Page 12

Preparation
Preparation Overview
This section explains the preparation and resources required to install the Smart Card feature.
12
Xerox®AltaLink®Series Smart Card
Installation and Configuration Guide
Page 13
Configuration Checklist
The following items are required to complete the installation:
Preparation
Summary
1. Obtain the IP address or host name for each applicable Windows domain controller.
2. If domain controller certificate validation is required, obtain the certificate for each
applicable domain controller, including all intermediate certificates up to the root certificate.
Note: Typically, this procedure is required only for the Smart Card solution.
3. If Online Certificate Status Protocol (OCSP) is available, obtain the IP address or host name
for the OCSP server.
4. If a software upgrade is required, obtain and install the required software release.
5. Mount the Smart Card Reader to the multifunction printer, then connect the USB cable to
one of the rear ports. Refer to Connect the USB Smart Card Reader to the Multifunction
Printer.
6. Install the Smart Card software feature enablement key. Refer to Enter the Smart Card
Enablement Key.
7. Configure Smart Card authentication, the optional NTP, and the optional Alternate Control
Panel Login. Refer to Configuring the Smart Card.
Status
8. Install any required certificates, then configure the validation settings. Refer to Configure a
Security Certificate.
9. Configure the multifunction printer LDAP settings. Refer to Configure Acquiring Logged-In
User's Email Address.
10. Configure the multifunction printer SMTP email, signing and encryption settings. Refer to
Configure SMTP (Email) Settings.
11. Configure the Hold All Jobs and Secure Print policies, if necessary. Refer to Printing
Features.
Xerox®AltaLink®Series Smart Card
Installation and Configuration Guide
13
Page 14

Preparation
14
Xerox®AltaLink®Series Smart Card
Installation and Configuration Guide
Page 15

3
Installation
This chapter contains:
• Installation Overview . ..... ................. ..... ..... ..... ................. ..... ..... ...................... ..... ..................... 16
• Hardware Installation . ..... ..... ................. ..... ..... ...................... ..... ........................... ..... ............... 17
• Software Configuration.......... ..... ..... ................. ..... ..... ..... ..... ............ ..... ..... ..... ................. ..... .... 20
• Configuring the Smart Card .. ..... ............ ..... ..... ..... ..... ................. ..... ..... ...................... ..... .......... 23
• Printing Features.. ................. ..... ..... ..... ................. ..... ..... ..... ................. ..... ..... ...................... ..... 54
• Confirm the Installation ..... ..... ...................... ..... ...................... ..... ..... ...................... ..... ..... ..... ... 60
• Using the Smart Card................ ........................... ..... ...................... ..... ..... ..... ............ ..... ..... ..... . 61
Xerox®AltaLink®Series Smart Card
Installation and Configuration Guide
15
Page 16

Installation
Installation Overview
This section provides instructions for installing and configuring the Smart Card solution.
There are four main installation procedures to follow in the sequence given:
1. Hardware Installation: Unpack the Smart Card Enablement kit, then install the card reader device.
2. Enabling the Smart Card: To enable the Smart Card for configuration, use the feature enable key.
3. Configuring the Smart Card: Enable the Smart Card function, then customize the settings.
4. Using the Smart Card: For instructions on how to use the card reader to access the printer
functions, refer to Using the Smart Card.
Note: Depending on the printer model and software version you are using, the configuration
instructions can vary.
16
Xerox®AltaLink®Series Smart Card
Installation and Configuration Guide
Page 17
Installation
Hardware Installation
CCoonnnneecctt tthhee UUSSBB SSmmaarrtt CCaarrdd RReeaaddeerr ttoo tthhee PPrriinntteerr
To install the card reader:
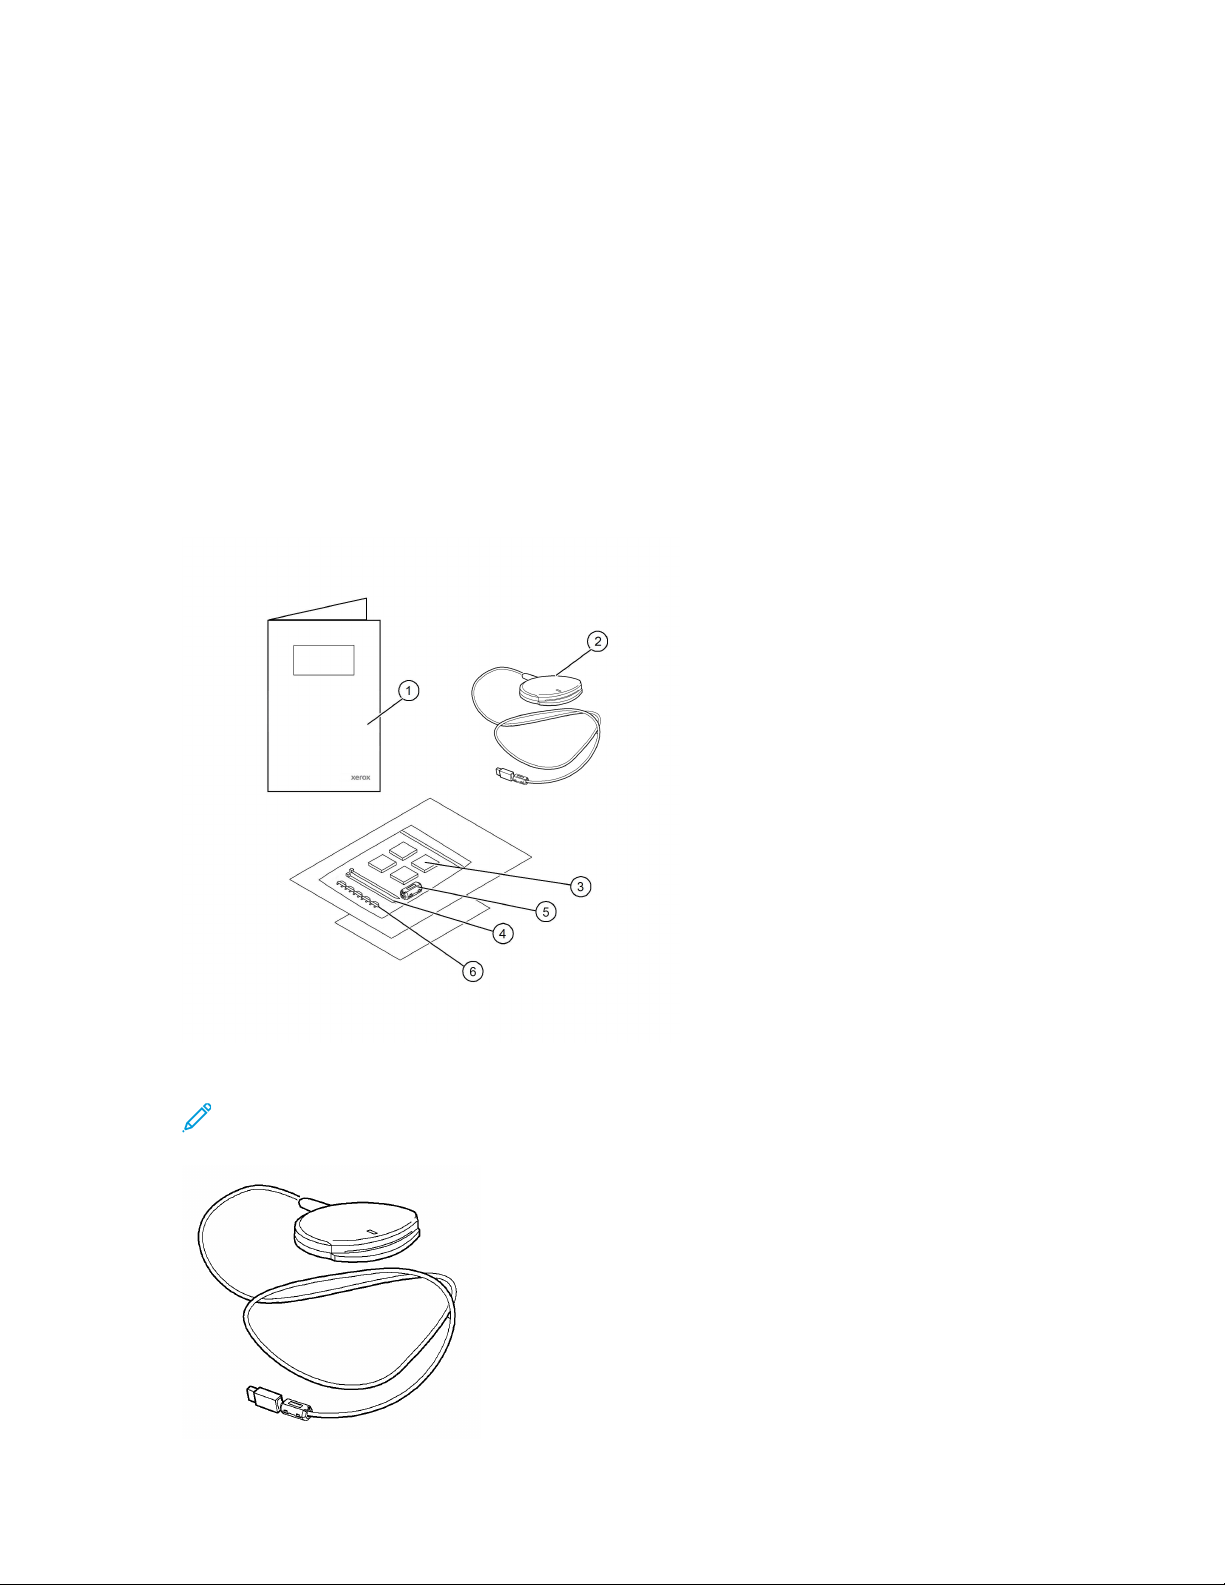
1. Unpack the Xerox
• Xerox
• Card Reader SCR3310v2
• Four Velcro
• Two cable ties
• One ferrite bead
• Five cable clamps
Before you install the hardware, ensure that you have read the license agreement and agree to
the terms and conditions.
®
Smart Card Enablement Guide (CAC/PIV)
®
Smart Card Enablement Kit (CAC/PIV). The kit contains the following items:
®
dual-lock fastener pads
2. Locate the card reader device, then install and configure the device.
Note: The system administrator configures the cards before the card reader is installed on
the printer.
Xerox®AltaLink®Series Smart Card
Installation and Configuration Guide
17
Page 18
Installation
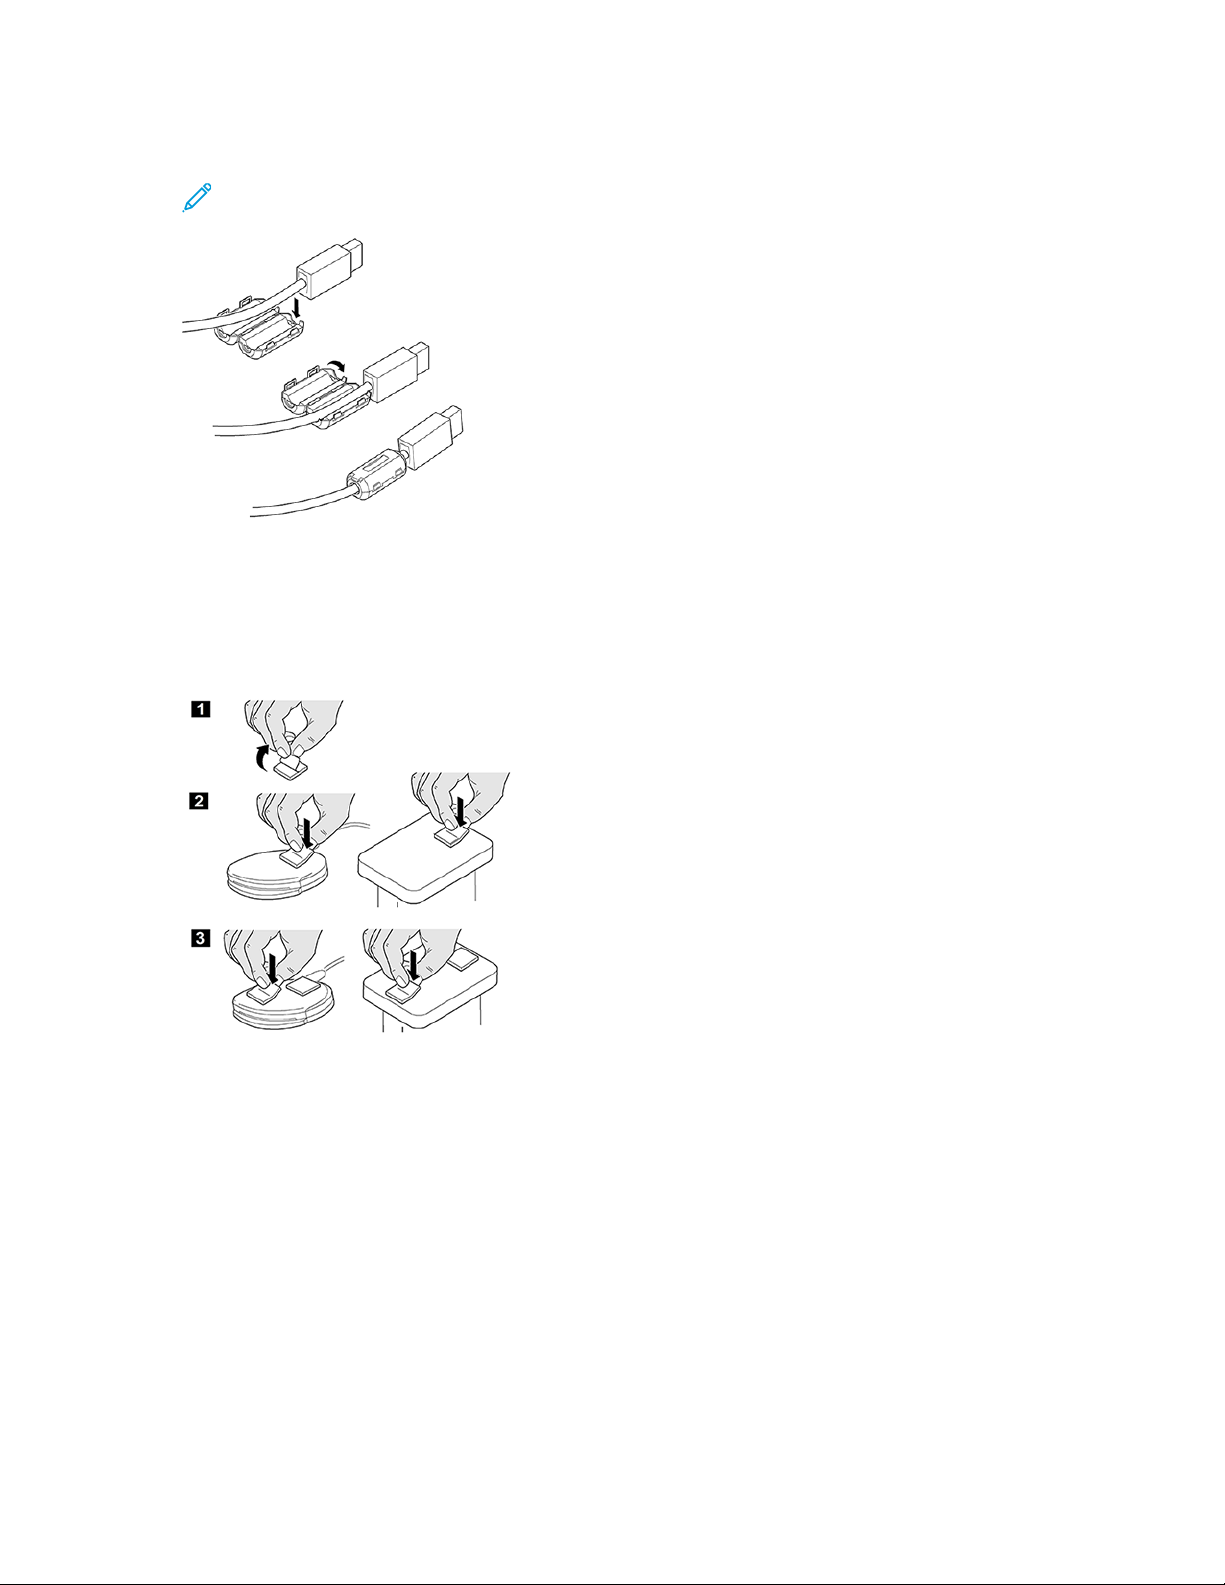
3. Attach the ferrite bead to the reader cable.
Note: Clip the ferrite bead onto the cable that is behind the connector.
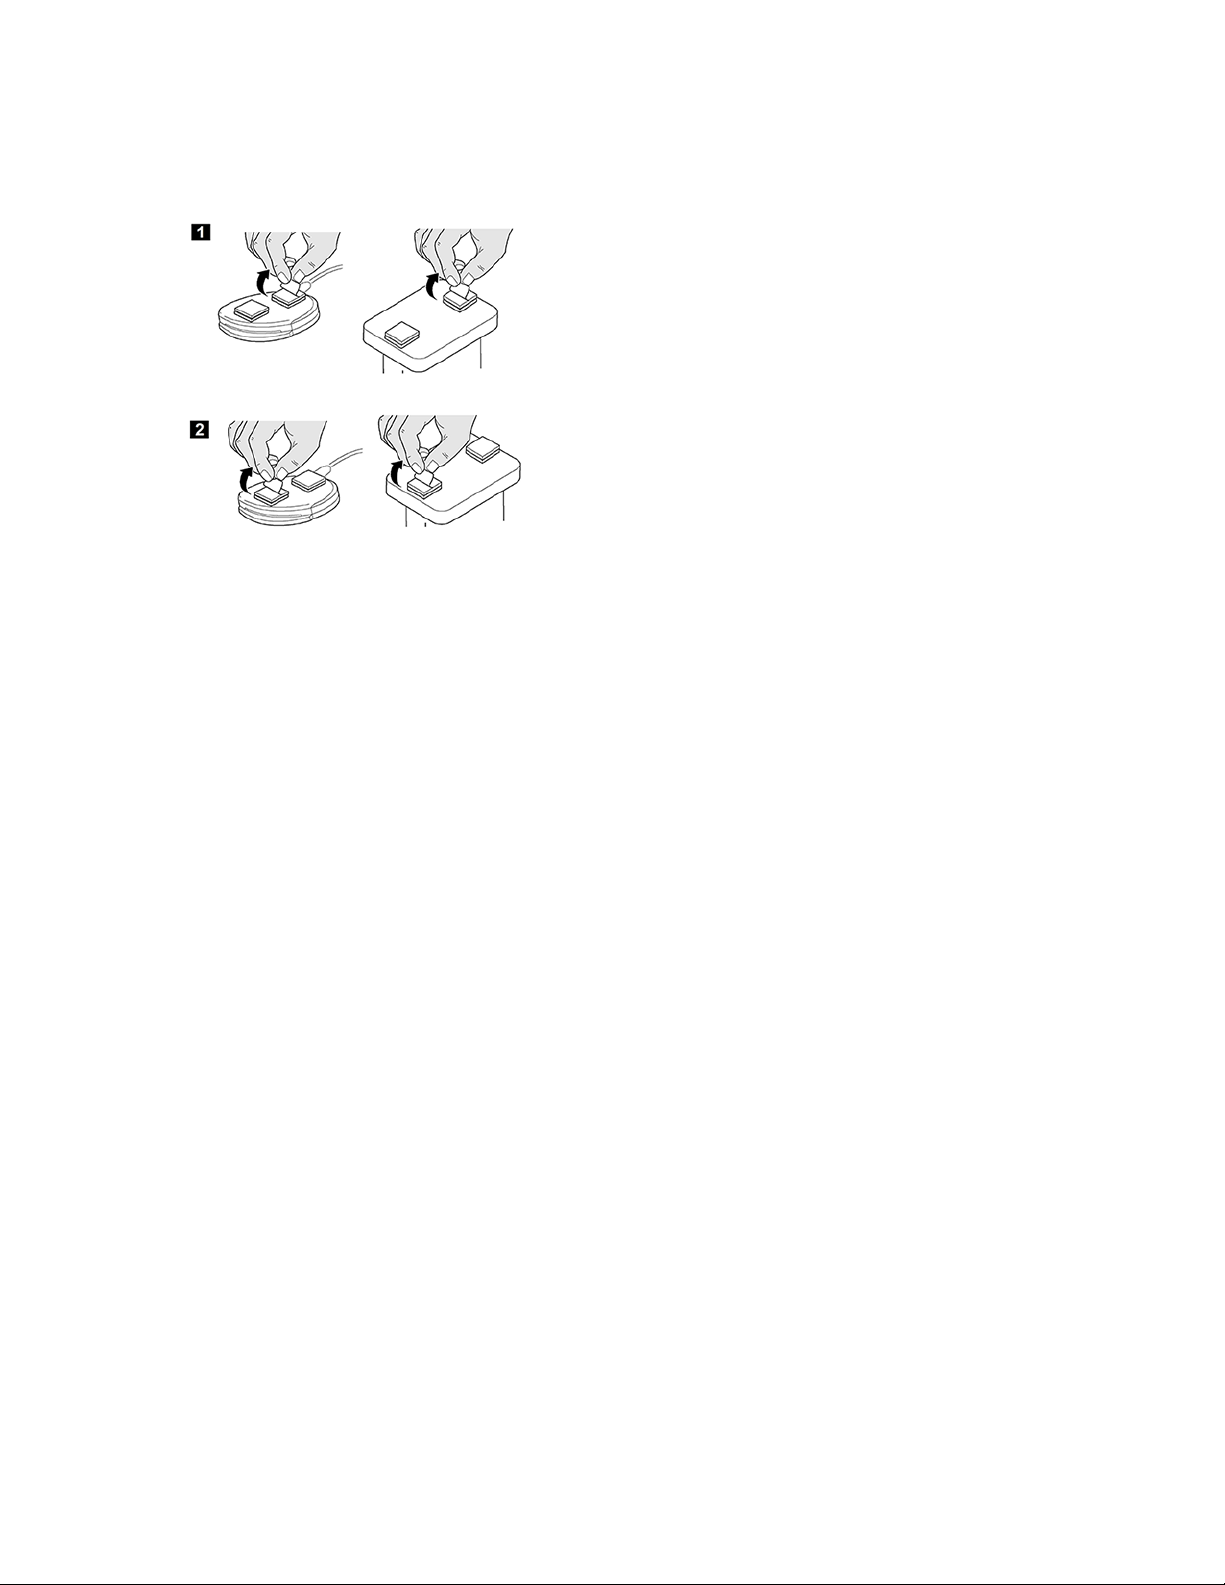
4. Attach the dual-lock fastener pads to the card reader device.
Fasteners are provided to secure the card reader to the multifunction printer.
• Peel back the fastener pad backing strip, then position the fastener pad on the under-side of
the card reader, as shown.
• Repeat these steps for each of the fastener pads supplied.
18
Xerox®AltaLink®Series Smart Card
Installation and Configuration Guide
Page 19
Installation
5. When all the dual-lock fastener pads are attached to the card reader, remove the backing strips
on each of the pads.
6. Place the card reader on the multifunction printer.
• Gently place the card reader on the printer. Do not fix the card reader in place at this time.
• Position the card reader in a suitable location. Ensure that the card reader does not obstruct
any access points or the opening of doors or covers.
• Verify that the cable has sufficient length to connect to the rear of the network controller.
• When the card reader is in a suitable location, to fix the card reader device in place, press
firmly on the reader.
7. Connect the card reader to the multifunction printer.
• Insert the USB connection into the slot provided on the rear of the network controller.
• Use the cable clamps and cable ties provided to bundle the cables and ensure that the
cabling is neat.
The hardware installation is now complete.
®
Xerox
AltaLink®Series Smart Card
Installation and Configuration Guide
19
Page 20
Installation
Software Configuration
AAcccceessssiinngg AAddmmiinniissttrraattiioonn aanndd CCoonnffiigguurraattiioonn SSeettttiinnggss
The Embedded Web Server is the administration and configuration software installed on the printer.
This software allows you to configure and administer the printer from a Web browser.
The administrator password is required to access locked settings in the Embedded Web Server or at
the control panel. Most printer models have a default configuration that restricts access to some
settings. In the Embedded Web Server, you can restrict access for settings on the Properties tab. At
the device touch screen, you can restrict settings in the Tools menu.
To access the Embedded Web Server and log in as the administrator:
1. At your computer, open a Web browser.
2. In the URL address field, type http:// followed by the IP Address of the multifunction printer.
For example: If the IP Address is 192.168.100.100, type the following into the URL address field:
http://192.168.100.100. Press Enter or Return.
3. In the top-right area of the page, click Login.
a. For User ID, type admin.
b. For Password, type the administrator password. The default administrator password is 1111,
or the printer serial number. You can obtain the serial number from inside the front door of
the printer, from the configuration report, and from the home page of the Embedded Web
Server. The password is case-sensitive.
4. Click Login.
For more information about accessing and configuring the Embedded Web Server settings, refer to
the System Administrator Guide for your Xerox multifunction printer.
EEnntteerr tthhee SSmmaarrtt CCaarrdd EEnnaabblleemmeenntt KKeeyy
Before you configure the Smart Card solution, use the Embedded Web Server to enable the Smart
Card feature on your Xerox
inside cover of the enablement guide provided within the Xerox
®
multifunction printer. The Feature Enablement Key is printed on the
®
Smart Card (CAC/PIV) kit.
To enable the device software:
1. Access the Embedded Web Server, then click the Properties tab. For more information, refer to
Accessing Administration and Configuration Settings.
20
Xerox®AltaLink®Series Smart Card
Installation and Configuration Guide
Page 21
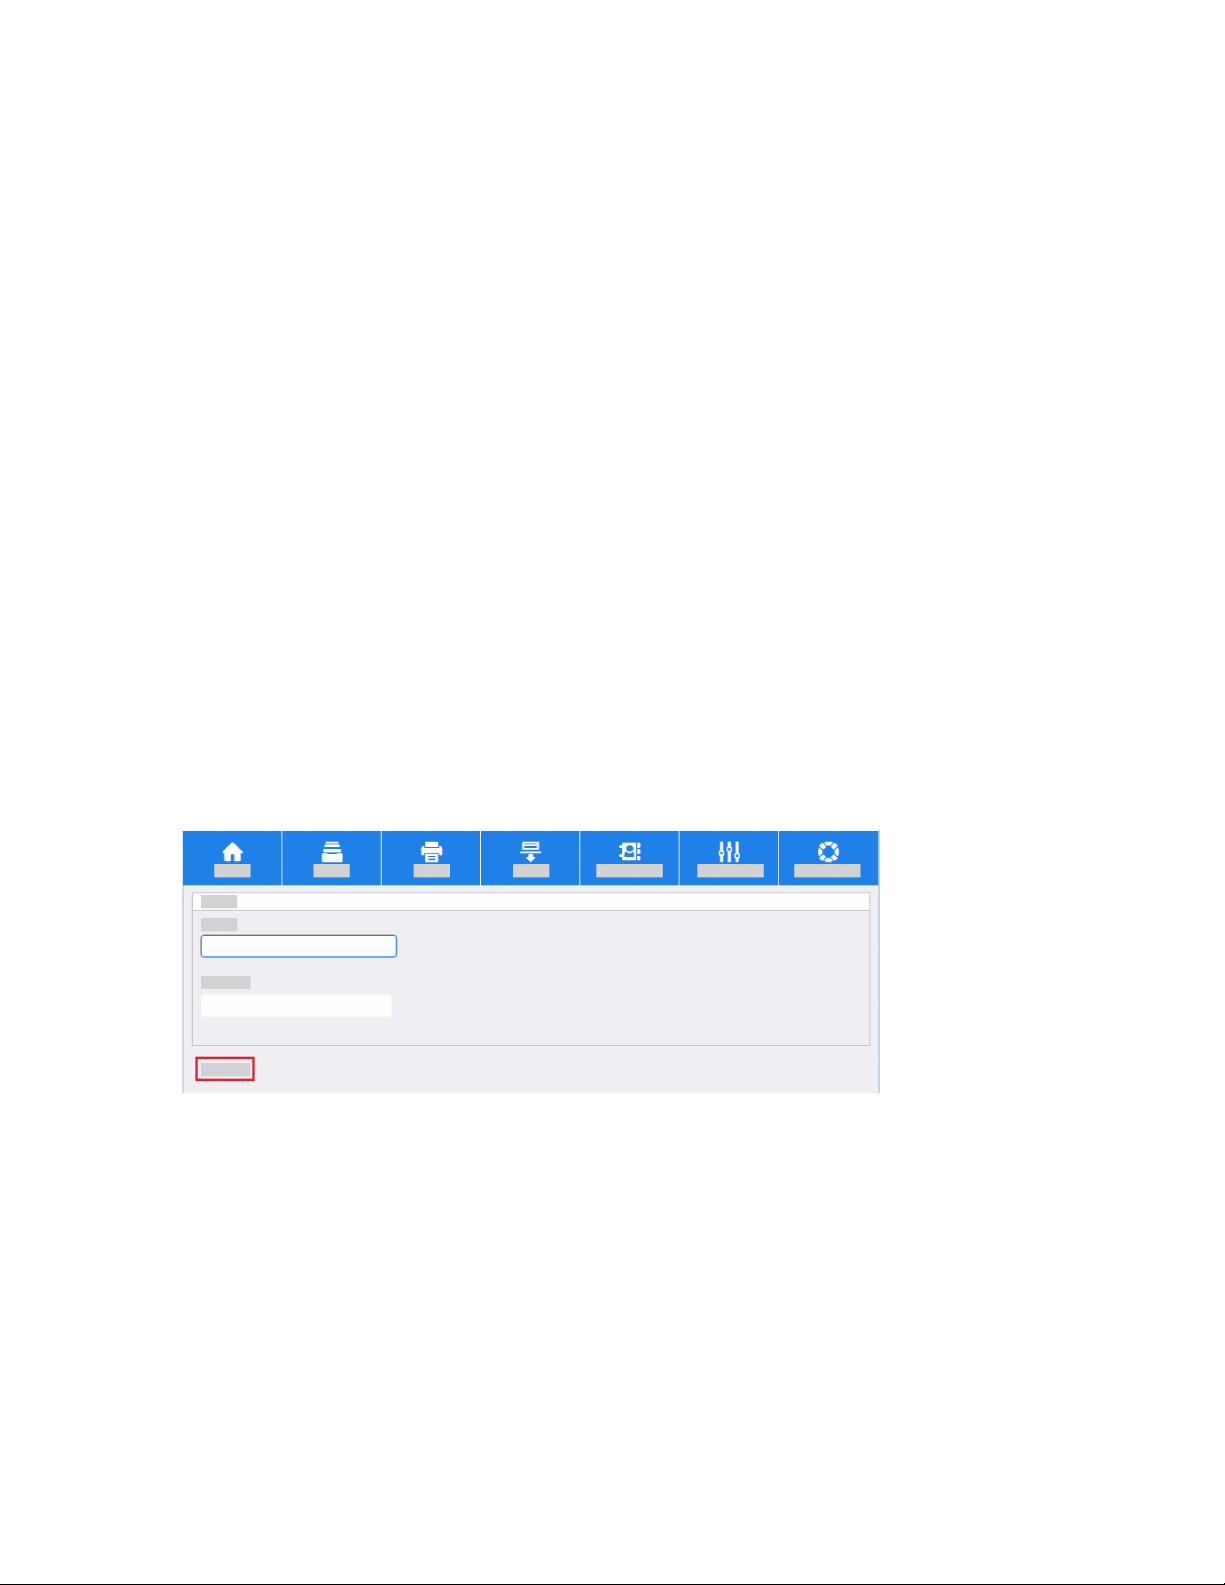
2. Click the Login/Permissions/Accounting link.
3. Click the Login Methods link.
4. Click the Control Panel Login button.
a. From the Control Panel Login menu, select Smart Cards.
b. If users need an alternate method of authentication, from the Alternate Control Panel
Login menu, select User Name/Password — Validate on the Network.
Installation
c. If the device uses the email address registered to the authenticated user, select the check
box for Personalized User Profile.
Xerox®AltaLink®Series Smart Card
Installation and Configuration Guide
21
Page 22

Installation
d. Click Save.
5. In the Smart Card Enablement area, enter the unique Feature Enablement Key provided on the
inside cover of the Xerox
®
Smart Card Enablement (CAC/PIV) Guide.
6. Click Next.
A confirmation message appears.
7. Click Next. The Smart Card settings are now ready to configure.
Note: No services are restricted until the Smart Card is configured fully through the Embedded
Web Server.
22
Xerox®AltaLink®Series Smart Card
Installation and Configuration Guide
Page 23

Installation
Configuring the Smart Card
After the Smart Card feature is enabled on the multifunction printer, you can use the Embedded Web
Server to configure the smart card.
CCoonnffiigguurree SSmmaarrtt CCaarrdd AAuutthheennttiiccaattiioonn
To enable and configure the Smart Card:
1. Access the Embedded Web Server, then click the Properties tab. For more information, refer to
Accessing Administration and Configuration Settings.
2. Click the Login/Permissions/Accounting link, then click Login Methods.
3. For Domain Controller, enter the details for the authentication server.
a. From the Configuration Settings list, for Domain Controllers, click Edit.
Note: Initially, the domain controllers are empty and the NTP server is not set.
b. Click Add Domain Controller.
c. Select the check box for Windows Based Domain Controller. Or, to select the Linux-Based
Domain Controller, clear the check box.
d. Select the IP Address or the fully qualified host name, then enter the domain controller
details.
®
Xerox
Installation and Configuration Guide
AltaLink®Series Smart Card
23
Page 24

Installation
e. Unless your Kerberos Port is different, ensure that Port 88 is selected.
f. For the Domain Name field, enter the fully qualified domain name.
g. Click Save.
24
Xerox®AltaLink®Series Smart Card
Installation and Configuration Guide
Page 25

EEnnaabbllee NNTTPP SSeerrvviiccee
To configure the date and time to update automatically:
1. From the Configuration Settings list, for Network Time Protocol, click Edit.
a. To enable NTP, select the check box for Enabled.
Installation
b. Enter the IP address or host name for the primary and alternate time server. Often this
address is the same address as the domain controller.
Xerox®AltaLink®Series Smart Card
Installation and Configuration Guide
25
Page 26

Installation
c. Click Save.
2. View the Summary screen and ensure that all settings are correct.
3. Click Close.
CCoonnffiigguurree AAlltteerrnnaattee AAuutthheennttiiccaattiioonn
If Alternate Authentication is not required, refer to Configure a Security Certificate.
If Alternate Authentication is enabled, configure the authentication server.
1. In the Configuration Settings list, for Authentication Servers / Control Panel (Alternate), click
Edit.
26
Xerox®AltaLink®Series Smart Card
Installation and Configuration Guide
Page 27

a. From the Authentication Type menu, select Kerberos.
b. Click Add New.
Installation
c. Enter the required domain or realm details.
d. Select the IP Address or the host name, then enter the server details. For most installations,
the Alternate Authentication server is the same as the Smart Card domain controller.
Xerox®AltaLink®Series Smart Card
Installation and Configuration Guide
27
Page 28

Installation
2. Click Save.
3. Click Close.
CCeerrttiiffiiccaattee VVaalliiddaattiioonn
When you use certificate validation, one of the following options is required:
Note: The Online Certificate Status Protocol (OCSP) is an Internet protocol used for obtaining
the revocation status of an X.509 digital certificate.
• Validate the certificate returned from the domain controller server against the OCSP server.
Note: Ensure that the OCSP signed certificate and its issuing CA chain of trust is
imported.
• Validate the domain controller certificate stored on the Xerox machine against the OCSP server.
Note: Ensure that the OCSP signed certificate and its issuing CA chain of trust is
imported and that the domain controller certificate is imported.
• Validate the email encryption certificate from the smart card against the OCSP server.
Note: Ensure that the OCSP signed certificate and its issuing CA chain of trust is
imported.
• Validate if that the domain controller certificate returned by the domain controller server matches
the domain controller certificate stored on the Xerox machine.
Note: Ensure that the domain controller certificate is imported.
If the multifunction printer requires certificate validation, perform the instructions in these sections:
• Import a Certificate Authority Certificate
• Install a Domain Controller Certificate
If certificate validation is not required, refer to Configure Smart Card Inactivity Timer.
IImmppoorrtt aa CCeerrttiiffiiccaattee AAuutthhoorriittyy CCeerrttiiffiiccaattee
To import a certificate from the Certificate Authority, perform the following steps:
1. Click the Properties tab, then click the Security link.
2. Click Certificates→Security Certificates.
28
Xerox®AltaLink®Series Smart Card
Installation and Configuration Guide
Page 29

a. Click the Root/Intermediate Trusted Certificates tab.
b. Click Install Certificate.
Installation
c. Click Browse, then navigate to your certificate authority certificates.
d. Select the certificate required, then click Open.
e. If the certificate is encrypted, on the Password Required screen, enter the password.
Xerox®AltaLink®Series Smart Card
Installation and Configuration Guide
29
Page 30

Installation
f. To install the certificate, click Next.
Note: Import both the Root CA and the Intermediate CA certificates to the
multifunction printer. This action establishes a chain of trust for certificates on
individual smart cards.
3. Click Next.
4. When you configure security certificates on the printer, SSL provides a secure connection
between your computer and the multifunction printer. To configure SSL, refer to Configure SSL.
IInnssttaallll aa DDoommaaiinn CCoonnttrroolllleerr CCeerrttiiffiiccaattee
To install a domain controller certificate, perform the following steps:
1. Click the Properties tab, then click the Security link.
2. Click Certificates→Security Certificates.
a. Click the Domain Controller Certificates tab.
30
Xerox®AltaLink®Series Smart Card
Installation and Configuration Guide
Page 31

b. Click Install Certificate.
c. Click Browse, then navigate to the domain controller certificates.
Installation
d. Select the certificate required, then click Open.
e. If the certificate is encrypted, enter the password.
f. To install the certificate, click Next.
Xerox®AltaLink®Series Smart Card
Installation and Configuration Guide
31
Page 32

Installation
3. Repeat the process until you have uploaded all the required certificates.
CCoonnffiigguurree TTrraannssppoorrtt LLaayyeerr SSeeccuurriittyy ((TTLLSS))
When you configure security certificates on the printer, Transport Layer Security (TLS) provides a
secure connection between your computer and the multifunction printer. TLS is enabled on the
printer automatically. If you do not want to configure TLS, proceed to Configure Certificate
Validation.
To configure TLS, perform the following steps:
1. Click the Properties tab, then click the Connectivity link.
2. Click Setup.
a. From the Protocol settings list, for HTTP, click Edit.
b. If you want to force traffic over a secure connection, such as HTTPS, click Yes (All HTTP
requests are switched to HTTPS).
32
Xerox®AltaLink®Series Smart Card
Installation and Configuration Guide
Page 33

Installation
c. From the Choose Device Certificate menu, select the required certificate.
3. If you made changes, click Save. The device restarts automatically. If you have not made
changes, click Cancel.
CCoonnffiigguurree CCeerrttiiffiiccaattee VVaalliiddaattiioonn
To configure certificate validation information, perform the following steps. If you do not require
certificate validation, proceed to Configure Smart Card Inactivity Timer.
1. Click the Properties tab, then click the Login/Permissions/Accounting link.
2. Click Login Methods.
a. From the Configuration Settings list, for Certificate Validation click Edit.
Xerox®AltaLink®Series Smart Card
Installation and Configuration Guide
33
Page 34

Installation
b. Select the required validation options.
3. If you have selected one or more options, to configure further settings, click Next.
4. If prompted, enter the OCSP server URL for certificate validation.
5. If prompted, to enter the proxy server information, for Proxy Server, click Configure. If the OCSP
server is outside the firewall, a proxy server can be required to access the server.
34
Xerox®AltaLink®Series Smart Card
Installation and Configuration Guide
Page 35

6. To validate each domain controller, select the domain controller certificates required.
7. Click Save.
Installation
CCoonnffiigguurree SSmmaarrtt CCaarrdd IInnaaccttiivviittyy TTiimmeerr
To configure the smart card inactivity timer, perform the following steps. If you do not require
inactivity settings for smart card authentication, proceed to Configure Acquiring Logged-In User
Email Address.
1. Click the Properties tab, then click the Login/Permissions/Accounting link.
2. Click Login Methods.
®
Xerox
Installation and Configuration Guide
AltaLink®Series Smart Card
35
Page 36

Installation
a. For Smart Card Inactivity Timer, click Edit.
b. For Timer, enter the required number of minutes.
3. Click Save.
CCoonnffiigguurree AAccqquuiirriinngg LLooggggeedd--IInn EEmmaaiill AAddddrreesssseess ffoorr
UUsseerrss
To configure LDAP and SMTP server information, perform the following steps.
If you do not want to configure the settings for Configure Acquiring Logged-In Email Addresses
for Users, proceed to Confirm the Installation.
1. Click the Properties tab, then click the Login/Permissions/Accounting link.
2. Click Login Methods.
36
Xerox®AltaLink®Series Smart Card
Installation and Configuration Guide
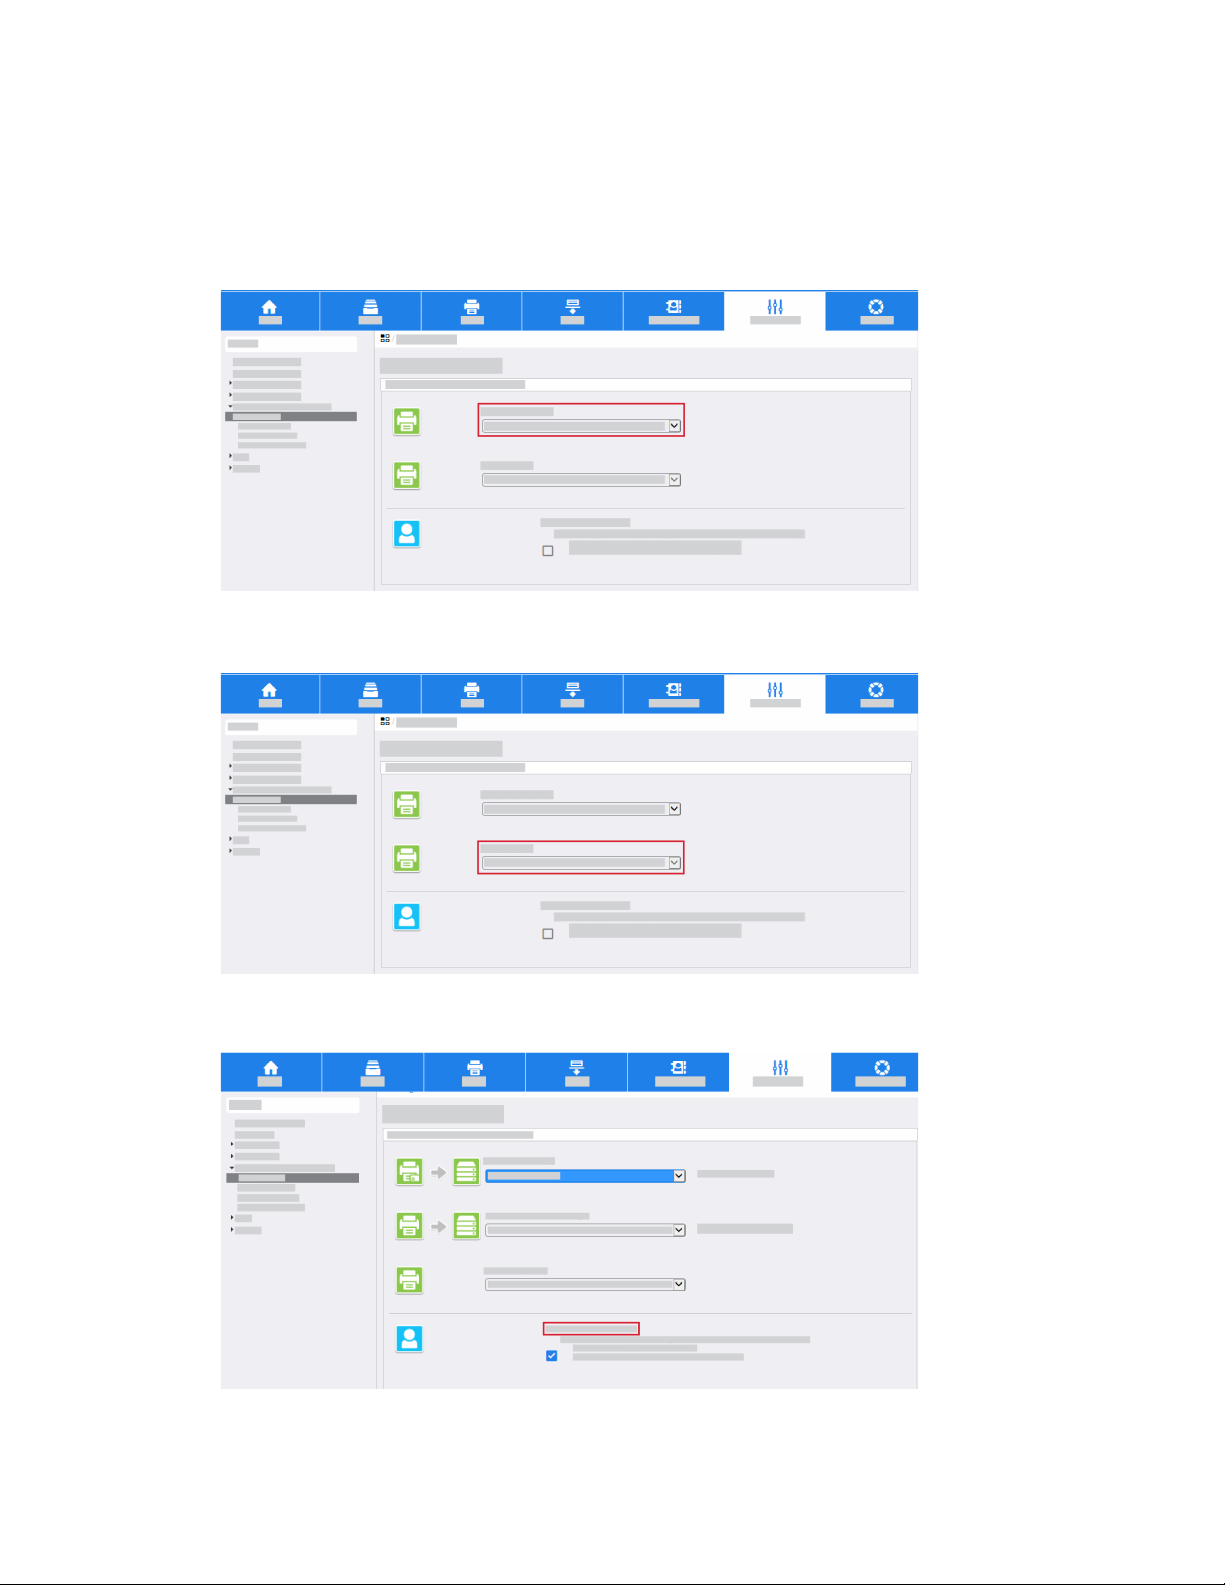
Page 37

a. For Acquiring Logged-In Email addresses for Users, click Edit.
b. Select the required option for Acquire Logged-In Email Addresses for Users.
Installation
c. If you select Auto or Only Network Address Book (LDAP), configure LDAP server settings. For
Network Address Book (LDAP), click Edit.
d. Click Add New.
®
Xerox
AltaLink®Series Smart Card
Installation and Configuration Guide
37
Page 38

Installation
e. At the LDAP Server screen, enter a friendly name.
f. Enter the IP address or host name of the primary and alternate LDAP server.
g. From the list, select the required LDAP server.
h. Enter the LDAP search directory root. Typically, this directory root is related to the domain
name for the server. For example, if the fully qualified domain name for the server is
Hostname.Example.Search.Root the search directory root is dc=Example,dc=
Search,dc=Root.
i. For Login Credentials to Access LDAP Server, enter the required information.
j. Click Apply.
3. Click Close.
4. Select LDAP Policies.
38
Xerox®AltaLink®Series Smart Card
Installation and Configuration Guide
Page 39

a. Select Enable SASL Binds to LDAP.
Note: Smart Cards use a ticket-based authentication to LDAP and require SASL for
authentication.
Installation
b. Click Save.
5. Click Close.
CCoonnffiigguurree SSMMTTPP EEmmaaiill SSeettttiinnggss
To configure SMTP email settings, perform the following steps:
1. Click the Properties tab.
2. Click Apps→Email→Setup.
3. In the Email Setup screen, click the Required Settings tab.
®
Xerox
Installation and Configuration Guide
AltaLink®Series Smart Card
39
Page 40

Installation
a. For SMTP, click Edit.
b. To configure the server address, click Use DNS (to identify SMTP Server). Or, click IP Address
or Host Name, then enter the SMTP server address.
40
Xerox®AltaLink®Series Smart Card
Installation and Configuration Guide
Page 41

c. For Device E-mail Address, enter the required information.
4. Click Save.
Installation
Configure SMTP Authentication
To configure SMTP authentication, perform the following steps.
1. Click the Properties tab.
2. Click Apps→Email→Setup.
3. For SMTP, click Edit.
Xerox
Installation and Configuration Guide
®
AltaLink®Series Smart Card
41
Page 42

Installation
a. Click the SMTP Authentication tab.
b. For the required method of authentication, select for SMTP. For Login credentials used for
user initiated email jobs, select Logged-in User.
Note: The credentials for the logged-in user typically provide authentication for the
SMTP server when you enable Smart Card authentication.
c. Click Always Use Kerberos Tickets.
d. For automated emails, click None.
42
Xerox®AltaLink®Series Smart Card
Installation and Configuration Guide
Page 43

4. Click Save.
Configure Connection Encryption
To configure connection encryption, perform the following steps.
1. Click the Properties tab.
2. Click Apps→Email→Setup.
3. For SMTP, click Edit.
a. Click the Connection Encryption tab.
Installation
b. Select the required encryption setting.
4. Click Save.
Configure File Size Management
To configure file size management settings, perform the following steps:
1. Click the Properties tab.
2. Click Apps→Email→Setup.
3. For SMTP, click Edit.
®
Xerox
AltaLink®Series Smart Card
Installation and Configuration Guide
43
Page 44

Installation
a. Click the File Size Management tab.
Note: This screen defines how to manage large email payloads.
b. Select the required settings.
4. Click Save.
Test Configuration
To enter test configuration settings, perform the following steps:
1. Click the Properties tab.
2. Click Apps→Email→Setup.
3. For SMTP, click Edit.
a. Click the Test Configuration tab.
Note: This screen allows you to send a test email to confirm that all email settings are
correct.
44
Xerox®AltaLink®Series Smart Card
Installation and Configuration Guide
Page 45

b. In the To Address field, enter a valid email address.
c. Click Send Email.
Installation
Note: If the SMTP settings are correct, a success message appears and an email is
received at the address.
4. Select the Required Information tab.
If the required settings are configured correctly, the message Required Settings
Configured appears.
5. Click Save.
CCoonnffiigguurree GGeenneerraall EEmmaaiill SSeettttiinnggss
To configure general email settings, perform the following steps:
1. Click the Properties tab.
2. Click Apps→Email→Setup.
3. Click the General tab.
Xerox
Installation and Configuration Guide
®
AltaLink®Series Smart Card
45
Page 46

Installation
a. Enter the required information to appear in the Subject line of an email that is sent from the
multifunction printer.
b. For Message Body, select the required information that you want to appear in the body of
an email.
46
Xerox®AltaLink®Series Smart Card
Installation and Configuration Guide
Page 47

Installation
c. For the Signature field, enter the information that you want to include in an email signature.
d. To print a confirmation sheet, from the menu, select the required option.
e. If you want the multifunction printer to add your email address automatically to the To field
when you are logged in, for Auto Add Me, click Enabled.
4. Click Apply.
Configure Address Books
To configure address books, perform the following steps:
1. Click the Properties tab.
2. Click Apps→Email→Setup.
3. Click the Address Books tab.
4. LDAP was configured in a previous step. To configure the device address book, for Device
Address Book, click Edit.
5. Configure the device address book. For more information, refer to the System Administrator Guide
for your Xerox multifunction printer.
Configure Email Defaults
To configure default email settings, perform the following steps:
1. Click the Properties tab.
2. Click Apps→Email→Setup.
®
Xerox
AltaLink®Series Smart Card
Installation and Configuration Guide
47
Page 48

Installation
3. Click the Defaults tab.
4. For default email settings, click Edit, then select the required options. To save selections, click
Save.
5. Click Apply.
Configure Email Compression
To configure email compression settings, perform the following steps:
1. Click the Properties tab.
2. Click Apps→Email→Setup.
3. Select the Compression tab.
4. For Compression Settings, select the required settings.
5. Click Save.
Configure Email Security
To configure email security settings, perform the following steps:
1. Click the Properties tab.
2. Click Apps→Email→Setup.
48
Xerox®AltaLink®Series Smart Card
Installation and Configuration Guide
Page 49

3. Click the Security tab.
a. For Encryption/Signing, click Edit.
Installation
b. Select the required Enablement setting:
• Off: You cannot sign email.
• Always On: An email signature is required.
®
Xerox
AltaLink®Series Smart Card
Installation and Configuration Guide
49
Page 50

Installation
• Editable by user: The local user settings determine if an email signature is required.
c. If you selected Editable by User, and if the ability to sign is required by default, for the
Email App Encryption Default setting, click On.
d. For Encryption Algorithm, select the required setting.
50
Xerox®AltaLink®Series Smart Card
Installation and Configuration Guide
Page 51

Installation
e. Click Apply.
4. If you want to configure email domain restrictions, in the Network Policies area, click Edit.
Xerox®AltaLink®Series Smart Card
Installation and Configuration Guide
51
Page 52

Installation
a. Select the required restrictions.
• Domain Filtering: This option enables you to configure a list of domains to allow or block
emails.
• Email Filtering: This option allows you to send internal email without a corporate name.
This option requires configuration of your email server.
b. Click Save.
5. If you want to configure restrictions on email recipients, in the User Policies area, click Edit.
52
Xerox®AltaLink®Series Smart Card
Installation and Configuration Guide
Page 53

a. Select the required settings for User Permissions.
b. Click Save.
c. If necessary, in the Only Send to Self area, click Edit.
Installation
d. Select the required Security settings.
e. Click Save.
The configuration of the smart card settings is complete.
®
Xerox
AltaLink®Series Smart Card
Installation and Configuration Guide
53
Page 54

Installation
Printing Features
To hold jobs at the multifunction printer until you authenticate at the control panel, configure the
Hold All Jobs and Secure Print features.
CCoonnffiigguurree HHoolldd AAllll JJoobbss
The Hold All Jobs feature allows you to configure the multifunction printer to require users to release
print jobs manually at the control panel. If you want to configure Hold All Jobs, perform the
following steps:
1. Access the Embedded Web Server, then click the Properties tab. For more information, refer to
Accessing Administration and Configuration Settings.
2. Click Apps→Printing→Hold All Jobs.
a. Select the required Enablement option:
• Hold Jobs in a Private Queue: This option holds jobs in a locked folder. Users are required
to log in at the control panel to view, print, and delete jobs.
• Hold Jobs in a Public Queue: This option holds sent jobs in an unlocked folder. Users are
not required to log in at the control panel.
b. Select the required option for Unidentified Job Policies (Unknown User ID). For more
information, refer to the System Administrator Guide for your Xerox multifunction printer.
54
Xerox®AltaLink®Series Smart Card
Installation and Configuration Guide
Page 55

Installation
CCoonnffiigguurree SSeeccuurree PPrriinntt DDrriivveerr DDeeffaauullttss
The Secure Print feature allows you to send a job to the multifunction printer with a unique
passcode. Jobs are stored at the printer until you enter the same passcode to release the jobs. For
more information about how to use Secure Print, refer to the User Guide for your Xerox
multifunction printer. You can configure the settings to require a User ID instead of a passcode to
release jobs at the control panel.
To configure the Secure Print driver defaults, perform the following steps:
1. Access the Embedded Web Server, then click the Properties tab. For more information, refer to
Accessing Administration and Configuration Settings.
2. Click Apps→Printing→Secure Print.
a. Click the Defaults tab.
Xerox®AltaLink®Series Smart Card
Installation and Configuration Guide
55
Page 56

Installation
b. Select the required release method.
• Passcode: This option requires that you type a passcode to release your Secure Print
jobs at the control panel. If required, enter a number from 4–10 to specify the length of
the Secure Print passcode.
• User ID: This option requires you to log in at the control panel to release your Secure
Print jobs.
c. Click Save.
For more information on how to configure Secure Print settings, refer to the System Administrator
Guide for your Xerox multifunction printer.
56
Xerox®AltaLink®Series Smart Card
Installation and Configuration Guide
Page 57

Installation
CCoonnffiigguurree tthhee PPrriinntt DDrriivveerr
You can configure your print driver to pull the user name alias from the smart card certificate, or from
the Windows operating system. To configure the print driver to pull the user name from the smart
card certificate, install the Xerox print driver for your Xerox printer. For more information, refer to the
System Administrator Guide for your Xerox multifunction printer.
1. Install your Xerox
®
Print Driver.
2. Access the properties for your print driver.
3. Click the Administration tab.
®
Xerox
Installation and Configuration Guide
AltaLink®Series Smart Card
57
Page 58

Installation
4. From the Access and Verification menu, select Enabled.
5. Click OK.
58
Xerox®AltaLink®Series Smart Card
Installation and Configuration Guide
Page 59

Installation
Note: If you configure Hold All Jobs or Secure Print Driver defaults at the multifunction
printer, the settings can override the settings in your print driver. For more information, refer to
Configure Hold All Jobs and Configure Secure Print Driver Defaults.
®
Xerox
AltaLink®Series Smart Card
Installation and Configuration Guide
59
Page 60

Installation
Confirm the Installation
When you install and configure the card reader and the software, the Card Reader Detected
screen appears on the Xerox
The smart card is now ready for use.
Note: If the card reader is not detected, refer to Troubleshooting Tips.
®
multifunction printer control panel touch screen.
60
Xerox®AltaLink®Series Smart Card
Installation and Configuration Guide
Page 61

Installation
Using the Smart Card
When the Smart Card solution is installed and enabled, insert a valid card, then enter your Personal
Identification Number (PIN) on the touch screen. When you finish, to end the session, remove your
card from the card reader. If you forget to remove your card, the printer ends the session
automatically after a specified period of inactivity.
To use the Smart Card, perform the following steps:
The Authentication Required window can appear on the touch screen, if that is how your device is
configured.
1. Insert your card into the card reader.
2. Use the touch screen and numeric keypad to enter your PIN, then touch Enter.
If the card and PIN are authenticated, access is granted.
Note: If the access attempt fails, refer to Troubleshooting Tips.
3. Complete the job.
4. To end the session, remove your card from the card reader.
The current session is terminated and the Authentication Required window appears.
®
Xerox
Installation and Configuration Guide
AltaLink®Series Smart Card
61
Page 62

Installation
62
Xerox®AltaLink®Series Smart Card
Installation and Configuration Guide
Page 63

4
Troubleshooting
This chapter contains:
• Troubleshooting....................... ..... ...................... ..... ..... ................. ..... ..... ..... ................. ..... ..... .. 64
• Fault Clearance ... ..... ................. ..... ..... ..... ................. ..... ..... ..... ................. ..... ..... ..... ................. . 65
• Troubleshooting Tips...... ..... ..... ..... ................. ..... ..... ..... ................. ..... ..... ...................... ..... ....... 66
Xerox®AltaLink®Series Smart Card
Installation and Configuration Guide
63
Page 64

Troubleshooting
Troubleshooting
For optimal performance from your card reader, follow these guidelines:
• Ensure that the card reader is compatible with network-connected products only.
• Ensure that the card reader is plugged into the network controller. Refer to Connect the USB
Smart Card Reader to the Printer.
• Do not position the card reader in direct sunlight or near a heat source, such as a radiator.
• Ensure that the card reader does not get contaminated with dust and debris.
• To clean the outer surfaces of the card reader, use a lint-free cloth moistened with water and a
mild detergent. Wipe the outer surfaces of the card reader with the lint-free cloth.
64
Xerox®AltaLink®Series Smart Card
Installation and Configuration Guide
Page 65

Troubleshooting
Fault Clearance
When a fault occurs, a message appears on the printer control panel touch screen. The message
provides information to clear the fault. If you cannot resolve the fault using the onscreen instructions,
refer to Troubleshooting Tips.
If the problem persists, identify if the problem is related to the card reader device or the Xerox
printer:
• For problems with the card reader device, for further assistance, contact the manufacturer.
• For problems relating to the Xerox
– Before you contact Xerox Technical Support, ensure that you have the printer serial number
and the fault code.
– Contact Xerox Technical Support. Contact Xerox at 1-800-ASK-XEROX or 1-800-275-9376.
®
printer:
LLooccaattiinngg tthhee SSeerriiaall NNuummbbeerr
At the Xerox multifunction printer control panel, touch Device, then touch About. The printer serial
number appears on the About screen.
®
Note: You can find the serial number inside the front cover of the Xerox multifunction printer.
®
Xerox
Installation and Configuration Guide
AltaLink®Series Smart Card
65
Page 66

Troubleshooting
Troubleshooting Tips
The table provides a list of problems, the possible cause, and a recommended solution.
If you experience a problem during the installation process, refer to the During Installation problemsolving table.
If you installed the Smart Card solution successfully, but you now experience problems, refer to the
After Installation problem-solving table.
DDuurriinngg IInnssttaallllaattiioonn
Problem Possible Cause Solution
The card reader is installed but no
message appears on the user
interface.
The card reader is faulty.
The card reader connection is
faulty.
The card reader is not compatible. To verify that the card reader is on
Smart Card access is not enabled
on the Xerox multifunction printer.
• Try a different card reader.
• Contact your system
administrator.
• Check that the cable is plugged
in correctly. For more
information, refer to Connect
the USB Smart Card Reader to
the Printer.
• Unplug the card reader cable,
then plug it back in.
• Plug the card reader into a
different USB port.
the list of compatible devices, refer
to Supported Card Readers.
Use the Embedded Web server to
enable Smart Card through the
Properties setup screens. For more
information, refer to Software
Configuration.
AAfftteerr IInnssttaallllaattiioonn
Problem Possible Cause Solution
The login was successful, however
you do not have the appropriate
access to the operation that you
requested.
The passcode entered was
incorrect.
66
Xerox®AltaLink®Series Smart Card
Installation and Configuration Guide
LDAP is not configured properly or
the local user permission roles are
not configured properly.
Incorrect PIN was entered. Carefully re-enter the PIN.
Verify the authorization method.
Page 67

Problem Possible Cause Solution
Caution: Consecutive
incorrect entries can lead to
your card being locked.
Troubleshooting
Authentication failed. There is a
problem with your card that is
preventing successful login.
Authentication failed because the
device was unable to access the
remote server, domain controller,
or the authentication sequence
failed.
The number of attempts exceeded
the allowable limit.
Server Certificate Failed.
Authentication failed because the
remote server or domain controller
certificate were not found, are
invalid, are expired, or access was
revoked.
Certificates cannot be read from
the card.
The domain controller IP address
or host name is incorrect.
Incorrect domain. Verify that the domain is
Network error. Verify that the network cable is
Card was locked due to failed login
attempts.
This problem usually occurs
because the device does not trust
the certificates on the smart card.
To reload the certificates or get a
new card, contact the Registration
Authority.
Verify that the server address is
entered correctly.
configured properly.
connected firmly.
To reset the PIN or to get a new
card, contact the Registration
Authority.
• Ensure that all the chain of
trust certificates are imported
on the multifunction printer.
• Verify which root certificate
authority and intermediate
certificate authority issued the
smart card certificates.
The card reader was not detected. The card reader was disconnected.
Invalid time stamp.
Authentication failed due to a
time or date difference between
the device and the remote server,
or domain controller.
NTP not enabled or properly
configured.
Xerox®AltaLink®Series Smart Card
Installation and Configuration Guide
• Verify that the card reader is
connected properly.
• If you suspect that the reader
has failed, uninstall the card
reader, then install a known
working card reader.
Verify that Network Time Protocol
is set up correctly. Refer to Enable
NTP Service.
67
Page 68

Troubleshooting
Problem Possible Cause Solution
The devices on your network
cannot see the Embedded Web
Server pages.
GMT offset is not set correctly.
The IP address is incorrect or was
reset.
• If you are not using DHCP,
verify that the date, time, GMT
offset, and time zone are
correct. For more information,
refer to the System
Administrator Guide for your
Xerox printer.
• Verify that GMT offset is
correct for Daylight Saving
Time.
Note: Unforeseen
errors are mapped
to this error
message.
• Verify that the IP address that
is printed on the configuration
report matches the DHCP
settings for your site.
• To print a configuration report
at the Xerox printer, touch
Device, then touch
Information Pages. Select the
configuration report from the
list, then touch Print.
68
Xerox®AltaLink®Series Smart Card
Installation and Configuration Guide
Page 69

Page 70

 Loading...