

Page 1

WorkCentre®
5632/5638/5645/5655/5665/5675/5687
Quick Use Guide
604P19210C
MAXIMISE YOUR PRODUCTIVITY...
...by taking advantage of all the capabilities of your device. An
Interactive User Guide CD is supplied with your product. The
CD provides animated tutorials and interactive screens. When
installed on your network it will always be available to
everyone, or load it on your hard drive for easy access.
Page 2

Prepared by:
Xerox
GKLS European Operations
Bessemer Road
Welwyn Garden City
Hertfordshire
AL7 1BU
ENGLAND
©2008 Xerox Corporation. All rights reserved.
®
Xerox
or other countries.
Product names and trademarks of other companies are hereby acknowledged.
Changes, technical inaccuracies and typographical errors will be corrected in subsequent editions.
and the sphere of connectivity design are trademarks of Xerox Corporation in the United States and/
Page 3

Contents
Welcome......................................................................................... 1
Additional Resources ................................................................................ 1
Features ...................................................................................................... 2
Safety and Legal ........................................................................................ 4
Product Overview .......................................................................... 5
WorkCentre Overview................................................................................ 5
WorkCentre Options .................................................................................. 5
Finishing Devices ...................................................................................... 8
Getting Started............................................................................. 11
Control Panel Overview........................................................................... 11
Power On or Off ....................................................................................... 12
Loading Paper .......................................................................................... 13
Making Copies.......................................................................................... 14
Copying an ID Card.................................................................................. 15
Saving for Reprint .................................................................................... 16
Reprinting Saved Jobs ............................................................................ 17
Sending an Embedded Fax ..................................................................... 18
Sending a Server Fax .............................................................................. 19
Sending an Internet Fax .......................................................................... 20
Scanning a Document to a File............................................................... 21
Sending an E-mail .................................................................................... 22
Printing from a PC.................................................................................... 23
Sending a LAN Fax .................................................................................. 24
Printing with Internet Services ............................................................... 25
Logging On / Logging Off........................................................................ 26
Customising your Machine ..................................................................... 27
Further Assistance .................................................................................. 28
Maintenance................................................................................. 29
Consumables ........................................................................................... 29
Cleaning the Machine .............................................................................. 30
Further Assistance .................................................................................. 31
Troubleshooting .......................................................................... 33
Fault Clearance ........................................................................................ 33
Xerox Welcome and Support Centre...................................................... 34
Quick Use Guide Page i
Page 4

Table of Contents
Page ii Quick Use Guide
Page 5

Welcome
Introduction
Welcome to your new Xerox machine.
This Quick Use Guide provides you with an overview of the features and options that may be
available on your machine.
For additional assistance at the machine press the Help button. If your machine is connected
to the network, use the CentreWare Help system or click on the Help button in the Print Driver.
NOTE: The appearance of the Touch Screens may differ slightly on other configurations.
However, feature descriptions and functionality as described remain the same.
Additional Resources
System Administration CD (CD1)
Contained in the CD Pack delivered with your machine, the System Administration CD (CD1)
offers detailed information on configuring your machine for network printing and instructions
on installing any of the optional features.
The System Administration CD (CD1) is intended for System/Machine Administrators.
Interactive User Guide CD (CD2)
For detailed information on any of the features or functions available on your machine, please
refer to the Interactive User Guide CD (CD2), contained in the CD Pack delivered with your
machine.
The Interactive User Guide CD is intended for all users, including Machine Administrators. It
contains comprehensive information about your new product including interactive ’how-to’s
and tutorials. To ensure maximum productivity is gained from your machine, please copy the
programme contained on the CD onto your network so that all users have access.
Utilities CD (CD3)
Contained in the CD Pack, the Utilities CD (CD3) contains a utility for upgrading to new
versions of software on the machine.
NOTE: This CD is not required during installation.
Quick Use Guide Page 1
Page 6

Welcome
Features
Overview of Features at the Machine
Using the powerful features available on your machine you can:
Scan Once and Print Many
When making copies your machine only has to scan a document once regardless of the
number of copies needed. This reduces the risk of jams and damage to originals.
Perform Different Tasks Simultaneously
Your machine performs different tasks simultaneously. A job can be added to the job queue
by scanning it, even while the machine is printing another job.
Make Copies Look Like Originals
Your machine allows the reproduction of high quality images, especially photographs,
graphics, text, or a combination. Compare your output to that from other copiers and see the
difference.
Customise Image Size and Placement
You can manipulate the appearance of the image on the output stock.
- Shift the image to create margins for binding.
- Automatically reduce, enlarge, or centre your images.
- Print multiple reduced images on a single page.
Use Digital Features to Simplify your Work Process
Use the Build Job feature to divide a copy or embedded fax job into different segments and
apply different settings to each of the segments. This allows you to:
- Combine originals from the document glass and the document handler into a single job.
- Create a single job, using different programming features for each original.
- Feed more than the maximum number of originals through the document handler
without reprogramming.
Use the Transparency feature to produce transparencies with transparency separators in
one step.
Use the Booklet Creation feature to automatically reduce or enlarge and sequence the
images when making booklets.
Use the Covers feature to automatically add covers to your documents.
Use the Mixed Size Originals feature to copy mixed size originals simultaneously.
Produces copies on uniform size paper or mixed size paper.
Use the Annotation feature to add a comment, page number or date to your copy output.
Be Environmentally Friendly
This product complies with a variety of international standards for environmental protection
and is compatible with most recycled paper.
Scan Documents to Create Electronic Files (Optional)
This feature allows you to create electronic files from your originals which can be:
Page 2 Quick Use Guide
Page 7

Welcome
- Filed on the server.
- Transferred over the network to your desktop.
- Distributed through an e-mail system.
- Automatically placed into a Document Management Application.
- Converted into an electronic digital document which can be edited, managed, shared and
distributed, using a wide variety of software applications.
Fax Documents (Optional)
The optional Embedded Fax service is a walk up feature that enables you to transmit and
receive hard copy faxes using a telephone network.
The optional Server Fax service is a walk up feature allowing you to scan your documents and
send them to any type of fax machine that is connected to a telephone network, via your fax
server.
NOTE: Both Embedded and Server Fax can be installed on the WorkCentre
time, however only one service can be enabled for use.
The optional Internet Fax service allows users to transmit and receive documents as an e-mail
attachment. This type of fax travels over the internet or intranet.
at the same
Welcome
Overview of Features at the Workstation
If your machine is connected to a network you can use the following features. Refer to the
System Administration CD (CD1) for connection details.
CentreWare Print Drivers
The Print Driver extends the productivity power of your machine to your desktop. Options
include:
• 1-sided or 2-sided.
• Collated and stapled sets, depending on the finisher options available on the machine.
• Resolutions up to 1200x1200 dpi.
• Adding standard or customised watermarks.
• Printing multiple images on one page.
CentreWare Tools
The CentreWare software suite also offers optional User Management Tools.
CentreWare Internet Services
A ‘built in’ web Home Page which allows print-ready files to be sent via the World Wide Web.
This feature is accessed via Internet Services.
FreeFlow™ SMARTsend™
The FreeFlow™ SMARTsend™ or FreeFlow™ SMARTsend™ Professional offer optional
Network Scanning tools.
Quick Use Guide Page 3
Page 8

Welcome
Safety and Legal
To ensure you operate the equipment safely please carefully read the safety and regulatory
notes in the Interactive User Guide on the Interactive User Guide CD (CD2) before using this
product.
Your Xerox product and recommended supplies have been designed and tested to meet
strict safety requirements. These include safety agency approval, and compliance to
established environmental standards.
The safety and environment testing and performance of this product have been verified
using Xerox materials only.
Any unauthorised alteration, which may include the addition of new functions or connection
of external devices, may impact the product certification. Please contact your authorised
local dealer for more information.
This product must be operated from the electrical supply type indicted on the data plate label
located on the rear cover. This product must be connected to a protective earth circuit.
This product is supplied with a plug that has a protective earth pin. This plug will fit only into
an earthed electrical outlet. Never use an earthed adapter plug to connect the product to an
electrical outlet that lacks an earth connection terminal.
Never remove these covers or guards, as these are fitted to ensure user safety.
Any operator maintenance procedures will be described in the customer documentation
supplied with the product. Do not carry out any maintenance on this product, which is not
described in the customer documentation.
Follow the electrical safety information as described in the customer documentation
supplied with the product. The power cable is the disconnect device for this equipment. It is
attached to the back of the machine as a plug-in device. To remove all electrical power from
the equipment, disconnect the power cable from the electrical outlet.
Use of controls, adjustments or performance of procedure other than those specified in the
customer documentation supplied with the product may result in hazardous light exposure.
Follow the operational safety information as described in the customer documentation
supplied with the product.
Do not attempt any maintenance procedure that is not specifically described in the
documentation that is supplied with the product.
This product will produce ozone during normal operation. The ozone produced is heavier
than air and is dependent on copy volume. Providing the correct environmental parameters
as specified in the Xerox installation procedure will ensure that the concentration levels meet
safe limits.
Store all consumables in accordance with the instructions given on the package or
container.
This equipment has been tested and found to comply with the limits for a Class A digital
device, pursuant to part 15 of the FCC Rules. Shielded interface cables must be used with
this equipment to maintain compliance with FCC regulations in the United States.
This product is certified by the following Agency using the Safety standards listed.
Agency Standard
Underwriters Laboratories Inc UL60950-1 1st (2003) (USA/Canada)
This product has been manufactured under a registered ISO9001 Quality system.
Please refer to the customer documentation supplied with the product for full safety and legal
information.
IEC60950-1 Edition 1 (2001)
Page 4 Quick Use Guide
Page 9
Product Overview
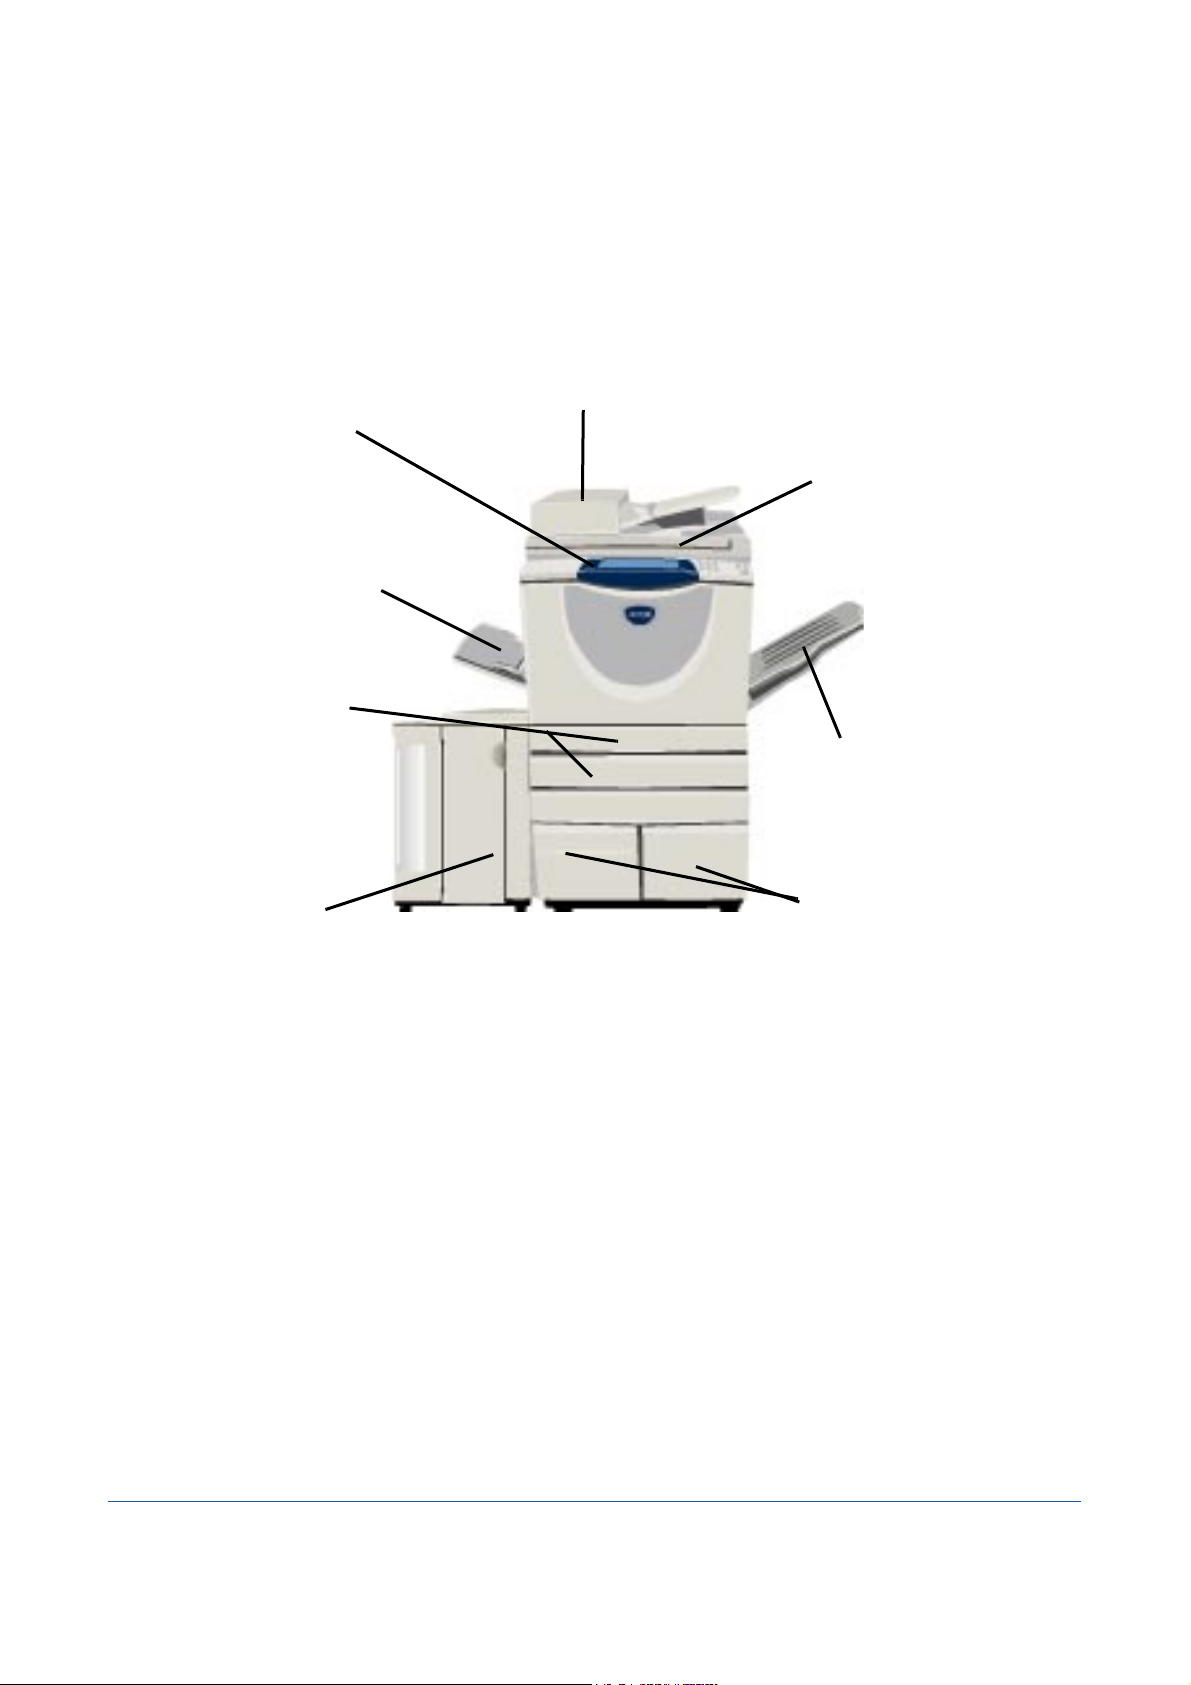
Document Handler
Document Glass
(under the Document
Handler)
Control Panel
(Touch Screen and
Numeric Keypad)
Offset Catch Tray
Paper Tray 5
Bypass Tray
(folds up when not in use)
Paper Trays 3 & 4
Paper Trays 1 & 2
WorkCentre Overview
WorkCentre Options
Document
Handler
Paper Trays 3
Paper Tray 5 Has a larger capacity than trays 3 and 4, further reducing the number of times you need to
Paper Tray 6
(Inserter)
Offset Catch
Quick Use Guide Page 5
The following options are available for the WorkCentre copier/printer/scanner:
Feeds 75 or 100 single or double sided documents depending on model speed. Documents
from A5 to A3 (5.5"x8.5" to 11"x17") can be fed. Fitted instead of the document cover.
Both trays have a larger capacity than trays 1 and 2, therefore reducing the number of times
& 4
you need to replace paper in the machine.
replace paper in the machine.
Optional inserter tray available with the High Volume Finisher and High Volume Finisher with
Booklet Maker. Designed to hold special stock, for example covers, that is inserted into a job
Delivers output either face up or face down, collated or uncollated. Each set or stack will be
Tray
offset from the previous to enable easy separation. Fitted instead of a finisher.
Page 10

Product Overview
Finisher There are 6 finisher types available, depending on your machine configuration:
- Basic Office Finisher
- Office Finisher
- Advanced Office Finisher
- Professional Finisher
- High Volume Finisher
- High Volume Finisher with Booklet Maker
To identify your finisher type and for more information about each finisher, refer to “Finishing
Devices” on page -8.
Your chosen finisher is fitted instead of the Offset Catch Tray.
Hole Punch This option is available if your machine is equipped with any of the five finishers fitted with a
Hole Punch. The kits available are 2 Hole, 3 Hole, 4 Hole or Swedish 4 Hole. Each sheet is
punched individually, so there is no limit to the number of sheets in the set. Additional Hole
Punch kits can be purchased as an option, although only one kit can be fitted at one time.
Convenience
Stapler
Up to 50 sheets of 90g/m
manually using the Convenience Stapler. The staple cartridge holds 2000-5000 staples.
2
(24lb) paper or a maximum stack height of 5.5mm can be stapled
NOTE: The Convenience Shelf must be fitted to your machine before the Convenience
Stapler can be installed.
Envelope Tray This tray is installed in place of paper tray 2 to enable envelope printing. The tray is adjustable
for the most common sizes and has a capacity of up to 50 envelopes.
Basic Fax Kit
(Embedded)
This kit enables a single telephone line connection. Basic Fax, also referred to as Embedded
Fax, will scan your documents and send them to most types of fax machine connected to a
telephone network. The images are sent from your machine directly to the fax number
entered.
Extended Fax
(Embedded)
Enables two telephone lines to be attached to the machine. This provides all the features of
Kit
the Basic Fax kit plus the capability to send and receive faxes at the same time.
LAN Fax Enables a document to be sent to a fax machine that is connected to a telephone network.
The images are sent from the PC directly to the fax number entered.
Server Fax Enables users to send and receive hard copy faxes via a fax server. The images are sent from
your machine to a third party fax server, which relays them to the fax number entered.
Internet Fax Allows users to send or receive faxes over the internet or intranet.
E-mail Allows an image to be scanned and sent to any valid e-mail address. The scanned image is
sent as an e-mail attachment to the specified recipient(s).
Network
Scanning
Used to scan an original document and convert it into an electronic file. The file can be
distributed and archived in a variety of ways. The final destination of the electronic file will
depend on the scan path chosen by the user.
Colour
Scanning
Used to add colour scanning capabilities to Network enabled machines. The Colour Scanning
Enablement card also upgrades machines with E-mail and Internet Fax capabilities.
Enablement
Kit
Network
Accounting
Page 6 Quick Use Guide
Enables the tracking of machine usage for Print, Copy and Scan jobs from multiple machines
over the network.
Page 11

Product Overview
Xerox
Standard
Accounting
Foreign
Interface
Device
256MB
Electronic Pre-
Collation
(EPC) Memory
A tool which can be used by administrators to track the number of Copy, Print, Network
Scanning, Server Fax and Embedded Fax jobs for each user, provided these services are
installed on the machine. Usage limits can be applied to users and the administrator can print
a report which contains all Xerox Standard Accounting data.
Enables the attachment of a third party access and accounting device, such as a card swipe
or coin operated unit.
Additional temporary storage area for scanned information.
Product Overview
Quick Use Guide Page 7
Page 12
Product Overview
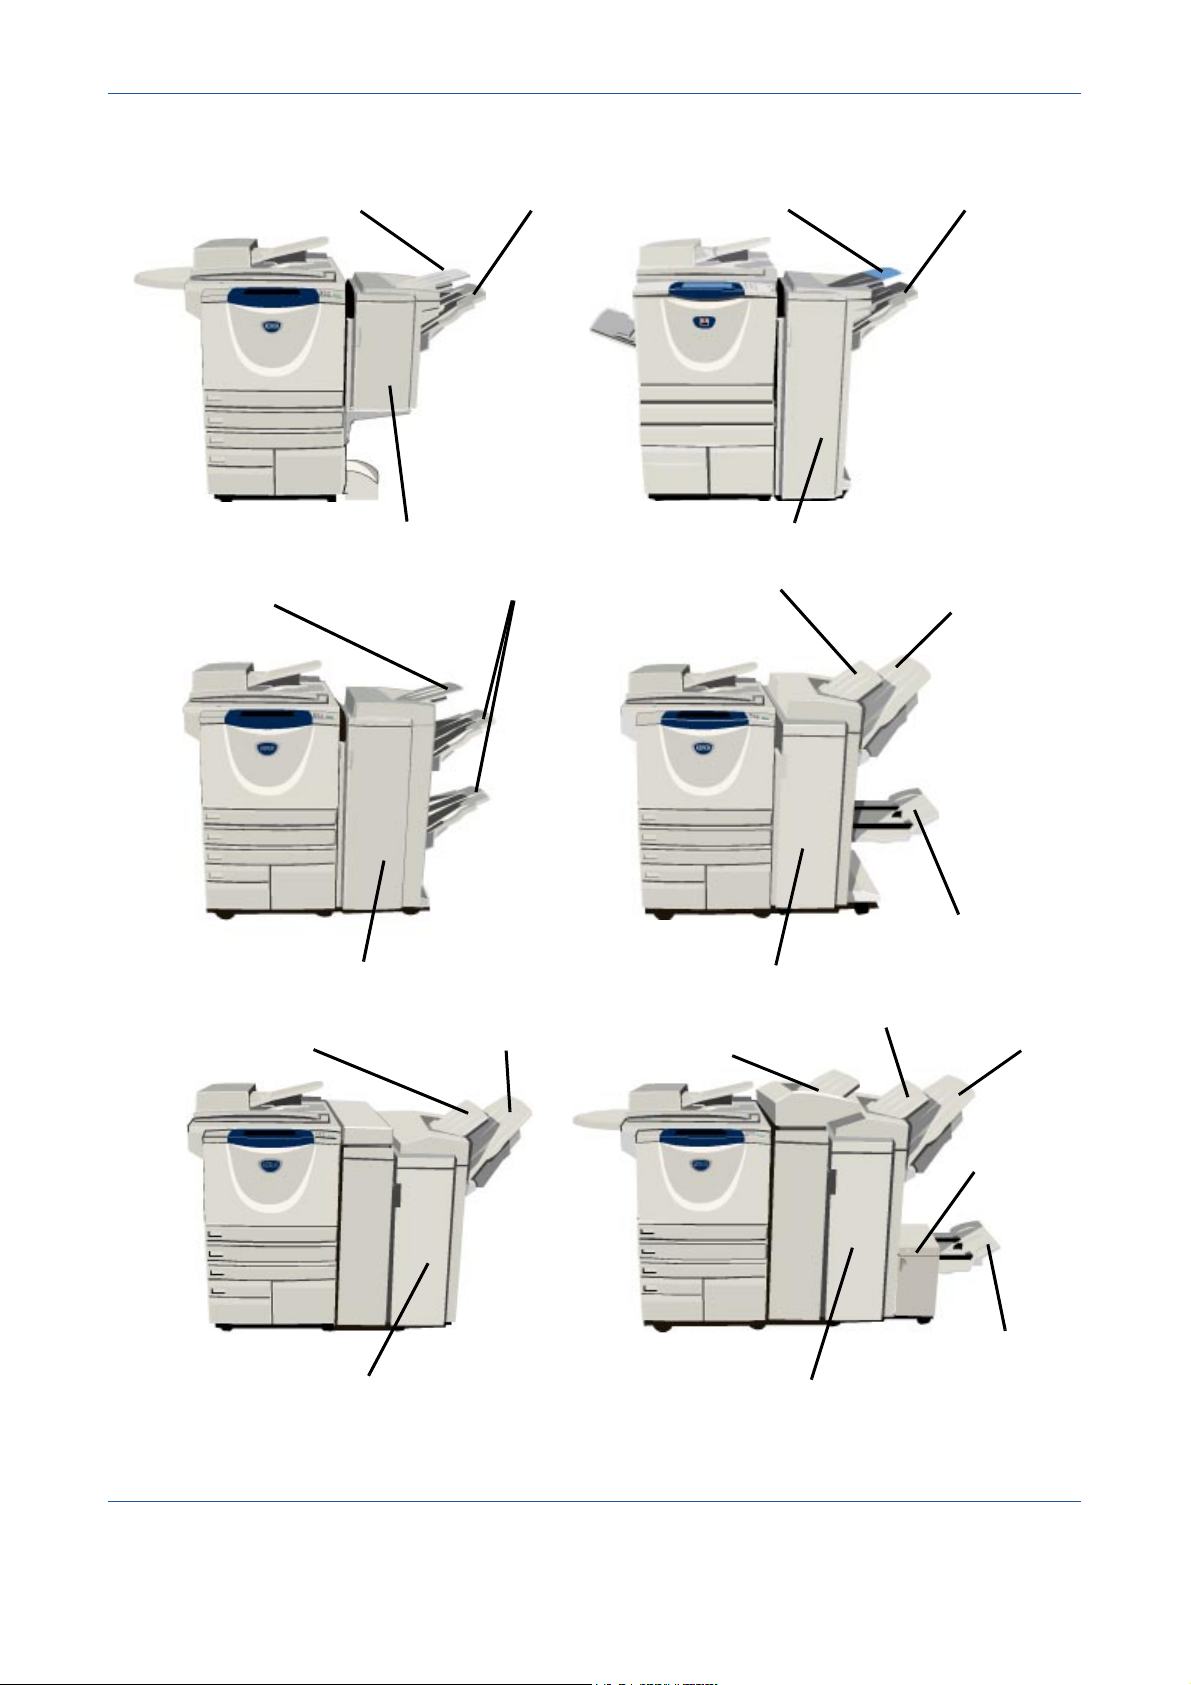
Office Finisher
Basic Office Finisher
Advanced Office Finisher
Professional Finisher (with Booklet Maker)
Stacker Tray
Booklet Maker Tray
Top Tray
Stacker Trays
Top Tray
Stacker Tray
Top Tray
Stacker TrayTop Tray
High Volume Finisher
Stacker
Tray
Top Tray
High Volume Finisher with Booklet Maker
Booklet Maker Tray
Stacker Tray
Top Tray
Tray 6
(Inserter)
C\Z Folder
(tri-fold)
Finishing Devices
Page 8 Quick Use Guide
Page 13

Product Overview
Basic Office
Finisher
Holds up to 250 sheets of paper in the Top Tray, and up to 1000 sheets in the Stacker Tray.
The Stacker can collate, stack and staple your output, depending on the features selected.
The staple cartridge for the Basic Office Finisher contains a minimum of 3000 staples.
NOTE: Double Staple is not available with the Basic Office Finisher.
Office Finisher Holds up to 250 sheets of paper in the Top Tray, and up to 2000 sheets in the Stacker Tray.
The stacker can collate, stack, staple and hole punch your output depending on the features
selected.
The staple cartridge for the Office Finisher contains a minimum of 3000 staples.
Advanced
Holds up to 250 sheets of paper in the Top Tray, and up to 1500 sheets in the Stacker Tray.
Office Finisher
The Advanced Office Finisher can collate, stack, staple and hole punch your output
depending on the features selected.
The finisher stapler has 1 staple cartridge containing 5000 staples.
Professional
Holds up to 250 sheets of paper in the Top Tray, and up to 1500 sheets in the Stacker Tray.
Finisher
The Professional Finisher can collate, stack, staple and hole punch your output depending on
the features selected.
The Professional Finisher also incorporates a Booklet Maker which can fold and staple your
output. The Booklet Maker stapler requires 2 staple cartridges, each containing 2000 staples.
The finisher stapler has 1 staple cartridge containing 5000 staples.
High Volume
Finisher
This finisher can hold up to 250 sheets of paper in the top tray, and up to 3000 sheets of paper
in the stacker tray. The optional Tray 6 (Inserter) can be installed on this finisher.
Product Overview
High Volume
Finisher with
Booklet Maker
The stacker can collate, stack, staple and hole punch your output, depending on the features
selected.
This finisher can hold up to 250 sheets of paper in the top tray, and up to 3000 sheets of paper
in the stacker tray. The optional Tray 6 (Inserter) can be installed on this finisher.
The stacker can collate, stack, staple and hole punch your output, depending on the features
selected.
The finisher incorporates a booklet maker that will fold and staple your output. A C\Z Folder
(tri-fold) is available as an option.
Quick Use Guide Page 9
Page 14

Product Overview
Page 10 Quick Use Guide
Page 15
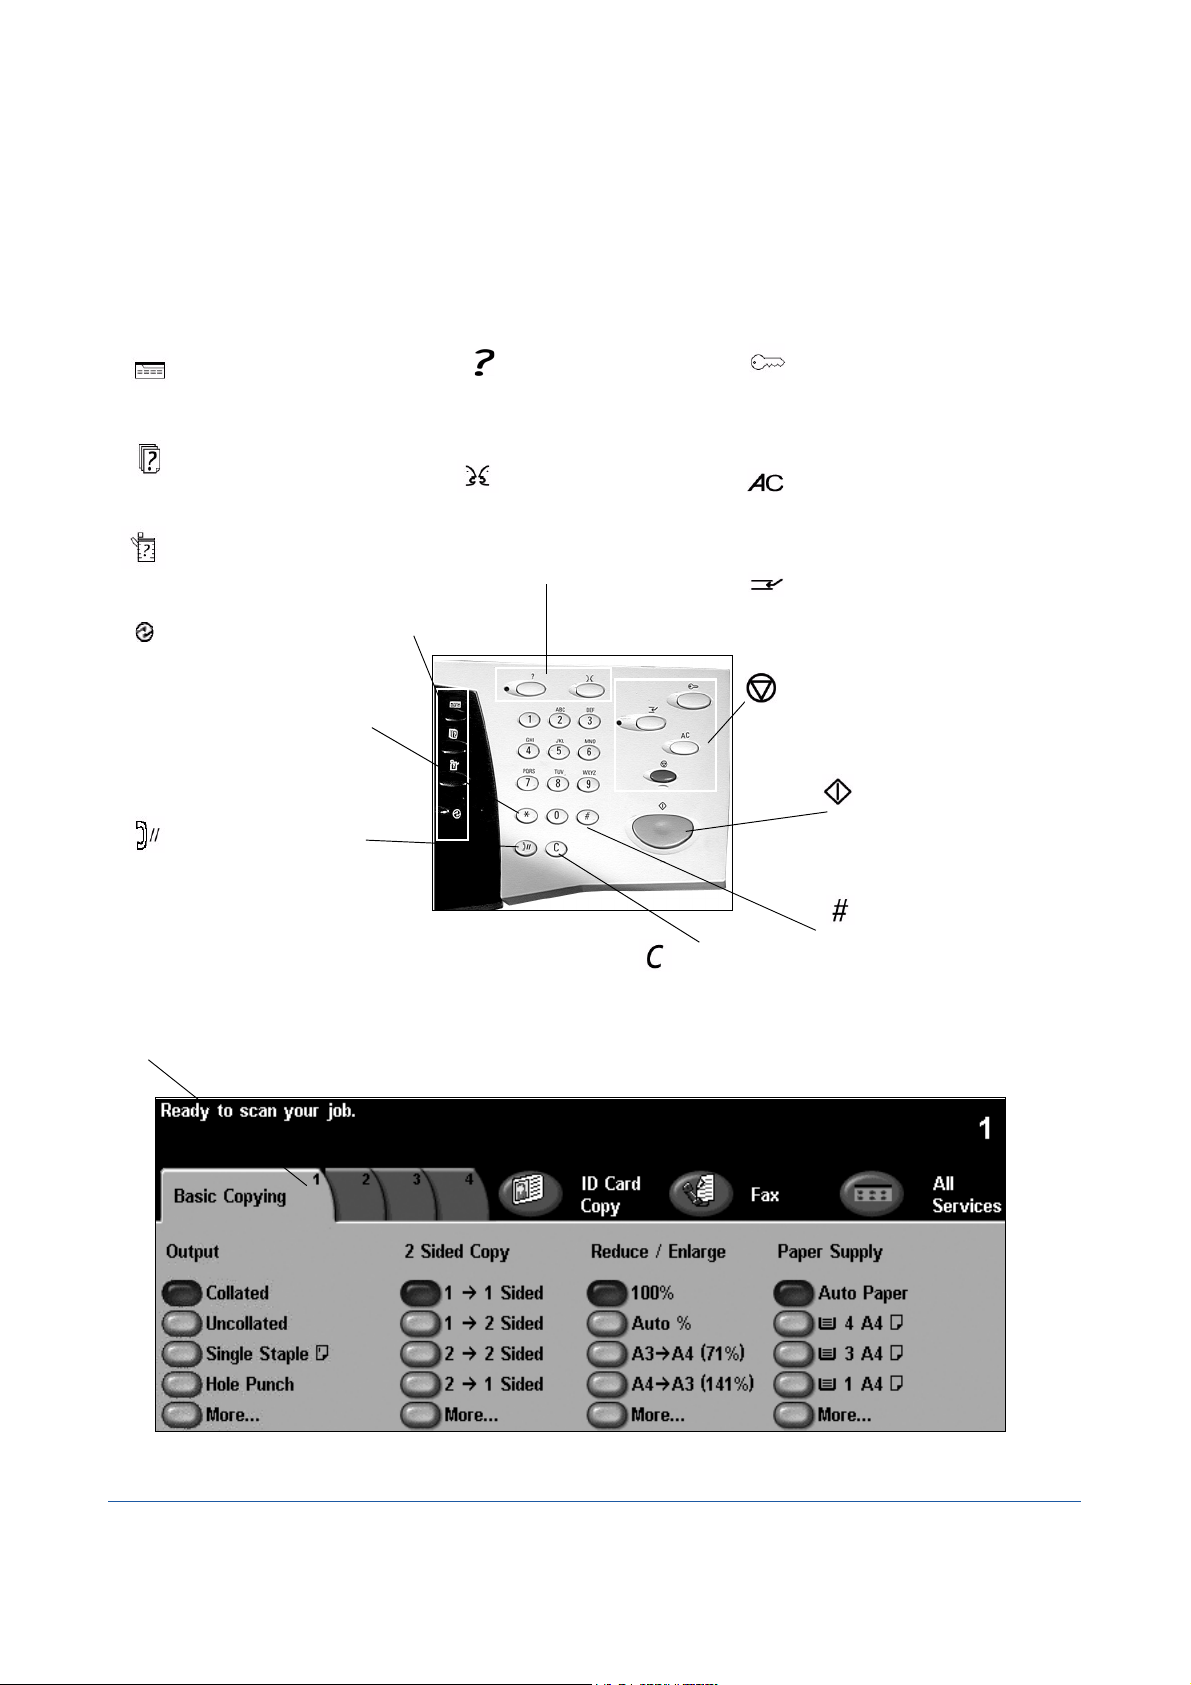
Getting Started
Help
Accesses additional
information.
Pause
Temporarily stops the current job.
Interrupt
Temporarily stops the current job to
allow a priority job to be run.
Features
Displays the job features on the screen.
Hash
Indicates the dialing
character or designates a
group dial number. Also
used when entering a
password.
Clear
Deletes numeric
values or the last digit
entered.
Asterisk
Use to start a DTMF (Dual Tone
Multi-frequency) operation.
Language
Changes text to an alternative
language.
Start
Starts the job.
Touch Screen
Displays and selects all the available programming
features, plus fault clearance procedures and general
machine information.
Access
Accesses Tools, used to adjust the
defaults of the machine.
Clear All
Resets all the features to their default
settings.
Job Status
Displays job progress
information.
Machine Status
Displays the current status of the
machine.
Power Saver Indicator
Indicates when the machine is in
Power Saver Mode.
*
Dial Pause
Enters a pause in a telephone
number when transmitting a fax.
Control Panel Overview
Quick Use Guide Page 11
Page 16

Getting Started
1
To power ON:
¾ Press the [Power] switch. The entire powering on
process (to power on all installed options) takes less
than 165 seconds.
NOTE: Certain functions of the machine e.g. copying
and scanning will be available before others.
2
To power OFF:
¾ Press the [Power] switch. A confirmation screen will appear requesting a power down
option.
3
Power On or Off
¾ If [Power Down] is selected the Power Down Confirmation screen displays a warning that
data may be lost if the machine is powered down.
NOTE: Confirmation of this screen will result in the deletion of any jobs currently in the
queue.
¾ Touch the [Confirm] button to power off the machine.
NOTE: The machine remains on for approximately 45 seconds before the power is
terminated.
¾ If [Enter Power Saver Mode] is selected, the machine will immediately enter the Power
Saver Mode appropriate to its configuration. If there are any jobs in the queue, a second
pop-up screen displays.
NOTE: To re-activate the machine when in this mode, touch a button on the Touch Screen or
control panel.
¾ If [Quick Restart] is selected and confirmed the machine will restart. A pop-up screen will
appear warning that any jobs in the queue will be deleted.
NOTE: Any copy jobs in the queue will be deleted, print jobs in the queue are recovered.
¾ If [Cancel] is selected the power down options will be canceled and the machine will be
available for use.
Page 12 Quick Use Guide
Page 17

Loading Paper
1
¾ Open the required paper tray.
NOTE: Paper trays 1 and 2 are fully
adjustable for all stock sizes between A5 and
A3 (5.5"x8.5" and 11"x17"). Paper trays 3 and
4 are dedicated paper trays which can be
adjusted to hold either A4 or 8.5" x 11" long
edge feed paper only.
2
¾ Load paper. Paper must not be loaded
above the fill line.
¾ Close the tray.
NOTE: For paper trays 1 and 2, ensure the
guides are just touching the paper, otherwise
the size automatically detected may be
incorrect.
3
¾ Select [Confirm] OR select [Change Size] and/or [Change Type and Colour] to
reprogramme the tray if the paper size, type or colour has changed.
NOTE: Ensure the Size, Type and Colour are all correct. For standard copy paper the
following should apply:
Size - A4
Type - Plain paper
Colour - White
NOTE: Some machine configurations do not support envelope printing, please refer to
the Product Overview chapter for more information.
Getting Started
Getting Started
Quick Use Guide Page 13
Page 18

Getting Started
1
¾ Load the documents either in the
document handler or on the
document glass.
NOTE: Documents are only
scanned once.
2
¾ Access the Basic Copy screen - if necessary
select the [Features] button on the control
panel.
3
¾ Select the required features on the Touch Screen.
¾ Select the number of copies required.
¾ Press [Start].
Making Copies
Copy features include...
• Producing stapled or hole punched sets, if there is
a finisher available
• Auto Reduce/Enlarge • Copying mixed size originals
• Adding printed or blank separators into
transparency sets
Page 14 Quick Use Guide
• Adding printed or blank covers • Adding Annotations
• Inserting printed or blank sheets or tabs • Image Shift
• Erasing edges and borders • Build Job to apply different programming within a
• Storing the programming for frequently run jobs • Creating booklets
• Image Quality adjustment
• Arranging multiple images on a page
set of documents
Page 19

Copying an ID Card
1
¾ Load side 1 of the ID card on the document
glass.
2
¾ Access the ID Card Copy screen - if necessary select the [Features] button on the
control panel.
3
¾ Select the required side 1 Image Quality features on the Touch Screen.
¾ Press [Start].
NOTE: Side 1 of the card is only scanned once.
4
¾ Load side 2 of the ID card on the document glass.
¾ Select the required side 2 Image Quality features on the Touch Screen.
¾ Select the number of copies required.
¾ Press [Start].
NOTE: Side 2 of the card is scanned and both sides are printed to a single side output.
Getting Started
Getting Started
Quick Use Guide Page 15
Page 20

Getting Started
1
¾ Load the documents either in the
document handler or on the
document glass.
NOTE: Documents are only
scanned once.
2
¾ Access the Save Job for Reprint screen - if necessary select the [Features] button on
the control panel.
3
¾ Select the required option. Select [Save Only] if you want to store your document
without printing. Select [Copy and Save] if you want to print a copy and store your
document.
¾ Select the folder where you want to store your document.
¾ Select the required features on the Touch Screen.
¾ Press [Start].
Saving for Reprint
Page 16 Quick Use Guide
Page 21

Reprinting Saved Jobs
1
¾ Access the Reprint Jobs screen - if necessary
select the [Features] button on the control
panel.
2
¾ Select the folder where you stored your document.
¾ Select the document from the list.
¾ Select the required features on the Touch Screen.
¾ Select the required option:
• Select [Print] if you want to print and then delete your document.
•Select [Print and Save] if you want to print and then save changes to your
document settings.
•Select [Save] to save changes to your document settings.
¾ Press [Start].
Getting Started
Getting Started
Quick Use Guide Page 17
Page 22

Getting Started
1
¾ Load the documents
either in the document
handler or on the
document glass.
NOTE: Documents are
only scanned once.
2
¾ Select [Fax].
NOTE: You may need to select [All
Services] first to access the fax
option.
¾ Enter the telephone number.
3
¾ Select the required features on the
Touch Screen.
¾ Press [Start].
Sending an Embedded Fax
Embedded Fax is an optional walk up fax feature on your machine. If the Basic Fax screen
matches that displayed in step 2 then Embedded Fax is enabled. Refer to the System
Administration CD (CD1) for more information.
NOTE: Both Embedded and Server Fax can be installed on the WorkCentre at the same
time, however only one service can be enabled for use.
Fax features include...
¾ Adjusting the Resolution
¾ Faxing double sided originals
¾ Programming the size of the originals being scanned
¾ Image Quality adjustment
¾ Delaying the start time of a fax
¾ Adding a Cover Letter
¾ Sending to more than one recipient
¾ Mailbox storage and polling to and from your machine
¾ Setting the transmission speed
Page 18 Quick Use Guide
Page 23

Sending a Server Fax
1
¾ Load the documents
either in the document
handler or on the
document glass.
NOTE: Documents are
only scanned once.
2
¾ Select [Fax].
NOTE: You may need to select [All
Services] first to access the fax
option.
¾ Enter the telephone number.
3
¾ Select the required features on the
Touch Screen.
¾ Press [Start].
Server Fax is an optional feature on networked WorkCentre machines. If the Basic Fax screen
matches that displayed in step 2 then Server Fax is enabled. Refer to the System
Administration CD (CD1) for more information.
Getting Started
NOTE: Both Embedded and Server Fax can be installed on the WorkCentre
time, however only one service can be enabled for use.
at the same
Getting Started
Fax features include...
¾ Adjusting the Resolution
¾ Faxing double sided originals
¾ Programming the size of the originals being scanned
¾ Image Quality adjustment
¾ Delaying the start time of a fax
Quick Use Guide Page 19
Page 24

Getting Started
1
¾ Load the documents
either in the document
handler or on the
document glass.
NOTE: Documents are
only scanned once.
2
¾ Select [Internet Fax].
NOTE: You may need to select [All
Services] first to access the Internet
Fax option.
¾ Select [To.], enter the recipient
e-mail details and select [Save].
¾ Select [Edit Subject], enter a
subject and select [Save].
3
¾ Select the required features on the
Touch Screen.
¾ Press [Start].
Sending an Internet Fax
Internet Fax is an optional feature on networked WorkCentre machines. Refer to the System
Administration CD (CD1) for more information.
Internet Fax features include...
¾ Setting up a Public or Internal Address Book
¾ Adjusting the Resolution
¾ Scanning double sided originals
¾ Programming the size of the originals being scanned
¾ Image Quality adjustment
¾ Changing the default file format setting
Page 20 Quick Use Guide
Page 25

Scanning a Document to a File
1
¾ Load the documents
either in the document
handler or on the
document glass.
NOTE: Documents are
only scanned once.
2
¾ Select [Network Scanning].
NOTE: You may need to select [All
Services] first to access the Network
Scanning option.
3
¾ Select the template required.
¾ Select the required features on the
Touch Screen.
¾ Press [Start].
¾ On completion access your job at
your workstation.
Refer to the System Administration CD (CD1) for more information on Network Scanning.
Getting Started
Getting Started
Network Scanning features include...
¾ Adjusting the image output requirements
¾ Adjusting the Resolution
¾ Scanning double sided originals
¾ Programming the size of the originals being scanned
¾ Changing the destination for the scanned image
Quick Use Guide Page 21
Page 26

Getting Started
1
¾ Load the documents
either in the document
handler or on the
document glass.
NOTE: Documents are
only scanned once.
2
¾ Select [E-mail].
NOTE: You may need to select [All
Services] first to access the e-mail
option.
3
¾ Select [To], enter the recipient
e-mail details and select [Enter].
¾ Select [Edit Subject], enter a
subject and select [Save].
¾ Select the required features on the
Touch Screen.
¾ Press [Start].
Sending an E-mail
Refer to the System Administration CD (CD1) for more information on the E-mail feature.
E-mail features include...
¾ Setting up a Public or Internal Address Book
¾ Adjusting the Resolution
¾ Scanning double sided originals
¾ Programming the size of the originals being scanned
¾ Image Quality adjustment
Page 22 Quick Use Guide
Page 27

Printing from a PC
1
¾ Select [Print] in your application.
¾ Select your machine as the printer.
2
¾ Select [Properties], make your
selections and click [OK].
¾ Click [OK] to print your document.
NOTE: Instructions may vary depending
on the application being used.
If your machine is connected to a network, documents can be printed directly from your PC
using the CentreWare Print Driver supplied. The Print Driver must be loaded on each PC
which uses the machine for printing.
Getting Started
Getting Started
Print features include...
¾ Printing 1 or 2 sided
¾ Producing stapled or hole punched sets, if available
¾ Changing the printing Resolution
¾ Adding a Banner Sheet
¾ Adding a front cover
¾ Adjusting the Image Quality
¾ Adding a Watermark
¾ Reprint Saved Jobs
Quick Use Guide Page 23
Page 28

Getting Started
1
¾ Select [Print] in your application.
¾ Select your machine as the printer.
2
¾ Select [Properties].
¾ Select [Job Type] and then [Fax] from
the pull down menu.
¾ Enter the recipient details and select
the features required.
¾ Click [OK] to send your document.
NOTE: Instructions may vary depending
on the application being used.
Sending a LAN Fax
Refer to the System Administration CD (CD1) for more information on the LAN Fax feature.
LAN fax features include...
¾ Creating a Phone book
¾ Confirmation Sheet
¾ Send Speed
¾ Resolution
¾ Send Time
¾ Cover sheet
Page 24 Quick Use Guide
Page 29

Printing with Internet Services
1
¾ Open your Web Browser, then enter:
http:// and the printer TCP/IP address.
¾ Press the [Enter] key on your workstation keyboard.
The default Status window displays.
HINT: If you do not have the TCP/IP address for your machine, Refer to the
System Administration CD (CD1).
2
¾ Click on [Print]
and make your
selections.
3
¾ Click on [Browse] and locate the file to be printed.
¾ Click on [Submit Job].
NOTE: For more detailed information on using Internet Services refer to the
System Administration CD (CD1).
Printing with Internet Services is available on the WorkCentre if the option compatible with
PostScript
machine to communicate between the HTTP server and the machine. This option is only
available when the machine is connected to a network.
®
3™ is installed. Internet Services uses a Web User Interface embedded in the
Getting Started
Getting Started
Internet Services features include...
¾ Creating, modifying and deleting scan templates if Network Scanning is available
¾ Promoting, deleting or releasing a job in the Print Queue
¾ Reviewing the status of your machine
¾ Reprint Saved Jobs
Quick Use Guide Page 25
Page 30

Getting Started
1
Internal Auditron
Log on screen
¾ To Log On when the Internal
Auditron has been enabled, use
the keypad to enter a 4 digit
password and then select [Enter].
Network Accounting Log on
screen
¾ To Log On when Network
Accounting has been enabled,
enter a valid User ID and Account
ID and select [Enter].
2
¾ Complete your job.
3
To Log Off:
¾ Press [Access ] on the control panel.
¾ Select [Logout] on the Touch Screen.
Logging On / Logging Off
If an authentication mode has been enabled, a valid User Number needs to be entered in
order to access the machine functions.
Authentication is a useful network security management tool
limiting, restricting and monitoring access to the network via
the machine. Authentication can be set up by the System
Administrator to restrict access to the features within E-mail,
Network Scanning, Server Fax and Internet Fax.
Network
Authentication
Access
Guest Access Requires a generic passcode that is set up by the System Administrator. You will need to
Xerox Secure
Access
Requires your network login name and password. If you do not have a network account on
the local network you will not be authenticated using this mode.
obtain the passcode from the System Administrator.
Requires a configured card and card-reader that is set up by the System Administrator. You
will need to obtain the access details from the System Administrator.
Page 26 Quick Use Guide
Page 31

Customising your Machine
Your machine can be customised to suit your working environment and practices. The System
Management Tools enable your System or Machine Administrator to set-up, customise and
maintain the machine.
After your machine is installed, it is recommended that the settings and options are
customised to fully meet the requirements of the Users. Please discuss your requirements
with your System or Machine Administrator to ensure you get optimum performance from your
machine.
The Tools facility is accessed using the Access button on the control panel. Some of
the settings within Tools are critical to the operation of the machine, therefore the screens are
password protected so they cannot be accidently changed or corrupted.
Full instructions for accessing and customising the System Management Tools are located in
the Interactive User Guide CD (CD2), contained in the CD Pack delivered with your machine.
System Management Tools include...
¾ System Settings
¾ Screen Defaults
¾ Access and Accounting
¾ Feature Defaults
¾ Connectivity and Network Setup
¾ Consumables Management
¾ Machine Tests
¾ Power Saver Administration
¾ Fax Setups
Getting Started
Getting Started
Quick Use Guide Page 27
Page 32

Getting Started
1
Access the Job Queue
¾ Press the Job Status button on
the control panel. The All
Incomplete Jobs queue displays.
¾ Review the status of the job.
¾ Select [Other Queues] to access
and review the other queues
available.
2
Access the on-line Help
¾ Press Help at any time to
access the on-line help screens.
¾ Messages, screen instructions and
graphics provide additional
information.
3
¾ Press the [Machine Status]
button on the control panel.
¾ Select [Machine Details] to
display the machine serial
number.
NOTE: The serial number can also
be found on a metal plate inside
the front door.
For additional Help
If you need any additional help on using your machine you can:
¾ Refer to the Interactive User Guide CD (CD2), contained in the CD Pack
delivered with your machine.
¾ Refer to the System Administration CD (CD1) contained in the CD Pack
delivered with your machine.
¾ Visit our Customer Web Site at www.xerox.com or contact the Xerox Welcome
and Support Centre quoting the machine serial number
.
Further Assistance
Page 28 Quick Use Guide
Page 33

Maintenance
Consumables
Consumables are items on the machine that need replenishing or replacing, such as paper,
staples, and customer replaceable units.To place an order for Xerox consumables, please
contact your local Xerox Representative giving your Company Name, product number and the
machine serial number.
HINT: For information about locating the serial number, please refer to “Locating the Serial
Number” on page -34.
To find out more information about each consumable please refer to the Maintenance section
of the Interactive User Guide CD (CD2), contained in the CD Pack delivered with your
machine.
Customer Replaceable Units
There are 5 replaceable units on the machine:
Xerographic Module
Replenisher Bottle (toner)
Fuser Module and Ozone Filter
Document Handler Feed Head
Waste Toner bottle
The machine will display a message on the Touch Screen when any of the above need to be
reordered. This message is a warning that the unit is nearing the end of its life.
Only replace the unit when a message actually instructs you to do so.
To replace a Replaceable Unit, follow the instructions on the User Interface or refer to the
Maintenance section of the Interactive User Guide CD (CD2), contained in the CD Pack
delivered with your machine.
CAUTION: When replacing consumables, DO NOT remove the covers or guards that
are fastened with screws. You cannot maintain or service any of the parts that are
behind these covers and guards. Do NOT attempt any maintenance procedure that is
NOT specifically described in the documentation supplied with your machine.
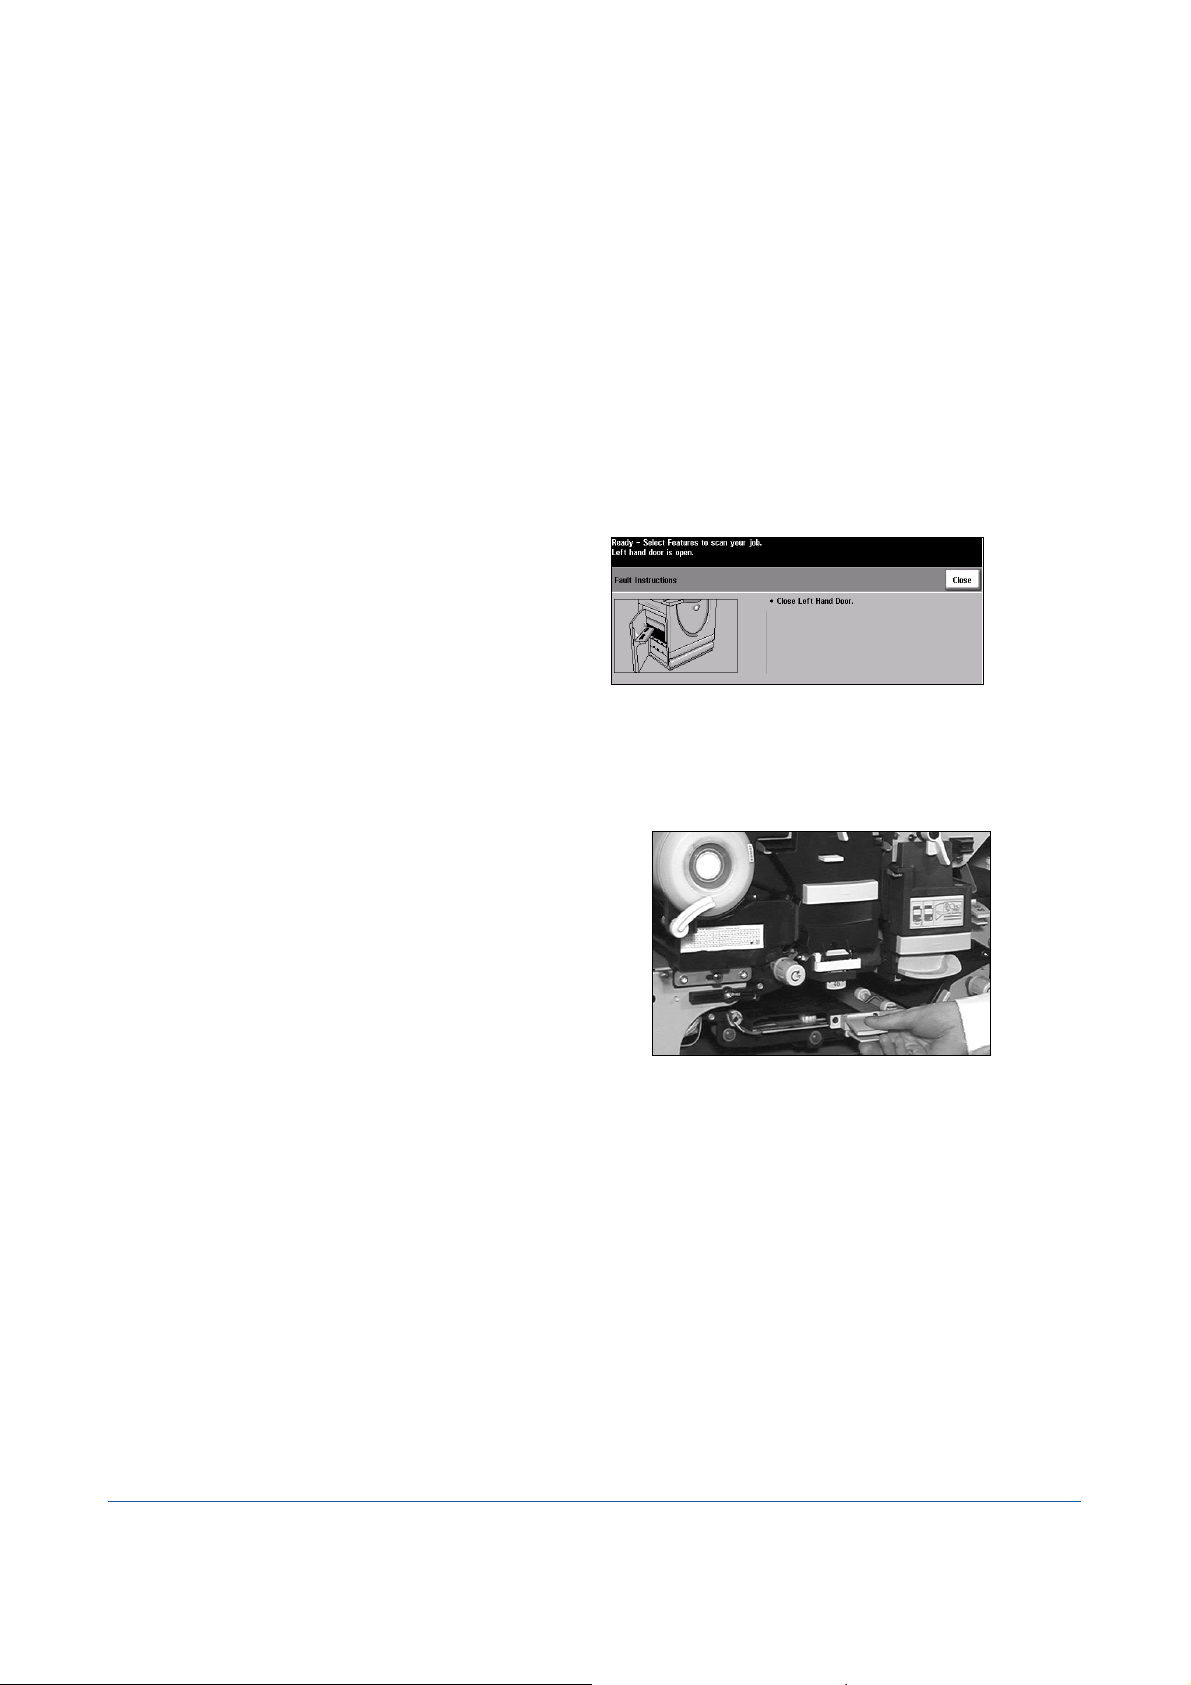
Staple Cartridges
If your machine is equipped with a finisher you will be required to replace the staple cartridge
or cartridges when the machine displays a message instructing you to do so.
To replace a staple cartridge, follow the instructions on the User Interface or refer to the
Maintenance section of the Interactive User Guide CD (CD2), contained in the CD Pack
delivered with your machine.
HINT: To place an order for any Xerox consumables, please contact your local Xerox
Representative giving your Company Name, product number and the machine serial
Quick Use Guide Page 29
Page 34

Maintenance
1
Document Glass and Constant
Velocity Transport Glass
¾ Apply Xerox Cleaning Fluid or Xerox
Anti-Static Cleaner, to a lint-free cloth.
Liquid should never be poured directly
onto the glass.
¾ Wipe clean the entire glass area.
¾ Wipe away any residue with a clean
cloth or paper towel.
Constant velocity
transport glass
NOTE: Spots or marks on the glass will be reproduced on the prints when
copying from the document glass. Spots on the Constant Velocity Transport
Glass will show up as streaks on the prints when copying from the document
handler.
2
Touch Screen
¾ Use a soft, lint-free cloth, lightly
dampened with water.
¾ Wipe clean the entire area, including
the Touch Screen.
¾ Remove any residue with a clean cloth
or paper towel.
number.
CAUTION: When replacing consumables, DO NOT remove the covers or guards that
are fastened with screws. You cannot maintain or service any of the parts that are
behind these covers and guards. Do NOT attempt any maintenance procedure that is
NOT specifically described in the documentation supplied with your machine.
Cleaning the Machine
WARNING: When cleaning the machine do NOT use organic or strong chemical
solvents or aerosol cleaners. Do NOT pour fluids directly onto any area. Use supplies
and cleaning materials only as directed in this documentation. Keep all cleaning
materials out of the reach of children.
WARNING: Do not use pressurised air-spray cleaning aids on or in this equipment.
Some pressurised air-spray containers contain explosive mixtures and are not
suitable for use in electrical applications. Use of such cleaners can result in a risk of
explosion and fire.
Page 30 Quick Use Guide
For more information about maintaining other areas of your machine please refer to the
Interactive User Guide CD (CD2), contained in the CD Pack delivered with your machine.
Page 35

Further Assistance
1
¾ Press the [Machine Status] button on
the control panel.
2
¾ The Machine Information screen
displays.
¾ Select [Machine Details].
3
¾ The Customer Support Number
for the Welcome and Support
Centre and the Machine Serial
Number are displayed.
For any additional help visit our customer web site at www.xerox.com or contact the Xerox
Welcome and Support Centre quoting the machine serial number.
Maintenance
Maintenance
Quick Use Guide Page 31
Page 36

Maintenance
Page 32 Quick Use Guide
Page 37
Troubleshooting
1
When a fault occurs, a fault screen
displays which provides recovery
instructions.
¾ Follow these instructions to clear
the fault.
NOTE: Any printed sheets removed
will automatically be reprinted once
the paper jam is cleared.
2
Paper Jams
¾ The fault screen will indicate the
location of the jam.
¾ Use the green handles and knobs
indicated in the instructions displayed
on the screen to remove the jammed
paper.
¾ Ensure that all jam clearance handles
and levers are returned to their
correct positions. The red flashes
behind the jam clearance handles
and levers should not be visible.
NOTE: Jam Clearance areas vary
depending on your machine model and
configuration.
NOTE: For additional Troubleshooting information please refer to the Interactive User Guide
CD (CD2) or the System Administration CD (CD1).
Fault Clearance
Quick Use Guide Page 33
Page 38

Troubleshooting
3
Document Jams
¾ Remove all the documents from the
document handler and document
glass as instructed.
¾ Re-order the documents as at the
start of the job and reload. The
documents will be recycled
automatically to recover the job.
1
¾ Press the [Machine Status] button on
the control panel.
2
¾ The Machine Information
screen displays.
¾ Select the [Faults] tab to see
details of recent faults,
together with fault codes.
3
¾ Select [Machine Details] to
display the Customer
Support Number for the
Welcome and Support
Centre and the Machine
Serial Number.
If you are unable to clear the fault, refer to the next section to contact your local Xerox
Welcome and Support Centre for assistance.
Xerox Welcome and Support Centre
If the difficulty persists, contact the Xerox Welcome and Support Centre. The Welcome and
Support Centre will want to know the following information: The nature of the problem, the
Machine Serial number, the fault code (if any) plus the name and location of your company.
Locating the Serial Number
Page 34 Quick Use Guide
NOTE: The serial number can also be found on a metal plate inside the front door.
 Loading...