

Page 1

Color 550 Printer
Color 560 Printer
Administrator Guide
Page 2
Microsoft and Windows are trademarks or registered trademarks of Microsoft Corporation in the U.S.
and other countries.
Adobe and Acrobat are trademarks of Adobe Systems Incorporated.
RSA and BSAFE are either registered trademarks or trademarks of RSA Security Inc. in the United
States and/or other countries.
RSA Security Inc. All right reserved.
All product/brand names are trademarks or registered trademarks of the respective holders.
Microsoft product screen shot(s) reprinted with permission from Microsoft Corporation.
For information on license, refer to About License in the User Guide.
In this manual, safety instructions are preceded by the symbol .
Always read and follow the instructions before performing the required procedures.
The data saved in the hard disk of the machine may be lost if there is any problem in the hard disk.
Fuji Xerox is not responsible for any direct and indirect damages arising from or caused by such data
loss.
Fuji Xerox is not responsible for any breakdown of machines due to infection of computer virus or
computer hacking.
Important
1. This manual is copyrighted with all rights reserved. Under the copyright laws, this manual may not
be copied or modified in whole or part, without the written consent of the publisher.
2. Parts of this manual are subject to change without prior notice.
3. We welcome any comments on ambiguities, errors, omissions, or missing pages.
4. Never attempt any procedure on the machine that is not specifically described in this manual.
Unauthorized operation can cause faults or accidents. Fuji Xerox is not liable for any problems
resulting from unauthorized operation of the equipment.
An export of this product is strictly controlled in accordance with Laws concerning Foreign
Exchange and Foreign Trade of Japan and/or the export control regulations of the United States.
XEROX and the sphere of connectivity design are trademarks or registered trademarks of Xerox
Corporation in the U.S. or Fuji Xerox Co., Ltd.
DocuWorks is a trademark of Fuji Xerox Co., Ltd.
Page 3

Table of Contents
Table of Contents ........................................................................................................ 3
1 Before Using the Machine ........................................................................................ 9
Preface ...................................................................................................................... 10
Types of Manuals ...................................................................................................... 11
Using This Guide ....................................................................................................... 12
Organization of This Guide ................................................................................... 12
Conventions .......................................................................................................... 12
Energy Saver Mode................................................................................................... 14
Changing the Interval for Entering Energy Saver Mode ....................................... 14
Customizing the Control Panel .................................................................................. 17
Changing the Screen Default................................................................................ 17
Setting the Screen After Auto Clear...................................................................... 18
Assigning Services to <Custom> Buttons ............................................................. 19
Adjusting Screen Brightness................................................................................. 21
Table of Contents
Entering Text ............................................................................................................. 22
2 Paper and Other Media ........................................................................................... 23
Paper Types .............................................................................................................. 24
Loadable Quantity and Weight for Supported Paper ............................................ 24
Supported Paper Type.......................................................................................... 25
Loading Paper ........................................................................................................... 27
Loading Paper in Trays 1 and 2............................................................................ 28
Loading Paper in Tray 3........................................................................................ 28
Loading Paper in Tray 4........................................................................................ 29
Loading Paper in Tray 5 (Bypass) ........................................................................ 30
Loading Tab Stock Paper in the Tray 5 (Bypass) ................................................. 31
Loading Paper in Tray 6 (A4 High Capacity Feeder) ............................................ 31
Loading Paper in Trays 6 and 7 (High Capacity Feeder C1-DS).......................... 32
Loading Tab Paper in Trays 6 and 7 (High Capacity Feeder C1-DS)................... 33
Loading Postcards in Trays 6 and 7 (High Capacity Feeder C1-DS) ................... 35
Facilitating Feeding of Heavyweight Paper Loaded in Trays 6 and 7 (High
Capacity Feeder C1-DS)....................................................................................... 36
Improving the Paper Feeding Performance in Trays 6 and 7 (High Capacity
Feeder C1-DS)...................................................................................................... 37
Loading Paper in Tray 8 (Interposer on Finisher D4 and Finisher D4 with
Booklet Maker)...................................................................................................... 38
Loading Tab Stock Paper in Tray 8 (Interposer on Finisher D4 and Finisher D4
with Booklet Maker) .............................................................................................. 38
Changing the Paper Size........................................................................................... 40
Changing the Paper Size for Trays 1 and 2.......................................................... 40
Changing the Paper Size for Tray 3...................................................................... 41
Changing the Paper Size for Tray 4...................................................................... 43
3
Page 4

Changing the Paper Size for Tray 6 (A4 High Capacity Feeder)...........................44
Changing the Paper Size for Trays 6 and 7 (High Capacity Feeder C1-DS).........46
Changing the Paper Settings .....................................................................................47
3 Maintenance..............................................................................................................51
Replacing Consumables ............................................................................................52
Replacing Toner Cartridges...................................................................................54
Replacing Waste Toner Container.........................................................................56
Replacing Drum Cartridge R1 (For Customers Having a Time and Material
Contract) ................................................................................................................58
Replacing Drum Cartridges R2, R3, or R4 (For Customers Having a Time
and Material Contract) ...........................................................................................62
Replacing the Staple Cartridge (For Finisher C2 or Finisher C2 with Booklet
Maker)....................................................................................................................66
Replacing the Booklet Staple Cartridge (For Finisher C2 with Booklet Maker) .....67
Replacing the Staple Cartridge (For Finisher D4 or Finisher D4 with Booklet
Maker)....................................................................................................................69
Replacing the Booklet Staple Cartridge (For Finisher D4 with Booklet Maker) .....70
Emptying the Punch Waste Container (For Finisher C2 or Finisher C2 with
Booklet Maker).......................................................................................................72
Emptying the Punch Waste Container (For Finisher D4 or Finisher D4 with
Booklet Maker).......................................................................................................73
Emptying the Staple Waste Container (For Finisher D4 or Finisher D4 with
Booklet Maker).......................................................................................................74
Cleaning the Machine.................................................................................................76
Cleaning the Exterior .............................................................................................76
Cleaning the Document Cover and Document Glass ............................................77
Cleaning the Document Presser and Narrow Glass Strip......................................77
Cleaning the Document Feeder Rollers.................................................................78
Executing Calibration .................................................................................................79
Printing a Report/List ..................................................................................................82
4 Machine Status .........................................................................................................83
Overview of Machine Status.......................................................................................84
Machine Information ...................................................................................................85
General Information...............................................................................................85
Paper Tray Status..................................................................................................87
Print Reports..........................................................................................................87
Overwrite Hard Disk...............................................................................................91
Faults..........................................................................................................................92
Supplies......................................................................................................................93
Billing Information .......................................................................................................94
Billing Information ..................................................................................................94
User Account Billing Information............................................................................95
4
Page 5

Table of Contents
5 Tools ......................................................................................................................... 97
System Settings Procedure ....................................................................................... 98
Step 1 Entering System Administration Mode ...................................................... 98
Step 2 Entering the System Administrator User ID and Passcode....................... 98
Step 3 Selecting [Tools] ........................................................................................ 99
Step 4 Selecting a Setting Item on the [Tools] Screen ......................................... 99
Step 5 Setting a Feature ..................................................................................... 100
Step 6 Exiting System Administration Mode ....................................................... 100
Tools Menu List ....................................................................................................... 101
Common Service Settings ....................................................................................... 108
Machine Clock/Timers ........................................................................................ 108
Audio Tones........................................................................................................ 111
Screen/Button Settings ....................................................................................... 112
Paper Tray Settings ............................................................................................ 113
Image Quality Adjustment................................................................................... 118
Reports ............................................................................................................... 119
Maintenance ....................................................................................................... 120
Watermark .......................................................................................................... 122
Force Annotation................................................................................................. 123
Print Universal Unique ID.................................................................................... 124
Notify Job Completion by E-mail ......................................................................... 125
Other Settings ..................................................................................................... 125
Copy Service Settings ............................................................................................. 133
Copy Tab - Features Allocation .......................................................................... 133
Preset Buttons .................................................................................................... 134
Copy Defaults ..................................................................................................... 134
Copy Control ....................................................................................................... 139
Original Size Defaults ......................................................................................... 141
Reduce/Enlarge Presets ..................................................................................... 141
Custom Colors .................................................................................................... 142
Annotations - Create Comments......................................................................... 142
Connectivity & Network Setup................................................................................. 142
Print Service Settings .............................................................................................. 142
Scan Service Settings ............................................................................................. 143
First Tab.............................................................................................................. 143
Scan Defaults...................................................................................................... 143
Scan to PC Defaults............................................................................................ 145
Original Size Defaults ......................................................................................... 145
Output Size Defaults ........................................................................................... 146
Reduce/Enlarge Presets ..................................................................................... 146
Other Settings ..................................................................................................... 146
Email Service Settings............................................................................................. 148
Folder Service Settings ........................................................................................... 148
Job Flow Service Settings ....................................................................................... 148
5
Page 6

Stored File Settings ..................................................................................................148
Network Controller Settings......................................................................................149
Connectivity & Network Setup .............................................................................149
Setup ........................................................................................................................151
Create Folder.......................................................................................................151
Stored Programming............................................................................................151
Create Job Flow Sheet ........................................................................................151
Create Job Flow Sheet Keyword .........................................................................151
Add Address Book Entry......................................................................................151
Paper Tray Attributes...........................................................................................151
Accounting................................................................................................................152
Create/View User Accounts.................................................................................152
Reset User Accounts...........................................................................................154
System Administrator’s Meter (Copy Jobs) .........................................................155
Accounting Type..................................................................................................155
Accounting Login Screen Settings.......................................................................156
Accounting/Billing Device Settings ......................................................................156
Authentication/Security Settings...............................................................................158
System Administrator Settings.............................................................................158
Authentication ......................................................................................................159
Allow User to Disable Active Settings..................................................................163
Job Status Default ...............................................................................................163
Overwrite Hard Disk.............................................................................................164
6 Authentication and Accounting Features ............................................................167
Overview of Authentication and Accounting Feature ...............................................168
Overview of Authentication Feature.....................................................................168
Overview of Accounting Feature..........................................................................169
Authentication...........................................................................................................170
User Types Managed by Authentication Feature ................................................170
User Roles and Authorization Groups .................................................................171
Types of Authentication .......................................................................................171
Types of Account Administration .........................................................................172
Authentication and Accounting Relationship .......................................................172
Services Controlled by Authentication......................................................................173
Overview ..............................................................................................................173
Services Restricted by User ID Authentication ....................................................173
Configuration for Authentication ...............................................................................174
Enabling Authentication.......................................................................................174
Changing the Default Authorization Group Settings ............................................175
Creating an Authorization Group .........................................................................176
Configuration for Account Administration.................................................................177
Step 1 Selecting an Accounting Type..................................................................177
Step 2 Registering User Information....................................................................177
6
Page 7

Table of Contents
7 Problem Solving ................................................................................................... 179
Troubleshooting....................................................................................................... 180
Machine Trouble...................................................................................................... 181
Image Quality Trouble ............................................................................................. 185
Trouble during Copying ........................................................................................... 191
Unable to Copy ................................................................................................... 191
The Copy Result is Not What was Expected ...................................................... 192
Error Code ............................................................................................................... 195
Other Errors ........................................................................................................ 219
Paper Jams ............................................................................................................. 220
Paper Jams in Trays 1 and 2 .............................................................................. 221
Paper Jams in Tray 3 .......................................................................................... 221
Paper Jams in Tray 4 .......................................................................................... 222
Paper Jams in Tray 5 (Bypass)........................................................................... 222
Paper Jams in Tray 5 (Bypass) with High Capacity Feeder C1-DS.................... 223
Paper Jams in Tray 6 (A4 High Capacity Feeder) .............................................. 224
Paper Jams in Trays 6 and 7 (High Capacity Feeder C1-DS)............................ 226
Paper Jams in Tray 8 (Interposer on Finisher D4 and Finisher D4 with Booklet
Maker) ................................................................................................................. 229
Paper Jams in the Transfer Module.................................................................... 229
Paper Jams in the Bottom Left Cover ................................................................. 231
Paper Jams in the Bottom Right Cover............................................................... 232
Paper Jams in the Output Tray ........................................................................... 233
Paper Jams in the Finisher C2 and the Finisher C2 with Booklet Maker............ 234
Paper Jams Inside the Finisher Left Cover (For Finisher D4 or Finisher D4
with Booklet Maker) ............................................................................................ 243
Paper Jams Inside the Finisher Right Cover (For Finisher D4 or Finisher D4
with Booklet Maker) ............................................................................................ 246
Paper Jams Inside the Z-Folder (For Finisher D4 or Finisher D4 with Booklet
Maker) ................................................................................................................. 249
Paper Jams at the Output Area of the Finisher................................................... 252
Paper Jams in the Interface Module ................................................................... 254
Document Jams....................................................................................................... 257
Stapler Faults .......................................................................................................... 260
Staple Jams in Staple Cartridge (For Finisher C2 or Finisher C2 with Booklet
Maker) ................................................................................................................. 261
Staple Jams in the Booklet Staple Cartridge (For Finisher C2 with Booklet
Maker) ................................................................................................................. 262
Staple Jams in the Staple Cartridge (For Finisher D4 or Finisher D4 with
Booklet Maker).................................................................................................... 264
Staple Jams in the Booklet Staple Cartridge (For Finisher D4 with Booklet
Maker) ................................................................................................................. 265
Re-inserting the Staple Cartridge into the Cartridge Unit ........................................ 267
Correcting the Curl of Outputs (When Finisher D4 or Finisher D4 with Booklet
Maker is Installed) ................................................................................................... 269
7
Page 8

8 Appendix .................................................................................................................271
Specifications ...........................................................................................................272
Optional Components...............................................................................................281
Alignment Adjustment Settings ................................................................................282
Alignment Adjustment ..........................................................................................282
Alignment Adjustment Settings............................................................................283
Skew Adjustment .................................................................................................286
Perpendicularity Adjustment ................................................................................287
Scale Adjustment.................................................................................................288
Print Position Adjustment.....................................................................................289
Adjust Fold Position..................................................................................................291
Fold Position Adjustment .....................................................................................291
Single Fold Position Adjustment ..........................................................................294
Booklet Position Adjustment ................................................................................295
C Fold Position Adjustment .................................................................................296
Z Fold Position Adjustment..................................................................................297
Z Fold Half Sheet Position Adjustment................................................................298
Adjust Image Transfer ..............................................................................................300
Image Transfer Adjustment .................................................................................300
Notes and Restrictions .............................................................................................304
Notes and Restrictions on the Use of the Machine..............................................304
Notes and Restrictions on the Use of the Copy Feature .....................................304
Notes and Restrictions on the Interrupt Mode .....................................................305
Index...............................................................................................................................307
8
Page 9

1 Before Using the Machine
This chapter describes the organization of this guide and conventions used in
this guide.
z
Preface ....................................................................................................... 10
z
Types of Manuals .......................................................................................11
z
Using This Guide ........................................................................................ 12
z
Energy Saver Mode .................................................................................... 14
z
Customizing the Control Panel ................................................................... 17
z
Entering Text ..............................................................................................22
Page 10

1 Before Using the Machine
Preface
Before Using the Machine
1
Thank you for selecting Color 550/560 Printer (hereafter referred to as “the machine”).
This guide is intended for system administrators, and provides maintenance
information such as how to replace consumables, how to configure network, and
troubleshooting procedures.
The guide assumes that you are familiar with a personal computer and that you are
knowledgeable of computer networks. When you need additional information, refer to
the manuals provided with the personal computer, operating system, and network
products.
After reading this guide, be sure to keep it handy for quick reference. It will be useful in
case you forget how to perform operations or if a problem occurs with the machine.
For more information on how to copy and scan, refer to the User Guide.
The Print Server is used to utilize the print feature. For capabilities of and how to
operate the Print Server, refer to the manual supplied with your Print Server.
10
Page 11

Types of Manuals
Types of Manuals
The following guides are provided with the machine.
Accompanying Manuals
User Guide
The guide describes all the necessary steps for copy and scan.
Administrator Guide (this guide)
The guide is intended for system administrators, and describes how to solve problems
that may occur with the machine. This guide also describes daily maintenance and the
system settings procedures.
Before Using the Machine
1
11
Page 12

1 Before Using the Machine
Using This Guide
Before Using the Machine
This guide is intended for system administrators, and provides maintenance
information such as how to replace consumables, and troubleshooting procedures.
Organization of This Guide
This guide consists of the following chapters.
1 Before Using the Machine
Describes the organization of this guide and conventions.
2 Paper and Other Media
1
Describes the types of paper and other media that you can use on the machine and
how to load media in a tray.
3 Maintenance
Describes how to replace consumables and to clean the machine.
4 Machine Status
Describes how to check the faults that occurred on the machine and to print various
reports/lists.
5 Tools
Describes the procedures to set up the system.
6 Authentication and Account Administration
The machine has the Authentication feature to restrict the availability of services for
each feature and the Accounting feature to manage the use of each feature based on
the Login Type selected.
7 Problem Solving
Describes troubleshooting procedures to solve the problems with the machine.
8 Appendix
Describes the specifications of the machine, optional accessories, and cautions/
restrictions.
Conventions
z
z
z
z
The screen shots and illustrations used in this guide vary depending on the machine
configuration and optional components installed. Some of the items in the screen
shots may not be displayed or available depending on your machine configuration.
The procedures in this guide may vary depending on the driver and utility software
being used due to the upgrades.
In this document, "Computer" refers to a personal computer or workstation.
The following terms are used in this guide:
12
Important : Important information that you should read.
Note : Additional information on operations or features.
Page 13

z
LEF Orientation
Paper feed direction
SEF Orientation
Paper feed direction
The following symbols are used in this guide:
" " : • A cross-reference included in this guide.
Using This Guide
• Names of CD-ROM, features, and touch screen messages
and input text.
[ ] : • Folders, files, applications, button or menu names displayed
on the touch screen.
• Names of menus, commands, windows, or dialog boxes
displayed on the computer screen and their buttons and
menu names.
< > button : Hardware buttons on the control panel.
< > key : Keys on the keyboard of the computer.
> : • Path to a certain item within a procedure on the control panel.
For example: When you see the procedure "select [Tools] >
[Setup] > [Create Folder]", this means that you need to select
[Tools], select [Setup], and then select [Create Folder].
• Path to a certain item within a procedure on a computer.
For example: When you see the procedure "to search for files
and folders, click [Start] > [Search] > [For Files or Folders]",
this means that you need to click [Start], click [Search], and
then click [For Files or Folders] to search for files and folders.
• Cross-reference
For example: "Refer to "5 Tools" > "Common Service
Settings" > "Audio Tone" in the Administrator Guide."
The sentence above means that you need to refer to the
section "Audio Tone", which can be found under "Common
Service Settings" in chapter 5 Tools of the Administrator
Guide.
z
Orientation of documents or paper is described in this guide as follows:
Before Using the Machine
1
, ,Long Edge Feed (LEF): Loading the document or paper in portrait orientation
when viewed from the front of the machine.
, ,Short Edge Feed (SEF): Loading the document or paper in landscape
orientation when viewed from the front of the machine.
13
Page 14

1 Before Using the Machine
<Log In/Out> button
Energy Saver Mode
Before Using the Machine
1
The machine is equipped with the Energy Saver mode that reduces the power
consumption by saving the electricity to the machine when no copy or print data is
received for a specified time.
The Energy Saver feature has two modes: Low Power mode and Sleep mode.
The machine enters the Low Power mode after the preset time has elapsed if the
machine is left unused for a fixed period of time.
The machine then enters the Sleep mode if a further preset time elapses.
To enter the Energy Saver mode, press the <Energy Saver> button on the control
panel.
Low Power Mode
In this mode, the power to the control panel and fusing unit is lowered to save power.
The touch screen goes out, and the <Energy Saver> button on the control panel lights
up. To use the machine, press the <Energy Saver> button. The <Energy Saver> button
goes out to indicate that the Low Power mode is exited.
Sleep Mode
In this mode, the power being sent to parts, such as the hard disk, is cut off and the
power is lowered even more than in the Low Power mode.
The touch screen goes out, and the <Energy Saver> button on the control panel lights
up. To use the machine, press the <Energy Saver> button. The <Energy Saver> button
goes out to indicate that the Sleep mode is exited.
It takes longer for the machine to recover from Sleep mode than from Low Power mode.
Changing the Interval for Entering Energy Saver Mode
This section describes the procedures for setting the Energy Saver mode.
To activate the Energy Saver, set the time to elapse until the machine enters the Low
Power mode as well as the time to elapse until the machine enters the Sleep mode.
Note • You can set the time to elapse until the machine enters the Low Power mode and the Sleep
mode from 1 to 240 minutes in 1 minute increments.
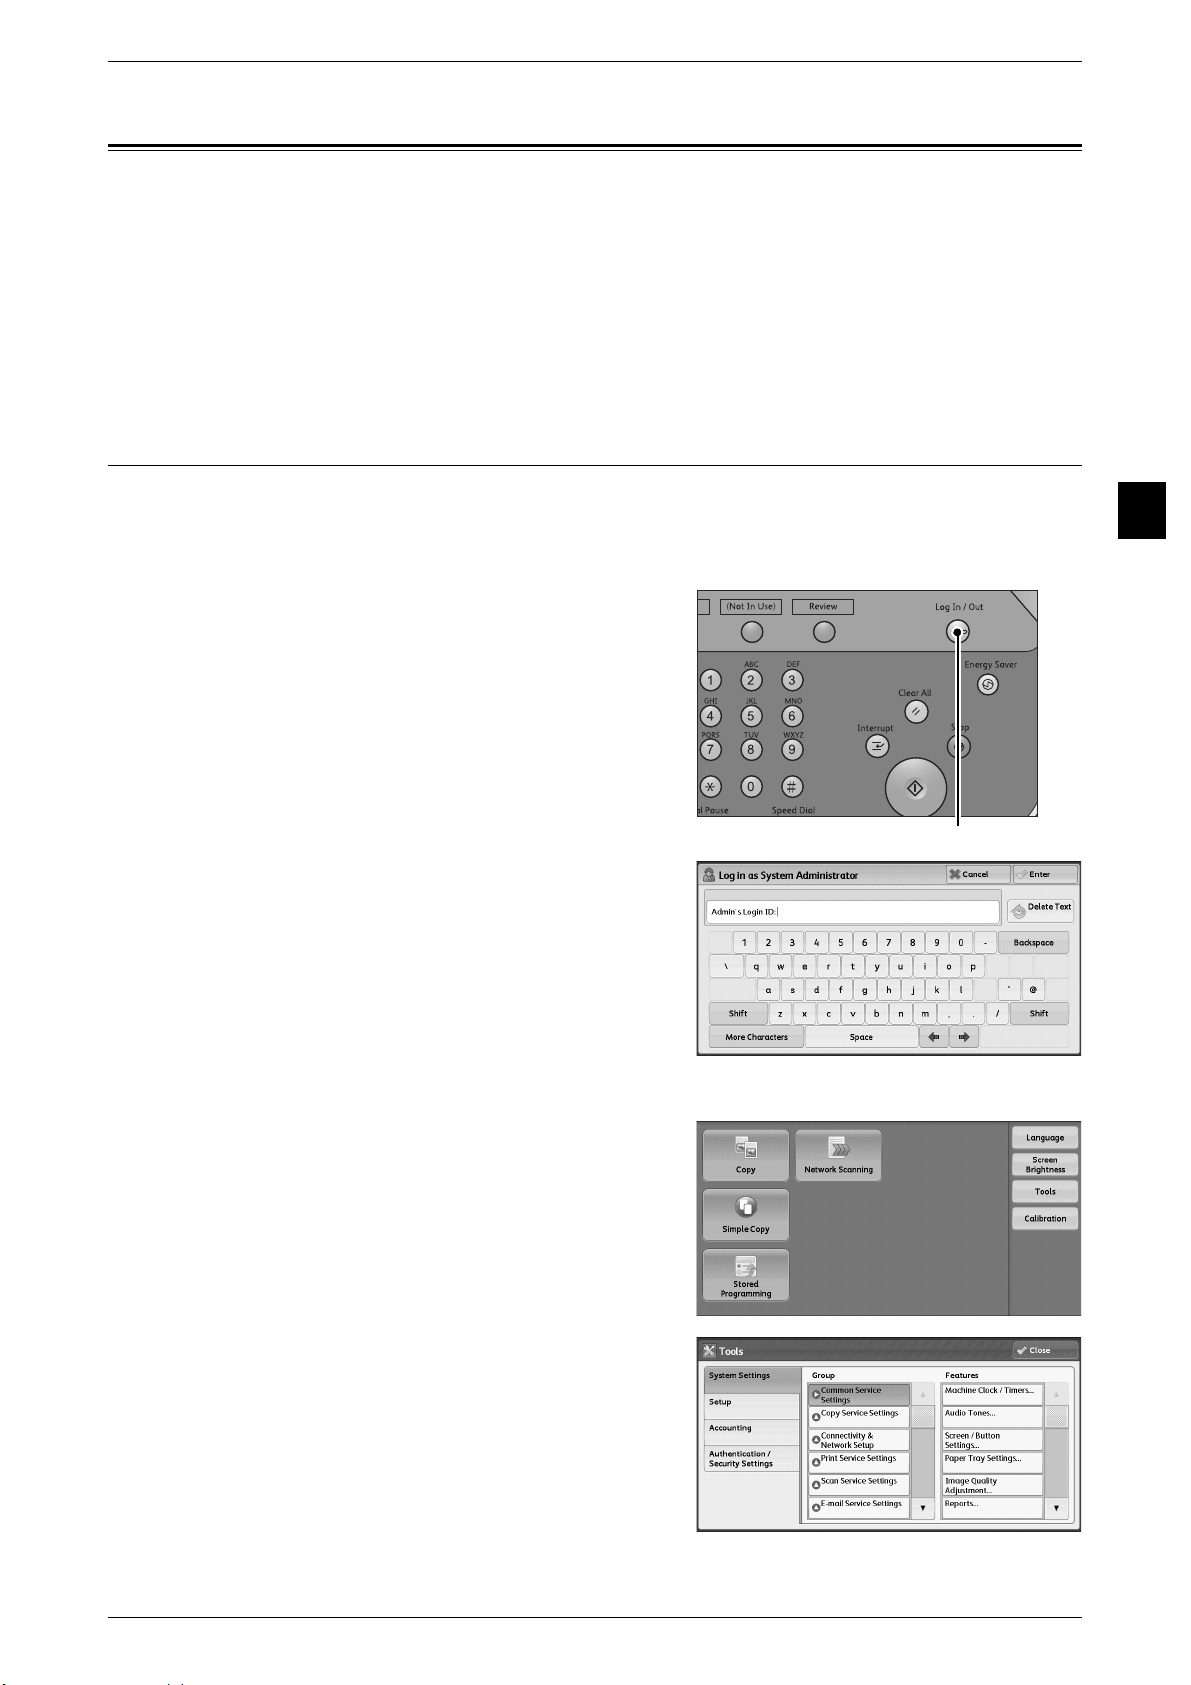
1 Press the <Log In/Out> button.
14
Page 15

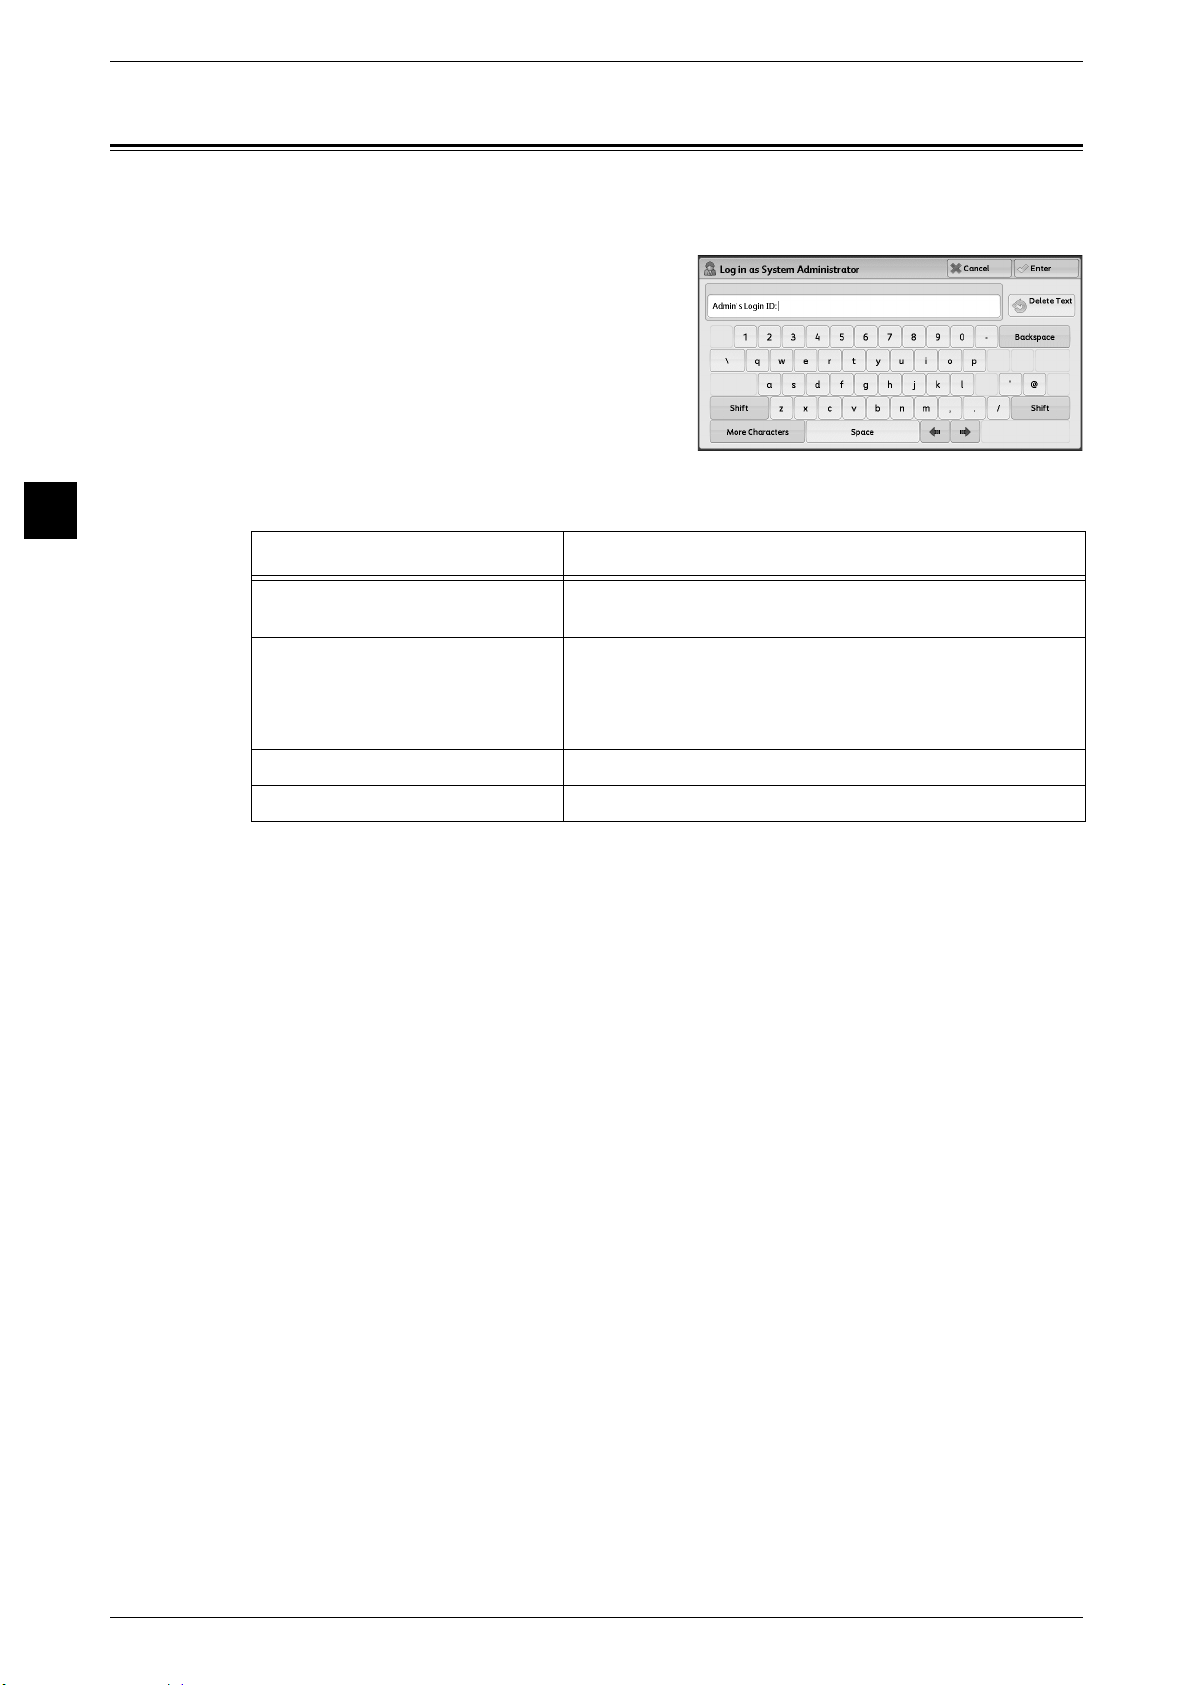
2 Enter the system administrator’s user ID with
the numeric keypad or the keyboard
displayed on the screen, and select [Enter].
When a passcode is required, select [Next]
and enter the system administrator’s
passcode, and select [Enter].
Note • The default user ID is "11111".
• The default passcode is "x-admin".
3 Select [Tools] on the [Services Home]
screen.
Note • When the [Services Home] screen is not
displayed on the touch screen, press the
<Services Home> button.
4 Select [System Settings] > [Common
Service Settings] > [Machine Clock/Timers].
Energy Saver Mode
Before Using the Machine
1
5 Select [Energy Saver Timers], and then
select [Change Settings].
Note • Select [ ] to display the previous screen
or [ ] to display the next screen.
6 Using [] and [], set the time to elapse until
entering the Energy Saver mode, in 1 minute
increments.
From Last Operation to Low Power Mode
Set the time to elapse from the last operation until the machine enters the Low Power
mode.
Note • The default value for [From Last Operation to Low Power Mode] is [1] minute. You cannot
disable the Low Power mode.
From Last Operation to Sleep Mode
Set the time to elapse from the last operation until the machine enters the Sleep mode.
Note • The default value for [From Last Operation to Sleep Mode] is [50] minutes. You must set a
longer period of time for [From Last Operation to Sleep Mode] than for [From Last Operation
to Low Power Mode].
15
Page 16

1 Before Using the Machine
7 Select [Save].
8 Select [Close] repeatedly until the [Tools] screen is displayed.
Before Using the Machine
1
9 Select [Close].
16
Page 17
Customizing the Control Panel
<Log In/Out> button
Customizing the Control Panel
You can change the services displayed on the touch screen or the features assigned
to the buttons to make best use of the machine.
This section describes how to change the screen default, the services displayed after
Auto Clear, and the services assigned to the <Custom> buttons, and how to adjust the
screen brightness.
For information on how to change the other settings of the control panel, refer to "Screen/Button
Settings" (P.112).
Changing the Screen Default
You can change the screen displayed when the machine is turned on or the Energy
Saver mode is deactivated.
The [Services Home] screen is displayed by factory default.
1 Press the <Log In/Out> button.
Before Using the Machine
1
2 Enter the system administrator’s user ID with
the numeric keypad or the keyboard
displayed on the screen, and select [Enter].
When a passcode is required, select [Next]
and enter the system administrator’s
passcode, and select [Enter].
Note • The default user ID is "11111".
• The default passcode is "x-admin".
3 Select [Tools] on the [Services Home]
screen.
Note • When the [Services Home] screen is not
displayed on the touch screen, press the
<Services Home> button.
4 Select [System Settings] > [Common
Service Settings] > [Screen/Button Settings].
17
Page 18
Before Using the Machine
<Log In/Out> button
1
1 Before Using the Machine
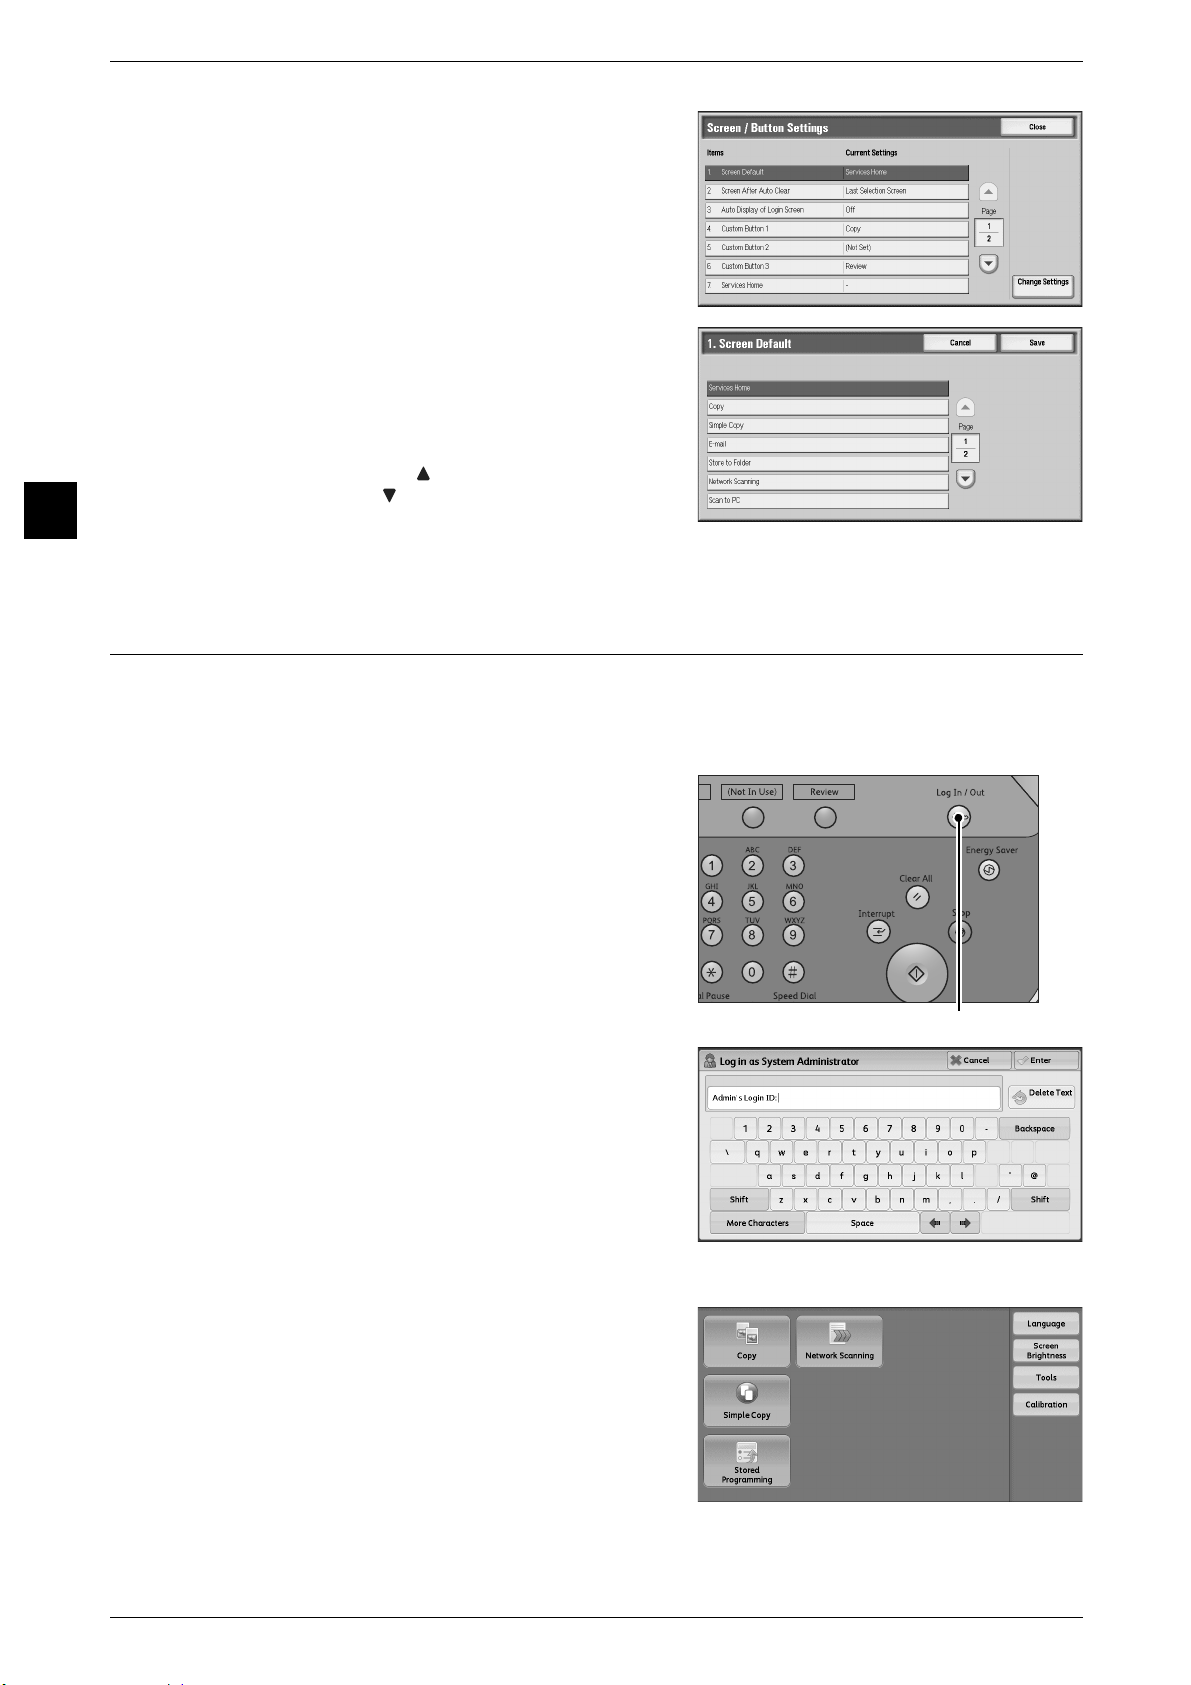
5 Select [Screen Default], and then select
[Change Settings].
6 Select a service you want to display.
Important • [E-mail], [Store to Folder], [Scan to PC],
[Store & Send Link], [Send from Folder],
and [Job Flow Sheets] cannot be used on
this machine.
Note • Select [ ] to display the previous screen
or [ ] to display the next screen.
7 Select [Save].
Setting the Screen After Auto Clear
You can select the screen to be displayed after Auto Clear from [Last Selection Screen]
or [Services Home].
For information on Auto Clear, refer to "Auto Clear" (P.109).
1 Press the <Log In/Out> button.
2 Enter the system administrator’s user ID with
the numeric keypad or the keyboard
displayed on the screen, and select [Enter].
When a passcode is required, select [Next]
and enter the system administrator’s
passcode, and select [Enter].
Note • The default user ID is "11111".
• The default passcode is "x-admin".
18
3 Select [Tools] on the [Services Home]
screen.
Note • When the [Services Home] screen is not
displayed on the touch screen, press the
<Services Home> button.
Page 19

4 Select [System Settings] > [Common
<Log In/Out> button
Service Settings] > [Screen/Button Settings].
5 Select [Screen After Auto Clear], and then
select [Change Settings].
6 Select [Last Selection Screen] or [Services
Home].
Customizing the Control Panel
Before Using the Machine
1
7 Select [Save].
Assigning Services to <Custom> Buttons
You can assign services to the <Custom 1> to <Custom 3> buttons on the control
panel.
Assigning a service to a <Custom> button allows you to switch to this service without
having to return to the [Services Home] screen. If you do not need to assign any service
to a <Custom> button, select [(Not Set)].
[Copy] is assigned to the <Custom 1> button and [Review] is assigned to the <Custom
3> button, while the <Custom 2> button has no assignment.
This section describes how to assign [Stored Programming] to the <Custom 2> button,
as an example.
Note • After you change the assignment, apply the labels provided with the machine. When you
assign a service for which no label is provided, use a blank label and write down the service
name with a permanent marker. The labels include the services that are not supported by
the machine.
1 Press the <Log In/Out> button.
19
Page 20
Before Using the Machine
1
1 Before Using the Machine
2 Enter the system administrator’s user ID with
the numeric keypad or the keyboard
displayed on the screen, and select [Enter].
When a passcode is required, select [Next]
and enter the system administrator’s
passcode, and select [Enter].
Note • The default user ID is "11111".
• The default passcode is "x-admin".
3 Select [Tools] on the [Services Home]
screen.
Note • When the [Services Home] screen is not
displayed on the touch screen, press the
<Services Home> button.
4 Select [System Settings] > [Common
Service Settings] > [Screen/Button Settings].
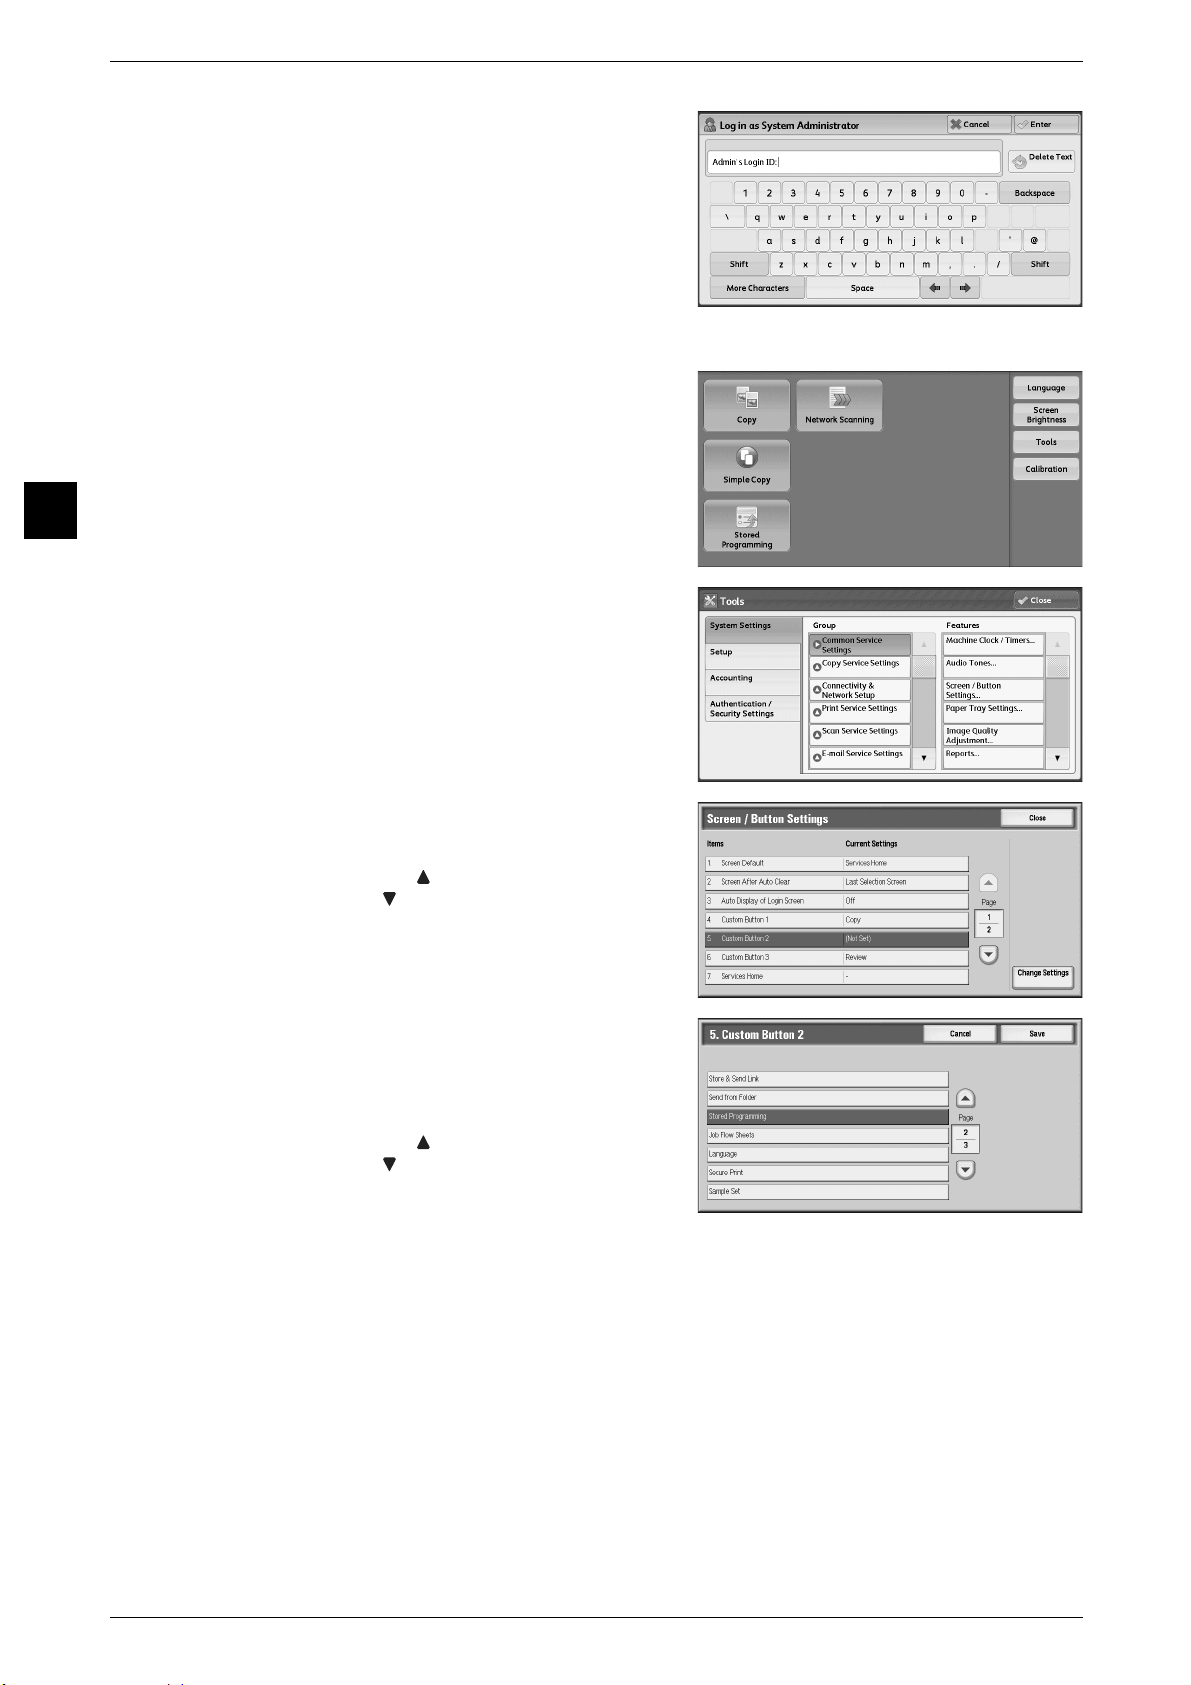
5 Select [Custom Button 2], and then select
[Change Settings].
Note • Select [ ] to display the previous screen
or [ ] to display the next screen.
6 Select [Stored Programming].
Important • Only [(Not Set)], [Copy], [Simple Copy],
[Network Scanning], and [Stored
Programming] can be selected.
Note • Select [ ] to display the previous screen
or [ ] to display the next screen.
7 Select [Save].
20
Page 21

Adjusting Screen Brightness
You can adjust the screen brightness of the screen on the [Services Home] screen.
Customizing the Control Panel
1 Select [Screen Brightness] on the [Services Home] screen.
2 Press [+] or [-] to adjust the screen
brightness.
3 Select [Save].
To adjust the screen brightness from the [Tools] screen, refer to "Screen Brightness" (P.113).
Before Using the Machine
1
21
Page 22
1 Before Using the Machine
Entering Text
Before Using the Machine
1
During operations, a screen for entering text sometimes appears. The following
describes how to enter text.
You can enter the following characters: numerals, alphabets, and symbols.
Item Description
Entering alphabets and numerals To enter uppercase letters, select [Shift]. To return to the
lowercase letters, select [Shift] again.
Entering symbols Select [More Characters].
Note • Depending on the keyboard, you can select a
symbol from the pull-up options displayed on the
bottom left of the screen.
Entering a space Select [Space].
Deleting characters Select [Backspace] to delete one character at a time.
22
Page 23

2 Paper and Other Media
This chapter describes the paper that can be used with the machine,
precautions when handling paper, and how to load paper in trays.
z
Paper Types ...............................................................................................24
z
Loading Paper ............................................................................................27
z
Changing the Paper Size............................................................................40
z
Changing the Paper Settings......................................................................47
Page 24

2 Paper and Other Media
WARNING
Paper Types
Paper and Other Media
2
This section describes the paper that can be used with this machine.
Use of unrecommended paper may result in paper jams, lower print quality,
malfunctions, or damage to the machine. To achieve optimum performance of the
machine, we recommend that you use only paper recommended by Fuji Xerox.
If you desire to use paper other than the paper recommended by Fuji Xerox, contact
your local Fuji Xerox representative.
Do not use conductive paper such as origami paper, carbonic paper or conductivelycoated paper. When paper jam occurs, it may cause short-circuit and eventually a
fire accident.
Important • Moisture generated by water, rain, or vapor may cause the printed images to be degraded or
to fade. For more information, contact your local Fuji Xerox representative.
Loadable Quantity and Weight for Supported Paper
When using commonly used paper (known as printable paper) for copying, make sure
that it complies with the following specifications.
Paper Trays Basis Weight/Ream Weight Loadable Quantity
Trays 1 and 2 64 to 220 gsm
Ream Weight: 55 - 189.1 kg
Tray 3 870 sheets
Tray 4 1,140 sheets
Tray 5 (bypass) 64 to 300 gsm
Ream Weight: 55 - 257.9 kg
Tray 6 (A4 High Capacity
Feeder) (optional)
Trays 6 and 7 (High
Capacity Feeder C1-DS)
(optional)
Tray 8 (Interposer on
Finisher D4) (optional)
64 to 220 gsm
Ream Weight: 55 - 189.1 kg
64 to 300 gsm
Ream Weight: 55 - 257.9 kg
64 to 220 gsm
Ream Weight: 55 - 189.1 kg
500 sheets
(80 gsm)
(80 gsm)
(80 gsm)
Up to 27mm 250 sheets
(80 gsm)
2,000 sheets
(80 gsm)
2,000 sheets
(80 gsm) x 2
200 sheets
(80 gsm)
24
Important • Printing on paper that differs from the paper type and size selected in the print server, or
printing from a tray that does not support the loaded paper may result in a paper jam. To
ensure correct printing, select the correct paper size, paper type, and paper tray.
Note • Basis weight is the weight of 1 m
• Ream weight is the weight of 1,000 sheets of duodecimo size (788 x 1,091 mm) paper.
• When copying on non-standard size paper from Tray 5, you must enter the paper size.
Furthermore, if you frequently copy on non-standard size paper, you can preset the size on
the machine. That size then appears under [Standard Sizes] on the [Tray 5] screen. For
more information on the settings, refer to "Tray 5 - Paper Size Defaults" (P.115).
• Optimum image quality on the paper can be obtained by setting the image quality for each
type of paper. For more information on the settings, refer to "Image Quality" (P.116).
• When loading postcards (100 x 148 mm) in the optional High Capacity Feeder C1-DS, the
Postcard Kit is required.
2
of a paper sheet.
Page 25

Supported Paper Type
Standard Paper
When printing or copying on commonly used paper (plain paper), use paper meeting
the standards described below. To copy or print as clear as possible, we recommend
the following standard paper.
FX P Paper 64 : Plain
Colortech + 90 : Plain
FX-J 82 : Plain
FX-JD 98 : Plain
FXK-H 80 : Plain
FX-J 98 : Plain
NO. 1 (Xerox Brand) 80 : Plain
Premier 80 : Plain
Paper Types
Paper and Other Media
Paper Weight (gsm) and Paper Type
2
Business 80 : Plain
Purple Wrap 80 : Plain
Premier A4 80 : Plain
Business (Blue) 80 : Plain
For more information on selecting the paper type setting for the paper loaded on a tray, refer to
"Changing the Paper Settings" (P.47).
For more information on setting or adjusting the image quality for each paper type to obtain optimum
image quality on the paper, refer to "Image Quality" (P.116).
Semi Standard Paper
In addition to the standard paper, the following paper also can be used.
Indagit 75 : Plain
No. GA (Package: Green) 80 : Plain
No. ZA (Package: Orange) 70 : Plain
White & Red Label 70 : Plain
Performer 80 : Plain
Paper Weight (gsm) and Paper Type
Gold Flag Ship 80 : Plain
For more information on selecting the paper type setting for the paper loaded on a tray, refer to
"Changing the Paper Settings" (P.47).
For more information on setting or adjusting the image quality for each paper type to obtain optimum
image quality on the paper, refer to "Image Quality" (P.116).
25
Page 26

2 Paper and Other Media
Unusable Paper
Using paper not recommended by Fuji Xerox and transparencies may cause a paper
jam or machine malfunction. Use paper recommended by Fuji Xerox.
z
Color transparency sheets (bordered with a white frame)
z
Pre-printed paper printed on another printer or offset press
Paper and Other Media
2
Storing and Handling Paper
z
Pre-printed paper printed on this printer
z
Inkjet paper
z
Tracing paper
z
Folded, creased, or curled paper
z
Label sheets whose face sheet surface does not cover the entire backing sheet
z
Envelopes with sticky adhesive
z
Multi-color printed postcard
Please keep the following points in mind when storing paper
z
Store paper inside a cabinet or other dry place. Paper that has absorbed moisture
can cause paper jams and image quality defects.
z
After opening a package of paper, wrap up the remaining paper to store it. It is
recommended that you include moisture prevention packets.
z
Paper should be stored flat to prevent bends or warping.
Please adhere to the following points when setting paper into a tray
z
Align the stack of paper neatly before setting it in a tray.
z
Do not use paper that is folded, creased, or heavily warped.
z
Do not use waved or curled paper.
z
Do not load paper of mixed sizes together into a tray.
z
Transparencies and labels can cause paper jams, and multiple sheets can be fed to
the printer at once. Be sure to carefully fan these types of paper.
z
When continuously outputting onto transparencies, transparency sheets may
sometimes stick to each other. Remove transparencies from the output tray every 20
or so sheets, and fan them to cool them down.
26
Page 27

Loading Paper
This section describes how to load paper.
Types of paper loaded in trays
Loading Paper
The machine automatically detects the size and orientation of loaded paper in a tray,
but not a paper type. Normally, each tray is set to plain paper. When loading paper
other than plain paper, you must change the paper type setting. You can name paper
types and can set up to five paper types as user-defined paper.
For information on changing the paper type settings, refer to "Changing the Paper Settings" (P.47).
Automatic Tray Selection
When making copies, automatic tray selection is active if [Auto Select] is selected for
[Paper Supply]. If the machine detects two or more corresponding trays in the
automatic tray selection, the machine gives higher priority to the tray having the highest
[Paper Type Priority] set at [Paper Type Settings].
A tray may not be targeted during automatic tray selection depending on what is
selected in [Auto Paper Select] for the paper tray.
For information on the setting for [Auto Paper Select], refer to "Change Settings" (P.113).
Note • Tray 5 (bypass) cannot be selected in automatic tray selection.
• When the machine runs out of paper during copying or printing, select a tray containing the
paper of the same size and orientation that was being used for copying or printing, and
continue copying or printing (Auto Tray Switching feature). During this operation, the
machine cannot switch to a tray containing a paper type for which the [Paper Type Priority]
setting is set to [Auto Paper Off].
For information about [Paper Type], [Paper Type Priority], and [Paper Tray Priority] settings, and the
paper substitute feature, refer to "Paper Tray Settings" (P.113).
Paper and Other Media
2
Adding paper
When the machine runs out of paper during copying or printing, a message appears on
the touch screen. Add paper according to the message instructions. Copying or printing
automatically resumes when paper is added.
Note • Carefully fan the paper before loading it in a tray. Otherwise, the paper may stick together,
resulting in paper jams, or multiple sheets being fed to the machine simultaneously.
27
Page 28
2 Paper and Other Media
CAUTION
Loading Paper in Trays 1 and 2
The following describes the procedures to load paper in Trays 1 and 2.
When the machine runs out of paper during copying or printing, a message appears on
the touch screen. Add paper according to the message instructions. Copying or printing
automatically resumes when paper is added.
Paper and Other Media
Note • Carefully fan the paper before loading it in a tray. Otherwise, the paper may stick together,
resulting in paper jams.
For information on changing the paper size and orientation, refer to "Changing the Paper Size for Trays
1 and 2" (P.40).
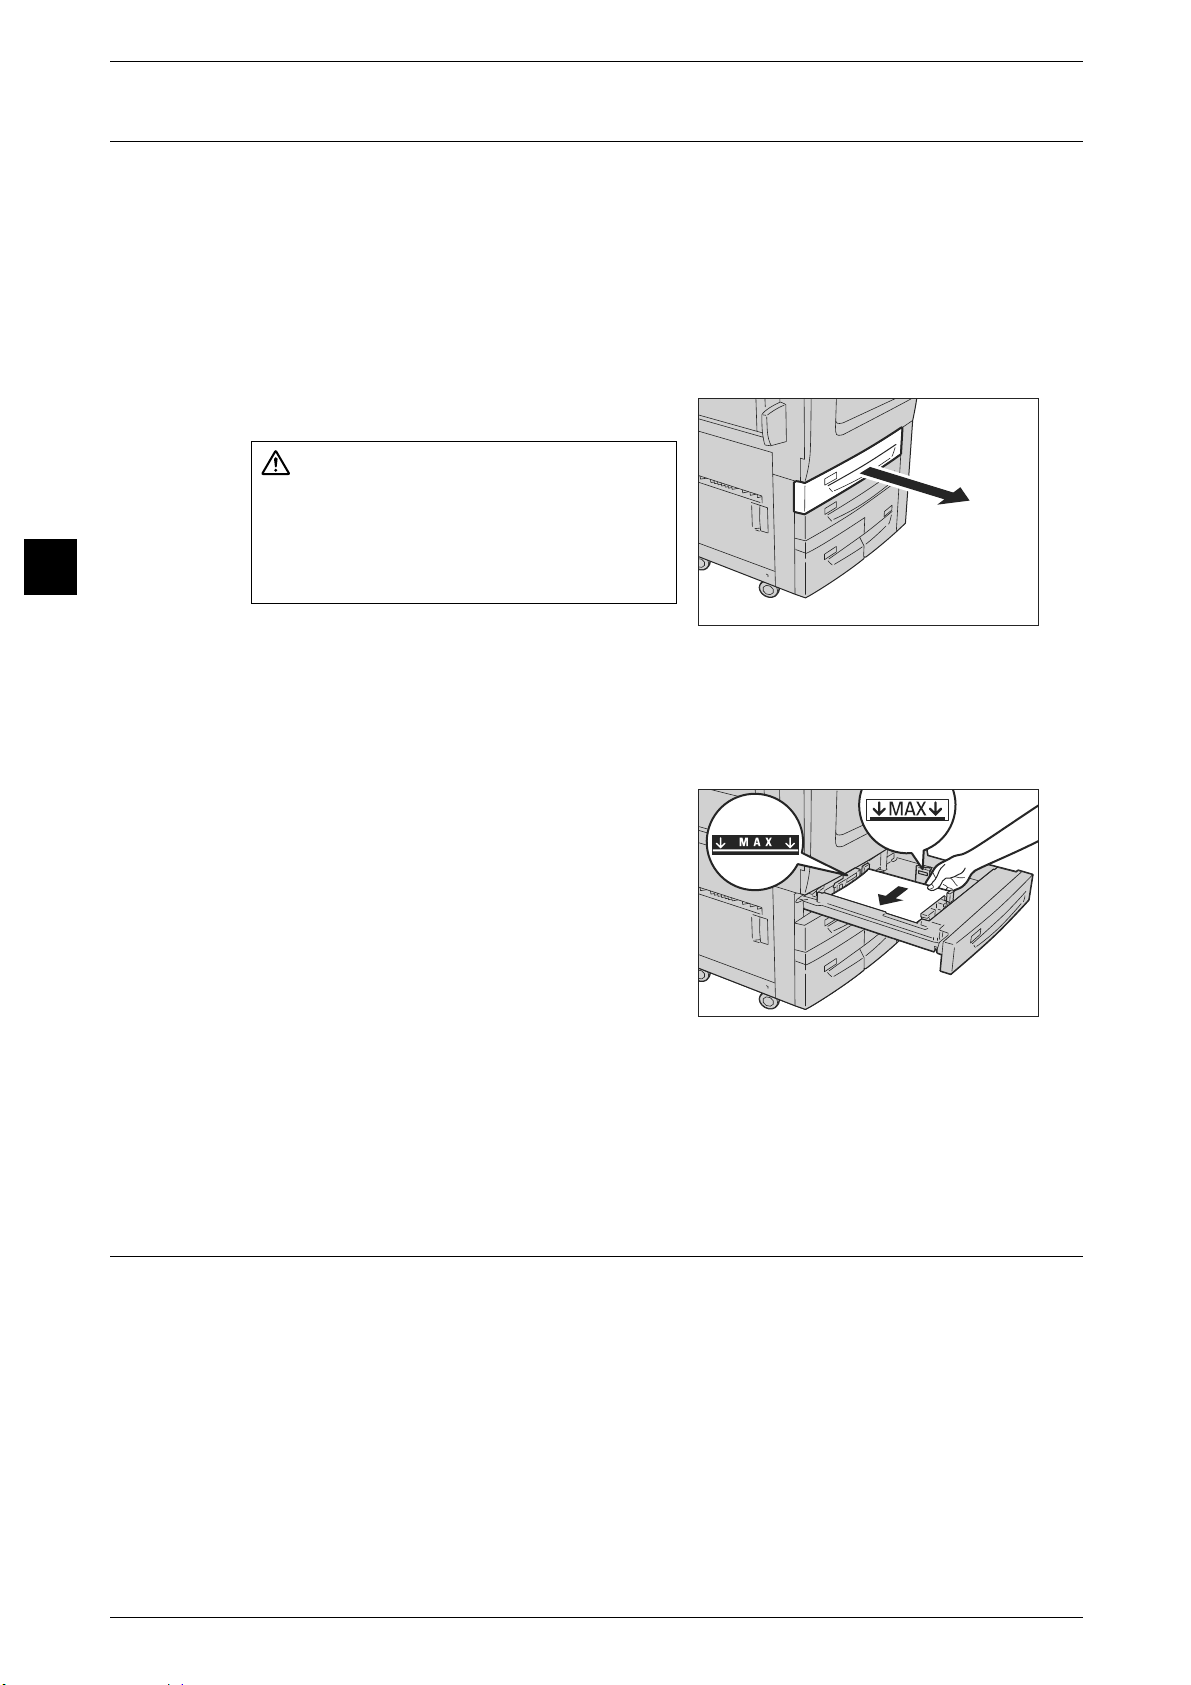
1 Pull out the tray until it stops.
Be sure to pull out the paper tray slowly. If
pulled out with too much force, the tray
may hit and injure your knees or other
2
parts of your body.
Important • While the machine is processing a job, do
not pull out the tray that is being used for
the job.
• To prevent paper jams or erroneous detection of loaded paper in a tray by the machine, do
not add paper on top of any remaining paper in the tray. Remove any remaining paper in the
tray, and then load that paper on top of the newly loaded paper.
2 Load and align the edge of the paper against
the left edge of the tray, with the side to be
copied or printed on facing down.
Important • Do not load paper above the maximum fill
line ("MAX" in the right illustration). It may
cause paper jams or machine
malfunction.
• Do not place any paper or objects in the
empty space on the right side of Trays 1
and 2. It may cause paper jams or
machine malfunction.
3 Push the tray in gently until it comes to a stop.
Important • When inserting the tray, push it gently. Forcibly pushing in the tray may cause machine
malfunction.
Loading Paper in Tray 3
The following describes the procedures to load paper in Tray 3.
When the machine runs out of paper during copying or printing, a message appears on
the touch screen. Add paper according to the message instructions. Copying or printing
automatically resumes when paper is added.
Note • Carefully fan the paper before loading it in a tray. Otherwise, the paper may stick together,
resulting in paper jams.
For information on changing the paper size and orientation, refer to "Changing the Paper Settings"
(P.47).
28
Page 29

1 Pull out the tray until it stops.
CAUTION
CAUTION
Be sure to pull out the paper tray slowly. If
pulled out with too much force, the tray
may hit and injure your knees or other
parts of your body.
Important • While the machine is processing a job, do
not pull out the tray that is being used for
the job.
• To prevent paper jams or erroneous detection of loaded paper in a tray by the machine, do
not add paper on top of any remaining paper in the tray. Remove any remaining paper in the
tray, and then load that paper on top of the newly loaded paper.
2 Load and align the edge of the paper against
the left edge of the tray, with the side to be
copied or printed on facing down.
Important • Do not load paper above the maximum fill
line ("MAX" in the illustration). It may
cause paper jams or machine
malfunction.
Loading Paper
Paper and Other Media
2
3 Push the tray in gently until it comes to a stop.
Important • When inserting the tray, push it gently. Forcibly pushing in the tray may cause machine
malfunction.
Loading Paper in Tray 4
The following describes the procedure for loading paper in Tray 4.
When the machine runs out of paper during copying or printing, a message appears on
the touch screen. Add paper according to the message instructions. Copying or printing
automatically resumes when paper is added.
Note • Carefully fan the paper before loading it in a tray. Otherwise, the paper may stick together,
resulting in paper jams.
For information on changing the paper size and orientation, refer to "Changing the Paper Settings"
(P.47).
1 Pull out the tray until it stops.
Be sure to pull out the paper tray slowly. If
pulled out with too much force, the tray
may hit and injure your knees or other
parts of your body.
Important • While the machine is processing a job, do
not pull out the tray that is being used for
the job.
• To prevent paper jams or erroneous detection of loaded paper in a tray by the machine, do
not add paper on top of any remaining paper in the tray. Remove any remaining paper in the
tray, and then load that paper on top of the newly loaded paper.
29
Page 30

2 Paper and Other Media
2 Load and align the edge of the paper against
the left edge of the tray, with the side to be
copied or printed on facing down.
Important • Do not load paper above the maximum fill
line ("MAX" in the right illustration). It may
cause paper jams or machine
Paper and Other Media
malfunction.
3 Push the tray in gently until it comes to a
stop.
Important • When inserting the tray, push it gently. Forcibly pushing in the tray may cause machine
malfunction.
Loading Paper in Tray 5 (Bypass)
2
When printing or copying on a size or type of paper that cannot be set in Trays 1 to 4,
or Trays 6 (optional) or 7 (optional), use Tray 5 (bypass). The following describes the
procedure for loading paper in Tray 5.
Important • To prevent paper jams and erroneous detection of paper loaded in the tray by the machine,
do not take out paper of a package until the tray runs out of paper.
Note • Carefully fan paper before loading it in a tray. Otherwise, the paper may stick together,
resulting in paper jams, or multiple sheets being fed to the machine simultaneously.
1 Open Tray 5.
Note • If necessary, pull out the extension tray.
The extension tray can be extended in
two stages. Pull out the extension tray
gently.
2 Adjust the paper guides to the size of the
paper to be loaded.
30
3 Load paper with the side to be copied or
printed on facing up, inserting the paper until
its edge lightly touches against the paper
feed entrance.
Important • Do not load mixed paper types into the
tray.
• Do not load paper above the maximum fill
line ("MAX" in the illustration). It may
cause paper jams or machine
malfunction.
Page 31

4 When using non-standard sized paper, make find adjustments aligning the paper
guides to the edges of the paper loaded.
Loading Tab Stock Paper in the Tray 5 (Bypass)
Loading Paper
The following describes the procedure for loading tab paper in Tray 5 (bypass).
Important • Tab paper can be used only for [Tab Margin Shift], and [Covers/Separators].
Note • Carefully fan paper before loading it in a tray. Otherwise, the paper may stick together,
resulting in paper jams, or multiple sheets being fed to the machine simultaneously.
1 Open Tray 5.
Note • If necessary, pull out the extension tray.
The extension tray can be extended in
two stages. Pull out the extension tray
gently.
2 Adjust the paper guides to the size of the
paper to be loaded.
Paper and Other Media
2
3 Load paper with the side to be copied or
printed on facing up, inserting the paper until
its edge lightly touches against the paper
feed entrance.
Important • Do not load mixed paper types into the
tray.
• Do not load paper above the maximum fill
line ("MAX" in the illustration). It may
cause paper jams or machine
malfunction.
Loading Paper in Tray 6 (A4 High Capacity Feeder)
The following describes the procedure for loading paper in Tray 6 (A4 High Capacity
Feeder).
When the machine runs out of paper during copying or printing, a message appears on
the touch screen. Add paper according to the message instructions. Copying or printing
automatically resumes when paper is added.
Note • Carefully fan the paper before loading it in a tray. Otherwise, the paper may stick together,
resulting in paper jams.
For information on changing the paper size and orientation, refer to "Changing the Paper Settings"
(P.47).
31
Page 32

Paper and Other Media
CAUTION
CAUTION
2
2 Paper and Other Media
1 Pull out the tray towards you until it stops.
Be sure to pull out the paper tray slowly. If
pulled out with too much force, the tray
may hit and injure your knees or other
parts of your body.
Important • While the machine processes a job, do
not pull the tray out that the job uses.
• To prevent paper jams or misloading, do not load new paper into the tray until the tray is
empty. Remove any paper remaining in the tray and then load the paper on newly loaded
paper.
2 Load and align the edge of the paper against
the right edge of the tray, with the side to be
copied or printed on facing up.
Important • Do not load paper above the maximum fill
line. It may cause paper jams or machine
malfunction.
3 Push the tray in gently until it comes to a stop.
Important • When inserting the tray, push it gently. Forcibly pushing in the tray may cause machine
malfunction.
Loading Paper in Trays 6 and 7 (High Capacity Feeder C1-DS)
The following describes the procedure for loading paper in optional Trays 6 and 7 (High
Capacity Feeder C1-DS).
When the machine runs out of paper during copying or printing, a message is displayed
on the touch screen. Add paper according to the displayed instructions. Copying or
printing is automatically resumed when paper is loaded and the tray is closed.
Note • Be sure to fan the paper well. Otherwise, paper may cause paper jams, and multiple sheets
may be fed to the printer at once.
For information about changing the paper size and orientation, refer to "Changing the Paper Size for
Trays 6 and 7 (High Capacity Feeder C1-DS)" (P.46).
The [Paper Tray Attributes] screen is displayed when you load paper in a tray. For more information,
refer to "Paper Tray Attributes" (P.113).
1 Pull out the tray towards you until it stops.
32
Be sure to pull out the paper tray slowly. If
pulled out with too much force, the tray
may hit and injure your knees or other
parts of your body.
Important • While the machine processes a job, do
not pull the tray out that the job uses.
Page 33

• To prevent paper jams or misloading, do not load new paper into the tray until the tray is
empty. Remove any paper remaining in the tray and then load the paper on newly loaded
paper.
2 Remove any paper loaded on the tray.
3 Load a stack of paper (approximately 100 to
500 sheets) and align the edge of the paper
against the right edge of the tray with the
side to be copied or printed on facing up (1).
Move the long-side paper guide while
holding the grip so that they lightly contact
the edges of the paper (2).
4 Load the remaining paper and align the edge
of the paper against the right edge of the tray
with the side to be copied or printed on
facing up (1). Move the left short-side paper
guide while holding the grip so that they
lightly contact the edges of the paper (2).
Important • Do not load paper exceeding the
maximum fill line. It may cause paper
jams or machine malfunctions.
• If the paper stack loaded in the tray is 100
sheets or less, the guides apply more
pressure to the paper stack. It may cause distortion of paper stack, and may cause paper
jams.
• Position the guides correctly to match the paper size. If the position of the guide is not
correct, the paper may not be fed properly and cause paper jams.
Loading Paper
Paper and Other Media
2
5 Push the tray in gently until it comes to a stop.
Loading Tab Paper in Trays 6 and 7 (High Capacity Feeder C1-DS)
The following describes the procedure for loading tab paper in optional Trays 6 and 7
(High Capacity Feeder C1-DS).
Important • Tab paper can be used only for [Tab Margin Shift], and [Covers/Separators].
Note • Be sure to fan the paper well. Otherwise, paper may cause paper jams, and multiple sheets
may be fed to the printer at once.
For information about changing the paper size and orientation, refer to "Changing the Paper Size for
Trays 6 and 7 (High Capacity Feeder C1-DS)" (P.46).
When heavyweight paper is loaded in the tray, be sure to make adjustment of the position of the weight
switch buttons. For more information, refer to "Facilitating Feeding of Heavyweight Paper Loaded in
Trays 6 and 7 (High Capacity Feeder C1-DS)" (P.36).
The [Paper Tray Attributes] screen is displayed when you load paper in a tray. For more information,
refer to "Paper Tray Attributes" (P.113).
33
Page 34

Paper and Other Media
CAUTION
2
2 Paper and Other Media
1 Pull out the tray towards you until it stops.
Be sure to pull out the paper tray slowly. If
pulled out with too much force, the tray
may hit and injure your knees or other
parts of your body.
Important • While the machine processes a job, do
not pull the tray out that the job uses.
• To prevent paper jams or misloading, do not load new paper into the tray until the tray is
empty. Remove any paper remaining in the tray and then load the paper on newly loaded
paper.
2 Remove any paper loaded on the tray.
3 Load a stack of paper (approximately 100 to
500 sheets) and align the edge of the paper
against the right edge of the tray with the
side to be copied or printed on facing up (1).
Move the long-side paper guide while
holding the grip so that they lightly contact
the edges of the paper (2).
Important • When loading tab paper, position the side
with the tab facing the left short-side
paper guide.
4 Load the remaining paper and align the edge
of the paper against the right edge of the tray
with the side to be copied or printed on
facing up (1). Move the left short-side paper
guide while holding the grip so that they
lightly contact the edges of the paper (2).
Important • Do not load paper exceeding the
maximum fill line. It may cause paper
jams or machine malfunctions.
• If the paper stack loaded in the tray is 100
sheets or less, the guides apply more
pressure to the paper stack. It may cause distortion of paper stack, and may cause paper
jams.
• Position the guides correctly to match the paper size. If the position of the guide is not
correct, the paper may not be fed properly and cause paper jams.
5 Push the tray in gently until it comes to a stop.
34
Page 35

Loading Paper
CAUTION
Loading Postcards in Trays 6 and 7 (High Capacity Feeder C1-DS)
The following describes the procedure for loading postcards in optional Trays 6 and 7
(High Capacity Feeder C1-DS). When using postcards in Trays 6 and 7, be sure to
attach the Postcard Kit in the tray before loading the paper.
Note • Be sure to fan the paper well. Otherwise, paper may cause paper jams, and multiple sheets
may be fed to the printer at once.
For information about changing the paper size and orientation, refer to "Changing the Paper Size for
Trays 6 and 7 (High Capacity Feeder C1-DS)" (P.46).
When heavyweight paper is loaded in the tray, be sure to make adjustment of the position of the weight
switch buttons. For more information, refer to "Facilitating Feeding of Heavyweight Paper Loaded in
Trays 6 and 7 (High Capacity Feeder C1-DS)" (P.36).
The [Paper Tray Attributes] screen is displayed when you load paper in a tray. For more information,
refer to "Paper Tray Attributes" (P.113).
1 Pull out the tray towards you until it stops.
Paper and Other Media
Be sure to pull out the paper tray slowly. If
pulled out with too much force, the tray
may hit and injure your knees or other
parts of your body.
Important • While the machine processes a job, do
not pull the tray out that the job uses.
• To prevent paper jams or misloading, do not load new paper into the tray until the tray is
empty. Remove any paper remaining in the tray and then load the paper on newly loaded
paper.
• When you have pulled out the tray with the Postcard Kit attached, remove any paper
remaining in the tray and then load the paper again.
2 Remove any paper loaded on the tray.
3 Insert the small protrusions of the guide into
the notch to the right side at the bottom of
the tray (1). Align the hole of the guide with
the front tray hole and rotate the screw
clockwise (2).
2
4 Load a stack of paper (approximately 100 to
500 sheets) and align the edge of the paper
against the right edge of the tray with the
side to be copied or printed on facing up (1).
Move the long-side paper guide while
holding the grip so that they lightly contact
the edges of the paper (2).
35
Page 36

2 Paper and Other Media
CAUTION
Paper and Other Media
5 Load the remaining paper and align the edge
of the paper against the right edge of the tray
with the side to be copied or printed on
facing up (1). Move the left short-side paper
guide while holding the grip so that they
lightly contact the edges of the paper (2).
Note • Do not load paper exceeding the
maximum fill line. It may cause paper
jams or machine malfunctions.
• If the paper stack loaded in the tray is 100
sheets or less, the guides apply more
pressure to the paper stack. It may cause distortion of paper stack, and may cause paper
jams.
• Position the guides correctly to match the paper size. If the position of the guide is not
correct, the paper may not be fed properly and cause paper jams.
6 Push the tray in gently until it comes to a stop.
2
Note • When removing the Postcard Kit, unscrew the screw completely and remove the guide.
Store the removed guide in a place you can easily remember.
Facilitating Feeding of Heavyweight Paper Loaded in Trays 6 and 7 (High Capacity Feeder C1-DS)
The following describes how to make it easier to feed heavyweight paper loaded in
Trays 6 and 7 (High Capacity Feeder C1-DS).
Use the weight switches to adjust the air assist level. This helps the paper to be fed
smoothly. For the paper heavier than 256 gsm, slide the switch button to the heavier
weight group.
Important • If 256 gsm or heavier paper is loaded in the tray, be sure to switch the button to the heavier
weight group. Otherwise, paper jams or malfunctions may occur.
1 Pull out the tray towards you until it stops.
Be sure to pull out the paper tray slowly. If
pulled out with too much force, the tray
may hit and injure your knees or other
parts of your body.
36
Important • While the machine processes a job, do
not pull the tray out that the job uses.
2 Slide the switches to the appropriate weight
setting.
3 Push the tray in gently until it comes to a stop.
Page 37

Loading Paper
CAUTION
Improving the Paper Feeding Performance in Trays 6 and 7 (High Capacity Feeder C1-DS)
This section describes how to improve the paper feeding performance.
If images are skewed even when paper is loaded correctly, use the following procedure
to feed paper more accurately.
Important • If any of the following types of paper is loaded in the tray, performing the procedure in this
section may cause the paper to be fed improperly, resulting in paper jams.
- Heavyweight (221 gsm or more) - Tab Stock (221 gsm or more)
- Heavyweight Reload (221 gsm or more) - Labels (106 gsm or more)
- Hole Punched Heavyweight
(221 gsm or more)
- Gloss (106 gsm or more) - Adhesive
- Gloss Reload (106 gsm or more)
- Transparency
1 Pull out the tray towards you until it stops.
Be sure to pull out the paper tray slowly. If
pulled out with too much force, the tray
may hit and injure your knees or other
parts of your body.
Paper and Other Media
2
Important • While the machine is processing a job, do
not pull out the tray.
2 Slide the switch on top of the long-side paper
guide to the right until it stops.
Note • To return the switch to its original
position, slide it to the left until it stops.
3 If the paper feeding performance is not
improved after Step 2, slide the switch on the
right front side towards the back of the
machine until it stops.
Important • To return the switch to its original
position, slide it towards you until it stops.
4 Push the tray in gently until it comes to a stop.
37
Page 38

2 Paper and Other Media
Loading Paper in Tray 8 (Interposer on Finisher D4 and Finisher D4 with Booklet Maker)
The following describes the procedure for loading paper in optional Tray 8 (Interposer).
The Interposer allows you to load paper (blank, copied paper, etc.), which will only be
used as separators and covers, so that the machine does not output on the paper
Paper and Other Media
loaded in this tray.
Note • When adding paper to interposer, remove any paper remaining in the tray, add it to the stack
of paper to be added, then load all of the paper into the interposer at once.
1 Hold the center of the paper guides and slide
them to match the size of the paper to be
loaded.
2
2 Load the paper, neatly aligning all edges.
Note • Do not load paper exceeding the
maximum fill line. It may cause paper
jams or machine malfunctions.
Loading Tab Stock Paper in Tray 8 (Interposer on Finisher D4 and Finisher D4 with Booklet Maker)
The following describes the procedure for loading tab paper in optional Tray 8
(Interposer).
1 Hold the center of the paper guides and slide
them to mach the size of the paper to be
loaded.
38
Page 39

2 If the paper is already printed on, load the
paper with the printed side facing up and
with the tab side to be fed first.
Note • Do not load paper exceeding the
maximum fill line. It may cause paper
jams or machine malfunctions.
Loading Paper
A
A
Paper and Other Media
2
39
Page 40

2 Paper and Other Media
CAUTION
Changing the Paper Size
This section describes how to change the paper size in Trays 1, 2, 3, 4, 6, and 7.
Note • The types of paper in Trays 1 to 4, 6, and 7 are preset. Normally, Trays 1, 2, 3, 4, 6 and 7
are set to plain paper. When changing to a different paper type, change the paper quality
Paper and Other Media
For more information on corresponding paper sizes, refer to "Paper Tray Settings" (P.113).
For more information on how to copy on non-standard size paper, refer to "3 Copy" > "Copy" > "Paper
Supply (Selecting the Paper for Copying)" in the User Guide.
Important • Do not load paper of mixed sizes together into a tray.
settings to match the type of paper to be loaded so that you can maintain high quality
printing.
For more information on paper type settings, refer to "Changing the Paper Settings" (P.47).
• Non-standard size paper can be loaded in Trays 1 and 2. When loading non-standard size
paper, you must register the paper size. For information on registering paper sizes, refer to
"Paper Size" (P.114).
2
Changing the Paper Size for Trays 1 and 2
The following describes how to change paper size in Trays 1 and 2.
Note • The types of paper in Trays 1 and 2 are preset. The available preset paper types are: Plain,
Recycled, Plain Reload, Punched, Letterhead, Transparency, Heavyweight, HW Reload,
Extra-HW, X-HW Reload, Hole Punched HW 1, Hole Punched HW 2, Gloss, Gloss Reload,
Heavyweight Gloss, HW Gloss Reload, Labels, Heavyweight Labels, Tab Stock, HW Tab
Stock, Pre-Printed, Custom 1 to 5, and normally, plain paper is set. When changing to a
different paper type, change the paper quality settings to match the type of paper to be
loaded so that you can maintain high quality printing.
For more information on paper type settings, refer to "Changing the Paper Settings" (P.47).
• Non-standard size paper can be loaded in Trays 1 and 2. When loading non-standard size
paper, you must register the paper size. For information on registering paper sizes, refer to
"Paper Tray Attributes" (P.113).
For more information on supported paper sizes, refer to "Paper Size Settings" (P.126).
For more information on how to copy on non-standard size paper, refer to "3 Copy" > "Copy" > "Paper
Supply (Selecting the Paper for Copying)" in the User Guide.
1 Pull out the tray until it stops.
Be sure to pull out the paper tray slowly. If
pulled out with too much force, the tray
may hit and injure your knees or other
parts of your body.
40
Important • While the machine is processing a job, do
not pull out the tray that is being used for
job.
• To prevent paper jams or erroneous detection of loaded paper in a tray by the machine, do
not add paper on top of any remaining paper in the tray.
2 Remove any paper loaded in the tray.
Page 41

Changing the Paper Size
3 While pinching the long-side paper guide,
move it to match the size of the paper to be
loaded (1). While pinching the short-side
paper guide, move it to match the size of the
paper to be loaded (2).
Note • If loading tab paper, move the paper
guides to the edges of the tray, load the
paper, and then move the guides so that
they lightly contact the edges of the
paper.
4 Load and align the edge of the paper against
the left side of the tray, with the side to be
copied or printed on facing down.
Important • Do not load paper above the maximum fill
line ("MAX" in the right illustration).
• Do not place any paper or objects in the
empty space on the right side of Trays 1
and 2. It may cause paper jams or
machine malfunction.
5 Push the tray in gently until it comes to a stop.
2
1
Paper and Other Media
2
Important • When inserting the tray, push it gently. Forcibly pushing in the tray may cause machine
malfunction.
Note • Affix the paper size label to the front of the paper tray.
6 If you have changed the paper type, you need to change the tray settings.
For more information on paper type settings, refer to "Changing the Paper Settings" (P.47).
Changing the Paper Size for Tray 3
The following describes how to change paper size in Tray 3.
Note • The types of paper in Tray 3 are preset. The available preset paper types are: Plain,
Recycled, Plain Reload, Punched, Letterhead, Transparency, Heavyweight, HW Reload,
Extra-HW, X-HW Reload, Hole Punched HW 1, Hole Punched HW 2, Gloss, Gloss Reload,
Heavyweight Gloss, HW Gloss Reload, Labels, Heavyweight Labels, Pre-Printed, Custom 1
to 5, and normally, plain paper is set. When changing to a different paper type, change the
paper quality settings to match the type of paper to be loaded so that you can maintain high
quality printing.
For more information on paper type settings, refer to "Changing the Paper Settings" (P.47).
For more information on supported paper sizes, refer to "Paper Size Settings" (P.126).
41
Page 42

Paper and Other Media
CAUTION
2
2 Paper and Other Media
1 Pull out the tray until it stops.
Be sure to pull out the paper tray slowly. If
pulled out with too much force, the tray
may hit and injure your knees or other
parts of your body.
Important • While the machine is processing a job, do
not pull out the tray that is being used for
job.
• To prevent paper jams or erroneous detection of loaded paper in a tray by the machine, do
not add paper on top of any remaining paper in the tray.
2 Remove any paper loaded in the tray.
3 While pinching the paper guide, move the
guide to match the size of the paper to be
loaded.
Note • If loading tab paper, move the paper
guides to the edges of the tray, load the
paper, and move the guides so that they
lightly contact the edges of the paper.
4 Load and align the edge of the paper against
the left side of the tray, with the side to be
copied or printed on facing down.
Important • Do not load paper exceeding the
maximum fill line. It may cause paper
jams or machine malfunctions.
5 Push the tray in gently until it comes to a stop.
Important • When inserting the tray, push it gently. Forcibly pushing in the tray may cause machine
malfunction.
Note • Affix the paper size label to the front of the paper tray.
6 If you have changed the paper type, you need to change the tray settings.
For more information on paper type settings, refer to "Changing the Paper Settings" (P.47).
42
Page 43

Changing the Paper Size for Tray 4
CAUTION
The following describes how to change paper size in Tray 4.
Note • The types of paper in Tray 4 are preset. The available preset paper types are: Plain,
Recycled, Plain Reload, Punched, Letterhead, Transparency, Heavyweight, HW Reload,
Extra-HW, X-HW Reload, Hole Punched HW 1, Hole Punched HW 2, Gloss, Gloss Reload,
Heavyweight Gloss, HW Gloss Reload, Labels, Heavyweight Labels, Pre-Printed, Custom 1
to 5, and normally, plain paper is set. When changing to a different paper type, change the
paper quality settings to match the type of paper to be loaded so that you can maintain high
quality printing.
For more information on paper type settings, refer to "Changing the Paper Settings" (P.47).
For more information on supported paper sizes, refer to "Paper Size Settings" (P.126).
1 Pull out the tray until it stops.
Be sure to pull out the paper tray slowly. If
pulled out with too much force, the tray
may hit and injure your knees or other
parts of your body.
Changing the Paper Size
Paper and Other Media
2
Important • While the machine is processing a job, do
not pull out the tray that is being used for
job.
• To prevent paper jams or erroneous detection of loaded paper in a tray by the machine, do
not add paper on top of any remaining paper in the tray. Remove any paper remaining in the
tray and then load the paper on newly loaded paper.
2 Remove any paper loaded in the tray.
3 While pinching the paper guide, move the
guide to match the size of the paper to be
loaded.
Note • If loading tab paper, move the paper
guides to the edges of the tray, load the
paper, and move the guides so that they
lightly contact the edges of the paper.
4 Load and align the edge of the paper against
the left side of the tray, with the side to be
copied or printed on facing down.
Important • Do not load paper exceeding the
maximum fill line. It may cause paper
jams or machine malfunctions.
5 Push the tray in gently until it comes to a stop.
Important • When inserting the tray, push it gently. Forcibly pushing in the tray may cause machine
malfunction.
6 If you have changed the paper type, you need to change the tray settings.
For more information on paper type settings, refer to "Changing the Paper Settings" (P.47).
43
Page 44

2 Paper and Other Media
CAUTION
Changing the Paper Size for Tray 6 (A4 High Capacity Feeder)
The following describes how to change paper size in Tray 6 (A4 High Capacity Feeder).
1 Pull out the tray until it stops.
Paper and Other Media
2
Be sure to pull out the paper tray slowly. If
pulled out with too much force, the tray
may hit and injure your knees or other
parts of your body.
Important • While the machine is processing a job, do
not pull out the tray that is being used for
job.
• To prevent paper jams or erroneous detection of loaded paper in a tray by the machine, do
not add paper on top of any remaining paper in the tray. Remove any paper remaining in the
tray and then load the paper on newly loaded paper.
2 Remove any paper loaded in the tray.
3 Open the end guide (1) and unscrew the
screw (2). Then remove the guide from the
tray.
4 Insert the small protrusions at the bottom of the guide into the holes corresponding to
the paper size (1). Then insert the screw into a hole corresponding to the paper size
on top of the guide and tighten the screw (2).
5 Unscrew the screw of the front guide and
remove the guide from the tray.
44
Page 45

Changing the Paper Size
6 Insert the small protrusions at the bottom of the guide into the holes corresponding to
the paper size (1). Then insert the screw into a hole corresponding to the paper size
on the top of the guide and tighten the screw (2).
7 Pull up on the end guide lever (1) as shown
in the illustration. Move the guide to the
desired paper size (2) and then press down
on the lever (3).
Important • Set the guide to gently touch the edge of
the paper. If the position of the guide is
not correct, the paper may not be fed
properly and may cause paper jams.
Note • The slot on the left of 8.5 on the end guide
is not used.
Paper and Other Media
2
8 Open the end guide (1). Load and align the
edge of the paper against the right edge of
the tray, with the side to be copied or printed
on facing up (2).
Note • Do not load paper above the maximum fill
line ("MAX" in the illustration). It may
cause paper jams or machine
malfunctions.
9 Close the end guide tightly.
10 Push the tray in gently until it comes to a stop.
Important • When inserting the tray, push it gently. Forcibly pushing in the tray may cause machine
malfunction.
45
Page 46

2 Paper and Other Media
CAUTION
Changing the Paper Size for Trays 6 and 7 (High Capacity Feeder C1-DS)
The following describes how to change the paper size for Trays 6 and 7 (High Capacity
Feeder C1-DS).
1 Pull out the tray towards you until it stops.
Paper and Other Media
Be sure to pull out the paper tray slowly. If
pulled out with too much force, the tray
may hit and injure your knees or other
parts of your body.
Important • While the machine processes a job, do
not pull the tray out that the job uses.
• To prevent paper jams or misloading, do not load new paper into the tray until the tray is
empty. Remove any paper remaining in the tray and then load the paper on newly loaded
paper.
2
• When you have pulled out the tray with the Postcard Kit attached, remove any paper
remaining in the tray and then load the paper again.
2 Remove any paper loaded in the tray.
3 Load a stack of paper (approximately 100 to
500 sheets) and align the edge of the paper
against the right edge of the tray with the
side to be copied or printed on facing up (1).
Move the long-side paper guide while
holding the grip so that they lightly contact
the edges of the paper (2).
4 Load the remaining paper and align the edge
of the paper against the right edge of the tray
with the side to be copied or printed on
facing up (1). Move the left short-side paper
guide while holding the grip so that they
lightly contact the edges of the paper (2).
Important • Do not load paper exceeding the
maximum fill line. It may cause paper
jams or machine malfunctions.
• If the paper stack loaded in the tray is 100
sheets or less, the guides apply more
pressure to the paper stack. It may cause distortion of paper stack, and may cause paper
jams.
• Position the guides correctly to match the paper size. If the position of the guide is not
correct, the paper may not be fed properly and cause paper jams.
46
5 Push the tray in gently until it comes to a stop.
Page 47

Changing the Paper Settings
<Log In/Out> button
This section describes how to change the paper type for Trays and how to set image
quality processing by the individual paper type.
After loading paper in a tray, specify the type of paper loaded and select the image
quality for the paper type. Setting the image quality for each paper type enables you to
print with the most suitable image quality for the paper type.
For information on image quality processing for each paper type, refer to "Image Quality" (P.116).
Note • Users can name Custom 1 to Custom 5 displayed in the paper type settings. For information
on how to set names to Custom 1 to Custom 5, refer to "Custom Paper Name/Color"
(P.113).
• You can change the paper type setting without entering to the System Administration mode
on the [Setup] screen, which is displayed by selecting [Setup] in the [Services Home] screen
if you configure the settings in advance. For more information, refer to "Customize Paper
Supply Screen" (P.114).
Changing the Paper Settings
Paper and Other Media
1 Press the <Log In/Out> button.
2 Enter the system administrator’s user ID with
the numeric keypad or the keyboard
displayed on the screen, and select [Enter].
When a passcode is required, select [Next]
and enter the system administrator’s
passcode, and select [Enter].
Note • The default user ID is "11111".
• The default passcode is "x-admin".
3 Select [Tools] on the [Services Home]
screen.
Note • When the [Services Home] screen is not
displayed on the touch screen, press the
<Services Home> button.
2
4 Select [System Settings] > [Common
Service Settings] > [Paper Tray Settings].
47
Page 48

Paper and Other Media
2
2 Paper and Other Media
5 Select [Paper Tray Attributes].
6 Select a paper tray for changing the paper
type setting under [Items].
7 Select [Change Settings].
8 Select the [Paper Type], [Paper Size],
[Paper Color], and [Auto Paper Select]
respectively.
Note • The paper weight displayed in under
[Paper Type] varies depending on the
setting.
• Select the paper weight in Step 12. Select
only the paper type in Step 8.
Important • If the desired paper type is not displayed
under [Paper Type], select [Other Media Selection] to view all of the available paper types.
The available paper types are as follows.
- Plain A (64 - 79 gsm) - Plain B (80 - 90 gsm)
- Plain C (91 - 105 gsm) - Plain A Reloaded (64 - 79 gsm)
- Plain B Reloaded (80 - 90 gsm) - Plain C Reloaded (91 - 105 gsm)
- Recycled A (64 - 79 gsm) - Recycled B (80 - 90 gsm)
- Recycled C (91 - 105 gsm) - Heavyweight A (106 - 128 gsm)
- Heavyweight B (129 - 150 gsm) - Heavyweight C (151 - 176 gsm)
- HW A Reload (106 - 128 gsm) - HW B Reload (129 - 150 gsm)
- HW C Reload (151 - 176 gsm) - Extra-HW (177 - 220 gsm)
- X-HW Reload (177 - 220 gsm) - X-HW Plus (221 - 256 gsm)
- X-HW Plus Reload (221 - 256 gsm) - X-HW Plus 2 (257 - 300 gsm)
- X-HW Plus 2 Reload(257 - 300 gsm) - Punched HW 1A (106 -128 gsm)
- Punched HW 1B (127 - 150 gsm) - Punched HW 1C (151 - 176 gsm)
- Hole Punched HW 2 (177 - 220 gsm) - Hole Punched HW 3 (221 -256 gsm)
- Hole Punched HW 4 (257 - 300 gsm) - Gloss A (106 - 128 gsm)
- Gloss B (129 - 150 gsm) - Gloss A Reload (106 - 128 gsm)
- Gloss B Reload (129 - 150 gsm) - Coated 2A (151 - 176 gsm)
- Coated 2B (177 - 220 gsm) - Coated 2A RL (151 - 176 gsm)
- Coated 2B RL (177 - 220 gsm) - Coated 3A (221 - 256 gsm)
- Coated 3B (257 - 300 gsm) - Coated 3A RL (221 - 256 gsm)
- Coated 3B RL (257 - 300 gsm) - Labels 1A (106 - 128 gsm)
- Labels 1B (129 - 150 gsm) - Labels 1C (151 - 176 gsm
- Heavyweight Labels (177 - 220 gsm) - Labels 3A (221 - 256 gsm)
48
Page 49

Changing the Paper Settings
- Labels 3B (257 - 300 gsm) - Tab Stock 1A (106 - 128 gsm)
- Tab Stock 1B (129 - 150 gsm) - Tab Stock 1C (151 -176 gsm)
- HW Tab Stock (177 - 220 gsm) - X-HW Tab Stock (221 - 256 gsm)
- X-HW Tab Stock (257 - 300 gsm) - Transparency
- Custom Paper 1 to 5
9 Select [Cancel], [Save], [Close] or [Confirm] repeatedly until the [Paper Tray Settings]
screen is displayed.
10 Select [Image Quality].
Note • Select [ ] to display the previous screen
or [ ] to display the next screen.
11 Select the paper type for changing the image
quality settings under [Items], and then
select [Change Settings].
Note • Select [ ] to display the previous screen
or [ ] to display the next screen.
12 Select the image quality, and then select
[Save].
Paper and Other Media
2
13 Make sure that the paper type you selected is displayed under [Current Settings] of
[Items], and then select [Close].
14 Select [Close] repeatedly until the [Tools] screen is displayed.
15 Select [Close].
49
Page 50

Paper and Other Media
2
2 Paper and Other Media
50
Page 51

3 Maintenance
This chapter describes how to replace consumables, clean the machine,
calibrate colors, and print a report/list.
z
Replacing Consumables .............................................................................52
z
Cleaning the Machine ................................................................................. 76
z
Executing Calibration .................................................................................. 79
z
Printing a Report/List ..................................................................................82
Page 52

3 Maintenance
WARNING
Replacing Consumables
The machine is provided with the following consumables and periodic replacement
parts. We recommend the use of the following consumables as they are manufactured
to meet the specifications of the machine.
Maintenance
3
Type of Consumables/
Periodic Replacement Parts
Toner Cartridge - Black CT201702 1 unit/box
Toner Cartridge - Cyan CT201703 1 unit/box
Toner Cartridge - Magenta CT201704 1 unit/box
Toner Cartridge - Yellow CT201705 1 unit/box
Drum Cartridge - Black CT350887 1 unit/box
Drum Cartridge - Color CT350888 1 unit/box
Waste Toner Container CWAA0663 1 unit/box
Staple Cartridge for Finisher C
Staple Cartridge for Finisher D4
Staple Cartridge for Finisher C w/ BM
Staple Cartridge for Finisher D4 w/ BM
*1 For Finisher C2
*2 For Finisher C2 with Booklet Maker
*3 For Finisher D4
*4 For Finisher D4 with Booklet Maker
Note • We recommend that you always keep spare consumables/periodic replacement parts
available.
*1
*3
*2
*4
Product
Code
CWAA0540 5,000 staples x 3 sets/box
CWAA0677 5,000 staples x 4 sets/box
CWAA0749 5,000 staples x 4 sets/box,
Quantity/Box
Staple Scrap Container x 1
unit/box
z
Use a broom or a wet cloth to wipe off spilled toner. Never use a vacuum cleaner
for the spills. It may catch fire by electric sparks inside the vacuum cleaner and
cause explosion. If you spill a large volume of toner, contact your local Fuji Xerox
representative.
z
Never throw a toner cartridge into an open flame. Remaining toner in the cartridge
may catch fire and cause burn injuries or explosion.
If you have a used toner cartridge no longer needed, contact your local Fuji Xerox
representative for its disposal.
z
Never throw a waste toner container into an open flame. Toner may catch fire and
cause burn injuries or explosion.
If you have a used waste toner container no longer needed, contact your local Fuji
Xerox representative for its disposal.
52
Page 53

Replacing Consumables
CAUTION
z
Keep drum cartridges and toner cartridges out of the reach of children. If a child
accidentally swallows toner, spit it out, rinse mouth with water, drink water and
consult a physician immediately.
z
When replacing drum cartridges and toner cartridges, be careful not to spill the
toner. In case of any toner spills, avoid contact with clothes, skin, eyes and mouth
as well as inhalation.
z
If toner spills onto your skin or clothing, wash it off with soap and water.
If you get toner particles in your eyes, wash it out with plenty of water for at least
15 minutes until irritation is gone. Consult a physician if necessary.
If you inhale toner particles, move to a fresh air location and rinse your mouth with
water.
If you swallow toner, spit it out, rinse your mouth with water, drink plenty of water
and consult a physician immediately.
Handling consumables/periodic replacement parts
z
Do not store boxes of consumables/periodic replacement parts upright.
z
Do not unpack consumables/periodic replacement parts before use. Avoid storing
consumables/periodic replacement parts in the following locations:
- In high temperature and humid locations
- Near heat-generating devices
- In direct sunlight
- in dusty locations
z
Use consumables/periodical replacement parts only as directed on their packages.
z
We recommend always keeping spare consumables/periodic replacement parts
available.
z
When calling your local Fuji Xerox representative to order consumables/periodical
replacement parts, have the product codes ready.
z
The use of consumables/periodic replacement parts not recommended by Fuji Xerox
could impair machine quality and performance. Use only consumables/periodic
replacement parts recommended by Fuji Xerox.
Maintenance
3
Checking the status of consumables
The status of consumables can be checked on the [Supplies] screen.
For information on consumables, refer to "Supplies" (P.93).
The following shows the reference section for each procedure.
Replacing Toner Cartridges ....................................................................................................... 54
Replacing Waste Toner Container ............................................................................................. 56
Replacing Drum Cartridge R1 (For Customers Having a Time and Material Contract) ........... 58
Replacing Drum Cartridges R2, R3, or R4 (For Customers Having a Time and Material Contract)..........62
Replacing the Staple Cartridge (For Finisher C2 or Finisher C2 with Booklet Maker) ............ 66
Replacing the Booklet Staple Cartridge (For Finisher C2 with Booklet Maker)....................... 67
Replacing the Staple Cartridge (For Finisher D4 or Finisher D4 with Booklet Maker)............ 69
Emptying the Punch Waste Container (For Finisher C2 or Finisher C2 with Booklet Maker)........ 72
Emptying the Punch Waste Container (For Finisher D4 or Finisher D4 with Booklet Maker) ....... 73
Emptying the Staple Waste Container (For Finisher D4 or Finisher D4 with Booklet Maker) ....... 74
53
Page 54

3 Maintenance
WARNING
Replacing Toner Cartridges
The machine comes with toner cartridges. The machine will display the following
messages when a toner cartridge is empty. Follow the messages and replace the toner
cartridge as necessary.
Maintenance
3
Message
Please order a Yellow
Toner [Y] Cartridge.
Yellow Toner [Y] Cartridge
needs to be replaced soon.
*1 The above messages are indications for yellow toner replacement. The part name "Yellow Toner
[Y]" in the messages varies depending on the colors or number of the toner cartridges.
*2 The page yield after each message is displayed is for when A4 paper LEF ( ) is used. The value is
an estimate and varies depending on the conditions such as the content printed, dot coverage (area
coverage), paper size, paper type, copy density, output image type, and the machine operating
environment.
z
Use a broom or a wet cloth to wipe off spilled toner. Never use a vacuum cleaner
*1
Remaining Page Yield
Black: Approx. 1,800 pages
Other than Black:
Approx. 1,200 pages
-
*2
You do not need to replace the
Toner Cartridge immediately.
Order the Toner Cartridge
displayed on the screen.
Replace the toner cartridge
with a new one.
Solution
for the spills. It may catch fire by electric sparks inside the vacuum cleaner and
cause explosion. If you spill a large volume of toner, contact your local Fuji Xerox
representative.
z
Never throw a toner cartridge into an open flame. Remaining toner in the cartridge
may catch fire and cause burn injuries or explosion.
If you have a used toner cartridge no longer needed, contact your local Fuji Xerox
representative for its disposal.
Important • When replacing a toner cartridge, toner may spill and soil the floor. We recommend laying
paper on the floor beforehand.
• The use of toner cartridges not recommended by Fuji Xerox may degrade image quality and
performance. Use only toner cartridges recommended by Fuji Xerox.
• When the remaining amount of toner becomes small, the machine may stop printing and
display a message. If this occurs, replace the toner cartridge to resume copying.
• Replace toner cartridges while the machine is on.
• Copy density may decrease slightly after the message appears on the screen.
• If a partially used toner cartridge is used, a message appears and the number of pages that
you can copy displayed on the screen may differ considerably.
Note • Monochrome copying is available even when color toners run out. In this case, only plain
paper can be used.
1 Open the front cover.
54
Page 55

2 Hold the handle of the toner cartridge of the
WARNING
color indicated in the message and gently
pull it out.
Note • "Y", "M", "C", or "K" indicates Yellow,
Magenta, Cyan, and Black, respectively.
3 Pull out the toner cartridge slowly, and slide
it out.
Never throw a toner cartridge into an open
flame. Remaining toner in the cartridge
may catch fire and cause burn injuries or
explosion.
If you have a used toner cartridge no
longer needed, contact your local Fuji
Xerox representative for its disposal.
Replacing Consumables
Maintenance
3
Important • Slide out the toner cartridge gently. Otherwise, toner may spill from the cartridge.
• If you have a used toner cartridge which is no longer needed, contact your local Fuji Xerox
representative for its disposal.
4 Take the new toner cartridge of the same
color out of the box, and shake the cartridge
up and down and left and right several times.
5 Push the cartridge in gently until it comes to
a stop.
Note • Be sure to push in the cartridge until you
hear it click into place.
6 Close the toner cover.
Note • If the toner cover is not completely closed, a message will appear and the machine will
remain paused.
55
Page 56

3 Maintenance
WARNING
Replacing Waste Toner Container
The waste toner container holds used toner. The following messages are displayed on
the touch screen according to the status of the waste toner container. Follow the
messages.
Maintenance
3
Message
Please order a Waste
Toner Container.
The Waste Toner
Container needs to be
replaced.
*1 The remaining page yield for copy jobs is applicable when A4 paper LEF ( ) is used. The value is
an estimate and varies depending on the conditions such as the content printed, dot coverage (area
coverage), paper size, paper type, copy density, output image type, and machine operating
environment.
z
Use a broom or a wet cloth to wipe off spilled toner. Never use a vacuum cleaner
Remaining Page Yield
Approx. 3,000 pages Order the waste toner
-
*1
container.
The machine will stop. Replace
the waste toner container with
a new one.
Solution
for the spills. It may catch fire by electric sparks inside the vacuum cleaner and
cause explosion. If you spill a large volume of toner, contact your local Fuji Xerox
representative.
z
Never throw a waste toner container into an open flame. Toner may catch fire and
cause burn injuries or explosion.
If you have a used waste toner container no longer needed, contact your local Fuji
Xerox representative for its disposal.
Important • When you replace the waste toner container, toner may spill and soil the floor. We
recommend laying paper on the floor beforehand.
• The proper disposal of used waste toner containers is required. Return the old waste toner
container to your local Fuji Xerox representative.
• The use of waste toner containers not recommended by Fuji Xerox may degrade image
quality and performance. Use only waste toner containers recommended by Fuji Xerox.
1 Make sure that the machine is not operating,
and open the front cover.
56
Page 57

2 Open the waste toner container cover.
3 Pull out the waste toner container halfway.
Replacing Consumables
Maintenance
4 Hold the center part on the top edge of the
used waste toner container and pull it out
from the machine.
5 Use both hands to carefully place the used
waste toner container into the plastic bag
supplied with the new waste toner container.
Important • Return used waste toner containers to
your local Fuji Xerox representative.
• Be sure to put the used waste toner
container in the dedicated plastic bag
supplied with the new waste toner
container.
6 Hold the center part on the top edge of a
new container and insert it into the machine
until it comes to a stop.
3
7 Close the waste toner container cover.
8 Close the front cover.
Note • If the front cover is not completely closed, a message will appear and the machine will
remain paused.
57
Page 58

3 Maintenance
CAUTION
Replacing Drum Cartridge R1 (For Customers Having a Time and Material Contract)
The machine displays the message "Please order a Drum Cartridge R1" when a drum
cartridge needs to be replaced. When the message is displayed, contact your local Fuji
Xerox representative.
For customers having a Time and Material Contract, refer to this section and locate the
position or the indicated drum cartridge (R1), and replace the drum cartridge.
If you continue to copy without replacing the drum cartridge after the message is
displayed on the touch screen, the machine will stop after copying or printing the
number of pages as follows.
z
Color 550 Printer: Approximately 6,000 pages
Maintenance
3
z
Color 560 Printer: Approximately 7,000 pages
z
When replacing drum cartridges and toner cartridges, be careful not to spill the
toner. In case of any toner spills, avoid contact with clothes, skin, eyes and mouth
as well as inhalation.
z
If toner spills onto your skin or clothing, wash it off with soap and water.
If you get toner particles in your eyes, wash it out with plenty of water for at least
15 minutes until irritation is gone. Consult a physician if necessary.
If you inhale toner particles, move to a fresh air location and rinse your mouth with
water.
If you swallow toner, spit it out, rinse your mouth with water, drink plenty of water
and consult a physician immediately.
z
Keep drum cartridges and toner cartridges out of the reach of children. If a child
accidentally swallows toner, spit it out, rinse mouth with water, drink water and
consult a physician immediately.
Important • The use of drum cartridges not recommended by Fuji Xerox may degrade image quality and
performance. Use only drum cartridges recommended by Fuji Xerox.
• When pulling out a unit containing drum cartridges, make sure to cover the upper portion of
the drum cartridges with the supplied black sheet within 2 minutes. Exposing drum
cartridges to light may degrade image quality.
Note • Do not expose drum cartridges to direct sunlight or strong light from indoor fluorescent
lighting. Do not touch or scratch the surface of the drum. Doing so may result in
unsatisfactory printing.
• The remaining page yield is applicable when A4 paper LEF ( ) is used. The value is an
estimate and varies depending on the conditions such as the paper size, the paper
orientation, the number of pages continuously printed, and the machine operating
environment.
• Keep the power of the machine on when replacing drum cartridges. If the power is turned off,
the information saved in the memory of the machine will be lost.
• When the machine is in the Energy Saver mode, press the <Energy Saver> button before
replacing a drum cartridge and deactivate the Energy Saver mode.
• When replacing drum cartridges, even if the control panel is lit, make sure to press the
<Machine Status> button for accurate information on the drum cartridge status.
• Images output from the machine may get dirty after the message "Please order a Drum
Cartridge R1" appears on the touch screen.
58
Page 59

1 Remove the new drum cartridge and the
CAUTION
supplied black sheet from the box
beforehand.
Important • Place the new drum cartridge on a level
surface.
• Do not place the new drum cartridge in an
upright position.
2 Make sure that the machine is not operating,
and open the front cover.
Replacing Consumables
Maintenance
3 Pull down lever R1-R4 towards you.
4 Hold the handle of the unit and pull it out.
Be sure to pull out the unit slowly. If pulled
out with too much force, it may hit and
injure your knees or other parts of your
body.
5 Cover the upper surface of the unit other
than drum cartridge R1 using the supplied
black sheet removed from the box earlier.
Important • When replacing a drum cartridge, be sure
to cover the unit with the black sheet.
Leaving it uncovered may degrade the
image quality.
3
59
Page 60

3 Maintenance
CAUTION
CAUTION
6 Hold the rings provided at both ends of the
drum cartridge, and lift the cartridge out from
the machine.
the rings when lifting up the drum
cartridge.
Be sure to insert your fingers into
Maintenance
3
7 Insert the used drum cartridge into the box which contained the new drum cartridge.
8 Remove the new drum cartridge from the
plastic bag.
Important • When removing the drum cartridge from
the plastic bag, be careful not to touch or
scratch the surface of the drum.
9 Open the protective cover so it unfolds
underneath the drum cartridge.
10 Lift the drum cartridge, holding the rings
provided at both ends of the cartridge.
60
Be sure to insert your fingers into
the rings when lifting up the drum
cartridge.
11 Aligning it with the guides, place the drum
cartridge into the unit with the ( ) side
facing you.
Page 61

12 Push down on the drum cartridge at both
ends so that it is level.
Note • Make sure that the ( ) and ( ) marks
are aligned.
13 Remove the black sheet covering the top of the unit.
Replacing Consumables
14 Push the unit in completely (1), and return
the lever of the unit to its original position (2).
2
1
15 Lift up lever R1-R4 to close.
16 Close the front cover.
Note • If the front cover is not completely closed, a message will appear and the machine will
remain paused.
Maintenance
3
61
Page 62

3 Maintenance
CAUTION
Replacing Drum Cartridges R2, R3, or R4 (For Customers Having a Time and Material Contract)
The machine displays the message "Please order a Drum Cartridge RX" when a drum
cartridge needs to be replaced. When the message is displayed, contact your local Fuji
Xerox representative.
For customers having a Time and Material Contract, refer to this section and locate the
position or the indicated drum cartridge (R2, R3, or R4), and replace the drum cartridge.
If you continue to copy without replacing the drum cartridge after the message is
displayed on the touch screen, the machine will stop after copying the number of pages
as follows.
z
Color 550 Printer: Approximately 4,000 pages
Maintenance
3
z
Color 560 Printer: Approximately 4,000 pages
z
When replacing drum cartridges and toner cartridges, be careful not to spill the
toner. In case of any toner spills, avoid contact with clothes, skin, eyes and mouth
as well as inhalation.
z
If toner spills onto your skin or clothing, wash it off with soap and water.
If you get toner particles in your eyes, wash it out with plenty of water for at least
15 minutes until irritation is gone. Consult a physician if necessary.
If you inhale toner particles, move to a fresh air location and rinse your mouth with
water.
If you swallow toner, spit it out, rinse your mouth with water, drink plenty of water
and consult a physician immediately.
z
Keep drum cartridges and toner cartridges out of the reach of children. If a child
accidentally swallows toner, spit it out, rinse mouth with water, drink water and
consult a physician immediately.
Important • The use of drum cartridges not recommended by Fuji Xerox may degrade image quality and
performance. Use only drum cartridges recommended by Fuji Xerox.
• When pulling out a unit containing drum cartridges, make sure to cover the upper portion of
the drum cartridges with the supplied black sheet within 2 minutes. Exposing drum
cartridges to light may degrade image quality.
Note • Do not expose drum cartridges to direct sunlight or strong light from indoor fluorescent
lighting. Do not touch or scratch the surface of the drum. Doing so may result in
unsatisfactory printing.
• The remaining page yield is applicable when A4 paper LEF ( ) is used. The value is an
estimate and varies depending on the conditions such as the paper size, the paper
orientation, the number of pages continuously printed, and the machine operating
environment.
• Keep the power of the machine on when replacing drum cartridges. If the power is turned off,
the information saved in the memory of the machine will be lost.
• When the machine is in the Energy Saver mode, press the <Energy Saver> button before
replacing a drum cartridge and deactivate the Energy Saver mode.
• When replacing drum cartridges, even if the control panel is lit, make sure to press the
<Machine Status> button for accurate information on the drum cartridge status.
• Images output from the machine may get dirty after the message "Please order a Drum
Cartridge RX" appears on the touch screen.
62
Page 63

1 Remove the new drum cartridge and the
CAUTION
CAUTION
supplied black sheet from the box
beforehand.
Important • Place the new drum cartridge on a level
surface.
• Do not place the new drum cartridge in an
upright position.
2 Make sure that the machine is not operating,
and open the front cover.
Replacing Consumables
Maintenance
3 Pull down lever R1-R4 towards you.
4 Hold the handle of the unit and pull it out.
Be sure to pull out the unit slowly. If pulled
out with too much force, it may hit and
injure your knees or other parts of your
body.
5 Hold the rings provided at both ends of the
drum cartridge, and lift the cartridge out from
the machine.
Note • This section explains how to replace drum
cartridge R2, as an example.
3
Be sure to insert your fingers into
the rings when lifting up the drum
cartridge.
6 Place the used drum cartridge into the box which contained the new drum cartridge.
63
Page 64

3 Maintenance
CAUTION
Maintenance
7 Using the supplied black sheet removed
from the box earlier, cover the upper surface
of the unit pulled out.
Important • When replacing a drum cartridge, be sure
to cover the unit with the black sheet.
Leaving it uncovered may degrade the
image quality.
8 Remove the new drum cartridge from the
plastic bag.
Important • When removing the drum cartridge from
the plastic bag, be careful not to touch or
scratch the surface of the drum.
3
9 Open the protective cover so it unfolds
underneath the drum cartridge.
10 Remove the black sheet covering the top of the unit.
11 Lift the drum cartridge holding the rings
provided at both ends.
Be sure to insert your fingers into
the rings when lifting up the drum
cartridge.
64
Important • Do not touch the surface of the drum.
12 Aligning it with the guides, place the drum
cartridge into the unit with the ( ) side
facing you.
Page 65

13 Push down on the drum cartridge at both
ends so that it is level.
Note • Make sure that the ( ) and ( ) marks
are aligned.
14 Peel off the film sheet attached to the upper
surface of the drum cartridge.
Replacing Consumables
Maintenance
15 Push the unit in completely (1), and return
the lever of the unit to its original position (2).
2
1
16 Lift up lever R1-R4 to close.
17 Close the front cover.
Note • If the front cover is not completely closed, a message will appear and the machine will
remain paused.
3
65
Page 66

3 Maintenance
Lever (R1)
Orange lever
1
1
2
Replacing the Staple Cartridge (For Finisher C2 or Finisher C2 with Booklet Maker)
When the Finisher C2 (optional) or Finisher C2 with Booklet Maker (optional) is
installed and it is time to replace the staple cartridge, a message appears on the touch
screen. When this message appears, replace the staple cartridge.
The following example shows how to replace the staple cartridge in the Finisher C2 with
Booklet Maker. The procedure for the Finisher C2 is the same.
Important • The use of staples not recommended by Fuji Xerox may degrade image quality and
performance. Use only staples recommended by Fuji Xerox.
Note • If the staple cartridge is not replaced properly, the message prompting replacement will
remain displayed. In this case, set the new staple cartridge again by performing the following
Maintenance
procedure one more time from the beginning.
• To order a staple cartridge, contact your local Fuji Xerox representative.
1 Make sure that the machine is not operating,
and open the front cover of the finisher.
3
2 Grip lever R1 of the staple cartridge holder,
and pull out the holder to the right towards
you.
3 Remove the staple cartridge holder by
gripping the orange lever.
Note • The staple cartridge is firmly set in place.
Removing the cartridge may require
pulling on the cartridge with slight force.
66
4 Grasp the empty staple case with your
fingers (1), and then remove the case from
the cartridge (2) as shown in the figure.
Page 67

Replacing Consumables
5 Prepare a new staple case. Insert the front of
the staple case into the staple cartridge (1),
and push down the rear of the case (2).
2
1
6 Insert the staple cartridge while gripping the
orange lever until you hear it click into place.
Orange lever
7 Close the front cover of the finisher.
Note • A message will be displayed and the machine will not operate if the front cover of the finisher
is even slightly open.
Maintenance
3
Replacing the Booklet Staple Cartridge (For Finisher C2 with Booklet Maker)
When the Finisher C2 with Booklet Maker (optional) is installed and it is time to replace
the booklet staple cartridge, a message appears on the touch screen. When this
message appears, replace the booklet staple cartridge.
Important • The use of staple cartridges not recommended by Fuji Xerox may degrade image quality
and performance. Use only staple cartridges recommended by Fuji Xerox.
Note • If the booklet staple cartridge is not replaced properly, the message prompting replacement
will remain displayed. In this case, set the new booklet staple cartridge again by performing
the following procedure one more time from the beginning.
• To order a staple cartridge, contact your local Fuji Xerox representative.
1 Make sure that the machine is not operating,
and open the front cover of the finisher.
67
Page 68

3 Maintenance
R2
R3
Maintenance
2 While pressing the lever for R2 R3 to the
right (1), pull the staple cartridge unit out of
the machine (2).
3 Hold the staple cartridge by the tabs on both
sides and lift the cartridge out of the unit.
3
4 While holding the tabs of the new staple
cartridge, push the cartridge into the unit.
Lightly push the cartridge down until you
hear it click into place.
5 Push the staple cartridge unit into its original
position.
6 Close the front cover of the finisher.
Note • A message will be displayed and the machine will not operate if the front cover of the finisher
is even slightly open.
68
Page 69

Replacing Consumables
Replacing the Staple Cartridge (For Finisher D4 or Finisher D4 with Booklet Maker)
When the Finisher D4 (optional) or Finisher D4 with Booklet Maker (optional) is
installed and it is time to replace the staple cartridge, a message appears on the touch
screen. When this message appears, replace the staple cartridge.
For remedies if the staple cartridge happened to come off the holder during replacement work, refer to
"Re-inserting the Staple Cartridge into the Cartridge Unit" (P.267).
Important • The use of staples not recommended by Fuji Xerox may degrade quality and performance.
Use only staples recommended by Fuji Xerox.
Note • If the staple cartridge is not replaced properly, the message prompting replacement will
remain displayed. In this case, set the new staple cartridge again by performing the following
procedure one more time from the beginning.
• To order a staple cartridge, contact your local Fuji Xerox representative.
1 Make sure that the machine is not operating,
and open the right cover of the finisher.
Maintenance
2 Hold unit R1 located at the position shown in
the illustration.
3 Pull out the unit.
3
4 Hold the position indicated by the arrow to
remove the staple cartridge from the unit.
69
Page 70

Maintenance
3
3 Maintenance
5 Push a new staple cartridge into the unit.
6 Push the removed unit back to its original
position.
7 Close the right cover of the finisher.
Note • A message will be displayed and the machine will not operate if the right cover of the finisher
is even slightly open.
Replacing the Booklet Staple Cartridge (For Finisher D4 with Booklet Maker)
When the Finisher D4 with Booklet Maker (optional) is installed and the booklet staple
cartridge needs to be replaced, a message appears on the touch screen. When this
message appears, replace the booklet staple cartridge.
Important • The use of staple cartridges not recommended by Fuji Xerox may impair quality and
performance. Use only staple cartridges recommended by Fuji Xerox for the machine.
Note • If the booklet staple cartridge is not replaced properly, the message prompting replacement
will remain displayed. In this case, set the new booklet staple cartridge again by performing
the following procedure one more time from the beginning.
• To order a staple cartridge, contact your local Fuji Xerox representative.
1 Make sure that the machine is not operating,
and open the right cover of the finisher.
70
Page 71

2 While pushing the lever for R2 R3 to the right
(1), pull the staple cartridge unit out of the
machine (2).
3 Hold the staple cartridge by the tabs on both
sides and lift the cartridge out of the unit.
Replacing Consumables
Maintenance
4 While holding the tabs of the new staple
cartridge, push the cartridge into the unit.
Lightly push the cartridge down until you
hear it click into place.
5 Push the staple cartridge unit into its original
position.
6 Close the right cover of the finisher.
Note • A message will be displayed and the machine will not operate if the right cover of the finisher
is even slightly open.
3
71
Page 72

3 Maintenance
Emptying the Punch Waste Container (For Finisher C2 or Finisher C2 with Booklet Maker)
When the Finisher C2 (optional) or Finisher C2 with Booklet Maker (optional) is
installed and the punch waste container becomes full, a message appears on the touch
screen. Discard the waste according to the message.
If you take the punch waste container out of the machine, make sure to empty it
completely. If it is reinstalled with some waste remaining, it may become full before the
message appears again, and this can cause machine breakdown.
Important • When emptying the punch waste container, make sure that the machine is switched on. If
not switched on, the machine will not recognize that the punch waste container has been
emptied.
Maintenance
• When the machine is in the Energy Saver mode, press the <Energy Saver> button before
emptying the punch waste container and deactivate the Energy Saver mode.
• When emptying the punch waste container, even if the control panel is lit, make sure to
press the <Machine Status> button for accurate information on the punch waste container
status.
1 Make sure that the machine is not operating,
and open the front cover of the finisher.
3
2 Pull out punch waste container R4 towards
you.
3 Discard all waste.
72
Page 73

Replacing Consumables
4 Insert the empty punch waste container until
it comes to a stop.
5 Close the front cover of the finisher.
Note • A message will be displayed and the machine will not operate if the front cover of the finisher
is even slightly open.
Emptying the Punch Waste Container (For Finisher D4 or Finisher D4 with Booklet Maker)
When the Finisher D4 (optional) or Finisher D4 with Booklet Maker (optional) is
installed and the punch waste container becomes full, a message appears on the touch
screen. Discard the waste according to the message.
Maintenance
3
If you take the punch waste container out of the machine, make sure to empty it
completely. If it is reinstalled with some waste remaining, it may become full before the
message appears again, and this can cause machine breakdown.
Important • When emptying the punch waste container, make sure that the machine is switched on. If
not switched on, the machine will not recognize that the punch waste container has been
emptied.
• When the machine is in the Energy Saver mode, press the <Energy Saver> button before
emptying the punch waste container and deactivate the Energy Saver mode.
• When emptying the punch waste container, even if the control panel is lit, make sure to
press the <Machine Status> button for accurate information on the punch waste container
status.
1 Make sure that the machine is not operating,
and open the right cover of the finisher.
2 Pull out the punch waste container R4
towards you.
73
Page 74

Maintenance
CAUTION
3
3 Maintenance
3 Discard all waste.
4 Insert the empty punch waste container all
the way into the machine.
5 Close the right cover of the finisher.
Note • A message will be displayed and the machine will not operate if the right cover of the finisher
is not closed properly.
Emptying the Staple Waste Container (For Finisher D4 or Finisher D4 with Booklet Maker)
When the staple waste container becomes full, a message appears on the touch
screen. Replace the staple waste container according to the message.
Be careful not to get injured by waste staples when detaching the staple waste
container.
Important • Replace the staple waste container while the power is on.
• A staple waste container is included in a Staple Cartridge for 100 sheets XF.
1 Make sure that the machine is not operating,
and open the right cover of the finisher.
74
Page 75

2 Move the lock lever, shown in the illustration,
left-ward to the position.
3 Hold R5 as shown in the illustration and
remove the staple waste container from the
machine.
Replacing Consumables
Maintenance
4 Put the used staple waste container into the
supplied plastic bag.
Important • Do not disassemble the container and
return it to your local Fuji Xerox
representative.
5 Hold the new staple waste container by R5
and push it into the machine.
Important • To prevent injury, do not put your fingers
on top of the container.
6 Push R5 until the lock lever moves to the
position.
3
7 Close the right cover of the finisher.
Note • A message will be displayed and the machine will not operate if the right cover of the finisher
is even slightly open.
75
Page 76

3 Maintenance
WARNING
CAUTION
CAUTION
Cleaning the Machine
This section describes how to clean the machine such as the machine exterior,
document cover, document feeder, and document glass.
When cleaning this product, use the designated cleaning materials exclusive to it.
Other cleaning materials may result in poor performance of the product. Never use
aerosol cleaners, or it may catch fire and cause explosion.
Maintenance
Cleaning the Exterior
3
The following describes how to clean the exterior of the machine.
Important • Do not use benzene, paint thinner, or other volatile liquids or spray insect repellent on the
1 Wipe the exterior with a firmly wrung soft
cloth moistened with water.
Important • Do not use cleaning agents other than
Note • If you cannot remove the dirt easily,
When cleaning this product, always switch off the power and then the main power
inside the body front cover, and unplug the product. Access to a live machine interior
may cause electric shock.
When cleaning this product, always switch off the power and then the main power
inside the body front cover, and unplug the product. Access to a live machine interior
may cause electric shock.
machine as they might discolor, deform, or crack covers.
• Cleaning the machine with an excessive amount of water may cause the machine to
malfunction or damage documents during copying.
water or neutral detergent.
gently wipe the machine with a soft cloth
moistened with a small amount of neutral
detergent.
76
2 Wipe off any excess water with a soft cloth.
Page 77

Cleaning the Document Cover and Document Glass
If the document cover and document glass become soiled, smudges may appear on
copies or scanned documents and the machine may not properly detect document
sizes.
To ensure clean copies at all times, clean the document cover and the document glass
about once a month.
Important • Do not use benzene, paint thinner, or other organic solvents. Doing so might damage paint
or coating on plastic parts.
• Cleaning the machine with an excessive amount of water may cause the machine to
malfunction or damage documents during copying or scanning.
1 Wipe the document cover with a soft cloth
moistened with water to remove any dirt, and
then wipe it with a soft, dry cloth.
Important • Do not use cleaning agents other than
water or neutral detergent.
Note • If you cannot remove dirt easily, gently
wipe the document cover with a soft cloth
moistened with a small amount of neutral
detergent.
Document cover
Cleaning the Machine
Maintenance
Document glass
3
2 Wipe the document glass with a soft cloth moistened with water to remove any dirt,
and then wipe it with a soft, dry cloth.
Important • Do not use cleaning agents other than water or neutral detergent.
Note • If you cannot remove dirt easily, gently wipe the document glass with a soft cloth moistened
with a small amount of neutral detergent.
Cleaning the Document Presser and Narrow Glass Strip
If the document presser or narrow glass strip are dirty, streaks or smears may appear
on copies or scanned documents and the machine may not properly detect document
sizes.
To ensure clean copies and scans at all times, clean the document presser and narrow
glass strip about once a month.
Important • Do not use benzene, paint thinner, or other organic solvents. Doing so might damage paint
or coating on plastic parts.
• Cleaning the machine with an excessive amount of water may cause the machine to
malfunction or damage documents during copying or scanning.
1 Wipe the document presser, narrow glass
strip, and guide with a soft cloth moistened
with water to remove any dirt, and then wipe
them with a soft, dry cloth.
Important • Do not use cleaning agents other than
water or neutral detergent.
Note • If you cannot remove dirt easily, gently
wipe the film with a soft cloth moistened
with a small amount of neutral detergent.
Document
presser
Narrow
glass
strip
Guide
77
Page 78

3 Maintenance
Lever
Narrow
glass
strip
2 Hold the green lever to open the part of the
illustration on the right. Wipe the narrow
glass strip with a soft cloth moistened with
water to remove any dirt on the optical glass,
and then wipe it with a soft, dry cloth.
Important • Do not press the narrow glass strip with
excessive force as it is easy to damage
the film around the optical glass surface.
• Do not use cleaning agents other than
water or neutral detergent.
Note • If you cannot remove dirt easily, gently wipe the glass with a soft cloth moistened with a
small amount of neutral detergent.
Maintenance
3 Close the cover until it clicks into place by pushing the center part of the left edge of
the cover.
Cleaning the Document Feeder Rollers
3
If the document feeder rollers become soiled, smudges may appear on copies or
scanned documents and paper jams may occur.
To ensure clean copies at all times, clean the document feeder rollers about once a
month.
Important • Do not use benzene, paint thinner, or other organic solvents. Doing so might damage paint
or coating on plastic parts.
• Cleaning the machine with an excessive amount of water may cause the machine to
malfunction or damage documents during copying scanning, or printing.
1 Lift the latch of the document feeder top,
until it is completely open.
Note • When you fully open the cover, it enters a
fixed position. Open the cover gently.
78
2 While turning the rollers, wipe them with a
soft cloth moistened with water.
Important • Do not use cleaning agents other than
water or neutral detergent.
• Use a cloth firmly wrung to prevent water
drops from falling into the machine. If
water gets into the machine, it may cause
the machine to malfunction.
Note • If you cannot remove dirt easily, gently
wipe the rollers with a soft cloth
moistened with a small amount of neutral
detergent.
3 Close the top cover of the document feeder until it clicks into place.
4 Close the left cover of the document feeder until it clicks into place.
Page 79

Executing Calibration
<Log In/Out> button
The machine can automatically calibrate colors when the reproducibility of density or
color in copies and prints deteriorates. The available screen types are [Copy Job 1],
[Copy Job 2], [Print Job 1], and [Print Job 2].
We recommend executing auto calibration for all four screen types. When the
adjustment for one screen type is complete, specify the next screen type and repeat
the procedure.
Note • If color is not calibrated despite the periodic execution of auto calibration, contact your local
Fuji Xerox representative.
• Confirm the settings of the following items under [Tools] > [System Settings] > [Copy Service
Settings] > [Copy Defaults] in the System Administration mode before executing auto
calibration:
- Lighten/Darken: Normal
- Contrast: Normal
- Sharpness: Normal
- Saturation: Normal
- Color Balance: 0, 0, 0
- Color Shift: Normal
• After finishing the auto calibration, change the settings of [Copy Defaults] if necessary. For
information on [Copy Defaults], refer to "Copy Defaults" (P.134).
Executing Calibration
Maintenance
3
The following describes how to perform calibration.
1 Select [Calibration] on the [Services Home]
screen.
If [Calibration] is not displayed, follow the
procedure below.
1) Press the <Log In/Out> button.
2) Enter the system administrator’s user ID
with the numeric keypad or the keyboard
displayed on the screen, and select
[Enter].
When a passcode is required, select [Next]
and enter the system administrator’s
passcode, and select [Enter].
Note • The default user ID is "11111".
• The default passcode is "x-admin".
79
Page 80

3 Maintenance
Magenta
Maintenance
3) Select [Tools] on the [Services Home]
screen.
Note • When the [Services Home] screen is not
displayed on the touch screen, press the
<Services Home> button.
4) Select [System Settings] > [Common
Service Settings] > [Image Quality
Adjustment].
2 Select [Calibration].
3
3 Select [Screen Type] and [Paper Supply].
Note • The following describes calibration
procedures using Copy Job 1, as an
example.
• For Paper Supply, select the paper tray
on which A4 , A3 , 8.5
x 17" white paper is loaded.
11
• Make sure that [Target] is set to [Copy &
Print Jobs].
• If [Copy & Print Jobs] is not selected for [Target], calibration is not valid for the mode that
does not correspond to [Target].
x 11" , or
4 Select [Start].
Note • The message "Outputting the Calibration
Chart... - Copy Job 1" appears and the
document for calibration (Calibration
Chart) is printed.
5 Align the magenta patch (squares printed at
the top and bottom of the Calibration Chart)
of the printed Calibration Chart against the
left side of the document glass, and load the
chart facing down on the document glass.
Note • Place the Calibration Chart on the
document glass.
80
Page 81

Executing Calibration
6 Place at least five sheets of white paper on
the Calibration Chart to cover the Chart and
close the document cover.
7 Select [Start].
The message “Calibration in progress. - Copy Job 1” appears and the machine
automatically calibrates the colors. It takes about 30 seconds to complete calibration.
A screen showing the result appears.
8 Select [Confirm].
9 To continue calibration for other screen types, repeat steps 3 to 8.
Maintenance
10 Select [Close].
11 Copy or print to confirm the image quality.
Note • During auto calibration, the machine cannot receive print jobs.
3
81
Page 82

3 Maintenance
<Machine Status> button
Printing a Report/List
You can print a report/list to check the settings and communication status.
This section describes how to print a report/ list.
For information on the types of report/list, refer to "Print Reports" (P.87).
1 Press the <Machine Status> button.
Maintenance
2 Select [Print Reports].
3
Note • If [Print Reports Button] is set to
[Disabled] under [Reports], [Print Reports]
appears only in the System
Administration mode. For information on
[Reports], refer to "Reports" (P.119).
3 Select the service that you want a report or
list for.
Note • [Printer Reports], [Scan Reports], and
[Folder List] cannot be used on this
machine.
4 Select a report or list to print, and then press the <Start> button.
82
Page 83

4 Machine Status
This chapter describes the features for checking the machine status.
z
Overview of Machine Status .......................................................................84
z
Machine Information ................................................................................... 85
z
Faults .......................................................................................................... 92
z
Supplies ......................................................................................................93
z
Billing Information .......................................................................................94
Page 84

4 Machine Status
<Machine Status> button
Overview of Machine Status
You can check machine status and the number of printed pages on the screen. You
can also print various reports/lists to check the job history, settings and registered
information.
1 Press the <Machine Status> button.
Machine Status
You can check the following information on the [Machine Status] screen:
4
Machine Information
You can check the machine configuration, paper tray status, and hard disk overwriting
status. You can also check the number of pages printed per meter or per user. You also
can print various reports/lists to check the job history, settings and registered
information.
For more information, refer to "Machine Information" (P.85).
Faults
You can check the information on errors that occurred on the machine.
For more information, refer to "Faults" (P.92).
Supplies
You can check the status of consumables.
For more information, refer to "Supplies" (P.93).
Billing Information
You can check the number of pages printed by meter (meters 1 to 4).
For more information, refer to "Billing Information" (P.94).
84
Page 85

Machine Information
On the [Machine Information] screen, you can check the machine configuration and
paper tray status, and print various reports/lists.
The following shows the reference section for each item.
General Information ................................................................................................................... 85
Paper Tray Status ....................................................................................................................... 87
Print Reports............................................................................................................................... 87
Overwrite Hard Disk .................................................................................................................. 91
1 Press the <Machine Status> button.
Machine Information
2 On the [Machine Information] screen
displayed, you can check the machine
status.
General Information
On the [General Information] screen, you can check the serial number of the machine,
machine configuration, and software version.
1 Check the general information.
Website
Tells you whom to contact when making inquiries about maintenance and operation.
Machine Serial Number
Indicates the serial number of the machine.
Machine Status
4
Current System Software
Indicates the current system software.
IP Address
Indicates the IP address of the machine.
Machine Configuration
Displays the [Machine Configuration] screen.
For more information, refer to "[Machine Configuration] Screen" (P.86).
Software Version
Displays the [Software Version] screen.
For more information, refer to "[Software Version] Screen" (P.86).
85
Page 86

4 Machine Status
[Machine Configuration] Screen
You can check the machine configuration.
1 Select [Machine Configuration].
2 Check the machine configuration on the
screen displayed.
Note • Select [ ] to display the previous screen
or [ ] to display the next screen.
Machine Status
On the [Machine Configuration] screen, you can check the following items:
Note • The items displayed vary depending on the optional features installed.
z
z
z
z
4
z
z
z
z
z
*1 This feature cannot be used on this machine.
*2 XPS stands for XML Paper Specification.
[Software Version] Screen
You can check the software version.
1 Select [Software Version].
Configuration Code
Document Feeder
Paper Tray
High Capacity Feeder
Tray 8 (Inserter)
Offset Stacking Module
Output Device
Folder
Booklet Maker
z
Duplex Module
z
Hard Disk
z
Page Memory Size
z
System Memory Size
z
System Memory Size
z
PCL 6/5e
z
KS
z
KSSM
z
KS5895
*1
*1
*1
*1
z
HP-GL/2
z
ESC/P
z
TIFF/JPEG
z
PDF
z
XPS
z
DocuWorks
z
USB
z
Network Controller
*1
*1
*1
*1
*1, *2
*1
*1
86
2 Check the software versions.
On the [Software Version] screen, you can check the following items:
Note • The items displayed vary depending on the optional features installed.
z
Controller ROM
z
IOT ROM
z
HCF ROM
z
Finisher D ROM
z
Finisher C ROM
z
IFM ROM
z
IIT ROM
z
ADF ROM
z
SJFI
z
SSMI
Page 87

Paper Tray Status
You can check the paper trays set on the machine. On the screen, you can check the
following items:
z
Status
z
% Full (Amount of paper remaining)
z
Paper Size
z
Paper Type
1 Select [Paper Tray Status].
2 Check the status of the paper trays.
Machine Information
Machine Status
Print Reports
The following describes how to print a report and a list.
Note • The items displayed vary depending on the optional features installed.
1 Select [Print Reports].
2 Select the type of a report or a list to print.
Note • The screen as shown on the right
Job Status
1 Select [Job Status].
Note • To display the [Job Status] screen, select the <Machine Status> button, and then select
2 Select a report or a list to print.
4
• [Printer Reports], [Scan Reports], and [Folder List] cannot be used on this machine.
appears when the [Tools] button is
displayed on the [Services Home] screen.
[Machine Information] > [Print Reports] > [Job Status].
3 Press the <Start> button.
87
Page 88

4 Machine Status
Machine Status
Copy Reports
Job History Report
This report displays and prints the job results and related information about the latest
200 jobs. Select a report to print from [All Jobs], [Printer & Print from Folder Jobs], or
[Scan, Fax, & Internet Fax Jobs].
Selecting [Include Child Jobs] check box prints each related job on each line.
Deselecting this check box prints the multiple related jobs on one line.
You can also set up the machine to automatically print a [Job History Report] every 50
jobs.
For information on the auto print of a job history report, refer to "Reports" (P.119). When you set the
machine to print a job history report automatically, the machine prints the results of all jobs.
Error History Report
You can print information on errors occurred in the machine. The latest 50 errors are
printed.
1 Select [Copy Reports].
Note • To display the [Copy Reports] screen, select the <Machine Status> button, and then select
[Machine Information] > [Print Reports] > [Copy Reports].
4
2 Select [Configuration Report].
3 Press the <Start> button.
Configuration Report
You can check the hardware configuration, network information, and copy settings of
the machine.
Network Controller Job Report
Note • This option may not be selectable depending on the print server installed.
1 Select [Network Controller Jobs Report].
2 Select the report/list to be printed.
3 Press the <Start> button.
Note • The items displayed vary depending on
the optional features installed.
88
Job History Report
You can check the job results of the Network Controller.
Page 89

Error History Report
You can print error information about the Network Controller.
Font List
This prints a list of the fonts available for PostScript.
Configuration Report
You can check the network information, and print and scan settings of the Network
Controller.
Job Counter Report
Prints the counter report for each job. You can check the breakdown of the number of
actual use of the machine by feature (such as the number of pages printed and the
number of times used) and cumulative time when the machine is used (such as
runtime, standby time, Low Power mode, Sleep mode, and power-off time) by minutes
on the Job Counter Report.
Note • [Job Counter Report] appears when the [Tools] button is displayed on the [Services Home]
Machine Information
Machine Status
screen.
1 Select [Job Counter Report].
Note • To display the [Job Counter Report] screen, select the <Machine Status> button, and then
2 Select [Job Counter Report].
3 Press the <Start> button.
Auditron Reports
You can print an auditron report by each user. Note that the content on the screen
differs depending on whether the Auditron mode for services is enabled or not.
Note • [Auditron Reports] appears when the [Tools] button is displayed on the [Services Home]
When [Accounting Type] is set to other than [Local Accounting]
When [Accounting Type] of each service is set to other than [Local Accounting], the
following screen appears, allowing you to print a Meter Report (Print Jobs).
select [Machine Information] > [Print Reports] > [Job Counter Report].
screen.
4
1 Select [Auditron Reports].
Note • To display the [Auditron Reports] screen, select the <Machine Status> button, and then
select [Machine Information] > [Print Reports] > [Auditron Reports].
2 Select [Meter Report (Print Jobs)].
89
Page 90

4 Machine Status
3 Press the <Start> button.
Meter Report (Print Jobs)
When [Accounting Type] is set to [Local Accounting]
You can check the total number of printed pages and sheets of paper used for each
client (job owner). [Meter Report (Print Jobs)] counts pages from the time at which the
data is initialized.
When [Accounting Type] is set to [Local Accounting], the [Auditron Reports] screen
appears. You can print the auditron report per user for the services of which the
Auditron mode is set to [Enable Accounting].
For information on enabling the Auditron feature for each service, refer to "Accounting" (P.152).
Machine Status
4
1 Select [Auditron Reports].
Note • To display the [Auditron Reports] screen, select the <Machine Status> button, and then
select [Machine Information] > [Print Reports] > [Auditron Reports].
2 Select an auditron report to print.
3 Select a range of user numbers to print.
Note • Selecting [Select All] selects all users.
4 Press the <Start> button.
Auditron Report (Copy Jobs)
You can check the total number of pages copied on the machine. If the limit is set for
the number of pages or colors that can be copied, you can also check the limit value.
[Auditron Report (Copy Jobs)] counts pages from the time at which the data is
initialized.
Note • [No.] displayed on the report is the User Administration Number assigned when a user is
registered under [Accounting] or [Authentication/Security Settings].
90
Auditron Report (Print Jobs)
You can check the total number of printed pages and sheets of paper used for each
client (job owner). [Auditron Report (Print Jobs)] counts pages from the time at which
the data is initialized.
Important • When [Print Service] is set to [Disable Accounting] in [Auditron Mode] under [Accounting
Type], [Meter Report (Print Jobs)] is displayed instead of [Auditron Report (Print Jobs)]. For
more information on Meter Report (Print Jobs), refer to "Meter Report (Print Jobs)" (P.90).
Note • [No.] displayed on the report is the User Administration Number assigned when a user is
registered under [Accounting] or [Authentication/Security Settings].
Auditron Report (Scan Jobs)
You can check the total number of pages scanned with the machine. If the limit is set
for the number of pages that can be scanned, you can also check the limit value.
[Auditron Report (Scan Jobs)] counts pages from the time at which the data is
initialized.
Note • [No.] displayed on the report is the User Administration Number assigned when a user is
registered under [Accounting] or [Authentication/Security Settings].
Page 91

Overwrite Hard Disk
You can check the overwriting status of the hard disk. "Overwriting" indicates that the
overwriting is in progress. "Standby" indicates that the overwriting is completed.
Note • This feature does not appear for some models. For more information, contact your local Fuji
Xerox representative.
[Overwrite Hard Disk] appears when [Overwrite Hard Disk] is enabled under [Authentication/Security
Settings]. For more information, refer to "Overwrite Hard Disk" (P.164).
1 Select [Overwrite Hard Disk].
2 Check the overwriting status of the hard disk.
Machine Information
Machine Status
4
91
Page 92

4 Machine Status
Faults
Machine Status
This section describes how to check the information on errors that occurred on the
machine.
The error history report shows the list of the latest 50 errors. The items printed include
the date and time, error code, and error category.
The following describes how to print the error history report.
1 Press the <Machine Status> button.
2 Select the [Faults] tab.
3 Select [Error History Report].
4 Press the <Start> button.
4
Note • You can also access [Error History Report] under [Machine Information] > [Print Reports] >
[Job Status].
• If [Print Reports Button] under [Reports] is set to [Disabled], the [Error History Report] button
does not appear on the screen. For more information on Reports, refer to "Reports" (P.119).
92
Page 93

Supplies
1 Press the <Machine Status> button.
2 Select the [Supplies] tab and confirm the
3 Select [Toner] from the drop-down list box,
Supplies
You can check the status of consumables on the [Supplies] screen. The status of
consumables is shown as "OK", "Replace Soon", or "Replace Now".
The following describes the procedure to check the status of consumables.
For information on replacing consumables, refer to "Maintenance" (P.51).
status of the toners.
Note • Pressing a supply name displays a
screen about the status of the supply.
and then select [Other Consumables] and
confirm the status of the consumables.
Machine Status
On the [Supplies] screen, you can check the following items:
z
Black Toner [K1]
z
Black Toner [K2]
z
Cyan Toner [C]
z
Magenta Toner [M]
z
Yellow Toner [Y]
z
Drum Cartridge [R1]
z
Drum Cartridge [R2]
Important • If you replace a toner cartridge with a partially used toner cartridge (such as a toner cartridge
removed from another Color 550/560 Printer), the status displayed may differ from the actual
remaining amount. When replacing toner cartridges, we recommend that you use new ones.
Note • Staple Cartridge: Displays when Finisher C2, Finisher C2 with Booklet Maker, or Finisher D4
with Booklet Maker is installed.
• Hole Punch Waste Container: Displays when Finisher C2, Finisher C2 with Booklet Maker,
or Finisher D4 with Booklet Maker is installed.
• Booklet Staple Cartridge: Displays when Finisher D4 with Booklet Maker is installed.
z
Drum Cartridge [R3]
z
Drum Cartridge [R4]
z
Waste Toner Container
z
Staple Cartridge [R1]
z
Booklet Staple Cartridge [R2]
z
Booklet Staple Cartridge [R3]
z
Hole Punch Waste Container [R4]
4
93
Page 94

4 Machine Status
Billing Information
On the [Billing Information] screen, you can check the number of pages printed per
meter or user.
The following shows the reference section for each item:
1 Press the <Machine Status> button.
2 Select the [Billing Information] tab.
Machine Status
Billing Information .....................................................................................................................94
User Account Billing Information ..............................................................................................95
Billing Information
4
1 Select [Billing Information].
2 On the screen, check each meter.
You can check the total number of copies and pages printed by individual meters.
Serial Number
Displays the serial number of the machine.
Color Impressions
Displays the total number of pages copied or printed in full color.
Black Impressions
Displays the total number of pages copied or printed in black and white.
94
Color Large Impressions
Displays the total number of pages copied or printed in large-size (sheet size larger
than 297
Black Large Impressions
Displays the total number of pages copied or printed in large-size (sheet size larger
than 297
Total Impressions
Displays the total number of Color Impressions and Black Impressions.
x 400 mm) full color.
x 400 mm) black and white.
Page 95

User Account Billing Information
You can check the number of pages printed by user.
When the Auditron mode is enabled, you can check the billing meters for the currently
authenticated user ID.
Note • [User Account Billing Information] is displayed when the [Accounting Type] is set to [Local
Accounting].
For more information on the Auditron mode, refer to "Accounting" (P.152).
1 Press the <Log In/Out> button.
To check the billing meter of a currently authenticated user ID
1) Enter the user ID with the numeric keypad
or the keyboard displayed on the screen,
and select [Enter].
When a password is required, select
[Next] and enter the user’s passcode, and
select [Enter].
2) Press the <Machine Status> button.
Billing Information
Machine Status
To check the system administrator meter
1) Enter the system administrator’s user ID with the numeric keypad or the keyboard
displayed on the screen, and select [Enter].
When a passcode is required, select [Next] and enter the system administrator’s
passcode, and select [Enter].
Note • The default user ID is "11111".
• The default passcode is "x-admin".
2) Press the <Machine Status> button.
2 Select the [Billing Information] tab.
3 Select [User Account Billing Information].
4 Select a meter to check.
Note • The meters are displayed only for the
features set to [Enable Accounting] in the
Auditron mode.
4
Meter (Copy Jobs)
Displays the number of pages copied.
Meter (Scan Jobs)
Displays the number of pages scanned.
Meter (Print Jobs)
Displays the number of pages printed.
Note • [Meter (Print Jobs)] is not displayed for the system administrator.
95
Page 96

4 Machine Status
Machine Status
4
96
Page 97

5Tools
Each feature of the machine is set to the factory default (initial) settings, but you
can customize these settings in accordance with your environment. To change
or customize these settings, enter the System Administration mode and make
changes in the [Tools] screen.
This chapter describes the features that can be changed and the procedures to
change the settings.
z
System Settings Procedure ........................................................................ 98
z
Tools Menu List ........................................................................................101
z
Common Service Settings ........................................................................ 108
z
Copy Service Settings .............................................................................. 133
z
Connectivity & Network Setup ..................................................................142
z
Print Service Settings ............................................................................... 142
z
Scan Service Settings............................................................................... 143
z
Email Service Settings .............................................................................. 148
z
Folder Service Settings............................................................................. 148
z
Job Flow Service Settings ........................................................................ 148
z
Stored File Settings .................................................................................. 148
z
Network Controller Settings ...................................................................... 149
z
Setup ........................................................................................................ 151
z
Accounting ................................................................................................ 152
z
Authentication/Security Settings ............................................................... 158
Page 98

5 Tools
<Log In/Out> button
System Settings Procedure
To change or customize the system settings, enter the System Administration mode.
This section describes the basic procedures for system settings.
The following shows the reference section for each procedure.
Step 1 Entering System Administration Mode ...........................................................................98
Step 2 Entering the System Administrator User ID and Passcode .............................................98
Step 3 Selecting [Tools]..............................................................................................................99
Step 4 Selecting a Setting Item on the [Tools] Screen................................................................99
Step 5 Setting a Feature ............................................................................................................100
Step 6 Exiting System Administration Mode ...........................................................................100
Step 1 Entering System Administration Mode
Press the <Log In/Out> button or the login
1
Tools
information field on the touch screen.
5
Step 2 Entering the System Administrator User ID and Passcode
To enter the System Administration mode, enter the system administrator User ID. If
[Passcode Entry from Control Panel] is set to [On] under [Authentication/Security
Settings] > [Authentication] > [Passcode Policy], you need to enter the passcode.
We recommend that you change the system administrator user ID and passcode
immediately after installing the machine.
For more information on how to change the passcode, refer to "System Administrator Settings" (P.158).
1 Enter the system administrator’s user ID with
the numeric keypad or the keyboard
displayed on the screen, and select [Enter].
When a passcode is required, select [Next]
and enter the system administrator’s
passcode, and then select [Enter].
Note • The default user ID is "11111".
• The default passcode is "x-admin".
• The screen may differ depending on the settings of the machine.
• The <Log In/Out> button is lit when the machine enters the System Administration mode.
98
Page 99

Step 3 Selecting [Tools]
Select [Tools] on the [Services Home]
1
screen.
Note • When the [Services Home] screen is not
displayed on the touch screen, press the
<Services Home> button.
Step 4 Selecting a Setting Item on the [Tools] Screen
On the [Tools] screen, select a setting item to set.
For the items that can be selected on the [Tools] screen, refer to "Tools Menu List" (P.101).
1 Select a tab to set.
System Settings Procedure
Tools
System Settings
You can set or change the default values of each service.
Common Service Settings
Allows you to configure the general settings of the machine.
For more information, refer to "Common Service Settings" (P.108).
Copy Service Settings
Allows you to configure the copy service settings such as copy feature defaults, copy
operation control, and button indications.
For more information, refer to "Copy Service Settings" (P.133).
Scan Service Settings
Allows you to configure the scan service settings such as scanner defaults and button
indications.
For more information, refer to "Scan Service Settings" (P.143).
Setup
5
Accounting
You can register stored programs and set paper tray attributes.
For more information, refer to "Setup" (P.151).
You can register users and configure the settings for account administration.
For more information, refer to "Accounting" (P.152).
99
Page 100

5 Tools
Authentication/Security Settings
You can configure the authentication and security settings.
For more information, refer to "Authentication/Security Settings" (P.158).
Step 5 Setting a Feature
Select any feature.
1
Note • Select a submenu from the [Group] list, and then select a feature from the [Features] list.
• Select [ ] or [ ] as required.
2 Select an item to set.
3 After setting the feature, select [Save].
4 Select [Close] repeatedly until the [Services Home] screen is displayed.
Note • If rebooting the machine is required to enable the new settings, when you select [Close] in
the [Tools] screen, a message may be displayed. Follow the message and reboot the
machine. After the machine reboots, it exits from the System Administration mode, and the
Tools
<Log In/Out> button is unlit.
Step 6 Exiting System Administration Mode
5
Press the <Log In/Out> button.
1
Note • You can also log out by pressing the login information field on the touch screen, and then
selecting [Logout].
• The <Log In/Out> button is unlit when the machine exits from the System Administration
mode.
100
 Loading...