


Blue Power GTE 850
GTE 845
GTE 840
GTE 830
Originalbetriebsanleitung - de |
6 |
Original operating instructions - en |
12 |
Notice d'instructions d'origine - fr |
18 |
Istruzioni per l'uso originali - it |
25 |
Originele 111 - nl |
31 |
Originale driftsvejledning - da |
37 |
Alkuperäinen käyttöohjekirja - fi |
43 |
Originale driftsanvisningen - no |
49 |
Originalbruksanvisning - sv |
55 |
Originální návod k obsluze - cs |
61 |
Eredeti üzemeltetési útmutató - hu |
67 |
Oryginalna instrukcja obsugi - pl |
73 |
Originalna uputa za rad - hr |
80 |
Originálny návod na obsluhu - sk |
86 |
Izvirno navodilo za obratovanje - sl |
92 |
Оригинално упътване за експлоатация - bg |
98 |
Оригинальная инструкция по эксплуатации - ru |
105 |
Instrucţiuni de funcţionare originale - ro |
112 |
Orijinal işletme kılavuzu - tr |
118 |
Αυθεντικέςοδηγίεςχειρισμούel |
124 |

2
L
3
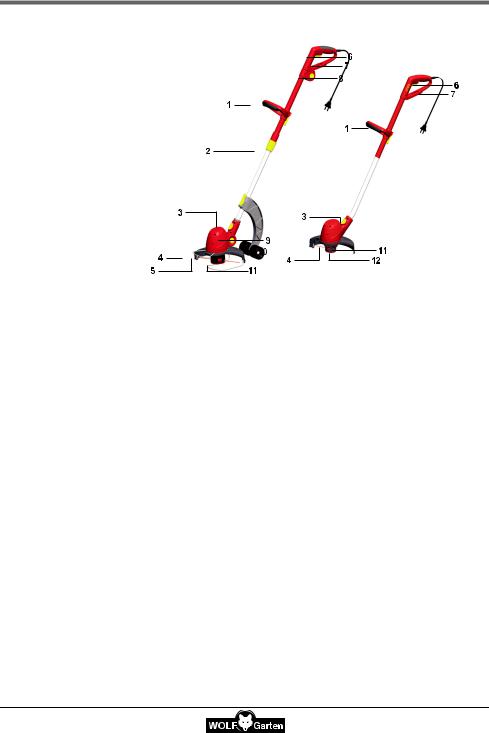
GTE 830 - GTE 840 - GTE 845 - Blue Power GTE 850
de
1Mittelgriff
2Teleskopstiel
3Einstellung Senkrechtschnitt
4Fadenmesser
5Pflanzenschutzbügel (Blue Power GTE 850)
6Ein- /Ausschalter
7Obergriff mit Kabelzugentlastung
8Blue Power Button (Blue Power GTE 850)
9Einstellung Stielneigung
10Räder (GTE 845, Blue Power GTE 850)
11Fadenkassette
12Tipp-Automatik
en
1Middle grip
2Telescoping handle
3Edge adjustment
4Cord cutter
5Plant hoop guard (Blue Power GTE 850)
6On-/Off-switch
7Upper grip with cable holder
8Blue Power Button (Blue Power GTE 850)
9Handle angle adjustment
10Chassis (GTE 845, Blue Power GTE 850)
11Cord spool
12Tilt switch
fr
1Poignée centrale
2Manche télescopique
3Réglage taille-bordures
4Couteau
5Arceau de protection (Blue Power GTE 850)
6Interrupteur
7Poignée supérieure avec fixe-câble
8Blue Power Button (Blue Power GTE 850)
9Réglage inclinaison du manche
10Châssis (GTE 845, Blue Power GTE 850)
11Bobine de fil
12Systéme automatique à impulsion
GTE 840 - GTE 845
Blue Power GTE 850
it
1Impugnatura centrale
2Manico telescopico
3Regolazioni bordi
4Misuratore del filo
5Staffa protezione piante (Blue Power GTE 850)
6Interrutore per avviare
7Impugnatura superiore con eliminazione trazione cavo
8Pulsante Blue Power (Blue Power GTE 850)
9Regolazione inclinazione manico
10Autotelaio (GTE 845, Blue Power GTE 850)
11Cassetta filo
12Regolazione automatica fine
nl
1Middelste handgreep
2Telescoopsteel
3Instelling edgen
4Draadmes
5Veiligheidsbeugel ter be-
scherming van de planten
(Blue Power GTE 850)
6Inen uitschakelaar
7Bovenste handgreep met kabeltrekontlasting
8Blue Power-knop (Blue Power GTE 850)
9Instelling stand van de steel
10Onderstel (GTE 845, Blue Power GTE 850)
11Draadspoel
12Tip-automaat
da
1Midtergreb
2Teleskopskaft
3Indstilling kantning
4Trådkniv
5Plantebeskyttelsesbøjle (Blue Power GTE 850)
6Strömbrytare start-stop
7Overgreb med kabeltrækaflastning
8Blue Power Button (Blue Power GTE 850)
9Indstilling skafthældning
10Kørestel (GTE 845, Blue Power GTE 850)
11Trådkassette
12Tryk-automatik
GTE 830
fi
1Keskikahva
2Teleskooppivarsi
3Reunanleikkuuasento
4Lanka
5Suojakaari (Blue Power GTE 850)
6Virtakytkin
7Yläkahva ja vedonpoistin
8Blue Power-painike (Blue Power GTE 850)
9Varren kallistuksensäätö
10Alusta (GTE 845, Blue Power GTE 850)
11Lankakasetti
12Siimansäätökatkaisin
no
1Midthåndtak
2Teleskopstang
3Kantinnstilling
4Trådkniv
5Bøyle for beskyttelse av planter
(Blue Power GTE 850)
6Bryter
7Øverste håndtak med kabelstrekkavlastning
8Blue Power-knapp (Blue Power GTE 850)
9Innstilling av stanghelning
10Chassis (GTE 845, Blue Power GTE 850)
11Trådkassett
12Trykke-automatik
4

sv |
|
5 |
Ochrona roślin przed |
7 |
Zgornji ročaj s sponko za |
ro |
|
1 |
Mitthandtag |
|
uszkodzeniem (Blue |
|
razbremenitev kabla |
1 |
Mâner median |
2 |
Teleskopskaft |
|
Power GTE 850) |
8 |
Gumb Blue Power |
2 |
Tijă telescopică |
3 |
Inställning för kantklipp- |
6 |
Włącznik / wyłącznik |
|
(Blue Power GTE 850) |
3 |
Reglare tăiere lângă |
|
ning |
7 |
Uchwyt górny z |
9 |
Nastavitev naklona |
|
muchii |
4 |
Trådkniv |
|
odciążeniem ciągu kabla |
|
držaja |
4 |
Fir de tăiere |
5 |
Plantskyddsbygell |
8 |
Blue Power Button |
10 |
Kolesa (GTE 845, |
5 |
Arc pentru protecţia |
|
(Blue Power GTE 850) |
|
(Blue Power GTE 850) |
|
Blue Power GTE 850) |
|
plantelor |
6 |
Strömbrytare |
9 |
Regulacja nachylenia |
11 |
Kaseta za nitko |
|
(Blue Power GTE 850) |
7 |
Övre handtag med |
|
trzonka |
12 |
Avtomatika na dotik |
6 |
Comutator pornit/oprit |
|
kabeldragavlastning |
10 |
Podwozie (GTE 845, |
bg |
|
7 |
Mâner superior cu |
8 |
Blue Power-knapp |
|
Blue Power GTE 850) |
|
|
dispozitiv pentru |
|
|
(Blue Power GTE 850) |
11 |
Szpulka z żyłką |
1 |
средна ръкохватка |
|
descărcarea de tracţiune |
9 |
Inställning av skaftlutning |
12 |
Przycisk zwalniania żyłki |
2 |
телескопично |
|
mecanică a cablului |
10 |
Underrede (med hjul) |
hr |
|
|
удължаващ се прът |
8 |
Butonul Blue Power |
|
(GTE 845, Blue Power |
|
3 |
регулираневертикално |
|
(Blue Power GTE 850) |
|
|
1 |
Srednja ručka |
|
||||
|
GTE 850) |
|
рязане |
9 |
Reglare înclinare tijă |
||
11 |
Trådkassett |
2 |
Teleskopsko držalo |
4 |
нож за нишката |
10 |
Şasiu (GTE 845, |
12 |
Trådkniven |
3 |
Podešavanje sečenje |
5 |
предпазна скоба за |
|
Blue Power GTE 850) |
cs |
|
|
ivica |
|
растенията |
11 |
Caseta firului |
|
4 |
Nož niti |
|
(Blue Power GTE 850) |
12 |
Automatizare prin impuls |
|
1 |
střední držadlo |
5 |
Zengija za zaštitu bilja |
6 |
Включвател/ прекъсвач |
tr |
|
2 |
teleskopická násada |
|
(Blue Power GTE 850) |
7 |
горна ръкохватка с |
|
|
3 |
nastavení úhlu hlavy |
6 |
Sklopka uključi/isključi |
|
обтегач за кабела |
1 |
Orta sap |
4 |
strunový nůž |
7 |
Gornja ručka sa zaštitom |
8 |
Бутон Blue Power |
2 |
Teleskop kol |
5 |
ochranný třmen na |
|
kabela od vučenja |
|
(Blue Power GTE 850) |
3 |
Dikey kesme ayarı |
|
rostliny |
8 |
Gumb Blue Power |
9 |
регулиране |
4 |
Kesici misina |
|
(Blue Power GTE 850) |
|
(Blue Power GTE 850) |
|
наклоняване на пръта |
5 |
Bitki koruma maşası |
6 |
Spínač |
9 |
Podešavanje nagiba |
10 |
ходова част (GTE 845, |
|
(Blue Power GTE 850) |
7 |
horní držadlo |
|
držala |
|
Blue Power GTE 850) |
6 |
Açma/Kapama düğmesi |
|
s odlehčením tahu |
10 |
Stajni trap (GTE 845, |
11 |
касета за нишката |
7 |
Kablo çekme kuvveti |
|
kabelu |
|
Blue Power GTE 850) |
12 |
Бутонно пускане и |
|
azaltıcısıyla birlikte üst |
8 |
Tlačítko Blue Power |
11 |
Kazeta niti |
|
спиране |
|
tutma kolu |
|
(Blue Power GTE 850) |
12 |
Automatika za tipkanje |
ru |
|
8 |
Blue Power düğmesi |
9 |
nastavení sklonu násady |
sk |
|
|
|
(Blue Power GTE 850) |
|
|
|
|
|
||||
10 |
kolečka (GTE 845, |
|
1 |
Средняя рукоятка |
9 |
Kol eğimi ayarı |
|
|
|
||||||
|
Blue Power GTE 850) |
1 |
Stredný držiak |
2 |
Телескопическая |
10 |
Yürüyen aksam (GTE |
11 kazeta se strunou |
2 |
Teleskopická násada |
|
стойка |
|
845, Blue Power GTE |
|
12 |
Tipp - automatika |
3 |
Nastavenie Edgen |
3 |
Регулятор |
|
850) |
hu |
|
4 |
Strunový nôž |
|
вертикального среза |
11 |
Misina kaseti |
|
5 |
Chránič rastlín (Blue |
4 |
Режущий корд |
12 |
Tipp-Automatik |
|
1 |
középső fogantyú |
|
Power GTE 850) |
5 |
Скоба для защиты |
el |
|
2 |
teleszkópos nyél |
6 |
Vypínač ZAP / VYP |
|
растений |
|
|
3 |
a szélezés beállítása |
7 |
Horná rukoväť s |
|
(Blue Power GTE 850) |
1 |
Μεσαία λαβή |
4 |
késél |
|
odľahčením ťahu kábla |
6 |
Включатель / |
2 |
Τηλεσκοπικός βραχίονας |
5 |
növényvédő keret |
8 |
Tlačidlo Blue Power |
|
Выключатель |
3 |
Ρύθμιση κάθετης κοπής |
|
(Blue Power GTE 850) |
|
(Blue Power GTE 850) |
7 |
Верхняя рукоятка с |
4 |
Μαχαίρι νήματος |
6 |
be- / kikapcsoló |
9 |
Nastavenie sklonu |
|
устройством для |
5 |
Προστατευτική λαβή |
7 |
fölső fogantyú, |
|
násady |
|
снятия натяжения |
|
φυτών (Blue Power GTE |
|
kábelkihúzás gátlóval |
10 |
Podvozok (GTE 845, |
|
кабеля |
|
850) |
8 |
Blue Power gomp |
|
Blue Power GTE 850) |
8 |
Кнопка Blue Power |
6 |
Διακόπτης |
|
(Blue Power GTE 850) |
11 |
Strunová kazeta |
|
(Blue Power GTE 850) |
|
ενεργοποίησης / |
9 |
nyélmeredekség állító |
12 |
Tipovacia automatika |
9 |
Регулятор наклона |
|
απενεργοποίησης |
10 alváz (GTE 845, |
sl |
|
|
стойки |
7 |
Πάνω λαβή με |
|
|
Blue Power GTE 850) |
|
10 |
Шасси (GTE 845, |
|
αποφόρτιση καλωδίου |
|
11 |
szálkazetta |
1 |
Srednji ročaj |
|
Blue Power GTE 850) |
8 |
Blue Power Κουμπί |
12 |
gyorsító automatika |
2 |
Teleskopstiel |
11 |
Катушка с кордом |
|
(Blue Power GTE 850) |
pl |
|
3 |
Nastavitev navpičnega |
12 |
Толчковая автоматика |
9 |
Ρύθμιση κλίσης |
|
|
rezanja |
|
|
|
βραχίονα |
|
1 |
Uchwyt pośredni |
4 |
Nož za rezanje nitke |
|
|
10 |
Πλαίσιο (GTE 845, Blue |
2 |
Trzonek teleskopowy |
5 |
Streme za zaščito rastlin |
|
|
|
Power GTE 850) |
3 |
Ustawienie Edgen |
|
(Blue Power GTE 850) |
|
|
11 |
Κασέτα νήματος |
4 |
Nóż żyłkowy |
6 |
Stikalo za vklop/izklop |
|
|
12 |
Αυτοματισμός |
|
|
|
|
|
|
|
λειτουργίας Tipp |
5
Originalbetriebsanleitung - en
de Herzlichen Glückwunsch zum Kauf Ihres WOLF-Garten-Produkts
Lesen Sie die Gebrauchsanweisung sorgfältig, und machen Sie sich mit den Bedienungselementen und dem richtigen Gebrauch des Gerätes vertraut. Achtung! Beim Gebrauch von Elektrowerkzeugen sind zum Schutz gegen elektrischen Schlag, Verletzungen und Brandgefahr, nachstehende Sicherheitshinweise zu beachten. Der Benutzer ist verantwortlich für Unfälle mit anderen Personen oder deren Eigentum.
Lassen Sie nie Kinder oder andere Personen, die die Gebrauchsanweisung nicht kennen, das Gerät benutzen. Jugendliche unter 16 Jahre dürfen das Gerät nicht benutzen. Örtliche Bestimmungen können das Mindestalter des Benutzers festlegen.
Inhalt
Bedeutung der Symbole . . . . . . . . . . . . 6 Sicherheitshinweise . . . . . . . . . . . . . . 7
Betrieb . . . . . . . . . . . . . . . . . . . . 8 Wartung . . . . . . . . . . . . . . . . . . . 10
Beseitigung von Störungen . . . . . . . . . 11
Ersatzteile . . . . . . . . . . . . . . . . . . 11 Garantie . . . . . . . . . . . . . . . . . . . 11
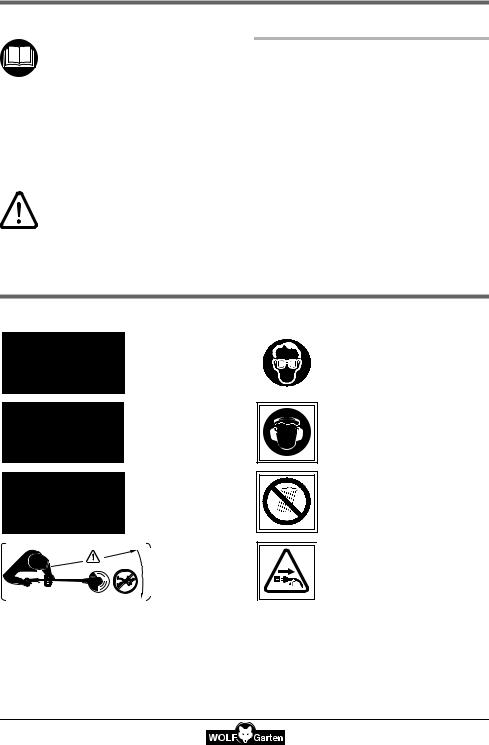
Bedeutung der Symbole
Achtung! Lesen Sie |
|
|
|
Augenschutz tragen! |
|
|
|
||
vor Inbetriebnahme |
|
|
|
|
die Gebrauchsan- |
|
|
|
|
weisung! |
|
|
|
|
|
|
|
|
|
|
|
|
|
|
Werkzeug läuft nach!
Dritte aus dem Gefahrenbereich fernhalten!
|
|
|
|
|
|
|
|
|
|
Halten Sie an- |
|
|
|
|
|
|
|
|
|
|
|
|
|
|
|
|
|
|
|
|
|
|
|
|
|
|
|
|
|
603 |
|
dere Personen |
|
|
|
fern! |
||||||||
|
° |
|||||||||
|
|
|
|
|
|
|
|
|
|
|
|
|
|
|
|
|
|
|
|
|
|
|
|
|
|
|
|
|
|
|
|
|
|
|
|
|
|
|
|
|
|
|
|
|
|
|
|
|
|
|
|
|
|
|
Gehörschutz tragen!
Nicht dem Regen aussetzen!
Bei Beschädigung des Anschlusskabels das Gerät ausschalten und den Netzstecker ziehen!
6 |
de |

Sicherheitshinweise
Allgemeine Hinweise
•Dieser Rasenkantentrimmer ist für die Pflege von Rasenkanten sowie kleineren Grasund Rasenflächen im privaten Bereich vorgesehen. Dieser Trimmer sollte nicht in öffentlichen Anlagen, Parks, Sportstätten, an Straßen usw. sowie in der Landund Forstwirtschaft eingesetzt werden.
•Wegen körperlicher Gefährdung des Benutzers darf der Rasentrimmer nicht gebraucht werden:
–zum Trimmen von Büschen, Hecken und Sträuchern;
–zum Schneiden von Blumen;
–zum Zerkleinern im Sinne der Kompostierung.
•Aus Sicherheitsgründen dürfen Jugendliche unter 16 Jahren sowie Personen, die mit der Handhabung nicht vertraut sind, diesen Rasentrimmer nicht benutzen.
•Das Gerät darf nicht in Betrieb genommen werden, wenn sich Personen (insbesondere Kinder) oder Tiere in unmittelbarer Nähe befinden; Sie sind für die Schäden verantwortlich!
•Unterbrechen Sie den Gebrauch der Maschine, wenn Personen, vor allem Kinder oder Haustiere in der Nähe sind.
•Benutzen Sie die Maschine nur bei Tageslicht oder guter künstlicher Beleuchtung.
•Den Trimmer nur bei trockenem Wetter benutzen und nicht im Regen liegen lassen.
•Montieren Sie nie metallische Schneidelemente.
Vor dem Einsatz
•Säubern Sie den Rasen von Fremdkörpern wie Äste, Steine, Draht usw. Achten Sie auch während des Trimmens auf Fremdkörper.
•Das außen am Gerät installierte Anschlusskabel und das Verlängerungskabel müssen regelmäßig auf Beschädigung und Alterung (Brüchigkeit) untersucht werden. Nur in einwandfreiem Zustand benutzen!
•Benutzen Sie niemals ein Gerät mit beschädigten Schutzeinrichtungen oder Abdeckungen.
•Aus Sicherheitsgründen sind nur Originalersatzteile oder vom Hersteller freigegebene Teile zu verwenden. Beim Austausch Einbauhinweise beachten!
•Vor dem Einstellen oder Säubern des Gerätes oder vor dem Prüfen, ob die Anschlussleitung verschlungen oder verletzt ist, das Gerät ausschalten und den Netzstecker ziehen.
•Vor Inbetriebnahme der Maschine und nach jeglichem Aufprall prüfen Sie die Anschlussleitung auf Anzeichen von Verschleiß oder Beschädigung und lassen Sie notwendige Reparaturen durchführen.
Kabel
•Verwenden Sie ausschließlich Verlängerungskabel mit einem Mindest-Querschnitt von 3x1,5 mm2 und einer max. Länge von 25 m:
–wenn Gummischlauchleitungen, dann nicht leichter als Typ HO7RN-F
–wenn PVC-Leitungen, dann nicht leichter als Typ HO5 VV-F (Leitungen diesen Typs sind für die ständige Verwendung im Freien nicht geeignet, wie z. B.: unterirdische Verlegung zum Anschluss einer Gartensteckdose, Anschluss einer Teichpumpe oder Lagerung im Freien)
•Sie müssen spritzwassergeschützt sein.
•Benutzen Sie eine Fehlerstromschutzeinrichtung (RCD) mit einem Fehlerstrom von nicht mehr als 30 mA.
•Anschlusskabel an der Zugentlastung befestigen. Nicht an Kanten, spitzen oder scharfen Gegenständen scheuern lassen. Kabel nicht durch Türritze oder Fensterspalten quetschen. Schalteinrichtungen dürfen nicht entfernt oder überbrückt werden (z. B. Anbinden des Schalthebels am Führungsholm)
Beim Arbeiten
•Halten Sie immer Hände und Füße von der Schneideinrichtung entfernt, vor allem, wenn Sie den Motor einschalten.
•Seien Sie achtsam vor Verletzungen an der Vorrichtung, die zum Abschneiden der Fadenlänge dient. Nach dem Herausziehen eines neuen Fadens halten Sie die Maschine immer in ihrer normalen Arbeitsposition, bevor sie eingeschaltet wird.
•Den Rasentrimmer beim Einschalten parallel zum Rasen halten, da sonst Verletzungsgefahr gegeben ist.
•Auch beim Arbeiten Sicherheitsabstand zum rotierenden Faden einnehmen. Nicht in den rotierenden Faden greifen.
de |
7 |

•Tragen Sie immer geeignete Arbeitskleidung; keine weite Kleidung etc. die vom Schneidwerkzeug erfasst werden kann. Festes Schuhwerk! Schützen Sie auch Ihre Beine (z. B. durch lange Hosen).
•Augenschutz und Gehörschutz tragen!
•Beim Transport zu den einzelnen Arbeitsstellen ist der Motor abzustellen.
•Üben Sie besondere Vorsicht beim Rückwärtsgehen. Stolpergefahr!
•Halten Sie die Anschlussleitungen von den Schneidwerkzeugen fern.
•Wenn die Anschlussleitung während des Gebrauchs beschädigt wird, muss sie sofort vom Netz getrennt werden. Leitung nicht berühren bevor sie vom Netz getrennt ist.
•Bei Arbeitsunterbrechungen lassen Sie den Trimmer nie unbeaufsichtigt liegen. Bitte an einem sicheren Ort aufbewahren.
•Die am Gerät installierten Schalteinrichtungen dürfen nicht entfernt oder überbrückt werden (z. B. durch Anbinden des Tastschalters am Griff).
•Die Fadenbox nicht auf den Boden stoßen und nicht an Mauerkanten anschlagen. Hat die Fadenbox einmal einen starken Stoß erlitten, ist auf eine verstärkte Vibration am Griff zu achten. Wenn dies der Fall ist, muss das Gerät von einer Kundendienstwerkstatt überprüft werden.
Nach dem Arbeiten
•Ziehen Sie nach dem Gebrauch den Netzstecker und überprüfen Sie die Maschine auf Beschädigung.
•Beim Abstellen: Achtung, Gefahr! Schneidwerkzeug läuft nach!
•Immer den Stillstand des Schneidwerkzeuges abwarten.
•Wartungsund Reinigungsarbeiten am Gerät, das Abnehmen der Schutzeinrichtungen oder der Austausch der Fadenkassette dürfen nur bei stillgesetztem Motor und abgeschaltetem
Schneidwerkzeug und nur bei abgezogenem Netzstecker vorgenommen werden.
Nur Original Hersteller - Fadenkassetten verwenden, Einbauhinweise beachten!
•Der Fadenschneider darf nicht mit fließendem Wasser, insbesondere nicht unter Hochdruck gereinigt werden.
•Reparaturen am Gerät dürfen nur von Original-Her- steller - Service-Stationen und autorisierten Werkstätten vorgenommen werden.
•Achten Sie darauf, dass Luftöffnungen frei von Verschmutzungen sind.
•Lagern Sie die Maschine nicht in Reichweite von Kindern.
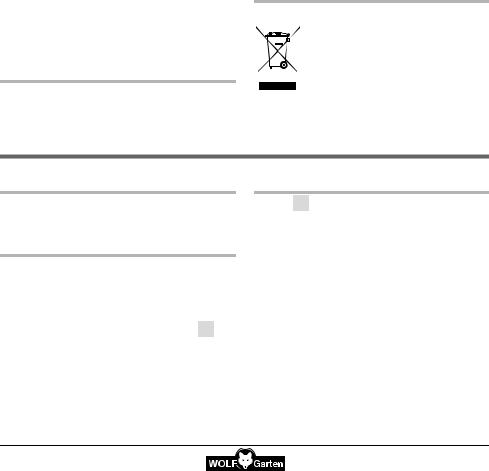
Entsorgung
Elektrogeräte gehören nicht in den Hausmüll. Gerät, Zubehör und Verpackung einer umweltfreundlichen Wiederverwertung zuführen.
Betrieb
Betriebszeiten
•Bitte regionale Vorschriften beachten.
•Erfragen Sie die Betriebszeiten bei Ihrer örtlichen Ordnungsbehörde.
Arbeitswinkel
GTE 840 - GTE 845 - Blue Power GTE 850 A
Der Rasentrimmer verfügt über einen 4-fach verstellbaren Arbeitswinkel. Dadurch können Sie problematische und schwer zugängliche Stellen im Garten
bequem erreichen C .
1.Drücken Sie den Arretierknopf  .
.
2.Stellen Sie den Arbeitswinkel ein 


 . Der Stiel rastet hörbar ein.
8 |
de |

Freischneiden D
1. Halten Sie das Gerät am Oberund Mittelgriff.
2. Schwingen Sie das Gerät halbkreisförmig vor dem
3Körper (ohne Bodenkontakt).
Hinweise
•Der optimale Arbeitswinkel für das Freischneiden beträgt ca. 30°.
•Höheres Gras langsam und stufenweise schneiden.
Kantenschnitt
Die Funktion des Kantenschnitts ermöglicht ein präzises Trimmen entlang der Rasenkante E .
GTE 840 - GTE 845 - Blue Power GTE 850 A
1.Drücken Sie den Arretierknopf  .
.
2.Drehen Sie den Schneidkopf um 90°  (der Schneidkopf rastet hörbar ein).
3.Drücken Sie den Arretierknopf  .
.
4.Stellen Sie den Arbeitswinkel ein  (der Stiel rastet hörbar ein).
GTE 830 B
1.Drücken Sie den Arretierknopf  .
.
2.Drehen Sie den Schneidkopf um 180° bis zum Einrasten  .
.
Räder
GTE 845 - Blue Power GTE 850
Um einen gleichmäßig hohen und sauberen Schnitt
zu erzielen, sollte man die Räder verwenden F .
•Montage bzw. Höhenverstellung gemäß Abbildungen G H J .
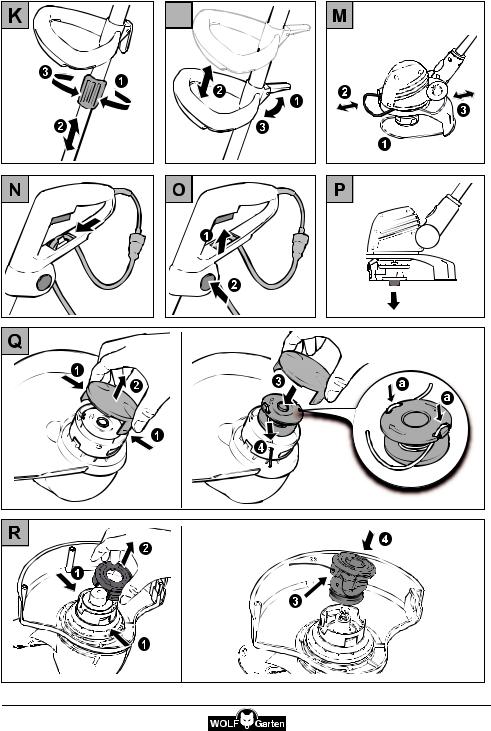
Holmlänge einstellen K
GTE 840 - GTE 845 - Blue Power GTE 850
1.Lösen Sie die Gewindehülse  .
.
2.Ziehen Sie den Teleskopstiel auseinander, bis die ideale Holmlänge erreicht ist  .
.
3.Drehen Sie die Gewindehülse fest  .
.
Motorschutzbügel/Führungsschiene und Pflanzenschutzbügel
Blue Power GTE 850 M
Der Motorschutzbügel schützt den Motor vor Beschädigungen durch Schlag oder Stoß. Gleichzeitig dient der Schutzbügel als Führungsschiene für den komfortableren Betrieb  .
.
Der Pflanzenschutzbügel schützt Sträucher, Bäume und Beetpflanzen.
• Ziehen Sie den Pflanzenschutzbügel vom Schneidkopf ab und stecken ihn wie abgebildet wieder
auf  .
.
1Beim Kantenschnitt muss der Pflanzenschutzbügel umgesteckt bleiben  .
.
Kabel in die Zugentlastung führen N
Die Zugentlastung im Führungsgriff verhindert ein unbeabsichtigtes Lösen des Verlängerungskabels.
•Bitte befestigen Sie das Verlängerungskabel wie abgebildet in der Zugentlastung.
Anschluss an die Steckdose (230 V, 50 Hz)
• Das Gerät nur an Steckdosen anschließen, die mit einer 10-16 A Sicherung träge (oder LS-Schalter
Typ B) abgesichert sind.
3
Die Schutzeinrichtungen schützen bei Berühren von beschädigten Leitungen, Isolationsfehlern und in bestimmten Fällen auch beim Beschädigen von unter Spannung stehenden Leitungen vor schweren Verletzungen.
•Wir empfehlen, das Gerät nur an Steckdosen anzuschließen, die mit einer Fehlerstromschutzeinrichtung (RCD) mit einem Fehlerstrom von nicht mehr als 30 mA abgesichert sind.
•Für Alt-Installationen gibt es Nachrüstsätze. Sprechen Sie mit der Elektro-Fachkraft
Mittelgriff einstellen L
1.Lösen Sie den Arretierhebel am Mittelgriff  .
.
2.Schieben Sie den Mittelgriff in die gewünschte Höhe  .
.
3.Spannen Sie den Arretierhebel  .
.
Ein -/ Ausschalten O
1Achtung! Rotierender Faden
Werkzeug läuft nach!
Gerät einschalten
• Drücken und halten Sie den Ein-/Ausschalter  .
.
de |
9 |

Gerät ausschalten
• Lassen Sie den Ein-/Ausschalter los.
Blue Power Button O
Blue Power GTE 850
Der Blue Power Button ermöglicht Ihnen ein strom- sparendes-, umweltbewusstes und geräuschreduziertes Arbeiten bei reduzierter Drehzahl.
•Drücken Sie den Blue Power Button bei laufendem Motor, um die Drehzahl zu reduzieren  .
.
•Drücken Sie den Blue Power Button erneut bei lau-
fendem Motor, um die Drehzahl wieder zu erhöhen
 .
.
Fadennachstellung
GTE 840 - GTE 845 - Blue Power GTE 850
•Wird durch Verschleiß der Schneidfaden zu kurz, stellt sich dessen Arbeitslänge automatisch nach.
•Bei jedem Einund Ausschalten wird der Faden jeweils um 6-8 mm aus der Fadenkassette nachgestellt. Häufiges Anund Abschalten ohne Grund führt daher zu erhöhtem Fadenverschleiß.
Wartung
Reinigung
1Achtung! Rotierender Faden
Werkzeug läuft nach!
•Vor allen Arbeiten am Gerät Netzstecker entfernen!
•Sie erhöhen die Lebensdauer Ihres Trimmers, wenn Sie vor oder nach jedem Trimmen, die Lüftungsschlitze reinigen und die Unterseite des Gerätes von Grasresten säubern.
Fadenkassette austauschen
1Achtung! Rotierender Faden
Werkzeug läuft nach!
• Vor allen Arbeiten am Gerät Netzstecker entfernen!
1Vor dem Einschalten: Rasentrimmer parallel zum Boden halten, da sonst Verletzungsgefahr besteht.
GTE 840 - GTE 845 - Blue Power GTE 850 Q
1.Spulendeckel an beiden Rastnasen gleichzeitig kräftig zusammendrücken  und abziehen
  .
.
2.Fadenspule entnehmen.
3.Eventuelle Verschmutzungen entfernen.
4.Fadenspule ins Gehäuse einlegen  .
.
5.Fadenenden durch die Ösen der Fadenbox fädeln
 .
.
10
Beseitigung von Störungen
Problem |
Ursache |
Abhilfe |
|
|
• Spule leer |
• Fadenkassette austauschen. |
|
|
• Schneidfaden ist abgerissen und in die |
• Fadenspule entnehmen, ggf. Faden mit |
|
|
Fadenbox eingezogen. |
||
Fadennachstel- |
leichtem Zug neu aufwickeln und Spule |
||
• Schneidfaden hat sich auf der Spule ver- |
|||
lung funktioniert |
einlegen. |
||
klemmt. |
|||
nicht |
|
||
|
• Verschweißten Fadenteil entfernen, ggf. |
||
|
• Schneidfaden ist auf der Spule ver- |
||
|
Faden mit leichtem Zug neu aufwickeln |
||
|
schweißt. |
||
|
und Spule einlegen. |
||
|
|
||
|
|
• Stromversorgung überprüfen, gegebe- |
|
|
• Netzspannung fehlt |
nenfalls durch eine Elektrofachkraft repa- |
|
|
|
rieren lassen. |
|
|
• Kabelschaden: |
|
|
|
1Achtung! Stromschlag durch Ka- |
|
|
Motor läuft nicht |
belschaden |
• Beschädigtes Kabel durch Original-Her- |
|
|
Wenn das Kabel durchtrennt oder |
steller Service-Werkstatt komplett aus- |
|
|
beschädigt wird, löst nicht immer die |
||
|
tauschen. Es ist verboten, das Kabel mit |
||
|
Sicherung aus. |
||
|
Isolierband zu flicken. |
||
|
• Kabel nicht berühren, bevor der |
||
|
|
||
|
Netzstecker aus der Steckdose ge- |
|
|
|
zogen ist. |
|
|
|
|
|
Ersatzteile
Bestell-Nr. |
Artikel-Bezeichnung |
Artikel-Beschreibung |
7136095 |
GT-F5 |
Fadenspule (GTE 830) |
49ATS0--650 |
GT-F10 |
Fadenspule (GTE 840, GTE 845, Blue Power GTE 850) |
|
|
|
Lieferung über Ihren Händler
Garantie
In jedem Land gelten die von unserer Gesellschaft oder dem Importeur herausgegegeben Garantiebestimmungen. Störungen beseitigen wir an ihrem Gerät im Rahmen der Gewährleistung kostenlos, sofern ein Materialoder Herstellungsfehler die Ursache sein sollte. Im Garantiefall wenden Sie sich bitte an Ihren Verkäufer oder die nächstgelegene Niederlassung.
de |
11 |

Original operating instructions - en
en Congratulations on the purchase of your WOLF-Garten product!
Please read the instructions carefully and familiarize yourself with the different control elements and how to operate the device properly. Attention! When using power tools it is important to observe the following safety advice in order to protect yourself against electrical shock. The operator is responsible for accidents involving other persons and/or their property.
Never let children or other persons who have not read these instructions use the device. Persons younger than 16 must not use the device. Local regulations may determine the minimum age for users.
Contents |
|
Meaning of the symbols . . . . . . . . . . . |
12 |
Safety instructions . . . . . . . . . . . . . |
13 |
Operation . . . . . . . . . . . . . . . . . . |
14 |
Maintenance . . . . . . . . . . . . . . . . |
16 |
Faults and how to remedy . . . . . . . . . . |
17 |
Spare parts . . . . . . . . . . . . . . . . . |
17 |
Warranty . . . . . . . . . . . . . . . . . . |
17 |
Meaning of the symbols
|
|
|
|
|
|
|
|
|
|
|
Warning! Read |
|
|
|
|
|
|
|
|
|
|
|
|
|
|
|
|
|
|
|
|
|
|
|
the operating |
|
|
|
|
|
|
|
|
|
|
|
instructions be- |
|
|
|
|
|
|
|
|
|
|
|
fore placing in |
|
|
|
|
|
|
|
|
|
|
|
service! |
|
|
|
|
|
|
|
|
|
|
|
|
|
|
|
|
|
|
|
|
|
|
|
Tool is coast- |
|
|
|
|
|
|
|
|
|
|
|
ing! |
|
|
|
|
|
|
|
|
|
|
|
Keep bystan- |
|
|
|
|
|
|
|
|
|
|
|
|
|
|
|
|
|
|
|
|
|
|
|
ders away! |
|
|
|
|
|
|
|
|
|
|
|
Keep other |
|
|
|
|
|
|
|
|
|
|
|
|
|
|
|
|
|
|
|
|
|
|
|
|
|
|
|
|
|
|
|
|
603 |
|
people well |
|
|
|
|
clear! |
||||||||
|
|
° |
|||||||||
|
|
|
|
|
|
|
|
|
|
|
|
|
|
|
|
|
|
|
|
|
|
|
|
|
|
|
|
|
|
|
|
|
|
|
|
|
|
|
|
|
|
|
|
|
|
|
|
|
|
|
|
|
|
|
|
|
|
|
|
Wear protective goggles!
Wear hearing protection!
Do not expose to moisture!
If the connection cable is damaged, switch off the unit and pull out the mains plug!
12 |
en |

Safety instructions
General
•This trimmer is ideal for trimming lawn edges and small lawn areas in private gardens. The trimmer should not be used in public gardens, parks, sports grounds, streets etc. and in farming and forestry.
•Because of possible accidents the trimmer must not be used for:
–trimming of bushes and hedges
–cutting of flowers
–cutting garden by-products for composting
•These tools are not intended to be used by persons with insufficient experience and/or lack of skills or persons with limited physical, sensory or mental abilities unless these per-sons are supervised or instructed on the use of the tools by a person responsible for the safety of these persons.
•Young adults below the age of 16 may not use the tools.
•Make sure that no persons (in particular children) or pets are in the vicinity of the working area. You are responsible for damages!
•Never operate the unit in the presence of individuals (particularly children) or animals.
•Only operate the unit in daylight hours or if adequate artificial lightning is available.
•Use trimmer when the weather is dry and do not leave it outside when it rains.
•Use a residual current device (RCD) rated for a residual current not greater than 30 mA.
•Never install metal cutting elements.
Before operating
•Before starting the trimmer, clear all string, wire etc. away from the area to be cut. Whilst cutting look out for foreign objects.
•All cable must be inspected regularly for signs of damage or ageing. Use only in perfect condition!
•Tool must not be used when the safety device or the covering is damaged.
•For safety reasons only original WOLF-Garten spare-parts or parts appointed by the manufacturer shall be used. Please note the installation instructions!
•Before adjusting or cleaning the tool and before checking for a caught or damaged connecting cable, switch off the tool and disconnect the mains plug.
•Before starting the unit, and after any impacts, examine the unit for signs of wear or damage. Have any detected damage repaired immediately.
Cable
•Use only extension cables with a minimum crosssection of 3x1.5mm2 and a length of max. 25 m:
–When using rubber-sheathed cables, they must be of typeHO7RN-F or heavier.
–When using PVC-sheathed cables, they must be of type HO5 VV-F or heavier (cables of this type are not suitable for continuous outdoor use - e.g. underground installation for the connection of an outdoor socket or pond pump, or outdoor storage).
•They must be waterproofmobile decvices that are used outdoors must be connected via a residual current circuit breaker.
•Use a leakage-protective system (RCD) with a leakage current of no more than 30 mA.
•Attach connection cable to traction relief. Make sure that in does not rub against edges, pointed or sharp objects. Do not squeeze cable through door or window gaps.
•Switching devices must not be removed or bridged (e.g. tying of switching lever to guide spar).
Working
•Always keep hands and feet well clear of the cutting mechanism, particularly when starting the unit.
•Risk of being injured by the device which is used to cut the line to length. After pulling out a new line, always hold the machine in its normal operating position before switching it on.
•When starting the trimmer hold its base parallel to the lawn area in order to avoid accidents.
•Keep your hands away from the moving cord.
•Wear eye and hearing protection!
•Always wear appropriate working clothes and sound footwear when using the trimmer.
•Before carrying the trimmer to the next lawn area to be cut, switch it off.
•Be careful when you go backwards. You may stumble!
•Keep the cable away from the cutting tool.
en |
13 |

•Should the powercord be damaged during use, immediately disconnect it from the mains. Do not touch the cable until it has been disconnected from the mains.
•Never leave the trimmer without supervision. Store it in a safe place.
•The switches installed shall not be removed or bridged over, e. g. by binding the switch to the handle.
•Do not allow the cord spool to strike the ground or edges of working area. If the cord spool receives a hard knock, this will cause a strong vibration on the handle. If this occurs, the trimmer should be checked by a qualified service centre.
After operating
•After using the unit, disconnected the power cord from the wall outlet and inspect the unit for damage.
•When switching off the trimmer: Attention: the cutting tool does not stop immediately!
•Always wait for the cutting tool is stop.
•Before servicing or cleaning the unit, removing the guards or replacing the line cassette, switch off the motor and cutter and pull out the mains plug. Only use original WOLF-Garten cord spools and note the installation instructions!
•The cutting knife should not be cleaned under running water or under high-pressure.
•Faults shall only be repaired by appointed service centres or by the manufacturer.
•Make sure all air holes are free of dirt.
•Do not store the unit within reach of children.
Disposal
Do not dispose of electrical equipment in domestic waste. Recycle equipment, accessories and packaging in an environment-friendly manner.
Operation
Operating times
•Please check noise abatement regulations prevailing in your country.
Working angle
GTE 840 - GTE 845 - Blue Power GTE 850 A
The trimmer has 4-adjustable working angles. This allows you to easily reach hard to reach areas in your
garden C .
1.Press the lock button  .
.
2.Adjust to the desired working angle 


 . The handle noticeably snaps into place.
Free-cutting D
1. Hold the device at the upper and middle grips.
2. Swing the device in semicircles in front of the body 3(without touching the ground).
Notes
•The optimal working angle for cutting is 30°.
•Cut high grass slowly, step by step.
Edge trimming
The edge trimming function allows you to trim your grass precisely all around the edge of your lawn E .
GTE 840 - GTE 845 - Blue Power GTE 850 A
1.Press the lock button  .
.
2.Rotate the cutting head by 90°  (the cutting head will audibly click into place).
3.Press the lock button  .
.
4.Adjust the working angle  (the handle will audible click into place).
GTE 830 B
1.Press the locking button  .
.
2.Turn the cutting head by 180° until it clicks into place  .
.
Wheels
GTE 845 - Blue Power GTE 850
Use the wheels provided to achieve a clean cut at a
uniform height F . Wheels are particularly useful when edging.
•Assembly or height adjustment according to diagrams G H J .
14 |
en |

Adjusting the length of the bar K
GTE 840 - GTE 845 - Blue Power GTE 850
1.Loosen the threaded sleeve  .
.
2.Pull the telescopic handle out until the shaft is the length you require  .
.
3.Tighten up threaded sleeve  .
.
Adjusting the mid-grip L
1.Loosen the clamp on the loop handle  .
.
2.Push the loop handle to the height you require  .
.
3.Tighten up the clamp  .
.
Motor guard/guide rail and plant protector
Blue Power GTE 850 M
The motor guard protects the motor from damage caused by impacts or blows. At the same time the guard acts as a guide rail to facilitate operation.  The plant protector protects shrubs, trees and bedding plants.
• Pull the plant guard out of the cutting head and reattach it as shown  .
.
1The plant protector must remain inserted at the rear for edging tasks  .
.
Threading the cable through the strain relief mechanism N
The cable strain relief mechanism in the guide handle prevents the extension lead from becoming disconnected accidentally.
•Please fasten the extension lead as shown into the cable strain reliever.
Connect to the socket (230 Volt, 50 Hz)
• Connect the device only to sockets that are protect-
ed with a 10-16 Amp. fuse (or LS switch type B)
3
These safeguards provide protection against severe injuries resulting from touching damaged cables, insulation defects and in some cases cables that conduct electricity.
•We recommend that the equipment only be plugged into a power socket, which is protected by a residual current protection device (RCD) with a residual current of no more than 30 mA.
•Retrofit kits are available for old installations. Consult an electrician
Switching on and off O
1Caution! Spinning strands
Tool continues spinning after switching off!
Switching on the device
• Press and hold down the on/off switch  .
.
Switching off the device
• Release the on/off switch.
Blue Power Button O
Blue Power GTE 850
The Blue Power Button allows you to work in an en- ergy-saving, environmentally friendly and with lower noise levels at a reduced rotary speed.
•Press the Blue Power Buttons while the motor is running in order to reduce its rotary speed  .
.
•Press the Blue Power Buttons again while the motor
is running in order to bring its rotary speed back up again  .
.
Thread adjustment
GTE 840 - GTE 845 - Blue Power GTE 850
•If the cutting cord becomes too short due to normal wear, simply switch off the trimmer. The cord will then automati-cally adjust to the correct length.
•Whenever the trimmer is switched off and then on again, the cord automatically lengthens 6-8 mm. If the trimmer is fre-quently switched on and off for no reason, this will increase wear of the cord.
GTE 830 P
•Briefly tilt the running machine on a firm base, e. g. paving slab (approx. 3 kg pressure). Approx. 2,5 cm cutting thread are the automatically paid out.
en |
15 |

Maintenance
GTE 830 R
Cleaning
1Attention! Rotating string!
Tool is still running!
•Always disconnect from the power supply before performing any work on the trimmer!
•You can prolong the life of your trimmer by removing grass from the ventilation slots and the bottom of the trimmer before or after each use.
Replacing the cord spool
1Attention! Rotating string!
Tool is still running!
•Always disconnect from the power supply before performing any work on the trimmer!
1Before switching on: Hold trimmer parallel to the ground; otherwise, there is danger of injury.
GTE 840 - GTE 845 - Blue Power GTE 850 Q
1.Press both locking tabs of spool cover simultaneously and remove  +
+  .
.
2.Remove cord spool.
3.Clean, if necessary.
4.Insert cord spool into housing  .
.
5.Thread the end of the wire through the eye of the
3wire box  .To avoid inadvertent unwinding, do not
take wire on the new spool out through the support holes before inserting  .
.
6.Place the spool cover on the cord spool holder so that the two locking tabs lock into place.
16

Faults and how to remedy
Problem |
Possible cause |
Remedy |
|
|
• Spool is empty. |
• Fit new spool. |
|
|
• Line is torn and stuck inside spool. |
• Remove spool, check tightness of winding |
|
Cord adjustment |
and replace spool in the usual way. |
||
|
|||
does not work |
• Line is „welded“ to itself or to spool |
• Remove welded line section, check tight- |
|
|
|||
|
ness of winding and replace spool in the |
||
|
through heat build-up. |
||
|
usual way. |
||
|
|
||
|
|
• Check power connection and engage a |
|
|
• No electrical power |
qualified electrical professional to repair if |
|
|
|
necessary. |
|
|
• Cable damaged: |
|
|
Motor will not run |
1Attention! Electric shock through |
|
|
|
cable damage |
• Damaged cable has to be completely re- |
|
|
When the cable is cut through or |
||
|
placed. Patching cable with insulating |
||
|
damaged, the safety fuse doesn’t al- |
||
|
tape is forbidden. |
||
|
ways trip. |
||
|
|
||
|
• Do not touch cable, before pulling |
|
|
|
out the power plug from the socket. |
|
|
|
|
|
When in doubt, always consult a WOLF-Garten service workshop.
1Always disconnect from the power supply before performing any work on the trimmer!
Spare parts
Ordering Number |
Designation of the item |
Description of the item |
7136095 |
GT-F5 |
Cord spool (GTE 830) |
49ATS0--650 |
GT-F10 |
Cord spool (GTE 840, GTE 845, Blue Power GTE 850) |
|
|
|
Supplied by your dealer
Warranty
The warranty rules issued by our company or the importer apply to every country. As part of the warranty, we remedy malfunctions on your appliance free of charge provided that this malfunction is caused by a material or manufacturing defect. In the event of a warranty claim, please turn to your dealer or the nearest branch office.
en |
17 |

Notice d'instructions d'origine - fr
fr Merci d'avoir acheté un produit WOLF-Garten
Lire attentivement le mode d'emploi et se familiariser avec les éléments de commande et l'usage correct de l'appareil. Attention ! Lors de l'utilisation d'outils électriques, les consignes de sécurité cidessous doivent être respectées afin d'éviter tout risque d'électrocution, de blessure et de brûlure. L'utilisateur est responsable de tout accident impliquant des tiers ou leurs biens.
Ne jamais laisser des enfants ou des personnes non informées du mode d'emploi utiliser l'appareil. L'usage de l'appareil est interdit aux personnes de moins de 16 ans. L'âge minimum d'utilisation peut être déterminée par des dispositions locales.
Sommaire
Signification des symboles. . . . . . . . . . 18 Consignes de sécurité . . . . . . . . . . . 19
Utilisation . . . . . . . . . . . . . . . . . . 20 Entretien . . . . . . . . . . . . . . . . . . 22
Comment remédier aux pannes . . . . . . . 23 Pièces de rechange . . . . . . . . . . . . . 24
Garantie . . . . . . . . . . . . . . . . . . . 24
Signification des symboles
Attention! Lisez |
|
|
|
Portez des protections pour les |
|
|
|
||
le mode d‘emploi |
|
|
|
yeux! |
avant la mise en |
|
|
|
|
service! |
|
|
|
|
|
|
|
|
|
|
|
|
|
|
|
|
|
|
|
|
|
|
|
|
|
L‘outil marche à |
|
|
|
|
|
|
|
|
|
|
|
vide! |
|
|
|
|
|
|
|
|
|
|
|
Eloignez les tiers |
|
|
|
|
|
|
|
|
|
|
|
|
|
|
|
|
|
|
|
|
|
|
|
de la zone dan- |
|
|
|
|
|
|
|
|
|
|
|
gereuse! |
|
|
|
|
|
|
|
|
|
|
|
Tenir les autres |
|
|
|
|
|
|
|
|
|
|
|
|
|
|
|
|
|
|
|
|
|
|
|
|
|
|
|
|
|
|
|
|
603 |
|
personnes éloi- |
|
|
|
|
gnées ! |
||||||||
|
|
° |
|||||||||
|
|
|
|
|
|
|
|
|
|
|
|
|
|
|
|
|
|
|
|
|
|
|
|
|
|
|
|
|
|
|
|
|
|
|
|
|
|
|
|
|
|
|
|
|
|
|
|
|
|
|
|
|
|
|
|
|
|
|
|
Portez une protection auditive!
Ne pas exposer à la pluie!
Si le câble de branchement a été endommagé, éteignez l'appareil et débranchez sa fiche mâle de la prise de courant!
18 |
fr |

Consignes de sécurité
En général
•L’appareil est idéal pour l’entretien des bords de pelouses et de petites pelouses privées. Cette tondeuse apparaat uitzetten en de stekker eruit halen. à fil WOLF-Garten n’est pas à utiliser dans les jardins publics, les parcs, les stades étc. et même pas dans l’agriculture et activité forestière.
•A cause d’accidents possibles, l’appareil ne doit pas être utilisé:
– pour tondre des buissons, haies et des arbrisseaux;
– pour découper des fleurs;
– pour couper des résidus jardinières en morceaux.
•Ces outils ne sont pas destinés à être utilisés par des personnes possédant une expérience et/ou un savoir insuffisant ni par des person-nes aux capacités physiques, sensorielles ou mentales aliénées, sauf si elles sont encad-rées par une personne responsable de leur sécurité ou ont reçu de cette personne des instructions comment utiliser l‘outil.
•L‘utilisation de ces outils est interdite aux mineurs de moins de 16 ans.
•Arrèter l’appareil, lorsque des personnes, mais surtout des enfants ou des animaux domesti-ques, se trouvent à procimité.
•Veillez à ce qu’il n’y ait personne (particulièrement des enfants) a proximité immédiate de l’appareil en action. Vous êtes responsable!
•N’utiliser l’appareil qu’à la lumière du jour ou à luminosité artificielle èquivalente.
•Ne l’utilisez pas quand l’herbe est mouilleé et ne le laissez pas dehors quand il pleut.
•Ne jamais monter d’éléments de coupe métalliques.
Avant la mise en marche
•Enlevez tous les corps étrangers (ficelles, fils de fer étc.) de la surface à tondre et même pendant la tonte regardez bien s’il n’en reste pas.
•Vérifiez régulièrement le bon état du cáble d’alimentation. Regardez bien s’il n’est pas croqué ou dénudé ou simplement usé. N’utilisez jamais l’appareil lorsque le câble d’alimentation n’est pas dans un état impéccable.
•N’utilisez jamais l’appareil lorsque l’écran de protection ou le dispositif de sécurité est endommagé.
•Pour des raisons de sécurité n’utilisez que des pièces d’origine ou agrées par WOLF-Garten. Observez les instructions de montage.
•Débranchez la fiche avant d’ajuster ou nettoyer l’appareil ou avant de vérifier si le câble d’alimentation s’est entrelacé ou endommagé.
•Avant de mettre l’appareil en marche ou après un choc, contrôler son état d’usure et d’emdommagement et faire effectuer les réparations nécessaires.
Câbles électriques
•Employer comme rallonge électrique unique-ment un câble dont la section minimale est de 3x1,5 mm2 et la longueur maximale de 25 m:
–Si des câbles souples en caoutchouc sont employés, ils ne doivent pas être plus légers que le type HO7RN-F
–Si des câbles en PVC sont employés, ils ne doivent pas être plus légers que le type HO5 VV-F (ces câbles ne convi-ennent pas pour une utilisation permanente à l‘extérieur, par exemple : pose enterrée pour bran-chement à une prise électrique de jardin, branchement d’une pompe de bassin ou entreposage à l’extérieur)
•Elles doivent être protégées contre les projec-tions d‘eau.
•Utiliser un disjoncteur (RCD) dont le courant de défaut ne dépasse pas les 30 mA.
•Attacher les câbles électriques du détendeur. Éviter les dépasse pas les 30 mA. dépasse pas les
30 mA. frottements avec des arêtes, des corps pointus ou aiguisés. Ne pas écraser les câbles à des encoignures de portes ou de fenêtres.
•Il est interdit de supprimer ou de ponter les interrupteurs (par ex. en attachant le levier de commande au guidon).
L’appareil en opération
•Ne pas mettre les mains et les pieds à proximité du dispositif de coupe, surtout pour démarrer le moteur.
•Faites attention au risque de blessure avec le dispositif qui sert à couper le fil à la longueur. Après avoir sorti un nouveau fil, tenez toujours la machine dans sa position de travail normale avant de l'allumer.
•Gardez l’appareil parallèle à la pelouse lors de la mise en marche.
fr |
19 |

•N’approchez pas la main ou le pied du fi l en rotation.
•Portez des lunettes enveloppantes et une protection auditive!
•Portez toujours des vêtements adéquats et des chaussures fermées pour tondre.
•Pour transporter la tondeuse jusqu’à l’autre pelouse à tondre, coupez toujours le moteur.
•Gardez le câble d’alimentation à l’écart de la tondeuse.
•Si l’appareil abîme le câble d’alimentation pendant l’utilisation, débranchez immédiatement la fi che mâle de la prise de secteur. Ne touchez jamais le câble tant qu’il n’est pas débranché du secteur.
•Toujours surveiller la tondeuse. Gardez l’appareil dans une bonne place.
•Les parties élèctriques installées ne doivent pas être enlevées. N’attachez jamais l’interrupteur à la poignée.
•Ne frappez pas la cassette de fi l contre le sol ou ne la cognez pas contre un mur. Si malgré toutes vos précautions, la cas-sette reçoit un solide coup et que vous constatez de fortes vibrations dans la poignée, faites vérifi er l’appareil par une des nombreuses stations service WOLF-Garten.
Après l’opération
•Après utilisation, débrancher l’appareil et rechercher toute trace d’endommagement.
•Attention! Le système de coupe continue à tourner quelques instants après la rupture de courant!
•Toujours attendre l’arrêt complèt du système de coupe.
•Les travaux de maintenance et de nettoyage sur l'appareil, l'enlèvement de dispositifs de protection ou le remplacement de la cassette à fil ne doivent avoir lieu qu'après avoir arrêté le moteur et désactivé l'outil de coupe, et seulement après avoir débranché la fiche mâle de la prise de courant! N’utilisez que des cassettes de fi l d’origine WOLFGarten. Observez les conseil du mode d’emploi.
•Ne pas nettoyer le couteau au jet d’eau ou à haute pression.
•Les réparations doivent être éffectuées par une des nombreu-ses stations service WOLF-Garten ou des ateliers agrées.
•Les orifi ces de ventilation doivent rester propres.
•Remiser l’appareil hors de portée des enfants.
Élimination de l’appareil
Ne jetez pas l’équipement électrique avec les ordures ménagères. Recyclez équipement, accessoires et emballage de façon écologique.
Utilisation
Tranches horaires
•Observez les dispositions spécifiques de la lloi nationale.
Angle de travail
GTE 840 - GTE 845 - Blue Power GTE 850 A
Le coupe-bordures possède 4 positions d'angles de travail réglables. Cela vous permet d'atteindre plus facilement les endroits difficilement accessibles de
votre jardin C .
1.Appuyez sur le bouton de verrouillage  .
.
2.Réglez l'angle de travail désiré 


 . Le manche encrante audiblement.
Coupe non guidée D
1. Tenez l'appareil par les poignées supérieure et centrale.
2. Faites pivoter l'appareil en faisant des demi- 3cercles devant le corps (sans toucher le sol).
Remarque
•L'angle en travail optimal pour la coupe non guidée est de 30°.
•Couper l`herbe haute lentement et en plusieurs passes.
20 |
fr |
Coupe de bordure
La fonction de la coupe de bordure permet une coupe
précise le long de la bordure de la pelouse. E .
GTE 840 - GTE 845 - Blue Power GTE 850 A
1.Appuyez sur le bouton d'arrêt  .
.
2.Tournez le bouton de coupe de 90°  (le bouton de coupe s'encrante de manière audible).
3.Appuyez sur le bouton d'arrêt  .
.
4.Réglez l'angle de travail  (le manche s'encrante de manière audible).
GTE 830 B
1.Appuyez sur le bouton de retenue  .
.
2.Tournez la tête de coupe de 180° jusqu'à l'encrantement  .
.
Roues
GTE 845 - Blue Power GTE 850
Il faut utiliser les roues pour obtenir une coupe nette
de hauteur égale F . Les roues sont particulièrement adaptées pour la coupe de bordure.
•Montage et réglage en hauteur conformément aux figures G H J .
Étrier de protection moteur / Rail de guidage et étrier de protection plantes
Blue Power GTE 850 M
L'étrier protège le moteur contre les dégâts par percussion et choc. Simultanément, l'étrier de protection sert de rail de guidage pour une utilisation confortable  .
.
L'étrier de protection des plantes protège les arbustes, les arbres et les massifs.
•Retirez l'étrier de protection des plantes de la tête de coupe et remettez-le en place comme illustré
1. En cas de coupe de bordure, l'étrier de protection des plantes doit rester en place  .
.
Guider le câble dans le dispositif de protection de câble N
Le dispositif de protection de câble évite un déclenchement involontaire du câble de rallonge.
•Veuillez fixer le câble de rallonge comme illustré dans le dispositif de protection de câble.
Régler la hauteur du longeron K
GTE 840 - GTE 845 - Blue Power GTE 850
1.Desserrez la douille filetée  .
.
2.Sortez le manche télescopique jusqu'à atteindre la longueur idéale  .
.
3.Serrez à fond la douille filetée  .
.
Régler la poignée centrale L
1.Desserrez le levier d'arrêt sur la poignée centrale
 .
.
2.Déplacez la poignée centrale à la hauteur souhaitée  .
.
3.Tendez le levier d'arrêt  .
.
Branchement à une prise de courant (230 Volt, 50 Hz)
•Ne brancher l'appareil que sur des prises de courant protégée par un fusible inerte de 1016 amp. (ou par un disjoncteur de type B).
fr |
21 |

3 Remarque : Dispositif de protection contre le courant résiduel
Ces dispositifs de protection protègent l'utilisateur contre les graves blessures que peut occasionner le contact avec des fils détériorés, les défauts d’isolation et, dans certains cas, si des fils sous tension sont détériorés lors de l'utilisation.
•Ne brancher l’appareil qu'à une prise de courant protégée par un dispositif de protection contre le courant résiduel (RCD) et, avec un courant résiduel inférieur à
30 mA.
•Des kits d’adaptation sont disponibles pour les anciennes installations. Consulter un électricien.
Marche/arrêt O
1Attention ! Fil en rotation
Marche à vide de l'outil !
Mettez l'appareil en marche
•Appuyez et maintenez la pression sur l'interrupteur marche/arrêt  .
.
Mettre l'appareil à l'arrêt
• Relâchez l'interrupteur marche/arrêt.
Blue Power Button O
Blue Power GTE 850
Le Blue Power Button vous permet de travailler en économisant le courant dans le respect de l'environnement avec réduction des bruits à régime réduit.
•Appuyez sur le Blue Power Button avec le moteur en marche pour réduire le régime  .
.
•Appuyez à nouveau sur le Blue Power Button avec
le moteur en marche pour augmenter à nouveau le régime  .
.
Adjustage du fil
GTE 840 - GTE 845 - Blue Power GTE 850
•Si le fil de coupe devient trop court de par l`usure, arrêter l`appareil. Le fil se règle automatiquement sur la bonne longueur.
•A chaque mise en marche et arrêt, le fil avance automatiquement de 6 à 8 mm. La mise en marche et l`arrêt fréquents et sans raison provoquent donc une usure accrue du fil.
GTE 830 P
•Donner une brève impulsion à I‘appareil, en marche, contre une surface ferme, par exemple une dalle (force d‘appui environ 3 kg). (Cela amène automatiquement environ 2,5 cm supplémentaire de fil coupant.
Entretien
Nettoyage
1Attention ! Fil en rotation
L'outil s'arrête de façon progressive !
•Débrancher l`appareil avant toute intervention!
•Vous augmenterez la durée de vie de votre tailleherbe, si vous nettoyez les fentes d`aération avant ou après chaque utilisation et que vous enlevez les débris d`herbes de la face inférieure de l`appareil.
Changer la bobine de fil
1Attention ! Fil en rotation
L'outil s'arrête de façon progressive !
•Débrancher l`appareil avant toute intervention!
1Avant la mise en marche: Tenir le tailleherbe parallèlement au sol sinon risque de blessure.
22 |
fr |

GTE 840 - GTE 845 - Blue Power GTE 850 Q
1.Presser simultanément les deux crans du couvercle de la bobine et retirer le couvercle  +
+  .
.
2.Retirer la bobine de fil.
3.Enlever d`éventuelles impuretés.
4.Mettre la bobine de fil en place dans le carter  .
.
5.Enfilez l'extrémité du fil dans l'œillet de la boîte à fil
3. Pour éviter un déroulement involontaire, ne pas sortir le fil de la nouvelle bobine des fentes de retenue avant d'avoir installé la bobine  .
.
6.Poser le couvercle sur le logement de la bobine de fil de sorte que vous sentiez que les deux crans s`enclenchent.
GTE 830 R
1. Comprimez  simultanément et énergiquement les deux crans du couvercle de bobine et retirez-le
 .
.
2.Retirez la bobine de fil.
3.Enlevez les souillures éventuellement présentes.
4.Introduisez l'extrémité de la bobine de fil neuve par l'œillet situé dans le couvercle du boîtier puis introduisez la cassette à fil dans le couvercle du boîtier
3. Veillez à bien introduire la bobine de fil comme illustré.
5. Posez le couvercle de bobine sur le réceptacle de la bobine de sorte que les deux crans encrantent
perceptiblement .
1
Comment remédier aux pannes
Dysfonctionne- |
Causes possible |
Réparation |
|
ments |
|||
|
|
||
|
• Bobine de fil vide. |
• Voir ´change de la cassette de fil. |
|
|
• Le fil tranchant est arraché ou grippé dans |
• Prendre la bobine de fil. Dérouler à nou- |
|
L'ajustage du fil |
la boîte du fil. |
veau un fil en tirant légèrement et re- |
|
• Le fil tranchant a collé sur la bobine. |
mettre la bobine. |
||
ne fonctionne pas |
|||
|
|
• Enlever la partie du fil soudée. Dérouler à |
|
|
• Le fil tranchant est soudé sur la bobine. |
nouveau un fil en tirant légègerement et |
|
|
|
remettre la bobine. |
|
|
|
• Contrôler l'alimentation en courant, la |
|
|
• Absence de tension réseau |
faire réparer par un électricien le cas |
|
|
|
échéant. |
|
|
• Le câble est endommagé: |
|
|
Le moteur ne dé- |
1Attention ! La déterioration du |
|
|
marre pas |
câble produit du choc électrique |
• Le câble détérioré doit être complètement |
|
Quand le câble est coupé ou détério- |
|||
|
ré, le fusible de sécurité ne se dé- |
remplacé. Il est interdit de rapiécer le |
|
|
clenche pas toujours. |
câble avec du chatterton. |
|
|
• Ne touchez pas le câble avant de |
|
|
|
sortir la fiche d’alimentation élec- |
|
|
|
trique de la prise de courant. |
|
|
|
|
|
En cas de doute, consulter toujours l‘atelier de service aprés-vente WOLF-Garten.
1
fr |
23 |

Pièces de rechange
N° de commande |
Désignation de l‘article |
Description de l‘article |
7136095 |
GT-F5 |
Cassette de fil nylon (GTE 830) |
49ATS0--650 |
GT-F10 |
Cassette de fil nylon (GTE 840, GTE 845, Blue Power GTE 850) |
|
|
|
Fourni(e) par le revendeur spécialisé
Garantie
Dans chaque pays les conditions de garantie en vigueur sont celles publiées par notre société ou par notre importateur. Si pendant la durée de la garantie votre appareil présente des vices de matière ou
de fabrication, la réparation est gratuite. En cas de recours en garantie, veuillez vous adresser à votre revendeur ou à notre succursale la plus proche.
24 |
fr |

Istruzioni per l'uso originali - it
Congratulazioni per l'acquisto di questo prodotto WOLF-Garten |
it |
Leggere attentamente il manuale d'uso e prendere dimestichezza con gli elementi di comando e l'uso corretto dell'apparecchio. Attenzione! Quando si utilizzano utensili elettrici, occorre osservare le indicazioni di sicurezza riportate di seguito per proteggersi dalle scosse elettriche, da lesioni e dal rischio d'incendio. L'utilizzatore è responsabile degli incidenti ai danni di altre persone o proprietà delle stesse.
Non consentire l'uso dell'apparecchio a bambini o altre persone che non conoscano il manuale d'uso. Non è consentito l'uso dell'apparecchio ai minori di 16 anni. È possibile che l'età minima dell'utilizzatore sia stabilita da disposizioni locali.
Indice
Legenda simboli . . . . . . . . . . . . . . . 25
Indicazioni di sicurezza . . . . . . . . . . . . 26
Messa in opera. . . . . . . . . . . . . . . . 27 Manutenzione . . . . . . . . . . . . . . . . 29
Interventi di riparazione . . . . . . . . . . . . 30
Ricambi . . . . . . . . . . . . . . . . . . . 30 Garanzia . . . . . . . . . . . . . . . . . . . 30
Legenda simboli
Attenzione!Leggere attentamente le istruzioni d‘uso prima della messa in funzione!
L‘utensile continua a funzionare!
Tenere lontano i non addetti ai lavori dalla zona di pericolo!
Mantenete lontani i presenti!
603
Proteggere gli occhi!
Indossare la protezione acustica!
Non esporre alla pioggia!
In caso di danni al cavo di allacciamento spegnere l'apparecchio ed estrarre la spina di rete!
°
it |
25 |

Indicazioni di sicurezza
Avvertenze generali
•Questa rotofalce è stata progettata per la manutenzione di bordure, nonché di superfi ci erbose e piccoli prati. Questa rotofalce non va usato per impiante pubblici, parchi, centri sportivi, vicino a strade ecc. nonché in agricoltura o in silvicoltura.
•Per salvaguardare l’incolumità fi sica dell’utente, la rotofalce non deve essere utilizzata:
–per spuntare siepi, cespugli e macchie;
–per tagliare fi ori;
–per sminuzzare prodotti destinati alla produzione di compost
•Questi apparecchi non sono destinati ad essere usati da persone poco esperte e/o non informate o da persone con limitate capacità fisiche, sensoriali o mentali, a meno che non siano sorvegliate da una persona re- sponsa-bile della loro sicurezza o abbiano ricevuto da quest‘ultima istruzioni sulle modalità d‘uso degli apparecchi.
•Gli apparecchi non possono essere azionati dai giovani di età inferiore a 16 anni.
•Interrompere la macchina se nelle vicinanze si trovano persone, soprattutto bambini o animali domestici.
•L’apparecchio non può essere messo in funzione se persone (in particolare bambini) o animali si trovano nelle sue immediate vicinanze; sarete responsabili per i danni eventualmente provocati!
•Utilizzare la macchina solo durante il giorno oppure se vi è una buona illuminazione artifi ciale.
•Usare la rotofalce soltanto quando il tempo è asciutto e non lasciarla esposta.
•Non installare mai elementi di taglio in metallo.
Prima dell ’utilizzo
•Ripulire l’erba da corpi estranei quali rametti, pietre, pezzi di ferro ecc. Fare attenzione ai corpi estranei anche durante la tosatura.
•Il cavo dell’alimentazione installato sull’esterno dell’apparecchio e la prolunga devono essere controllati regolarmente in relazione a eventuali danni ed allo stato di invecchiamento. Utilizzarli solo se sono in perfette condizioni.
•Non utilizzare mai l’apparecchio se vi sono dispositivi di sicurezza o coperture danneggiate.
•Per ragioni di sicurezza devono essere utilizzati soltanto ricambi originali o approvati dal produttore. Nella sostituzione, rispettare le istruzioni per l’installazione!
•Spegnere l’attrezzo e staccare la spina prima di regolare o pulire l’attrezzo o di controllare se il cavo di collegamento sia attorcigliato o danneggiato.
•Prima della messa in funzione e in seguito ad urto, eseguire un controllo accurato della macchina per verifi care l’eventuale presenza di usura o danni, e fare eseguire i lavori di riparazione necessari.
Cavo
•Utilizzare esclusivamente prolunghe con una sezione di almeno 3x1,5mm2 e una lunghez-za massima di 25 m:
–eventuali cavi in gomma flessibile devono essere del tipo HO7RN-F o superiore
–eventuali cavi in PVC devono essere del tipo HO5 VV-F o superiore (i cavi di questo tipo non sono adatti per l‘impiego continuo all‘aperto - come p. es. posa sotto terra per il collegamento di una presa elettrica da giardino, collegamento di una pompa per laghetti o conservazione all’aperto.)
•Essi devono essere protetti dagli spruzzi d‘acqua.
•Utilizzare un dispostivo di sicurezza per correnti di guasto (RCD) con una corrente di guasto di non oltre 30 mA.
•Fissare il cavo di collegamento allo sgravio di tiraggio. Non far sfregare oggetti appuntiti o taglienti agli spigoli. Non schiacciare il cavo attraverso fessure della porta o spalti delle finestre. I dispositivi di commutazione non devono essere rimossi o superati (ad es. Attaccando la leva di comando al manico di guida).
Durante l’utilizzo
•Tenere sempre mani e piedi a una certa distanza dal dispositivo di taglio, in modo particolare quando si avvia il motore.
•Prestare attenzione a non ferirsi con il dispositivo di taglio del filo a lunghezza. Dopo avere estratto un filo nuovo, prima di accendere la macchina metterla sempre nella sua normale posizione di lavoro.
•La totofalce, quando vienne avviata, deve essere tenuta parallela al prato, per evitare incidenti.
•La distanza di sicurezza dal fi lo rotante deve essere rispettata anche durante l’utilizzo. Non mettere le mani nel filo rotante.
•Indossare occhiali protettivi e protezione acustica!
26 |
it |
•Indossare sempre abiti indicati per il lavoro; non capi molto larghi ecc., che possono restare impigliati nel meccanismo di taglio. Calzature resistenti! Proteggere anche le gambe (ad esempio mediante pantaloni lunghi).
•Durante il trasporto fi no ai singoli punti di utilizzo, è necessario spegnere il motore.
•Fare particolare attenzione quando si cammina all’indietro: c’è il pericolo d’inciampare!
•Tenere il cavo di alimentazione lontano dal meccanismo di taglio.
•Se il cavo elettrico viene danneggiato durante l’uso, staccare immediatamente la spina dalla presa di corrente. Non toccare il cavo primadi aver tolto la spina.
•Nelle pause tra i vari utilizzi non lasciare incustodita la rotofalce! Si raccomanda di tenerla in un luogo sicuro.
•I dispositivi di attivazione installati sull’apparecchio non devono essere rimossi o bypassati, ad esempio legando al manico l’interruttore con richiamo.
•Non sbattere la scatola del fi lo contro il terreno e non farla picchiare contro gli spigoli dei muri. Se la scatola ha ricevuto un colpo forte, si deve fare attenzione ad una più intensa vibrazione del manico. Se così è, l’apparecchio deve esere fatto controllare da un’offi cina autorizzata dal servizio assistenza.
Dopo l’utilizzo
•Dopo l’utilizzo sfi lare la spina elettrica e controllare se la macchina ha subito dei danni.
•Al momento di riporlo fare: Attenzione! Il meccanismo di taglio continua a funzionare per un certo lasso di tempo!
•Attendere sempre che il meccanismo di taglio si fermi.
•Eseguire i lavori di manutenzione e pulizia all'apparecchio, la rimozione dei dispositivi di protezione o la sostituzione della cassetta del filo di taglio solo a motore spento ed utensile di taglio disinserito e dopo avere staccato la spina di rete. Utilizzare sempre solo cassette fi lo originali WOLF-Garten, rispettando le istruzioni d’uso.
•Il meccanismo di taglio a fi lo non deve essere pulito sotto l’acqua corrente ed in particolare non a forte pressione.
•Le riparazioni dell’apparecchio devono essere eseguite soltanto dai centri assistenza WOLF-Garten oppure da offi cine autorizzate.
•Verifi care che le aperture dell’aria siano perfettamente pulite.
Smaltimento rifi uti
Non smaltire apparecchiature elettriche insieme ai rifi uti domestici. Riciclare componenti, accessori e imballaggi in modo ecologico.
Messa in opera
Tempo d’esercizio
•Si prega di osservare le prescrizioni vigenti nei singoli stati.
Angolatura di lavoro
Isolate D
1. Tenete l'apparecchio dalla manopola superiore e da quella mediana.
2. Ruotate l'apparecchio in semicerchi davanti al vo-
3stro corpo (senza toccare il suolo).
Note
GTE 840 - GTE 845 - Blue Power GTE 850 |
A |
|
• |
L'angolatura di lavoro ottimale per tagliare le |
L'adattatore ha un angolatura di lavoro regolabile in 4 |
|
siepi è di 30°. |
||
modalità. Questo vi permette di raggiungere certe aree |
• Tagliare lentamente e gradualmente l’erba più |
|||
del vostro giardino in maniera più conveniente C . |
|
alta. |
||
1.Premete il pulsante di blocco  .
.
2.Regolate l'angolo di lavoro desiderato 


 . Il manico s'innesta con uno scatto percettibile.
it |
27 |

Taglio dei bordi
La funzione di taglio dei bordi consente di tosare con
precisione lungo il bordo del prato E .
GTE 840 - GTE 845 - Blue Power GTE 850 A
1.Premere il pulsante di blocco  .
.
2.Girare la testa di taglio di 90°  (la testa di taglio scatta in posizione in modo udibile).
3.Premere il pulsante di blocco  .
.
4.Regolare l'angolo di lavoro  (il manico scatta in posizione in modo udibile).
GTE 830 B
1.Premere il pulsante di arresto  .
.
2.Girare la testa di taglio di 180° finché scatta in posizione  .
.
Ruote
GTE 845 - Blue Power GTE 850
Per ottenere un taglio di altezza e precisione uniformi, è
preferibile utilizzare le ruote F . Le ruote sono particolarmente adatte al taglio dei bordi.
•Montaggio o regolazione in altezza come nelle figure
G H J .
Regolazione della lunghezza della sbarra
K
GTE 840 - GTE 845 - Blue Power GTE 850
1.Allentare la bussola filettata  .
.
2.Tirare il manico telescopico fino a raggiungere la lunghezza ideale della sbarra  .
.
3.Avvitare saldamente la bussola filettata  .
.
Regolazione della maniglia centrale L
1.Allentare la leva di blocco della maniglia centrale  .
.
2.Far scivolare la maniglia centrale fino all'altezza desiderata  .
.
3.Stringere la leva di blocco  .
.
Staffa di protezione motore/guida bordi e staffa di protezione piante
Blue Power GTE 850 M
La staffa di protezione motore protegge il motore da danni causati da colpi o impatti. Contemporaneamente la staffa di protezione serve come guida per l'uso confortevole  .
.
L'archetto proteggi-piante protegge cespugli, alberi e aiuole.
• Staccare l'archetto proteggi-piante dalla testa di taglio e applicarlo nuovamente come illustrato  .
.
1L'archetto proteggi-piante deve restare spostato durante il taglio dei bordi  .
.
Inserimento del cavo nel serracavo N
Il serracavo della maniglia di guida impedisce il distacco non intenzionale del cavo di prolunga.
•Fissare il cavo di prolunga nel serracavo come illustrato.
Collegamento alla presa (230 Volt, 50 Hz)
• Collegare l'apparecchio solo a prese protette da un fusibile ritardato da 10-16 ampère (o da un interruttore
di protezione della linea di tipo B).
3
Questi dispositivi di protezione proteggono da lesioni gravi qualora si entri in contatto con linee danneggiate nonché in caso di errori di isolamento e, in determinati casi, anche in caso di danneggiamento di linee sotto tensione.
•Raccomandiamo che l’attrezzo sia collegato ad una presa di corrente che sia protetta da un dispositivo di protezione contro la corrente residuale (RCD) con una corrente residuale non superiore a 30 mA.
•Sono disponibili dei retrofit per i vecchi impianti. Rivolgersi ad un tecnico elettricista
Accensione / spegnimento O
1Attenzione! Filo rotante
L'utensile continua a funzionare!
Accensione dell'apparecchio
•Premere l'interruttore di accensione/spegnimento e mantenerlo premuto  .
.
28 |
it |

Spegnimento dell'apparecchio
• Rilasciare l'interruttore di accensione/spegnimento.
Pulsante Blue Power O
Blue Power GTE 850
Il pulsante Blue Power consente di lavorare a numero di giri ridotto risparmiando corrente, proteggendo l'ambiente e riducendo il rumore.
•Premere il pulsante Blue Power a motore acceso per ridurre il numero di giri  .
.
•Premere nuovamente il pulsante Blue Power a motore acceso per aumentare di nuovo il numero di giri  .
.
•La regolazione automatica della lunghezza del filo non funziona
•Manca la tensione di rete
•Controllare l'alimentazione di corrente, eventualmente farla riparare da un tecnico.
Regolazione del filo
GTE 840 - GTE 845 - Blue Power GTE 850
•Se a causa dell’usura il filo di taglio si accorcia, disinserire sempli-cemente l’apparecchio. Il filo si regola poi automaticamente.
•Durante l’inserimento e il disinserimento il filo si regola automaticamente a 6-8 mm. Un inserimento e disinserimento frequente senza motivazioni comporta una maggiore usura del filo.
GTE 830 P
•Premere per breve tempo il tagliabordi funzionante sul terreno solido, ad es. sul marciapiede (pressione 3 kg). In tal modo vengono alimentati circa 2,5 cm di filo da aglio.
Manutenzione
Pulizia
1Attenzione! Cinghia rotante
Utensile in autoavanzamento!
•Prima di tutti i lavori estrarre la spina della rete sull’apparecchio!
•Aumentate la durata del Vostro tagliaerba, quando – prima o dopo ogni taglio – pulite le fessure di ventilazione e eliminate dal lato inferiore dell’apparecchio l’erba residua.
Sostituire la cassetta del filo
1Attenzione! Cinghia rotante
Utensile in autoavanzamento!
•Prima di tutti i lavori estrarre la spina della rete sull’apparecchio!
1Prima dell’inserimento: mantenere il tagliaerba parallelo al terreno, dato che altrimenti esiste il pericolo di ferirsi.
GTE 840 - GTE 845 - Blue Power GTE 850 Q
1.Premere contemporaneamente i coperchi delle bobine sulle due serrature a scatto ed estrarre  +
+  .
.
2.Togliere la bobina del filo.
3.Eliminare eventuali insudiciamenti.
4.Introdurre la bobina del fi lo nella scatola  .
.
5.Fate passare la parte finale del filo attraverso la cruna
 .
.
3 Onde evitare svolgimenti inavvertiti, mettere il nuovo nastro prima di caricare dalla fessura di montaggio  .
.
6.Collocare i coperchi delle bobine sull’attacco delle bobine del filo, in modo da sentire le due serrature a scatto.
GTE 830 R
it

Interventi di riparazione
Problem |
Possibile causa |
Rimedio |
|
|
• Rocchetto vuto. |
• Vedi sostituzione cassetta filo di taglio. |
|
La regolazione au- |
• Filo di taglio strappato e cassetta rientrata. |
• Togliere la bobina, tira re eventual-mente il |
|
tomatica della lun- |
• Filo inceppato sulla bobina. |
filo leggermente avvolgendolo e rientrare la |
|
ghezza del filo non |
bobina. |
||
funziona |
• Filo attaccato saldamente sulla bobina. |
• Staccare il filo eventualmente avvolgendolo |
|
|
|||
|
tirato leggermente e rientrare la bobina. |
||
|
|
||
|
• Manca la tensione di rete |
• Controllare l'alimentazione di corrente, |
|
|
eventualmente farla riparare da un tecnico. |
||
|
|
||
|
• Cavo danneggiato: |
|
|
Il motore non fun- |
1Attenzione! Scarica elettrica da |
|
|
ziona |
cavo danneggiato |
• Il cavo danneggiato deve essere completa- |
|
Quanto il cavo è tagliato completa- |
|||
metne sostituito. E’ proibito rappezzare il |
|||
|
|||
|
mente o danneggiato, il fusibile di sicu- |
||
|
cavo con nastro isolante. |
||
|
rezza non sempre funziona. |
||
|
|
||
|
• Non toccate il cavo prima di estrarre |
|
|
|
la spina dalla presa di corrente. |
|
|
|
|
|
Preghiami di far eliminare tutti gli altri disturbi dal servizio assistenza.
1Prima di tutti i lavori estrarre la spina della rete sull’apparecchio!
Ricambi
N. di ordinazione |
Denominazione dell‘articolo |
Descrizione dell‘articolo |
7136095 |
GT-F5 |
Filocasetta (GTE 830) |
49ATS0--650 |
GT-F10 |
Filocasetta(GTE 840, GTE 845, Blue Power GTE 850) |
|
|
|
Fornitura attraverso il Vostro Rivenditore.
Garanzia
In ogni paese sono valide le condizioni di garanzia pubblicate dalla nostra società, o dall'importatore. Nei limiti della garanzia, eliminiamo gratuitamente guasti alla vostra macchina, se originati da difetti di materiale o di fabbricazione. In caso di garanzia siete pregati
di rivolgervi al Vostro rivenditore o alla filiale più vicina.
30 |
it |
 Loading...