


72V Li-ION P WER 55H
www.WOLF-Garten.com


 | 72V LI-ION POWER 55H

|
|
|
|
|
|
|
|
|
|
|
|
|
|
|
|
|
|
|
|
|

90°


 90°
90°
45° 0° 45°


|
10 cm |
|
|
|
|
|
100 cm |
|
|
|
|
|
|
72V LI-ION POWER 55H | |

H |
| 72V LI-ION POWER 55H |

|
|
|
|
|
|
DE |
Deutsch . . . . . . . . . . . . . . . . . . . . . . . . . . . . . |
|
6 |
|
|
|
|
|
|
|
|
(Originalbetriebsanleitung) |
|
|
|
|
|
|
|
|
|
|
|
|
||
|
|
|
|
|
|
|
|
|
|
|
|
|
|
|
|
|
EN |
English . . . . . . . . . . . . . . . . . . . . . . . . . . . . . |
|
13 |
|
|
|
|
|
|
|
|
||||
|
|
|
|
|
|
|
(Original operating instructions) |
|
|
|
|
|
|
|
|
|
|
|
|
||
|
|
|
|
|
|
|
Français . . . . . . . . . . . . . . . . . . . . . . . . . . . . . |
|
26 |
|
|
|
|
|
|
|
FR |
|
|||
|
|
|
|
|
|
|
||||
|
|
|
|
|
|
|
(Notice d’instructions d’origine) |
|
|
|
|
|
|
|
|
|
|
|
|
||
|
|
|
|
|
|
|
Italiano . . . . . . . . . . . . . . . . . . . . . . . . . . . . . |
|
35 |
|
|
|
|
|
|
|
IT |
|
|||
|
|
|
|
|
|
|
||||
|
|
|
|
|
|
|
(Istruzioni per l’uso originali) |
|
|
|
|
|
|
|
|
|
|
|
|
||
|
|
|
|
|
|
|
Nederlands . . . . . . . . . . . . . . . . . . . . . . .. |
. |
44. . |
|
|
|
|
|
|
|
NL |
||||
|
|
|
|
|
|
|||||
|
|
|
|
|
|
|
(Originele gebruiksaanwijzing) |
|
|
|
|
|
|
|
|
|
|
|
|
||
|
|
|
|
|
|
|
Svenska . . . . . . . . . . . . . . . . . . . . . . . . . . . . . |
|
53 |
|
|
|
|
|
|
|
SV |
|
|||
|
|
|
|
|
|
|
||||
|
|
|
|
|
|
|
(Originalbruksanvisning) |
|
|
|
|
|
|
|
|
|
|
|
|
||
|
|
|
|
|
|
|
Dansk |
. . . . . . . . . . . . . . . . . . . . . . . . . . . . . |
|
62 |
|
|
|
|
|
|
DA |
|
|||
|
|
|
|
|
|
|
||||
|
|
|
|
|
|
|
(Originale driftsvejledning) |
|
|
|
|
|
|
|
|
|
|
|
|
||
|
|
|
|
|
|
|
Norsk |
. . . . . . . . . . . . . . . . . . . . . . . . . . . . . |
|
71 |
|
|
|
|
|
|
NO |
|
|||
|
|
|
|
|
|
|
||||
|
|
|
|
|
|
|
(Originale driftsanvisningen) |
|
|
|
|
|
|
|
|
|
|
|
|
||
|
|
|
|
|
|
|
Suomi |
. . . . . . . . . . . . . . . . . . . . . . . . . . . . . |
|
80 |
|
|
|
|
|
|
FI |
|
|||
|
|
|
|
|
|
|
||||
|
|
|
|
|
|
|
(Alkuperäinen käyttöohjekirja) |
|
|
|
|
|
|
|
|
|
|
|
|
||
|
|
|
|
|
|
|
Español . . . . . . . . . . . . . . . . . . . . . . . . . . . . . |
|
89 |
|
|
|
|
|
|
|
ES |
|
|||
|
|
|
|
|
|
|
||||
|
|
|
|
|
|
|
(Instrucciones de funcionamiento originales) |
|
|
|
|
|
|
|
|
|
|
|
|
||
|
|
|
|
|
|
|
Português . . . . . . . . . . . . . . . . . . . . . . . . . . . . |
98 |
||
|
|
|
|
|
|
PT |
||||
|
|
|
|
|
|
|||||
|
|
|
|
|
|
|
(Instruções de serviço originais) |
|
|
|
|
|
|
|
|
|
|
|
|
||
|
|
|
|
|
|
|
Ελληνικά . . . . . . . . . . . . . . . . . . . . . . . . . . . . . |
107 |
||
|
|
|
|
|
|
EL |
||||
|
|
|
|
|
|
|||||
|
|
|
|
|
|
|
(Αυθεντικές οδηγίες χειρισμού) |
|
|
|
|
|
|
|
|
|
|
|
|
||
|
|
|
|
|
|
|
Magyar . . . . . . . . . . . . . . . . . . . . . . . . . . . . . |
|
116 |
|
|
|
|
|
|
|
HU |
|
|||
|
|
|
|
|
|
|
||||
|
|
|
|
|
|
|
(Eredeti üzemeltetési útmutató) |
|
|
|
|
|
|
|
|
|
|
|
|
||
|
|
|
|
|
|
|
Polski |
. . . . . . . . . . . . . . . . . . . . . . . . . . . . . |
125 |
|
|
|
|
|
|
|
PL |
||||
|
|
|
|
|
|
|||||
|
|
|
|
|
|
|
(Oryginalna instrukcja obsługi) |
|
|
|
|
|
|
|
|
|
|
|
|
||
|
|
|
|
|
|
|
Český |
. . . . . . . . . . . . . . . . . . . . . . . . . . . . . |
134 |
|
|
|
|
|
|
|
CS |
||||
|
|
|
|
|
|
|||||
|
|
|
|
|
|
|
(Originální návod k obsluze) |
|
|
|
|
|
|
|
|
|
|
|
|
||
|
|
|
|
|
|
|
Slovenský . . . . . . . . . . . . . . . . . . . . . . . . . .. .143 |
|||
|
|
|
|
|
|
SK |
||||
|
|
|
|
|
|
|||||
|
|
|
|
|
|
|
(Originálny návod na obsluhu) |
|
|
|
|
|
|
|
|
|
|
|
|
||
|
|
|
|
|
|
|
Slovensko .. .. .. .. .. .. .. .. .. .. .. .. .. .. .. .. .. .. .. .. .. .. .. .. .. .. .. .. |
152 |
||
|
|
|
|
|
|
SL |
||||
|
|
|
|
|
|
|||||
|
|
|
|
|
|
|
(Izvirno navodilo za obratovanje) |
|
|
|
|
|
|
|
|
|
|
|
|
||
|
|
|
|
|
|
|
Hrvatski . . . . . . . . . . . . . . . . . . . . . . . . . . . . . |
161 |
||
|
|
|
|
|
|
HR |
||||
|
|
|
|
|
|
|||||
|
|
|
|
|
|
|
(Originalna uputa za rad) |
|
|
|
|
|
|
|
|
|
|
|
|
||
|
|
|
|
|
|
|
Русский . . . . . . . . . . . . . . . . . . . . . . . . . . . . . |
170 |
||
|
|
|
|
|
|
RU |
||||
|
|
|
|
|
|
|||||
|
|
|
|
|
|
|
(Оригинальная инструкция по эксплуатации |
|
|
|
|
|
|
|
|
|
|
|
|
||
72V LI-ION POWER 55H | 


DE |
Inhalt |
|
|
Inhalt |
|
Bedeutung der Symbole....................................... |
6 |
Zu Ihrer Sicherheit................................................ |
6 |
Sicherheitshinweise............................................. |
7 |
Bestimmungsgemäße Verwendung..................... |
9 |
Typenschild.......................................................... |
9 |
Bedienelemente................................................... |
9 |
Schutzeinrichtungen............................................. |
9 |
Inbetriebnahme.................................................. |
10 |
Betrieb................................................................ |
10 |
Wartung............................................................... |
11 |
Transport und Lagerung...................................... |
11 |
Beseitigung von Störungen................................ |
12 |
Garantie............................................................. |
12 |
EG-Konformitätserklärung.................................. |
12 |
Umweltgerechte Entsorgung.............................. |
12 |
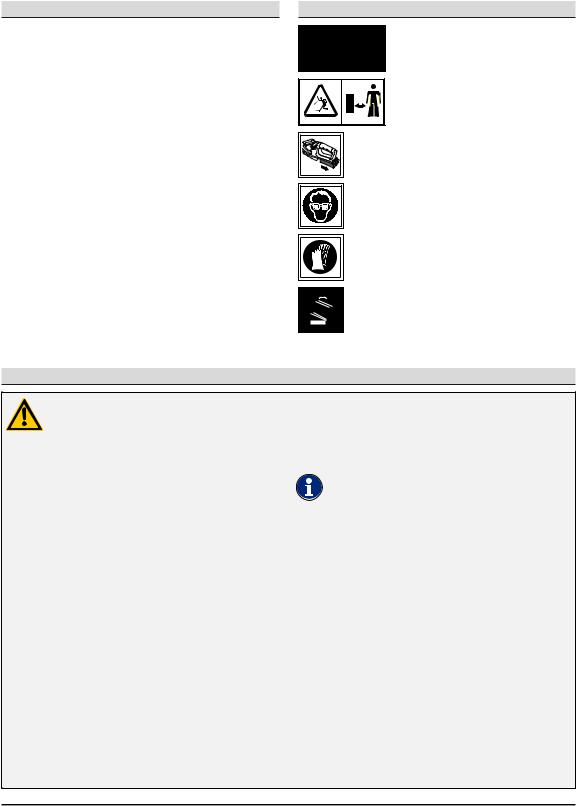
Bedeutung der Symbole
Warnung!
Lesen Sie die Betriebsanleitung vor der Inbetriebnahme!
Vorsicht!
Halten Sie Dritte immer aus dem
Gefahrenbereich fern.
Vor der Reinigung oder Wartung
Batterie entfernen!
Augenschutz tragen!
Schutzhandschuhe tragen!
Setzen Sie das Gerät nicht dem
Regen aus!
Zu Ihrer Sicherheit
Lesen Sie vor der ersten Benutzung Ihres Gerätes diese Betriebsanleitung sorgfältig und handeln Sie danach.
Bewahren Sie diese Betriebsanleitung für späteren Gebrauch oder Nachbesitzer auf.
ÎÎLesen Sie vor der ersten Inbetriebnahme unbedingt die Sicherheitshinweise!
Bei Nichtbeachtung der Betriebsanleitung und der Sicherheitshinweise können Schäden am Gerät und Gefahren für den Bediener und andere Personen entstehen.
ÎÎAlle Personen, die mit der Inbetriebnahme, Bedienung und Wartung des Gerätes zu tun haben, müssen entsprechend qualifiziert sein.
Verbot eigenmächtiger Veränderungen und Umbauten
Es ist verboten, Veränderungen am Gerät durchzuführen oder Zusatzgeräte daraus herzustellen. Solche Änderungen können zu Personenschäden und Fehlfunktionen führen.
ÎÎReparaturen am Gerät dürfen nur von hierzu beauftragten und geschulten Personen durchgeführt werden. Verwenden Sie hierbei stets die Originalersatzteile. Damit wird sichergestellt, dass die Sicherheit des Gerätes erhalten bleibt.
Informationssymbole dieser Anleitung
Die Zeichen und Symbole in dieser Anleitung sollen Ihnen helfen, die Anleitung und das Gerät schnell und sicher zu benutzen.
Hinweis
Informationen über die effektivste bzw. praktikabelste Nutzung des Gerätes.
ÎÎHandlungsschritt
Fordert Sie zum Handeln auf.
33Handlungsergebnis
Hier finden Sie das Ergebnis einer Abfolge von
Handlungsschritten.
[1]Positionsnummer
Positionsnummern sind im Text mit eckigen Klammern [ ] gekennzeichnet.
AIllustrationskennzeichnung
Illustrationen sind mit Buchstaben nummeriert und im Text gekennzeichnet.
1Handlungsschrittnummer
Die definierte Abfolge von Handlungsschritten ist nummeriert und im Text gekennzeichnet.
6 | 


 | 72V LI-ION POWER 55H

Sicherheitshinweise |
DE |
|
|
Sicherheitshinweise
Gefahrenstufen von Warnhinweisen
In dieser Betriebsanleitung werden die folgenden Gefahrenstufen verwendet, um auf potenzielle Gefahrensituationen hinzuweisen:
GEFAHR !
Die gefährliche Situation steht unmittelbar bevor und führt, wenn die Maßnahmen nicht befolgt werden, zu schweren Verletzungen bis hin zum Tod.
WARNUNG !
Die gefährliche Situation kann eintreten und führt, wenn die Maßnahmen nicht befolgt werden, zu schweren Verletzungen bis hin zum Tod.
VORSICHT !
Die gefährliche Situation kann eintreten und führt, wenn die Maßnahmen nicht befolgt werden, zu leichten oder geringfügigen Verletzungen.
Achtung !
Eine möglicherweise schädliche Situation kann eintreten und führt, wenn sie nicht gemieden wird, zu Sachschäden.
Aufbau von Sicherheitshinweisen
GEFAHR !
Art und Quelle der Gefahr!
ÂÂFolgen bei Nichtbeachtung ¾¾Maßnahme zur Gefahrenabwehr
Selbstund Personenschutz
¾¾Aus Sicherheitsgründen dürfen Kinder oder
Personen, die die Gebrauchsanweisung nicht kennen, die Heckenschere nicht benutzen..
Örtliche Bestimmungen können das Mindestalter des Benutzers festlegen.
¾¾Nehmen Sie die Heckenschere nicht in
Betrieb, wenn sich Personen (insbesondere Kinder) oder Tiere in unmittelbarer Nähe befinden. Achten Sie auch darauf, dass Kinder nicht mit der Heckenschere spielen.
¾¾Unterbrechen Sie den Gebrauch der
Maschine, wenn Personen (insbesondere Kinder) oder Haustiere in der Nähe sind..
¾¾Dieses Gerät darf nicht von Kindern und nicht von Personen mit eingeschränkten körperlichen, sensorischen oder geistigen Fähigkeiten oder mit unzureichender Erfahrung und Wissen verwendet werden.. Ebenso dürfen Personen, die mit dieser Betriebsanleitung nicht vertraut sind, das Gerät nicht verwenden.. Lokale Vorschriften können eine Altersbeschränkung für Benutzer festlegen.
¾¾Schalten Sie den Motor nur ein, wenn Ihre
Füße und Hände in sicherem Abstand von der Schneideinrichtung entfernt sind..
¾¾Trennen Sie die Maschine stets von der
Stromversorgung, wenn diese unbeaufsichtigt gelassen wird und beim Entfernen einer Blockierung..
¾¾Tragen Sie bei Arbeiten mit oder an der Heckenschere immer feste Schuhe und lange Hosen sowie weitere entsprechende geeignete persönliche
Schutzausrüstung (Schutzbrille, Gehörschutz, Arbeitshandschuhe etc..).. Das Tragen von persönlicher Schutzausrüstung verringert das Risiko von Verletzungen. Vermeiden Sie das Tragen weiter Kleidung etc., die vom Schneidwerkzeug erfasst werden kann.
Vor dem Einsatz
¾¾Machen Sie sich vor Arbeitsbeginn mit der
Heckenschere und ihren Funktionen sowie ihren Bedienelementen vertraut..
¾¾Benutzen Sie keine Heckenschere, deren
Schalter defekt ist und sich nicht mehr einoder ausschalten lässt.. Lassen Sie diesen von einer qualifizierten Fachkraft oder einer Fachwerkstatt reparieren.
¾¾Verwenden Sie niemals ein Gerät mit beschädigten oder fehlenden
Schutzeinrichtungen oder Abdeckungen..
Lassen Sie diese von einer dazu qualifizierten
Fachkraft oder Fachwerkstatt reparieren oder ggf. austauschen.
¾¾Bevor Sie Einstellungen am Gerät vornehmen, oder es säubern, schalten Sie das Gerät aus und entnehmen Sie den Akku..
¾¾Lesen und beachten Sie Bedienungsanleitung des Akkus und des Ladegerätes für den Akku..
72V LI-ION POWER 55H | 


 | 7
| 7

DE |
Sicherheitshinweise |
|
|
Sicherheitshinweise
Beim Einsatz
¾¾Halten Sie alle Körperteile vom
Schneidmesser fern.. Versuchen Sie nicht, bei laufendem Messer Schnittgut zu entfernen oder zu schneidendes Material festzuhalten.. Entfernen Sie eingeklemmtes Schnittgut nur bei ausgeschaltetem Gerät.. Ein Moment der Unachtsamkeit bei Benutzung der Heckenschere kann zu schweren Verletzungen führen.
¾¾Tragen Sie die Heckenschere am Griff bei stillstehendem Messer.. Bei Transport oder Aufbewahrung der Heckenschere stets die Schutzabdeckung aufziehen.. Sorgfältiger Umgang mit dem Gerät verringert die Verletzungsgefahr durch das Messer.
¾¾Halten Sie das Elektrowerkzeug nur an den isolierten Griffflächen, da das Schneidmesser in Berührung mit verborgenen Stromleitungen kommen kann.. Der Kontakt des Schneidmessers mit einer spannungsführenden Leitung kann metallene Geräteteile unter Spannung setzen und zu einem elektrischen Schlag führen.
¾¾Arbeiten Sie mit dem Gerät nicht in explosionsgefährdeter Umgebung, in der sich brennbare Flüssigkeiten, Gase oder Stäube befinden. Die Heckenschere kann Funken erzeugen, die den Staub oder die Dämpfe entzünden können.
¾¾Lassen Sie bei Arbeitsunterbrechungen die Heckenschere nie unbeaufsichtigt und
bewahren Sie ihn an einem sicheren Ort auf..
¾¾Suchen Sie die Hecke nach verborgenen
Objekten, z.. B.. Drahtzäunen ab..
¾¾Halten Sie die Heckenschere mit beiden
Händen fest
¾¾Halten Sie die Heckenschere beim
Einschalten parallel zur Hecke, da sonst Verletzungsgefahr besteht..
¾¾Halten Sie auch beim Arbeiten einen
Sicherheitsabstand zum Schneidwerkzeug ein..
¾¾Tragen Sie geeigneten Augenschutz und
Gehörschutz!
¾¾Vermeiden Sie eine abnormale Körperhaltung..
Sorgen Sie für einen sicheren Stand und halten Sie jederzeit das Gleichgewicht.. Laufen Sie nie, sondern bewegen sich in einem ruhigen Gang vorwärts. Dadurch können Sie das Gerät in unerwarteten Situationen besser kontrollieren.
¾¾Seien Sie besonders vorsichtig, wenn Sie rückwärts gehen.. Stolpergefahr!
¾¾Schalten Sie den Motor beim Transport von/ zu den einzelnen Arbeitsstellen ab..
¾¾Überbrücken und manipulieren Sie niemals die am Gerät installierten Schalteinrichtungen (z. B.. durch Anbinden des Schalters am Griff)..
Nach dem Einsatz
¾¾Schalten Sie das Gerät aus, entnehmen
Sie den Akku und überprüfen Sie das Gerät auf Beschädigung.. Achtung, Gefahr! Schneidwerkzeug läuft nach!
¾¾Sollten Sie Wartungsund Reinigungsarbeiten am Gerät durchführen, schalten Sie das Gerät aus und entnehmen Sie den Akku..
¾¾Warten Sie immer den Stillstand des
Schneidwerkzeuges ab..
¾¾Das Abnehmen der Schutzeinrichtungen darf nur bei stillgesetztem Motor und entferntem Akku erfolgen..
¾¾Achten Sie darauf, dass Lüftungsschlitze frei von Verschmutzungen sind..
¾¾Reinigen Sie die Heckenschere nicht mit
Wasser..
¾¾Lagern Sie das Gerät an einem sicheren Ort nicht in Reichweite von Kindern..
¾¾Nehmen Sie selbst keine Reparaturen am
Gerät vor, sondern lassen Sie diese nur von einer qualifizierten Fachkraft oder in einer
Fachwerkstatt durchführen..
Allgemeine Sicherheitshinweise
¾¾Ersatzteile müssen den vom Hersteller festgelegten Anforderungen entsprechen..
Verwenden Sie daher nur Original-WOLF-Garten- Ersatzteile oder die vom Hersteller zugelassenen Ersatzteile. Bitte beachten Sie beim Austausch immer die mitgelieferten Einbauhinweise, entnehmen Sie vorher den Akku.
¾¾Lassen Sie Reparaturen ausschließlich von einer qualifizierten Fachkraft oder in einer
Fachwerkstatt durchführen..
¾¾Diese Heckenschere ist für die Pflege von
Hecken im privaten Bereich vorgesehen..
Wegen körperlicher Gefährdung des Benutzers oder anderer Personen darf das Gerät nicht für artfremde Zwecke eingesetzt werden.
¾¾Verwenden Sie die Heckenschere nur bei
Tageslicht oder unter guter künstlicher Beleuchtung.. Halten Sie Ihren Arbeitsbereich sauber und gut beleuchtet.
¾¾Verwenden Sie die Heckenschere nur bei trockenen Wetterbedingungen.. Halten Sie ihn von Regen oder Nässe fern. Durch das Eindringen von Wasser in die Heckenschere erhöht sich das Risiko eines elektrischen Schlags.
8 | 


 | 72V LI-ION POWER 55H

Bestimmungsgemäße Verwendung |
DE |
|
|
Bestimmungsgemäße Verwendung |
|
|
Bedienelemente |
Die Heckenschere ist ausschließlich zum Schnei- |
|
Bedienelemente (Abb.. H) |
|
den von Hecken und Büschen mit einer maximalen |
1 |
Handgriff |
|
Aststärke von 26 mm bestimmt. |
|||
Jeder darüber hinausgehende Gebrauch gilt als |
2 |
Ein-/Ausschalter am Handgriff |
|
3 |
Griffteil |
||
nicht bestimmungsgemäß. |
4 |
Ein-/Ausschalter am Bügelgriff |
|
Für Schäden bei nicht bestimmungsgemäßer Ver- |
5 |
Bügelgriff |
|
wendung haftet der Benutzer. |
6 |
Schutzschild |
|
Bestimmungswidrige Verwendung |
7 |
Schneidmesser |
|
8 |
Akkuentriegelung |
||
Diese Heckenschere sollte nicht in öffentlichen Anla- |
9 |
Akkufach |
|
10 |
Einstellung Arbeitswinkel |
||
gen, Parks, Sportstätten, an Straßen usw. sowie in |
11 |
Motor-/Getriebeeinheit |
|
der Land und Forstwirtschaft eingesetzt werden. |
12 |
Schutzabdeckung |
|
|
13 |
Anschlagschutz |
|
|
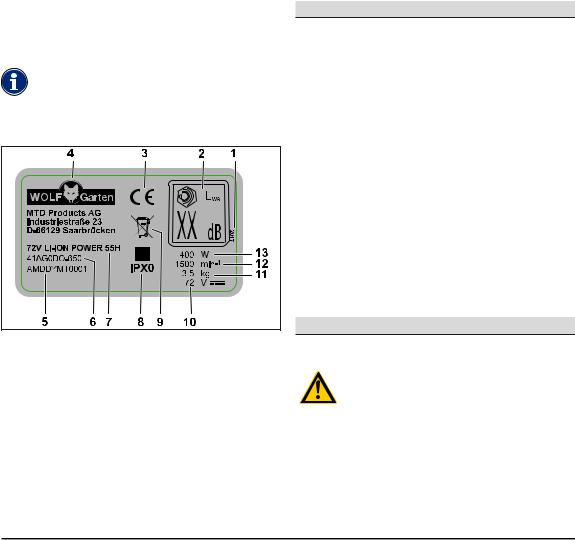
Typenschild |
Schutzeinrichtungen |
|
Lage |
|
||
Schutzeinrichtungen (Abb. H) |
|
||
Das Typenschild finden Sie am Gehäuse der |
|
||
Schutzschild H 6 |
|
||
Heckenschere. |
|
||
|
Hinweis |
Das klartransparente Schutzschild schützt Ihre |
|
|
Hände und ermöglicht Ihnen ein einwandfreies |
||
|
Die Kennzeichnung besitzt Urkundenwert |
Schneiden mit guter Sicht auf den Schnittbereich. |
|
|
und darf nicht verändert oder unkenntlich |
|
|
|
gemacht werden. |
Anschlagschutz H 13 |
|
Aufbau |
Die überstehende Führungsschiene schützt Sie |
||
beim Anstoßen an einen festen Gegenstand (Wand, |
|||
|
|
Boden etc.) gegen unangenehme Schläge, z. B. |
|
|
|
Rückstoßmomente des Schneidmessers. |
|
|
|
Zwei-Hand-Sicherheitsschaltung H 2 |
H 4 |
|
|
Das Einschalten und Bedienen der Heckenschere |
|
|
|
erfolgt mit beiden Händen. Eine Hand bedient den |
|
|
|
Ein-/Ausschalter am Handgriff, die andere Hand |
|
|
|
bedient den Ein-/Ausschalter am Bügelgriff. Lassen |
|
|
|
Sie eines der beiden Schaltelemente los, kommt das |
|
|
|
Schneidmesser automatisch zum Stillstand. |
|
|
|
Inbetriebnahme |
|
|
|
Ergänzende Dokumentationen |
|
|
Baujahr |
Nehmen Sie das Gerät erst |
|
1 |
in Betrieb, wenn Ihnen die |
|
|
2 |
Schallleistung garantiert |
mitgelieferten Betriebsanleitungen |
|
3 |
CE-Kennzeichnung |
des Ladegerätes POWER Base 72V / |
|
4 |
Hersteller |
POWER Base 72V Basic und die des |
|
5 |
Seriennummer |
Akkus Li High Energy 72V vorliegen und |
|
6 |
Modellnummer |
Sie diese verstanden und beachtet haben.. |
|
7 |
Modellname |
|
|
8 |
Schutzklasse/Schutzart |
|
|
9 |
Entsorgungshinweis |
|
|
10 |
Nennspannung, Stromart |
|
|
11 |
Gewicht |
|
|
12 |
Motordrehzahl in min-1 |
|
|
13 |
Leistung |
|
|
|
|
72V LI-ION POWER 55H | |
| 9 |

DE |
Betrieb |
|
|
Akku laden
WARNUNG !
Gefahr von Verletzungen oder Sachschäden
¾¾Akku ausschließlich mit dem Ladegerät POWER Base 72V / POWER Base 72V Basic laden.
Achtung !
Der Akku wird teilgeladen ausgeliefert. Laden Sie den Akku mit dem Ladegerät POWER Base 72V / POWER Base 72V Basic vor dem ersten Einsatz vollständig auf, um die volle Leistung des Akkus zu gewährleisten.
ÎÎLaden Sie den Akku entsprechend der Anweisungen der ergänzenden Dokumentation auf.
Betriebszeiten
33Beachten Sie bitte regionale Vorschriften. ÎÎErfragen Sie die Betriebszeiten bei Ihrer örtlichen
Ordnungsbehörde.
Betrieb
Akku einsetzen (Abb. A)
WARNUNG !
Falsche Handhabung des Akkus und des Ladegerätes
ÂÂGefahr von Verletzungen und Sachschäden
¾¾Lesen und beachten Sie die Betriebsanleitung des Akkus und des Ladegerätes.
Mithilfe der 2-Stufen Einrastung kann der Arbeitsbzw. Transportmodus des Akkus eingestellt werden.
Stufe 1 A 1
33Akku befindet sich im Transportmodus.
•Die elektrischen Kontakte sind getrennt und verhindern somit eine ungewollte Selbstentladung des Akkus bei Lagerung.
Stufe 2 A 2
33Akku befindet sich im Arbeitsmodus.
•Die elektrischen Kontakte sind verbunden und das Gerät ist betriebsbereit.
Gerät einschalten (Abb. B)
ÎÎHalten Sie mit der einen Hand den Ein-/Aus- schalter am Handgriff gedrückt B 1.
ÎÎDrücken Sie mit der anderen Hand gleichzeitig den Ein-/Ausschalter am Bügelgriff B 2.
33Das Gerät ist in Betrieb.
Arbeitswinkel einstellen (Abb. C)
WARNUNG !
Gefahr von Verletzungen durch das Schneidwerkzeug.
¾¾Schalten Sie das Gerät ab und warten Sie, bis das Schneidwerkzeug stillsteht, bevor Sie Einstellungen am Gerät vornehmen.
Die Heckenschere verfügt über einen 5-fach verstellbaren Arbeitswinkel. Sie können die Motor-/ Getriebeeinheit, an der sich das Schneidmesser befindet, jeweils um 45° oder 90° nach rechts oder links schwenken.
Dadurch können Sie problematische und schwer zugängliche Stellen im Garten bequem erreichen.
ÎÎDrücken Sie den Arretierknopf C 1.
33Die Motor-/Getriebeeinheit löst sich aus der Einrastung.
ÎÎStellen Sie den Arbeitswinkel ein, indem Sie die Motor-/Getriebeeinheit nach rechts oder links drehen.
33Die Motor-/Getriebeeinheit rastet in der nächsten Einrastung ein C 2.
ÎÎUm die Motor-/Getriebeeinheit weiterdrehen zu können, drücken Sie erneut den Arretierknopf C 1.
Schneiden (Abb. D E F)
Schneiden der Heckenoberseite D
--Führen Sie zum Schneiden der Heckenoberseite nach links und rechts schwenkende/schweifende Bewegungen mit der Heckenschere aus.
--Halten Sie für optimale Schneidergebnisse das Schneidmesser in leicht abgeneigter Position in Richtung der Schneidbewegung.
Schneiden der Heckenseiten E
--Sollten die Heckenseiten geschnitten werden, so beginnen Sie zunächst mit dem unteren Teil der Hecke und schneiden Sie aufwärts.
--Halten Sie für optimale Schneidergebnisse das Schneidmesser in leicht abgeneigter Position in Richtung der Schneidbewegung.
--Schneiden Sie die Seiten der Hecke nach oben hin verjüngt, um einen gleichmäßigen Heckenwuchs zu ermöglichen.
10 | 


 | 72V LI-ION POWER 55H
Wartung |
|
|
DE |
|
|
|
|
|
|
Tipps zum Schneiden |
Reinigung |
|||
--Bitte beachten Sie die Brutzeiten der Vögel! |
ÎÎReinigen Sie die Heckenschere, insbesondere die |
|||
-- Die ideale Form zum Heckenschnitt ist die |
||||
Trapezform, welche für ausreichende Lichtund |
Lüftungsschlitze, nach jedem Einsatz mit einem |
|||
Luftzufuhr in allen Bereichen der Hecke sorgt F. |
trockenen Tuch bzw. bei starker Verschmutzung |
|||
--Um bei jungen Hecken den Dichtwuchs zu för- |
mit einer Bürste. |
|||
dern, sollten neue Triebe nur zur Hälfte gekürzt |
ÎÎReinigen Sie das Schneidmesser vorsichtig nach |
|||
werden. |
|
jedem Gebrauch. |
||
--Hat die Hecke bereits Ihre gewünschte Höhe er- |
ÎÎSprühen Sie das Schneidmesser nach dem Ein- |
|||
reicht, können neue Triebe ganz entfernt werden. |
satz mit Pflegeöl ein, um eine lange Lebensdauer |
|||
--Um eine gleichbleibende Höhe der Hecke zu erzie- |
der Heckenschere zu garantieren. Verwenden Sie |
|||
len, können Sie eine Richtschnur auf gewünschter |
hierzu möglichst umweltfreundliche Schmiermittel. |
|||
Höhe spannen und entlang dieser Linie schneiden. |
ÎÎÖlen Sie die Heckenschere nicht während des |
|||
|
|
Betriebs. |
||
|
Schnittzeiten |
ÎÎLegen Sie die Heckenschere zum Ölen auf die |
||
Laubhecken |
Mai/Juni und Oktober (Rück- |
Seite und tragen sie einen dünnen Ölfilm auf das |
||
Schneidmesser auf. |
||||
|
schnitt um ca. 1/3 der Gesamt- |
|||
|
höhe im Winter vornehmen) |
ÎÎUnterbrechen Sie bei längerem Heckenschneiden |
||
|
|
öfter Ihre Arbeit und ölen Sie das Schneidmesser |
||
Nadelholzhecken |
April und Oktober |
|||
Ihrer Heckenschere. |
||||
Koniferen |
April und Oktober |
|||
|
|
|||
Achtung !
Gerät ausschalten (Abb. B)
33Das Gerät schaltet sich aus, sobald Sie einen der beiden Ein-/Ausschalter B 1 oder B 2 loslassen.
Akku entnehmen (Abb. G)
ÎÎDrücken Sie die Akkuentriegelung G 1. ÎÎEntnehmen Sie den Akku G 2.
Wartung
WARNUNG !
Gefahr von Verletzungen oder Sachschäden.
¾¾Wartungsund Reinigungsarbeiten am Gerät dürfen nur bei stillgesetztem Motor und stillstehendem Schneidwerkzeug vorgenommen werden.
¾¾Vor allen Arbeiten am Gerät den Akku entnehmen.
¾¾Reparaturund Wartungsarbeiten sowie den Austausch von Sicherheitselementen nur von einer qualifizierten Fachkraft oder einer Fachwerkstatt durchführen lassen.
Spritzen Sie das Gerät keinesfalls mit Wasser oder Hochdruckreiniger ab.
Transport und Lagerung
WARNUNG !
Gefahr von Verletzungen durch das Schneidwerkzeug.
¾¾Vor jedem Transport und jeder Lagerung das Gerät abschalten und den Stillstand des Schneidwerkzeuges abwarten.
¾¾Entnehmen Sie den Akku vor Transport oder Lagerung.
Lagerung
ÎÎFühren Sie nach jeder Saison eine gründliche Reinigung an Ihrem Gerät durch.
ÎÎLagern Sie das Gerät stets an einem trockenen und sicheren Ort, welcher unzugänglich für Kinder ist.
ÎÎLagern Sie den Akku und die Heckenschere getrennt voneinander.
ÎÎLagern Sie den Akku an einem kühlen und trockenen
Ort. Empfohlenene Lagertemperatur ca. 18 °C.
ÎÎHalten Sie die Heckenschere und insbesondere seine Plastikbestandteile fern von Bremsflüssigkeiten, Benzin, erdölhaltigen Produkten, Kriechölen etc. Sie enthalten chemische Stoffe, welche die Plastikbestandteile der Heckenschere beschädigen, angreifen oder zerstören können.
ÎÎDüngemittel und andere Gartenchemikalien enthalten Stoffe, die stark korrosiv auf die Metallteile der Heckenschere wirken können. Lagern Sie Ihre Heckenschere daher nicht in der Nähe dieser Stoffe.
72V LI-ION POWER 55H | 


 | 11
| 11

DE |
Beseitigung von Störungen |
|
|
Beseitigung von Störungen
WARNUNG !
Gefahr von Verletzungen oder Sachschäden
¾¾Suchen Sie im Zweifelsfall immer eine Fachwerkstatt auf.
¾¾Stellen Sie vor jeder Prüfung oder vor Arbeiten am Gerät den Motor ab und entnehmen Sie den Akku.
Problem |
Mögliche Ursache |
Abhilfe |
|
Das Gerät schaltet |
Der Akku ist zu heiß. |
Lassen Sie den Akku abkühlen. |
|
ab. |
Der Akku ist entladen. |
Laden Sie den Akku auf. |
|
|
|||
|
Temperatur des Gerätes (Elektronik) ist zu hoch. |
Lassen Sie das Gerät abkühlen und |
|
|
|
reinigen Sie ggf. die Lüftungsschlitze |
|
|
Überstromauslösung |
Suchen Sie bei erneutem Auftreten eine |
|
|
|
Fachwerkstatt auf. |
|
Das Gerät lässt sich |
Der Akku ist entladen. |
Laden Sie den Akku auf. |
|
nicht einschalten. |
Überspannungsauslösung |
Suchen Sie bei erneutem Auftreten eine |
|
|
|
Fachwerkstatt auf. |
|
|
Überstromauslösung |
Suchen Sie bei erneutem Auftreten eine |
|
|
|
Fachwerkstatt auf. |
|
|
Temperatur des Akkus zu hoch oder zu niedrig. |
Lassen Sie den Akku abkühlen bzw. |
|
|
|
aufwärmen. |
|
|
Der Akku ist defekt. |
Tauschen Sie den Akku aus. |
|
Das Schneidmesser Das Schneidmesser ist stumpf. |
Suchen Sie eine Fachwerkstatt auf. |
||
wird heiß. |
|
|
|
Es besteht zu viel Reibung aufgrund fehlender |
Ölen Sie das Schneidmesser. |
||
|
|||
|
Schmierung. |
|
|
Unruhiger Lauf, |
Das Schneidmesser ist schadhaft. |
Suchen Sie eine Fachwerkstatt auf. |
|
starkes Vibrieren |
Die Befestigung des Schneidmessers hat sich |
Suchen Sie eine Fachwerkstatt auf. |
|
der Heckenschere. |
|||
gelöst. |
|
||
Ersatzteile und Zubehör
Bestell-Nr.. |
Artikel-Bezeichnung |
Artikel-Beschreibung |
196-651-650 |
POWER Base 72V |
72V Ladegerät |
196-652-000 |
POWER Base 72V Basic |
72V Ladegerät |
196-650-650 |
Li-High Energy 72V |
72V Akku |
Garantie
In jedem Land gelten die von unserer Gesellschaft oder dem Importeur herausgegebenen Garantiebestimmungen. Störungen beseitigen wir an ihrem Gerät im Rahmen der Gewährleistung kostenlos, sofern ein Materialoder Herstellungsfehler die Ursache sein sollte. Im Garantiefall wenden Sie sich bitte an Ihren Verkäufer oder die nächstgelegene Niederlassung.
EG-Konformitätserklärung
Weitere Angaben zum Gerät finden Sie auf der separat beigelegten EG Konformitätser klärung, die ein Bestandteil dieser Betriebs anleitung ist.
Umweltgerechte Entsorgung
Elektrowerkzeuge, Zubehör und Verpackungen müssen einer umweltgerechten Wiederverwertung zugeführt werden.
Akkus/Batterien:
Werfen Sie Akkus/Batterien nicht in den Hausmüll, ins Feuer oder ins Wasser.
Akkus/Batterien müssen gesammelt, recycelt oder auf umweltfreundliche
Weise entsorgt werden. Nur für EU-Länder:
Gemäß der Richtlinie 2013/56/EU müssen defekte oder verbrauchte Akkus/Batterien recycelt werden. Werfen Sie das Elektrowerkeug nicht in den Hausmüll! Geben Sie es in einer geeigneten Entsorgungseinrichtung ab.
12 | 


 | 72V LI-ION POWER 55H
Contents |
EN |
|
|
Contents |
|
|
Meaning of the symbols..................................... |
|
13 |
For your safety................................................... |
|
13 |
Safety instructions.............................................. |
|
14 |
Intended use...................................................... |
|
16 |
Identification plate.............................................. |
|
16 |
Operating elements............................................ |
|
16 |
Protective equipment......................................... |
|
16 |
Putting into use................................... |
....................... |
16 |
Operation........................................................... |
|
17 |
Servicing............................................................ |
|
18 |
Transport and storage................................... |
. . . . . . . . . . . . . . . . . . |
18 |
Troubleshooting................................................. |
|
19 |
Warranty............................................................. |
|
19 |
CE Declaration of Conformity............................. |
19 |
|
Environmentally-friendly disposal....................... |
19 |
|
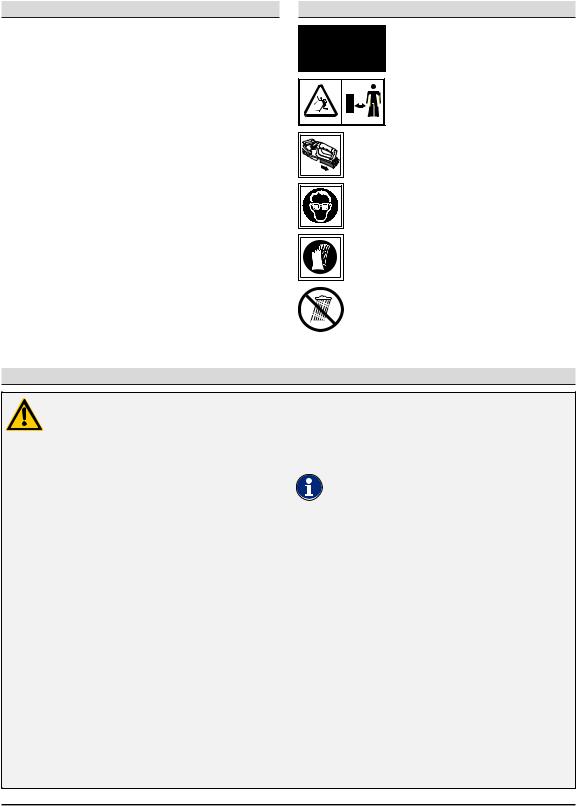
Meaning of the symbols
Warning!
Read the instruction manual before using for the first time!
Caution!
Do not allow any other persons to enter the danger area.
Remove the battery before cleaning or maintenance!
Wear safety goggles!
Wear safety gloves!
Do not leave the device in the rain!
For your safety
Before using your device for the first time, read this instruction manual carefully and observe the instructions.
Keep this instruction manual for later use or subsequent owners.
ÎÎBefore using for the first time, you must read the safety information!
Failure to observe the instruction manual and the safety instructions can result in damage to the device and danger for the operator and other persons.
ÎÎAll persons involved with set-up, operation and servicing of the device must have appropriate qualifications.
The making of unauthorised changes or conversions is not permitted
Do not make any changes to the device nor convert it to produce other devices. Such changes may result in personal injury and malfunctions. ÎÎRepairs to the device must only be performed
by trained persons who have been instructed to do so. When doing so always use original spare parts. This ensures that the safety of the device is maintained.
Information symbols in this manual
The signs and symbols in this manual should help you to use the manual and device quickly and safely.
Note
Information to ensure the most effective and practical use of the device.
ÎÎStep
Requires you to perform an action.
33Action result
This is the result of a sequence of steps.
[1]Item number
Item numbers are indicated in the text by square brackets [].
AIllustration label
Illustrations are numbered with letters and identified in the text.
1Step number
The defined sequence of steps is numbered and identified in the text.
72V LI-ION POWER 55H | 


 | 13
| 13

EN |
Safety instructions |
|
|
Safety instructions
Danger levels of warning information
The following danger levels are used in this instruction manual to indicate potentially dangerous situations:
DANGER !
A dangerous situation is highly likely and, if the measures are not followed, will result in severe injury and even death.
WARNING !
A dangerous situation may occur and, if the measures are not followed, will result in severe injury and even death.
CAUTION !
A dangerous situation may occur and, if the measures are not followed, will result in slight or minor injuries.
¾¾This device must not be used by children or persons with reduced physical, sensory or mental capabilities or with inadequate experience and knowledge.. Likewise persons must be familiar with this instruction manual before using the device.. The minimum age for using the device may be specified by local or national legislation.
¾¾Only switch the motor on if your feet and hands are at a safe distance from the cutting element..
¾¾Always disconnect the device from the power supply if you are leaving it unattended or removing a blockage..
¾¾Always wear sturdy shoes and long trousers as well as other appropriate personal protective equipment (safety glasses, ear defenders, safety gloves etc..) when working on the hedge trimmer.. The wearing of personal protective equipment minimises the risk of injury. Do not wear loose clothing, etc., which could be caught by the cutting tool.
Attention!
A possibly harmful situation may occur which if not avoided will result in property damage.
Safety information content
DANGER !
Type and source of the danger!
ÂÂConsequences of non-observation
¾¾Measure for preventing the danger
Protection of yourself and others
¾¾For safety reasons, children or persons who are not familiar with the instruction manual and operation of the hedge trimmer, must not use it.. The minimum age of users may be defined by local or national legislation.
¾¾Do not operate the hedge trimmer when there are people (especially children) or animals in the immediate vicinity.. Ensure children do not play with the hedge trimmer.
¾¾Stop using the device if persons (especially children) or animals are nearby..
Before use
¾¾Before use, make sure you are familiar with the hedge trimmer, its functions and controls..
¾¾Do not use any hedge trimmer whose switch is defective and which can no longer be switched on or off.. It must be repaired by a qualified expert or workshop.
¾¾Never use a device with damaged or missing guards or covers.. They must be repaired or replaced by a qualified expert or workshop.
¾¾Before making adjustments to the device or cleaning it, switch it off and remove the power pack..
¾¾Read and observe the operating instructions of the power pack and its charger..
14 | 


 | 72V LI-ION POWER 55H

Safety instructions |
EN |
|
|
Safety instructions
When in use
¾¾Keep all body parts away from the cutting blade.. Do not attempt to remove grass cuttings or hold material to be cut with the blade running.. Only remove jammed grass cuttings with the device switched off.. One moment of inattentiveness when using the hedge trimmer can result in serious injuries.
¾¾Hold the hedge trimmer at the handle with the blade at a standstill.. Always put on the protective cover when transporting or storing away the hedge trimmer.. Careful handling of the device reduces the risk of injury from the blade.
¾¾Only hold the power tool by the insulated handles, because the cutting blade can come into contact with hidden power cables.. Contact of the cutting blade with a live cable can conduct electrical voltage into metallic device parts resulting in an electric shock.
¾¾Do not use the device in an explosive environment, where there are inflammable liquids, gases or dusts.. The device may create sparks, which could ignite the dust or vapours.
¾¾Never leave the hedge trimmer unattended during breaks and store it in a secure location..
¾¾Check for hidden objects in the hedge, such as wire fencing, before commencing work..
¾¾Hold the hedge trimmer securely with both hands..
¾¾Hold the hedge trimmer parallel to the hedge when switching on, otherwise there is a risk of injury..
¾¾Also when working maintain a safe distance relative to the cutting tool..
¾¾Wear suitable safety goggles and ear defenders!
¾¾Adopt a normal posture.. Ensure you are standing securely and that you maintain your balance at all times.. Do not run, rather walk forwards at a steady pace. This will ensure that you can maintain better control of the device if unexpected situations occur.
¾¾Take extra care if you are walking backwards..
Risk of tripping!
¾¾Switch the motor off when carrying the device to or from separate working positions..
¾¾Never bypass or tamper with safety devices installed on the device (e..g.. by taping the switch to the handle)..
After use
¾¾Switch the device off, remove the power pack and check the device for damage.. Attention, danger! Cutting tool still running!
¾¾If you need to clean or service the device, switch it off and remove the power pack..
¾¾Always wait until the cutting tool comes to a standstill..
¾¾Removal of the protective equipment must only be performed with the motor stationary and the power pack removed..
¾¾Ensure that ventilation slots are free from dirt.. ¾¾Do not clean the hedge trimmer using water..
¾¾Store the device in a safe location out of reach of children..
¾¾Do not repair the device yourself; it must be repaired by a qualified expert or workshop.
General safety instructions
¾¾Spare parts must meet the requirements of the manufacturer.. Therefore use only original WOLF-Garten spare parts or spare parts approved by the manufacturer. During replacement, always observe the supplied fitting instructions, remove the power pack in advance.
¾¾Repairs must only be performed by a qualified expert or workshop..
¾¾This hedge trimmer is intended for the care of hedges in private households.. The device must not be used for purposes other than those intended because of the risk of bodily injury to the user or other persons.
¾¾Only use the hedge trimmer in daylight or under bright artificial light. Keep your work area clean and well lit.
¾¾Only use the hedge trimmer in dry weather conditions.. Keep it away from rain or damp. The ingress of water into the hedge trimmer increases the risk of an electric shock.
72V LI-ION POWER 55H | 


 | 15
| 15
EN |
Intended use |
|
|
Intended use
The hedge trimmer is intended solely for the cutting of hedges and bushes with a maximum branch thickness of 26 mm (1 inch).
Any other use is classed as unintended use. The user is liable for any damages arising from unintended use.
Incorrect/abnormal use
This hedge trimmer should not be used in public facilities, parks, sports grounds, roads etc. nor in agriculture or forestry.
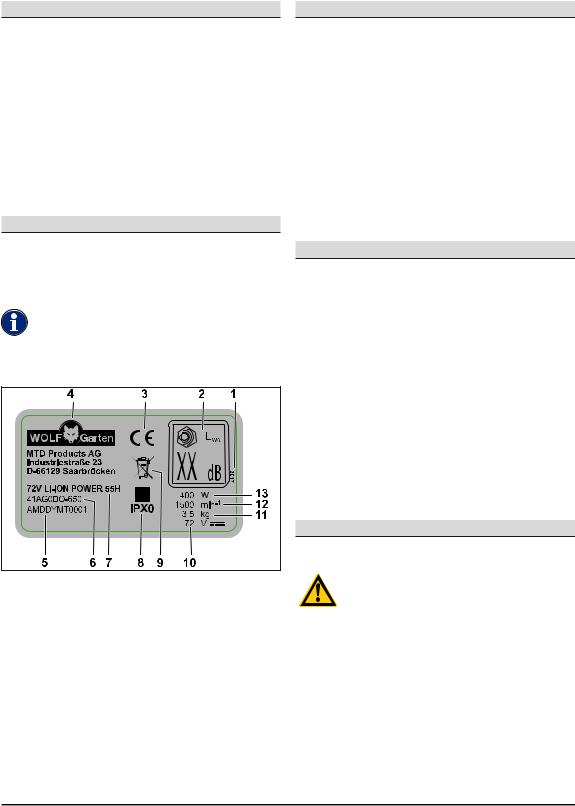
Identification plate
Position
The identification plate is located on the casing of the hedge trimmer.
Note
The label has the status of a certificate. It must never be altered or obliterated.
Layout |
1Year of manufacture
2Guaranteed sound level
3CE label
4Manufacturer
5Serial number
6Model number
7Model name
8Protection class/IP code
9Disposal note
Rated voltage, kind of current Weight
Motor rotation speed in rpm
Capacity10111213
Operating elements
Operating elements (Fig.. H)
1Handle
2On/off switch on handle
3Handle part
4On/off switch on bow-shaped handle
5Bow-shaped handle
6Shield
7Cutting blade
8Power pack release
9Power pack compartment Working angle adjustment Motor-/gearbox unit Protective cover
Impact protection10111213
Protective equipment
Protective equipment (Fig. H)
Shield H 6
The transparent shield protects your hands ensuring easy cutting with a good view of the cutting area.
Impact protection H 13
The projecting guide rail protects you against unpleasant impacts, e.g. recoil moments, if you hit a solid object (wall, floor, etc.).
Two-handed safety switch H 2 H 4
Switching on and operation of the hedge trimmer requires both hands. One hand operates the on/off switch on the handle, the other hand operates the on/off switch on the bow-shaped handle. If one or other of the switches is released, the cutting blade automatically comes to a standstill.
Putting into use
Supplementary documentation
Make sure the operating instructions of the POWER Base 72V / POW-
ER Base 72V Basic charger and of the Li High Energy 72V power pack are available and that you understand them and adhere to them..
16 | 


 | 72V LI-ION POWER 55H
Operation |
|
EN |
|
|
|
Power pack charging |
Switching the device on (Fig. B) |
|
WARNING !
Risk of injuries or material damage
¾¾Only charge the power pack with charger POWER Base 72V / POWER Base 72V Basic.
Attention!
The power pack is supplied partially charged.
Before first use, fully charge the power pack using the charger POWER Base 72V / POWER Base 72V Basic to ensure the full capacity of the power pack.
ÎÎPower pack charging must be carried out according to the instructions in the supplementary documentation.
Operating times
33Observe the times stipulated in local byelaws.
ÎÎCheck if there are any operating time limitations with your local authorities.
Operation
Inserting the power pack (Fig. A)
WARNING !
Incorrect handling of the power pack and the charger
ÂÂRisk of injuries and material damage
¾¾Read and observe the operating instructions of the power pack and the charger.
The 2-stage latching mechanism is used to set operating or transport mode of the power pack.
Position 1 A 1
33The power pack is in transport mode.
•Electric contacts are open to prevent the power pack from self-discharging during storage.
Position 2 A 2
33The power pack is in operating mode.
•The electrical contacts are closed and the device is ready for use.
ÎÎWith one hand maintain the on/off switch depressed on the handle B 1.
ÎÎThen with the other hand simultaneously press the on/off switch on the bow-shaped handle B 2.
33The device operates.
Adjusting the working angle (Fig. C)
WARNING !
Risk of injuries due to the cutting tool.
¾¾Switch off the device and wait until the cutting tool comes to a standstill before making adjustments to the device.
The hedge trimmer can be set in any of five different operating angles. You can rotate the motor / gear unit on which the cutting blade is located through
45° or 90° to the left or right.
This allows you to easily reach problematic and difficult-to-access positions in the garden.
ÎÎPress the locating button C 1.
33The motor/gearbox unit comes free from the engaging position.
ÎÎSet the operating angle by turning the motor/ gearbox unit to the left or right.
33The motor/gearbox unit engages in the next position C 2.
ÎÎTo start the motor/gearbox unit again, press the locating button C 1.
Cutting (Fig. D E F)
Cutting the top of the hedge D
--To cut the hedge top, perform swinging/sweeping movements to the left and right using the hedge trimmer.
--For optimum cutting results, maintain the cutting blade in a slightly inclined position in the direction of the cutting movement.
Cutting the hedge sides E
--If the hedge sides are to be cut, start at the bottom part of the hedge and cut upwards.
--For optimum cutting results, maintain the cutting blade in a slightly inclined position in the direction of the cutting movement.
--Cut the sides of the hedge so that the hedge narrows towards the top. This ensures uniform hedge growth.
72V LI-ION POWER 55H | 


 | 17
| 17

EN |
Servicing |
|
|
Cutting tips
--Please remember the breeding season of birds! -- The ideal shape for hedge cutting is trapezoidal,
which allows enough light and air to reach all parts of the hedge F.
--To promote thick growth in young hedges new shoots should only be shortened by half.
--If the hedge has already reached your desired height, now shoots can be completely removed.
--To obtain a uniform hedge height, you can tension a guide line at the desired height and then cut along this line.
Cutting times
Deciduous hedges May/June and October (perform pruning by about 1/3 of the total height in winter)
Evergreen hedges |
April and October |
Conifers |
April and October |
Switching the device off (Fig. B)
33The device switches off as soon as you release one of the two on/off switches B 1 or B 2.
Power pack removal (Fig. G)
ÎÎPress the power pack release button G 1. ÎÎRemove the power pack G 2.
Servicing
WARNING !
Risk of injuries or material damage.
¾¾Only clean or service the device if the motor and cutting tool are stationary.
¾¾Always remove the power pack prior to working on the device.
¾¾Repair and service work as well as the replacement of safety elements must be performed by a qualified expert or workshop.
Cleaning
ÎÎClean the hedge trimmer after every use, especially the ventilation slots, using a dry cloth or, in the event of heavy soiling, a brush.
ÎÎCarefully clean the cutting blade after each use.
ÎÎAfter use, spray the cutting blade with conditioning oil to ensure a long service life for the hedge trimmer. Where possible, use an environmentally friendly lubricant.
ÎÎDo not oil the hedge trimmer during use.
ÎÎTo oil the hedge trimmer, place it on its side and apply a thin oil film to the cutting blade.
ÎÎDuring extended periods of hedge cutting, interrupt your work frequently to oil the hedge trimmer cutting blade.
Attention!
Never spray the device with water or a pressure washer.
Transport and storage
WARNING !
Risk of injuries due to the cutting tool.
¾¾Before transport or storage, switch off the device and wait until the cutting tool comes to a standstill.
¾¾Remove the power pack before transport or storage.
Storage
ÎÎThoroughly clean your device after every season. ÎÎAlways store the device in a dry and safe location
that is inaccessible to children.
ÎÎStore the power pack and hedge trimmer separately.
ÎÎStore the power pack in a cool and dry location. Recommended storage temperature approx.
18 °C.
ÎÎKeep the hedge trimmer and especially its plastic components away from brake fluids, petrol, mineral oil containing products, penetrating oils etc. They contain chemical substances that can damage, attack or destroy the plastic components of the hedge trimmer.
ÎÎFertilizers and other garden chemicals contain substances that may have a highly corrosive effect on the metal parts of the hedge trimmer. Therefore do not store your hedge trimmer in the vicinity of these substances.
18 | 


 | 72V LI-ION POWER 55H
Troubleshooting |
EN |
|
|
Troubleshooting
WARNING !
Risk of injuries or material damage
¾¾In case of doubt always consult a specialist workshop.
¾¾Before any inspection or any work on the device, switch off the motor and remove the power pack.
Problem |
Possible cause |
Remedy |
The device switches off.
The power pack is too hot. |
Allow the power pack to cool. |
The power pack is discharged. |
Charge the power pack. |
The temperature of the device (electronics) is |
Allow the device to cool and if necessary, |
too high. |
clean the ventilation slots |
Overcurrent release |
If this occurs again take your device to a |
|
specialist workshop. |
|
The device will not |
The power pack is discharged. |
Charge the power pack. |
|
|
switch on. |
|
|
|
|
Overvoltage release |
|
If this occurs again take your device to a |
|
|
|
|
|
specialist workshop. |
|
|
Overcurrent release |
|
If this occurs again take your device to a |
|
|
|
|
specialist workshop. |
|
|
Power pack temperature too high or too low. |
Allow the power pack to cool down or heat |
|
|
|
|
|
up. |
|
|
The power pack is defective. |
Replace the power pack. |
|
|
The cutting blade |
The cutting blade is blunt. |
|
Take your mower to a specialist workshop. |
|
becomes hot. |
|
|
|
|
There is a lot of friction because of a lack of |
Oil the cutting blade. |
||
|
|
|||
|
|
lubrication. |
|
|
|
Uneven running, |
The cutting blade is damaged. |
Take your mower to a specialist workshop. |
|
|
severe vibration of |
The cutting blade fastening has come loose. |
Take your mower to a specialist workshop. |
|
|
the hedge trimmer. |
|||
|
|
|
|
|
Spare parts and accessories |
|
|
||
|
Order no.. |
Part code |
Part description |
|
196-651-650 |
POWER Base 72V |
72V charger |
|
|
|
196-652-000 |
POWER Base 72V Basic |
72V charger |
|
196-650-650 |
Li-High Energy 72V |
72V power pack |
|
|
Warranty
The warranty conditions of our local company or importer apply in all countries. Under the terms of the warranty we will repair faults on your device free of charge, insofar as material or manufacturing defects are the cause. Should you need to make a claim under warranty, please apply to the vendor of your machine or to the nearest branch.
CE Declaration of Conformity
Further details about the device are con tained on the separately enclosed CE Declaration of Conformity, which forms part of this instruction manual.
Environmentally-friendly disposal
Electrical tools, accessories and packaging must be routed into an environmentally compatible recycling chain.
Power packs/batteries:
Do not dispose of power packs/batteries in domestic waste, by burning or throwing
into water. Power packs/batteries must be collected, recycled or disposed of in an
environmentally friendly manner. For EU countries only:
Defective or used power packs/batteries must be recycled in accordance with 2013/56/EU.
Do not throw your power tool away with domestic waste! Take it to a disposal facility.
72V LI-ION POWER 55H | 


 | 19
| 19

FR |
Table des matières |
|
|
Table des matières |
|
||
Signification des symboles................................. |
|
20 |
|
Pour votre sécurité............................................. |
|
|
20 |
Consignes de sécurité........................................ |
|
21 |
|
Utilisation conforme............................................ |
|
|
23 |
Plaque signalétique............................................ |
|
|
23 |
Éléments de commande.................................... |
|
23 |
|
Dispositifs de protection..................................... |
|
23 |
|
Mise en service.................. |
....................... |
|
23 |
Fonctionnement................................................. |
|
|
24 |
Maintenance....................................................... |
|
|
25 |
Transport et stockage.................. |
.................. |
25 |
|
Dépannage......................................................... |
|
|
26 |
Garantie............................................................. |
|
|
26 |
Déclaration de conformité CE............................ |
|
26 |
|
Élimination conforme aux impératifs écologiques 26 |
|||
Signification des symboles
Avertissement !
Lisez la notice d'utilisation avant la mise en service !
Prudence !
Tenez toujours les tierces personnes à l’écart de la zone à risques.
Retirer la batterie avant de procéder au nettoyage ou à la maintenance !
Porter des lunettes de protection !
Portez des gants de protection !
N’exposez pas l’appareil aux intempéries !
Pour votre sécurité
Avant d'utiliser l'appareil pour la première fois, lisez attentivement la pré-
sente notice d’utilisation et observez les instructions qu’elle contient. Conservez la présente notice d'utilisation pour toute consultation ultérieure ou la remettre à un éventuel racheteur.
ÎÎAvant la première mise en service, lisez impérativement les consignes de sécurité !
En cas de non-respect de la notice d’utilisation et des consignes de sécurité, l’appareil risque de subir des dommages et l’utilisateur et les autres personnes s’exposent à des risques.
ÎÎToutes les personnes chargées de la mise en service, de l’utilisation et de la maintenance de l’appareil doivent disposer des qualifications requises.
Interdiction de procéder à des modifications et transformations arbitraires
Il est interdit de modifier l’appareil ou de fabriquer des appareils supplémentaires à partir de ce dernier. De telles modifications peuvent provoquer des dommages corporels et des dysfonctionnements. ÎÎLes réparations de l’appareil sont strictement
réservées aux personnes dûment mandatées et formées. Veuillez, à cette fin, toujours employer des pièces de rechange d'origine. Cela permet de préserver la sécurité de l’appareil.
Symboles d’information figurant dans la présente notice
Les repères et symboles figurant dans la présente notice vous aident à garantir une prise en main rapide et une utilisation en toute sécurité de l’appareil.
Remarque
Informations à propos de la méthode d’utilisation la plus efficace ou la plus pratique de l’appareil.
ÎÎÉtape de la procédure
Vous invite à réaliser une action.
33Résultat de la procédure
Vous trouverez ici le résultat d’une séquence d’étapes de la procédure.
[1]N° de repère
Les numéros de repère apparaissent dans le texte entre [crochets].
ARepère des illustrations
Les illustrations sont identifiées par des lettres qui apparaissent dans le texte.
1N° de l’étape de la procédure
La séquence définie des étapes de la procédure est identifiée par des numéros qui apparaissent dans le texte.
20 | 


 | 72V LI-ION POWER 55H
Consignes de sécurité |
FR |
|
|
Consignes de sécurité
Niveaux de danger des mentions d’avertissement
Les niveaux de danger suivants sont employés dans la présente notice d’utilisation pour attirer l’attention sur les situations potentiellement dangereuses :
DANGER !
La situation dangereuse décrite est imminente et provoque, lorsque les mesures ne sont pas observées, de graves blessures, voire la mort.
AVERTISSEMENT !
La situation dangereuse décrite peut survenir et provoque, lorsque les mesures ne sont pas observées, de graves blessures, voire la mort.
PRUDENCE !
La situation dangereuse décrite peut survenir et provoque, lorsque les mesures ne sont pas observées, des blessures légères ou mineures.
Attention !
Une situation potentiellement dangereuse peut survenir et provoque, à moins de l’éviter, des dommages matériels.
Structure des consignes de sécurité
DANGER !
Nature et source du danger !
ÂÂConséquences en cas de non-observation ¾¾Mesure à prendre afin d’éviter le danger
Protection de l’utilisateur et des personnes
¾¾Pour des raisons de sécurité, il est interdit aux enfants et aux autres personnes qui ne connaissent pas le contenu de la notice d’utilisation d’utiliser le taille-haie.. Observer
la réglementation locale relative à l’âge minimum requis de l’utilisateur.
¾¾Ne mettez pas le taille-haie en marche tant que des personnes (en particulier des enfants) ou des animaux se trouvent à proximité immédiate de ce dernier.. Veillez également à ce que les enfants ne jouent pas avec le taille-haie.
¾¾Interrompez l’utilisation de la machine dès que vous remarquez que des personnes (en particulier des enfants) ou des animaux se trouvent à proximité..
¾¾Cet appareil ne doit pas être utilisé par des enfants, ni par des personnes dont les facultés physiques, sensorielles et intellectuelles sont limitées ou ne disposant pas de suffisamment d’expérience ou des connaissances requises.. Cet appareil ne doit également pas être utilisé par les personnes qui ne sont pas familiarisées avec la présente notice d’utilisation.. Les prescriptions locales peuvent fixer une limite d’âge pour les utilisateurs.
¾¾N'allumez le moteur que lorsque vos pieds et mains se trouvent à une distance sûre du dispositif de coupe..
¾¾Débranchez toujours la machine de l’alimentation électrique lorsque celle-ci est laissée sans surveillance ou que vous remédiez à un blocage..
¾¾Lors des travaux effectués avec ou sur le taille-haie, portez toujours des chaussures robustes et un pantalon ainsi que tous les équipements de protection individuelle appropriés (lunettes de protection, casque de protection acoustique, gants de travail, etc..)..
Le port d'équipements de protection individuelle permet de réduire le risque de blessures. Évitez de porter des vêtements amples susceptibles d'être happés par l’outil de coupe.
Avant l’utilisation
¾¾Avant le début des travaux, familiarisez-vous avec le taille-haie, ses fonctions ainsi que ses éléments de commande..
¾¾N’utilisez pas le taille-haie lorsque ses interrupteurs sont défectueux et qu’il n’est plus possible de l’allumer ou de l’éteindre..
Demandez à un technicien qualifié ou à un atelier spécialisé de réparer l’interrupteur.
¾¾N’employez jamais un appareil avec des dispositifs de protection ou des capots endommagés ou manquants.. Demandez à un technicien qualifié ou à un atelier spécialisé de les réparer ou de les remplacer le cas échéant.
¾¾Avant d’effectuer des réglages sur l’appareil ou de le nettoyer, éteignez l’appareil et retirez l'accumulateur..
¾¾Veuillez lire et respecter la notice d'utilisation de l'accumulateur et de son chargeur..
72V LI-ION POWER 55H | 


 | 21
| 21

FR |
Consignes de sécurité |
|
|
Consignes de sécurité
Durant l’utilisation
¾¾N'approchez aucune partie du corps de la lame.. N'essayez pas de débarrasser la lame de végétaux coupés, ni de retenir les végétaux à couper quand la lame marche.. Éteindre impérativement l'appareil avant de retirer
les végétaux coupés.. Un moment d’inattention pendant l'utilisation du taille-haie peut entraîner de graves blessures.
¾¾Portez le taille-haie en le saisissant au niveau de la poignée et lorsque la lame est arrêtée.. Toujours recouvrir la lame de l'étui de protection avant de transporter ou de ranger le taille-haie.. Une utilisation soignée de l'appareil réduit les risques de blessures susceptibles d'être occasionnées par la lame.
¾¾Tenez l’outil électrique uniquement au niveau des surfaces de préhension isolantes, étant donné que la lame peut malencontreusement toucher des conducteurs dissimulés.. Si la lame entre en contact avec un conducteur électrique sous tension, celle-ci peut se propager à des parties métalliques de l’outil et provoquer un choc électrique.
¾¾Ne travaillez pas avec l’appareil dans les atmosphères explosives qui contiennent des liquides, gaz ou poussières inflammables. Le taille-haie peut produire des étincelles qui risqueraient d’enflammer la poussière ou les vapeurs.
¾¾En cas d’interruption du travail, ne laissez jamais le taille-haie sans surveillance et ran- gez-le dans un lieu sûr..
¾¾Avant de commencer le travail, vérifiez qu'aucun objet ne se dissimule dans la haie, fils de fer par ex..
¾¾Tenez le taille-haie fermement des deux mains
¾¾Lors de la mise en marche, positionnez le taille-haie parallèlement à la haie afin d’écarter tout risque de blessure..
¾¾Pendant le travail, observez également une distance de sécurité par rapport à l'outil de coupe..
¾¾Portez des lunettes de protection et un casque de protection acoustique appropriés !
¾¾Évitez toute posture anormale du corps..
Veillez à une bonne stabilité et à ne pas perdre l’équilibre.. Ne courez pas, mais marchez à une allure modérée vers l’avant. Cela vous permettra de mieux contrôler l’appareil dans les situations inattendues.
¾¾Faites preuve d’une grande prudence lorsque vous reculez.. Risque de trébuchement !
¾¾Pendant le transport de l’appareil depuis / vers les différents lieux de travail, coupez le moteur..
¾¾Ne contournez et ne manipulez jamais les dispositifs de commutation installés sur l’appareil (par ex.. en plaquant l'interrupteur contre la poignée à l'aide de fil ou de ruban adhésif).
Après l’utilisation
¾¾Éteignez l’appareil, retirez l'accumulateur et assurez-vous que l’appareil n’est pas endommagé.. Attention, danger ! L’outil de coupe continue de fonctionner par inertie !
¾¾Si vous réalisez des travaux de maintenance et de nettoyage sur l’appareil, éteignez ce dernier et retirez l'accumulateur..
¾¾Attendez toujours que l’outil de coupe se soit entièrement immobilisé..
¾¾Ne retirer les dispositifs de protection qu'après avoir arrêté le moteur et retiré l'accumulateur..
¾¾Veillez à ce que les fentes d’aération ne soient pas obstruées par des impuretés..
¾¾Ne nettoyez pas le taille-haie à l'eau..
¾¾Rangez l’appareil dans un endroit sûr, hors de portée des enfants..
¾¾Ne réalisez aucune réparation vous-même sur l’appareil, confiez les travaux de réparation exclusivement à un technicien qualifié ou à un atelier spécialisé..
Consignes de sécurité générales
¾¾Les pièces de rechange doivent satisfaire aux exigences définies par le fabricant.
N'employez par conséquent que des pièces de rechange d'origine WOLF-Garten ou des pièces dûment agréées par le fabricant. En cas de remplacement, observez toujours les instructions de montage jointes et retirez préalablement l'accumulateur.
¾¾Ne confiez les réparations qu'à un technicien qualifié ou à un atelier spécialisé.
¾¾Ce taille-haie a uniquement été conçu en vue de l’entretien des haies par les particuliers.. En raison des dangers corporels auxquels l’utilisateur et les autres personnes sont exposés, il est interdit d’utiliser l’appareil à des fins autres que celles prévues.
¾¾N'utilisez le taille-haie qu'à la lumière du jour ou sous éclairage artificiel suffisant. Veillez à ce que la zone de travail soit propre et bien éclairée.
¾¾N'utilisez le taille-haie que par temps sec..
Protégez-le de la pluie et de l’humidité. La pénétration d’eau à l’intérieur du taille-haie accroît le risque d’électrocution.
22 | 


 | 72V LI-ION POWER 55H
Utilisation conforme |
FR |
|
|
Utilisation conforme |
|
|
Éléments de commande |
|
Le taille-haie se prête exclusivement à la taille des |
|
Éléments de commande (fig. H) |
||
haies et des arbustes dont l'épaisseur des branches ne |
1 |
Poignée |
||
dépasse pas les 26 mm. |
||||
Toute autre utilisation est considérée comme étant |
2 |
Interrupteur de mise en marche / |
||
3 |
à l'arrêt de la poignée |
|||
non conforme. |
Pièce de poignée |
|||
L’utilisateur assume l’entière responsabilité en cas de |
4 |
Interrupteur de mise en marche / |
||
dommages résultant d’une utilisation non conforme. |
5 |
à l'arrêt de la poignée en forme d'étrier |
||
Utilisation non conforme |
Poignée en forme d'étrier |
|||
6 |
Cache protecteur |
|||
Ce taille-haie ne doit pas être utilisé dans les |
7 |
Lame de coupe |
||
8 |
Bouton de déverrouillage de l'accumulateur |
|||
espaces publics, les parcs, les établissements spor- |
9 |
Logement de l'accumulateur |
||
tifs, sur la voie publique ainsi que dans les secteurs |
10 |
Réglage de l'angle d'inclinaison |
||
agricole et sylvicole. |
11 |
Unité d'entraînement / de transmission |
||
|
12 |
Étui de protection |
||
|
13 |
Butée de protection anti-chocs |
||
Plaque signalétique |
||||
|
|
|
||
Emplacement
La plaque signalétique se trouve sur le boîtier du taille-haie.
Remarque
Le marquage a valeur de document officiel et il est interdit de le modifier ou de le rendre illisible.
Structure |
Dispositifs de protection
Dispositifs de protection (fig. H)
Cache protecteur H 6
Le cache protecteur transparent protège non seulement vos mains, mais vous permet également de garder un œil sur la zone de coupe.
Butée de protection anti-chocs H 13
La barre de guidage en saillie vous protège des chocs pouvant s'avérer désagréables contre certains objets fixes (paroi, sol etc.), par ex. impulsions de retour de choc de la lame.
Circuit de sécurité bi-manuel H 2 H 4
La mise en marche et la commande du taille-haie s'effectuent avec les deux mains. Une main actionne l'interrupteur de mise en marche / à l'arrêt situé sur la poignée tandis que l'autre actionne celui situé sur la poignée en forme d'étrier. La lame de coupe s'immobilise immédiatement lorsque vous retirez la main de l'un de ces éléments de commutation.
Mise en service
1Année de fabrication
2Puissance acoustique garantie
3Marquage CE
4Fabricant
5Numéro de série
6Numéro du modèle
7Nom du modèle
8Classe/type de protection
9Mention relative à la mise au rebut 10 Tension nominale, type de courant 11 Poids
12 Vitesse du moteur en min-1
13 Puissance
Documentations complémentaires
Ne mettez l'appareil en service qu'à condition de disposer des notices d’utilisation fournies du
chargeur POWER Base 72V / POWER Base 72V Basic et de l’accumulateur Li High Energy 72V, de les
avoir comprises et d'avoir observé leur contenu..
72V LI-ION POWER 55H | 


 | 23
| 23
FR |
Fonctionnement |
|
|
Charge de l’accumulateur
AVERTISSEMENT !
Risque de blessures ou de dommages matériels
¾¾Ne charger l’accumulateur qu’avec le chargeur POWER Base 72V / POWER Base 72V Basic.
Attention !
L'accumulateur est livré partiellement chargé. Avant la première utilisation, chargez entièrement l’accumulateur avec le chargeur
POWER Base 72V / POWER Base 72V Basic afin de garantir la puissance maximale de l’accumulateur.
ÎÎChargez l’accumulateur conformément aux instructions figurant dans la documentation complémentaire.
Horaires de travail autorisés
33Veuillez observer les réglementations locales. ÎÎRenseignez-vous auprès de la mairie pour
connaître les horaires de travail autorisés.
Fonctionnement
Insertion de l'accumulateur (fig. A)
AVERTISSEMENT !
Mauvaise manipulation de l'accumulateur et du chargeur
ÂÂRisque de blessures et de dommages matériels
¾¾Veuillez lire et respecter la notice d'utilisation de l'accumulateur et du chargeur.
L’enclenchement à 2 niveaux permet de sélectionner le mode de travail ou le mode de transport de l’accumulateur.
Niveau 1 A 1
33L’accumulateur se trouve en mode de transport.
•Les contacts électriques sont déconnectés et empêchent ainsi une autodécharge accidentelle de l’accumulateur en cas de stockage.
Niveau 2 A 2
33L’accumulateur se trouve en mode de travail.
•Les contacts électriques sont connectés et l’appareil est opérationnel.
Mise en marche de l'appareil (fig. B)
ÎÎD'une main, maintenez l'interrupteur de mise en marche / à l'arrêt qui se trouve sur la poignée B 1.
ÎÎDe l'autre main, appuyez simultanément sur l'interrupteur de mise en marche / à l'arrêt qui se trouve sur la poignée en forme d'étrier B 2.
33L'appareil est en service.
Réglage de l'angle d'inclinaison (fig.. C)
AVERTISSEMENT !
Attention au risque de blessures pouvant être occasionnées par l'outil de coupe.
¾¾Éteignez l'appareil et attendez que l’outil de coupe se soit entièrement immobilisé avant de modifier les réglages de l’appareil.
Le taille-haie est inclinable selon 5 positions. Vous avez la possibilité de faire basculer l'unité d'entraînement / de transmission sur laquelle se trouve la lame de coupe, de 45° ou 90° vers la droite ou la gauche.
Vous pourrez ainsi facilement atteindre les zones problématiques et difficiles d’accès de votre jardin.
ÎÎAppuyez sur le bouton de blocage C 1. 33L'unité d'entraînement / de transmission se dé-
senclenche.
ÎÎRéglez l’inclinaison en tournant l'unité d'entraînement / de transmission vers la droite ou vers la gauche.
33L'unité d'entraînement / de transmission s'enclenche dans le cran suivant C 2.
ÎÎPour tourner davantage l'unité d'entraînement / de transmission, appuyez de nouveau sur le bouton de blocage C 1.
Débroussaillage (fig. D E F)
Taille de la partie supérieure des haies D
--Pour débroussailler la partie supérieure des haies, effectuez des mouvements flottants et oscillants vers la droite et la gauche avec le taille-haie.
--Pour des résultats de coupe optimaux, maintenez la lame de coupe en position légèrement inclinée en direction du mouvement de coupe.
Taille des parties latérales des haies E
--Si vous souhaitez tailler les parties latérales de vos haies, commencez par le bas puis remontez.
--Pour des résultats de coupe optimaux, maintenez la lame de coupe en position légèrement inclinée en direction du mouvement de coupe.
--Taillez les côtés de vos haies de bas en haut en veillant à rétrécir davantage les branches du haut afin de garantir une croissance régulière de vos haies.
24 | 


 | 72V LI-ION POWER 55H
Maintenance |
|
|
|
|
FR |
|
|
|
|
|
|
Tuyaux et astuces pour la coupe |
|
Nettoyage |
|||
--Veuillez tenir compte des périodes de reproduc- |
|
ÎÎAprès chaque utilisation, nettoyer le taille-haie et |
|||
tion des oiseaux ! |
|
|
|
||
-- La forme idéale pour la taille de vos haies est |
|
notamment des fentes d'aération avec un chiffon |
|||
la forme trapézoïdale. En effet, celle-ci permet à |
|
sec ou avec une brosse en cas d'encrassement |
|||
la lumière d'entrer suffisamment dans toutes les |
|
important. |
|||
zones de votre haie F. |
|
ÎÎAprès chaque utilisation, nettoyez la lame de coupe |
|||
--Afin de favoriser la croissance dense des haies |
|
avec précaution. |
|||
les plus jeunes, il convient de raccourcir les nou- |
|
ÎÎAprès l'utilisation, pulvérisez la lame de coupe |
|||
velles pousses de moitié uniquement. |
|
d'huile d'entretien afin de garantir une longue durée |
|||
--Si la haie a déjà atteint la hauteur souhaitée, |
|
de vie du taille-haie. Pour ce faire, utilisez des lubri- |
|||
vous pouvez supprimer entièrement les nouvelles |
|
fiants respectueux de l'environnement. |
|||
pousses. |
|
|
|
ÎÎNe graissez pas le taille-haie lorsqu'il est en service. |
|
--Afin d'obtenir une haie de hauteur constante, vous |
|
ÎÎPosez le taille-haie sur le côté et appliquez un léger |
|||
avez la possibilité de tendre un fil à la hauteur |
|
film d'huile sur la lame de coupe. |
|||
souhaitée et de couper le long de cette ligne. |
|
ÎÎLors de travaux prolongés, marquez des temps de |
|||
|
|
|
|
pause et n'oubliez pas de graisser la lame de coupe |
|
Périodes de coupe |
|
de votre taille-haie. |
|||
Haies d'arbustes |
Mai/juin et octobre |
|
Attention ! |
||
|
(tailler env. 1/3 de la hauteur |
|
N’aspergez jamais l’appareil avec de l’eau ou un |
||
|
totale en hiver) |
|
|||
|
|
|
|
nettoyeur haute pression. |
|
Haies de conifères |
Avril et octobre |
||||
|
|
|
|
|
|
Conifères |
Avril et octobre |
|
|
|
|
Mise à l'arrêt de l'appareil (fig. B)
33L'appareil s'arrête dès que vous relâchez l'un des deux interrupteurs de mise en marche / à l'ar-
rêt B 1 ou B 2.
Retrait de l'accumulateur (fig. G)
ÎÎAppuyez sur le bouton de déverrouillage de l'accumulateur G 1.
ÎÎRetirez l'accumulateur G 2.
Maintenance
AVERTISSEMENT !
Risque de blessures ou de dommages matériels.
¾¾Durant les travaux de maintenance et de nettoyage sur l’appareil, le moteur doit toujours être coupé et l’outil de coupe complètement immobilisé.
¾¾Retirer l'accumulateur avant d'effectuer des travaux sur l'appareil.
¾¾Confier les travaux de réparation et de maintenance ainsi que le remplacement des éléments de sécurité exclusivement
à un technicien qualifié ou à un atelier spécialisé.
Transport et stockage
AVERTISSEMENT !
Attention au risque de blessures pouvant être occasionnées par l'outil de coupe.
¾¾Avant chaque transport et chaque stockage, éteindre l’appareil et attendre que l’outil de coupe se soit entièrement immobilisé.
¾¾Retirez l'accumulateur avant de ranger ou de transporter l'appareil.
Rangement
ÎÎLa saison une fois terminée, nettoyez minutieusement votre appareil.
ÎÎRangez toujours l'appareil dans un lieu sec et sûr inaccessible aux enfants.
ÎÎRetirez l'accumulateur du taille-haie avant de ranger ce dernier.
ÎÎRangez l'accumulateur dans un endroit frais et sec. Température de stockage recommandée : env.
18°C.
ÎÎTenez le taille-haie et notamment ses composants en plastique à l'écart des liquides inflammables, de l'essence, des produits contenant du pétrole, des huiles pénétrantes etc. Ceux-ci contiennent des substances chimiques susceptibles d'endommager, d'attaquer ou de détériorer les composants en plastique du taille-haie.
ÎÎLes engrais et autres produits phytosanitaires contiennent des substances susceptibles d'exercer une forte action corrosive sur les pièces métalliques du taille-haie. Veuillez par conséquent ne pas stocker le taille-haie à proximité de ces substances.
72V LI-ION POWER 55H | 


 | 25
| 25

FR |
Dépannage |
|
|
Dépannage
AVERTISSEMENT !
Risque de blessures ou de dommages matériels
¾¾En cas de doute, n'hésitez pas à contacter un atelier spécialisé.
¾¾Avant chaque contrôle ou avant d'effectuer des travaux sur l'appareil, éteignez le moteur et retirez l'accumulateur.
Problème |
Cause possible |
Solution |
L'appareil s'éteint. |
L'accumulateur est trop chaud. |
Laissez refroidir l'accumulateur. |
|
L'accumulateur est déchargé. |
Chargez l'accumulateur. |
|
La température de l'appareil (électronique) est |
Laissez refroidir l'appareil et nettoyez |
|
trop élevée. |
éventuellement les fentes d'aération. |
|
Déclenchement par surintensité de courant |
Si l’erreur se reproduit, adressez-vous à |
|
|
un atelier spécialisé. |
Impossible de |
L'accumulateur est déchargé. |
Chargez l'accumulateur. |
mettre l'appareil en |
Déclenchement à maximum de tension |
Si l’erreur se reproduit, adressez-vous à |
marche. |
|
un atelier spécialisé. |
|
|
|
|
Déclenchement par surintensité de courant |
Si l’erreur se reproduit, adressez-vous à |
|
|
un atelier spécialisé. |
|
Température de l’accumulateur trop élevée ou |
Laissez refroidir ou chauffer l’accumula- |
|
trop faible. |
teur. |
|
L'accumulateur est défectueux. |
Remplacez l'accumulateur. |
La lame chauffe. |
La lame est émoussée. |
Adressez-vous à un atelier spécialisé. |
|
|
|
|
Frottement important dû à un graissage insuffi- |
Graissez la lame. |
|
sant. |
|
Fonctionnement bruyant, fortes vibrations du taillehaie.
La lame est endommagée. |
Adressez-vous à un atelier spécialisé. |
La fixation de la lame s'est défaite. |
Adressez-vous à un atelier spécialisé. |
Pièces de rechange et accessoires
Référence |
Désignation de l’article |
Description de l’article |
196-651-650 |
POWER Base 72V |
Chargeur 72V |
196-652-000 |
POWER Base 72V Basic |
Chargeur 72V |
196-650-650 |
Li-High Energy 72V |
Accumulateur 72V |
Garantie
Les dispositions de la garantie publiées par notre société ou notre importateur dans le pays respectif doivent être observées. À condition que la panne résulte d’un vice matériel ou d'un défaut de fabrication, votre appareil sera réparé à titre gracieux durant la période couverte par la garantie légale. Pour recourir à la garantie, veuillez vous adresser à votre revendeur ou à la succursale la plus proche.
Déclaration de conformité CE
La déclaration de conformité CE jointe séparément contient des informations complémentaires à propos de l’appareil. La déclaration fait partie intégrante de la notice d’utilisation.
Élimination conforme aux impératifs écologiques
Les outils électriques, accessoires et emballages doivent faire l’objet d’un recyclage respectueux de l’environnement.
Accumulateurs/piles :
Ne jetez pas les accumulateurs/piles aux ordures ménagères, dans le feu ou dans
l'eau. Les accumulateurs/piles doivent faire l'objet d'une collecte, être recyclés et
éliminés de manière écologique. Uniquement pour les pays de l’UE :
Conformément à la directive 2013/56/UE, les accumulateurs/piles défectueux ou usagés doivent être recyclés.
Ne jetez pas l’outil électrique aux ordures ménagères ! Remettez-le à un point de collecte approprié.
26 | 


 | 72V LI-ION POWER 55H

Indice |
|
|
IT |
|
|
|
|
|
|
|
|
|
|
|
Indice |
Significato dei simboli |
|||
Significato dei simboli......................................... |
27 |
Per la vostra sicurezza....................................... |
27 |
Avvertenze sulla sicurezza................................. |
28 |
Utilizzo a norma................................................. |
30 |
Targhetta............................................................ |
30 |
Elementi di comando.......................................... |
30 |
Dispositivi di protezione..................................... |
30 |
Messa in funzione . |
30 |
Funzionamento.................................................. |
31 |
Manutenzione..................................................... |
32 |
Trasporto e rimessaggio................................. |
32 |
Risoluzione delle anomalie................................ |
33 |
Garanzia............................................................. |
33 |
Dichiarazione di conformità CE.......................... |
33 |
Smaltimento ecocompatibile.............................. |
33 |
Avvertenza!
Prima della messa in funzione leggere le istruzioni per l'uso!
Attenzione!
Non far avvicinare nessuno alla zona di pericolo.
Rimuovere la batteria prima della pulizia o della manutenzione!
Indossare protezioni per gli occhi!
Indossare guanti protettivi!
Non esporre l'apparecchio alla pioggia!
Per la vostra sicurezza
Prima del primo utilizzo dell'apparecchio leggere attentamente le presenti istru-
zioni per l'uso e attenersi a quanto qui riportato. Conservare queste istruzioni per l'uso in modo da poterle consultare di nuovo in futuro o cederle al nuovo proprie tario in caso di vendita dell'apparecchio.
ÎÎPrima della prima messa in funzione leggere assolutamente le avvertenze sulla sicurezza! La mancata osservanza delle istruzioni per l'uso e delle avvertenze sulla sicurezza può provocare danni all'apparecchio e mettere in pericolo l'utente e altre persone.
ÎÎTutte le persone che si occupano della messa in funzione, dell'utilizzo e della manutenzione dell'apparecchio devono essere opportunamente qualificate.
Divieto di apportare modifiche e trasformazioni arbitrarie
È vietato apportare modifiche all'apparecchio o ricavare da esso apparecchi accessori. Tali modifiche possono provocare lesioni personali e determinare malfunzionamenti.
ÎÎEventuali riparazioni all'apparecchio possono essere effettuate solo da persone appositamente incaricate e addestrate. A tale scopo utilizzare sempre ricambi originali. In questo modo si è certi di preservare la sicurezza dell'apparecchio.
Simboli associati alle informazioni di queste istruzioni per l'uso
I segnali e i simboli presenti in queste istruzioni per l'uso servono a consentire un utilizzo rapido e sicuro delle istruzioni per l'uso e dell'apparecchio.
Nota
Informazioni per rendere l’utilizzo dell’appa recchio il più possibile efficace e pratico.
ÎÎOperazione
Indica un'operazione da svolgere.
33Risultato dell'operazione
Indica il risultato di una sequenza di operazioni.
[1]Numero di posizione
All'interno del testo i numeri di posizione sono inseriti tra parentesi quadre [ ].
A Identificativo figura
All'interno del testo le figure sono identificate e numerate con delle lettere.
1Numero operazione
All'interno del testo la sequenza definita delle operazioni è opportunamente numerata.
72V LI-ION POWER 55H | 


 | 27
| 27

IT |
Avvertenze sulla sicurezza |
|
|
Avvertenze sulla sicurezza
Livelli di pericolo delle avvertenze
Nelle presenti istruzioni per l'uso, per segnalare le potenziali situazioni pericolose vengono utilizzati i seguenti livelli di pericolo:
PERICOLO!
Situazione di pericolo imminente che, se non evitata, provoca gravi lesioni, potenzialmente mortali.
AVVERTENZA!
Situazione potenzialmente pericolosa che, se non evitata, provoca gravi lesioni, potenzialmente mortali.
ATTENZIONE!
Situazione potenzialmente pericolosa che, se non evitata, provoca lesioni di minore o modesta entità.
Avviso!
Situazione potenzialmente negativa che, se non evitata, provoca danni materiali.
Struttura delle avvertenze sulla sicurezza
PERICOLO!
Tipo e origine del pericolo!
ÂÂConseguenze della mancata osservanza
¾¾Cosa fare per prevenire il pericolo
Protezione personale e di terzi
¾¾Per motivi di sicurezza non devono utilizzare il tagliasiepi i bambini e coloro che non hanno letto le istruzioni per l'uso.. Eventuali disposizioni locali potrebbero prescrivere una diversa età minima per l'utente dell'apparecchio.
¾¾Non mettere in funzione il tagliasiepi se nelle sue vicinanze sono presenti altre persone (in particolare bambini) o animali.. Assicurarsi inoltre che i bambini non giochino con il tagliasiepi.
¾¾Interrompere l'uso della macchina, quando si notano persone (in particolare bambini) oppure animali domestici nelle vicinanze..
¾¾Questo apparecchio non deve essere utilizzato da bambini e da persone con limitate capacità fisiche, sensoriali o mentali o con esperienza e conoscenze insufficienti. Inoltre, l'apparecchio non deve essere utilizzato da persone che non abbiano familiarità con le presenti istruzioni per l'uso.. Le normative locali possono prevedere un'età limite per gli utenti.
¾¾Accendere il motore solo quando i propri piedi e le proprie mani sono a una distanza di sicurezza dal dispositivo di taglio..
¾¾Scollegare sempre la macchina dall'alimentazione elettrica se si lascia la macchina incustodita e durante la rimozione di un inceppamento..
¾¾Quando si lavora con il tagliasiepi e si eseguono interventi su di esso, indossare sempre scarpe robuste e pantaloni lunghi, nonché gli altri necessari dispositivi di protezione individuale (occhiali di protezione, cuffie insonorizzanti, guanti da lavoro, ecc..).. Indossando i dispositivi di protezione individuale si riduce il rischio di lesioni. Evitare di indossare indumenti larghi ecc. che possono rimanere intrappolati nell'utensile di taglio.
Prima dell'uso
¾¾Prima di iniziare a lavorare, cercare di familiarizzare con il tagliasiepi, le sue funzioni e i suoi elementi di comando..
¾¾Non utilizzare il tagliasiepi se l'interruttore è difettoso e non si riesce più ad accenderlo o spegnerlo.. Farlo riparare da un tecnico qualificato o un'officina specializzata.
¾¾Non utilizzare mai l'apparecchio se i dispositivi di protezione o le coperture sono danneggiati o assenti.. Farli riparare o se necessario sostituire da un tecnico qualificato o un'officina specializzata.
¾¾Prima di cambiare le regolazioni dell'apparecchio o di pulirlo, spegnere l'apparecchio e rimuovere la batteria..
¾¾Leggere e rispettare le istruzioni per l'uso della batteria e del relativo caricabatterie..
28 | 


 | 72V LI-ION POWER 55H

Avvertenze sulla sicurezza |
IT |
|
|
Avvertenze sulla sicurezza
Durante l'uso
¾¾Tenere tutte le parti del corpo lontane dalla lama.. Non cercare di rimuovere il materiale tagliato o di tenere fermo il materiale da tagliare mentre la lama è in funzione.. Rimuovere il materiale tagliato inceppato soltanto quando l’apparecchio è spento.. Un momento di disattenzione durante l’uso del tagliasiepi può causare lesioni gravi.
¾¾Afferrare il tagliasiepi tenendolo dall’impugnatura quando la lama è ferma.. Durante il trasporto oppure il magazzinaggio del
tagliasiepi applicare sempre la copertura di protezione.. La cura nell’utilizzo dell’apparecchio riduce il pericolo di lesioni causate dalla lama.
¾¾Afferrare l’elettroutensile soltanto nei punti di presa isolati in quanto la lama può venire a contatto con linee di corrente nascoste.. Se la lama viene a contatto con una linea sotto tensione può mettere sotto tensione parti metalliche dell’apparecchio e causare una scossa elettrica.
¾¾Non utilizzare l'apparecchio in ambienti a rischio di esplosione, in cui sono presenti liquidi, gas o polveri infiammabili. Il tagliasiepi può produrre scintille che, a loro volta, possono far infiammare la polvere o i vapori.
¾¾Se si interrompe il lavoro, non lasciare mai il tagliasiepi incustodito e riporlo in un luogo sicuro..
¾¾Controllare la siepe alla ricerca di oggetti nascosti, come per es.. reti metalliche di recinzione..
¾¾Tenere saldamente il tagliasiepi con entrambe le mani
¾¾Tenere il tagliasiepi parallelo alla siepe al momento dell'accensione per via del pericolo di lesioni..
¾¾Tenersi a distanza di sicurezza dal tagliasiepi anche durante il lavoro..
¾¾Indossare adeguate protezioni per gli occhi e per l'udito!
¾¾Evitare di tenere una postura innaturale.. Cercare di puntare bene i piedi a terra e di non perdere mai l’equilibrio.. Non correre, ma procedere a passo tranquillo in avanti. In questo modo si riuscirà a controllare meglio l'apparecchio nel caso in cui si dovessero presentare situazioni inaspettate.
¾¾Prestare particolare attenzione quando si procede all'indietro.. Pericolo di inciampare!
¾¾Spegnere il motore durante il trasporto da/ verso i singoli punti di lavoro..
¾¾I dispositivi di commutazione installati sull'apparecchio non devono essere mai bypassati o manipolati (ad es.. legando l'interruttore all'impugnatura)..
Al termine dell'uso
¾¾Spegnere l'apparecchio, rimuovere la batteria e controllare se l'apparecchio è danneggiato.. Attenzione, pericolo! L'utensile di taglio continua a girare!
¾¾Nel caso si debbano effettuare interventi di pulizia e manutenzione sull'apparecchio, spegnere l'apparecchio e rimuovere la batteria..
¾¾Attendere sempre l'arresto dell'utensile di taglio..
¾¾La rimozione dei dispositivi di protezione può avvenire solo dopo aver spento il motore e rimosso la batteria..
¾¾Verificare che le fessure di aerazione non siano sporche..
¾¾Non pulire il tagliasiepi con acqua..
¾¾Tenere l'apparecchio in un luogo sicuro fuori dalla portata dei bambini..
¾¾Non provare a riparare da sé l'apparecchio, ma farlo fare da un tecnico qualificato o un'officina specializzata.
Avvertenze generali sulla sicurezza
¾¾Le parti di ricambio devono essere conformi ai requisiti prescritti dal costruttore.. Pertanto utilizzare solo parti di ricambio originali WOLF-Garten o parti di ricambio omologate dal costruttore. Quando si effettuano interventi di sostituzione, attenersi sempre alle indicazioni di montaggio fornite in dotazione e rimuovere la batteria prima di iniziare.
¾¾Far eseguire le riparazioni esclusivamente da un tecnico qualificato o un'officina specializzata..
¾¾Questo tagliasiepi è stato concepito per consentire di tagliare siepi in ambito privato..
Dato il rischio di lesioni a cui sono esposti l'utente o altre persone, l'apparecchio non deve essere utilizzato per altri scopi.
¾¾Utilizzare il tagliasiepi solo alla luce del giorno o in presenza di una buona illuminazione artificiale. Tenere l'area di lavoro pulita e ben illuminata.
¾¾Utilizzare il tagliasiepi solo in condizioni atmosferiche asciutte.. Non esporlo a pioggia o umidità. Eventuali infiltrazioni d'acqua all'interno del tagliasiepi incrementano il rischio di scossa elettrica.
72V LI-ION POWER 55H | 


 | 29
| 29
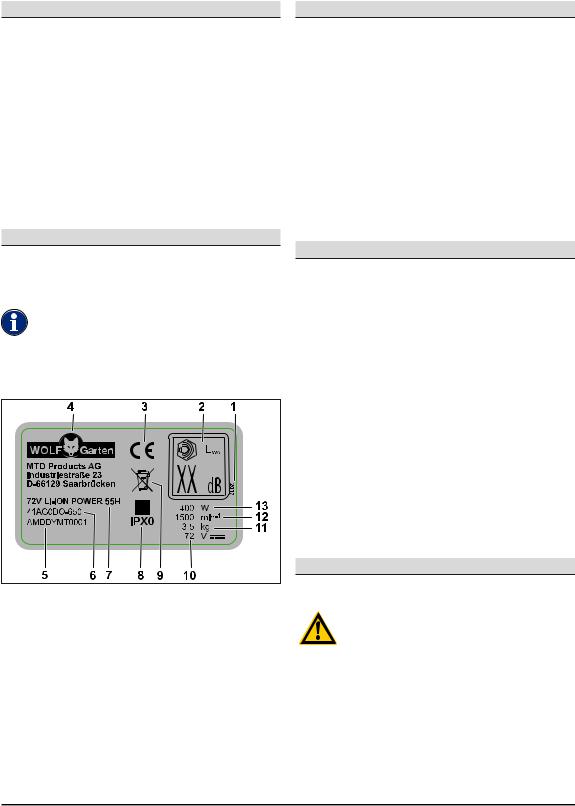
IT |
Utilizzo a norma |
|
|
Utilizzo a norma
Il tagliasiepi è destinato esclusivamente al taglio di siepi e cespugli con rami di spessore massimo di 26 mm.
Ogni altro uso diverso da questo è considerato non a norma.
L'utente sarà responsabile degli eventuali danni provocati da un utilizzo non a norma.
Utilizzo non conforme
Questo tagliasiepi non deve essere utilizzato in aree pubbliche, parchi, impianti sportivi, su strade ecc. nonché in ambito agricolo e forestale.
Targhetta
Posizione
La targhetta si trova sul corpo del tagliasiepi.
Nota
La marcatura ha valore di documento legale e non deve essere modificata o resa irriconoscibile.
Struttura |
1Anno di costruzione
2Livello di potenza sonora garantito
3Marcatura CE
4Costruttore
5Numero di serie
6Numero di modello
7Nome modello
8Classe/grado di protezione
9Avvertenza per lo smaltimento Tensione nominale, tipo di corrente Peso
Numero di giri del motore in giri/min
Potenza10111213
Elementi di comando
Elementi di comando (Fig. H)
1Impugnatura
2Interruttore di accensione/spegnimento sull'impugnatura
3Manico
4Interruttore di accensione/spegnimento sulla maniglia
5Maniglia
6Schermo protettivo
7Lama
8Sblocco batteria
9Vano batteria
Regolazione angolo di lavoro Unità motore/riduttore Copertura di protezione
Protezione di battuta10111213
Dispositivi di protezione
Dispositivi di protezione (Fig. H)
Schermo protettivo H 6
Lo schermo protettivo trasparente protegge le mani e consente un taglio perfetto con una buona visuale sull'area di taglio.
Protezione di battuta H 13
La sbarra di guida sovrapposta protegge l'utente in caso di urto contro un oggetto fisso (muro, terreno ecc.) per evitare colpi sgradevoli, ad es. i contraccolpi della lama.
Circuito di sicurezza a due mani H 2 H 4
Per l'accensione e l'uso della tagliasiepi è necessario usare entrambe le mani. Una mano controlla l'interruttore di accensione/spegnimento sull'impugnatura, mentre l'altra mano aziona l'interruttore di accensione/spegnimento sulla maniglia. Se si
rilascia uno dei due elementi di comando, la lama si ferma automaticamente.
Messa in funzione
Documentazione integrativa
Mettere in funzione l'apparecchio solo se si dispone delle istruzioni per l'uso in dotazione del ca-
ricabatterie POWER Base 72 V/ POWER Base 72 V Basic e della batteria Li High Energy 72 V e dopo averle comprese e rispettate..
30 | 


 | 72V LI-ION POWER 55H
 Loading...