


Gold GGX9868JQ0
Whirlpool Gold GGX9868JQ0, Gold GGX9868JT2, Gold GGX9868JT1, Gold GGX9868JQ1, Gold GGX9868JT0 Use & Care Manual
...
ELECTRONIC
ELECTRICANDGAS
DRYERS
For questions about features, operation/performance, parts
accessories or service call: 1-800-253-1301
InCanada, for assistance call: 1-800--461-5681 for installation
and service call: 1-800-807-6777
or visit our website at,.. www.whidpool.com or
www.whirlpool,com/canada
SECHEUSES
ELE,CTRIQUESETAGAZ
ELECTRONIQUES
e_d%_tre_ie_3_
Pour assistance, composer le 1-800-461-5681,
pour installationou se_'ice _e1-800-807.,6777
ou visitaz notre siteweb & www.whirlpool.comJcanada
3"ableof Contents_able des mati6res..........................................2
8314828A

TABLEOFCONTENTS
DRYER SAFETY .......................................................................... 3
PARTS AND FEATURES ............................................................ 5
CHECKING YOUR VENT ............................................................ 6
USING YOUR DRYER ................................................................. 7
Starting Your Dryer....................................................................... 7
Stopping, Pausing and Restarting ............................................... 7
Loading Clothes ........................................................................... 8
Drying, Cycle and Temperature Tips ........................................... 8
CYCLE DESCRIPTIONS ............................................................. 8
Automatic Cycle(s) ....................................................................... 8
Timed Cycles ................................................................................ 9
Favorite Cycle ............................................................................... 9
Air Only Setting .......................................................................... 10
Dryer Features .............................................................. .............. 10
Additional Features .................................................................... 10
CARING FOR YOUR DRYER ................................................... 11
Cleaning the Lint Screen ............................................................ 11
Cleaning the Dryer Interior ......................................................... 11
Removing Accumulated Lint from Inside the Dryer Cabinet ..... 11
Changing the Drum Light ........................................................... 12
TROUBLESHOOTING ............................................................... 12
ASSISTANCE OR SERVICE ..................................................... 14
In the U.S,A ................................................................................ 14
In Canada ................................................... ;............................... 14
WARRANTY .......................................................................... :... 15
TABLEDESMATIERES
SECURrFI_ DE LA SI_CHEUSE ................................................. 18
Pli=CES ET CARACTERISTIQUES ........................................... 20
VITRIFICATION DU CONDUIT D'_VACUATION ...................... 21
UTILISATION DE LA SI_CHEUSE ............................................. 22
Mise an marche de la sL:_cheuse................................................ 22
Arr_t, pause et remise en marche .............................................. 22
Chargement des v_tements ....................................................... 23
Conseils pour s_chage, programme et temperature ................. 23
DESCRIPTION DES PROGRAMMES ....................................... 23
Programme(s) automatique(s) .................................................... 24
Programmes minutes ................................................................. 24
Programme pr6f_r6 (Favorite Cycle) .......................................... 25
R_glage & I'air seulement (Air Only) ........................................... 25
Caract_dstiques de la s6cheuse ................................................ 25
Caract6dstiques suppl_mentaires ............................................. 26
ENTRETIEN DE LA SleCHEUSE ............................................... 27
Nettoyage du filtre &charpie ...................................................... 27
Nettoyage de rint_rieur de la s_cheuse ..................................... 27
Comment enlever la charpie accumul_e
de I'int_deur de la sdcheuse ...................................................... 27
Changement de I'ampouie d'6clairage du tambour .................. 28
DI_PANNAGE ............................................................................. 28
ASSISTANCE OU SERVICE ...................................................... 30
GARANTIE ................................................................................. 32

DRYERSAFETY
Your safety and the safety of others are very important,
We have provided many important safety messages in this manual and on your appliance. Always read and obey all
safety messages,
This is the safety alert symbol.
This symbol alerts you to potential hazards that can killor hurt you and others.
All safety messages willfollow the safety alert symbol and either the word "DANGER" or
"WARNING." These words mean:
You can be killed or seriously injured if you don't
immediately follow instructions,
You can be killed or seriously injured if you don't
follow instructions.
All safety messages will tell you what the potential hazard is, tell you how to reduce the chance of injury, and tell you
what can happen if the instructions are not followed.
I WARNING: For your safety, the information in this manual must be followed to minimize I
I
the risk of fire or explos,on, or to prevent property damage, personal injury, or death. I
- Do not Store or use gasoline or other flammable vapors and liquids in the vicinity of this
or any other appliance.
- WHAT TO DO IF YOU SMELL GAS:
• Do not try to light any appliance.
• Do not touch any electrical switch; do not use any phone in your building.
• Clear the room, building, or area of all occupants.
• Immediately call your gas supplier from a neighbor's phone. Follow the gas supplier's
instructions.
• If you cannot reach your gas supplier, call the fire department.
- Installation and service must be performed by a qualified installer, service agency, or
the gas supplier.
3
IMPORTANT SAFETY INSTRUCTIONS
WARNING; To reduce the risk of fire, electric shock, or injuryto persons when using the dryer, follow basic
precautions, including the following:
• Read all instructions before using the dryer.
• Do not place items exposed to cooking oils in
your dryer. Items contaminated with cooking oils
may contribute to a chemical reaction that could
cause a load to catch fire.
• Do not dry articles that have been previously
cleaned in, washed in, soaked in, or spotted with
gasoline, dry-cleaning solvents, other flammable,
or explosive substances as they give off vapors
that could ignite or explode.
• Do not allow children to play on or in the dryer.
Close supervision of children is necessary when
the dryer is used near children.
• Before the dryer is removed from service or dis-
carded, remove the door to the drying compart-
ment.
• Do not reach into the dryer if the drum is moving.
• Do not install or store the dryer where it will be
exposed to the weather.
• Do not tamper with controls.
• Do not repair or replace any part of the dryer or
attempt any servicing unless specifically recom-
mended in this Use and Care Guide or in published
user-repair instructions that you understand and have
the skills to carry out.
• Do not use fabric softeners or products to eliminate
static unless recommended by the manufacturer of
the fabric softener or product.
• Do not use heat to dry articles containing foam rubber
or similarly textured rubber-like materials.
• Clean lint screen before or after each load.
• Keep area around the exhaust opening and adjacent
surrounding areas free from the accumulation of lint,
dust, and dirt.
• The interior of the dryer and exhaust vent should be
cleaned periodically by qualified service personnel.
• See Installation Instructions for grounding require-
ments.
SAVE THESE INSTRUCTIONS
4
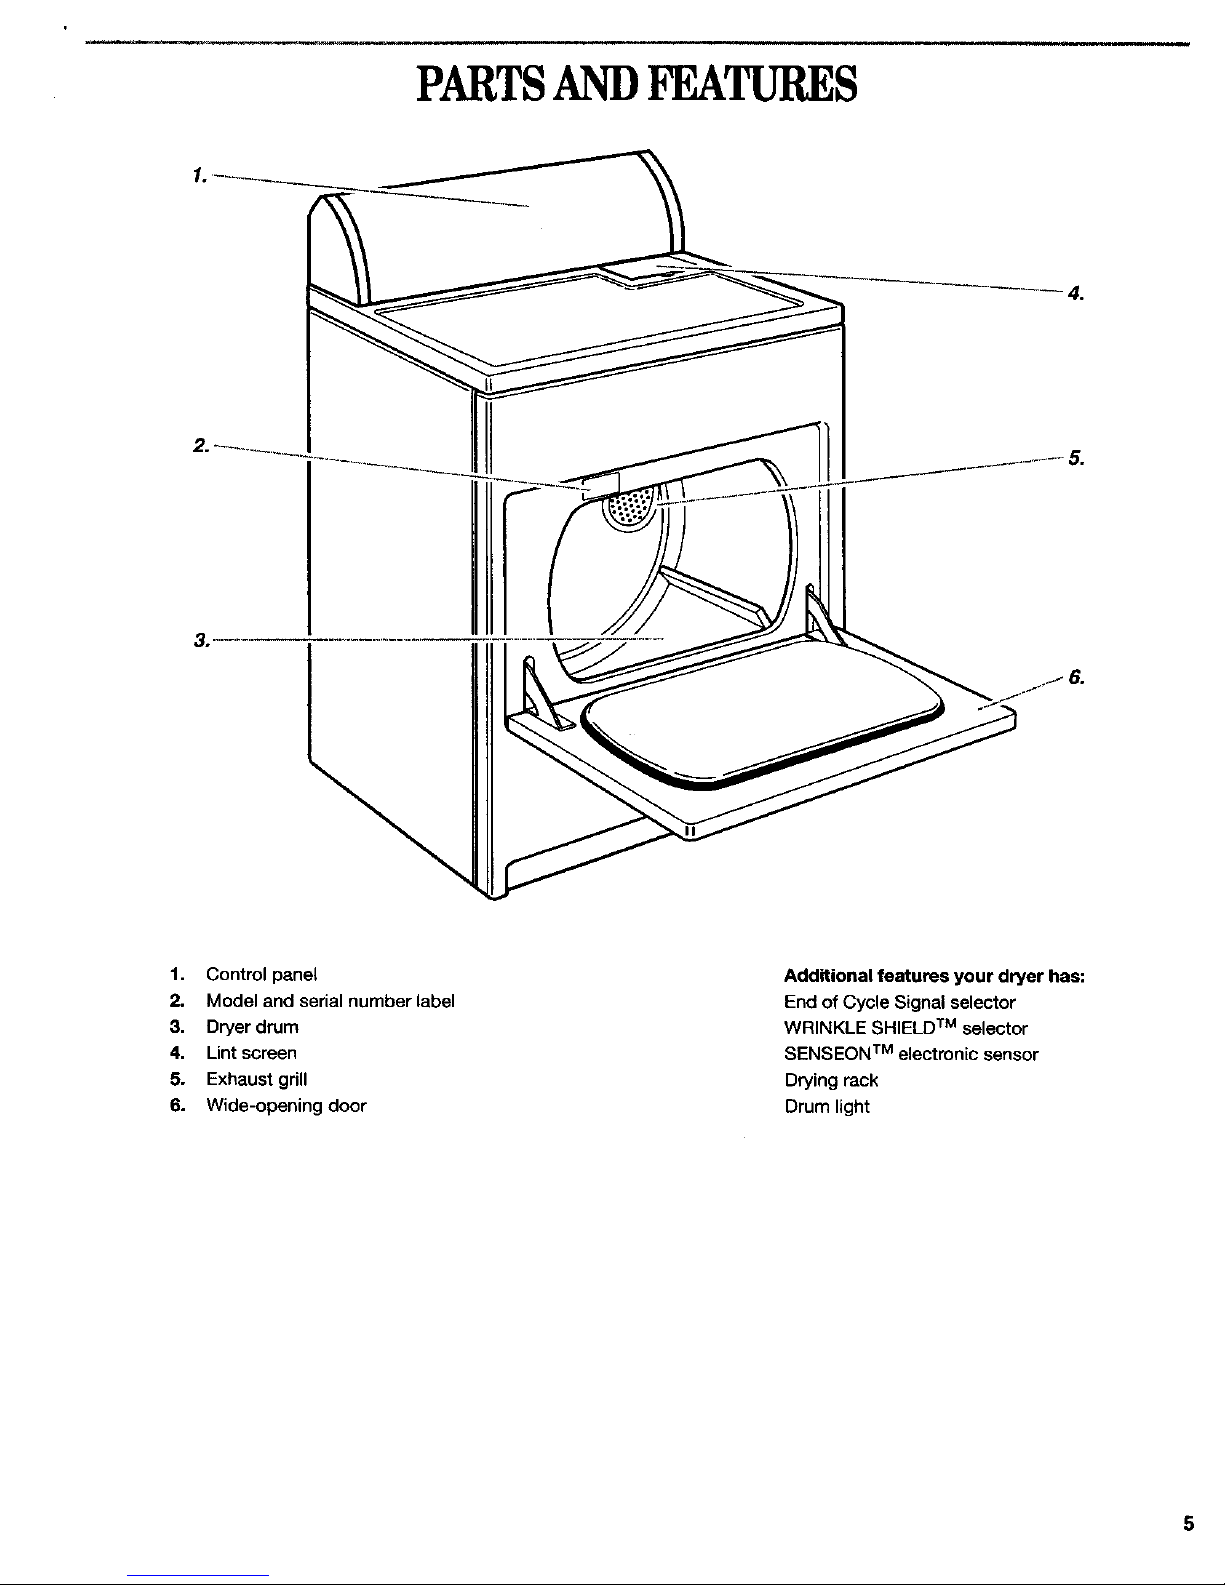
PARTSANDFEATURES
°
1. Control panel
2. Model and serial number label
3. Dryer drum
4. Lint screen
5. Exhaust grill
6. Wide-opening door
Additional features your dryer has:
End of Cycle Signal selector
WRINKLE SHIELD TM selector
SENSEON TM electronic sensor
Drying rack
Drum light

CHECKING
YOURVENT
Your dryer must be properly installed and vented to achieve
maximum drying efficiency and shorten drying times. Use the
minimum recommended installation clearances (found in your
Installation Instructions) to avoid blocking the flow of combustion
and ventilation air. Refer to your Installation Instructions for more
information.
Fire Hazard
Use a heavy metal vent.
Do not use a plastic vent.
Do not use s metal foil vent.
Failure to follow these instructions can result in
death or fire.
3. The exhaust vent can be routed up, down, left, right, or
straight out the back of the dryer. Space requirements are
listed in your Installation Instructions.
4. Use the straightest path possible when routing the exhaust
vent. Use the fewest number of elbows and turns. Allow
room when using elbows or making turns. Bend vent
gradually to avondkmkmg.
5. Use duct tape to seal all joints. Do not use screws to secure
vent. Lint may catch on screws.
If the dryer is not properly instaUed and vented, it will not be
covered under the warranty.
NOTE: Service calls caused by improper venting will be paid for
by the customer, whether itwas a paid installation or self-
installed.
1. Do not use plastic vent or metal foil vent. Use 4 in. (10.2 cm)
metal or flexible metal vent. Do not kink or crush flexible
metal vent. It must be completely extended to allow adequate
exhaust airto flow. Check vent after installation. Refer to your
Installation Instructions for proper length requirements of
vent.
2. Use a 4 in. (10.2 cm) exhaust hood. Smaller hoods increase
drying times.
(10_ cm)
6. Clean exhaust vent periodically, depending on use, but at
least every 2 years, or when instarling your dryer in a new
location.
• Disconnect vent from the dryer and clean one section at a
time until you reach the exhaust hoed.
To clean out lint, use the hose attachment on your
vacuum, or a pole or wire with a feather duster or rag
attached.
• Be sure the flapper on the outside end of vent moves
freely.
• When cleaning is complete, be sure to follow the
Installation Instructions supplied with your dryer for final
product check.
6
 Loading...