


ADG78002
Quick reference guide
Chart
BEFORE USING THE APPLIANCE FOR THE FIRST TIME CAREFULLY READ THIS
QUICK REFERENCE GUIDE AND THE ASSEMBLY INSTR UCTIONS!
(see at right for options description)
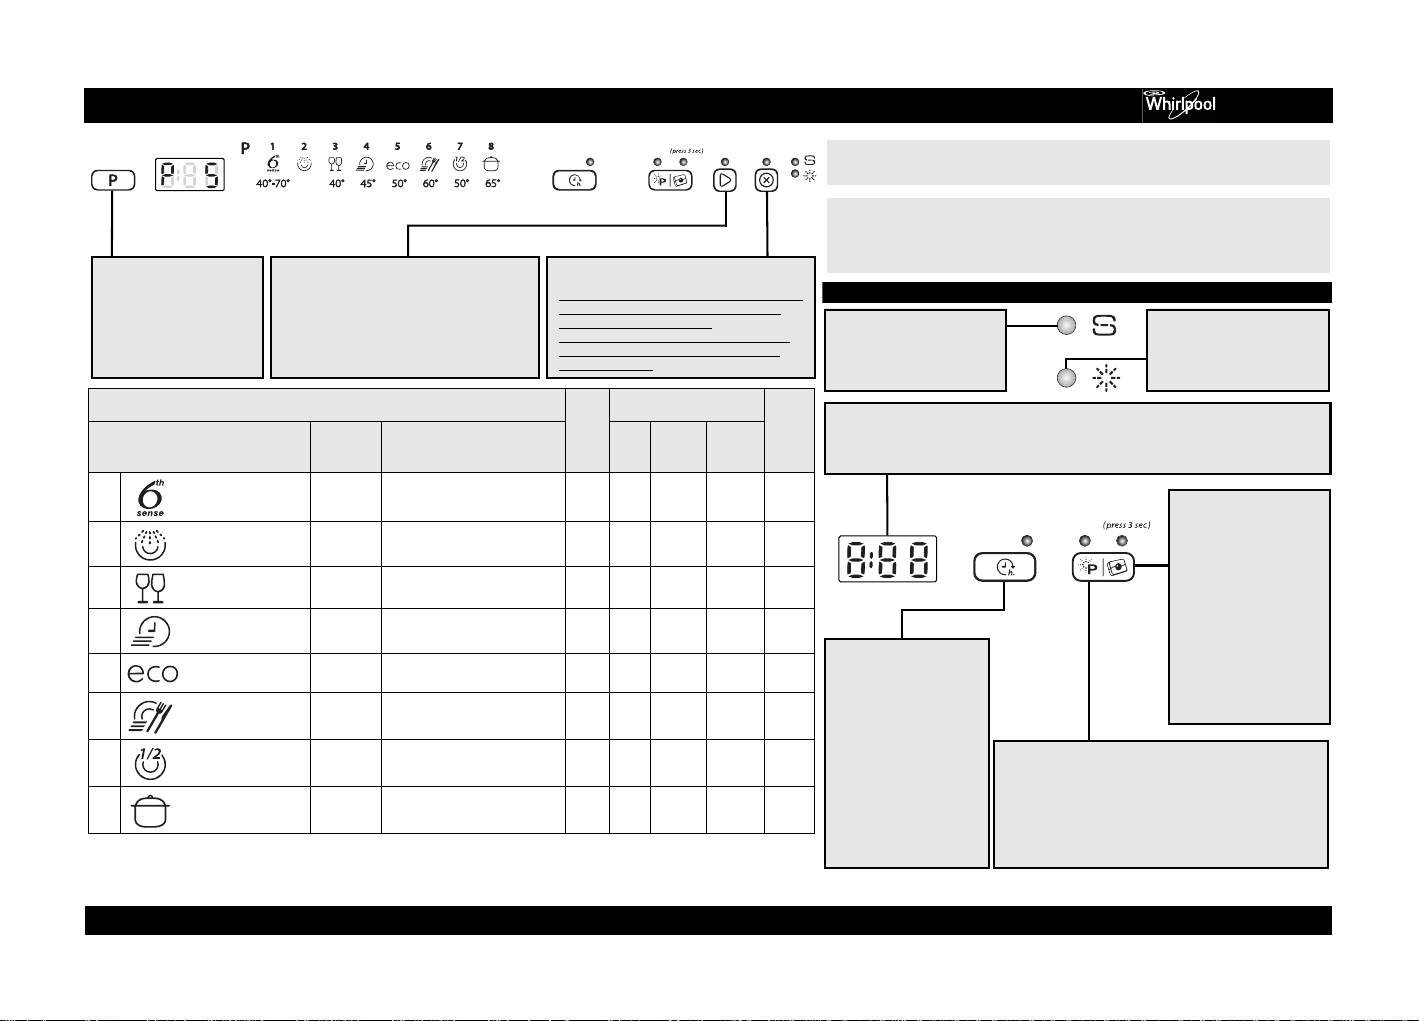
PROGRAM SELECTION
BUTTON
Push “P” button (repeatedly)
until selected program number
is shown on the display
(P1...Px) - see “Table of
programs” below.
Programs
P1
P2
P3
P4
P5
P6
P7
P8
1) Program data obtained in conformity with European standard EN 50242, obtained under normal conditions (without additional options) and may
vary depending on conditions. Differences of up to 20 minutes are possible with sensor programs as a result of the appliance’s automatic
calibration system.
2) Reference program for energy label in compliance with EN 50242 regulations. - Note for Testing Institutes: for detailed information on the EN/Standard
loading comparison test and other tests, contact the following address: “nk_customer@whirlpool.com”.
Sensor 40-70°C
Pre-Wash cold
Fragile 40°C
Rapid 45°C
2)
Eco
Fast Daily 60°C
Half Load 50°C
Intensive 65°C
START/RESUME BUTTON
Push this button to start the selected program: the
indicator lights up and goes off at the end of the program.
When the door is opened during a washing cycle, the
cycle is temporarily paused: the Start indicator blinks.
To resume the cycle push Start button and close
the door within 3 second s.
Table of programs
50°C
Available
options
Delay
Power Clean
Delay Crockery to be washed later. — 4.0 0.03 14 NO
Delay
Delay
Delay
Power Clean
Delay Normally soiled crockery. X 10.0 1.30 80 Full
Delay
Delay
Power Clean
Loading instructions
Recommended program for routine
washes, with dried-on food
(e.g. EN 50242).
Light soiling, for example glasses and
cups.
Lightly soiled crockery, with no
dried-on food.
Normally soiled crockery.
Energy-saving program.
Ideal for washing a half load of lightly
or normally soiled crockery.
Recommended program for heavily
soiled crockery, especially suitable
for pans and saucepans.
CANCEL/OFF BUTTON
Push this button to switch off the control panel.
If pressed when a program is running it cancels the
program ongoing draining water for 1 minute
(0:01 is shown into the display).
If pressed when the dishwasher is switched off,
it drains any possible liquids from dishwasher
(1 minute process).
Consumption
Deter-
gent
Litres kWh
X 7-14 1.00-1.60 70-155 Full
X 10.0 0.85 100 Light
X 11.0 0.80 30 NO
X 11.5 1.03 170 Full
X 10.0 1.07 132 Full
X 14.0 1.60 145 Full
Minutes
Drying
Phase
1)
Whirpool is a registered trademark of Whirpool USA
THE CONTROL PANEL OF THIS DISHWASHER ACTIVATES PUSHING ANY
AUTOMATICALLY AFTER 30 SECONDS IF NO CY CLE HAS STARTED.
BUTTON EXCEPT CANCEL/OFF BUTTON.
FOR ENERGY SAVING THE CONTROL PANEL DEACTIVA TES
Options and display description
SALT INDICATOR
When lit (at the end of the cycle),
the salt reservoir needs to be
refilled.
WASH TIME DISPLAY
Indicated the cycle duration and the remaining time (h:min). With “Delayed start” selected it indicates
the time remaining until program start (h.00) - below 1h (0:min).
If “Fx Ey” messages appears on the display, see page 6 - chapter “What to do if...”.
DELAYED START BUTTON
Push the button (repeatedly)
to delay the start o f t he
program. - delay indicator
turns on.
Adjustable from 1 to 24 hours.
With each press of the button,
the delayed increases by one
hour and after “h 24” returns
to “h 00”.
When this option is selected
the delay indicator turns on.
Then press the START button.
The dishwasher will start after
the set time.
POWER CLEAN
Thanks to the additional power jets this option provides a more
intensive and powerful wash in the lower rack, in the specific
area. This option is recommended for washing pots and
casseroles (see page 4). Press this button to activate Power Clean
(the indicator lights up).
RINSE AID INDICATOR
When lit (at the end of the cycle),
the rinse aid dispenser needs to
be refilled.
TABLET SETTING
This setting allows to
optimize the cycle
performances according the
type of detergent used.
Push the Tablet button for
3 seconds (until the indicator
lights up) if you are using the
combined detergents in
tablet (rinse aid, salt and
detergent in 1 dose).
If you are using powder
detergent or liquid
detergent, the Tablet
indicator on the control
panel has to be off.
5019 396 03637
GB -1-
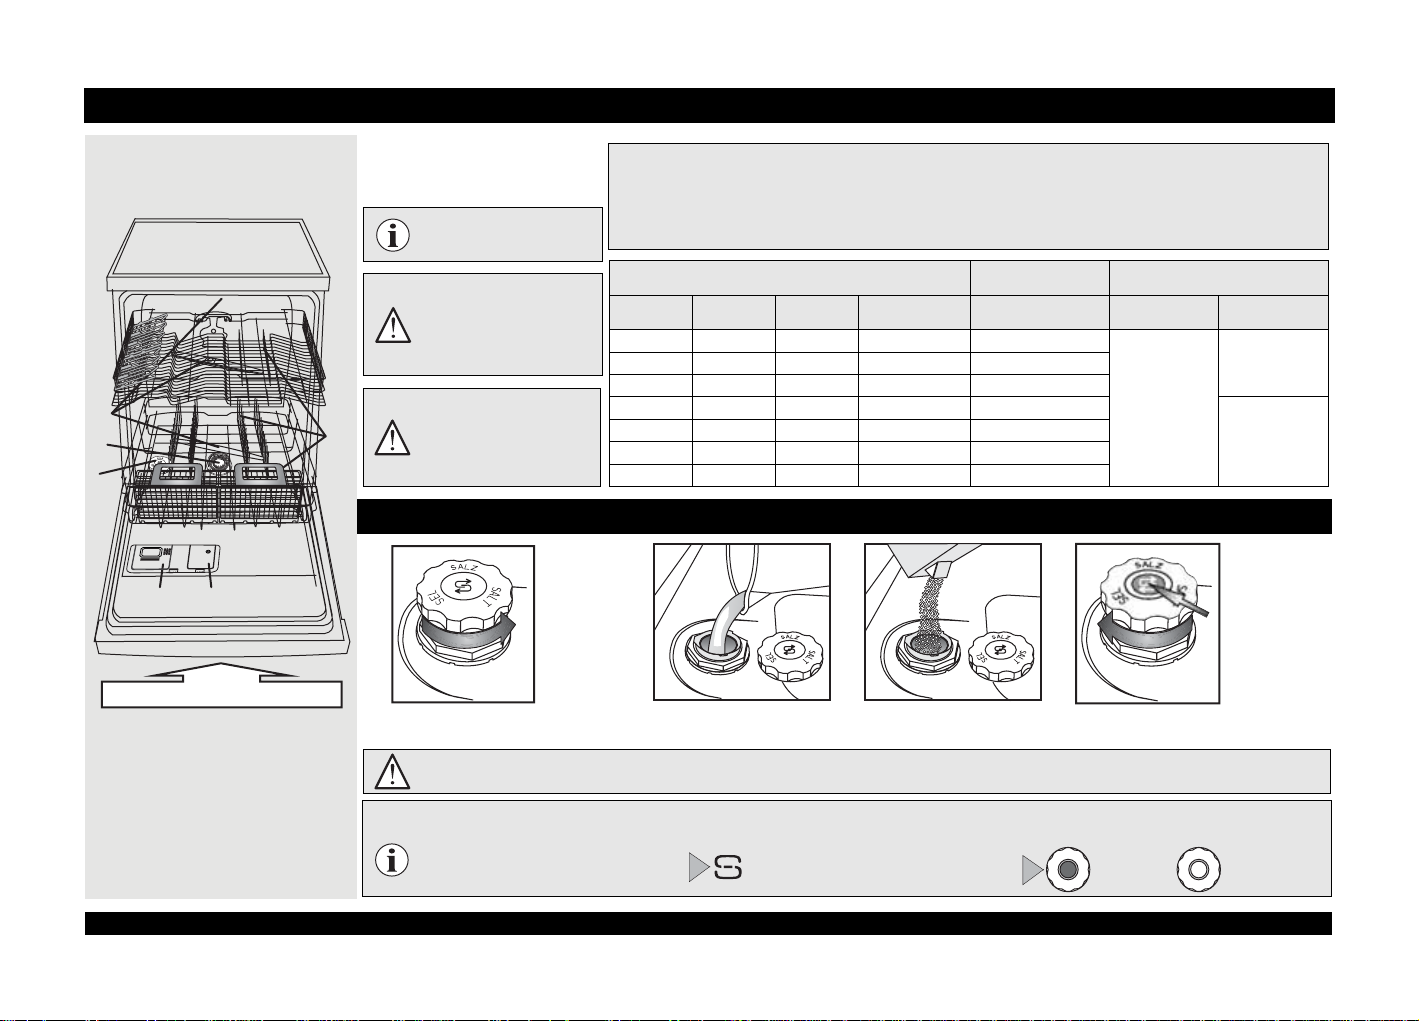
How to set water hardness in order to always assure the best cleaning results
First time use
10
9
1
23
86
5
1- salt reservoir
2- rinse aid dispenser
3- detergent dispenser
4- racks system
5,6,7,8- available functions on the panel
9- filters
10- spray arms
7
Water hardness should be set only
before the first wash or if water
hardness has been changed
Water hardness level is factory
set for medium-hard water
(level 4).
Even if you use tablets which
include salt functionality, you
must still add regeneration salt
since such detergents are not
effective enough at softening
hard water.
At first time use, the salt
reservoir has to be filled
4
independently from water
hardness level (see
description below in step 1
“Daily check”).
- Press and hold together PROGRAM Selection and CANCEL/Off buttons for minimum 3 seconds.
- The current water hardness setting will be visible on the display.
- Press the PROGRAM Selection button to increase setting. Value range goes from 1 to 7 (when the lev el reaches 7, the next
press of the start button will set the leve l back to 1).
- Wait 30 seconds (control panel switches off) or press Start/Resume button to save setting.
1. Ask your water supply company what the water hardness is... 2. ...enter this value on
German
degrees °dH
0 - 5 0 - 9 0 - 6.3 Soft 1
6 - 10 10 - 18 7 - 12.6 Medium 2
11 - 15 19 - 27 13.3 - 18.9 Average 3
16 - 21 28 - 37 19.6 - 25.9 Medium-hard 4
22 - 28 38 - 50 26.6 - 35 Hard 5
29 - 35 51 - 63 35.7 - 44.1 Very hard 6
36 - 50 64 - 90 44.8 - 62.4 Extremely hard 7
French
degrees °fH
English
degrees °eH
Water hardness
level
Filling the salt reservoir - Dissolve limescale (not necessary if water hardness level is set to “soft”!)
Visual indicator
1
Once regeneration salt is added, immediately start a wash program (the “Pre-wash” program alone is not sufficient). Residual saline solution or grains of salt can lead to
deep-down corrosion, irreparably damaging the stainless steel components. The guarantee is not applicable if faults are caused by such circumstances.
The salt level indicator lamp may rem ai n lit
at the end of several wash cycles. If the
water hardness level falls with in category
(soft), no salt is required.
(depending
on the model).
Unscrew cap.
Fill the salt reservoir with water
before the first wash only.
(depending on the model)
Salt indicator on the control pa ne l Salt indicator on the salt reservoir cap
The indicator lamp lights up when SALT
NEEDS TO BE ADDED.
Add salt (never add detergent!)
min. 0.8 kg / max. 1 kg
your dishwasher
Insert value is shown
in the display
Suggestions for detergent use
Gel or Powder
(rinse aid and salt)
go to step 1
(see “Daily
check”)
green: OK.
Tablets
if water is
HARD extra salt
needs to be added
(go to step 1,
“Daily check”)
Daily check
Screw on the cap.
Salt residual
around the cap
need to be
removed. Some
salt reservoir have
a level indicator
integrated in the
cap (see below
how to check).
clear: NEEDS TO
BE ADDED
GB -2-
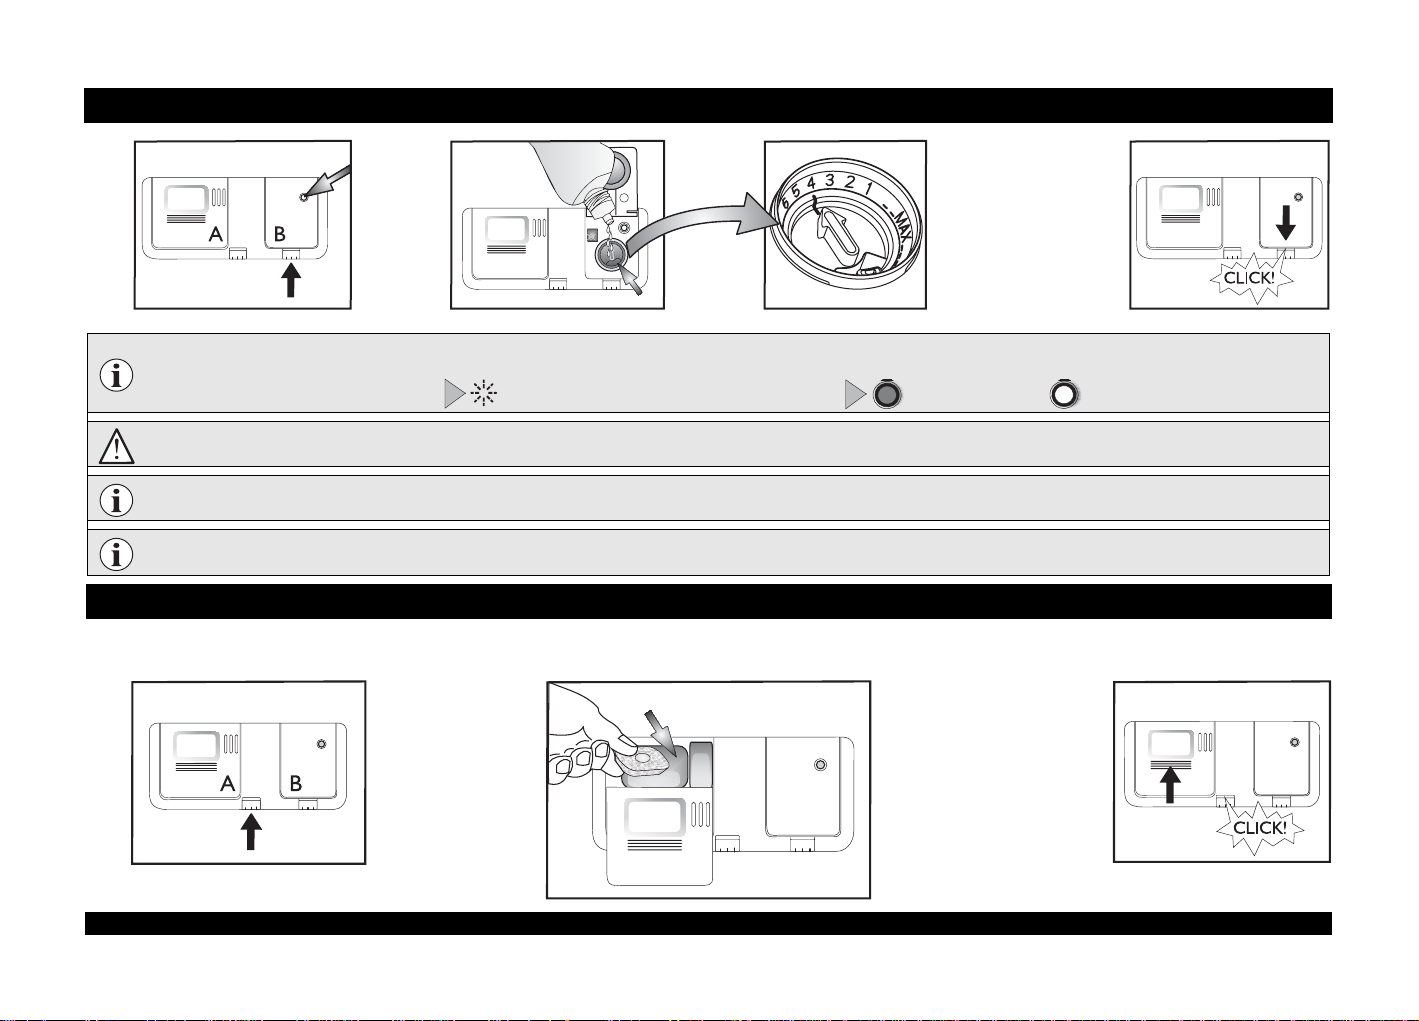
Adding rinse aid (not necessary when you use tablets). How to adjust the rinse aid dosage regulator
Daily check
Visual
2
Check the rinse aid indicator to check the level
into the dispenser.
Only use rinse aids recommended for use in domestic dishwashers. Immediately wipe away any rinse aid spilt accidentally. This prevents the formation of excess suds which can cause a fault function of the
appliance.
If there are streaks: reduce the dosage by turning t he dial to a lower setti ng (1-3). If crockery is not perfectly dry: increase th e dosage by turning the dial to a higher setting (5- 6). Plastic di shes have more diff iculty
drying and a higher rinse aid setting will not improve the situation.
Detergents with rinse aid incorporated may be effective only with longer programs. In the case of shorter programs, detergent residue may be a problem (if necessary, use powder detergent). Detergents with
rinse aid incorporated tend to form excess suds.
indicator
If required,
open the
cover B
(press the
dedicated
button).
Add rinse aid
to the max.
line ~150 ml
(depending on the model)
Rinse aid indicator on the control panel Rinse aid indicator on the dispenser
The indicator lamp lights up when RINS E AID NEEDS
TO BE ADDED.
The rinse aid dosage can be
adjusted to the detergent used.
The lower the setting, the less
rinse aid is dispensed (factory
setting: position 4).
Press the button to open the
cover B. Using a coin or similar
object, turn the arrow to the
desired setting. After adjusting
the rinse aid setting, shut the
cover again.
dark: OK. clear: NEEDS TO BE ADDED
Adding detergent - Use only detergent specifically for dishwashers in accordance with the supplier’s recommendations
Insert detergent: Tablet / powder / liquid into the big chamber
Please look for the recommendation of the detergent manufacturer on the
packaging of the detergent product.
Use only one tablet per one cycle, only
placed in detergent dispenser.
All types of tablets can be used, but for
2 in 1 type adding of salt is mandatory.
Some types of tablets may not dissolve
completely during the short programs
(Rapid, Fragile, H an dwash); placing the
tablet on the tub bottom can help
dissolving and washing.
Shut the cover
by pressing dedicated ribs.
3
Open the cover A
(press the dedicated button).
Only fill the
detergent dispenser
prior to starting a
wash program.
Daily use
GB -3-
 Loading...