


N C
INTRODUCTION
BEFORE STARTING
1. Remove the cardboard and accessories from inside the oven.
2. Clean the hob.
3. The first time you use the oven heat it at the maximum setting for about two hours to eliminate
odours and fumes due to the protective grease.
ROUTINE USE
Hob
1. Turn the knob to the required setting (see “Using the hotplates”).
2. To switch off, turn the knob to “0”.
Oven
1. Arrange the food in the oven.
2. Select the required cooking function (see “Using the oven”).
3. Select the temperature.
To get the most out of your new appliance, be sure to read the instructions in this
booklet.
103
M Y
103
N C
CONTENTSGB
THE APPLIANCE AND ITS COMPONENTS Page 105
CONTROL PANEL Page 105
GENERAL PRECAUTIONS AND RECOMMENDATIONS Page 106
USING THE HOTPLATES Page 107
USING THE OVEN Page 108
USING THE CONVENTIONAL OVEN – mod. ACM 372 – ACM 373 Page 109
USING THE CONVENTIONAL FAN-ASSISTED OVEN – mod. ACM 396 Page 112
USING THE MULTIFUNCTION OVEN – mod. ACM 396N Page 116
CLEANING AND MAINTENANCE Page 120
TROUBLE-SHOOTING GUIDE Page 122
AFTER SALES SERVICE Page 122
INSTALLATION Page 123
TABLES Page 125
104
M Y
104
N C
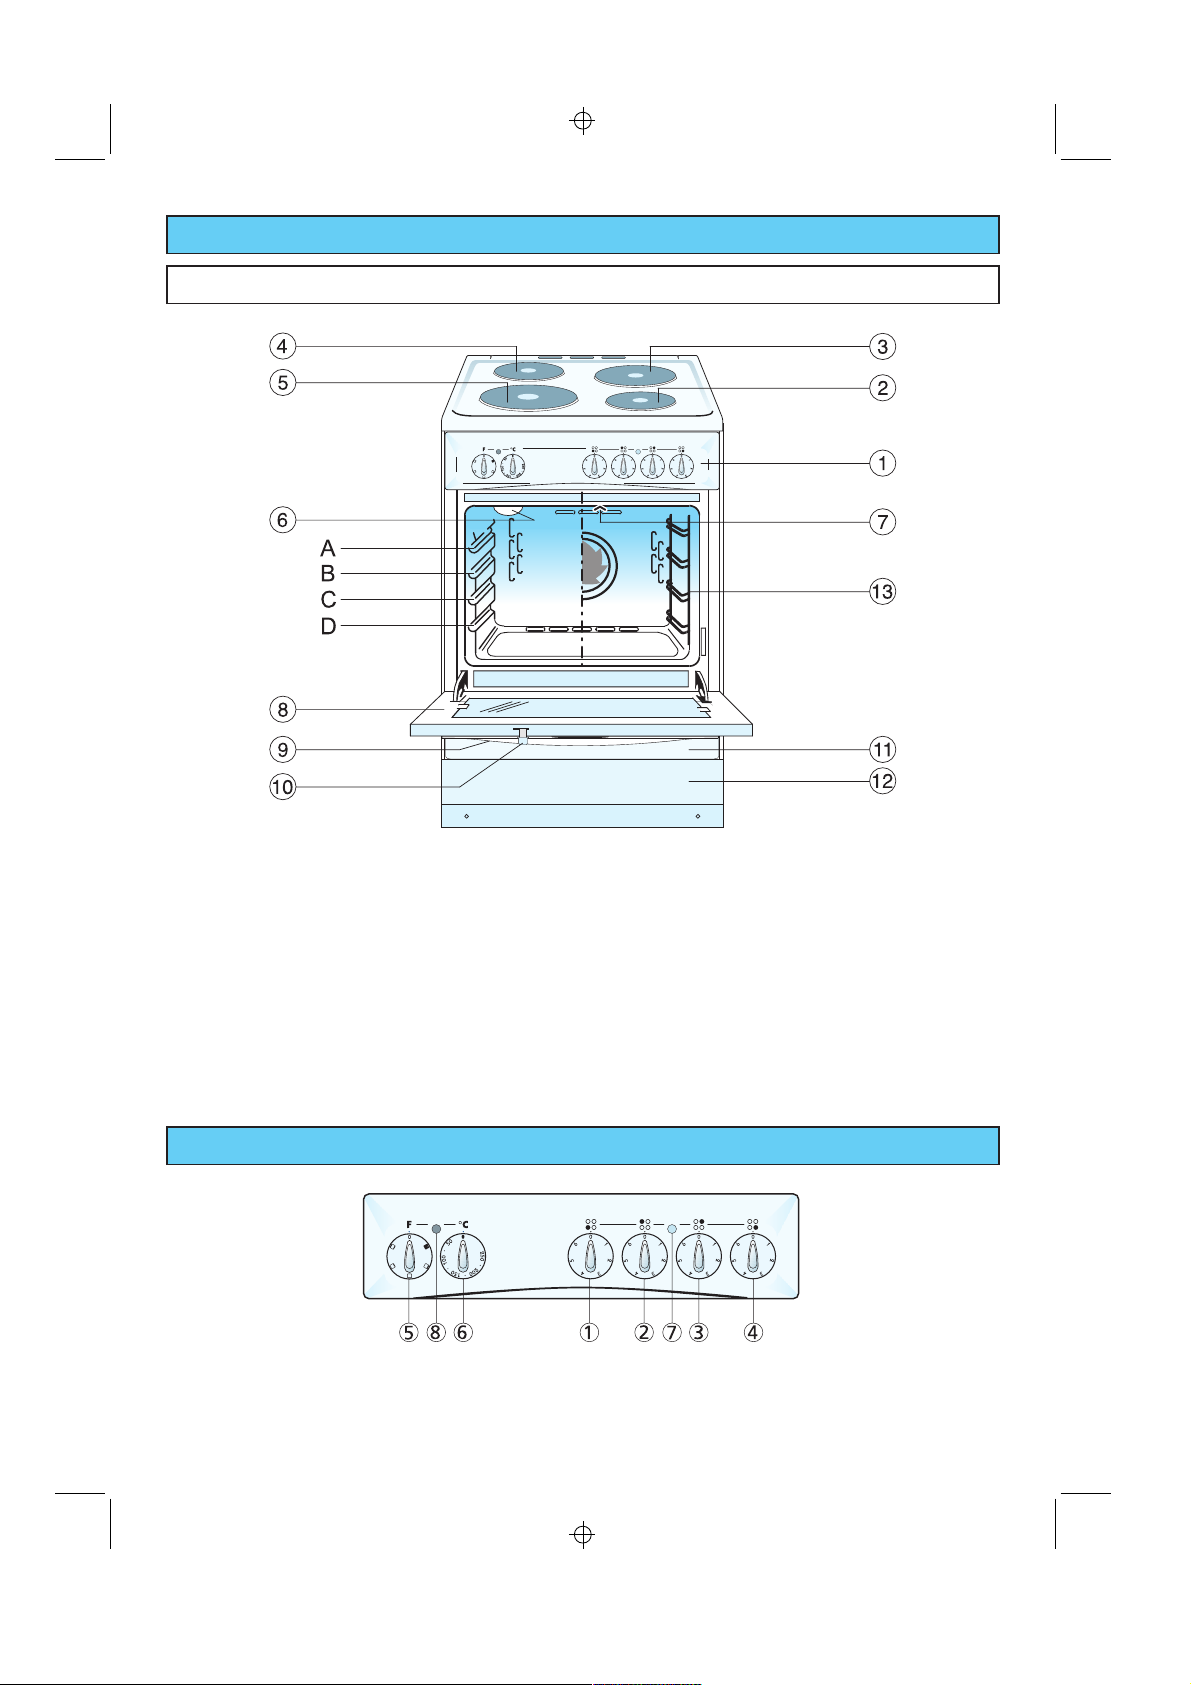
THE APPLIANCE AND ITS COMPONENTS
ACM372–ACM373–ACM396–ACM396N
1. Control panel
2. High-speed hotplate – Ø 145 – 1500 W
3. High-speed hotplate – Ø 180 – 2000 W
4. Normal hotplate – Ø 145 – 1000 W
5. Normal hotplate – Ø 220 – 2000 W
6. Oven light
7 Grill elements (self-cleaning)
8. Oven door
9. Door handle
10. Child lock
11. Warming drawer (with safety device)
12. Plinth (not for Denmark)
13. Side racks (only in some models).
1. Front lh plate (5) control knob
2. Rear lh plate (4) control knob
3. Rear rh plate (3) control knob
4. Front rh plate (2) control knob
A, B, C, D:
Guides for baking trays, grids or drip tray (see cooking
time tables).
Accessories:
2 enamel baking trays
1 enamel drip tray
1 grid for grilling, roasting or baking
2 adjustable feet
CONTROL PANEL
5. Oven function selector knob
6. Oven thermostat knob
7. Plate on indicator light
8. Oven thermostat indicator light
105
M Y
105

N C
GENERAL PRECAUTIONS AND RECOMMENDATIONS
x
Before starting
1. Packaging materials (plastic film, expanded
polystyrene, etc.) are potentially dangerous and
must be kept out of the reach of children.
2. The packaging materials can be recycled, as
confirmed by the symbol
Ù
.
3. Make sure the appliance has not been damaged
during transport and that the oven door closes
correctly.
4. Installation and electrical connection of the appliance
must be entrusted to skilled personnel in
accordance with the instructions supplied by the
manufacturer and in compliance with established
safety standards.
5. Remove packaging residues from inside and outside
the appliance. Remove the accessories. Keep
cardboard and plastic protective packages in a safe
place for future use, or dispose of them properly.
6. Hotplates
x
Heat up empty for about 3-5 minutes.
x
Never cook the food directly on the electric
hotplates, but always use pans or
containers.
7. Oven
x
Empty the oven and close the door. Heat
the oven at the maximum temperature
setting for around two hours to eliminate
the odour of grease and fumes from the
manufacturing process. Make sure that the
kitchen is well ventilated and do not remain
in the room during this process.
x
Clean the oven and accessories with warm
water and washing-up liquid.
During and after use of the oven, certain
parts will become very hot (e.g. the oven
door inspection window). Do not touch hot
parts.
x
Keep children well away from the
appliance while it is in use.
x
Fire risk! Do not store flammable material in
the oven, above the hob or in the
accessory drawer.
x
Make sure that electrical cables connecting
other appliances near the cooker cannot
come into contact with the hob or be
trapped in the oven door.
x
Do not line the oven walls with aluminium
foil. Do not place baking trays or the drip
tray on the floor of the oven chamber.
x
Do not allow heavy or sharp objects to
drop on the hob.
x
The manufacturer declines all liability for
injury to persons or damage to property
caused by incorrect or improper use of the
appliance.
x
The various components of the appliance
are recyclable. Dispose of them in
accordance with the regulations in force in
your country. If the appliance is to be
scrapped, cut off the power cord.
106
M Y
106
N C
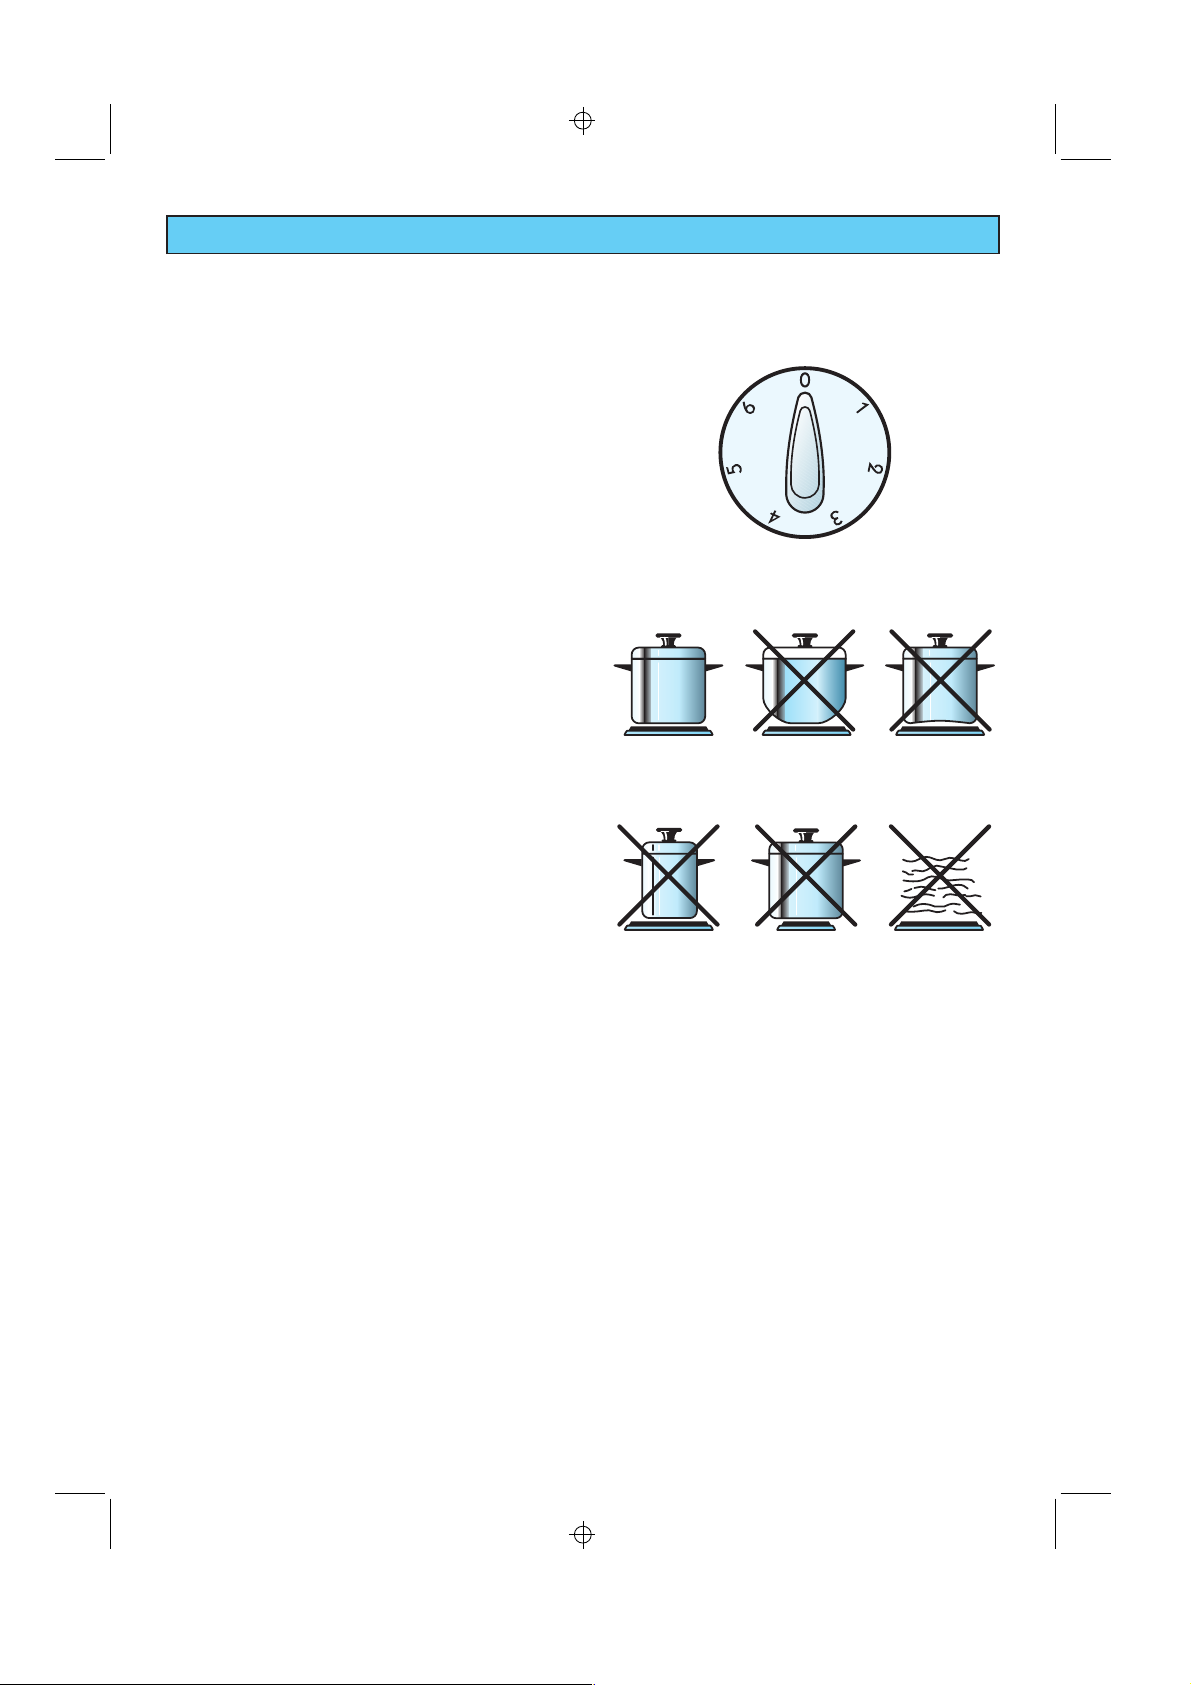
USING THE NORMAL AND HIGH-SPEED HOTPLATES
Tip:
The yellow pilot light remains on as long as a hotplate
is switched on.
Turn the control knob to the performance level
required:
1. Boiling and browning: setting “5” or “6”.
2. Frying: setting “4”.
3. Simmering: setting “2” or “3”.
4. Simmering and warming up: setting “1”.
5. To switch OFF: setting “0”.
x
When necessary select a higher or lower setting.
x
With sensitive foods turn down earlier.
HIGH-SPEED HOTPLATES (RED
DOT)
These are used for particularly quick boiling and
browning.
TIP FOR ENERGY SAVING
Use the residual heat. For nearly all boiling or frying the
hotplates can be switched to “0” 5 – 10 minutes
before finishing.
TIPS FOR PANS
x
Use special pans for electric cookers with flat and
solid bottoms. Pans with turned bottoms are
particularly suitable.
x
Uneven pans require longer cooking times and
consume more energy.
x
The pan diameter should be the same as that of the
hotplate or slightly larger.
x
To save energy, always use lids.
x
Do not leave any wet or damp lids on the hotplate.
x
Put the pan on the hotplate first, then switch on.
x
Never cook the food directly on the hotplates but
use special pans or containers.
107
M Y
107
N C
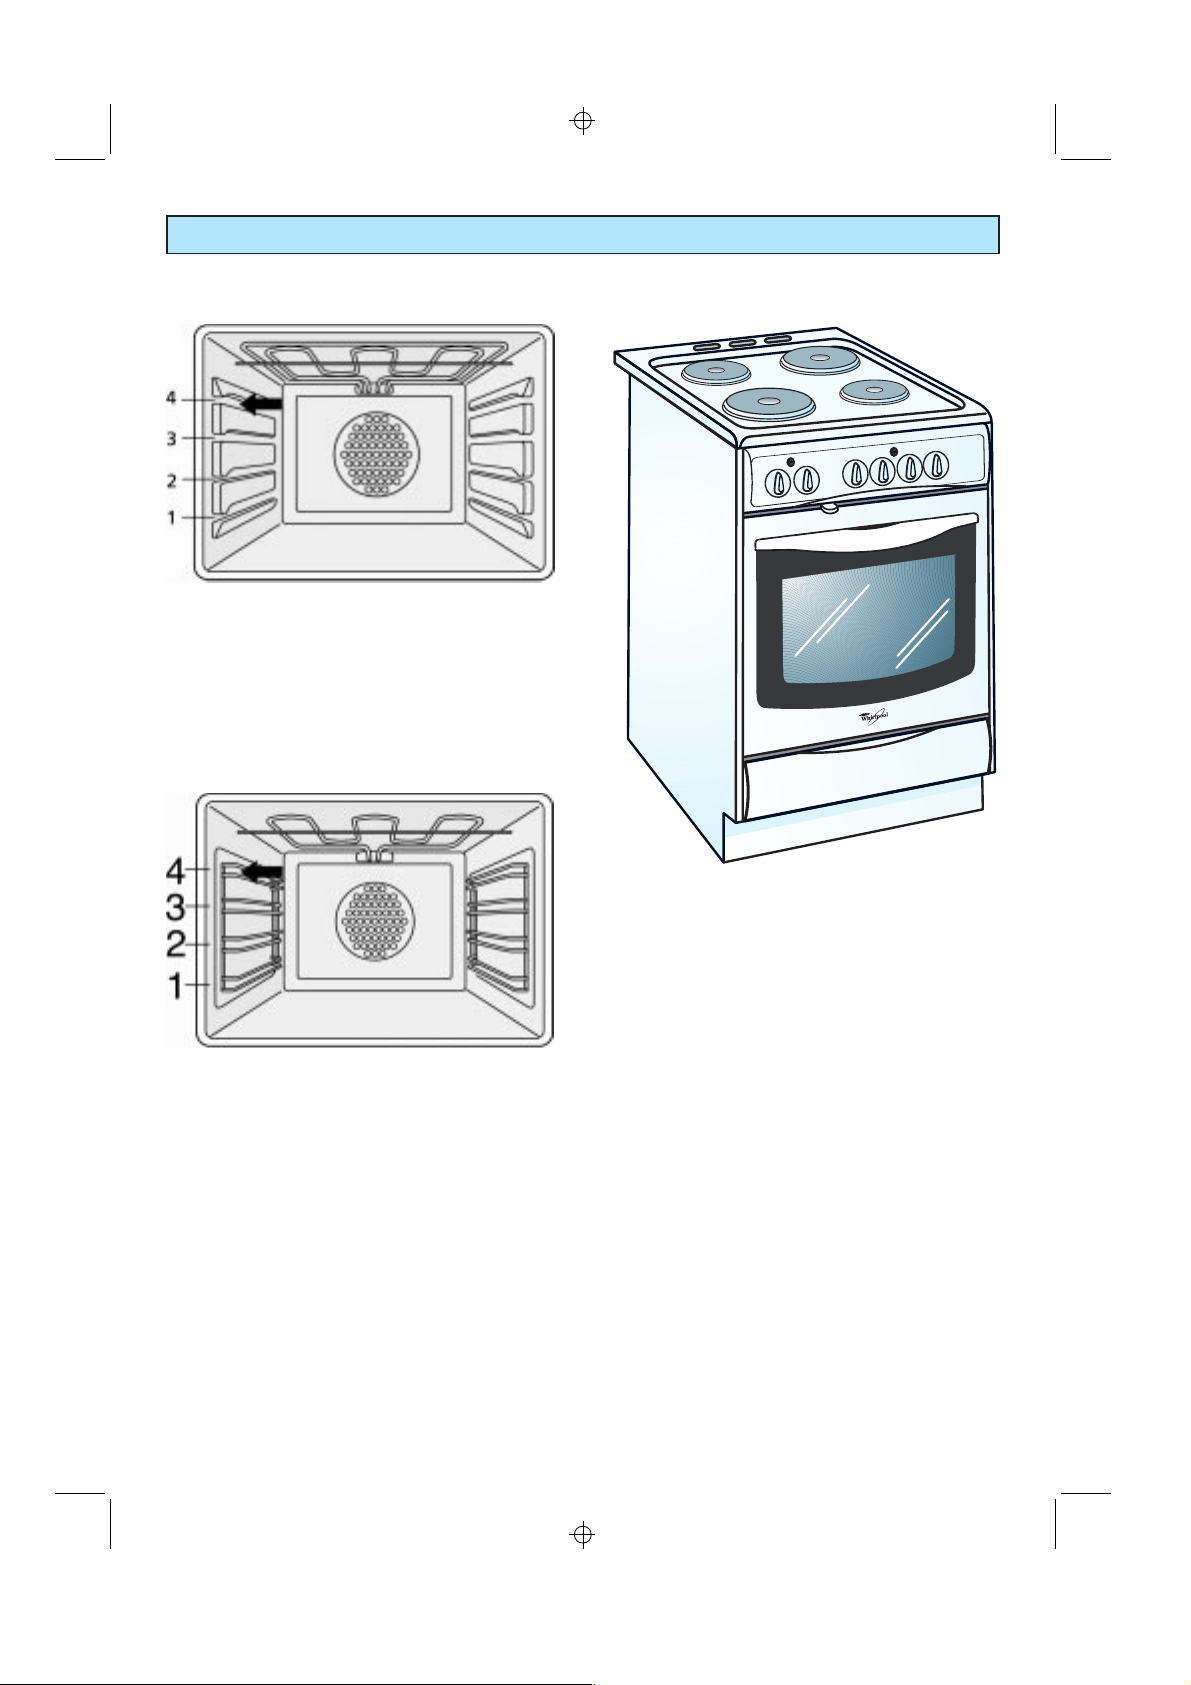
USING THE OVEN
SIDE GUIDES
The embossed oven side walls form 4 guides for the
insertion of the drip tray, baking trays and grids.
Recommended grid/baking tray levels are shown in the
tables at the end of this handbook.
Side racks
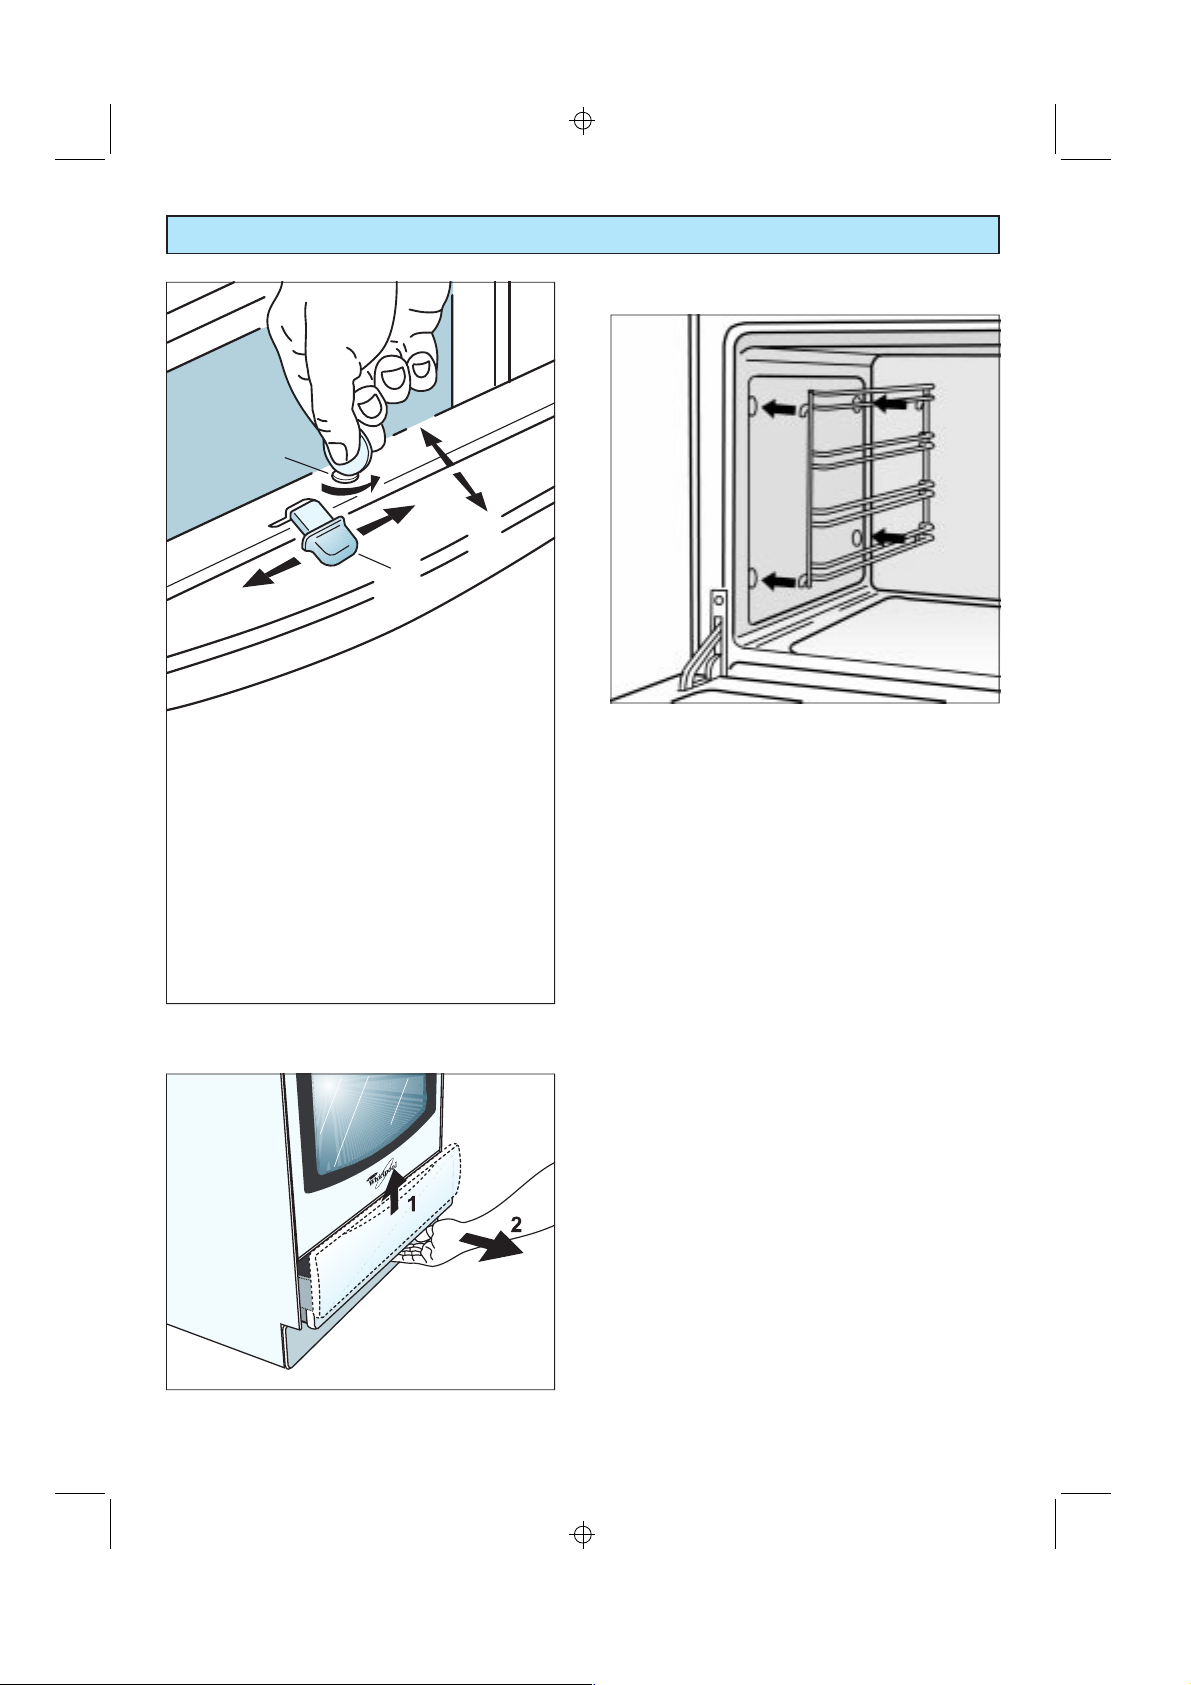
CHILD LOCK
The oven has two removable side racks which allow for
four different oven-loading positions. They provide
support for the drip tray, baking tray and/or grid, which
slide between the two guides on either side of the
oven, at the same height. When you fit the tray or grid,
take care to position it correctly so that it is horizontal.
For the choice of the best oven position, refer to the
baking and grilling tables.
108
The cookers are equipped with a “Child lock” safety
device.
M Y
108
N C
USING THE OVEN
Installing and removing the side racks
2
B
R
1
L
C
USE OF THE SAFETY DEVICE
x USE:
x DEACTIVATION:
x ACTIVATION:
The door closes normally and is blocked by
the safety device.
To open the door move lever C to the R.
With the door open move
lever C to the R and block it in this position by
screwing screw B in position 2.
Open the oven door and with a
coin slacken screw B.
Lever C moves to the L after screw B is tightened
in position 1.
x
Hook up the side racks to the oven walls.
x
Slide the required grip or tray into the guides.
In order to open drawer please act as shown in
the picture.
109
M Y
109

N C
USING THE CONVENTIONAL OVEN
ACM 372 – ACM 373
Upper and lower heating elements
Inside the oven the heating elements are located on
the oven floor and ceiling. Heat is supplied by
radiation.
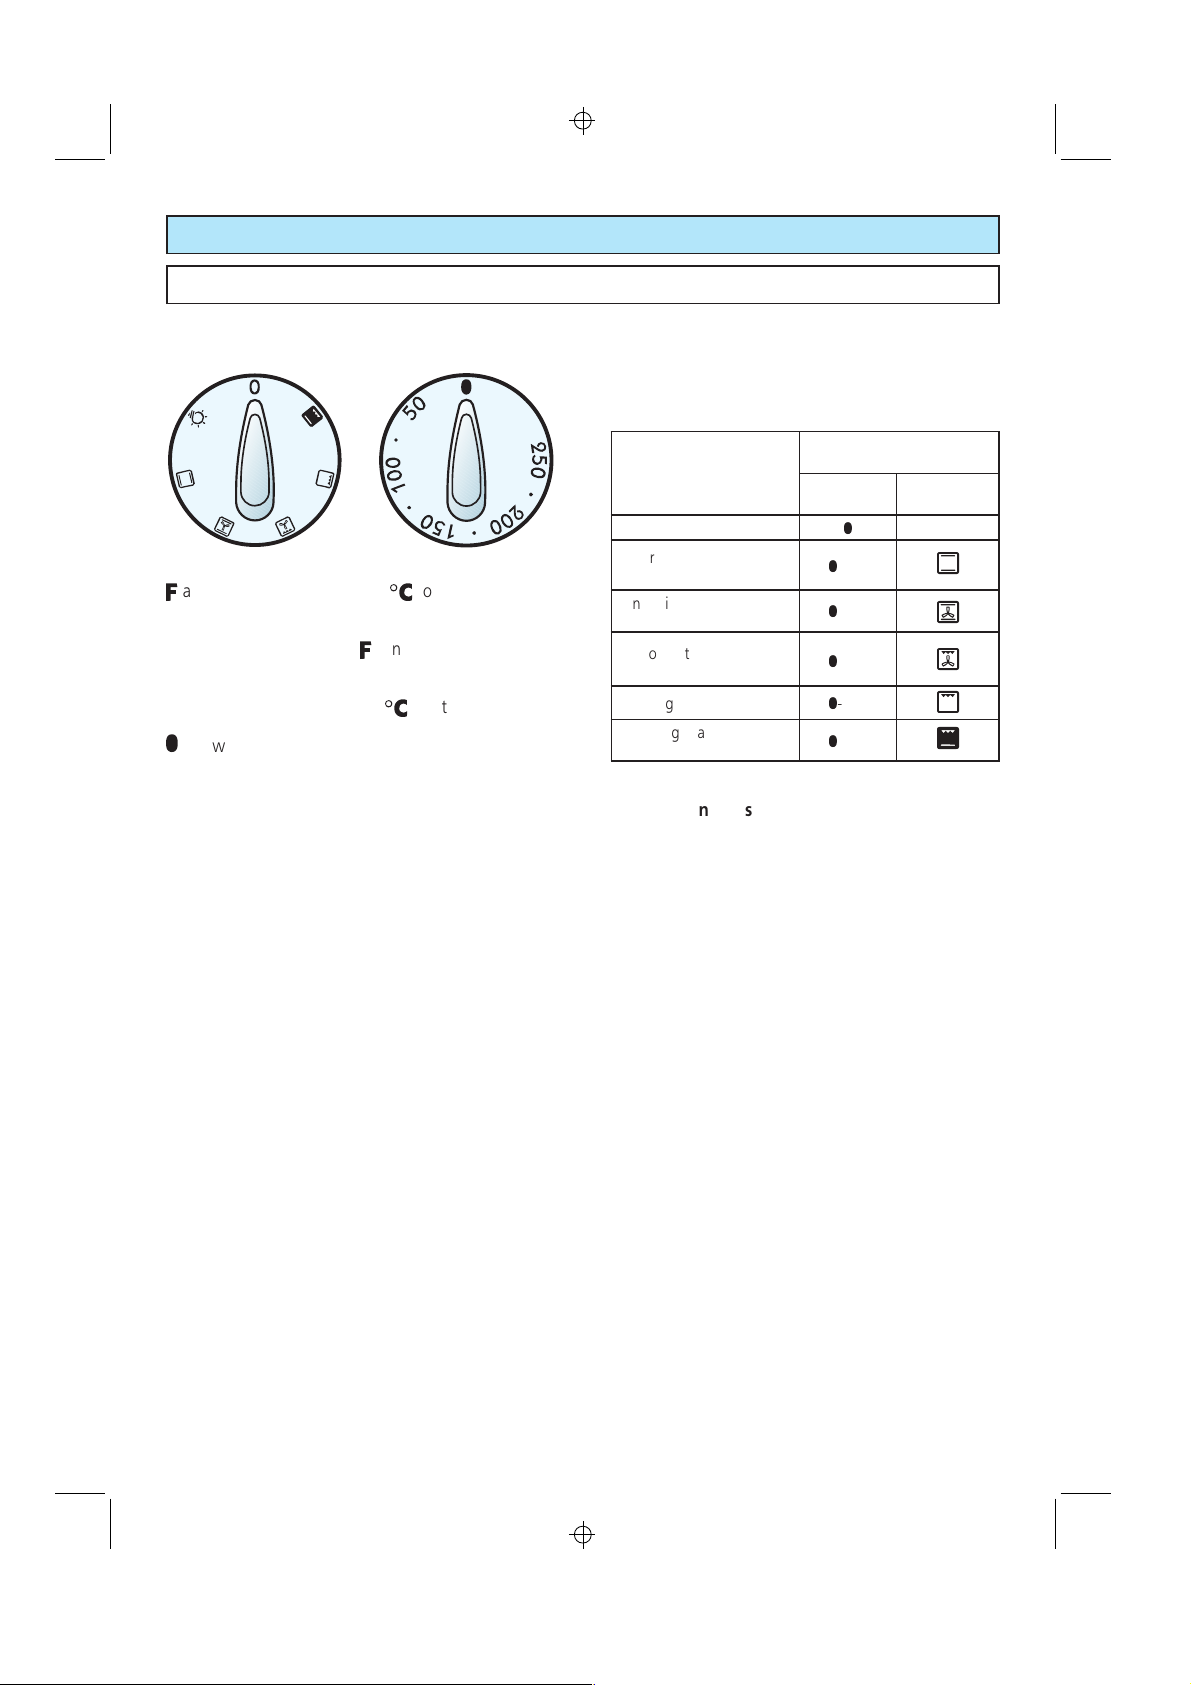
Switching on and off
Summary table
Cooking functions and temperatures
The following table shows cooking modes and
temperatures for oven and grill cooking.
Control knob
Temperature Cooking
o
C function
Off
Lower and upper
heating elements
Lower heating element
Upper heating element
Grill
Booster (grill & lower
heating elements)
Energy saving tips
You can utilise residual heat by setting the control knob
to “0” for approximately 5 or 10 minutes to finish
nearly all types of cooking.
You can also cook side dishes, such as potatoes, rice or
vegetables, together with the meat course.
N
-250
N
-150
N
-150
N
-200
N
-200
N
0
Þ
2
ñ
W
x
To switch on the oven turn the cooking mode selector
and the temperature selectorPto the required
Q
positions.
The cooking mode selector
direction.
The temperature selector knob
the right to switch on the oven and to the left, position
, to switch it off.
N
Preheating
Preheating is unnecessary when preparing roasts,
casseroles, and slow-cooking dishes in general. Oven
preheating is recommended, however, for delicate
cooking and dishes that require shorter cooking times
(pastries, etc.). Consult the cooking time tables at the
back of the handbook.
The outdoor parts of the oven become hot
during operation. Keep children well out of
reach.
110
can be turned in either
Q
must be turned to
P
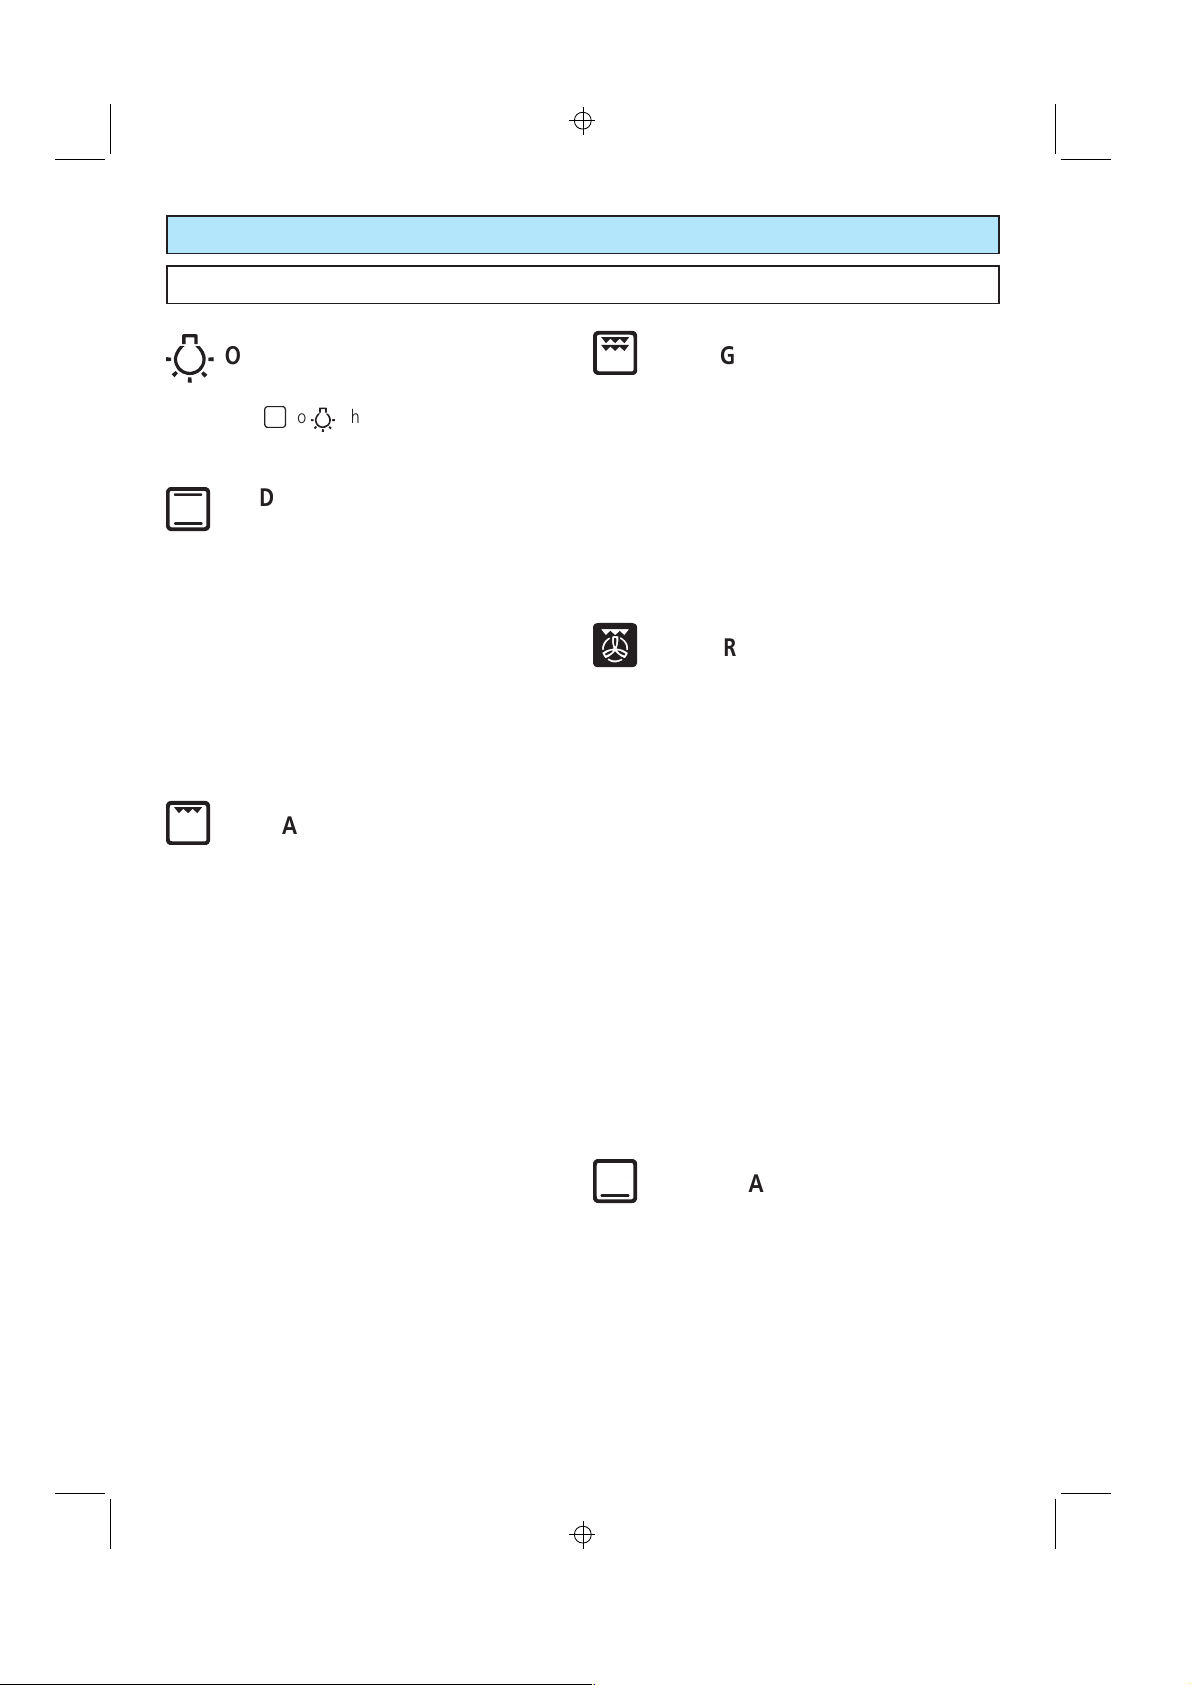
Oven light
Turning the knob to any setting switches on the oven
light. The oven remains alight while any of the
functions is on.
M Y
110

N C
USING THE CONVENTIONAL OVEN
ACM 372 – ACM 373
TRADITIONAL CONVECTION
Þ
COOKING
Conventional cooking with heating from top and bottom.
In this position the lower and upper heating elements are
switched on.
Heating takes place through natural convection and
thermostat temperature can be set between 50 and
o
C. This type of cooking requires oven preheating.
250
Tip:
This function is particularly suitable for desserts that must
be heated from below, such as fruit pies, bread, pizzas
and roasts, e.g. chicken.
LOWER HEATING ELEMENT
2
In this position only the lower element is switched on.
Heat is distributed by natural convection. The thermostat
can be set between 50 and 150
are not available.
Tip:
This mode is particularly suitable to complete cooking of
dishes that require higher temperature at the bottom.
UPPER HEATING ELEMENT
ñ
In this position only the upper element is switched on.
Heat is distributed by natural convection. The thermostat
can be set between 50 and 150
are not available.
Tip:
This mode is particularly suitable to complete cooking of
dishes that require higher temperature at the top.
o
C; higher temperatures
o
C; higher temperatures
NORMAL GRILL
W
In this position the infrared heating element is working.
Heat is supplied by radiation. The thermostat must be
settomax.200
Tip:
This function is particularly useful for gratins or
browning, for example onion soup, toast and sausages.
Warning: During grilling the oven door becomes
very hot.
Keep children away!
The operation of the grill should not exceed 30
minutes.
x
Quick oven heating.
In this position the infrared heating element and the
lower element are working.
Heat is supplied by radiation and convection. The
thermostat must be set to max. 200
Use with the oven door closed.
Tip:
This function is particularly useful for preheating the
oven quickly and for very fast cooking.
Roasts
For traditional roasts allow the meat to cook evenly.
Make sure the temperature is between 180
o
200
C and set cooking time in relation to the quantity
and type of meat you are preparing.
Warning: During this function the oven door
becomes very hot. Keep children away!
o
C. Use with the oven door closed.
BOOSTER
o
C.
o
Cand
111
M Y
111

N C
USING THE CONVENTIONAL FAN-ASSISTED OVEN
ACM 396
Upper and lower heating elements
Inside the oven the heating elements are located on
the oven floor and ceiling. Heat is supplied by radiation.
Fan-assisted convection system
The heat produced by the upper and lower element is
distributed by the fan.
This function assures uniform heat distribution in the
oven and permits simultaneous cooking of food on any
of the three oven levels. Temperatures for convection
cooking are lower than those for conventional radiant
heat cooking (see “Temperature selection”).
112
M Y
112
N C
USING THE CONVENTIONAL FAN-ASSISTED OVEN
ACM 396
Switching on and off
To switch on the oven turn the cooking mode selector
and the temperature selectorPto the required
Q
positions.
The cooking mode selector
direction.
The temperature selector knob
the right to switch the oven on and to the left, position
N
, to switch it off.
Preheating
Preheating is unnecessary when preparing roasts,
casseroles, and slow-cooking dishes in general. Oven
preheating is recommended, however, for delicate
cooking and dishes that require shorter cooking times
(pastries, etc.). Consult the cooking time tables at the
back of the handbook.
can be turned in either
Q
must be turned to
P
Summary table
Cooking functions and temperatures
The following table shows cooking modes and
temperatures for oven and grill cooking.
Control knob
Temperature Cooking
Off
Lower and upper
heating elements
Convection cooking
with fan
Fan convection
cooking with grill
Normal grill
Booster (grill and lower
heating elements)
Energy saving tips
You can utilise residual heat by setting the control knob
to “0” for approximately 5 or 10 minutes to finish
nearly all types of cooking.
You can also cook side dishes, such as potatoes, rice or
vegetables, together with the meat course.
N
-250
N
-250
N
-200
N
-200
N
-200
N
function
0
Þ
V
X
W
x
Selecting the temperature for convection
cooking
Fan convection cooking temperatures are generally
between 20
temperatures (heat exclusively supplied from above and
below).
M Y
o
Cand40oC lower than natural convection
113
113

N C
USING THE CONVENTIONAL FAN-ASSISTED OVEN
ACM 396
OVEN LIGHT
Å
To switch on the oven light turn the cooking function
selector knob
direction).
toÅ(the knob can turn in either
Q
TRADITIONAL CONVECTION
COOKING
Þ
Conventional cooking with heating from top and bottom.
In this position the lower and upper heating elements are
switched on. Heating takes place through natural
convection and thermostat temperature can be set
between 50
oven preheating.
Tip:
This function is particularly suitable for desserts that must
be heated from below, such as fruit pies, bread, pizzas
and roasts, e.g. chicken.
V
The upper and lower heating elements and the fan turn
on. The heat coming from the top and bottom is diffused
by forced convection.
The temperature must be regulated between 50
Max. with the thermostat knob.
Tip:
For foods of large volume and quantity which require the
same internal and external degree of cooking; e.g.: rolled
roasts, turkey, legs, cakes, etc.
o
C and 250oC. This type of cooking requires
CONVECTION COOKING WITH FAN
o
Cand
GRILL COOKING WITH FAN
X
In this position the grill heating element operates together
with the fan. Heat distribution is by means of air
circulation and temperatures are higher towards the top
of the oven. The thermostat can be used to set
temperatures between 50
Tip:
This mode is particularly suitable for dishes that call for
long cooking at high temperatures. This grill convection
cooking is also recommended for keeping oven-cooked
food such as roasts and grilled dishes warm, or for
delicate reheating of pre-cooked dishes.
Use with the oven door closed.
Warning: During the use of the oven with this
function, the oven door becomes very hot. Keep
children away!
The operation of the oven with the function should
not exceed 30 minutes.
NORMAL GRILL
W
In this position the infrared heating element operates.
Heat is supplied by radiation. The thermostat must be set
to max. 200
Tip:
This function is particularly useful for gratins or browning,
for example onion soup, toast and sausages.
Warning: During grilling the oven door becomes
very hot. Kep children away!
The operation of the grill should not exceed 30
minutes.
o
C. Use with the oven door closed.
o
C and 200oC.
BOOSTER
x
Quick oven heating.
In this position the infrared heating element and the
lower element operate.
Heat is supplied by radiation and convection.
The thermostat must be set to max. 200
Use with the oven door closed.
Tip:
This function is particularly useful for preheating the oven
quickly and for very fast cooking.
Warning: During the use of the oven with this
function the oven door becomes very hot. Keep
children away!
114
M Y
114
o
C.

N C
USING THE CONVENTIONAL FAN-ASSISTED OVEN
ACM 396
Grilling and browning
The
function is used for perfect spit skewer type
X
cooking without using a spit, because the forced air
circulation ensures even cooking on all sides. Preheat
the oven, setting the thermostat on 200
meat or other food to be grilled, close the oven door
and set the temperature between 50
Just before cooking is complete, spread butter on the
food so that a thin crust forms, similar to au gratin
preparation.
Roasts
For traditional roasts allow the meat to cook evenly.
Make sure the temperature is between 180
o
200
C and set cooking time in relation to the quantity
and type of meat you are preparing.
o
C. Put in the
o
and 200oC.
o
and
Simultaneous cooking of different food
Set the mode selector knob to
kinds of food at the same time. For example, you can
grill fish or meat at the top of the oven while baking a
cake at the bottom, without any risk of contamination
of flavour or aroma.
For this type of cooking observe the following basic
rules:
- Cooking temperature for each food type must be
roughly the same (difference within 20
- Cooking times may differ. This oven function allows
considerable energy savings.
to cook different
V
o
-25oC).
115
M Y
115

N C
USING THE MULTIFUNCTION OVEN
ACM 392 N
Fan convection system
The air is drawn in through openings on the
rear panel of the oven and then heated before
being returned to the oven chamber.
The convection function assures uniform heat
distribution in the oven and permits
simultaneous cooking of food on any of the
three oven levels.
Temperature for convection cooking are lower
than those for conventional radiant heat
cooking (see “Temperature selection”).
Upper and lower heating elements
Inside the oven the heating elements are
located on the oven floor and ceiling. Heat is
supplied by radiation.
116
M Y
116

N C
USING THE MULTIFUNCTION OVEN
ACM 392 N
Switching on and off
To switch on the oven turn the cooking mode selector
and the temperature selectorPto the required
Q
positions.
The cooking mode selector
direction.
The temperature selector knob
the right to switch the oven on and to the left, position
N
, to switch it off.
Preheating
Preheating is unnecessary when preparing roasts,
casseroles, and slow-cooking dishes in general. Oven
preheating is recommended, however, for delicate
cooking and dishes that require shorter cooking times
(pastries, etc.). Consult the cooking time tables at the
back of the handbook.
Selecting the temperature for convection
cooking
Fan convection cooking temperatures are generally
between 20
temperatures (heat exclusively supplied from above and
below).
o
Cand40oC lower than natural convection
can be turned in either
Q
must be turned to
P
Summary table
Cooking functions and temperatures
The following table shows cooking modes and
temperatures for oven and grill cooking.
Control knob
Temperature Cooking
o
C function
Off
Oven light
Lower and upper
heating elements
Normal grill
Turbo grill
Booster – Quick heat
Booster – Quick cooking
Lower heating element
Fan convection
cooking with
lower heating element
Fan convection cooking
Energy saving tips
You can utilise residual heat by setting the control knob
to “0” for approximately 5 or 10 minutes to finish
nearly all types of cooking.
You can also cook side dishes, such as potatoes, rice or
vegetables, together with the meat course.
N
-Max
N
-200
N
-200
N
-200
N
-250
N
-150
N
-250
N
-250
N
N
0
Å
Þ
W
P
w
2
Z
ç
117
M Y
117
N C
USING THE MULTIFUNCTION OVEN
ACM 392 N
OVEN LIGHT
Å
To switch on the oven light turn the cooking function
selector knob
direction).
toÅ(the knob can turn in either
T
TRADITIONAL CONVECTION
COOKING
Þ
Conventional cooking with heating from top and
bottom. In this position the lower and upper heating
elements are switched on. Heating takes place through
natural convection and thermostat temperature can be set
between 50
oven preheating.
Tip:
This function is particularly suitable for desserts that must
be heated from below, such as fruit pies, bread, pizzas
and roasts, e.g. chicken.
W
In this position the infrared heating element is working.
Heat is supplied by radiation. The thermostat must be set
to max. 200
Tip:
This function is particularly useful for gratins or browning,
for example onion soup, toast and sausages.
o
C and Max. This type of cooking requires
NORMAL GRILL
o
C. Use with the oven door closed.
TURBO GRILL
P
In this position the upper heating element and the grill
element are on simultaneously so that the corner areas
are also heated. Heat is radiated over the entire surface
area of the grill. Set the thermostat to max. 200
with the door closed.
Warning: When using this function, the oven door
becomes very hot. Keep children away!
The operation of the Turbo grill should not exceed
30 minutes.
BOOSTER
w
1 - Quick oven heating.
In this position the grill heating element operates together
with the perimeter heating element and the fan. The
thermostat can be used to set temperatures between
o
C and 200oC. Use with the oven door closed.
50
Tip:
This function is particularly useful for preheating the oven
quickly.
2 - Quick fan convection cooking with grill.
Heat distribution is by means of air circulation and
temperatures are higher towards the top of the oven. The
thermostat can be used to set temperatures between
o
50
C and 250oC.
o
C. Use
Warning: During grilling the oven door becomes
very hot.
Keep children away!
The operation of the grill should not exceed
30 minutes.
118
M Y
118
Tip:
This mode is particularly suitable for dishes that call for
fast cooking at high temperatures.
Warning: When using this function the oven door
becomes very hot. Keep children away!
LOWER HEATING ELEMENT
2
In this position only the lower element is switched on.
Heat is distributed by natural convection. The thermostat
can be set between 50 and 150
are not available.
o
C; higher temperatures

N C
USING THE MULTIFUNCTION OVEN
ACM 392 N
FAN CONVECTION COOKING WITH
Z
LOWER HEATING ELEMENT
This mode combines the lower heating element, the
perimeter heating element and the fan. The food is
cooked by forced air circulation with additional heat from
the bottom of the oven. The thermostat can be set
between 50
Tip:
This cooking mode is ideal for large joints of meat and
large quantities of food that call for uniform cooking
inside and out, e.g. roasts, turkey, chicken, cakes, etc.
ç
In this position the perimeter resistance and the fan are
on. Heat is distributed by air circulation. Thermostat
temperature can be adjusted between 50 and 250
Preheating is not required.
Tip:
This function is particularly useful when using more than
one oven level to prepare cakes, pastry, etc. or roasts
such as beef, pork or lamb.
Fan cooking and browning
The
skewer type cooking without using a spit, because the
forced air circulation ensures even cooking on all sides.
Preheat the oven, setting the thermostat on 250
the meat or other food to be grilled, close the oven door
and set the temperature between 50
before cooking is complete, spread butter on the food so
that a thin crust forms, similar to au gratin preparation.
o
C and 250oC.
FAN CONVECTION COOKING
w
Zç
functions are used for perfect spit
o
C and 200oC. Just
o
C.
o
C. Put in
Simultaneous cooking of different food
Set the mode selector knob to
kinds of food at the same time. For example, you can
grill fish or meat at the top of the oven while baking a
cake at the bottom, without any risk of contamination
of flavour or aroma.
For this type of cooking observe the following basic
rules:
- Cooking temperature for each food type must be
roughly the same (difference within 20
- Cooking times may differ. This oven function allows
considerable energy savings.
to cook different
ç
o
C-25oC).
Roasts
For traditional roasts allow the meat to cook evenly. Make
sure the temperature is between 180
set cooking time in relation to the quantity and type of
meat you are preparing.
M Y
o
C and 200oCand
119
119
N C
CLEANING AND MAINTENANCE
x
Before any cleaning and maintenance operation,
make sure that the appliance is switched off.
COOKING TOP
x
Clean with a soft cloth and fat-soluble household
cleaner. Do not use scouring powder.
x
Remove boiled-over food immediately. If it has dried
on or burnt, first soak with a wet cloth.
GRILL HEATING ELEMENT
x
The heating element is self-cleaning and does not
require maintenance.
INNER GLASS OF OVEN DOOR
x
To clean the oven door thoroughly, remove the
inner pane by unscrewing the fixing screws.
HOTPLATES
x
wipe with a damp cloth.
x
if they are very dirty use liquid scouring agent or
household sponge with special layer of abrasive
sponge.
x
wipe the cleansing agent off. Dry the hotplate by
switching on briefly.
CLEANING THE OVEN AND THE
ACCESSORY
x
Following each oven cooking session, allow the
oven to cool and then clean it. This precaution
eliminates the risk of burning food residues the next
time the oven is used.
x
Do not use scouring powder. To remove
accumulated dirt, use a specific commercially
available cleaning agent and follow the
manufacturer’s instructions.
x
Clean outer surfaces of the appliance with a damp
cloth and hot water. Do not use scouring powder or
abrasive cleaners under any circumstances.
x
Clean the oven door window and the light cover
with a cleaning agent.
x
Theaccessoriescanbewashedbyhandorina
dishwasher, using a specific detergent for ovens.
x
After prolonged use of the oven, it may be
necessary to dry the water that tends to condense
inside the door and around the gasket [seal].
CHANGING THE OVEN LIGHT
1. Disconnect the electrical power supply (for example,
by switching off the main power switch).
2. Unscrew the light cover
3. Fit a new bulb.
4. Refit the cover.
Note:
Use only bulbs designed to resist up to 300
following characteristics: 15 W, 230 V, type E-14.
Spare bulbs can be ordered from Customer Service.
o
Cwiththe
Do not use a steam cleaner because the
moisture can get into the appliance thus make
it unsafe.
120
M Y
120

N C
CLEANING AND MAINTENANCE
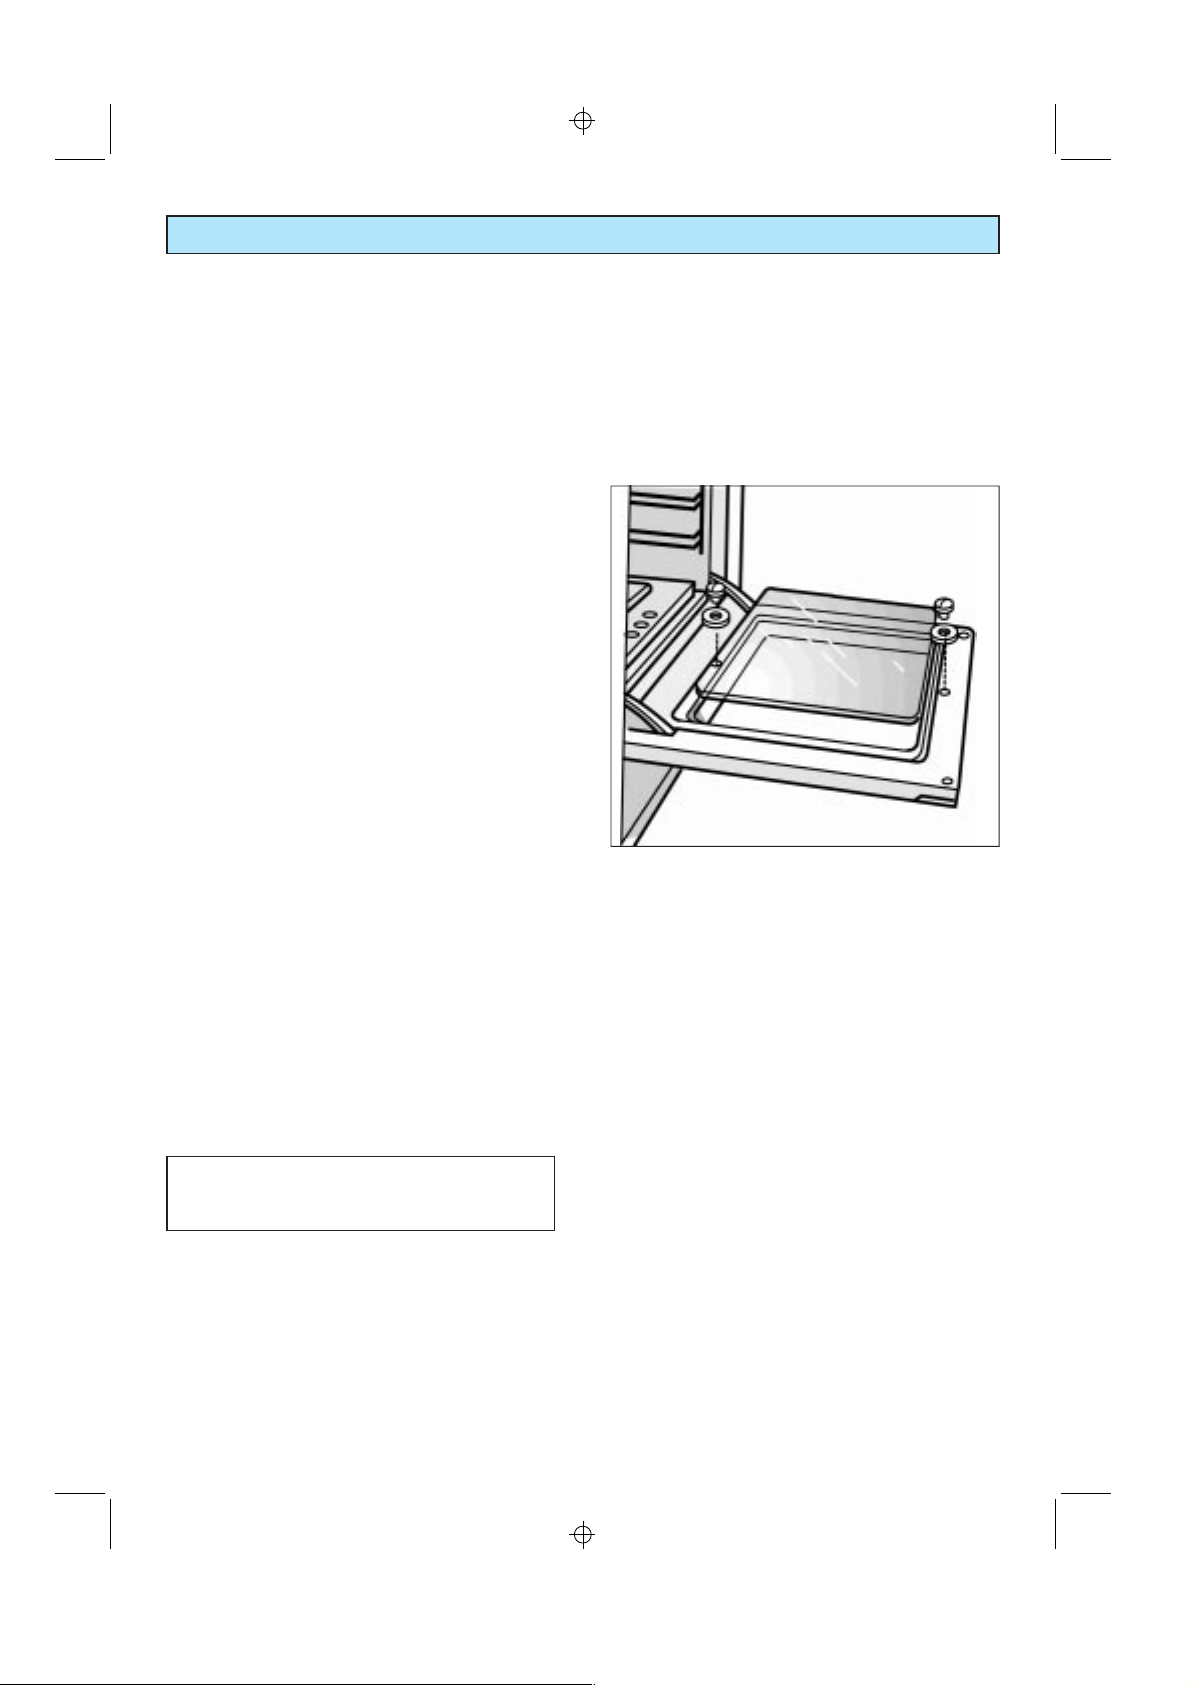
DISMANTLING THE DOOR
Please operate as follows:
x
Open the door completely.
x
The swivel retainers of the rh and lh hinges are
hooked onto the metal bar above them.
x
Lift the oven door slightly. The notch on the bottom
of the hinge will disengage.
x
Now pull the oven door forwards off the appliance.
Release both hinge sections from the slots.
DOOR ASSEMBLY
x
Grip the door (as indicated in figure) and refit it in
reverse order of removing procedure.
121
M Y
121

N C
TROUBLE-SHOOTING GUIDE
1. Hotplate not working
Check:
x
that the corresponding knob is on the required
temperature setting.
x
that the appliance is receiving electrical power.
2. Oven not working.
Check:
x
that the function selector knob is on the required
position
x
that the temperature knob is on the required
position.
x
that the appliance is receiving electrical power.
3. Oven light not working.
Check:
x
that the appliance is receiving electrical power.
x
that the light is not burnt out (if it is, fit a new light).
AFTER SALES SERVICE
Before you contact the After-Sales Service:
x
Check the instructions in the “Troubleshooting”
section to see whether you can deal with the
problem without help.
x
Connect the appliance to the power supply again to
see if the problem persists.
x
If the problem persists, call in the After-Sales Service.
When you call the After-Sales Service, please provide
the following details:
x
A brief description of the fault;
x
The appliance’s exact service number (the number
indicated alongside the word
x
Your full address;
x
Your telephone number and local dialling code;
x
When you can be contacted.
l
)
l
The service number can be seen on the bottom
left-hand side when you open the oven door.
122
M Y
122

N C
INSTALLATION
GENERAL INFORMATION
1. The appliance is built in compliance with applicable
safety regulations and national/international EU
directives.
2. The appliance must be installed by a licensed
electrician in compliance with the laws in force in
your country and in observation of the instructions
supplied by the manufacturer.
3. Remove all packing material from around and inside
the appliance.
The
conforms to the following EU directives:
x
x
The connection of the appliance to the
grounding unit is mandatory. The
manufacturer declines every responsability for
any inconvenience resulting from the
inobservance of this condition.
Once the cooker has been installed, the switch or
socket must always be accessible.
marking confirms that the appliance
n
90/683; 73/23 (low voltage directive) and
amendments;
89/336 (electromagnetic compatibility) and
amendments.
ADJUSTABLE PLINTH (not for Denmark)
123
M Y
123

N C
INSTALLATION
LOCATION
The cooker has type “Y” overheating protection so that
it can be installed in a cabinet.
The kitchen furniture near the sides of the cooker
should be made of heat-resistant material.
AMENDED INSTRUCTIONS
ANTI-TILT BRACKET
This cooker must not be used until it has been
fastened to the anti-tilt bracket.
Attaching the anti-tilt bracket:
x
After you have located where the cooker is to be
positioned mark, on the wall, the place where the 2
screws of the anti-tilt bracket have to be fitted.
Please follow the dimensions given in the drawing
below.
x
Maketwoholesofdiameterø8mmonthewall
and insert the plastic plugs.
x
Move the cooker to the wall and adjust the height
of the anti-tilt bracket so that it can engage in one
slot of the cooker back.
x
Attach the anti-tilt brachet tightly.
x
Push the cooker against the wall so that the anti-tilt
bracket is fully inserted in one slot of the cooker
back.
Only for DENMARK
For 850 mm high cookers, an additional base can be
ordered separately which can be installed under the
cooker itself, thus bringing the overall height to
900 mm.
124
M Y
124
Cookers with plinth (H = 900 mm) A = 130 mm
Cookers without plinth (H = 850 mm) A = 80 mm

N C
TABLES
The cooking times indicated are approximate; the temperature can be increased or decreased depending on the
starting temperature of the food to be cooked, its size, etc. First set the lower temperature indicated, then the higher
one if necessary.
Levels A, B, C and D are (from the top)
1. Confectionery
Confectionery
Kouglof 150 » 160 C 160 » 190 D or C 0:55 » 1:15
Biscuits preheat the oven preheat the oven
Pastry 170 » 180 C or B 200 » 220 D or C 0:15 » 0:30
Fruit cake 160 » 170 C or B 180 » 210 D or C 0:45 » 1:00
Cheese cakes 140 » 160 C or B 170 » 190 D or C 1:00 » 1:30
Croissants 150 » 170 C 180 » 200 C 0:25 » 0:40
Bread if necessary 230
Confectionery to be cooked on baking tray
Cake with thick trimmings
1 layer 160 » 180 B 180 » 200 C or B 0:30 » 0:45
2 layers 150 » 170 C and A - - 0:40 » 0:55
3 layers 150 » 170 D; B; A - - 0:40 » 1:00
Fruit cake
1 layer 150 » 170 B 180 » 200 C or B 0:30 » 0:45
2layers
Rolled biscuits preheat the oven
2. Cooking meat and fish
Meat
Boneless roast (1 kg) 140 » 160 C 175 » 200 C 1:40 » 2:20
Roast with rind (1 kg) 160 » 170 C 190 » 210 C 1:40 » 2:20
Roast beef 150 » 170 C 190 » 210 C 1:00 » 1:30
Meat loaf (1/2 kg) 140 » 160 C 190 » 210 C 1:00 » 1:10
Roast with bone (1 kg) 150 » 160 C 175 » 200 C 2:00 » 2:40
Chops 150 » 160 C 180 » 200 C 1:20 » 1:50
Poultry
Chicken 160 » 180 C 190 » 210 C or B 1:00 » 1:30
Duck (1/2 kg) 160 » 170 C 190 » 210 C 1:50 » 2:10
Goose 140 » 160 C 180 » 200 C 2:30 » 3:00
Fish
Whole fish up to 2 kg 150 » 170 C or B 200 » 220 C or B 0:45 » 1:00
Steam cooking up to 2 kg - - 180 » 190 C 0:35 » 1:00
Gameandroastsinapan
Depending on the food 180 » 230 D or C 200 » 230 D or C 0:50 » 2:00
Static/Fan function
Temperature Shelf Temperature Shelf
o
C] position [oC] position
[
150 » 160 C 160 » 180 D or C 0:30 » 0:45
preheat preheat the oven
180 » 200 C 200 » 230 C 0:50 » 1:10
if necessary preheat
150 » 170 C and A - - 0:35 » 0:50
160 » 180 C or B 190 » 210 C 0:10 » 0:20
Grill with fan function
Temperature Shelf Temperature Shelf
o
C] position [oC] position
[
V
X
Static function
preheat the oven
Static function
Þ
Þ
Cooking
times
[Hours:min]*
Cooking
times
[Hours:min]*
Gratinating
* The cooking times refer to a meat temperature of 10oC.
Bigger roasts and frozen meats require a longer cooking time.
230 » 250 C or A 250 B or A 0:15 » 0:30
125
M Y

N C
TABLES
Put the drip tray in the oven as indicated in the grill section.
Preheat the grill for 5 minutes.
Often the first side of the food needs longer cooking than the second.
3. Grill
Meat
Rump steak, 200 g 250 A 5 » 8 per side
Steak, fillet up 2.5 cm thick 250 A 7 » 9 per side
Steak, ficker fillet 250 B 10 » 15 per side
Thin fillet 225 » 250 B 12 » 15 per side
Hamburger 225 » 250 A 6 » 8 per side
Liver (in slices) 225 » 250 A 5 » 7 per side
Chicken thighs 210 » 250 B 15 » 20 per side
Roast beef, 500 g 210 » 225 B 15 » 20 per side
Chicken (half) 200 » 225 B 20 » 25 per side
Fish
Mackerel 200 » 220 B 6 » 10 per side
Herring 200 » 225 B 5 » 8 per side
Fillets 225 » 250 A 6 » 8 per side
Gratinating
Toasted cheese sandwich 225 » 250 B or A 5 » 8
Onion soup 225 » 250 B 6 » 8
Fruit and vegetables
Bananas (halved) 210 » 225 A 5 » 7
Stuffed tomatoes 225 » 250 A 6 » 8
Þ
Temperature Shelf Cooking time
o
[
C] position [min]
126
M Y

N C
TABLES
4. Fan cooking
Defrosting
Chicken 50 C or B 1:20 » 1:35
Confectionery 150 » 170 C or B 0:05 » 0:20
Pre-cooked dishes 150 » 170 C or B 0:30 » 0:50
Drying without changing colour 100 » 120 - -
Bread, pizza 190 » 220 B – D 0:20 » 0:25
(respect the degree of resistance at the Pre-heat I temperature
heat declared by the manufacturer). regulation
Biscuits, puff pastry, kouglof 140 » 160 C or B 0:16 » 0:20
Croissants, defrosting frozen products 150 » 170 B – D 0:18 » 0:22
(pre-cooked food), sterilise Pre-heat I temperature
Cheese cake, main dishes and 140 » 160 C or B 1:00 » 1:30
confectionery which does not require
a high temperature
Meat
Boneless roast (1 kg) 140 » 160 C 1:40 » 2:20
Meat loaf (1/2 kg) 140 » 160 C 1:00 » 1:10
Roast with bone (1 kg) 150 » 160 C 2:00 » 2:40
Chops 150 » 160 C 1:20 » 1:50
Fish
Whole fish up to a 2 kg 150 » 170 C or B 0:45 » 1:00
Steaming up to 2 kg 150 » 160 C 0:35 » 1:00
V
Temperature Shelf Cooking time
o
[
C] position [Hours:min]
Pre-heat I temperature
regulation
regulation
Game and roasts in a pot
Depending on the food 180 » 230 D or C 0:50 » 2:00
127
M Y

N C
Ecological Paper − Cod. 1101746 − Whirlpool is a registered trademark of Whirlpool, U.S.A.
u
5019 100 70251/A
M Y
567O2
Printed in Italy 2/03/01
 Loading...