


3XARG457WP00
\
ENVIRONMENTAL HINTS
Packing L/J
Do not throw the packing into the garbage: first sort out the
different materials (i.e.: steel, cardboard, polystyrene), following local regulations.
Conformity declarations
Thus appliance incorporates parts intended to come into contact with foodstuffs in compliance with EEC directive
89/l 09/CEE.
KNOW YOUR FROST FREE APPLIANCE
The main advantage of your refrigerator and low temperature
compartment with fan circulation is the total absence of frost
and ice forming on the compartments walls, thanks to the
process described below.
The cold air is produced by an evaporator and is circulated by
means of a fan into the two compartments.
The air, having been circulated, is again passed to the evaporator.
This keeps the humidity low. In this way, there will be no frost
formation on the compartment walls, as in a traditional appliance, and defrosting is no more needed.
The “ventilated cold” system ensures a better storage of foods
maintaining their original condition for a longer period of time.
DESCRIPTION OF THE APPLIANCE
(Fig. 1)
A) Ice cube tray
6) Low temperature compartment grid
C) Control panel
D) Rating plate (on side wall)
E) Interior light
F) Rollers
G) Plinth
H) Crispers
I) Crispers cover
J) Removable shelves
K) Meat drawer
L) Refrigerator racks
M) Butter compartment
N) Low temperature compartment shelves
INSTALLATION
(Fig. 2)
Please check your appliance and ensure that it is undamaged;
any transport damage must be reported to your dealer within
24 hours of receipt The appliance should not be installed close
to heat sources such as cookers, central heating, boilers, direct
sunlight, etc. If the appliance is to be installed under a kitchen
furniture, allow an extra space of 5 cm approx. above the appliance, and 1 cm approx. at each side.
After installation of the appliance, level the screw (A) (Fig. 3)
of the rollers.
Clean the interior with a sponge dampened in a solution of
lukewarm water and vinegar.
Clean the exterior with a sponge dampened in a solution of
lukewarm water and dry with a soft cloth,
Do not use abrasives, detergents or harsh cleansers.
Mount the internal accessories (Fig. 1).
ELECTRICAL CONNECTION AND
OPERATION
This appliance conforms to EEC directive 87/308 on radiointerference.
Leave the appliance to stand for one hour before connecting it
to the electricity supply. Please check that the voltage on the
rating plate (Fig. 4) corresponds to the voltage in your home
(220/240 V).
The earthing of this appliance is compulsory by law.
The Manufacturer will accept no liability for damage to
persons or objects arising from the non-observance of
this requirement.
If the plug and the wall socket do not comply, have the socket
replaced by a qualified electrician.
He should also check that the section of the socket wires can
withstand the power absorbed by the appliance.
The use of the adapters, multiple sockets and extension cords
is not advisable.
If absolutely necessary, use simple or multiple adapters and extension cords in compliance with local safety regulations,
paying attention not to exceed the maximum amperage, which
is marked on the simple adaptors and on extension cords and
that of the total power marked on the multiple adapters.
Connect the appliance to the supply by means of the plug; the
Interior light switches on when the refrigerator door is opened.
Some hours are necessary to attain the correct storage temperature in the appliance.
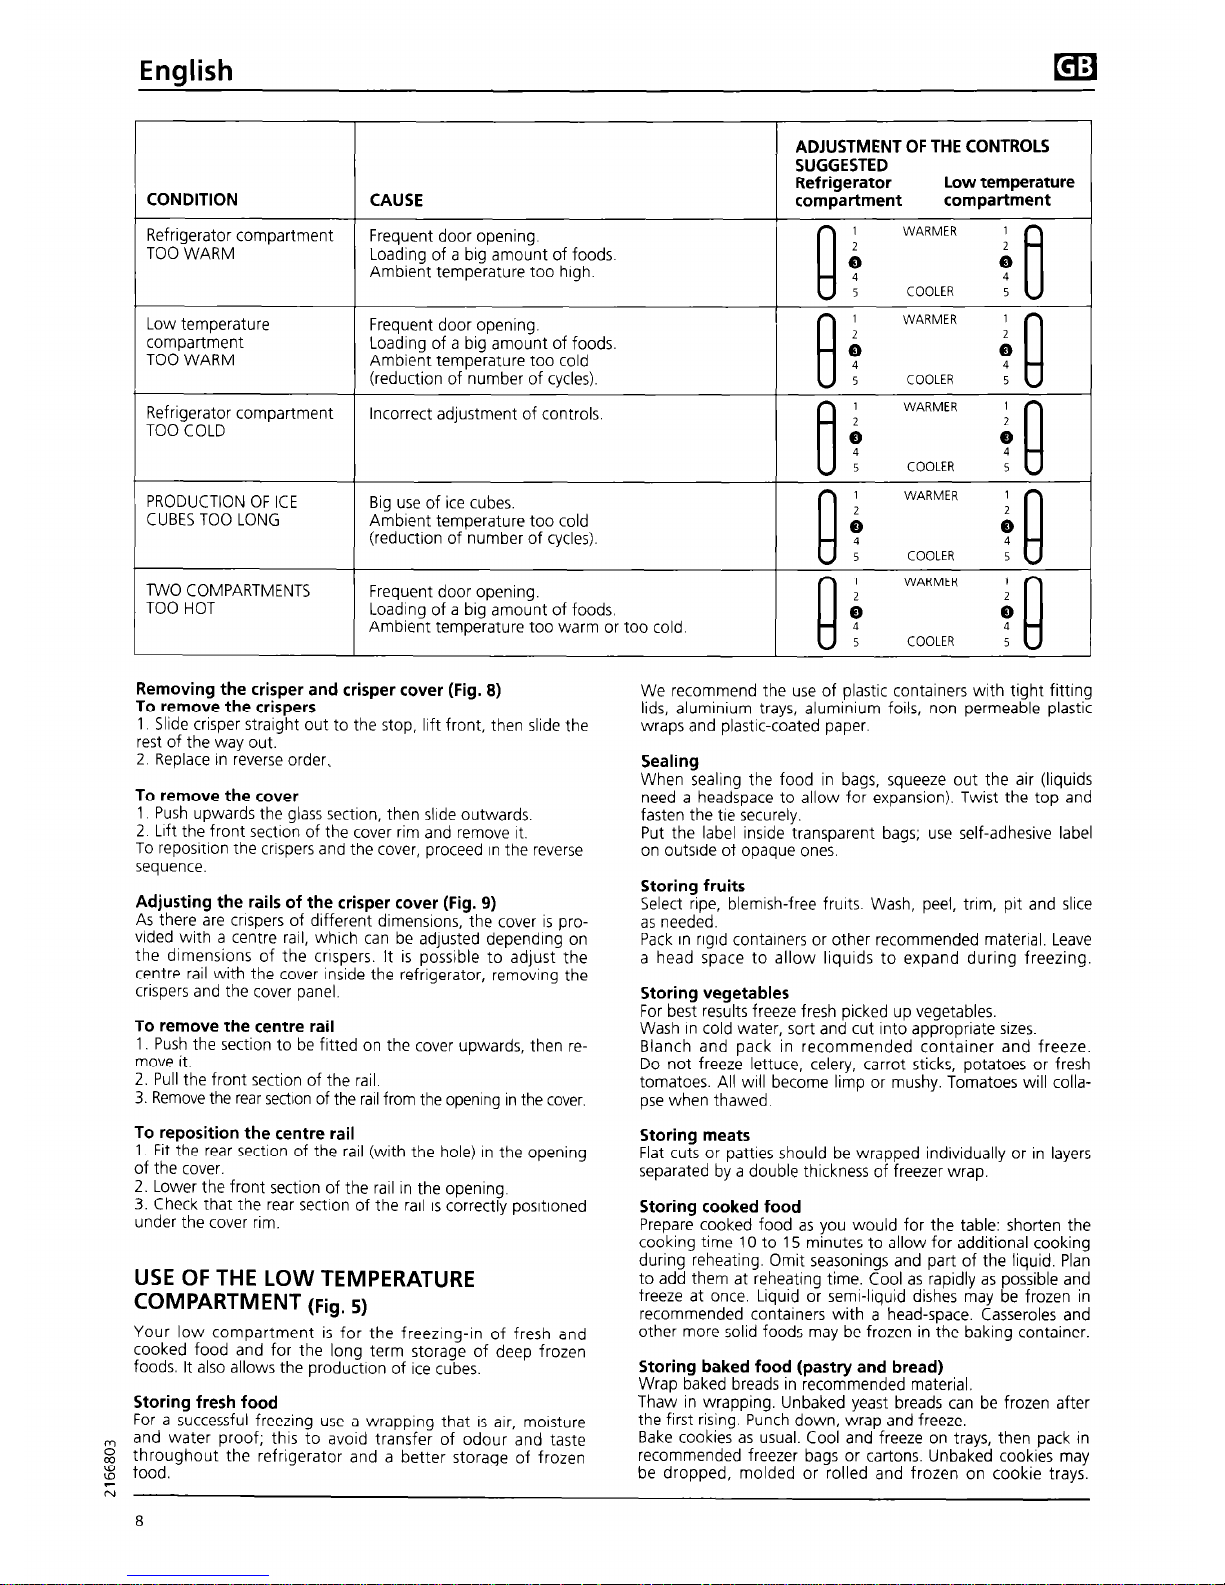
ADJUSTING THE TEMPERATURES
To modify the temperature of the refrigerator or of the low
temperature compartment, use the adjustment listed in the table page 8.
- Adjust the refrigerator thermostat control.
- Wait 24 hours approx. prior to re-adjust it.
- If required, adjust the thermostat control of the low temperature compartment.
USE OF THE REFRIGERATOR
COMPARTMENT
(Fig. 5)
We recommend that you wrap all items stored in the refrigerator compartment in ‘cling films, aluminium foil or keep them in
a covered container. This prevents foods from losing their freshness and stop strong smells and flavours being transferred
from one food to another. Some fruits with particularly thick
rind or skin, can be stored without wrapping.
Different foods are best stored in the positions indicated hereafter:
Meat, fish: store in the appropriate drawer.
Eggs, cheese, dairy produces: use the appropriate compartments in the Inner door liner.
Butter: store in the compartment In the inner door liner.
Fruits and vegetables: store on the inner door liner racks.
Canned foods: once the can has been opened, transfer unused
food into a non-metallic container.
Important: Store all foods so as to permit free circulation of air.
Allow cooked food to cool before storing in the refrigerator
compartment.
Store liquids in covered containers. You may adjusts the shel-
ves in height dependent on your needs.
Adjusting the shelves
The shelves may be adjusted In height dependent on your
needs.
To remove the shelves (Fig. 6)
1. Pull out to the stop
2. Lift up at back.
3. Pull out completely.
To replace the shelves, proceed in the reverse sequence.
Removing the meat drawer (Fig. 7)
To remove the meat drawer:
1. Slide the meat drawer out to the stop.
2. Lift up at front.
3. Slide the drawer the rest of the way out.
4. Replace in reverse order.
To remove the cover (Fig. 7)
1, Remove the meat drawer as previously described.
2. Push the cover backwards and lift it at both sides.
English
ADJUSTMENT OF THE CONTROLS
SUGGESTED
Refrigerator
Low temperature
CONDITION CAUSE
compartment
compartment
Refrigerator compartment Frequent door opening.
Q
1
WARMER
1
TOO WARM
Loading of a big amount of foods.
Ambient temperature too high.
;
z,
4
4
5
COOLER
5
u
Low temperature
Frequent door opening.
1
WARMER
1
compartment
Loading of a big amount of foods.
TOO WARM
Ambient temperature too cold
E
;
;
4
4
(reduction of number of cycles).
5
COOLER
5
Q
Refrigerator compartment
Incorrect adjustment of controls.
1
WARMER
1
TOO COLD
u
;
;
4
4
5 COOLER
5
Q
PRODUCTION OF ICE
Big use of ice cubes.
1
WARMER
1
CUBES TOO LONG
Ambient temperature too cold
(reduction of number of cycles).
Q
;
;
4
4
5
COOLER
5
Q
TWO COMPARTMENTS
Frequent door opening.
1
WARMER
1
TOO HOT
Loading of a big amount of foods.
Q
;
;
Ambient temperature too warm or too cold.
4
4
5
COOLER 5
Q
Removing the crisper and crisper cover (Fig. 8)
To remove the crispers
I. Slide crisper straight out to the stop, lift front, then slide the
rest of the way out.
2. Replace In reverse order,
To remove the cover
I. Push upwards the glass section, then slide outwards.
2. Lift the front section of the cover rim and remove It.
To reposrtron the crispers and the cover, proceed in the reverse
sequence.
Adjusting the rails of the crisper cover (Fig. 9)
As there are crispers of different dimensions, the cover is provided with a centre rail, which can be adjusted depending on
the dimensions of the cnspers. It is possible to adjust the
centre rail with the cover inside the refrigerator, removing the
crispers and the cover panel.
To remove the centre rail
1. Push the section to be fitted on the cover upwards, then remove it.
2. Pull the front section of the rail.
3. Remove the rear section of the rail from the opening in the cover.
To reposition the centre rail
I, Fit the rear section of the rail (with the hole) In the opening
of the cover.
2. Lower the front section of the rail in the opening.
3. Check that the rear section of the rail is correctly positioned
under the cover rim.
USE OF THE LOW TEMPERATURE
COMPARTMENT (Fig. 5)
Your low compartment is for the freezing-in of fresh and
cooked food and for the long term storage of deep frozen
foods. It also allows the production of ice cubes.
Storing fresh food
For a successful freezing use a wrapping that is air, moisture
and water proof; this to avoid transfer of odour and taste
throughout the refrigerator and a better storage of frozen
food.
We recommend the use of plastic containers with tight fitting
lids, aluminium trays, aluminium foils, non permeable plastic
wraps and plastic-coated paper.
Sealing
When sealing the food in bags, squeeze out the air (liquids
need a headspace to allow for expansion). Twist the top and
fasten the tie securely.
Put the label inside transparent bags; use self-adhesive label
on outside of opaque ones.
Storing fruits
Select ripe, blemish-free fruits. Wash, peel, trim, pit and slice
as needed.
Pack in rigid containers or other recommended material. Leave
a head space to allow liquids to expand during freezing.
Storing vegetables
For best results freeze fresh picked up vegetables.
Wash in cold water, sort and cut into appropriate sizes.
Blanch and pack in recommended container and freeze.
Do not freeze lettuce, celery, carrot sticks, potatoes or fresh
tomatoes. All will become limp or mushy. Tomatoes will collapse when thawed.
Storing meats
Flat cuts or patties should be wrapped individually or in layers
separated by a double thickness of freezer wrap.
Storing cooked food
Prepare cooked food as you would for the table: shorten the
cooking time 10 to 15 minutes to allow for additional cooking
during reheating. Omit seasonings and part of the liquid. Plan
to add them at reheating time. Cool as rapidly as possible and
freeze at once. Liquid or semi-liquid dishes may be frozen in
recommended containers with a head-space. Casseroles and
other more solid foods may be frozen in the baking container.
Storing baked food (pastry and bread)
Wrap baked breads in recommended material.
Thaw in wrapping. Unbaked yeast breads can be frozen after
the first rising. Punch down, wrap and freeze.
Bake cookies as usual. Cool and freeze on trays, then pack in
recommended freezer bags or cartons. Unbaked cookies may
be dropped, molded or rolled and frozen on cookie trays.
 Loading...