

Whirlpool 3DWTW4800YQ Owner's Manual

TOP-LOADING WASHER
USE AND CARE GUIDE
GUIDE D'UTILISATION ET D'ENTRETIEN
DU LAVE-LINGE A CHARGEMENT PAR LE DESSUS
LAVADORA DE CARGA SUPERIOR
MANUAL DE USO Y CUIDADO
Table of Contents
WASHER SAFETY ............................................................................................ 2
WHAT’S NEW UNDER THE LID ......................................................................3
CONTROL PANEL AND FEATURES ...............................................................4
CYCLE GUIDE .................................................................................................. 6
USING YOUR WASHER ................................................................................... 7
WASHER MAINTENANCE .............................................................................10
TROUBLESHOOTING .................................................................................... 12
Table des matières
SÉCURITÉ DU LAVE-LINGE .......................................................................... 16
QUOI DE NEUF SOUS LE COUVERCLE? .................................................... 17
TABLEAU DE COMMANDE ET CARACTÉRISTIQUES ................................ 18
GUIDE DE PROGRAMMES ........................................................................... 20
UTILISATION DU LAVE-LINGE ..................................................................... 21
ENTRETIEN DU LAVE-LINGE ....................................................................... 24
DÉPANNAGE .................................................................................................. 26
W10454259A
Índice
SEGURIDAD DE LA LAVADORA ................................................................... 32
¿QUÉ HAY DE NUEVO DEBAJO DE LA TAPA? ........................................... 33
PANEL DE CONTROL Y CARACTERÍSTICAS ............................................. 34
GUIÁ DE CICLOS ........................................................................................... 36
USO DE SU LAVADORA ................................................................................ 37
MANTENIMIENTO DE LA LAVADORA ......................................................... 40
SOLUCIÓN DE PROBLEMAS ........................................................................ 42
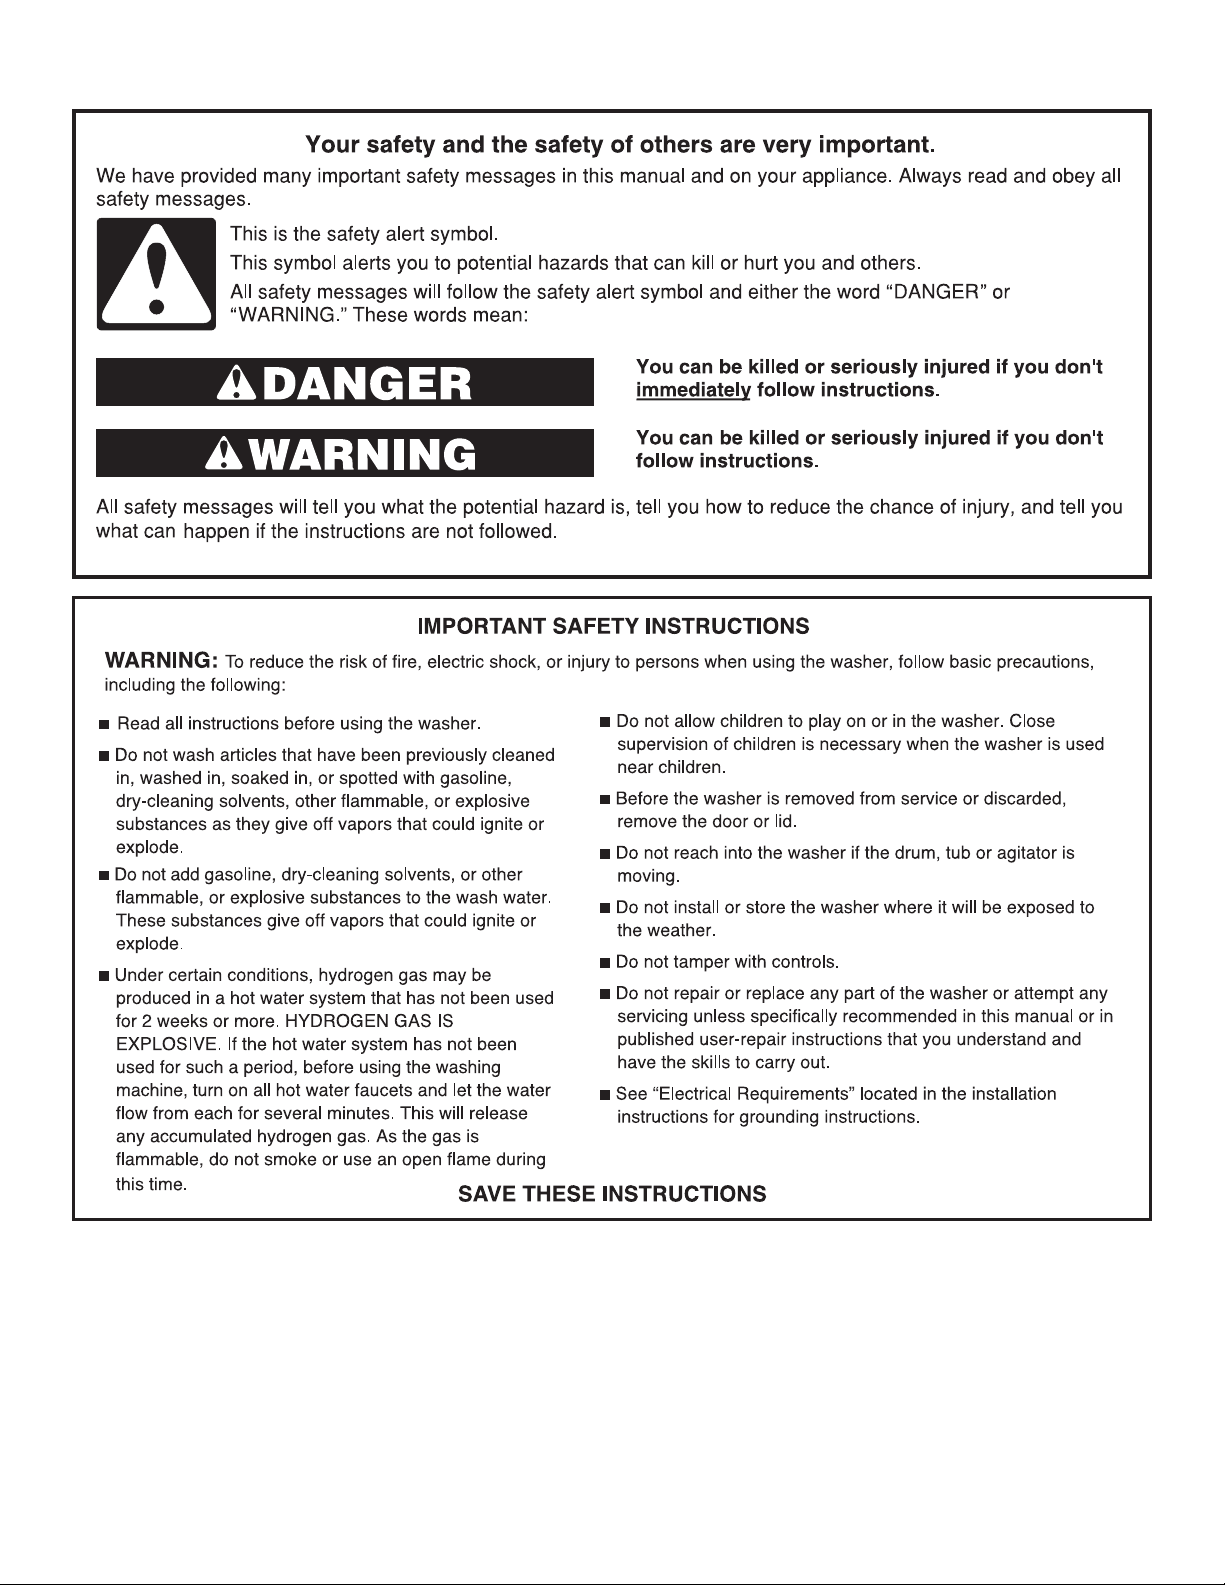
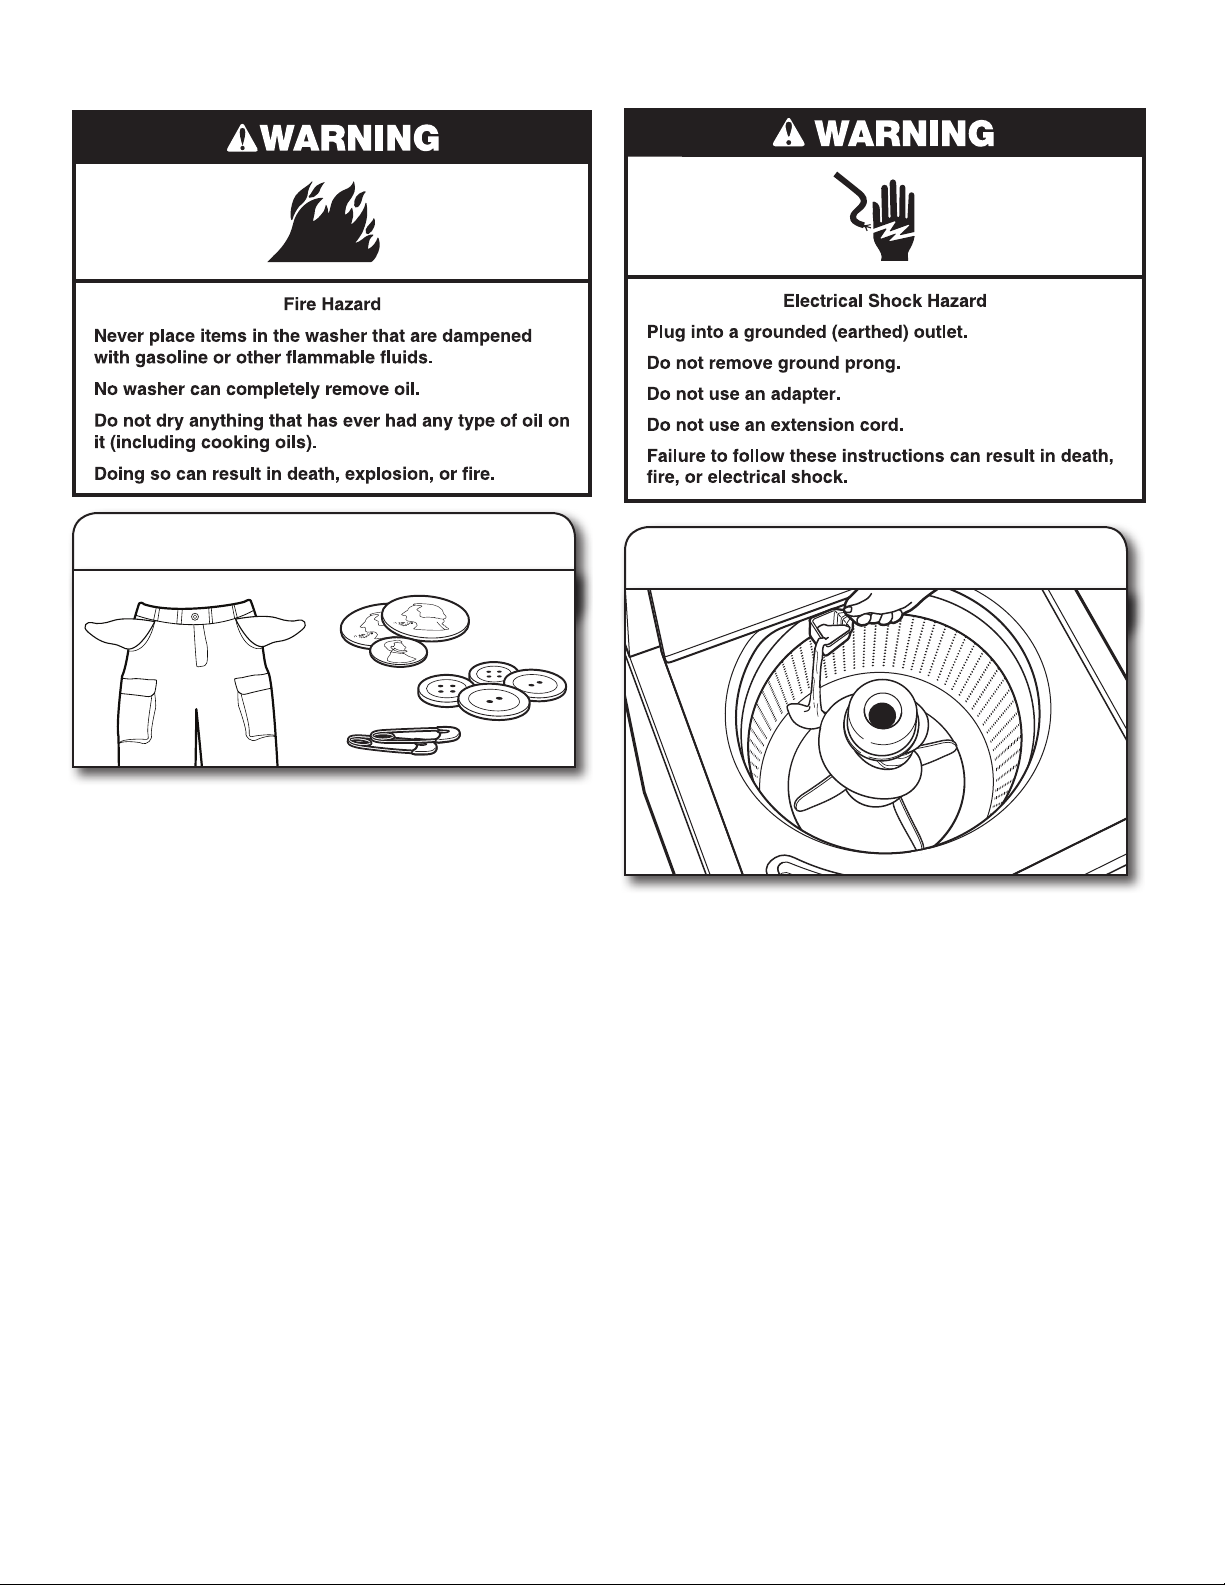
WASHER SAFETY
2

WHAT’S NEW UNDER THE LID?
Your new washer will operate differently than your past agitator-style washer.
Lid Lock
To allow for higher spin speeds, the lid will lock and the
Lid Locked light will turn on. When this light is lit, the lid is
locked and cannot be opened. When this light is blinking,
the washer is paused. When this light is off, the lid can be
opened. After a cycle is started, the lid locks, unlocks, and
locks again. If you need to open the lid to add a garment
after this point, you must press START/PAUSE/UNLOCK
and wait for the lid to unlock. The lid will only unlock after
washer movement has stopped. Depending on when in
the cycle you try to pause, it may take several seconds to
several minutes for the lid to unlock.
Sensing
This washer will perform a series of spins to check for load
balance. When a load is started, it may take 2–3 minutes
before water begins to enter the basket. During this time,
a series of clicks and a whirring noise signal that sensing
technology is determining if there is an off-balance load.
IMPORTANT:
• Washer will not operate if the lid is open.
• Washer will not begin to ll with water until the lid is closed, locked, and the sensing process is complete.
This delay in ll could take 2–3 minutes.
• Fabric Softener Added option must be selected “Yes” to ensure fabric softener dispenses at the correct time.
NOTE: Fabric Softener dispenser not available on all models.
Sounds
At different stages of the wash cycle, you may hear
sounds and pauses that are different from those of your
previous washer. For example, you may hear a clicking
and hum at the beginning of the cycle as the lid lock
goes through a self-test. There will be different kinds of
humming and whirring sounds as the agitator tests for
load balance or moves the load. And, sometimes, you may
hear nothing at all as the washer allows time for clothes to
soak.
Spray Rinse
Select cycles default to a spray rinse. During these cycles,
you will hear water enter the washer as the tub spins,
allowing the rinse water to penetrate clothes. Check the
“Cycle Guide” for details.
3

CONTROL PANEL AND FEATURES
4
1
Model 4GWTW4800YQ
1
32
6
4
2
5
Model 4GWTW4740YQ
Not all features and options are available on all models.
LOAD SIZE
1
Select the setting most suitable for your load. Small will
add a low amount of water for smaller loads and Large or
Super (depending on your model) will add the most amount
of water for large or bulky loads. Items need to move freely.
Tightly packing can lead to poor cleaning performance, and
may increase wrinkling and tangling.
2
TEMPERATURE
Temperature Control senses and maintains uniform
water temperatures by regulating incoming hot and
cold water.
Select a wash temperature based on the type of fabric
and soils being washed. For best results and following
the garment label instructions, use the warmest wash
water safe for your fabric.
• Warm and hot water will be cooler than what your
previous washer provided.
• Even in a cold and cool water wash, some warm water
may be added to the washer to maintain a minimum
temperature.
Appearance may vary.
3
OPTIONS (on some models)
The following options may be added to most cycles.
EXTRA RINSE
This option can be used to automatically add a second
rinse to most cycles.
FABRIC SOFTENER ADDED - YES
This option must be selected if using fabric softener
during a cycle. It ensures that fabric softener is added
at the correct time in the rinse for even distribution.
FABRIC SOFTENER ADDED - with EXTRA RINSE
This option combines both the Fabric Softener and the
Extra Rinse options.
4
WASH CYCLE KNOB
Use the Wash Cycle Knob to select available cycles on your
washer. Turn the knob to select a cycle for your laundry load.
See “Cycle Guide” for detailed descriptions of cycles.
6
5
4

5
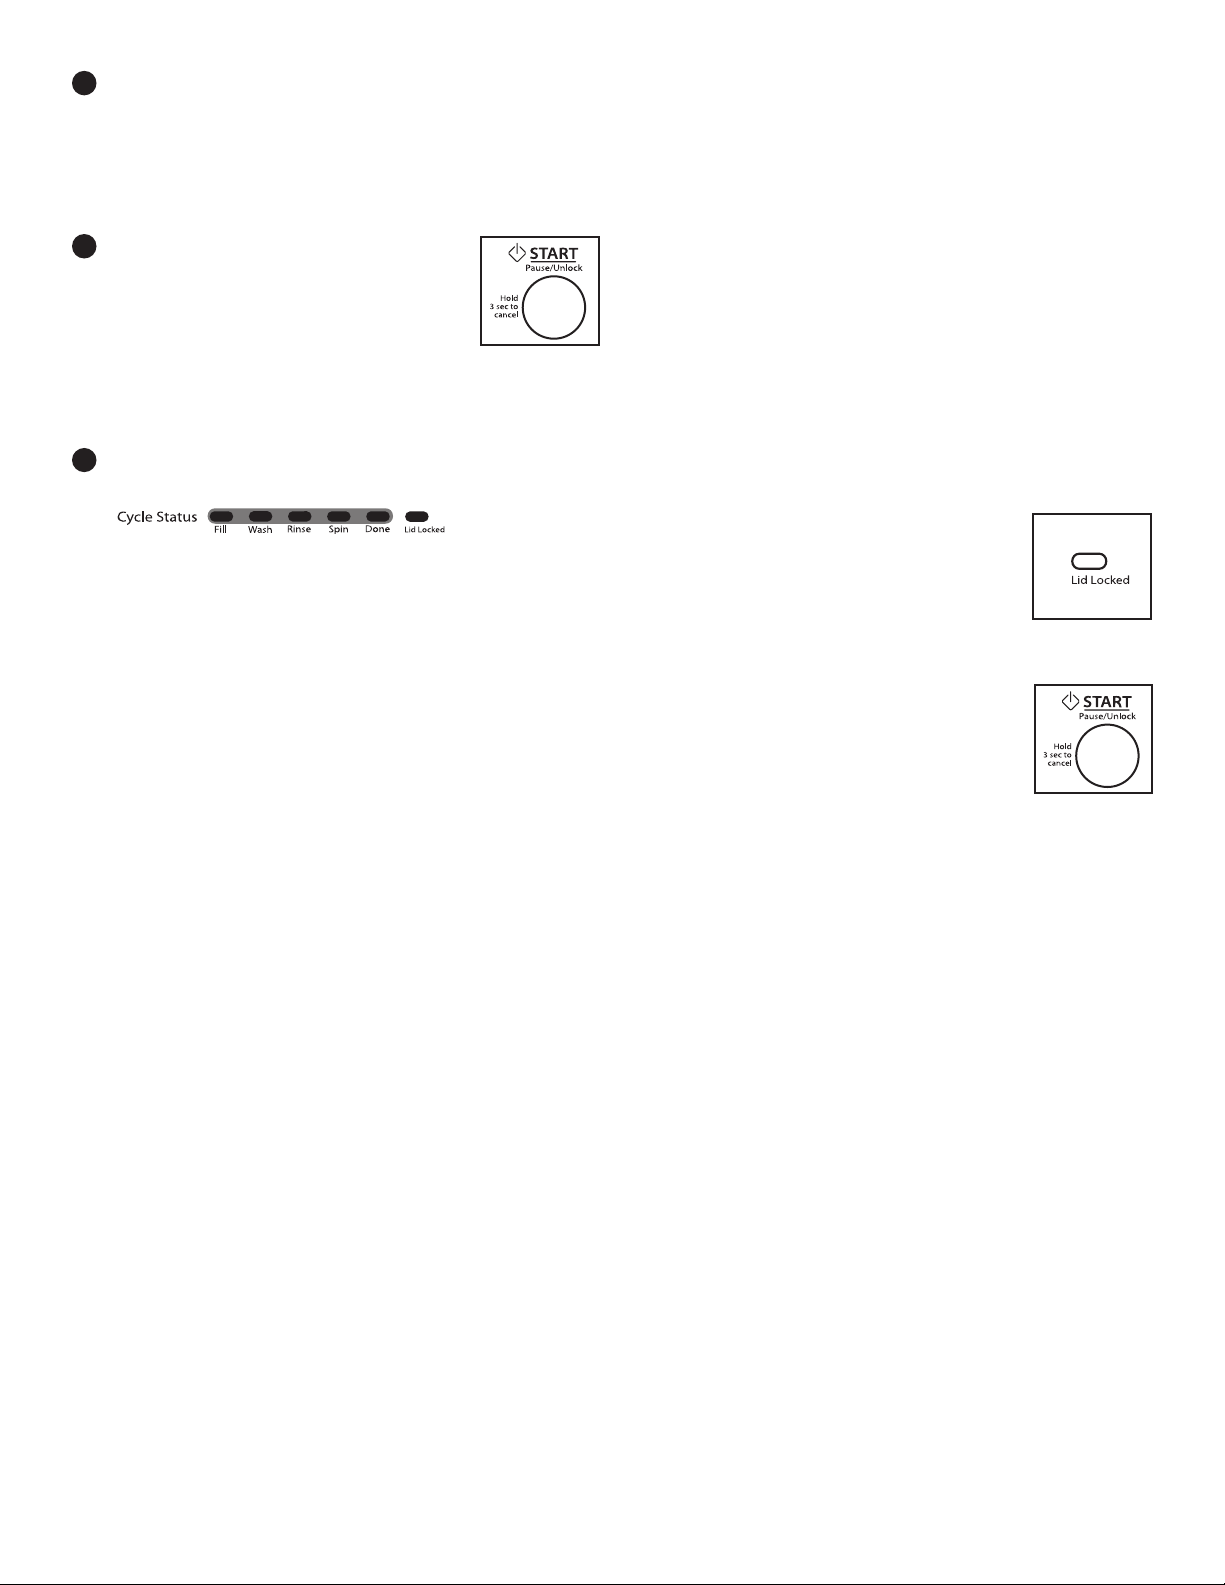
START/PAUSE/UNLOCK BUTTON
Press to start the selected cycle; press
again to pause the cycle and unlock
the lid.
NOTE: If the washer is spinning, it
may take several minutes to unlock the
lid. Press and hold for 3 seconds to
cancel a cycle.
6
CYCLE STATUS LIGHTS INDICATOR
The Cycle Status Lights shows the progress of a cycle.
At each stage of the process, you may notice sounds or
pauses that are different from traditional washers.
FILL
When the START/Pause/Unlock button is pressed,
the washer will rst perform a self-test on the lid lock
mechanism. You will hear a click, and the lid will unlock
briey before locking again. The washer will use spins
to check for load balance. These spins may take
several minutes before water is added to the washer.
You may hear the hum of the spins before lling. This
is normal.
WASH
You will hear the agitator moving the load. The motor
sounds may change at different stages in the cycle.
The wash time is determined by the selected soil level.
RINSE
You will hear sounds similar to the wash cycle as
the washer rinses and moves the load. et déplace
la charge. You may hear the motor turning on briey
(short hum) to move the basket while lling. Fabric
softener will be added if the Fabric Softener option
was selected.
Some cycles use spray rinsing. After draining and
spinning out wash water, the washer will continue to
spin and spray in rinse water for the entire rinse time.
SPIN
The washer spins the load at increasing speeds for
proper water removal, based on the selected cycle
and spin speed.
DONE
Once the cycle is complete, this light will come on.
Remove the load promptly for best results.
LID LOCKED
To allow for proper spin operation, the
lid will lock and the Lid Lock light will
turn on. This light indicates that the lid
is locked and cannot be opened.
If you need to open the lid, press
START/Pause/Unlock. The lid will
unlock once the washer movement
has stopped. This may take several
minutes if the load was spinning at
high speed. Press START/Pause/
Unlock again to resume the cycle.
5

CYCLE GUIDE
For best fabric care, choose the cycle that best ts the load being washed.
Not all cycles and options are available on all models.
Items to
wash:
Sturdy fabrics,
colorfast items,
towels, jeans
Cottons, linens,
sheets, and mixed
garment loads
Light-weight
cotton fabrics
No-iron fabrics,
cottons, perm
press, linens,
synthetics
Lightly-soiled
no-iron fabrics
and synthetics
Machine-wash
silks, lingerie,
washable wools
Swimsuits and
items requiring
rinsing without
detergent
Cycle:
Temperature*:
Spin
Speed:
Normal
Heavy
Normal
Regular
Normal
Light
Casual
Regular
Casual
Light
Delicate Low
Rinse &
Spin
Hot
Warm
Cool
Cold
Hot
Warm
Cool
Cold
Hot
Warm
Cool
Cold
Hot
Warm
Cool
Cold
Hot
Warm
Cool
Cold
Hot
Warm
Cool
Cold
Cold rinse only
High
High
High
Low
Low
High
Cycle Details:
Use this cycle for heavily soiled or sturdy items. This cycle
uses spray rinses only and is the recommended cycle for
use in washer care.
Use this cycle for normally soiled cottons and mixed fabric
loads. This cycle uses spray rinses only.
Use this cycle for lightly soiled mixed loads. This cycle
uses spray rinses only.
Use this cycle to wash loads of no-iron fabrics such as
sport shirts, blouses, casual business clothes, permanent
press, and blends.
Use this cycle to wash lightly-soiled loads of no-iron fabrics
such as sport shirts, blouses, casual business clothes,
permanent press, and blends.
Use this cycle to wash lightly soiled garments indicating
“Machine Washable Silks” or “Gentle” cycle on the care
label. Place small items in mesh garment bags before
washing.
Combines a rinse and high speed spin for loads requiring
an additional rinse cycle or to complete a load after power
interruption. Also use for loads that require rinsing only.
Dripping wet or
hand-washed
items
*All rinses are cold.
NOTE: Select “Fabric Softener Added - Yes” if using fabric softener in your chosen cycle (on some models).
Drain &
Spin
N/A
High
This cycle uses a spin to shorten drying times for heavy
fabrics or special-care items washed by hand. Use this
cycle to drain washer after cancelling a cycle or completing
a cycle after a power failure.
6
USING YOUR WASHER
1. Sort and prepare your laundry
• Empty pockets. Loose change, buttons, or any small object
can pass under the agitator and become trapped, causing
unexpected sounds.
• Sort items by recommended cycle, water temperature,
and colorfastness.
• Separate heavily soiled items from lightly soiled.
• Separate delicate items from sturdy fabrics.
• Do not dry garments if stains remain after washing, because
heat can set stains into fabric.
• Treat stains promptly.
• Close zippers, fasten hooks, tie strings and sashes, and
remove non-washable trim and ornaments.
• Mend rips and tears to avoid further damage to items
during washing.
Helpful Tips:
• When washing water-proof or water-resistant items, load
evenly.
• Use mesh garment bags to help avoid tangling when washing
delicate or small items.
• Turn knits inside out to avoid pilling. Separate lint-takers from
lint-givers. Synthetics, knits, and corduroy fabrics will pick up
lint from towels, rugs, and chenille fabrics.
NOTE: Always read and follow fabric care label instructions to
avoid damage to your garments.
2. Add detergent
Add a measured amount of detergent into the bottom of the
washer basket before adding clothes. If using an Oxi or
color-safe bleach laundry boost product, add to the bottom
of the washer basket, as well.
IMPORTANT: Follow the manufacturer’s instructions to
determine the amount of detergent to use.
7

3. Load laundry into washer
Load garments in loose heaps evenly
around basket wall. For best results, do
not pack the load tightly. Do not wrap large
items such as sheets around the agitator;
load them in loose piles around the sides of
the basket. Try mixing different sized items
to reduce tangling.
IMPORTANT: Do not tightly pack or force items into washer.
Items need to move freely for best cleaning and to reduce
wrinkling and tangling.
4. Add liquid chlorine bleach
to dispenser
5. Add fabric softener to dispenser
(on some models)
Pour a measured amount of liquid fabric
softener into dispenser, always follow
manufacturer’s directions for correct amount
of fabric softener based on your load size.
Dilute liquid fabric softener by lling the dispenser with warm
water until liquid reaches the underside of the rim. See max ll
line arrows. Then select Fabric Softener Added Yes option or
Fabric Softener Added with Extra Rinse option.
IMPORTANT: Fabric Softener Added option must be selected
to “Yes” to ensure proper distribution at correct time in cycle.
Adding Liquid Fabric Softener Manually to Wash Load
During the nal rinse, wait until the washer has completed
ling, press the START/Pause/Unlock button to pause the
washer. Lift the lid and add the measured recommended
amount of liquid fabric Softener. Close the lid and press the
START/Pause/Unlock button again to start the washer.
IMPORTANT: Fabric Softener Added option must be selected
to “Yes” to ensure proper distribution of the fabric softener
during the rinse portion of the cycle.
MAX FILL
Liquid
Chlorine Bleach
Do not overll, dilute, or use more than 250 mL (1 cup.)
Do not use color-safe bleach or Oxi products in the same
cycle with liquid chlorine bleach.
6. Select cycle
Turn cycle knob to choose your wash cycle. For more
information, see “Cycle Guide”.
8

7. Select LOAD SIZE
Model 4GWTW4800YQ Model 4GWTW4800YQ
9. Select options (on some models)
Select the load size setting most suitable for your load. Small
will add a low amount of water for smaller loads and Super will
add the most amount of water for large or bulky loads. Items
need to move freely.
8. Select TEMPERATURE
Model 4GWTW4800YQ
Once you select a cycle, select the desired wash temperature
by turning the Temperature knob to the appropriate setting
based on your load. All rinses are tap cold.
NOTE: Always read and follow fabric care label instructions
to avoid damage to your garments.
Wash Temp
Hot
Some cold water is added to save
energy. This will be cooler than
your hot water heater setting.
Warm
Some cold water will be added, so
this will be cooler than what your
previous washer provided.
Suggested Fabrics
Whites and pastels
Durable garments
Heavy soils
Bright colors
Moderate to light soils
Select the desired cycle options. If you are using fabric
softener, be sure to select one of the Fabric Softener Added
options.
10. Press START/Pause/Unlock
to begin wash cycle
Press the START/Pause/Unlock button to start the wash cycle.
Filling is delayed for several minutes while load balance is
sensed. When the cycle has nished, the DONE indicator will
light. Promptly remove garments after cycle has completed
to avoid odor, reduce wrinkling, and rusting of metal hooks,
zippers, and snaps.
Unlocking the lid to add garments:
If you need to open the lid to add 1 or 2 missed garments:
Press START/Pause/Unlock; the lid will unlock once the
washer movement has stopped. This may take several
minutes if the load was spinning at high speed. Then close
lid and press START/Pause/Unlock again to restart the cycle.
If lid is left open for more than 10 minutes the water will pump
out automatically.
Delay in water ll
Filling is delayed for 2 to 3 minutes to check for load unbalance. You will hear the hum of the spin prior to lling. This is
normal operation.
Cool
Warm water may be added to
assist in soil removal and to help
dissolve detergents.
Cold
This is the temperature from your
faucet. If your tap cold water is
very cold, warm water may be
added to assist in soil removal
and help dissolve detergent.
Colors that bleed
or fade
Light soils
Dark colors that
bleed or fade
Light soils
9
WASHER MAINTENANCE
WATER INLET HOSES
Replace inlet hoses after 5 years of use to reduce the risk of
hose failure. Periodically inspect and replace inlet hoses if
bulges, kinks, cuts, wear, or leaks are found.
When replacing your inlet hoses, mark the date of replacement
on the label with a permanent marker.
WASHER CARE
Recommendations to Help Keep Your Washer Clean
and Performing at its Best
1. Always follow the detergent manufacturer’s instructions
regarding the amount of detergent to use. Never use
more than the recommended amount because that may
increase the rate at which detergent and soil residue
accumulate inside your washer, which in turn may result
in undesirable odor.
2. Use warm and hot wash water settings sometimes (not
exclusively cold water washes), because they do a better
job of controlling the rate at which soils and detergent
accumulate.
3. Always leave the washer lid open between uses to help
dry out the washer and prevent the buildup of odorcausing residue.
Cleaning Your Top Loading Washer
Read these instructions completely before beginning the
routine cleaning processes recommended below. This
Washer Maintenance Procedure should be performed,
at a minimum, once per month or every 30 wash cycles,
whichever occurs sooner, to control the rate at which soils
and detergent may otherwise accumulate in your washer.
Cleaning the Inside of the Washer
To keep your washer odor-free, follow the usage instructions
provided above, and use this recommended monthly
cleaning procedure:
Recommended Cycle for Cleaning the Washer
Refer to the “Cycle Guide” for the optimal cycle for cleaning
the inside of the washer. Use this cycle with liquid chlorine
bleach as described below.
Begin procedure
1. Chlorine Bleach Procedure:
a. Open the washer lid and remove any clothing
or items.
b. Add 236 mL (1 cup) of liquid chlorine bleach
to the bleach compartment.
NOTE: Use of more liquid chlorine bleach than is
recommended above could cause washer damage
over time.
c. Close the washer lid.
d. Do not add any detergent or other chemical
to the washer when following this procedure.
e. Select the cycle recommended for cleaning the
inside of the washer.
f. Press the START/PAUSE/UNLOCK button to start the
cycle.
NOTE: For best results, do not interrupt cycle. If cycle
must be interrupted, press START/PAUSE/UNLOCK
once or twice [depending on model]. After the cycle has
stopped, run a RINSE and SPIN cycle to rinse cleaner
from washer.
WASHER CARE (cont.)
Cleaning the Dispensers
After a period of using your washer, you may nd some
residue buildup in the washer’s dispensers. To remove
residue from the dispensers, wipe them with a damp cloth
and towel dry. Do not attempt to remove the dispensers or
trim for cleaning. The dispensers and trim are not removable.
If your model has a dispenser drawer, however, remove the
drawer and clean it before or after you run the Clean Washer
cycle. Use an all-purpose surface cleaner, if needed.
Cleaning the Outside of the Washer
Use a soft, damp cloth or sponge to wipe away any spills.
Use only mild soaps or cleaners when cleaning external
washer surfaces.
IMPORTANT: To avoid damaging the washer’s nish, do not
use abrasive products.
NON-USE AND VACATION CARE
Operate your washer only when you are home. If moving, or
not using your washer for a period of time, follow these steps:
1. Unplug or disconnect power to washer.
2. Turn off water supply to washer, to avoid ooding due
to water pressure surge.
WINTER STORAGE CARE
IMPORTANT: To avoid damage, install and store washer
where it will not freeze. Because some water may stay in
hoses, freezing can damage washer. If storing or moving
during freezing weather, winterize your washer.
To winterize washer:
1. Shut off both water faucets, disconnect and drain water
inlet hoses.
2. Put 1 L. (1 qt.) of R.V. - type antifreeze in basket and run
washer on RINSE & SPIN cycle for about 30 seconds
to mix antifreeze and remaining water.
3. Unplug washer or disconnect power.
10

TRANSPORTING YOUR WASHER
REINSTALLING/USING WASHER AGAIN
1. Shut off both water faucets. Disconnect and drain water
inlet hoses.
2. If washer will be moved during freezing weather, follow
Winter Storage Care directions before moving.
3. Disconnect drain from drain system and drain any
remaining water into a pan or bucket. Disconnect drain
hose from back of washer.
4. Unplug power cord.
5. Place inlet hoses and drain hose inside washer basket.
6. Drape power cord over edge and into washer basket.
7. Place packing tray from original shipping materials back
inside washer. If you do not have packing tray, place heavy
blankets or towels into basket opening. Close lid and place
tape over lid and down front of washer. Keep lid taped until
washer is placed in new location.
To reinstall washer after non-use, vacation, winter storage
or moving:
1. Refer to “Installation Instructions” to locate, level, and
connect washer.
2. Before using again, run washer through the following
recommended procedure:
To use washer again:
1. Flush water pipes and hoses. Reconnect water inlet hoses.
Turn on both water faucets.
2. Plug in washer or reconnect power.
3. Run washer through Casual Regular cycle to clean washer
and remove antifreeze, if used. Use half the manufacturer’s
recommended amount of detergent for a medium-size load.
11
TROUBLESHOOTING
First try the solutions suggested here to possibly avoid the cost of a service call.
If you experience
Vibration or Off-Balance
Check the following for
proper installation or
see “Using Your
Washer” section.
Noises
Clicking or metallic
noises
Gurgling or humming
Humming
Water Leaks
Check the following for
proper installation:
Washer not performing as expected
Washer won’t run or ll,
washer stops working
or wash light remains
on (indicating that the
washer was unable to
ll appropriately)
Feet may not be in contact with the
oor and locked.
Washer may not be level.
Load could be unbalanced.
Objects caught in washer drain
system.
Washer may be draining water.
Fill light on
Washer not level.
Fill hoses not attached tightly.
Fill hose washers.
Drain hose connection.
Check household plumbing for leaks
or clogged sink or drain.
Washer not loaded as
recommended.
Check for proper water supply.
Possible Causes
Solution
Front and rear feet must be in rm contact with oor, and
washer must be level to operate properly. Jam nuts must be
tight against the bottom of the cabinet.
Check oor for sagging. If ooring is uneven, a 19 mm (3/4")
piece of plywood under your washer will reduce sound.
See “Level the Washer” in Installation Instructions.
Load dry items in loose heaps evenly around basket wall.
Adding wet items to washer or adding more water to basket
could unbalance washer.
Wash smaller loads to reduce imbalance.
Do not tightly pack. Avoid washing single items.
Use Normal Regular cycle and super or Large load for oversized,
non-absorbent items such as comforters or poly-lled jackets.
See “Cycle Guide” and “Using Your Washer”.
Empty pockets before washing. Loose items such as coins
could fall between basket and tub or may block pump.
It may be necessary to call for service to remove items.
It is normal to hear metal items on clothing such as metal snaps,
buckles, or zippers touch against the stainless steel basket.
It is normal to hear the pump making a continuous humming
sound with periodic gurgling or surging as nal amounts of
water are removed during the Drain & Spin cycles.
You may hear the hum of the sensing spins after you have
started the washers. This is normal. Sensing spins will take
several minutes before water is added to the washer.
Water may splash off basket if washer is not level. Check that
load is not unbalanced or tightly packed.
Tighten ll-hose connection.
Check that all four ll hose at washers properly seated.
Pull drain hose from washer cabinet and properly secure it to
drainpipe or laundry tub.
Do not place tape over drain opening.
Water can backup out of a clogged sink or drainpipe. Check all
household plumbing for leaks (laundry tubs, drain pipe, water
pipes, and faucets.)
Improper loading can cause basket to be out of alignment
and cause water to splash off tub. See “Using Your Washer”
for loading instructions.
Both hoses must be attached and have water owing to
inlet valve.
Both hot and cold water faucets must be turned on.
Check that inlet valve screens have not become clogged.
Check for any kinks in inlet hoses, which can restrict water ow.
12

TROUBLESHOOTING
First try the solutions suggested here to possibly avoid the cost of a service call.
If you experience
Washer not performing as expected (cont.)
Washer won’t run or ll,
washer stops working
or wash light remains
on (indicating that the
washer was unable to
ll appropriately) cont.
Washer not draining/
spinning, loads are
still wet, or spinning
light remains on
(indicating that the
washer was unable
to pump out water
within 10 minutes)
Check proper electrical supply.
Normal washer operation. Lid must be closed for washer to run.
Washer not loaded as
recommended.
Empty pockets and use garment
bags for small items.
Use a cycle with a low spin speed. Cycles with lower spin speeds remove less water than cycles
Washer not loaded as recommended. Tightly packing or unbalanced loads will not allow the washer
Check plumbing for correct drain hose
installation. Drain hose extends into
standpipe farther than 114 mm (4,5").
Too much detergent causing suds to
slow or stop draining and spinning.
Possible Causes
Solution
Plug power cord into a grounded 3 prong outlet.
Do not use an extension cord.
Ensure there is power to outlet.
Reset a tripped circuit breaker. Replace any blown fuses.
NOTE: If problems continue, contact an electrician.
Washer will pause during certain phases of cycle. Do not
interrupt cycle.
Washer spins the dry load for several minutes before lling to
determine if load is balanced. You may hear the hum of the
spins. This is normal.
Remove several items and rearrange load evenly in basket.
Close lid and press START/Pause/Unlock.
Do not add more than 1 or 2 additional items after cycle has
started to avoid tightly packing or unbalancing.
Small items may have been caught in pump or between basket
and tub, which can slow draining.
with high spin speeds. Use the recommended cycle/speed spin
for your garment. To remove extra water in the load, select Drain
& Spin. Load may need to be rearranged to allow even
distribution of the load in the basket.
to spin correctly, leaving the load wetter than normal. Evenly
arrange the wet load for balanced spinning. Select the Drain &
Spin cycle to remove excess water. See "Using Your Washer" for
loading recommendations.
Check drain hose for proper installation. Use drain hose form
and securely attach to drainpipe or tub. Do not tape over drain
opening. Lower drain hose if the end is higher than 1,2 m (48")
above the oor. Remove any clogs from drain hose.
Always measure and follow detergent directions for your load.
To remove extra suds, select Rinse & Spin. Do not add detergent.
13
TROUBLESHOOTING
First try the solutions suggested here to possibly avoid the cost of a service call.
If you experience
Washer not performing as expected (cont.)
Dry spots on load
after cycle
Incorrect or wrong
wash or rinse
temperatures
Load not rinsed Check for proper water supply.
Sand, pet hair, lint,
etc. on load after
washing
Load is tangling Washer not loaded as recommended. See “Using Your Washer” section.
Not cleaning or
removing stains
High speed spins extract more
moisture than traditional top-load
washers.
Check for proper water supply. Check to be sure hot and cold inlet hoses are not reversed.
Energy saving controlled
wash temperatures.
Using too much detergent.
Washer not loaded as recommended.
Using too low a load size/water level
selection.
detergent or bleach residues may
require additional rinsing.
Washer not loaded as recommended.
Adding detergent on top of load. Add detergent, oxi products, and color safe bleach to the
Using too low a load size/water level
selection.
Possible causes
The high spin speeds combined with air ow during the nal
spin can cause items near the top of the load to develop dry
spots during the nal spin. This is normal.
Both hoses must be attached to both washer and faucet, and
have both hot and cold water owing to inlet valve.
Check that inlet valve screens are not clogged.
Remove any kinks in hoses.
This washer uses cooler wash and rinse water temperatures
than your previous washer. This includes cooler hot and warm
washes.
Check to be sure hot and cold inlet hoses are not reversed.
Both hoses must be attached and have water owing to the
inlet valve.
Both hot and cold water faucets must be on.
Inlet valve screens on washer may be clogged.
Remove any kinks in the inlet hose.
The suds from too much detergent can keep washer from
operating correctly. Always measure detergent and follow
detergent directions based on load size and soil level.
The washer is less efcient at rinsing when load is tightly packed.
Load garments in loose heaps evenly around the basket wall.
The washer will not rinse well if tightly packed. Load with dry
items only.
Use cycle designed for the fabrics being washed.
Add only 1 or 2 garments after washer has started.
Choose a load size (water level) that matches the load being
washed.
Add an Extra Rinse to the selected cycle. Heavy sand, pet hair, lint, and
Select a cycle with a slower wash action and spin speed;
however, items will be wetter than those using a higher
speed spin. See the "Cycle Guide" to match your load with
the best cycle.
Load garments in loose heaps evenly around the basket wall.
Reduce tangling by mixing types of load items. Use the
recommended cycle for the type of garments being washed.
Washer is less efcient at cleaning when load is tightly packed.
Load garments in loose heaps evenly around the basket wall.
Load with dry items only.
Add only 1 or 2 garments after washer has started.
bottom of the basket before adding the load items.
Choose a load size (water level) that matches the load being
washed.
Solution
14
TROUBLESHOOTING
First try the solutions suggested here to possibly avoid the cost of a service call.
If you experience
Washer not performing as expected (cont.)
Not cleaning or
removing stains (cont.)
Incorrect dispenser
operation
Fabric damage
Odors
Lid locked light is
ashing
Using too much detergent.
Not using correct cycle for fabric type.
Not using dispensers.
Not washing like colors together.
Clogged dispenser.
Sharp items were in pockets during
wash cycle.
Strings and straps could have tangled.
Items may have been damaged before
washing.
Fabric damage can occur if load is
tightly packed.
Liquid chlorine bleach may have been
added incorrectly.
Garment care instructions may not
have been followed.
Monthly maintenance not done as
recommended.
Using too much detergent.
The lid is not closed.
A cycle was stopped or paused using
the START/Pause/Unlock button.
Possible Causes
Solution
The suds from too much detergent can keep washer from
operating correctly. Always measure detergent and follow
manufacturer’s directions based on load size and soil level.
Use a higher soil level cycle option and warmer wash
temperature to improve cleaning.
Use Normal Heavy cycle for tough cleaning.
Use dispensers to avoid chlorine bleach and fabric softener
staining.
Load dispensers before starting a cycle. Select Fabric Softener
Added Yes when using fabric softener.
Do not add products directly to load.
Wash like colors together and remove promptly after the cycle
is complete to avoid dye transfer.
Use only liquid chlorine bleach in the bleach dispenser. Use only
fabric softener in the fabric softener dispenser.
Empty pockets, zip zippers, and snap or hook fasteners before
washing to avoid snags and tears.
Tie all strings and straps before starting wash load.
Mend rips and broken threads in seams before washing.
Load garments in loose heaps evenly around the basket wall.
Load with dry items only.
Use cycle designed for the fabrics being washed.
Add only 1 or 2 garments after washer is started.
Do not pour liquid chlorine bleach directly onto load. Wipe up
bleach spills.
Undiluted bleach will damage fabrics. Do not use more than
recommended by manufacturer.
Do not place load items on top of bleach dispenser when
loading and unloading washer.
Always read and follow garment manufacturer’s care label
instructions.
See “Cleaning Your Washer” in Washer Maintenance.
Unload washer as soon as cycle is complete.
Be sure to measure correctly. Always follow the manufacturer’s
directions.
See “Cleaning your Washer” section.
Close the lid. The washer will not start or ll with the lid open.
The washer may still be spinning. The lid will not unlock until the
basket has stopped spinning. This may take several minutes if
washing large loads or heavy fabrics.
15

SÉCURITÉ DU LAVE-LINGE
16

QUOI DE NEUF SOUS LE COUVERCLE?
Votre nouveau lave-linge fonctionne différemment de votre précédent lave-linge de type agitateur.
Verrou couvercle
Pour permettre des essorages à vitesse plus élevée, le
couvercle se verrouille et le témoin de verrouillage du
couvercle s’allume. Lorsque ce témoin lumineux s’allume,
cela signie que le couvercle est verrouillé et ne peut
être ouvert. Lorsque ce témoin lumineux clignote, cela
signie quel le lave-linge effectue une pause. Lorsque ce
témoin lumineux est éteint, cela signie qu’on peut ouvrir
le couvercle. Une fois qu’un programme a commencé, le
couvercle se verrouille, se déverrouille puis se verrouille
à nouveau. Si l’on doit ouvrir le couvercle pour ajouter un
vêtement après cette période, il faut appuyer sur START/
PAUSE/UNOCK (mise en marche/pause/déverrouillage)
puis attendre que le couvercle se déverrouille. Le
couvercle se déverrouille uniquement une fois que le
mouvement du lave-linge a cessé. Selon le moment où
l'on souhaite suspendre le programme, le couvercle peut
mettre entre plusieurs secondes et plusieurs minutes à se
déverrouiller.
Détection
Ce lave-linge effectue une série d’essorages pour
contrôler l’équilibre de la charge. Une fois une charge mise
en route, il peut s’écouler de 2 à 3 minutes avant que de
l'eau ne pénètre dans le panier. Durant cette période, une
série de cliquetis et un bruit de frottements rythmiques
indiquent que la technologie de détection détermine si la
charge est déséquilibrée.
Bruits
Adifférents stades du programme de lavage, votre
nouveau lave-linge émettra peut-être des bruits que la
précédente ne produisait pas. De même, il fera peut-être
des pauses que votre machine précédente ne faisait
pas. Il est par exemple possible que vous entendiez un
cliquetis et un bourdonnement au début du programme,
lorsque le système de verrouillage du couvercle effectue
un test automatique. Différents bourdonnements et
bruits de frottements rythmiques se produiront à mesure
que l’agitateur évalue l’équilibre de la charge et qu’il la
déplace. Il est aussi possible que le lave-linge soit parfois
complètement silencieus, lorsqu'il laisse tremper les
vêtements.
Rinçage par vaporisation
Certains programmes utilisent l’option Spray rinse
(rinçage par vaporisation) par défaut. Au cours de ces
programmes, on entend l'eau pénétrer dans le lave-
linge tandis que la cuve tourne, ce qui permet à l’eau de
rinçage de pénétrer les vêtements. Consulter le "Guide de
programmes" pour plus de détails.
IMPORTANT :
• Le lave-linge ne fonctionnera pas si le couvercle est ouvert.
• Le lave-linge n’entamera pas le remplissage d’eau tant que le couvercle n’aura pas été fermé et verrouillé et que le processus de
détection n’est pas terminé. Ce délai avant le remplissage peut prendre entre 2 et 3 minutes.
• L’option Fabric Softener Added (assouplissant pour tissu ajouté) doit être placée sur "Yes" (oui) pour que l’assouplissant pour tissu
soit distribué au moment adéquat.
REMARQUE: Le distributeur d’assouplissant pour tissu n’est pas disponible sur tous les modèles.
17
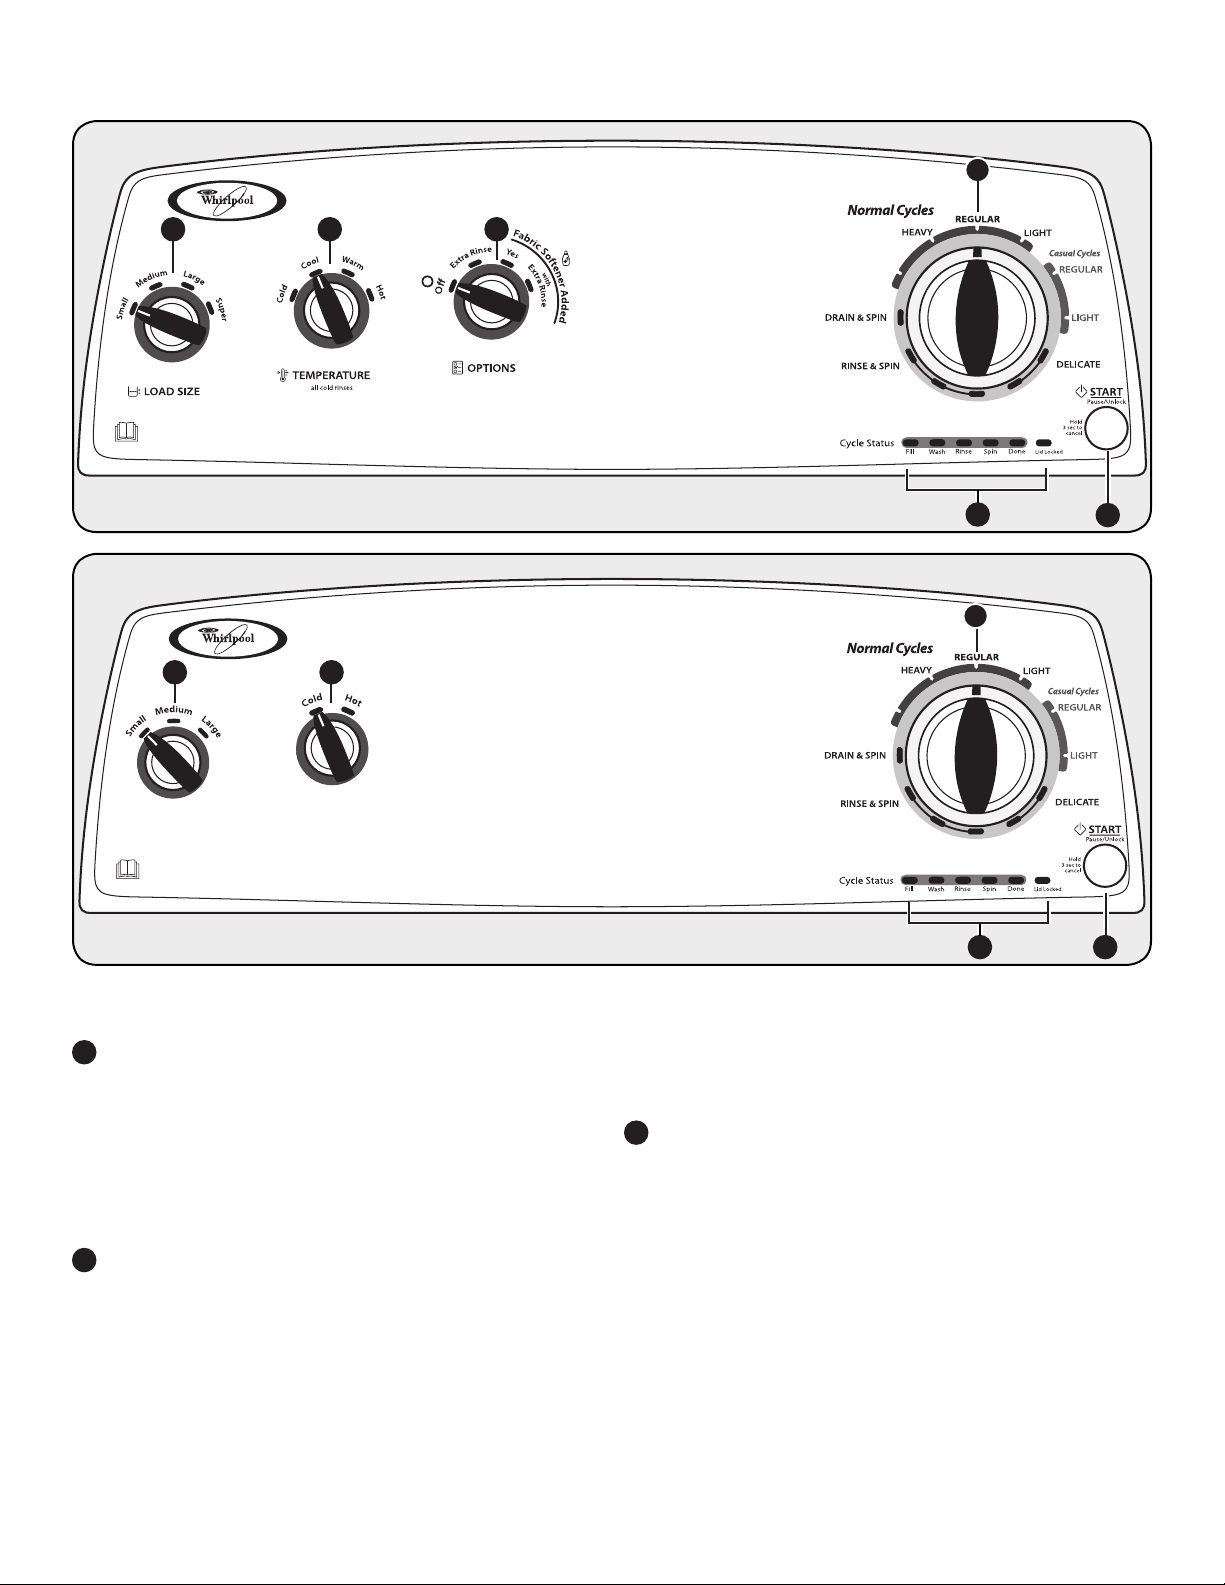
TABLEAU DE COMMANDE ET CARACTERISTIQUES
4
1
Modèle 4GWTW4800YQ
1
32
6
4
2
5
Modèle 4GWTW4740YQ
Certains programmes et options ne sont pas disponibles sur certains modèles.
1
LOAD SIZE (VOLUME DE LA CHARGE)
Sélectionner le réglage le plus adapté à votre charge. Small
(petite) ajoute une faible quantité d’eau pour les charges
plus petites et Large ou Super (grande) (selon le modèle)
ajoute la quantité d’eau la plus importante pour les grandes
charges ou les charges volumineuses. Les articles doivent
pouvoir se déplacer librement. Trop tasser le linge peut
entraîner une mauvaise performance de lavage et augmenter
le froissement et l'emmêlement.
TEMPERATURE (TEMPÉRATURE)
2
La fonction de contrôle de température détecte et maintient
une température uniforme de l'eau en régulant le débit
d’arrivée d'eau chaude et d'eau froide.
Sélectionner une température de lavage en fonction du type
de tissu et de saleté à laver. Pour des résultats optimaux,
suivre les instructions sur l'étiquette du vêtement et utiliser
la température d’eau de lavage la plus chaude possible qui
reste sans danger pour le tissu.
• Les températures de l'eau tiède et de l'eau chaude seront
inférieures à celles de votre lave-linge précédent.
L’apparence des appareils peut varier.
18
6
• Même avec un lavage à l'eau froide, il est possible que de
l’eau tiède soit ajoutée au lave-linge pour maintenir une
température minimale.
OPTIONS (sur certains modèles)
3
On peut ajouter les options suivantes à la plupart des
programmes.
EXTRA RINSE (rinçage supplémentaire)
On peut utiliser cette option pour ajouter
automatiquement un second rinçage à la plupart des
programmes.
FABRIC SOFTENER ADDED YES
(ajout d’assouplissant pour tissu sélectionné)
Cette option doit être sélectionnée si l’on utilise de
l’assouplissant pour tissu durant un programme. Ceci
garantit que l'assouplissant pour tissu est ajouté au bon
moment lors du rinçage pour être correctement distribué.
FABRIC SOFTENER ADDED with EXTRA RINSE
(ajout d’assouplissant pour tissu avec rinçage
supplémentaire)
Cette option active les options Fabric Softener
(assouplissant pour tissu) et Extra Rinse (rinçage
supplémentaire).
5
WASH CYCLE KNOB
4
(BOUTON DE PROGRAMME DE LAVAGE)
Utiliser le bouton de programme de lavage pour sélectionner
les programmes disponibles sur le lave-linge. Tourner le
bouton de programme pour sélectionner un programme
correspondant à la charge de linge. Voir “Guide de
programmes” pour des descriptions de programmes
détaillées.
5
BOUTON START/PAUSE/UNLOCK
(mise en marche/pause/déverrouillage)
Appuyer sur ce bouton pour démarrer le
programme sélectionné, puis appuyer de
nouveau pour suspendre le programme et
déverrouiller le couvercle.
REMARQUE : Si le lave-linge tourne, le couvercle peut
mettre quelques minutes à se déverrouiller. Appuyer pendant
3 secondes pour annuler un programme se déverrouiller.
Appuyer pendant 3 secondes pour annuler un programme.
CYCLE STATUS LIGHT INDICATOR
6
(TEMOINS LUMINEUX DE PROGRAMME)
Les témoins lumineux indiquent la progression du
programme. À chaque étape du processus, il est possible
que l'on remarque des pauses ou des sons différents de
ceux que l’on remarque avec des lave-linge ordinaires.
FILL (REMPLISSAGE)
Lorsqu’on appuie sur le bouton START/Pause/Unlock
(mise en marche/pause/déverrouillage), le lave-linge
effectue un test automatique sur le mécanisme de
verrouillage du couvercle. On entend un déclic et
le couvercle se déverrouille brièvement avant de se
verrouiller à nouveau. Le lave-linge procède à des
essorages pour vérier l’équilibrage de la charge.
Ces essorages peuvent prendre plusieurs minutes
avant que l’eau ne soit admise dans le lave-linge. Les
essorages peuvent émettre un bourdonnement avant
le remplissage. Ceci est normal.
RINSE (RINÇAGE)
On entend des sons similaires à ceux entendus lors du
programme de lavage à mesure que le lave-linge rince
et déplace la charge. Le moteur émettra peut-être un
court bourdonnement pour déplacer le panier pendant
le remplissage. L’assouplissant pour tissu sera ajouté
si l’option Fabric Softener (assouplissant pour tissu)
est sélectionnée.
Certains programmes utilisent un rinçage avec
vaporisation. Après avoir effectué la vidange et
l’extraction de l'eau, le lave linge poursuit l'essorage et
la vaporisation d'eau de rinçage pendant toute la durée
de rinçage.
SPIN (ESSORAGE)
Le lave-linge essore la charge à des vitesses
augmentant graduellement pour une bonne extraction
de l’eau, en fonction du programme et de la vitesse
d'essorage sélectionnés.
DONE (TERMINE)
Une fois le programme terminé, ce témoin s’allume.
Retirer la charge rapidement pour un résultat optimal.
LID LOCK
(COUVERCLE VERROUILLÉ)
Pour permettre le fonctionnement
correct de l’essorage, le couvercle se
verrouille et le témoin de verrouillage
du couvercle s’allume. Ce témoin
lumineux indique que le couvercle est verrouillé et ne
peut être ouvert.
Si l’on doit ouvrir le couvercle, appuyer
sur START/Pause/Unlock. Le couvercle
se déverrouille une fois que le
mouvement du lave-linge a cessé.
Il se peut que cela prenne plusieurs
minutes si le lave-linge essorait la
charge à grande vitesse. Appuyer de
nouveau sur START/Pause/Unlock pour poursuivre
le programme.
WASH (LAVAGE)
On entend l’agitateur déplacer la charge. Les
bruits émis par le moteur peuvent changer lors des
différentes étapes du programme. La durée de lavage
est déterminée par le niveau de saleté sélectionné.
19
 Loading...